

ESI Feature Phone, 48-Key Feature Phone, 24-Key Feature Phone, 12-Key Feature Phone, 60-Key Expansion Console User Manual
Page 1
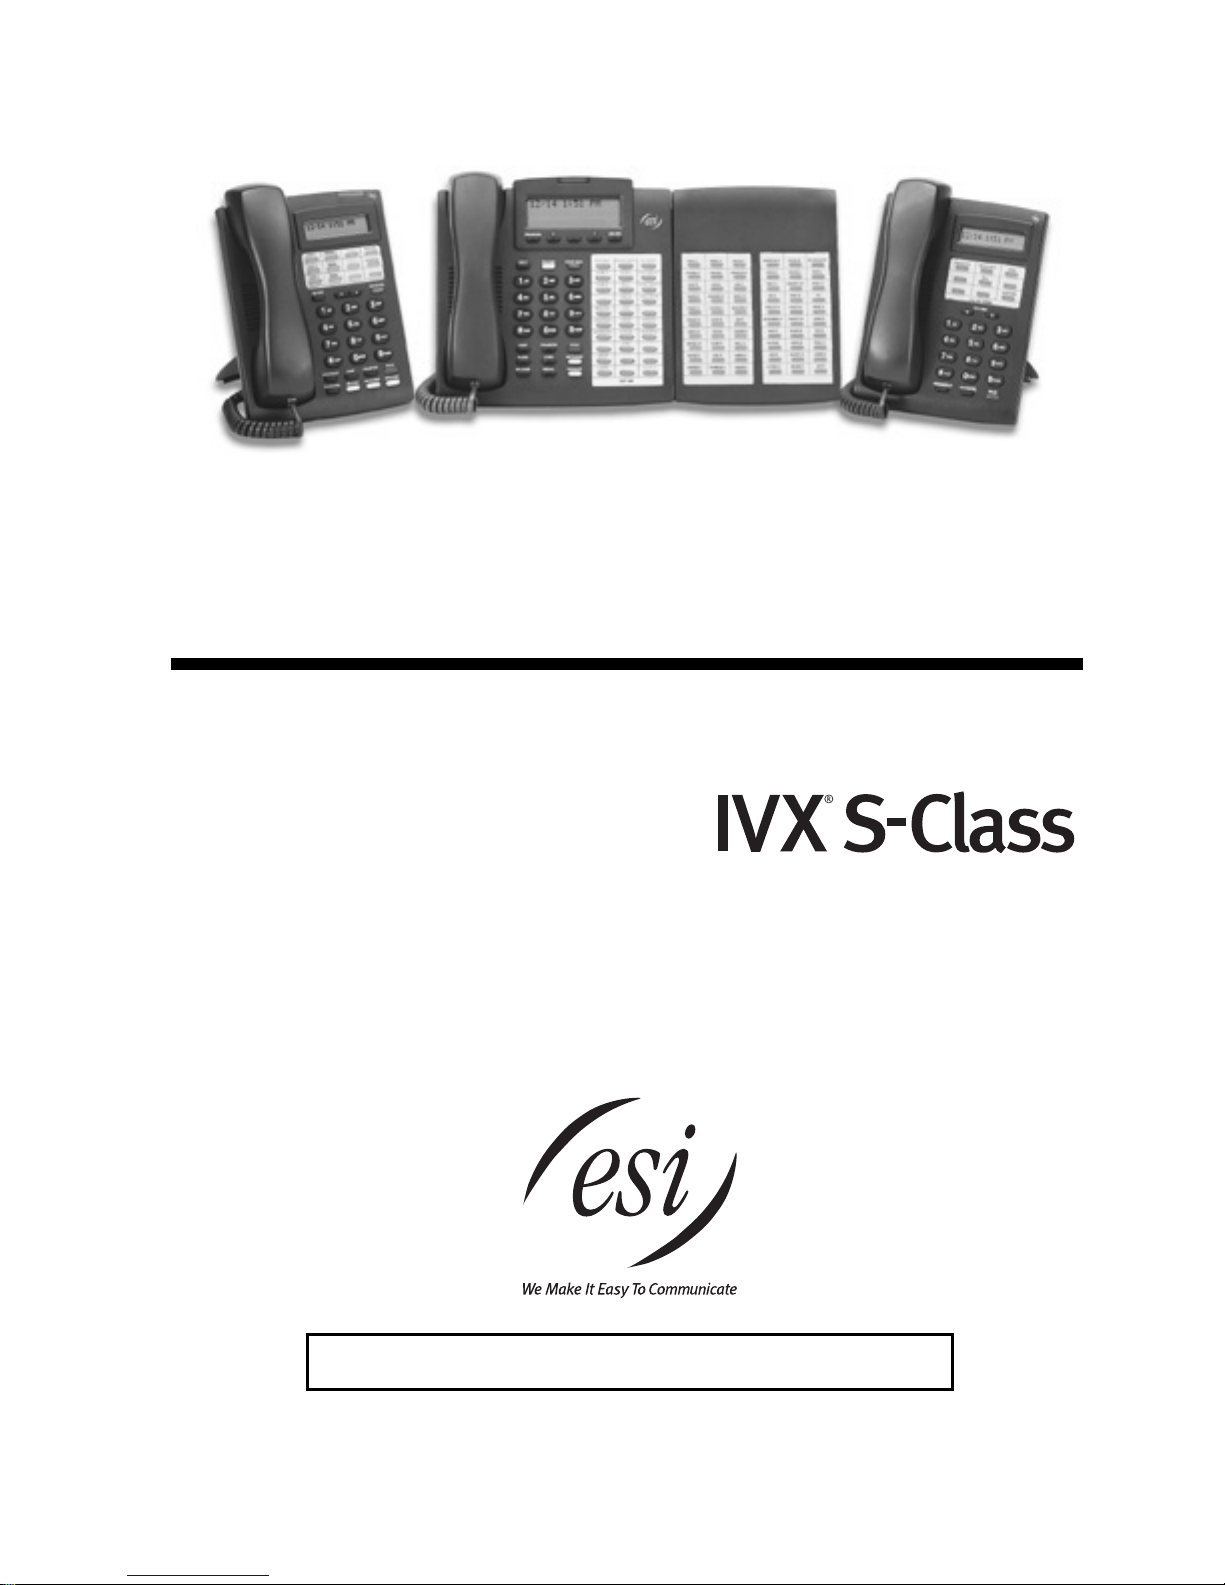
ESI Feature Phone
WITH
User’s Guide
FOR
Integrated Answering Machine
0450-0484
Rev. D
Visit http://www.esiuser s.com for up -to- d ate help.
Page 2

About ESI
ESI (Estech Systems, Inc.) is a privately held corporation based in Plano, Texas. Founded in 1987, ESI
designs and builds innovative telecommunications products for business es like yours. Because of their
pow erful combination of value and featu r es, ES I products are c onsistently rec ognized by industr y
publications and leaders.
Copyright © 2003 ESI (Estech Systems, Inc.).
IVX is a register ed trad emar k, and Esi-Dex, Integrated Answering Machine, Quick Groups, Quick Moves, Virtual Mailbox Key,
AutoPage, Quick Page and Verbal User Guide are trademarks, of E SI. CompactFlash is a registered trademark of SanD isk
Corporation. Act! is a regist ered trademark of Symantec Corporation. Goldmine is a trademark of Goldmine S oftwar e Corpor ati on.
Microsoft, Windows, NT and Outlook are r egis ter ed trad emarks of Microsof t Corp oration. Panasonic and DBS are registered
trad emarks of M ats ushita Electr ic Corporation of America.
Information contained herein is subject to change without notice.
ESI products are protected by U.S. Patents No. 6,067,349 and 6,252,944, and others pending.
ESI is an ISO 9001-certified company. Visit ESI on the Web at www.esi-estech.com.
Page 3

Table of contents
Introduction................................................................................................................................................A.1
What it covers ...............................................................................................................................................................................................A.1
How it’s arranged..........................................................................................................................................................................................A.1
48-Key Feature Phone ................................................................................................................................................................................A.2
24-Key Feature Phone ................................................................................................................................................................................A.4
12-Key Feature Phone ................................................................................................................................................................................A.5
Connecting your ESI phone ........................................................................................................................................................................A.6
Help mode (Verbal User’s Guide)................................................................................................................B.1
User programming: An introduction...........................................................................................................C.1
User programming menu ............................................................................................................................................................................C.1
Integrated Answering Machine operation ...................................................................................................D.1
Introduction ...................................................................................................................................................................................................D.1
Greetings.......................................................................................................................................................................................................D.1
Leaving messages . . . .................................................................................................................................................................................D.2
Off-premises “reach me”..............................................................................................................................................................................D.2
Message retrieval .........................................................................................................................................................................................D.2
Off-premises message delivery ..................................................................................................................................................................D.5
Message Recycle Bin (un-delete)...............................................................................................................................................................D.6
Status Indicator lamp ...................................................................................................................................................................................D.6
ESI Feature Phone operation......................................................................................................................E.1
Display...........................................................................................................................................................................................................E.1
Caller ID ........................................................................................................................................................................................................E.1
Keys...............................................................................................................................................................................................................E.1
Dial tone ........................................................................................................................................................................................................ E.3
Basic phone use...........................................................................................................................................................................................E.3
Direct station selection .................................................................................................................................................................................E.4
Transferring an outside call . . . ...................................................................................................................................................................E.5
Conference calling .......................................................................................................................................................................................E.6
Call forwarding..............................................................................................................................................................................................E.6
Call waiting.................................................................................................................................................................................................... E.7
Hold/exclusive hold operation ..................................................................................................................................................................... E.8
Paging .........................................................................................................................................................................................................E.10
Call pickup...................................................................................................................................................................................................E.10
Optional feature ..........................................................................................................................................................................................E.10
Special keys ............................................................................................................................................... F.1
FLASH, REDIAL, RELEASE .......................................................................................................................................................................F.1
Esi-Dex...........................................................................................................................................................................................................F.2
Override ring ..................................................................................................................................................................................................F.9
Message monitor mode (live call screening) ........................................................................................................................................... F.10
Greeting reminder ...................................................................................................................................................................................... F.10
Headset operation...................................................................................................................................................................................... F.10
Outside dial tone preference ......................................................................................................................................................................F.11
Line keys ......................................................................................................................................................................................................F.11
Optional features ........................................................................................................................................................................................ F.12
Analog stations ......................................................................................................................................... G.1
Placing calls ................................................................................................................................................................................................. G.1
Transferring calls ......................................................................................................................................................................................... G.1
Call forwarding............................................................................................................................................................................................. G.2
Call waiting................................................................................................................................................................................................... G.2
Call hold ....................................................................................................................................................................................................... G.2
Paging .......................................................................................................................................................................................................... G.2
Call pick-up .................................................................................................................................................................................................. G.3
Voice mail operation from an analog station ............................................................................................................................................. G.3
Analog station programming ...................................................................................................................................................................... G.5
Select greeting (Master Station user only) ................................................................................................................................................ G.5
Password ..................................................................................................................................................................................................... G.5
Off-premises message delivery ................................................................................................................................................................. G.6
Message Recycle Bin (un-delete).............................................................................................................................................................. G.7
Page 4

(This page included for pagination purposes only.)
Page 5

User’s Guide Introduction
Introduction
Accessing the rich ESI feature set is simple and easy through the straightforward design of ESI Feature
Phones. Each feature has been designed for ease of use while providing capabilities needed in an
advanced business phone. As for the IVX S-Class phone system itself, its Integrated Answering
Machine
You’ll be able to learn many of the features simply by using your phone; and this User’s Guide will
introduce you to the wide variety of features offered by your ESI phone system and how to use your
phone effectively to achieve maximum benefits.
What it covers
• 48-Key Feature Phone
• 24-Key Feature Phone
• 12-Key Feature Phone
• 60-Key Expansion Console (for use with only the 48-Key Feature Phone)
How it’s arranged
• Section A — Introduction and Phone Illustrations
• Section B — User help
• Section C — User programming
• Section D — Integrated Answering Machine operation
• Section E — Phone operation
• Section F — Special keys and features
• Section G — Analog Stations
• Index
™
functions like a traditional answering machine but with additional, special features.
A.1
Page 6
Introduction User’s Guide
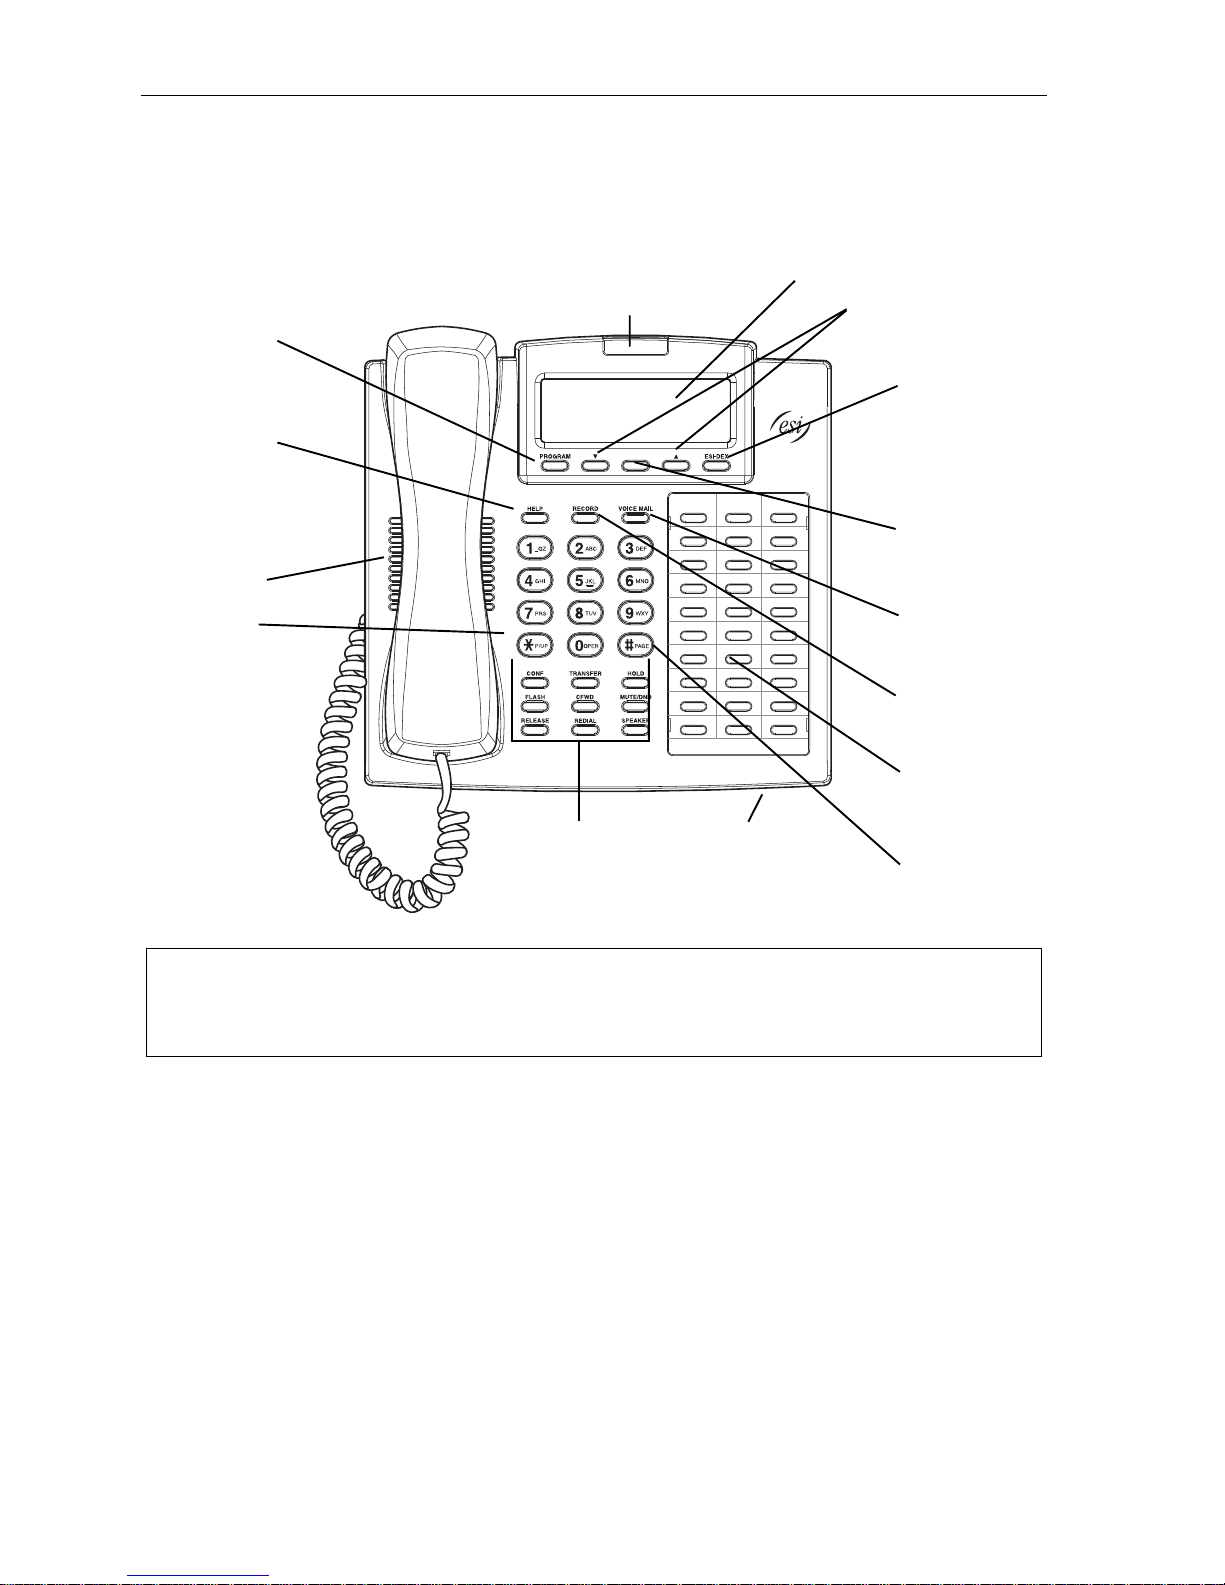
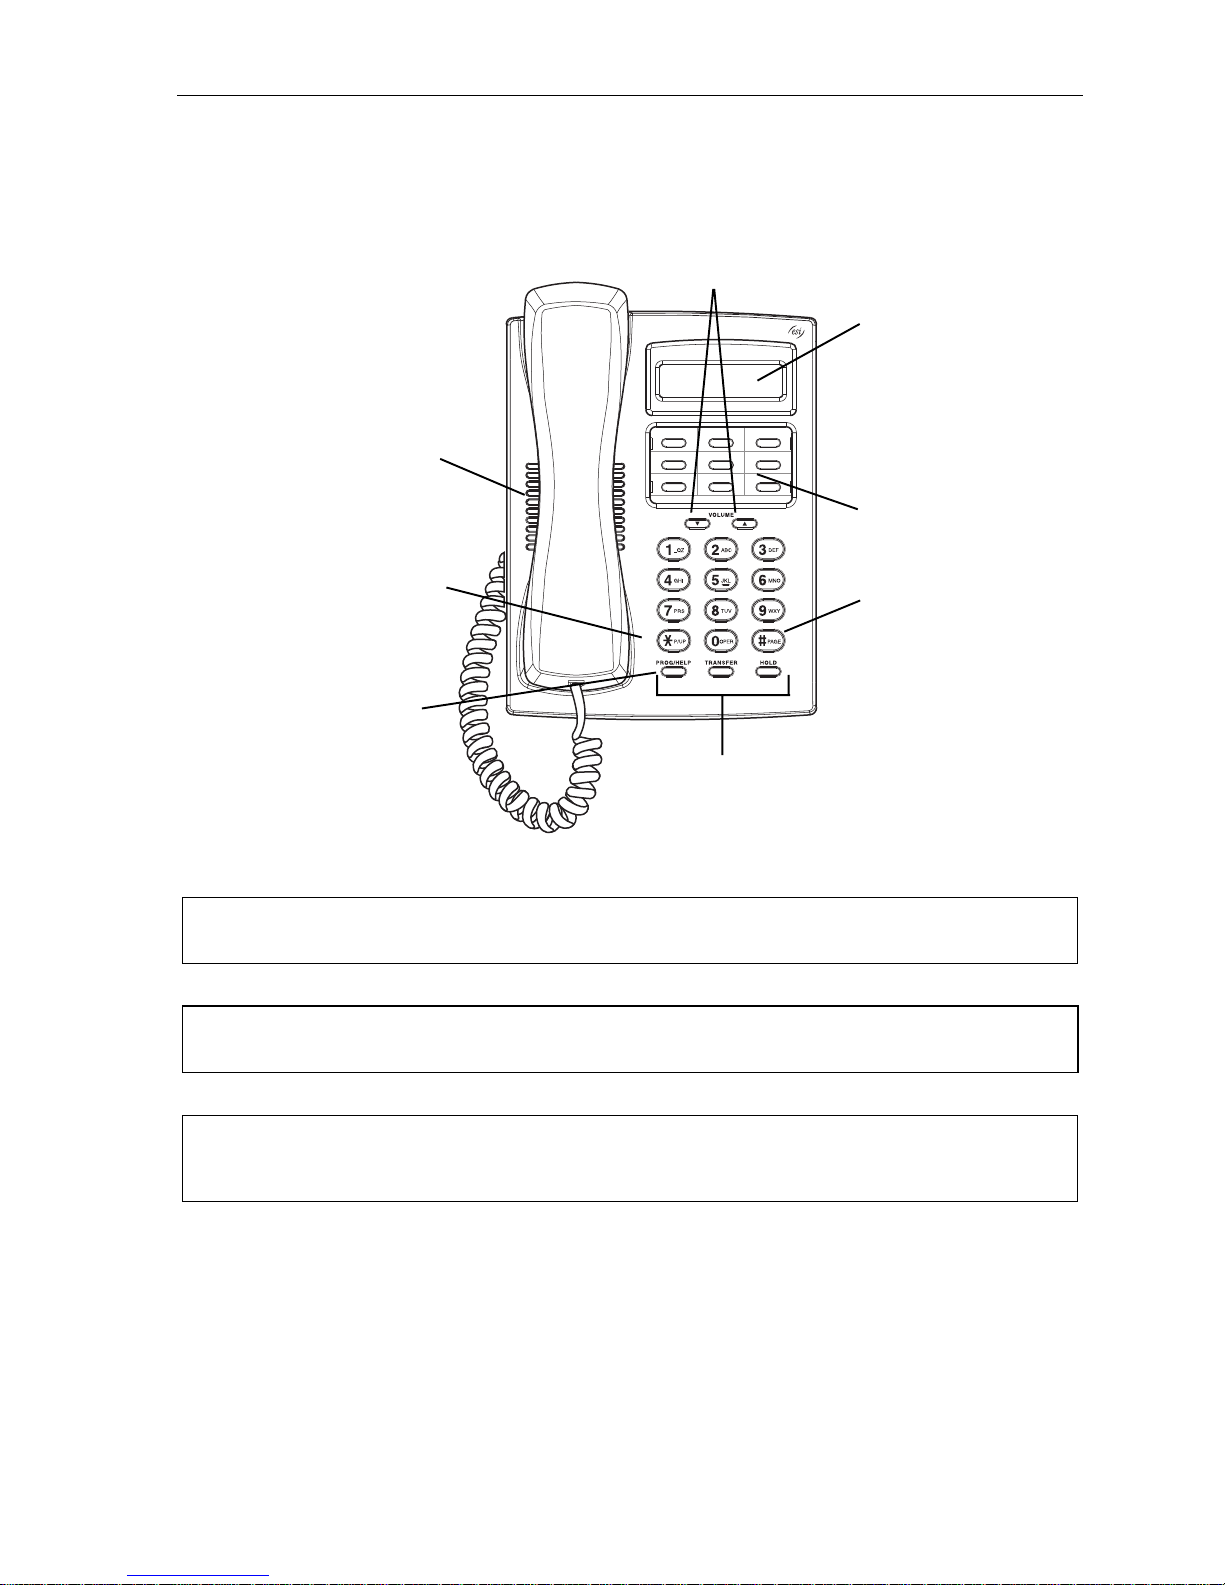
48-Key Feature Phone
The 48-Key Feature Phone has a variety of programmable and built-in features. Additionally, it
supports the optional 60-Key Expansion Console. The 48-Key Feature Phone’s built-in voice mail
features and voice prompts make it easy to program and use.
PROGRAM
feature key
(pg. C.2)
HELP key for
access to Verbal
User Guide
and tutorial
(pg. B.1)
Speaker
Status ind ic ator
lamp (pg. D .6)
3-line, 56- c h aracter dis play
Volume/scroll keys
(pg. E.2)
ESI-DEX
feature key
(pg. F.2)
Context-specific
key to select
displayed options
P/UP
(pickup) key
(pg. E.10)
Fixed feature keys
(pg. E.1)
Microphone for
buil t-in speakerphone
VOICE MAIL
key (pg. D.1)
RECORD key
30 program mable
feature keys
(pg. C.2)
PAGE key
(pg.E.10)
Hint: On any of these phone varieties (including the 60-Key Expansion Console), you can perform direct
programming by holding down a programmable feature key for at least two seconds (similar to how you
might program a car radio button). This isn’t applicable to the fixed feature keys which, as their name
implies, are already programmed.
A.2
Page 7
User’s Guide Introduction
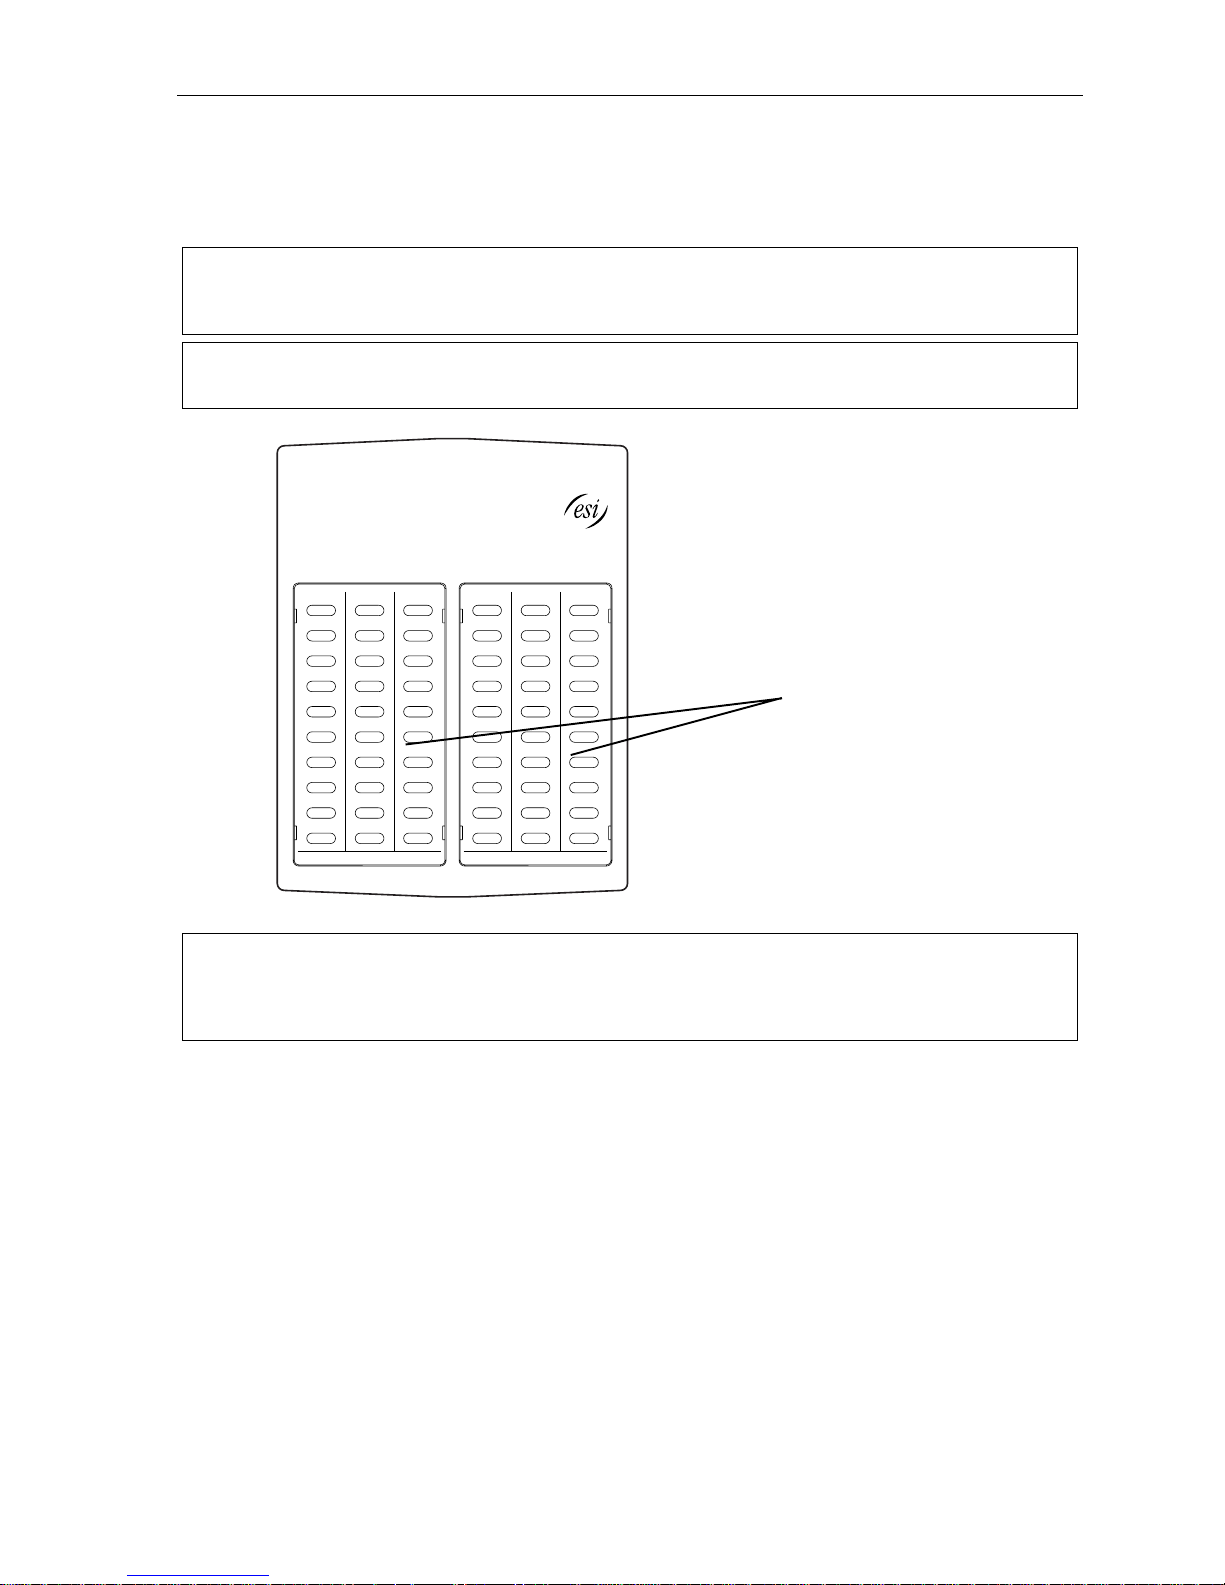
Optional 60-Key E xpansi o n C onsole f or use w ith the 48-K ey Fe at ur e P hone
The 60-Key Expansion Console adds 60 more programmable feature keys to your 48-Key Feature Phone.
You program the Expansion Console’s keys just as you do the programmable feature keys on your ESI
Feature Phone, using either direct or traditional programming (see pages C.2).
Note: Only one key can exist per extension, feature or operation. If you program a second key for the same
extension, feature or operation, this automatically erases the first key so programmed, thus making it
available for a new extension, feature or operation.
Hint: You may find it easier to write in the names on the overlay before you program the keys and attach the
overl ay to the Co ns ol e.
60 program mable
feature keys
(pg. C.2)
in two banks
of 30 each
Hint: On any of these phone varieties (including the 60-Key Expansion Console), you can perform direct
programming by holding down a programmable feature key for at least two seconds (similar to how you
might program a car radio button). This isn’t applicable to the fixed feature keys which, as their name
implies, are already programmed.
A.3
Page 8
Introduction User’s Guide
4
y
y
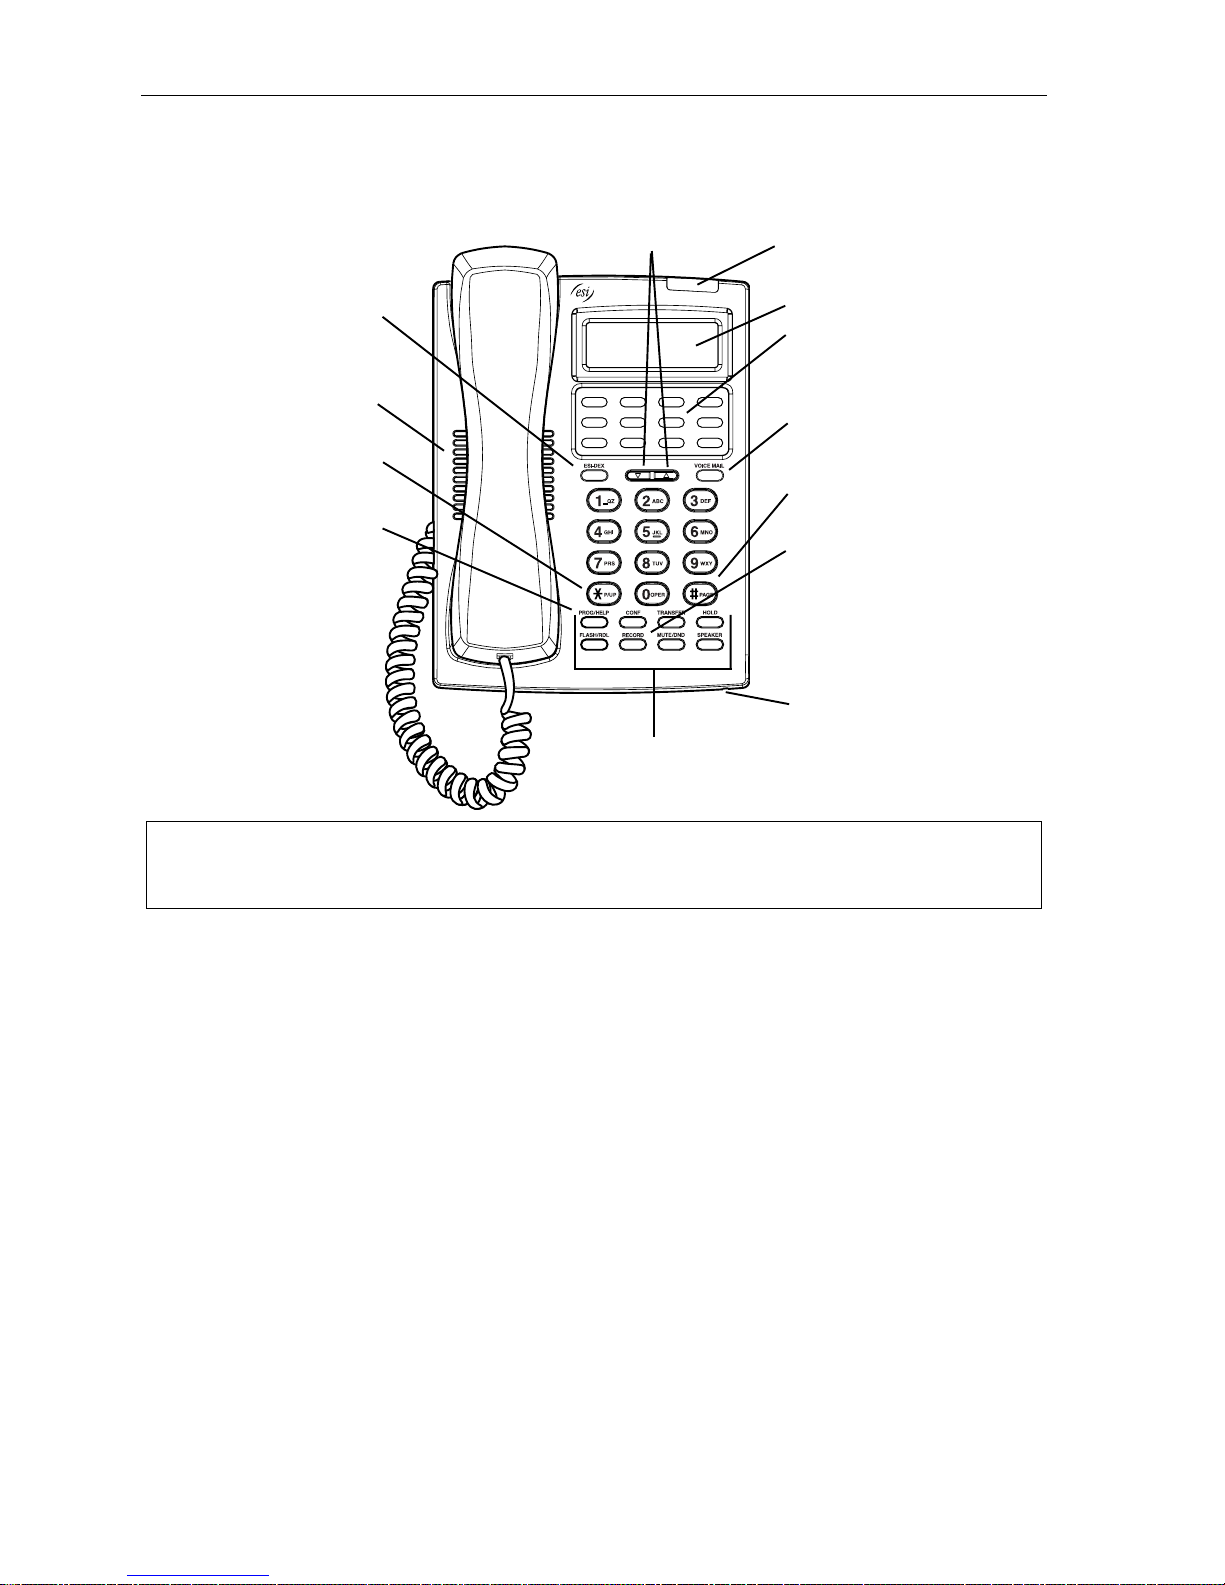
24-Key Feature Phone
The 24-Key Feature Phone has a variety of programmable and built-in features. The 24-Key Feature
Phone’s built-in voice mail features and voice prompts make it easy to program and use.
Volume/scroll keys (pg. E.2)
Status ind ic ator light (p g. D.6)
ESI-DEX feature key
(pg. F.2)
Speaker
P/UP (pickup) ke
(pg. E.10)
PROG/HELP
feature ke
for phone pr o gramming
as well as access
to Verbal User’s Guide
and tutorial (pg. B.1)
Fxed featu r e k ey s
(pg. E.1)
2-line, 32- c h aracter dis play
12 program mable feature keys
(pg. C.2)
VOICE MAIL feature key
(pg. D.1)
PAGE key (pg. E.10)
RECORD fixed feature key
Microphone for
buil t-in speakerphone
Hint: You can perform direct programming by holding down a programmable feature key for at least two
seconds (similar to how you might program a car radio button). This isn’t applicable to the fixed f eature
keys which, as their name implies, are already programmed.
A.
Page 9
User’s Guide Introduction
y
y
l
12-Key Feature Phone
The 12-Key Feature Phone includes the basic, most commonly used phone features.
Volume/scroll keys (pg. E.2)
1-line,
16-char ac t er d isp lay
Speaker
9 programmable
feature keys
P/UP (pickup) ke
(pg. E.10)
PAGE key (pg. E.10)
combo fixed feature ke
for phone pr o gramming
to Verbal User’s Guide
PROG/HELP
as well as access
and tutoria
Fixed feature keys
Note: Certain special features, including Esi-Dex (see “Special keys,” pages F.1–F.13), are not available on
the 12-Key Feature Phone.
Important: A VOICE MAIL key, CONFERENCE key, and MUTE/DND key must be set on one of the nine
programmable feature keys to utilize those features.
Hint: You can perform direct programming by holding down a programmable feature key for at least two
seconds (similar to how you might program a car radio button). This isn’t applicable to the fixed f eature
keys which, as their name implies, are already programmed.
A.5
Page 10
Introduction User’s Guide
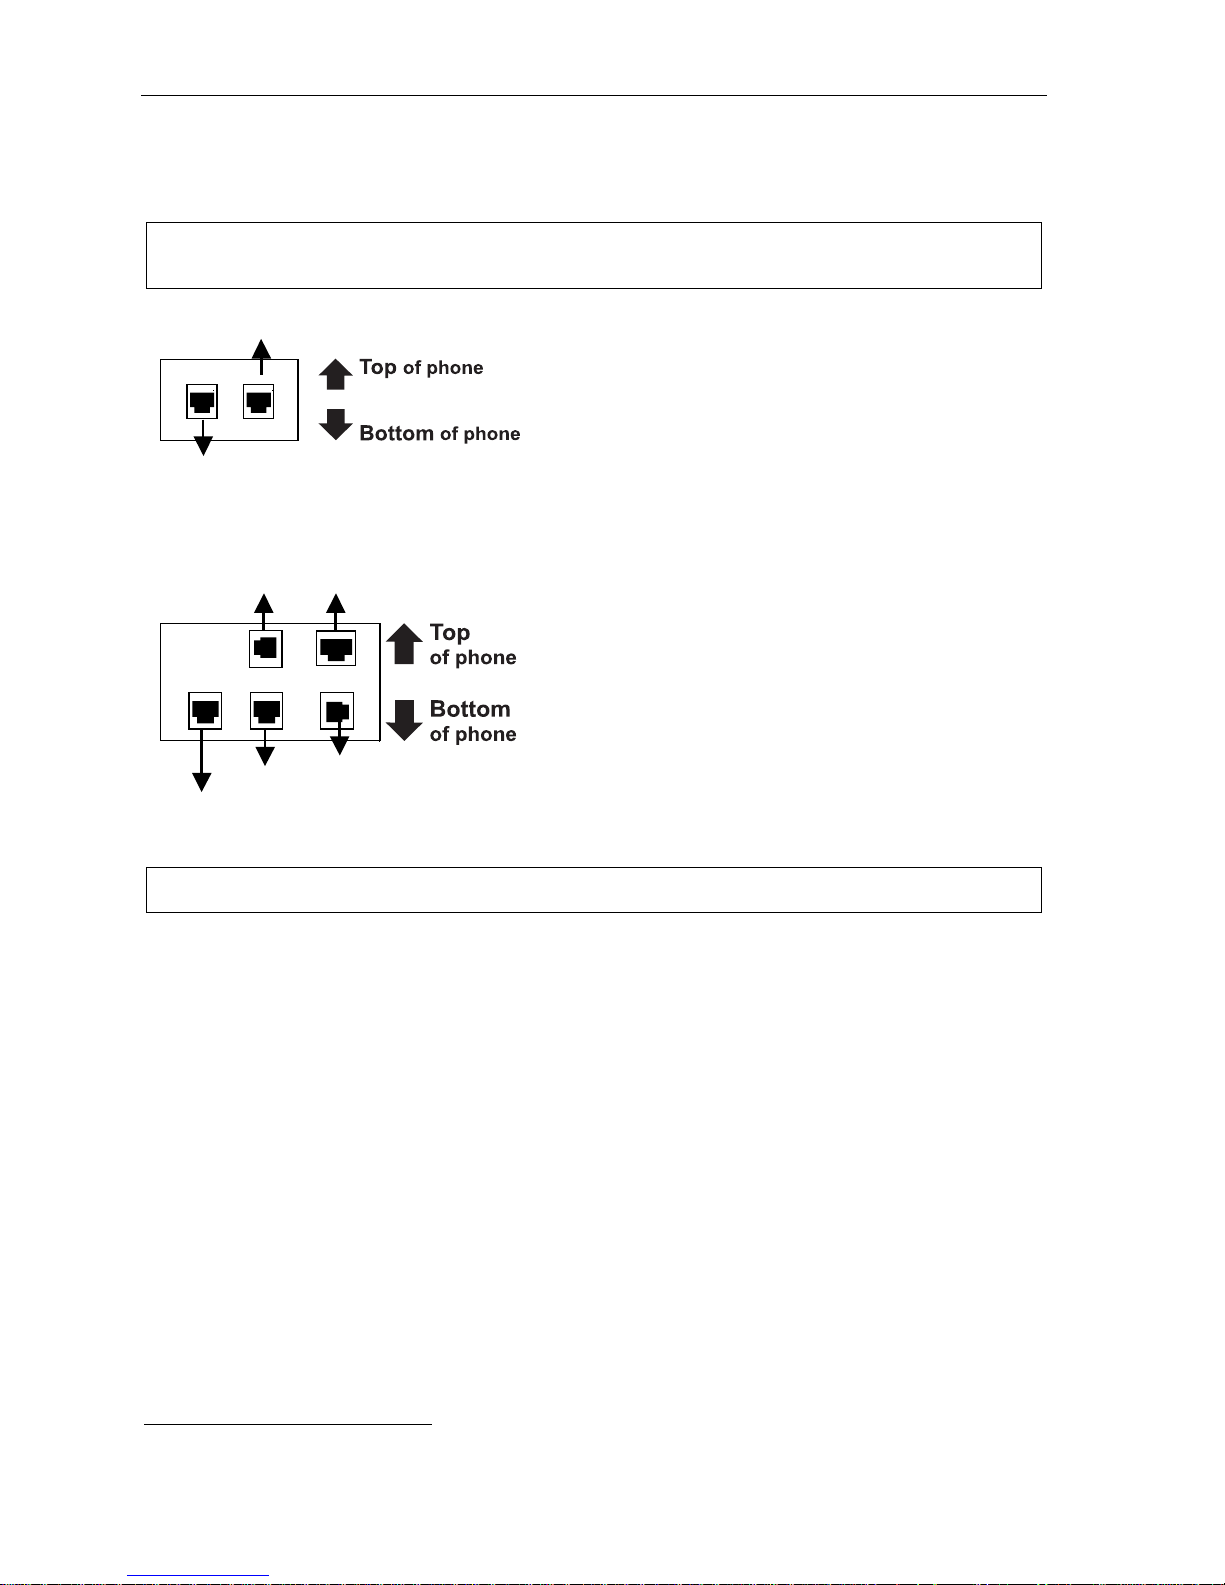
Connecting your ESI phone
Use the diagram (below) to connect your ESI phone. Each diagram represents the panel on the
phone’s underside.
Note: The “Top of phone” and “Bottom of phone” references in this diagram shows the correct vertical
orientation of the phone — i.e., the part with the display is the top.
Line cord
To 60-Key
Cons ole
to wall
Handset
[Headset
jack]
Line cord
to wall
(TAPI)
To P C
Handset
12-Key Featur e P hone
24-Key Featur e P hone
• Connects like a basic phone.
• Handset plugs into right-side jack.
• Line cord plugs into left-side jack.
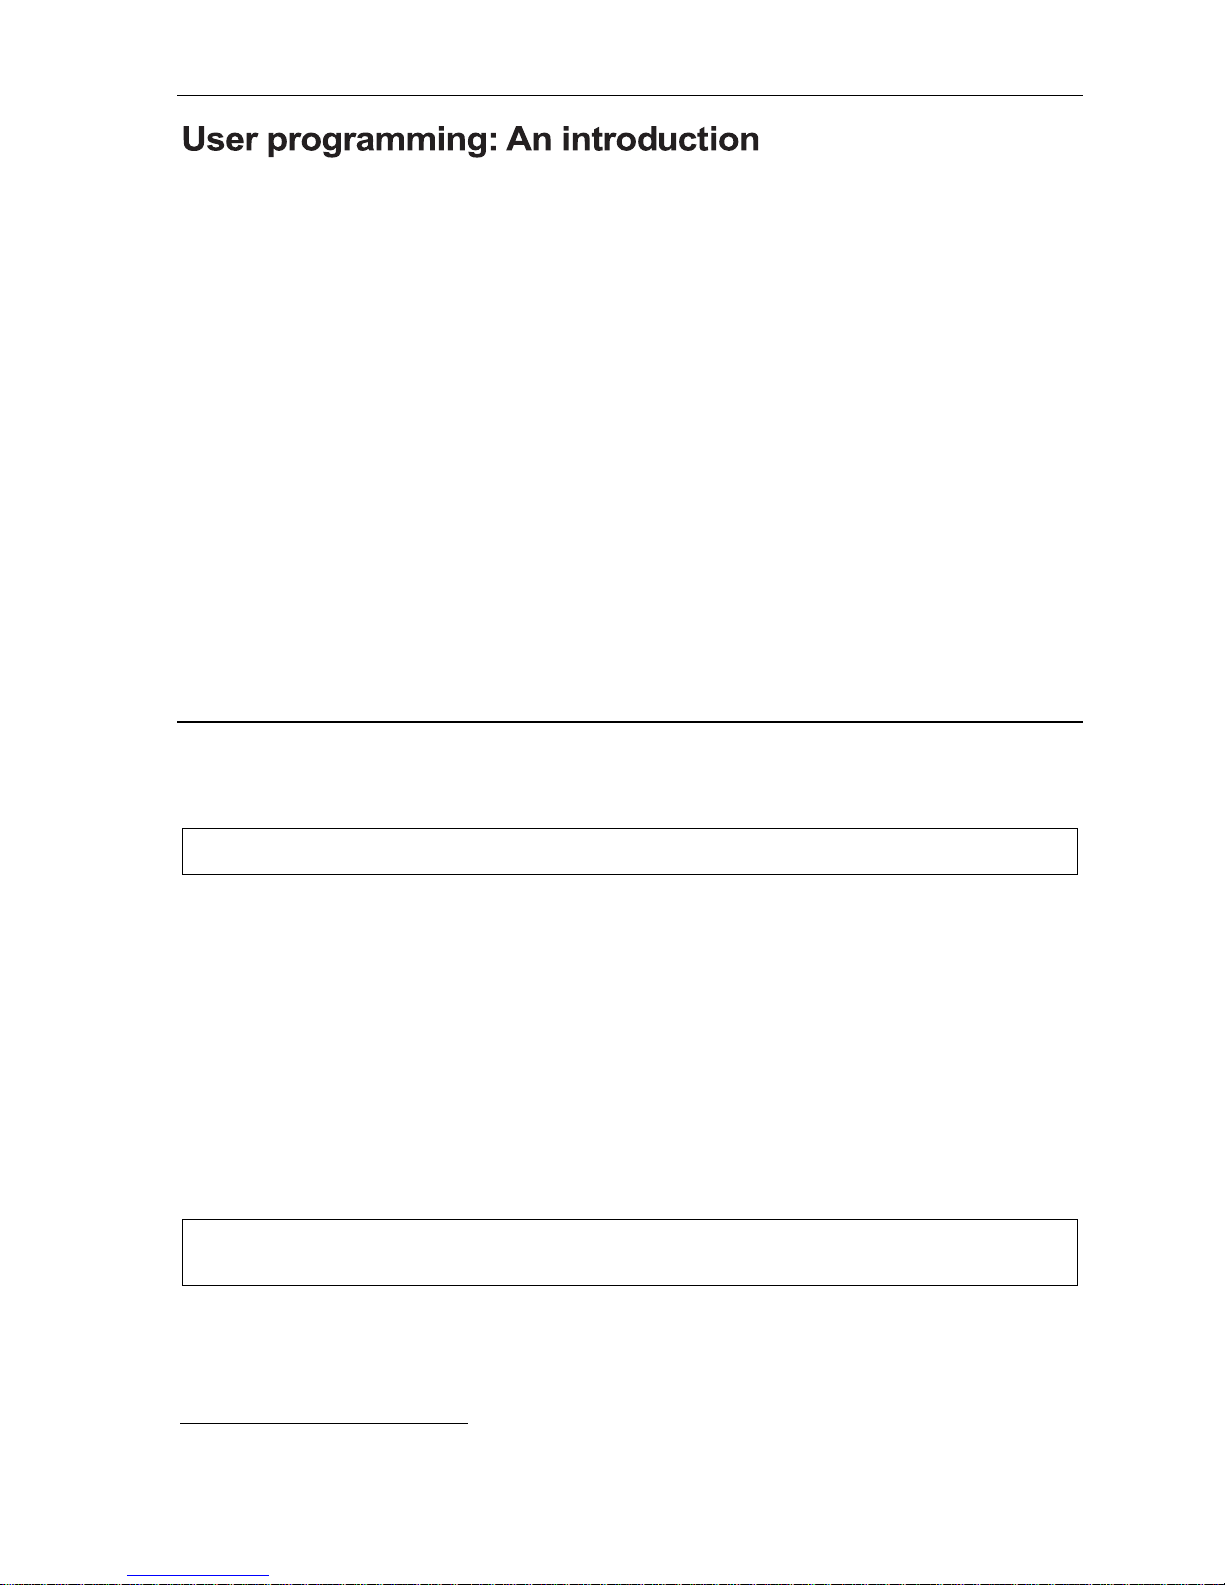
48-Key Digi tal Fe atur e P hone
In addition to how the 24-Key Feature Phone connects
to the handset and line cord, note the following:
1
• Headset jack.
• TAPI version includes a cable for connecting to your
PC’s serial port.
• 60-Key Expansion Console cable (included with each
Console) uses standard RJ-11 telephone connectors.
Note: Use the wall mount hook (located under the handset) when the phone is in the furthest upright position.
1
If shipped after March 1, 2004.
A.6
Page 11

User’s Guide Help mode (Verbal User Guide)
Help mode (Verbal User’s Guide)
Your ESI phone system’s help mode (also called the Verbal User Guide) — a carefully conceived
combination of spoken information, display readouts and even key illumination when appropriate — is a
powerful tool to help you learn how to use the system’s many features.
Tutorial
When your station is idle, press HELP, and then follow the spoken help menu to:
• Learn how to use the phone • Hear a description of how any key is used
• Learn how to use voice mail features • Hear a complete tutorial on phone operation
Help during st ation programming
To hear a detailed description of a function you wish to program, press HELP while programming it.
Help during a call
Press HELP while on a call and this will place the call on hold, whereupon you can use help mode to
hear a description of the function you wish to perform. When you exit help mode, you will be
reconnected to the call.
While you are either in help mode or programming your phone, your station will be temporarily placed in
DND (see “MUTE/DND,” page E.2). Anyone calling your station while you are in DND will be forwarded
to the Integrated Answering Machine (or other destination set by the Installer).
Exiting help m ode
To exit help mode, simply hang up.
Visit www.esiusers.com for up-to-date help.
B.1
Page 12

Help mode (Verbal User Guide) User’s Guide
(This page included for pagination purposes only.)
B.2
Page 13
User’s Guide User programming: An introduction
User programming: An introduction
The answering machine can record up to two simultaneous calls. When a message is left, the
VOICE MAIL key on the 12, 24, or 48-Key Feature Phone will light. Messages can be retrieved by
any authorized 12, 24, or 48-Key Feature Phone or remotely from an off-premises location. Only one
user can access the mailbox at a time. The system can also be programmed to call an off-premises
number to deliver messages.
The first member in the Master List is allowed to program the Integrated Answering Machine via the
PROGRAM key. This station is designated as the Master Station. All other users will only be able to
play and delete messages. A 12, 24, or 48-Key Feature Phone can be installed on an extension in the
Master Lst. However, a 24 or 48-Key Feature Phone must be on the extension designated as the
Master Station.
Voice prompts will play menu and sub-menu options to access the desired feature. You don't have to wait
for the entire prompt to be played. Therefore, once you’ve become familiar with the prompts (consult
“User programming menu,” below), you can quickly set any frequently used feature.
Program m ing hel p
During any of the programming steps, press HELP to hear a more detailed description of the feature
and related programming options.
Exiting pr ogr am m ing mode
To exit programming mode, simply hang up.
User programming menu
Overview
Note: Only menu options 2, 3, and 4 (except for personal greeting reminder) are available to non-Master users.
1 Select personal greeting
1 Record
2 Delete
3 Hear
2 Progr ammabl e fe atu re keys
(Station ke ys, li ne keys, spee d-di al keys, othe r
feature keys)
3 Station options
1 Call waiting/background announce
2 Personal greeting reminder
3 Headset op eration
4 Outside dial ton e pr eference
5 Hands-free answer
6 Message monitor
1
Note: Background announce and selections 3, 5, and 6 under station options are not available on a 12-Key
Feature Phone.
4 Station audibles
1 Station ring tone
2 Station ring volume
3 Message ring
5 Password
1 Enter
2 Delete
3 Hear
4 Security level
6 External message notification
1 Delivery opti ons
2 Phone d eli ver y
3 Pager notification
9 Un-delete
1
Not necessary with G eneration II system. If unsure which system you have, consult your System Administration.
C.1
Page 14
User programming: An introduction User’s Guide
1 Select per sona l gr ee ting
Select the desired greeting — 1, 2 or 3. The system will play the current greeting, followed by
prompts to re-record, delete or hear again — or select the current greeting by pressing #.
1 Record personal greeting
Begin recording at the tone. Press 1 to stop. The new personal greeting automatically replaces
the previous greeting.
2 Delete personal greeting
When prompted, press 2 again to confirm deletion.
Warning: The mailbox is disabled if no greeting exists. Never delete all of the existing greetings
before you record at least one new one.
3 Hear current personal greeting
2 Programmable feature keys
There are two methods for programming your phone:
• Direct programming — Select the key you want to program, and hold it down for at least two
seconds. This not only initiates programming but also lets you immediately program that specific key.
Direct programming example:
You wish to set one of the keys to dial a co-worker, whose extension is 105. Hold down the
key for at least two seconds. This automatically puts you in feature key programming.
Follow the prompts to enter 1 0 5. (This has allowed you to skip two steps — pressing
PROGRAM and selecting a menu option — that you’d have had to perform if using
traditional programming.)
• Traditional programming — Press PROGRAM. The Verbal User’s Guide will speak to you,
walking you through the full menu, during which you can choose the appropriate option.
How the programmable feature keys can be set
• Line keys — If a line number (1 through 12) is programmed, the programmable feature key
becomes a line key providing the appropriate lamp information and manual outside-line access.
• Station keys — If the dialed digits input are a three-digit number, the programmable feature key
will become a station key, providing the appropriate lamp information and easy access or
transfer. Three-digit numbers you enter can be:
— User extensions (100–123 and 124–129)
— Department numbers (290–299)
— System speed-dial numbers (600–699)
• Speed-dial keys — In addition to programming a programmable feature key with a system
speed-dial number, you can create personal speed-dial keys for automatic dialing of frequently
called outside numbers. If you program 9 (or 8 or 7) plus a phone number, the programmable
feature key becomes a speed-dial key. When you program a speed-dial key, there's no need to
insert a pause after the 9 (or 8 or 7). The speed-dial number can be up to 24 characters long.
Use the up scroll key (▲) to enter special characters in a dial string (see Option 6 on page C.4).
• Other feature keys — If you enter feature codes, the programmable feature key will serve as an
enable/disable key for that feature. The Installer may have programmed certain stations for
accessing additional features; consult your System Administrator for your access (see page F.12).
C.2
Page 15
User’s Guide User programming: An introduction
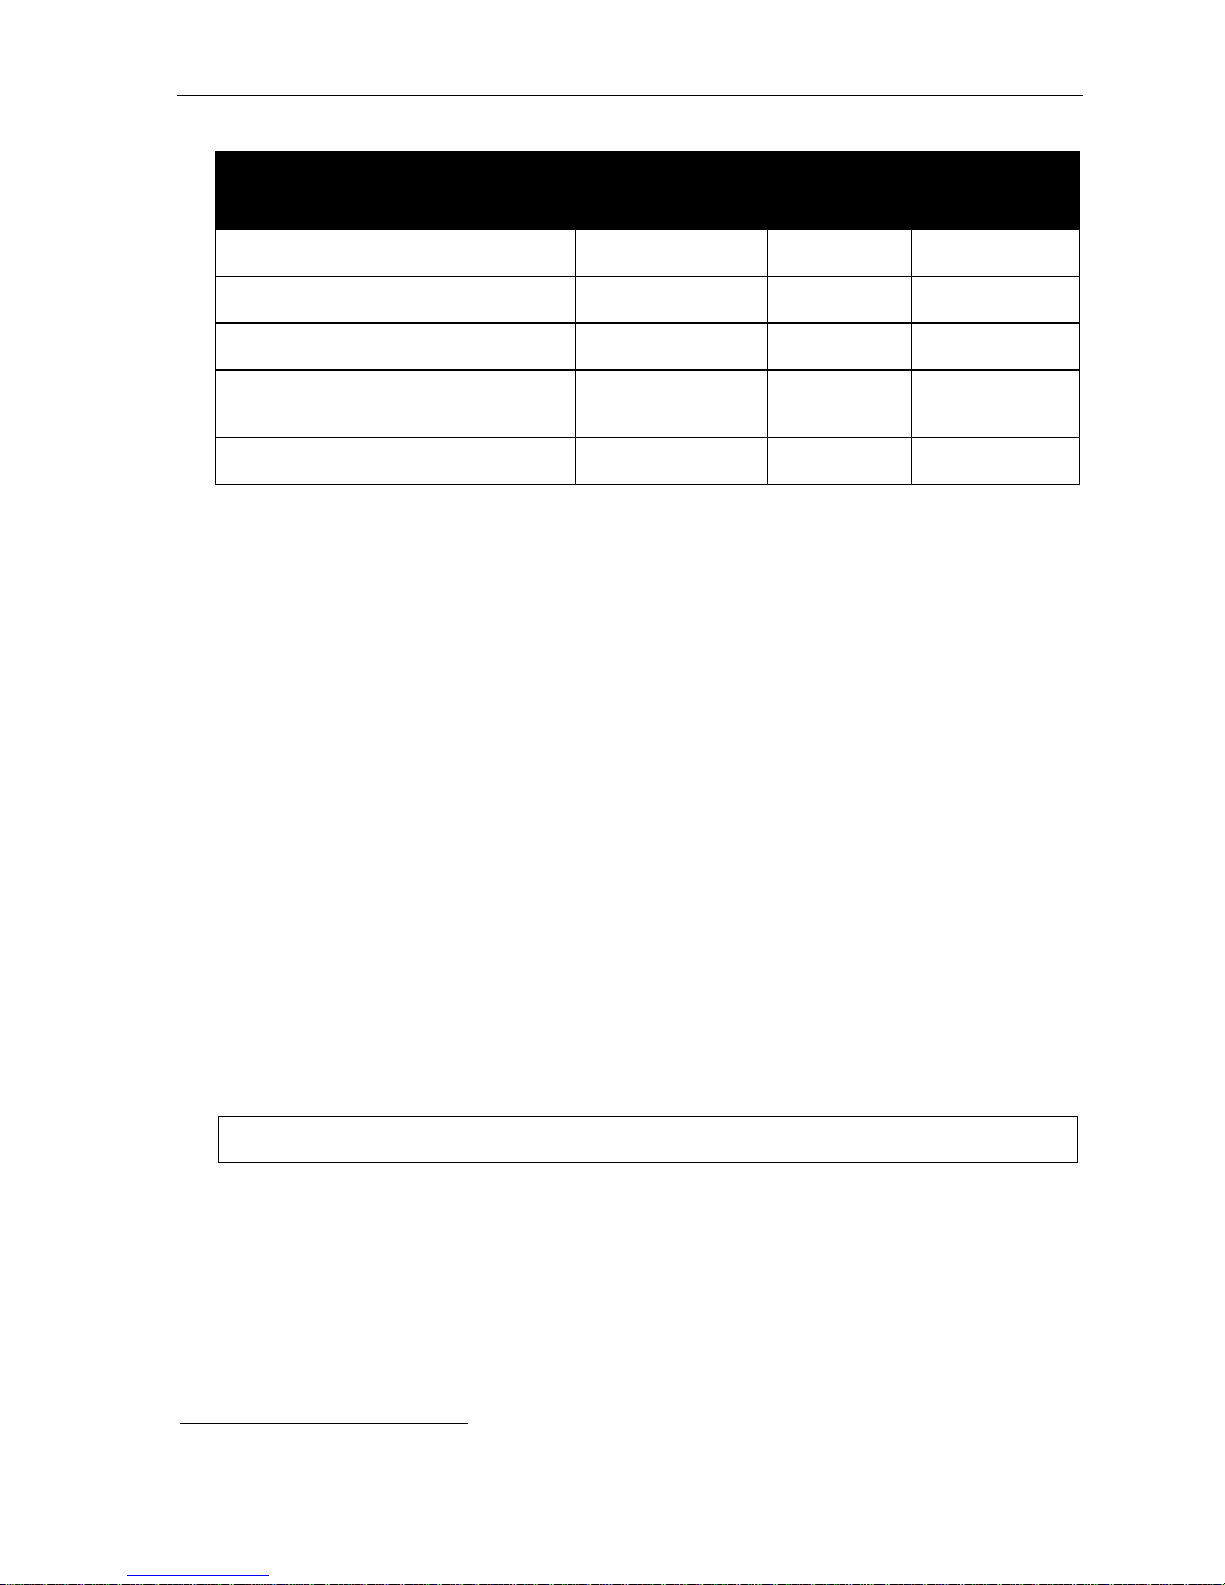
Keys’ LED activity during programming
Key type and LED indication
Mode
Currently being programmed and
previously assigned
Currently being programmed and
previously unassigned
Programming mode — Was assigned or
viewed in current session
Assigned in a previous programming
session and not yet viewed in current
session
Never assigned and not yet viewed in
current session
Station key or
Virtual Mailbox Key
Flashing red Flashing green Flashing amber
Flashing red Flashing red Flashing red
Blinking red Blinking green Blinking amber
Solid red Solid green Solid amber
Off Off Off
Line key
Feature key
or speed-dial key
3 Station options
The station options sub-menu (PROGRAM 3) lets you activate or deactivate several features your
station can provide. At each option sub-menu, 1 enables the option and 0 disables it. (Each option
listed below is explained elsewhere in this manual, as noted.)
1 Call waiting/Background announce
See page E.7 for call waiting and page E.8 for background announce.
2 Greeting reminder (Master station only)
See page F.10.
3 Headset operation
See page F.10.1
4 Outside dial tone preference
See page F.11.
5 Hands-free answer
See page E.2.
6 Message monitor
See page F.10.
Note: Background announce and selections 3, 5, and 6 are not available on a 12-Key Feature Phone.
1
Not necessary with G eneration II system. If unsure which system you have, consult your System Administration.
C.3
Page 16

User programming: An introduction User’s Guide
4
4 Station audibles
The station audibles programming provides control of the following audible items:
1 Station ring tone
You can select from six possible tones to help distinguish it from other nearby ringing phones.
Press ▼ or ▲ to select a tone, then press # to accept it.
2 Station ring volume
Press ▼ and ▲ to set the desired ringer volume (range: off to high), then press # to accept it.
3 Message ring
When enabled, this feature will periodically generate a short ring tone at your station as an
additional alert that you have new messages.
5 Password
1 Enter new password
Your password may consist of 2–8 digits followed by # (0 cannot be the first digit). Entering only
0 as the password will turn off the password requirement.
2 Delete current password
Resets the password to the default password.
3 Hear current password
Displays and plays back the current password.
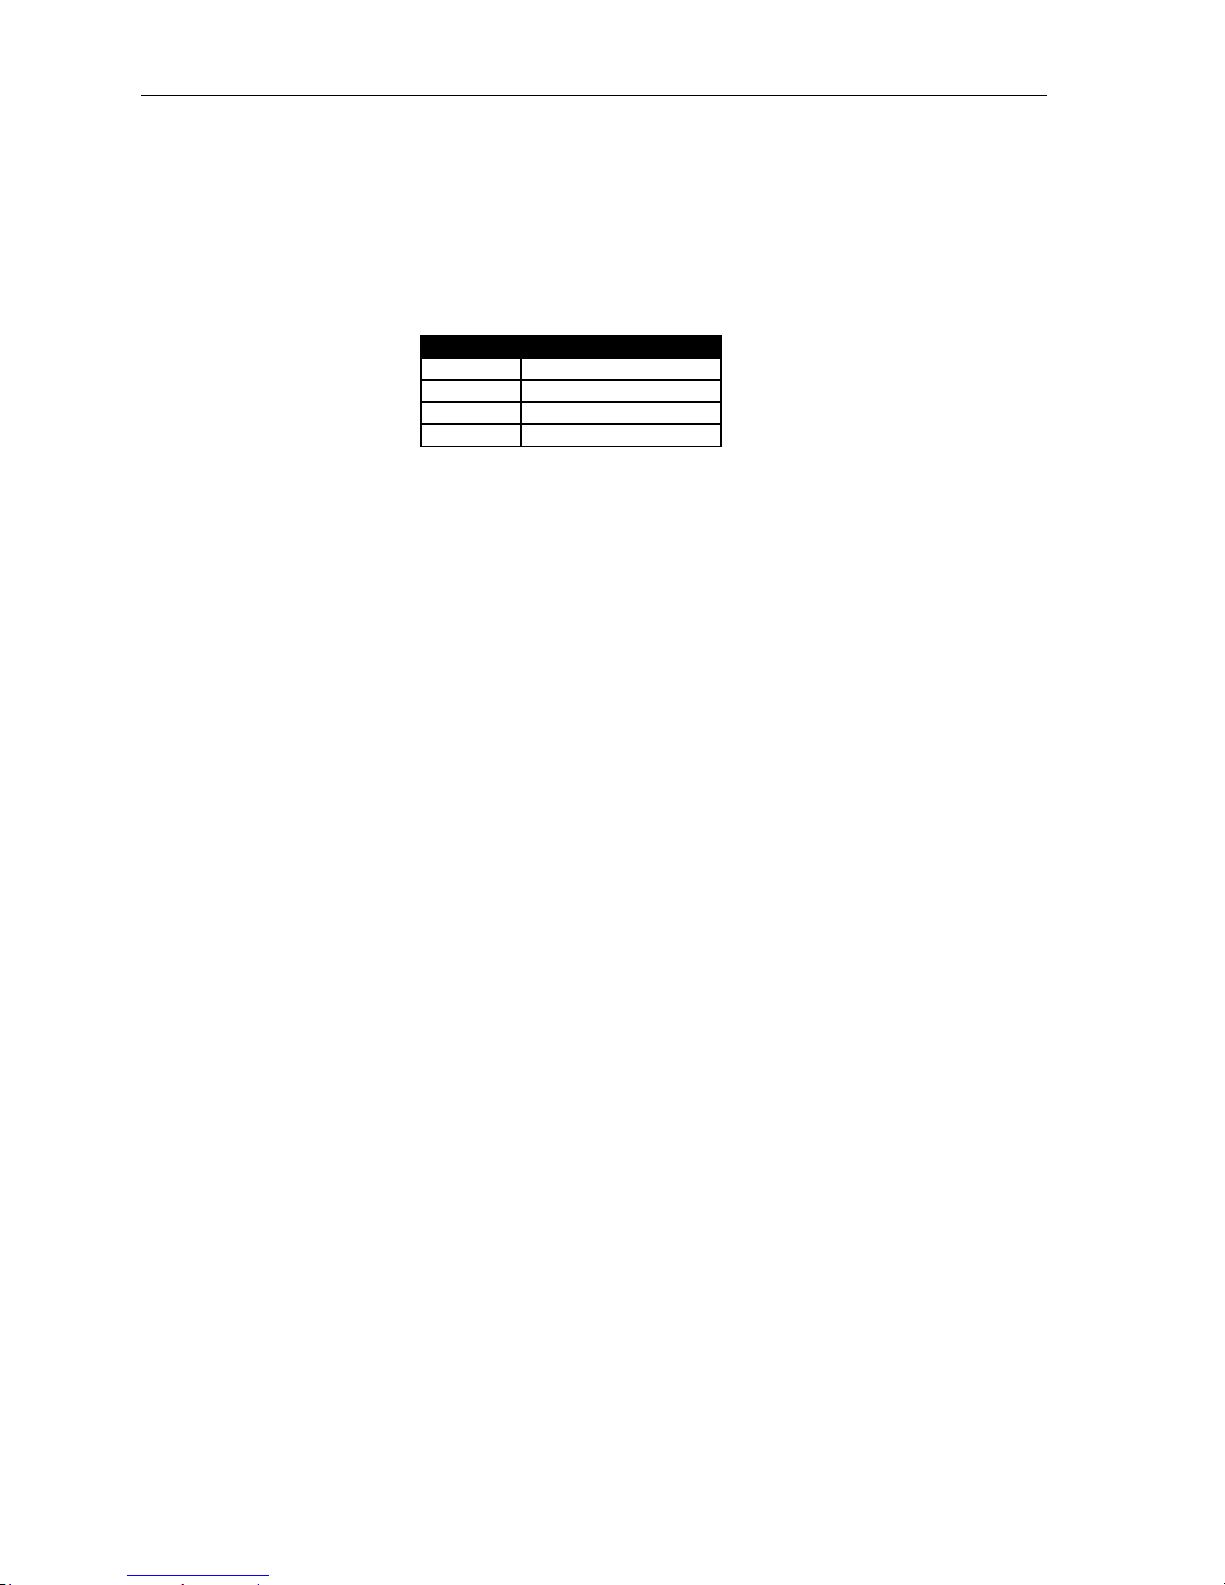
4 Password security level
Selection Result
0 No password required for access from any phone
1 Password required only for remote access, either off-premises or from other
stations within the system
2 Password always required
C.
Page 17

User’s Guide User programming: An introduction
6 External message notification
1 Delivery options
1 Delivery to phone number only
2 Notify pager only
0 No off-premis es de liver y
2 Phone delivery
1 Enter phone number
Enter the phone number (24 digits, maximum) followed by #. Do not include an outside line
access code (i.e., don’t add 9, 8 or 7) before the number.
To insert a special character, press the right scroll key (▲) to select the desired special
code: # , , F or P. Press # to confirm the inserted character and continue. Press # # to
complete the entry.
Code What it produces
# # DTMF tone
F Flash hook
P 2-second pause
Use the down arrow key (▼) to backspace.
DTMF tone
2 Delete phone number
3 Display current phone number
(Continued)
Once the number is saved you can use the scroll keys to move back and forth to view the
number. To edit the number, you must delete it and enter the correct number.
Deletes the currently programmed phone number.
Displays the currently programmed phone number.
C.5
Page 18
User programming: An introduction User’s Guide
3 Pager notification
1 Enter pager number
Enter the pager number (24 digits, maximum) followed by #. Do not include an outside line
access code (i.e., don’t add 9, 8 or 7) before the number.
To insert a special character, press the right scroll key (▲) to select the desired special
code: # , , F or P. Press # to confirm the inserted character and continue. Press # # to
complete the entry.
Code What it produces
# # DTMF tone
F Flash hook
P 2-second pause
Use the down arrow key (▼) to backspace.
Once the number is saved you can use the scroll keys to move back and forth to view the
number. To edit the number, you must delete it and enter the correct number.
2 Delete pager number
Deletes the currently programmed pager number.
DTMF tone
3 Display current pager number
Displays the currently programmed pager number.
9 Message Recycle Bin (un-delete)
The 10 most recently deleted message will be played first. Press 9 to move to the next message.
Press 8 to restore the message to your mailbox as an old message.
C.6
Page 19

User’s Guide Integrated Answering Machine operation
Integrated Answering Machine operation
Introduction
Your phone system provides accurate and timely messages. Others will become more comfortable
leaving you voice messages if you promptly retrieve and respond to your messages.
VOICE MAIL key
The VOICE MAIL key is used for direct access to voice mail features.
Warning: On stations with a 12-Key Feature Phone, a programmable feature key must be set to
code 5 7 9 (for VOICE MAIL key). If a key is not programmed to 5 7 9, you will still be able to
retrieve previously left messages and access user programming, but you will not be able to receive
new messages (when you access the mailbox, the phone system will announce that the mailbox is
disabled). Program 5 7 9 on a programmable feature key to enable the mailbox.
Greetings
Note: Greetings are for use by only the Master Station.
Initially, the mailbox has a generic greeting: “You have reached mailbox 501. Di al zero to reac h the
operator or begin recording at the tone.” You can record up to three different greetings in your own
voice, indicating your availability to return calls. Also, you can change any greeting as often as necessary,
by just recording over a previously recorded greeting.
Warning: Don’t delete all of the greetings; make sure at least one always remains. Deleting all the greetings
will turn off the mailbox.
Examples
Sample greeting 1: Hello. Thank you for calling [company name]. We are currently assisting other customers.
Please dial zero to reach our operator or leave your name, number, and message at the
tone and we will get back to you as soon as we can.
Sample greeting 2: Hello. Thank you for calling [company name]. We are currently out of the office.
T o attempt to reach our mobile phone, please press four now. Otherwise leave your
name, number, and message at the tone and we will get back to you as soon as we can.
Sample greeting 3: Hello. Thank you for calling [company name]. We are currently out of the office.
Please leave your name, number, and message at the tone and we will get back to you
as soon as we can.
You may wish to include one or more of these options in your greetings:
Option Instruction
0 To reach the operator
1 To skip directly to the record tone (or “beep”)
4 To perform off-premises “reach-me” (see “Off-premises ‘reach-me,’” page D.2)
XXX An extension number of another user
Note: Option 4 is available only when Greeting 2 has been recorded. (see “Off-premises ‘reach-me,’” page D.2)
D.1
Page 20

Integrated Answering Machine operation User’s Guide
Greeting keys
You can program a programmable feature key as a greeting key for any one of the three greetings (see
page F.13). Once created, this shortcut can then be used to activate the associated greeting (the key’s
LED will glow green and the greeting played as confirmation).
Note: On a 48 or 24-Key Feature Phone, press RECORD while the confirmation is playing and follow the
prompts to record the greeting. Otherwise, listen to the greeting to the end and follow the prompts.
Leaving messages . . .
If you call another station that is DND, busy, or does not answer, you will be transferred to the mailbox.
You can skip the greeting by pressing 1; this takes you directly to the record tone.
. . . directly in the mailbox
The procedure for going directly to the mailbox without ringing an extension depends upon whether you
have the mailbox (501) set as one of your station keys:
• If you do, press VOICE MAIL and then the MB 501 station key.
• If you don’t, press VOICE MAIL and TRANSFER and then dial the mailbox number (501)
Either will connect you directly to the mailbox greeting.
Off-premises “reach me”
After a caller has been forwarded to the mailbox and is listening to the greeting, this feature allows the
caller to be forwarded to a number outside the system — i.e., a regular phone number rather than an
extension. You must have greeting 2 selected and it must tell callers to press 4 for this feature.
When the caller presses 4 during your greeting, the system forwards him/her to the number set for “phone
delivery” under “external message notification” (PROGRAM 6 2 — see page C.5). If that number
doesn’t answer, the caller is returned to the voice mailbox. When you receive a forwarded call, you’ll be
prompted to “press any key” to accept the call.
Note: This feature is activated only if your Administrator enables it on your station and you have set your
mailbox to play greeting 2.
Sample greeting 2 for off-premises “reach me”:
“Hello. Thi s is Ri ck. I’m cu rren tly ou t of the of fice . To attempt to rea ch me on my mobi l e phone , pleas e pres s 4 now.
Otherwise, please leave me a message after the tone and I will return your call as soon as possible.”
Message retrieval
Message(s) waiting display
If you have at least one new message, the VOICE MAIL LED will blink and your display will show the
number of new and old messages in your mailbox. The 12-Key Feature Phone displays only the date
and time.
24-Key
Feature
Phone
48-Key
Feature
Phone
Note: Message status (shown in the examples above as NEW 3 OLD 1) appears only when new messages exist.
D.2
Page 21

User’s Guide Integrated Answering Machine operation
Retrieving voice mail messages from the mailbox
1. Press VOICE MAIL.
2. Enter your password if required (you may change the requirement for a password in user
programming menu 5; see "Password” on page C.4).
3. The ESI phone system will start playback of messages with the oldest new message and continue
until all messages are played. The display will show the origination of the message, the countdown
duration of the message, whether new or old, and the time/date of when the message was left.
48-Key
24-Key
Feature
Phone
4. At the end of each message, the ESI phone system prompts you for instructions (see the chart,
“Keys’ functions during voice mail message retrieval,” be low). Once you’ve learned these prompts,
you can proceed more rapidly by pressing one of the appropriate keys any time during a message
or during a prompt.
Note: If, while picking up messages, you receive a call-waiting tone, hang up. When your phone rings, lift
the handset and you will be connected to the waiting call. Alternatively, you may simply press the
hook switch when you hear the call-waiting tone; this automatically connects you to the waiting call
without your having to first hang up, then pick back up, the handset.
5. To exit playback of messages, simply hang up your phone.
Feature Phone
(also shows
running playback
time in reverse)
Note: If you hang up during playback of a message, the system saves that message and all others
aren’t deleted.
Key functions during voice m ail m essage retrieval fr om an ESI Featur e Phone
Key Function name Description
4 Back up (rewind) • If pressed during message playback, rewinds 4 seconds
for each key-press.
If pressed after the playback has finished, returns to
•
beginning of message.
7 Delete Deletes the message from the mailbox (see “Message
Recycle Bin,” page D.6).
9 Save Saves the message (it will play as an old message the
next time you retrieve messages).
FLASH/RDL Auto-callback Exits your mailbox without erasing the message, and then
automatically dials the number.
(Not available from an analog phone or off-premises location.)
1
ESI-DEX Store If Caller ID is present, saves to your Personal Dex for later
use.
(Not available from a 12-Key Feature Phone, an analog phone or
an off-premises location.)
1
A local call may not be dialed correctly depending on the limitations of the local dialing plan. You may need to dial some of these
calls manually.
D.3
Page 22

Integrated Answering Machine operation User’s Guide
4
Retrieving messages from an off-pr emi ses location
You can pick up messages when away from the office or from an analog station. Since the display is not
available to you, message handling will operate slightly differently.
To retrieve a message from a remote location:
1. Dial into the system.
2. When the operator or another user answers your call, have them transfer you by pressing
VOICE MAIL and hanging up. You will hear the mailbox greeting. Press 8 # to hear the messages.
3. If no one answers and the mailbox greeting plays, press 8 # to hear the messages.
4. If required, enter your password.
5. The ESI phone system will announce the number of new and old messages, and will start
playback of messages starting with the oldest new message and continue until all messages and
recordings have played or you press to disconnect.
Additional functions available during off-premises voice mail message retrieval
Key Function Description
2 Hear time/date Pauses the message, plays the time/date when the message was left and resumes.
5 Access user
programming
7 Delete Deletes the current message.
9 Save Saves the current message as Old.
0 Operator Transfers you to the operator.
Disconnect Disconnects you from the system. Always press before hanging up (if you press it
Access certain user-programmable features.
Note: Fast-forward is not available from a remote location.
during message playback, the system will save the playing message and any other
currently unsaved messages in your mailbox).
D.
Page 23

User’s Guide Integrated Answering Machine operation
Off-premises message delivery
Introduction
The ESI phone system can be programmed to deliver messages to an off-premises phone or to page
you when the voice mailbox receives a message. You can set the phone number (cell phone, home
number, another extension, etc.), a delay time (the period that the system is to wait before attempting
to deliver the message), or the pager number.
The Administrator can also set for your station the:
• Number to be called or paged
• Delay period
• Number of attempts
• Interval between attempts (in increments of 30 minutes)
• "Quiet period” which suspends message delivery for late night, etc.
If you have programmed both an off-premise delivery number and a pager number, the system will
prompt you to choose one of the following delivery options:
• Phone-only
• Pager-only
• No off-premises delivery
Message delivery
. . . To a phone
Whenever the mailbox receives a new message, the system will call the number that you have
programmed and play the prompt: "You have messages. Please enter your password.” The prompt will
repeat three times before the system assumes that no one has answered (i.e., because it has "heard”
no password) and disconnects.
Upon answering, enter your password (if you have set your password options for no password, you must
enter 0 as your password).
Warning: A “” response instead of the password will cause the system to suspend calling you until it
receives the next new message.
You will then be connected to the mailbox and can proceed with normal remote operation (see
"Retrieving voice mail messages from an off-premises location,” page D.4).
. . . To an external pager
You can have the system call and activate your external pager whenever the first new message is left in
the mailbox and repeat the page (at the interval programmed by the Administrator) until all new
messages have been retrieved.
Note: Either entering or deleting the phone number to be called for off-premises delivery or activate your
pager1 will toggle the feature on or off.
1
If pager notification was enabled as described.
D.5
Page 24

Integrated Answering Machine operation User’s Guide
Message Recycle Bin (un-delete)
The ESI phone system stores the Integrated Answering Machine’s 10 most recently deleted messages
in a Message Recycle Bin to allow you to recover, or "un-delete,” messages that may have been
deleted in error.
You access the Message Recycle Bin through user programming (PROGRAM 9). Press 9 to advance
through deleted messages. Press 8 to restore a message to the mailbox as an old message.
Status Indicator lamp
The red status indicator lamp, located at the top of the 48 and 24-Key Feature Phones, indicates
three conditions:
• Phone is off-hook — Light glows solid red.
• Phone is ringing — Light “flutters” continuously.
• Phone has at least one new voice mail message — Light blinks.
For example, if a user is wearing a headset, it can be difficult to know whether he or she is on a call.
Therefore, just look at the status indicator lamp — if it’s glowing solid red, the person is, indeed, on
a call.
Note: If more than one of these three conditions is true at the same station, the light will behave according to
the following priority: off-hook, then ringing, then new voice mail. Here’s an example. You have a new
voice mail message waiting, which makes the light blink. However, if the phone begins to ring, the light
will “flutter” continuously because ringing has a higher priority than new voice mail; and, if you then pick
up the handset or press SPEAKER to take the call, the light glows solid red because the off-hook
condition has the highest priority of the three conditions.
D.6
Page 25

User’s Guide ESI Feature Phone operation
ESI Feature Phone operation
Display
When your phone (or station) is not in use, the display will show the current date and time, activated
features such as DND (do not disturb; see “MUTE/DND,” page E.2), monitor mode, etc., and — on a
48- or 24-Key Feature Phone — the system’s current line usage. A 12-Key Feature Phone does not
display line usage.
Each block on the bottom line of the
display will represent an individual line
24-Key Feature Phone
48-Key Feature Phone
(as in the examples, right). Incoming
calls usually are assigned beginning
with Line 1 at the far-left line indicator.
Outgoing calls are assigned from the
highest numbered line beginning at the
far right.
Line in use
Available line
As you use your ESI Feature Phone, its display changes frequently to give you detailed information
during call processing and voice mail operations.
Caller ID
If you subscribe to Caller ID from your telephone service provider, the phone’s display will show an
outside caller’s name and/or number.
caller status — such as UNAVAILABLE, PRIVATE or NO DATA SENT.
1
In some instances, the service provider can send only a general
Keys
Programmable feature keys
The programmable feature keys at the top of the Feature Phone — 30 on a 48-Key, 12 on the 24-Key,
and nine on the 12-Key — have been pre-programmed by the Installer. You may wish to add to or
change some of these keys to perform different functions explained throughout this manual. Press
PROGRAM to verify current settings (see page C.1).
Note: Key codes for VOICE MAIL, CONFERENCE, and MUTE/DND for a 12-Key Feature Phone must be
programmed on a programmable feature key to use these functions. See page F.12.
Fixed-feature keys
The fixed-feature keys on the phone are permanently labeled as to their usage. The FLASH/RDL and
MUTE/DND keys both have dual purposes; your ESI phone system will govern this by permitting only
the appropriate function when either is pressed, depending on the circumstances at that moment. The
different phone models have some different fixed-feature keys.
Note: The fixed keys on the 48- and 24-Key Feature Phone vary from those on the 12-Key Feature Phone.
The 12-Key Feature Phone’s programmable feature keys can be set for certain optional features
(described on page F.12) that com e as fixed-feature keys on the 48- and 24-Key Feature Phones.
1
If you don’t subscribe to Caller ID, the LCD will show which line is rec eiving the call, instead of the caller’s name or number.
E.1
Page 26

ESI Feature Phone operation User’s Guide
Keys’ LEDs (lamps)
The LEDs (light-emi t ting diodes), or lamps, associated with the programmable and fixed keys aid in
determining the status of their function. In general:
• Green indicates a function associated with your phone.
• Red indicates an occurrence at another station.
• A solidly lit lamp indicates in-use status.
• Blinking indicates an action, such as ringing or holding, is required; a fast blink calls for
immediate action.
As an example, a blinking red key is a call ringing at another station; blinking green signifies ringing at
your station. (See also “Line keys,” page F.11.)
SPEAKER key and speakerphone oper ation
For hands-free conversation, use the SPEAKER key.1 When an outside call rings, you can press
SPEAKER to connect to the caller via your phone’s built-in speakerphone.
key’s LED. Or, while using the handset, you can switch a call to the speakerphone by pressing
SPEAKER and hanging up the handset. (To revert to the handset from speakerphone mode, lift the
handset again.) To perform group listening — i.e., have a handset conversation along with the caller’s
voice broadcast over your speaker — press SPEAKER while on a handset conversation but do not
hang up the handset.
Hands-free answer (internal calls only)
You can program your phone to enable or disable hands-free answer1 — press PROGRAM 3 5. With
hands-free enabled, an internal call to your station generates a short ring and a double connect tone, then
automatically connects the caller to your speakerphone. With hands-free disabled, an internal call to
your station generates a single-ring cadence; outside calls ring with a double-ring cadence.
1
This lights the SPEAKER
Note: The 12-Key Feature Phone only supports hands-free listening. You must pick up the handset to
respond to the caller.
Volume/scr oll keys
The two smaller keys just above the dial pad labeled ▼ and ▲ serve two purposes:
• Adjusting the volume heard through the handset and speaker — Your phone will maintain the
chosen volume setting until you change it.
• Serving as scroll keys for operations (such as Esi-Dex or programming) that may show several
entries on the display, such as special characters: #, , P, and F.
MUTE/DND key
To disable your handset or speaker microphone during a conversation (either with the handset or
speaker), press MUTE/DND. While the mute function is activated, the MUTE/DND LED will blink rapidly
and the display shows “MUTED.”
When your phone is idle and you wish to make sure its calls go straight to voice mail, press MUTE/DND
to toggle your phone in or out of DND (do-not-disturb) mode. The display will show DND and the
MUTE/DND LED will glow amber.
2
Notes: If you press MUTE/DND while your phone is ringing, this forwards the call to the voice mailbox
your station will be placed in DND.
On stations with a 12-Key Feature Phone, a programmable feature key must be set to 5 7 8
for MUTE/DND capability. For more information, see page F.12.
and
1
Not available on 12- Key Feature Phon e.
2
See “Integrated Ans wering Mac hine op eration,” pp. D.1–D.6.
E.2
Page 27

User’s Guide ESI Feature Phone operation
Soft feature keys
Soft feature keys are dynamic: when used, they constantly change your ESI Feature Phone’s status.
These soft keys, located under the display, include ESI-DEX
and ▲). Along with spoken and displayed commands, they guide you through the use of Esi-Dex (page
F.2), various programming activities and controlling the volume of your phone’s handset and speaker.
1
, PROGRAM, HELP, and scroll keys (▼
Dial tone
When you first lift your handset, you will hear an internal dial tone that allows you to call other stations
or perform other internal functions. To gain an outside dial tone, dial 9 (or 8 or 7)
2
or press a
programmable feature key that has been set as a line key. (A line key, when pressed, automatically
gains an outside line. Consult your System Administrator if you have questions.)
Basic phone use
Outside calls
To answer (double-ring cadence): Lift the handset or press SPEAKER.
1
To place: Lift the handset or press SPEAKER.
Then either press an unlit line key or dial 9 (or 8 or
7) to be assigned an outside dial tone.
To hang up: Replace the handset or — if using the speakerphone
Internal calls
To answer (single-ring cadence): In hands-free mode, answer directly through the speakerphone or pick
up the handset. Or, to answer a ringing call, lift the handset or press SPEAKER.
To place: Lift the handset and dial the extension number or press a station key (see “Direct station
selection,” page E.4).
To hang up: Replace the handset or press RELEASE or press the station key again or — if using the
speakerphone — press SPEAKER.
1
1
1
— press SPEAKER.
1
Shortcut for either outside or internal calls:
If you press a station key or dial an extension number, the phone system automatically activates
the speakerphone.1
1
Not available on 12- Key Feature Phon e.
2
What you dial to reach an outside line depends on your system’s particular setup. If you’re not sure, consult your System
Administrator.
E.3
Page 28

ESI Feature Phone operation User’s Guide
4
Direct station selection
Programming some of the programmable feature keys (see pp. C.2–C.3) as station keys will provide
direct access to those stations as well as providing lamp information as to their status. The station keys’
LEDs indicates the status of the station assigned to each key:
If a station key’s LED is . . . The station assigned to that key is . . .
Unlit Available; currently unused
Red; steadily lit In use
Red; blinking Ringing from another call
Green; steadily lit Connected to you (including via voice mail)
Green; blinking Ringing from your call
Amber; steadily lit In DND mode
To call another station programmed into one of your station keys:
1. Press an available (unlit) station key.
2. The called station will sound a short ring followed by a double connect tone.
3. The phone system will activate the called station’s speakerphone (or the station will ring if that
station’s user has hands-free answer disabled).
4. To disconnect when finished, do one of the following:
(a.) Replace the handset.
or
(b.) (if in hands-free mode) Press the station key again.
or
(c.) Press SPEAKER (if in hands-free mode).
If you press a key for a station that’s in use (red; steadily lit), you will “camp onto” the station, where its
Feature Phone’s display will tell its user that you’re waiting (see “Call waiting,” page E.7).
1
If you press a key for a station that’s in DND (amber; steadily lit), you’ll be forwarded directly to the
person’s mailbox.
1
Not available on 12- Key Feature Phon e.
E.
Page 29

User’s Guide ESI Feature Phone operation
Transferring an outside call . . .
. . . to another station
Blind transfer
1. While connected to an outside call, press a station key (or press TRANSFER and then dial the
extension number).
2. Hang up immediately to perform a blind transfer.
Note: If the called person does not answer, the caller will be forwarded to the Integrated Answering Machine.
Supervised transfer — announcing the caller to the called person
1. Do not hang up (as in “Blind transfer,” above); instead, wait until the called person answers.
2. Announce the caller (e. g., “Hello; I have Bill on the line and I’m transferring him to you now.”)
3. Hang up.
Note: If the transferred-to person does not answer in step 1, press the station key again or press FLASH
to be reconnected to the original caller.
. . . to the mailbox
1. Press VOICE MAIL and the appropriate station key programmed for 5 0 1 — or, if your phone
has no station key programmed for this destination, press VOICE MAIL and TRANSFER, and then
dial 5 0 1.
2. You and the caller will be connected to the mailbox greeting. Hang up immediately.
Note: Regardless of when you hang up, the caller will hear the entire greeting. To insure the privacy of the
message, you will automatically be disconnected at the record tone.
E.5
Page 30

ESI Feature Phone operation User’s Guide
Conference calling
Note: On stations with a 12-Key Feature Phone, a programmable feature key must be set to 570 in order to
initiate a conference call. For more information, see page F.12.
To create a conference call:
1. Establish the first call.
2. Press CONF to place the call on hold.
3. Place a second call as you normally would.
4. Once connected to the second call, press CONF again to connect all of you together.
Note: Repeat these steps to add a fourth member to the conference.
A total of four members can be in conferences within the system at any one time.
If the newest added-on member does not answer, press his/her station key again or press FLASH to
return to the original conferees. If you place any incoming caller on HOLD or exclusive HOLD (see
“Hold/exclusive hold operation,” page E.8), you can add that caller, as well, to the conference by
pressing CONF, retrieving the call from hold (or exclusive hold) and pressing CONF again.
Any member of the conference can drop out by simply hanging up. However, when the station that
created the conference hangs up, all members in the conference are disconnected. Individual stations
or lines connected to the conference can be dropped from the conference by pressing their station or
line key (lit green).
Note: Your Installer or System Administrator may have enabled trunk-to-trunk conferencing (unsupervised
conferencing) for your station. If so, the steps to initiating such a conference are the same as for
performing any other conference (see above); the difference is that you may hang up, thus exiting the
conference, but the remaining members won’t be disconnected. (If this feature isn’t enabled, your
hanging up disconnects all members.)
Important:
USE OF FEATURES, SUCH AS TRUNK-TO-TRUNK TRANSFER, THAT REQUIRE TRUNK-TO-TRUNK CONNECTIONS
WILL INCREASE THE RISK OF TOLL FRAUD. IN NO EVENT SHALL ESTECH SYST EMS, INC. BE LIABLE FOR ANY
DIRECT, INDIRECT, INCIDENTAL OR CONSEQUENTIAL DAMAGES WHATSOEVER INCLUDING, BUT NOT LIMITED
TO, FRAUDULENT TOLL CHARGES, LOSS OF BUSINESS PROFITS, BUSINESS INTERRUPTIONS, OR ANY OTHER
COSTS OR DAMAGES RELATED THERETO, ARISING FROM THE USE OF THESE FEATURES
.
Call forwarding
Your station has been pre-programmed by the Installer to “call-forward” your phone to the mailbox
when your station is busy or does not answer. In addition, you can temporarily call-forward all of your
calls to another station or the Integrated Answering Machine.
On an ESI phone:
1. Dial 5 6 5.
2. Dial the extension number (or VOICE MAIL and then the mailbox number) to which the system
should forward all calls.
Note: If the forwarded-to station is busy or does not answer a forwarded call, the call will be returned to
mailbox 501.
If you frequently call-forward your phone, you can program a programmable feature key as a call forwarding
key to automatically turn forwarding on and off. If you always forward to the same extension, you can
program a key with both 5 6 5 and the extension number. (For more information, see “Programmable
feature keys,” pp. C.2–C.3.) The call forwarding key will be solid green to indicate that it is active.
E.6
Page 31

User’s Guide ESI Feature Phone operation
Call waiting
If you have enabled call waiting for your station (PROGRAM 3 1) and a second call comes in while you
are on another, you’ll hear a tone in your earpiece and the bottom line of your display will indicate that a
second call is waiting. You can ignore the call waiting and it will be transferred to mailbox 501 (or other
destination set by the Installer).
To toggle between the two calls on a 48 or 24-Key Feature Phone, press FLASH. To drop either call,
press RELEASE while connected to the call to be dropped: this disconnects the call and automatically
re-connects you to the other call.
On a 12-Key Feature Phone, press the hook switch quickly to toggle between two calls (FLASH), or
hold the hook switch down to release the call (RELEASE).
Call waiting display
Be sure to check the display when you’re using call waiting. Initially, the first line shows the name or number
of your original call (depending on how the call was created) and the call duration. The second line shows
the name or number of the call waiting along with the duration of that call. The arrow on the display will
move between the first and second lines, indicating to which call you are connected.
1. You’re connected to XYZ Company, when you hear a beep and see that Joe Smith is calling:
1
Here’s an example:
24-Key
Feature
Phone
48-Key
Feature
Phone
(In this example, Joe’s call is being transferred to you; it’s been in the system for 31 seconds.)
2. You press FLASH and are connected to Joe. Note how the arrow moves to indicate the change
of connection:
Note: If Caller ID is not used, the Line number will appear instead of the caller’s name or number. If Caller ID
is used, in some instances the local telephone service provider will only show a general caller status
such as Unavailable, Private, or No Data Sent.
24-Key
Feature
Phone
48-Key
Feature
Phone
Station-to-station call waiting
You can call, or transfer a call to, another station that is in use (as indicated by the fact that its station
key, if one exists for it on your ESI Feature Phone, is glowing red). This generates a call waiting tone in
the other station’s earpiece and puts a call waiting indication on the bottom line of that station’s display,
as explained in “Call waiting display” (above). If the person ignores the call waiting, your call or the
transferred call will be forwarded to the mailbox.
1
A 12-Key Feature Phone will show only the first caller. Even if you hang up from the first call, the sec ond call’s Caller ID
information will not appear.
E.7
Page 32

ESI Feature Phone operation User’s Guide
t
Background announce fea tur e
During call waiting, you can also make a brief, private background announcement1 to the station's
earpiece (if its user has enabled the background announce feature; see “Station options,” page C.3).
A background announce key must have been programmed at your station by programming code 5 6 9
at a programmable feature key (see pp. C.2–C.3).
1. During call waiting (as described previously), press and hold the programmed announce key to
speak; the key will glow green if background announce is permitted or red if it isn’t permitted. The
called station will hear your voice over the outside person’s voice. The outside caller, however,
cannot hear you. The called person can respond by pressing FLASH, which places the original call
on hold.
2. Release the key when you are finished speaking.
2
Note: The background announce feature works only between ESI Feature Phones
called person has allowed call waiting and background announce and (b.) the called person is using
his/her handset. The background announce key will be green (if these conditions are met), indicating
that a background announce can be made.
— and only if (a.) the
Hold/exclusive hold operation
The difference between hold and exclusive hold
Your ESI Feature Phone lets you put a call on either hold or exclusive hold. Each puts a call into a
standby mode, but here’s the difference between the two:
3
• Hold
• Exclusive hold
allows anyone on the ESI phone system to retrieve the call. Users connected to outside calls
can press HOLD to place the call on hold. The system identifies held calls as being in numerically
identified lines — e.g., “Line One,” “Line Four,” etc.
For example, if you need to transfer a call to another station and know the person is in the building
but not at his/her desk, you might page him/her to pick up a “call on Line One.”
4
keeps the call only at the station where the user pressed HOLD.
Hold
To place a call on hold
While on an outside call, press HOLD to place the call on hold. The HOLD key LED will light solid red
on your ESI Feature Phone and will blink red on all other phones. Also, your ESI Feature Phone’s
display will show the quantity, and numerical line identifications, of the calls currently on hold throughout
your ESI phone system:
Oldest (and Newest Calls
recalling) holding
12-Key
Feature
Phone
24-Key
Feature
Phone
48-Key
Feature
Phone
Oldest (and recalling) Newest
1
Not available on 12-Key Feature Phone
2
I.e., non-ESI analog phones on the system can neither send nor receive background announcements.
3
On previous ESI systems, this feature was called park.
4
On previous ESI systems, this feature was called just hold.
Oldest (and recalling) Newes
E.8
Page 33

User’s Guide ESI Feature Phone operation
To retrieve a held call
To retrieve a held call from the same ESI Feature Phone where it was put on hold, press HOLD again and
dial the appropriate line number (using the display for reference).
To retrieve a held call from any idle ESI Feature Phone on the system, press HOLD and dial the
appropriate line number.
Note: If your phone has any line keys programmed (see pp. C.2–C.3), each will blink red when a call is on
hold on its lines; in such cases, just press that line key to retrieve the held call.
After you press HOLD, the display will help you choose the line number to retrieve: the top row will
show how many calls are on hold and the second row will show all held calls in the system. Newly held
calls are added from the right side of the second row.
Note: If more calls are on hold than the display can show, each side of the display’s second row will show an
arrow, indicating that more lines have calls on hold. Press the corresponding scroll key (either ▼ to
scroll to the left or ▲ to scroll to the right) to view the other line numbers where calls are holding.
A call that is not retrieved from hold will be transferred to the Integrated Answering Machine.
Exclusive hold
To place a call on exclusive hold
To place an outside call on exclusive hold on an ESI Feature Phone, press HOLD for at least one
second. The display will briefly appear as follows . . .
12-Key
Feature
Phone
24-Key
Feature
Phone
48-Key
Feature
Phone
. . . and then return to its normal state. This exclusive hold will cause the HOLD key to light solid red on
just that Feature Phone (i.e., where the key was pressed) and none other in the system.
To retrieve a call from exclusive hold
To reconnect to a call from the ESI Feature Phone where the call was placed on exclusive hold, you
may do any of the following:
(a.) From a phone idle state, press HOLD for at least one full second.
(b.) Press the blinking programmable feature key (see pp. C.2–C.3) that you know is pre-programmed
for that outside line. This will reconnect you immediately to the call.
(c.) Press HOLD briefly and dial the appropriate outside line number. Only the ESI Feature Phone
where the call was placed on exclusive hold will display an “E” next to the line (identified by
number) on which the call is holding. (That line number won’t appear on the hold display on any
other ESI Feature Phone, because no other Feature Phone can retrieve that call.) In the example
below, the Feature Phone has a call on exclusive hold on line 9.
12-Key
Feature
Phone
24-Key
Feature
Phone
48-Key
Feature
Phone
E.9
Page 34

ESI Feature Phone operation User’s Guide
Paging
Your ESI phone system can be programmed to allow paging through an overhead paging system and/or
paging through some or all of the system’s Feature Phone speakers.
Overhead pagi ng
Station number 199 is designated as the overhead paging port. If the ESI phone system has been
connected to an overhead paging system, you can page by dialing 1 9 9 and making your announcement
after the tones. If you frequently page, assign 1 9 9 to a programmable feature key (see pp. C.2–C.3).
Paging through phones
Press PAGE to page through all of the ESI Feature Phone speakers. The Installer may have added an
overhead page system to the page zone.
Note: Phones in use or in do-not-disturb mode will not carry a page through their speakers.
To page for pickup of an outside call
To page someone to pick up an outside call:
1. Place the call on hold by pressing HOLD.
2. Verify the line number from the display.
3. Page the person and announce the hold location for retrieval. For example:
“Sarah, you have a call on Line Two — Sarah, Line Two, please.”
Call pickup
From your station, you can answer a call ringing at another station or department by pressing and
then either dialing the extension or (if the destination is programmed into one of your keys; see
“Programmable feature keys,” pp. C.2–C.3) pressing the station key for the ringing station.
During night mode (see page F.12), if a night bell is in use instead of the night greeting, press PICK UP 0
to access the ringing outside call.
Optional feature
Operator station
If your station has been designated as the operator station, you will also receive calls when a caller
dials 0 the from a station.
As the operator, you may be responsible to manually change the day/night mode of the system; if so,
you must program a programmable feature key to perform this (initially, the upper left key will be the
day/night mode key). Each time the key is pressed the display will change: DAY or NGT. If you select
DAY (day mode) or NGT (night mode), the system will operate in the selected mode until you manually
change it again.
E.10
Page 35

User’s Guide Special keys
Special keys
FLASH, REDIAL, RELEASE
FLASH
The FLASH key serves several purposes:
• Getting a fresh dial tone without replacing the handset — When connected to an outside line, press
FLASH to automatically disconnect and receive fresh outside dial tone. (See also “RELEASE,” below.)
• Sending a flash hook signal — If operating behind Centrex
flash hook signal automatically to either the phone company’s central office or the host PBX. Either
may use this signal to provide you with additional features.
• Toggling between calls — If you hear a call waiting tone while on a call, press FLASH to toggle
between the two calls.
REDIAL
The REDIAL key allows you to automatically call a stored name and number as shown below:
To ... Press REDIAL ...
Redial the last number called When your station is idle
. . . or . . .
After first lifting the handset or pressing SPEAKER
Automatically respond to a message During message playback with Caller ID
1
or a PBX, press FLASH to transmit a
RELEASE
The RELEASE key serves several purposes:
• If pressed when connected to a call through the handset, it disconnects the call and gives you
internal dial tone.
• If pressed when you’re connected to a call via the speakerphone, it disconnects the call.
• If pressed during call waiting, it drops the current call and automatically connects to the waiting call.
Note: The hookswitch also acts as a combination FLASH/RELEASE key (and is the only way to perform
these functions on a 12-Key Feature Phone, which has neither a FLASH key nor a RELEASE key).
To send a flash hook signal, quickly press the hookswitch once.
To release (disconnect), hold down the hookswitch for one second.
1
A special service your phon e c omp any may off er. See your S ystem Ad minis trator f or further det ails.
F.1
Page 36

Special keys User’s Guide
Esi-Dex
Esi-Dex
You may access names and numbers from as many as four different Dexes (i.e., indexes):
Esi-Dex prompts displayed on a 48-K ey Feat ur e Phone
1
(“easy Dex”) is a powerful feature that lets you access and auto-dial stored names and numbers.
Dex Source
Personal Dex Names you’ve stored for your use (see “Adding names to your Personal Dex,” pp. F.4–F.6)
Station Dex All station names programmed by the Installer
System Dex
2
All system speed-dial names set up by the System Administrator
Prompt What it means
[Arrows] Move in the direction of the arrow as desired
BACK
DEL
DIAL
EDIT
NEW
NEXT
PAUSE
PER
STA
STOR
SYS
Moves backward to previous screen/record
Deletes a specific name and/or number shown on the display
Dials the phone number
Edits information shown on the display
Creates a new record in Esi-Dex
Moves to next record or programming prompt
Inserts a three-second pause in a phone number (if required for proper dialing)
Selects Personal Dex
Selects Station Dex
Stores a name and phone number
Selects System Dex
Auto-dialing using Esi- Dex
. . . On the 24-Key Feature Phone
1. W hile your station is idle (or just after receiving dial tone), repeatedly press ESI-DEX to select the
desired Dex:
2. Choose the desired name from the selected Dex, using one of the two following methods:
Press repeatedly ... To ...
▼ or ▲ (scroll keys)
(A dialpad key) Scroll through only the names that correspond to the three letters on the
Scroll through all names in the list from the beginning or end
key
3. When the desired name and number appears . . .
. . . press ESI-DEX again to dial the number.
1
Not available on 12-Key Featur e Phone.
2
The System Dex is available only if the System Administrator has programmed system-wide speed-dial numbers.
F.2
Page 37

User’s Guide Special keys
. . . On the 48-Key Feature Phone
1. W hile your station is idle (or just after receiving dial tone), press ESI-DEX. This causes the Esi-Dex
menu to appear, as shown:
2. Press a key to choose the appropriate Dex —Station Dex (STA), System Dex (SYS), or Personal
Dex (PER) — or press RELEASE to cancel the procedure.
Notes: System Dex is not available on every system.
For the remainder of this example, we’ll assume you selected Personal Dex. However, the
procedure is the same for any of the other Dexes.
The display now reads:
3. Select the desired name from the selected Dex, using one of two methods.
Either:
(a.) Press the scroll keys (▼ and ▲) to look up and down through the Dex until you find the name
(names will appear in the order in which they were stored in the Dex);
. . . Or . . .
(b.) Press the dialpad key that contains the first three letters of the person’s name. For example: if you
want to call John Doe, press 5 — because it contains the letters J K L. You will begin to see
names that begin with those letters (again, names will appear in the order in which they were
stored in the Dex). Keep pressing the dialpad key until the desired name and number appear:
4. Press DIAL to place the call.
F.3
Page 38

Special keys User’s Guide
4
Adding names to y o ur P er sona l D ex
You can add names to your Personal Dex by using either the Caller ID method or the manual method.
The Caller ID method is the same regardless of whether you’re using a 24-Key or 48-Key Feature
Phone; however, the manual method is used differently on each phone model.
Caller ID method (on either Feature Phone)
Whenever a Caller ID name appears on your LCD display (while talking on an incoming call or during
message retrieval) press ESI-DEX to automatically store the name and number in your Personal Dex.
The display confirms:
24-Key
Feature
Phone
48-Key
Feature
Phone
Manual method (on the 24-Key Feature Phone)
While your station is idle, press ESI-DEX until prompted to “ADD-A-NAME” . . .
. . . and then enter the name and the number as prompted.
Note: If needed, press HELP for assistance.
1. To enter each character for the name, press the dialpad key that includes the desired character.
The key’s possible character entries will change each time you press the key.
2. When the desired character appears, press # to confirm its entry. The cursor will move to the next
character position. Use ▼ and ▲ (the scroll keys) to back up or to insert a space.
Example: To enter a B, press 2 twice (the possible options through which to scroll are A, B, C and 2). When
B appears, press # to confirm and move to the next entry.
3. Repeat steps 1–2 until the name is complete. The name may contain up to 15 characters (a space
is a character, too).
4. Press # again when finished entering the name.
5. Now, enter the number — including the line access code 9 (or 8 or 7).
Note: Use t he ▲ scroll key to enter special characters; use the ▼ scroll key to backspace. You also can
use the scroll keys to view the number after it’s saved. To change the number, you must delete it
and then re-enter it as desired.
6. Press # to confirm the entry.
F.
Page 39

User’s Guide Special keys
Manual method (on the 48-Key Feature Phone)
1. W hile your station is idle (or just after receiving dial tone), press ESI-DEX. This causes the Esi-Dex
menu to appear, as shown:
Note: Your display may differ, depending upon the availability of certain Dexes on your system.
2. Press PER to choose the Personal Dex.
The display now reads:
3. Press NEW.
4. To enter each character for the name, press the dialpad key that includes the desired character.
The key’s possible character entries will change each time you press the key.
5. When the desired character appears, press # to confirm its entry. The cursor will move to the next
character position. Use ▼ and ▲ (the scroll keys) to back up or to insert a space.
Example: To enter a B, press 2 twice (the possible options to scroll through are A, B, C and 2). When B
appears, press # to confirm and move to the next entry.
6. Repeat steps 4–5 until the name is complete. The name may contain up to 15 characters (a space
is a character, too).
7. Press NEXT when finished entering the name. You will see the display for entering the number that
goes with the name you entered.
(Continued)
F.5
Page 40

Special keys User’s Guide
8. Enter the number — including the line access code 9 (or 8 or 7). To insert a two-second pause,
press PAUSE.
Note: Use t he ▲ scroll key to enter special characters; use the ▼ scroll key to backspace. You also can
use the scroll keys to view the number after it’s saved. To change the number, you must delete it
and then re-enter it as desired.
9. Press STOR to confirm the entry, which the phone will show briefly before returning to the Personal
Dex display.
10. To make another name/number entry, repeat steps 3–9.
To finish, press BACK.
Deleting nam es fr om your P ers onal D ex
. . . On the 24-Key Feature Phone
1. W hile your station is idle (or just after receiving dial tone), repeatedly press ESI-DEX to select the
Personal Dex:
2. Choose the desired name from the selected Dex, using one of the two following methods:
Press repeatedly ... To ...
▼ or ▲ (scroll keys)
(A dialpad key) Scroll through only the nam es that correspond to the three letters on the key
3. When the desired name and number appears . . .
. . . delete the entry by pressing either or HOLD.
Scroll through all names in the list from the beginning or end
F.6
Page 41

User’s Guide Special keys
. . . On the 48-Key Feature Phone
1. W hile your station is idle (or just after receiving dial tone), press ESI-DEX. This causes the Esi-Dex
menu to appear, as shown:
2. Press PER to choose the Personal Dex.
3. Select the desired name from the selected Dex, using one of two methods.
Either:
(a.) Press the scroll keys (▼ and ▲) to look up and down through the Dex until you find the name
(names will appear in the order in which they were stored in the Dex);
. . . Or . . .
(b.) Press the dialpad key that contains the first three letters of the person’s name.
For example: if you want to delete “FIRST INTERNATL,” press 3 (D E F). You will begin to see
names that begin with those letters (again, names will appear in the order in which they were
stored in the Dex). Keep pressing the dialpad key until the desired name and number appear:
4. Delete the entry by pressing either * or HOLD.
F.7
Page 42

Special keys User’s Guide
Using Esi-Dex: An example
Let’s say you’re on a call with the XYZ Company — XYZ COMPANY appears on your display — and
you wish to save the name and number for future use. Just press ESI-DEX. Your display will confirm
that the information has been stored.
described below for each model of ESI Feature Phone.
. . . On the 24-Key Feature Phone
1. Press ESI-DEX until you see PERSONAL DEX on the display.
1
Then, to call the XYZ Company in the future, use Esi-Dex as
2. Press 9 (W X Y). The display will show the first stored name that starts with W, X or Y.
3. Continue to press 9 until XYZ COMPANY appears in the display.
4. Press ESI-DEX again. This dials the number for the XYZ Company.
Important: The number dialed (if stored from a Caller ID) will be the number for the actual line used by the
caller, and may be different than the caller’s listed number. Additionally, some local calls may not be
auto-dialed correctly, depending on the limitations of your area’s local dialing plan. You may wish
to create a manual listing for these. Consult your Administrator if you need further assistance.
. . . On the 48-Key Feature Phone
1. W hile your station is idle (or just after receiving dial tone), press ESI-DEX.
2. Press PER to select the Personal Dex.
(Continued)
1
If the number is alr ead y in your Personal D ex, th e mes sage ALREADY STORED will appear on the display. This indicates
Esi-Dex has prevented storing the same number multiple times.
F.8
Page 43

User’s Guide Special keys
3. Press 9 (W X Y). The display will show the first stored name that starts with W, X or Y.
4. Continue to press 9 until XYZ COMPANY appears in the display.
5. Press DIAL. This dials the number for the XYZ Company.
Important: The number dialed (if stored from a Caller ID) will be the number for the actual line used by the
caller, and may be different than the caller’s listed number. Additionally, some local calls may not be
auto-dialed correctly, depending on the limitations of your area’s local dialing plan. You may wish
to create a manual listing for these. Consult your Administrator if you need further assistance.
System speed-dialing with Esi-Dex
If your Administrator has programmed system speed-dial numbers, you can access one of these
numbers either via Esi-Dex, as explained in the foregoing discussion, or auto-dial it by dialing its
corresponding three-digit access number (in the range 600–699).
Example: If an out-of-town factory location has been programmed as system speed-dial access number 605,
you can lift the handset, receive internal dial tone, dial 6 0 5 and this will automatically dial the
factory’s number. You may also program 605 (in this example) as a programmable feature key (see
page C.2).
Override ring
The override ring feature1 lets you place a call — station-to-station or outside line — or leave a voice
message when another call is ringing.
Placing a ca ll us ing the ov er r ide r ing fea tur e
First, program a feature key2 to be an override ring key — by assigning to it the function code 5 8 0.
Then, to bypass an incoming station or line call:
1. Before you begin the call, press the override ring key you programmed. When you do this,
don’t take the handset off-hook and don’t press either a pre-assigned headset key (see F.12), a
preprogrammed line key or SPEAKER.
2. Once you receive dial tone, pick up the handset and proceed with your call as you normally would.
The incoming call will be rerouted to the forwarding destination (such as your voice mailbox) your
Installer or System Administrator has set for your station.
Notes: Any other feature keys not mentioned above will neither answer a call nor initiate the override ring feature.
Use of the override ring key also overrides any outside dial tone preference (see page F.11) that may
have been set for your station.
1
Not available on the 12-Key Featur e Phone.
2
See “Programmable feature keys,” pages C.2–C.3, for full details.
3
The overrid e ring f eature has no effec t on calls ringing in from a hold rec all or a queu ed line..
3
F.9
Page 44

Special keys User’s Guide
Message monitor mode (live call screening)
Message monitor mode1, also known as live call screening, lets you hear a caller leaving a message
in the mailbox, just as with your home answering machine. You turn this feature on or off as part of user
programming — PROGRAM 3 6. While you hear the caller through your speaker, you have the
following options:
Option Result
Lift the handset You intercept the call
Do nothing The system records the message to your mailbox for your later retrieval
Press MUTE/DND Temporarily mutes your speaker (the system continues to record the message to the mailbox)
Note: During monitor mode, you will hear a call ring, then subdued ringing while the caller is hearing your
greeting, then their message. You can intercept the call at any time.
Greeting reminder
Note: This is for use on only the Master Station (see “Integrated Answering Machine operation,” pp. D.1–D.6).
If you frequently change the greeting, use this option; it sets the mailbox to remind you of the current
greeting. The first time you use your phone after it has been idle (for the period you set in this function), the
system automatically plays the current greeting (and gives you the option to change it). The range is 0 (no
reminder) to 500 hours. To set this, press PROGRAM 3 2.
Example: If you change the greeting only when out of town for a few days, set the reminder interval to 60 hours;
you’ll be reminded if the mailbox has not been used for three days. If it’s Friday, set the reminder for
36 hours and you will be reminded the upcoming Monday morning or if you are away for a couple of
days. If you change your greeting several times a day, set the reminder for about 3 hours.
Headset operation
You can use a 48-Key or 24-Key (but not 12-Key) Feature Phone with a headset. However, the details
vary depending on whether your system is IVX S-Class Generation II or Generation I (consult your
System Administrator if you’re not sure which system you have).
. . . On IVX S-Class Generation II
You must have a headset key programmed as one of your programmable feature keys (see “Other
feature keys,” page C.2) that you’ll use to connect or disconnect from a call. The key will blink green
when a call is ringing and glow green when connected. You turn headset mode on or off as part of user
programming (PROGRAM 3 3).
. . . On IVX S-Class Generation I
You must program one of your programmable feature keys to be a headset key2 (see “Optional
features,” pp. F.12–F.13) that you’ll use to connect to or disconnect from a call. The key will blink green
when a call is ringing and glow green when connected. If you have a headset connected and the phone
is off-hook, pressing the scroll keys (W and V) will adjust the headset volume. After you initiate or
answer a call using the headset key, lifting the phone’s handset automatically takes you out of headset
mode. To switch back to headset mode while on a call, press the headset key again and then place the
phone’s handset on-hook.
1
Not available on 12- Key Feature Phon e.
2
Not available on a 12-K ey Feature Ph one.
F.10
Page 45

User’s Guide Special keys
Outside dial tone preference
If you make mostly outside calls, you may find this setting helpful. It tells your station to connect
automatically to an available outside line; i.e., you don’t have to dial 9 (or 8 or 7) before the phone
number. Therefore, when you lift the handset or press SPEAKER, you will immediately receive an
outside dial tone from the highest-numbered line available to you.
Note: To place an internal call while in this mode, press the appropriate station key or (a.) press TRANSFER
to switch to internal dial tone and (b.) then dial the extension number.
1
Line keys
If some of your programmable feature keys have been programmed as line keys (or you can program
line keys using PROGRAM 2), press an unlit key to access the line. An outside call transferred to your
station can be answered by simply lifting the handset or pressing SPEAKER
the line key. The LED indications for the line keys are:
LED Line status
Solid red In use
Solid green Connected to your station
Blinking red Ringing at another station
Blinking green Ringing at your station
Slowly blinking red On hold by another station
Slowly blinking green Held by you
2
. You do not hav e to press
Note: Dialing 9 (or 8 or 7) to be assigned a line automatically is always available.
Private line
If a private line has been assigned to your station, you must have a line key programmed (see pages
C.2–C.3) in order to access it.
1
This aspect (i.e., that it’s always the high est line avail abl e to you) can’t be changed.
2
Not available on 12- Key Feature Phon e.
F.11
Page 46

Special keys User’s Guide
Optional features
The following optional features may be accessible from your station. See the Administrator for details.
In many of the cases you can dial the appropriate feature code (one that starts with 5) to activate or use
the feature. In some instances, you must use a programmable feature key to serve as an on/off key for
the feature (see “Programmable feature keys,” page C.2).
• Other feature keys — If you enter one of the following feature codes, the programmable feature key
will serve as an enable/disable key for that feature. The Installer may have programmed certain
stations for accessing additional features (consult your System Administrator regarding your access
to them).
Code(s)
199 Overhead page
560 Day/night mode
564 Headset
565
565YYY
568 Message monitor
569
570
571 Greeting 1
572 Greeting 2
573 Greeting 3
578
580 Override ring
Call forward
Call forward to an
extension
Background announce
Conference
Mute/DND
Key usage
Note: Gray shaded items are the only key codes available for the 12-Key Feature Phone.
Manual day/ni ght m ode (C ode 56 0 )
The system’s main greeting can be manually changed using a programmable feature key. Each time
the key is pressed, the display switches between DAY and NGT.
Note: The Administrator can also change the mode and/or re-record the greeting remotely to handle
unexpected closings, such as for inclement weather.
Headset key (Code 564)
This key provides for easy connecting to/disconnecting from calls when operating in headset mode (see
“Headset operation,” page F.10). Press the key to receive dial tone or to answer a ringing call. Press the
key again or press RELEASE to disconnect from the call.
Call-forward key (Code 565 or 565XXX)
If you frequently call-forward your phone (see “Call forwarding,” page E.6), you can program a
programmable feature key as a call forwarding key to automatically turn forwarding on and off. If you
always forward to the same extension, you can program a key with both 5 6 5 and the extension number.
Message monitor key (Code 568)
Easily toggle the message monitor mode on or off with this key. (Otherwise, you can perform the toggle
by pressing PROGRAM 3 6 and following the prompts; see “Message monitor mode [live call
screening],” page F.10.)
F.12
Page 47

User’s Guide Special keys
Background announce key (Co de 569)
During call waiting, you can also make a brief, private background announcement (see “Background
announce feature,” page E.8) to the station's earpiece (if the station user has enabled the background
announce feature). Hold down the key until you hear a beep, then begin talking; release the key
when finished.
Greeting key (Codes 571–573)
These keys will provide for easy activation of one or more of the greetings (see “Greetings” page D.1).
The key's LED will be green for the associated greeting that is active. These keys can be used in place
of or in conjunction with manual activation of the greetings in programming mode.
Override ring (Code 580)
The override ring feature lets you place a call — station-to-station, outside line — or leave a voice
message when another call is ringing. For full details on use of this feature, see “Override ring,”
page F.9.
F.13
Page 48

Special keys User’s Guide
4
(This page included for pagination purposes only.)
F.1
Page 49

User’s Guide Analog stations
Analog stations
If your station has been installed as an analog station, it will be able to use only a standard-type
telephone. Because the phone isn’t digitally integrated to the phone system (like the ESI Feature
Phones), its operation and capabilities will be different.
Tip: To use a cordless phone in conjunction with an ESI Feature Phone, program a programmable feature key
( 5 6 5 ) to easily forward calls to the cordless phone when out of your office. Have the Installer program
the cordless phone’s station programming to forward calls not sent to the mailbox.
FLASH
A flash-hook, or FLASH — a momentary break in the connection — is required to perform many of the
station operations below. You can generate a FLASH by momentarily depressing the hook switch (or, if
your phone is so equipped, press the special key on your phone).
Placing calls
When you first lift the handset you will hear internal dial tone. Dial 9 (or 8 or 7) to access an outside line
and dial the number. To place an internal call, simply dial the extension number, department number, etc.
Transferring calls
1
Transferring outside calls
While connected to an outside call, FLASH and dial the extension number. Hang up immediately to
perform a blind transfer, wait until the called person answers, announce the caller and then hang up. If
the transferred-to person does not answer, FLASH to be reconnected to the original caller.
Transferring a call to the mailbox
To transfer an outside caller to the mailbox, FLASH and dial #501. You and the caller will be connected to
that mailbox greeting. You may choose to hang up immediately or listen to a portion of the greeting.
FLASH to exit the mailbox and be reconnected to the original caller.
Note: Regardless of when you hang up, the caller will hear the entire greeting. To insure the privacy of the
message, you will automatically be disconnected at the record tone.
1
If you're not sure about the installation of your station, contact your System Administrator.
G.1
Page 50

Analog stations User’s Guide
Call forwarding
Your station has been pre-programmed by the Installer to call-forward your phone to the mailbox when
your station is busy or does not answer. In addition, you can temporarily call-forward all of your calls to
another station. Lift the handset, dial 5 6 5 and dial the extension number (or # and the mailbox number)
to which the system should forward all calls.
Note: If the forwarded-to station is busy or does not answer a forwarded call, the ESI phone system will return
the call to the mailbox.
To turn off call forwarding, dial 5 6 5 * without selecting a destination, and hang up.
Call waiting
If you have enabled call waiting for your station ( XXX 5 3, where xxx represents your extension
number), you will hear a tone in your earpiece. FLASH to toggle between the original call and the call
waiting. To drop either call, hang up while connected to the call to be dropped. When your phone rings,
lift the handset and you will be reconnected to the other caller.
Call hold
This is used to place callers on hold for retrieval from any station within the ESI phone system.
Putting a call on hold
While on an outside call, FLASH and dial . A short voice prompt will tell which line number the
call is using; you will then receive internal dial tone.
Retrieving a call from on hold
From internal dial tone, dial and the line number where the call is on hold.
Dial 0 to answer the oldest held call in the system.
Hold recall
If a held call is not retrieved during the period of time (set by the Installer), it will recall to your phone if
your station is idle. You will hear three short ring tones. Lift the handset; you will be connected to the
held call.
If you are on a call when the recall occurs, you will hear a call waiting tone. To toggle between the two
calls, FLASH (or hang up, wait for ring, then answer). If a call placed on hold is not retrieved it will be
forwarded to the Integrated Answering Machine.
Paging
This function allows for paging through an overhead paging system and/or designated available
telephone speakers. Press # to access all available stations.
Note: A page will not be sent to the speakers of phones in use.
Tip: To page for pick up of an outside call, put the caller on hold by dialing . A voice prompt will
indicate the line number. Then page the person and announce the line number for retrieval. For
example: “John, you have a call on line 1. John, pick up line 1, please.”
Overhead pagi ng
Station number 199 is designated as the overhead paging port. If the ESI phone system has been
connected to an overhead paging system, you can page by dialing 1 9 9 and making your announcement
after the tones.
G.2
Page 51

User’s Guide Analog stations
Call pick-up
A call ringing at another station can be picked-up by pressing and dialing the extension number.
Dialing 0 will answer the longest ringing outside call.
Voice mail operation from an analog station
The ESI phone system will provide accurate and timely messages. Others will become more
comfortable leaving you voice messages if you pick-up and respond to your messages promptly.
Greetings
Note: This is for use on only the Master Station (see “Integrated Answering Machine operation,” pp. D.1–D.6).
Initially, the mailbox has a generic greeting: “You have re ache d ma ilbo x 501, dial z ero to rea ch the
operator or begin recording at the tone.” You can record up to three different greetings in your own voice
indicating your availability to return calls.
Examples:
Sample greeting 1: Hello. Thank you for calling [company name]. We are currently assisting other customers.
Please dial zero to reach our operator or leave your name, number, and message at the
tone and we will get back to you as soon as we can.
Sample greeting 2: Hello. Thank you for calling [company name]. We are currently out of the office.
T o attempt to reach our mobile phone, please press four now. Otherwise leave your
name, number, and message at the tone and we will get back to you as soon as we can.
Sample greeting 3: Hello. Thank you for calling [company name]. We are currently out of the office.
Please leave your name, number, and message at the tone and we will get back to you
as soon as we can.
You may wish to include one or more of these options in your greetings:
Option Instruction
0 To reach the operator
1 To skip directly to the record tone (or “beep”)
Shortcut: When leaving a message in the mailbox, press 1 during the greeting to advance directly to the
XXX An extension number of another user
record tone without having to listen to the remainder of the greeting.
You can change any greeting as often as necessary, by just recording over a previously recorded greeting.
Warning: Do not delete all of the greetings; make sure at least one always remains. Deleting all the
greetings will turn off the mailbox.
Message waiting indication
If there are new messages, you will hear a short prompt "You have messages" and then internal dial tone
whenever you lift the handset to place a call. You can choose to retrieve the messages or place the call.
G.3
Page 52

Analog stations User’s Guide
Retrieving messages
You can pick up messages from your station, when away from the office or from another user’s ESI
Feature Phone.
1. Lift the handset, and dial 501.
2. If calling from outside, when the operator or another user answers your call, have them transfer
you by pressing VOICE MAIL and hanging up.
3. You will hear the mailbox greeting. Press 8 to hear the messages.
4. If required, enter your password.
5. The ESI phone system will announce the number of new and old messages, and will start
playback of messages starting with the oldest new message and continue until all messages and
recordings have played or you press to disconnect.
Note: If, while picking up messages, you receive a call waiting tone, hang up, lift the handset and you will be
connected to the waiting call. If you hang up during the playback of a message, the message will be saved.
Voice prompted instructions will be played at the end of each message. Once you've learned these
prompts (see the chart, “Functions available during analog station voice mail message retrieval,” below)
you can proceed more rapidly by pressing one of the following keys any time during the message or
during a prompt.
Functions available during analog station voice mail message retrieval
Note: Functions tinted gray, below, either change or are not available when you’re using an ESI Feature
Phone (see page D.3).
Key Function Description
4 Back up (rewind) When pressed during message playback, rewinds 4 seconds
for each key press. If pressed after the message has finished,
it returns you to the beginning of the message.
5 Access user
programming
7 Delete Deletes the message from the mailbox
9 Save Saves the message (it will be played as an old message the
0 Operator
To disconnect Always press before hanging up (if you press it during
Accesses user programming menu.
(see “Message Recycle Bin,” page D.6).
next time messages are picked up).
Transfers you to the operator.
playback of a message, the message and any other unsaved
messages will be saved).
Retrieving messages fr om another user’s ESI Featur e Phone
Press 501. Follow the procedures described previously (see top of this page).
G.4
Page 53

User’s Guide Analog stations
Analog station programming
After logging into the mailbox (pressing followed by the mailbox number), dial 5 to program.
Select greeting (Master Station user only)
Select the desired greeting number: 1, 2 or 3. The system will prompts to re-record, delete, hear, or
select as the current greeting by pressing #.
1 Record greeting
Begin recording at the tone; press 1 to stop. The new greeting automatically replaces the
previous greeting.
Note: The Integrated Answering Machine will be disabled if no greeting exists.
2 Delete greeting
When prompted, press 2 again to confirm deletion.
Warning: Don't delete all of your greetings. If you do, the system will turn off the mailbox until at least
there is once again at least one greeting.
3 Hear current greeting
Password
The password will apply to station programming, message retrieval and certain other features
(when activated).
1 Enter new password
Your password may consist of 2–8 digits followed by # (0 cannot be the first digit). Entering 0
(zero) as the sole password will turn off the password requirement.
2 Delete current password
3 Hear current password
4 Password security level
Select one of the following password levels.
Selection Result
0 No password required for access from any phone
1 Password required only for remote access, either off-premises or from other
stations within the system
2 Password always required
G.5
Page 54

Analog stations User’s Guide
Off-premises message delivery
The ESI phone system can be programmed to deliver messages to an off-premises phone and/or to
page you when the mailbox receives a message. You can set the phone number (cell phone, home
number, another extension, etc.) or the pager number and a delay time (the period that the system is to
wait before attempting to deliver the message/page).
Note: You must record and use Greeting #2 for this feature.
The Administrator can also set for your station the:
• Number to be called or paged
• Delay period before attempting message delivery
• Number of attempts
• Interval between attempts (in increments of 30 minutes)
• "Quiet period” which suspends message delivery for late night, etc.
If you have programmed both an off-premises delivery number and a pager number, the system will
prompt you to choose one of the following delivery options:
• Phone-only
• Pager-only
• No off-premises delivery
Phone deliver y
Whenever it receives a new message into the mailbox, the system will call the number that you have
programmed and play the prompt “You have messages; please enter your password.” The prompt will
repeat three times before assuming that no one has answered and disconnecting.
Upon answering, enter your password (if no password is set, you must enter 0). You will then be
connected to the mailbox and can proceed with normal message retrieval operation.
Note: A “” response instead of the password will cause the system to suspend calling until another new
message is received.
Pager notifi cati on
You can have the system call and activate your external pager whenever the first new message is left in
the mailbox and repeat the page (at the interval programmed by the Administrator) until all new messages
have been retrieved.
Note: Inputting or deleting the phone number that is to be called for off-premise delivery or to activate your
pager will turn the feature on or off, respectively.
G.6
Page 55

User’s Guide Analog stations
Off-premises message delivery
1 Delivery options
1 Delivery to phone number only
2 Notify pager only
0 No off-premis es de liver y
2 Phone delivery
1 Enter phone number
Enter the phone number followed by # (24 digits maximum). Do not include an outside line
access code (i.e., don’t add 9, 8 or 7) before the number.
2 Delete phone number
Deletes the current phone number.
3 Hear current phone number
Plays back the current phone number.
3 Pager notification
1 Enter pager number
Enter the pager number followed by # (24 digits maximum). Do not include an outside line
access code (i.e., 9, 8 or 7) before the number.
2 Delete pager number
Deletes the currently programmed pager number.
3 Hear current pager number
Plays back the currently programmed pager number.
Message Recycle Bin (un-delete)
The Integrated Answering Machine’s 10 most recently deleted messages will be stored in a Message
Recycle Bin to allow the user to recover messages that may have been deleted in error.
The most recently deleted message will be played first. Press 9 to move to the next message. Press 8
to restore the message to the mailbox as an old message.
G.7
Page 56

Analog stations User’s Guide
(This page included for pagination purposes only.)
G.8
Page 57

Index
▼/▲ keys. See Volume/scroll keys
Anal og s tations
Off-premises delivery, G.6
Programming, G.5
Voice m ail operations from, G.3
Attendant op eration, E.10
Background announce, E.8
Background announce key, F.13
Basic phone use, E.3
Blind transfer, E.5
Call forwarding, E.6
Call forward key, F.12
Call pick-up, E.10
Call waiting, E.7
Background announce, E.8
Station-to-station, E.7
Caller ID, E.1
Conference calling, E.6
Cons ol e, A.3
Day/night mode, F.12
Dial tone, E.3
Pref erence, F.11
Direct station select, E.4
DSS. See Direct station select
Esi-Dex, F.2
Personal Dex
Adding names, F.4
Deleting names, F.6
System speed dialing, F.9
Exclusive hold. See Hold
Fixed feature keys, E.1
FLASH key, F.1
Greeting, F.10
Greeting key, F.13
reminder, F.10
Greetings, D.1, G.3
Hands-free answer, E.2
Headset oper ati on
Headset key, F.12
Hold, E.8
Difference between hold and exclusive hold, E.8
Exclusive hold, E.9
Retrieving a call, E.9
Retrieving a held call, E.9
Integrated Ans wering Mac hin e, D .1–D.6
Internal calls, E.3
Leaving messages, D.2
LEDs, E.2
Line keys, F.11
Private lin e, F.11
Live call screening. See Message monitor mode
Manual day/night mode, F.12
Message light. See Status indicator lamp
Message monitor mode (live call screening), F.10
Message monitor key, F.12
Message Recycle Bin (un-delete), C.6, D.6
Message retrieval, D.2
Off-premises delivery, D.5
Message(s) waiting, D.2
MUTE/DND key, E.2
Off-premises delivery, D.5, G.6
Oper at or station, E.10
Optional features, F.12
Outside calls, E.3
Blind transfer, E.5
Supervised transfer, E.5
Transferring, E.5
Outside dial tone pr ef erence. See Dial tone
Override ring, F.13
Paging, internal, E.10
Overhead paging port (199), E.10, G.2
Paging through phones, E.10
Password, C.4
Personal Dex. See Esi-Dex
Phon e us e
Basic, E.3
Programmable f eature keys, C.2, E.1
REDIAL key, F.1
RELEASE key, F.1
Retrieving messages, D.3, D.5
Ring tone, C.4
Ring volume, C.4
Scroll keys. See Volume/scroll keys
SPEAKER key, E.2
Speed-dial keys, C.2
Station keys, C.2
Station opti ons, C.3
Station audibles, C.4
Ring tone, C.4
Ring volume, C.4
Status indicator lamp, D.6
Supervised transfer, E.5
Transferring an outside call, E.5
Un- delete. See Mes sage Recycle Bin
User programming
Exiting programming mode, C.1
Programmable f eature keys, C.2
Select personal greeting, C.2
VOICE MAIL key, D.1
Volume/scroll keys, E.2
Spec ial charac ters, C.5, C.6
Page 58

www.esi-estech.com
 Loading...