

ESET SMART SECURITY - QUICK START GUIDE FOR MICROSOFT WINDOWS VISTA-XP-2000-2003-2008, Smart Security Quick Start Manual
Page 1

Page 2

ESET Smart Security provides state-oftheart protection for your computer against
malicious code. Based on the ThreatSense®
scanning engine first introduced in the
awardwinning NOD32 antivirus system,
ESET Smart Security continues to deliver
unprecedented protection against zeroday threats, without the need for constant
reactive signature updates to recognize
the threats. The integrated firewall and
antispam modules make ESET Smart Security
a complete integrated security solution. This
manual will guide you step-by-step through
the quick setup and configuration of the
product.
ESET Smart Security
Table of contents
1. Installation (typical installation description)
2. Trusted zone setup
3. Starting ESET Smart Security
4. Entering User name and Password for update
5. Computer scanning
6. Protection status indication
7. Resolving Issues
Page 3
Integrated components
ESET Antivirus
detects and eliminates viruses, trojans,
worms, rootkits and other threats
ESET Personal firewall
monitors all trac between the protected
computer and other computers in the
network.
ESET Antispyware
fights against spyware and adware which
are rapidly becoming more popular
ESET Antispam
serves to filter unsolicited commercial
e‑mail increasing the security and comfort
of electronic communication
Page 4

. Installation
Before commencing installation, please close all running
programs. Since ESET Smart Security contains an antivirus
and firewall components, we strongly recommend that
you remove any other antivirus programs or firewall
you might have installed on your computer to prevent
mutual conflicts. You do not need to disable or remove
the Windows firewall in Windows XP or Vista, as this is
automatically hadnled by the ESET Smart Security installer.
You can install ESET Smart Security from an installation CD
or from a file that you download from the ESET website:
www.eset.com.
.. Launching the installation
To launch the installer wizard, either do one of the following:
▪ If you install from the installation CD, insert the CD
into the CD-ROM drive and the installation should
automatically begin.
▪ If you install from a downloaded file double-click the file
you downloaded to launch the installer.
After launching the installer and accepting the license
agreement, the installer will oer two types of installation.
▪ Typical – only the most important parameters will be
configured during installation. Other parameters will
be pre-set to their recommended settings. This mode
provides our recommended comprehensive protection
and is suitable for most users.
▪ Custom – enables configuration of all advanced
parameters during installation.
This guide describes typical installation
Page 5
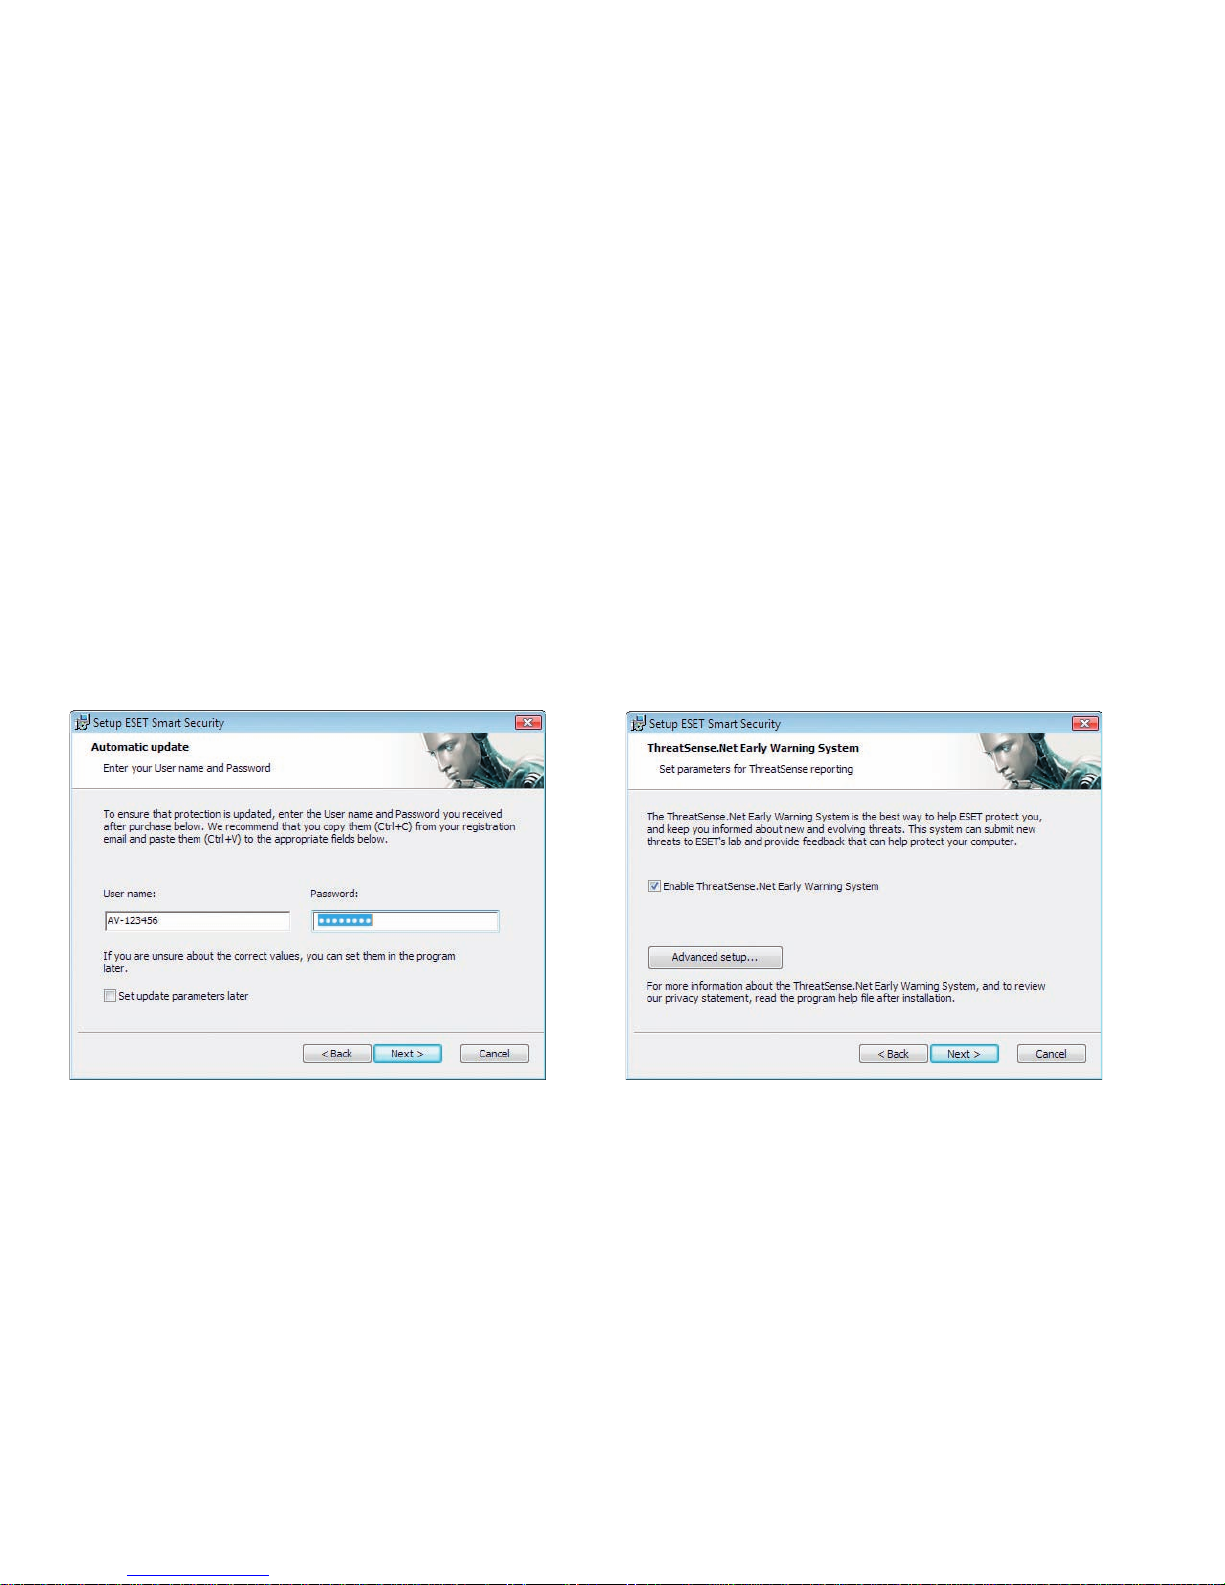
.. Entering your User name and Password for update
Setting up your User name and Password for update is
vital for the correct functioning of ESET Smart Security. If
you decide to set the update parameters later, we strongly
recommend doing so immediately after the installation is
complete, to ensure that your protection remains current.
.. ThreatSense.Net
ThreatSense.Net plays an important role in our research
into new detection technologies for capturing malware
proactively and thus providing you with better protection.
We recommend that you leave the ThreatSense.Net Early
Warning System activated.
Click Next to proceed to the next step. Click Next to proceed to the next step.
Page 6

.. Detection of potentially unwanted applications
Since some potentially unwanted applications are used
legitimately, and might not necessarily pose a security risk,
the user‘s consent is required to enable detection. Select
this option if you want to block these types of applications.
.. Completing the installation
When all necessary parameters have been configured,
start the final installation by clicking the Install button.
The installation progress will be indicated by a progress
bar. After installation is complete, ESET Smart Security will
be started automatically. Since a computer restart is not
normally required, you can carry on working with ESET
Smart Security working in the background to protect your
computer from malware threat.
Click Next to proceed to the next step.
Page 7

. Trusted zone setup
After the installation has completed and a network
connection is detected, a prompt window allowing you to
configure a trusted zone will appear. The window shows
the local subnet defined in your computer’s system setup.
These options only aect the visibility of your computer in
the local network, not the internet. There are two access
modes available:
▪ Strict protection – select this option if you do not want
to share files and folders on your computer and want
your computer to be invisible to other users on the same
network. This setting is recommended for users with
a wireless connection.
▪ Allow sharing – select this option if you want to be able
to share files and folders on your computer and want
your computer to be visible to other users on the same
network. This setting is recommended for local home or
oce trusted networks.
Page 8

. Starting ESET Smart Security
ESET Smart Security starts protecting your computer
immediately after instalation. You do not have to start the
program to activate it. However at any time you may open
ESET Smart Security to check your protection status or to
perform various scanning and maintenance tasks.
To start ESET Smart Security do one of following:
▪ Double click on the ESET Smart Security icon located
in the Windows notification area (System tray)
▪ On the windows taskbar click Start > All Programs > ESET
> ESET Smart Security > Display user interface
Page 9

If your license has expired and you have received a new
User name and Password after purchasing a renewal
(or you did not enter your username and password at
installation time) enter the new User name and Password
in the update setup window. This is vital for the proper
functioning of updates and for ensuring that your
computer is continually protected against newly emerging
threats.
In the left pane of the ESET Smart Security screen, select
Setup and then click Enter User name and Password on
the right.
Enter the data you received in the License details window
and click OK to confirm The User name and Password
are both case sensitive. Enter them carefully and
exactly. Copying and pasting from the license email is
recommended.
.. Update
By default, ESET Smart Security comes with a predefined
task to ensure regular updates. If you have not entered
your User name and Password during installation and no
update has been performed yet, we recommend starting
the update manually as follows:
. Entering User name and Password for update
Page 10

. Computer scanning
After successful installation and update, we recommended
that you perform a complete computer scan for threats.
To do this, click Computer scan in the main ESET Smart
Security screen and select Standard scan. Scanning of all
local hard drives will start. As long as the scan continues,
the status window shows the progress bar as well as the
current statistics about scanned and infected files found.
If a threat is detected, ESET Smart Security quarantines the
file and displays an alert in the system tray area. You should
be able to continue working as normal while the scan takes
place.
▪ Select Update in the left pane of the main ESET Smart
Security screen
▪ Click Update virus signature database
The update module will connect to the Internet, contact an
available ESET update server and download digitally signed
update files, which contain the most recent malware
signaturesand new definitions for advanced heuristics and
other program modules.
As soon as a newer update has been installed, ESET Smart
Security displays a notification in the system tray area
showing the version number of the installed virus signature
database.
Page 11

ESET Smart Security informs the user about the status
of antivirus protection by means of the following controls:
1. the system tray icon (indicates activation or
deactivation of the real-time file system protection or
firewall by changing color according to status).
2. a detailed report in the Protection status window
If a particular module is disabled, its name will appear
along with a link to enable it in the Protection status panel.
Protection status is indicated by 3 colors:
. blue (recommended) – Antivirus protection is fully
functional and your computer is protected against threats
as well as network attacks. In this mode, all modules are
enabled and the virus signature database is current.
. yellow – The real-time file system protection is
enabled, but at least one of the following events has
occurred:
▪ the firewall is blocking all network trac
▪ an update has failed (e.g. no Internet connection was
detected, your license has expired, invalid User name or
Password is entered in the update setup, etc.)
. red – The realtime file system protection or
firewall is disabled. Since these modules are vital parts
of antivirus protection, we recommend enabling the
inactive module immediately!
. Resolving Issues
ESET’s technical support specialists are ready to assist
you in resolving potential problems. Before contacting
technical support, we strongly recommend that you search
for a solution on the ESET website first. This will help you
resolve the problem quickly within a couple of minutes.
Answers to the most frequently asked questions can be
found at:
http://www.eset.eu/support/faq
For various problem solutions, directions and hints, read
our knowledge base:
http://www.eset.eu/support/knowledge
To contact ESET’s technical support, please fill in the
support query submission form integrated into the
program. Instructions are in the following section of this
manual or use the web form available at the following url if
for some reason you cannot use the integrated form:
http://www.eset.eu/support/form
. Protection status indication
Page 12

A window with contact information, issue type and its
specification will appear. Filling in the contact information
correctly is crucial for receiving a swift response to your
query.
In the Subject field, enter a concise description of the
issue or question. Next, type in as detailed description of
the issue as possible in the Question or issue description
field.
. Submitting a technical support query
In the event of a problem, contact ESET’s technical
support using the query submission form integrated in
the program. In the Help and support section, select
Technical support query.
Page 13

Click Next to proceed to the next step.
In addition to the issue description, the program also
supports submission of other important information to
ESET that can help find the source of the problem. We
strongly recommend that you leave all options selected. To
view the information submitted in the XML format before
submission, check the Display submitted data with
confirmation checkbox.
Besides submitting system information, you can also
attach any file if relevant to the issue or question.Click
Next to proceed to the next step.
After you have filled in all necessary information, submit
the query to technical support by clicking the Finish
button. A technical support representative will contact you
as soon as possible.
Page 14

Copyright ESET, spol. s r. o. ESET, logo of ESET, NOD32, ThreatSense, ThreatSense.Net
and/or other mentioned products of ESET, spol. s r. o. are registered trademarks of ESET, spol. s r. o.
Other companies mentioned here or products, may be registered trademarks of its proprietors.
Produced according to quality standards of ISO 9001:2000.
 Loading...