

ESET REMOTE ADMINISTRATOR 4 - ANNEXE 335, Remote Administrator 4 Installation Manual

ESET
Remote Administrator 4
Installation Manual and User Guide

ESET Remote Administrator 4
Copyright © 2010 by ESET, spol. s r.o.
ESET Remote Administrator 4 was developed by ESET, spol. s r.o.
For more information visit www.eset.com.
All rights reserved. No part of this documentation may be reproduced,
stored in a retrieval system or transmitted in any form or by any means,
electronic, mechanical, photocopying, recording, scanning, or
otherwise without permission in writing from the author.
ESET, spol. s r.o. reserves the right to change any of the described
application software without prior notice.
Customer Care Worldwide: www.eset.eu/support
Customer Care North America: www.eset.com/support
REV. 11/24/2010

Contents
..................................................5Introduction1.
........................................................................5What's new1.1
........................................................................7Program architecture1.2
..................................................8
Installation of ERA Server and ERA
Console
2.
........................................................................8Requirements2.1
.....................................................................................8Software requirements2.1.1
.....................................................................................8Performance requirements2.1.2
.....................................................................................10Ports used2.1.3
........................................................................11Basic Installation guide2.2
.....................................................................................11Environment overview (network structure)2.2.1
.....................................................................................12Before installation2.2.2
.....................................................................................12Installation2.2.3
.......................................................................................12Installation of ERA Server2.2.3.1
......................................................................................13Cluster Mode Installation2.2.3.1.1
.......................................................................................13Installation of ERA Console2.2.3.2
.......................................................................................13Mirror2.2.3.3
.......................................................................................14Database types supported by ERA Server2.2.3.4
......................................................................................14Basic requirements2.2.3.4.1
......................................................................................15Database connection setup2.2.3.4.2
......................................................................................16Installing over an existing database2.2.3.4.3
........................................................................16Scenario - Installation in an Enterprise environment2.3
.....................................................................................16Environment overview (network structure)2.3.1
.....................................................................................17Installation2.3.2
.......................................................................................17Installation at headquarters2.3.2.1
.......................................................................................17Branch office: Installation of ERA Server2.3.2.2
.......................................................................................17Branch office: Installation of HTTP Mirror server2.3.2.3
.......................................................................................17Branch office: Remote installation to clients2.3.2.4
.....................................................................................18Other requirements for Enterprise environments2.3.3
..................................................19Working with ERAC3.
........................................................................19Connecting to ERAS3.1
........................................................................20ERAC - main window3.2
........................................................................21Information filtering3.3
.....................................................................................21Filter3.3.1
.....................................................................................22Context menu3.3.2
.....................................................................................23View mode3.3.3
........................................................................23Tabs in ERAC3.4
.....................................................................................23General description of tabs and clients3.4.1
.....................................................................................23Replication & information in individual tabs3.4.2
.....................................................................................24Clients tab3.4.3
.....................................................................................27Threat Log tab3.4.4
.....................................................................................27Firewall Log tab3.4.5
.....................................................................................27Event Log tab3.4.6
.....................................................................................28Scan Log tab3.4.7
.....................................................................................28Mobile Log tab3.4.8
.....................................................................................28Quarantine tab3.4.9
.....................................................................................29Tasks tab3.4.10
.....................................................................................29Reports tab3.4.11
.....................................................................................29Remote install tab3.4.12
........................................................................29ERA Console setup3.5
.....................................................................................29Connection tab3.5.1
.....................................................................................29Columns - Show / Hide tab3.5.2
.....................................................................................29Colors tab3.5.3
.....................................................................................29Paths tab3.5.4
.....................................................................................29Date / Time tab3.5.5
.....................................................................................30Other settings tab3.5.6
........................................................................30Display modes3.6
........................................................................31ESET Configuration Editor3.7
.....................................................................................31Configuration layering3.7.1
.....................................................................................32Key configuration entries3.7.2
..................................................34Installation of ESET client solutions4.
........................................................................34Direct installation4.1
........................................................................34Remote installation4.2
.....................................................................................36Requirements4.2.1
.....................................................................................37
Configuring the environment for remote
installation
4.2.2
.....................................................................................38Remote Push Install4.2.3
.....................................................................................40Logon /email remote install4.2.4
.....................................................................................42Custom remote install4.2.5
.....................................................................................43Upgrade4.2.6
.....................................................................................44Avoiding repeated installations4.2.7
........................................................................44Installation in an Enterprise environment4.3
..................................................46Administering client computers5.
........................................................................46Tasks5.1
.....................................................................................47Configuration Task5.1.1
.....................................................................................47On-demand Scan Task5.1.2
.....................................................................................48Update Now Task5.1.3
.....................................................................................48SysInspector Script Task5.1.4
.....................................................................................48Restore/Delete from Quarantine Task5.1.5
.....................................................................................49Generate Security Audit Log Task5.1.6
.....................................................................................49Show Notification Task5.1.7
.....................................................................................49Interactive Task5.1.8
........................................................................50Group Manager5.2
.....................................................................................51Static Groups5.2.1
.....................................................................................51Parametric Groups5.2.2
.....................................................................................52Active Directory Synchronization5.2.3
........................................................................52Policies5.3
.....................................................................................52Basic principles and operation5.3.1
.....................................................................................53How to create policies5.3.2
.....................................................................................54Virtual policies5.3.3
.....................................................................................54
Role and purpose of policies in the policy tree
structure
5.3.4
.....................................................................................55Viewing policies5.3.5
.....................................................................................55Importing/Exporting policies5.3.6
.....................................................................................55Assigning policies to clients5.3.7
.......................................................................................55Default Primary Clients Policy5.3.7.1
.......................................................................................55Manual assigning5.3.7.2
.......................................................................................56Policy Rules5.3.7.3
.....................................................................................56Deleting policies5.3.8
.....................................................................................57Special settings5.3.9
.....................................................................................58Policy deployment scenarios5.3.10
.......................................................................................58
Each server is a standalone unit and policies are
defined locally
5.3.10.1
.......................................................................................59
Each server is administered individually - policies
are managed locally but the Default Parent Policy
is inherited from the upper server
5.3.10.2
.......................................................................................60Inheriting policies from an upper server5.3.10.3
.......................................................................................61Assigning policies only from the upper server5.3.10.4
.......................................................................................61Using policy rules5.3.10.5

.......................................................................................62Using groups5.3.10.6
........................................................................62Notifications5.4
.....................................................................................63Notification Manager5.4.1
.......................................................................................67Notifications via SNMP Trap5.4.1.1
.....................................................................................67Rule creation5.4.2
........................................................................68Detailed information from clients5.5
........................................................................69Centralized quarantine5.6
..................................................70Firewall Rules Merge Wizard6.
..................................................71Reports7.
........................................................................73Example report scenario7.1
..................................................74
ESET Remote Administrator Server
(ERAS) setup
8.
........................................................................74Security8.1
........................................................................74Server Maintenance8.2
........................................................................75Mirror server8.3
.....................................................................................76Operation of the Mirror server8.3.1
.....................................................................................76Types of updates8.3.2
.....................................................................................77How to enable and configure the Mirror8.3.3
.....................................................................................79Mirror for clients with NOD32 version 2.x8.3.4
........................................................................79Replication8.4
........................................................................81Logging8.5
........................................................................81License management8.6
........................................................................82Advanced settings8.7
........................................................................82Other settings8.8
..................................................83
ESET Remote Administrator
Maintenance Tool
9.
........................................................................83ERA Server Information9.1
........................................................................83Task Type9.2
.....................................................................................83Stop ERA Server9.2.1
.....................................................................................83Start ERA Server9.2.2
.....................................................................................83Database Transfer9.2.3
.....................................................................................84Database Backup9.2.4
.....................................................................................84Database Restore9.2.5
.....................................................................................84Delete Tables9.2.6
.....................................................................................84Install New License Key9.2.7
.....................................................................................84Modify server configuration9.2.8
..................................................85Troubleshooting10.
........................................................................85FAQ10.1
.....................................................................................85
Problems installing ESET Remote Administrator to
Windows server 2000/2003
10.1.1
.....................................................................................85What is the meaning of the GLE error code?10.1.2
........................................................................85Frequently encountered error codes10.2
.....................................................................................85
Error messages displayed when using ESET Remote
Administrator to remotely install ESET Smart
Security or ESET NOD32 Antivirus
10.2.1
.....................................................................................86Frequently encountered error codes in era.log10.2.2
........................................................................86How to diagnose problems with ERAS?10.3
..................................................87Hints & tips11.
........................................................................87Scheduler11.1
........................................................................89Removing existing profiles11.2
........................................................................89Export and other features of client XML configuration11.3
........................................................................90Combined update for notebooks11.4
........................................................................91Installation of third party products using ERA11.5
..................................................92ESET SysInspector12.
........................................................................92Introduction to ESET SysInspector12.1
.....................................................................................92Starting ESET SysInspector12.1.1
........................................................................92User Interface and application usage12.2
.....................................................................................93Program Controls12.2.1
.....................................................................................94Navigating in ESET SysInspector12.2.2
.....................................................................................95Compare12.2.3
........................................................................96Command line parameters12.3
........................................................................96Service Script12.4
.....................................................................................96Generating Service script12.4.1
.....................................................................................97Structure of the Service script12.4.2
.....................................................................................99Executing Service scripts12.4.3
........................................................................100Shortcuts12.5
........................................................................101System requirements12.6
........................................................................101FAQ12.7
..................................................103ESET SysRescue13.
........................................................................103Minimun requirements13.1
........................................................................103How to create rescue CD13.2
.....................................................................................103Folders13.2.1
.....................................................................................104ESET Antivirus13.2.2
.....................................................................................104Advanced settings13.2.3
.....................................................................................104Bootable USB device13.2.4
.....................................................................................104Burn13.2.5
........................................................................104Working with ESET SysRescue13.3
.....................................................................................105Using ESET SysRescue13.3.1

5
1. Introduction
ESET Remote Administrator (ERA) is an application which allows you to manage ESET’s products in a networked
environment, including workstations and servers – from one central location. With ESET Remote Administrator‘s builtin task management system, you can install ESET security solutions on remote computers and quickly respond to new
problems and threats.
ESET Remote Administrator itself does not provide any other form of protection against malicious code. ERA depends
on the presence of an ESET security solution on workstations or servers, such as ESET NOD32 Antivirus or ESET Smart
Security.
To perform a complete deployment of an ESET security solutions portfolio, the following steps must be taken:
Installation of ERA Server (ERAS),
Installation of ERA Console (ERAC),
Installation on client computers (ESET NOD32 Antivirus, ESET Smart Security, Linux ESET Security client, etc…).
NOTE: Some parts of this document use system variables which refer to an exact location of folders and files:
%ProgramFiles% = typically C:\Program Files
%ALLUSERSPROFILE% = typically C:\Documents and Settings\All Users
1.1 What's new
ESET Remote Administrator Version 4.0
- support for ESET Smart Security/ESET NOD32 Antivirus 4.2
- support for ESET Mail Security 4 for Microsoft Exchange Server
- support for Linux/Mac desktop security solution (ESET NOD32 Antivirus 4)
- support for ESET Mobile Security
New features
- Remote Installation - new design
- Group Management - new design (Static groups, Parametric Groups, improved Active Directory synchronization)
- Filter - improved functionality (policy filters, static and parametric groups filters)
- Policies - new parameters in policy rules (support for parametric groups), import/export of policies and policy rules,
scheduler tasks merging, Policy Rules Wizard
- Notifications - support for parametric groups + several minor improvements
- Centralized view on clients' quarantine (for v4 and higher ESS/EAV clients)
- Reports - support for static and parametric groups, new types of reports (mobile log, quarantine, firewall), new
templates
- Firewall rules merge wizard - wizard for merging rules created in learning mode
- Windows/Domain authentication of ERA Console user
- Windows Passive Cluster support
- Supports reinstallation of older ERA versions (3.x, 2.x, 1.x) including data migration support
- Communication encryption with AES-256
New ESET Configuration Editor
- support for new ESET Security products
- support for new ERA Server features
- zipped license files
- possibility to add predefined scheduled tasks
ESET Remote Administrator Version 3.0
- support for ESET Security products 4.x
- support for Linux solutions
New features
- Policy Management
- Notification Manager
- Read-Only Console access
- support for ESET SysInspector

6
- enhanced data transfer scalability
- deletion of replicated clients
- license key merging /License Manager/
- Mirror for ESET NOD32 Antivirus 2.x
- new setup
- domain-based filtering option added in Find Unregistered Computers
- compression of server logs (zip)
- minor bugs fixed and several minor features added
- Rescue CD
Internal Server enhancements
- support for additional databases (MS Access, MS SQL Server, Oracle, MySQL)
New ESET Configuration Editor
- support for ESET Security products 4.x
ESET Remote Administrator Version 2.0
- support of new ESET Security Products version 3 (ESET Smart Security, ESET NOD32 Antivirus)
- new logs (new columns, ESET Personal Firewall logs)
- new client state information for version 3 clients (Protection Status, Protection Features, System Information)
- tasks (configuration, update now, on-demand scan, interactive task)
- still supports NOD32 version 2 products
New features
- extended client identification (MAC address added)
- extended remote installation (support of msi and custom packages)
- security enhancements (encryption possibility for all new server clients)
- performance improvements (compression in communication protocol)
- added forwarding of ThreatSense.Net data via ERA Server
- GUI improvements (new graphics, enhanced state coloring, extended filters, resizable dialogs)
- new report template (ESS Scheme)
- server performance monitoring (data, queries)
- update functionality in ERA Server (allows updating of important information)
- mirror functionality in ERA Server
- extended remote installation (support of msi and custom packages, possibility of ERA remote installation, diagnostics)
Internal Server enhancements
- new replication (replication priority, better multi-level replication)
- new database structure
- new directory structure
- internal security improvements
New ESET Configuration Editor
- supports ESET Security Products version 2 and version 3
- possibility to configure ERA Server
- other minor new features (search, custom settings)
New installer (MSI)
- database migration from previous versions
New documentation (help, manual)

7
1.2 Program architecture
Technically, ESET Remote Administrator consists of two separate components: ERA Server (ERAS) and ERA Console
(ERAC). You can run an unlimited number of ERA Servers and Consoles on your network as there are no limitations in
the license agreement for their use. The only limitation is the total number of clients your installation of ERA can
administer.
ERA Server (ERAS)
The server component of ERA runs as a service under the following Microsoft Windows® NT-based operating systems:
NT4 SP6, 2000, XP, 2003, Vista, 7 and 2008. The main task of this service is to collect information from clients and to
send them various requests. These requests, including configuration tasks, remote installation requests, etc., are
created through the ERA Console (ERAC). ERAS is a meeting point between ERAC and client computers – a place where
all information is processed, maintained or modified before being transferred to clients or to ERAC.
ERA Console (ERAC)
ERAC is the client component of ERA and is usually installed on a workstation. This workstation is used by the
administrator to remotely control ESET solutions on individual clients. Using ERAC, the administrator can connect to
the server component of ERA – on TCP port 2223. The communication is controlled by the process console.exe, which is
usually located in the following directory:
%ProgramFiles%\ESET\ESET Remote Administrator\Console
When installing ERAC, you may need to enter the name of an ERAS. Upon startup, the console will automatically
connect to this server. ERAC can also be configured after installation.

8
2. Installation of ERA Server and ERA Console
2.1 Requirements
ERAS works as a service, and therefore requires a Microsoft Windows NT-based operating system (NT4 SP6, 2000, XP,
2003, Vista, 7, or 2008). Although the Microsoft Windows Server Edition is not necessary for ERAS to work, we
recommend installing ERAS on server-based operating systems for smooth operation. A computer with ERAS installed
on it should always be online and accessible via computer network by:
Clients (usually workstations)
PC with ERA Console
Other instances of ERAS (if replicated)
NOTE: ESET Remote Administrator 4 fully supports installation over older versions (3.x, 2.x, 1.x) including data
migration.
2.1.1 Software requirements
ERA Server
32 bit operating systems:
Windows NT4 SP6 and later
64 bit operating systems:
Windows XP and later
Databases:
Microsoft Access (built-in)
Microsoft SQL Server 2005 and later
MySQL 5.0 and later
ORACLE 9i and later
Windows Installer:
2.0
ERA Console
32 bit operating systems:
Windows 2000 and later
64 bit operating systems:
Windows XP and later
Windows Installer:
2.0
Internet Explorer:
recommended 6.0, minimum 4.0 (some reports may not be displayed correctly)
2.1.2 Performance requirements
The server performance may vary depending on the following parameters:
1.
Database used
MS Access database - installed with the server by default. We recommend this solution when servicing hundreds
of clients. However, there is a 2GB size limit for the database. Consequently, you will need to activate cleanups on
the server and define an interval (under Tools > Server Options > Server Maintenance) for removing old data.
Other databases (MySQL, MSSQL, ORACLE) require a separate installation, but may result in better server
performance. It is essential to use suitable hardware for each database engine (mainly ORACLE) following the
technical recommendations of its distributor.
If you choose ORACLE as your database solution, you must set the number of cursors higher than the
Maximum number of active connections value (under Tools > Server Options > Advanced >
Edit Advanced Settings > Advanced; the default is set to 500). The final number of cursors must take into
account the number of lower servers, (if replication is used) and cursors that are used by other applications
accessing the database engine.
Typically, the server's performance is higher when using external databases (i.e. installed on a different physical
machine).
2.
Client connection interval
The client connection interval is set to 10 minutes by default in ESET Smart Security / ESET NOD32 Antivirus
versions 4.2 and later. If you need the client status to update more or less frequently than the default interval,
you can change the setting.Keep in mind that a shoerter client connection interval will affect server performance.
3.
Average number of events reported by clients per connection
Any information sent from client to server is listed under the particular event (e.g. threat log, event log, scan log,

9
configuration change). This parameter cannot be changed directly, but it can be altered if other settings relevant
to it are changed. For example, in advanced server configuration (under Tools > Server Options >
Server Maintenance) you can setup the maximum amount of logs that can be accepted by the server (this
setting includes clients that connect directly as well as replicated clients).In regular operation the long-term
average can be estimated at 1 event every 4 hours per client.
4.
Hardware and operating system used
We strongly recommend using the minimum hardware recommended for your server's operating system,
accounting for the number of clients to be serviced.
Overload
If a server is overloaded (e.g., we connect 20,000 clients to a server only able to service 10,000 clients at an interval of
every 10 minutes) it will skip some of the clients connected. On average every second client connection will be serviced,
as if the client connection interval were set to 20 minutes instead of 10 minutes. Every service denial will be logged as
follows: "<SERVERMGR_WARNING> ServerThread: maximum number of threads for active connections reached (500), the
server will skip this connection”. Service denials may also occur during temporary server overloads.
You can change the value under the Maximum number of active connections (the default is 500) in the advanced
server settings, but we recommend to do so only in exceptional cases (e.g. when solving specific issues). Should there
be an overabundance of system resources and database engine performance you can use this setting to adjust the
overall server performance.
Data transfer over a network
During a server's standard operation, we can estimate a client connecting every 10 minutes will report 0.04 events per
connection, which is 1 event reported every 4 hours per client. This will produce ~2 kilobytes of traffic per connection.
In a virus outbreak scenario, with a client reporting 7 events every time it connects traffic may increase up to 240
kilobytes per connection. If you use compression (default) the data transferred will be approximately 50% smaller in
size, i.e. about 120 kilobytes per connection.
The data includes direct client connections, omitting replicated connections. Replication occurs much less often and
serves to send new events from lower servers. Events to be automatically replicated and their verbosity level can be
configured in the advanced settings of the server (under Tools > Server Options > Advanced >
Edit Advanced Settings > Replication). In the Server maintenance section you can configure the maximum level of
logs, that the upper server will accept - this setting applies to both directly connecting clients and replicated clients.
Storage capacity requirements
Clean installation of the product with an MS Access database takes up to 60 MB of disk space.
Most of the storage space is taken up by client events, that are stored in the database and to a repository on the disk
(default directory is C:\Documents and Settings\All Users\Application Data\Eset\ESET Remote Administrator\Server). ERA
requires that at least 5% of the disk be free. If this minimum is exceeded the server will stop receiving some of the client
events. This setting can be found under Tools > Server Options > Advanced > Edit Advanced Settings > Advanced >
Maximum disk space usage. Approximately 10GB per 1000 clients of free disk space is required for regular operation
under the default cleanup settings (deleting events older than 3 months).
Case study
A server using an MS Access database that has clients connecting to it every 5 minutes and reporting 7 events (e.g.
threat log, event log, scan log, configuration change etc.) per connection in average can temporarily service up to 3000
clients. This scenario depicts a temporary overload situation, such as reporting during a virus outbreak etc.
If the server uses an external MySQL database and the client connection interval is set to 10 minutes (generating 0.02
events per connection) the maximum number of clients the server will be able to service increases to 30,000. Such a
scenario exhibits optimal database performance, with clients reporting a relatively small number of events.
In regular operation, using an MS Access database and a client connection interval of 10 minutes enables the server to
service a maximum of 10,000 clients.

10
2.1.3 Ports used
The chart below lists the possible network communications used when ERAS is installed. The process EHttpSrv.exe
listens on TCP port 2221 and the process era.exe listens on TCP ports 2222, 2223, 2224 and 2846. Other communications
occur using native operating system processes (e.g., ”NetBIOS over TCP/IP”).
Protocol
Port
Description
TCP
2221 (ERAS listening)
Default port used by the Mirror feature integrated in ERAS (HTTP
version)
TCP
2222 (ERAS listening)
Communication between clients and ERAS
TCP
2223 (ERAS listening)
Communication between ERAC and ERAS
If all the program features are in use, the following network ports need to be open:
Protocol
Port
Description
TCP
2224 (ERAS listening)
Communication between the agent einstaller.exe and
ERAS during remote install
TCP
2846 (ERAS listening)
ERAS replication.
TCP
139 (target port from the point of view of ERAS)
Copying of the agent einstaller.exe from ERAS to a
client using the share admin$
UDP
137 (target port from the point of view of ERAS)
“Name resolving” during remote install.
UDP
138 (target port from the point of view of ERAS)
“Browsing” during remote install
TCP
445 (target port from the point of view of ERAS)
Direct access to shared resources using TCP/IP during
remote install (an alternative to TCP 139)
The predefined ports 2221, 2222, 2223, 2224 and 2846 can be changed if they are already in use by other applications.
To change the default ports used by ERA, click Tools > Server Options… To change port 2221, select the Updates tab
and change the HTTP server port value. Ports 2222, 2223, 2224 and 2846 can be modified in the Ports section on the
Advanced tab.
The predefined ports 2222, 2223, 2224 and 2846 can also be modified during the advanced install mode (ERAS).
11
2.2 Basic Installation guide
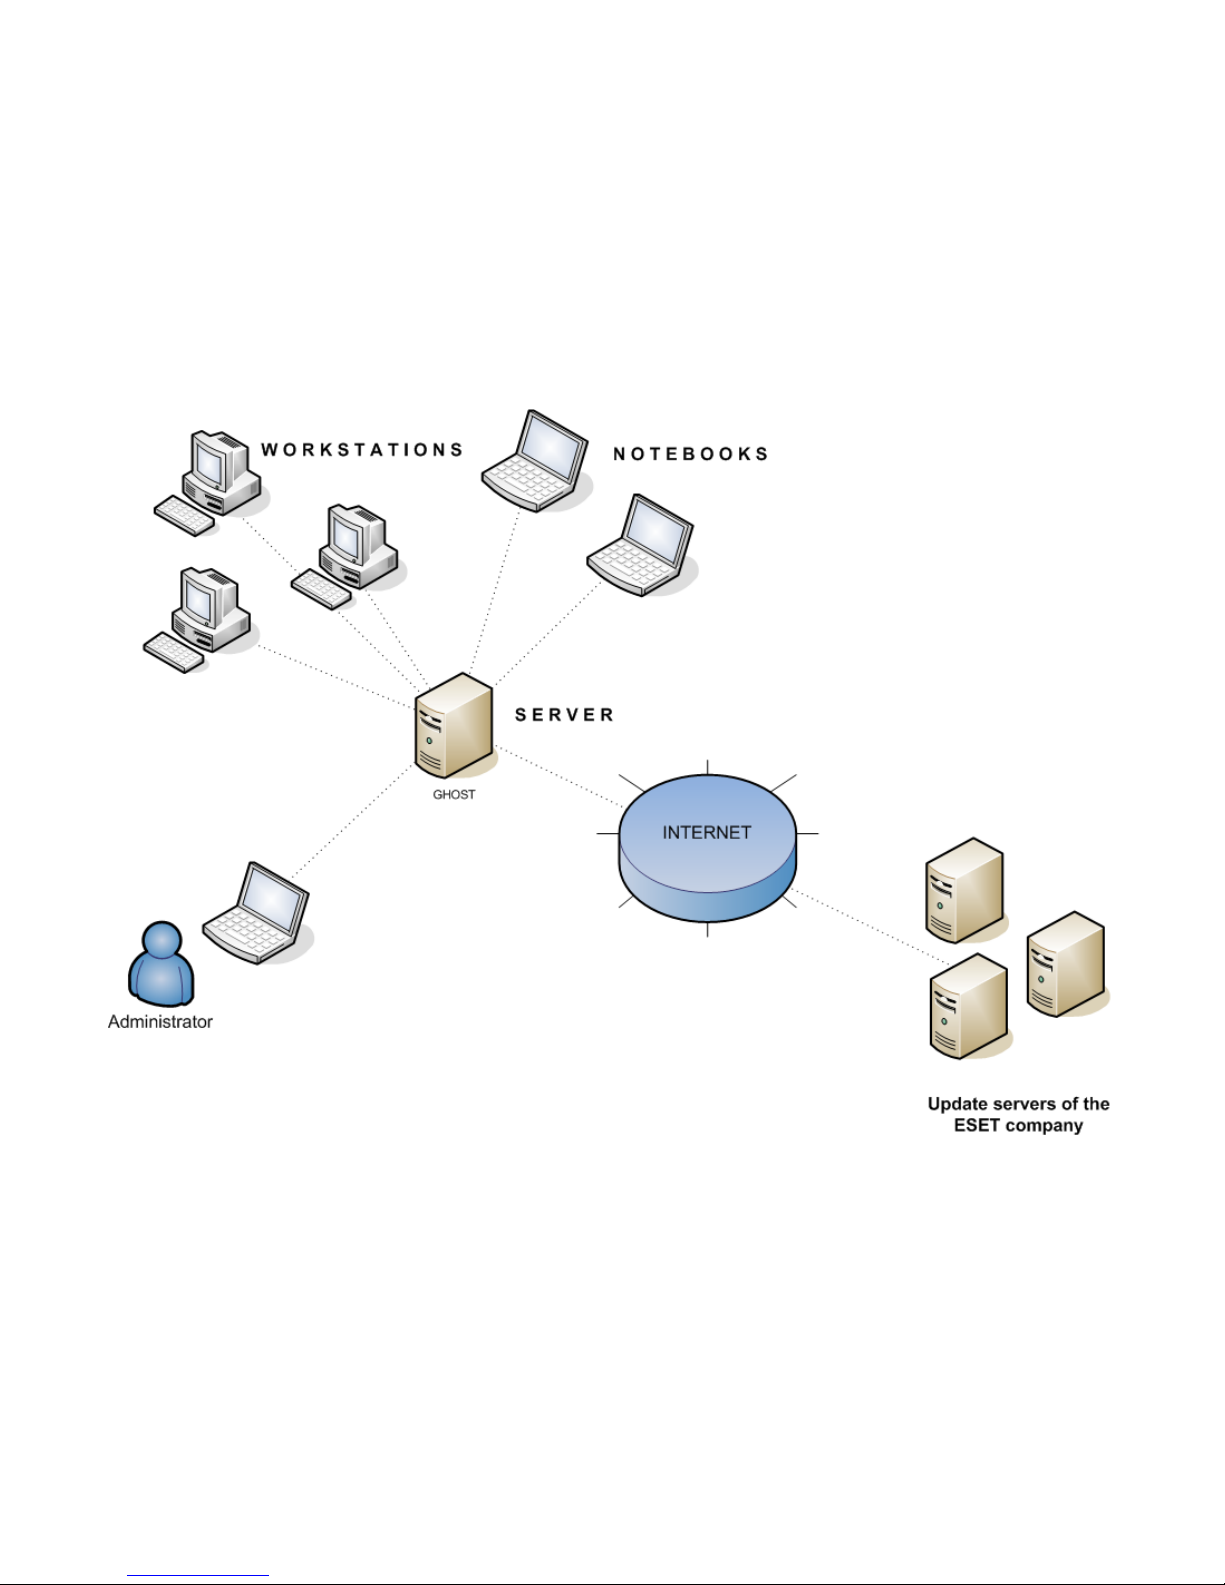
2.2.1 Environment overview (network structure)
A company network usually consists of one local area network (LAN), therefore we suggest installing one ERAS and
one Mirror server. The Mirror server can either be created in ERAS or in ESET NOD32 Antivirus Business Edition / ESET
Smart Security Business Edition.
Suppose all clients are Microsoft Windows 2000/XP/Vista/7 workstations and notebooks, networked within a domain.
The server named GHOST is online 24/7 and can be a Windows workstation, Professional, or Server Edition (it does not
have to be an Active Directory Server). In addition, suppose that notebooks are not present in the company’s network
during the installation of ESET client solutions. The network structure may resemble the one displayed below:

12
2.2.2 Before installation
Before installing, the following installation packages should be downloaded from ESET’s website:
ESET Remote Administrator components:
ESET Remote Administrator – Server
ESET Remote Administrator – Console
ESET client solutions:
ESET Smart Security 4.x
ESET Smart Security 3.x
ESET NOD32 Antivirus 4.x
ESET NOD32 Antivirus 3.x
ESET NOD32 Antivirus 2.7
Only download the client solutions you will use on client workstations.
2.2.3 Installation
2.2.3.1 Installation of ERA Server
Install ERAS on the server named GHOST (see the example in Environment overview ). You can select either Typical
or Advanced installation mode.
If you select Typical mode, the program will prompt you to insert a license key – a file with the extension .lic or .zip that
provides operation of ERAS for the period defined in the license. Next, the program will ask you to set the update
parameters (username, password and update server). You can also proceed to the next step and enter the update
parameters later.
If you select the Advanced installation mode, the installer will offer additional parameters to be set. These parameters
can be modified later via ERAC, but in most cases this is not necessary. The only exception is server name, which should
match the DNS name, or %COMPUTERNAME% value of your operating system or the IP address assigned to the
computer. This is the most essential piece of information for performing the remote installation. If a name is not
specified during installation, the installer will automatically supply the value of the system variable %COMPUTERNAME
%, which is sufficient in most cases.It is also important to select the correct database to which ERAS information will be
stored. For more information see the chapter titled Database types supported by ERA Server .
Important: Recent versions of Microsoft Windows (Windows Vista, Windows Server 2008 and Windows 7) enforce
security policies limiting local user account permissions, meaning the user may not be able to execute specific network
operations. If your ERA service is running on a local user account, push installation issues may occur in certain specific
network configurations (e.g. when installing remotely from domain to workgroup). When using Windows Vista,
Windows Server 2008 or Windows 7, we recommend running the ERA service on accounts with sufficient networking
rights. You can specify the user account on which you want to run ERA in the Advanced installation scenario.
Note: Although ERA Server has full Unicode support, there are situations when the server converts characters to ANSI
or vice versa (e.g. email, computername). In such situations the Language for non-Unicode programs setting is used.
We recommend you change this setting to match the server environment locale, even if you are not using a localized
version of ERA (i.e. you are using the English language mutation). You can find this setting under Control panel >
Regional and language options on the Advanced tab.
ERAS program components are installed by default in the following folder:
%ProgramFiles%\ESET\ESET Remote Administrator\Server
Other data components such as logs, install packages, configuration, etc. are stored in:
%ALLUSERSPROFILE%\Application Data \ESET\ESET Remote Administrator\Server
The ERAS service is launched automatically after the installation. The activity of the ERAS service is recorded in the
following location:
%ALLUSERSPROFILE%\Application Data\ESET\ESET Remote Administrator\Server\logs\era.log
11
14

13
Command line installation
ERAS can be installed with the following command line parameters:
/q - Silent installation. No user intervention is possible. No dialog windows are displayed.
/qb - No user intervention is possible, but the installation process is indicated by a progress bar.
Example: era_server_nt32_ENU.msi /qb
Parameters and configuration of the command line installation can be further supplemented by the administrator's .xml
configuration file the "cfg.xml", which must be in the same folder as the ERA .msi installation file. The configuration file
can be created in the ESET Configuration Editor and allows you to configure various ERA settings. See chapter ESET
Configuration Editor for more details.
2.2.3.1.1 Cluster Mode Installation
The Advanced installation scenario also allows you to activate the Cluster Mode Installation. If the Cluster Mode
Installation is enabled you will need to specify the path to a cluster shared data folder that is fully accessible for all
cluster nodes (i.e. all nodes must have read/write permissions for this folder). It can either be a quorum disk or a UNC
shared folder. If a shared folder is used, you must enable sharing for Computers in the shared folder's properties. The
cluster node name must then be added to Share Permissions with full rights.
It is necessary to install ERA Server individually on all cluster nodes. If anything other than the built-in MS Access
database is used, it is important to make sure that all ERA Server nodes connect to the same database. In the next
steps it is also important to set the name of the cluster node where ERA is to be installed as the server name.
Important: It is necessary to configure the ESET Remote Administrator Server service (ERA_SERVER) as the cluster's
Generic Service in the Cluster Administrator console.
If you plan to uninstall ERA Server, you must disable the cluster node before uninstalling.
2.2.3.2 Installation of ERA Console
Install the ESET Remote Administrator Console to the administrator’s PC/notebook. At the end of the Advanced
installation mode enter the name of the ERA Server (or its IP address) to which ERAC will automatically connect at
startup. It is labeled GHOST in our example.
After installation launch ERAC and check the connection to ERAS. By default, no password is required to connect to an
ERA Server (the password text field is blank), but we strongly recommend that one be established. To create a
password to connect to an ERA Server click File > Change Password… and then modify the Password for Console by
clicking the Change... button.
The administrator can specify a password for Administrator Access and for Read-Only Access (which only allows users
to view the ERAS configuration, not edit it).
2.2.3.3 Mirror
You can use the ERA Console to activate the LAN Update server – the Mirror in the ERA Server. This server can then be
used to update workstations located in the LAN. By activating the Mirror you will decrease the volume of data
transferred through your Internet connection.
Proceed as follows:
1)
Connect the ERA Console to the ERA Server by clicking File > Connect.
2)
From the ERA Console click Tools > Server Options… and click the Updates tab.
3)
From the Update server drop-down menu, select Choose Automatically, leave Update interval at 60 minutes.
Insert Update username (EAV-***) and then click Set Password... and type or paste the password you received with
your username.
4)
Select the Create update mirror option. Leave the default path for mirrored files and HTTP server port (2221). Leave
Authentication at NONE.
5)
Click the Advanced tab and click Edit Advanced Settings… In the advanced setup tree, navigate to ERA Server >
Setup > Mirror > Create mirror for the selected program components. Click Edit on the right-hand side and select
the program components to be downloaded. Components for all language versions that will be used in the network
should be selected.
31
14
6)
In the Updates tab, click Update now to create the Mirror.
For more detailed Mirror configuration options, please see chapter How to enable and configure the Mirror .
2.2.3.4 Database types supported by ERA Server
By default, the program uses the Microsoft Access (Jet Database) engine. ERAS 4.0 also supports the following
databases:
Microsoft SQL Server 2005 and later
MySQL 5.0 and later
Oracle 9i and later
The database type can be selected during the Advanced installation mode of ERAS. After the installation it is not
possible to change the database type directly from ERA, however, you can do so using the ERA Maintenance Tool .
NOTE:
Microsoft Access database is not supported on Windows Server 2008 Core.
SQL Server Express has 4 GB database size limit.
2.2.3.4.1 Basic requirements
First, it is necessary to create the database on a database server. The ERAS installer is capable of creating an empty
MySQL database, which is automatically named ESETRADB.
By default, the installer automatically creates a new database. To create the database manually, select the option
Export Script. Make sure that the Create tables in the new database automatically option is deselected.
Collation Settings
Sorting will be realized according to the default settings of each database. It is required to activate CASE INSENSIVITY
(CI).
To activate:
- For MS SQL and MySQL a COLLATE must be set up with the CI activated
- For ORACLE a NLS_SORT must be set up with the CI activated
- For MS Access no action is required because CI is already activated
Character set
It is important to use the UNICODE character set (UTF-8 is recommended), especially when clients have specific locales
or if ERA itself is working in a localized version. If there is no plan for replication and all clients connect to the same
server, you can use the character set for the locale of ERA that you want to install.
MARS (Multiple Active Result Sets)
If a MS SQL database is used, an ODBC driver with MARS support is required for smooth operation. Otherwise the
server will operate less effectively and log the following error message to the server log:
Database connection problem. It is strongly recommended to use odbc driver that supports multiple active result sets (MARS).
The server will continue to run but the database communication may be slower. See the documentation or contact ESET support
for more information.
If the problem occurs with other than a MS SQL database the server logs the following message to the server log and
stops:
Database connection problem. Updating the odbc driver may help. You can also contact ESET support for more information.
Drivers without MARS support:
- SQLSRV32.DLL (2000.85.1117.00)
- SQLSRV32.DLL (6.0.6001.18000) - natively contained in Windows Vista and Windows Server 2008
77
83
15
Native driver with MARS support:
- SQLNCLI.DLL (2005.90.1399.00)
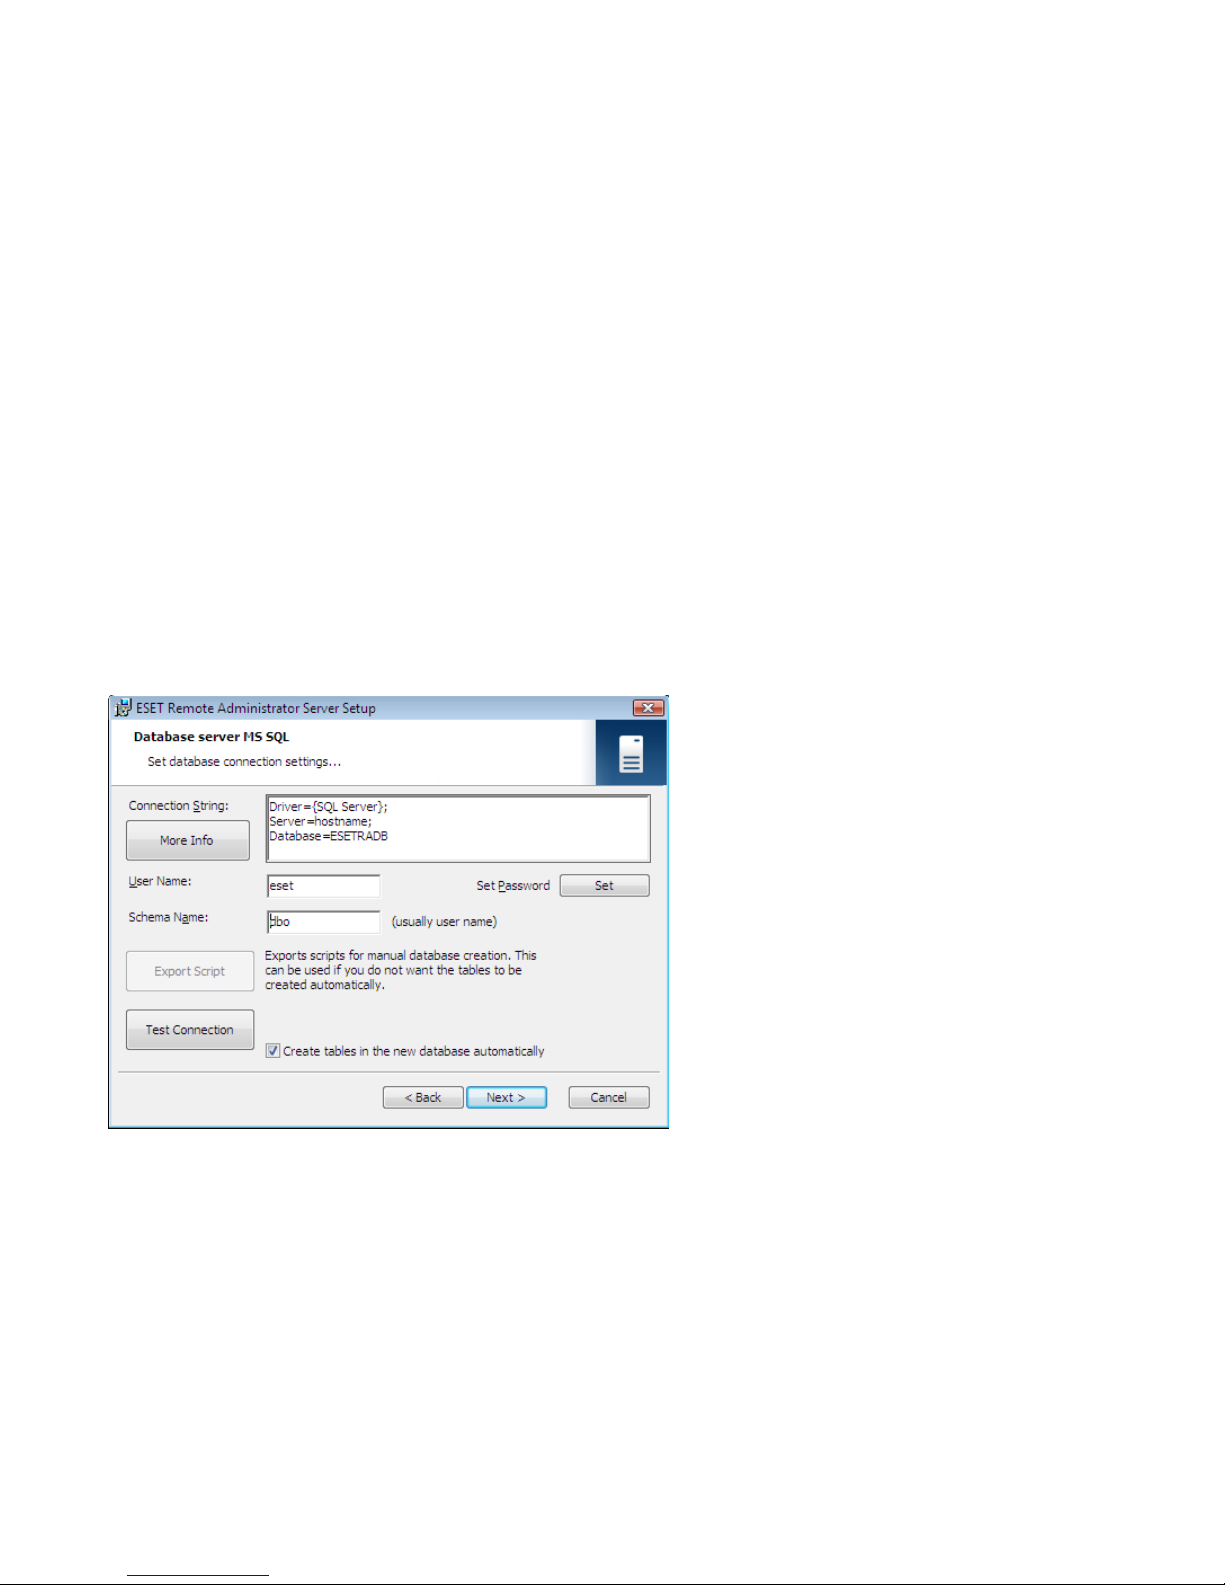
2.2.3.4.2 Database connection setup
After a new database is created, you must specify connection parameters for the database server using one of two
options:
1.
Using DSN (data source name)
To open DSN manually, open the ODBC
Date Source Administrator
(Click Start > Run – and type odbcad32.exe).
Example of a DSN connection:
DSN =ERASqlServer
Important: The use of the System DSN is recommended for ERA to work properly.
Important: On a 64-bit operating system, odbcad32.exe must be run from the %SystemRoot%\SysWOW64\ foder.
To make the installation under MSSQL with Windows/Domain authentication successful make sure you use DSN
format when entering the connection string.
2.
Directly, using a complete connection string
All required parameters must be specified – driver, server and name of database.
This is an example of a complete connection string for MS SQL Server:
Driver ={SQL Server}; Server =hostname; Database =ESETRADB
This is an example of a complete connection string for Oracle Server:
Driver ={Oracle in instantclient10_1}; dbq =hostname: 1521/ESETRADB
This is an example of a complete connection string for MySQL Server:
Driver ={MySQL ODBC 3.51 Driver}; Server =hostname; Database =ESETRADB
Then set the Username and Password for the connection (the Set button). Oracle and MS SQL Server databases also
require a Schema Name (for MS SQL Server this is usually the same as username).
Click Test Connection to verify the connection to the database server.
Note: We recommend using the database server authentication, instead of windows/domain authentication.
16
2.2.3.4.3 Installing over an existing database
If there are existing tables in the database, the installer will display a notification. To overwrite contents of an existing
table, select Overwrite (Warning: this command deletes the contents of tables and also overwrites their structure!).
Select Ignore to leave tables untouched.
NOTE: Selecting Ignore may under certain conditions cause database inconsistency errors; especially when tables are
damaged or incompatible with the current version.
To cancel installation of ERAS and analyze the database manually, click Cancel.
2.3 Scenario - Installation in an Enterprise environment
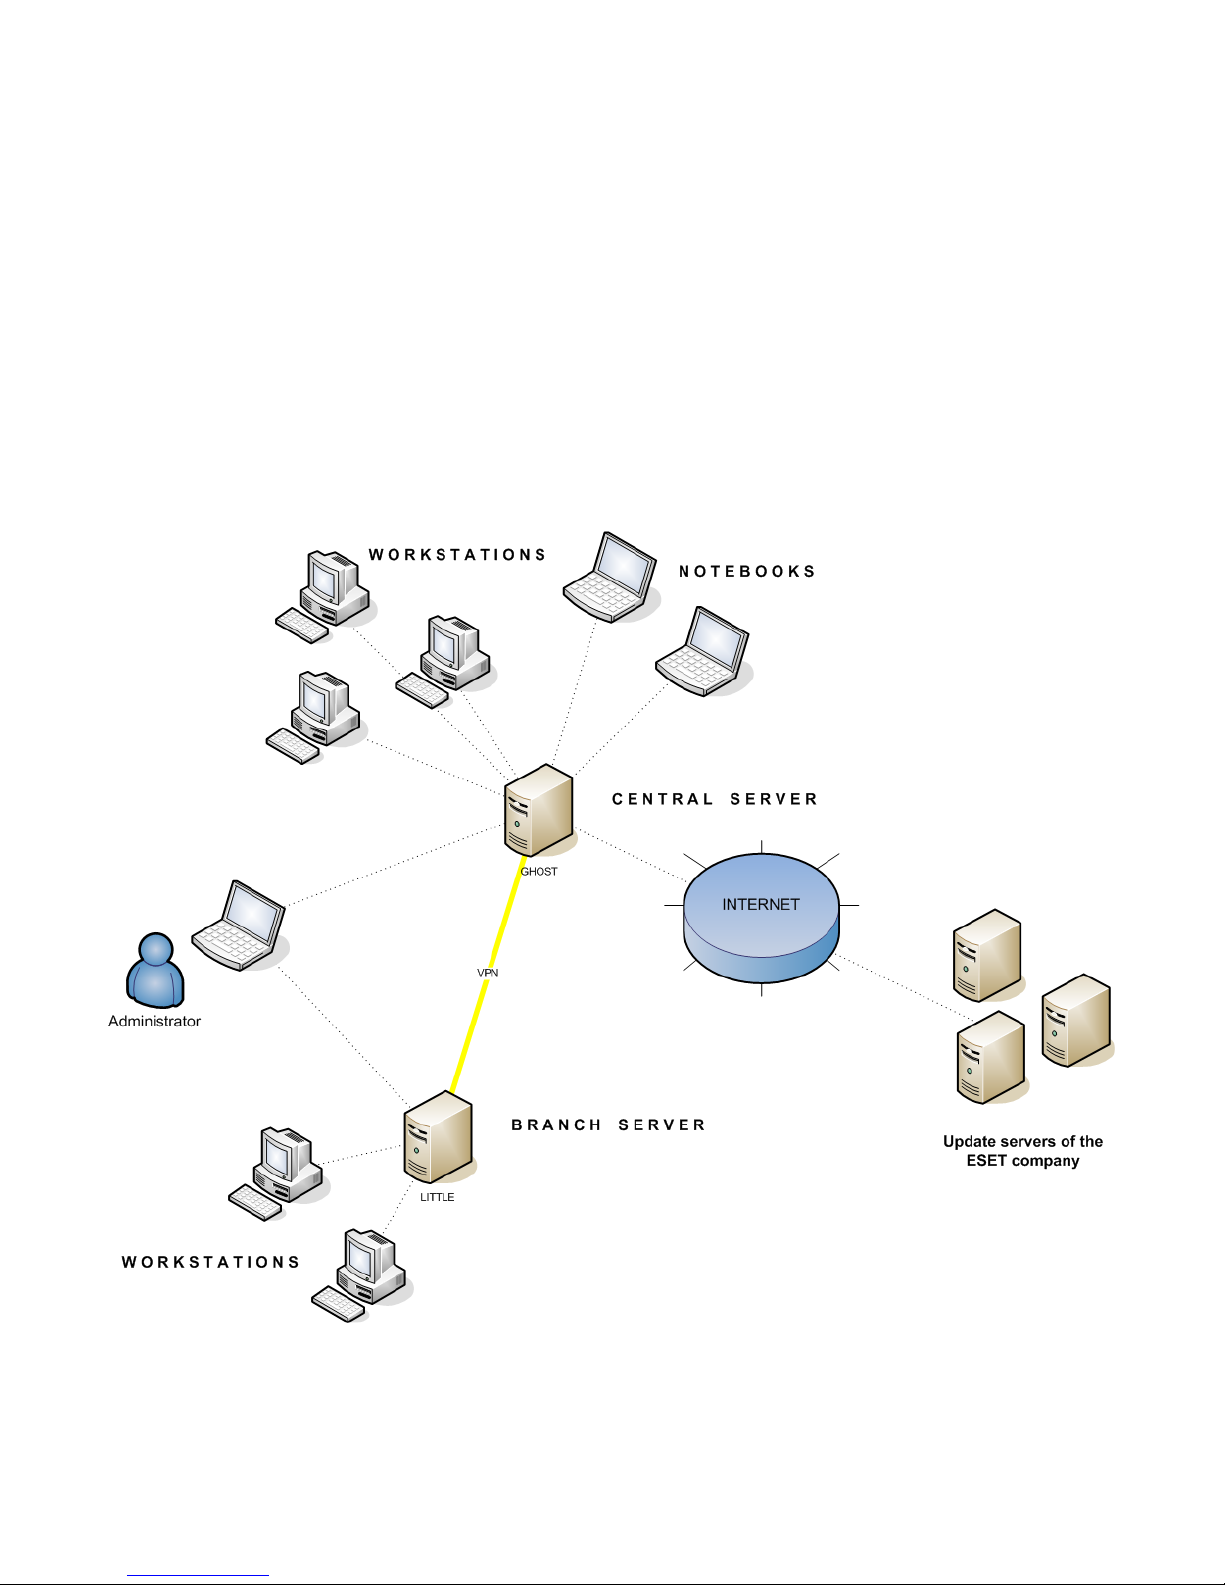
2.3.1 Environment overview (network structure)
Below is a copy of the previous network structure with one additional branch office, several clients and one server
named LITTLE. Let’s suppose there is a slow VPN channel between the headquarters and the branch office. In this
scenario, the Mirror server should be installed on the server LITTLE. We will also install a second ERA Server on LITTLE
in order to create a more user-friendly environment and minimize the volume of transferred data.
17
2.3.2 Installation
2.3.2.1 Installation at headquarters
Installations of ERAS, ERAC and client workstations are very similar to the previous scenario. The only difference is in
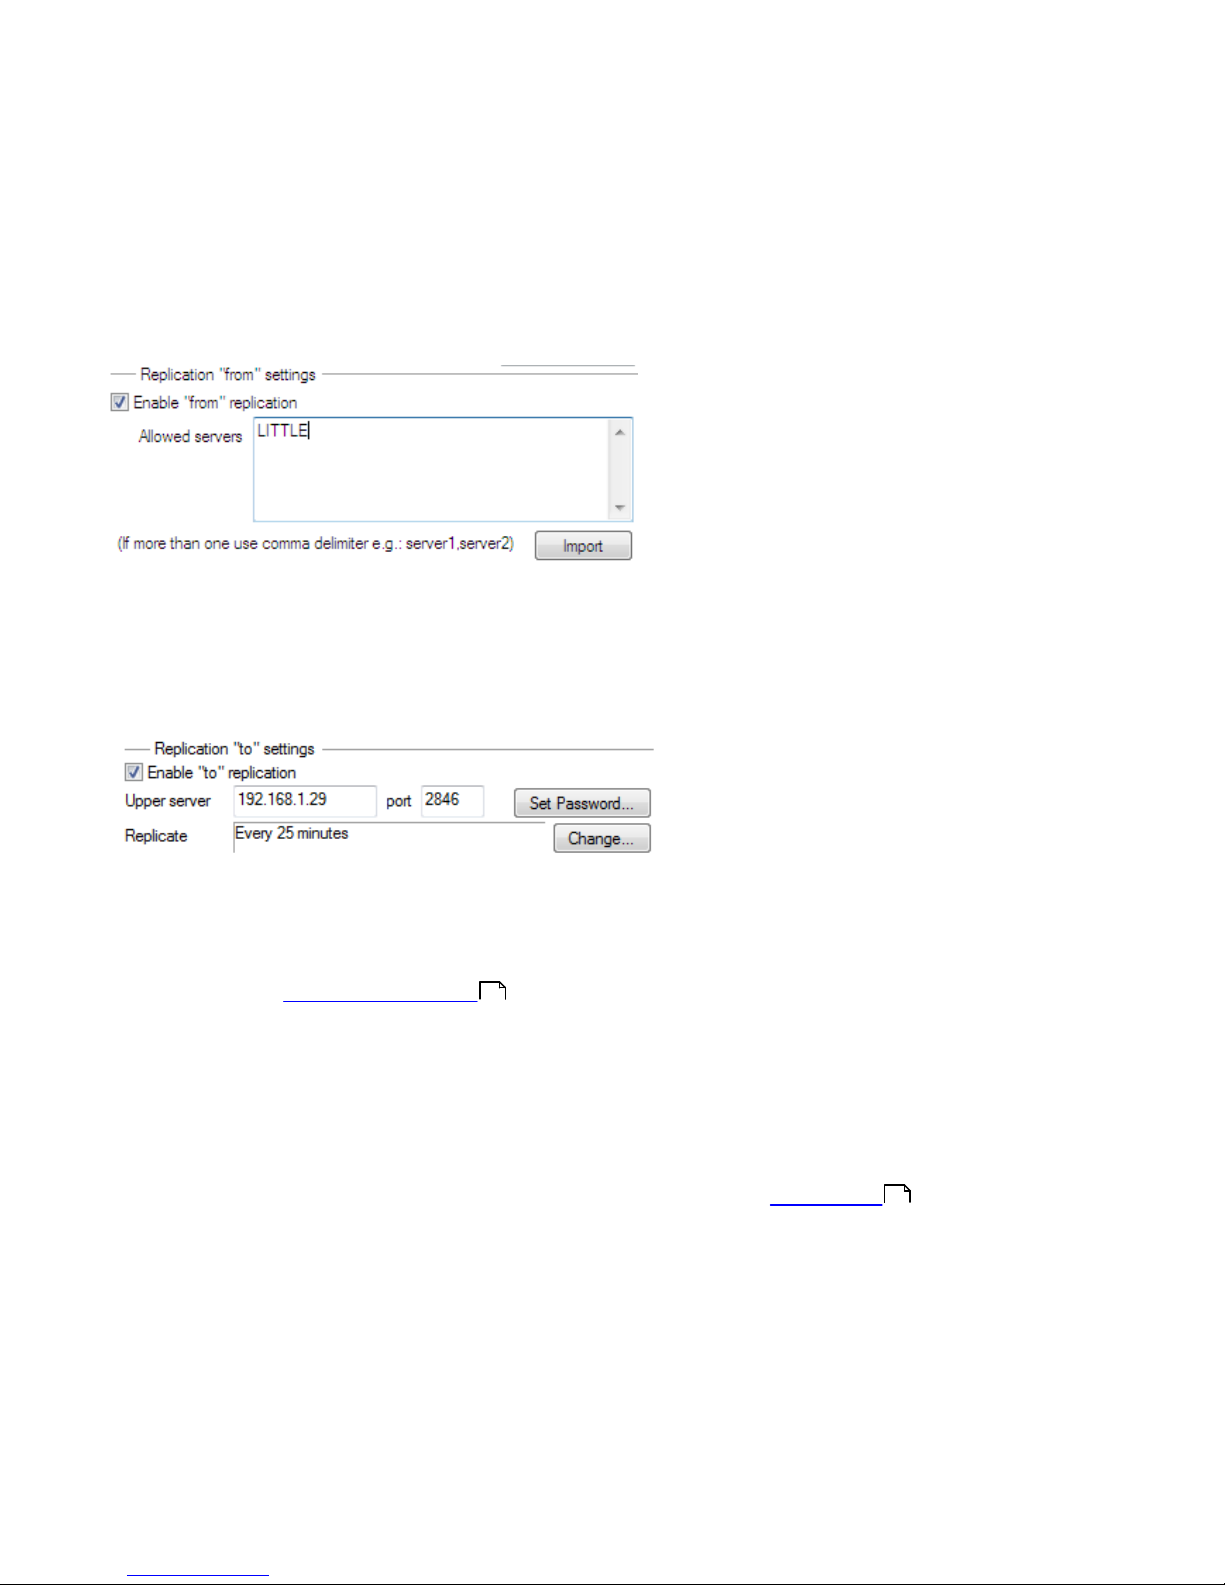
the configuration of the master ERAS (GHOST). In Tools > Server Options… > Replication select the
Enable “from” replication check box and enter the name of the secondary server in Allowed servers. In our case, the
lower server is named LITTLE.
If there is a password for replication set on the upper server (Tools > Server Options… > Security >
Password for replication), then that password must be used for authentication from the lower server.
2.3.2.2 Branch office: Installation of ERA Server
As in the example directly above, install the second ERAS and ERAC. Again, enable and configure the replication
settings. This time select the Enable “to” replication check box (Tools > Server Options… > Replication) and define
the name of the master ERAS. We recommend using the IP address of the master server, which is the IP address of the
server GHOST.
2.3.2.3 Branch office: Installation of HTTP Mirror server
The Mirror server installation configuration in the previous scenario can also be used in this case. The only changes are
in the sections defining the username and password.
As in the figure from Environment overview chapter, updates for the branch office are not downloaded from ESET’s
update servers, but from the server at the headquarters (GHOST). The update source is defined by the following URL
address:
http://ghost:2221 (or http://IP_address_of_ghost:2221)
By default, there is no need to specify a username or password, because the integrated HTTP server requires no
authentication.
For more information on configuring the Mirror in ERAS, see the chapter titled Mirror Server .
2.3.2.4 Branch office: Remote installation to clients
Once more, the previous model can be used, except that it is suitable to perform all operations with the ERAC
connected directly to the ERAS of the branch office (in our example: LITTLE). This is done to prevent installation
packages from being transferred via the VPN channel, which is slower.
16
75
18
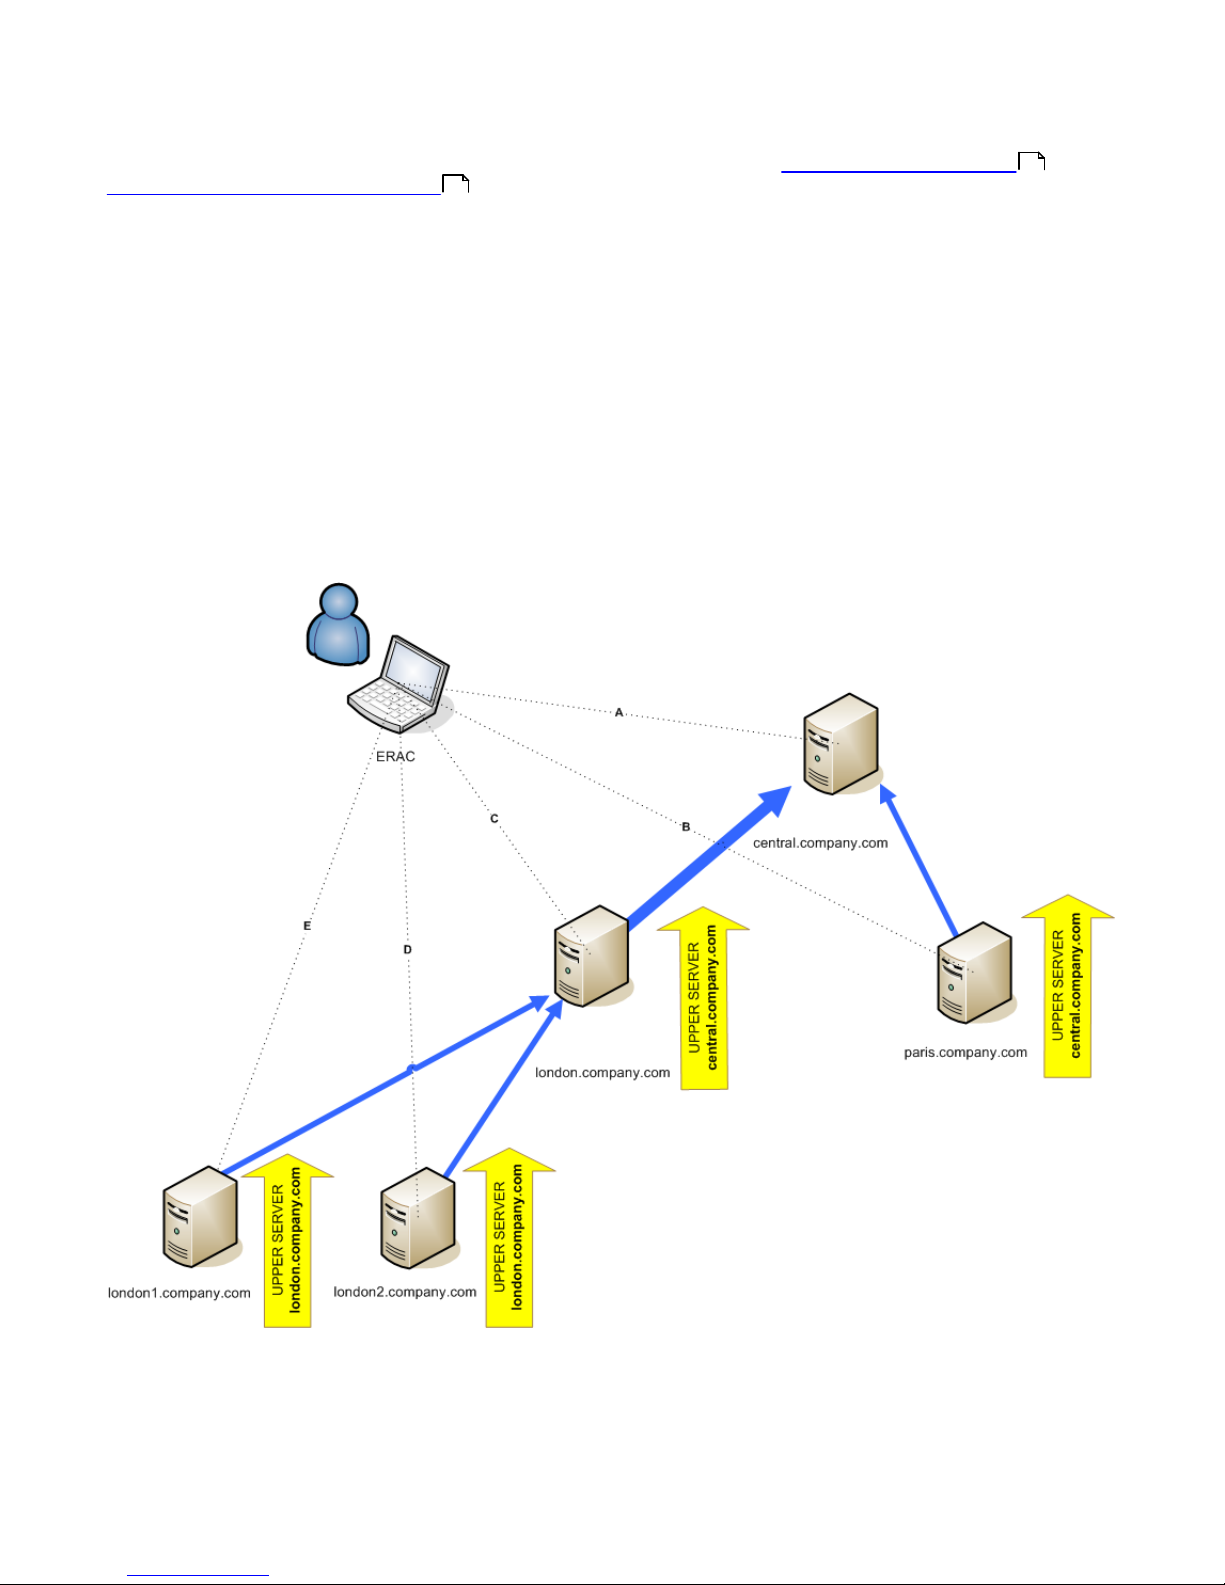
2.3.3 Other requirements for Enterprise environments
In larger networks, multiple ERA Servers can be installed to perform remote installs of client computers from servers
which are more accessible. For this purpose, ERAS offers replication (see chapter Installation at headquarters and
Branch office: Installation of ERA Server ), which allows stored information to be forwarded to a parent ERAS (upper
server). Replication can be configured using ERAC.
The replication feature is very useful for companies with multiple branches or remote offices. The model deployment
scenario would be as follows: Install ERAS in each office and have each replicate to a central ERAS. The advantage of
this configuration is especially apparent in private networks which are connected via VPN, which is usually slower – the
administrator will only need to connect to a central ERAS (the communication marked by the letter A in the figure
below). There is no need to use VPN to access individual departments (the communications B, C, D and E). The slower
communication channel is bypassed through the use of ERAS replication.
The replication setup allows an administrator to define which information will be transferred to upper servers
automatically at a preset interval, and which information will be sent upon request from the upper server
administrator. Replication makes ERA more user-friendly and also minimizes network traffic.
Another advantage of replication is that multiple users can log in with various permission levels. The administrator
accessing the ERAS london2.company.com with the console (communication E) can only control clients connecting to
london2.company.com. The administrator accessing the central company.com (A) can control all clients located at
company headquarters and departments/branches.
17
17

19
3. Working with ERAC
3.1 Connecting to ERAS
Most features in ERAC are only available after connecting to ERAS. Define the server by name or IP address before
connecting:
Open the ERAC and click File > Edit Connections… (or Tools > Console Options…) and click the Connection tab.
Click the Add/Remove… button to add new ERA Servers or to modify currently listed servers. Pick the desired server in
the Select connection drop-down menu. Then, click the Connect button.
Other options in this window:
Connect to selected server on the console startup
If this option is selected, the console will automatically connect to the selected ERAS on startup.
Show message when connection fails
If there is a communication error between ERAC and ERAS, an alert will be displayed.
There are two authentication types available:
ERA Server
The user authenticates with ERAS credentials. By default no password is required to connect to an ERAS, but we
strongly recommend that one be established. To create a password to connect to an ERAS:
Click File > Change Password… (or Tools > Server Options > Security) and then click the Change… button to the right
of Password for Console.
When entering a password you can check the Remember password option. Please consider the possible security risks
associated with this option. To delete all remembered passwords click File > Clear Cached Passwords….
Select the access type from the Access drop-down menu (options are either Administrator or Read-Only), enter your
password and click OK.
Windows/Domain
The user authenticates with Windows/Domain user credentials. In order for the Windows/Domain authentication to
work properly ERAS needs to be installed under the Windows/Domain account with sufficient rights. You must also
enable this feature in Tools > Server Options… > Advanced tab > Edit Advanced Settings… > ESET Remote
Administrator > ERA Server > Setup > Security:
Allow Windows/Domain authentication - enables/disables Windows/Domain authentication
Administrator groups - allows you to define groups for which Windows/Domain authentication will be enabled
Read only groups - allows you to define groups with read-only access
When communication has been established the program’s header will change to Connected [server_name].
Alternatively you can click File > Connect to connect to ERAS.
NOTE: Communication between ERAC and ERAS is encrypted (AES-256)
20
3.2 ERAC - main window
The current communication status between ERAC and ERAS is displayed in the status bar (1). All necessary data from
ERAS is refreshed regularly (Default is every minute. See Tools > Console Options…). The refresh progress can also be
seen in the status bar.
NOTE: Press F5 to refresh displayed data.
Information is divided into several tabs in order of importance (2). In most cases data can be sorted in ascending or in
descending order by clicking on an attribute (5), while a drag-and-drop operation can be used for reorganization. If
multiple data rows are to be processed, you can limit them by using the Items to show drop-down menu and the
browse page by page buttons. Select the View mode to display attributes according to your need (for further details,
see chapter Information filtering ).
The Server section (4) is important if you replicate ERA Servers. This section displays summary information about the
Console to which ERAS is connected, as well as information about child or ”lower” ERA Servers. The Servers drop-down
menu in section 4 will influence the scope of information displayed in section 5.
Use All Servers
Displays information from all ERA Servers – section (5).
Use Only Selected Servers
Displays information from selected ERA Servers – section (5).
Exclude Selected Servers
Excludes information from selected ERA Servers.
21

21
Columns in Section 4:
Server Name
Displays name of server.
Clients
Total number of clients connecting to or in the database of the selected ERAS.
Virus Signature DB Range
Version of virus signature databases among the clients of the selected ERAS.
Least Recent Connection
Time elapsed since the least recent connection to the server.
Last Threat Alerts
Total number of virus alerts (see the attribute Last Threat Alert in section 5).
Last Firewall Alerts
The total number of firewall alerts.
Last Event Warnings
Total number of current events (see the attribute Last Event in section 5).
If you are not currently connected, you can right-click in the Server section (4) and select Connect to This Server to
connect to the chosen ERAS.
More information will be displayed in the Server section (4) if replication is enabled.
The most important features of ERAC are accessible from the main menu or from the ERAC toolbar (3).
The last section is Computer filter criteria (6) – see the chapter titled Information filtering .
3.3 Information filtering
ERAC offers several tools and features which provide user-friendly administration of clients and events. Having an
advanced filtering system can often be priceless, especially on systems with a large number of clients, when the
displayed information needs to be grouped and easily manageable. There are several tools in ERAC that allow you to
efficiently sort and filter information about the connected clients.
3.3.1 Filter
Filter allows the administrator to display only information related to specific servers or client workstations. To show the
filter options, click View > Show/Hide Filter Pane from the ERAC menu.
To activate filtering, select the Use filter option in the upper left side of the ERAC. Any future modifications to the filter
criteria will automatically update displayed data, unless configured otherwise in the Tools > Console Options… >
Other Settings tab.
Define the filtering criteria in the Client filter criteria section. Clients can belong to multiple groups and policies.
Assigning a client to a Static or Parametric group can prove very useful, not only for filtering purposes, but also for
activities such as reporting. To learn more about Group management see the chapter titled Group Manager . Using
Policies for client segregation can also serve multiple functions; for more information about Policy creation and
management see the chapter titled Policies .
The first filtering tool is the Group and Policy selecting section. There are three options available:
Clients in checked
Clients in selected groups/policies will be displayed in the Clients panel
Clients in not checked
Clients in groups/policies that are not selected and clients in no groups will be displayed in the Clients panel
Clients in no groups
Only clients that do not belong to any group/policy will be displayed
NOTE: When selecting a Group from the list, all its subgroups will be displayed as well.
21
50
52

22
In the lower part of the Filter section you can specify another set of parameters:
Only clients (using whole words)
Output only includes clients with names identical to the string entered.
Only clients beginning like (?,*)
Output will only list clients with names beginning with the specified string.
Only clients like (?,*)
Output will list only clients with names containing the specified string.
Exclude clients (using whole words), Exclude clients beginning like (?,*), Exclude clients like (?,*)
These options will yield results opposite to the previous three.
The Primary server, Client name, Computer name and MAC Address fields accept whole strings. If any of these are
populated, a database query will be run and results will be filtered based on the populated field; the logical operator
AND is used.
The last option is problem based filtering – outputs will only include clients with the specified type of problem. To
display the list of problems, select the Only show problems option and click Edit…. Select the problems to be displayed
and click OK to show clients with the selected problems.
All changes made in the filtering setup will be applied after clicking the Apply Changes button. To restore defaults, click
Reset. To automatically generate new outputs at each modification of filter settings, select the Tools >
Console Options... > Other Settings... > Auto apply changes option.
3.3.2 Context menu
Use the right mouse button to invoke the context menu and adjust output in columns. Context menu options include:
Select All
Selects all entries.
Select by ‘...’
This option allows you to right-click on any attribute and automatically select (highlight) all other workstations or
servers with the same attribute. The string ... is automatically replaced by the value of the current tab.
Inverse Selection
Performs inverted selection of entries.
Hide Selected
Hides selected entries.
Hide Unselected
Hides all unselected entries in the list.
Show/Hide Columns
Opens the Console Options > Columns - Show/Hide window where you can define columns that will be available in
the selected pane.
The Hide Selected/Unselected options are effective if further organization is needed after using previous filtering
methods. To disable all filters set by the context menu, click View > Cropped View, or click the icon on the ERAC
toolbar. You can also press F5 to refresh displayed information and disable filters.
Example:
To only display clients with threat alerts:
In the Clients tab, right-click on any empty pane with Last Virus Alert and choose Select by ‘…‘ from the context
menu. Then, again from the context menu, click Hide Selected.
To display threat alerts for clients ”Joseph” and ”Charles”:
Click the Threat Log tab and right-click any attribute in the Client Name column with the value Joseph. From the
context menu click Select by ‘Joseph’. Then, press and hold the CTRL key, right-click and click Select by ‘Charles’.
Finally, right-click and select Hide Unselected from the context menu and release the CTRL key.
The CTRL key can be used to select/deselect specific entries and the SHIFT key can be used to mark/unmark a group of
entries.
NOTE: Filtering can also be used to facilitate the creation of new tasks for specific (highlighted) clients. There are many
ways to use filtering effectively, please experiment with various combinations.
23
3.3.3 View mode
In the Clients tab, the number of columns displayed can be adjusted by using the View mode drop-down menu on the
far right side of the Console. The Full View Mode displays all columns, while the Minimal View Mode only shows the
most important columns. These modes are predefined and cannot be modified. To activate the Custom View, select
Custom View Mode. It can be configured in the Tools > Console Options… > Columns > Show/Hide tab.
3.4 Tabs in ERAC
3.4.1 General description of tabs and clients
Most of the information on tabs is related to the connected clients. Each client connected to ERAS is identified by the
following attributes:
Computer Name (client name) + MAC Address + Primary Server
The behavior of ERAS related to certain network operations (such as renaming a PC) can be defined in ERAS Advanced
Setup. This can help prevent duplicate entries in the Clients tab. For example, if one of the computers in the network
has been renamed, but its MAC address remained unchanged, you can avoid creating a new entry in the Clients tab.
Clients that connect to ERAS for the first time are designated by a Yes value in the New User column. They are also
marked by a small asterisk in the upper right corner of the client’s icon (see the figure below). This feature allows an
administrator to easily detect a newly connected computer. This attribute can have different meanings depending on
the administrator’s operating procedures.
If a client has been configured and moved to a certain group, the New status can be disabled by right-clicking the client
and selecting Set/Reset Flags > Reset ”New“ Flag. The client's icon will change to the one shown in the figure below
and the value in the New User column will switch to No.
NOTE: The Comment attribute is optional in all three tabs. The administrator may insert any description here (e.g.,
”Office No. 129”).
Time values in ERAS can be displayed either in the relative mode (“2 days ago”), in the absolute mode (20.5.2009) or in
the system mode (Regional settings).
In most cases data can be sorted in ascending or in descending order by clicking on an attribute, while a drag-and-drop
operation can be used for reorganization.
Clicking on certain values activates other tabs in order to display more detailed information. For example, if you click on
a value in the Last Threat Alert column, the program will move to the Threat Log tab and display Threat Log entries
related to the given client. If you click on a value which contains too much information to be displayed in a tabbed view,
a dialog window will open showing detailed information about the corresponding client.
3.4.2 Replication & information in individual tabs
If ERAC is connected to an ERAS which is operating as an upper server, clients from the lower servers will be displayed
automatically. The types of replicated information can be configured on the lower server in Tools > Server Options >
Replication > Replicate "to" settings.
In this scenario, the following information may be missing:
Detailed alert logs (Threat Log tab)
Detailed On-demand scanner logs (Scan Log tab)
Detailed current client configurations in the.xml format (the Clients tab, the Configuration column,
Protection Status, Protection Features, System Information)
Information from the ESET SysInspector program may also be missing. ESET SysInspector is integrated with generation
4.x ESET products and later.
24
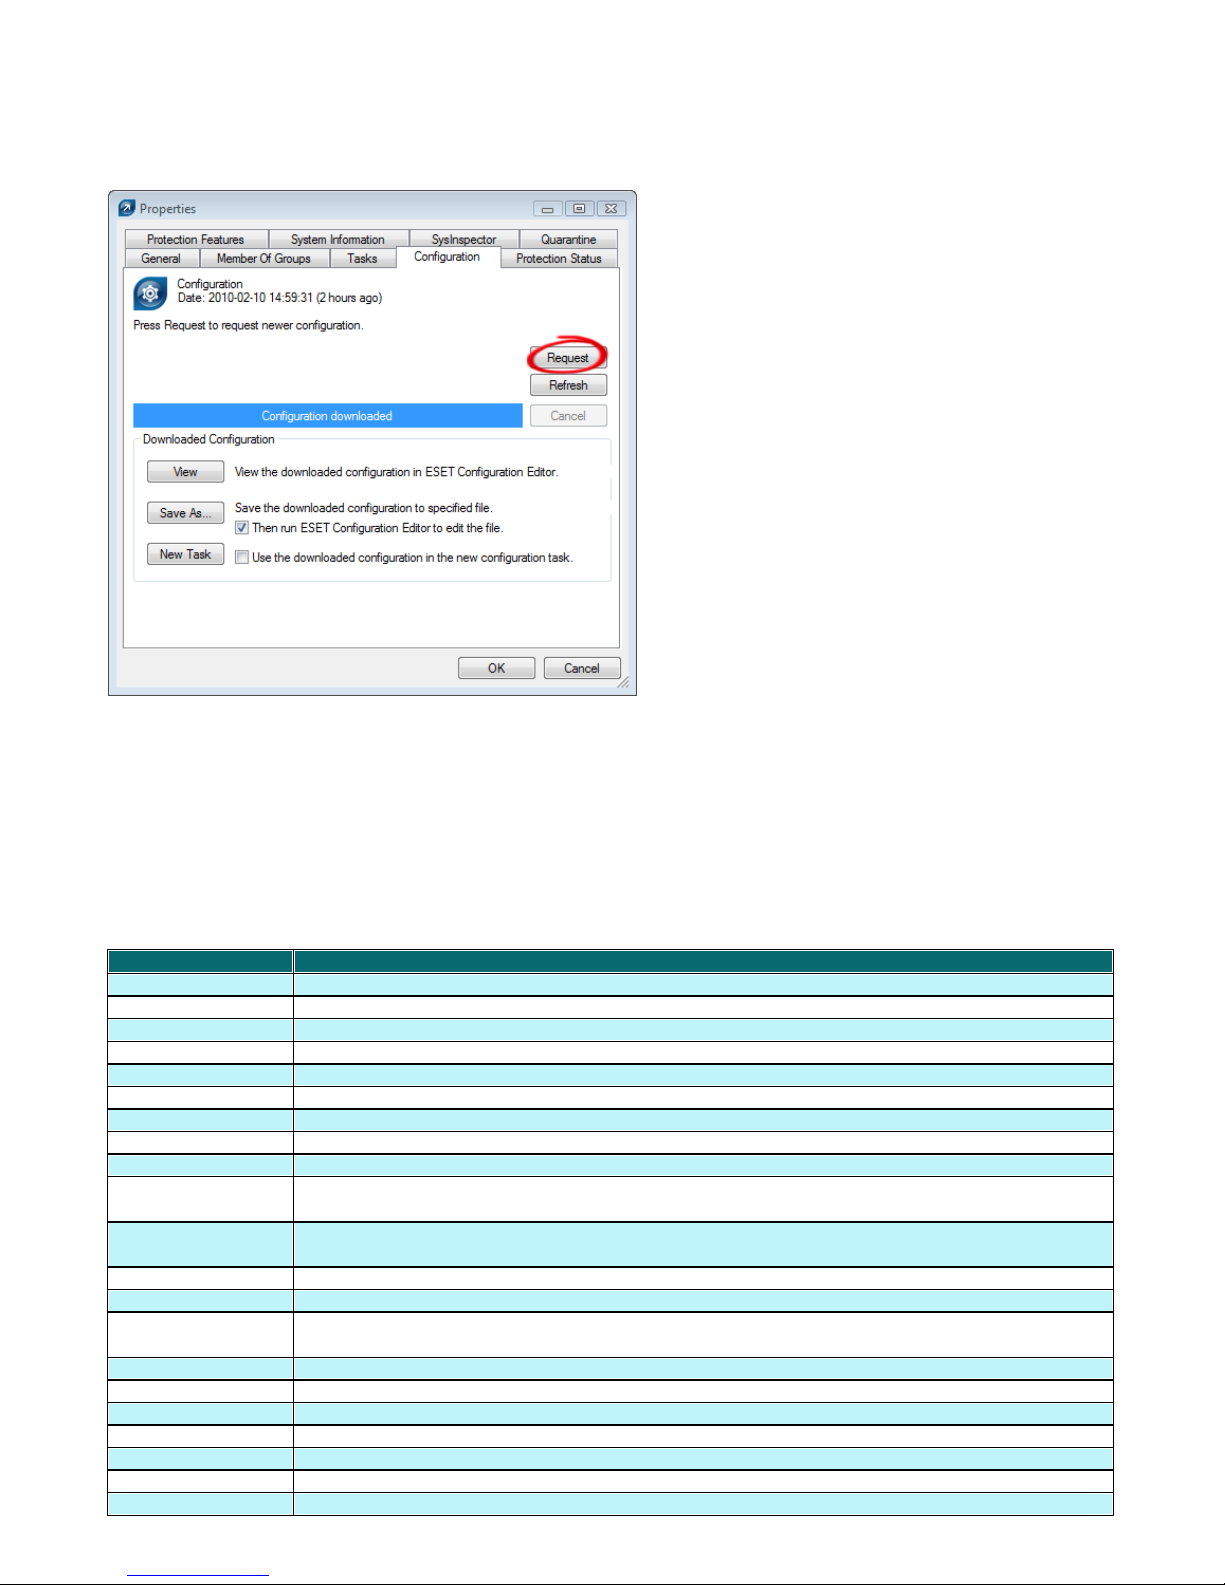
If the information cannot be found in the dialog windows of the program, click the Request button (available under
Actions > Properties > Configuration). Clicking this button will download missing information from a lower ERAS.
Since replication is always initiated by a lower ERAS, the missing information will be delivered within the preset
replication interval.
Fig: Click Request to retrieve missing information from lower ERA Servers.
On the upper server you can set the level of logs that will be received by the server (Tools > Server Options >
Advanced > Edit Advanced Settings... > ESET Remote Administrator > ERA Server > Setup > Server Maintenance
> .... logs to accept).
NOTE: This option applies to all clients connected to the server (not only the replicated ones).
3.4.3 Clients tab
This tab displays general information about individual clients.
Attribute
Description
Client Name
Name of Client (Can be changed in the Client's properties dialog - tab General)
Computer Name
Name of workstation / server (hostname)
MAC Address
MAC address (network adapter)
Primary Server
Name of ERAS with which a client is communicating
Domain
Domain / group name, to which a client belongs (these are not groups created in ERAS)
IP
IP address
Product Name
Name of ESET security product
Product Version
Version of ESET security product
Policy Name
Name of policy assigned to a client
Last Connected
Time that client last connected to ERAS (All other data collected from clients includes this
timestamp, except for some data obtained by replication)
Protection Status
Text
Current status of the ESET security product installed on a client
Virus Signature DB
Version of virus signature database
Last Threat Alert
Last virus incident
Last Firewall Alert
Last event detected by the ESET Smart Security Personal firewall (Events from the Warning level
and higher are shown)
Last Event Warning
Last error message
Last Files Scanned
Number of scanned files during the last On-demand scan
Last Files Infected
Number of infected files during the last On-demand scan
Last Files Cleaned
Number of cleaned (or deleted) files during the last On-demand scan
Last Scan Date
Time of last On-demand scan
Restart Request
Is a restart required (e.g., after a program upgrade)
Restart Request Date
Time of first restart request
25
Attribute
Description
Product Last Started
Time that client program was last launched
Product Install Date
Date that the ESET security product was installed on the client
Roaming User
Clients with this attribute will perform the ”update now” task each time they establish a
connection with the ERAS (recommended for notebooks). The update is only performed if the
client's virus signature database is not up to date.
New Client
Newly connected computer (see chapter General description of tabs and clients )
OS Name
Name of client operating system
OS Platform
Operating system platform (Windows / Linux…)
HW Platform
32-bit / 64-bit
Configuration
Client’s current.xml configuration (including date/time that the configuration was created)
Protection Status
General status statement (Similar in nature to the Configuration attribute)
Protection Features
General status statement for program components (Similar to Configuration attribute)
System Information
Client submits system information to ERAS (including time that the system information was
submitted)
SysInspector
Clients with versions containing the ESET SysInspector tool can submit logs from this
complementary application.
Custom Info
Custom Information to be displayed specified by the administrator (this option can be configured
in ERAC through Tools > Server Options… > Advanced tab > Edit Advanced Settings… > ESET
Remote Administrator > ERA Server > Setup > Other settings > Client custom info).
Comment
A short comment describing the client (entered by the administrator)
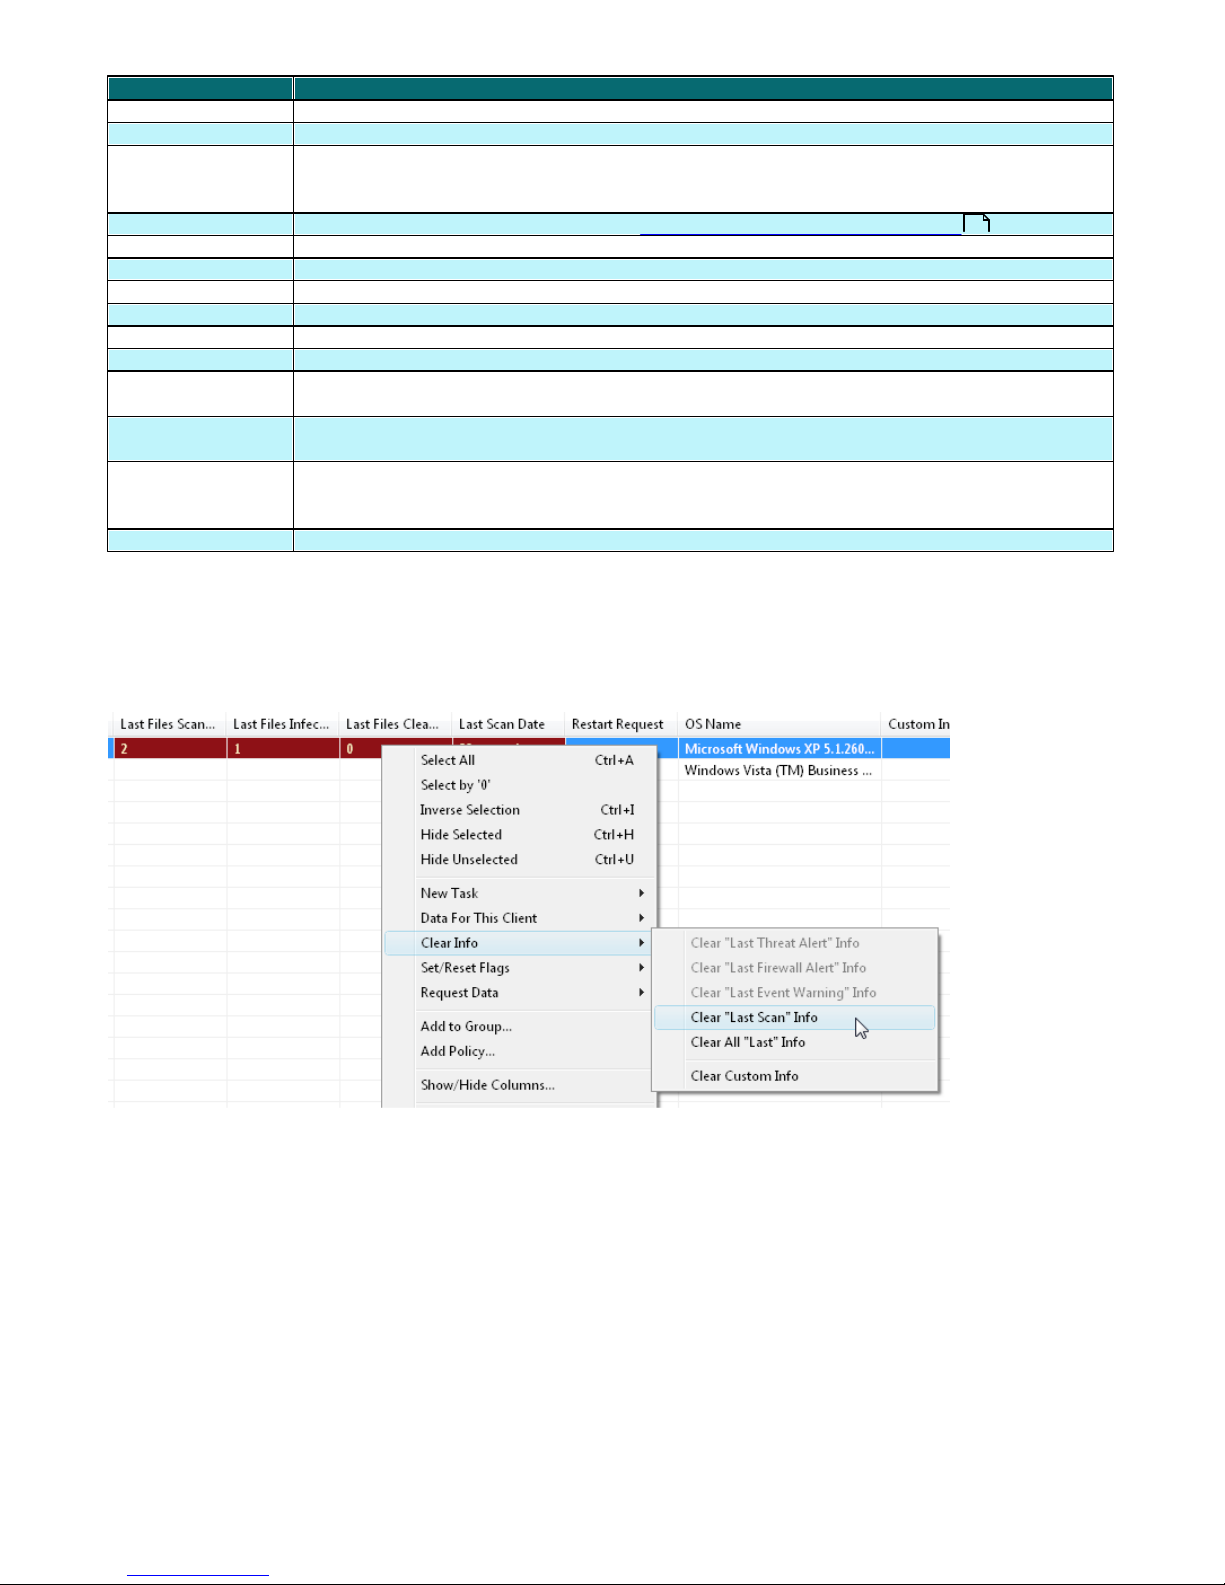
NOTE: Some values are for informational purposes only and may not be current when the administrator views them at
the Console. For example, at 7 a.m. there may have been an update error, but at 8 a.m. it was performed successfully.
These values may include Last Threat Alert and Last Event Warning. If the administrator knows this information is
obsolete, it can be cleared by right-clicking and selecting Clear Info > Clear “Last Threat Alert” Info or
Clear “Last Event Warning” Info . Information about the last virus incident or last system event will be deleted.
Fig.: Obsolete events from the Last Threat Alert and Last Event Alert Warning columns can easily be removed.
23
26
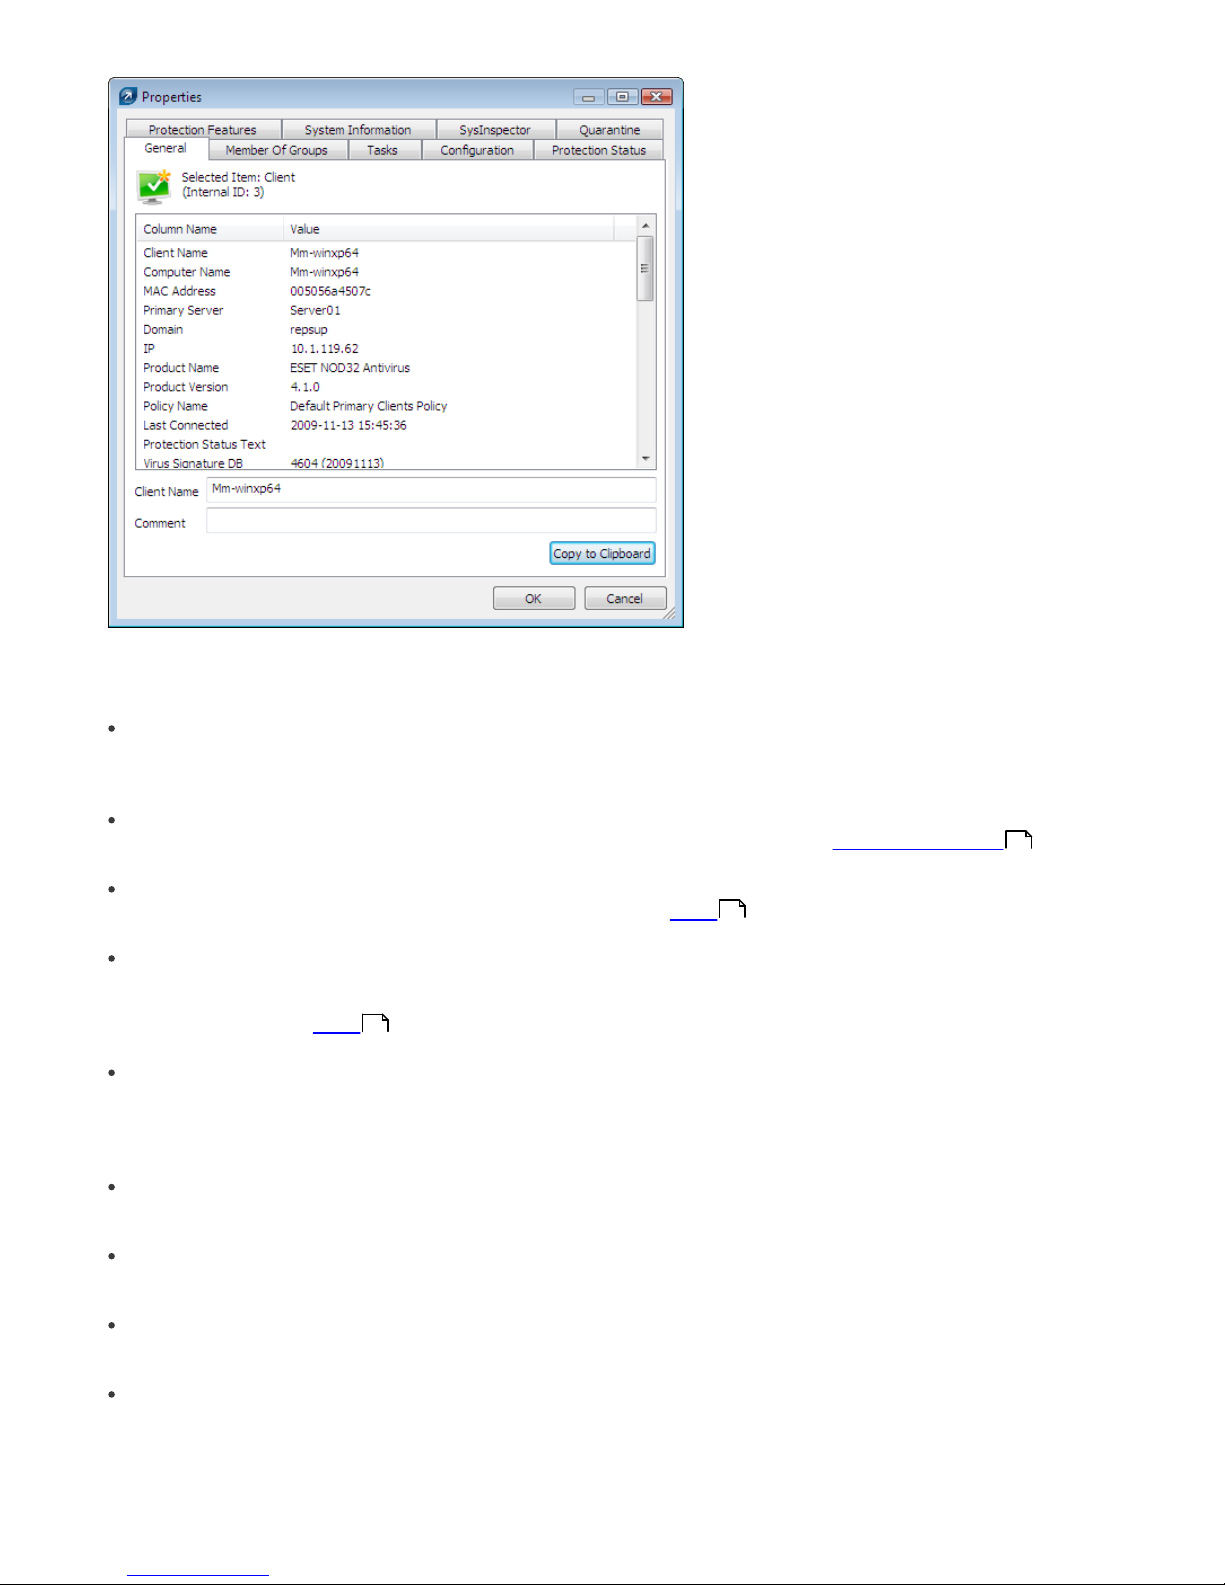
Fig.: Detailed information about a client workstation.
The Clients tab offers several options after double-clicking on a client:
General
Contains similar information to that displayed in the Clients tab. Here you can specify the Client Name – the name
under which this client is visible in ERA, plus an optional comment.
Member Of Groups
This tab lists all groups to which the client belongs. For more information, see chapter Information filtering .
Tasks
Tasks related to the given client. For more information see chapter Tasks .
Configuration
This tab allows you to view or export the current client configuration to an.xml file. Later in this manual, we will explain
how .xml files can be used to create a configuration template for new/modified.xml configuration files. For more
information see chapter Tasks .
Protection Status
This is a general status statement regarding all ESET programs. Some of the statements are interactive and allow
immediate intervention. This functionality is useful in that it prevents the need to manually define a new task to solve
a given protection problem.
Protection Features
Component status for all ESET security features (Antispam, Personal firewall, etc.)
System Information
Detailed information about the installed program, its program component version, etc.
SysInspector
Detailed information about startup processes and processes running in the background.
Quarantine
Contains a list of quarantined files. Quarantined files can be requested from a client and saved to a local disk.
21
46
46
27
3.4.4 Threat Log tab
This tab contains detailed information about individual virus or threat incidents.
Attribute
Description
Client Name
Name of client reporting the threat alert
Computer Name
Workstation/server name (hostname)
MAC Address
MAC address (network adapter)
Primary Server
Name of ERAS with which a client is communicating
Date Received
Time at which the event was logged by ERAS
Date Occurred
Time at which the event occurred
Level
Alert level
Scanner
Name of security feature which detected the threat
Object
Object type
Name
Usually a folder where the infiltration is located
Threat
Name of the detected malicious code
Action
Action taken by the given security feature
User
Name of the user that was identified when the incident occurred
Information
Information about the detected threat
Details
Client log submission status
3.4.5 Firewall Log tab
This tab displays information related to client firewall activity.
Attribute
Description
Client Name
Name of client reporting the event
Computer Name
Workstation/server name (hostname)
MAC Address
MAC address (network adapter)
Primary Server
Name of ERAS with which a client is communicating
Date Received
Time at which the event was logged by ERAS
Date Occurred
Time at which the event occurred
Level
Alert level
Event
Description of the event
Source
Source IP address
Target
Target IP address
Protocol
Protocol concerned
Rule
Firewall Rule concerned
Application
Application concerned
User
Name of the user that was identified when the incident occurred
3.4.6 Event Log tab
This tab shows a list of all system-related events.
Attribute
Description
Client Name
Name of client reporting the event
Computer Name
Name of workstation / server (hostname)
MAC Address
MAC address (network adapter)
Primary Server
Name of ERAS with which a client is communicating
Date Received
Time at which the event was logged by ERAS
Date Occurred
Time at which the event occurred
Level
Alert level
Plugin
Name of the program component reporting the event
Event
Description of the event
User
Name of the user associated with the event

28
3.4.7 Scan Log tab
This tab lists results of On-demand computer scans that were started remotely, locally on client computers, or as
scheduled tasks.
Attribute
Description
Scan Id
ID of the corresponding entry in the database (ID is in the form: Scan Number)
Client Name
Name of client where the scan was performed
Computer Name
Name of workstation / server (hostname)
MAC Address
MAC address (network adapter)
Primary Server
Name of the ERA Server a client is communicating with
Date Received
Time at which the scan event was logged by ERAS
Date Occurred
Time at which the scan took place on client
Scanned Targets
Scanned files, folders and devices
Scanned
Number of checked files
Infected
Number of infected files
Cleaned
Number of cleaned (or deleted) objects
Status
Status of the scan
User
Name of the user that was identified when the incident occurred
Type
User type
Scanner
Scanner type
Details
Client log submission status
3.4.8 Mobile Log tab
This tab displays detailed logs from the mobile phones connected to ERA Server.
Attribute
Description
Mobile Id
Network ID of the mobile device
Client Name
Name of client where action was performed
Computer Name
Name of workstation / server (hostname)
MAC Address
MAC address (network adapter)
Primary Server
Name of the ERA Server a client is communicating with
Date Received
Time at which the event was logged by ERAS
Date Occurred
Time at which the event took place on client
Level
Alert level
Log Type
Type of a log (e.g. Security Audit Log, SMS Antispam Log)
Event
Description of the event
Object Type
Object to which the event is related (e.g. SMS, file, ...)
Object Name
Particular object to which the event is related (e.g. SMS sender phone number, path to file, ...)
Action
Action performed (or error encountered) during the event
3.4.9 Quarantine tab
This tab consolidates all quarantine entries in your network.
Attribute
Description
Quarantine Id
ID number of the quarantined object assigned in order of occurrence
Hash
File hash code
DateReceived
Time at which the scan event was logged by ERAS
Occurred First
Time passed from the first occurrence of the quarantined item
Occurred Last
Time passed from the latest occurrence of the quarantined item
Object Name
Usually a folder where the infiltration is located
File Name
Name of the quarantined file
Extension
Type of extension of the quarantined file
Size
Size of the quarantined file
Reason
Reason for quarantining - usually a description of the threat type
Client Count
Number of clients quarantining the object
Hits
Number of times the object was quarantined
File
Indicates whether the object was requested to be downloaded to the server
29
3.4.10 Tasks tab
The meaning of this tab is described in the chapter titled ”Tasks”. The following attributes are available:
Attribute
Description
State
Task status (Active = being applied, Finished = task was delivered to clients)
Type
Task type
Name
Task name
Description
Task description
Date to deploy
Task execution time /date
Date Received
Time at which the event was logged by ERAS
Details
Task log submission status
Comment
A short comment describing the client (entered by the administrator)
3.4.11 Reports tab
This tab contains features which can be used to archive the activity in the network over certain time periods. The
Reports tab is used to organize statistical information in graph or chart form. For more information, see chapter
Reports .
3.4.12 Remote install tab
This tab provides options for several remote installation methods of ESET Smart Security or ESET NOD32 Antivirus on
clients. For detailed information, see chapter Remote Installation .
3.5 ERA Console setup
ERAC can be configured in the Tools > Console Options… menu.
3.5.1 Connection tab
This tab is is used to configure the connection from ERAC to ERAS. For more detail, see chapter Connecting to ERAS
.
3.5.2 Columns - Show / Hide tab
This tab allows you to specify which attributes (columns) are displayed in individual tabs. Changes will be reflected in
the Custom View Mode (Clients tab). Other modes cannot be modified.
3.5.3 Colors tab
This tab allows you to associate different colors with specific system-related events, in order to better highlight
problematic clients (Conditional Highlighting). For example, clients with a slightly outdated virus signature database (
Clients: Previous Version) could be distinguished from clients with an obsolete one (Clients: Older Versions or N/A).
3.5.4 Paths tab
This tab allows you to specify the directory to which ERAC will save reports downloaded from ERAS. By default, reports
are saved to:
%ALLUSERSPROFILE%\Application Data\Eset\ESET Remote Administrator\Console\reports
3.5.5 Date / Time tab
Appearance of the date / time columns:
Absolute
Console will display absolute time (e.g., "14:30:00").
Relative
Console will display relative time (e.g., ”2 weeks ago”).
Regional
Console will display time according to regional settings (taken from the Windows settings).
Recalculate UTC time to your local time (use local time)
Select this check box to recalculate to your local time. Otherwise, GMT – UTC time will be displayed.
71
34
19

30
3.5.6 Other settings tab
Filter settings > Auto apply changes
If enabled, filters in individual tabs will generate new outputs upon each modification of filter settings. Otherwise,
filtering will only take place after clicking the Apply Changes button.
Remote Administrator updates
This section allows you to enable checking for new versions of ESET Remote Administrator. We recommend the
default value of Monthly. If a new version is available, ERAC displays a notification at program startup.
Other settings > Use automatic refresh
If selected, data in individual tabs is automatically refreshed according to the designated interval.
Other settings > Show gridlines
Select this option to separate individual cells in all tabs by gridlines.
Other settings > Prefer showing Client as ”Server/Name” instead of ”Server/Computer/MAC”
Affects the display mode for clients in some dialog windows (e.g., New task). This option has only a visual effect.
Other settings > Use systray icon
ERA Console will be represented by an icon in the Windows notification area.
Other settings > Show on taskbar when minimized
If the ERAC window is minimized, it will be accessible from the Windows task bar.
Other settings > Use highlighted systray icon when problematic clients found
Select this option in conjunction with the Edit button to define events which will trigger a change in color to the ERAC
icon in the notification area.
If the ERAC on the administrator’s PC is going to be connected permanently to ERAS, we recommend that you select
the Show on taskbar when minimized option and leave the Console minimized when inactive. If a problem occurs,
the icon in the notification area will turn red – which is a signal for the administrator to intervene. We also recommend
adjusting the option Use highlighted systray icon when problematic clients found in order to specify which
events will trigger a color change of the ERAC icon. However, the ERAC will disconnect if database compression is
enabled on the server.
Other settings > Tutorial messages
Enables (Enable All) or Disables (Disable All) all informative messages.
3.6 Display modes
ERAC offers the user two display modes:
Administrative mode
Read-only mode
The administrative mode of ERAC gives the user full control over all features and settings, as well as the ability to
administer all client workstations connected to it.
The read-only mode is suitable for viewing the status of ESET client solutions connecting to ERAS; creation of tasks for
client workstations, creation of install packages and remote installation are not allowed. The License Manager, Policy
Manager and Notification Manager are also inaccessible. Read-only mode does allow the administrator to modify ERAC
settings and generate reports.
The Display mode is selected at each console startup in the Access drop-down menu, while the password to connect to
ERAS can be set for either display mode. Setting a password is especially useful if you want some users to be given full
access to ERAS and others read-only access. To set the password, click Tools > Server Options... > Security and click
the Change... button next to Password for Console (Administrator Access) or (Read-Only Access).
 Loading...