

Eset REMOTE ADMINISTRATOR Installation Manual
Administration Installation Guide
2
Remote Adminstrator 1.0.14
and LAN Update Server 2.7
NOD32 Version 2.7 Includes Windows Vista and 64-bit protection
Proactive protection
against Viruses, Spyware,
Worms, Trojans, Rootkits,
Installation
Guide
Best Detection
Fastest Performance
Minimal Resource
Adware and Phishing
Utilization

Administration Installation Guide
Copyright © 1997 – 2007 ESET LLC. All rights reserved.
No part of this document may be reproduced or transmitted in any form
or by any means electronic or mechanical, for any purpose without the
express written permission of Eset LLC. Information in this document is
subject to change without prior notice.
Certain names of program products and company names used in this
document might be registered trademarks or trademarks owned by other
entities.
Eset, NOD32 and AMON are trademarks of Eset.
Microsoft and Windows are registered trademarks of Microsoft Corporation.
Eset, LLC
610 West Ash Street
Suite 1900
San Diego
California
92101
U.S.A.
http://www.eset.com
2
For Sales and Technical Support (US and Canada):
Tel: (619) 876-5400
Fax: +1 (619) 876-5845
Online purchase: http://www.eset.com/purchase/index.php
Sales email:
sales@eset.com
Technical Support Worldwide:
http://www.eset.com/support
Then by clicking on your country’s name, you can locate the support details
closest to you.
This guide is frequently updated to reect changes in the product. The
latest version can always be found at
http://download1.eset.com/manuals/nod32raman.pdf
This guide was prepared for NOD32 Remote Administrator Server, Remote
Administrator Console version 1.0.14 and the NOD32 LAN Update Server
version for Windows, Version 2.7 (December 2006)

Administration Installation Guide
Contents
Introduction
Minimum System Requirements
Section 1: Overview
What you can do with Remote Administrator
Summary of features
Section 2: Installation for an office network
Installing RAS and RAC
Section 3: Running Remote Administrator Console
Connecting to server
Section 4: Configuration Editor
Overview
Section 5: Create a package
Installation package
Section 6: Remote Installation of NOD32
Points to watch out for
Push installation
Export to logon script
Export via email
Manual installation
Section 7: Use of Tasks
Creating tasks
On-Demand Scan Task
Update Now Task
Section 8: More Detailed Information
Remote Install in detail
The file nod32installer.exe
Clients window
Context menu options
Context menu examples
Alert log window
Event log window
Scan log window
Tasks window
Reports window
License key (nod32.lic)
RAC connection to RAS + settings
RAC server options setup
Use RAC more efficiently
Section 9: Possible Problems & Error Codes
Error messages
Section 10: Installation in a multi-site network
Installation instructions
Section 11: Installation in a small network
Installation instructionInstallation instructions
Creating a Mirror
Creating a customized installation
Section 12: Additional information
Command line parameters
3
Page
3
4
5
6
7
8
9
10
14
15
17
18
33
34
35
36
37
39
41
42
43
44
46
48
49
50
51
52
54
55
56
56
56
56
57
59
59
61
63
65
66
70
71
74
75
76
78
82
83

Administration Installation Guide
Introduction
Congratulations, you have just purchased NOD32 Enterprise Edition
incorporating Eset’s Remote Administrator Server & Console, which will
help you manage the most advanced antivirus solution available in a
network environment.
The following information will help you to get a better understanding of the
many features of NOD32 Remote Administrator, so that you get the best
protection and administration possible.
NOD32 is more than just a virus scanner – being able to scan for known
viruses is the bare minimum that should be expected from an anti-virus
product, so it should be reassuring to know that NOD32 not only does
this faster, and more reliably than other products, but that it also has an
excellent track record in discovering new threats. In addition, version 2.7
includes detection for adware, spyware and riskware aswell as rootkit
detection with its Anti-Stealth technology. With NOD32 you can be sure you
have the most advanced and comprehensive virus protection possible.
4
Administration Installation Guide
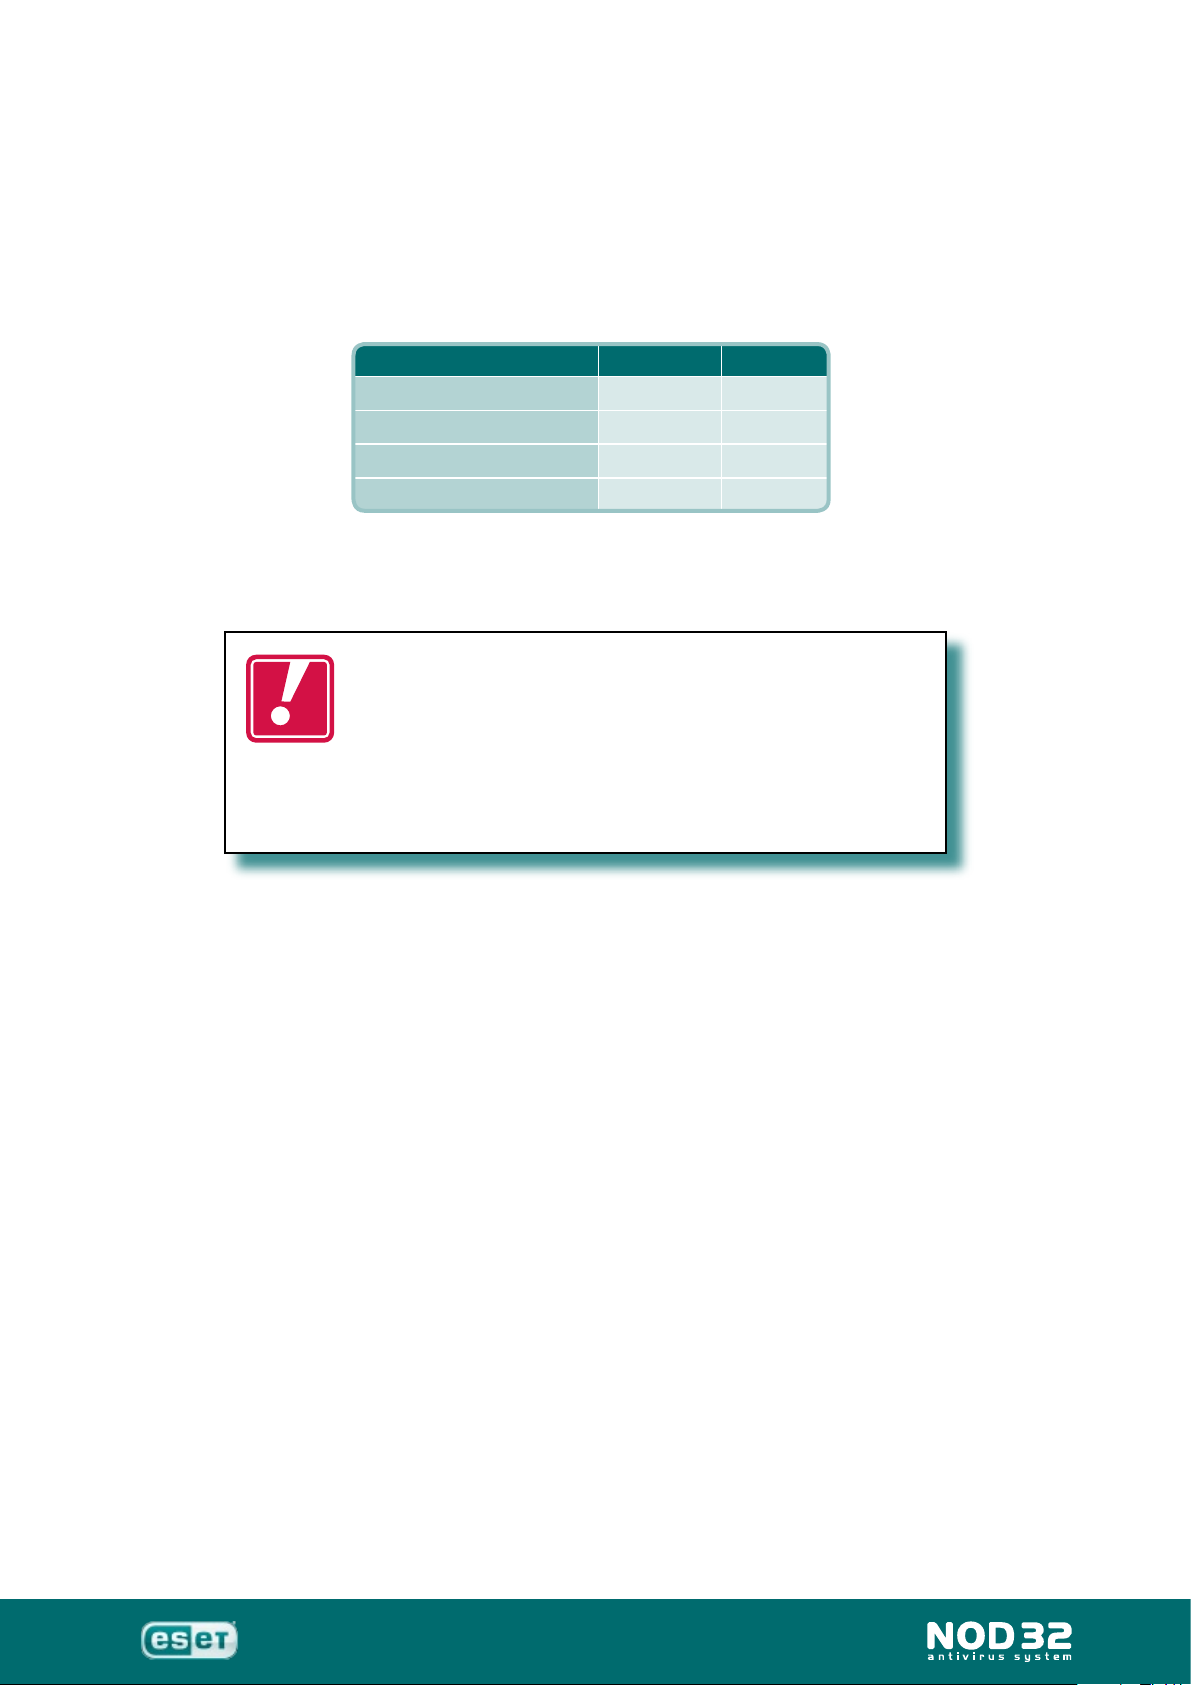
Operating system CPU RAM
Windows 98/ME
133 MHz/150 MHz 32 MB
Windows NT4/2000
133 MHz 32 MB/64 MB
Windows XP/2003/XP 64 or 32-bit
300 MHz 128 MB
Windows Vista
800 MHz 512 MB
Minimum System Requirements
Please make sure that the computer on which you plan to install NOD32
meets the minimum system requirements for the program to run:
Disk Space: 30MB free disk space
Graphics: VGA video card. (SVGA 800x600 recommended)
5
You must only install ONE anti-virus On-Access
scanner at one time (a scanner that is always running
while your PC is switched on); otherwise you could
cause serious system instability.
If you are installing NOD32 with another anti-virus
program, please make sure you do not enable both
On-Access scanners at once.
If another anti-virus program has previously been installed on your
computer, its scanner may interfere with NOD32. Usually resident
scanners will display an icon in the system tray (the area of the taskbar
near the clock). We recommend removing any other antivirus software,
including older versions of NOD32, before installing NOD32 Version 2.7, to
avoid the possibility of serious problems
Version 2.7 may be installed over your existing NOD32 if it is version 2 or
higher, however, if any problems were encountered, a clean installation is
recommended.

Administration Installation Guide
Overview
6
Administration Installation Guide
Overview of what you can do with the
Enterprise Edition of Remote Administrator
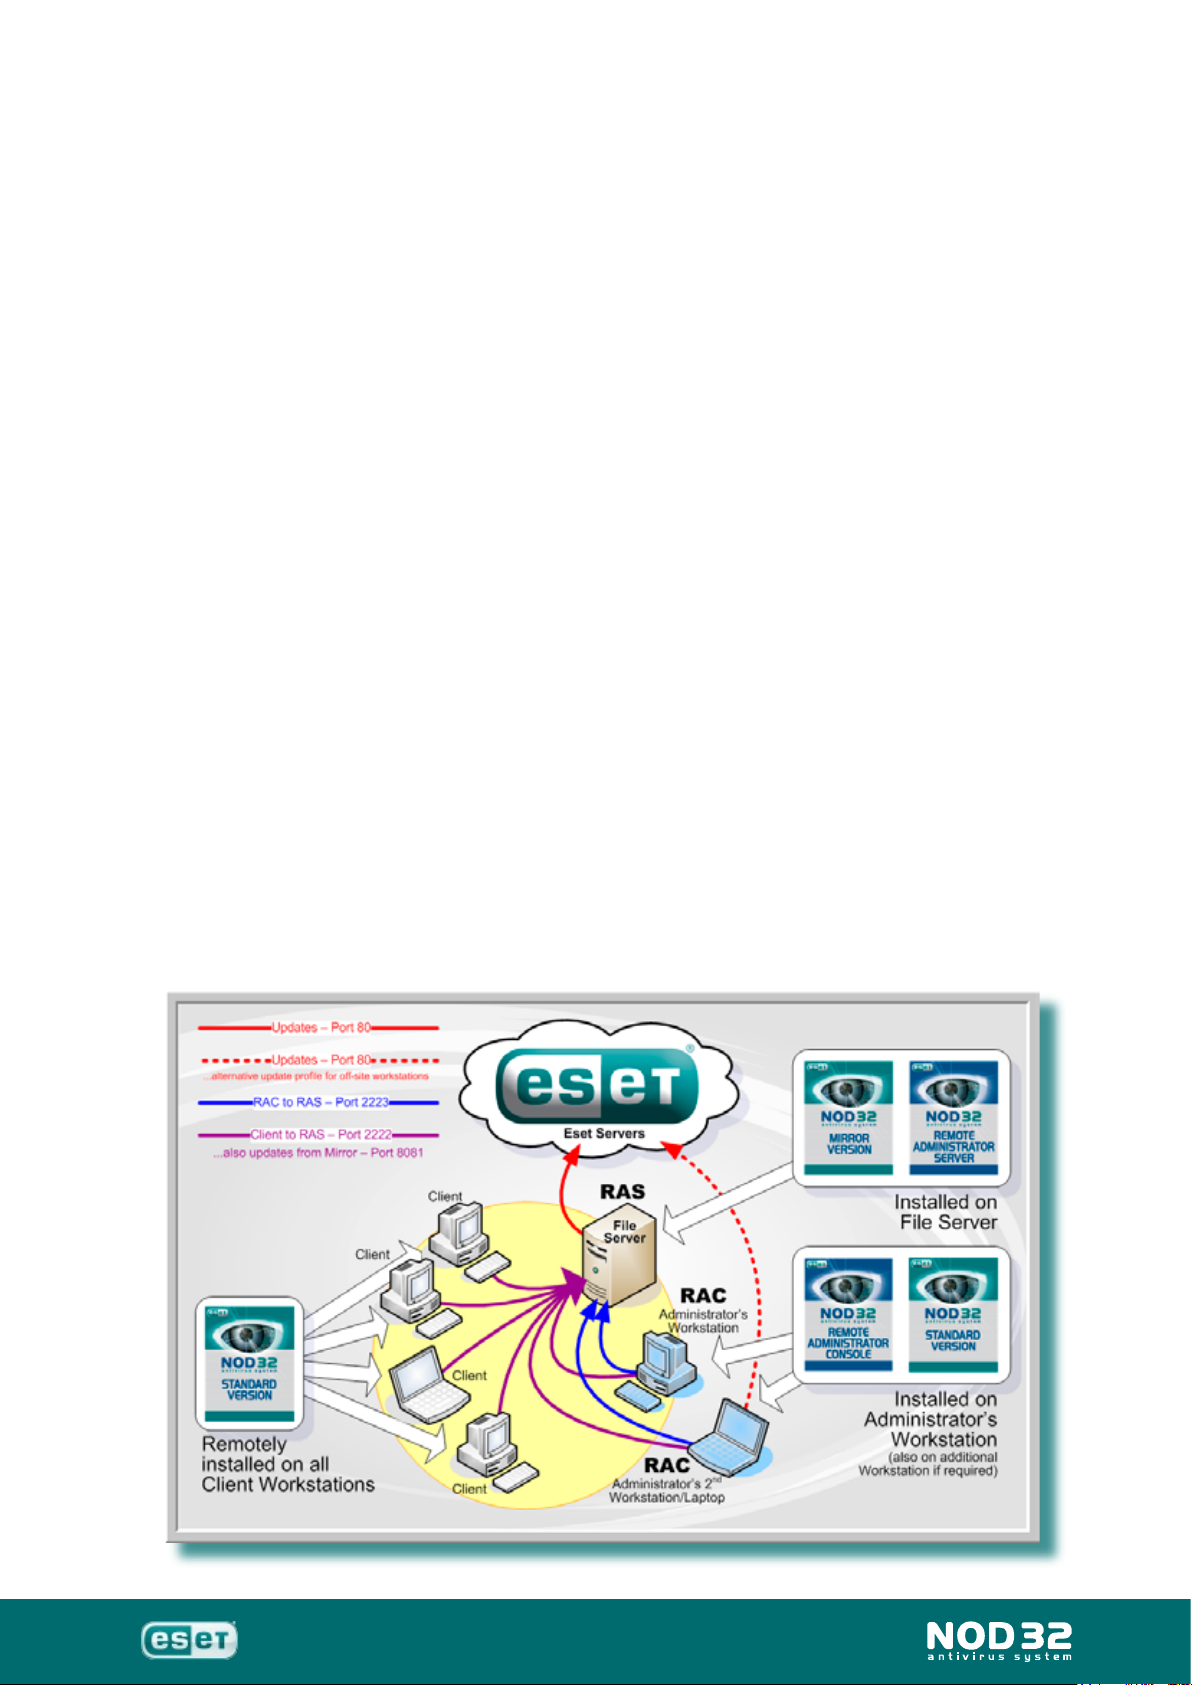
This is the complete package for any medium to large sized business.
It comprises of the standard NOD32 antivirus for workstations, the LAN
Update Server (Mirror) version which will receive all updates & upgrades
from Eset, the Remote Administrator Server which will run on the
company’s server and the Remote Administrator Console where you can
administrate the whole setup.
This will mean that you only have to download updates to your server, thus
reducing internet trafc. Naturally, your server should be in operation during
the entire working day and should have an NT-based operating system
(NT4/2000/XP/2003) but doesn’t have to be a ‘server’ operating system.
The updates will be stored there and then picked up by the workstations in
your network. So the server acts as a ‘mirror’ to your clients and is referred
to as such in the setup.
7
Using NOD32 Remote Administrator Console (RAC), the administrator
can get a global overview of the NOD32 antivirus system activity on
network workstations, and can receive information about threats, or other
problems, via email or Windows Messenger. The information retrieved
from the workstations is stored centrally on the server (NOD32 Remote
Administrator – RAS) which the administrator can access via RAC from his/
her own workstation or laptop. The communication takes place both ways
and thus the administrator can immediately react to fresh situations, and
assign tasks to the relevant NOD32 on client workstations.

Administration Installation Guide
Important features of NOD32 Remote
Administrator:
NOD32 Remote Administrator is a powerful tool that enables an
administrator to manage large installations of the NOD32 antivirus
system in large corporate networks. It consists of two modules NOD32 RA Server (RAS) and NOD32 RA Console (RAC).
FEATURES
Quick overview of your network security situation
►
Comprehensive statistics in an intuitive graphical form
►
Enables virus scan on remote disks
►
8
Remote NOD32 client conguration le editing on chosen
►
workstations
Remote installation/uninstall of NOD32 antivirus system
►
Localization of unprotected computers in network
►

Administration Installation Guide
Installation
9
for an office network

Administration Installation Guide
Installation instructions for a typical ofce
network setup.
When you received your Enterprise Edition license email, you will have
seen the Username and Password required to access the Eset servers for
updates and there will have been a .lic key also attached (nod32.lic). This
key is specic for your RAS and determines how many clients you can
connect to your server and the expiry date of the license.
Save the nod32.lic key you received as an attachment with the email
►
from Eset to the desktop for the time being. (Note: do NOT use a web
based email program to download this attachment. eg: Outlook Web
Access, because this will corrupt the key).
AFTER installation is complete, you should move the nod32.lic key to
►
C:\Program Files\ESET\RA\Server directory and re-start the RAS
service.
10
Here are the basic, recommended steps to take when setting up Enterprise
Edition for NOD32:
Install Remote Administrator Server (RAS)
Using your Username and Password, download and install NOD32
►
Remote Administrator Server (RAS) onto your server (http://www.
eset.com/download/balance.php?dir=/download/ra/rasrvnten.exe).
The product must be installed on an MS Windows NT based operating
system (NT4, 2000, XP, 2003). RAS is installed by running the le
rasrvnten.exe.
During installation, the program will ask for the location of the license
►
key, ie: the le called nod32.lic, which contains information about its
owner, its expiry date as well as about the number of users, for which
the RAS was purchased. Alternatively, you can copy the key later into
the directory C:\Program Files\Eset\RA\Server (it is activated after
restarting the NOD32 Remote Administration Server service). Later
on, after connecting to the server from the console (RAC), Information
included in the key can be seen in Help > About NOD32 Remote
Administrator Console.
During the ‘Expert’ installation, the name of the server, under which
►
workstations in the network recognize it, is required. If not stated
otherwise, the server is represented using the name of the machine/
server where RAS is being installed.
Please be careful when entering the name of the server. This name
is used by nod32installer, providing remote installation of NOD32
on workstations. If RAS was not visible under this name, the remote
installation could fail.
We recommend entering the DNS name of the server.

Administration Installation Guide
RAS is installed as a service. Note: The service is installed, but not
►
started, during RAS installation. You can control the service manually
using these commands:
“c:\program les\eset\ra\server\nod32ra.exe” /installservice
♦
“c:\program les\eset\ra\server\nod32ra.exe” /removeservice
♦
You can stop and start the service by going to Start > Control Panel >
►
Administrative Tools > Services > NOD32 Remote Administrator Server
> ‘Start the service’,
Install Remote Administrator Console (RAC)
Using your Username and Password, download and install NOD32
►
Remote Administrator Console (RAC) onto your server plus any
machine that you want to administrate your clients from. ie: your
workstation or laptop as well as the server if you wish. (http://www.
eset.com/download/balance.php?dir=/download/ra/raconsnten.
exe)
11
Install NOD32 LAN Update Server
Using your Username and Password, download and install NOD32 LAN
►
Update Server (Mirror) version onto your server (http://www.eset.com/
download/balance.php?dir=/download/win/v2ad/ndntenad.exe). Its
virus signature database will form the basis of a so called Mirror for the
client workstations.
For detailed instructions on downloading and installing NOD32 LAN
►
Update Server (Mirror) version (which is the same as installing the
Standard, single-user version) please click here: http://download1.
eset.com/manuals/StandardInstallGuide.pdf. The IMON module
should not be running on the server. In fact, the only module that is
required on a server is AMON.
If you wish, you may defer the restart until all other installations are
►
completed. Once installed and you have rebooted your server, NOD32
will automatically update. You should then create a Mirror on the server.
Click this icon once in the system tray, which will open the Control
Center.
Administration Installation Guide
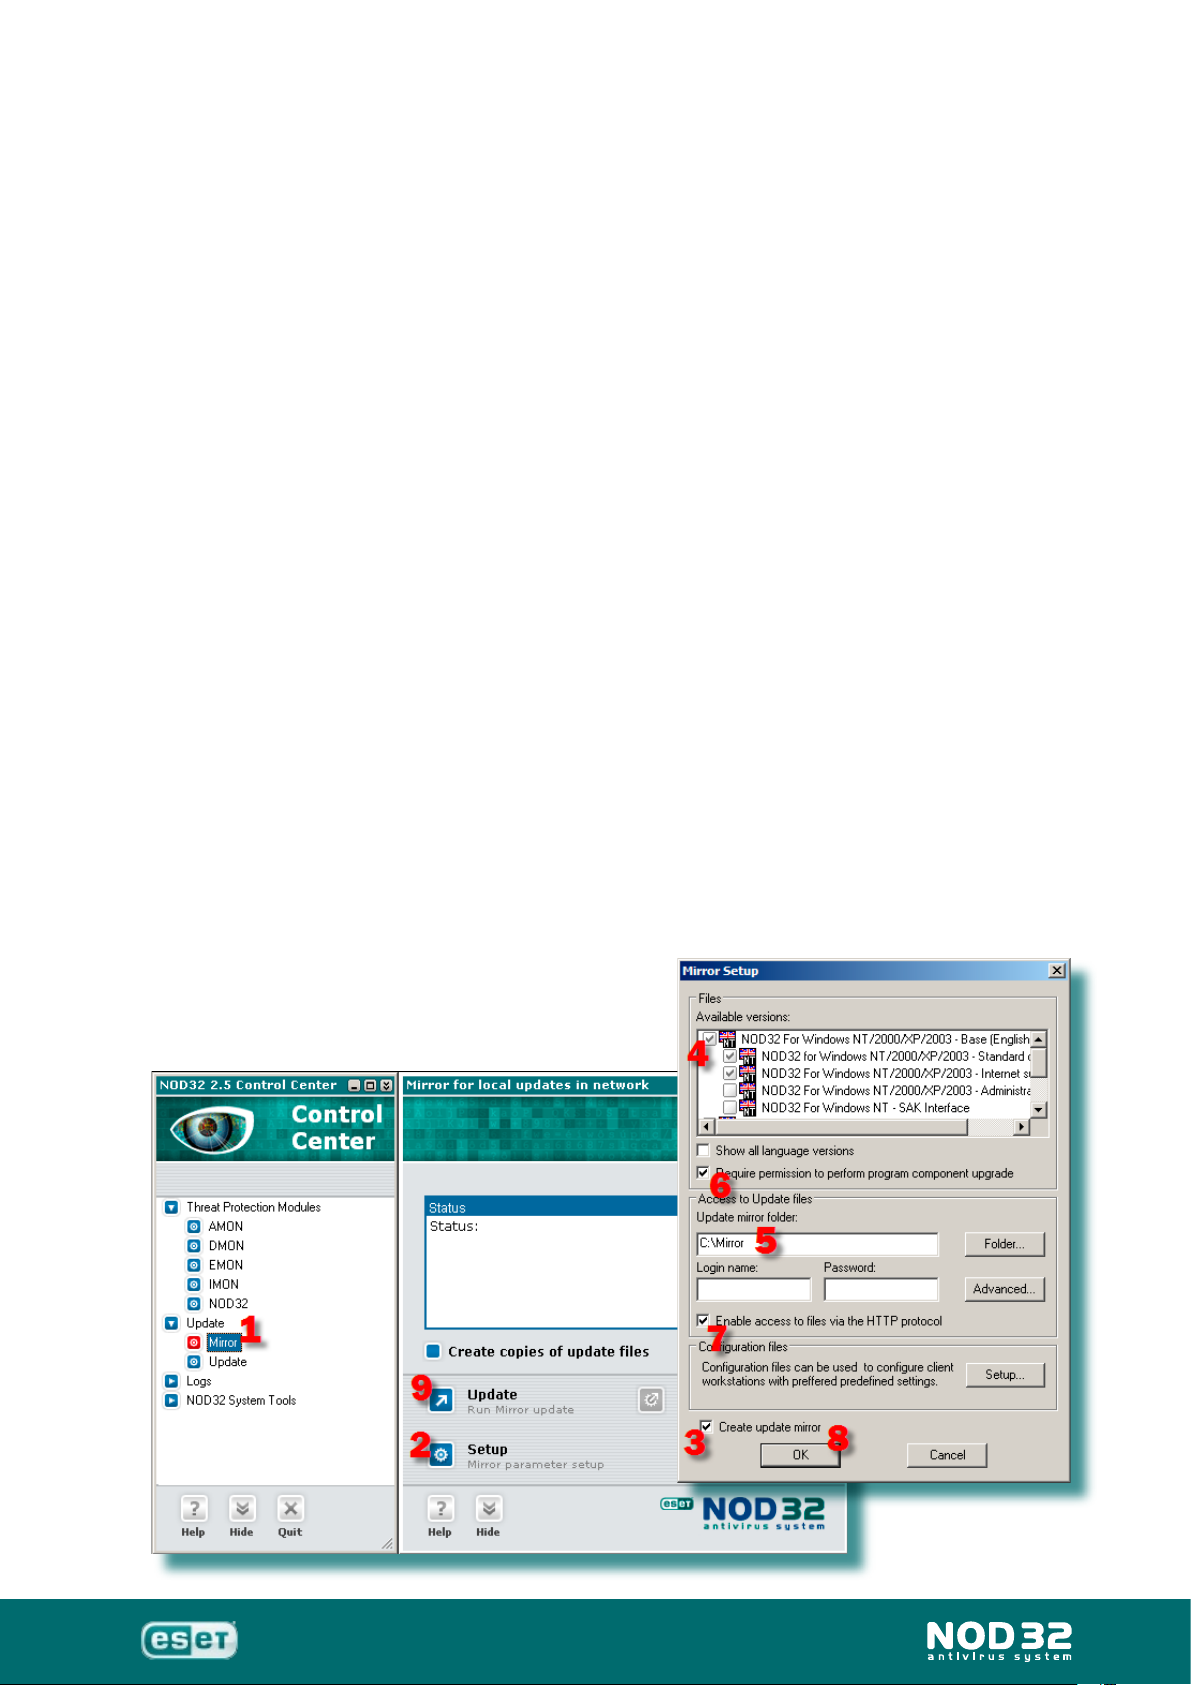
Creating a Mirror
Click ‘Mirror’
1.
Click ‘Setup’
2.
Check ‘Create update mirror’
3.
Check the ‘Available versions’ you require for your network. ie: WinNT
4.
machines and/or Win9x machines. All versions that will be running on
the workstations should be checked.
Setup a path to the Mirror on your server. You can choose to create
5.
this folder anywhere you wish, but it’s recommended to keep the path
reasonably short (ie: C:\Mirror or C:\NOD32\Mirror or C:\Program Files\
Eset\Mirror)
Check ‘Require permission to perform program component upgrade’.
6.
Besides the virus signatures database update, a license also includes
program updates – program component upgrades, which require a
restart of the operating system and bring a lot of new features and
improvements to NOD32 (it is an upgrade to a completely new version,
eg: from 2.5 to 2.7). Choose this to ensure that the program component
upgrade will not be applied to a local update server immediately
it is available on the servers of the Eset company. NOD32 on the
workstations will remain in the current version, and the workstations will
only accept virus signatures updates from the mirror. It is up to the user
to consider this option, especially since before updating all workstations
in the network, the new version may be tested in a detached network
dedicated to testing.
Check ‘Enable access to les via the HTTP protocol’
7.
Click ‘OK’
8.
Click the ‘Update’ button to update your
9.
newly created Mirror, since there may
be more components mirrored than are
used by the local system.
12

Administration Installation Guide
If you would prefer a Shared Folder Mirror path, when entering it,
►
please use the UNC path. Let’s assume that the shared folder is named
NOD32NET and is located on the MAIN server. Then enter the path in
this form: \\MAIN\NOD32NET
In this case, a Logon name and Password should be entered that the
►
clients will use to access the Mirror on the server.
(Optional) Download NOD32 for Windows,
standard, single-user version(s)
RAS has both of the installers (Windows NT/2000/2003/XP/Vista and
►
Windows 95/98/ME) embedded into the program but because the
contents of RAS is not updated as frequently on the Eset website as the
standard version of NOD32, you may wish to download the very latest
versions to be installed on your client machines as described above,
which will save pushing a possible Program Component Upgrade at
some point after the initial installation on the client workstations.
13
Using your Username and Password, download only NOD32 for
►
Windows NT/2000/2003/XP/Vista 32-bit/64-bit onto your server (http://
www.eset.com/download/balance.php?dir=/download/win/v2st/
ndntenst.exe) assuming you have machines running these operating
systems in your network.
Using your Username and Password, download only NOD32 for
►
Windows 95/98/ME onto your server (http://www.eset.com/download/
balance.php?dir=/download/win/v2st/nd98enst.exe) assuming you
also have machines running these operating systems in your network. If
not, there’s no need to download this version.
SAVE these 2 installers into a new folder and call it NOD32 Installers,
►
for example, and place the folder in C:\Program Files\Eset\RA\Server,
or wherever you choose on the server. It is not necessary to install the
standard, single-user version of NOD32 at this point.
The initial downloading and installing of components is now complete.
►

Administration Installation Guide
Running RAC
14
Administration Installation Guide
Setting up RAC connection to the server.
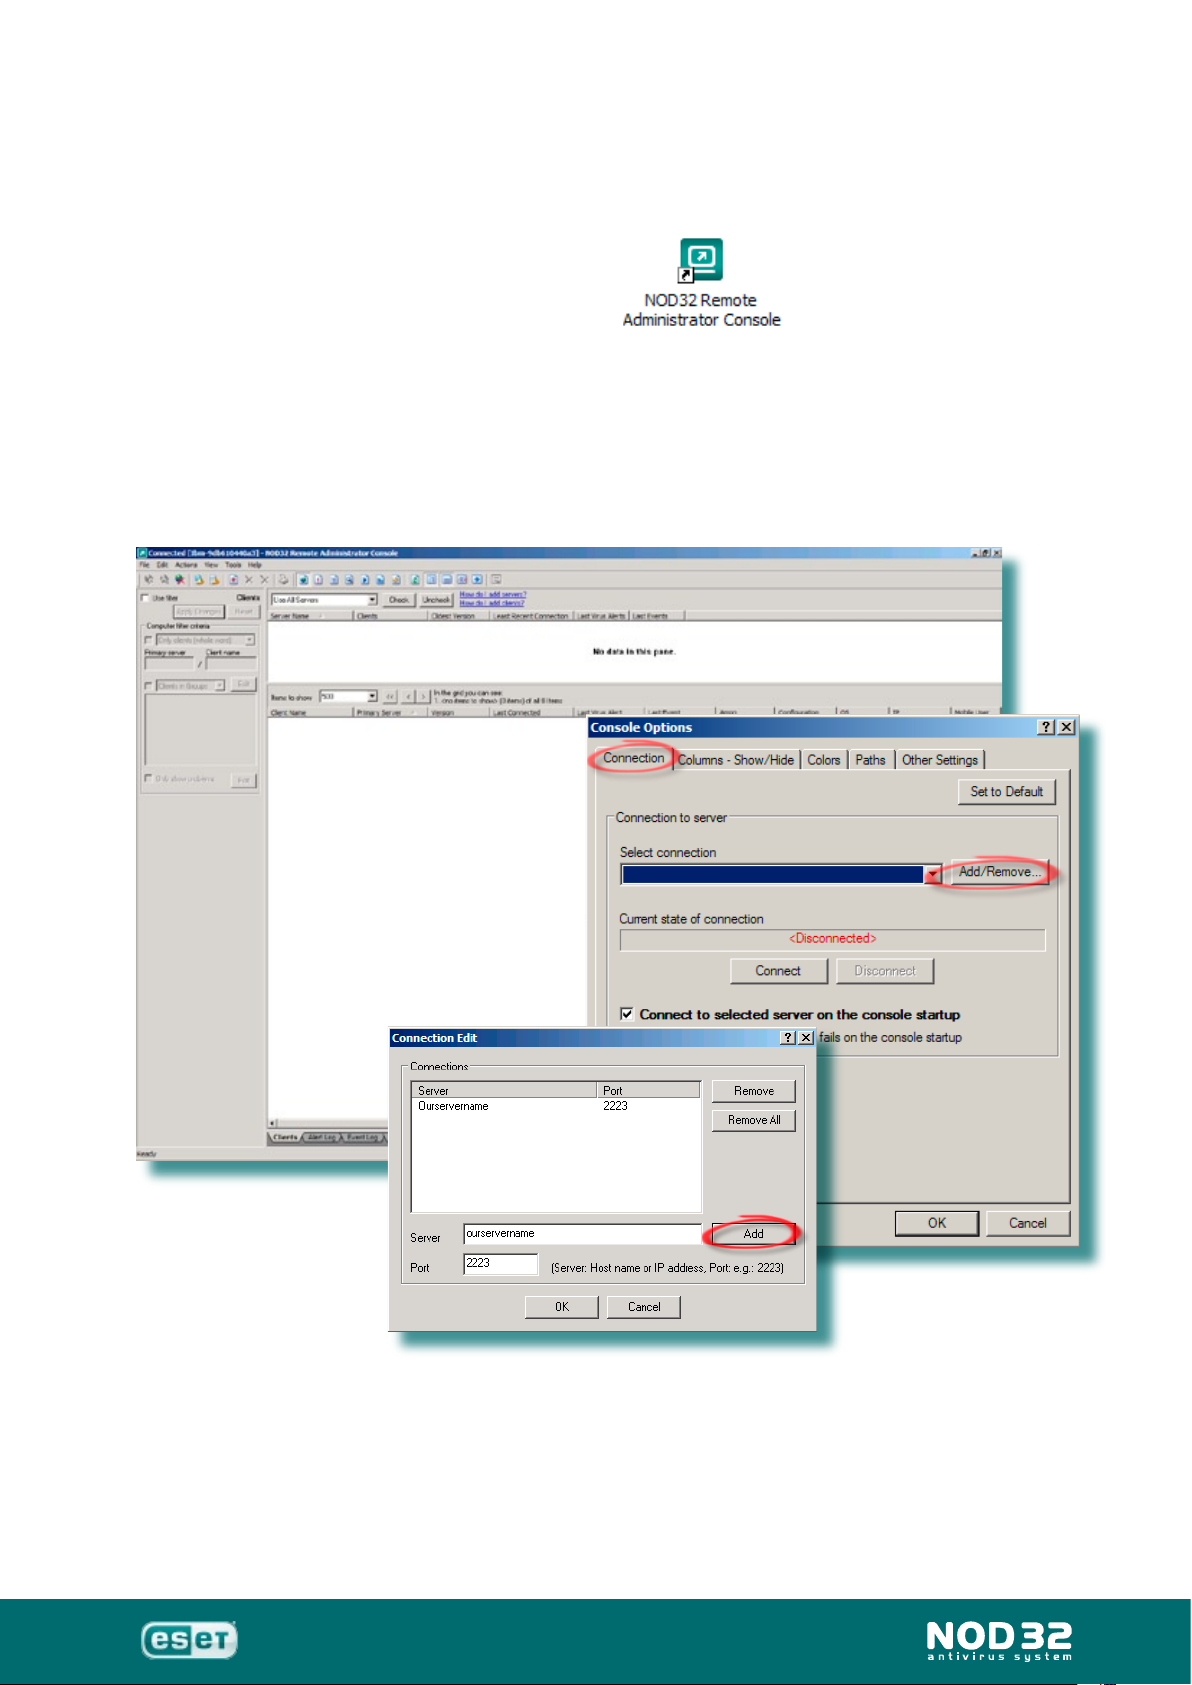
Run RAC by double-clicking on this icon on the desktop of
►
your workstation or laptop.
Note: No clients will appear yet, unless you have already manually
installed NOD32 onto some workstations and congured them for
Remote Administration via their Control Center(s).
Go to Tools ---> Console options ---> Connection ---> Add/Remove, and
►
enter the DNS name of your server (You can use the IP address instead
but if that ever changed in the future, it might cause a problem) ---> click
OK.
15
From the ‘Select Connection’ box, choose the server name you’ve just
►
added.
Press ‘Connect’.
►
In the ‘Current state of connection’ window, you should see the name
►
of the server. If true, press OK. Note: The server will not show up in the
upper section of the RAC until it has at least one client connected.
Administration Installation Guide
►
The attribute Primary Server denotes the name of the server with RAS
installed, to which the remote client is connected via NOD32 Control
Center. If there is another server showing other than the one which the
administrator is currently connected to, then it is a result of replication.
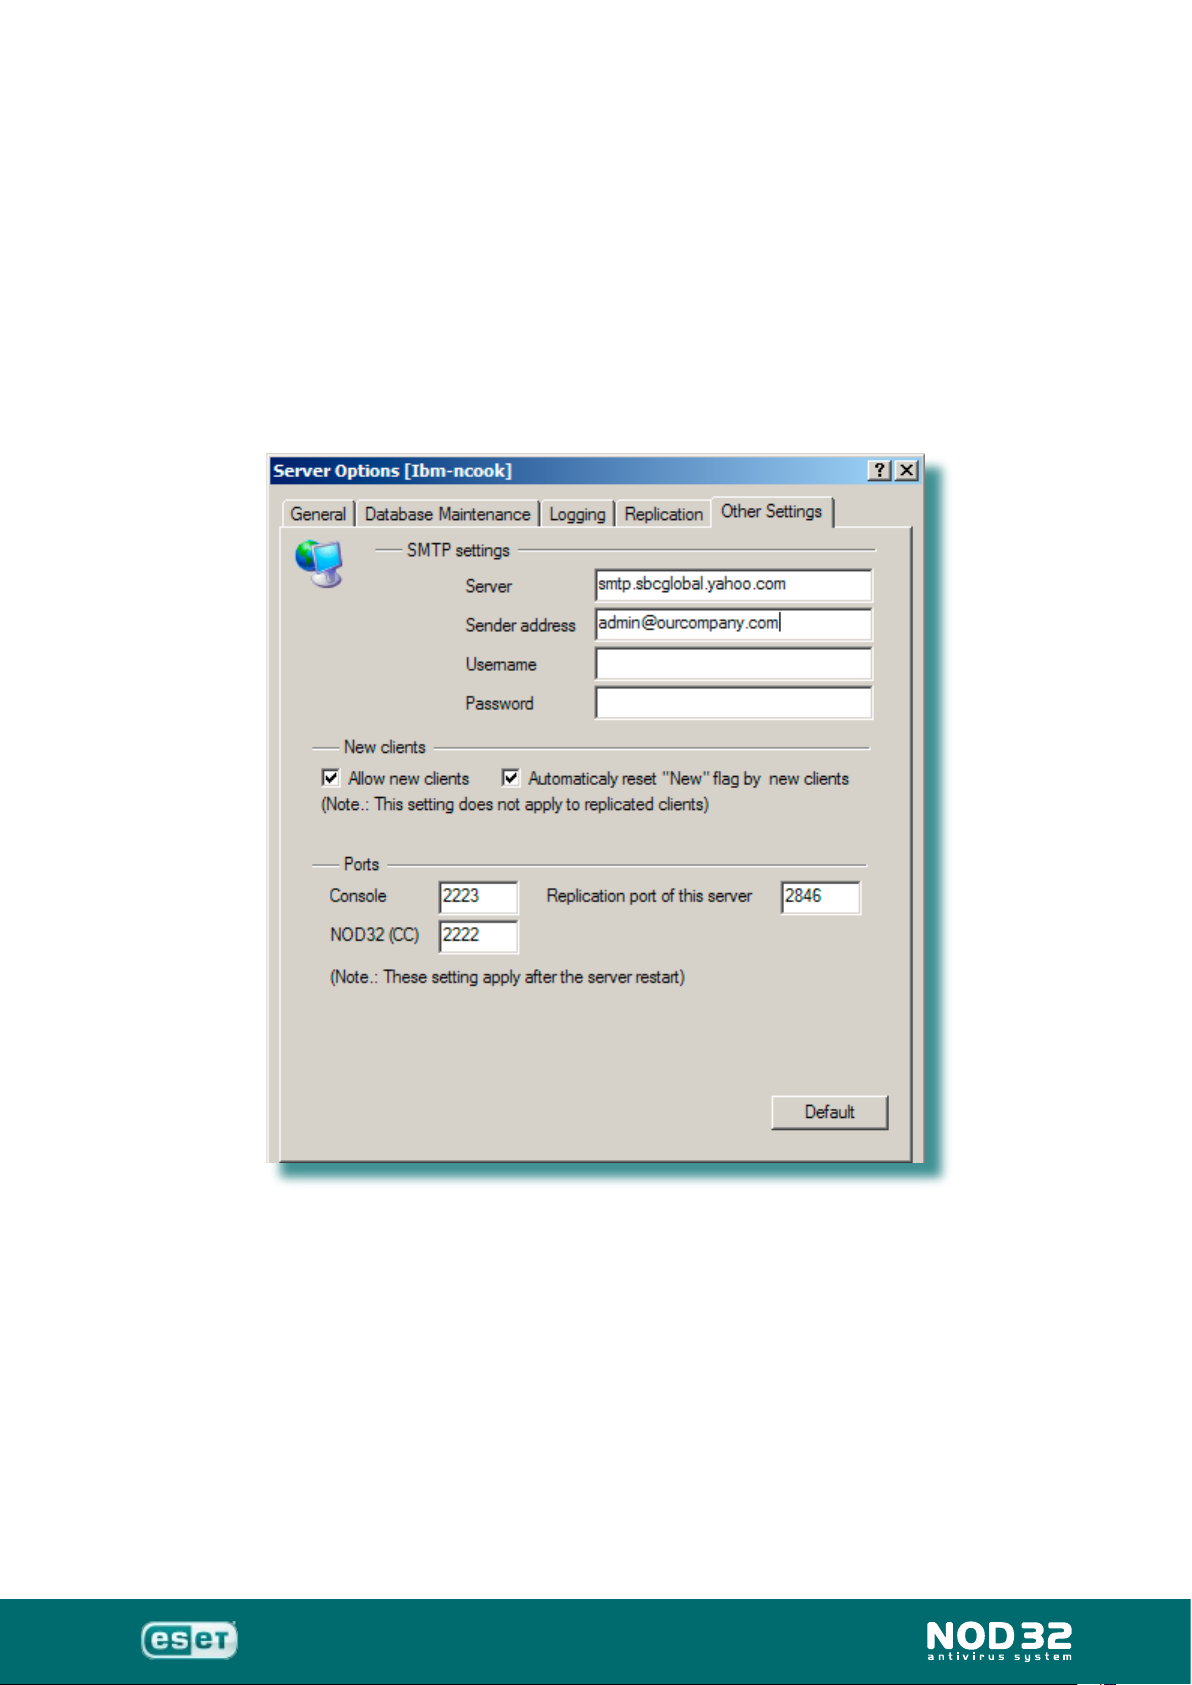
You may add a connection via SMTP server also if you have a mail
►
server address and you wish to be contacted via email from your clients
about alerts, etc. or you wish to install on some clients via email: Tools
---> Server Options ---> Other Settings tab.
16

Administration Installation Guide
Configuration
17
Editor

Administration Installation Guide
Overview of the Conguration Editor
If you’re already familiar with the standard version of NOD32 for Windows,
you’ll know that the program has a vast array of options when it comes to
scanning, updating, scheduling and reporting inltrations.
The Conguration Editor does exactly the same job but is designed for you,
the administrator of your network, to create a universal set, or various sets,
of parameters associated with the installation package(s) you will soon
create.
The Conguration will be saved as an .xml le. You can set this up before
or during the creation of your installation package. Here are 3 ways to do
this:
Start ---> Program Files ---> Eset ---> Conguration Editor. Now make
1.
the necessary changes to your conguration as described on the next
page and save, with a title and directory of your choice, on the server.
RAC ---> Tools ---> Conguration Editor. Now make the necessary
2.
changes to your conguration as described on the next page and save,
with a title and directory of your choice, on the server.
18
During the setup of an installation package. Details on page 33.
3.
Administration Installation Guide
The Conguration Editor setup
The conguration le (.xml) may be created on the server
►
or, you can also install NOD32 LAN Update Server version
on your workststion and create the conguration there and
then copy it to the server (C:\Program Files\Eset\RA\Server\
MyConguration.xml).
Start
►
Program Files
►
Eset
►
Conguration Editor.
►
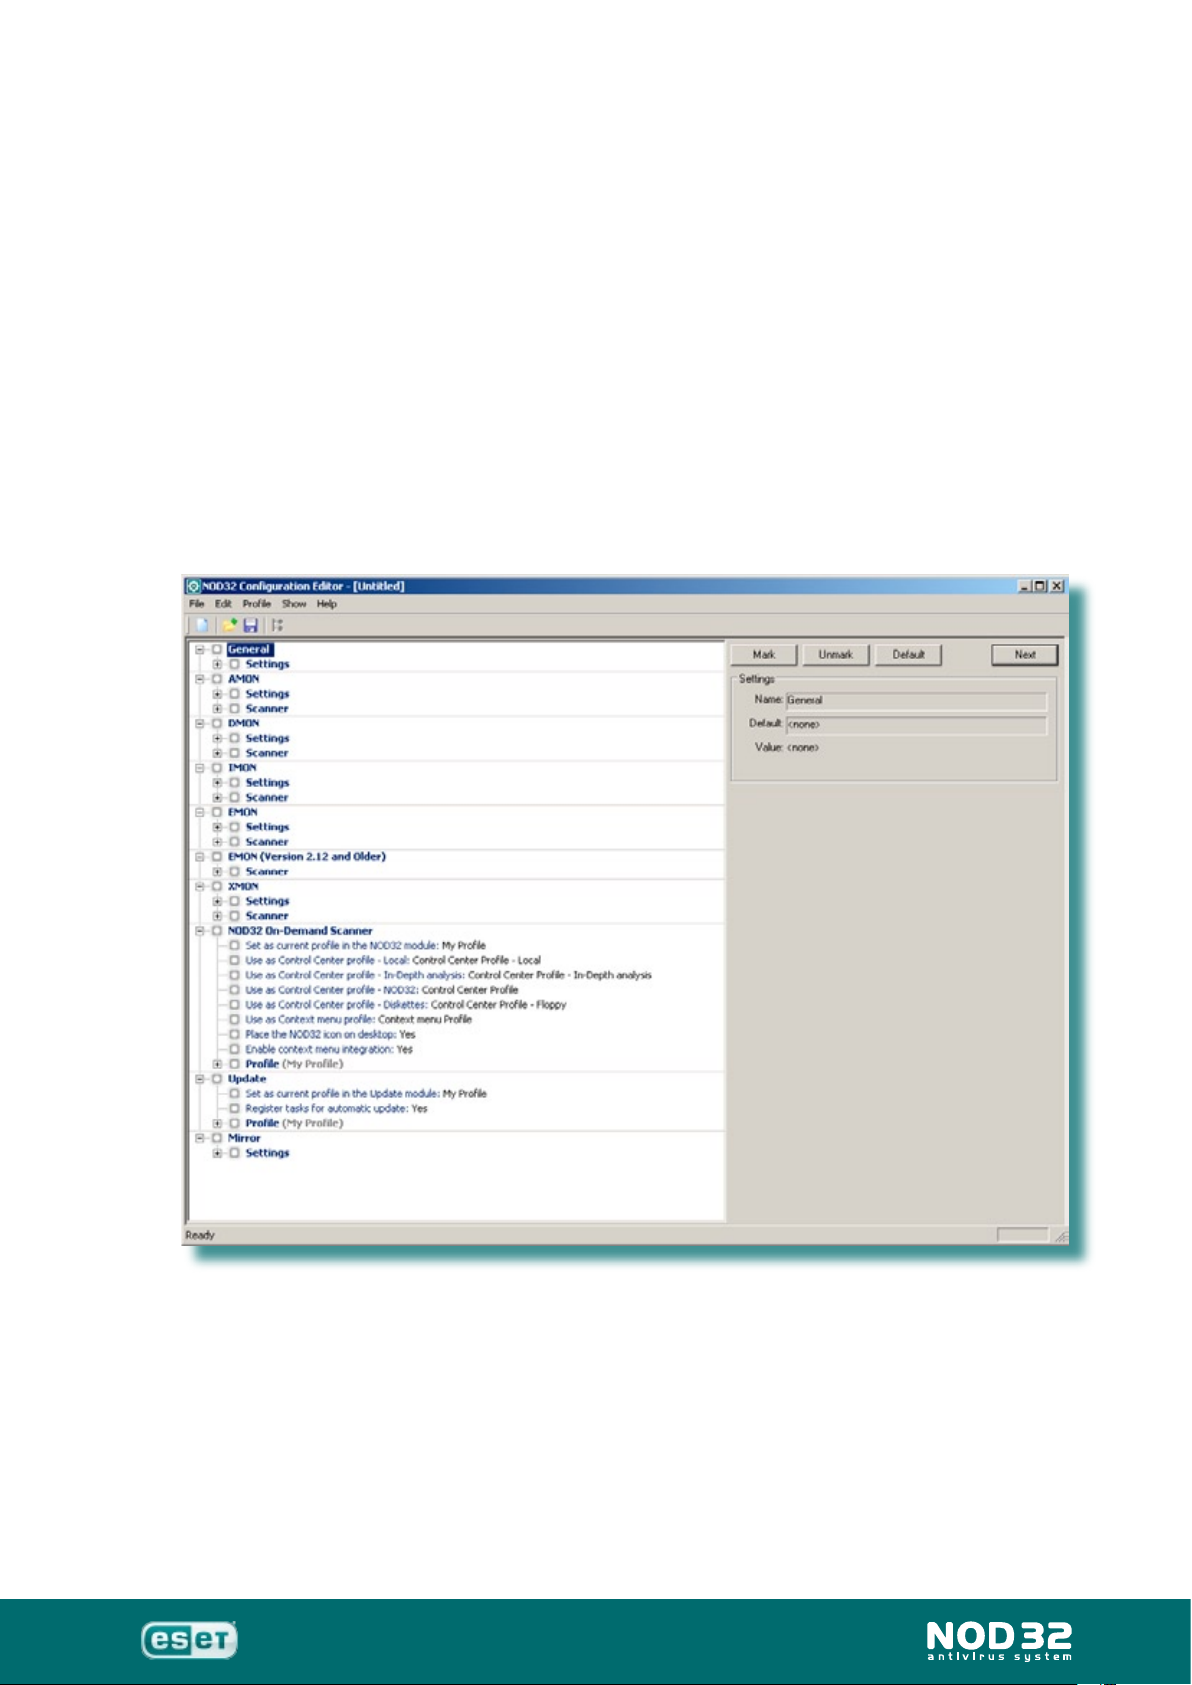
You will now see a window like this:
19
Rather than look at every single option in the editor, we’ll take a look at the
crucial areas that should be considered when setting up a conguration, but
obviously, you can change as many options as you wish. Further in-depth
information can be found on page 49.
When an item is changed, the radio button beside it turns blue. This helps
you to identify quickly the areas of alteration that you’ve made. Also, in
future conguration amendments, the client workstations will only look for
any new items that have been modied.
Administration Installation Guide
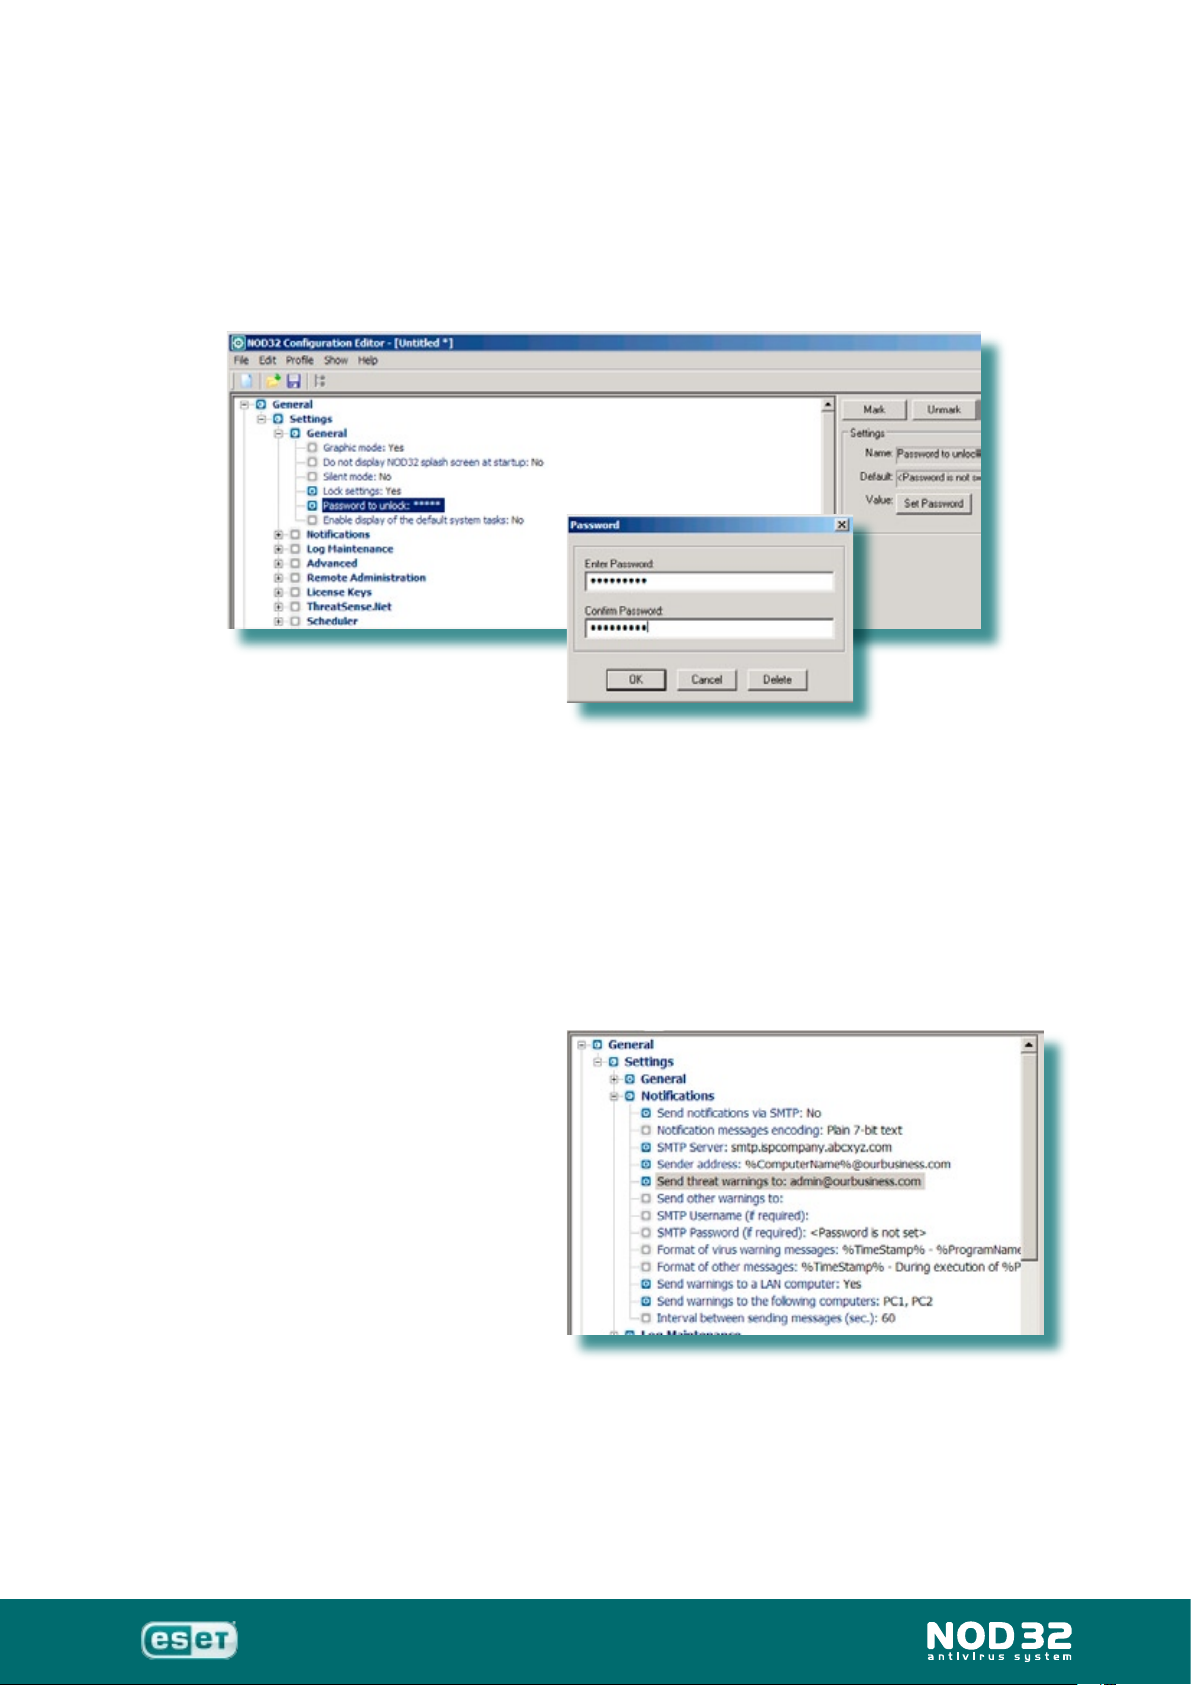
The rst section is General and we’ll look at the Settings area. Here it is
advisable to ‘lock’ the settings in NOD32 and Password Protect them with a
password of your choosing, so that only you can alter the conguration on
any workstation, and not your clients.
20
The next section is Notications. If you choose to have messages
sent to you about alerts/inltrations on your client machines, you will need
to enter the SMTP server address (or IP address) that you use plus the
sender address should be entered exactly as
%ComputerName%@yourcompany.com
which will enable you to identify the relevant machine in your network. Pay
close attention to the way %ComputerName% is entered as this is casesensitive.
Also, enter the email address
you’d like the warnings sent to.
Also you can choose to have
Windows Messenger messages
sent via your LAN instead of, or
in addition to, the email method.
Here, you will just need to
enter the name(s) of the PC(s)
you’d like the messages sent
to, delimited by a semicolon or
comma.
Administration Installation Guide
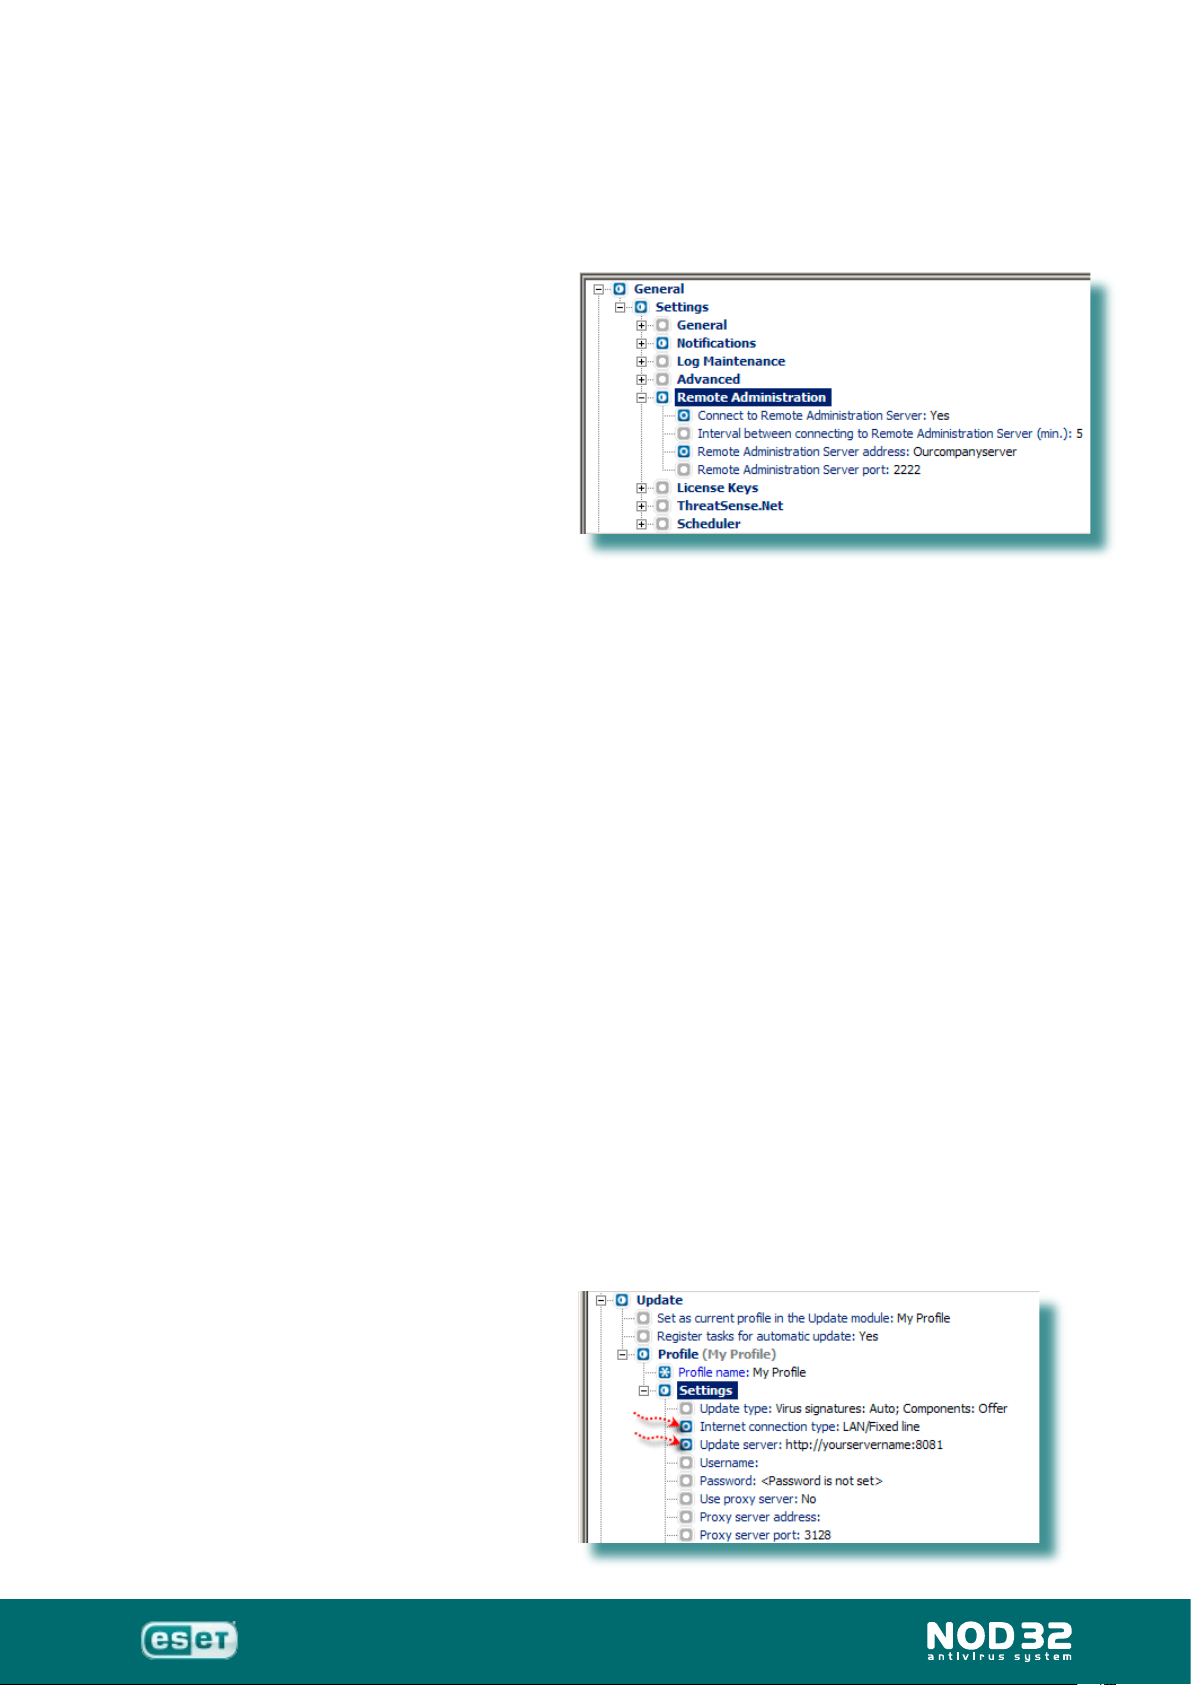
The next item of note is Remote Administration. This is vital to ensure the clients will connect to the RAS.
The Conguration Editor will,
by default, pick up the name of
the server where RAS has been
installed.
The default time for clients to
connect to RAS is 5 minutes, but
you can alter this if you wish. The
default port, that is opened on
the server for the workstations to
connect via, is 2222.
In the License Keys section, you can locate and add the license key (nod32.lic) that you have purchased. This only allows your clients to see when your license will expire for information purposes.
21
If you use MS Exchange Server, you will need a 2nd license key for XMON
which can also be added to this folder.
Now move further down the list to Update > Prole(My Prole) > Settings:
Update server address
In the Update section, again, the majority of the default settings should
prove satisfactory, however, there are a couple of absolutely vital settings
that you must enter in this section.
‘Internet connection type’ should be dened. In a network environment,
it’s highly likely that your company will connect to the internet via a Local
Area Network (LAN).
The ‘Update server’ must be specied so that your clients will know where
to look for their updates on the local server.
Using an HTTP connection is recommended and therefore you should
enter:
http://yourservername:8081.
If you prefer to use a shared
folder, you should enter:
\\yourservername\sharename.
Administration Installation Guide
Now let’s move back to the rst section again: General > Settings
ThreatSense.Net is recommended to leave with default setup but you
may review the settings if you wish.
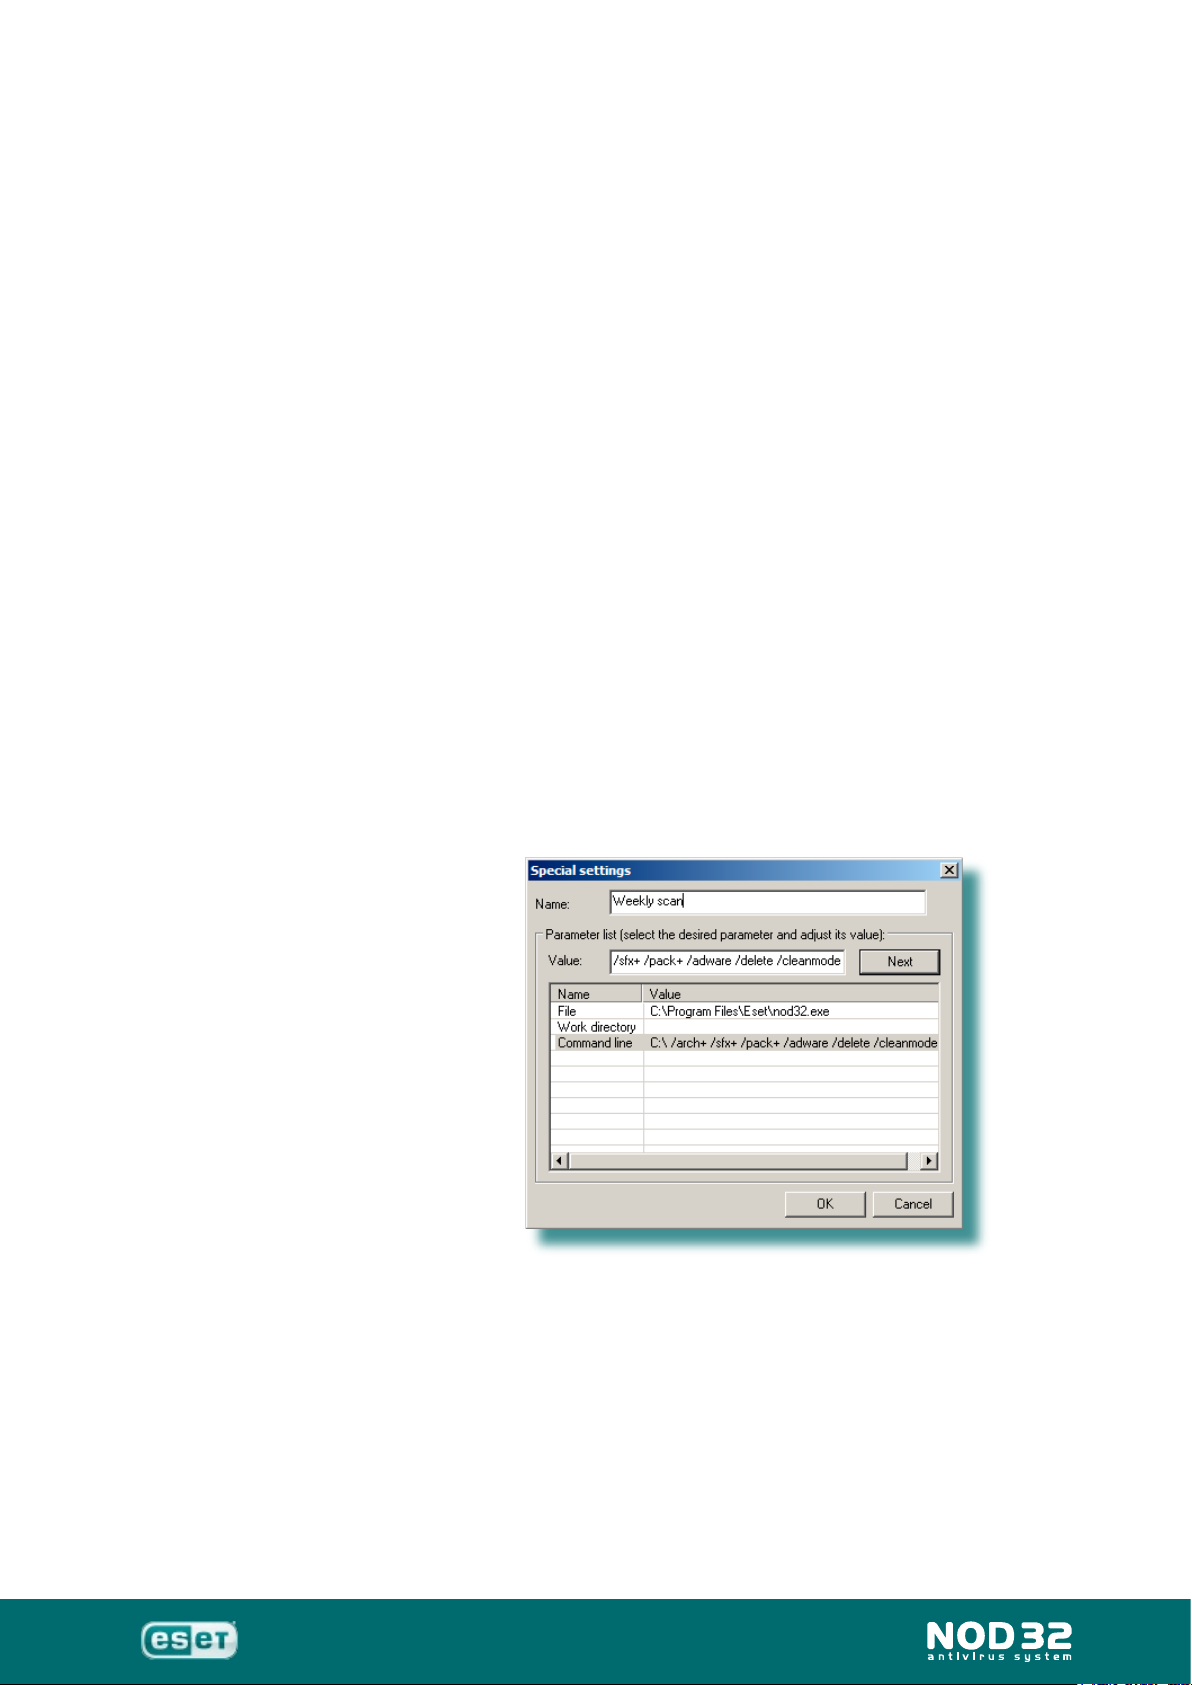
Scheduler is useful if you would like to run a scheduled scan on all your
workstations once a day, a week or a month, for example. Click the ‘Edit’
button in the right hand side of the Editor’s window and in the new window
click ‘Add’.
Select the type of task you wish to add. Hint: if you wish to run a scan
with specic command line parameters, choose ‘Execution of an external
application’.
The next few windows will be quite self-explanatory, ie: giving the task a
name, when you want it to run, etc.
22
After you click the ‘Finish’ button you will need to enter the name of the task
again and also the path to NOD32 on the client workstations. By default,
this would be C:\Program Files\Eset\nod32.exe
A list of the command line switches is shown on page 83 & 84.
Administration Installation Guide
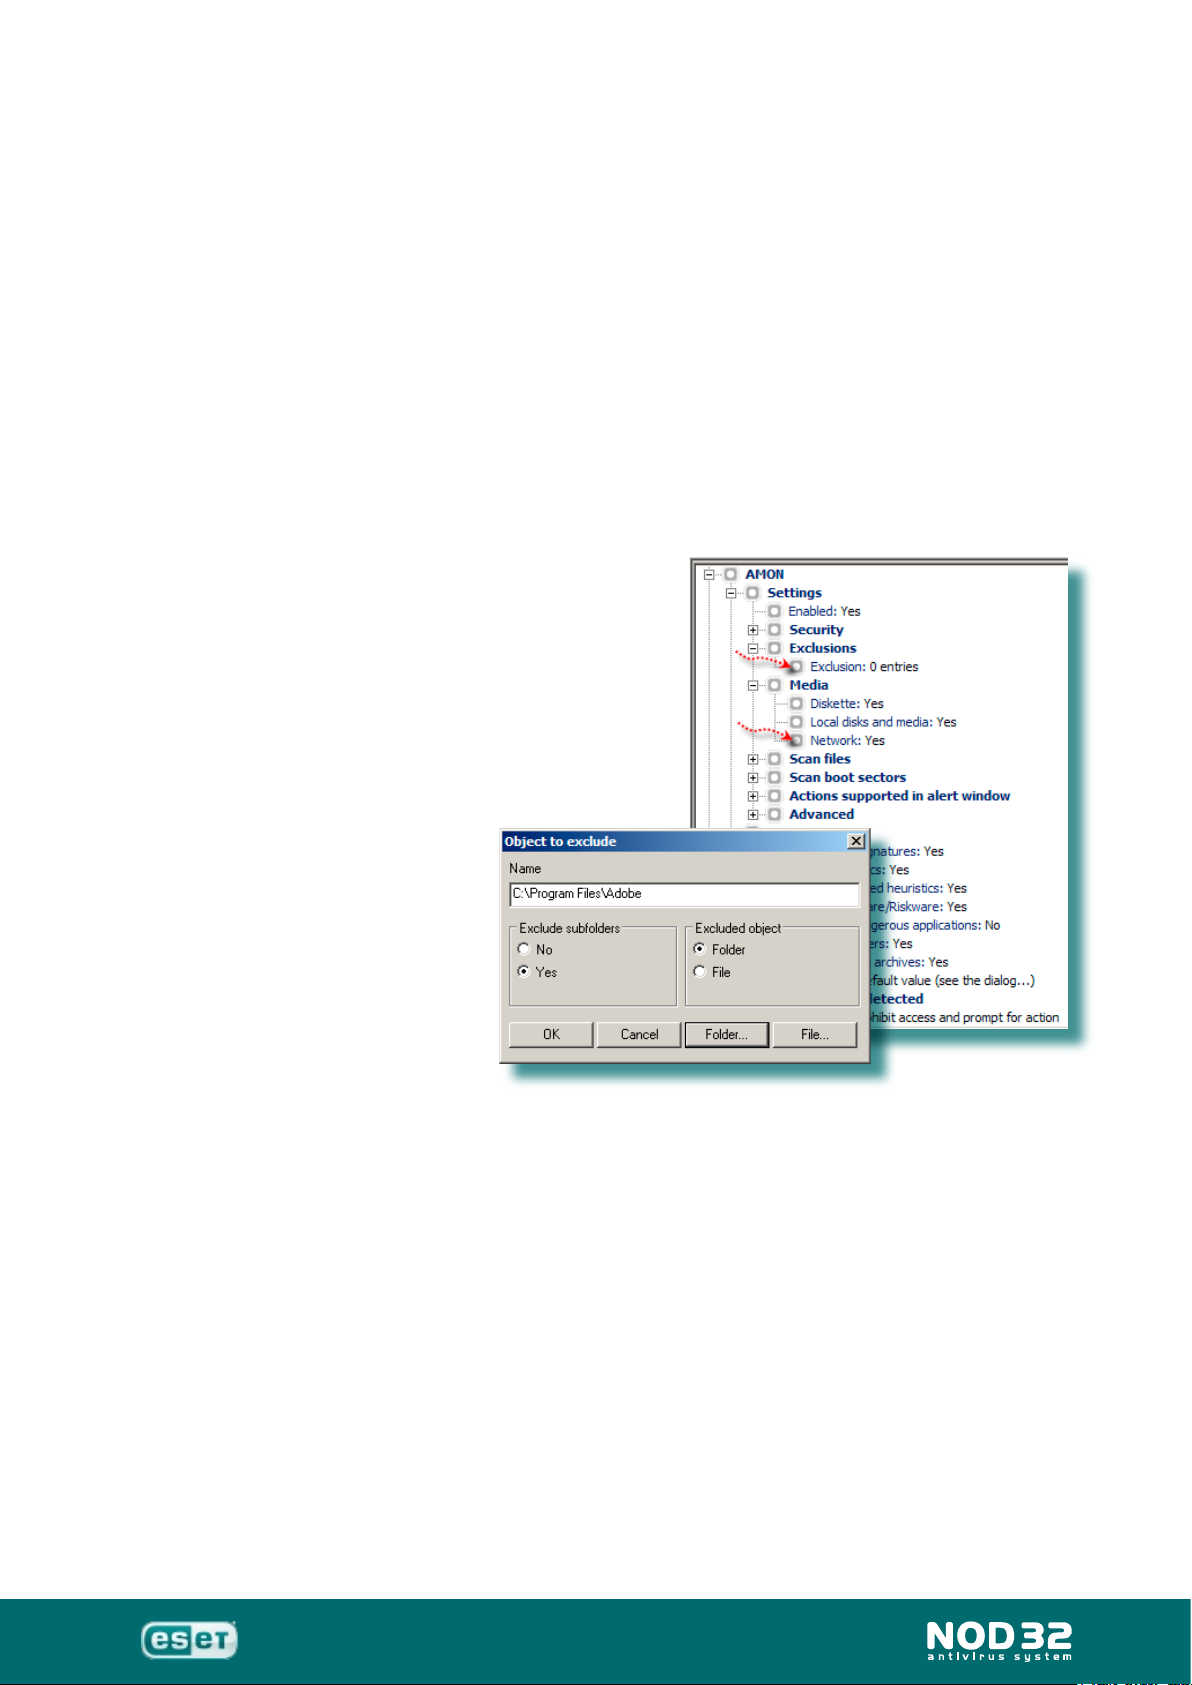
AMON
AMON (Access MONitor) is a memory-resident (always running when
computer is on) le scanning program. Automatic starting of AMON after
computer restart is a fundamental defense against malicious code. Quitting
AMON is not recommended and should only be done under special
circumstances. Execution of two different antivirus monitors (from different
products or companies) is not recommended since it may make the client’s
computer slower and/or cause a system crash, especially on Windows NT
systems, and might lead to serious problems.
AMON is the most important line of antivirus defense. AMON monitors all
potentially threatening actions on protected computers such as opening,
executing, creating or renaming les.
It is recommended to leave the default
settings for this module. However, there
may be an instance when a particular le or
program used in your network, needs to be
excluded from scanning. Also, you may have
reason to not want your workstations to scan
network les.
23
DMON
Microsoft Ofce documents (Word, Excel, etc.) can sometimes contain
viruses which infect other les when the document is opened. Document
MONitor (DMON) provides protection against this sort of threat. Later
versions of Internet Explorer allow Microsoft Ofce documents to be
opened within the browser, directly from the internet. DMON will monitor
these documents and prevent inltration of a virus should an infected
document be opened. Generally speaking, the default settings should prove
adequate.
Administration Installation Guide
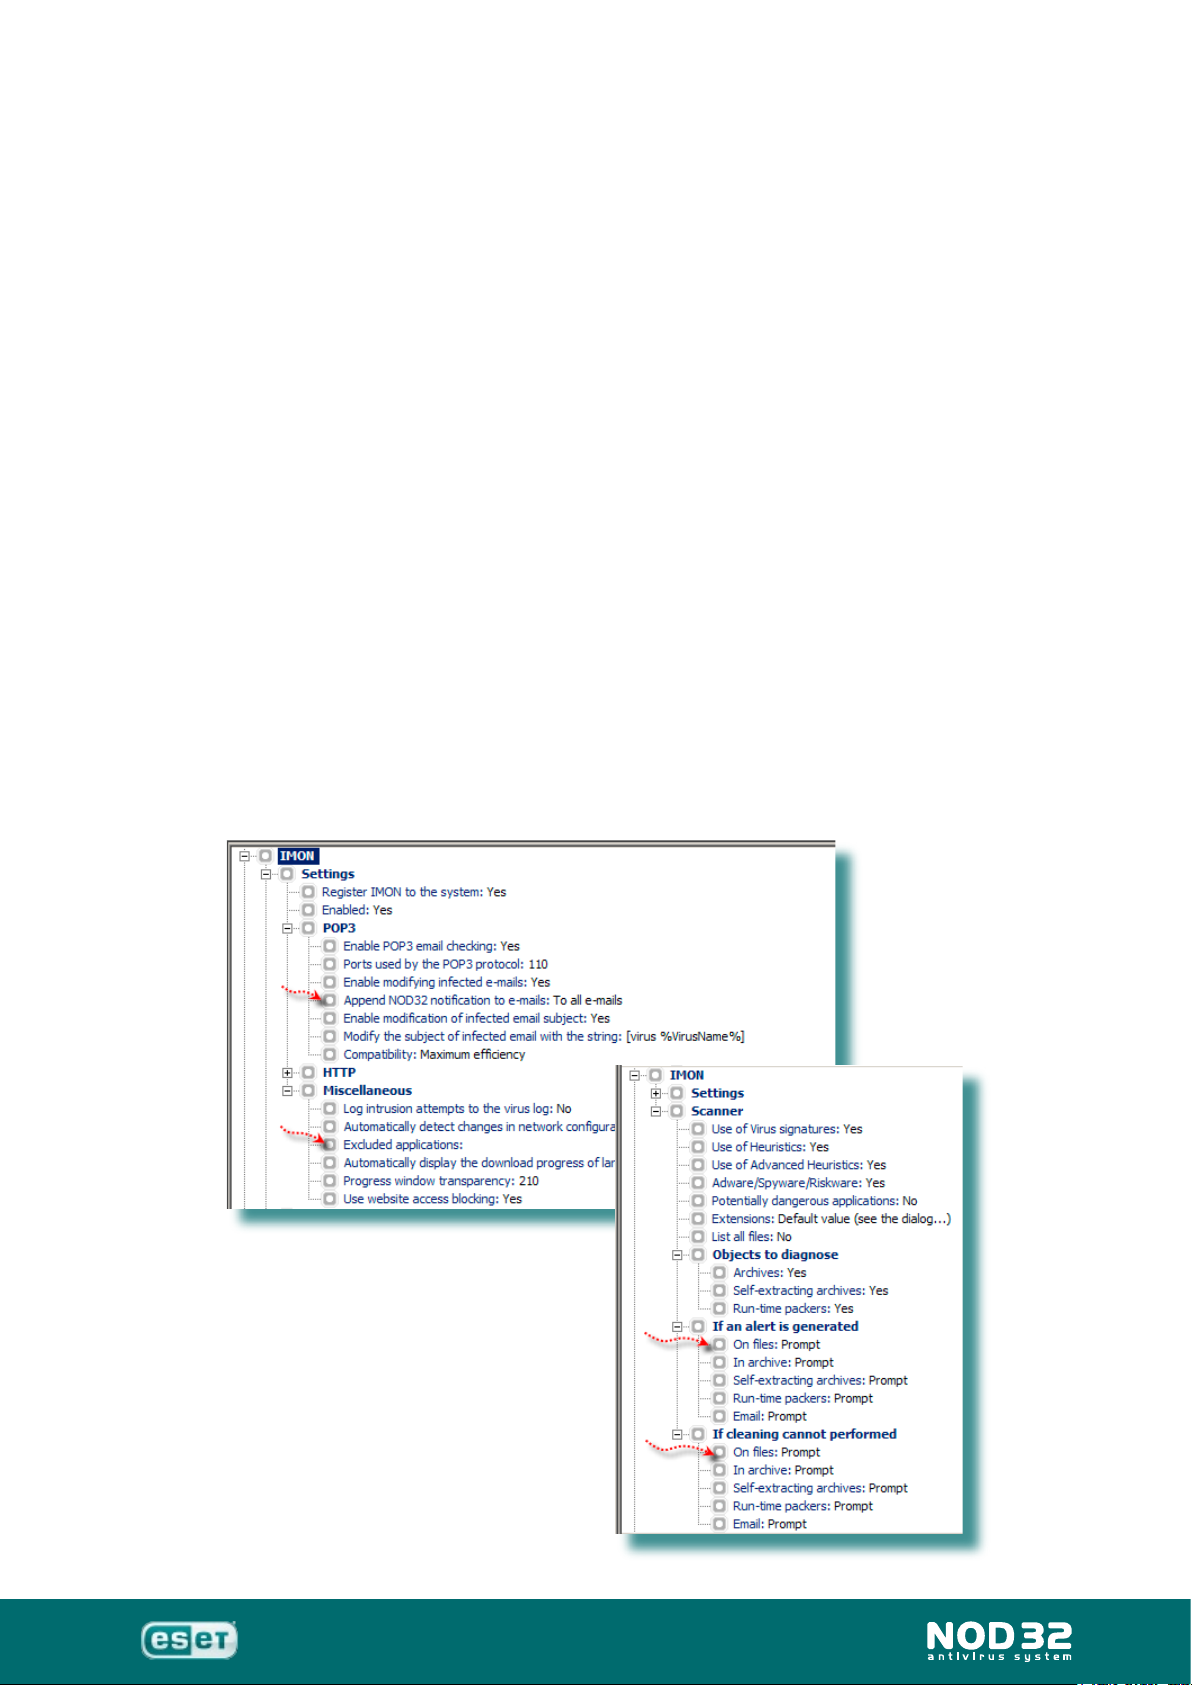
IMON
While the role of AMON is to provide real-time, resident, anti-virus
monitoring of a system and user actions, the IMON module protects your
computer from email and internet threats. To allow scanning of POP3 email
and while also using the internet, we recommend having IMON enabled.
IMON’s primary role is to monitor incoming email. There is virtually no setup
necessary since this module works with all email programs. IMON works on
the winsock level (operating system level). Again, the default settings are
recommended, but there are a couple of items you may want to look at: You
may not want IMON to append a message at the bottom of every email that
your clients receive, so this can be changed to only infected emails or no
notication at all.
Also, you may have reason to want certain applications excluded from
IMON’s scanning, so the program(s) can be added to an exclusion list here.
IMON’s Scanner is generally setup to optimum performance but in the
areas titled ‘If an alert is generated’ and also ‘If cleaning cannot be
performed’ the default setting is to Prompt the user to take some action
in both cases. However, you may prefer to have ‘Files’ cleaned as the
rst action and if that cannot be performed to have them deleted. This is
merely an example of the various choices you have, not a recommendation
necessarily.
24
Administration Installation Guide
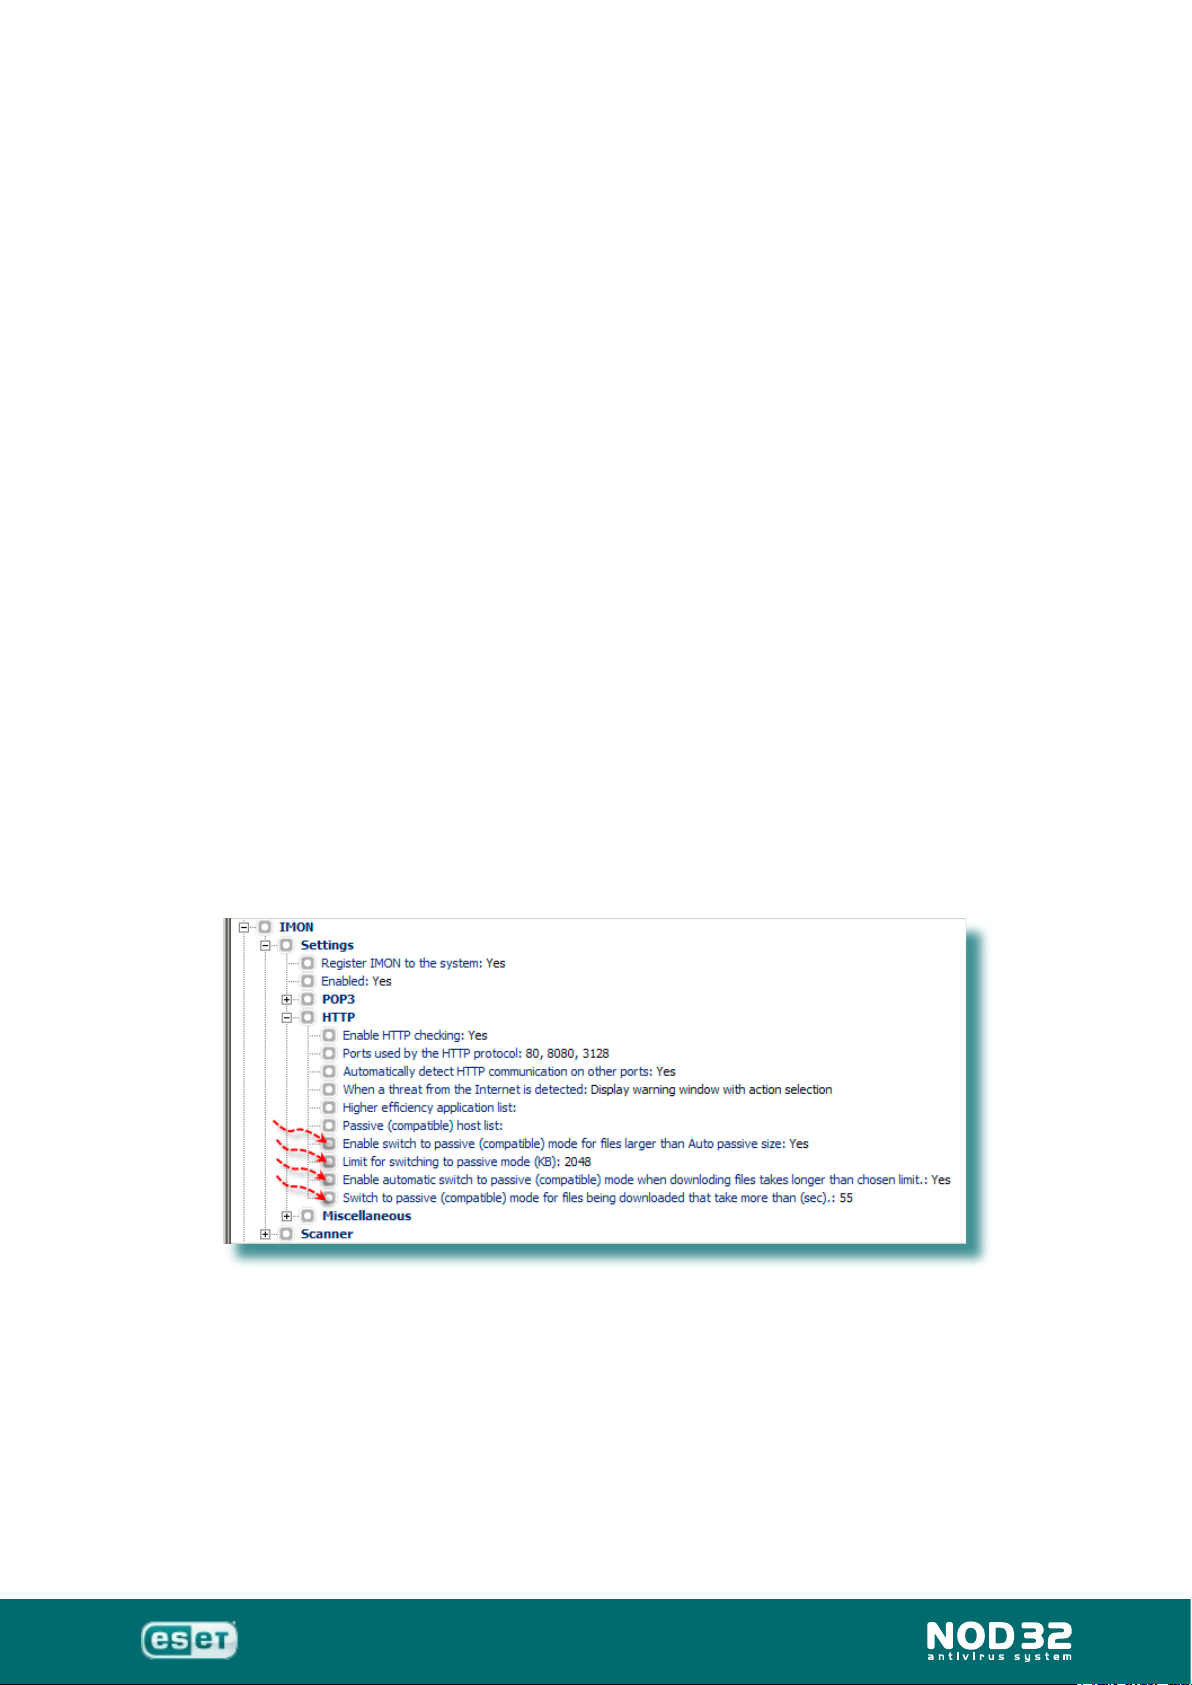
HTTP: Active & Passive modes
The download popup window is shown only for applications set to Active
mode (Higher efciency) in the HTTP scanner compatibility (default).
With IMON in Passive mode, portions of a downloaded le are
continuously passed on to the target application whilst IMON stores a
temporary copy of each of the fragments. When the last fragment is
detected, the whole le is scanned for viruses. If an inltration is detected,
a warning window appears and the connection with the particular server
is terminated. A disadvantage of that is that the already downloaded
portion of the le may already contain a fundamental portion of a malicious
code. What’s more, if the application repeatedly attempts to download an
infected le, it may use the already downloaded data and request only the
rest of the le. In this case, IMON may not nd anything suspicious in the
remaining portion.
25
In Active mode (default), IMON rst downloads and scans the whole le
and then passes it on to the target application. This procedure is safer
because in the case of an inltration, the application does not receive
any portion of the downloaded le. A disadvantage is that the application
receives all the data at once, therefore it cannot show the download status
properly. Therefore, if the download lasts for more than 55 seconds (default,
but can be altered), a small window showing the download progress pops
up. Active mode is not suitable for certain types of data which requires a
continual data ow (e.g. multimedia, streaming video/audio).

Administration Installation Guide
EMON
EMON (Email MONitor), a complementary resident module, scans emails
incoming via MAPI interface. The MAPI interface hooks into the different
interfaces of Microsoft Outlook. MAPI interface is used also when receiving
emails from the Microsoft Exchange Mail Server via the Exchange protocol.
Even if the MAPI Interface is not used on the computer, EMON will still
be installed. E-mails incoming via the POP3 protocol will be checked
by IMON.
As with IMON, you may want to alter similar scanning features within this
module.
XMON
XMON stands for MS Exchange MONitor which serves for scanning
incoming and outgoing email, utilizing the MS VSAPI interface on MS
Exchange servers. The minimum requirements are MS Exchange 5.5
SP3, MS Exchange Server 2000 SP1, MS Exchange 2003 or higher. The
newer the version of MS Exchange server you have, the more features are
available in XMON.
26
The removal of entire infected email is supported from MS Exchange server
2003. Otherwise, this option is unavailable and the appropriate check-box
is grayed out.
Using XMON requires a 2nd license le. In the License Keys section
(top of the Conguration Editor list: General / Settings), you can locate and
add the license key for XMON (nod32.lic) that you have purchased.
 Loading...