

Page 1

NOD32 for Windows
Administrator
NOD32 Remote
Administrator
User’s guide
w e p r o t e c t d i g i t a l w o r l d s
Page 2

2
content
chapter 1.
Basic network features of NOD32 for Windows ................5
chapter 2.
Centralized management –
NOD32 Remote Administrator .......................................13
chapter 3.
Remote installation .......................................................25
chapter 4.
Tasks, typical examples .................................................31
chapter 5.
Large hierarchical networks – replications ....................35
chapter 6.
Summary of information ...............................................39
Copyright © Eset, spol. s r. o.
All rights reserved.
No part of this document may be reproduced or
transmitted in any form or by any means electronic
or mechanical, for any purpose without the express
written permission of Eset, spol. s r. o. Information
in this document is subject to change without prior
notice.
Certain names of program products and company
names used in this
document might be registered trademarks or
trademarks owned by other entities.
Eset, NOD32 and AMON are trademarks of Eset, spol.
s r. o.
Microsoft and Windows are registered trademarks of
Microsoft Corporation.
Eset, spol. s r. o.
Svoradova 1, 811 03 Bratislava, Slovak Republic
http://www.eset.sk/en
Technical Support Worldwide:
http://www.eset.com/support
Technical Support for Europe:
http://www.eset.sk/en/support
Page 3

3
INTRODUCTION
The NOD32 Antivirus system oers a wide range of
tools, which make running and managing both smaller
and larger company networks easier.
Even the multi-license NOD32 for Windows oers
the basic network services. Especially a feature called Mirror, which serves to decrease trac across your Internet
LAN connection. Client workstations, with NOD32 installed, will not download updates directly from the manufacturer (Eset company), but from a local update server,
which is located in the same LAN. Using a Mirror, you can
congure all NOD32 system settings. Thus you can recongure NOD32 settings on all workstations “en bloc“.
In addition, NOD32 for Windows itself, or the control
module NOD32 Control Center, can inform the administrator about virus or other problems on workstations via electronic mail or Windows Messenger.
NOD32 Enterprise Edition oers much more. It includes NOD32 for Windows and NOD32 Remote Administrator.
NOD32 Remote Administrator serves to manage the NOD32 antivirus system in large computer networks. Thanks to NOD32 Remote Administrator,
you can get a global overview of the NOD32 antivirus system activity on network workstations together with information about eventual inltration. The information
retrieved from the workstations (from the NOD32 for Windows, or the NOD32 Control Center module) are
stored centrally on the server (NOD32 Remote Ad-
ministrator – RAS), and the network administrator
can access them at once using the user-friendly graphical
interface of the console (NOD32 Remote Adminis-
trator Console – RAC). The communication takes
place also in the opposite direction and administrator can
thus immediately react to newly-created situations, and
assign tasks to the NOD32 Antivirus System on the client
workstations.
Because a lot of information, which may be dicult
to remember is to follow, at the end of the manual you
can nd a summary of the most important issues.
Page 4

Page 5

Chapter 1:
Basic network features of
NOD32 for Windows
1 Basic network features of NOD32 for Windows
Page 6
6
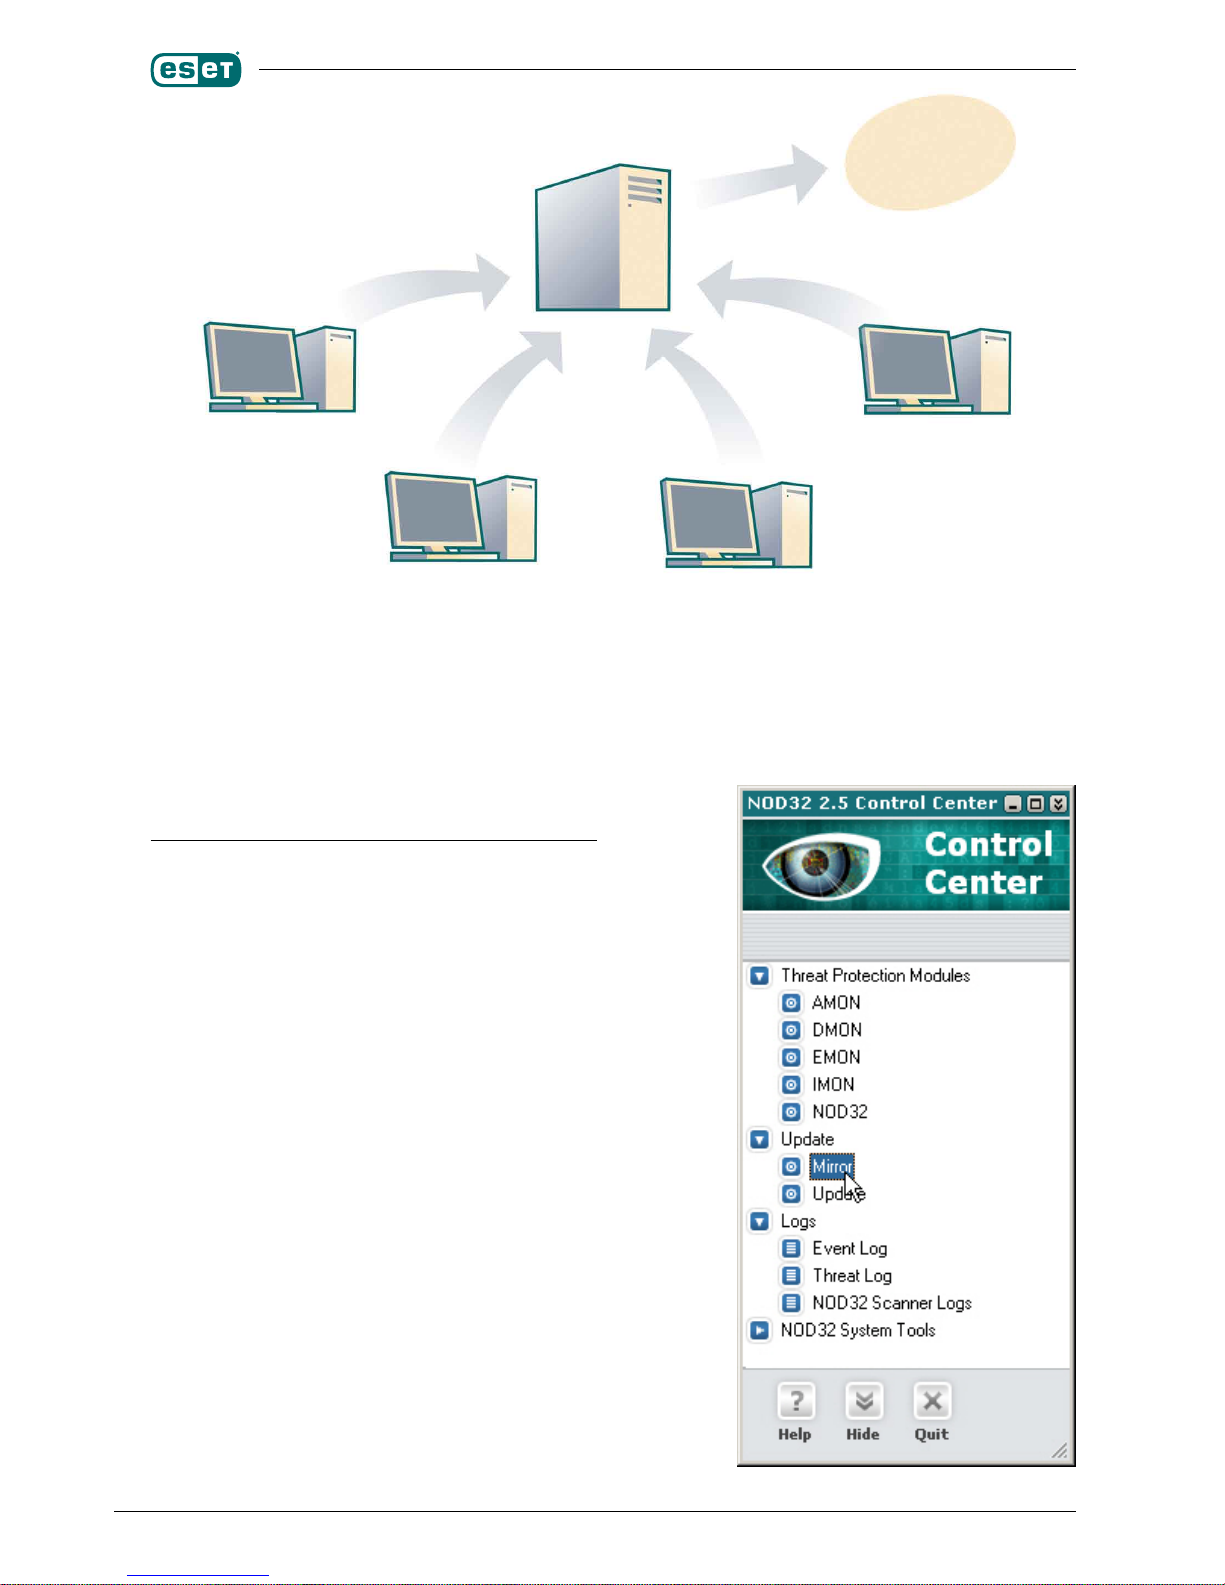
Mirror server
Workstation
Workstation
Workstation
Workstation
Internet
Mirror
Mirror is available in two versions:
• mirror as a shared network folder
• mirror as an HTTP server
and its setup is available from NOD32 Control
Center.
When you create the Mirror as an HTTP server, one PC
serves for downloading updates from Eset`s servers, and
as a NOD32 update server for the other workstations in
the LAN at the same time. This version is easier to congure and is not limited by the number of licenses of the
le server, which is required by the rst version for access
to the shared folder.
HTTP Server is a direct part of NOD32 2.5 administra-
tor version and by default runs on port 8081.
If the Mirror is created as a shared folder, then its prin-
ciple lies in distribution of updates across the network,
using a shared network folder. In contrast to the rst method (HTTP server), a computer creating a Mirror does not
have to be a server, to which the other workstations connect to download updates at the same time.
Figure 1 Principle of a Mirror: The company server downloads updates from the Internet, and workstati
ons update from this local server. The Mirror thus decreases trac across your Internet connection, because the workstations download update les from the local server, and not from the Internet. Update process is initialized by Mirror server (Update from the Internet) and workstations (update from Mirror Server) in regular intervals.
Page 7
7
chapter 1 / Basic network features of NOD32 for Windows
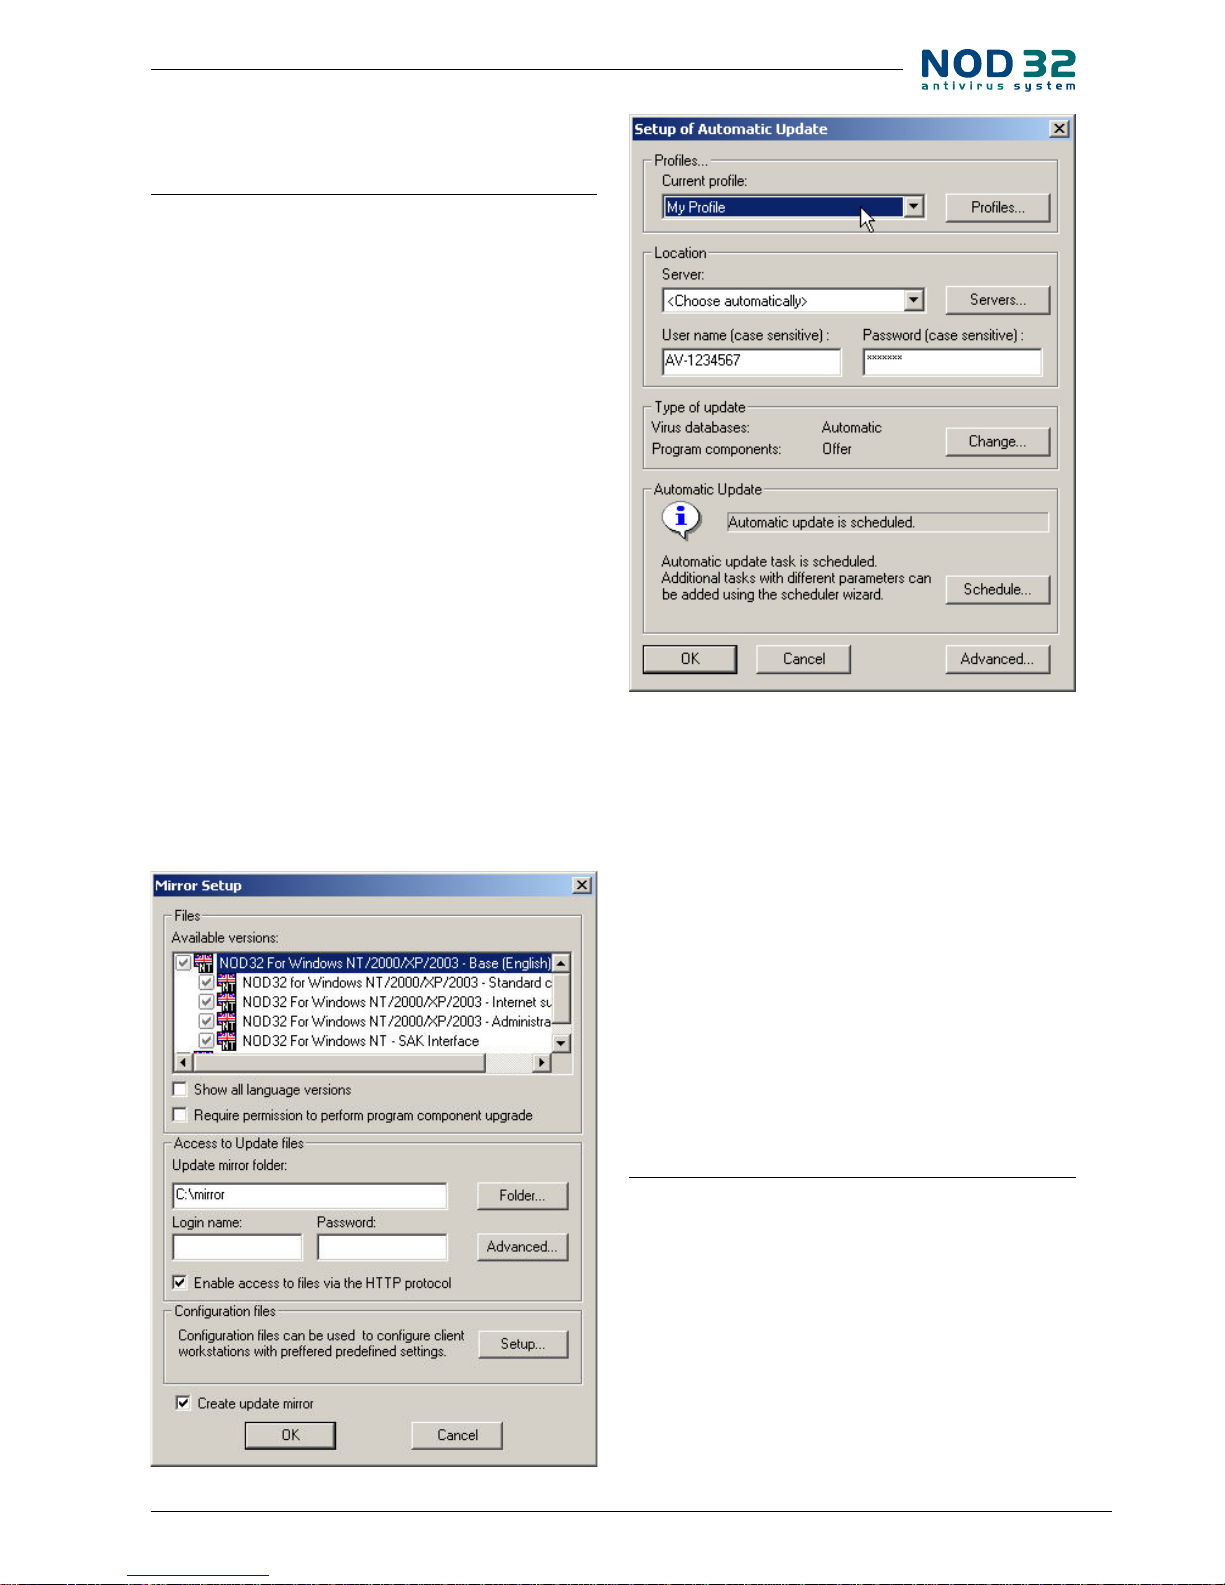
Model installation of Mirror
as an HTTP server
1. In the NOD32 Control Center choose Mirror and on the
right, click on the Setup button.
2. Check Create update and also Enable access to les
to perform program component upgrade. In the upper part, choose those versions of NOD32, for which
updates will be downloaded from the Internet. All
versions that will be running on the workstations should be checked. Into the dialog box Upda-
te mirror folder, enter a path to the folder, where the
update les will be downloaded and later presented by the HTTP server. For example the path can be
C:\ OD32LAN.
3. Click OK to save your settings.
4. In order not to wait for the next automatic update (and
thus for the folder C:\NOD32LAN to be lled in), click on
the Update now button in the Update dialog window.
Now server setup is completed. We will proceed to the
workstations.
5. For NOD32 on workstations, just change the update
server URL. In most cases it means from Choose auto-
matically to http:// IP_address_of_my_server:8081.
This is done in NOD32 Control Center: click on the
Update button, and then choose Setup.
6. When there, click on the Servers button and add
a new server, namely http:/ /IP_address_of_my_ser-
ver:8081. Save the changes by clicking OK and set this
server in the previous dialog window.
Now the conguration of workstations is comple-
ted too.
Now click on the Update now button in the Update tab
to check whether it is set up correctly.
Model installation of Mirror
as a shared folder
The whole process of installation is similar to the pre-
vious case. Some dierences can be found in the steps 2,
5, and 6, the others are identical.
• Step 2:
Check the Create update mirror checkbox. In the up-
per part choose those versions of NOD32, for which updates will be downloaded from the Internet. All versions
that will be running on the workstations should be
Page 8

8
checked. Into the Update mirror folder enter a path to
the directory, where updates will be downloaded – i.e.
a path to the shared network folder – Mirror – and en
ter username and password of user with a right to read,
write and browse.
When entering a path, please use the UNC path. Let’s
assume that the shared folder is named NOD32NET and
is located on the MAIN server. Then enter the path in this
form: \\MAIN\NOD32NET.
WARNING! Please, pay attention when entering
“username” and “password”. See below chapter for
details.
• Step 5:
Just change the URL of update server on NOD32 on
the workstations. Again, please be careful when entering
username with Windows NT / 2000 / XP / 2003. Open the
NOD32 Control Center, then choose Update, click on the
Setup button, and enter the username.
Click on the Servers button to add a new update server. According to the previous example, enter \\MAIN\NO-
D32NET. Save the changes and return to the Update setup
window and choose it from the roll down menu.
WARNING! Please, pay attention when entering
“username” and “password”. See below chapter for
details.
Click OK in the bottom section to save the settings. To
make sure that it is set up correctly, click on the Update
Now button in the Update dialog window.
If it is set up correctly, you should not be asked for
username and password, and, naturally, no error messages should be displayed.
Now click on Update now in the Update tab to check
whether it is set up correctly.
How to transfer conguration via
Mirror.
Using a local update server – Mirror – you can also distribute a conguration for NOD32, by which the workstations will be congured at the next attempt to update.
In order to automatically distribute a conguration,
• set update server on the workstations to http://IP_
address_of_your_server:8081 (if it is the version with an HTTP server) or to \\MAIN\NOD32NET (if it is the
version with a shared folder)
• place the conguration XML le on the server.
The conguration itself is created on the same PC
where the mirror is created. Click on the Mirror button
in the Update section in the NOD32 Control Center, and
then click on the Setup button. In the Mirror Setup dialog window, click on Setup in Conguration les. After clic-
king on the Setup button, select Add, then New and create a new conguration le. Save the new conguration
le anywhere on the local disk, EXCEPT for the folder with
the Mirror. After this is done, the application NOD32 Con-
guration Editor is launched (see below).
After required changes are made, save them by clic-
king on the diskette in the upper part of the window.
Then just close the window and click OK to return to the
NOD32 Control Center. Now, by clicking on the Update
button in the Mirror for local updates section the conguration le will be generated in the folder with the Mirror.
The presence of the conguration le in the update folder / mirror will ensure, that the workstations
will, besides downloading updates, apply this conrmation also.
Access usernames and passwords
Please pay attention when lling in the username
and password dialog boxes in the Update setup dialog
window before updating from the mirror (or before creating the mirror).
The NOD32 update process runs at the service level,
and a currently logged in user cannot aect this situation
(even if he/she has access to the folder with the Mirror).
So in case of MS Windows NT / 2000 / XP / 2003 opera-
ting system ll in the “name” dialog box this way:
DOMAIN\USER
or
WORKGROUP\USER
under Novell system, just put USER.
Of course we must not forget the password. LOGIN
NAME is a name of the user with read-only rights to the
folder with the mirror (if the user creates the mirror, then
also to write).
Page 9

9
We recommend creating a new special account for
this purpose (e. g. noduser) and using it for downloading
updates (company\noduser etc.)
NOD32 Program component
upgrades
Besides the virus signatures database update, a license also includes program updates – program component
upgrades, which require a restart of the operating system and bring a lot of new features and improvements
to NOD32 (it is an upgrade to a completely new version, e.
g. from 2.0 to 2.5). Choose “Require permission to perform
program component upgrade” in the Mirror Setup window
to ensure that the program component upgrade will not
be applied to a local update server immediately it is available on the servers of the Eset company. NOD32 on the
workstations will remain in the current version, and the
workstations will only accept virus signatures updates
from the mirror.This feature is suitable if the administrator tests new program updates before applying them to
all workstations in the network.
If “Require permission to perform program component upgrade” is active and there is a newer program
update available than the one saved in the Mirror directory, the “Components Update” in NOD32 Control Center
> Mirror will be active. By clicking on this button the administrator agrees that the program update will be available to the workstations via Mirror.
Installation of NOD32 for Windows
on workstations
The above-mentioned conguration le can serve
also for a new installation of NOD32 according to the requested setup. Place the conguration le into the folder
with the installation of NOD32, i.e. where SETUP.EXE is lo-
cated and name the conguration le NOD32.XML.
It may be useful to remember the parameter /SILENT-
MODE connected with SETUP.EXE (i.e. SETUP.EXE /SILENT-
MODE), which installs NOD32 in silent mode – no dialog
window will be displayed during installation.
chapter 1 / Basic network features of NOD32 for Windows
Now there follows a list of all useful parameters that
can be used during installation of NOD32:
/SILENTMODE – a mode without dialog windows – silent installation.
/UNINSTALL – uninstall of existing installation.
/FORCEOLD – will also install over newer version.
/CFG= – switch with a conguration name (if this para-
meter is not present, NOD32.XML is used by default).
/SETTINGS= – name with obligatory SETUP.XML le (entered only if SETUP.XML is not present in the installation
folder, or has a dierent name).
/TEST – if the installation is launched with this parameter, NSETUP.LOG is created, where the installation progress
is described in details. Here you can exact reasons of eventual problem when installing.
/REBOOT – after a silent installation is complete, the
PC is not restarted by default, even though it may be required. Using this parameter will switch the restart option on.
/SHOWRESTART – if this parameter is combined with the
previous one, conrmation for restart will be required.
/PWD= – entering password for uninstall. This is important in case a current version of NOD32 is protected by
a password, and the administrator intends to reinstall in
silent mode.
/NUP= – if the value of this parameter is set (name of
the le with component), the installation does not require SETUP.XML for the whole installation, but you can
install only one component.
/INSTMFC – this parameter turns on installation of MFC
libraries – if it is necessary – without asking. The MFC library must be located in the same directory as SETUP.EXE.
The installation program will check whether there are
newer libraries in the system (or none) and will proceed
according to the verdict (e. g. install).
The switches with “=” require entering of a thread. It
can be put into quote marks, but does not have to. Quote
marks are obligatory only if the thread contains spaces.
Should this version of the installation be applied, for
example using logon scripts, then make sure that the installation will not be repeated by every start of the logon
script. SETUP.EXE can not decide by itself whether there is
NOD32 already installed on the workstation.
Page 10
10
Such control can be provided for example with this batch
le (.BAT):
@echo o
IF EXIST “c:\program les\eset\nod32.exe” GOTO end
echo Installing NOD32...
\\server\nod32\setup.exe /SILENTMODE /REBOOT /cfg=\\
server\cfg\kong01.xml
GOTO end2
:end
echo NOD32 already installed...
GOTO end3
:end2
echo Completed...
:end3
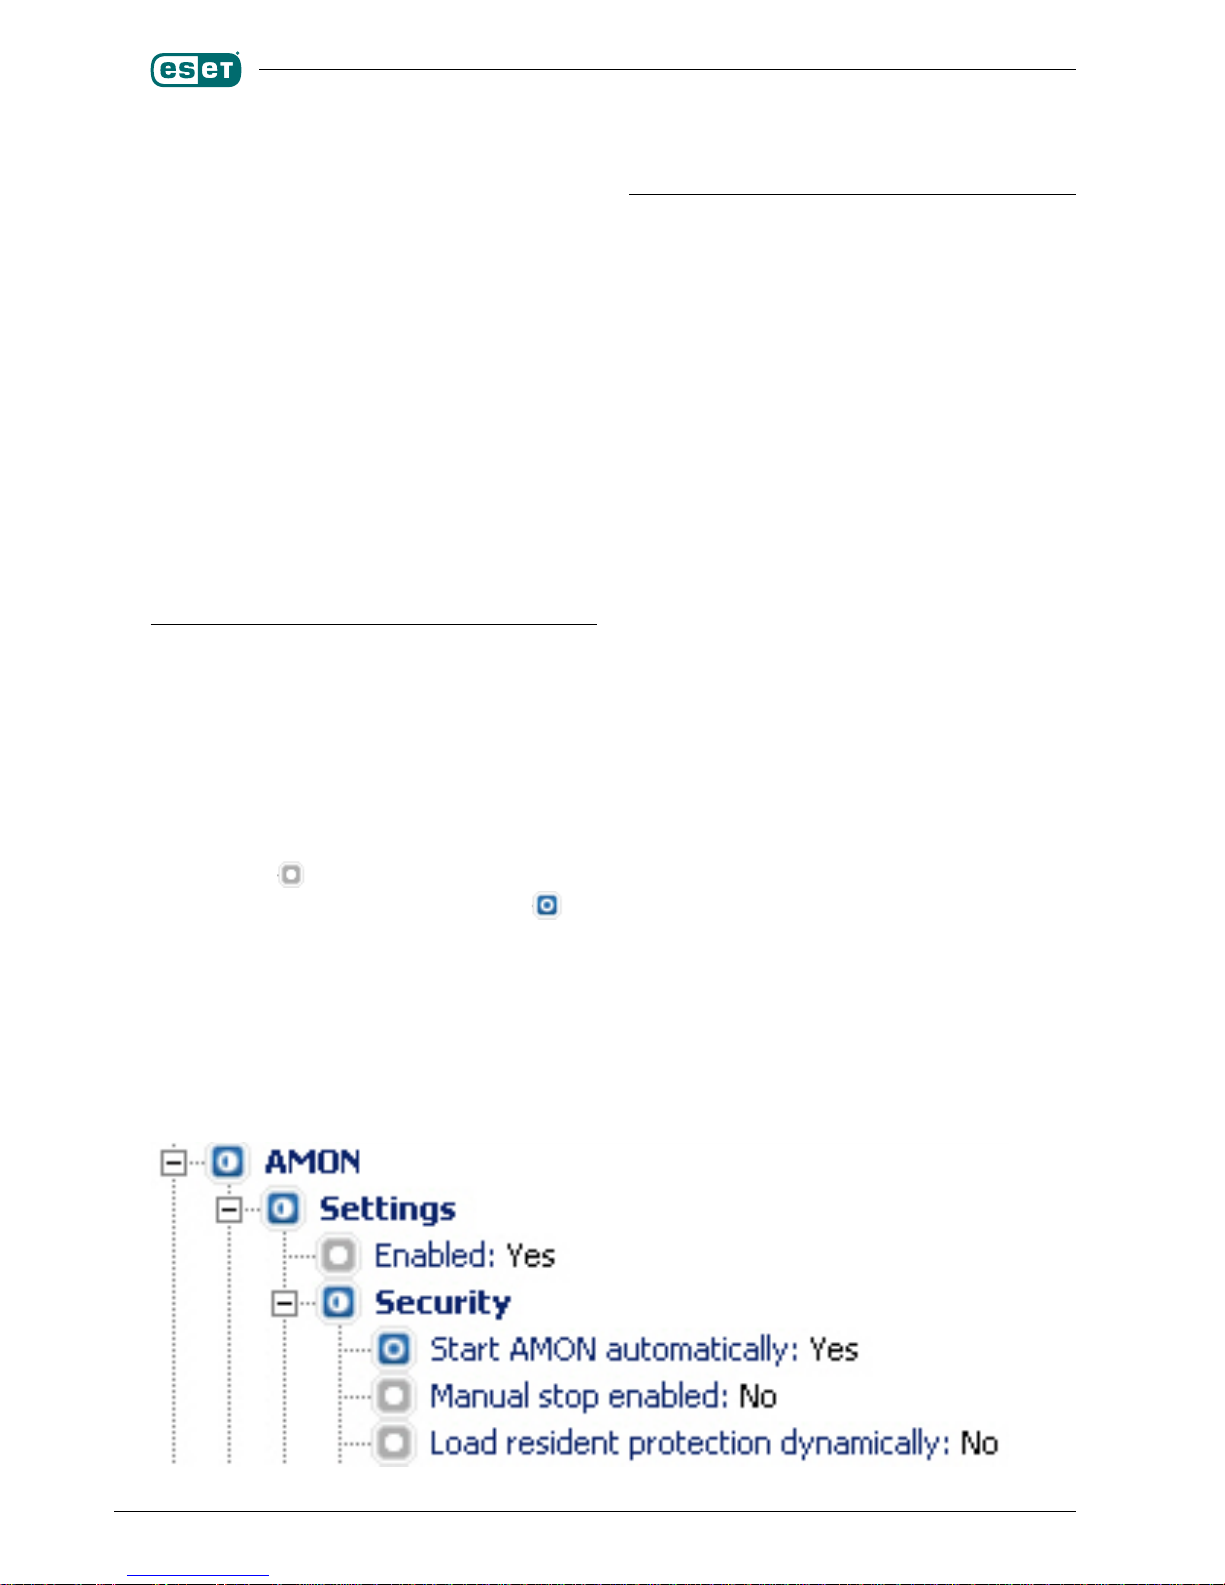
Conguration editor
Using the Conguration editor, you can create a conguration XML le, according to which, NOD32 on workstations and servers will be set up, or scan the computers
using its conguration. All of the features are arranged in
a tree structure. The small icons in front of each feature
are very important. At the moment when the conguration will be applied on the target PC, the setting marked by
a “grey” symbol will be left unchanged on the target
PC. However, all items marked by blue symbols: will
be changed on the target PC.
Thus you can easily recongure chosen features on
all computers at once and leave the other settings unchanged.
Some of the key settings of the
NOD32 conguration
Now there follows a list of some key conguration options (other important information can be found in the
Proles chapter).
Path:
• General / Settings / General / Silent Mode
If the Silent mode is turned on, no messages about
successful updates and so on, will be displayed. This
setting will not aect behavior of NOD32 in case an
inltration was found.
• General / Settings / General / Lock Settings and Password
to unlock
These settings protect access to the NOD32 congura-
tion options by the workstation user.
• General / Settings / Remote Administration
Very important in case NOD32 Remote Administra-
tor is also installed. Then it is important to enter the
IP address (or DNS name) of the RA server, by which
the client workstations communicate (you can leave
default settings for Server port and Interval between
connecting to RA Server) and allow remote adminis-
tration.
• AMON / Settings / Security / Start AMON automatically
We recommend leaving the default setting. Change
it only if you are not sure, whether there is another
antivirus system installed. It is not recommended to
have two AV’s installed and running in real-time on
one PC (it can lead to conicts). These settings can be
changed also in the NOD32 Control Center > Threat-
Page 11
11
Protection Modules > AMON > Setup > Security tab
> Enable automatic startup of AMON.
• AMON / Settings / Enabled
AMON – the resident shield will watch over the ma-
nipulation of les (YES), or will be running only in the
background and will not watch over the manipulation
(NO).
• IMON / Settings / Register IMON to the system
We recommend setting this option to YES, if it is
a workstation, and to NO, if NOD32 for Windows will
be installed on a server, or a PC, where some other
services are running.
These settings can be changed also in the menu
NOD32 Control Center > Threat Protection Modules >
IMON > Quit.
• IMON / Settings / Enabled
IMON – the Internet monitor – will control commu-
nication (YES), or will be running only in the background and will not watch over the communication
(NO).
• Update / Prole / Settings / Update server
This option sets a path to the server, which will be ser-
ving as an update server. By default it is set to AUTOSELECT - NOD32 automatically chooses one of the Eset
company update servers.
• Update / Prole / Settings / Username and Password
Username and password are authorization data to the
above mentioned server. In case NOD32 is updated directly from an Internet update server of the Eset Company, then enter the username and password you received when you purchased the NOD32 license. If you
use your own update server (see chapter about “Mirror”), enter the username and password for this update server (also described in a separate chapter).
• General /Settings / ThreatSense.Net
This system allows sending of suspicious les (that
were identied by heuristic analysis as probably being infected by an unknown virus) from client to our
virus lab. We recommend considering this feature,
especially the option that decides whether the suspicious les will be sent automatically, after user’s consent or not at all..
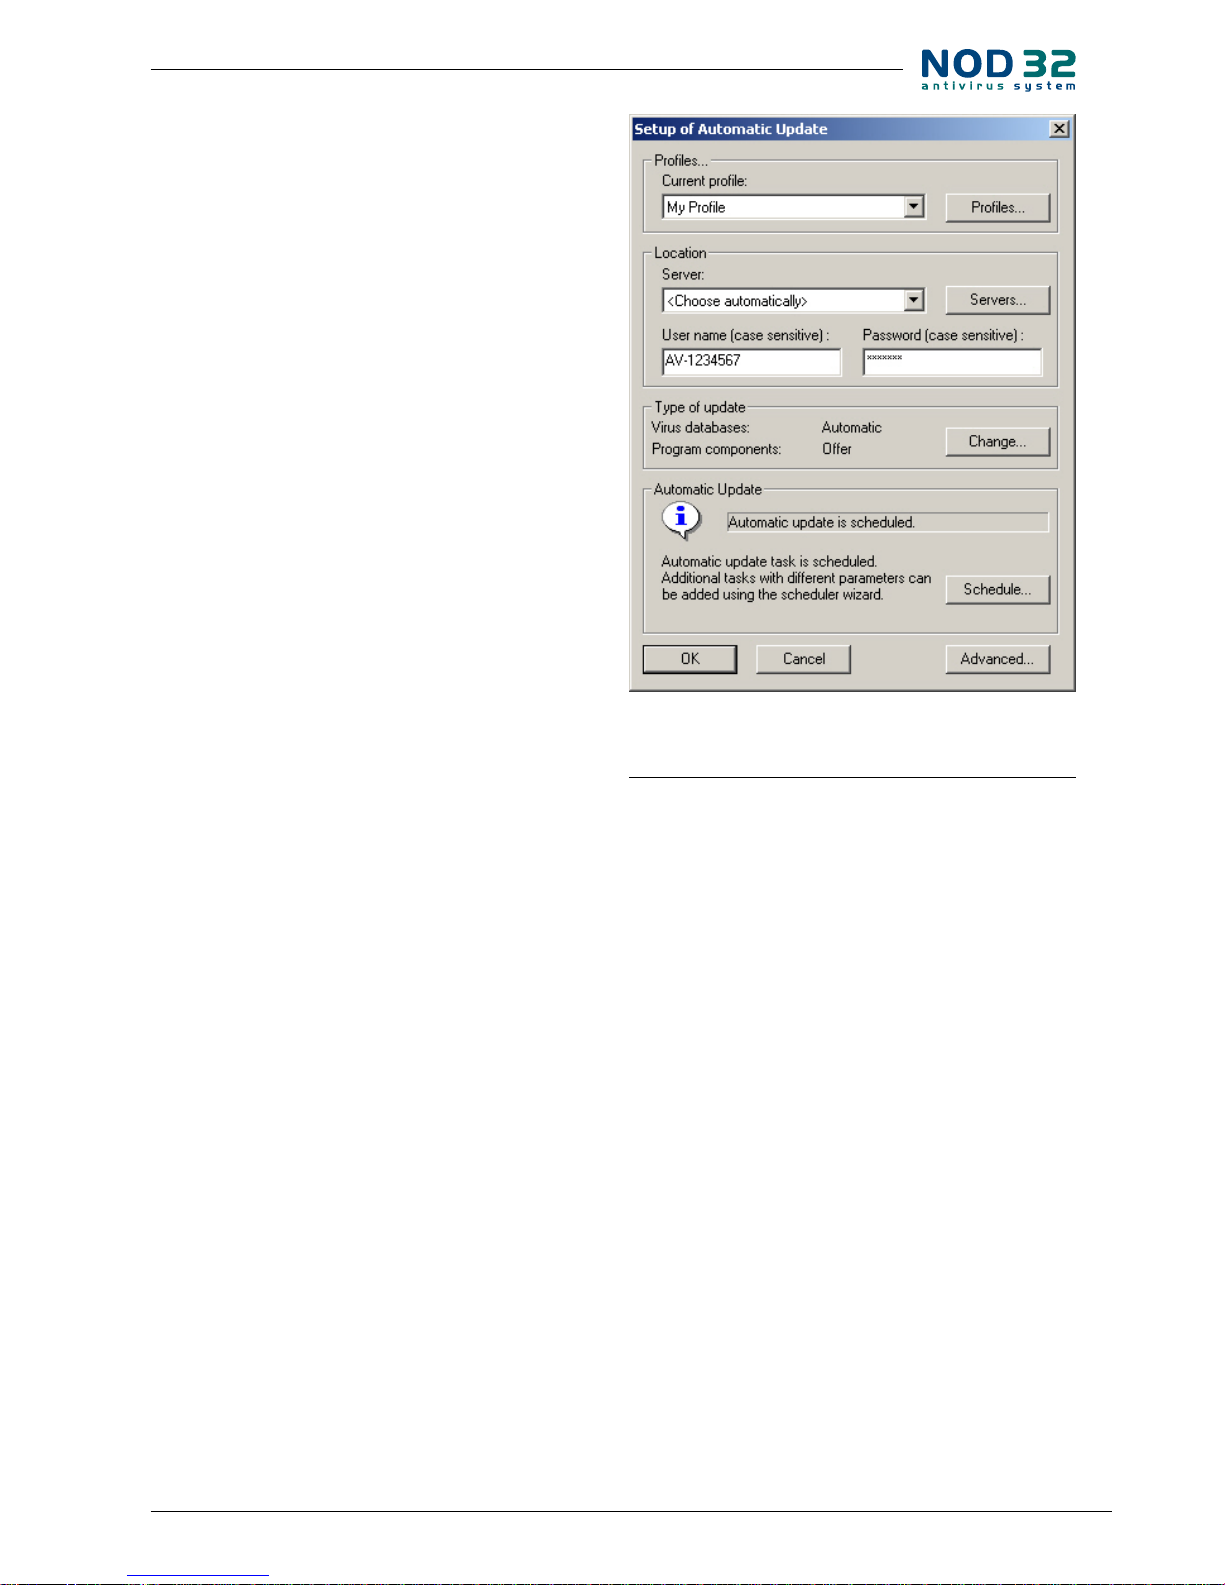
Proles – Scheduler/Planner
NOD32 for Windows allows dening “groups” of settings – proles – in certain parts of the program, especially in update proles and scanning proles. You may,
for example, want to have one prole p roviding updates
from a local server and another one, providing updates directly from the Internet. The same applies to the scanning
proles – one prole would test local disks without scanning of archives, and another would scan network drives
including archives.
The proles are interconnected with scheduled tasks
(NOD32 Control Center / NOD32 System Tools / Scheduler/Planner). For example, after standard installation of
NOD32 for Windows, a prole is created called My Prole, which as one of its tasks sets automatic update for
every hour.
Please pay attention when setting compatibility of
the proles and the scheduled tasks, and please also be
careful when dening your own proles – check whether
the proles are really launched automatically.
If there’s no automatic update scheduled, it is shown
in the Setup of Automatic Update tab, as can be seen in
the screenshot.
chapter 1 / Basic network features of NOD32 for Windows
Page 12

Page 13

Chapter 2:
Centralized management –
NOD32 Remote Administrator
2 Centralized management – NOD32 Remote Administrator
Page 14

14
Workstation
Workstation Workstation
Workstation
RAC2
RAC1
RAS
TCP 2222
TCP 2222 TCP 2222
TCP 2222
TCP 2223
TCP 2223
Remote Administrator
NOD32 Remote Administrator serves to manage the
NOD32 antivirus system in large computer networks.
Thanks to NOD32 Remote Administrator, you can get
a global overview of the NOD32 antivirus system activity
on network workstations together with information about
any eventual inltration. The information retrieved from
workstations (from NOD32 for Windows, or the NOD32
Control Center module) are stored centrally on the server
(NOD32 Remote Administrator – RAS), and the network
administrator can access them at once using the userfriendly graphical interface of the console (NOD32 Remote
Administrator Console – RAC
). The communication takes
place also in the opposite direction and the administrator
can thus immediately react to newly-created situations,
and assign tasks to the NOD32 Antivirus System on the
client workstations.
Figure 2: Simple RA connection diagram. The real situation can be much more complex. There can be also
a separate mirror server – though usually RA server and Mirror would be located on one computer/server.
The connection to RAS is initiated by the workstations in preset intervals.
Installation of RAS and RAC, basic
conguration
NOD32 Remote Administrator Server (from now
on only referred to as RAS) – is an application which
communicates with NOD32 on workstations (or with
NOD32 Control Center), gathers information about them
and sends them to the other application – NOD32 Remote
Administrator Console (RAC). It is advised to install RAS on
a PC that is running all the time and that is “visible” for the
workstations with NOD32 on the TCP/IP level, but also for
the PCs, from which the administrator will connect using
the console (RAC). The product must be installed on the MS
Windows NT based operating system (NT4, 2000, XP, 2003).
RAS is installed by running the le rasrvnten.exe. RAS
is installed as a service.
Page 15

15
You can control the service manually using these
commands:
NOD32RA.EXE –INSTALLSERVICE
NOD32RA.EXE –REMOVESERVICE
During installation, the program will ask for the
location of the license key, i.e. of the le called nod32.
lic, which contains information about its owner, its expiry
date as well as about the number of users, for which the
RAS was purchased. You can copy the key later into the
directory C:\Program Files\Eset\RA\Server (it is activated
after restarting the NOD32 Remote Administration Server
service). Information included in the key can be seen
in Help / About / Server Options after connecting to the
server with the console.
During the expert installation, the name of the server,
under which workstations in the network recognize it, is
required. If not stated otherwise, the server is presented
under the name of the PC where it is located.
Please pay attention when entering the name of the
server. This name is used for example by nod32installer
providing remote installation of NOD32 on workstations.
If RAS would not have been visible under this name, the
remote installation could fail.
We recommend entering the DNS name of the server.
chapter 2 / Centralized management – NOD32 Remote Administrator
Also NOD32 for Windows Antivirus System is
supposed to be running on the same PC – connected
to the Internet. Its virus signature database serves as
a detector of the most recent for the databases present
on the workstation.
NOD32 Remote Administrator Console (from now
on only referred to as RAC) serves for accessing the
information retrieved by RAS from the workstations with
the NOD32 installation. It is advised to install RAC on
workstations, from which the administrator will access RAS.
The installation begins after running the le
raconsnten.exe (console for Windows NT/2000/XP/2003)
or racons98en.exe (console for Windows 95/98/ME).
To complete the setup procedure, congure also
the workstations with NOD32 for Windows, which will
communicate with RAS. Remote administration therefore
must be enabled on the workstations with NOD32 for
Windows in the menu NOD32 Control Center / NOD32
System Tools / NOD32 System Setup / Setup – Remote
Administration. Enter the name or IP address of the RA
server, or change the interval between connections (5
minutes by default). Communication between NOD32 (or
NOD 32 Control Center) on the workstation and RAS takes
place by default on TCP port 2222.
Connecting to server using console
interface
The console connects to RAS after entering the
RAS IP address in menu Tools / Console Options (the
Connection tab) and clicking on the Connect button.
Select the option Connect to selected server on the console
startup provides automatic connection to selected RAS
after starting the console.
Enter your access data to chosen RAS during
connection. By default the password dialog box is blank
– it is advised to dene your password in the menu
File / Change Password…
The console can remember passwords – check the
Remember password checkbox during entering – but it
is recommended to leave this option disabled for security
reasons. If it is already enabled and you do not want the
passwords to be lled in automatically by the console,
then check File / Clear Cached Passwords.
Page 16

16
The communication between the console and RAS
takes place on TCP port 2223.
As soon as the communication is established, the title
Connected [name_of_the_server] appears in the title.
1. In this section you can nd more detailed information
about the RA server to which the console is connected
and also information about RA servers related to it (in
case of replication).
Attributes:
– Clients – number of clients (workstations)
connected to the server, or clients that were
connected in the past and are registered in RAS
database
– Oldest Version – the oldest version occurring on
the workstations connected to t he RAS
– Least Recent Connection – value that was taken
from a client workstation that has not been
connected to the RAS for the longest time period.
– Last Virus Alert – number of virus alert messages
sent from clients to their RAS.
– Last Events – number of events sent from clients
to their RAS.
3) In the left part of this dialog window, there is
a sensitive, adjustable lter displaying only the
information that is interesting to the user.
3) In the bottom part of the dialog window, there is
information retrieved from client computers. In order
Figure 3. The main screen of the NOD32 Remote Administrator Console.
to get an overview, the information is displayed in tabs
in the bottom part. The tabs Reports a Remote Install
are exceptions; they serve for remote installation.
Tabs in the bottom part of the
console window
Clients
In this tab, there is a list of clients (workstations with
NOD32) that were connected to the RAS in the past. You
can apply a lter on this tab – as well as on all other tabs
(Use lter in the left part). The client workstations can be
divided into groups using the menu Edit / Groups and by
applying the division into groups using the lter.
Clients – computers with NOD32, that have logged
to the RAS for the rst time, are in a state Yes with the
attribute New, that can be seen in the bottom-right part
of an icon in a shape of a small monitor. This feature serves
only for easier orientation of the administrator, who can
thus quickly nd out that there is a client computer which
has not been “cared for“. The attribute can also serve for
other dierentiations – it is up to the administrator.
At the time when the administrator sets up the client
workstation as necessary through RAC (places it in a group,
etc.), the administrator can place it into “already registered“
Page 17

17
by using the right button of the mouse and by choosing
the feature Reset “New“ Flag. The icon will change to this:
The attribute Comment is selectable in all of the tabs.
It serves for inserting the administrator’s comments (for
example alternative name of client workstation).
The attribute Primary Server denotes the name of the
RAS, to which the remote client is connected via NOD32
Control Center. If it is another server than the one which
the administrator is currently connected to, then it is
a result of replication. Version is the current version
of the NOD32 antivirus system on the client workstation,
and Last Connect is the time of the last connection of
NOD32 on the workstation to the RAS server. According
to the settings of the console, time is either relative (e.g.:
“20 seconds ago“) or absolute (e.g.: 12:56:13). If there
is an older version on the workstation, the data eld is
in a dierent color (again, depending on settings of the
console), but it does not inevitably mean a problem (for
example, in case the workstation has been shut down for
a week – it can be seen in Last Connect).
The attributes Last Virus Alert (inltration detected
by the AMON, IMON, and EMON… modules) and Last
Event (error event) display the last event of that type
on the chosen client workstation. The events checked by
the administrator can be removed from the list. Click right
mouse button and select the Clear “Last Event” Text, or
Clear “Last Virus Alert” Text option.
To switch the tab with automatic lter to display
only records belonging to a chosen client computer, click
the left mouse button on the corresponding cell in the
column Last Virus Alert or Last.
Other attributes:
AMON – status of the AMON module on client
workstation.
Conguration – using the console (by the Conguration
option in context menu) you can retrieve a conguration
of a remote client workstation. In case the client is not
present directly on the server, to which the administrator
is connected with the console, conguration can be
retrieved by clicking on the Request button. The
conguration can be viewed by selecting the View option
or saved by clicking on the Save As button. Click on the
New Task button to create a new task. The attribute
Conguration also informs about the state of import of
the conguration. You can view status (Ready- import
nished or Requested•request to import), last request
for conguration – from the view of the administrator
using console, but also from the view of a user on a client
workstation.
IP – last known IP address of client workstation.
OS – operating system on client workstation.
Mobile User – if the Mobile User option is turned on
(Yes), then the workstation will be updated (the Update
Now task) as soon as the client workstation connects to
the console (see interval dened by the NOD32 Control
Center settings). This attribute can be enabled by the Set
“Mobile User” ag option using the right mouse button
context menu. It is recommended to use the Mobile Server
if you connect to the network with a notebook computer.
The NOD32 Antivirus System update is performed
immediately afterwards.
Alert Log
Alert log contains information about inltrations
detected by the AMON, EMON, IMON, and other modules.
Click left mouse button to gain more information about
the alert. The displayed information can be ltered too.
Attributes:
Event Id – log identication number.
Client Name – name of client workstation.
Primary Server – name of RAS to which client is connected
via NOD32 Control Center (related to replication).
Date – date and time of the event (when it happened –
according to time on client workstation).
Received – date and time of receipt by the server.
Module – name of the module that created the event.
Object – type of infected object.
Virus – name of virus.
Name – name of infected object, sector, or information
about e-mail.
Action – action performed.
Info – contains supplementary information.
Log Details – information about the log accessibility in
relation to replication.
chapter 2 / Centralized management – NOD32 Remote Administrator
Page 18

18
Event Log
Event log contains information about an event other
than the virus. The report can be ltered to display only
information you need – for example with the tick boxes in
Type of Event Log
. To get more detailed information about
an event, click left mouse button on the event.
Attributes:
Alert Id
– log identication number.
Client Name
– name of client workstation.
Primary Server – name of RAS, to which is client
connected via NOD32 Control Center to RAS (related
to replication).
Date – and time of the event (when it happened).
Received – date and time of receipt by the server.
Module – name of the module that created the event
Type – type of log.
Event – description of event.
Scan Log
Scan Log contains reports that were performed by the
NOD32 on-demand scanner (antivirus test), which was
planned in the Tasks tab, or started directly on the client
computer. Click left mouse button to gain more detailed
information about the performed test, or request for
the details if servers in your network are replicated. (See
chapter on RAS conguration).
Attributes:
Scan Id – log identication number.
Client Name – name of client workstation.
Primary Server – name of RAS to which client is
connected via NOD32 Control Center to RAS (related
to replication).
Date – date and time of event (when it happened –
according to time on workstation).
Received – date and time of receipt by the server.
Description – contains supplemental information.
Scanned – number of scanned les.
Infected – number of infected les.
Cleaned – number of cleaned les.
Status – status of task completion.
Log Details
– information about the log accessibility in
relation to replication.
Tasks
The Tasks tab contains information about tasks
planned in the past (more details in the chapter on Tasks).
Attributes:
Task Id – task identication number
Type – type of task
Name – name of task
Date To Deploy – date and time of assigning to target
client computers
Date Received – date and time of the client computer
response
Description – note added by administrator to describe
the task.
Conguration – information about accessibility to current
conguration
Click left mouse button on the task to get more
detailed information, especially in the Details tab. In
the Details tab you can nd a list of client computers
(the attribute Client), which were assigned the task,
and current state (the attribute State) of the task. This
attribute has one of these values:
• Waiting
A task is waiting on RA server to be sent to the client
computer (target workstation). There can be one or two
reasons for this – for example, the client workstation is
shut down, or the NOD32 Control Center has made no
contact to the RA server yet (by default it connects in ve
minutes intervals).
• Done
Task has been assigned to the client computer –
the target workstation. It does not necessarily mean that
the task has been performed by the target workstation
yet.
• Pending
Task is being performed.
Reports
The Reports tab serves for creation of statistical
information – reports. Reports can be planned (for
example once a week) or performed on demand
(generated on administrator’s command).
Individual variants of reports can be selected in the
menu Report / Type. Report / Style determines graphical
Page 19

19
interface of the resulting report (NOD32 Scheme is more
graphically-demanding).
In the Filter section you can choose what clients
(Target Clients), or viruses (Viruses) will be included in the
report.
Other details can be set by clicking on the Additional
Settings tab. It applies mostly to data in the heading and
in the types of the diagrams used. At the same time,
you can lter the client computers according to states of
chosen attributes, and you can also choose the format of
the output le (HTML, CSV).
In the Interval tab you can dene an interval, for
which the report will be generated:
• Current
Only events that took place in a chosen time period
will be included in the report – meaning the same as now
(e.g.: if a report is created on Wednesday and the interval
is set to Current Week, then the events from Sunday,
Monday, Tuesday, and Wednesday will be included).
• Completed
Only events that took place in a chosen, closed period
will be included in the report (for example the whole of
August, a whole week – from Sunday to next Saturday).
If the parameter Add also the current period is active, the
period chosen above will also include events from the last
closed period until the moment of creating.
Example:
• We want to create a report including events from
the last calendar week, i.e.: from Sunday to next
Saturday. We want such report to be generated on the
next Monday (after Saturday).
In the Reports / Interval tab, choose Completed and
set 1 Weeks. Remove Add also the current period. In the
Reports / Scheduler tab, set Frequency to Weekly and
choose Monday. The other settings can be set according
to request of the administrator.
• From / To. Use this setting to dene a period for which
the report will be generated.
Click on the Scheduler tab to dene and set up an
automatic report in chosen time or intervals (Frequency
section).
Enter time and date, when the report will be
generated to the Run at tab, and in the Store the Result
to section (the Select Target… button, specify how the
report will be exported. The report can be sent via e-mail
to a chosen address, or exported to a folder. A report can
be exported, for example, to a folder that is accessible via
intranet. Then it can be shared by all employees.
To send generated reports via e-mail, you need to set
the SMTP server and sender address as described in the
chapter “RA Setup“.
To dene the time period when generating will
be active, go to the Range section. You can dene the
number of generated reports (End after), or a date of the
last report (End by).
To save the settings of a dened report to a template,
click on the Save or Save as buttons. When creating
a new template, click on the Save As button and give
the template a name.
In the upper part of the console window, you can see
names of templates that were already created. Beside
the template names, there is information about time/
intervals, when the reports are generated according to
the preset templates. Click on the Generate Now button
(either in upper part, or in context menu – by clicking
right mouse button on chosen template) to generate
a report at any moment regardless of the schedule.
Already generated reports can be viewed in the
Generated Reports tab. With the context menu options
you can perform other operations with reports.
Favorite templates can be placed in the left window
Favorites, and thus you can later immediately generate
reports from favorite templates. To move a template to
Favorites choose Add to Favorites in the context menu in
the list of the scheduled templates.
This is a list of report types:
Top Viruses – list of the most frequently detected viruses
Top Clients with most Alerts – list of the most “active”
client workstations (in number of detected viruses)
Alerts Progress – progress of virus events (number)
Alerts Comparative Progress – progress of virus reports by
chosen viruses (using lter) compared with the total
number of viruses.
Alerts By Module – number of virus alerts from the
individual NOD32 modules.
Alerts By Object – number of virus alerts according to the way
they attempted to inltrate (emails, les, boot sectors).
chapter 2 / Centralized management – NOD32 Remote Administrator
Page 20

20
Combined Top Clients / Top Viruses – combination of the
above mentioned types.
Combined Top Viruses / Alerts Progress – combination of
the above mentioned types.
Combined Top Viruses / Alerts Comparative Progress –
combination of the above mentioned types.
Clients Report, Alerts Report, Events Report, Scans Report,
Tasks Report – typical reports that can be viewed in
the Clients, Alert Log, Event Log, Scan Log or Tasks
tab.
Comprehensive Report – summary of these types:
Combined Top Clients / Top Viruses
Combined Top Viruses / Alerts Comparative Progress
Specied Alerts Progress
Remote Install
This tab oers several variants of remote installation
of the NOD32 Antivirus System on workstations and
related features. More detailed information can be found
below.
RA Conguration
License keys (.LIC les)
NOD32 Remote Administration (or NOD32 Enterprise
Edition package) is delivered with a license key – a le
with .lic extension. In this case the key must be copied into
the folder C:\Program Files\Eset\RA\Server, which is done
automatically during installation of the server part. Later
manipulation of the license key has to be done manually.
The license key le must always have .lic extension.
The license le contains information about expiry date
and extension of the NOD32 Remote Administrator product
license. The license le in fact determines functioning of
NOD32 Remote Administrator as a product.
RAS reads information from .lic les when starting
the nod32.exe service, and then every 60 minutes. If
there are more license keys in the folder C:\Program
Files\Eset\RA\Server, then RAS will choose the most
appropriate (more detailed information can be found
in the le nod32ra.log). If the license key has expired,
NOD32 Remote Administrator will run in demo mode, i.e.:
number of clients will be limited to two. If there are more
clients than is dened in the license key (purchased),
only a limited number of clients, corresponding with the
dened number, will be displayed.
From the version 1.0.11 license key can be changed
remotely on RA server via RA console. It is possible in the
menu Tools/ Server options – Renew License… button.
Note: Should you have any problems with application
of license keys, please look in the le C:\Program Files\
Eset\RA\Server\nod32ra.log where you can nd the
exact reason for the failure.
RA server conguration
To congure RA server, connect RA console to it (for
example in the menu File / Edit Connections…) and then
select Tools/Server Options…
General Tab
Information on server part of RA Curent NOD32
ver. attribute is taken from NOD32 for Windows that
physically runs on the same machine as RA server. This
version is considered to be up-to-date and determines
the currentness of the stations (meaning that the older
versions dier from these ones in colors).
With Change password button it is possible to change
or set the password for RA server. From the version 1.0.11
the button Renew License is available. It gives the option
to change license key on RA server.
Database Maintenance Tab
Here you can set RA server behavior in connection
with database maintenance.
Following options will inuence how many (X) events
for each station should be saved in event log and scan log
tabs. The oldest ones will be deleted.
Only keep the latest X events for each client
Only keep the latest X scan logs for each client
Delete clients not connected for the last X months – the
workstations that has not been connected to RA server
for more than X months will be deleted from clients tab
(usually the ones that do not exist in LAN)
Following choices will inuence how the old events
should be deleted from the alert log, event log and scan
Page 21

21
log tabs. Events older that X months will be deleted.
Delete alert logs older than X months
Delete event logs older than X months
Delete scan logs older than X months
Clean up every X minutes – settings above will be
applied every X minutes.
When deleting events (by administrator or functions
described above) no physical cleaning directly from the
database le is done. To clean the events directly from the
database (this will compact the size of database le), it is
necessary to set the following option:
Compact every X (days, weeks, months)
During this activity the service of RA server is
temporarily stopped (for maximum few minutes) till
the database is “cleaned”. In this time the RA server will
not be able to accept console requests and workstation
information. Therefore it is no recommended to do this
activity too often and during the heavy trac.
Loggig Log
Enable logging
– enables logging of RA server events
NOD32 RA server is able to log to the le (Log
lename), whereas the size of this le can be restricted
(Rotate when greater than). If it greater, it is rotated. In
Log verbosity part it is possible to set the verbosity of log
events.
At the same time it is possible to enable log to OS
application log (Log to OS application log) or enable log
over database (not recommended).
Replication Log
Replication „to“ settings
Enable „to“ replication – enables replication –
described in “Large Hierarchical Networks” chapter.
Upper server – the address (IP or according to DNS)
of superior RA server to which the data replication from
just congured RA server will be applied. From the picture
in “Large Hierarchical Networks” chapter it is obvious
what should be written in this column, see upper server
attribute.
Replicate every XX minutes – replication frequency
(every XX minutes)
Replicate Up Now – instant application to chosen
upper server
Checkboxes on the left part enable to dene log
types (alert, event, scan), which can be replicated
(transferred) to superior RA server on administrator’s
request. Checkbox in the right part enables dening if this
should be done automatically (Automatically replicate ...).
It is not necessary to activate automatic log replication.
Administrator can request them individually from inferior
server any time. Thus the transmission band among RA
servers can be partly saved.
Replication „from“ settings
Enable „from“ replication – ticking this option in Allow
servers column allows to dene RA servers (their name),
from which the RA server will accept replication requests.
Higher number of servers can be separated by commas.
Standard replication runs on TCP 2846 port, thus it
can be changed (on inferior server directly in this tab, on
superior – upper server in Other Settings tab).
Other settings Tab:
SMTP settings
Server - SMTP Server address, through which the
reports will be sent, or requests for remote installation
via email
Sender address
- e-mail address which will be set as
the „sender“ in outgoing e-mails.
Allow new clients
– Clients are, by default, added to
the list (the Clients tab in console) automatically at the
moment when RAS registers the rst attempt to establish
connection from a new, so far unregistered client module
of NOD32 Control Center. Ticking this option enables
automatic adding of new clients to the clients list. If you
leave this option unchecked, automatic adding will not
be enabled. The setting does not apply to new clients,
which were added to the clients list from child servers by
replication.
Automatically reset “New” ag by new clients
–
denes whether a newly added client will be marked by
the attribute New or not (turned o = the attribute New
assigned). More detailed information can be found in the
chapter “Clients”.
In the lower part numbers of ports where the RA
server will “listen” can be changed.
chapter 2 / Centralized management – NOD32 Remote Administrator
Page 22

22
We recommend keeping original port numbers on
server and client part parts.
RA console setup
The console can be congured in the menu
Tools / Console Options…
Columns – Show / Hide tab:
Here you can dene, what attributes should be
displayed in individual console tabs.
Colors tab:
Here you can dene what colors will be assigned for
what events.
Clients: Previous Version – color of previous virus signature
database (compared with current)
Clients: Older Version or N/A – color of older virus
signature database (compared with current), or color
of unknown database.
Clients: Last Connected – color of client which was not
connected for the longest time. This option can be
set.
Clients: Last Virus Alert – color of last virus event.
Clients: Last Event – color of last event – other than virus
event.
Clients: AMON Stopped – color assigned to client with
AMON turned o.
Event Log: Diagnostic – color of events classied as
“Diagnostic“.
Event Log: Warning – color of events classied as
“Warning“.
Paths tab:
Here you can specify a directory to which the console
will locally save reports downloaded from RAS. By
default, it is the directory relative to CONSOLE.EXE, strictly
speaking .\Reports.
Other Settings tab:
Appearance of the date/time columns
Time display format.
Absolute – console will display absolute time (e.g.:
14:30:00).
Relative – console will display relative time (e.g.: 2 weeks
ago).
Regional – console will display time according to regional
settings (taken from the Windows settings).
Recalculate UTC time to your local time (use local time) –
Check this checkbox to recalculate to your local time.
Otherwise, GMT – UTC time will be displayed.
Other settings
Auto Apply Changes – lter automatically selects appro-
priate data as soon as any change is done (except the
change of dened client name or server)
Use automatic refresh X – automatic data refresh in a cur-
rent folder and in chosen interval (X minutes).
Empty console recycle bins at application exit – click to re-
move items from internal recycle bin of the console
after nishing working with it. You can select it in the
Reports tab.
Show gridlines – click to separate all individual cells of all
tabs by gridlines.
Use systray icon – console will be represented by
a Windows system tray icon.
Show on taskbar when minimized – denes if the consol
should be minimized on the Windows taskbar.
Use highlighted systray icon when problematic clients found
– use this option, together with the Edit button
to dene events, which will trigger a change of the
systray icon color. So if, for example, you minimize the
RA console program, by the change of color you will
see that a new problem has occurred.
In a larger network, with more workstations, these
features will come in handy:
Selection of more records can be performed, for
example, by pressing the CTRL key and left clicking on
the selected items, or in a similar way, but with the SHIFT
key. Press the key combination “CTRL” and “A” to select all
workstations.
Groups
Individual clients can be placed in groups using the
Edit / Groups feature from the console menu. Placing into
groups can be used to lter or to create tasks, since the
tasks can be applied to the whole group. The groups are
independent to each server – they do not replicate.
Page 23

23
Filter
Filter is used to display only records that are important
for the administrator to know. Filter can be enabled by the
option View / Show/Hide Filter Panel in the console menu.
To activate lter, check the Use Filter checkbox and
click the Apply Changes button to start the ltering. In
the rst section – Computer lter criteria you can lter
servers / clients in several ways:
Only clients (whole word) –
Only those clients whose
name corresponds to a word thread you typed in will
be included in the output.
Only clients like – Only those clients whose name contains
a thread you typed in will be included in the output.
Exclude clients (whole word) – The opposite of “Only clients
(whole word)”.
Exclude clients like – The opposite of “Only clients like”. In
the next section, you can limit ltration by the Groups
division.
Clients in Groups – In this case, only clients belonging to
dened groups will be selected.
Clients in other Groups or N/A - Only clients belonging
to other than chosen groups, or not belonging
to any group will be included in output. If
a client belongs to some of the chosen groups,
but also in a group that was not selected, then
this client will also be included in output.
Clients in no groups - Only the workstations not
belonging to any other groups will be chosen.
The other lter settings dier depending on the active
tab, but mostly it is only a variation of the time lter that
can limit outputs only to records that were created in
a certain time period.
Context menu
Click the right mouse button on the event list to
bring up a menu that enables applying other features to
eectively lter events. These are the options:
Select by 'aaa' – Only records containing thread aaa
in the same attribute (column), where the context
menu has been brought up will be selected. Thread
aaa will be automatically replaced by the value from
the cell, where the context menu has been brought
up.
Inverse selection – Inversed selection will be performed.
Hide selected – Hides selected items.
Hide unselected –Choose this option to hide items that
were not selected.
The two last options can be suitably applied after you
have used the previous options. Filters set by the context
menu can be canceled in the menu View / Cropped View,
or by console tray icon. Or, alternatively, press F5 (shortcut
to refresh).
A Practical Example:
• We want only those workstations with some virus
event to be displayed:
Click the right mouse button in the Clients tab on any
of the Last Virus Alert empty cells and choose Select by ‘’
from the context menu. Now, in the context menu bring
up the Hide selected feature.
• We want to display virus events only from the
workstations George and Edward.
Click the right mouse button on any cell with the
text “George” in the Client Name column in the Alert Log
tab. In the context menu choose Select by ‘George‘. Now
press and hold the CTRL and in a similar way (with the
right mouse button and by selecting Select by ‘Edward’)
select ‘Edward’. Click the right mouse button and choose
Hide unselected from the context menu. Release the
CTRL key.
At the same time, together with the left mouse
button, you can use the CTRL key to select/unselect
chosen items, as well as the SHIFT key to select/unselect
a group of items.
How to use the console more
eectively
Export
Data from the tabs Clients, Alert Log, Event Log, Scan
Log and Tasks can be (even after lters have been applied)
exported to a le using the option Export in the File menu.
Or, alternatively, by the option Export Selected – only
selected records will be exported.
chapter 2 / Centralized management – NOD32 Remote Administrator
Page 24

Data can be exported to dierent le extensions. We
recommend exporting to an HTML, or to a CSV le (the le
can be edited, for example, in MS Excel after that), where
individual attributes are separated by commas (comma
delimited) or by semicolons (semicolon delimited).
Print
Similarly, data from the tabs Clients, Alert Log, Event
Log, Scan Log, Tasks
can be printed.
First of all, congure page setup in the menu File / Page
Setup. In the section Mode you can choose, whether the
page will be printed in mode WYSIWYG (“what you see is
what you get“), or in grayscale.
In the section Tables also choose whether eventual
graphics will be printed (PC symbols, etc.) To set page
headers and to browse and enable printing of a logo (e.g.:
of a company) do to Headers and Footers.
Click Preview to view the nal appearance of the page
(as well as with the option Print Preview in the menu
File).
Deleting unnecessary data
To eectively remove old and unnecessary data
in the tabs Alert Log, Event Log, Scan Log, and Tasks,
choose the Edit / Delete special… option. Click Specify
Date to dene what data should be removed. Automatic
removal of specic data is provided in options in Database
Maintenance tab.
Maintenance and backing up of NOD32
Remote Administrator Server
We recommend keeping the RAS database up to
date and deleting old records in order not to overburden
the system unnecessarily. It applies mostly to data in
the “Alert Log” tab. To delete unnecessary data, use the
feature described in “Deleting unnecessary data”.
What is relevant to saving information: all data is
saved in the le nod32ra.mdb, which is usually located
in the folder C:\Program Files\Eset\RA\Server. It can be
stored in case of server failure (when saving, please stop
the NOD32 service – required).
Details from individual logs (for example NOD32 ondemand scanner logs) are stored into the subdirectory
Storage. Also client congurations and reports in xml
extensions can be found there.
Page 25

chapter 3:
Remote installation
3 Remote installation
Page 26

26
Introduction
The product NOD32 Remote Administrator
enables remote installations of NOD32 for Windows to
workstations in a network.
Remote installation can be divided into two parts:
• Creation of installation packages and their
conguration
• Export to remote workstations. In the NOD32 Remote
Administrator console, navigate to the “Remote
Install” tab. This tab deals with remote install.
NOD32 Remote Administrator oers two basic ways
of how to install NOD32 for Windows remotely:
• Push installation, where the installation is “pushed”
to remote workstations directly on administrator’s
command. This is possible only assuming that there
is a Windows NT based operating system installed on
workstations (NT4, 2000, XP…).
• Installation using the short installer nod32installer.
exe, exported to workstations in a logon script or in an
e-mail. To install the program, run nod32installer.exe
on a client workstation. This type of installation can
be used on computers with all versions of Windows
(beginning from the version 95).
Minimal requirements for successful remote installation:
• Operation of a client workstation in Microsoft
network
• Operation of the les and printers sharing (+
exception in integrated rewall in Windows XP)
• NT systems: knowledge of username/password with
administrator rights on given workstations. Without
it the remote installation cannot be performed
• At least these ports should be available on RA server:
2222 (communication of NOD32 for Windows with RA
server), 2223 (communication of RA console with RA
server), 2224 (feedback to RA server during remote
installation).
• Accessibility of client on the level of ”network places”
towards RA server
• Dened administrator account password in NT
systems (the remote installation is not possible
without dened administrator account password)
• With Windows XP it is required to disable the option
“Use simple le sharing”. To disable this option, go to
Control panel/Folder Option
In both cases, TCP/IP connection between target
workstation and RA server is established on port 2224.
That’s why a properly congured TCP/IP protocol is among
minimal requirements for a successful installation.
For the NT based systems it is necessary to provide:
– operation of a client workstation in Microsoft
network,
– operation of the le sharing service,
– operation of these services: Remote Registry
Service, Remote Service Manager.
– username and password with administrator rights
for all workstations. Remote Install is not possible
without username / password of a user with
administrator rights to all computers – without it,
installation cannot be performed.
Especially on computers with the MS Windows XP
operating system, it is required to disable the option “Use
Simple le sharing”. To disable this option, go to Control
Panel / Folder Options … in the View tab.
In Windows registry, it is: HKLM\SYSTEM\
CurrentControlSet\Control\Lsa\
- the forceguest item. Set its value to 0.
Note: NOD32 can be installed remotely also without
using NOD32 Remote Administrator. More details in the
chapter 2.
Page 27

27
chapter 3 / Remote installation
Remote Installation Process
How to create and congure
installation packages
First of all, create installation packages – les with
*.nip extension, or installers for specic workstations
(according to their operating system) with a preset
conguration.
To do it, click on the Packages (the Manage Packages
section) button in the Remote Install tab.
In the Create/Select NOD32 installation package
contents section, create (clicking on the Create button),
or choose already existing (the Select button) “content”
of package. If you run the program for the rst time,
choose Create. In the Source section, browse for NOD32
installer (in a form that can be also downloaded from
the Internet – to navigate to the Eset website, click on
the Download button), or for the le update.ver from the
update copy (mirror).
In the Package section, dene where the content
will be saved. By default it is set to Server, or the PC
where the RAS service is running. Or, alternatively, export
the package to an EXE le. Click on the Create button to
create. The console will automatically detect, for which
version is which installation dedicated, and will distribute
it accordingly.
It is recommended to associate a new package
to a conguration that will be applied on remote
workstations. To do it, navigate to the Edit/Select
conguration associated with this package section. Click
the Select button to choose an already existing XML
conguration le, or create a new one with the Edit
button. If you chose both Windows NT and Windows
9x workstations in the previous paragraph, then after
clicking on the Edit button you have to decide which
version of operating system it will be used (by default
for the both). In the section Edit/Clear command line
associated with this package you can dene command
line parameters, which will be used with the package.
A summary of the parameters can be found below in the
corresponding chapter.
Export to remote workstations
PUSH install method
It is a method where the installation is “pushed”
to remote workstations directly on administrator’s
command. This is possible only assuming that there
is a Windows NT based operating system installed on
workstations (NT4, 2000, XP…).
Choose the workstations in the Push Installation
dialog window (click on the Install…button in the
Remote Install tab) where NOD32 for Windows will be
installed. To select a workstation, click the right mouse
button and select Copy to Remote List, or use the drag &
drop method in the left section (Network places). To get
current information from a workstation, click the right
mouse button on it and select Get Info (in the Remote
installation section). Similarly, you can start remote
installation itself (the Install option), or uninstall (the
Uninstall option). To apply the installation, select
a “package” in the pull down menu, and select
workstations (press CTRL or SHIFT and click the left
mouse button to select more workstations).
The console may ask for administrator’s username
and password for this situation. Please specify whether
the workstation is located in a domain or in a workgroup.
“Export to logon script” and “Send via
E-mail”
These two methods are almost similar. They dier
only in the
way the le nod32installer.exe is sent to target
workstations.
In case of the version “Export to logon script”, select
Package in the section Installation location, dene the
directory where the le nod32installer.exe will be located,
or edit the path to the parent directory “from the point
of view” of remote workstations (the item Share). It is
required to enable access to the directory for the remote
workstations.
In the section Script location, select a directory where
the logon script to be edited is located.
All corresponding les in the directory will be
displayed according to the mask in the File(s) section
(including logon scripts). Now also select les into
Page 28

28
which a line providing installation (or uninstallation)
of NOD32 on remote workstations will be inserted. Click
on the EDIT button to edit the le in the user-friendly
internal editor. Click on the SAVE button to conrm the
changes made.
HINT: Alternatively, you can choose your own way,
outside the console. Copy the le nod32installer.exe from
the RA server from corresponding package and install it
in your own way. It is located in the directory: C:\Program
Files\Eset\RA\Server\packages\{package_name}.
Variant “Send via E-mail” naturally sends the le
nod32installer.exe via e-mail. After running the email
attachment, either remote installation or remote uninstall
of NOD32 for Windows will start.
During the installation, again choose the
required Package and select addresses, where the le
nod32installer.exe shall be sent. It is also advised to dene
Subject (of e-mail) and Body (of e-mail).
For the RA server to work properly, it is required to
set the SMTP server address and sender e-mail address.
In case this information is not available, the e-mail can
be sent using the Microsoft Outlook application (Outlook
Express is not supported).
HINT: Alternatively, you can choose your own way,
outside the console. Copy the le nod32installer.exe from
the RA server from corresponding package and install it
in your own way. It is located in the directory: C:\Program
Files\Eset\RA\Server\packages\{package_name}.
Other information
Remote install in detail
In this chapter you can nd more detailed information
about the remote install process. In the case of a Push
installation, the following operations take place:
1) RA server contacts a remote workstation and attempts
to authorize by username and password, entered by
the administrator from the RA console.
2) If successful, the RA server connects to
the workstation using share ADMIN$ and
starts copying the le nod32installer.
exe belonging to the installation package.
3) The le nod32installer.exe is started as a service and
executed.
4) After that nod32installer.exe contacts the RA server
on port 2224 (TPC). For RA server this is a signal for
corresponding installation package again via share
ADMIN$
5) When the download nishes successfully, the
installation of the package starts, together with
predened attributes. Installation package is on
the machine unpacked and started using SETUP.EXE
together with attributes dened in given package.
Thanks to NOD32.XML the setting dened by
conguration editor NOD32 (more in chapter 2) will
be applied.
In the case of the variant “Export to logon script“, or “Send
via E-mail“, the process starts with the running of
the le nod32installer.exe (either manual – by user,
or automatic, e.g.: from logon script). Then these
operations take place:
1) The le nod32installer.exe is started as a service and
executed.
2) After that nod32installer.exe contacts the RA server
on port 2224 (TPC). For RA server this is a signal for
corresponding installation package again via share
ADMIN$ .
3) Access via share ADMIN$ and to remote installation
uses information dened in RA console by the
administrator in Remote Install folder, with the Log
on… button (Set Default Logon for E-mail and Logon
Script).
4) When the download nishes successfully, the
installation of the package starts, together with
predened attributes. Installation package is on
the machine unpacked and started using SETUP.EXE
together with attributes dened in given package.
Thanks to NOD32.XML the setting dened by
conguration editor NOD32 (more in chapter 2) will
be applied.
The le nod32installer.exe
The le nod32installer.exe is an installer that
will prepare NOD32 for Windows for remote install.
After executing, it is installed as a service. It can
perform the following tasks as well:
• Check, whether there is NOD32 for Windows already
Page 29

29
installed on workstations. If yes, it will not attempt to
install it again.
• Run the installation of NOD32 for Windows under an
administrator account. All data is sent from the RA
console, or the le nod32installer.exe receives them
from the RA server.
• Uninstall NOD32 for Windows from workstations.
Each new package created in the RA console has its
own nod32installer.exe. Internal information in this le is
related to the package and RA server.
Address of RA in the les nod32installer.exe is usually
dened during the expert installation of the NOD32
Remote Administrator Server product. In case this address
was not specied, the le is given a default name – i.e.:
name of the PC where RAS is installed.
The le nod32installer.exe can be installed with the
following parameters (without slash “/”):
MODE= denes whether it is installation of NOD32 for
Windows (value 1), or uninstallation (0)
SERVER= name or IP address of RA server, from which the
NOD32 installation package will be downloaded.
PORT= port to which a request for sending NOD32
installation packages will be sent
Since nod32installer.exe runs in a totally silent mode,
and no information about problems with installation is
displayed, the installer creates a log that is saved in the
le C:\nod32installer.log. It contains information about
the most important operations.
At the same time, nod32installer.exe creates a key _
LOCAL_MACHINE\Software\Eset\NOD32 Remote Installer
in the Windows registry. This will prevent repeated
installation of the same package, if previous installation
was successful.
As it was already mentioned, nod32installer.exe
can be started in any other way and does not have
to be exported on workstations with NOD32 Remote
administrator tools.
Possible problems
Error messages
As with every product, NOD32 Remote Administrator
can return more detailed information about a problem
that has occurred.
The error message is in many cases accompanied with
its SC error code and GLE error code, e.g.:
Could not set up IPC connection to target computer (SC
error code 6, GLE error code 1326)
SC codes mostly contain only internal information
for easier orientation in the problem code, GLE codes are
more important for the user. These are classic “Win32 Error
Codes” – list of such codes can be found on this webpage:
http://msdn.microsoft.com/library/default.asp?url=/
library/en-us/debug/base/system_error_codes.asp
In this particular case, GLE error means, that a wrong
or unknown password of the account (under which
remote installation was to take part) was entered.
Quite often you can come across this message caused
by nod32installer.exe:
NOD32 Installer was told to quit by the server XXX
It means that installation from the chosen client
workstation was already performed (successful or not)
and RA refuses to repeat it. This message keeps on
occurring until the administrator deletes the message
related to the workstation in Remote Install tab (by the
Clear option, also accessible from the context menu after
clicking the right mouse button), namely from:
– the bottom of the List of pending and failed
installations,
– the Successful Install List tab.
Error message NOD32 Installer could not connect to
server XXX means that RA server is not accessible for the
le nod32installer.exe. We recommend to check, whether
XXX can really be localized in the network (e.g: by ‘pinging’
XXX), or whether the communication is not blocked by
a rewall (port 2224 on RA server must be allowed).
Especially with MS Windows XP, you can come across
other, already mentioned problems connected with the
option “Use simple le sharing“. In this case, the error
“Access denied“ can appear already when using the “Get
Info“ option during the Push install.
Overview of some other error
situations:
Could not set up IPC connection to target computer (SC error
code 6, GLE error code 53) - It is not allowed to share
les or printers (possible exception on rewall - ports
chapter 3 / Remote installation
Page 30

445, 135 - 139), or the relevant station is not visible
on the level of network places.
Could not install NOD32 Installer onto target computer (SC
error code 6, GLE error code 67)
- It is not possible to
get to a workstation through share ADMIN$ (or it is a
workstation with Windows XP Home, which does not
support such system sharing)
Could not retrieve required information from target compu-
ter (RES error code 13, GLE error code 997)
- Probably
„Remote registry“ service is not enabled at the station. If the RA server works on server with Windows
2003, the system account, under which the service
NOD32 RAS is running, does not have the right to read
registers on a remote system. In this case, it is necessary to dene data of domain administrator‘s account
(name and password) in the properties of NOD32 RAS
service and restart the service (after the execution of
remote installation we recommend to re-setup the
system account).
Could not set up IPC connection to target computer (SC er
-
ror code 6, GLE error code 1327) - The password of ad-
ministrator cannot be empty.
Could not set up IPC connection to target computer (SC error
code 6, GLE error code 1326) - „Use simple le sharing“
function is enabled.
Could not set up IPC connection to target computer (SC er-
ror code 6, GLE error code 51) - „Server“system service
is not enabled on the workstation.
Failure during NOD32 uninstall - exit code: 207
- For uninstall it is required to dene a password. In the uninstall package it is required to dene a parameter /
PWD=”password”
Possible error messages produced by
the NOD32 workstation
The error messages can be produced directly by the
installer, which is used with all Eset MS Windows based
products (i.e. the installer launched by the le SETUP.EXE,
or after running the installation package downloaded
from the Eset company website).
Error Meaning
101 administration rights required
102 no configuration file specified
103 lack of memory
104 old version of the Operating System
105
cannot create a temporary folder to extract the installation files
106 error extracting files
107 internal program error
108 attempting to overinstall with an older component
109 internal program error
110 internal program error
111 cannot create a file on the disk
112 internal program error
113 internal program error
114 SETUP.XML corrupt or missing
115
the current version not compatible with the old version (you need to uninstall the old version)
116 error writing to the operating system registr y
117 upgrade required
118
attempting to overinstall with a different language version (uninstall the previous version first
119 corrupt uninstall file
120 registering service error
121 component installation error
122 cannot install a certain component to the computer
123 attempting to install the trial version again error
124
wrong Operating System, the installer is intended for the Windows NT/2000/XP/2003 Operating System
125
wrong Operating System, the installer is intended for the Windows 95/98/ME Operating System
To nd out the exact reason why the installation
failed, run the install le (i.e.: the SETUP.EXE le) with
the /TEST parameter (i.e.: SETUP.EXE /TEST). The detailed
description of the installation progress will be saved in
the NSETUP.LOG le.
Page 31

chapter 4.
Tasks, typical examples
4 Tasks, typical examples
Page 32

32
Introduction
NOD32 Remote Administrator enables the
administrator to create tasks and apply them to remote
client workstations with NOD32 for Windows.
symbols in front of each attribute – they show whether
the attribute will be applied or the original setting will
not change. The selected conguration can be viewed
(the View button), or changed (the Edit button).
Use the Create from Template… button to open an
existing conguration and use it as a base for a new
conguration. The original template will stay unchanged,
even if you make some changes.
In the next step, please choose workstations or
workgroups, to which you want to assign the conguration
(those in the “Selected items” section). Click on the Add
Using the RA console you can create three types of
tasks:
• “Conguration” – to make changes in conguration of
remote client workstations.
• “On-Demand Scan” – to run an antivirus scan on
remote client workstations.
• “Update Now” – to immediately update remote client
workstation.
To run the planner wizard, press the key combination
CTRL and N, from the menu File / New Task…, on the icon
tray, or from context menu on the chosen workstation (in
this case, some dialog windows may be omitted – for
a complete set, we recommend other ways of running
the wizard.)
Tasks in detail
Conguration task – changes in
conguration
To apply a conguration task, i.e.: apply a conguration
on client workstations, rst you must create (clicking on
the Create … button), or choose an already existing (the
Select … button) XML conguration le.
Conguration setup takes place in the NOD32
Conguration Editor – it is described in a separate chapter.
We recommend to focus on the color distinction of small
Page 33

33
from Clients Panel to add currently displayed clients to
the list from the “Clients” tab of the console. Check the
Selected option to move only those clients which were
picked up in the “Clients” tab.
In the nal step, you can name the task, or add its
description. This data serves only to help the administrator
and for easier orientation. At the same time, you can
delay the task (Apply task after), or provide its automatic
deletion from the RA console after it has been successfully
performed (Delete tasks automatically by cleanup if
successfully completed).
To apply this type of task, rst create (clicking on the
Create …
button), or choose an already existing (the
Select … button) XML conguration le with a scanner
conguration, which will be applied on remote client
computers to start antivirus scanning
To setup the conguration le, open the NOD32
Conguration Editor. It is described in a
separate chapter.
In the upper section, choose a prole name from the
“Prole name” pull-down menu. If this prole is found
also on the target workstation, the above mentioned
conguration will be applied together with a local
conguration of the prole.
If you want to push a complete scanner conguration
regardless of previous target workstation congurations,
then press the key combination CTRL + A during creation
of the conguration (or choose “Select all” from the menu
“Edit“).
To run the scan task in cleaning mode (not in
the default one), check the Clean automatically option.
The scanner will then take the action dened in the menu
NOD32 On-Demand Scanner / Prole / Scanner / If an alert
is generated
in the above mentioned conguration le.
Next choose workstations, or workgroups, where
the conguration will be applied (those in the “Selected
items” section). Click on the Add from Clients Panel to add
currently displayed client workstations from the “Clients”
tab of the RA console. Select the Selected option to
move only clients selected in the “Clients” tab.
And nally name the task, or add a description to
it. These features serve only for easier orientation of the
administrator, who can thus later quickly identify tasks.
At the same time, you can Apply tasks after, or delete it
from the “Tasks” tab of the RA console after it has been
completed (Delete tasks automatically by cleanup if
successfully completed).
Update Now task
First, dene the name of the current Update prole
that will be applied on remote workstations. If you do not
use update proles for update, you do not need to choose
any prole, you can skip to the next step.
Next choose workstations, or workgroups, where
the conguration will be applied (those in the “Selected
items” section). Click on the Add from Clients Panel to add
currently displayed client workstations from the “Clients”
tab of the RA console. Select the Selected option to move
only clients selected in the “Clients” tab.
And nally name the task, or add a description to
it. These features serve only for easier orientation of the
administrator, who can thus later quickly identify tasks.
At the same time, you can Apply tasks after, or delete it
chapter 4 / Tasks, typical examples
We recommend to focus on the color distinction of small
symbols in front of each attribute – they show whether
the attribute will be applied or whether the original
setting will not change. The selected conguration can be
viewed (the View button) or changed (the Edit button).
Use Create from Template… button to open an
existing conguration and use it as a background for
a new conguration. The original template will stay
unchanged even if you make some changes.
Page 34

34
from the “Tasks” tab of the RA console after it has been
completed (Delete tasks automatically by cleanup if
successfully completed).
Page 35

chapter 5.
Large hierarchical networks –
replications
5 Large hierarchical networks – replications
Page 36

36
RAS 6 (Upper server RAS 5)
RAS 4 (Upper server RAS 3)
RAS 5
(Upper
server
RAS 3)
RAS 3 (Upper server RAS 1)
RAS 2 (Upper
server RAS 1)
RAS 1
RAC (Console)
Client
Client
Client
Client
Client
Client
Client
Client
Client
Client
Client
Client
Client
Client
Client
Client
Client
Client
Client
Client
Client
replication way
Large networks
In large networks, you can install more RA servers for
easier manipulation. The servers would create an imaginary
structure. The burden connected with communication
with client workstations and RAS can be distributed. This
way you can also dene sub-administrators who will
control only a group of client workstations. All transfers
between servers are encrypted.
A company department network is an example of
a sub-network. It is recommended to install RAS for each
department controlling client computers only within its
own network, as seen in the next gure.
If, from the point of view of replication, RAS1 will be
set as the main (root) server, then all the other servers are
controlled by it. According to the gure, RAS3 is superior
to RAS4, RAS5, and RAS6, as well as RAS5 is superior to
RAS6 (superior = “upper server” in the scheme).
Page 37

37
kapitola 5 / Large hierarchical networks – replications
Networks consisting of superior / inferior RAS servers
allows the administrator to only control those client
workstations that can be momentarily accessed by RAS
(using RA console) and eventually can control clients
connected to inferior RA server(s).
So if the administrator connects using RA console for
example to RAS3, he/she will be able to control client
workstations connected to RAS3, RAS4, RAS5, and RAS6.
If the administrator connects to RAS5, he/she will be able
to control RAS5 and RAS6. And if he/she connects to RAS1,
he/she will be able to control all workstations of course.
It leads to another idea – you can use more
administrators to control only partial groups of client
workstations (and which are connected to a certain RAS
and to RA servers inferior to it).
What information will be retrieved from the
client workstations connected to inferior RA servers is
congured in the replication setup.
Replication is nothing else but a communication of
RAS with superior RA servers. Its specic features are
described in the chapter about the RA server setup.
Mirror servers replication
This is not directly connected to NOD32 Remote
Administrator, but you can replicate also updates on
local mirror servers. Updates from the server can be
distributed not only to the target workstations, but also
to inferior servers – they will send them to workstations
they control.
Page 38

Page 39

chapter 6.
Summary of information
6 Summary of information
Page 40

40
This is a summary of the most
important information:
• You can install either NOD32 for Windows – standard
edition, or NOD32 for Windows – professional edition
on the workstations.
• NOD32 for Windows – professional edition contains
the Mirror feature.
• Mirror provides an update download from the
Internet and distributes it to other workstations in
the network.
• Mirror has two variations: as a shared folder, or as an
HTTP server.
• Mirror, as an HTTP server, is simpler when it comes to
its conguration.
• Using Mirror, you can distribute also congurations.
• You must modify settings in NOD32 Control Center/
Setup of Automatic Update for the workstations
that will download updates from the Mirror to work
properly.
• NOD32 for Windows can be installed with a predened
conguration.
There are dierent ways to do so:
• By a direct start with a parameter for XML
conguration le application.
• By a call from a logon script as described above.
• By a call from a logon script using nod32installer.exe
(NOD32 Remote Administrator console installation is
required).
• By sending nod32installer.exe by electronic mail to
client workstations (NOD32 Remote Administrator
console installation is required).
• By Push Install – installation is “pushed” to the client
workstation from the NOD32 Remote Administrator
console.
• The NOD32 Enterprise Edition package includes NOD32
for Windows and NOD32 Remote Administrator.
• NOD32 Remote Administrator consists of a client
(console – RAC) and a server part (RAS).
• RAC is installed to the administrator’s workstation.
• RAS is installed to MS Windows NT based computers
(NT4 / 2000/ XP / 2003), which should be working 24
hours a day.
• When installing RAS, browse for and add the license
key, and be careful when entering the server name
(if unsure, we recommend leaving the dialog box
blank).
• The client workstations will automatically appear
in the RA console assuming that you have enabled
Remote Administration on the workstations and
entered correct data (particularly the IP address). To
set this option, go to NOD32 Control Center / NOD32
System Tools / Setup / Remote Administration.
• In NOD32 for Windows you can protect the
conguration by a password to prevent unauthorized
modication by users.
 Loading...