

ESET NOD32 ANTIVIRUS - FOR LINUX-BSD FILE SERVER, NOD32 ANTIVIRUS System Installation Manual
Page 1

NOD32 for Linux/BSD
File Server
Installation Manual
and User’s documentation
w e p r o t e c t d i g i t a l w o r l d s
Page 2

2
Table of contents
1. Introduction ........................................................... 3
2. Installation .............................................................. 5
3. Product’s Roadmap .................................................. 7
4. Integration with Linux/BSD File System ....................11
4.1. On-demand scanner ........................................................... 12
4.2. On-access scanner .............................................................. 12
4.2.1. On-access scanner powered by Dazuko ........................... 13
4.2.1.1. Operation principle....................................................... 13
4.2.1.2. Installation and conguration ...................................... 14
4.2.1.3. Tips ............................................................................... 15
4.2.2. On-access scanner using preload LIBC library .................. 16
4.2.2.1. Operation principle....................................................... 16
4.2.2.2. Installation and conguration ...................................... 16
4.2.2.3. Tips ............................................................................... 17
5. Important NOD32LFS/NOD32BFSMechanisms ............19
5.1. User Specic Conguration ................................................. 20
5.2. Handle Object Policy .......................................................... 20
5.3. Samples Submission System .............................................. 21
6. NOD32 system update and maintenance ...................23
6.1. Basic concept of NOD32 system update .............................. 24
6.1.1. NOD32 mirror creation..................................................... 24
6.1.2. Generation of NOD32 scanner loading modules .............. 24
6.2. Automatic update of the virus denitions database ........... 25
7. Let us know ............................................................27
NOD32 for Linux/BSD File Server, First Edition
Published on 6th December 2006
Copyright © 2006 Eset, s.r.o.
NOD32 for Linux/BSD File Server was developed by
Eset, s.r.o. For more information visit www.eset.com.
All rights reserved. No part of this documentation
may be reproduced, stored in a retrieval system or
transmitted in any form or by any means, electronic,
mechanical, photocopying, recording, scanning, or
otherwise without a permission in writing from the
author. Eset, s.r.o. reserves the right to change any
of the described application software without prior
notice.
Eset, spol. s r. o.
Svoradova 1, 811 03 Bratislava, Slovak Republic
http://www.eset.sk/en
NOD32 for Linux/BSD File Server
Page 3

Chapter 1:
Introduction
1 Introduction
Page 4

4
Dear user, you have acquired NOD32 for Linux/BSD File Server - NOD32LFS/NOD32BFS - probably the best antivirus system running under the Linux/BSD OS. As you will soon nd out, the system using, the state-of-the-artNOD32
scanning engine, has unsurpassed scanning speed and detection rate, combined with a very small footprint that makes
it the ideal choice for any Linux/BSD OS server.
In the rest of this chapter we review a key features of the system.
NOD32 scanning engine algorithms provide both the highest detection rate and the fastest scanning times.
The system is developed to run on the single-processor units as well as on themulti-processor units.
It includes unique advanced heuristics for Win32 worms and back-doors.
InbuiltNOD32 archivers unpack archived objectswithout the need for any external programs.
In order to increase speed and eciency of the system, its architecture is based on the running daemon (resident
program) where all the scanning requests are sent to.
The system supports selective scanner conguration specic for user or client/server identication.
Six various levels of logging can be congured to get information about system activity and inltrations.
One of the major advantages is the fact that the system installation does not require external libraries or programs
except for LIBC.
The system can be congured to notify any person in case of detected inltration. To run eciently, the system
requires just 16MB of hard-disk space and 32MB of RAM. The system runs smoothly under the 2.2.x, 2.4.x and 2.6.x
Linux OS kernel versions and also under 5.x, 6.x FreeBSD OS kernel versions.
From lower-powered, small oce servers to enterprise-class ISP servers with thousands of users, the system delivers
the performance and scalability you expect from a UNIX based solution and the unequaled security of NOD32.
•
•
•
•
•
•
•
•
•
NOD32 for Linux/BSD File Server
Page 5

Chapter 2:
Installation
2 Installation
Page 6

6
NOD32 for Linux/BSD File Server
This product is distributed as a binary le. Its format for Linux OS is:
nod32ls.i386.ext.bin
where ’ext’ is a Linux OS distribution dependent sux, i.e. ’deb’ for Debian Linux OS distribution, ’rpm’ for RedHat and
SuSE Linux OS distributions, ’tgz’ for other Linux OS distributions.
Note that we support also RedHat Ready and Novell (SuSE) Ready variation of the product1 The RedHat and Novell
(SuSE) Ready variation of the binary le format is:
nod32ls-rsr.i386.rpm.bin
Slightly dierent format is used to name the binary le for BSD OS,
nod32bs.i386.ext.tgz.bin
where ’ext’ stands for BSD OS distribution dependent sux, i.e. ’fbs4’ for FreeBSD 4.xx, ’fbs5’ for FreeBSD 5.xx and
’fbs6’ for FreeBSD 6.xx OS distributions.
In order to install or update the product on Linux OS, use the statement:
sh ./nod32ls.i386.ext.bin
resp. the RedHat Ready or Novell (SuSE) Ready variation of the product is installed using the following statement:
sh ./nod32ls-rsr.i386.rpm.bin
In case of BSD OS, the install statement is as follows.
sh ./nod32bs.i386.ext.tgz.bin
As a result the User License Acceptance Agreement related with the product is shown. Once you have conrmed
the Acceptance Agreement, the whole installation package is extracted into the current working directory and relevant
information regarding installation or update of the package extracted as well as information necessary for uninstall the
already installed package is printed into terminal.
Once the package is installed and the main NOD32 daemon service is running, in Linux OS you can check its operation
by using command:
ps -C nod32d
In case of BSD OS you can use a similar command:
ps -ax nod32d | grep nod32d
You will see the following (or similar) message on return:
PID TTY TIME CMD
2226 ? 00:00:00 nod32d
2229 ? 00:00:00 nod32d
where at least two main NOD32 daemon ’nod32d’ processes running in the background have to be present. One of
the processes is so-called process and threads manager of the system. The other serves as NOD32 scanning process.
The dierence from the original RedHat and SuSE Linux OS package is that the RedHat Ready and Novell SuSE Ready package
meets criteria dened by FHS Filesystem Hierarchy Standard dened as a part of Linux Standard Base document required by the
RedHat Ready and Novell SuSE Ready certicate This means in particular that the package is installed as an addon application
ie the primary installation directory is ’⁄opt⁄eset⁄nod’ instead of the base Linux OS directory structure However there are more
dierences between the original and ’Ready’ variation of the product that are beyond the scope of this document
Page 7

Chapter 3:
Product’s Roadmap
3 Product’s Roadmap
Page 8
8
Once the product package has been successfully installed, it is time to become familiar with its content.
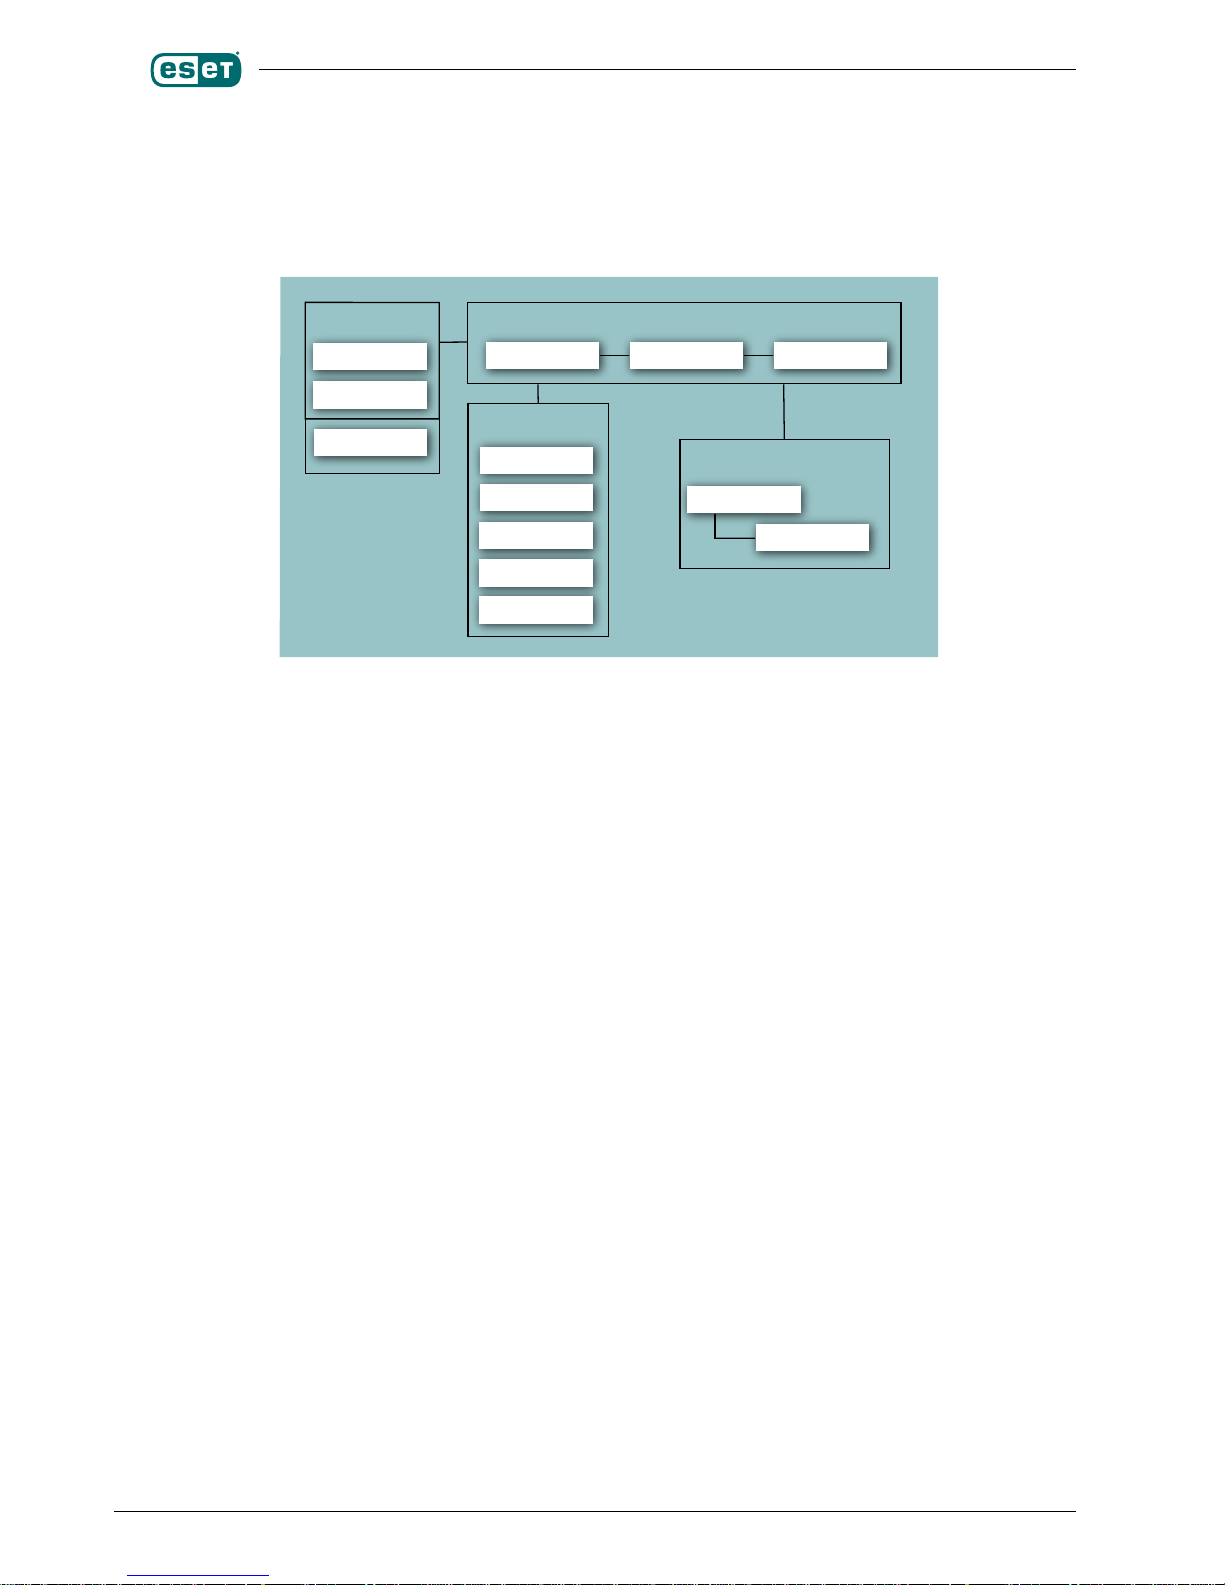
The structure of the NOD32LFS/NOD32BFS is shown in the gure 3-1. The system is composed of the following
components.
CORE
Core of the NOD32LFS/NOD32BFS consists of main NOD32 system control and scanning daemon module nod32d.
The daemon uses NOD32 API library libnod32.so and NOD32 loading modules nod32.00X to provide essential system
tasks: anti-virus scanning, maintenance of the agent daemon processes, maintenance of the samples submission system,
logging, notication, etc.. To get detailed information on the main NOD32 system control and scanning daemon, refer
to nod32d(8) manual page.
AGENTS
The purpose of NOD32 agent modules is to integrate the NOD32LFS/NOD32BFS with the Linux/BSD le system
environment. Please note a special chapter in this document devoted to the topic.
UPDATE
The update utilities create a particular fraction of the system. They are built with only one purpose, i.e. update
of NOD32 loading modules containing for instance virus signatures database, archives support, advanced heuristics
support etc. Please note a special chapter in this document devoted to the topic.
CONFIGURATION
Proper conguration is the most important condition for the system operation. Therefore we describe all the related
components in the rest of this chapter. We also strongly recommend to read nod32.cfg(5) manual page, an essential
information source regarding NOD32LMS/NOD32BMS conguration.
After the product package is successfully installed, all the components related to its conguration and authorization
are stored in directory
/etc/nod32
NOD32 for Linux/BSD File Server
Figure 3-1. Structure of NOD32LFS/NOD32BFS.
nod32
libnod32pac.so
nod32dac
AGENTS
license
nod32.cfg
scripts
templates
extern
CONFIGURATION
nod32update
nod32_update
UPDATE
nod32d libnod32.so nod32.00X
CORE
Page 9

9
Note that in case of RedHat Ready and Novell (SuSE) Ready variation of the NOD32 for Linux Mail Server the
conguration and authorization directory is
/etc/opt/eset/nod32
The directory consists of the following les.
nod32.cfg
This is the most important conguration le as it maintains the major part of the product functionality. For this
reason the le is further referred to as ‘main conguration le‘ or ‘main NOD32 conguration le‘. After exploring the
le you can see that it is built from various parameters distributed within sections. Note the section names always
enclosed in square brackets. In the main conguration le there is always one global and several so-called agent
sections. Parameters in global section are used to dene conguration options of main NOD32 daemon ‘nod32d‘ as
well as default values of NOD32 scanning engine conguration options. Parameters in agent sections are used to dene
conguration options of so-called agents, i.e. modules used to intercept various data ow types in the computer and/
or its neighborhood and prepare this data for anti-virus scanning. Note that besides the number of parameters used
for the system conguration, there is also a number of rules determining organization of conguration le. To become
familiar with this knowledge. please refer to nod32.cfg(5), nod32d(8) manual page and also to manual pages related
to relevant agents.
license
This directory is used to store the product license key you have acquired fromyour vendor. Note that the main
NOD32 daemon will always check only this directory to evaluate license key validity unless it is redened by the main
conguration le parameter ’nod32_lic_dir’.
scripts/nod32d_license_warning_script
This script, if enabled by main conguration le parameter ’license_warn_enabled’, is executed since 30 days (once
per day) before product license expiration. It is used to send e-mail notication about the expiration status to system
administrator.
scripts/nod32d_script
This script, if enabled by main conguration le parameter ’exec_script’, is executed in case the inltration has been
detected by the anti-virus system. It is used to send e-mail notication about the event to system administrator.
chapter 3 / Product’s Roadmap
Page 10

NOD32 for Linux/BSD File Server
Page 11

Chapter 4:
Integration with Linux/BSD
File System
4 Integration with Linux/BSD File System
Page 12

12
This chapter describes process of conguration of NOD32LFS/NOD32BFS system in order to provide an ecient
protection from virus and worm infections of the le systems by using ondemand and on-access scanning techniques.
The NOD32 for Linux/BSD File Server is composed from the so-called on-demand scanner ‘nod32‘ and so-called onaccess scanner ’nod32dac’. The Linux version of the products implements also additional on-access scanner technique
using preload library module ’libnod32pac.so. All concerned components are described in the following sections.
4.1. On-demand scanner
On-demand scanner is scanner that can be invoked by privileged user (usually system administrator) using
command line interface or by operating systemusing periodic command scheduler. This is also an explanation of the
term ’on-demand’ that the le system objects are scanned on user and/or system demand.
Concerning NOD32 on-demand scanner there are not special requirements for its operation. After proper installation
of theNOD32LFS/NOD32BFS package and after valid license has been provided within the license keys directory feel free
to run on-demand scanner by using command line interface or scheduler tool.
In order to run on-demand scanner from command line the following syntax is expected
/usr/sbin/nod32 [option(s)] INCL_SCAN_DIR -- -EXCL_SCAN_MASK
Note that in Linux RedHat Ready and Novell (SuSE) Ready variation of the product an appropriate command will
look as follows.
/opt/eset/nod32/sbin/nod32 [option(s)] INCL_SCAN_DIR -- -EXCL_SCAN_MASK
where INCL_SCAN_DIR (resp. EXCL_SCAN_MASK) is list of directories and/or les to be scanned (resp. excluded
from scanning).
Multiple command line options are implemented within NOD32 on-demand scanner. To get full list of them, please,
read appropriate manual page for NOD32 on-demand scanner nod32(8).
Tip: As indicated already it is good idea to use on-demand scanner on the regular basis to protect operating system.
Next example shows how to set periodic command scheduler ’cron’ for running on-demand scanner each day at 3AM. In
order to do so one has to enter the following line into the ’cron’ table (use statement ’crontab -e’ for this purpose):
0 3 * * * /usr/sbin/nod32 [option(s)] INCL_SCAN_DIR -- -EXCL_SCAN_DIR
Note that in Linux RedHat Ready and Novell (SuSE) Ready variation of the product an appropriate command line
will look as follows.
0 3 * * * /opt/eset/nod32/sbin/nod32 [option(s)] INCL_SCAN_DIR \
-- -EXCL_SCAN_DIR
Please note that there is no conguration le interface supported for this module.
4.2. On-access scanner
On-access scanner is scanner invoked by predened triggered access of user(s) and/or operating systemto the le
systemobjects. This also explains the term ‘on-access‘; the scanner is started on attempt to access selected le system
object.
TheNOD32LFS/NOD32BFS technique based on kernel calls interception is powered by Dazuko (read da-tzu-ko)
kernelmodule. Dazuko project is a Free software, by means that it is distributed as a free source code, in order to allow
users compilation of the kernelmodule for their own custom kernels. Note that the Dazuko kernel module is not a part
NOD32 for Linux/BSD File Server
Page 13

13
of the NOD32LFS/NOD32BFS product and thus it must be compiled and installed into the kernel prior the NOD32 onaccess scanner (nod32dac daemon) initialization. On the other hand the Dazuko technique make on-access scanning
independent of used le system type. It is also suitable for controlling le system objects via Network File System (NFS),
Nettalk and Samba.
The additional installation of the Dazuko module can be non-wished for Linux OS system administrators which
carry on the critical systems where source code and/or conguration le appropriate to the currently running kernel
is not available or the kernel is rather monolithic than modular. In this case the second discussed on-access scanning
technique based on the preload LIBC library comes in handy.
IMPORTANT: Before we provide user with the detailed information related with the on-access scanner conguration
and operation, we would like to point out that any NOD32 on-access scanner is not assumed to provide protection of
whole le system where installed. It has been developed and tested to protect primarily the le systems mounted
externally. If this is not your case, you will have to count on exclusion of multiple directories from le access control
to prevent system from hang-up. Typical directory to be excluded in this case is ‚/dev‘ directory or directories used by
NOD32LFS/NOD32BFS.
4.2.1. On-access scanner powered by Dazuko
This section contains information concerned with operation, installation and conguration of on-access scanner
using Dazuko kernel module.
4.2.1.1. Operation principle
On-access scanner ‘nod32dac’ (NOD32 Dazuko powered le Access Controller) is a resident program (daemon)
providing permanent monitoring and control over the le system. Scanning of each le system object is performed
upon customizable le access event of the user and/or operating system. The following le access types are supported
by the current version:
ON_OPEN events
This le access type is controlled once the rst bit of the integer parameter ’event_mask’ in the main NOD32
conguration le (section [dac]) is 1. In this case ON_OPEN bit of Dazuko access mask is set on.
ON_CLOSE events
This le access type is controlled once second bit of the integer parameter ’event_mask’ in the main NOD32
conguration le (section [dac]) is 1. In this case ON_CLOSE bit and ON_CLOSE_MODIFIED bit of Dazuko access mask
is set on.
Note that some of the kernel versions do not support interception of the ON_CLOSE events. In this case problems
could be detected when running nod32dac module.
ON_EXEC events
This le access type is controlled once third bit of the integer parameter ‘event_mask’ in the main NOD32
conguration le (section [dac]) is 1. In this case ON_EXEC bit of Dazuko access mask is set on.
By using this mechanism all opened, closed and executed regular les are scanned by daemon nod32d for viruses.
Based on the result of this scanning the access to the les is denied or allowed.
chapter 4 / Integration with Linux/BSD File System
Page 14

14
4.2.1.2. Installation and conguration
It has been already discussed that prior any ‘nod32dac’ initialization, so-called Dazuko kernel module has to
be compiled and installed within the running kernel. Note that the following text contains only brief description
of the Dazuko kernel module installation. Therefore it is highly recommended to read the Dazuko how-to-install
documentation (see http://www.dazuko.org/howto-install.shtml) in order to compile and load the Dazuko module
properly into the kernel.
Download Dazuko tarball from (http://www.dazuko.org/downloads.shtml). Note that the NOD32 on-access scanner
is compatible with the Dazuko kernel module whose version is equal or higher than 2.1.0. Therefore the proper behavior
of NOD32 on-access scanner running with the older versions of Dazuko kernel module is not guaranteed. Before
compilation of the Dazuko it is necessary to have a source code of currently running kernel stored in the kernel source
code directory:
/usr/src/linux*
resp. in BSD OS the appropriate directory is:
/usr/src/sys
Note that it is important to have a version of the kernel source code exactlymatching the version of the kernel that is
currently running on the operating system. Even if the kernel source code is present in the kernel source code directory,
make sure that it is properly congured. Read the Dazuko FAQ related to this topic (http://www.dazuko.org/faq.shtml).
Notes (for administrators running Linux OS kernel 2.6.x): When running multiple security modules, make sure the
„Enable dierent security modules“ is enabled and the dazuko module is the rst security module loaded into kernel.
To get more information what has to be done during kernel conguration, please read the Dazuko FAQ related to this
topic (http://www.dazuko.org/faq.shtml). Note also that the ’commoncap’ kernel module has to be loaded into kernel
prior ’dazuko’ module.
Generate the Makele by running:
./congure
within the Dazuko source code directory. Compile Dazuko code with:
make
which will create the ’dazuko.o’ le (note that for Linux 2.6 kernel and for BSD OS an appropriate le ’dazuko.ko’ is
created). If any warnings or errors appeared as a consequence of the above steps, the Dazuko module was not compiled
properly. In this case it is not recommended to go further over the next steps of this section but rather refer to the
appropriate Dazuko documentation (http://www.dazuko.org/faq.shtml).
Insert the dazuko module into kernel by typing
/sbin/insmod dazuko.o
resp. in BSD OS an appropriate command to insert the module is
/sbin/kldload dazuko.ko
and check that themodule is properly loaded. In the Linux OS the check can be done for instance by using:
/sbin/lsmod
or:
cat /proc/modules
In BSD OS the check can be done using command
NOD32 for Linux/BSD File Server
Page 15

15
/sbin/kldstat
In all cases there should be Dazuko listed in the output of these commands. Unless the device node is created
automatically, create it with:
mknod -m 600 /dev/dazuko c $(grep dazuko /proc/devices | sed “s/ .*//“) 0
chown root:root /dev/dazuko
resp. in BSD OS by using command
mknod /dev/dazuko c 33 0
Read and edit [global] and [dac] sections of NOD32 main conguration le.
Note also that for the proper functioning of on-access scanner it is necessary to enable nod32dac agent using
‚agent_enabled‘ parameter within a [dac] section of main NOD32 conguration le. Furthermore it is necessary to
dene le system objects (i.e. directories and les) that are required to be under control of dazuko kernel module.
This can be achieved via ’ctl_incl’ and ’ctl_excl’ conguration options dened within [dac] section of the main NOD32
conguration le.
IMPORTANT: Please, do not remove ‚/dev‘ directory from the control of on-access scanner (e.g. ctl_excl = “/dev“)
unless you know exactly what you are doing, otherwise system can hang up.
For reread of newly created NOD32 conguration, enter the following command.
/etc/init.d/nod32d reload
4.2.1.3. Tips
To provide Dazuko module loading prior each nod32dac daemon initialization, follow the next steps:
Provide copy of Dazukomodule in some of the directories located within the directory reserved for the kernel
modules
/lib/modules
or
/modules
Use the kernel utilities ’depmod’ and ’modprobe’ (resp. in BSD OS ‚kldcong‘ and ‚kldload‘) to handle dependencies
and proper loading of the newly added Dazuko module.
Insert the following line into initialization script for main NOD32 scanning daemon ’/etc/init.d/nod32d’ before the
daemon initialization statement.
/sbin/modprobe dazuko
Note that in BSD OS an appropriate line for inserting module is
/sbin/kldcong dazuko
IMPORTANT: It is highly important to execute the individual steps above exactly in order as they are written. The
reason is that in case of kernel module not located within the kernel modules directory, ’modprobe’ (resp. ’kldload’ in
BSD OS) will not be able to handle loading of the module and the system can hang-up.
4.2.2. On-access scanner using preload LIBC library
Note that this section is relevant only for users of NOD32LFS product. This section contains information concernedwith
operation, installation and conguration of on-access scanner using preload library ‘libnod32pac.so’.
chapter 4 / Integration with Linux/BSD File System
Page 16

16
4.2.2.1. Operation principle
On-access scanner ‘libnod32pac.so’ (NOD32 Preload library based le Access Controller) is a shared objects library
that is used as a preload library of LIBC and can become functional during the system start-up. It is thus applicable for
le system servers using LIBC calls, for instance ftp server, Samba server etc.
Scanning of each le system object is performed upon customizable le access event of the user and/or operating
system. The following le access types are supported by the current version:
ON_OPEN events
This le access type is controlled once rst bit of the integer parameter ’event_mask’ in the main NOD32 conguration
le (section [pac]) is 1. In this case all ’open’ or ’open64’ calls of the LIBC are intercepted.
ON_CLOSE events
This le access type is controlled once second bit of the integer parameter ’event_mask’ in the main NOD32
conguration le (section [pac]) is 1. In this case all ’close’, ’dup’ and ’dup2’ calls of the LIBC are intercepted.
By using this mechanism all opened and closed descriptors tied to ‚kldcong‘ and ‚kldload‘) to handle dependencies
and proper loading result of this scanning the access to the les is denied or allowed.
4.2.2.2. Installation and conguration
The ‘libnod32pac.so’ installation is done using standard installation mechanism of the preload libraries. One has just
to dene the environment variable ’LD_PRELOAD’ with absolute path pointing to the ‘libnod32pac.so’ library. Please
refer also to the manual page ld.so(8) to get further information.
IMPORTANT: It is important to note that the ’LD_PRELOAD’ environment variable has to be dened just for the
network server daemon process (ftp, samba, etc.) we would like to have under control. Generally it is not recommended
to preload LIBC calls in all operating system processes as for controlling the selected le system area it is not necessary
and it can dramatically slow down the performance of the system or even cause the system hang-up. In this sense
all mechanisms using ‚/etc/ld.so.preload‘ conguration le are not correct as well as mechanisms using ‚export LD_
PRELOAD‘ statement. Both would override all relevant LIBC calls in the whole system that will lead to the system
hang-up during its initialization.
Thus in order to intercept just relevant le access calls related with just objects within selected le system area, one
has to override an executable statement of an appropriate network le system server with the following line
LD_PRELOAD=/usr/lib/libnod32pac.so COMMAND COMMAND-ARGUMENTS
where ’COMMAND COMMAND-ARGUMENTS’ is the original executable statement.
Note also that for the proper run of on-access scanner it is necessary to dene le system objects (i.e. directories
and les) that are required to be under control of the preload library. This can be achieved via ’ctl_incl’ and ’ctl_excl’
conguration options dened within [pac] section of the conguration le.
4.2.2.3. Tips
In order to provide on-access scanner functionality immediately after network le systemserver start-up, it is good
to dene environment variable ’LD_PRELOAD’ directly within an appropriate network le server initialization script.
EXAMPLE: Let’s assume we would like to have on-access scanner catching all le system access events immediately
after starting the samba server. Thus within the initialization script concerned with samba daemon (/etc/init.d/smb),
we replace the statement
daemon /usr/sbin/smbd $SMBDOPTIONS
NOD32 for Linux/BSD File Server
Page 17

17
responsible for initialization of smbd daemon by the following line
LD_PRELOAD=/usr/lib/libnod32pac.so daemon /usr/sbin/smbd $SMBDOPTIONS
In this manner selected le system objects controlled by Samba will be checked immediately after Samba
initialization, i.e. during the system start-up.
chapter 4 / Integration with Linux/BSD File System
Page 18

NOD32 for Linux/BSD File Server
Page 19

Chapter 5:
Important NOD32LFS/
NOD32BFS Mechanisms
5 Important NOD32LFS/NOD32BFS Mechanisms
Page 20

20
5.1. User Specic Conguration
User Specic Conguration mechanism is implemented in the product in order to provide user with enhanced
conguration functionality. It allows to dene NOD32 anti-virus scanner parameters selectively for user accessing le
system objects.
Please note that the detailed description of this functionality can be found in nod32.cfg(5) manual page and
manual pages referenced there. Thus in this section we will only provide short example of user specic conguration
denition.
Let’s say we use nod32dac module for the scanning purpose. This module is subjected to the conguration section
[dac] found within main NOD32 conguration le. The example of the section can be as follows.
[dac]
agent_enabled = yes
event_mask = 5
ctl_incl = “/home“
action_on_processed = accept
In order to provide individual parameters setting one has to dene ‘user_cong‘ parameter with the path to the
special conguration le where the individual setting will be stored. In the next example we create reference to the
special conguration le ’nod32dac_spec.cfg’ located within default conguration le directory.
[dac]
agent_enabled = yes
event_mask = 5
ctl_incl = “/home“
action_on_processed = accept
user_cong = “nod32smtp_spec.cfg“
Note that the ‘user_cong‘ parameter accepts also absolute path to the specic conguration le.
Once special conguration le referenced from within [dac] section we have to create this le and provide the le
with an appropriate individual settings.
In the next example we create individual parameter setting of parameter ’action_on_processed’ for user
’username’.
[username]
action_on_processed = reject
Note that the section header name of the special section contains identication of the user for which we have created
the individual setting. The section body then contains individual parameters specied for this identication. Thus with
this special conguration all users attempting to access le-system will be processed, i.e. all le system objects accessed
by the users will be scanned for inltrations, with exception to the user ’username’ that will be rejected, i.e. the access
of the le system will be blocked for this user.
5.2. Handle Object Policy
The Handle Object Policy (see gure 5-1) is a mechanism that provides handling of the scanned objects depending
on their scanning status. The mechanism is based on so-called action conguration options (’action_on_processed’,
’action_on_infected’, ’action_on_uncleanable’, ’action_on_notscanned’) combined with Anti-Virus enabling
NOD32 for Linux/BSD File Server
Page 21

21
conguration option (‘av_enabled‘). For detailed information on these conguration options, please refer to the nod32.
cfg(5) manual page.
Every object processed by NOD32LFS/NOD32BFS is at rst handled with respect to the setting of the conguration
option ’action_on_processed’. Once this parameter is set to ’accept’, the object is handled according to the setting of
conguration option ’av_enabled’. Note that this parameter is of paramount importance if combined with so-called
User Specic Conguration mechanism. In this case various types of black-lists and white-lists can be
Once ’av_enabled’ is enabled the object processed is scanned for virus inltrations and set of action conguration
options ’action_on_infected’, ’action_on_uncleanable’ and ’action_on_notscanned’ is taken into account to evaluate
further handling of the object. If action ’accept’ has been taken as a result of the three above action options or ’av_
enabled’ is disabled the object is accepted i.e. the access to the object is allowed. On the other hand if any of action
conguration options caused other than ’accept’ value, the object is blocked.
5.3. Samples Submission System
Sample submission system is functionality that provides catching of the infected objects found by advanced
heuristics method and delivering these objects to the sample submission system server. All virus samples catched by
the sample submission system will be processed by the team of NOD32 virus laboratory department and consequently
added into the NOD32 virus database, if necessary.
NOTE: ACCORDING TO OUR LICENSE AGREEMENT, BY ENABLING SAMPLE SUBMISSION SYSTEM YOU ARE AGREEING
TO ALLOW THE COMPUTER AND/OR PLATFORM ON WHICH THE NOD32D IS INSTALLED TO COLLECT DATA (WHICH MAY
INCLUDE PERSONAL INFORMATION ABOUT YOU AND/OR THE USER OF THE COMPUTER) AND SAMPLES OF NEWLY
DETECTED VIRUSES OR OTHER THREATS AND SEND THEM TO OUR VIRUS LAB. THIS FEATURE IS TURNED OFF BY DEFAULT.
WEWILL ONLY USE THIS INFORMATION AND DATA TO STUDY THE THREAT AND WILL TAKE REASONABLE STEPS TO PRESERVE
THE CONFIDENTIALITY OF SUCH INFORMATION.
In order to turn on this feature, enable both parameters ’samples_enabled’ and ’samples_send_enabled’ in global
section of main conguration le.
ThreatSense.NET technology is able to send infected samples also via http proxy server with basic authentication.
See the nod32d manual page for details.
chapter 5 / Important NOD32LFS/NOD32BFS Mechanisms
Figure 5-1. Scheme of Handle Object Policy mechanism.
accept defer, discard, reject
action_on_processed
object not accepted
NO YES
av_enabled
accept defer, discard, reject
action_on_infected
action_on_uncleanable
action_on_notscanned
object not accepted
object accepted
Page 22

NOD32 for Linux/BSD File Server
Page 23

Chapter 6:
NOD32 system update and
maintenance
6 NOD32 system update and maintenance
Page 24

24
6.1. Basic concept of NOD32 system update
In order to keep the anti-virus system eective, it is necessary to keep NOD32 virus signatures databse up to date.
The nod32update utility has been developed for this purpose. To get details on the operation of the utility, read the
nod32update(8) manual page. Basic concept of the NOD32 system update is composed from two parts.
6.1.1. NOD32 mirror creation
First, the mirror of all relevant so-called NOD32 precompiled modules have to be created from the origin ESET
server(s). In the product developed for Linux OS and BSD OS the precompiled NOD32 modules introduced above are
downloaded by default in directory
/var/lib/nod32/mirror
The Linux RedHat Ready and Novell (SuSE) Ready product downloads the modules in directory
/var/opt/eset/nod32/lib/mirror
The NOD32 modules are divided into two categories; engine category and component category. The modules of
component category are currently only for use on the MS Windows OS.
Currently the following types of engine category modules are supported: base scanning modules (prex engine)
containing virus signatures database, archives support modules (prex archs) supporting various le system archive
formats, advanced heuristics modules (prex advheur) containing implementation of so-called advanced heuristics
method of virus and worm detection, packed worm scanner modules (prex pwscan) used on MS Windows OS, NOD32
utilities modules (prex utilmod) used on MS Windows OS and ThreatSense.NET technology support modules (prex
charon).
These modules are always necessary for proper running of any NOD32 anti-virus scanner based application and
therefore are all downloaded by default at each download process. On the other hand the component category modules
are platform dependent and language localization dependent and thus the download of component category modules
is optional.
After download of precompiled NOD32 modules the ‚update.ver‘ le is created in the mirror directory as well. This
le contains the information about the modules currently stored in the newly created mirror. The newly created mirror
thus serves as fully functional modules download server and can be used to create subordinate mirros, however, some
more conditions have to be fulllled yet. First, as the update utility uses http protocol to download the NOD32 modules
there must be a http server installed on the computer where the modules are going to be downloaded from. Second, the
NOD32 modules to be downloaded by other computers have to be placed at the directory path
/http-serv-base-path/nod_upd
where ‚http-serv-base-path‘ is a base http server directory path, as this is the rst place where update utility looks
the NOD32 modules for.
6.1.2. Generation of NOD32 scanner loading modules
Second part of the update process is the compilation of NOD32 modules loadable by NOD32 scanner from those
stored in the local mirror.
Typically the following NOD32 loading modules are created: base module (nod32.000), archives support module
(nod32.002), advanced heuristics module (nod32.003), packed worm scanner module (nod32.004), windows utilities
NOD32 for Linux/BSD File Server
Page 25

25
module (nod32.005) and ThreatSense.NET support module (nod32.006) in the directory:
/var/lib/nod32
resp. in RedHat Ready and Novell (SuSE) Ready variation of the product the target directory is as follows:
/var/opt/eset/nod32/lib
Note that the above directory is exactly the NOD32 base directory where main NOD32 daemon loads NOD32
modules from.
6.2. Automatic update of the virus denitions database
To provide the highest security for the user, the NOD32 team collects the virus denitions continuously from all
over the world. The new patterns can appear within the database in very short intervals. It is therefore useful, and also
recommended, to trigger an update attempt on a regular basis.
Threre are two ways to provide periodic update of the system. First, the main NOD32 daemon can provide the update
once ‚av_update_period‘ parameter dened in [update] section of the main NOD32 conguration le. Second, the
update can be triggeret externally by using script:
/usr/sbin/nod32_update
Note that the Linux RedHat Ready and Linux Novell (SuSE) Ready products locates the script in directory
/opt/eset/nod32/sbin/nod32_update
In order to trigger update script in one hour intervals, congure periodic scheduler (cron) in Linux OS and BSD OS
by entering the following line
0 * * * * /usr/sbin/nod32_update
into its conguration le (crontab). To add the above line into the crontab use command line statement
crontab -e
to invoke the editor set up for the current system environment (dened by EDITOR environment variable).
Similar command is valid for Linux RedHat Ready and Linux Novell (SuSE) Ready product
0 * * * * /opt/eset/nod32/sbin/nod32_update
chapter 6 / NOD32 system update and maintenance
Page 26

NOD32 for Linux/BSD File Server
Page 27

Chapter 7:
Let us know
7 Let us know
Page 28

28
NOD32 for Linux/BSD File Server
Dear user, this guide should have given you a good knowledge about the product installation, conguration and
maintenance. However, writing a documentation is a process that is never nished. There will always be some parts that
can be explained better or are not even explained at all. Therefore, in case of bugs or inconsistencies found within this
documentation, please report a problem to our support center
http://www.eset.com/support
We are looking forward to help you solve any problem concerning the product.
 Loading...