

Eset Mail Security 4 for Microsoft Exchange Server Version 4.2 Installation Manual and User Guide
Page 1

ESET Mail Security 4
for Microsoft Exchange Server
Version 4.2
Installation Manual and User Guide
Microsoft® Windows® Server 2000 / 2003 / 2008
Page 2
Contents
ESET Mail Security
Copyright ©2010 by ESET, spol. s.r.o.
ESET Mail Security was developed by ESET, spol. s r.o.
For more information visit www.eset.com.
All rights reserved. No part of this documentation may be
reproduced, stored in a retrieval system or transmitted in any
form or by any means, electronic, mechanical, photocopying,
recording, scanning, or otherwise without permission in writing
from the author.
ESET, spol. s r.o. reserves the right to change any of the
described application software without prior notice.
1. Introduction
2. Installation
3. Update
................................................3
........................................................................3System requirements1.1
........................................................................3Methods used1.2
..............................................................................3Mailbox scanning via VSAPI1.2.1
..............................................................................4Message filtering on the SMTP server level1.2.2
........................................................................4Types of protection1.3
..............................................................................4Antivirus protection1.3.1
..............................................................................4Antispam protection1.3.2
..............................................................................4Application of user-defined rules1.3.3
................................................5
........................................................................5Typical Installation2.1
........................................................................7Custom Installation2.2
........................................................................11Upgrading to a newer version2.3
........................................................................11Installation in a clustered environment2.4
........................................................................13License2.5
........................................................................14Post-Installation Configuration2.6
................................................16
........................................................................17Proxy server setup3.1
4. ESET Mail Security - Microsoft
................................................19
Exchange Server protection
........................................................................19General settings4.1
..............................................................................19Rules4.1.1
..............................................................................20Adding new rules4.1.1.1
..............................................................................20Actions4.1.1.2
..............................................................................22Log files4.1.2
..............................................................................23Message quarantine4.1.3
..............................................................................23Adding a new quarantine rule4.1.3.1
..............................................................................24Performance4.1.4
..............................................................................25Transport Agent4.1.5
........................................................................26Antivirus and antispyware settings4.2
..............................................................................26Actions4.2.1
..............................................................................27Alerts and notifications4.2.2
..............................................................................28Performance4.2.3
4.2.4
4.2.4.4
........................................................................40Antispam settings4.3
........................................................................46FAQ4.4
Virus-Scanning Application Programming
..............................................................................28
Interface (VSAPI)
..............................................................................29Microsoft Exchange Server 5.5 (VSAPI 1.0)4.2.4.1
.............................................................................30Actions4.2.4.1.1
.............................................................................31Performance4.2.4.1.2
..............................................................................31Microsoft Exchange Server 2000 (VSAPI 2.0)4.2.4.2
.............................................................................32Actions4.2.4.2.1
.............................................................................33Performance4.2.4.2.2
..............................................................................34Microsoft Exchange Server 2003 (VSAPI 2.5)4.2.4.3
.............................................................................35Actions4.2.4.3.1
.............................................................................35Performance4.2.4.3.2
Microsoft Exchange Server 2007/2010 (VSAPI
..............................................................................36
2.6)
.............................................................................37Actions4.2.4.4.1
.............................................................................38Performance4.2.4.4.2
..............................................................................39Transport Agent4.2.5
..............................................................................40Antispam engine parameter setup4.3.1
..............................................................................41Configuration file4.3.1.1
..............................................................................45Alerts and notifications4.3.2
..............................................................................45Transport Agent4.3.3
Customer Care Worldwide: www.eset.eu/support
Customer Care North America: www.eset.com/support
REV. 11/2/2010
Page 3
1. Introduction
ESET Mail Security 4 for Microsoft Exchange Server is an integrated solution protecting user mailboxes from various
types of malware content (most often they are email attachments infected by worms or trojans, documents
containing harmful scripts, phishing, spam etc.). ESET Mail Security provides three types of protection: Antivirus,
Antispam and application of user-defined rules. ESET Mail Security filters the malicious content on the mailserver level,
before it arrives in the addressee’s email client inbox.
ESET Mail Security supports Microsoft Exchange Server versions 5.5 and later as well as Microsoft Exchange Server in a
cluster environment. In newer versions (Microsoft Exchange Server 2007 and later), specific roles (mailbox, hub, edge)
are also supported. You can remotely manage ESET Mail Security in larger networks with the help of ESET Remote
Administrator.
As far as functionality is concerned, ESET Mail Security is very similar to ESET NOD32 Antivirus 4.0. It has all the tools
necessary to ensure protection of the server-as-client (resident protection, web-access protection, email client
protection and antispam), while providing Microsoft Exchange Server protection.
1.1 System requirements
Supported Operating Systems:
Microsoft Windows Server 2000
Microsoft Windows Server 2003 (x86 and x64)
Microsoft Windows Server 2008 (x86 and x64)
Microsoft Windows Server 2008 R2
Microsoft Windows Small Business Server 2003
Microsoft Windows Small Business Server 2003 R2
Microsoft Windows Small Business Server 2008
Supported Microsoft Exchange Server versions:
Microsoft Exchange Server 5.5 SP3, SP4
Microsoft Exchange Server 2000 SP1, SP2, SP3
Microsoft Exchange Server 2003 SP1, SP2
Microsoft Exchange Server 2007 SP1, SP2
Microsoft Exchange Server 2010 SP1
Hardware requirements depend on the operating system version and the version of Microsoft Exchange Server in use.
We recommend reading the Microsoft Exchange Server product documentation for more detailed information on
hardware requirements.
1.2 Methods used
Two independent methods are used to scan email messages:
Mailbox scanning via VSAPI
Message filtering on the SMTP server level
1.2.1 Mailbox scanning via VSAPI
The mailbox scanning process is triggered and controlled by the Microsoft Exchange Server. Emails in the Microsoft
Exchange Server store database are scanned continuously. Depending on the version of Microsoft Exchange Server,
the VSAPI interface version and the user-defined settings, the scanning process can be triggered in any of the
following situations:
3
4
When the user accesses email, e.g. in an email client (email is always scanned with the latest virus signature
database)
In the background, when use of the Microsoft Exchange Server is low
Proactively (based on the Microsoft Exchange Server’s inner algorithm)
3
Page 4

The VSAPI interface is currently used for antivirus scan and rule-based protection.
1.2.2 Message filtering on the SMTP server level
SMTP server-level filtering is secured by a specialized plugin. In Microsoft Exchange Server 2000 and 2003, the plugin
in question (Event Sink) is registered on the SMTP server as a part of Internet Information Services (IIS). In Microsoft
Exchange Server 2007/2010, the plugin is registered as a transport agent on the Edge or the Hub roles of the Microsoft
Exchange Server.
SMTP server-level filtering by a transport agent provides protection in the form of antivirus, antispam and userdefined rules. As opposed to VSAPI filtering, the SMTP server-level filtering is performed before the scanned email
arrives in the Microsoft Exchange Server mailbox.
1.3 Types of protection
There are three types of protection:
1.3.1 Antivirus protection
Antivirus protection is one of the basic functions of the ESET Mail Security product. It guards against malicious system
attacks by controlling file, email and Internet communication. If a threat with malicious code is detected, the Antivirus
module can eliminate it by first blocking it and then cleaning, deleting or moving it to quarantine.
1.3.2 Antispam protection
Antispam protection integrates several technologies (RBL, DNSBL, Fingerprinting, Reputation checking, Content
analysis, Bayesian filtering, Rules, Manual whitelisting/blacklisting, etc.) to achieve maximum detection of email
threats. The antispam scanning engine’s output is the spam probability value of the given email message expressed as
a percentage (0 to 100). Values of 90 and above are considered sufficient for ESET Mail Security to classify an email as
spam.
Another component of the antispam protection module is the Greylisting technique (disabled by default). The
technique relies on the RFC 821 specification, which states that since SMTP is considered an unreliable transport, every
message transfer agent (MTA) should repeatedly attempt to deliver an email after encountering a temporary delivery
failure. A substantial part of spam consists of one-time deliveries (using specialized tools) to a bulk list of email
addresses generated automatically. A server employing Greylisting calculates a control value (hash) for the envelope
sender address, the envelope recipient address and the IP address of the sending MTA. If the server cannot find the
control value for the triplet within its own database, it refuses to accept the message, returning a temporary failure
code (temporary failure, for example, 451). A legitimate server will attempt a redelivery of the message after a variable
time period. The triplet’s control value will be stored in the database of verified connections on the second attempt,
allowing any email with relevant characteristics to be delivered from then on.
1.3.3 Application of user-defined rules
Protection based on user-defined rules is available for scanning with both the VSAPI and the transport agent. You can
use the ESET Mail Security user interface to create individual rules that may also be combined. If one rule uses multiple
conditions, the conditions will be linked using the logical operator AND. Consequently, the rule will be executed only if
all its conditions are fullfilled. If multiple rules are created, the logical operator OR will be applied, meaning the
program will run the first rule for which the conditions are met.
In the scanning sequence, the first technique used is greylisting - if it is enabled. Consequent procedures will always
execute the following techniques: protection based on user-defined rules, followed by an antivirus scan and, lastly, an
antispam scan.
4
Page 5
2. Installation
After purchase, the ESET Mail Security installer can be downloaded from ESET’s website as an .msi package. Once you
launch the installer, the installation wizard will guide you through the basic setup. There are two types of installation
available with different levels of setup details:
1. Typical Installation
2. Custom Installation
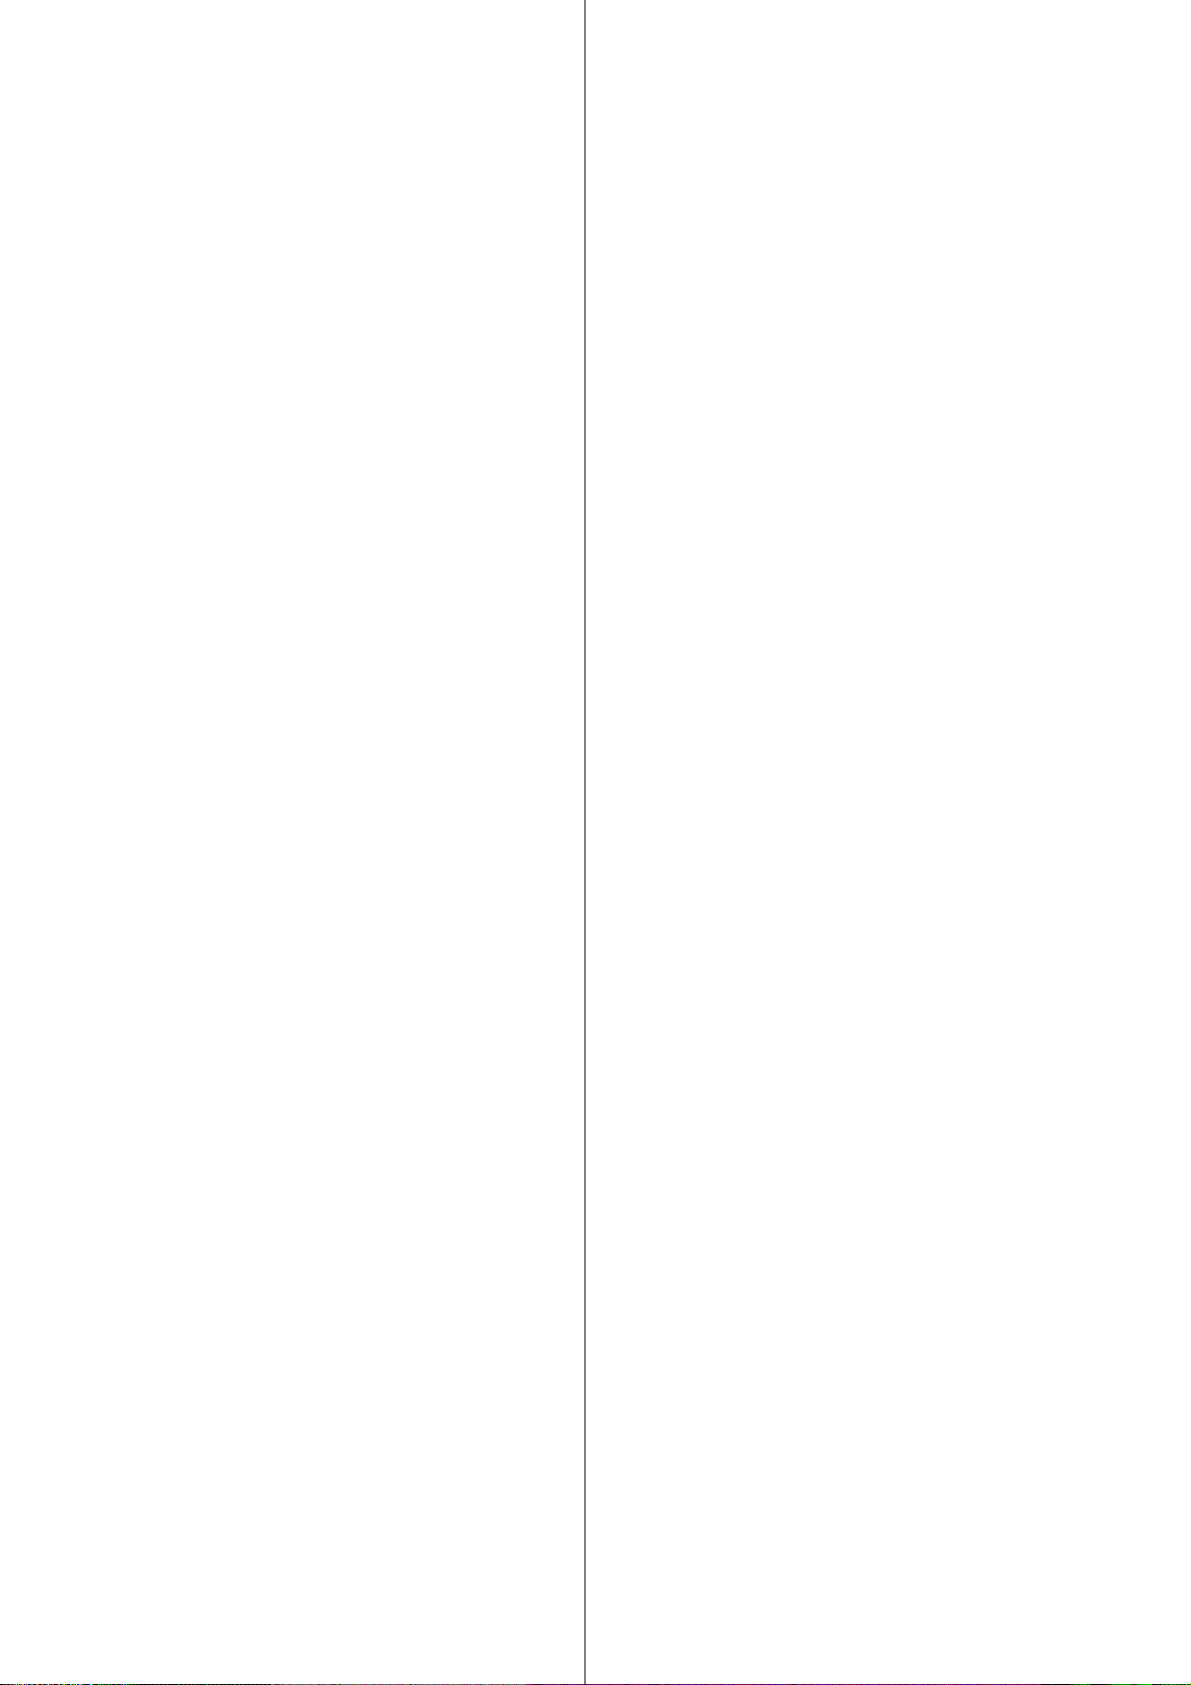
2.1 Typical Installation
Typical installation provides configuration options appropriate for most users. The settings provide excellent security
coupled with ease of use and high system performance. Typical installation is the default option and is recommended
if you do not have the particular requirements for specific settings.
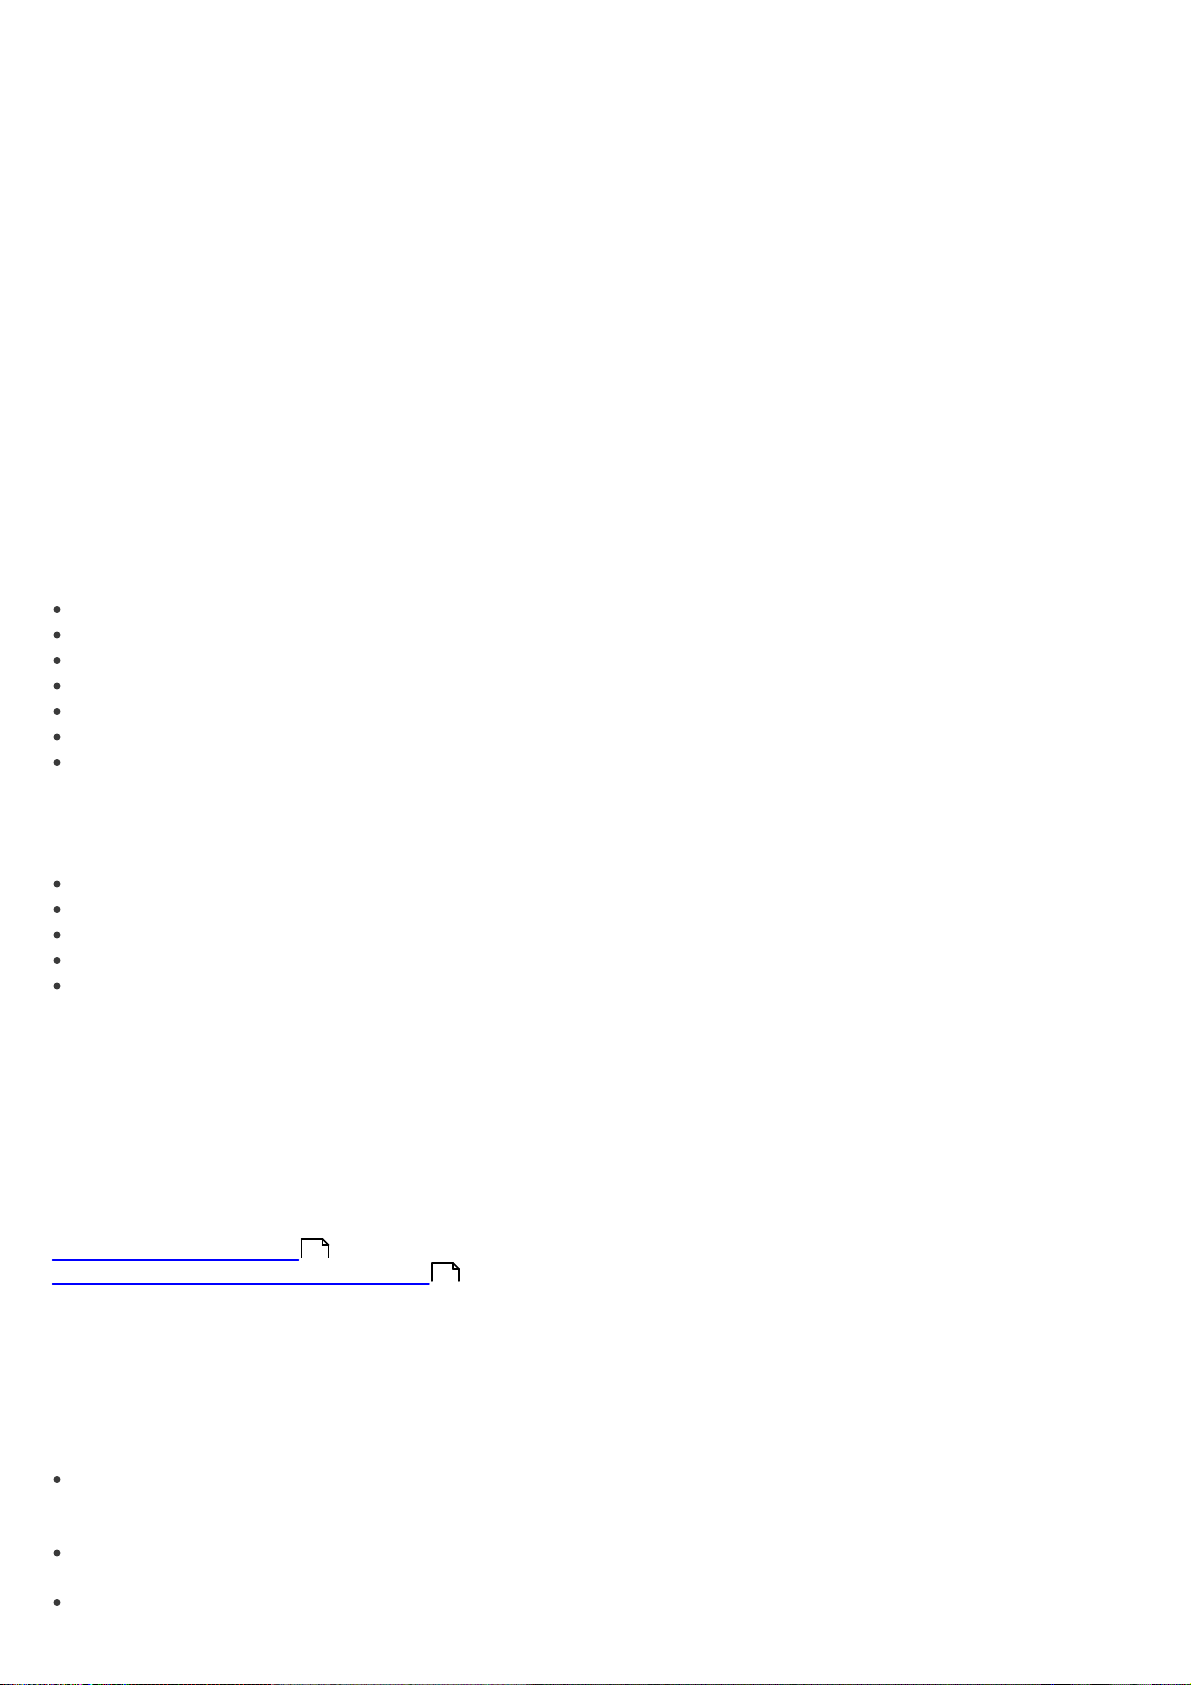
After selecting the installation mode and clicking Next, you will be prompted to enter your username and password
for automatic updates of the program. This plays a significant role in providing constant protection of your system.
Enter your Username and Password, i.e., the authentication data you received after the purchase or registration of
the product, into the corresponding fields. If you do not currently have your username and password available,
authentication data can be inserted at any time, directly from the program.
5
Page 6
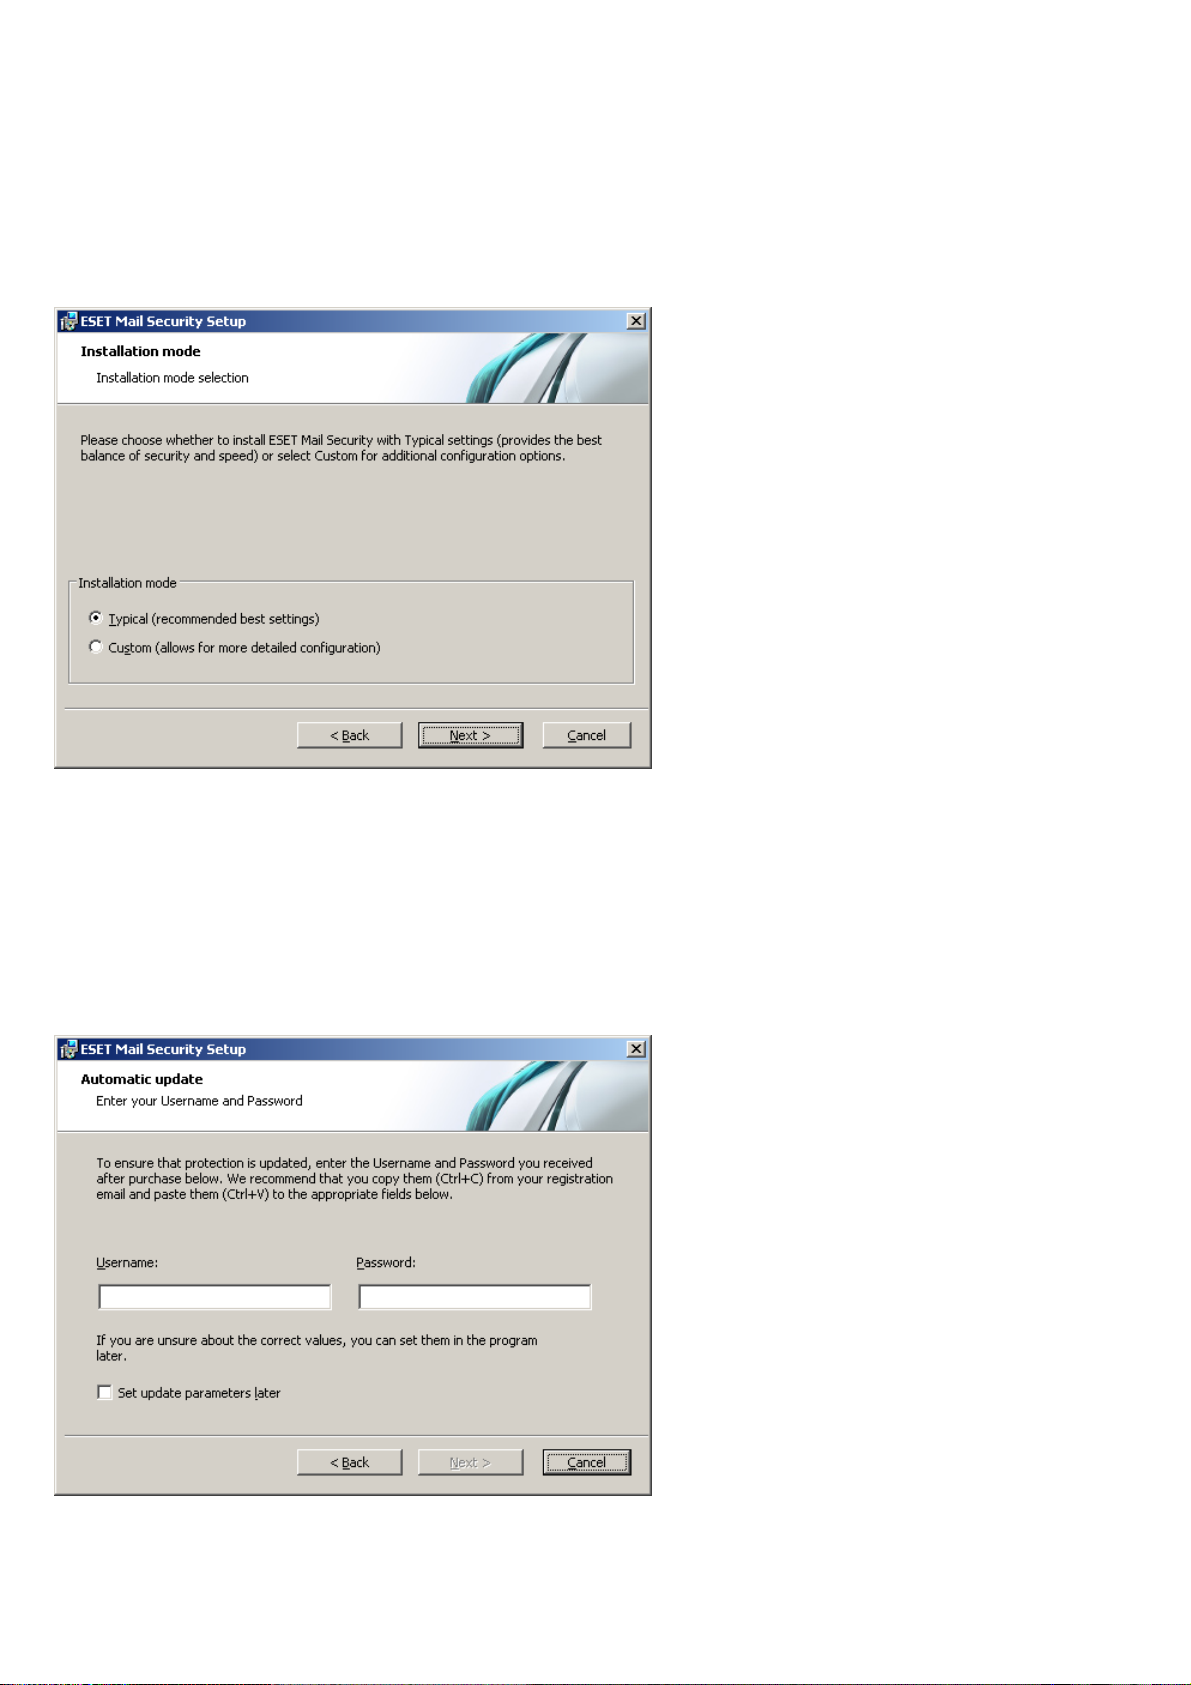
In the next step - License Manager - Add the license file delivered via email after product purchase.
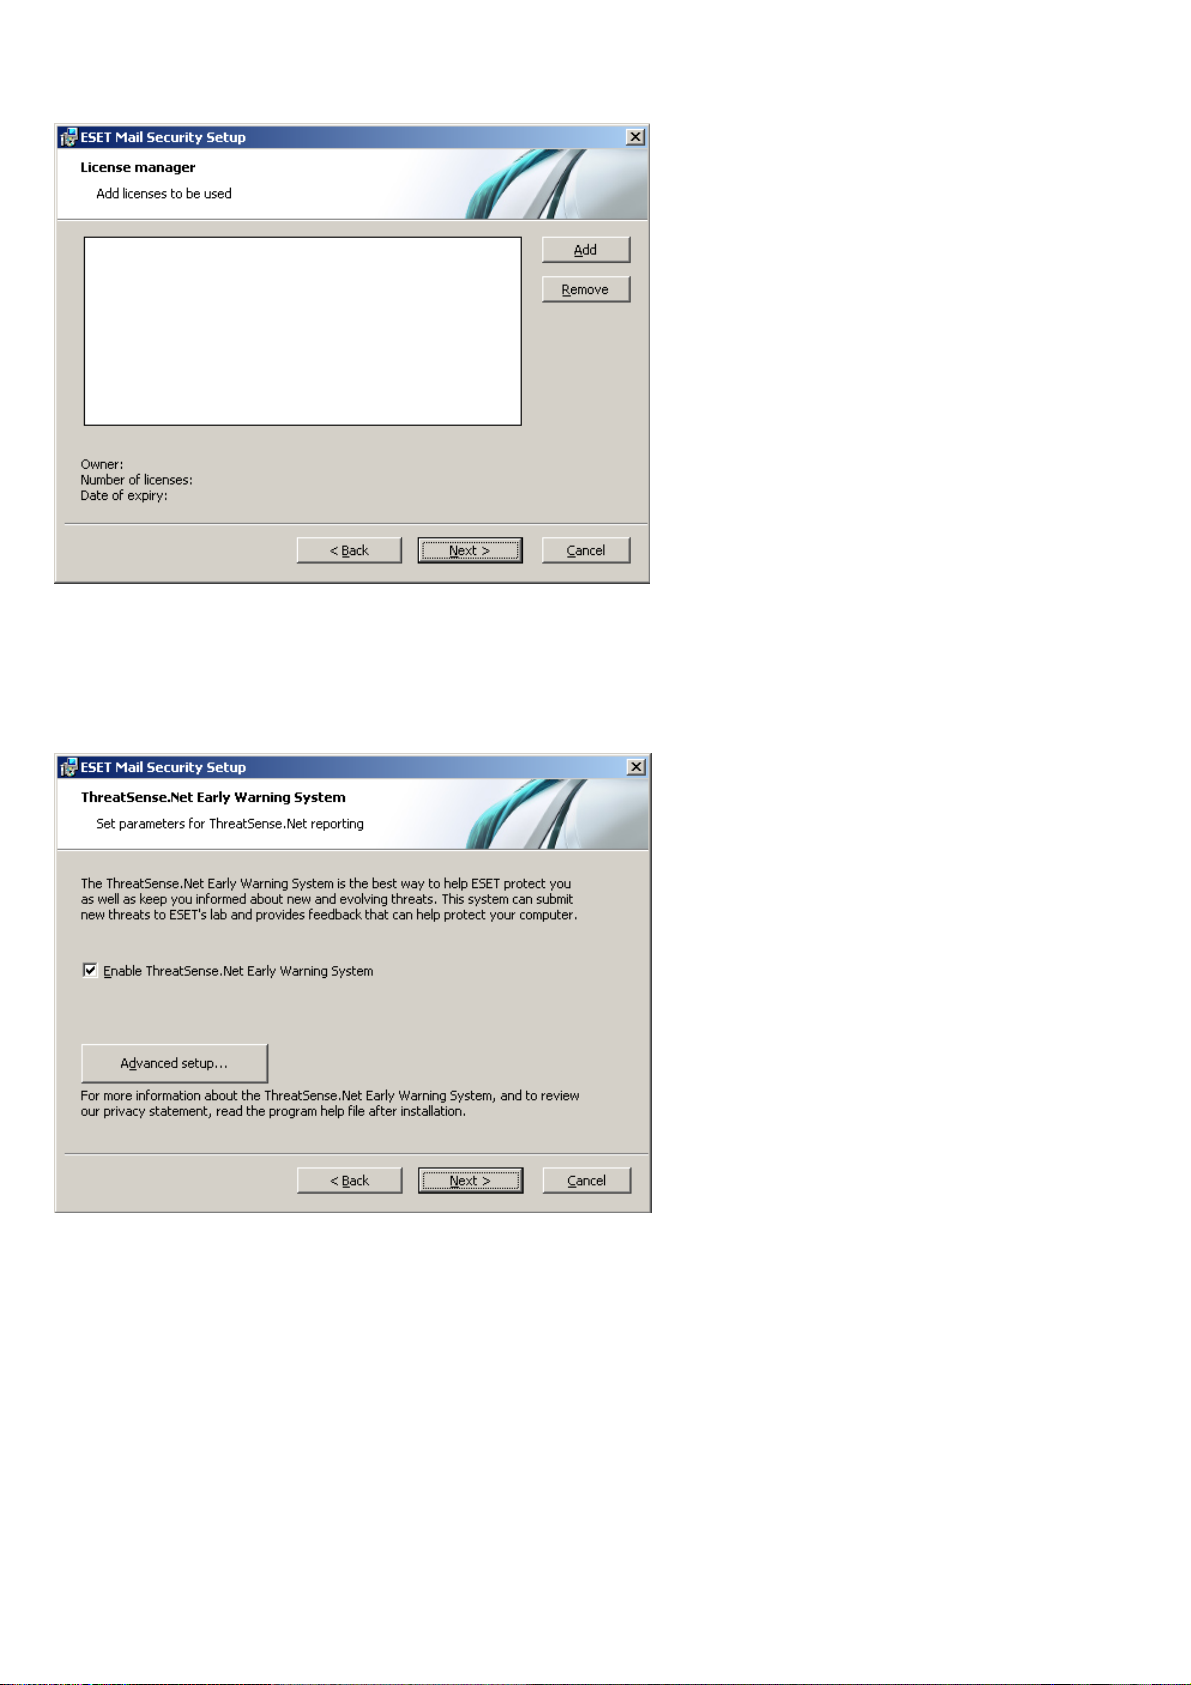
The next step is configuration of the ThreatSense.Net Early Warning System. The ThreatSense.Net Early Warning
System helps ensure that ESET is immediately and continuously informed about new infiltrations in order to quickly
protect its customers. The system allows for submission of new threats to ESET‘s Threat Lab, where they are analyzed,
processed and added to the virus signature database.
By default, the Enable ThreatSense.Net Early Warning System option is selected, which will activate this feature.
Click Advanced setup... to modify detailed settings for the submission of suspicious files.
The next step in the installation process is to configure Detection of potentially unwanted applications. Potentially
unwanted applications are not necessarily malicious, but can often negatively affect the behavior of your operating
system.
These applications are often bundled with other programs and may be difficult to notice during the installation
process. Although these applications usually display a notification during installation, they can easily be installed
without your consent.
6
Page 7
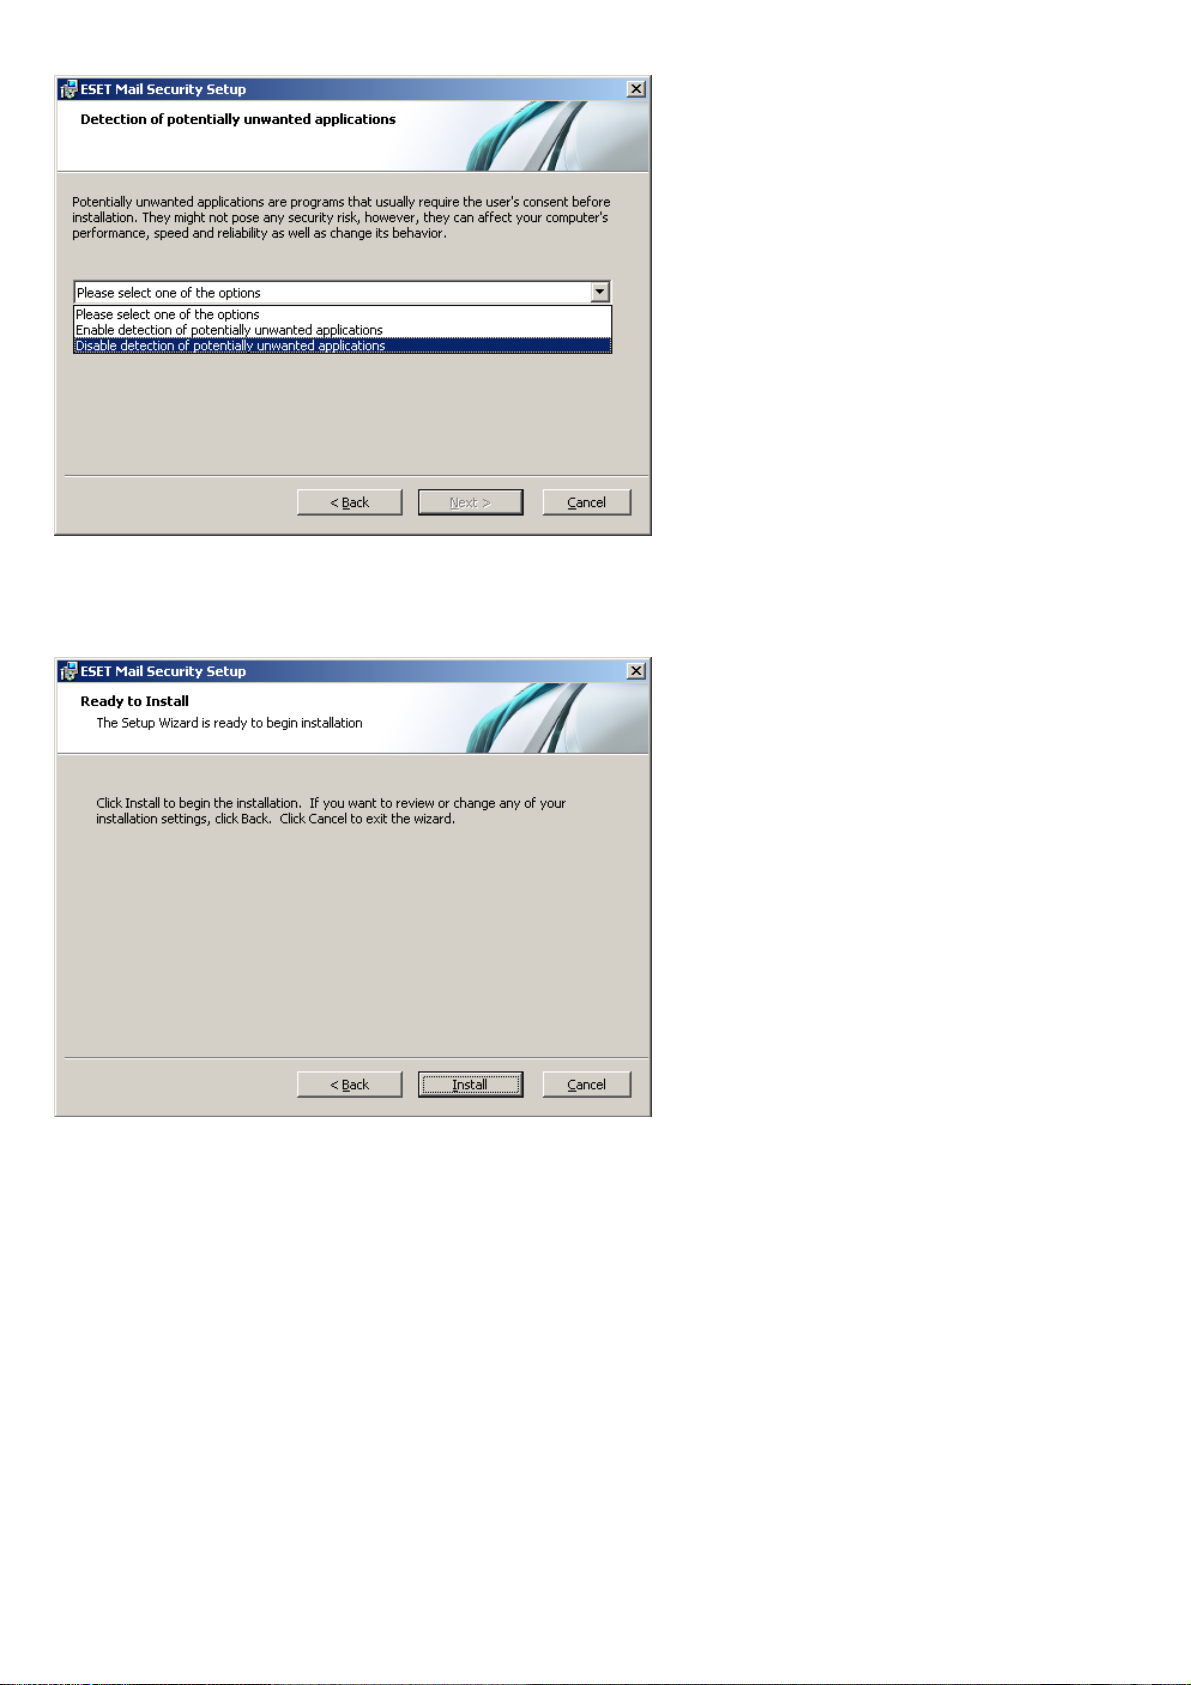
Select the Enable detection of potentially unwanted applications option to allow ESET Mail Security to detect this
type of threat (recommended).
The final step in Typical installation mode is to confirm installation by clicking the Install button.
2.2 Custom Installation
Custom installation is designed for users who have experience with fine-tuning programs and who wish to modify
advanced settings during installation.
After selecting the installation mode and clicking Next, you will be prompted to select a destination location for the
installation. By default, the program installs in
C:\Program Files\ESET\ESET Mail Security\.
Click Browse… to change this location (not recommended).
7
Page 8

Next, Enter your Username and Password. This step is the same as in Typical installation (see “Typical installation” ).
5
In the next step - License Manager - add the license file delivered via email after product purchase.
After entering your username and password, click Next to proceed to Configure your Internet connection.
8
Page 9
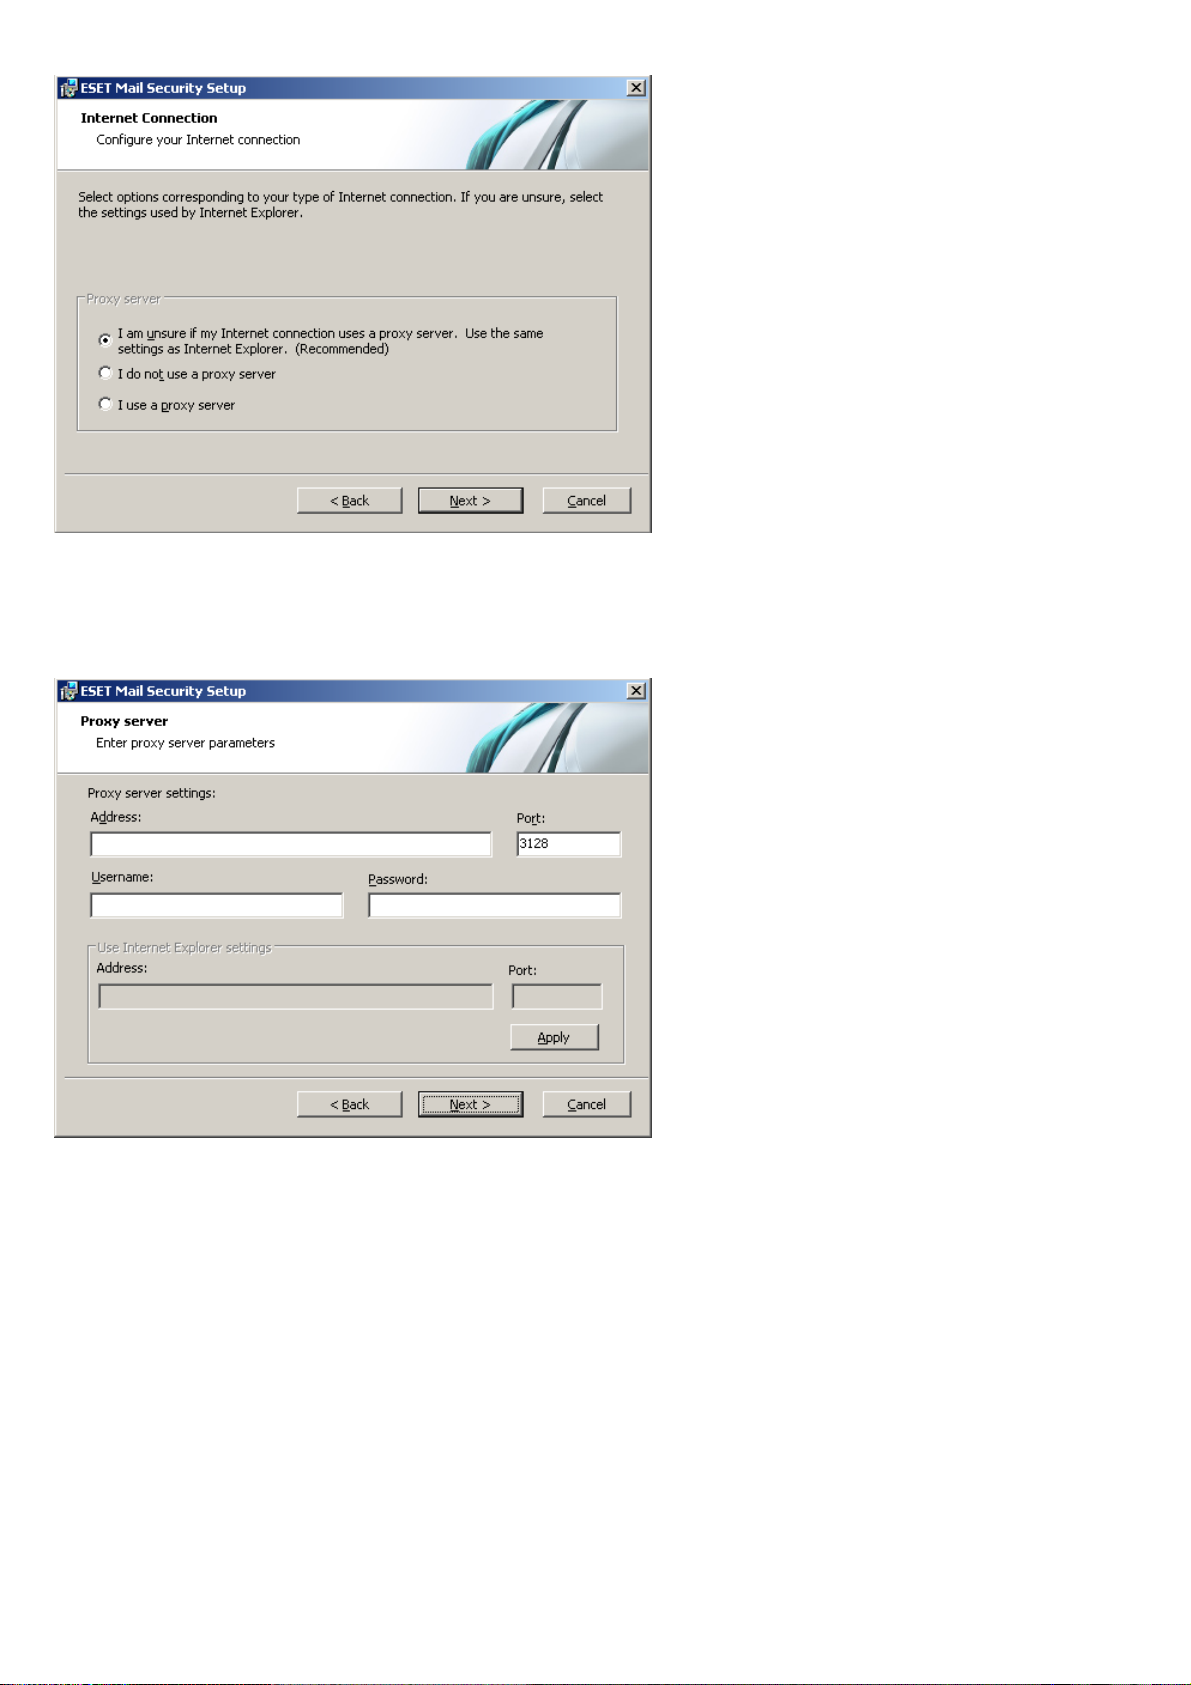
If you use a proxy server, it must be correctly configured for virus signature updates to work correctly. If you do not
know whether you use a proxy server to connect to the Internet, select the default setting I am unsure if my Internet
connection uses a proxy server. Use the same settings as Internet Explorer (Recommended) and click Next. If you
do not use a proxy server, select the I do not use a proxy server option.
To configure your proxy server settings, select I use a proxy server and click Next. Enter the IP address or URL of your
proxy server in the Address field. In the Port field, specify the port where the proxy server accepts connections (3128 by
default). In the event that the proxy server requires authentication, enter a valid Username and Password to grant
access to the proxy server. Proxy server settings can also be copied from Internet Explorer if desired. To do this, click
Apply and confirm the selection.
9
Page 10
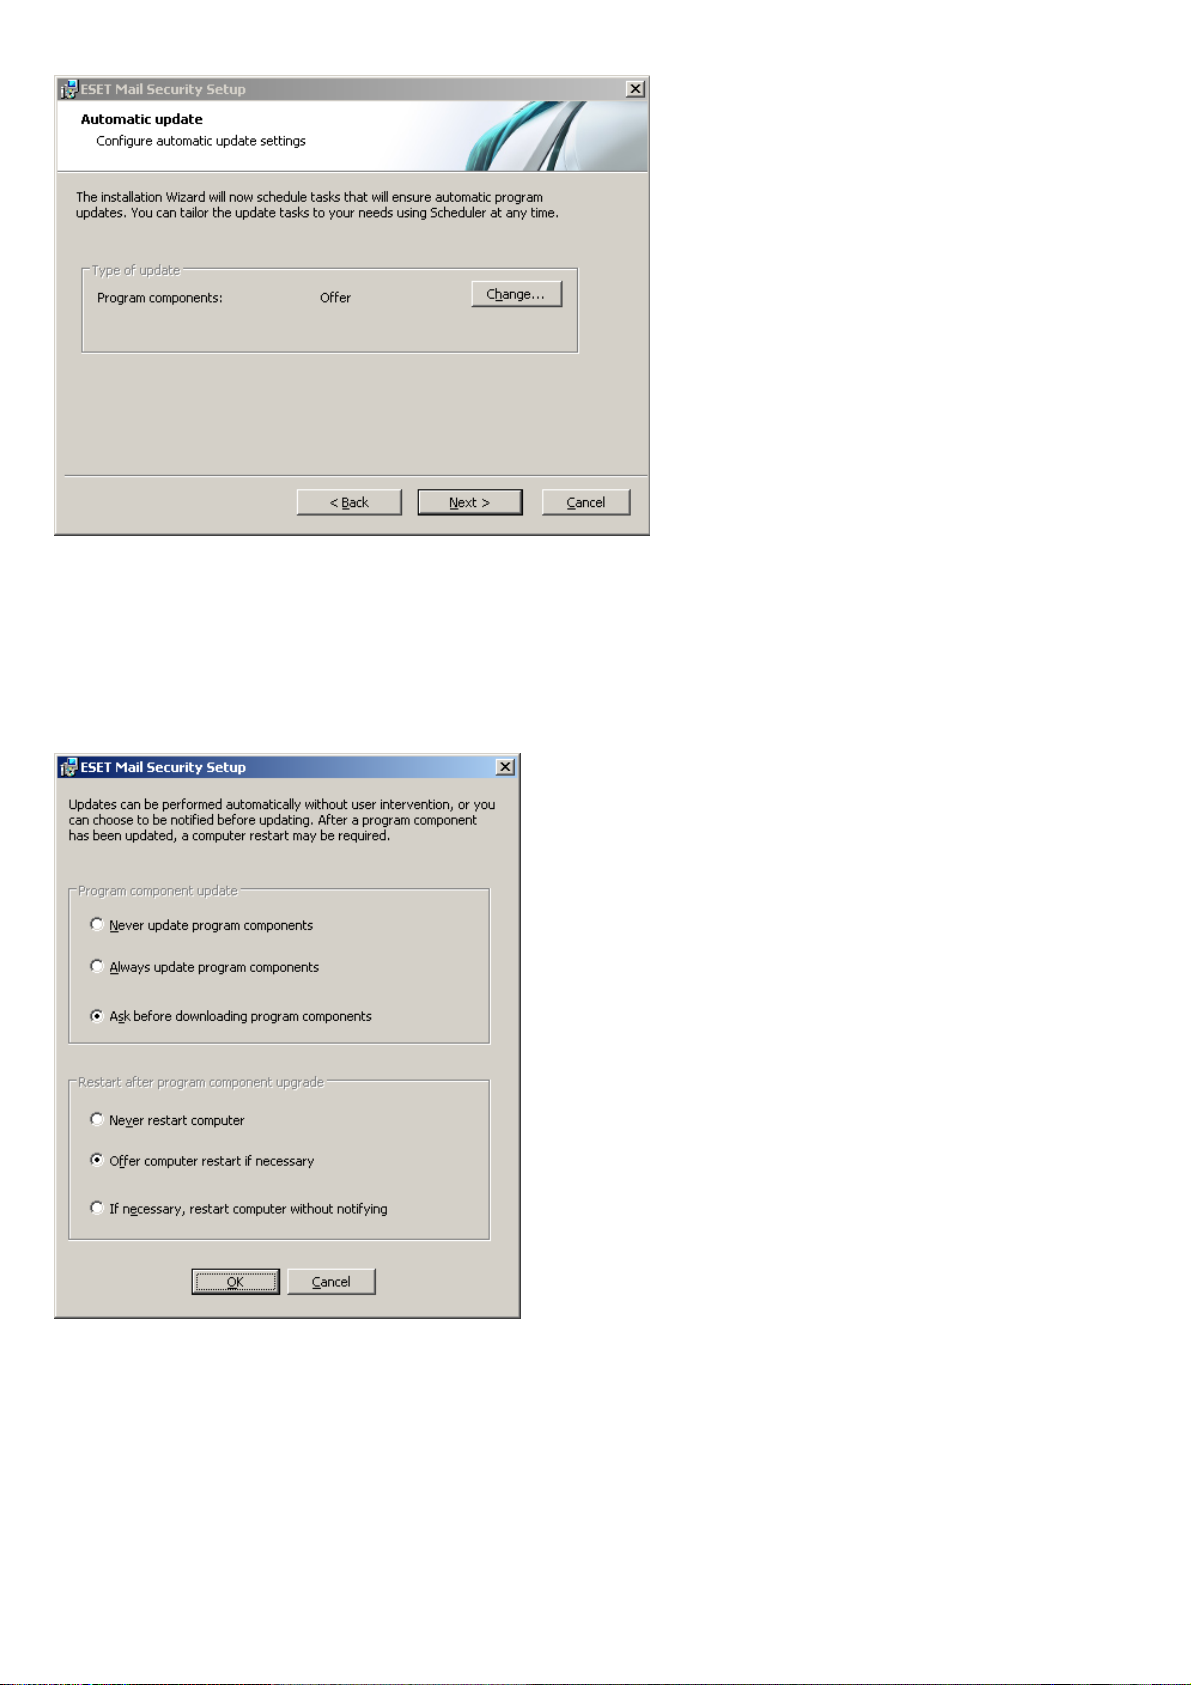
Click Next to proceed to Configure automatic update settings. This step allows you to designate how automatic
program component updates will be handled on your system. Click Change... to access the advanced settings.
If you do not want program components to be updated, select the Never update program components option.
Select the Ask before downloading program components option to display a confirmation window before
downloading program components. To download program component upgrades automatically, select the Always
update program components option.
NOTE: After a program component update, a restart is usually required. We recommend selecting the If necessary,
restart computer without notifying option.
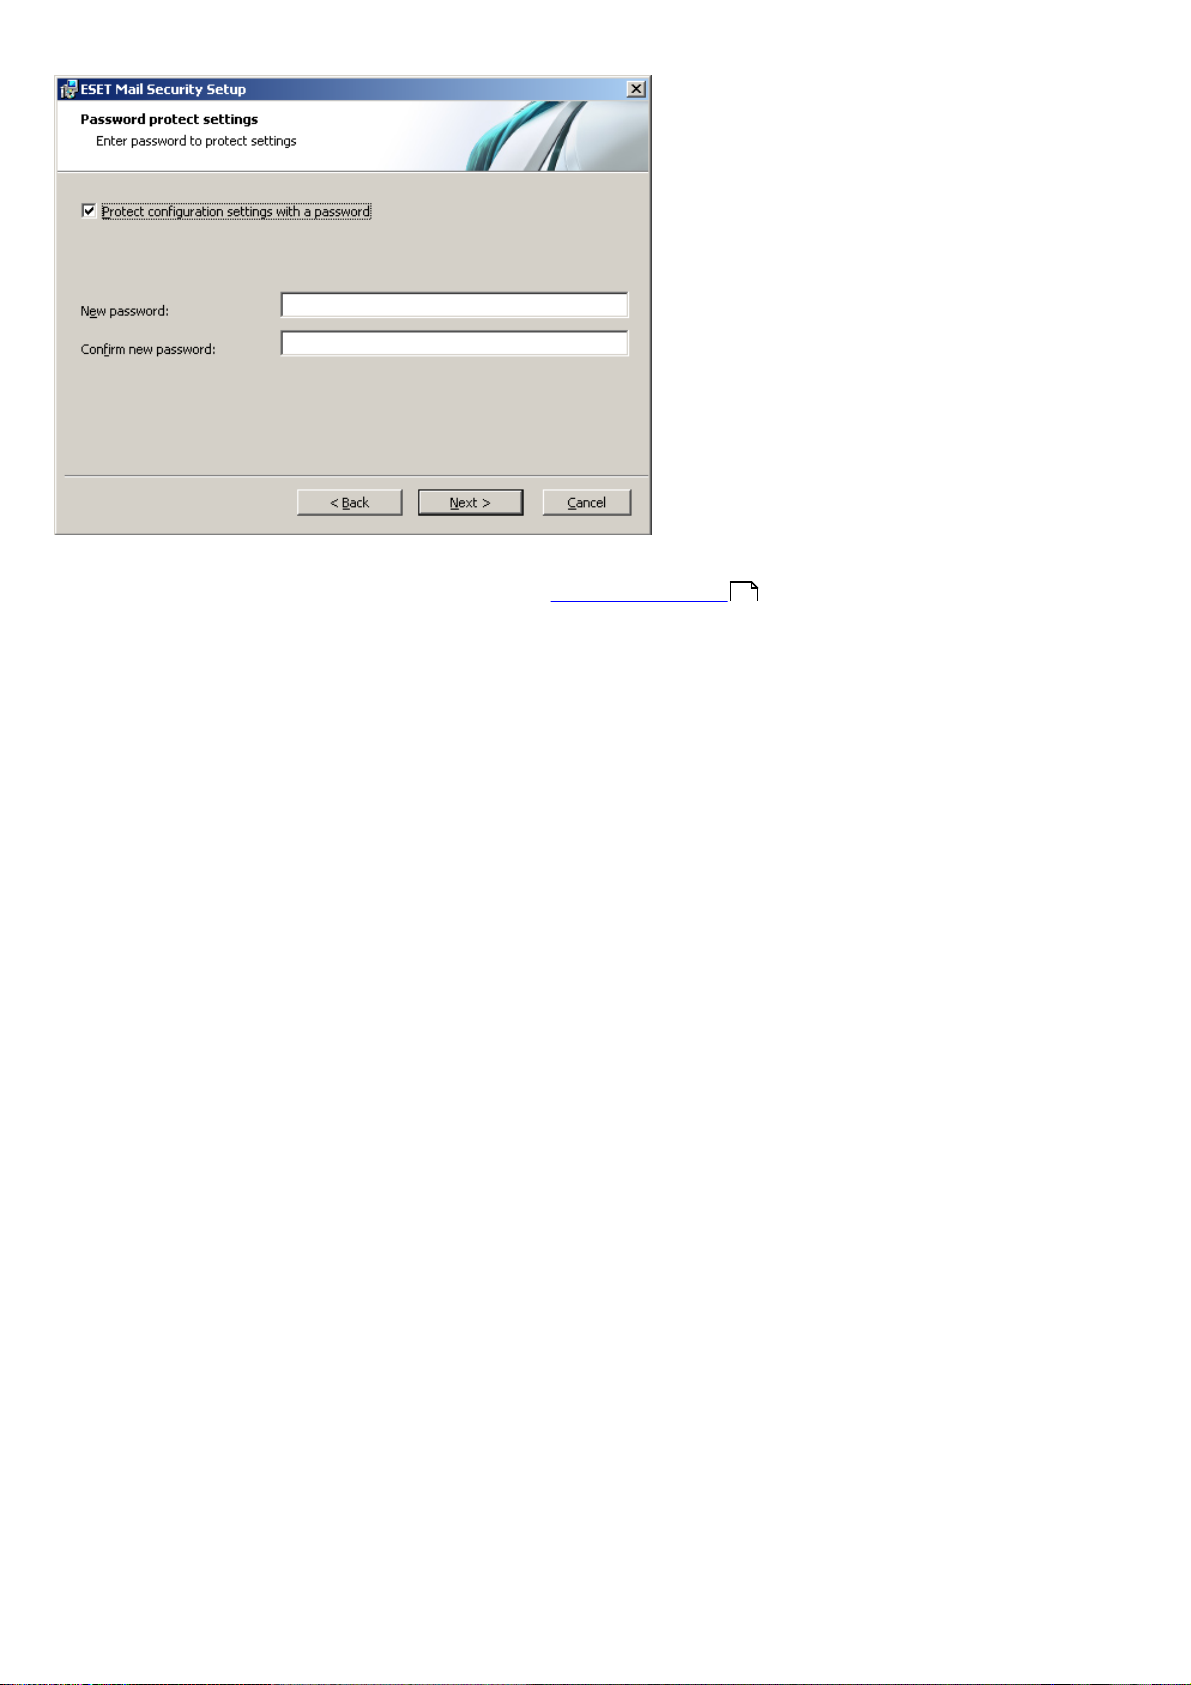
The next installation window offers the option to set a password to protect your program settings. Select the Protect
configuration settings with a password option and choose a password to enter in the New password and Confirm
new password fields.
10
Page 11
The next two installation steps, ThreatSense.Net Early Warning System and Detection of potentially unwanted
applications are the same as in Typical installation (see “Typical installation” ).
5
Click Install in the Ready to install window to complete installation.
2.3 Upgrading to a newer version
Newer versions of ESET Mail Security are issued to bring improvements or fix issues that cannot be remedied by
automatic update of the program modules. Upgrade to a newer version can be accomplished in several ways:
Automatically by means of a program component update (PCU)
1.
Since program component updates are distributed to all users and may have impact on certain system configurations,
they are issued after a long period of testing for seamless upgrade on all possible system configurations. If you need to
upgrade to a newer version instantly after it has been released, use either of the following methods.
Manually by downloading and installing a new version over the previous one
2.
At the beginning of installation, you can choose to preserve current program settings by selecting the Use current
settings check box
Manually with automatic deployment in a network environment by means of ESET Remote Administrator
3.
2.4 Installation in a clustered environment
A cluster is a group of servers (a server connected to a cluster is called a "node") that work together as a single server.
This type of environment provides high accessibility and reliability of available services. If one of the nodes in the
cluster fails or becomes inaccessible, its functioning is automatically covered by another node in the cluster. ESET Mail
Security fully supports Microsoft Exchange Servers connected in a cluster. In order for ESET Mail Security to function
properly, it is important that each node in a cluster contains the same configuration. This can be achieved by applying
a policy using ESET Remote Administrator (ERA). In the following chapters we will describe how to install and
configure ESET Mail Security on servers in a clustered environment using ERA.
Installation
This chapter explains the push installation method; however this is not the only way to install a product on the target
computer. For information on additional installation methods, refer to the ESET Remote Administrator User Guide.
1) Download the ESET Mail Security msi installation package from the ESET website to the computer where ERA is
installed. In ERA > Remote Install tab > Computers, right-click on any computer from the list and choose Manage
Packages from the context menu. In the Type drop-down menu, select ESET Security Products package and click
Add... In the Source, locate the downloaded ESET Mail Security installation package and click Create.
2) In Edit/Select configuration associated with this package, click Edit and configure the settings of ESET Mail
Security according to your needs. ESET Mail Security settings are in the following branches: ESET Smart Security,
11
Page 12

ESET NOD32 Antivirus > Mail server protection and Mail server protection for Microsoft Exchange Server. You
may also set the parameters of other modules included in ESET Mail Security (e.g., Update module, Computer scan,
etc.). We recommend exporting configured settings into an xml file which you can later use, e.g. when creating
installation package, applying Configuration Task or a Policy.
3) Click Close. In the next dialog window (Do you want to save the package into server?) select Yes and type the
name of the installation package. The finished installation package (including name and configuration) will be saved on
the server. Most frequently, this package is used for a Push Installation, but it is also possible to save it as a standard
msi installation package and use it for a direct installation on the server (in the Installation Packages Editor > Save
As...).
4) Now that the installation package is ready, you can initiate the remote installation on the nodes within a cluster. In
the ERA > Remote Install tab > Computers, select the nodes on which you want to install ESET Mail Security (Ctrl +
Left-click or Shift + Left-click). Right-click on any of selected computers and select Push Installation from the context
menu. Using the Set / Set All buttons, set the Username and Password of a user on the target computer (this must
be a user with administrator rights). Click Next to choose the installation package and initiate the remote installation
process by clicking Finish. The installation package containing ESET Mail Security and custom configuration settings
will be installed on selected target computers/nodes. After a short time, clients with ESET Mail Security will appear in
the ERA > Clients tab. You may now manage the clients remotely.
NOTE: For a seamless remote installation process, it is necessary to fulfill certain conditions on the target computers
as well as on the ERA Server. For further details, refer to the ESET Remote Administrator User Guide.
Configuration
For ESET Mail Security to function correctly on the nodes within a cluster, the nodes must have the same configuration
at all times. This condition is met if you followed the push installation method above. However, there is a chance that
the configuration will be changed by mistake, causing inconsistencies between ESET Mail Security products within a
cluster. You can avoid this by using a policy in ERA. A policy is very similar to a standard Configuration Task – it sends
the configuration defined in the Configuration Editor to the client(s). A policy is different from a Configuration Task
because it is continuously applied to the client(s). So the Policy can be defined as a configuration that is regularly
forced to a client / group of clients.
In ERA > Tools > Policy Manager... there is a number of options on how to use a policy. The easiest option is to use
Default Parent Policy which also generally serves as Default policy for primary clients. This kind of policy is
automatically applied to all currently connected clients (in this case, to all ESET Mail Security products within a cluster).
You can configure the Policy by clicking Edit..., or use existing configuration saved in the xml file, if you have already
created one.
The second option is to create a new policy (Add New Child Policy) and use the Add Clients... option to assign all
ESET Mail Security products to this policy.
This configuration ensures a single policy with the same settings will be applied to all clients. If you wish to modify
existing settings of an ESET Mail Security server within a cluster, it is sufficient to edit the current policy. Changes will
be applied to all clients assigned to this policy.
NOTE: Refer to the ESET Remote Administrator User Guide for detailed information on policies.
12
Page 13
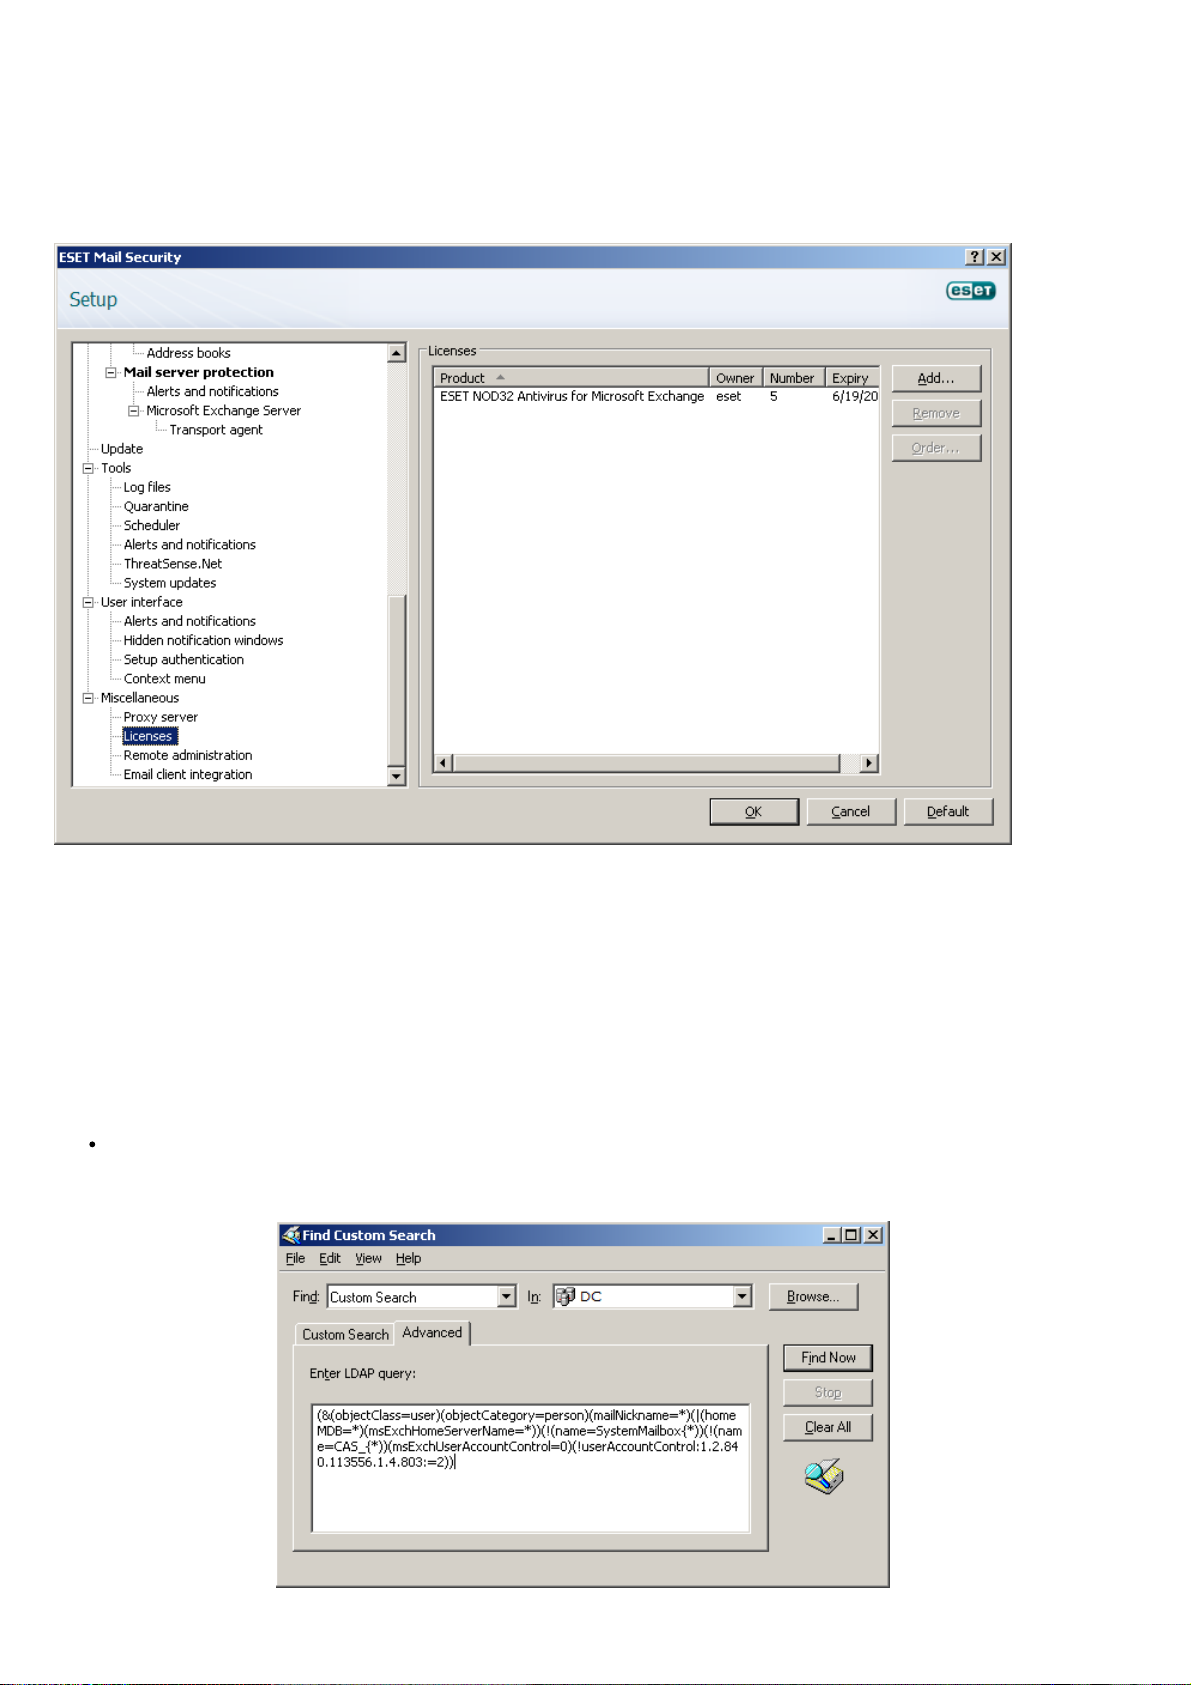
2.5 License
A very important step is to enter the license file for ESET Mail Security for Microsoft Exchange Server. Without it, email
protection on the Microsoft Exchange Server will not work properly. If you do not add the license file during
installation, you can do so later in the advanced settings, under Miscellaneous > Licenses.
ESET Mail Security 4 for Microsoft Exchange Server (EMSX) compares the number of mailboxes for the active directory
to your license count. Each Exchange server's active directory is checked to determine the total mailbox count. There is
no way to determine which mailboxes are protected and which ones are excluded from protection. Resource
mailboxes (i.e. a conference room mailbox) will be tallied in the mailbox count. Email aliases are not tallied in the
mailbox count. In a clustered environment, nodes with clustered mailbox role are not tallied in the mailbox count.
To determine how many Exchange enabled mailboxes you have, open Active Directory users and computers on the
server. Right-click on the domain and click Find.... Then from the Find drop-down menu select Custom search and
click the Advanced tab. Paste in the following Lightweight Directory Access Protocol (LDAP) query and click Find Now
:
(&(objectClass=user)(objectCategory=person)(mailNickname=*)(|(homeMDB=*)
(msExchHomeServerName=*))(!(name=SystemMailbox{*))(!(name=CAS_{*))(msExchUserAccountControl=0)
(!userAccountControl:1.2.840.113556.1.4.803:=2))
13
Page 14

If the number of mailboxes in your active directory exceeds your license count a message will be entered into your
Microsoft Exchange Server log reading, "Protection status changed due to exceeded number of mailboxes (count)
covered by your license (count)." Your ESET Mail Security will also notify you by changing its Protection status to
ORANGE and displaying a message informing you that you have 42 days left before your protection will be disabled. If
you receive this notification, please contact your sales representative to purchase additional licenses.
If the 42 days period has passed and you did not add the required licenses to cover the exceeding mailboxes, your
Protection status will change to RED. The message will inform you that your protection has been disabled. If you
receive this notification, immediately contact your sales representative to purchase additional licenses.
2.6 Post-Installation Configuration
There are several options that have to be configured after the product installation.
Antispam protection setup
This section describes the settings, methods and techniques you can use to protect your network from spam. We
recommend reading the following instructions carefully before choosing the most suitable combination of settings for
your network.
Spam management
To ensure a high level of Antispam protection you must set actions to be performed on messages already marked as
SPAM.
There are three options available:
Deleting spam
1.
The criteria for a message to be marked as SPAM by ESET Mail Security are set reasonably high, decreasing the
chances of deleting legitimate email. The more specific the Antispam settings, the less likely it is to delete legitimate
email. Advantages of this method include very low consumption of system resources and less administration. The
drawback to this method is that if a legitimate email is deleted it cannot be restored locally.
Quarantine
2.
This option excludes the risk of deleting legitimate email. Messages can be restored and resent to the original
recipients immediately. The drawbacks of this method are higher consumption of system resources and additional
time required for email quarantine maintenance. You can use two methods to quarantine email:
A. Internal Exchange Server quarantine:
- If you want to use the internal server quarantine make sure the Common message quarantine field on the
right pane in the advanced settings menu (under Mail server protection > Message quarantine) is left blank.
Also make sure that the Quarantine message to the mail server system quarantine option is selected from
the drop-down menu at the bottom.
B. Custom quarantine mailbox:
- If you type the desired mailbox in the Common message quarantine field ESET Mail Security will move all
new spam messages into your custom mailbox.
Forwarding spam
3.
Spam will be forwarded along to its recipient. However, ESET Mail Security will fill in the relevant MIME header with
the SCL value into each message. Based on the SCL value the relevant action will be executed by the Exchange
server IMF (Intelligent Message Filtering).
Spam filtering
Antispam Engine
The Antispam engine offers the three following configurations - Recommended, Most accurate, Fastest.
If there is no need to optimize your configuration to allow maximum throughput (e.g. high server load), we
recommend you select the Most accurate option. When the Recommended configuration is set, the server will
automatically adjust its settings based on scanned messages to balance the load. When Most accurate is enabled, the
14
Page 15

settings will be optimized in regard to the catch rate. Clicking Custom > Open configuration file allows a user to edit
the spamcatcher.conf file. This option is recommended for advanced users only.
Before starting full operation, we recommend that you manually configure the lists of restricted and allowed IP
addresses. To do so:
Open the Advanced settings window and navigate to the section Antispam protection > Mail server protection.
1)
Make sure to check the Enable mail server antispam protection field.
2)
Click the Setup... button to set Allowed, Ignored and Blocked IP addresses lists.
3)
The Blocked IP addresses tab contains the list of restricted IP addresses, i.e., if any non-ignored IP in Received
headers matches the address on this list, the message scores 100 and no other checks are made.
The Allowed IP addresses tab lists all IP addresses that are approved, i.e., if the first non-ignored IP in Received
headers matches any address on this list, the message scores 0 and no other checks are made.
The Ignored IP addresses tab lists addresses that should be ignored during Real-time Blackhole List (RBL) checks.
The list should include all internal IP addresses in the firewall not directly accessible from the Internet. Doing so
prevents unnecessary checks and helps to differentiate the external connecting IP addresses from the internal IP
addresses.
Greylisting
Greylisting is a method protecting users from spam using the following technique: Transport agent sends a
“temporarily reject” SMTP return value (default is 451/4.7.1) for any email from a sender it does not recognize. A
legitimate server will attempt to redeliver the message. Spammers typically do not attempt to redeliver messages,
because they go through thousands of email addresses at a time and typically cannot spend extra time on resending.
When evaluating the message source, the method takes into account the configurations of the Approved IP
addresses list, the Ignored IP addresses list, the Safe Senders and Allow IP lists on the Exchange server and the
AntispamBypass settings for the recipient mailbox. Greylisting must be thoroughly configured, or else unwanted
operational flaws (e.g. delays in legitimate message deliveries etc.) may occur. These negative effects recede
continuously as this method fills the internal whitelist with trusted connections. If you are not familiar with this
method, or if you consider its negative side-effect unacceptable, we recommend that you disable the method in the
Advanced settings menu under Antispam protection > Mail server protection > Microsoft Exchange Server >
Transport agent > Enable Greylisting.
We recommend disabling greylisting if you intend to test the product's basic functionalities and do not want to
configure the advanced features of the program.
NOTE: Greylisting is an additional layer of antispam protection and does not have any effect on the spam evaluation
capabilities of the antispam module.
Antivirus protection setup
Quarantine
Depending on the type of cleaning mode you are using we recommend that you configure an action to be performed
on infected (not cleaned) messages. This option can be set in the Advanced settings window > Antivirus and
antispyware > Mail server protection > Microsoft Exchange Server > Transport agent.
If the option to move messages into email quarantine is enabled, you need to configure the quarantine under the
section Message quarantine in the Advanced settings window.
Performance
If there are no other restrictions, our recommendation is to increase the number of ThreatSense scan engines
according to this formula: number of scan engines = number of scan threads and increase the number of VSAPI scanning
threads based on this formula: number of scan threads = (number of physical CPUs * 2) + 1 in the Advanced settings
window under Antivirus and antispyware > Performance.
NOTE: We recommend that you set the number of ThreatSense scan engines equal to the number of scan threads
used.
15
Page 16

3. Update
Updating the virus signature database and updating program components are an important part of providing
complete protection against malicious code. Please pay attention to their configuration and operation. From the main
menu, select Update and then click Update virus signature database in the primary window to check for a newer
database update. Username and Password setup... displays a dialog box where the username and password
received at the time of purchase should be entered.
If the username and password were entered during installation of ESET Mail Security you will not be prompted for
them at this point.
The Advanced Setup window (click Setup from the main menu and then click Advanced setup..., or press F5 on your keyboard) contains additional update options. Click Update from the Advanced Setup tree. The Update server: drop- down menu should be set to Choose automatically. To configure advanced update options such as the update mode, proxy server access, LAN connections and creating virus signature copies, click the Setup... button.
16
Page 17

3.1 Proxy server setup
If you use a proxy server to control Internet connections on a system using ESET Mail Security, it must be specified in
Advanced Setup. To access the Proxy server configuration window, press F5 to open the Advanced Setup window
and click Miscellaneous > Proxy server from the Advanced Setup tree. Select the Use proxy server option and then
fill in the Proxy server (IP address) and Port fields. If needed, select the Proxy server requires authentication option
and then enter the Username and Password.
If this information is not available, you can attempt to automatically detect proxy server settings by clicking the
Detect proxy server button.
NOTE: Proxy server options for various update profiles may differ. If this is the case, configure the different update
17
Page 18

profiles in Advanced Setup by clicking Update from the Advanced Setup tree.
18
Page 19

4. ESET Mail Security - Microsoft Exchange Server protection
4.1 General settings
This section describes how to administer rules, log files, message quarantine and performance parameters.
4.1.1 Rules
The Rules menu item allows administrators to manually define email filtering conditions and actions to take with filtered emails. The rules are applied according to a set of combined conditions. Multiple conditions are combined with the logical operator AND, applying the rule only if all the conditions are met. The column Number (next to each rule name) displays the number of times the rule was successfully applied.
The rules are checked against a message when it is processed by transport agent (TA) or VSAPI. When both TA and
VSAPI are enabled and the message matches the rule conditions, the rule counter may increase by 2 or more. This is
because VSAPI accesses each part of the message individually (body, attachment) meaning the rules are consequently
applied to each part individually. Furthermore, rules are also applied during background scanning (e.g. repeated
mailbox-store scan after virus signature database update), which can increase the rule counter.
NOTE: You can also use system variables to apply Rules (for example: %PATHEXT%).
19
Page 20

4.1.1.1 Adding new rules
By target mailbox:
smith
By email sender:
smith@mail.com
By email recipient:
“J.Smith” or “smith@mail.com”
By email subject:
“ ”
By attachment name:
“.com” OR “.exe”
By email body:
(“free” OR “lottery”) AND (“win” OR “buy”)
This wizard guides you through adding user-specified rules with combined conditions.
Note, that not all of the conditions are applicable when the message is scanned by transport agent.
By target mailbox applies to the name of a mailbox (VSAPI)
By message recipient applies to a message sent to a specified recipient (VSAPI + TA)
By message sender applies to a message sent by a specified sender (VSAPI + TA)
By message subject applies to a message with a specified subject line (VSAPI + TA)
By message body applies to a message with specific text in the message body (VSAPI)
By attachment name applies to a message with a specific attachment name (VSAPI)
By attachment size applies to a message with an attachment exceeding a defined size (VSAPI)
By frequency of occurrence applies to objects (email body or attachment) for which the number of occurrences
within the specified time interval exceeds the specified number (VSAPI + TA). This is particularly useful if you are
constantly spammed with emails with the same email body or the same attachment.
When specifying the abovementioned conditions (except the By attachment size condition) it is sufficient to fill in
only part of a phrase as long as the Match whole words option is not selected. Values are not case-sensitive, unless
the Match case option is selected. If you are using values other than alphanumerical characters, use parentheses and
quotes. You can also create conditions using the logical operators AND, OR and NOT.
NOTE: Microsoft Exchange Server 2000 (VSAPI 2.0) only evaluates displayed sender/recipient name and not the email
address. Email addresses are evaluated starting with Microsoft Exchange Server 2003 (VSAPI 2.5) and higher.
Examples of entering conditions:
4.1.1.2 Actions
This section allows you to select actions to take with messages and/or attachments matching conditions defined in
rules. You can take no action, mark the message as if it contained a threat/spam or delete the whole message.When a
message or its attachment matches the rule conditions, it is not scanned by the antivirus or antispam modules by
default, unless scanning is enabled explicitly by selecting the respective check boxes at the bottom (the action taken
then depends on the antivirus/antispam settings).
20
Page 21

No action – no action will be taken with the message
Mark as uncleaned threat - the message will be marked as if it contained an uncleaned threat (regardless of
whether it contained the threat or not)
Mark as unsolicited email - the message will be marked as if it were a spam (regardless of whether it is spam or
not). This option is not available if you are using ESET Mail Security without Antispam module.
Delete message – removes the entire message with content that meets the conditions
Quarantine file - quarantines the attachments
NOTE: Do not confuse this with mail quarantine (see chapter Message quarantine)
23
Submit file for analysis - sends suspicious attachments to ESET’s lab for analysis
Send event notification - sends a notification to the administrator (based on settings in Tools > Alerts and
notifications)
Log - writes information about the applied rule to the program log
Evaluate other rules - allows the evaluation of other rules, enabling the user to define multiple sets of conditions
and multiple actions to take, given the conditions
Scan by antivirus and antispyware protection - scans the message and its attachments for threats
Scan by antispam protection - scans the message for spam
The last step in the new rule creation wizard is to name each created rule. You can also add a Rule comment. This
information will be stored in the Microsoft Exchange Server log.
21
Page 22

4.1.2 Log files
Log files settings let you choose how the log file will be assembled. More detailed protocol can contain more
information but it may slow server performance.
If Synchronized writing without using cache is enabled, all the log entries will be immediately written in the log file
without being stored in the log cache. By default, ESET Mail Security components running in Microsoft Exchange
Server store log messages in their internal cache and send them to the application log at periodic time intervals to
preserve performance. In this case, however, the diagnostic entries in the log might not be in the proper order. We
recommend keeping this setting turned off unless it is necessary for diagnostics. You can specify the type of
information stored in the log files in the Content menu.
22
Page 23

4.1.3 Message quarantine
The Message quarantine mailbox is a special mailbox defined by the system administrator to store potentially
infected messages and SPAM. Messages stored in quarantine can be analyzed or cleaned later using a newer virus
signature database.
You can specify the message quarantine address in the Common message quarantine field (e.g.
main_quarantine@company.com). You can also use the Microsoft Exchange Server 2007/2010 internal quarantine
system by leaving this field blank and choosing Quarantine message to the mail server system quarantine (if
defined by administrator) from the drop-down menu at the bottom. Mails are then delivered to quarantine by
Exchange's internal mechanism using its own settings.
In the Message quarantine by recipient field, you can define message quarantine mailboxes for multiple recipients.
Every quarantine rule can be enabled or disabled by selecting or deselecting the check box in its row.
NOTE: You can also use system variables when administering the message quarantine (for example: %PATH%).
4.1.3.1 Adding a new quarantine rule
Enter the desired Recipient’s email address and the desired Quarantine email address in the appropriate fields.
If you want to delete an email message addressed to a recipient who does not have a quarantine rule applied, you can
select the Delete message option in the Message intended for non-existing message quarantine pull-down menu.
23
Page 24

4.1.4 Performance
In this section, you can define a folder in which to store temporary files to improve program performance. If no folder
is specified, ESET Mail Security will create temporary files in the system’s temporary folder.
NOTE: In order to reduce the potential I/O and fragmentation impact, we recommend placing the Temporary folder
on a different hard drive than the one on which Microsoft Exchange Server is installed. We strongly recommend that
you avoid assigning the Temporary folder to removable media such as floppy disk, USB, DVD, etc.
NOTE: You can use system variables (e.g., %SystemRoot%\TEMP) when configuring Performance settings.
24
Page 25

4.1.5 Transport Agent
Primary response code
Complementary status code
Description
250
2.5.0
Requested mail action okay, completed
451
4.5.1
Requested action aborted: local error in processing
550
5.5.0
Requested action not taken: mailbox unavailable
In this section, you can set up automatic startup of the transport agent as well as the agent loading priority. On
Microsoft Exchange Server 2007 and later, it is only possible to install a transport agent if the server is in one of two
roles: Edge Transport or Hub Transport.
NOTE: Transport agent is not available in Microsoft Exchange Server 5.5 (VSAPI 1.0).
In the Agent priority setup menu, you can set the priority of ESET Mail Security agents. The agent priority number
range depends on the version of Microsoft Exchange Server (the lower the number, the higher the priority).
Write spam confidence level (SCL) to the header of scanned messages based on spam score – SCL is a normalized
value assigned to a message that indicates the likelihood of the message being spam (based on the characteristics of
the message header, its subject, content, etc.). A rating of 0 indicates that the message is highly unlikely to be spam,
while a rating of 9 indicates that the message is very likely spam. SCL values can be processed further by the Microsoft
Exchange Server's Intelligent Message Filter (or Content Filter Agent). For additional information please refer to the
Microsoft Exchange Server documentation.
The When deleting messages, send SMTP reject response option:
If unchecked, the server sends an OK SMTP response to the sender’s Mail Transfer Agent (MTA) in the format ‘250
2.5.0 – Requested mail action okay, completed’ and then performs a silent drop.
If checked, an SMTP reject response is sent back to the sender’s MTA. You can type a response message in the
following format:
Warning: Incorrect syntax of the SMTP response codes can lead to malfunctioning of program components and
decrease effectiveness.
NOTE: You can also use system variables when configuring SMTP Reject Responses.
25
Page 26

4.2 Antivirus and antispyware settings
You can enable antivirus and antispyware mail server protection by selecting the Enable antivirus and antispyware
mail server protection option. Note that antivirus and antispyware protection is turned on automatically after every
service/computer restart.
4.2.1 Actions
In this section you can choose to append a scan task ID and/or scan result information to the header of scanned
messages.
26
Page 27

4.2.2 Alerts and notifications
ESET Mail Security allows you to append text to the original subject or body of infected messages.
By enabling Add to the subject of infected messages, ESET Mail Security will append a notification tag to the email
subject with the value defined in the Template added to the subject of infected messages text field (by default [virus
%VIRUSNAME%]). The above-mentioned modifications can automate infected-email filtering by filtering email with a
specific subject (if supported in your email client) to a separate folder.
NOTE: You can also use system variables when adding a template to the message subject.
27
Page 28

4.2.3 Performance
In this section, you can set the number of ThreatSense scan engines that should be used for virus scanning. More
ThreatSense scan engines on multiprocessor machines can increase the scan rate.
4.2.4 Virus-Scanning Application Programming Interface (VSAPI)
Microsoft Exchange Server provides a mechanism to make sure that every message component is scanned against the
current virus signature database. If a message component is not scanned, its corresponding component is submitted
to the scanner before the message is released to the client. Every supported version of Microsoft Exchange Server
(5.5/2000/2003/2007/2010) offers a different version of VSAPI.
28
Page 29

4.2.4.1 Microsoft Exchange Server 5.5 (VSAPI 1.0)
This version of Microsoft Exchange Server includes VSAPI version 1.0.
The Background scanning option allows scanning of all messages in the system background. Microsoft Exchange
Server decides whether a background scan will run or not, based on various factors, such as the current system load,
the number of active users, etc. Microsoft Exchange Server keeps a record of scanned messages and the virus
signature database version used. If you are opening a message that has not been scanned by the most current virus
signature database, Microsoft Exchange Server sends the message to ESET Mail Security to be scanned before
opening the message in your e-mail client.
Since background scanning can affect system load (scanning is performed after each virus signature database update),
we recommend using scheduled scanning outside working hours. Scheduled background scanning can be configured
via a special task in the Scheduler/Planner. When you schedule a Background scanning task you can set the launch
time, the number of repetitions and other parameters available in the Scheduler/Planner. After the task has been
scheduled, it will appear in the list of scheduled tasks and, as with the other tasks, you can modify its parameters,
delete it or temporarily deactivate the task.
29
Page 30

4.2.4.1.1 Actions
In this section you can specify the actions to be performed when a message and/or attachment is evaluated as
infected.
The Actions to take if cleaning not possible field allows you to block infected content or delete the message. This
action will be applied only if the automatic cleaning (defined in ThreatSense engine parameter setup > Cleaning) did
not clean the message.
The Deletion option allows you to truncate a file attachment to zero size or replace an infected file with a virus
protocol or rule description.
By activating Rescan, you can scan messages and files that have already been scanned again.
30
Page 31

4.2.4.1.2 Performance
During a scan, Microsoft Exchange Server allows you to limit a time for opening message attachments. This time is set
in the Response time limit (ms) field and represents the period after which the client will retry accessing the file that
had previously been inaccessible due to scanning.
4.2.4.2 Microsoft Exchange Server 2000 (VSAPI 2.0)
This version of Microsoft Exchange Server includes VSAPI version 2.0.
If the Proactive scanning option is enabled, new inbound messages will be scanned in the same order in which they
were received.
31
Page 32

The Background scanning option allows scanning of all messages in the system background. Microsoft Exchange
Server decides whether a background scan will run or not, based on various factors, such as the current system load,
the number of active users, etc. Microsoft Exchange Server keeps a record of scanned messages and the virus
signature database version used. If you are opening a message that has not been scanned by the most current virus
signature database, Microsoft Exchange Server sends the message to ESET Mail Security to be scanned before
opening the message in your e-mail client.
Since background scanning can affect system load (scanning is performed after each virus signature database update),
we recommend using scheduled scanning outside working hours. Scheduled background scanning can be configured
via a special task in the Scheduler/Planner. When you schedule a Background scanning task you can set the launch
time, the number of repetitions and other parameters available in the Scheduler/Planner. After the task has been
scheduled, it will appear in the list of scheduled tasks and as with the other tasks, you can modify its parameters,
delete it or temporarily deactivate the task.
If you want to scan plain text messages, select the Scan plain text message bodies option.
Enabling the Scan RTF email bodies option activates scanning of RTF message bodies.
4.2.4.2.1 Actions
In this section you can specify the actions to be performed when a message and/or attachment is evaluated as
infected.
The Actions to take if cleaning not possible field allows you to block infected content or delete the message. This
action will be applied only if the automatic cleaning (defined in ThreatSense engine parameter setup > Cleaning) did
not clean the message.
The Message body deletion method option offers the choice to either delete the message body or rewrite the
message body with action information.
Attachment deletion method lets you decide to delete the message, truncate file attachment to zero size or replace
the infected file with action information.
By activating Rescan, you can scan messages and files that have already been scanned again.
32
Page 33

4.2.4.2.2 Performance
In this section you can set the number of independent scan threads used at a single time. More threads on
multiprocessor machines can increase the scan rate. For the best program performance we advise using an equal
number of ThreatSense scan engines and scan threads.
The Response time limit (sec.) allows you to set the maximum amount of time a thread waits for a message scan to
complete. If the scan is not finished within this time limit, Microsoft Exchange Server will deny the client access to the
email. Scanning will not be interrupted and, after it is finished, every other attempt to access the file will be successful.
TIP: To determine the Number of scan threads the Microsoft Exchange Server provider recommends, use the
following formula: [number of physical processors] x 2 + 1.
NOTE: Performance is not improved significantly if there are more ThreatSense scanning engines than scanning
threads.
33
Page 34

4.2.4.3 Microsoft Exchange Server 2003 (VSAPI 2.5)
This version of Microsoft Exchange Server includes VSAPI version 2.5.
If the Proactive scanning option is checked, new inbound messages will be scanned in the same order in which they
were received.
The Background scanning option allows scanning of all messages in the system background. Microsoft Exchange
Server decides whether a background scan will run or not, based on various factors, such as the current system load,
the number of active users, etc. Microsoft Exchange Server keeps a record of scanned messages and the virus
signature database version used. If you are opening a message that has not been scanned by the most current virus
signature database, Microsoft Exchange Server sends the message to ESET Mail Security to be scanned before
opening the message in your e-mail client.
Since background scanning can affect system load (scanning is performed after each virus signature database update),
we recommend using scheduled scanning outside working hours. Scheduled background scanning can be configured
via a special task in the Scheduler/Planner. When you schedule a Background scanning task you can set the launch
time, the number of repetitions and other parameters available in the Scheduler/Planner. After the task has been
scheduled, it will appear in the list of scheduled tasks and as with the other tasks, you can modify its parameters,
delete it or temporarily deactivate the task.
If you want to scan plain text messages, select the Scan plain text email bodies option.
Enabling the Scan RTF email bodies option activates scanning of RTF message bodies. RTF message bodies may
contain macro viruses.
The Scan transported messages option enables scanning for messages that are not stored on the local Microsoft
Exchange Server and are delivered to other e-mail servers through the local Microsoft Exchange Server. If scanning for
transported messages is enabled, ESET Mail Security also scans these messages. This option is only available when the
transport agent is disabled.
NOTE: Plain text email bodies are not scanned by VSAPI.
34
Page 35

4.2.4.3.1 Actions
In this section you can specify the actions to be performed if a message and/or attachment is evaluated as infected.
The Actions to take if cleaning not possible field allows you to block infected content or delete the message. This
action will be applied only if the automatic cleaning (in ThreatSense engine parameter setup > Cleaning) did not
clean the message.
The Message body deletion method option offers the choice to either delete the message body or rewrite the
message body with action information.
Attachment deletion method lets you decide to delete the message, truncate file attachment to zero size or replace
the infected file with action information.
By activating Rescan, you can scan the messages and files that have already been scanned again.
4.2.4.3.2 Performance
In this section you can set the number of independent scan threads used at a single time. More threads on
multiprocessor machines can increase the scan rate. For the best program performance we advise using an equal
number of ThreatSense scan engines and scan threads.
The Response time limit (sec.) allows you to set the maximum amount of time a thread waits for a message scan to
complete. If the scan is not finished within this time limit, Microsoft Exchange Server will deny the client access to the
email. Scanning will not be interrupted and after it is finished, every other attempt to access the file will be successful.
35
Page 36

TIP: To determine the Number of scan threads the Microsoft Exchange Server provider recommends, use the
following formula: [number of physical processors] x 2 + 1.
NOTE: Performance is not improved significantly if there are more ThreatSense scanning engines than scanning
threads.
4.2.4.4 Microsoft Exchange Server 2007/2010 (VSAPI 2.6)
This version of Microsoft Exchange Server includes VSAPI version 2.6.
If the Proactive scanning option is enabled, new inbound messages will be scanned in the same order in which they
were received.
36
Page 37

The Background scanning option allows scanning of all messages in the system background. Microsoft Exchange
Server decides whether a background scan will run or not, based on various factors, such as the current system load,
the number of active users, etc. Microsoft Exchange Server keeps a record of scanned messages and the virus
signature database version used. If you are opening a message that has not been scanned by the most current virus
signature database, Microsoft Exchange Server sends the message to ESET Mail Security to be scanned before
opening the message in your e-mail client. You can choose to Scan only messages with attachment and filter based
on time received.
Since background scanning can affect system load (scanning is performed after each virus signature database update),
we recommend using scheduled scanning outside working hours. Scheduled background scanning can be configured
via a special task in the Scheduler/Planner. When you schedule a Background scanning task you can set the launch
time, the number of repetitions and other parameters available in the Scheduler/Planner. After the task has been
scheduled, it will appear in the list of scheduled tasks and as with the other tasks, you can modify its parameters,
delete it or temporarily deactivate the task.
Enabling the Scan RTF email bodies option activates scanning of RTF message bodies. RTF message bodies may
contain macro viruses.
NOTE: Plain text email bodies are not scanned by VSAPI.
4.2.4.4.1 Actions
In this section you can specify the actions to take if a message and/or attachment is evaluated as infected.
The Actions to take if cleaning not possible field allows you to block infected content or delete the message. This
action will be applied only if the automatic cleaning (defined in ThreatSense engine parameter setup > Cleaning) did
not clean the message.
The Message body deletion method option offers the choice to either delete the message body or rewrite the
message body with action information.
Attachment deletion method lets you decide to delete the message, truncate file attachment to zero size or replace
the infected file with action information.
If the Use VSAPI Quarantine option is enabled, infected messages will be stored in the email server quarantine. Please
note that this is the server's managed quarantine (not the client's quarantine or the quarantine mailbox). Infected
messages stored in mail server quarantine are inaccessible until they are cleaned with the latest virus signature
database.
By activating Rescan, you can scan messages and files that have already been scanned again.
37
Page 38

4.2.4.4.2 Performance
In this section you can set the number of independent scan threads used at a single time. More threads on
multiprocessor machines can increase the scan rate. For the best program performance we advise using an equal
number of ThreatSense scan engines and scan threads.
TIp: To determine the Number of scan threads the Microsoft Exchange Server provider recommends, use the
following formula:
[number of physical processors] x 2 + 1.
NOTE: Performance is not improved significantly if there are more ThreatSense scanning engines than scanning
threads.
38
Page 39

4.2.5 Transport Agent
In this section you can enable or disable antivirus and antispyware protection by the transport agent. For Microsoft
Exchange Server 2007 and higher it is only possible to install a transport agent if the server is in one of two roles: Edge
Transport or Hub Transport.
If the message cannot be cleaned, you can delete it, send it to the quarantine mailbox or retain it.
If a threat is found, you can choose to write a spam score to the scanned message and specify the value (in %). Since
botnets are responsible for sending the majority of infected messages, the messages distributed this way are to be
categorized as spam. Write spam confidence level (SCL) to scanned messages based on spam score option (in Mail
server protection > Microsoft Exchange Server > Transport agent) must be enabled in order for this feature to work
effectively.
You can also choose to scan messages received from authenticated sources or local servers.
39
Page 40

4.3 Antispam settings
In the Mail server protection section you can enable spam protection for the installed mail server, configure antispam
engine parameters and set other levels of protection.
4.3.1 Antispam engine parameter setup
You can select a profile from a set of preconfigured profiles (such the Recommended, Most accurate or Fastest
profiles). The list of profiles is loaded from the Antispam module.
The Recommended profile is comprised of the recommended settings, striking a balance between security and impact
on system performance.
The Most accurate profile is focused solely on mail server security. This profile requires more system resources than
the Recommended profile.
The Fastest profile is preconfigured for a minimal usage of system resources, achieved through the disabling of some
scanning features.
Custom > Open configuration file allows a user to edit the spamcatcher.conf file. This option is recommended for
advanced users only. See chapter Configuration file for details.
41
40
Page 41

In the Allowed IP addresses tab you can specify IPs that should be approved, i.e., if the first non-ignored IP in
Received headers matches any address in this list, the message scores 0 and no other checks are made.
In the Ignored IP addresses tab you can specify IPs that should be ignored during Real-time Blackhole List (RBL)
checks. You should include all internal IP addresses within the firewall not directly accessible from the Internet. Doing
so prevents unnecessary checks and helps identify actual connecting IP addresses. Internal IP addresses are already
skipped by the engine (192.168.x.y and 10.x).
In the Blocked IP addresses tab you can specify IPs that should be blocked, i.e., if any non-ignored IP in Received
headers matches the address in this list, the message scores 100 and no other checks are made.
In the Allowed domains tab you can specify domains used in the message body that should be approved.
In the Ignored domains tab you can specify domains used in the message body that should always be excluded from
the DNSBL and MSBL checks and ignored.
In the Blocked domains tab you can specify domains used in the message body that should always be blocked.
NOTE: Unlike IP addresses, wildcards cannot be used for domains.
4.3.1.1 Configuration file
The spamcatcher.conf configuration file allows you to modify several additional settings, that are not available in the
ESET Mail Security GUI. The settings in spamcatcher.conf are transparently structured and described. Each setting
contains these items:
Name - parameter name
Arguments - values the parameter can be assigned and their format of entry
Default - default parameter value
Description - detailed parameter description
Blank lines and lines beginning with # are omitted.
41
Page 42

List of the most important settings in spamcatcher.conf:
Parameter name
Details
approved_ip_list
List of approved IP addresses. There's no need to add the list to the spamcatcher.conf file. You
can define it in the GUI of the program (see chapter Antispam engine parameter setup ).
blocked_ip_list
List of blocked IP addresses. There's no need to add the list to the spamcatcher.conf file. You
can define it in the GUI of the program (see chapter Antispam engine parameter setup ).
ignored_ip_list
List of ignored IP addresses. There's no need to add the list to the spamcatcher.conf file. You
can define it in the GUI of the program (see chapter Antispam engine parameter setup ).
rbl_list
List of Realtime Blackhole servers to be used when evaluating messages. The RBL request
checks for presence of a specific IP address on a given RBL server. Subject to these checks are
IP addresses in the Received: sections in the mail header.
The entry format is as follows:
rbl_list=server:response:offset,server2:response2:offset2,...
Meaning of used parameters:
1) server - RBL server name
2) response - RBL server response if IP address was found (standard responses are 127.0.0.2,
127.0.0.3, 127.0.0.4., etc.). This parameter is optional, and if not set, all answers will be
considered.
3) offset - value from 0 to 100. Influences overall spam score. Standard value is 100, i.e. in case
of a positive check the message is assigned the spam score of 100 and is evaluated as spam.
Negative values lower the overall spam score of a message. Expect the 0 value also with
messages from senders in the approvedsenders file and the value 100 with messages from
senders in the blockedsenders file (see below).
Example 1:
rbl_list=ent.adbl.org
RBL check is performed using the ent.adbl.org server. If the check is positive, the message
will be assigned a standard offset of 100 and marked as spam.
Example 2:
rbl_list=ent.adbl.org::60
RBL check is performed using the ent.adbl.org server. If the check is positive, the message
will be assigned an offset of 60 which increases its overall spam score.
Example 3:
rbl_list=bx9.dbl.com::85, list.dnb.org:127.0.0.4:35, req.gsender.org::-75
RBL check is performed using the defined servers (from left to right). In case of a positive check
on bx9.dbl.com the offset of 85 will be added. If the check on list.dnb.org will be positive
giving a response of 127.0.0.4 offset of 35 will be used. The offset will not be applied in cases
of answers other than 127.0.0.4. If a check is positive on req.gsender.org the spam score will
be decreased by 75 point (negative value).
rbl_max_ips
Maximum IP addresses that can be sent to RBL server check. Total number of RBL requests is
the total amount of IP addresses in the Received: sections in the email header (up to the set
limit in rbl_maxcheck_ips) multiplied by the number of RBL servers set in the rbl_list. The value
of 0 means there is no limit to the maximum number of IP addresses that can be checked.
IP addresses on the ignored_ip_list (i.e. the Ignored IP addresses list in the ESET Mail Security
settings).
This parameter is applied only if the rbl_list is enabled (i.e. contains a minimum of 1 server).
approved_domain_list
Is a list domains and IP addresses in the email body, that are to be considered as allowed. Do
not use to whitelist emails by sender's domain!
blocked_domain_list
Is a list domains and IP addresses in the email body, that are to be considered as permanently
blocked. This is not a blacklist of sender's addresses! There's no need to add the list to the
spamcatcher.conf file. You can define it in the GUI of the program (see chapter Antispam engine
parameter setup ).
ignored_domain_list
List of domains in the email body, that are to be permanently excluded from DNSBL checks
and ignored. There's no need to add the list to the spamcatcher.conf file. You can define it in the
GUI of the program (see chapter Antispam engine parameter setup ).
dnsbl_list
List of DNSBL servers to be used in checks of domains and IP adrresses in the email body.
Format of entry is as follows:
dnsbl_list=server:response:offset,server2:response2:offset2,...
40
40
40
40
42
40
Page 43

Meaning parameters used:
1) server - DNSBL server name
2) response - DNSBL server response if IP address/domain was found (standard responses are
127.0.0.2, 127.0.0.3, 127.0.0.4., etc.). This parameter is optional, and if not set, all answers will
be considered.
3) offset - value from 0 to 100. Influences overall spam score. Standard value is 100, i.e. in case
of a positive check the message is assigned the spam score of 100 and is evaluated as spam.
Negative values lower the overall spam score of a message. Expect the 0 value also with
messages from senders in the approvedsenders file and the value 100 with messages from
senders in the blockedsenders file (see below).
DNSBL checks can have negative influence on server performance due to the fact that every
domain/IP address from the message body is checked against all defined DNSBL servers and
every single check requires processing a DNS server request. You can reduce the impact on
system resources by deploying a DNS cache server for this purpose. For the same reason the
non-routable IP addresses (10.x.x.x, 127.x.x.x, 192.168.x.x) are also omitted from DNSBL
checks.
Example 1:
dnsbl_list=ent.adbl.org
DNSBL check is realized against the ent.adbl.org server and if there is a positive the message
will be assigned the default offset 100, in other words it will be marked as spam.
Example 2:
dnsbl_list=ent.adbl.org::60
DNSBL check is performed using the ent.adbl.org server. If the check is positive, the message
will be assigned an offset of 60 which increases its overall spam score.
Example 3:
dnsbl_list=bx9.dbl.com::85, list.dnb.org:127.0.0.4:35, req.gsender.org::-75
DNSBL check is performed using the defined servers (from left to right). In case of a positive
check on bx9.dbl.com the offset of 85 will be added. If the check on list.dnb.org will be
positive giving a response of 127.0.0.4 an offset of 35 will be used. No offset will be applied in
cases of answers other than 127.0.0.4. If a check is positive on req.gsender.org the spam
score will be decreased by 75 points (negative value).
home_country_list
List of countries, that will be considered "home". Messages routed through a country not on
this list will be evaluated using more strict rules (higher spam score will be applied). Entry
format for countries is their two character code in compliance with ISO 3166.
home_language_list
List of preferred languages - i.e. languages that are the most used in your email messages.
Such messages will be evaluated using less strict rules (lower spam score). Entry format for
languages is their two character code in compliance with ISO 639.
custom_rules_list
Allows to define custom lists of rules and store each to an individual file. Each rule is stored on
a separate line in the file and the following format is used:
Phrase, Type, Confidence, CaseSensitivity
Phrase - any text, must not contain commas (,)
Type - can have the following values: SPAM, PHISH, BOUNCE, ADULT, FRAUD. If you enter
other value that those listed above, the SPAM value will be used automatically. SPAM defines
phrases that occurr in classical spam messages (offers of goods and services). PHISH are
phrases occurring in fraudulent messages (phishing), that are aimed at extraction of
confidential data (names, passwords, credid card numbers, etc.) from users. BOUNCE are
phrases used in automatic server responses - Non-Delivery Notification (used when spoofing
sender's address). ADULT represents phrases typical for messages offering pornographical
content. FRAUD stands for phrases used in fraudulent emails (scam) offering suspicious
banking operations (money transfers via your account etc.). Typical representant of this spam
type is the so-called Nigerian spam.
Confidence - value from 0 to 100. Defines percentual probability of the phrase to be member
of a specific spam category (listed above). If the Type PHISH has the Confidence 90, there is a
very high probability of the phrase being used in phishing messages. The higher the
Confidence score, the bigger impact it exerts on the overall spam score of the message. The
Confidence value of 100 presents a special case, where the message spam score will also be
100, i.e. message will be marked as 100% spam. Analogically, if the value is 0, the message will
43
Page 44

be marked as not-spam.
CaseSensitivity - values 0 or 1. 0 meaning the phrase is case insensitive. 1 meaning the
phrase is case sensitive.
Examples:
replica, SPAM, 100, 0
Dear eBay member, PHISH, 90, 1
return to sender, BOUNCE, 80, 0
Further options for blacklisting/whitelisting are offered by files approvedsenders and blockedsenders, that can be found
enable_spf
This option enables/disables validation by Sender Policy Framework. This validation method
checks the public rules of a domain - domain policy to determine whether a sender is authorized
to send messages from that domain.
enable_all_spf
This option is to determine whether domains not on the spf_list or Mailshell file can bypass the
SPF validation. For this option to work correctly the enable_realtime_spf parameter must be set
to yes.
enable_realtime_spf
Is the option enabled, DNS requests will be sent in real-time during SPF validation. This can
negatively influence the performance (delays during message evaluation).
spf_list
This option allows you to assign importance to a specific SPF entry, thus influencing the overall
spam score of a message.
spf_*_weight
The asterisk represents 14 possible SPF validation results (see spamcatcher.conf for more details).
The value entered for this parameter is an offset, that is then applied to the spam score
according to individual result types. If the SPF validation results is "fail" the offset from the
spf_fail_weight parameter will be applied. Depending on the offset value the resulting spam
score is then increased/decreased.
spf_recursion_depth
Maximum nesting depth (using the "include" mechanism). The RFC 4408 norm specifies this limit
to 10 (to prevent Denial-of-Service), however, some SPF records nowadays do not respect this
limit, as more nesting levels need to be applied to fully satisfy the SPF request.
enable_livefeed_sen
der_repute
If this option is disabled, the SPF information from LiveFeed will be ignored.
under C:\Documents and Settings\All Users\Application Data\ESET\ESET Mail Security\MailServer. You can add sender
addresses or domains to these lists, while the approvedsenders file represents the list of allowed addresses/domains,
the blockedsenders file represents the list of blocked addresses/domains.
Warning: As senders' addresses are very often spoofed (altered to appear as original), we do not recommend to use
the approvedsenders and blockedsenders files as means of whitelisting/blacklisting. The use of allowed and blocked IP
addresses for this purpose is much more reliable and secure. If you need to whitelist by the address/domain of the
sender (the approvedsenders file), you should always employ an additional method of message validation (e.g. SPF).
Other settings:
44
Page 45

4.3.2 Alerts and notifications
Each email scanned by ESET Mail Security and marked as spam can be flagged by appending a notification tag to the
email subject. By default, the tag is [SPAM], although it can be a user-defined string.
NOTE: You can also use system variables when adding a template to the message subject.
4.3.3 Transport Agent
In this section you can set up options for spam protection using the transport agent.
NOTE: The transport agent is not available in Microsoft Exchange Server 5.5.
45
Page 46

You can take any of the following actions with spam messages:
Primary response code
Complementary status
code
Description
451
4.7.1
Requested action aborted: local
error in processing
Retain the message even if it is marked as spam
Send the message to the quarantine mailbox
Delete the message
If you want to include information about a message’s spam score in its header, enable the Write spam score to
scanned messages option.
The Enable Greylisting function activates a feature that protects users from spam using the following technique: The
transport agent will send a “temporarily reject” SMTP return value (default is 451/4.7.1) for any received email that is not
from a recognized sender. A legitimate server will try to resend the message after a delay. Spam servers will typically
not attempt to resend the message, as they usually go through thousands of email addresses and do not waste time
resending. Greylisting is an additional layer of antispam protection and does not have any effect on the spam
evaluation capabilities of the antispam module.
When evaluating the message source the method takes into account the configurations of the Approved IP addresses
list, the Ignored IP addresses list, the Safe Senders and the Allow IP lists on the Exchange server and the
AntispamBypass settings for the recipient mailbox. Emails from these IP addresses/senders lists or emails delivered to
a mailbox that has the AntispamBypass option enabled will be bypassed by the greylisting detection method.
The SMTP response for temporarily denied connections field defines the SMTP temporary denial response sent to
the SMTP server if a message is refused.
Example of SMTP response message:
Warning: Incorrect syntax in SMTP response codes may lead to malfunctioning of greylisting protection. As a result,
spam messages may be delivered to clients or messages may not be delivered at all.
Time limit for the initial connection denial (min.) - when a message is delivered for the first time and temporarily
refused, this parameter defines the time period during which the message will always be refused (measured from the
first refusal). After the defined time period has elapsed, the message will be successfully received. The minimum value
you can enter is 1 minute.
Unverified connections expiration time (hours) – this parameter defines the minimum time interval for which the
triplet data will be stored. A valid server must resend a desired message before this period expires. This value must be
greater than the value of Time limit for the initial connection denial.
Verified connections expiration time (days) – the minimum number of days for which the triplet information is
stored, during which emails from a particular sender will be received without any delay. This value must be greater
than the value of Unverified connections expiration time.
NOTE: You can also use system variables when defining the SMTP reject response.
4.4 FAQ
Q: After installing EMSX with Antispam, emails stopped being delivered into mailboxes.
A: If Greylisting is enabled, this is normal behavior. In the first hours of full operation emails may arrive with several
hours of delay. If the issue continues for a longer period, we recommend you turn off (or reconfigure) Greylisting.
Q: When the VSAPI scans email attachments, does it also scan email message bodies?
A: In Microsoft Exchange Server 2000 SP2 and later, the VSAPI scans email message bodies as well.
Q: Why does message scanning continue after the VSAPI option has been disabled?
A: Changes to VSAPI settings run asynchronously, meaning the modified VSAPI settings have to be called by the
Microsoft Exchange Server to go into effect. This cyclic process runs in intervals of approximately one minute. The
same applies to all other VSAPI settings.
46
Page 47

Q: Can VSAPI remove an entire message containing an infected attachment?
A: Yes, VSAPI can remove the entire message. However, it is necessary to select the Delete whole message option in
the Actions section of the VSAPI settings first. This option is available in Microsoft Exchange Server 2003 and later.
Older versions of Microsoft Exchange Server do not support removal of entire messages.
Q: Is outgoing email also scanned by VSAPI for viruses?
A: Yes, VSAPI scans outgoing emails unless you have configured an SMTP server in your mail client that is different
from your Microsoft Exchange Server. This feature is applied in Microsoft Exchange Server 2000 Service Pack 3 and
later.
Q: Is it possible to add a notification tag text via VSAPI to each scanned message, in the same manner as the Transport
agent?
A: Adding text to messages scanned by VSAPI is not supported in Microsoft Exchange Server.
Q: Sometimes I cannot open a particular email in Microsoft Outlook. Why is that?
A: The Action to take if cleaning not possible option in your VSAPI settings in the Actions section is most likely set
to Block or you have created a rule that includes the Block action. Either of these settings will mark and block both
infected messages and/or messages that fall under the aforementioned rule.
Q: What does the Response time limit item in the Performance section stand for?
A: If you have Microsoft Exchange Server 2000 SP2 or later, the value Response time limit represents the maximum
time in seconds required to finish the VSAPI scanning of one thread. If the scan is not finished within this time limit,
Microsoft Exchange Server will deny the client access to the email. Scanning will not be interrupted and after it is
finished, every other attempt to access the file will be successful. If you have Microsoft Exchange Server 5.5 SP3 or SP4,
the value will be expressed in milliseconds and represents the period after which the client will retry to access the file
that had been previously inaccessible due to scanning..
Q: How long can the list of file types be in one rule?
A: The file extensions list can contain a maximum of 255 characters in a single rule.
Q: I have enabled the Background scanning option in VSAPI. Until now, messages on Microsoft Exchange Server
were always scanned after each virus signature database update. This did not happen after the last update. Where is
the problem?
A: The decision to scan all messages immediately or at the user's attempt to access a message depends on several
factors, including server load, CPU time required to scan all messages in bulk and the total number of messages. The
Microsoft Exchange Server will scan every message before it reaches the client’s inbox.
Q: Why did the rule counter increase by more than one after receiving a single message?
A:The rules are checked against a message when it is processed by transport agent (TA) or VSAPI. When both TA and
VSAPI are enabled and the message matches the rule conditions, the rule counter may increase by 2 or more. VSAPI
accesses the parts of the message individually (body, attachment) meaning the rules are consequently applied to each
part individually. Furthermore, rules can be applied during a background scan (e.g. repeated mailbox-store scan after
a virus signature database update), which can increase the rule counter.
Q: Is ESET Mail Security 4 for Microsoft Exchange Server compatible with Intelligent Message Filter?
A: Yes, ESET Mail Security 4 for Microsoft Exchange Server (EMSX) is compatible with Intelligent Message Filter (IMF).
The processing of emails in the case that message is evaluated as spam is as follows:
- If ESET Mail Security Antispam has the Delete message (or Quarantine message) option enabled the action will
be executed regardless of the action set in Microsoft Exchange IMF.
- If ESET Mail Security Antispam has the No action set, the Microsoft Exchange IMF settings will be used and the
relevant action executed (e.g. Delete, Reject, Archive...). Write spam confidence level (SCL) to scanned
messages based on spam score option (in Mail server protection > Microsoft Exchange Server > Transport agent)
must be enabled in order for this feature to work effectively.
Q: How do I setup ESET Mail Security to move unsolicited emails into the user-defined Microsoft Outlook spam folder?
A: ESET Mail Security default settings cause Microsoft Outlook to store unwanted email in the Junk E-mail folder. To
enable this functionality select the Write spam score to the header of scanned email option (under F5 > Antispam
protection > Mail server protection > Microsoft Exchange Server > Transport agent). If you want the unwanted
email to be stored in a different folder, please read the following instructions:
In ESET Mail Security:
1)
- disable the Write spam score to the header of scanned email option, ,
- enable the No action action for messages marked as spam,
- define a text tag that will be added into unwanted messages, e.g. "[SPAM]" (under Antispam protection >
47
Page 48

Mail server protection > Alerts and notifications).
In Microsoft Outlook:
2)
- setup a rule to ensure messages with a specific text in the subject ("[SPAM]") will be moved into the defined
folder.
Q: In the antispam protection statistics many messages fall into the Not scanned category. What email is not scanned
by the antispam protection?
A: The Not scanned category comprises of:
All messages that were scanned while the antispam protection has been disabled.
All messages sent within the organization (all will be scanned by antivirus protection )
All messages sent into the mailbox, that has the AntispamBypass option enabled.
All messages from senders on the Safe Senders list.
All messages from servers on the Whitelist list (e.g. MS Exchange IPAllow list or the Allowed IP addresses).
Q: Users download messages to their email clients via POP3 (bypassing Microsoft Exchange server), but the mailboxes
are stored on Microsoft Exchange Server. Will these emails be subject to antivirus and antispam scanning by ESET Mail
Security ?
A: In this type of configuration ESET Mail Security will scan the emails stored on the Microsoft Exchange Server only for
the presence of viruses (via VSAPI). Antispam scanning will not be realized as this requires an SMTP server.
Q: Does the ESET Mail Security Antispam Protection module scan also messages that are downloaded via POP3
Connector?
A: Messages downloaded via POP3 Connector are scanned for the presence of spam only on SBS 2008.
48
 Loading...