

Page 1

ESET Cybersecurity
Installation Manual and User Guide
Page 2

ESET Cybersecurity
Copyright ©2010 by ESET, spol. s.r.o.
ESET Cybersecurity was developed by ESET, spol. s r.o.
For more information visit www.eset.com.
All rights reserved. No part of this documentation may be
reproduced, stored in a retrieval system or transmitted in
any form or by any means, electronic, mechanical,
photocopying, recording, scanning, or otherwise without
permission in writing from the author.
ESET, spol. s r.o. reserves the right to change any of the
described application software without prior notice.
Customer Care Worldwide: www.eset.eu/support
Customer Care North America: www.eset.com/support
REV. 11/3/2010
Page 3

Contents
.................................................41. ESET Cybersecurity
.................................................................4System requirements1.1
.................................................52. Installation
.................................................................5Typical installation2.1
.................................................................5Custom installation2.2
.................................................................6On-demand computer scan2.3
.................................................73. Beginners guide
.................................................................7Introducing user interface design - modes3.1
.......................................................................................7Checking operation of the system3.1.1
3.1.2
What to do if the program doesn't work
.......................................................................................7
properly
.................................................94. Work with ESET Cybersecurity
.................................................................9Antivirus and antispyware protection4.1
.......................................................................................9Real-time file system protection4.1.1
......................................................................................9Real-time Protection setup4.1.1.1
....................................................................................9Scan on (Event triggered scanning)4.1.1.1.1
....................................................................................9Advanced scan options4.1.1.1.2
....................................................................................9Exclusions from scanning4.1.1.1.3
4.1.1.2
4.1.1.4
When to modify Real-time protection
......................................................................................9
configuration
......................................................................................10Checking Real-time protection4.1.1.3
What to do if Real-time protection does not
......................................................................................10
work
.......................................................................................10On-demand computer scan4.1.2
......................................................................................10Type of scan4.1.2.1
....................................................................................10Smart scan4.1.2.1.1
....................................................................................10Custom scan4.1.2.1.2
......................................................................................11Scan targets4.1.2.2
......................................................................................11Scan profiles4.1.2.3
.......................................................................................11ThreatSense engine parameters setup4.1.3
......................................................................................12Objects4.1.3.1
......................................................................................12Options4.1.3.2
......................................................................................12Cleaning4.1.3.3
......................................................................................12Extensions4.1.3.4
......................................................................................13Limits4.1.3.5
......................................................................................13Others4.1.3.6
.......................................................................................13An infiltration is detected4.1.4
.................................................................14Updating the program4.2
.......................................................................................14Upgrading to a new build4.2.1
.......................................................................................14Update setup4.2.2
.......................................................................................15How to create update tasks4.2.3
.................................................................15Scheduler4.3
.......................................................................................15Purpose of scheduling tasks4.3.1
.......................................................................................15Creating new tasks4.3.2
.................................................................16Quarantine4.4
.......................................................................................16Quarantining files4.4.1
.......................................................................................16Restoring from Quarantine4.4.2
.......................................................................................16Submitting file from Quarantine4.4.3
.................................................................16Log files4.5
.......................................................................................17Log maintenance4.5.1
.......................................................................................17Log filtering4.5.2
.................................................................17User interface4.6
.......................................................................................17Alerts and notifications4.6.1
......................................................................................17Alerts and notifications advanced setup4.6.1.1
.......................................................................................17Privileges4.6.2
.......................................................................................18Context menu4.6.3
.................................................................18ThreatSense.Net4.7
.......................................................................................18Suspicious files4.7.1
.................................................205. Advanced user
.................................................................20Import and export settings5.1
.......................................................................................20Import settings5.1.1
.......................................................................................20Export settings5.1.2
.................................................................20Proxy server setup5.2
.................................................................20Removable media blocking5.3
.................................................216. Glossary
.................................................................21Types of infiltrations6.1
.......................................................................................21Viruses6.1.1
.......................................................................................21Worms6.1.2
.......................................................................................21Trojan horses6.1.3
.......................................................................................21Adware6.1.4
.......................................................................................22Spyware6.1.5
.......................................................................................22Potentially unsafe applications6.1.6
.......................................................................................22Potentially unwanted applications6.1.7
Page 4

1. ESET Cybersecurity
System requirements
Processor
architecture
32bit, 64bit Intel®
Operating system
Mac OS X 10.5 and later
Memory
512 MB
Free disk space
100 MB
As a result of the increasing popularity of Unix-based
operating systems, malware users are developing more
threats to target Mac users. ESET Cybersecurity offers
powerful and efficient protection against threats. ESET
Cybersecurity includes the ability to deflect Windows
threats, protecting Mac users as they interact with
Windows users and vice versa. Although Windows
malware does not pose a direct threat to Mac, disabling
malware that has infected a Mac machine will prevent its
spread to Windows-based computers through a local
network or the Internet.
1.1 System requirements
For the seamless operation of ESET Cybersecurity, your
system should meet the following hardware and
software requirements:
ESET Cybersecurity:
4
Page 5

2. Installation
detailed settings for the submission of suspicious files.
(For more information see ThreatSense.Net ).
18
Before you begin the installation process, please close all
open programs on your computer. ESET Cybersecurity
contains components that may conflict with other
antivirus programs that may already be installed on your
computer. ESET strongly recommends that you remove
any other program to prevent potential problems. You
can install ESET Cybersecurity from an installation CD or
from a file available on the ESET website.
To launch the installer wizard, do one of the following:
If you are installing from the installation CD, insert the
CD into the CD-ROM drive and the menu screen will
appear. Double-click on the ESET Cybersecurity
Installation icon to launch the installer.
If you are installing from a downloaded file, doubleclick the file you downloaded to launch the installer.
Additional features, including manuals, training, and
uninstalling can be accessed by double-clicking on the
appropriate icon from the menu screen.
The next step in the installation process is to configure
Detection of potentially unwanted applications.
Potentially unwanted applications are not necessarily
malicious, but can often negatively affect the behavior of
your operating system. These applications are often
bundled with other programs and may be difficult to
notice during the installation process. Although these
applications usually display a notification during
installation, they can easily be installed without your
consent. Select the Enable detection of potentially
unwanted applications option to allow ESET
Cybersecurity to detect this type of threat
(recommended). If you do not wish to Enable this
feature, select the Disable detection of potentially
unwanted applications option.
The final step in Typical installation mode is to confirm
installation by clicking the Install button.
2.2 Custom installation
Custom installation is designed for experienced users
who wish to modify advanced settings during the
installation process.
Launch the installer and the installation wizard will guide
you through the basic setup. After agreeing to the End
User License Agreement, you can choose from the
following installation types:
Typical installation
Custom installation
5
5
2.1 Typical installation
Typical installation includes the configuration options
that are appropriate for most users. The settings provide
maximum security combined with excellent system
performance. Typical installation is the default option
and is recommended if you do not have particular
requirements for specific settings.
The ThreatSense.Net Early Warning System helps
ensure that ESET is immediately and continuously
informed of new infiltrations in order to quickly protect
our customers. The system allows for submission of new
threats to ESET Threat Lab, where they are analyzed,
processed and added to the virus signature database. By
default, the Enable ThreatSense.Net Early Warning
System option is selected. Click Setup... to modify
If you are using a proxy server you can define its
parameters now by selecting the I use a proxy server
option. Enter the IP address or URL of your proxy server
in the Address field. In the Port field, specify the port
where the proxy server accepts connections (3128 by
default). In the event that the proxy server requires
authentication, enter a valid Username and Password
to grant access to the proxy server. If you are sure that
no proxy server is used, choose the I do not use a proxy
server option.If you are not sure, you can use your
current system settings by selecting Use system
settings (Recommended).
In the next step you can Define privileged users that will
be able to edit the program configuration. From the list
of users on the left side, select the users and Add them
to the Privileged Users list. To display all system users,
select the Show all users option.
The ThreatSense.Net Early Warning System helps
ensure that ESET is immediately and continuously
informed of new infiltrations in order to quickly protect
our customers. The system allows for submission of new
threats to ESET Threat Lab, where they are analyzed,
processed and added to the virus signature database. By
default, the Enable ThreatSense.Net Early Warning
System option is selected. Click Setup... to modify
detailed settings for the submission of suspicious files.
For more information see ThreatSense.Net .
18
The next step in the installation process is to configure
detection of potentially unwanted applications.
Potentially unwanted applications are not necessarily
malicious, but can often negatively affect the behavior of
your operating system. These applications are often
bundled with other programs and may be difficult to
5
Page 6

notice during the installation process. Although these
applications usually display a notification during
installation, they can easily be installed without your
consent. Select the Enable detection of potentially
unwanted applications option to allow ESET
Cybersecurity to detect this type of threat
(recommended).
Click Install to install ESET Cybersecurity on standard
Macintosh HD disk. If you wish to select another disk,
click Change Install Location...
2.3 On-demand computer scan
After installing ESET Cybersecurity, a computer scan for
malicious code should be performed. From the main
program window, click Computer scan and then click
Smart scan. For more information about On-demand
computer scans, see the section On-demand computer
10
scan .
6
Page 7
3. Beginners guide
This chapter provides an initial overview of ESET
Cybersecurity and its basic settings.
3.1 Introducing user interface design modes
The main program window of ESET Cybersecurity is
divided into two main sections. The primary window on
the right displays information that corresponds to the
option selected from the main menu on the left.
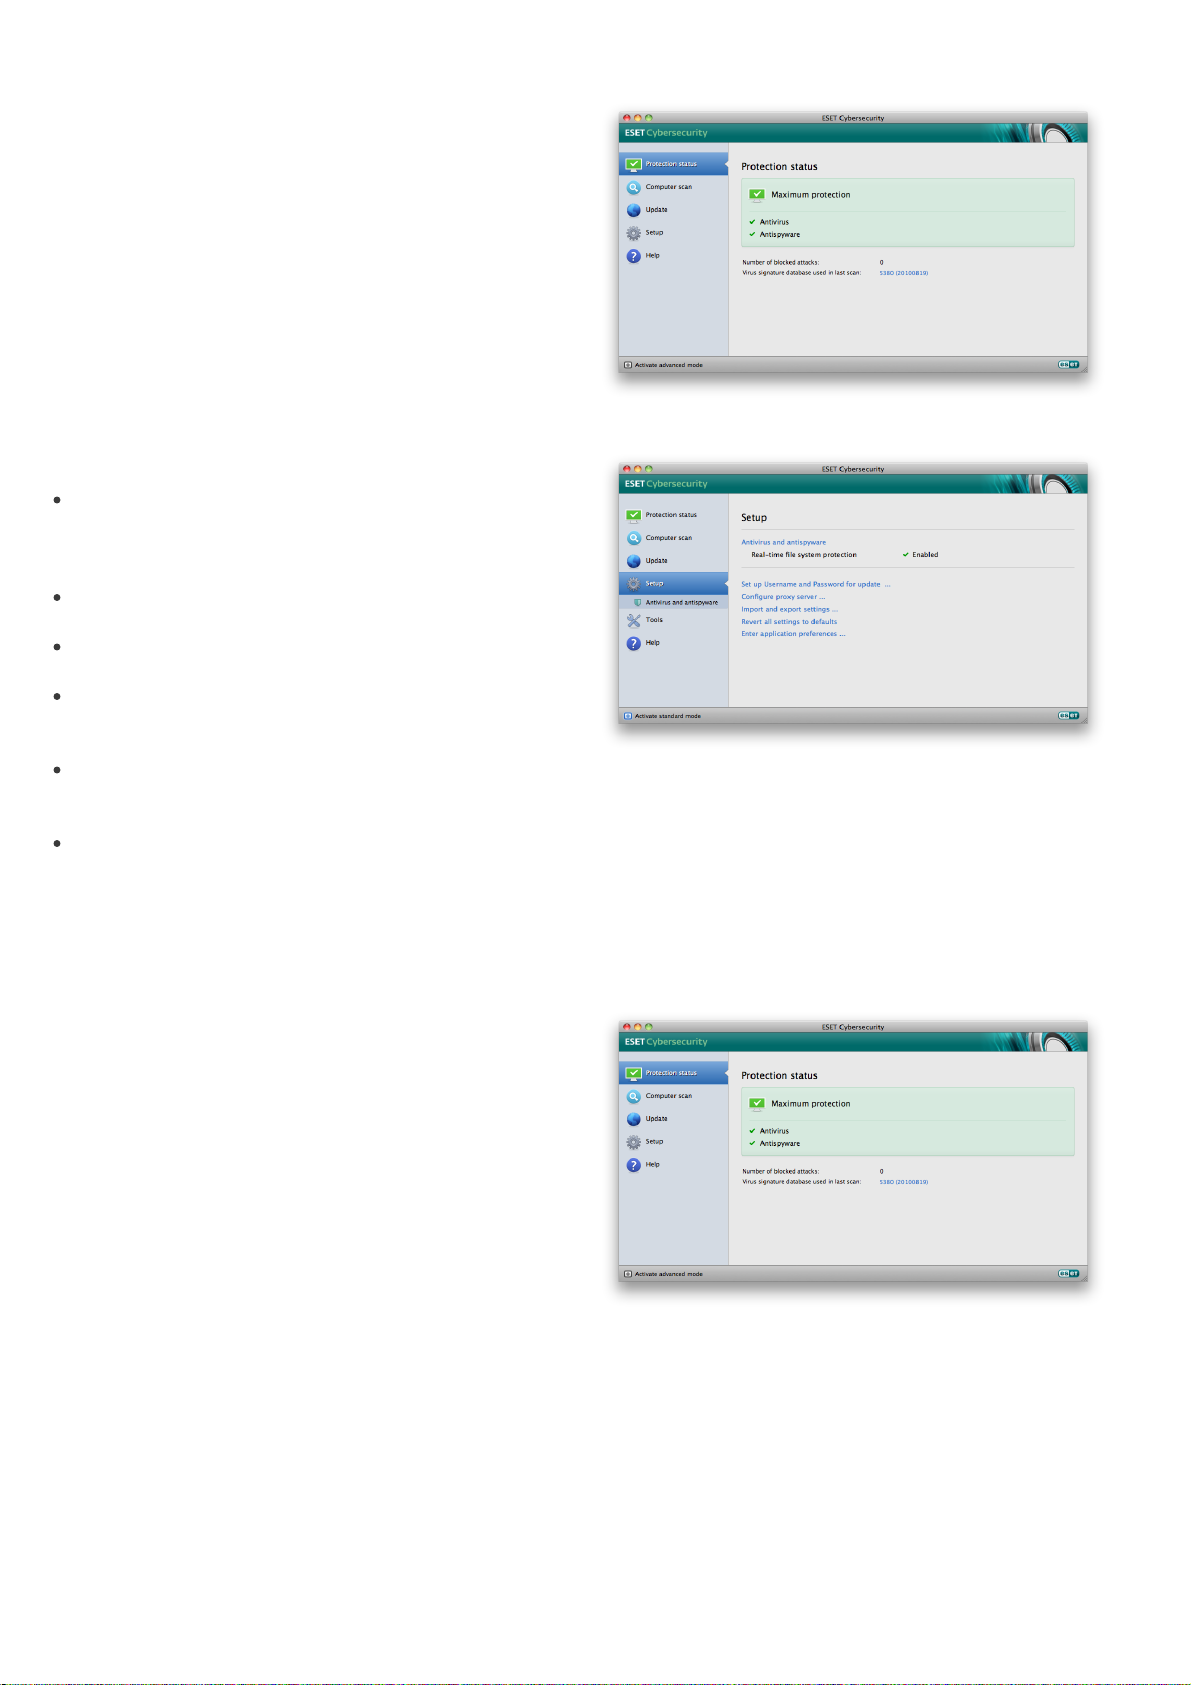
Standard mode:
The following is a description of options within the main
menu:
Protection status – Provides information about the
protection status of ESET Cybersecurity. If Advanced
mode is activated, the Statistics submenu will
display.
Computer scan – This option allows you to configure
and launch the On-demand computer scan.
Update – Displays information about updates to the
virus signature database.
Setup – Select this option to adjust your computer’s
security level. If Advanced mode is activated, the
Antivirus and antispyware submenu will display.
Tools – Provides access to Log files, Quarantine and
Scheduler. This option only displays in Advanced
mode.
Help – Provides program information, access to help
files, Internet Knowledgebase and ESET website.
The ESET Cybersecurity user interface allows users to
toggle between Standard and Advanced mode.
Standard mode provides access to features required for
common operations. It does not display any advanced
options. To toggle between modes, click the plus icon
next to Activate advanced mode/Activate standard
mode in the bottom left corner of the main program
window.
Advanced mode:
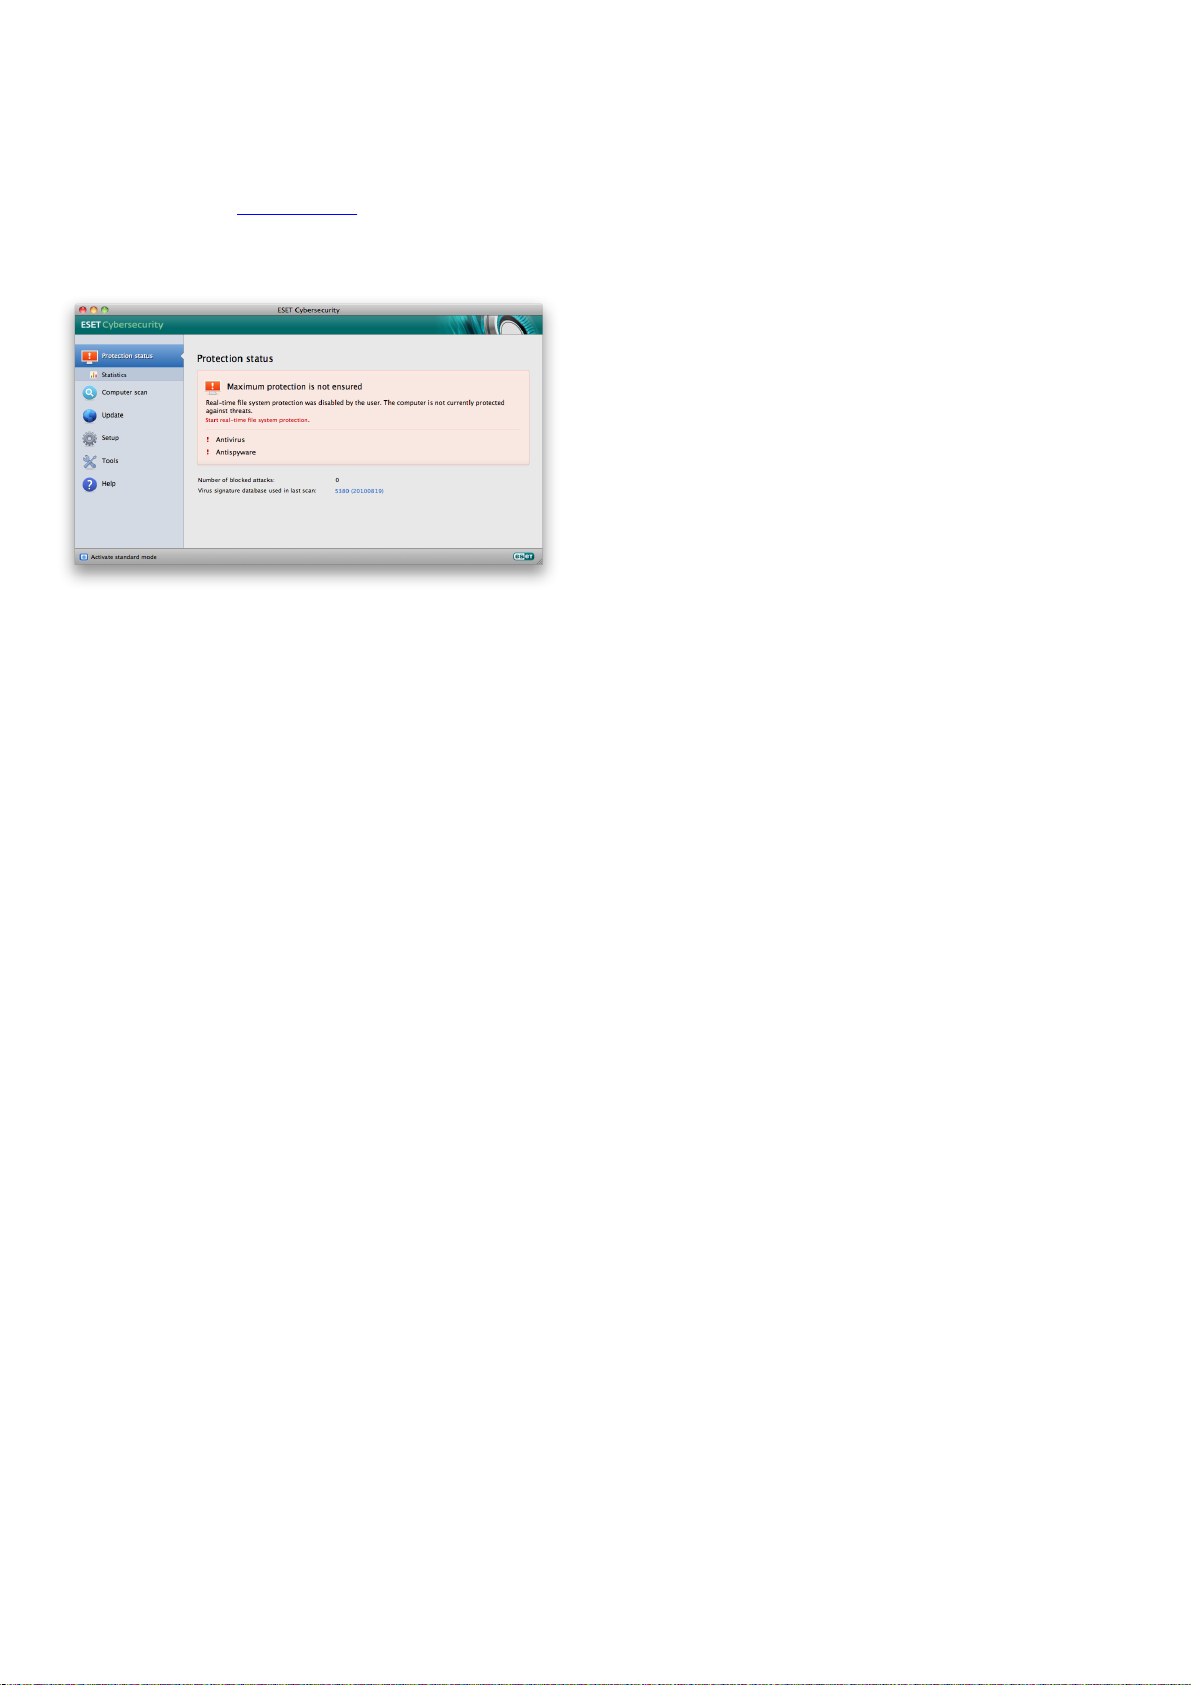
3.1.1 Checking operation of the system
To view the Protection status, click the top option from
the main menu. A status summary about the operation
of ESET Cybersecurity will display in the primary window
as well as a submenu with Statistics. Select it to view
more detailed information and statistics about computer
scans that have been performed on your system. The
Statistics window is available only in advanced mode.
The Standard mode provides access to features required
for common operations. It does not display any
advanced options.
Toggling to Advanced mode adds the Tools option to
the main menu. The Tools option allows you to access
the submenus for Log files, Quarantine and Scheduler.
NOTE: All remaining instructions in this guide take place
in Advanced mode.
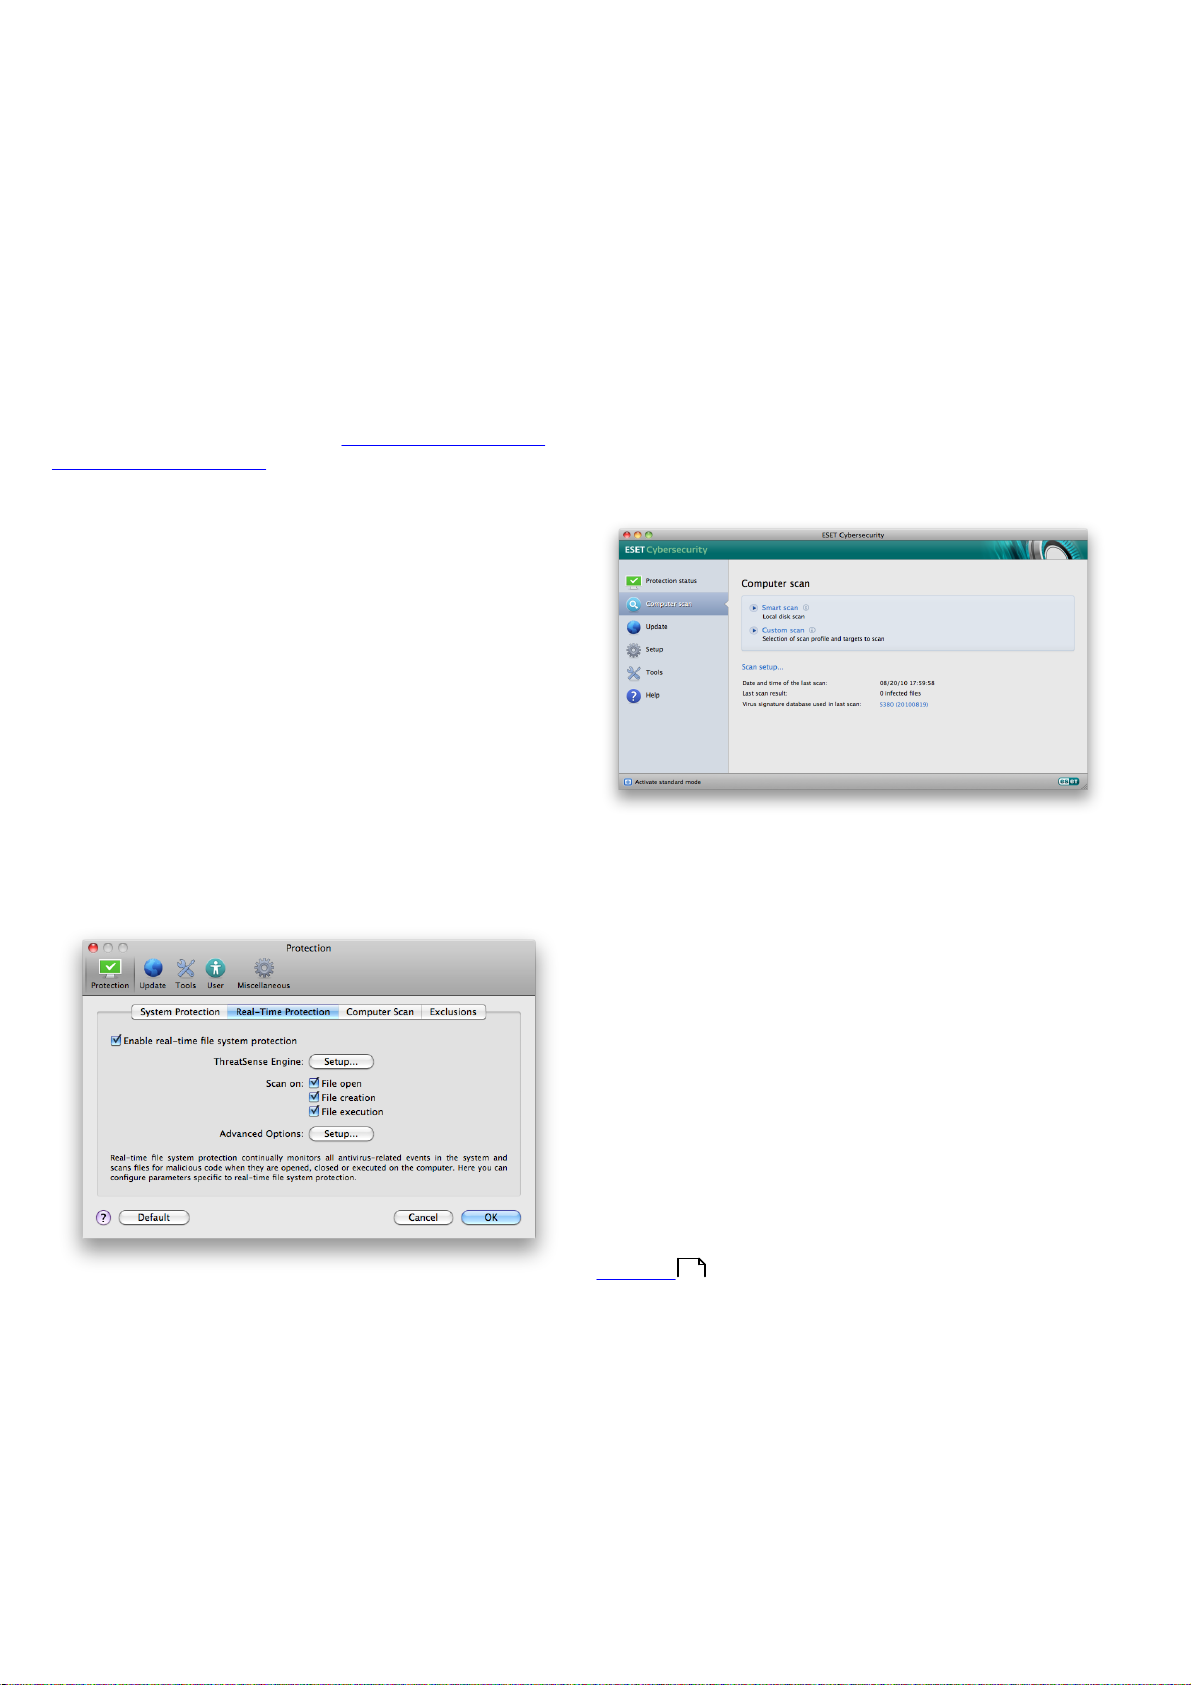
3.1.2 What to do if the program doesn't work
properly
If the modules enabled are working properly, they are
assigned a green check icon. If not, a red exclamation
point or orange notification icon is displayed, and
additional information about the module is shown in the
upper part of the window. A suggested solution for
fixing the module is also displayed. To change the status
of individual modules, click Setup in the main menu and
click on the desired module.
7
Page 8
If you are unable to solve a problem using the suggested
solutions, click Help to access the help files or search the
Knowledgebase.
If you need assistance, you can contact ESET Customer
Care support on the ESET website. ESET Customer Care
will respond quickly to your questions and help
determine a resolution.
8
Page 9

4. Work with ESET Cybersecurity
4.1 Antivirus and antispyware protection
Antivirus protection guards against malicious system
attacks by modifying files that pose potential threats. If a
threat with malicious code is detected, the Antivirus
module can eliminate it by blocking it and then cleaning
it, deleting it or moving it to quarantine.
4.1.1 Real-time file system protection
Real-time file system protection controls all antivirusrelated events in the system. All files are scanned for
malicious code when they are opened, created or run on
your computer. Real-time file system protection is
launched at system startup.
4.1.1.1 Real-time Protection setup
Real-time file system protection checks all types of media
and the scan is triggered by various events. Using
ThreatSense technology detection methods (described
in the section titled ThreatSense engine parameter setup
11
), Real-time file system protection may vary for newly
created files and existing files. For newly created files, it is
possible to apply a deeper level of control.
By default, Real-time protection launches at system
startup and provides uninterrupted scanning. In special
cases (e.g., if there is a conflict with another Real-time
scanner), Real-time protection can be terminated by
clicking the ESET Cybersecurity icon located in your
menu bar (top of the screen) and then selecting the
Disable Real-time File System Protection option.
Real-time protection can also be terminated from the
main program window (Setup > Antivirus and
Antispyware > Disable).
You can toggle ThreatSense Advanced heuristics
scanning for executed files as well as for created and
modified files separately by clicking the Advanced
heuristics checkbox in each of the respective
ThreatSense parameters sections.
To provide the minimum system footprint when using
Real-time protection, you can define the size of the
optimization cache. This behavior is active when you are
using the Enable clean file cache option. If this is
disabled, all files are scanned each time they are
accessed. Files will not be scanned repeatedly after being
cached (unless they have been modified), up to the
defined size of the cache. Files are scanned again
immediately after each virus signature database update.
Click Enable clean file cache to enable/disable this
function. To set the amount of files to be cached simply
enter the desired value in the input field next to Cache
size.
Additional scanning parameters can be set in the
ThreatSense Engine Setup window. You can define
what type of Objects should be scanned, using which
Options and Cleaning level, as well as defining
Extensions and file-size Limits for Real-time file system
protection. You can enter the ThreatSense engine setup
window by clicking the Setup... button next to
ThreatSense Engine in the Advanced Setup window.
For more detailed information about ThreatSense engine
parameters see ThreatSense engine parameter setup .
11
4.1.1.1.3 Exclusions from scanning
This section enables you to exclude certain files and
folders from scanning.
Path - path to excluded files and folders
To modify advanced settings of the Real-time
protection, go to Setup > Enter application
preferences ... > Protection > Real-Time Protection
and click the Setup... button next to Advanced Options (described in the section titled Advanced scan options
9
).
4.1.1.1.1 Scan on (Event triggered scanning)
By default, all files are scanned upon File opening, File
creation or File execution. We recommend that you
keep the default settings, as these provide the maximum
level of Real-time protection for your computer.
4.1.1.1.2 Advanced scan options
In this window you can define object types to be
scanned by the ThreatSense engine and enable/disable
Advanced heuristics as well as modify settings for
archives and file cache.
We do not recommend changing the default values in
the Default archives settings section unless needed to
resolve a specific issue, as higher archive nesting values
can impede system performance.
Threat - if there is a name of a threat next to an
excluded file, it means that the file is only excluded for
the given threat, but not completely. Therefore, if that
file becomes infected later with other malware, it will
be detected by the antivirus module.
Add... - excludes objects from detection. Enter the
path to an object (you can also use wildcards * and ?)
or select the folder or file from the tree structure.
Edit... - enables you to edit selected entries
Delete - removes selected entries
Default - cancels all exclusions.
4.1.1.2 When to modify Real-time protection
configuration
Real-time protection is the most essential component of
maintaining a secure system. Use caution when
modifying the Real-time protection parameters. We
recommend that you only modify these parameters in
specific cases. For example, a situation in which there is a
conflict with a certain application or Real-time scanner of
another antivirus program.
After installation of ESET Cybersecurity, all settings are
9
Page 10
optimized to provide the maximum level of system
security for users. To restore the default settings, click
the Default button located at the bottom-left of the
Real-Time Protection window (Setup > Enter
application preferences ... > Protection > Real-Time
Protection).
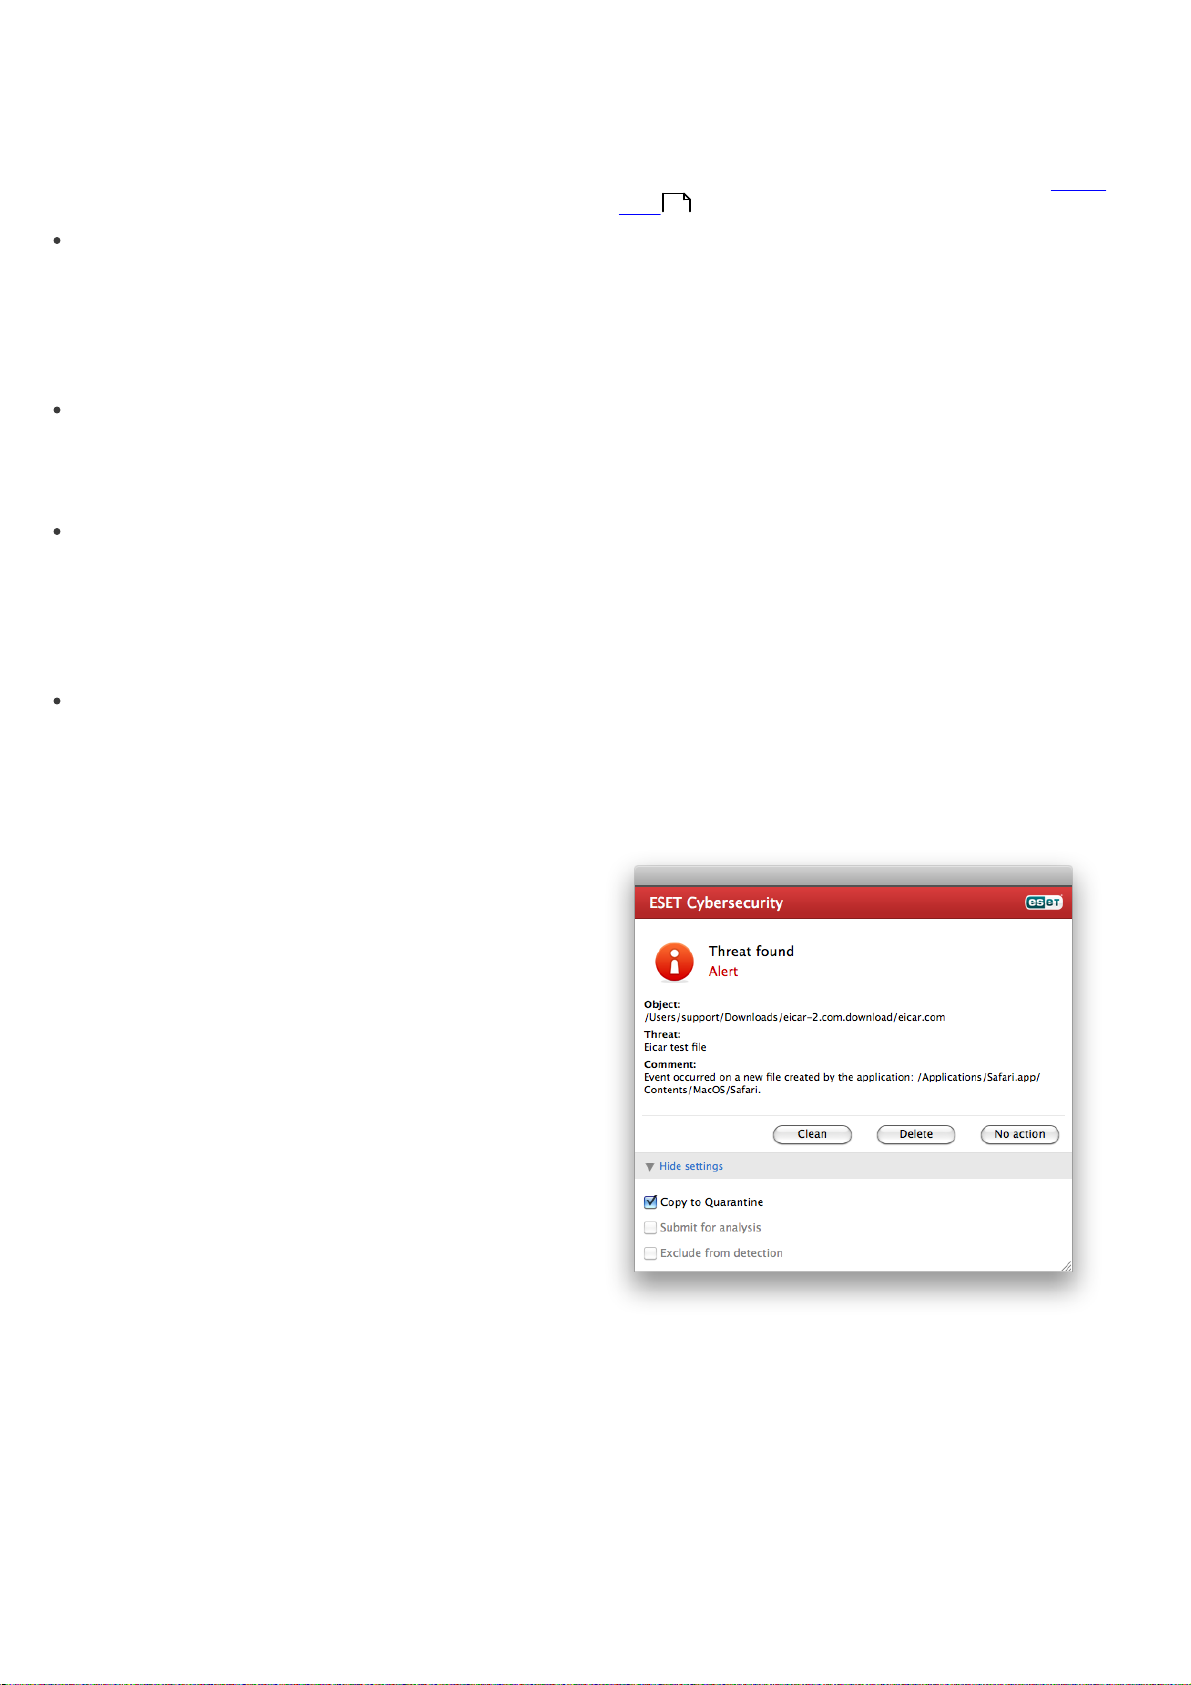
4.1.1.3 Checking Real-time protection
To verify that Real-time protection is working and
detecting viruses, use the eicar.com test file. This test file
is a special harmless file detectable by all antivirus
programs. The file was created by the EICAR company
(European Institute for Computer Antivirus Research) to
test the functionality of antivirus programs. The file eicar.
com is available for download at http://www.eicar.org/
anti_virus_test_file.htm.
4.1.1.4 What to do if Real-time protection does
not work
In this chapter, we describe problem situations that may
arise when using Real-time protection, and how to
troubleshoot them.
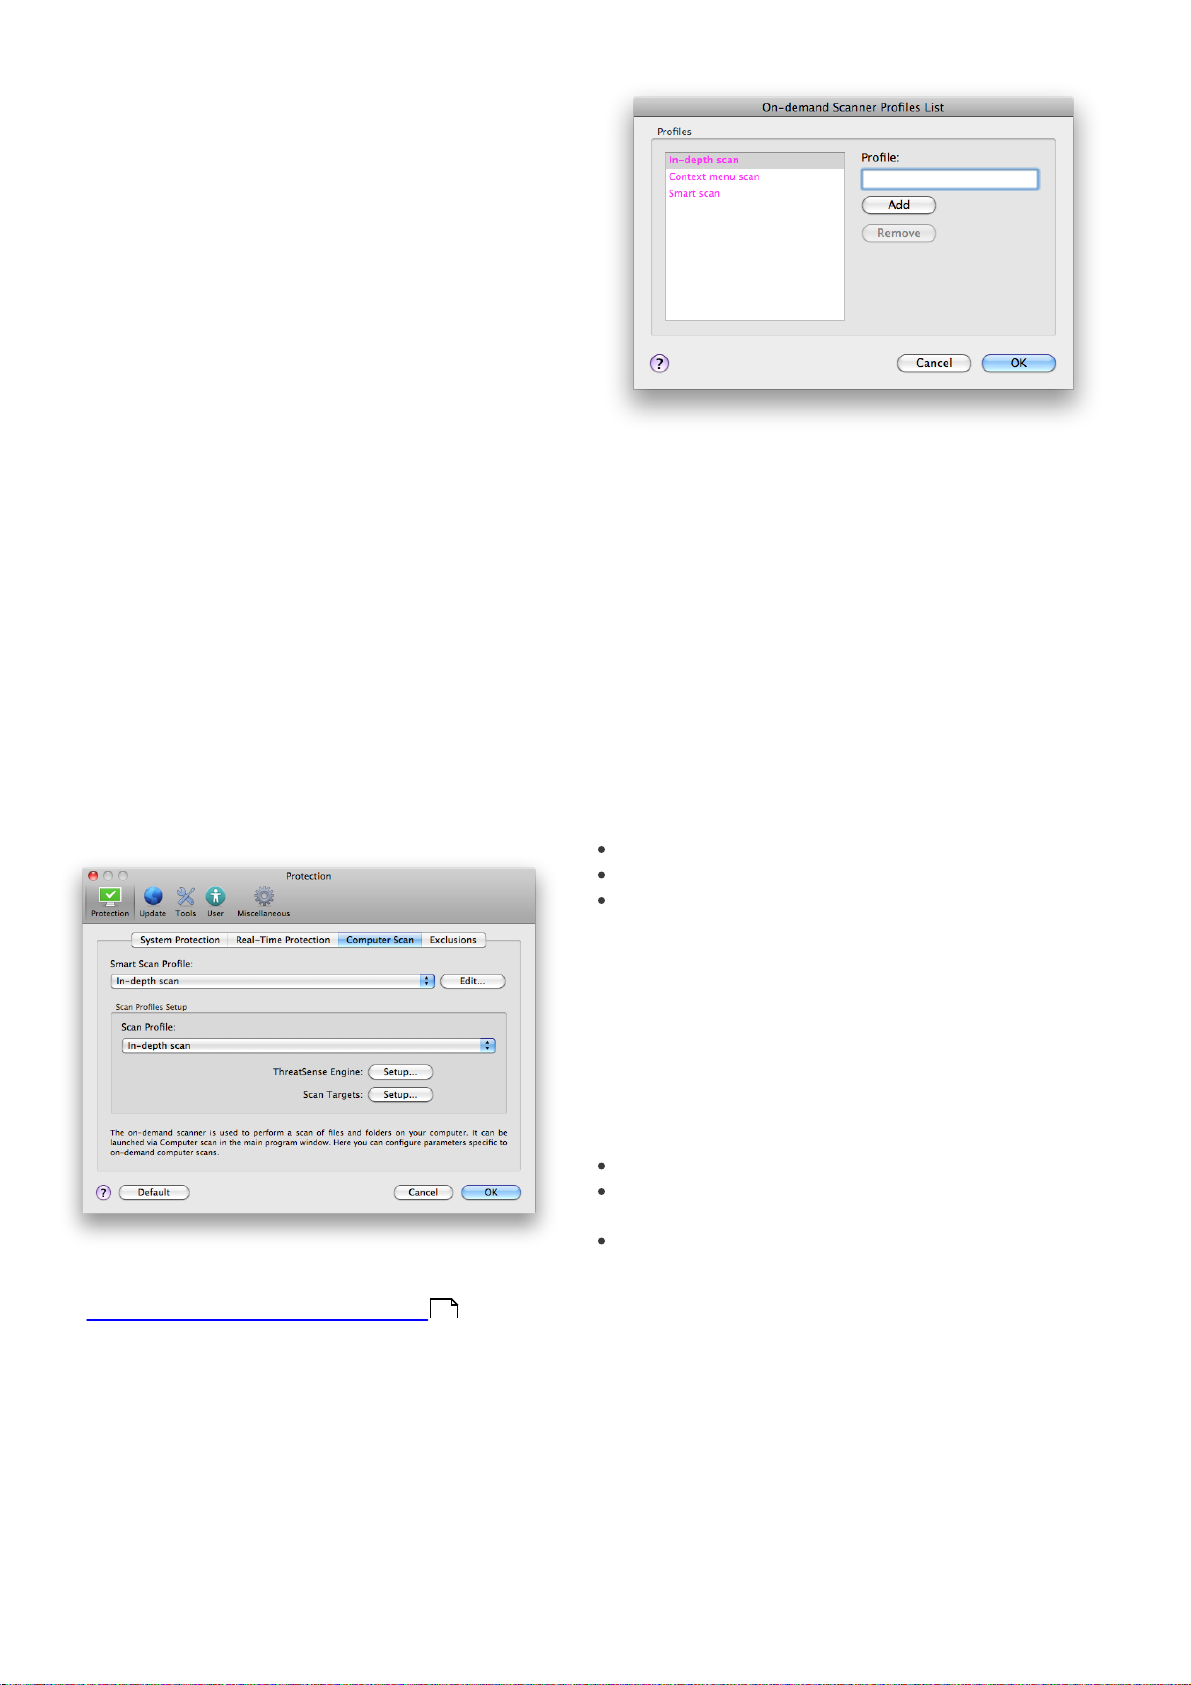
4.1.2 On-demand computer scan
If you suspect that your computer is infected (it behaves
abnormally), run Computer scan > Smart scan to
examine your computer for infiltrations. For maximum
protection, computer scans should be run regularly as
part of routine security measures, not just run when an
infection is suspected. Regular scanning can detect
infiltrations that were not detected by the Real-time
scanner when they were saved to the disk. This can
happen if the Real-time scanner was disabled at the time
of infection, or if the virus signature database is not upto-date.
We recommend that you run an On-demand computer
scan at least once a month. Scanning can be configured
as a scheduled task from Tools > Scheduler.
Real-time protection is disabled
If Real-time protection was inadvertently disabled by a
user, it will need to be reactivated. To reactivate Realtime protection, navigate to Setup > Antivirus and
antispyware and click the Enable real-time file system
protection link (to the right) in the main program
window. You can alternatively enable the Real-time file
system protection in the Advanced setup window under
Protection > Real-Time Protection by selecting the
Enable real-time file system protection option.
4.1.2.1 Type of scan
Two types of On-demand computer scans are available.
Smart scan quickly scans the system with no need for
further configuration of the scan parameters. Custom
scan allows you to select any of the predefined scan
profiles, as well as choose specific scan targets.
4.1.2.1.1 Smart scan
Smart scan allows you to quickly launch a computer scan
and clean infected files with no need for user
intervention. Its main advantages are easy operation
with no detailed scanning configuration. Smart scan
checks all files in all folders and automatically cleans or
deletes detected infiltrations. The cleaning level is
automatically set to the default value. For more detailed
information on types of cleaning, see the section on
Cleaning .
12
Real-time protection does not detect and clean infiltrations
Make sure that no other antivirus programs are installed
on your computer. If two real-time protection shields are
enabled at the same time, they may conflict with each
other. We recommend that you uninstall any other
antivirus programs that may be on your system.
Real-time protection does not start
If Real-time protection is not initiated at system startup,
it may be due to conflicts with other programs. If this is
the case, please consult ESET‘s Customer Care
specialists.
10
4.1.2.1.2 Custom scan
Custom scan is optimal if you would like to specify
scanning parameters such as scan targets and scanning
methods. The advantage of running a Custom scan is
the ability to configure the parameters in detail. Different
configurations can be saved as user-defined scan
profiles, which can be useful if scanning is repeatedly
performed with the same parameters.
To select scan targets, select Computer scan > Custom
scan and select specific Scan Targets from the tree
structure. A scan target can also be more precisely
Page 11
specified by entering the path to the folder or file(s) you
wish to include. If you are only interested in scanning the
system without additional cleaning actions, select the
Scan without cleaning option. Furthermore, you can
choose from three cleaning levels by clicking Setup... >
Cleaning.
Performing computer scans with Custom scan is
recommended for advanced users with previous
experience using antivirus programs.
4.1.2.2 Scan targets
The Scan targets tree structure allows you to select files
and folders to be scanned for viruses. Folders may also
be selected according to a profile's settings.
A scan target can be more precisely defined by entering
the path to the folder or file(s) you wish to include in
scanning. Select targets from the tree structure that lists
all available folders on the computer.
4.1.2.3 Scan profiles
Your preferred scan settings can be saved for future
scanning. We recommend that you create a different
profile (with various scan targets, scan methods and
other parameters) for each regularly used scan.
To create a new profile, go to Setup > Enter application
preferences ... > Protection > Computer Scan and click
Edit... next to the list of current profiles.
4.1.3 ThreatSense engine parameters setup
ThreatSense is the name of the technology consisting of
complex threat detection methods. This technology is
proactive, which means it also provides protection
during the early hours of the spread of a new threat. It
uses a combination of several methods (code analysis,
code emulation, generic signatures, virus signatures)
which work in concert to significantly enhance system
security. The scanning engine is capable of controlling
several data streams simultaneously, maximizing the
efficiency and detection rate. ThreatSense technology
also successfully eliminates rootkits.
The ThreatSense technology setup options allow you to
specify several scan parameters:
File types and extensions that are to be scanned
The combination of various detection methods
Levels of cleaning, etc.
To enter the setup window, click Setup > Antivirus and
antispyware > Advanced Antivirus and antispyware
protection setup and then click the Setup... button
located in the System Protection, Real-Time
Protection and Computer Scan wildcards, which all use
ThreatSense technology (see below). Different security
scenarios could require different configurations. With
this in mind, ThreatSense is individually configurable for
the following protection modules:
System Protection > Automatic startup file check
Real-Time Protection > Real-time file system
protection
Computer Scan > On-demand computer scan
To help you create a scan profile to fit your needs, see the ThreatSense engine parameters setup section for
11
a description of each parameter of the scan setup.
Example: Suppose that you want to create your own
scan profile and the Smart scan configuration is partially
suitable, but you do not want to scan runtime packers or
potentially unsafe applications and you also want to
apply Strict cleaning. In the On-demand Scanner
Profiles List window, write the profile name, click the
Add button and confirm by OK. Then adjust the
parameters to meet your requirements by setting
ThreatSense Engine and Scan Targets.
The ThreatSense parameters are specifically optimized
for each module, and their modification can significantly
influence system operation. For example, changing
settings to always scan runtime packers, or enabling
advanced heuristics in the Real-time file system
protection module could result in a slower system .
Therefore, we recommend that you leave the default
ThreatSense parameters unchanged for all modules
except Computer scan.
11
Page 12

4.1.3.1 Objects
The Objects section allows you to define which computer files will be scanned for infiltrations.
Files – provides scanning of all common file types
(programs, pictures, audio, video files, database files,
etc.).
Symbolic links - (On-demand scanner only) scans
special type of files that contain a text string that is
interpreted and followed by the operating system as a
path to another file or directory.
Email files - (not available in Real-time protection)
scans special files where email messages are
contained.
Mailboxes - (not available in Real-time protection)
scans user mailboxes in the system. Incorrect use of
this option may result in a conflict with your email
client. To learn more about advantages and
disadvantages of this option, read this knowledgebase
article.
Archives - (not available in Real-time protection)
provides scanning of files compressed in archives (.
rar, .zip, .arj, .tar, etc.).
Self-extracting archives - (not available in Real-time
protection) scans files which are contained in selfextracting archive files.
Runtime packers - unlike standard archive types,
runtime packers decompress in memory, in addition
to standard static packers (UPX, yoda, ASPack, FGS,
etc.).
4.1.3.2 Options
In the Options section, you can select the methods used during a scan of the system for infiltrations. The following options are available:
Potentially unwanted applications – These
applications are not necessarily intended to be
malicious, but may affect the performance of your
computer in a negative way. Such applications usually
require consent for installation. If they are present on
your computer, your system behaves differently
(compared to the way it behaved before these
applications were installed). The most significant
changes include unwanted pop-up windows,
activation and running of hidden processes, increased
usage of system resources, changes in search results,
and applications communicating with remote servers.
Potentially unsafe applications – these applications
refer to commercial, legitimate software that can be
abused by attackers, if it was installed without user's
knowledge. The classification includes programs such
as remote access tools, which is why this option is
disabled by default.
4.1.3.3 Cleaning
The cleaning settings determine the manner in which the
scanner cleans infected files. There are 3 levels of
cleaning:
No cleaning – Infected files are not cleaned
automatically. The program will display a warning
window and allow you to choose an action.
Standard cleaning – The program will attempt to
automatically clean or delete an infected file. If it is not
possible to select the correct action automatically, the
program will offer a choice of follow-up actions. The
choice of follow-up actions will also be displayed if a
predefined action could not be completed.
Strict cleaning – The program will clean or delete all
infected files (including archives). The only exceptions
are system files. If it is not possible to clean them, you
will be offered an action to take in a warning window.
Virus signature database – Signatures can exactly
and reliably detect and identify infiltrations by name
using the virus signature database.
Heuristics – Heuristics use an algorithm that analyzes
the (malicious) activity of programs. The main
advantage of heuristic detection is the ability to detect
new malicious software which did not previously exist,
or was not included in the list of known viruses (virus
signatures database).
Advanced heuristics – Advanced heuristics comprise
a unique heuristic algorithm, developed by ESET,
optimized for detecting computer worms and trojan
horses written in high-level programming languages.
The program's detection ability is significantly higher
as a result of advanced heuristics.
Adware/Spyware/Riskware – This category includes
software that collects sensitive information about
users without their informed consent. This category
also includes software which displays advertising
material.
12
Warning: In the Default Standard cleaning mode, the
entire archive file is deleted only if all files in the archive
are infected. If the archive also contains legitimate files, it
will not be deleted. If an infected archive file is detected
in Strict cleaning mode, the entire archive will be deleted,
even if clean files are present.
4.1.3.4 Extensions
An extension is the part of the file name delimited by a
period. The extension defines the type and content of
the file. This section of the ThreatSense parameter setup
lets you define the types of files to be excluded from
scanning.
By default, all files are scanned regardless of their
extension. Any extension can be added to the list of files
excluded from scanning. Using the Add and Remove
buttons, you can enable or prohibit scanning of desired
extensions.
Excluding files from scanning is sometimes necessary if
scanning of certain file types prevents the proper
function of a program that is using the extensions. For
example, it may be advisable to exclude the .log, .cfg and
.tmp extensions.
Page 13
4.1.3.5 Limits
The Limits section allows you to specify the maximum
size of objects and levels of nested archives to be
scanned:
Maximum Size: Defines the maximum size of objects
to be scanned. The antivirus module will then scan
only objects smaller than the size specified. We do not
recommend changing the default value, as there is
usually no reason to modify it. This option should only
be changed by advanced users who have specific
reasons for excluding larger objects from scanning.
Maximum Scan Time: Defines the maximum time
allotted for scanning an object. If a user-defined value
has been entered here, the antivirus module will stop
scanning an object when that time has elapsed,
whether or not the scan has finished.
Maximum Nesting Level: Specifies the maximum
depth of archive scanning. We do not recommend
changing the default value of 10; under normal
circumstances, there should be no reason to modify it.
If scanning is prematurely terminated due to the
number of nested archives, the archive will remain
unchecked.
Maximum File Size: This option allows you to specify
the maximum file size for files contained in archives
(when they are extracted) that are to be scanned. If
scanning is prematurely terminated as a result of this
limit, the archive will remain unchecked.
e.g., it is slower, often freezes, etc., we recommend the
following steps:
Open ESET Cybersecurity and click Computer scan.
1.
Click Smart scan (for more information, see the Smart
2.
10
scan section).
After the scan has finished, review the log for the
3.
number of scanned, infected and cleaned files.
If you only wish to scan a certain part of your disk, click
Custom scan and select targets to be scanned for
viruses.
As a general example of how infiltrations are handled in
ESET Cybersecurity, suppose that an infiltration is
detected by the Real-time file system monitor, which
uses the default cleaning level. It will attempt to clean or
delete the file. If there is no predefined action to take for
the Real-time protection module, you will be asked to
select an option in an alert window. Usually, the options
Clean, Delete and No action are available. Selecting No
action is not recommended, since the infected file(s)
would be left untouched. An exception to this is when
you are sure that the file is harmless and has been
detected by mistake.
Cleaning and deleting – Apply cleaning if a file has been
attacked by a virus that has attached malicious code to
it. If this is the case, first attempt to clean the infected file
in order to restore it to its original state. If the file
consists exclusively of malicious code, it will be deleted.
4.1.3.6 Others
With Smart Optimization enabled, the most optimal
settings are used to ensure the most efficient scanning
level, while simultanneously maintaining the highest
scanning speeds. The various protection modules scan
intelligently, making use of different scanning methods
while applying them to specific file types. The Smart
Optimization is not rigidly defined within the product.
The ESET Development Team is continuously
implementing new changes which then get integrated
into your ESET Cybersecurity via the regular updates. If
the Smart Optimization is disabled, only the userdefined settings in the ThreatSense core of the particular
module are applied when performing a scan.
Scan alternative data streams (On-demand scanner
only)
Alternate data streams (resource/data forks) used by the
file system are file and folder associations which are
invisible from ordinary scanning techniques. Many
infiltrations try to avoid detection by disguising
themsleves as alternative data streams.
4.1.4 An infiltration is detected
Infiltrations can reach the system from various entry
points; webpages, shared folders, email or removable
computer devices (USB, external disks, CDs, DVDs,
diskettes, etc.).
Deleting files in archives – In the default cleaning
mode, the entire archive will be deleted only if it contains
infected files and no clean files. In other words, archives
are not deleted if they also contain harmless clean files.
However, use caution when performing a Strict
cleaning scan – with Strict cleaning the archive will be
deleted if it contains at least one infected file, regardless
of the status of other files in the archive.
If your computer is showing signs of malware infection,
13
Page 14
4.2 Updating the program
Regular updates of ESET Cybersecurity are necessary to
maintain the maximum level of security. The Update
module ensures that the program is always up to date
by updating the virus signature database.
By clicking Update from the main menu, you can find
the current update status, including the date and time of
the last successful update and if an update is needed. To
begin the update process manually, click the Update
virus signature database.
Under normal circumstances, when updates are
downloaded properly, the message Virus signature
database is up to date will appear in the Update
window. If the virus signature database cannot be
updated, we recommend that you check the update
settings - the most common reason for this error is
incorrectly entered authentication data (Username and
Password) or incorrectly configured connection settings
20
The Update window also contains the information about
the virus signature database version. This numeric
indicator is an active link to ESET’s website, listing all
signatures added during the given update.
NOTE: Your username and password are provided by
ESET after purchasing ESET Cybersecurity.
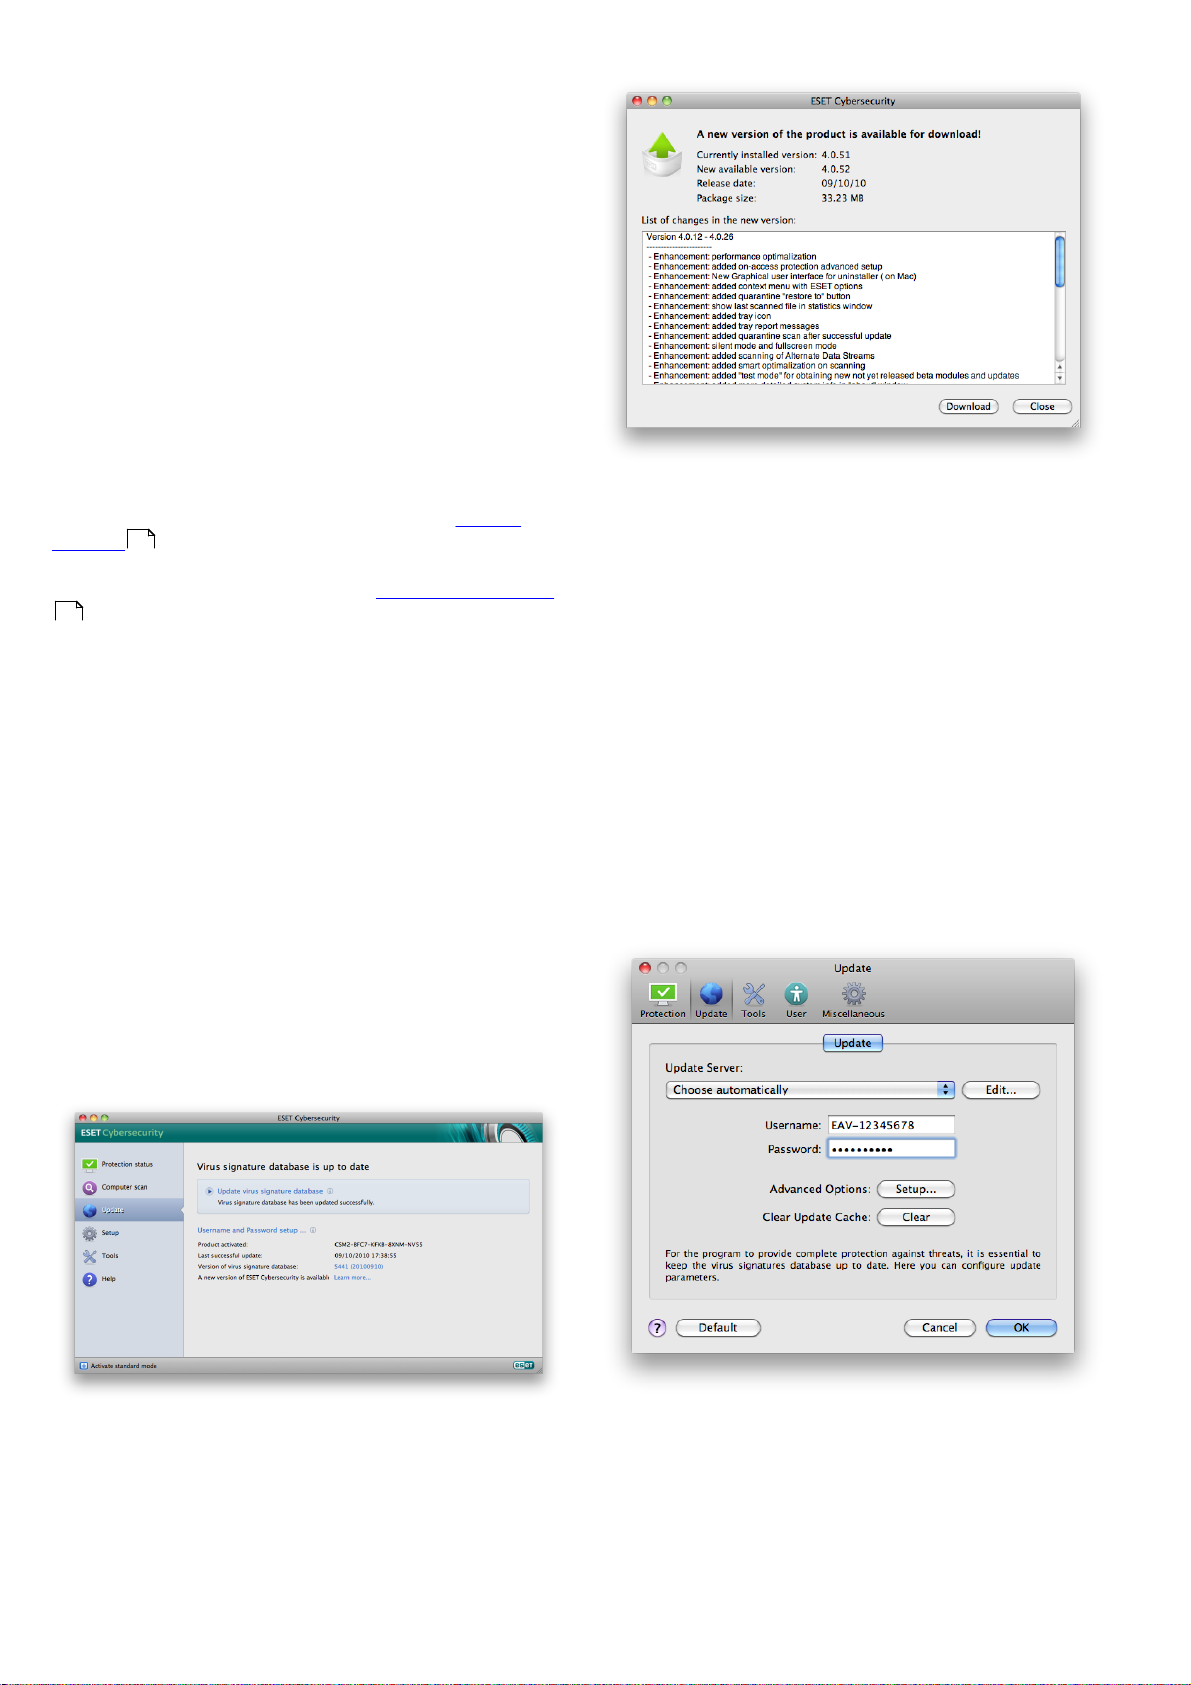
4.2.1 Upgrading to a new build
For maximum protection, it is important to use the latest
build of ESET Cybersecurity. To check for a new version,
click Update from the main menu on the left. If a new
build is available, a message that says A new version of
ESET Cybersecurity is available will be displayed at the
bottom of the window. Click Learn more... to display a
new window containing the version number of the new
build and the changelog.
14
.
If you clicked Download, the file will be downloaded to
your downloads folder (or the default folder set by your
browser). When the file has finished downloading,
launch the file and follow the installation directions. Your
username and password will be automatically
transferred to the new installation. It is recommended to
check for upgrades regularly, especially when installing
ESET Cybersecurity via CD/DVD.
4.2.2 Update setup
The update setup section specifies update source
information such as the update servers and
authentication data for these servers. By default, the
Update Server drop-down menu is set to Choose
automatically to ensure that update files will
automatically download from the ESET server with the
least network traffic.
Click Download to download the latest build. Click Ok to
close the window and download the upgrade later.
14
The list of available update servers is accessible via the
Update Server drop-down menu. To add a new update
server, click Edit... Then enter the address of the new
server in the Update Server input field and click the Add
button. Authentication for update servers is based on
the Username and Password generated and sent to you
after purchase.
Page 15
To enable the use of test mode (downloads pre-release
updates) click the Setup... button next to Advanced
Options and select the Enable pre-release updates
checkbox. To disable system tray notifications displaying
after each successful update, select the Do not display
notification about successful update checkbox.
To delete all temporarily stored update data, click the
Clear button next to Clear Update Cache. Use this
option if you are experiencing difficulty while updating.
4.2.3 How to create update tasks
Updates can be triggered manually by clicking Update
virus signature database in the primary window
displayed after clicking Update from the main menu.
Updates can also be run as scheduled tasks. To configure
a scheduled task, click Tools > Scheduler. By default, the
following tasks are activated in ESET Cybersecurity:
To edit the configuration of an existing scheduled task
(both default and user-defined), right-click the task and
click Edit... or select the desired task you wish to modify
and click the Edit... button.
4.3.1 Purpose of scheduling tasks
The Scheduler manages and launches scheduled tasks
with predefined configurations and properties. The
configuration and properties contain information such
as the date and time as well as specified profiles to be
used during execution of the task.
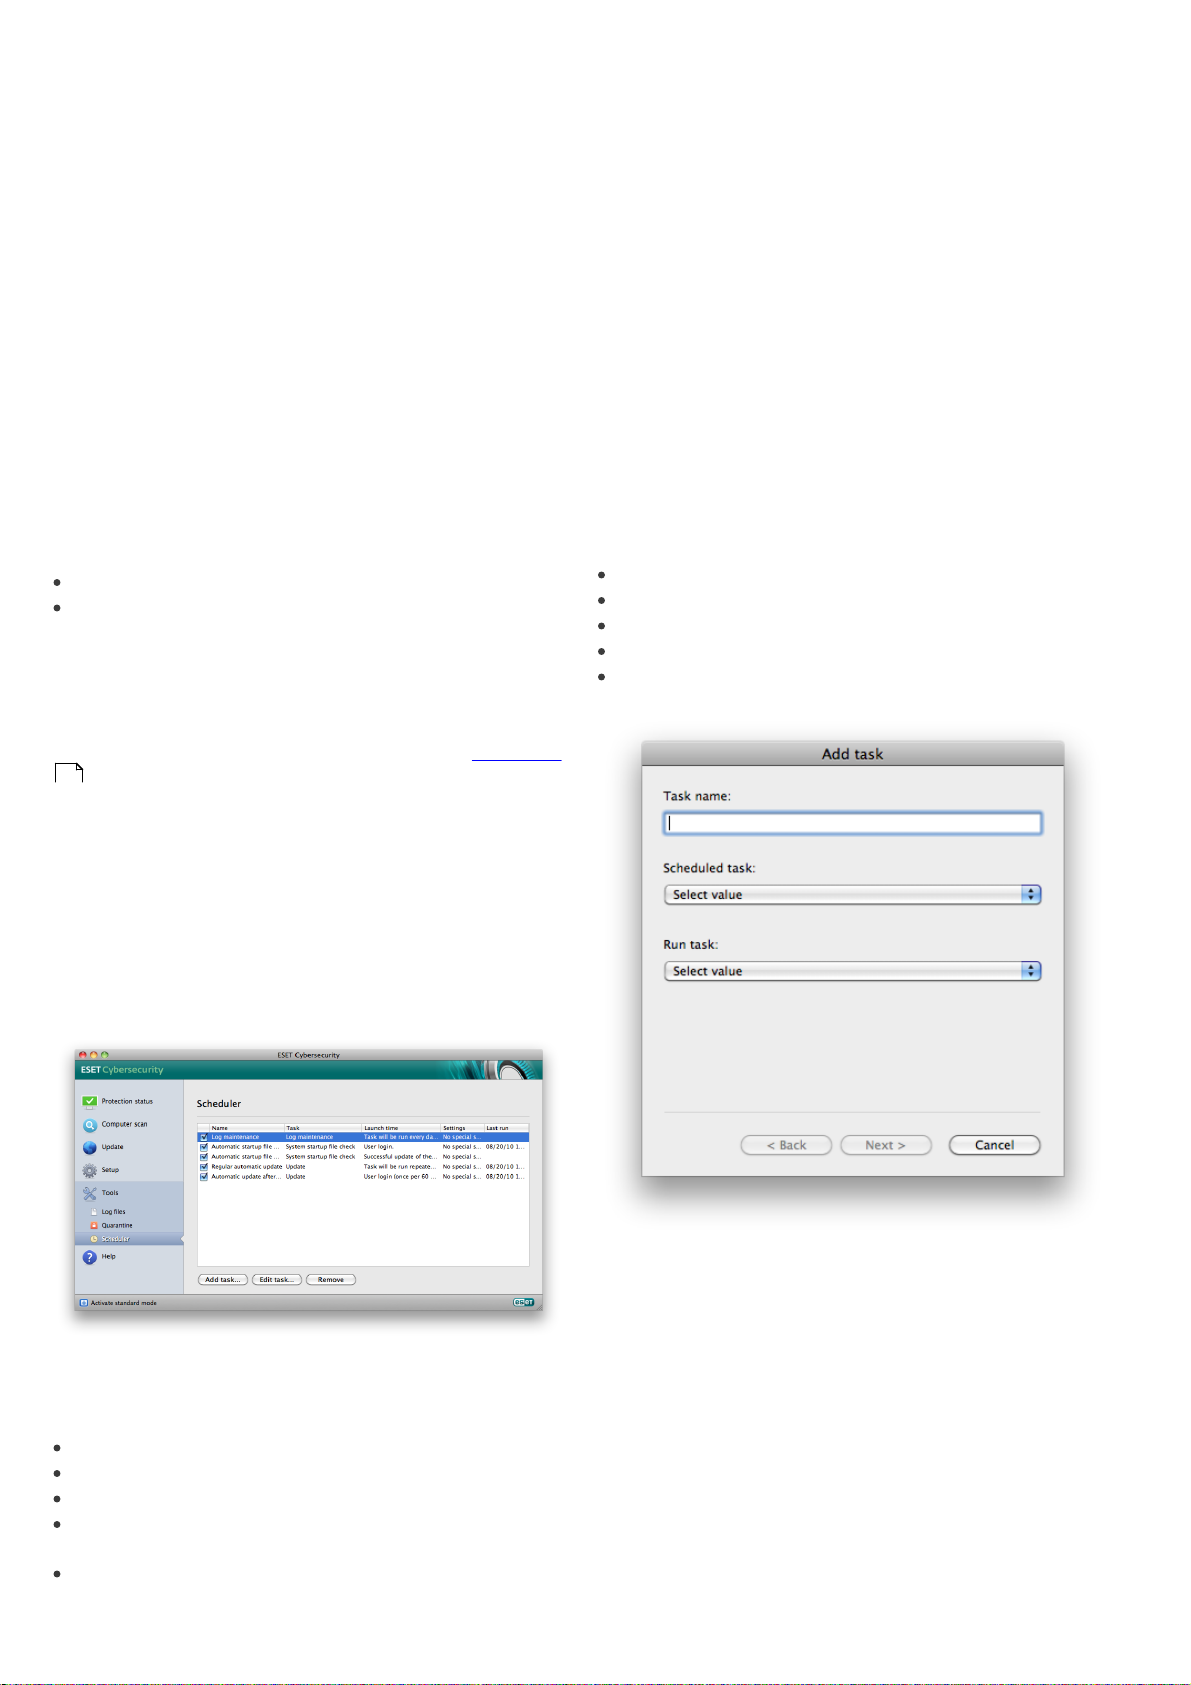
4.3.2 Creating new tasks
To create a new task in the Scheduler, click the Add
task... button or right-click and select Add... from the
context menu. Five types of scheduled tasks are
available:
Regular automatic update
Automatic update after user logon
Each of the aforementioned update tasks can be modified to meet your needs. In addition to the default update tasks, you can create new update tasks with a user-defined configuration. For more details about creating and configuring update tasks, see the Scheduler
15
section.
4.3 Scheduler
The Scheduler is available if Advanced mode in ESET
Cybersecurity is activated. The Scheduler can be found in
the ESET Cybersecurity main menu under Tools. The
Scheduler contains a list of all scheduled tasks and
configuration properties such as the predefined date,
time, and scanning profile used.
Run application
Update
Log maintenance
On-demand computer scan
System startup file check
By default, the following scheduled tasks are displayed in
the Scheduler:
Regular automatic update
Automatic update after user logon
Automatic startup file check after user logon
Automatic startup file check after successful update of
the virus signature database
Log maintenance (after enabling the Show system
tasks option in the scheduler setup)
Since Update is one of the most frequently used
scheduled tasks, we will explain how to add a new
update task.
From the Scheduled task drop-down menu, select
Update. Enter the name of the task into the Task name
field. Select the frequency of the task from the Run task
drop-down menu. The following options are available:
User-defined, Once, Repeatedly, Daily, Weekly and
Event triggered. Based on the frequency selected, you
will be prompted with different update parameters.
Next, define what action to take if the task cannot be
performed or completed at the scheduled time. The
following three options are available:
15
Page 16

Wait until the next scheduled time
Run the task as soon as possible
Run the task immediately if the time since its last
execution exceeds specified interval (the interval can
be defined using the Minimum task interval scroll
box)
In the next step, a summary window with information
about the current scheduled task is displayed. Click the
Finish button.
4.4.1 Quarantining files
ESET Cybersecurity automatically quarantines deleted
files (if you have not cancelled this option in the alert
window). If desired, you can quarantine any suspicious
file manually by clicking the Quarantine... button. The
context menu can also be used for this purpose – rightclick in the Quarantine window, choose file you want to
quarantine and click the Open button.
4.4.2 Restoring from Quarantine
The new scheduled task will be added to the list of
currently scheduled tasks.
The system, by default, contains essential scheduled
tasks to ensure correct product functionality. These
should not be altered, and are hidden by default. To
change this option and make these tasks visible, enter
the Setup > Enter application preferences ... > Tools >
Scheduler and select the Show system tasks option.
4.4 Quarantine
The main task of quarantine is to safely store infected
files. Files should be quarantined if they cannot be
cleaned, if it is not safe or advisable to delete them, or if
they are being falsely detected by ESET Cybersecurity.
You can choose to quarantine any file. This is advisable if
a file behaves suspiciously but is not detected by the
antivirus scanner. Quarantined files can be submitted for
analysis to ESET’s Threat Lab.
Quarantined files can also be restored to their original
location. Use the Restore button for this purpose;
Restore is also available from the context menu by rightclicking on the given file in the Quarantine window,
then clicking Restore. The context menu also offers the
option Restore to..., which allows you to restore a file to
a location other than the one from which it was deleted.
4.4.3 Submitting file from Quarantine
If you have quarantined a suspicious file that was not
detected by the program, or if a file was incorrectly
evaluated as infected (e.g., by heuristic analysis of the
code) and subsequently quarantined, please send the file
to ESET‘s Threat Lab. To submit a file from quarantine,
right-click the file and select Submit file for analysis
from the context menu.
4.5 Log files
The Log files contain information about all important
program events that have occurred and provide an
overview of detected threats. Logging acts as an
essential tool in system analysis, threat detection and
troubleshooting. Logging is performed actively in the
background with no user interaction. Information is
recorded based on the current log verbosity settings. It
is possible to view text messages and logs directly from
the ESET Cybersecurity environment, as well as to
archive logs.
Files stored in the quarantine folder can be viewed in a table which displays the date and time of quarantine, the path to the original location of the infected file, its size in bytes, reason (e.g., added by user…), and number of threats (e.g., if it is an archive containing multiple infiltrations). The quarantine folder with quarantined files (/Library/Application Support/Eset/cache/esets/ quarantine) remains in the system even after uninstalling ESET Cybersecurity. Quarantined files are stored in a safe encrypted form and can be restored again after installing ESET Cybersecurity.
16
Log files are accessible from the ESET Cybersecurity main menu by clicking Tools > Log files. Select the desired log type using the Log drop-down menu at the top of the window. The following logs are available:
Detected threats – Use this option to view all
1.
information about events related to the detection of
infiltrations.
Events – This option is designed for system
2.
administrators and users to solve problems. All
important actions performed by ESET Cybersecurity
are recorded in the Event logs.
Computer scan – Results of all completed scans are
3.
displayed in this window. Double-click any entry to
view details of the respective On-demand computer
scan.
In each section, the displayed information can be directly
copied to the clipboard by selecting the entry and
clicking on the Copy button.
Page 17
4.5.1 Log maintenance
4.6.1 Alerts and notifications
The logging configuration for ESET Cybersecurity is
accessible from the main program window. Click Setup >
Enter application preferences ... > Tools > Log Files.
You can specify the following options for log files:
Delete old log records automatically - log entries
older than the specified number of days are
automatically deleted.
Optimize log files automatically - enables
automatic defragmentation of log files if the specified
percentage of unused records has been exceeded.
To configure the Log Records Default Filter click the
Edit... button and select/deselect log types as required.
4.5.2 Log filtering
Logs store information about important system events.
The log filtering feature allows you to display records
about a specific type of event.
The most frequently used log types are listed below:
Critical warnings – critical system errors (e.g.,
Antivirus protection failed to start)
Errors - errors messages such as "Error downloading file"
and critical errors
Warnings – warning messages
Informative records - informative messages including
successful updates, alerts etc.
Diagnostic records - information needed for fine-
tuning the program as well as all records described
above.
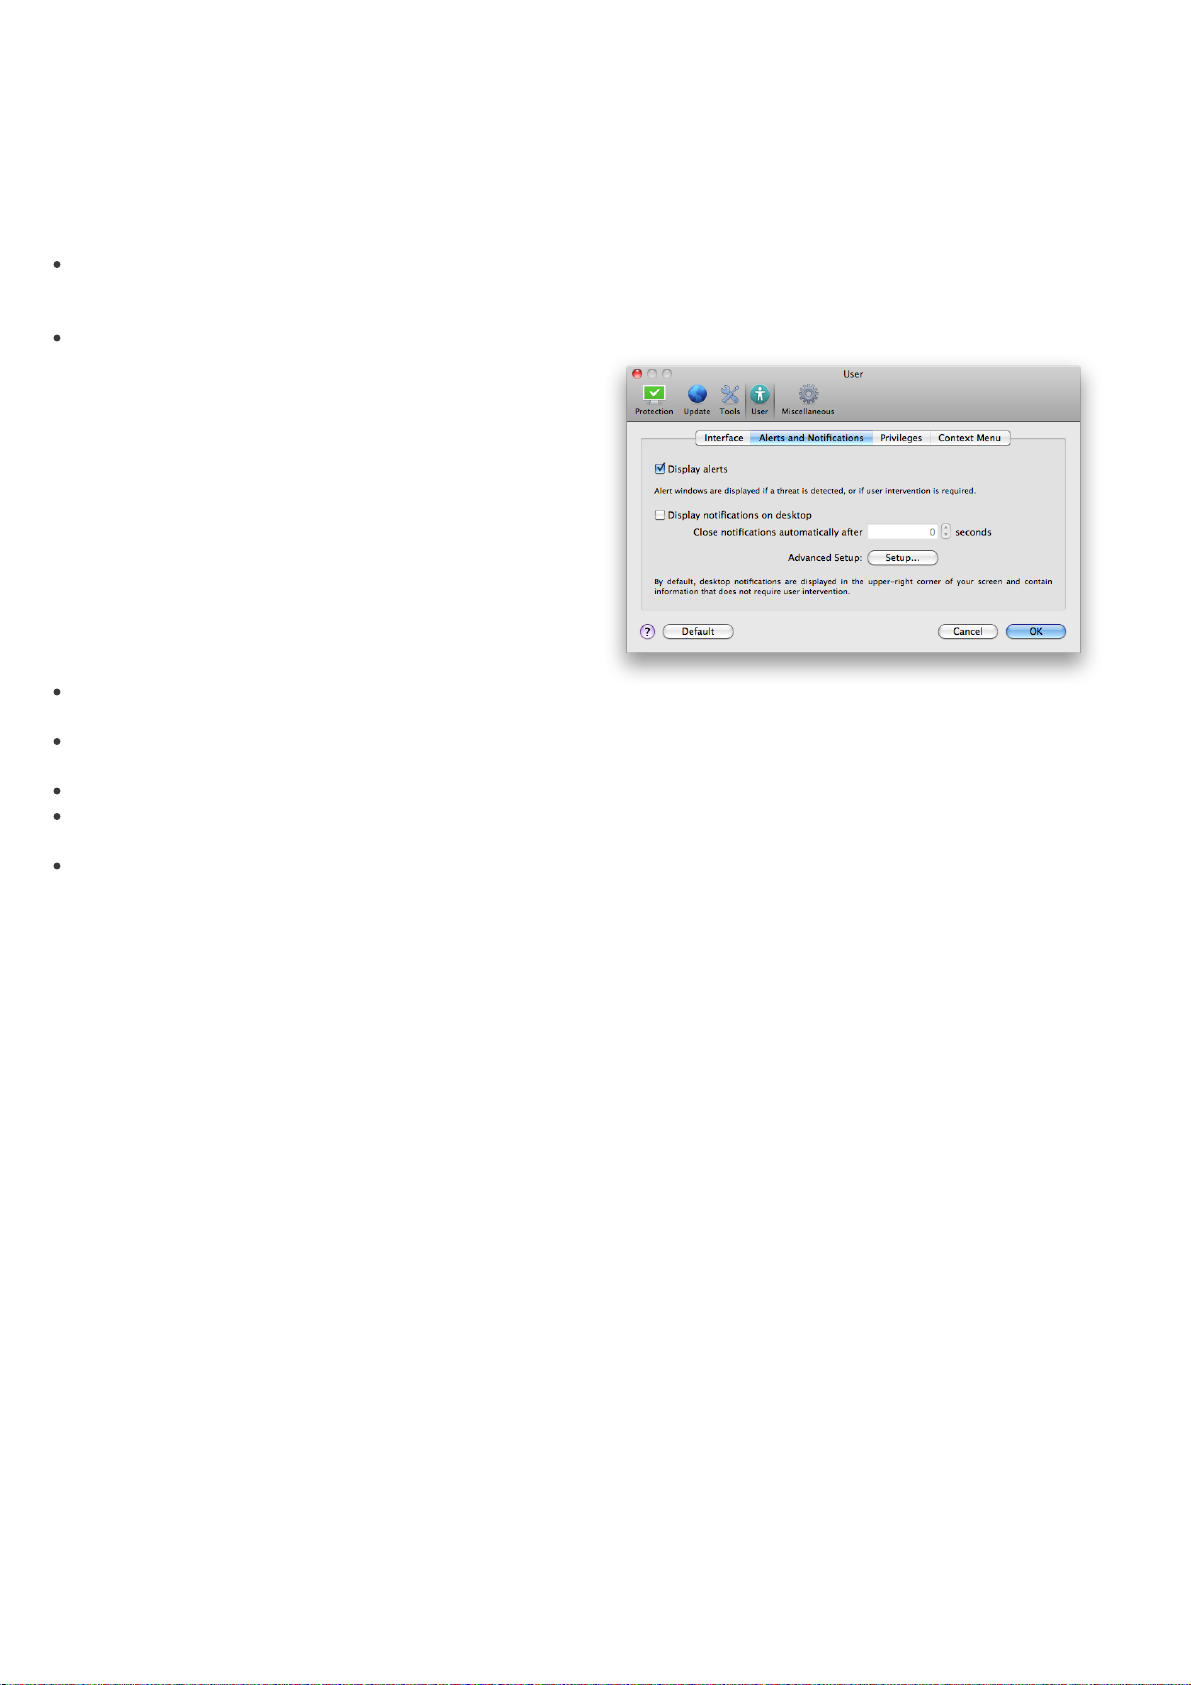
The Alerts and Notifications section allows you to
configure how threat alerts and system notifications are
handled in ESET Cybersecurity.
Disabling the Display alerts option will cancel all alert
windows and is only suitable in specific situations. For
most users, we recommend that this option be left to its
default setting (enabled).
Selecting the Display notifications on desktop option
will enable alert windows that do not require user
interaction to display on desktop (by default in the
upper-right corner of your screen). You can define the
period for which a notification will be displayed by
adjusting the Close notifications automatically after
X seconds value.
4.6.1.1 Alerts and notifications advanced setup
4.6 User interface
The user interface configuration options in ESET
Cybersecurity allow you to adjust the working
environment to fit your needs. These configuration
options are accessible from the Setup > Enter
application preferences ... > User > Interface.
In this section, the Advanced mode option gives users
the ability to allow toggling to Advanced mode.
Advanced mode displays more detailed settings and
additional controls for ESET Cybersecurity.
To enable the startup splash screen functionality select
the Show splash-screen at startup option.
In the Use standard menu section you can select the In
standard mode/In advanced mode options to enable
the use of the standard menu in the main program
window in the respective display mode(s).
To enable the use of tool tips select the Show tooltips
option. The Show hidden files option allows you to see
and select hidden files in the Scan Targets setup of a
Computer scan.
Display only notifications requiring user interaction
With this option, you can toggle the display of messages
requiring user interaction.
Display only notifications requiring user interaction
when running applications in full screen mode
This option is useful while doing presentations, playing
games or doing other activities that require the entire
screen.
4.6.2 Privileges
ESET Cybersecurity settings can be very important to
your organization’s security policy. Unauthorized
modifications may endanger the stability and protection
of your system. Consequently, you can choose which
users will have permission to edit the program
configuration.
To specify privileged users, enter the Setup > Enter
application preferences ... > User > Privileges.
17
Page 18
In order to provide maximum security for your system, it
is essential that the program be correctly configured.
Unauthorized modifications could result in the loss of
important data. To set a list of privileged users, simply
select them from the Users list on the left side and click
the Add button. To remove a user simply select his/her
name in the Privileged Users list on the right side and
click Remove.
NOTE: If the list of privileged users is empty, all users of
the system will have permission to edit the program
settings.
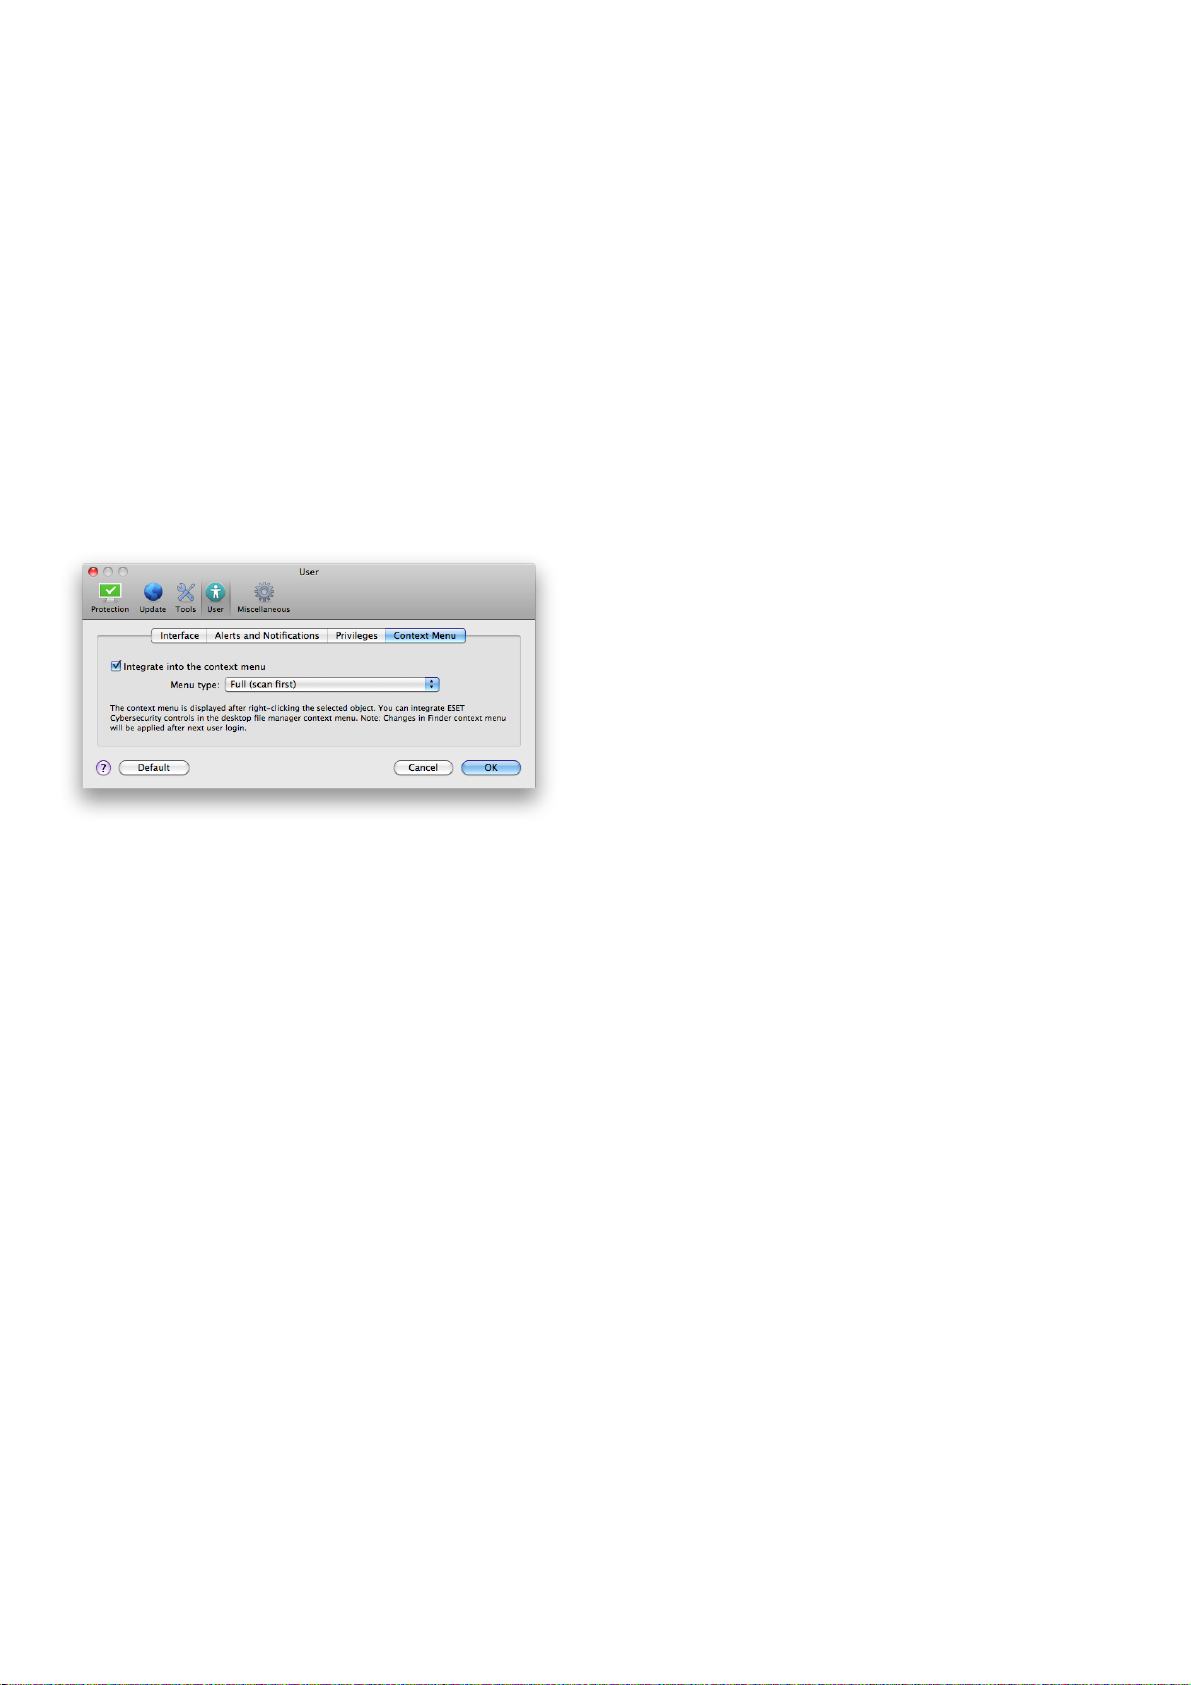
4.6.3 Context menu
The context menu integration can be enabled in the
Setup > Enter application preferences ... > User > Context Menu section by enabling the Integrate into the context menu check box.
While there is a chance this may occasionally disclose
some information about you or your computer
(usernames in a directory path, etc.) to ESET’s Threat
Lab, this information will not be used for ANY purpose
other than to help us respond immediately to new
threats.
The ThreatSense.Net setup is accessible from the
Advanced Setup window, under Tools > ThreatSense.
Net. Select the Enable ThreatSense.Net Early Warning
System option to activate and then click the Setup...
button beside the Advanced Options heading.
4.7.1 Suspicious files
The Suspicious files option allows you to configure the
manner in which threats are submitted to ESET‘s Threat
Lab for analysis.
If you find a suspicious file, you can submit it to our
Threat Labs for analysis. If it is a malicious application, its
detection will be added to the next virus signature
database update.
4.7 ThreatSense.Net
The ThreatSense.Net Early Warning System keeps ESET
immediately and continuously informed about new
infiltrations. The bidirectional ThreatSense.Net Early
Warning System has a single purpose – to improve the
protection that we can offer you. The best way to ensure
that we see new threats as soon as they appear is to
“link“ to as many of our customers as possible and use
them as our Threat Scouts. There are two options:
You can decide not to enable the ThreatSense.Net
1.
Early Warning System. You will not lose any
functionality in the software, and you will still receive
the best protection that we offer.
You can configure the ThreatSense.Net Early Warning
2.
System to submit anonymous information about new
threats and where the new threatening code is
contained. This file can be sent to ESET for detailed
analysis. Studying these threats will help ESET update
its database of threats and improve the program's
threat detection ability.
The ThreatSense.Net Early Warning System will collect
information about your computer related to newlydetected threats. This information may include a sample
or copy of the file in which the threat appeared, the path
to that file, the filename, the date and time, the process
by which the threat appeared on your computer and
information about your computer‘s operating system.
18
Submission of Suspicious Files - You can choose to
send these files During update, meaning they will be
submitted to ESET's Threat Lab during a regular virus
signature database update. Alternatively, you can
choose to send them As soon as possible – this setting
is suitable if a permanent Internet connection is
available.
If you do not want any files to be submitted, select the
Do not submit option. Selecting not to submit files for
analysis does not affect submission of statistical
information, which is configured in a separate area.
The ThreatSense.Net Early Warning System collects
anonymous information about your computer related to
newly detected threats. This information may include
the name of the infiltration, the date and time it was
detected, the ESET security product version, your
operating system version and the location setting. The
statistics are typically delivered to ESET‘s servers once or
twice a day.
Below is an example of a statistical package submitted:
# utc_time=2005-04-14 07:21:28
# country=“Slovakia“
# language=“ENGLISH“
# osver=9.5.0
# engine=5417
# components=2.50.2
# moduleid=0x4e4f4d41
# filesize=28368
# filename=Users/UserOne/Documents/Incoming/
rdgFR1463[1].zip
Submission of Anonymous Statistical Information –
You can define when the statistical information will be
submitted. If you choose to submit As soon as possible,
statistical information will be sent immediately after it is
created. This setting is suitable if a permanent Internet
connection is available. If the During update option is
Page 19

selected, all statistical information will be submitted
during the update following its collection.
If you would not like to send anonymous statistical
information, you can select the Do not submit option.
Exclusion Filter – This option allows you to exclude
certain files/folders from submission. For example, it
may be useful to exclude files which may carry
confidential information, such as documents or
spreadsheets. The most common file types are excluded
by default (.doc, etc.). You can add file types to the list of
excluded files.
Contact Email (optional) – Your email can be sent with
any suspicious files and may be used to contact you if
further information is required for analysis. Please note
that you will not receive a response from ESET unless
more information is needed.
19
Page 20

5. Advanced user
5.1 Import and export settings
Importing and exporting configurations of ESET
Cybersecurity is available in Advanced mode under
Setup.
Both Import and Export use archive files to store the
configuration. Import and export are useful if you need
to backup the current configuration of ESET
Cybersecurity to be able to use it later. The export
settings option is also convenient for users who wish to
use their preferred configuration of ESET Cybersecurity
on multiple systems - they can easily import the
configuration file to transfer the desired settings.
authentication, select the Proxy server requires
authentication checkbox and enter a valid Username
and Password into the respective fields.
5.3 Removable media blocking
Removable media (i.e., CD or USB key) may contain
malicious code and put your computer at risk. To block
removable media, check the Enable removable media
blocking option. To allow access to certain types of
media, uncheck desired media volumes.
5.1.1 Import settings
Importing a configuration is very easy. From the main
menu, click Setup > Import and export settings ... and
then select the Import settings option. Enter the name
of the configuration file or click the Browse... button to
browse for the configuration file you wish to import.
5.1.2 Export settings
The steps to export a configuration are very similar.
From the main menu, click Setup > Import and export
settings ... Select the Export settings option and enter
the name of the configuration file. Use the browser to
select a location on your computer to save the
configuration file.
5.2 Proxy server setup
Proxy server settings can be configured under
Miscellaneous > Proxy Server. Specifying the proxy
server at this level defines global proxy server settings
for all of ESET Cybersecurity. Parameters here will be
used by all modules requiring connection to the
Internet.
To specify proxy server settings for this level, select the
Use proxy server check box and then enter the address
of the proxy server into the Proxy Server field, along
with the port number of the proxy server.
If communication with the proxy server requires
20
Page 21

6. Glossary
6.1 Types of infiltrations
An Infiltration is a piece of malicious software trying to
enter and/or damage a user’s computer.
6.1.1 Viruses
A computer virus is an infiltration that corrupts existing
files on your computer. Viruses are named after
biological viruses, because they use similar techniques to
spread from one computer to another.
than other types of malware.
A worm activated in a system can cause a number of
inconveniences: It can delete files, degrade system
performance, or even deactivate programs. The nature
of a computer worm qualifies it as a “means of transport“
for other types of infiltrations.
If your computer is infected with a worm, we
recommend you delete the infected files because they
likely contain malicious code.
Examples of well-known worms are: Lovsan/Blaster,
Stration/Warezov, Bagle and Netsky.
Computer viruses mainly attack executable files, scripts
and documents. To replicate, a virus attaches its “body“
to the end of a target file. In short, this is how a
computer virus works: after execution of the infected
file, the virus activates itself (before the original
application) and performs its predefined task. Only after
that is the original application allowed to run. A virus
cannot infect a computer unless a user, either
accidentally or deliberately, runs or opens the malicious
program.
Computer viruses can range in purpose and severity.
Some of them are extremely dangerous because of their
ability to purposely delete files from a hard drive. On the
other hand, some viruses do not cause any damage –
they only serve to annoy the user and demonstrate the
technical skills of their authors.
It is important to note that viruses (when compared to
trojans or spyware) are increasingly rare because they
are not commercially enticing for malicious software
authors. Additionally, the term “virus” is often used
incorrectly to cover all types of infiltrations. This usage is
gradually being overcome and replaced by the new,
more accurate term “malware” (malicious software).
If your computer is infected with a virus, it is necessary
to restore infected files to their original state – i.e., to
clean them by using an antivirus program.
Examples of viruses are: OneHalf, Tenga and Yankee
Doodle.
6.1.2 Worms
A computer worm is a program containing malicious
code that attacks host computers and spreads via a
network. The basic difference between a virus and a
worm is that worms have the ability to replicate and
travel by themselves – they are not dependent on host
files (or boot sectors). Worms spread through email
addresses in your contact list or exploit security
vulnerabilities in network applications.
Worms are therefore much more viable than computer
viruses. Due to the wide availability of the Internet, they
can spread across the globe within hours of their release
– in some cases, even in minutes. This ability to replicate
independently and rapidly makes them more dangerous
6.1.3 Trojan horses
Historically, computer trojan horses have been defined
as a class of infiltrations which attempt to present
themselves as useful programs, tricking users into
letting them run. Today, there is no longer a need for
trojan horses to disguise themselves. Their sole purpose
is to infiltrate as easily as possible and accomplish their
malicious goals. “Trojan horse” has become a very
general term describing any infiltration not falling under
any specific class of infiltration.
Since this is a very broad category, it is often divided into
many subcategories:
Downloader – A malicious program with the ability to
download other infiltrations from the Internet.
Dropper – A type of trojan horse designed to drop
other types of malware onto compromised
computers.
Backdoor – An application which communicates with
remote attackers, allowing them to gain access to a
system and to take control of it.
Keylogger – (keystroke logger) – A program which
records each keystroke that a user types and sends
the information to remote attackers.
Dialer – Dialers are programs designed to connect to
premium-rate numbers. It is almost impossible for a
user to notice that a new connection was created.
Dialers can only cause damage to users with dial-up
modems, which are no longer regularly used.
Trojan horses usually take the form of executable files.
If a file on your computer is detected as a trojan horse,
we recommend deleting it, since it most likely contains
malicious code.
Examples of well-known trojans are: NetBus,
Trojandownloader.Small.ZL, Slapper.
6.1.4 Adware
Adware is a shortened term for advertising-supported
software. Programs displaying advertising material fall
under this category. Adware applications often
automatically open a new pop-up window containing
advertisements in an Internet browser, or change the
browser’s home page. Adware is frequently bundled
with freeware programs, allowing creators of freeware
programs to cover development costs of their (usually
useful) applications.
21
Page 22

Adware itself is not dangerous – users may only be
bothered by the advertisements. The danger lies in the
fact that adware may also perform tracking functions (as
spyware does).
“Potentially unsafe applications” is the classification used
for commercial, legitimate software. This classification
includes programs such as remote access tools,
password-cracking applications, and keyloggers (a
program that records each keystroke a user types).
If you decide to use a freeware product, please pay
particular attention to the installation program. The
installer will most likely notify you of the installation of
an extra adware program. Often you will be allowed to
cancel it and install the program without adware.
Some programs will not install without adware, or their
functionality will be limited. This means that adware may
often access the system in a “legal” way, because users
have agreed to it. In this case, it is better to be safe than
sorry. If there is a file detected as adware on your
computer, it is advisable to delete it, since there is a high
probability that it contains malicious code.
6.1.5 Spyware
This category covers all applications which send private
information without user consent/awareness. Spyware
uses tracking functions to send various statistical data
such as a list of visited websites, email addresses from
the user‘s contact list, or a list of recorded keystrokes.
The authors of spyware claim that these techniques aim
to find out more about users’ needs and interests and
allow better-targeted advertisement. The problem is
that there is no clear distinction between useful and
malicious applications and no one can be sure that the
retrieved information will not be misused. The data
obtained by spyware applications may contain security
codes, PINs, bank account numbers, etc. Spyware is
often bundled with free versions of a program by its
author in order to generate revenue or to offer an
incentive for purchasing the software. Often, users are
informed of the presence of spyware during a program‘s
installation to give them an incentive to upgrade to a
paid version without it.
If you find that there is a potentially unsafe application
present and running on your computer (and you did not
install it), please consult your network administrator or
remove the application.
6.1.7 Potentially unwanted applications
Potentially unwanted applications are not necessarily
intended to be malicious, but may affect the
performance of your computer in a negative way. Such
applications usually require consent for installation. If
they are present on your computer, your system
behaves differently (compared to the way it behaved
before their installation). The most significant changes
are:
new windows you haven’t seen previously are opened
activation and running of hidden processes
increased usage of system resources
changes in search results
application communicates with remote servers.
Examples of well-known freeware products which come
bundled with spyware are client applications of P2P
(peer-to-peer) networks. Spyfalcon or Spy Sheriff (and
many more) belong to a specific spyware subcategory –
they appear to be antispyware programs, but in fact
they are spyware programs themselves.
If a file is detected as spyware on your computer, we
recommend deleting it, since there is a high probability
that it contains malicious code.
6.1.6 Potentially unsafe applications
There are many legitimate programs whose function is
to simplify the administration of networked computers.
However, in the wrong hands they may be misused for
malicious purposes. ESET Cybersecurity provides the
option to detect such threats.
22
 Loading...