

Page 1

CAN-CBM-DP
y
PROFIBUS-DP / CAN-Gatewa
Software Manual
to Product: C.2844.xx
CAN-CBM-DP Software Manual Rev. 2.0
esd electronic system design gmbh
Vahrenwalder Str. 207 • 30165 Hannover • Germany
www.esd-electronics.com • Fax: 0511/37 29 8-68
Phone: 0511/37 29 80 • International: +49-5 11-37 29 80
Page 2

N O T E
The information in this document has been carefully checked and is believed to be entirely reliable. esd
makes no warranty of any kind with regard to the material in this document, and assumes no
responsibility for any errors that may appear in this document. esd reserves the right to make changes
without notice to this, or any of it s product s, to improve reliability, performance or design.
esd assumes no responsibility for the use of any circuitry other than circuitry which is part of a product
of esd gmbh.
esd does not convey to the purchaser of the product described herein any license under the patent rights
of esd gmbh nor the rights of others.
esd electronic system design gmbh
Vahrenwalder Str. 207
30165 Hannover
Germany
Phone: +49-511-372 98-0
Fax: +49-511-372 98-68
E-mail: [email protected]
Internet: www.esd-electronics.com
USA / Canada:
esd electronics Inc.
525 Bernardston Road
Suite 1
Greenfield, MA 01301
USA
Phone: +1-800-732-8006
Fax: +1-800-732-8093
E-mail: [email protected]
Internet: www.esd-electronics.us
CAN-CBM-DP Software Manual Rev. 2.0
Page 3
Manual file:
I:\texte\Doku\MANUALS\CAN\CBM\DP\Englisch\DP_Software\DPCAN20S.en9
Date of print:
Manual order No.:
Software order No.:
Described software version:
15.12.2006
C.2844.21
CAN 2.0A: C.2844.02/03 CAN 2.0A/B: C.2844.05
Command-File: cbmdp18
DP/CANopen: V. 1.07
Command-File: cbmdpb01
DP/CANopen: V. 1.11
Changes in the chapters
The changes in the user’s manual listed below affect changes in the firmware as well as changes in the
description of the facts only.
Manual Rev. Chapter Changes versus previous version
5 Chapter restructured, notes inserted
1.9
7 Complete chapter restructured
7.1 Chapter: “Editing the GSD-File with a Text Editor” inserted
Technical details are subject to change without notice.
CAN-CBM-DP Software Manual Rev. 2.0
Page 4

This page is intentionally left blank.
CAN-CBM-DP Software Manual Rev. 2.0
Page 5

Contents
Page
1. Overview
1.1 About this Manual ....................................................5
1.2 Introduction into Functionality of the Firmware .............................. 5
1.3 Configuration via PROFIBUS-DP ........................................ 5
1.4 The Diagnose and Configuration Tool CICT ................................6
1.5 More addressable Identifiers via Page Mode................................. 6
2. Functionality of the Local Firmware
2.1 PROFIBUS-Slave Address.............................................. 7
2.2 User Data........................................................... 8
2.3 Watchdog (Reaction Control) ........................................... 8
2.4 Diagnose ........................................................... 8
2.5 Parameter Telegram (CAN Bit Rate) ...................................... 8
2.6 Global-Control Services (FREEZE, SYNC, UNSYNC) ........................8
2.7 PROFIBUS-DP Profiles................................................ 8
2.8 More Addressable CAN Identifiers in Page Mode.............................9
3. Implementing and Diagnose
3.1 Prerequisites for Implementation ........................................ 10
3.2 Implementation ..................................................... 10
3.3 Diagnose via LED Display ............................................. 12
3.4 Slave Diagnose...................................................... 13
................................................................. 5
................................................. 10
3.2.1 Strategy .................................................. 10
3.2.2 Start-Up .................................................. 11
3.2.3 Data Transfer .............................................. 11
3.4.1 Diagnose Bytes 0...5 ......................................... 13
3.4.1.1 Station Status 1....................................... 14
3.4.1.2 Station Status 2....................................... 15
3.4.1.3 Station Status 3....................................... 16
3.4.1.4 Diagnose Byte 3: Master-PROFIBUS Address ............... 16
3.4.1.5 Diagnose Bytes 4 and 5: Manufacturer Identification........... 16
3.4.2 External (Module-Specific) Diagnose Bytes........................ 17
........................................... 7
4. GSD File
5. Configuration via SIMATIC Manager
CAN-CBM-DP
................................................................. 18
5.1 Course of Configuration .............................................. 21
5.1.1 Set PROFIBUS address ...................................... 22
5.1.2 Parameter Telegram ......................................... 23
CAN-Bitrate ............................................... 24
Communication Window...................................... 24
RTR-Frames ............................................... 24
CANopen-Slave ............................................ 24
CANopen-Master ........................................... 24
Start-Frame................................................ 24
Page-Mode ................................................ 24
Module-ID:................................................ 25
Software Manual Rev. 2.0 1
......................................... 21
Page 6

Contents
5.2 Description of Input Window ‘Properties - DP Slave’ ........................ 29
5.3 The Communication Window........................................... 31
Page
Wakeup Time .............................................. 25
SYNC Time:............................................... 26
5.1.3 Assigning the Slots of the DP Slave.............................. 27
5.1.4 Configuration of Slots ........................................ 28
5.1.5 Save Settings to Hard Disk .................................... 28
5.3.1 Introduction ............................................... 31
5.3.2 Configuring the Communication Window ......................... 32
5.3.3 Format of Communication Window.............................. 33
5.3.3.1 Write Bytes of the Communication Window ................. 33
5.3.3.2 Read Bytes of the Communication Window.................. 34
5.3.4 Examples on the Communication Window......................... 38
5.3.4.1 Transmitting data ..................................... 38
5.3.4.2 Receiving Data .......................................40
6. Page Mode
6.1 Properties.......................................................... 43
6.2 Activation ......................................................... 43
6.3 Communication Window in Page Mode ................................... 43
6.4 Mode of Operation................................................... 44
6.5 Using the Page Mode with FBs and DBs .................................. 54
6.6 Methodology .......................................................63
............................................................... 43
6.4.1 Overview ................................................. 44
6.4.2 Definition of PLC-Addresses................................... 45
6.4.3 Page Structure ............................................. 48
6.4.4 Setup via Page 0 and 1 ....................................... 49
6.4.5 Tx-Configuration via Pages 51...150 ............................. 50
6.4.6 Rx-Configuration via Pages 151...250 ............................51
6.4.7 Data Exchange via Pages 251...n ................................ 52
6.5.1 Function Block FB 2: Configuration and Data Exchange .............54
FREIGABE ...............................................55
WRITE_ADDRESS ......................................... 55
WRITE_CONFIG_DB .......................................55
READ_ADDRESS .......................................... 56
READ_CONFIG_DB ........................................ 57
WRITE_DB ...............................................59
READ_DB ................................................ 61
7. Configuration via Tools of other Manufacturers
7.1 Editing the GSD-File with a Text Editor................................... 64
7.2 Parameter Display and Configuration with the Tool CICT ..................... 67
7.2.1 Display and Configuration..................................... 67
7.2.2 Hardware Selection .......................................... 68
7.2.3 Online / Offline Configuration ..................................69
7.2.4 Configuration of the CAN-CBM-DP Module ...................... 70
7.2.4.1 Properties in the Data Mapping Dialog Box.................. 71
7.2.4.2 Display and Edit User Parameter Properties.................. 74
................................. 64
CAN-CBM-DP
Software Manual Rev. 2.02
Page 7

Contents
Page
Meaning of User Parameters ............................. 74
Editing User Parameter Properties......................... 77
Deleting all User Parameter Properties...................... 78
Displaying Information about Wrong User Parameters.......... 78
7.2.4.3 Data-Mapping Dialog Box in Page Mode ................... 79
7.2.5 Configuration Example ....................................... 80
7.2.6 Managing the Configuration Files ............................... 81
7.2.7 Diagnose .................................................. 83
7.2.7.1 Search Modules....................................... 83
7.2.7.2 Look CANOPEN Modules .............................. 84
7.2.7.3 Config Modules.......................................85
7.2.8 Maintenance ............................................... 87
7.2.8.1 Memory ............................................ 87
8. Examples
8.1 Application Example with Page Mode .................................... 89
9. Important CANopen Messages
................................................................ 89
............................................. 101
CAN-CBM-DP
Software Manual Rev. 2.0 3
Page 8

This page is intentionally left blank.
CAN-CBM-DP Software Manual Rev. 2.04
Page 9

Overview
1. Overview
1.1 About this Manual
This manual describes the local firmware of the CAN-CBM-DP module. The local firmware controls
the data exchange between PROFIBUS-DP (abbreviated to PROFIBUS below) and CAN.
Layer 2 Implementation
The manual describes the Layer 2 implementation and the implemented CANopen functions.
Furthermore, the Windows configuration tool CICT will be described. By means of CICT parameters
of the module can be displayed via the serial interface. A limited setting by means of CICT is possible,
as well.
Page Mode
Furthermore, the manual describes the Page Mode which was developed to allow more than 48 CAN
identifiers to be controlled by one gateway. For a general understanding fundamental functions of the
Page Mode will be described first, followed by descriptions of the function blocks (FBs) and data
blocks (DBs), which are used to realize the Page Mode.
11-Bit and 29-Bit Identifier
The module is available with two firmware versions. The version with the order-no. C.2844.03 supports
only 11-bit CAN identifier and the version with the order-no. C.2844.05 supports 11-bit and 29-bit
CAN identifier.
1.2 Introduction into Functionality of the Firmware
The gateway simulates a slave device with a defined number of input and output bytes to the
PROFIBUS. After the gateway has been configured CAN devices such as PROFIBUS slaves can be
operated.
The PROFIBUS output bytes are transmitted to the CAN-bus. One to eight output bytes are assigned
to an Tx-identifier. Rx-identifiers are assigned to the input bytes on CAN side. Received CAN data is
treated as input data by the PROFIBUS.
The PROFIBUS station address is set directly at the CAN-CBM-DP module by means of coding
switches.
1.3 Configuration via PROFIBUS-DP
The CAN-CBM-DP module is configured via the PROFIBUS. The Siemens SIMATIC Manager for
S7, for example, can be used as a configuration tool. Here, the gateway is assigned with logical modules
which are assigned with further parameters such as the PLC address, data direction, data length and
CAN identifier.
CAN-CBM-DP Software Manual Rev. 2.0 5
Page 10
Overview
1.4 The Diagnose and Configuration Tool
The tool CICT offers an operating surface designed for the CAN-CBM-DP for the display of parameters
and configuration of the module. Since the module is mainly to be configured via the PROFIBUS, the
tool is mainly used for the display of transmitted parameters. Only a limited number of parameters can
be modified.
CICT
1.5 More addressable Identifiers via Page Mode
Page-Mode offers the possibility t o address more CAN-Identifiers than a PROFIBUS-Telegramm can
contain (thus more than 48). The number of t he identifiers possible is only limited by the available
memory capacity of the PLC and the CAN-Gateway.
Note: Page Mode can only be used, if the Siemens SIMATIC Manager for S7 is used as
configuration-tool!
CAN-CBM-DP Software Manual Rev. 2.06
Page 11

2. Functionality of the Local Firmware
The following figure represents the functionality of the firmware.
CANProfibus
Slave
Address
output
xyz
Profibus CAN
(coding
switch)
input
Byte-no.Direction Identifier
0 Tx-Id_a
Tx-Id_a
1
2
Tx-Id_a
3
Tx-Id_a
Tx-Id_a
4
Tx-Id_a
5
n
Tx-Id_k
n+1
Tx-Id_k
0
Rx-Id_b
1
Rx-Id_b
2
Rx-Id_b
3
Rx-Id_b
Functionality of the Local Firmware
m
Rx-Id_l
m+1
Rx-Id_l
Fig. 2.1.1: Overview of functions of the CAN-CBM-DP module
2.1 PROFIBUS-Slave Address
The CAN-CBM-DP module simulates a slave module on the PROFIBUS side. The slave address is set
by means of coding switches at the module. When switching on the module the hexadecimal
PROFIBUS address set is requested. The settings have to be changed before switching on the module,
because changes are ineffective during operation.
The address range which can be set is hexadecimal 03 to 7C or decimal 3 to 124. If an address is set
which is smaller than 3 (decimal) or smaller than 03 (HEX), address 3 is valid. If an address is set
which is larger than 7C (HEX) or larger than 124 (decimal), address 124 is valid.
The upper coding switch (SW211, HIGH) is used to set the MSBs, while the LSBs are set by means of
the lower coding switch (SW210, LOW).
The PROFIBUS-slave address can only be set via coding switches. It cannot be programmed by means
of a class 2 master via the command ‘Set_Slave_Address’.
CAN-CBM-DP Software Manual Rev. 2.0 7
Page 12

Functionality of the local Firmware
2.2 User Data
The CAN-CBM-DP-module simulates a total of up to 300 bytes for the input direction and the output
direction in the current software implementation. From these 300 bytes a maximum of 244 bytes can
be selected for one data direction, otherwise the division into input bytes and output bytes is entirely
up to the user. (Examples: 150 input bytes and 150 output bytes, or 244 input bytes and 56 output
bytes).
One to eight bytes (16 bytes when using the communication window, see page 31) each are assigned
to a Tx-or Rx-identifier. The same identifier cannot be used as Tx-and Rx-identifier. The automatic
response to remote requests (RTR) on the CAN bus cannot be used, therefore.
2.3 Watchdog (Reaction Control)
The firmware can be run with activated or deactivated reaction control. It is recommendable, though,
to run it with activated reaction control.
2.4 Diagnose
The status of the LED displays and the DP-slave diagnose can be used for diagnose. The module
supports five module-specific diagnose bytes. The diagnose will be described in more detail on page
12.
2.5 Parameter Telegram (CAN Bit Rate)
In addition to the seven standard bytes of the configuration, the CAN-CBM-DP module supports three
module-specific bytes. Here, the DP master can change the CAN bit rate. Setting the bit rate by means
of the parameter telegram is described on page 23.
2.6 Global-Control Services (FREEZE, SYNC, UNSYNC)
The Global-Control services have not yet been implemented.
2.7 PROFIBUS-DP Profiles
The PROFIBUS-DP profiles are not being supported yet.
CAN-CBM-DP Software Manual Rev. 2.08
Page 13

Functionality of the Local Firmware
2.8 More Addressable CAN Identifiers in Page Mode
The Page Mode offers the chance to address more CAN identifiers than can be stored in one
PROFIBUS telegram (that means more than 48). Because of the additional protocol expenditure the
handling of the Page Mode is slightly more complicated than the standard operation of the gateway. The
data exchange between PROFIBUS and CAN requires two cycles instead of one PLC cycle.
CAN-CBM-DP Software Manual Rev. 2.0 9
Page 14
Implementing and Diagnose
3. Implementing and Diagnose
3.1 Prerequisites for Implementation
This chapter describes the implementation of t he CAN-CBM module at a PROFIBUS which is
controlled by a Siemens SIMATIC-S7-300 or S7-400.
In order to be able to implement the module as will be described here, you need the configuratio n
program ‘SIMATIC-Manager’ with the tool ‘HW-configurator’.
Note for CANopen:
Configure the CAN-CBM-DP module absolutely first with the PLC via the SIMATICManager as described in chapter: “5. Configuration with the SIMATIC Manager”. Only
after carried out configuration the CAN-CBM-DP module can be identified as CANopen
slave!
3.2 Implementation
3.2.1 Strategy
Please make the following steps to implement the module:
1
2 Set the PROFIBUS address of the module by means of the coding switch.
3
4
5
Install and wire the CAN-CBM-DP module (power supply, CAN bus, see hardware
manual).
Connect the PROFIBUS connector to the PROFIBUS interface of the CAN-CBM-DP
module.
Configure the settings of the CAN-CBM-DP module in the PLC via the SIMATIC
manager
Switch on the power supply for the CAN-CBM-DP.
Now the module has to run.
The CAN-CBM-DP module is now automatically configured via the PLC.
Note: Take into account that in particular the CAN bit rate and the module ID (CANopen) must
be set via the PROFIBUS.
CAN-CBM-DP Software Manual Rev. 2.010
Page 15

Implementing and Diagnose
3.2.2 Start-Up
After switching on the power supply, the CAN-CBM module starts automatically. It does not have its
own mains switch.
During start-up LEDs 2 (PROFIBUS LED) and 3 (data exchange LED) flash. The PROFIBUS address
set via the coding switches is read in.
The module receives projection data from the DP master and evaluates the specifications in them. If
the projection complies with the structure, the CAN-CBM-DP module starts the data transfer.
3.2.3 Data Transfer
If the module is configured, the data transfer starts automatically after start-up: If the PLC master
changes transmission data of an identifier, the data is transmitted from the CAN-CBM-DP module to
the CAN bus. When the CAN-CBM-DP module receives data, it provides these to the PLC master.
The configuration is described in chapter 5 ‘Configuration via the SIMATIC-Manager’ from page 21.
CAN-CBM-DP Software Manual Rev. 2.0 11
Page 16
Implementing and Diagnose
g
y
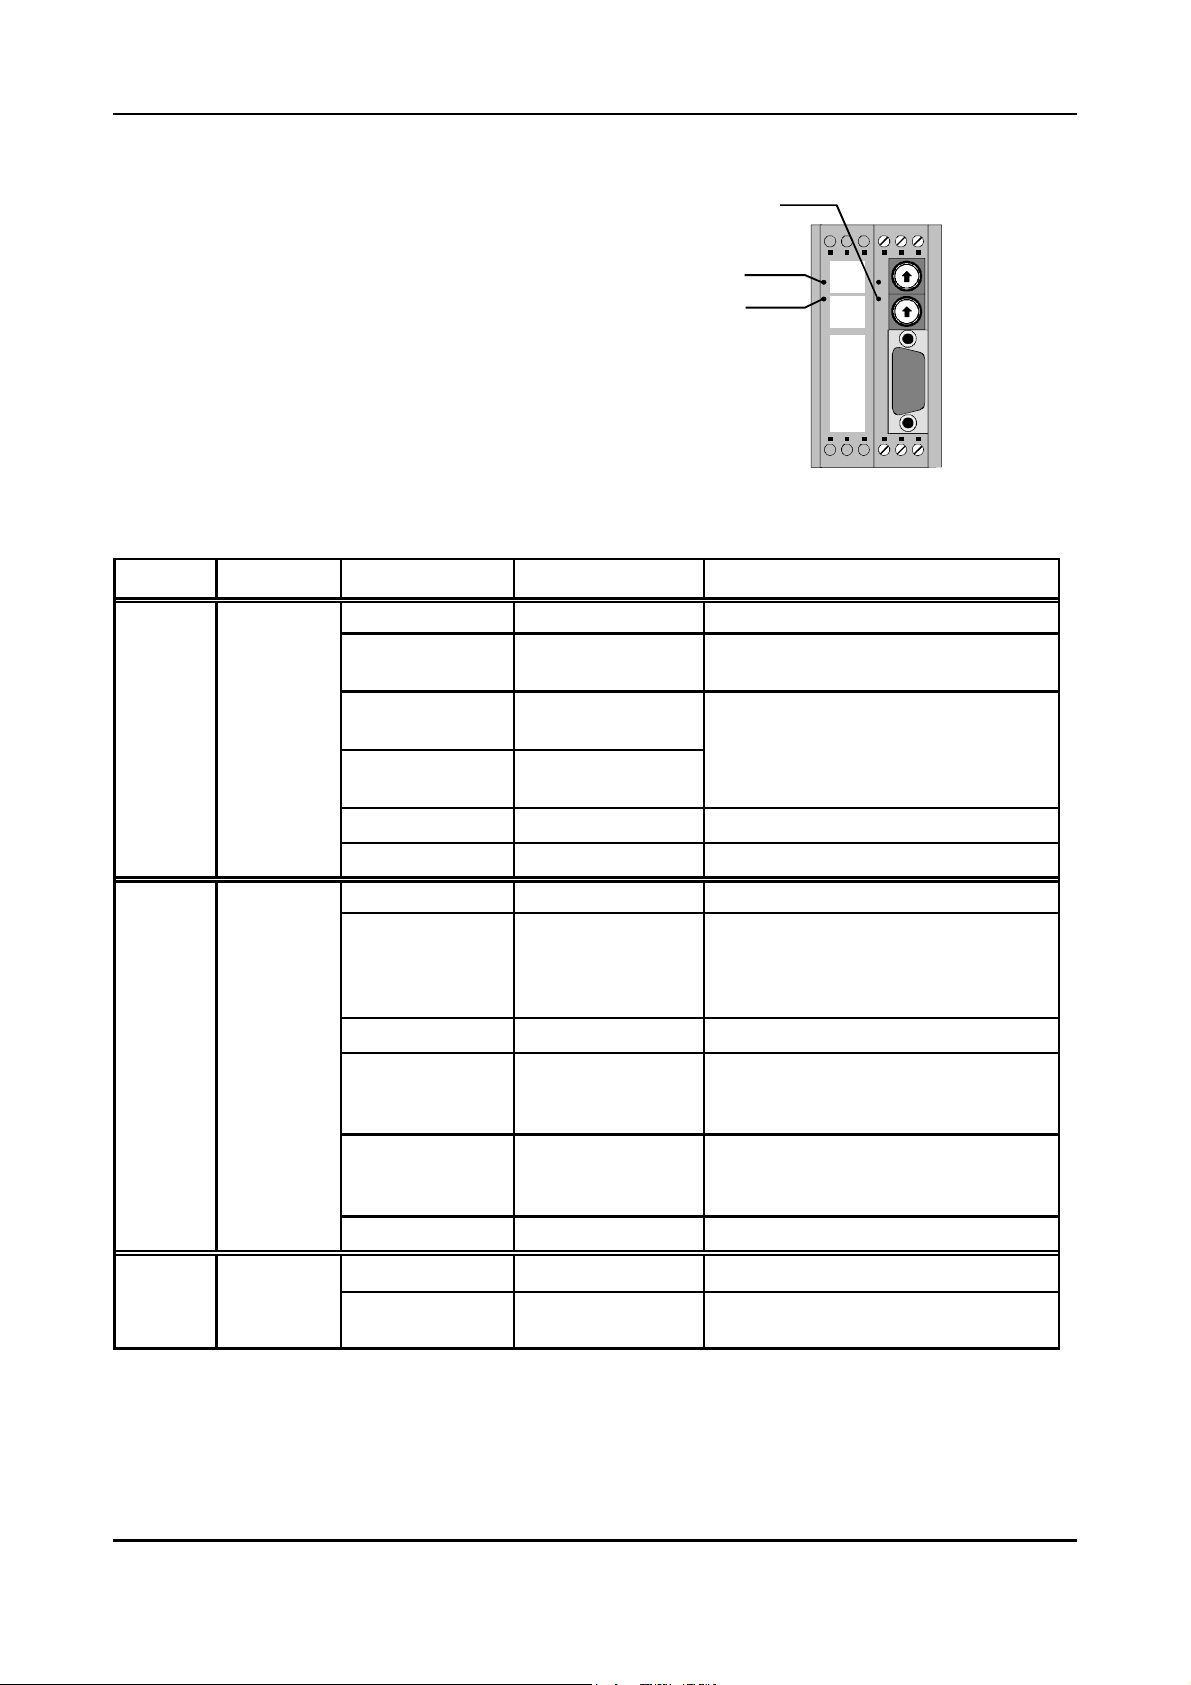
3.3 Diagnose via LED Displa
LED3
The function of LEDs has been defined by the firmware.
In normal operation the LEDs are never switched off, i.e.
they either flash or shine permanently.
LED 2
LED 1
The flash sequences which are listed in the following
table are repeated about every six seconds.
Fig. 3.3.1: Position of LEDs
LED Function Status Meaning Error handling
off no power supply check the 24 V power supply
PROFI
ADR.
HIGH
PROFI
ADR.
LOW
SERIAL
8
Coding Switch
SW211
0
8
Codin
Switch
SW210
0
LED 1
(red)
LED 2
(red)
CAN bus
status
modulePROFIBUS
status
1x short flash
only 29-bit version:
3x long flash
CAN error
(morse signal ‘E’)
CAN off
(morse signal ‘O’)
-
-
only 11-bit version:
5x long flash
CAN off
short-long-long CAN warning (‘W’) -
on CAN bus OK -
off no power supply check the 24 V power supply
the connection to the DP master has failed,
1x short flash looking for bit rate
check the PROFIBUS connection (fault in
wiring in PROFIBUS cable, short circuit,
terminating impedance in wrong position)?
2x short flashes bit rate is monitored check the PROFIBUS address specified
parameter telegram is faulty. Diagnose via
SIMATIC-Manager or system function
SFC13 (DPNRM_DG) (see chap. 3.4)
configuration telegram is faulty. Diagnose
via SIMATIC-Manager or system function
SFC13 (DPNRM_DG) (see chap. 3.4)
3x short flashes
4x short flashes
waiting for parameter
telegram
waiting for
configuration
telegram
on PROFIBUS OK -
LED 3
(red)
PROFIBUSdata
exchange
off no data exchange -
on
data exchange via
PROFIBUS
-
Table 3.3.1: LED status
CAN-CBM-DP Software Manual Rev. 2.012
Page 17
Implementing and Diagnose
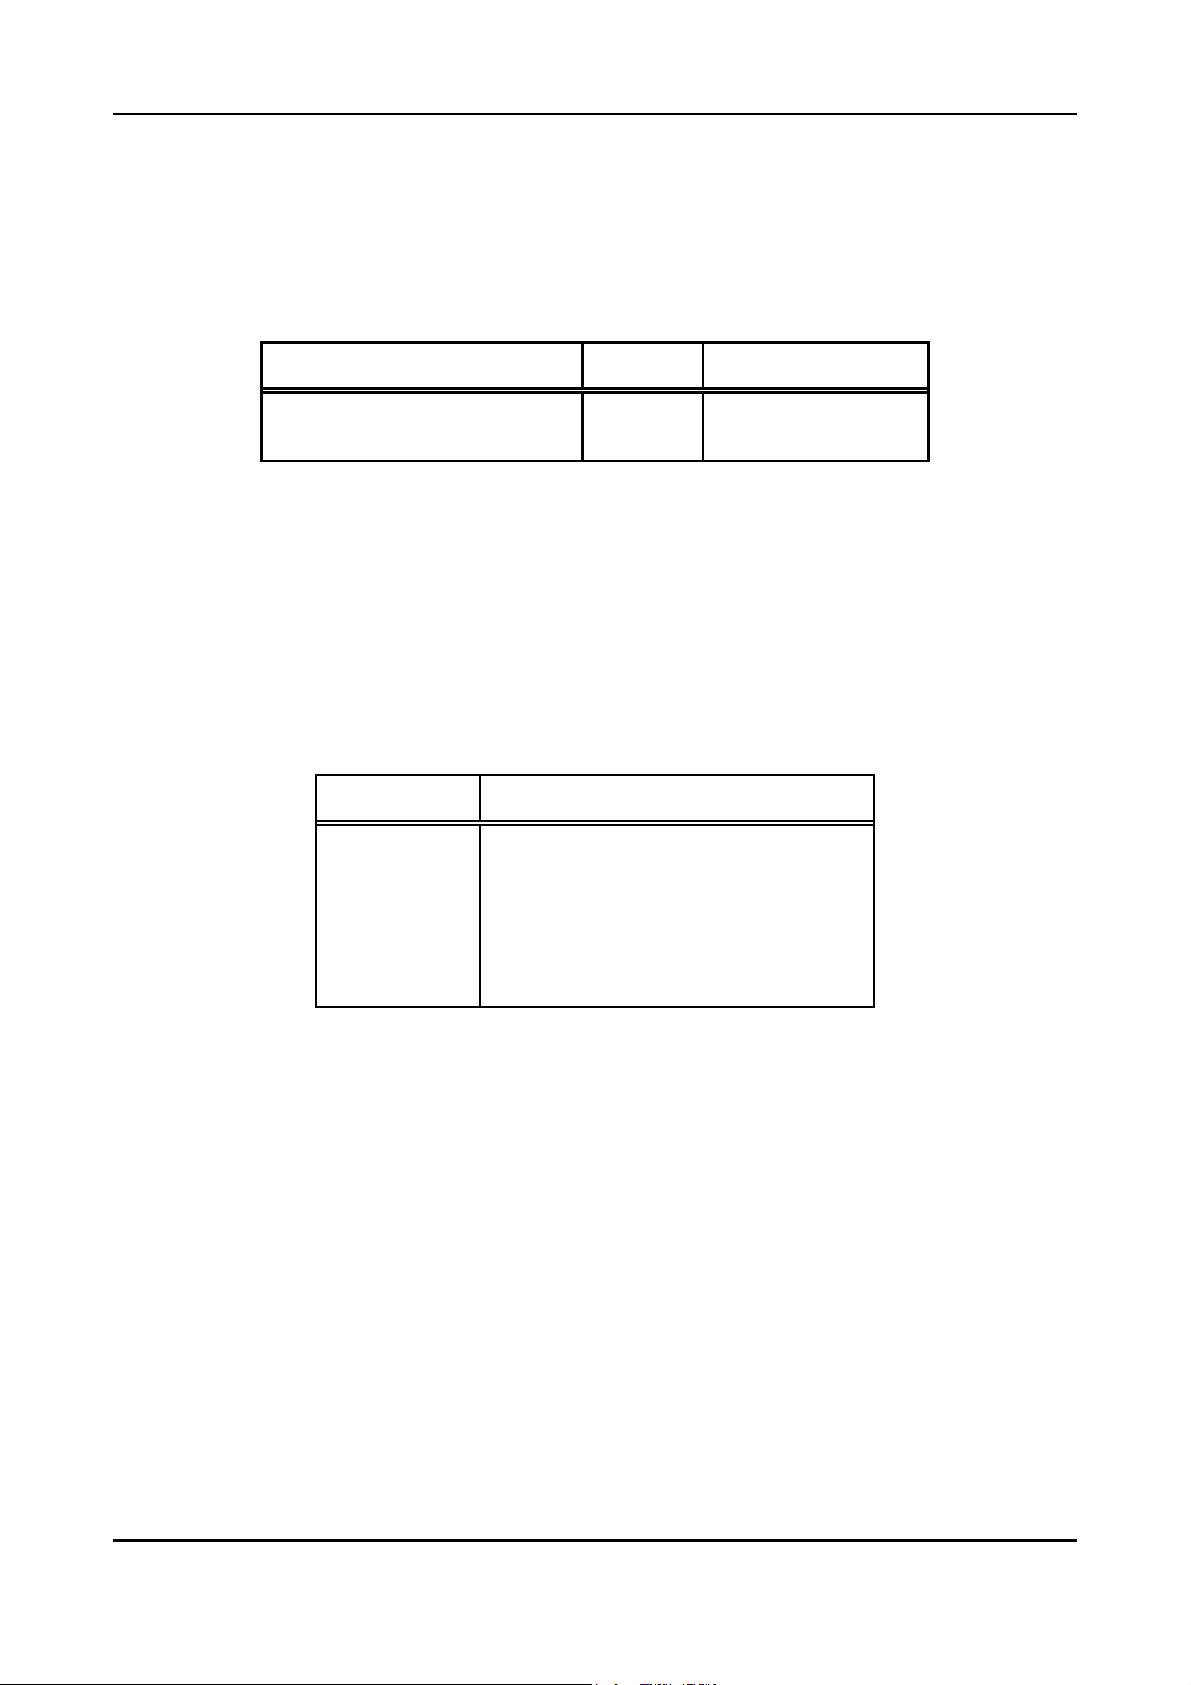
3.4 Slave Diagnose
In addition to the six diagnose bytes predefined in norm DIN EN 19245, part 3, the module supports
three further module-specific diagnose bytes.
The slave diagnose can be requested by the following function components:
Automation device family Number Name
SIMATIC with IM 308-C
SIMATIC S7/M7
Table 3.4.1: Function component for requesting the slave diagnose
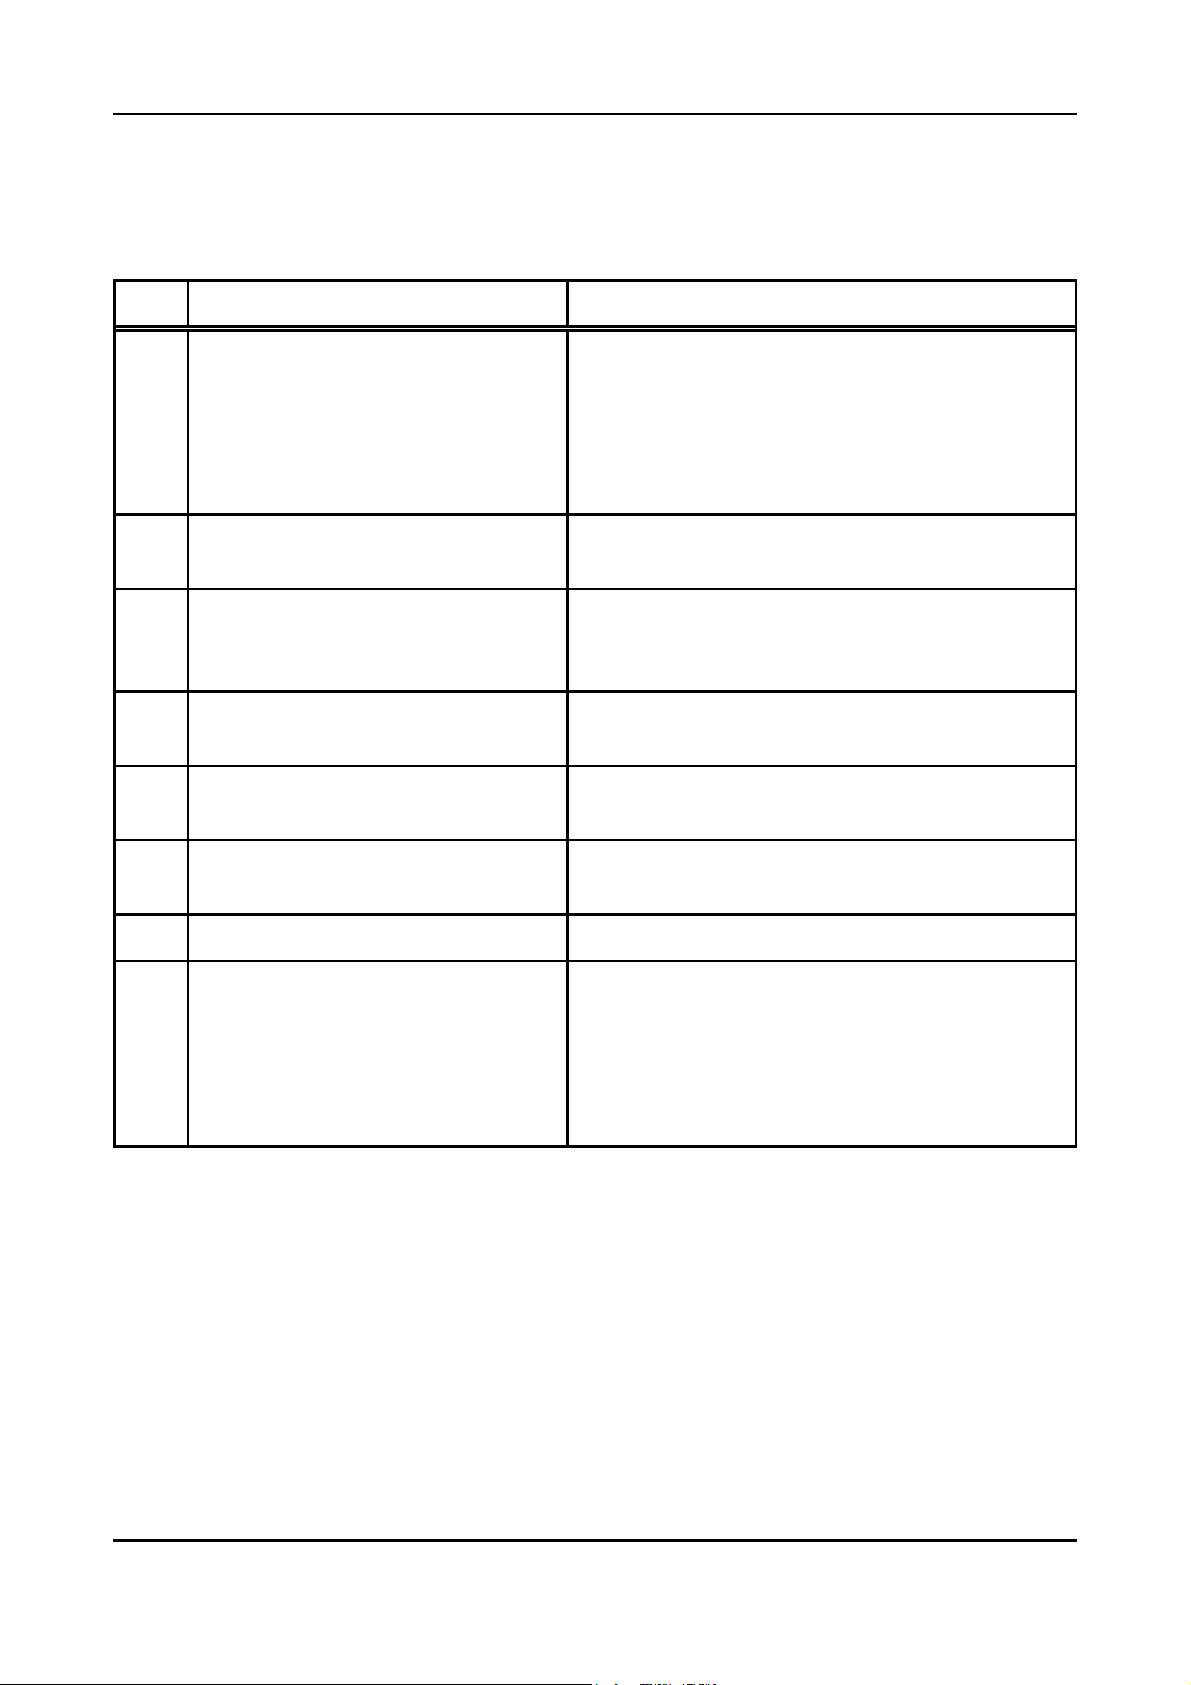
3.4.1 Diagnose Bytes 0...5
The assignment of these diagnose bytes has been predefined in norm DIN EN 19425, part 3. Below, the
status messages will be described in consideration of the CAN-CBM-DP module.
The following designations will be used for this:
Byte number Status-byte designation
0
1
2
3
4
5
station status 1
station status 2
station status 3
master-PROFIBUS address
manufacturer-identification high byte
manufacturer-identification low byte
FB 192
SFC 13
FB IM308C
SFC DPNRM_DG
Table 3.4.2: Diagnose bytes 0...5
CAN-CBM-DP Software Manual Rev. 2.0 13
Page 18
Implementing and Diagnose
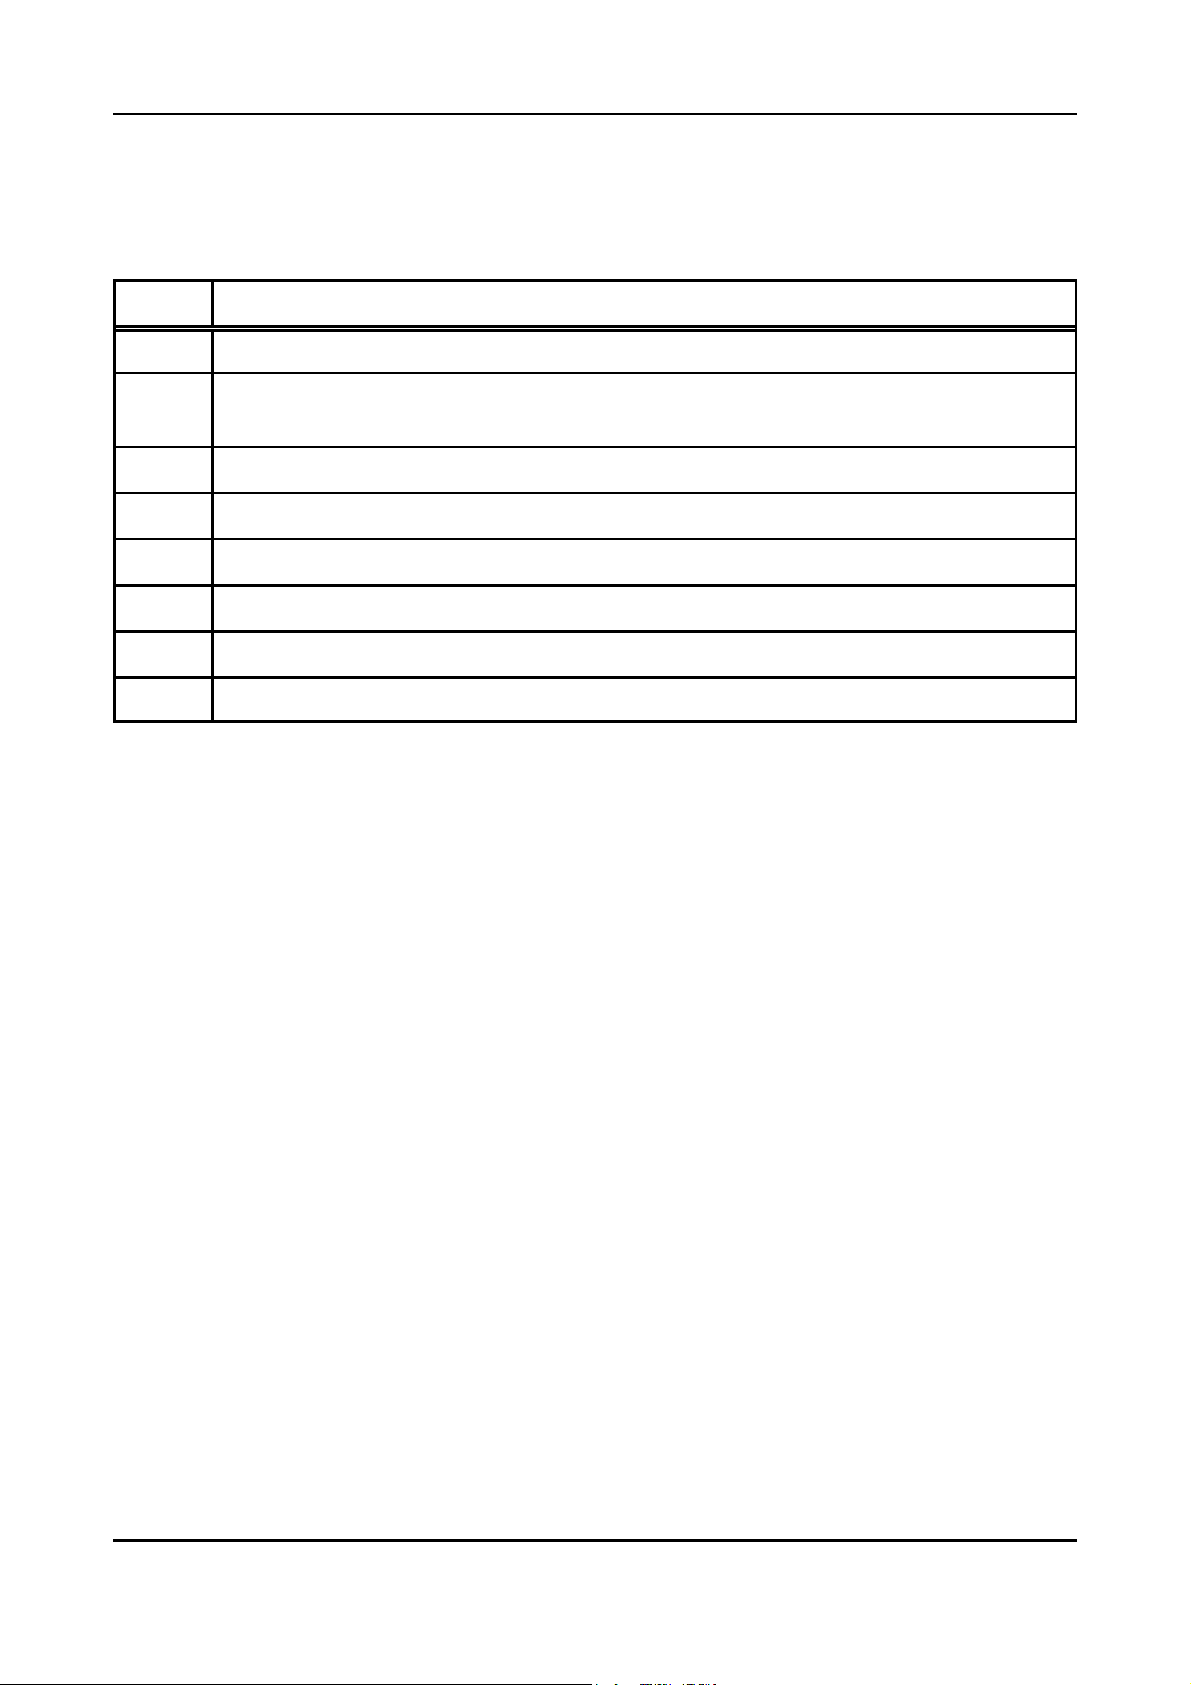
3.4.1.1 Station Status 1
Station status 1 contains error messages of the DP slave. If a bit is ‘0’, no error applies. A bit set to ‘1’
signalizes an error.
Bit Error message if bit = ‘1’ Error handling
- correct PROFIBUS address set at the CANCBM-DP?
DP slave cannot be addressed by the
0
master
- bus connector correctly wired?
- power supply available at CAN-CBM-DP?
- power off/power on executed at CAN-CBM-DP
in order to read in DP address?
DP slave is not yet ready for data
1
exchange
The configuration data transmitted
2
from DP master to DP slave do not
correspond to the DP slave structure.
The slave has got external diagnose
3
data.
The requested function is not being
4
supported by the DP slave.
DP master cannot interpret the
5
response of the DP slave.
6 Wrong setting. - evaluate diagnose bytes 9 and 10
DP slave has already been set by
7
another master.
- wait until the CAN-CBM-DP has completed
start up
- check whether the station type and the CANCBM-DP structure have been correctly entered
via the configuration tool
- request and evaluate external diagnose data
- check projecting
- check bus structure
- this bit is always ‘1’, if you, e.g., just access the
CAN-CBM-DP by means of a PG or another
DP master.
The PROFIBUS address of the setting master is
in the diagnose byte ‘Master-PROFIBUS
address’.
Table 3.4.3: Bits of station status 1
CAN-CBM-DP Software Manual Rev. 2.014
Page 19
Implementing and Diagnose
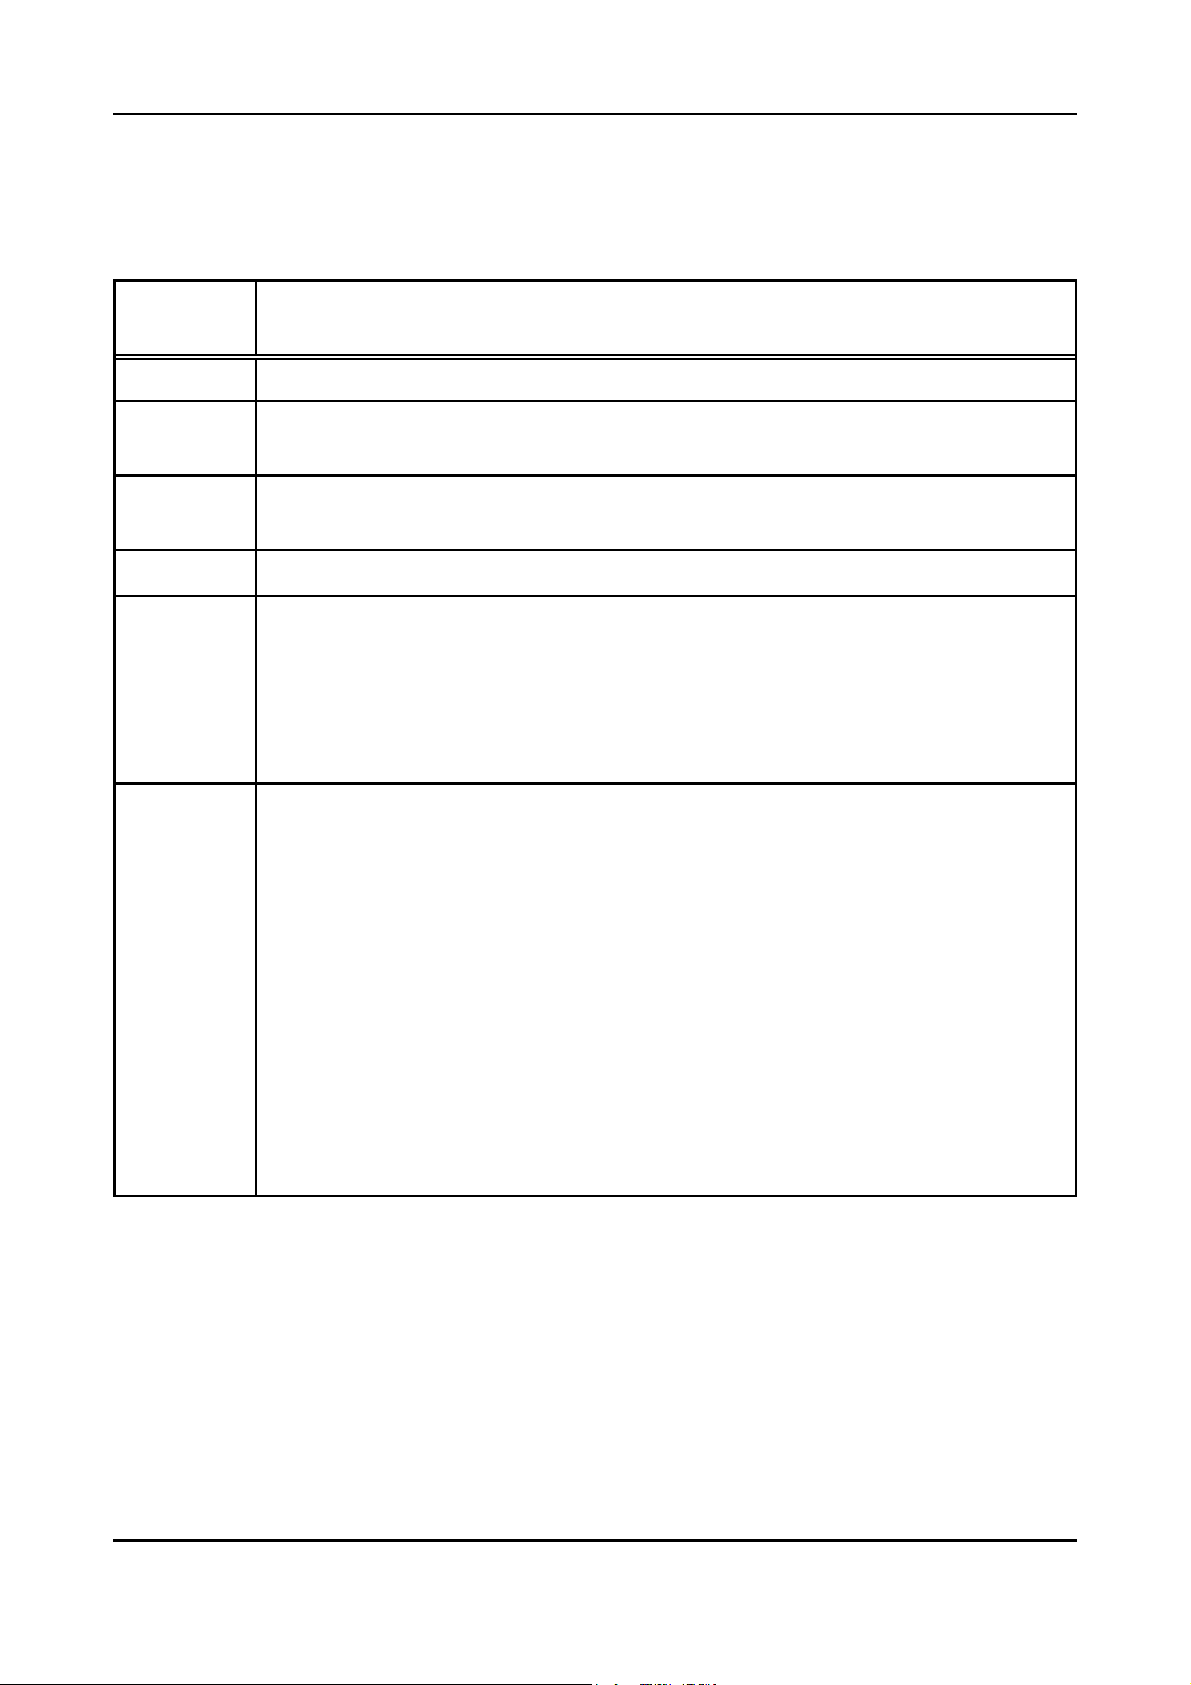
3.4.1.2 Station Status 2
Station status 2 contains status messages to the DP slave. If a bit is ‘1’, the according message is active.
A bit set to ‘0’ signalizes an inactive message.
Bit Error message if bit = ‘1’
0 DP slave has to be set again.
1
2 This bit is always ‘1’.
3 The response monitoring for the CAN-CBM-DP is activated.
4 DP slave has received freeze command.
5 DP slave has received SYNC command.
6 This bit is always ‘0’.
7 DP slave is deactivated.
A diagnose message applies. The DP slave cannot operate until the error has been
removed (static diagnose message).
Table 3.4.4: Bits of station status 2
CAN-CBM-DP Software Manual Rev. 2.0 15
Page 20

Implementing and Diagnose
3.4.1.3 Station Status 3
Station status 3 is reserved and without significance for the CAN-CBM-DP.
3.4.1.4 Diagnose Byte 3: Master-PROFIBUS Address
The PROFIBUS address of the master which was the last to set the DP slave and has got reading and
writing access to the DP slave is stored in this byte.
3.4.1.5 Diagnose Bytes 4 and 5: Manufacturer Identification
The manufacturer identification has been coded into two bytes. For the CAN-CBM-DP module the
designation 04A4 hex is returned.
CAN-CBM-DP Software Manual Rev. 2.016
Page 21
Implementing and Diagnose
3.4.2 External (Module-Specific) Diagnose Bytes
The CAN-CBM module supports diagnose bytes 6 to 10 for module-specific diagnose messages.
Diagnose
bytes
0...5 defined in the PROFIBUS specification (see previous chapter)
6
7
8 DP service (SAP) which led to error
9
length specification for module-specific diagnose information
(here always 5)
header byte: bits 0...5 contain the block length including header
(here always 4)
depending on status of byte 8:
byte 8 = 3D hex setting (SAP61) faulty, byte 9 contains the number of the faulty
setting byte
byte 8 = 3E hex configuration (SAP62) faulty, byte 9 contains the number of the
faulty PROFIBUS module (= address of the simulated PLC
module)
depending on status of byte 8:
byte 8 = 3D hex setting (SAP61) faulty, byte 10 shows the PROFIBUS master
with the correct values
Meaning
10
byte 8 = 3E hex configuration (SAP62) faulty
1 wrong I/O type: "out- input" or "blank")
correct: "input" or "output"
2 wrong unit, such as "words"
correct: unit = "byte"
3 wrong length
correct: length = 1-8 or 16
4 only one byte has been specified for identifier
5 format specification is missing
6 wrong identifier
Table 3.4.5: Module-specific status messages
CAN-CBM-DP Software Manual Rev. 2.0 17
Page 22

GSD File
4. GSD File
Below, the GSD file (Device Master Data) of the CAN-CBM-DP module has been printed. The
specification printed here are for orientation. Decisive is the data contained in the GSD file
CDPS04A4.GSD, included in the product package.
;======================================================================================================
; (c) esd electronic system design GmbH Hannover
;
; PROFIBUS-DP Geraetestammdatei
; Version: 1.06
;
; Autor: Olaf Kruse
; Erstellungsdatum: V1.0 30.04.1999 ok
; Aenderungen: V1.01 03.08.1999 ok baudrate 6 MBaud, MaxTsdr-times
; ...
; V1.06 10.04.2000 uh menu structure for parameter
;======================================================================================================
; Art des Parameters
; (M) Mandatory (zwingend notwendig)
; (O) Optional (zusõtzlich m÷glich)
; (D) Optional mit Default=0 falls nicht vorhanden
; (G) mindestens einer aus der Gruppe passend zur entsprechenden Baudrate
#PROFIBUS_DP
;--- Kapitel 2.3.2 Allgemeine DP-Schluesselwoerter --GSD_Revision = 1 ; (M ab GSD_Revision 1) (Unsigned8)
Vendor_Name = "esd" ; (M) Herstellername (Visible-String 32)
Model_Name = "CAN-CBM/DP" ; (M) Herstellerbezeichnung des DP-Geraetes (Visible-String 32)
Revision = "V1.0" ; (M) Ausgabestand des DP-Geraetes (Visible-String 32)
Revision_Number = 1 ; (M ab GSD_Revision 1) (Unsigned8 (1 bis 63)) (1234)
Ident_Number = 1188 ; (M) Gerõtetyp des DP-Gerõtes (Unsigned16)
Protocol_Ident = 0 ; (M) Protokollkennung des DP-Geraetes 0: Profibus-DP (Unsigned8)
Station_Type = 0 ; (M) DP-Geraetetyp 0: DP-Slave (Unsigned8)
FMS_supp = 0 ; (D) kein FMS/DP-Mischgeraet (Boolean)
Hardware_Release = "V1.0" ; (M) Hardware Ausgabestand des DP-Geraetes (Visible-String 32)
Software_Release = "V1.0" ; (M) Software Ausgabestand des DP-Geraetes (Visible-String 32)
9.6_supp = 1 ; (G) 9,6 kBaud wird unterstuetzt
19.2_supp = 1 ; (G) 19,2 kBaud wird unterstuetzt
;31.25_supp = 1 ; fuer Gateway CAN-CBM-DP nicht moeglich (1234)
45.45_supp = 1 ; (G ab GSD_Revision 2) 45,45 kBaud wird unterstuetzt
93.75_supp = 1 ; (G) 93,75 kBaud wird unterstuetzt
187.5_supp = 1 ; (G) 187,5 kBaud wird unterstuetzt
500_supp = 1 ; (G) 500 kBaud wird unterstuetzt
1.5M_supp = 1 ; (G) 1,5 MBaud wird unterstuetzt
3M_supp = 1 ; (G ab GSD_Revision 1) 3 MBaud wird unterstuetzt
6M_supp = 1 ; (G ab GSD_Revision 1) 6 MBaud wird unterstuetzt
12M_supp = 1 ; (G ab GSD_Revision 1) 12 MBaud wird unterstuetzt
MaxTsdr_9.6 = 60 ; (G)
MaxTsdr_19.2 = 60 ; (G)
;MaxTsdr_31.25 = 15 ; fuer Gateway CAN-CBM-DP nicht moeglich (1234)
MaxTsdr_45.45 = 60 ; (G ab GSD_Revision 2)
MaxTsdr_93.75 = 60 ; (G)
MaxTsdr_187.5 = 60 ; (G)
MaxTsdr_500 = 100 ; (G)
MaxTsdr_1.5M = 150 ; (G)
MaxTsdr_3M = 250 ; (G ab GSD_Revision 1)
MaxTsdr_6M = 450 ; (G ab GSD_Revision 1)
MaxTsdr_12M = 800 ; (G ab GSD_Revision 1)
Redundancy = 0 ; (D) keine redundante Uebertragungstechnik
Repeater_Ctrl_Sig = 0 ; (D) RTS-Signalpegel (CNTR-P) Pin 4 des 9pol. SUB-D
24V_Pins = 0 ; (D) Bedeutung der 24V Pins des 9pol. SUB-D (Pin 7 24V; Pin 2 GND)
; Implementation_Type = "Visible-String" ; (1234)
Bitmap_Device = "CDPS00_N" ; (O ab GSD_Revision 1)
Bitmap_Diag = "CDPS00_D" ; (O ab GSD_Revision 1)
Bitmap_SF = "CDPS00_S" ; (O ab GSD_Revision 1)
;--- Kapitel 2.3.4 DP-Slave-bezogene Schluesselwoerter --Freeze_Mode_supp = 0 ; (D) Der Freeze-Mode wird nicht unterstuetzt
Sync_Mode_supp = 0 ; (D) Der Sync-Mode wird nicht unterstuetzt
Auto_Baud_supp = 1 ; (D) Die Automatische Baudratenerkennung wird unterstuetzt
Set_Slave_Add_supp = 0 ; (D) Die Slave-Adresse kann vom Master nicht gesetzt werden
;User_Prm_Data_Len = 9 ; (D) Hoechstlaenge von User-Parameter-Daten
;User_Prm_Data=0x00,0x06,0x00,0x00,0x00,0x00,0xff,0xff,0xff ; (O) User-Parameter-Daten ( byte 7 - 15 )
Min_Slave_Intervall = 20 ; (M) Minimaler Abstand zwischen 2 DDLM_Data_Exchange-Aufrufen (xx * 100us)
Modular_Station = 1 ; (D) 0: Kompaktstation 1: Modulare Station
Max_Module = 244 ; (M falls modulare Station) Hoechstanzahl der Module einer Modularen
Max_Input_Len = 240 ; M falls modulare Station) Hoechstlaenge der Eingangsdaten einer
; 0: nicht vorhanden 1: RS 485 2: TTL
; 0: nicht angeschlossen 1: Input 2: Output
Station
Modularen Station
CAN-CBM-DP Software Manual Rev. 2.018
Page 23

GSD File
Max_Output_Len = 240 ; (M falls modulare Station) Hoechstlaenge der Ausgangsdaten einer
Max_Data_Len = 465 ; (O nur falls modulare Station) Groesste Summe der Ein- und
; --- (1234) --->
;PrmText = 1
;Text(0) = "STOPP"
;Text(1) = "START"
;PrmText = 2
;Text(0) = "Drehzahl 1"
;Text(1) = "Drehzahl 2"
;Text(2) = "Drehzahl 3"
;Text(3) = "Drehzahl 4"
;EndPrmText
; <--- (1234) --Unit_Diag_Bit(0000) = "Wert 0" ; (1234)
Unit_Diag_Bit(0001) = "Wert 1" ; (1234)
Unit_Diag_Bit(0002) = "Wert 2" ; (1234)
Unit_Diag_Bit(0003) = "Wert 3" ; (1234)
Unit_Diag_Bit(0004) = "Wert 4" ; (1234)
Unit_Diag_Bit(0005) = "Wert 5" ; (1234)
Unit_Diag_Bit(0006) = "Wert 6" ; (1234)
Unit_Diag_Bit(0007) = "Wert 7" ; (1234)
Unit_Diag_Bit(0008) = "Wert 8" ; (1234)
Unit_Diag_Bit(0009) = "Wert 9" ; (1234)
Unit_Diag_Bit(0010) = "Wert 10" ; (1234)
Unit_Diag_Bit(0011) = "Wert 11" ; (1234)
Unit_Diag_Bit(0012) = "Wert 12" ; (1234)
Unit_Diag_Bit(0013) = "Wert 13" ; (1234)
Unit_Diag_Bit(0014) = "Wert 14" ; (1234)
Unit_Diag_Bit(0015) = "Wert 15" ; (1234)
;Unit_Diag_Area = 0 - 5 ; (1234)
;Value(0) = "Fehlerfrei" ; (1234)
;Value(1) = "Fehler auf Eingang 0 - 23" ; (1234)
;Value(2) = "Fehler auf Ausgang 0 - 15" ; (1234)
;Value(3) = "24V ausgefallen" ; (1234)
;Unit_Diag_Area_End ; (1234)
Max_Diag_Data_Len = 16 ; max. 16 Byte Diagnosedaten
Modul_Offset = 0 ; (D ab GSD_Revision 1) erste Steckplatznummer
Max_User_Prm_Data_Len = 9
PrmText=1
Text(0)="1000 kbit/s"
Text(1)=" 666.6 kbit/s"
Text(2)=" 500 kbit/s"
Text(3)=" 333.3 kbit/s"
Text(4)=" 250 kbit/s"
Text(5)=" 166 kbit/s"
Text(6)=" 125 kbit/s"
Text(7)=" 100 kbit/s"
Text(8)=" 66.6 kbit/s"
Text(9)=" 50 kbit/s"
Text(10)=" 33.3 kbit/s"
Text(11)=" 20 kbit/s"
Text(12)=" 12.5 kbit/s"
Text(13)=" 10 kbit/s"
EndPrmText
PrmText=2
Text(0)="No"
Text(1)="Yes"
EndPrmText
PrmText=3
Text(0)="Yes"
Text(1)="No"
EndPrmText
ExtUserPrmData=1 "CAN-Bitrate"
Unsigned8 6 0-13
Prm_Text_Ref=1
EndExtUserPrmData
ExtUserPrmData=2 "Communication Window"
Bit(7) 0 0-1
Prm_Text_Ref=2
EndExtUserPrmData
ExtUserPrmData=3 "RTR-Frames"
Bit(4) 0 0-1
Prm_Text_Ref=3
EndExtUserPrmData
ExtUserPrmData=4 "CANopen-Slave"
Bit(3) 0 0-1
Prm_Text_Ref=2
EndExtUserPrmData
ExtUserPrmData=5 "CANopen-Master"
Bit(2) 0 0-1
Prm_Text_Ref=2
EndExtUserPrmData
ExtUserPrmData=6 "Start-Frame"
Bit(1) 0 0-1
Prm_Text_Ref=2
EndExtUserPrmData
ExtUserPrmData=7 "Page-Mode"
Bit(0) 0 0-1
Prm_Text_Ref=2
EndExtUserPrmData
Modularen Station
Ausgangsdaten einer Modularen Station in Bytes
CAN-CBM-DP Software Manual Rev. 2.0 19
Page 24

GSD File
Unsigned8 1 1-127
EndExtUserPrmData
ExtUserPrmData=9 "WakeUp Time (0=Off, 255=Default)"
Unsigned8 255 0-255
EndExtUserPrmData
ExtUserPrmData=10 "Sync Time (0=Off, 65535=Default)"
Unsigned16 65535 0-65535
EndExtUserPrmData
Ext_User_Prm_Data_Const(0)=0x00,0x06,0x00,0x00,0x00,0x00,0xff,0xff,0xff
Ext_User_Prm_Data_Ref(1)=1
Ext_User_Prm_Data_Ref(2)=2
Ext_User_Prm_Data_Ref(2)=3
Ext_User_Prm_Data_Ref(2)=4
Ext_User_Prm_Data_Ref(2)=5
Ext_User_Prm_Data_Ref(2)=6
Ext_User_Prm_Data_Ref(2)=7
Ext_User_Prm_Data_Ref(3)=8
Ext_User_Prm_Data_Ref(6)=9
Ext_User_Prm_Data_Ref(7)=10
Slave_Family = 9@CAN@V01
Periphery = "ET 200"
OrderNumber = "C.2844.03"
CAN-CBM-DP Software Manual Rev. 2.020
Page 25
Configuration via SIMATIC Manager
5. Configuration via SIMATIC Manager
5.1 Course of Configuration
The CAN-CBM-DP module is configured via the PROFIBUS or the serial interface by means of tool
CICT (limited configuration). The configuration via the PROFIBUS is of higher priority, i.e. the
PROFIBUS configuration overwrites the configuration made via the serial interface. It is not possible
to change parameters which have been set via the PROFIBUS by means of the serial interface.
Note: Without correct configuration via the SIMATIC manager the CAN-CBM-DP module and
the CAN participants connected do not operate together and operation of the CAN
participants connected can be disturbed.
In particular the CAN-Bitrate configured in the CAN-CBM-DP-module and the moduleID (at CANopen) must match the settings of the CAN participants connected!
If problems should occur, further information can be obtained with the diagnose as
described in the chapters “4.3 Diagnose via LED Display” and “4.4 Slave Diagnose”.
Please follow the steps below to configure the CAN-CBM-DP module:
1. Select CAN-CBM-DP
Select menu Hardware Catalogue and there Additional Field Devices and Other. There select GSD
CAN-CBM-DP.
2. Set PROFIBUS Address
Set the PROFIBUS address as described in chapter 5.1.1 on page 22.
3. Parameter Telegramm (set CAN bit rate, general configuration and CANopen module ID)
Configure the configuration settings by means of the parameter telegram as described in chapter
5.1.2 on page 23.
4. Assignment of the Slots of the DP-slaves
Assign the slots as described in chapter 5.1.3 on page 27.
5. Configuration of the Slots (SPS-Adresse)
Configure the slots as described in chapter 5.1.4 on page 28.
6. Save settings on hard disk
Save the settings as described in chapter 5.1.5 on page 28.
CAN-CBM-DP Software Manual Rev. 2.0 21
Page 26
Configuration via SIMATIC Manager
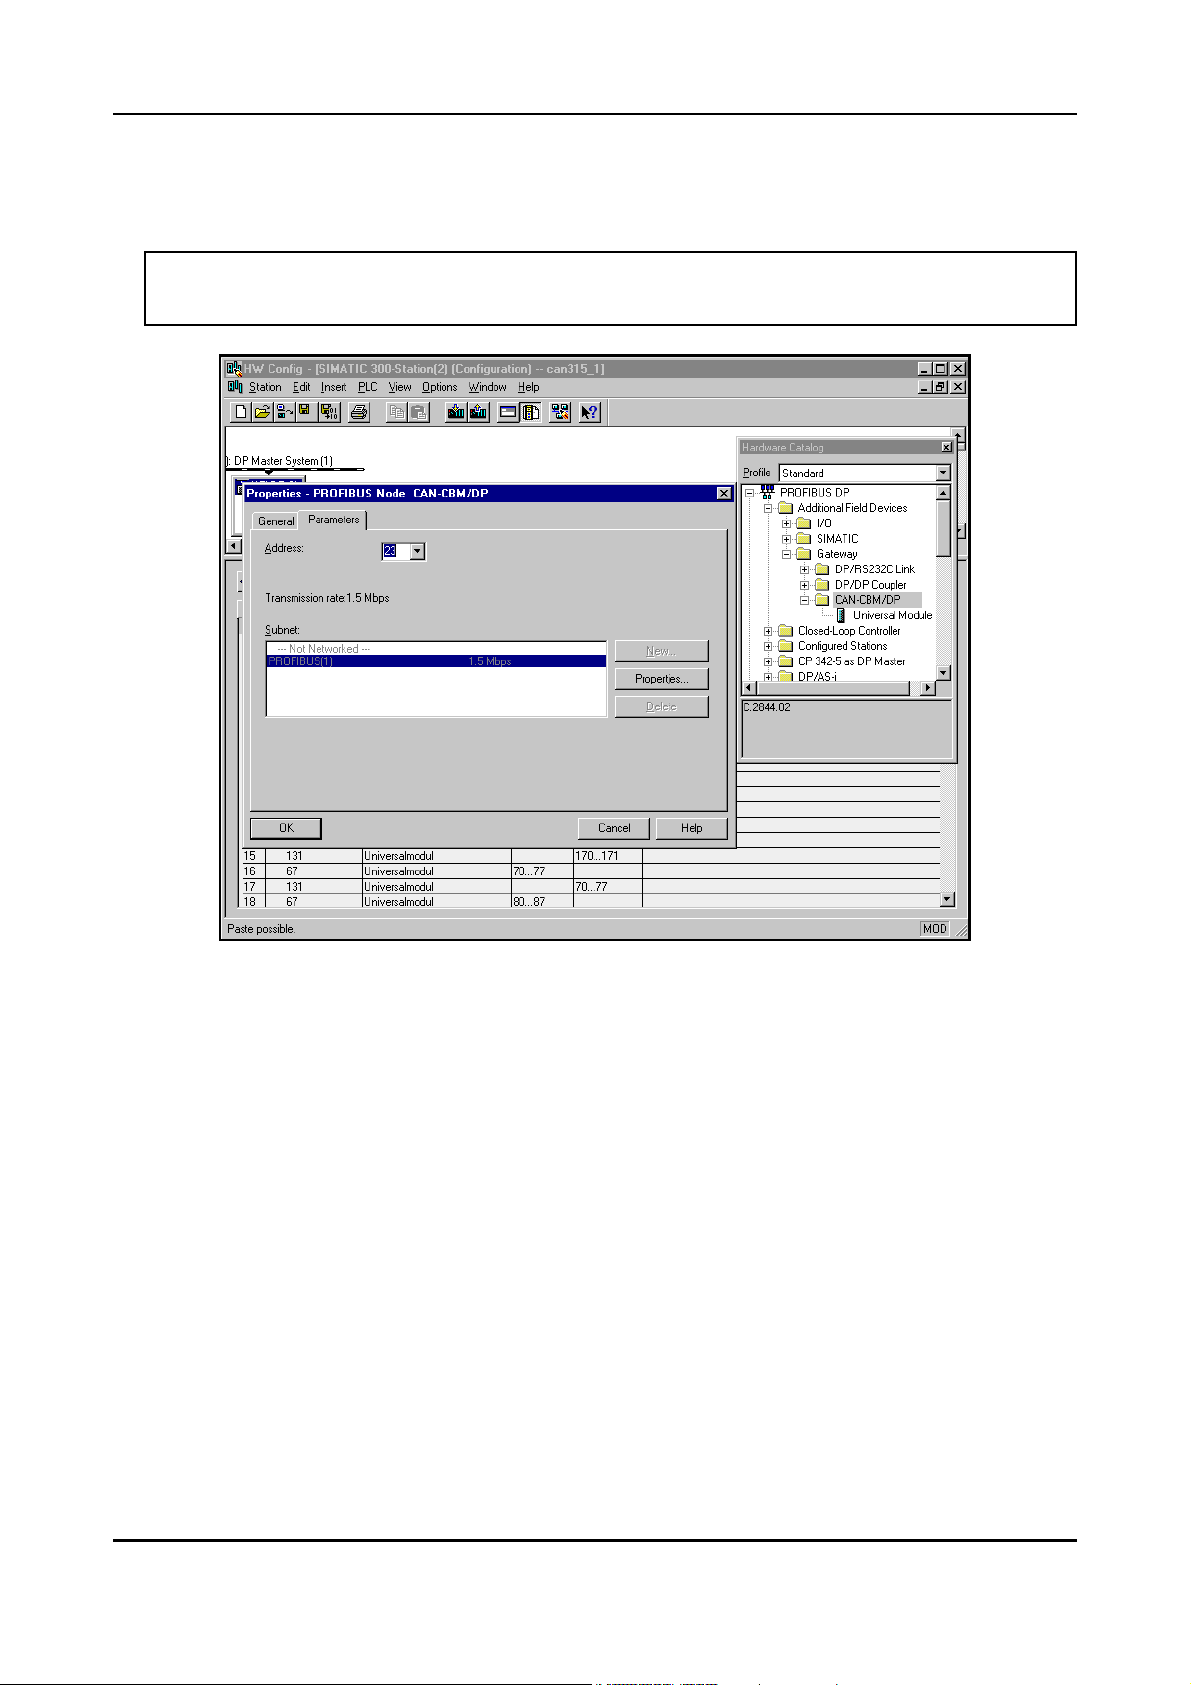
5.1.1 Set PROFIBUS address
A window opens in which you have to specify the PROFIBUS station address.
Attention!! The hexadecimal address set at the coding switches has to be converted into a
decimal value and entered here!
Fig. 5.1.1: Setting the PROFIBUS address of the CAN-CBM-DP
CAN-CBM-DP Software Manual Rev. 2.022
Page 27
Configuration via SIMATIC Manager
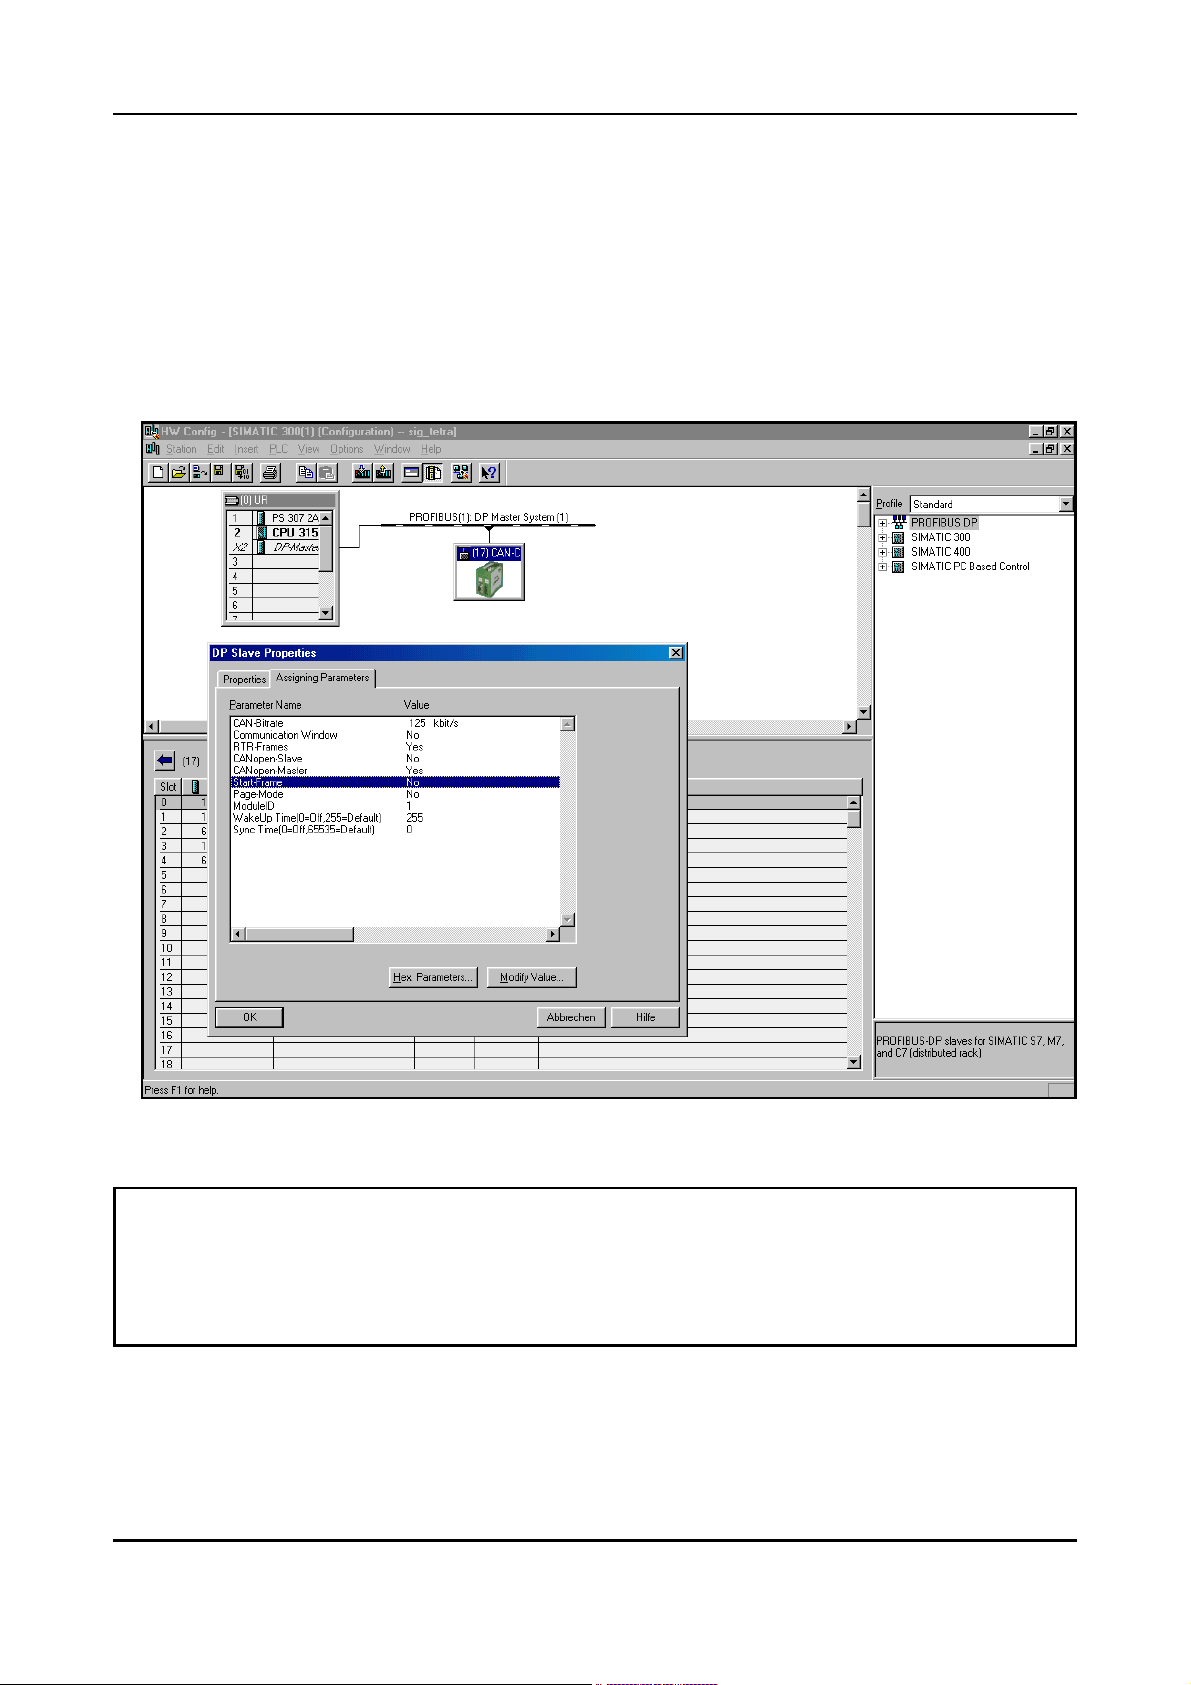
5.1.2 Parameter Telegram
In the configuration window the module ‘DP slave’ is now automatically added. If you desire
another CAN bit rate than the standard setting of 125 kbit/s, you can change it by means of the
parameter telegram.
The module-specific bytes of the parameter telegram can be changed in the Properties window
which opens, if the header of the DP-slave window is double clicked (here line ‘(23) DP-
Slave’).
Fig. 5.1.2: Setting the parameters in the DP-slave properties window
Note: By means of selection point Hex-Parameter the parameters can be specified by means of
entering hexadecimal values, as in older software versions. More comfortable, however,
is of course the specification in the format shown above. Here, the parameters can be
configured ‘directly’. Therefore, in the following descriptions the configuration by means
of hexadecimal values will not be considered.
CAN-CBM-DP Software Manual Rev. 2.0 23
Page 28
Configuration via SIMATIC Manager
Description of Parameters:
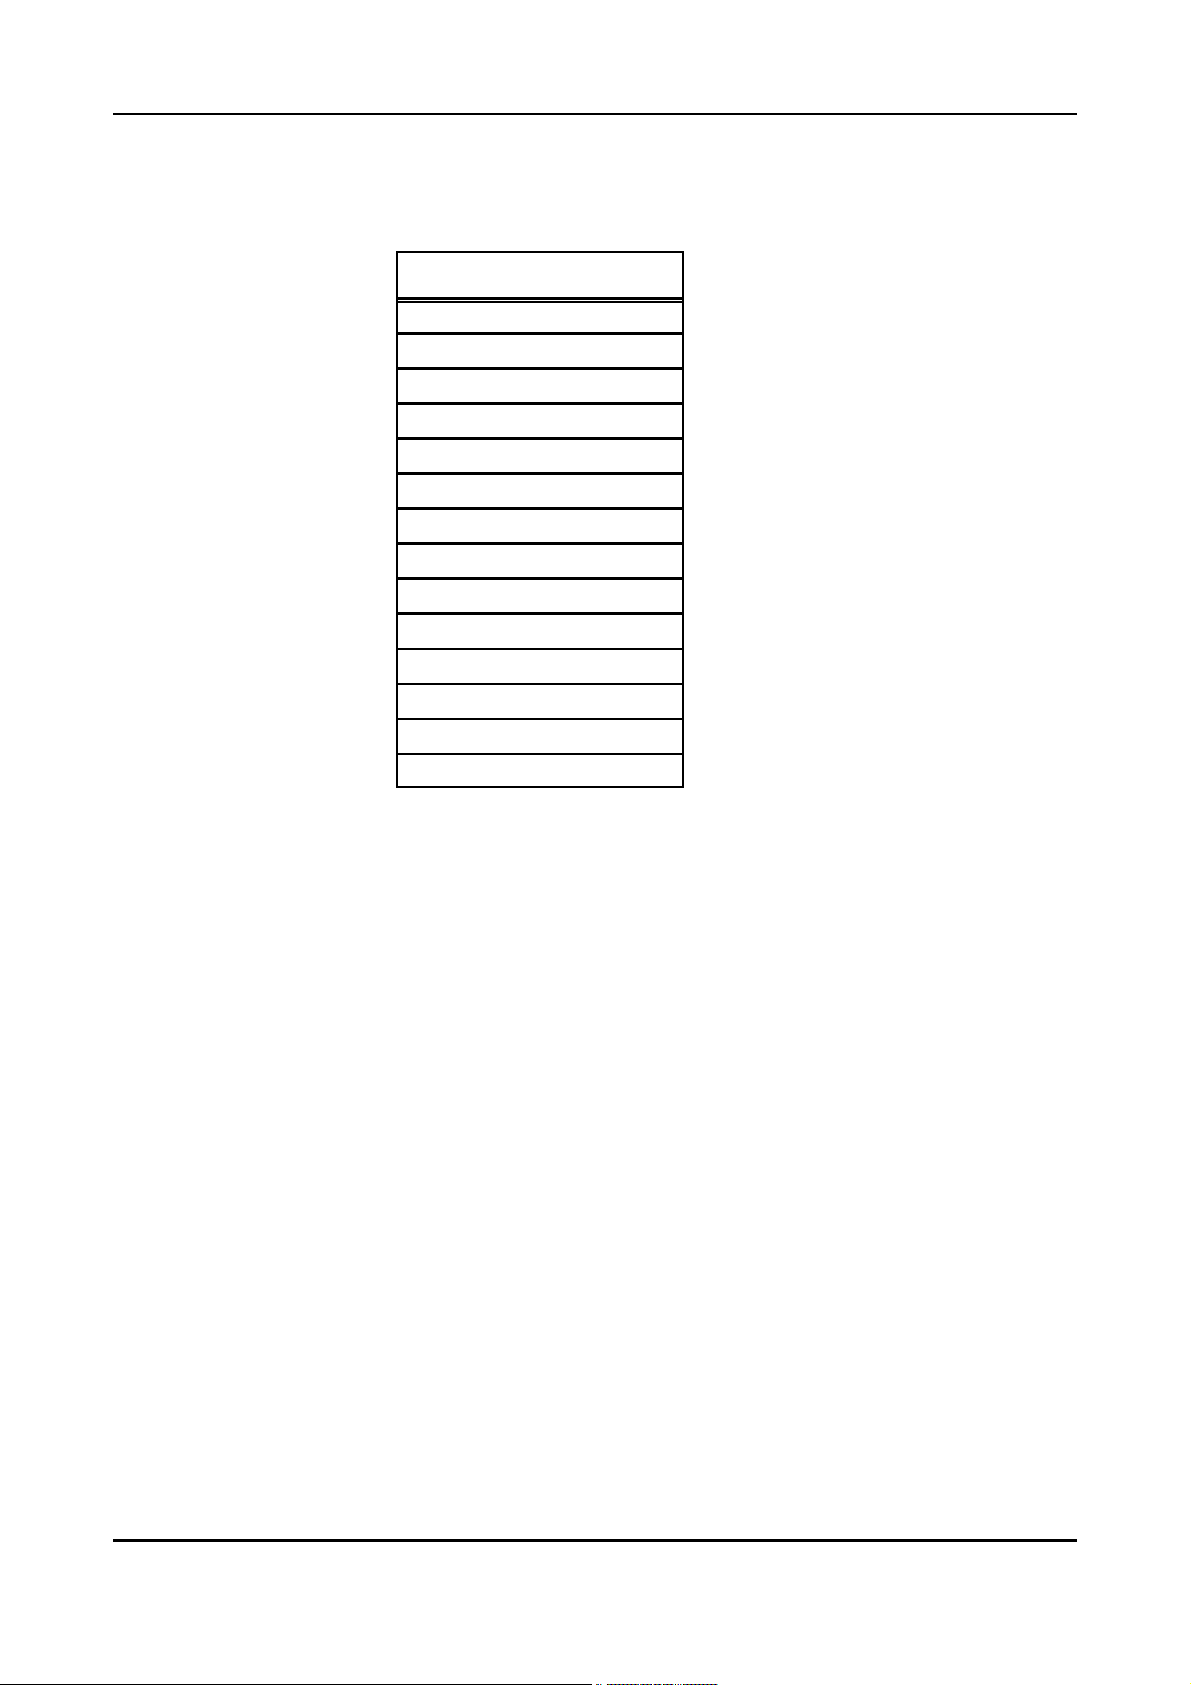
CAN-Bitrate: For the bit rate the following selections can be made:
Bitrate [kbit/s]
1000
666.6
500
333.3
250
166
125
100
66.6
50
33.3
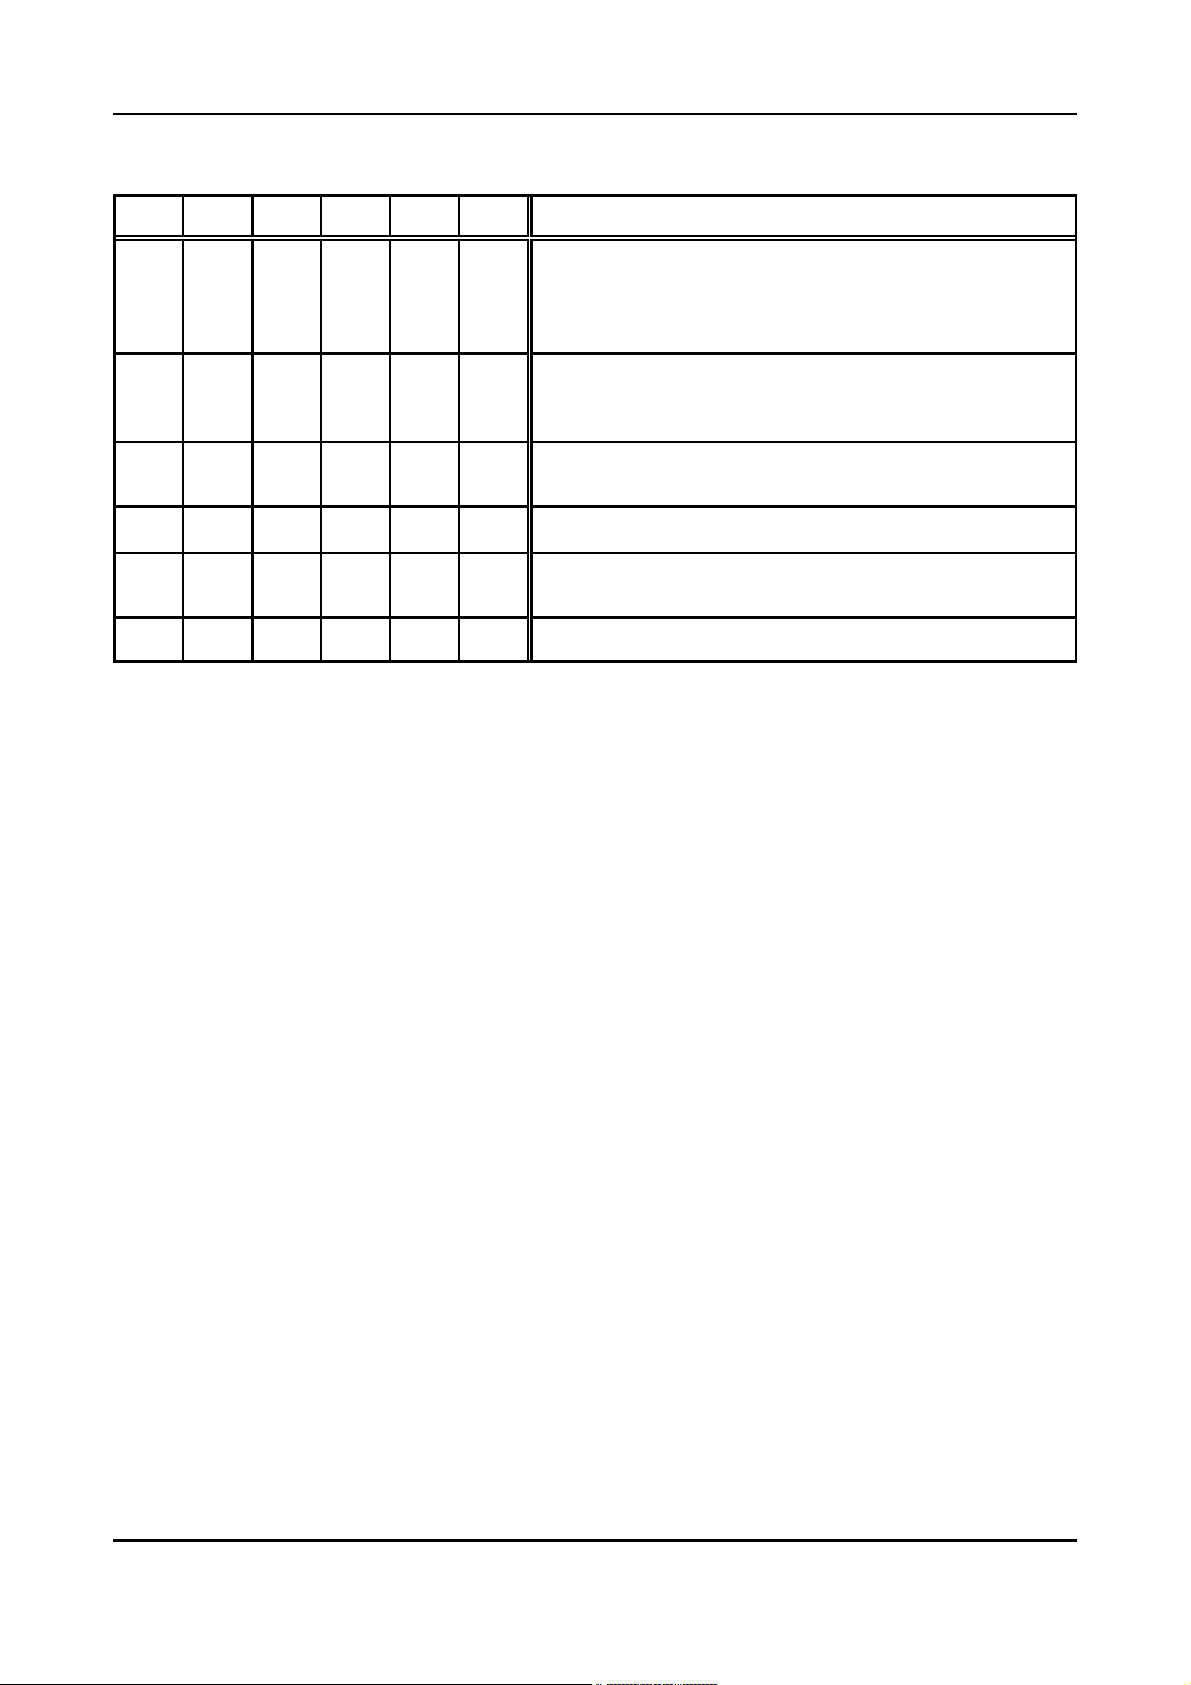
Communication Window:
(CW)
RTR-Frames:
(NR)
CANopen-Slave:
(CS)
CANopen-Master:
(CM)
20
12.5
10
Table 5.1.1: Setting the bit rate in 14 levels
This parameter activates the Communication Window. It is
described in detail at page 31.
Transmit RTR-frames for the Rx-identifiers configured via
PROFIBUS.
Configure gateway as CANopen slave.
Configure gateway as CANopen master.
Start-Frame:
(AS)
Page-Mode:
(PM)
After wake-up time has expired, a start frame is transmitted, if the
gateway is a master (autostart).
Activate Page-Mode.
CAN-CBM-DP Software Manual Rev. 2.024
Page 29
Configuration via SIMATIC Manager
p
p
p
Permissible combinations:
CW NR CS CM AS PM Meaning
xnoyesnoxno
xyesyesno x no
x no no yes no no
xyesnoyesnono
xnonoyesyesno
x yes no yes yes no
Table 5.1.2: Example for permissible settings
Module-ID: The
Module-ID
under which the gateway is addressed is set via this byte, if the
gateway has been configured as CANopen slave.
- after wake-up time the module automatically transmits
+ Module-No.
- after a start frame has been received: put out TxId, transmit
RTR-frames on RxId
- after wake-up time the module automatically transmits
+ Module-No.
- after a start frame has been received: put out TxId
- after wake-up time, put out TxId
- transmit RTR-frames on RxId
- after wake-up time, put out TxId
- after wake-up time start frame, put out TxId, transmit RTRframes on RxId
- after wake-up time start frame, put out TxId
and is in ‘Pre-Operational’ status
and is in ‘Pre-Operational’ status
128 dec
128 dec
Value range: 1 ... 127 (decimal)
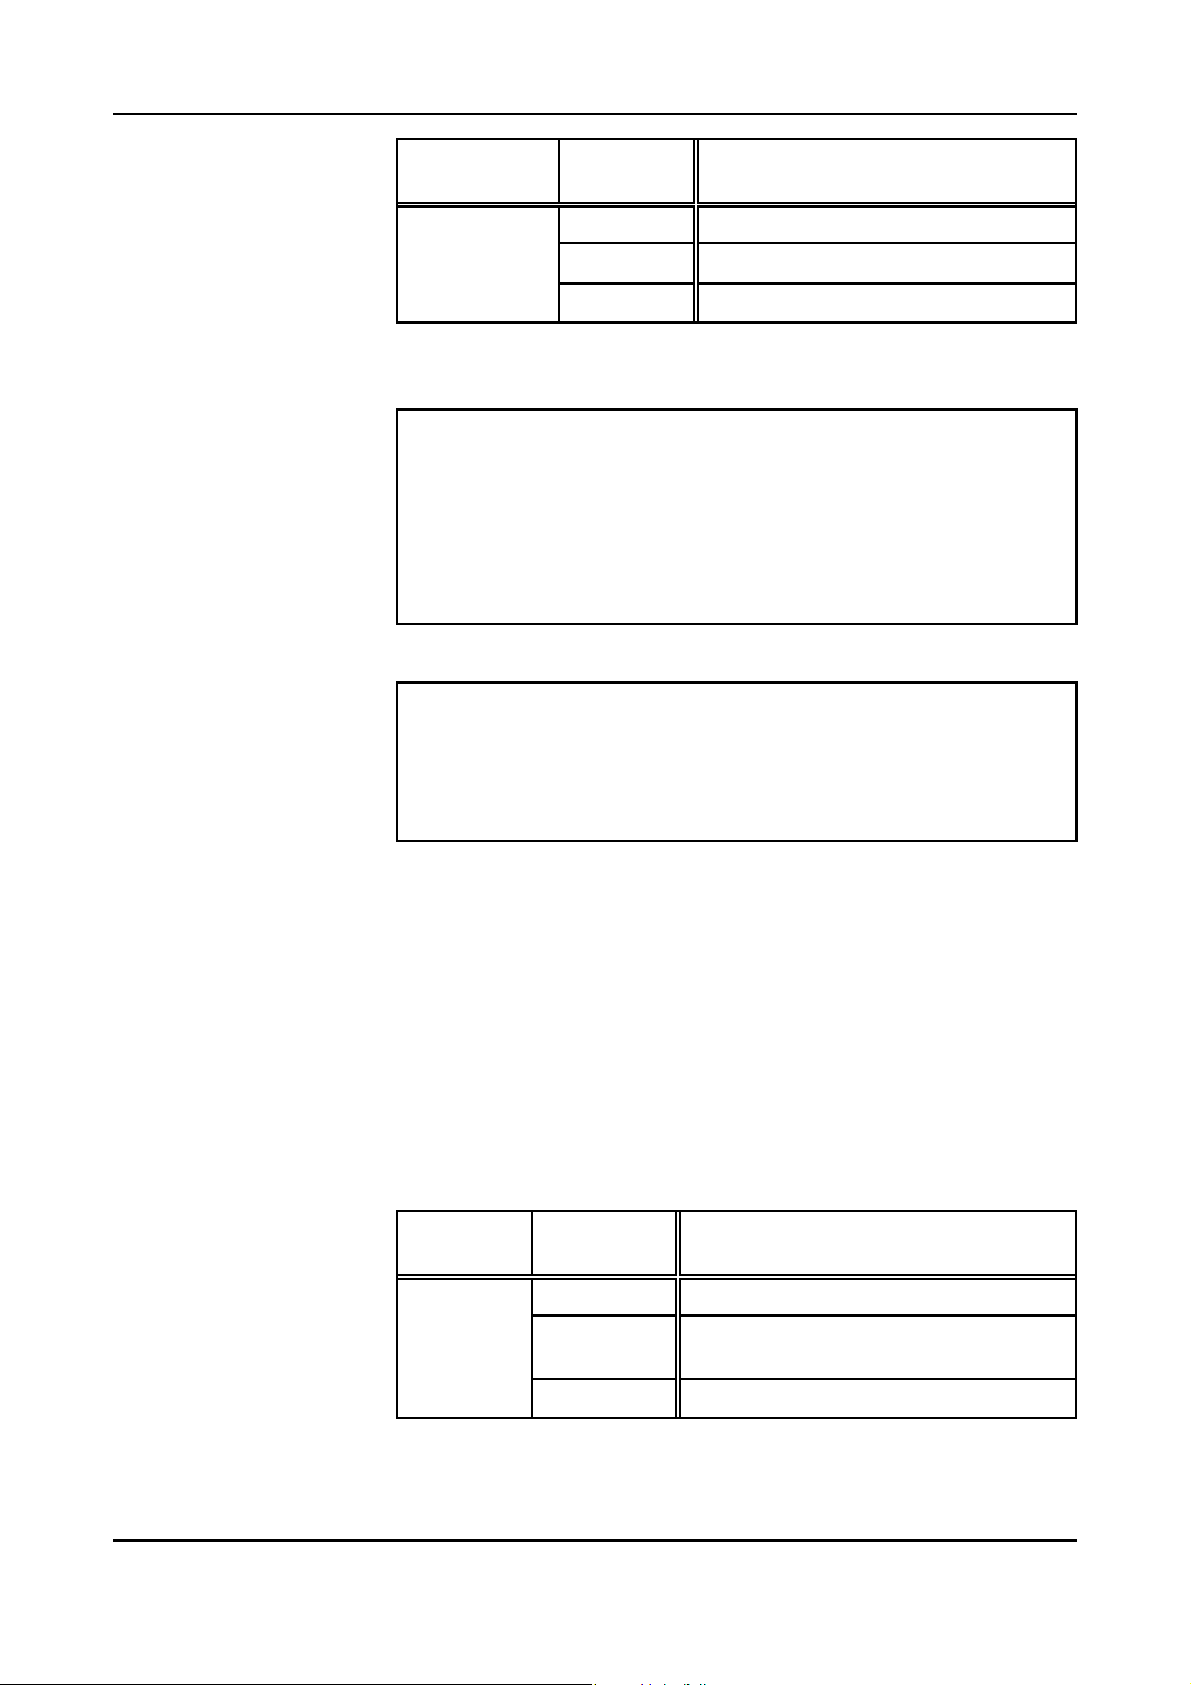
Wakeup Time Via parameter
time a module has to wait after a RESET or power-on, before it starts to transmit
data to the CAN.
The
Wakeu
Time
previously in the CAN-CBM-DP gateway, if another value than ‘255’ was
specified. If ‘255’ is specified, the value stored in the gateway will be used.
If parameter
Wakeu
transmission of data as soon as they are available.
The Wakeup Time is specified as a decimal value, here.
Wakeu
Time
a delay in seconds is specified. It determines the
specified here, overwrites the value of
Time
is set to ‘0’, the module does not wait, but start the
Wakeup Time
stored
CAN-CBM-DP Software Manual Rev. 2.0 25
Page 30
Configuration via SIMATIC Manager
Parameter
Wakeup Time
Value range
[dec] in [s]
0 Wakeup-Time function off
1...254 Wakeup Time in seconds
255 Use current value from gateway (default)
Explanations
Table 5.1.3: Function of parameter Wakeup Time
Attention:
Wakeup Time can be set in two different ways:
1. As described above.
2. Via the configuration tool CICT (refer to page 72)
Both entries are equal. That means that the last specification is
valid!
Note:
If the software is updated to a version t 1.03, when using an
existing application program (older than 12/1999), the missing entry
of the configuration data would be interpreted as ‘0’, and the
Wakeup-Time function would be deactivated, therefore.
SYNC Time:
The CAN-CBM-DP module can cyclically transmit the commands
SYNC and START for simple CANopen applications. The SYNC Time
for the transmission can be specified in the properties window as
described above, via the Communication Window or via the tool CICT.
The specified cycle is used for the SYNC command as well as the
START command. It is specified in milliseconds.
SYNC Time
Parameter
SYNC Time
is specified as a decimal value, here.
Value range
[dec] in [ms]
0 No SYNC and Start transmissions possible
1...65534
65535 Use current value from gateway (default)
SYNC Time and Start Time in milliseconds
(1...65534 ms)
Explanations
Table 5.1.4: Function of parameter SYNC Time
CAN-CBM-DP Software Manual Rev. 2.026
Page 31
Configuration via SIMATIC Manager
Attention:
SYNC Time can be set in three different ways:
1. As described above.
2. Via bytes 4 and 5 of the Communication Window (refer to page
37).
3. Via the configuration tool CICT (refer to page 73).
All three specifications are equal. That means that the last
specification is valid!
Note:
If the software is updated to a version t 1.03, when using an
existing application program (older than 12/1999), the missing entry
of the configuration data would be interpreted as ‘0’, and the SYNC
and START functions would be deactivated, therefore.
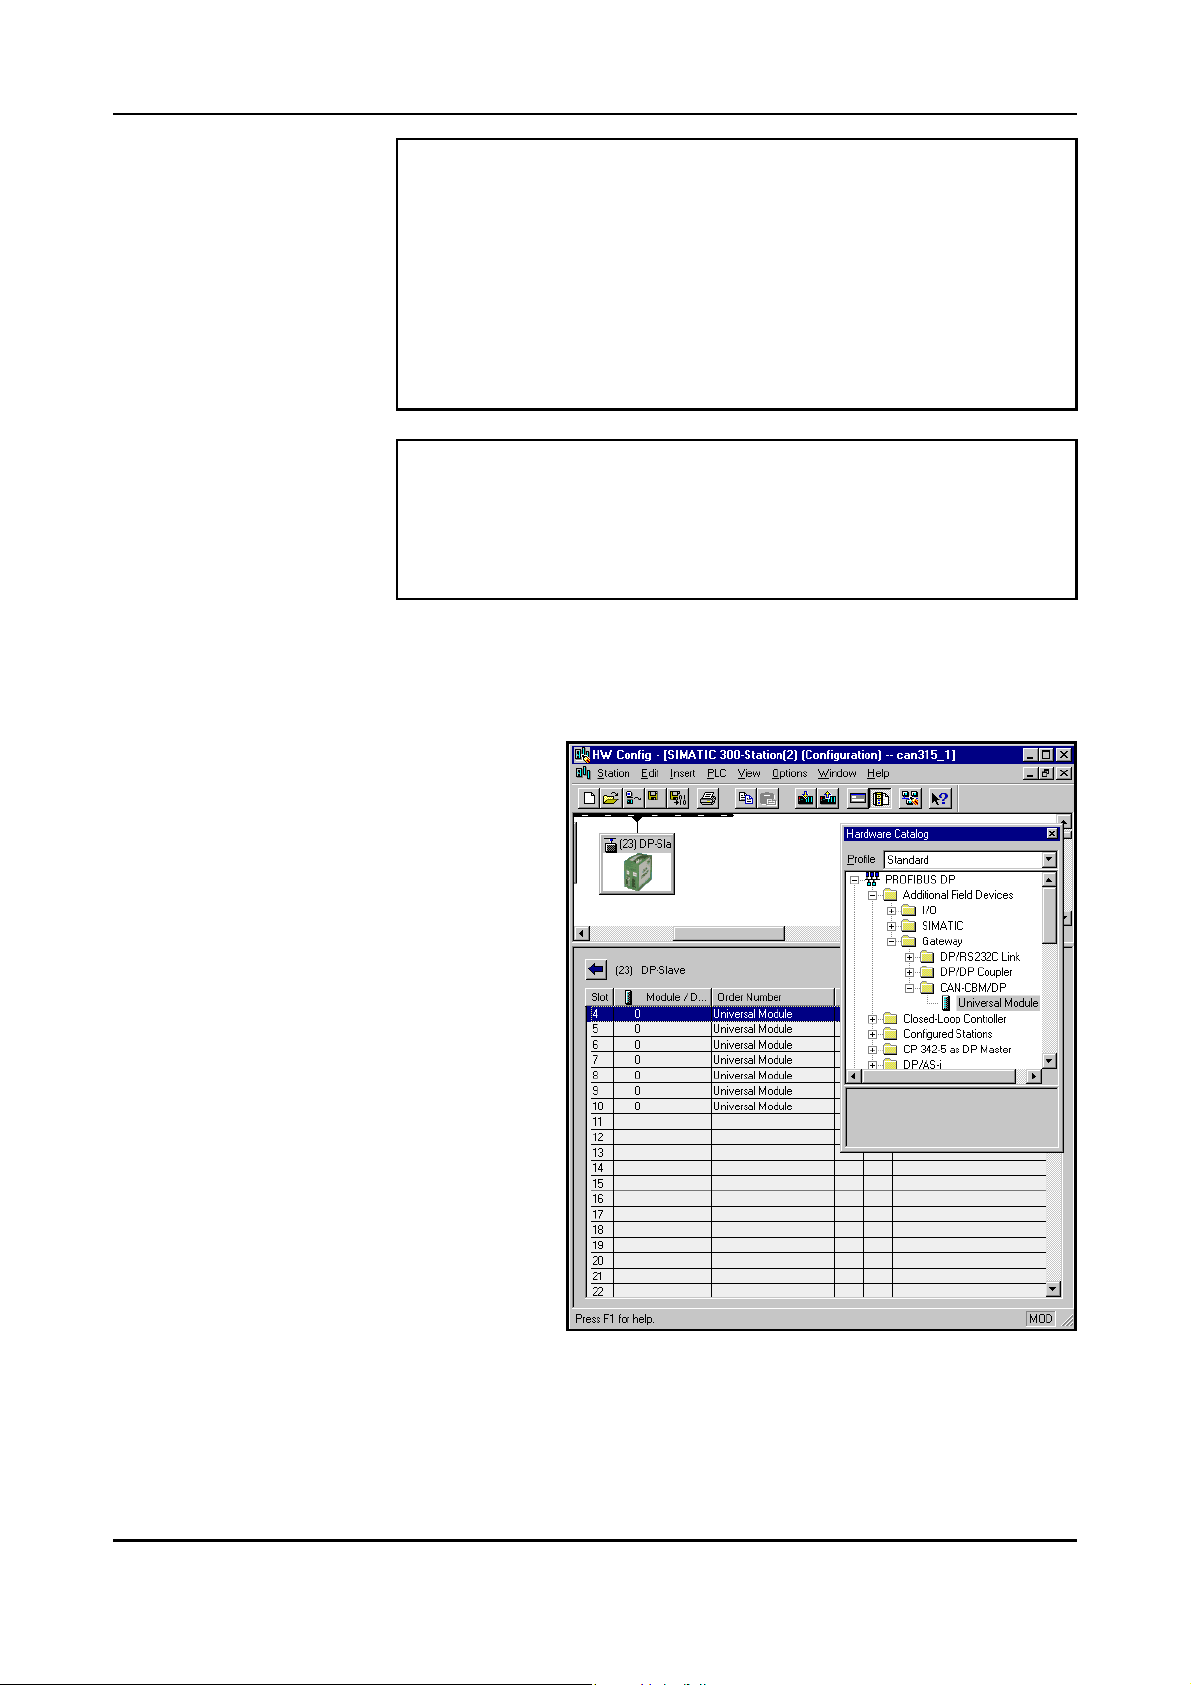
5.1.3 Assigning the Slots of the DP Slave
The desired number of slots to be used by the
DP slave for data exchange is set by double
clicking the device ‘Universal Module’ for
each byte with activated DP-slave window.
In the DP-slave window the assigned slots are
represented by a ‘0’.
Fig. 5.1.3: Setting the parameters
CAN-CBM-DP Software Manual Rev. 2.0 27
Page 32
Configuration via SIMATIC Manager
5.1.4 Configuration of Slots
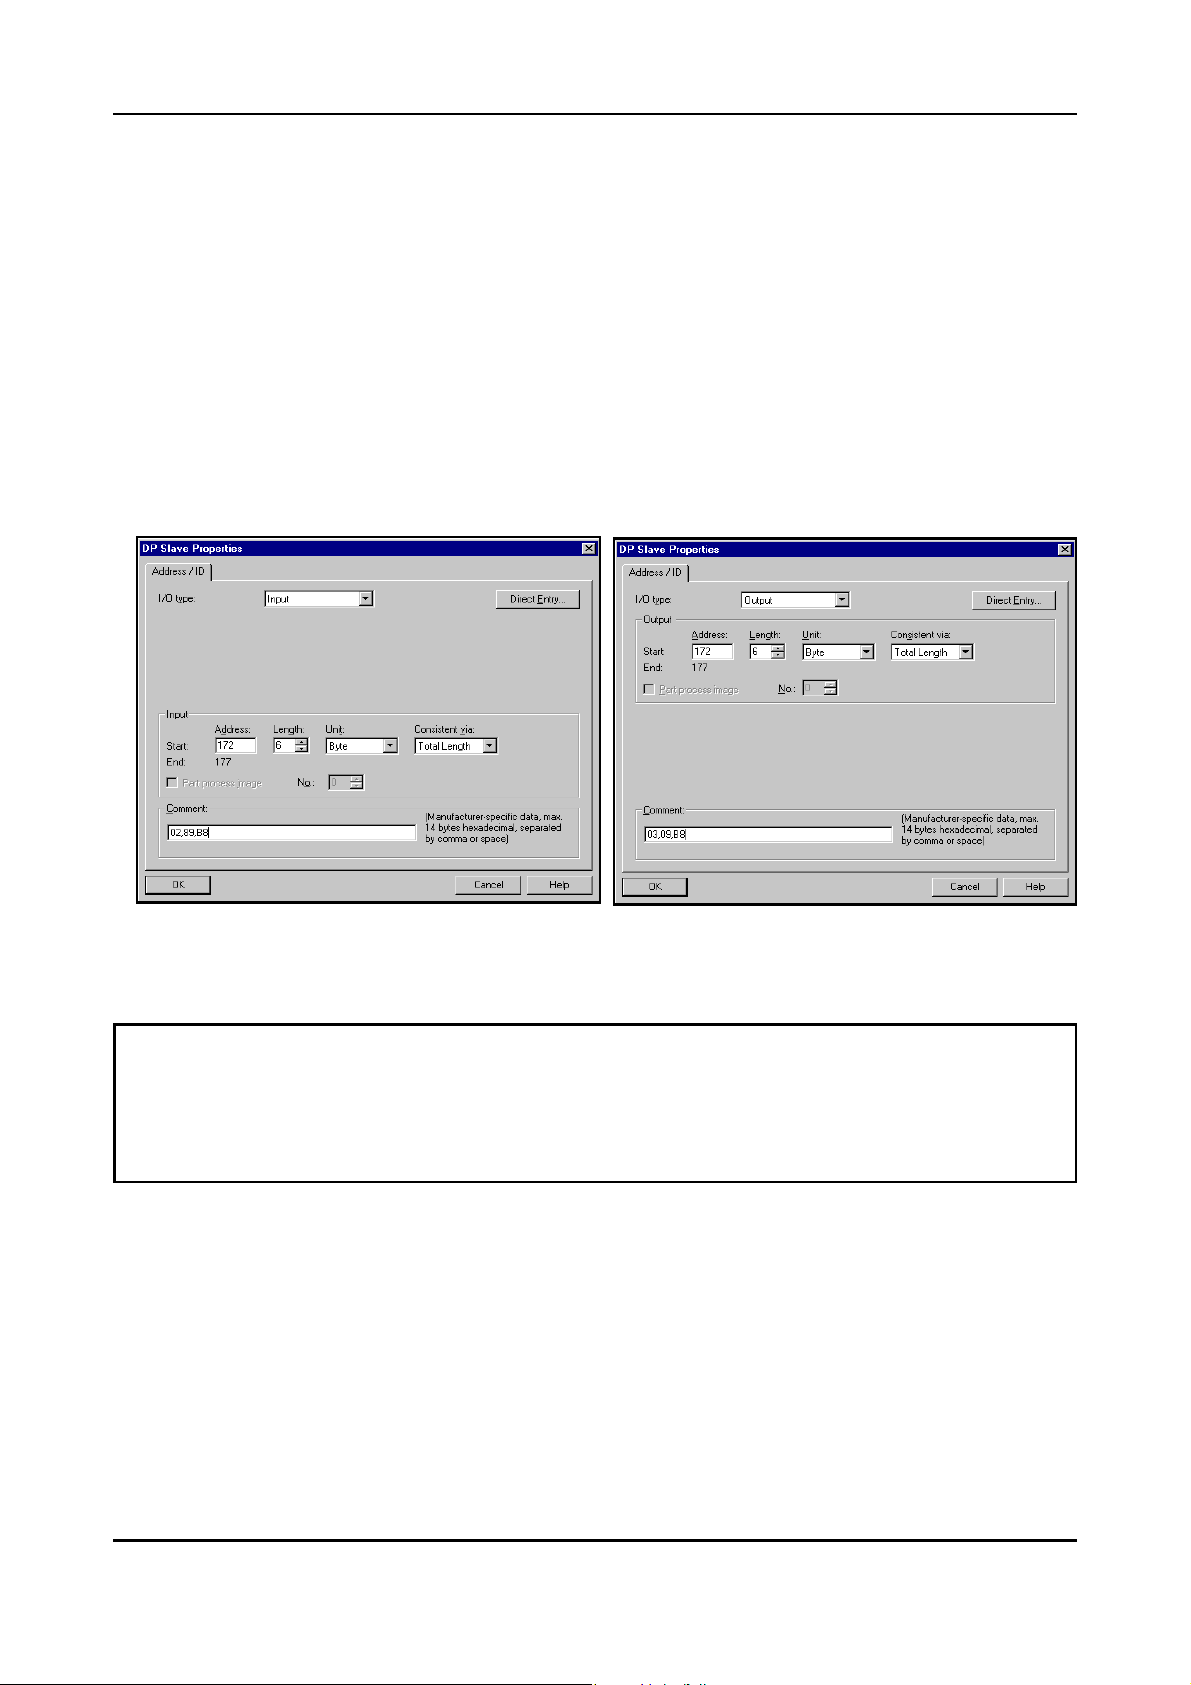
In order to configure the slots the slot entry has to be double clicked. A properties window opens in
which the simulated PLC slots are configured. Below, two examples with 11-bit identifiers are shown:
Data direction: input
PLC address: 172 decimal
Length: 6
Unit: byte
Consistent for: whole length
Identifier: 0289 hexadecimal
Form byte: B8 hexadecimal
Data direction: output
PLC address: 172 decimal
Length: 6
Unit: byte
Consistent for: whole length
Identifier: 0309 hexadecimal
Form byte: B8 hexadecimal
Fig. 5.1.4: Example: Configuration of input
data
Attention:
In order to guarantee that the module works perfectly, at least one output (any unit) has to be
configured always. The PROFIBUS controller SPC3 does not trigger an interrupt, if no output is
defined! If no CAN is to be assigned when an output is defined, it is permissible to specify the value
07F8 hex as an identifier, here.
The individual parameters of the properties window will be explained in detail in the following chapter.
5.1.5 Save Settings to Hard Disk
Now you have to save the settings via menu points Station/Save to hard disk. Afterwards the
settings are transmitted to the PLC by means of menu points Target System/Load in Unit.
Fig. 5.1.5: Example: Configuration of output
data
CAN-CBM-DP Software Manual Rev. 2.028
Page 33
Configuration via SIMATIC Manager
5.2 Description of Input Window ‘
-In field
Other properties are not permissible.
-In field
- By means of fields
- The entry in field
(bytes, words, etc.) or as complete package (1-8 bytes or 16 bytes in Communication Window)
during a PLC cycle. This function is only t o be set to ‘whole length’ if required, because the
transmission as ‘unit’ is faster.
Note:
If the data is to be transmitted consistently for the entire length, you have to specify this here
and you have to use SFC14 and SFC15 (refer to Step7-PLC Manual).
-In field
transmitted in the first two bytes. The data format for all properties is hexadecimal (!).
I/O-Type
Address
Comment
the PLC-I/O address is entered as a decimal value.
‘input’ or ‘output’ has to be selected, depending on the data direction desired.
Length
Consistent for
the CAN identifier and then the control byte form, each divided by commas, are
and
Unit
Properties - DP Slave
the number of data bytes is specified.
shows whether the data is to be transmitted as individual unit
’
Note:
The CAN-CBM-DP-module with the order no. C.2844.05 can handle 29-Bit-CAN-identifiers.
A 29-bit identifier requires four bytes and bit 29 must be set to ‘1’ (counted 0...31 bits), in order
to enable the module to distinguish between 11-bit and 29-bit identifiers.
If ‘input’ has been selected in the I/O-Type field, the CAN identifier entered there is regarded as
an Rx-identifier by the PLC. If ‘output’ has been selected in the I/O-Type, the CAN identifier
entered here is a Tx-identifier.
Attention: No Rx-identifier must be assigned twice!
Example: If the same Rx-identifier has unpermissibly been selected on PLC-address 50 and
address 51, no new Rx-data would be received on address 50 after the Rx-identifier has
been assigned. The data received last remained unchanged.
This Rx-identifier rule is also valid for the Rx-identifier activated via the Communication Window.
The control byte form is used to convert the user data from Motorola format (high byte first) into
Intel format (low byte first).
CAN-CBM-DP Software Manual Rev. 2.0 29
Page 34
Configuration via SIMATIC Manager
Background: Messages which are longer than 1 byte are normally transmitted via a CANopen
network in Intel notation, while the Siemens PLC operates in Motorola format.
Starting with bit 7 of the format byte you can decide whether the following byte is to be converted
as well, i.e. swapped, or not. If a ‘1’ is specified for a byte, the following bytes are converted until
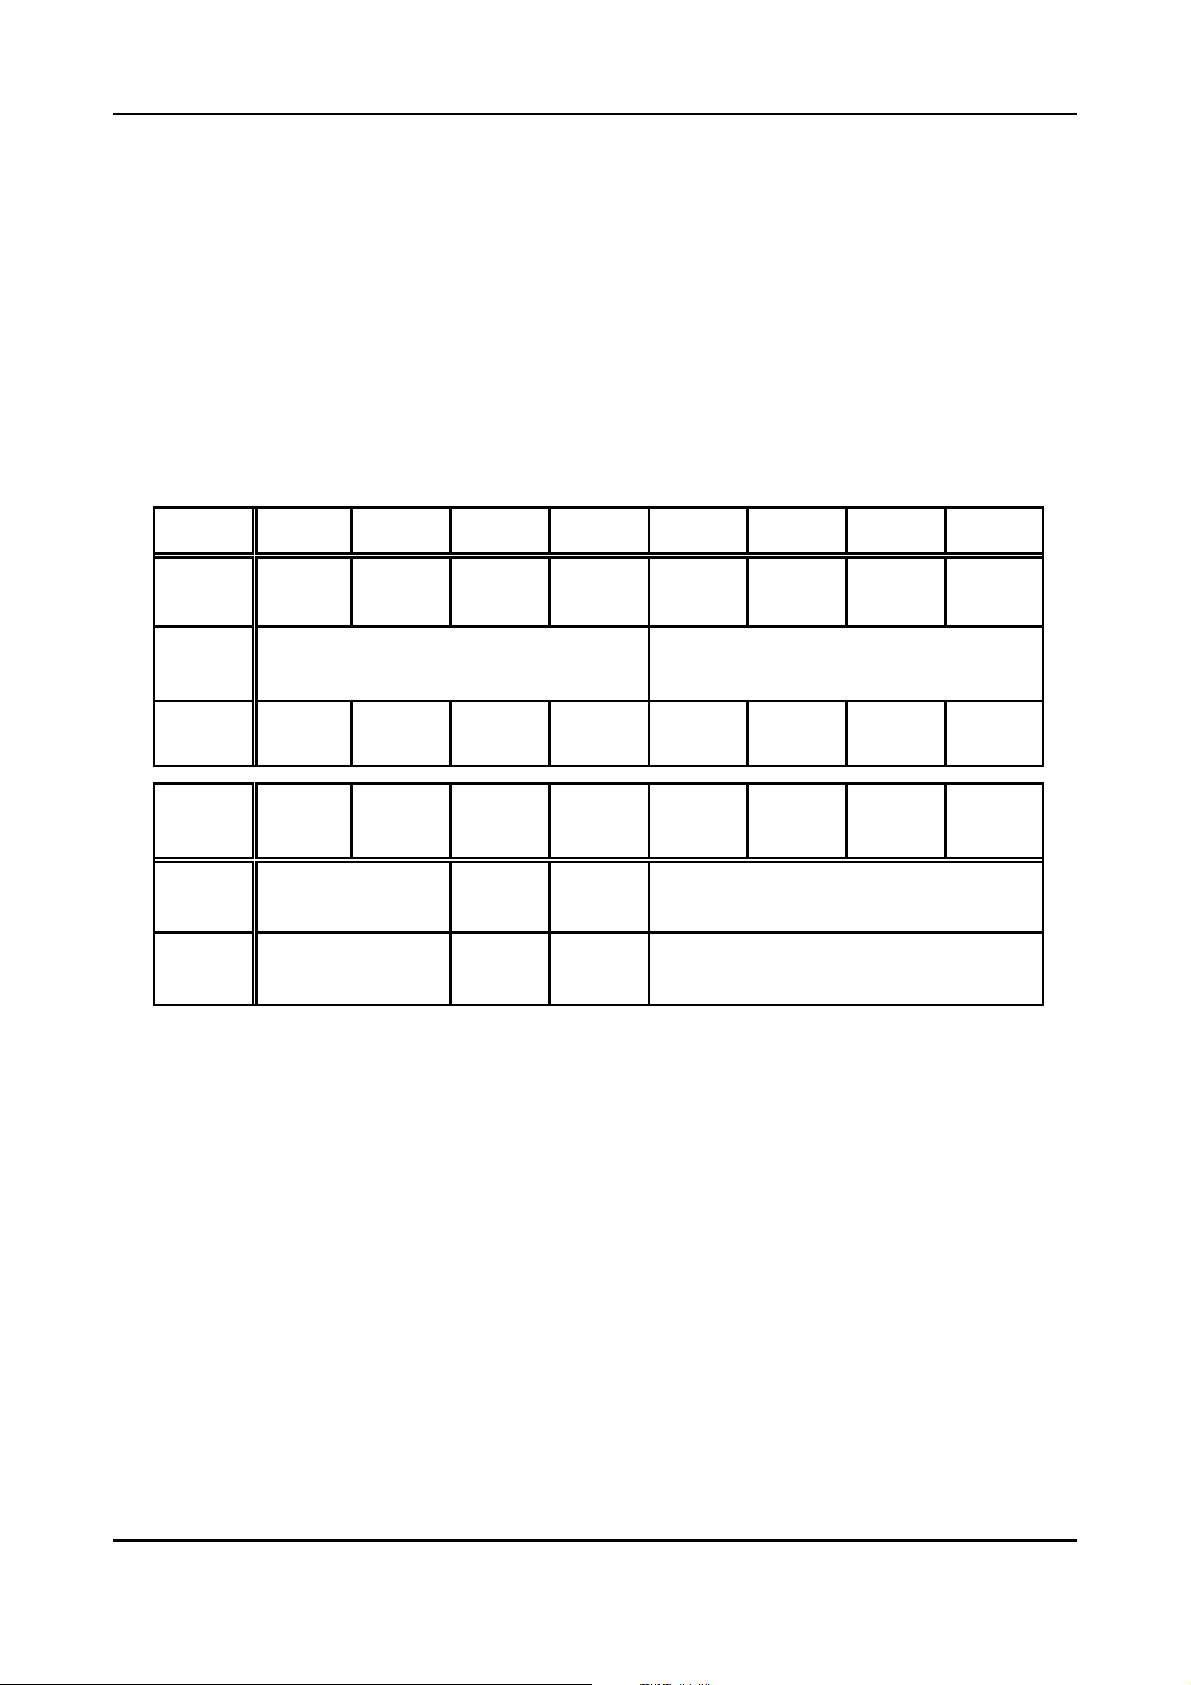
the next ‘0’ transmitted. The functionality can be explained best by means of an example.
Example:
A CAN telegram has got a date in Intel format in the first byte, followed by 2 bytes which are not
to be swapped and a long word in the last 4 bytes which is in Intel format again.
Binary the following representation results for the format byte:
Bit No.76543210
Bit of
form
hexadecimal
action
Data
bytes
CANframe
PLC data
10001110
8E
begin
swap
end swap
un-
changed
un-
changed
begin
swap
swap swap
end
swap
12345678
2 bytes
Intel format
2 bytes
Motorola format
byte 3 byte 4
byte 3 byte 4
4 bytes
Intel format
4 bytes
Motorola format
From this the format byte results in 8E hex. If all eight bytes are to be swapped, for instance, value
FE hex is specified for the format byte.
The lowest bit is generally without significance, because the telegram and therefore the formatting
have been completed. The bit should always be set to 0.
Note:
If parameter ‘form’ is not set, the default setting will be used. In default setting all bits are set to ‘0’,
i.e. no data is converted.
If form and the CAN Identifier are not set, these parameters can be changed via tool CICT. A Can
identifier which has not been set is indicated by the entry EEEE hex.
CAN-CBM-DP Software Manual Rev. 2.030
Page 35
Configuration via SIMATIC Manager
5.3 The Communication Window
5.3.1 Introduction
If the connected CANopen modules are addressed as described in chapter ‘5.1 Course of
Configuration’, each CAN identifier needs its own PLC address. The Communication Window has the
advantage that individual PLC addresses for different Tx-identifiers and different Rx-identifiers can be
used. This is possible, because the identifiers of the CANopen modules are transmitted as parameters
together with the data at each access.
The disadvantage of the Communication Window is the lower data flow, though. Therefore it is
recommendable to use the Communication Window for non-time-critical accesses such as writing the
SDOs after starting up the device.
The data length must always be 16 bytes in the configuration!
The identifier to be used is always ‘FFEF’ hex!
The Communication Window will be described in detail on the following pages.
Note:
The CAN-CBM-DP-module with the order no. C.2844.05 can handle 29-Bit-CAN-identifiers. A 29bit identifier requires four bytes and bit 29 must be set to ‘1’ (counted 0...31 bits), in order to enable
the module to distinguish between 11-bit and 29-bit identifiers.
CAN-CBM-DP Software Manual Rev. 2.0 31
Page 36
Configuration via SIMATIC Manager
5.3.2 Configuring the Communication Window
The Communication Window is configured via PROFIBUS. An entry for each the transmission and
reception of data via the Communication Window is required. More than these two properties is not
accepted by the firmware.
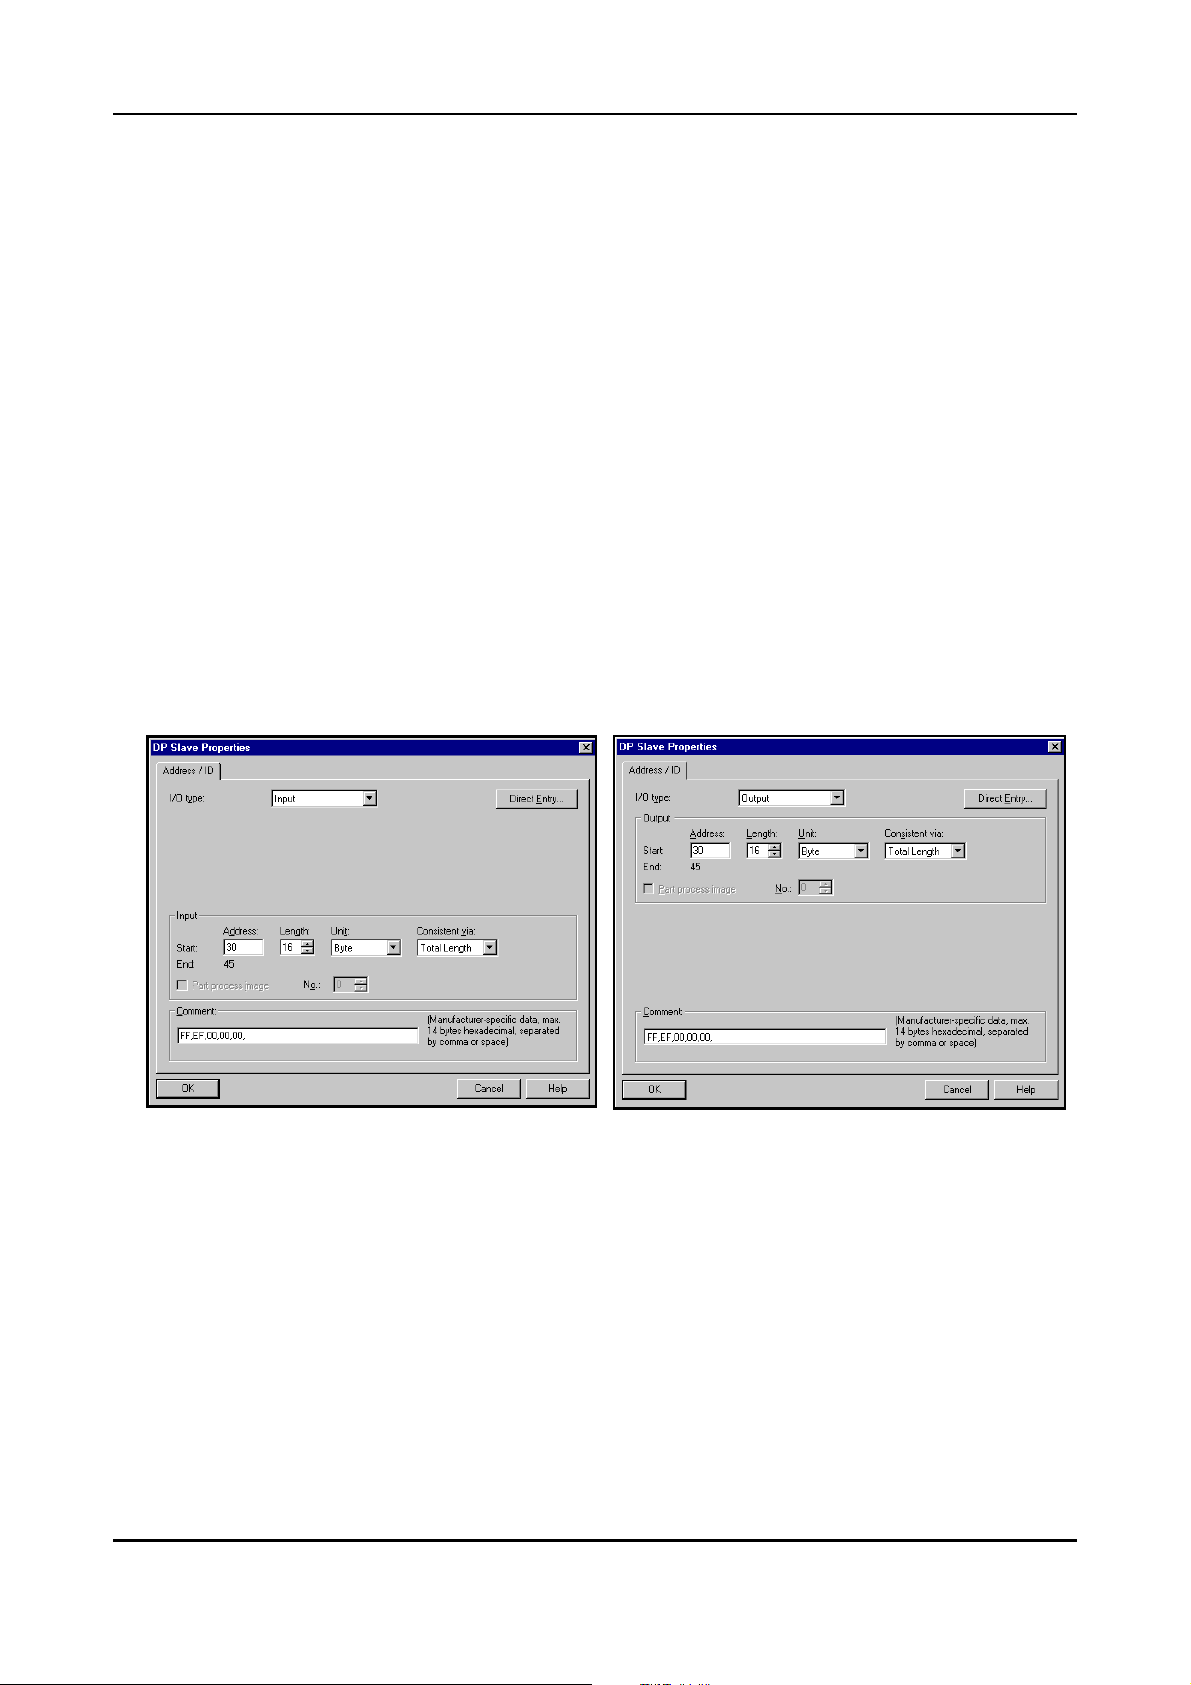
The following two pictures show the required properties. Apart from the PLC address and the
specifications for the SYNC Time in the comment bytes 4 and 5, all parameters have been
specified. Even the identifier cannot be selected freely! Consistently the whole length has always to be
specified! A shared PLC address or different PLC addresses are permissible for input and output
direction.
Data direction: input
PLC address: any (example: 30)
Length: 16
Unit: byte
Consistent for: whole length!
Identifier: FFEF hexadecimal
Form byte: 00 hexadecimal
Data direction: output
PLC address: any (example: 30)
Length: 16
Unit: byte
Consistent for: whole length!
Identifier: FFEF hexadecimal
Form byte: 00 hexadecimal
Fig. 5.3.1: Configuring the input path of the
Communication Window
Fig. 5.3.2: Configuring the output path of the
Communication Window
CAN-CBM-DP Software Manual Rev. 2.032
Page 37
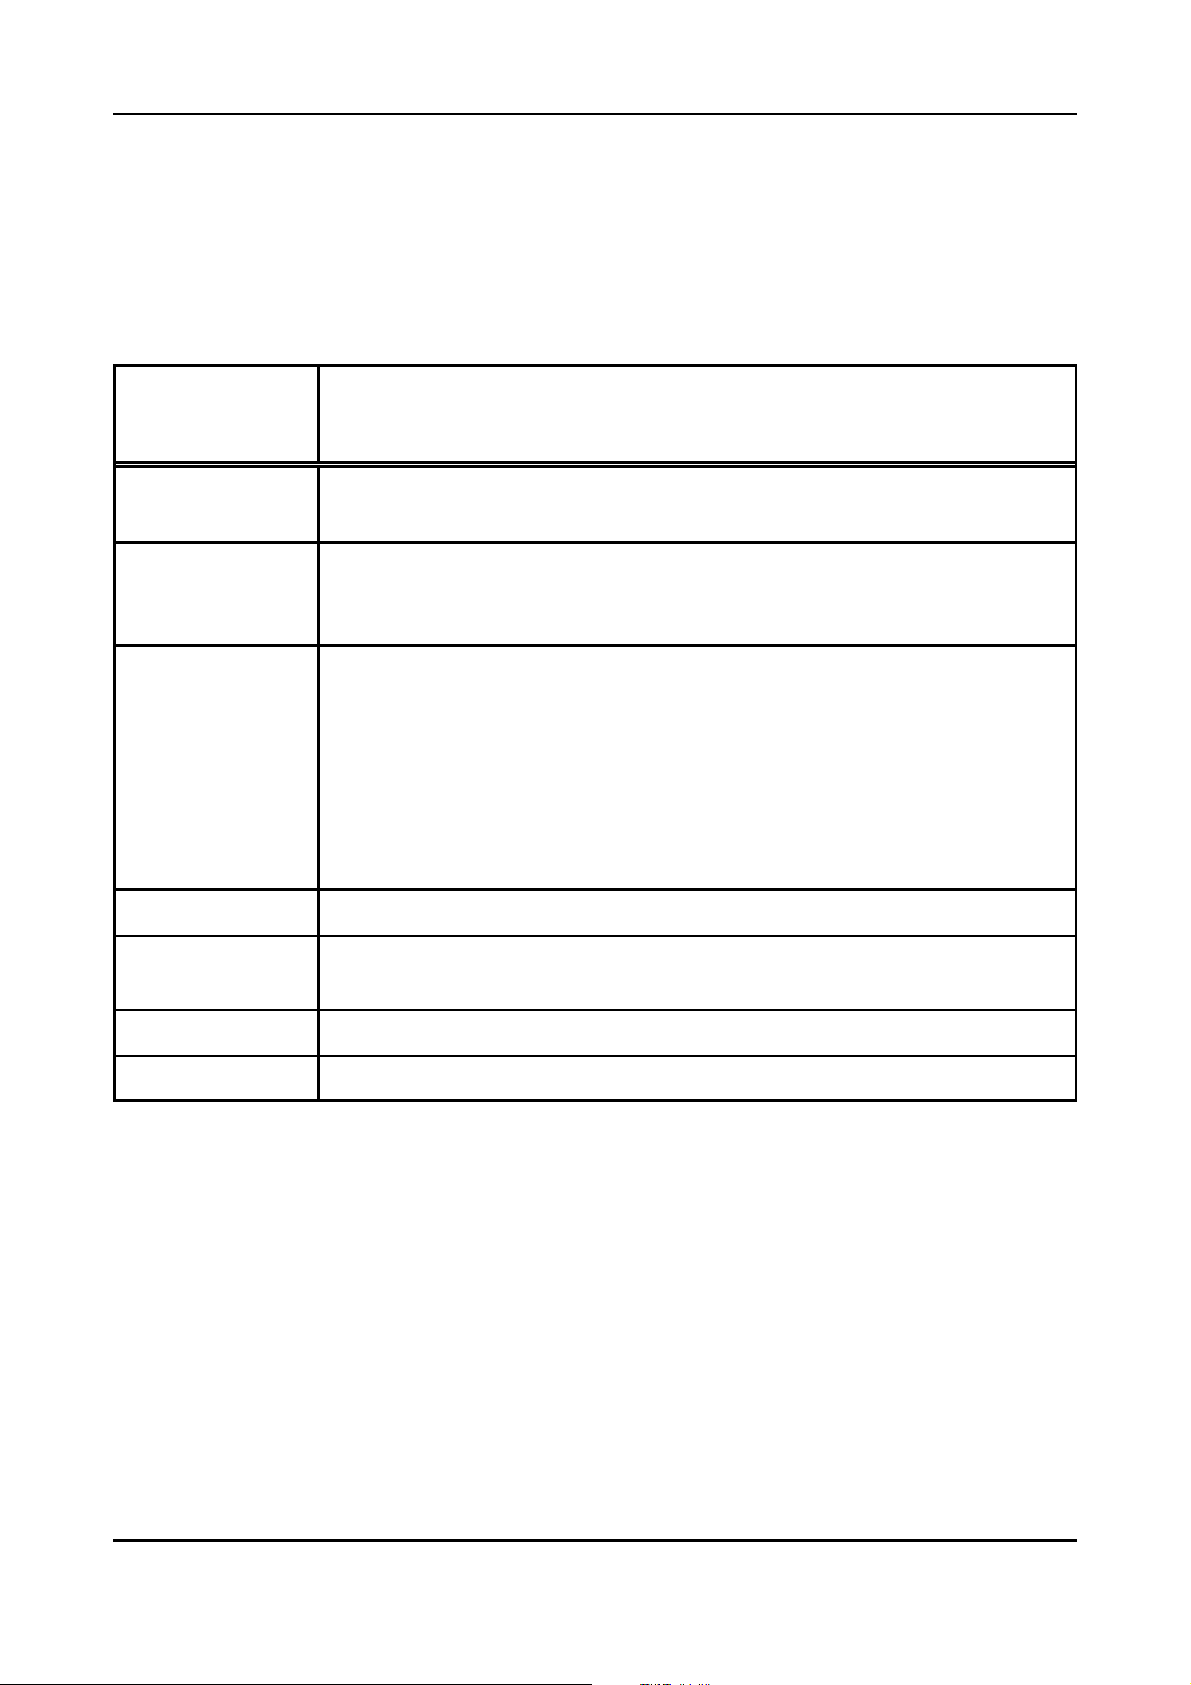
Configuration via SIMATIC Manager
5.3.3 Format of Communication Window
The 16 bytes of the Communication Window are assigned differently, according to data direction.
5.3.3.1 Write Bytes of the Communication Window
(command setting and transmitting of data PLC -> Gateway -> CAN)
Bytes of
Communication
Window
Contents
0
1
2
3
4
5
6
7
8
9
10
11
12 data length for transmission jobs (Tx)
13
14 sub command (always set to ‘0’)
high byte of CAN identifier (identifier bits [15] 10...8)
low byte of CAN identifier (identifier bits 7...0)
with 11-bit CAN identifier byte 2 and 3 always ‘0’
with 29-bit CAN identifier byte 2: identifier bits 28...24
byte 3: identifier bits 23...16
data byte 0
data byte 1
data byte 2
data byte 3
data byte 4
data byte 5
data byte 6
data byte 7
PLC loop counter (has to be incremented in pulse with OB1 in order to tell
the gateway the OB1 cycle)
15 command (description refer page ?)
Table 5.3.1: Write bytes of the Communication Window
CAN-CBM-DP Software Manual Rev. 2.0 33
Page 38
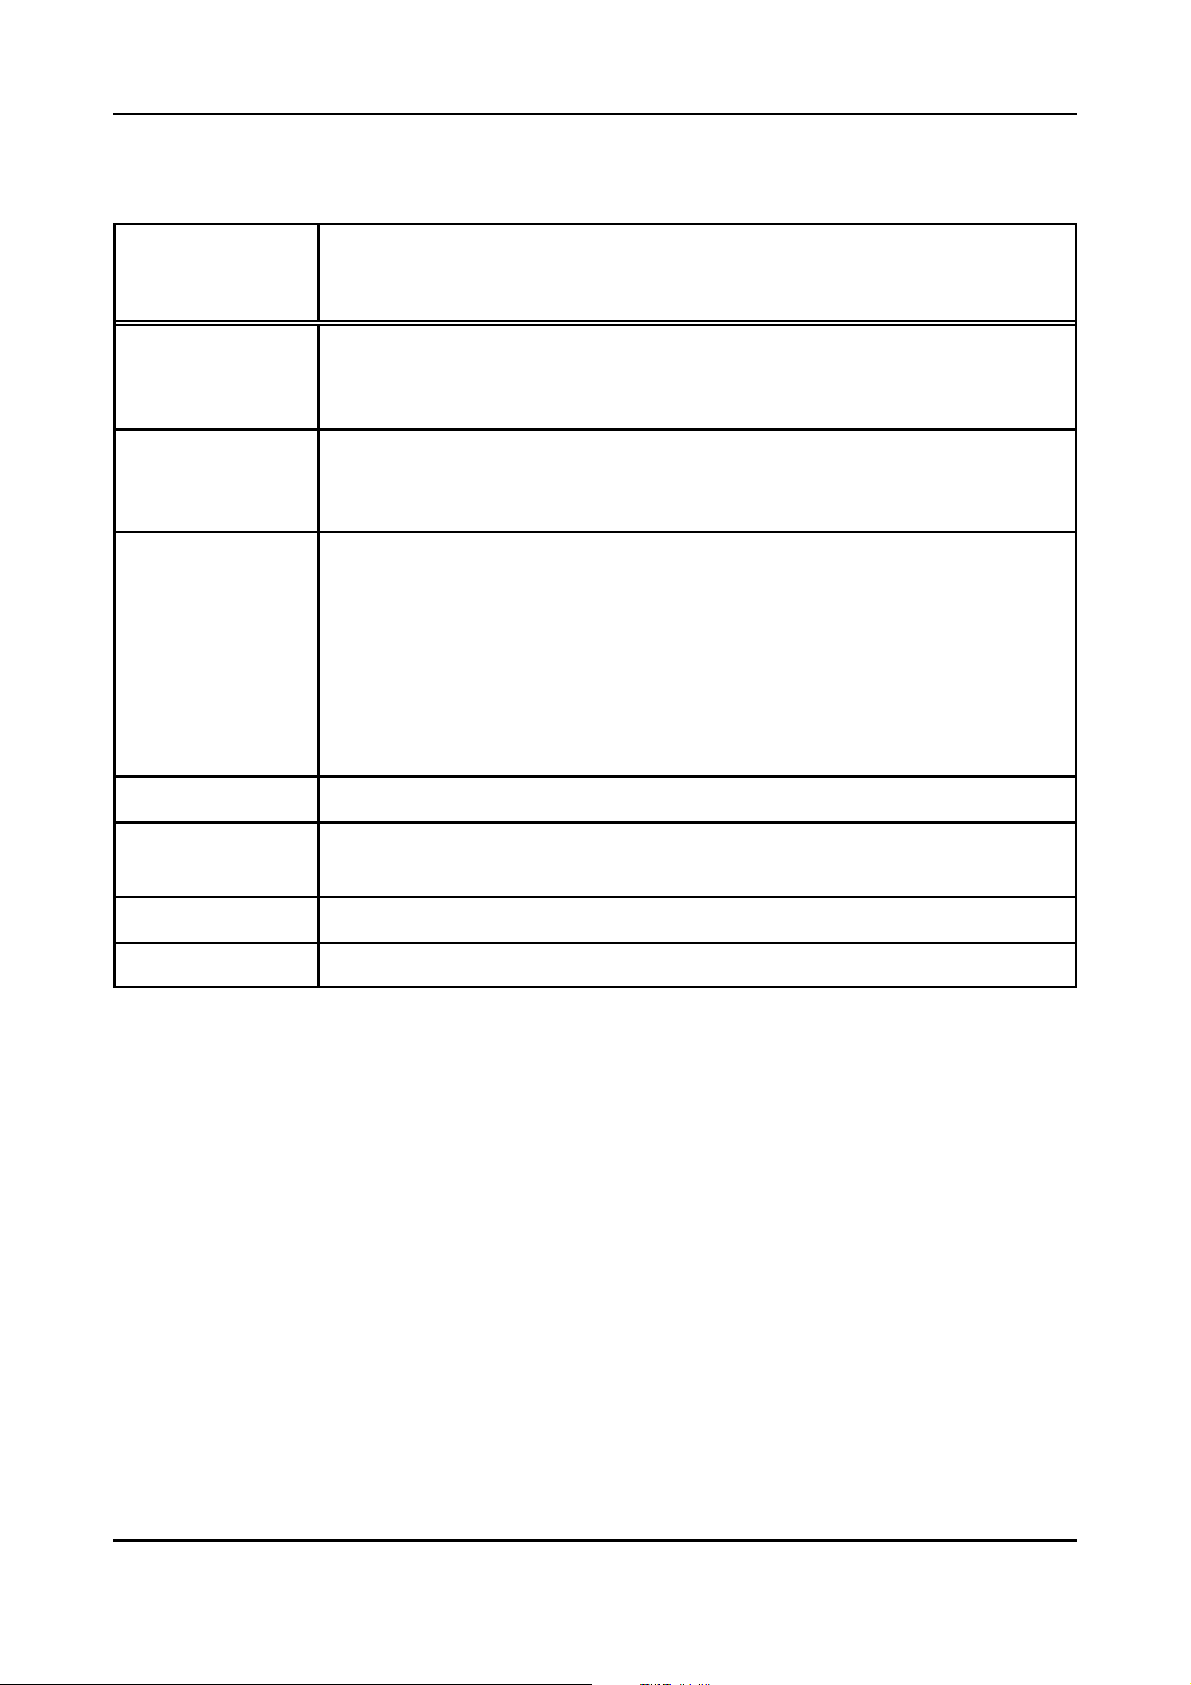
Configuration via SIMATIC Manager
5.3.3.2 Read Bytes of the Communication Window
(command acknowledge and reception of data CAN -> Gateway -> PLC)
Bytes of the
Communication
Window
0
1
2
3
as long as no receive data are available ‘EEEE’ hex, otherwise
high byte of CAN identifier (identifier bits [15] 10...8)
low byte of CAN identifier (identifier bits 7...0)
with 11-bit CAN identifier byte 2 and 3 always ‘0’
with 29-bit CAN identifier byte 2: identifier bits 28...24
Contents
byte 3: identifier bits 23...16
4
5
6
7
8
9
10
11
12 number of received data bytes
13
14 return of the sub command
15 error code of the read function (not supported at the moment)
data byte 0
data byte 1
data byte 2
data byte 3
data byte 4
data byte 5
data byte 6
data byte 7
return of the PLC loop counter which has been transmitted to the gateway
via the last PROFIBUS telegram
Table 5.3.2: Read bytes of the Communication Window
CAN-CBM-DP Software Manual Rev. 2.034
Page 39
Configuration via SIMATIC Manager
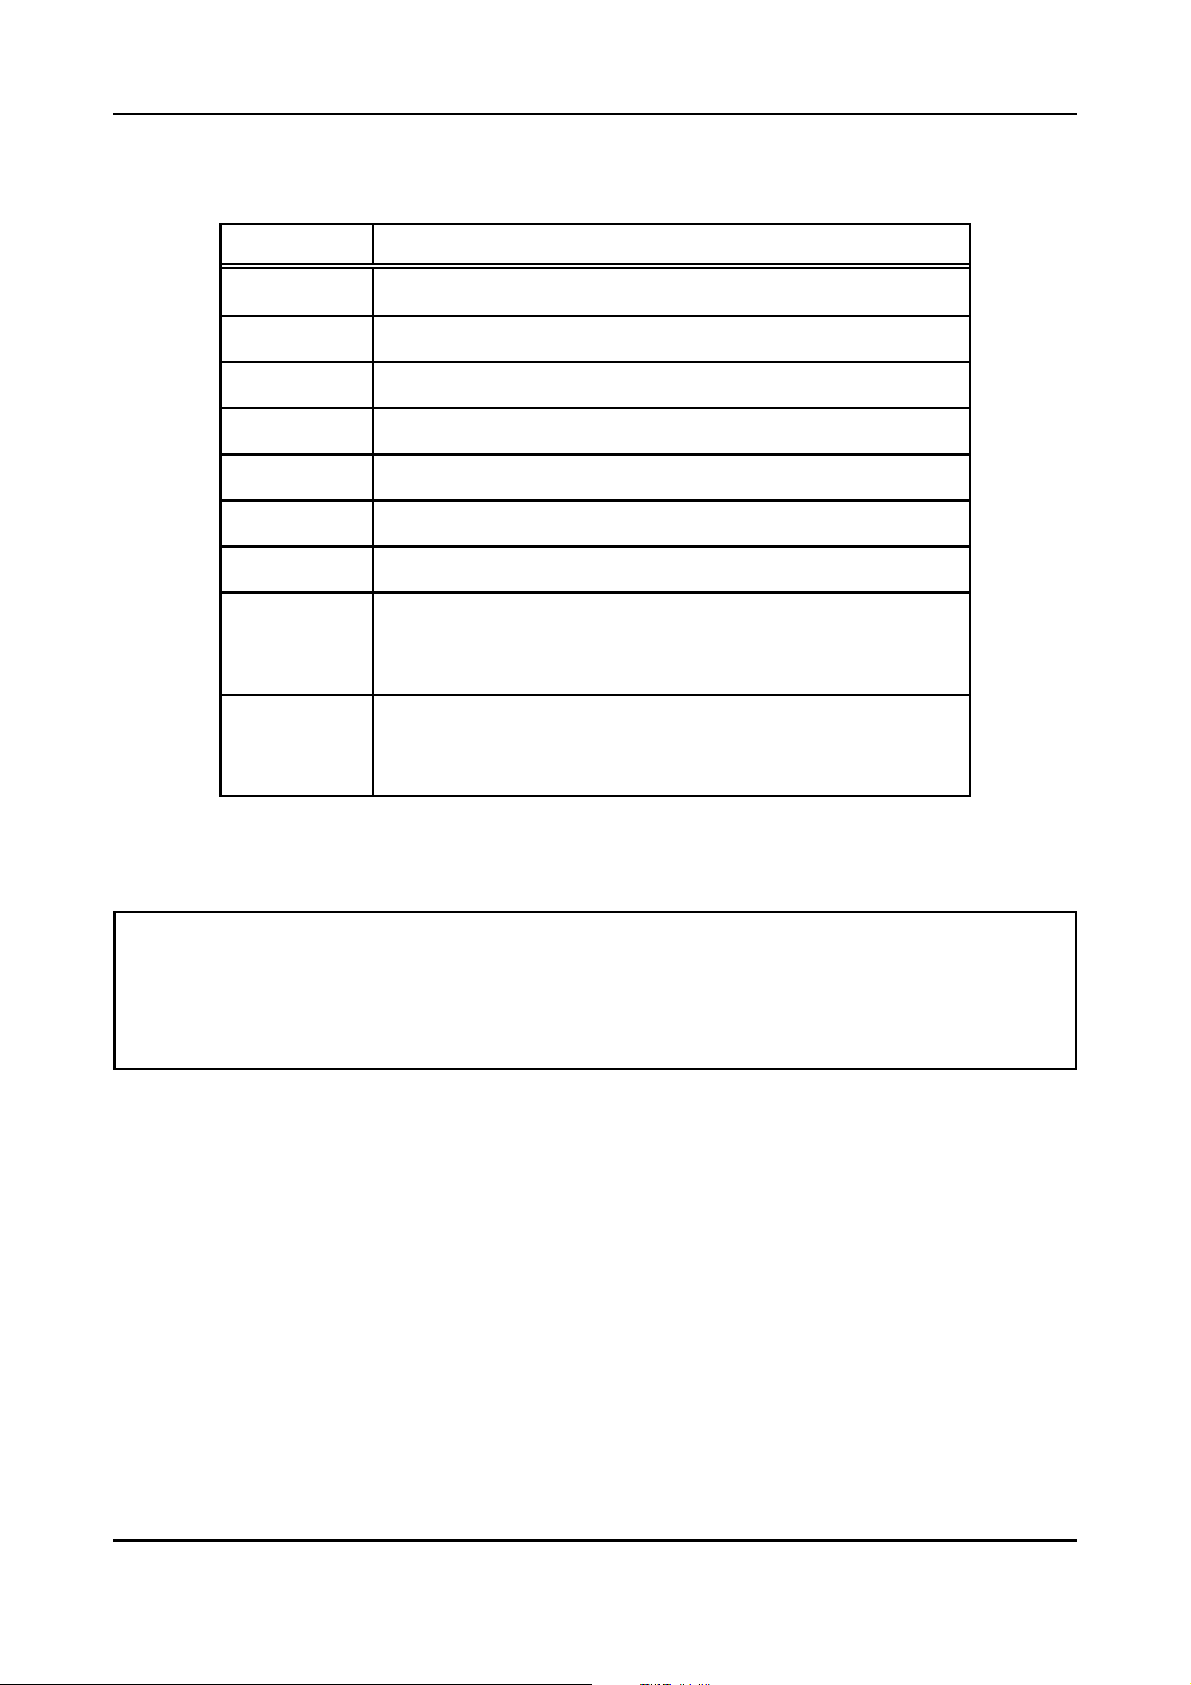
The following table shows commands which are currently being supported. The sub command is
not yet being evaluated and should always be set to ‘0’, therefore.
Command Function
1 transmit data
3 receive data at enabled Rx-identifiers
4 enable Rx-identifier for data reception
5 deactivate reception (command 4)
6 transmits an RTR frame
7 executes command 4 and command 6
(11) (reserved)
If the gateway is configured as CANopen master:
20
Cyclical transmission of the CANopen SYNC command
(ID 80 hex, len = 0)
If the gateway is configured as CANopen master:
21
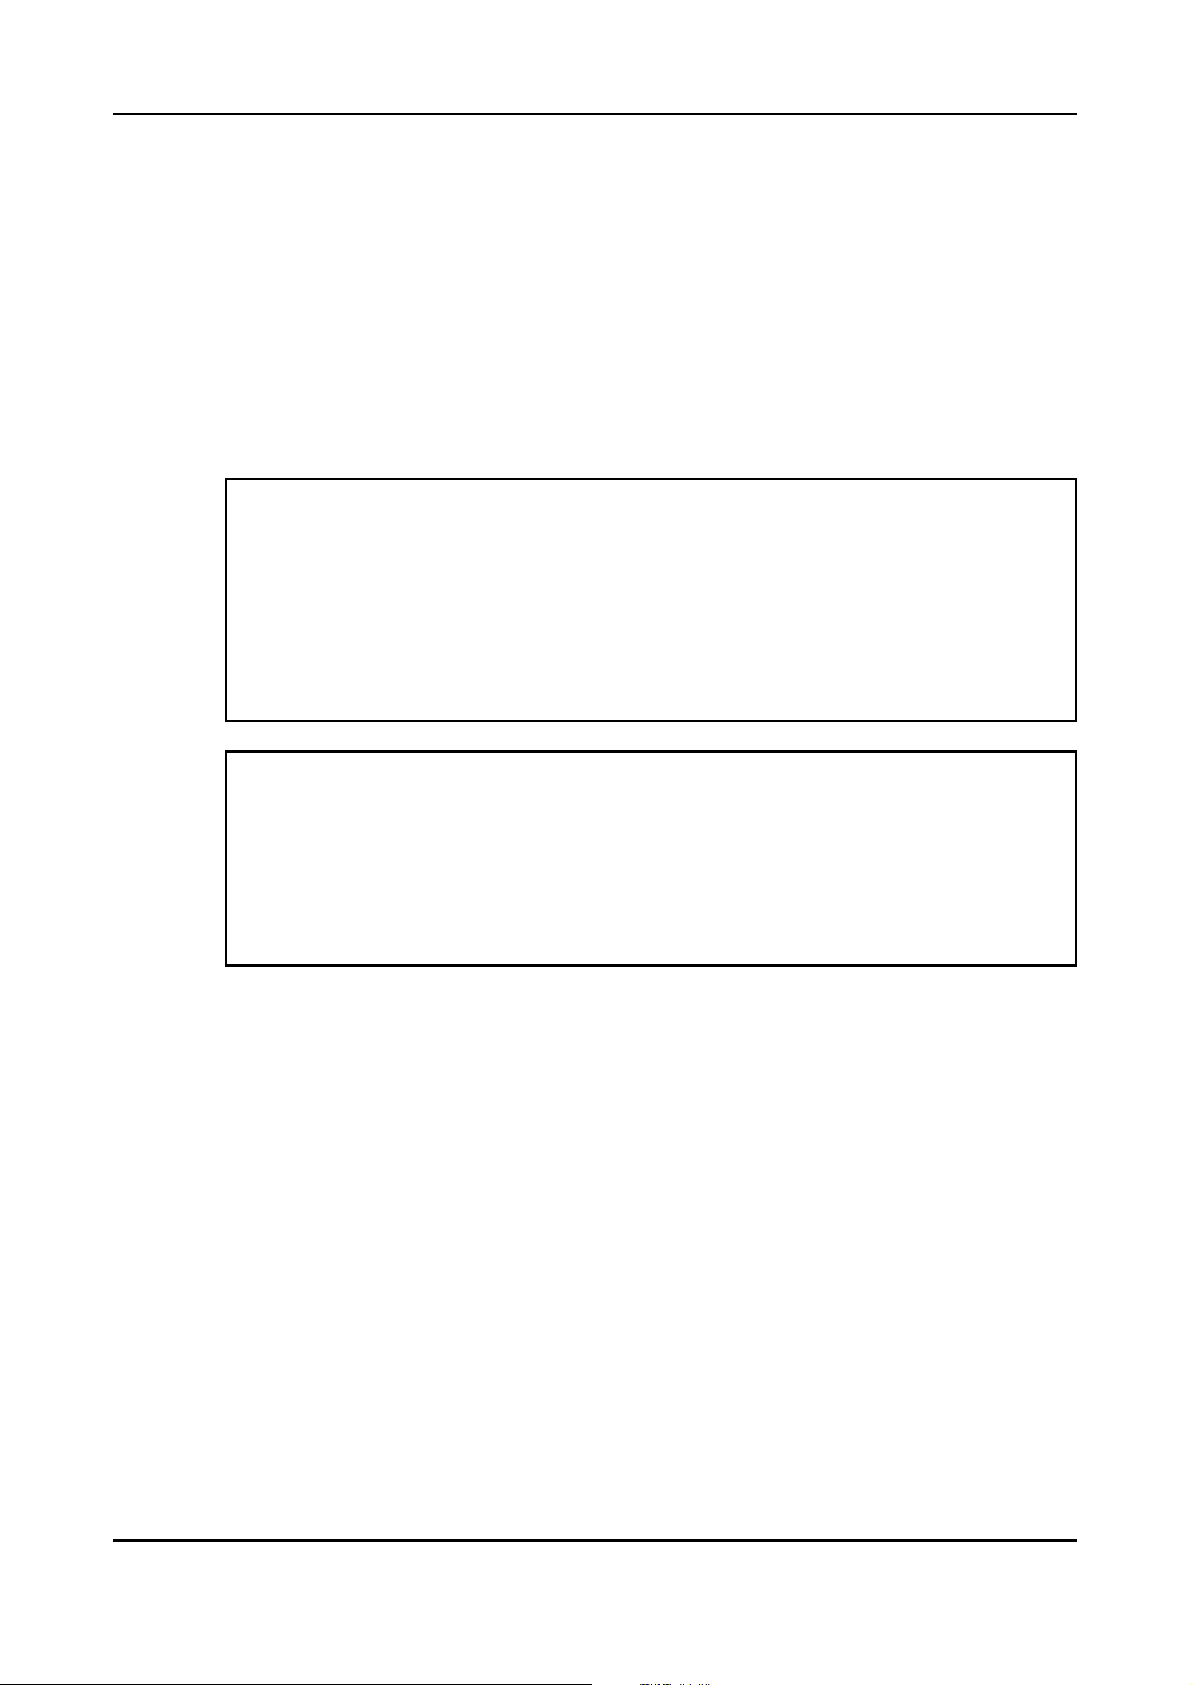
Attention:
A command is only completely processed, if, when reading the Communication Window, byte 13
of the CBM-module provides the value of the PLC-loop counter which was specified during the
command call.
Before the following command is called, it therefore advisable to check byte 13 first!
Explanations to the commands:
Command 1: Send data
In order to send data via the Communication Window the CAN identifier has to be
specified in bytes 0 and 1 (or 0...3 for 29-bit identifiers). In addition to the number of
bytes to be transmitted, a PLC-loop counter has to be specified. The loop counter has to
be realised by the user. It is required to provide the CAN-CBM-gateway with the OB1-
cycle of the PLC.
Cyclical transmission of the CANopen START command
(ID 00 hex, len = 2, data = 0100 hex)
Table 5.3.3 Commands of Communication Window
CAN-CBM-DP Software Manual Rev. 2.0 35
Page 40

Configuration via SIMATIC Manager
Command 3: Reception on enabled Rx-identifiers
The reception of data requires the CAN-Rx-identifiers which are to receive data to be
enabled (see command 4).
After reception command 3 has been written, read accesses to the Communication
Window will give you the data structure shown on page 34. The Rx-data is received
asynchronously to the PLC-cycle. Until valid data has been received you will be returned
the value ‘EEEE’ hex in the first bytes in read accesses. Only after valid data has been
received the Rx-identifier of the read frame in the first bytes becomes readable. In
addition, the read command which requested the reception of data is assigned by means of
the returned PLC-loop counter in byte 13.
The module has got a FIFO-memory for 255 CAN-frames to buffer the received Rx-data.
If several Rx-frames are to be received on one Rx-identifier, or if frames of various Rx-
identifiers enabled for reception are received, the data is not lost, as long as the PLC reads
out the FIFO memory quicker than it is being filled.
Command 4: Enabling Rx-identifiers for reception
By means of this command the Rx-identifier whose data is to be received has to be
enabled. More than one Rx-identifier can be enabled at the same time. For this, the
command has to be called an according number of times.
Command 5: Deactivate reception (command 4)
After this command has been called no data is received any longer on the specified Rx-
identifiers.
Command 6: Sending an RTR-frame
By means of this command a remote-request frame is transmitted. Prior to the
transmission the reception on the Rx-identifier has to be enabled by command 4.
Command 7: Executes command 4 and command 6
See there.
CAN-CBM-DP Software Manual Rev. 2.036
Page 41
Configuration via SIMATIC Manager
Command 20, 21: Cyclical transmission of the CANopen commands SYNC or START
The CAN-CBM-DP module can cyclically transmit the commands SYNC and START for
simple CANopen applications.
The commands are transmitted as shown in the table above. The cycle is specified e.g in
the properties window in bytes 4 and 5 when the Communication Window is configured
(refer to page 31). The cycle is specified in milliseconds and is used for SYNC as well as
for START.
Value range: 0...FFFE hex (0...65534 ms)
Attention:
In order to guarantee that all CANopen users have received their new data when they
receive the SYNC command, the cyclical transmission command of the SYNC command
cannot interrupt transmission of a DP-telegram on the CAN. That means that the SYNC
command is delayed until the DP-telegram has been transmitted, if its transmission and
the transmission of a SYNC command coincide.
This can result in slight changes of time in the cyclical transmission of the SYNC
command.
Attention:
SYNC Time can be set in three different ways:
1. In the parameter telegram in the DP-properties window (refer to page 25)
2. Via byte 4 and 5 of the Communication window (refer to page 33)
3. Via the configuration tool CICT (refer to page 73)
All three specifications are equal. That means that the last specification is valid!
CAN-CBM-DP Software Manual Rev. 2.0 37
Page 42
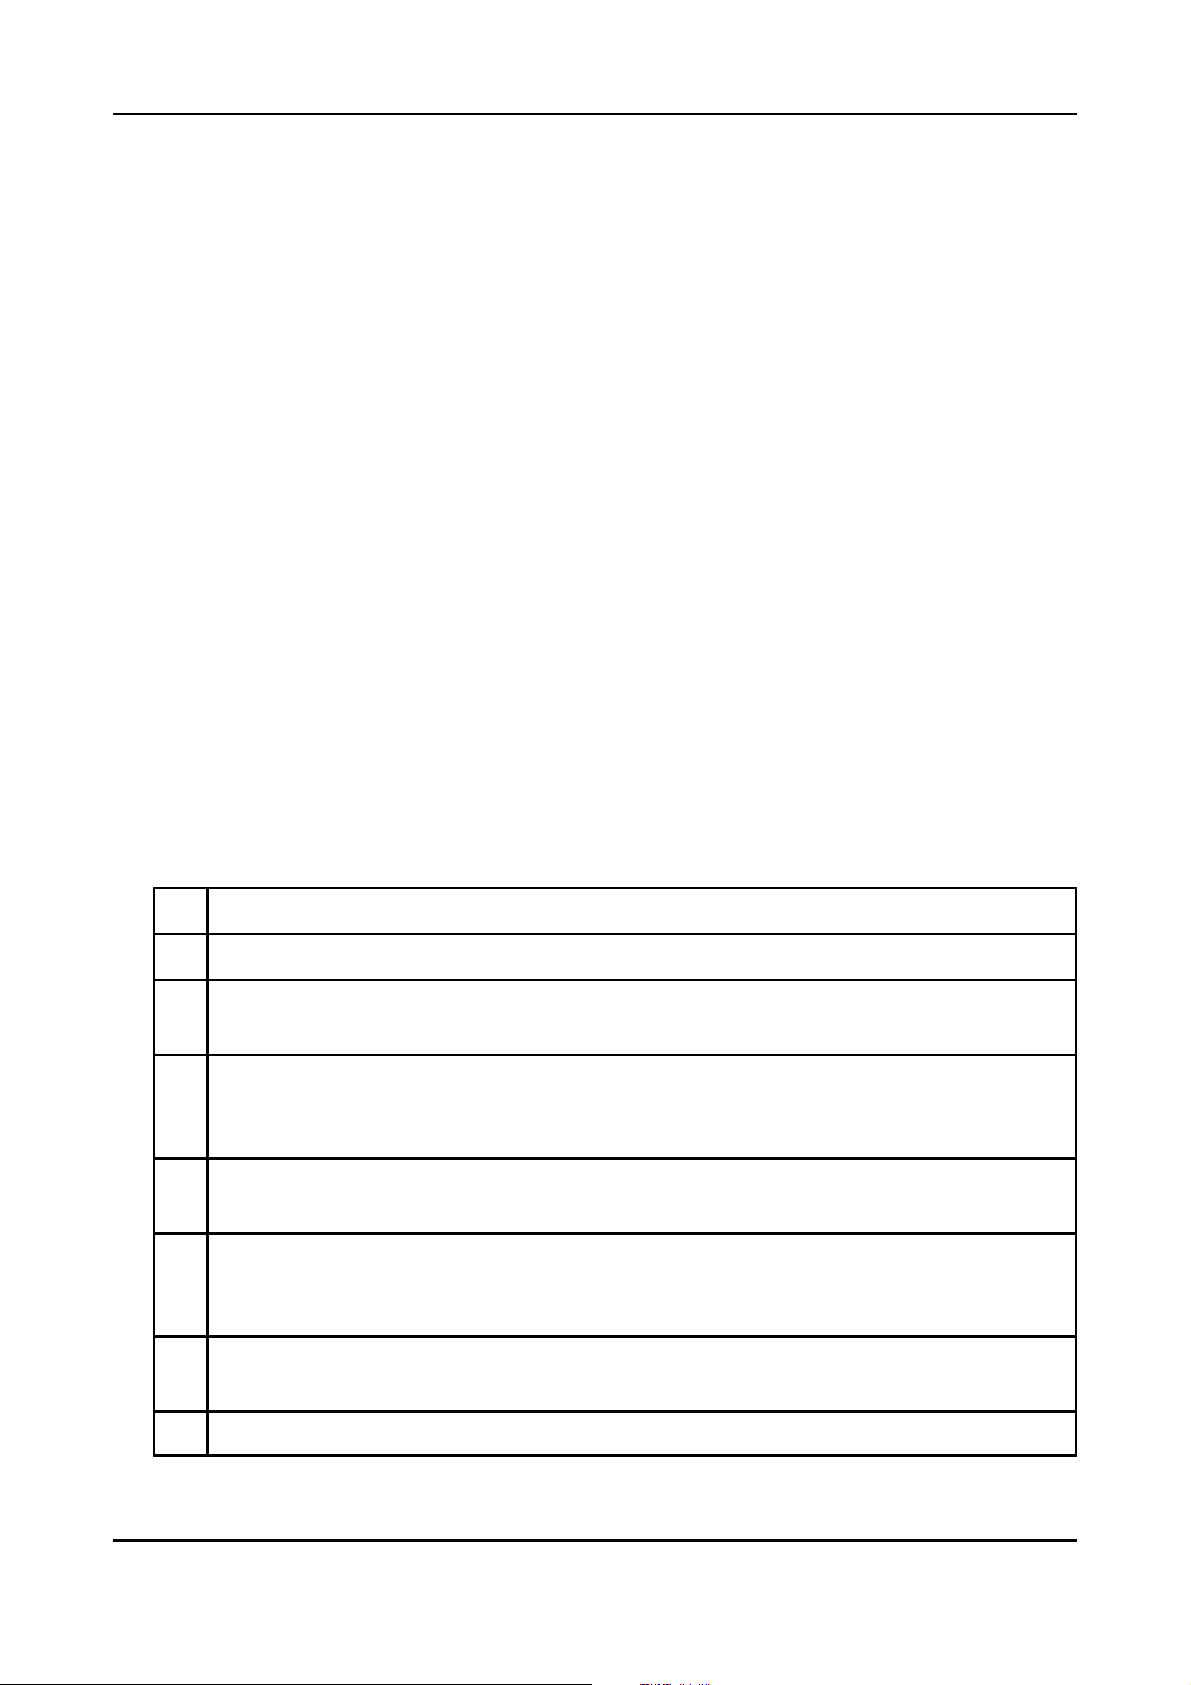
Configuration via SIMATIC Manager
5.3.4 Examples on the Communication Window
5.3.4.1 Transmitting data
1. Basic Setting of the Communication Window
The basic settings have to be made only once when setting up the Communication Window.
1.1 Activating the Communication Window during the configuration of the CBM-gateway (see page
24)
Communication Window: yes
1.2 Definition of the 16 input and output bytes of the Communication Window (see page 33) e.g.
Data direction:
PLC-address: e.g. here: 30
Length: 16 (always)
Unit: byte
Consistently via: entire length!
Identifier: FFEF hexadecimal (always)
Form byte: 00 hexadecimal
input
Data direction:
PLC-address: e.g. here: 30
Length: 16 (always)
Unit: byte
Consistently via: entire length!
Identifier: FFEF hexadecimal (always)
Form byte: 00 hexadecimal
1.3 Program PLC-loop counter
8-bit loop counter for handshake function between PLC and gateway
PLC-Cycle (Pseudo Code):
... ...
1
Read Byte 13 (returned loop counter) of ‘Read Bytes of Communication-Windows’
(refer to page 34)
2
Compare Byte 13 of the ‘Read Bytes of Communication-Windows’ with PLC-loop
counter byte 13 of the ‘Write Bytes of Communication-Windows’(refer to page 33), if
unequal go to 6., if equal go to 3.
output
3
Increase PLC-loop counter (Byte 13) of ‘Write Bytes of Communication-Window’
(refer to page33)
4
Evaluation of ‘Read Bytes of Communication-Windows’ (refer to page 34), i.e. the
evaluation of the answer to the last command or received CAN frame (depending on the
application).
5
Send new ‘Read Bytes of Communication-Window’ (refer to page 33) with increased
loop-counter value of 3. and if necessary new application data.
6 Continue PLC programm (new request at the next programm cycle)
CAN-CBM-DP Software Manual Rev. 2.038
Page 43
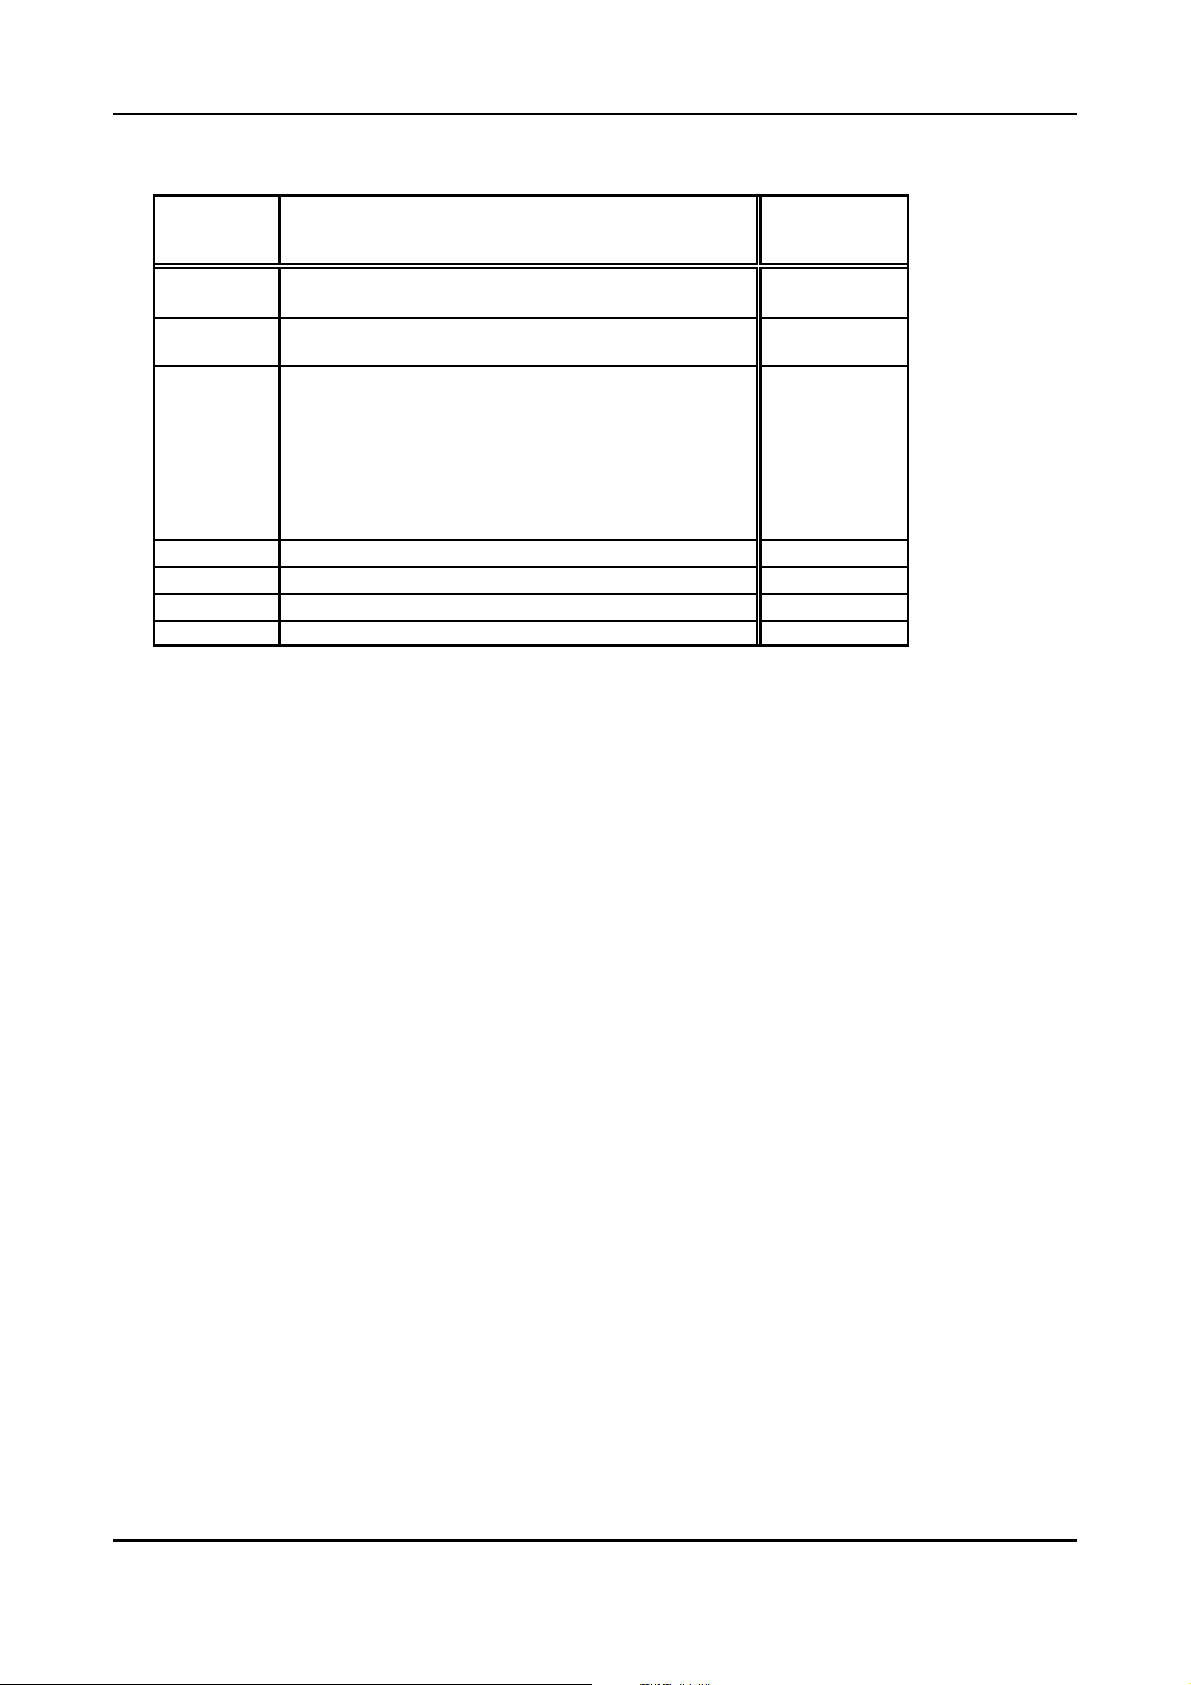
Configuration via SIMATIC Manager
2. Start Transmission Command by Writing the 16 Bytes of the Communication Window
Byte of
Communication
Window
1
2
3
4
5
6
7
8
9
10
11
12 data length for transmission commands
13 PLC-loop counter
14 sub-command (always set to ‘0’)
15 command ‘transmit data’
high byte of CAN-identifier (identifier bit [15] 10...8)
low byte of CAN-identifier (identifier bit 7...0)
bytes 2 and 3 always ‘0’ for 11-bit identifier
data byte 0
data byte 1
data byte 2
data byte 3
data byte 4
data byte 5
data byte 6
data byte 7
Contents
Example here
[hex]
00
12
00
00
00
01
02
03
04
05
06
07
08
8-bit counter
00
01
The data bytes 00, 01, 02, 03, 04, 05, 07 are transmitted on Tx-identifier 0012 hex.
In order to acknowledge the execution of the command a read access to byte 13 of the
Communication Window should follow. It has to have the same value of the PLC-loop counter as
when the command was called.
CAN-CBM-DP Software Manual Rev. 2.0 39
Page 44
Configuration via SIMATIC Manager
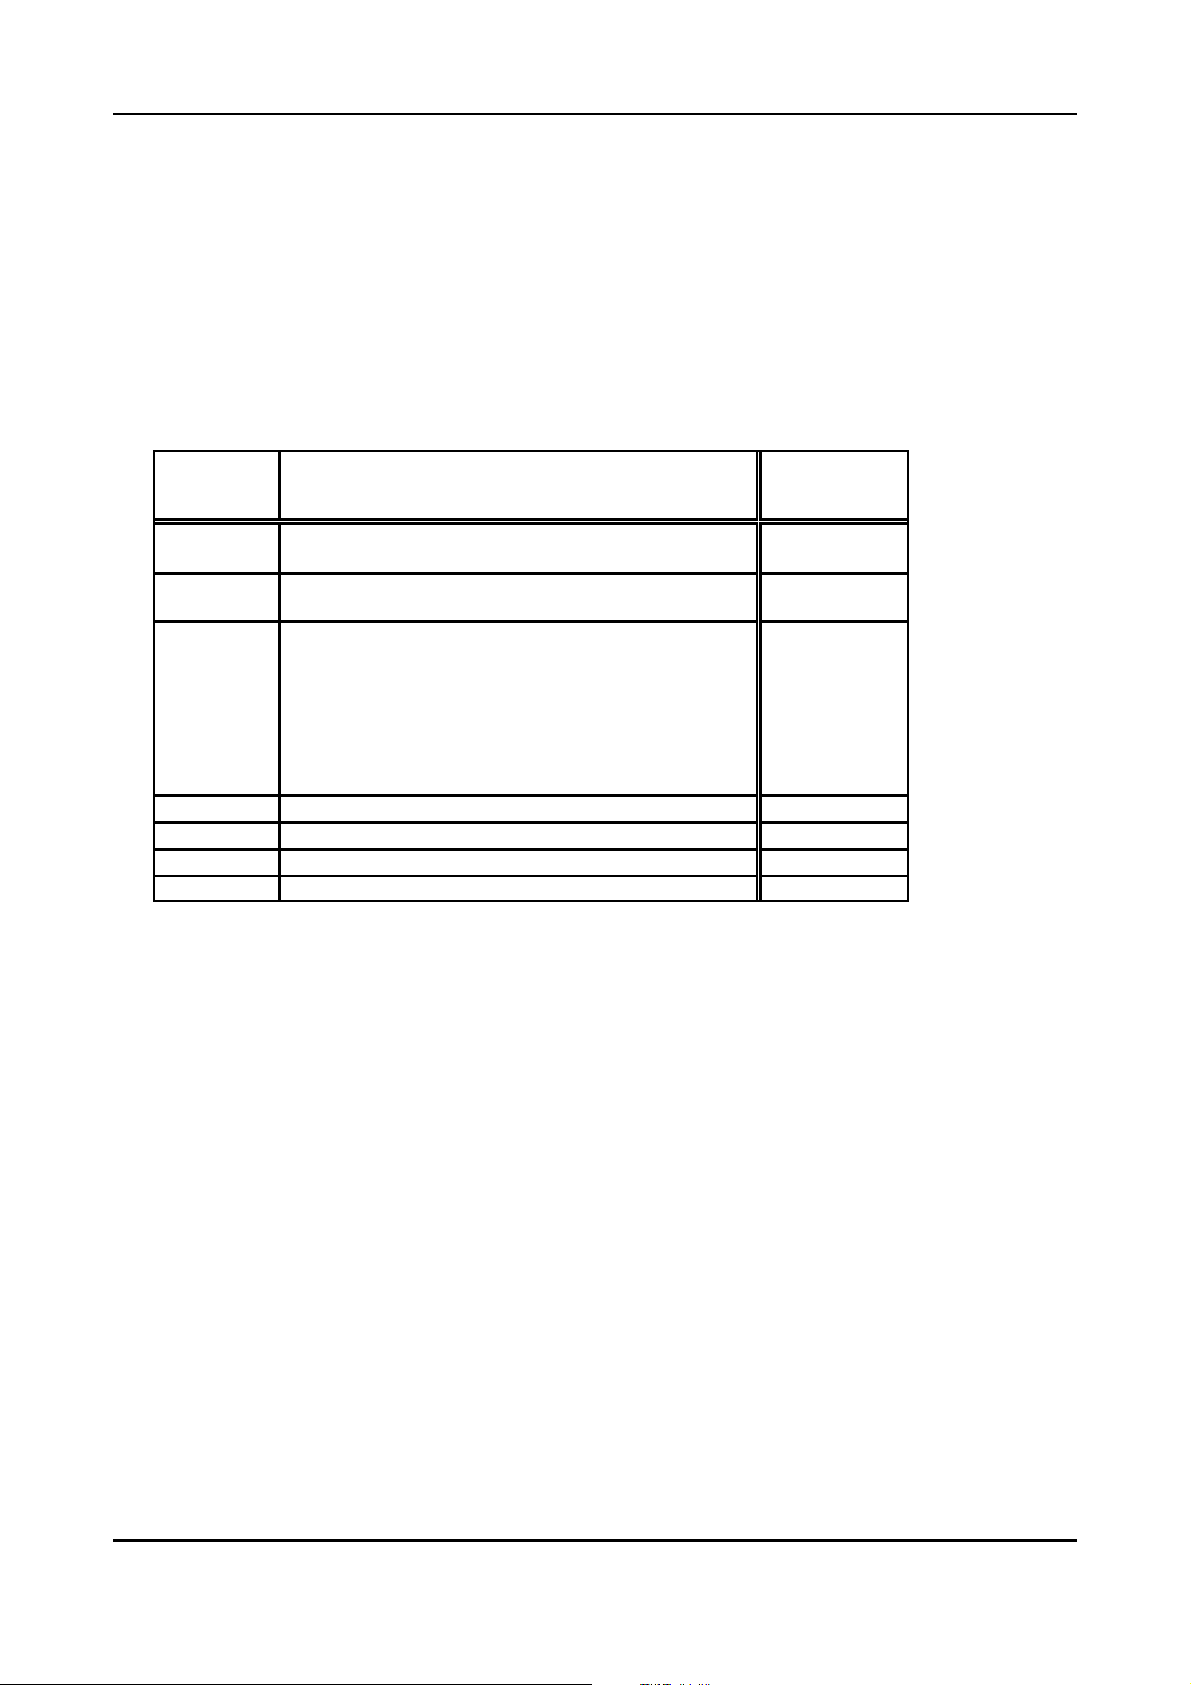
5.3.4.2 Receiving Data
1. Basic Setting of the Communication Window
The basic settings of the Communication Window have already been described in the example
above ‘Transmitting data’.
2. Receiving Data
2.1 Enabling the Rx-identifier for reception
In this example the data of the Rx-identifier 0123 hex are to be received.
Byte of
Communication
Window
1
2
3
4
5
6
7
8
9
10
11
12 data length for transmission command (Tx)
13 PLC-loop counter
14 sub-command (always set to ‘0’)
15 command ‘Enable Rx-Identifier’
high byte of CAN-identifier (identifier bit [15] 10...8)
low byte of CAN-identifier (identifier bit 7...0)
bytes 2 and 3 always ‘0’ for 11-bit identifier
data byte 0
data byte 1
data byte 2
data byte 3
data byte 4
data byte 5
data byte 6
data byte 7
Contents
Example here
[hex]
01
23
00
00
00
00
00
00
00
00
00
00
00
8-bit counter
00
04
In order to acknowledge the execution of the command a read access of byte 13 of the
Communication Window should be made with every command call. It has t o have the same value
of the PLC-loop counter as it had when the command was called.
CAN-CBM-DP Software Manual Rev. 2.040
Page 45
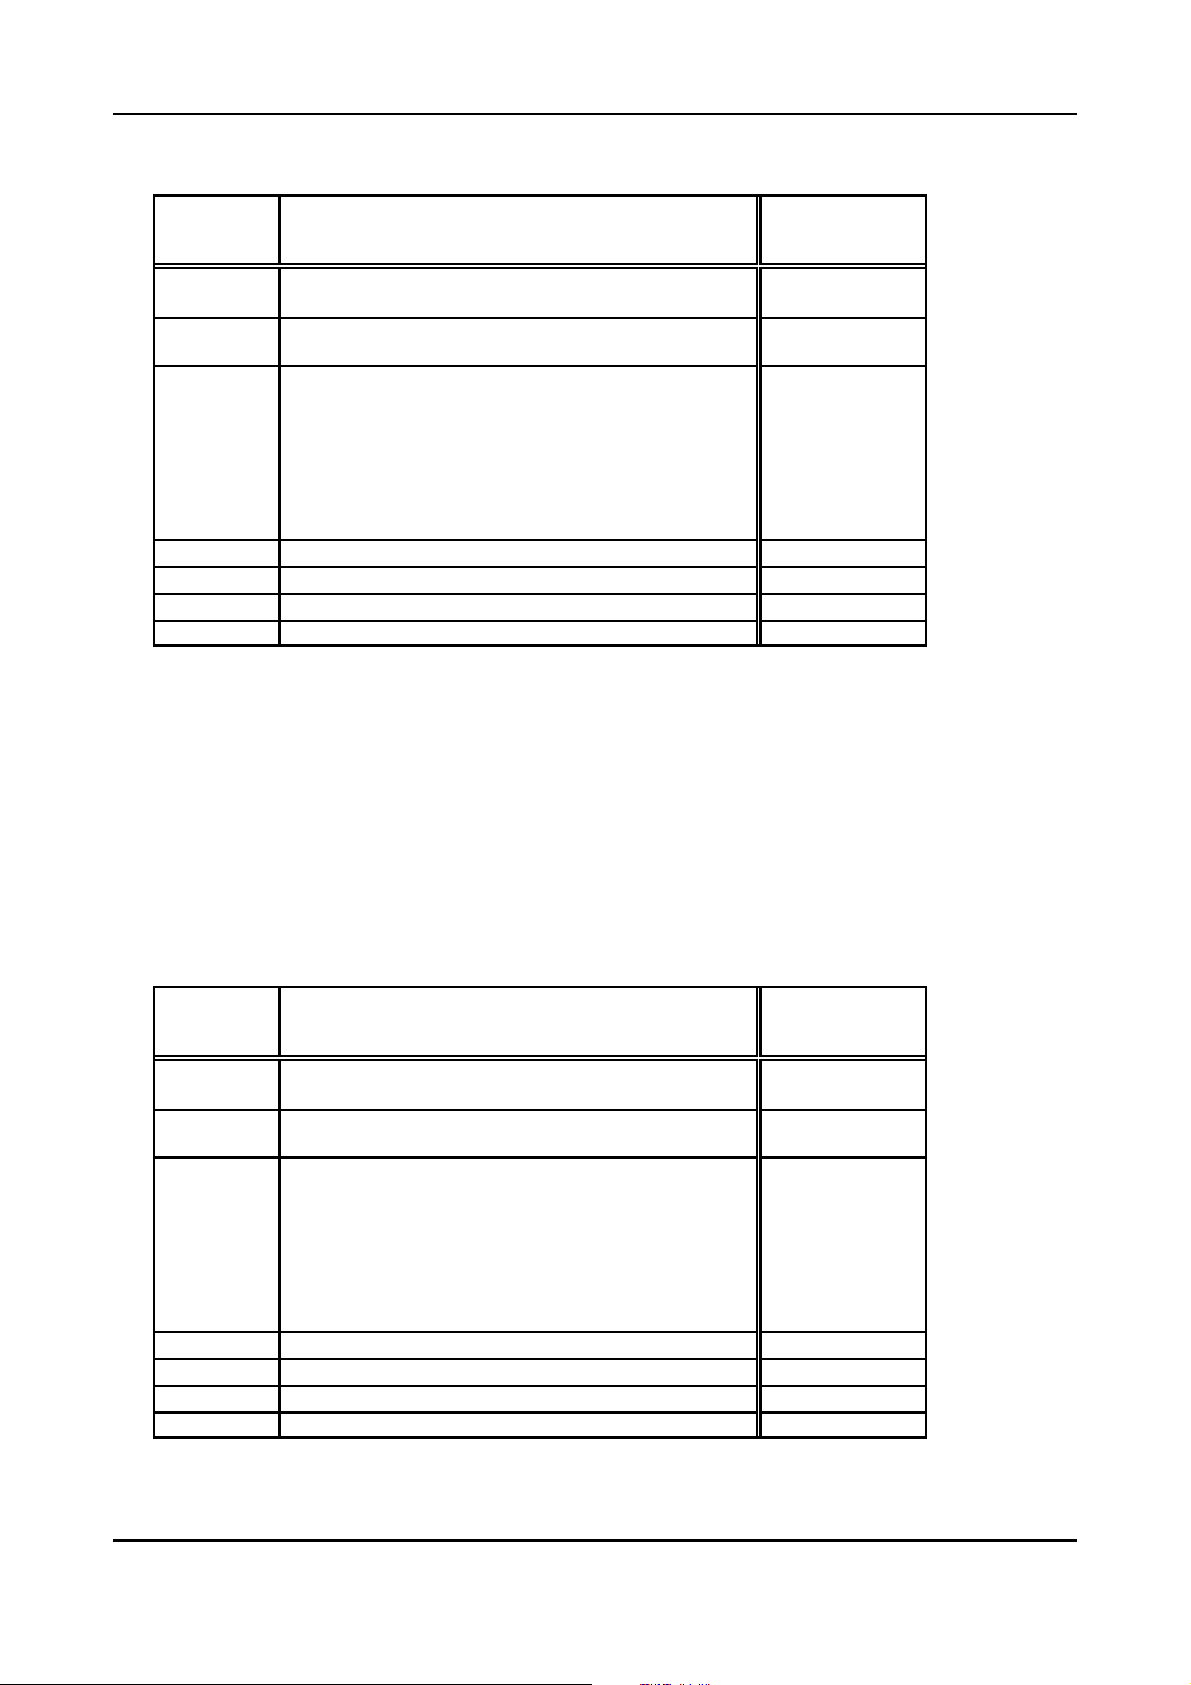
2.2 Initiate reception of data of the enabled Rx-identifier
Configuration via SIMATIC Manager
Byte of
Communication
Window
1
2
3
4
5
6
7
8
9
10
11
12 data length for transmission commands (Tx)
13 PLC-loop counter
14 sub-command (always set to ‘0’)
15 command ‘Read Rx-Identifier’
high byte of CAN-identifier (identifier bit [15] 10...8)
low byte of CAN-identifier (identifier bit 7...0)
bytes 2 and 3 always ‘0’ for 11-bit identifier
data byte 0
data byte 1
data byte 2
data byte 3
data byte 4
data byte 5
data byte 6
data byte 7
Contents
Example here
[hex]
01
23
00
00
00
00
00
00
00
00
00
00
00
8-bit counter + n
00
03
2.3 Reading the data
After an undetermined time the Rx-data is received and can be accessed by reading the
Communication Window. Since the data is received asynchronously to the PLC-cycles the
Communication Window has to be read again and again until the data was received (polling). By
comparing the values of the PLC-loop counter you can determine, whether the data received is the
correct data from the read command.
A read access returns the following bytes:
Byte of
Communication
Window
1
2
3
4
5
6
7
8
9
10
11
12 data length
13 PLC-loop counter
14 returned sub-command (without significance)
15 error code of the read function (without significance)
high byte of CAN-identifier (identifier bit [15] 10...8)
low byte of CAN-identifier (identifier bit 7...0)
bytes 2 and 3 always ‘0’ for 11-bit identifier
received data byte 0
received data byte 1
received data byte 2
received data byte 3
received data byte 4
received data byte 5
received data byte 6
received data byte 7
Contents
Example here
[hex]
01
23
00
00
AA
BB
CC
DD
EE
FF
00
11
08
8-bit counter + n
00
00
CAN-CBM-DP Software Manual Rev. 2.0 41
Page 46
Configuration via SIMATIC Manager
2.2 Deactivate reception of data on this Rx-identifier
If no further data is to be received on this identifier, the reception is to be disabled again.
Byte of
Communication
Window
1
2
3
4
5
6
7
8
9
10
11
12 data length for transmission commands (Tx)
13 PLC-loop counter
14 sub-command (always set to ‘0’)
15 command ‘Disable Rx-Identifier’
high byte of CAN-identifier (identifier bit [15] 10...8)
low byte of CAN-identifier (identifier bit 7...0)
bytes 2 and 3 always ‘0’ for 11-bit identifiers
data byte 0
data byte 1
data byte 2
data byte 3
data byte 4
data byte 5
data byte 6
data byte 7
Contents
Example here
[hex]
01
23
00
00
00
00
00
00
00
00
00
00
00
8-bit counter + m
00
05
CAN-CBM-DP Software Manual Rev. 2.042
Page 47
Page Mode
6. Page Mode
Note: Page Mode can only be used, if the configuration tool Siemens SIMATIC Manager for S7
is used!
6.1 Properties
The Page Mode offers the chance to address more CAN identifiers than can be stored in a PROFIBUS
telegram (that means more than 48). The number of possible identifiers is only limited by the free
memory available on the PLC and the CAN gateway.
By means of the Communication Window, too, more than 48 identifiers can be transmitted. You can
only transmit one CAN frame each per PLC cycle, however, via the Communication Window, therefore
it is generally more suitable for infrequent accesses, such as one-time configurations.
Because of the additional protocol expenditure the handling of the Page Mode is slightly more
complicated than the standard operation of the gateway. The data exchange between PROFIBUS and
CAN requires two cycles instead of one PLC cycle, because of the required handshake.
In order to simplify the handling of the Page Mode, function blocks and data blocks which control the
Page Mode are contained in the package.
6.2 Activation
Before you activate the Page Mode you have to integrate the according functional and data blocks into
your PLC program. Please read the following chapters carefully to get an insight into the mode of
operation and be able to use the contained functional and data blocks according to your demands.
The Page Mode is activated, for instance, via the SIMATIC manager (SIEMENS PLC, S7) during the
configuration of the gateway in the DP-slave properties window (refer to page 24).
6.3 Communication Window in Page Mode
When specifying Communication Window the Communication Window can be activated in the DPsalve properties window while configuring the gateway.
The Communication Window is set up and handled like in normal operation (see page 31). The
Communication Window must be defined in the last segment, however.
Note: Using the Communication Windows (CW) is only useful to configure the connected
CAN-devices. If the connected CAN-devices have been configured, the normal page
mode (PM) is to be preferred
Note: The CAN-CBM-DP-module with the order no. C.2844.05 can handle 29-Bit-CAN-
identifiers. A 29-bit identifier requires four bytes and bit 29 must be set to ‘1’ (counted 0...31
bits), in order to enable the module to distinguish between 11-bit and 29-bit identifiers.
CAN-CBM-DP Software Manual Rev. 2.0 43
Page 48
Page Mode
6.4 Mode of Operation
6.4.1 Overview
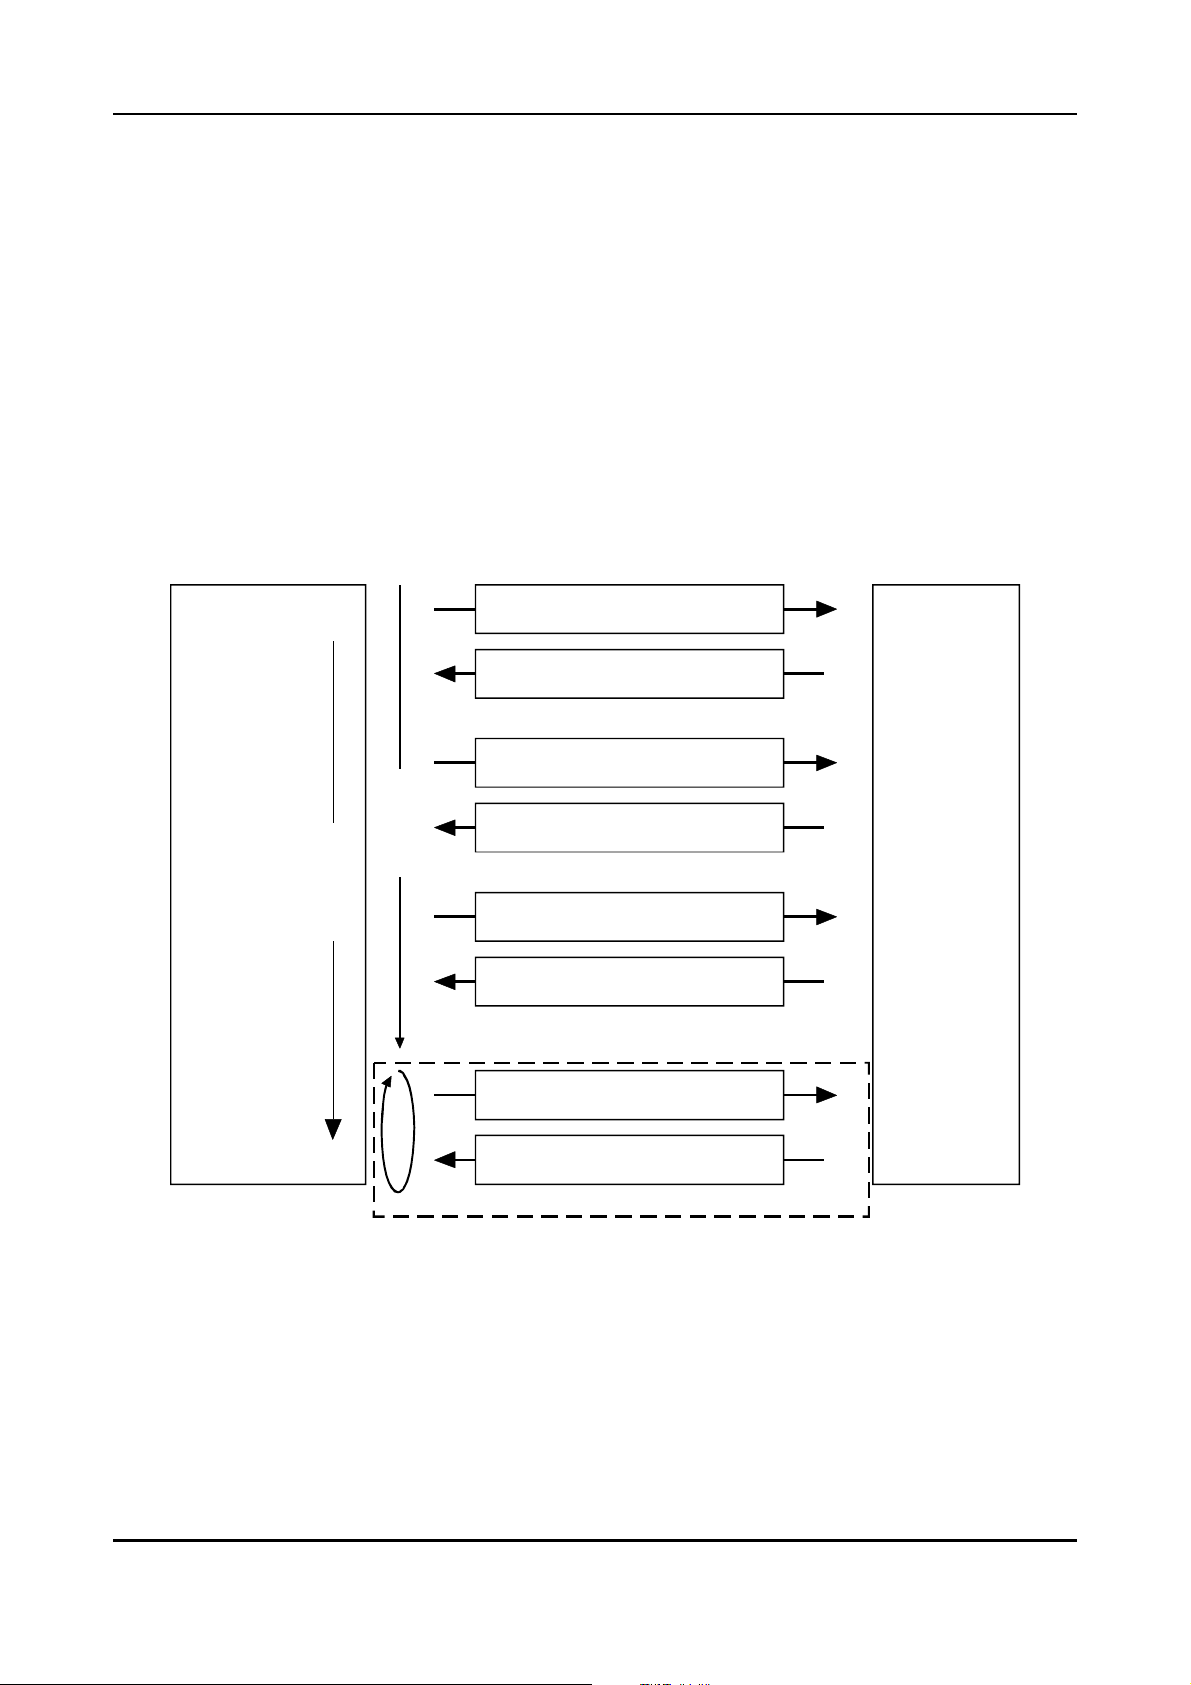
In order to provide more CAN identifiers than can be stored in a PROFIBUS telegram, a protocolcontrolled data exchange between PLC and gateway is necessary.
For the communication so-called pages are defined in which the parameters and data are exchanged.
On PLC side an input and an output area are reserved for the transmission of the pages.
After the system has been started a page with setup data is exchanged between PLC and gateway. In
the following pages the PLC transmits the configuration of the Tx- and Rx-identifiers. These pages
contain the identifier numbers used for the CAN, the number of bytes and information about the data
format.
PROFIBUS-DP
Page 0: Setup
Page 0: Acknowledge of Setup
From Page 51: TxId-Configuration
Page 51: Acknowledge of TxId-Configuration
Single Call
PLC
From Page 151: RxId-Configuration
PLC-Cycles
Page 151: Acknowledge of RxId-Configuration
From Page 251: Tx-Data
From Page 251: Rx-Data
Program Loop
Fig. 6.4.1: Exchange of parameters and data in Page Mode (overview)
CAN
Gateway
If the setup has been completed, data can be exchanged. With each PLC cycle an input and an output
page is transmitted. If more identifiers have to be provided than can be stored in a page, the following
identifiers will be handled in the following PLC cycles. With rising number of identifiers and depending
on the length of data to be transmitted per identifier, more PLC cycles are required, therefore, to
transmit all data. In order to keep the number of PLC cycles low, input and output page should be
selected as large as possible.
CAN-CBM-DP Software Manual Rev. 2.044
Page 49
Page Mode
In an example below, 127 motors are controlled by a SIEMENS SIMATIC S7-PLC. Together these
motors use 127 Tx- and 127 Rx-identifiers. In this example 20 PLC-cycles are needed to supply all
identifiers (20 cycles are required for 10 pages).
The product package contains function blocks (FB) and data blocks (DB) with which the
transmission of the pages can be controlled. Users do not have to program the control of the
pages themselves, therefore !
The FB and DB will be described from page 54.
6.4.2 Definition of PLC-Addresses
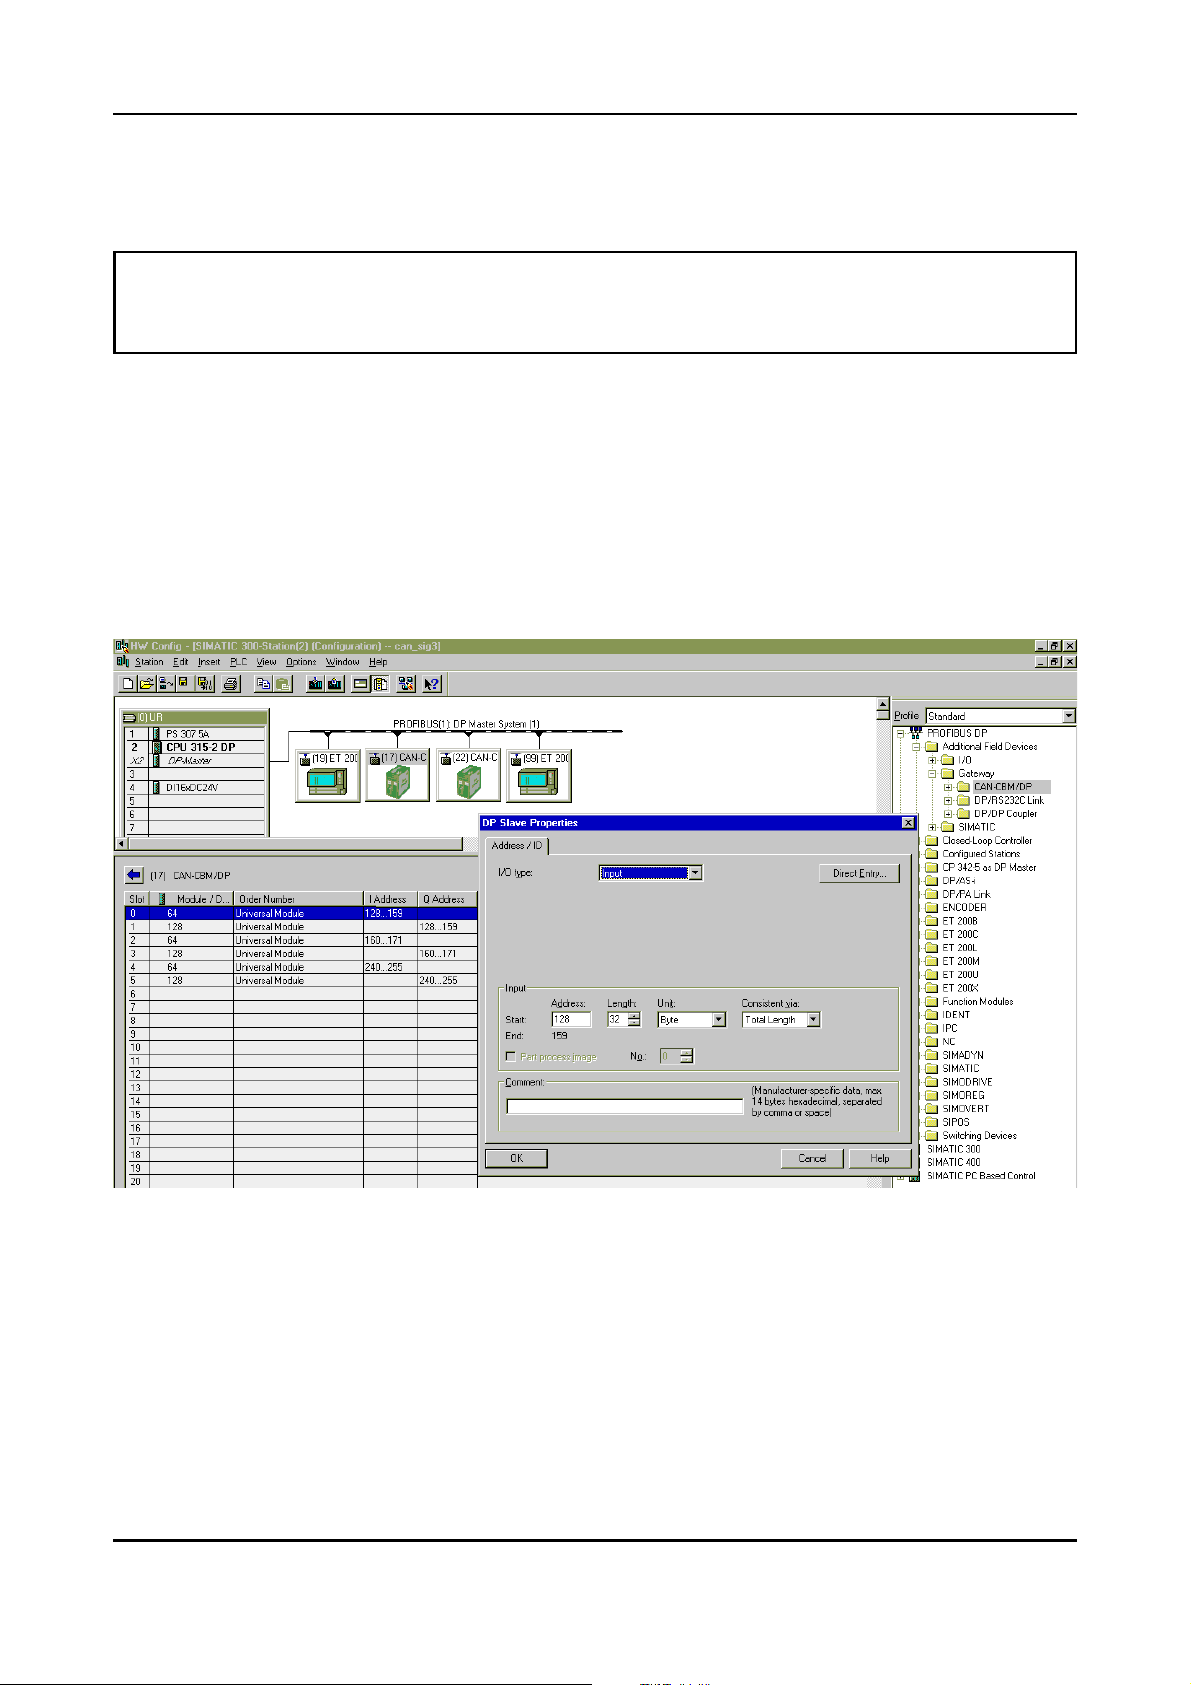
The Page Mode needs input and output addresses. The number of addresses used is limited to the top
only by the PLC. The inputs need at least a page size of 32 bytes so that the setup can be made via page
0 and page 1.
Fig. 6.4.2: Example 1: Configuring the PLC-addresses in Page Mode
CAN-CBM-DP Software Manual Rev. 2.0 45
Page 50
Page Mode
Example 1:
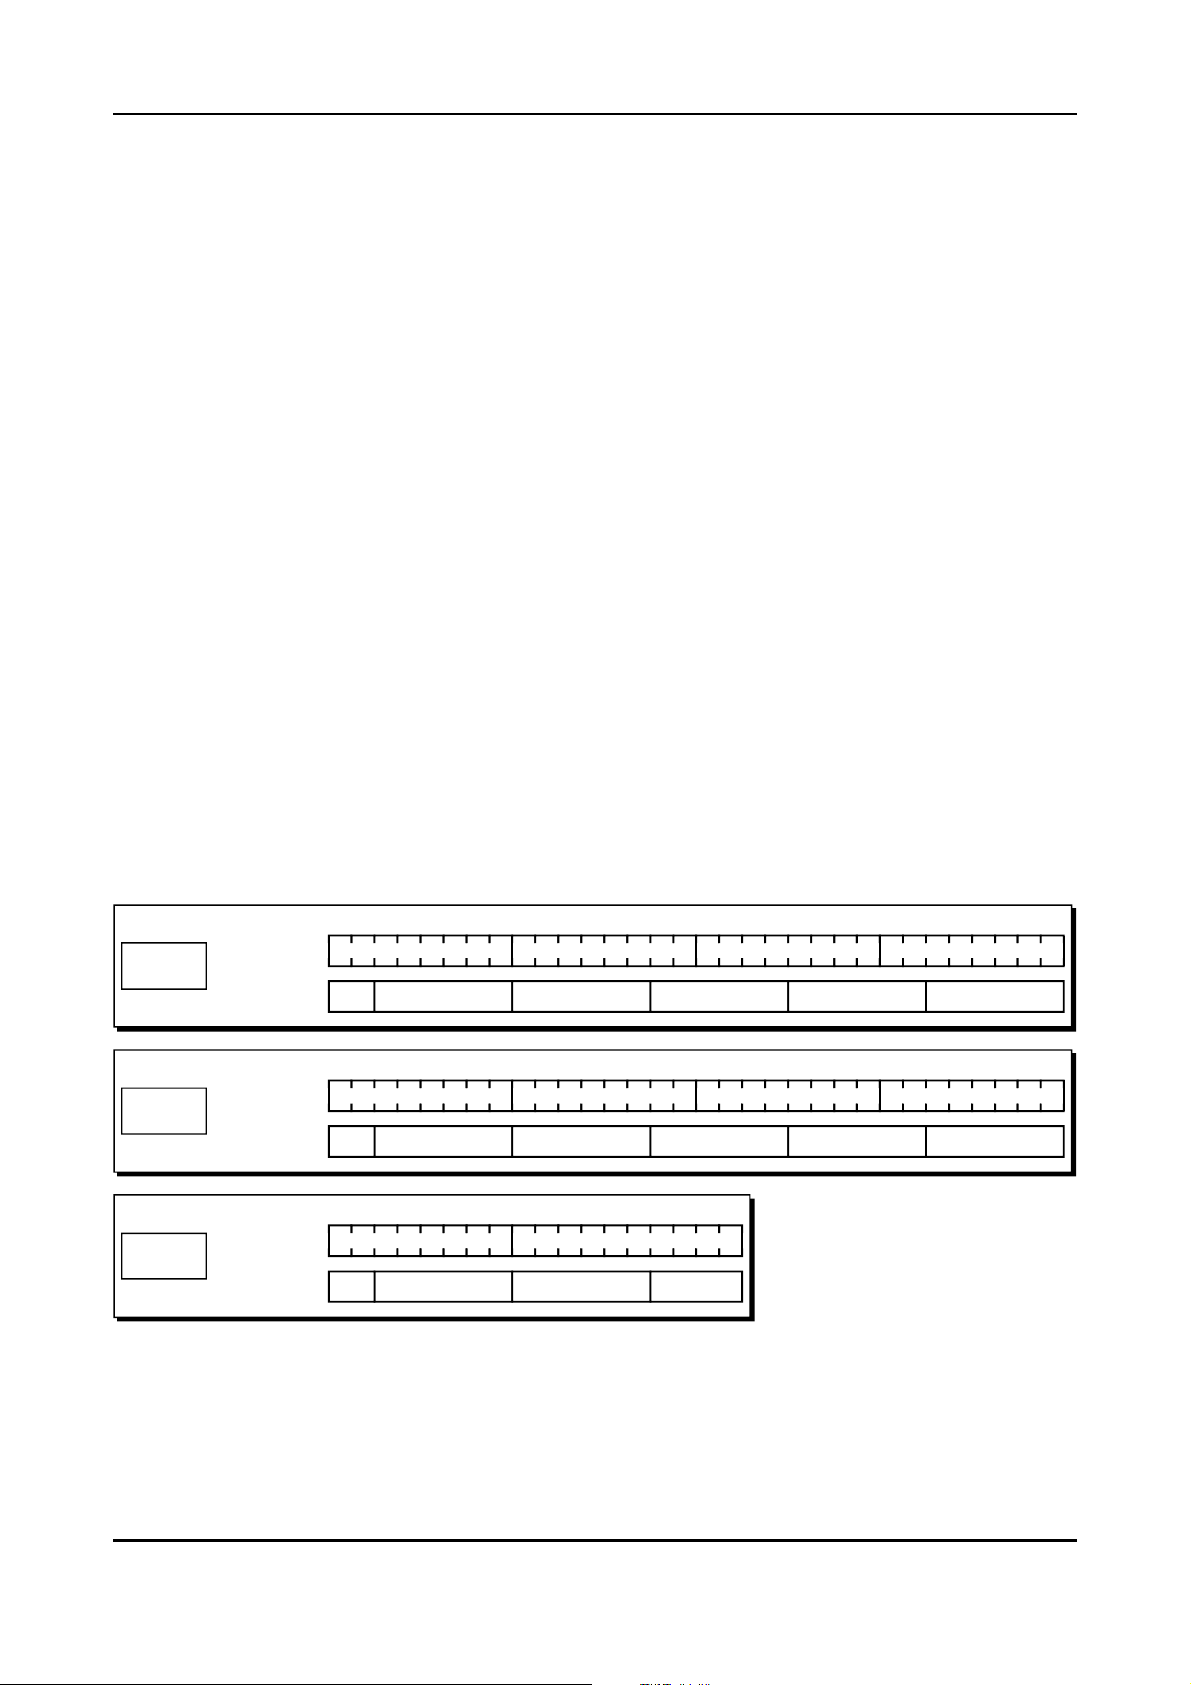
The figure above represents the assignment of a SIMATIC-S7-300 PLC for the Page Mode. 105 bytes
have been specified for the Page Mode and 16 bytes for the Communication Window. With these the
S7-300 is completely occupied, because it offers a maximum of 122 bytes.
Below the specification of a PLC-slot will be called page segment.
In example 1 a data length of 32 bytes for each segment and the consistency for the entire 32 bytes have
been set. The data length has not been chosen larger, because the S7-300 cannot transmit more than 32
bytes consistently. This, however, is absolutely necessary for the Page Mode.
Generally a segment is to be specified with 32 bytes. Given that at least 32 bytes have already been
specified for the input data, it is also permissible to use any length between 0 and 32 bytes for the last
segment. The length of the input data might differ from the length of the output date. It is absolutely
necessary, however, that the input addresses of successive slots are sequentially, and that the output
addresses of successive slots are sequentially.
Example 2:
For the output page 32 bytes have been specified at slot 0 from address 128. Slot 1 has also 32 bytes
and therefore covers addresses 160...191. Slot 2 has only 18 bytes and covers addresses 192...209. A
maximum size of 82 bytes results for the output page.
The following figure shoes the page in the address range of the PLC. For the application example the
assignment with the Tx-configuration page (page 51) has been specified. With a size of 82 bytes 11 Txidentifiers could be configured on one page. In the last four bytes the end identifier is specified. If more
Tx-identifiers are required, Tx-pages 52, 53, etc. are transmitted afterwards.
128 159
Byte:
Byte:
Byte: 8180
1 2 3 4 5 6 7 8 9 10 11 12 13 14 15 160 17 18 19 20 21 22 23 24 25 26 27 28 29 30 31
Page no.
160 191
Page no.
192 209
Page no.
Protocol Dat a Paramet er of Tx-Id 1
33 34 35 36 37 38 39 40 41 42 43 44 45 46 47 4832 49 50 51 52 53 54 55 56 57 58 59 60 61 62 63
Parameter of Tx-Id 5 Parameter of Tx-Id 6 Parameter of Tx-Id 7 Parameter of Tx-Id 8 Parameter of Tx-Id 9
65 66 67 68 69 70 71 72 73 74 75 76 77 78 7964
Para meter of Tx- Id 1 0
Parameter of Tx-Id 11 endconfig
Parameter of Tx-Id 2 Parameter of Tx-Id 3 Parameter of Tx-Id 4
Slot 0
Slot 1
Slot 2
Output Address:
Example: Page 51
(Tx-Configuration)
Output Address:
Example: Page 51
(Tx-Configuration)
Output Address:
Example: Page 51
(Tx-Configuration)
Fig. 6.4.4: Example 2: Output page with a length of 82 bytes
CAN-CBM-DP Software Manual Rev. 2.046
Page 51
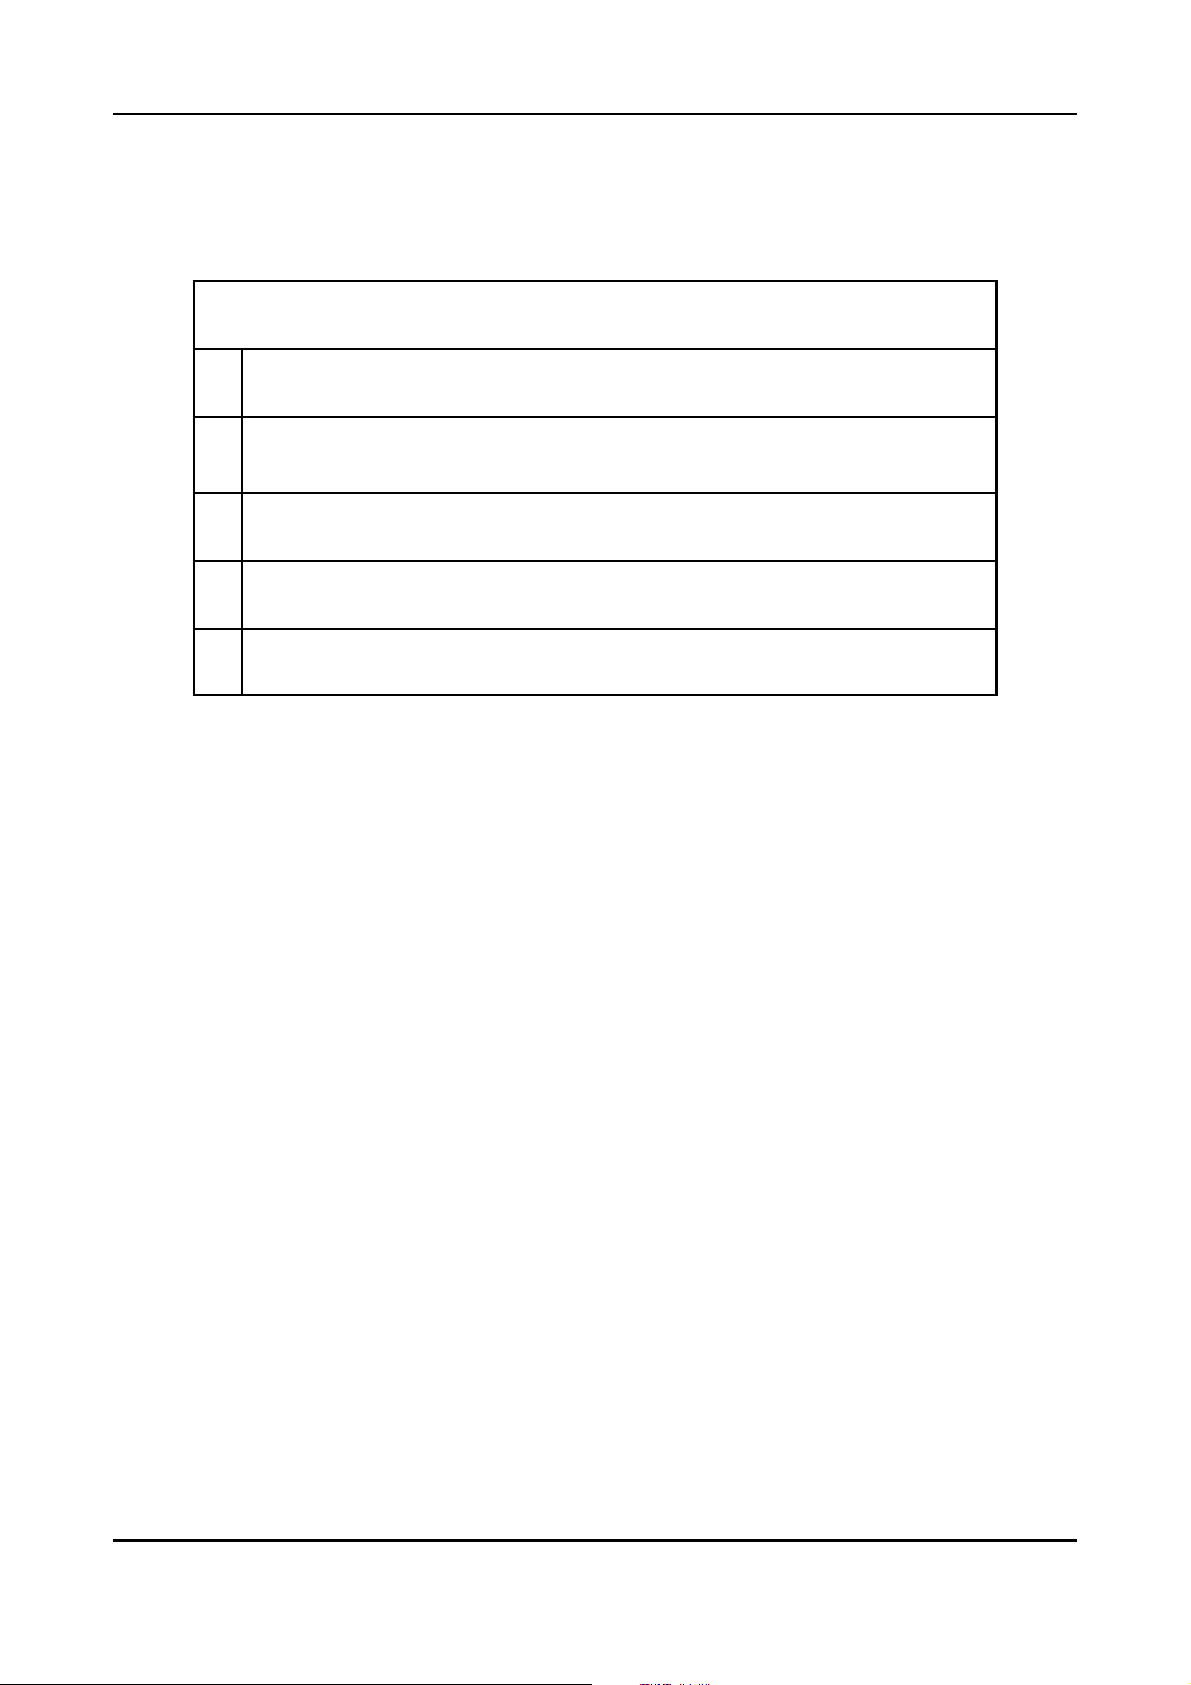
Page Mode
If the Page Mode is used with Communication Window, the Communication Window must be defined
in the segment which is assigned to the last PLC-slot.
The following table summarizes the rules for the assignment of addresses in PLC Page Mode:
Rules for the assignment of addresses in Page Mode
1 Define at least 32 input bytes !
Segment length always = 32 bytes !
2
Exception: last segment d 32 bytes !
3 Consistency over the entire length !
4 Sequential addressing of segments of inputs and outputs !
5 Communication Window into the last two segments (if desired) !
Table 6.4.1: Rules for the assignment of addresses in Page Mode
CAN-CBM-DP Software Manual Rev. 2.0 47
Page 52
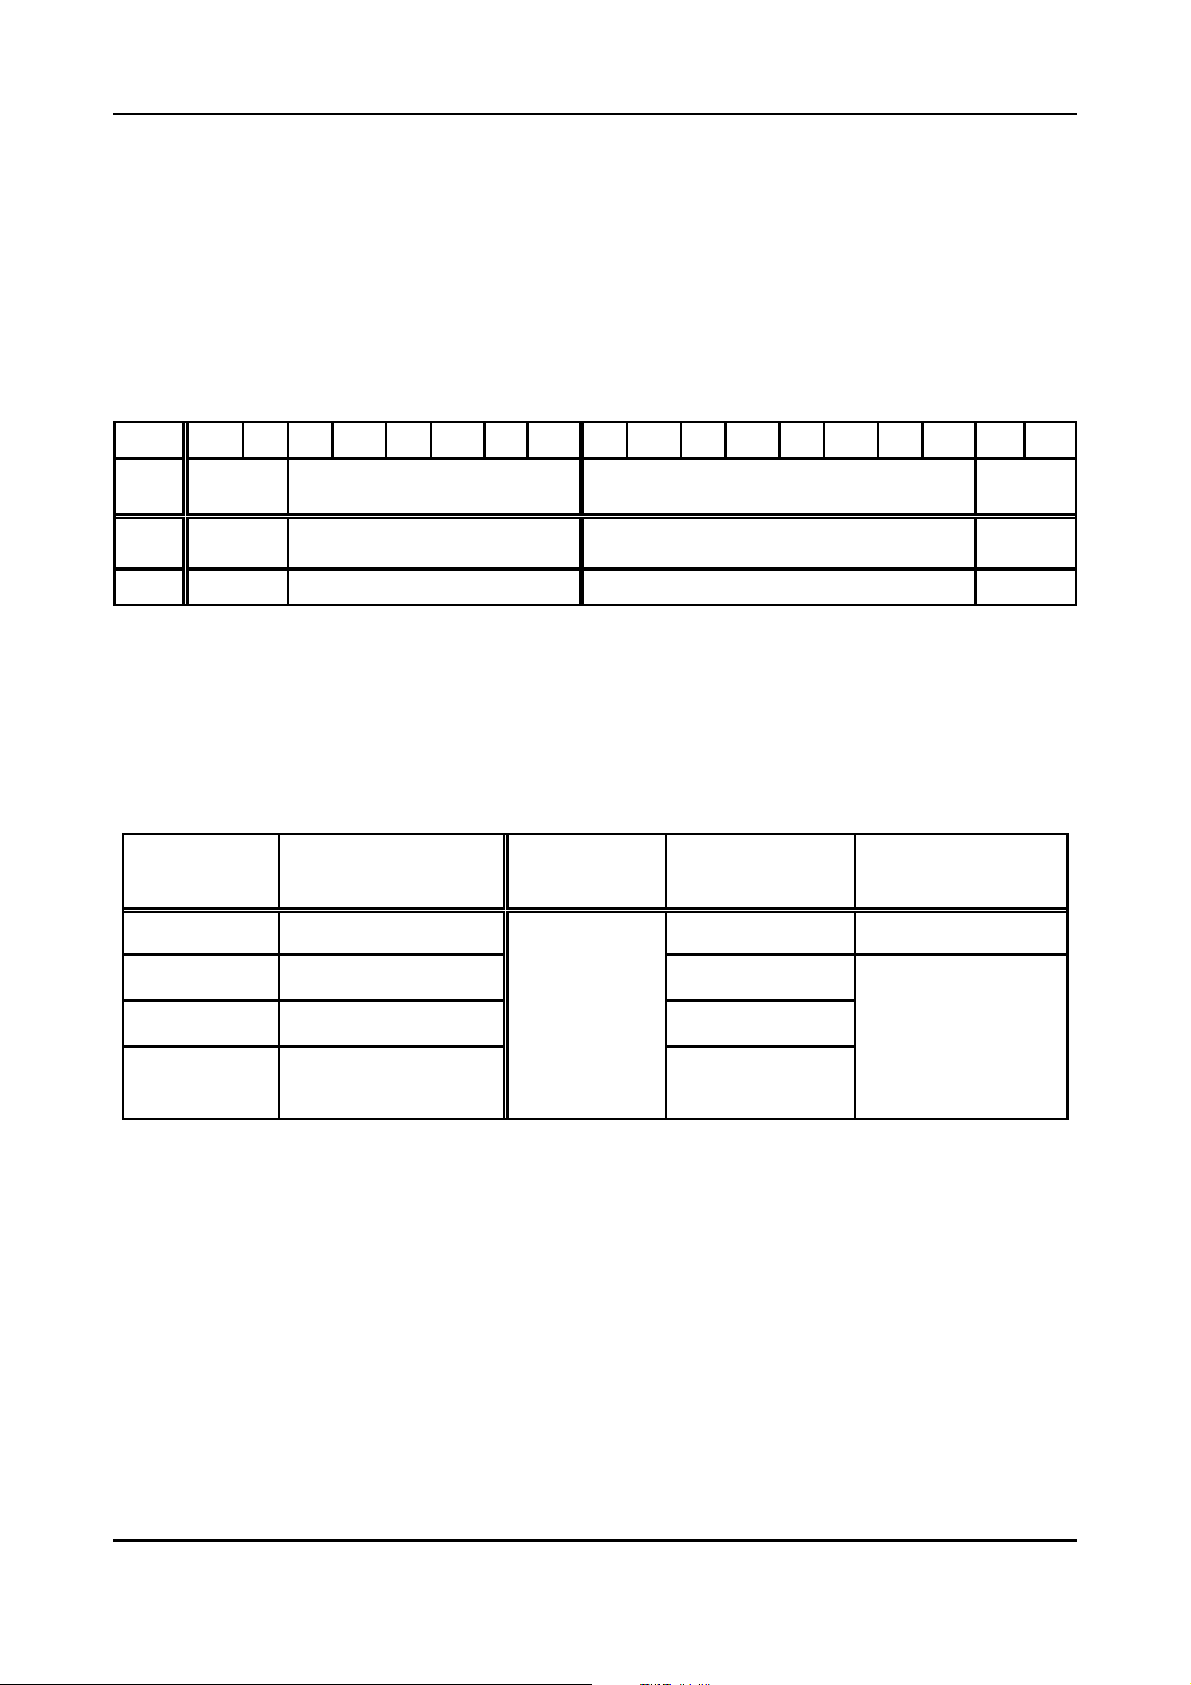
Page Mode
6.4.3 Page Structure
The maximum length of the page depends on the configuration of addresses, made by the user (see page
45).
On all pages the first eight bytes contain information which is required for the protocol-controlled
exchange of pages between PLC and gateway. They are followed by the ‘user data’ of the page. During
configuration this data contains, e.g., the definition of identifiers, during operation the data of the
identifiers.
Byte 0 1 2 3 4 5 6 7 8 9 10 11 12 13 14 15 16 ...
Length
[bytes]
Content page no. protocol data
Example 51 ... e.g. Tx-identifier definition ...
2 6 depending on page no. ...
user data
...
Table 6.4.2: Structure of pages
The first two bytes of each segment of a page specify the page number. The page number marks the
page to be transmitted and the type of page. The following table shows the page numbers, page types
and the functional and data blocks which are available.
Page number Page type
0 setup page
Function
block
Data block
-0
Formal operand
ENABLE
51...150 Tx-configuration DB94
151...250 Rx-configuration DB95
t 251
data exchange
FB2
1
output: DB96
input: DB97
Table 6.4.3: Overview of pages
The contents of bytes 3 to 7, the ‘protocol data’ will not be referred to. Please use the function block
(FB2) contained in the product package to control the transmission of pages. It contains the commands
required for the protocol control.
The following chapters will describe the page types.
CAN-CBM-DP Software Manual Rev. 2.048
Page 53

Page Mode
6.4.4 Setup via Page 0 and 1
After the system has been started, the gateway has to transmit the length of the previously configured
page to the PLC. This is made by means of the so-called page 1.
For this the PLC has to transmit page 0 to the gateway first. The gateway then returns the setup data
in page 1.
The product package contains a function block which is responsible for the transmission and reception
of pages 0 and 1 (FB2). We recommend that you use this function block. If you use function block FB2,
you do not have to configure further parameters.
The setup requires some time. Therefore it is recommendable to delay the transmission of the next page
for about 5 sec. It is, for example, possible to program a PLC timer which considers the delay.
CAN-CBM-DP Software Manual Rev. 2.0 49
Page 54
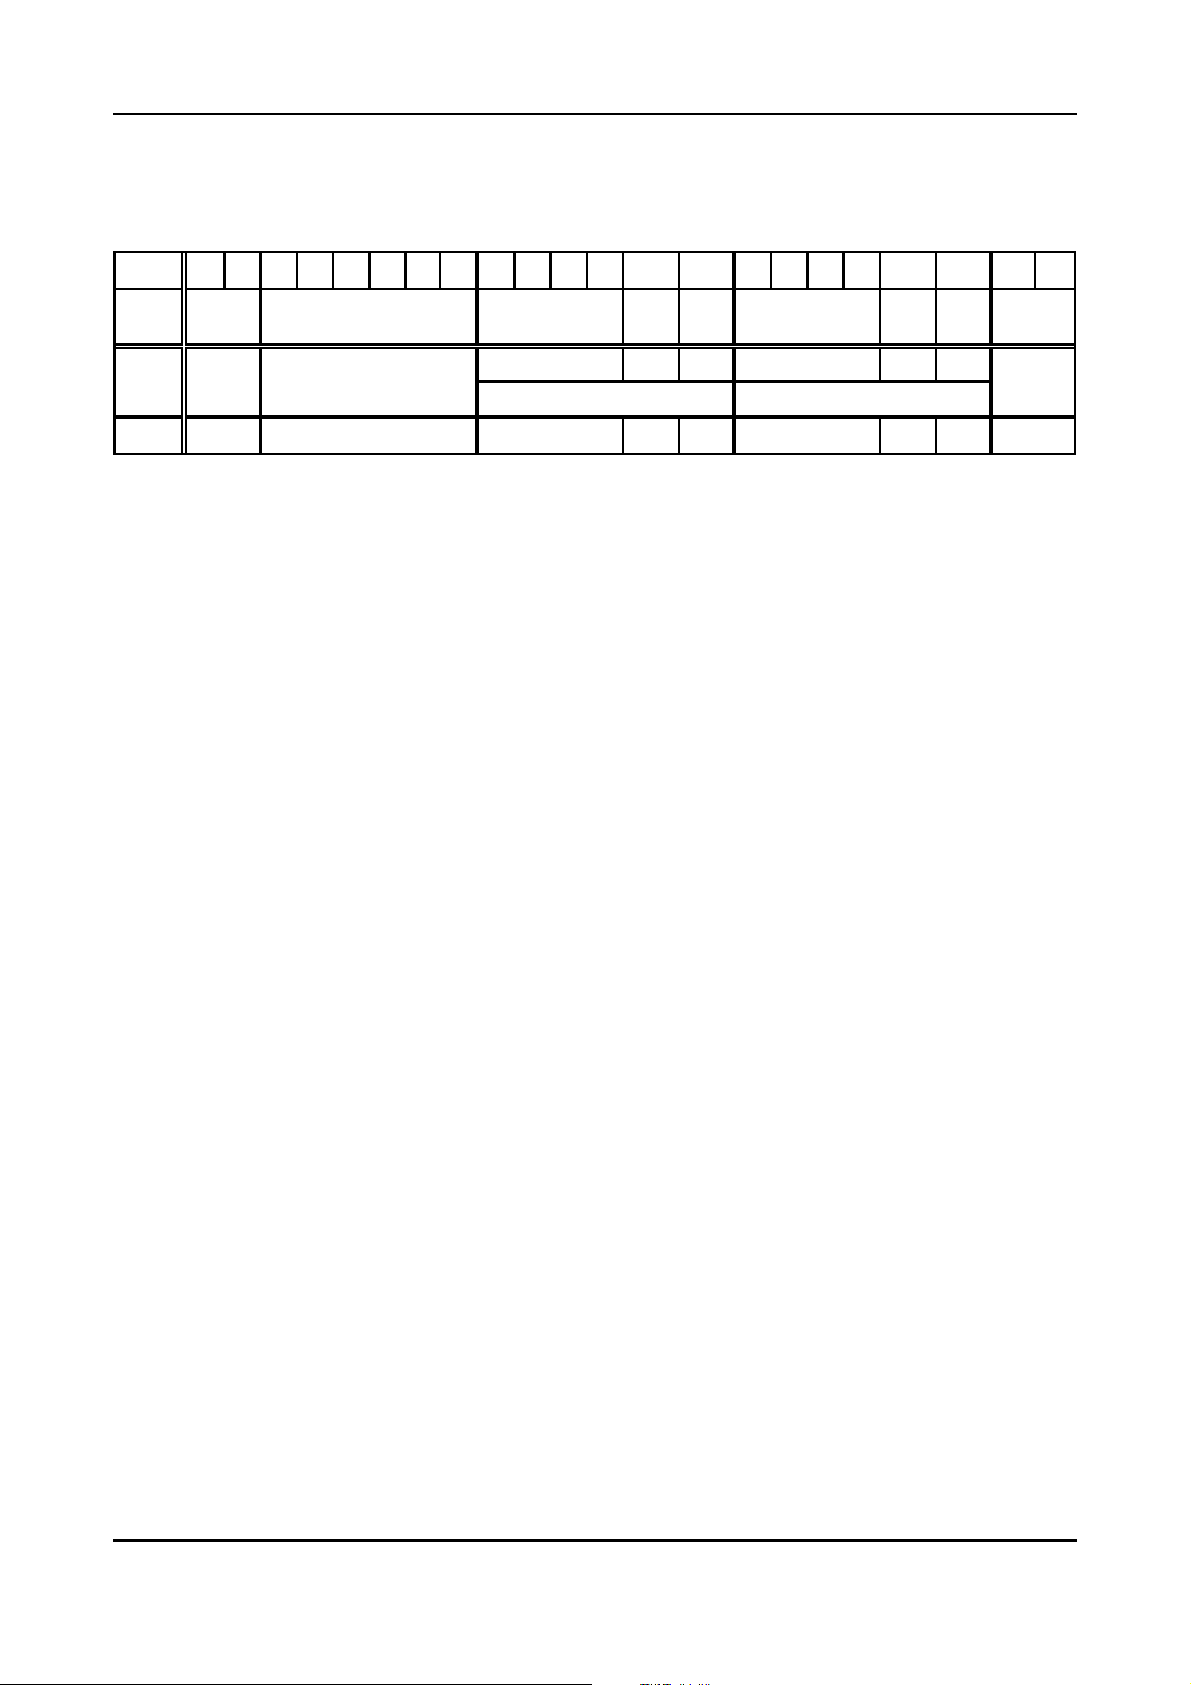
Page Mode
6.4.5 Tx-Configuration via Pages 51...150
The Tx-identifiers are configured via pages 51 to 150 (decimal). The page structure is as follows:
Byte 0 1 2 3 4 5 6 7 8 9 10 11 12 13 14 15 16 17 18 19 20 ...
Length
[bytes]
Contents page no. protocol data
Example
2 6 411411...
TxId_value form length TxId_value form length
parameters of Tx-identifier 1 parameters of Tx-identifier 2
t
51
... 301 B8 6 303 B8 8 ...
...
Table 6.4.4: Structure of pages 51...150
Bytes 0 to 7 contain the protocol information already mentioned above (refer also to page 48).
From byte 8 in the first segment (byte 2 in the following segments) the definition of the desired Txidentifiers is transmitted to the CAN gateway. For each Tx-identifier 6 bytes are required:
TxId_value
These four bytes specify the numeric value of the Tx-identifier.
The CAN-CBM-DP module with the order-no. C.2844.03 supports 11-bit-identifier:
0 ... 2047 (decimal).
The CAN-CBM-DP module with the order-no. C.2844.05 supports 29-bit-identifier, too.
form
Via this byte you can choose whether the output data is to be converted from Motorola
data format of the PLC into Intel data format of the CAN network or not. Byte
form
has
already been described in detail on page 29.
length
Her e the number of data bytes of the Tx-identifier is specified. Entries between 1 and
8 are permissible.
CAN-CBM-DP Software Manual Rev. 2.050
Page 55
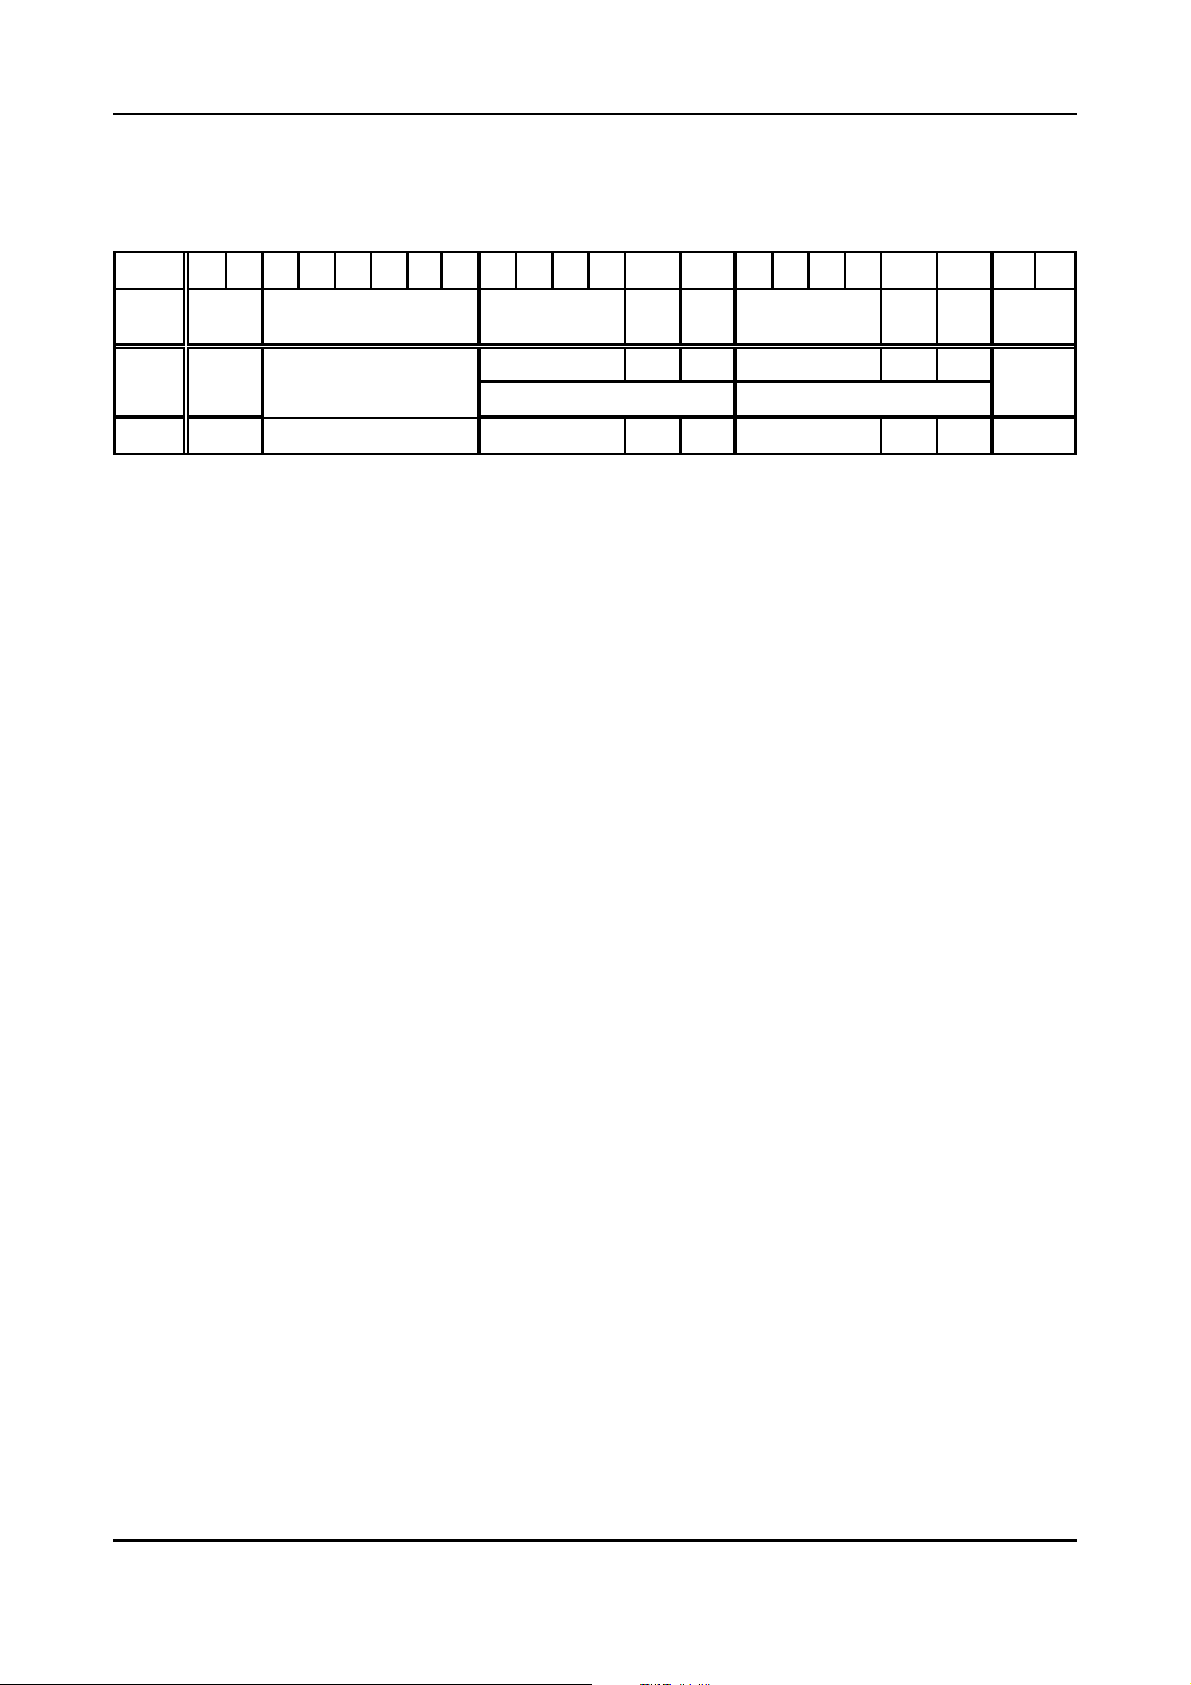
Page Mode
6.4.6 Rx-Configuration via Pages 151...250
The Rx-identifiers are configured via pages 151 to 250 (decimal). The page structure is as follows:
Byte 0 1 2 3 4 5 6 7 8 9 10 11 12 13 14 15 16 17 18 19 20 ...
Length
[bytes]
Contents page no. protocol data
Example
2 6 411411...
t
151
RxId_value form length RxId_value form length
parameters of Rx-identifier 1 parameters of Rx-identifier 2
... 301 B8 6 303 B8 8 ...
...
Table 6.4.5: Structure of pages 151...250
Bytes 0 to 7 contain the protocol information already mentioned above (refer also to page 48).
From byte 8 in the first segment (byte 2 in the following segments) the definition of the desired Rxidentifiers is transmitted to the CAN gateway. For each Rx-identifier 6 bytes are required:
RxId_value
These four bytes specify the numeric value of the Rx-identifier.
The CAN-CBM-DP module with the order-no. C.2844.03 supports 11-bit-identifier:
0 ... 2047 (decimal).
The CAN-CBM-DP module with the order-no. C.2844.05 supports 29-bit-identifier, too.
form
Via this byte you can choose whether the output data is to be converted from Motorola
data format of the PLC into Intel data format of the CAN network or not. Byte
form
has
already been described in detail on page 29.
length
Her e the number of data bytes of the Rx-identifier is specified. Entries between 1 and
8 are permissible.
CAN-CBM-DP Software Manual Rev. 2.0 51
Page 56
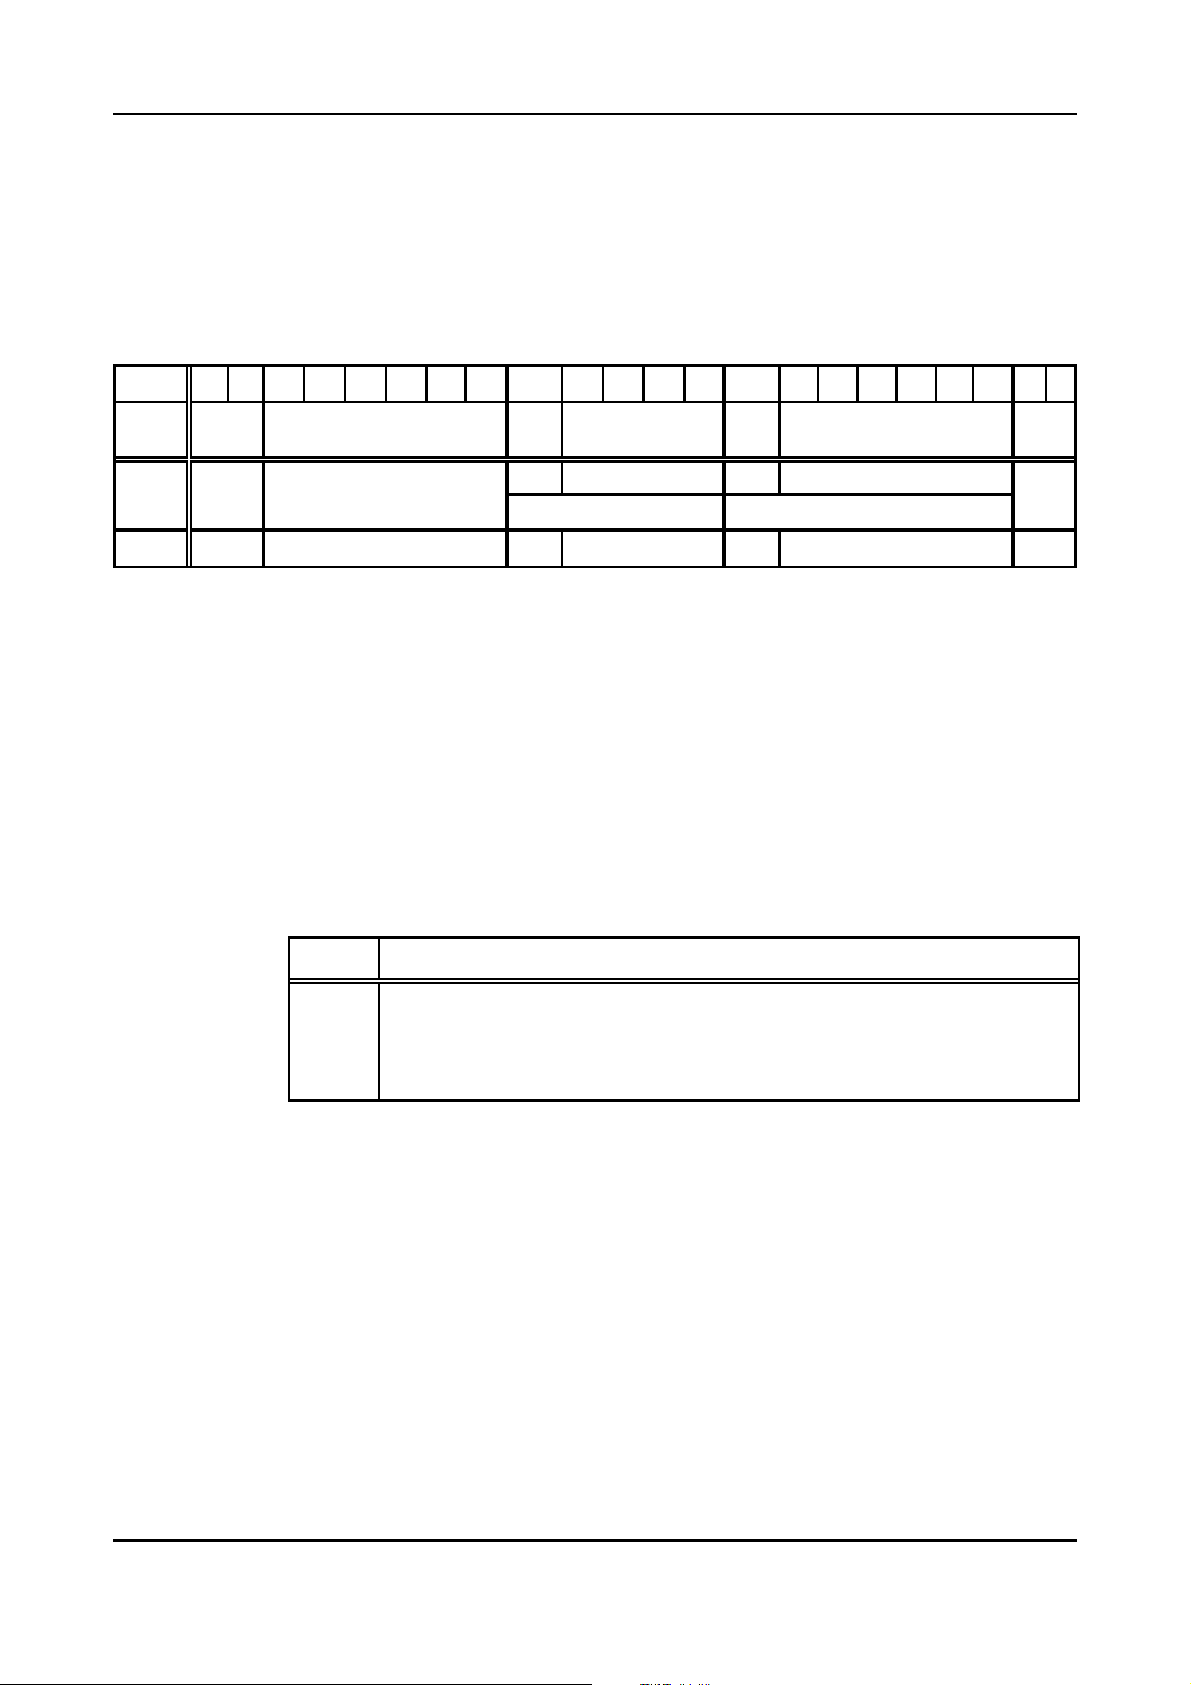
Page Mode
6.4.7 Data Exchange via Pages 251...n
The user data is read and written via page 251 (decimal) and following. The maximum number of data
pages is 65285.
The structure of the page for output data can differ from the page structure for input data, because the
number of Rx-data can differ from the number of Tx-data.
Byte 01234567 8 91011121314151617181920...
Length
[bytes]
Contents page no. protocol data
Example
2 6 1 1...8 (here: 4) 1 1...8 (here: 6) ...
force Tx_user_data force Tx_user_data
data of Tx-identifier 1 data of Tx-identifier 2
t
251
... 2 12 34 56 78 (hex) 1 BA 98 76 54 32 10 (hex) ...
...
Table 6.4.6: Example of a data page for output data
Bytes 0 to 7 contain the protocol information already mentioned above (refer also to page 48).
Starting with byte 8 in the first segment, the data of the first identifier are transmitted to the gateway.
The data of the next identifier follow directly, that means that only as many data bytes are transmitted
each per identifier as have been defined in
length
!
In the second segment the transmission of data already starts with byte 2, because bytes 2 to 7 do not
contain protocol information.
force
In this byte you can specify the time when the Tx-data is to be transmitted:
force
0
1
2
3
4
*) Change between 3 and 4 causes a direct output of data
data is not put out as CAN frame
data is always (following each PROFIBUS telegram) put out as CAN frame
data is only put out as CAN frame, if data was changed
data is put out as CAN frame once *)
data is put out as CAN frame once *)
Transmission
Tx_user_data
Table 6.4.7: Specifying the cause for transmitting Tx-data
Here the user data of this Tx-identifier to be transmitted are specified.
CAN-CBM-DP Software Manual Rev. 2.052
Page 57
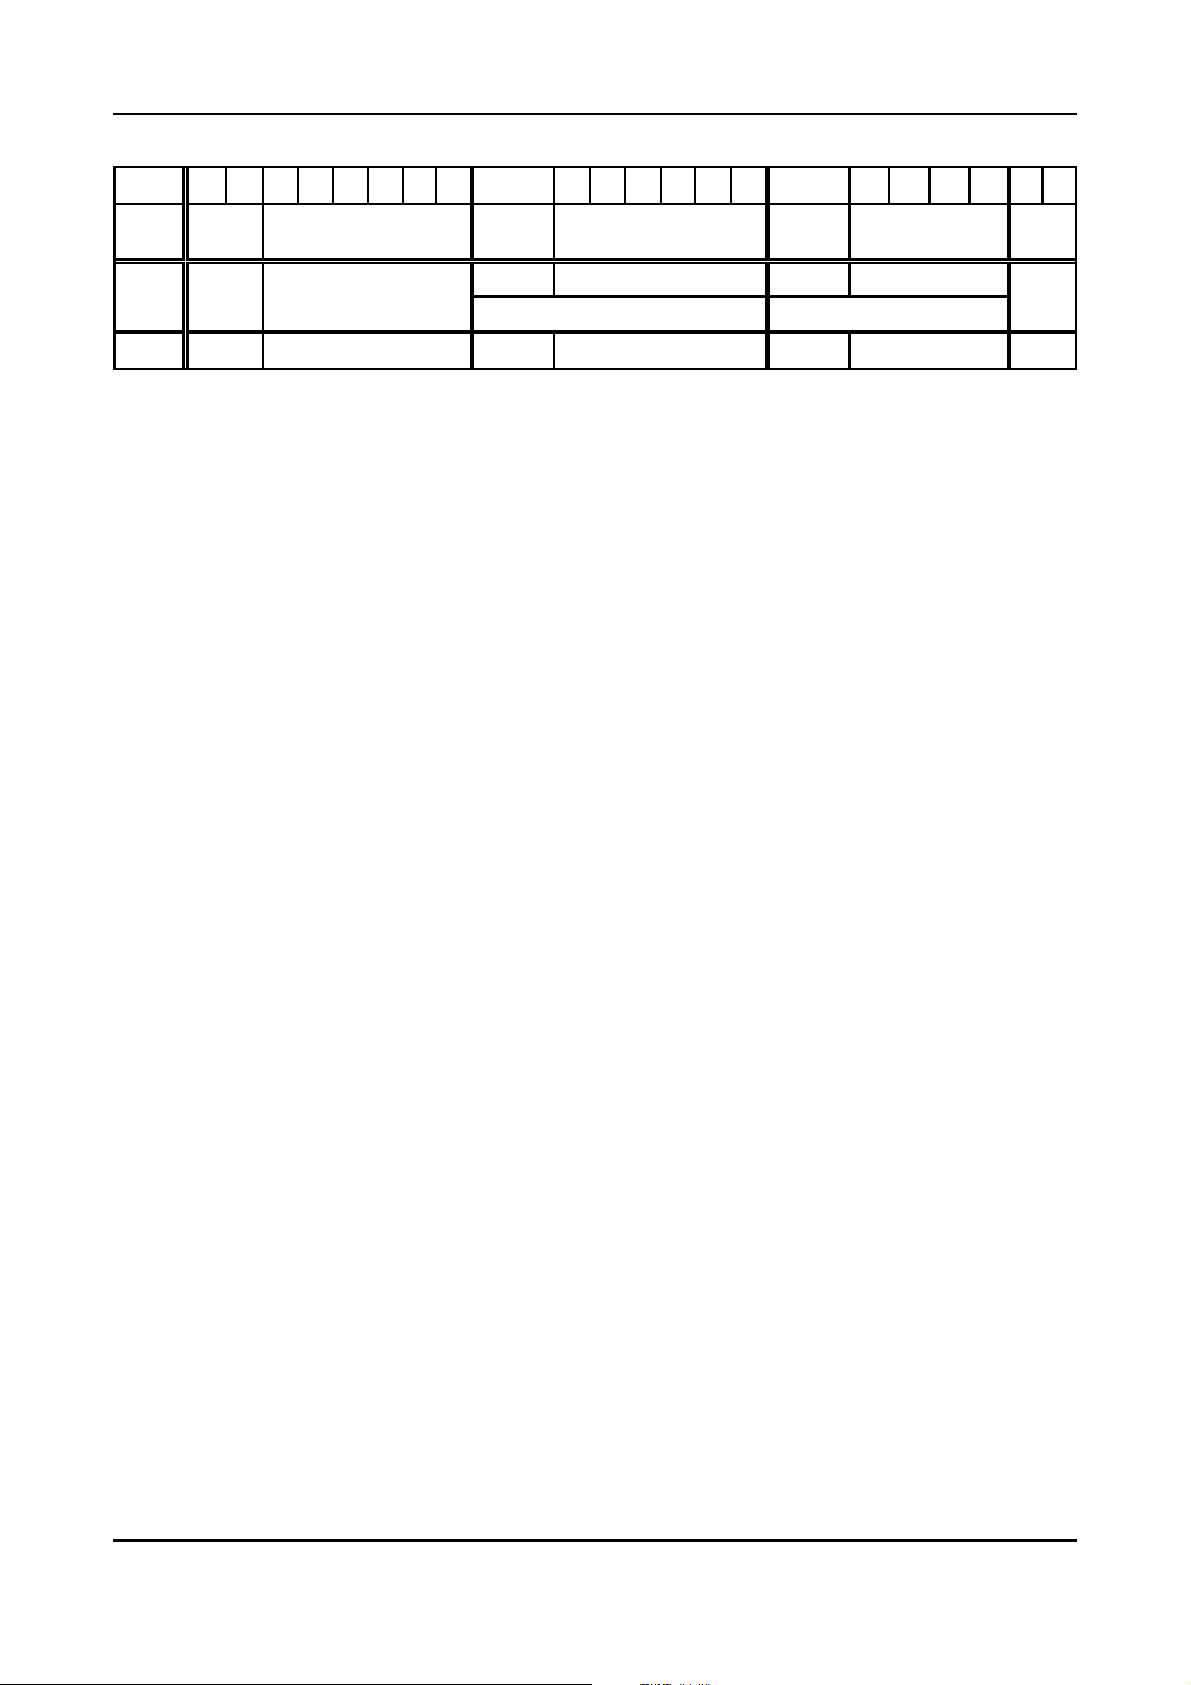
Page Mode
Byte 01234567 8 91011121314 15 1617181920...
Length
[bytes]
Contents page no. protocol data
Example
2 6 1 1...8 (here: 6) 1 1...8 (here: 4) ...
t
251
... 14 11 22 33 44 55 66 (hex) 15 99 88 77 66 (hex) ...
Table 6.4.8: Example of a data page for input data
count_in x
In this byte the gateway specifies an input counter. The input counter is incremented
with each Rx-frame received. It can be used by the user, for example, to program a
guarding protocol.
Rx_user_data
Here the received user data of this Rx-identifier are entered.
count_in 1 Rx_user_data count_in 2 Rx_user_data
...
data of Rx-identifier 1 data of Rx-identifier 2
CAN-CBM-DP Software Manual Rev. 2.0 53
Page 58
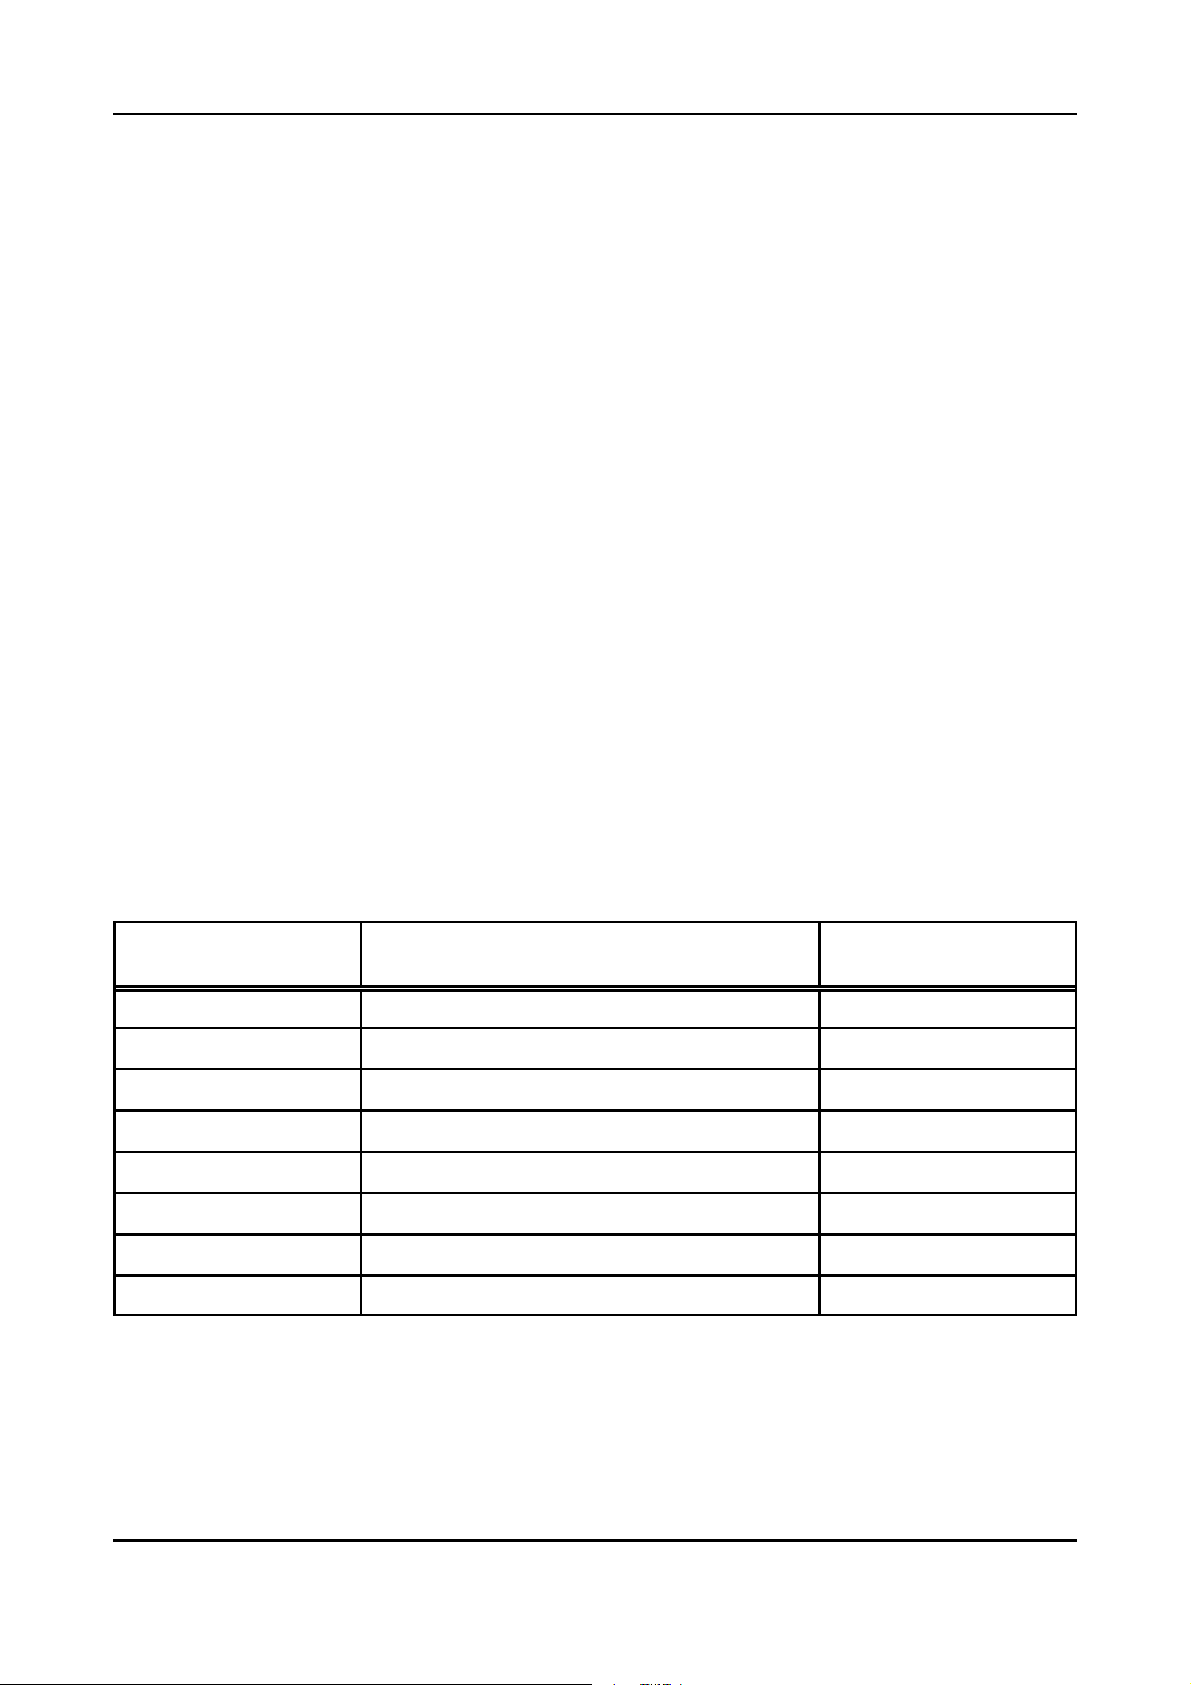
Page Mode
6.5 Using the Page Mode with FBs and DBs
The previous chapter has described the principal function of the Page Mode and the assignment of
pages to show the functionality. The product package of the gateway includes function blocks and data
blocks as source codes, which you should include in your PLC program, if you wanted to use the Page
Mode.
6.5.1 Function Block FB 2: Configuration and Data Exchange
By means of function block FB2 all configurations and data transfers of the Page Mode can be
executed. The types of data blocks which are used by FB2 will be shown in the following example call.
Calling FB2 (example):
CALL FB 2 , DB102
FREIGABE :=#BIT1
WRITE_ADDRESS :=#WRITE_ADDRESS
WRITE_CONFIG_DB:=#WRITE_CONFIG_DB
WRITE_DB :=#WRITE_DB
READ_ADDRESS :=#READ_ADDRESS
READ_CONFIG_DB :=#READ_CONFIG_DB
READ_DB :=#READ_DB
RET_VALUE :=#t016
Explanation of data blocks and parameters:
Data block/parameter Function
FREIGABE
WRITE_ADDRESS
WRITE_CONFIG_DB
WRITE_DB
READ_ADDRESS
READ_CONFIG_DB
READ_DB
RET_VALUE
Enable after setup via page 0 and 1. 55
Start address of the first output segment. 55
Data block to define the Tx-identifiers. 55
Data block to write the output data. 59
Start address of the first input segment. 56
Data block to define the Rx-identifiers. 57
Data block to read the input data. 61
Message about the handling of the present page. 62
Table 6.5.1: Function of data blocks used by FB2
For a detailed description
refer to page
CAN-CBM-DP Software Manual Rev. 2.054
Page 59
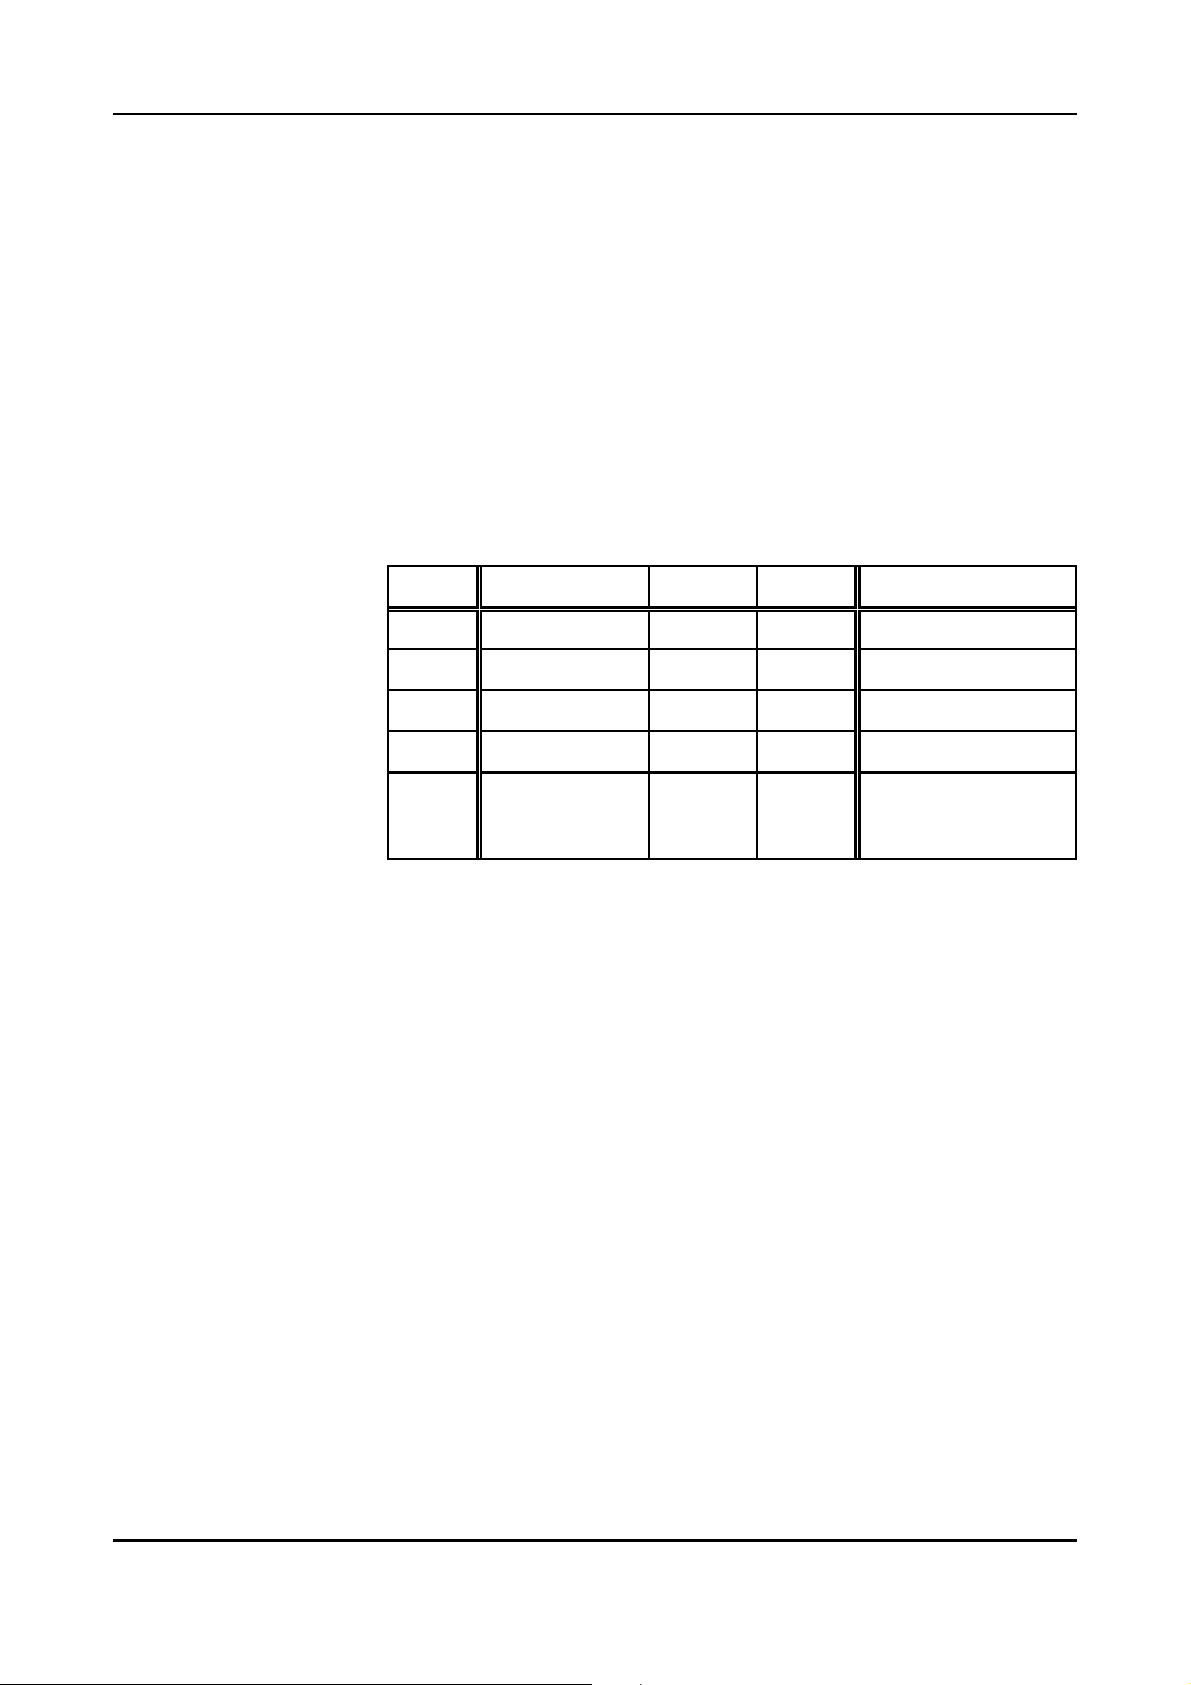
Page Mode
f
f
FREIGABE Enable after basic set-up via pages 0 and 1.
The module is initialized by means of function block FB2 by bit
FREIGABE = 0. For all other operations you have to set it to ‘1’. FB2 only
needs an instance DB for the setup.
WRITE_ADDRESS Start address of the first output segment.
Via this parameter the PLC start address of the first segment of the output
page is transferred to the PLC.
WRITE_CONFIG_DB Data block to define the Tx-Identifiers.
(DB94) In the PLC-source code, included in the product package, the WRITE-
CONFIG-DB has been realized as data block DB94.
In WRITE-CONFIG-DB 6 bytes are required for each Tx-identifier to be
written:
Address Bytes 0...3 Byte 4 Byte 5 Explanation
0
6
12
:: :::
6
n
Tx-Identifier 1 form 1 length 1
Tx-Identifier 2 form 2 length 2
Tx-Identifier 3 form 3 length 3
endconfig - -
definition of Tx-Id 1
definition of Tx-Id 2
definition of Tx-Id 3
marking the end of the
DB or the Txconfiguration
Table 6.5.2: Structure of the WRITE-CONFIG-DB
Tx-Identifier x
Here the value of the Tx-identifier has to be specified.
CAN-CBM-DP order-no. C.2844.03: 0 ... 2047
CAN-CBM-DP order-no. C.2844.05: 0 ... 536870911
form x
In parameter
you choose whether the output data is to
orm
be converted from Motorola format of the PLC into the
Intel format of the CAN network or not. Byte
already been described in detail on page 29.
orm
has
length x
This byte specifies the number of data bytes which are to
be transmitted on the Tx-identifier which is defined here.
CAN-CBM-DP Software Manual Rev. 2.0 55
Page 60

Page Mode
endconfig
The PLC has to be told whether another data block is
required for the definition of the Tx-identifiers and when
the Tx-definition will be finished.
- If another data block is required, the hexadecimal value
‘DDDDDDDD’ has to be specified as last Tx-identifier
definition. FB2 will then continue with the handling of
the following DB.
- If the last Tx-identifier has been defined, this is
indicated to the FB2 by specifying the hexadecimal
value ‘EEEEEEEE’ as last Tx-identifier definition. FB2
will then continue with the configuration o f t he Rxidentifiers.
The length of the data blocks differs. The required length can be
determined from the number of required Tx-identifiers plus the four bytes
for the end flag.
Example:
You have to define 16 Tx-identifiers via DB11.
DB11 defines Tx-Ids 1 ... 10,
therefore requires a length of (10 6 + 4) = 64 bytes
End flag = DDDDDDDD hex
DB12 defines Tx-Ids 11 ... 16,
therefore requires a length of (6 6 + 4) = 40 bytes
End flag = EEEEEEEE hex
Note:
In FB2 the bit FREIGABE has to be set = 1!
READ_ADDRESS Start address of the first input segment.
Via this parameter the PLC-start address of the first segment of the input
page is transferred to the PLC.
CAN-CBM-DP Software Manual Rev. 2.056
Page 61
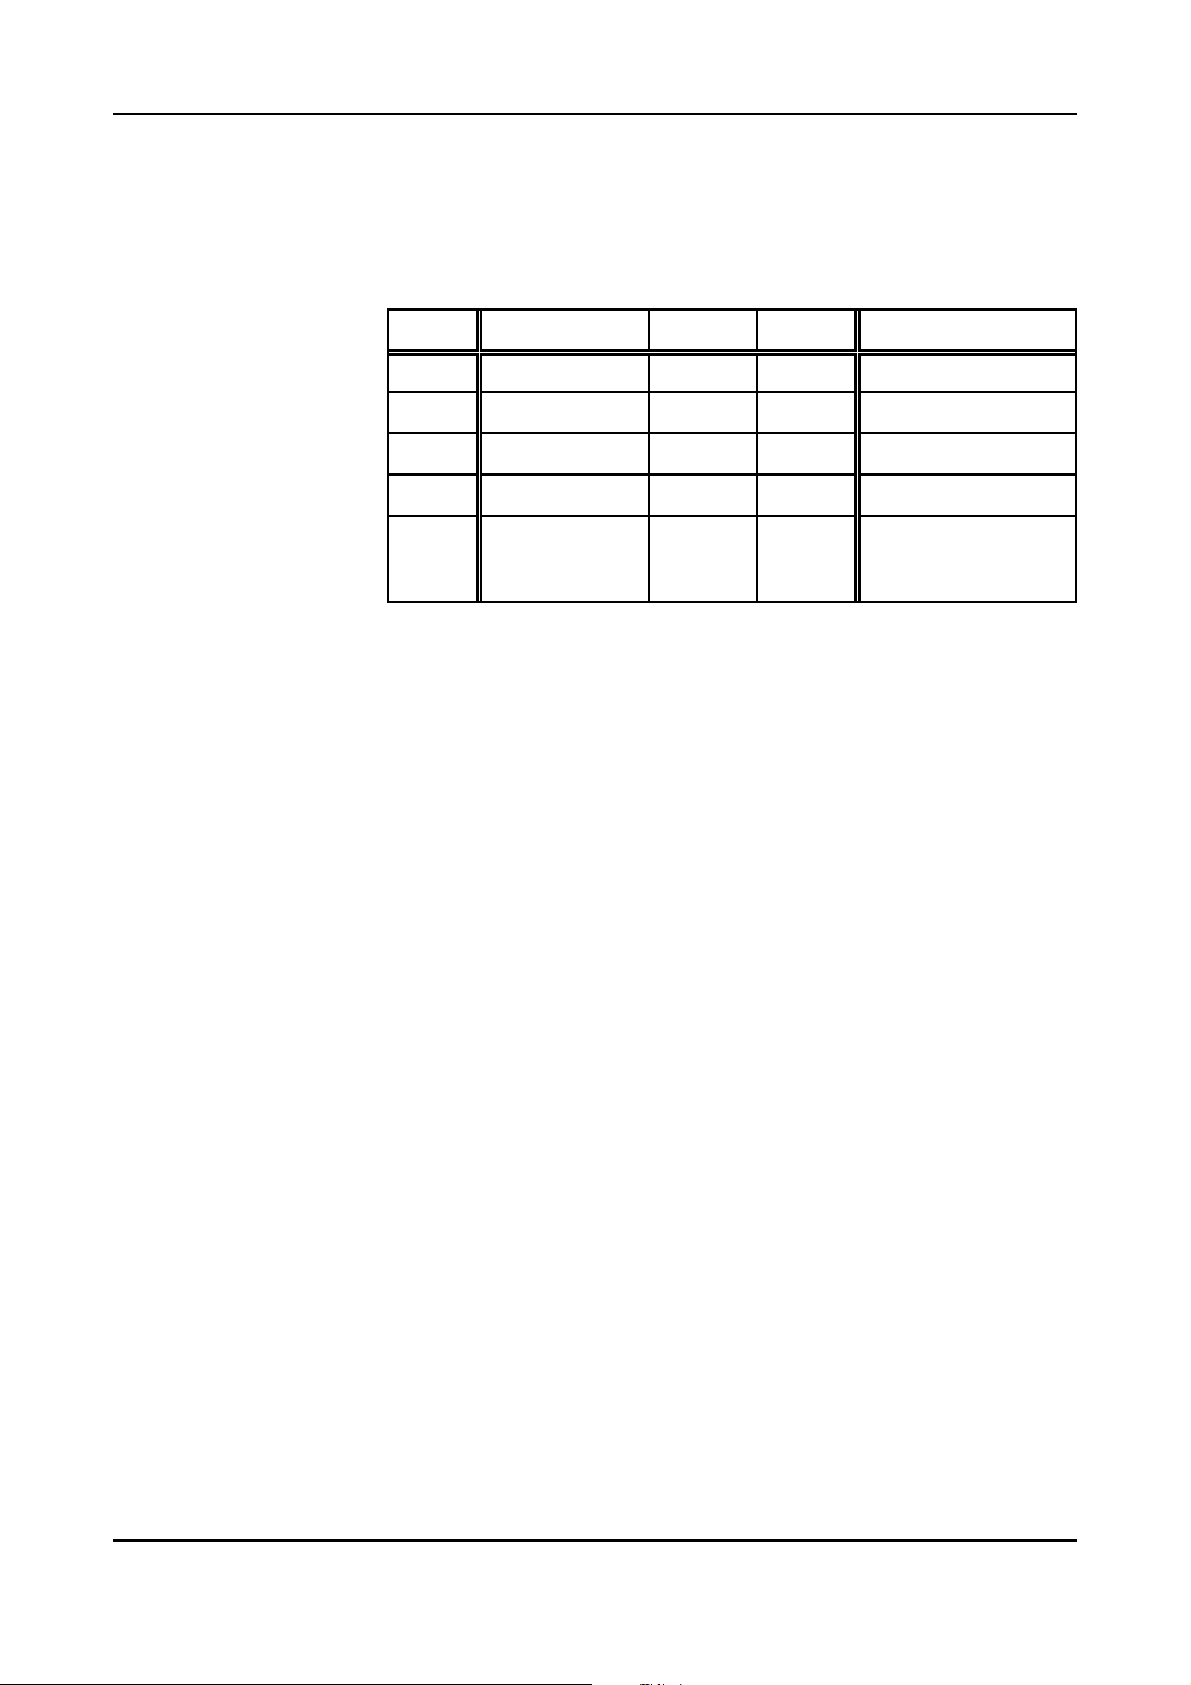
Page Mode
f
f
READ_CONFIG_DB Data block for defining the Rx-identifiers.
(DB95) In the PLC-source code included in the product package, the READ-
CONFIG-DB has been realized as data block DB95.
In READ-CONFIG-DB 6 bytes are required for each Rx-identifier to be
written:
Address Bytes 0...3 Byte 4 Byte 5 Explanation
0
6
12
:: :::
6
n
Rx-Identifier 1 form 1 length 1
Rx-Identifier 2 form 2 length 2
Rx-Identifier 3 form 3 length 3
endconfig - -
definition of Rx-Id 1
definition of Rx-Id 2
definition of Rx-Id 3
marking the end of the
DB or the Rxconfiguration
Table 6.5.3: Structure of the READ-CONFIG-DB
Rx-Identifier x
Here the value of the Rx-identifier has to be specified.
CAN-CBM-DP order-no. C.2844.03: 0 ... 2047
CAN-CBM-DP order-no. C.2844.05: 0 ... 536870911
form x
In parameter
you choose, whether the input data is to
orm
be converted from Intel format of the CAN network to the
Motorola format of the PLC or not. Byte
been described in detail on page 29.
has already
orm
length x
This byte specifies the number of data bytes which are to
be received by this Rx-identifier.
endconfig
The PLC has to be told whether another data block is
required for the definition of the Rx-identifiers and when
the Rx-definition will be finished.
- If another data block is required, the hexadecimal value
‘DDDDDDDD’ has to be specified as last Rx-identifier
definition. FB2 will then continue with the handling of
the following DB.
- If the last Rx-identifier has been defined, this is
indicated to the FB2 by specifying the hexadecimal
value ‘EEEEEEEE’. FB2 will then continue with the
transmission of user data.
The length of the data blocks differs. The required length can be
determined from the number of Rx-identifiers required plus the four bytes
for the end flag.
CAN-CBM-DP Software Manual Rev. 2.0 57
Page 62

Page Mode
Example:
You have to define 19 Rx-identifiers, starting with DB26.
DB26 defines Rx-Ids 1 ... 10,
therefore requires a length of (10 6 + 4) = 64 bytes
End flag = DDDDDDDD hex
DB27 defines Rx-Ids 11 ... 19,
therefore requires a length of (9 6 + 4) = 58 bytes
End flag = EEEEEEEE hex
Note:
In FB2 the bit FREIGABE has to be set = 1!
CAN-CBM-DP Software Manual Rev. 2.058
Page 63
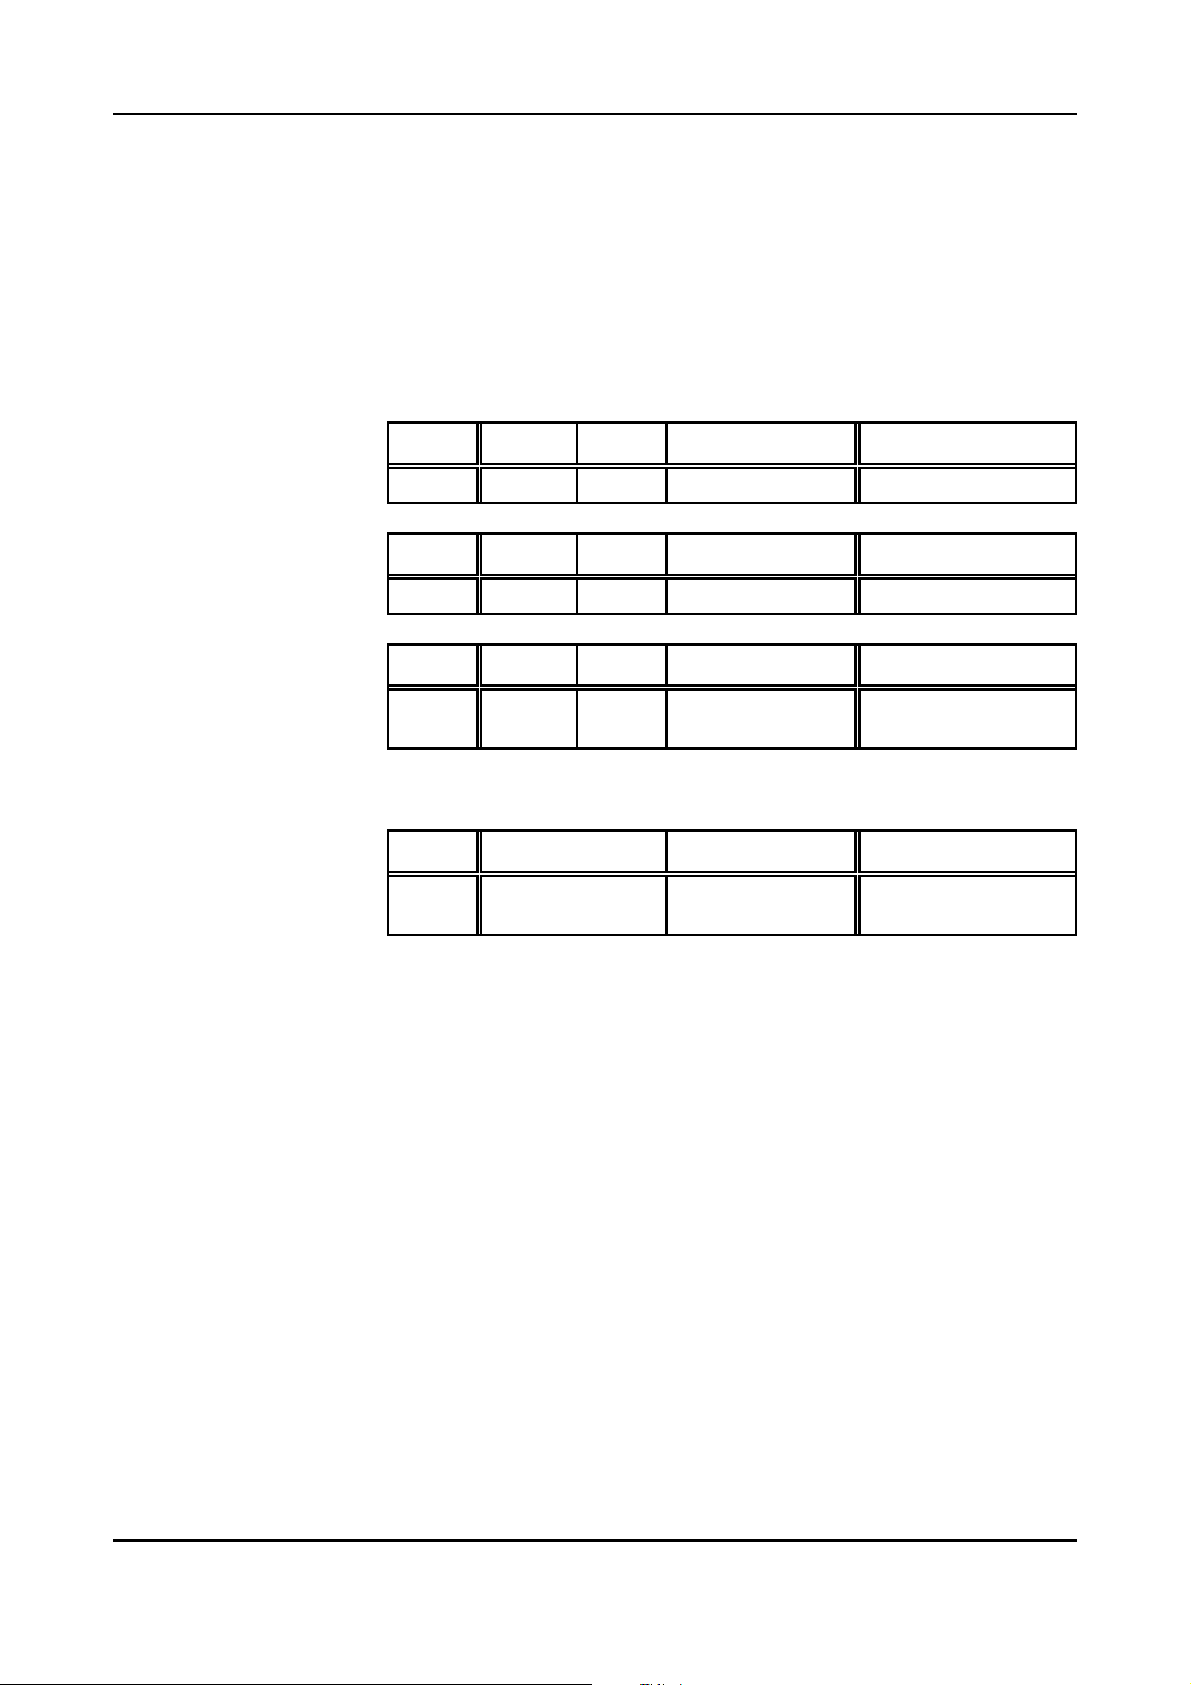
Page Mode
WRITE_DB Data block for writing the output data
(DB96) The output data is stored in the data block according to identifier number
(TxId1, TxId2, etc.). For each Tx-identifier the length (number of data
bytes + force-byte) is stored in one byte, the parameter force is stored in
another byte and then the user data is stored. The number of user data can
differ from 1 to 8 bytes. The data of the following Tx-identifier always
come directly after the previous one. The address from which the data of
a Tx-identifier is stored has to be determined from the data of the previous
Tx-identifiers, therefore.
Address 1 byte 1 byte
0
Address 1 byte 1 byte
n
+ 2
Address 1 byte 1 byte
n
+ 2 +
m
+ 2
length 1 force 1 user data 1
length 2 force 2 user data 2
length 3 force 3 user data 3
n
bytes Explanation
user data of Tx-Id 1
m
bytes Explanation
user data of Tx-Id 2
l
bytes Explanation
user data of Tx-Id 3
:
Address 1 byte - Explanation
xxx enddata -
marking the end of the
DB or the output data
Table 6.5.4: Structure of WRITE_DB
length x
This byte specifies the number of data bytes which are to
be transmitted on the Tx-identifier defined here (+1 for the
force-byte):
lenght = (number of data bytes) + 1
CAN-CBM-DP Software Manual Rev. 2.0 59
Page 64
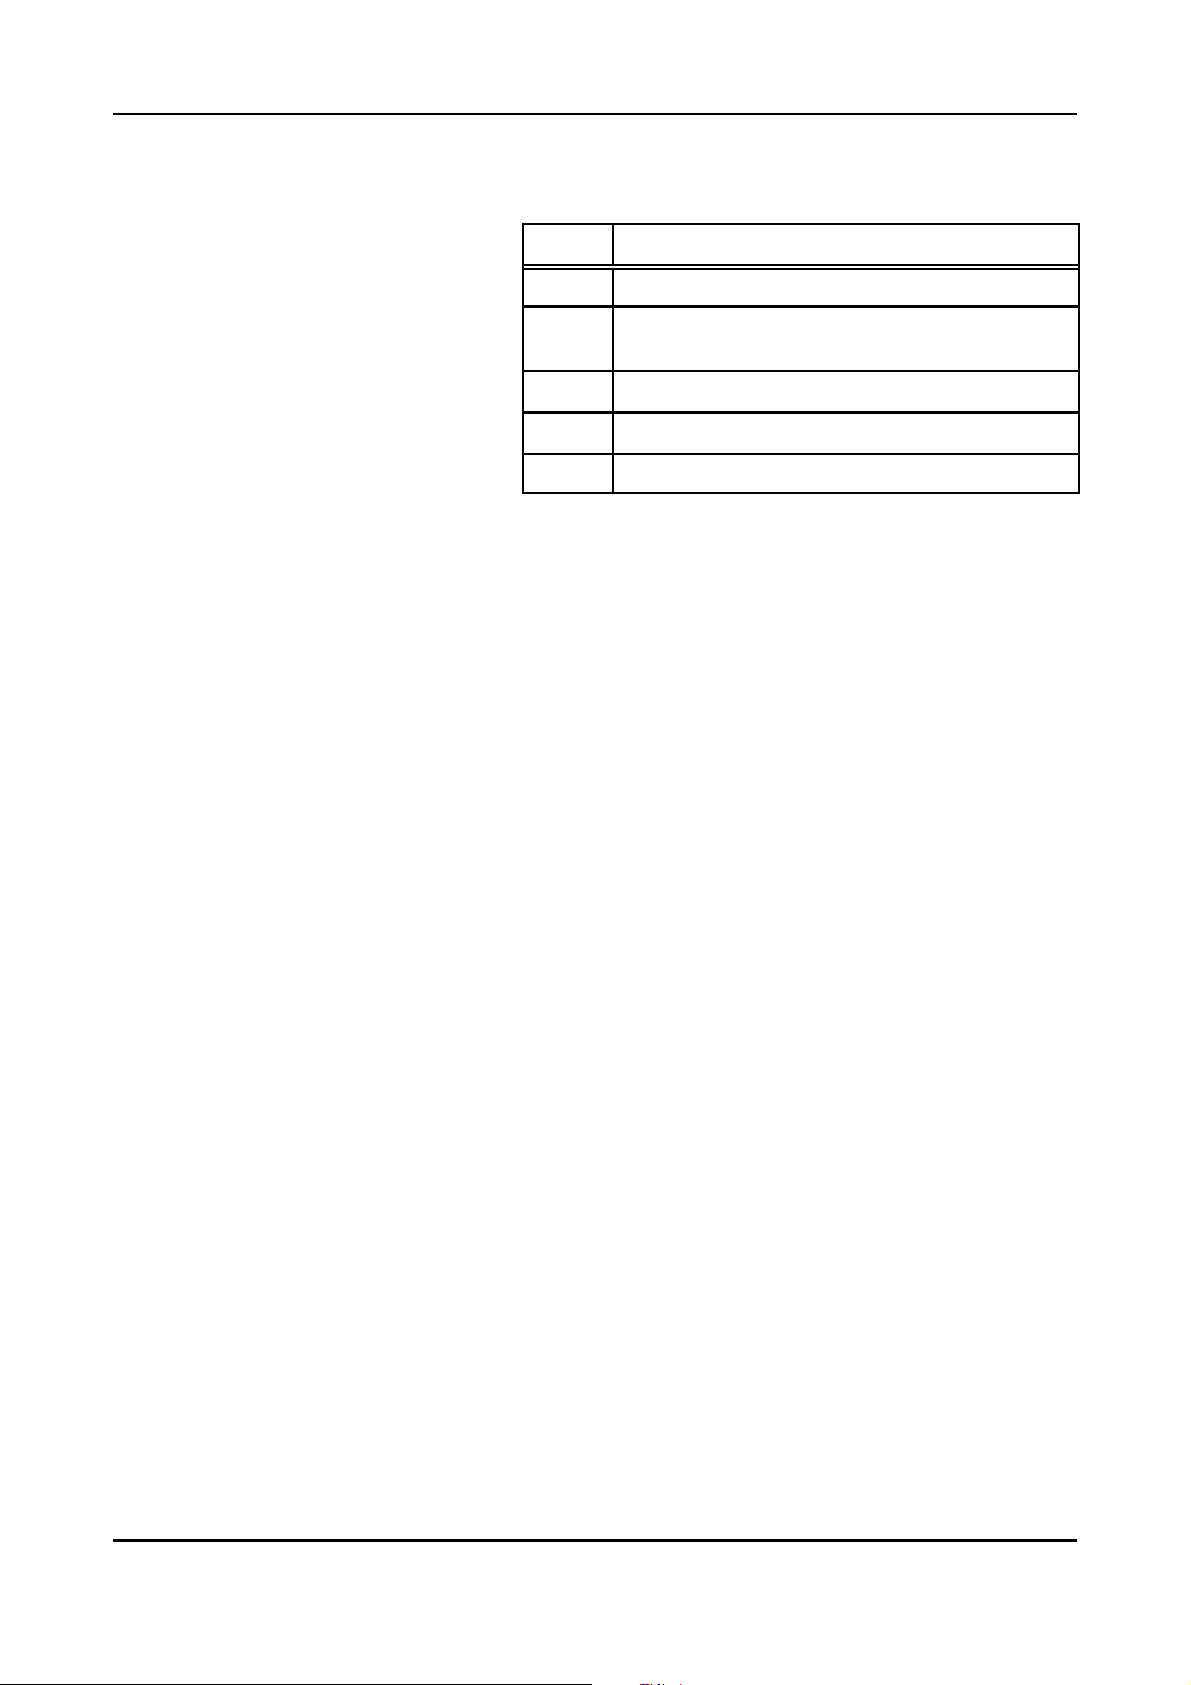
Page Mode
f
f
g
force x
Via this byte you can specify the time when the data of the
Tx-identifier are to be transmitted to the CAN.
force
0 Data is not put out as CAN frame.
1
2 Data is only put out as CAN frame if data has changed.
3 Data is only put out as CAN frame once.
4 Data is only put out as CAN frame once.
Data is always (following each PROFIBUS telegram)
put out as CAN frames.
Table 6.5.5: Meaning of parameter
Function
orce
In order to transmit the CAN frame with the user data
once, parameter force has to be set to value ‘3’. If the
parameter is set to ‘3’ again in the following cycle, the
frame will not be transmitted. In order to transmit more
than once force has to be set to the value ‘4’ in the
following cycle. Each further switch between the values
triggers a transmission of frames.
userdata x
enddata
The user data between 1 to 8 bytes is specified after
parameter
orce.
This parameter tells the PLC whether another data block
with user data will follow, or whether this was the last user
data to be transmitted.
- If another data block is required, the hexadecimal
value ‘DD’ has to be specified for
len
th
following the definition of the last user data. FB2
will then continue to handle the following DB.
- If the last user data of this application has been
specified, FB2 will be told by entering the
hexadecimal value ‘EE’ in cell
length.
FB2 will
then continue to transmit the user data of the first
WRITE_DB.
Note:
Bit FREIGABE has to be set = 1 in FB2, if the output data is to be written!
CAN-CBM-DP Software Manual Rev. 2.060
Page 65
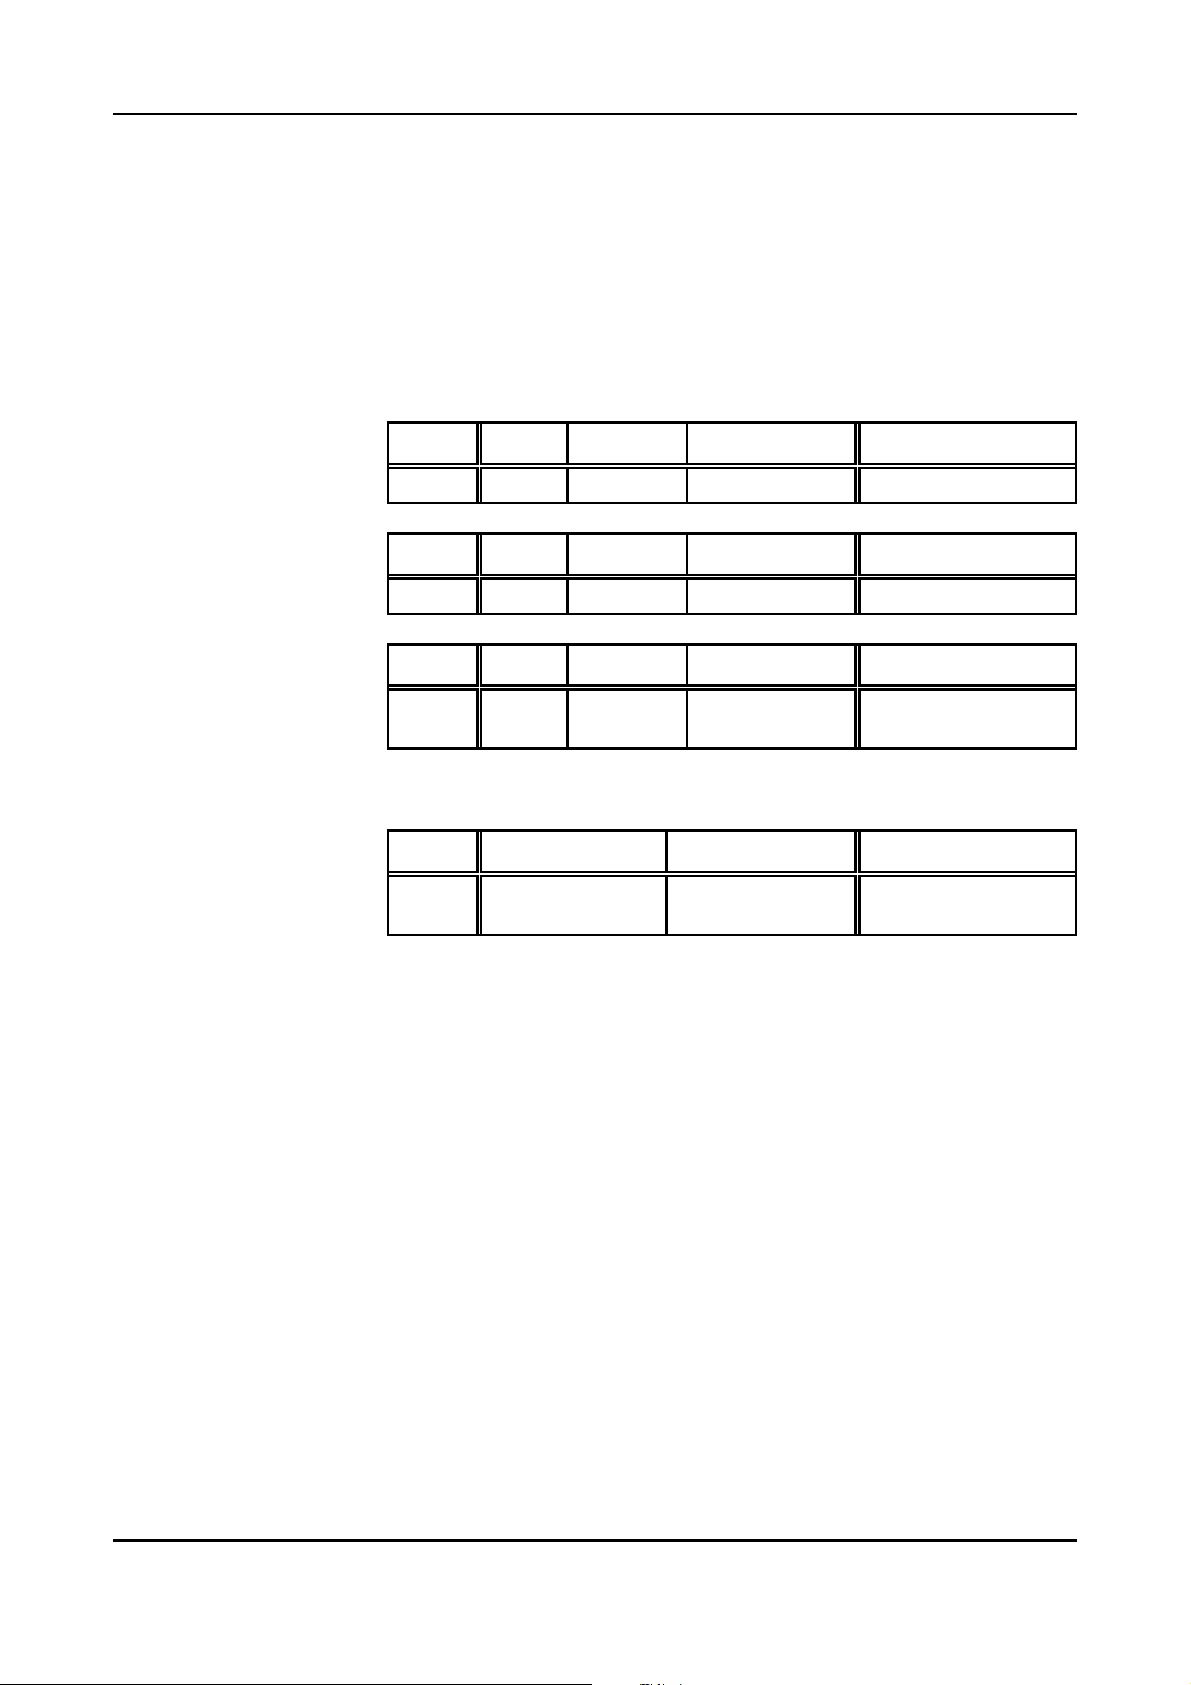
Page Mode
READ_DB Data block for reading the input data.
(DB97) The input data is stored in the data block according to identifier number
(RxId1, RxId2, etc.). For each Rx-identifier the length (number of data
bytes + count_in-byte) is stored in one byte, the input counter count_in is
stored in another byte and then the user data is stored. The number of user
data can differ from 1 to 8 bytes. The data of the following Rx-identifier
always comes directly after the previous one. The address from which the
data of an Rx-identifier is stored has to be determined from the data of the
previous Rx-identifiers, therefore.
Address 1 byte 1 byte
0
Address 1 byte 1 byte
n
+ 2
Address 1 byte 1 byte
n + 2 +
m
+ 2
length 1 count_in 1 userdata 1
length 2 count_in 2 userdata 2
length 3 count_in 3 userdata 3
n
bytes Explanation
user data of Rx-Id 1
m
bytes Explanation
user data of Rx-Id 2
l
bytes Explanation
user data of Rx-Id 3
:
Address 1 byte - Explanation
xxx enddata -
marking the end of the
DB or the input data
Table 6.5.6: Structure of WRITE_DB
length x
This byte specifies the number of data bytes to be received
via this Rx-identifier (+1 for the count_in-byte):
length = (number of data bytes) + 1
count_in x
In this byte an input counter is specified by the gateway.
The input counter is incremented with every Rx-frame
received. It can, for example, be used to program a
guarding protocol.
userdata x
The user data between 1 to 8 bytes is specified after
parameter count-in.
CAN-CBM-DP Software Manual Rev. 2.0 61
Page 66
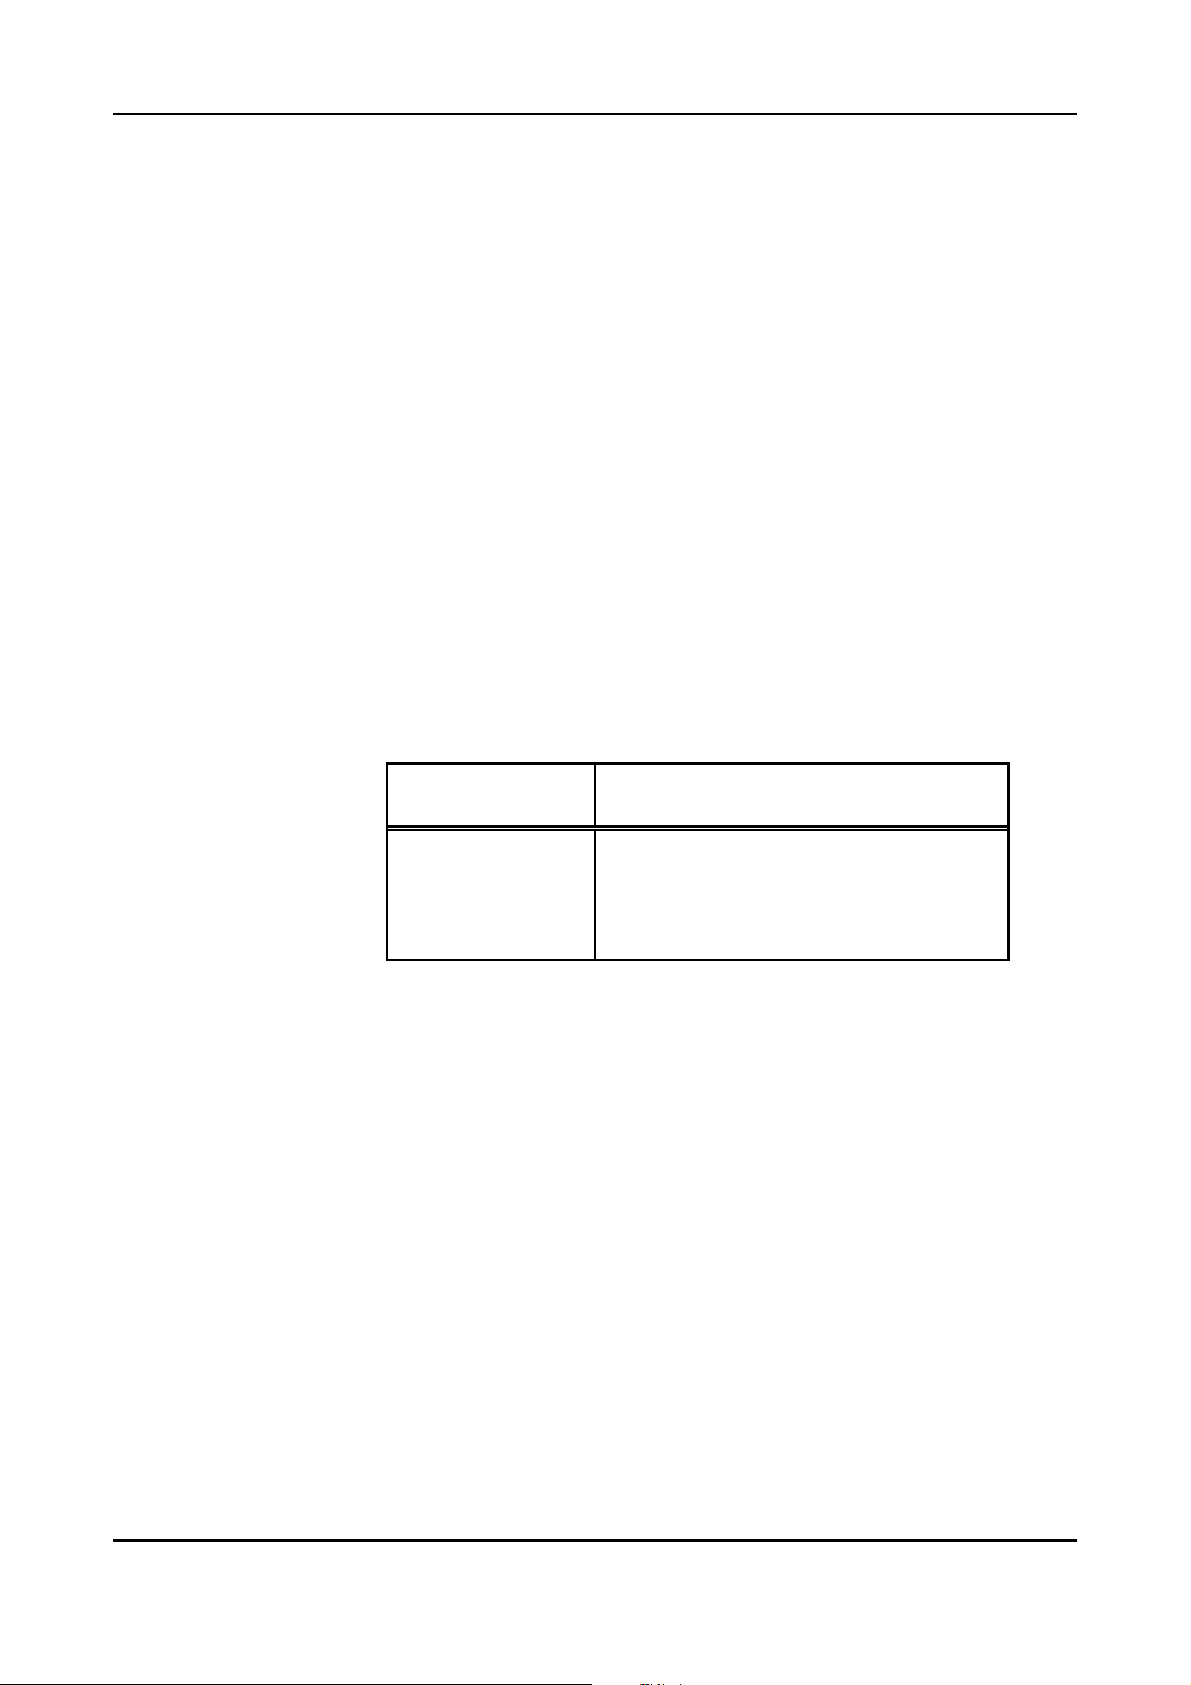
Page Mode
enddata
This parameter tells the PLC whether another data block
with user data will follow, or whether this was the last user
data to be received.
- If another data block is required, the hexadecimal
value ‘DD’ has to be specified for
following the definition of the last user data. FB2
will then continue to handle the following DB.
- If the last user data of this application has been
specified, FB2 will be told by entering the
hexadecimal value ‘EE’ in cell
then continue to transmit the user data of the first
READ_DB.
Note:
Bit FREIGABE has to be set = 1 in FB2, if the input data is to be read!
RET_VALUE Returning status of handling of current page.
This parameter is ‘0’, if bit
FREIGABE
= ‘0’. If
RET_VALUE contains a number which specifies the page type which is
being handled at the moment:
length.
FB2 will
FREIGABE
length
= ‘1’,
RET_VALUE
(at
FREIGABE
= 1)
0
1
2
3
4
Page type currently being transmitted
no page transmission
reserved
Tx-configuration via pages 51...150
Rx-configuration via pages 151...250
data pages 251...n
Table 6.5.7: Return parameter RET_VALUE
CAN-CBM-DP Software Manual Rev. 2.062
Page 67

Page Mode
gy
6.6 Methodolo
The following list gives a step-by-step instruction for the configuration and operation of the Page Mode.
1. Hardware Configuration
1.1 Determine PLC-address range for Page Mode (inputs/outputs), i.e.
- configure segments: n 32 bytes + x bytes (x d 32)
- successive addresses!
1.2 If required: Communication Window (at the end)
2. PLC-Program
2.1 Include FB2:
WRITE_ADDRESS: start address of first output segment
READ_ADDRESS: start address of first input segment
2.2 Data blocks:
WRITE_CONFIG_DB: generate and preset (determine length of DB!)
READ_CONFIG_DB: generate and preset (determine length of DB!)
WRITE_DB: generate and supply with data during program
READ_DB: generate and read data during program
3. Include More FBs
3.1 FB4: data exchange via Communication Window
3.2 FB1: initializing CANopen modules by means of a list (INIT_LIST_DB, INIT_DB)
3.3 FB3: controlling 127 uniform CANopen devices
This page is intentionally left blank.
CAN-CBM-DP Software Manual Rev. 2.0 63
Page 68
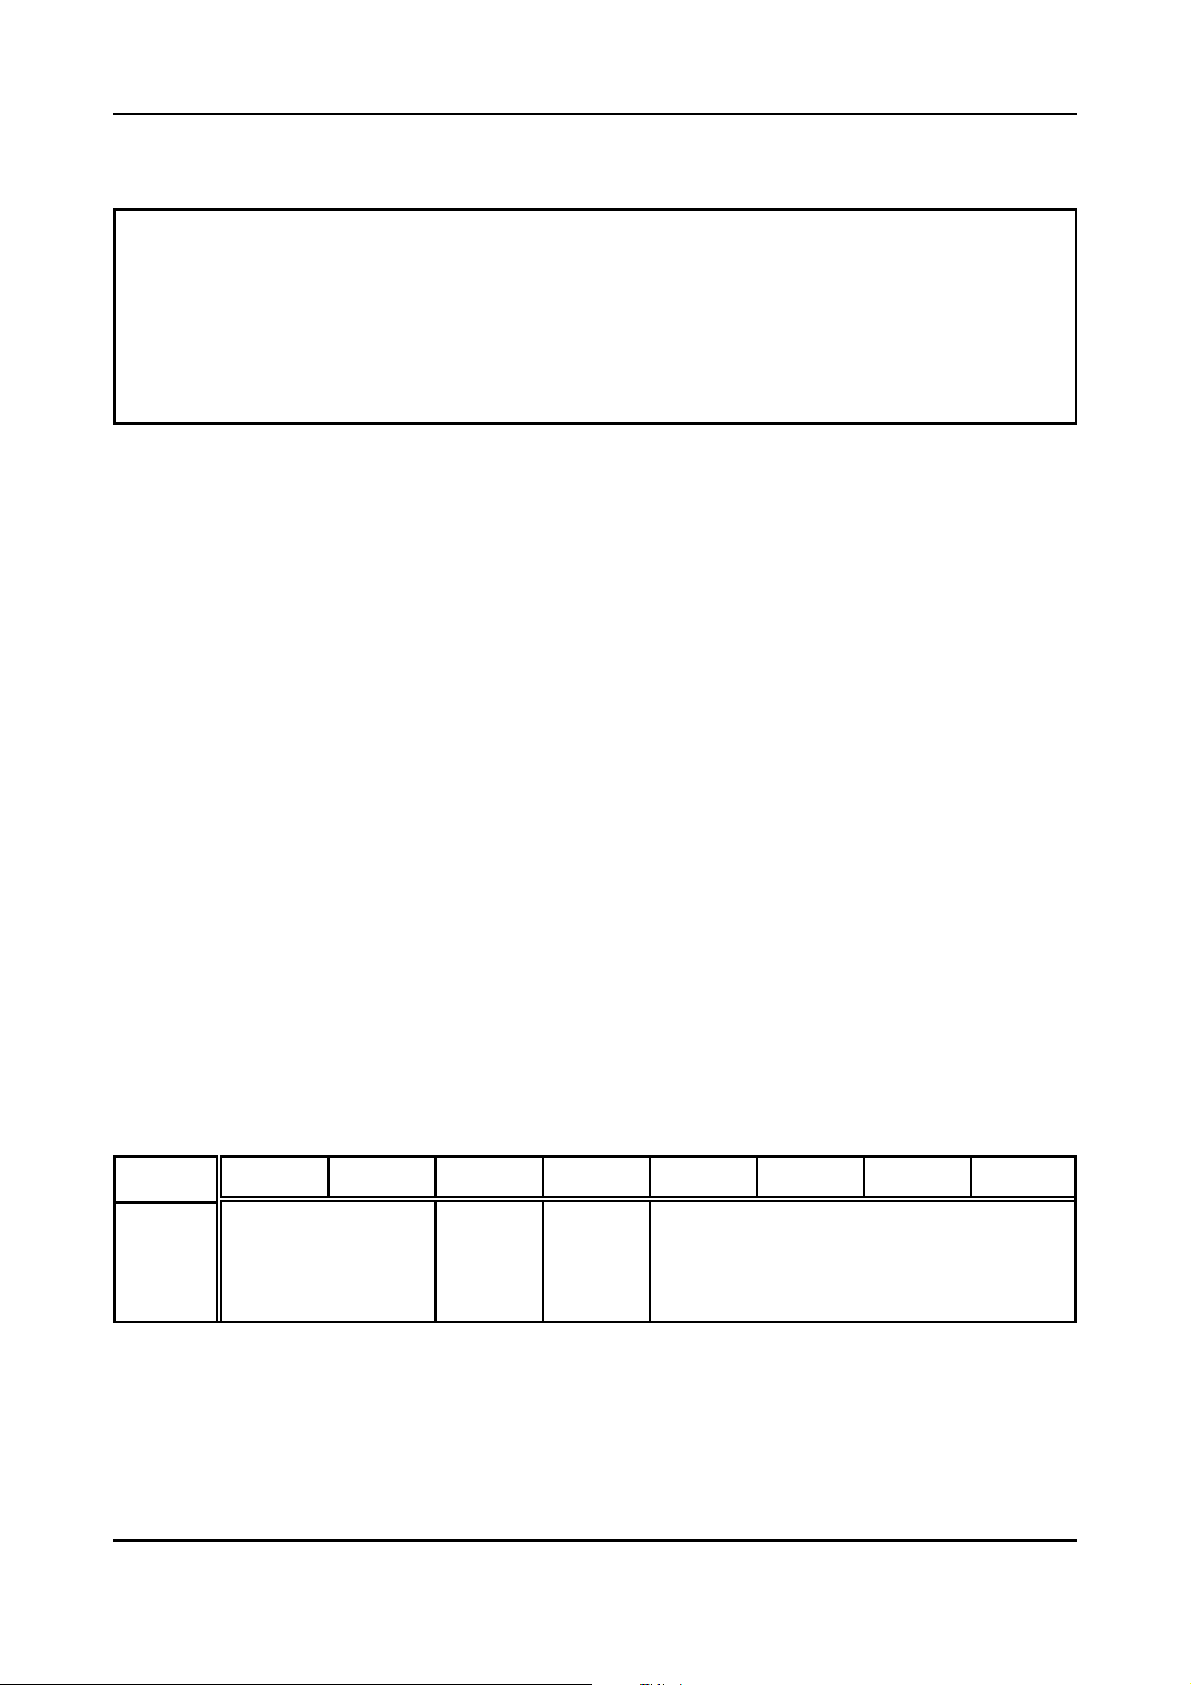
Editing the GSD File with a Text Editor
7. Configuration via Tools of other Manufacturers
We recommend to configure the module with a PROFIBUS configuration tool, as e.g. the
SIMATIC manager.
Not every PROFIBUS configuration software supports the “Universalmodule” (see chapter “5.
Configuration with the SIMATIC Manager”).
If the “Universalmodule” is not supported, the GSD-file has to be adapted via a text editor or the
CAN-CBM-DP module can be configurated via the tool CICT, whereas editing the GSD-file with
a text editor is recommended.
7.1 Editing the GSD-File with a Text Editor
The configuration of a module is made by means of a configuration frame, whose content is enterd in
the GSD-file.
The frame of the configuration is sub-devided in three octets (see also PROFIBUS-Spezification,
Normative Part 8, Spage 738, Fig. 16):
Octet 1: Number_of_the_manufacturer-specific data
Octet 2: Number_of_output_or_iputbytes
Octet 3: Manufacturer-specific_configuration_byte
:
:
The octets have the following meaning:
Octet 1: Number_of_manufacturer-specific_data
Because the CAN-CBM-DP always uses a specific ID-format to represent a connected CAN-module,
the identifier-byte has the following structure (see also PROFIBUS-Specification- Normative-Part-8,
page 737):
MSB LSB
Bit-No.:76543210
Length of the manufactuere-specific data:
0011 11-bit identifier
0101 29-bit identifier
0101 Communication window
Content:
00: free place
01: Input
10: Output
always
0
always
0
CAN-CBM-DP Software Manual Rev. 2.064
Page 69
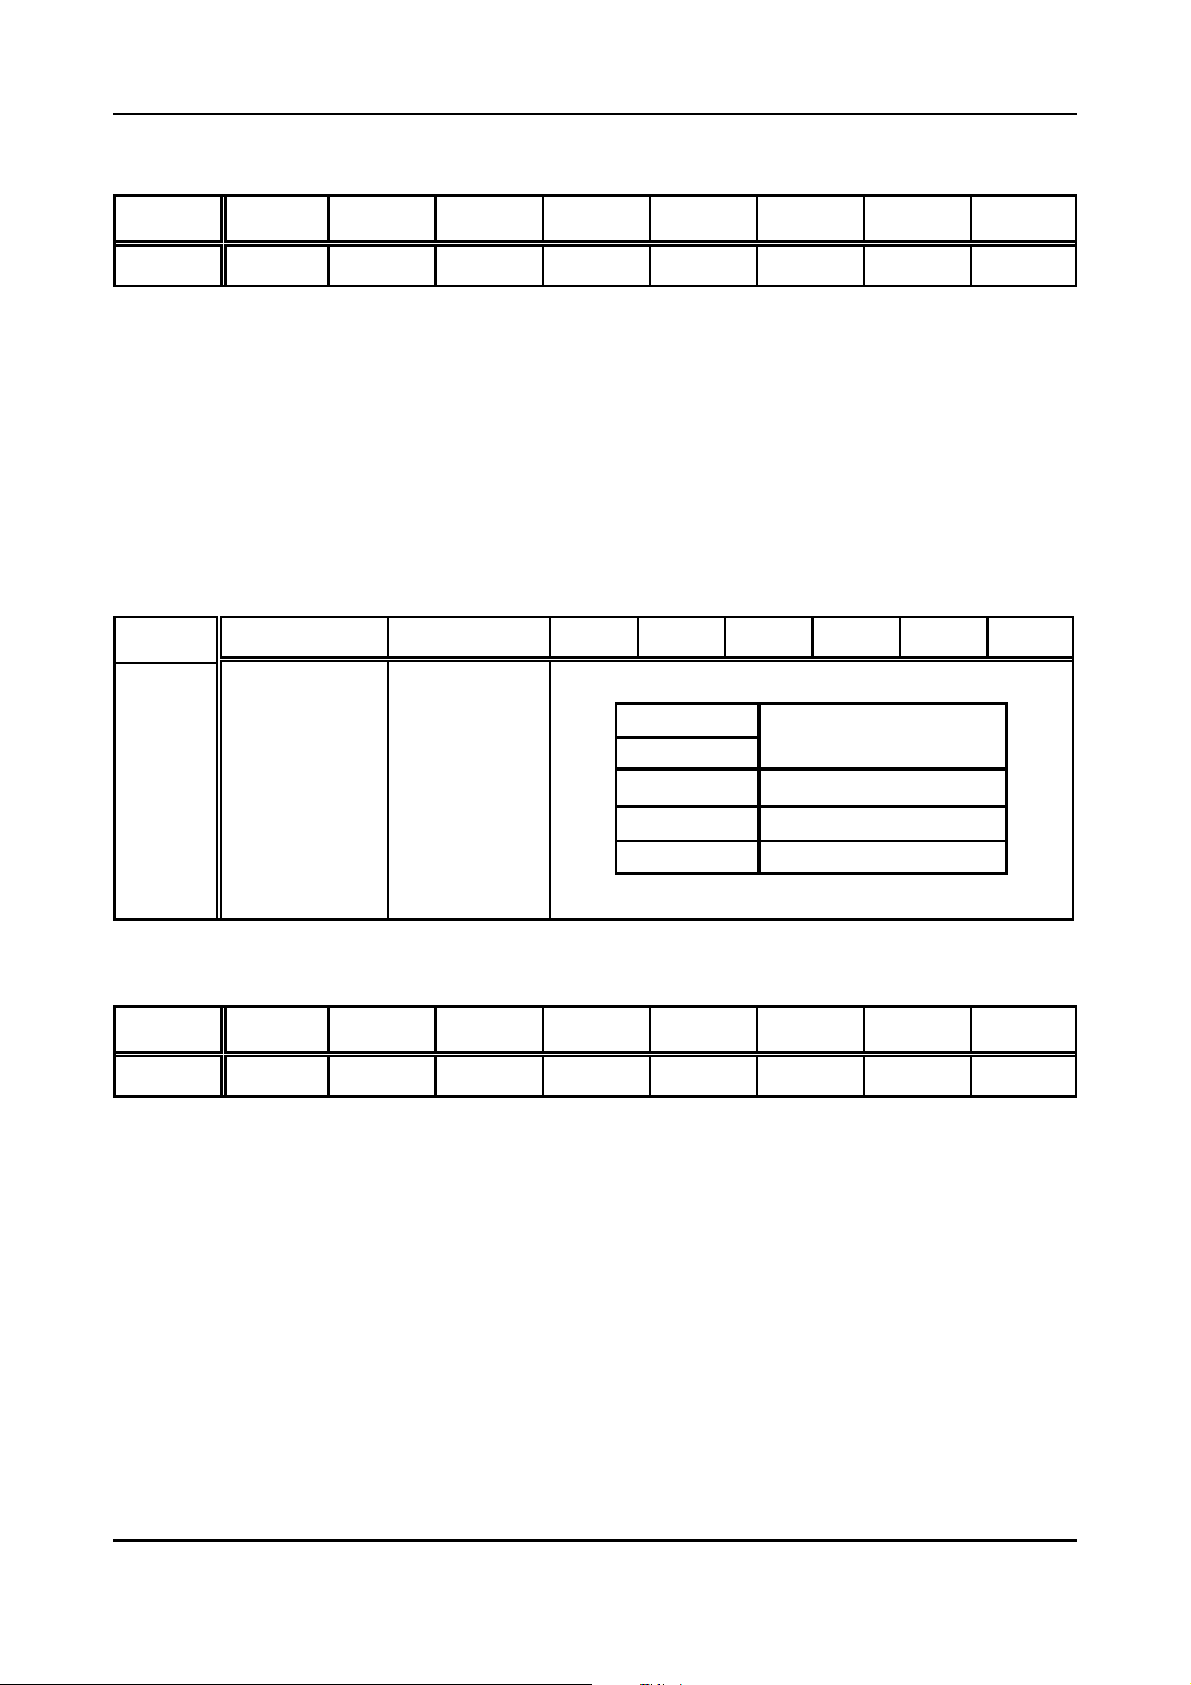
Editing the GSD File with a Text Editor
Example Octet 1:
Bit-No.:76543210
Content:10000011
= 0x83 Output, 3 byte manufactuerer-specific data (11-bit identifier)
Octet 2: Number_of_output_bytes
Octet 2 gives the consistency, the structure (byte/word) and the number of the output bytes.
Length bytes of the output as seen from the PROFIBUS master (see also PROFIBUS-SpecificationNormative-Part-8, page 738)
MSB LSB
Bit-No.: 7 6 543210
Number of inputs/outputs
Content:
Consistency over
0: byte or word
1: complete
length
Length-format
0: byte-structure
1: word-
structure
Bit
543210
000000 1 byte, resp. 1 word
::
1 1 1 1 1 1 63 bytes, resp. 63 words
Meaning
Example Module 1:
Bit-No.:76543210
Content:00000101
= 0x05 6 byte data
Octet 3, 4, 5: Manufacturer-specific_configuration_byte
Octet 3 and Octet 4 = CAN-identifier example: Identifier 0x0203
Octet 5 = Form byte
CAN-CBM-DP Software Manual Rev. 2.0 65
Page 70
Editing the GSD File with a Text Editor
Example Module 1
The configuration-frame for module 1 has the following structure and has to be inserted into the GSDfile.
Example for manual GSD-file entries:
...
Module="Name of the module" 0x83, 0x05, 0x02, 0x03, 0x00
EndModule
...
Meaning of the entries under “Name of the module”:
“Name of the module” ... Comment to name the module
0x83... Modul is an output (0x80) and three manufacturer-specific configuration-
byte (0x03) will follow.
0x05... Consistency over byte, the length format is byte-structure (0x05) and 6 byte
data are transferred (0x05 = 6...1).
0x02... Manufacturer-specific data: 0x02
0x03... Manufacturer-specific data: 0x03 Identifier = 0x0203
(e.g.: CANopen Rx PDO for
Modul-ID 3)
0x00... Manufacturer-specific data: 0x00 no byte-swapping,
i.e. the sequence of the data will
not be changed
Attention!: Please note, that the GSD-file has to be renamed. The file name may be maximum
8 characters long. Some configuration-software for the PROFIBUS Master does not
operate with longer file names.
CAN-CBM-DP Software Manual Rev. 2.066
Page 71
Parameter Display and Configuration via CICT
7.2 Parameter Display and Configuration with the Tool
CICT
is a menu-controlled program for PC. It is used to display parameters and configure (limited) the
CAN-CBM-DP module. It can be operated under Windows 3.11, Windows NT 4.x and Windows 95.
At the moment CICT only supports 11-bit CAN identifiers.
Note: We recommend to configure the module with a PROFIBUS-configuration software (e.g.
the SIMATIC Manager). If this is not available, we recommend t o edit the GSD-file via a
text editor.
This chapter explains the individual menu points of CICT in detail.
An application example can be found at the end of this chapter.
7.2.1 Display and Configuration
In order to display parameters and configure the module the following steps are required:
Command Notes
1 Setup selecting the serial interface at the PC (COM1, COM2,..)
Connect
2
Data Mapping
3
CBM-DP/Load From
4
or
File/Open
if an ‘online’ configuration is desired
opens dialog box
for display the current parameters are loaded from the module or
a configuration file stored on the PC is loaded
CICT
5 Wakeup Timer set start delay
configuration:
Edit
6
File/Save configuration be stored in PC
7
8 Connect only if configuration has been ‘offline’
enter user parameter (one entry per identifier);
here PLC addresses are assigned to CAN-IDs;
last entry: end flag
Table 7.2.1: Configuration commands
CAN-CBM-DP Software Manual Rev. 2.0 67
Page 72
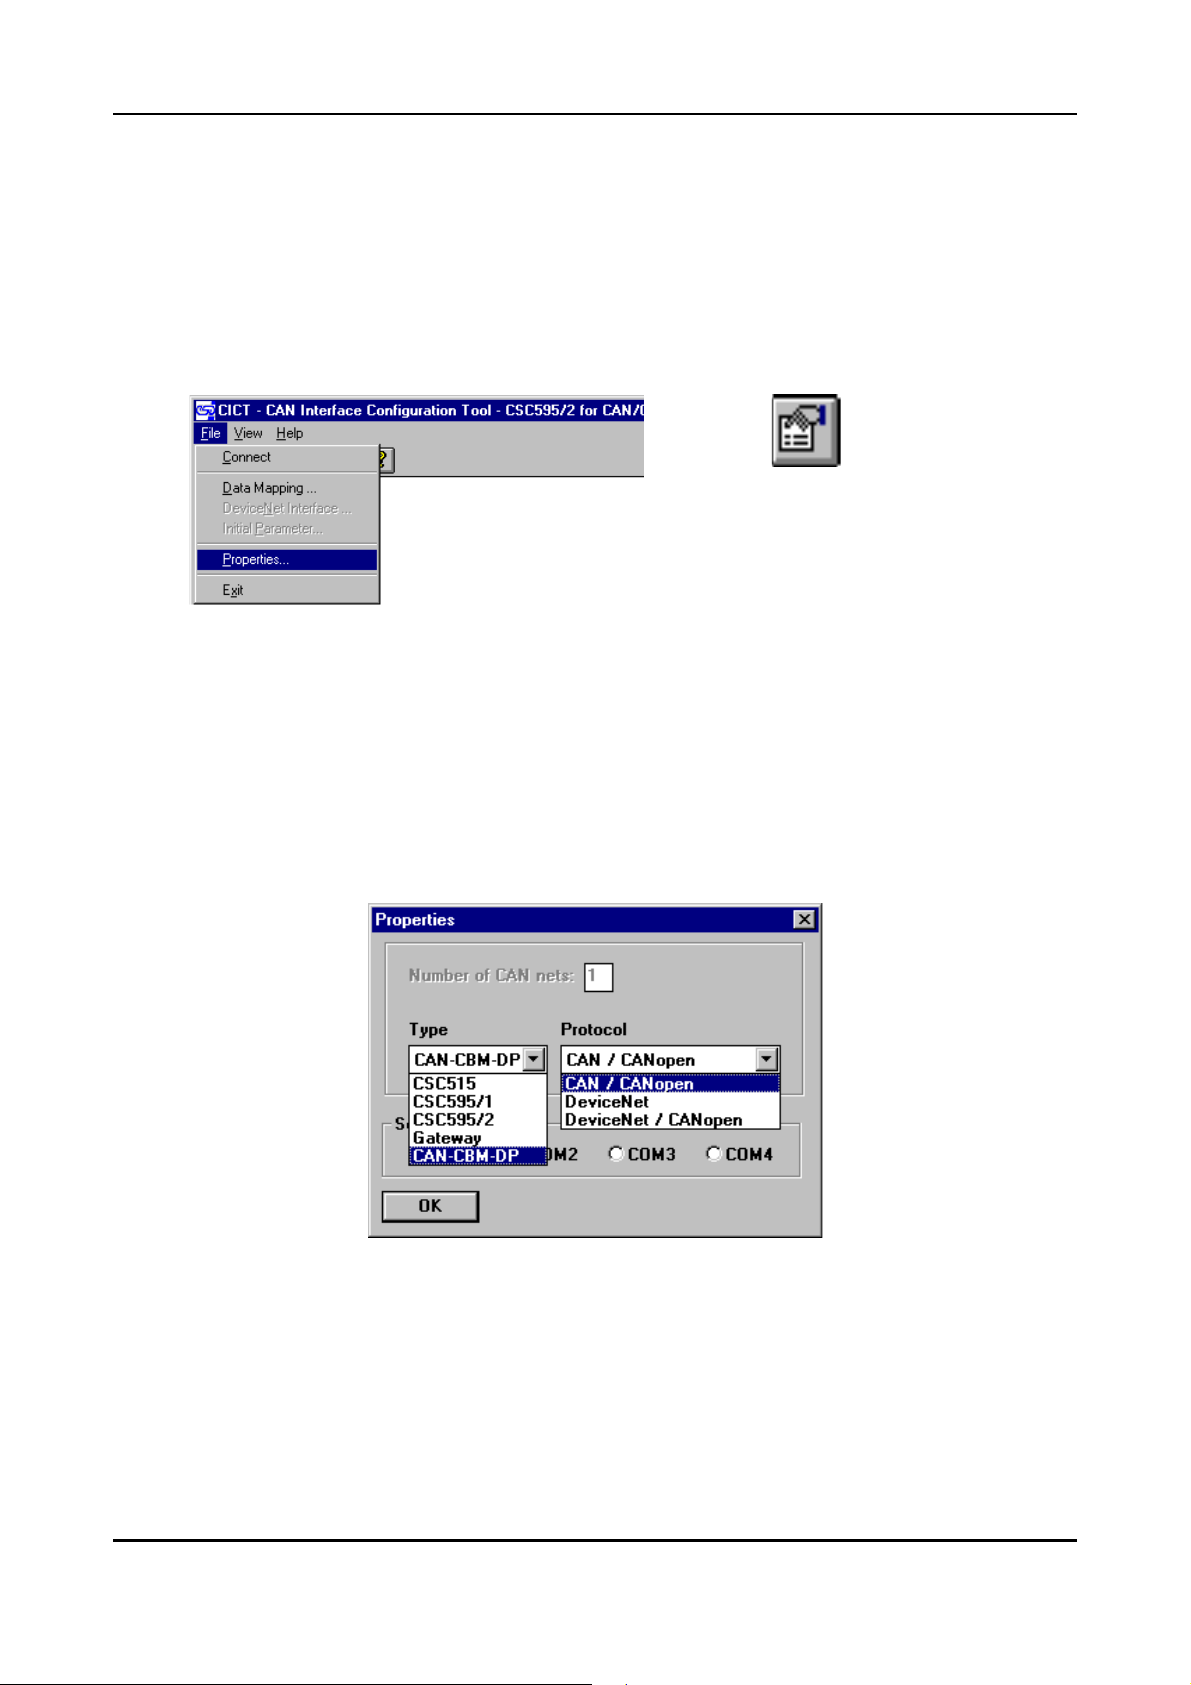
Parameter Display and Configuration via CICT
7.2.2 Hardware Selection
In order to configure the CAN-CBM-DP module you first have to select the hardware to be configured,
the CAN protocol and the serial interface to which the module is connected.
This can be achieved in the following way:
1. Select menu point Properties from menu File (see following figure) or click the properties button
in the tool bar.
Properties-
Button
Fig. 7.2.1: Select menu point Properties
2. Now the dialog box represented in the following figure appears (example CAN-CBM-DP). IN order
to configure the CAN-CBM-DP module it has to be set as shown. The selection of the Serial Port
depends on the interface available at your PC. If a mouse is already connected to interface COM1,
please select COM2 for the module.
The configuration program automatically sets the required parameters of the serial interface in your
PC. Apart from the selecting the port (COM1, COM2...) you do not have to set any parameters.
Fig. 7.2.2: Settings of menu Properties
3. By pressing the OK button or by pressing the >Enter< key the selection of the hardware to be
configured is completed.
These settings are stored in the INI file and are available at once when you call the program the next
time.
CAN-CBM-DP Software Manual Rev. 2.068
Page 73
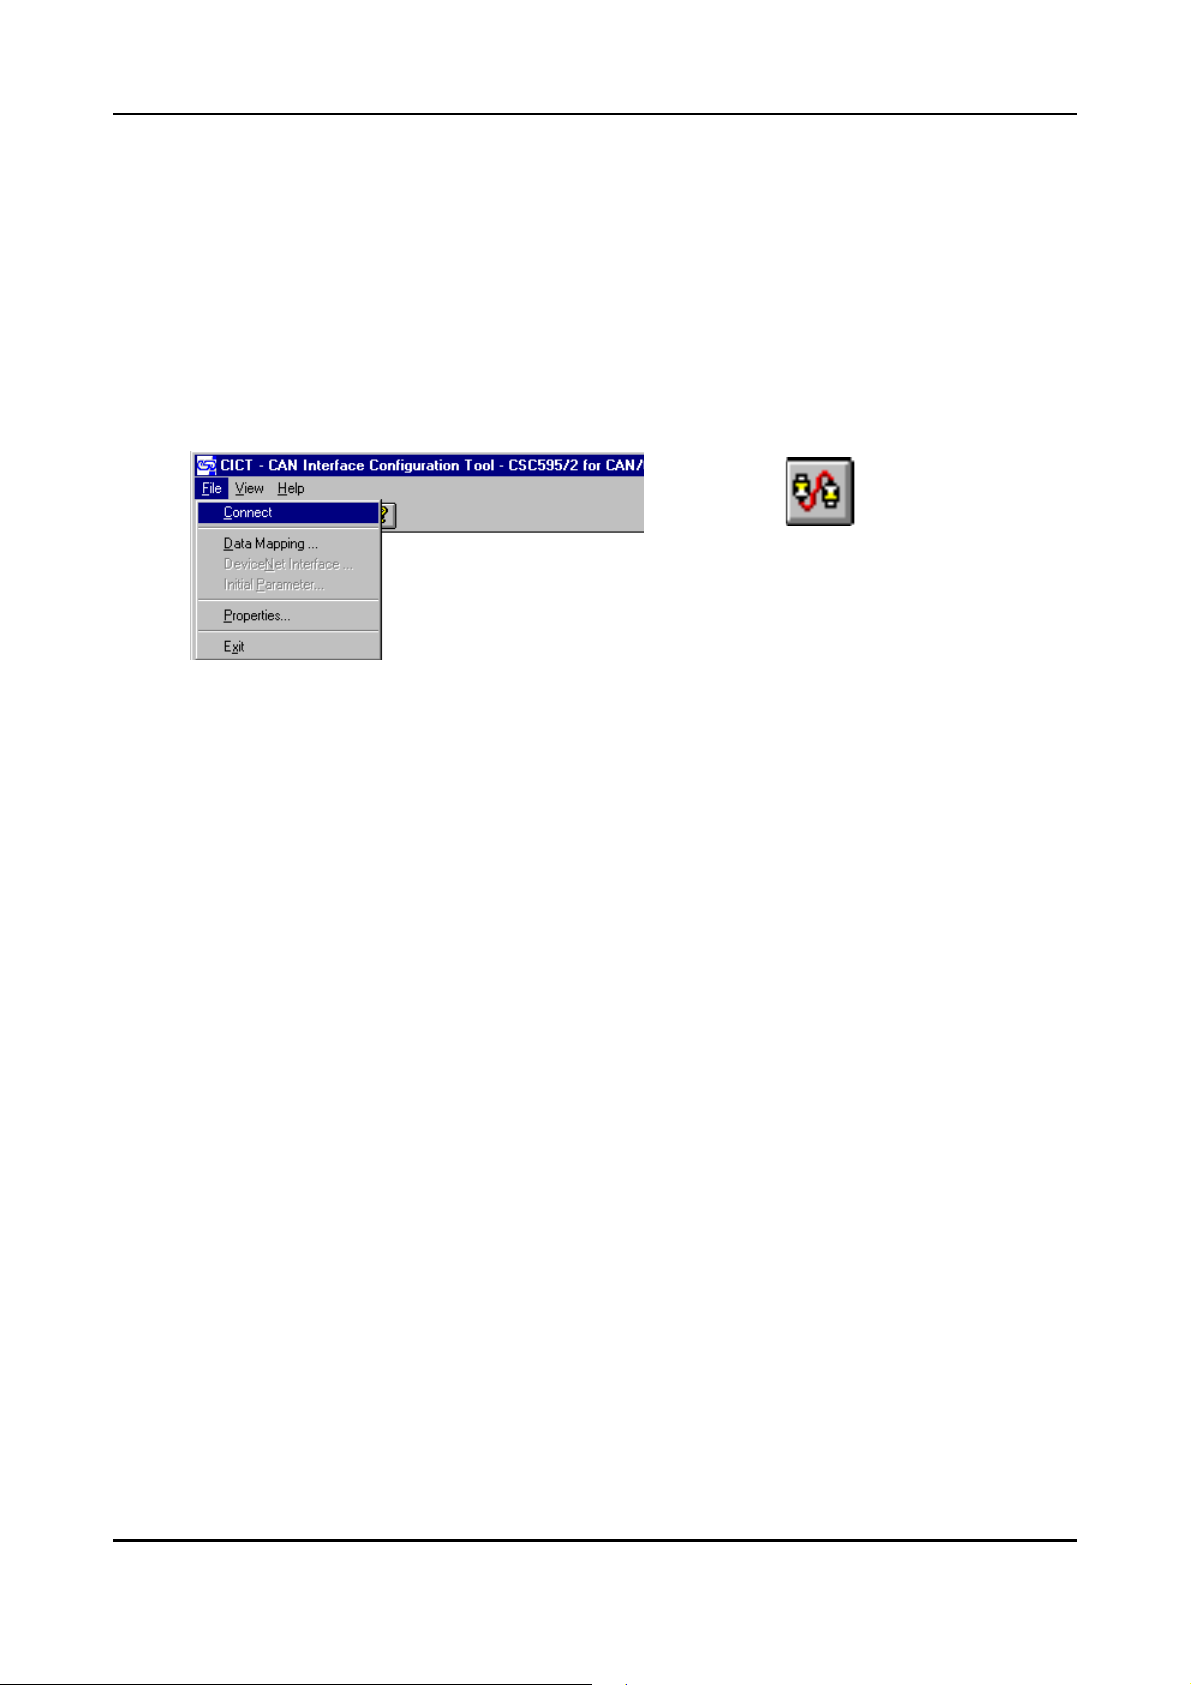
Parameter Display and Configuration via CICT
7.2.3 Online / Offline Configuration
The CAN-CBM-DP module can either be configured in online or offline operation. During online
configuration a connection must be available between PC and CAN-CBM-DP module by means of the
serial interface. If you configure offline, the connection to the CAN-CBM-DP module only has to be
established after all configuration parameters have been entered in the CICT program.
Online configuration
In order to configure online, you have to select menu point Connect from menu File or click the
Connect/Disconnect button in the tool bar.
Connect-
Button
Fig. 7.2.3: Select menu point Connect
If a connection to the CAN-CBM-DP has been established, the message ‘ONLINE’ appears in the status
line on the right below, and the CAN-CBM-DP module can be configured as described in the following
chapter.
Offline configuration
In offline operation you configure the CAN-CBM-DP module as described in the following chapter.
In order to transmit the configuration to the CAN-CBM-DP module after it has been configured offline,
you have to execute the command Save to... from the DPCAN menu. The DPCAN menu will be
described in detail in one of t he following sections.
CAN-CBM-DP Software Manual Rev. 2.0 69
Page 74
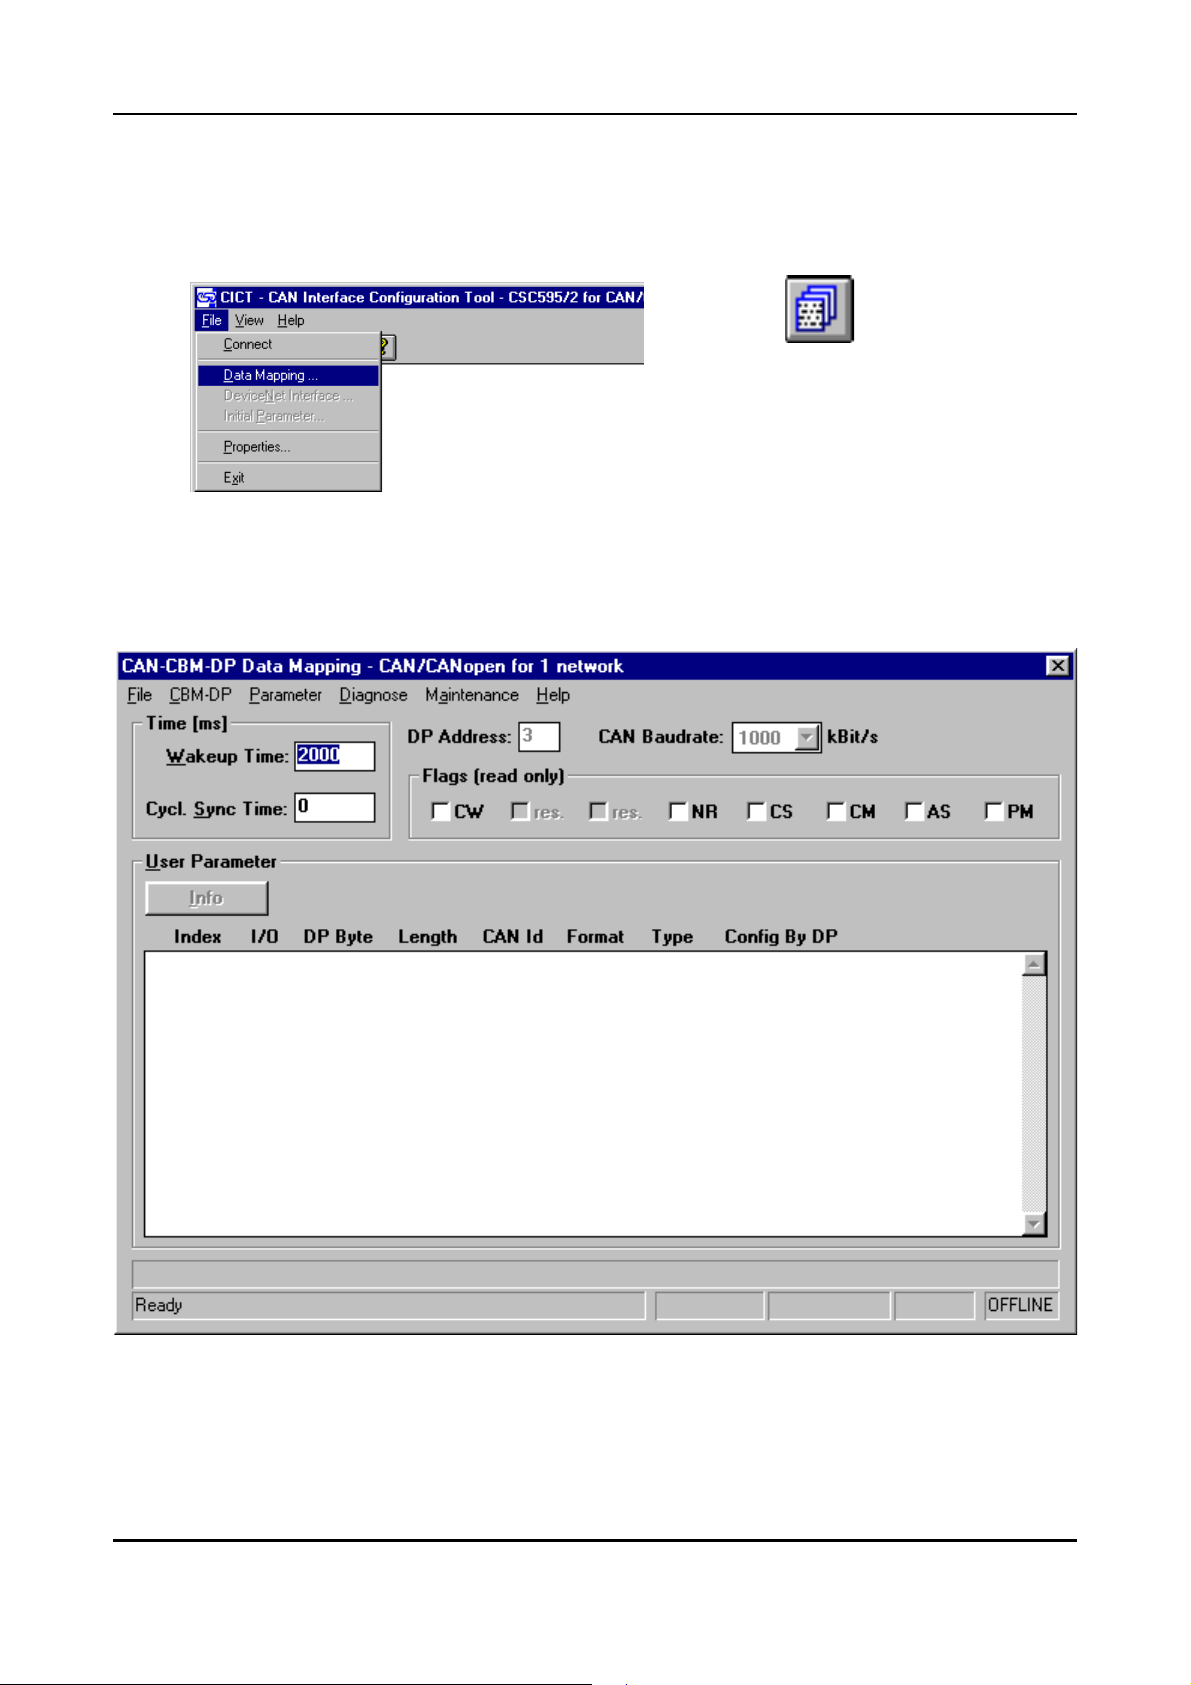
Parameter Display and Configuration via CICT
7.2.4 Configuration of the CAN-CBM-DP Module
In order to configure the CAN-CBM-DP module you have to select menu point Data Mapping from
menu File or click the Data Mapping button in the tool bar.
Data
Mapping-
Button
Fig. 7.2.4: Select menu point Data Mapping
The following dialog box appears:
Fig. 7.2.5: Data Mapping dialog box
CAN-CBM-DP Software Manual Rev. 2.070
Page 75
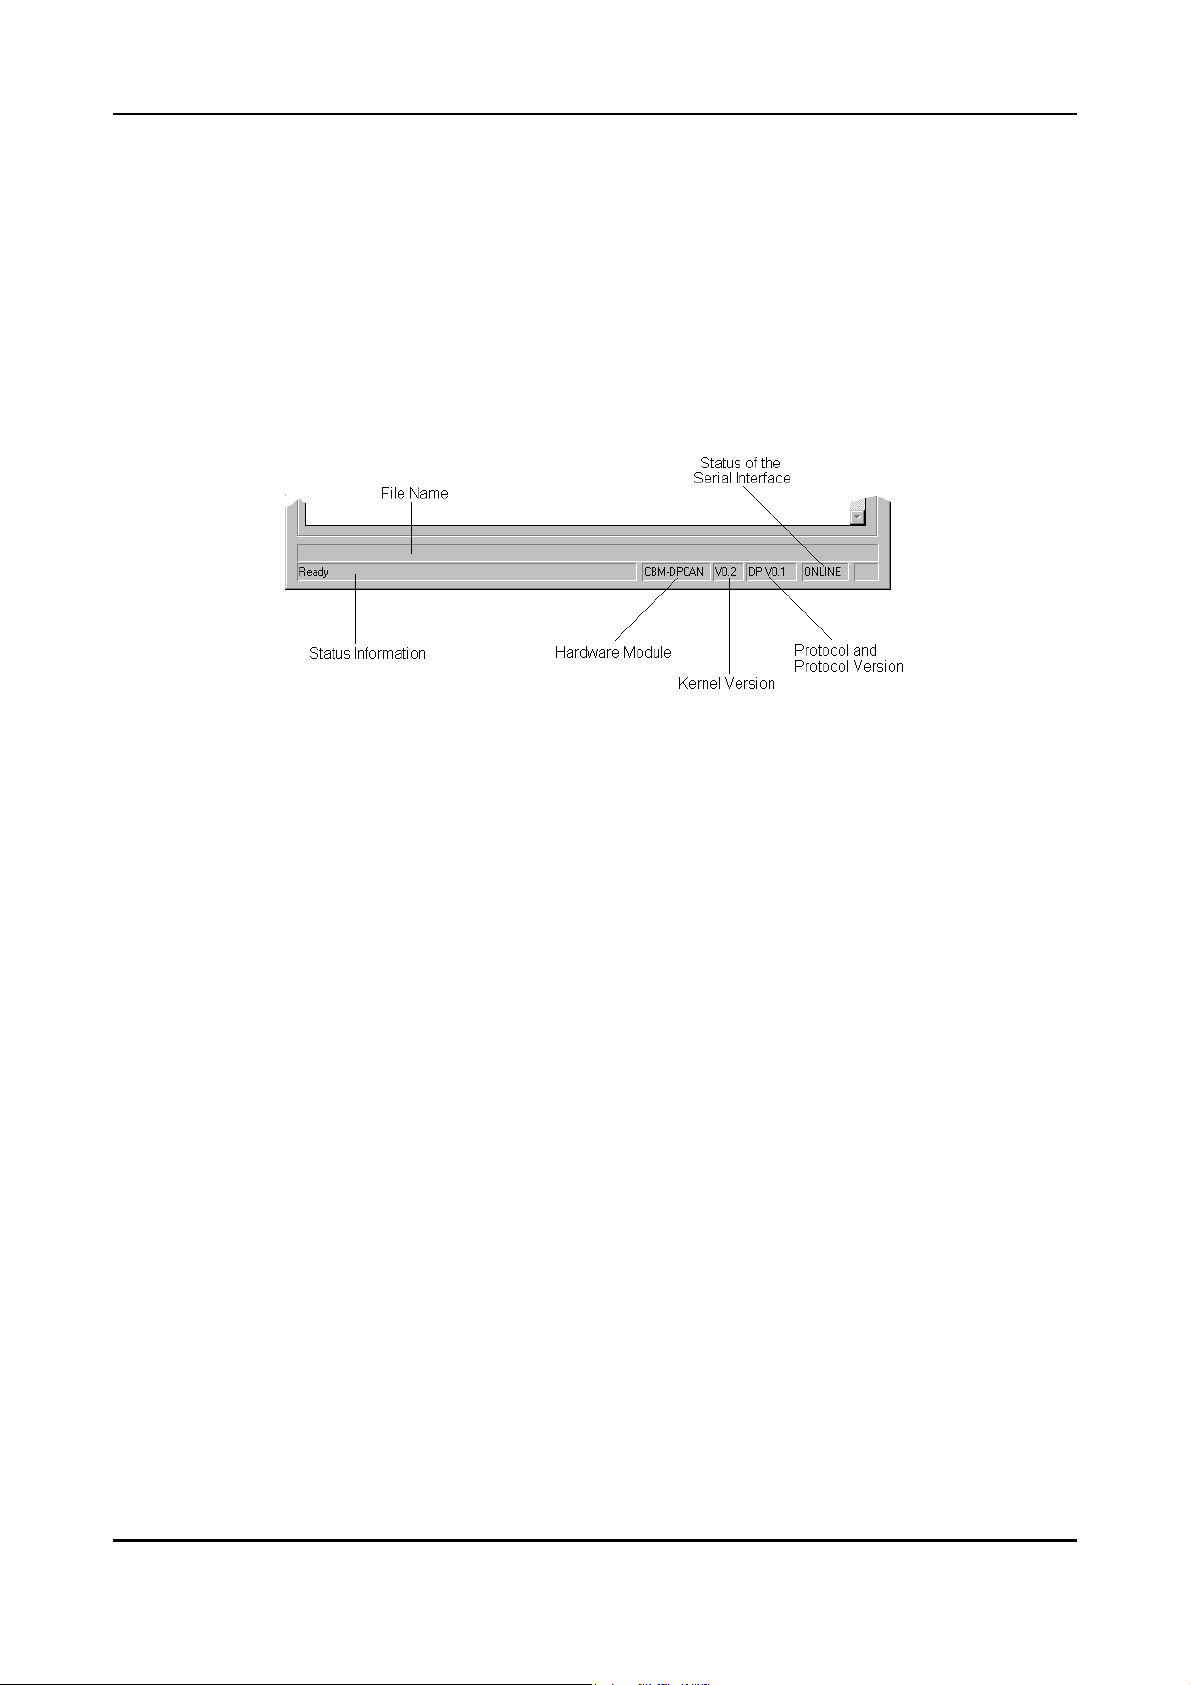
Parameter Display and Configuration via CICT
7.2.4.1 Properties in the Data Mapping Dialog Box
In the Data Mapping dialog box the parameters set via PROFIBUS can be displayed after they have
been read in from the module.
The parameters ‘Sync-Time’ and ‘Wakeup-Time’ can also be changed. Parameters CAN ID and
Format can be changed as well, provided that the parameter ConfigByDP has the value N.
Status Line
In the status line of the Data Mapping dialog box the following properties are displayed:
Fig. 7.2.6: Meaning of specifications in the status line
PROFIBUS-DP Address The PROFIBUS-DP Address can only be read. The value read
corresponds to the value set via the coding switches.
Value range: 3...124 decimal
CAN-CBM-DP Software Manual Rev. 2.0 71
Page 76

Parameter Display and Configuration via CICT
Wakeup Time By means of this parameter a delay is specified in milliseconds which
determines the time a module waits after a RESET or power-on before it
transmits data to the CAN bus.
In default setting of the parameters the wake-up time is 2000 ms.
Wake-up Time can here only be entered as a decimal value.
Parameter
Wake-up Time
Table 7.2.2: Function of parameter Wake-up Time
Attention:
Wakeup Time can be set in two different ways:
1. As described above.
2. Via the parameter telegram in the DP properties windows (refer to
page 23)
Both entries are equal. That means that the last specification is valid!
Value range
[ms]
0...32767
Descriptions
Delay in milliseconds.
Decimal value range: 0 ms ... 32767
CAN-CBM-DP Software Manual Rev. 2.072
Page 77
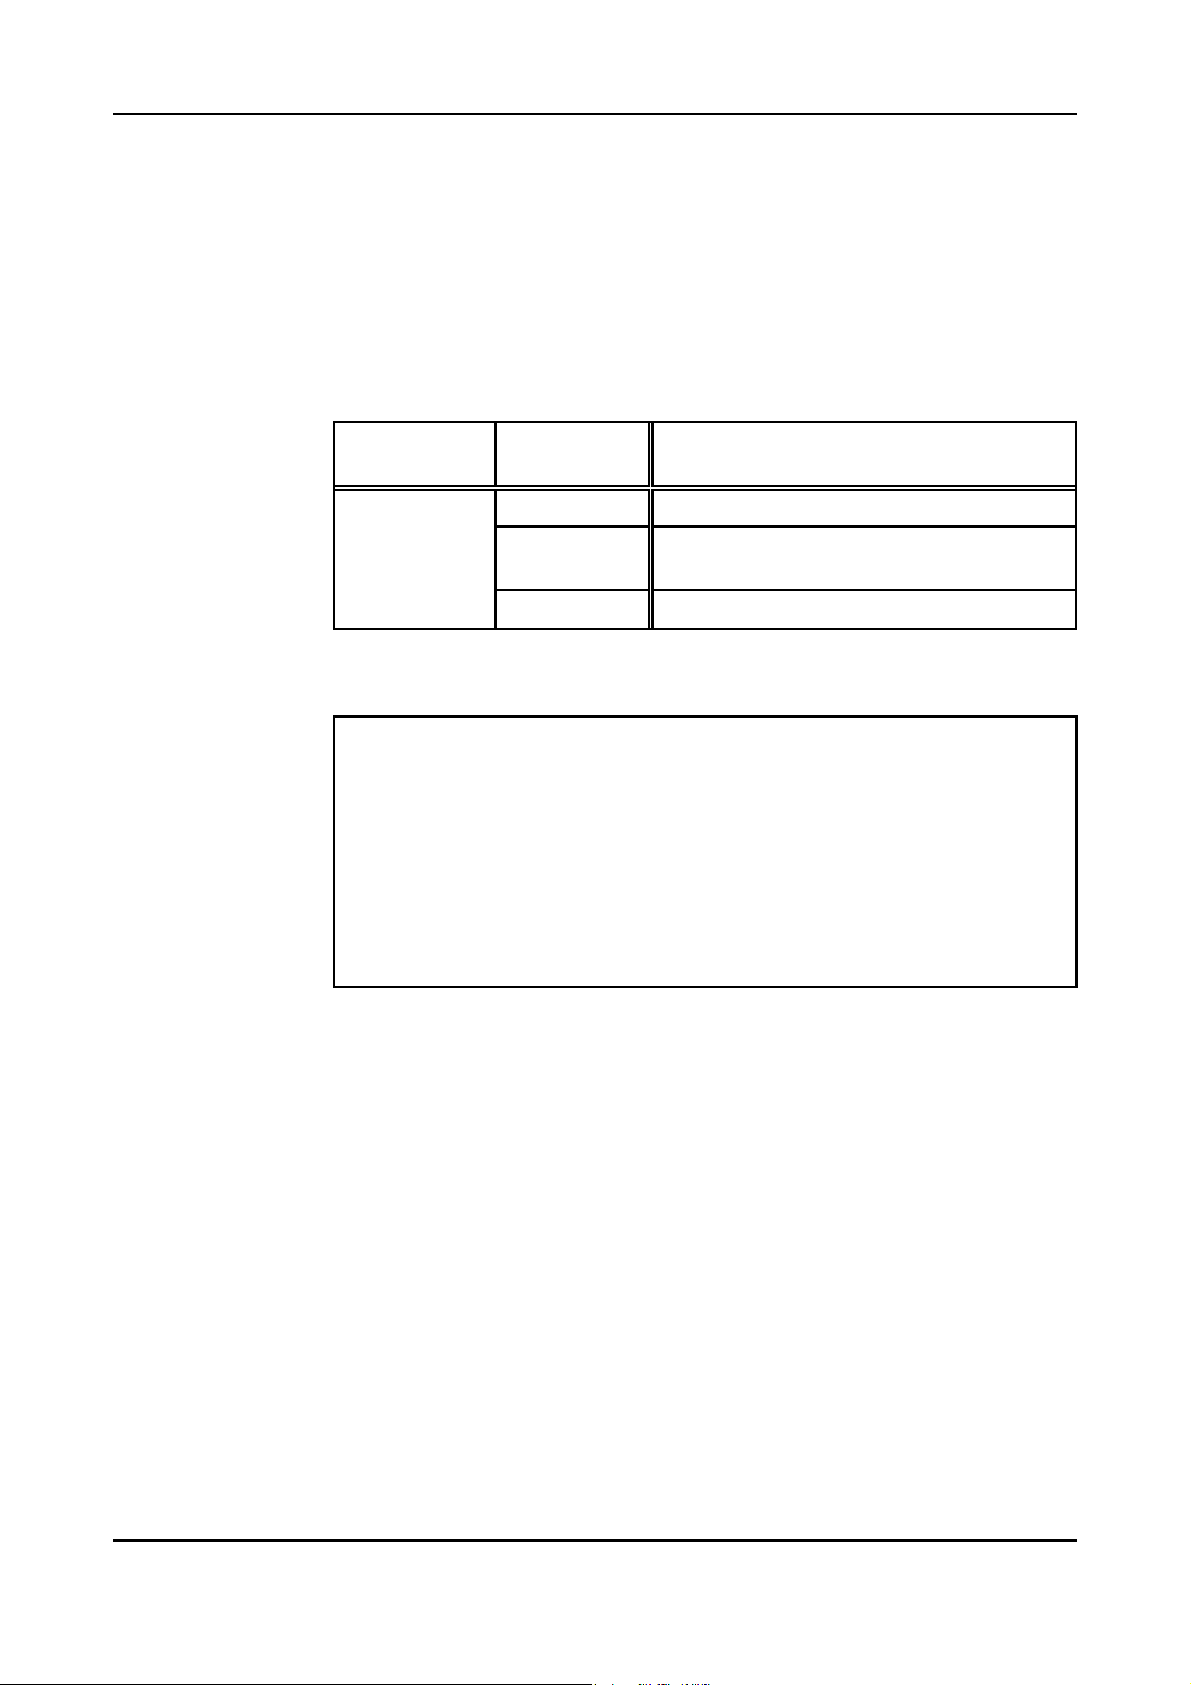
Parameter Display and Configuration via CICT
SYNC Time: The CAN-CBM-DP module can cyclically transmit the commands SYNC and
START for simple CANopen applications. The SYNC Time for the transmission
can be specified in the properties window, via the Communication Window or
via the tool CICT as described above.
The specified cycle is used for the SYNC command as well as the START
command. It is specified in milliseconds.
SYNC Time is specified as a decimal value, here.
Parameter
SYNC Time
Value range
[dec] in [ms]
0 No SYNC and Start transmissions possible
1...65534
65535 Use current value from gateway (default)
SYNC Time and Start Time in milliseconds
(1...65534 ms)
Explanations
Table 7.2.3: Function of parameter SYNC Time
Attention:
SYNC Time can be set in three different ways:
1. As described above.
2. Via the parameter telegram in the DP properties windows (refer to
page 23)
3. Via bytes 4 and 5 of the Communication Window (refer to page 37).
All three specifications are equal. That means that the last specification is
valid!
CAN Bit Rate In program CICT the CAN bit rate can only be read. The CAN bit rate is set by
means of the configuration telegram as described on page 23.
CAN-CBM-DP Software Manual Rev. 2.0 73
Page 78
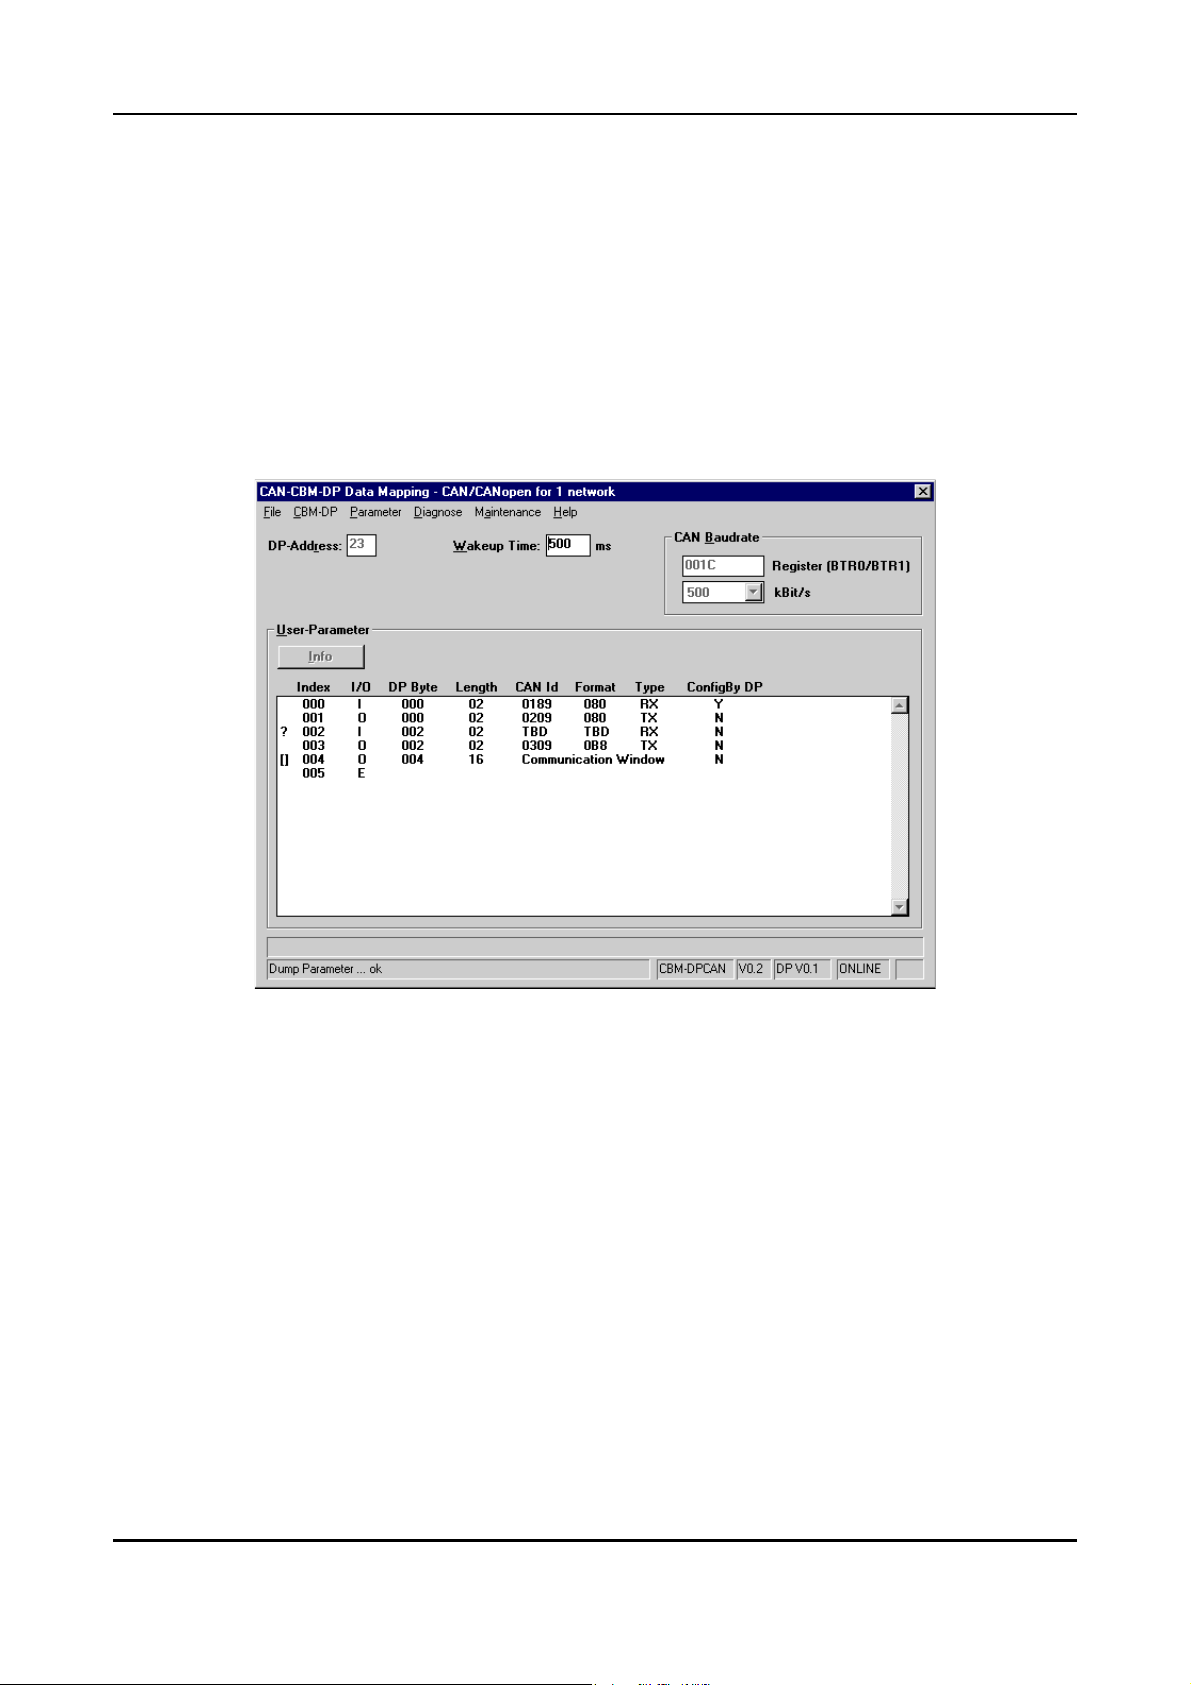
Parameter Display and Configuration via CICT
7.2.4.2 Display and Edit User Parameter Properties
In order to display parameter properties they have to be loaded from the CAN-CBM-DP module into
the PC by means of the interface.
In order to load the configuration currently stored in the CAN-CBM-DP module you have to select
menu point Load from... from menu CBM-DP. All data stored in the CAN-CBM-DP module are read
and displayed in the configuration window.
Further notes on the management of the configuration file can be found in the chapter of the same name
on page 81.
Fig. 7.2.7: User parameter properties in data mapping window
Meaning of User Parameters
Index
Chronological number of properties (decimal).
I/O
In selection box I/O the setting of the data direction of the PLC port selected via DP Byte (as seen from
the PLC) is displayed. The data direction can only be set or changed via the PROFIBUS side by means
of the SIMATIC Manager program.
CAN-CBM-DP Software Manual Rev. 2.074
Page 79

Parameter Display and Configuration via CICT
DP Byte
Absolute PLC peripheral address (decimal).
Parameter DP Byte can only be set or changed via the PROFIBUS side by means of the SIMATIC
Manager program and is only displayed, here.
Value range: 0 ... 127 (decimal)
Length
Number of data bytes of one frame transmitted on the CAN bus (decimal).
Parameter Length can only be set or changed via the PROFIBUS side by means of the SIMATIC
Manager program and is only displayed, here.
Value range: 1 ... 8, 16 (decimal)
CAN ID
CAN ident ifier which is to be linked to PLC address (hexadecimal).
If a PLC input port, i.e. I/O=input has been selected for the address, the CAN identifier for the CANCBM-DP module is a reception identifier (RxId).
If a PLC output port, i.e. I/O=output has been selected for the address, the CAN identifier for the CANCBM-DP module is a transmission identifier (TxId).
The CAN identifier can only be changed, if parameter ConfigByDP has the value N (see user parameter
list).
Value range: 0 ... 7FD hex, EEEE hex, FFEF hex
Format
Setting of byte assignment between CAN and PLC data regarding Intel and Motorola format
(hexadecimal).
Parameter Format will be described in detail on the following page.
Format can only be changed, if parameter ConfigByDP has the value N (see user parameter list).
Value range: 00 ... FE hex
Type
Parameter Type depends on the setting of other parameters and is only used for information.
ConfigByDP
This parameter shows whether the module has last been configured via the PROFIBUS. Only if an N
for NO is displayed, it is possible to change parameters CAN Id and Format via the configuration
program CICT. Otherwise (i.e. Y for YES) the configuration can only be changed via the PROFIBUS.
CAN-CBM-DP Software Manual Rev. 2.0 75
Page 80
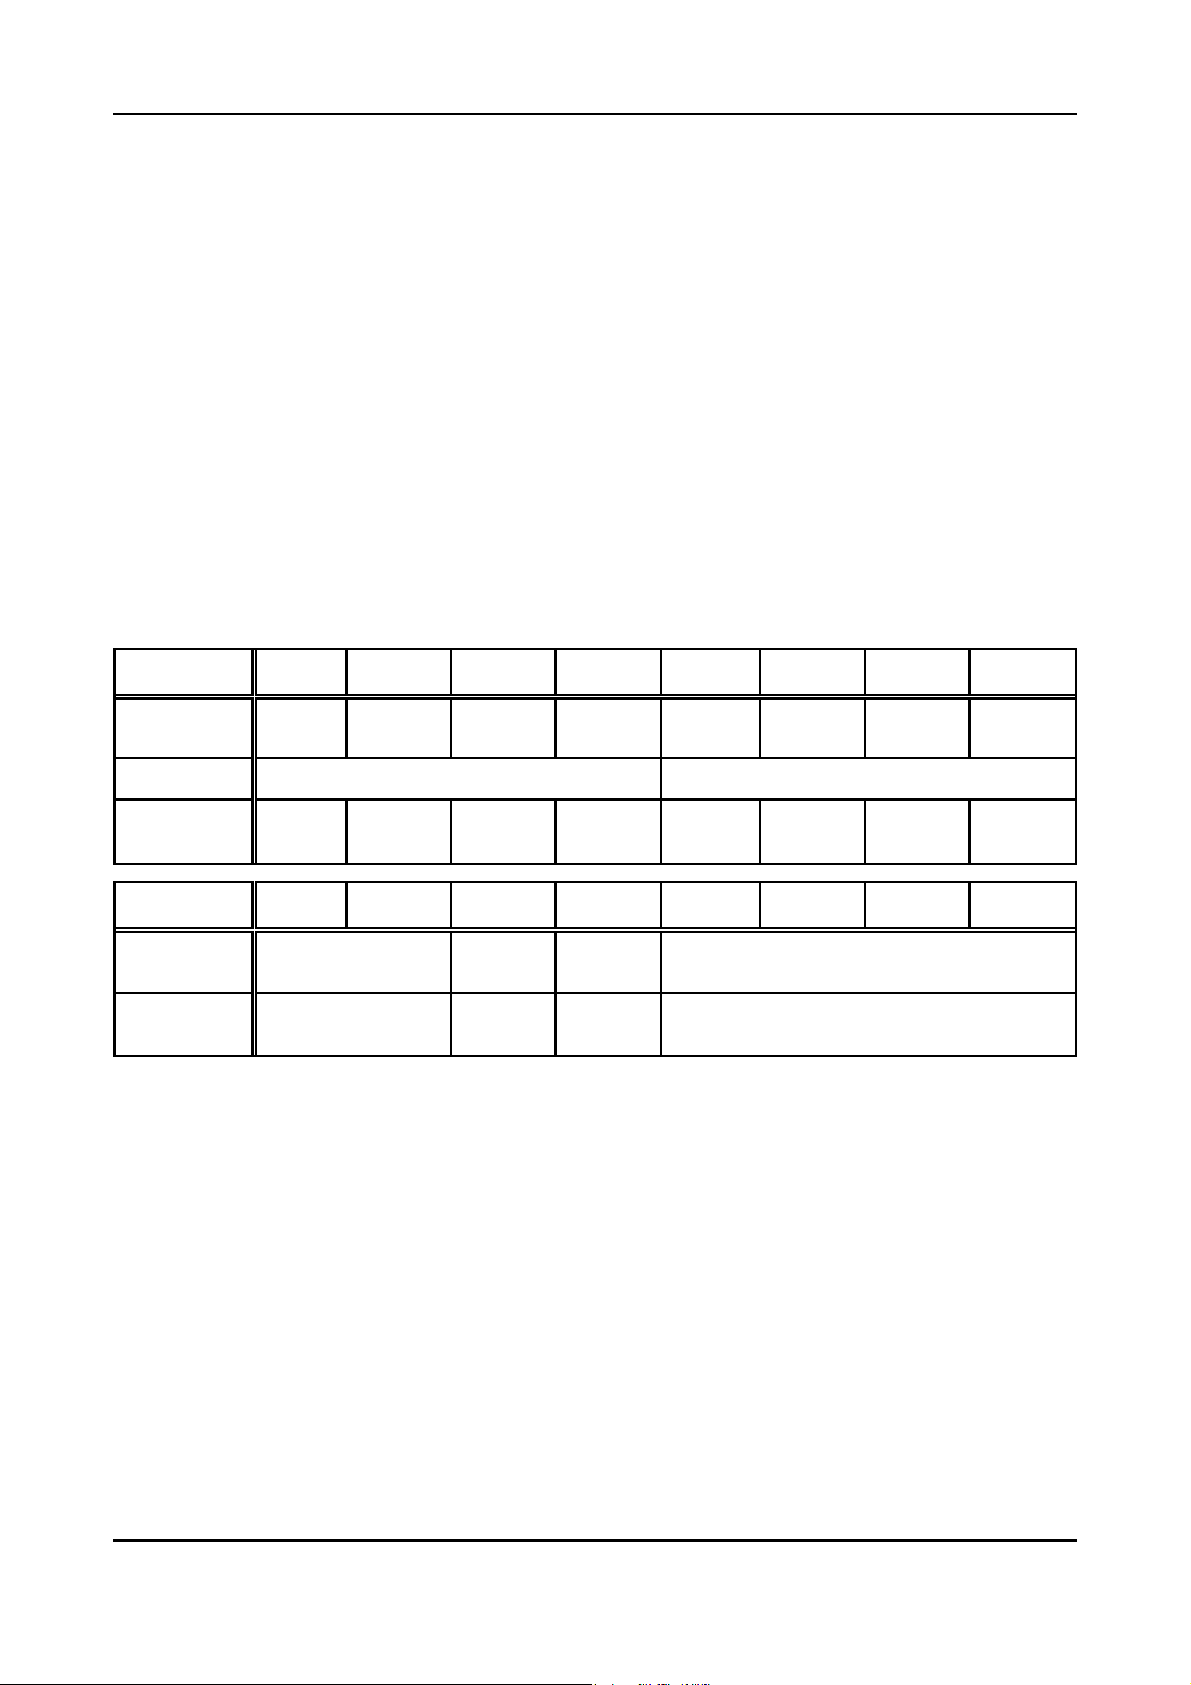
Parameter Display and Configuration via CICT
Further Explanations about Parameters
Parameter Format: Converting the Data Format
Parameter Format is used to convert the data format.
Background: Messages which are longer than 1 byte are normally transmitted in Intel notation (lowbyte
first) in the CAN network, while the Siemens PLC operates in Motorola format (highbyte first). These
formats can be converted via the format byte.
Starting with bit 7 of the format byte you can decide whether the following byte is to be converted as
well, i.e. swapped, or not. If a ‘1’ is specified for a byte, the following bytes are converted until the next
‘0’ transmitted. The functionality can be explained best by means of an example.
Example:
A CAN telegram has got a date in Intel format in the first byte, followed by 2 bytes which are
not to be swapped and a long word in the last 4 bytes which is in Intel format again.
Binary the following representation results for the format byte:
Bit No.
Bit of
Format
hexadecimal 8 E
action
Data bytes
CAN frame
PLC data
76 5432 1 0
10 0011 1 0
begin
swap
end swap
un-
changed
un-
changed
begin
swap
swap swap
end
swap
12 3456 7 8
2 bytes
Intel format
2 bytes
Motorola format
byte 3 byte 4
byte 3 byte 4
4 bytes
Intel format
4 bytes
Motorola format
From this the format byte results in 8E hex. If all eight bytes are to be swapped, for instance, value FE
hex is specified for the format byte.
The lowest bit is generally without significance, because the telegram and therefore the formatting have
been completed. The bit should always be set to 0.
If parameter Format has not been set, the default setting will be used. In default setting all bits are set
to ‘0’, i.e. no data is being converted.
CAN-CBM-DP Software Manual Rev. 2.076
Page 81
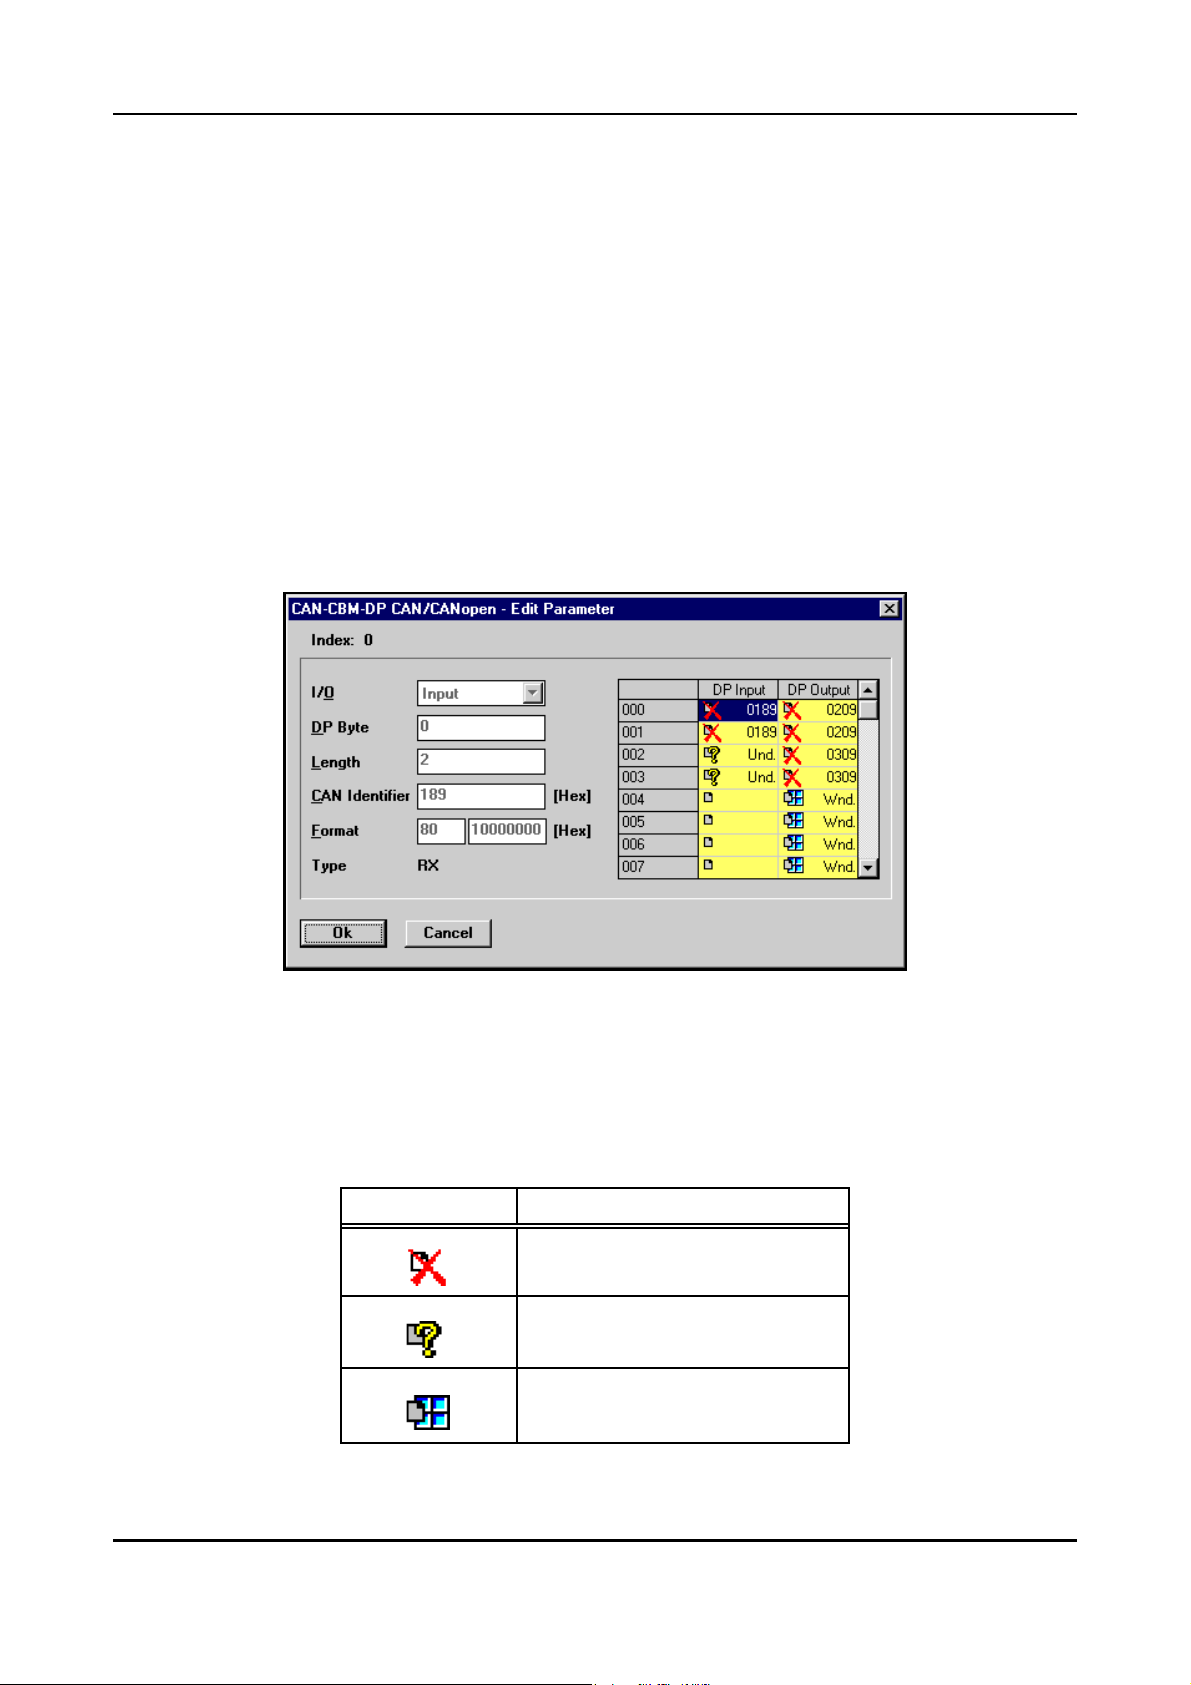
Parameter Display and Configuration via CICT
Editing User Parameter Properties
User parameters CAN Id and Format can only be changed, if the module has not been configured via
the PROFIBUS last, i.e. the comment field has not been filled in during PROFIBUS configuration via
the SIMATIC Manager.
Parameter ConfigByDP shows whether the parameters can be edited or not (N=parameters can be
changed via program CICT, Y= no change is possible). All other parameters can only be changed by
means of the PROFIBUS!
In order to edit parameters you have to follow the steps below:
1. Mark user parameter which is t o be edited.
2. Select menu point Edit from menu Parameter, press >Enter< or double click the entry with the
left mouse button. The following Edit Parameter window appears:
Fig. 7.2.8: Edit Parameter window
In the spreadsheet of the parameter window the assignment of the DP bytes by the CAN identifiers
is displayed. Each cell in the spreadsheet corresponds to one DP byte. The meaning of the
pictograms shown in the spreadsheet is explained in the following table:
Pictogram Meaning
DP byte is assigned with entry
unknown CAN identifier
(CAN-ID = EEEE hex)
communication window
(CAN-ID = FFEF hex)
Table 7.2.4: Pictograms in Edit Parameter window
CAN-CBM-DP Software Manual Rev. 2.0 77
Page 82
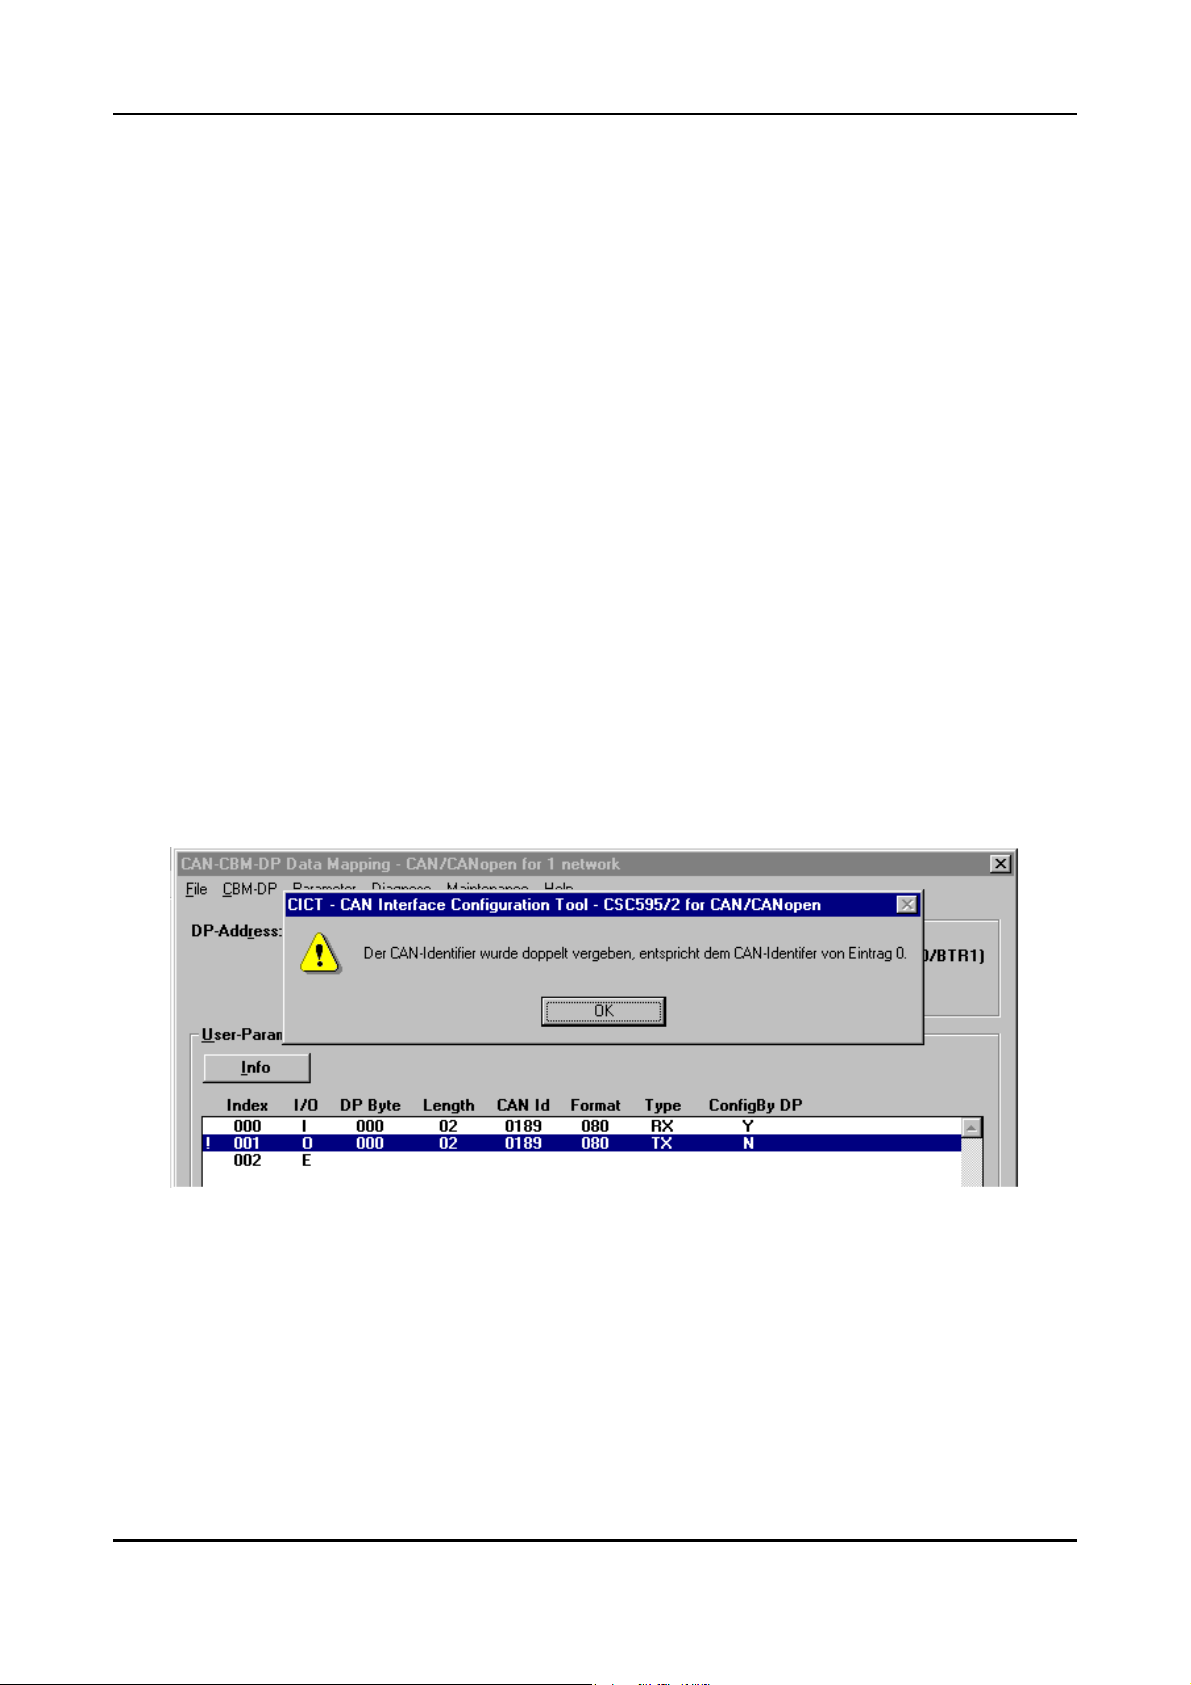
Parameter Display and Configuration via CICT
3. By means of the mouse you can now click the parameter to be change and enter the desired value.
4. By pressing the >Enter< key or by clicking the OK button the Edit Parameter window is closed and
the entry with the changed parameters is displayed in the user parameter list.
Deleting all User Parameter Properties
1. Select menu point Clear in menu CAN-CBM-DP.
2. You are requested to save your changes in a file.
3. All user parameter properties are deleted.
Displaying Information about Wrong User Parameters
If an error occurs because a user parameter entry has been edited (such as assigning a CAN identifier
twice), this will be indicated by an exclamation mark ‘!’. If you want the reason for the error being
displayed, you have t o follow the steps below.
1. Mark user parameter entry for which you want to have an error displayed.
2. Click Info button. A window with the following error message appears:
Fig. 7.2.9: Example: Error message caused by assigning an identifier twice
3. Read error message and click OK button or press >Enter< key.
4. Correct error by editing the user parameter entry.
CAN-CBM-DP Software Manual Rev. 2.078
Page 83
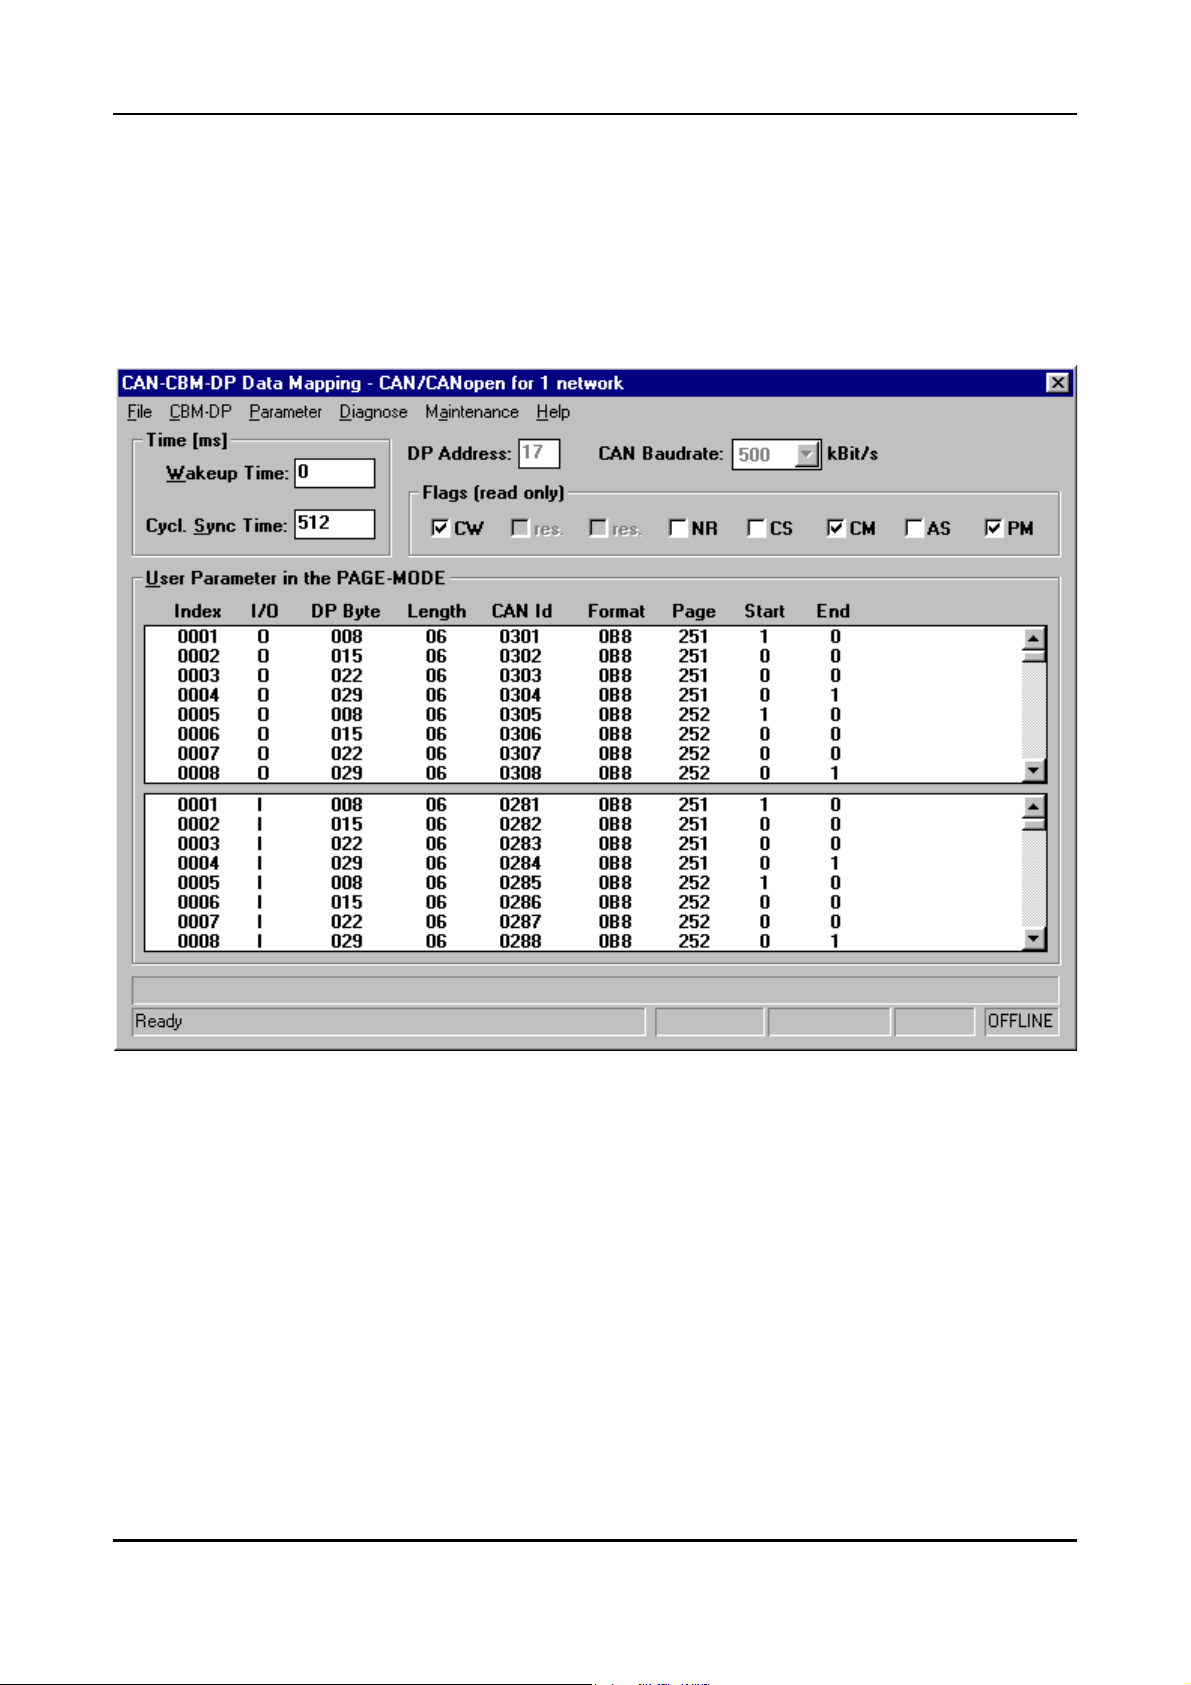
Parameter Display and Configuration via CICT
7.2.4.3 Data-Mapping Dialog Box in Page Mode
The Data Mapping can also be shown by means of the tool CICT when the module is operated in Page
Mode. You cannot change specifications in the user parameter window, however.
In contrast to the normal way of representation the user parameter window is divided horizontally in
Page Mode: In the upper half only outputs are represented, while the lower half only shows inputs.
Fig. 7.2.10: Data Mapping dialog box in Page Mode
Most of the parameters have already been described above. Only the differing parameters are to
explained shortly, here:
Page Shows the number of the assigned page.
Start, End Here, the first and last entry of a page are represented by a ‘1’.
CAN-CBM-DP Software Manual Rev. 2.0 79
Page 84
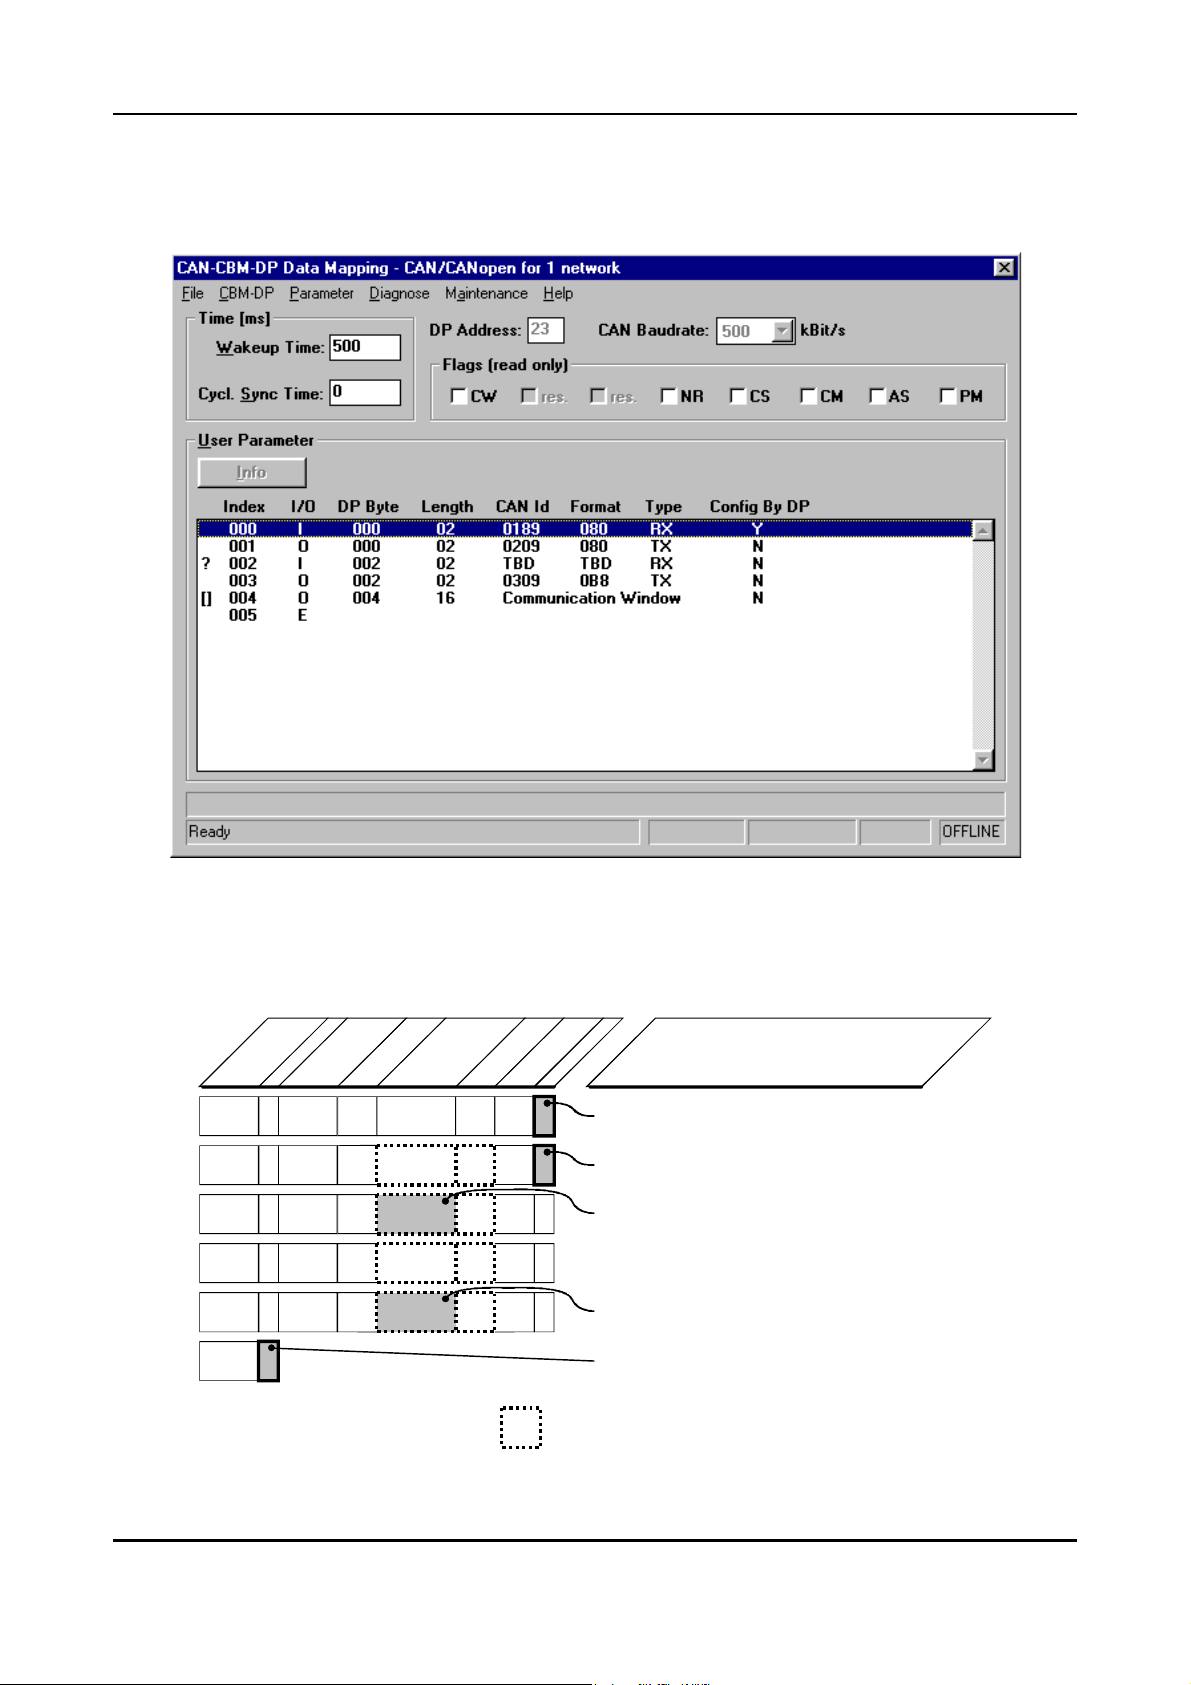
Parameter Display and Configuration via CICT
7.2.5 Configuration Example
The configuration example shown in the following figure will be explained in the table below.
Fig. 7.2.11: Example configuration
The properties shown above have the following meaning:
Index
I/O
DP Byte
Length
CAN ID
Forma t
Type
ConfigByDP
005
018902000000 I 80 RX
020902000001 O 80 TX
02002002 I RX N
EEEE
00
02002003 TXO
16004004 00 TX NO
FFEF
E
Y
this entry can not be changed
N
this entry can be changed
the identifier has to be set
N0309 B8
communication window
end mark
These parameters are changable, if
Comment
ConfigByDP
= N.
Table 7.2.12: Explanation of some parameters by means of an example configuration
CAN-CBM-DP Software Manual Rev. 2.080
Page 85

Parameter Display and Configuration via CICT
7.2.6 Managing the Configuration Files
Loading the Configuration from the CAN-CBM-DP Module
In order to load the configuration currently stored in the CAN-CBM-DP module, you have select menu
point Load from... from menu CBM-DP. All data stored in the CAN-CBM-DP-module are read and
displayed in the configuration window.
Transmitting the Configuration to the CAN-CBM-DP Module
If all parameters are faultless, then and only then you can transmit the configuration to the CAN-CBM-
DP module as well.
For this you have to select menu point Save to... from menu CBM-DP. If you have configured the
CAN-CBM-DP module offline until now, a connection to the CAN-CBM-DP module is established
first. As soon as the connection has successfully been established, all parameters are transmitted to the
CAN-CBM-DP module.
Then a RESET has to be executed in order to store the configuration and have the parameters available
after the following power-on of the PLC. For this you have to execute the Reset CBM-DP command
in the diagnose menu.
Store Configuration File on PC
1. Select menu point Save from menu File. A window appears in which you can select a file.
2. Select CFG file (possibly change path).
3. Click OK button or press >Enter< key.
Load Configuration File from PC
1. Select menu point Open from menu File. A window appears in which you can select a file.
2. Select CFG file (possibly change path).
3. Click OK button or press >Enter< key. All data stored in the file will be displayed in the
configuration window.
CAN-CBM-DP Software Manual Rev. 2.0 81
Page 86

Parameter Display and Configuration via CICT
Printing a Configuration File
1. Select menu point Print from menu File. A window appears in which you can select a file.
2. Select CFG file (possibly change path).
3. Click OK button or press >Enter< key. The Windows standard window for setting the printer
options appears.
4. Click OK button or press >Enter< key. The printout will be generated.
CAN-CBM-DP Software Manual Rev. 2.082
Page 87
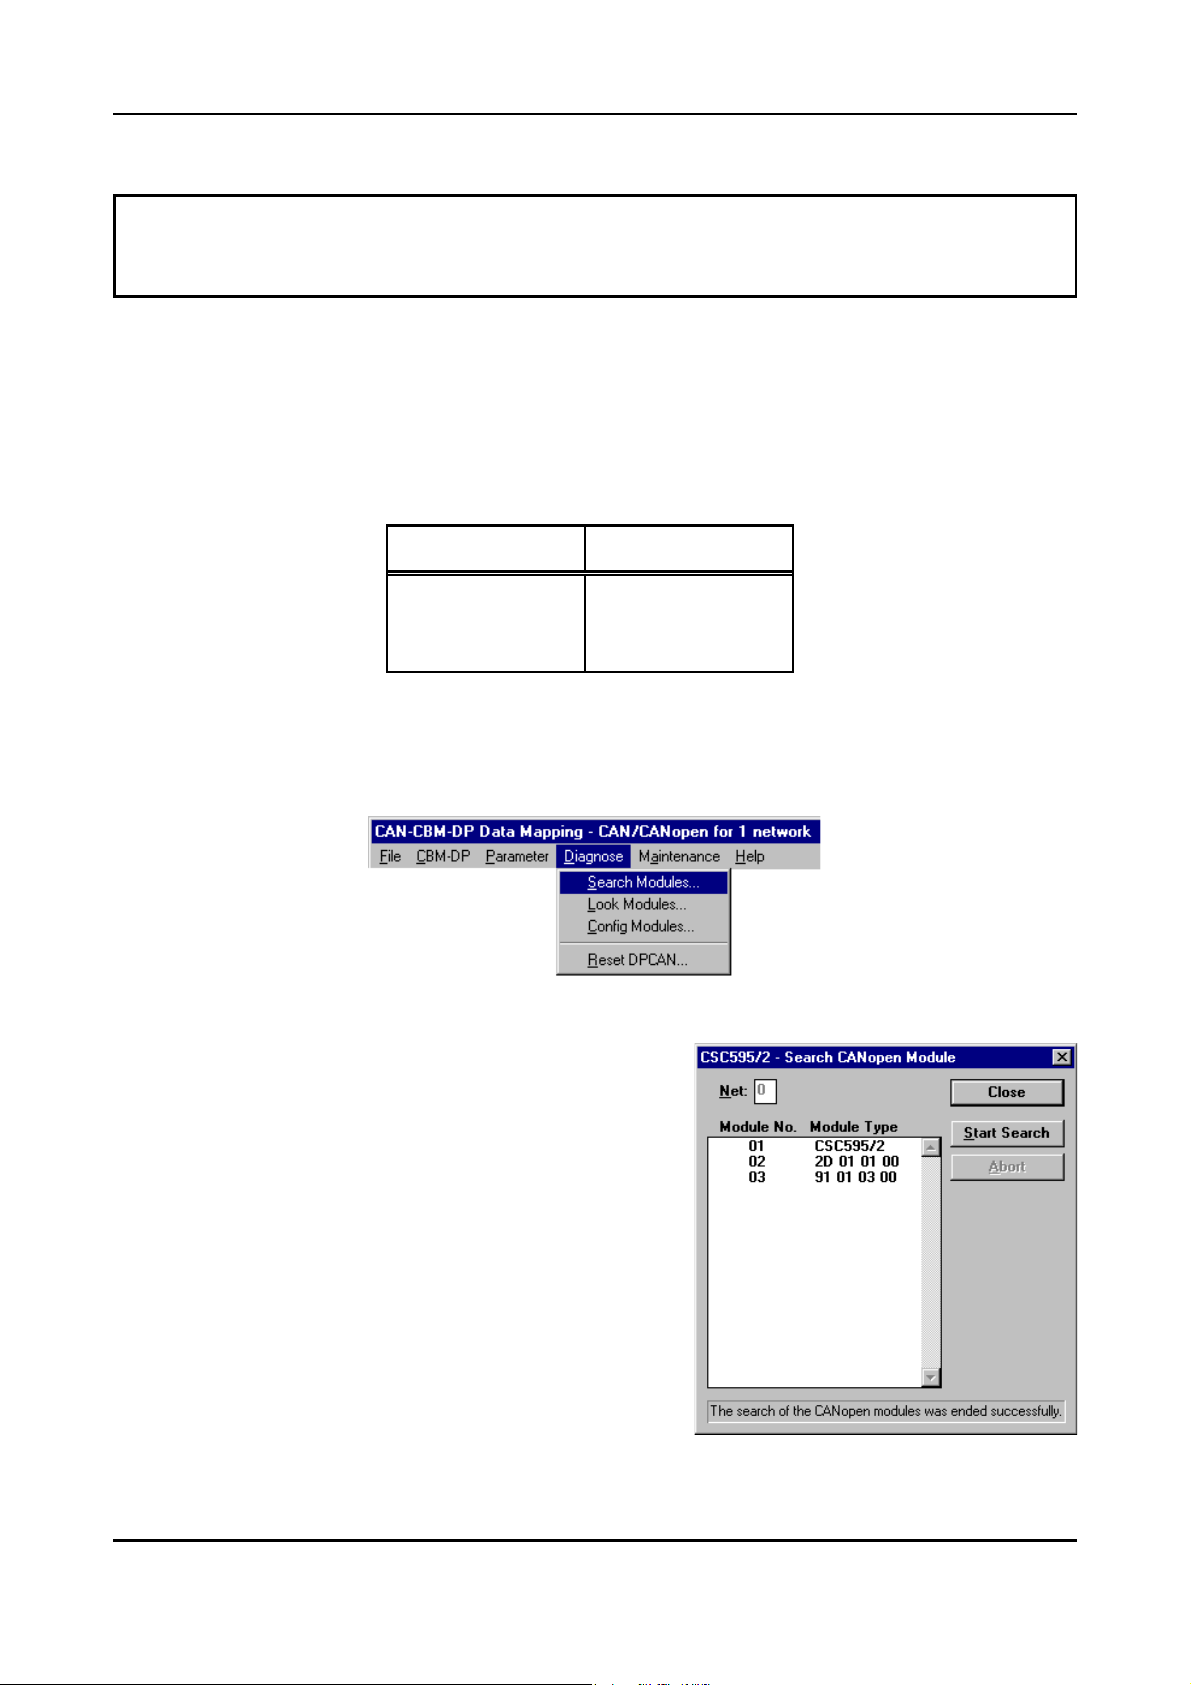
Parameter Display and Configuration via CICT
7.2.7 Diagnose
The functionality described here is valid for various esd-CAN modules. Therefore, the descriptions
have been kept general. If limitations regarding the modules apply, this will be mentioned at the
according place.
The functionality described in this chapter is not being supported by CAN-Interface modules which use
the standard esd-CAN protocol, but only by CAN-Interface modules with CANopen Protocol, apart
from the CAN-CSC595/1. The CAN protocol used is shown in the status line, as represented on page
71.
The diagnose functions have been implemented into the following CAN-Interface modules:
Interface module Protocol
CSC595/2
CSC515
CAN-CBM-DP
Table 7.2.5: CAN modules with diagnose mode (x.x = software version)
The following figure represents the four selection points in the submenu of the diagnose:
Fig. 7.2.13: Diagnose menu
7.2.7.1 Search Modules
By means of this command the CAN bus can be searched
for CANopen modules which are connected to the CAN
network specified under ‘Net’.
Net = 0 -> CAN network 1
Net = 1 -> CAN network 2
CO V x.x
CO V x.x
DP V x.x
The search is started by the Start Search button. Once the
search has been started, it can always be terminated by
means of the Abort button.
The search results are shown in the list:
Fig. 7.2.14: Search results of command Start Search
CAN-CBM-DP Software Manual Rev. 2.0 83
Page 88
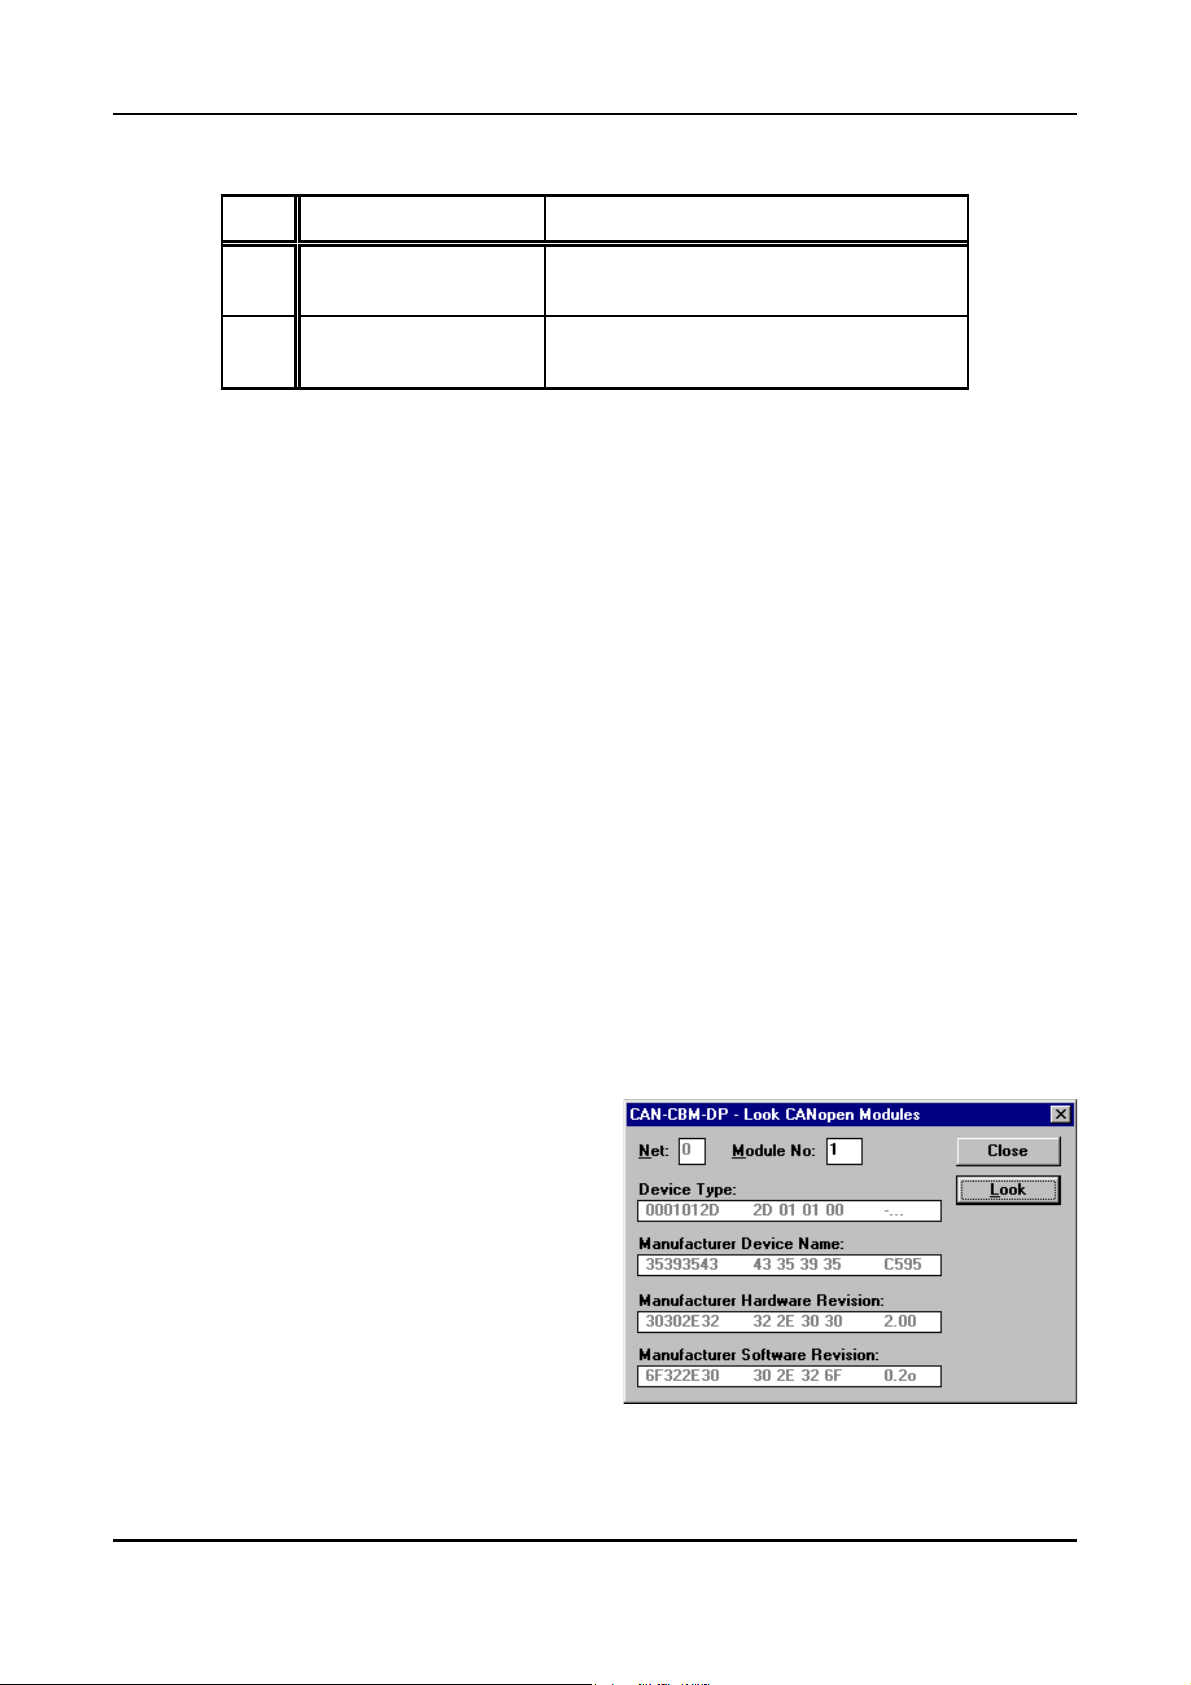
Parameter Display and Configuration via CICT
The Module Type is structured as follows:
Byte Assignment Example from display above [hex]
3
2
1
0
The meaning of the contents of ‘Device Profile Type’ and ‘Additional Information’ can be taken from
the CANOPEN specification DS-301.
In addition to the display of all CANOPEN modules at the CAN bus, you can have the most important
CANOPEN standard objects for the individual CANOPEN modules on the list being displayed (see
Look CANOPEN Modules).
For this you have follow the steps below:
1. Select entry in the list.
2. In order to select the Look CANOPEN Modules dialog double click the selected entry or press the
>Enter< key.
3. The Look CANOPEN Modules dialog will be displayed.
Device Profile Type
Additional Information
Table 7.2.6: Meaning of parameter Module Type
2D
01
01
00
Note: Sometimes it might be helpful to have an overview of all CANOPEN modules available at t he
CAN bus and their parameters while generating a parameter list in the Data-Mapping dialog.
This can be achieved by means of the software. Do not close the Search Modules dialog after
Start/Abort of the search for CANOPEN modules and switch between the dialogs as desired.
7.2.7.2 Look CANOPEN Modules
By means of the Look CANOPEN Modules dialog it
is possible to have the CANOPEN standard objects:
- Device Type
- Manufacturer Device Name
- Manufacturer Hardware Version
- Manufacturer Software Version
being displayed as shown in the figure on the right.
Fig. 7.2.15: Menu Look CANopen Modules
CAN-CBM-DP Software Manual Rev. 2.084
Page 89
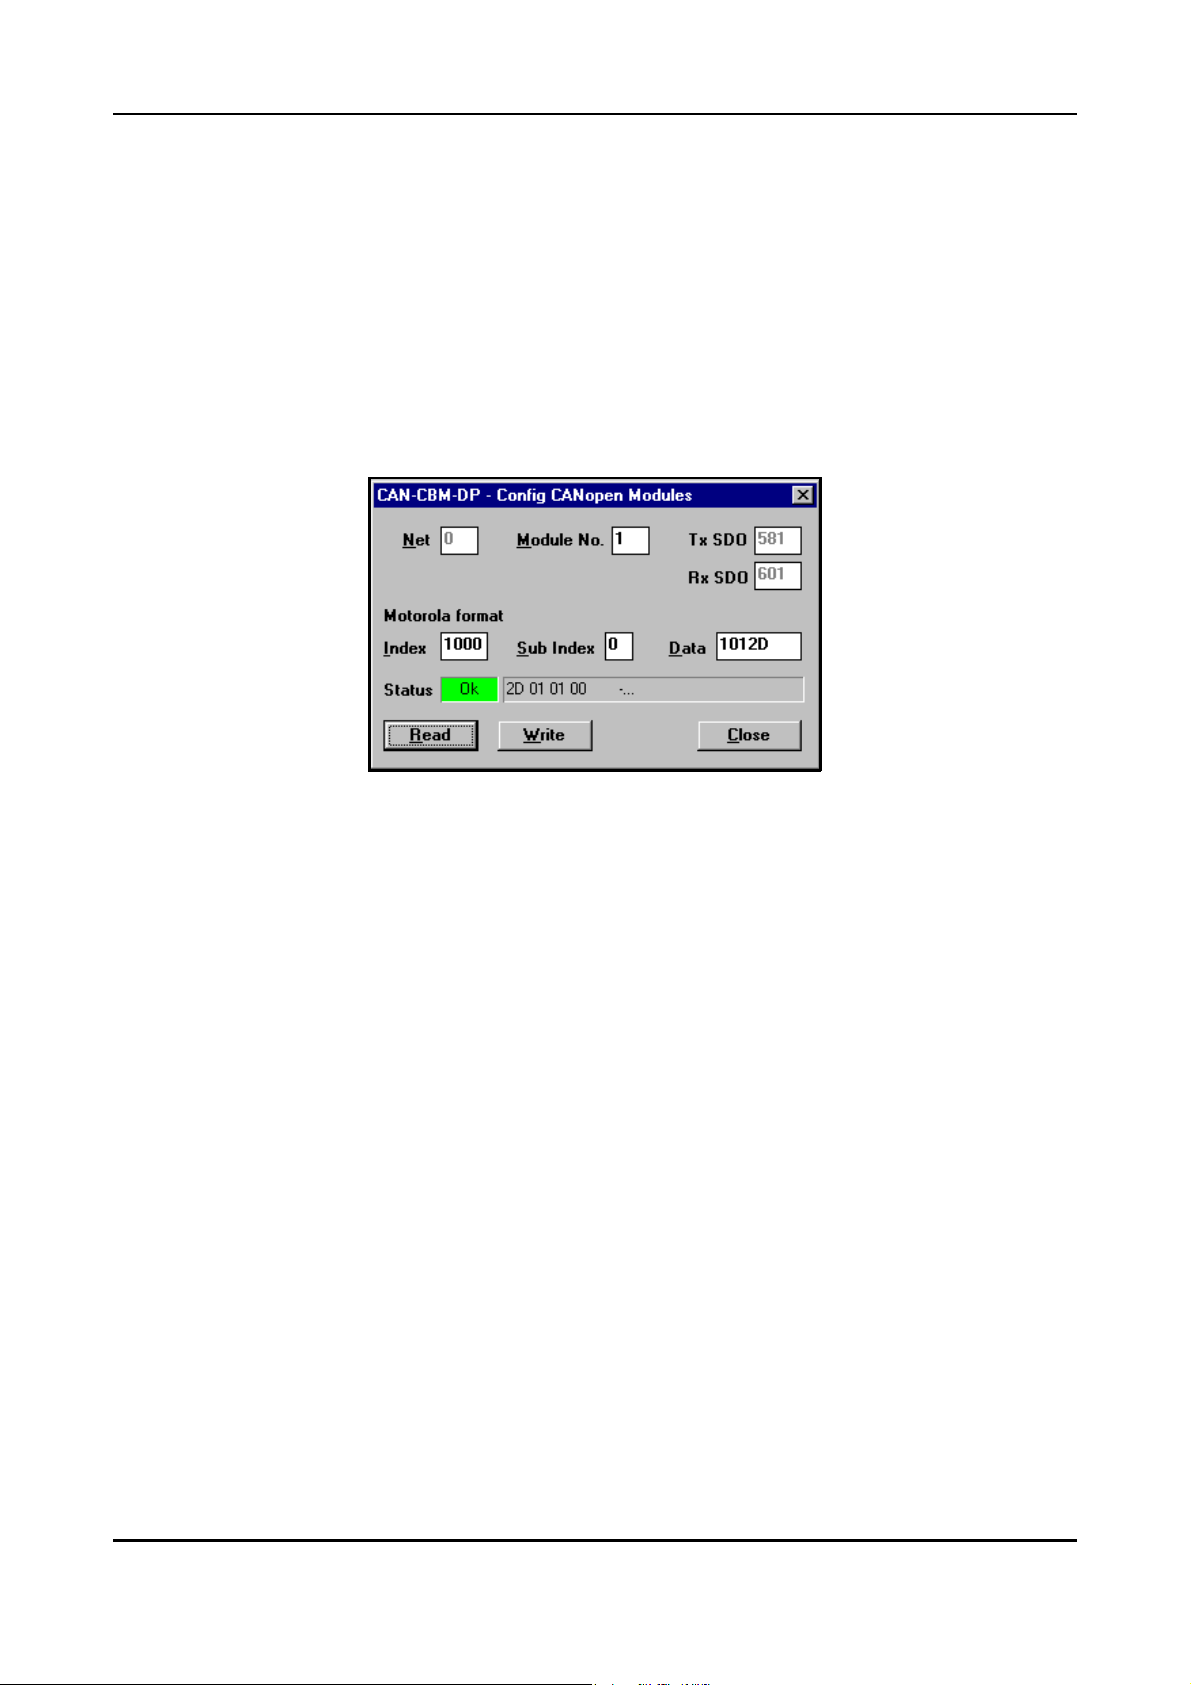
Parameter Display and Configuration via CICT
Net
Net indicates the CAN network for which the CANOPEN standard objects from the CANOPEN module
specified under Module No. are to be determined. A 0 indicates CAN network 1 and a 1 indicates CAN
network 2. The value can only be changed for CAN interface modules which have more than one CAN
network.
Module No.
Module No. displays the module No. whose values are to be displayed.
7.2.7.3 Config Modules
Fig. 7.2.16: Window Config CANOPEN Modules
Net
Net indicates the CAN network for which the CANOPEN standard objects from the CANOPEN module
specified under Module No. are to be determined. A 0 indicates CAN network 1 and a 1 indicates CAN
network 2. The value can only be changed for CAN interface modules which have more than one CAN
network.
Module No.
Module No. displays the module No. whose values are to be displayed.
Tx SDO / Rx SDO
TxSDO and RxSDO indicate the transmission or reception CAN identifier for the CANOPEN module
No. specified under Module No..
Index
Indicates the index of the SDO.
Sub Index
Indicates the sub index of the SDO.
Data
Here the data is entered which is to be written, or the received data is displayed.
CAN-CBM-DP Software Manual Rev. 2.0 85
Page 90

Parameter Display and Configuration via CICT
Status
Status shows the kind of a response received for a read request (Read button) or write request (Write
button) and the data received. The data behind the status display are displayed as they are received via
the CAN bus.
The following status messages are implemented:
Ok
At a read request the received data is displayed.
At a write request no further data is displayed.
Timeout
The message Timeout appears, if no response has been received within about 100 ms after a read
or write request has been transmitted.
Abort
The message Abort appears always, if an error response has been received. The data specified
behind the status messages indicate the error code of the SDO domain transfer. The error codes and
their meaning are represented in the following table:
Error code
[HEX]
0x05040001
0x06010000
0x06010001
0x06020000
0x06060000
0x06070010
0x06090011
0x06090030
0x06090031
0x06090032
0x08000000
CAN-PSS designation Explanation
SDO_CS_UNKNOWN
SDO_WRITE_ONLY
SDO_READ_ONLY
SDO_WRONG_INDEX
SDO_ACCESS_FAIL
SDO_WRONG_LENGTH
SDO_WRONG_SUBIND
SDO_VALUE_EXCEED
SDO_VALUE_2_HIGH
SDO_VALUE_2_LOW
SDO_OTHER_ERROR
Table 7.2.7: Error codes of the SDO domain transfer
wrong command specifier
read access is wrong here
write access is wrong here
wrong index
I²C-EEPROM has not been accessed
wrong number of data bytes
wrong subindex
specified value exceeds permissible thresholds
value range too high
value range too low
undefined error
CAN-CBM-DP Software Manual Rev. 2.086
Page 91

Parameter Display and Configuration via CICT
7.2.8 Maintenance
7.2.8.1 Memory
Attention!
Setting or changing memories can be risky, because you can also change memories which are of great
significance for the function of the interface module.
Even the reading out of certain memories itself can trigger system errors, because reading out
memories can trigger or prevent interrupts unintentionally, and a faultless function cannot be
guaranteed anymore.
Therefore, please execute these functions (reading and writing of memory cells) only after you
have specifically talked about it with esd!
By means of the Memory dialog data can be read or written in memory and controller of the interface
module.
Address
Address specifies the address from which the module is to be read out.
Data
Editing field for entering data which is to be overwritten. Depending on the format selected values in
the range of 00...FF hex or 0000...FFFF hex can be entered here.
Lines
Number of lines which are to be read, a maximum of 16 lines. Therefore, a total of 256 bytes or 128
words, depending on the format selected, can be read in a read access.
Format
By means of Format you can select the display of data. Changing the format influences both the data
on the list and the maximum value which can be entered the entry field Data.
If the format is changed from Byte to Word or vice versa, the memory is read in completely again.
Dump Memory
By clicking the Dump Memory button n-times 16 bytes or n-times 8 words are read in at the address
specified under Address. Here, n indicates the number of lines specified under Lines.
Set Memory
By clicking the Set Memory button the byte or the word is overwritten at the address specified under
Address.
CAN-CBM-DP Software Manual Rev. 2.0 87
Page 92

Examples
8. Examples
8.1 Application Example with Page Mode
The following summary shows the FBs and DBs required to control the CANopen devices:
Example for calling FB 1
---------------------------------
( Setup of CANopen module by means of a list, see below)
Network 7: motor setup
-----------
O #BIT15 // domain-transfer is on ?
O #BIT14
SPB M033 // yes --> jump
L #INIT_LIST_DB
T #t016
AUF DB [#t016] // open DB with init-list
M012: L 127 // maximum 127 motors
L #MOTOR
+ 1
T #MOTOR
<I // 127 < motor ? -> yes ==> configuration ready
SPB M013 // ==> jump to the end
+ -1 // motor 1 starts at byte 0, motor 2 starts at byte 8, ...
SLW 3 // means * 8: motor-index -> byte-number
SLW 3 // means * 8: byte-number -> bit-address
T #t000
L 0 // means: motor not present
L DBW [#t000] // get DB-number to init this motor
T #INIT_DB
==I
SPB M012 // to next motor
L W#16#FFFF // means: motor not needed to initialize
==I
SPB M012 // to next motor
L #t000
+ 16
T #t000
L DBW [#t000] // get offset in the actual init-DB
T #INIT_OFFSET
L #MOTOR // motor no.
L W#16#600
+I
T #TX_ID
L #MOTOR // motor no.
L W#16#580
+I
T #RX_ID
UN #BIT15
S #BIT15
M033: CALL FB 1 , DB101
transfer :=#BIT15
tx_id :=#TX_ID
rx_id :=#RX_ID
write_address_cw:=#WRITE_ADDRESS_CW
read_address_cw :=#READ_ADDRESS_CW
init_db :=#INIT_DB
offset :=#INIT_OFFSET
ret_value :=#t016
U #BIT15
S #BIT14
L W#16#0 // means: configuration in FB1 is off
L #t016 // status of setup
==I
SPB M034
UN #FREIGABE
SPB M014
L #INIT_LIST_DB
T #t008
AUF DB [#t008] // open DB with init-list
L #MOTOR
CAN-CBM-DP Software Manual Rev. 2.088
Page 93

Examples
+ -1 // motor 1 starts at byte 0, motor 2 starts at byte 8, ...
SLW 3 // means * 8: motor-index -> byte-number
SLW 3 // means * 8: byte-number -> bit-address
+ L#32
T #t000
L #t016 // get status of setup
T DBW [#t000] // save in init-list-DB
L W#16#FFFF // means: configuration in FB1 allways runs
L #t016 // status of setup
==I
SPB M014
L W#16#FFFE // means: configuration in FB1 is ready
L #t016 // status of setup
==I
SPB M011
SPA M014
M034: U #BIT14
R #BIT14
SPA M014
M011: U #BIT15
R #BIT15
SPA M014
M013: UN #BIT1
S #BIT1 // say motor-configuration is ready
L 2
T #RET_VALUE // say: configuration of Tx-ID
M014: SPA M035
M015: NOP 0
**************************************************************************
Calling FB 2: Data exchange via Page Mode
------------------------------------------------
(
1. : Page 0 -> reading the lengths (absolutely necessary !!!)
2. : Page 51 ff -> Tx-configuration ( once )
3. : Page 151 ff -> Rx-configuration ( once )
4. : Page 251 ff -> data exchange: output and input ( cyclically )
( Page 251, 252, 253, ... xyz, 251, 252, ... xyz (depending on the number of pages required)
)
)
Network 9: page-mode-output and page-mode-input
-----------
CALL FB 2 , DB102
FREIGABE :=#BIT1 // muss zuerst NULL sein (s.o.)
WRITE_ADDRESS :=#WRITE_ADDRESS
WRITE_CONFIG_DB:=#WRITE_CONFIG_DB
WRITE_DB :=#WRITE_DB
READ_ADDRESS :=#READ_ADDRESS
READ_CONFIG_DB :=#READ_CONFIG_DB
READ_DB :=#READ_DB
RET_VALUE :=#t016
**************************************************************************
Calling FB 4: give commands via Communication Window
-----------------------------------------------------------------
(after setup via FB 1, because FB 1 operates via the Communication Window as well)
Network 5:
-----------
U M 95.0
SPB M401
L 0 // CAN-ID = 0
T MW 0
T MW 4
T MB 12
T MB 14 // subcommand
T MB 15 // command = 0:
SPA M499
M401: U M 95.1 // start-frame ready ?
SPB M402
L 0 // CAN-ID = 0 (for start-frame)
T MW 0
L W#16#100 // CAN-data = 0x01,0x00 (start-frame)
T MW 4
L 2
CAN-CBM-DP Software Manual Rev. 2.0 89
Page 94

Examples
T MB 12
L 0
T MB 14 // subcommand
L 1
T MB 15 // command = 1: send frame
SPA M499
M402: U M 95.2 // sync-time ready ?
SPB M403
L 0
T MW 0
L W#16#200 // time = 512 msec
T MW 4
L 0
T MB 12
L 0
T MB 14 // subcommand
L 20
T MB 15 // command = 20: set sync-frame-time
SPA M499
M403: U M 95.3
SPB M404
L W#16#181 // 1.PDO of motor 1
T MW 0
L 0
T MW 4
T MB 12
T MB 14 // subcommand
L 4
T MB 15 // command = 4: activate reception
SPA M499
M404: U M 95.4
SPB M405
L W#16#18A // 1.PDO of motor 10
T MW 0
L 0
T MW 4
T MB 12
T MB 14 // subcommand
L 4
T MB 15 // command = 4: activate reception
SPA M499
M405: U M 95.5
SPB M406
L W#16#183 // 1.PDO of motor 3
T MW 0
L 0
T MW 4
T MB 12
T MB 14 // subcommand
L 4
T MB 15 // command = 4: activate reception
SPA M499
M406: U M 95.6
SPB M407
L W#16#184 // 1.PDO of motor 4
T MW 0
L 0
T MW 4
T MB 12
T MB 14 // subcommand
L 4
T MB 15 // command = 4: activate reception
SPA M499
M407: U M 95.7
SPB M408
L W#16#187 // 1.PDO of motor 7
T MW 0
L 0
T MW 4
T MB 12
T MB 14 // subcommand
L 4
T MB 15 // command = 4: activate reception
SPA M499
M408: U M 96.0
SPB M499
L W#16#188 // 1.PDO of motor 8
T MW 0
CAN-CBM-DP Software Manual Rev. 2.090
Page 95

L 0
T MW 4
T MB 12
T MB 14 // subcommand
L 4
T MB 15 // command = 4: activate reception
SPA M499
M499: NOP 0
U E 125.7
SPB M498
UN E 125.7
= M 99.7
= M 99.6
L 0
T MW 0
T MW 4 // time = 0 => sync-frame off
L 0
T MB 12
L 0
T MB 14 // subcommand
L 20
T MB 15 // command = 20: set sync-frame-time
M498: NOP 0
Network 6:
-----------
CALL FB 4 , DB104
FREIGABE :=M99.6
WRITE_ENABLE :=M99.7
READ_ENABLE :=M99.7
WRITE_CAN_ID :=MW0
WRITE_DATA0 :=MB4
WRITE_DATA1 :=MB5
WRITE_DATA2 :=MB6
WRITE_DATA3 :=MB7
WRITE_DATA4 :=MB8
WRITE_DATA5 :=MB9
WRITE_DATA6 :=MB10
WRITE_DATA7 :=MB11
WRITE_LEN :=MB12
WRITE_SUBCOMMAND:=MB14
WRITE_COMMAND :=MB15
WRITE_ADDRESS :=W#16#F0
READ_ADDRESS :=W#16#F0
TRANSFER_READY :=M99.5
READ_CAN_ID :=MW0
READ_DATA0 :=MB4
READ_DATA1 :=MB5
READ_DATA2 :=MB6
READ_DATA3 :=MB7
READ_DATA4 :=MB8
READ_DATA5 :=MB9
READ_DATA6 :=MB10
READ_DATA7 :=MB11
READ_LEN :=MB12
READ_FIFO_COUNT :=MB14
READ_COMMAND :=MB15
READ_RET_VAL :=MW14
WRITE_RET_VAL :=MW16
L W#16#181
L MW 0
>I
SPB M601
L W#16#1FF
L MW 0
<I
SPB M601
L W#16#181
-I
SLD 4
SLD 3
T MD 14
AUF DB 92
L MW 0 // CAN-ID
T DBW [MD 14]
L MD 14
+ L#16
Examples
CAN-CBM-DP Software Manual Rev. 2.0 91
Page 96

Examples
T MD 14
L 0 // reserve byte 2 + 3
T DBW [MD 14]
L MD 14
+ L#16
T MD 14
L MD 4 // data-byte 0 - 3
T DBD [MD 14]
L MD 14
+ L#32
T MD 14
L MD 8 // data-byte 4 - 7
T DBD [MD 14]
L MD 14
+ L#32
T MD 14
L MD 12 // length, counter, fifo-counter, command
T DBD [MD 14]
M601: UN M 99.6
S M 99.6
U M 99.5
R M 99.6
U M 99.5
U M 95.7
S M 96.0
U M 99.5
U M 95.6
S M 95.7
U M 99.5
U M 95.5
S M 95.6
U M 99.5
U M 95.4
S M 95.5
U M 99.5
U M 95.3
S M 95.4
U M 99.5
U M 95.2
S M 95.3
U M 99.5
U M 95.1
S M 95.2
U M 99.5
U M 95.0
S M 95.1
U M 99.5
S M 95.0
*****************************************************************************
Calling FB3
=======================
( in FB 3 FB 1 (motor set-up) and FB 2 (data exchange) are called )
CALL FB 3 , DB103
FREIGABE :=E125.7
KONFIG_DB:=W#16#5D // DB93: initialize motors 1,3,4,7,8 ; 1,4,8
DATEN_DB :=W#16#64
RET_VALUE:=MW16
L MW 16
L 2
>=I
= M 99.7
// motors initiliazed => Communication Window can be used
CAN-CBM-DP Software Manual Rev. 2.092
Page 97

Examples
DB93: CONFIG_DB = configuration data block
==============================================
Address Name Type Initial val. Actual val. Comment
------- ---- --- ----------- ---------- ---------
0.0 v000 WORD W#16#5E W#16#5E Number of first DB with Tx-configuration
2.0 v002 WORD W#16#2FE W#16#2FE Length of DBs with Tx-configuration
4.0 v004 WORD W#16#0 W#16#0 Number of DBs with Tx-configuration
6.0 v006 WORD W#16#5F W#16#5F Number of first DB with Rx-configuration
8.0 v008 WORD W#16#2FE W#16#2FE Length of DBs with Rx-configuration
10.0 v010 WORD W#16#0 W#16#0 Number of DBs with Rx-configuration
12.0 v012 WORD W#16#60 W#16#60 Number of first DB with output data
14.0 v014 WORD W#16#3F9 W#16#3F9 Length of DBs with output data
16.0 v016 WORD W#16#0 W#16#0 Number of DBs with output data
18.0 v018 WORD W#16#61 W#16#61 Number of first DB with input data
20.0 v020 WORD W#16#3F9 W#16#3F9 Length of DBs with input data
22.0 v022 WORD W#16#0 W#16#0 Number of DBs with input data
24.0 v024 WORD W#16#80 W#16#80 PLC-start address of output page
26.0 v026 WORD W#16#80 W#16#80 PLC-start address of input page
28.0 v028 WORD W#16#F0 W#16#F0 PLC-start address of output-communication window
30.0 v030 WORD W#16#F0 W#16#F0 PLC-start address of input-communication window
32.0 v032 WORD W#16#62 W#16#62 Number of DB with Init list
Set-up motors 1, 3, 4, 7 and 8 ==> DB 94, DB 95, DB 96 and DB 97
DB94: TX_CONFIG = Data block with configuration of Tx-identifiers
===================================================================
Address Name Type Initial val. Actual val. Comment
------- ---- --- ----------- ---------- ---------
0.0 CAN_ID1 DWORD DW#16#0 DW#16#301 CAN-identifier
4.0 FORMAT1 BYTE B#16#0 B#16#B8 format-byte
5.0 LENGTH1 BYTE B#16#0 B#16#6 length
6.0 CAN_ID2 DWORD DW#16#0 DW#16#303 CAN-identifier
30.0 CAN_ID6 DWORD DW#16#0 DW#16#EEEEEEEE CAN-identifier (end flag)
FORMAT2 BYTE B#16#0 B#16#B8 format-byte
LENGTH2 BYTE B#16#0 B#16#6 length
CAN_ID3 DWORD DW#16#0 DW#16#304 CAN-identifier
FORMAT3 BYTE B#16#0 B#16#B8 format-byte
LENGTH3 BYTE B#16#0 B#16#6 length
CAN_ID4 DWORD DW#16#0 DW#16#307 CAN-identifier
FORMAT4 BYTE B#16#0 B#16#B8 format-byte
LENGTH4 BYTE B#16#0 B#16#6 length
CAN_ID5 DWORD DW#16#0 DW#16#308 CAN-identifier
FORMAT5 BYTE B#16#0 B#16#B8 format-byte
LENGTH5 BYTE B#16#0 B#16#6 length
FORMAT6 BYTE B#16#0 B#16#0 format-byte
LENGTH6 BYTE B#16#0 B#16#0 length
CAN_ID7 DWORD DW#16#0 DW#16#0 CAN-identifier
FORMAT7 BYTE B#16#0 B#16#0 format-byte
LENGTH7 BYTE B#16#0 B#16#0 length
DB95: RX_CONFIG = Data block with configuration of Rx-identifiers
===================================================================
Address Name Type Initial val. Actial val. Comment
------- ---- --- ----------- ---------- ---------
0.0 CAN_ID1 DWORD DW#16#0 DW#16#281 CAN-identifier
4.0 FORMAT1 BYTE B#16#0 B#16#B8 format-byte
5.0 LENGTH1 BYTE B#16#0 B#16#6 length
6.0 CAN_ID2 DWORD DW#16#0 DW#16#283 CAN-identifier
30.0 CAN_ID6 DWORD DW#16#0 DW#16#EEEEEEEE CAN-identifier
FORMAT2 BYTE B#16#0 B#16#B8 format-byte
LENGTH2 BYTE B#16#0 B#16#6 length
CAN_ID3 DWORD DW#16#0 DW#16#284 CAN-identifier
FORMAT3 BYTE B#16#0 B#16#B8 format-byte
LENGTH3 BYTE B#16#0 B#16#6 length
CAN_ID4 DWORD DW#16#0 DW#16#287 CAN-identifier
FORMAT4 BYTE B#16#0 B#16#B8 format-byte
LENGTH4 BYTE B#16#0 B#16#6 length
CAN_ID5 DWORD DW#16#0 DW#16#288 CAN-identifier
FORMAT5 BYTE B#16#0 B#16#B8 format-byte
LENGTH5 BYTE B#16#0 B#16#6 length
FORMAT6 BYTE B#16#0 B#16#0 format-byte
LENGTH6 BYTE B#16#0 B#16#0 length
CAN_ID7 DWORD DW#16#0 DW#16#0 CAN-identifier
FORMAT7 BYTE B#16#0 B#16#0 format-byte
LENGTH7 BYTE B#16#0 B#16#0 length
CAN-CBM-DP Software Manual Rev. 2.0 93
Page 98

Examples
DB96: OUTPUT_DB = Data block for output data
======================================================
Address Name Type Initial val. Actual val. Comment
------- ---- --- ----------- ---------- ---------
0.0 laenge1 BYTE B#16#0 B#16#7 Length
1.0 force1 BYTE B#16#0 B#16#2 Force byte
2.0 data01 BYTE B#16#0 B#16#0 Data byte 0
3.0 data11 BYTE B#16#0 B#16#0 Data byte 1
4.0 data21 BYTE B#16#0 B#16#0 Data byte 2
5.0 data31 BYTE B#16#0 B#16#0 Datenbyte 3
6.0 data41 BYTE B#16#0 B#16#0 Data byte 4
7.0 data51 BYTE B#16#0 B#16#0 Data byte5
8.0 laenge2 BYTE B#16#0 B#16#7 Length
9.0 force2 BYTE B#16#0 B#16#1 Force byte
10.0 data02 BYTE B#16#0 B#16#0 Data byte 0
11.0 data12 BYTE B#16#0 B#16#0 Data byte 1
40.0 laenge6 BYTE B#16#0 B#16#EE Length
data22 BYTE B#16#0 B#16#0 Data byte 2
data32 BYTE B#16#0 B#16#0 Data byte 3
data42 BYTE B#16#0 B#16#0 Data byte 4
data52 BYTE B#16#0 B#16#0 Data byte5
laenge3 BYTE B#16#0 B#16#7 Length
force3 BYTE B#16#0 B#16#4 Force byte
data03 BYTE B#16#0 B#16#0 Data byte 0
data13 BYTE B#16#0 B#16#0 Data byte 1
data23 BYTE B#16#0 B#16#0 Data byte 2
data33 BYTE B#16#0 B#16#0 Data byte 3
data43 BYTE B#16#0 B#16#0 Data byte 4
data53 BYTE B#16#0 B#16#0 Data byte5
laenge4 BYTE B#16#0 B#16#7 Length
force4 BYTE B#16#0 B#16#0 Force byte
data04 BYTE B#16#0 B#16#0 Data byte 0
data14 BYTE B#16#0 B#16#0 Data byte 1
data24 BYTE B#16#0 B#16#0 Data byte 2
data34 BYTE B#16#0 B#16#0 Data byte 3
data44 BYTE B#16#0 B#16#0 Data byte 4
data54 BYTE B#16#0 B#16#0 Data byte5
laenge5 BYTE B#16#0 B#16#7 Length
force5 BYTE B#16#0 B#16#3 Force byte
data05 BYTE B#16#0 B#16#0 Data byte 0
data15 BYTE B#16#0 B#16#0 Data byte 1
data25 BYTE B#16#0 B#16#0 Data byte 2
data35 BYTE B#16#0 B#16#0 Data byte 3
data45 BYTE B#16#0 B#16#0 Data byte 4
data55 BYTE B#16#0 B#16#0 Data byte5
force6 BYTE B#16#0 B#16#0 Force byte
DB97: INPUT_DB = Data block for input data
======================================================
Address Name Type Initial val. Actual val. Comment
------- ---- --- ----------- ---------- ---------
0.0 laenge1 BYTE B#16#0 B#16#7 Length
1.0 zaehler1 BYTE B#16#0 B#16#0 Counter
2.0 data01 BYTE B#16#0 B#16#0 Data byte 0
3.0 data11 BYTE B#16#0 B#16#0 Data byte 1
4.0 data21 BYTE B#16#0 B#16#0 Data byte 2
5.0 data31 BYTE B#16#0 B#16#0 Data byte 3
6.0 data41 BYTE B#16#0 B#16#0 Data byte 4
7.0 data51 BYTE B#16#0 B#16#0 Data byte 5
8.0 laenge2 BYTE B#16#0 B#16#7 Length
zaehler2 BYTE B#16#0 B#16#0 Counter
data02 BYTE B#16#0 B#16#0 Data byte 0
data12 BYTE B#16#0 B#16#0 Data byte 1
data22 BYTE B#16#0 B#16#0 Data byte 2
data32 BYTE B#16#0 B#16#0 Data byte 3
data42 BYTE B#16#0 B#16#0 Data byte 4
data52 BYTE B#16#0 B#16#0 Data byte 5
laenge3 BYTE B#16#0 B#16#7 Length
zaehler3 BYTE B#16#0 B#16#0 Counter
data03 BYTE B#16#0 B#16#0 Data byte 0
data13 BYTE B#16#0 B#16#0 Data byte 1
data23 BYTE B#16#0 B#16#0 Data byte 2
data33 BYTE B#16#0 B#16#0 Data byte 3
data43 BYTE B#16#0 B#16#0 Data byte 4
data53 BYTE B#16#0 B#16#0 Data byte 5
laenge4 BYTE B#16#0 B#16#7 Length
CAN-CBM-DP Software Manual Rev. 2.094
Page 99

Examples
zaehler4 BYTE B#16#0 B#16#0 Counter
data04 BYTE B#16#0 B#16#0 Data byte 0
data14 BYTE B#16#0 B#16#0 Data byte 1
data24 BYTE B#16#0 B#16#0 Data byte 2
data34 BYTE B#16#0 B#16#0 Data byte 3
data44 BYTE B#16#0 B#16#0 Data byte 4
data54 BYTE B#16#0 B#16#0 Data byte 5
laenge5 BYTE B#16#0 B#16#7 Length
zaehler5 BYTE B#16#0 B#16#0 Counter
data05 BYTE B#16#0 B#16#0 Data byte 0
data15 BYTE B#16#0 B#16#0 Data byte 1
data25 BYTE B#16#0 B#16#0 Data byte 2
data35 BYTE B#16#0 B#16#0 Data byte 3
data45 BYTE B#16#0 B#16#0 Data byte 4
40.0 laenge6 BYTE B#16#0 B#16#EE Length
DB98: INIT_LIST_DB = Data block with list of motors which are available / are being initialized
====================================================================================================
Address Name Type Initial val. Actual val. Comment
------- ---- --- ----------- ---------- ---------
0.0 init_db1 WORD W#16#63 W#16#63 Motor 1 available and initialize
2.0 init_offset1 WORD W#16#0 W#16#0 --> list from DB 99 data word 0
4.0 init_status1 WORD W#16#0 W#16#0
6.0 reserve1 WORD W#16#0 W#16#0
8.0 init_db2 WORD W#16#0 W#16#0 Motor 2 not available
10.0 init_offset2 WORD W#16#0 W#16#0
12.0 init_status2 WORD W#16#0 W#16#0
14.0 reserve2 WORD W#16#0 W#16#0
16.0 init_db3 WORD W#16#FFFF W#16#FFFF Motor 3 available
18.0 init_offset3 WORD W#16#0 W#16#0
20.0 init_status3 WORD W#16#0 W#16#0
22.0 reserve3 WORD W#16#0 W#16#0
24.0 init_db4 WORD W#16#63 W#16#63 Motor 4 available and initialize
26.0 init_offset4 WORD W#16#82 W#16#82 --> list from DB 99 data word 130
28.0 init_status4 WORD W#16#0 W#16#0
30.0 reserve4 WORD W#16#0 W#16#0
32.0 init_db5 WORD W#16#0 W#16#0 Motor 5 not available
34.0 init_offset5 WORD W#16#0 W#16#0
36.0 init_status5 WORD W#16#0 W#16#0
38.0 reserve5 WORD W#16#0 W#16#0
40.0 init_db6 WORD W#16#0 W#16#0 Motor 6 not available
42.0 init_offset6 WORD W#16#0 W#16#0
44.0 init_status6 WORD W#16#0 W#16#0
46.0 reserve6 WORD W#16#0 W#16#0
48.0 init_db7 WORD W#16#FFFF W#16#FFFF Motor 7 available
50.0 init_offset7 WORD W#16#0 W#16#0
52.0 init_status7 WORD W#16#0 W#16#0
54.0 reserve7 WORD W#16#0 W#16#0
56.0 init_db8 WORD W#16#63 W#16#63 Motor 8 available and initialize
58.0 init_offset8 WORD W#16#0 W#16#0 --> list from DB 99 data word 0
60.0 init_status8 WORD W#16#0 W#16#0
62.0 reserve8 WORD W#16#0 W#16#0
64.0 init_db9 WORD W#16#0 W#16#0 Motor 9 not available
66.0 init_offset9 WORD W#16#0 W#16#0
68.0 init_status9 WORD W#16#0 W#16#0
70.0 reserve9 WORD W#16#0 W#16#0
. . . . .
. . . . .
. . . . .
(always 0 => motor xxx not available)
data55 BYTE B#16#0 B#16#0 Data byte 5
zaehler6 BYTE B#16#0 B#16#0 Counter
DB99: INIT_DB = Data block with setup list
================================================================
Address Name Type Initial val. Actual val. Comment
------- ---- --- ----------- ---------- ---------
0.0 v010 WORD W#16#1000 W#16#1000 index
2.0 v012 BYTE B#16#0 B#16#0 subindex
3.0 v013 BYTE B#16#2 B#16#2 ccs = 2 => read (domain upload)
4.0 v014 BYTE B#16#0 B#16#0 length
5.0 v015 BYTE B#16#0 B#16#0 data 0
6.0 v016 BYTE B#16#0 B#16#0 data 1
7.0 v017 BYTE B#16#0 B#16#0 data 2
8.0 v018 BYTE B#16#0 B#16#0 data 3
CAN-CBM-DP Software Manual Rev. 2.0 95
Page 100

Examples
9.0 v019 BYTE B#16#0 B#16#0 reserve
10.0 v020 WORD W#16#6040 W#16#6040 index
12.0 v022 BYTE B#16#0 B#16#0 subindex
v023 BYTE B#16#1 B#16#1 ccs = 1 => write (domain download)
v024 BYTE B#16#2 B#16#2 length
v025 BYTE B#16#0 B#16#0 data 0
v026 BYTE B#16#6 B#16#6 data 1
v027 BYTE B#16#0 B#16#0 data 2
v028 BYTE B#16#0 B#16#0 data 3
v029 BYTE B#16#0 B#16#0 reserve
v0101 WORD W#16#6040 W#16#6040 index
v0121 BYTE B#16#0 B#16#0 subindex
v0131 BYTE B#16#1 B#16#1 ccs
v0141 BYTE B#16#2 B#16#2 length
v0151 BYTE B#16#0 B#16#0 data 0
v0161 BYTE B#16#7 B#16#7 data 1
v0171 BYTE B#16#0 B#16#0 data 2
v0181 BYTE B#16#0 B#16#0 data 3
v0191 BYTE B#16#0 B#16#0 reserve
v0102 WORD W#16#1002 W#16#1002 index
v0122 BYTE B#16#0 B#16#0 subindex
v0132 BYTE B#16#2 B#16#2 ccs
v0142 BYTE B#16#0 B#16#0 length
v0152 BYTE B#16#0 B#16#0 data 0
v0162 BYTE B#16#0 B#16#0 data 1
v0172 BYTE B#16#0 B#16#0 data 2
v0182 BYTE B#16#0 B#16#0 data 3
v0192 BYTE B#16#0 B#16#0 reserve
v0103 WORD W#16#6060 W#16#6060 index
v0123 BYTE B#16#0 B#16#0 subindex
v0133 BYTE B#16#1 B#16#1 ccs
v0143 BYTE B#16#1 B#16#1 length
v0153 BYTE B#16#6 B#16#6 data 0
v0163 BYTE B#16#0 B#16#0 data 1
v0173 BYTE B#16#0 B#16#0 data 2
v0183 BYTE B#16#0 B#16#0 data 3
v0193 BYTE B#16#0 B#16#0 reserve
v0104 WORD W#16#6098 W#16#6098 index
v0124 BYTE B#16#0 B#16#0 subindex
v0134 BYTE B#16#1 B#16#1 ccs
v0144 BYTE B#16#1 B#16#1 length
v0154 BYTE B#16#FF B#16#FF data 0
v0164 BYTE B#16#0 B#16#0 data 1
v0174 BYTE B#16#0 B#16#0 data 2
v0184 BYTE B#16#0 B#16#0 data 3
v0194 BYTE B#16#0 B#16#0 reserve
v0105 WORD W#16#200B W#16#200B index
v0125 BYTE B#16#0 B#16#0 subindex
v0135 BYTE B#16#1 B#16#1 ccs
v0145 BYTE B#16#4 B#16#4 length
v0155 BYTE B#16#0 B#16#0 data 0
v0165 BYTE B#16#0 B#16#0 data 1
v0175 BYTE B#16#0 B#16#0 data 2
v0185 BYTE B#16#0 B#16#0 data 3
v0195 BYTE B#16#0 B#16#0 reserve
v0106 WORD W#16#6040 W#16#6040 index
v0126 BYTE B#16#0 B#16#0 subindex
v0136 BYTE B#16#1 B#16#1 ccs
v0146 BYTE B#16#2 B#16#2 length
v0156 BYTE B#16#0 B#16#0 data 0
v0166 BYTE B#16#1F B#16#1F data 1
v0176 BYTE B#16#0 B#16#0 data 2
v0186 BYTE B#16#0 B#16#0 data 3
v0196 BYTE B#16#0 B#16#0 reserve
v0107 WORD W#16#6060 W#16#6060 index
v0127 BYTE B#16#0 B#16#0 subindex
v0137 BYTE B#16#1 B#16#1 ccs
v0147 BYTE B#16#1 B#16#1 length
v0157 BYTE B#16#1 B#16#1 data 0
v0167 BYTE B#16#0 B#16#0 data 1
v0177 BYTE B#16#0 B#16#0 data 2
v0187 BYTE B#16#0 B#16#0 data 3
v0197 BYTE B#16#0 B#16#0 reserve
v0108 WORD W#16#6040 W#16#6040 index
v0128 BYTE B#16#0 B#16#0 subindex
v0138 BYTE B#16#1 B#16#1 ccs
v0148 BYTE B#16#2 B#16#2 length
v0158 BYTE B#16#0 B#16#0 data 0
CAN-CBM-DP Software Manual Rev. 2.096
 Loading...