

ESCORT REDi EA-RI-8, EA-RI-9 User Manual

ESCORT REDi
Wireless Receiver
EA-RI-8 and EA-RI-9
User Manual
Thank you for purchasing an ESCORT
Product. Please read this user manual
before using this product.
www.escortdataloggers.com
© ESCORT Data Loggers 2011
Version 1.01

2
1 - Introduction ............................................................................................................................... 4
1.1 – Safety Precautions ............................................................................................................. 4
1.2 – About REDi ......................................................................................................................... 5
1.3 – Package Contents .............................................................................................................. 6
1.4 – Part Descriptions ................................................................................................................ 7
2 – Getting started ......................................................................................................................... 8
2.1 – Installing Batteries .............................................................................................................. 8
2.2 – Turning on/off your REDi .................................................................................................... 9
2.3 – Entering Password (Code) ............................................................................................... 10
2.4 – Setting REDi Date and Time ............................................................................................ 12
2.5 – Downloading Software ..................................................................................................... 12
3 – REDi Functions ...................................................................................................................... 13
3.1 – Downloading Wireless Data Loggers ............................................................................... 13
3.1.1 - Read New .................................................................................................................. 13
3.1.2 - Read All ..................................................................................................................... 14
3.2 – Viewing and Interpreting Data .......................................................................................... 15
3.2.1 – View Recent .............................................................................................................. 16
3.2.2 – View All ..................................................................................................................... 18
3.2.3 – View Summary .......................................................................................................... 19
3.2.4 – View out of Specification ........................................................................................... 21
3.2.5 - Clearing a wireless loggers alarm status using your REDi ................................... 22
3.2.6 - Restarting a wireless loggers using your REDi .................................................... 23
3.2.7 - Viewing Bookmarked Readings using your REDi ................................................ 23
3.2.8 - Locate a wireless logger using your RE Di ............................................................ 24
3.2.9 - Sending a bookmark command from your REDi to a wireless logger .................. 25
3.2.10 - Restarting a Wireless logger using your REDi ........................................................ 26
3.3 – Transferring Data to your PC ........................................................................................... 27
4 – System options ...................................................................................................................... 28
4.1 – Shut Down ........................................................................................................................ 28
4.2 – Auto off ............................................................................................................................. 28
4 3 – Backlight ........................................................................................................................... 29
4.4 – Available Memory ............................................................................................................. 29
4.5 – Rechargeable Batteries .................................................................................................... 30
4.6 – Temperature Unit Conversion .......................................................................................... 30
4.7 – Erase All Data .................................................................................................................. 31
4.8 – System Information .......................................................................................................... 31
4.9 – Exit ................................................................................................................................... 32
5 - Software .................................................................................................................................. 33
5.1 - Installation ......................................................................................................................... 33
5.2 - Connecting your REDi ...................................................................................................... 33
5.3 - Software Setup.................................................................................................................. 34
5.4 – Configuring REDi.............................................................................................................. 35
5.4.1 – Enter Password ......................................................................................................... 36
5.4.2 – Description ................................................................................................................ 36
5.4.3 –Password Settings ..................................................................................................... 37
5.4.4 – Temperature Scale ................................................................................................... 37
5.4.5 – Date Format .............................................................................................................. 38
5.4.6 – Time Format .............................................................................................................. 38
5.4.7 – Auto Off Delay ........................................................................................................... 39
5.4.8 – Backlight On Time..................................................................................................... 39
5.4.9 – Rechargeable Batt e r ies ............................................................................................ 40
5.4.10 – Delete Data ............................................................................................................. 40
5.4.11 - Summary ................................................................................................................. 40

3
5.5 - Download logger data to PC ............................................................................................. 41
5.5.1 – Selecting Logger Data for Download ........................................................................ 42
5.5.2 - Download password protection ................................................................................. 43
5.5.3 – Logger Properties ..................................................................................................... 43
5.5.4 – Retrieving Logger Data from the REDi ..................................................................... 44
5.5.5 – Deleting Logger Data Blocks .................................................................................... 44
6 – Useful Information ................................................................................................................. 46
6.1- Battery Specifications ........................................................................................................ 46
6.1.1 - Battery Indicator ............................................................................................................. 46
6.1.2 - Prolonging the battery life of wireless loggers ........................................................... 46
6.2 – Successful REDi to Wireless Communication ................................................................. 47
6.3 – Recharging your REDi ..................................................................................................... 48
6.3.1 – Attempting to charge faulty or non-rechargeable batteries ...................................... 49
6.4 – Specifications ................................................................................................................... 50
6.4.1 – Storage & Database.................................................................................................. 50
6.4.2 – Readout .................................................................................................................... 50
6.4.3 – Power Supply ............................................................................................................ 50
6.4.4 – Processor .................................................................................................................. 50
6.4.5 – Communication ......................................................................................................... 50
6.4.6 – Communication Frequency ....................................................................................... 50
6.4.7 – Keyboard ................................................................................................................... 50
6.4.8 – Other Features .......................................................................................................... 50
6.4.9 – User Software ........................................................................................................... 50
6.5 Wireless Regulations .......................................................................................................... 51
6.5.1 - Radio, EMC and Safet y Regulatio ns ......................................................................... 51
6.6 – Warranty ........................................................................................................................... 52
6.8 – Recycling of electronic devices ........................................................................................ 54

4
1 - Introduction
1.1 – Safety Precautions
a. Please be sure to follow the instructions, warnings and notices specified
within this document to avoid malfunction.
b. The REDi device’s IP rating is 54 and therefore is protected against a
limited amount of dust and vertically falling drops of water. Users should
not use the device in any environments where moisture could enter the
case of the device. If the REDi unit requires cleaning Escort Dat a Lo ggers
recommends users wipe the device with a clean dry cloth and mild
detergent.
c. Escort Data Loggers does not recommend the use of any AC adapter
other that does not meet the specifications addressed within this
document (see page 43). The use of a non -compatible AC adapter could
cause your REDi device to malfunction or result in personal injury.
d. If your REDi device is not to be used for prolonged periods of time,
remove the batteries to prevent loss of battery life and possible battery
leakages that may damage t he dev i c e.
e. Force should never be applied to this device.
f. Your REDi device should only be operated within the parameters specified
within this manual.
g. Never attempt to recharge non-rechargeable batteries.
h. Never attempt to repair this device. If you experience any problems with
this device, please contact your local distributor to arrange repair.
i. Your REDi has a sensitive antenna and at no time should you attempt to
tamper with, turn or remove the antenna. Interactions of this nature could
result in communication failure between your REDi and other wireless
devices.
j. Use of the protective rubber boot is recommended.
k. Variations of data transfer distance can occur due to interference.

5
1.2 – About REDi
The REDi is a portable, handheld device that facilitates radio communication with
Wireless Mini loggers. The REDi enables a user to gather recorded data from
selected loggers and to collect the log data from many remote sites before
transferring this data to a PC. In addition, the REDi has the ability to display
statistics about the data (including readings out of specification) and to restart
loggers.
The unit is physicall y arranged in an easy to hold handheld plastic case which is
battery powered and contains a large liquid crystal display (160 x 160 bitmap)
and 7 key keyboards. A communications connector, which allows the REDi to be
connected to a PC, is supplied with the unit and can be mounted at the top of the
unit.
The REDi is menu based. To trigger actions and display data the user must
select a menu item by using the up / down arrow keys to move a highlight bar
over that option then select it using the Select key (OK button). The Select key is
also used to toggle between states and to return to a higher level menu.
The REDi has a power down key (bottom left hand button) which will
immediately put the unit into sleep mode, as well as an escape key which will
return the screen to an earlier menu (generally Menu 1).
6
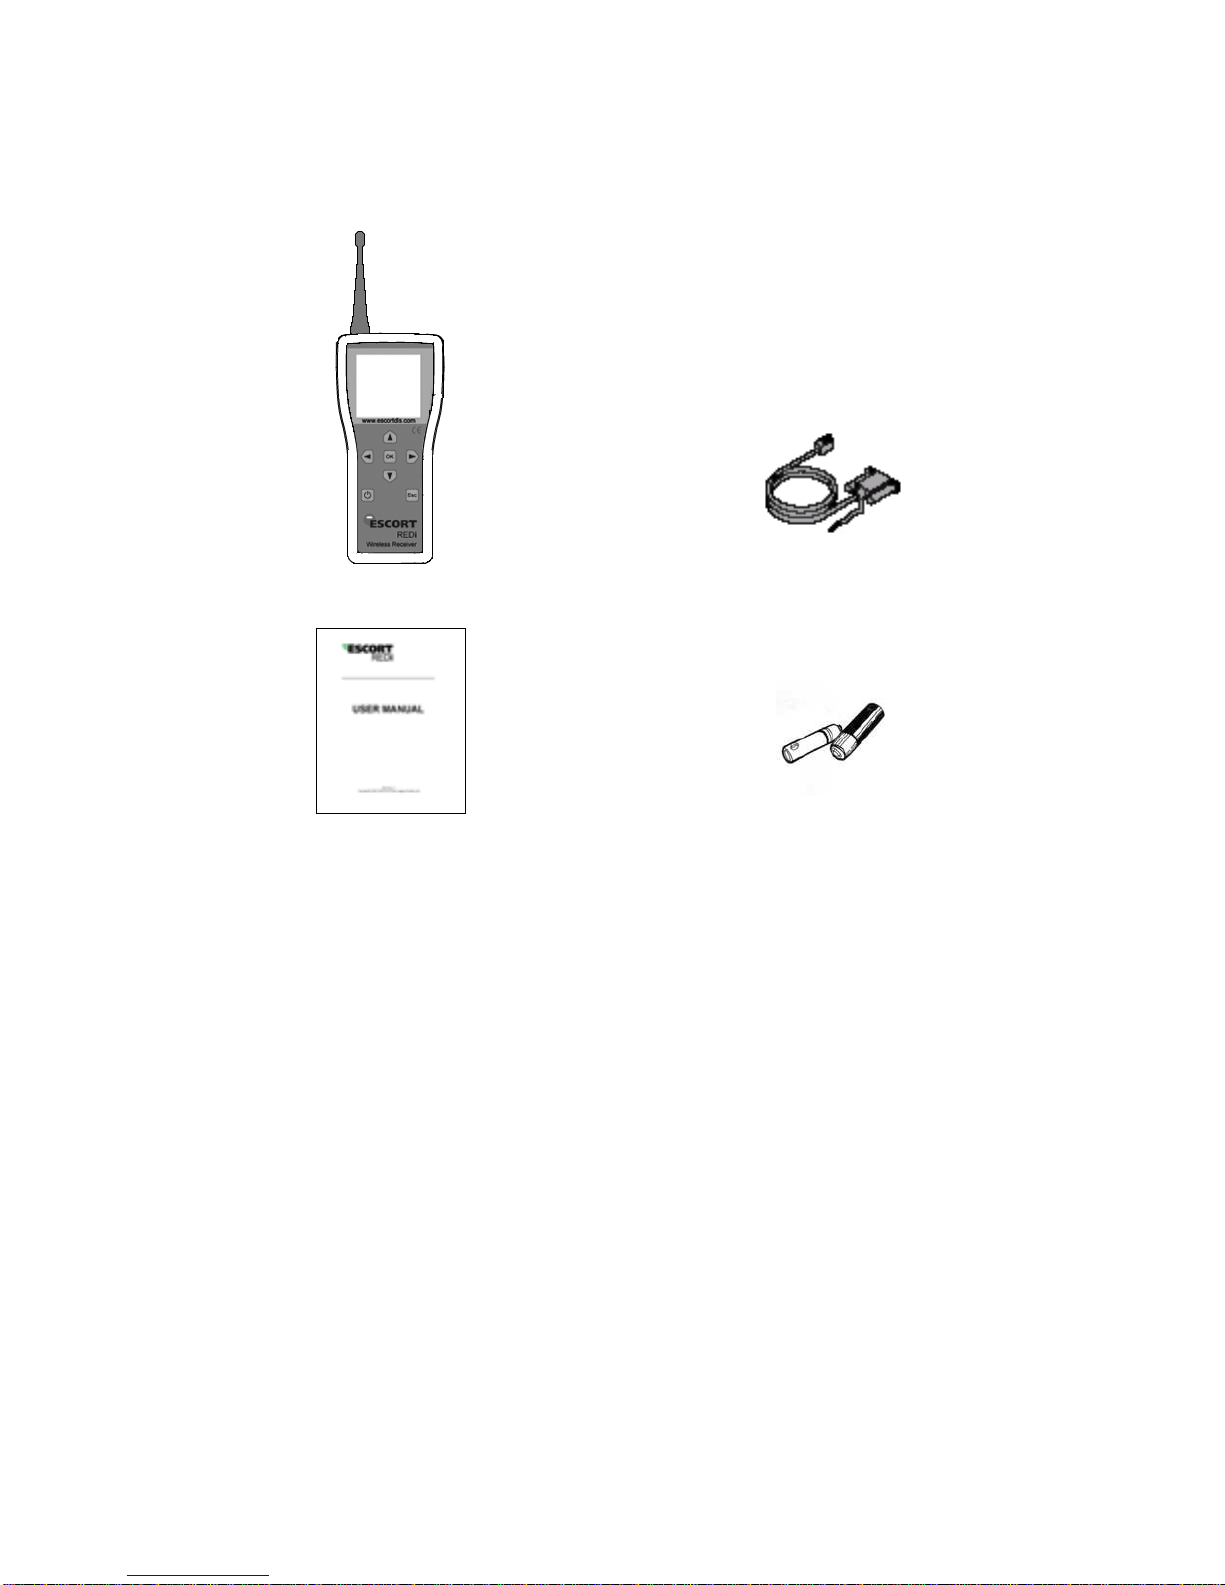
1.3 – Package Contents
1x REDi Device
1x Serial port connector
1x REDi user manual
2x AA batteries (re-chargeable)
Your REDi package contains the following items:

7
1.4 – Part Descriptions
5
6
Connected to
Read new
1
2
3
4
1. Liquid-Crystal-Display 5. Antenna (top view)
2. Keypad and OK button 6. Interface Connector
3. Escape button (Esc) 7. Antenna (side view)
4. Power button 8. Battery compartment
10 loggers
[9/10] read
Message text
Loggers connected to
Status bar
Loggers downloaded with scrolling
7
8
Read all
View data
System Options
15:54
OK option
Option
Select ed Opt ion
Time
8
2 – Getting started
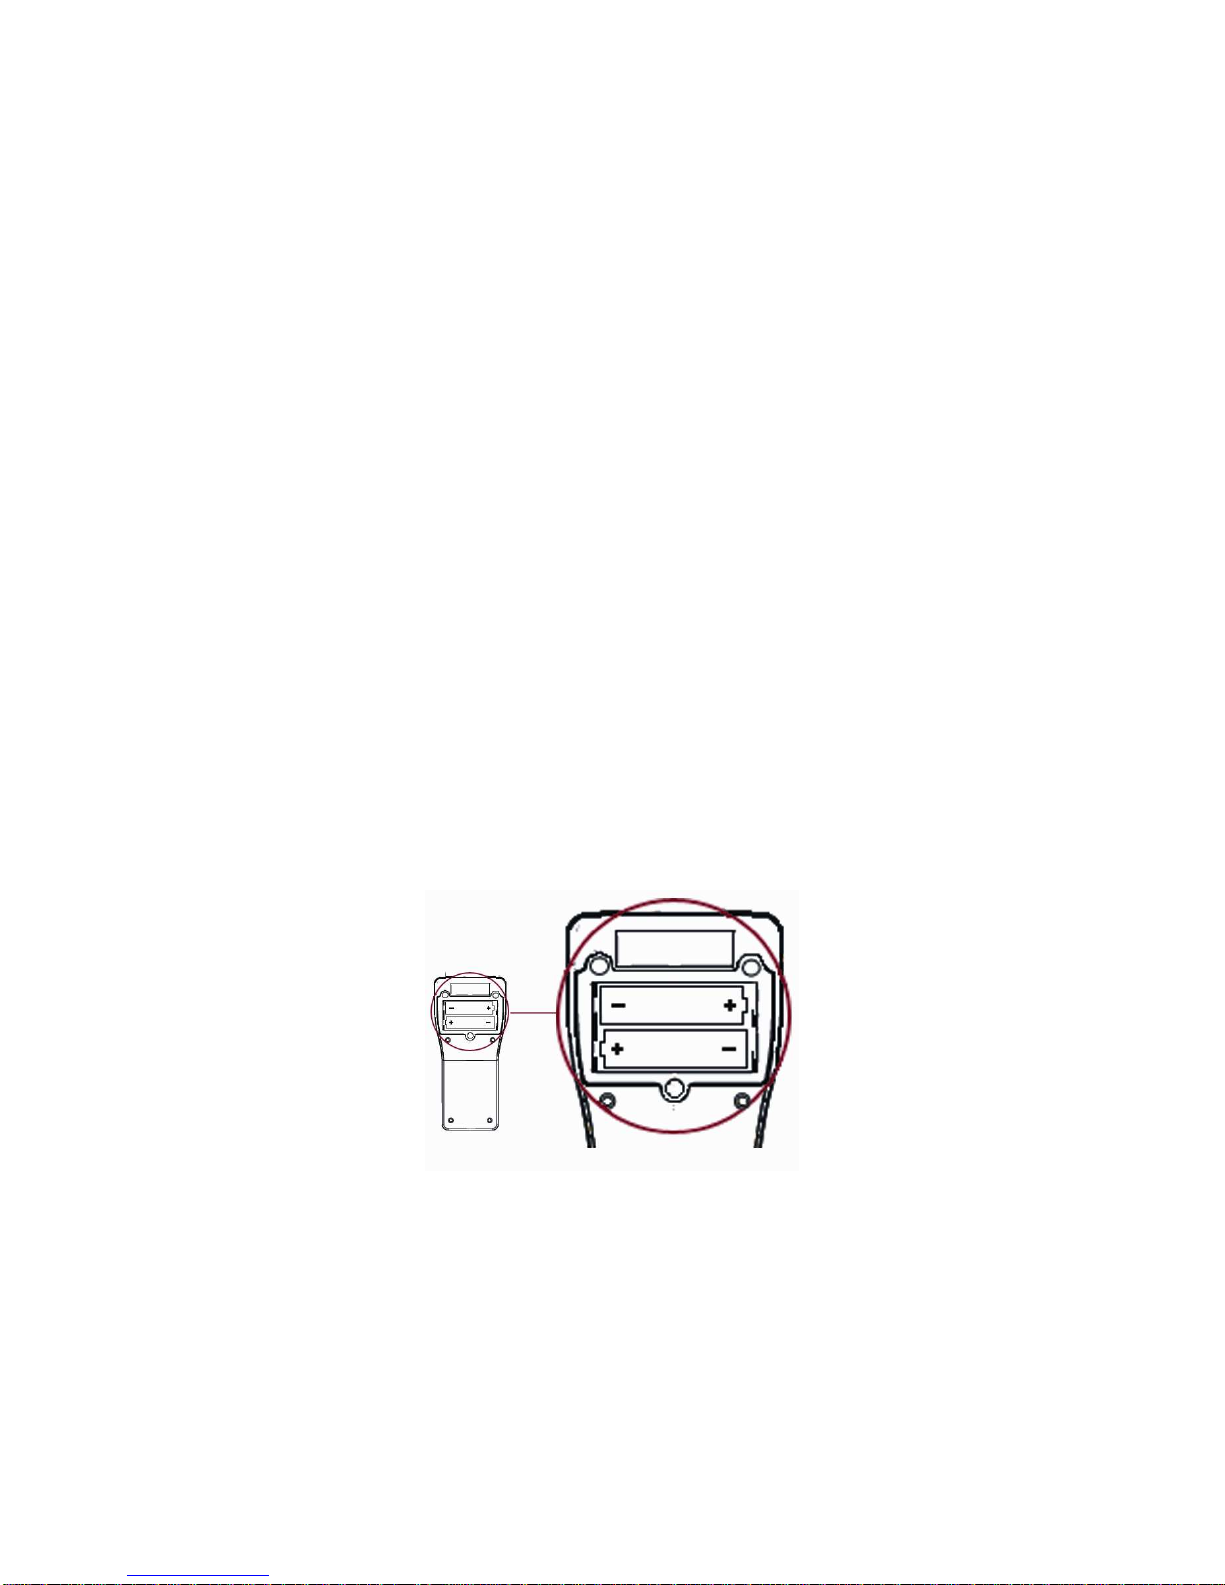
2.1 – Installing Batteries
Your REDi requires two AA batteries to operate. You can use either alkaline or
re-chargeable (for example, NiCd or NiMH) batteries, however please remember
that you must never attempt to charge alkaline batteries.
The two AA batteries delivered with your REDi are rechargeable. They have
been installed for your convenience.
To install new batteries first remove the battery panel located at the top of back
of your REDi device (see figure 2.0). The REDi battery panel is fastened with
three small Philips head screws and you will require a Philips screwdriver to
remove these.
Insert the two batteries with the correct polarity (as marked inside the
compartment).
Before replacing the lid, ensure that the batteries are fully inserted. If the
batteries are not inserted correctly, the lid will not fit properly, and could
consequently damage the seal or the batteries.
Carefully place the cover of the battery compartment back on, and gently tighten
the three screws.
If you switch to alkaline batteries, please remember to change the corresponding
option in the System Options to “Rechargeable N”. See chapter 6.3 for more.
Important – To ensure that the REDi device functions to an optimum level for the
duration required, it is vital that the REDi device is recharged regularly, preferably
at the end of each assignment.
Figure 2.0 (REDi battery compartment)

9
2.2 – Turning on/off your REDi
Press the power button to turn on and/or off.
Figure 2.1 (REDi Power Button)
Read new
Shut Down…………….
There are several ways in which you can switch your REDi device on and off. To
turn the device on, simply press any one of the REDi keyboard keys. The Unit
will briefly show ‘System Info’ (see chapter 4.7) and then display the ‘Main Menu’.
To switch your REDi device off you can either press the on/off button located at
bottom left of the REDi interface (see figure 2.1). If you would prefer to shut your
REDi device down via the menu screens you can do so by selecting ‘System
Options’ and then ‘Shut Down’ (see figure 2.2).
For information regarding REDi’s ‘AutoOff’ function refer to chapter 4 ‘System
Options’ of the REDi user manual.
Read all
View data
System Options.
15:54
Figure 2.2 (REDi Shut Down Screenshots)
Your REDi will s witch on automatically when it is connected to a serial port (COM
port) of your PC, or to mains power (for recharging the batteries).
AutoOff 30 min
Backlight 90 s
Mem. left 801K
Rechargeable Y
Temp Unit ºC
Erase all data
System info
Exit
15:54

10
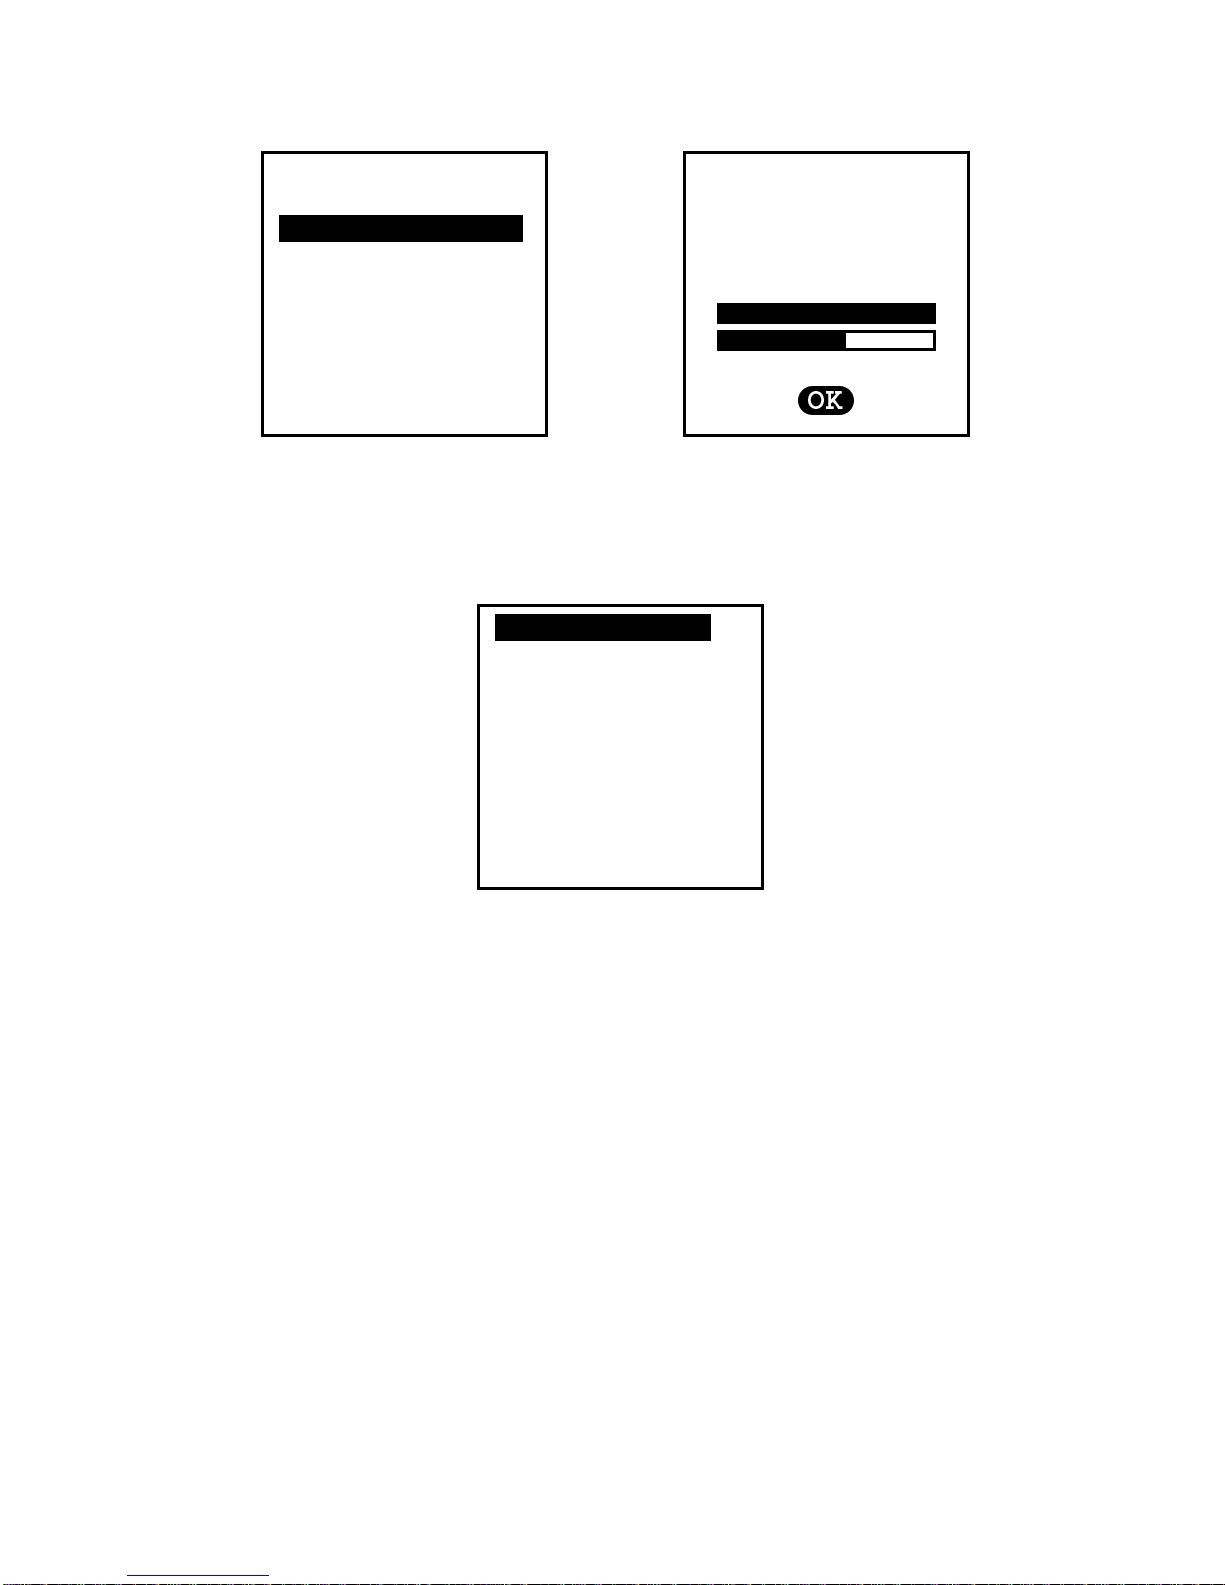
2.3 – Entering Password (Code)
Your REDi device has the ability to be Password protected. Each REDi device is
capable of having one password allocated. The REDi device defines the
password as a ‘Code’ (see f igure 2.3). REDi password is setup using ESCORT
Console software. To learn more about how to password protect your REDi
device please refer to the Software chapter (chapter 5) of this user manual.
If your REDi device has the password function enabled but you have not
assigned a password using ESCORT Console the default password is ‘0000’
(see figure 2.3).
Once a password has been assigned to your REDi device, a screen will be
displayed upon start up that prompts users to enter their password (see figure
2.3).
ENTER CODE
0***
Figure 2.3 (Enter Password Screenshot)
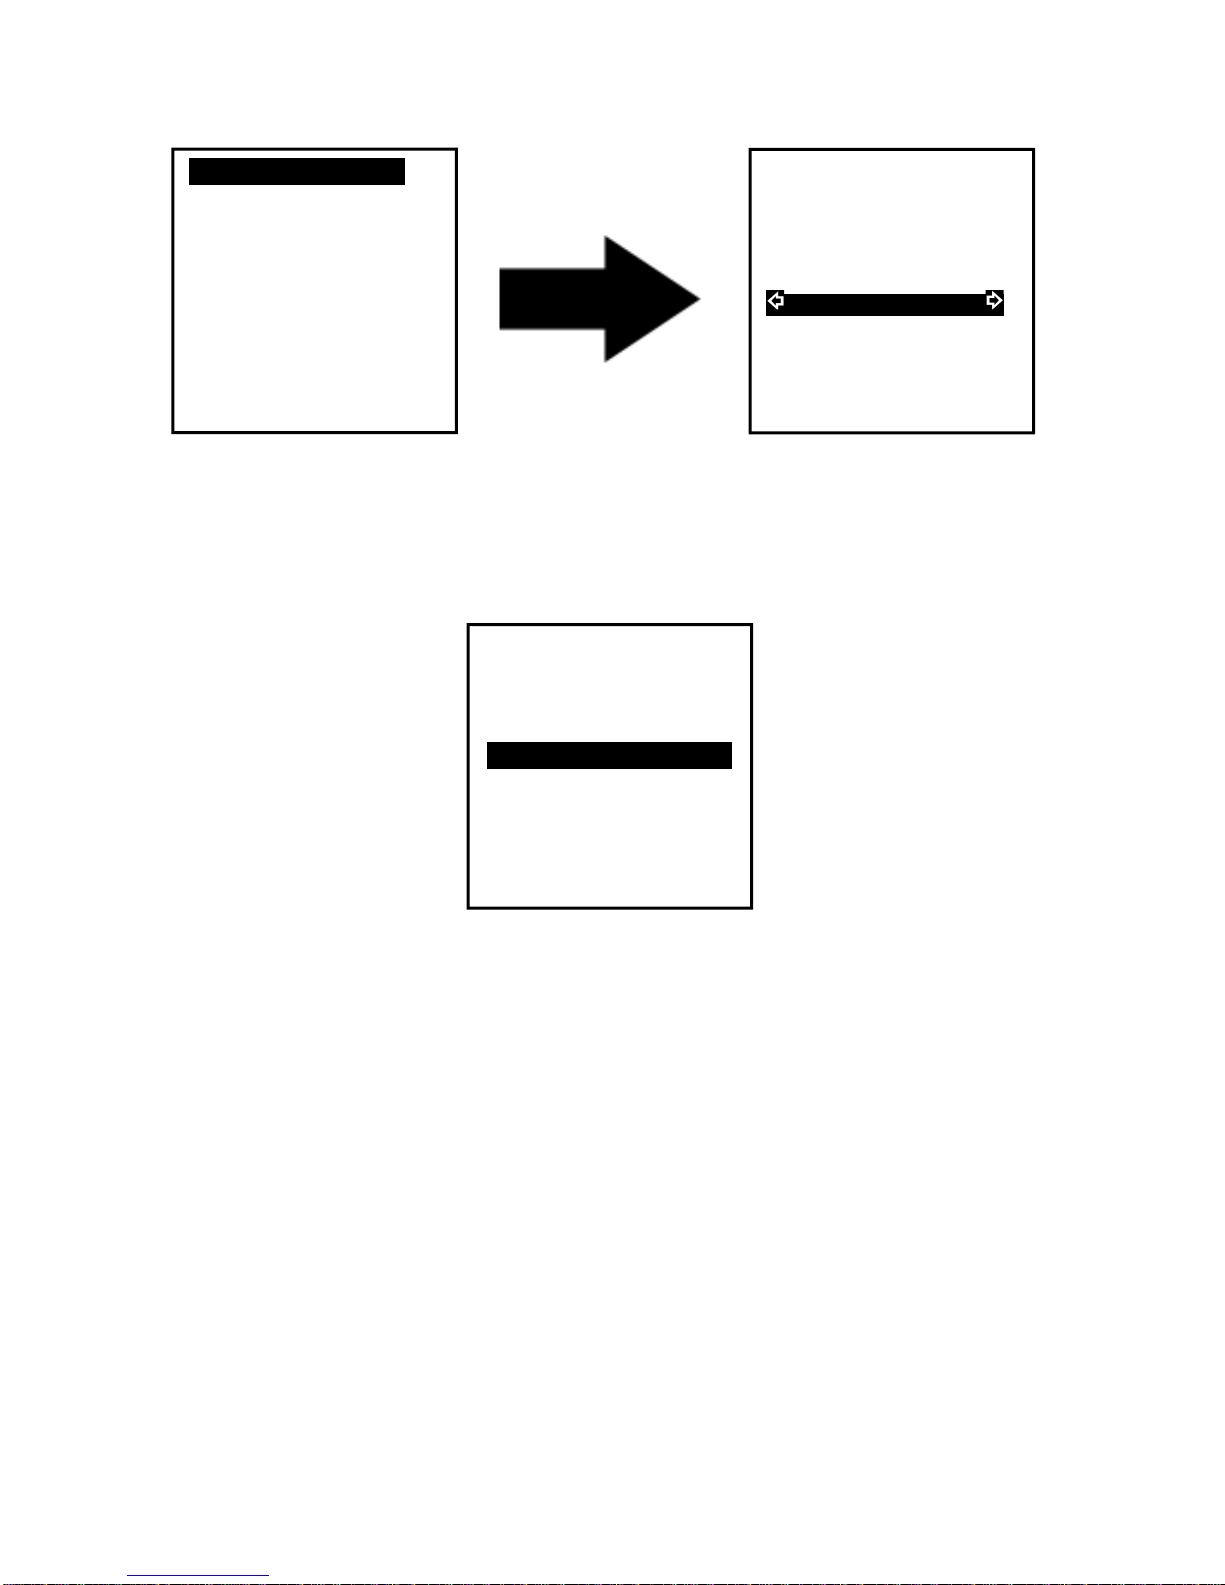
To enter your password use the up and down arrow keys on the key pad to
change the numbers (from 0 to 9) and the left and right arrow keys to move to the
next. Once you have entered the correct password click the ‘OK’ key located in
the middle of the arrow keys on the keypad (see figure 2.4).
Figure 2.4 (REDi Keypad)

11
Read new
If an invalid password is entered, your REDi device will display the message ‘*
INVALID *’ (see figure 2.5) and shut down immediately. To make another attempt
at entering a password, press any key to restart your REDi device and re-enter
your four digit password as per the instructions above.
ENTER CODE
0***
* INVALID *
Figure 2.5 (Invalid Password screenshot)
Once the correct password has been entered, your REDi device will proceed to
the ‘System Info’ (see chapter 4.7) and after that automatically to the ‘Main Menu’
(see figure 2.6). You will then be able to access all of the menus and functions
that your REDi device offers.
Read all
View data
System Options.
15:54
Figure 2.6 (REDi Mai n Scr een)

12
2.4 – Setting REDi Date and Time
The REDi clock is located in the bottom left of the REDi display (see figure 2.5).
For your convenience your REDi device has been designed to automatically
configure its date and time to your PC’s date and time. This takes place when
using either the program and configure or the download function in ESCORT
Console.
2.5 – Downloading Software
In order to access your REDi using your PC, you need to download ESCORT
Console software from the Escort Data Loggers website
(www.escortdataloggers.com). ESCORT Console software is free to download
and use.

13
3 – REDi Functions
3.1 – Downloading Wireless Data Loggers
The REDi uses a short wave radio signal to communicate with Wireless Mini data
loggers (MI-IN-D-2-LR8, MI-OE-D-2-LR8, MI-IN-D-LR9 and MI-OE-D-LR9).
Radio communication depends on communication distance, interference by other
objects and other radio waves. Metal and water (rain) especially can disturb the
signal. Further, both the orientation of the REDi and the logger antenna strongly
influence the quality of the communication. There should be at least 0.5m of clear
space around the antenna. To improve communication, get closer to the logger,
remove obstacles in the way or metal in the surrounding area, and hold the REDi
at different angles for each attempt.
The first screen, referred to as the main menu screen, is the first visible menu
(which follows the System Info, see 4.7) after initiating your REDi device and
allows for two download options ‘Read New’ and Read All’.
3.1.1 - Read New
The ‘Read New’ option allows you to locate and download loggers that have not
previously been downloaded by a specific REDi unit. The highlight bar
automatically defaults to the first option (Read new) on the main menu.
If you select ‘Read New’ and press ‘OK’, the next screen displayed is the ‘search’
screen. REDi communicates with the loggers in range and checks their serial
numbers against all records already in the REDi memory. Connection will only be
established with loggers that cannot be found in the REDi memory already. The
device then displays the ‘Connected to loggers’ screen (see figure 3.1). Once the
REDi has downloaded all data of new loggers, you are given the option to either
view the data just downloaded with ‘View recent’, or view all of the data stored in
the REDi memory (see 3.2.1 and 3.2.2) using ‘View all’. ‘Exit’ will t ake you back
to the main menu.
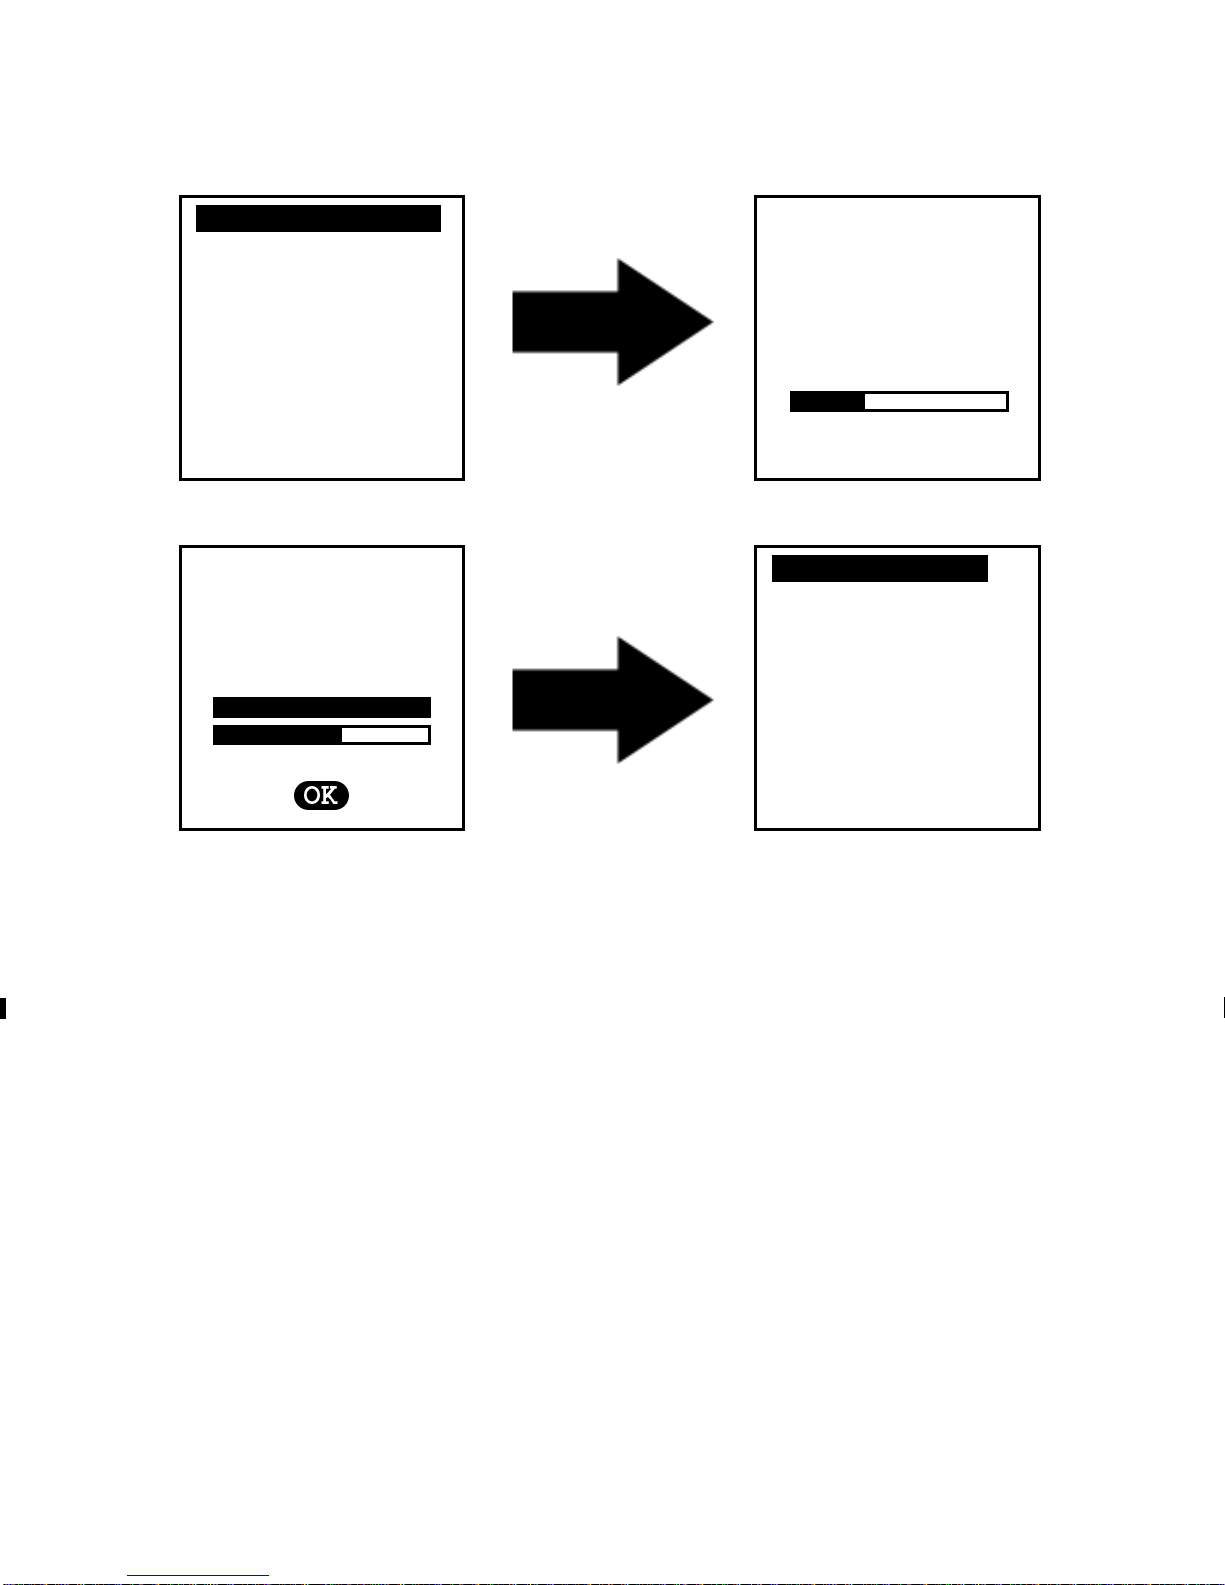
14
Screen 1
Screen 2
Screen 3
Screen 4
Read new…………………….
Connected to
View recent……….
Read all
View data
System Options
15:54
10 loggers
[9/15] read
Searching…
View all
Exit
15:54
Figure 3.1 (Steps to download new logger data)
You will typically use the ‘Read New’ function when you have already
downloaded some of the loggers you are searching for and want to find any
loggers that the REDi could not connect to during your previous try.
3.1.2 - Read All
The ‘Read All’ option allows you to locate and download data from all of the
loggers (both new and downloaded previously) that are within communicating
distance. The ‘Read All’ option is located on the ‘Main Menu’ screen and is option
number two.
To download the entire available logger data select ‘Read All’ and press ‘OK’.
The next screen displayed is the ‘search’ screen followed by the ‘connected to
loggers screen (see f igure 3.2). Once the REDi has downloaded all of the found
logger information you are given the option to either view the recently
downloaded data or view all of the data stored in the REDi memory (see 3.2.1
View Recent and 3.2.2 View All for more information).
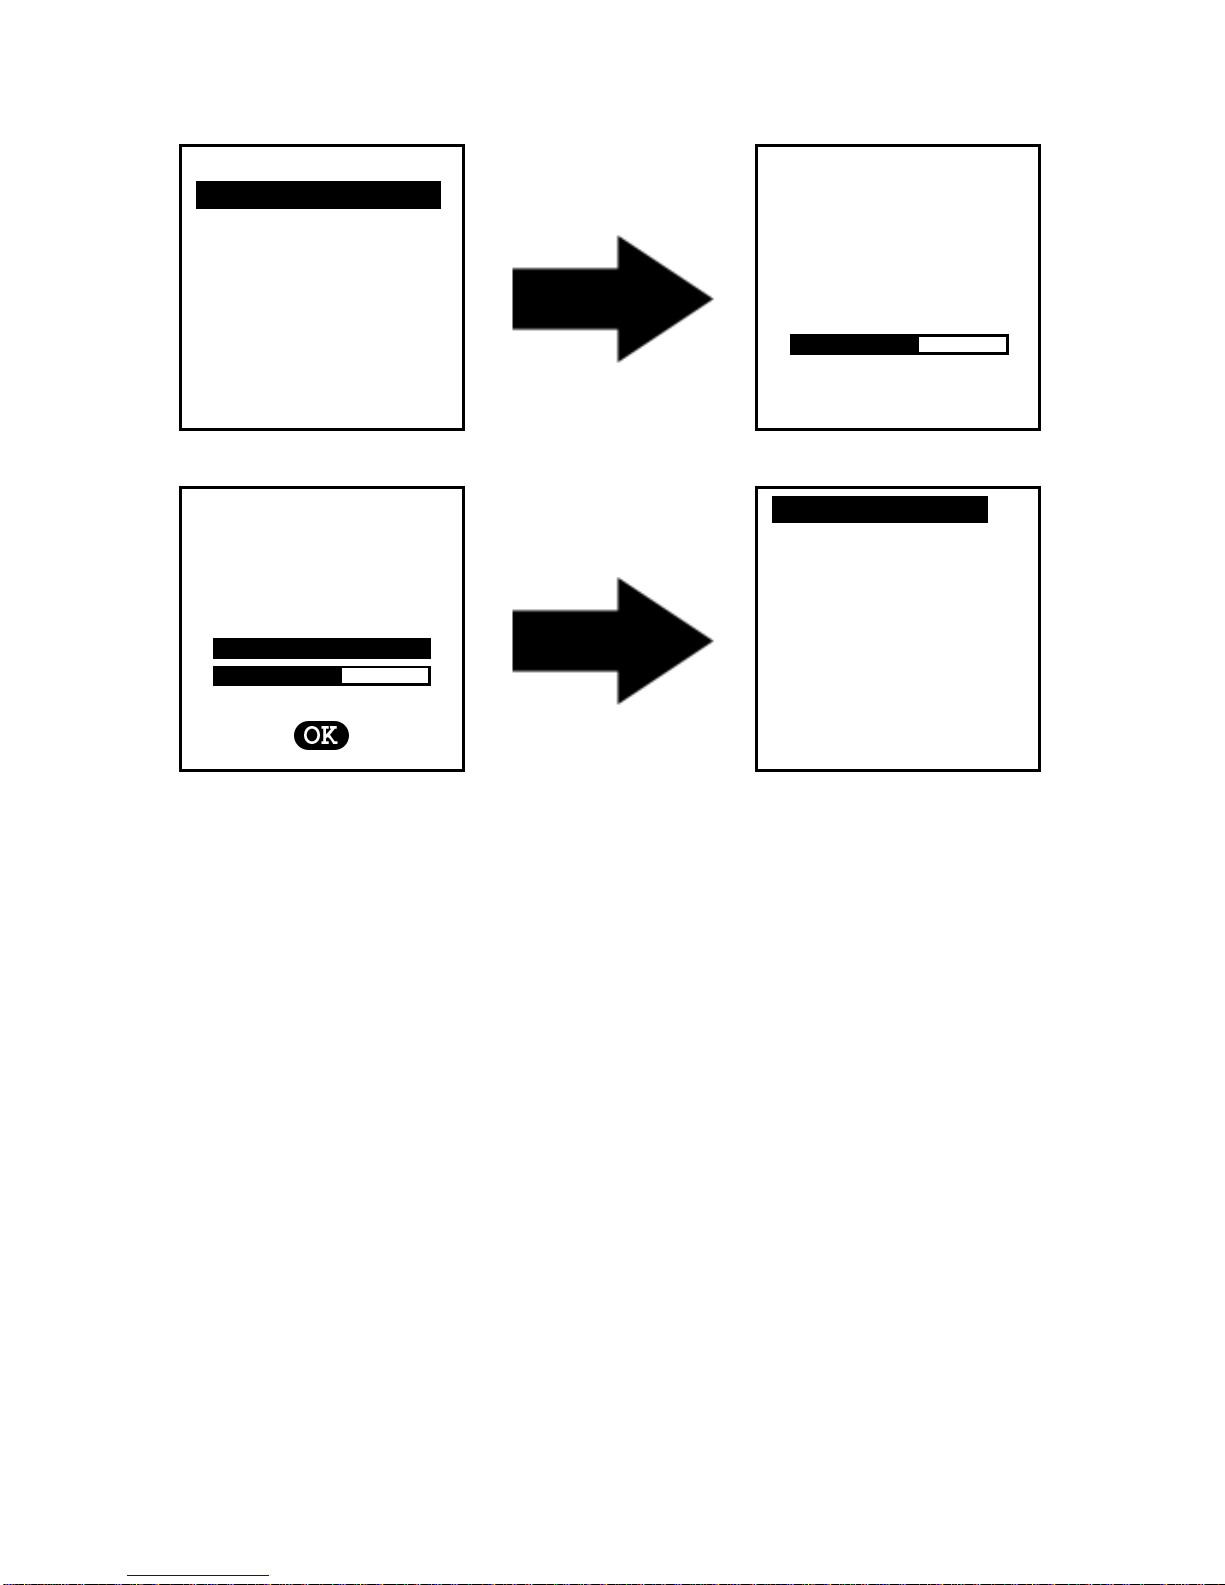
15
Screen 1
Screen 2
Screen 3
Screen 4
Read new
Read all…………………….
Connected to
View recent……….
View data
System Options
15:54
Searching…
27 loggers
[22/27] read
View all
Exit
15:54
Figure 3.2 (Steps to download all logger data)
This function will typically be used if you need to repeat the download of some
loggers because additional readings have been taken. The existing data will not
be overwritten, but a new logger data block for the same logger will be added in
the REDi.
The REDi can only connect to a maximum of 32 loggers at the same time. If you
did not connect to all loggers you were expecting, try to get closer to those you
are missing and repeat ‘Read all’. If those missing loggers have not been
downloaded before, use the ‘Read new’ function.
3.2 – Viewing and Interpreting Data
Your REDi device is designed to provide several different ways in which to view
the logger data that has been downloaded into its memory.
There are two ways in which you can access logger data from the REDi’s
memory. Firstly, you can access data saved from previous download sessions by
choosing the ‘View Data’ option from the main menu (see figure 3.3). Secondly,
you are given the option to view logger data immediately after downloading has
finished (see figure 3.4).
16
Read new
Read all
Connected to
View recent……….
View data………………….
System Options
10 loggers
[9/10] read
15:54
Figure 3.3 (Main Screen – View Data) 3.4 (Download Screen – Read Loggers)
Both the main screen and the download screen direct you to the ‘View Screen’,
where you have two viewing options, “View recent’ and ‘View all’ (see figure 3.5).
For more information on the ‘View Recent’ and ‘View All’ options please read
sections 3.2.1 and 3.2. 2.
View all
Exit
15:54
For Wireless Mini loggers which have the downloaded data password protected,
you can only view the Overview, not summary or out of specification information.
3.2.1 – View Recent
The ‘View Recent’ option will only display data which has been collected during
the REDi’s most recent scan (see figure 3.6). To scroll through the different
loggers, first the ‘Number of Loggers in Memory’ window (see figure 3.8) must be
highlighted. By pressing the left and right arrow keys on the key pad you can
move through the logger list.
For information regarding the viewing of detailed logger information please refer
to 3.2.3 ‘View Summary’ and 3.2.4 ‘View out of Specification’.
Figure 3.5 (View Screen)
17
No loggers
View recent……….
View all
MI-IN-D-2-LR8
Exit
15:54
MI-BF-053-001
CONTAINER 4
Battery LOW
Stopped. PASS
[5/10]
View Summary
View Out Spec
Restart Logger
15:54
Figure 3.6 (‘View recent’ to ‘Overview’ Screenshots)
If there have been no recent downloads of data the REDi with display a screen
with the message ‘No Loggers’ (see figure 3.7). To return to the ‘View Screen’
select the ‘Exit’ option (near the bottom of the screen) or press the ‘Esc’ button.
..…………[0/0]…………..
Exit
15:54
If your REDi registers recently downloaded data within its memory, your REDi
screen will displa y the basic information relating to that logger data (‘Overview’),
Items such as; product code, serial number, battery status and whether the
logger has logged readings out of specification (see figure 3.8).
Figure 3.7 (No Loggers screen)
 Loading...