

Page 1
PASSPORT SRX is designed in the USA
ESCORT Inc.
5440 West Chester Road
West Chester OH 45069
/
Sales
Service 80
ww
w.EscortRadar.com
©2007 ESCORT Inc. Escort®, Passport®, AutoSensitivity™, SpecDisplay™, ExpertMeter™, and Laser
Shif ter™ are trademarks of Escort Inc.
SWS is a trademark of SWS LC.
Features, specifications and prices subject to change without notice.
0-433-3487
S U P E R C H A R GE D R A D A R P E R F O R M A N C E • L A S E R SH I F T I N G T E C H N O L OG Y
P R O F E S SI O N A L IN S TA L L AT I O N R E Q U I R E D
U L T I M A T E R A D A R
/
L A S E R D E F E N S E S Y S T E M
Ow ne r’ s Manu a l
Page 2

Congratulations and Important Warning
Quick Reference Card
Congratulations
Your new PASSPORT SRX is the most
advanced remote radar/laser detector
available.
The PASSPORT SRX includes full X, K,
and SuperWide Ka radar coverage, new
front and rear Laser Shifters, improved
Digital Signal Processing for superior
range and reduced false alarms, our
patented Mute and AutoMute, audible and
visual band alerts, and all the performance
you’d expect from Escort.
In addition, your new PASSPORT SRX
introduces a new level of radar/laser
defense including:
• Supercharged radar performance, for
superior K and Ka-band sensitivity
• New programmable Laser Shifters, for
maximum protection against laser
targeting
• Advanced EZ-Programming lets you
instantly set up to 9 customized features
™
• Exclusive AutoSensitivity
mode
drastically reduces false alarms, plus
Highway and City settings
• Ultra-bright alphanumeric display uses
280 LEDs for crystal clear information
™
• Exclusive ExpertMeter
tracks and
displays up to 8 radar signals
• New SpecDisplay provides numeric
frequency for any radar signal
• Detects and decodes up to 64 Safety
Warning Systems signals
• High-Speed A/D converter dramatically
improves radar detection range
• Exclusive vertical display option
provides unlimited installation options
• Standard remote mute button provides
one-touch mute and volume adjustment
• Optional external speaker enables Voice
alerts
If you’ve used a radar detector before,
a review of the Quick Reference Guide on
page 4 and the EZ-Programming
information on pages 9 and 10 will briefly
explain the new features. If this is your
first detector, please read the manual in
detail to get the most out of your new
PASSPORT’s
performance and features.
Please drive safely.
IMPORTANT INSTALLATION WARNING
Your new PASSPORT must be
installed by a professional. Car Audio
specialists and
PASSPORT for you.
Attempting to install the PASSPORT
SRX without expertise in automotive
electronic installations can cause personal
injury during the installation, or can
damage your PASSPORT or your vehicle. If
your vehicle is damaged during
installation, its safety systems may be
compromised, which could cause
personal injury or property damage.
You can locate an authorized dealer in
your area by logging on to our web site at
www.EscortRadar.com
I
many car dealers can install
Remove card along perforations
PASSPORT SRX Quick Reference Card
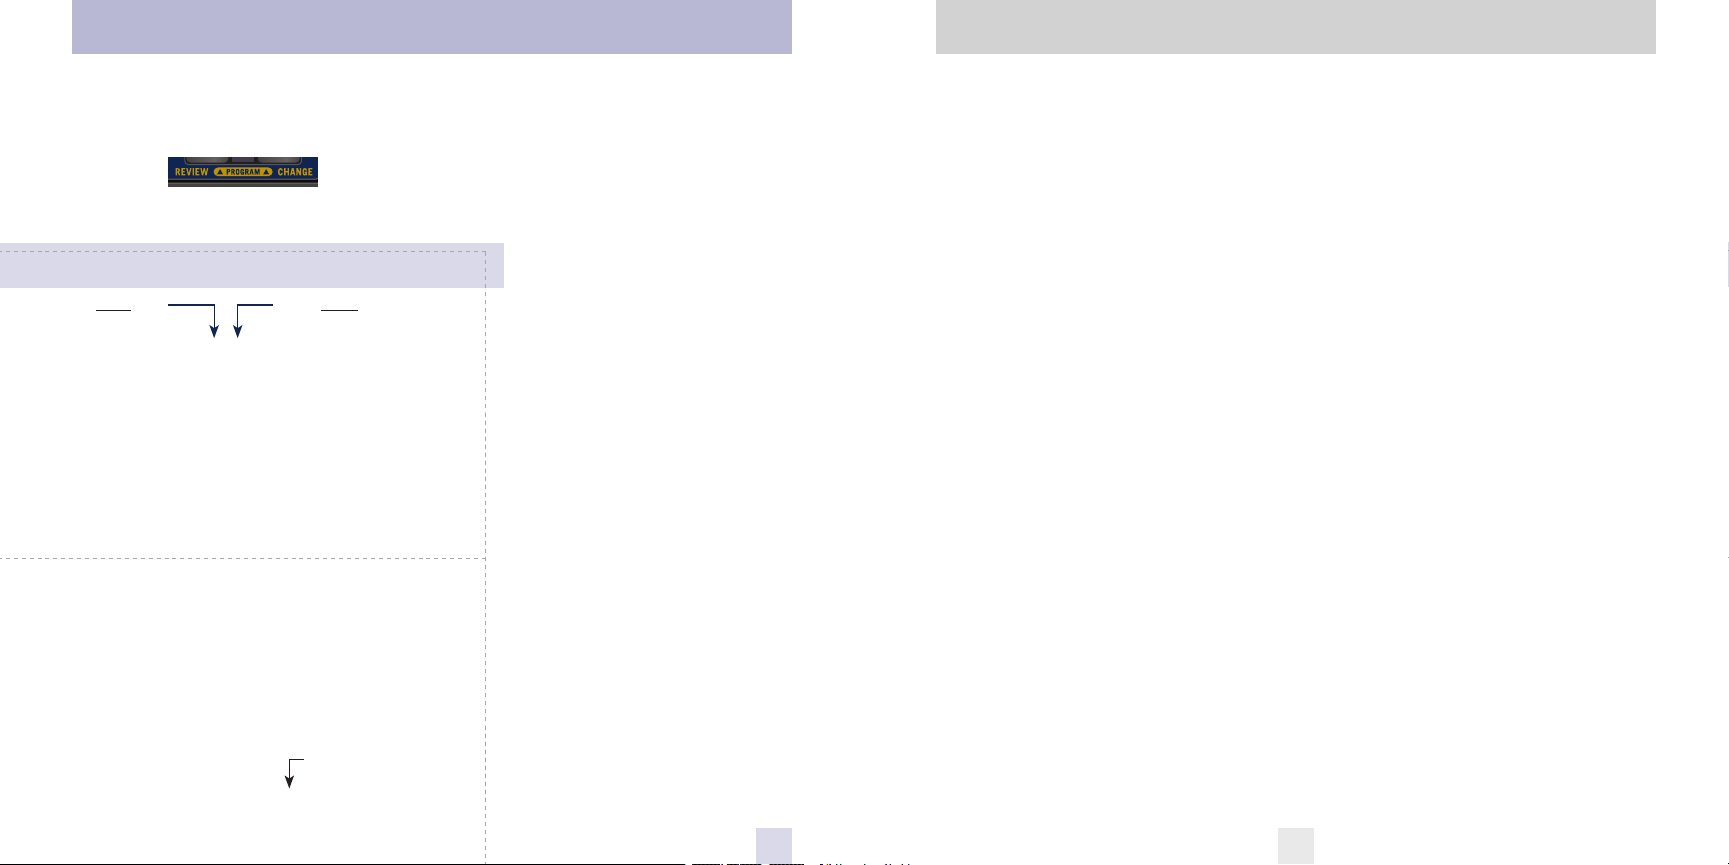
There are 9 user-selectable options so
you can customize your PASSPORT SRX
for your own preferences.
The buttons labeled CITY and MUTE are
also used to enter the Program Mode,
REVIEW your current program settings,
and to CHANGE any settings as desired. The
words PROGRAM, REVIEW, and
are located on the front of the
and are highlig hted in gold graphics.
How to use EZ-Programming
1 To enter Program Mode, press and
hold both buttons down for 2 seconds.
The unit will beep twice, and will display
Program.
the word
1
2 Then press the REVIEW button to
review the current settings. You can
either tap the button to change from item
to item, or hold the button to scroll
through the items.
3 Press the CHANGE button to change
any setting. You can either tap the button
to change from setting to setting, or hold
the button to scroll through all the options.
Remove card along perforations
4 To leave Program Mode, simply wait
8 seconds without pressing any button.
The unit will display
times, and return to normal operation.
Factory Default Settings
To reset PASSPORT to its original factory
settings, press and hold the “CIT
“MUTE” buttons while turning the power
on. PASSPORT’s display will provide a
Reset message, accompanied by an
audible alert, acknowledging the reset.
CHANGE
display,
Complete, beep 4
Y” and
An example
Here is how you would turn PASSPORT’s
AutoMute feature off.
1 Enter the Program Mode by holding
both the CITY and MUTE buttons down
for 2 seconds. PASSPORT will beep twice
and display Program.
2 Press and hold the REVIEW button.
PASSPORT will scroll through the
categories, starting with Pilot Light
(Pilot), then Power-on sequence
(PwrOn ), then Signal strength meter
(Meter), and then AutoMute (aMute).
3 Release the REVIEW button when
PASSPORT shows the AutoMute item.
Since the factory setting is for AutoMute
to be on, PASSPORT will display
aMute ON.
If you accidentally don’t release the
Review button in time, and PASSPORT
goes to the next category, hold the
Review button down again, and after
PASSPORT scrolls through all categories ,
it will begin again at the top of t he list.
4 Press the CHANGE button to change
from
aMute ON to aMute OFF.
5 To complete the Programmi ng, simply
wait 8 seconds without pressing any
PASSPORT will display Complete,
button.
beep 4 times, and return to normal
operation.
EZ-Programming Details
Page 3
Quick Reference Card
Table of Contents
Remove card along perforations
PASSPORT SRX Quick Reference Card
Press the REVIEW button
to go from one category
to the next
DISPLAY
PILOT LIGHT
(Power-on indication)
POWER-ON SEQUENCE
SIGNAL STRENGTH METER
AUTOMUTE
AUDIOTONES
CITY MODE SENSITIVITY
BRIGHTNESS
BANDS
* Factory Default Settings
Disp STD
Disp VERT
Pilot HWY
Pilot H
Pilot H.>
Pilot +
Pilot +.>
Pilot +>
Pilot V
PwrOn STD
PwrOn FST
Meter STD
Meter EXP
Meter SPC
aMute ON
aMute OFF
Tone STD
Tone LOUD
City STD
City LoX
City NoX
Brt AUTO
Brt MIN
Brt MED
Brt MAX
Brt DARK
Bands ALL
Bands MOD
X ON
K ON
Ka ON
LSR ON
SWS ON
Press the CHANGE button
to change your setting
within a category
* Standard display
Vertical display
* Full word: Highway or Auto or City
Letter: H or A or C
Letter with scanning dot
Symbol: + or
Symbol with scanning dot
Scanning symbol
Vehicle voltage
* Standard power-on sequence
Fast power-on sequence
* Standard signal strength meter
ExpertMeter
SpecDisplay
* AutoMute on
AutoMute off
* Standard tones
Loud tones
* Standard City mode sensitivity
Low X band sensitivity in City Mode
No X band sensitivity in City Mode
* Brightness adjusts automatically
Minimum brightness when turned on
Medium brightness when turned on
Maximum brightness when turned on
Dark Mode when PASSPORT turned on
* All bands enabled (Laser receive only)
One or more bands has been modified
Turn bands “ON” or “OFF” by
pressing the mute button
or OFF
or OFF
or OFF
or SHFT or OFF
or OFF
or --
•
Remove card along perforations
Introduction I
• Congratulations I
• Important Warning I
• Quick Reference Card 1-2
• Quick Reference Guide 4
Controls and Features 5-8
• Power and Volume Control 5
• Power-on Indication 5
• AutoMute 5
• Mute 5
• Remote Mute / Volume 5
• Highway / Auto / City Switch 6
• Display Brightness 6
• Audible Alerts 6
• Signal Strength Meter 7
• ExpertMeter 7
• SpecDisplay 8
• Laser Shifters 8
EZ-Programming 9-13
• How to use EZ-Programming 9
• Example of Programming 9
• Overview of Programming
• Details of Programming
Technical Details 14-18
• Interpreting Alerts 14-15
• How Radar and Laser Work
Service 19-25
• Troubleshooting 19-20
• Specifications
• Service 22
• Registation Card 2
• Warranty 25
32
10
11-13
16-18
21
3-24
Page 4
Quick Reference Guide
Controls and Features
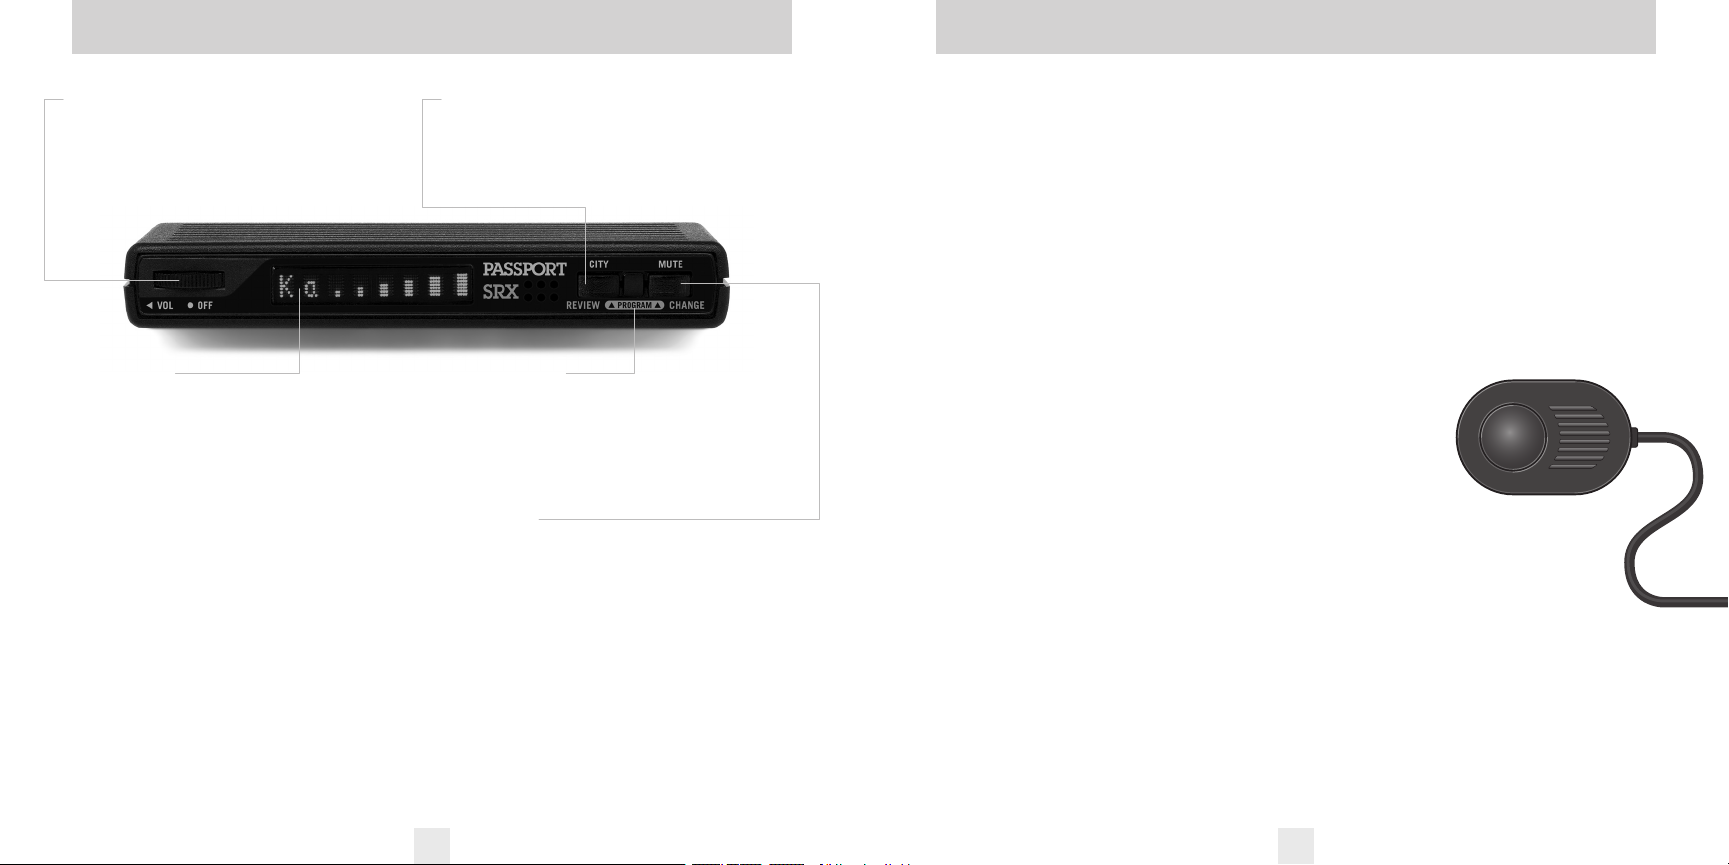
Power/Volume Control
Rotate the thumbwheel to turn PASSPORT
on and set the volume. (We recommend
wiring the SRX to a switched circuit so that
it will turn on/off with your ignition).
Matrix Display
PASSPORT’s display will show “Highway,”
“Auto,” or “City” as its standard power-on
indication. Page 5. If you prefer, you can
choose other power-on indications. Pages
10-11.
During an alert, the display will indicate
the radar band, and a precise bar graph for
the signal strength. Page 7.
You can program PASSPORT for
ExpertMeter, which displays up to 8 radar
signals at once, or choose SpecDisplay
mode, which provides the actual numeric
radar frequency. Pages 7
The display can also show Safety Radar
text messages. Pages
AutoMute
PASSPORT’s patented AutoMute
automatically reduces the volume level of
the audio alert. Page 5. If you prefer, you
can turn AutoMute off. Page 9.
-8.
18-19.
City Button
Switches sensitivity modes between
Highway, AutoSensitivity, and City settings.
In general, we recommend the Auto mode.
Page 6.
Power and volume control
To turn PASSPORT on and adjust the alert
tone volume level, rotate the thumbwheel
on PASSPORT’s Display/Controller. Turn
the control to the left to increase the audio
volume. When you turn PASSPORT on, it
goes through a sequence of alerts.
If you prefer, you may program your
PASSPORT for a shorter power-on sequence.
See the EZ Programming section for details.
Power-on indication
EZ-Programming
PASSPORT is ready to go—just turn it on.
But you can also easily change 9 features for
your preferences. Press both buttons to
enter the Program Mode, then easily
Review or Change your settings. Pages
Mute Button
Briefly press this button on the display
controller, or the standard remote mute
button, to silence the audio for a specific
alert. (The audio will alert you to the next
encounter.) Page 5.
9-13.
After PASSPORT’s start-up sequence is
complete, the matrix display will show
“Highway,” “Auto,” or “City,” to show which
sensitivity mode is selected.
If you prefer, you can select alternate
power-on displays. See the EZ-Programming
section for details.
AutoMute
Your PASSPORT has our patented AutoMute
feature. After PASSPORT alerts you to a radar
encounter at your selected volume level, it
automatically mutes the volume to a lower
level. This keeps you informed without the
annoyance of a continuous full-volume alert.
If you prefer, you can turn the AutoMute
feature off. See the EZ-Programming section
for details.
Mute
The Mute Button, located on PASSPORT’s
front panel, or the installed Remote Mute
4 5
Button, allows you to totally silence the
audio alert during a radar encounter.
To mute the audio for a single specific
signal, briefly press the Mute Button or the
installed Remote Mute Button. After that
radar encounter has passed, the mute will
automatically reset and the audio will alert
you to the next encounter.
Remote Mute/Volume Adjust
The installed Remote Mute Button can also
be used to change the volume level without
accessing the Display Controller. To change
the volume level
with the Remote
Mute Button,
simply press and
hold. An audible
tone will be
generated, and the
display will provide a bar graph for the
volume level. Once the desired volume
level has been reached, simply release
the Remote Mute Button. Your volume
setting will be stored in memory.
When the Laser Shifters are engaged,
(see EZ-Programming section) the Remote
Mute button can be used to manually stop
shifting once you have corrected your
speed. Simply press the Remote Mute
Button twice during the “Laser Shifting”
message, and the Shifters will cease to
transmit. The Shifters will automatically
reset within one minute, and a “Shift ON”
reset message will be displayed.
Page 5

Controls and Features
Highway / Auto / City Switch
The “City” button selects PASSPORT’s
sensitivity mode. We recommend the “Auto”
(AutoSensitivity) mode for most driving.
PASSPORT’s exclusive AutoSensitivity
mode provides long-range warning with
minimum false alarms. In this mode,
PASSPORT’s internal computer
continuously analyzes all incoming signals
and intelligently adjusts the sensitivity—
eliminating the majority of false alarms.
You can also select conventional
“Highway” and “City” modes. When driving
in urban areas where annoying X-band
intrusion alarms and door openers are
common, City Mode can be engaged to
lower X-band sensitivity and reduce X-band
alerts. Full sensitivity is maintained on all
other bands. You can customize
PASSPORT’s City Mode sensitivity. See the
EZ-Programming section for details.
Display Brightness
PASSPORT’s display brightness is
automatically adjusted to suit ambient
lighting conditions in your car. (The light
sensor is located between the City and Mute
buttons on the display controller and may
dim the display momentarily when you are
accessing one or both of these buttons).
If you prefer, you can program your
PASSPORT for a fixed brightness level
(Maximum, Medium, Minimum, or Dark).
See the EZ-Programming section for details.
Dark Mode
If you set PASSPORT to its Dark Mode with
its EZ-Programming, PASSPORT changes to a
very inconspicuous power-on indication: a
very dim “HD,” AD,” or “CD.” (In this display,
the H, A, or C indicates Highway, Auto, or
City, and the D indicates Dark.)
When PASSPORT is in the Dark Mode,
the display will not show visual alerts when
PASSPORT detects signals. Only the audible
alert will tell you of detected signals.
See the EZ-Programming section for
more details.
Audible Alerts
For Radar signals:
PASSPORT uses a Geiger-counter-like
sound to indicate the signal strength and
type of radar signal being encountered.
When you encounter radar, a distinct
Audible Alert will sound and occur faster as
the signal gets stronger. When the signal is
very strong, the Audible Alerts will blend
into a solid tone. This allows you to judge
the distance from the signal source without
taking your eyes from the road. Each band
has a distinct tone for easy identification.
X-band = beep tone
K-band = raspy brap tone
Ka-band = double-brap tone
For Laser signals:
Since Laser signals are a possible threat
no matter how weak, PASSPORT alerts you
to all laser signals with a full laser alert.
6 7
For Safety signals:
When SWS detection in PASSPORT’s
programming is turned on (factory
default), PASSPORT will alert you to these
signals with a double-beep tone, and a
corresponding text message. A complete
listing of the text messages is on page
If you have turned off SWS detection
in programming, PASSPORT will still report
these as a K-band signal.
19.
Signal Strength Meter
PASSPORT’s matrix display consists of 280
individual LEDs, to provide an intuitive
ultra-bright display of signal strength and
text messages.
When PASSPORT detects radar, it
displays the band of the radar (X, K, or Ka),
and a precise bar graph of signal strength.
ExpertMeter
PASSPORT’s exclusive ExpertMeter option
is an advanced display for experienced
detector users. Please use PASSPORT for
a few weeks to get fully familiar with its
other features before using ExpertMeter.
To use the ExpertMeter instead of the
standard bar graph signal strength meter,
you must select ExperMeter in PASSPORT’s
EZ-Programming (see pages
PASSPORT’s ExpertMeter
simultaneously tracks up to 8 radar signals.
It shows you detailed information on up to
2 Ka-band, 2 K-band, and 4 X-band signals.
9-12).
ExpertMeter can help you spot
a change in your normal driving
environment; for example, a traffic radar
unit being operated in an area where there
are normally other signals present.
The ExpertMeter is actually a
miniature spectrum analyzer. It shows what
band each signal is, its relative frequency
within the band, and its signal strength.
KA|| K|| X
Above is the ExpertMeter Display if
PASSPORT was detecting 2 strong
Ka-band, 2 strong K-band, and 4 strong
X-band signals.
As you can see, there are vertical lines
after each band designator. Each line shows
a signal being detected. The height of each
line shows the relative signal strength of
that signal. The position of the line shows
the relative frequency of the signal within
the band.
NOTE: If you use ExpertMeter, the brief
signal shown in the power-on sequence
when you turn on your PASSPORT will
also be in ExpertMeter: an “X” with a single
vertical line.
A few more examples will help you
better see how the ExpertMeter works.
K
Here ExpertMeter shows 1 strong K-band
signal, and three X-band signals, two
strong and one weak.
||||
| X||
'
Page 6

Controls and Features
How to customize PASSPORT with EZ-Programming
|
X
KA
Here ExpertMeter shows 1 strong Kaband signal, and three weak X-band signals.
'''
X
On very weak signals, there will not be a
vertical line at all. This shows a very weak
X-band signal.
ExpertMeter Details
The band designators (X, K, Ka) will
stay on the display for a few seconds after
the signal has passed. This allows you to see
what the unit detected, even on very brief
signals.
However, the vertical lines representing
individual signals continuously change
(several times a second) to give you a
continuous view of the signal strength of all
radar signals present.
SpecDisplay
PASSPORT’s new SpecDisplay option is also
designed for the advanced detector user. In
this mode, PASSPORT will display the actual
numeric radar frequency being received.
K 24.150
Display shows a K-band signal at
24.150 GHz.
Ka34.700
Display shows a Ka-band signal at
34.700 GHz.
X 10.525
Display shows a X-band signal at
10.525 GHz
Note: Even long-time detector users
will require a significant amount of
time to get familiar with this new level
of information.
Laser Shifters
Your PASSPORT SRX is equipped with a
total of three Laser Shifters* (2 front, 1 rear).
These Laser Shifters are shipped from
the factory in the “receive only” mode.
If you prefer, you or your installer can
program them to “Shift” an incoming laser
signal when it is received. See the
programming section for details.
When PASSPORT is in receive only
mode (factory default), and detects laser
from the front, the display will show
F LASER. When PASSPORT detects laser
from the rear, the display will show R LASER
When PASSPORT has been
programmed to “Shift,” the display will
show F LASER – SHIFTING when a signal
is received from the front, or R LASER –
SHIFTING when a signal is received from
the rear.
This message will be accompanied by
the normal Laser alert tone.
*This feature may be limited or prohibited in some jurisdictions.
Check applicable laws before using.
8 9
.
™
.
There are 9 user-selectable options so you
can customize your PASSPORT for your
own preferences. The buttons that are
normally used for CITY and MUTE are used
to enter the Program Mode, to REVIEW
your current program settings, and to
CHANGE any settings as desired. Pages
13 explain each option in more detail.
11-
How to use EZ-Programming
1 To enter Program Mode, press
both buttons and hold for 2 seconds.
PASSPORT will beep twice and display
Program. Brightness is at maximum
during programming.
2 Then press the REVIEW button to
review the current settings. You can either
tap the button to change from item to item,
or hold the button to scroll through the items.
3 Press the CHANGE button to change
any setting. You can either tap the button
to change from setting to setting, or hold
the button to scroll through all the options.
4 To leave the Program Mode, simply
wait 8 seconds without pressing any
button. The unit will display
beep 4 times, and return to normal operation.
To quickly return to all of the factory
defaults, press and hold the CITY and
MUTE buttons while turning on the unit.
A reset message will be displayed.
Complete
An example
For example, here is how you would turn
PASSPORT’s AutoMute feature off.
1 Enter the Program Mode by holding
both the CITY and MUTE buttons down for
2 seconds. PASSPORT will beep twice and
display Program.
2 Press and hold the REVIEW button.
PASSPORT will scroll through the
categories, starting with Display (
then Pilot Light (
sequence (
meter (
Meter), then AutoMute (aMute).
3 Release the REVIEW button when
PASSPORT shows the AutoMute item. Since
the factory setting is for AutoMute to be
on, PASSPORT will display aMute ON.
If you accidentally don't release the
Review button in time, and PASSPORT
goes to the next category, hold the Review
button down again, and after PASSPORT
scrolls through all categories, it will begin
again at the top of the list.
4 Press the CHANGE button to change
from
aMute ON to aMute OFF.
5 To complete the Programming, simply
wait 8 seconds without pressing any
button. PASSPORT will display Complete,
beep 4 times, and return to normal
operation.
Pilot), then Power-on
PwrOn), then Signal strength
Disp),
Page 7
Overview of EZ-Programming Options
Details of EZ-Programming Options
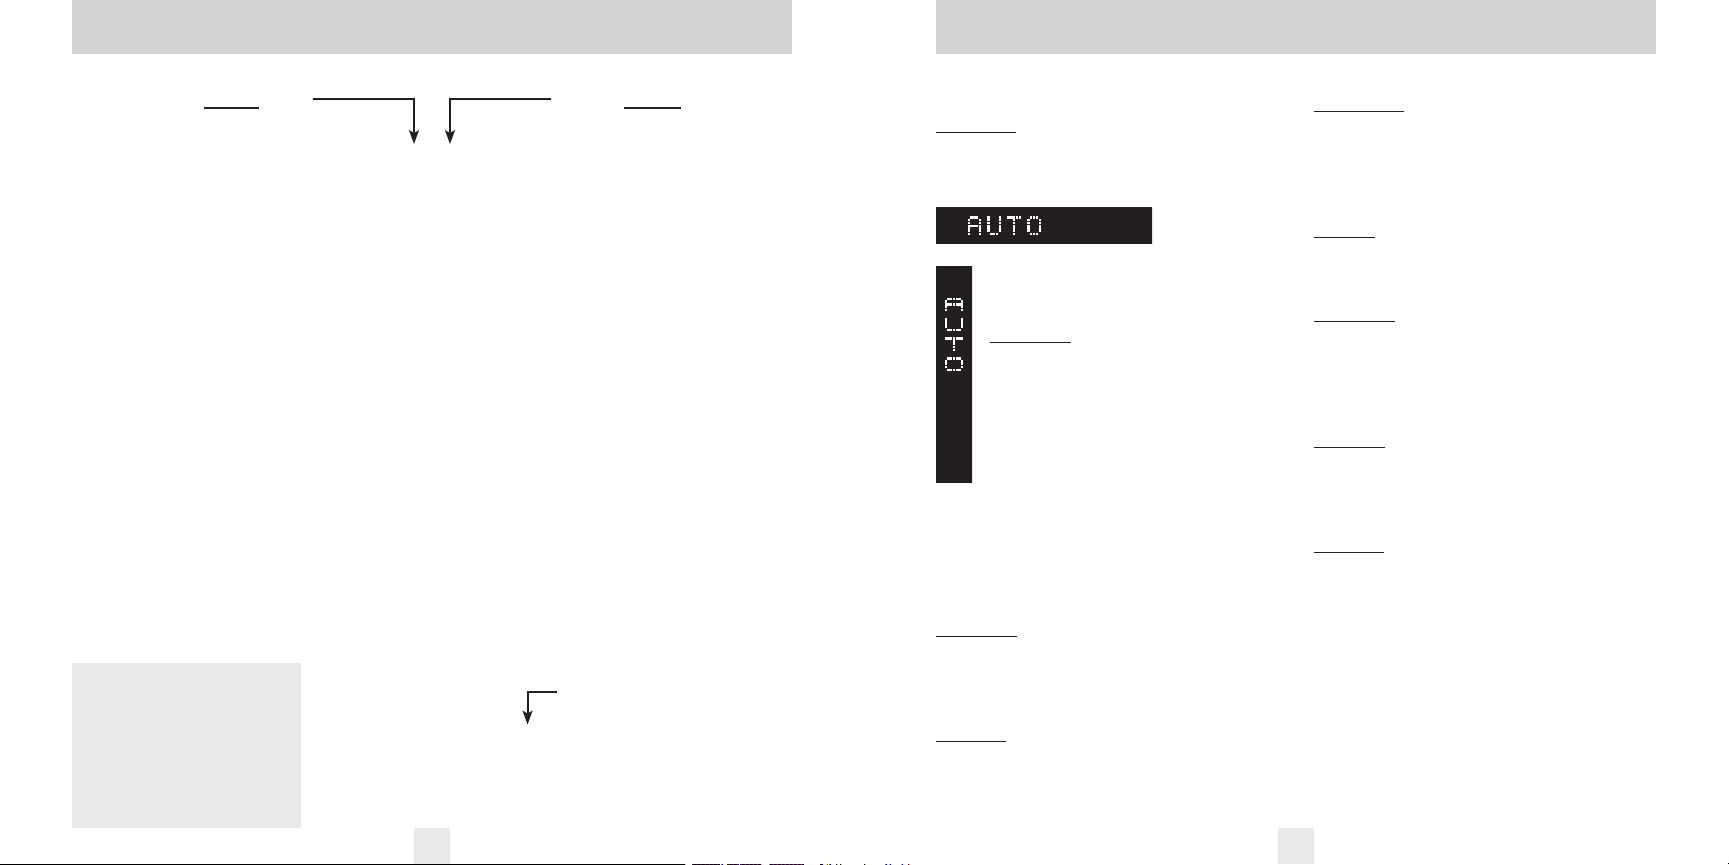
Press the REVIEW button
to go from one category
(Power-on indication)
POWER-ON SEQUENCE
SIGNAL STRENGTH METER
CITY MODE SENSITIVITY
to the next
DISPLAY
PILOT LIGHT
AUTOMUTE
AUDIOTONES
BRIGHTNESS
BANDS
* PASSPORT’s Factory Default Settings
To reset PASSPORT to its
original factory settings, press
and hold the “CITY” and “MUTE”
buttons while turning the
power on. PASSPORT’s display
will provide a Reset message,
accompanied by an audible
alert, acknowledging the reset.
Press the CHANGE button
to change your setting
within a category
Disp STD
Disp VERT
Pilot HWY
Pilot H
Pilot H.>
Pilot +
Pilot +.>
Pilot +>
Pilot V
PwrOn STD
PwrOn FST
Meter STD
Meter EXP
Meter SPC
aMute ON
aMute OFF
Tone STD
Tone LOUD
City STD
City LoX
City NoX
Brt AUTO
Brt MIN
Brt MED
Brt MAX
Brt DARK
Bands ALL
Bands MOD
X ON
K ON
Ka ON
LSR ON
SWS ON
10 11
* Standard display
Vertical display
* Full word: Highway or Auto or City
Letter: H or A or C
Letter, with scanning dot
Symbol: + or • or - Letter, with scanning dot
Scanning symbol
Vehicle voltage
* Standard power-on sequence
Fast power-on sequence
* Standard signal strength meter
Expert Meter
SpecDisplay
* AutoMute on
AutoMute off
* Standard tones
Loud tones
* Standard City mode sensitivity
Low X-band sensitivity in City Mode
No X-band sensitivity in City Mode
* Brightness adjusts automatically
Minimum brightness when turned on
Medium brightness when turned on
Maximum brightness when turned on
Dark Mode when PASSPORT turned on
* All bands enabled (Laser receive only)
One or more bands has been modified
Turn bands “ON” or “OFF” by holding
down the Mute button
or OFF
or OFF
or OFF
or SHFT or OFF
or OFF
Display
Disp STD (Display standard)
This is the standard setting for use
when PASSPORT’s Display is mounted
horizontally. (factory default)
DispVERT (Display vertical)
This setting is used when
PASSPORT’s Display is mounted
vertically; for example, mounted
on the side of a center console.
Pilot Light (Power-on indication)
Note: When you are using the Dark mode,
the display will only show HD, AD, or CD,
(Highway-Dark, Auto-Dark, or City-Dark).
PilotHWY (Full description)
In this setting, PASSPORT will display
“Highway,” “Auto,” or “City” as its power-on
indication. (factory default)
Pilot H (Letter)
In this setting, PASSPORT will display “H”
for Highway, “A” for Auto, or “C” for City.
Pilot H.> (Letter with scanning dot)
In this setting, PASSPORT will display “H”
for Highway, “A” for Auto, and “C” for City.
Also, a single dot will continuously scroll
across the display.
Pilot+ (Symbol)
In this setting, PASSPORT will display “+” for
Highway, “.” for Auto, and “–” for City.
Pilot+.> (Symbol with scanning dot)
In this setting, PASSPORT will display “+” for
Highway, “.” for Auto, and “–” for City. Also, a
single dot will continuously scroll across
the display.
Pilot+> (Scanning symbol)
In this setting, PASSPORT will display “+” for
Highway, “.” for Auto, and “–” for City. Each
will continuously scroll across the display.
Pilot V (Vehicle voltage)
In this setting, PASSPORT will display “H”
for Highway, “A” for Auto, or “C” for City, and
the vehicle’s voltage. If the vehicle’s voltage
drops below 10.5 volts, a low voltage
warning is displayed, followed by an
audible alert. A high voltage warning is also
given if the voltage goes above
The high-voltage warning is also followed
by an audible alert.
16.5 volts.
Page 8
Details of EZ-Programming Options
Power-on Sequence
PwrOnSTD (Standard)
In this setting, each time you turn on
PASSPORT, it will display “Passport,” “SRX,”
“LASER,” “Ka-band,” “K-band,” “X-band,”
followed by a brief X-band alert. It then
confirms communications to the front
receiver, and front and rear Laser
radar
Shifters. If a communications error occurs,
the appropriate error message will be
displayed. (see page 21 for error messages)
PwrOnFST (Fast power-on)
This setting shortens PASSPORT’s start up
sequence to a single beep. PASSPORT’s selfdiagnostic test is still performed in this mode.
Signal Strength Meter
MeterSTD (Standard meter)
The meter displays the band, and bar graph
showing signal strength. (factory default)
MeterEXP (ExpertMeter)
The meter simultaneously tracks up to 2
Ka-band, 2 K-band, and 4 X-band signals.
MeterSPC (SpecDisplay)
The meter displays the actual numeric
frequency of the radar signal being received.
Note: See more details on pages 6-7.
AutoMute
aMute ON (AutoMute on)
In this setting, PASSPORT’s audio alerts will
initially be at the volume you set, but after a
few seconds, PASSPORT will automatically
reduce the volume level, to keep you
informed, but not annoyed. (factory default)
aMuteOFF (AutoMute off)
With AutoMute off, PASSPORT’s audio alerts
will remain at the volume you set for the
duration of the radar encounter.
Audio Tones
Tone STD (Standard tones)
This setting uses more pleasing tones.
(factory default)
ToneLOUD (Loud tones)
This setting uses tones that are more piercing,
and easier to hear in a louder vehicle.
Optional Voice Alerts
Voice alerts are only available using an
external speaker, which can be purchased
through your local installer.
Voice ON
In this setting, all radar and laser alerts,
including SWS messages will be
accompanied by a voice announcement.
Voice OFF
With Voice off, the standard tones will be
used.
NOTE: The program option to turn
Voice ON/OFF is only displayed when
an external speaker is plugged in.
12 13
City Mode Sensitivity
City STD (Standard)
In this setting, when you put PASSPORT in
the City mode, X-band sensitivity is
significantly reduced, to minimize
annoyances from X-band intrusion alarms
and motion sensors. (factory default)
City LoX (Low X band sensitivity)
In this setting, when you put PASSPORT in
the City mode, X-band sensitivity is reduced
more than the standard setting. This will
reduce X band alarms from other sources
even further, but also significantly reduces
range to X band traffic radar.
City NoX (No X band sensitivity)
In this setting, when you put PASSPORT in
the City mode, PASSPORT will not respond
to any X band signals. WARNING: Only
choose this setting if you are
absolutely certain that there are no
X-band traffic radar units where you
drive.
Note: These settings only apply when
PASSPORT is operated in City mode. X-band
sensitivity is not affected when used in
“Auto” or “Highway” modes.
Brightness
Brt AUTO (Auto)
Display brightness automatically adjusted
to suit the ambient lighting in your car.
(factory default)
Brt MIN (Minimum)
Sets display to minimum brightness.
Brt MED (Medium)
Sets display to medium brightness.
Brt MAX (Maximum)
Sets display to maximum brightness.
Brt DARK (Dark)
In this setting, PASSPORT will only display a
very dim HD, AD, or CD for the power-on
indication, and will not show any visual
alerts when signals are detected.
Bands
BandsALL
In this setting, all rada
and SWS frequencies are monitored. This is
the factory default setting, and it is highly
recommended that you use your PASSPORT
in this mode.
BandsMOD
In this setting, PASSPORT will warn you
with an audible alert, and associated text
message, that one or more bands have been
turned off in programming (i.e.”SWS OFF”).
This warning is displayed during the startup sequence (standard or fast).
WARNING: Only modify bands if you
are absolutely certain that there are
no traffic radar units using that
specific band in your area.
r, laser (receive only),
Page 9
Interpreting Alerts
Although PASSPORT has a comprehensive
warning system and this handbook
is as complete as we can make it, only
experience will teach you what to expect
from your PASSPORT and how to interpret
what it “tells” you. The radar alerts you
receive are affected by the specific type of
Alert
PASSPORT begins to sound slowly, then the
rate of alert increases until the alert
becomes a solid tone. The Signal Meter
ramps accordingly.
PASSPORT emits short alerts for a few
seconds and then falls silent only to briefly
alert and fall silent again.
PASSPORT suddenly sounds a continuous
tone for the appropriate band received. All
segments in the Signal Strength Meter are lit.
A brief laser alert.
PASSPORT receives weak signals. These
signals may be a little stronger as you pass
large, roadside objects. The signals increase
in frequency.
radar being used, the type of transmission
(continuous or instant-on) and the location
of the radar source.
The following examples will give
you an introduction to understanding
PASSPORT’s warning system for radar, laser
and safety alerts.
Explanation
You are approaching a continuous radar
source aimed in your direction.
An instant-on radar source is being used
ahead of you and out of your view.
An instant-on radar source or laser source is
being used nearby. This kind of alert
requires immediate attention!
Laser is being used in the area. Because laser
is inherently difficult to detect, any laser
alert may indicate a source very close by.
A moving patrol car with continuous radar
is overtaking you from behind. Because
these signals are reflected (reflections are
increased by large objects), they may or may
not eventually blend into a solid tone even
when the patrol car is directly behind you.
Alert
PASSPORT alerts slowly for awhile and then
abruptly jumps to a strong alert.
PASSPORT alerts intermittently. Rate and
strength of alerts may be consistent or vary
wildly.
PASSPORT alerts intermittently. Rate and
strength of signal increases with each alert.
PASSPORT gives an X-band alert
intermittently.
Explanation
You are approaching a radar unit concealed
by a hill or an obstructed curve.
A patrol car is travelling in front of you with
a radar source aimed forward. Because
signals are sometimes reflected off of large
objects and sometimes not,
seem inconsistent.
A patrol car is approaching from the other
direction, sampling traffic with instant-on
radar. Such alerts should be taken seriously.
You are driving through an area populated
with radar motion sensors (door openers,
burglar alarms, etc.). Since these
transmitters are usually contained inside
buildings or aimed toward OR away from
you, they are typically not as strong or
lasting as a real radar encounter.
CAUTION: Since the characteristics of
these alerts may be similar to some of
the preceding examples,
confidence
be dangerous. Likewise, if an alert in a
commonly traveled area is suddenly
stronger or on a different band than
usual, speed radar may be set up
nearby.
in an unfamiliar area can
the alerts may
over
14 15
Page 10

How Radar and Laser Work
How Radar Works
Traffic radar, which consists of microwaves,
travels in straight lines and is easily
reflected by objects such as cars, trucks,
even guardrails and overpasses. Radar
works by directing its microwave beam
down the road. As your vehicle travels into
range, the microwave beam bounces off
your car, and the radar antenna looks for
the reflections. Using the Doppler
Principle, the radar equipment then
calculates your speed by comparing the
frequency of the reflection of your car to
the original frequency of the beam sent out.
Traffic radar has limitations, the most
significant of these being that it typically
can monitor only one target at a time. If
there is more than one vehicle within
range, it is up to the radar operator to
decide which target is producing the
strongest reflection. Since the strength of
the reflection is affected by both the size of
the vehicle and its proximity to the antenna,
it is difficult for the radar operator to
determine if the signal is from a sports car
nearby or a semi-truck several hundred feet
away.
Radar range also depends on the
power of the radar equipment itself. The
strength of the radar unit's beam
diminishes with distance. The farther the
radar has to travel, the less energy it has for
speed detection. Because intrusion alarms
and motion sensors often operate on the
same frequency as X-Band radar, your
PASSPORT will occasionally receive nonpolice radar signals. Since these X-Band
transmitters are usually contained inside of
buildings or aimed toward the ground, they
will generally produce much weaker
readings than will a true radar encounter.
As you become familiar with the sources of
these pseudo alarms in your daily driving,
they will serve as confirmation that your
PASSPORT’s radar detection abilities are
fully operational.
How Laser (Lidar) Works
Laser speed detection is actually LIDAR
(Light Detection And Ranging). LIDAR guns
project a beam of invisible infrared light.
The signal is a series of very short infrared
light energy pulses which move in a
straight line, reflecting off your car and
returning to the gun. LIDAR uses these light
pulses to measure the distance to a vehicle.
Speed is then calculated by measuring how
quickly these pulses are reflected given the
known speed of light.
16 17
LIDAR (or laser) is a newer technology
and is not as widespread as conventional
radar; therefore, you may not encounter
laser on a daily basis. And unlike radar
detection, laser detection is not prone to
“false” alarms. Because LIDAR transmits a
much narrower beam than does radar, it is
much more accurate in its ability to
distinguish between targets and is also
more difficult to detect. As a result, even
the briefest laser alert should be taken
seriously.
There are limitations to LIDAR
equipment. LIDAR is much more sensitive
to weather conditions than RADAR, and a
LIDAR gun’s range will be decreased by
anything affecting visibility such as rain, fog,
or smoke. A LIDAR gun cannot operate
through glass and it must be stationary in
order to get an accurate reading. Because
LIDAR must have a clear line of sight and is
subject to cosine error (an inaccuracy
which increases as the angle between the
gun and the vehicle increases) police
typically use LIDAR equipment parallel to
the road or from an overpass. LIDAR can be
used day or night.
How Safety Warning Systems Works
Safety Warning Systems, or SWS, is a
modified K-band radar signal used to
transmit important driving related
information.
From the factory, your PASSPORT is
programmed with SWS turned ON. If SWS
is not used in your area, you can simply
turn SWS reception OFF by using
PASSPORT’s EZ-Programming feature.
The SWS system has 64 possible
messages (60 allocated). The SWS messages
your PASSPORT can decode and display are
listed on the facing page.
Note: Some of the safety messages
have been condensed, so each message can
be displayed on one or two screens on
PASSPORT’s eight character display.
Since Safety radar technology is
relatively new and the number of
transmitters in operation is not yet
widespread, you will not receive Safety
signals on a daily basis and should not be
surprised to encounter emergency vehicles,
road hazards and railroad crossings that are
unequipped with these transmitters and,
therefore, fail to provide a signal. As Safety
transmitters become more prevalent (the
number of operating transmitters is
growing every day), these Safety radar
signals will become more common.
For more information and details about
SWS safety radar, visit their web site at
www.swslc.com.
Page 11

SWS Safety Radar Text Messages Troubleshooting
SWS Text Messages
1 WorkZone
2 Road Closed
3 Bridge Closed
4 WorkCrew Highway
5 WorkCrew Utility
6 Detour
7 Truck Detour
8 MustExit
9 Rtlane Closed
10 CntrLane Closed
11 LeftLane Closed
12 Future Use
13 Police
14 Train
15 Low Overpass
16 BridgeUp
17 Bridge Wt Limit
18 RockSlid Area
19 School Zone
20 Road Narrows
21 Sharp Curve
22 Croswalk
23 Deer Crossing
24 Blind or Deaf Kid
25 SteepUse LowGear
26 Accident
27 PoorRoad Surface
28 Loading ScholBus
29 DontPass
30 Dangrous Intrsect
31 Emergncy Vehicle
32 Future Use
33 HighWind
34 Severe Weather
35 HeavyFog
36 Flooding
37 BridgIce
38 RoadIce
39 Dust Blowing
40 Sand Blowing
41 Blinding Snow
42 Future Use
43 RestArea
44 RestArea w/servic
45 24hrFuel
46 Insp Stn Open
47 Insp Stn Closed
48 Reduced Speed
49 Speed Enforced
50 HazMatls Exit
51 Expect Delay
52 10 Min Delay
53 20 Min Delay
54 30 Min Delay
55 1 Hour Delay
56 Traffic TunRadio
57 Pay Toll
58 Trucks ExitRght
59 Trucks ExitLeft
60 Future Use
61 Emerg Veh Mvng
62 Police Pursuit
63 Oversize Vehicle
64 SloMovng Vehicle
Problem
PASSPORT beeps briefly at the
same location every day, but no
radar source is in sight.
PASSPORT does not seem sensitive
to radar or laser.
PASSPORT did not alert when a
police car was in view.
PASSPORT did not provide a Safety
signal while within range of an
emergency vehicle.
PASSPORT’s audible alerts are less
loud after the first few alerts.
PASSPORT’s power-on sequence
reoccurs while you are driving.
Your 14-year old son has changed
all 9 of the EZ-Programming
options.
PASSPORT will not turn on.
PASSPORT’s Display feels warm.
Solution
• An X-band motion sensor or intrusion alarm is located
within range of your route. With time, you will learn
predictable patterns of these signals.
• PASSPORT may be in City Mode.
• Radar band(s) are turned off in programming.
• VASCAR, (Visual Average Speed Computer And Recorder) a
stopwatch method of speed detection, may be in use.
• Officer may not have radar or laser unit turned on.
• Safety transmitters may not be commonly used in your area.
• PASSPORT is in AutoMute Mode. See pages 4 and 5 for details.
• A loose power connection can cause PASSPORT to be
briefly disconnected, and will retrigger the power-on
sequence.
• You can return all of the programming options to the
factory defaults by holding down the City and Mute buttons
while you turn PASSPORT on.
• Check that volume control is ON.
• Check that vehicle ignition is ON.
• Check all connections.
• It is normal for PASSPORT to feel warm.
18 19
Page 12

Troubleshooting Specifications
Explanation of Displays
LsrF ERR
LsrR N/A
Check
Receiver
Wiring
HD
AD
CD
PilotHWY
WorkZone
|
, or K|,
X
There is a problem with one or both front Laser Shifter(s). There could be an
unplugged connection, damaged wiring, or a problem within the front Laser
Shifter(s). After PASSPORT alerts you to this, it will then resume operation with the
front radar receiver and rear laser only.
There is a problem with the rear Laser Shifter. It could be an unplugged connection,
damaged wiring, or a problem within the rear Laser Shifter itself. After PASSPORT alerts
you to this, it will then resume operation with the front radar and Laser Shifters only.
There is a problem with the front receiver. It could be an unplugged connection,
damaged wiring, or a problem within the front receiver itself. PASSPORT will continue
to display this message, and will not operate until the problem has been repaired.
Sensitivity control is in Highway mode, display is in Dark Mode (page
Sensitivity control is in Auto mode, display is in Dark Mode (page
Sensitivity control is in City mode, display is in Dark Mode (page
One of the many programming messages (pages
One of the many Safety Radar messages (page 19)
PASSPORT has been programmed in the ExpertMeter Mode (pages 7
or KA|, etc.
Self Cal
Rcvr ERR
ShiftOFF
Comm ERR
PASSPORT is running a self-calibration test.
PASSPORT’s radar receiver has failed to calibrate. Contact your Dealer for repair.
Laser Shifters were manually shut off during a laser alert.
Serial communications between the interface and the display have been interrupted.
Contact your dealer for repair.
9-13)
13)
13)
13)
-8)
Features and Specifications
Operating Bands
• X-band 10.525 GHz ±25 MHz
• K-band 24.150 GHz ±100 MHz
• Ka-band 34.700 GHz ±1300 MHz
• Laser 900nm, 33 MHz bandwidth
Radar Receiver / Detector Type
• Superheterodyne, GaAs FET VCO
• Scanning Frequency Discriminator
• Digital Signal Processing (DSP)
• 4-bit High-Resolution A-to-D Converter
Laser Detection
• Quantum Limited Video Receiver
• Multiple Laser Sensor Diodes (6F, 3R)
Laser Shifter
• Multiple Laser-Shifting Diodes (16F, 8R)
Display Type
• 280 AlGaAs LED Matrix/Text
• Bar Graph, ExpertMeter or SpecDisplay
• Automatic Brightness Control
Power Requirement
•
12VDC, Negative Ground
Programmable Features
• Display (Horizontal or Vertical)
• Power-On Indication
• Power-On Sequence
• Signal Strength Meter
• AutoMute
• Audio Tones
• City Mode Sensitivity
• Display Brightness
• Radar and Laser Bands
Sensitivity Control
• AutoSensitivity, Highway, and City
Auto Calibration Circuitry
Complete VG2 Immunity
Dimensions (Inches)
• Display/Controller: 4.2 x 1.4 x .55
• Receiver Unit: 3.75 x 3.15 x 1.75
• Front Laser Units: 4.65 x 1.8 x 0.8
• Rear Laser Unit: 6.0 x 1.0 x .65
Patented Technology
PASSPORT is covered by one or more of the
following:
U.S. Patents
7,098,844 6,836,238 6,779,765 6,693,578
6,670,905 6,614,385 6,587,068 6,400,305
6,249,218 6,127,962 6,069,580 5,668,554
5,600,132 5,587,916 5,559,508 5,446,923
5,402,087 5,365,055 5,347,120 5,305,007
5,206,500 5,164,729 5,134,406 5,111,207
5,079,553 5,049,885 5,049,884 4,961,074
4,954,828 4,952,937 4,952,936 4,939,521
4,896,855 4,887,753 4,862,175 4,750,215
4,686,499 4,631,542 4,630,054 4,625,210
4,613,989 4,604,529 4,583,057 4,581,769
4,571,593 4,313,216 D314,178 D313,365
D310,167 D308,837 D296,771 D288,418
D253,752
Canadian Patents
2,337,077 2,330,964 1,295,715 1,295,714
1,187,602 1,187,586
European Patents
1,145,030 1,090,456
Other patents pending.
20 21
Page 13

Service
_
__
__
__
Service Procedure
If your PASSPORT ever needs service,
please follow these steps:
1 Check the troubleshooting section of
this manual. It may have a solution to your
problem.
2 Contact your installing dealer. They
will evaluate your unit and arrange
repairs if necessary.
Parts
Replacement parts are available from your
installing dealer.
Accessories
The following accessories are available
through your local dealer:
12-volt Amplified External Speaker*.
•
• Hidden Display Package. Package
includes a single bi-color LED for alert and
a 12-volt Amplified External Speaker*.
*Use of external speaker enables Voice alerts.
Register
online:
www.
@
escortradar.com
P______________
Remove card along perforations
FCC Note:
Modifications not expressly
approved by the manufacturer
could void the user’s FCC granted
authority to operate the equipment.
22
23
If you purchased your detector directly from Escort, you do not need to fill this out.
If you did not purchase your detector directly from Escort, please fill out this section and return to us, or
register online at our web address: www.EscortRadar.com
1. First Name:___________________ Middle Initial____ Last Name__________________________
Address_____________________________________________________________________
ESCORT PRODUCT REGISTRATION CARD
Phone Number (In case we have a question)_____________________________________________
2. Product Purchased________________________ Model___________ Serial Number___________
3. Place of Purchase__________________________________ Date_________ Price__________
City_______________________________________ State_____________ ZI
4. Primary reason for purchasing this ESCORT product_______________________________________
__________________________________________________________________________
__________________________________________________________________________
Page 14

Warranty
Remove card along perforations
ESCORT One Year
Limited Warranty
What this warranty covers: ESCORT
warrants your Product against all defects
in materials and workmanship.
For how long: One (1) year from the date
of the original purchase.
What we will do: ESCORT, at our discre
tion, will either repair or replace your
Product free of charge.
What we will not do: ESCORT will not
pay shipping charges that you incur for
sending your product to us.
What you must do to maintain this
warranty: Show original proof of pur-
chase from an authorized ESCORT dealer.
Warranty Exclusions: Warranty does not
apply to your product under any of the following conditions: 1. The serial number has
been removed or modified. 2. Your product
has been subjected to misuse or damage
(including water damage, physical abuse,
and/or improper installation). 3. Your product has been modified in any way. 4. Your
receipt or proof-of-purchase is from a nonauthorized dealer or internet auction site
including E-bay, U-bid, or other non-authorized resellers. 5. You are not the original
purchaser of the radar detector from an
authorized dealer or did not receive it as a
gift from the original purchaser of the
radar detector from an authorized dealer.
To obtain service: 1. Contact ESCORT
(1-800-543-1608) to obtain a Return
Authorization Number. 2. Properly pack
-
your product and include: your name,
complete return address, written descrip
tion of the problem with your product,
daytime telephone number, and a copy of
the original purchase receipt. 3. Label the
outside of the package clearly with your
Return Authorization number. Ship the
product pre-paid (insured, for your protec
tion) to: ESCORT Inc, 5440 West Chester
Rd., West Chester, OH 45069.
LIMITATION OF WARRANTY: EXCEPT
AS EXPRESSLY PROVIDED HEREIN, YOU
ARE ACQUIRING THE PRODUCT “AS IS”
AND “WHERE IS,” WITHOUT
REPRESENTATION OR WARRANTY.
ESCORT SPECIFICALLY DISCLAIMS ANY
REPRESENTATION OR WARRANTY
INCLUDING, BUT NOT LIMITED TO
THOSE CONCERNING THE MERCHANTABILITY AND SUITABILITY OF THE
PRODUCT FOR A PARTICULAR PURPOSE.
ESCORT SHALL NOT BE LIABLE FOR
CONSEQUENTIAL, SPECIAL OR
INCIDENTAL DAMAGES INCLUDING,
WITHOUT LIMITATION, DAMAGES
ARISING OUT OF THE USE, MISUSE OR
MOUNTING OF THE PRODUCT.
The above limitations or exclusions shall
be limited to the extent they violate the
laws of any particular state. ESCORT is not
responsible for products lost in shipment
between the owner and our service center.
Other legal rights: This Warranty gives
you specific rights. You may have other
legal rights, which vary, from state to state.
2524
-
-
 Loading...