

Escooter ES Series, ESOI, ESIII, ESIII L1, ESII User Manual
...
User Manual
Balance Scooter
ES Series

2
When the Escooter is sold, it comes with this user manual for user’s reference.
The User manual is applicable to all the Escooter Series made by our company. You may
find that some functions are different from what you ordered. It is normal because of different
series.
The content and technical specifications in this manual are valid when permitted to be
printed. But our company has the right to alter and change technical specification or design
without prior notification. And we will not assume any obligation.
To enjoy a nice and wonderful driving experience of Escooter,please read the user
manual carefully. You will learn how to drive and maintain the new Escooter. After reading,
please keep the user manual well so that you can read it any time when you need it.
Please maintain Escooter according to the user manual so that you can keep the Escooter
in the best condition. Any problems about your Escooter,please contact your distributor.They
will supply best after service for you, and also answer any questions or problems from you.
Sincerely wish you a nice driving!
Safety Instructions
For adults use only!
Please abide by your local traffic regulations!
Please wear helmet, knee and elbow pads when driving!
Please read the relevant driving guidelines in this manual!
Do not speed up sharply!Please slow down when you hear sound alert!Continue
speeding up after sound alert could result in a loss of balance and cause a rider fall.
The user manual contains important safety information --- Please read carefully.

3
Contents
Warning................................................................................................4
Preface..................................................................................................6
Chapter I Introduction of Escooter ..................................................7
Chapter II Setting Up Escooter........................................................14
Chapter III Escooter.........................................................................17
Chapter IV Riding your Escooter ...................................................27
Chapter V Escooter Battery ............................................................42
Chapter VI Maintaining Your Escooter..........................................47

4
WARNING
Whenever you ride the Escooter you risk death or serious injury from loss of control,
collisions, and falls. It is your responsibility to learn how to safely ride the Escooter in
order to reduce this risk. To ride safely you must follow all instructions in the user
Manual.
Always wear a helmet, knee and elbow pats when riding. Use an approved bicycle or
skateboard helmet that fits properly with the chin strap in place, and provides protection
for the back of your head.
Never place anything on the Mats except your feet. Doing so could interfere with the
rider Detection system and allow the Escooter to travel on its own, risking running into
a person or property and causing injury or damage.
Avoid obstacles and slippery surfaces that could result in a loss of balance or traction
and cause a fall.
Pay attention to all Safety Warnings and Alerts from the Escooter. They indicate unsafe
operating conditions. You must learn about and understand the Escooter Safety Alerts
described in the User Manual and respond as instructed.
Do not get back on the Escooter after a Power Shutdown until the condition that caused
the Power Shutdown has been identified and the power has been turned on.
Never let go of the Escooter when it is in Balance Mode because it will travel some
distance on its own, give the Beep Warning, then cut power to the wheels.If you let go
of a Escooter while in Balance Mode, you risk injury to others and damage to the
Escooter.
Never restart and ride your Escooter after it has indicated an empty battery condition or
performed a power shutdown due to low battery. The Escooter may not have enough
power to keep you balanced, especially if you demand a lot of power at once. If you
restart and continue riding, you risk falling. Also, you risk damaging your batteries,
resulting in reduced battery life and capacity.
While the Escooter is designed to keep you upright under a variety of conditions, If you
overpower the balancing capability of your Escooter by aggressively leaning into and
ignoring the speed limit warning alert, that could result in a loss of balance and cause a

5
rider fall.
Do not insert the power cord if the Escooter Charge Port is wet.
Always shut down your Escooter and unplug the AC Power Cord before performing any
maintenance or installing any part or accessory.
All Escooter parts must be properly installed. Never attempt to use your Escooter
without the riding steer attached and secured. Using your Escooter without all parts
properly installed could damage your Escooter and result in serious injury from loss of
control, collisions, and falls.
Use only the Escooter approved parts and accessories. Do not modify the Escooter
without after service’s guide. Modifications without permission to the Escooter could
interfere with the operation of the Escooter, could result in serious injury or damage,
and could void the Escooter Limited Warranty.
Theft detection systems or magnetic field, can interfere with the Escooter’s ability to
balance and/or cause the Escooter problem. Do not ride within 5 ft. (1.5 m) of any theft
detection system.

6
Preface
Thanks for purchasing our new Escooter! Our Escooter described in this user manual include
city model series and off road model series.The models are different, but the fundamentals
found in this manual apply to all the models produced by our company.
About This Manual
To learn to ride your Escooter, you must read and follow all instructions and warnings in the
User Manual. It is important that you follow all safety warnings and cautions that appear
throughout the User Manual and that you use good judgment when riding your Escooter. It is
hard for us list all associated dangerous and cautions when riding,please be careful and pay
attention to the safety of yourself and other things when riding.Remember to pass on this User
Manual if you ever resell your Escooter. If you have questions, or need copy of the User
Manual, contact the distributor, before you attempt to use your Escooter.
The Risk of Injury
The Escooter is a self-balancing, personal transporter that uses balancing technology.
Balancing technology cannot prevent injury if you do not ride the Escooter safely.
WARNING: Whenever you ride the Escooter, you risk death or serious injury from loss of
control, collisions, and falls. To reduce risk of injury, you must read and follow all
instructions and warnings in the user materials.
Before You Begin
Before you begin, it may be necessary to assemble your Escooter. The Batteries should be
charged for 8-10 hours. To assemble the Escooter and charge the Batteries for the first time,
refer to the instructions in this manual.

7
Chapter I Introduction of Escooter
This chapter introduces the Escooter. It includes:
Instructions on how to locate and record the serial number of your Escooter.
Escooter model description and specifications.
Operating limits of the Escooter.
1.Serial Numbers
(1)Recording Serial Numbers
Record the unique serial numbers for Escooter. Store this information in a secure location,
separate from your Escooter, in case the scooter has problem .
The Escooter serial numbers are unique to your machine. The number can provide helpful
information in the future for asset and warranty tracking. Store the serial numbers in a secure
location, separate from your Escooter.
(2)Escooter Serial Number
To record the Escooter Serial Number:
1.Stand bottom the Escooter and on the cover of motherboard.
2. The serial number is a 10-digit number and letters beginning with "ES".
3. Record the Escooter serial number on this User Manual.
8
2.Model description and specifications
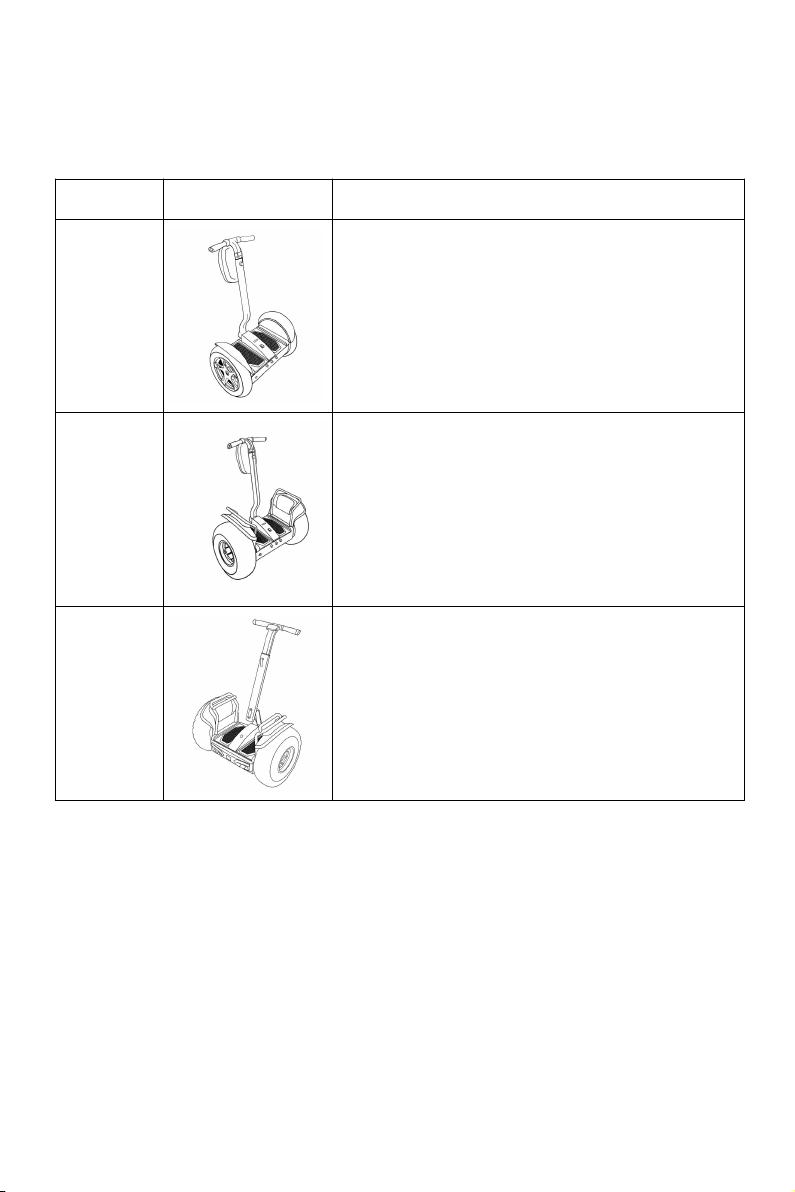
(1)Table 1 lists the Escooter models described in this manual.
Table 1 Escooter Models Descriptions
Model Name
Picture
Description
ESIII
The city model is optimized for indoor/outdoor use in a
wide variety of environments
ESOI
The off road model is optimized for outdoor use and has
larger wheels and wider tires with knobby treads.
Its wider stance and low pressure tires provide increased
stability and traction on more varied and rough terrain.
It is not intended for use on sidewalks.
ESIII
The city model is optimized for indoor/outdoor use in a
wide variety of environments

9
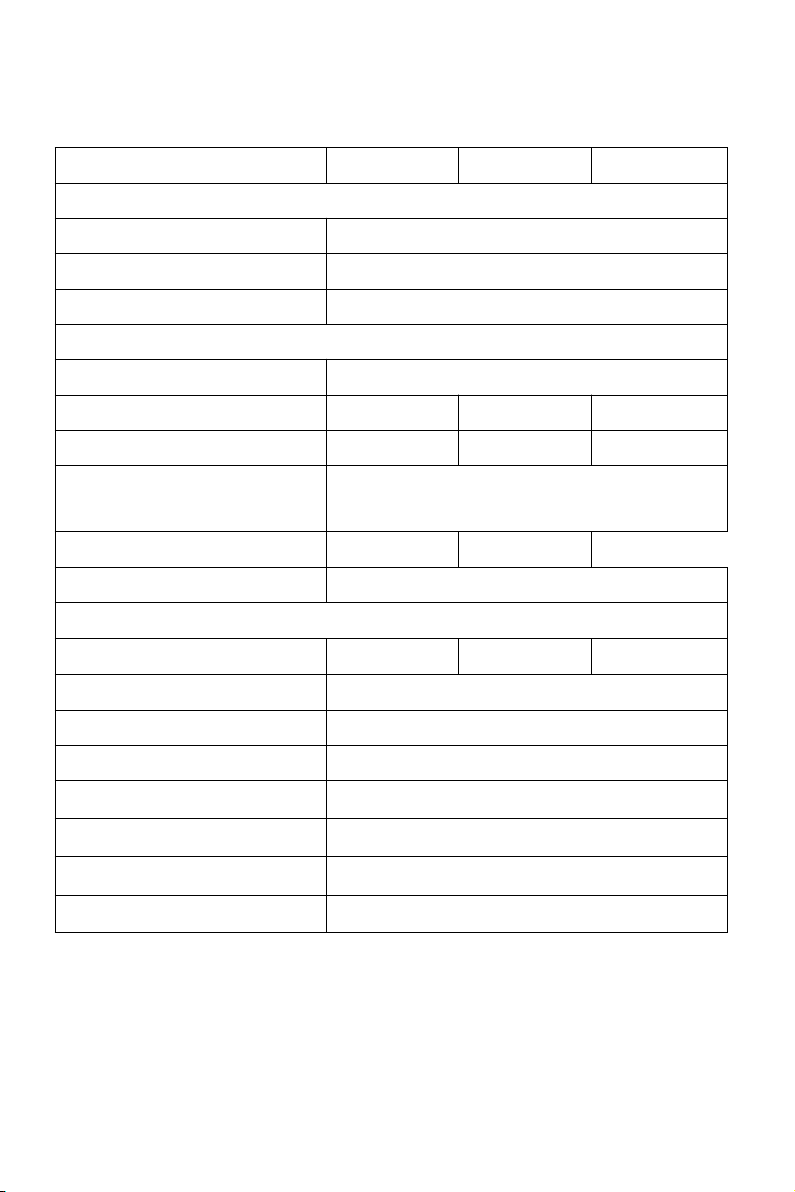
(2)Table 2 and 3 shows the specifications for the Escooter in this manual
Table 2 Escooter City Model Specification
Model Specification
ESIII
ESIII(L1)
ESIII(L2)
Rider Weight and Cargo Limits
Maximum Payload (Rider plus all Cargo)
275 lbs(125 kg)
Minimum Rider Weight
100 lbs(45 kg)
Maximum Handlebar Cargo Weight
10 lbs(4.5 kg)
Performance
Maximum Speed
11.2 mph(18 km/h)
Energy (Rechargeable Batteries)
Lead acid battery
36V Lithium battery
72V Lithium battery
Range on a Full Charge
18-22 mi (30-35 km)
18-22 mi (30-35 km)
20-25 mi (35-40 km)
Turing Radius
Zero. The wheels can rotate in opposite directions, enabling the
Escooter to turn in place.
Tire Inflation Pressure
15 psi (1.03 bar)
15 psi (1.03 bar)
12 psi (0.8 bar)
Power Requirements (Worldwide)
100-240 V~ ; 50 or 60HZ
Dimensions
Machine Weight
104 lbs (47 kg)
99 lbs (45 kg)
104 lbs (47 kg)
Ground Clearance (Unloaded)
3.9 in (10 cm)
Machine Length and Width
17*26 in (43*68 cm)
Handlebar Height from Mat
35-42 in (88-105 cm)
36-42 in (93-106 cm)
36-42 in (93-106 cm)
Handlebar Height from Ground
(Unloaded)
41-48 in
(102-119 cm)
42-48 in
(107-120cm)
42-48 in
(107-120 cm)
Metal Thickness(Unloaded)
6 in ( 14cm)
Tire Diameter
16 in (42cm)
Tire Type
Standard
10
Table 3 Escooter Off Road Model Specification
Model Specification
ESOI
ESOI(L1)
ESOI(L2)
Rider Weight and Cargo Limits
Maximum Payload (Rider plus all Cargo)
287 lbs(130 kg)
Minimum Rider Weight
100 lbs(45 kg)
Maximum Handlebar Cargo Weight
10 lbs(4.5 kg)
Performance
Maximum Speed
12.5 mph(20 km/h)
Energy (Rechargeable Batteries)
Lead acid battery
36V Lithium battery
72V Lithium battery
Range on a Full Charge
18-22 mi (30-35 km)
18-22 mi (30-35 km)
20-25 mi (35-40 km)
Turing Radius
Zero. The wheels can rotate in opposite directions, enabling the
Escooter to turn in place.
Tire Inflation Pressure
12 psi (0.8 bar)
12 psi (0.8 bar)
10 psi (0.65 bar)
Power Requirements (Worldwide)
100-240 V~ ; 50 or 60HZ
Dimensions
Machine Weight
123 lbs (56 kg)
104 lbs (47 kg)
104 lbs (47 kg)
Ground Clearance (Unloaded)
5.1 in (13 cm)
Machine Length and Width
19*34 in (48*85 cm)
Handlebar Height from Mat
35-42 in (88-105 cm)
Handlebar Height from Ground (Unloaded)
41-48 in (102-119 cm)
Metal Thickness(Unloaded)
6 in ( 14cm)
Tire Diameter
19 in (48.3cm)
Tire Type
All-terrain

11
Table 4 Escooter New Off Road Model Specification
Model Specification
ESOII
Rider Weight and Cargo Limits
Maximum Payload (Rider plus all Cargo)
330 lbs(150 kg)
Minimum Rider Weight
100 lbs(45 kg)
Maximum Handlebar Cargo Weight
10 lbs(4.5 kg)
Performance
Maximum Speed
12.5 mph(20 km/h)
Energy (Rechargeable Batteries)
72V Lithium battery
Range on a Full Charge
20-25 mi (35-40 km)
Turing Radius
Zero. The wheels can rotate in opposite directions,
enabling the Escooter to turn in place.
Tire Inflation Pressure
10 psi (0.65 bar)
Power Requirements (Worldwide)
100-240 V~ ; 50 or 60HZ
Dimensions
Machine Weight
Ground Clearance (Unloaded)
Machine Length and Width
Handlebar Height from Mat
Handlebar Height from Ground (Unloaded)
Metal Thickness(Unloaded)
Tire Diameter
19 in (48.3cm)
Tire Type
All-terrain

12
3.Operating Limits
It is important that you familiarize yourself with the operating limits of the Escooter. These
limits are set to maximize rider safety while reducing the risk of damage to the Escooter. The
Escooter will perform better when you observe these limits.
(1)Weight Limits for rider and Cargo
Escooter sets weight limits for two reasons:
Rider safety
To reduce the risk of damage to the Escooter
Dynamic Weight Limits
To keep the Escooter and rider upright, the Escooter must always have enough power to be
able to drive its wheels forward and backward.
WARNING: Exceeding the weight limits, especially when combined with other variables that
require more power, will increase your risk of falling or damaging the Escooter
Variables that require more power include:
Higher payloads (weight of rider and all cargo)
Steeper slopes
Bumpier surface conditions
Higher speeds
Abrupt maneuvers
The Escooter monitors the amount of power being used and will activate safety alerts
when it senses excessive power demands. It is important that you learn to anticipate and
recognize when the Escooter is reaching the limits of performance
Minimum rider Weight
The rider’s weight must not be less than 100 lbs (45 kg). If the rider is below the minimum
rider weight, he/she may not be able to ride safely because he/she cannot shift his/her weight
far enough back (behind the centerline of the wheels) to safely slow down and stop. This is
especially true when riding downhill. Also, riders below the minimum weight may not
sufficiently activate the rider detect system, failing to properly interact with the Escooter’s
balancing system
Handlebar Cargo
The total weight of any handlebar payload plus any other attachments hanging from the

13
handlebar must not exceed 10 lbs (4.5 kg).
WARNING: Exceeding the handlebar cargo limit interferes with the Escooter's balancing
ability and could cause the Escooter to accelerate forward,risking injury and/or damage to the
Escooter.
Structural Weight Limits (Maximum Payload)
The maximum payload (rider plus all cargo) is 275 lbs (125 kg) for city model,287 lbs(130 kg)
for off road model,330 lbs(150 kg) for new off road model. Exceeding the maximum weight
limit increases the risk of damage to the Escooter. Heavier payloads place greater stress on the
Escooter. Several factors affect the loads transmitted to the two wheel electric balance:
Skill level of the rider
Payload (weight of the rider and all cargo)
Surface condition (obstacle height, etc.)
NOTICE: Exceeding the rider or cargo weight limits, especially when riding on uneven
terrain, could damage the Escooter.
(2)Maximizing Range
Maximum range distances are provided in Table 2,3 and 4. The range of your Escooter is
affected by many variables, including:
Terrain: Riding on smooth, flat terrain improves range, and riding on hilly terrain and
unpaved surfaces reduces range.
Speed and Riding Style: Riding at a consistent, moderate speed will increase range.
Frequent starting, stopping, acceleration, and deceleration reduces range.
Tire Inflation Pressure: Riding with tire pressures below the specified limit reduces
range and can result in premature tire wear.
Rider Weight and Cargo: Lighter riders with less cargo experience better range than
heavier riders with more cargo.
Temperature: Storing, charging, and riding in temperatures close to the median of the
recommended temperature range improves range. Riding in colder temperatures reduces
range significantly.
Battery Condition: Properly charged and maintained batteries provide greater range. Old,
cold, heavily used, or poorly maintained batteries provide less range.
Wind: Riding with a tailwind increases range. Riding against a headwind reduces range.

14
Chapter II Setting Up Escooter
This section describes what included with your Escooter and gives assembly instructions.
1.Unpacking Escooter
The following items/parts ship with your Escooter
Handlebar Battery Charger
LeanSteer Frame Front Bag
Adjusting Screw Helmet,Knee and Elbow Pad
Metal Body Two Remote Controls
Fender Wrench Set
User Manual
2.Assembling Escooter
WARNING: Always shut down your Escooter and unplug the AC Power Cord before
performing any maintenance or installing any part or accessory.Adhere to torque
specifications when tightening fasteners. Over tightened or under tightened fasteners could
malfunction, leading to damage or serious injury.
To Set Up your Escooter, follow the procedures below in the order listed
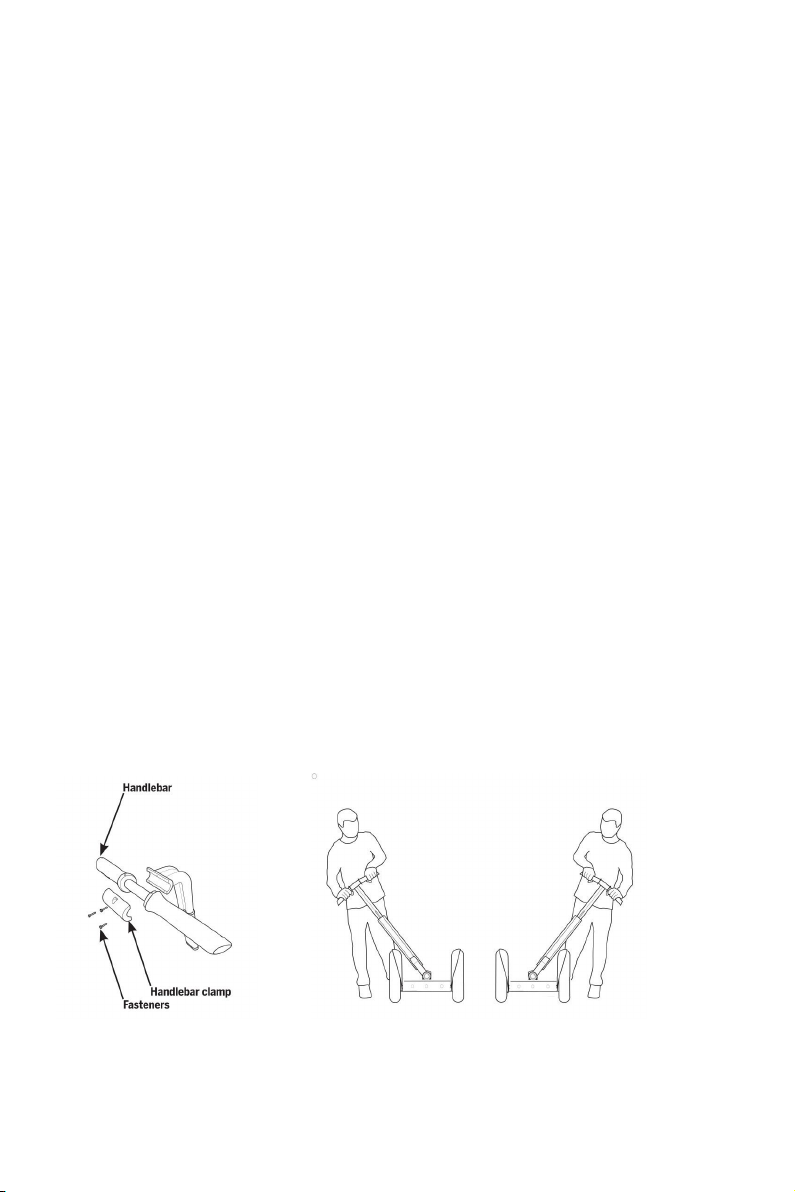
(1)Attach the Handlebar
To attach the Handlebar to the riding Steer:
1) Align the Handlebar in right place on the riding steers.
2) Position the Handlebar Clamp against the Handlebar.
3) Insert the 3 fasteners through the Handlebar Clamp into the riding steer.
4) Using the wrench, alternate between the 3 fasteners,evenly tightening in small
increments(Refer to Picture 1).
(2)Prepare the LeanSteer Frame
1) The LeanSteer Frame is apart for shipping.
2) Insert the installed Handlebar parts into the LeanSteer Frame.
3) Extend the upper bar of the LeanSteer Frame by sliding it up from its position until the
slot for the Height Adjustment screw is visible.
4) Reinstall the Height Adjustment screw by turning and tightening the screw clockwise.
15
(3)Attach the LeanSteer Frame
WARNING: The LeanSteer Frame must be properly attached and secured. Failure to properly
assemble the LeanSteer Frame and maintain torque on the fasteners could lead to an
unexpected change in steering and result in serious injury and/or damage to your Escooter
from loss of control,collisions, and falls.
1) Make sure the Escooter is unplugged and powered off.
2) Place the LeanSteer Frame onto the stem.
3) Install the two fasteners; do not tighten.
5) Make sure the LeanSteer Frame is standing straight vertically, then torque the fasteners.
6) With the Escooter powered down (OFF), lean the LeanSteer Frame fully left and right,
until it touches each fender (Refer to Picture 2).
7) Ensure the LeanSteer Frame returns to a straight, upright position.
8) Check the fasteners to be sure they are tight.
(4)Adjust the Handlebar Height
To adjust the Handlebar height:
1) Loosen the Height Adjustment screw.
2) Adjust the height of the upper LeanSteer Frame by pulling up on the Handlebar until the
Handlebar is just above your elbow or higher while you are standing on the floor and the
Metal body is level. You can adjust as necessary for comfort.
3) Tighten the Height Adjustment screw.
NOTE:The handlebar should be adjusted for each rider. Adjusting the Handlebar to the
correct height is important for both safety and comfort.
Picture 1 Attach the Handlebar Picture 2 Check LeanSteer Frame
 Loading...