

Page 1
WEB User Interface
USER’S MANUAL
Page 2
THANK YOU
The team at Escient would like to take this
opportunity to thank you for purchasing an Escient
product. Escient is committed to providing our
customers the most technologically advanced, yet
easier-than-ever to use products that converge the
power of the Internet with home entertainment.
To maximize your enjoyment, please take a few
minutes to review this User’s Manual.
If you should need assistance please call our
Customer Support Staff at 800.372.4368
THE ESCIENT TEAM
INTRODUCTION 3
ESCIENT PRIVACY POLICY 3
CONTACT INFORMATION 3
COPYRIGHT 3
TERMS AND DEFINITIONS
THE WEB INTERFACE 3
USING THE WEB INTERFACE 3
CONNECTING TO YOUR FIREBALL
FIREBALL WEB INTERFACE 4
LISTENING TO MUSIC
BROWSING YOUR MUSIC LIBRARY 5
SHOW AND HIDE TRACKS 5
PLAYING THE CURRENT TITLE
SELECTING A DIFFERENT SONG
CHANGING THE GUIDE VIEW 6
View By Artist
View By Title 6
View By Song
View By Cover
CHANGING THE CURRENT PLAY MODE
VIEWING BY GENRE
5
LISTENING TO INTERNET RADIO 8
BROWSING INTERNET RADIO STATIONS 8
PLAYING THE CURRENT STATION
GETTING MUSIC INTO FIREBALL 11
RECORDING FROM THE INTERNAL CD 11
RECORDING FROM AN EXTERNAL CHANGER 12
MANAGING YOUR MEDIA 13
CREATING PLAYLISTS 13
CREATING GROUPS 14
ADDING INTERNET RADIO STATIONS 15
UPDATING THE INTERNET RADIO STATIONS LIST 16
EDITING MUSIC INFORMATION 1
Automatically Lookup Information for This Disc 1
Searching for the Original Cover 19
Tips for Searching for Covers 19
Selecting an Existing Cover 20
Editing Track Names 2
EDITING RADIO INFORMATION 2
EDITING PLAYLISTS 22
EDITING GROUPS 23
DELETING MUSIC 24
DELETING PLAYLISTS 2
DELETING GROUPS 2
SETTING USER PREFERENCES 26
SELECTING THE CLIENT MODE 26
3
SETTING THE SCREEN SAVER PREFERENCES 27
Activation Idle Time 27
Mode 27
Retail Demo Mode 27
Photo Screen Saver Mode 27
3
SETTING YOUR TIME ZONE
SETTING YOUR ZIP CODE 28
ENABLING PASSWORD PROTECTION 28
Setting a System Password 28
Removing a System Password 28
CHOOSING YOUR NETWORK CONNECTION 2
Ethernet Settings 2
Dialup Settings 30
SETTING THE FIREBALL SERVER NAME 30
5
SELECTING THE AUDIO ENCODER TYPE 31
6
SETTING THE DISC INSERT PREFERENCES 3
MANAGING EXTERNAL CHANGERS 3
6
Automatically Getting Disc Information 32
Getting Disc Information for a Range of Discs 33
6
Getting Disc Information for All Discs 33
6
RECORDING FROM EXTERNAL CHANGERS 3
7
Automatically Recording CDs 3
7
Recording a Range of CDs 35
FIREBALL UTILITIES 36
Getting Information about Your FireBall 36
Restarting the System 3
Updating the Software 3
8
28
7
8
0
1
5
5
9
9
1
2
4
4
6
6
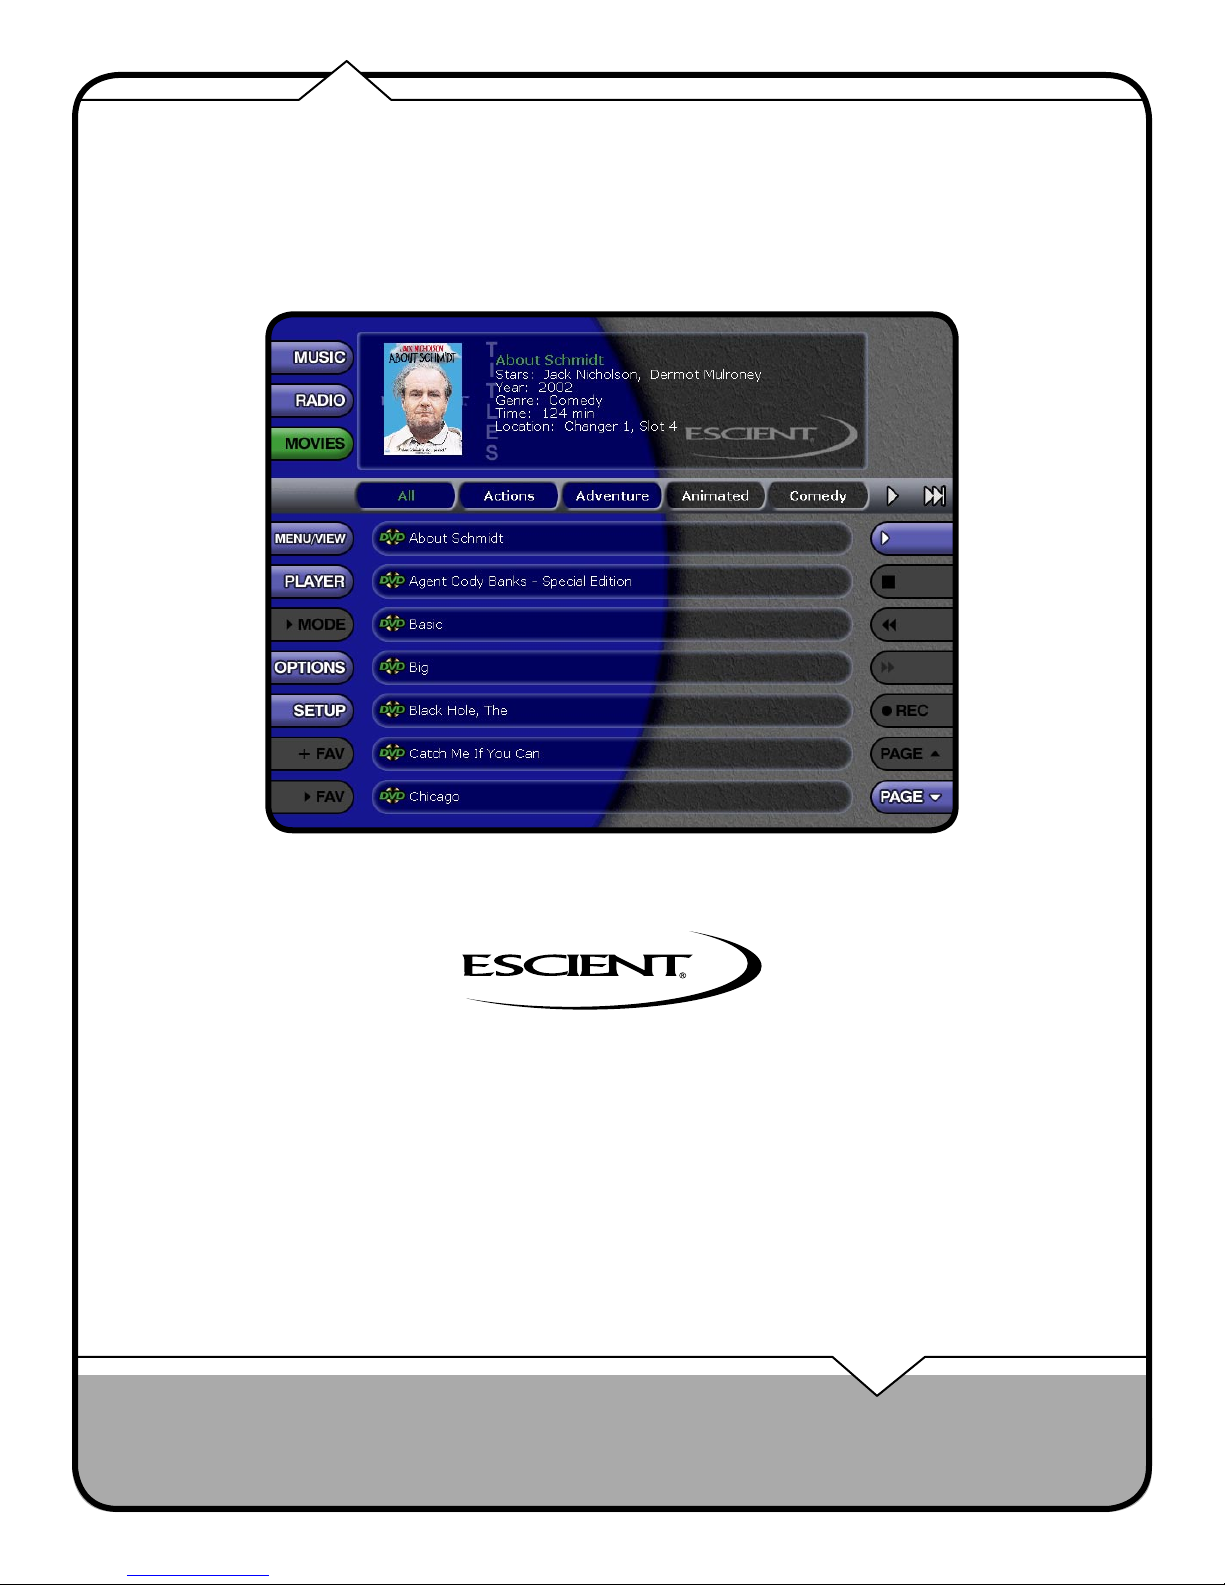
WATCHING DVD MOVIES 9
BROWSING YOUR MOVIE LIBRARY 9
PLAYING THE CURRENT MOVIE
CONTROLLING THE DVD PLAYER 9
CHANGING THE GUIDE VIEW 9
View By Title
View By Cover
VIEWING BY GENRE 1
ADDITIONAL INFORMATION 36
ESCIENT SUPPORT 36
9
9
9
0
PAGE 2
Web UI User’s Manual
Page 3

INTRODUCTION
ESCIENT PRIVACY POLICY
Escient is committed to providing you with a product that you enjoy and are
confident in using, and are committed to providing services in a private and
secure environment.
We recognize and respect each individual user’s privacy and have created this
Privacy Policy to demonstrate our commitment to your privacy.
We want you to be fully informed about the information that we collect, why
we collect it, and with whom we share it.
It is our hope that, after reading this notice, you will understand our
commitment to privacy and be confident that we will use your information
responsibly. By using the Escient FireBall Web Interface, you are accepting the
practices described in this Privacy Policy.
CONTACT INFORMATION
Escient may be contacted by using the following information. Once you have
worked with your local Escient dealer, we encourage you to contact us if you
are in need of any further assistance.
Escient
6640 Intech Blvd. Suite 250
Indianapolis, Indiana 46278
Phone: 800-372-4368 Press “2” for Sales, or “3” for Support
Fax: 317-616-6790
Internet: www.escient.com
Email: support@escient.com
THE WEB INTERFACE
USING THE WEB INTERFACE
The FireBall Web Interface is used to remotely control the FireBall over a local
network using a standard web browser on your PC. The Web Interface provides
an almost identical interface as that of the FireBall TV User Interface. This
commonality among interfaces makes it easy for Escient customers to manage
and control any FireBall product using the same methods, regardless of the
actual interface. More details are provided in the following sections of this
manual.
Hours: Monday - Friday 9:00am - 7pm EST
COPYRIGHT
This manual is copyright ©2006 by Digital Networks North America and
Escient. All rights reserved.
TERMS AND DEFINITIONS
Following are terms used throughout this manual.
• Button - refers to a graphic item on the display screen.
• Group – a collection of similar music titles. Standard genre groups are
provided and custom groups can be created by the user.
• Highlight – highlighting is used to indicate the user’s selection on screen.
When the selection moves up, down, left, or right, the highlight moves to
the next nearest item. No action is taken (except that more information
may be displayed on the screen) until the Select key is pressed.
• Info Text Area – the portion of the guide screen used to display
information about the highlighted title.
• Playlist- a collection of one or more music tracks or songs.
• Title- a collection of music tracks commonly referred to as a CD, Album
or Playlist.
• Key - refers to one of the buttons on your remote or keyboard.
• MP3 - a compressed digital audio format. MP3 files are smaller than the
original CD tracks and sound almost identical.
• FLAC - a lossless compressed digital audio format. FLAC files are smaller
than the original CD tracks and are bit for bit duplicates of the original.
• Guide- a grid or list of information, used to browse your media library.
• Player- the screen used to display the currently playing media.
CONNECTING TO YOUR FIREBALL
Each FireBall Media Manager contains a built-in web server capable of serving
web pages specifically designed to control almost every aspect of the FireBall
from a standard web browser such as Microsoft’s Internet Explorer.
CONNECTING TO YOUR FIREBALL
Connect to your FireBall Server from Internet Explorer, if you know the “IP
Address” of your FireBall.
Follow these steps to determine the IP Address:
1. Select the SETUP button to display the Setup menu on your TV.
2. Select the Utilities menu item.
3. Select the System Information menu item.
4. Write down the IP Address of your FireBall’s Ethernet connection.
This number is located in the bottom right of the System Information
screen and consists of four numbers separated by periods. Example:
192.168.1.1
5. Select the SETUP key again to exit Setup
Using the Internet Explorer web browser (or any web browser connected to the
same network as your FireBall) enter the IP address of your FireBall and then
the RETURN command. Your FireBall Server’s Music Guide will appear in the
web browser in a few seconds.
PAGE 3
Web UI User’s Manual
Page 4
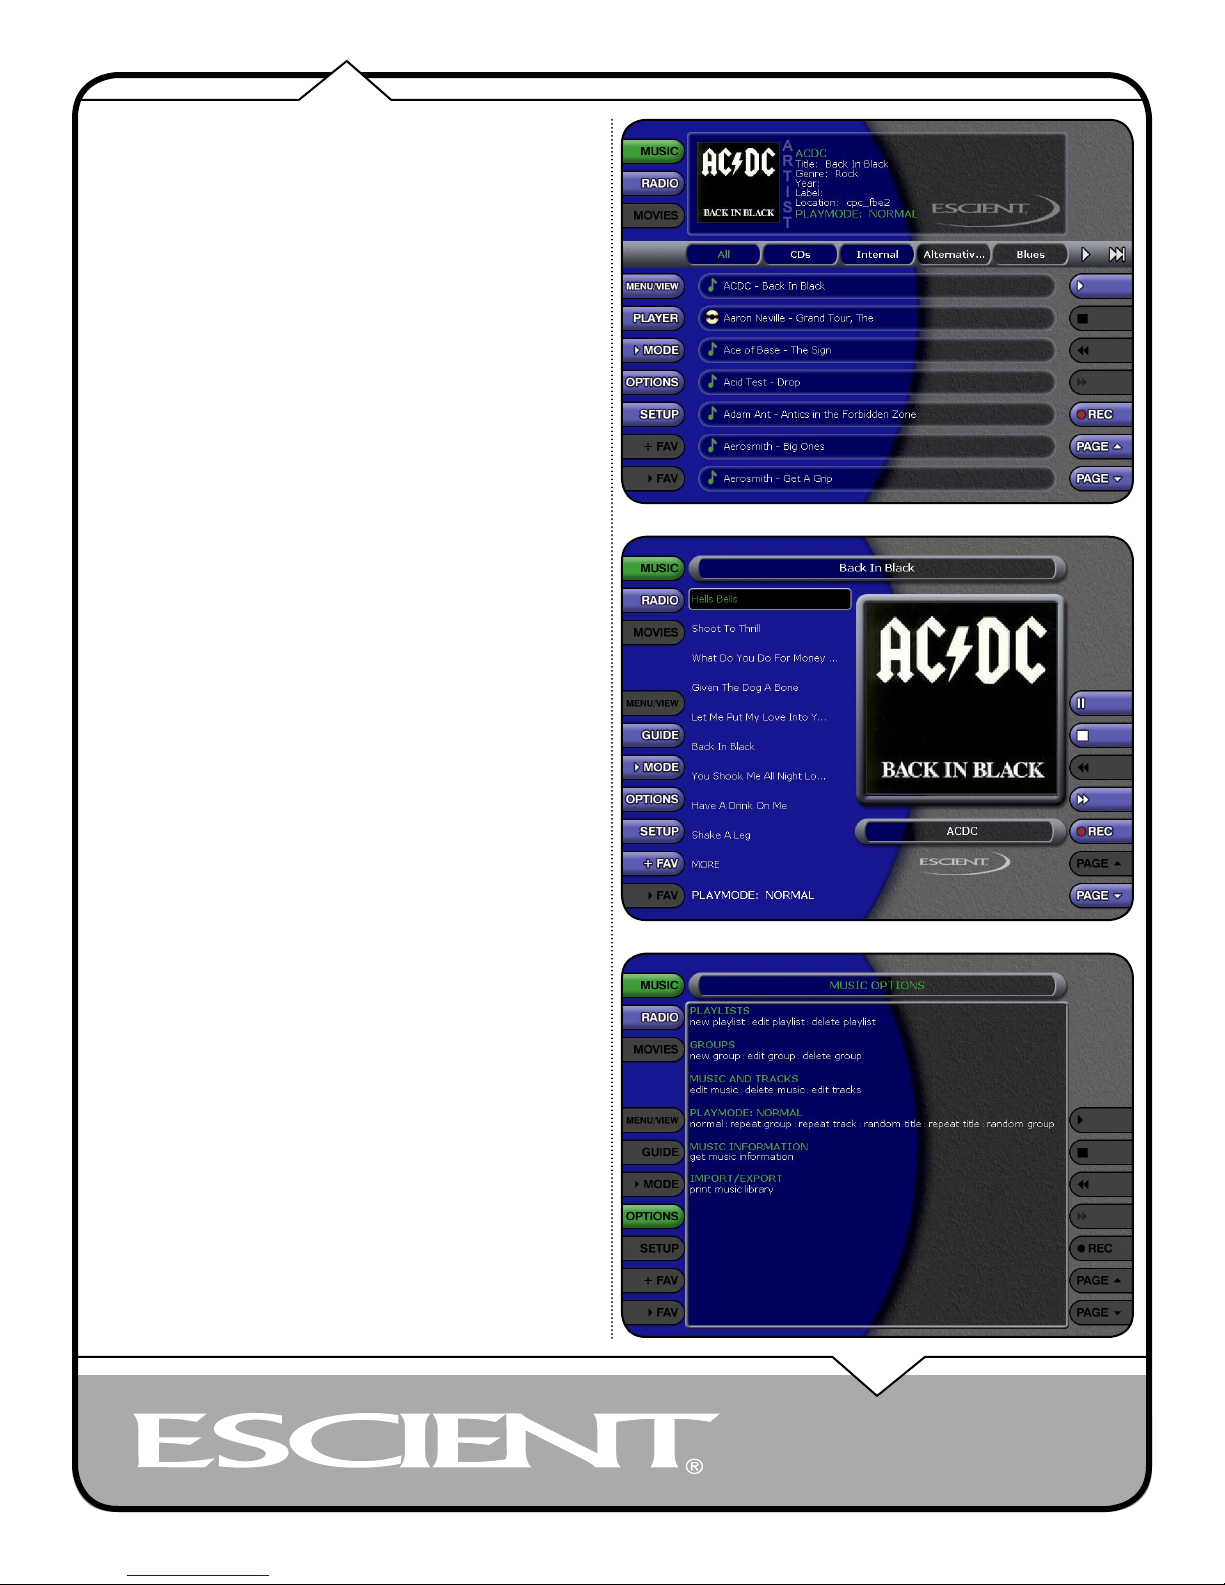
FIREBALL WEB INTERFACE
The FireBall Web Interface is the graphics and control system web pages
that appear in your Internet Explorer browser. From this web page, you can
control almost every aspect of your FireBall, just as you would from the
original IR remote and TV. The familiar FireBall Guide, Player, Options
and Setup mode are all supported from the Web Interface.
You will notice that unlike the TV user interface, there are buttons along the
left and right edges of the web browser. These buttons duplicate the features
found on your remote control.
MUSIC GUIDE SCREENMUSIC PLAYER SCREENMUSIC OPTIONS SCREEN
PAGE 4
Web UI User’s Manual
Page 5
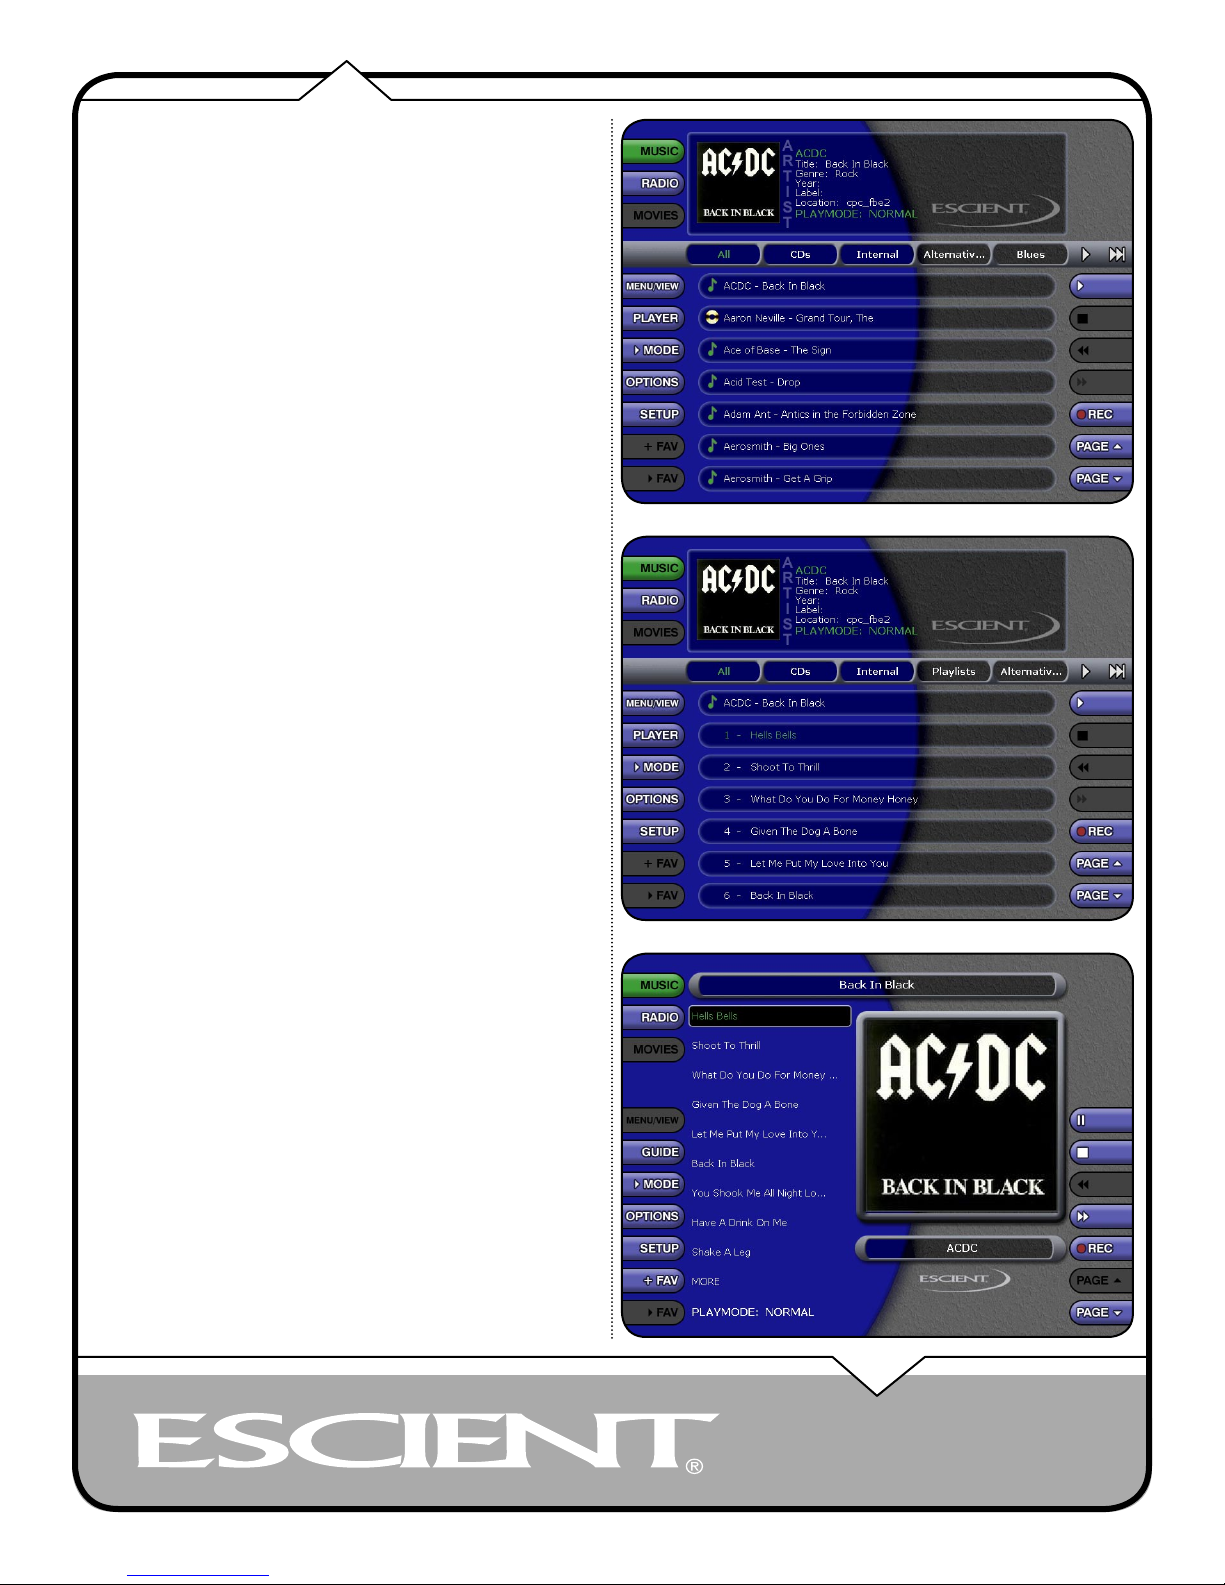
LISTENING TO MUSIC
BROWSING YOUR MUSIC LIBRARY
The Music Guide allows you to browse, locate, and play all of your music in
one easy to use on-screen guide.
The Music Guide displays a list of all your Music Titles. Using the Page
buttons on the right edge of the screen, you can scroll up and down the list.
SHOW AND HIDE TRACKS
If you select a Title in the list, you will expand the current Title to reveal a
list of the Title’s Tracks.
Select the Title again to collapse the current Title and hide the track names.
PLAYING THE CURRENT TITLE
Playing the currently highlighted Title is the same as playing a CD in a
conventional CD player. Simply select the PLAY button and it begins to play
from track 1.
Note: If you select a track name, you will start playback from the selected Track.
You’ll notice that a new screen appears with a list of the songs (or tracks) on
the current Title, this is the Music Player screen. The Music Player displays
the artist name, album name, album cover art, and track list for the current
Title.
MUSIC GUIDE SCREENMUSIC PLAYER SCREEN MUSIC GUIDE SHOWING TRACKS
PAGE 5
Web UI User’s Manual
Page 6
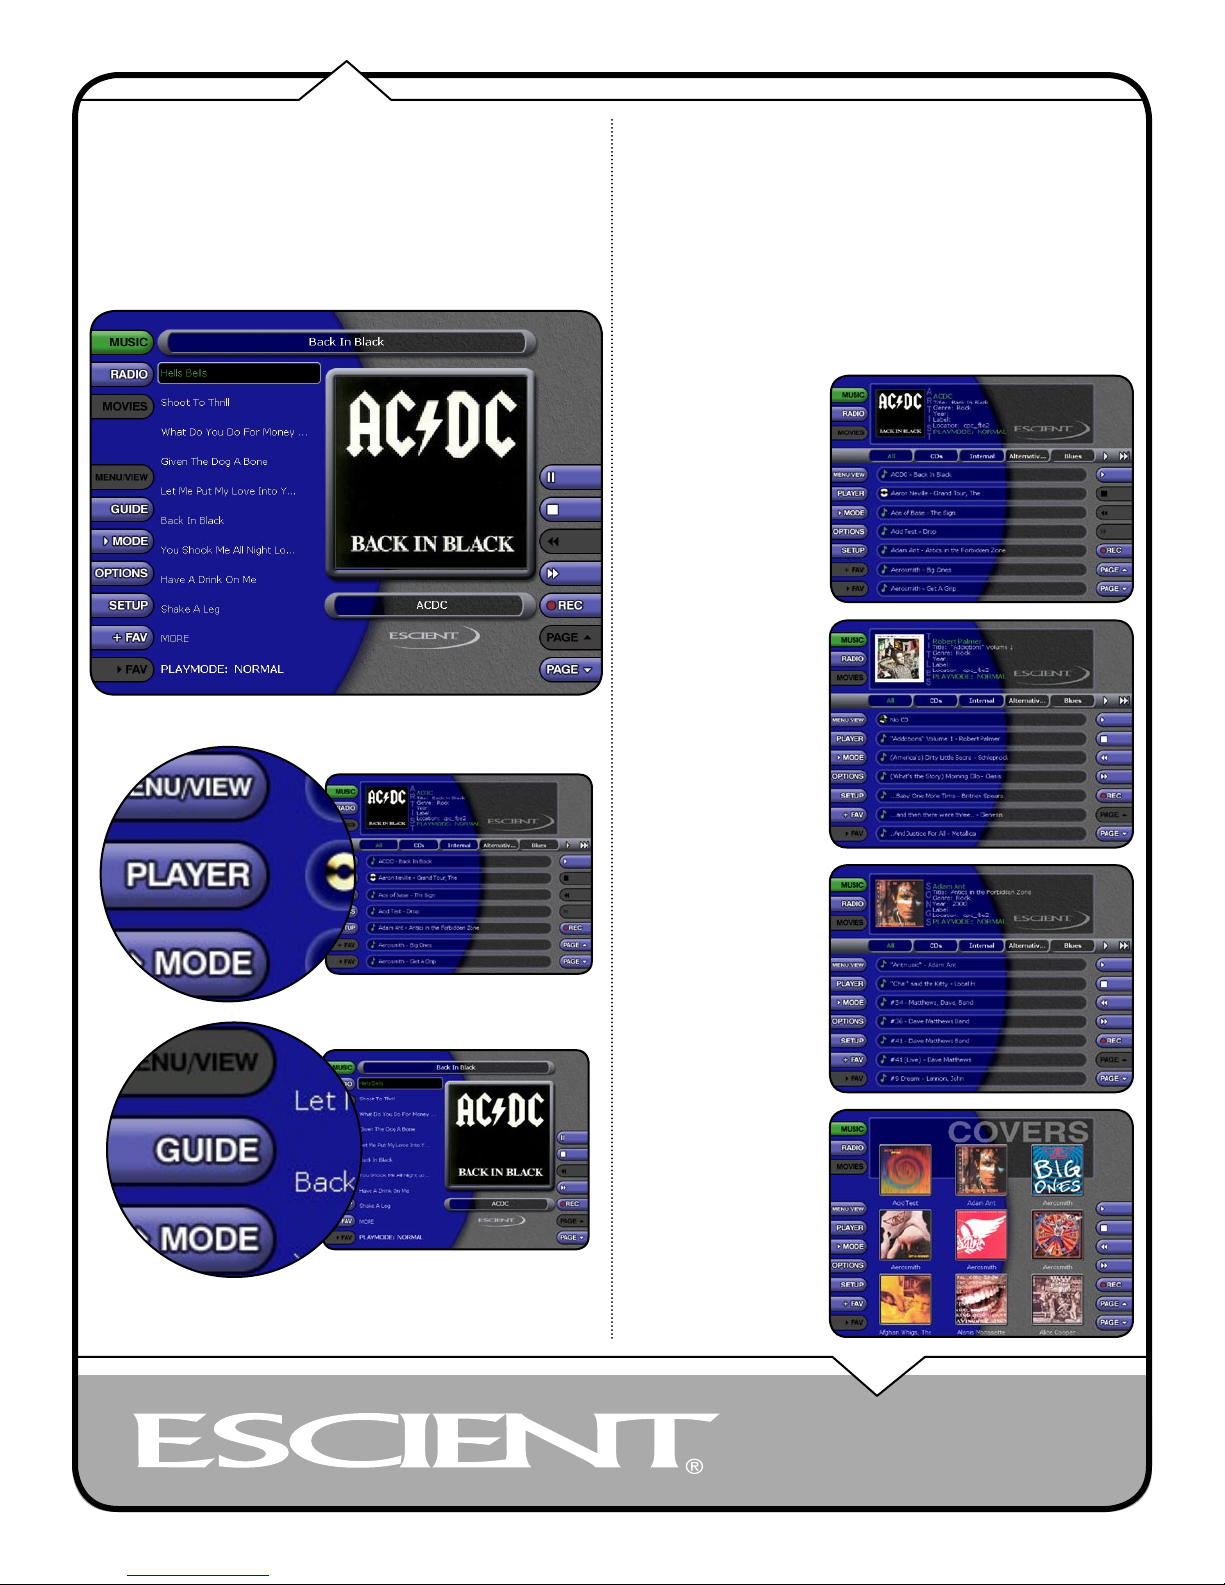
SELECTING A DIFFERENT SONG
In the Music Player you can scroll up and down the track list using the page
button on the right edge of the screen. Select a different song to play the song.
CHANGING THE GUIDE VIEW
The PLAYER button on the left edge of the screen is used to switch between
the Music Guide and Music Player screens. When you are viewing the Music
Player screen, select the GUIDE button to return to the Music Guide.
The Music Guide provides you with several ways to view the contents of your
Music Library. One of the easiest ways to browse and sort your Music Library
is by using the Music “Views”. There are four Views that you can toggle
through using the MENU/VIEW button on the left edge of the screen:
• View By Artist
• View By Title
• View By Song
• View By Cover
View By Artist
View By Artist is the default
View and displays your Music
Library alphabetically from
A to Z using according to the
Artist Name then the Album
Name.
View By Title
View By Title will order the
list of Titles alphabetically
from A to Z, according to the
Album Name then the Artist
Name.
View By Song
View By Song will order the
list of Titles alphabetically
from A to Z, according to the
Song Name.
View By Cover
View By Cover displays
a graphical 3x3 grid of
album cover art, sorted
alphabetically from A to Z,
according to the Artist Name
then Album Name.
Web UI User’s Manual
PAGE 6
Page 7
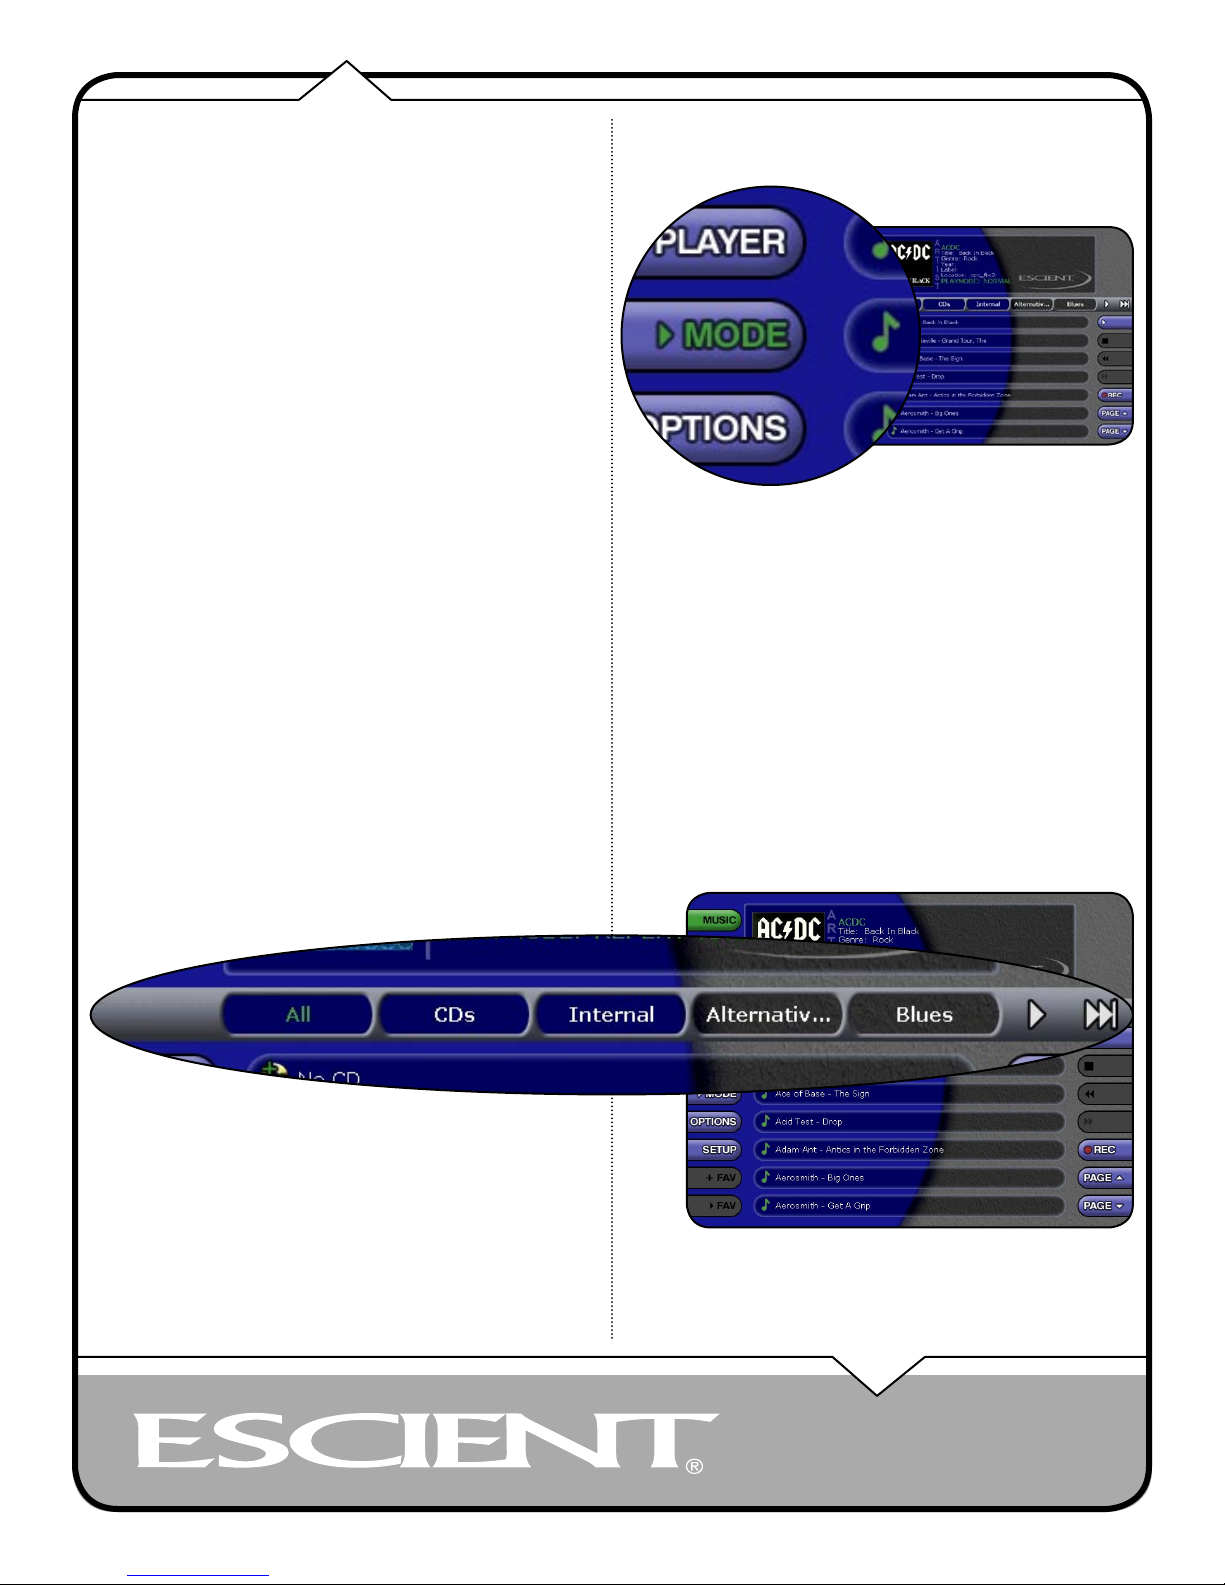
CHANGING THE CURRENT PLAY MODE
The default Play Mode will play the current Title from Track 1 to the last track
in order, then stop. If you want to change the order of how tracks are played,
there are six different Play Modes to choose from:
• Normal – play each track in order in the current Title, then stop.
• Repeat Track – repeat the same track over and over until you select stop.
• Repeat Title – play each track in the current Title in order then repeat the
entire disc until you select stop.
• Repeat Group – play each track in each title in the current group and then
repeat them until you select stop.
• Random Title –randomly select and play a track from within the current
title. Continue until you select stop or every track in the current title is
played.
• Random Group – randomly select and play a track from any title in the
current group. Continue until you select stop or every track in the current
group is played
To change the current Play Mode, select the PLAY MODE key on the left edge
of the screen. Each press of the PLAY MODE key will switch to the next Play
Mode. Stop pressing the PLAY MODE key when you see the desired Play Mode
appear on the screen.
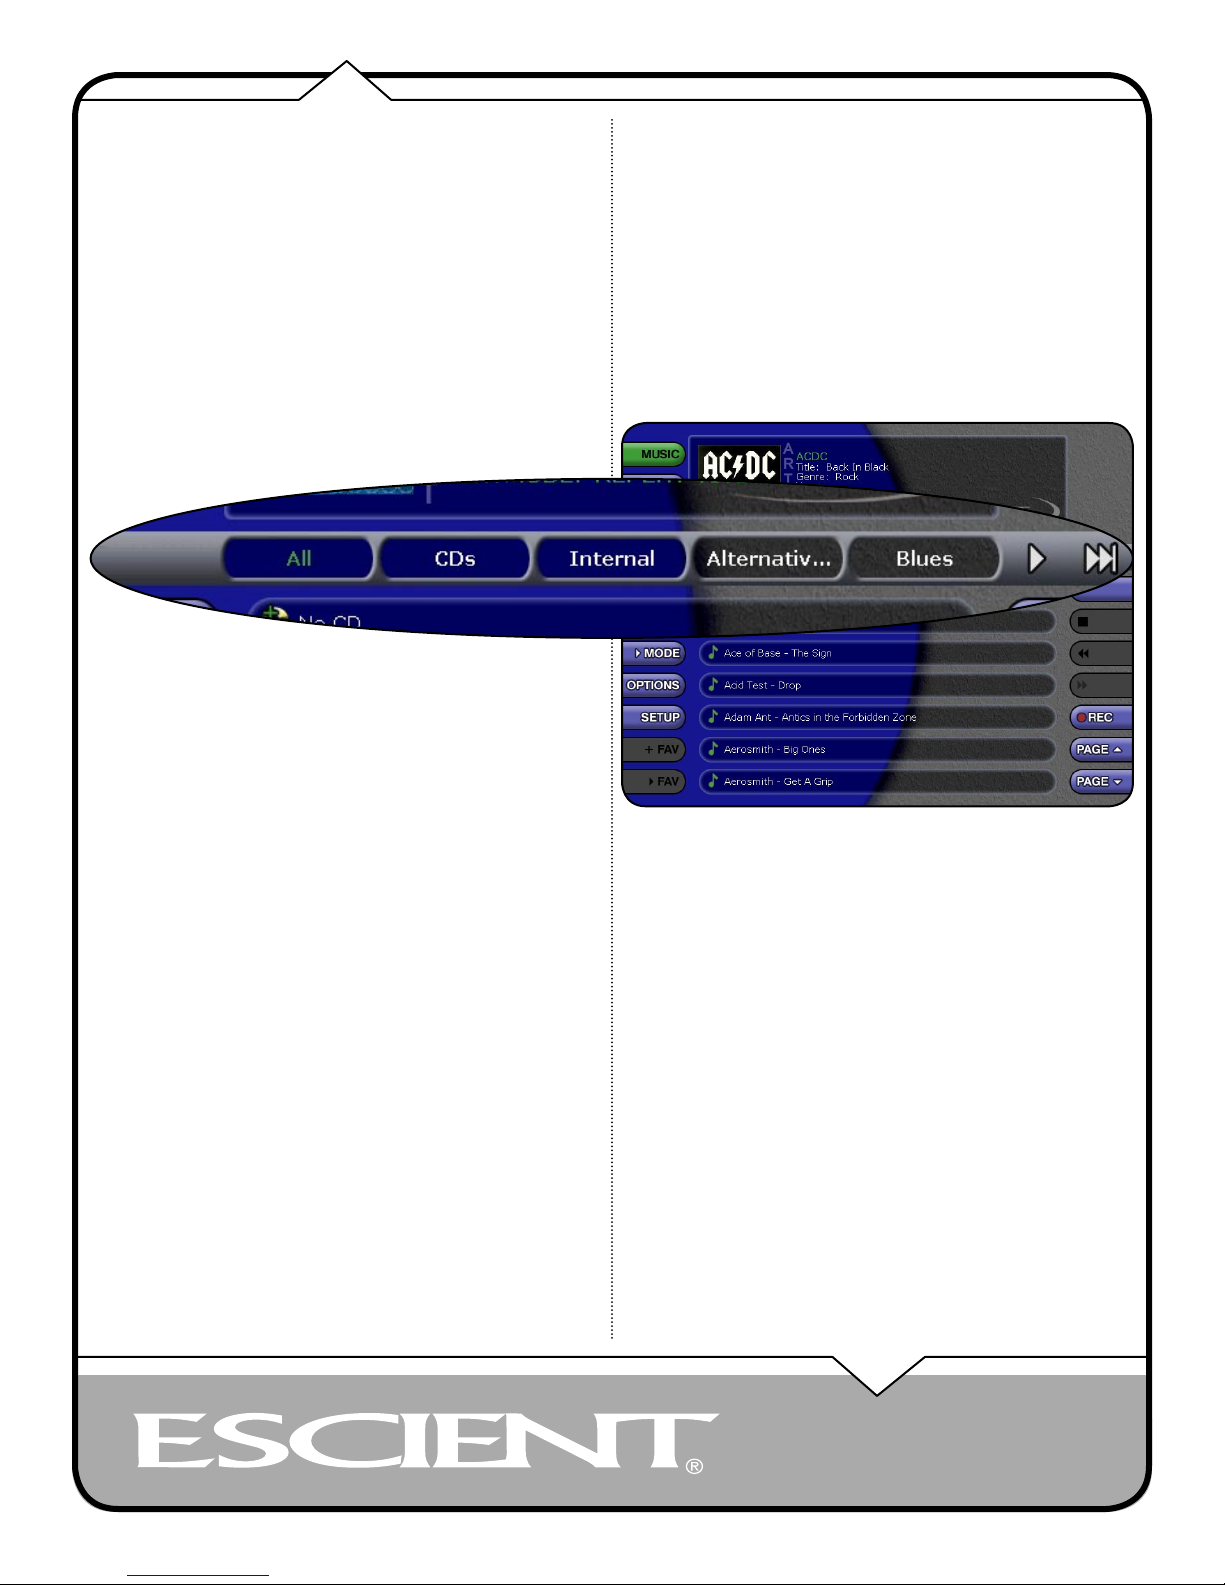
VIEWING BY GENRE
In addition to the current Guide View, the Music Guide automatically organizes
your Music into default “Genres” also called “Groups”. The Group Bar displays
a horizontal scrolling list of Genres corresponding to the music in your library.
Five Genres or Groups are visible at one time. The “All” genre is the default,
which displays all Titles in your Music Library.
LEFT and RIGHT arrow buttons appear on the left and right edges of the
Group Bar when more Groups are available. Pressing these arrows scrolls the
Group Bar horizontally by one or 5 items at a time. Notice that the list of Titles
updates to show only Titles in the selected Genre.
• Scroll all the way to the left to return to the All Genre.
• Genre list will scroll to the right to reveal more Genres.
• Refer to the section “Managing Your Media” for instructions on creating
your own Genres to create custom groupings of your favorite music titles
PAGE 7
Web UI User’s Manual
Page 8
LISTENING TO INTERNET RADIO
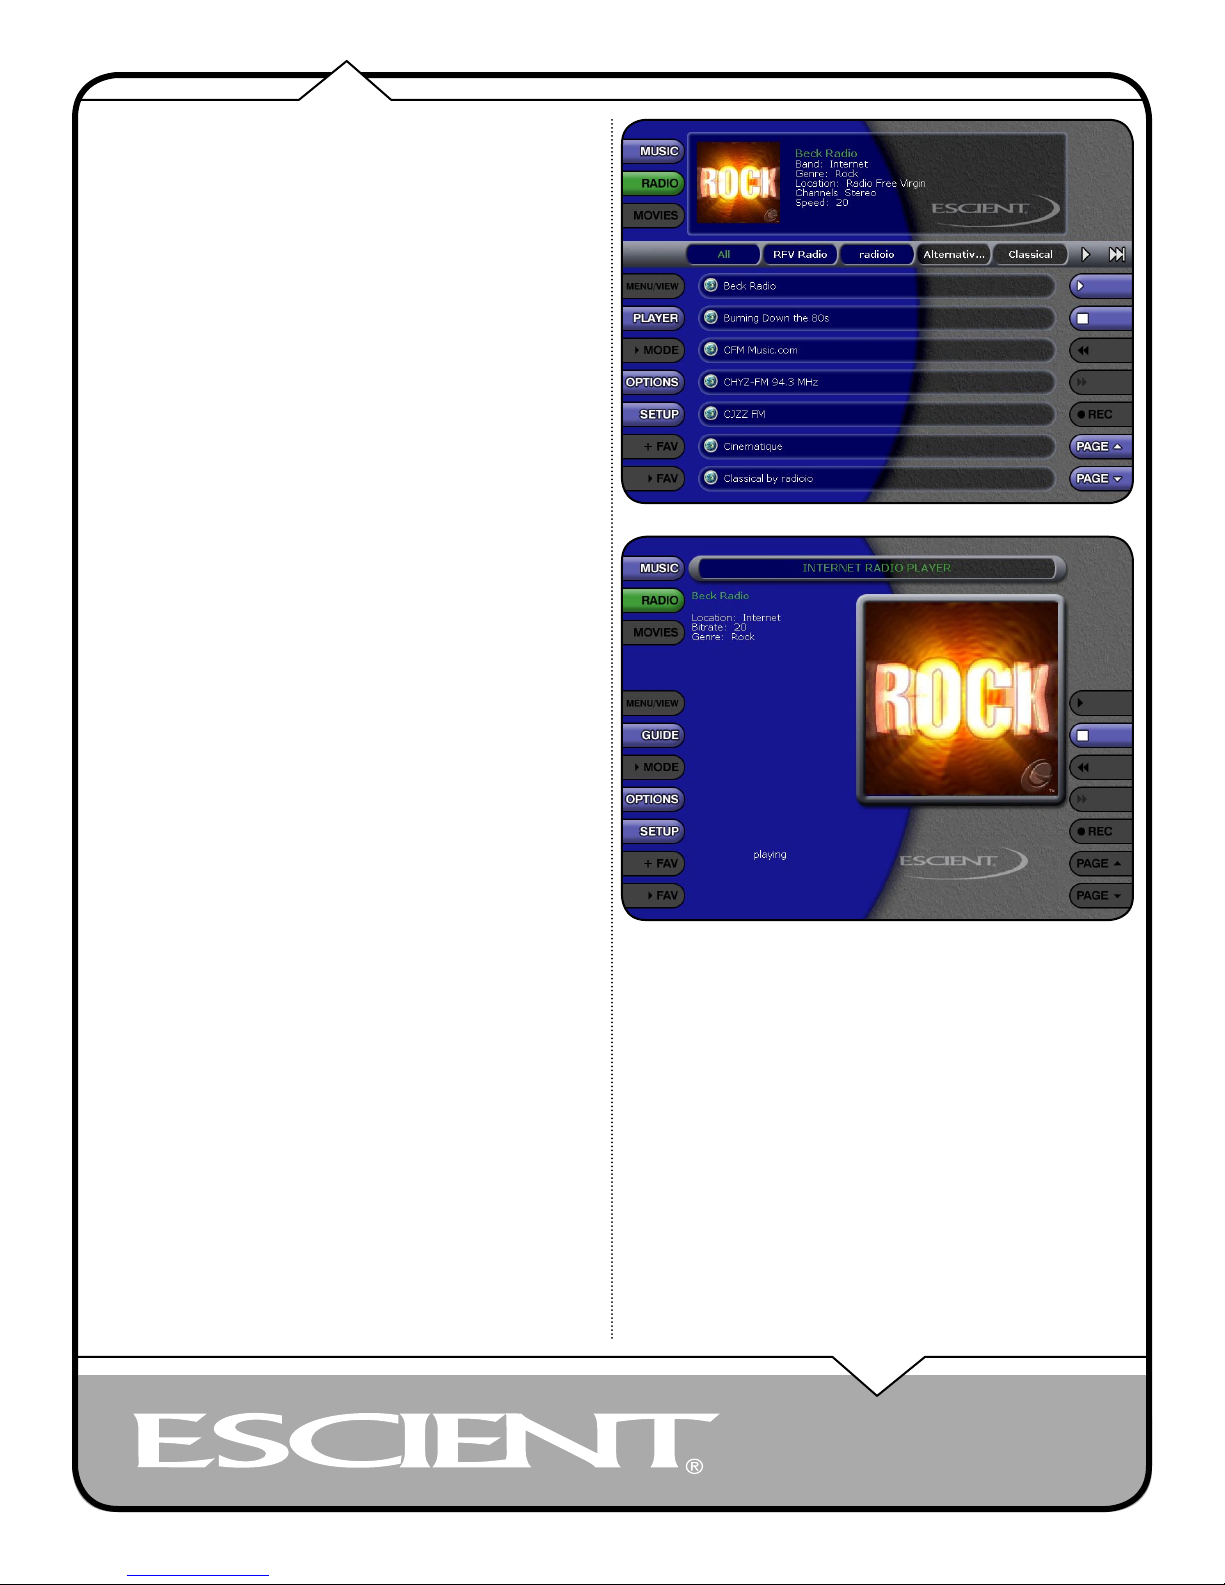
BROWSING INTERNET RADIO STATIONS
The Radio Guide displays a scrolling list of Internet Radio Stations. Using the
Page buttons on the right edge of the screen, you can scroll up and down the
list. As each Station is highlighted, you will notice that the Information Area
and Cover Art changes to reflect the currently highlighted Station.
PLAYING THE CURRENT STATION
Simply select the PLAY key on the right edge of the screen and the currently
highlighted station will be located, buffered, and then played.
You’ll notice that a new screen appears displaying information about the
selected station. This is the Radio Player screen. The Radio Player displays
the station name, location, genre, genre cover art, and status about the current
Internet Radio station stream. FireBall will attempt to locate the station to
make sure it is currently broadcasting over the Internet, connect to it, buffer
some audio, then begin playing the audio stream. The status of all of this
activity is indicated at the bottom left of the screen.
• Playing Internet Radio requires a valid Internet connection.
• Although some stations will work over a Dialup Internet Connection, a
broadband Internet connection is recommended.
• Due to the dynamic nature of the Internet, you may experience periodic
audio drop-outs which could be due to many factors such as Internet
access problems, busy networks, etc...
• Internet Radio Stations are not hosted by Escient and may not be available
at all times. You can update your Internet Radio Stations list by running
Tune Stations. Please refer to the “Managing Your Media” section for
more information.
PAGE 8
Web UI User’s Manual
Page 9
WATCHING DVD MOVIES
The Movies source button is only available when you are connected to an
Escient DVDM Media Manger with an external DVD changer. The Movies
source button will be disabled when you are connected to a FireBall Music
Manager.
Please refer to the FireBall DVDM User’s Guide for information about setting
up external DVD changers and loading your DVD movies.
BROWSING YOUR MOVIE LIBRARY
Once you have properly configured your DVDM, loaded your DVDs into the
external changer, and the Quick Lookup feature has acquired information for
your DVD collection, the Movies Guide allows you to browse, locate, and play
all of your DVD movies in one easy to use on-screen guide.
The Movies Guide displays a list of all your Movies Titles. Using the Page
buttons on the right edge of the screen, you can scroll up and down the list.
PLAYING THE CURRENT MOVIE
Playing the currently highlighted Movie is the same as playing a DVD in a
conventional DVD player. Simply select the PLAY button. The appropriate
DVD disc is located in your external changer, loaded into the player and begins
to play.
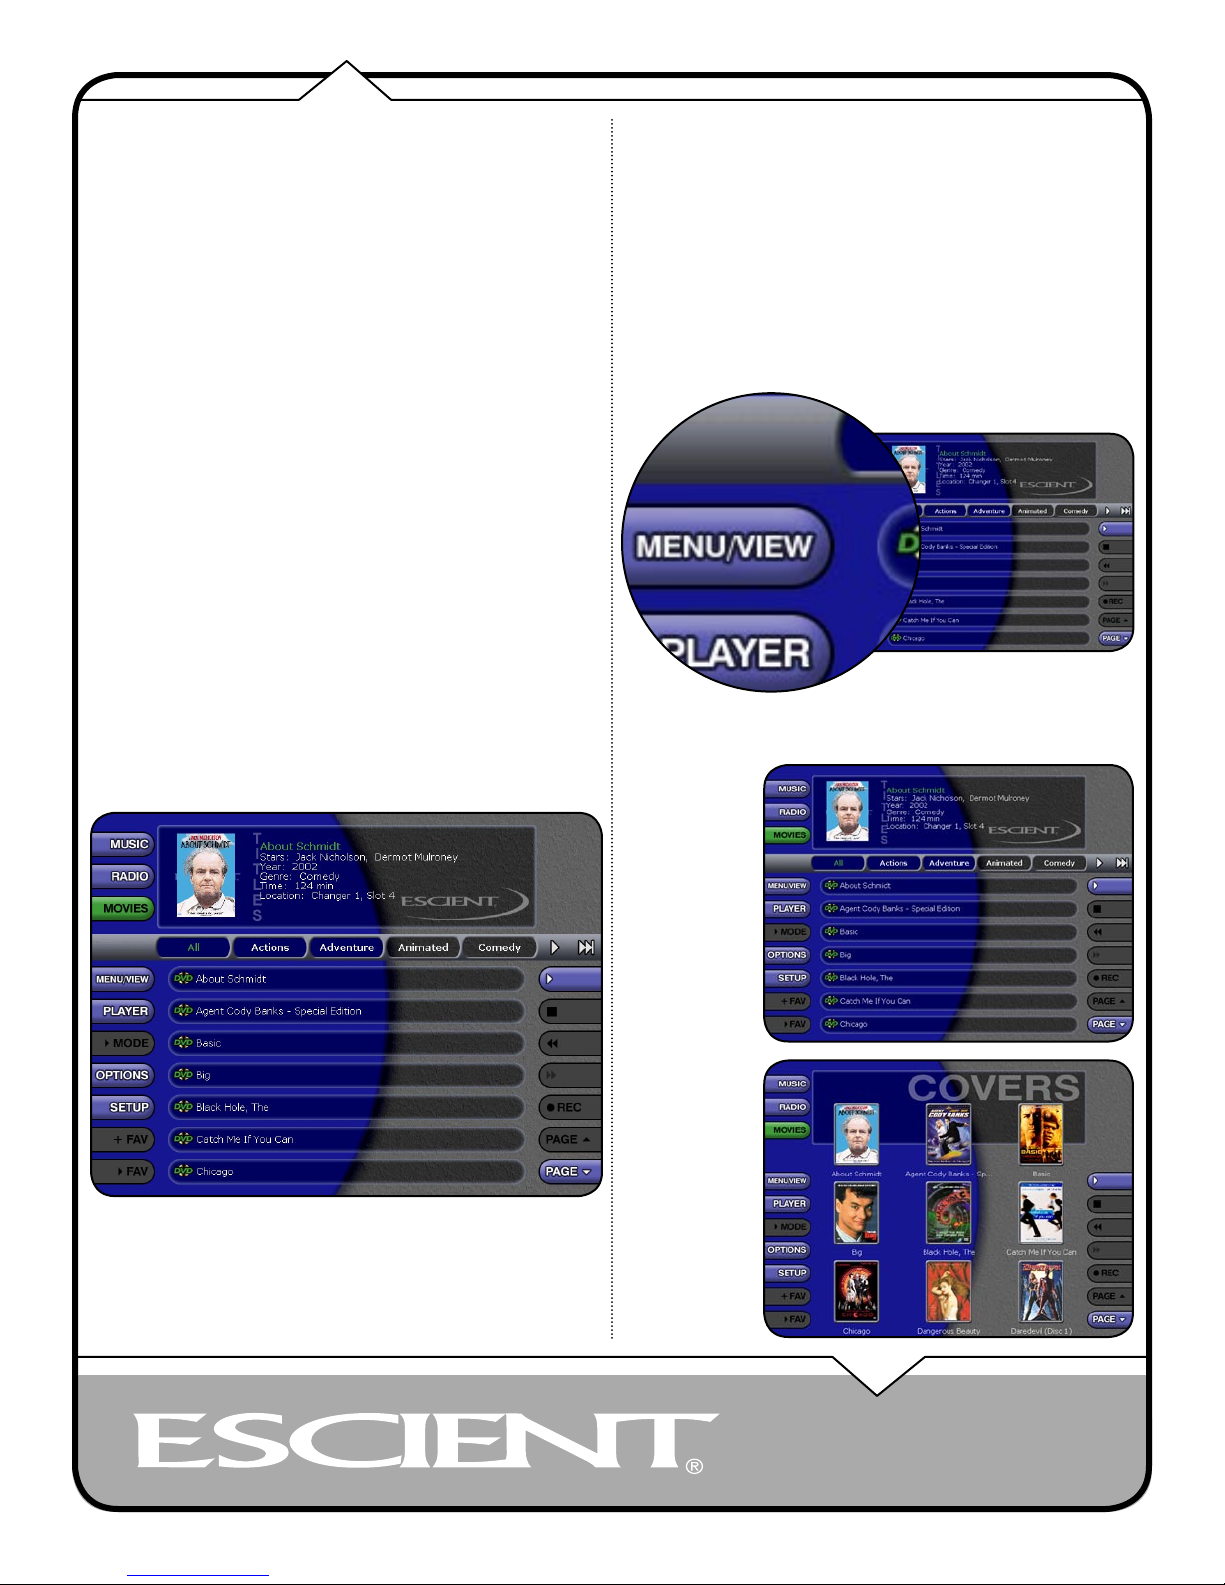
You’ll notice that a new screen appears with a description of the movie, a large
cover image, and DVD controls. This is the Movies Player screen. The Movies
Player displays information about the current movie and lets you control the
playback of the DVD player using the touch screen.
CHANGING THE GUIDE VIEW
The GUIDE button on the left edge of the screen is used to switch between the
Movies Guide and Movies Player screens. When you are viewing the Movies
Player screen, select the GUIDE button to return to the Movies Guide.
The Movies Guide provides you with several ways to view the contents of your
DVD Library. One of the easiest ways to browse and sort your Movies Library
is by using the Movies “Views”. There are two Views that you can toggle
through using the “MENU/VIEW” button on the left edge of the screen:
• View By Title
• View By Cover
CONTROLLING THE DVD PLAYER
In the Movies Player you can access the DVD’s menu system by using the DVD
Top Menu and the DVD Menu buttons. Use the arrow buttons to navigate up,
down, left, and right within the DVD’s on screen menu.
MOVIES GUIDE SCREEN
View By Title
View By Title
will order the
list of Movies
alphabetically from
A to Z, according
to the movie’s title.
View By Cover
View By Cover
displays a graphical
3x3 grid of movie
cover art, sorted
alphabetically from
A to Z, according
to the movie’s title.
PAGE 9
Web UI User’s Manual
Page 10
VIEWING BY GENRE
In addition to the current Guide View, the Movies Guide automatically
organizes your Movies into default “Genres” also called “Groups”. The Group
Bar displays a horizontal scrolling list of Genres corresponding to the Movies in
your library. Five Genres or Groups are visible at one time. The “All” genre is
the default, which displays all DVDs in your Movie Library.
LEFT and RIGHT arrow buttons appear on the left and right edges of the
Group Bar when more Groups are available. Selecting these arrows scrolls the
Group Bar horizontally by one or 5 items at a time. Notice that the list of Titles
updates to show only Titles in the selected Genre.
• Scroll all the way to the left to return to the All Genre.
• Genre list will scroll to the right to reveal more Genres.
• Refer to the section “Managing Your Media” for instructions on creating
your own Genres to create custom groupings of your favorite Movies titles
PAGE 10
Web UI User’s Manual
Page 11

GETTING MUSIC INTO FIREBALL
Before you can enjoy the many benefits of your FireBall Music Management
system, you will want to get your music collection into the FireBall. The
process of getting music into FireBall is called “Recording” or sometimes
“Ripping”.
There are several ways to get your music into FireBall:
• Record CDs using the internal CD Drive
• Record CDs using optional external CD changers
• Record from an external source (such as a tape, LP, or other real-time
source)
• Transfer Music files from your PC using a network
You may choose to use any or all of these methods at any time. Here is a brief
description of a few of these methods, however you should refer to the FireBall
User’s Manual for more detailed information about getting music into your
FireBall.
RECORDING FROM THE INTERNAL CD
The easiest and quickest way to get music into your FireBall is to record
CDs using the built-in internal CD drive. This method requires no additional
equipment and is very fast, as the internal CD drive can rip audio at several
times the speed of normal playback. This is known as “fast-ripping”.
Follow these steps to record using the internal CD drive:
1. Select the EJECT key on the front panel of your FireBall.
2. Insert an audio CD (label side up) into the CD tray.
3. Select the EJECT key again to close the CD tray.
4. The CD cover and track names for this CD will appear on your web pad.
(If the disc is not in the FireBall’s local database, FireBall will use your
Internet connection to retrieve the disc information).
5. Select the RECORD button on the right side of the web pad’s screen to
display the Recording Options Menu.
6. Make sure that rip to internal hd is selected, then select the CONTINUE
button.
7. The Record Select Guide will be displayed showing the current CD with
checkmarks to the left of each track name.
8. Select the CONTINUE button to begin recording.
• When recording is complete, FireBall will return to the Music Guide.
• Repeat steps 1-8 for each disc in your music collection.
• Refer to the section “Setting User Preferences” for setting Recording
Preferences and Disc Insert Preferences.
PAGE 11
Web UI User’s Manual
Page 12

RECORDING FROM AN EXTERNAL CHANGER
FireBall can manage multiple external disc changers in addition to any music
recorded onto the internal hard drive.
Recording from an external changer (of course) requires at least one supported
external CD changer properly connected to FireBall. Recording from an
external changer is much slower than recording from the internal CD drive
because each CD must be played and recorded in real-time compared to the fast
ripping speed of recording from the internal CD drive.
All changer based CDs are seamlessly integrated into the same easy to use
Music Guide as your recorded CDs.
Please refer to the FireBall’s User Manual for details on how to setup and
record from an external changer, as well as the additional method of getting
music into your FireBall.
PAGE 12
Web UI User’s Manual
Page 13

MANAGING YOUR MEDIA
CREATING PLAYLISTS
FireBall allows you to organize your favorite songs into custom “Playlists”. A
Playlist is simply a group of songs that you choose from your Music Library.
Common uses for Playlists are:
• Collections of your favorite songs
• Songs that have a similar tempo or feel
• Custom albums from one or more of your favorite artists
• Party mixes
• Workout mixes
Playlists are available only in the Music Source. Follow these steps to create
your own custom Playlist:
1. Select the MUSIC source button to make sure you are in the Music
source.
2. Select the OPTIONS button to display the Options Menu.
3. Select the New Playlist menu item.
4. Using the popup keyboard, enter a name for your Playlist.
5. Select the CONTINUE button on screen to advance to the Edit Playlist
Select Guide. The Edit Playlist Select Guide works just like the Music
Guide. Page up and down the list and select the OPEN or CLOSE
button, expand, or collapse music titles.
6. For each song you want to add to the Playlist, select the box to the left
of the song. A checkmark appears in the box of each selected song
indicating that it will be added to the Playlist. Select the box again to
remove the checkmark.
7. When you have selected all of the songs you want to include in the
playlist, select the SAVE button on the New Playlist screen to save the
Playlist.
• The new Playlist is added to the Playlist Group on the Group Bar.
• You can play any Playlist the same way you play a music title or CD. Just
select the Playlist you want to play and then select the PLAY button.
• Notice that a Playlist genre is added to the Group Bar. The Playlist genre
will always be available as long as you have at least one playlist in your
Music Library.
PAGE 13
Web UI User’s Manual
Page 14

CREATING GROUPS
In addition to Playlists, FireBall allows you to create custom “Groups” of
Music Titles, DVD Movies, or Radio Stations. User created Groups appear in
the Group Bar along with the automatically created Genre Groups and System
Groups (All, CDs, Internal, and Playlists). Some uses for custom Group are:
• Organize music titles or radio stations into custom genres, like “Funk”,
80’s, “Hits’, etc…
• Group all of the albums for a favorite artists together for quick access.
• Create an easily accessible collection of your favorite albums.
To create a custom Group, follow these steps:
1. Select the MUSIC source button to make sure you are in the Music
source mode or select the RADIO source button if you want to create a
custom Radio Group.
2. Select the OPTIONS button to display the Options Menu.
3. Select the New Group menu item.
4. Using the popup keyboard, enter a name for your Group.
5. Select the CONTINUE button on screen to advance to the Edit Group
Select Guide. The Edit Group Select Guide works just like the Music or
Radio Guide.
6. For each Music Title or Radio Station you want to add to the Group,
select the box to the left of the Title. A checkmark appears on the box
of each selected Title or Station indicating that it will be added to the
Group. Select the box again to remove the checkmark.
7. When you have selected all of the Titles or Stations you want to include
in the group, select the SAVE button on the New Group screen to save
the Group.
• Notice that a custom Group is added to the Group Bar along with the
System Groups.
• The custom Group will always be sorted alphabetically within the Group
Bar and appear to the right of the All and Playlist Groups.
PAGE 14
Web UI User’s Manual
Page 15

ADDING INTERNET RADIO STATIONS
FireBall comes preloaded with several high quality streaming Internet Radio
Stations from around the world, but that may not be enough for you, so FireBall
also let’s you add your own Internet Radio Stations.
Internet Radio stations must conform to these specifications:
• MP3 streams (Shoutcast)
• Windows Media 8 or earlier. Windows Media 9/10 is not supported.
To add your own Internet Radio Stations, you will need to obtain the URL or
Internet Link to the stream using your PC and Microsoft’s Windows Media
Player.
Assuming you have a valid URL for a station, follow these steps to add your
own Internet Radio Station to the Radio Guide:
1. Make sure you are in the Radio source mode by selecting the RADIO
source mode on the left edge of the screen.
2. Select the OPTIONS button to display the Options Menu.
3. Select the New Station menu item.
4. Using the popup keyboard, enter information for the new station
including: station name, location, URL, the bit rate of the stream, the
genre, and the number of channels (mono or stereo). The cover art will
be set according to which genre you select.
5. Select the SAVE button to save the new station.
• When you are finished creating your new station, the Radio Guide is
displayed with the newly created Station.
• You can play the station just like any other Internet Radio station.
PAGE 15
Web UI User’s Manual
Page 16

UPDATING THE INTERNET RADIO STATIONS LIST
Escient makes every attempt to insure that the preloaded Internet Radio Stations
are alive and well, but due to the dynamic nature of the Internet and the third
parties who actually serve up these radio streams, sometimes you will not be
able to play a station. The “Tune Stations” feature allows you to download a list
of the most recent Internet Radio stations from Escient.
Note: Tune Stations WILL NOT erase any custom stations you may have added,
from your Radio Guide. It WILL replace the Escient supplied stations with a fresh
new list.
If you want to replace the current Internet Radio Stations with a new list of
stations, follow these steps:
1. Select the Radio source button to make sure you are in the Radio
source.
2. Select the OPTIONS button to display the Options Menu
3. Select the Tune Stations menu item.
4. Read the WARNING screen and select Tune Stations to proceed.
5. FireBall will Connect to the Escient server and download the latest
Internet Radio Stations.
When you are finished Tuning the Stations, the Radio Guide is displayed
showing only the new Internet Radio Stations and any user added stations.
PAGE 16
Web UI User’s Manual
Page 17

EDITING MUSIC INFORMATION
FireBall has access to over 4 million CD titles, but you may still encounter a
CD that does not return a custom cover or the correct disc information. You
can edit the disc information for any Music Title using the Edit Disc and Edit
Tracks screens.
Editing Disc Info
Follow these steps to edit the disc information for the current Music Title:
1. Select the Music Title you want to edit in the Music Guide.
2. Select the OPTIONS button to display the Options Menu.
3. Select the EDIT MUSIC menu item to display the Edit Music Information
screen.
4. Using the popup keyboard, change the artist name, album title, label,
year of release, or genre.
5. Select the SAVE button to save your changes and return to the
previous screen.
Edit Movie Info
You can also edit DVD movie information for any using the Edit Movie Info
screen.
Follow these steps to edit the DVD information for the current DVD Movie:
1. Select the DVD Title you want to edit in the Movies Guide.
2. Select the OPTIONS button to display the Options Menu.
3. Select the EDIT MOVIE menu item to display the Edit Movie Information
screen.
4. Using the popup keyboard, change the movie title, studio, year of
release, etc...
5. Select the SAVE button to save your changes and return to the previous
screen.
PAGE 17
Web UI User’s Manual
Page 18

Automatically Lookup Information for This Disc
The “Lookup This Disc” button will initiate a disc lookup for only the current
title. First, the local database is checked for a match, then if a match is not
found, FireBall will connect to the Internet to download the disc information.
Follow these steps to lookup information for the current disc:
1. Select the Music or Movie Title you want to edit in the Music or Movies
Guide.
2. Select the OPTIONS button to display the Options Menu.
3. Select the EDIT MUSIC or EDIT MOVIE menu item to display the Edit
Information screen.
4. Select the Lookup This Disc button. The Get Info screen will be
displayed as FireBall attempts to lookup the disc information for you.
5. When the lookup is complete, you will return to the Edit Disc
Information screen where you can verify or edit the results.
6. Select the SAVE button to save your changes and return to the
previous screen.
PAGE 18
Web UI User’s Manual
Page 19

Searching for the Original Cover
Occasionally the wrong cover or the default cover will be displayed for a Music
Title. You can manually search for the original cover art by using the “Search
for Cover” feature. This is a very powerful tool that allows you to search the
Escient servers for an exact or partial match using the artist name and/or album
name.
Follow these steps to search for a cover:
1. Select the Music Title you want to edit in the Music Guide.
2. Select the OPTIONS button to display the Options Menu.
3. Select the EDIT MUSIC menu item to display the Edit Music Information
screen.
4. Select the Search for Cover button to display the Search for Cover
screen.
5. The current Artist Name and Album Title are entered as the default
search strings. You can change either one of these to modify the
search. Note that editing the Artist Name or Title WILL NOT change
them in the Music Library. These edits are ONLY used to search for a
new cover.
6. Select the SEARCH button to start the search.
7. The Get Music Info screen will be displayed as FireBall attempts to
search for the cover using the Artist Name and Title you entered.
8. When the search is complete, you will return to the Edit Music
Information screen where you can verify or edit the results.
9. Select the SAVE button to save your changes and return to the
previous screen.
Tips for Searching for Covers
The Escient server uses a fuzzy-match algorithm to locate a matching cover
using the Artist Name and Title you enter. There are a few tips to try when
searching for covers:
• Remove any punctuation marks from the Artist Name and Title.
• Remove Disc Numbers from the Titles.
• Try different spellings in the Title.
• Try removing part of the Artist Name (if it is more than 2 words).
PAGE 19
Web UI User’s Manual
Page 20

Selecting an Existing Cover
If for some reason you cannot download the original cover, you can choose one
of the existing covers for the current Music Title or DVD Movie
Editing Track Names
You can also manually edit the Track/Song names of the current Title in the
Music Guide.
Follow these steps to select an existing cover to assign to the current Title:
1. Select the Title you want to edit in the Guide.
2. Select the OPTIONS button to display the Options Menu.
3. Select the EDIT MUSIC or EDIT MOVIE menu item to display the Edit
Information screen.
4. Select the Select a Cover button to display the Select Cover Art screen.
5. Locate the name of the Title corresponding to the cover you wish to
use for the current Title in the list of covers. Notice that a preview of
the selected cover appears on the right of the list as you highlight each
name. Note that it may take several minutes to display all the covers
available on your FireBall.
6. Select the SAVE button when you have located the cover of your choice
and return to the previous screen.
Follow these steps to edit the track information for the current Music Title:
1. Select the Music Title you want to edit in the Music Guide.
2. Select the OPTIONS button to display the Options Menu.
3. Select the EDIT TRACKS menu item to display the Edit Tracks screen.
4. Using the popup keyboard, change the name of each track.
5. Select the SAVE button to save your changes and return to the
previous screen.
PAGE 20
Web UI User’s Manual
Page 21

EDITING RADIO INFORMATION
Similar to editing Music Information, you can also Edit the Radio Information.
Follow these steps to edit the station information for the currently
highlighted Internet Radio Station:
1. Select the RADIO source button to make sure you are in the Radio
source.
2. Select the OPTIONS button to display the Options Menu.
3. Select the Edit Station menu item to display the Edit Station screen.
4. Using the popup keyboard, edit the information for the new station
including: station name, location, URL, the bit rate of the stream, the
genre, and the number of channels (mono or stereo). The cover art will
be set according to which genre you select.
5. Select the SAVE button to save the changes.
PAGE 21
Web UI User’s Manual
Page 22

EDITING PLAYLISTS
You can change the name and add or remove tracks from any Playlist you
created.
Follow these steps to edit a Playlist:
1. Select the MUSIC source button to make sure you are in the Music
source.
2. Highlight the Playlist Name you want to edit. Note: The Playlist group
will list all of your Playlists.
3. Select the OPTIONS key to display the Options Menu.
4. Select the Edit Playlist menu item.
5. Using the popup keyboard, change the name of your Playlist or select
the CONTINUE button on screen to keep the current name and advance
to the Edit Playlist Select Guide.
6. For each song you want to add to the Playlist, select the box to the left
of the song. A checkmark appears in the box indicating that it will be
added to the Playlist.
7. For each song you want to remove from the Playlist, select the box
again and the checkmark will be removed, indicating that the song
should be removed from the Playlist.
8. When you have added or removed all of the songs you want to include
in the playlist, select the SAVE button to save the Playlist.
• If you remove all songs from a Playlist, the Playlist is automatically
deleted.
• You cannot reorder songs within a current Playlist.
PAGE 22
Web UI User’s Manual
Page 23

EDITING GROUPS
As with Playlists, you can also edit the name of a Group, add Music Titles or
Radio Stations to the Group, or remove Music Titles or Radio Stations from the
Group.
Follow these steps to edit a Group:
1. Select the Group you want to edit within the Group Bar.
2. Select the OPTIONS button to display the Options Menu
3. Select the Edit Group menu item.
4. Using the popup keyboard, change the name for your Group.
5. Select the CONTINUE button on screen to advance to the Edit Group
Select Guide.
6. For each item you want to add to the Group, select the white box to the
left of the Title. A checkmark appears on the box of each selected Title
or Station indicating that it will be added to the Group. Select the box
again to remove the checkmark.
7. When you have selected all of the Titles or Stations you want to include
in the group, select the SAVE button on the New Group screen to save
the Group.
• You cannot edit the System Groups (All, CDs, Internal, or Playlists).
• If you remove all Titles or Stations from a Group, the Group is
automatically deleted.
• You cannot reorder Titles and Stations within a Group. They are always
sorted alphabetically.
PAGE 23
Web UI User’s Manual
Page 24

DELETING MUSIC
You can remove any music you have recorded to the FireBall by using the
Delete Music feature. You may want to do this if you have filled up your
FireBall and you cannot record any more music or if you want to remove songs
that you just don’t listen to.
Follow these steps to delete music from your FireBall:
1. Select the MUSIC key to make sure you are in the Music source mode.
2. Select the OPTIONS key to display the Options Menu
3. Select the Delete Music menu item to display the Delete Music screen.
4. For each Track you want to delete, highlight the Track and select the
SELECT key on the remote. A checkmark appears to the right of each
selected Track indicating that it will be deleted. Select the SELECT key
again to remove the checkmark. Selecting the Toggle key on the remote
when a Title is highlighted will toggle all or none of the Title’s tracks for
deletion.
5. When you have selected all of the Titles you want to delete in the
group, select the RECORD button on the remote control to permanently
remove and delete the checked tracks.
You cannot “delete” physical CDs from the Music Library. You must remove
the discs from your changers if you want the CDs to be removed from the
Music Guide.
PAGE 24
Web UI User’s Manual
Page 25

DELETING PLAYLISTS
You may delete entire Playlists from the Music Guide. Follow these steps to
permanently delete one or more Playlists from the Music Guide:
Follow these steps to delete playlists from your FireBall:
1. Select the MUSIC button to make sure you are in the Music source.
2. Select the OPTIONS button to display the Options Menu
3. Select the Delete Playlists menu item to display the Delete Playlists
screen.
4. For each Playlist you want to delete, select the box to the left of the
playlist name. A checkmark appears in the box indicating that it will be
deleted. Select the box again to remove the checkmark.
5. When you have selected all of the Playlists you want to delete, select
the SAVE button to permanently remove and delete the checked
Playlists.
DELETING GROUPS
Deleting Groups from the Group Bar is very similar to deleting Playlists. The
contents of the Group (the Music Titles, DVD Movies or Radio Stations) are
not deleted. They are still available in any other Groups they may be assigned to
and in the All Group.
Follow these steps to delete Groups.
1. Select the OPTIONS key to display the Options Menu
2. Select the Delete Groups menu item to display the Delete Groups
screen.
3. For each Group you want to delete, select the box to the left of the
Group name. A checkmark appears in the box indicating that it will be
deleted. Select the box again to remove the checkmark.
4. When you have selected all of the Goups you want to delete, select the
SAVE button to permanently remove and delete the checked Playlists.
Note: You cannot delete the System Groups (All, CDs, Internal, or Playlists).
PAGE 25
Web UI User’s Manual
Page 26

SETTING USER PREFERENCES
User preferences are available to specify global configuration options and
preferred system settings by accessing the Setup Menu. To access any of these
global user preferences, Select the SETUP button to display the Setup Menu
and then select any menu item.
SELECTING THE CLIENT MODE
The FireBall Web Interface can operate in two different modes:
• Remote Control Mode
• Streaming Music Client Mode
Remote Control Mode is the default mode and controls your FireBall playback
system remotely. This means that when you play, pause, stop, or use any other
transport control, the FireBall itself is affected. The FireBall is the playback
device and the web pad is the controller.
When you set the Client Mode to Streaming Music Client Mode, your computer
becomes the playback device. This means that anytime you play, pause, stop,
or use any other transport control, the your computer’s playback system is
affected. This mode is useful because the your computer becomes another
“zone”. This means that someone in the main room where your FireBall is
located can play one song while you are in another room playing another song
from the your computer.
Regardless of the Client mode, browsing the music library is independent of
what is displayed or browsed on FireBall’s main video output.
Note that when you are set to Streaming Client Mode, you will only have access
to MP3 and FLAC files through the Music source. Internet Radio and Movies are
not streamable to the Web Interface. Also, the Setup menus will be disabled and
hidden until you switch back to Remote Control Mode.
REMOTE CONTROL MODE - CONTROL
AND PLAY BACK THROUGH FIREBALL
STREAMING MUSIC CLIENT MODE -
CONTROL FIREBALL AND STREAM PLAY
BACK TO HOME PC OR MAC
PAGE 26
Web UI User’s Manual
Page 27

SETTING THE SCREEN SAVER PREFERENCES
Screen Savers are provided for each source mode. Screen Savers provide two
important functions, to prevent a static image from being displayed on the video
output device for extended periods of time and to provide useful information to
the user when activated.
Follow these steps to set your screen saver preferences:
1. Select the SETUP button to display the Setup menu.
2. Select the Screen Saver Menu item.
3. Select your Screen Saver Preferences
Activation Idle Time
You can specify the amount of idle time that FireBall will wait before activating
the screen saver from 1 to 60 minutes.
Warning: Some televisions and plasma monitors are more susceptible to screen
burn-in than others, therefore, we recommend using a low activation time (like 1
minute) to reduce the risk of burn-in.
Mode
Select either the Normal mode or Product Demonstration mode. The Normal
mode displays the current title or station information while the Product
Demonstration mode is intended for retail product demos during idle time.
displaying the Demo Mode screen saver.
6. Select the Save button.
• The RDM will be activated whenever the FireBall is idle for the specified
period of time.
• Do not set the idle time too high as the possibility of screen burn is
increased with certain types of displays, particularly “Plasma” type
displays.
Photo Screen Saver Mode
FireBall has a Photo Screen Saver Mode for displaying your own photos
whenever FireBall is idle for a specified period of time. You can import your
own photos into the Photos shared directory using Windows Networking.
Photos should be 720x480 for 4:3 NTSC TVs and 640x360 for 16:9 widescreen
TVs.
Retail Demo Mode
FireBall has a Retail Demo Mode for use in retail display environments. The
Retail Demo Mode (RDM) is a special screen saver that is activated during idle
time. The RDM continuously displays key features and benefits of the FireBall
product on the attached TV. Pressing any button on the remote will temporarily
disable the RDM and allow the user to demo the product. After the specified
idle time, the RDM will reactivate as the screensaver.
Follow these steps to enable the Retail Demo Mode in your FireBall
display model:
1. Follow the Quick Start instructions to connect and register your demo
FireBall.
2. When your FireBall is configured and you see the Music Guide, press
the SETUP key on the remote.
3. Select the General menu.
4. Select the Screen Saver menu.
5. Select the Demo Mode option and the number of minutes to wait before
Follow these steps to enable the Photo Screen Saver Mode in your
FireBall:
1. Press the SETUP key on the remote.
2. Select the General menu.
3. Select the Screen Saver menu.
4. Select the Photo Viewer option and the number of minutes to wait
before displaying the next photo.
5. Select Random or Alphabetical ordering.
6. Select the Save button.
Note: You can set the Photo Interval or how long each photo is displayed as
well as the Photo Order or how you want to display your photos, in random or
alphabetical order.
• The Photos Screen Saver will be activated whenever the FireBall is idle
for the specified period of time.
• Do not set the idle time too high as the possibility of screen burn is
increased with certain types of displays, particularly “Plasma” type
displays.
PAGE 27
Web UI User’s Manual
Page 28

SETTING YOUR TIME ZONE
Specify which time zone your FireBall is located in.
Follow these steps to set your Time Zone:
1. Select the SETUP button to display the Setup menu.
2. Select the Time Zone Menu
3. Select your select your Time Zon
e.
SETTING YOUR ZIP CODE
Select US Zip Code or Canadian Postal Code. Your Zip Code or Postal Code
is used to tell the automatic update manager when to connect to Escient for
software updates.
Follow these steps to set your Zip Cod:
1. Select the SETUP button to display the Setup menu.
2. Select the Zip Code Menu
3. Enter your Zip or Postal Code
.
ENABLING PASSWORD PROTECTION
Optional Password Protection enables you to limit user access to the Setup
Menus. This is useful to lockout the ability to change the global user settings
and preferences.
Setting a System Password
Follow these steps to setup a new system password:
1. Using the popup keyboard, enter a 4 to 8 digit code into the password
field.
2. Re-enter the same password into the VERIFY field.
3. Select the SAVE button to save your password and enable Password
Protection on the Setup Menus.
• You must exit Setup and re-enter setup to activate the password
protection.
• If a user password is specified, you will be prompted for your password
whenever you press the Setup key on the remote.
• If the password entered matches the stored password, full access is
granted to the user until the next power off cycle.
• If the password does not match, the user will be asked 2 more times
to enter the correct password. If after the third try the password still
does not match, the system will not allow the user access to the Setup
menus.
• If the user does not specify a System Password, access to the Setup
menus will be allowed whenever you press the Setup key.
Removing a System Password
Follow these steps to remove the system password:
1. Select the SETUP button and enter your existing system password.
2. Select the Clear button. The password and verify fields will be cleared.
3. Select the SAVE button to save the settings.
You will now be able to enter Setup without entering a password.
PAGE 28
Web UI User’s Manual
Page 29

CHOOSING YOUR NETWORK CONNECTION
Some FireBall products support two built-in networking methods, Ethernet
and Dialup Modem. Your FireBall must be connected to the Internet in order to
lookup disc information, download software updates, and access Internet Radio.
If you have a broadband Internet connection such as a cable modem, DSL,
or ISDN line, select Ethernet and connect FireBall to your Ethernet network.
You may need additional networking hardware(like an Ethernet hub) to join
your FireBall to your Ethernet network. See y our Escient dealer for more
information about home networking.
Ethernet Settings
Ethernet is the preferred networking choice which provides you with the best
network performance and allows your FireBall to act as a “server” to deliver
your music collection throughout your home network using the optional
FireBall Music Players.
Ethernet networks require that you configure each device on the network with a
valid “address”. These addresses are usually configured automatically by your
network hardware. If your PC is setup using Dynamic or “DHCP” addressing,
you should most likely use the same for your FireBall.
If you have a dialup ISP (Internet Service Provider (such as AOL, Compuserve,
Earthlink, MSN etc…) select the Dialup Modem button.
Follow these steps to select your network connection:
1. Select the SETUP button to display the Setup menu.
2. Select the Connections Menu item under Network.
3. Select either ethernet or dialup modem.
Note: Changing your Network Connection will disconnect the web browser from
the FireBall as the network interface is reset. You will have to manually reconnect
to the FireBall.
Connect your FireBall to your Ethernet network using the included Ethernet
cable and then follow these steps to specify your Ethernet settings:
1. Select the SETUP button to display the Setup menu.
2. Select the Ethernet Settings Menu item under Network.
3. Select Dynamic for automatic address configuration or Static if you
want to manually enter your TCP/IP address information.
If you select Static TCP/IP addressing, you will need to obtain a valid IP
address, subnet mask, DNS server, and gateway addresses from your network
administrator.
NOTE: CHANGING YOUR NETWORK CONNECTION WILL
DISCONNECT THE WEB INTERFACE FROM THE FIREBALL AS THE
NETWORK INTERFACE IS RESET. YOU WILL HAVE TO MANUALLY
RECONNECT TO THE FIREBALL.
PAGE 29
Web UI User’s Manual
Page 30

Dialup Settings
If you are going to use a dialup ISP to connect your FireBall to the Internet,
you must provide information for your selected ISP. This information can
be obtained by contacting your ISP or from your PC, if you already use it to
connect to the Internet.
Connect your FireBall to your phone line using the included phone cable and
then follow these steps to specify your Dialup Modem settings:
1. Select the SETUP button to display the Setup menu.
2. Select the Dialup Settings Menu item under Network.
3. Enter your login or user name.
4. Enter your password.
5. Enter 1 or 2 dialup access numbers obtained from your ISP.
6. Select your dialing method: Tone or Pulse.
7. Enter any required dialing prefixes you may need for your phone
system such as ‘9’ to get an outside line.
8. If you have Call Waiting service on your phone line, you should enter
“*70,” (or any other code) to temporarily disable it while using FireBall.
This prevents a Call Waiting call from interrupting any FireBall Internet
functions that may be in progress, such as updating.
9. Finally select which Provider you are using: AOL, CompuServe or
Other.
SETTING THE FIREBALL SERVER NAME
Your FireBall can act as a “server” delivering audio to optional remote FireBall
“clients” over a local network. This allows you to control it remotely over a
network using a standard web browser and allows Network File Sharing to your
PC for backup and import features. The FireBall Name allows you to easily
locate and connect to your FireBall by name.
Follow these steps to enter a name for your FireBall:
1. Select the SETUP button to display the Setup menu.
2. Select the FireBall Name menu item under Network.
3. Enter a name for your FireBall using the popup keyboard. For example:
“Living Room” or “Home Theater” might be a name which helps
identify which FireBall you want to connect to.
PAGE 30
Web UI User’s Manual
Page 31

SELECTING THE AUDIO ENCODER TYPE
You can specify which audio encoder (MP3 or FLAC) you want to use for
recording audio to your FireBall. The MP3 format allows the most flexibility
and compatibility for efficiently storing many audio files while the FLAC
format uses considerably more space than MP3 files, but preserves an exact bitfor-bit recording of the original, using half the space when compared to the full
44.1k CD audio format..
NOTE: YOU CANNOT STREAM FLAC TO THE WEB PAD. ONLY MP3
FILES CAN BE STREAMED.
SETTING THE DISC INSERT PREFERENCES
You can specify what to do with new discs inserted into FireBall’s front panel
CD drive. Display and Play will display the information for the disc and then
play the disc. Record and Eject assists in bulk recording, allowing you to insert
disc after disc, automatically recording then ejecting each one.
Follow these steps to set the Disc Insert Preferences:
1. Select the SETUP button to display the Setup menu.
2. Select the Disc Insert Preferences menu item under Audio.
3. Select Display and Play or Record and Eject.
Follow these steps to select an audio encoder:
1. Select the SETUP button to display the Setup menu.
2. Select the Recording Preferences menu item under Audio.
3. Select MP3 or CD Quality (FLAC) as your preferred encoder
4. If you selected MP3 as your preferred encoder, select a bitrate.
The MP3 bitrate is used to determine the relative quality and compression level.
The higher the bitrate, the better quality and more space each song will occupy
on the hard drive. Selecting a lower bitrate will provide lesser quality audio and
will use less space for each song, allowing you to store more songs on your
FireBall.
FLAC audio will always take up approximately 50% of the original WAV/
AIFF file size. The FLAC compression level has been optimized to FireBall’s
processor speed and is not user adjustable. Creating a mix CD using FLAC
audio files creates a CD which is identical to the original, thus it is referred to as
“CD Quality”.
Record and Eject will use the current Recording Preferences to record each disc
to your internal hard drive. The Record Select Guide will not be displayed as
all tracks are automatically selected and recorded to the internal hard drive. Use
the Delete Music feature to delete any unwanted tracks.
PAGE 31
Web UI User’s Manual
Page 32

MANAGING EXTERNAL CHANGERS
The disc information that FireBall displays on your TV screen is NOT included
on the original CDs that you recorded or loaded into your changers. The artist
name, album name, track list, and album cover art are supplied by Escient and
it’s partners. This information is downloaded from the Escient’s servers to your
FireBall, using your Internet connection. This process is referred to as “Looking
up Disc Information”.
ESCIENT SERVERS ON
THE INTERNET
CORRECT, ARTIST,
TITLE, SONG, AND
COVERS INFO
CURRENT DISC DATA FROM CHANGER
Automatically Getting Disc Information
Once your changers are connected to FireBall and loaded with CDs, all you
have to do is close the changer door and in a few seconds FireBall will begin
looking up the disc information from each disc in each changer.
Quick Lookup checks each previously empty slot in the changers to see if any
new discs were added, and then checks each previously occupied slot in the
changer to see if any discs were removed.
One by one, the Table of Contents is read from each CD and compared to the
local music database or the Gracenote CDDB™ using your Internet connection,
as FireBall builds your Music Library. As each disc is accessed and looked up,
the Quick Lookup screen is updated to display the disc’s information and cover
art. When all of the discs are looked up, the Music Guide will be displayed.
You can manually run Quick Lookup at any time by following these steps:
1. Select the SETUP button to display the Setup menu.
2. Select the Lookup Discs menu item under Changer Management.
3. Select the Quick Lookup menu item.
4. FireBall will perform a Quick Lookup for each new disc.
Warning: Quick Lookup checks for newly added and removed CDs each time
it runs. Do not remove CDs and replace new CDs into the same changer slots
without running Quick Lookup in-between, or FireBall will not know that these slots
have changed.
If you want to reuse the same slots, first remove your CDs, let Quick Lookup
run, then add new CDs to the same slots.
PAGE 32
Web UI User’s Manual
Page 33

Getting Disc Information for a Range of Discs
If you want to lookup the disc information for a specific range of slots in a
changer, you can use the Lookup Range feature.
Getting Disc Information for All Discs
If you want to lookup the disc information for all discs in all changers, you can
use the Lookup All feature.
Follow these steps to lookup a range of changer slots:
1. Select the SETUP button to display the Setup menu.
2. Select the Lookup Discs menu item under Changer Management.
3. Select the Lookup Range menu item.
4. Enter a valid range of slots to lookup. If you have more than 1 changer,
select which changer you want to use.
5. Select the CHECK RANGE button.
6. The Lookup Range screen displays the progress and results for each
disc in the selected range.
Follow these steps to lookup all discs in all changers:
1. Select the SETUP button to display the Setup menu.
2. Select the Lookup Discs menu under Changer Management.
3. Select the Lookup All menu item.
4. The Lookup All screen displays the progress and results as each disc
in each changer is looked up.
PAGE 33
Web UI User’s Manual
Page 34

RECORDING FROM EXTERNAL CHANGERS
In addition to manually loading and recording CDs one by one using the front
panel CD drive, you can record as many CD as you want directly from your
external changers.
The advantage of recording multiple discs from your changers is that you don’t
have to sit there and unload/load each disc after it’s recorded, however there is
the disadvantage that external recording must occur in real-time, at 1x record
speeds, taking up to several weeks to complete for large music collections.
External Changer recording uses the same recording preferences mentioned
above in the “Selecting the Audio Encoder Type” and “Handling duplicate
Tracks” sections.
Note: Make sure you have both the digital and analog audio connections from
your changers connected to FireBall. FireBall will use the digital inputs first,
but if there is digital copy protection on a CD, FireBall will then attempt to use
the analog audio inputs to record the protected CD.
Automatically Recording CDs
You can easily record changer based CDs to your FireBall’s internal hard drive
using the Quick Record feature. Quick Record will record all tracks from newly
added CDs which are NOT already record to your FireBall, in one easy step.
Follow these steps to automatically record changer CDs to your FireBall:
1. Select the SETUP button to display the Setup menu.
2. Select the Record Discs menu item under Changer Management.
3. Select the Quick Record menu item.
4. FireBall will determine which changer discs have not been recorded
to the internal hard drive, and proceed with recording each disc (all
tracks) to the internal hard drive.
PAGE 34
Web UI User’s Manual
Page 35

Recording a Range of CDs
If you want to record a specific range of slots in a changer, you can use the
Record Range feature.
Follow these steps to record a range of changer slots:
1. Select the SETUP button to display the Setup menu.
2. Select the Record Discs menu item under Changer Management.
3. Select the Record Range menu item.
4. Enter a valid range of slots to record. If you have more than 1 changer,
select which changer you want to use.
5. Select the RECORD RANGE button.
6. The Record Range screen displays the recording progress for each
disc in the selected range.
Recording All CDs
If you want to record all discs in all changers, you can use the Record All
feature.
Follow these steps to record each disc in all changers:
1. Select the SETUP button to display the Setup menu.
2. Select the Record Discs menu item under Changer Management.
3. Select the Record All menu item.
4. The Record All screen displays the recording progress for each disc in
each changer.
PAGE 35
Web UI User’s Manual
Page 36

FIREBALL UTILITIES
Getting Information about Your FireBall
Information about your FireBall hardware and software is available under the
Utilities menu. This information is useful for troubleshooting any problems you
may encounter with your network connection or verifying the current software
versions.
Follow these steps to view the FireBall system information:
1. Select the SETUP button to display the Setup menu.
2. Select the System Information menu item under Utilities.
Restarting the System
There are two ways of manually performing a full restart or reboot of the
FireBall system, one using the front panel power button and the other using the
Restart System menu.
Follow these steps to restart the system using the front panel Power Button:
1. Select and hold the power button for 4 seconds.
2. When the blue LED on the front panel begins to flash, release the
power button.
3. When the blue LED on the front panel glows solid blue (standby mode),
FireBall is ready to use.
4. Select and release the Power button to turn on FireBall.
Follow these steps to restart the system using Utilities menu:
1. Select the SETUP button to display the Setup menu.
2. Select the Restart System menu item under Utilities.
3. Confirm that you want to restart the system and select the RESTART
button.
4. When the blue LED on the front panel glows solid blue (standby mode),
FireBall is ready to use.
5. Select and release the Power button to turn on FireBall.
Updating the Software
FireBall will automatically check the Escient server once a week for any
FireBall software updates, and automatically install them. You can also
manually check for a software update.
Follow these steps to manually update the software:
1. Select the SETUP button to display the Setup menu.
2. Select the Update Software menu item under Utilities.
3. Confirm that you want to update the current software.
4. FireBall will connect to Escient and compare the current software
version with the latest release. If a newer version of the FireBall
software is available, it will be downloaded and installed.
ADDITIONAL INFORMATION
ESCIENT SUPPORT
Contact your dealer or Escient’s Customer Support group.
Hours: Monday - Friday 9:00am - 7pm EST
Phone: 800-372-4368 Press “2” for Sales, or “3” for Support
Fax: 317-616-6790
Internet: www.escient.com
Email: support@escient.com
Please have the following information ready for the Escient Customer Support
technician:
• Product Serial Number
• Model Number
• Date of Registration or Purchase
• Place of Purchase
PAGE 36
Web UI User’s Manual
 Loading...