

Page 1

EscientConvergence Corp.
Manual No. M21201-01A1
Revision February 27, 2002
Copyright 2002
Installation
and User’s
Guide
Page 2

PAGE 1
TUNEBASE 200 INSTALLATION & USER’S GUIDE - M21201-01A1
T
ABLE OF CONTENTS
!
An extensive index is available in
the back of this manual. If you do
not find what you are looking for in
this Table of Contents, please
check the index.
Table of Contents
Chapter 1 - Introduction ------------------------------------------------------------------------------------------------- 5
About This Manual ......................................................................................................................6
Record Your Serial Number .......................................................................................................6
Copyright .................................................................................................................................... 6
Warranty Information..................................................................................................................7
Regulatory Statements ............................................................................................................. 10
Trademarks & Service Marks ................................................................................................... 11
Escient and OpenGlobe Privacy Policy ...................................................................................12
Cautions & Warnings................................................................................................................13
Manual Disclaimers ..................................................................................................................13
Terms and Definitions ............................................................................................................... 14
Contact Information .................................................................................................................. 16
Chapter 2-Setting Up TuneBase 200 ----------------------------------------------------------------------------- 17
Unpack The Equipment .............................................................................................................18
What Else Is Needed ................................................................................................................ 19
Back Panel Reviewed ..............................................................................................................20
Connecting TuneBase 200 to a Composite TV or Monitor ...................................................... 21
About Connecting Audio ..........................................................................................................24
What CD Changers are Supported? ........................................................................................25
Connecting CD Changer(s) Overview .................................................................................... 26
Connecting Sony Changers Using S-Link Cables ................................................................... 27
Connecting CD Changers Using RS-232 Cables .....................................................................29
Connecting CD Changers Using Digital Connectors ................................................................31
Connecting Devices Using IR ...................................................................................................31
Connecting to Internet Using Internal Modem ..........................................................................32
Connecting to Internet Using HPNA .........................................................................................33
Page 3
PAGE 2
T
UNEBASE 200 INSTALLATION & USER’S GUIDE - M21201-01A1
T
ABLE OF CONTENTS
!
An extensive index is available in
the back of this manual. If you do
not find what you are looking for
in this Table of Contents, please
check the index.
Connecting Multi-Room Controller or Touch Panel ...................................................................34
Connect Power Cord ...............................................................................................................35
TuneBase 200 Power States: On, Standby, Off .....................................................................36
Chapter 3 - Getting Started ------------------------------------------------------------------------------------------- 37
What Is The Setup Process? ................................................................................................... 38
Running Quick Start .................................................................................................................39
Guided Tour Through Quick Start ............................................................................................ 40
Run the Autobuild Process ......................................................................................................49
Inserting and Removing Discs ................................................................................................. 49
Adding or Removing Changers ................................................................................................ 50
Register with Escient ............................................................................................................... 51
Using the Remote, Keyboard, or Touch Panel .........................................................................51
Overview Of User Interface .................................................................................................... 52
Chapter 4 - Playing Music --------------------------------------------------------------------------------------------- 57
Accessing Music Mode ............................................................................................................58
Music Player Screen Overview ............................................................................................... 59
Navigating the Music Player Screen ........................................................................................60
Selecting and Listening to a Music Title ...................................................................................61
Sorting Music by Artist, Title, or Song ..................................................................................... 61
One Key Access to Favorite Music ......................................................................................... 62
One Key Access to Random Music ......................................................................................... 62
Chapter 5 - Managing Music ---------------------------------------------------------------------------------------- 63
To Further Organize Your Music .............................................................................................. 64
To Create a New Music Playlist ...............................................................................................65
To Edit a Music Playlist .............................................................................................................66
To Delete a Music Playlist ......................................................................................................... 67
To Change How Music is Played ............................................................................................. 68
To Edit Tracks ........................................................................................................................... 69
To Edit Disc Information ............................................................................................................ 70
To Search For Cover Art .......................................................................................................... 71
Page 4

PAGE 3
TUNEBASE 200 INSTALLATION & USER’S GUIDE - M21201-01A1
TABLE OF CONTENTS
To Select Cover Art .................................................................................................................. 72
To Access “More...” Music Options .........................................................................................73
To Create a New Music Group ................................................................................................ 74
To Edit a Music Group ..............................................................................................................75
To Delete a Music Group ..........................................................................................................76
To Get Music Info ......................................................................................................................77
Chapter 6 - Customizing TuneBase 200 -------------------------------------------------------------------------- 78
Two Ways to Customize TuneBase 200 .................................................................................79
To Change User Information .....................................................................................................80
To Change Internet Configuration Settings ..............................................................................82
To Change Preferences ...........................................................................................................84
To Access Changer Management Features ............................................................................ 87
To Change Security Settings ....................................................................................................89
To Access TuneBase 200 Utilities ........................................................................................... 91
Chapter 7 - Escient Touch Panel Overview --------------------------------------------------------------------- 93
Touch Panel Interaction ............................................................................................................ 94
Appendix A - Cable Pin-Out Configurations ------------------------------------------------------------------- 100
Pin Configurations for RS-232 Cables to CD Changers ....................................................... 101
Pin Configurations for RS-232 Cables to Control Systems .................................................. 102
Appendix B - TuneBase 200 Technical Specs---------------------------------------------------------------- 103
Video ..................................................................................................................................... 104
Dimensions ............................................................................................................................ 104
Audio Specifications ............................................................................................................. 105
Power Usage and Power Supply ......................................................................................... 106
3rd Party Certifications ......................................................................................................... 106
Telephone Regulations .......................................................................................................... 107
FCC Part 15, Subpart B ......................................................................................................... 108
Appendix C - Minor Troubleshooting----------------------------------------------------------------------------- 109
Minor Troubleshooting Tips .................................................................................................... 110
Appendix D - External Control Protocol -------------------------------------------------------------------------- 112
!
An extensive index is available in
the back of this manual. If you do
not find what you are looking for in
this Table of Contents, please
check the index.
Page 5

PAGE 4
T
UNEBASE 200 INSTALLATION & USER’S GUIDE - M21201-01A1
T
ABLE OF CONTENTS
Commands and Responses Overview ................................................................................. 113
Unsolicited Status Events ...................................................................................................... 115
Remote/Keyboard Commands ............................................................................................... 117
Database Commands ............................................................................................................ 124
Status Commands ................................................................................................................. 130
Control Commands ................................................................................................................ 132
Appendix E - TuneBase 200 Internet Connections ---------------------------------------------------------- 133
When Does TuneBase 200 Connect To Internet? ................................................................ 134
Appendix F - Enhanced Entertainment Services ------------------------------------------------------------- 137
Enhanced Entertainment Services Through OpenGlobe ...................................................... 138
Appendix G - Home Networking ---------------------------------------------------------------------------------- 139
What is Home Networking? ................................................................................................... 140
Setup Diagrams - Single TuneBase 200 on a Network ........................................................ 141
Appendix H - Remote Overview ---------------------------------------------------------------------------------- 144
Text Entry Via the TuneBase 200 Remote Control ............................................................... 150
Installing Batteries Into Remote ............................................................................................. 153
Programming the Remote ...................................................................................................... 153
Programming TV/VCR Combo ............................................................................................... 154
Searching for Your Code ...................................................................................................... 155
Checking the Codes .............................................................................................................. 156
Re-Assigning Device Keys ................................................................................................... 157
Changing Volume Lock.......................................................................................................... 159
Other Manufacturer’s IR Codes ............................................................................................ 160
Appendix I - Wireless Keyboard Overview ------------------------------------------------------------------- 165
TuneBase 200 Manual Index --------------------------------------------------------------------------------------- 167
!
An extensive index is available in
the back of this manual. If you do
not find what you are looking for
in this Table of Contents, please
check the index.
!
An extensive index is available in
the back of this manual. If you do
not find what you are looking for
in this Table of Contents, please
check the index.
Page 6

PAGE 5
TUNEBASE 200 INSTALLATION & USER’S GUIDE - M21201-01A1
1
Chapter 1 Introduction
About This Manual
Record Your Serial Number
Copyright
Warranty Information
Regulatory Statement
Trademarks and Service Marks
Escient and OpenGlobe Privacy Policy
Cautions and Warnings
Manual Disclaimers
Terms and Definitions
Contact Information
CHAPTER 1 - INTRODUCTION
Page 7

PAGE 6
T
UNEBASE 200 INSTALLATION & USER’S GUIDE - M21201-01A1
!
The notes icon is shown
throughout this manual. It
indicates a tip or an additional
piece of information that could
prove useful.
CHAPTER 1 - INTRODUCTION
About This Manual
This combination installation and user’s manual serves as a step-by-step guide to
setting up the TuneBase 200 system developed and shipped by Escient Convergence.
Chapter 2 shows you how to set up and connect TuneBase 200 to your other equipment, while the rest of the Chapters show you how to use TuneBase 200 for your music
enjoyment.
Record Your Serial Number
The serial number for this unit is located at the rear of the device. Please record the
serial number in the space provided below. Refer to it whenever you call upon your
Escient dealer regarding this product.
TuneBase 200 Serial No. __________________
Copyright
This manual is the copyrighted property of Escient Convergence Corp. Any use or
reproduction of this manual in any form without the expressed written permission of
Escient Convergence Corp. is a violation of copyright laws.
Page 8

PAGE 7
TUNEBASE 200 INSTALLATION & USER’S GUIDE - M21201-01A1
Warranty Information
Terms of Coverage - Each Escient Convergence Corp. branded music management system sold and installed
in the United States, comes with a standard one (1) year warranty. This warranty provides no-charge coverage
under normal product usage, for a period of one year from the date of registration and/or purchase (whichever
is earlier). This warranty program provides the following key features and benefits:
• Twelve (12) months service, parts and labor.
• Five (5) day turn around time on all standard in-warranty repairs. No charges to the customer other than
in-bound shipping charges which are determined by the shipping method. All return shipments will be via
Standard Ground Transportation (approximately 5 business days).
• Twelve (12) months of regular hour telephone support (9AM to 7PM EST), Monday through Friday.
• 24-hour email response from the Escient Convergence Corp. Support Web Site.
• Free software upgrades for a period of twelve (12) months. 24-hour on-line software maintenance
updates provided via a broadband or dial-up telephone connection.
• Twelve (12) months of access to online music recognition services, including, but not limited to, CD text
information and cover art.
• Access to 24-hour music database (CDDB) and entertainment services providing access to over 900,000
CD titles and associated information.
What is Covered - The goal of this warranty is to cover operational problems that might arise with your
product during normal use. This includes failure to start, improper operation, or intermittent failures. As part of
the warranty, Escient Convergence Corp. will pay for all labor and materials used in the repair of the system.
Escient Convergence Corp. reserves the right to use new or factory refurbished parts in the repair of these inwarranty systems.
Escient Convergence Corp. will also pay for the return shipment of the repaired system via standard ground
transportation.
At Escient Convergence Corp.’s discretion, the Company will repair or replace any system sent in for repair.
Upon repair, the product will be new or like-new in condition and will meet all necessary regulatory
requirements.
C
HAPTER 1 - INTRODUCTION
Page 9

PAGE 8
T
UNEBASE 200 INSTALLATION & USER’S GUIDE - M21201-01A1
What is Not Covered - Escient Converge Corp. products are sold through Escient Convergence Corp.
approved dealers. A number of items must remain intact in order for Escient Convergence Corp. to verify and
validate this warranty. Additionally, there are several conditions which violate Escient Convergence Corp.’s
warranty program. These include:
• The product must have been purchased through an Escient Convergence Corp. approved dealership.
• Any product, on which the serial numbers has been defaced, modified or removed physically or
electronically will not be covered by an Escient Convergence Corp. warranty.
• Escient Convergence Corp. will not cover under warranty damage to the product as a result of accident,
misuse, abuse, neglect, fire, water, lightning, or other acts of God or nature, improper storage,
unauthorized modification, or failure to follow instructions.
• Any type of unauthorized repair or modifications made to the system resulting in damage to the product
will not be covered under this warranty.
• Damage caused to the product as a result of improper shipping or installation.
• Any problems related to the use of the product which is not a direct problem with the product.
• Damage caused to the product as a result of improper installation to third party peripherals or products,
or incorrect connection to peripheral or products.
• Unauthorized software installation.
Additionally, Escient Convergence Corp. does not cover the following items under the terms or its warranty
programs:
• Installation or removal charges.
• Cost of initial technical adjustments (setup costs).
• Battery replacement.
Escient Convergence Corp.’s sole liability for any defective product is limited to the repair or replacement of
the product at our discretion. Escient shall not be liable for damages to other property caused by defects in
this product, damages based upon inconvenience, loss of use of the product, loss of time or data, commercial
loss or any other damages, whether real, incidental or consequential.
C
HAPTER 1 - INTRODUCTION
Page 10

PAGE 9
TUNEBASE 200 INSTALLATION & USER’S GUIDE - M21201-01A1
How to Return a Product - Contact your dealer or Escient Convergence Corp.’s Customer Support group at
800-372-4368. Please have the following information ready for your dealer or Escient Convergence Corp.’s
Customer Support technician.
• Product Serial Number
• Model Number
• Date of Registration or Purchase
Upon reviewing the request for repair under warranty provisions, Escient Convergence Corp.’s Technical
Support group will issue a Return Material Authorization (RMA) number. This number is to be attached to the
outside of the shipping carton. Additional instructions will be provided by technical support.
Please be sure to use original packing carton and internal packing materials to assure proper shipment of the
system. Insurance costs are the responsibility of the customer. Most shippers only provide standard
coverage for $100 in cost so please protect yourself by providing additional insurance for the returned
product.
Out of Warranty Repair - Escient Convergence Corp. provides out of warranty repair service on a cost plus
labor basis. Minimum charges will apply. Technical support will provide information on this service at the time
of the call.
C
HAPTER 1 - INTRODUCTION
Page 11

PAGE 10
T
UNEBASE 200 INSTALLATION & USER’S GUIDE - M21201-01A1
Regulatory Statements
‘’NOTICE: The Industry Canada label identifies certified equipment. This certification means that the
equipment meets telecommunications network protective, operational and safety requirements as prescribed
in the appropriate Terminal Equipment Technical Requirements document(s). The Department does not
guarantee the equipment will operate to the user’s satisfaction.
Before installing this equipment, users should ensure that it is permissible to be connected to the facilities of
the local telecommunications company. The equipment must also be installed using an acceptable method of
connection. The customer should be aware that compliance with the above conditions may not prevent
degradation of service in some situations.
Repairs to certified equipment should be coordinated by a representative designated by the supplier. Any
repairs or alterations made by the user to this equipment, or equipment malfunctions, may give the
telecommunications company cause to request the user to disconnect the equipment.
Users should ensure for their own protection that the electrical ground connections of the power utility,
telephone lines and internal metallic water pipe system, if present, are connected together. This precaution
may be particularly important in rural areas.
Caution: Users should not attempt to make such connections themselves, but should contact the appropriate
electric inspection authority, or electrician, as appropriate.’’
‘’NOTICE: The Ringer Equivalence Number (REN) assigned to each terminal device provides an indication
of the maximum number of terminals allowed to be connected to a telephone interface. The termination on an
interface may consist of any combination of devices subject only to the requirement that the sum of the
Ringer Equivalence Numbers of all the devices does not exceed 5.’’
!
Additional information regarding
this statement may be found in
Appendix B.
CHAPTER 1 - INTRODUCTION
Page 12

PAGE 11
TUNEBASE 200 INSTALLATION & USER’S GUIDE - M21201-01A1
Trademarks & Service Marks
Escient and the Escient logo are registered trademarks of Escient Technologies, LLC.
TuneBase 200 is a trademark of Escient® Convergence Corp.
Other product names mentioned herein are used for identification purposes only and
may be trademarks of their respective companies.
Gracenote is CDDB, Inc. d/b/a “Gracenote.” CD-related data from Gracenote CDDB®,
copyright 1999, 2000, 2001 Gracenote. CDDB is a registered trademark of Gracenote. The
Gracenote logo and the Gracenote CDDB logo are trademarks of Gracenote. Music
Recognition Service and MRS are service marks of Gracenote.
Enhanced entertainment services are provided by OpenGlobe
®
. These services provide
the ability to explore new music, learn about artists and their influences, purchase new
music, and more.
Hereafter in this manual, Escient Convergence Corp. shall be referred to as Escient.
CHAPTER 1 - INTRODUCTION
Page 13

PAGE 12
T
UNEBASE 200 INSTALLATION & USER’S GUIDE - M21201-01A1
Escient and OpenGlobe Privacy Policy
Escient is committed to providing you with a product that you enjoy and are confident
in using, while OpenGlobe is committed to providing services in a private and secure
environment. We recognize and respect each individual user’s privacy and have
created this Privacy Policy to demonstrate our commitment to your privacy.
We want you to be fully informed about the information that we collect, why we collect
it, and with whom we share it.
It is our hope that, after reading this notice, you will understand our commitment to
privacy and be confident that we will use your information responsibly. By using the
Escient TuneBase 200, you are accepting the practices described in this Privacy Policy.
!
The Escient and OpenGlobe
Privacy Policy appears on the zip
code screen of the Quick Start
automatic setup procedure.
In addition, you can access the
statement at any time by pressing
the SETUP key on your remote or
keyboard and choosing the
option: user information,
privacy policy.
CHAPTER 1 - INTRODUCTION
Page 14
PAGE 13
TUNEBASE 200 INSTALLATION & USER’S GUIDE - M21201-01A1
Cautions & Warnings
Caution: To reduce the risk of electric shock, do not remove the cover. No user
serviceable parts are inside. Refer servicing to qualified service personnel.
Caution: To prevent electric shock, do not use a 3 wire to 2 wire adapter plug.
A 3 prong outlet is required.
Caution: You are cautioned that any change or modification not expressly approved in
this manual or approved in writing by an authorized representative of Escient could void
your warranty and/or your authority to operate this equipment.
Caution: Prolonged use of any video device which produces a static (non-moving,
non-changing) or repetitive image on your projector, television or plasma display device
can cause “screen burn-in”. You are encouraged to leave the TuneBase 200 screensaver turned on and set to the lowest possible “time-out” duration.
Manual Disclaimers
At the time of printing, the TuneBase 200 screen shot images in this manual matched the
TuneBase 200 interface screens. However, since TuneBase 200 has the capability of
downloading software updates and enhancements on a regular basis, the resulting
screen updates may no longer match the images in this manual.
CHAPTER 1 - INTRODUCTION
Page 15

PAGE 14
T
UNEBASE 200 INSTALLATION & USER’S GUIDE - M21201-01A1
Terms and Definitions
Following are terms used throughout this manual.
• Autobuild -the process whereby TuneBase 200 connects to the Internet and
performs a disc lookup (gets cover art, track titles, artist info) on CD’s in your
attached changers.
• Button - refers to a graphic item on the display screen.
• Group – a collection of similar titles used to organize content. Standard groups are
provided (such as groups based on genre) and custom groups can be created. For
example, within the Music guide, groups contain a collection of CD’s or custom
Playlists organized automatically by genre or manually by the user.
• Highlight – highlighting is used to indicate the cursor location. When the cursor
moves up, down, left, or right, the highlight moves to the next nearest item. No
action is taken except that more information may be displayed on the screen, until
the Select key is pressed.
• Info text area – the portion of the guide screen used for displaying the description
of the highlighted title.
• Key - refers to the push-down mechanisms on your remote or keyboard.
CHAPTER 1 - INTRODUCTION
Page 16
PAGE 15
TUNEBASE 200 INSTALLATION & USER’S GUIDE - M21201-01A1
• Playlist – a custom Music title made up of tracks from one or more titles – in effect,
a custom CD.
• Selected – the result of pressing the PLAY or SELECT key to activate the
highlighted title, track, or program.
• Title – the name of the music collection, typically used with CD titles or Playlists.
Music titles can include the album name for a standard CD or the name of a custom
Playlist.
• Tracks – single songs within a Music title (CD, or Playlist title).
CHAPTER 1 - INTRODUCTION
Page 17

PAGE 16
T
UNEBASE 200 INSTALLATION & USER’S GUIDE - M21201-01A1
C
HAPTER 1 - INTRODUCTION
Contact Information
Escient Convergence Corp. may be contacted by using the following information. Once
you have worked with your local Escient dealer, we encourage you to contact us if you
are in need of any further assistance.
Escient Convergence Corp.
6325 Digital Way
Indianapolis, Indiana 46278
Phone: 800-372-4368 Press “1” for Sales, or “2” for Support
Pager Support (24-hour): 317-990-2333
Hours: Monday - Friday 9:00am - 7pm EST
Fax: 317-616-6790
www.escientconvergence.com
Email: support@escient.com
!
Please visit the Escient website at
www.escientconvergence.com
for the current product updates,
technical information, and
document updates.
The website is also the most
convenient method for accessing
information, 7 days a week, 24
hours a day.
Page 18

PAGE 17
TUNEBASE 200 INSTALLATION & USER’S GUIDE - M21201-01A1
2
CHAPTER 2 - SETTING UP TUNEBASE 200
Chapter 2-Setting
Up TuneBase 200
Unpack The Equipment
What Else Is Needed
Back Panel Reviewed
Connecting TuneBase 200 to a Composite TV or Monitor
About Connecting Audio
What CD Changers are Supported?
Connecting CD Changer(s) Overview
Connecting Sony Changers Using S-Link Cables
Connecting CD Changers Using RS-232 Cables
Connecting CD Changers Using Digital Connectors
Connecting Devices Using IR
Connect to Internet Using Internal Modem
Connect to Internet Using HPNA
Connect Multi-Room Controller or Touch panel
Connect Power Cord
TuneBase 200 Power States: On, Standby, Off
®
Page 19

PAGE 18
T
UNEBASE 200 INSTALLATION & USER’S GUIDE - M21201-01A1
Unpack The Equipment
! Carefully unpack all of the TuneBase 200 equipment from the shipping container.
" Next, compare it to the following list and make sure you have everything available
before you get started.
• TuneBase 200 unit packed in plastic bag
• Escient 48 button remote control w/(qty2) AA batteries
• A/C Power Cord - 5’
• S-Video cable (Y-C) - 5’
• Composite Video cable - 5’
• Phone cable - 25’
• S-Link mono cable - 10’
• Dual RCA cable - 5’
• TOSlink Digital Audio Cable - 3’
• User/Installation Manual
• Quick Start Guide
Optional items:
• Wireless keyboard with 3 AA batteries
• Escient Touch Panel: Model ETP-1000
• USB to Ethernet Adapter
• RS-232 Communication Cables (for other CD changers or control & audio distribution
systems).
• Escient Pipeline Software - allows editing of TuneBase 200 data (such as playlists,
song names, groups) on a PC.
• Rack shelves specifically made for the TuneBase 200 unit (available from Middle
Atlantic at http://www.middleatlantic.com or 973-839-1011)
• HPNA Bridge or Router
CHAPTER 2 - SETTING UP TUNEBASE 200
!
Since no two people are likely to have
the same exact audio or video
configuration, the steps involved in
putting the TuneBase 200 system
together are not specific to any one
piece of audio or video equipment.
Therefore, it may be necessary for
you to customize one or more of the
cables that are included with this
equipment. Please see Appendix A for
a cable pin-out configuration guide.
Depending upon the intricacy of the
audio and video equipment and the
access to each component, installation
should take approximately 2-4 hours
including Autobuild.
!
Listings of supported optional
equipment such as CD Changers may
be found on the Escient website.
Page 20

PAGE 19
TUNEBASE 200 INSTALLATION & USER’S GUIDE - M21201-01A1
!
During the Quick Setup procedure
in Chapter 3, you will be asked for
information regarding your (ISP)
Internet Service Provider.
Please gather the following
information if you are using a dialup ISP.
• Dialing Number
• Login Name
• Login Password
• Name of ISP
What Else Is Needed
In order for TuneBase 200 to function properly, you will need to provide the following
items:
! A video connection such as a television, monitor, VGA projector, Touch Panel, or
external Control System.
" Stereo receiver, CD changers, speakers, and other associated audio equipment.
# Available Internet access through an Internet Service Provider (ISP): standard
telephone dial-up or broadband connection such as a cable modem or DSL.
In order to take full advantage of the groundbreaking entertainment services
provided through TuneBase 200, the preferred method of connection is Broadband
(either Cable Modem or DSL).
TuneBase 200 supports many dial-up Internet Service Providers (ISPs). AOL®,
CompuServe®, and some free ISPs do not use standard, consistent methods of
Internet connectivity and do not open their networks to outside users. Therefore,
these cannot be used with TuneBase 200 in a dial-up connection. A special offer
for EarthLink’s award-winning ISP service is available on one of the TuneBase 200
Quick Start setup screens.
CHAPTER 2 - SETTING UP TUNEBASE 200
Page 21
PAGE 20
T
UNEBASE 200 INSTALLATION & USER’S GUIDE - M21201-01A1
!
Please note that the audio and
video ports on the back panel of
the actual TuneBase 200 unit are
labeled and color-coded.
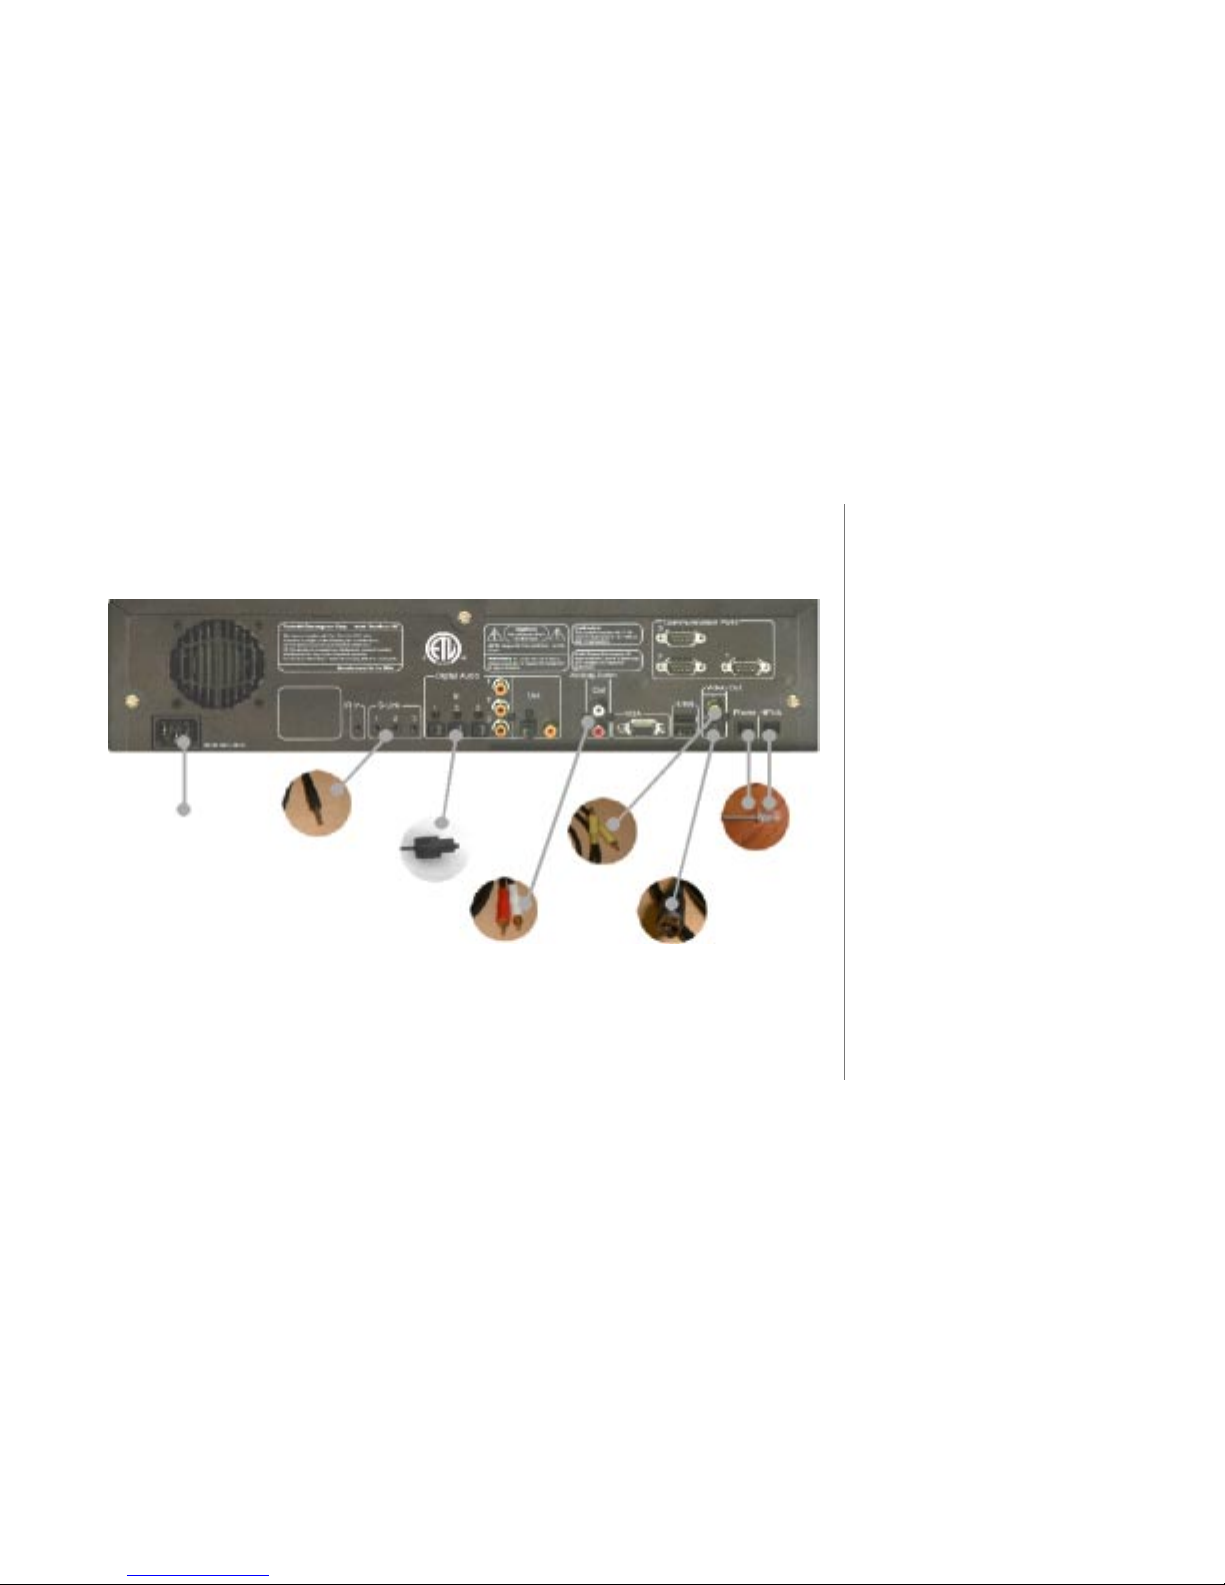
Back Panel Reviewed
Review the back panel of the TuneBase 200 unit and the associated cabling.
CHAPTER 2 - SETTING UP TUNEBASE 200
5’ Power Cord
10’ Mono
S-Link Cable
5’ Dual RCA Cable
(Red Connector and
White Connector)
5’ Composite Video
Cable (Yellow
Connector)
5’ S-Video Cable
25’ Phone Wire
3’ TOSlink Digital
Audio Cable
Page 22
PAGE 21
TUNEBASE 200 INSTALLATION & USER’S GUIDE - M21201-01A1
Connecting TuneBase 200 to a Composite TV or Monitor
! Use the Composite Video Cable, which can be
identified through its yellow colored connectors.
" Connect one end of the cable to the TuneBase 200 Video Out (Composite) port.
# Connect the other end of the cable to the Video In (Composite) port on your TV
or Monitor.
!
The cables you receive are black.
The connectors on the cables are
the only portions that are “colored.”
!
Note to Escient dealers:
If connecting TuneBase 200 to a
TV, there may be several VIDEO IN
ports. Use a VIDEO IN port that is
not currently being utilized. Also,
be sure to inform your client which
port is connected to TuneBase 200
so that the appropriate selection
can be made to access TuneBase
200.
CHAPTER 2 - SETTING UP TUNEBASE 200
Video IN
Comp osite P ort
TV or MONITOR
BACK PANEL
Video Out – Co mposite P ort
Composite Video Cable
TuneBase Back Panel
Video IN
Comp osite P ort
TV or MONITOR
BACK PANEL
Video Out – Co mposite P ort
Composite Video Cable
TuneBase Back Panel
Page 23
PAGE 22
T
UNEBASE 200 INSTALLATION & USER’S GUIDE - M21201-01A1
Connecting TuneBase 200 to an S-Video TV or Monitor
! Use the S-Video Cable, which can be identified as a
gold cup connector with tiny pins inside.
" Connect one end of the cable to the TuneBase 200 Video Out (S-Video) port.
# Connect the other end of the cable to the S-Video In port on your TV or
Monitor.
CHAPTER 2 - SETTING UP TUNEBASE 200
!
Note to Escient dealers:
If connecting TuneBase 200 to a
TV, there may be several VIDEO
IN ports. Use a VIDEO IN port that
is not currently being utilized.
Also, be sure to inform your client
which port is connected to
TuneBase 200 so that the
appropriate selection can be
made to access TuneBase 200.
S-Vide o IN port
S-Video TV or
S-Video
MONITOR
BACK PANEL
Video Out – S-V ideo Port
S-Video Cable
TuneBase Back Panel
S-Vide o IN port
S-Video TV or
S-Video
MONITOR
BACK PANEL
Video Out – S-V ideo Port
S-Video Cable
TuneBase Back Panel
Page 24
PAGE 23
TUNEBASE 200 INSTALLATION & USER’S GUIDE - M21201-01A1
Connecting TuneBase 200 to a VGA Projector or Monitor
! Use a VGA cable.
(Not supplied with TuneBase 200.)
" Connect one end of the cable to the TuneBase 200 VGA port.
# Connect the other end of the cable to the VGA port on your VGA device.
!
If you are connecting to a VGA
Projector or VGA Monitor, you
may need to supply your own
VGA cable (must be less than 25
feet).
CHAPTER 2 - SETTING UP TUNEBASE 200
VGA Port
VGA Monitor or
VGA Projector
Back Panel
VGA Port
VGA Cable
TuneBase Back Panel
VGA Port
VGA Monitor or
VGA Projector
Back Panel
VGA Port
VGA Cable
TuneBase Back Panel
Page 25

PAGE 24
T
UNEBASE 200 INSTALLATION & USER’S GUIDE - M21201-01A1
About Connecting Audio
TuneBase 200 does not contain an amplifier nor does it contain speakers, so it will be
necessary for you to have your TuneBase 200 attached to a stereo receiver or to
amplified speakers. Follow your particular manufacturer’s instructions for this hookup
procedure.
You will also be attaching audio connections from the cd changer or controller to the
TuneBase 200 unit. To take full advantage of the digital capabilities of your music
management system and for best audio performance, please use the appropriate cables
for your particular devices. TuneBase 200 is equipped with input and output ports for
the following types of audio inputs/outputs:
• 1 set of stereo analog audio outputs
• 1 coax S/PDIF output
• 1 optical TOSLink output
• 3 coax S/PDIF inputs
• 3 optical TOSLink inputs
!
Escient recommends protecting
TuneBase 200 with a surge
suppressor or an uninterruptable
power supply (UPS). Surge
Protectors and UPS devices come
in different sizes/ratings. Be sure
to evaluate the protection
capacity of the unit by checking
the manufacturer’s guidelines.
CHAPTER 2 - SETTING UP TUNEBASE 200
Page 26

PAGE 25
TUNEBASE 200 INSTALLATION & USER’S GUIDE - M21201-01A1
C
HAPTER 2 - SETTING UP TUNEBASE 200
!
During the automatic Quick Start
setup procedure, TuneBase 200
checks for any supported CD
Changers. If CD changers are
found, the appropriate internal
settings will be made to setup
the changer for play back, play
through and control. For
example, if a supported changer
is detected, the digital inputs are
reserved for this changer’s use
and will not show up as an
External Input in the Music Guide.
What CD Changers are Supported?
The following changers with digital audio outputs are or will very soon be currently
supported by TuneBase 200. Since new models continue to become available, please
check the Escient website for the latest list of supported CD Changers.
• Sony Audio Changers (CDPCX-220, 300, or 400 series)
• Pioneer DVD Changer (DVF07) Compatible in late 2002
• Marantz (VC8100) Compatible in late 2002
• Integra by Onkyo (DPT-1) Compatible in late 2002
• Kenwood CD Changers: (CD-4700M, CD-425M ) Compatible in late 2002
• Kenwood DVD Changers: (DV-5700M, DV-5030M) Compatible in late 2002
When new changer models become compatible, you can use the SETUP, UTILITIES,
UPDATE SOFTWARE menu to download compatible TuneBase 200 software over the
Internet connection. Please refer to Chapter 6 for instructions.
Page 27

PAGE 26
T
UNEBASE 200 INSTALLATION & USER’S GUIDE - M21201-01A1
Connecting CD Changer(s) Overview
CD Changers can be connected to TuneBase 200 in a variety of ways, depending upon
model and cable attachments.
• Sony changers are connected through standard S-Link cables.
• Some changers connect to communication ports through the use of RS-232 cables.
Examples of popular brands that connect in this manner: Kenwood, Pioneer,
Marantz, and Onkyo.
• Other changers may also connect through digital connections requiring fiber optic
or co-ax digital cables.
!
You should not interact with the
front panel of your changer
except to load and unload discs.
Page 28

PAGE 27
TUNEBASE 200 INSTALLATION & USER’S GUIDE - M21201-01A1
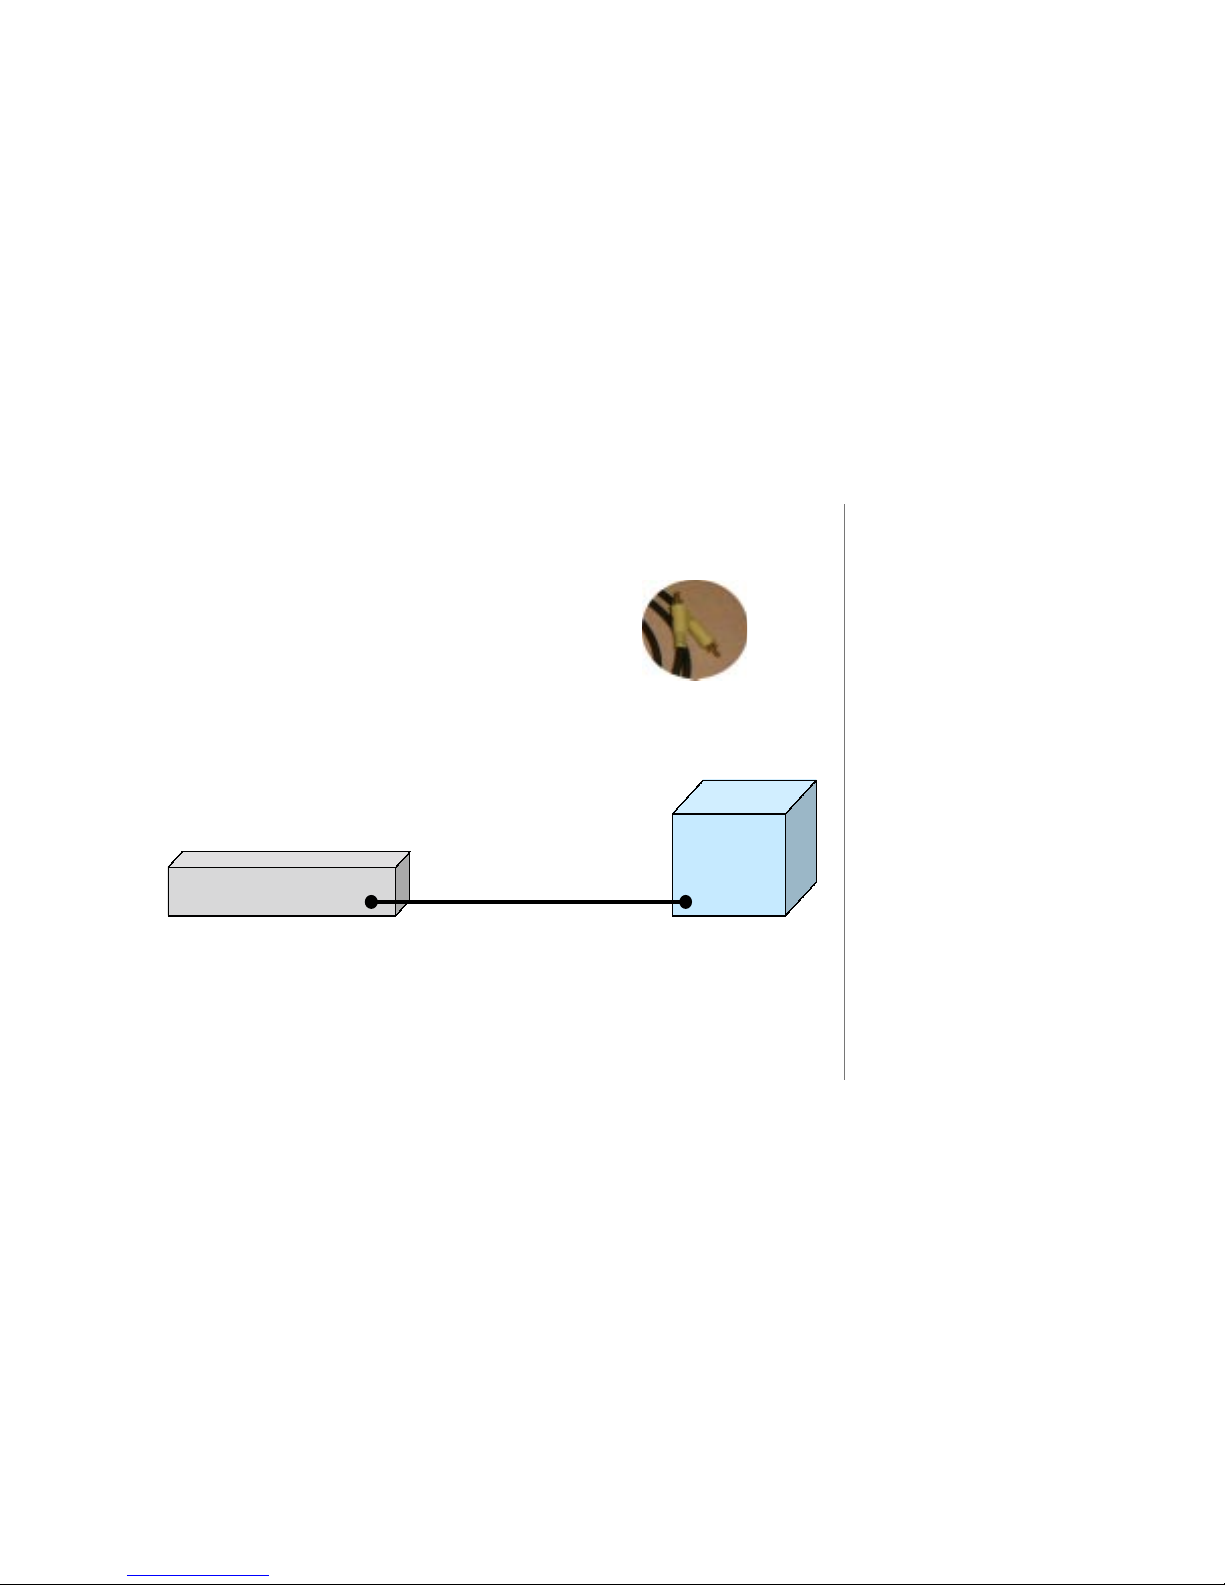
Connecting Sony Changers Using S-Link Cables
Up to 3 Sony changers can be connected to TuneBase 200 using individual standard SLink cables.
! Use the S-Link cable (1/8” mini-jack).
" Connect one end of the cable to the TuneBase 200 S-Link (number 1) port.
# Connect the other end of the cable to the S-Link port on your Sony changer.
$ To connect additional Sony changers, repeat steps 1 through 3 using S-Link
Ports 2 and 3. See next page.
!
If you need more S-Link cables,
use 6’ - 8’ standard & mono 1/8”
mini-jack cables. Do not exceed
10’ in length.
CHAPTER 2 - SETTING UP TUNEBASE 200
S-Link Port
Sony Changer Back Panel
S-Link Port
S-Link Cable
TuneBase Back Pa nel
S-Link Port
Sony Changer Back Panel
S-Link Port
S-Link Cable
TuneBase Back Pa nel
Page 29
PAGE 28
T
UNEBASE 200 INSTALLATION & USER’S GUIDE - M21201-01A1
% Set CD Control on all Sony Changers to 1. This is either a switch setting on
the back of the changer or a front panel menu selection. Please refer to your
Sony manual for instructions.
& Connect audio from each CD Changer to TuneBase 200. Connections using
optical cables to the digital ports will produce the highest quality audio.
!
When installing digital audio
inputs and S-Link input to
TuneBase 200, make sure SLink 1 and Digital Audio 1 are
from Changer 1, S-Link 2 and
Digital Audio 2 are from
Changer 2, etc.
S-Link Port
Sony Changer Back Panel
S-Link Port 1
S-Link Cable
TuneBas e
Back Panel
S-Link Port
Sony Changer Back Panel
S-Link Port
Sony Changer Back Panel
S-Link Port 2
S-Link Port 3
S-Link Cable
S-Link Cable
S-Link Port
Sony Changer Back Panel
S-Link Port 1
S-Link Cable
TuneBas e
Back Panel
S-Link Port
Sony Changer Back Panel
S-Link Port
Sony Changer Back Panel
S-Link Port 2
S-Link Port 3
S-Link Cable
S-Link Cable
Page 30

PAGE 29
TUNEBASE 200 INSTALLATION & USER’S GUIDE - M21201-01A1
CHAPTER 2 - SETTING UP TUNEBASE 200
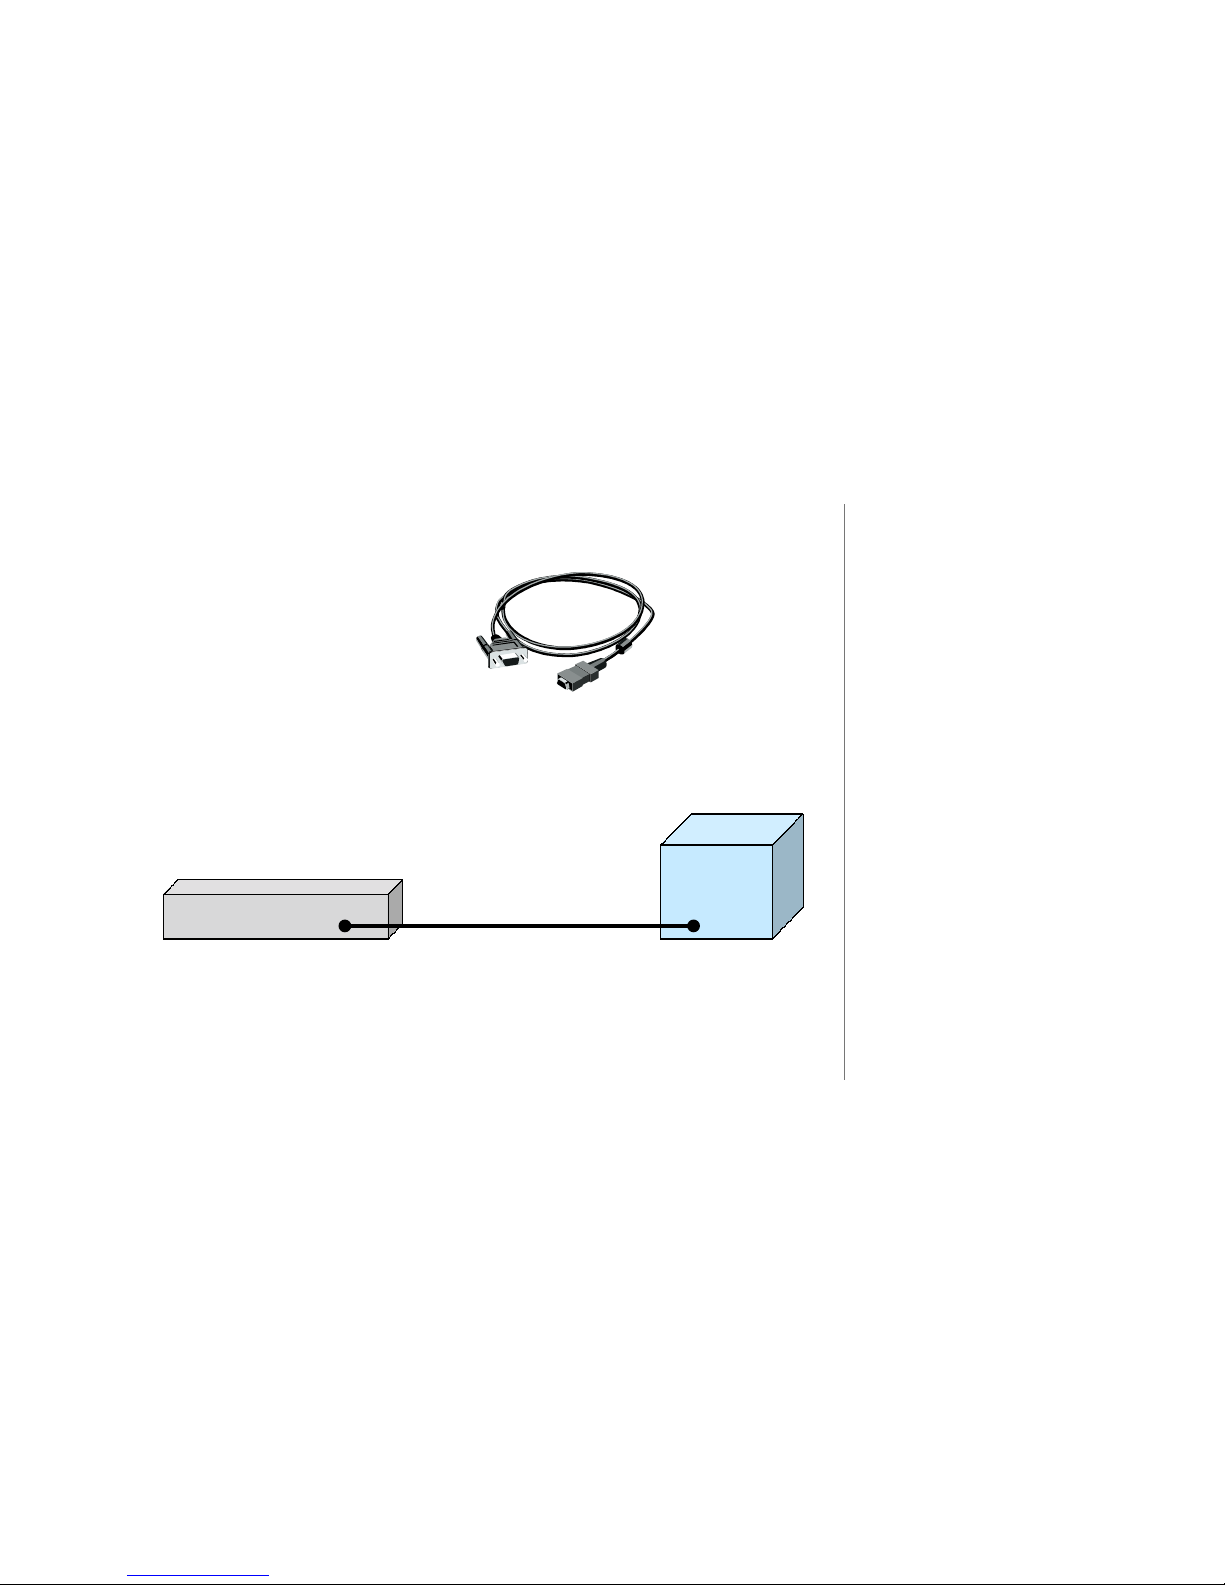
Connecting CD Changers Using RS-232 Cables
! Use an RS-232 cable (not supplied) with connectors made specifically so that
one end connector fits the pin configuration for TuneBase 200 and the other
end connector fits the pin configuration for your specific CD changer. Refer to
Appendix A for the pin configurations.
" Insert one end of the cable (the TuneBase 200 connector end) into an RS-232
COM port on TuneBase 200. There are 3 available COM ports.
# Insert the other end of the cable (the connector that fits the CD Changer) into
the RS-232 port on the CD Changer.
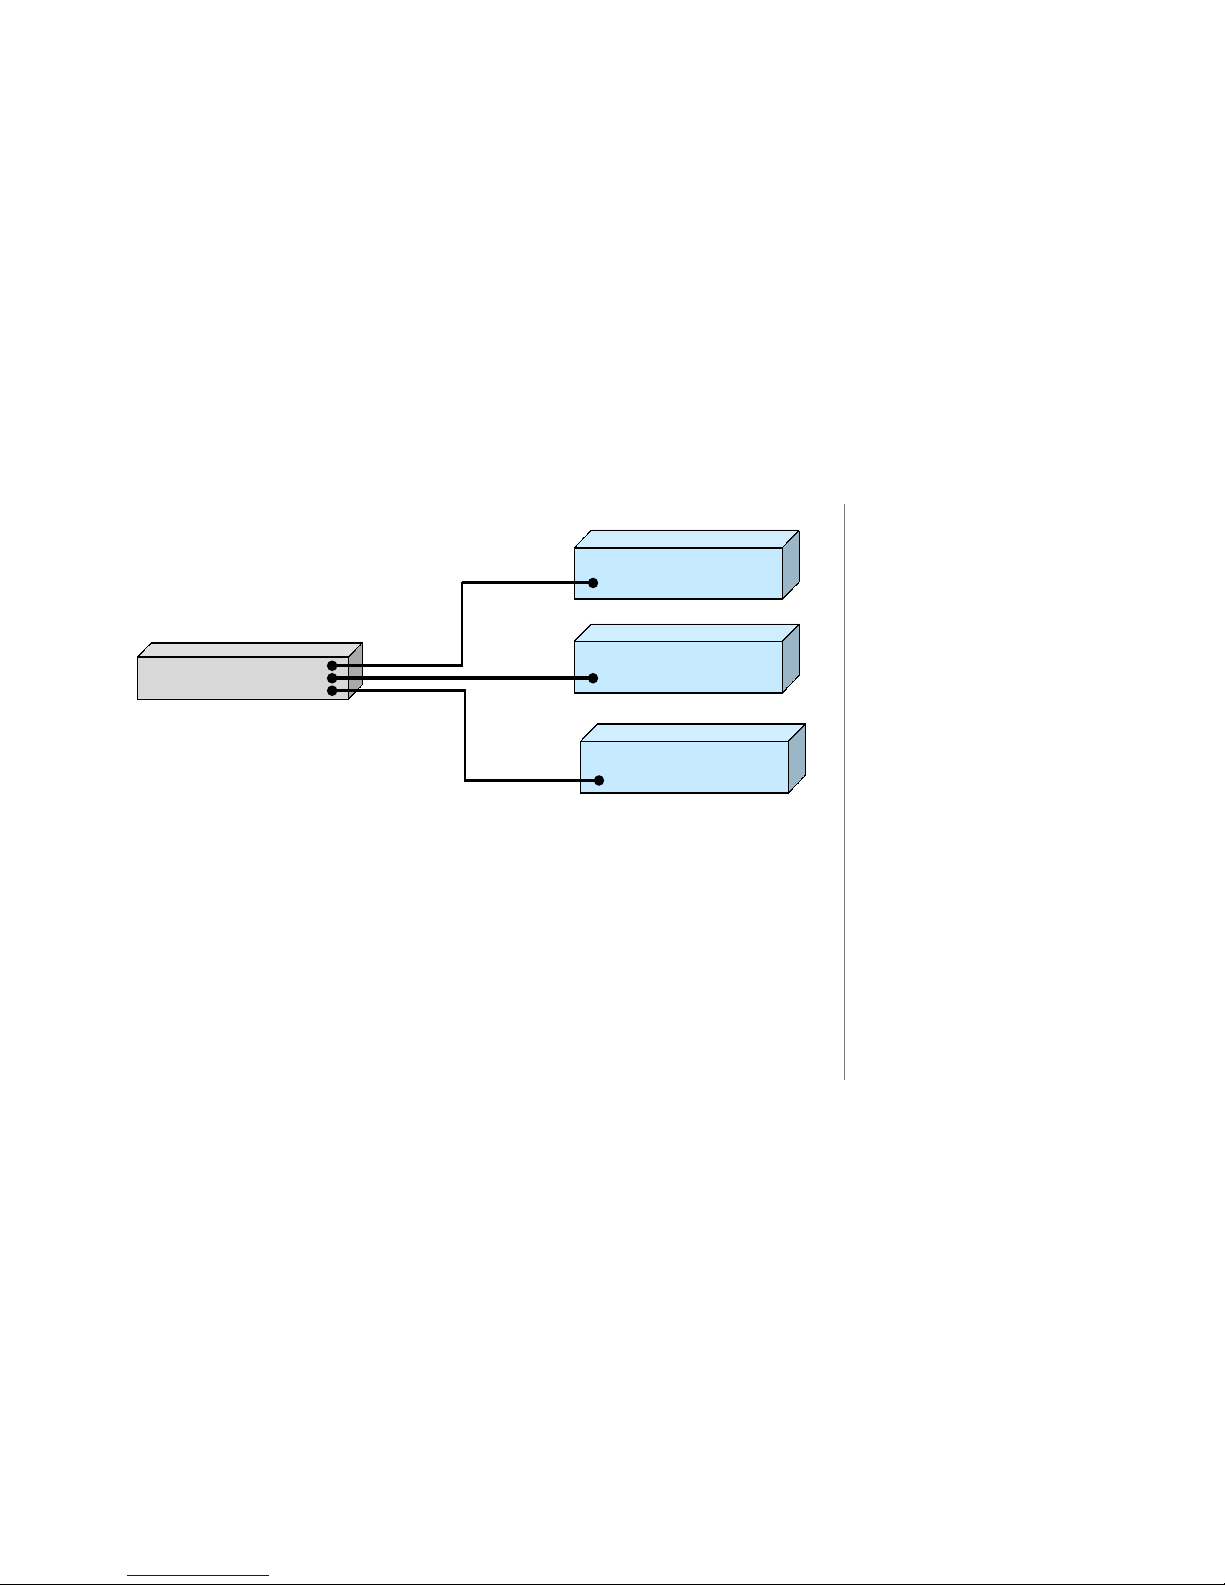
$ To connect additional CD changers, repeat steps 1 through 3 using the other
COM ports. See next page.
!
Refer to Appendix A for cable
pin-out configurations.
Page 31

PAGE 30
T
UNEBASE 200 INSTALLATION & USER’S GUIDE - M21201-01A1
RS-2 32 Port
CD Changer Back Panel
RS-232 COM Port 1
RS-2 32 Cable
TuneBase
Back Panel
RS-2 32 Port
CD Changer Back Panel
RS-232 P ort
CD Changer Back Panel
RS-232 COM Port 2
RS-232 COM Port 3
RS-2 32 Cable
RS-2 32 Cable
RS-2 32 Port
CD Changer Back Panel
RS-232 COM Port 1
RS-2 32 Cable
TuneBase
Back Panel
RS-2 32 Port
CD Changer Back Panel
RS-232 P ort
CD Changer Back Panel
RS-232 COM Port 2
RS-232 COM Port 3
RS-2 32 Cable
RS-2 32 Cable
% Connect audio from each CD Changer to TuneBase 200. Or, refer to the
changer’s manufacturer documentation regarding daisy-chaining or audio passthrough capabilities.
Page 32

PAGE 31
TUNEBASE 200 INSTALLATION & USER’S GUIDE - M21201-01A1
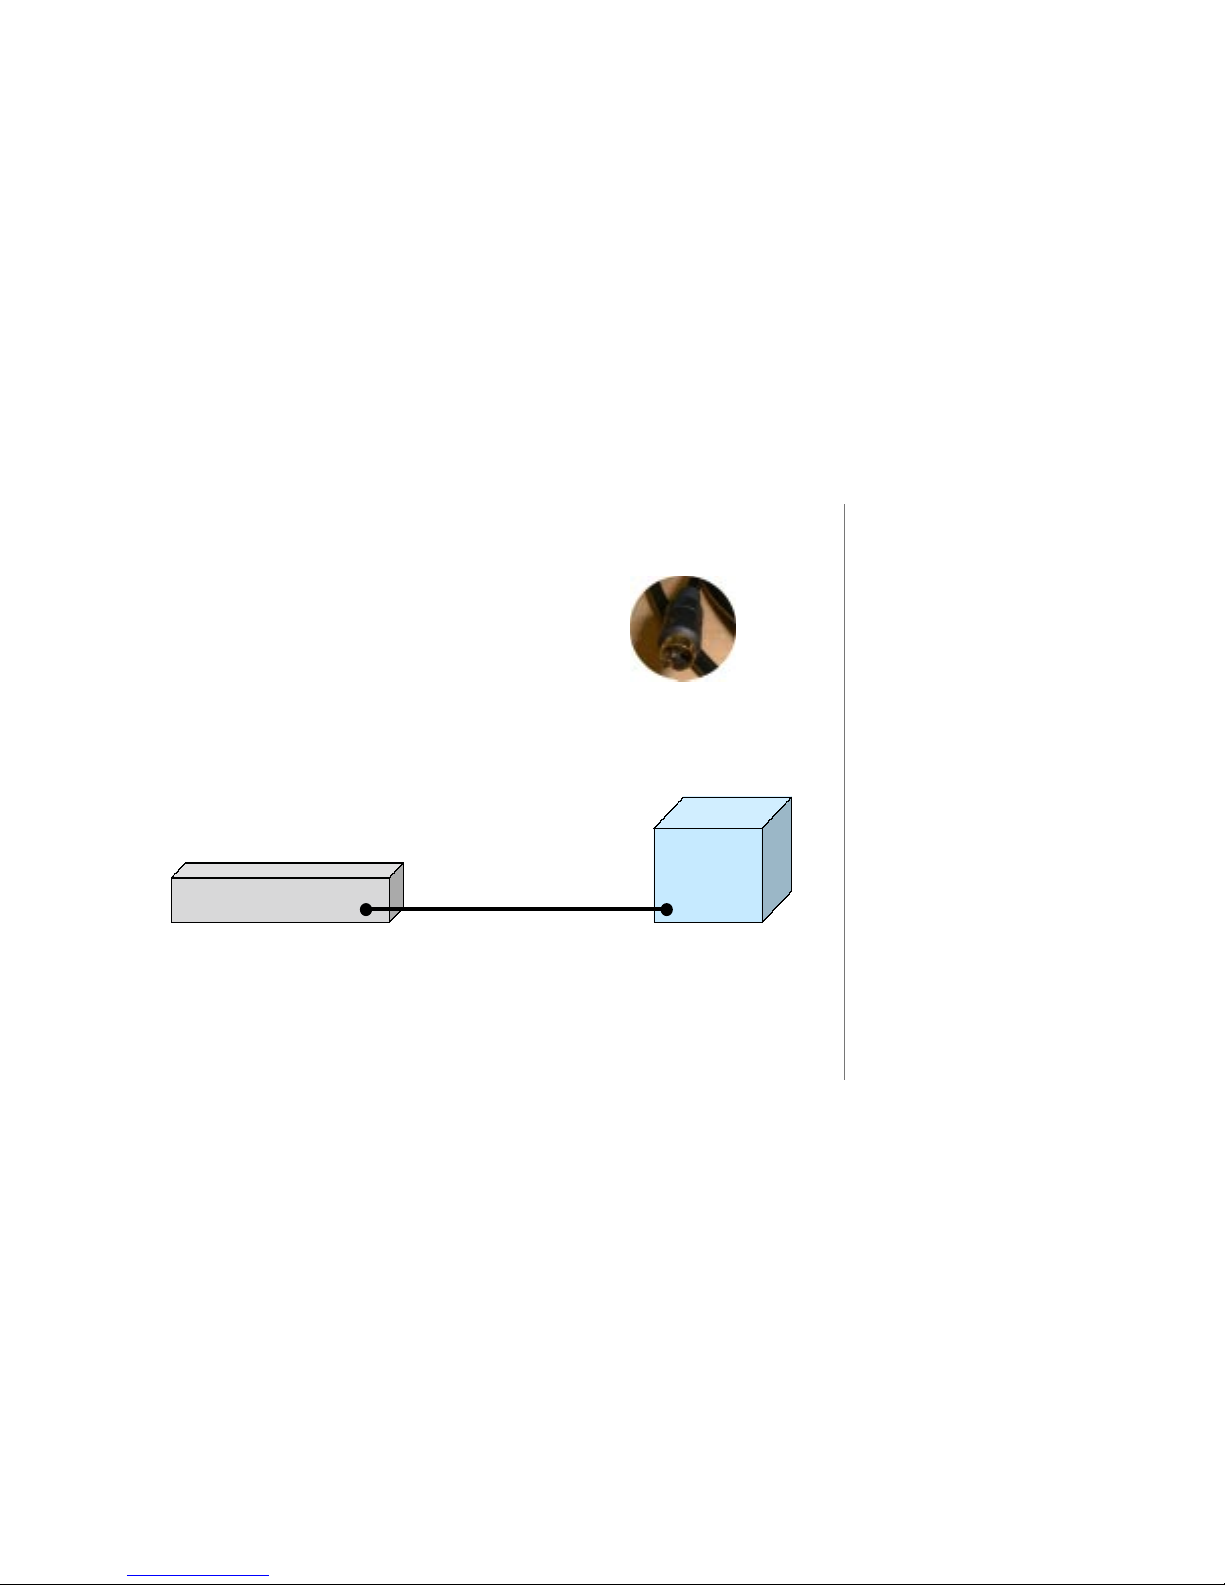
Connecting CD Changers Using Digital Connectors
! Use provided TOSlink cable.
" Insert one end of the cable into the TuneBase 200 Digital Input Port.
# Insert the other end of the cable into the Digital Output port on your changer.
$ To connect additional CD changers, repeat steps 1 through 3 using the
additional TuneBase 200 digital ports provided.
% Connect audio from each CD Changer to TuneBase 200.
Connecting Devices Using IR
! Insert an appropriate IR cable that will connect to the 1/8” mini connector on
the back of the TuneBase 200 Unit.
" Insert the other end of the IR cable into the IR out port on your device.
!
The Kenwood line of CD/DVD
players (Model 5050 and 5900)
have both Digital Coax Out and
TOSLink ports and could be
connected through either type of
cabling.
CHAPTER 2 - SETTING UP TUNEBASE 200
Tune Base
Back Panel
Digital Audio Out
CD Player
Digital Audio IN port
TOSlink cableTune Base
Back Panel
Digital Audio Out
CD Player
Digital Audio IN port
TOSlink cable
Page 33

PAGE 32
T
UNEBASE 200 INSTALLATION & USER’S GUIDE - M21201-01A1
!
TuneBase 200 is designed to
automatically connect and disconnect
from the Internet as needed. A list
describing when Internet connections
occur can be found in Appendix E.
!
The preferred method of connecting to
the Internet is Broadband (either Cable
Modem or DSL).
!
If you have a network with a gateway
to the Internet, TuneBase 200 allows
you to connect through a broadband
connection such as Cable Modem or
DSL service. This may require the use
of a USB to Ethernet Adapter.
Diagrams of possible networking
configurations are available in
Appendix G - Home Networking.
Connecting to Internet Using Internal Modem
TuneBase 200 contains an internal modem that can be used to connect to the Internet for
retrieving information such as music data, cover art, and entertainment services.
! Use the Telephone Cable.
(Can be identified by see-through connectors.)
" Connect one end of the telephone cable to the TuneBase 200 Phone
(modem jack).
# Connect the other end of the telephone cable to the Telephone Wall Jack.
CHAPTER 2 - SETTING UP TUNEBASE 200
Phone Jac k
Telephone W all Jack
Telephone Cable
Tune Base Back Panel
Phone Jac k
Telephone W all Jack
Telephone Cable
Phone Jac k
Telephone W all Jack
Telephone Cable
Tune Base Back Panel
Page 34

PAGE 33
TUNEBASE 200 INSTALLATION & USER’S GUIDE - M21201-01A1
Connecting to Internet Using HPNA
TuneBase 200 has an HPNA jack that can be used to connect to the internet. (Minimum
and maximum length cabling requirements are found in Appendix G - Home Networking.)
! Use the Telephone Cable.
(Can be identified by see-through connectors.)
" Connect one end of the telephone cable to the TuneBase 200 HPNA jack.
# Connect the other end of the telephone cable to a Telephone Wall Jack.
!
The preferred method of
connecting to the Internet is
Broadband (either Cable Modem
or DSL).
!
Connecting to the Internet
using Ethernet requires a USB
to Ethernet Adapter. In
addition, certain minimum
and maximum length cabling
requirements must be met.
Please see Appendix G Home Networking for
additional information.
CHAPTER 2 - SETTING UP TUNEBASE 200
HPNA Jack
Telephone W all Jack
Telephone Cable
TuneBase Back Panel
HPNA Jack
Telephone W all Jack
Telephone Cable
HPNA Jack
Telephone W all Jack
Telephone Cable
TuneBase Back Panel
Page 35

PAGE 34
T
UNEBASE 200 INSTALLATION & USER’S GUIDE - M21201-01A1
Connecting Multi-Room Controller or Touch Panel
Three RS-232 external control ports (Communication Ports) are available on TuneBase
200 so that you can add Control and Audio Distribution systems from other
manufacturers, or an optional Touch Panel from Escient Convergence.
The supported Control and Audio Distribution systems for TuneBase 200 are AMX and
Crestron with additional equipment support to follow.*
The RS-232 cable needed to connect TuneBase 200 to any of these models is dependent
upon the model’s RS-232 pin configuration, and therefore the cable may have to be
custom-made. In most cases this will be a DB-9 Null Modem Cable (please refer to
Appendix A).
! Find the RS-232 pin configuration for your Control System model in Appendix
A of this manual.
" Contact a Custom Cable Supplier to make a cable for your particular
configuration.
# Connect one end of this cable to the TuneBase 200 RS-232 communication
Port.
$ Connect the other end of this cable to the RS-232 communication port on your
Control System.
CHAPTER 2 - SETTING UP TUNEBASE 200
!
* Control and Audio Distribution
system models that can integrate
with TuneBase 200 are updated
periodically and may not be
reflected in this particular manual.
Please consult your Dealer or
Escient if you wish to use a
system not specified in this
manual.
Page 36

PAGE 35
TUNEBASE 200 INSTALLATION & USER’S GUIDE - M21201-01A1
Connect Power Cord
! Use the Power Cord.
" Connect one end of power cord to the TuneBase 200 AC Port (plug).
# Connect the other end of the power cord to a 120V electrical outlet.
CHAPTER 2 - SETTING UP TUNEBASE 200
Caution: To prevent electric
shock, do not use a 3 wire to
2 wire adapter plug. A 3
prong outlet is required.
AC Plug
TuneBase Back Panel
AC Plug
TuneBase Back Panel
Page 37

PAGE 36
T
UNEBASE 200 INSTALLATION & USER’S GUIDE - M21201-01A1
TuneBase 200 Power States: On, Standby, Off
After the TuneBase 200 unit is plugged in, the LED located next to the power button will
flash - when it is finished flashing, the LED will stop flashing and turn OFF. This means
TuneBase 200 is now in a standby or “sleep” mode. Because there is no video, the unit
may appear to be in an OFF mode, however, the unit is actually in standby. You can now
press the Power button (on the front panel or on the remote) once and the display will
appear immediately. The Power LED will turn ON.
To change from the ON mode back to the standby or “sleep” mode, press the Power
button on the front panel or on the remote once.
To reset the TuneBase 200 unit, PRESS and HOLD the Power button for more than 4
seconds and release. The Power LED light will blink for approximately 3 minutes before
turning OFF. When the light is OFF, you can press the Power button on the front panel
or on the remote.
If power is removed from TuneBase 200 for any reason, including a power outage or if
the unit is unplugged, TuneBase 200 will automatically return to the Standby state as
soon as power is restored. When TuneBase 200 is turned on again, TuneBase 200 will
return to the same source mode that it was in when power was lost.
Please follow the guidelines
regarding Power ON and
Power Standby procedures.
TuneBase 200 has three
power states:
1. ON - you will see video
output on your display.
The Power LED is lit
constant.
2. STANDBY or SLEEP - no
video output, the Power
LED is OFF.
3. OFF - unplugged from the
wall unit.
CHAPTER 2 - SETTING UP TUNEBASE 200
Page 38

PAGE 37
TUNEBASE 200 INSTALLATION & USER’S GUIDE - M21201-01A1
3
Chapter 3 Getting Started
What Is The Setup Process?
Running Quick Start
Guided Tour Through Quick Start
Run the Autobuild Process
Inserting and Removing Discs
Adding or Removing Changers
Register with Escient
Using the Remote, Keyboard or Touch Panel
Overview of User Interface
CHAPTER 3 - GETTING STARTED
Page 39

PAGE 38
T
UNEBASE 200 INSTALLATION & USER’S GUIDE - M21201-01A1
What Is The Setup Process?
To optimize TuneBase 200 so that you can enjoy all of its capabilities, you will need to
go through a “setup” procedure.
You will encounter two types of setup procedures within TuneBase 200.
! The first type of Setup is Quick Start, and occurs automatically the first time the
Power button is pressed. It is a required procedure which presents a series of
screens and menus that enable TuneBase 200 to get Internet access.
" The second type of Setup is one you can initiate at any time by pressing the
Setup button on your remote or wireless keyboard . This particular setup
allows you to customize user preferences, audio and video settings, changer
management, communication port settings, security and parental controls, and
more.
CHAPTER 3 - GETTING STARTED
!
The Quick Start process
takes an average of 15
minutes to complete.
However, the time it takes to
process your music library
through Autobuild (get CD
cover art, titles, artist info)
depends upon the number of
CD changers and the number
of CDs in your collection. For
example, four-hundred (400)
CDs could take a couple of
hours to build the music
library. (You do not have to be
present during Autobuild.
TuneBase can be left
unattended.)
Page 40

PAGE 39
TUNEBASE 200 INSTALLATION & USER’S GUIDE - M21201-01A1
Running Quick Start
! After you are done with Quick Start, you can use either the remote or the
wireless keyboard as your input device. (You cannot use the touch panel
during the Quick Start procedure. In addition, you must first calibrate the touch
panel before using it.)
" If you have an Internet Service Provider (ISP), gather the following information:
• Dialing Number
• Login Name
• Login Password
• Name of ISP
TuneBase 200 has a simple selection menu so that you can easily select and
configure your connection on an existing account. Most other ISPs are
supported if they use standard PPP type connections. If you do not know if
your ISP supports this standard (Point to Point Protocol), simply call the
provider and ask. If you do not have an Internet Service Provider (ISP), please
sign up for one before proceeding to step 3.
# Press Power on the wireless keyboard or on the TuneBase 200 front panel. If
you are using the remote, press the TB source button first, then press the
Power key.
!
AOL, CompuServe, and free
Internet Service providers
(ISPs) do not use standard,
consistent methods of
Internet connectivity and do
not open their networks to
outside users. Therefore,
these cannot be used with
TuneBase 200 unless you
have a Broadband connection.* Escient Convergence
Corp. has set up an out of the
box offer with our EarthLink
and OpenGlobe partners. You
can sign up for EarthLink’s
award winning ISP service for
only $19.95 per month and
receive the first 30 days free.
To receive the offer, call
EarthLink at 1-800-327-8454.
You must mention promo
code 400065402 to receive this
offer. Call OpenGlobe at 877885-6392 with any questions
regarding this offer.
CHAPTER 3 - GETTING STARTED
Page 41

PAGE 40
T
UNEBASE 200 INSTALLATION & USER’S GUIDE - M21201-01A1
!
Point your keyboard or remote
toward the TuneBase 200 unit,
and not your display device.
!
“Button” refers to a graphic item
on the display screen.
“Key” refers to the push-down
mechanisms on your remote or
keyboard.
CHAPTER 3 - GETTING STARTED
Guided Tour Through Quick Start
Quick Start is a setup procedure that occurs automatically the first time the Power button
is pressed. It is a required procedure which presents a series of screens and menus that
enable TuneBase 200 to get internet access.
Each screen contains a button bar at the bottom for accessing the previous or back
page and the next page.
The UP, DOWN, LEFT, RIGHT ARROW keys on the keyboard or remote are used to
highlight the items while the SELECT key is used to accept the item. The default button
on the Quick Start screens is the next button, which means you can always press the
SELECT key to accept the current page and move to the next screen.
The following pages guide you through the entire Quick Start process.
Page 42

PAGE 41
TUNEBASE 200 INSTALLATION & USER’S GUIDE - M21201-01A1
!
The Quick Start process begins
with a welcome screen.
Remember to press the SELECT
key to advance to the next page.
The next button is highlighted by
default.
"
Do you currently have an ISP
(Internet Service Provider)? The
yes button is highlighted by
default.
CHAPTER 3 - GETTING STARTED
Page 43

PAGE 42
T
UNEBASE 200 INSTALLATION & USER’S GUIDE - M21201-01A1
#
If you do not have an ISP account,
you will be presented with the
option of obtaining one. (Go to
step 6).
Pressing SELECT will advance
you to the Dial-up Login Info
screen.
$
Which type of Internet connection
do you have? The choices are:
Dial-up modem, HomePNA, and
Ethernet (cable modem, DSL,
LAN). Dial-up is highlighted by
default.
CHAPTER 3 - GETTING STARTED
Page 44

PAGE 43
TUNEBASE 200 INSTALLATION & USER’S GUIDE - M21201-01A1
CHAPTER 3 - GETTING STARTED
• If you select “Dial-up modem” as
the network type, the system will
look for a dial tone on the internal
modem. If no dial tone is found,
you are notified to check the
phone line before continuing.
• If you select “HomePNA” as the
network type, the system will
look for an attached HomePNA
network on the built in HomePNA
port. If no HPNA activity is found,
you are notified that a HomePNA
network could not be found and
that you should check your
HomePNA connections before
proceeding.
• If you select “Ethernet” as the
network type, the system will
look for an attached USB to
Ethernet Adapter since it is
required for Ethernet networking.
If no adapter is found, you are
notified that a USB to Ethernet
Adapter is required and
instructions are provided to
obtain one.
Page 45

PAGE 44
T
UNEBASE 200 INSTALLATION & USER’S GUIDE - M21201-01A1
%
The next button is the only
control on this page and is
highlighted by default.
TuneBase 200 supports many
dial-up Internet Service Providers
but requires Internet access
through a standard ISP dial-up,
cable modem, or DSL. The
preferred method of Internet
connection is Broadband, so that
full advantage can be taken of the
groundbreaking entertainment
services offered through
TuneBase 200.
CHAPTER 3 - GETTING STARTED
AOL, CompuServe, and free
Internet Service providers (ISPs) do
not use standard, consistent
methods of Internet connectivity
and do not open their networks to
outside users. Therefore, these
cannot be used with TuneBase 200
unless you have a Broadband
connection.* Escient Convergence
Corp has set up an out of the box
offer with our EarthLink and
OpenGlobe partners.
You can sign up for EarthLink’s
award winning ISP service for only
$19.95 per month and receive the
first 30 days free. To receive the
offer, call EarthLink at 1-800-327-
8454. You must mention promo
code 400065402 to receive this
offer. Call OpenGlobe at 877-8856392 with any questions regarding
this offer.
*A Broadband connection
automatically provides access to
the Internet.
Page 46

PAGE 45
TUNEBASE 200 INSTALLATION & USER’S GUIDE - M21201-01A1
C
HAPTER 3 - GETTING STARTED
&
If you are using a dial-up internet
account, the Internet Settings
screen displays. This is where
you enter the login name and
password for your ISP account.
The password will appear as
visible text when the field is
empty AND you are entering the
password. Once you leave the
password field or whenever you
return to this screen, the
password text is hidden.
A default entry for DNS is shown,
but you can enter your own DNS
servers into the TCP/IP Settings
screen in Setup.
DNS (Domain Name System)
translates Internet domain and
host names to IP addresses.
Page 47

PAGE 46
T
UNEBASE 200 INSTALLATION & USER’S GUIDE - M21201-01A1
CHAPTER 3 - GETTING STARTED
'
The Internet Dialing screen
displays. This screen allows
you to setup dialing preferences
for your location. This includes
dialing method, dialing prefix (if
needed), and the ability to
disable call waiting.
(
If you have a dial-up account,
go to step 10. These screens
will not appear.
For HomePNA and Ethernet
connections, you can choose
between dynamic or manually
configured IP information. The
dynamic button is highlighted
by default.
(Dynamic is set by the router. It
can vary based on how the
router distributes the IP address.
Static is defined at installation
and does not change unless
changes are made by the user.)
Page 48

PAGE 47
TUNEBASE 200 INSTALLATION & USER’S GUIDE - M21201-01A1
)
If you are using HomePNA or an
Ethernet connection, you will be
able to set up a static IP address
configuration. Fill out all the
appropriate fields according to the
information that your ISP or
network administrator provides.
IP Address, Subnet Mask, and
Router Address are all required
fields. If the IP address entered
does not fit into the entered
Subnet Mask, a warning dialog
appears because you are
required to enter a valid IP
Address for the current Subnet
Mask.
!*
Enter your zip code. This is
required for Enhanced Services.
Select the “read privacy policy”
button if you are interested in
Escient’s privacy policy. It is also
available from the SETUP menu.
CHAPTER 3 - GETTING STARTED
Page 49

PAGE 48
T
UNEBASE 200 INSTALLATION & USER’S GUIDE - M21201-01A1
!!
TuneBase 200 now attempts to
connect to the OpenGlobe registration
server using the previously selected
Internet configuration. Each step in
the authentication process is
conveyed through the text string in the
Connection Progress dialog shown.
Upon successfully connecting with the
OpenGlobe Server, the final Quick
Start screen informs you that
authentication has been accepted.
If authentication was NOT successful,
TuneBase 200 will continue to perform
the Quick Start procedure (each time
you Power On) until authentication is
successful.
!"
The final step is identifying all the
CDs on external changers so that
TuneBase 200 can manage the CD
libraries. This identification process is
called Autobuild. Please proceed to the
next page for instructions.
CHAPTER 3 - GETTING STARTED
Please be patient during the
authentication process.
Page 50

PAGE 49
TUNEBASE 200 INSTALLATION & USER’S GUIDE - M21201-01A1
We recommend that you do not
interrupt the Autobuild process.
Please allow enough time (see note
below) for the process to complete.
!
The length of time it takes to
complete the Autobuild process is
dependent upon changer brand
and model. In addition, please
allow approximately 30-60 seconds
per disc for the actual information
processing. This means that a 200disc changer could potentially take
200 minutes.
!
Escient Pipeline software, sold
separately, allows you to add scanned
or downloaded covers not recognized
by TuneBase 200.
C
HAPTER 3 - GETTING STARTED
Run the Autobuild Process
TuneBase 200 manages CD libraries on external changers through an initial identification
process Escient calls “Autobuild”. During this process, TuneBase 200 contacts the
Gracenote CDDB database to gather data about the CDs in your collection. This
information includes Artist, Songs/Titles, and Cover Art.
To initiate an Autobuild, load the changer(s) with discs and close the door. Or, if the
discs are already loaded, open and close the changer(s) doors. TuneBase 200 will
immediately initiate a connection to the CDDB database on the Internet to get the data
for your collection. Processing time will vary based on changer brand and models.
When complete, the guide screen will be updated with a CD group on the filter bar and
all music available from the attached CD changer(s) will be identified by a CD icon to the
left of the title/artist/track that it recognizes. (Some CDs may not be recognized, and in
that instance, TuneBase 200 attaches a generic “style/genre of music” cover and generic
text.)
Inserting and Removing Discs
After the initial Autobuild, what happens when you insert and remove discs from your
changer? If TuneBase 200 detects that a changer door has been closed, the Quick
Lookup screen is shown, and TuneBase 200 will begin to check each previously empty
slot in the changer to see if any new discs were added. It also checks each previously
occupied slot in the changer to see if any discs were removed. However, do not remove
and insert discs into the same slot in the same step.
Page 51

PAGE 50
T
UNEBASE 200 INSTALLATION & USER’S GUIDE - M21201-01A1
CHAPTER 3 - GETTING STARTED
!
To add a new changer, make
sure the changer number is
set to 1.
Attach the appropriate
connections (see Chapter 2).
Power the changer On.
Insert discs. If discs are
already inserted, simply
open and close the changer
door.
This will start the Autobuild
process which is the
downloading of information
regarding your CD collection.
If it finds new CDs, TuneBase 200 will initiate a connection to the CDDB database on
the Internet to get data for your new CD.
If you remove discs and put others back in the same slot, you will have to manually
initiate a detailed lookup such as lookup range in the changer management section
in SETUP. The GET MUSIC INFO screen will report the status of the lookup progress
until it is complete, or you press STOP to cancel the operation.
Adding or Removing Changers
If a changer has been attached to TuneBase 200, removed, and then re-attached,
TuneBase 200 will assume that the disc collection has not changed. If you have made
disc changes to TuneBase 200, you should manually go to the changer
management
section in SETUP and check all discs to insure that all discs are
recognized.
When you remove a changer, the CD titles and playlists still appear in the guide.
However, when you choose a title or a playlist, TuneBase 200 provides a message
stating that a changer is not connected and that the music selection or playlist is not
available and cannot be played.
Page 52

PAGE 51
TUNEBASE 200 INSTALLATION & USER’S GUIDE - M21201-01A1
Register with Escient
Please take a moment to register TuneBase 200.
• Press SETUP on your remote or wireless keyboard.
• SELECT user information.
• SELECT user registration.
• Follow instructions on screen.
Using the Remote, Keyboard, or Touch Panel
You can navigate through the TuneBase 200 menus and screens using any of the
following devices: TuneBase remote, wireless keyboard, or Touch Panel.
In order to use your ETP-1000 Touch Panel, it must first be calibrated with the TB-200
Calibration Utility. See Chapter 7 for this procedure.
Each device has its pros and cons and each individual user will undoubtedly have their
favorite access method. It is possible that you may end up using different devices
depending upon what you want to do.
The basics of navigation are:
• Use the UP, DOWN, LEFT, and RIGHT ARROW keys to maneuver around the
screen to highlight items of interest.
• Use the SELECT key to accept the highlighted item.
!
In order to use your ETP-1000
Touch Panel, it must first be
calibrated with the TB-200
Calibration Utility. See Chapter
7 for this procedure.
!
For a complete overview of each
access device, please refer to
the Appendices.
Chapter 7 - Touch Panel
Overview
Appendix H - Remote Overview
Appendix I - Wireless Keyboard
Overview
CHAPTER 3 - GETTING STARTED
Page 53

PAGE 52
T
UNEBASE 200 INSTALLATION & USER’S GUIDE - M21201-01A1
Overview of User Interface
The TuneBase 200 user interface is very simple and uses three common screens
throughout. The screens operate consistently, regardless of the source. The screens
you will see are Guide Screen, Player screen, and Option Screen.
Main Guide Screen Overview
Guides contain listings of content that can be selected for listening and assist you in
finding and organizing your library.
Sample Guide Screen
Indic ates MUS IC
source Entertainment Services (Exploring Artists, new music, etc.)
CD Info Tex t
CD or Playlist titles/tracks
Filter Bar
& Touch
Screen Bar:
Groups,
To uch
Controls
VisualCues
Cover Art
Indicates current vi ew:
By Artist, Title, or Song
Content Icons
Indic ates MUS IC
source Entertainment Services (Exploring Artists, new music, etc.)
CD Info Tex t
CD or Playlist titles/tracks
Filter Bar
& Touch
Screen Bar:
Groups,
To uch
Controls
VisualCues
Cover Art
Indicates current vi ew:
By Artist, Title, or Song
Content Icons
Page 54

PAGE 53
TUNEBASE 200 INSTALLATION & USER’S GUIDE - M21201-01A1
Content Icons
In front of each song title track in the Guide Screen is a content icon that describes the format and
the type of song displayed. Following are descriptions of all the icons.
This icon indicates that the CD is recognized and has known information associated with it.
This icon indicates that the CD is not available and has been removed from the
changer.
This icon identifies the music as a “collection of songs” known as a playlist.
CHAPTER 3 - GETTING STARTED
Sample Guide Screen
Page 55

PAGE 54
T
UNEBASE 200 INSTALLATION & USER’S GUIDE - M21201-01A1
Player Screen
The Player screen is used to listen to your music content.
• The Music Player allows you to listen to a music selection and view the tracks
that are being played, the name of the artist, the title, track times, and a large
image of the album’s cover art.
Options Screen
The OPTIONS menu allows you to organize and access content.
Page 56

PAGE 55
TUNEBASE 200 INSTALLATION & USER’S GUIDE - M21201-01A1
Title/Track Area Details
• Each item below the filter bar represents a single title or Playlist. A music type
indicator is shown to the left of each title name.
• The Music Guide always has one selected title (the title that was last selected in the
Music Guide).
• Titles are sorted according to the current guide view: Songs, Titles, and Artists.
The guide view can be changed by toggling the MENU/VIEW button on the remote
or keyboard.
• Tracks are sorted by the track location on the original CD. On Playlists, tracks are
sorted in the order they were originally selected when creating the Playlist.
• The currently highlighted title’s information is displayed in the Info Text Area.
When a Playlist is highlighted, the Info Text area displays on the Playlist name.
Screen Saver
All player screens will display a screen saver after 10 minutes of inactivity (no user
inputs received from the remote or keyboard). You can change the timing of this option
through the SETUP menu, PREFERENCES option. (10 minutes is the default.)
!
All player screens will display a
screen saver after 10 minutes of
inactivity.
CHAPTER 3 - GETTING STARTED
Page 57

PAGE 56
T
UNEBASE 200 INSTALLATION & USER’S GUIDE - M21201-01A1
Filter Bar Details
If more than 5 groups exist, the Filter Bar displays an arrow pointing right next to the
right most group. This indicates that additional groups are available. When you cursor
past the rightmost group to access a new group, all of the displayed groups will slide to
the left - hiding the ALL group. An arrow pointing left will be displayed in the left most
group.
There are 2 non genre specific groups created automatically: ALL which always exists
and includes all titles and PLAYLISTS which contains custom playlists created by you.
There are 15 groups generated automatically based on genre. These groups are Blues,
Classical, Country, Dance, Easy, Family, Jazz, Latin, New Age, Other, Pop, R&B, RAP,
Rock, and Sound Tracks.
CHAPTER 3 - GETTING STARTED
Page 58

PAGE 57
TUNEBASE 200 INSTALLATION & USER’S GUIDE - M21201-01A1
Chapter 4 Playing Music
Music Player Screen Overview
Navigating the Music Player Screen
Selecting and Listening to a Music Title
Sorting Music by Artist, Title, or Song
One Key Access to Favorite Music
One Key Access to Random Music
CHAPTER 4 - PLAYING MUSIC
4
Page 59

PAGE 58
T
UNEBASE 200 INSTALLATION & USER’S GUIDE - M21201-01A1
Accessing Music Mode
There are a number of ways of entering Music mode:
1. Select the GUIDE key on the remote, Touch Panel, or keyboard. FireBall displays
the Music Guide view so that you can navigate and select an item of choice.
3. Select the RANDOM key on the remote. FireBall displays the Player Screen and
starts playing a random music selection.
4. Once you have added songs to your “Favorites” playlist, you can select the
PLAY FAVORITES key on the remote or the FAVS key on the keyboard to
automatically play these songs.
Page 60

PAGE 59
TUNEBASE 200 INSTALLATION & USER’S GUIDE - M21201-01A1
Music Player Screen Overview
When you select a music title for listening, the screen displayed is the Music Player
screen.
!
When a Playlist is playing, the
cover and artist name from the
currently playing track will be
displayed and the Playlist name
will appear in place of the usual
title.
CHAPTER 4 - PLAYING MUSIC
Title o f CD or Playlist
Artist
Cover Art : If you press
the INFO key while in
the Player View, the
co ver a rt and artist is
replace d with a listing
of each track’s
estimated time.
Tracks are
displ ayed
sequentially in the
order they will be
played. The
currently playing
track is identified
through green
text. If you select
the play mode as
‘random’ then
tracks are shown
in the order on the
disc.
Page 61

PAGE 60
T
UNEBASE 200 INSTALLATION & USER’S GUIDE - M21201-01A1
Navigating the Music Player Screen
• ARROW - Use the UP and DOWN keys to move the highlight from one track to
another. The RIGHT and LEFT keys are not used on the Music Player Screen.
• SELECT - Pressing this key when a track is highlighted stops playing the selected
track and starts playing the highlighted track. You can also play the track by
pressing the PLAY key.
• PAGE UP, PAGE DOWN - These keys are used to scroll the music player track list
one page at a time. Each page contains 12 different tracks. On a page that contains
less than 12 tracks, the bottom rows will be empty.
• NUMERIC KEYPAD - You can enter a track number using the keypad and then
pressing the SELECT key.
• INFO - When you press this key, detailed track information (transport status, play
mode, elapsed track time) is displayed.
• PLAY, PAUSE, & STOP - These keys are used to play, pause, or stop music. An
onscreen status is provided each time the key is pressed.
• FAST FORWARD & REWIND - These keys are used to fast forward and rewind
through a track. Both stop when the beginning or end of a track is reached. An
onscreen status is provided each time the key is pressed.
CHAPTER 4 - PLAYING MUSIC
Page 62

PAGE 61
TUNEBASE 200 INSTALLATION & USER’S GUIDE - M21201-01A1
Selecting and Listening to a Music Title
! Press the GUIDE key. The MUSIC GUIDE screen appears.
" Use the LEFT and RIGHT ARROW keys to highlight the GROUP of your
choice.
# Use the UP and DOWN ARROW keys to highlight the music title of your
choice.
$ Press the SELECT or PLAY key on your remote or keyboard. The title tracks
and cover art are displayed in the Player screen and the music plays.
Sorting Music by Artist, Title, or Song
! Press the GUIDE key. The MUSIC GUIDE screen appears.
" Press the MENU/VIEW key on your remote or keyboard. The screen will toggle
through a different view each type you press the key. This allows you to sort
your music not only by genre but by artist, by title, or by song.
CHAPTER 4 - PLAYING MUSIC
Page 63

PAGE 62
T
UNEBASE 200 INSTALLATION & USER’S GUIDE - M21201-01A1
One Key Access to Favorite Music
The FAVS key on the remote allows you to immediately start playing the music in your
“Favorites” playlist. No other key presses are required once you have added music to
the list.
To add music to your “Favorites” playlist, simply press the ADD FAVS key on the
keyboard or ADD on the remote to quickly add the CURRENT selection of music to the
playlist. No confirmation dialog is presented.
One Key Access to Random Music
When you press the RANDOM key on the remote or keyboard, TuneBase 200 automatically starts playing random music selections from TuneBase 200.
CHAPTER 4 - PLAYING MUSIC
Random
Add to Favorites
Play Favorites
Page 64

PAGE 63
TUNEBASE 200 INSTALLATION & USER’S GUIDE - M21201-01A1
CHAPTER 5 - MANAGING MUSIC
5
Chapter 5 Managing Music
To Further Organize Your Music
To Create a New Music Playlist
To Edit a Music Playlist
To Delete a Music Playlist
To Change How Music is Played
To Edit Tracks
To Edit Disc Information
To Search For Cover Art
To Select Cover Art
To Access “More...” Music Options
To Create a New Music Group
To Edit a Music Group
To Delete a Music Group
To Get Music Info
Page 65

PAGE 64
T
UNEBASE 200 INSTALLATION & USER’S GUIDE - M21201-01A1
To Further Organize Your Music
You can easily manage your music through TuneBase 200’s MUSIC OPTIONS feature.
This set of screens allows you to create and manage Playlists (lists of songs), look up
and edit music information. In addition, MUSIC OPTIONS also allows you to adjust
player modes such as random, repeat, audio effects, and speaker settings.
There are two screens of MUSIC OPTIONS. The first screen appears when you press
the OPTION key while in MUSIC mode. The second screen becomes available after
selecting the “more...” button in the MUSIC OPTIONS panel.
!
“Button” refers to a graphic item
on the display screen.
“Key” refers to the push-down
mechanisms on your remote or
keyboard.
!
Use the ARROW keys to highlight
the desired option and use the
SELECT key to activate the
desired option.
CHAPTER 5 - MANAGING MUSIC
Page 66

PAGE 65
TUNEBASE 200 INSTALLATION & USER’S GUIDE - M21201-01A1
To Create a New Music Playlist
A Playlist is a collection of specific songs from your music content that you create.
! Press the OPTION key. The OPTION panel appears.
" SELECT the new playlist button. A screen displays so that you can enter the
name for the new playlist.
# After you have entered the new name, press SELECT to continue.
$ When the playlist name is saved, the screen transitions to the EDIT PLAYLIST
screen where you will select the tracks you want to add to the Playlist from all
the music TuneBase 200 knows. Use the ARROW keys to navigate through the
music and highlight your choice. Use the SELECT key to toggle between
including (shows check mark) or not including a track.
% Press the RECORD key to save the new playlist and exit the OPTION mode.
!
If no songs are added to a new
Playlist, it is not saved. Likewise,
if all songs are removed from a
playlist, it is deleted.
Up to 200 songs may be added to
a single playlist or “favorites”
playlist.
There is no limitation on the
number of playlists.
CHAPTER 5 - MANAGING MUSIC
Page 67

PAGE 66
T
UNEBASE 200 INSTALLATION & USER’S GUIDE - M21201-01A1
To Edit a Music Playlist
! Press the GUIDE key. The MUSIC GUIDE screen appears.
" Use the ARROW keys to highlight the music playlist you want to edit.
# Press the OPTION key.
$ At the OPTION panel, SELECT the edit playlist button. The EDIT PLAYLIST
MODE screen displays which allows you to edit the name of the playlist. You
do not have to edit the name of the playlist in order to modify its members.
% Press the SELECT key to continue so that you can modify the tracks in the
playlist.
& Cursor UP and DOWN to highlight the channels. A check mark indicates when
a track is to be included in the playlist. Use the SELECT key to toggle between
including or not including a track.
' Press the RECORD key to save this playlist and exit the OPTION mode.
CHAPTER 5 - MANAGING MUSIC
Page 68

PAGE 67
TUNEBASE 200 INSTALLATION & USER’S GUIDE - M21201-01A1
CHAPTER 5 - MANAGING MUSIC
To Delete a Music Playlist
! Press the GUIDE key. The MUSIC GUIDE screen appears.
" Use the ARROW keys to highlight the music playlist you want to delete.
# Press the OPTION key.
$ At the OPTION panel, SELECT the delete playlist button to remove the
currently active playlist. The DELETE PLAYLIST screen displays and shows the
contents of the playlist.
% Press the RECORD key to delete the playlist and return to the previous Guide or
Player view. A dialog message displays asking for confirmation before the
playlist is deleted.
Page 69

PAGE 68
T
UNEBASE 200 INSTALLATION & USER’S GUIDE - M21201-01A1
To Change How Music is Played
! Press the OPTION key.
" At the OPTION panel, SELECT the play mode option button. The PLAY
MODE option screen displays
# Select the option of your choice from the available settings:
• normal - Start with a selected track and play a CD or Playlist to its end and
then stop.
• repeat track - Keep playing the same track over and over again.
• repeat title - Keep playing the current music collection (CD, or Playlist)
from start to finish and then start over.
• repeat group - Keep playing all the music collections in the current group
of music from start to finish and then start over.
• random title - Randomly select and play songs from the current music
collection (CD, or Playlist)
• random group - Randomly select and play songs from the current group of
music.
$ Press the SELECT key to continue.
CHAPTER 5 - MANAGING MUSIC
Page 70

PAGE 69
TUNEBASE 200 INSTALLATION & USER’S GUIDE - M21201-01A1
To Edit Tracks
This option allows you to modify the track name for the currently selected title.
! Press the GUIDE key. The MUSIC GUIDE screen appears.
" Use the ARROW keys to highlight the track you want to edit.
# Press the OPTION key.
$ At the OPTION panel, SELECT the edit tracks button. The EDIT TRACKS
screen displays.
% Use the UP and DOWN ARROW keys to highlight the desired track, and press
SELECT to display a text entry cursor in the edit field at the end of the track
name.
& Enter a new track title/name.
' Press the RECORD key to accept the changes.
CHAPTER 5 - MANAGING MUSIC
Page 71

PAGE 70
T
UNEBASE 200 INSTALLATION & USER’S GUIDE - M21201-01A1
To Edit Disc Information
This option allows you to edit the music collection’s information such as artist name,
music collection title, label name, and year of release. Or, you can have TuneBase 200
look up the latest information from the OpenGlobe service.
Edit Disc also allows you to identify previously unidentified discs and get cover art.
! Press the GUIDE key. The MUSIC GUIDE screen appears.
" Use the ARROW keys to highlight the disc you want to edit.
# Press the OPTION key.
$ At the OPTION panel, SELECT the edit disc button. The EDIT DISC INFO
screen displays.
% Use the ARROW keys to move to the text field of your choice and edit the field.
& Or, SELECT the lookup this disc button to replace the current disc information.
To save the new data, press the RECORD key.
CHAPTER 5 - MANAGING MUSIC
Page 72

PAGE 71
TUNEBASE 200 INSTALLATION & USER’S GUIDE - M21201-01A1
To Search For Cover Art
This option allows you to view the current cover art and select an option to look up the
cover.
! Press the GUIDE key. The MUSIC GUIDE screen appears.
" Use the ARROW keys to highlight the title of the disc cover art you want to
edit.
# Press the OPTION key.
$ At the OPTION panel, SELECT the edit disc button. The EDIT DISC INFO
screen displays.
% Use the ARROW keys to move to the search for cover button and press
SELECT.
& A “search for cover” confirmation dialog box appears. Press SEARCH to
continue. If a new cover is not found, then the current cover remains. If a new
cover is found, the resulting cover selection is displayed in the screen.
' Press the RECORD key to save the data.
CHAPTER 5 - MANAGING MUSIC
Page 73

PAGE 72
T
UNEBASE 200 INSTALLATION & USER’S GUIDE - M21201-01A1
To Select Cover Art
This option allows you to change the cover art for your current music selection.
! Press the GUIDE key. The MUSIC GUIDE screen appears.
" Use the ARROW keys to highlight the disc cover art you want to edit.
# Press the OPTION key.
$ At the OPTION panel, SELECT the edit disc button. The EDIT DISC INFO
screen displays.
% Use the ARROW keys to move to the select cover button and press SELECT.
A SELECT COVER ART screen display that allows you to choose a new cover.
& Use the UP and DOWN ARROW keys to highlight an image and use the
SELECT key to store the image.
CHAPTER 5 - MANAGING MUSIC
Page 74

PAGE 73
TUNEBASE 200 INSTALLATION & USER’S GUIDE - M21201-01A1
To Access “More...” Music Options
There are two screens of MUSIC OPTIONS. The first screen appears when you press
the MUSIC key on your remote or keyboard followed by the OPTION key.
The second screen becomes available after SELECTING the “more...” button in the
original MUSIC OPTIONS screen.
CHAPTER 5 - MANAGING MUSIC
!
“Button” refers to a graphic item
on the display screen.
“Key” refers to the push-down
mechanisms on your remote or
keyboard.
!
Use the ARROW keys to highlight
the desired option and use the
SELECT key to activate the
desired option.
Page 75

PAGE 74
T
UNEBASE 200 INSTALLATION & USER’S GUIDE - M21201-01A1
To Create a New Music Group
A group is a collection of content that classifies your music titles to make them easier to
find. Genre groups such as All, Jazz, and Country are automatically generated depending
upon the current music in your collection. The groups you create can be named
whatever you want (i.e., My Favorites, Dad’s Stuff, Background Music).
! Press the OPTION key. Use the ARROW keys to highlight the more... button
on the displayed panel and press the SELECT key.
" At the MORE MUSIC OPTIONS panel, SELECT the new group button. A
screen displays so that you can enter the name for the new group.
# After you have entered the new name, press SELECT to continue.
$ When the group name is saved, the screen transitions to the EDIT MUSIC
GROUP screen where you will select titles to be included in the new group.
Cursor UP and DOWN to highlight the titles. A check mark indicates when a
title is to be included in the group. Use the SELECT key to toggle between
including or not including a title.
% Press the RECORD key to save the new group and exit the OPTION mode.
CHAPTER 5 - MANAGING MUSIC
!
Music can reside in more than one
group. For example, the same
music could exist in the groups:
All, Rock, Favorites, and Mine.
Page 76

PAGE 75
TUNEBASE 200 INSTALLATION & USER’S GUIDE - M21201-01A1
To Edit a Music Group
! Press the GUIDE key. The MUSIC GUIDE screen appears.
" Use the RIGHT and LEFT ARROW keys to highlight the group you want to
edit.
# Press the OPTION key. Use the ARROW keys to highlight the more... button
on the displayed panel and press the SELECT key.
$ At the MORE MUSIC OPTIONS panel, SELECT the edit group button. The
EDIT GROUP screen displays which allows you to edit the name of the group.
You do not have to edit the name of the group in order to modify the members
of the group.
% Press the SELECT key to continue so that you can modify the titles in the
group when the EDIT MUSIC GROUP screen displays.
& Cursor UP and DOWN to highlight the titles. A check mark indicates when a
title is to be included in the group. Use the SELECT key to toggle between
including or not including a title.
' Press the RECORD key to save this group and exit the OPTION mode.
CHAPTER 5 - MANAGING MUSIC
Page 77

PAGE 76
T
UNEBASE 200 INSTALLATION & USER’S GUIDE - M21201-01A1
To Delete a Music Group
! Press the GUIDE key. The MUSIC GUIDE screen appears.
" Use the RIGHT and LEFT ARROW keys to highlight the group you want to
delete.
# Press the OPTION key. Use the ARROW keys to highlight the more... button
on the displayed panel and press the SELECT key.
$ At the MORE MUSIC OPTIONS panel, SELECT the delete group button to
remove the currently active group. The DELETE GROUP screen displays and
shows the contents of the group.
% A dialog message displays asking for confirmation before the group is deleted.
Press the RECORD key to delete the group.
CHAPTER 5 - MANAGING MUSIC
Page 78

PAGE 77
TUNEBASE 200 INSTALLATION & USER’S GUIDE - M21201-01A1
To Get Music Info
This option is only used to identify unknown titles or titles that never completed the
original lookup process in Quick Start. Normally, new titles are identified automatically
when they are inserted into an external changer. When this option is chosen, an
information screen displays the number of changers attached, number of discs, free
music slots, known discs, unknown discs, and cover art count. If you press SELECT to
continue the Get Music Information operation, TuneBase 200 will automatically connect
to the Internet if needed to lookup discs and will automatically disconnect as soon as
the lookup is completed. You can terminate the connection at any time.
! Press the OPTION key. Use the ARROW keys to highlight the more... button
on the displayed panel and press the SELECT key.
" At the MORE MUSIC OPTIONS panel, SELECT the get music info button. An
information screen displays.
# If you press the SELECT key to continue, a connection dialog message
displays showing the progress of the update from the OpenGlobe server. As
each disc is recognized, the tracking screen displays the current cover art and
title. When the process is complete, the internet connection is terminated.
CHAPTER 5 - MANAGING MUSIC
Page 79

PAGE 78
T
UNEBASE 200 INSTALLATION & USER’S GUIDE - M21201-01A1
Chapter 6 Customizing
TuneBase 200
Two Ways to Customize TuneBase 200
To Change User Information
To Change Internet Configuration Settings
To Change Preferences
To Access Changer Management Features
To Change Security Settings
To Access TuneBase 200 Utilities
CHAPTER 6 - CUSTOMIZING TUNEBASE 200
6
Page 80

PAGE 79
TUNEBASE 200 INSTALLATION & USER’S GUIDE - M21201-01A1
Two Ways to Customize TuneBase 200
There are two methods of customizing TuneBase 200: through the OPTIONS menu or
through the SETUP Menu. The OPTIONS menu is used to customize features which
need frequent changing during the normal operation of the system, while the SETUP
menu provides access to general user preferences.
Use the OPTIONS menu for:
• Organizing access to content - managing groups, managing play lists, editing
music information, and looking up music information.
• Adjusting player controls - play modes (random, repeat, etc.).
Use the SETUP Menu to change:
• user information
• internet configuration
• preferences
• audio, video, and com ports
• changer management
• security
• utilities
!
The OPTIONS menu is discussed
in Chapter 5: Managing Music.
CHAPTER 6 - CUSTOMIZING TUNEBASE 200
Page 81

PAGE 80
T
UNEBASE 200 INSTALLATION & USER’S GUIDE - M21201-01A1
To Change User Information
! Press the SETUP key on the remote control or keyboard. The SETUP main
menu displays.
" Select the menu item user information. The menu displays.
# Select the sub-menu item you want to modify and follow the instructions on the
screen.
user registration - Allows you to input your name, address, phone number to
identify you as the user.
time zone - This item is automatically configured during Quick Start. If you
need to, you can manually change this.
user profile - If you want to receive information or services from OpenGlobe
that caters to your particular age group or gender, you can fill in this menu.
additional product information - This item allows you to select whether or not
you want to be informed regarding additional valuable services or support.
CHAPTER 6 - CUSTOMIZING TUNEBASE 200
Page 82

PAGE 81
TUNEBASE 200 INSTALLATION & USER’S GUIDE - M21201-01A1
C
HAPTER 6 - CUSTOMIZING TUNEBASE 200
remote administration - Shows the User name and Password used to access
the OpenGlobe enhanced services website.
privacy policy - Displays all of the legal disclaimers and warranty information
for this product.
back - When you select this item, the screen goes back to the previous screen
displayed.
$ Exit SETUP by selecting the EXIT menu item located at the bottom of the main
menu, or by pressing the SETUP key when on the main menu or any sub-menu.
Page 83

PAGE 82
T
UNEBASE 200 INSTALLATION & USER’S GUIDE - M21201-01A1
To Change Internet Configuration Settings
! Press the SETUP key on the remote control or keyboard. The TuneBase 200
SETUP main menu displays.
" Select the menu item internet configuration. The menu displays.
# Select the sub-menu item you want to modify and follow the instructions on the
screen.
network connections - Specifies the Primary and Secondary network
connections. The Primary connection is used for all Internet and OpenGlobe
enhanced services such as disc lookups, purchasing, etc., and the Secondary
connection is used for connecting to the optional Pipeline software. The
Secondary connection may be different from the Primary connection.
dial-up settings - This item is originally configured in Quick Start but you can
manually change it here for dial-up access PPP accounts. The password
appears as visible text when the field is empty AND you enter the password.
Once you leave the password field, the password field changes to hidden text.
Subsequent returns to this screen will show the password as hidden text.
Specific dialing options for your location can also be set here such as Dial-up
Numbers and Dialing Prefix.
CHAPTER 6 - CUSTOMIZING TUNEBASE 200
!
If you backspace at any point
while in the password box, the
entire password is erased.
Page 84

PAGE 83
TUNEBASE 200 INSTALLATION & USER’S GUIDE - M21201-01A1
primary tcp/ip settings - TCP/IP can be configured Dynamically or Manually.
Dial-up connections only support dynamic IP configurations, so if the Primary
network connection is set to “dial-up modem”, you will only be able to
configure the name server fields. All others will be hidden. If the Primary
network connection is the same as the Secondary network connection,
changing these settings will effect both the Primary and Secondary network
connections.
secondary tcp/ip settings - Secondary TCP/IP can be configured Dynamically
or Manually. Use the NETWORK CONNECTIONS screen to enable a
Secondary network connection”. All controls on this screen are hidden if the
Secondary network connection is set to “none”. If the Primary network
connection is the same as the Secondary network connection, changing these
settings will effect both the Primary and Secondary network connections.
$ Exit SETUP by selecting the EXIT menu item located at the bottom of the main
menu, or by pressing the SETUP key when on the main menu or any sub-menu.
CHAPTER 6 - CUSTOMIZING TUNEBASE 200
!
Dial-up connections only support
dynamic IP configurations.
Page 85

PAGE 84
T
UNEBASE 200 INSTALLATION & USER’S GUIDE - M21201-01A1
To Change Preferences
! Press the SETUP key on the remote control or keyboard. The SETUP main
menu displays.
" Select the menu item preferences. The menu displays.
# Select the sub-menu item you want to modify and follow the instructions on the
screen.
screen saver preferences - Specifies the number of minutes of inactivity
allowed before the screen saver is activated. The default setting is 10 minutes.
Selections you may choose from are 5, 10, 15, 30, or 60 minutes.
automatic update preferences - Once a week (available time frames include
daytime 8am-4pm, evening 4pm-12am, or nightime 12am-8am), TuneBase 200
automatically dials into the network server and downloads any software or
database information that has been updated.
$ Exit SETUP by selecting the EXIT menu item located at the bottom of the main
menu, or by pressing the SETUP key when on the main menu or any sub-menu.
CHAPTER 6 - CUSTOMIZING TUNEBASE 200
Page 86

PAGE 85
TUNEBASE 200 INSTALLATION & USER’S GUIDE - M21201-01A1
To Change Audio, Video, and Com Ports Settings
! Press the SETUP key on the remote control or keyboard. The SETUP main
menu displays.
" Select the menu item audio, video, and com ports. The menu displays.
# Select the sub-menu item you want to modify and follow the instructions on the
screen.
audio input selection - Specifies which devices are attached to which input
connectors: optical or coaxial. All 6 audio sources can be used simultaneously.
com port settings - During the Quick Start setup, equipment attached to the
communication ports were automatically detected. If you attach additional
equipment or make changes to the communication ports, you will see the
modifications.
calibrate touch panel - Allows the attached ETP-1000 Touch Panel display
device to be calibrated.
screen centering - Adjusts the horizontal and vertical placement of the video
output buffer so that the generated computer image is centered on your TV.
CHAPTER 6 - CUSTOMIZING TUNEBASE 200
Page 87

PAGE 86
T
UNEBASE 200 INSTALLATION & USER’S GUIDE - M21201-01A1
brightness - Provides a brightness test screen on your display so you can
change settings through the controls on your display device.
contrast - Provides a contrast test screen so you can use your display’s contrast
controls to help reduce video “blooming” while creating a clearer, more readable
interface.
sharpness - Sets the sharpness or detail control of your TV so that onscreen text
is as readable as possible.
color bars - Displays the SMPTE color bars. You may use this screen to test the
display for color and tint accuracy.
$ Exit SETUP by selecting the EXIT menu item located at the bottom of the main
menu, or by pressing the SETUP key when on the main menu or any sub-menu.
CHAPTER 6 - CUSTOMIZING TUNEBASE 200
!
The UP, DOWN, LEFT, and RIGHT
ARROW keys on the remote or
keyboard are used to position the
screen.
Page 88

PAGE 87
TUNEBASE 200 INSTALLATION & USER’S GUIDE - M21201-01A1
To Access Changer Management Features
! Press the SETUP key on the remote control or keyboard. The SETUP main
menu displays.
" Select the menu item changer management. This section only appears in the
Setup Menu if there are external changers attached.
# Select the sub-menu item you want to modify and follow the instructions on the
screen.
quick lookup - Checks each previously empty slot in the changer(s) to see if
any new discs were added, and then checks each previously occupied slot to
see if any discs were removed. If the system detects that discs have been
added to previously empty slots, the system will automatically read the TOC
information from each disc. If discs have been previously recognized, the titles
will reappear in the guide and all tracks will be available in appropriate Playlists.
If the system detects that discs have been removed from slots in the changer,
the database record for the disc will remain on the hard disc. The disc title will
no longer appear in the guide in any group where it previously existed. Tracks
from CD titles are no longer visible in Playlists where they were previously
available. The Playlists will continue to work, but will not play or show the
missing tracks. The tracks will be visible for editing in the Edit Playlist Option.
You may press the STOP button to cancel the process.
CHAPTER 6 - CUSTOMIZING TUNEBASE 200
Page 89

PAGE 88
T
UNEBASE 200 INSTALLATION & USER’S GUIDE - M21201-01A1
lookup range - Prompts you to enter a range of disc from 1-400 and select one
of the attached changer(s) and performs a detailed lookup on each disc until
complete or until you press the STOP button to cancel the lookup.
lookup all - Looks up every disc in each changer. You may press the STOP
button to cancel the process.
changer statistics - This item displays the statistics of the changer based
media.
$ Exit SETUP by selecting the EXIT menu item located at the bottom of the main
menu, or by pressing the SETUP key when on the main menu or any sub-menu.
CHAPTER 6 - CUSTOMIZING TUNEBASE 200
!
To cancel any of the “Lookup”
items while in progress, press the
STOP button.
Page 90

PAGE 89
TUNEBASE 200 INSTALLATION & USER’S GUIDE - M21201-01A1
To Change Security Settings
! Press the SETUP key on the remote control or keyboard. The SETUP main
menu displays.
" Select the menu item security. The menu displays.
# Select the sub-menu item you want to modify and follow the instructions on the
screen.
password protection - Allows you to password protect access to the CE-
Commerce features to limit the possibility of unauthorized purchases from your
system. The same password is used for parental controls (content filters) and
CE-Commerce access. Subsequent access to the password specification screen
and setup will also be password protected.
If you specify a password, you will be prompted upon power ON to enter the
password. If the password entered matches the stored password, full access is
granted to you until the next power OFF cycle.
If the password does not match, you will be asked 2 more times to enter the
correct password. If after the third try the password still does not match, you
will not be allowed to use the system.
CHAPTER 6 - CUSTOMIZING TUNEBASE 200
Page 91

PAGE 90
T
UNEBASE 200 INSTALLATION & USER’S GUIDE - M21201-01A1
If you do not specify a system password, all content and all CE-Commerce
features will be enabled. If security access is in place, restricted content will not
be browseable, however you will have the opportunity to enter your password
when attempting to access CE-Commerce features during normal operation in
addition to power cycling. If successful password entry is granted, the CECommerce features remain enabled until the next power down.
The following information will be obtained:
1. Password (included legal notices about unauthorized purchases and content
filtering)
2. Verification of Password
You are given the option of enabling password protection by entering a
password and then verifying it. If you leave these fields blank, password
protection will be disabled.
$ Exit SETUP by selecting the EXIT menu item located at the bottom of the main
menu, or by pressing the SETUP key when on the main menu or any sub-menu.
!
Access to restricted content will
NOT be available when you enter
a password during normal
operation.
CHAPTER 6 - CUSTOMIZING TUNEBASE 200
Page 92

PAGE 91
TUNEBASE 200 INSTALLATION & USER’S GUIDE - M21201-01A1
To Access TuneBase 200 Utilities
! Press the SETUP key on the remote control or keyboard. The SETUP main
menu displays.
" Select the menu item utilities. The menu displays. (No other use of the system
is permitted while one of the utility processes is running.)
# Select the menu item you want to access and follow the instructions on the
screen.
web sync - Used to synchronize the database contents of TuneBase 200 with
the OpenGlobe server.
update software - This feature initiates a manual connection to the OpenGlobe
server to check for any software updates that are currently available. A
confirmation dialog will ask if you really want to continue and look for an
update because it will take some time. If an update is found, you will be asked if
you want to download the update. If you accept, the system will begin the
software update process. A progress status bar appears so that you can
estimate download time.
CHAPTER 6 - CUSTOMIZING TUNEBASE 200
Page 93

PAGE 92
T
UNEBASE 200 INSTALLATION & USER’S GUIDE - M21201-01A1
configuration information - Restores the TuneBase 200 system to its original
factory settings. This allows you to completely erase all user preferences and
settings and reconfigure the unit for the first time. Since this is a destructive
feature, two levels of confirmation dialogs are used to confirm that you really
want to do this. Once the feature is initiated, you will not be able to stop the
process.
$ Exit SETUP by selecting the EXIT menu item located at the bottom of the main
menu, or by pressing the SETUP key when on the main menu or any sub-menu.
CHAPTER 6 - CUSTOMIZING TUNEBASE 200
!
While using any of the SETUP
UTILITIES, no other use of the
system will be permitted.
Page 94

PAGE 93
TUNEBASE 200 INSTALLATION & USER’S GUIDE - M21201-01A1
Chapter 7 Escient Touch
Panel Overview
Touch Panel Interaction
7
CHAPTER 7 - ESCIENT TOUCH PANEL OVERVIEW
Page 95

PAGE 94
T
UNEBASE 200 INSTALLATION & USER’S GUIDE - M21201-01A1
Touch Panel Interaction
When you initially setup TuneBase 200, you will need to use the remote or wireless
keyboard to navigate through the automatic setup program called Quick Start. Once
you have gone through this setup, you will be able to calibrate TB-200 and use the
Touch Panel. (See the side note on this page for calibration info.)
There are a couple of differences between the guides and player screens that appear
when using the Touch Panel device.
The Player screen looks like this
when no Touch Panel is in use.
The Guide screen looks like this
when no Touch Panel is in use.
CHAPTER 7 - ESCIENT TOUCH PANEL OVERVIEW
!
If the Touch Panel does not seem
to be centered or is otherwise not
working, please use the remote or
keyboard and press the SETUP
key to go to the SETUP menu,
audio video and com ports,
calibrate touch panel.
Use the arrow keys to select the
option “calibrate touch panel” and
follow the instructions on the
screen.
Page 96

PAGE 95
TUNEBASE 200 INSTALLATION & USER’S GUIDE - M21201-01A1
When an Escient Touch Panel is detected and powered on or the SETUP option for an
external control system’s XY coordinates is set, the Touch Panel buttons will appear on
the Guide screen and the Player screen.
On the Guide screen a row of buttons appears on the right of the music content to let
you play or stop your music. The page up and page down buttons allow you to scroll
the guide one page at a time.
play
stop
all
page up
page down
Toggles through the 3
available guide button bars:
1. styles bar
2. remote control button bar
3. alpha-numeric bar
!
The default bar is the style bar.
The styles automatically navigate
to the left and right when the
leftmost or rightmost style is
selected if there are more styles
to view.
CHAPTER 7 - ESCIENT TOUCH PANEL OVERVIEW
record (not available)
Page 97

PAGE 96
T
UNEBASE 200 INSTALLATION & USER’S GUIDE - M21201-01A1
Pressing the toggle button once will change the view from the styles bar to the alphanumeric bar. This bar lets you enter a letter or number to jump down to the music
selection that begins with that letter. Pressing a letter will display the pressed letter in
the on screen display area located between the two smoked glass windows at the top of
the guide.
alpha-numeric
bar
CHAPTER 7 - ESCIENT TOUCH PANEL OVERVIEW
Page 98

PAGE 97
TUNEBASE 200 INSTALLATION & USER’S GUIDE - M21201-01A1
Pressing the toggle button again will change the view from the alpha-numeric bar to the
remote control button bar.
This bar includes a player button to get to the player screen, previous track, next track,
pause to round out the transport functions, a view button to toggle through Artist,
Title, and Song views, an option button to bring up the music or radio option screens, a
favs button to play your favorites Playlist, a random button to randomly play music, and
an OpenGlobe button to enhance your music experience by allowing you to view more
information about your music and to purchase items through a secure link.
!
Pressing the toggle button when
in the remote control button mode
advances to the alpha-numeric
bar. Pressing the toggle button
again replaces the bar back to
the styles button bar. The style
button bar is always displayed
when returning to the guide
screen from the player screen.
remote control
button bar
CHAPTER 7 - ESCIENT TOUCH PANEL OVERVIEW
Page 99

PAGE 98
T
UNEBASE 200 INSTALLATION & USER’S GUIDE - M21201-01A1
Selecting music to play or selecting the player button on the remote control button bar
will present the Player screen. The Player screen appears with a toggle button when a
Touch Panel is in use. The transport button bar is displayed when the toggle button is
pressed again.
toggle button
transport button bar
CHAPTER 7 - ESCIENT TOUCH PANEL OVERVIEW
ETP-1000 Touch Panel
Page 100

PAGE 99
TUNEBASE 200 INSTALLATION & USER’S GUIDE - M21201-01A1
The remote control button bar is displayed when the toggle button is pressed again.
Pressing the guide button will take you back to the guide screen. The mode button
will toggle through the available play modes. The add button will add the current
song to your favorites play list. The setup button will bring up the setup screen.
Pressing the toggle button again will return to the title view that is displayed by
default each time you enter the player screen. Pressing the Info button on the screen
or on the remote will cause the artist name and artist bar to hide while the detailed
track information is displayed. Pressing the info button again will hide the detailed
track information and show the artist name and artist bar again.
remote control button bar
CHAPTER 7 - ESCIENT TOUCH PANEL OVERVIEW
ETP-1000 Touch Panel
 Loading...