

Escient Fireball DVDM-300 Owners manual

P/N: M22006-01A6
DVDM-300 USER’S MANUAL
THANK YOU
The team at Escient would like to take this opportunity to thank you
for purchasing an Escient FireBall product. Escient is committed to
providing our customers the most technologically advanced, yet easierthan-ever to use products that converge the power of the Internet with
home entertainment.
To maximize your enjoyment, please take a few minutes to review this
User’s Manual. It will guide you through all the features and benefits of
your new FireBall.
PRODUCT INTRODUCTION 6
ABOUT THIS MANUAL 6
RECORD YOUR SERIAL NUMBER 6
MANUAL DISCLAIMERS 6
WARNINGS AND PRECAUTIONS 7
TRADEMARKS & SERVICE MARKS 8
WARRANTY INFORMATION 9
ESCIENT PRIVACY POLICY 11
CONTACT INFORMATION 11
COPYRIGHT 11
TERMS AND DEFINITIONS 12
If you should need assistance please call our Customer Support Staff at
800.372.4368
The Escient Team
PAGE 2
SETUP 13
POWER STATES 13
FRONT PANEL OVERVIEW 14
REAR PANEL OVERVIEW 15
REMOTE OVERVIEW 16
ENTERING TEXT WITH THE REMOTE CONTROL 17
Entering Numeric Entry Mode 17
Typing Characters with the Remote 17
CONNECTING EXTERNAL DISC CHANGERS 19
Supported External Changers 19
Connecting Sony DVP-CX777ES CD/DVD Changers 20
Connecting Kenwood CD/DVD Changers 21
Connecting Sony CD Changers 22
LOADING DVD MOVIE DISCS INTO CHANGERS 23
Automatically Getting Disc Information 24
Getting Disc Information for a Range of Discs 25
Getting Disc Information for All Discs 26
FireBall™ DVDM-300 User’s Manual
ADDITIONAL CONNECTION AND HOOKUP
INFORMATION 27
DIGITAL AUDIO INPUTS 27
AUDIO OUTPUTS 27
VIDEO OUTPUTS 28
RS-232 CONNECTIONS 29
EXTERNAL MODEM CONNECTIONS 29
IR CONNECTIONS 29
ETHERNET CONNECTIONS 30
EXTERNAL CHANGER CONNECTIONS 32
Changer Types 32
Control Connections 32
Digital Audio Connections 32
Analog Audio Connections 32
Sony CD Mega Changer Hookup 32
Sony DVD/CD Changer Hookup 33
Kenwood DVD/CD Changer Hookup 33
REGISTRATION 34
TESTING A BROADBAND CONNECTION 34
TESTING A DIALUP CONNECTION 35
WATCHING DVD MOVIES 37
BROWSING YOUR MOVIE LIBRARY 37
PLAYING THE CURRENT MOVIE 37
SELECTING A DIFFERENT MOVIE 38
Movie Info 38
CHANGING THE GUIDE VIEW 38
View By Title 38
View By Cover 38
VIEWING BY GENRE 39
GETTING MUSIC INTO FIREBALL 40
RECORDING FROM THE INTERNAL CD 41
RECORDING FROM EXTERNAL CHANGERS 42
Automatically Recording CDs 43
Recording a Range of CDs 44
Recording All CDs 45
IMPORTING MUSIC FILES 46
System Requirements 46
Audio File Requirements 46
Cover Art Image Requirements 46
Importing from a PC 47
Importing from a Mac 48
RECORDING FROM OTHER EXTERNAL SOURCES 50
ERASING A CD-RW DISC 51
LISTENING TO MUSIC 52
BROWSING YOUR MUSIC LIBRARY 52
SHOW AND HIDE TRACKS 52
PLAYING THE CURRENT TITLE 53
SELECTING A DIFFERENT SONG 53
CHANGING THE GUIDE VIEW 54
View By Artist 54
View By Title 54
View By Song 54
View By Cover 54
CHANGING THE CURRENT PLAY MODE 55
VIEWING BY GENRE 56
LISTENING TO INTERNET RADIO 57
BROWSING INTERNET RADIO STATIONS 57
PLAYING THE CURRENT STATION 58
FireBall™ DVDM-300 User’s Manual
PAGE 3

MANAGING YOUR MEDIA 59
CREATING PLAYLISTS 59
CREATING GROUPS 60
ADDING INTERNET RADIO STATIONS 61
UPDATING THE INTERNET RADIO STATIONS LIST 62
EDITING MOVIE INFORMATION 63
Editing Disc Info 63
Automatically Lookup Information for This Disc 64
Searching for Movie Information Manually 65
Tips for Searching for Movies 65
Selecting an Existing Cover 66
Edit Description 67
EDITING MUSIC INFORMATION 68
Editing Track Names 69
Automatically Lookup Information for This Disc 70
Searching for the Original Cover 71
Tips for Searching for Covers 71
Selecting an Existing Cover 72
EDITING RADIO INFORMATION 73
EDITING PLAYLISTS 74
EDITING GROUPS 75
DELETING MUSIC 76
DELETING PLAYLISTS 77
DELETING GROUPS 78
CREATING CDS 79
CREATING A CUSTOM MIX CD 79
DUPLICATING A CD 81
RECORDING FROM AN EXTERNAL SOURCE 82
SETTING USER PREFERENCES 83
SETTING THE SCREEN SAVER PREFERENCES 83
Activation Idle Time 83
Other Modes 83
Retail Demo Mode 84
Photo Screen Saver Mode 85
SETTING YOUR TIME ZONE 86
CUSTOMIZABLE USER INTERFACE 87
ENABLING PASSWORD PROTECTION 88
MOVIE RATINGS 89
CHOOSING YOUR NETWORK CONNECTION 90
Testing the Your Connection 91
Ethernet Settings 92
Dialup Settings 93
SETTING THE FIREBALL SERVER SETTINGS 94
PEER TO PEER MUSIC SHARING 95
SELECTING THE AUDIO ENCODER TYPE 96
SETTING THE DISC INSERT PREFERENCES 97
DIGITAL INPUT PREFERENCES 98
VIDEO OUTPUT PREFERENCES 99
Video Format 99
Centering the FireBall Screen 100
Adjusting your TV’s Brightness 101
Adjusting your TV’s Contrast 102
Adjusting your TV’s Sharpness 103
Adjusting your TV’s Color and Tint 104
EXTERNAL CONTROL 105
SURROUND MODE SETTINGS 105
INSTALLING THE ETP TOUCH PANEL 106
Calibrating the Touch Panel 107
Changing the Touch Panel Button Overlay 108
Using Your Touch Panel 108
FireBall™ DVDM-300 User’s Manual
PAGE 4
IR REMOTE CONTROL 109
DIRECT ACCESS CODES 110
PLAYLIST HOT KEYS 113
SERIAL COM PORTS 114
CONTROLLING FIREBALL FROM OTHER DEVICES 115
Networking 126
Server Selection 126
ESCIENT TECHNICAL SUPPORT 127
FIREBALL UTILITIES 116
GETTING INFORMATION ABOUT YOUR FIREBALL 116
RESTARTING THE SYSTEM 117
UPDATING THE SOFTWARE 118
CONTROLLING FIREBALL FROM A WEB
BROWSER 119
SETTING UP THE FIREBALL WEB SERVER 119
USING THE WEB USER INTERFACE 119
USING THE WEB BROWSER AS A MUSIC CLIENT 120
BACKUP AND RESTORE 121
FIREBALL MUSIC BACKUP 121
FIREBALL MUSIC RESTORE 122
ID3 Tag Support 122
NETWORKED AUDIO USING FIREBALL MUSIC
CLIENTS 123
SERVERS 123
CLIENTS 123
LOCATING THE FIREBALL CLIENTS AND SERVERS 124
Central 124
Distributed 125
CONFIGURING A FIREBALL SERVER 126
CONFIGURING A FIREBALL CLIENT 126
PAGE 5
TROUBLESHOOTING 128
NETWORK PROBLEMS 128
SOFTWARE UPDATE PROBLEMS 128
RECORDING PROBLEMS 128
ADDITIONAL INFORMATION 129
SPECIFICATIONS 129
Video Specifications 129
Audio Specifications 129
Physical Specifications 129
3rd Party Certifcations 129
FCC Part 15, Subpart B 129
GRACENOTE® END-USER LICENSE
AGREEMENT 130
FireBall™ DVDM-300 User’s Manual

PRODUCT INTRODUCTION
Thank you for purchasing a FireBall Media Management system from Escient (a division of D&M Holdings).
ABOUT THIS MANUAL
This FireBall User’s Manual is intended to provide the reader with an overview of the main features and benefits of the Escient FireBall Media
Management Systems. For more information, please refer to the Escient web site (www.escient.com) or contact your Escient dealer.
RECORD YOUR SERIAL NUMBER
The serial number for this unit is located at the rear of the device. Please record the serial number in the space provided below. Refer to it whenever
you call Escient Tech Support (800.372.4368) regarding this product.
FireBall Serial Number:
MANUAL DISCLAIMERS
At the time of printing, the screen shot images in this manual matched the interface screens. However, since FireBall has the capability of
downloading software updates and enhancements on a regular basis, the resulting screen updates may no longer match the images in this manual.
Please check the Escient website for more information about software updates.
PAGE 6
FireBall™ DVDM-300 User’s Manual
WARNINGS AND PRECAUTIONS
• Do not use this apparatus near water.
• Clean only with a dry cloth.
• Do not block any ventilation openings.
• Do not install near any heat sources such as radiators, heat registers, stoves, or other apparatus
(including amplifiers) that produce heat.
• To reduce the risk of electric shock, do not remove the cover. No user serviceable parts are
inside. Refer servicing to qualified service personnel.
• To prevent electric shock, do not use a 3 wire to 2 wire adapter plug.
• A three prong grounded outlet is required.
• You are cautioned that any change or modification not expressly approved in this manual or
approved in writing by an authorized representative of Escient could void your warranty and/
or your authority to operate this equipment.
• Prolonged use of any video device which produces a static (non-moving, non-changing) or
repetitive image on your projector, television or plasma display device can cause “screen
burn-in”. You are encouraged to leave the FireBall screen-saver turned on and set to the
lowest possible “time-out” duration. Warning: This device uses the mains plug as the means to
disconnect the unit, this unit remains powered unless disconnected from the mains source.
PAGE 7
FireBall™ DVDM-300 User’s Manual

TRADEMARKS & SERVICE MARKS
Escient®, the Escient logo, and FireBall® are trademarks of Digital Networks North America.
FireBall and Physital are trademarks of Escient®.
Other product names mentioned herein are used for identification purposes only and may be
trademarks of their respective companies.
Music recognition technology and related data are provided by Gracenote®. Gracenote is
the industry standard in music recognition technology and related content delivery. For more
information visit www.gracenote.com.
CD and music-related data from Gracenote, Inc., copyright © 2000-2005 Gracenote.
Gracenote CDDB® Client Software, copyright 2000-2005 Gracenote. This product and service
may practice one or more of the following U.S. Patents: #5,987,525; #6,061,680; #6,154,773,
#6,161,132, #6,230,192, #6,230,207, #6,240,459, #6,330,593, and other patents issued or pending.
Gracenote and CDDB are registered trademarks of Gracenote. The Gracenote logo and
logotype, and the “Powered by Gracenote” logo are trademarks of Gracenote.
PAGE 8
FireBall™ DVDM-300 User’s Manual

WARRANTY INFORMATION
Terms of Coverage - Each Escient branded media management system sold comes with a standard one (1) year warranty. This warranty provides
no-charge coverage under normal product usage, for a period of one year from the date of registration and/or purchase (whichever is earlier). This
warranty program provides the following key features and benefits:
• Twelve (12) months service, parts and labor.
• Five (5) day turn around time on all standard in-warranty repairs. No charges to the customer other than in-bound shipping charges which are
determined by the shipping method. All return shipments will be via Standard Ground Transportation (approximately 5 business days).
• Twelve (12) months of regular hour telephone support (9AM to 7PM EST), Monday through Friday.
• 24-hour email response from the Escient Support Website.
• Software maintenance updates provided via a broadband or dial-up Internet connections.
• Access to 24-hour music and movie databases and entertainment services providing access to thousands of CD and DVD titles and associated
information.
What is Covered - The goal of this warranty is to cover operational problems that might arise with your product during normal use. This includes
failure to start, improper operation, or intermittent failures. As part of the warranty, Escient will pay for all labor and materials used in the repair of
the system. Escient reserves the right to use new or factory refurbished parts in the repair of these in-warranty systems. Escient will also pay for the
return shipment of the repaired system via standard ground transportation. At Escient’s discretion, the Company will repair or replace any system sent
in for repair. Upon repair, the product will be new or like-new in condition and will meet all necessary regulatory requirements.
What is Not Covered - Escient products are sold through Escient approved dealers. A number of items must remain intact in order for Escient to
verify and validate this warranty. Additionally, there are several conditions which violate Escient’s warranty program. These include:
• The product was not purchased through an approved Escient Dealer.
• Any product, on which the serial numbers has been defaced, modified or removed physically or electronically will not be covered by an Escient
warranty.
• Escient will not cover under warranty damage to the product as a result of accident, misuse, abuse, neglect, fire, water, lightning, or other acts
of God or nature, improper storage, unauthorized modification, or failure to follow instructions.
• Any type of unauthorized repair or modifications made to the system resulting in damage to the product will not be covered under this warranty.
• Damage caused to the product as a result of improper shipping or installation.
• Any problems related to the use of the product which is not a direct problem with the product.
• Damage caused to the product as a result of improper installation to third party peripherals or products, or incorrect connection to peripheral or
products.
FireBall™ DVDM-300 User’s Manual
PAGE 9

• Additionally, Escient does not cover the following items under the terms or its warranty programs:
• Installation or removal charges.
• Cost of initial technical adjustments (setup costs).
• Battery replacement.
Escient’s sole liability for any defective product is limited to the repair or replacement of the product at our discretion. Escient shall not be liable
for damages to other property caused by defects in this product, damages based upon inconvenience, loss of use of the product, loss of time or data,
commercial loss or any other damages, whether real, incidental or consequential.
Escient shall not be liable for damage or loss of data including but not limited to music recorded to storage devices. It is the customer’s responsibility
to maintain the original media and/or appropriate backup copies within the specific rights of the media’s copyright holder.
How to Return a Product - Contact your dealer or Escient’s Customer Support group at 800-372-4368.
Please have the following information ready for your dealer or Escient’s Customer Support technician:
• Product Serial Number
• Model Number
• Date of Registration or Purchase
• Place of Purchase
Upon reviewing the request for repair under warranty provisions, Escient’s Technical Support group will issue a Return Material Authorization
(RMA) number. This number is to be attached to the outside of the shipping carton. Additional instructions will be provided by technical support.
Please be sure to use original packing carton and internal packing materials to assure proper shipment of the system. Insurance costs are the
responsibility of the customer. Most shippers only provide standard coverage for $100 in cost so please protect yourself by providing additional
insurance for the returned product.
Out of Warranty Repair - Escient provides out of warranty repair service on a cost plus labor basis. Minimum charges will apply. Technical
support will provide information on this service at the time of the call.
PAGE 10
FireBall™ DVDM-300 User’s Manual
ESCIENT PRIVACY POLICY
Escient is committed to providing you with a product that you enjoy and are confident in using, and are committed to providing services in a private
and secure environment.
We recognize and respect each individual user’s privacy and have created this Privacy Policy to demonstrate our commitment to your privacy.
We want you to be fully informed about the information that we collect, why we collect it, and with whom we share it.
It is our hope that, after reading this notice, you will understand our commitment to privacy and be confident that we will use your information
responsibly. By using the Escient FireBall, you are accepting the practices described in this Privacy Policy.
The option to read the Escient Privacy Policy appears on the zip code screen of the Quick Start automatic setup procedure. In addition, you can
access the statement at any time by pressing the SETUP key and choosing the GENERAL menu, and then selecting the PRIVACY POLICY
option..
CONTACT INFORMATION
Escient may be contacted by using the following information. Once you have worked with your local Escient dealer, we encourage you to contact us
if you are in need of any further assistance.
Escient
6640 Intech Blvd. Suite 250
Indianapolis, Indiana 46278
Phone: 800-372-4368 Press “2” for Sales, or “3” for Support
Fax: 317-616-6790
Internet: www.escient.com
Email: support@escient.com
Hours: Monday - Friday 9:00am - 7pm EST
COPYRIGHT
This manual is copyright ©2005 by D&M Holdings and Escient. All rights reserved.
PAGE 11
FireBall™ DVDM-300 User’s Manual

TERMS AND DEFINITIONS
Following are terms used throughout this manual:
• Button - refers to a graphic item on the display screen.
• Group - a collection of similar music titles. Standard genre groups are provided and custom groups can be created by the user.
• Highlight - highlighting is used to indicate the user’s selection on screen. When the selection moves up, down, left, or right, the highlight
moves to the next nearest item. No action is taken (except that more information may be displayed on the screen) until the Select key is pressed.
• Info Text Area - the portion of the guide screen used to display information about the highlighted title.
• Playlist - a collection of one or more music tracks or songs.
• Title - a collection of music tracks commonly referred to as a CD, Album or Playlist.
• Key - refers to one of the buttons on your remote or keyboard.
• MP3 - a compressed digital audio format. MP3 files are smaller than the original CD tracks and sound almost identical.
• FLAC - a lossless compressed digital audio format. FLAC files are smaller than the original CD tracks and are bit for bit duplicates of the
original.
• WMA - a digital audio format from Microsoft which stands for Windows Media Audio.
• Guide - a grid or list of information, used to browse your media library.
• Player - the screen used to display the currently playing media.
PAGE 12
FireBall™ DVDM-300 User’s Manual

SETUP
This manual assumes that you followed the printed “Quick Setup Guide” that came with your FireBall. If you have not properly connected your
FireBall to your audio/video system, please go back and follow the “Quick Setup Guide” guide before continuing with this User Manual.
POWER STATES
After the FireBall unit is plugged in, the Standby LED located next to the power button will flash red until the startup process is complete.
Please wait. This may take several minutes.
When the Standby LED is solid RED, the FireBall is now in a standby or “sleep” mode. There is no video output when FireBall is in standby mode.
Press the Power button (on the front panel or on the remote) once and the video output is displayed on your TV. The unit is now ON and the LED will
be solid blue.
To change from the ON mode back to the standby or “sleep” mode, press the Power button on the front panel or on the remote once. The video output
will go blank and the LED will be solid red.
If power is removed from FireBall for any reason, including a power outage or if the unit is unplugged, FireBall will automatically return to the
Standby state as soon as power is restored. When FireBall is turned on again, FireBall will return to the same source mode that it was in when power
was lost.
To force the FireBall to restart, PRESS and HOLD the Power button on the front of the unit for 4 seconds, and release it when
the standby LED starts blinking.
When the Standby LED is RED and FireBall has completed its startup process, press the Power button once to turn on the FireBall.
PAGE 13
FireBall™ DVDM-300 User’s Manual

FRONT PANEL OVERVIEW
2 3 4
1
1 - POWER
2 - MOVIES SOURCE
3 - MUSIC SOURCE
4 - RADIO SOURCE
5 - CD-RW DRIVE
6 - TEXT DISPLAY & IR RECEIVER
7 - OPEN/CLOSE DRIVE
8 - NAVIGATION
9 - SELECT
10 - TRANSPORT CONTROLS & GUIDE
6
5
10
8
7
9
FireBall™ DVDM-300 User’s Manual
PAGE 14
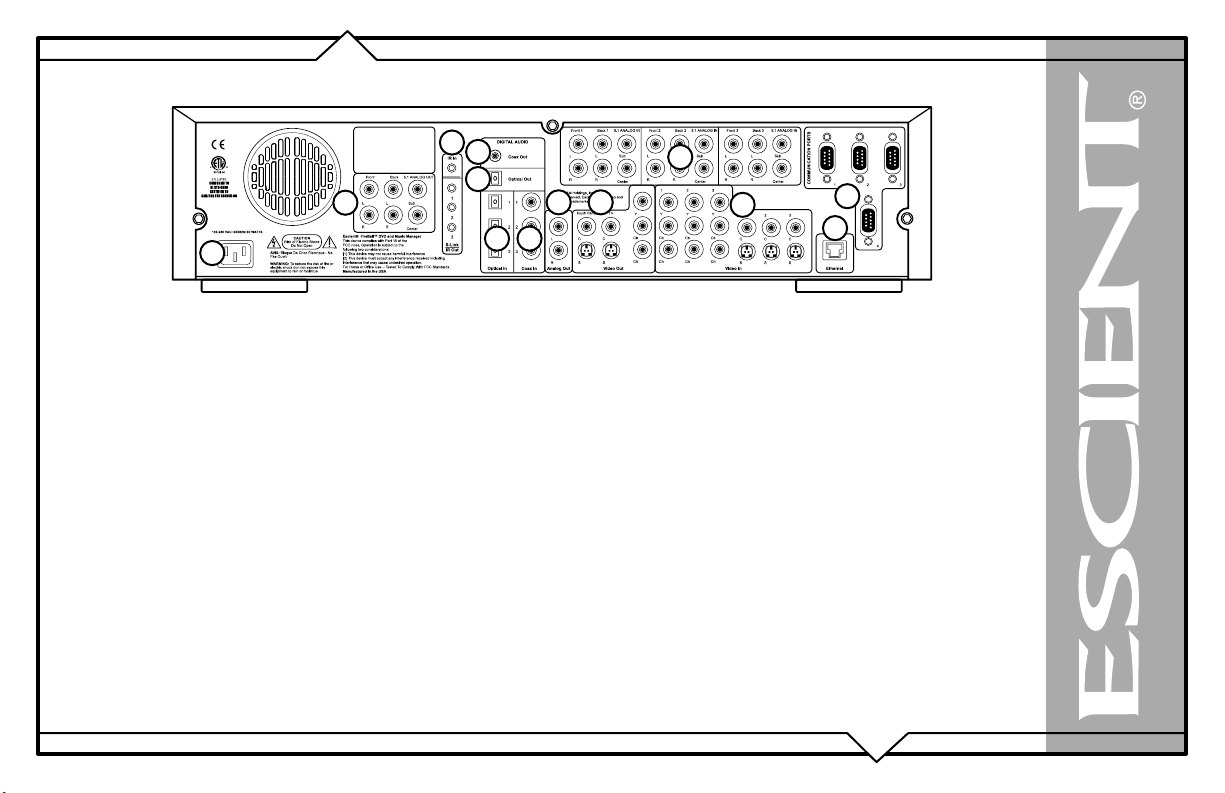
REAR PANEL OVERVIEW
3
4
5
2
6
1
1 - POWER
2 - 5.1 ANALOG AUDIO OUT
3 - IR IN AND S-LINK/IR OUT
4 - DIGITAL AUDIO COAX OUT
5 - DIGITAL AUDIO OPTICAL OUT
6 - DIGITAL AUDIO OPTICAL IN
7 - DIGITAL AUDIO COAX IN
8 - ANALOG AUDIO OUT
9 - VIDEO OUT
10 - 5.1 ANALOG AUDIO IN
11 - VIDEO IN
12 - COMMUNICATION PORTS
13 - ETHERNET
7
10
9
8
11
12
13
PAGE 15
FireBall™ DVDM-300 User’s Manual
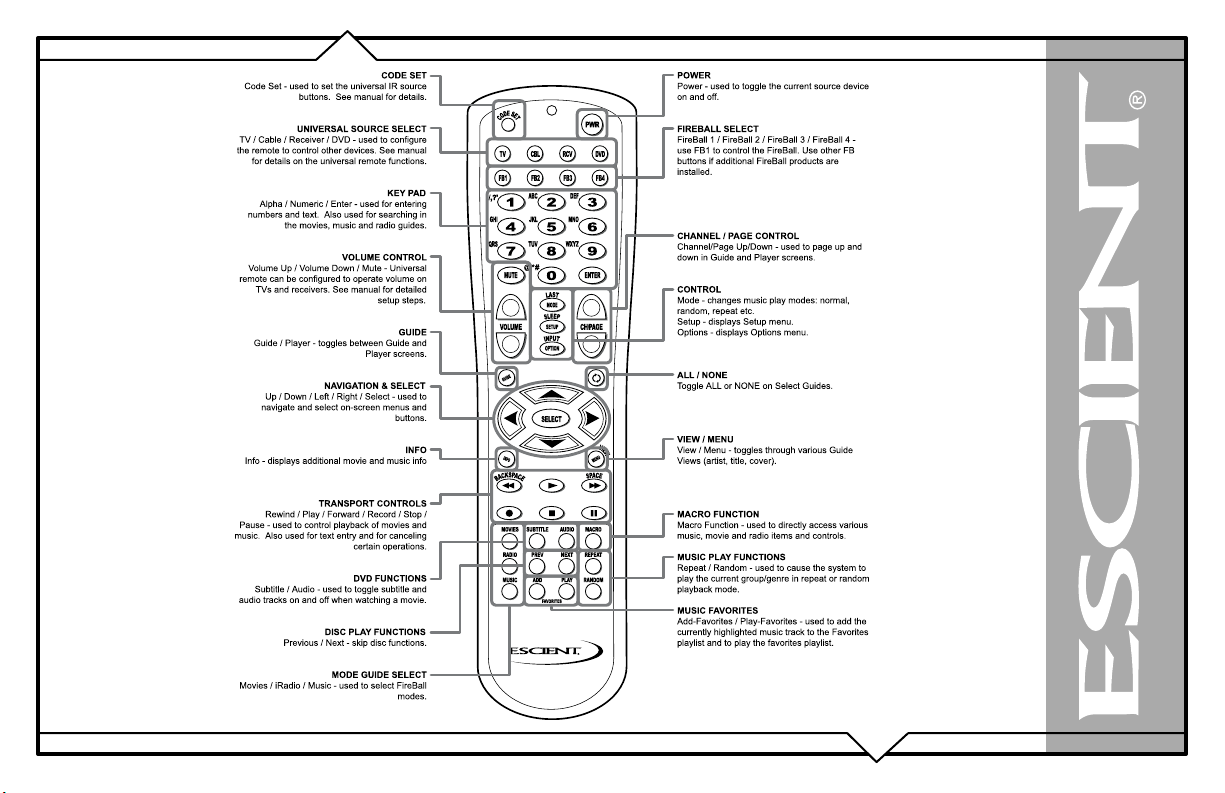
REMOTE OVERVIEW
PAGE 16
FireBall™ DVDM-300 User’s Manual
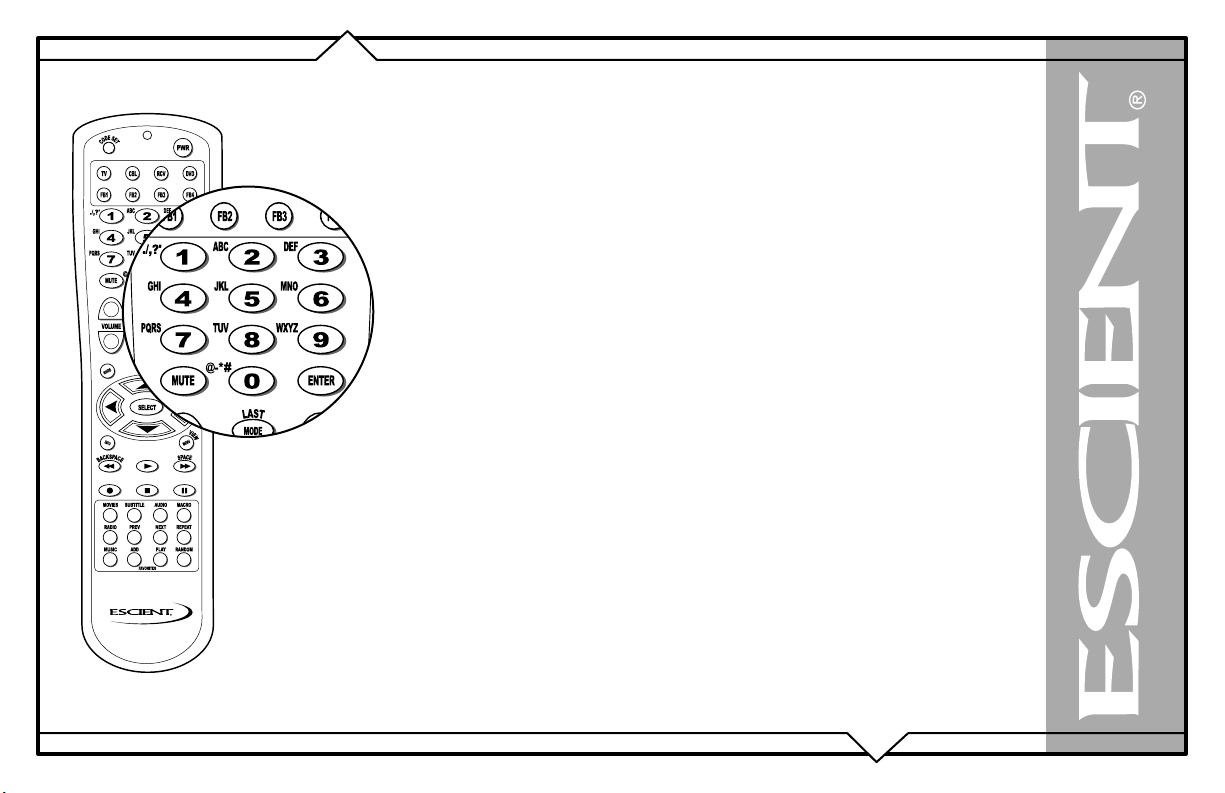
ENTERING TEXT WITH THE REMOTE CONTROL
The remote control can be used to enter text in all text fields. This text entry capability is provided
to allow you to fill out short text fields – such as those that occur in the setup and edit screens.
FireBall’s wireless keyboard should be used when extended typing is required.
Entering Numeric Entry Mode
In fields where FireBall expects only numeric characters to be entered (such as phone number
fields), an indicator will appear on the screen that displays the letters “123” indicating that only
numbers can be entered.
Typing Characters with the Remote
The remote control based text entry capability is similar to that provided on standard telephones and
cell phones. Each numeric key has characters associated with it that can be accessed by pressing
the key one or more times. You have .5 seconds after a key is pressed to enter a second character
from the same key. If you press the same key within .5 seconds, the second character associated
with that key replaces the initial character. If you do not press the same key within .5 seconds, the
text cursor moves to the next location so that the same key can be pressed again to enter a second
character.
The “2”, “3”, “4”, “5”, “6”, and “8” keys each support three letters and one number and can be
pressed from one to seven times to display upper case, lower case, and numeric characters. The “7”
and “9” keys both support four letters and one number and can be pressed from one to nine times.
The “1” and “0” keys support all of the special characters and will cycle through each character for
every key press.
The text characters follow the same convention used by a standard telephone – except in the case of
the “1” and “0” keys which contain additional characters.
When entering characters at the beginning of a field or characters that follow a space, FireBall
assumes that upper case characters are preferred. Therefore, characters are entered in the following
cycle – uppercase, lowercase, and numeric. For example, the first key press enters an uppercase
letter corresponding to the first letter associated with the key. Pressing the “2” key once displays an
“A” in the text field, pressing the “2” key twice displays a “B”, pressing it again will
FireBall™ DVDM-300 User’s Manual
PAGE 17
display a “C”. The fourth key press displays a lower case “a”, the fifth key press displays a lower case “b”, and the sixth key press displays a lower
case “c”. Lastly, pressing the “2” key a seventh time displays the number “2”.
When entering the second character in a text field or the second character following a space, FireBall assumes that lower case is preferred and the
character entry cycles in the following pattern – lowercase, uppercase, and numeric.
The following text entry table describes the sequence of characters that appear when specific keys are pressed on the
remote:
PAGE 18
Key
1
2
3
4
5
6
7
8
9
0
Alpha Mode
1stcharacter or 1st character after a
space
1. / , ? ‘ : ; &~! 1. / , ? ‘ : ; &~!
ABCabc2 abcABC2
DEFdef3 defDEF3
GHIghi4 ghiGHI4
JKLjkl5 jklJKL5
MNOmno6 mnoMNO6
PQRSpqrs7 pqrsPQRS7
TUVtuv8 tuvTUV8
WXYZwxyz9 wxyzWXYZ9
0@ _ - * # [ ] ( )+= 0@ _ - * # [ ] ( )+=
Alpha Mode 2
character or 2nd
character after a
space
nd
FireBall™ DVDM-300 User’s Manual

CONNECTING EXTERNAL DISC CHANGERS
Supported External Changers
The following changers are currently supported. This list may change from time to time as new changers are released by third party manufacturers.
Please check the Escient web site for a list of any new supported changers.
• Sony DVP-CX777ES CD/DVD changer
• Kenwood DV-5900M and DV-5050M CD/DVD Changers
• Sony CD Changers (CDP-CX 200, 300, 400 series with S-Link support)
Note: FireBall will support up to three connected changers. All changers must be the same brand and type. You can not mix DVD
and CD changers. When connecting the changers, the first changer should be connected to video in 1, digital audio in 1, 5.1 analog in
1, and RS232 1. The second changer to all #2 connectors, and the third to all #3 connectors.
PAGE 19
FireBall™ DVDM-300 User’s Manual
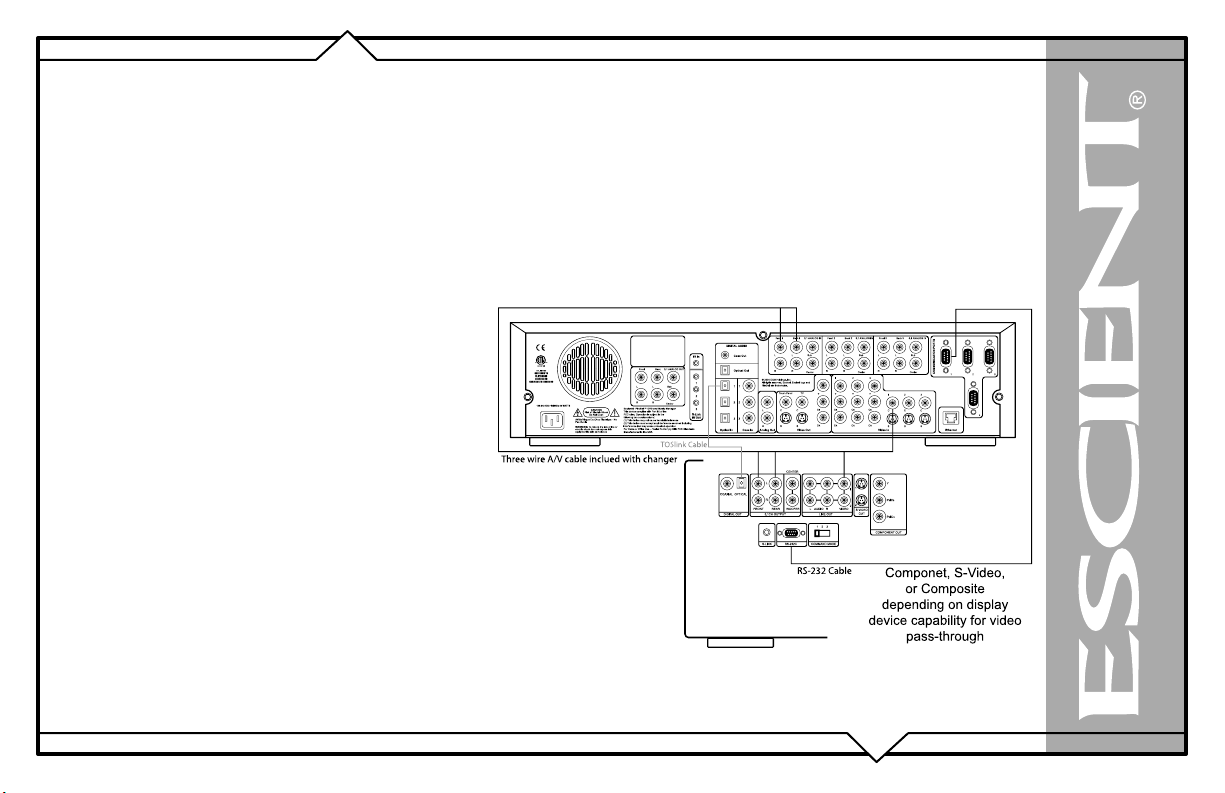
Connecting Sony DVP-CX777ES CD/DVD Changers
FireBall requires that you connect each changer to the back panel using audio and control cables.
Follow these steps to connect your Sony CD/DVD changers to your FireBall:
1. An RS-232 serial null modem cable with female DB-9 connectors on each end is required for connecting a Sony CD/DVD
Changer.
2. Connect one end of the RS-232 serial cable into Communication Port number 1, on the back of your FireBall.
3. Connect the other end of the RS-232 serial cable into the “RS-232C” port on the back of your changer.
4. Locate the stereo RCA audio patch cable that came with your changer.
5. Connect one end of the RCA audio cable into the Analog In jacks number 1 on the back of your FireBall
6. Connect the other end of the RCA audio cable into the Analog Line Out jacks on the back of your changer.
• If you have more than one changer, repeat these steps to
connect the additional changers to communications ports
and audio jacks 2 and 3 respectively.
• For the best audio quality, you should also connect digital
optical or coax audio cables (not included) between your
changers and FireBall.
• For the best video quality, you should also connnect
component video cables (not included) between your
changers and FireBall.
Note: Control Cable Pin-Outs and Requirements. FireBall
uses a standard null modem cable to connect between
it’s RS-232 COM ports and external changers and control
systems. Cables must be 25 feet or less in length.
PAGE 20
FireBall™ DVDM-300 User’s Manual
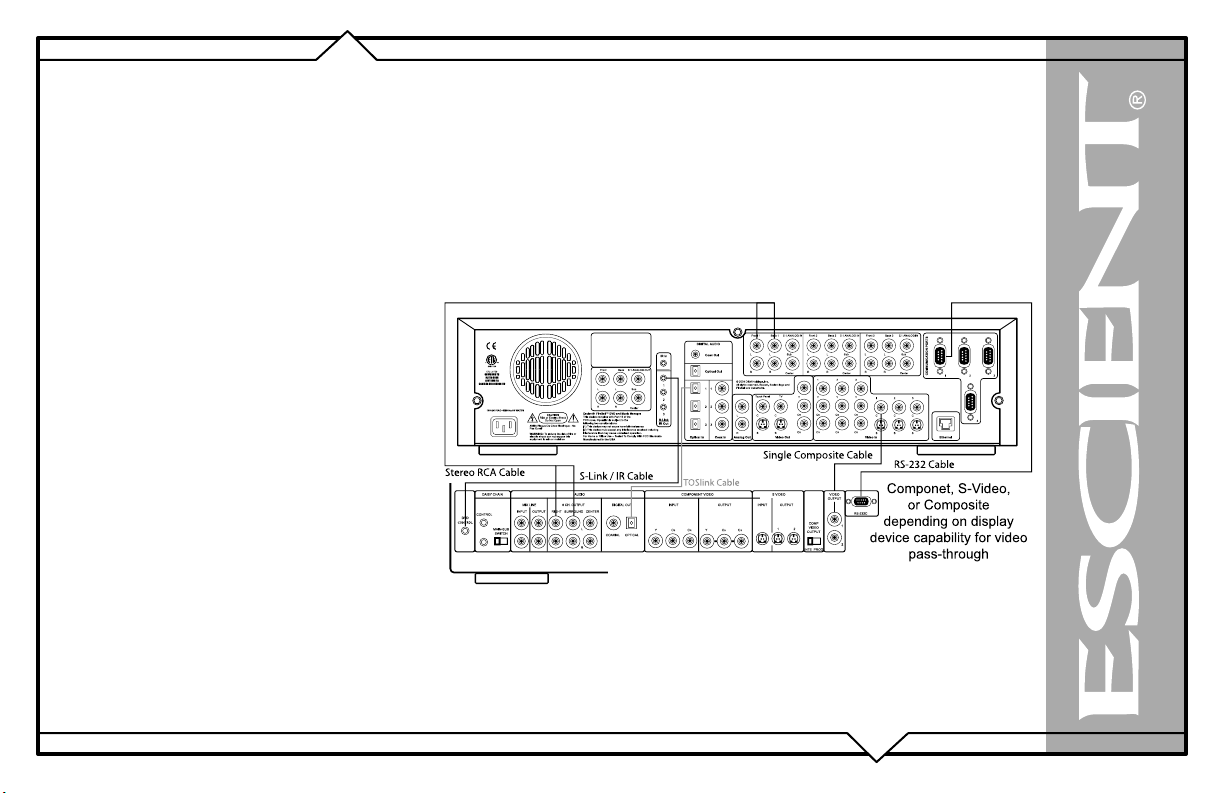
Connecting Kenwood CD/DVD Changers
FireBall requires that you connect each changer to the back panel using audio and control cables.
Follow these steps to connect your Kenwood DVD/CD changers to your FireBall:
1. Locate the RS-232 serial cable that came with your Kenwood changer. This is the black cable with female DB-9
connectors on each end.
2. Connect one end of the RS-232 serial cable into Communication Port number 1, on the back of your FireBall.
3. Connect the other end of the RS-232 serial cable into the “RS-232C” port on the back of your changer.
4. Locate the stereo RCA audio patch cable that came with your changer.
5. Connect one end of the RCA audio cable into the Analog In jacks number 1 on the back of your FireBall
6. Connect the other end of the RCA audio cable into the Analog Line Out jacks on the back of your changer.
• If you have more than one changer, repeat these
steps to connect the additional changers to
communications ports and audio jacks 2 and 3
respectively.
• For the best audio quality, you should also
connect digital optical audio or coax cables (not
included) between your changers and FireBall.
• For the best video quality, you should also
connnect component video cables (not included)
between your changers and FireBall.
• To control power on and power off for the
Kenwood changer you must connect the included
1/8” male to male cable between the “S-Link/
IR Out” jack on the FireBall and the “DVD
CONTROL” jack on the Kenwood changer.
PAGE 21
FireBall™ DVDM-300 User’s Manual
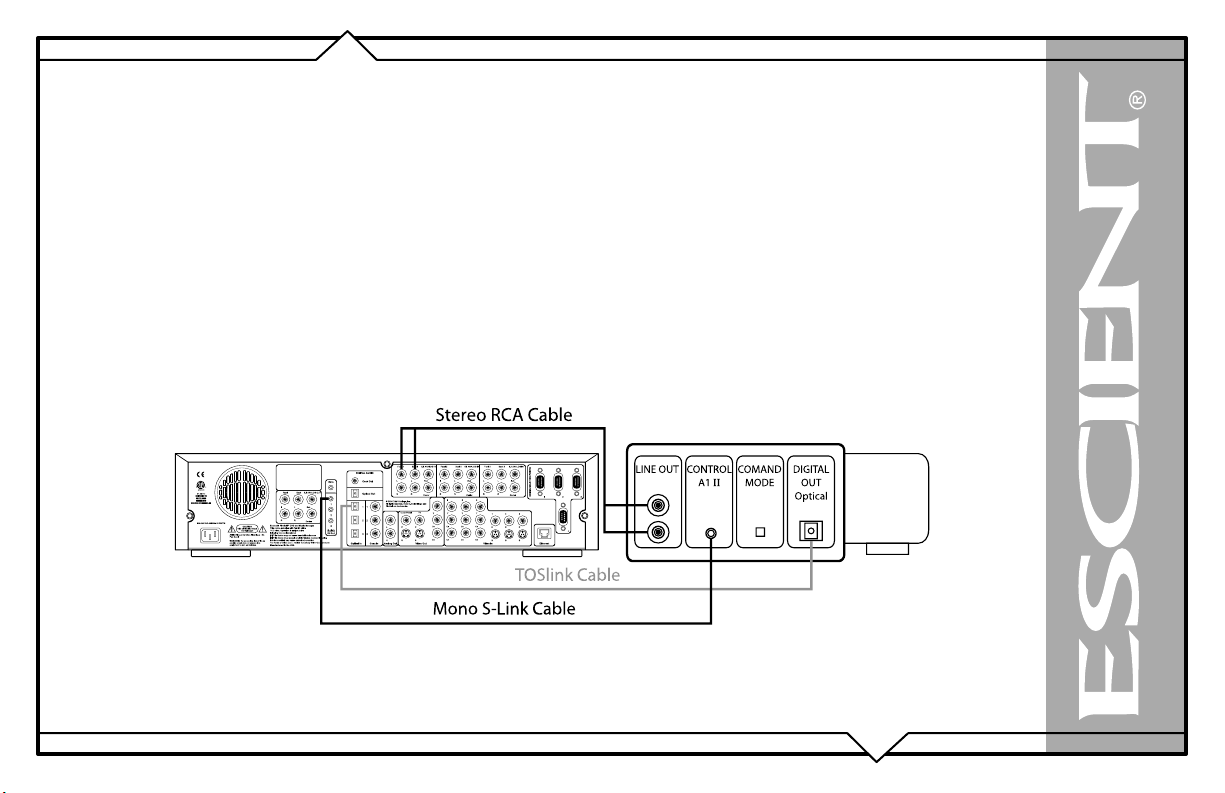
Connecting Sony CD Changers
FireBall requires that you connect each changer to the back panel using audio and control cables.
Follow these steps to connect your Sony CD changers to your FireBall:
1. Locate the included S-Link cable. This is the 10’ black cable with 1/8” male plugs on each end.
2. Connect one end of the S-Link cable into the S-Link/IR Out jack number 1 on the back of your FireBall.
3. Connect the other end of the S-Link cable into the Control A1 jack on the back of your changer.
4. Locate the stereo RCA audio patch cable that came with your changer.
5. Connect one end of the RCA audio cable into the Analog In jacks number 1 on the back of your FireBall
6. Connect the other end of the RCA audio cable into the Analog Line Out jacks on the back of your changer.
7. If your changers has a “Command Mode” switch on the rear panel, make sure the is set to 1 for all changers. If no rear
switch, use the changers menu to set it to CD1 for all changers.
• If you have more than one changer, repeat these steps to connect the additional changers to S-Link and audio jacks 2 and 3 respectively.
• For the best audio quality, you should also connect digital optical or coax audio cables (not included) between your changers and FireBall.
PAGE 22
FireBall™ DVDM-300 User’s Manual
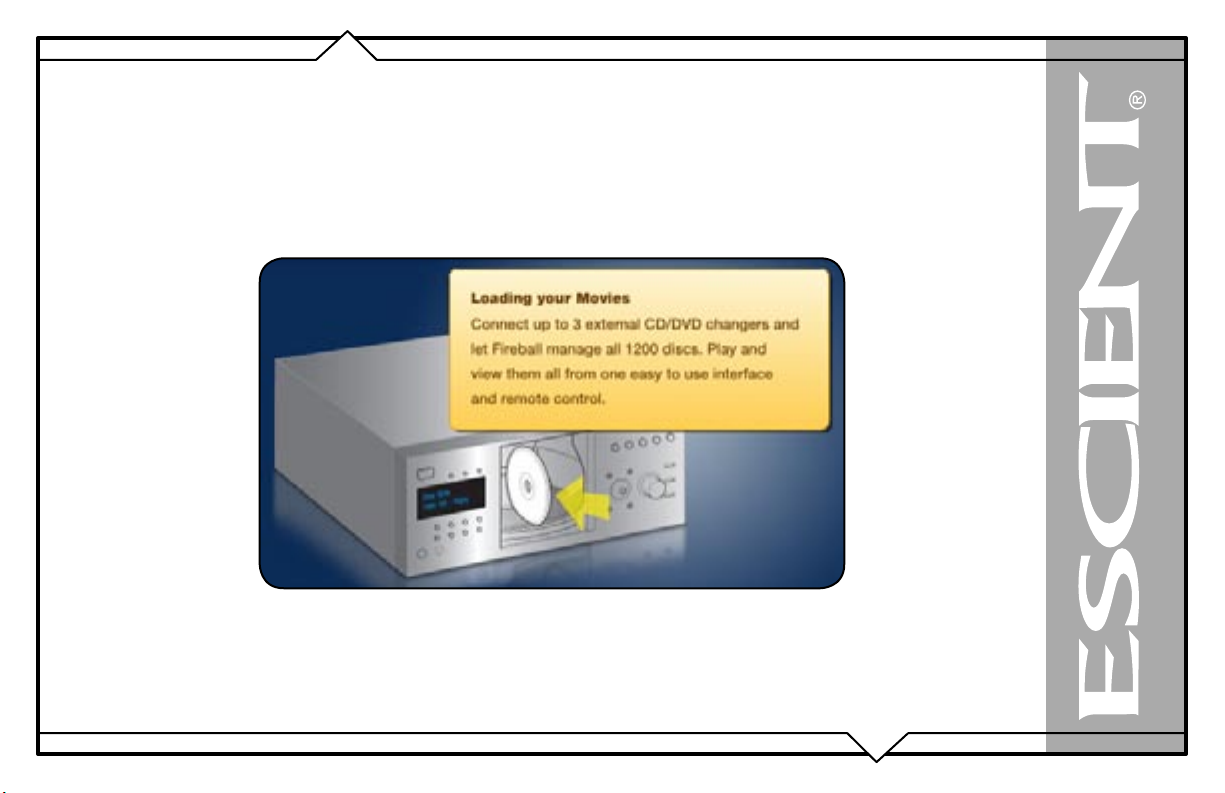
LOADING DVD MOVIE DISCS INTO CHANGERS
Insert DVDs into your changers, following the changer manufacturer’s instructions and close the changer door. Quick Lookup will automatically start
in a few seconds. If the Quick Lookup process does not automatically start, then manually start the Lookup using the steps described below.
The disc information that FireBall displays on your TV screen is NOT included on the original CDs that you recorded or CDs/DVDs loaded into your
changers. The artist name, album name, and track list are provided by the Gracenote® Music Recognition Service. The album cover, movie title,
movie info, and movie cover art are provided by the Escient service. This information is downloaded from the Escients servers to your FireBall using
your Internet connection. This process is referred to as “Looking up Disc Information”.
PAGE 23
FireBall™ DVDM-300 User’s Manual
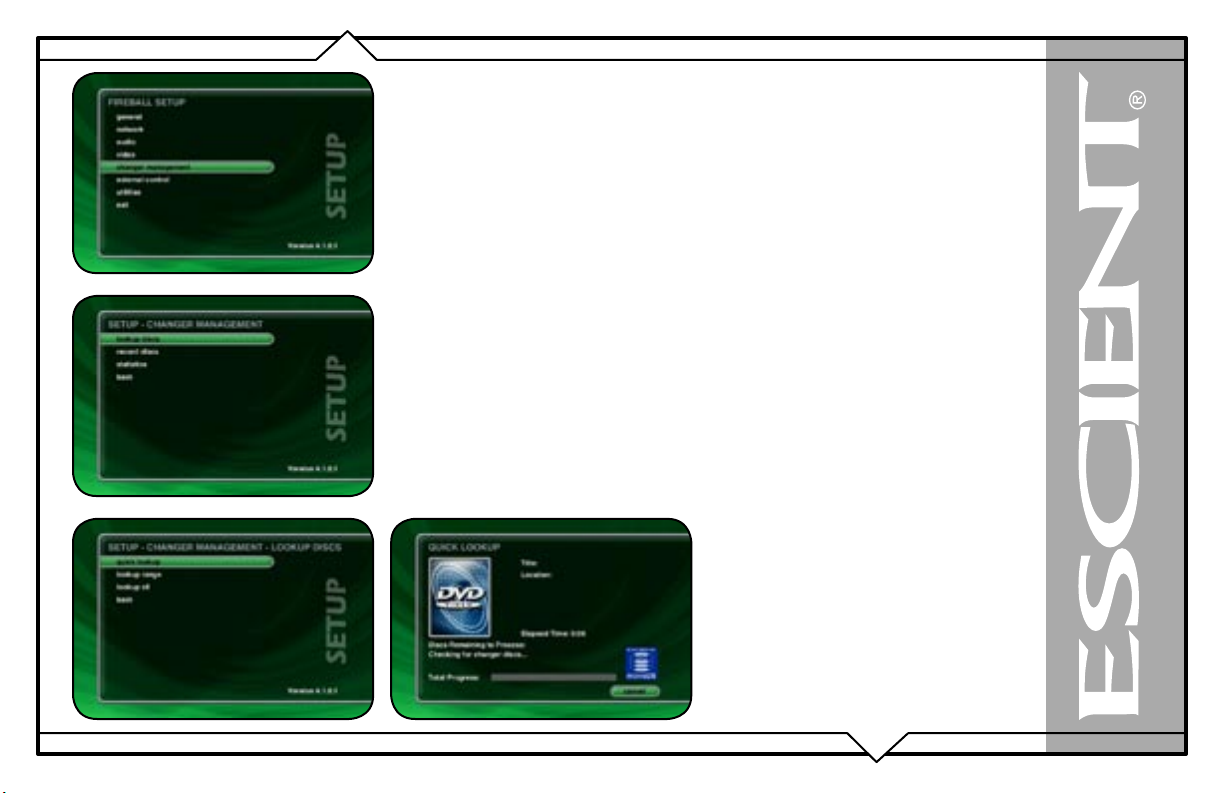
Automatically Getting Disc Information
Once your changers are connected to FireBall and loaded with CDs/DVDs, all you have to do is
close the changer door and in a few seconds FireBall will begin looking up the disc information
from each disc, in each changer.
Quick Lookup checks each previously empty slot in the changers to see if any new discs were
added, and then checks each previously occupied slot in the changer to see if any discs were
removed.
One by one, the Table of Contents is read from each CD/DVD and compared to the local music
database, Escient’s MovieDB™ service, or Gracenote CDDB® using your Internet connection,
as FireBall builds your Music/Movies Library. As each disc is accessed and looked up, the Quick
Lookup screen is updated to display the disc’s information and cover art. When all of the discs are
looked up, the Guide screen will be displayed.
You can manually run Quick Lookup at any time by following these steps:
1. Press the SETUP key on the remote to display the Setup menu.
2. Select the CHANGER MANAGEMENT menu.
3. Select the LOOKUP DISCS menu.
4. Select the QUICK LOOKUP menu.
5. FireBall will perform a Quick Lookup for each new disc.
WARNING: Quick Lookup checks for newly
added and removed CDs each time it runs.
Do not remove CDs and replace new CDs
into the same changer slots without running
Quick Lookup in-between, or FireBall will not
know that these slots have changed.
PAGE 24
If you want to reuse the same slots, first
remove your CDs, let Quick Lookup run, then
add new CDs to the same slots.
FireBall™ DVDM-300 User’s Manual
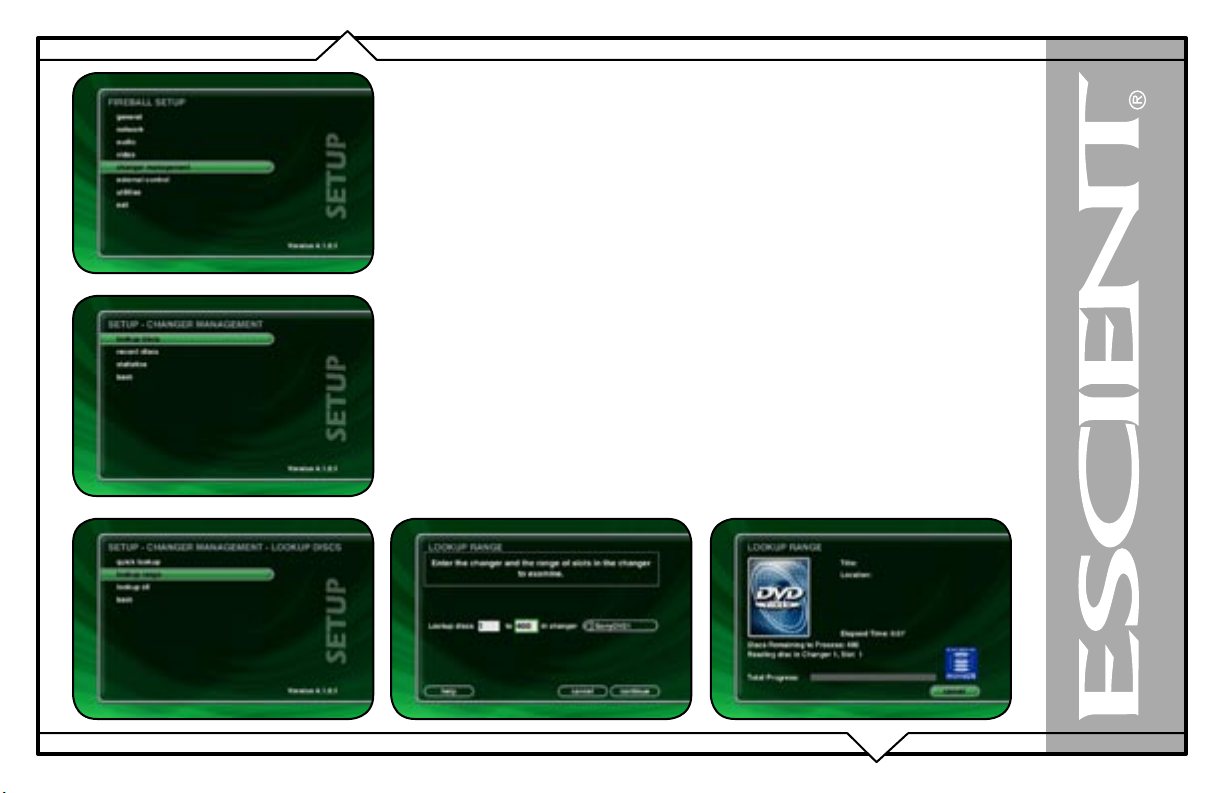
Getting Disc Information for a Range of Discs
If you want to lookup the disc information for a specific range of slots in a changer, you can use the
Lookup Range feature.
Follow these steps to lookup a range of changer slots:
1. Press the SETUP key on the remote to display the Setup menu.
2. Select the CHANGER MANAGEMENT menu.
3. Select the LOOKUP DISCS menu.
4. Select the LOOKUP RANGE menu.
5. Enter a valid range of slots to lookup. If you have more than 1 changer, select
which changer you want to use.
6. Select the CONTINUE button.
7. The Lookup Range screen displays the progress and results for each disc in
the selected range.
PAGE 25
FireBall™ DVDM-300 User’s Manual
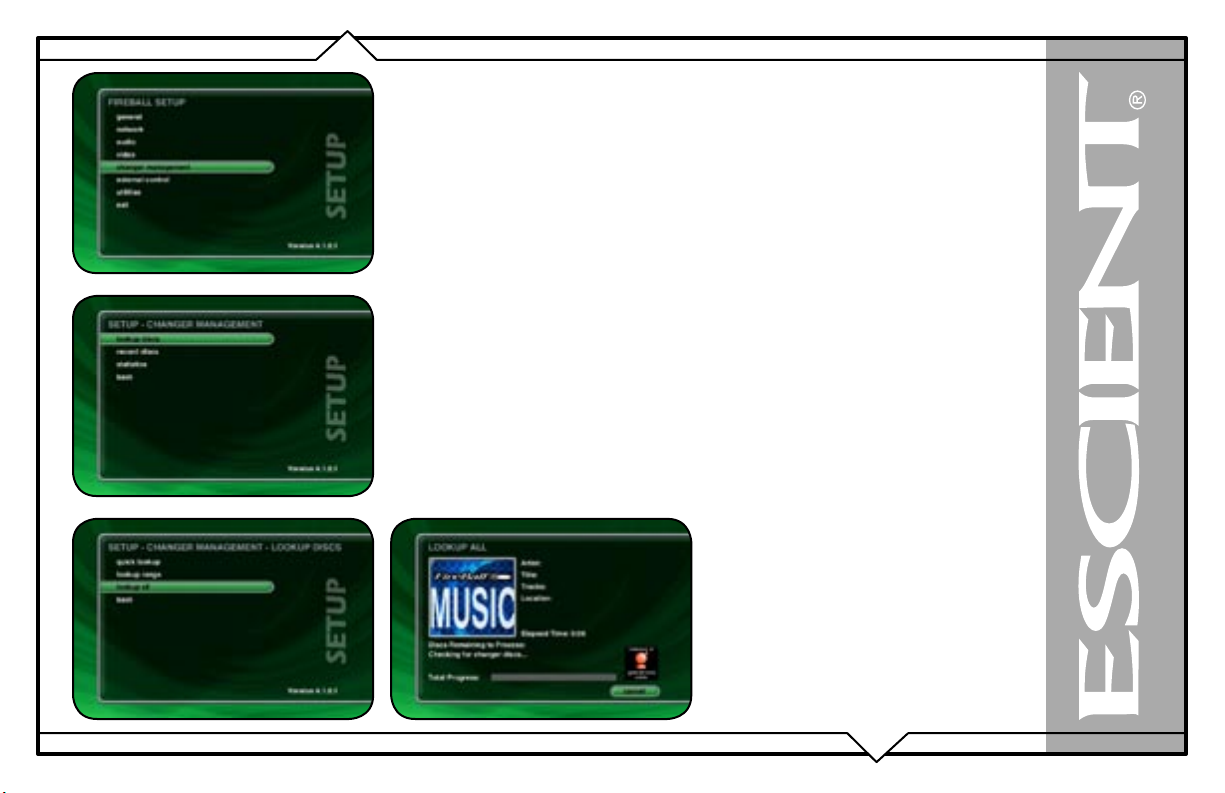
Getting Disc Information for All Discs
If you want to lookup the disc information for all discs in all changers, you can use the Lookup All
feature.
Follow these steps to lookup all discs in all changers:
1. Press the SETUP key on the remote to display the Setup menu.
2. Select the CHANGER MANAGEMENT menu.
3. Select the LOOKUP DISCS menu.
4. Select the LOOKUP ALL menu.
5. The Lookup All screen displays the progress and results as each disc in each
changer is looked up.
PAGE 26
FireBall™ DVDM-300 User’s Manual
ADDITIONAL CONNECTION AND HOOKUP INFORMATION
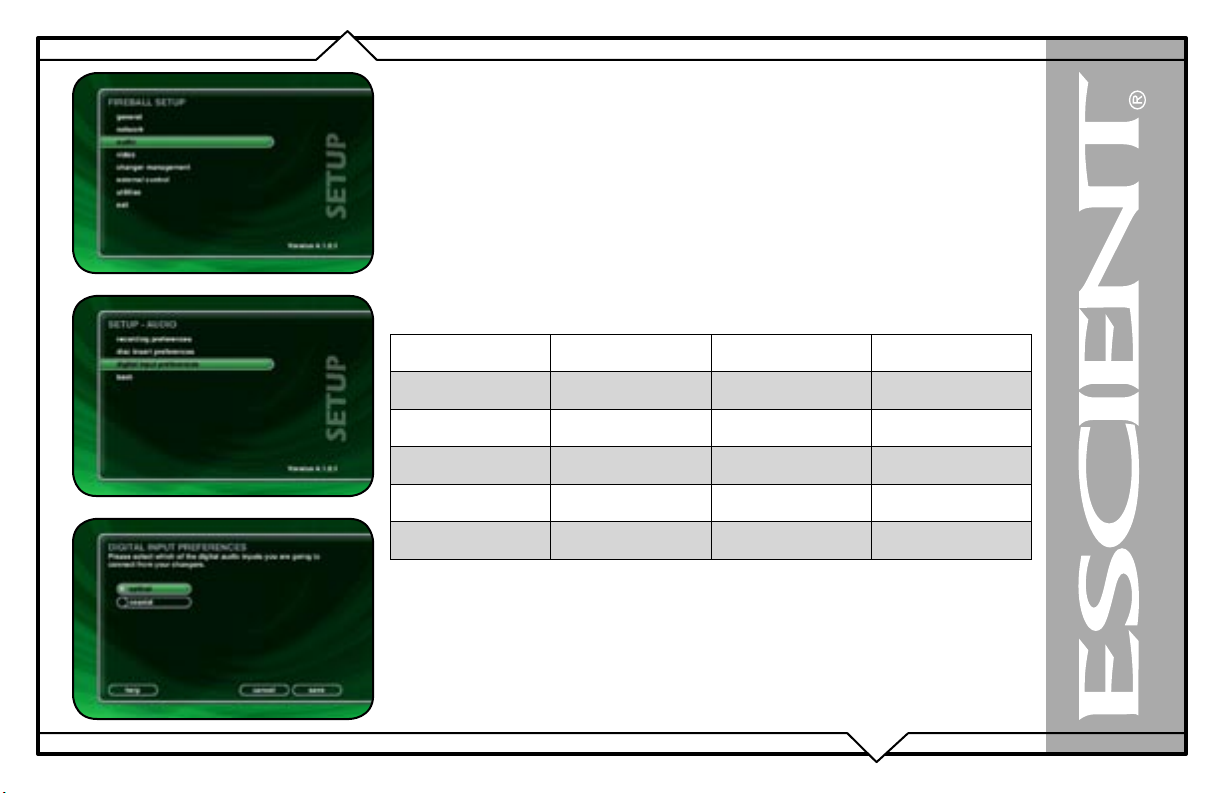
DIGITAL AUDIO INPUTS
The FireBall defaults to the optical inputs for changer audio. If you are using the coax inputs it
is necessary to manually change the digital inputs from optical to coax using the Setup / Audio /
Digital Input Preferences screen.
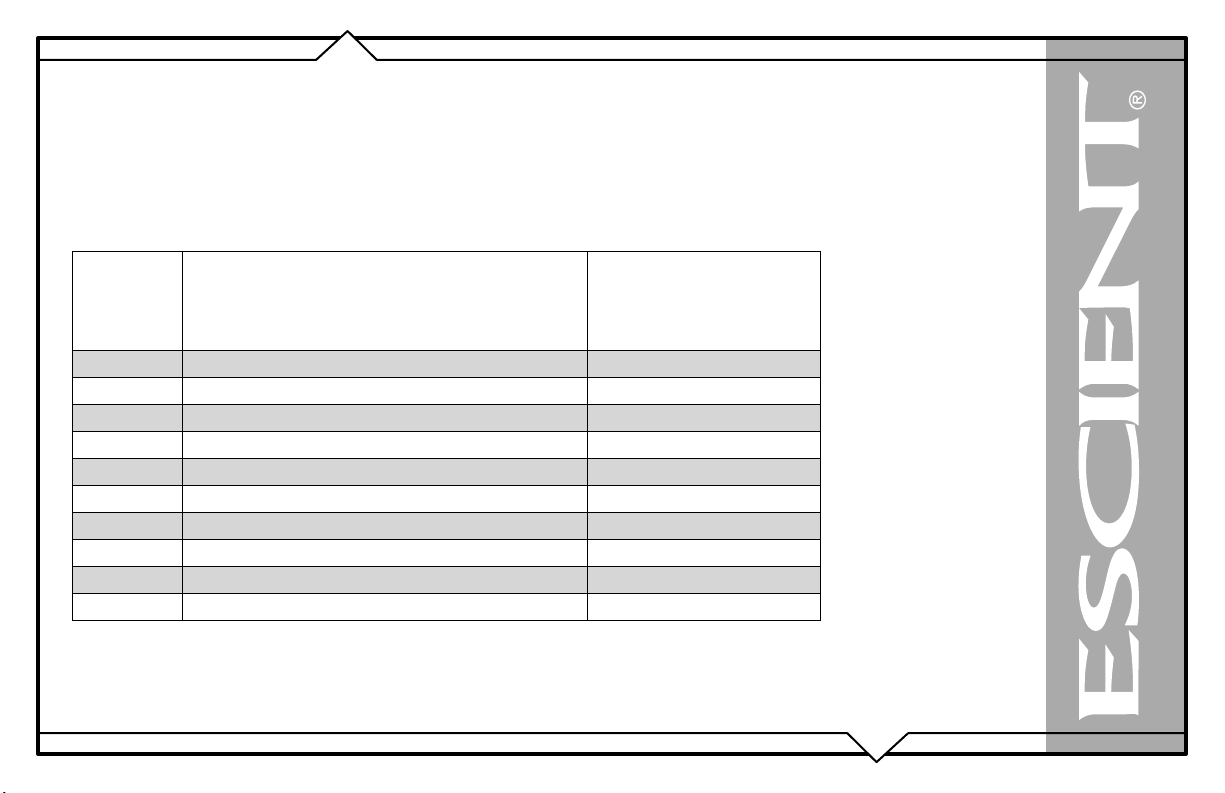
AUDIO OUTPUTS
The optical, coax, and analog audio outputs are all active when playing media from the internal
hard drive or Internet Radio. Both digital and analog connections must be made from the changer to
the FireBall for the FireBall to output both digital and analog outputs.
This table shows which audio outputs are active for each type of audio source.
Audio Source Analog Out
Hard Drive Audio
YES YES YES
Digital Optical
Out
Digital Coax Out
PAGE 27
Changer Analog
Changer Optical
Changer Coax
Internet Radio
YES
YES YES
YES YES
YES YES YES
For example, connecting only the analog audio outputs of the changer to the FireBall will
not provide digital audio on the digital outputs of the FireBall.
FireBall™ DVDM-300 User’s Manual

VIDEO OUTPUTS
FireBall has several video output formats and connectors including:
• 2 S-Video
• 2 Composite Video
• 1 Component Video (480i interlaced standard definition)
All video outputs are active at the same time, so you can use as many as you like without causing signal degradation.
The Component Video output will provide the best possible video quality for the FireBall User Interface, but will require that your video system has
an available component input.
One of the S-Video outputs is typically used for the optional Escient ETP-1500 touch panel to provide the user interface directly on the touch panel.
The other S-Video output can be used if the installation has an available S-Video input or for a distributed multi-room installation.
The two composite outputs are typically used for an a/v distribution system, such as the Xantech AV-61 or the Niles ZR-4630/8630 distribution
systems.
PAGE 28
FireBall™ DVDM-300 User’s Manual

RS-232 CONNECTIONS
External disc changers are controlled via two-way serial protocols using RS-232 serial cables. You should use COM ports 1,2, and 3 for each external
disc changer.
COM port 4 is to be used for connecting an Escient ETP-1500 wired touch panel, external modem or to interface with a third party control system
such as AMX or Crestron.
If you are using both an Escient ETP-1500 touch panel and an external modem, connect the Escient ETP-1500 to COM port 3 and use COM port 4
for the external modem.
Note: You should use the Ethernet control system for controlling FireBall from a third party control system whenever possible. Using the Ethernet
control system frees up COM port 4 for other purposes, allows much longer distances between FireBall and the control system, and provides a much
faster path for data transfer.
EXTERNAL MODEM CONNECTIONS
Use of an external modem for connecting to the Gracenote and Escient disc lookup services should only be used if a broadband connection is not
available. Any external modem which supports the standard AT Hayes command set and supports a serial connection (RS-232) will work. USB
modems will not work. Contact Escient for more information on compatible modem options.
IR CONNECTIONS
The direct IR input jack on the back panel of the FireBall is for controlling FireBall from a wired IR distribution system such as a Xantech system.
This connection must be an IR signal with a 36kHz carrier using an 1/8” mono or stereo connector.
The IR input jack provides 12V power. This means that you can directly connect a 12V IR receiver (like the Xantech series 291 units) to the FireBall
using a 1/8” stereo connector.
PAGE 29
FireBall™ DVDM-300 User’s Manual
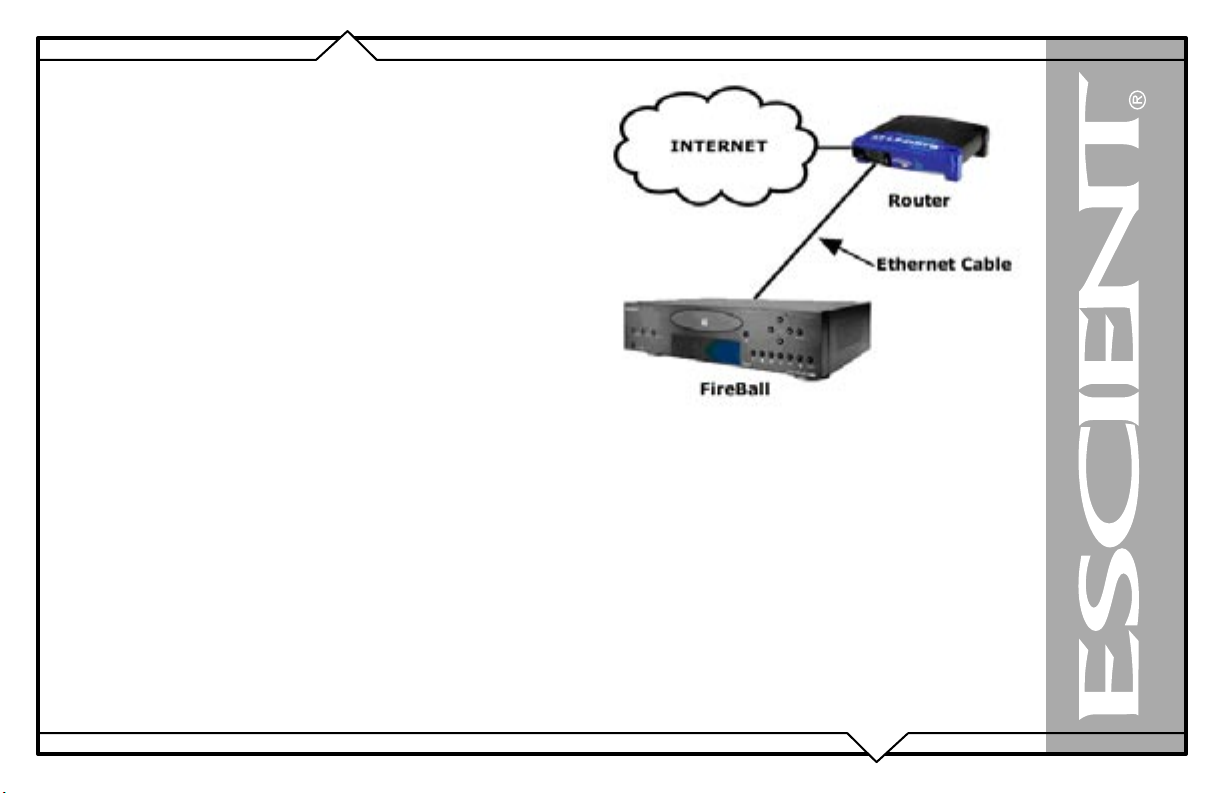
ETHERNET CONNECTIONS
The Ethernet jack on the back panel of the FireBall accepts any standard
twisted pair CAT5 Ethernet cable. If you are connecting FireBall to a home
network, you typically connect a standard Ethernet cable from your Ethernet
router or hub to the FireBall.
There are different grades, or categories, of twisted-pair cabling. Category 5
is the most reliable and widely compatible, and is highly recommended. It runs
easily with 10Mbps networks, and is required for 100Mbps networks. You can
buy Category 5 cabling that is pre-made, or you can cut & crimp your own.
Category 5 cables can be purchased or crimped as either straight-through or
crossed. A Category 5 cable has 8 thin, color-coded wires inside that run from
one end of the cable to the other. Only wires 1, 2, 3, and 6 are used by Ethernet
networks for communication. Although only four wires are used, if the cable
has 8 wires, all the wires have to be connected in both jacks.
Straight-through cables are used for connecting computers to a hub. Crossed
cables are used for connecting a hub to another hub (there is an exception:
some hubs have a built-in uplink port that is crossed internally, which allows
you to uplink hubs together with a straight cable instead).
In a straight-through cable, wires 1, 2, 3, and 6 at one end of the cable are also
wires 1, 2, 3, and 6 at the other end. In a crossed cable, the order of the wires
change from one end to the other: wire 1 becomes 3, and 2 becomes 6.
To figure out which wire is wire number 1, hold the cable so that the end of the
plastic RJ-45 tip (the part that goes into a wall jack first) is facing away from
you. Flip the clip so that the copper side faces up (the springy clip will now be
parallel to the floor). When looking down on the coppers, wire 1 will be on the
far left.
FireBall™ DVDM-300 User’s Manual
PAGE 30
 Loading...