

Page 1
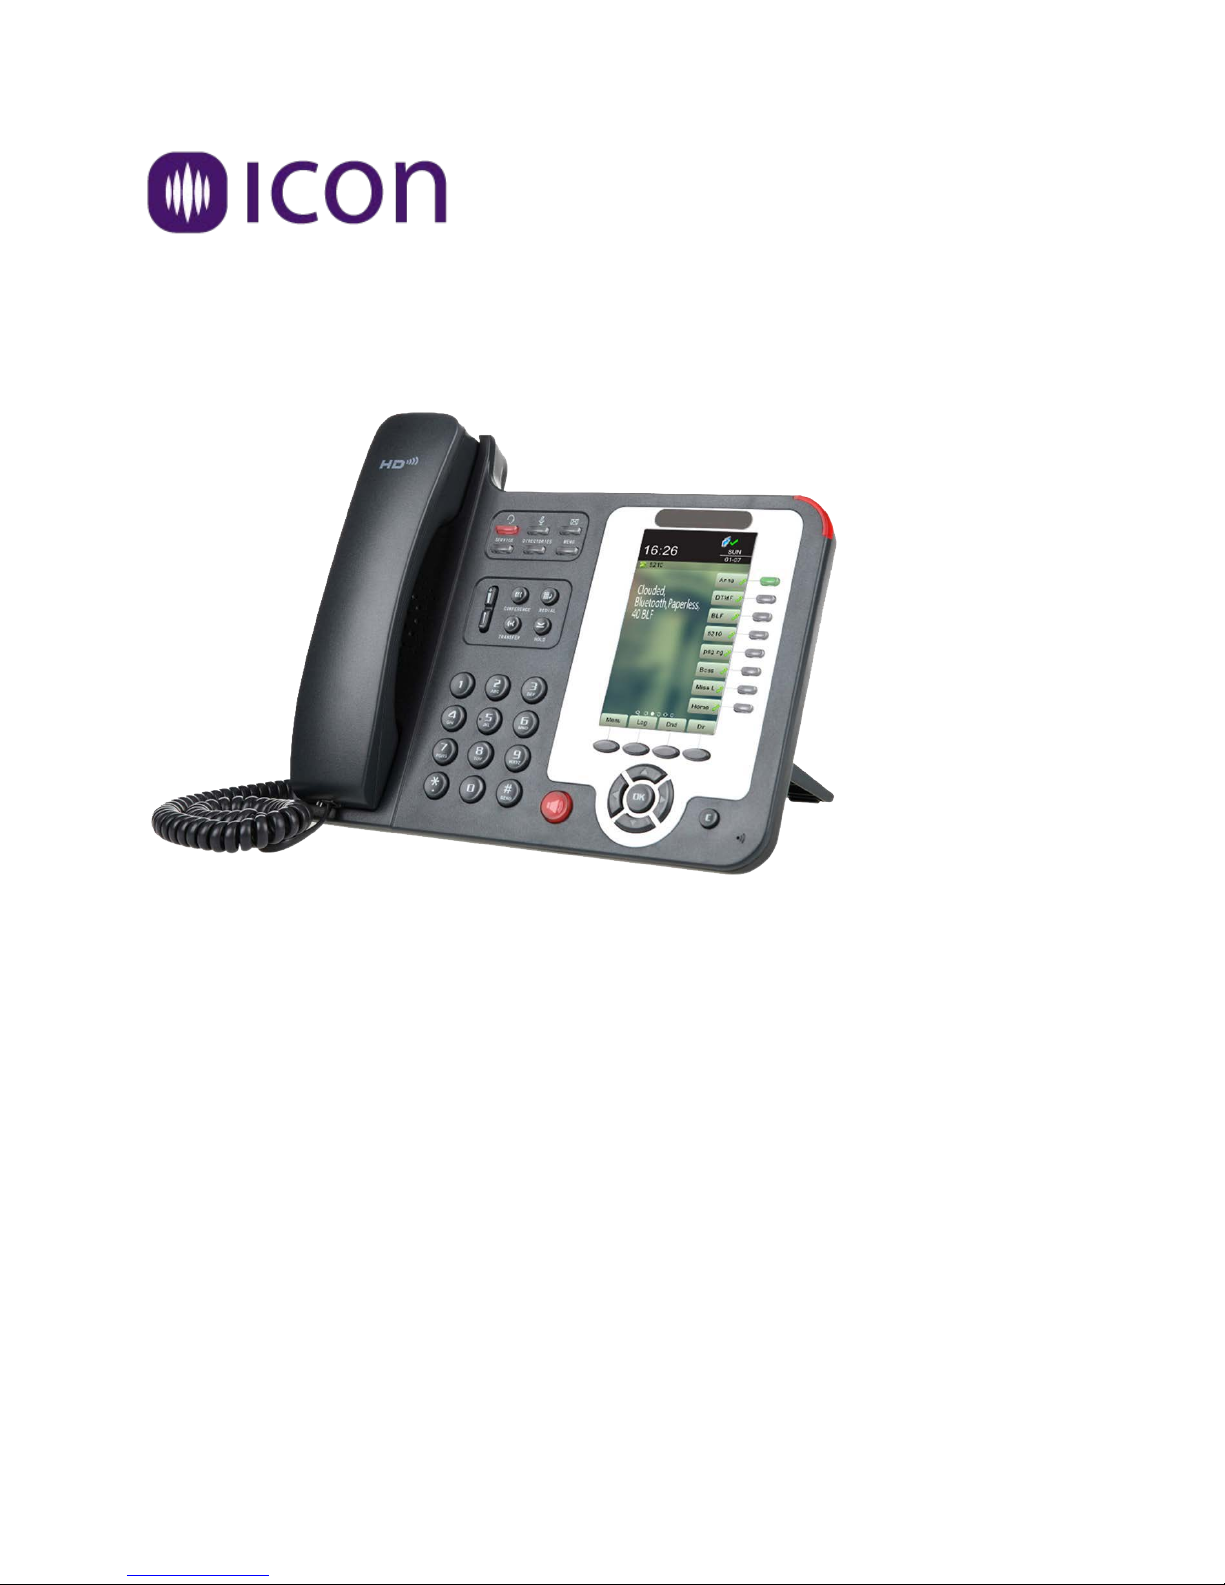
GS620 IP Phone Quick Reference Guide
Page 2

GS620 IP Phone Quick Reference Guide
Contents
1. Getting Started ...................................................................................................................................... 3
About......................................................................................................................................................... 3
Technical Specifications ............................................................................................................................ 3
2. Connecting Your Phone......................................................................................................................... 4
Packing List ................................................................................................................................................ 4
Connecting Your Phone ............................................................................................................................ 4
Adjusting the Angle of Your Phone ........................................................................................................... 5
3. Phone Overview .................................................................................................................................... 6
Upper Housing .......................................................................................................................................... 6
Lower Housing .......................................................................................................................................... 8
LCD Screen ................................................................................................................................................ 9
4. Operation ............................................................................................................................................ 11
Making a Call ........................................................................................................................................... 11
Answering a Call ...................................................................................................................................... 11
Hold ......................................................................................................................................................... 11
Redial ...................................................................................................................................................... 11
Directory Dial .......................................................................................................................................... 11
Making a Second Call .............................................................................................................................. 11
Transfer a Call (Blind Transfer)................................................................................................................ 11
Transfer a Call (Supervised Transfer) ...................................................................................................... 12
Mute ........................................................................................................................................................ 12
Do Not Disturb ........................................................................................................................................ 12
Conference Call ....................................................................................................................................... 12
Page | 2 www.iconcloud.com
Page 3

GS620 IP Phone Quick Reference Guide
Item
Description
Screen
High-definition Color LCD with back light 480x272 pixels (2 ¼ “ x 3 ¾ “)
Line Buttons
8 VoIP Line buttons (dual-colors LED),
Function Buttons
4 Soft Keys, 4 Navigation buttons, OK button, C button Volume adjust, Hand-free, Mute,
VoIP Protocol
SIP 2.0
Network Protocols
HTTP, BOOTP, TFTP,*IEEE 802.1Q,*IEEE 802.1X
Codec
G.723.1 (5.3K 6.4K b/s), G.729 A(8Kb/s), G.711 A/U (64Kb/s), G722
QoS
TOS, Jitter Buffer, VAD, CNG, G.168 (32ms)
Network
2*RJ45 10/100/1000M Ethernet interfaces(LAN/PC) IP Assignment: Static IP or DHCP
Conversation Mode
Handset, Headset or Hand-free Mode, RJ11 and 3.5mm headset jack, 9-level volume
Call Processing
Line status indicator (dual-colors LED), Multiple Acco unts, Call Waiting, Call Queuin g,
Expansion Module
EXT: ESM32 programmable button module, support up to 6 ESM32s SOR: FXS, FXO,
Application
Public phone directory Private phone directory, Other customizable applications, XML
Security
Password Login Web Signaling encryption, Media encryption
Management
Upgrade: HTTP/TFTP/FTP/Auto-provision Configurations: Phone/Web/Auto-provision
Power Supply
Power adapter: AC 100-240V input and DC 12V/1A output PoE (IEEE 802.af)
Physical Features
Storage Temperature: 0℃-60℃ Operating Humidity: 10%-90% Size:
Net weight:
3.02 lbs.
Certifications
CE, RoHS
1. Getting Started
About
The GS620 is a feature rich IP telephone t hat works with the ICON Cloud ICONnect hosted communications
platform as well as other manufacturer’s systems that support connection of a SIP terminals.
Technical Specifications
Headset, Message, Service, Directory, Menu, Conference, Transfer, Redial, Hold
or PPOE VPN(L2TP) DNS Clients (Primary and Secondary)
adjustment
Line Switching, Auto-answer Call Transfer, Call Holding, Call Pickup, One Button Dial,
Redial Speed dial via Phone directory, Dial directly via Call record 3-way conference,
DND, Voice Mail, BLF (dual-colors LED)
USB (reserved)
Debug: Telnet/Phone/Web
254mm*205mm*87mm
Page | 3 www.iconcloud.com
Page 4
GS620 IP Phone Quick Reference Guide
2. Connecting Your Phone
Your telephone will be preconfigured to connect to ICON Cloud’s ICONnect hosted communications platfor m. T his
section describes the connection.
Packing List
1 - IP Phone
1 - Handset
1 - Handset Cord
1 - Power adapter
1 - RJ45 cable
1 - CD
1 - Quick Refer ence Guide
1 - Product certification
Connecting Your Phone
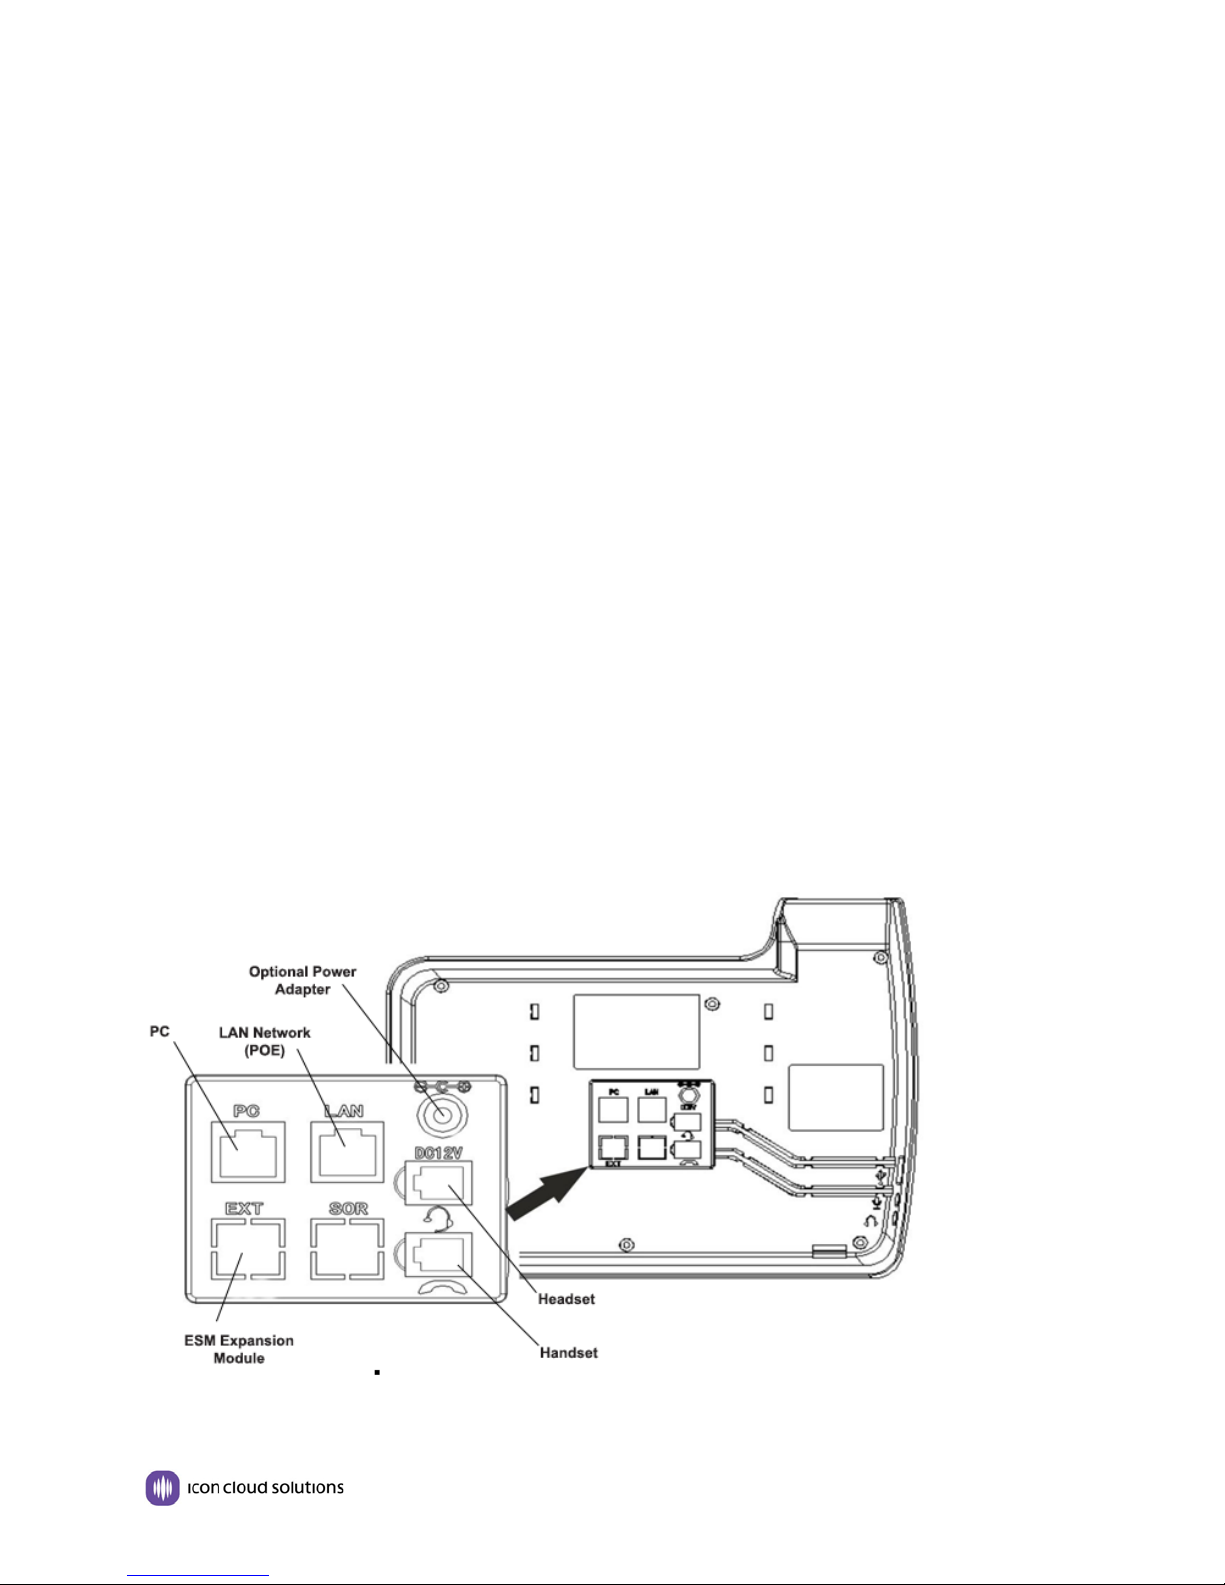
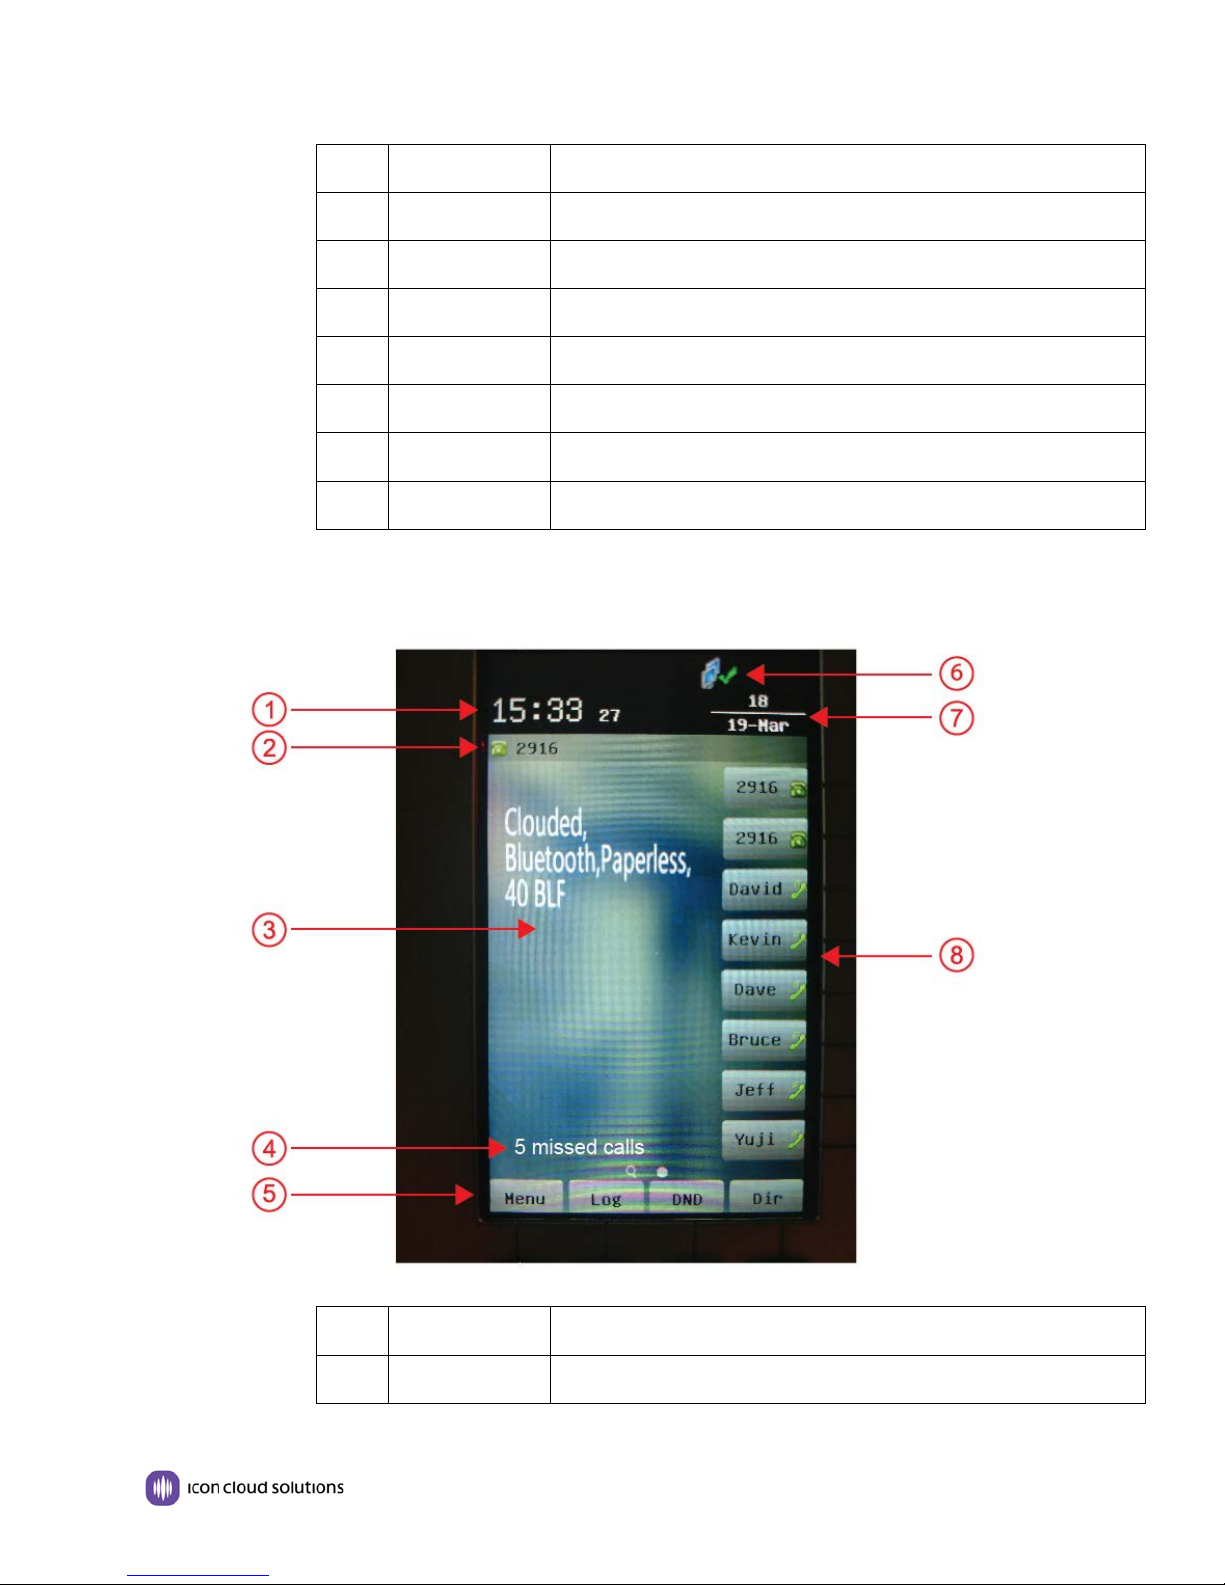
As illustrated below:
1. Plug your LAN network cable into the LAN connect or. If your network is e quipped with POE this
connectio n will also provide power to the phone. If your LAN is not equipped with POE, then you must
also use the power adapter.
2. Use the “PC” port to connect your PC.
3. The station handset is plugged into the jack with the hands et icon.
4. If using a headset, plug the headset into the jack labeled with a headset icon.
5. Plug the optional line expansion module into the EXT port.
Page | 4 www.iconcloud.com
Page 5
GS620 IP Phone Quick Reference Guide
Adjusting the Angle of Your Phone
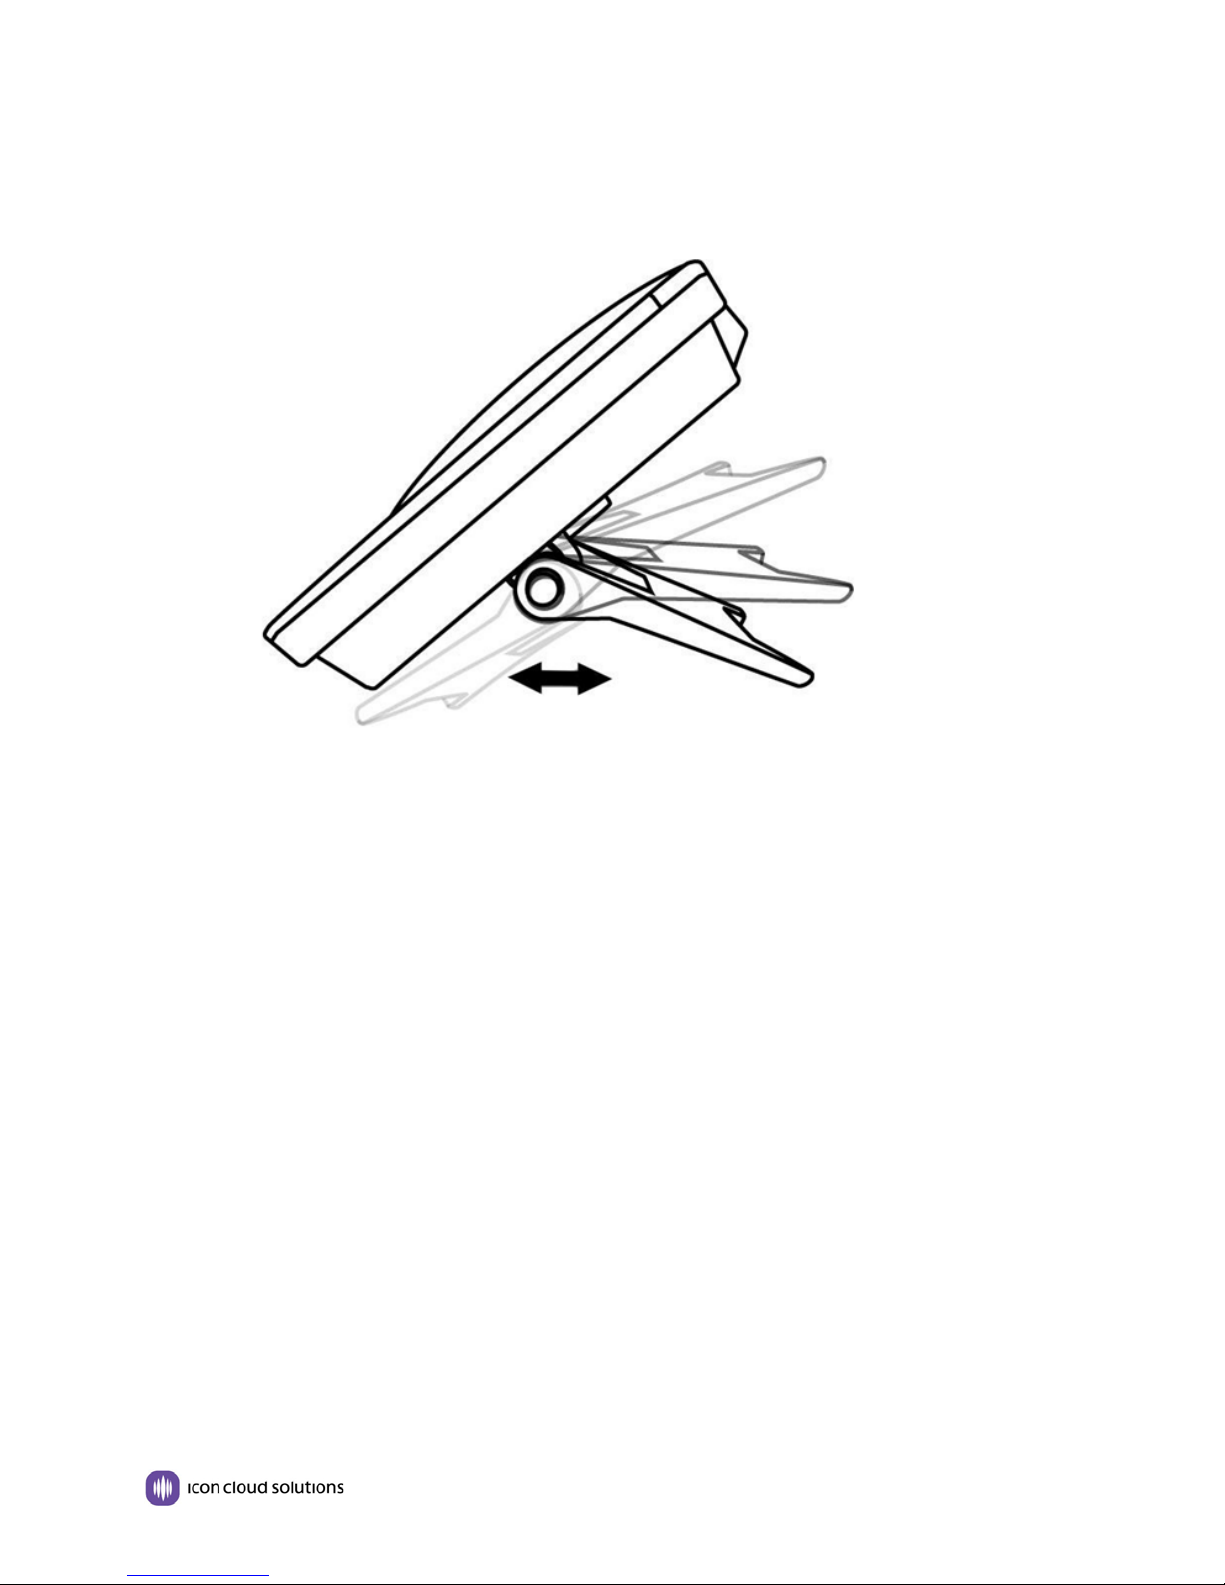
1. Press the two tabs on either side of the base to adjust the GS620 to the desired angle.
Page | 5 www.iconcloud.com
Page 6
GS620 IP Phone Quick Reference Guide
Num
Buttons
Description
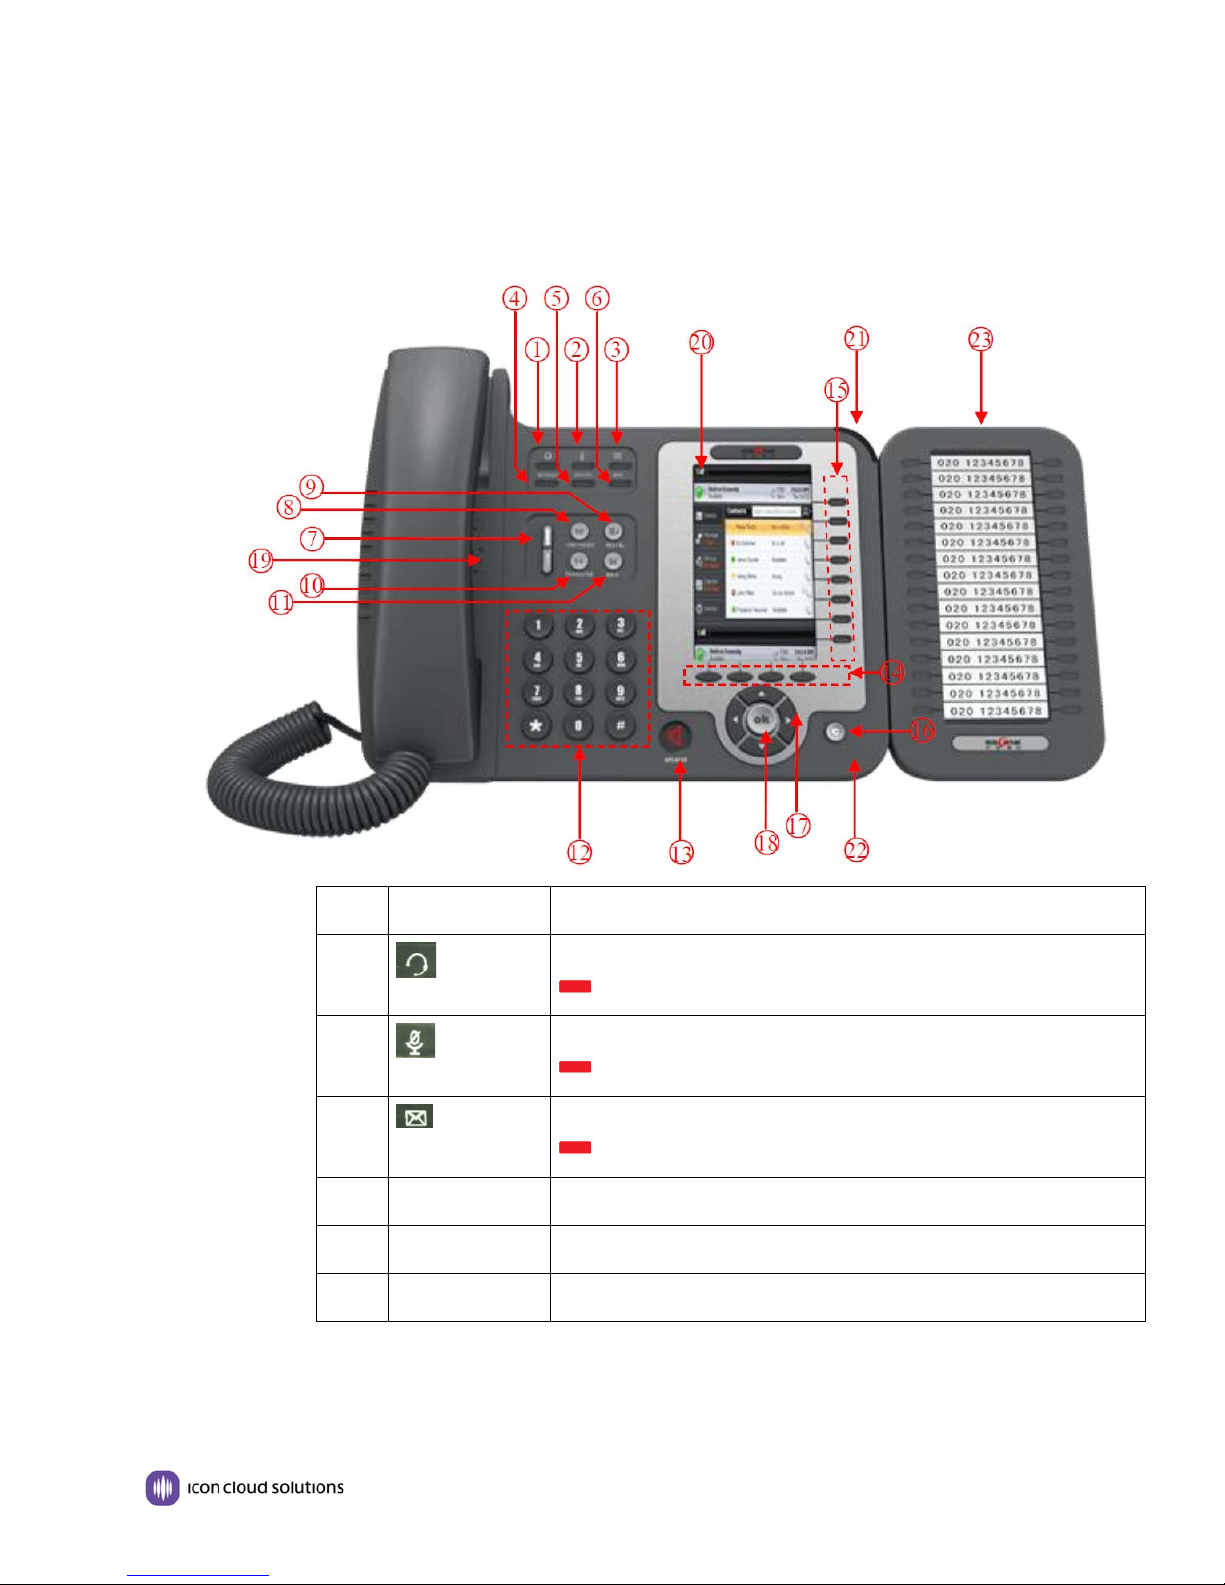
1 Headset button: Toggles the headset on or off
2 Mute button: Toggles the Mute feature on or off.
3 Message button: Typically auto-dials your voice message service.
4
Service
Service button: Open or Close the Services menu.
5
Directories
Directories button: Use it to access call logs and corporate directories
6
Menu
Menu button: Allows you to scroll through menus.
3. Phone Overview
Upper Housing
Red indicates the feature is enabled.
Red indicates the feature is enabled.
Red indicates there is an unread voice mail message.
Page | 6 www.iconcloud.com
Page 7
GS620 IP Phone Quick Reference Guide
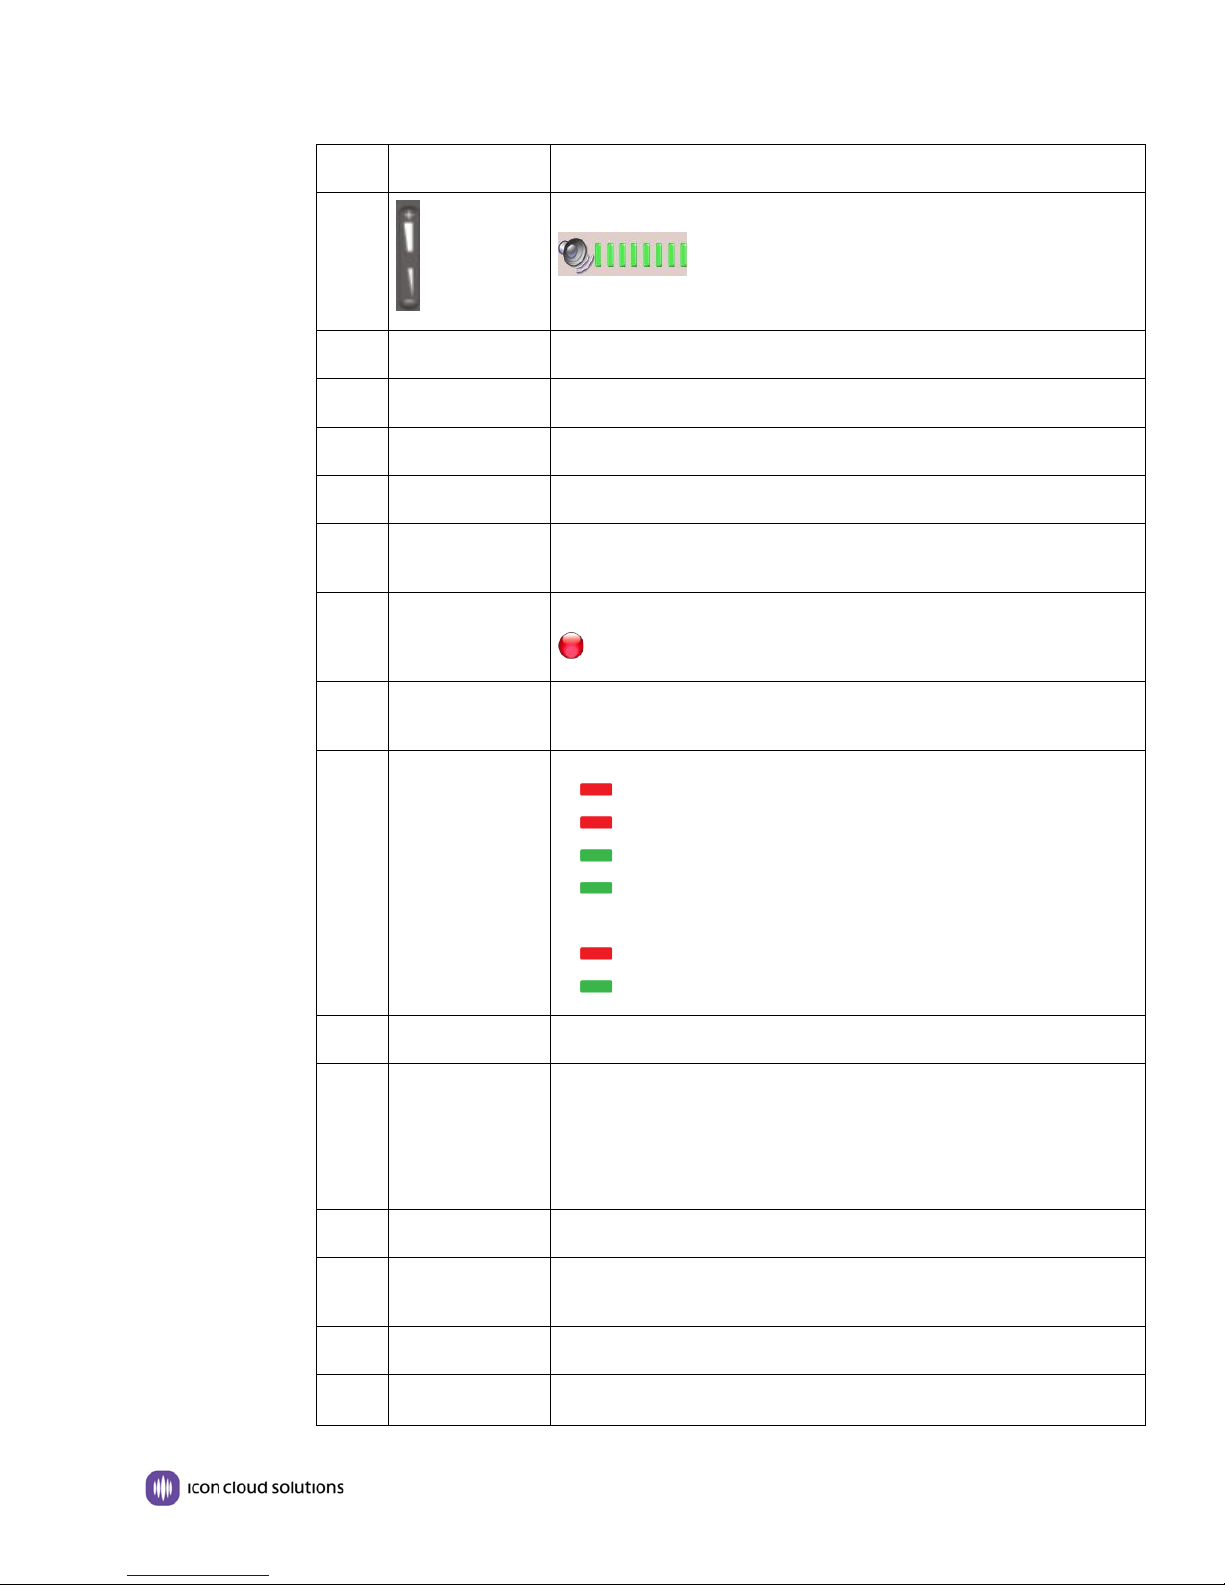
Num
Buttons
Description
7 Volume button: Controls the volume and other settings.
8
Conference
Conference button: Connect calling / called party to the conference
9
Redial
Redial button: To Redial the last number.
10
Transfer
Transfer button: Transfer a call to another extension or number.
11
Hold
Hold button: Put a call on hold
12
0-9,*,#
Basic Call Handling: Enter the desired number then press # to complete
13
Speaker button
Speaker button: Toggles the speakerphone on or off.
14
Softkey
Each displays a softkey function, To activate a softkey, press the softkey
15
Line/
Outside Line Key
16 C Back button: Return to the standby interface;
17
Navigation button
“Up”: Open “Speed Call” list;
18
OK
Select an option on the display.
19
Hands-free
Press to answer a call or place a call in the “hands-free” speakerphone
20
LCD Screen
480*272 pixel Color high-definition display.
21
Status Light
Red flashing: There are incoming call;
the outgoing call. Use the dial pad to naviagate automated menus.
Red, steady: Pick up and enter normal call.
Programmable
Buttons
Speakerphone
button.
1) Red, flashing: There is an incoming call.
2) Red, steady: Pick up and enter normal call.
3) Yellow-green, flashing: Holding call.
4) Yellow-green, steady: Active call. Programmable Keys:
Extension or Programmable Feature
1) Red, steady. Extension is busy / Feature in use.
2) Yellow-green, steady. Extension is idle / Feature idle.
“Down”: Open “Missed Calls” list:
“Left”: Open “Received Calls” list;
“Right”: Open “Dialed Numbers” list
mode.
Page | 7 www.iconcloud.com
Page 8
GS620 IP Phone Quick Reference Guide
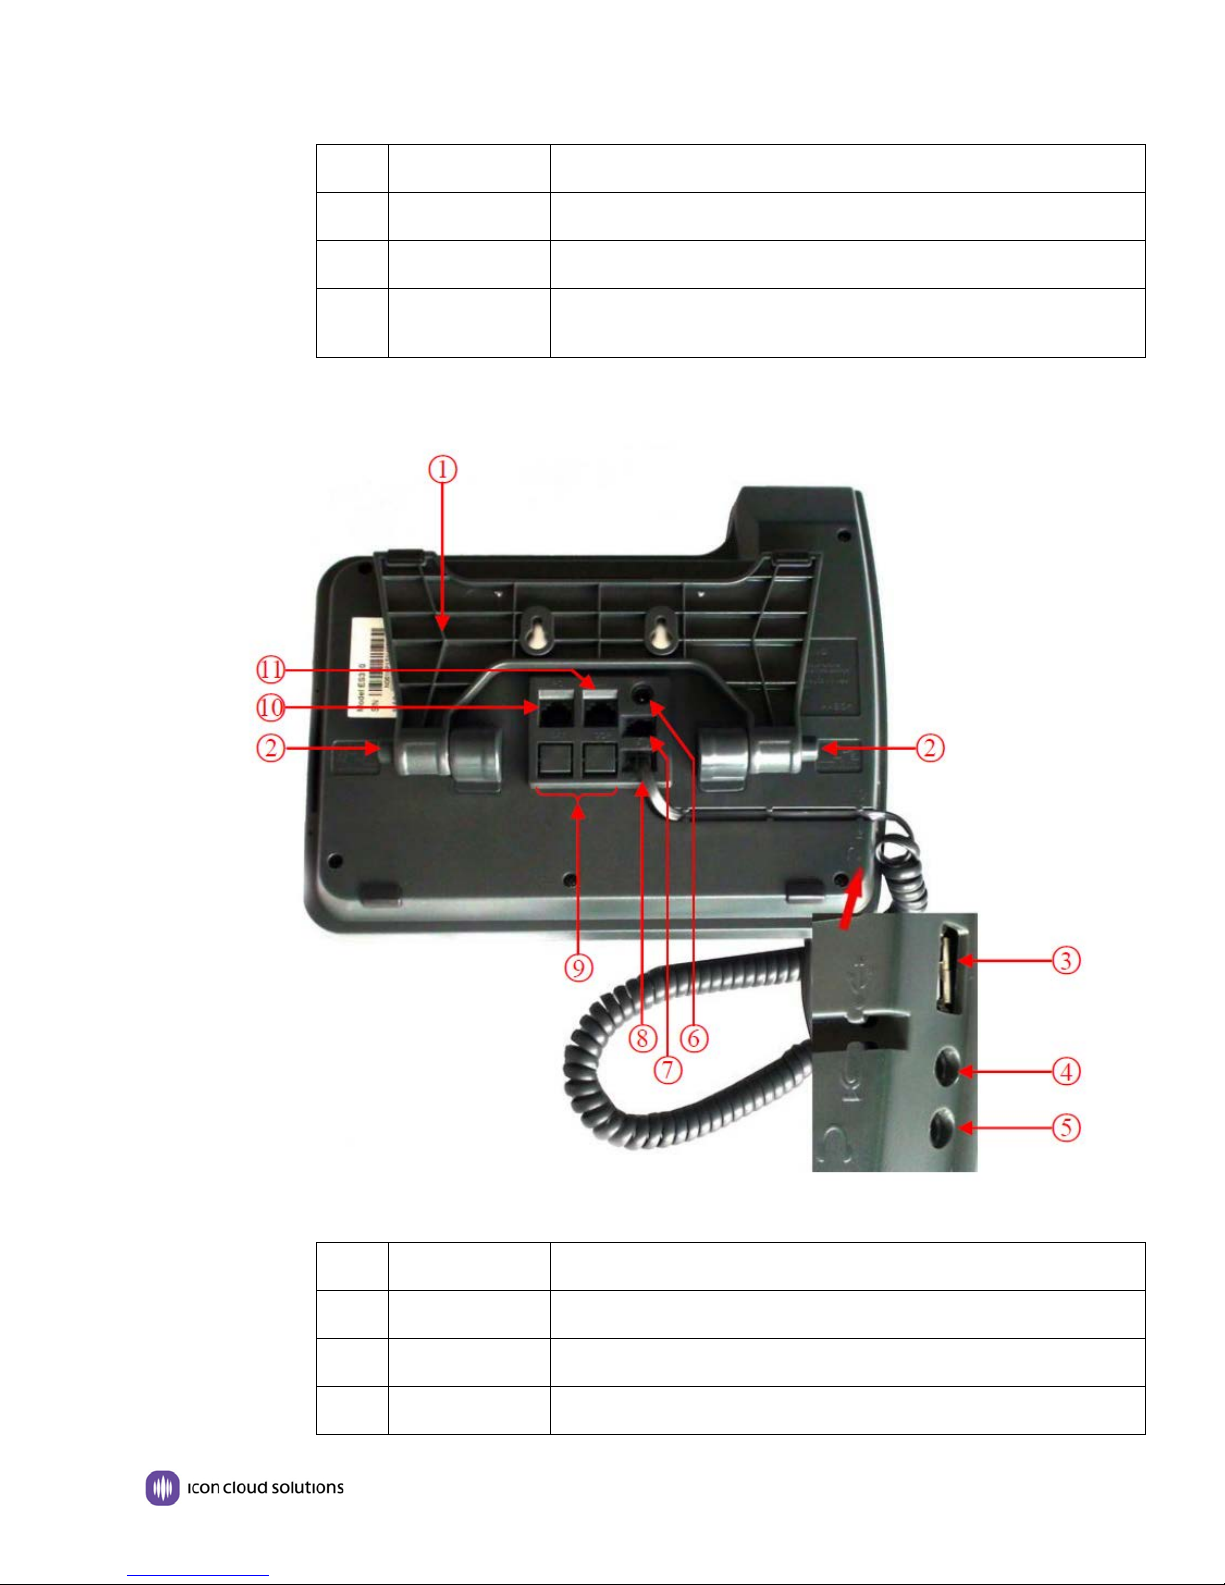
Num
Buttons
Description
Red, steady: Missed Calls, or phone busy;
22
Microphone
Hands free transmit audio
23
Line expansion
Maximum support 6 ESM32 line expansion module (the total of 192
Num
Buttons
Description
1
Adjustable Stand
Multiple angle stand with built-in wall mount bracket.
2
Stand buttons
Press buttons to adjust angle of the phone.
3
USB
Reserved
Lower Housing
module
programmable buttons).
Page | 8 www.iconcloud.com
Page 9
GS620 IP Phone Quick Reference Guide
4
3.5 mm
Headset Jack
5
---
Not included with GS620
6
Power
Connect External Power Supply. Not required for POE LAN connections.
7
Headset
Headset connection port.
8
Handset
Handset connection port.
9
EXT Port
Connector for optional EDM expansion module.
10
LAN Port
Connects phone to LAN for communication with telephone server.
11
PC Port
Connect to a local PC.
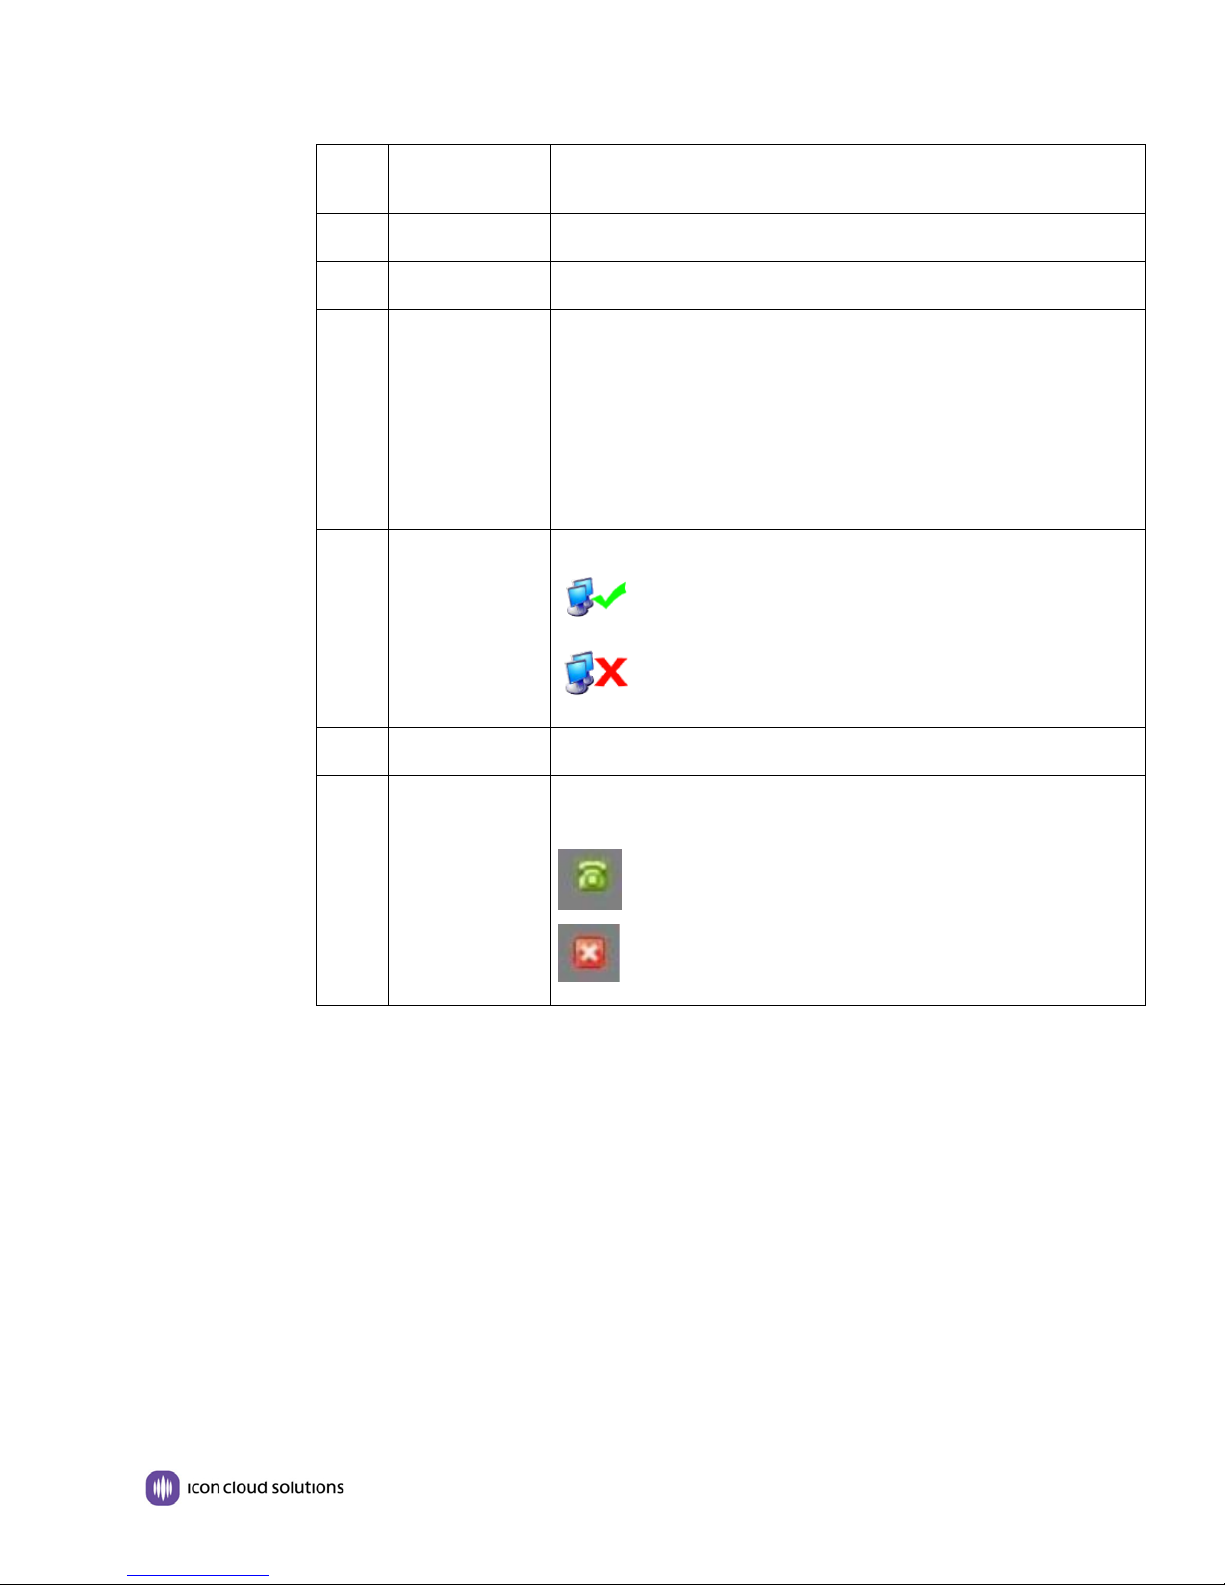
Num
Buttons
Description
1
Time HH:MM ss
Displays the current time. Can be set to 12 hour or 24 hour clock.
LCD Screen
Page | 9 www.iconcloud.com
Page 10
GS620 IP Phone Quick Reference Guide
2
Extension Status
Displays the extension number and shows the current status on hook /
3
Call Activity
Displays information about the active call including caller ID.
4
Missed Calls
Shows the number of missed calls.
5
Softkeys
The function of the softkeys will change based on the state of the phone.
6
Network Status
Displays the current LAN interface network connection status.
7
Date
Month, day, year
8
Programmable
DSS / BLF and Line Keys. Multiple screens available.
dialing / ringing / off hook.
In idle mode, the following options are displayed.
Menu: Phone setup, call history and phone book.
Log: Display the call log
DND: Activate / Deactivate Do Not Disturb. When active a Lock appears
on the upper line of the display.
Dir: Access the dial by name directory.
Connected
Keys
Disconnected
Line Status:
Line is registered to system.
Line is not registered to the system / out of service
Page | 10 www.iconcloud.com
Page 11

GS620 IP Phone Quick Reference Guide
4. Operation
Making a Call
1. Lift the handset or press the Speaker key or press the Headset key.
2. When you hear dial tone, the first outside line LED will light. You can stay on this line or choose ano ther
line to make the call.
3. Enter the telephone number.
4. Press the # key on the dial pad or the SEND soft key or wait five seconds.
5. The call is placed.
6. When finished, return the handset to the cradle, press the speaker key or press the END CALL softkey.
Answering a Call
1. With your phone ringing and one of the Line Keys f lashing re d,
2. Pickup the handset, or, press the Speaker Key, or, press the Headset Key.
3. Note: if you are on an active call and a second call rings in, press the flashing line key that the se cond call
is ringing in on to answer. Doing so will automatically place the first call on hold.
4. When finished, return the handset to the cradle, press the speaker key or press the END CALL softkey.
Hold
1. While on a call, press the HOLD key to place the call on hold.
2. The line on which the call is held will flash green.
3. To retrieve the held call, press the appropriate line button where the call is held.
Redial
1. Press the REDIAL key to view the last n umber dialed, or,
2. Press the Navigation UP button to vie w t he all c a ll list or press the Navigation DOWN button to view the
missed call list.
3. Once you have selected the desired number press the DIAL softkey.
Directory Dial
1. Press the DIR softkey or the DIRECTORIES key.
2. Navigate to the desired telephone number using the NAVIGATION keys or SOFTKEYS.
3. Press DIAL to complete the call.
Making a Second Call
1. While on an active call, press the HOLD key.
2. Enter the desired phone number.
3. Press # or SEND to complete the call.
Transfer a Call (Blind Transfer)
To transfer a call to another extensi on or outside line without talki ng to the transfer recipient:
Page | 11 www.iconcloud.com
Page 12

GS620 IP Phone Quick Reference Guide
1. Press the TRANS FER button or softkey.
2. Press the BLIND softkey.
3. Enter the number to which you want to transfer the call.
4. Press #, or press SEND, or wait five seconds.
5. The call is transferred.
Transfer a Call (Supervised Transfer)
To transfer a call to another extension or outside line by first talking to the transfer recipient:
1. Press the TRANS FER button or softkey.
2. Enter the nu mber to which you want to transfer the call.
3. Press #, or press SEND, or wait fi ve seconds.
4. When the transfer recipient answers begin speaking.
5. Hang up to complete the transfer.
6. The call is transferred.
Mute
1. While on a call press the MUTE key.
2. The Mute key will light red and the outside parties will not be able to hear you. You can still hear them.
3. Press MUTE a second time to return to a normal two-way conversatio n.
Do Not Disturb
1. Press the DND softkey.
2. A lock icon will appear on the top line o f the disp lay and next to each of the outside line keys. Callers will
be routed to your station voice mailbox (or another extension, or busy tone based on desired programming).
3. Press DND a second time to return to disable DND and return to normal mode.
Conference Call
You can initiate a 3-party confer ence call.
1. While on an active call, press the CONFERENCE button or the CONFER softkey.
2. The first caller is placed on hold .
3. Dial the phone number of the person you would like to join the conference. After they connect press the
CONFERENCE button or the CONFER softkey to complete the conference call.
4. NOTE: If you hang up, the confere nce ca ll will end for all parties.
To initiate a conference call with a held call:
1. With a call on hold, dial the phone number of the person you woul d like to join the conference. After they
connect press the CONFERENCE button or the CONFER softkey.
2. Press the line key with the held call to complete the conference call.
Page | 12 www.iconcloud.com
 Loading...