

Page 1
www.escene.ru
Escene Communication
1
1
ES320/ES330/WS320/GS320
IP Phone
User Manual
(firmware:V2.2.6.2-2733)
EEsscceennee CCoommmmuunniiccaattiioonn TTeecchhnnoollooggyy CCoo..LLttdd
Page 2

www.escene.ru
Escene Communication
2
2
Tables of Contents
1.Getting Started ..................................................................................................... 4
About ............................................................................................................... 4
Illustrate ........................................................................................................... 4
Feature Highlights: ............................................................................................ 4
Technical Features ............................................................................................. 4
2.Connecting Your Phone .......................................................................................... 7
3.Phone overview .................................................................................................... 9
Understanding Buttons and Hardware.................................................................. 9
Understanding Phone Screen Features ............................................................... 13
4.Basic Call Handling .............................................................................................. 14
Placing a Call .................................................................................................. 14
Answering a Call .............................................................................................. 15
Ending a Call ................................................................................................... 16
Using Hold and Resume (Switch Calling Line) ..................................................... 16
Transferring Calls ............................................................................................. 17
Using Mute ..................................................................................................... 18
Do Not Disturb ................................................................................................ 18
3-way Conference ............................................................................................ 19
Expansion Installation(only ES330 has this item) ....................................................... 19
Expansion Settings(only ES330 has this item) ........................................................... 20
Time&Date ............................................................................................................ 20
VOIP Call Forwarding ............................................................................................. 21
5.Advanced Call Handling ....................................................................................... 22
Speed Dialing .................................................................................................. 22
Using the phone book ...................................................................................... 22
Using Call Logs ................................................................................................ 26
6.Keypad Instruction .............................................................................................. 27
Language ....................................................................................................... 27
SIP Account Settings ........................................................................................ 27
Network Setting .............................................................................................. 29
Load default settings ....................................................................................... 29
Customizing Rings and Volume ......................................................................... 30
WIFI setting(only WS320 has this item) ............................................................. 31
View status ..................................................................................................... 31
Diagnose ........................................................................................................ 32
7.Web Settings ...................................................................................................... 33
Config Guide ................................................................................................... 33
WIFI Setting(only WS320 has this item ) ........................................................... 35
WIFI Status(only WS320 has this item )............................................................. 36
Network ......................................................................................................... 36
SISIP AcP Account ........................................................................................... 38
SIP Account .................................................................................................... 38
Page 3

www.escene.ru
Escene Communication
3
3
SIP Account .................................................................................................... 38
SIP Account .................................................................................................... 38
Programmable Keys ......................................................................................... 39
Expansion Module ........................................................................................... 40
Audio ............................................................................................................. 40
PhoneBook ..................................................................................................... 42
Group ...................................................................................................... 42
Contact .................................................................................................... 42
LDAP ....................................................................................................... 43
BanList .................................................................................................... 44
Enterprise Phonebook ................................................................................ 45
Advance ......................................................................................................... 45
Phone Setting ........................................................................................... 45
VLAN Setting ............................................................................................ 47
VPN Setting .............................................................................................. 47
BLF setting ............................................................................................... 48
Trusted Certs ............................................................................................ 49
Dial Plan .................................................................................................. 50
Global SIP ................................................................................................ 51
PasswordPhone Maintenance ............................................................................ 51
Log .......................................................................................................... 51
Default Setting.......................................................................................... 52
Auto Provision .......................................................................................... 53
FTP Upgrade ............................................................................................ 54
TFTP Upgrade .......................................................................................... 55
HTTP Upgrade .......................................................................................... 56
Reboot ..................................................................................................... 57
Phone Status .................................................................................................. 58
System info ..................................................................................................... 58
About ............................................................................................................. 59
Appendix: ..................................................................................................... 60
Page 4

www.escene.ru
Escene Communication
4
4
1.Getting Started
About
ES320P/ES330 is a small-screen-based IP phone in Sayhi IP phone series, it has fashion
and technological appearance, excellent voice quality, and powerful features, and it is a
new generation of intelligent phones to replace of the traditional desktop office terminals,
It accomplished the powerful telephony features by cooperating with the communications
platform,. such as the call transfer, hotline, three-party conference calling, speed dial, voice
mail, Do Not Disturb, etc.
Illustrate
Firstly, before you use this user manual ,please check the below illustrate carefully.
This user manual is common use in ES330、WS320、DS320、GS320.please check the
differwnt.
ES330 is different from ES320 :ES330 support expansion ,but ES320 don’t support it.
It can up to 6 EMS32 programmable key modules
WS 320 is wifi phone ,it has wifi module, it is the different from ES320,but the function
is the same . WS320 IP Phone support 2 accounts registering and 2 calls management.
DS320 series is Dual Model IP phone , and support PSTN and VOIP , DS3X2 P IP Phone
support 2 accounts registering and 2 calls management.
GS320 has a gbps network port. It is a supper rate phone .
Feature Highlights:
128*64 Pixel LCD with Support Chinese display
HD Voice: HD Codec
2 VoIP accounts
Enterprise Phone Book
12 programmable hard keys and support BLF
Support Plug and Play
Support PoE and AC power adapter
Technical Features
Item
ES320/ES330/WS320/DS3X2/GS320
Screen
Grayscale LCD with background light
Page 5

www.escene.ru
Escene Communication
5
5
128*64 pixel
Line
2
Function
Keys
4 Soft keys,2 Line keys(dual-color LED)
6 Navigation keys(arrow button, OK button, C button)
Volume adjust, Hands-free, Mute, Headset, Message,
Menu, Directory, Service, Hold, Redial, Conference, Transfer
VoIP
Protocol
SIP 2.0
Network
Protocol
HTTP, BOOTP, TFTP, *IEEE 802.1Q, *IEEE 802.1X
Codec
G.723.1, G.729 A, G.711 A/U, G.722
QoS
TOS, Jiffer Buffer, VAD, CNG, G.168 (32ms)
Network
2*RJ45 10/100M Ethernet interfaces(LAN/PC)
IP Assignment: Static IP or DHCP
VPN(L2TP)
DNS Clients (Primary and Secondary)
Conversation
Mode
Handset, Headset or Hand-free Mode,
Call center headset and 3.5mm headset supported
9-levels volume adjustment
Call
Processing
Call Sharing/Bridged Lines
Line Status Indicator(dual color LED)
Multi Account
Call Waiting, Call Queuing, Line Switching
Call Forward, Call Transfer, Call Holding, Call Pickup,
Callback One Key Dial, Redial
Phone directory speed dial, Call record direct dial
3-way conference
DnD
Voice mail, Voice Prompt, Voice Message
BLF
Expansion
Interface
EXT: ESM32 programmable key module
SOR: FXS, FXO, Record
USB
Security
User Authentication for configuration pages
Signaling encryption
Media encryption
Application
*Public phone directory
Private phone directory
*PnP (Plug & Play)
Power
Supply
Power adapter: AC 100-240V input and DC 12V/1A output
PoE (IEEE 802.af)
Page 6

www.escene.ru
Escene Communication
6
6
Specification
Storage Temperature: 0℃-60℃
Operating Humidity: 10%-90%
Size 254mm*205mm*87mm
Page 7

www.escene.ru
Escene Communication
7
7
2.Connecting Your Phone
Your system administrator will likely connect your new SayHi
ES320/ES330/WS320/DS3X2/GS320 IP Phone to the corporate IP telephony network. If
that is not the case, refer to the graphic and table below to connect your phone.
1) Open the box ES320/ES330/WS320/DS3X2/GS320 IP Phone; carefully check the
packing list, Packing List as follows:
Item
Counts
IP Phone
1
Handset
1
Handset Cord
1
Power adapter
1
RJ45 cable
1
CD 1 Quick Installation
1
Quick User Guide
1
Product
certification
1
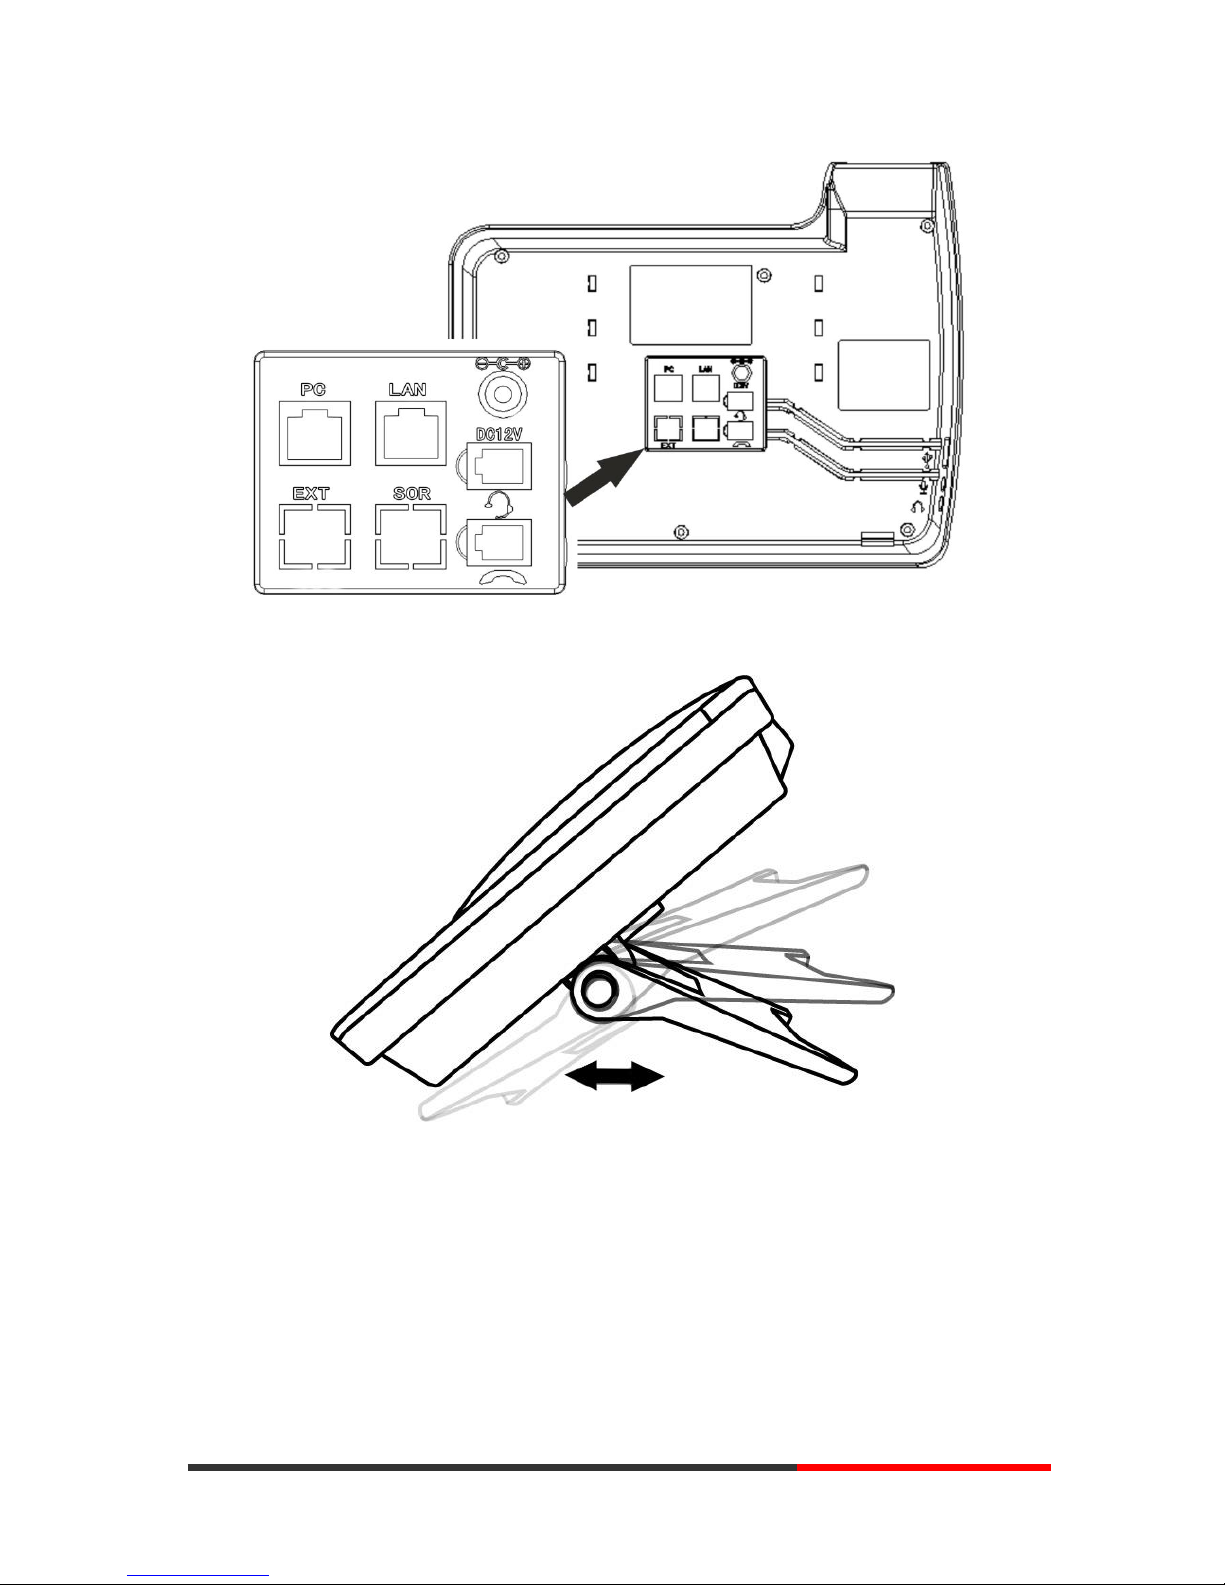
2) As shown in figure 2.1 and figure 2.2, Please plug Handset Cord into RJ11
interface(IP Phone and Handset), RJ45 cable into the LAN interface ;IP Phone will
automatically start if IP Phone with POE function.
3) The phone must work together with power adapter without POE support.
4) Connect your computer to PC interface of the phone with cable.
* More detailed description please refers to the
3.Phone overview-Understanding
phone buttons and hardware
.
Figure 2.1 Interfaces of SayHi ES320/ES330/WS320/DS3X2/GS320
Page 8
www.escene.ru
Escene Communication
8
8
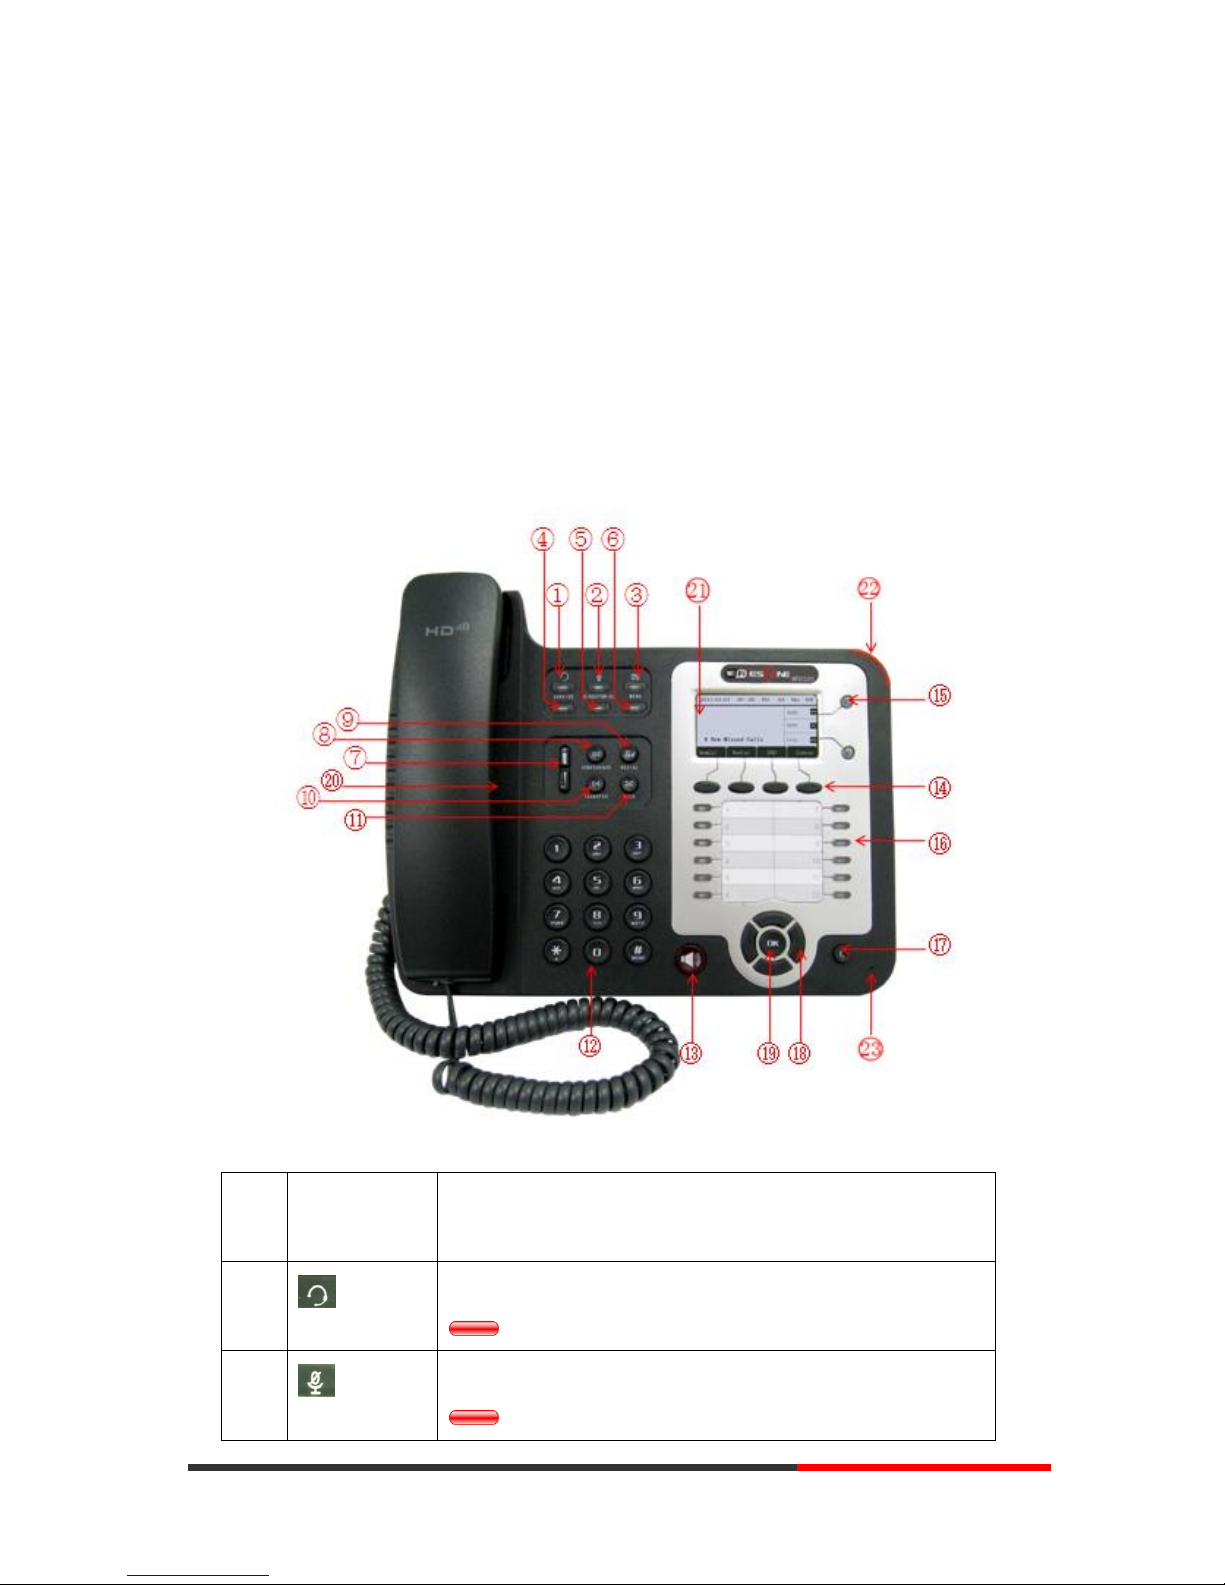
Figure 2.2 Footstand of ES320/ES330/WS320/DS3X2/GS320
Page 9
www.escene.ru
Escene Communication
9
9
3.Phone overview
Understanding Buttons and Hardware
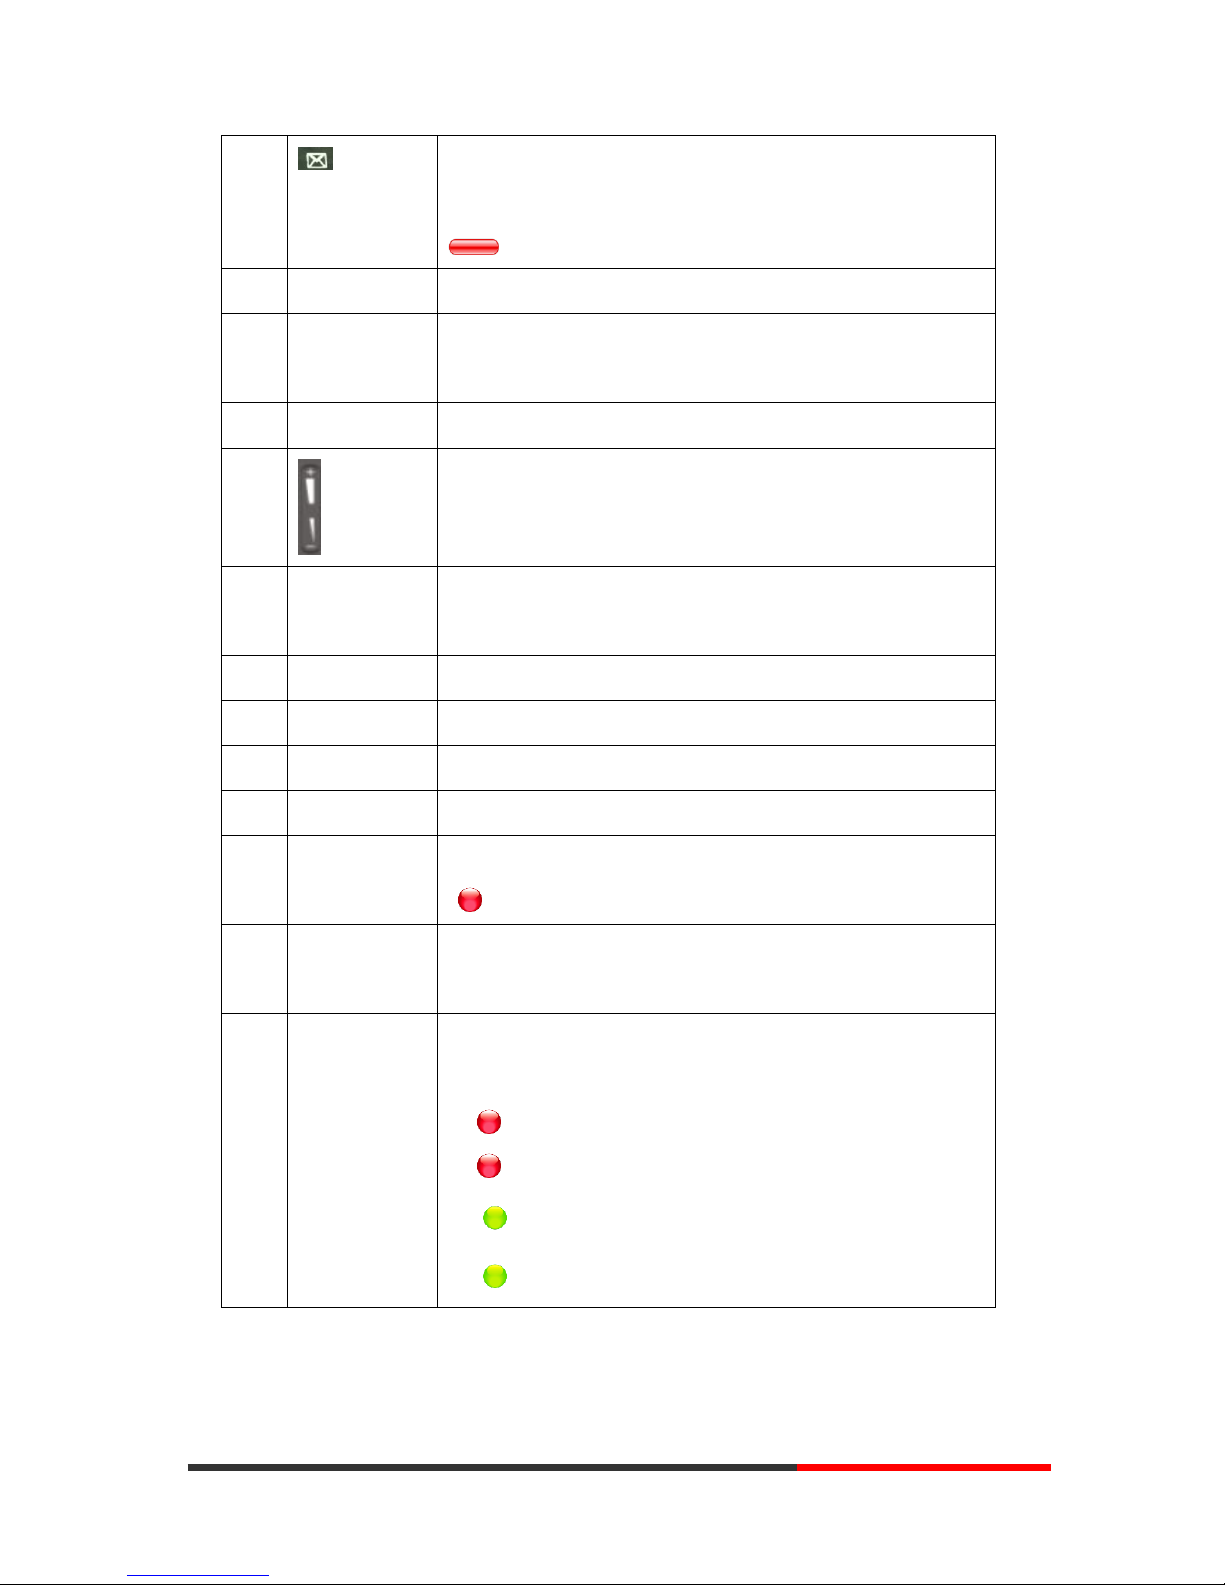
From figure 3.1 to figure 3.2, you can understand buttons and hardware about SayHi
ES320/ES330/WS320/DS3X2/GS320
Figure 3.1 Buttons and Hardware of SayHi
ES320/ES330/WS320/DS3X2/GS320
Num Buttons
Description
1 Headset button: Toggles the headset on or off.
Red means the feature is enabled.
2 Mute button: Toggles the Mute feature on or off.
Red means the feature is enabled.
Page 10
www.escene.ru
Escene Communication
10
10
3 Messages button: Typically auto-dials your voice message
service.
Red means have unread voice mail.
4
SERVICE
Server button: Open or Close the Services menu.
5
DIRECTORIES
Directory button: Use it to access call logs and corporate
directories.
6
MENU
Menu button: Allows you to scroll through menus.
7 Volume button: Controls the volume and other settings.
8
CONFERENCE
Conference button: Connect calling / called party to the
conference
9
REDIAL
Redial button: To Redial the last number.
10
TRANSFER
Transfer button: Transfer redirects a connected.
11
HOLD
Hold button: Put a call on hold
12
0-9, *, #
Basic Call Handling: press “#” send out a call(default)
13
Speaker
button
Speaker button: Toggles the speakerphone on or off.
Red, steady: Pick up and enter normal call.
14
Softkey
Each displays a softkey function, To activate a softkey, press
the softkey button.
15
Line buttons
Select the phone line(Call or Answer) ;
Different colors for different status:
1) Red, flashing: There is an incoming call.
2) Red, steady: Pick up and enter normal call.
3) Yellow-green, flashing: Holding call.
4) Yellow-green, steady: Active call.
Page 11

www.escene.ru
Escene Communication
11
11
16
Programmable
Buttons
Hotline number can be used to bind in order to achieve speed
dial;Turn on BLF:
1) Red, steady: Remote line is busying.
2) Yellow-green, steady: Remote line is idle.
The order of the hot keys:
On the left top to bottom: 1, 2, 3, 4, 5, 6;
On the right top to bottom: 7, 8, 9, 10, 11, 12;
17 C Back button: Return to the standby interface;
18
Navigation
button
“Up”: Adjust ring volume, operate with the “down” button
“Down”: Open ‘Missed Calls” list:
“Left”: Open “Received Calls” list;
“Right”: Open “Dialed Numbers” list
19
OK
OK button: To confirm the action;
20
Hands-free
speakerphone
Hands-free voice of the output
21
LCD screen
160*32 pixels, grayscale LCD with background light.
22
Light strip
Red flashing: There are incoming call;
Red, steady: Missed Calls, or phone busy;
23
Hands-free
microphone
Sounds input when hands-free
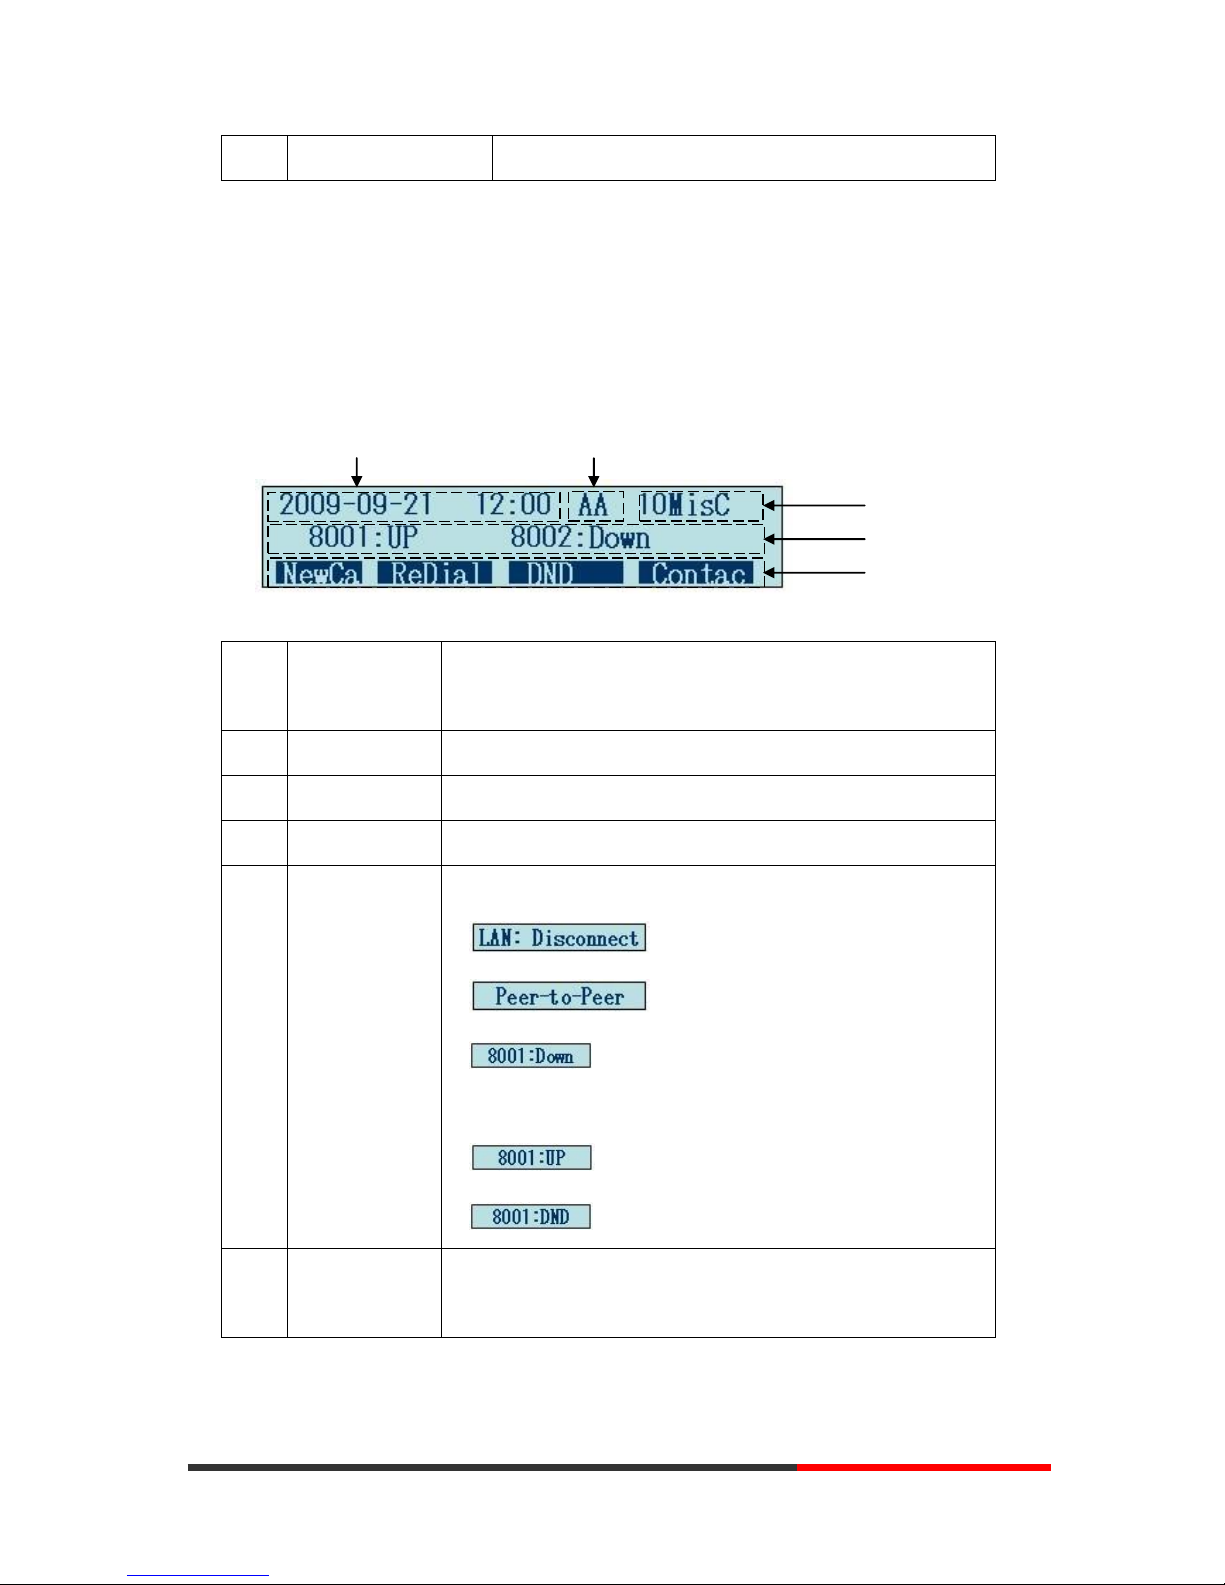
Figure 3.2 Interfaces of SayHi ES320/ES330/WS320/DS3X2/GS320
Page 12
www.escene.ru
Escene Communication
12
12
Num Hardware
functions
1
Footstand
Hold up phone
2
Footstand button
Press buttons at the same time to adjust the angle
3
Reserved for USB
port
Enhanced scalability
4
Microphone port
Connect the Microphone
5
Headphone port
Connect the Headphone
6
Power port
12VDC
7
Headset port
Support RJ11 interface connection
8
Handset port
Connect the Handset
9
Reserved port
Enhanced scalability:
1) EXT: ESM interface;
2) SOR: S-FXS O-FXO R-record
10
LAN port
Connect to a LAN interconnecting device
Ошибка!
Ошибка!
Ошибка!
Ошибка!
Ошибка!
Ошибка!
Ошибка!
Ошибка!
Ошибка!
Ошибка!
Ошибка!
Ошибка!
Page 13
www.escene.ru
Escene Communication
13
13
11
PC port
Connect to a local PC
Understanding Phone Screen Features
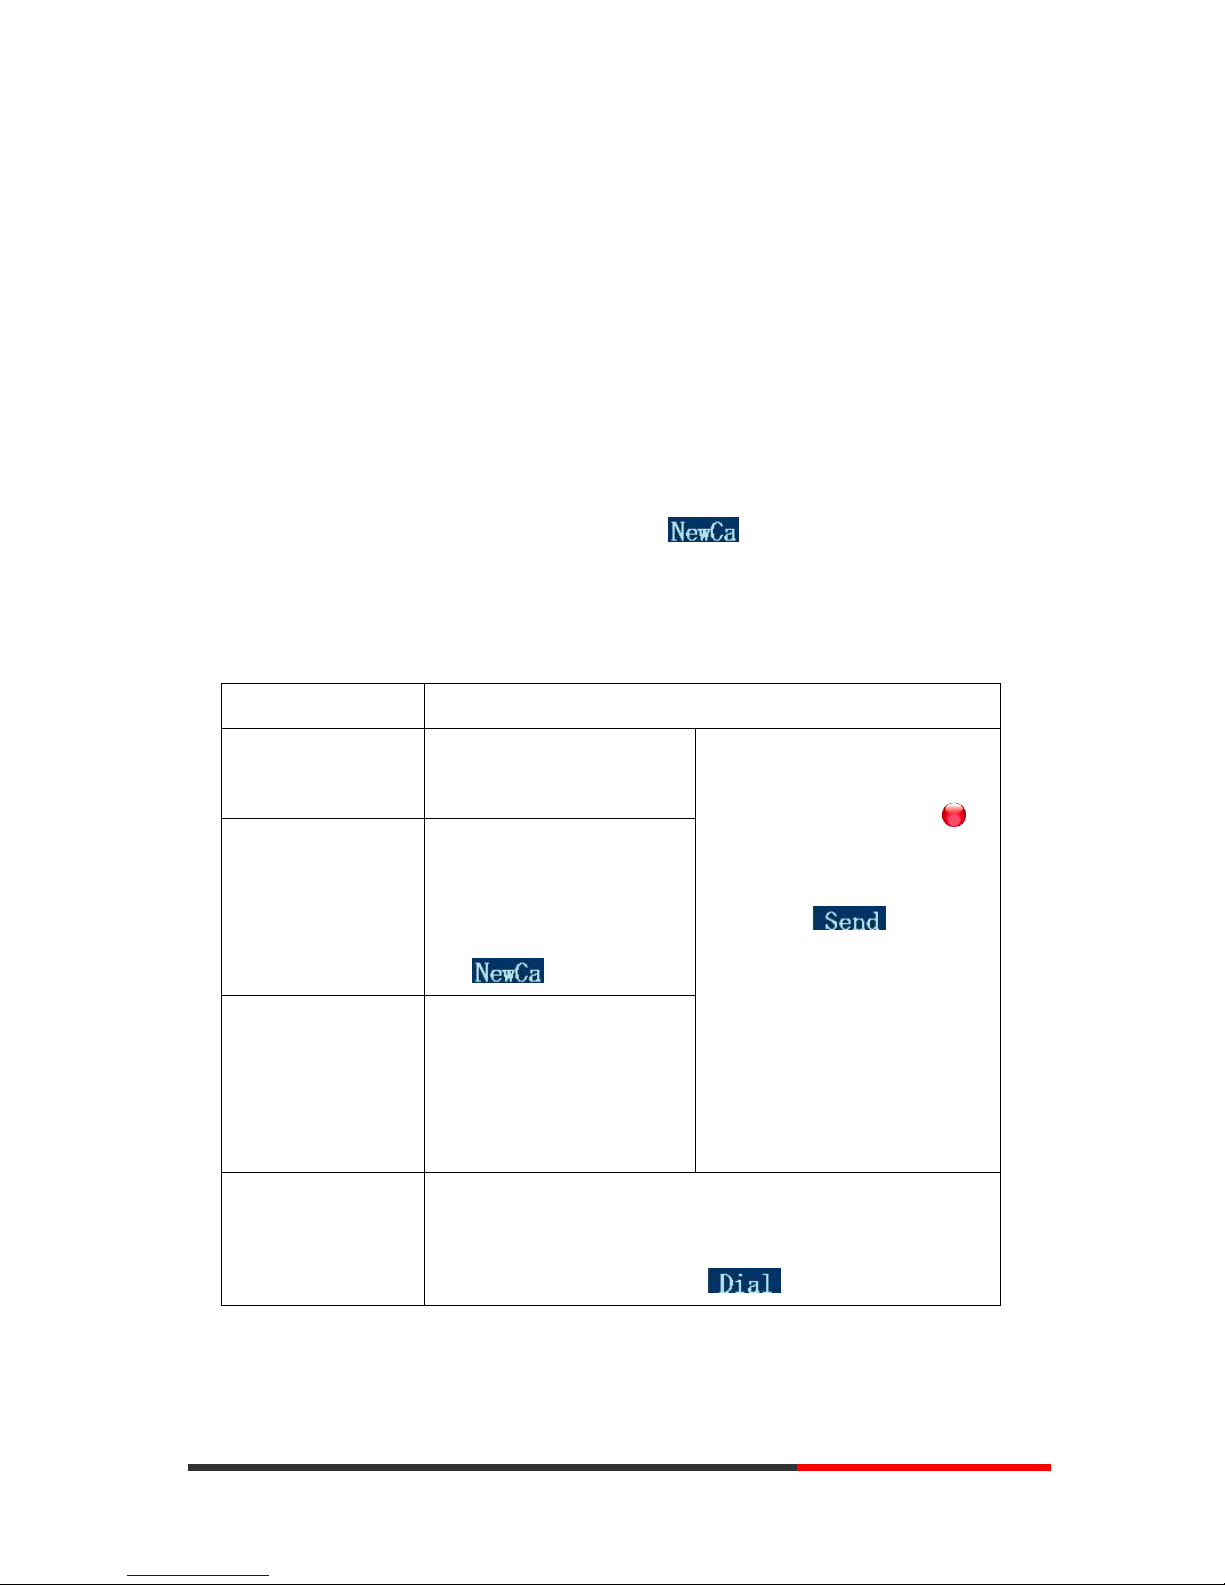
This is what your main phone screen might look like:
Figure 3.3 LCD of SayHi ES320/ES330
Num Screen
Functions
1
Time and Date
Show current time and date.
2
Auto-answer
Enabled Auto-answer, displays “AA”
3
Missed calls
Show the number of missed calls.
4
Line status
Show the phone line status:
1) : Disconnect into network.
2) : Only Peer-to-Peer call.
3) : Network connected normal, but the line is
not successfully registered.
4) : Network is OK and the line is available.
5) : Line is turned on DND.
5
Softkey labels
Each displays a softkey function (displayed on your phone
screen), and the function is different when menu changes.
Ошибка!
Ошибка!
Ошибка!
Ошибка!
Ошибка!
Page 14
www.escene.ru
Escene Communication
14
14
4.Basic Call Handling
You can perform basic call-handling tasks using a range of features and services. Feature
availability can vary; see your system administrator for more information.
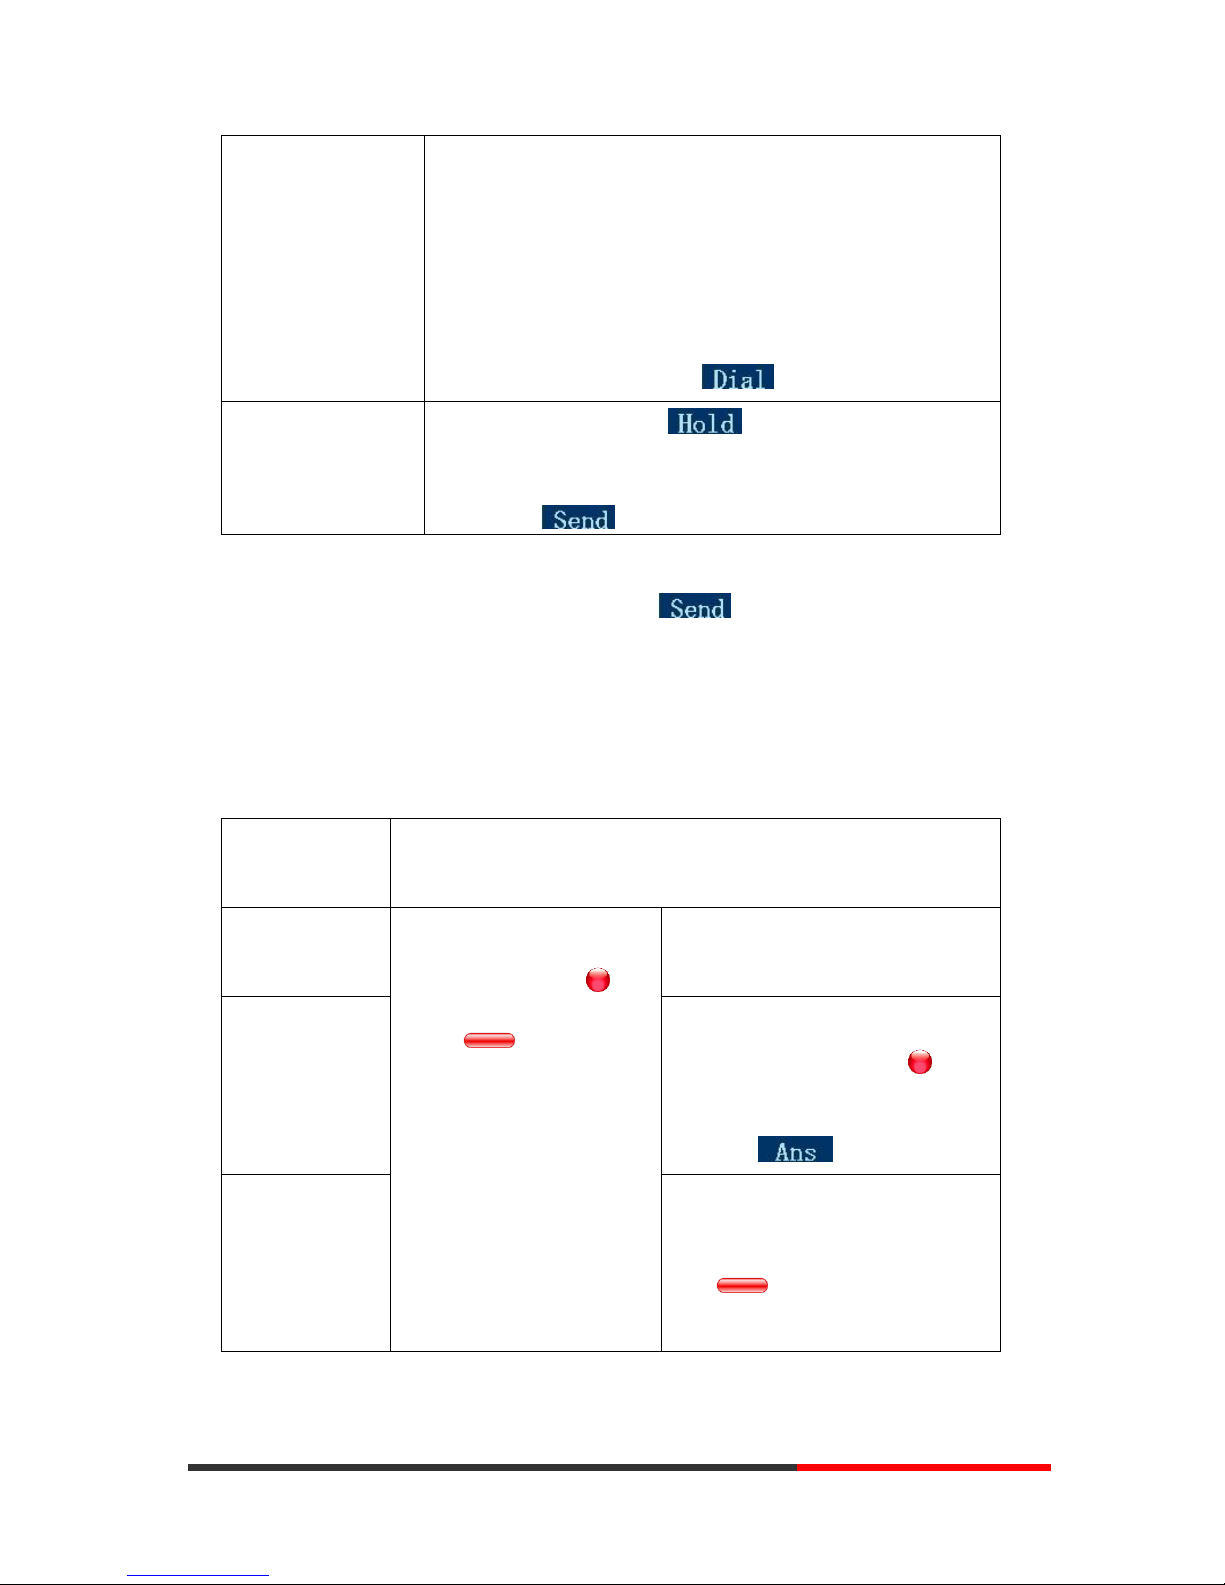
Note: The bold type of the following text and following a “button” in table signifies the
phone's button (for example, OK button), and the signifies softkey.
Placing a Call
Here are some easy ways to place a call on SayHi ES320 IP Phone:
If you want to...
Then...
Place a call using the
handset
Pick up the handset
--1) You can hear the dial
tone;
--2) The first line light is ;
--3) Enter a number;
--4) Press ‘#’ button(default) ,
-or press ;
-or wait 5s (default), then it
send the number
automatically.
Place a call using a
speakerphone
Press Speaker,
or Programmable
buttons
or
Place a call using a
headset
Put on your headset and
active Headset button, and
then do as using
speakerphone
Redial
--Press REDIAL button to dial the last number
-or press Navigation button-Right > “Dialed number”,
select a number, and press or OK button.
Page 15
www.escene.ru
Escene Communication
15
15
Dial from a call log
--1) Press MENU or OK button > “Call history”, you can select
“Missed calls”, “Received calls” and “Dialed numbers”,
- or press Navigation button (in Standby interface) > select
“Missed calls” (down), “Received calls” (left) and “Dialed
numbers” (right) );
--2) Then press OK button or .
Place a call while
Another call is active
--1) Press Hold button or ;
--2) Enter a number;
--3) Press ‘#’ button (default) ;
-or press to send the number.
Tips
• You can dial on-hook, without a dial tone (pre-dial). To pre-dial, enter a number, and
then go off-hook by lifting the handset or pressing , Headset or Speaker button.
• If you make a mistake while dialing, press C button to erase digits.
Answering a Call
You can answer a call by simply lifting the handset, or you can use other options if they are
available on SayHi ES320.
If you want
to...
Then...
Answer with a
handset
--1) Your phone ring;
--2) Line button of the
ringing line is Red and
flashing, Light strip is
Red and flashing;
--Pick up the handset
Answer with the
speakerphone
(Non-headset
mode)
--Press Speaker button
-or press the flashing Line
button,
-or press
Answer with the
a headset
--Put on headset, press Headset
button so that the status light is
Red , and then do as using
speakerphone
Page 16
www.escene.ru
Escene Communication
16
16
Switch from a
connected Call to
answer a ringing
call
--1) Another Line button is Red and flashing, Light strip is
Red and flashing;
--2) Press the flashing Line button to answer (at this time, the
original call will be hold.)
Auto-answer
--1) Press MENU or OK button > “Function setting” > “Auto
answer”;
--2) Select “Enable”;
--3) Your phone answers incoming calls automatically after a few
rings.
Ending a Call
To end a call, hang up. Here are some more details.
If you want to...
Then...
Hang up while using the
Handset
--Return the handset to its cradle,
-or press
Hang up while using the
Speakerphone
--Press Speaker button that is Red ,
-or press Line button for the appropriate line,
-or press
Hang up while using the
Headset
--Press Handset button, (Do not keep the headset mode) ,
-or press (keep the headset mode)
Hang up one call, but
preserve another call on
the other line
--Press ,
-or refer to the above three methods
Using Hold and Resume (Switch Calling Line)
You can hold and resume calls. You can take a call in one line at anytime, and the other
Page 17

www.escene.ru
Escene Communication
17
17
lines would be hold. As a result of that, you can switch different calling line on our phone.
If you want to...
Then...
Put a call on hold
--Press HOLD button,
-or press
Hold a line and switch to
another line
Press another Line button for the appropriate line
Resume a call on current
line
--Press Line button,
Release a call on
different line
Select the line want to release hold, press the line, so
recovery;
Tips
• Engaging the Hold feature typically generates music or a beeping tone.
• A held call is indicated by the Yellow-green and flashing Line button.
Transferring Calls
Transfer redirects a connected call. The target is the number to which you want to transfer
the call.
If you want to...
Then...
Talk to the transfer
recipient before
transferring a call
(consult transfer)
--1) Press TRANSFER button or press ;
--2) Enter number;
--3) press “#”(default) ,
-or press then transfer the call,
-or wait five seconds(default)then transfer the call
Transferred to idle
lines or other
numbers without
talking to the
transfer recipient
(Blind transfer)
--1) Press TRANSFER button or ;
--2) Press ;
--3) Enter number;
--4) Press “#”(default)
-or press , then transfer the call;
-or wait five seconds(default)then transfer the call
Page 18
www.escene.ru
Escene Communication
18
18
Blind transfer to the
held line
--1) Press TRANSFER button or press ;
--2) Press the Line button of held line
Using Mute
With Mute enabled, you can hear other parties on a call but they cannot hear you. You can
use mute in conjunction with the handset, speakerphone, or a headset。
If you want to...
Then...
Toggle Mute on
Press Mute button, then the button is Red
Toggle Mute off
Press Mute button, then the button light off
Do Not Disturb
You can use the Do Not Disturb(DND) feature to block incoming calls on your phone with a
busy tone(Can also be set to their voice mail or other extension numbers, etc.).
If you want to...
Then...
Enable global DND
--1) Press ;
--2) All enabled line on the phone would changes to
status.
Enable DND on a
single line
Press MENU or OK button > “Function setting” > “DND” >
(select line) “Enable”
Disable DND
--Global DND enabled, press to disable global DND;
--Line DND enabled, press twice ,
-or press MENU or OK button > “Function setting” >
“DND” >(select line) “Disable”
Page 19
www.escene.ru
Escene Communication
19
19
3-way Conference
You can establish a three-party conference, during the conversation three phone parties
can communicate with each other.
If you want to...
Then...
Invite the transfer
recipient into a
conference in a
transferring
--1) When the transfer recipient answer the call, press
CONFERCENCE button or on your phone;
--2) Then the held one, transfer recipient and you will be into a
conference, and the LCD will display
status.
Invite the third party
into a conference in
a active call
--1) Press CONFERENCE button or in an active call;
--2) Enter the third party number;
--3) After connected the third party, press CONFERENCE
button or again
establish a
conference with held
line
--1) when one phone line is holding on and the other line is
busy;
--2) Press CONFERENCE button,
-or Press Soft key
--3) press the held line's programmable button, the 3-way
Conference will establish.
Expansion Installation(only ES330 has this
item)
If you want to...
Then...
Expansion
installation
--1) Press MENU or OK button > “Function setting” >
“expansion installation”,
--2) if you want to install expansion, please according to tips to
do ,after you install ,press”finish”.
Page 20

www.escene.ru
Escene Communication
20
20
Expansion Settings(only ES330 has this item)
If you want to...
Then...
Expansion setting
--1) Press MENU or OK button > “Function setting” >
“expansion installation”,
--2) choose which you want to set “expansion”
--3)choose which you want to set “ programmable keys “
--4)you can set :
Mode:Speed Dial、Asterisk BLF、Speed Dial Prefix、BLA、
DTMF
Account :choose account which you want to set
Name:give it a name which you want
Number: set your expansion number
Time&Date
If you want to...
Then...
Time&Date
--1) Press MENU or OK button > “Function setting” >
“time&date”,
--2)you can select :
SNTP: select “enable ”to set parameter: time 、server 、
daylight
SIP server: select “enable ” to set parameter: root can
modify date .
manual Settings: select “enable ”to set parameter: date
and time
Page 21

www.escene.ru
Escene Communication
21
21
VOIP Call Forwarding
If you want to...
Then...
Unconditional transfer
--1) Press MENU or OK button > “Function setting” >
“voip call forwarding”;
--2)select “unconditional transfer”, select enable.
--3)input number which you want to transfer, when have
a call in ,it will unconditional transfer.
Busy transfer
--1) Press MENU or OK button > “Function setting” >
“voip call forwarding”;
--2)select “busy transfer”, select enable.
--3) input number which you want to transfer, when have
a call in conversation ,it will transfer.
No answer transfer
--1) Press MENU or OK button > “Function setting” >
“voip call forwarding”;
--2)select “no answer transfer”, select enable.
--3) input number which you want to transfer, when have
a call in but you don’t have time to answer ,it will transfer.
Page 22

www.escene.ru
Escene Communication
22
22
5.Advanced Call Handling
Speed Dialing
Speed dialing allows you to enter an index number, press a button, or select a phone
screen item to place a call.
If you want to...
Then…
Set up Speed Dials
on your phone
--1) Press MENU or OK button > “Function setting” > “Hot line
keys”;
--2) You can configure twelve speed dial numbers on the SayHi
ES320 IP Phone;
--3) Press OK button or to set and modify:
-Mode:
-Speed dial: Speed dial mode
-Asterisk BLF: In the Speed dial based on the increase in
BLF (Busy line detection) function
-Account: Speed Dial hot keys using the account
-Name: Description of this hot-key,
-Number: Need to speed dial numbers
--4) Press to save the changes
Using the phone book
You can store a large number of contacts in your phone's directory. You can add, edit,
delete, dial, or search for a contact in this directory.
If you want to…
Then…
Page 23
www.escene.ru
Escene Communication
23
23
Add Contacts
--1) Press ,
-or press MENU button > “Phone book”,
-or press Directories button > “Phone book”;
--2) Press ;
--3) Select “Add contact”, press OK button or ;
--4) Use the navigation keys to select content, press OK button or
to set and modify:
-Name: set the name of contact,
-NO.1-5: you can set up 5 contacts’ numbers,
-Group: the contacts be divided into different user’s groups
--5) Press soft key to complete
Add group
--1) Press soft key,
-or press MENU button > “Phone book”,
-or press Directories button > “Phone book”;
--2) Press soft key;
--3) Select the “add group” then press OK button or ;
--4) Use the navigation keys to select content, press OK button or
to set and modify:
-Group name: name of the group
-Description: description of the group
--5) Press soft key to complete
Page 24
www.escene.ru
Escene Communication
24
24
Modify group
--1) Press soft key,
-or press MENU button > “Phone book”,
-or press Directories button > “Phone book”;
--2) Press soft key;
--3) Select the “Modify group” then press OK button or press
;
--4) Select the group you want to modify, press the OK button or
to set and modify, press to save the change
Delete group
--1) Press soft key,
-or press MENU button > “Phone book”,
-or press Directories button > “Phone book”;
--2) Press soft key;
--3) Select the “Delete group” or OK button or ;
--4) Select a group you want to delete, press OK button or
View/Edit Contacts
--1) Press soft key,
-or press MENU button > “Phone book”,
-or press Directories button > “Phone book”;
--2) Select “View ALL”,
-or select a contact who are belong to different group;
--3) Select the contact, press the OK button or (to edit
the contact’s information, press OK button or )
Page 25
www.escene.ru
Escene Communication
25
25
LDAP
--1) --1) Press soft key,
-or press MENU button > “Phone book”
-or press Directories button > “Phone book”
--2)Select “LDAP”, press the OK button.
--3)Select“Search name->name”, then input the name ,and press
OK or Del.
--4)Select “Search number->Number”, then input the
number ,and press OK or Del.
Pay attention: before you use LDAP function, you need to
configure LDAP rule in the web configure page.
Call from phone
book
--1) Press soft key,
-or press MENU button > “Phone book”,
-or press Directories button > “Phone book”;
--2) Select “View ALL”,
-or select a contact who are belong to different group;
--3) Select a contact, then press ,
(If there are multiple numbers of one contact, press
to enter the interface of “call options”, select the one you want to
call and press )
Modify the relative
account of a
contact
--1) Open your web browser, enter the “web” interface. (For
details, you can refer to
7.Web Settings
.)
--2) Open “Contact” > “Phone book”, select the contact who are
needed to be modified, click
--3) Select the account in the drop-down column of the account,
click “Submit” to complete it.
Page 26

www.escene.ru
Escene Communication
26
26
Using Call Logs
Your phone maintains records of your missed, placed, and received calls.
If you want to…
Then…
View your call logs
--1) Press MENU button > “Call history” > “Missed Calls”,
“Received Calls”, or “Dialed numbers”
--2) Use the navigation keys to view the call record information.
Dial from a call log
Please refer to the previous part
4.Basic call handing – Placing a
call.
Erase your call logs
--1) If you want to delete a call record, you have to select this
record from the logs and press ;
--2) If you want to delete an entire call record list, you have to
select this record list from the logs and press
Tips
• Each call log store up to 20 entries on SayHi ES320 IP phone.
Page 27

www.escene.ru
Escene Communication
27
27
6.Keypad Instruction
SayHi series IP phones are can be configured in two ways. The first you can use the phone
keypad where you can settings for you IP phones, the other you can log in to User Options
web pages where you can settings for you IP phones.
Use phone keypad to setting. Press MENU or OK button to the main menu, Use the
navigation keys to select menu, press OK button to confirm menu selections, press C
button or to delete input information.
Language
SayHi 320 IP Phone supports Simplified Chinese and English Russian
If you want
to…
Then...
To change the
language via
Phone interface
--1) Choose “System setting” > “Phone setting” > “Language”;
--2) Scroll through the list of available languages.
--3) Press OK button or when the desired language is
highlighted. The language appears on the graphic display will be
changed to the one you chose.
SIP Account Settings
SayHi 320 series IP phone make calls based on sip accounts, SayHi 320 series IP phones
can support 2 independent SIP account, each account can be configured to different SIP
server.
If you want to…
Then...
Page 28

www.escene.ru
Escene Communication
28
28
Create an SIP
account
--1) Choose “System setting” > “Advanced setting”;
--2) Enter the password required(The default is empty) ;
--3) Choose “SIP” > “Account sip”;
--4) Choose one of the account you want to setting, you can
configure the following parameters
-Enable account*: choose Enable
-Display Name: The name displayed on the screen
-User Name*: the account matched with the SIP server.
(extension number) ,
-Authen usr: the Authenticated users matched with the SIP
server.(The default With the same account)
-user pwd*: the user password matched with the SIP server
-Description: description of this account,
-SIP1*: the primary SIP server, By default all calls through
the server,
-SIP2: the secondary SIP , When the primary server is
unavailable ,use the SIP server
-Refresh time: Registration refresh interval, the minimum
value is 20 The default value is 3600.
--5) Set up the above parameters, Press softkey to saves
settings, Complete the account creation;
* Note: the parameters with the * mark must be set.
Disable sip account
--1) Choose “System setting” > “Advanced setting”;
--2) Enter the password required(The default is empty) ;
--3) Choose “SIP” > “Account sip”;
--4) Choose “Enable account” > “Disable”;
--5) Press soft key
Page 29

www.escene.ru
Escene Communication
29
29
Network Setting
If you want
to …
Then…
network setting
--1) Choose “System setting” > “Advanced setting”;
--2) Enter the password required(The default is empty) ;
--3) Choose “Network”, you can configure the following parameters:
-Type: static IP or DHCP
-IP: enter IP address , Note: Do not duplicate the IP address
with other devices on the network
-Mask: enter appropriate subnet mask
-GW: enter appropriate gateway
- DNS1: enter IP address of the primary DNS server
- DNS2: enter IP address of the secondary DNS server
-Web port: the default Web port is 80,if you change it(for
example change it to 88),you must use IP and Web port to login
the web page (for example http://192.168.0.200:88).It will take
effect on next reboot.
-Telnet port: the default Telnet port is 23,if you change it(for
example change it to 2003),you must use IP and Telnet port to
login the manage page (for example telnet 192.168.0.200:2003).It
will take effect on next reboot.
Load default settings
If you want to...
Then...
Page 30
www.escene.ru
Escene Communication
30
30
Load default settings
--1) Choose “System settings” > “Advanced
settings”;
--2) Enter the password required ( The
default is empty) ;
--3) Choose “load default settings”,and
press’OK’, then “Reboot” the phone.
Customizing Rings and Volume
If you want
to…
Then…
Change the ring
tone
--1) Choose “System setting” > “Phone setting” > “Ring type”;
--2) Press navigation to choose ring tone;
--3) Press softkey Choose a ring tone to play a sample of
it.
Press softkey to Stop Playing
Press OK or softkey to set the ring tone,
Press softkey to cancel
Adjust the
volume level
--1) Choose “System setting” > “Phone setting” > “Volume setting”;
--2) You can adjust the volume level of following types
-Ring volume: Phone call ring volume,
-Handset volume: Handle output volume,
-Handset mic volume: Handle input volume,
-Speaker volume: Hands-free speaker output volume,
-Speaker mic volume: Hands-free input volume,
-Headset volume: Headphone output volume,
-Headset mic volume: Headset microphone input volume
Page 31

www.escene.ru
Escene Communication
31
31
WIFI setting(only WS320 has this item)
If you want
to…
This…
Set WIFI
--1)Choose "System settings">"advanced settings">"advanced
password:"
--2) Press navigation to choose WIFI setting;
--3)Press "ok" button or
-Current site: the wifi which the phone use now
-Site list: where you can choose wifi
--4)Press "site list", choose one wifi network which the phone
searched
-SSID: SSID name
-BSSID: the mac address of the WIFI network
-Channel:the channel of the WIFI network use
-Type:the type of the WIFI network
-Encrypt:the encrypt of the WIFI network
-Signal:the signal of the WIFI network
--5)Press "SSID",set WIFI which you choose
-Encryption: the encryption of the WIFI network
-Key type: the key type of the WIFI network
-Key: the password which you should set to allow yourself
to enter the WIFI network
View status
If you want to see the phone status,Press MENU button > “view status” ,or press OK
button > “view status”,you can see the detail information of the phone.
Page 32

www.escene.ru
Escene Communication
32
32
If you want to ......
Then......
Network
You can see the network detail information
of the phone
Lines
You can see the SIP account
software
It include phone Mode、software version、
kernel version 、 Upgrade date 、 Running
time
Expansion
Can check the expansion
Diagnose
If you want to check the phone hardware function,Press MENU button >
“diagnose” ,or press OK button > “diagnose”,you can check the phone item as below.
If you want to ....
Then ....
Keys
You can check the phone keys
LCD
Press’OK’to start,press’C’to exit
Lights
Press’OK’to start,press’C’to exit
Sound
Press’OK’to start
Page 33
ES320 IP-Phone
www.escene.ru
Escene Communication
33
33
7.Web Settings
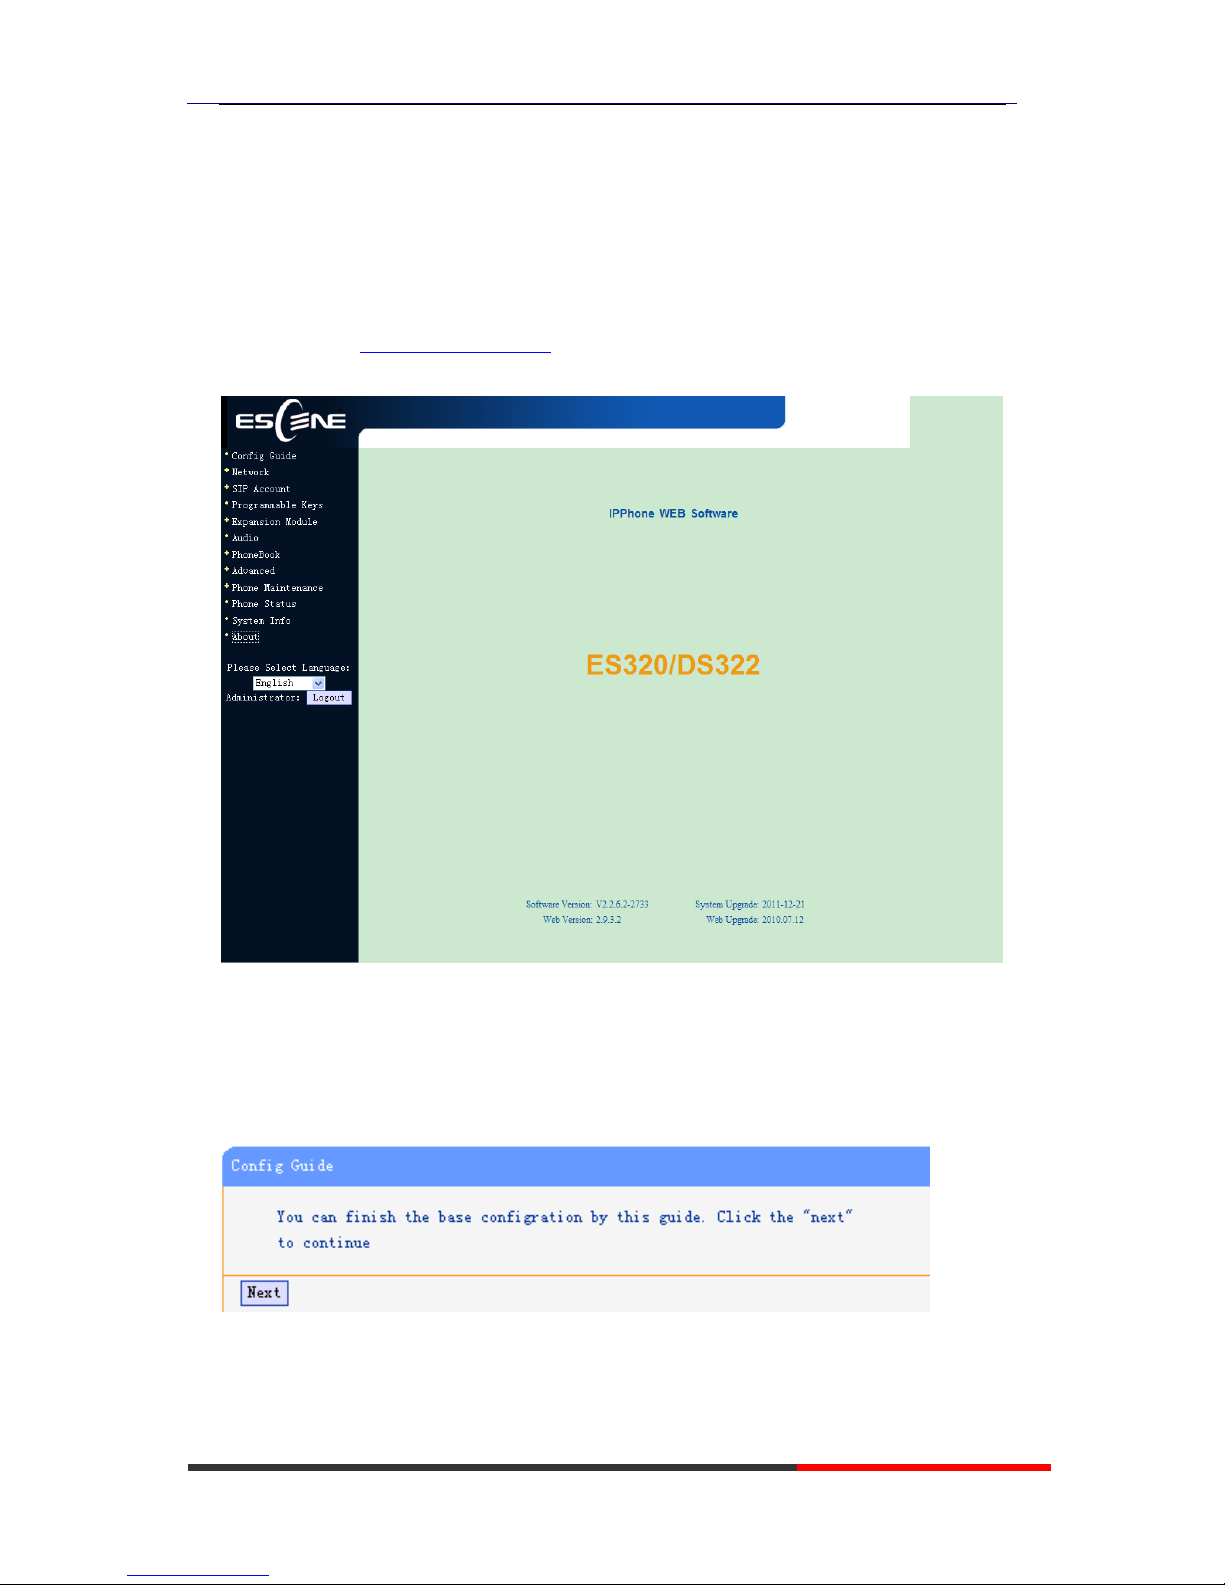
We can configure IP Phone more handy through web setting. Press OK button on the
keypad of the phone to enter the status page and find out the IP address of IP phone. Enter
it (for example http://192.168.0.200) into the address bar of web browser. The default
login name and password are both “root”.
Config Guide
You can finish the base configuration step-by-step by this guide.
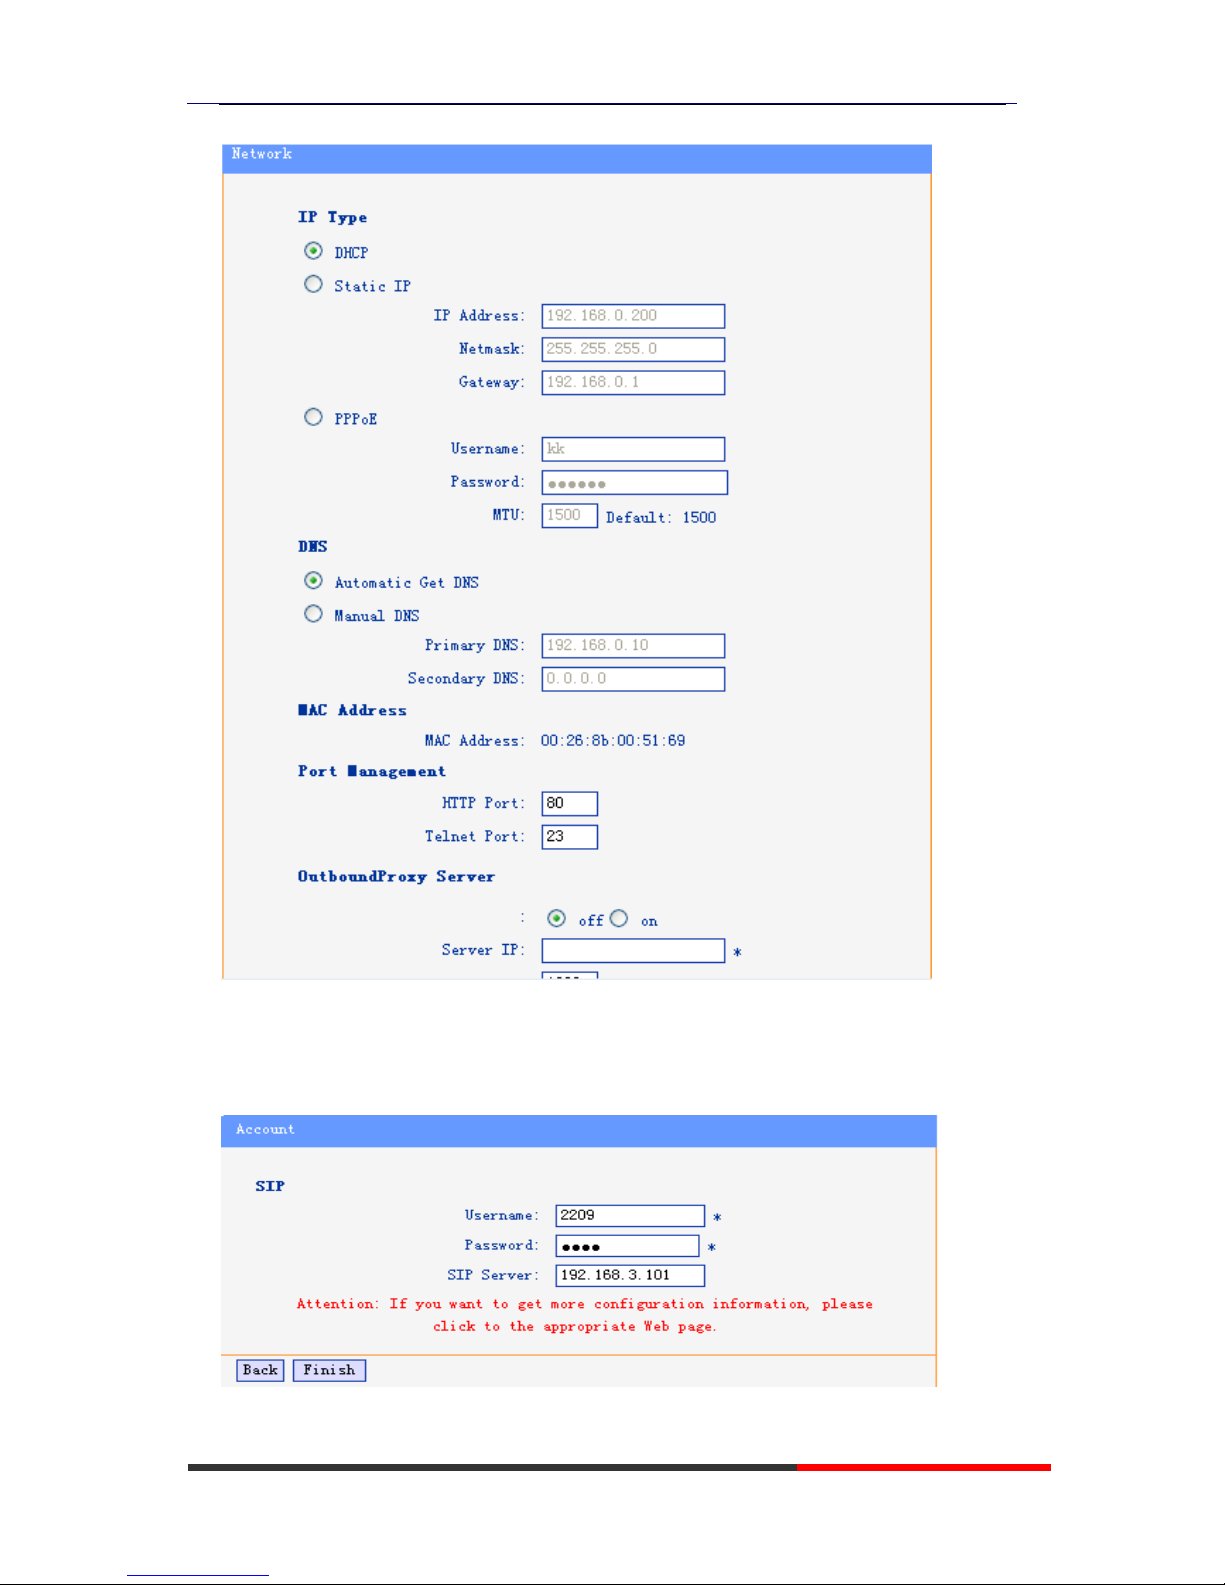
When press ‘next’,you can configure the Network parameters for the phone,You can chose
other option,such as static IP or PPPoE.
Page 34
ES320 IP-Phone
www.escene.ru
Escene Communication
34
34
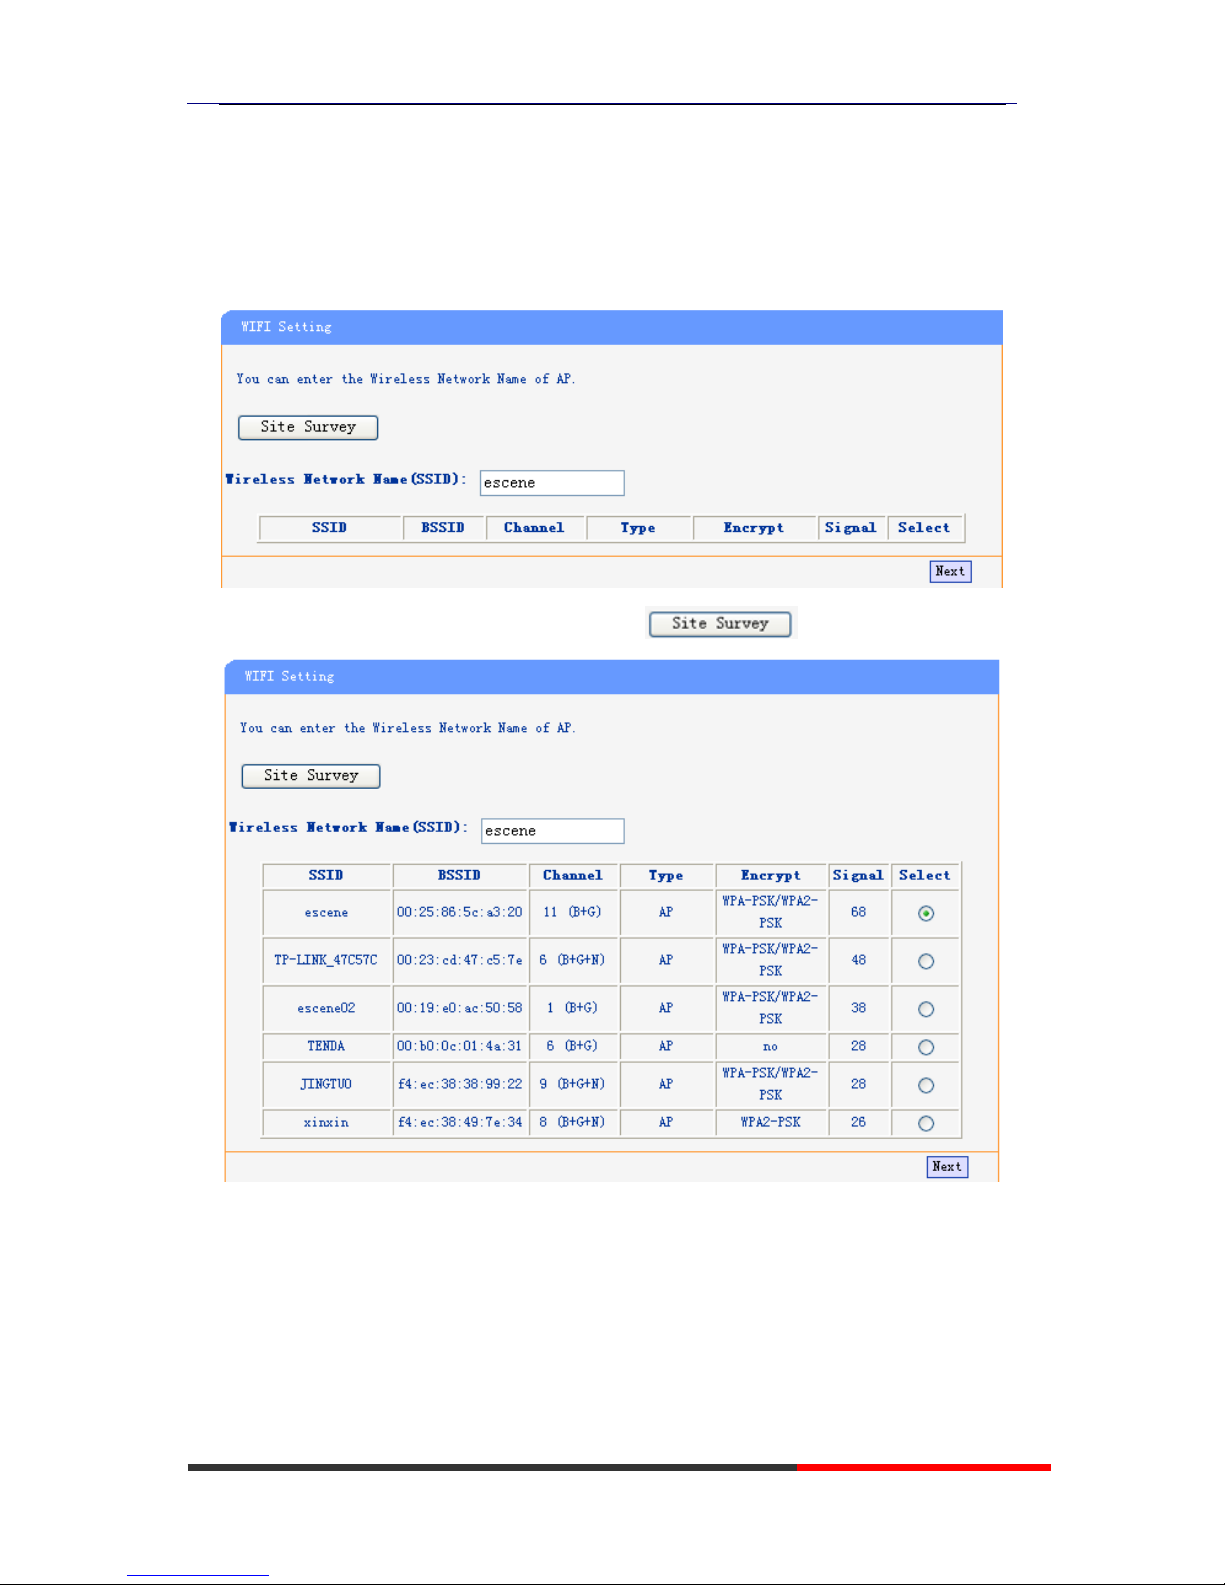
After config the network parameter,press next,then you can config sip account for the
phone.
Press Finish,the base configuration of the phone is complete,now you can use the phone to
Page 35
ES320 IP-Phone
www.escene.ru
Escene Communication
35
35
call with sip.
WIFI Setting(only WS320 has this item )
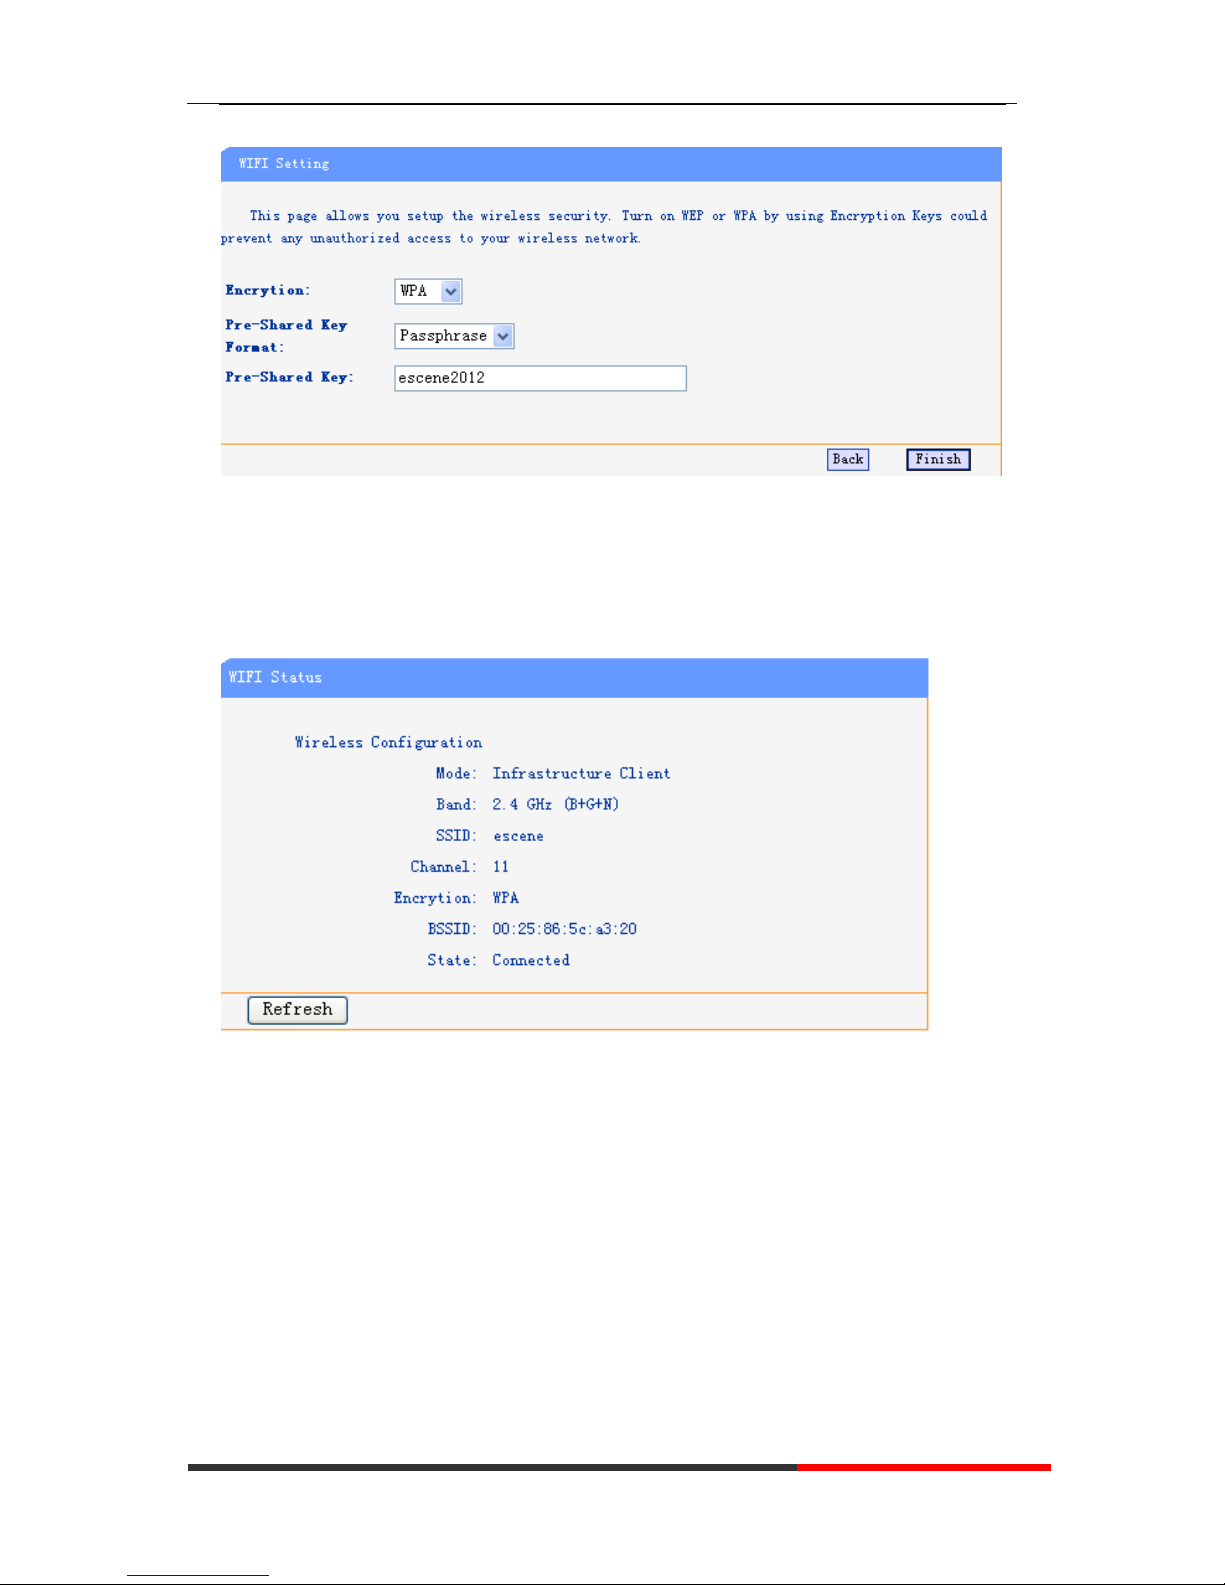
ou can config the WIFI parameters for the phone on the web page.
If you want to search the site, you can click the .
Choose anyone site and you will see,
Page 36
ES320 IP-Phone
www.escene.ru
Escene Communication
36
36
WIFI Status(only WS320 has this item )
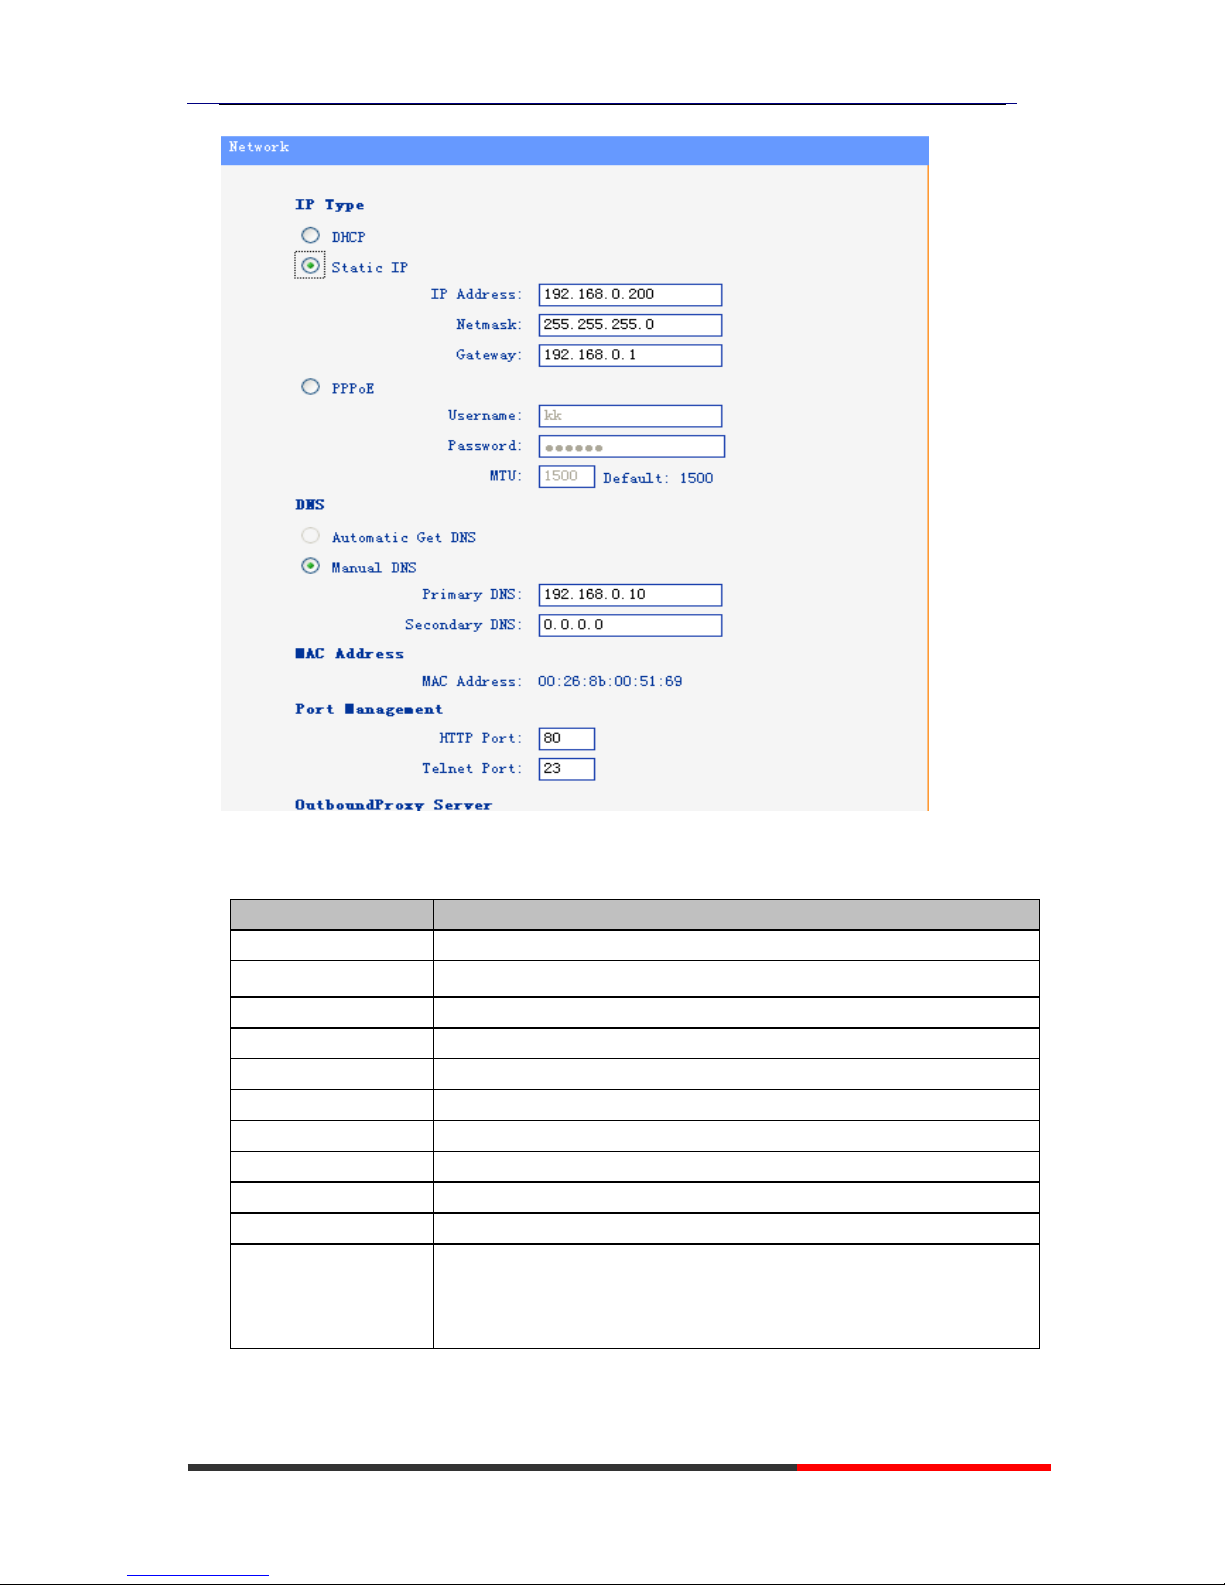
You can know what the status of the WIFI from this function.
Network
You can config the network parameters for the phone on the web page.
Page 37
ES320 IP-Phone
www.escene.ru
Escene Communication
37
37
Choose network,you will find the following parameters:
Field
Description
DHCP
Config the phone get ip info from DHCP server
IP Address
Config the ip manual for phone
Netmask
Config the netmask manual for phone
Gateway
Config the gateway manual for phone
Username (pppoe)
The pppoe username
Password (pppoe)
The pppoe password
MTU (pppoe)
The mtu for pppoe,default is 1500
Primary DNS
The primary DNS server
Secondary
The secondary DNS server
MAC Address
Display the MAC of the phone
HTTP Port
The default web port is 80,if you change it(for example change it
to88),
You must use IP and Web port to login the web page(for example
Page 38
ES320 IP-Phone
www.escene.ru
Escene Communication
38
38
Telnet Port
the default Telnet port is 23,if you change it(for example change it to
2003),you must use IP and Telnet port to login the manage page (for
example telnet 192.168.0.200:2003).It will take effect on next
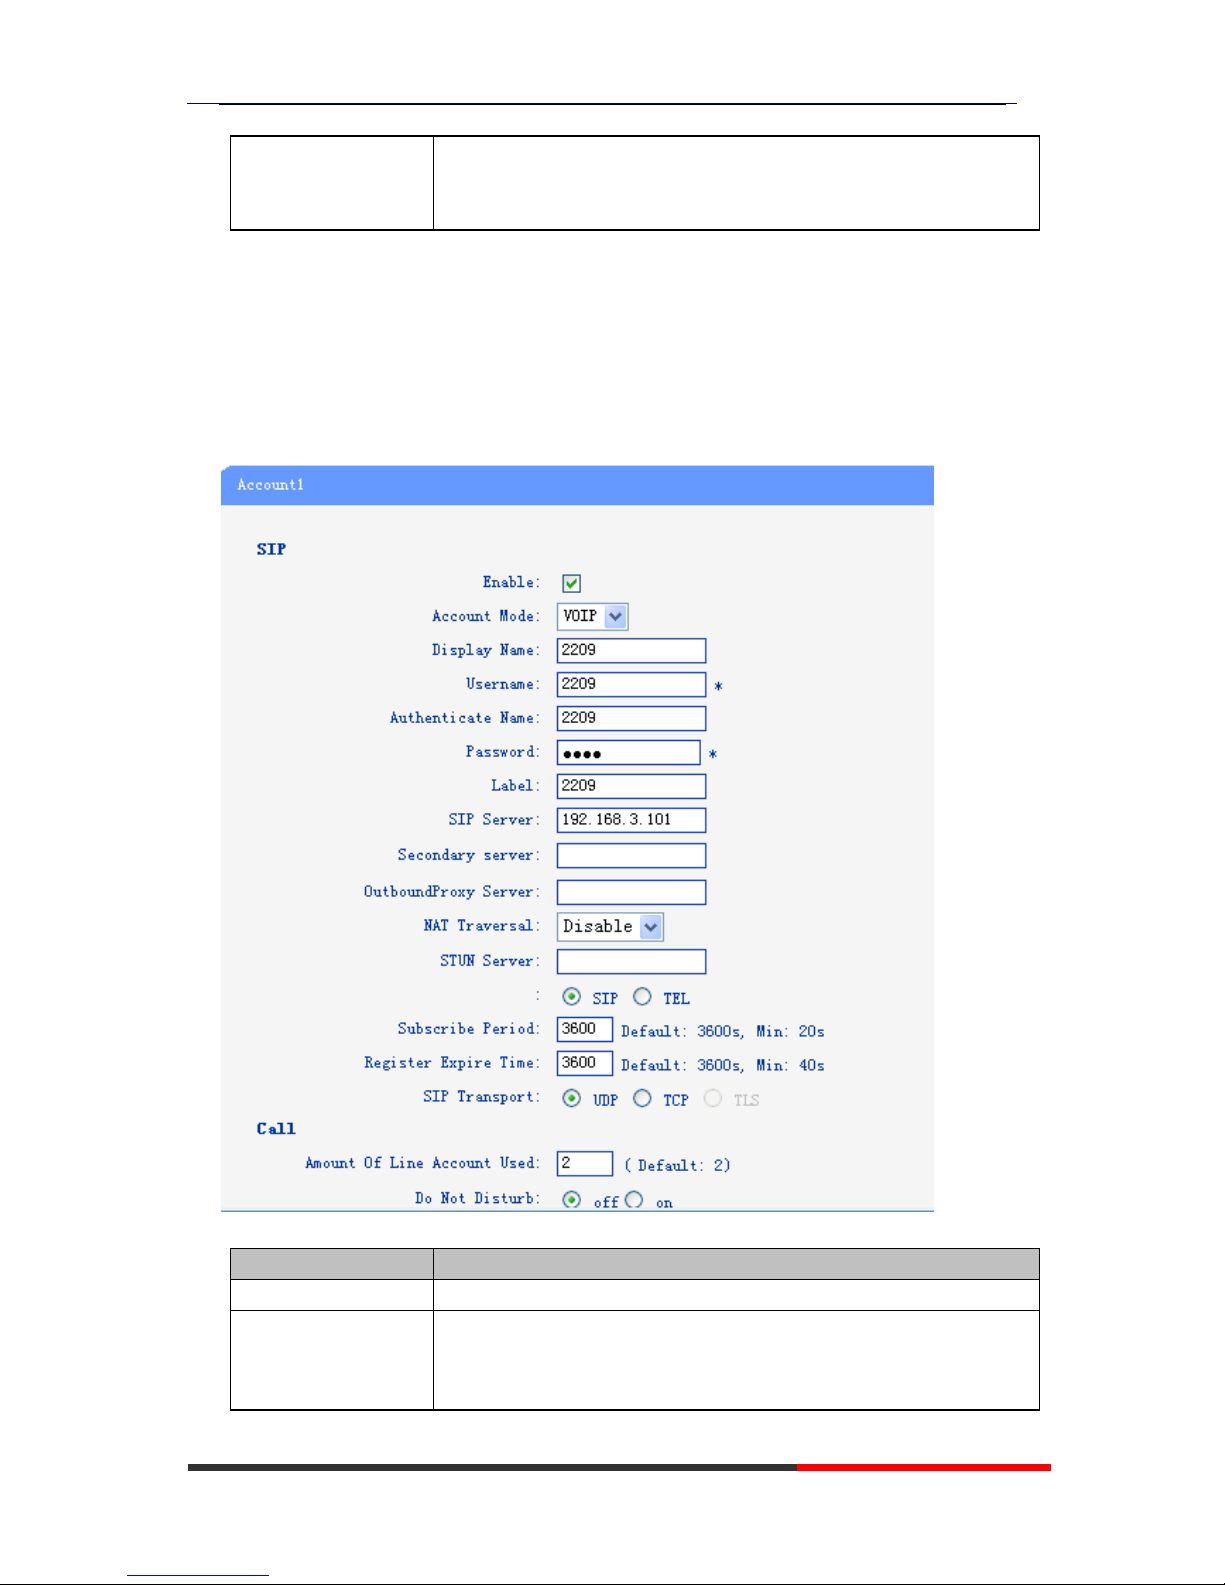
SIP Account
The phone attempts to register to the SIP server using the account/registrar data
provided by the automatic or manual initialization
Choose one Account, you will find the following parameters:
Field
Description
Enable
You can choose on/off to enable/disable the line.
Account Mode
You can choose VOIP/PSTN,when you want to use as PSTN,you
should
select PSTN and plug the RJ-11 phone line into the SOR port of the
Page 39
ES320 IP-Phone
www.escene.ru
Escene Communication
39
39
Display Name
It is showed as Caller ID when making a phone call
Username
It is a username provide by SIP Server
Authenticate Name
It is authenticated ID for authentication
Password
It is a password provide by SIP Server
SIP Server
Server for registration, provided by administrator
Register Expire Time
IP phone automatically registered every time
Amount Of Line
Account Used
The line key of account used,default is 2
Choose one Account, you will find the following parameters:
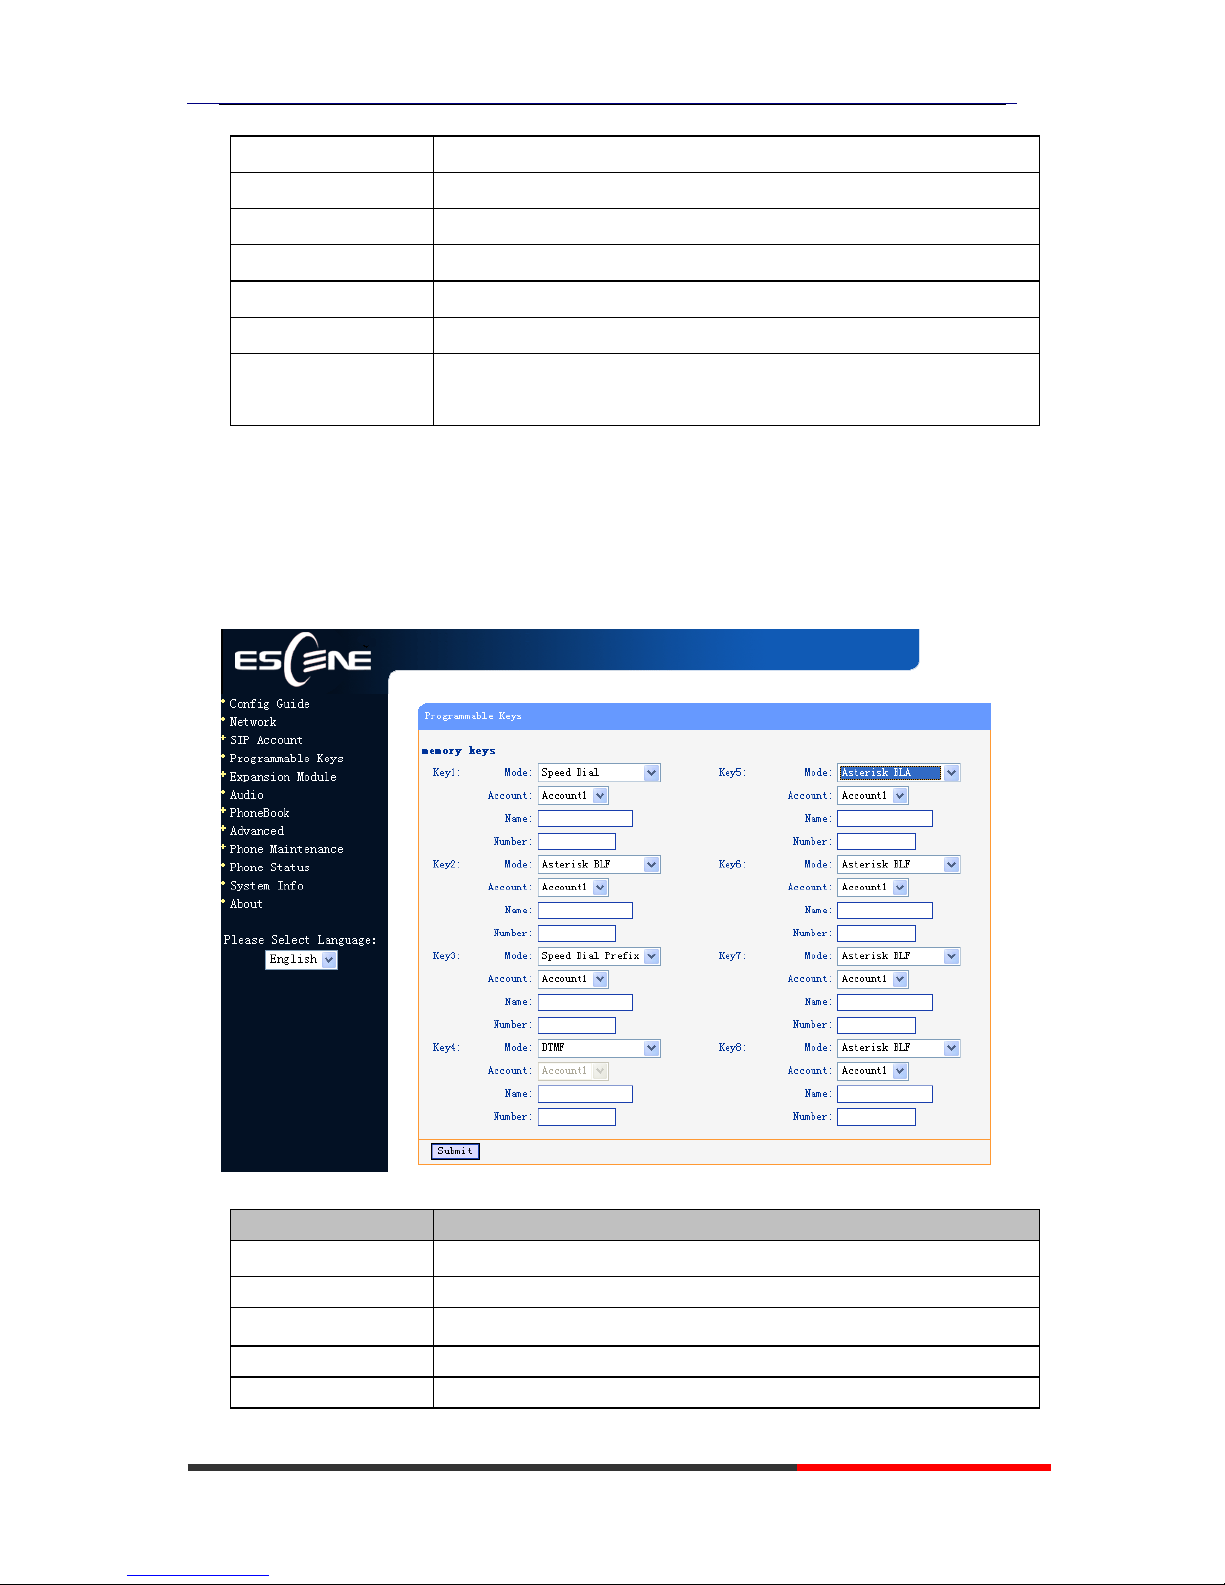
Programmable Keys
Choose Programmable Keys,you will find the following parameters:
Field
Description
Speed Dial(Mode)
Use specific Key as Speed Dial key
Asterisk BLF(Mode)
Use specific Key as BLF key
Speed Dial
Use specific Key as Speed Dial Prefix key
DTMF
Use specific Key as DTMF key
Asterisk BLA
Use specific Key as BLA key
Page 40
ES320 IP-Phone
www.escene.ru
Escene Communication
40
40
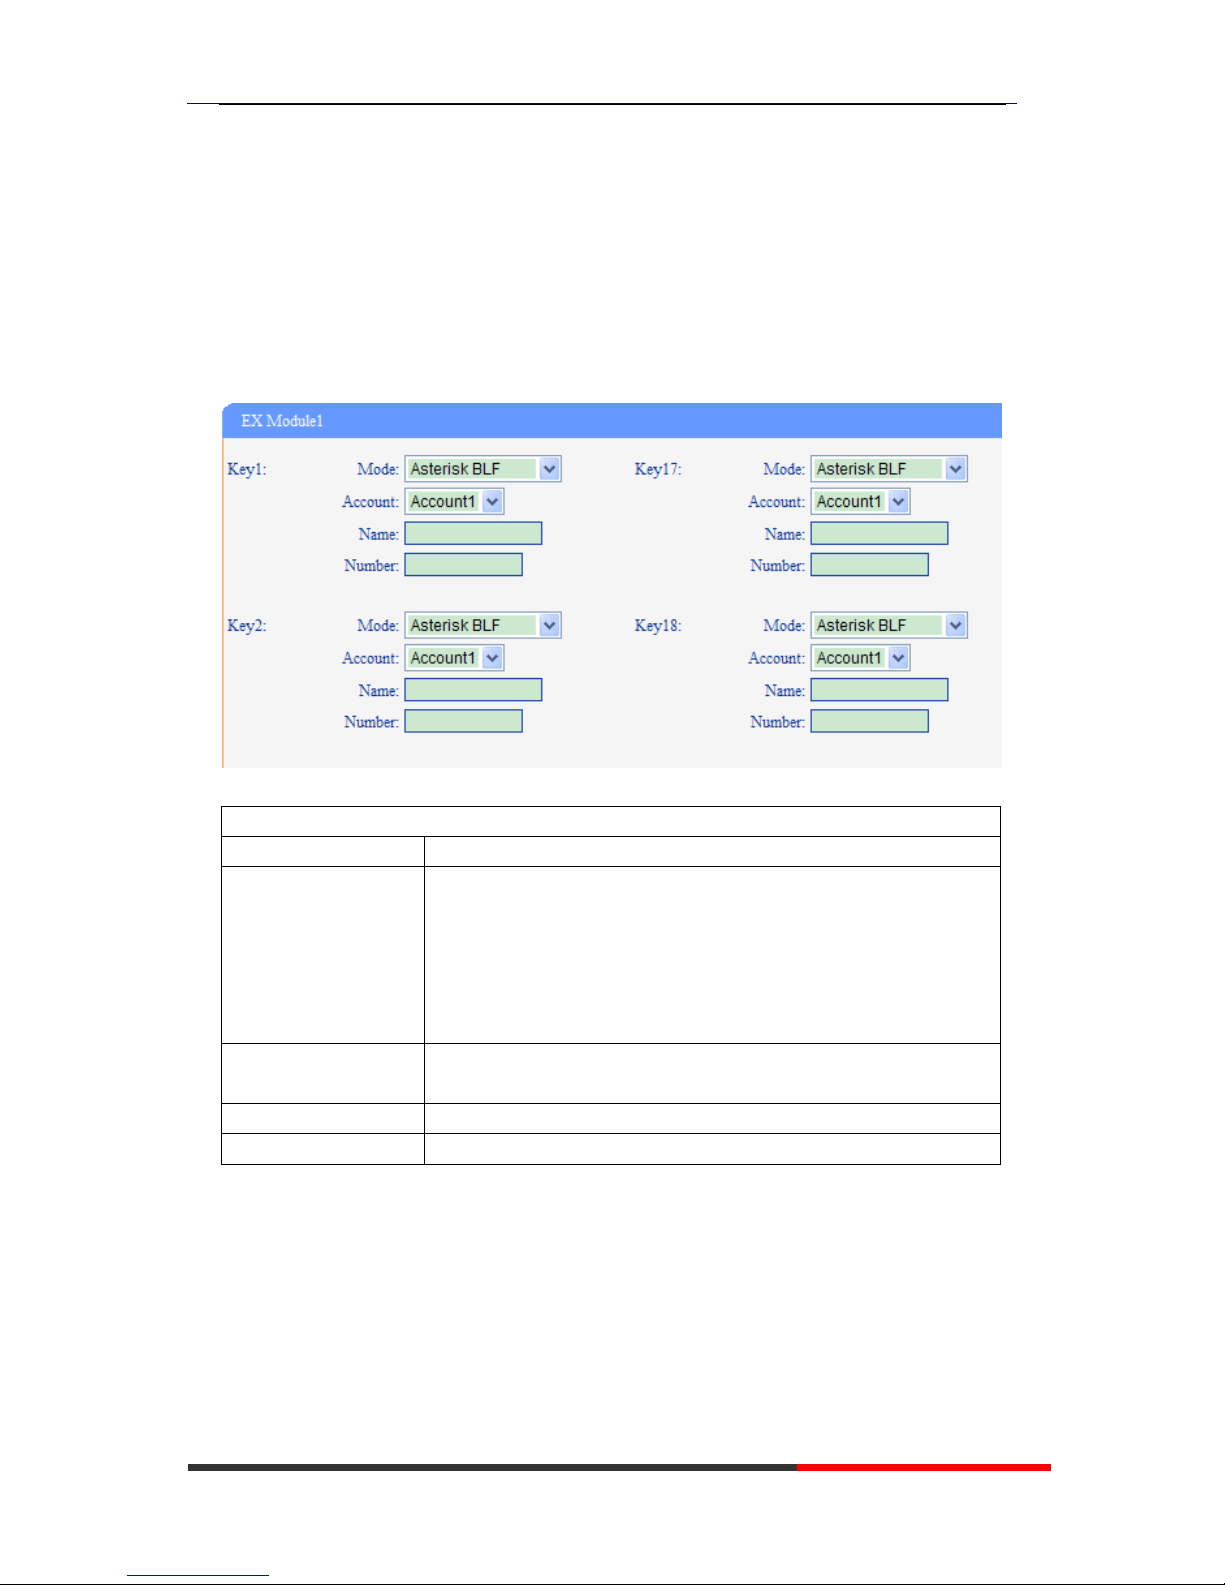
Expansion Module
Expansion module is extended Hotline function; you can believe it support more
hotline by using Expansion module. You can refer to
2.Connecting Your Phone
about
connecting of Expansion module.
After connecting Expansion module to a phone, you can install it as follow:
1) After installing, you can set parameters of each Extension as follow(only ES330
support)
Expansion module
Key n
Each Expansion module supports 32 keys.
Mode
Five modes:
--Speed Dial: Enable speed dialing in this key;
--Asterisk BLF: Enable BLF in this key;
--Speed Dial Prefix
--DTMF
--Asterisk BLA
Account
A SIP account relates to this key, another word, you will call this
hotline by this SIP account.
Name
Description of this hotline.
Number
Number relates to this key.
*Regarding the settings of Expansion module, please confirm the model of your phone is
DS3xx_E/DS3xx_PE.
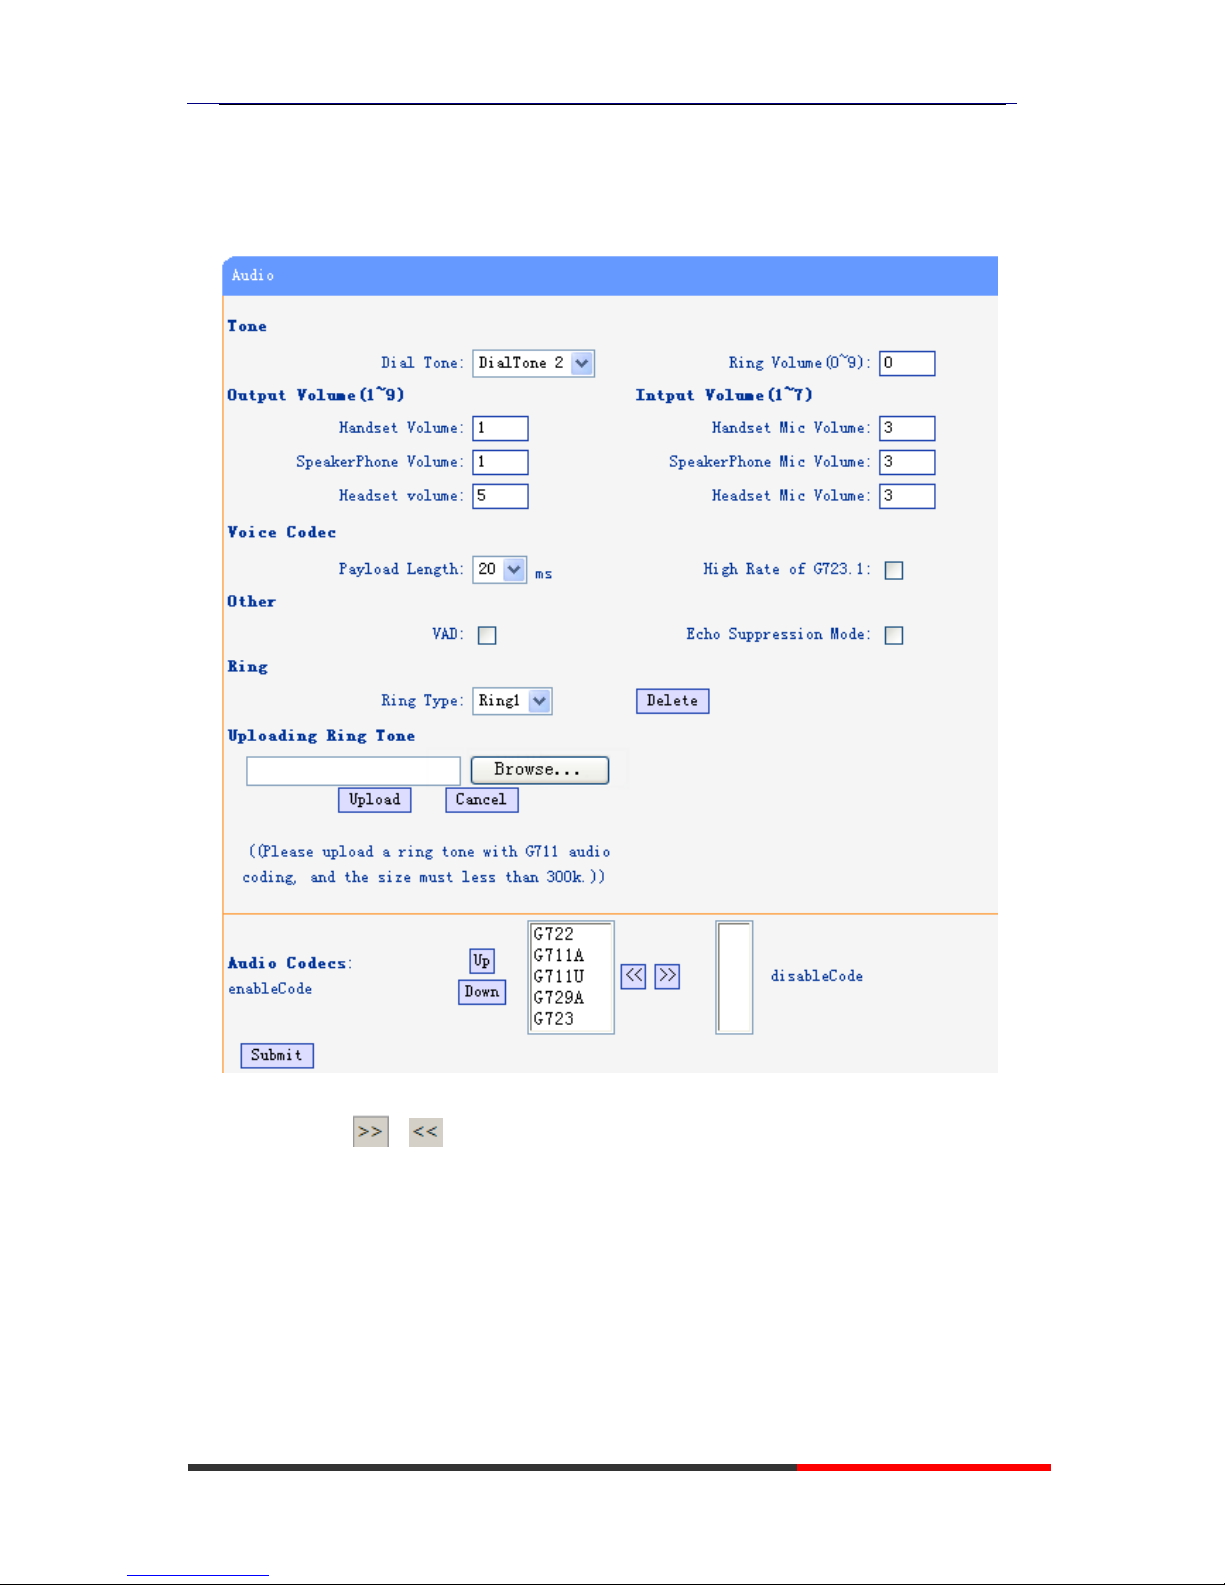
Audio
The IP phone supports the following voice codecs: G.722, G.711A, G.711U, G.723, and
G.729A.
Page 41
ES320 IP-Phone
www.escene.ru
Escene Communication
41
41
You can enable/disable the desired codecs via Web interface. Please contact your system
administrator for more details about the codecs.
To enable/disable the codecs:
1) Choose Audio-> Audio Codecs
2) Use the navigation keys to highlight the desired one in the Enabled/Disable Codecs list,
and press the / to move to the other list.
3) Choose Submit to save the change.
Of course, you can control the voice bulk in this choose.
Page 42
ES320 IP-Phone
www.escene.ru
Escene Communication
42
42
PhoneBook
Group
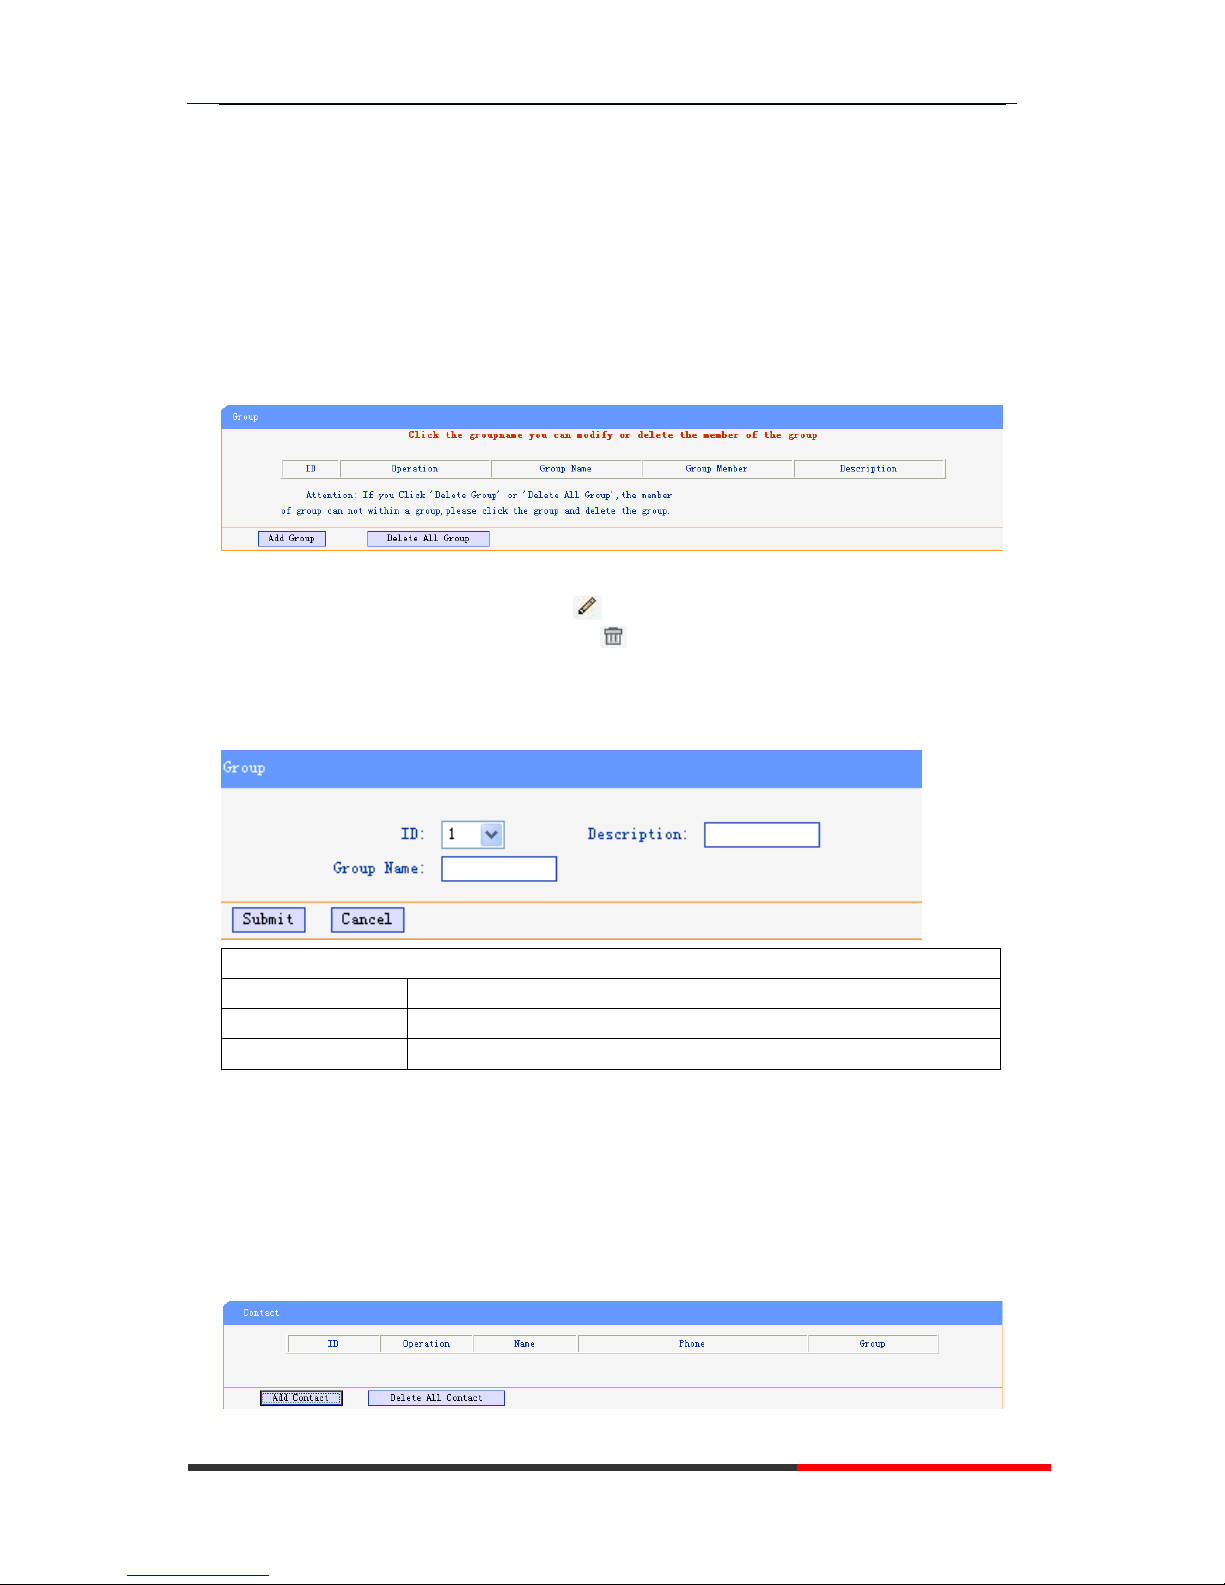
You can add, edit and delete group in a phone book on web page of ES320.
1) Click “PhoneBook” > “Group”,
If you want to add a Group, you just ought to click ‘Add Group’ .
You can edit an existed Group by click .
You can delete an existed Group by click , if you want to delete all Groups, you just
ought to click ’Delete All Group’.
2) When you add a group or edit an existed group, you can set several parameters as
follow:
Group
ID
Serial number of a group
Description
Description of a group
Group Name
Name of a group
Contact
You can add, edit and delete contact in a phone book on web page of ES320.
The phonebook can storage 300 contact entry.
1) Click “PhoneBook” > “Contact”,
If you want to add a Group, you just ought to click ‘Add Contact’.
Page 43

ES320 IP-Phone
www.escene.ru
Escene Communication
43
43
You can edit an existed Contact by click .
You can delete an existed Contact by click , if you want to delete all Contacts, you just
ought to click ’Delete All Contact’.
2) When you add a Contact or edit an existed Contact, you can set several parameters as
follow:
Contact
Serial Number
Serial number of a contact
First Name
The First Name of a contact
Last Name
The Last Name of a contact
Mobile Number
The Number1 phone number of a contact
Office Number
The Number2 phone number of a contact
OtherNumber
The Number3 phone number of a contact
Group
You can assign a contact to a specific group. If there isn’t any
group set on the phone, the group is None by default.
Account
Select a SIP account relating this contact, that is you can dial to
the contact from this SIP account.
LDAP
1).
Over
view
LDAP stands for Lightweight Directory Access Protocol which is a client-server
protocol for accessing a directory service. LDAP lets you locate organizations,
individuals, and other resources such as files and devices in a network, whether on
the Internet or on a corporate intranet, and whether or not you know the domain
name, IP address, or geographic whereabouts.
An LDAP directory can be distributed among many servers on a network, then
replicated and synchronized regularly.
2).
Con
figuration
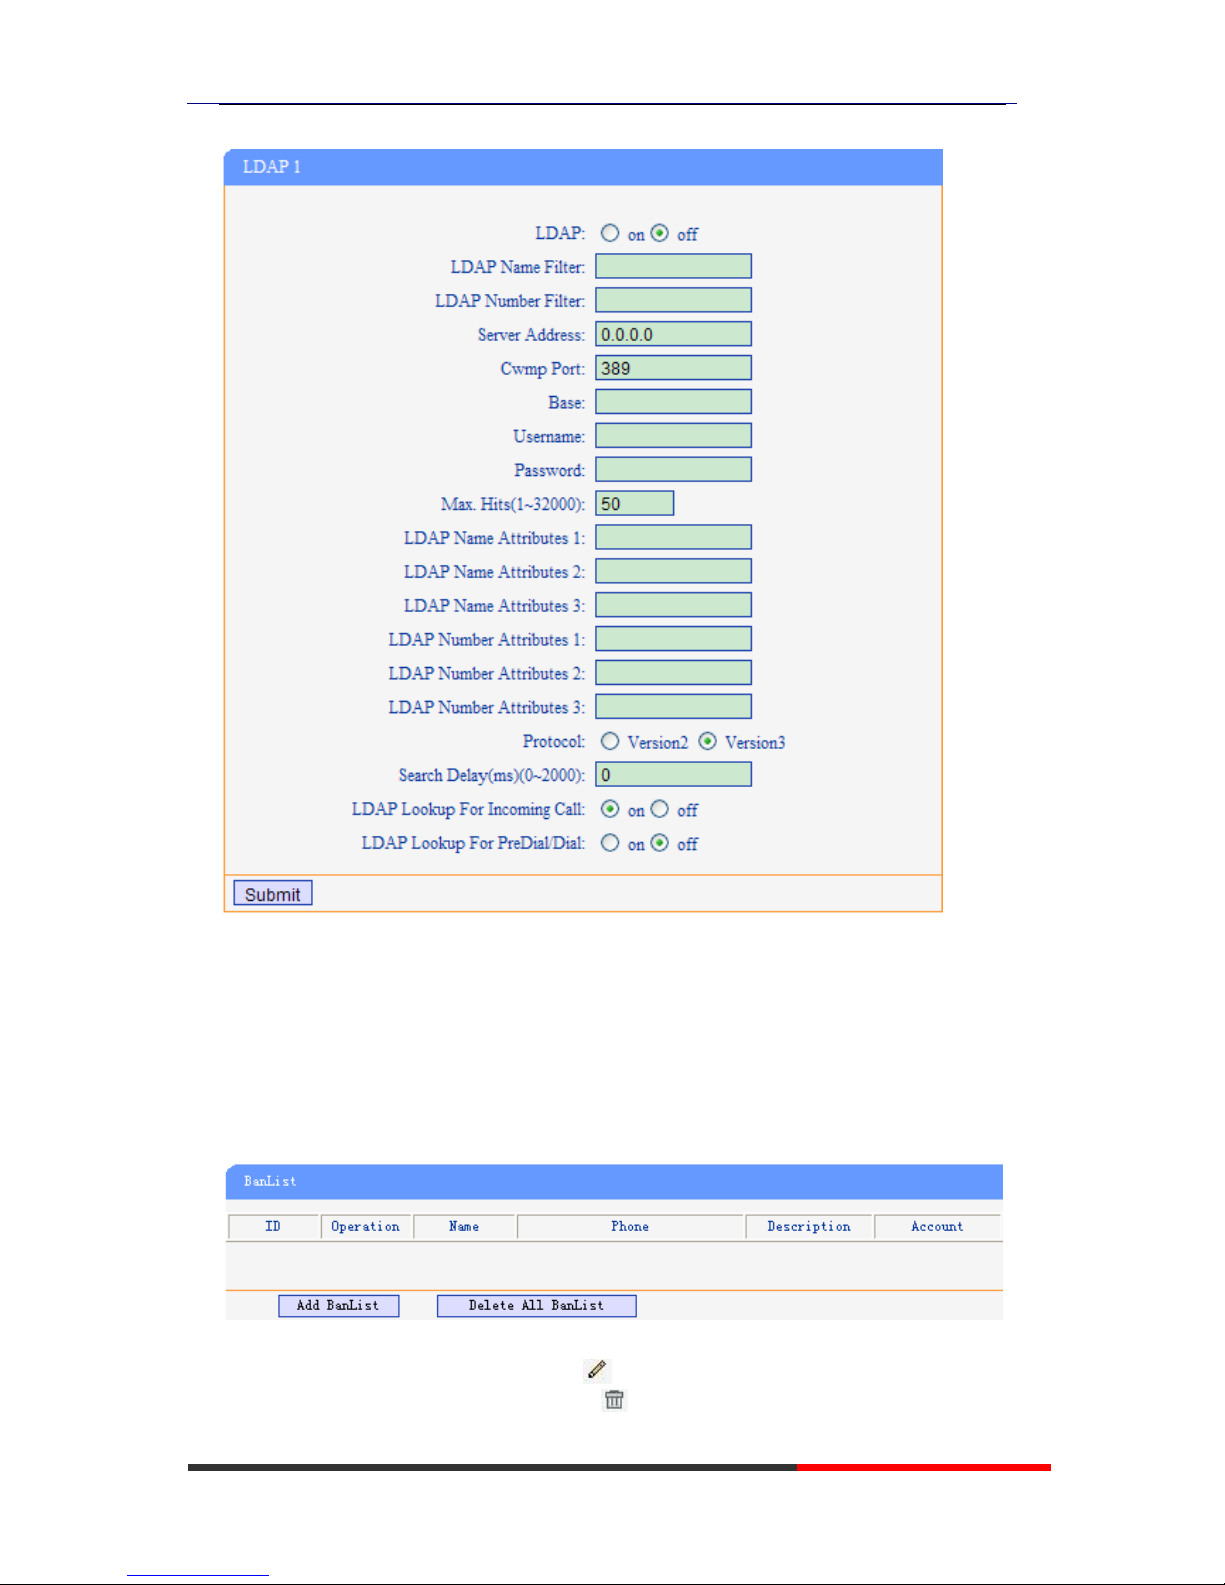
Please note that LDAP Phonebook support on ES620\ES410\ES330\ES320\ES310\ES210,
the version must be V2.2.3.1-2210 and higher, then access to the web
“PhoneBook>LDAP page, you can find the configured option is like following picture. the
detail configure in the appendix.
Page 44
ES320 IP-Phone
www.escene.ru
Escene Communication
44
44
BanList
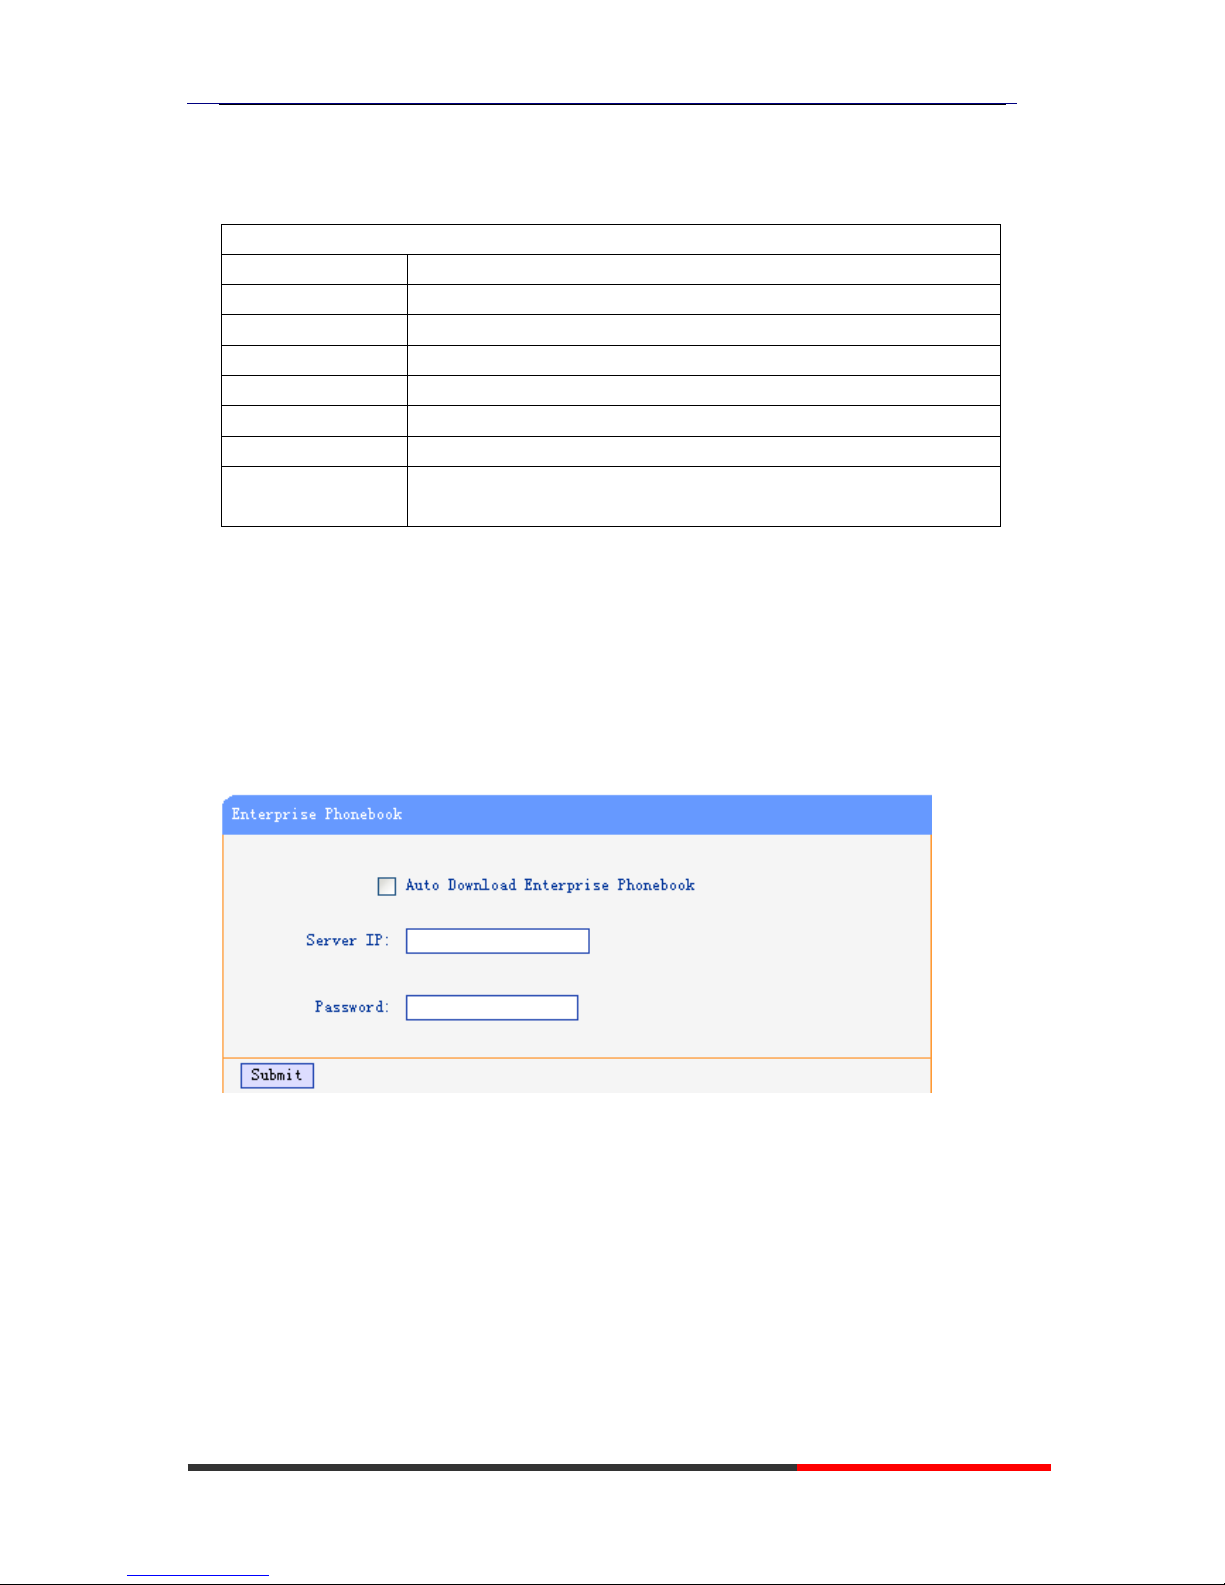
You can add, edit and delete banlist in a phone book on web page of ES320.
1) Click “PhoneBook” > “BanList”,
If you want to add a BanList, you just ought to click ‘Add BanList’.
You can edit an existed BanList by click .
You can delete an existed BanList by click , if you want to delete all BanLists, you just
Page 45
ES320 IP-Phone
www.escene.ru
Escene Communication
45
45
ought to click ’Delete All BanList’.
2) When you add a BanList or edit an existed BanList, you can set several parameters as
follow:
BanList
Serial Number
Serial number of a BanList
Description
Description of a BanList
First Name
The First Name of a ban contact
Last Name
The Last Name of a ban contact
Mobile Number
The number1 phone number of a ban contact
Home Number
The number2 phone number of a ban contact
Office Number
The number3 phone number of a ban contact
Account
Select a SIP account relating this ban contact, that is the ban
contact can’t dial to this SIP account.
Enterprise Phonebook
You can download Enterprise Phonebook from this web interface. But you should do
second develop on the sip server to enable this function completely.
If the sip server no add some function to hold this option ,this option can be userd.
Advance
Phone Setting
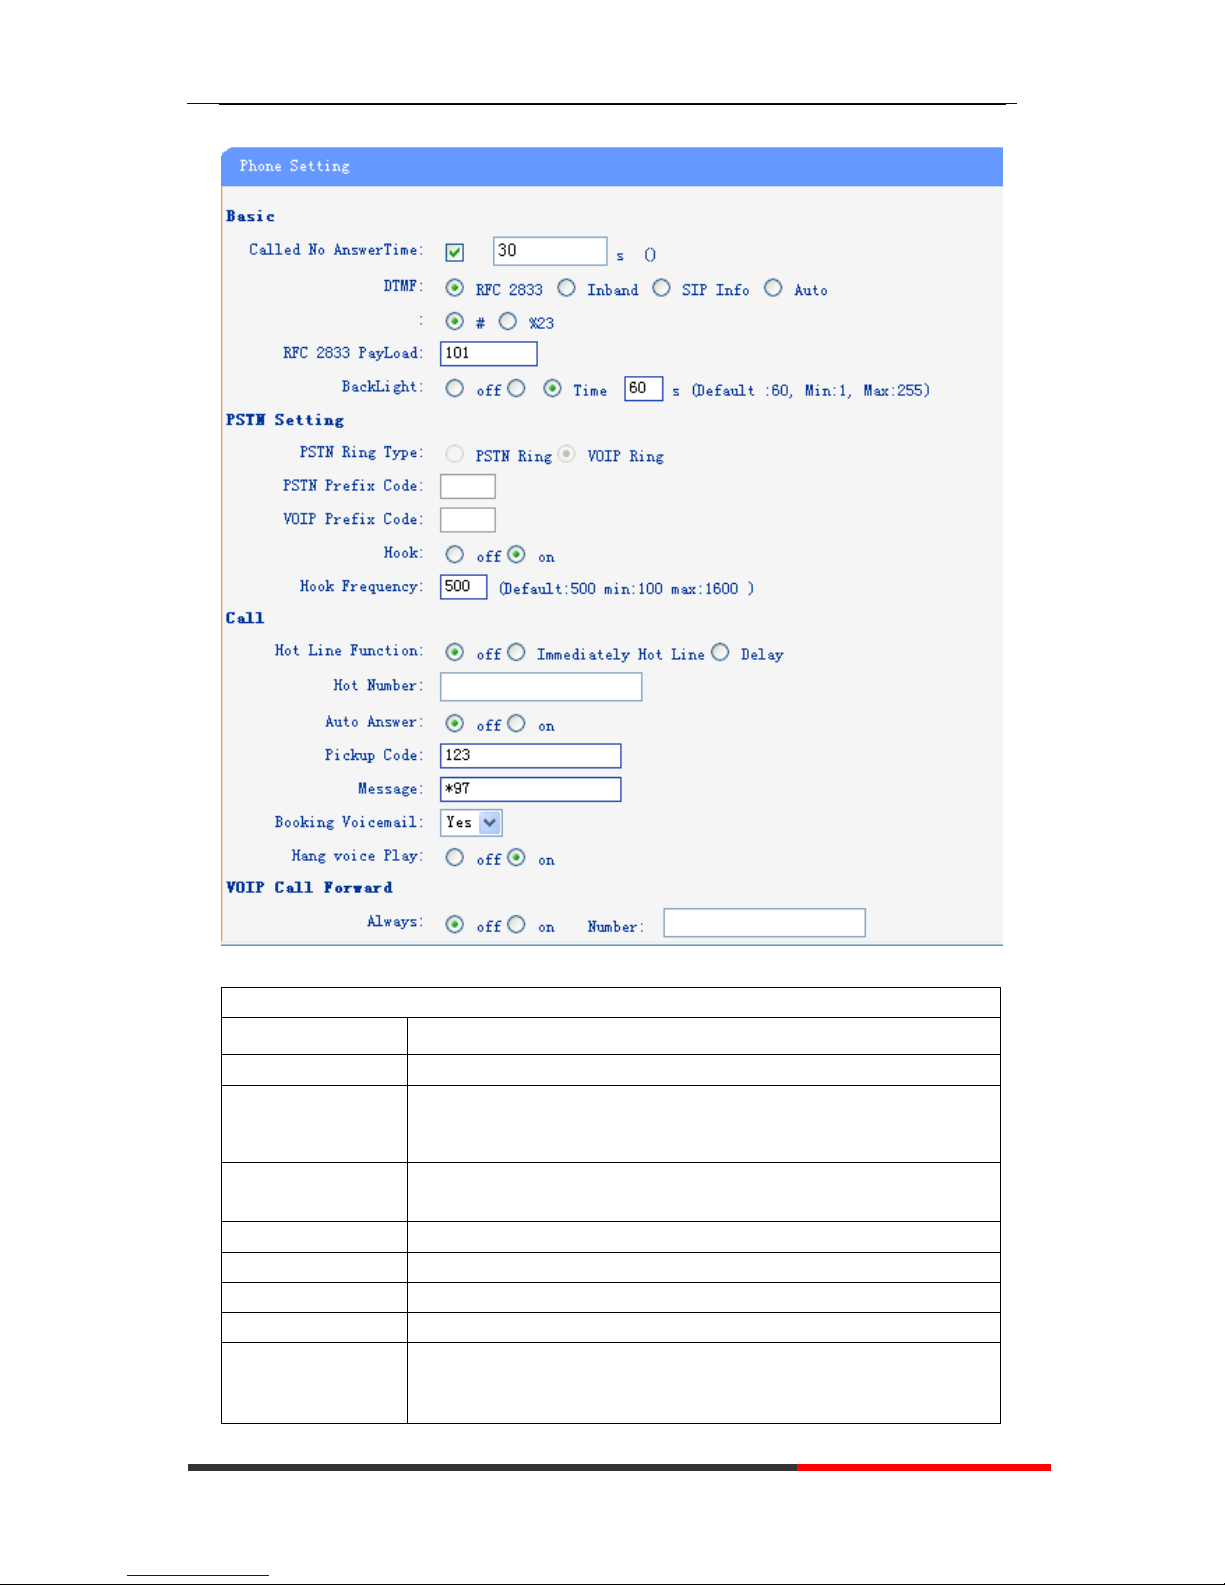
You can use phone setting to set the time,qos,port Mirroring for the phone.
Page 46
ES320 IP-Phone
www.escene.ru
Escene Communication
46
46
When used Phone Setting option,you can set several parameters as follow:
Phone Setting
DTMF
The DTMF transmitted mode,include RFC 2833,Inband,SIP Info
BackLight
The backlight of the phone LCD
Set Time Mode
The mode of set time for phone,include SNTP/SIP
Server/PSTN/Manual
Daylight Saving
Time
Enable/disable the DST for the phone
Time Format
You can use 24 hour time format or 12 hour time format
Time Zone-GMT
You can select different time zone for the phone
Manual Setting
This used to manual set time for the phone
QoS
The qos priority,support diff-serv and precedence
Network Packet
Mirroring
When select on,then you can capture the phone’s packet use
notebook which connect to pc port of the phone
Page 47
ES320 IP-Phone
www.escene.ru
Escene Communication
47
47
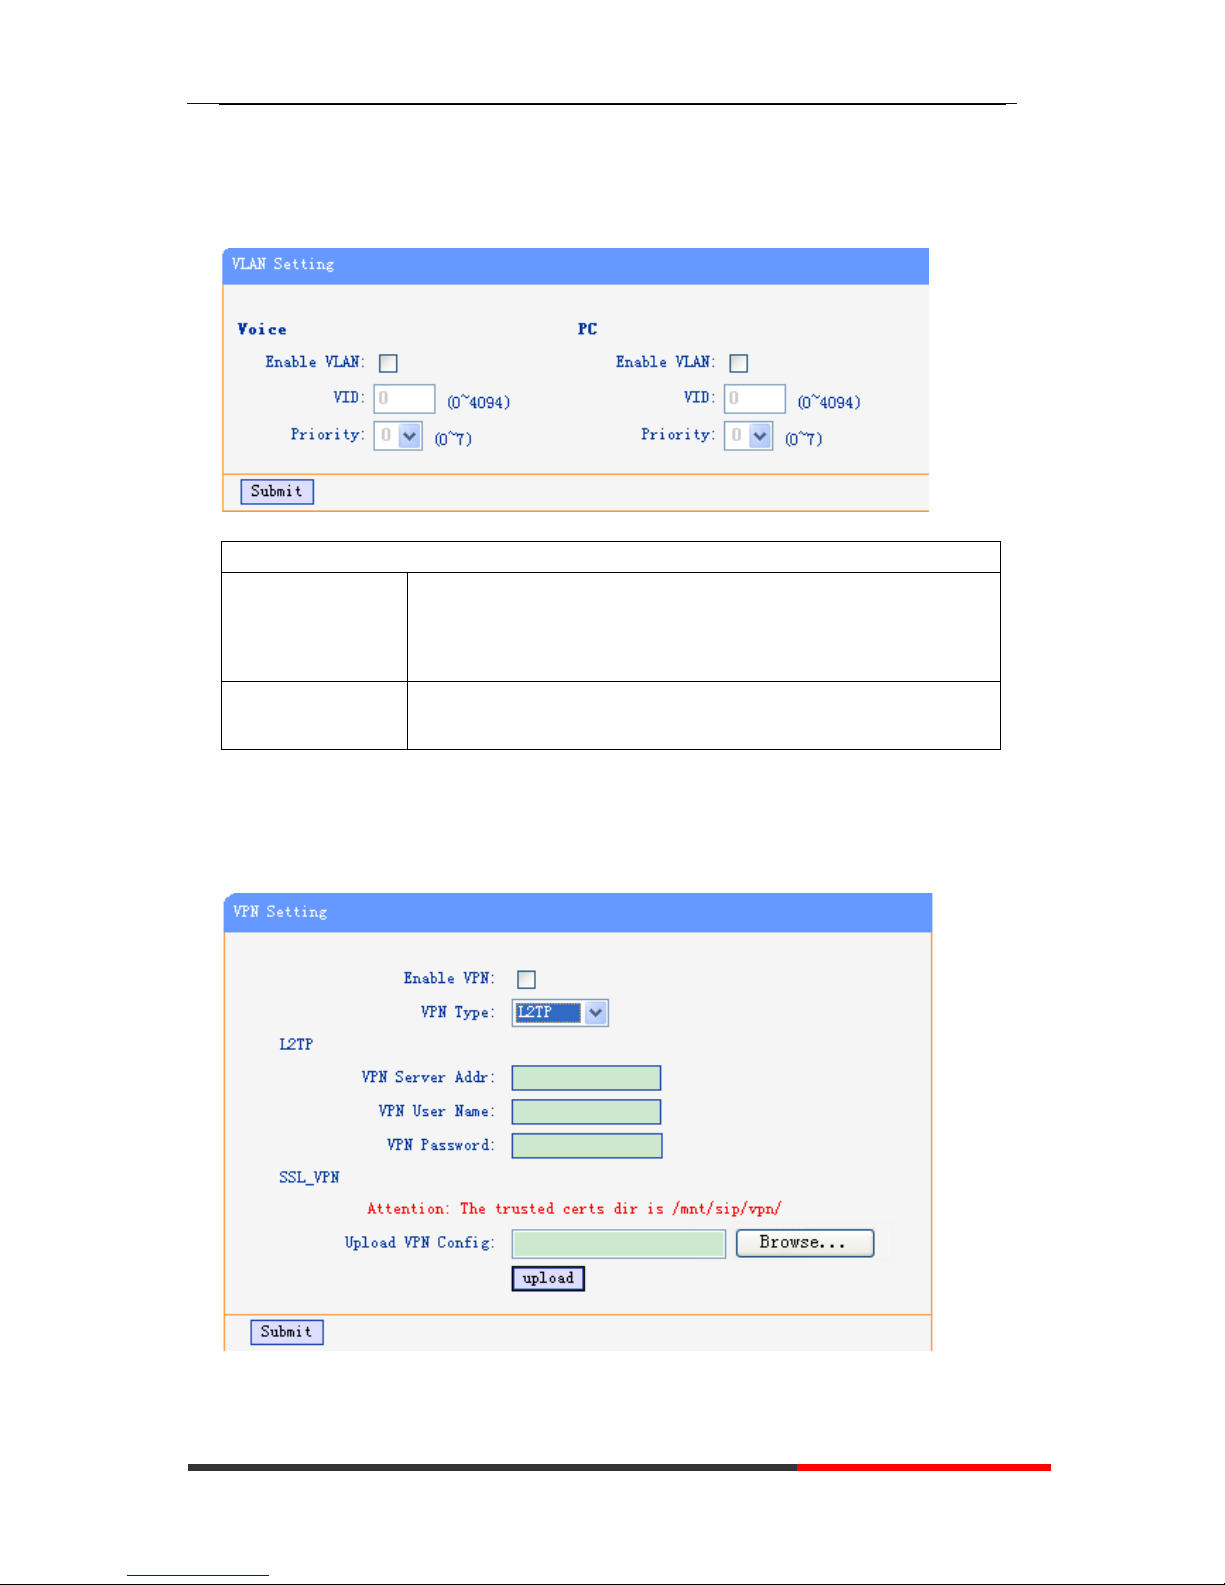
VLAN Setting
You can add the phone and PC to different VLAN used VLAN Setting option.
When used VLAN Setting option,you can set several parameters as follow:
VLAN Setting
Enable VLAN
You can enable/disable vlan for phone and pc
VID
The vlan you want the phone or pc to join
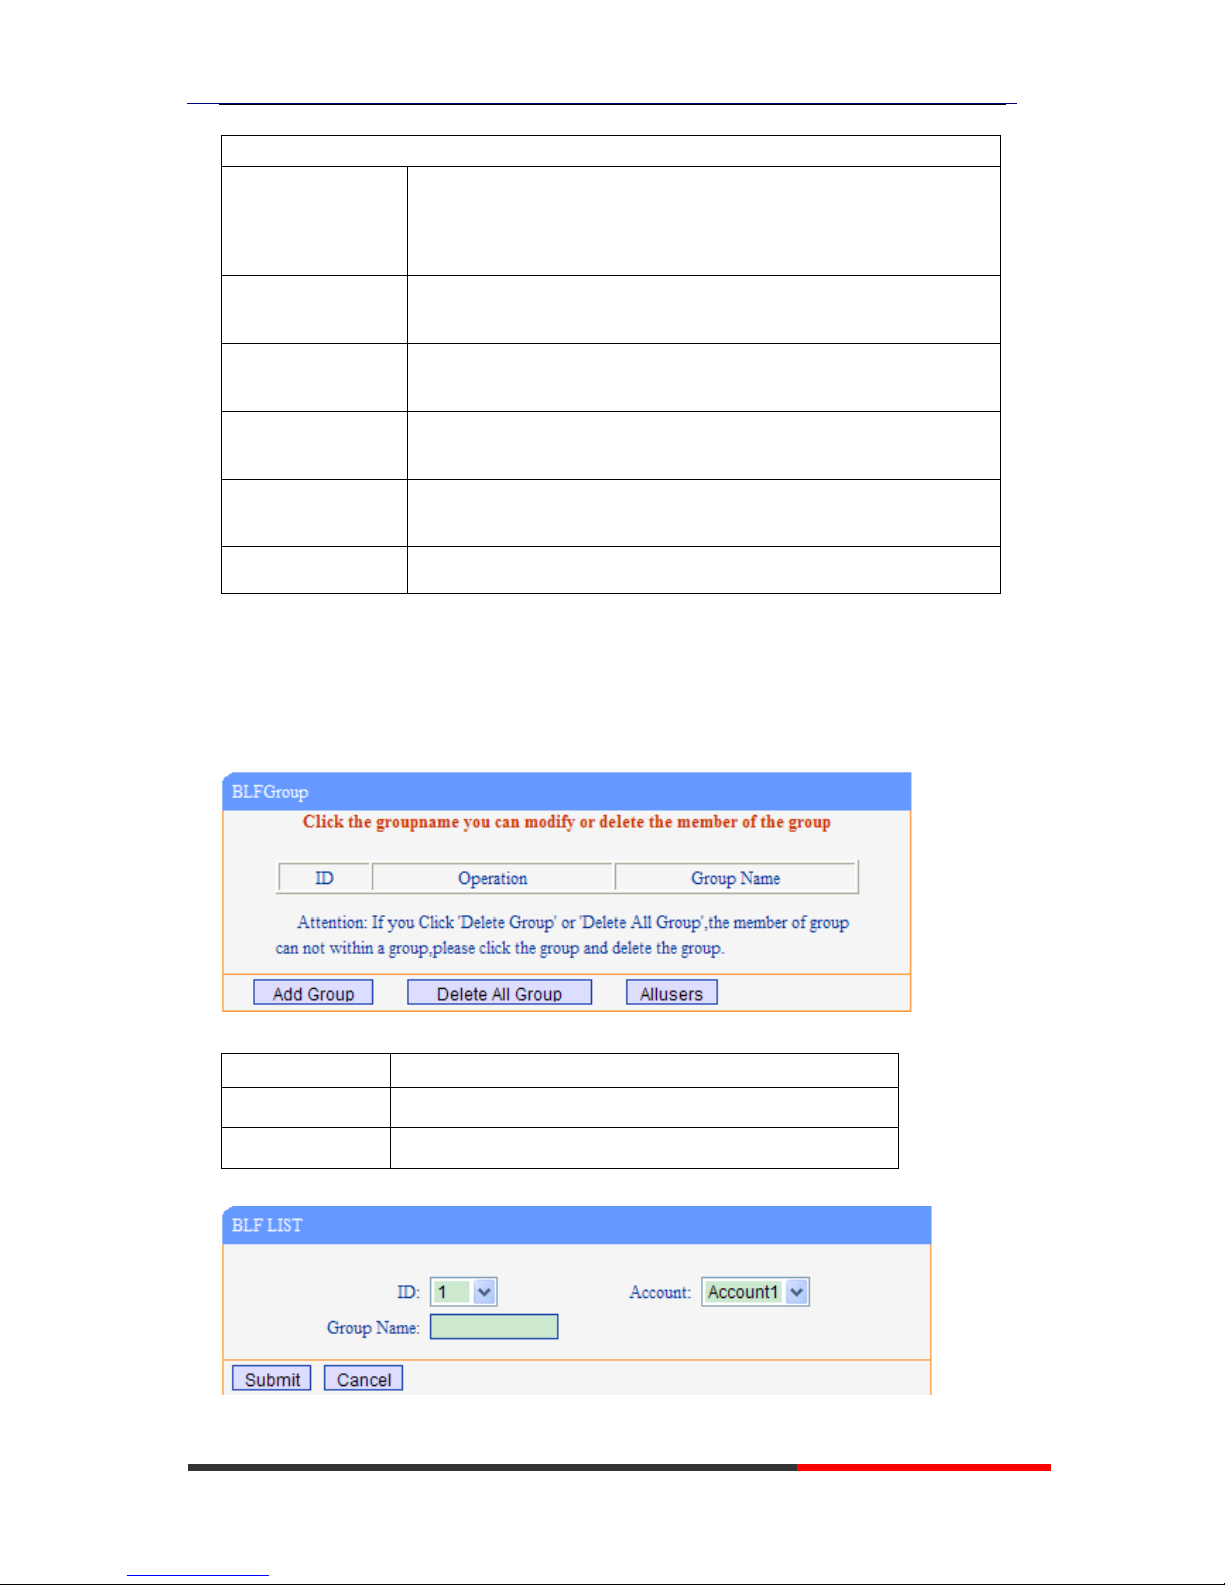
VPN Setting
IF you need to setup a VPN Setting, you should fill below options.
When used VPN Setting option, you can set several parameters as follow:
Page 48
ES320 IP-Phone
www.escene.ru
Escene Communication
48
48
VLAN Setting
Enable VPN
You can enable/disable VPN for phone and pc
VPN Type:
There is two choose you can choice.
VPN Server Addr
VPN server'ip
VPN User Name
VPN iser's name
VPN User Name
A password be userd foe authentication
SSL_VPN
You can upload VPN config
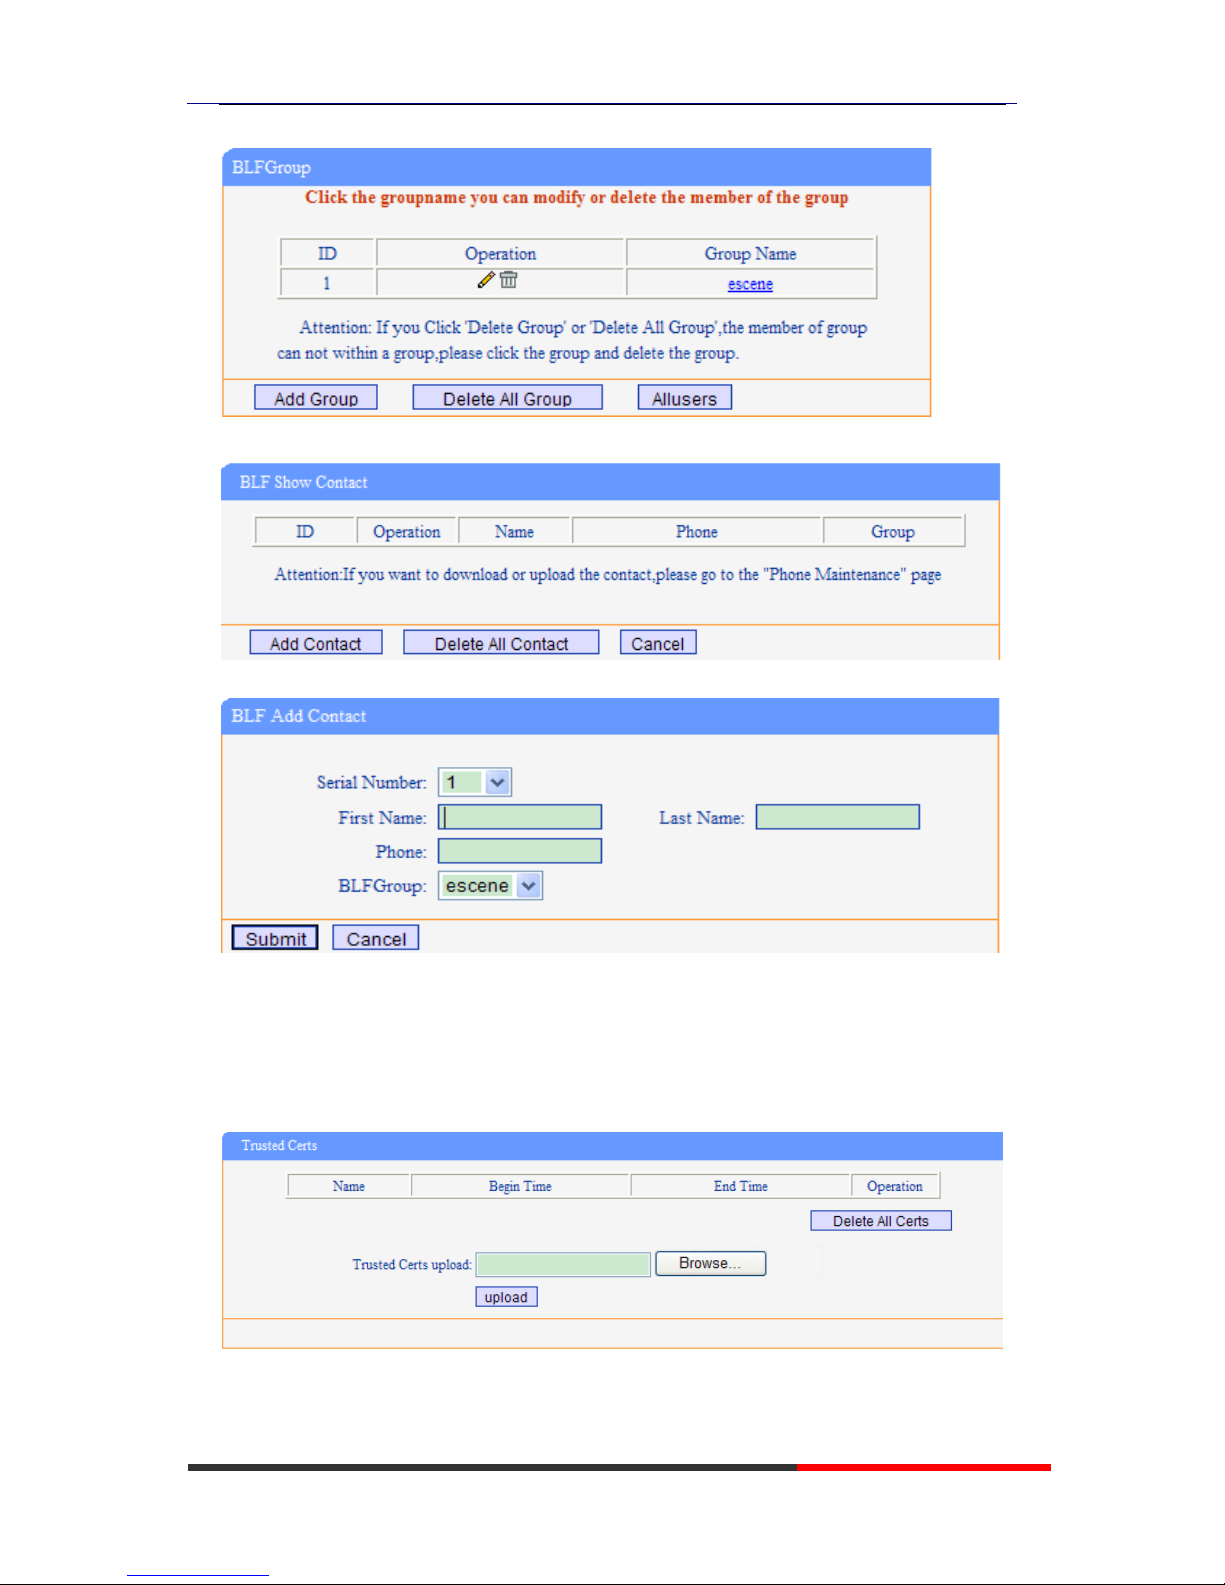
BLF setting
Add Group
You can add group
Delete All Group
You can delete all group
All users
You can add users
You can add group
After you add group, you can edit or delete group, you also can add user ,press”All users”
Page 49
ES320 IP-Phone
www.escene.ru
Escene Communication
49
49
You can add contact.
You can set user information
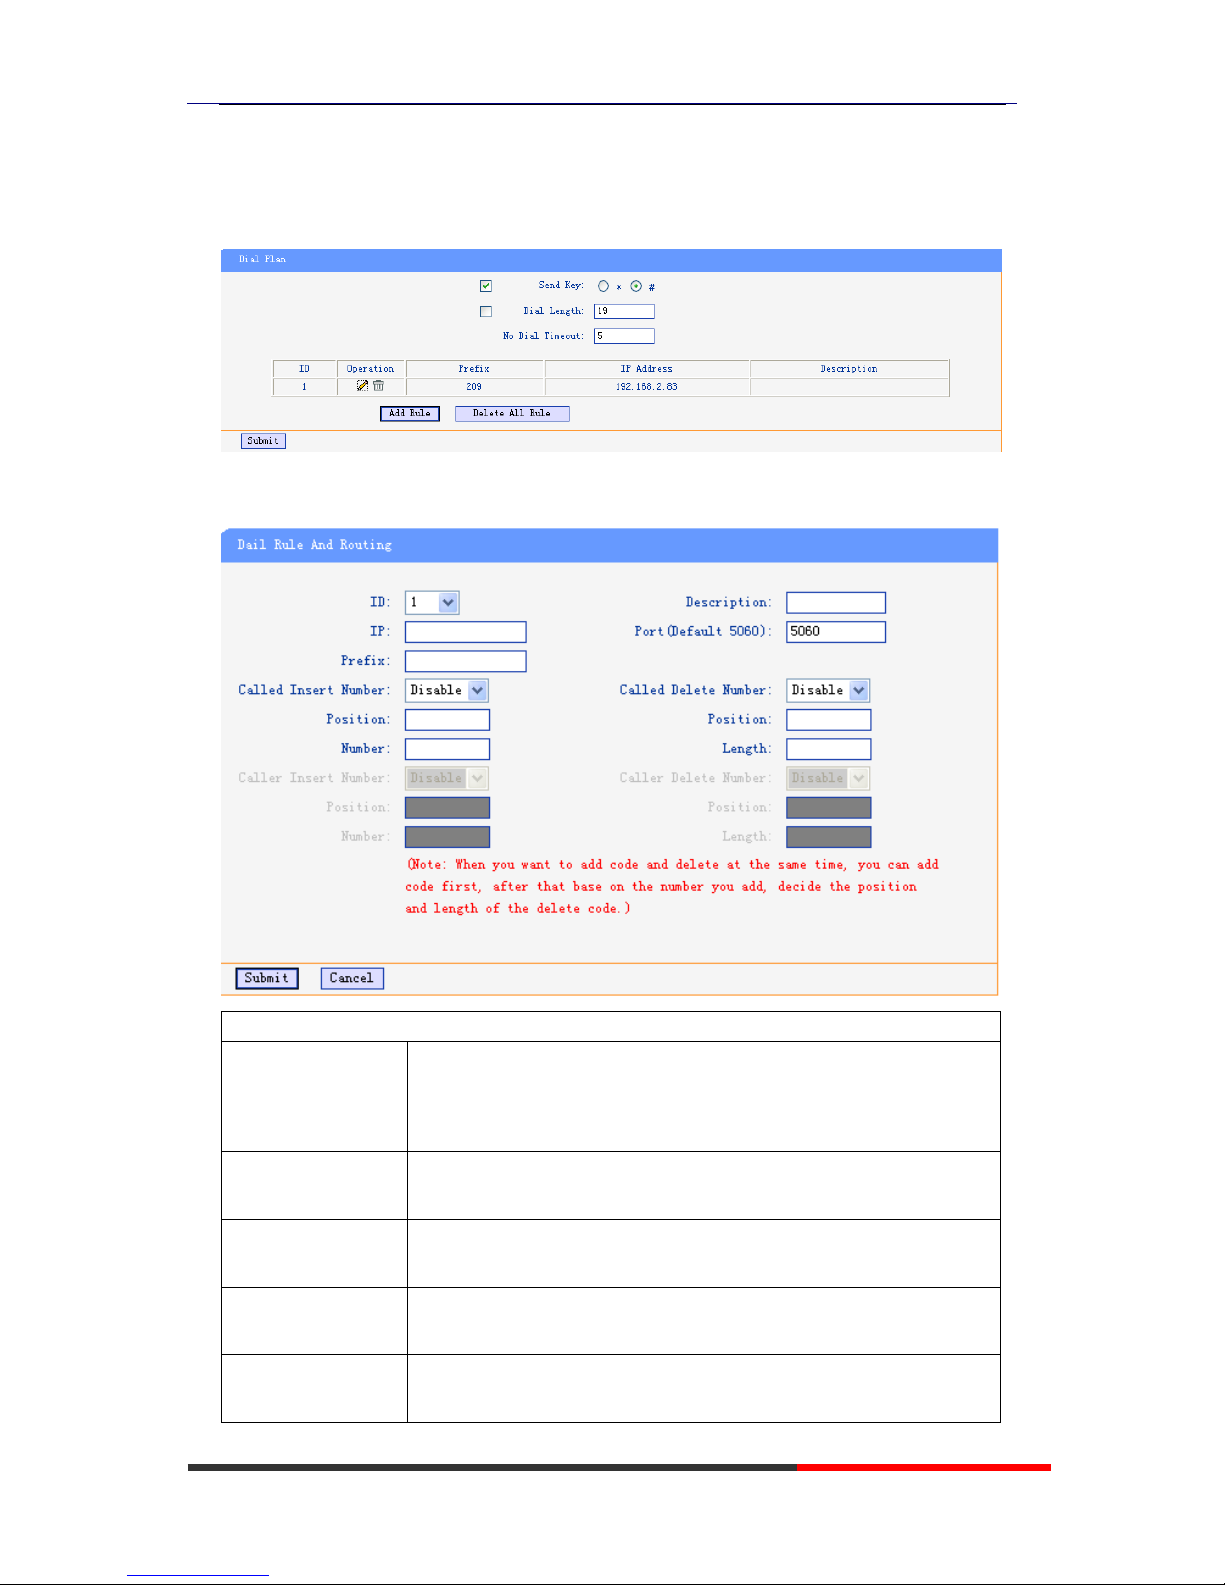
Trusted Certs
You can upload trusted certs.
Page 50
ES320 IP-Phone
www.escene.ru
Escene Communication
50
50
Dial Plan
If you want to setup a dial plan, you can click "Dial Plan".
Click "add rule" to entry this interface.
Dial Plan Setting
ID
Dial Plan ID
IP
The ip of a phone which you want to call
prefix
The number which you need to press actually if you want to call
the phone
Called Insert
Number
There have two option, Enable or Disable.
Position
Which position you want insert the number
Page 51
ES320 IP-Phone
www.escene.ru
Escene Communication
51
51
Number
Waht number you want to insert
Called Delete
Number
There have two option, Enable or Disable.
Tips
(Note: When you want to add code and delete at the same time, you can add code first,
after that base on the number you add, decide the position and length of the delete code.)
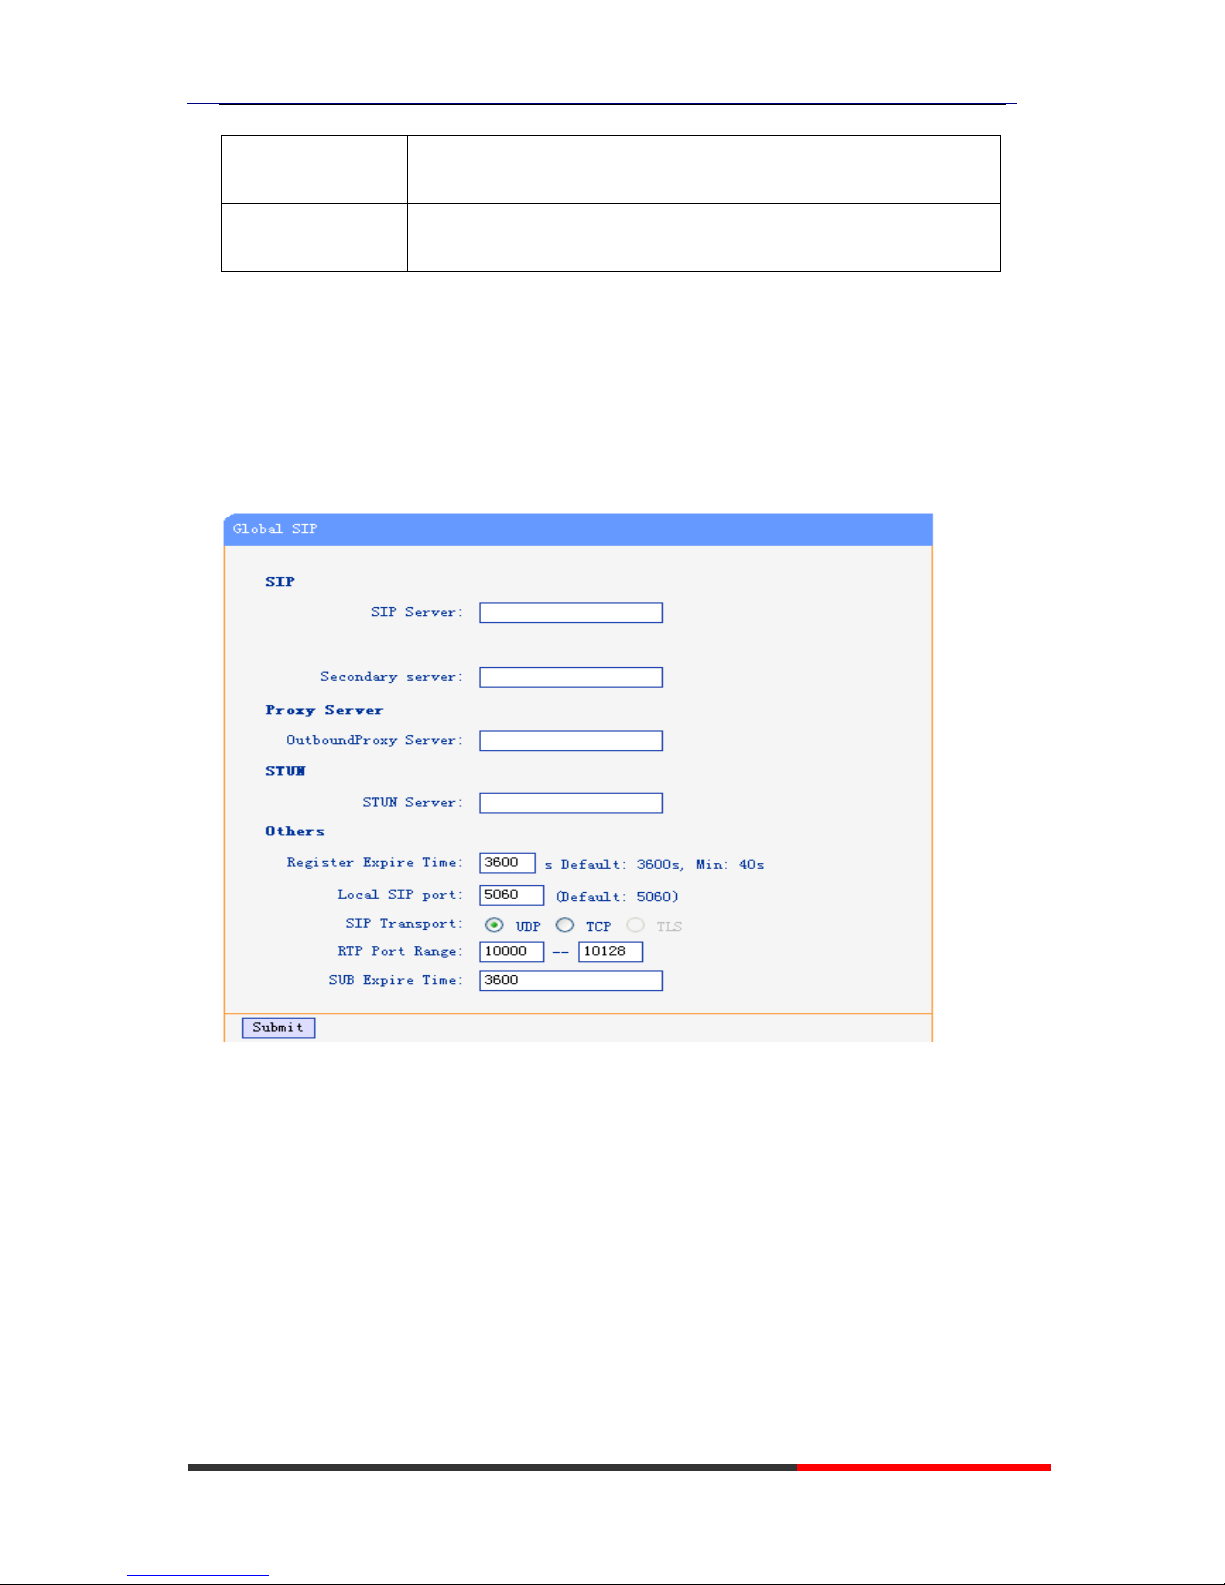
Global SIP
You also can setup the SIP server on Global SIP.
PasswordPhone Maintenance
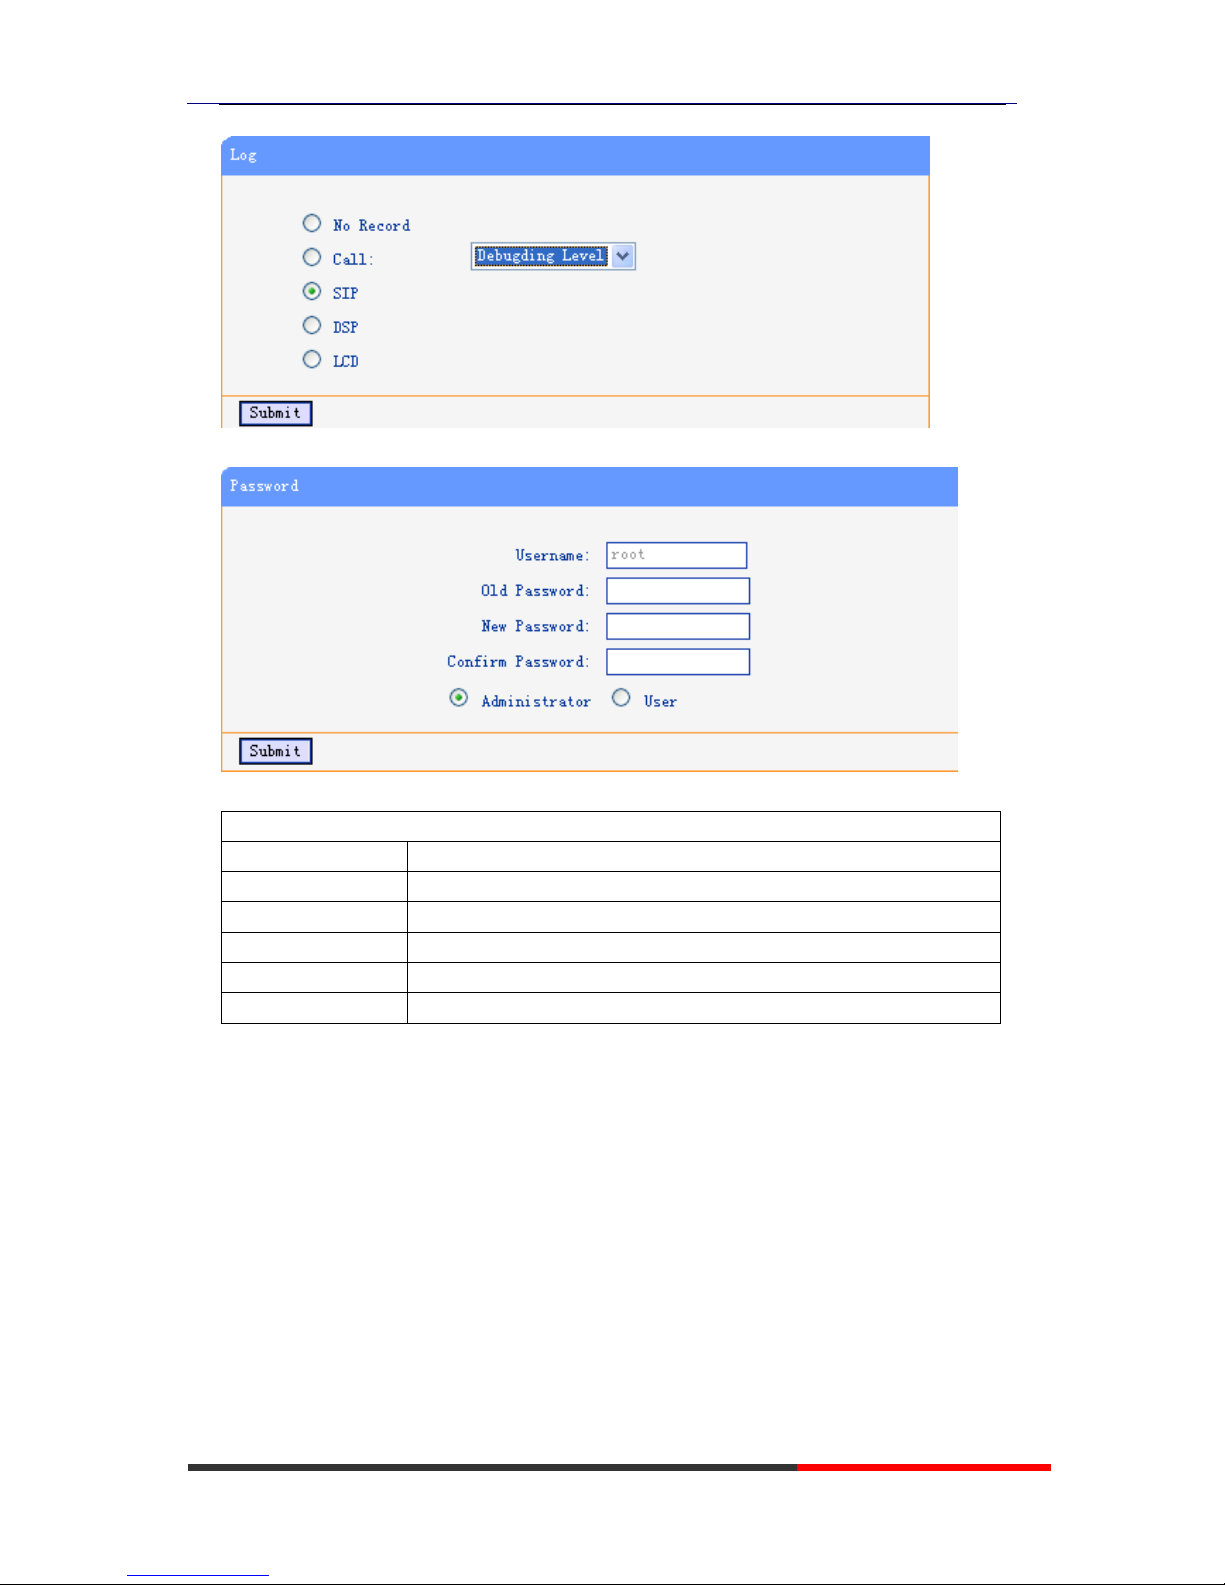
Log
If you need to catch a debuging Level, you need setup on this interface.
Page 52
ES320 IP-Phone
www.escene.ru
Escene Communication
52
52
You can change the password used to login phone GUI in Password option.
In Password option, you can set several parameters as follow:
Password
Username
The login username of the web page
Old Password
The old password used to login of the web page
New Password
The new password used to login of the web page
Confirm Password
The new password used to login of the web page
Administrator
Login phone web page used administrator privileged
User
Login phone web page used general user privileged
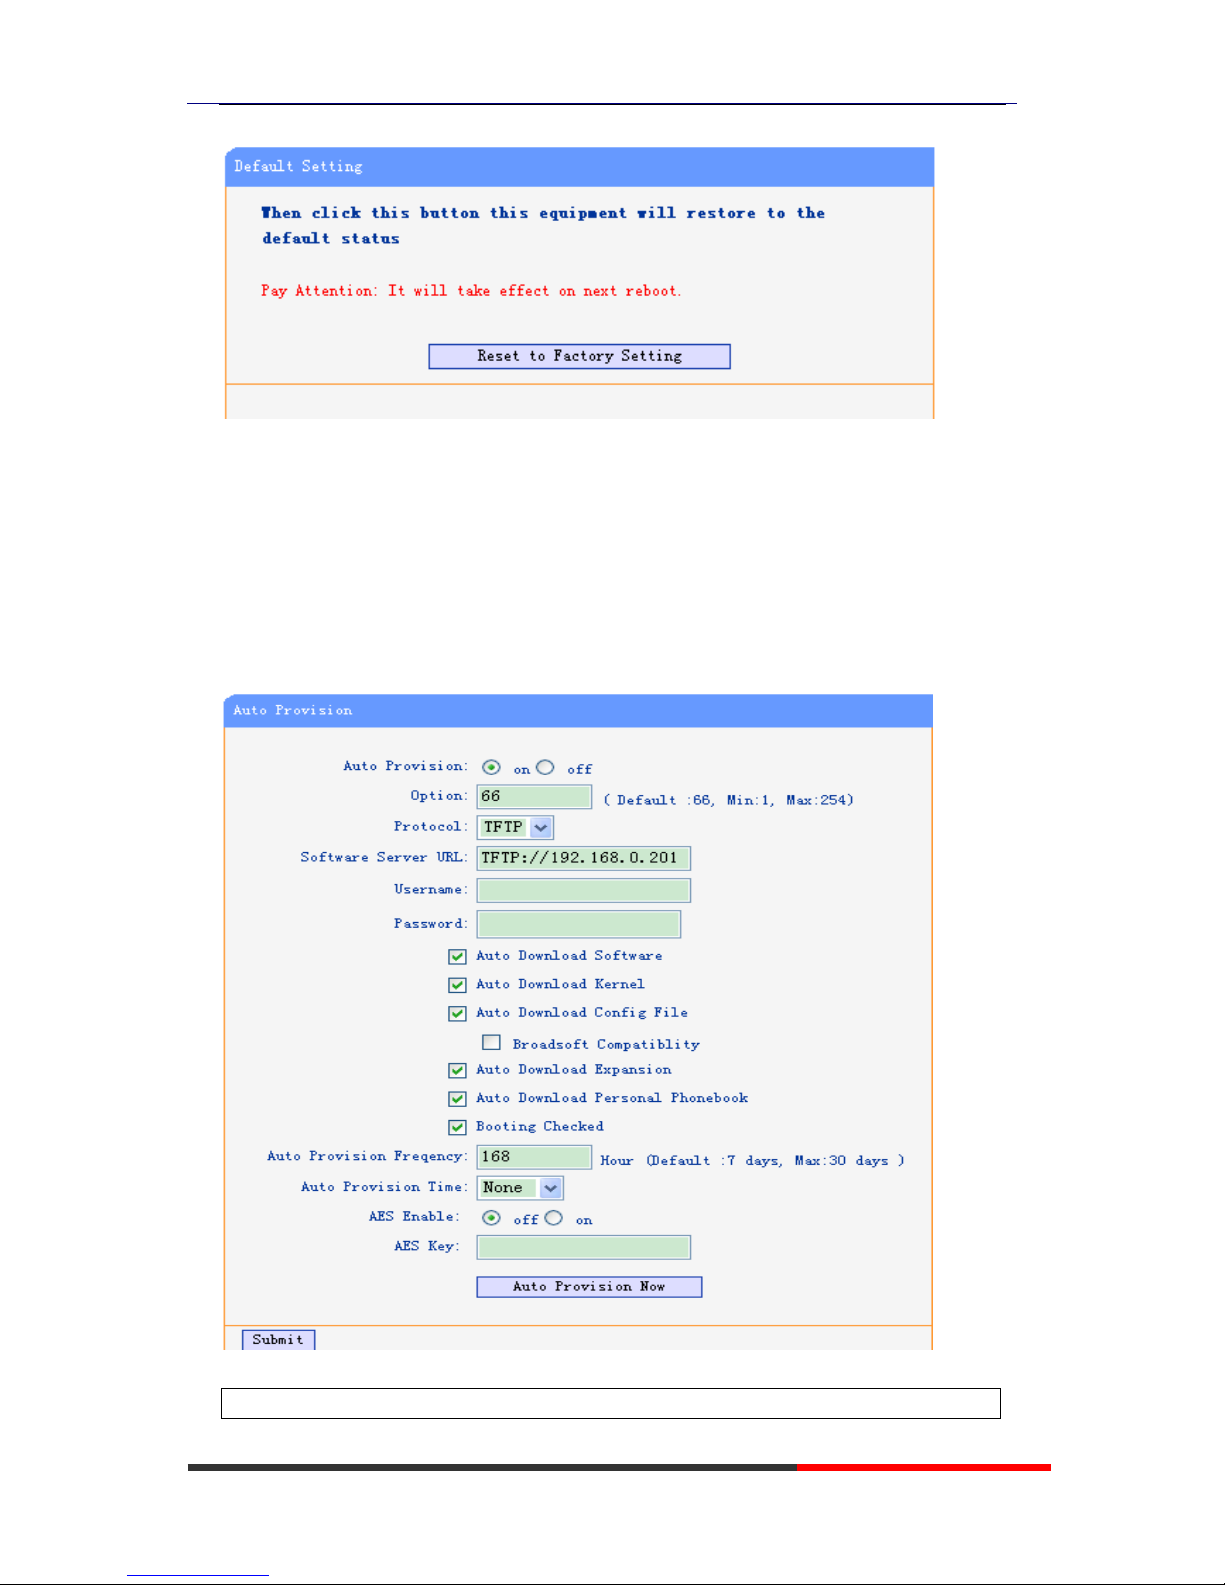
Default Setting
You can load the phone to the factory default setting in default setting option.
Page 53
ES320 IP-Phone
www.escene.ru
Escene Communication
53
53
Press the ‘Reset to Factory Setting’ option,the phone will load to factory default setting on
next reboot.
Auto Provision
when you open the auto provision function,the phone will auto provision if the phone
detect a higher software or kernel which are put on the software server .the detail
information about auto provision you can see the appendix.
When use auto provision, you can set several parameters as follow:
Auto Provision
Page 54

ES320 IP-Phone
www.escene.ru
Escene Communication
54
54
Auto Provision
You can enable/disable auto provision by select on/off
Protocol
The protocol use for auto provision,it include tftp/http/ftp
Software Server
URL
The server address of the auto provision
Username
The username provide by provision server
Password
The password provide by provision server
Auto Download
Software
This used to auto download software from server
Auto Download
Kernel
This used to auto download kernel from server
Auto Download
Config File
This used to auto download config file from server
Broadsoft
Compatiblity
This used to compatible the broadsoft format’s config file
Auto Download
Expension(only
ES330 has it)
This used to auto download expansion’s config from server
Auto Download
Personal
Phonebook
This used to auto download personal phonebook from server
Booting Checked
This used to checked the auto provision when phone booting
Auto Provision
Freqency
This used to set the time interval for auto provision
Auto Provision
Time
This used to the specific time for auto provision
AES Enable
You can enable/disable AES encrypt for auto provision
AES Key
The key of the AES
Auto Provision
Now
This used to do auto provision immediately
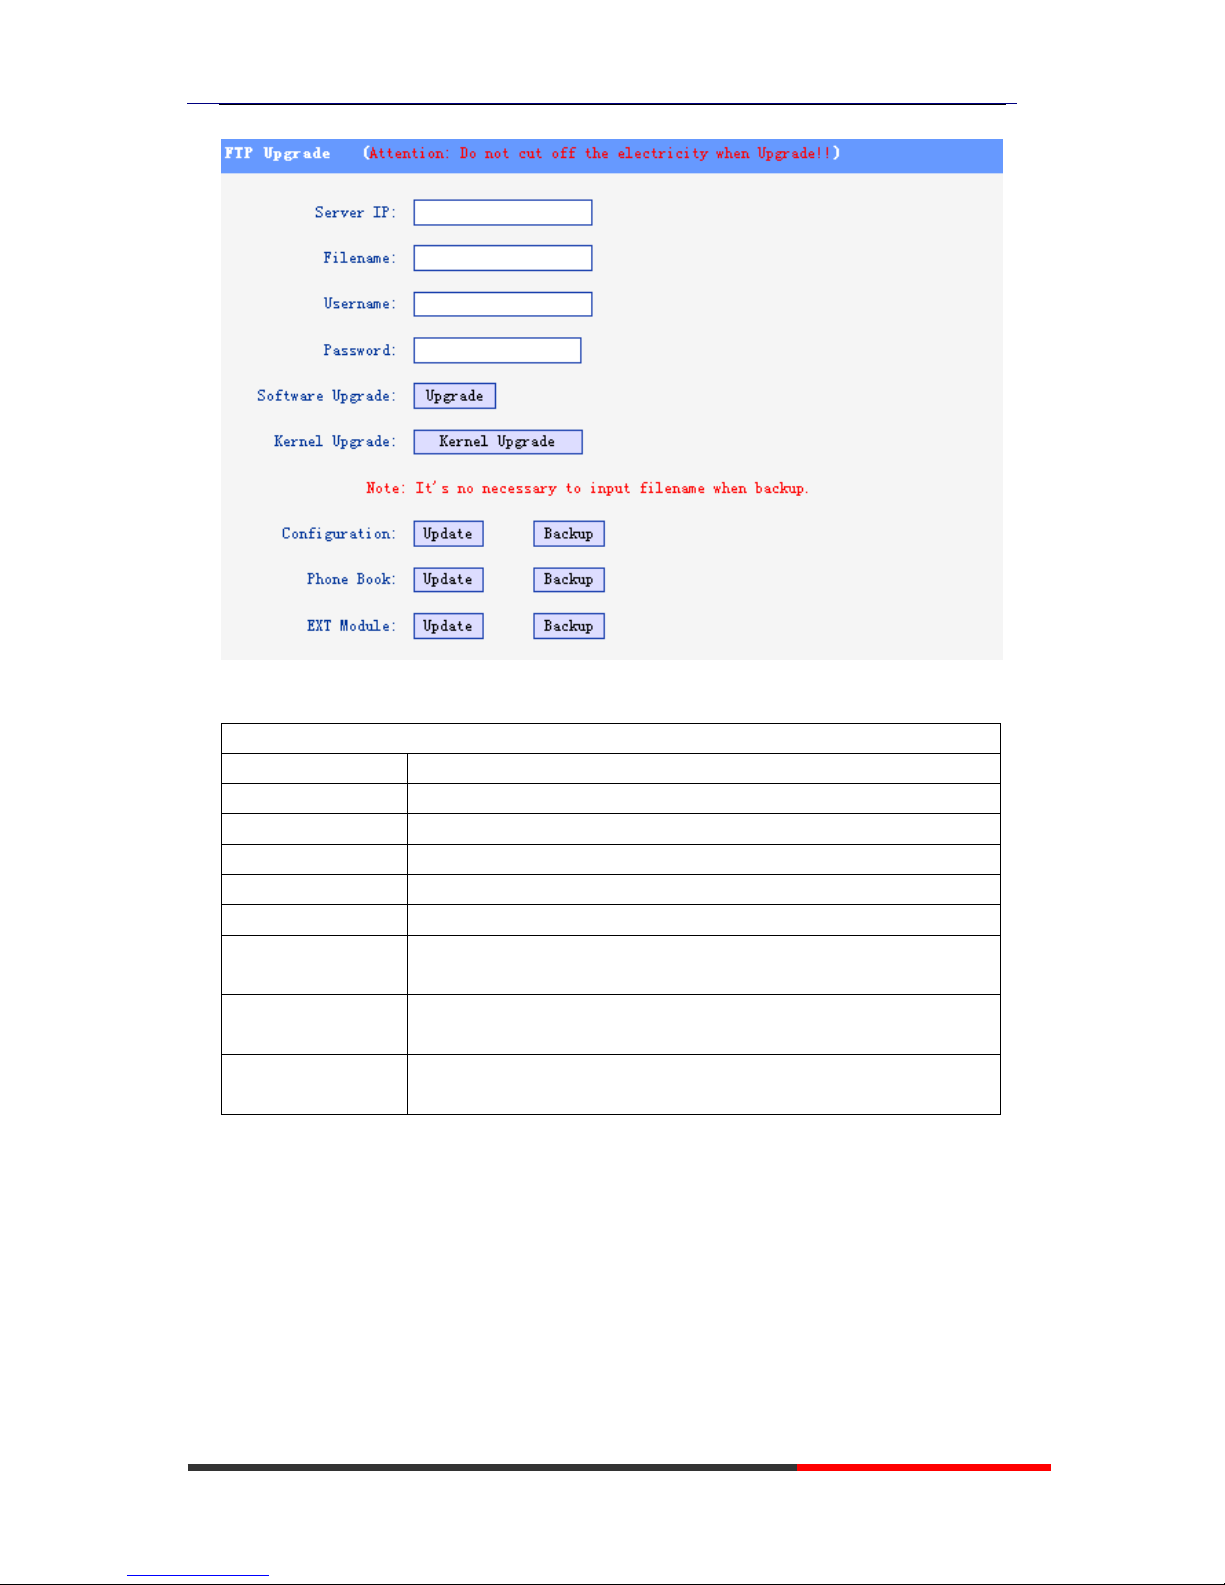
FTP Upgrade
You can upgrade the software,kernel and configure file for the phone use ftp.
Page 55
ES320 IP-Phone
www.escene.ru
Escene Communication
55
55
When use ftp upgrade, you can set several parameters as follow:
FTP Upgrade
Server IP
The ip address of the ftp server
Filename
The name of the file want to download from ftp server
Username
The username provide by ftp server
Password
The password provide by ftp server
Software Upgrade
Used to upgrade the software of the phone
Kernel Upgrade
Used to upgrade the kernel of the phone
Configuration
You can used update/backup to update/backup the configure file
of the phone
Phone Book
You can used update/backup to update/backup the phonebook of
the phone
EXT Module
You can used update/backup to update/backup the expansion of
the phone
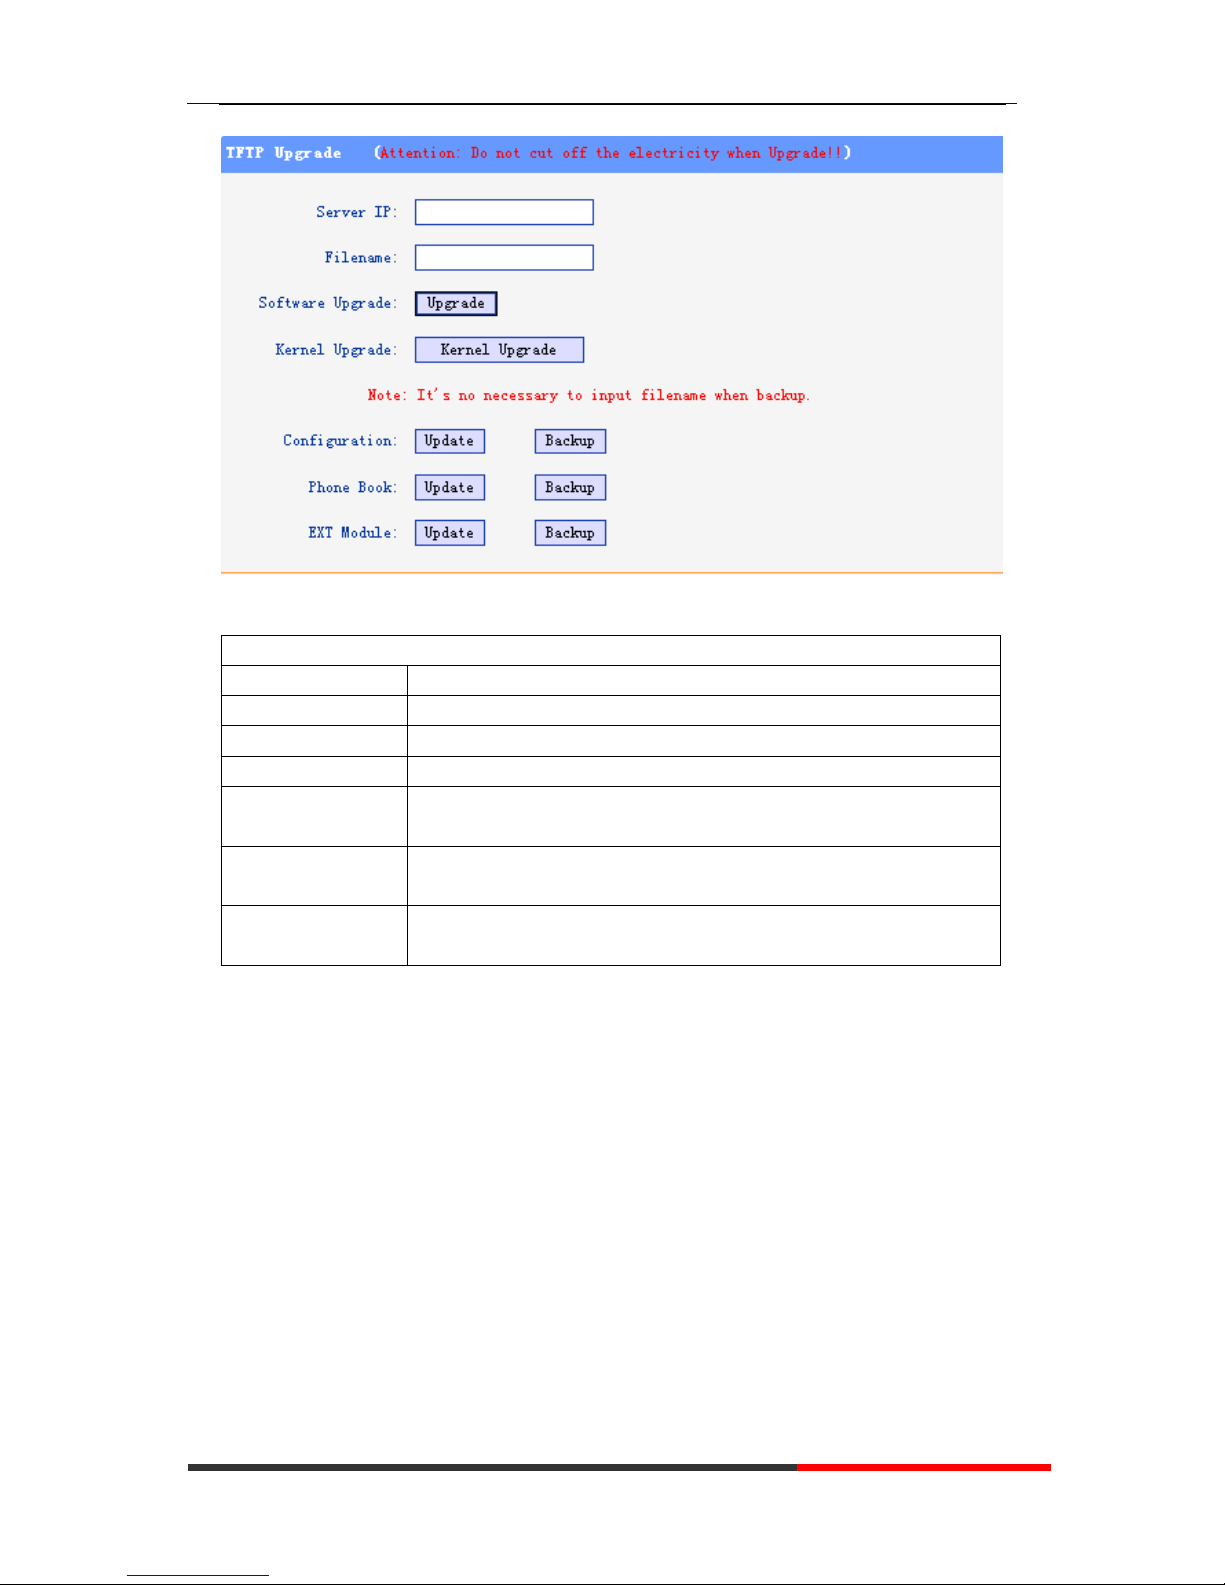
TFTP Upgrade
You can upgrade the software,kernel and configure file for the phone use tftp.
Page 56
ES320 IP-Phone
www.escene.ru
Escene Communication
56
56
When use tftp upgrade, you can set several parameters as follow:
TFTP Upgrade
Server IP
The ip address of the tftp server
Filename
The name of the file want to download from ftp server
Software Upgrade
Used to upgrade the software of the phone
Kernel Upgrade
Used to upgrade the kernel of the phone
Configuration
You can used update/backup to update/backup the configure file
of the phone
Phone Book
You can used update/backup to update/backup the phonebook of
the phone
EXT Module
You can used update/backup to update/backup the expansion of
the phone
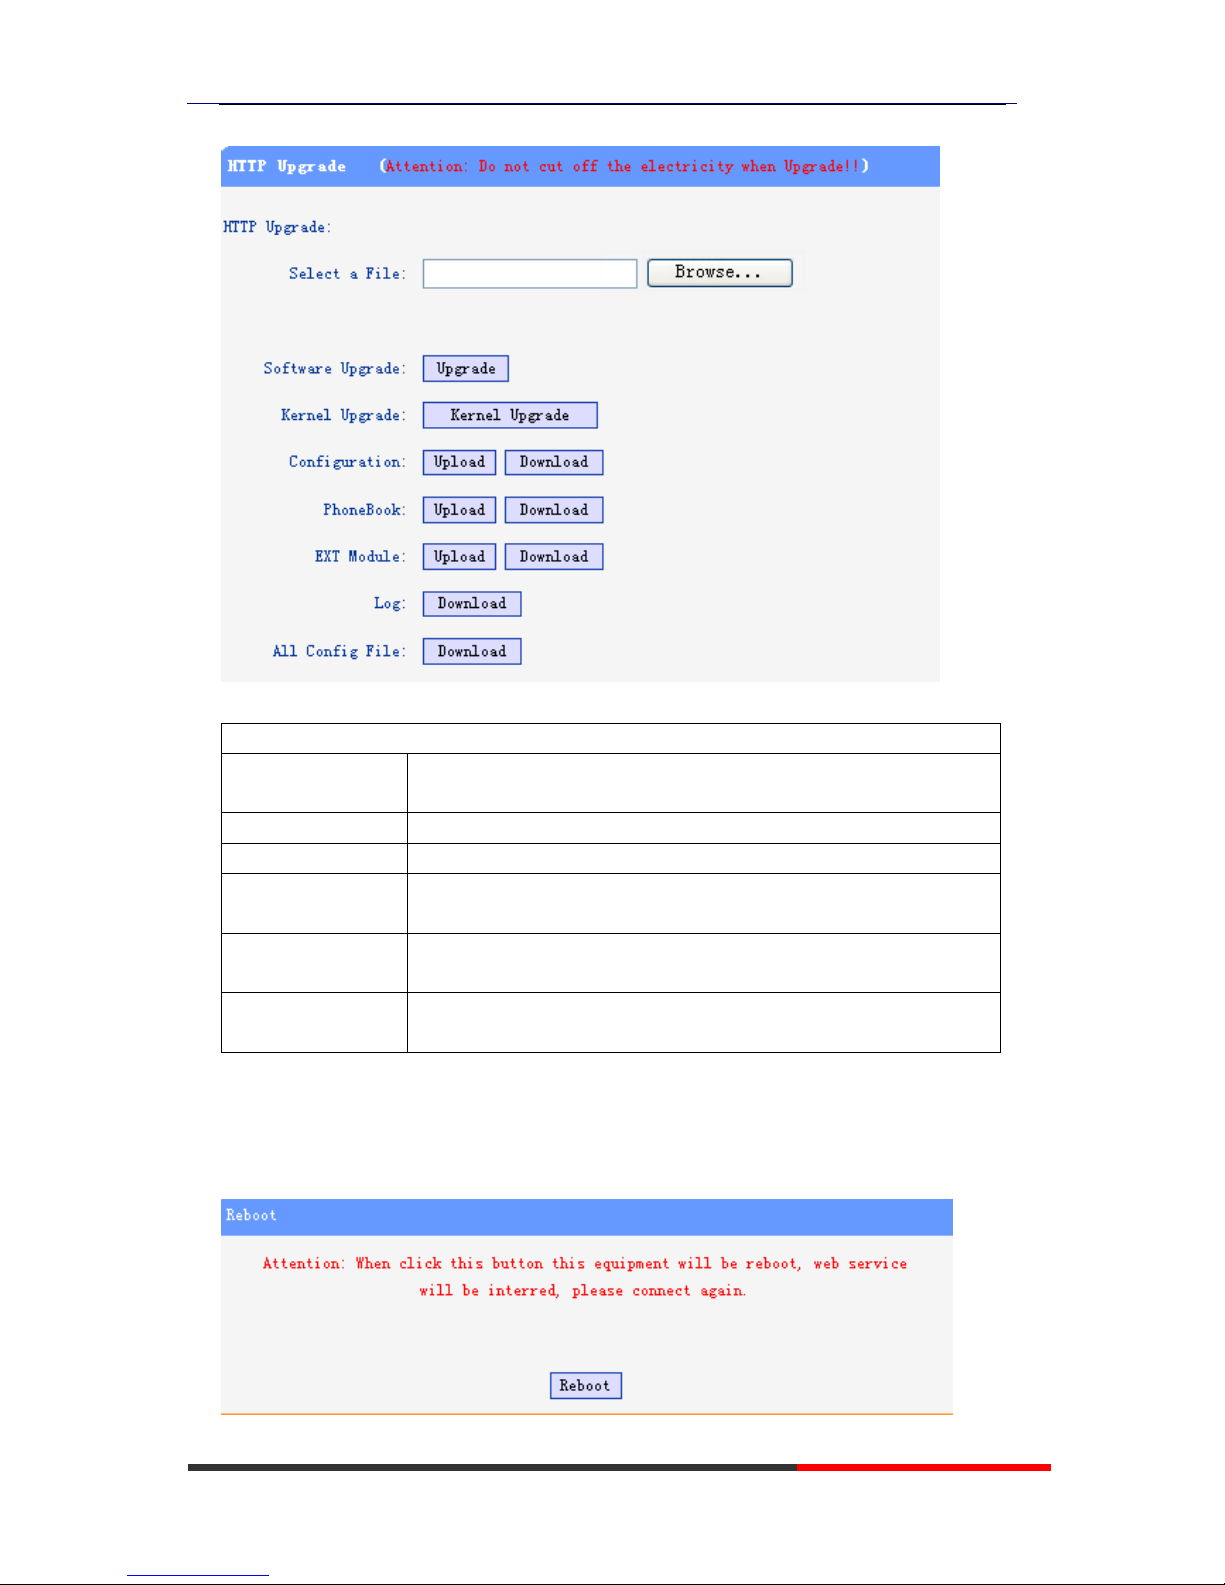
HTTP Upgrade
You can upgrade the software,kernel and configure file for the phone use http.
Page 57
ES320 IP-Phone
www.escene.ru
Escene Communication
57
57
When use http upgrade, you can set several parameters as follow:
HTTP Upgrade
Select a File
Browse the software/kernel/config file you want to upgrade from
http
Software Upgrade
Used to upgrade the software of the phone
Kernel Upgrade
Used to upgrade the kernel of the phone
Configuration
You can used upload/download to upload/download the configure
file of the phone
Phone Book
You can used upload/download to upload/download the
phonebook of the phone
EXT Module
You can used update/backup to update/backup the expansion of
the phone
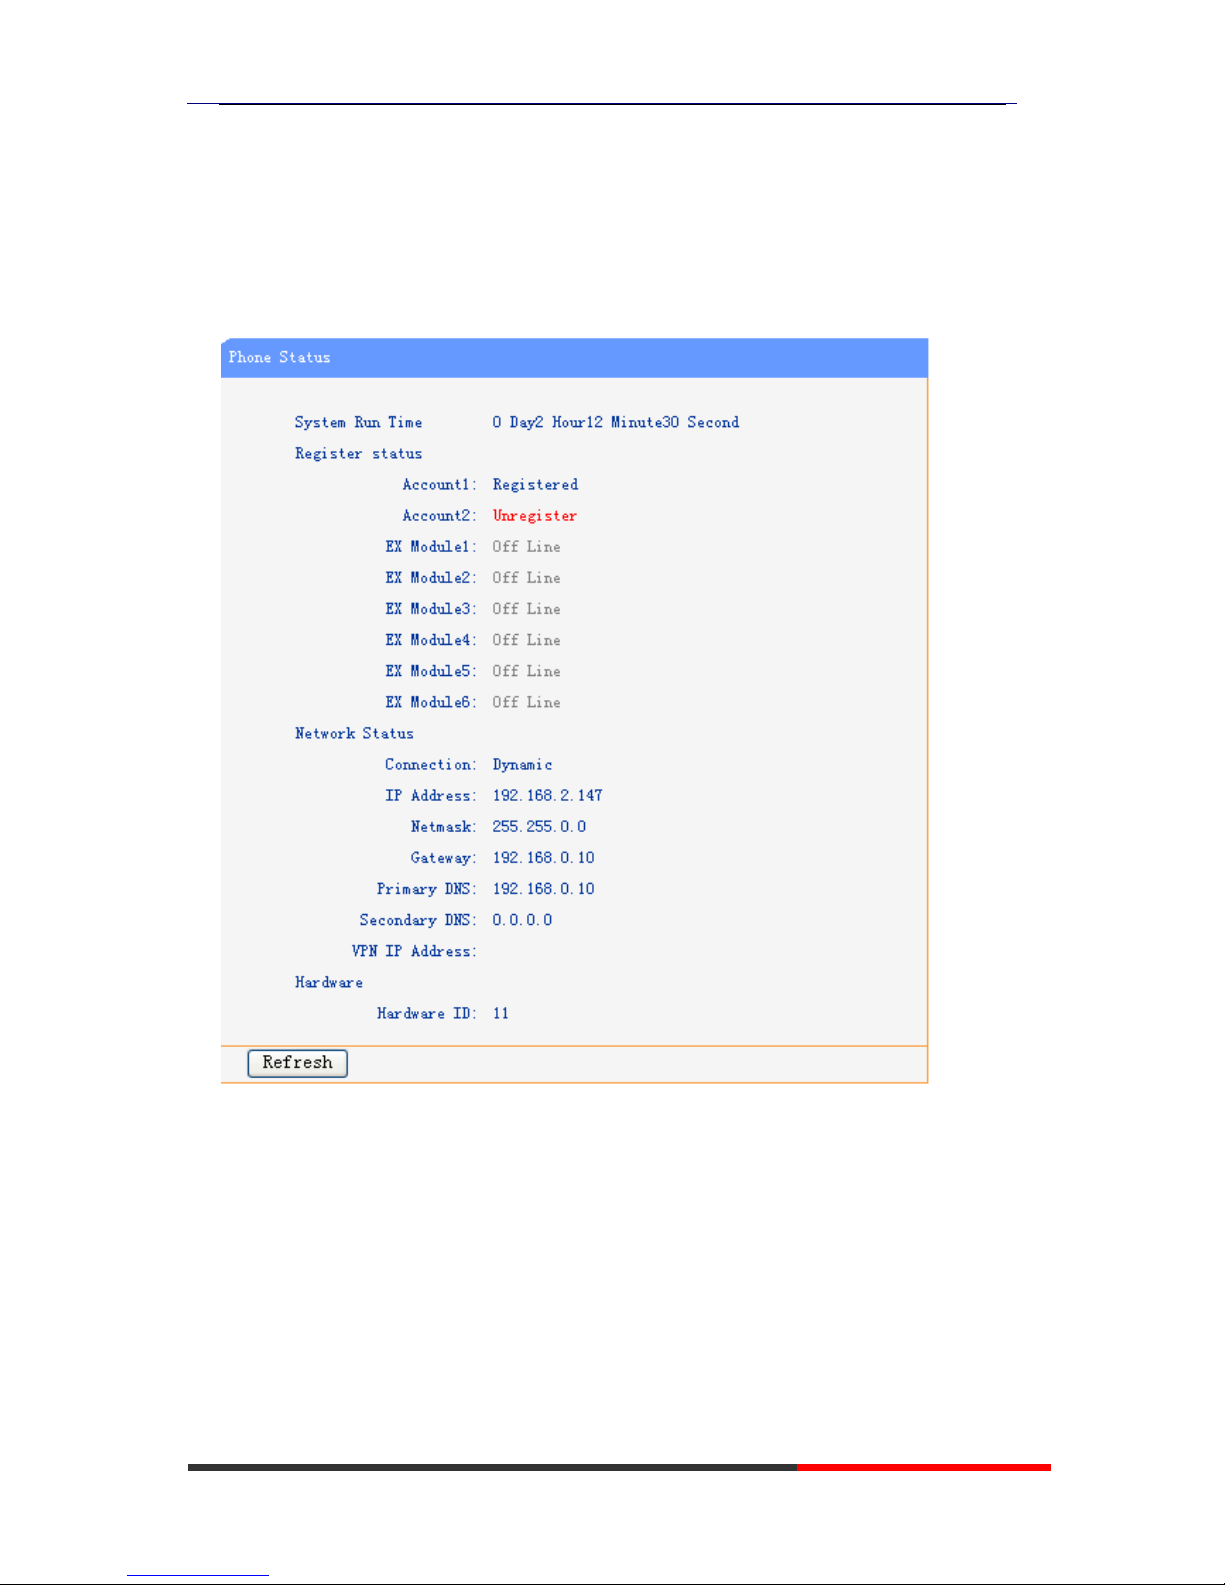
Reboot
You can use reboot option to reboot the phone.
Page 58
ES320 IP-Phone
www.escene.ru
Escene Communication
58
58
When you press ‘Reboot’,the phone will reboot.
Phone Status
You can see the currently status of the phone when use Phone Status option.
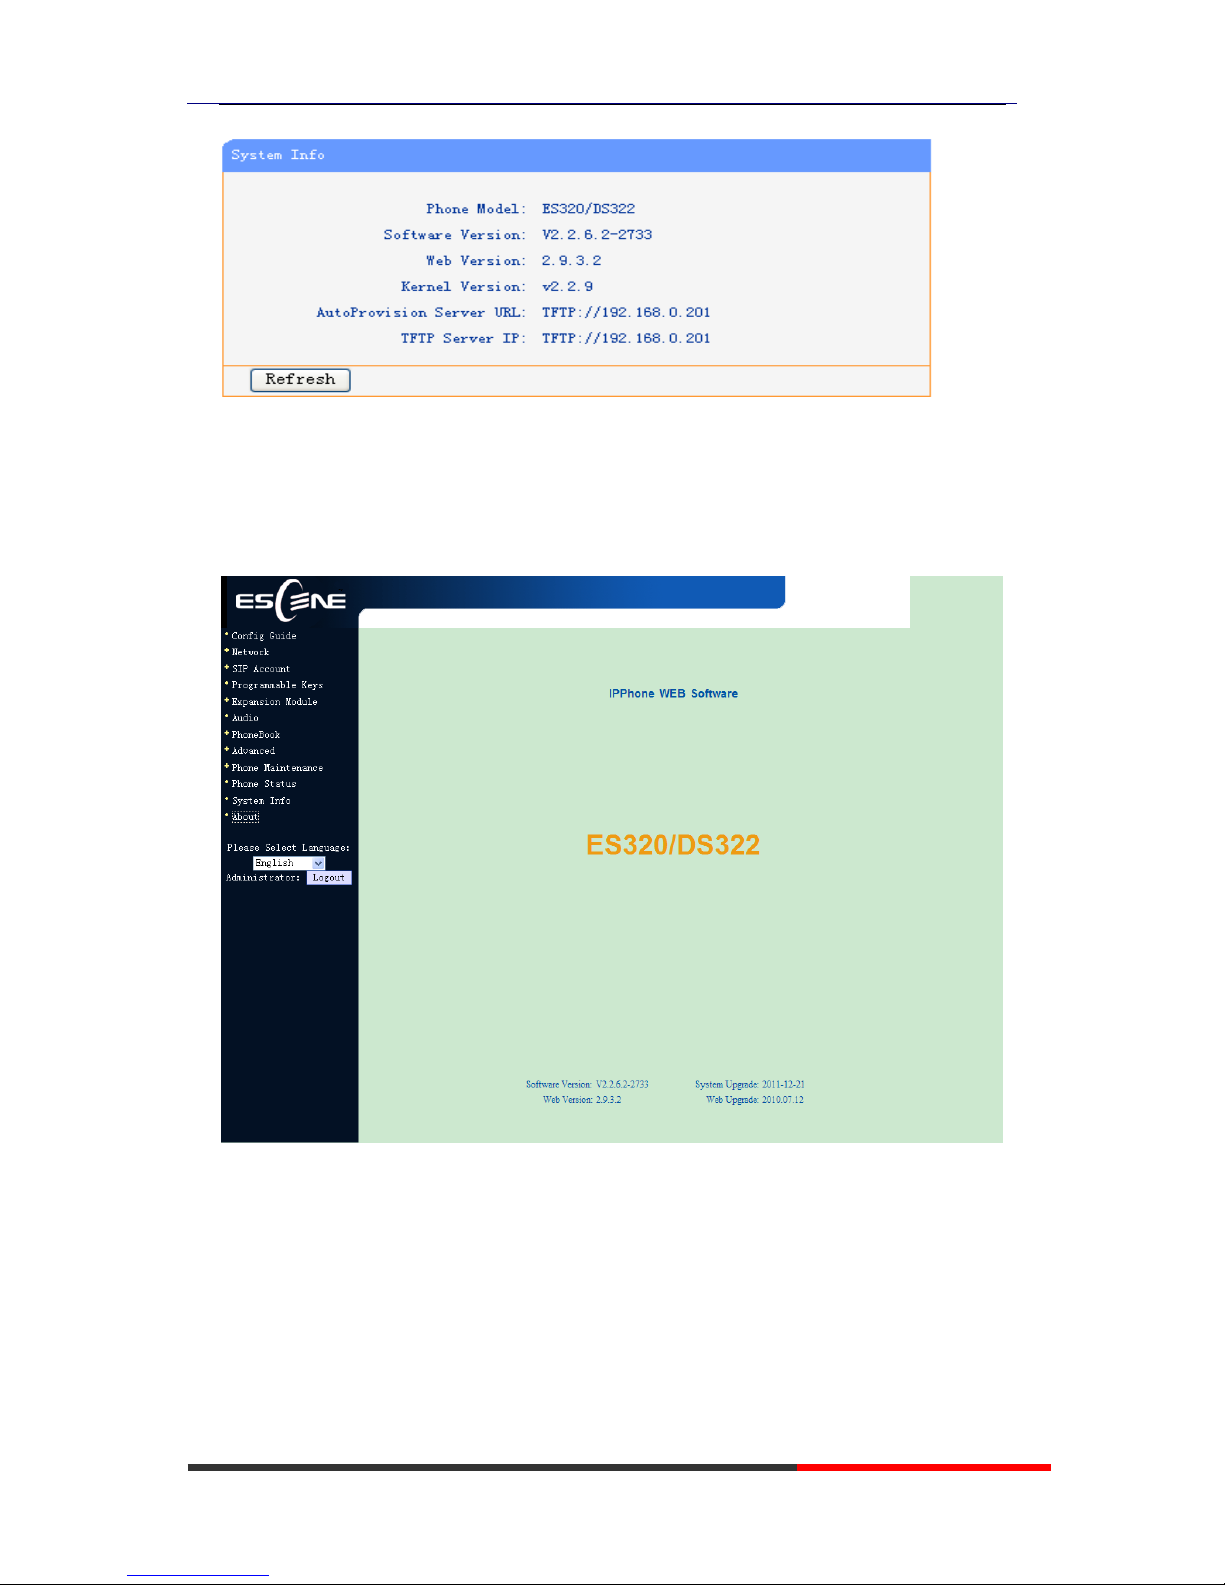
System info
Page 59
ES320 IP-Phone
www.escene.ru
Escene Communication
59
59
About
You can see the phone model when used About option.
Attention:
On this interface ,you can see the software and kernel which we used for test and this
user_manual is written base on this software and kernel.
This software version is V2.2.6.2-2733
This kernel version is v2.2.9
Page 60

ES320 IP-Phone
www.escene.ru
Escene Communication
60
60
Appendix:
Auto Provision
Pre-configuration on TFTP/HTTP/HTTPS/FTP Server
When the software or kernel auto-provision is enabled and want to run, IP
Phone will check the software and kernel version at first, so we need make
some pre-configuration on the provisioning server.
Auto Provision for Software:
1. Create a notepad file named“F000X00.cfg”(the “X” is decided by the
model of the IP phone you are using, for example, if the model is ES620,
the file name is “F000600.cfg”);
*Named rule of the file:
F00600.cfg: for ES620, ES610 and DS622;
F00400.cfg: for ES410 and DS412;
F00300.cfg: for ES310 and DS312;
F00200.cfg: for ES210 and DS212.
2. Open the notepad file “F000X00.cfg” and write the new software name in it,
for example,
S_ES6xx_version2.0.4.6: for ES620, ES610 and DS622;
S_ES410_version2.0.4.6: for ES410 and DS412;
S_ES310_version2.0.4.6: for ES310 and DS312;
S_ES210_version2.0.4.6: for ES210 and DS212
Write down the new version you want to upgrade and save it on your
provisioning server.
*Please note that if the version is not older than (and same as) the one on your
phone, auto-provision of your software would be not available.
3. After it, upload the new software to the TFTP/HTTP/HTTPS/FTP
provisioning server and complete the pre-configuration steps.
Auto Provision for Kernel:
1. Create a notepad file named“K000X00.cfg”(the “X” is decided by the
Page 61

ES320 IP-Phone
www.escene.ru
Escene Communication
61
61
model of the IP phone you are using, for example, if the model is ES620,
the file name is “K000600.cfg”);
*Named rule of the file:
K00600.cfg: for ES620, ES610 and DS622;
K00400.cfg: for ES410 and DS412;
K00300.cfg: for ES310 and DS312;
K00200.cfg: for ES210 and DS212.
2. Open the notepad file “K000X00.cfg” and write the new kernel name in it,
for example,
K_uImage_600.bin_version2.1.6: for ES620, ES610 and DS622;
K_uImage_400.bin_version2.1.6: for ES410 and DS412;
K_uImage_300.bin_version2.1.6: for ES310 and DS312;
K_uImage_200.bin_version2.1.6: for ES210 and DS212
Write the new version you want to upgrade and save it on your
provisioning server.
*Please note that if the version is not older than (and same as) the one on your
phone, auto-provision of your kernel would be not available.
3. After it, upload the new kernel to the TFTP/HTTP/HTTPS/FTP provisioning
server and complete the pre-configuration steps.
Configuration files on TFTP/HTTP/HTTPS/FTP Server
Name of configuration file:
The configuration file on the provisioning server is named as the MAC address
of IP phone itself. Escene’s IP phones support two different configuration files
for auto-provision:
1. Normal Configuration file:
Normal Configuration file is the configuration file of your Escene IP phone. You
can download it from your phone (You can see the following chapter to see how
to download a configuration file from Escene IP hone) and modify by yourself.
If the IP phone’s MAC address is 00:11:22:33:44:55, the normal configuration
file of it should be
001122334455.xml
.
2. Broadsoft Configuration files:
Broadsoft Configuration files support the format of Broadsoft IP-PBX. However,
you can use them for provisioning. There are two files should be set on your
provisioning server, they are also named by the MAC address of your phone
1)
001122334455.cfg
: a configuration file for system settings, for
example, network, audio and so on.
2)
001122334455.txt
: a configuration file for SIP accounts.
Download a configuration file from your phone:
You can download a configuration file from your phone by HTTP as follow:
Page 62
ES320 IP-Phone
www.escene.ru
Escene Communication
62
62
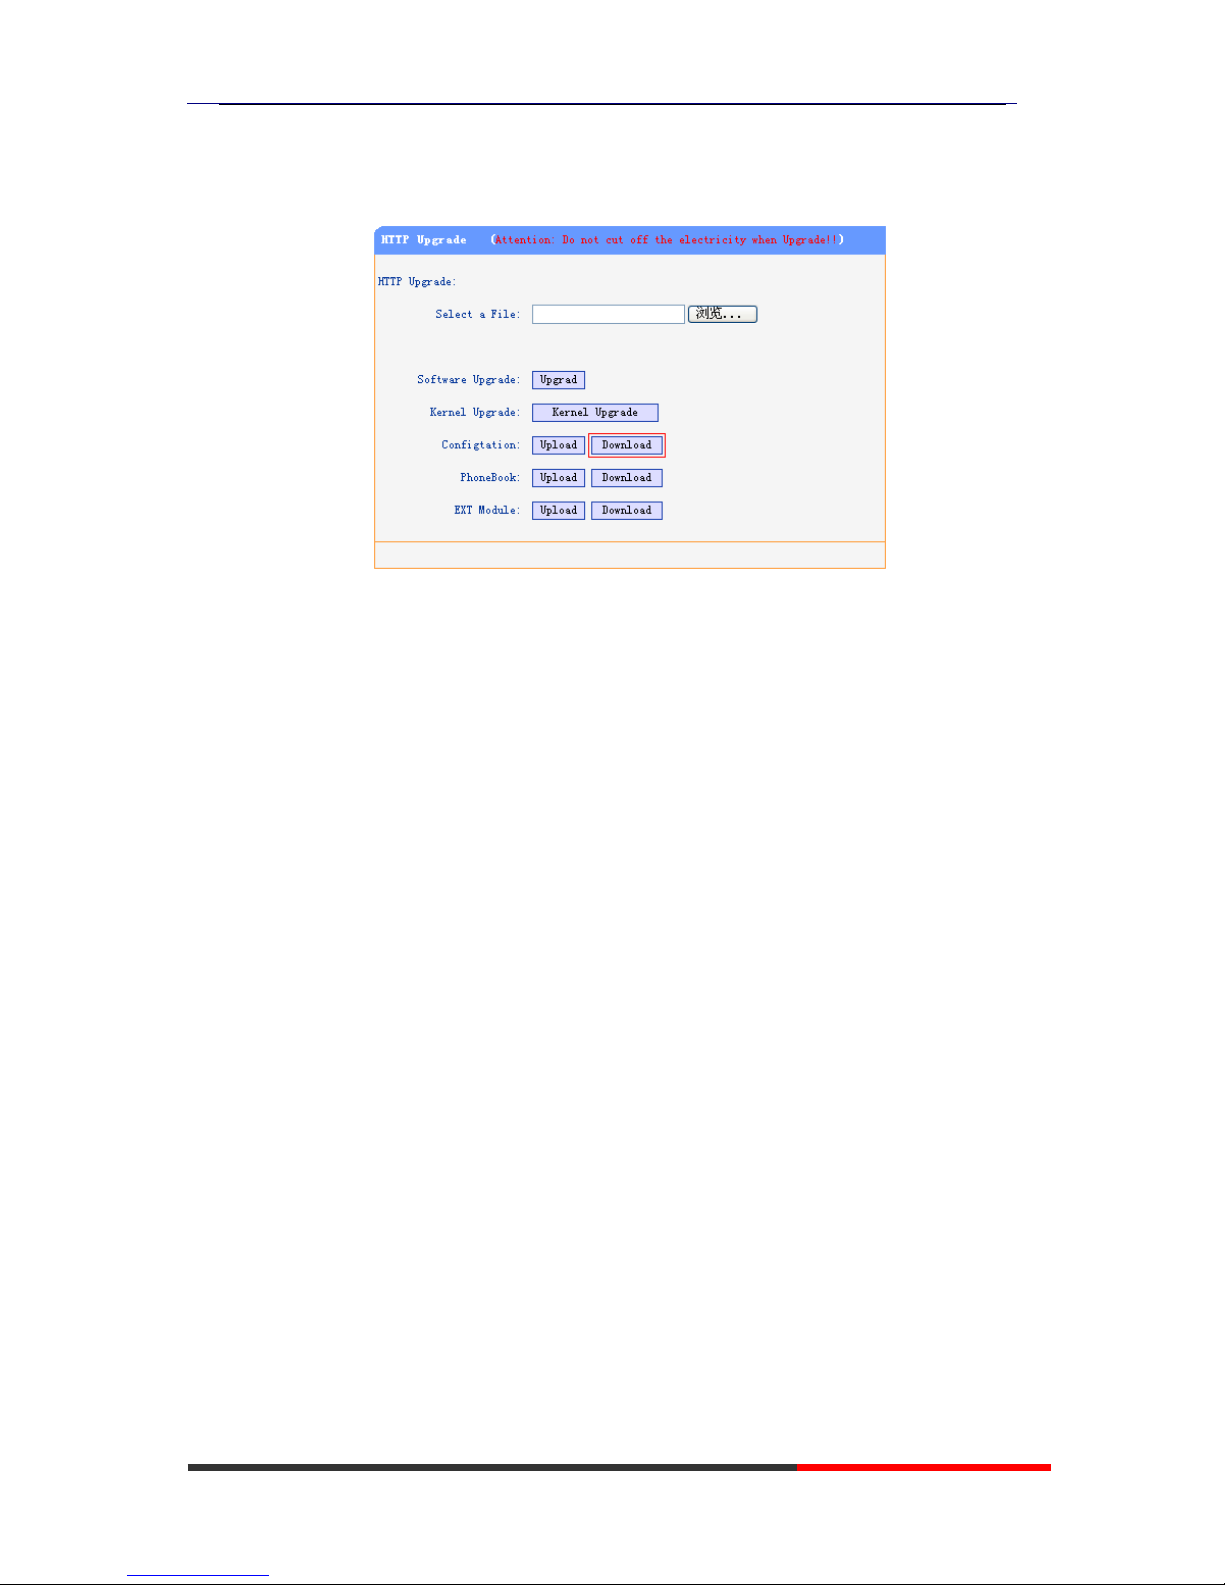
1. Open the web page of your IP phone, click “Phone Maintenance”>“HTTP
Upgrade”;
2. Then click “Download” of Configuration:
3. If you want to use this file to auto-provision, you just need to modify it by
yourself and rename it to the MAC address of your IP Phone with .xml suffix.
Extern.xml file on TFTP/HTTP/HTTPS/FTP Server
The Extern.xml includes the settings of programmable buttons on the phone
and all Expansion Modules. All the phones can download the settings from a
same file and they will have the same settings (for example, Speed-dial, BLF
and so on).
*You can’t rename the file on the provisioning server. The file name is fixed
to Account1_Extern.xml.(Account1 is the first account you register)
Phonebook on TFTP/HTTP/HTTPS/FTP Server
Escene IP phone supports Enterprise Phonebook and Personal Phonebook.
Enterprise Phonebook:
Enterprise Phonebook is used for all staffs in your office. All phones will
download a common phonebook for all staffs. The file’s name must be
Enterprise_Phonebook.xml
on your provisioning server and you can not
rename it.
Personal Phonebook:
Personal Phonebook is individual for each IP phone. The file on your
provisioning server is named by the first account of your IP phone. If the IP
phone’s first account is 1287, the Personal Phonebook of this phone is
1287_Phonebook.xml
.
Page 63
ES320 IP-Phone
www.escene.ru
Escene Communication
63
63
Automatic Provisioning using DHCP Option 66
The following steps will descript auto-provision by TFTP. You also can use
HTTP and FTP for auto-provision with our phones.
DHCP Server: (Microsoft Windows 2003 server)
1. Start up the “DHCP Management Console”;
2. Expand the DHCP scope which will contain the phones
3. Right-click on the “Scope Options” node
4. Select “Configure Options”
5. In the “General” tab, scroll down the list of options and identify the option
labeled “066 Boot Server Host Name”
6. Enable the “066 Boot Server Host Name” and enter the string value
according to the examples discussed previously
string value:
192.168.0.201(TFTP Server IP Address);
7. Click the “OK” button
IP Phone:
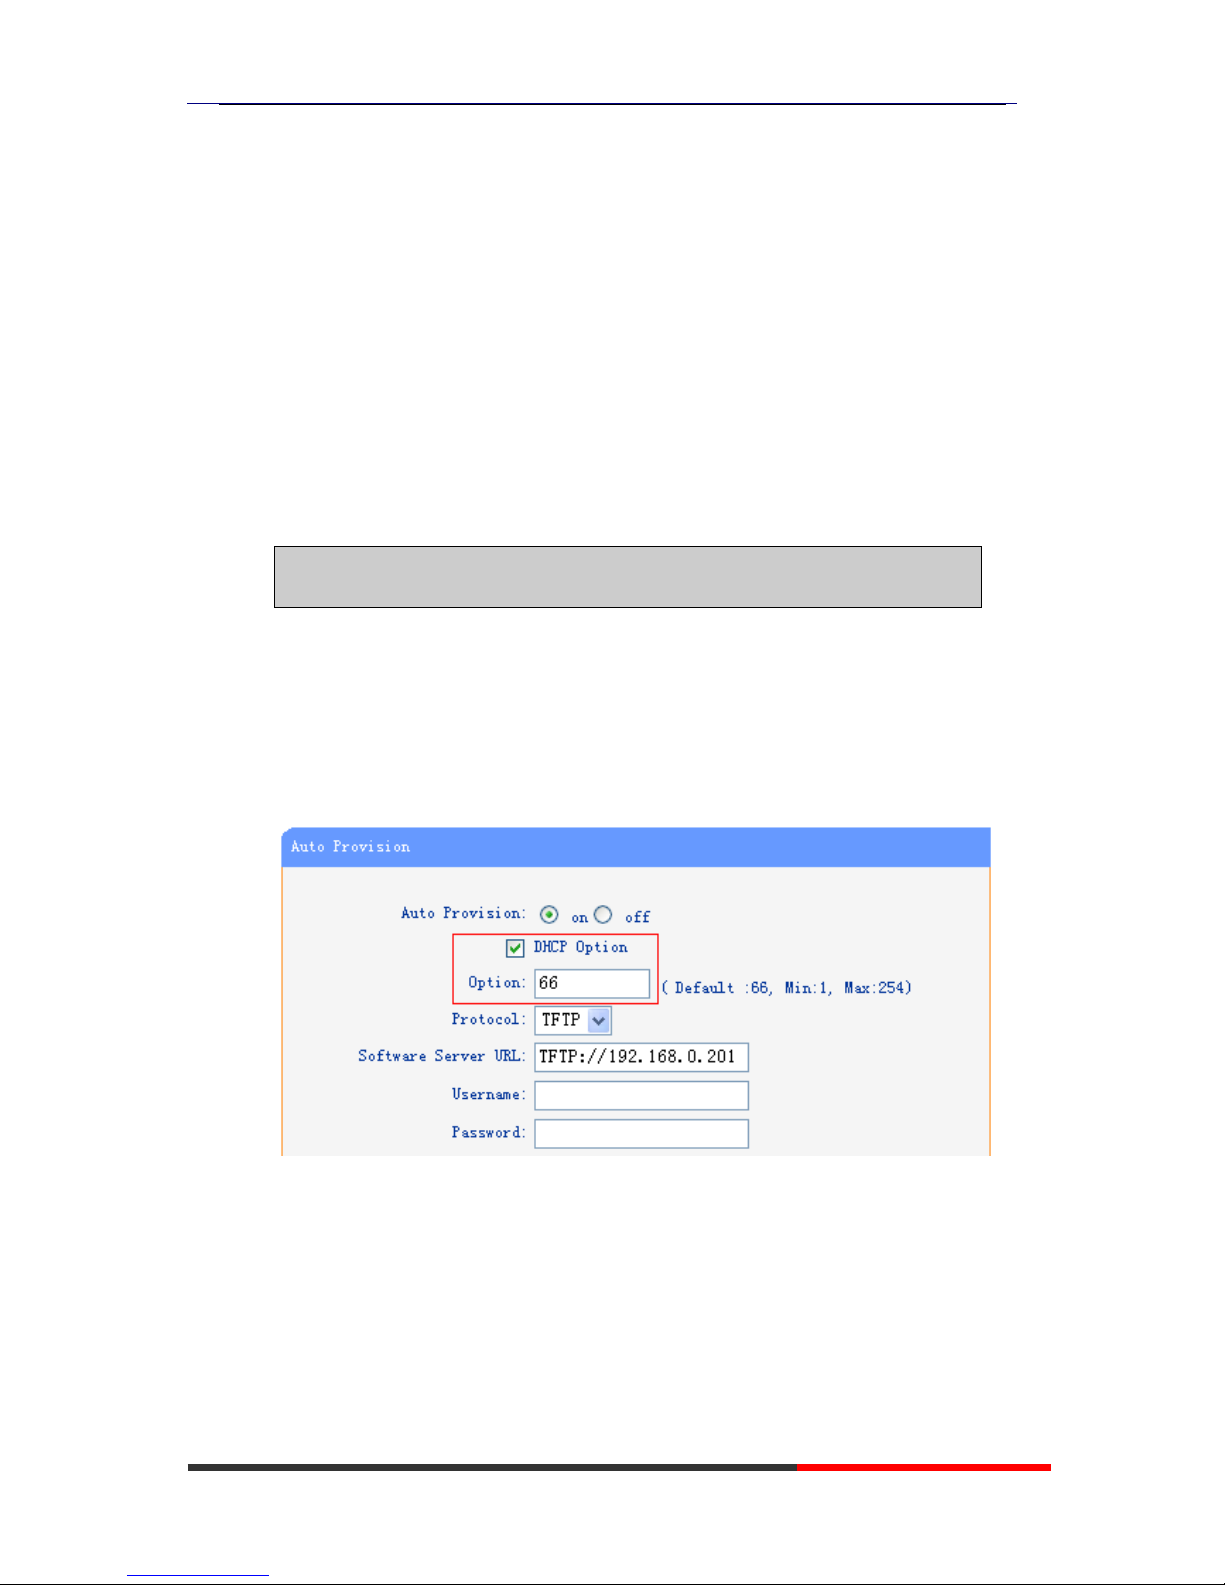
1. Input the IP Phone’s IP Address in browser;
2. Enter user and password with “root” then open the web page;
3. Click “Phone Maintenance” and select “Auto Provision”;
4. Select like as follows:
5. Click “Submit” to save it.
Auto-Provision via fixable TFTP/HTTP/HTTPS/FTP
Server
IP Phone:
1. Input the IP Phone’s IP Address in browser;
Page 64
ES320 IP-Phone
www.escene.ru
Escene Communication
64
64
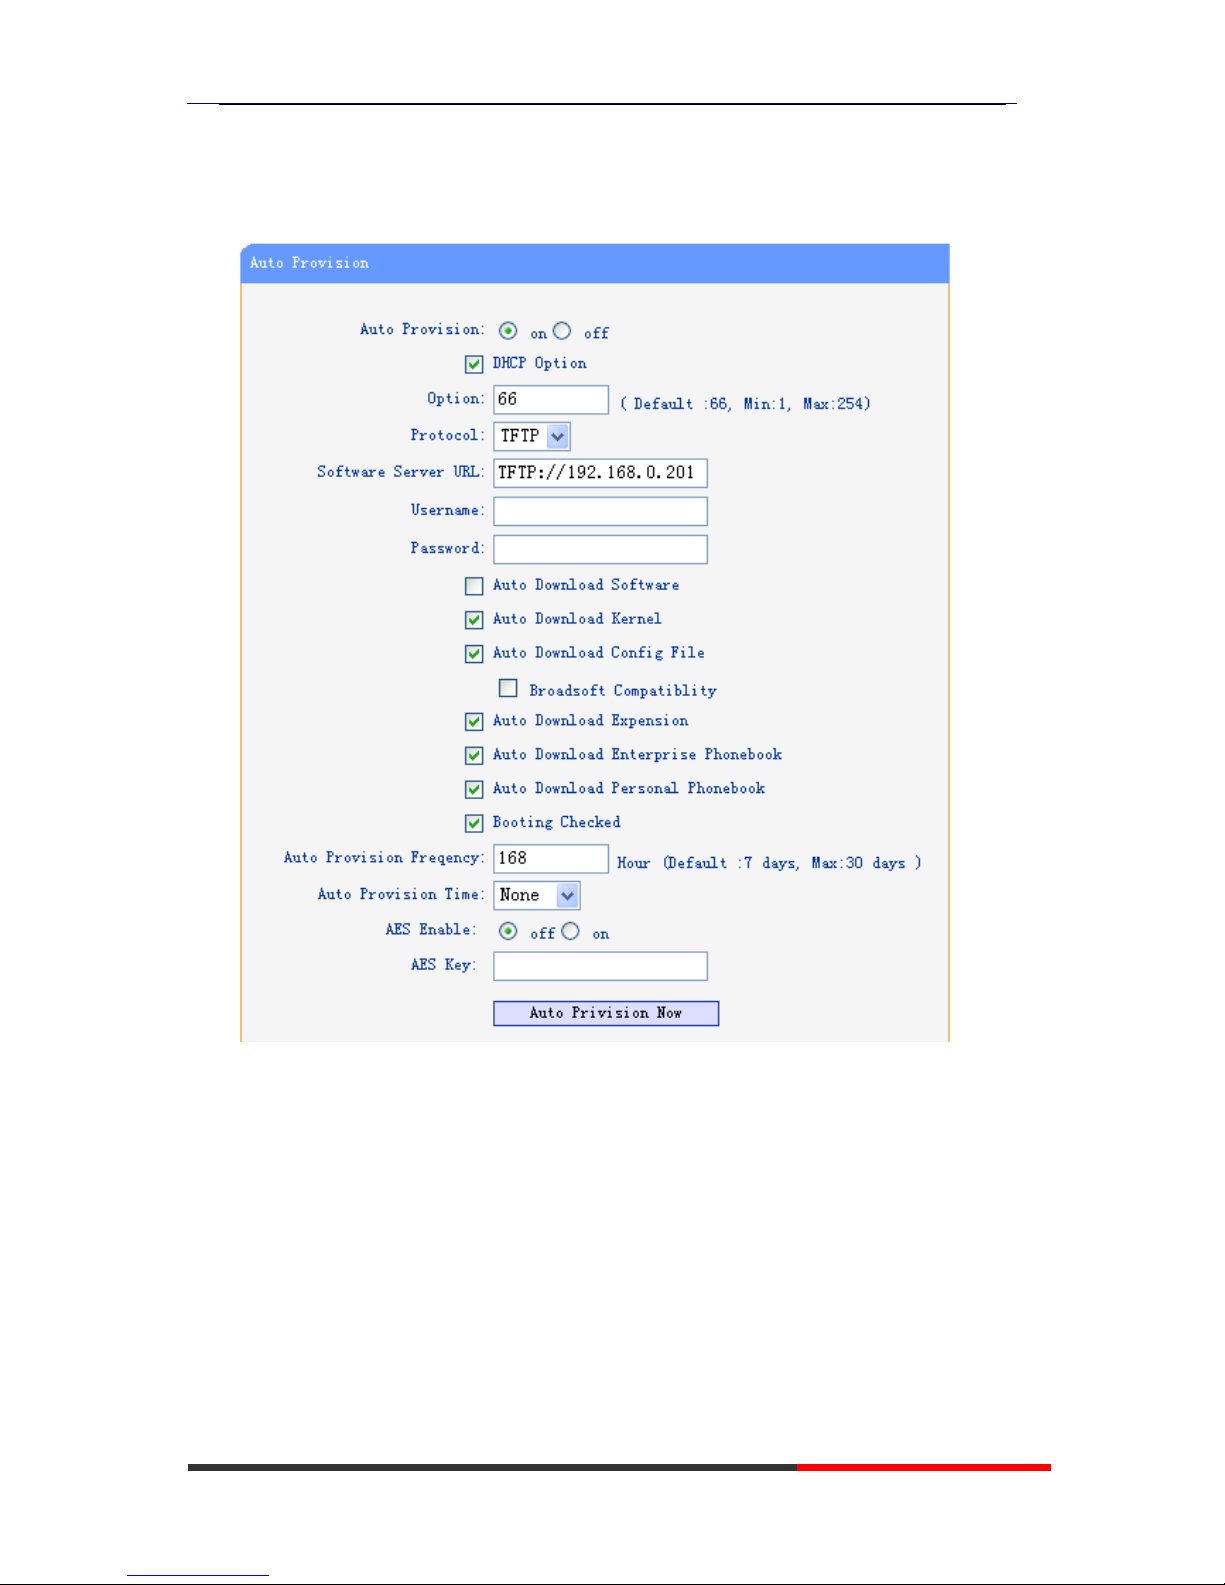
2. Enter user and password with “root” then open the web page;
3. Click “Phone Maintenance” and select “Auto Provision”;
4. select like as follows:
It supports three protocols in Auto-Provision:TFTP,HTTP and FTP.
The format with provisioning server URL is:
TFTP:
TFTP://192.168.0.201(192.168.0.201 is the default Server IP address)
HTTP:
HTTP://192.168.0.201
HTTPS:
HTTPS://192.168.0.201
FTP:
FTP://192.168.0.201
Username: the user to login FTP/HTTP/HTTPS server
Password: the password of the user using to login FTP/HTTP/HTTPS server
Page 65

ES320 IP-Phone
www.escene.ru
Escene Communication
65
65
*Username and password are available in FTP/HTTP/HTTPS only (unavailable
in TFTP).
Auto Download Software:
Download software from server and upgrade it automatically.
Auto Download Kernel:
Download kernel from server and upgrade it automatically.
Auto Download Config File:
Download configuration file from server and update it automatically.
BroadsoftCompatibility:
If you select this function, you need to put two configuration files (with
Broadsoft format) on the provisioning server. Otherwise, you can download
the configuration file from your phone via HTTP (regarding the steps, you
can refer to
“Download a configuration file from your phone”
in this
document.), modify it and upload it to the server for auto-provision.
Auto Download Expansion:
Download configuration file of the Programmable buttons on your phone or
Expansion Modules automatically.
Auto Download Enterprise Phonebook:
Download Enterprise Phonebook from server and update it automatically.
Auto Download Personal Phonebook:
Download Personal Phonebook from server and update it automatically.
Booting Checked:
Check all items you had selected and upgrade/update them when the phone
boot
Auto Provision Frequency:
The auto provision Frequency which you want.
Auto Provision Time:
The time you want to execute auto-provision.
Examples of Auto Provision Frequency and Time
1) When you set the Auto Provision Frequency and disableAuto
Provision Time (set to None), the Auto Provision function will work after
the AutoProvision Frequency;
2) When you set both Auto Provision Frequency and Auto Provision
Time, for example:
You set the AutoProvision Frequency to 24 hours, and the Auto
Provision Time to 2:00 at 8:00 today (1, Jan), it will pass 24 hours at first
and work at the nearest 2:00, it means that the Auto Provision function will
work at 2:00 on the day after tomorrow (3, Jan).
Therefore, if you want this function work at 23:00 tonight and it is 8:00
now, you need to set the Auto Provision Frequency to 0 hours and the
Auto Provision Time to 23:00.
Page 66

ES320 IP-Phone
www.escene.ru
Escene Communication
66
66
AES Encryption:
AES encryption is used for all the setting files of your phone (include
configuration file, Expansion file, Enterprise/Personal Phonebook etc. You just
need to enable the AES Encryption function and input the AES Key matching
the one on your server on.
1.
Over
view
LDAP stands for Lightweight Directory Access Protocol which is a client-server
protocol for accessing a directory service. LDAP lets you locate organizations,
individuals, and other resources such as files and devices in a network, whether on
the Internet or on a corporate intranet, and whether or not you know the domain
name, IP address, or geographic whereabouts.
An LDAP directory can be distributed among many servers on a network, then
replicated and synchronized regularly.
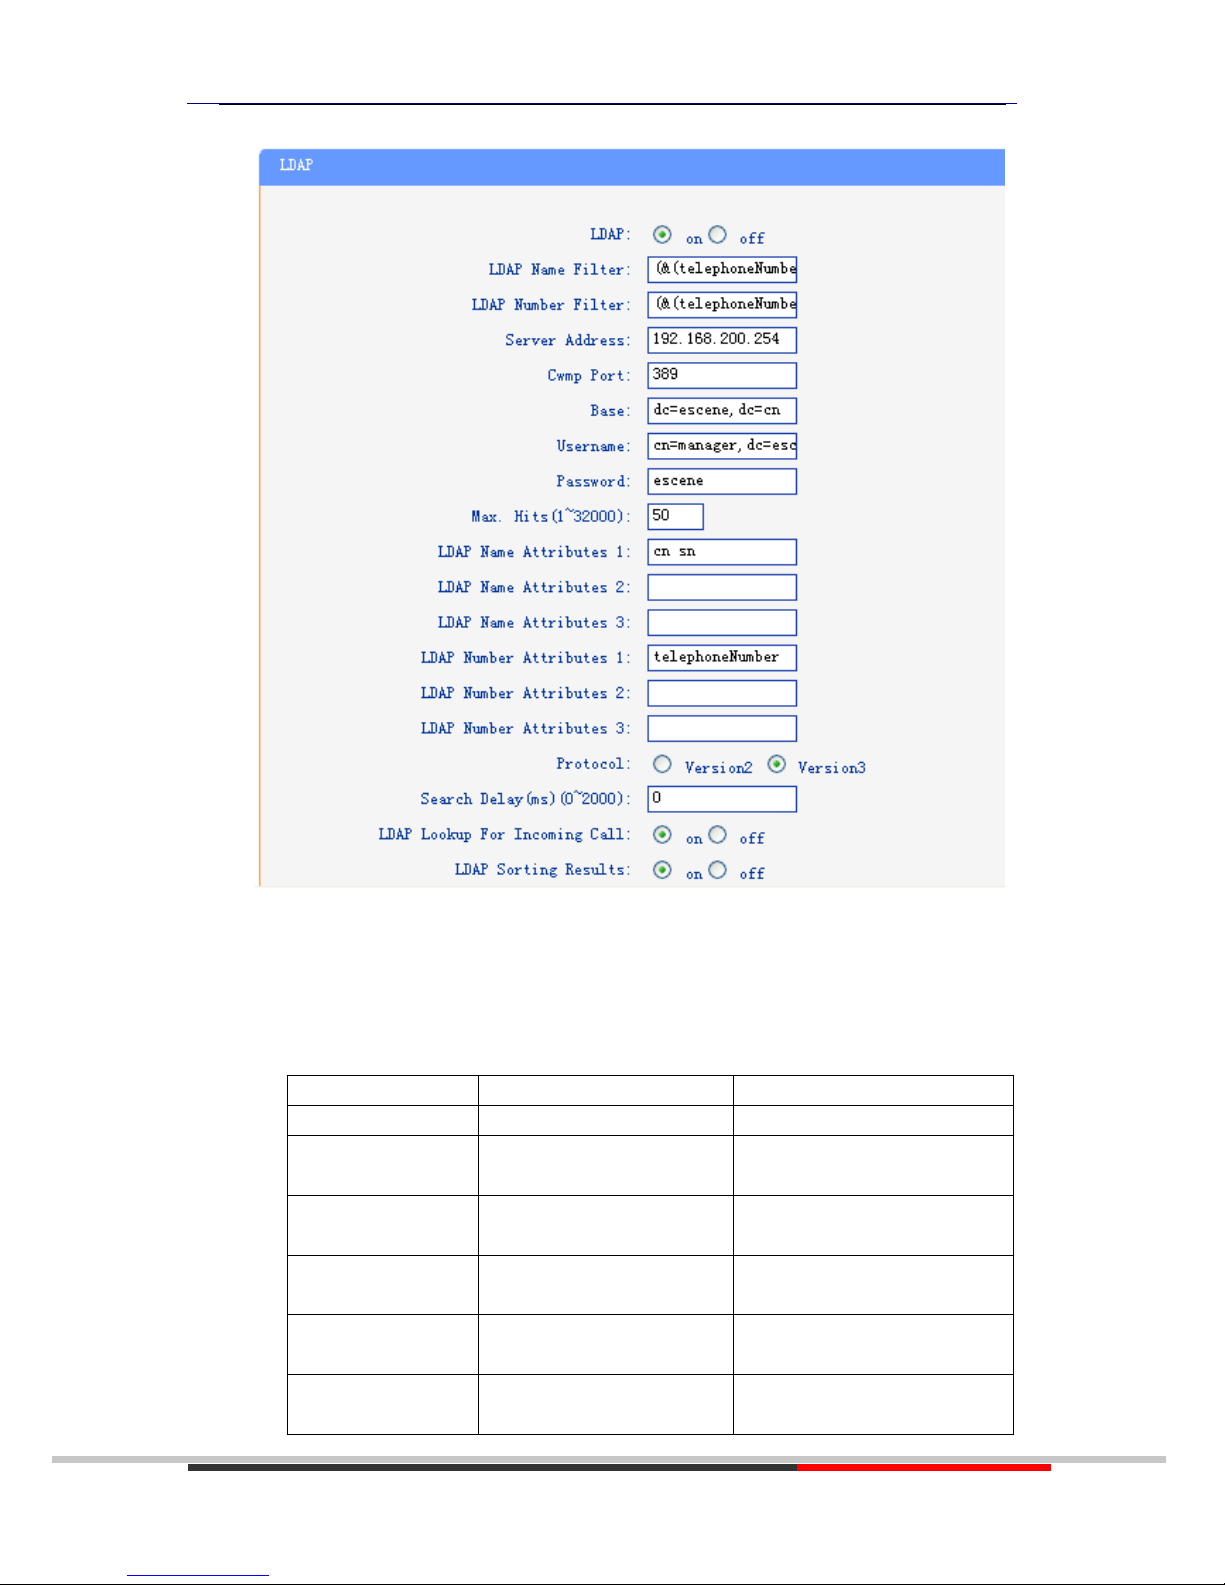
2.
Con
figuration
Please note that LDAP Phonebook support on ES620\ES410\ES330\ES320\ES310\ES210,
the version must be V2.2.3.1-2210 and higher, then access to the web UI¢
PhoneBook¢ LDAP page, you can find the configured option is like following picture.
Page 67
ES320 IP-Phone
www.escene.ru
Escene Communication
67
67
We introduce each parameter attributes in following section.
3. Attributes
3.1Co
mmon Attribut
es
Abbrevation
Name
Description
cn
commonName
Full name of the user.
company
company
Company or organization
name
gn
givenName
Firstname also called
Christian name
homePhone
homeTelephoneNumbe
r
Home Phone number
mobile
mobileTelephoneNumb
er
Mobile or cellular phone
number
o
organizationName
Organization name or
even organizational name
Page 68

ES320 IP-Phone
www.escene.ru
Escene Communication
68
68
ou
organizationalUnitNam
e
Usually department or any
sub entity of larger entity
pager
pagerTelephoneNumbe
r
Pager telephone number
sn
surname
Surname,last name or
family name
-
telephoneNumber
Office phone number
3.2Attributes on Escene Configured Page
3.2.1 LDAP Name Filter
Description: LDAP name filter is the search criteria for name look ups. The format
of the search filter is compliant to
the standard string representations of LDAP search filters (RFC 2254). The name
prefix for search entered by the user
is represented by the “%” symbol in the filter.
Valid Values: Standard LDAP filters e.g. (&(sn=%)(telephoneNumber=%s))
Default Value: <blank>
Examp
les:
¢
(&(telephoneNumber=%s)(sn=%))
Returns all LDAP records which have the “telephoneNumber” field set
and the “sn” field starts with the entered prefix.
¢
(|(cn=%s)(sn=%s))
Returns all LDAP records which have the “cn” or “sn” field starting with the
entered prefix.
¢
(!(cn=%s))
Returns all LDAP records which “do not” have the “cn” field starting with the
entered prefix.
3.2.2 LDAP Number Filte
r
Description: LDAP number filter is the search criteria for number look ups. The
format of the search filter is compliant to the standard string representations of
LDAP search filters (RFC 2254). The number prefix for search entered by the user
is represented by the “%” symbol in the filter.
Valid Values: Standard LDAP filters e.g.
(|(telephoneNumber=%s)(Mobile=%s)(ipPhone=%s))
Default Value: <blank>
Examp
les:
¢
(|(telephoneNumber=%s)(Mobile=%s)(ipPhone=%s))
Page 69

ES320 IP-Phone
www.escene.ru
Escene Communication
69
69
Returns all LDAP records which have the “telephoneNumber” or “Mobile” or
“ipPhone”field starting with the entered prefix.
¢
(&(telephoneNumber=%s)(sn=*))
Returns all LDAP records which have the “sn” field set and the
“telephoneNumber” field starts with the entered prefix.
3.2.3 Server Addr
ess
Description: This setting refers to the DNS name or IP address of the LDAP server.
Default Value: 0.0.0.0
Example:
¢
192.168.1.100
¢
ldap.company.com
3.2.4 Port
Description: This setting specifies the LDAP server port.
Default Value: 389
3.2.5 Base
Description: This setting specifies the LDAP search base (the distinguished
name of the search base object) which corresponds to the location in the
directory from which the LDAP search is requested to begin. The
search base narrows the search scope and decreases directory lookup
time. If you have multiple organizational units in your directory (for
example, OU=Sales in O=COMPANY and OU=Development in O=COMPANY), but
the "OU=Sales" organization never uses AOL AIM, you can restrict the
lookup to the OU=Development subtree only by entering providing the
following search base: OU=Development, O=COMPANY. Other examples see
below.
Default Value: <blank>
Examp
les:
¢
o=UNIVERSITY OF NEW ORLEANS,c=US
¢
o=SFU,c=CA
¢
dc=escene,dc=cn
3.2.6 User Nam
e
Description: This setting specifies the bind “Username” for LDAP
servers. Most LDAP servers allow anonymous binds in which case the
setting can be left blank. However if the LDAP server does not allow
anonymous binds, you will need to provide the Username and Password allowed
Page 70

ES320 IP-Phone
www.escene.ru
Escene Communication
70
70
to query the LDAP server.
Default Value: <blank>
3.2.7 Pa
ssword
Description: This setting specifies the bind “Password” for LDAP servers. Escene
phones use “simple” authentication scheme for bind requests. This setting can
be left blank in case the server allows anonymous binds. Otherwise you will
need to provide the Password along with the Username in order to access the
LDAP server.
Default Value: <blank>
3.2.8 Max.Hit
s(1~32000)
Description: This setting specifies the maximum number of search
results to be returned by the LDAP server. If Max.hits is 0 or blank the
LDAP server will return all search results. Please note that a very large value of
the “Max. Hits” will slow down the LDAP lookup, therefore the
setting should be configured according to the available bandwidth.
The default value for this setting is blank.
Default Value: 50
3.2.9 LDAP Nam
e Attributes
Description: This setting can be used to specify the “name” attributes of each
record which are to be returned in the LDAP search results. This setting
compresses the search results, as the server only returns the
attributes which are requested by the Escene phone. The setting allows
the user to configure multiple space separated name attributes. Please
consult your system administrator regarding which name attributes are to be
configured.
Valid Values: Space separated name attributes, see examples below.
Default Value: <blank>
Examp
les:
¢
cn sn displayName
Requires “cn”, “sn” and “displayName” fields for each LDAP record.
¢
givenName
Requires “givenName” field for each LDAP record.
¢
vorName nachName
Page 71

ES320 IP-Phone
www.escene.ru
Escene Communication
71
71
Requires “vorName” and “nachName” fields for each LDAP record.
3.2.10 LDAP Number Attributes
Description: This setting can be used to specify the “number” attributes of each
record which are to be returned in the LDAP search results by the LDAP
server. This setting compresses the search results, as the server only returns
the attributes which are requested. The user can configure multiple space
separated number attributes by using this setting. Please consult you system
administrator regarding which number attributes are to be configured.
Valid Values: space separated number attributes e.g. telephoneNumber Mobile
ipPhone Home
Default Value: <blank>
Examp
les:
¢
Mobile telephoneNumber ipPhone
Requires “Mobile”, “telephoneNumber” and “ipPhone” fields for each LDAP
record.
¢
Home Private Office
Requires “Home”, “Private” and “Office” fields for each LDAP record.
3.2.11 Prot
ocol
Description: Protocol is the protocol version for the phone when send the bind
request to the server. Please make sure your LDAP server support version 3/2 bind
request.
Valid Values: version 3/version 2
Default Value: version 3
3.2.12 Search
Delay(ms)(0~2000)
Description: This setting is for configuring the delay display time after search.
Valid Values: 0~2000
Default Value: 0
3.2.13 LDAP Loo
kup
for Incoming Call
Description: This setting can be used to enable calling line
identification using LDAP. When the setting is turned
“Enable”, the phone performs an LDAP number search for the incoming number
and displays the name of the calling party accordingly.
Valid Values: <Enabled>, <Disabled>
Default Value: Disabled
Page 72

ES320 IP-Phone
www.escene.ru
Escene Communication
72
72
3.2.14 LDAP Sorting Result
s
Description: This setting is for sorting the search results, if make this option
“Enabled”, it will arrange in the first alphabetical of the name order if return the
name display; if only has the number return, it will list in numerical order. Valid
Values: <Enabled>, <Disabled>
Default Value: Disabled
3.2.15
LDAP Lookup
for Pr
eDial/Dial
Description: This setting can be used to enable call out line identification using
LDAP. When the setting is turned
“Enabled”, the phone performs an LDAP number search for PreDial or Dial status.
Valid Values: <Enabled>, <Disabled>
Default Value: Disabled
3.3 Example for Configuration
You can use the below settings as a starting point and adjust the filter and display
attributes according to your needs.
LDAP Name Filter:
(&(telephoneNumber=%s)(sn=%))
LDAP Number Filter: (&(telephoneNumber=%s)(sn=*))
Server Addr
ess: 192.168.200.254 #####this setting is relate with the server
configuration.
Port: 389 #####this setting is relate with the server
configuration. Base: dc=Escene,dc=cn #####this setting is relate with
the server configuration. User Name:
cn=manager,dc=escene,dc=cn #####this
setting is relate with the server
configuration.
Password: ***** #####this setting is relate with the server
configuration. Max.Hits:
50
LDAP Name Attributes: cn sn displayName
LDAP Number Attributes:
Mobile telephoneNumber ipPhone
Protocol: Version 3 #####this setting is relate with the server
configuration.
Search
Delay(ms)(0~2000): 0
LDAP Lookup
for Incoming Call: Enabled
LDAP
Sorting Results:
Enabled
Page 73
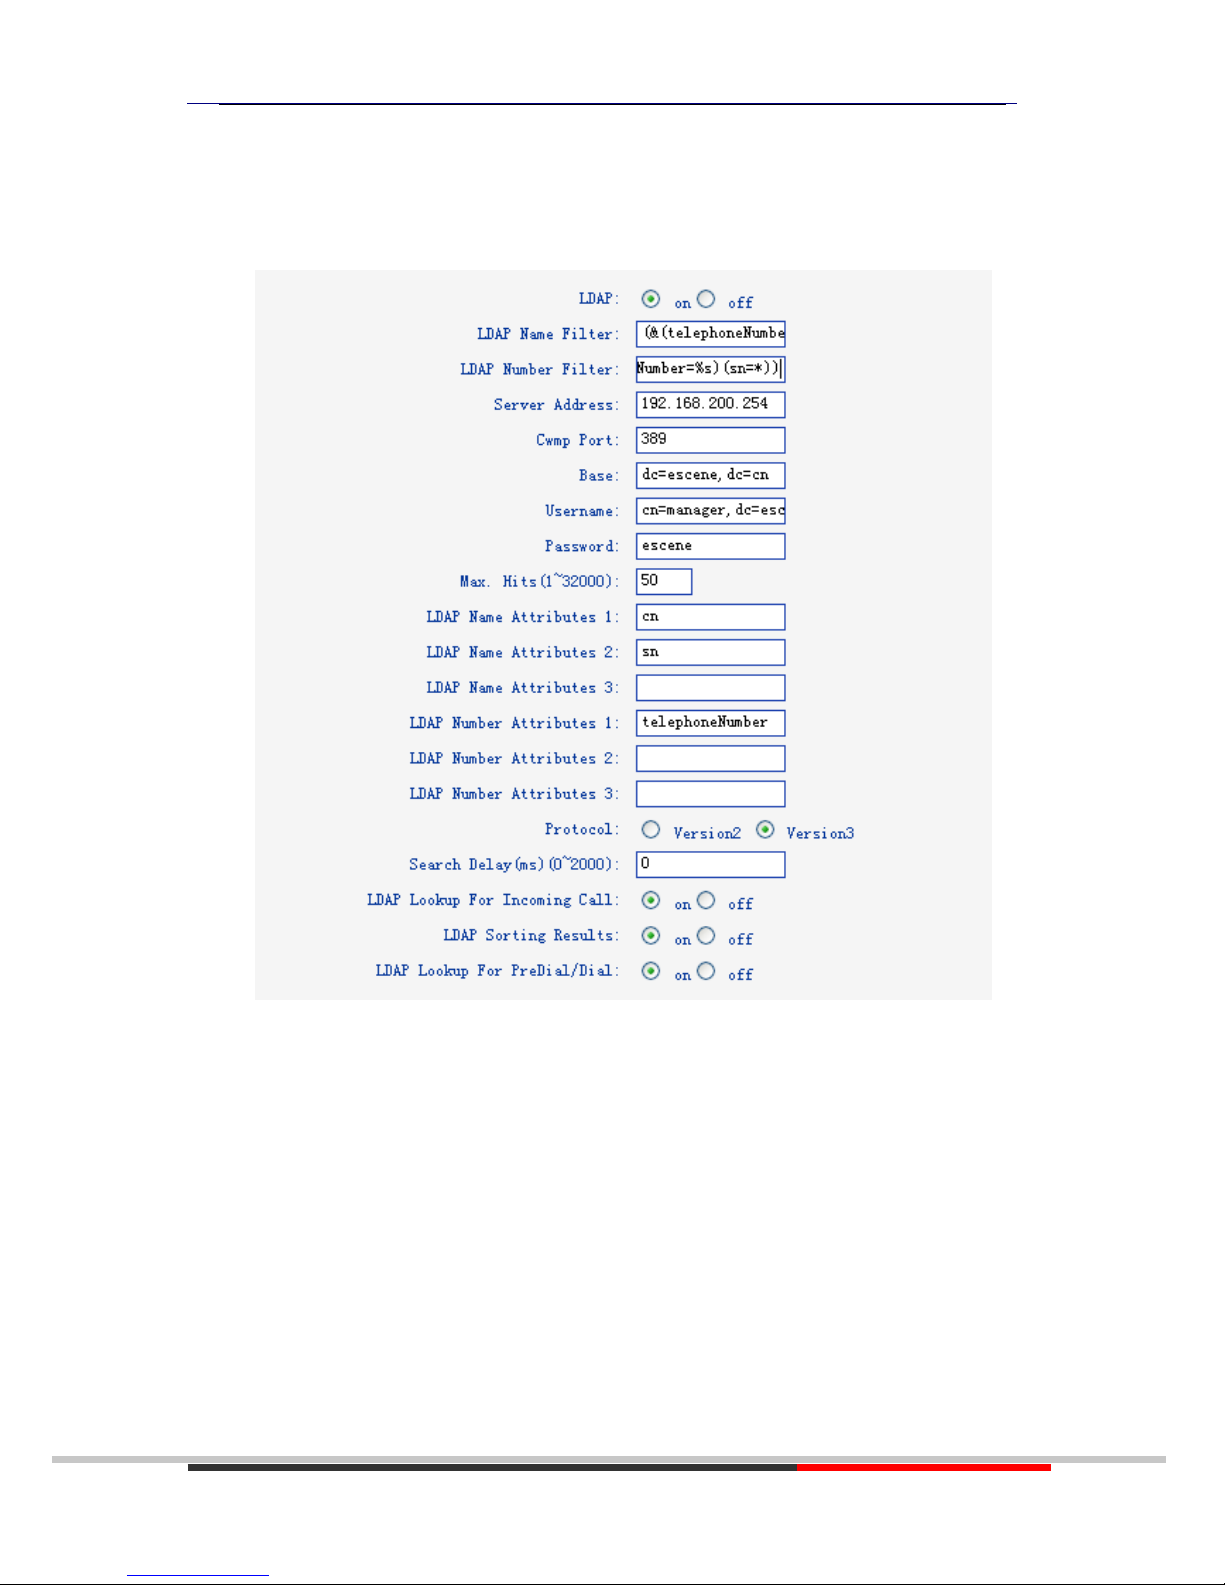
ES320 IP-Phone
www.escene.ru
Escene Communication
73
73
LDAP Lookup
for Pr
eDial/Dial: Enabled
4. Configuration on
Escene Phon
e
5. LDAP Server Installation
5.1Install OpenLDAP Server on Windows 2003 System
Install “openldap-2.2.29-db-4.3.29-openssl-0.9.8a-win32_Setup.exe”
according to default prompt,please remember the install path for next
steps.
1. Double click the install program to run the installation.
Page 74
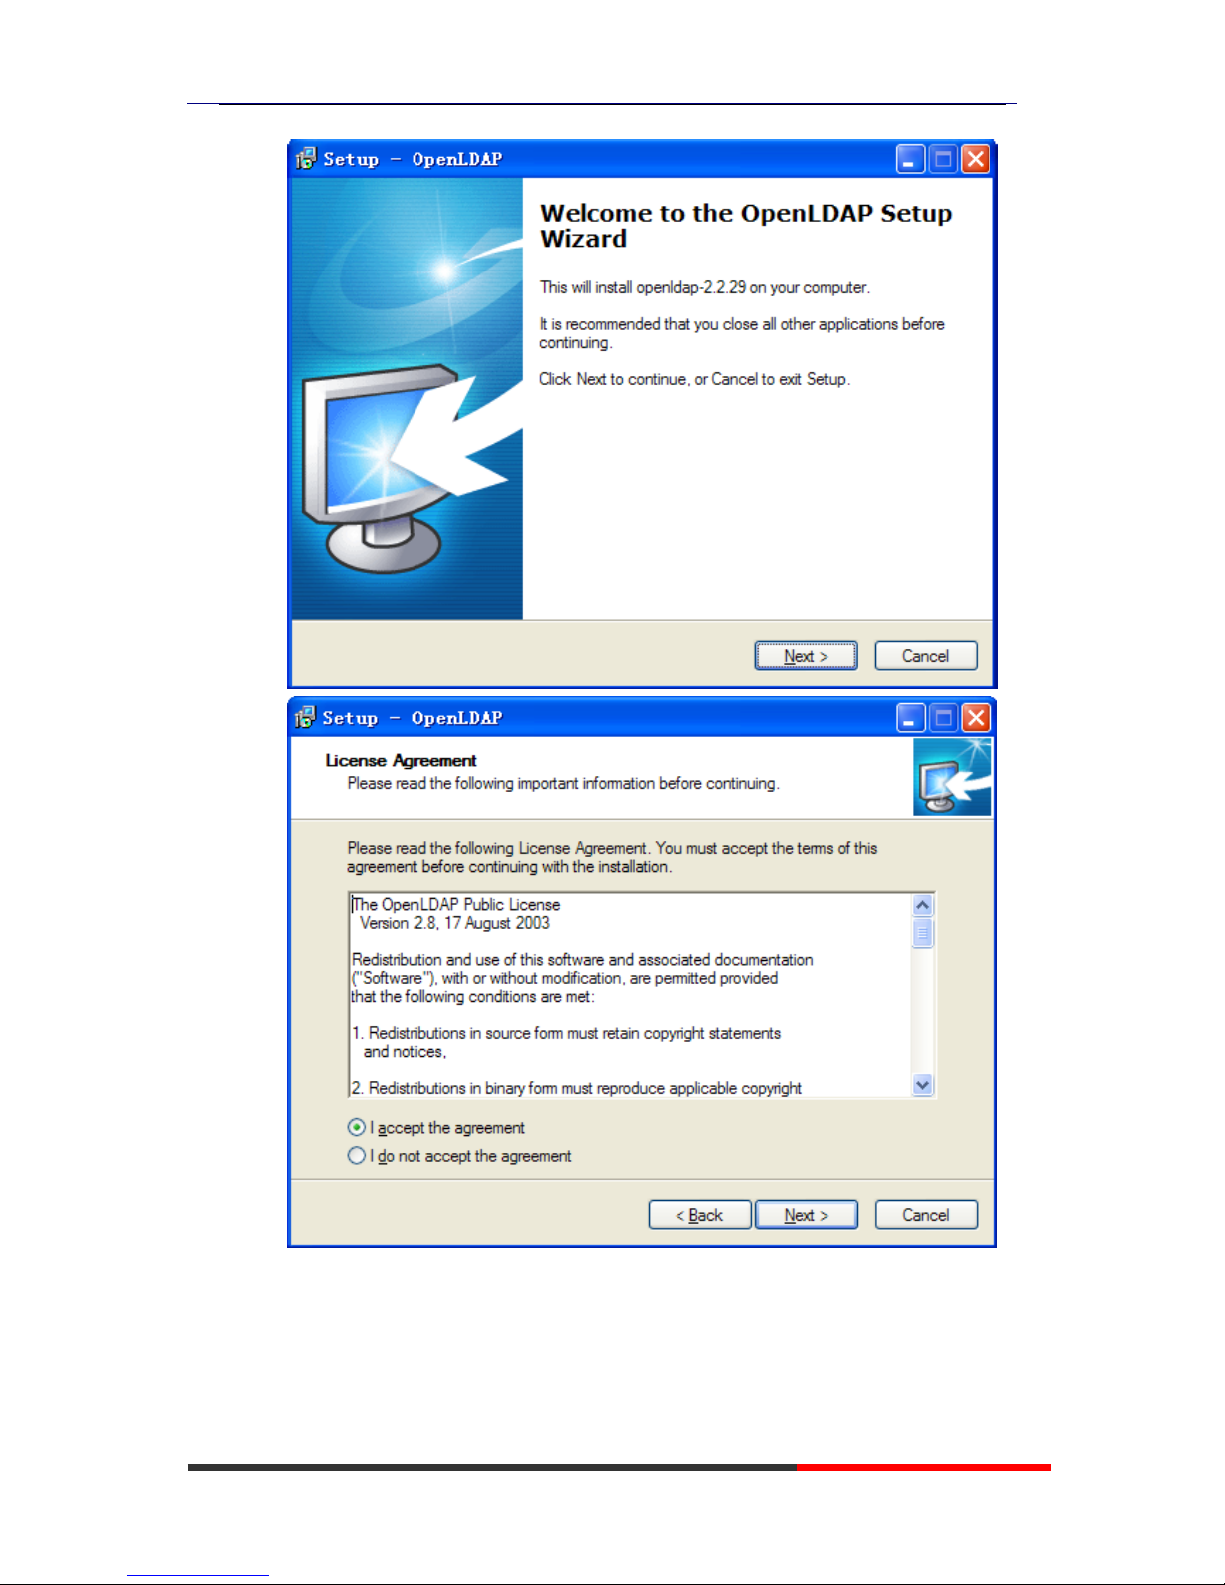
ES320 IP-Phone
www.escene.ru
Escene Communication
74
74
2. Please remember the install path. E.g. C:\Program Files\OpenLDAP.
Page 75
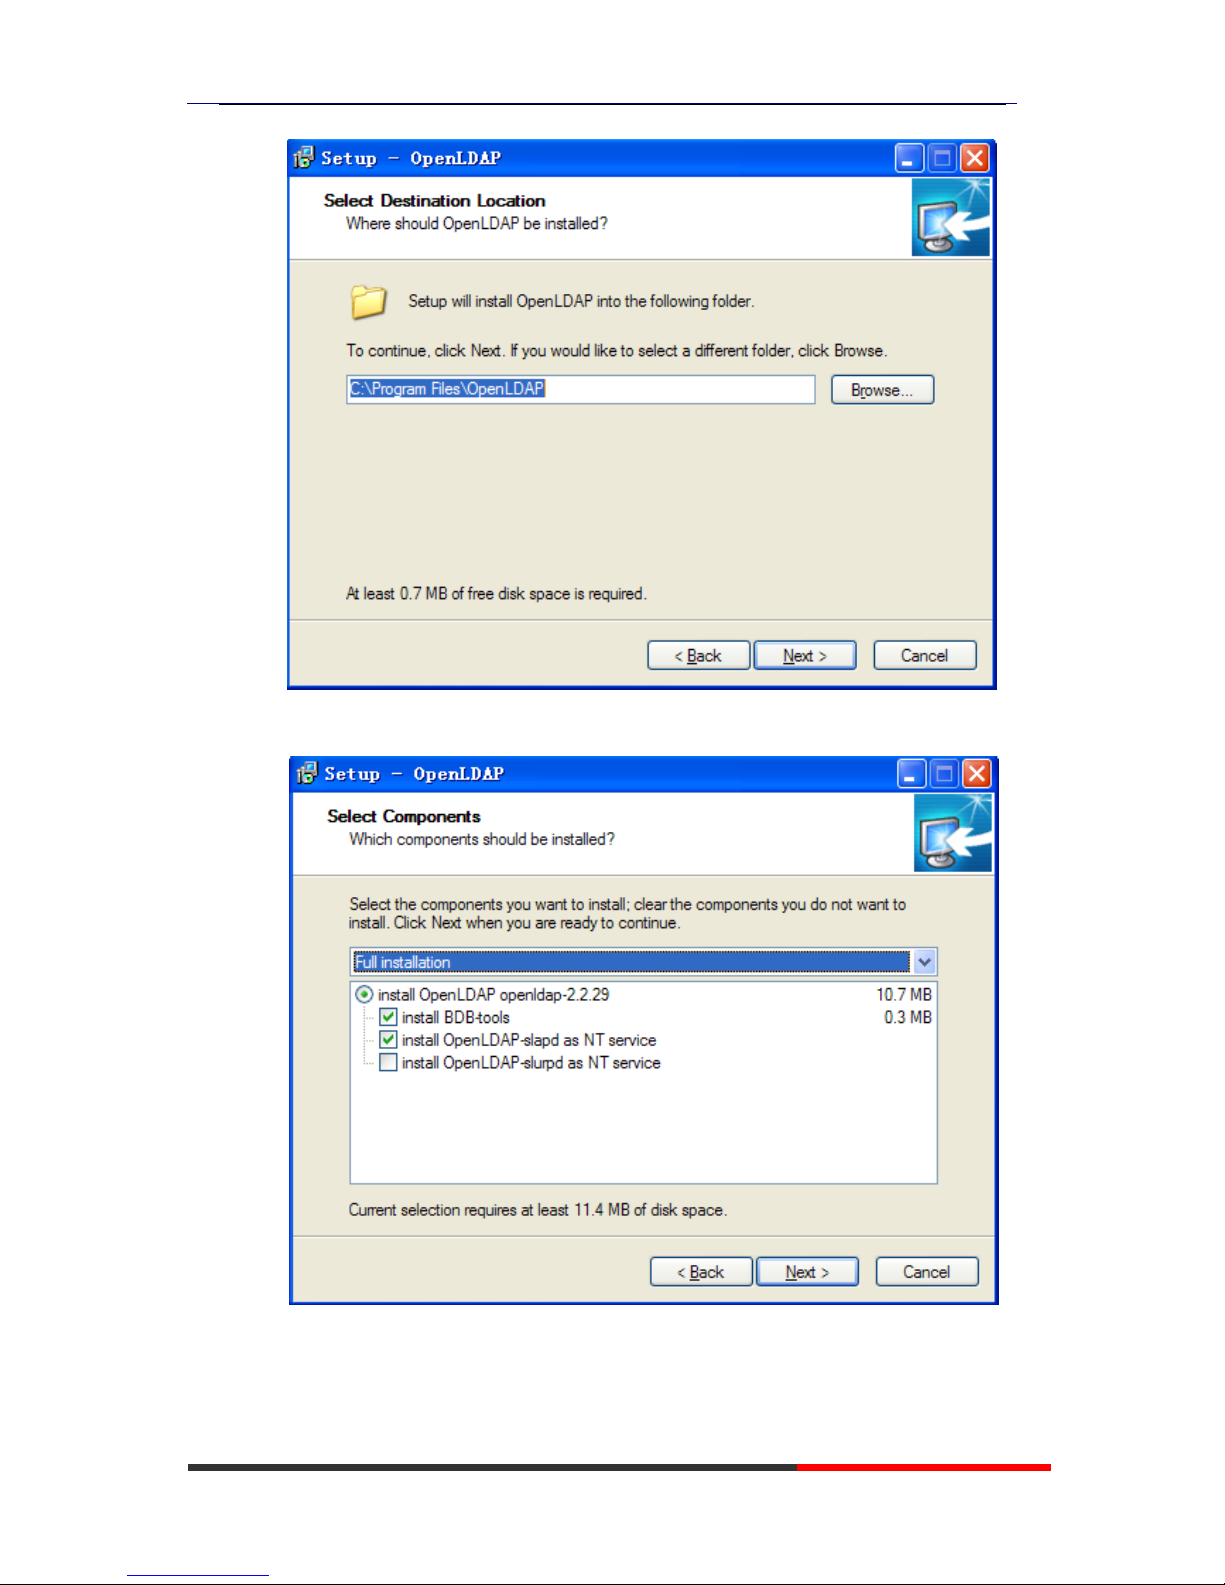
ES320 IP-Phone
www.escene.ru
Escene Communication
75
75
3. Choose the [Full installation] mode as picture.
Page 76
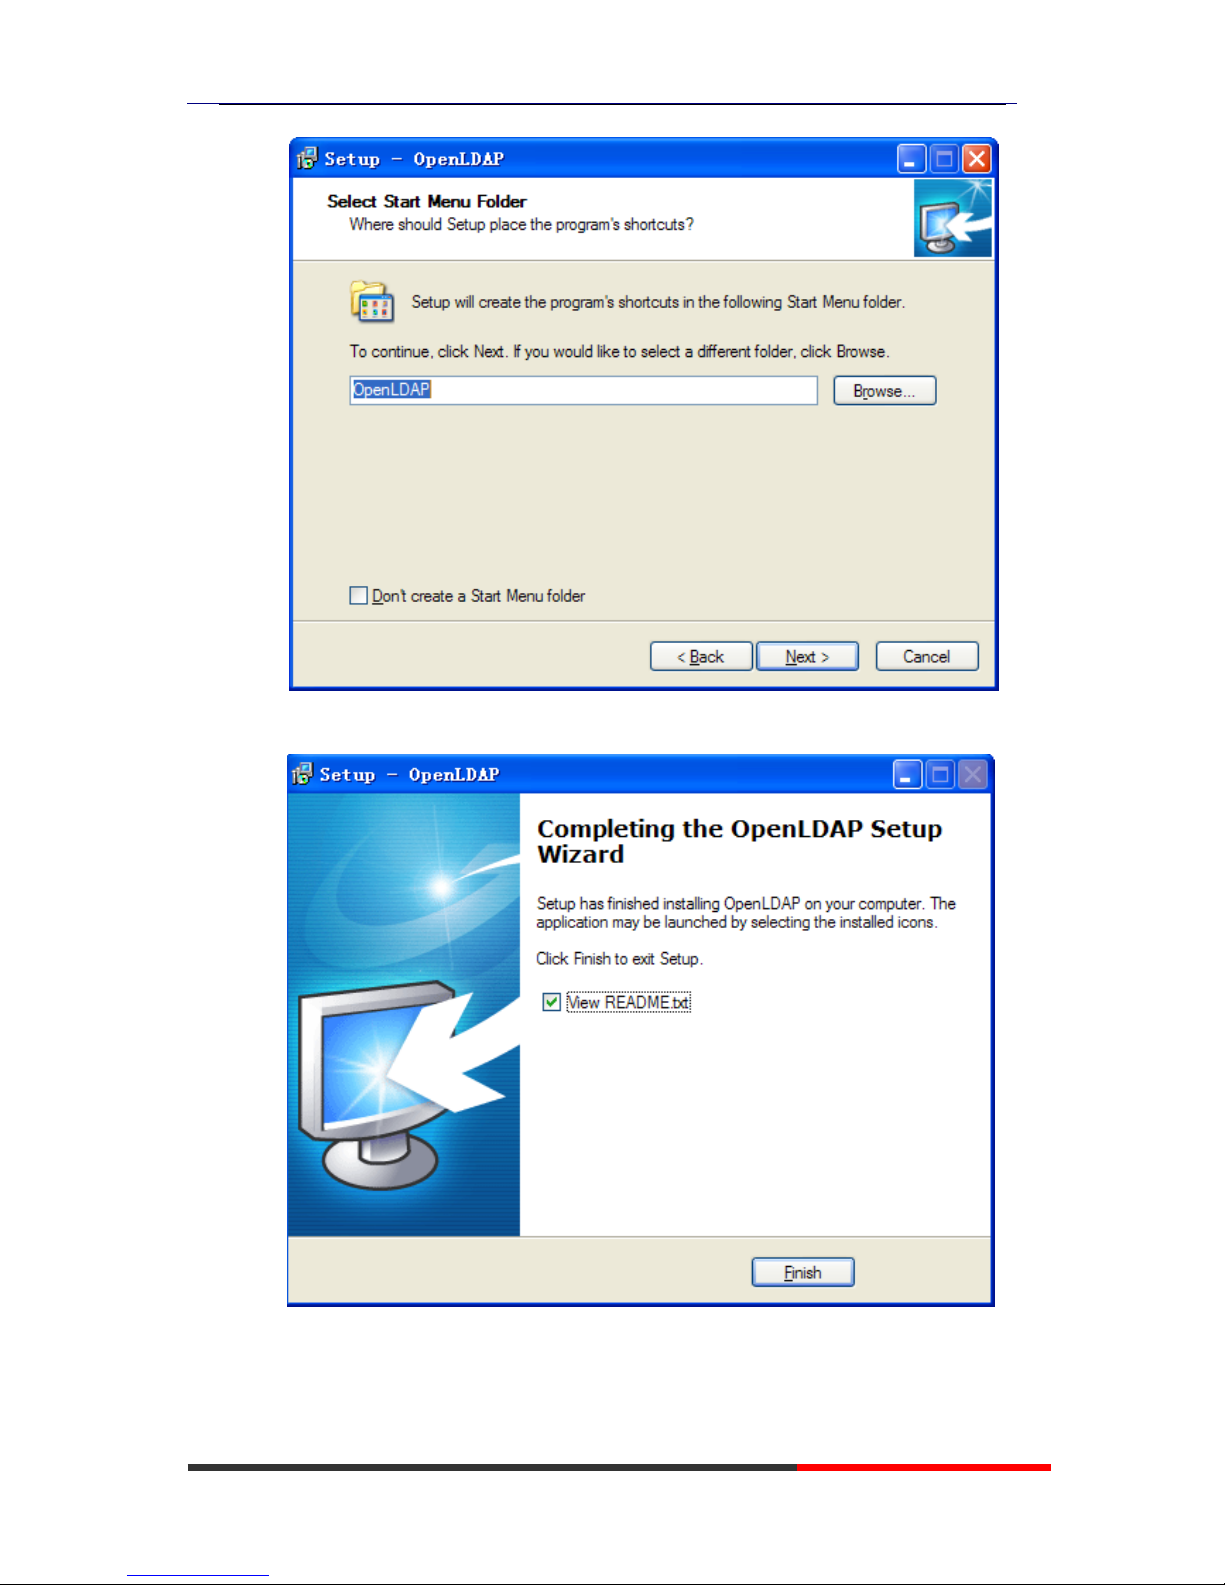
ES320 IP-Phone
www.escene.ru
Escene Communication
76
76
Page 77
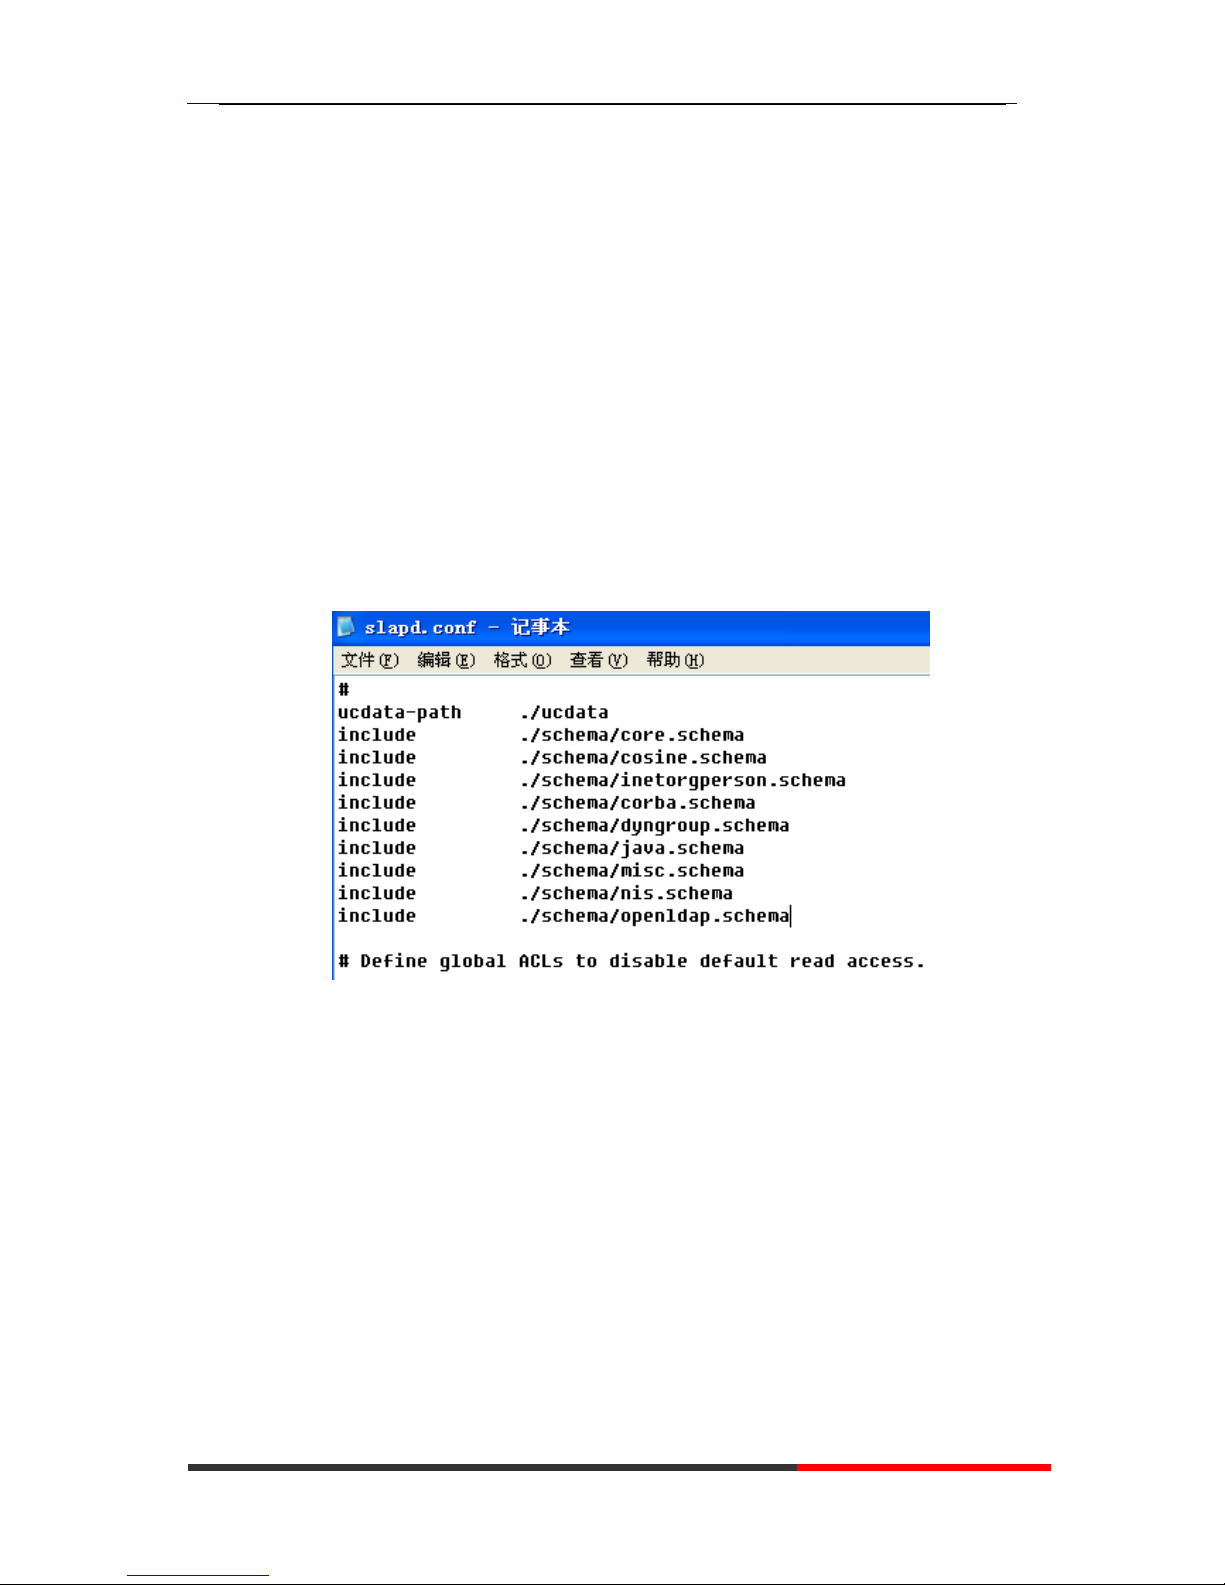
ES320 IP-Phone
www.escene.ru
Escene Communication
77
77
5.2Configure OpenLDAP
Server
5.2.1 Configur
e sl
apd
.conf file
1. Add “schema” in slapd.conf file
Access to the install path (for example,C:\Program
Files\OpenLDAP),open the file names slapd.conf,find the command
include ./schema/core.schema
Add the other commands like:
include ./schema/cosine.schema
include ./schema/inetorgperson.schema
include ./schema/corba.schema
include ./schema/dyngroup.schema
include ./schema/java.schema
include ./schema/misc.schema
include ./schema/nis.schema
include ./schema/openldap.schema
2. Modify the LDAP directory node
Access to the install path,open the file names slapd.conf,find the
command
suffix “dc=my-domain,dc=com”
rootdn “cn=Manager,dc=my-domain,dc=com”
Please modify these two commands to following commands (please
do not have any space during the quotation marks “”):
suffix “dc=escene,dc=cn”
rootdn “cn=Manager,dc=escene,dc=cn”
Page 78
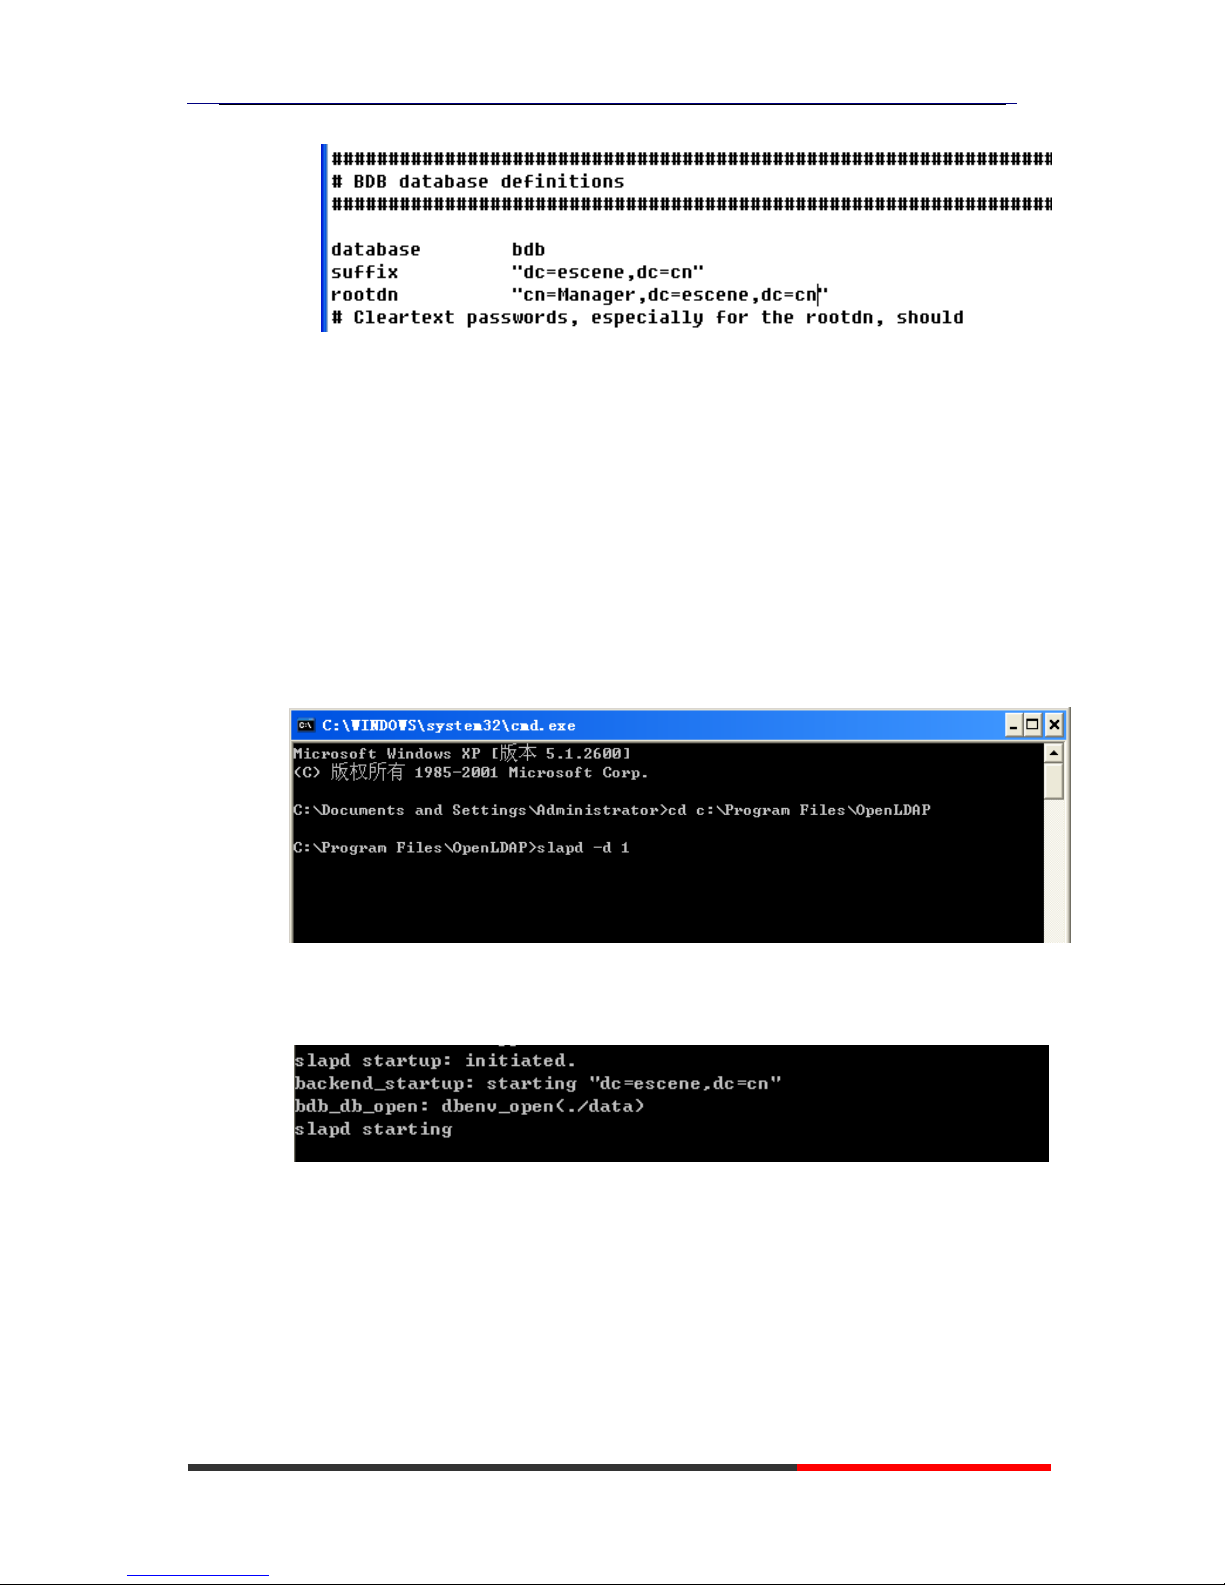
ES320 IP-Phone
www.escene.ru
Escene Communication
78
78
3. Modify the LDAP password
Access to the install path,open the file names slapd.conf,find the
command
rootpw secret
Please modify it to the password you want to set.
rootpw escene
5.2.2 Run
sl
apd
serve
r
Cmd to OpenLDAP’s install path,for example,”cd c:\Program
Files\OpenLDAP” , then run the command “slapd –d 1”
If run the server successfully,you can find the command of “slapd
starting”
NOTE:
Please do not close this window to make sure the LDAP Server keep
running.
5.2.3 Add contact
Create a plain text named “escene.ldif” in install path.
Then put the content like following:
dn: dc=escene,dc=cn
Page 79
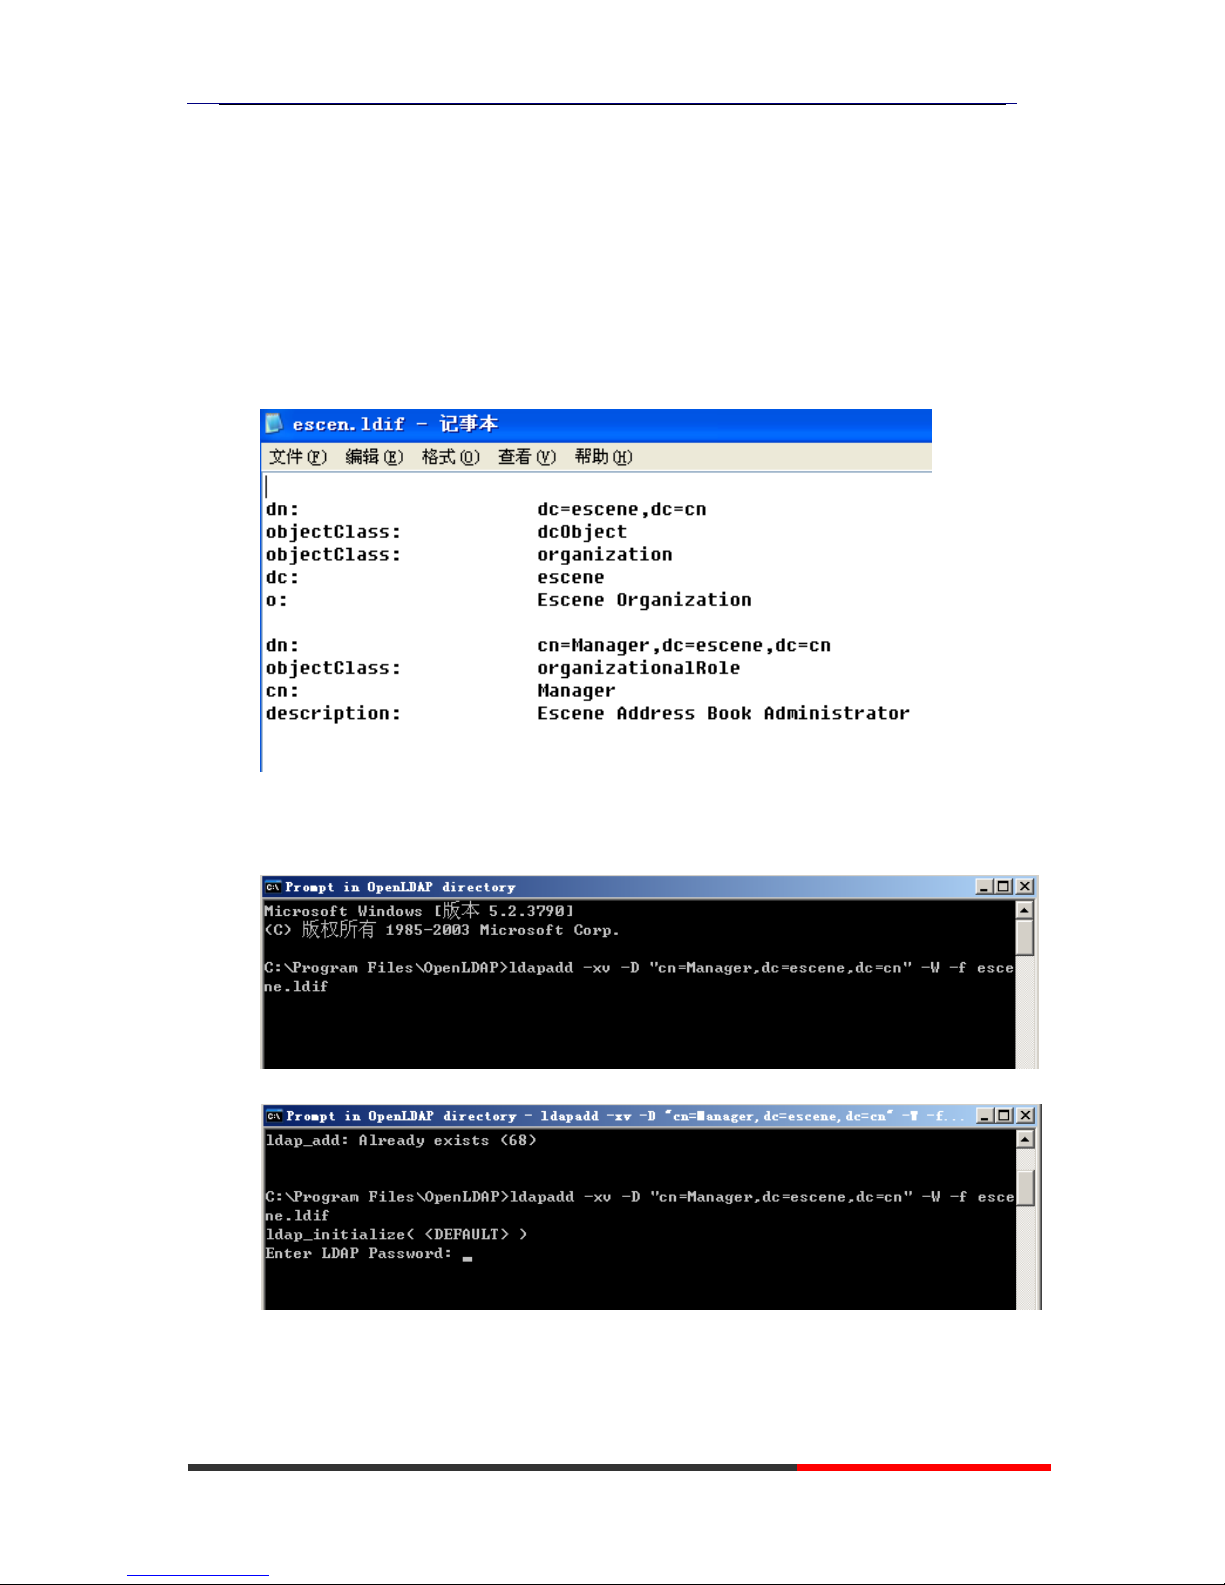
ES320 IP-Phone
www.escene.ru
Escene Communication
79
79
objectClass: dcObject
objectClass: organization
dc: escene
o: Escene Organization
dn: cn=Manager,dc=escene,dc=cn
objectClass: organizationalRole
cn: Manager
description: Escene Address Book Administrator
Cmd to execute command “ldapadd -xv –D
“cn=Manager,dc=escene,dc=cn” –W –f escene.ldif”.
Input the password you set,here is escene.
Page 80
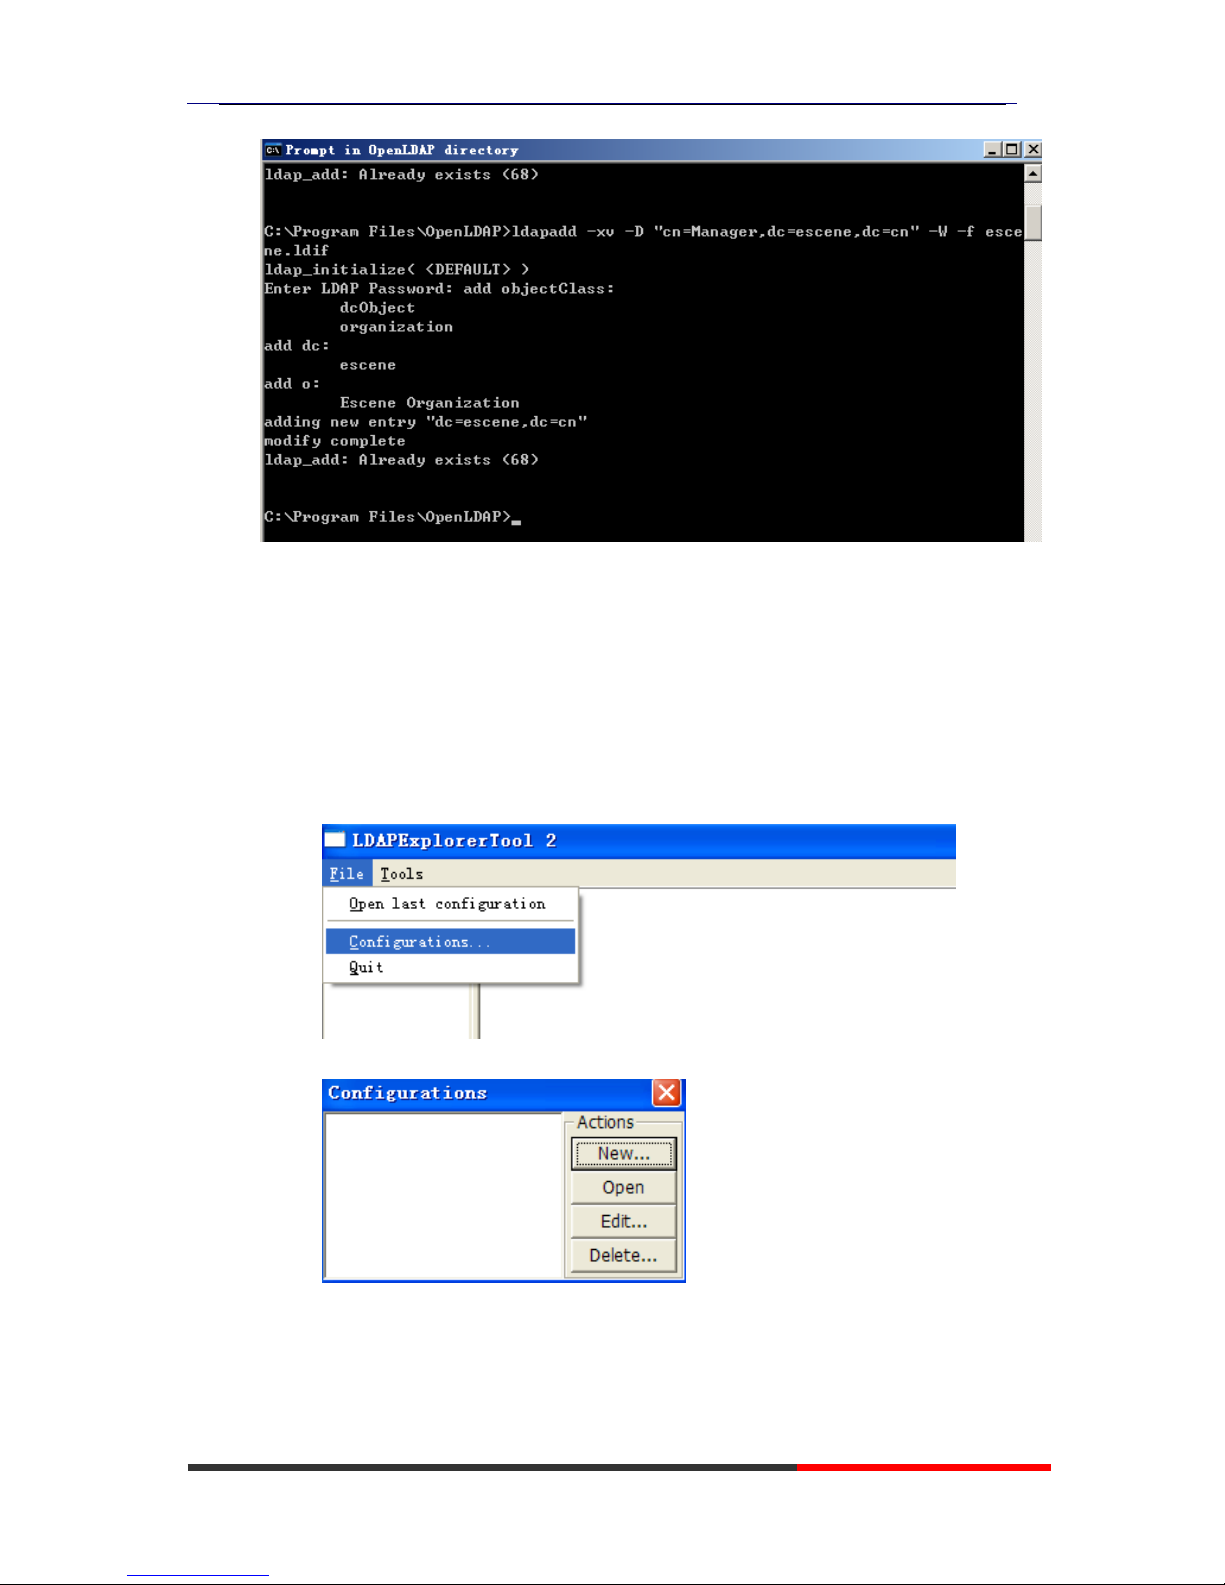
ES320 IP-Phone
www.escene.ru
Escene Communication
80
80
6. Install LDAP Client t
ool in Windows System
6.1 Install LDAPExploreTool2
Install the LDAPExploreTool2 according to the prompt.
6.2 Create the Con
figuration
s in LDAPExploreTool2
1. Run the LDAPExploreTool2,access to File→Configurations.
2. Create the New Configuration
a. Fill in a name in Configuration option
Page 81
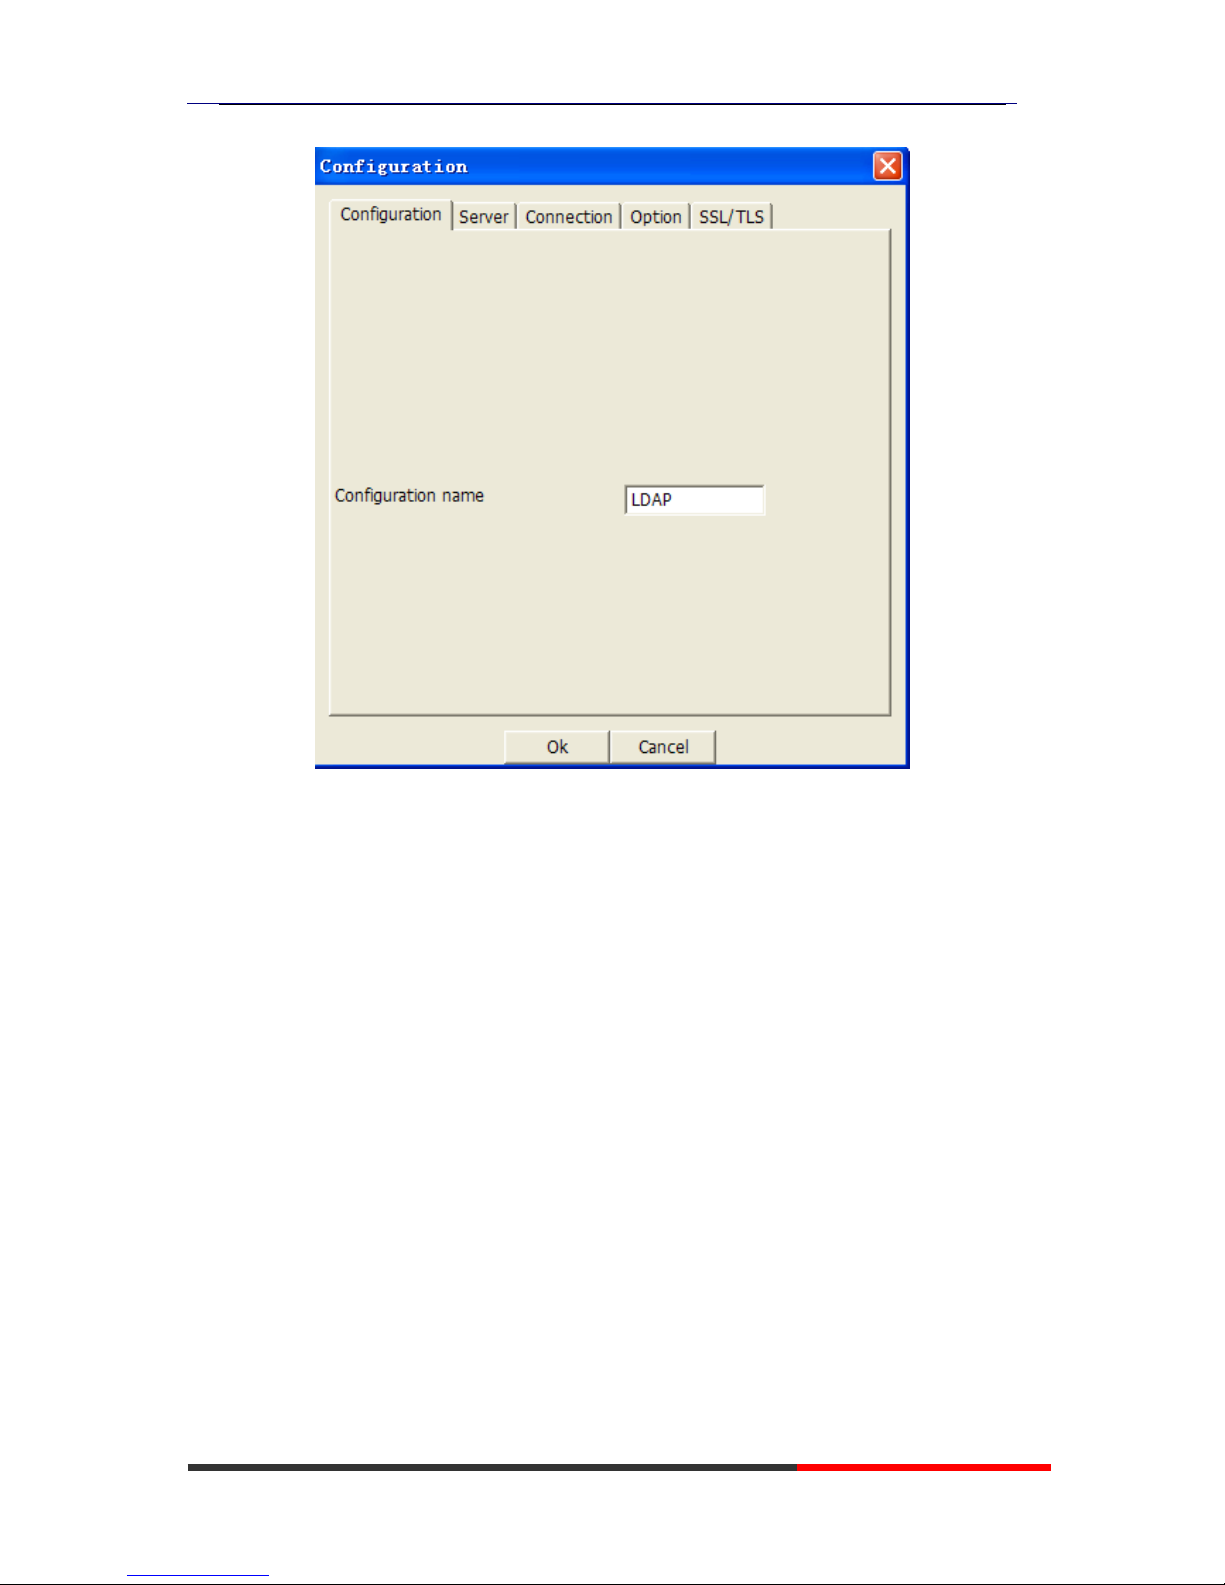
ES320 IP-Phone
www.escene.ru
Escene Communication
81
81
b. Input the server address on Server option.
Page 82
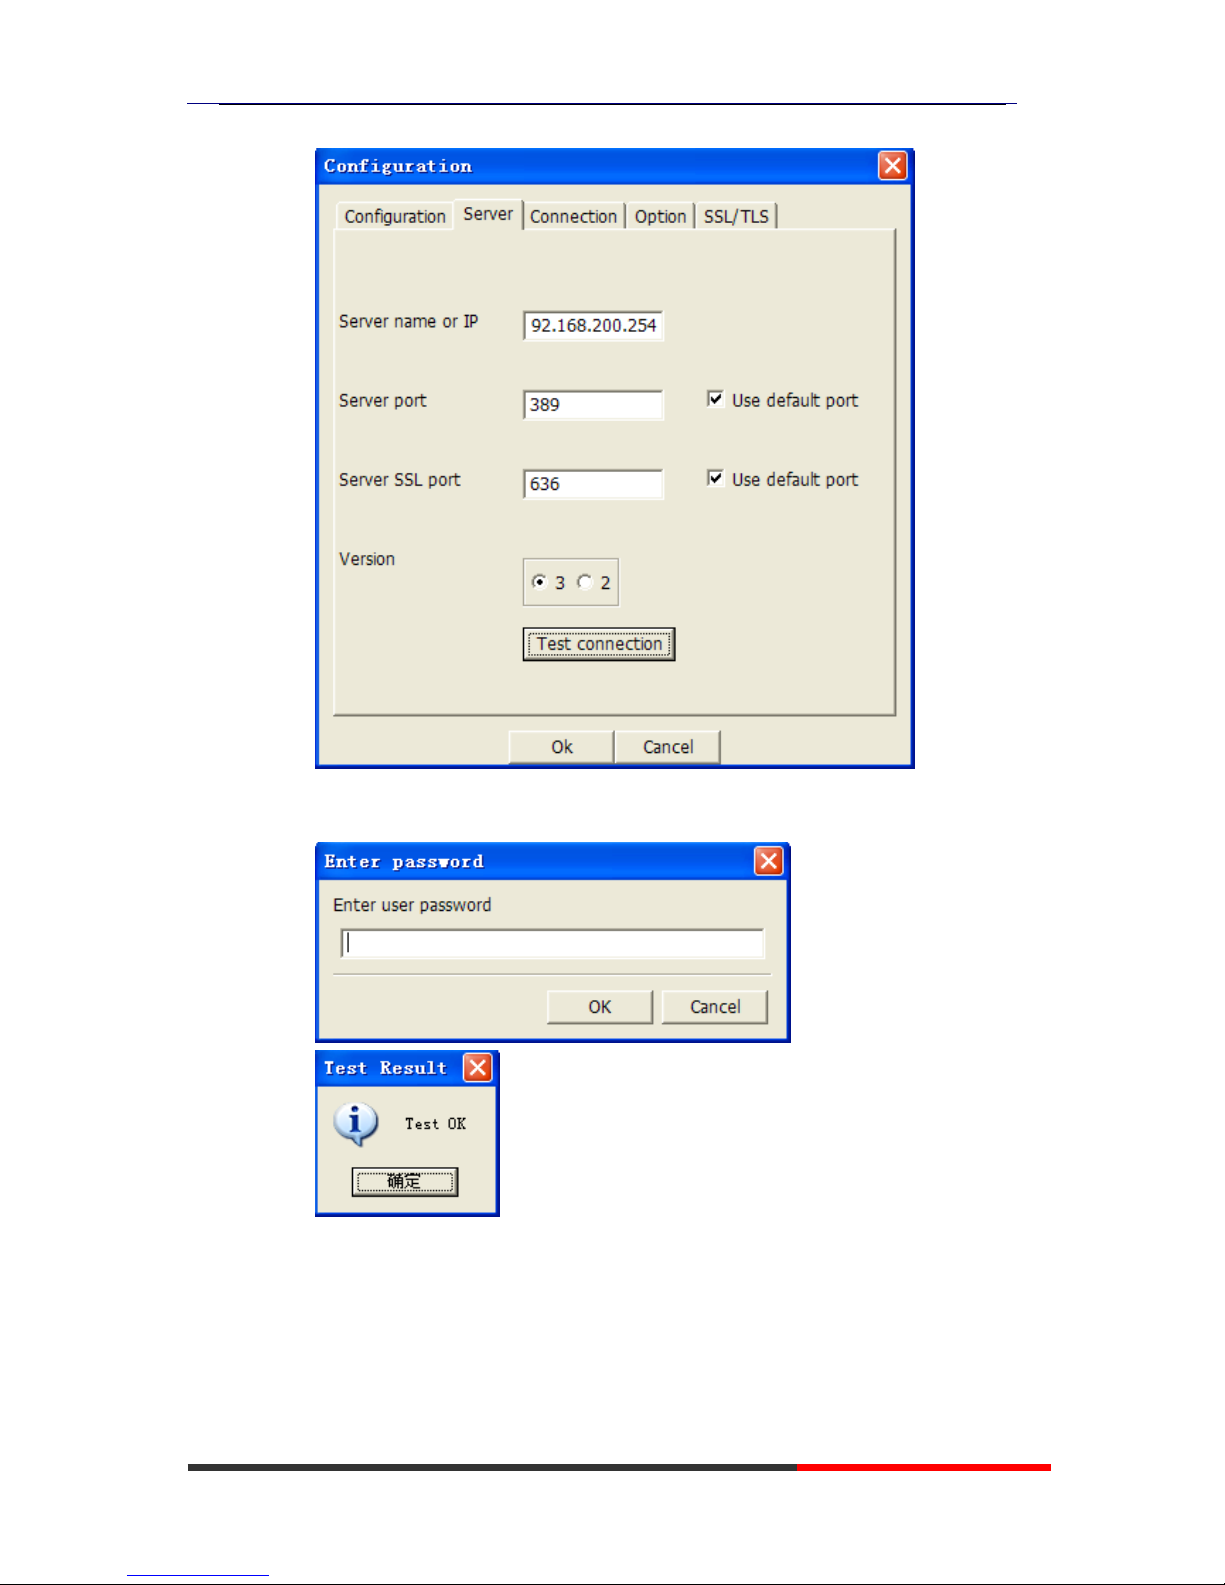
ES320 IP-Phone
www.escene.ru
Escene Communication
82
82
c. Press Test connection,the password is blank(no password),press ok,will
display Test OK.
NOTE:
Server name or IP\Server port\Version settings are relate with the
settings on escene phone.
d. Configure the “cn=Manager,dc=escene,dc=cn” on User DN,and tick
the Store password for protect your settings,enter the password
which you configure on the server.
Page 83
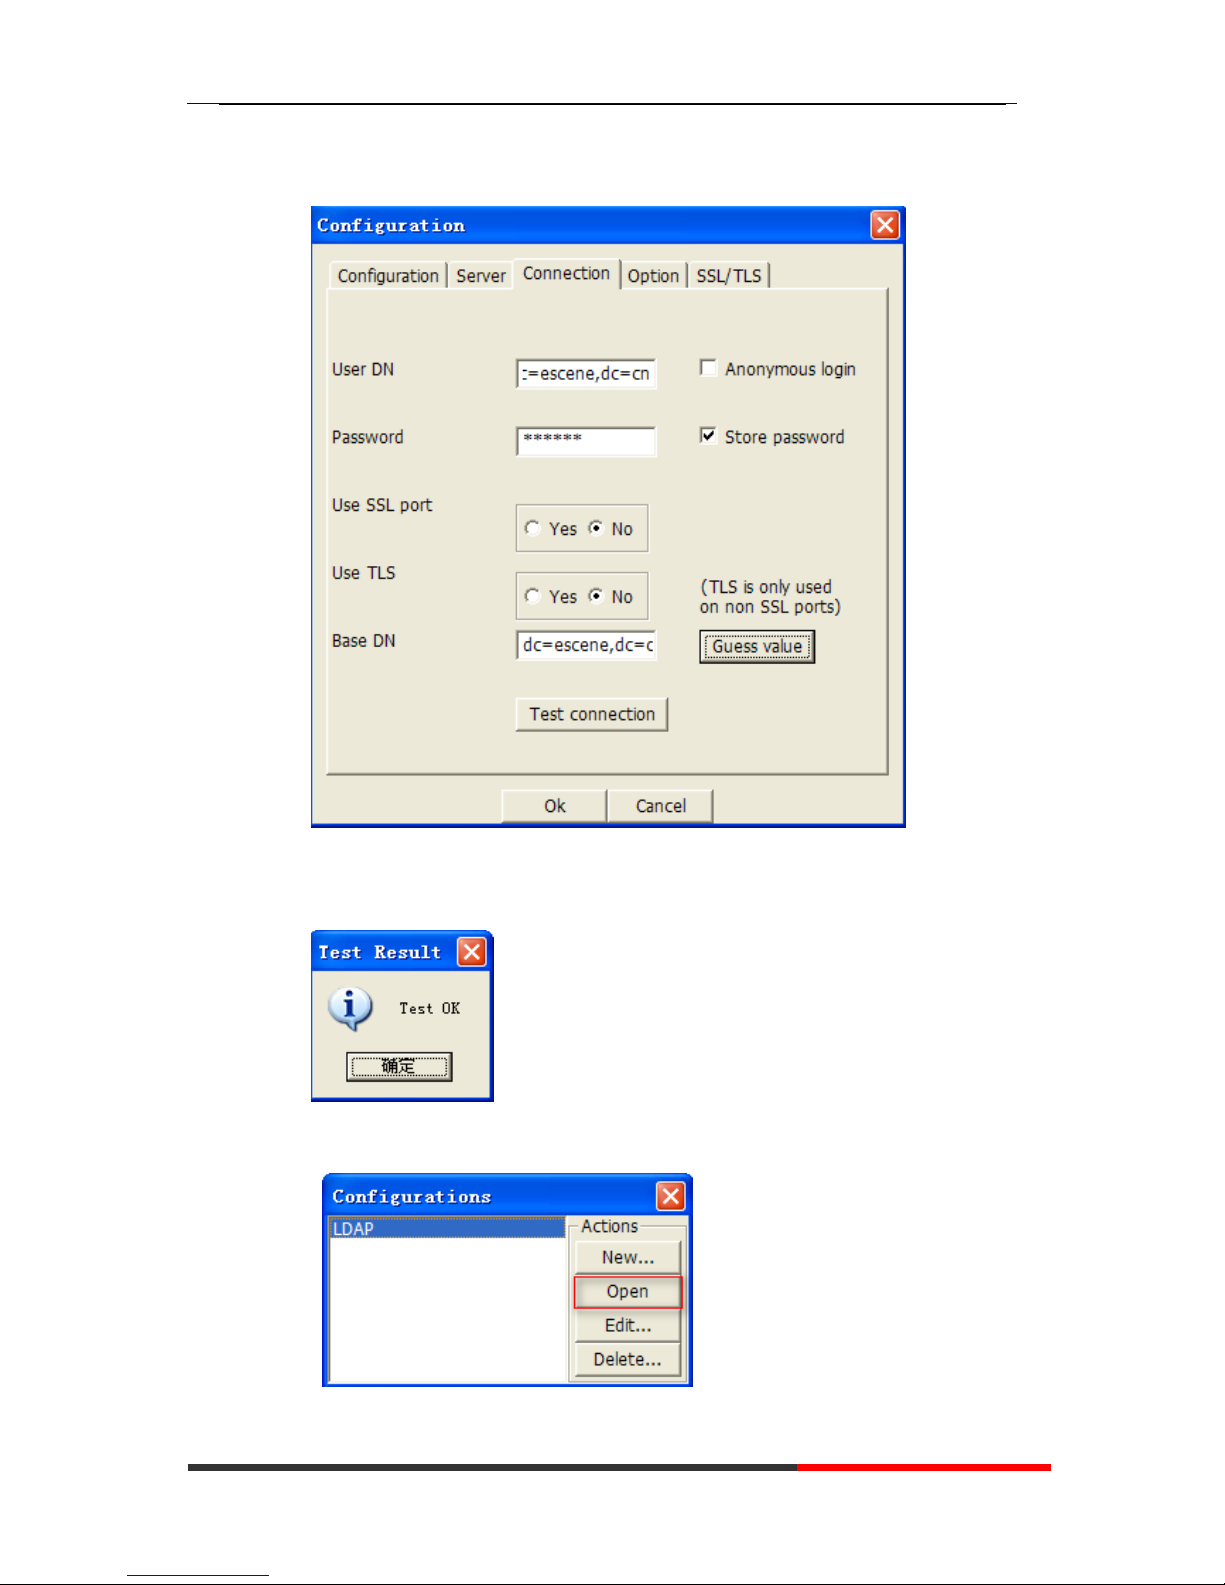
ES320 IP-Phone
www.escene.ru
Escene Communication
83
83
The Base DN will auto-configure if you press the [Guess value].
After the settings above,you can press [Test connection] to test your settings,if
it prompt warning message,please re-try the steps above again,we can
continue the next steps if the test is passed.
3. Choose the Action[LDAP],then press [Open] achieve the settings.
Then you can get the page like following picture. Please right click
Page 84
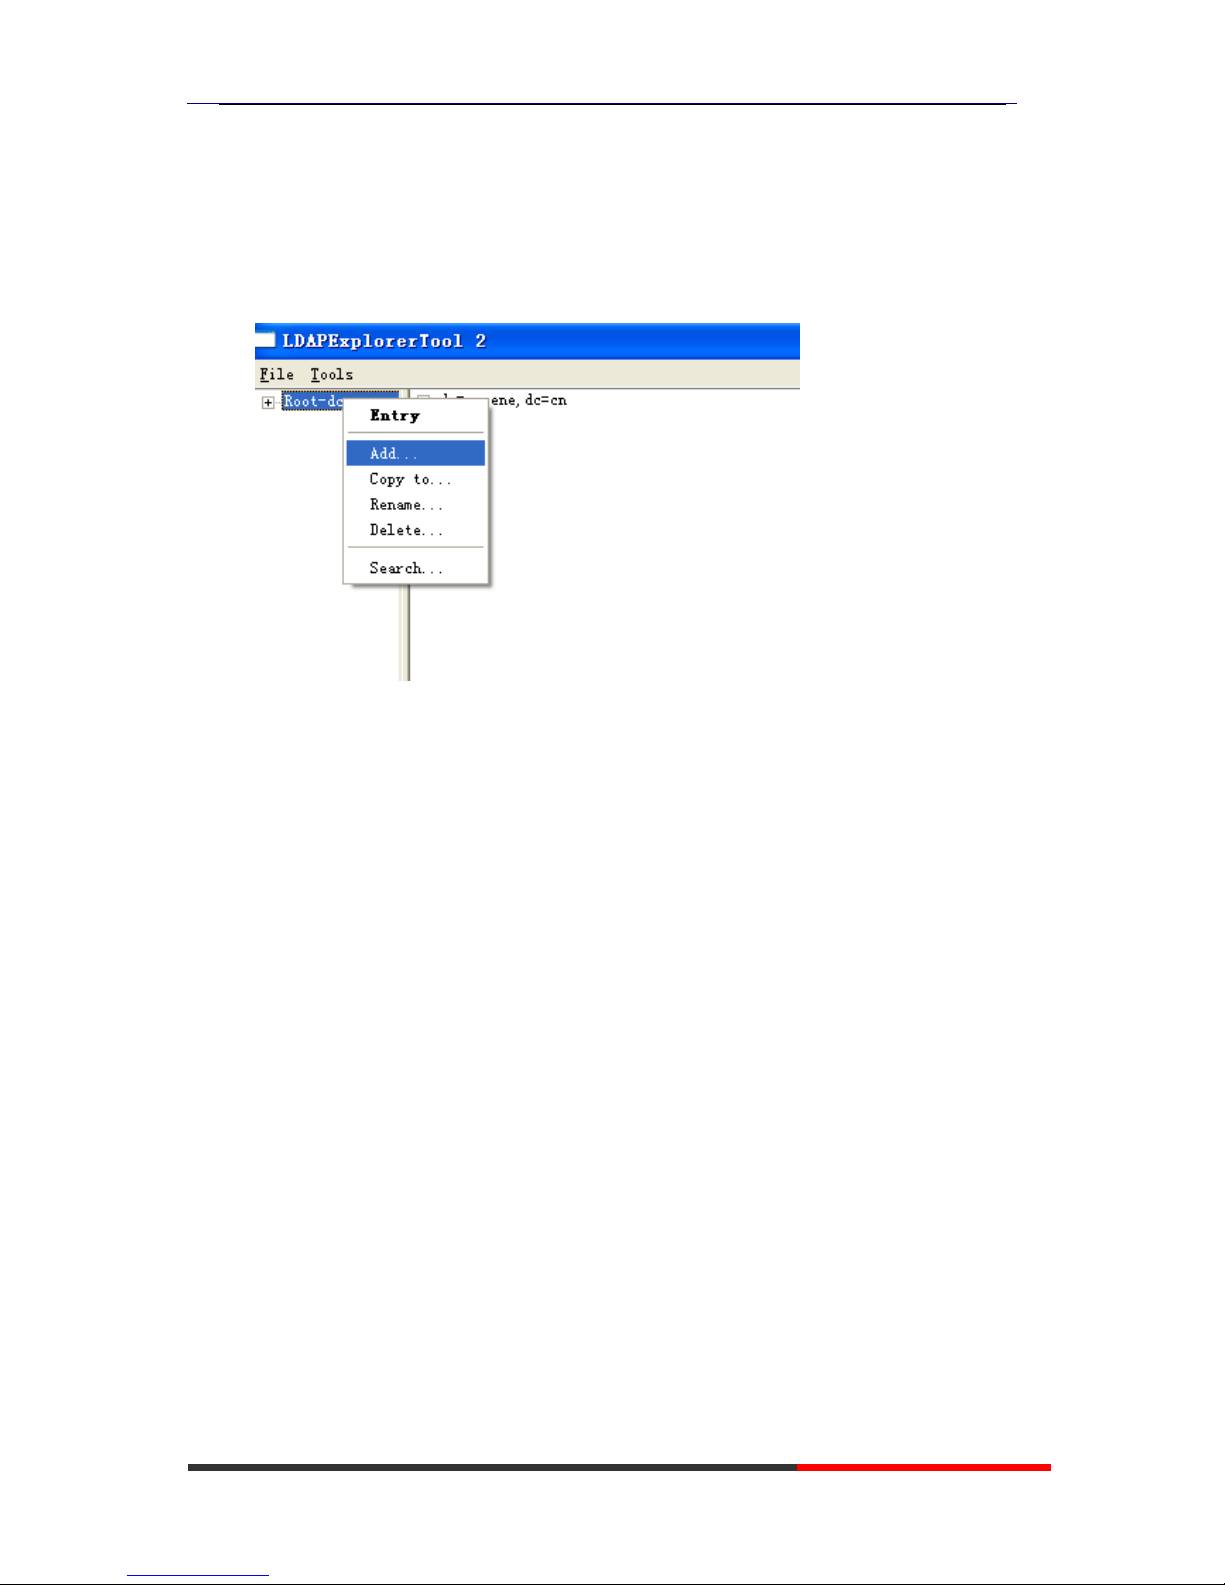
ES320 IP-Phone
www.escene.ru
Escene Communication
84
84
the action to add the contacts.
6.3 Add the Entry
1.Please right click the action to add the contacts.
2.Create new entry.
Parent DN: This setting will automatic generation according the
Configuration setting.
Entry RDN: The format is cn=XXX
Object Class(from schema): Select the structure class which entry
belongs to, each structure class has its own must attributes and may
attributes. We select [Person] for example here.
Must attributes: Double click attribute to add them to the entry node. If
need multi-cn, can be allow to repeat added.
May attributes: Double click attribute to add them to the entry node. If
need multi-Telphonenumber, can be allow to repeat added.
Page 85
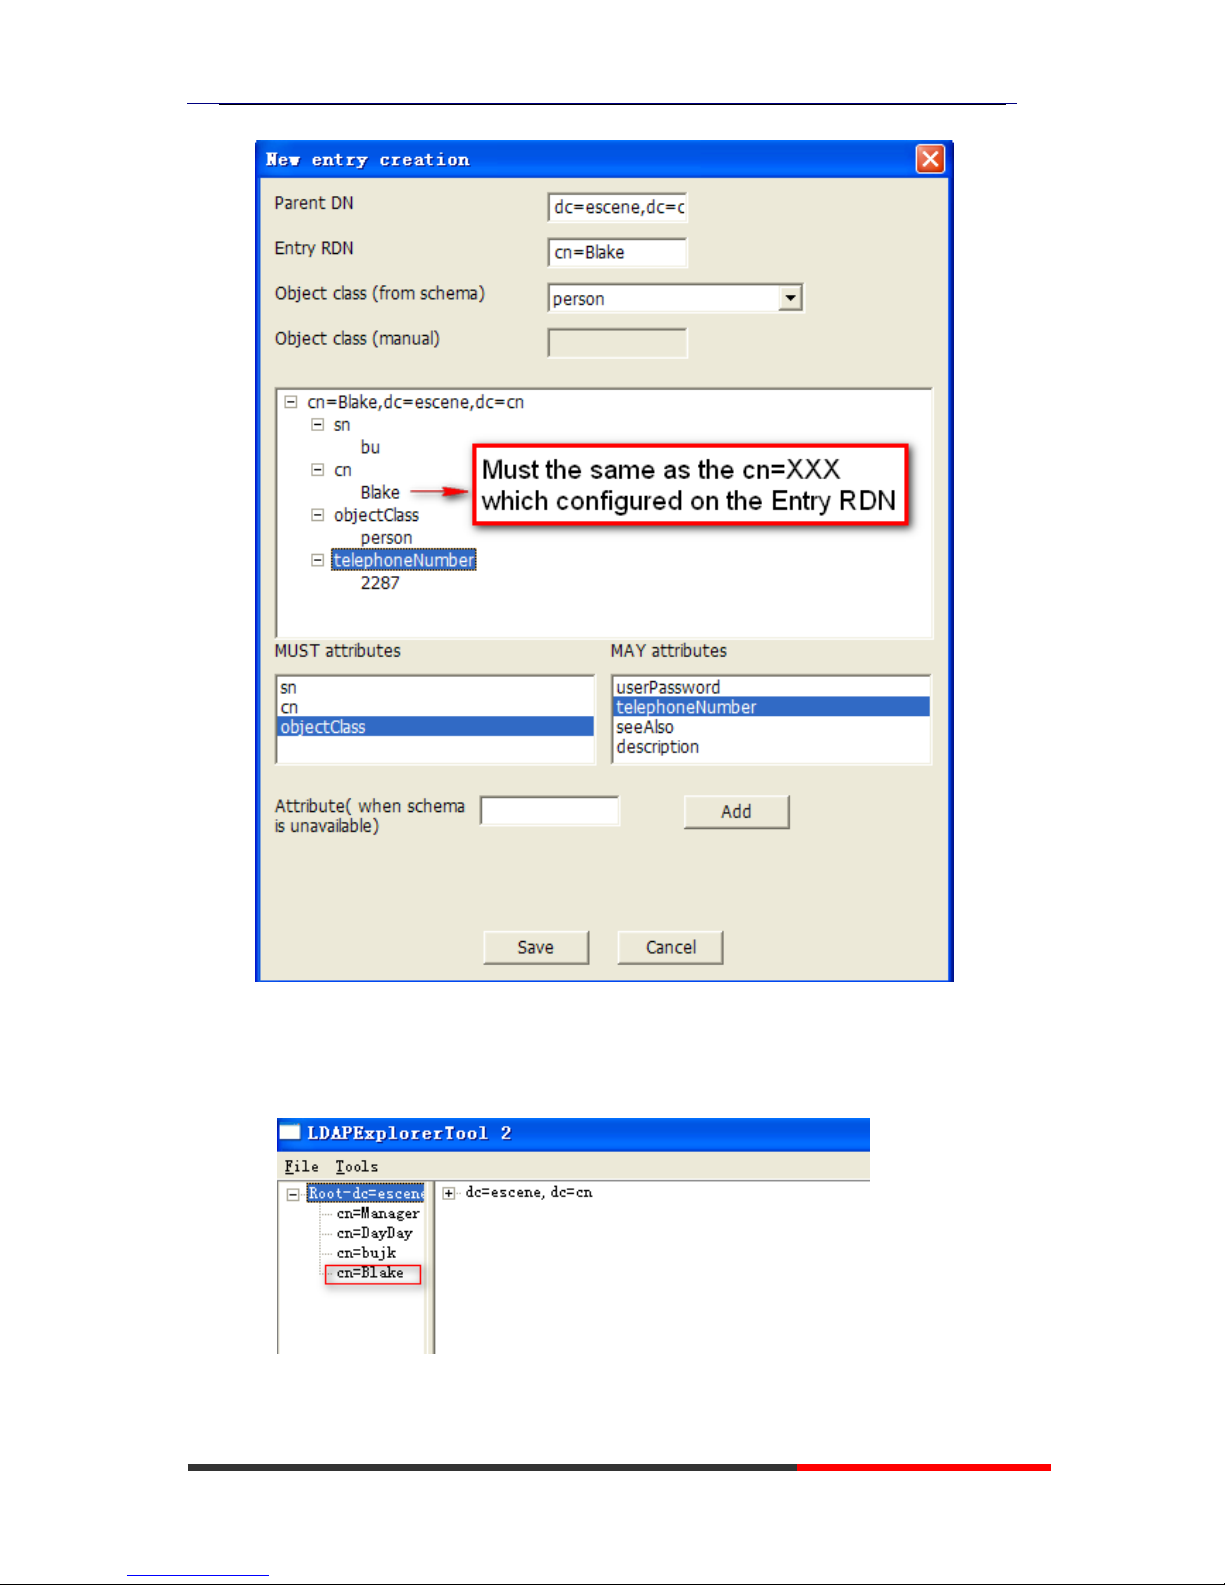
ES320 IP-Phone
www.escene.ru
Escene Communication
85
85
Please notice the note label on the picture above.
After save the settings, you can find the new added entry at the left of the
LDAP catalogue.
3.You can add more contact entries by these steps.
Page 86

ES320 IP-Phone
www.escene.ru
Escene Communication
86
86
------------------------------------------------------------------------------------------------------------
EEsscceennee вв РРооссссииии
 Loading...