

Escalade sports T8292 User Manual
OWNER'S
MANUAL
MODEL NOS.
EUROTECH
T8292
CAUTION
Thank you for buying our product. We try hard to insure that our products are of high
quality and free of problems, such as manufacturing defects or missing parts.
However, if you have any problems with your new product, please call us at:
TOLL FREE 1-866-873-3528
(THIS IS A CONSUMER ONLY NUMBER)
Please be sure to have this owner's manual with you when you call.
Or write us at:
CUSTOMER SERVICE DEPT., P.O. Box 889, Evansville, IN 47706
Fax Number: (812) 467-1399
Please provide model number and/or part number (not just the key number) of the product and/
or part when you call or write. These numbers can be found on the product, packaging, and/or in
this Owner’s Manual (Parts list can be found on the back page of this Owner's Manual).
READ THESE
INSTRUCTIONS
CAREFULLY!
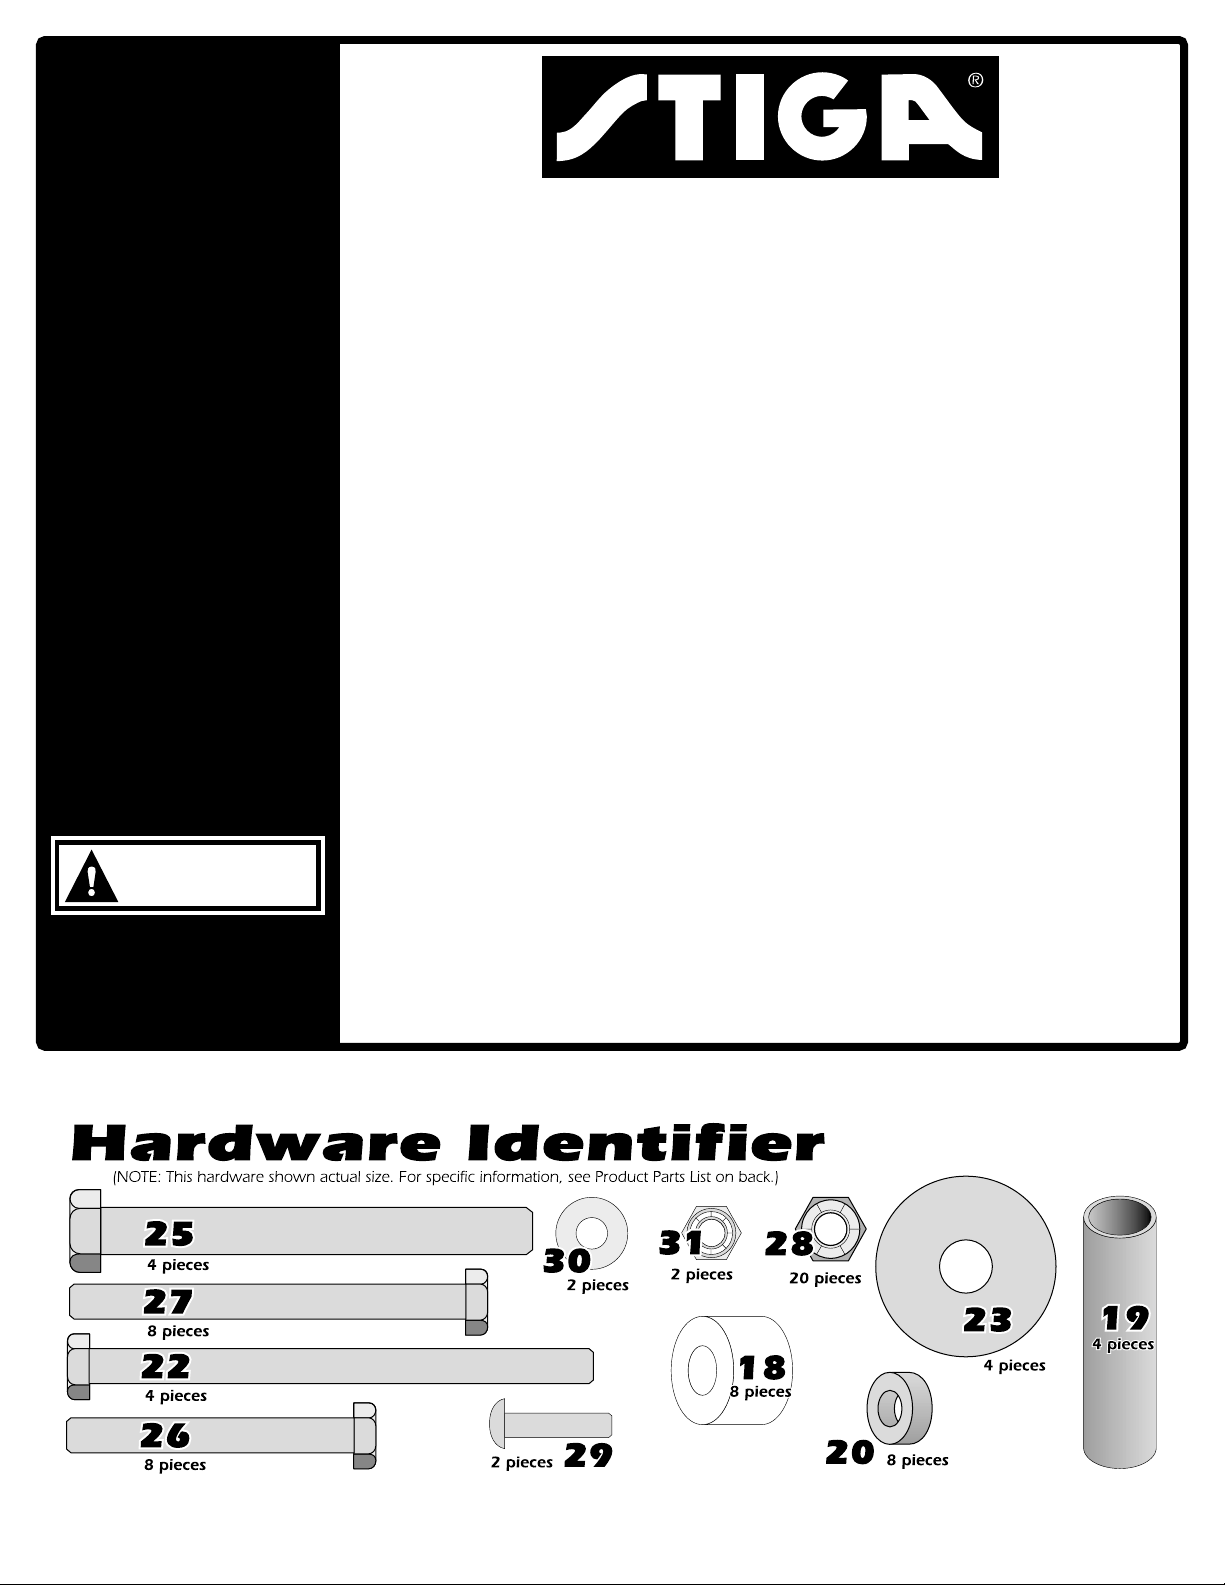
Tools Needed: ! Two 7/16 Open \ Boxed End Wrenches ! Two ½ Wrenches
! Tape Measure ! Two 9/16 Open \ Boxed End Wrenches
2L-6545-01

1. ATTACHING LEGS TO TABLE TOPS
AT LEAST TWO ADULTS ARE NEEDED TO
CAUTION
COMPLETE THE FOLLOWING STEPS!
1. Leave top halves #1 in shipping carton as shown
above or lay them on a carpeted floor (
them from damage and scratches
2. Attach leg assembly #10 to brackets #6 located
on the bottom of the first top half #1. (See above).
Use bolts #27, spacers #20 and locknuts #28.
(See Detail A).
NOTE: Be sure brace on leg assembly #10 is
against table. (See Detail B).
Tighten these locknuts snug but DO NOT
OVERTIGHTEN THEM. JOINT MUST MOVE!
3. Put caps #21 on bottom end of leg assembly
#10. (See Detail C).
to protect
).
4. Attach upright assembly #11 to remaining
brackets #6 on the bottom of the first top half #1.
(See above). Use bolts #26, spacers #20, and
locknuts #28. (See Detail D). Tighten locknuts
snug but DO NOT OVERTIGHTEN THEM.
JOINT MUST MOVE!
5. With a helper, set the first top half #1 on its side
against a wall. (
cardboard, cloth, or carpeting on the floor first to
protect the top's edges.
half #1 over and repeat steps 2-4 to assemble it.
2
Be sure to put a piece of
) Turn the second top
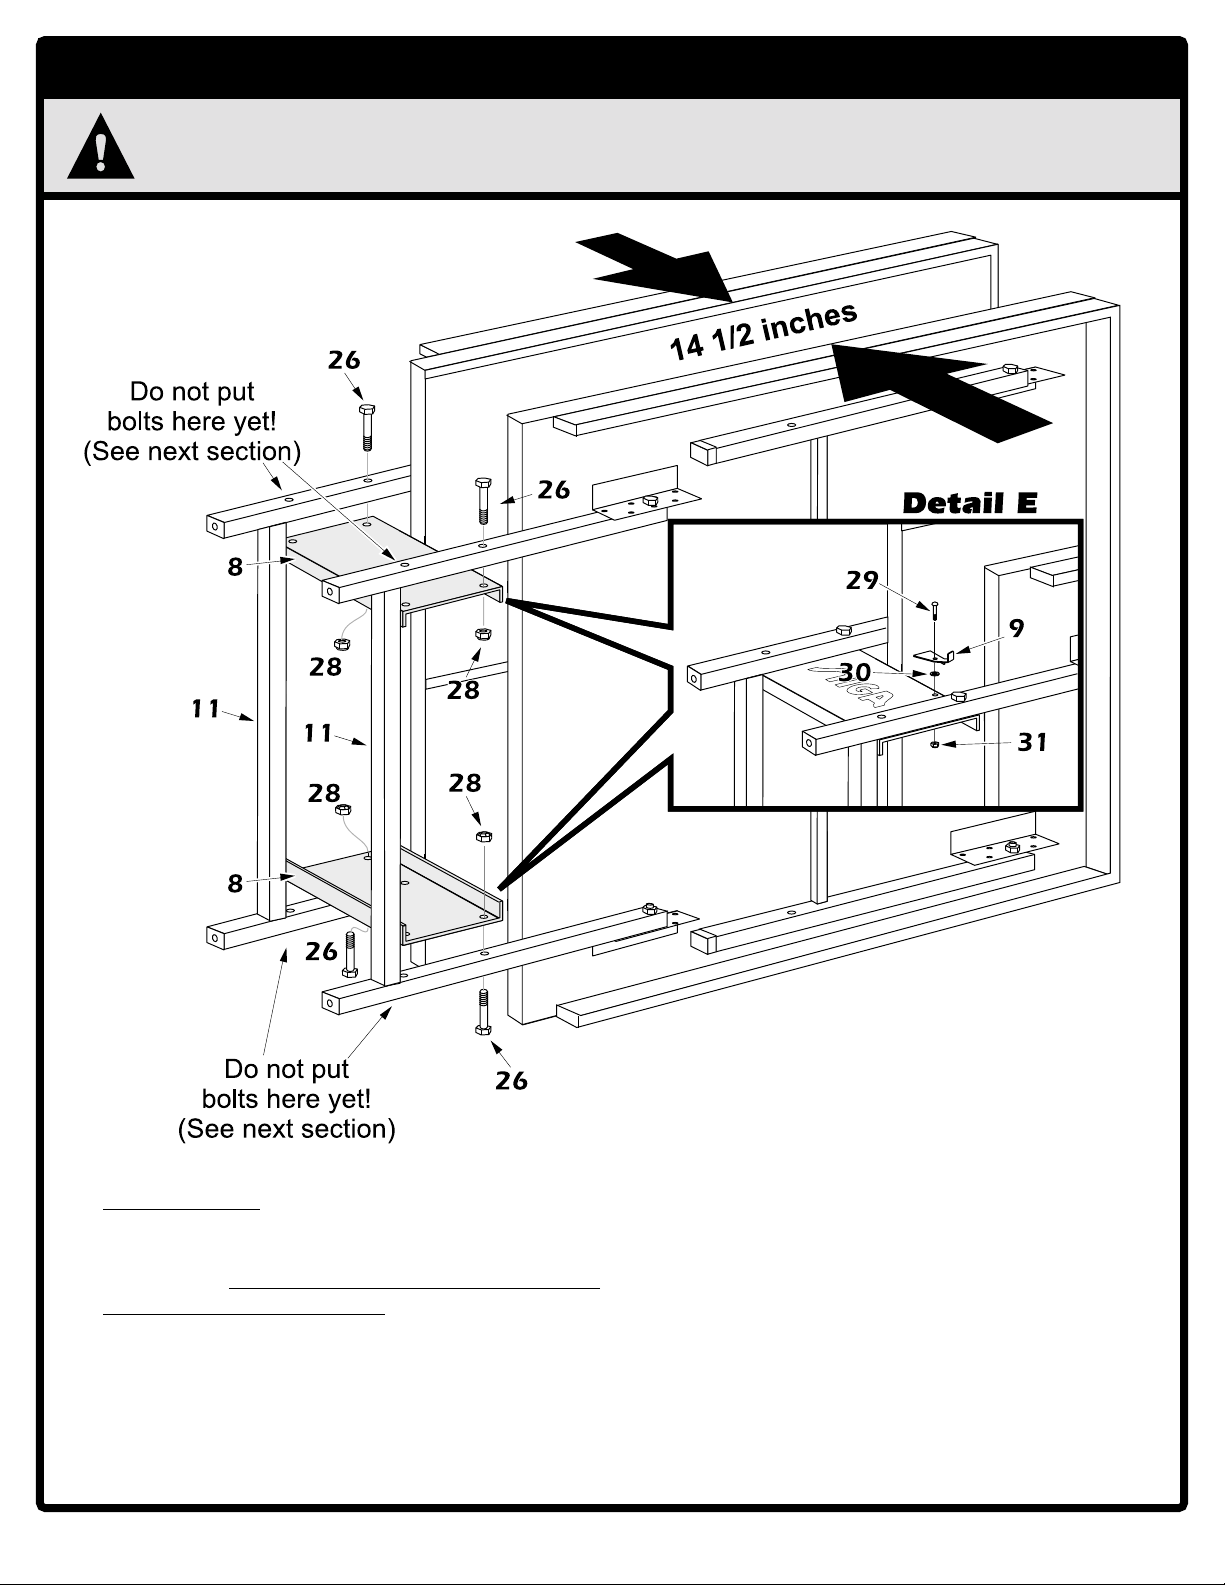
2. ATTACHING NAME PANELS TO LEGS
AT LEAST TWO ADULTS ARE NEEDED TO COMPLETE THEAT LEAST TWO ADULTS ARE NEEDED TO COMPLETE THE
AT LEAST TWO ADULTS ARE NEEDED TO COMPLETE THE
AT LEAST TWO ADULTS ARE NEEDED TO COMPLETE THEAT LEAST TWO ADULTS ARE NEEDED TO COMPLETE THE
FOLLOWING STEPS! DO NOT LEAVE TABLE UNATTENDED UNTILFOLLOWING STEPS! DO NOT LEAVE TABLE UNATTENDED UNTIL
FOLLOWING STEPS! DO NOT LEAVE TABLE UNATTENDED UNTIL
CAUTION
FOLLOWING STEPS! DO NOT LEAVE TABLE UNATTENDED UNTILFOLLOWING STEPS! DO NOT LEAVE TABLE UNATTENDED UNTIL
ASSEMBLY IS COMPLETE!ASSEMBLY IS COMPLETE!
ASSEMBLY IS COMPLETE!
ASSEMBLY IS COMPLETE!ASSEMBLY IS COMPLETE!
6.6.
With a helperWith a helper
6.
With a helper
6.6.
With a helperWith a helper
inches apart. inches apart.
inches apart. Attach only
inches apart. inches apart.
panels #8 to upright assemblies #11 as shown
above. Use
on each name panel.on each name panel.
#28
on each name panel.
on each name panel.on each name panel.
(
Two other bolts #27 and nuts #28 will be used in
, hold top halves about 14 ½, hold top halves about 14 ½
, hold top halves about 14 ½
, hold top halves about 14 ½, hold top halves about 14 ½
one halfone half
one half of name
one halfone half
ONLY TWOONLY TWO
ONLY TWO bolts #26 and locknuts
ONLY TWOONLY TWO
the next section to attach the other half of the
name panels and linkages #24 at the same time.
See next page.
completely tight yetcompletely tight yet
completely tight yet.
completely tight yetcompletely tight yet
Do not tighten these locknutsDo not tighten these locknuts
)
Do not tighten these locknuts
Do not tighten these locknutsDo not tighten these locknuts
HELPFUL HINT: HELPFUL HINT:
HELPFUL HINT: Start at the bottom and insert
HELPFUL HINT: HELPFUL HINT:
two bolts #26
assemblies #11 and name panel #8. Then attach
the upper name panel #8. Insert bolts #26
DOWNWARDDOWNWARD
DOWNWARD.
DOWNWARDDOWNWARD
7.7.
7. Attach safety latches #9 to name panels using
7.7.
one screw #29, flat washer #30 and locknut #31.
(See Detail
name panel to hold one table half and thename panel to hold one table half and the
name panel to hold one table half and the
name panel to hold one table half and thename panel to hold one table half and the
other safety latch to the other name panel toother safety latch to the other name panel to
other safety latch to the other name panel to
other safety latch to the other name panel toother safety latch to the other name panel to
hold the other table half.hold the other table half.
hold the other table half.
hold the other table half.hold the other table half.
3
UPWARDUPWARD
UPWARD through upright
UPWARDUPWARD
EE
Attach a safety latch to oneAttach a safety latch to one
E).
Attach a safety latch to one
EE
Attach a safety latch to oneAttach a safety latch to one
 Loading...