

Escalade sports T8166 User Manual

MODEL NOS.
T8166T8166
T8166
T8166T8166
QUICKSERVE 1000
TABLE TENNIS TABLE
OWNER'S MANUAL
1. Read this manual carefully before starting assembly. Read each step completely before beginning
each step.
2. Some smaller parts may be shipped inside larger parts. Check inside all parts and cartons
before assembling or ordering parts.
3. To make assembly easier, use the Hardware Identifier on page 6 to identify and sort all
fasteners. Check all cartons for kits. All hardware may not be located in one kit.
4. Do not tighten hardware until instructed to do so. If hardware is tightened too soon, mounting holes
may not align and parts may not easily fit together. Leave locknuts slightly loose until you are instructed to
tighten them.
5. Tools required for assembly: Phillips Screwdriver, 3/8 Wrench, and Two 7/16 Wrenches (adjustable
wrenches may be substituted for the wrenches).
Please Do Not Return This Product To The Store!
Contact Escalade® Sports customer service department at:
Phone: 1-866-873-3528 Toll – Free !
Fax: 1-866-873-3533 Toll – Free !
E-mail: tabletennis@escaladesports.com
Mailing Address (correspondence only):
Escalade Sports
PO Box 889
Evansville, IN 47706
Please visit our World Wide Web site at: www.escaladesports.com
ON-LINE TROUBLE SHOOTING TECHNICAL ASSISTANCE
ON-LINE PARTS REQUESTS FREQUENTLY ASKED QUESTIONS
®
ADDITIONAL ESCALADE
SPORTS PRODUCT INFORMATION
2L-6816-00
Escalade® Sports products may be manufactured and/or licensed under the following patents.
6120397, 5816957, 5769744, 5119741, 4911085, 4717157, D460140, D420563
Additional patents may be pending. One or more of the listed patents and/or pending patents may cover specific product.
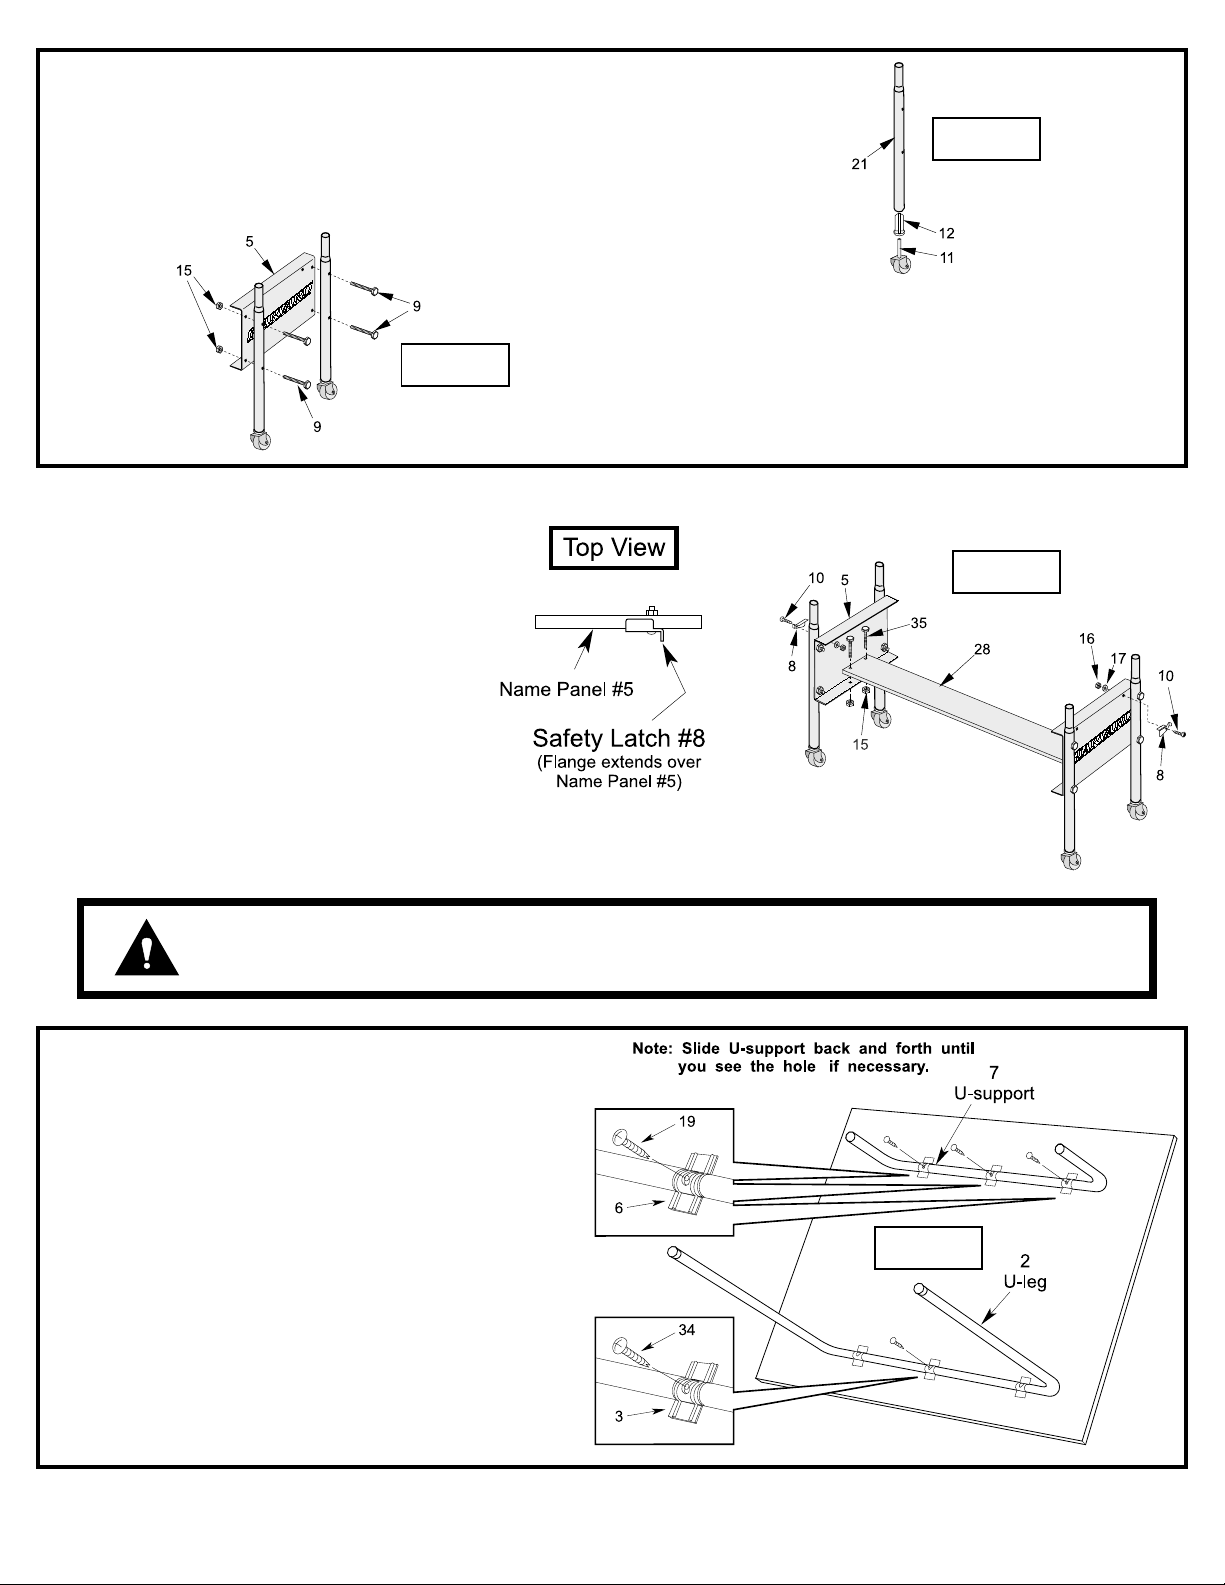
1. Gently tap a caster socket #12 into each Upright Tube #21 until
flange on sockets touches the edge of the tube. DO NOT HIT
CASTER SOCKET TOO HARD WITH A HAMMER! Sockets
may break if hit too hard.
2. Insert casters #11 into caster sockets #12.
Figure 2
4. Connect the two Name Plate Assemblies to the
Bottom Board #28, as shown in Figure 3, using
four bolts #35 and four nuts #15.
Figure 1
3. Attach two Upright Tube Assemblies to both Name Plates #5, as
shown in Figure 2, using four bolts #9 and four nuts #15.
Figure 3
5. Install a safety latch #8 into the right-hand hole
on each name panel as shown in Figure 3. Use
one screw #10 one washer #17 and one hex nut
#16. NOTE: Flange on safety latch must
extend over top of name panel as shown in
Figure 3. Safety latch must pivot freely.
INSTALL SAFETY LATCHES #8 AS SHOWN ABOVE FOR PROPER USE OF
CAUTION:
6. Rotate U-support #7 until you see the screw holes in the slots
of the three U-clips #6. Slide U-support #7 side to side if necessary. See Figure 4.
7. Rotate U-leg #2 until you see the screw hole in the slot of center U-clip #3. Slide U-leg #2 side to side if necessary. See Figure 4.
8. Insert screw #19 through slot in U-clip #6 and into U-support
#7. Thread it all the way into U-support #7 until it touches the
back of the tube. There should be about 3/8 inch of screw
#19 left sticking out.
TABLE! DO NOT SKIP THIS STEP! DO NOT OPERATE TABLE UNTIL SAFETY
LATCHES ARE INSTALLED AND ASSEMBLY IS COMPLETE!
Figure 4
9. Insert screw #34 through slot in U-clip #3 and into U-leg #2.
Thread it all the way into U-leg #2 until it touches the back of
the tube. There should be about 3/8 inch of screw #34 left
sticking out.
2
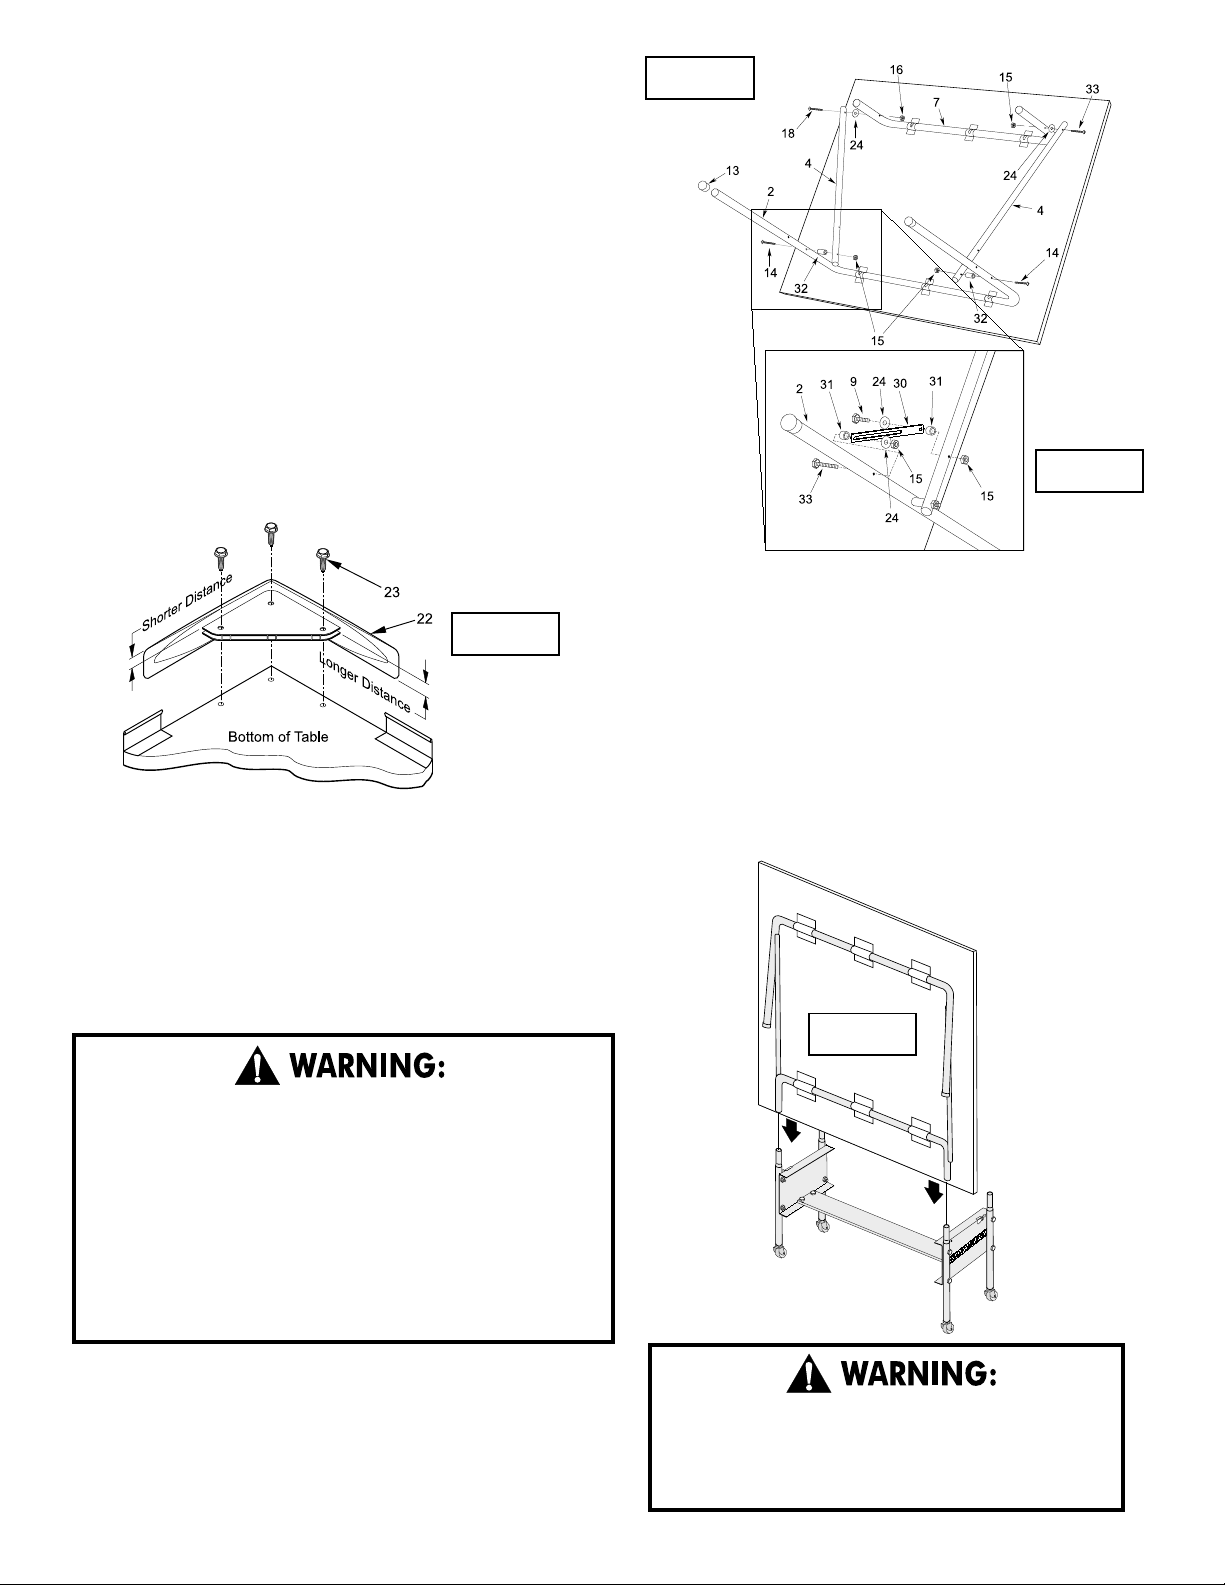
10. Lay table top #1 painted side down, on a smooth, flat surface. Use
the shipping container to protect the painted surface of the table
top.
11. Attach end of linkages #4 with two holes to INSIDE of U-leg #2 as
shown in Figure 5. Secure with bolts #14, locknuts #15 and plastic spacers #32. Tighten hardware snug enough to keep table stable
but do not overtighten. Tubes must pivot freely. NOTE: Plastic spacers go between linkages #4 and U-leg #2.
12. Attach other end of linkages #4 to OUTSIDE of U-support #7
with bolts #33, locknuts #15 and plastic washers #24. Tighten
hardware until snug but do not overtighten. Tubes must pivot freely.
13. Instal leg cap #13 onto end of U-legs #2.
14. On one side of the table attach slotted end of safety strap #30 to
INSIDE of U-Leg #2 using one bolt #33, one spacer #31, one
washer #24, and one hex nut #15. Tighten hardware until snug
but do not overtighten. Tubes must pivot freely. See Figure 6.
Figure 5
Figure 6
Figure 7
17. Prepare an area for the assembly of the second table top half. If
necessary, move the first table top half aside with the aid of a helper.
Be sure to place it in a location where it won't be disturbed or damaged. If setting on its side, be sure to place the bottom edge no less
than 12 inches away form the wall. Also be sure to place carpet or
pieces of the shipping carton down to protect table top edges. If
floor is not carpeted, brace table top half with a heavy object to
keep it from sliding.
18. Repeat steps 6 thru 16 on second table half.
AT LEAST TWO (2) ADULTS ARE NEEDED TO COMPLETE
THE REST OF THIS ASSEMBLY! WHEN ASSEMBLING TOPS
TO BASE, HANDLE TOP ASSEMBLIES BY GRASPING ONLY
THE TOPS THEMSELVES. DO NOT GRASP METAL LEGS,
U-SUPPORT, LINKAGE, OR HINGES. THESE PARTS CAN
MOVE AND COULD PINCH FINGERS OR HANDS
CAUSING SERIOUS INJURY! ASSEMBLE AS SHOWN WITH
LEGS FULLY CLOSED AND TOPS IN A VERTICAL
POSITION. DO NOT OPEN LEGS AND TRY TO ASSEMBLE.
TABLE TOPS ARE HEAVY - DO NOT ATTEMPT TO
ASSEMBLE ALONE!
15. Attach other end of safety strap #30 to OUTSIDE of linkage #4
using one bolt #9, one washer #24, one spacer #31, and one
hex nut #15.
Important! Do NOT put other saftey strap #6 on this table half.
It will be installed on other table half later.
16. Attach two Corner Caps #22 to bottom of table, as shown in
Figure 7, using three screws #23 per Corner Cap.
Figure 8
19. With two adults, attach table top (#1) to table base, as shown in
Figure 8. With at least one adult on each side of table top, lift top
and align ends of "U"-support tube with top of upright tubes. Slide
tubes together.
20. With two adults, put other table top onto other pivot tubes following
instructions in previous step.
DO NOT OPEN THE TABLE TO PLAYING POSITION
UNTIL BOTH TOPS ARE INSTALLED! DO NOT LEAVE
TABLE STANDING UNATTENDED. IT COULD BE
KNOCKED OVER CAUSING SERIOUS BODILY INJURY
OR PROPERTY DAMAGE.
3
OPENING AND CLOSING INSTRUCTIONS
READ OPERATING INSTRUCTIONS CAREFULLY BEFORE OPERATING TABLE! DO
NOT ALLOW CHILDREN TO OPEN TABLE! DO NOT CLIMB, STAND OR JUMP ON
CAUTION:
TABLE! SERIOUS OR FATAL INJURY MAY RESULT! THIS IS NOT A TOY! TABLE IS
TO BE OPENED OR CLOSED BY ADULTS ONLY! FAILURE TO COMPLY WITH
OPENING AND CLOSING INSTRUCTIONS COULD RESULT IN PERSONAL INJURY
OR PROPERTY DAMAGE.
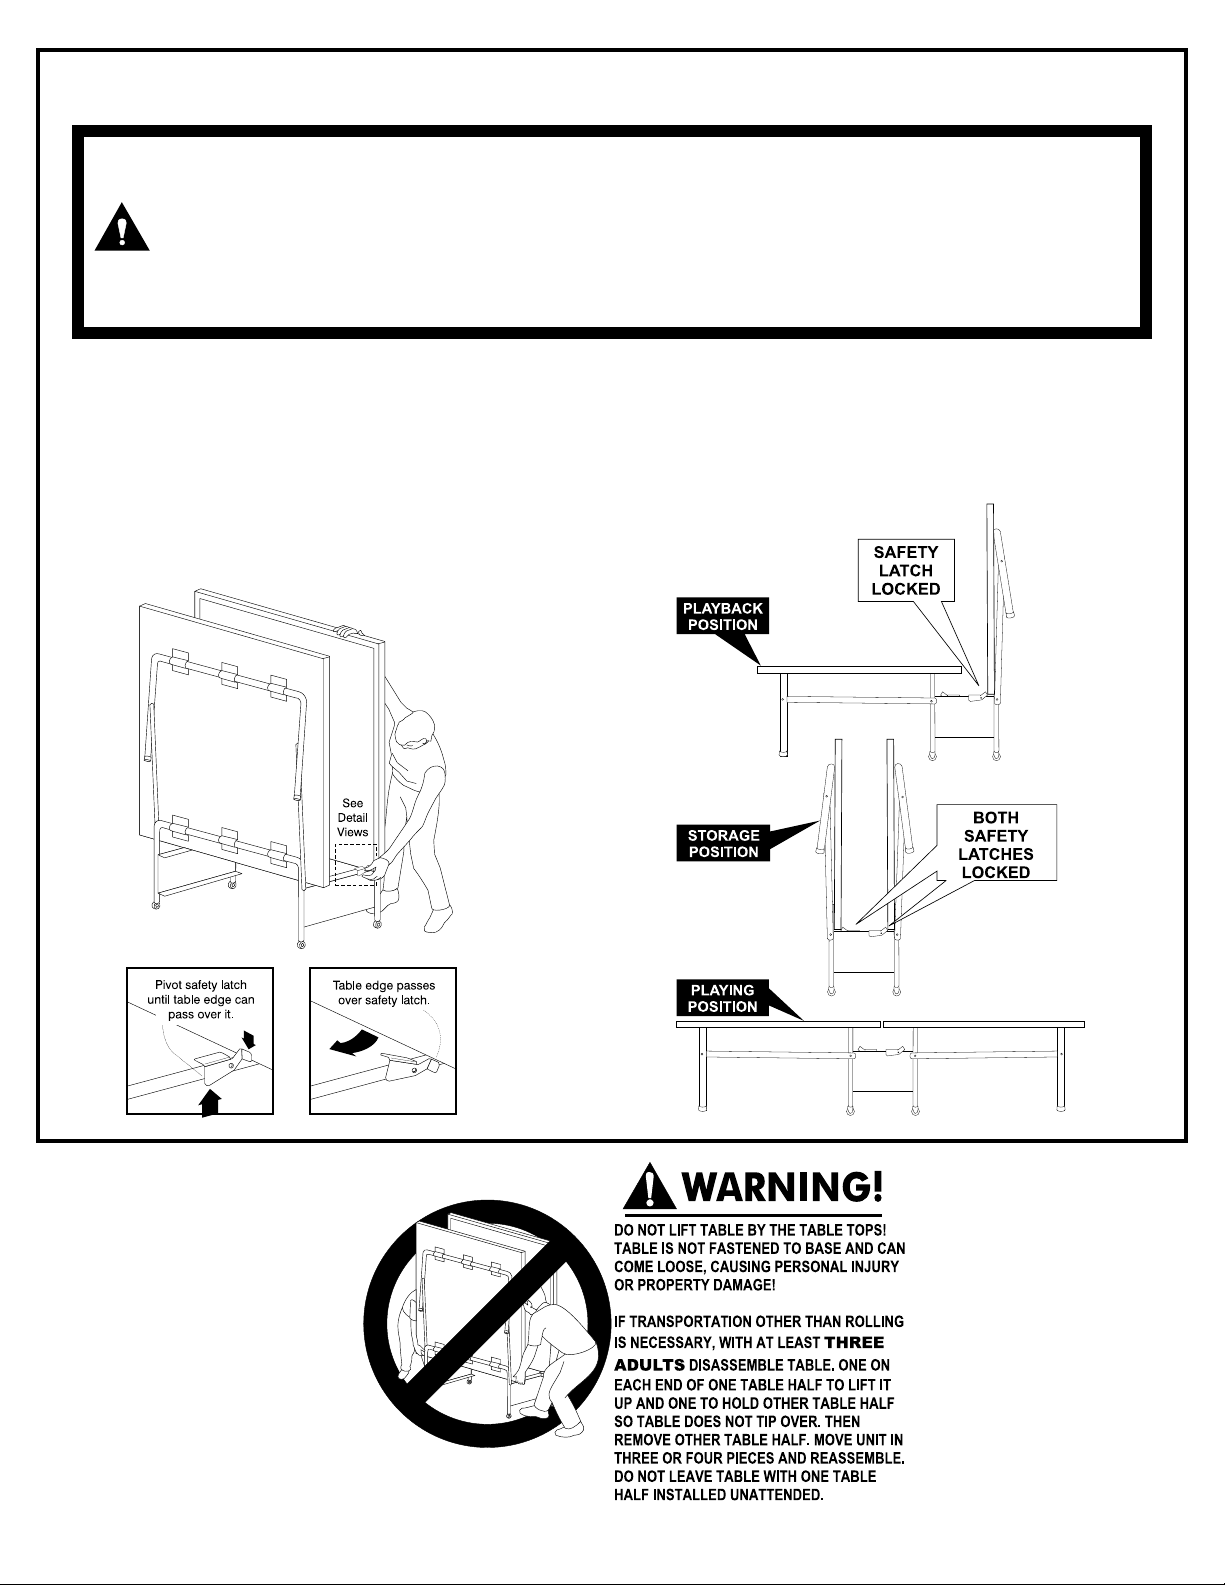
TO OPEN:
1. Stand behind the table near the safety latch.
2. Hold table half with one hand and pivot safety latch enough to
allow the edge of the table half to pass over it.
3. While keeping an eye on the safety latch, pivot table half until it
moves past the safety latch. Once edge of table has passed over
safety latch, stop pivoting table half.
4. With both hands on the table half, center yourself along the table
half and lower the table half to the floor.
5. Repeat for the other table half.
TO CLOSE:
1. Remove net posts from table.
2. Lift table half upward and inward to vertical position.
3. Check to be sure that table half is locked in the safety latch.
4. Repeat for the other table half.
4

90 DAY LIMITED WARRANTY
This consumer warranty extends to the original consumer purchase of any ESCALADE® SPORTS Product
(hereinafter referred as the "Product").
WARRANTY DURATION:
ninety (90) days from the original purchase.
WARRANTY COVERAGE: ESCALADE SPORTS warrants to the original Consumer Purchaser that any
Product of its manufacture is free from defects in material and workmanship when used for the intended
purpose under normal use and conditions. THIS WARRANTY IS VOID IF THE PRODUCT HAS BEEN DAMAGED BY ACCIDENT, UNREASONABLE USE, NEGLIGENCE, IMPROPER SERVICE, FAILURE TO FOLLOW
INSTRUCTIONS PROVIDED WITH THE PRODUCT OR OTHER CAUSES NOT ARISING OUT OF
DEFECTS IN MATERIAL AND WORKMANSHIP.
WARRANTY PERFORMANCE:
shall repair or replace with a comparable model, and Product, or component thereof, which may prove
defective under normal use and proper care, and which our examination shall disclose to our satisfaction
to be thus defective, please contact our Warranty Dept.
Escalade® Sports, Inc. - P.O. Box 889, Evansville, IN 47706 - Attn: Warranty Dept.
This Product is warranted to the original consumer purchase of a period of
During the above ninety (90) day warranty period, ESCALADE SPORTS
1-800-426-1421 / Warranty Dept.
Or Write us at:
Or E-mail us at:
customerservice@escaladesports.com
Other than shipping requirements no charge will be made for such repair or replacement of in-warranty
Products. ESCALADE® SPORTS strongly recommends that the Product is insured for value prior to mailing.
WARRANTY DISCLAIMERS: ANY IMPLIED WARRANTIES ARISING OUT OF THIS SALE, INCLUDING
BUT NOT LIMITED TO THE IMPLIED WARRANTIES OF MERCHANTABILITY AND FITNESS FOR A PAR-
TICULAR PURPOSE, ARE LIMITED IN DURATION TO THE ABOVE NINETY (90) DAY WARRANTY PERIOD. ESCALADE® SPORTS SHALL NOT BE LIABLE FOR LOSS OF USE OF THE PRODUCT OR OTHER
CONSEQUENTIAL OR INCIDENTAL COSTS, EXPENSES OR DAMAGES INCURRED BY THE CONSUMER OF ANY OTHER USE.
Some states do not allow the exclusion or limitation of implied warranties or consequential or incidental
damages, so the above limitations or exclusions may not apply to you.
LEGAL REMEDIES: This warranty gives you specific legal rights and you may also have other rights
which may vary from state to state.
5
CARE AND MAINTENANCE
You have purchased a quality product that will give you years of enjoyment. By following these simple maintenance steps, you will add to the life of
your new table.
THE TABLE TOP
The top (playing surface) of your table is made of particle board. Like all products made of wood, it can be affected by atmospheric changes in both
temperature and humidity. This may cause a slight sag or distortion as the top expands or contracts. This is normal and should not cause concern
as it does not detract from the play or utility value of the table. After assembly of the table, you can minimize the effects of temperature and humidity
changes by storing the table in the folded up position in a dry area when table is not in use.
STORAGE OF YOUR TABLE
This table must be stored indoors to prevent damage to the playing surface. Dampness and extreme temperature changes can cause the wood to
warp, swell, crack or blister. When your table is not in use, it should be folded up in a dry area. Due to the nature of particle board, table top may
bow. Damp and humid conditions will amplify this. This is normal and will not affect playability of table.
CLEANING YOUR TABLE
To clean your table use a soft, damp (NOT WET) cloth only. To prevent damage to your table's playing surface, DO NOT USE ANY CHEMICALS,
ABRASIVE OR CLEANING PRODUCTS on your table's playing surface.
MAINTENANCE OF YOUR TABLE
Be sure to oil all moving parts of your table including the pivot points. This will insure the safety and ease of use of your table.
This table must be kept indoors to prevent damage to the playing surface. Dampness and extreme temperature changes which occur on patios or
similar areas can cause wood to warp, swell, crack or blister.
UNLEVEL FLOORS
If table does not seem level, it is probably due to uneven or unlevel floors. Set the table in its PLAYING POSITION and move table several inches in
different directions to find the best location for the table. If the floor is extremely unlevel, table may not play or operate properly. If table is high in
the center, shim up under the outer U-legs.
6
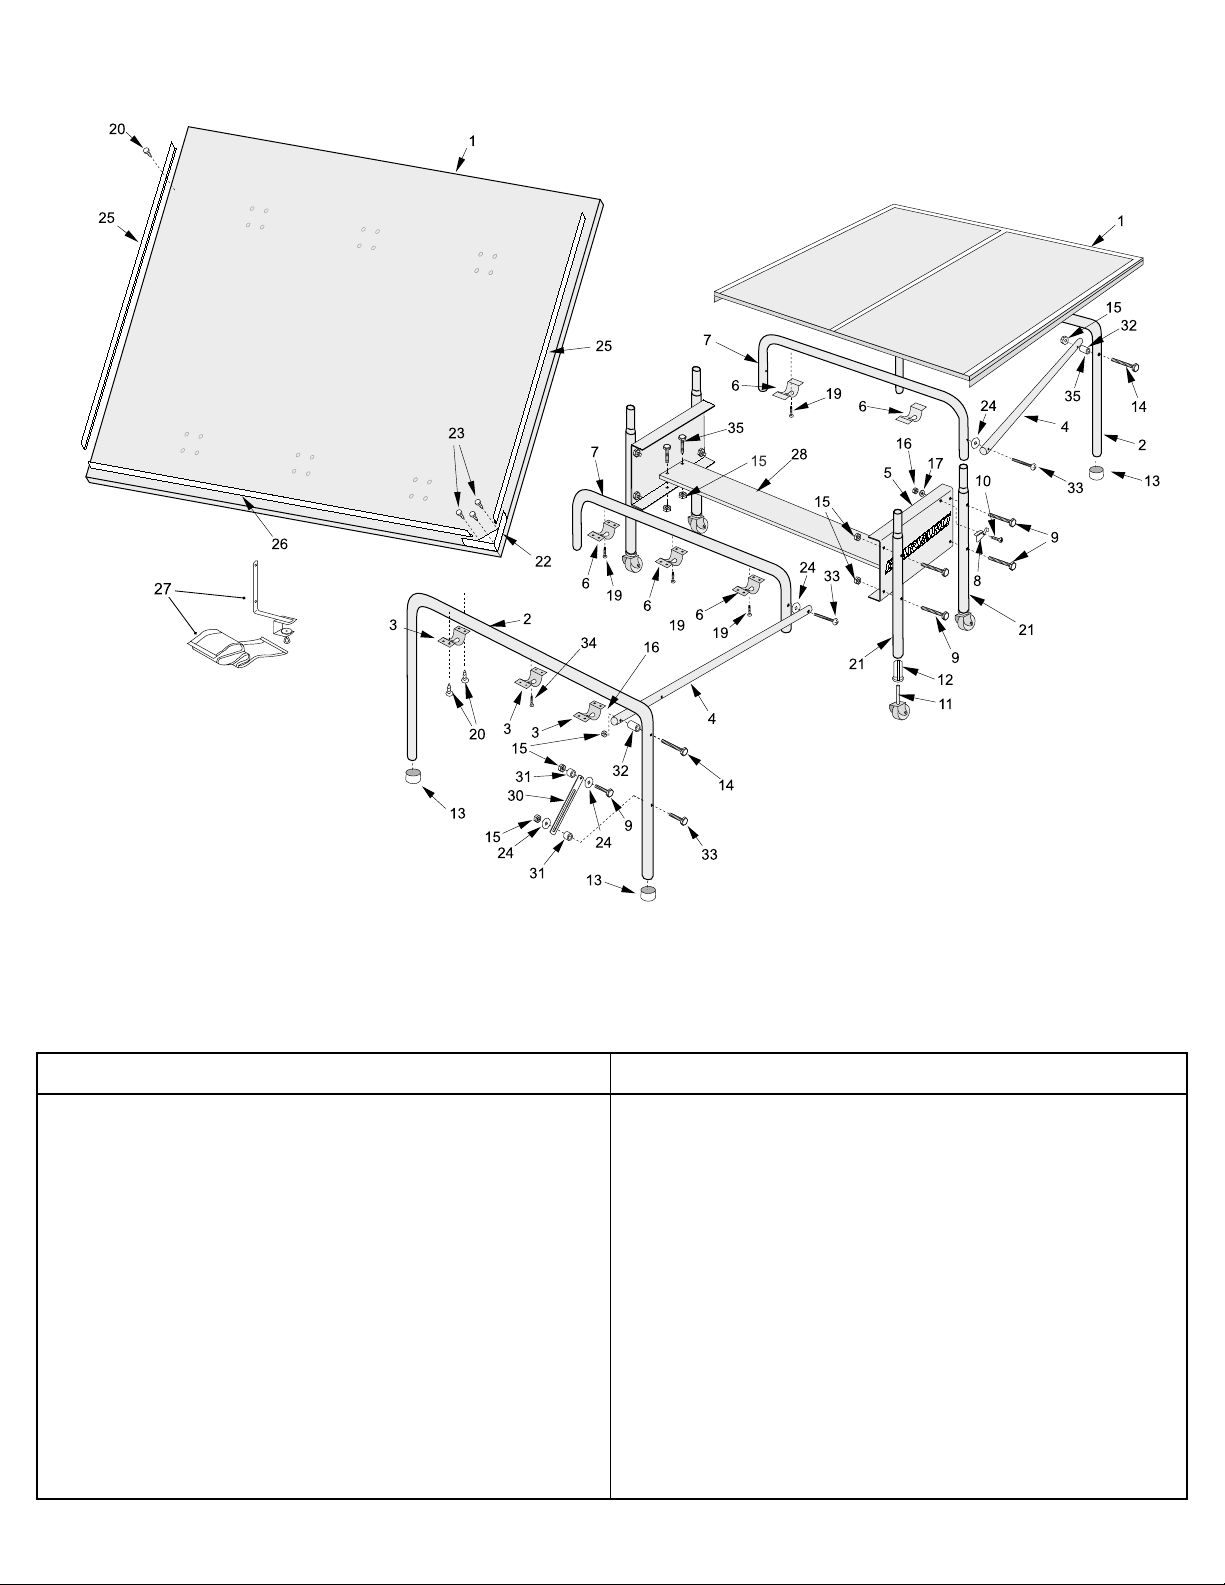
PRODUCT PARTS LIST T8166
Key # Part# Description Qty. Key # Part# Description Qty.
1 4A-6507-00 5/8" Board 2
2 8S-6636-02 U-leg 2
3 2S-6319-03 1-¼ U-Clip 6
4 8S-6635-02 Linkage 4
5 2S-6422-02 Name Panel 2
6 2S-6387-02 U-clip 6
7 8S-6637-01 U-support 2
8 2S-6264-03 Safety Latch 2
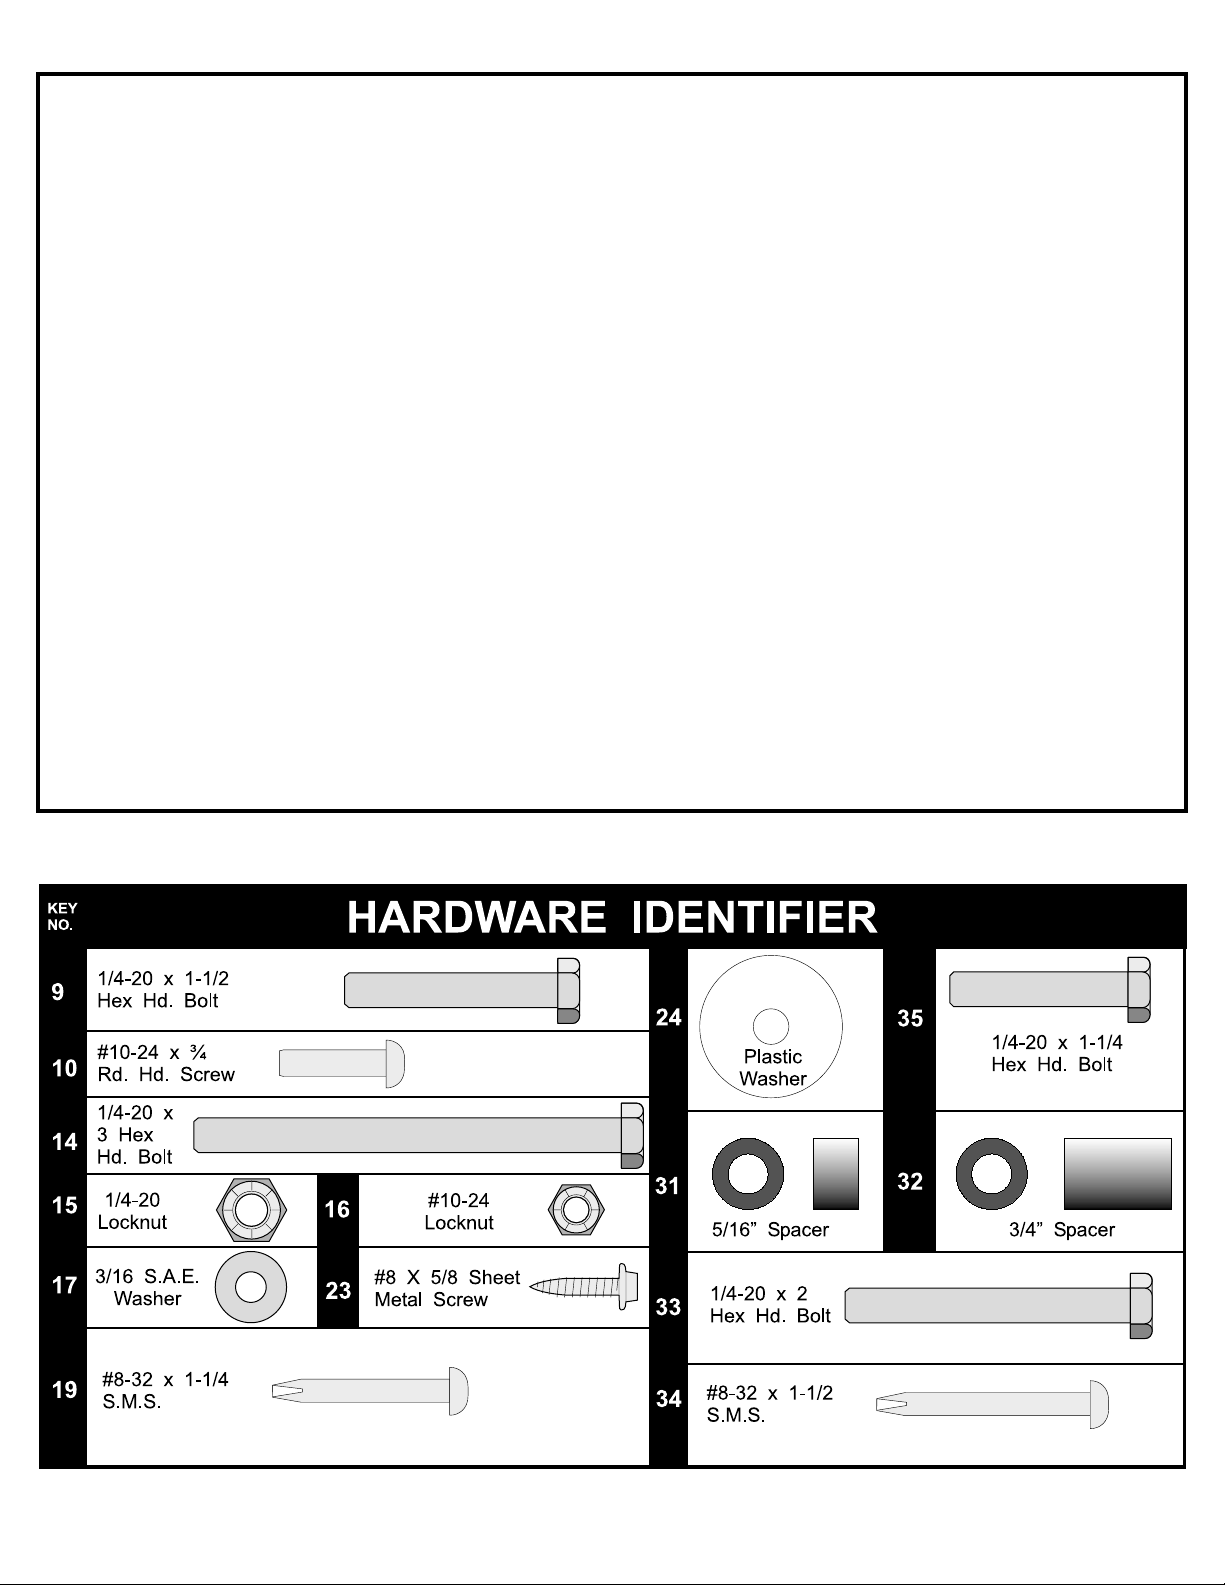
9 701-47 ¼-20 x 1½ Hex Head Bolt 10
10 801-120B #10-24 x 3/4 Phil Rnd Hd Scr 2
11 2Q-6084-00 Caster 4
12 3M-6115-00 Caster Socket 4
13 3M-6447-00 Leg Cap 4
14 701-166 ¼-20 x 3 Hex Head Bolt 4
15 701-26 ¼-20 Locknut 24
16 601-80B #10-24 Locknut 2
17 701-1B 3/16” Flatwasher 2
19 701-141 #8-32 x 1¼ Self Tapping Screw 6
20 701-105 #8 x 9/16 Sheet Metal Screw 84
21 8S-6576-03 Upright Tube 4
22 3M-6494-00 Corner Cap 4
23 1B-6449-00 #8 x 5/8 Sheet Metal Screw 12
24 2B-6087-00 Plastic Washer 8
25 2S-6384-00 Side Rail 4
26 2S-6385-00 End Rail 2
27 5A-6700-00 Net and Post Kit 1
28 2W-6269-02 Bottom Board 1
30 2S-6428-01 Safety Strap 2
31 7B-6257-00 5/16” Spacer 4
32 7B-6256-00 3/4” Spacer 4
33 701-82 ¼-20 x 2 Hex Head Bolt 6
34 1B-6452-00 #8-32 x 1½ Self Tapping Screw 2
35 1B-6475-00 ¼-20 x 1¼- Hex Head Bolt 4
36 2L-6816-00 Owner’s Manual 1
7
2L-6816-00
 Loading...