

Page 1

Thank you for buying our product. We strive to ensure that our
products are of the highest quality and free of manufacturing de-
fects or missing parts. However, if you have any problems with
your new product, DO NOT RETURN IT TO THE STORE,
please contact us toll free @:
1-866-556-2758
FAX: 1-866-873-3530
Please have your model number when inquiring about parts.
Or write to:
Escalade Sports
Customer Service Department
P.O. Box 889
Evansville IN 47706
When contacting Escalade Sports please provide your model number , serial number (if
applicable), and part number if requesting a replacement part. These numbers are
located on the product, packaging, and in this owners manual.
Y our Model Number _______________________
Y our model number is located on the original carton, this owners manual, and
under the table. Please retain these instructions for ordering parts.
© 2002 Escalade Sports
G03421
1
For Customer Service Call 1-866-556-2758
Page 2
I
MPORTANT! READ THIS MANUAL ALL THE
WAY THROUGH BEFORE BEGINNING TO
PUT YOUR GAME TABLE TOGETHER! THEN
READ EACH STEP BEFORE STARTING
THAT STEP.
TWO ADULTS ARE REQUIRED TO ASSEMBLE
THIS GAME TABLE
Philips Screwdriver
Adjustable Wrench or Socket Set
Furniture Polish and Cloth
An electric screwdriver is helpful in assembly. However, please use extreme caution with an electric
screwdriver because you could overtighten the hardware and strip the screws.
IMPORTANT!
Make sure you understand the following tips before you begin to assemble your soccer table.
1. When installing parts that have more than one bolt, start ALL the bolts in that part by
hand before tightening anything.
2. Some drawings or images in this manual may not look exactly like your product.
3. You can apply spray furniture polish to a cloth and then wipe down the playfield to make the
pucks slide easier on the table.
4. Only plug the table motor into a suitable 120v AC household outlet.
5. This product is intended for INDOOR use only.
READ AND FOLLOW ALL ASSEMBLY, OPERATION, AND
SAFETY INSTRUCTIONS CAREFULLY. AT LEAST TWO
ADULTS ARE NEEDED T O PUT THIS GAME TABLE
TOGETHER!
© 2002 Escalade Sports
2
For Customer Service Call 1-866-556-2758
Page 3
© 2002 Escalade Sports
3
For Customer Service Call 1-866-556-2758
Page 4
© 2002 Escalade Sports
4
For Customer Service Call 1-866-556-2758
Page 5
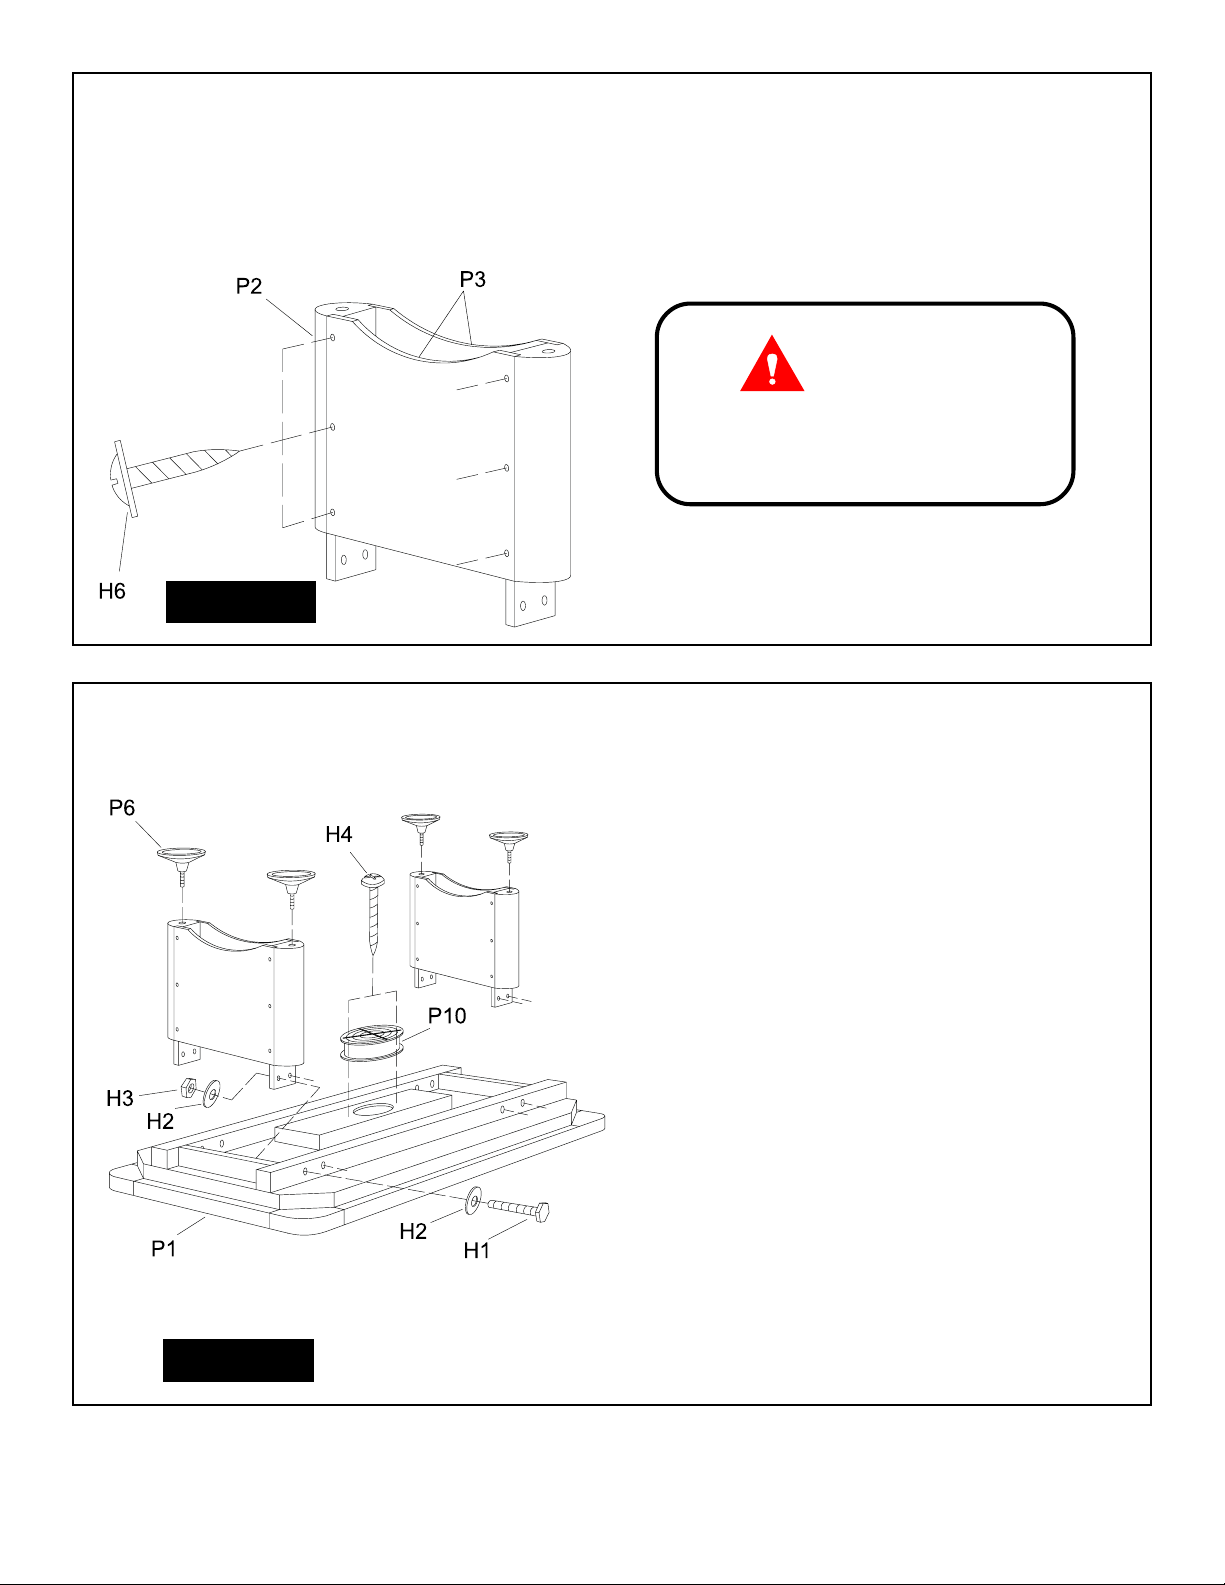
1. Find a clean, level place to begin the
assembly of your hockey table. We
reccomend building the table on the box
top to protect the parts during assembly.
Figure 1
2. Attach 2 leg panels P3 to each side of the
legs P2 using screws H6 as shown in
FIGURE 1.
CAUTION:
DO NOT OVERTIGHTEN THE
LEG PANEL SCREWS
3. Attach the previously made leg assemblies
to the main cabinet P1 using bolts H1
washers H2 and nuts H3. There are 4
bolts 8 washers and 4 nuts per leg
assembly.
4. Attach the blower motor and grill P10 in
the center of the main cabinet using
screws H2 as shown in FIGURE 2.
5. Screw one leg leveler P6 to the bottom
of each leg as shown.
Figure 2
© 2002 Escalade Sports
5
For Customer Service Call 1-866-556-2758
Page 6
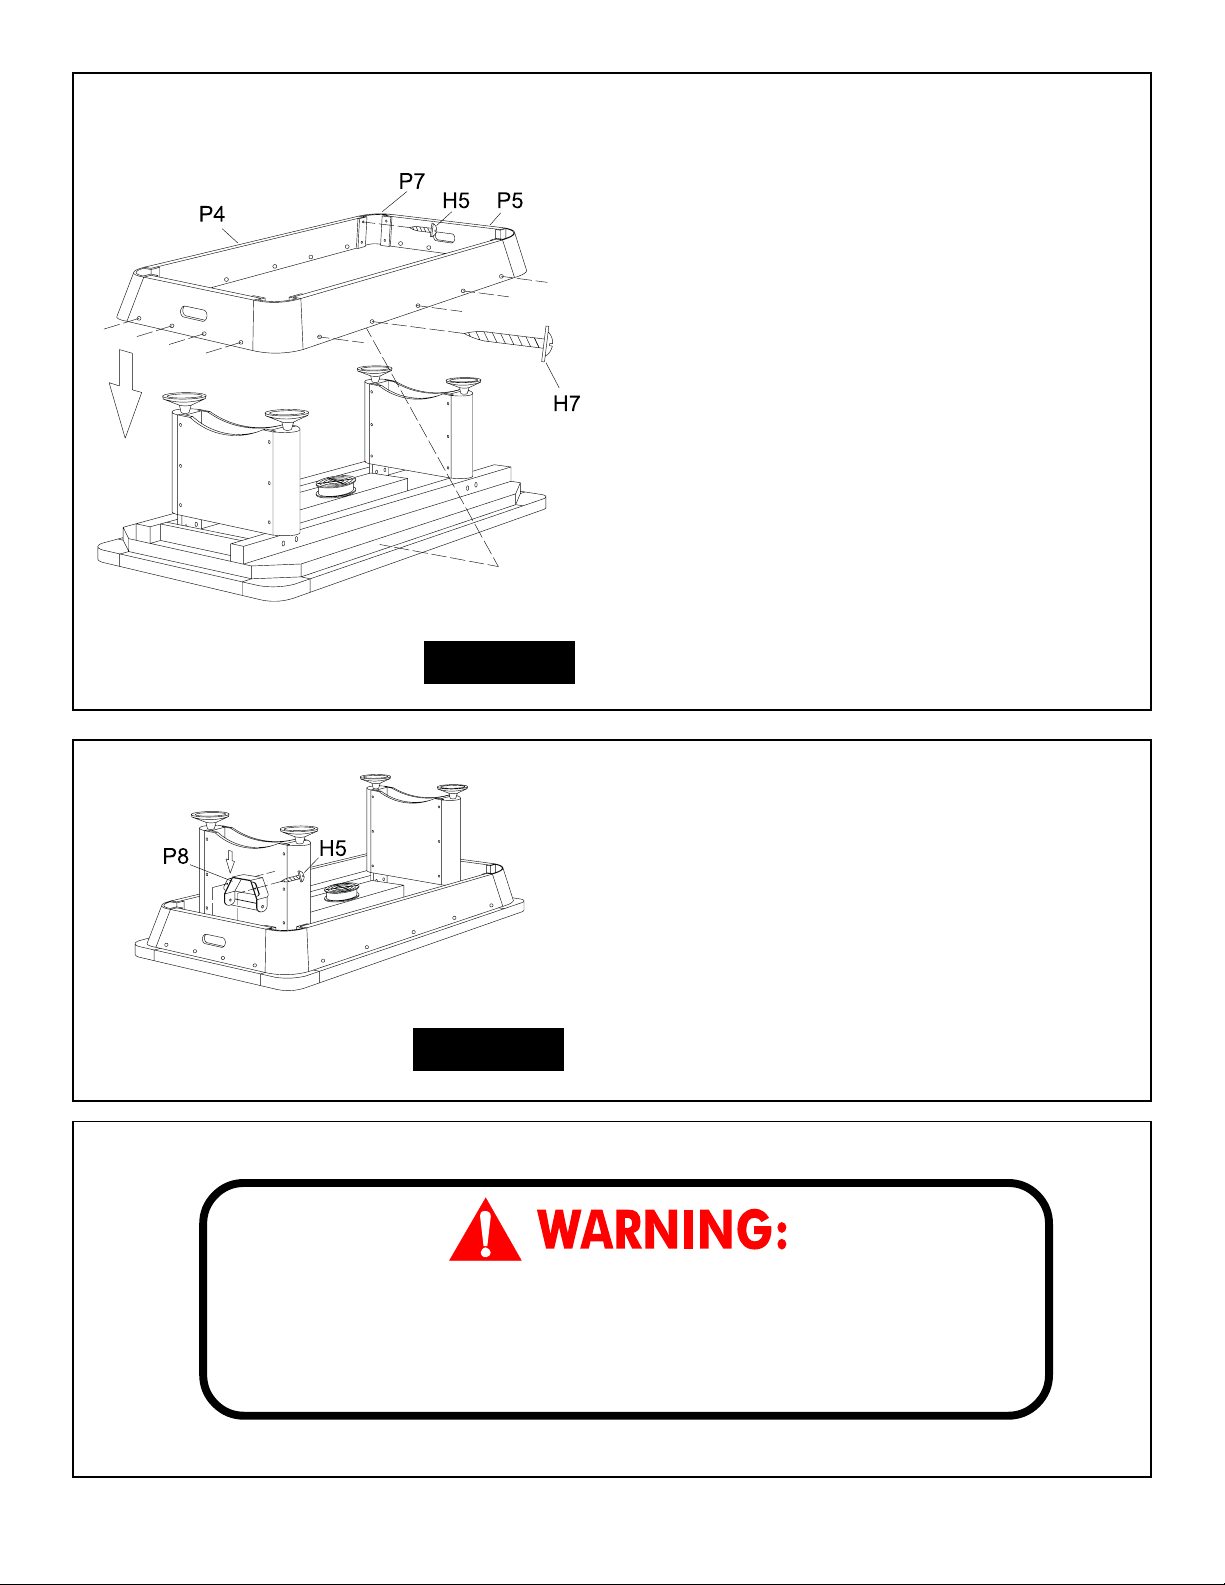
Note: Place all of the aprons and corners posts onto the main cabinet to ensure fit and finish before
you attach any of the parts.
6. Attach the end aprons P5 and side aprons
P4 to the main cabinet using screws H7
as shown in FIGURE 3.
7. Attach the corner posts P7 to the aprons
with screws H5 as shown in FIGURE 3.
Figure 3
8. Attach one puck catcher P8 to each end
panel using screws H5 as shown in
FIGURE 4. Center the puck catcher over
theopening in the end panel.
Figure 4
THIS STEP REQUIRES TWO OR MORE ADULTS.
VERY CAREFULLY TURN THE TABLE OVER AND SET IT ON
ITS LEGS. BE CAREFUL, THE TABLE IS VERY HEAVY.
© 2002 Escalade Sports
6
For Customer Service Call 1-866-556-2758
Page 7
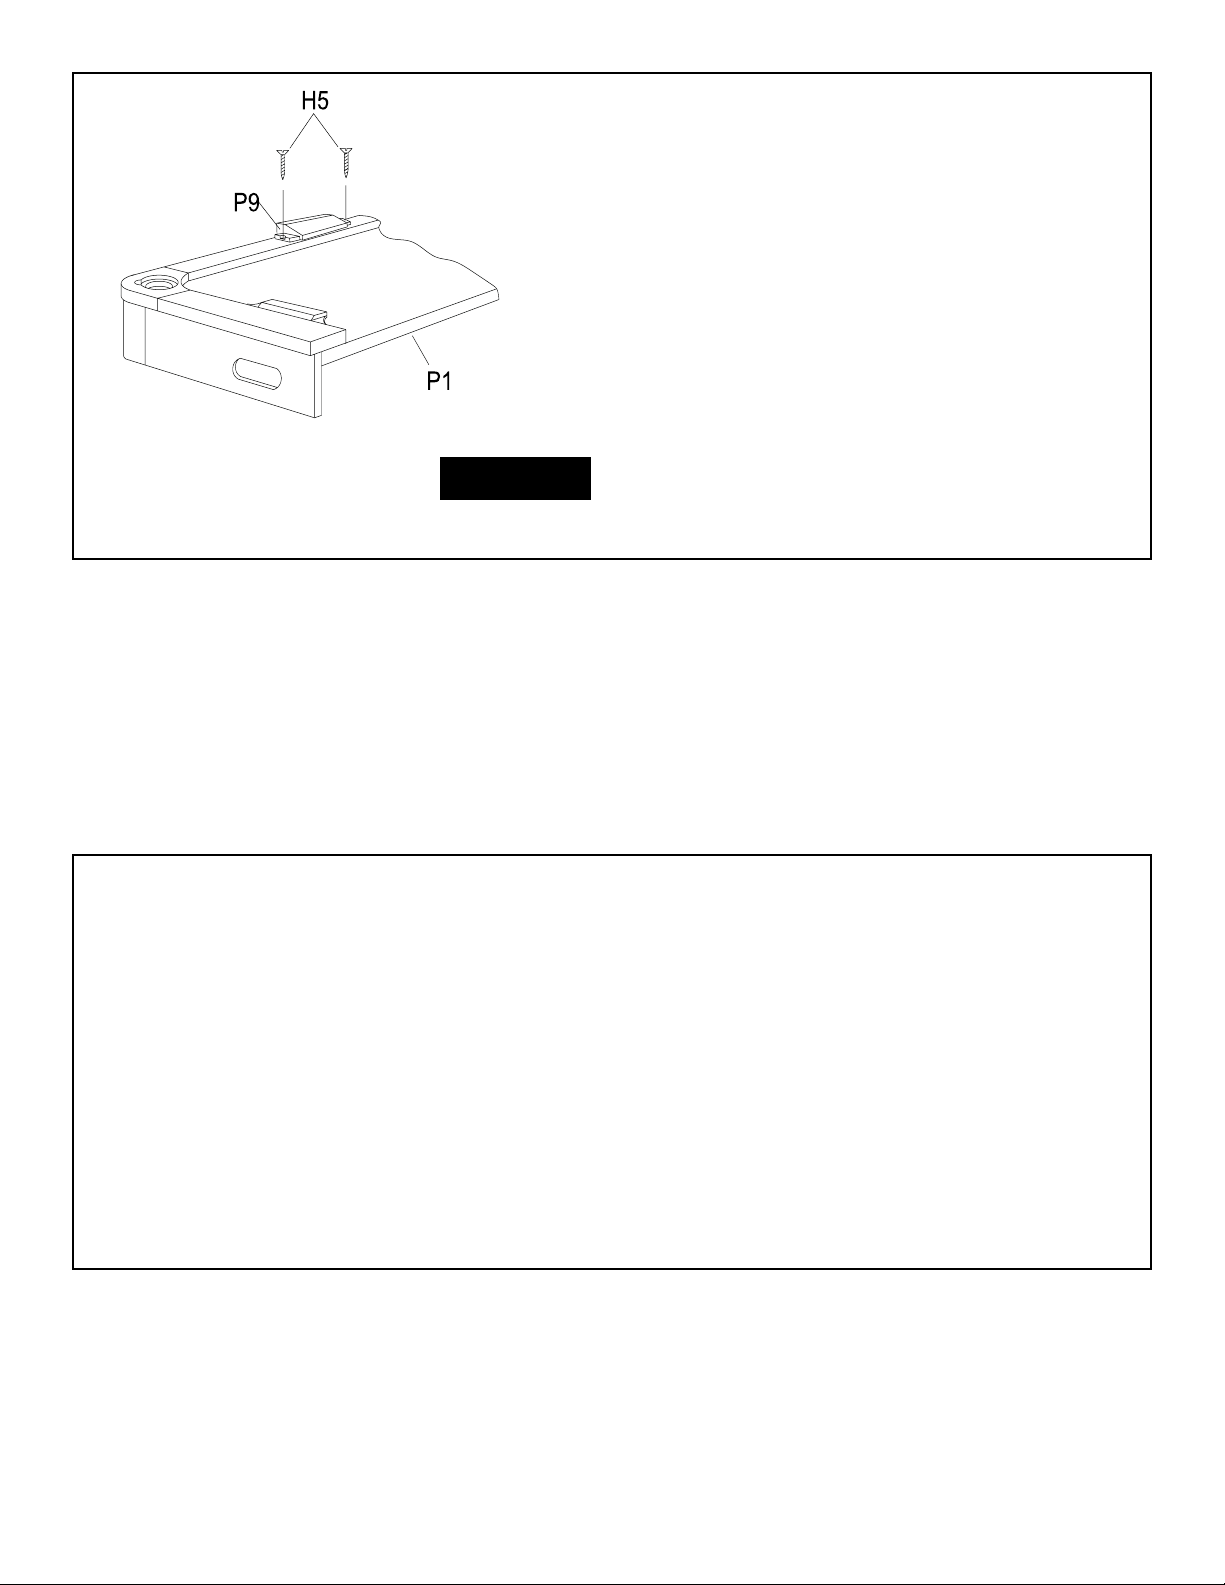
Figure 5
9. Once you have the table turned to its
upright position, feed the wires from
under the table throught the larger
holes and plug into the bottom of the
electronic scorer. Next attach the scorer
P9 to the top side rail using screws H5 as
shown in FIGURE 5.
GAME RULES
The Object of the Game
To score a predetermined number of points or to score the most points in given amount of time.
To Play
Flip a coin to determine who will begin play. Play begins when the puck is placed on the playing
surface. Players must hit the puck with the striker and attempt to shoot it into their opponent’s goal.
One point is awarded when a puck is shot into the opponent’s goal.
© 2002 Escalade Sports
7
For Customer Service Call 1-866-556-2758
Page 8
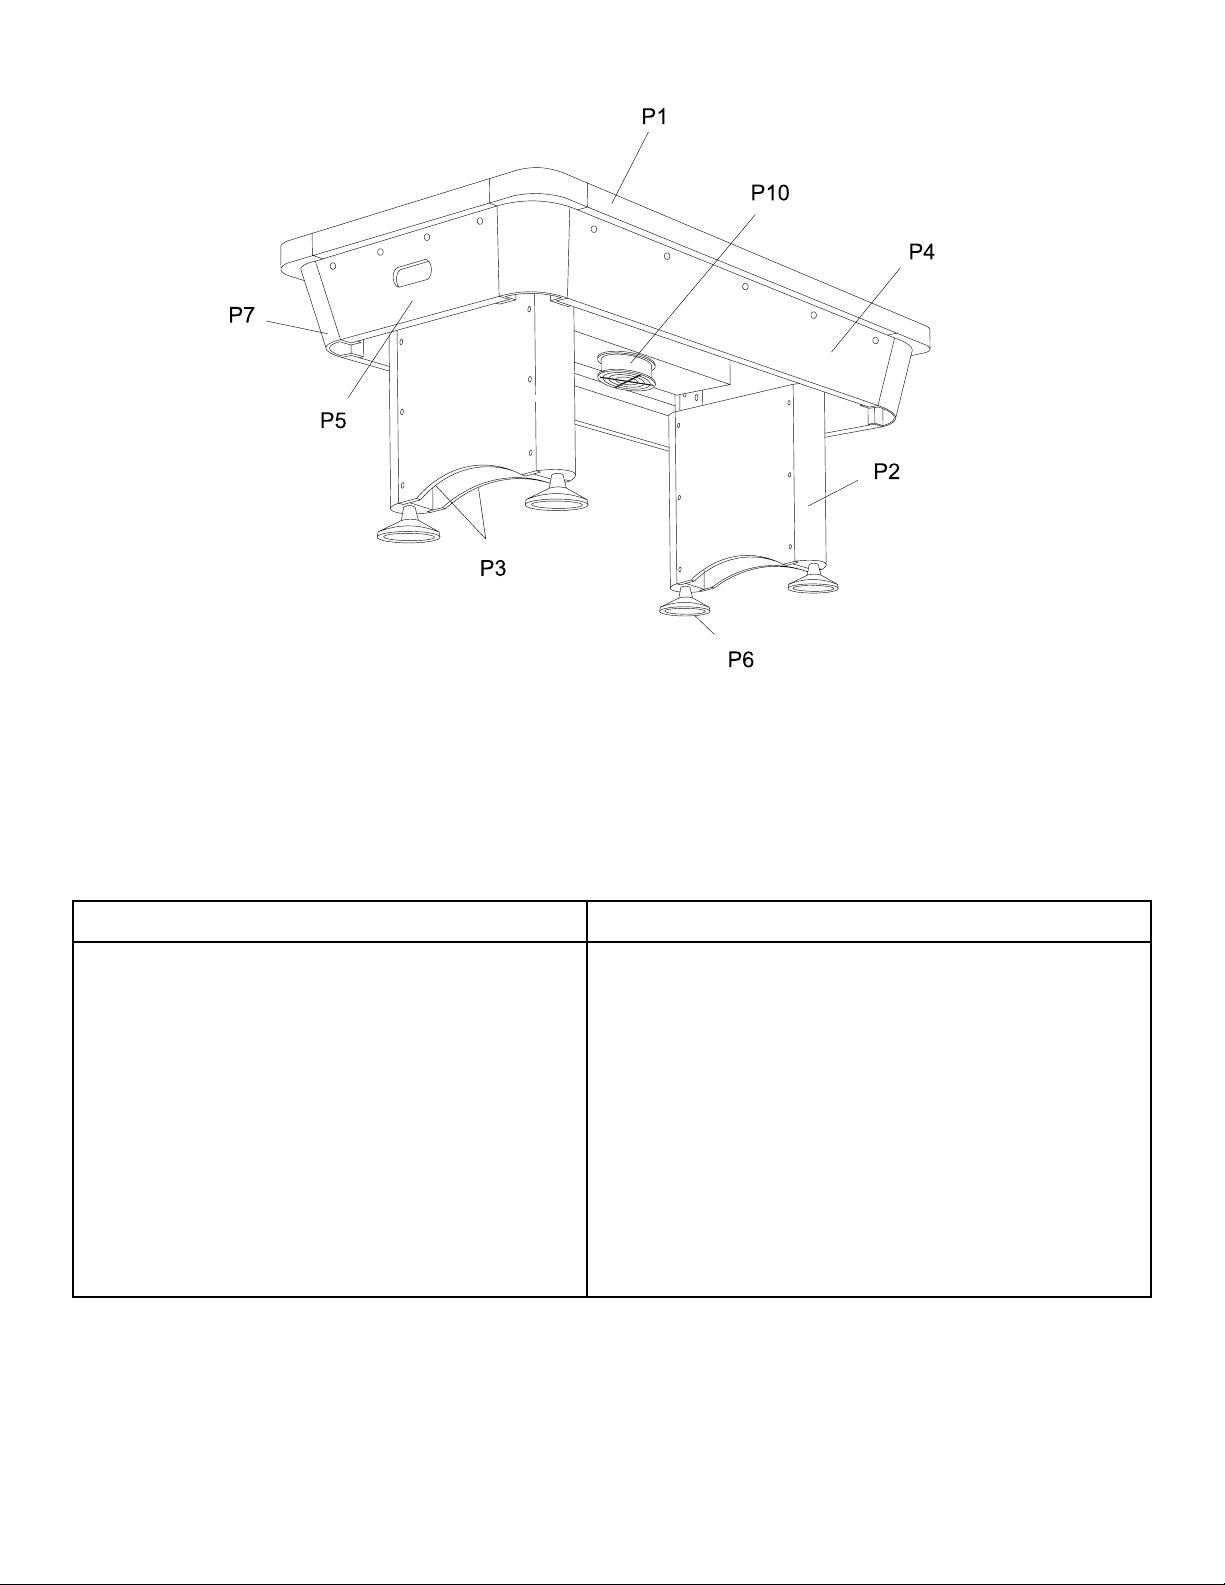
Model # G03421
PRODUCT PARTS LIST
Part # Description Qty. Part# Description Qty.
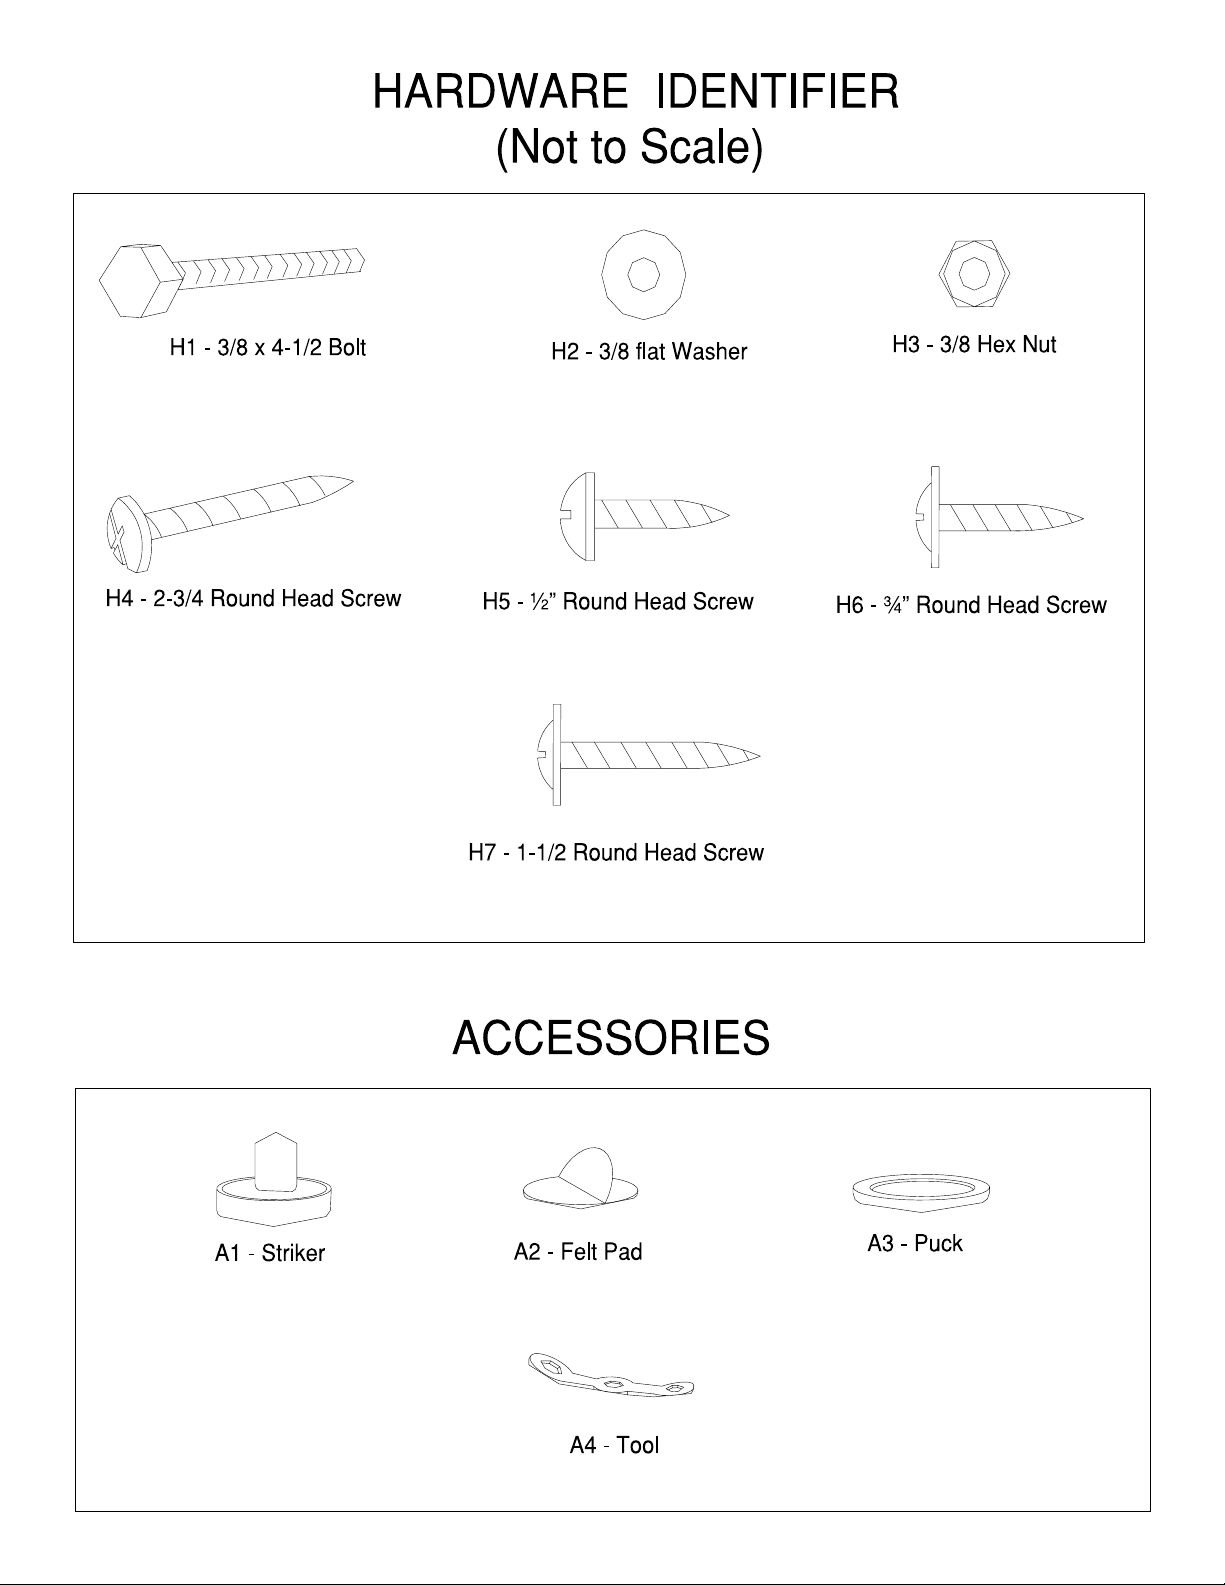
H1 3/8 x 4-1/2 Bolt 8
H2 3/8 Flat Washer 16
H3 3/8 Hex Nut 8
H4 2-3/4 Round Head Screw 2
H5 1/2 Round Head Screw 22
H6 3/4 Round Head Screw 24
H7 1-1/2 Round Head Screw 18
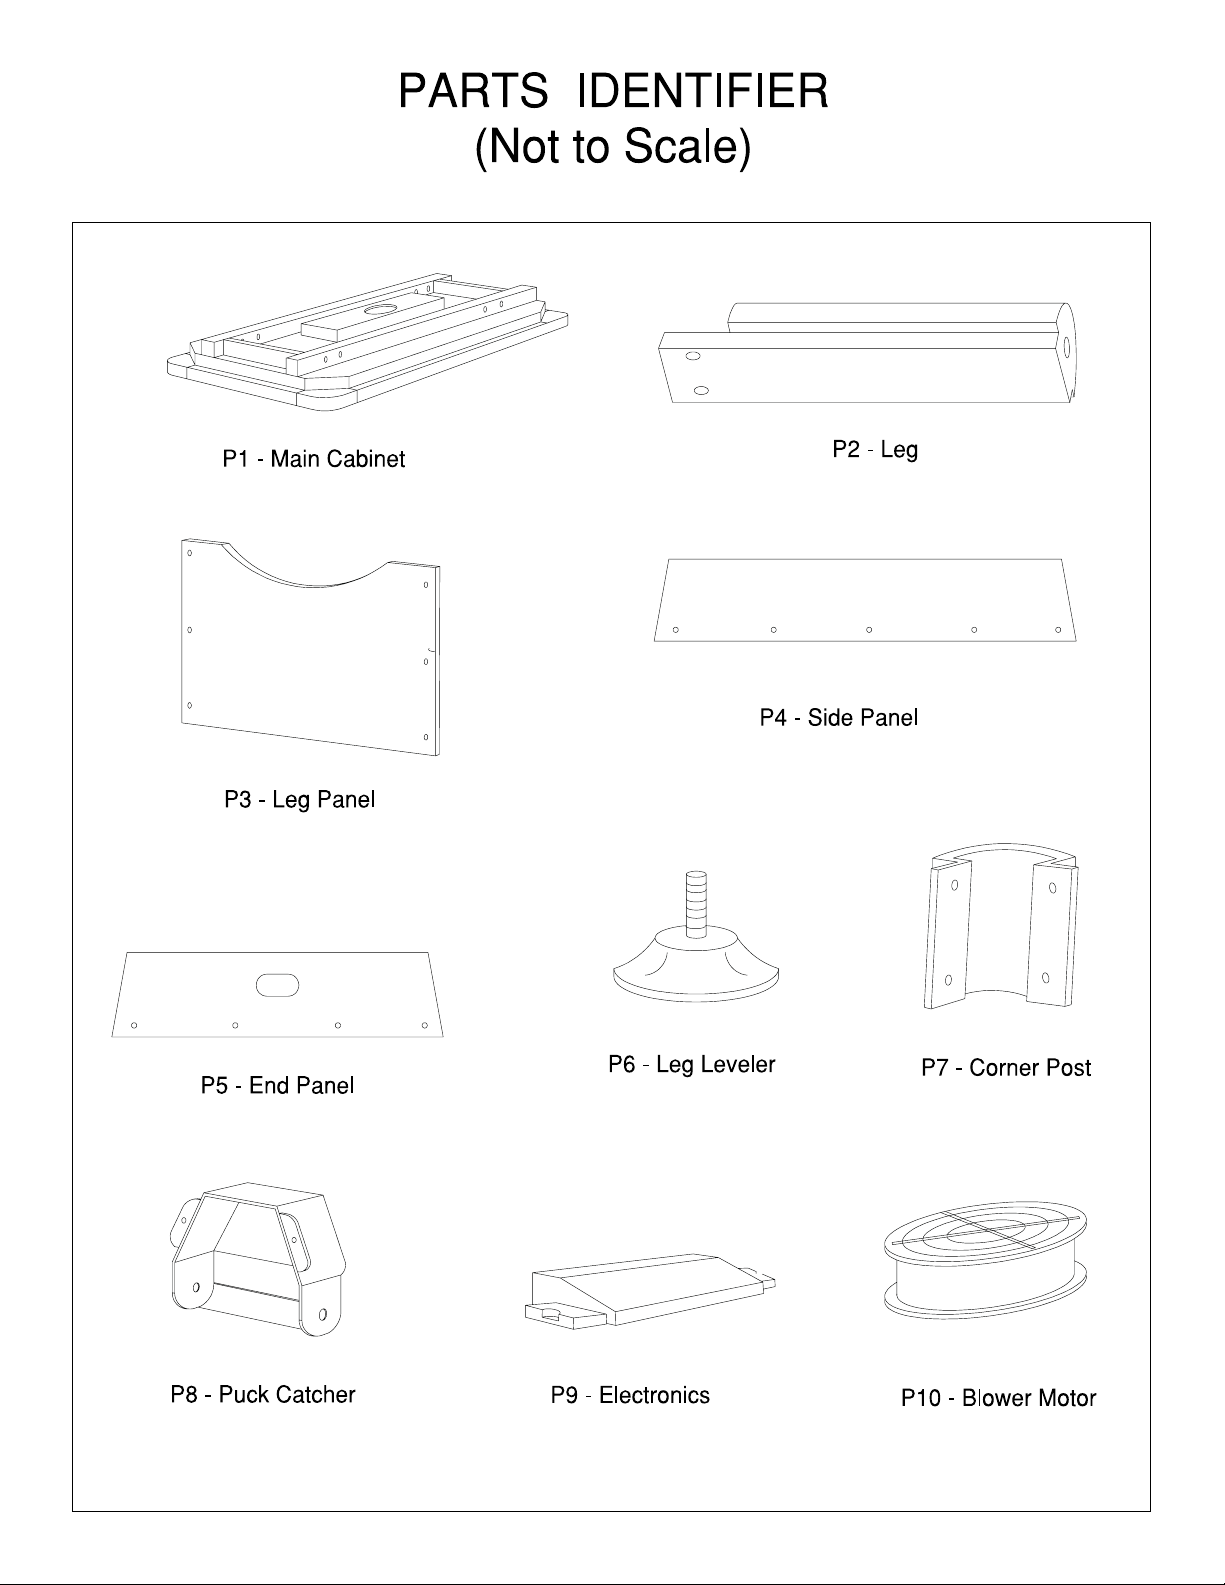
P1 Main Cabinet 1
P2 Leg 4
P3 Leg Panel 4
P4 Side Panel 2
P5 End Panel 2
P6 Leg Leveler 4
P7 Apron Corner 4
© 2002 Escalade Sports
P8 Puck Catcher (With Wires) 2
P9 Electronic Scorer 1
P10 Blower Moter & Grill 1
A1 Striker 4
A2 Felt Pad 4
A3 Puck 4
A4 Tool 1
C1 Blower Motor Grill 1
C2 Junction Box With Cord 1
C3 Red Plastic Goal 2
C4 Adapter 1
C6 Wire Set 1
K1 Hardware Kit 1
8
For Customer Service Call 1-866-556-2758
 Loading...