

Page 1

Product:
Model Code/s:
Air Conditioner
Remote Control
User Manual
Exactly what
you need
RG52E1
Online:
esatto.house
RG52E1 - UserManual_V1.indd 1 17/5/19 10:43 am
Page 2

User Manual
Welcome
2
Residentia Group
—
Head Office
165 Barkly Avenue
Burnley Victoria
Australia 3121
—
ACN
600 546 656
—
Online
residentia.group
—
Postage
PO Box 6077
Collingwood North
VIC Australia 3066
—
Telephone
1300 11 4357
—
Email
Congratulations on purchasing your air conditioner. The Esatto brand is proudly
distributed within Australia by Residentia Group Pty Ltd.
Please refer to the warranty card at the rear of this manual for information regarding your
product’s parts and labour warranty, or visit us online at: www.residentiagroup.com.au
At Residentia Group, we are customer obsessed and our Support Team are there to
ensure you get the most out of your appliance. Should you want to learn more about your
unit such as the various temperature guides or importantly taking care of the appliance,
our Support Team are here to help.
You can use our online Support Centre at anytime by visiting:
→ http://support.residentiagroup.com.au
Or you can contact us via phone by dialling: 1300 11 HELP (4357).
It is important that you read through the following use and care manual thoroughly to
familiarise yourself with the installation and operation requirements of your appliance
to ensure optimum performance.
Again, thank you for choosing an Esatto appliance and we look forward to being of
service to you.
Kind Regards,
The Residentia Team
RG52E1 - UserManual_V1.indd 2 17/5/19 10:43 am
Page 3
esatto.house
3
Contents
Page 2
Welcome
Page 5
Specications
Page 9
LCD Display
Page 4
Your Remote
Control
Page 6
Remote Buttons
Page 10
Remote Operation
RG52E1 - UserManual_V1.indd 3 17/5/19 10:43 am
Page 4
User Manual
Handling the remote controller
M
O
D
E
S
W
I
N
G
T
E
M
P
S
H
O
R
T
C
U
T
F
A
N
S
P
E
E
D
T
I
M
E
R
O
F
F
R
E
S
E
T
L
OC
K
L
E
D
F
O
L
L
O
W
M
E
T
I
M
E
R
O
N
T
U
R
B
O
S
E
L
F
CL
E
A
N
D
I
R
E
C
T
S
L
E
E
P
F
R
E
S
H
Your Remote Control
8m
CAUTIONS
4
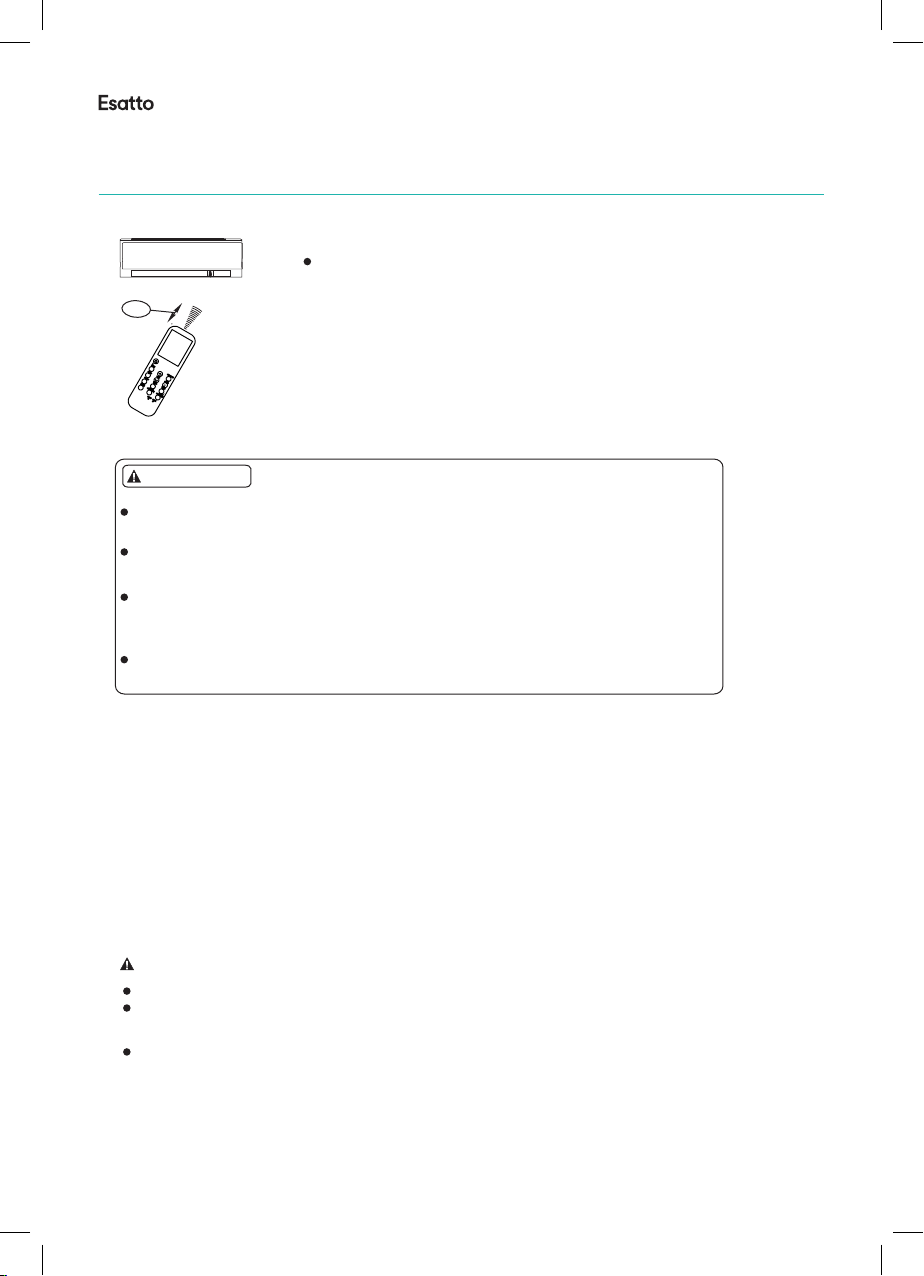
Location of the remote controller.
Use the remote controller within a distance of 8
meters from the appliance, pointing it towards the
receiver. Reception is confirmed by a beep.
The air conditioner will not operate if curtains, doors or other materials
block the signals from the remote controller to the indoor unit.
Prevent any liquid from falling into the remote controller. Do not expose
the remote controller to direct sunlight or heat.
If the infrared signal receiver on the indoor unit is exposed to direct
sunlight, the air conditioner may not function properly. Use curtains to
prevent the sunlight from falling on the receiver.
If other electrical appliances react to the remote controller, either move
these appliances or consult your local dealer.
Replacing batteries
The remote controller is powered by two dry batteries(R03/LR03X2) housed in the
rear part and protected by a cover.
(1) Remove the cover by pressing and sliding off.
(2) Remove the old batteries and insert the new batteries, placing the(+) and (-)
ends correctly.
(3) Reattach the cover by sliding it back into position.
NOTE: When the batteries are removed, the remote controller erases all programming. After inserting new batteries, the remote controller must be reprogrammed.
CAUTIONS
Do not mix old and new batteries or batteries of different types.
Do not leave the batteries in the remote controller if they are not
going to be used for 2 or 3 months.
Do not dispose batteries as unsorted municipal waste. Collection of such
waste separately for special treatment is necessary.
RG52E1 - UserManual_V1.indd 4 17/5/19 10:43 am
Page 5
esatto.house
5
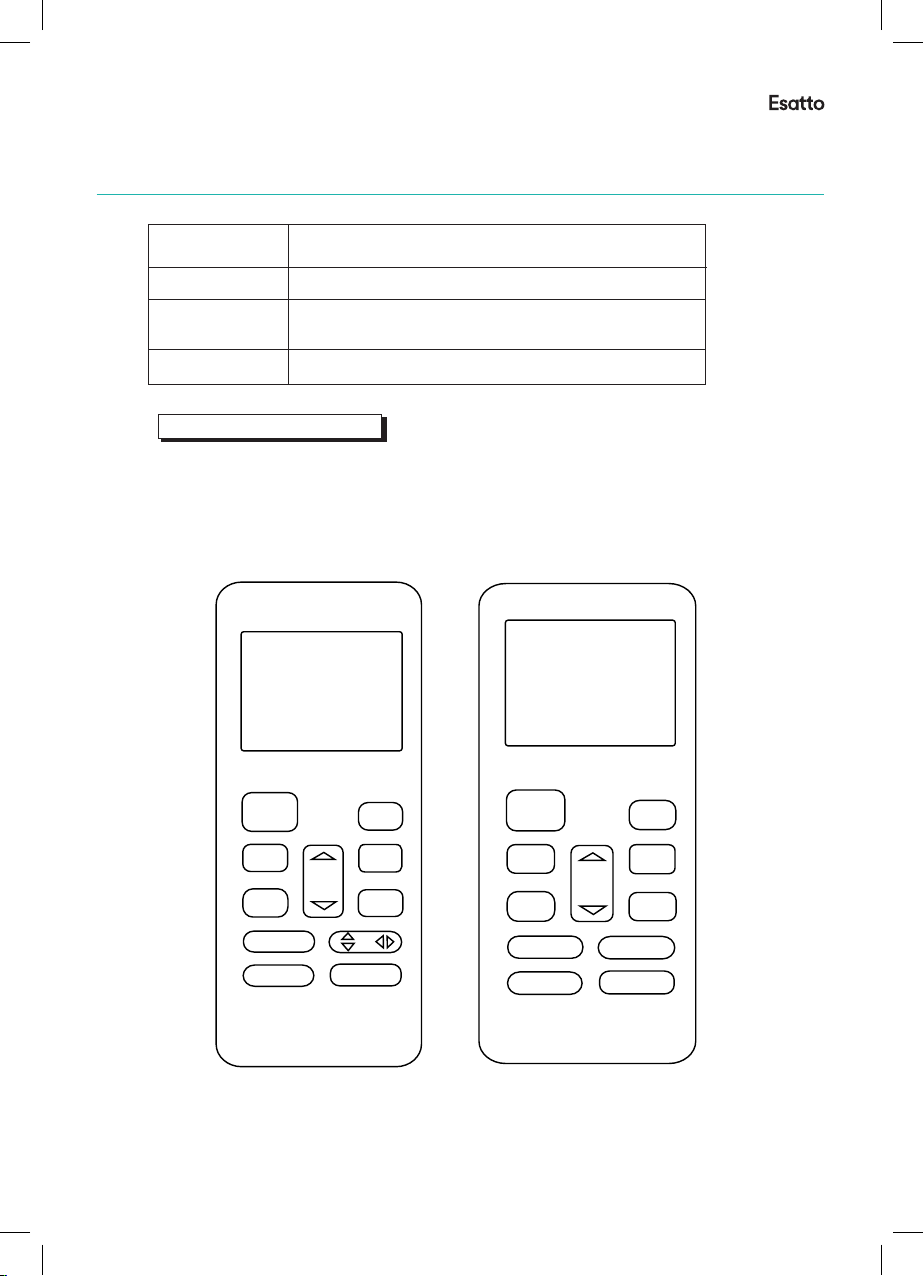
Remote Controller Specifications
Function buttons
1
2
4
5
3
6
7
ON/ OFF
MOD E
FAN
SLE EP
TURB O SELF CLE AN
RG52E1/BGEF
Specications
Model
Rated Voltage
Signal Receiving
Range
Environment
,RG52E1/BGEF RG52E2/BGEF
3.0V(Dry batteries R03/LR03×2)
8m
O O
-5 C~60 C
Performance Feature
1. Operating Mode: AUTO, COOL, DRY, HEAT(enabled on cooling& heating
models only ) and FAN.
2. Timer Setting Function in 24 hours.
3. Indoor Setting Temperature Range : 17 C~30 C.
4. Full function of LCD (Liquid Crystal Display).
ON/OFF
MODE
TEMP
FAN
ECO
TIM ER ON
TIM ER OFF
。 。
ON/OFF
MODE
FAN
TEMP
ECO
TIM ER ON
TIM ER OFF
SLE EP
TUR BO SELF CLE AN
LED FO LLOW ME
RG52E1/BGEF
RG52E1 - UserManual_V1.indd 5 17/5/19 10:43 am
SLE EP FRESH
TUR BO SELF CLE AN
SWI NG DIRE CT
LED FO LLOW ME
RG52E2/BGEF
Page 6
User Manual
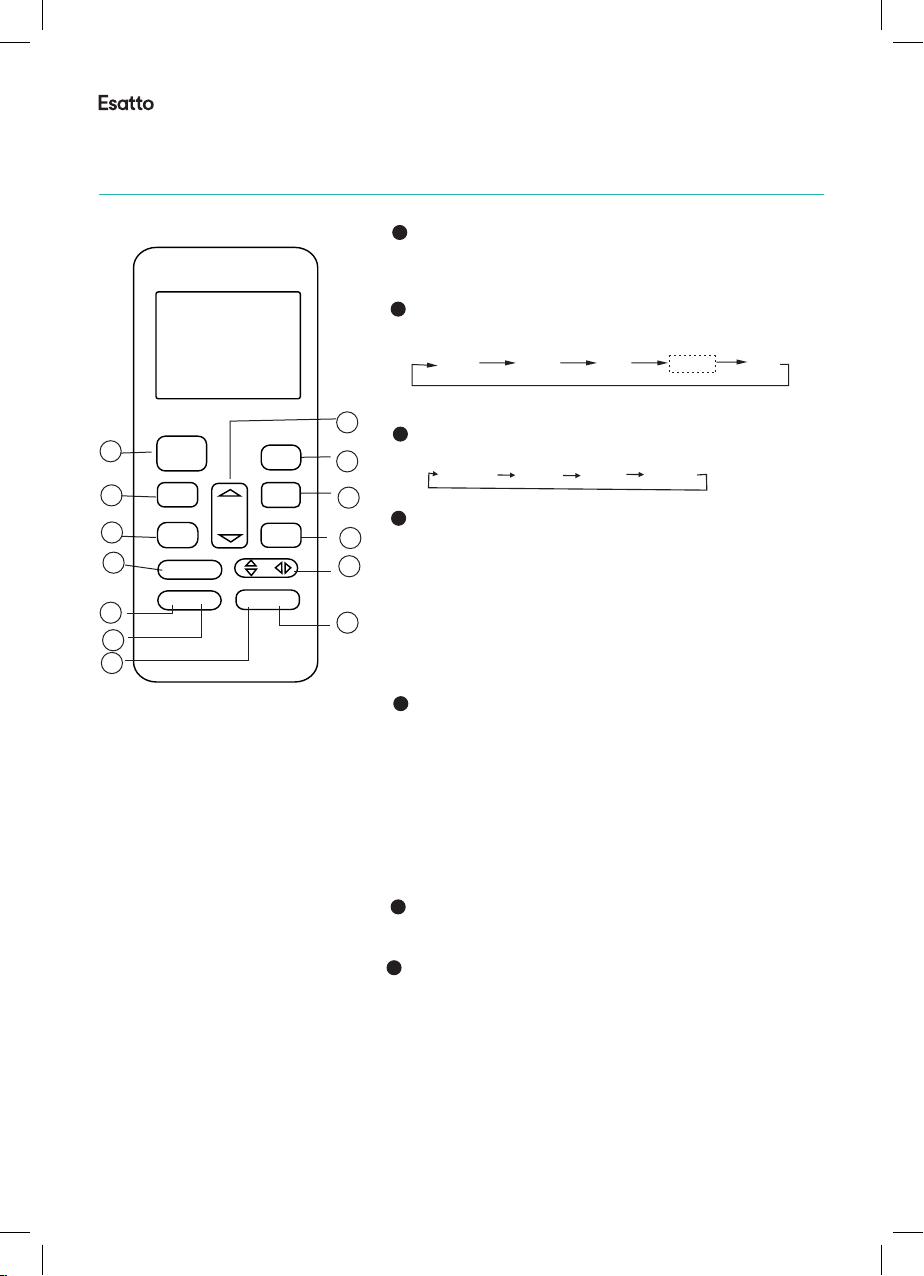
Function buttons
TIMER ON Button
TIMER OFF Button
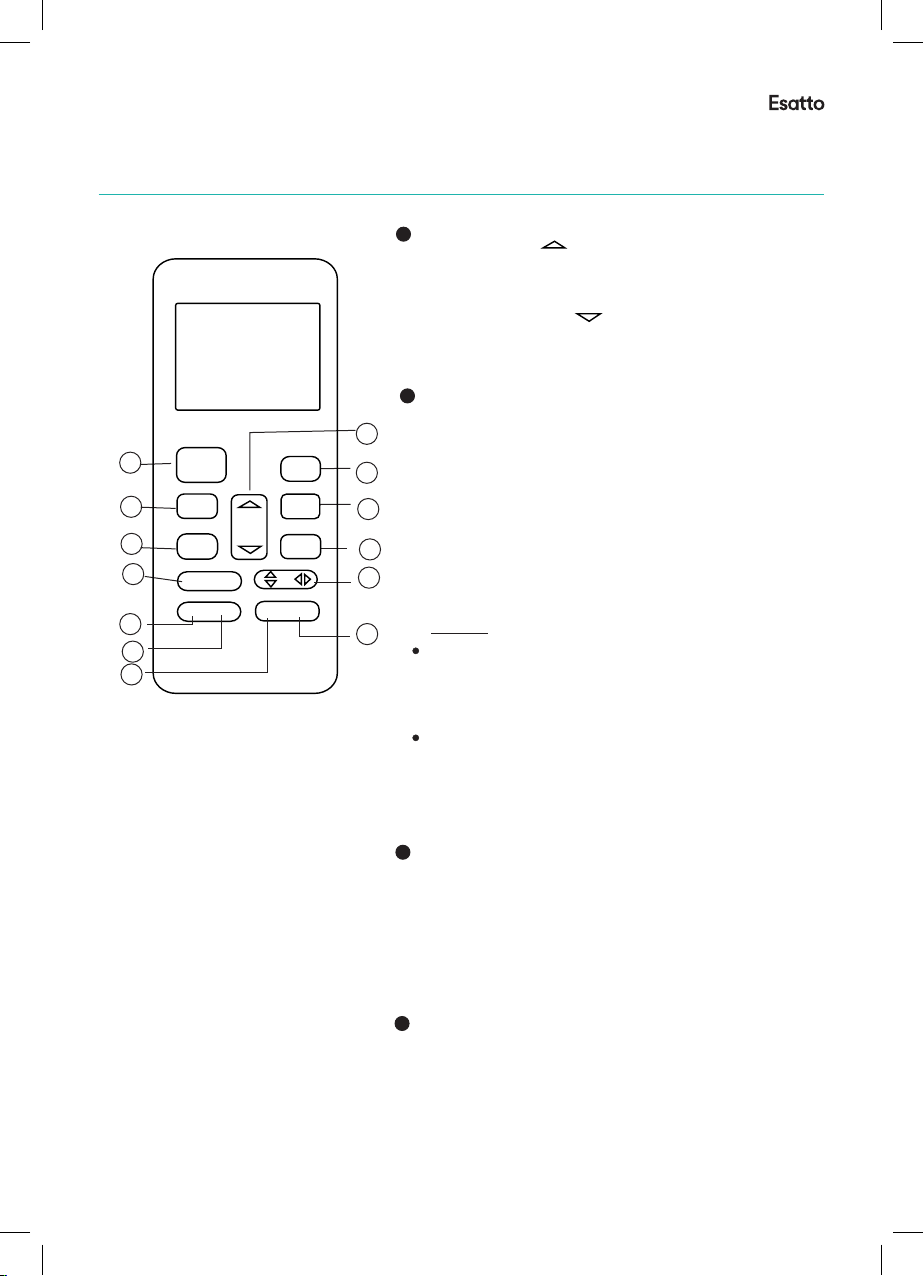
UP Button( )
Push this button to decrease the indoor
o o
temperature setting in 1 C increments to 17 C.
DOWN Button( )
8
10
11
Press this button to initiate the auto-on time
sequence. Each press will increase the auto-
timed setting in 30 minutes increments. When
the setting time displays 10.0, each press will
increase the auto-timed setting 60 minutes
increments. To cancel the auto-timed program,
simply adjust the auto-on time to 0.0.
Press this button to initiate the auto-off time
sequence. Each press will increase the auto-
timed setting in 30 minutes increments. When
the setting time displays 10.0, each press will
increase the auto-timed setting 60 minutes
increments. To cancel the auto-timed program,
simply adjust the auto-off time to 0.0
Push this button to increase the indoor
o o
temperature setting in 1 C increments to 30 C.
1
1
2
2
4
4
5
5
3
3
9
8
10
6
6
7
7
11
12
14
ON/ OFF
MOD E
FAN
SLE EP
TEM P
ECO
TIM ER ON
TIME R OFF
LED FO LLOW ME
TURB O SELF CLE AN
9
Used to enter the energy efficient mode.
Under cooling mode, press this button, the
remote controller will adjust the temperature
O
automatically to 24 C, fan speed of Auto to
save energy(but only if the set temperature
O
is less than 24 C). If the set temperature is
O O
between 24 C and 30 C, press the ECO
button, the fan speed will change to Auto,
the set temperature will remain unchanged.
NOTE:
Pressing the TURBO and SLEEP button,
modifying the mode or adjusting the set
O
temperature to less than 24 C will stop
ECO operation.
Under ECO operation, the set temperature
O
should be 24 C or more. it may result in
insufficient cooling. If you feel uncomfortable,
just press the ECO button again to stop it.
ECO Button:
RG52E1/BGEF
Remote Buttons
ON/OFF Button
1
Operation starts when this button is pressed
and stops when this button is pressed again.
MODE Button
2
Each time the button is pressed, the operation
mode is selected in a sequence of following:
ON/ OFF
1
MOD E
2
FAN
3
4
SLE EP
TURB O SELF CLE AN
5
6
7
RG52E1/BGEF
TEM P
ECO
TIM ER ON
TIME R OFF
LED FO LLOW ME
AUTO
NOTE: Heat mode is for Cooling & Heating models only.
8
9
10
11
12
14
3
FAN Button
Used to select the fan speed in four steps:
AUTO LOW MED HIGH
4
SLEEP Button
Active/Disable sleep function. It can maintain
the most comfortable temperature and save
energy. This function is available on COOL,
HEAT or AUTO mode only .
NOTE: While the unit is running under SLEEP
mode, it would be cancelled if MODE, FAN
SPEED or ON/OFF button is pressed.
TURBO Button
5
Active/Disable Turbo function. Turbo function
enables the unit to reach the preset temperature at cooling or heating operation in the
shortest time(if the indoor unit does not
support this function, there is no
corresponding operation happened when
pressing this button.)
SELF CLEAN Button
6
Active/Disable Self Clean function
7
LED Button
Disable/Active indoor screen Display. When
pushing the button, the indoor screen display
is cleared, press it again to light the display.
COOL
RG52E1 - UserManual_V1.indd 6 17/5/19 10:43 am
DRY
HEAT FAN
6
Page 7
esatto.house
7
1
2
4
5
3
6
7
8
UP Button( )
ON/ OFF
1
MOD E
2
FAN
3
4
SLE EP
TURB O SELF CLE AN
5
6
7
RG52E1/BGEF
TEM P
ECO
TIM ER ON
TIME R OFF
LED FO LLOW ME
Push this button to increase the indoor
temperature setting in 1 C increments to 30 C.
DOWN Button( )
Push this button to decrease the indoor
temperature setting in 1 C increments to 17 C.
9
ECO Button:
8
9
10
11
12
Used to enter the energy efficient mode.
Under cooling mode, press this button, the
remote controller will adjust the temperature
automatically to 24 C, fan speed of Auto to
save energy(but only if the set temperature
is less than 24 C). If the set temperature is
between 24 C and 30 C, press the ECO
O
O O
button, the fan speed will change to Auto,
the set temperature will remain unchanged.
14
NOTE:
Pressing the TURBO and SLEEP button,
modifying the mode or adjusting the set
temperature to less than 24 C will stop
ECO operation.
Under ECO operation, the set temperature
should be 24 C or more. it may result in
O
insufficient cooling. If you feel uncomfortable,
just press the ECO button again to stop it.
o o
o o
O
O
10
TIMER ON Button
Press this button to initiate the auto-on time
sequence. Each press will increase the autotimed setting in 30 minutes increments. When
the setting time displays 10.0, each press will
increase the auto-timed setting 60 minutes
increments. To cancel the auto-timed program,
simply adjust the auto-on time to 0.0.
11
TIMER OFF Button
Press this button to initiate the auto-off time
sequence. Each press will increase the autotimed setting in 30 minutes increments. When
the setting time displays 10.0, each press will
increase the auto-timed setting 60 minutes
increments. To cancel the auto-timed program,
simply adjust the auto-off time to 0.0
RG52E1 - UserManual_V1.indd 7 17/5/19 10:43 am
Page 8
User Manual
8
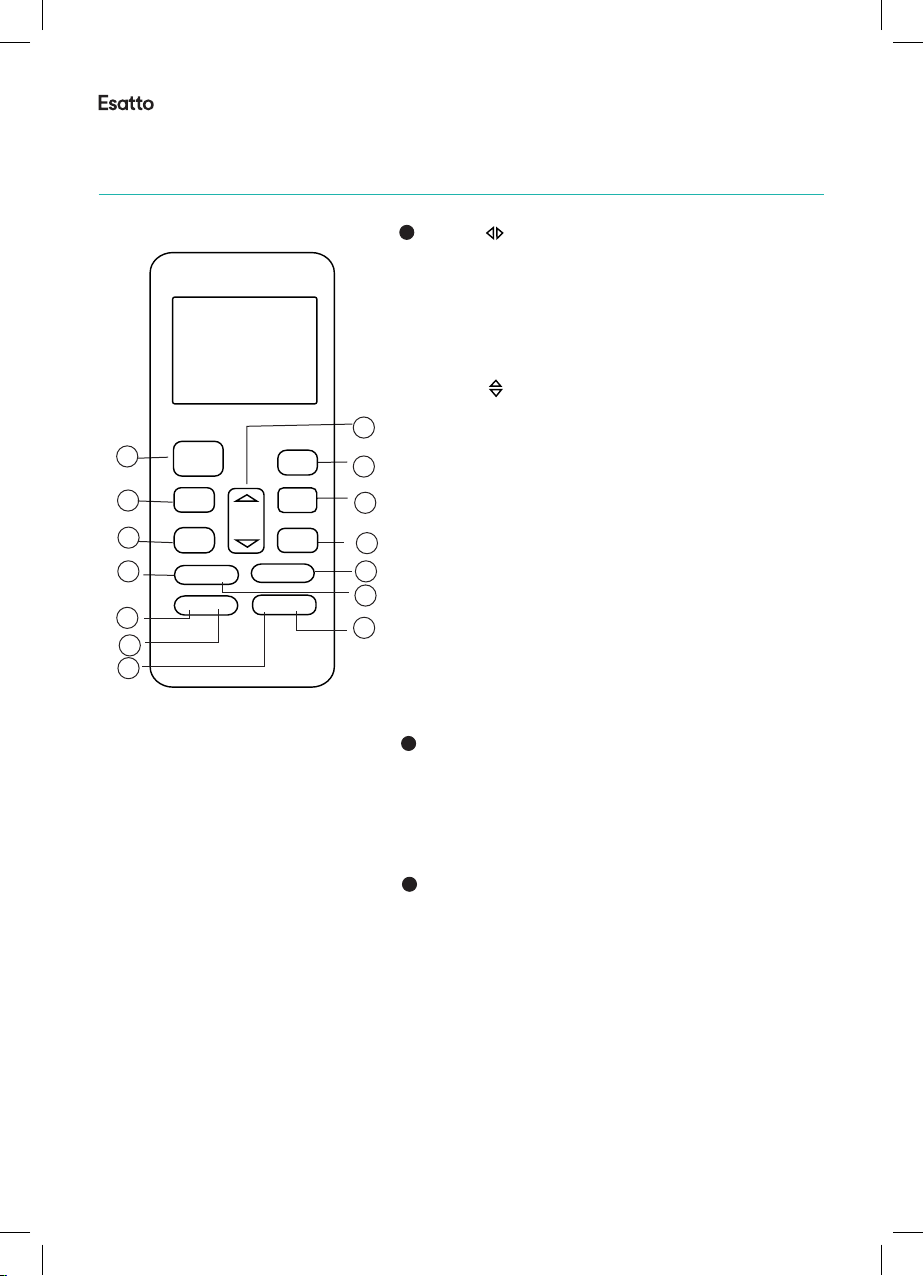
Swing Button
12
(applicable for RG52E1/BGEF)
Used to stop or start vertical louver movement
and set the desired left/right air flow direction.
The vertical louver changes 6 degree in angle
for each press. If keep pushing more than 2
seconds, the vertical louver auto swing feature
is activated.
Swing Button(applicable for RG52E1/BGEF)
Used to stop or start horizontal louver move-
8
ON/ OFF
1
MOD E
2
FAN
3
4
SLE EP FRESH
TURB O SELF CLE AN
5
TEM P
ECO
TIM ER ON
TIME R OFF
SWI NG DIREC T
LED FO LLOW ME
9
10
11
12
13
14
6
7
ment or set the desired up/down air flow
direction. The louver changes 6 degree in angle
for each press. If keep pushing more than 2
seconds, the louver will swing up and down
automatically.
SWING Button(applicable for RG52E2/BGEF)
Used to stop or start horizontal louver auto
swing feature.
DIRECT Button(applicable for RG52E2/BGEF)
Used to change the louver movement and set
the desired up/down air flow direction.
The louver changes 6 in angle for each press.
FRESH Button
13
Active/Disable When the
O
(applicable for RG52E2/BGEF)
FRESH function.
FRESH function is initiated, the Ionizer/
Plasma Dust Collector(depending on
models) is energized and will help to
remove pollen and impurities from the air.
14
FOLLOW ME Button:
Push this button to initiate the Follow Me
feature, the remote display is actual temperature at its location. The remote control will
send this signal to the air conditioner every 3
minutes interval until press the Follow Me
button again. The air conditioner will cancel
the Follow Me feature automatically if it does
not receive the signal during any 7 minute
interval.
RG52E1 - UserManual_V1.indd 8 17/5/19 10:44 am
Page 9
esatto.house
9
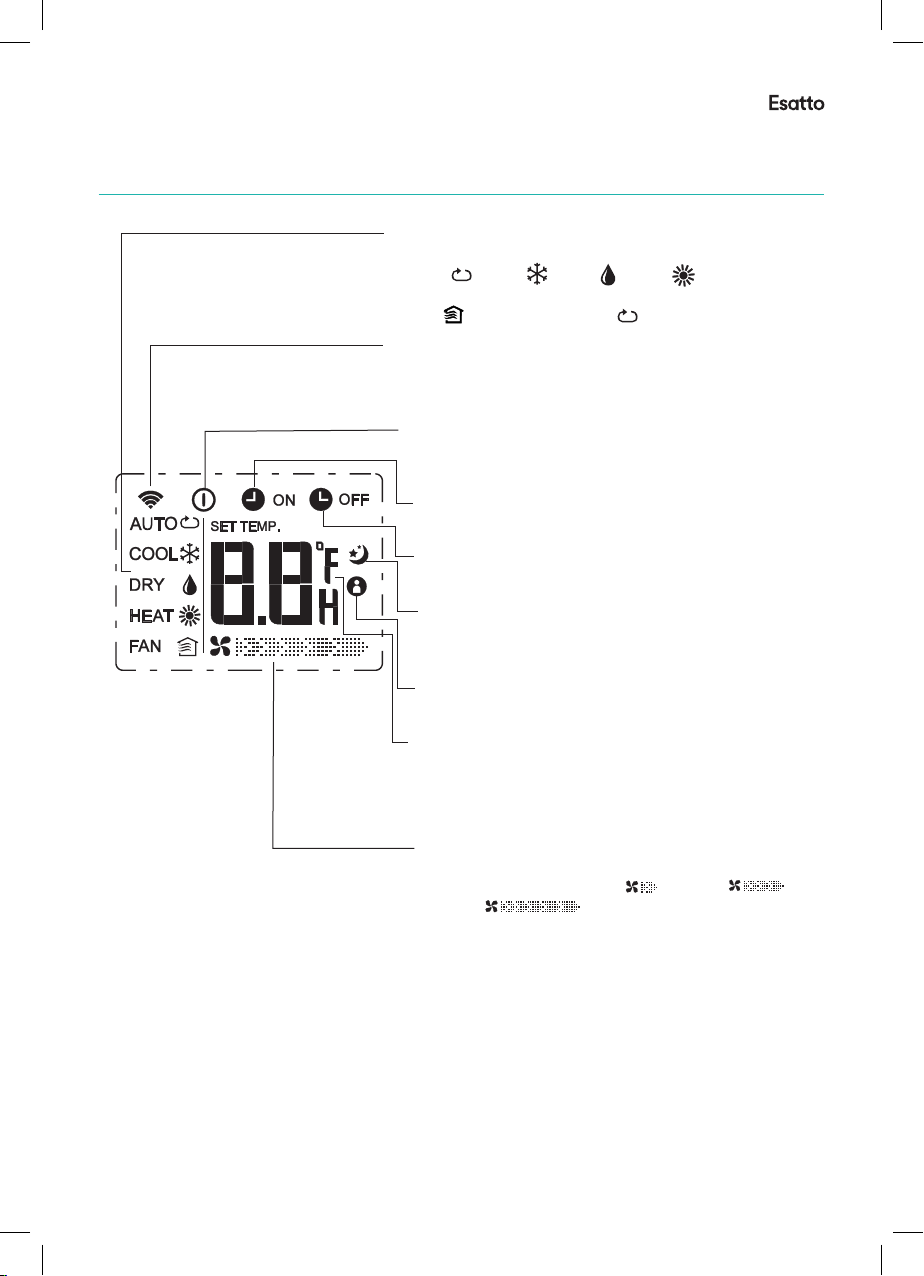
Indicators on LCD
1
1
4
3
3
ON/ OFF
MOD E
FAN
TURB O SELF CLE AN
ON/ OFF
MOD E
FAN
SLE EP
TURB O SELF CLE AN
SLE EP
LCD Display
Mode display
Displays the current operation mode. Including
auto( ), cool( ), dry( ), heat( ) (be
applicable to cooling & heating models only ),
fan( ) and back to auto( ).
Transmission Indicator
This transmission indicator lights when remote
controller transmits signals to the indoor unit.
ON/OFF display
Displayed by pressing the ON/OFF button.
Press the ON/OFF button again to remove.
TIMER ON display
Displayed when TIMER ON time is set.
TIMER OFF display
Displayed when TIMER OFF time is set.
Sleep Display
Displayed under sleeping operation.
Press the SLEEP button again to remove.
FOLLOW ME Display(on some models)
Displayed when FOLLOW ME function is activated.
Temp./Timer display
Displays the temperature setting(17 C~30 C). When
O O
you set the operating mode to FAN, no temperature
setting is displayed. And
if in the TIMER mode, shows
the ON and OFF settings of the TIMER.
Fan speed display
Displays the selected fan speed, AUTO(no display)
and three fan speed levels " " (LOW) " "
(MED) " " (HIGH) can be indicated.
The fan speed is AUTO when the operating mode is
either AUTO or DRY.
Note:
All indicators shown in the figure are for the purpose
of clear presentation. But during the actual operation
only the relative functional signs are shown on the
display window.
RG52E1 - UserManual_V1.indd 9 17/5/19 10:44 am
Page 10
User Manual
How to use the buttons
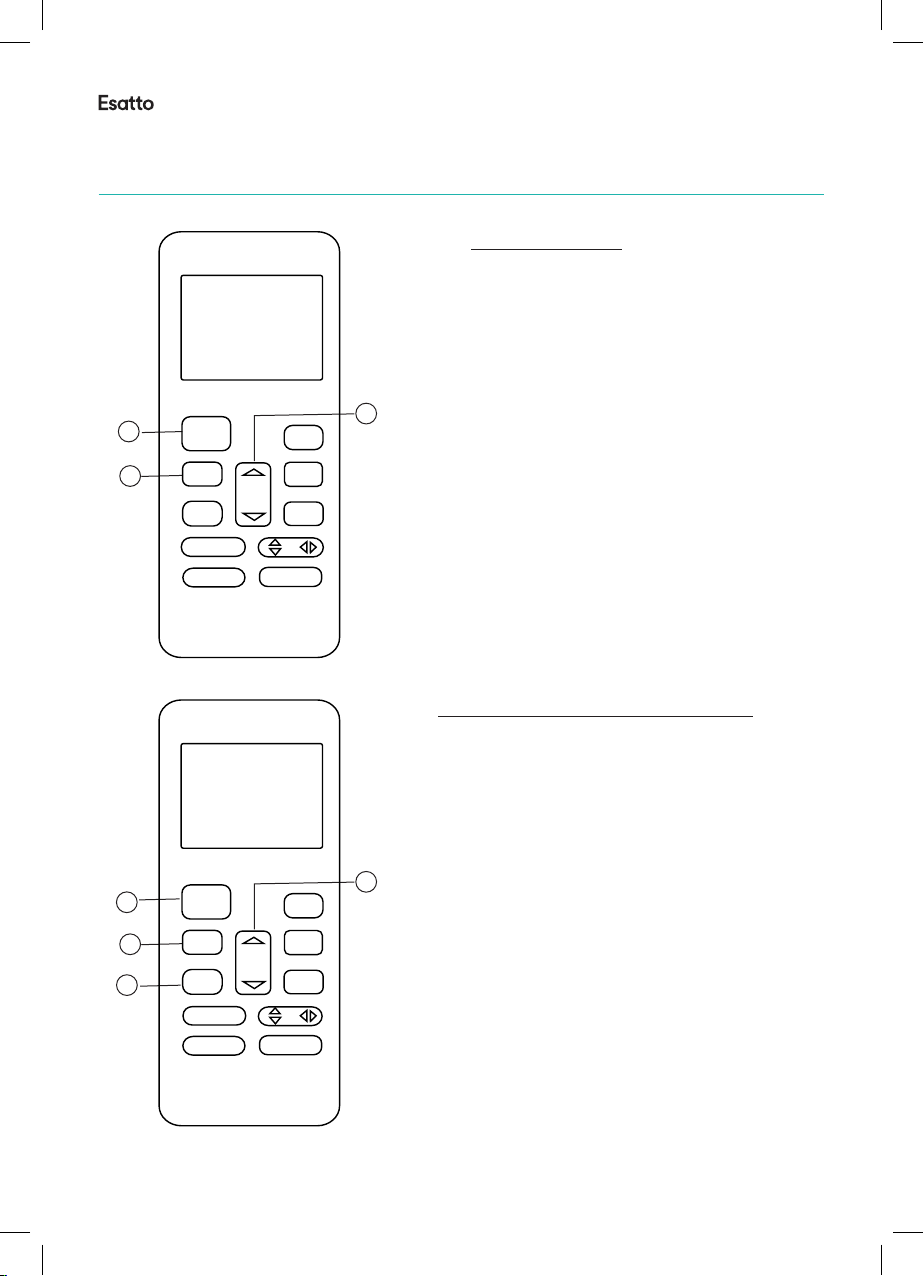
Dehumidifying operation
Ensure the unit i s plugged in an d power is
available. The OPERATION indicat or on the
display panel o f the indoor un it starts flash ing.
1. Press the MODE button to sele ct DRY mode.
2. Press the UP/D OWN buttons t o set the
desired tempe rature. The temperat ure
O O
can be set with in a r ange of 17 C~ 30 C
O
in 1 C in cr ements.
3. Press the ON /OFF button to st art the air
conditioner.
In the Dehumidifying mode, you can not switch the
fan speed. It has already been automatically controlled.
NOTE
2
1
3
ON/ OFF
MOD E
FAN
TEM P
TIM ER ON
TIME R OFF
SLE EP
LED FO LLOW ME
TURB O SELF CLE AN
ECO
Remote Operation
Ensure the unit i s plugged in an d power is
available. The OPERATION indicat or on the
display panel o f the indoor un it starts flash ing.
ON/ OFF
3
1
MOD E
FAN
SLE EP
TURB O SELF CLE AN
ECO
TIM ER ON
TEM P
TIME R OFF
LED FO LLOW ME
1. Press the MODE button to sele ct Auto.
2. Press the UP/D OWN button to s et the
desired tempe rature. The temperat ure can
be set within a r an ge of 17 C~ 30 C i n 1 C
increments.
2
3. Press the ON /OFFbutton to s tart the air
conditioner.
NOTE
1. In the Auto mode, the air conditioner can logically
choose the mode of Cooling, Fan, and Heating
by sensing the difference between the actual
ambient room temperature and the setting
temperature on the remote controller.
2. In the Auto mode, you can not switch the fan speed.
It has already been automatically controlled.
3. If the Auto mode is not comfortable for you , the
desired mode can be selected manually.
10
Auto operation
O O O
Cooling /Heating/Fan operation
Ensure the unit i s plugged in an d power is
available.
1. Press the MODE button to sele ct COOL,
HEAT(coo ling & heating mo dels only) or
FAN mode.
2. Press the UP/D OWN buttons t o set the
desired tempe rature. The temperat ure can
be set within a r an ge of 17 C~ 30 C i n 1 C
2
4
3
RG52E1 - UserManual_V1.indd 10 17/5/19 10:44 am
ON/ OFF
1
MOD E
FAN
SLE EP
TURB O SELF CLE AN
TEM P
LED FO LLOW ME
ECO
TIM ER ON
TIME R OFF
increments.
3. Press the FAN but ton to select t he fan speed
in four steps - Auto, Low, Med, or Hi gh.
4. Press the ON /OFF button to st art the air
conditioner.
NOTE
In the FAN mode, the setting temperature is not
displayed in the remote controller and you are not
able to control the room temperature either. In this
case, only step 1, 3 and 4 may be performed.
O O O
Page 11
esatto.house
11
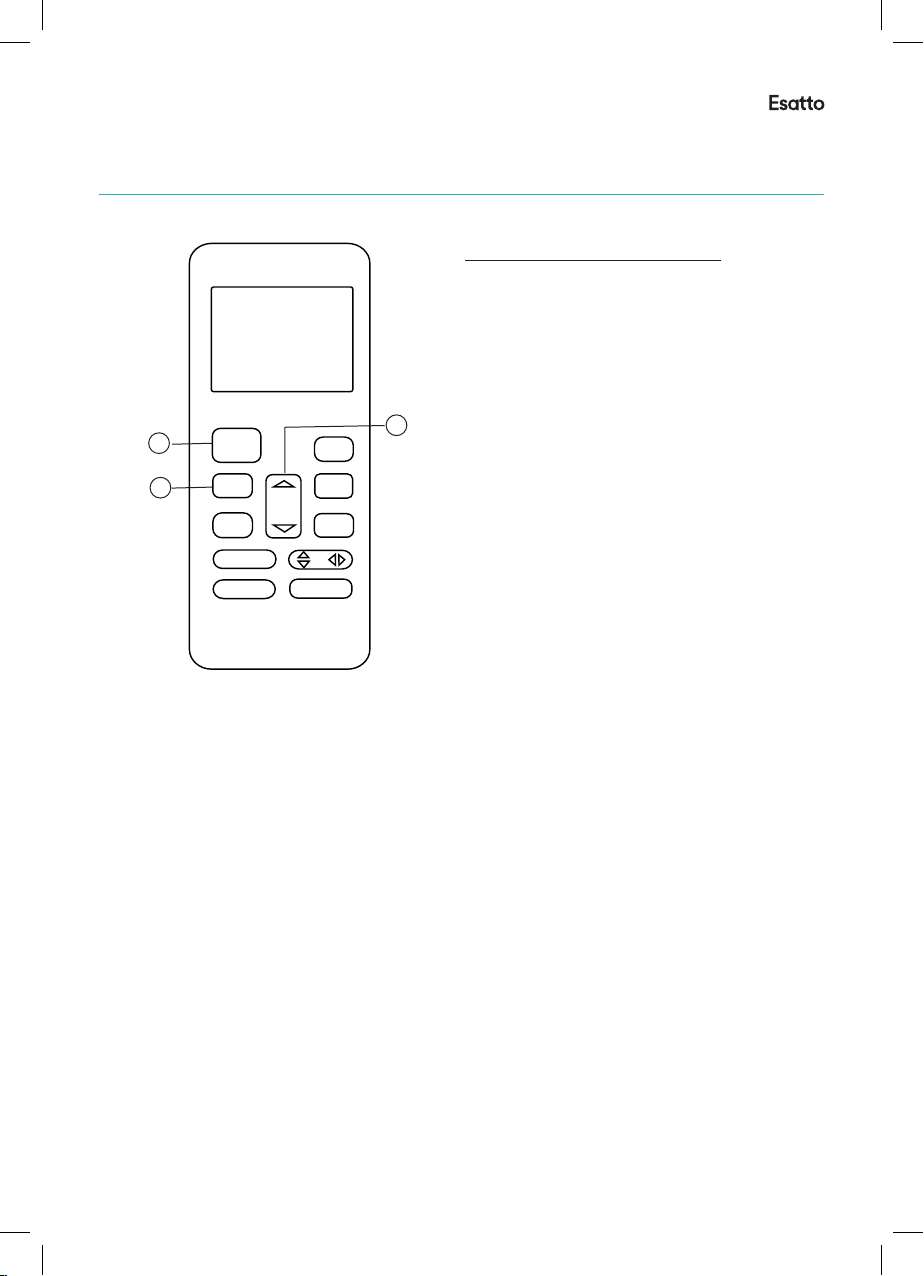
Dehumidifying operation
Ensure the unit i s plugged in an d power is
available. The OPERATION indicat or on the
display panel o f the indoor un it starts flash ing.
1. Press the MODE button to sele ct DRY mode.
2. Press the UP/D OWN buttons t o set the
desired tempe rature. The temperat ure
can be set with in a r ange of 17 C~ 30 C
O
in 1 C in cr ements.
ON/ OFF
3
ECO
2
3. Press the ON /OFF button to st art the air
conditioner.
1
MOD E
FAN
SLE EP
TURB O SELF CLE AN
TEM P
TIM ER ON
TIME R OFF
LED FO LLOW ME
NOTE
In the Dehumidifying mode, you can not switch the
fan speed. It has already been automatically controlled.
O O
RG52E1 - UserManual_V1.indd 11 17/5/19 10:44 am
Page 12
User Manual
Timer operation
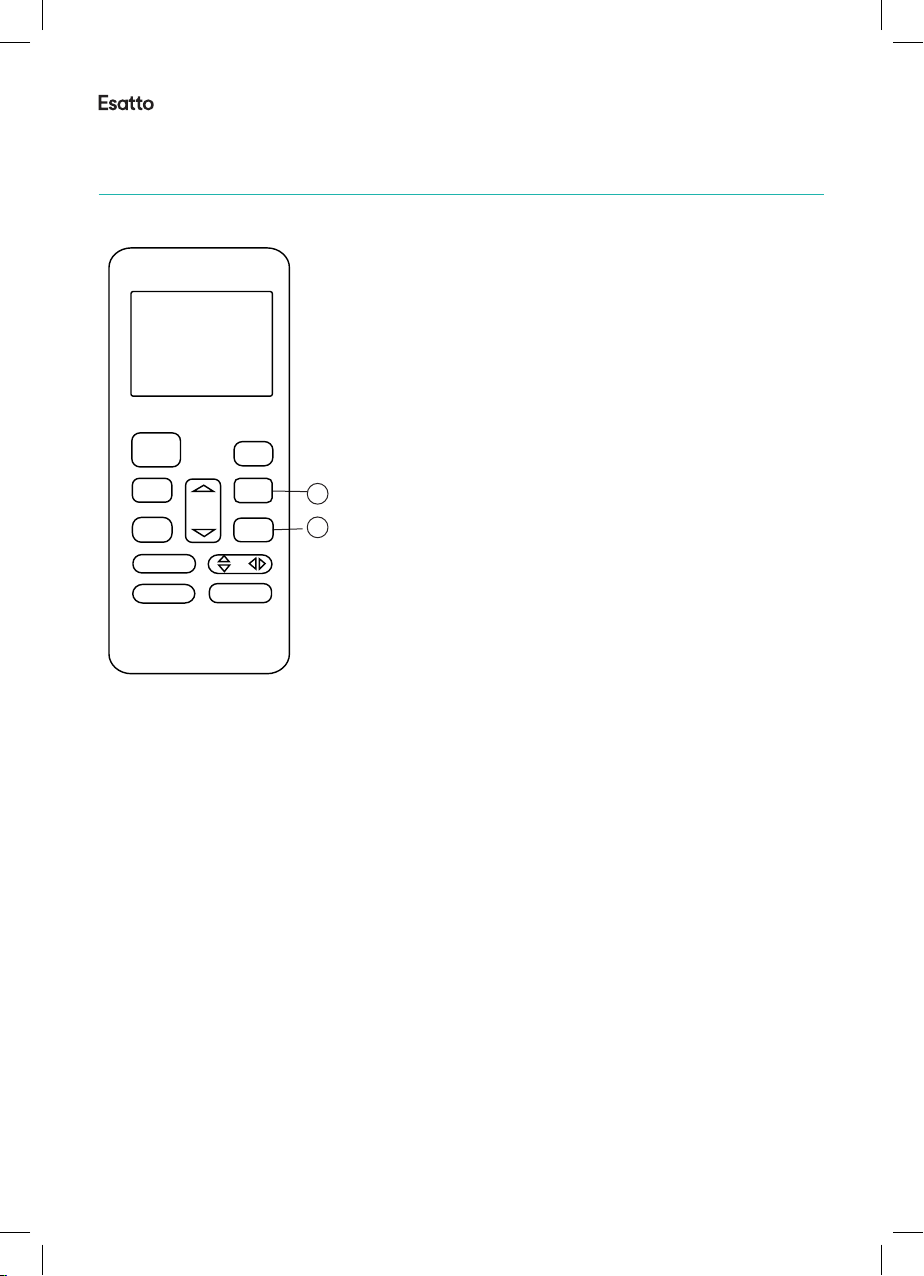
Press the TIMER ON button can set the auto-on
The effective operation time set by the remote controller for the timer function
is limited to the following settings: 0.5, 1.0, 1.5, 2.0, 2.5, 3.0, 3.5, 4.0, 4.5, 5.0,
5.5, 6.0, 6.5, 7.0, 7.5, 8.0, 8.5, 9.0, 9.5, 10, 11, 12, 13, 14, 15,16,17, 18, 19, 20,
21, 22, 23 and 24.
CAUTION
!
Example of timer setting
Start
Off
6 hours later
(Auto-on Operation)
The TIMER ON feature is useful when you want
the unit to turn on automatically before you return
home. The air conditioner will automatically start
operating at the set time.
To start the air conditioner in 6 hours.
1. Press the TIMER ON button, the last setting
of starting operation time and the signal "H"
will show on the display area.
2. Press the TIMER ON button to display "6.0H "
on the TIMER ON display of the remote
controller.
3. Wait for 3 seconds and the digital display
area will show the temperature again. The
"TIMER ON" indicator remains on and this
function is activated.
TIMER ON
Example:
Set
On
Set 10 hours later
On
Set
Remote Operation (Continued)
time of the unit. Press the TIMER OFF button
can set the auto-off time of the unit.
To set the Auto-on time.
1. Press the TIMER ON button. The remote
controller shows TIMER ON, the last Auto-on
setting time and the signal "H" will be shown on
the LCD display area. Now it is ready to reset
ON/ OFF
MOD E
FAN
ECO
TIM ER ON
TEM P
TIME R OFF
SLE EP
TURB O SELF CLE AN
LED FO LLOW ME
the Auto-on time to START the operation.
2. Push the TIMER ON button again to set desired
Auto-on time. Each time you press the button,
1
the time increases by half an hour between 0
and 10 hours and by one hour between 10 and
2
24 hours.
3. After setting the TIMER ON ,there will be a one
second delay before the remote controller
transmits the signal to the air conditioner. Then,
after approximately another 2 seconds, the
signal "h" will disappear and the set temperature
will re-appear on the LCD display window.
12
To set the Auto-off time.
1. Press the TIMER OFF button. The remote
controller shows TIMER OFF, the last Auto-off
setting time and the signal "H" will be shown on
the LCD display area. Now it is ready to reset
the Auto-off time to stop the operation.
2. Push the TIMER OFF button again to set
desired Auto-off time. Each time you press the
button, the time increases by half an hour
between 0 and 10 hours and by one hour
between 10 and 24 hours.
3. After setting the TIMER OFF ,there will be a
one second delay before the remote controller
transmits the signal to the air conditioner. Then,
after approximately another 2 seconds, the
signal "H " will disappear and the set temperature
will re-appear on the LCD display window.
RG52E1 - UserManual_V1.indd 12 17/5/19 10:44 am
Page 13
esatto.house
13
On
Set 10 hours later
On
Set
!
CAUTION
The effective operation time set by the remote controller for the timer function
is limited to the following settings: 0.5, 1.0, 1.5, 2.0, 2.5, 3.0, 3.5, 4.0, 4.5, 5.0,
5.5, 6.0, 6.5, 7.0, 7.5, 8.0, 8.5, 9.0, 9.5, 10, 11, 12, 13, 14, 15,16,17, 18, 19, 20,
21, 22, 23 and 24.
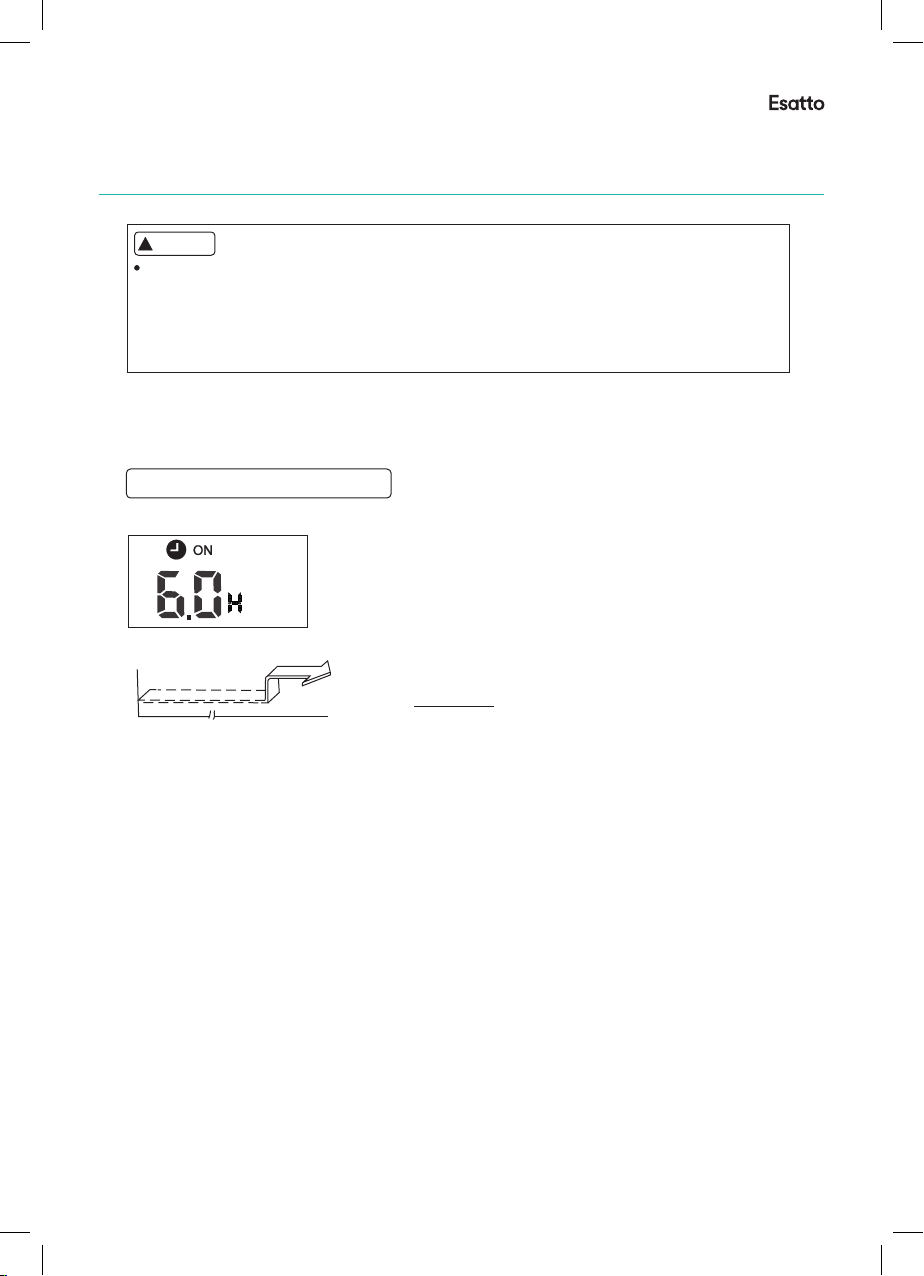
Example of timer setting
TIMER ON
(Auto-on Operation)
The TIMER ON feature is useful when you want
the unit to turn on automatically before you return
home. The air conditioner will automatically start
operating at the set time.
Example:
To start the air conditioner in 6 hours.
1. Press the TIMER ON button, the last setting
of starting operation time and the signal "H"
will show on the display area.
2. Press the TIMER ON button to display "6.0H "
on the TIMER ON display of the remote
controller.
3. Wait for 3 seconds and the digital display
area will show the temperature again. The
"TIMER ON" indicator remains on and this
function is activated.
Set
Start
Off
6 hours later
RG52E1 - UserManual_V1.indd 13 17/5/19 10:44 am
Page 14
User Manual
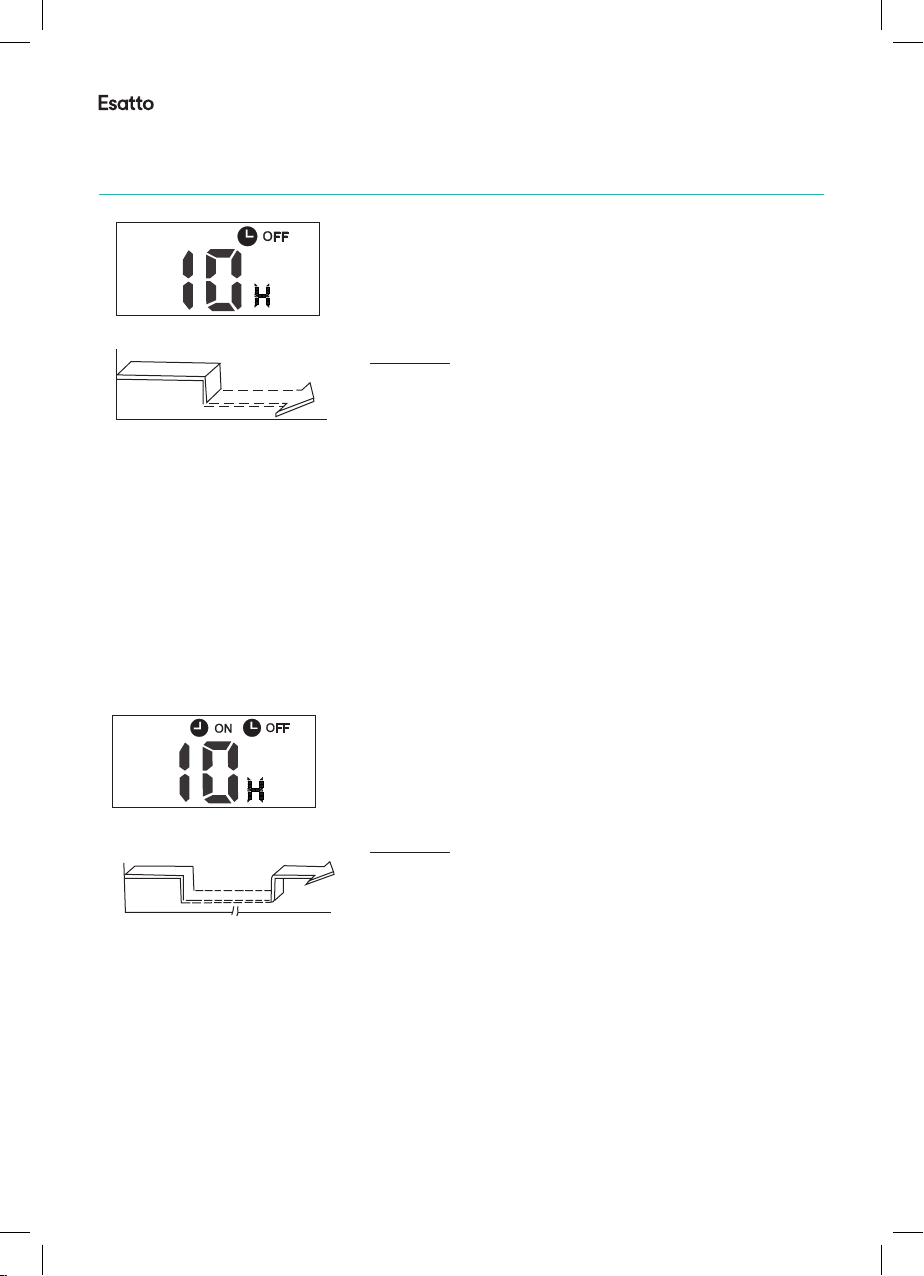
TIMER OFF
Example:
TIMER ON → TIMER OFF
(Off → Start → Stop operation)
This feature is useful when you want to start
the air conditioner before you wake up and
stop it after you leave the house.
To start the air conditioner 2 hours after setting,
and stop it 5 hours after setting.
1. Press the TIMER ON button.
2. Press the TIMER ON button again to display
2.0H on the TIMER ON display.
3. Press the TIMER OFF button.
4. Press the TIMER OFF button again to display
5.0H on the TIMER OFF display .
5. Wait for 3 seconds and the digital display area
will show the temperature again. The "TIMER
ON OFF" indicator remains on and this function
is activated.
Off
Stop
Start
2 hours later
after setting
5 hours later
after setting
Set
Remote Operation (Continued)
(Auto-off Operation)
The TIMER OFF feature is useful when you want the
unit to turn off automatically after you go to bed. The
air conditioner will stop automatically at the set time.
Stop
On
Set 10 hours later
Example:
To stop the air conditioner in 10 hours.
1. Press the TIMER OFF button, the last setting of
stopping operation time and the signal "H" will
show on the display area.
2. Press the TIMER OFF button to display "10H " on
the TIMER OFF display of the remote controller.
3. Wait for 3 seconds and the digital display area
will show the temperature again. The "TIMER
OFF" indicator remains on and this function is
activated.
COMBINED TIMER
(S both ON and OFF )etting timers simultaneously
14
TIMER OFF → TIMER ON
(On → Stop → Start operation)
This feature is useful when you want to stop the air
conditioner after you go to bed, and start it again in
the morning when you wake up or when you return
home.
Example:
To stop the air conditioner 2 hours after setting and
start it again 10 hours after setting.
1. Press the TIMER OFF button.
2. Press the TIMER OFF button again to display
2.0H on the TIMER OFF display.
3. Press the TIMER ON button.
4. Press the TIMER ON button again to display 10H
on the TIMER ON display .
5. Wait for 3 seconds and the digital display area
will show the temperature again. The "TIMER
ON OFF" indicator remains on and this function is
activated.
On
Set
2 hours later
after setting
Stop
Start
10 hours later
after setting
RG52E1 - UserManual_V1.indd 14 17/5/19 10:44 am
Page 15
esatto.house
15
TIMER ON → TIMER OFF
(Off → Start → Stop operation)
This feature is useful when you want to start
the air conditioner before you wake up and
stop it after you leave the house.
Set
Off
2 hours later
after setting
Start
Stop
5 hours later
after setting
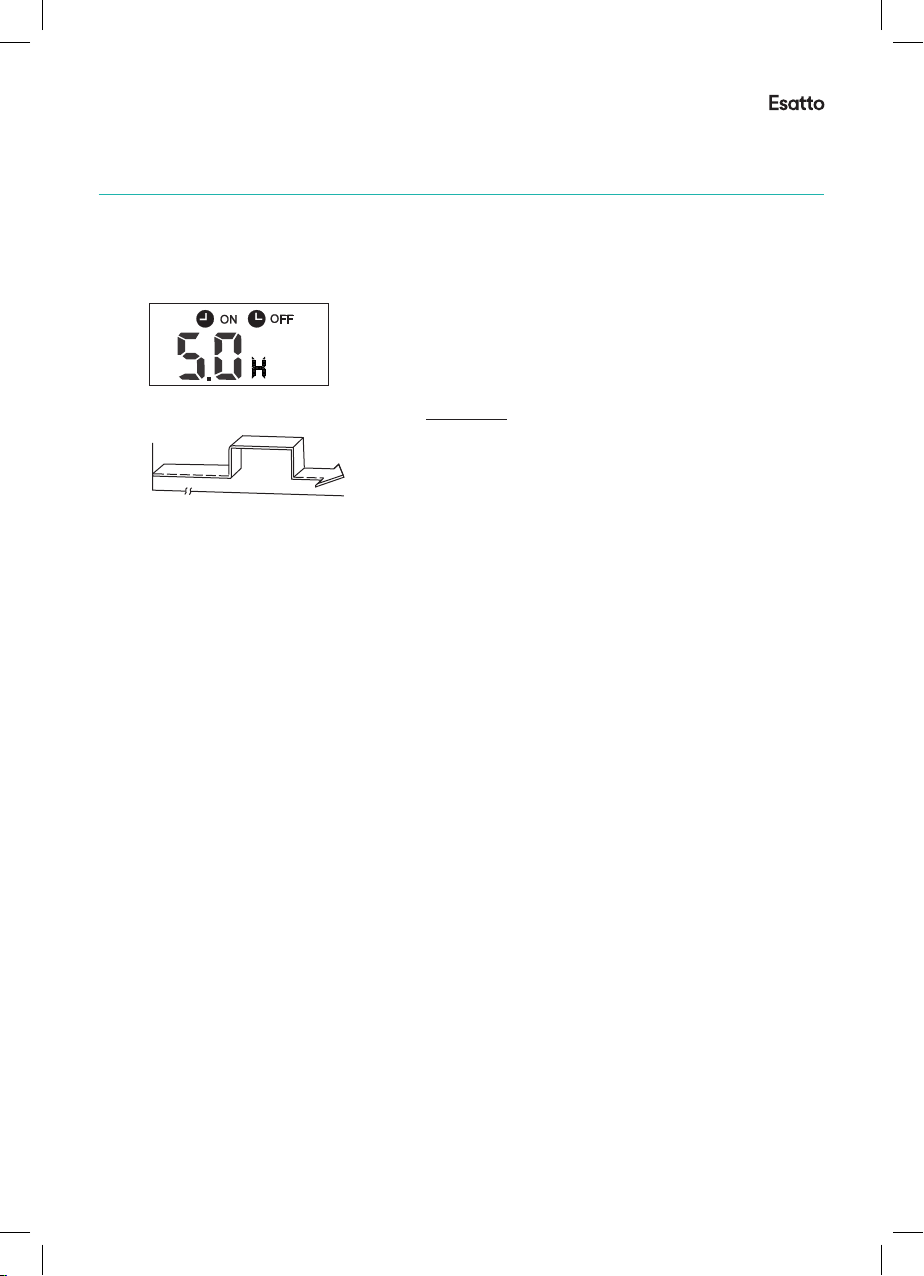
Example:
To start the air conditioner 2 hours after setting,
and stop it 5 hours after setting.
1. Press the TIMER ON button.
2. Press the TIMER ON button again to display
2.0H on the TIMER ON display.
3. Press the TIMER OFF button.
4. Press the TIMER OFF button again to display
5.0H on the TIMER OFF display .
5. Wait for 3 seconds and the digital display area
will show the temperature again. The "TIMER
ON OFF" indicator remains on and this function
is activated.
RG52E1 - UserManual_V1.indd 15 17/5/19 10:44 am
Page 16

User Manual
This page
is intentionally
left blank
Appliances
16
Exactly what
you need
A RESIDENTIA
GROUP INITIATIVE
RG52E1 - UserManual_V1.indd 16 17/5/19 10:44 am
 Loading...