

Page 1

Product:
Model Code/s:
Condenser Dryer 7kg
Heat Pump Dryer 7kg
User Mnul
ECD7
EHPD7
Exactly what
you need
Online:
esatto.house
Page 2
User Manual 02
Residentia Group
—
Head Office.
118 Campbell Street
Collingwood, VIC
Australia 3066
—
ACN.
600 546 656
—
Online.
residentia.group
Congratulations on purchasing your new dryer. The Esatto brand is proudly distributed
within Australia by esidentia Group Pty Ltd.
Please refer to the warranty card at the rear of this manual for information regarding
your product’s parts and labour warranty, or visit us online at www.residentia.group
At esidentia Group, we are customer obsessed and our Support Team are
there to ensure you get the most out of your appliance. Should you want to learn
more about recommended drying proceedures, the various features of your dryer,
and importantly taking care of your appliance when cleaning, our Support Team
are here to help. You can use our online Support Centre at anytime by visiting
http://support.residentiagroup.com.au, or you can contact us via calling us on
1300 11 HELP (4357).
It is important that you read through the following use and care manual thoroughly
to familiarise yourself with the installation and operation requirements of your
appliance to ensure optimum performance.
Again, thank you for choosing an Esatto appliance and we look forward to being
of service to you.
Kind Regards,
The esidentia Team
Postage.
PO Box 341, Mt Eliza
Victoria Australia 3930
Telephone.
1300 11 4357
Email.
[email protected]
Page 3

esatto.house 03
Contents 02
Welcome
04
Safety
Instructions
07
Your Esatto
Dryer
09
Controls
06
Installation
08
Quick Start
Guide
10
Operating
Your Dryer
11
Program Table
14
Troubleshooting
17
Purchase Details
12
Cleaning &
Maintenance
15
Technical Data
18
Warranty
Information
Page 4
Safety Instructions
User Manual 04
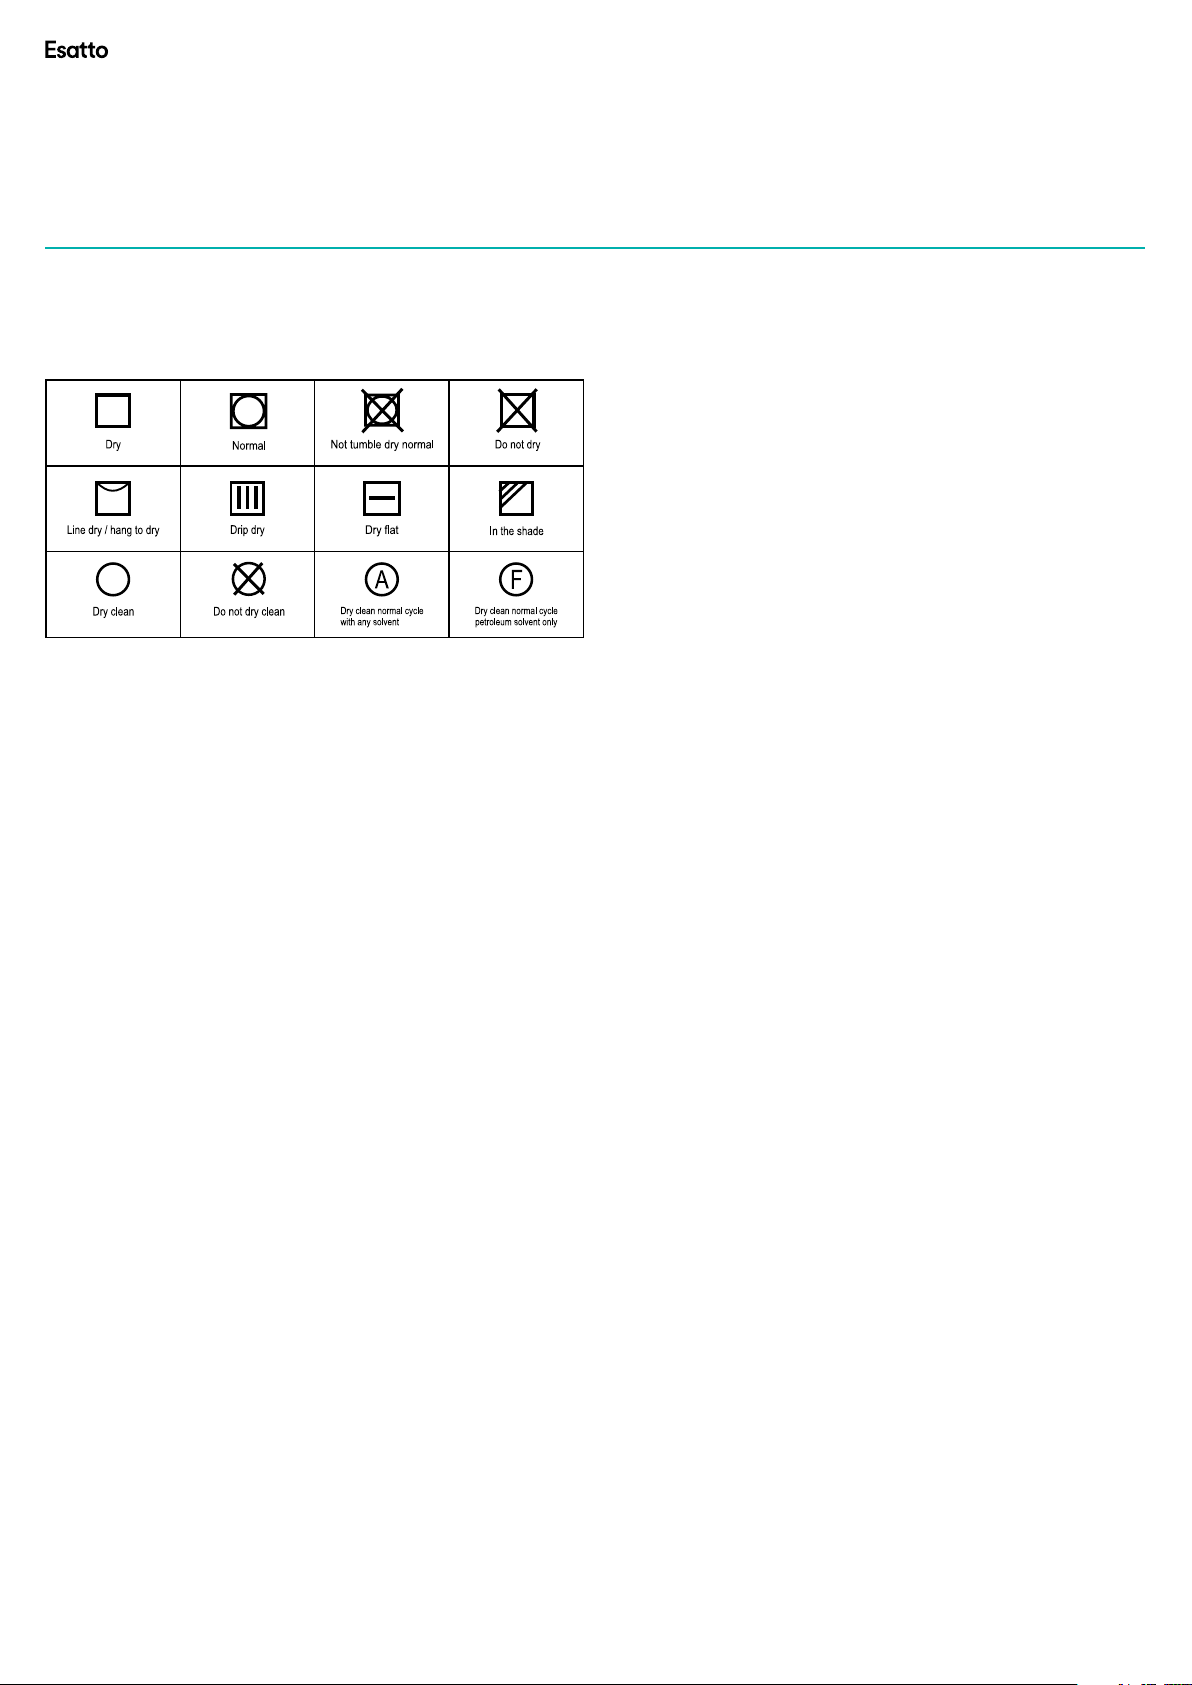
DRY CARE SYMBOLS
Please pay attention to use the drying machine if the
materials of your clothes can not be dried by it or contain
the symbols as follows:
IMPORTANT!
To prevent any damages to your and others’ life or property,
you have to follow the safety notes.
1. This product belongs to the category of electrical
appliances, and only for drying textiles which have been
washed with water in the household.
Please pay attention to the safety of power use during
the operation!
2. The power source with reliable earthing must be used.
Its earth wire must be buried under the ground and
shall not be connected with the public utilities such as
city water pipe or gas pipe etc. The earth wire and null
wire shall be distinguished and shall not be connected
together.
3. The maximum mass of dry textile material is 7 kilograms
to be used in the appliance.
4. That the tumble dryer is not to be used if industrial
chemicals have been used for cleaning.
5. Do not dry unwashed items in the tumble dryer.
6. Items that have been soiled with substances such
as cooking oil, acetone, alcohol, petrol, kerosene,
spot removers, turpentine, waxes and wax removers
should be washed in hot water with an extra amount of
detergent before being dried in the tumble dryer.
7. Items such as foam rubber (latex foam), shower caps,
waterproof textiles, rubber backed articles and clothes
or pillows tted with foam rubber pads should not be
dried in the tumble dryer.
8. Fabric softeners, or similar products, should be used as
specied by the fabric softener instructions.
9. The nal part of a tumble dryer cycle occurs without
heat (cool down cycle) to ensure that the items are left
at a temperature that ensures that the items will not be
damaged.
10. The lint trap has to be cleaned frequently.
11. The lint must not to be allowed to accumulate around
the tumble dryer.
12. Adequate ventilation has to be provided to avoid
the back ow of gases into the room from appliance
burning other fuels, including open res.
Page 5

esatto.house 05
13. WARNING: never stop a tumble dryer before the end
of the drying cycle unless all items are quickly removed
and spread out so that the heat is dissipated.
14. The exhaust air must not be discharged into a ue which
is used for exhausting fumes from appliance burning gas
or other fuels.
15. The appliance must not be install behind a lockable
door, a sliding door or a door with a hinge on the
opposite side to that of the tumble dryer. In such a way
that a full opening of the tumble dryer door is restricted.
16. Keep pets away from this appliance.
17. Oil-aected items can ignite spontaneously, especially
when exposed to heat sources such as in a tumble dryer.
The items become warm, causing an oxidation reaction
in the oil. Oxidation creates heat. If the heat cannot
escape, the items can become hot enough to catch re.
Piling, stacking or storing oil-aected items can prevent
heat from escaping and so create a re hazard.
18. If it is unavoidable that fabrics that contain vegetable
or cooking oil or have been contaminated by hair care
products be placed in a tumble dryer they should rst
be washed in hot water with extra detergent-this will
reduce, but not eliminate, the hazard.
19. The appliance should not be overturned during normal
use or maintenance.
20. Remove all objects from pockets such as lighters and
matches.
22. If the power cable is damaged, it must be replaced by
the manufacturer, its service agent or similarly qualied
persons in order to avoid a hazard.
23. This appliance is for indoor use only.
24. The openings must not be obstructed by a carpet.
25. Children of less than 3 years should be kept away unless
continuously supervised. 26. If the appliance appear
high temperature abnormally, please draw the mail plug
immediately.
26. The appliance is not intended for use by persons
(including children) with reduced physical, sensory
or mental capabilities, or lack of experience and
knowledge, unless they have been given supervision
or instruction concerning use of the appliance by a
person responsible for their safety. Children should
be supervised to ensure that they do not play with the
appliance.
27. The power wire shall be met IEC and must be able to
withstand the following current:
→ ECD7 16A
→ EHPD7 10A
CORRECT DISPOSAL OF THIS PRODUCT:
This marking indicates that this product should not be
disposed with other household wastes throughout the EU. To
prevent possible harm to the environment or human health
from uncontrolled waste disposal, recycle it responsibly
to promote the sustainable reuse of material resources. To
return your used device, please use the return and collection
systems or contact the retailer where the product was
purchased. They can take this product for environmental
safe recycling.
ELECTRIC SHOCK HAZARD
1. Do not draw the power cord forcefully to pull out the
mains plug.
2. Please do not plug/draw the mains plug with wet hands.
3. Do not damage the power cord and the power plug.
INJURY DANGER
1. Do not disassemble and install the dryer under no
instruction or supervision.
2. Do not stack this dryer on washing machine without
stacking kits.(if want stacking on washing machine,
please purchase the Independent parts and it must
be installed by the manufacturer, its service agent or
similarly qualied persons in order to avoid a hazard.)
3. Do not lean on the opened door of the dryer.
4. Do not put any pyrotoxin on the dryer, such as the
candle, electric cooker.
DAMAGE DANGER
1. Do not dry over the rated capacity.
2. Do not operate the dryer without the lter door and
lter base.
3. Do not dry the clothes before being spun.
4. Do not expose the dryer directly under the sun, and
indoor use only.
5. Do not install the dryer in the humid and drenching
environment.
6. At the cleaning and maintenance, please do remember
to pull out the power plug and do not directly wash the
dryer with water.
EXPLOSION DANGER
Please do not dry the clothes with some ammable
substances such as the coal oil, alcohol or there will be the
explosion.
To ensure your and your family’s safety, please make
improvement immediately if any power use at your
home does not meet the above-mentioned requirement.
Page 6
Installation
User Manual 06
TRANSPORT
Move cautiously. Do not grasp any salient parts of machine.
The machine door can not be used as the handle for delivery.
If the dryer can’t be transported erect, the dryer could be
slant to right less than 30°.
INSTALLATION POSITION
1. It is recommended that, for your convenience, the
machine is positioned close to your washing machine.
2. The tumble dryer must be installed in a clean place,
where dirt does not build up. Air must be able to
circulate freely all round the appliance. Do not obstruct
the front air inlet or the air intake grills at the back of the
machine.
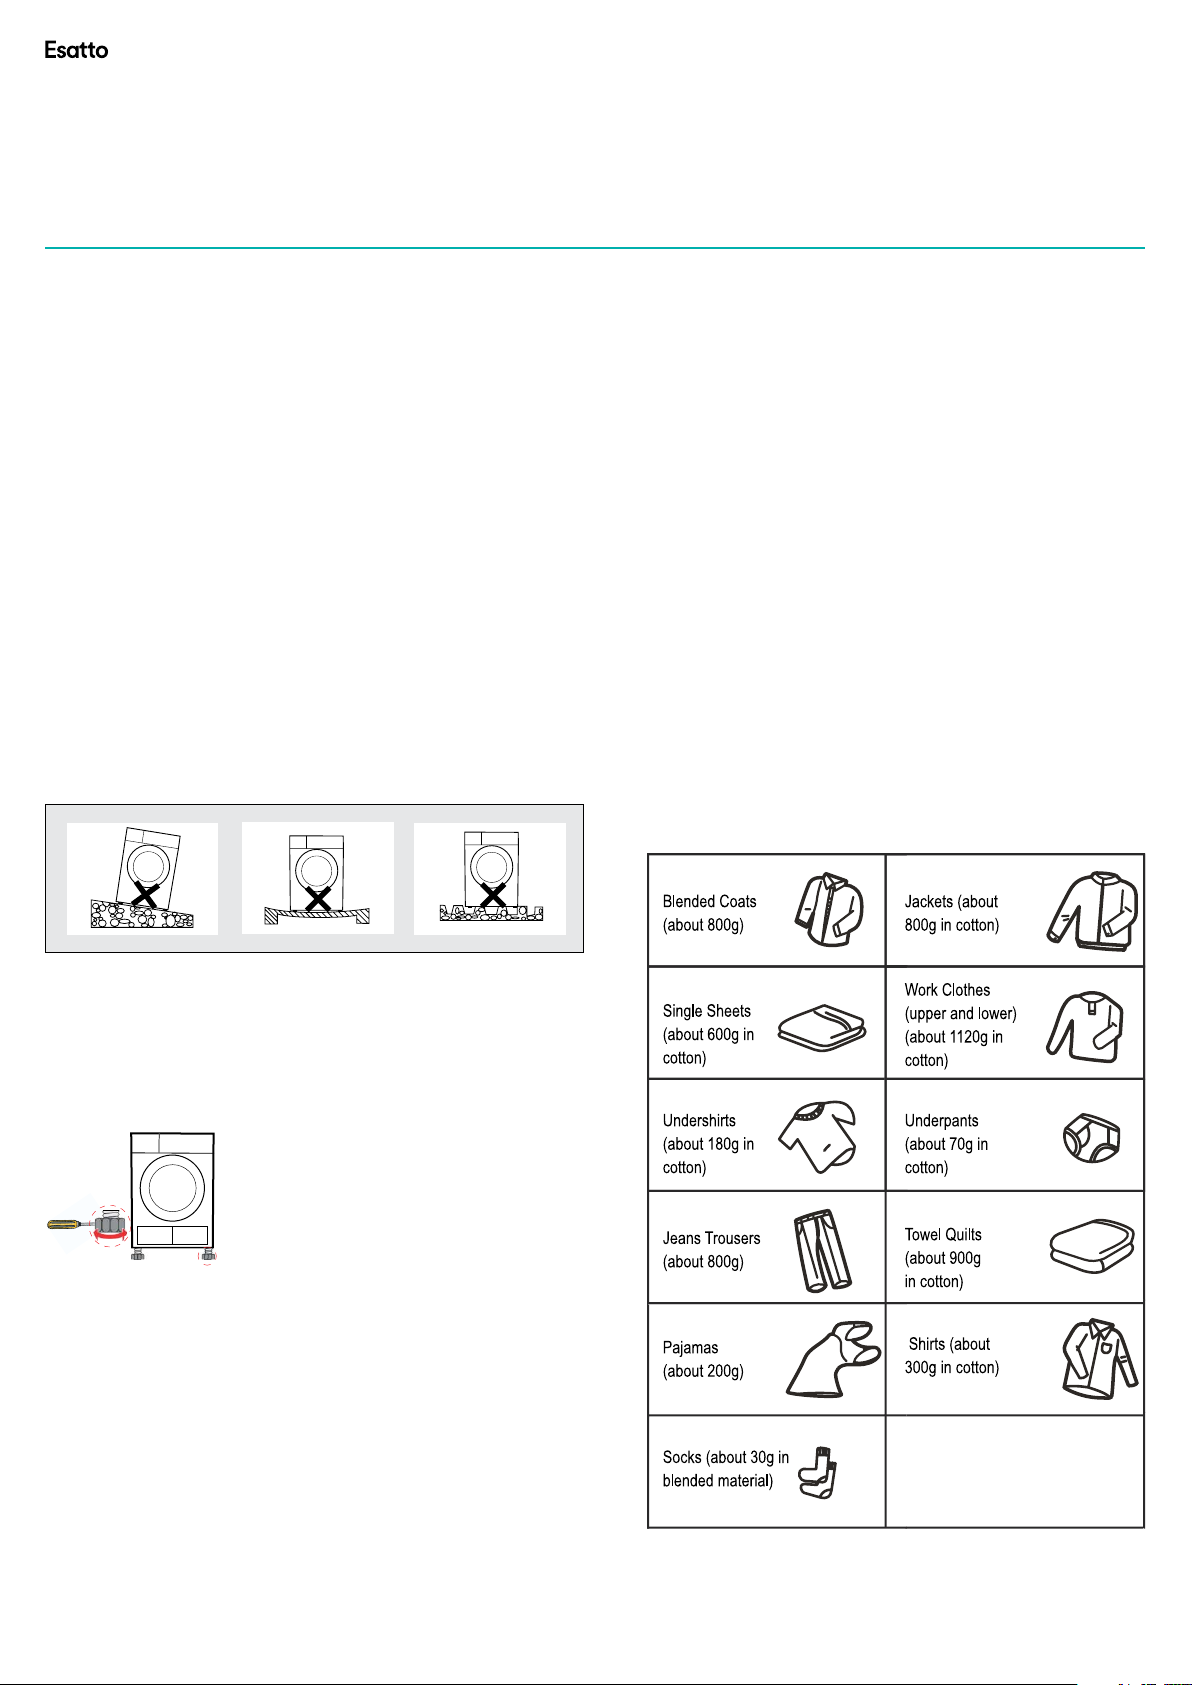
3. To keep vibration and noise to a minimum when the
dryer is in use, it should be placed on a rm and level
surface.
4. The feet must never be removed. Do not restrict the
oor clearance through deep pile carpets, strips of
wood or similar. This might cause heat built-up which
would interfere with the operation of the appliance.
ADVICE
1. Before drying, thoroughly spin the laundry in washing
machine. High spin speed can reduce the drying time
and save energy consumption.
2. For uniform drying result, sort the laundry according to
fabric type and drying program.
3. Before drying, please close zips, hooks and eyelets,
button up, tie fabric belts, etc.
4. Do not over dry the clothes, because over dried clothes
can easily get creases or shrinkage.
5. Do not dry the articles containing rubber or similar
elastic materials such as raincoats, bicycle covers and
etc.
6. The door can be opened only after the program of the
drying machine is completed. Do not open the door
before the program nished, as the skin may be scalded
by steam or hot surface.
7. Clean the lint lter and empty container after each
use to avoid extension of drying time and energy
consumption.
8. Please choose the related program when deal with
wool material clothes, to make the cloth more fresh and
uy.
9. The weight references as follows:
LEVEL ADJUSTING
Once in its permanent operating position, check that the
dryer is absolutely level with the aid of a spirit level. If it is
not, adjust the feet with a tool.
NOTE!
Leave it to stand for 2 hours after transporting. Before rst
use, please use the soft fabric to clean the inside drum.
1. Put some clean rags into the drum.
2. Plug the power, press On/O
3. Select the Refresh Program, press Start/Pause button
4. After nishing this program, please follow the “Cleaning
And Care” to clean the lter door.
During drying, the compressor and the water pump
generate some noise which is entirely normal (only for
EHPD7).
Page 7
Your Esatto Dryer
Catalogue
Part description
Part Description
Quick start
3. Close the machine door
2. Open the door and
4. Plug the power cord and
press the【On/Off】button
5. Select the desired
Step 3: put the hose holder on the washing basin or any other sink.
esatto.house 07
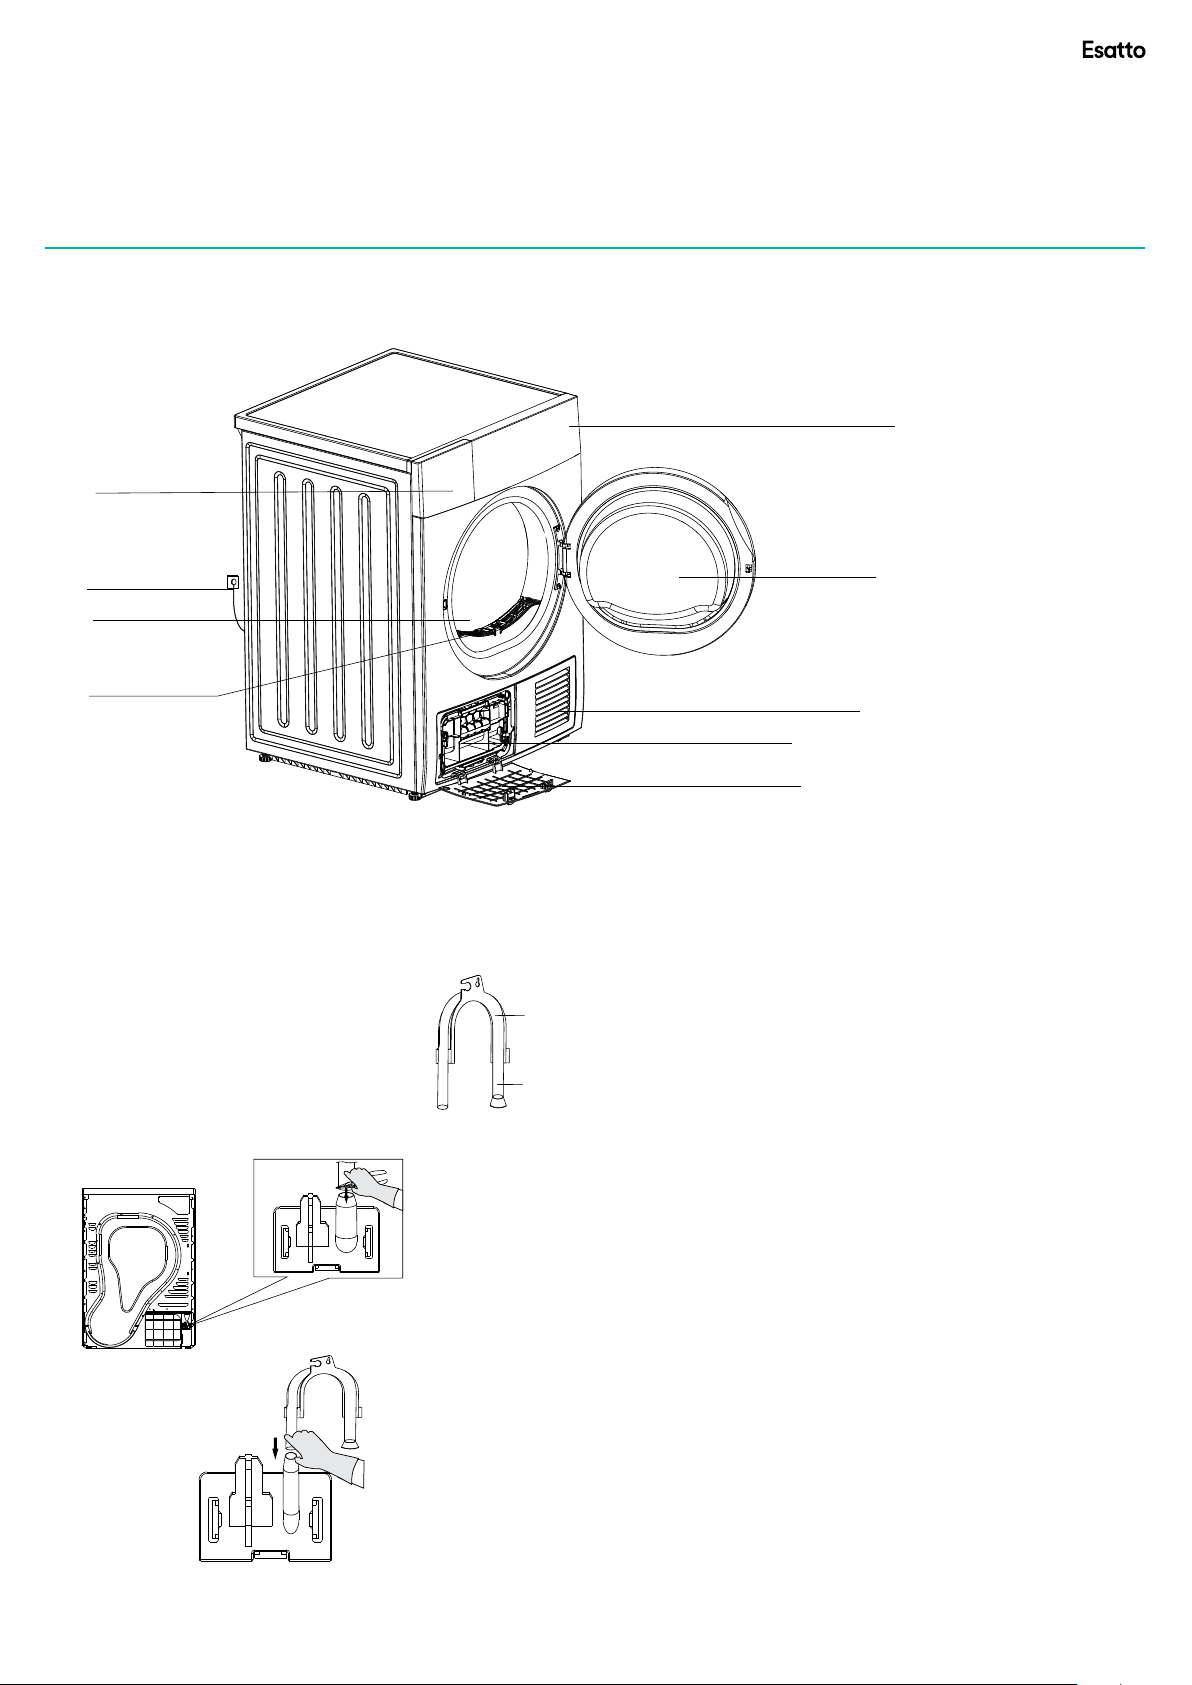
Container
Power Cord
Drum
Lint Filter
Accessories
Control panel
Door
Air inlet
Handle
Maintenance cover
The following parts are optional for specific models.
If your dryer has following parts, please them instruction
install following the
below .
Hose holder(optional)
Condensing drain
hose(optional)
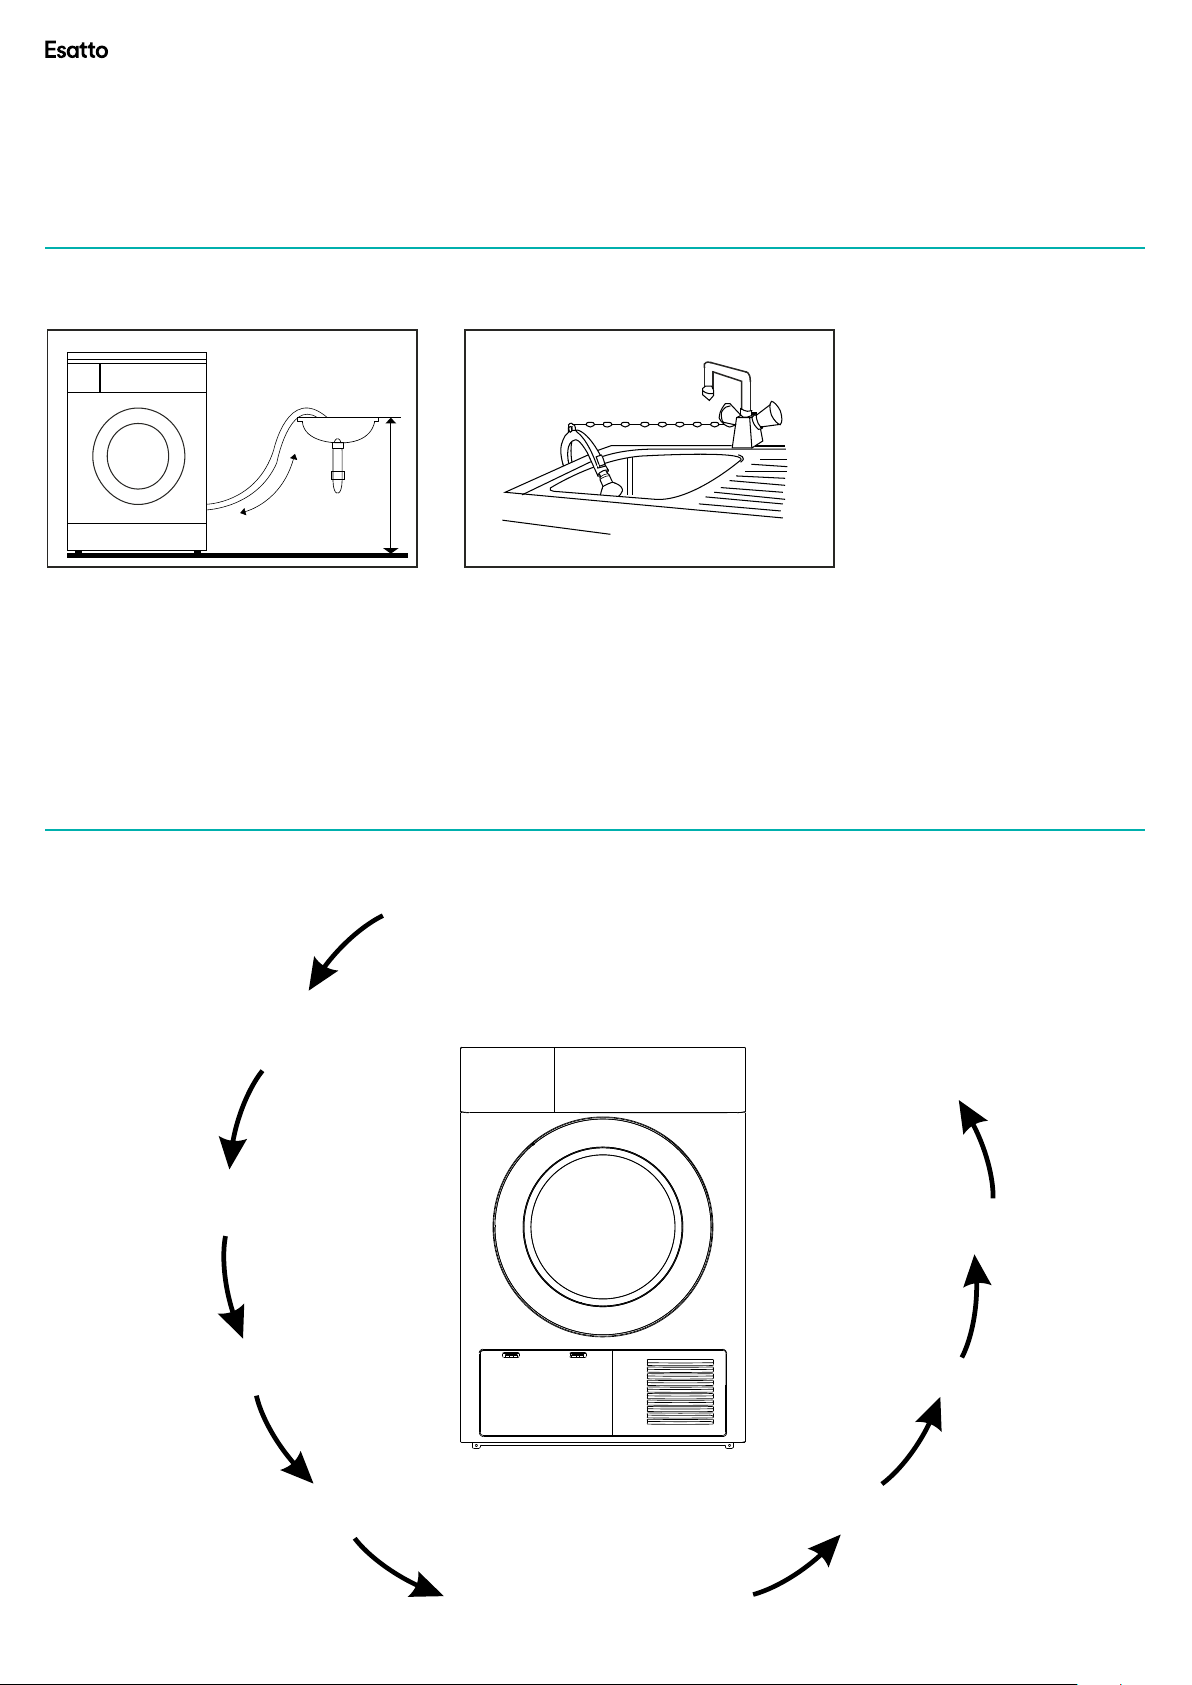
Installation step:
Step 1: removing the drain hose from the
hose connector using plier.
Step 2: insert the external drainage hose.
Page 8
User Manual 08
Catalogue
Part description
Step 3: put the hose holder on the washing basin or any other sink.
Catalogue
Part description
Quick start
Max. 120c m
200cm
Step 3: put the hose holder on the washing basin or any other sink.
200c m
Max. 120 cm
Quick Start Guide
1.Check if the container and filters
have been cleaned up
2. Open the door and
load the laundry
3. Close the machine door
4. Plug the power cord and
press the【On/Off】button
5. Select the desired
programme
6. Press the 【Start/Pause】button
10.Unplug the power cord
9. Clean the filters and
empty container
8.Press the 【 】buttonOn/Off
7. Remove the laundry when
finished
Page 9
Controls
esatto.house 09
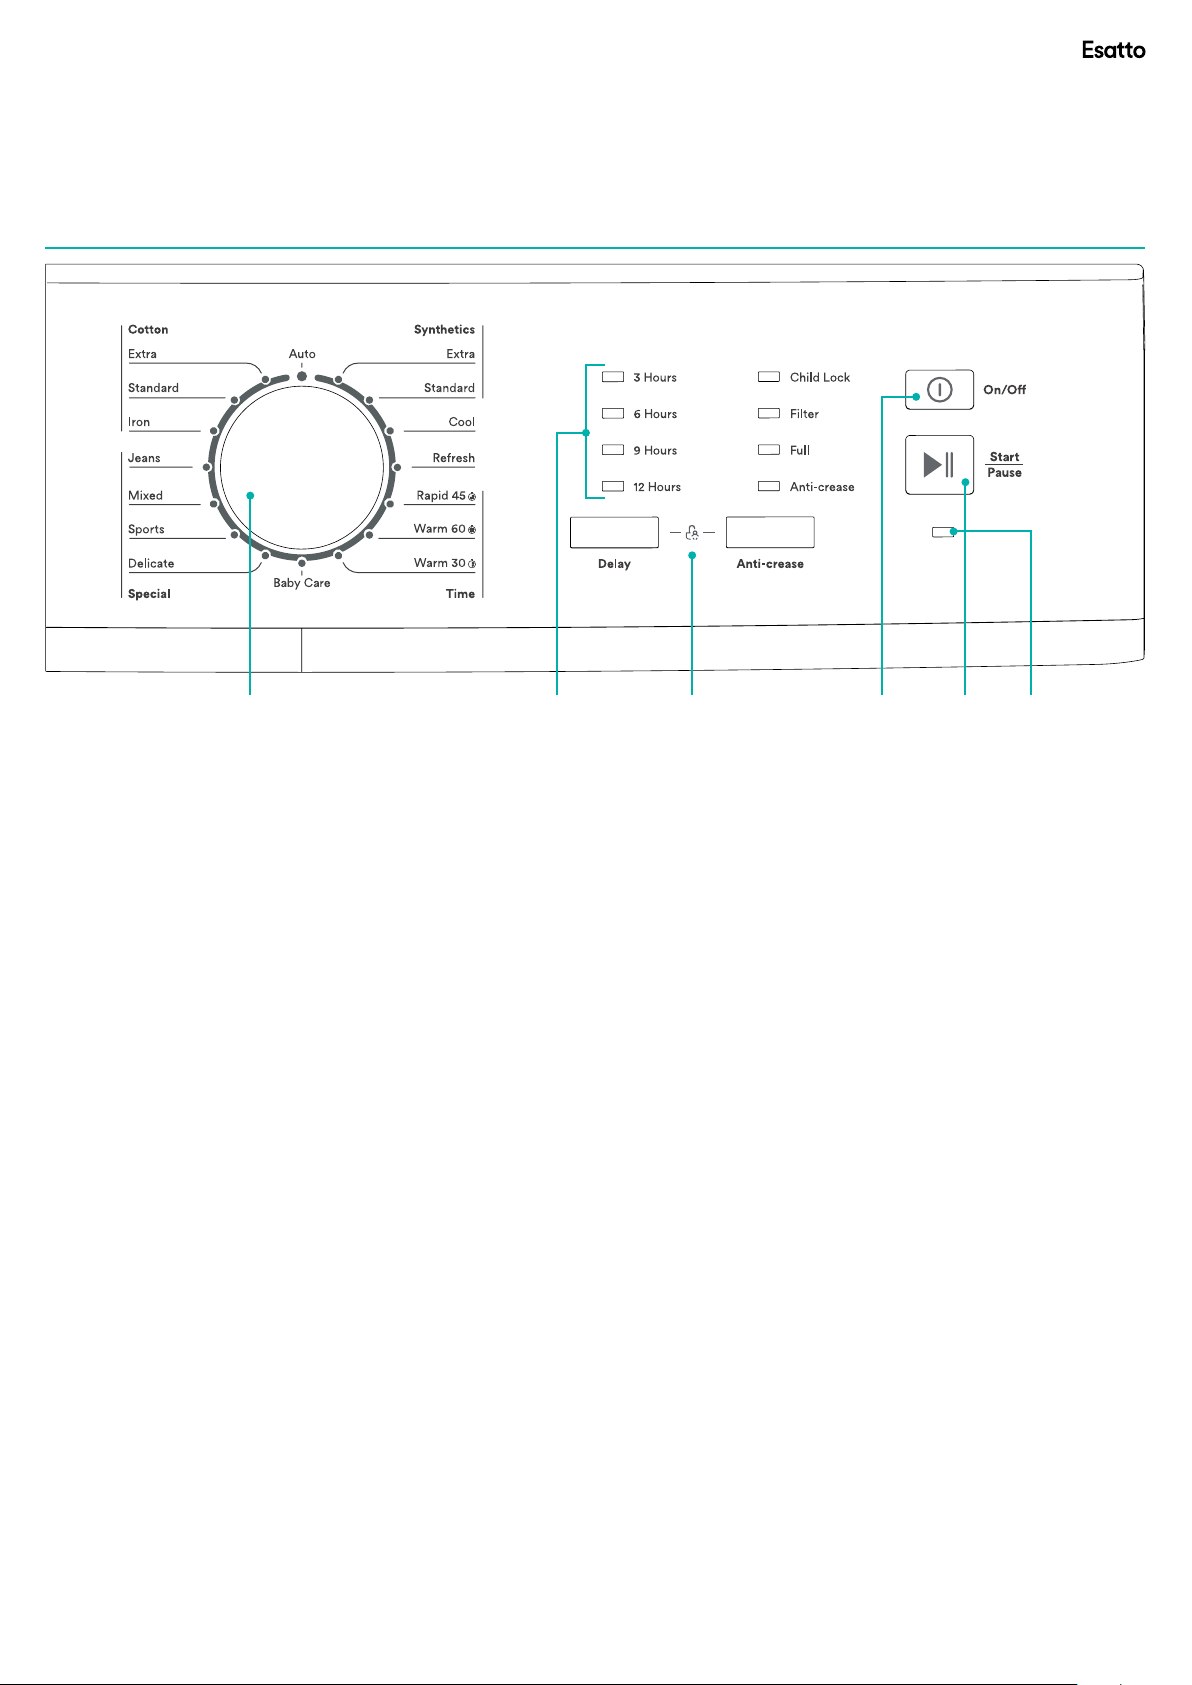
KEY
➀ ➁ ➂ ➃ ➄ ➅
1. PROGRAM SELECTION KNOB
2. FUNCTION LED:
→ 3H,6H,9H,12H
→ CHILD LOCK
→ FILTER
→ FULL
→ ANTI-CREASE LED
3. SPECIALTY FUNCTION BUTTONS:
→ DELAY
→ ANTI-CREASE
→ CHILD LOCK
4. ON/OFF BUTTON
5. START/PAUSE BUTTON
6. WORKING STATE LED
Page 10

Operating Your Dryer
User Manual 10
SELECTING THE PROGRAM
1. Press the On/O button ,when the working state LED
brighten up, rotate the program knob to select the
desired program.
2. Select the Delay, or Anti-Crease functions for additional
option.
3. Press the Start/Pause button.
PROGRAM START
The drum will keep rotating after the program start, the
working state LED will ash in sequence.
NOTE:
Occasionally, the drum might pause for approximately 40
seconds during the drying procedure, but the working state
LED will ash as per normal. The dryer is automatically
adjusting in this time and will continue operation.
PROGRAM END
1. The drum will stop running after the program ends, the
working state LED will stay light and buzzer will ring.
The “Filter” and “Full” LED will remind user to clean the
lters and container. The dryer will start Anti-crease
function if user doesn’t remove the load in time. Please
press On/O key to cut o power and pull the plug out.
2. Deal with the problem according to “Malfunction
display and solutions , if there is a unexpected stop
during the drying procedure and the dryer show
information.
SPECIALTY DRYING FUNCTION
DELAY FUNCTION
1. Load your laundry and make sure the machine door is
closed.
2. Press the On/O button,then to turn the program
selector knob and select a desired program.
3. You can select the Anti-Crease function according to
your need.
4. To press the Delay button.
5. Continue to press the Delay to select the delay time.
6. After the Start/Pause button is pushed, the dryer is
at the run condition. The drying procedure will be
automatically performed when the delay time is over.
7. If you push the Start/Pause button again, the delay
function will be paused.
8. If you want to cancel the “Delay” function, please press
the On/O button.
ANTI-CREASE FUNCTION
At the end of the drying cycle, the anti-crease operation
time is 30 minutes (default) or 120 minutes (selected).
The Anti-Crease LED shall light when the anti-crease
function is selected. This function prevents the laundry from
creases. The laundry can be removed during the anti-crease
phase. Except Cool, Refresh, Warm 30’ and Warm 60’, all
the other program have this function.
CHILD LOCK
1. This machine incorporates a special child safety lock,
which can prevent children from carelessly pressing
buttons or making the faulty operation.
2. When the dryer is at the operation state, press the AntiCrease and Delay buttons at the same time for over 3
seconds to start child lock function. When child lock
function is set, the LED light and no button can eect
to the dryer except On/O button. Under the start state
of the child lock, the Anti-Crease and Delay buttons
shall be pressed at the same time for over 3 seconds to
release the child lock function.
Page 11
Program Table
.
“Filter” and “Full” LED will remind user to clean the filters
【 】 function if user doesn’t
”
m might suspend about 40 seconds during the drying procedure, but the
esatto.house 11
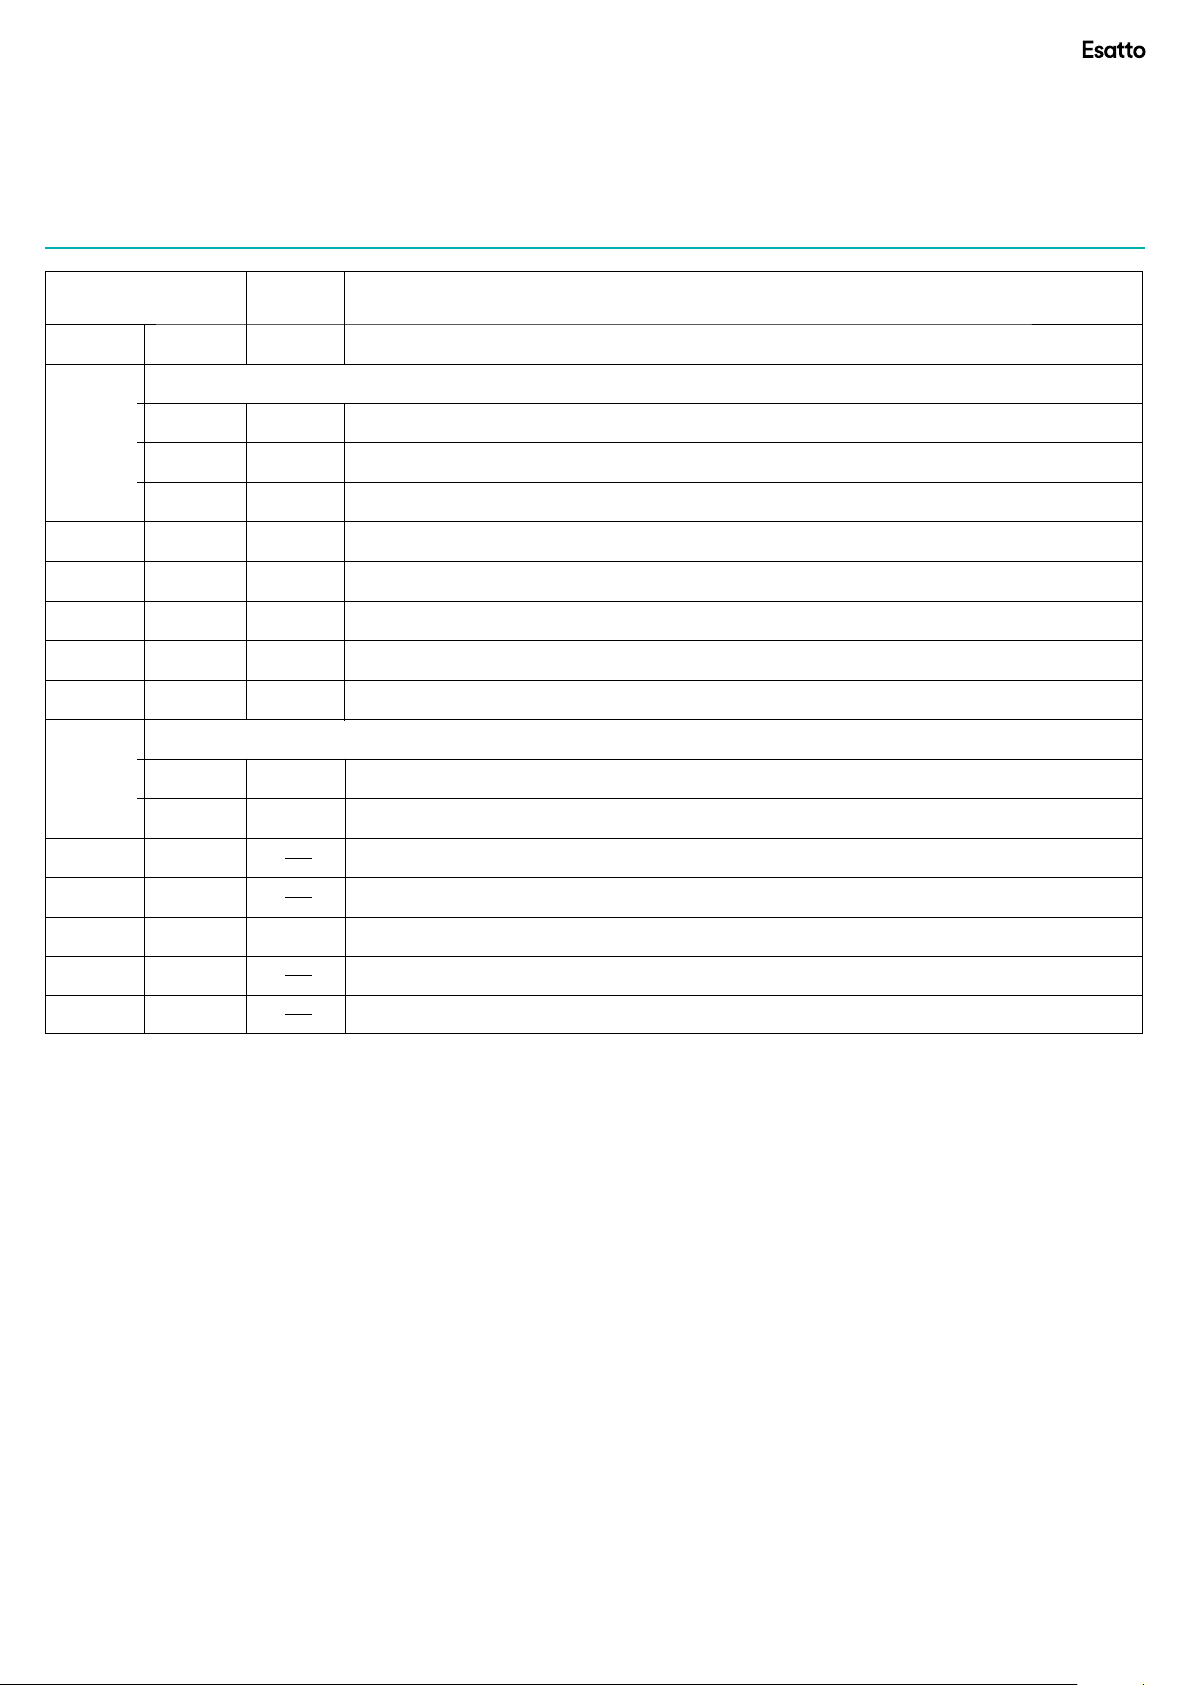
Programme
Auto
Cotton
Jeans
Mixed
Sports
Delicate
Baby Care
Synthetics
Cool
Weight
(max)
Auto
For cottons and coloureds made of cotton or linen.
Extra
Standard
Iron
Jeans
Mixed
Sports
Delicate
Baby Care
For non-iron washing made of synthetic and blended fabrics,cotton.
Extra
Standard
Cool
5.0kg
7.0kg
7.0kg
7.0kg
5.0kg
3.5kg
3.0kg
1.0kg
1.0kg
3.5kg
3.5kg
To dry unknown material clothes automatically.
To dry cotton pieces of clothing. Drying level: extra dry.
To dry cotton pieces of clothing. Drying level: cupboard dry.
To dry cotton pieces of clothing. Drying level: applicable to iron.
To dry jeans or leisure clothes that are spun at high speeds in the washing machine.
If you can not determine what the clothing's material is, please choose Mix.
To dry sportswear, thin fabrics, polyester,which are not ironed.
To dry delicate laundry that is suitable for drying or laundry which is advised to be hand-washed at a lower temperature.
To dry small amount of baby clothing.
To dry thick or multi-layered synthetic fabrics. Drying level: extra dry.
To dry thin synthetic fabrics which are not ironed, such as easy care shirts, table linen, baby clothes, socks
To air clothes without blowing hot air from in 10 min.
Application/Properties
Refresh
Rapid 45'
Warm 60'
Warm 30'
NOTE:
1. Cotton+Extra is for AS/NZS energy program.
2. The programs above are only recommended for using,
users can choose the appropriate program according to
the personal habits. Thick and multi-layered fabrics,e.g.
bedlinen, jeans, jackets etc, are not easy to dry, you’d
better choose Jeans program and maximum drying
intensity level.
3. As the uneven material, thick and multi-layered clothes
are not easy to dry, it is better to choose the appropriate
time drying program to dry them if some parts of the
clothes still damp after program nished.
Refresh
Rapid 45'
Warm 60'
Warm 30'
0.6kg
To refresh the clothes that have been kept at closed environments for a long time from minimum 20 min. to maximum 150 min.(in 10 min. steps).
To dry at most 3 shirts in 45 min.
To warm clothes with hot air in 60 min.
To warm clothes with hot air in 30 min.
Page 12
User Manual 12
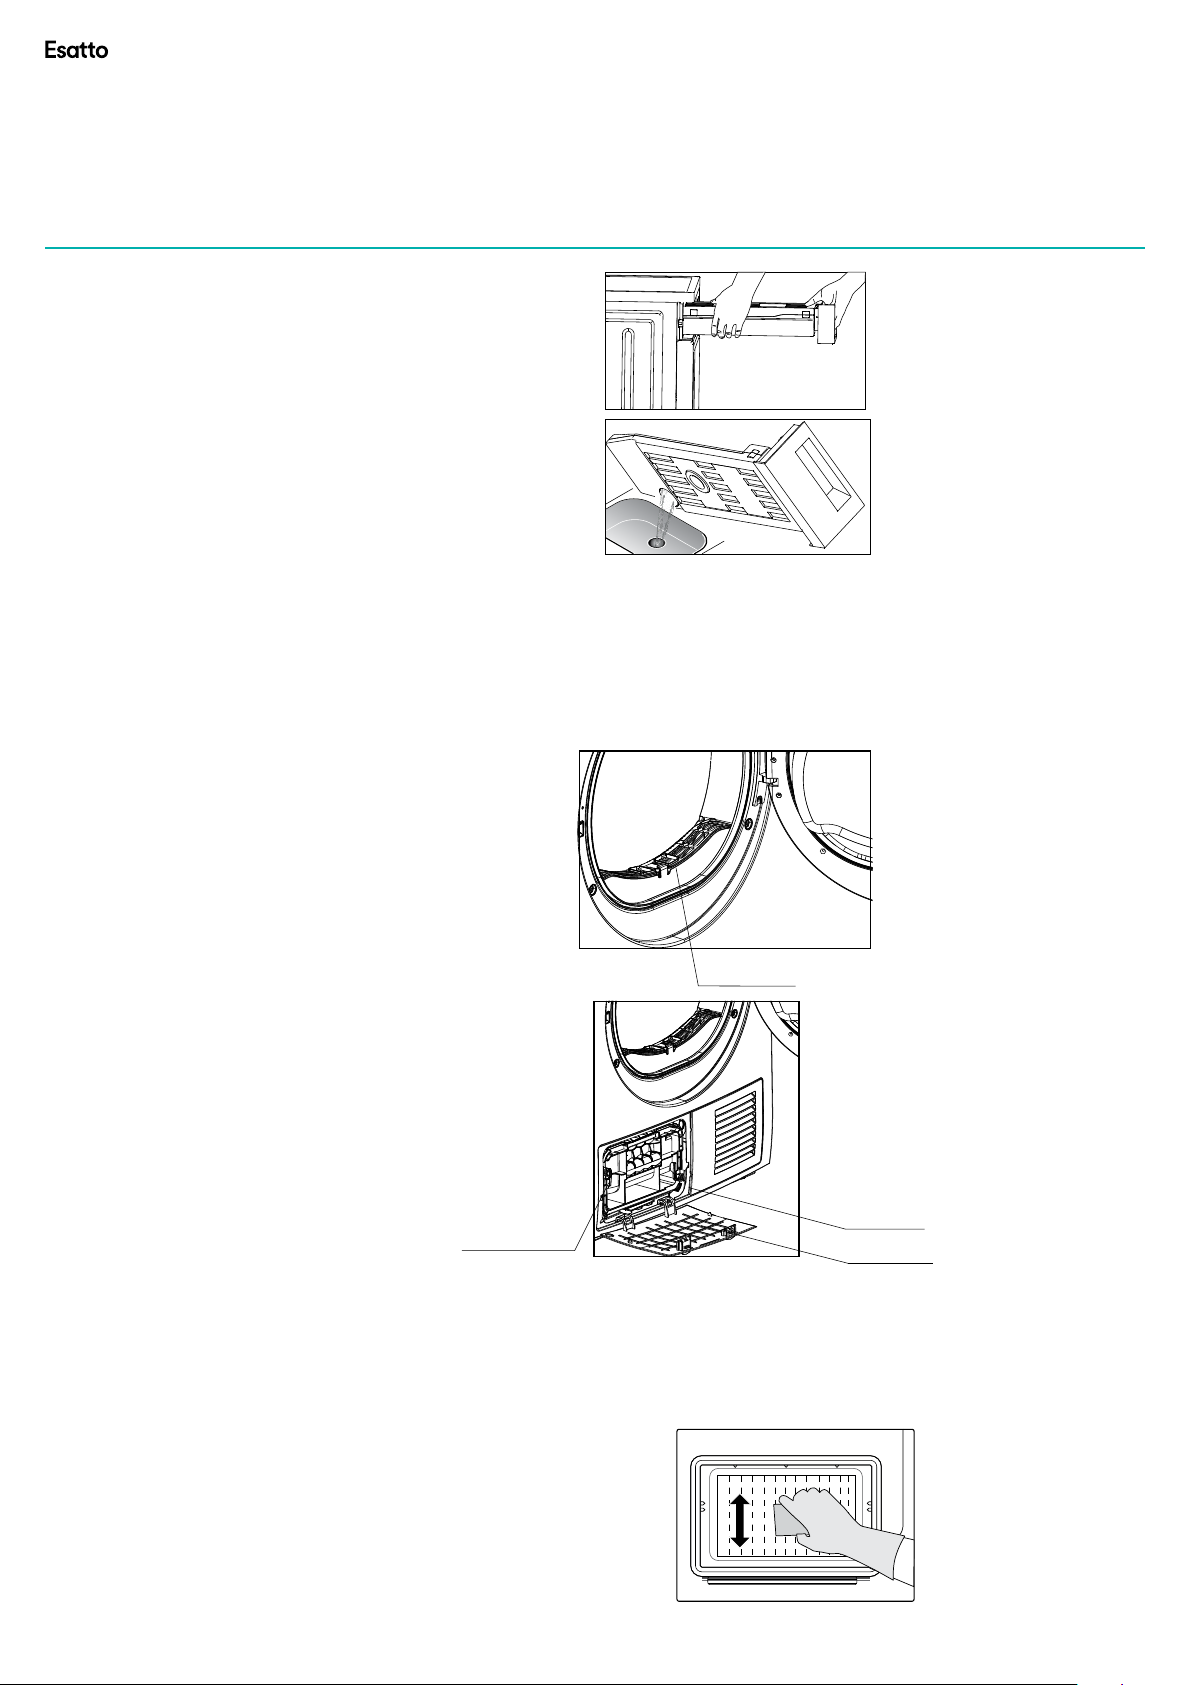
Empty the water container
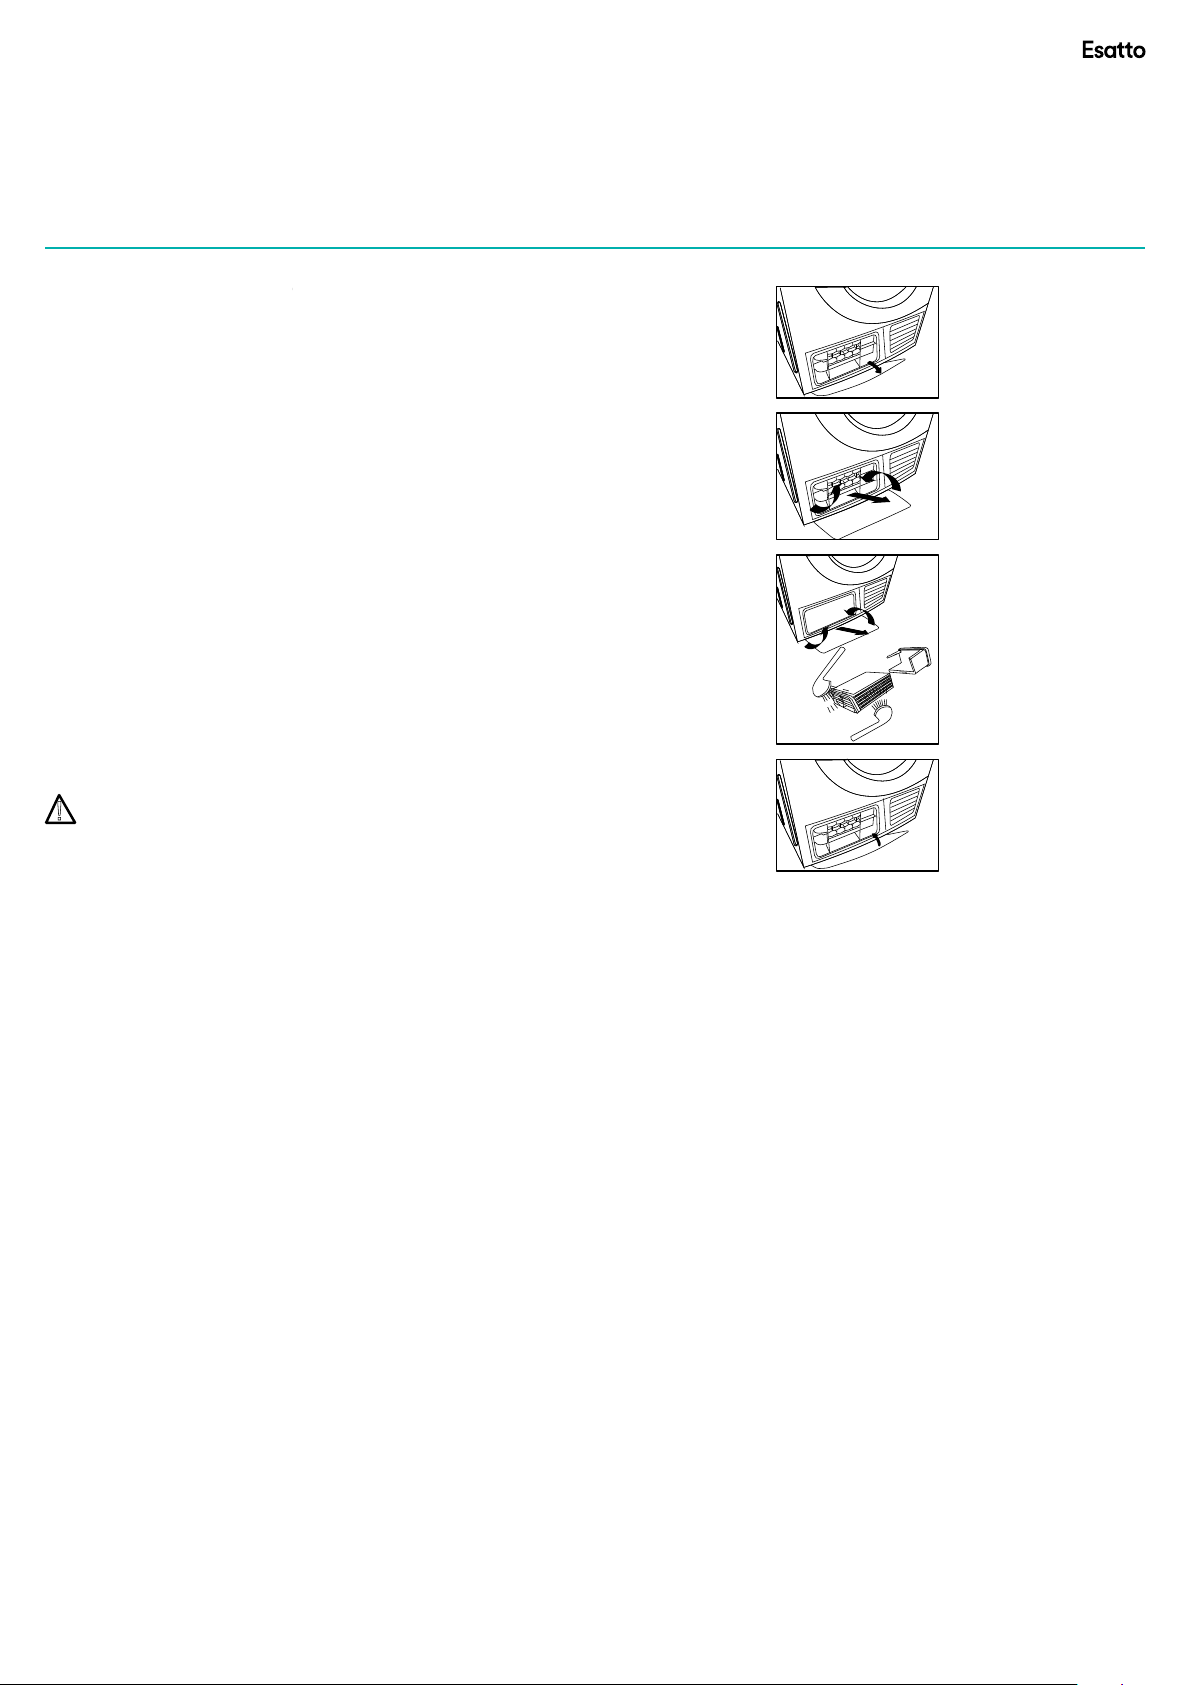
1.Open the maintenance cover.
2.Unscrew both locking levers towardas each other.
3.Clean the filter base completely.
4.Re-insert the filter base!
5.Screw both locking levers.
6.Close the until it locks into position.maintenance cover
1.Open the door.
2.Take out the filter door.
3.Clean the filter door; wipe off the scrap threads
4.Reinstall the filter door.
which will cause the extension of drying time and energy consumption;
1.The fluff accumulated on the filter will block the air circulation,
2.Do disconnect the power cord before cleaning!
3.Do not operate the dryer without the filter!
4.Clean the filter after each use to prevent lint accumulation inside the dryer.
NOTE!
Clean filter base (Only )MDS70-CH05/B08-AU(6)
accumulated on the filter door.
1. Hold and pull out the water container
with two hands;
2. Tilt the water container, pour out the
condensed water into basin;
3. Install the
WARNING:
1.
2.Do not drink the condensed water
.
water container.
Empty the water container after each use, the programme will be paused and the Full
LED will light if the water container is full during the drying process. After the container
emptyed, the dryer can be restarted by pressing
【Start/Pause】button.
3.Do not use the dryer without the water container
Clean the filter door
As necessary, approx. once every 2 months, remove the fluff from
the heat exchanger using the sponge or soft brush.
When doing this, please use gloves.
Note: The fluff can be removed more easily if it is first
dampened e. g. with a laundry dampener.
Clean heat exchanger (Only MDS70-CH05/B08-AU(6))
Filt er d oo r
Lockin g le ve r
Maintenance cover
Filter b as e
Cleaning and routine maintenance
-Leave the dryer to cool down.
-Residual water may escape, place an absorbent
cloth under the maintenance cover.
1.Clean with water only; do not use hard/sharp-edged objects!
Do not operate the dryer without the air condenser!
Wash air condenser (Only MDS70-C05/B08-AU(2))
2.During drying, water may and the seal, collect between the window
but this does not affect the function of your dryer!
!
1.Unlock the maintenance cover.
2.Completely open maintenace cover.
3.Screw both locking levers towardas each other.
4.Pool out the air condenser.
Do not damage the air condenser!
5.Clean the air condenser completely, drain thoroughly.
6.Clean the seals.
7.Re-insert the air condenser, handle at the button!
8.Unscrew both locking levers.
9.Cloth the maintenance flap until it locks into position.
Please clean the air condenser approx, once every 3
months if frequently used.
Cleaning and routine maintenance
Cleaning & Maintenance
(Only EHPD7)
(Only EHPD7)
Page 13
esatto.house 13
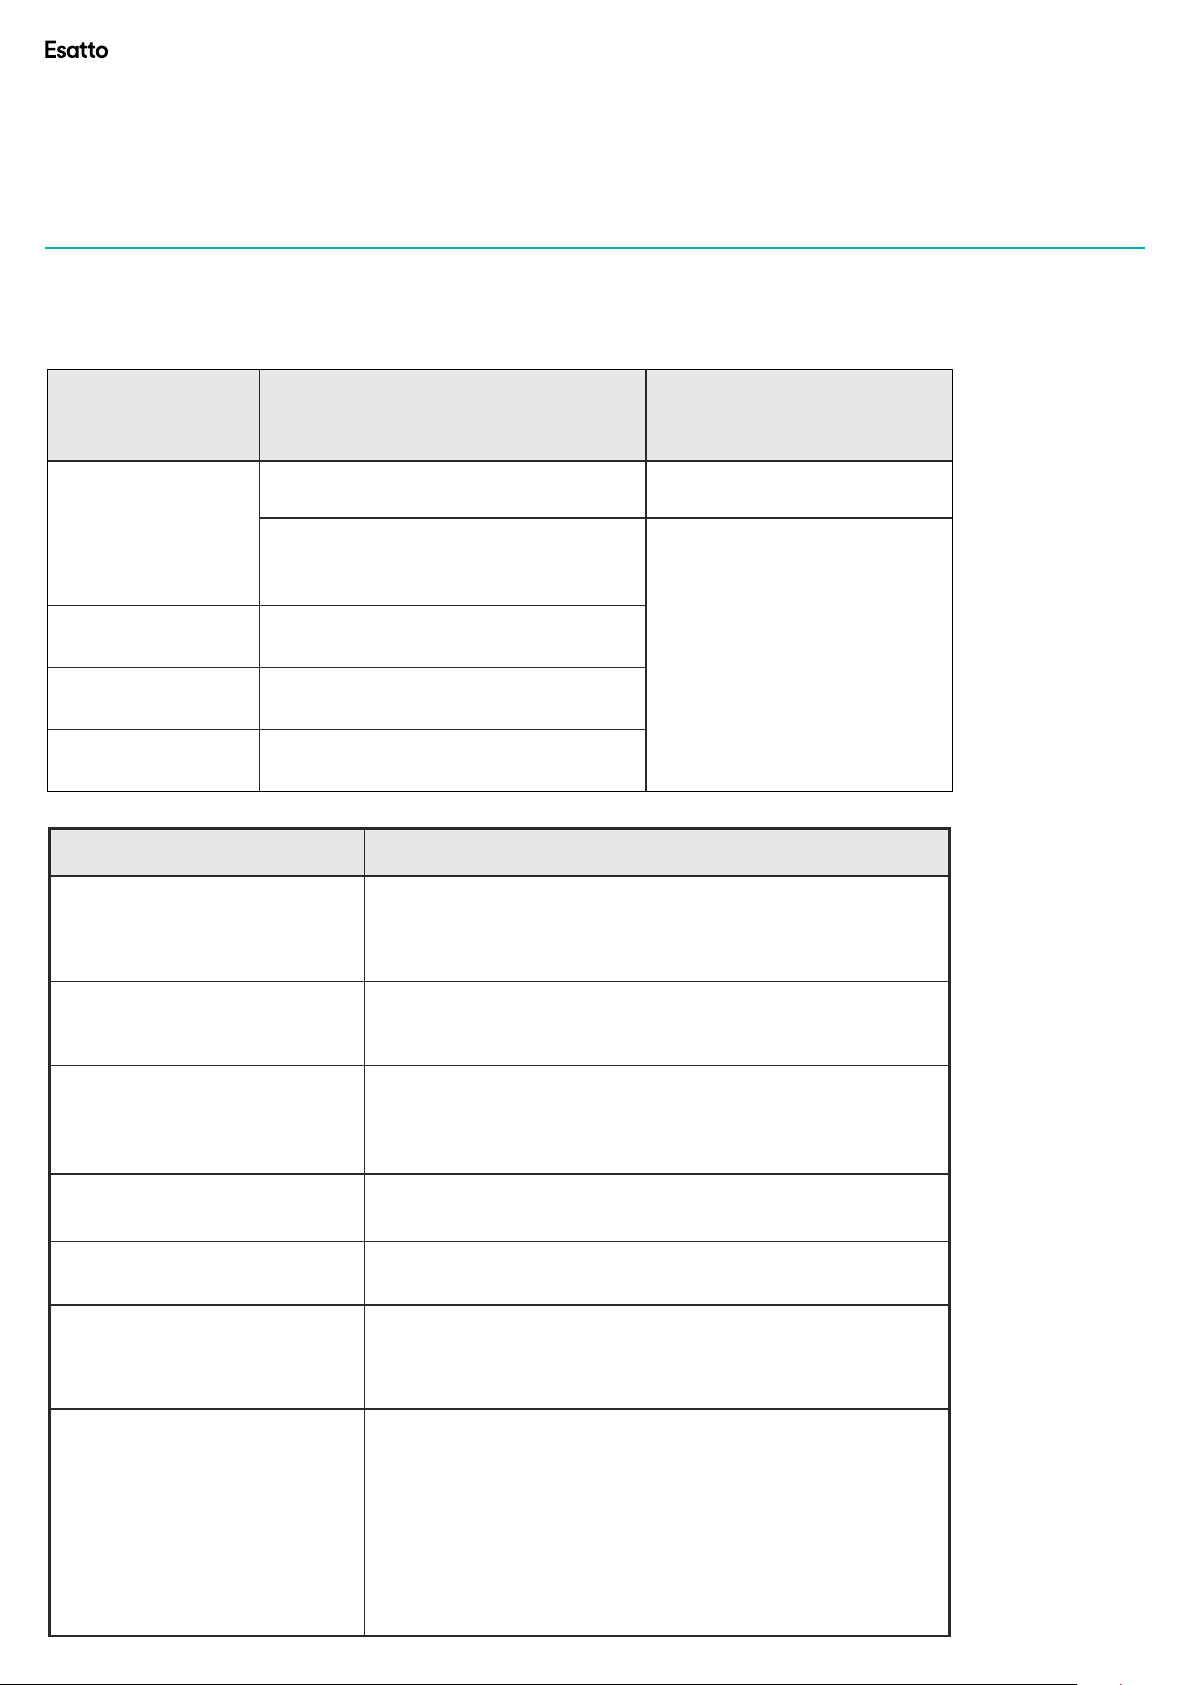
Cleaning and routine maintenance
Wash air condenser (Only MDS70-C05/B08-AU(2))
-Leave the dryer to cool down.
-Residual water may escape, place an absorbent
cloth under the maintenance cover.
1.Unlock the maintenance cover.
2.Completely open maintenace cover.
3.Screw both locking levers towardas each other.
4.Pool out the air condenser.
5.Clean the air condenser completely, drain thoroughly.
6.Clean the seals.
7.Re-insert the air condenser, handle at the button!
8.Unscrew both locking levers.
9.Cloth the maintenance flap until it locks into position.
Please clean the air condenser approx, once every 3
months if frequently used.
(Only ECD7)
Do not damage the air condenser!
1.Clean with water only; do not use hard/sharp-edged objects!
!
Do not operate the dryer without the air condenser!
2.During drying, water may and the seal, collect between the window
but this does not affect the function of your dryer!
Page 14
User Manual 14
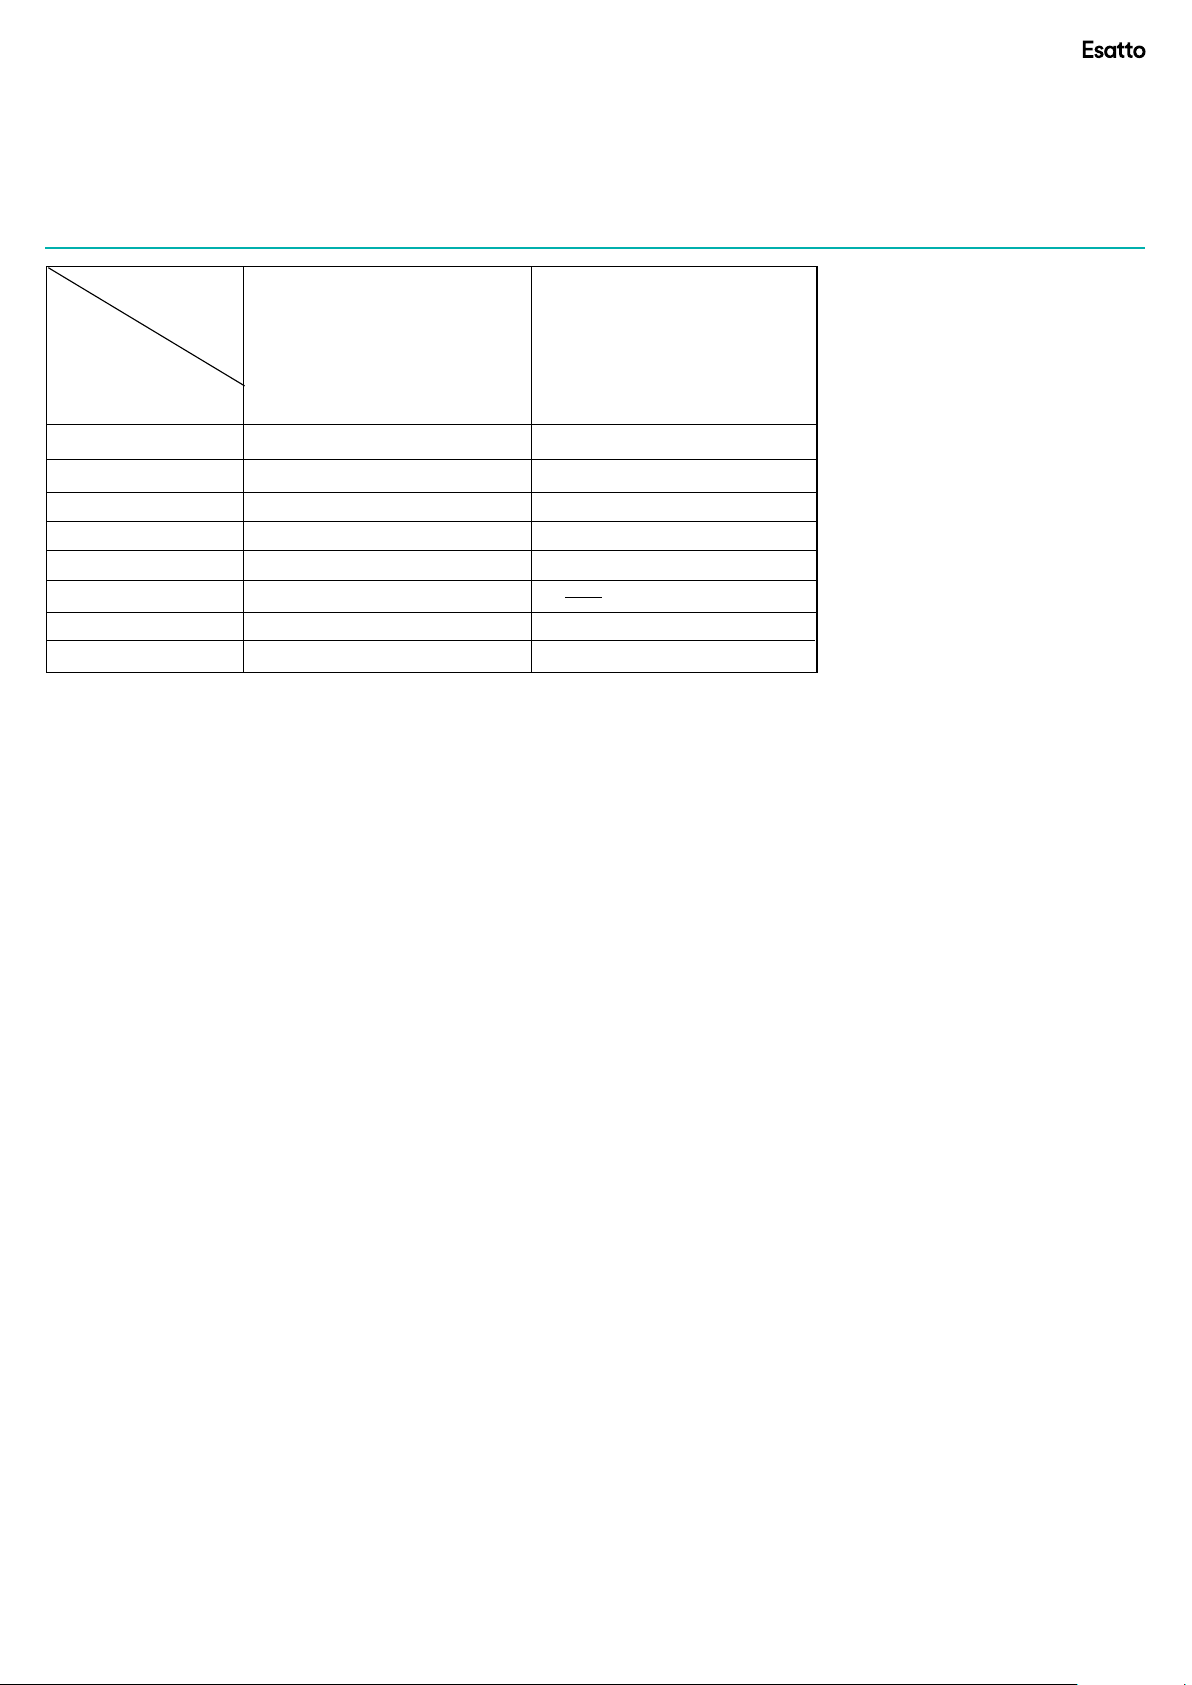
Precautions
Precautions
Only authorised technicans can carry out repairs.
Before you call customer service, please check if you have deal with the fault by yourself
or if you have follow the user instructions.
A technician will charge you for advice, even during the warranty period.
Malfunction display and solutions
Malfunction display and solutions
• “Full”LED on permanently
•Working state LED
not on
Precautions
Precautions
Only authorised technicans can carry out repairs.
Before you call customer service, please check if you have deal with the fault by yourself
or if you have follow the user instructions.
A technician will charge you for advice, even during the warranty period.
Troubleshooting
Please read the issues below carefully and try all relevant steps.
If none of this helps, please contact us on 1300 11 4357 for further
advice or to schedule a technician to inspect your dryer.
Dispiay
“Full” LED on
permanently
Child Lock + 9h
Container is full
Water pump failure or water
level sensor failure
Temperature sensor failure
Reason
Solutions
Empty container
P lease contact your
local service center
if the problem
Child Lock + 6h
Child Lock + 3h
(Only )MDS70-C 05 /B 08-AU(2)
•Working state LED
not on
Problem
Humidity sensor failure
Heater failure
•The mains plug is inserted.
•Check the programme selected.
•Check fuse in the house.
persists
Solution
• “Full”LED on permanently
•Dryer does not start
•Water is running out
•Door is open by itself
•Humidity in the room is
ease significantly
incr
•Degree of dryness was
reached or drying time too
long
not
•Empty condensation container.
•If failure, check hose for condensation outlet.
•Check the has selected
•Check the the door has closed.
•Check the programme has set.
•Align dryer horizontally.
•Clear air condenser and door seals.
•Press door until it “clicks”into position.
•Check the clothes is over load .
•Ventilate room adequately.
•Clean the cool grille.
•Ensure that the air condenser has been inserted.
•Clean lint filter and wash condenser.
•Empty container.
•Check water outlet.
•Dryer installation too restricted.
•Clean the moisture sensors.
•Use next higher drying programme or using Timer
programme.
start button .
Page 15
Technical Data
MAINTENANCEMAINTENANCE
Technical Specifications
Model
EHPD7 ECD7
Pa r amete r
MDS70-CH05/B08-AU(6)
esatto.house 15
MDS70-C05/B08-AU(2)
Dimension(L*W*H)
Ambient temperature
Rated input power
Rated voltage
Rated frequency
Refrigerant
Weight of product
Rated capacity
Contains fluorinated greenhouse gases covered by the Kyoto Protocol.
Hermetically sealed.
Note:
1. The rated capacity is the maximum capacity, make sure
that the dry clothes which are loaded to the appliance
do not exceed the rated capacity each time.
2. Do not install the tumble dryer in a room when there is a
risk of frost occurring. At temperatures around freezing
point the tumble dryer may not be able to operate
properly.
3. There is a risk of damage if the condensed water
is allowed to freeze in the pump, hoses and / or
condensed water container.
622*595*845(mm)
+5°c ~ +35°c
850W
220-240V~
50Hz
R134a
51kg
7.0kg
622*595*845(mm)
+5°c ~ +35°c
2000W
220-240V~
50Hz
41kg
7.0kg
Page 16
Attach your receipt
to this page
User Manual 16
Page 17
Purchase Details
esatto.house 17
For future reference, please record the following information
which can be found on the rating plate and the date of
purchase which can be found on your sales invoice.
STORE DETAILS
STORE NAME
ADDRESS
TELEPHONE
|
|
PURCHASE DATE
|
PRODUCT DETAILS
The rating plate of your hob is located on the underneath
of the appliance. Therefore please t the duplicate data
plates or label on the outside of the cupboard to sure that
the label can be easily seen during operation.
|
MODEL NO.
SERIAL NO.*
|
|
Page 18

User Manual 18
Warranty Information
WARRANTY TERMS & CONDITIONS
WASHING MACHINES & CLOTHES DRYERS
This document sets out the terms and conditions of the
product warranties for Residentia Group Appliances. It is
an important document. Please keep it with your proof of
purchase documents in a safe place for future reference
should you require service for your Appliance.
1. IN THIS WARRANTY
(a) ‘acceptable quality’ as referred to in clause 10 of this
warranty has the same meaning referred to in the ACL;
(b) ‘ACL’ means Trade Practices Amendment (Australian
Consumer Law) Act (No.2) 2010;
(c) ‘Appliance’ means any Residentia Group product
purchased by you accompanied by this document;
(d) ‘ASR’ means Residentia Group authorised service
representative;
(e) ‘Residentia Group’ means Residentia Group Pty Ltd
of 118 Campbell St, Collingwood VIC, ACN 600 546
656 in respect of Appliances purchased in Australia;
(f ) ‘major failure’ as referred to in clause 10 of this
warranty has the same meaning referred to in the ACL
and includes a situation when an Appliance cannot
be repaired or it is uneconomic for Residentia Group,
at its discretion, to repair an Appliance during the
Warranty Period;
(g) ‘Warranty Period’ means:
(i) where the Appliance is used for personal,
domestic or household use (i.e. normal
single family use) as set out in the instruction
manual, the Appliance is warranted against
manufacturing defects for 24 months, following
the date of original purchase of the Appliance;
(h) ‘you’ means the purchaser of the Appliance not having
purchased the Appliance for re-sale, and ‘your’ has a
corresponding meaning.
2. This warranty only applies to Appliances purchased
and used in Australia and is in addition to (and does
not exclude, restrict, or modify in any way) any
non-excludable statutory warranties in Australia.
3. During the Warranty Period Residentia Group or its
ASR will, at no extra charge if your Appliance is readily
accessible for service, without special equipment and
subject to these terms and conditions, repair or replace
any parts which it considers to be defective. Residentia
Group or its ASR may use remanufactured parts to
repair your Appliance. You agree that any replaced
Appliances or parts become the property of Residentia
Group. This warranty does not apply to light globes,
batteries, lters or similar perishable parts.
4. Parts and Appliances not supplied by Residentia Group
are not covered by this warranty.
Page 19

esatto.house 19
5. You will bear the cost of transportation, travel and
delivery of the Appliance to and from Residentia Group
or its ASR. If you reside outside of the service area,
you will bear the cost of:
(a) travel of an authorised representative;
(b) transportation and delivery of the Appliance to and
from Residentia Group or its ASR, in all instances,
unless the Appliance is transported by Residentia
Group or its ASR, the Appliance is transported at
the owner’s cost and risk while in transit to and from
Residentia Group or its ASR.
6. Proof of purchase is required before you can make
a claim under this warranty.
7. You may not make a claim under this warranty unless
the defect claimed is due to faulty or defective parts
or workmanship. Residentia Group is not liable in the
following situations (which are not exhaustive):
(a) the Appliance is damaged by:
(i) accident
(ii) misuse or abuse, including failure to properly
maintain or service
(iii) normal wear and tear
(iv) power surges, electrical storm damage or
incorrect power supply
(v) incomplete or improper installation
(vi) incorrect, improper or inappropriate operation
(vii) insect or vermin infestation
(viii) failure to comply with any additional instructions
supplied with the Appliance;
(b) the Appliance is modied without authority from
Residentia Group in writing;
(c) the Appliance’s serial number or warranty seal has
been removed or defaced;
(d) the Appliance was serviced or repaired by anyone
other than Residentia Group, an authorised repairer
or ASR.
8. This warranty, the contract to which it relates and the
relationship between you and Residentia Group are
governed by the law applicable where the Appliance
was purchased.
10. For Appliances and services provided by Residentia
Group in Australia, the Appliances come with a
guarantee by Residentia Group that cannot be
excluded under the Australian Consumer Law. You
are entitled to a replacement or refund for a major
failure and for compensation for any other reasonably
foreseeable loss or damage. You are also entitled
to have the Appliance repaired or replaced if the
Appliance fails to be of acceptable quality and the
failure does not amount to a major failure. The benets
to you given by this warranty are in addition to your
other rights and remedies under a law in relation to the
Appliances or services to which the warranty relates.
11. At all times during the Warranty Period, Residentia
Group shall, at its discretion, determine whether repair,
replacement or refund will apply if an Appliance has a
valid warranty claim applicable to it.
12. To enquire about claiming under this warranty, please
follow these steps:
(a) carefully check the operating instructions, user manual
and the terms of this warranty;
(b) have the model and serial number of the Appliance
available;
(c) have the proof of purchase (e.g. an invoice) available;
(d) telephone the numbers shown below.
13. You accept that if you make a warranty claim,
Residentia Group and its ASR may exchange
information in relation to you to enable Residentia
Group to meet its obligations under this warranty.
IMPORTANT
Before calling for service, please ensure that the steps
in point 12 have been followed.
Telephone contacts
→ Service: Please call 1300 11 HELP (4357)
→ Spare Parts: Please call 1300 11 SPARE (7727)
9. To the extent permitted by law, Residentia Group
excludes all warranties and liabilities (other than as
contained in this document) including liability for any
loss or damage whether direct or indirect arising from
your purchase, use or non use of the Appliance.
The Australian Consumer Law requires the
inclusion of the following statement with
this warranty:
Our goods come with guarantees that cannot be excluded under the Australian Consumer Law.
You are entitled to a replacement or refund for a major failure and for compensation for any other
reasonably foreseeable loss or damage. You are also entitled to have the goods repaired or replaced
if the goods fail to be of acceptable quality and the failure does not amount to a major failure.
Page 20
Appliances
Exactly what
you need
WWW.RESIDENTIA.GROUP
 Loading...