

Page 1

Product:
Model Code/s:
Front Load
Washing Machine
7.5kg
User Mnul
EFL75
Exctly wht
you need
Online:
esatto.house
Page 2
User Manual
02
Residentia Group
—
Head Office.
118 Campbell Street
Collingwood, VIC
Australia 3066
—
ACN.
600 546 656
—
Online.
residentia.group
Congratulations on purchasing your new washing machine. The Esatto brand is proudly
distributed within Australia by esidentia Group Pty Ltd.
Please refer to the warranty card at the rear of this manual for information regarding
your product’s parts and labour warranty, or visit us online at www.residentia.group
At esidentia Group, we are customer obsessed and our Support Team are
there to ensure you get the most out of your appliance. Should you want to learn
more about recommended washing proceedures, the various features of your washer,
and importantly taking care of your appliance when cleaning, our Support Team
are here to help. You can use our online Support Centre at anytime by visiting
http://support.residentiagroup.com.au, or you can contact us via calling us on
1300 11 HELP (4357).
It is important that you read through the following use and care manual thoroughly
to familiarise yourself with the installation and operation requirements of your
appliance to ensure optimum performance.
Again, thank you for choosing an Esatto appliance and we look forward to being
of service to you.
Kind Regards,
The esidentia Team
Postage.
PO Box 341, Mt Eliza
Victoria Australia 3930
Telephone.
1300 11 4357
Email.
[email protected]
Page 3
esatto.house
03
Contents
02
Welcome
05
Your Esatto
Washing
Machine
08
Washing
Your Clothes
04
Safety
Instructions
06
Installation
10
Quick Start
Guide
11
Controls
16
Maintenance
20
Technical Data
12
Operating Your
Washing Machine
19
Troubleshooting
21
Appendix
23
Purchase
Details
24
Warranty
Information
Page 4
User Manual
Safety Instructions
04
→ If the supply cord is damaged,it must be replaced by
the manufacturer,its service agent or similarly qualied
persons in order to avoid a hazard.
→ The new hose-sets supplied with the appliance are to be
used and that old hose-sets should not be reused.
→ This washing machine is for indoor use only.
→ The openings must not be obstructed by a carpet.
→ This appliance is not intended for use by persons
(including children) with reduced physical, sensory
or mental capabilities, or lack of experience and
knowledge, unless they have been given supervision
or instruction concerning use of the appliance by a
person responsible for their safety. Children should
be supervised to ensure that they do not play with the
appliance.
→ Pull out its plug from the power socket before cleaning
or maintenance.
→ Make sure that all pockets are emptied.
→ Sharp and rigid items such as coin,brooch,nail,screw or
stone etc. may cause serious damages to this machine.
→ Pull out its plug and cut o water supply after the
operation.
→ Please check whether the water inside the drum has
been drained before opening its door. Please do not
open the door if there is any water visible.
→ Pets and kids may climb into the machine. Check the
machine before every operation.
→ Glass door may be very hot during the operation. Keep
kids and pets far away from the machine during the
operation.
→ Take care that power voltage and frequency shall be
identical to those of washing machine.
→ Do not use any socket with rated current less than that
of washing machine. Never disconnect the power plug
with wet hands.
→ To ensure your safety,power cord plug must be inserted
into an earthed three-pole socket. Check carefully and
make sure that your socket is properly and reliably
earthed.
→ Children of less than 3 years should be kept away unless
continuously supervised.
→ Kids should be supervised to ensure that they do not
play with the machine.
→ Packing materials may be dangerous to the kids. Please
keep all packing materials (plastic bags,foams etc) far
away from the kids.
→ Washing machine shall not be installed in bath room or
very wet rooms as well as in the rooms with explosive or
caustic gases.
→ Make sure that the water and electrical devices must
be connected by a qualied technician in accordance
with the manufacturer’s instructions and local safety
regulations.
→ Before operating this machine,all packages and
transport bolts must be removed. Otherwise, the
washing machine may be seriously damaged while
washing the clothes.
→ Before washing the clothes at rst time, the washing
machine shall be operated in one round of the whole
procedures without the clothes inside.
→ The washing machine with single inlet valve only can
be connected to the cold water supply. The washing
machine with double inlet valves can be connected to
the hot water and cold water supply.
→ Your washing machine is only for home use and is only
designed for the textiles suitable for machine washing.
→ Flammable and explosive or toxic solvents are
forbidden. Gasoline and alcohol etc. shall not be used
as detergents. Please only select the detergents suitable
for machine washing, especially for drum.
→ Do not to wash carpets.
→ Be careful of burning when washing machine drains hot
washing water.
→ Never rell the water by hand during washing.
→ After the program is completed, Please wait for two
minutes to open the door.
→ Please remember to disconnect water and power supply
immediately after the clothes are washed.
→ Do not climb up and sit on top cover of the machine.
→ Do not lean against machine door.
→ Please do not close the door with excessive forces. If it
is found dicult to close the door, please check if the
excessive clothes are put in or distributed well.
→ The household washing machine isn’t intended to be
built-in.
CAUTIONS DURING HANDLING MACHINE
→ 1 Transport bolts shall be reinstalled to the machine by
a specialized person.
→ 2 The accumulated water shall be drained out of the
machine.
→ 3 Handle the machine carefully. Never hold each
protruded part on the machine while lifting. Machine
door can not be used as the handle during the
conveyance.
NOTES ON DISPOSAL:
This product should not be disposed with other household
wastes. To prevent possible harm to the environment or
human health from uncontrolled waste disposal,recycle it
responsibly to promote the sustainable reuse of material
resources. To return your used device,please use the
collection systems or contact the retailer where the product
was purchased. They return and can take this product for
environmental safe recycling.
Page 5
esatto.house
05
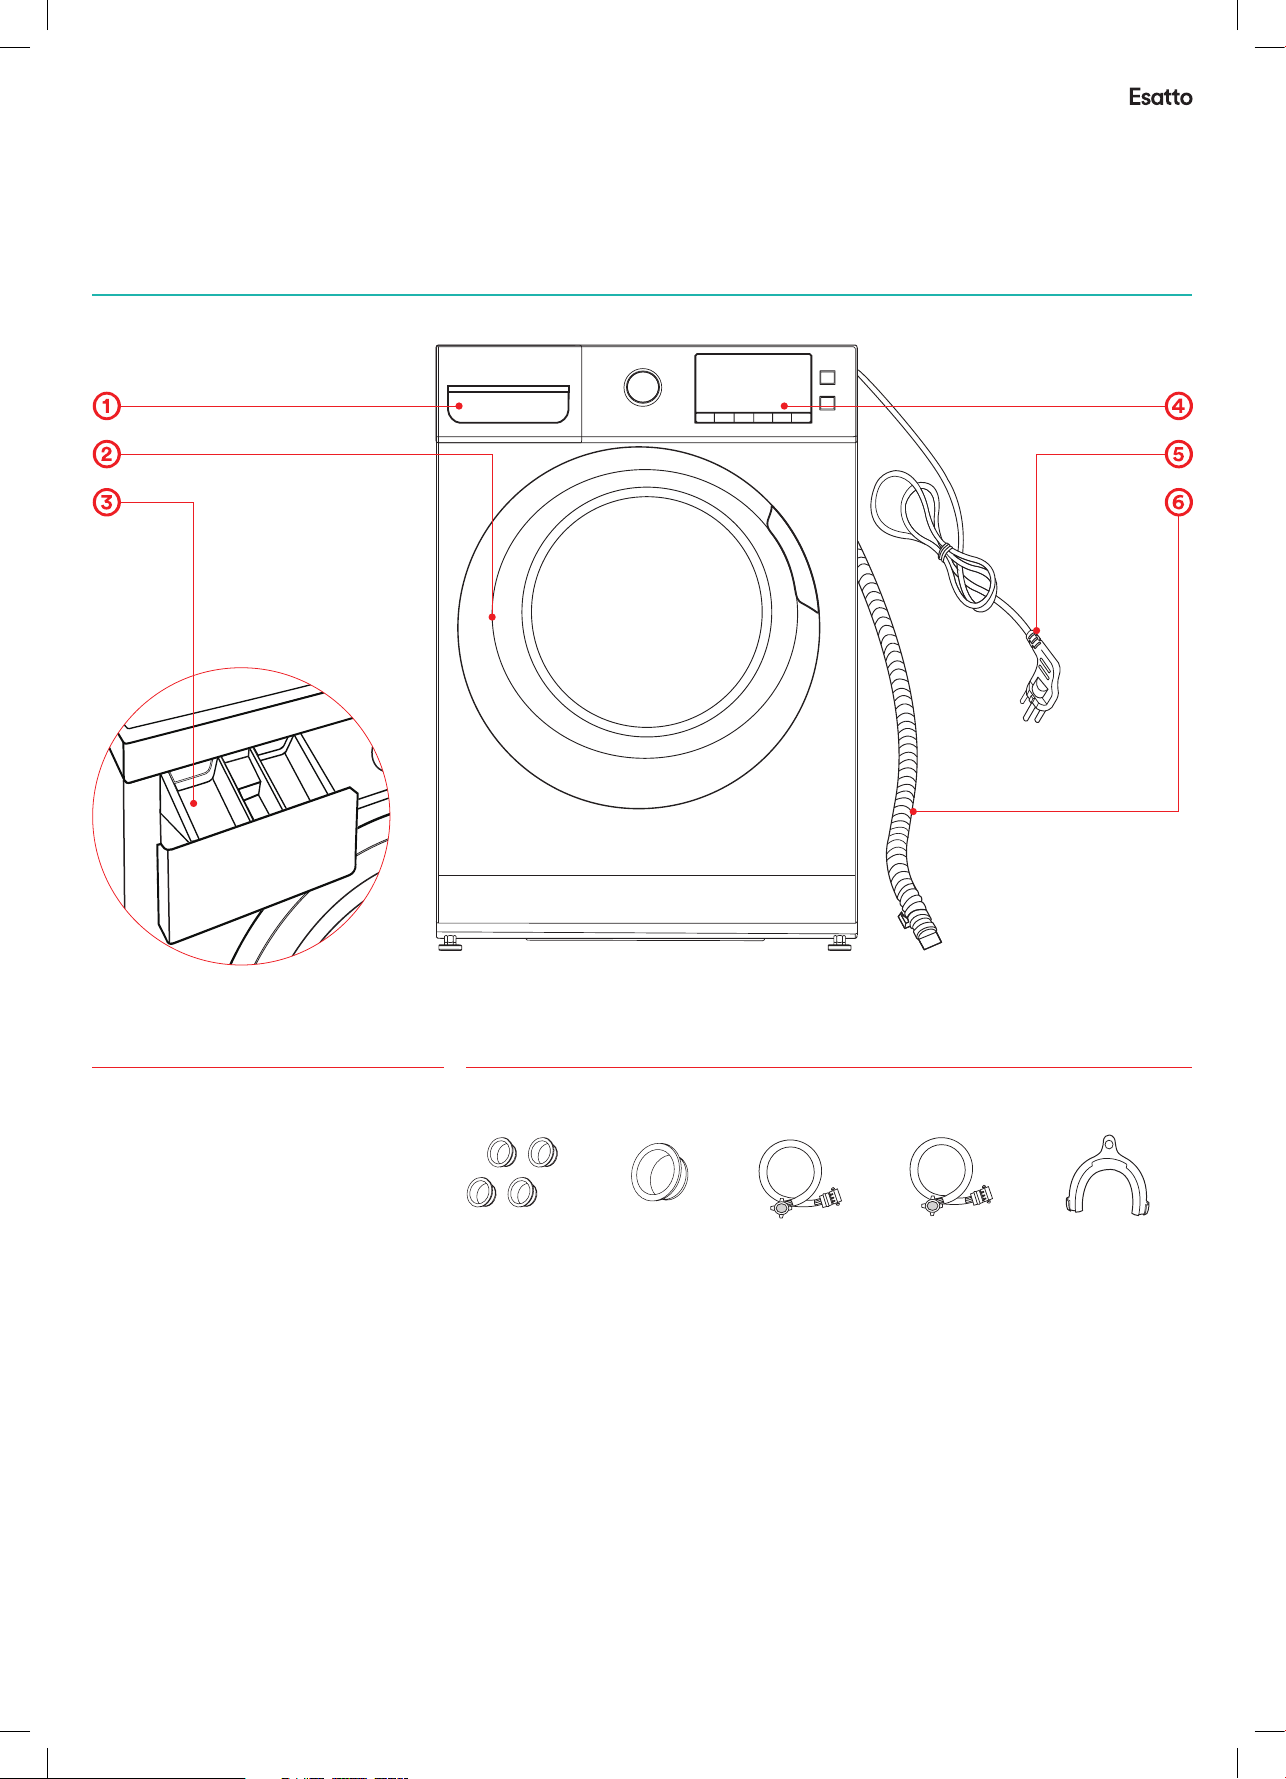
Your Esatto Washing Machine
Component
1 Detergent Drawer
2 Door
3 Detergent Box
4 Control Panel
5 Power Plug
6 Outlet Hose
Accessories
Transport
hole plug
Hole plug
(optional)
Inlet pipe,
cold
Inlet pipe,
hot (optional)
Outlet hose
support
(optional)
Page 6
User Manual
Installation
06
UNPACKING THE WASHING MACHINE
Unpack your washing machine and check if there is any
damage during the transportation. Also make sure that all
the items in the attached bag are received.
If there is any damage to the washing machine during the
transportation, or any item is missing, please contact the
local dealer immediately.
DISPOSE THE PACKING MATERIALS
The packing materials of this machine may be dangerous to
kids. Please dispose them properly and avoid easy touch by
kids. Please dispose the related packing materials according
to the relevant local regulations. Please do no throw the
packing materials away together with the other daily living
rubbishes.
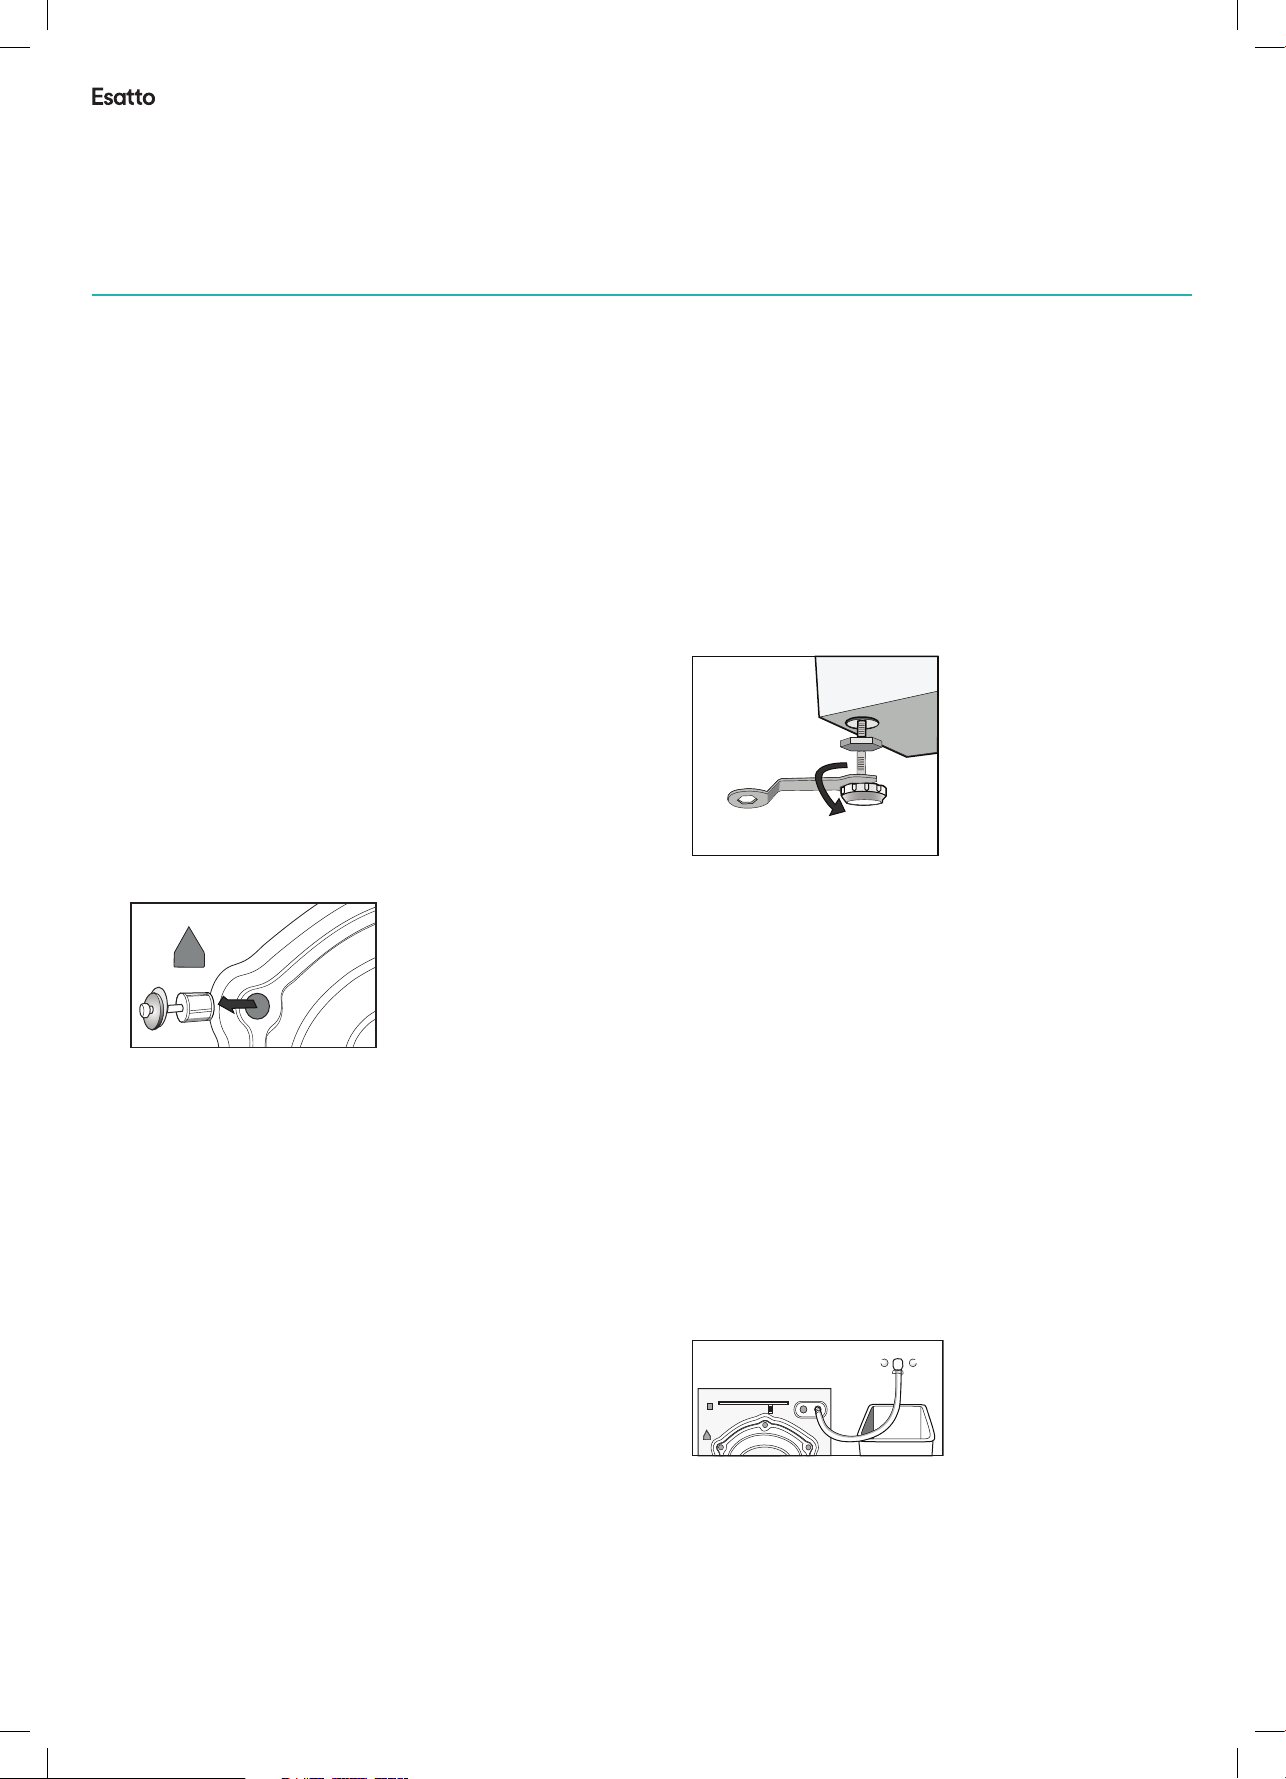
REMOVE TRANSPORT BOLTS
Before using this washing machine, transport bolts
must be removed from the backside of this machine. Please
take the following steps to remove the bolts:
1. Loosen all bolts with spanner and then remove them.
2. Stop the holes with transport hole plugs.
3. Keep the transport bolts properly for future use.
→
SELECT THE LOCATION
Before installing the washing machine, the location
characterized as follows shall be selected:
→ Rigid, dry, and level surface (if not level, please make it
level with reference to the following gure “Adjust Leg”)
→ Avoid direct sunlight
→ Sucient ventilation
→ Room temperature is above 0 C
→ Keep far away from the heat resources such as coal or
gas. Make sure that the washing machine will not stand
on power cord.
→ Do not install the washing machine on the carpet oor.
ADJUST LEG
1. When positioning the washing machine, please rst
check if the legs are closely attached to the cabinet.
If not, please turn them to their original positions with
hand or spanner and tighten the nuts with spanner.
2. After positioning the washing machine, press four
corners on top cover of washing machine in sequence.
If the washing machine is not stable when being
pressed, this leg shall be adjusted.
3. Ensure the positioning status of washing machine.
Loosen the lock nut with spanner and turn the leg with
hand until it closely contacts with the oor. Press the leg
with one hand and fasten the nut closely to the cabinet
with the other hand.
→
4. After being locked properly, press four corners again to
make sure that they has been adjusted properly. If it is
still unstable, it has to repeat Steps 2 and 3.
5. Put a solid cylinder (e.g. pop cans) oppositely on the
top cover of the washing machine from in the left, right,
front and back directions. If the cylinder keeps stable,
the washing machine is positioned level. If it rolls, the
washing machine is positioned unlevel. The rolling
direction is the direction of lower ground surface. Then,
the two legs in this direction shall be raised at the same
time until the washing machine is level. Steps 1–3 are
repeated to make the bottom legs closely against the
ground and the nuts shall be locked tightly.
CONNECT INLET PIPE
Connect the inlet pipe as indicated in the gure. For the
model which has hot valve , please connect the hot vale to
hot water tap. Energy will decrease automatically for some
program.
→
Page 7
esatto.house
07
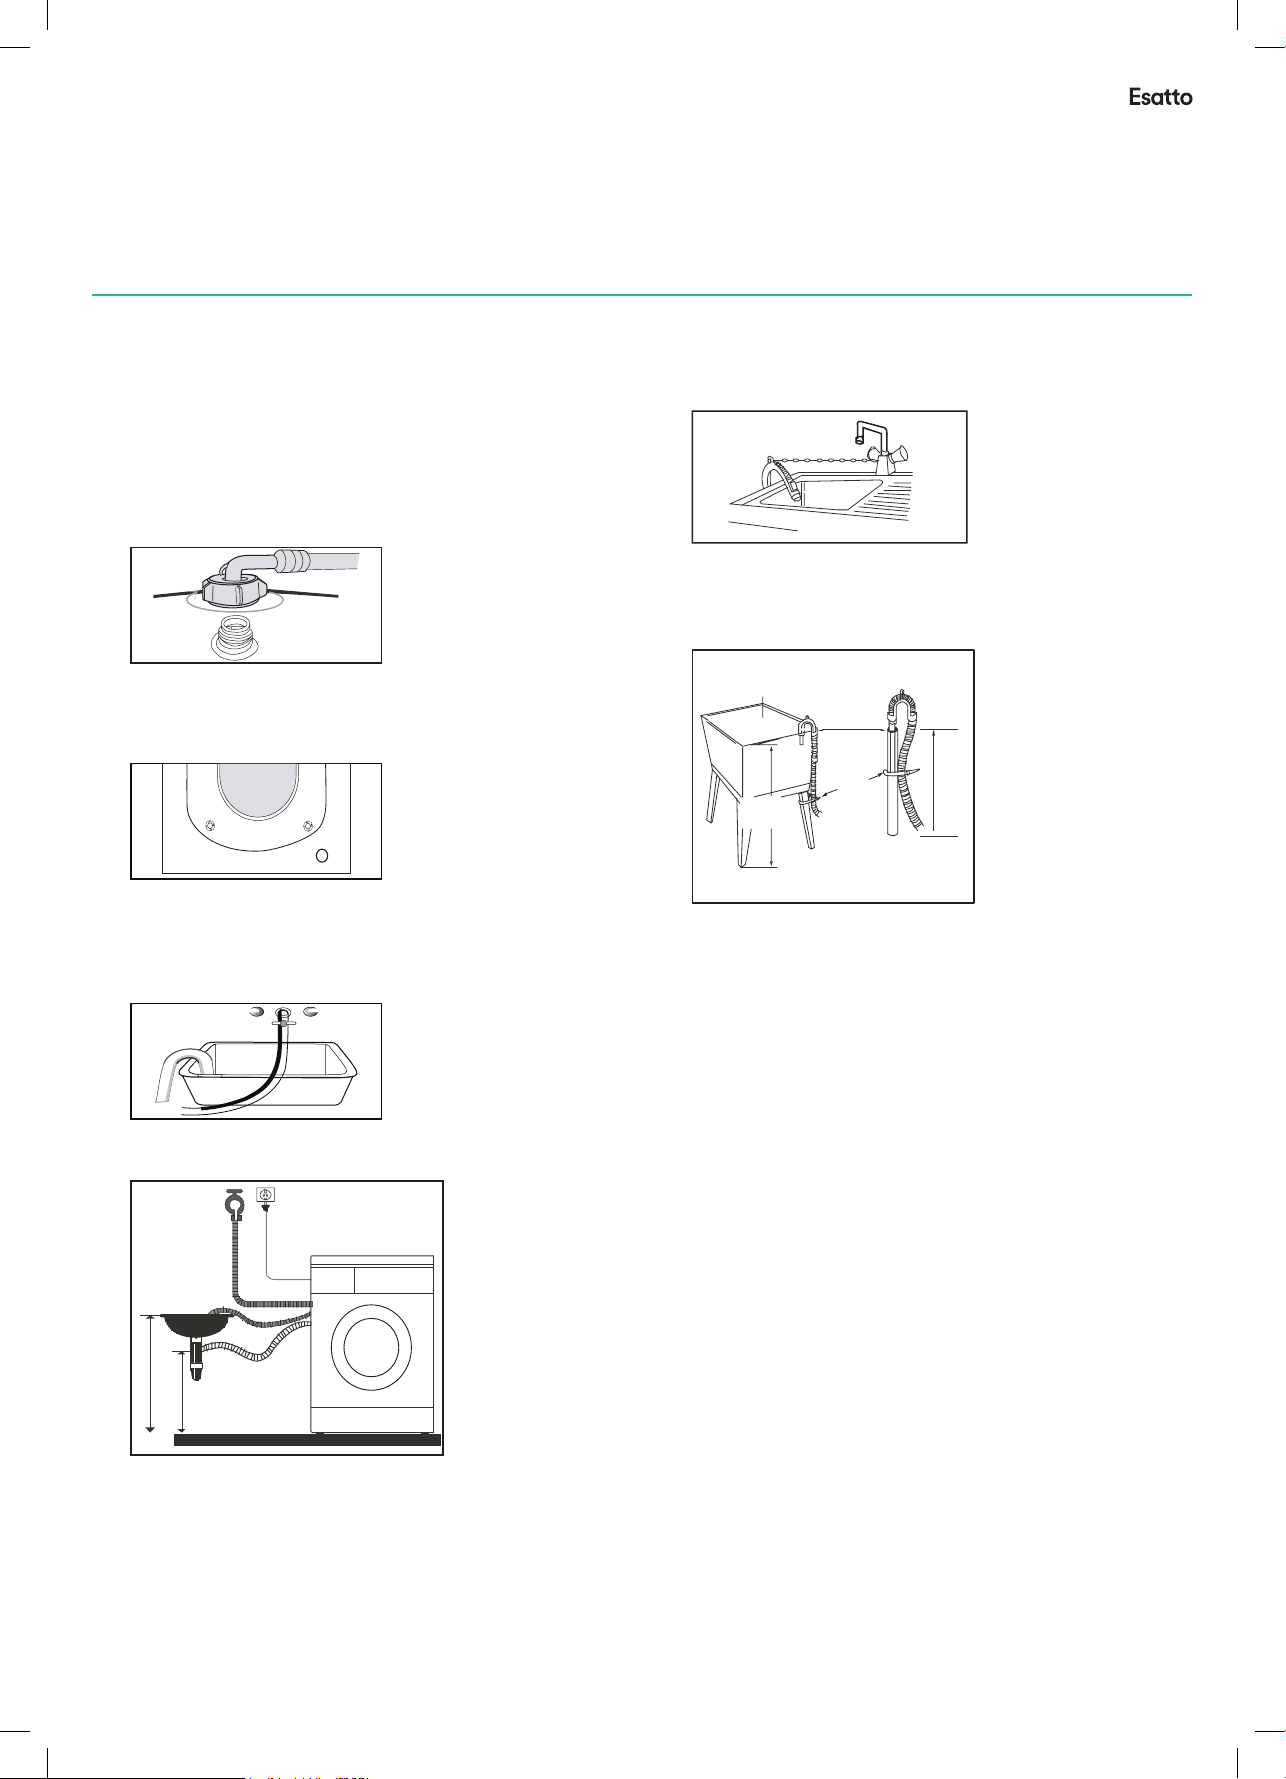
INSTALL INLET PIPE
1. Connect the elbow to tap and fasten it clockwise.
2. Connect the other end of inlet pipe to the inlet valve at
the backside of washing machine and fasten the pipe
tightly clockwise. Notes: after connection, if there is
any leakage with hose, then repeat the steps to connect
inlet pipe. The most common type of tap shall be used
to supply water. If tap is square or too big, then standard
tap shall be changed.
→
HOLE PLUG
This Hole plug is used to jam the hole on the back cabinet.
→
PLACE OUTLET HOSE
There are two ways to place the end of outlet hose:
1. Put it beside the water trough.
→
NOTE:
If the machine has outlet hose support, please install it like
the following pictures.
1.
→ When installing outlet hose, x it properly with a rope.
→ Position outlet hose properly so that the oor will not be
damaged by water leakage.
2.
Trough
Hose Retainer
Max.100cm
Min.60cm
Bin d
Min .60cm
Max .100c m
→ If outlet hose is too long, do not force it into washing
machine as it will cause abnormal noises.
ELECTRICAL CONNECTION
As the maximum current through the unit is 10A when you
are using its heating function, please make sure the power
supply system (current, power voltage and wire) at your
home can meet the normal loading requirements of the
electrical appliances.
2. Connect it to the branch drain pipe of the trough.
→
Max.100cm
Min.60c m
Position outlet hose properly so that the oor will not be
damaged by water leakage.
→ Please connect the power to a socket which is correctly
installed and properly earthed.
→ Make sure the power voltage at your place is same to
that in the machine’s rating label.
→ Power plug must match the socket and cabinet must be
properly and eectively earthed.
→ Do not use multi-purpose plug or socket as extension
cord.
→ Do not connect and pull out plug with wet hand.
→ When connecting and pulling out the plug, hold the
plug tightly and then pull it out. Do not pull power cord
forcibly.
→ If power cord is damaged or has any sign of being
broken, special power cord must be selected or
purchased from its manufacturer or service center for
replacement.
Page 8
User Manual
WARNING
1. This machine must be earthed properly. If there is
any short circuit, earthing can reduce the danger of
electrical shock. This machine is equipped with power
cord, which includes plug, earthing wire at earthing
terminal.
2. Washing machine shall be operated in a circuit separate
from other electrical appliances. Otherwise, power
protector may be tripped or fuse may be burned out.
Washing Your Clothes
08
CHECKLIST BEFORE WASHING CLOTHES
Please read this operation method carefully to avoid the
troubles of washing machine and damages of clothes.
Check rst if clothes will be damaged by detergent
Place your liquid detergent on a spare white towel and put
this in contact with a hidden part of your colour clothing.
Check if the towel takes on any of the colour.
→ When washing scarves and other clothes that easily
get decolorised, please wash them separately before
washing.
KEEP IN MIND:
Never put the clothes to be washed in washing machine
for a long period of time. Otherwise it may get moldy and
cause spots. Therefore, please wash the clothes in time. The
clothes also may get color changed or distorted if they are
not washed according to the stated washing temperature.
As for the stains on sleeves, collars and pockets, use the
liquid detergent and wash it with a brush gently before
washing.
CLOTHES THAT CANNOT BE WASHED
The clothes that may get distorted if being immersed in
water or put throught the washing machine cycle:
→ Ties, waistcoats, western-style clothes, outer garments
etc. may have obvious shrinkage if being immersed in
water; the decolorized clothes such as blended spinning
clothes of articial ber etc.
→ Wrinkle-style clothes, embossed clothes, resin clothes
etc. may get distorted when being immersed in water.
Among cotton and wool materials, the clothes that get
easily distorted are wrinkle-style silk, fur products and
fur decorations;
→ Clothes with decoration, long dress and traditional
clothes etc are the products to get decolorized easily.
→ Please do not wash the clothes without material labels
and washing requirements.
→ Never wash the clothes stained with the chemicals
such as gasoline, petroleum, benzene, paint thinner and
alcohol.
PLEASE PAY ATTENTION TO DETERGENTS
→ “Low bubble” detergent or washing powder or washing
powder special for drum washing machine shall be
selected according to ber types (cotton, synthetic
ber, soft products and wool products), colors, washing
temperatures, dirty degrees and types. Otherwise,
excessive bubbles may be generated and overowed
out of the drawer so that accidents may take place.
→ Bleacher belongs to alkali type and can damage clothes,
so it is suggested to use as little as possible.
→ Powder detergents can easily leave the residues in the
clothes so as to generate the bad smell, so they shall be
suciently rinsed.
→ Detergent can not easily get dissolved completely if
there is too much detergent or water temperature is
rather low. It can remain in clothes, pipes and washing
machines to pollute the clothes.
→ Washing shall follow the weight of clothes, dirty
degrees, local water hardness as well as the
recommendations from the detergent manufacturers.
Please consult the water company if you are not clear
of water hardness.
NOTES:
Keep detergents and additives in safe and dry places out
of touch by kids.
PLEASE TAKE OUT THE ITEMS OUT OF THE POCKETS
Please check the pockets of the clothes to be washed,
empty the rigid items such as decorations and coins,
otherwise washing machine may be damaged or have
abnormal troubles.
Page 9
esatto.house
09
FOR THE CLOTHES TO BE WASHED, THEY ARE
CLASSIFIED ACCORDING TO THE FOLLOWING
CHARACTERISTICS:
The symbol types of care labels: the clothes to be washed
are classied into cotton, blended ber, synthetic ber, silk,
wool and articial ber.
→ COLOR White and colorful colors shall be
identied. All new colorful articles shall
be washed in a separate way.
→ SIZE the articles of dierent sizes are
washed together to increase the
washing eects.
→ SENSITIVITY soft articles shall be washed separately.
As for new pure wool textiles, curtains
and silks, the soft washing procedure
shall be selected. Check the labels in
all washing articles.
The clothes shall be sorted before being put into washing
machine. As for the curtains with hooks, the hooks shall
be removed before being washed. The decorations on
the clothes may damage the washing machine. As for the
clothes with buttons or embroideries, they shall be turned
over before being washed.
→ FASTENERS Zips shall be zipped close and buttons
or hooks shall be xed. The loose band
or ribbon shall be bound together.
It is suggested to put bras into the pillowslip with zip or
buttons sealed to prevent the steel wire from popping out
of bras into the drum and damaging the machine. Especially
delicate textiles such as laced curtains, straight jackets,
small articles (tight socks, handkerchiefs, ties etc.) shall
be put into string bag for washing. When washing a single
big and heavy dress such as Turkish towels, jeans, wadded
jackets etc., it may easily cause great eccentricity and give
alarm due to great unbalance. Therefore it is suggested to
add one or two more clothes to be washed together so that
draining can be done smoothly.
CLEAN AWAY DUSTS, STAINS AND
PET HAIRS FROM THE CLOTHES.
The clothes may be damaged and disturb washing eects
during the friction between dusts, stains and clothes.
NOTE:
It is suggested that the parts that are easily stained such
as white sockets, collars and sleeves etc. shall be hand
washed before being put into washing machine to achieve
more ideal washing eects. Please use powder or liquid
detergents. The residues of the soap could remain in the
gaps of the clothes if soap is used.
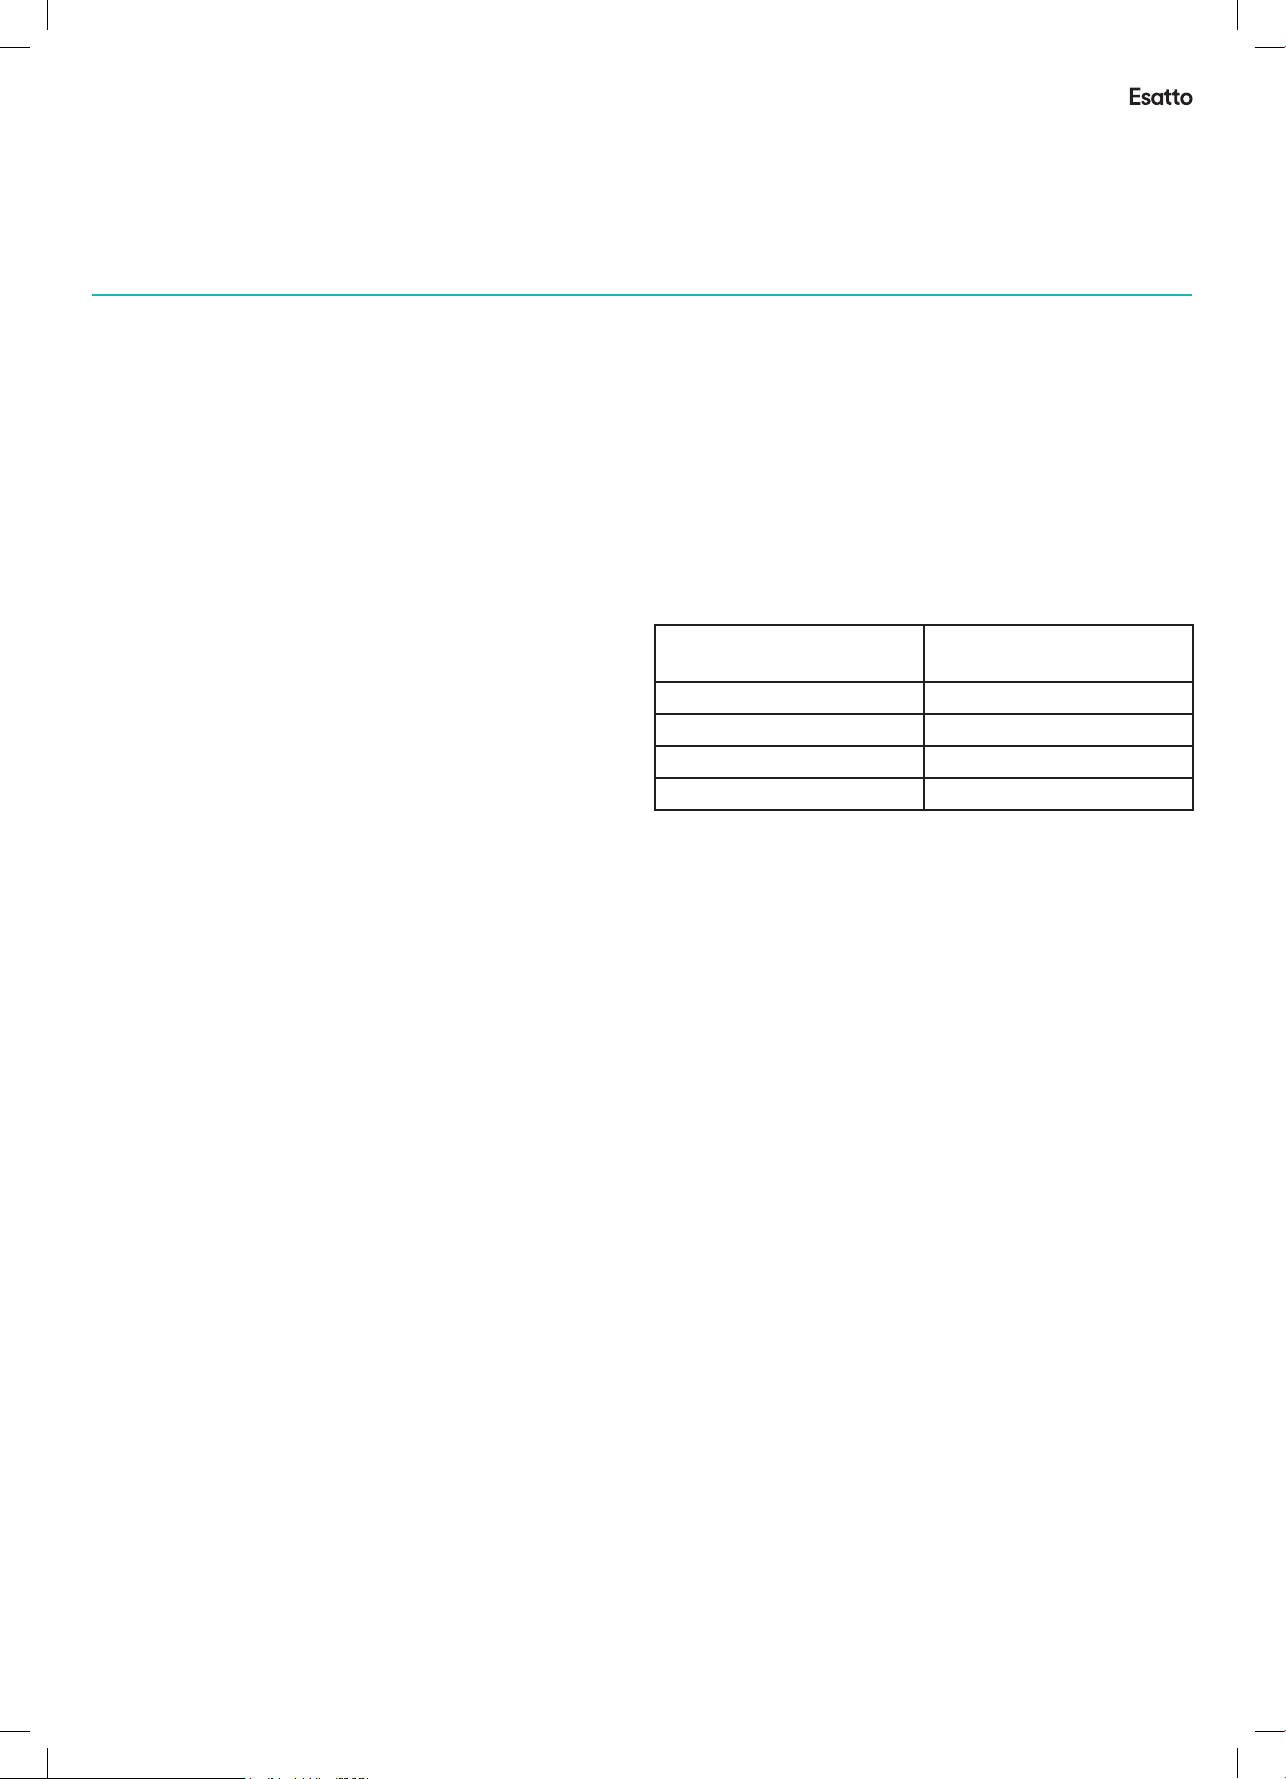
CONFIRM THE WASHING CAPACITY
Do not put excessive washings; otherwise it may aect the
washing eects. Please conrm the maximum aordable
washing quantity according to the following table.
FIBER TYPE MAX. LOADING
CAPACITY (7.5KG)
Cotton 6.0kg
Synthetic 3.0kg
Wool 2.0kg
Delicate 2.5kg
The clothes which easily get fuzzed shall be turned over
for washing The clothes which easily get fuzzed shall be
washed separately; otherwise the other articles can be
stained with dust and thrum etc. Preferably, black clothes
and cotton clothes shall be washed separately because they
can easily get stained with the thrums of other colors when
being washed together. Please check before washing.
WASHING MACHINE SHALL NOT WASH
WATERPROOF MATERIALS (SKI SUITS, OUTSIDE
NAPKIN PADS, CURTAINS).
As for the ber products that water can not get soaked
easily into such as water-proof cushions, and clothes, it is
better not to wash. Otherwise there will be water bursting
out or abnormal vibration to cause danger while rinsing and
draining so that the clothes also may be damaged (such
as outside napkin pads, raincoats, umbrella, ski suits, car
covers, sleeping sacks etc.).
CAUTIONS DURING DRAINING
Draining of normal clothes: Moistures of washings are
drained through drain hole. Draining of water-proof clothes
and ber products: In the normal washing and draining
status, moistures of water-proof clothes and ber products
can not be drained while washing water is gathered in one
direction so that the eccentricity of washing machine is too
great and vibration or moving is caused.
TO PROTECT BABY SKIN
Baby articles (baby clothes and towels) including napkins
shall be washed separately. If they are washed together with
the adults’ clothes, they may be infected. Rinsing times shall
be increased to ensure the thorough rinsing and cleaning
without the detergent residues.
Page 10
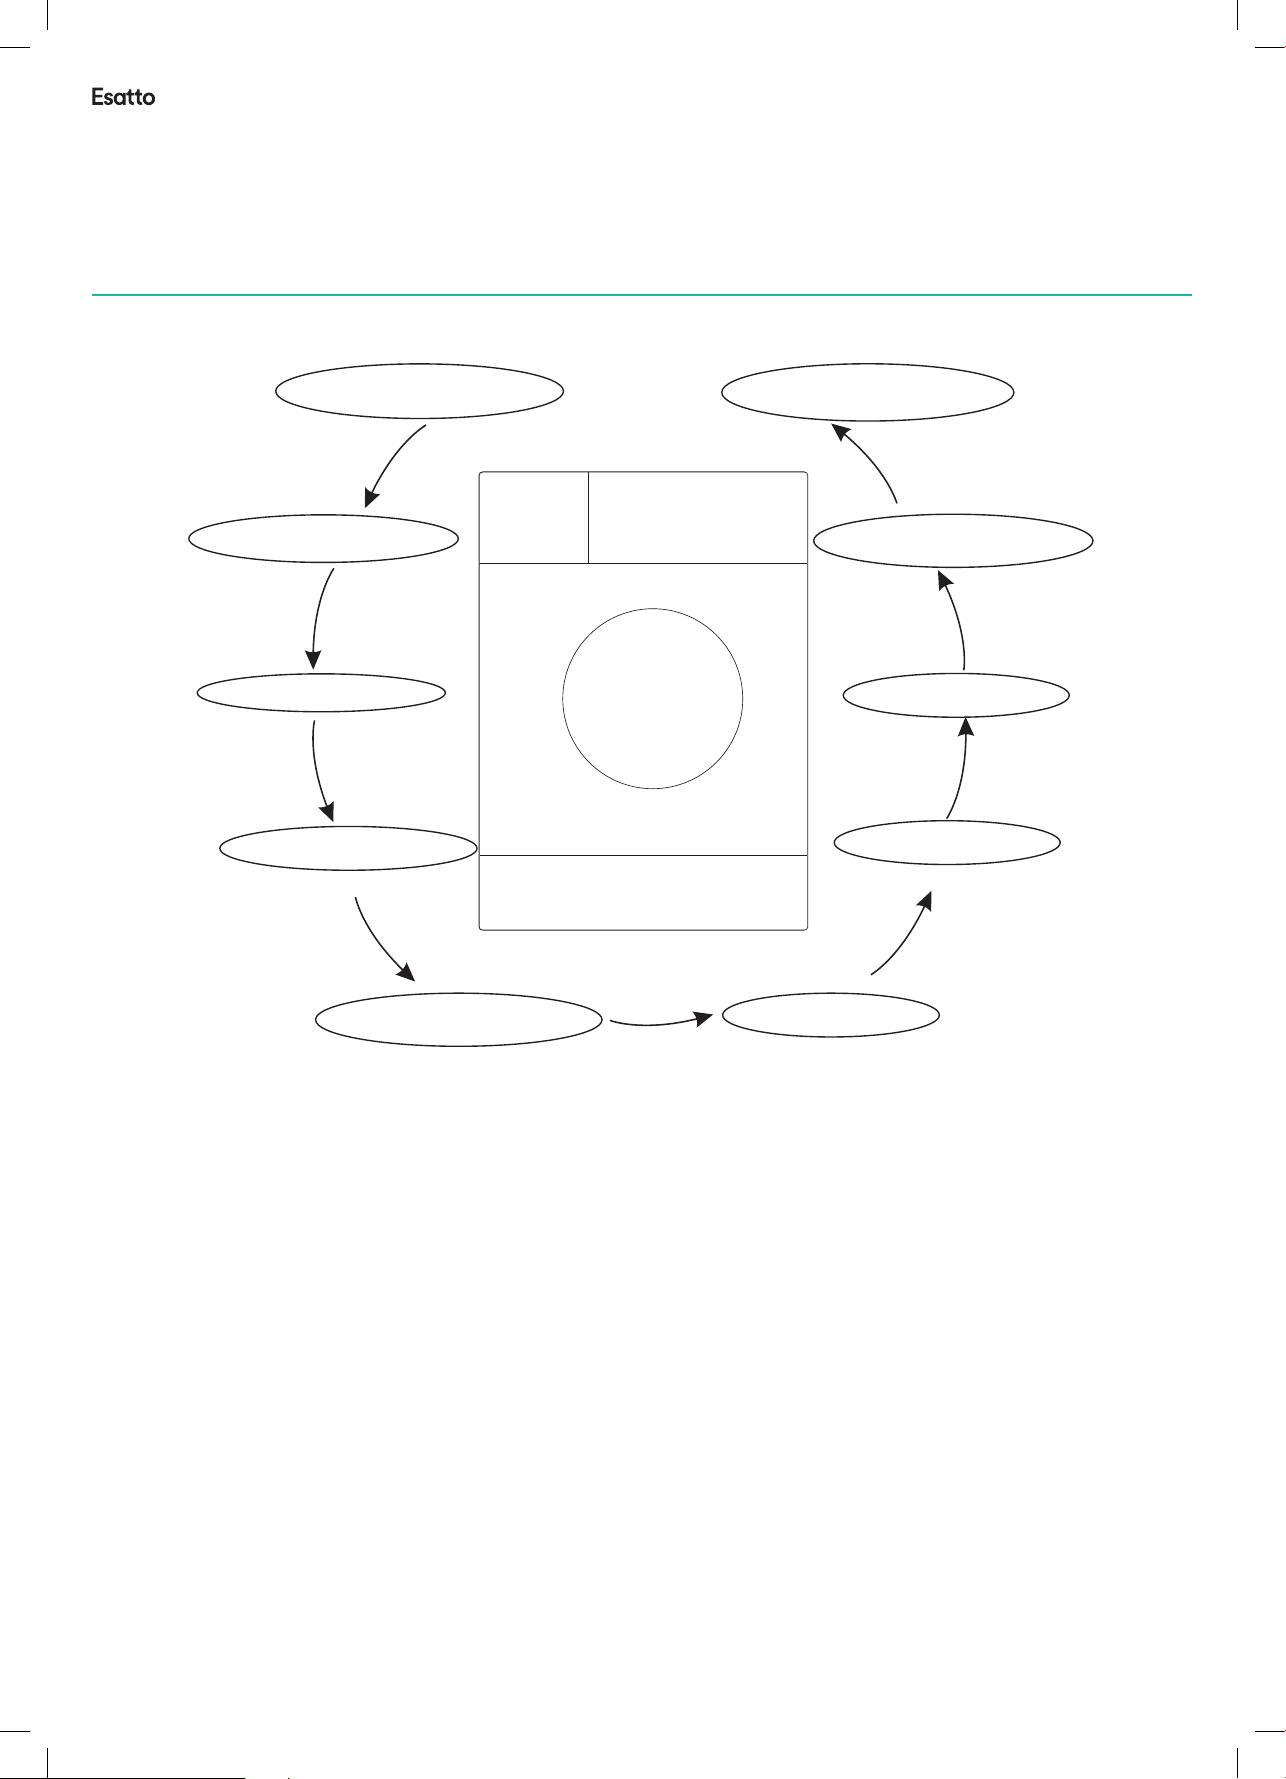
User Manual
Quick Start Guide
Operate Washing Machine
Quick start
10
1 Install the washing machine
2 Open the door and
Load the laundry
3 Measure out the detergent
4 Close the door
10 Press the [start/pause]
9 Select the desired programme
8 Press the On/Off
7 Plug the power supply
5 Put down (hang up) the drain pipe
AFTER WASHING NOTES:
1. After washing, the washing machine will
make the sound
2. Close the water tap;
3. Press the On/O button and pull out the
power plug.
6 Turn on the water tap
Page 11
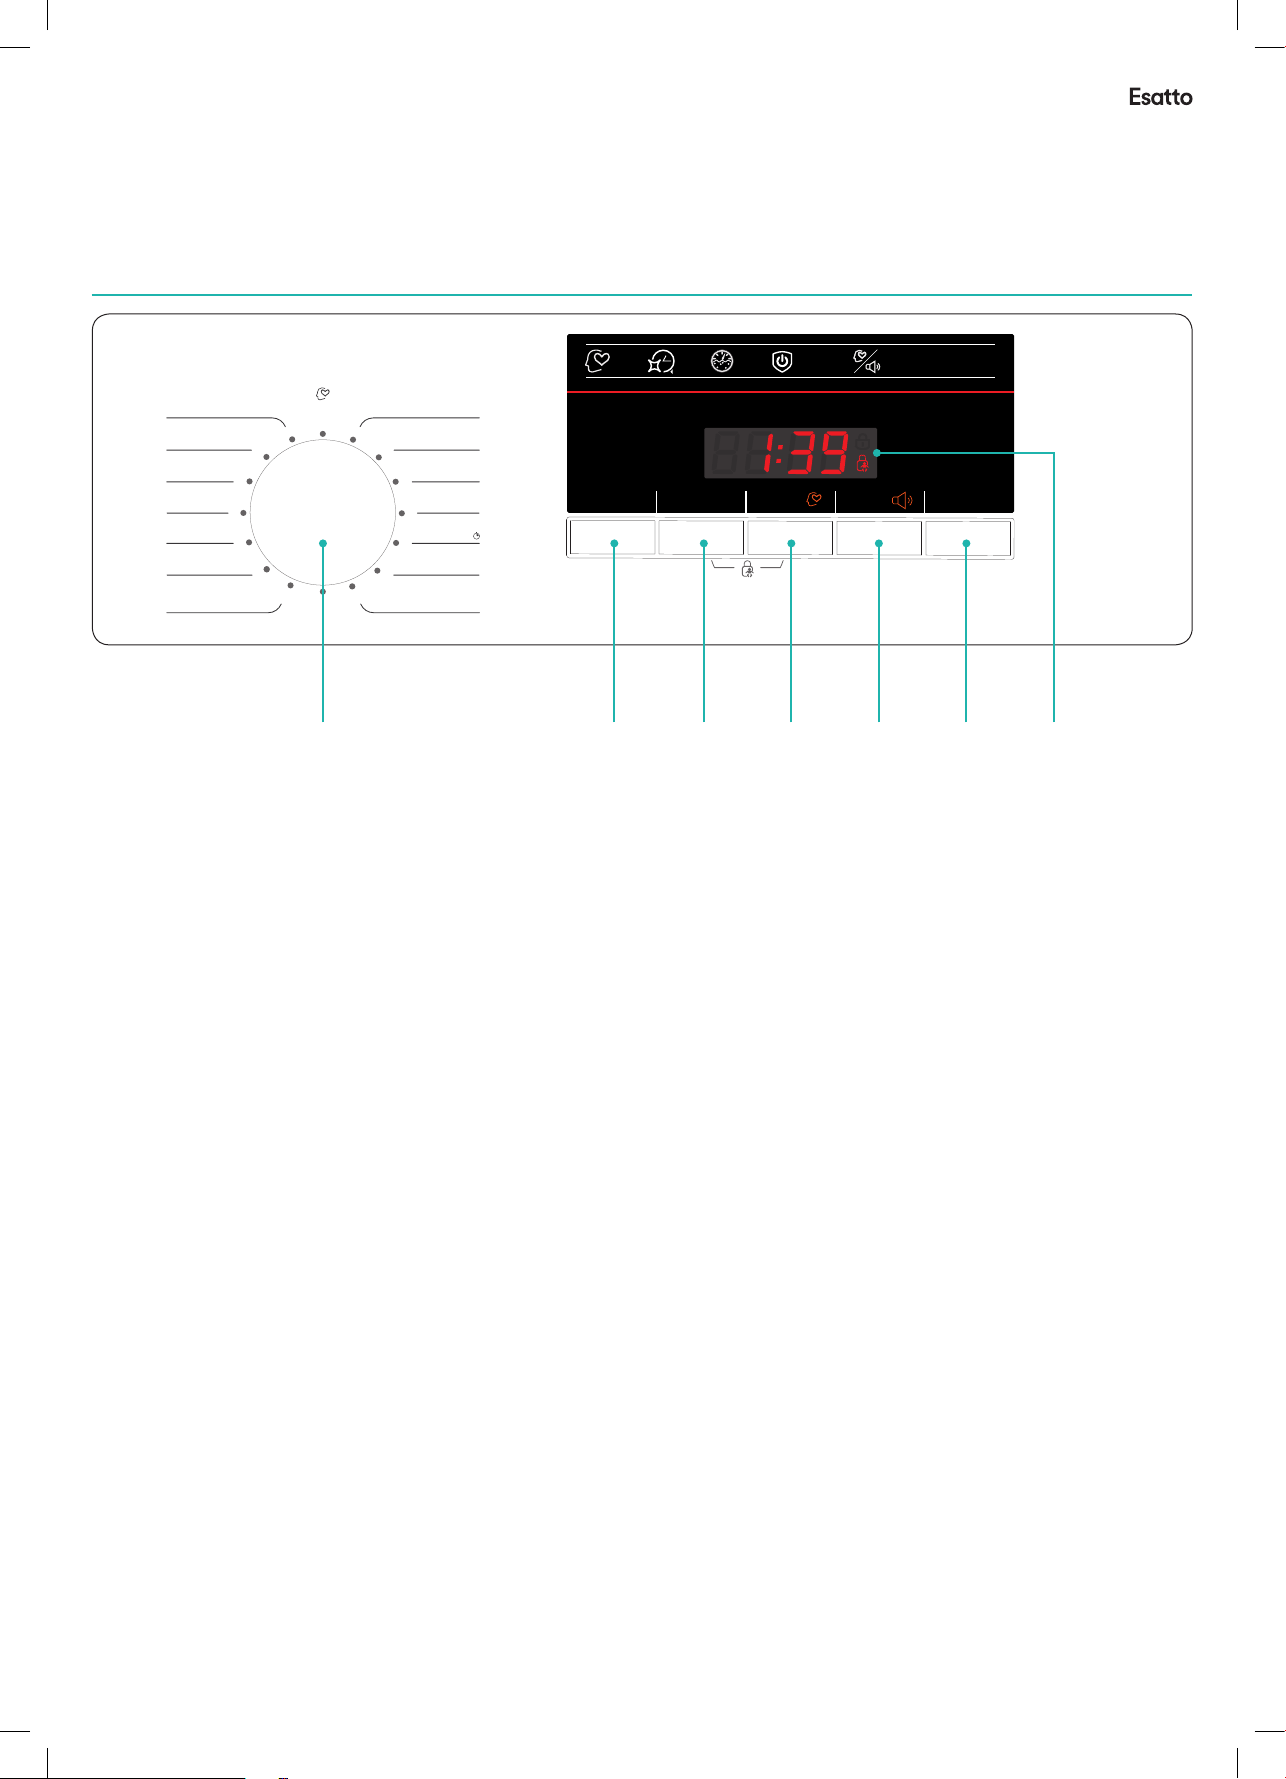
esatto.house
11
Spin Only
Baby Care
Sports
Synthetic
Mixed
Delicate
Wool
Drain Only
Cotton Intensive
Cotton 60ºC
Cotton 40ºC
Cotton 20ºC
Rinse & Spin
My Cycle
Rapid 15
Eco Wash
Speed Temp. Start/PauseDelayOn/O
DELAY
START
POWER OFF
MEMORY
SET MY CYCLE / SIGNAL:
PRESS FOR 3 SECONDS
QUICK
WASH
MY
CYCLE
Controls
KEY
1. PROGRAM SELECTION KNOB
2. ON/OFF BUTTON
3. DELAY BUTTON
4. SPEED BUTTON
5. TEMPERATURE BUTTON
6. START/PAUSE BUTTON
7. LED SCREEN DISPLAY
1. PROGRAM SELECTION KNOB
There are 16 types of washing selection functions
in display. For example:
– Cotton intensive: With the corresponding temperature
selections: 20, 30, 40, 60, 90º C, Cold
– Cotton 60º C; Cotton 40º C; Cotton 20º C;
– Quick 15’: 20, 30 , 40º C, Cold
– Eco Wash : 20, 30, 40º C, Cold
– Rinse & Spin
– Spin only
– Drain only
– Wool: 20, 30, 40º C, Cold
– Delicate: 20, 30º C, Cold
– Mixed: 20, 30, 40º C, Cold
– Synthetic: 20, 30, 40, 60º C, Cold
NOTES:
1. The Control panel line chart is for reference only.
Please refer to real product as standard.
2. The Control panel could be changed without written
notice. Please visit the website of Washing Machine
or call up the service line for consultation.
– Sports: 20, 30, 40º C, Cold
– Baby care: 20, 30, 40, 60, 90º C, Cold
– My Cycle: cusomised program of your choosing
Page 12
User Manual
Washing Clothes at first time
Operating Your Washing Machine
Before washing clothes at first time, the washing machine shall be operated in
one round of the whole procedures without clothes in as follows:
1.Connect power source and water.
2.Put a little detergent into the box and close it.
3.Press the button “On/Off”.
4.Press the button “Start/Pause”.
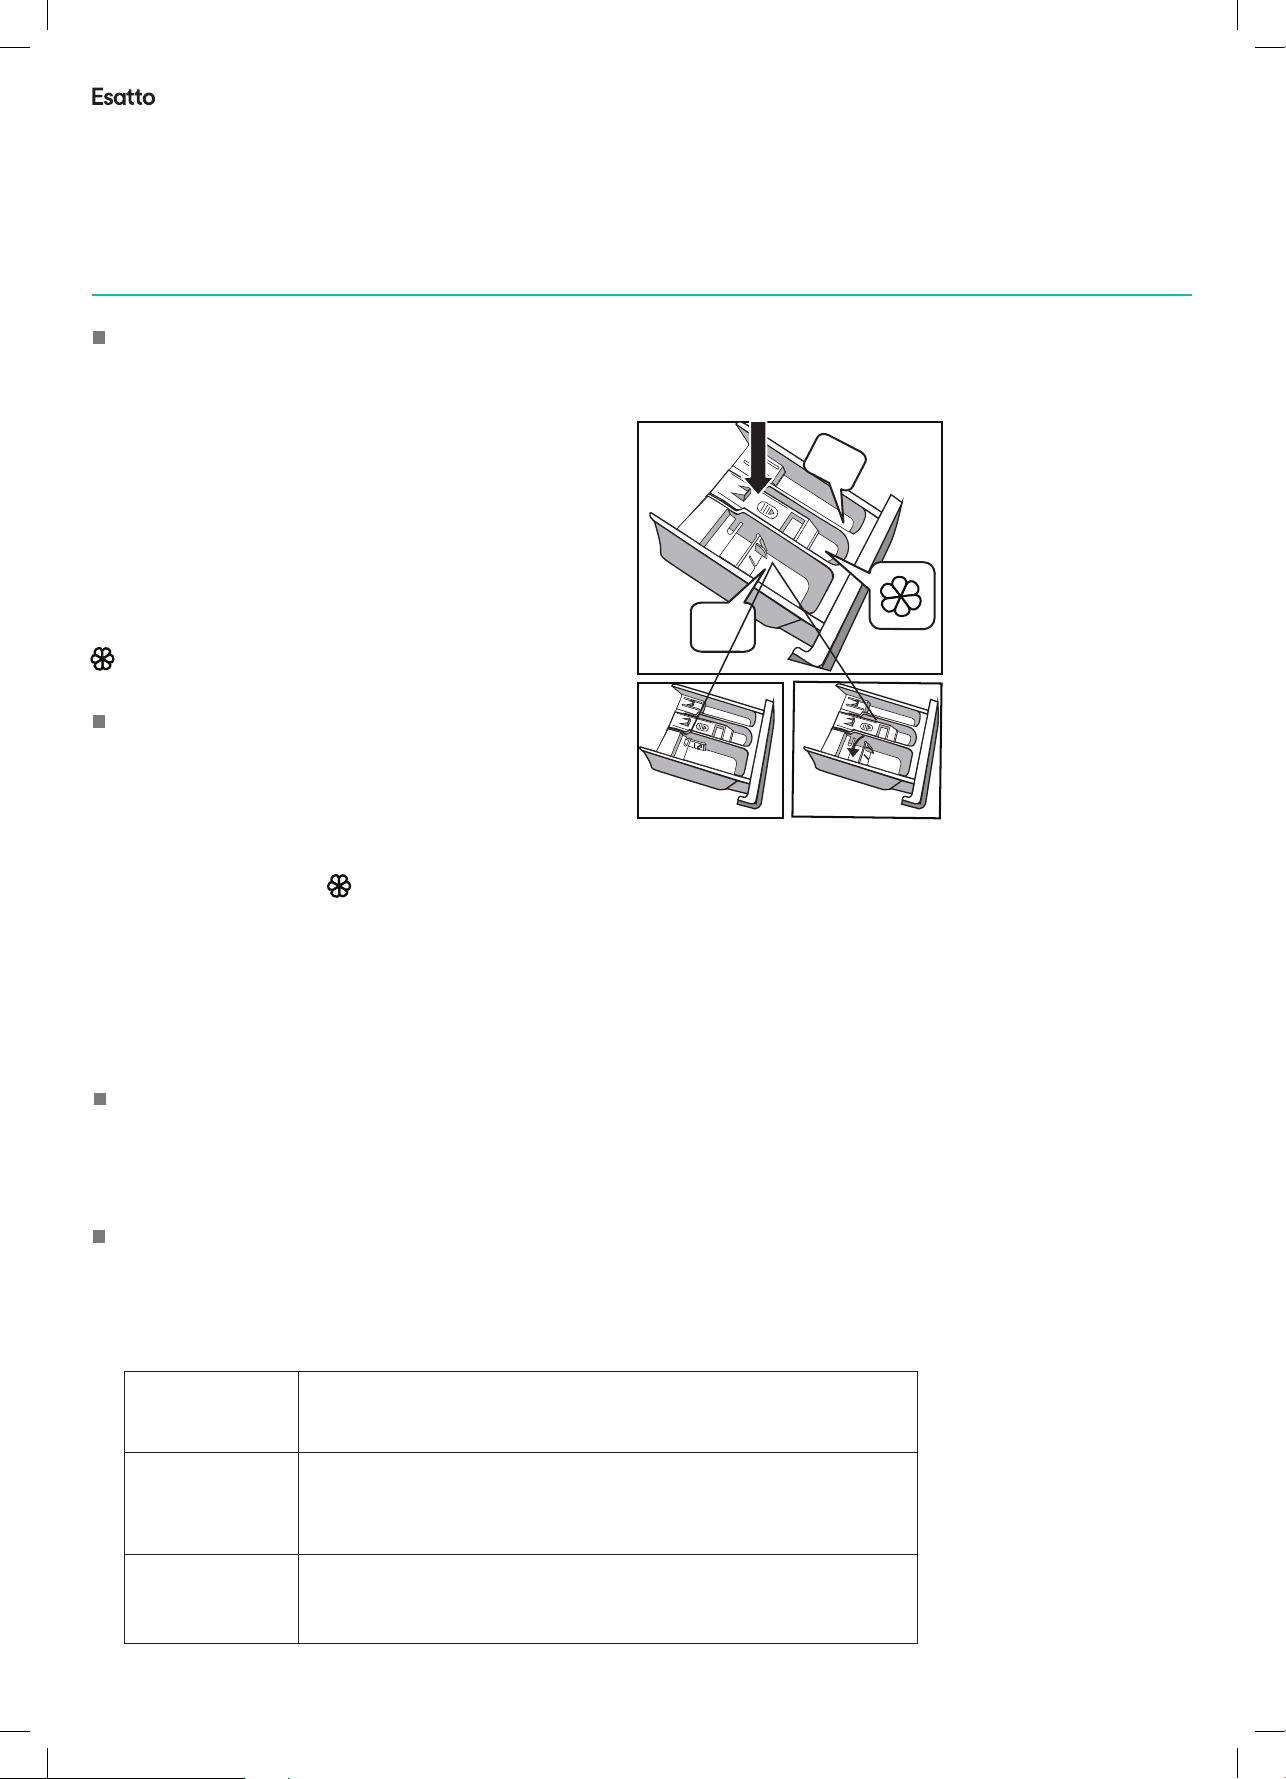
The drawer is separated as follows:
I: Pre-detergent or washing powder.
II: Main detergent
: Washing additive,such as fabric softener or tackifier.
12
Ⅰ
Ⅱ
Put detergent into washing machine.
1.Pull out the drawer.
2.Fill pre-detergent into Case I (when necessary).
3.Fill detergent into Case II.
option1: detergent (powder) . option2(liquid)
4.Fill softener into Case (when necessary).
Notes:
- As for the agglomerated or ropy detergent or additive, before they are poured into the detergent box,
it is suggested to use some water for dilution to prevent the inlet of detergent box from being blocked
and overflowing while filling water.
-
Please choose suitable type of detergent for the various washing temperature to get the best washing
effect with less water and energy consumption.
Option1 Option2
Start up washing machine
Connect the power. Check if water pipes are connected properly. Open the tap completely.
Put in the clothes to be washed and fill in the detergent and tackifier. Then press the button
“On/Off”,Select the proper procedures and functions and press the button “Start/Pause”.
Select the procedure
The proper washing procedures shall be selected according to the types, quantities, and
dirtiness of the clothes to be washed in combination with the following washing
temperature table.
90 ℃
60 ℃
40 ℃,30 ℃,
Cold water20 ℃,
Seriously besmirched, pure white cotton or flax (for example: coffee
table cloths, canteen table cloths, towels, bed sheets)
Moderately besmirched, colorful flax, cotton and synthetic articles
with certain decolorizing degree (for example: shirts, night pajamas;
Slightly besmirched, pure white flax
Normally besmirched articles ( synthetic and wool)for example:
Page 13

esatto.house
13
Operate Washing Machine
- Wool
You can select this procedure to wash the wool textiles labeled with “Machine Wash”.
Please select the proper washing temperature according to the label on the articles to be
washed. Furthermore, the proper detergent shall be selected for wool textiles.
- Drain Only
Separate Drain only Procedure.
- Spin Only
Separate spin only procedure. Soap water or rinse water shall be drained out before spinning.
- Rinse&Spin
Separate Rinse&Spin Procedure.
- My Cycle
Press Speed 3sec. for my cycle to me
The main function can be selected as follows:
- Prewash
The Prewash function can get an extra wash before main wash.
- Express Wash
The function can decrease the washing time.
- Extra Rinse
The laundry will undergo extra rinse once after you select it.
- Delay
Delay function can be set with this button, the delaying time is 0-24H.
Set the delay function:
1.Select a programme;
2.Press the Delay button to choose the time;
3.Press Start/Pause to commence the Delay operation.
Cancel the Delay function :Press the Delay b
pressed before starting the program. If the program already started, should press the
On/Off button.
Notes: If there is any break in the power supply while the machine is operating, a special
memory stores the selected programme and when the power is restarted ,press the
Start/Pause button the left time is continues.
- Child Lock
To avoid that the washing procedure cannot operate normally due to the mis operation by
kids during the washing procedure, you can select this function, In this case, the other
buttons except On/Off button can n
the key on/off. The machine remembers the program child lock and the program during
powered off when press the key on/off again.
Press “Temp” and “Speed” together 3 seconds during the running procedure, the buzzer
will beep ,Start/Pause button as well as the rotary switch are locked. Press the two buttons
for 3 seconds together and buzzer will beep to release to locking. But cut off the power
supply , the kid’s protection is also release to locking. The kid’s protection will not be
cancelled after all procedures are completed.
First, turn the rotary switch to select the corresponding procedures according to the types
of textiles.
Second, select the proper temperature according to the dirtiness. Generally, the higher the
temperature is, the more the power is consumed.
Last, select the proper revolution speed. The higher the revolution speed is, the drier the
textiles are spun, but higher the noises will also be increased
.
The surfaces of delicate textiles will have wrinkles and the working life of washing
machine will be shortened.
PLEASE NOTE: to protect the clothes, the lower revolution speed shall be selected for delicate textiles.
The main washing procedures depend on the types of the clothes to be washed as follows:
- Cotton
You can select this procedure to wash the daily washable clothes. The washing period
is quite long with quite strong washing intension. It is recommended to wash the daily
cotton articles, for example: bed sheets, quilt covers, pillowcases, gowns, underwear etc.
- Cotton 60/40
℃
You can select this procedure to wash the daily clothes. The washing period is quite long
with quite strong washing int
ension. The temperature is default is 60 .
℃/4 0℃
- Express 15'
This procedure is suitable for washing few and not very dirty with 15'.
- Rapid 45'
This procedure is suitable for washing few and not very dirty clothes quickly.
- ECO 60'
As for few light dirty clothes, the maximum temperature of washing is limited to 30℃ , and saving
more energy.
- Baby Care
You can select this procedure to wash your baby’s clothes, it can make the baby's wear
cleaner and make the rinse performance better to protect the baby skin.
- Sports
You can select this procedure to wash the activewear.
- Synthetic
You can select this procedure to wash the quite delicate clothes. The procedure is shorter
compared with that for cottons and the washing intension is quite gentle. It is recommended
to wash synthetic articles, for example: shirts, coats, blending. As for curtains an
d laced
textiles, the procedure “Synthetic ” shall be selected. While washing the knitting textiles,
detergent quantity shall be reduced due to its loose string construction and easily forming
bubbles.
- Mixed
You can select this proc
edure wash the tough clothes, that need much more time and
strength. It is used for the daily clothes fo cotton, such as sheets, chained, pillowcases
bathrobe and underwear.
- Delicate
You can select this procedure to wash your delicate clothes. Its washing intension is gentler
and revolution speed is less compared with the procedure “Synthetic”. It is recommended
for the articles to be washed softly.
Page 14
User Manual
.
cancelled after all procedures are completed.
- Bubble Removal Function
Bubble Check Function: Redundant bubbles will occur when there is excessive detergent,
which will affect wash and rinse effects. The procedure will check automatically and one
bubble removal procedure will be added automatically to remove bubbles when excessive
bubbles are checked.
- Power off Memory
For the convenience of the users, this program remember the washing program and function
that is the choice of the users at the last time. The next time when selecting the pr
ogram Memory,
this machine will run the program of your memory automatically.
- Suppression of the acoustic signals
This is an additional buzzer function on your appliance. After deactivating the buzzer function,
the buzzer will be closed.
After starting the machine, press the “Temp” button for 3 seconds and you will hear a beep,
then the buzzer will be closed. To restart the buzzer function, press the “Temp”button
again for 3 seconds. The setting will be kept until the next reset.
Warning: After deactivating the buzzer function, the sounds will not be activated any mo
re.
Table of Washing Procedures
Load(kg)
Detergent Box
Procedure
Description
Default Speed
(RPM)
Default Time
(Min)
Cotton
40
Sports
40
Mixed
40
Drain Only
Spin Only
Rinse&Spin
ECO 60'
Cold
Express15'
Cold
Wool
40
Delicate
30
Synthetic
40
Cotton 60℃
60
Cotton 40℃
40
Rapid 45'
40
Baby care
Delay
60
Softener
Case
×
1600
800
800
800
800
800
800
400
800
800
1400
1400
800
1200
800
Prewash
Extra rinse
9.0kg
9.0
9.0
4.5
9.0
9.0
9.0
2.0
2.0
2.0
2.5
4.5
9.0
9.0
2.0
4.5
2:40
1:19
1:13
0:01
0:14
0:31
1:00
0:15
1:06
1:00
1:40
2:05
1:32
0:45
1:39
(℃)
Default Temp.
14
- Wool
You can select this procedure to wash the wool textiles labeled with “Machine Wash”.
Please select the proper washing temperature according to the label on the articles to be
washed. Furthermore, the proper detergent shall be selected for wool textiles.
- Drain Only
Separate Drain only Procedure.
- Spin Only
Separate spin only procedure. Soap water or rinse water shall be drained out before spinning
- Rinse&Spin
Separate Rinse&Spin Procedure.
- My Cycle
Press Speed 3sec. for my cycle to memory the procedure. The default my cycle is cotton.
The main function can be selected as follows:
- Prewash
The Prewash function can get an extra wash before main wash.
- Express Wash
The function can decrease the washing time.
- Extra Rinse
The laundry will undergo extra rinse once after you select it.
- Delay
Delay function can be set with this button, the delaying time is 0-24H.
Set the delay function:
1.Select a programme;
2.Press the Delay button to choose the time;
3.Pre
ss Start/Pause to commence the Delay operation.
Cancel the Delay function :Press the Delay button until the display will be 0H . It should be
pressed before starting the program. If the program already started, should press the
On/Off button.
Notes: If there is any break in the power supply while the machine is operating, a special
memory stores the selected programme and when the power is restarted ,press the
Start/Pause button the left time is continues.
- Child Lock
To avoid that the washing procedure cannot operate normally due to the mis operation by
kids during the washing pro
buttons except On/Off button can not work, at this state ,the machine power off when press
the key on/off. The machine remembers the program child lock and the program during
powered off when press the key on/off again.
Press “Temp” and “Speed” together 3 seconds during the running procedure, the buzzer
will beep ,Start/Pause button as well as the rotary switch are locked. Press the two buttons
for 3 seconds together and buzzer will beep to release to locking. But cut off the power
supply , the kid’s protection is also release to lo
cedure, you can select this function, In this case, the other
cking. The kid’s protection will not be
Page 15
esatto.house
15
Operate Washing Machine
ory,
,
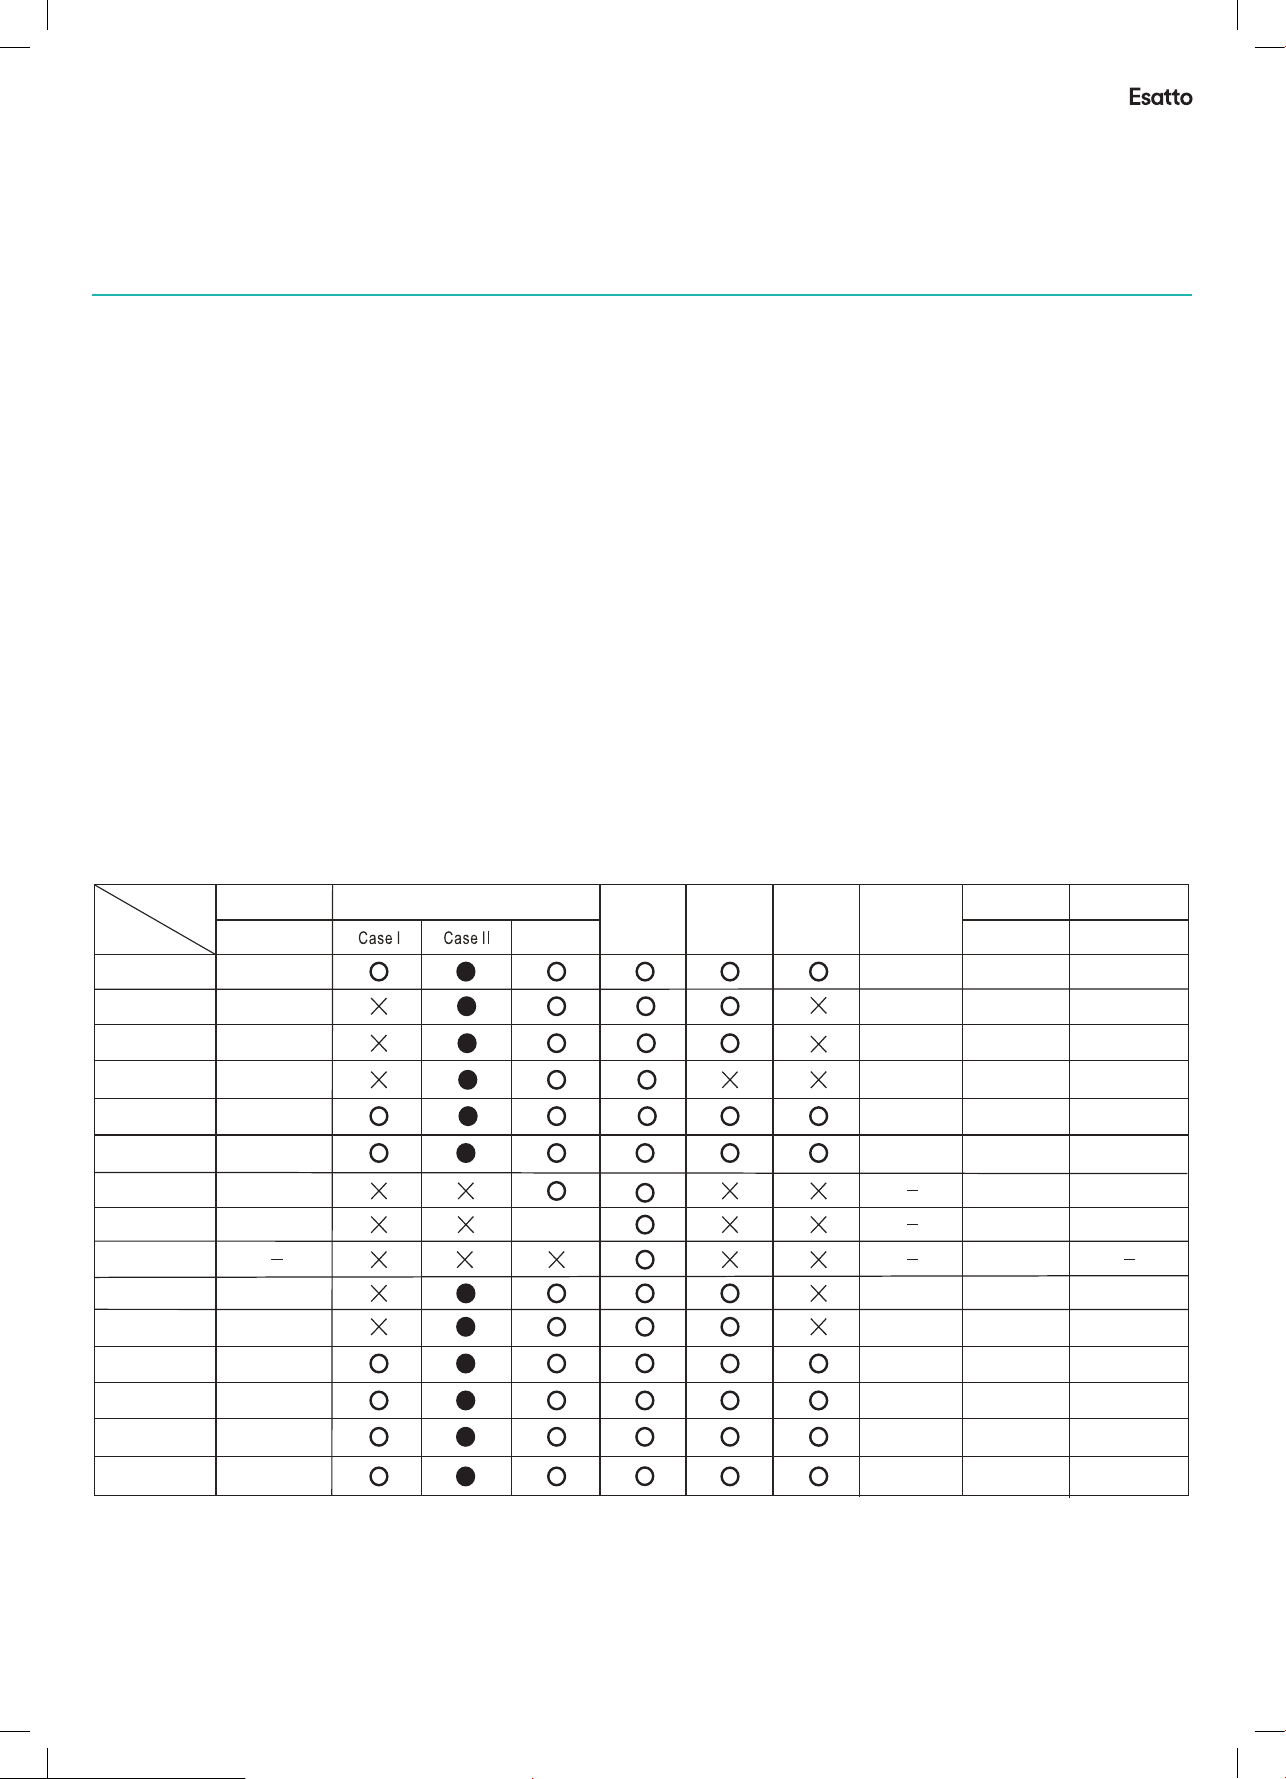
Table of Washing Procedures
Default Speed
(RPM)
Default Time
(Min)
40
60
40
1600
800
1400
1400
Prewash
9.0kg
2:40
2:05
1:32
(℃)
Default Temp.
Operate Washing Machine
Operate Washing Machine
- Bubble Removal Function
Bubble Check Function: Redundant bubbles will occur when there is excessive detergent,
which will affect wash and rinse effects. The procedure will check automatically and one
bubble removal procedure will be added automatically to remove bubbles when excessive
bubbles are checked.
- Power off Memory
For the convenience of the users, this program remember the washing program and function
that is the choice of the users at the last time. The next time when selecting the pr
ogram Memory,
this machine will run the program of your memory automatically.
- Suppression of the acoustic signals
This is an additional buzzer function on your appliance. After deactivating the buzzer function,
the buzzer will be closed.
After starting the machine, press the “Temp” button for 3 seconds and you will hear a beep,
then the buzzer will be closed. To restart the buzzer function, press the “Temp”button
again for 3 seconds. The setting will be kept until the next reset.
Warning: After deactivating the buzzer function, the sounds will not be activated any mo
re.
Table of Washing Procedures
- Power off Memory
For the convenience of the users, this program remember the washing program and function
that is the choice of the users at the last time. The next time when selecting the program Mem
this machine will run the program of your memory automatically.
- Suppression of the acoustic signals
This is an additional buzzer function on your appliance. After deactivating the buzzer function
the buzzer will be closed.
After starting the machine, press the “Temp” button for 3 seconds and you will hear a beep,
then the buzzer will be closed. To restart the buzzer function, press the “Temp”button
again for 3 seconds. The setting will be kept until the next reset.
Warning: After deactivating the buzzer function, the sounds will not be activated any more.
- Bubble Removal Function
Bubble Check Function: Redundant bubbles will occur when there is excessive detergent,
which will affect wash and rinse effects. The procedure will check automatically and one
bubble removal procedure will be added automatically to remove bubbles when excessive
bubbles are checked.
WASHING PROCEEDURES
Procedure
Description
Cotton
Cotton 60℃
Cotton 40℃
Express15'
Rapid 45'
ECO 60'
Rinse&Spin
Spin Only
Drain Only
Wool
Delicate
Mixed
Synthetic
Sports
Load(kg)
9.0
9.0
9.0
9.0
2.0
2.0
2.0
9.0
9.0
2.0
2.5
9.0
4.5
4.5
Detergent Box
Softener
Case
×
Delay
Extra rinse
Prewash
Default Temp.
(℃)
40
60
40
Cold
40
Cold
40
30
40
40
40
Default Time
(Min)
9.0kg
2:40
2:05
1:32
0:15
0:45
1:00
0:31
0:14
0:01
1:06
1:00
1:13
1:40
1:19
Default Speed
(RPM)
1600
800
1400
1400
800
800
800
800
800
400
800
800
800
800
Baby care
● Means must
○ Means optional
✕ Means not necessary
Notes
The parameters in this table are only for user’s reference.
The actual parameters maybe dierent with the parameters
in above mentioned table.
4.5
60
Energy test program: Cotton 60º C, Speed: the highest speed;
Other as the default. Half load for 6.0/7.5Kg machine:3.0kg/3.75Kg.
“Cotton 60” are the “standard cotton 60” program and the standard
washing programs to which the information in the label and the che
relates, and they are suitable to clean normally soiled cotton laundry and
that they are the most ecient programmes in terms of combined energy
and water consumptions for washing that type of cotton laundry,that the
actual water temperature may dier from the declared cycle temperature.
1:39
1200
Page 16
User Manual
Maintenance
Clean detergent box and grooves
Clean detergent drawer and grooves
1.Press down the arrow location on softener cover
inside the drawer.
2.Lift the clip up and take out softener cover and wash
all grooves with water.
3.Restore the softener cover and push the drawer into
position.
Clean inlet filter
Inlet filter shall must be cleaned if there is not any or
insufficient water in when the tap is opened.
Clean the tap filter:
1.Close the tap.
2.Select any procedure except “Wash” or “Drain”
procedure.
3.Press the button “Start/Pause” and keep the
procedure running for about 40 seco
4.Remove the inlet pipe from the tap.
5.Use water to wash the filter.
6.Reconnect the inlet pipe.
Washing the filter in washing machine:
1.Screw off the inlet pipe from the backside of the
machine.
2.Pull out the filter with long nose pliers and reinstall
it back after being washed.
3.Reconnect the inlet pipe.
4.Open the tap and make sure there is no water leakage.
5.Close the tap.
Notes: Generally, the tap filter is washed first and then the filter in washing machine will be washed.
If only the filter in washing machine is washed, then the steps 1~3 in cleaning the tap filter shall be
repeated.
Maintenance
16
Before your maintenance starts, please do pull out the power plug or disconnect power
and close the tap.
- Solvents are forbidden to avoid that the washing machine is damaged, and toxic gases
are generated or exploded.
- Never use water to sprinkle and wash the washing machine.
- It is forbidden that the detergents containing PCMX are used to clean the washing machine.
Cleaning and Maintenance of Washing Machine Cabinet
Proper maintenance on the washing machine can extend its working life. The surface can
be cleaned with diluted non-abrasive neutral detergents when nec
water overflow, use the wet cloth to wipe it off immediately. No sharp items are allowed to
strike the cabinet.
Notes: formic acid and its diluted solvents or equivalent are forbidden.
Clean Internal Drum
The rusts left inside the drum by the metal articles shall be removed immediately with
chlorine-free detergents.
Never use steel wool.
Dispose a Frozen Washing Machine
When the temperature drops below zero and your washing machine gets frozen, you may:
1.Disconnect the power supply for the washing machine.
2.Wash the tap with warm water to loosen in
3.Take down inlet pipe and immerse it in warm water.
4.Pour warm water into washing drum and wait for 10 minutes.
5.Reconnect inlet pipe to the tap and check whether inlet and outlet are working normally.
Notes: when the washing machine is reused, make sure the ambient temperature is above 0 C
Anti-freeze
If your washing machine is located in the room where it can get frozen easily, please drain
the remaining water inside drain pipe and inlet pipe thoroughly.
Remove the remaining water in inlet pipe:
1.Close the tap.
2.Screw off the inlet pipe from tap and put its end into the container.
3.S
tart up any procedure except single Wash or Drain
procedure. Water will be drained out of inlet pipe if any
for about 40 seconds.
4.Reconnect the inlet pipe to tap.
Remove the remaining water in drain pump
let pipe.
essary. If there is any
o avoid burning, it shall be done after the hot water
T
inside the machine cools down.
Page 17
esatto.house
17
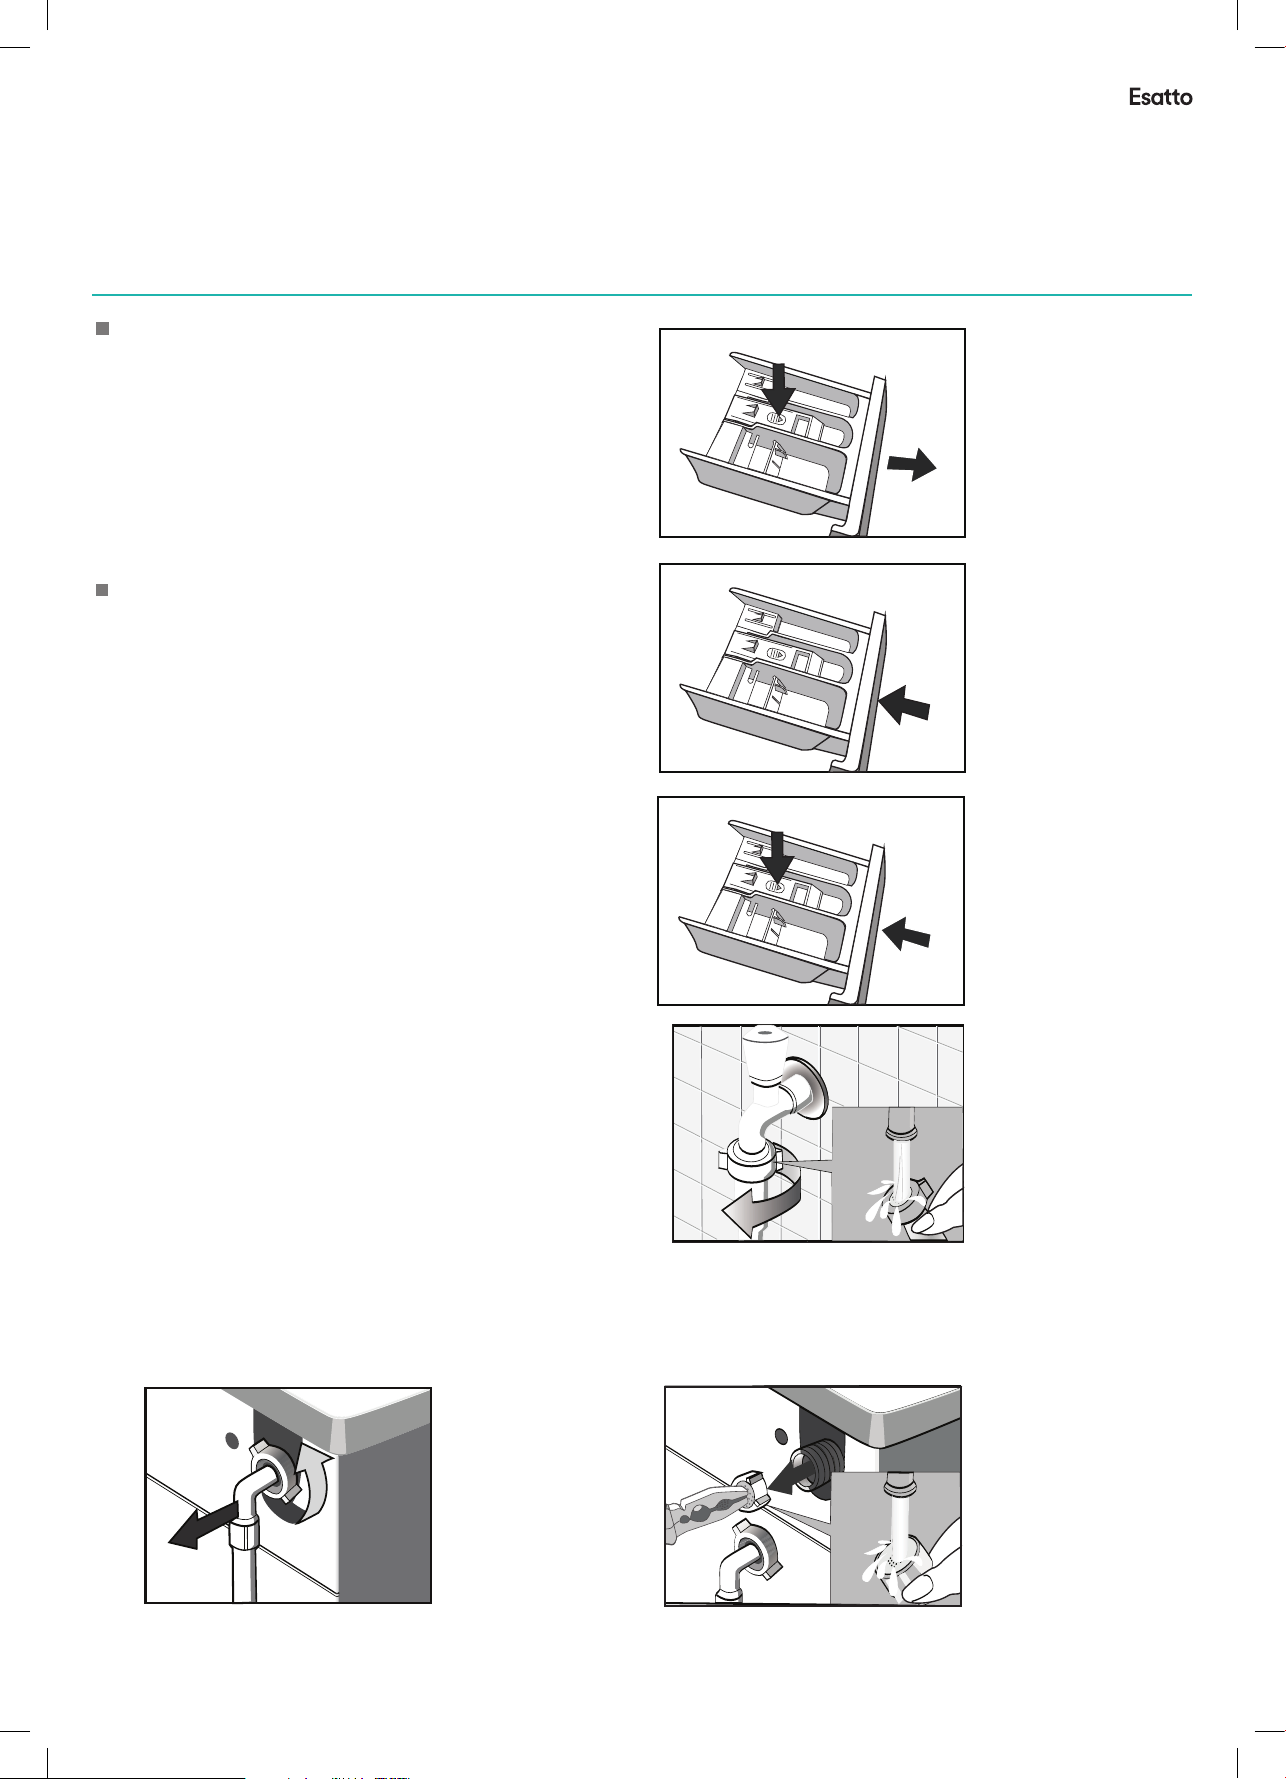
Clean detergent box and grooves
Clean detergent drawer and grooves
1.Press down the arrow location on softener cover
inside the drawer.
2.Lift the clip up and take out softener cover and wash
all grooves with water.
3.Restore the softener cover and push the drawer into
position.
Clean inlet filter
Inlet filter shall must be cleaned if there is not any or
insufficient water in when the tap is opened.
Clean the tap filter:
1.Close the tap.
2.Select any procedure except “Wash” or “Drain”
procedure.
3.Press the button “Start/Pause” and keep the
procedure running for about 40 seconds.
4.Remove the inlet pipe from th
e tap.
5.Use water to wash the filter.
6.Reconnect the inlet pipe.
Washing the filter in washing machine:
1.Screw off the inlet pipe from the backside of the
machine.
2.Pull out the filter with long nose pliers and reinstall
it back after being washed.
3.Reconnect the inlet pipe.
4.Open the tap and make sure there is no water leakage.
5.Close the tap.
Notes: Generally, the tap filter is washed first and then the filter in washing machine will be washed.
If only the filter in washing machine is washed, then the steps 1~3 in cleaning the tap filter shall be
repeated.
Page 18
User Manual
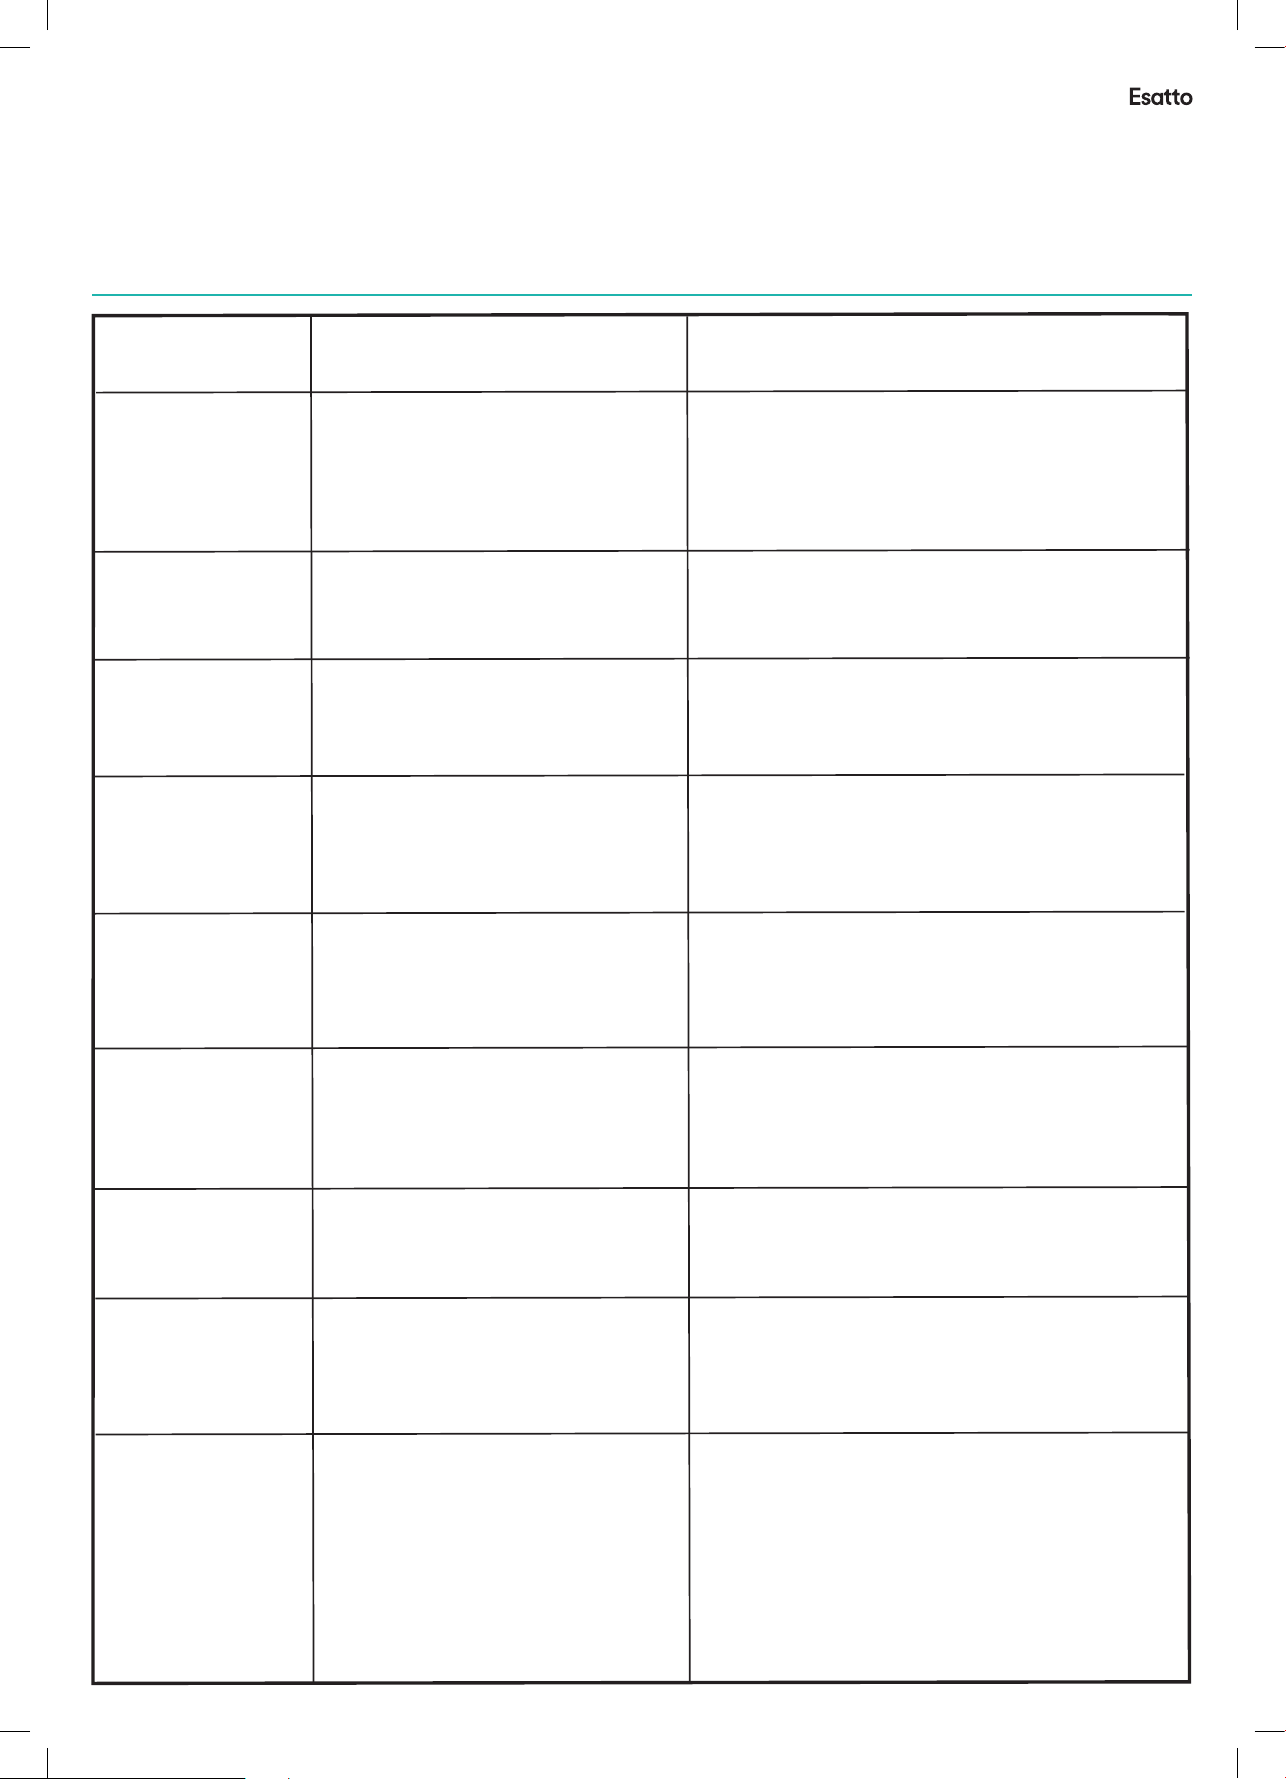
Troubles
Washing machine
cannot start up
Door cannot be
opened
Heating fault
Water leakage
Water is
overflowed from
the bottom of the
machine
Indicator or
display does
not light.
Detergent
residues in the
box
Washing effects
are not good
Abnormal noise
Great vibration
Troubleshooting
18
Pull out the power plug to avoid electrical shock before washing.
After using the washing machine, pull out the power cord and close the door tightly to avoid
pinching the kids.
Remove foreign matters
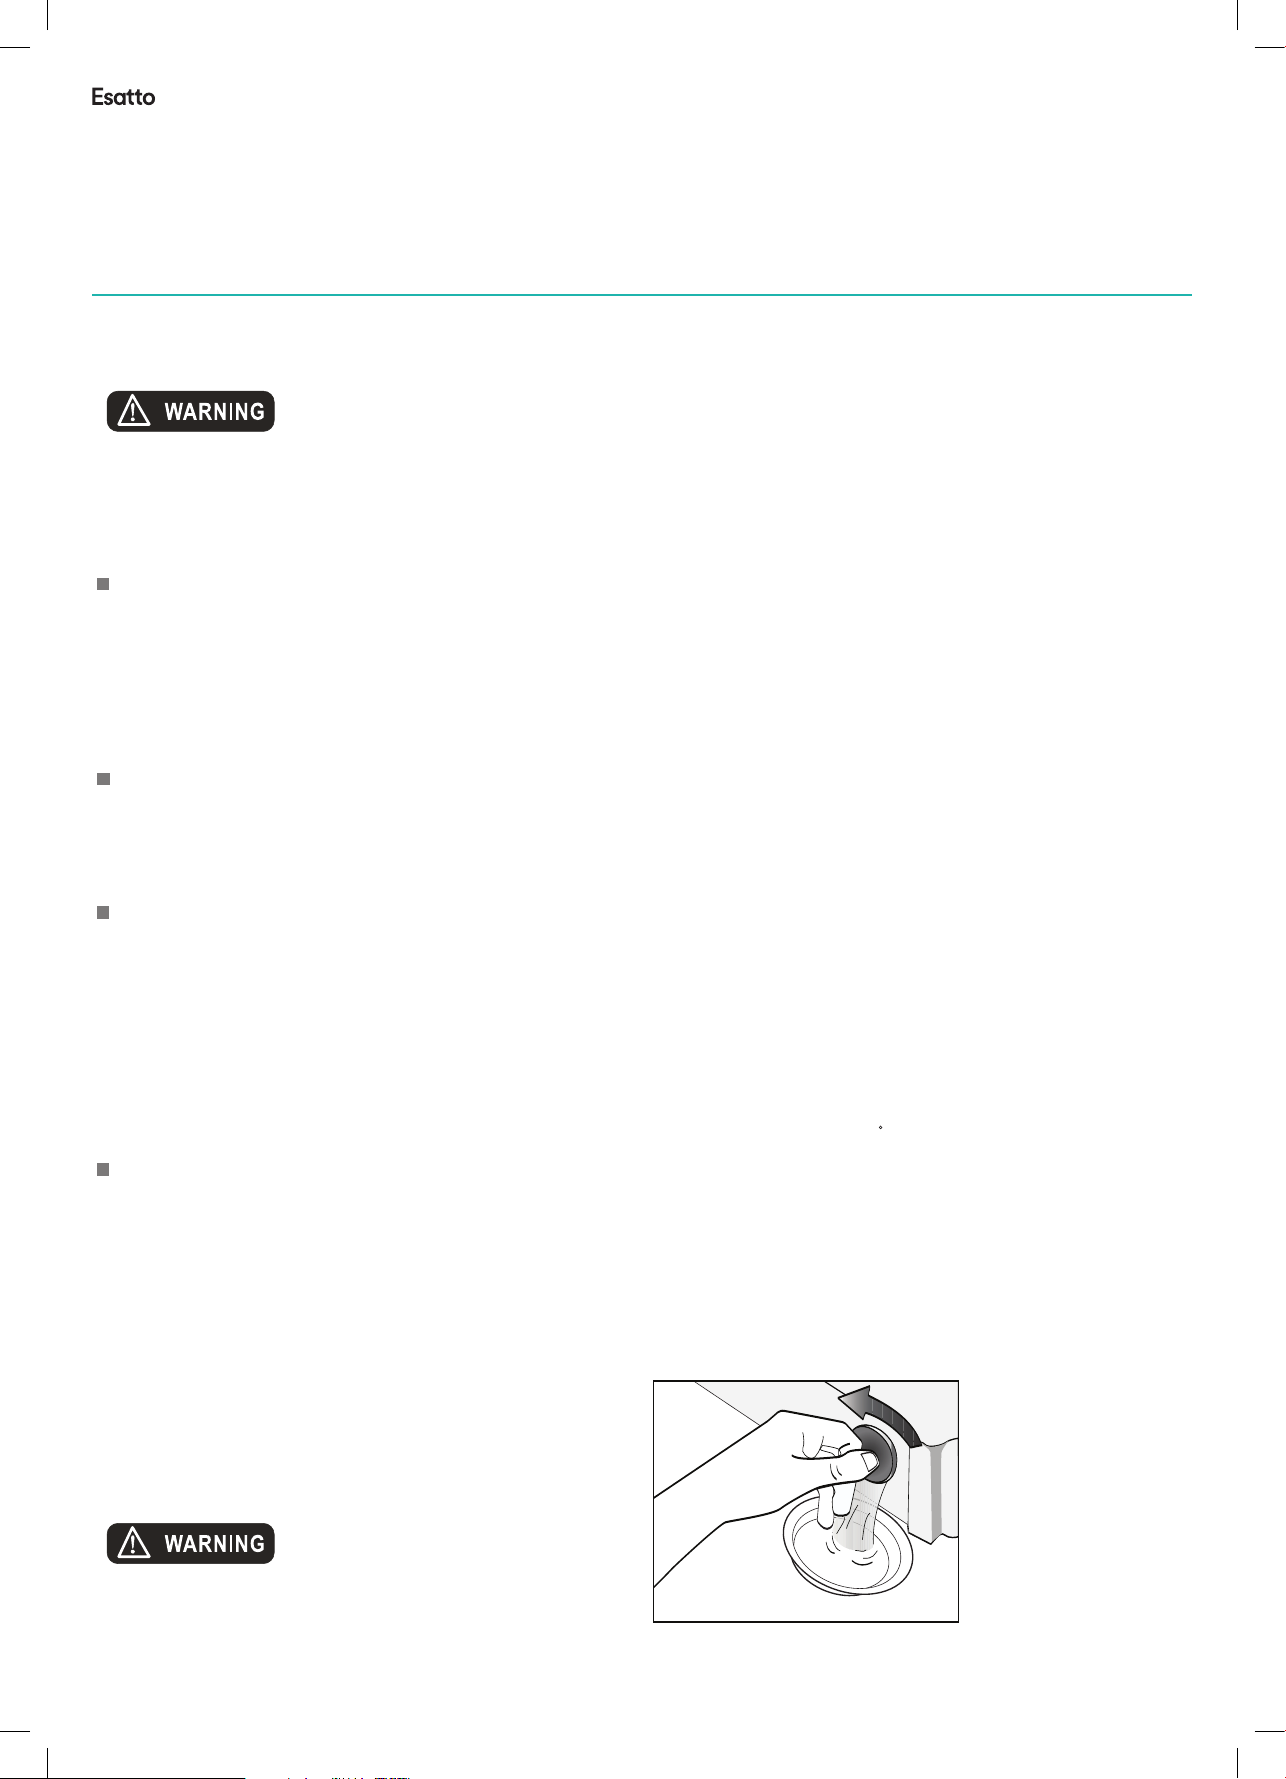
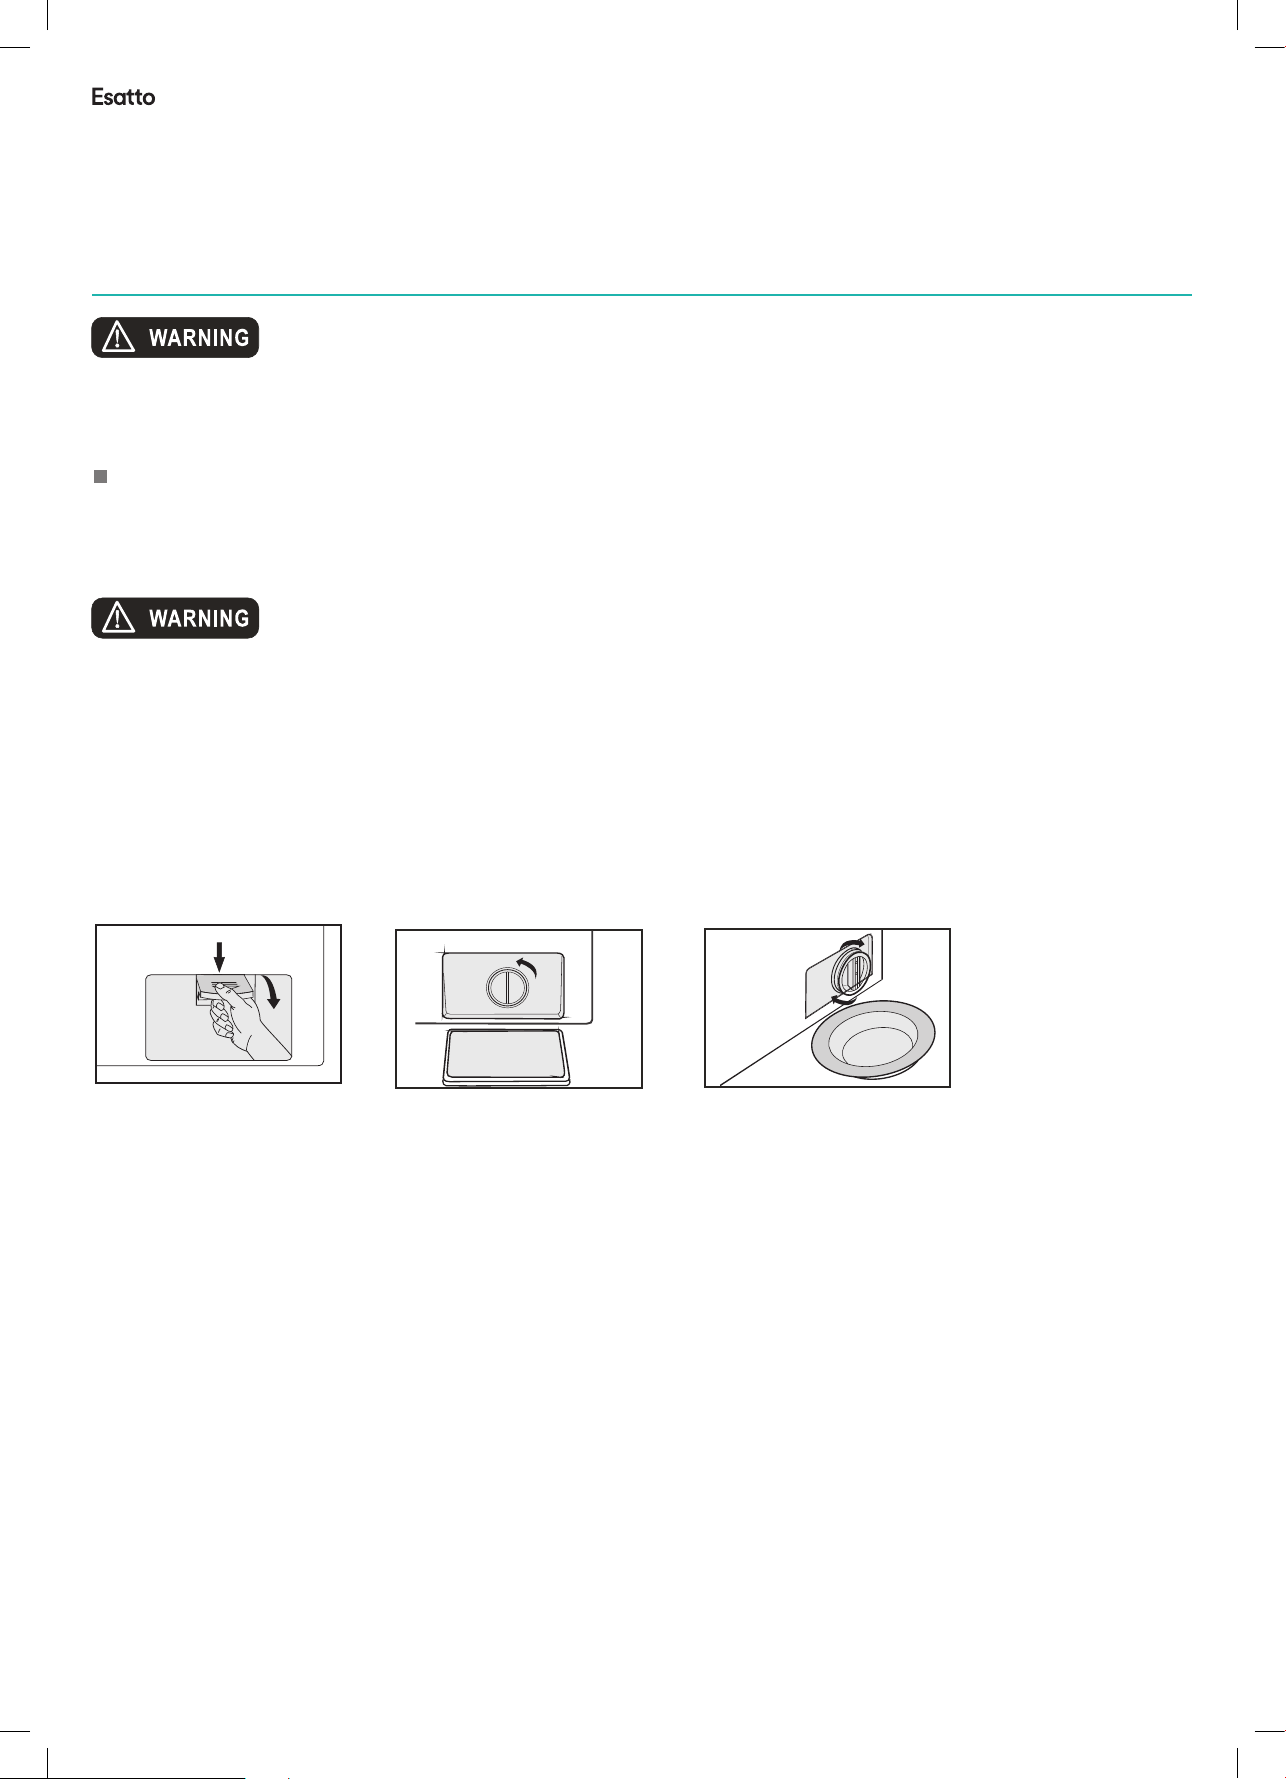
Drain Pump Filter:
Drain pump filter can filter the yarns and small foreign matters from the washings.
Clean the filter periodically to ensure the normal operation of washing machine
.
According to the soil level within the cycles and the frequency of the cycles, you have to inspect
and clean the filter regularly.
The pump should be inspected if the machine does not empty and/or spin;
The machine makes an unusual noise during draining due to objects such as safety pins, coins
etc. blocking the pump.
The Service_panel proceed as follows:
1.After the power is disconnected, use hand to
open the filter cover.
2.Turn the filter down as
shown with the figure and
take out sundries matters.
3.Reinstall each part back
after sundries matters are
removed.
Warning!
When the appliance is in use and depending on the programme selected there can be hot water in the
pump. Never remove the pump cover during a wash cycle, always wait until the appliance
the cycle, and is empty. When replacing the cover, ensure it is securely retight end so.
has finished
Page 19
esatto.house
19
Troubleshooting
Troubles
Washing machine
cannot start up
Door cannot be
opened
Heating fault
Water leakage
Reason
Machine's safety protection
design is working.
NTC is damaged and heating
pipe is aging.
The connection between inlet
pipe or outlet hose and tap or
washing machine is not tight.
Drain pipe in the room is blocked.
Solution
Check if the door is closed tightly.
Check if power plug is inserted well.
Check if water supply tap is opened.
Check if button “Start/Pause” is pressed.
Check if button “On/Off” is pressed.
Disconnect the power.
Can normally wash the clothes.
Only cannot wash with heating.
Shall contact the service center promptly.
Check and fasten water pipes.
Clean up outlet hose and ask a
specialized person to repair it when
necessary.
Water is
overflowed from
the bottom of the
machine
Indicator or
display does
not light.
Detergent
residues in the
box
Washing effects
are not good
Abnormal noise
Great vibration
The inlet pipe is not connected
firmly.
Outlet hose has water leakage.
Power is disconnected.
PC board has problems.
Harness has connection
problem.
Washin
and agglomerated.
The clothes are too dirty.
Insufficient detergent quantity.
g powder is dampened
Fix the inlet pipe.
Replace the drain hose.
Check if the power is shut down and
power plug is connected correctly.
If not, please call up service line.
Clean and wipe the box.
Use liquid detergents or the detergents
special for drum.
Select a proper procedure.
Add the proper detergent quantity
according to the instructions in
detergent package.
Check if the fixing (bolts) has been removed.
If cabinet is installed on the solid and level
floor.
Check if there are any barrettes or metal
articles ins
Check if the legs in the washing machine
are adjusted level.
ide.
Page 20
User Manual
20
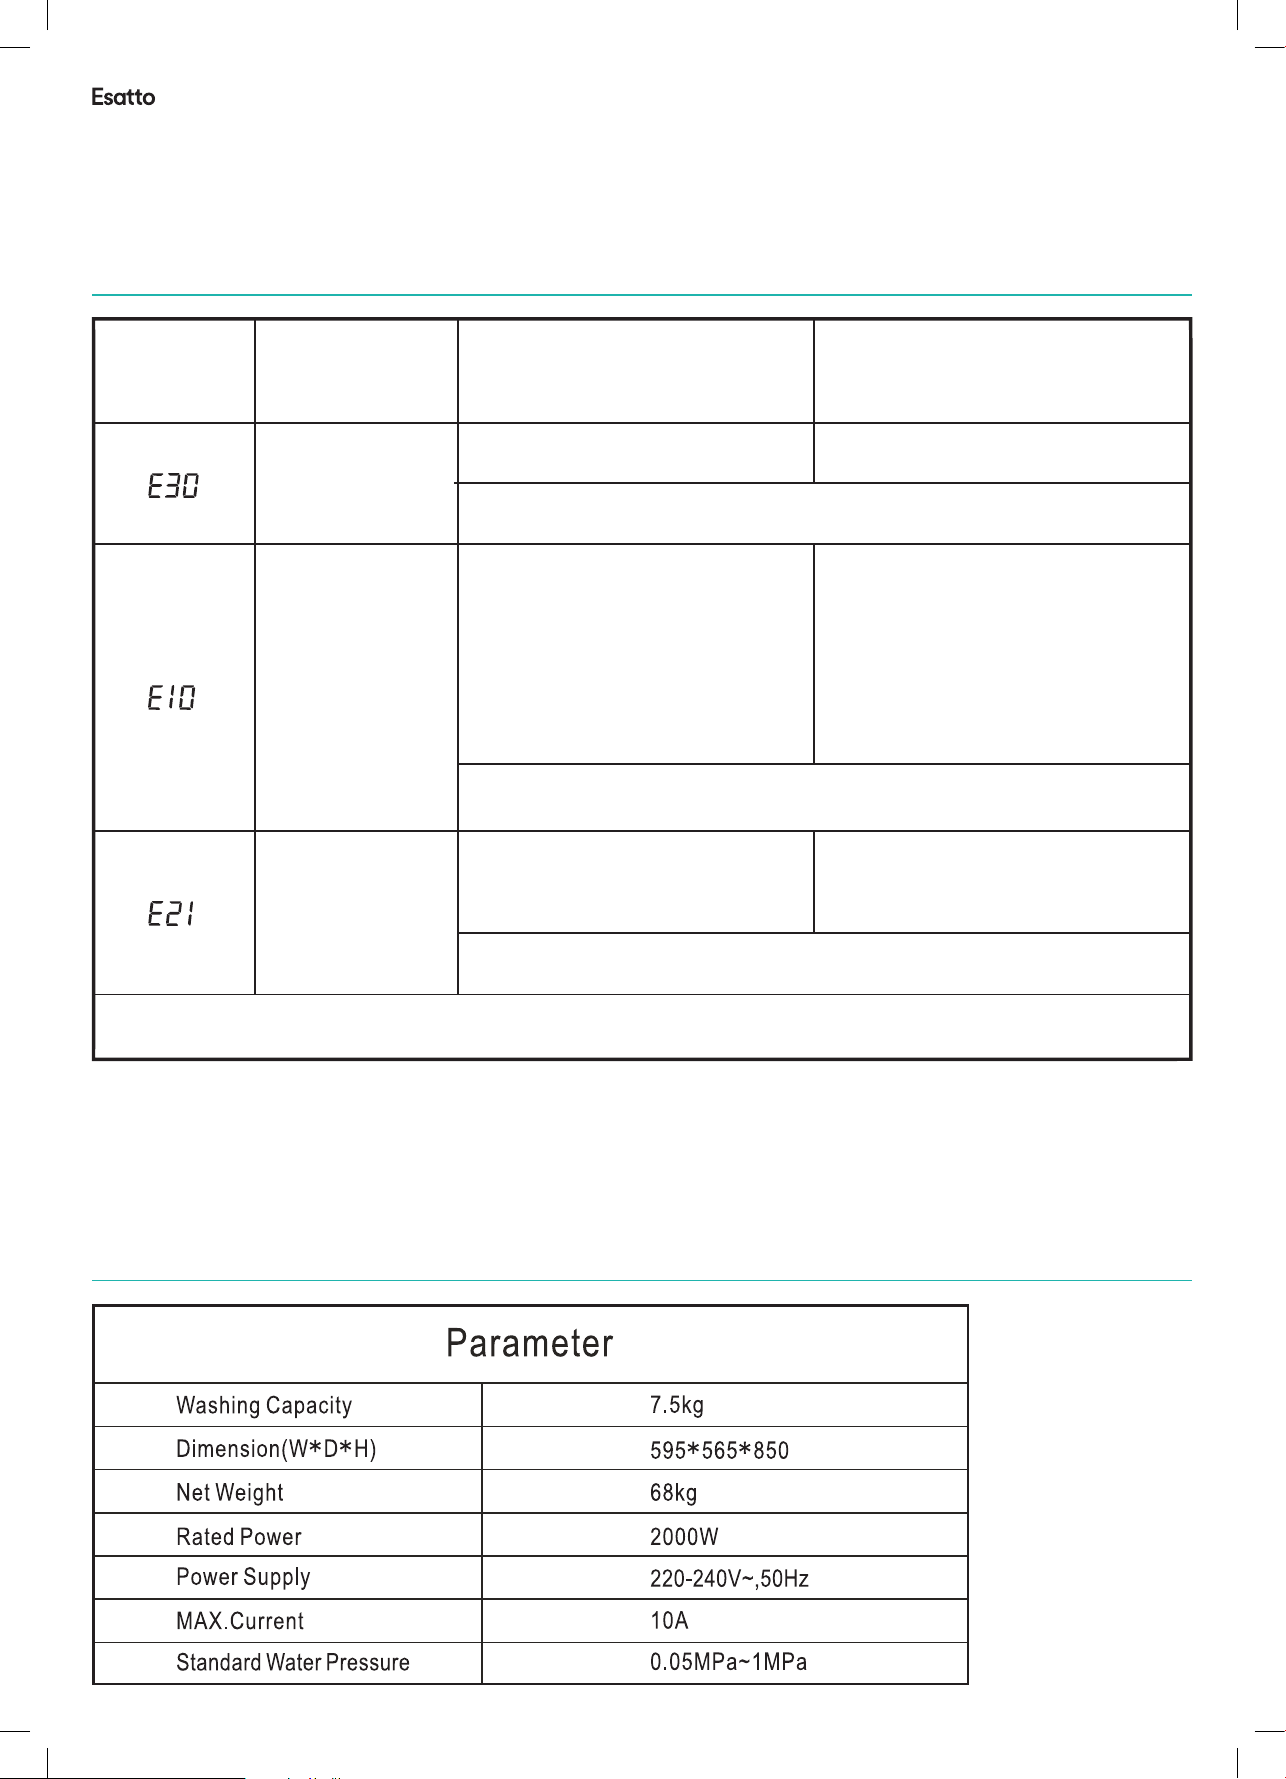
Display
LED
Description
Door lock
problem
Water injecting
problem while
washing
Drain problem
while washing
Reason
Door is not closed properly.
Please call up service line if there are still troubles.
Tap is not opened or water
flows too slowly.
Inlet valve filter is blocked.
Inlet pipe is twisted.
If water is not supplied
Please call up service line if there are still trouble
Outlet hose is blocked or twisted
Drain pump is blocked
Please call up service line if there are still troubles.
Restart after the door is closed.
Open the tap or wait till the
water supply becomes normal.
Check inlet valve filter.
Straighten the water pipe
Check the other taps in the
room.
Wash and straighten outlet hose.
Wash drain pump filter
Solution
s.
Please call up the service line if there is any other problem.
Technical Data
Page 21
esatto.house
21
Appendix
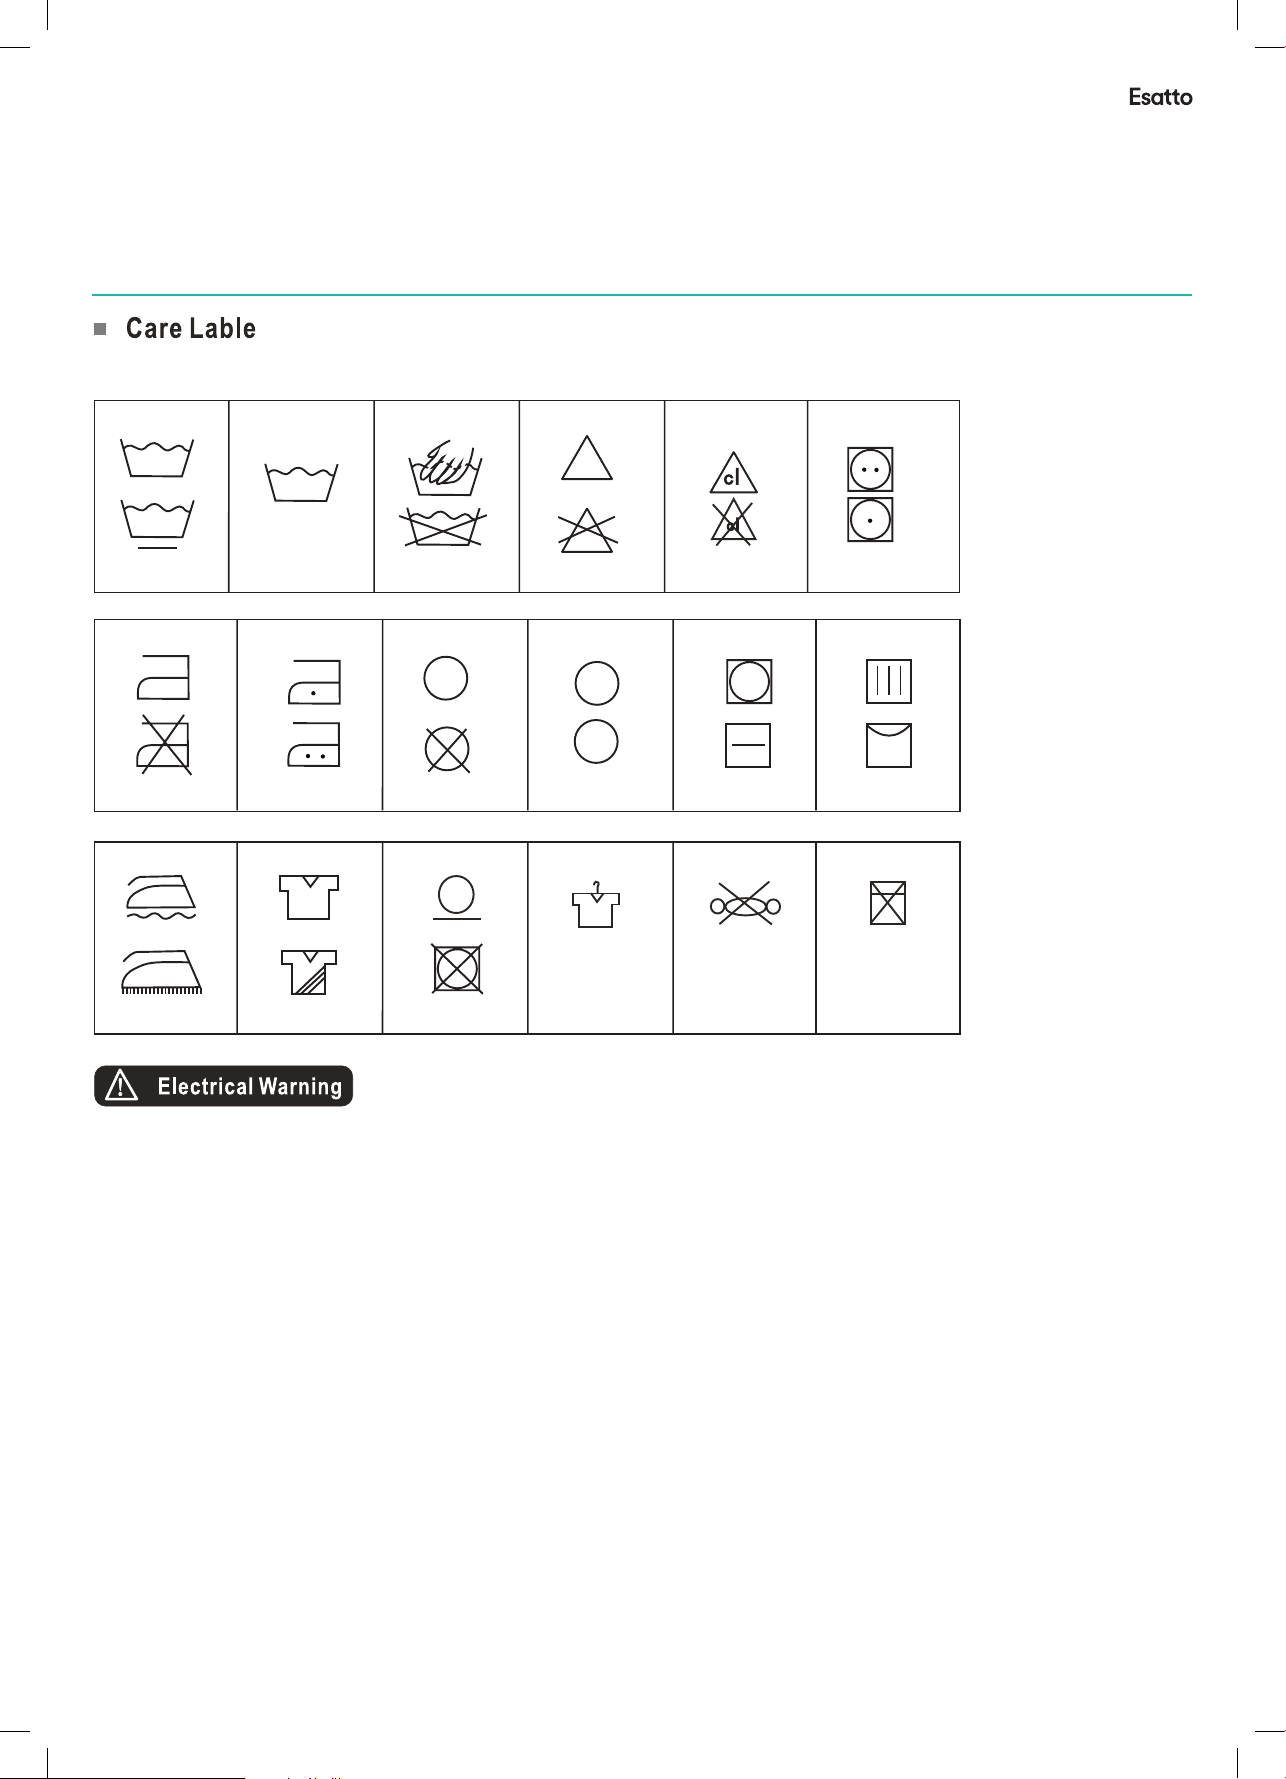
The label and sign on the fabric can help you to choose the best way to launder your clothes.
Normal wash
Gentle wash
Iron
Do not iron
Iron with cloth
40
Wa r m w a sh
(max 40℃ )
Coo l iron( max 110 ℃ )
Warm iro n.med ium
(ma x 150℃)
Dry after wash
Hand wash
Do not wash
Dry clean
Do not dry clean
Warmly dry clean
Bleach
Do not bleach
Dry clean normal cycle
with any solvent
A
F
Dry clean normal cycle
petroleum solvent only
Line Dry
Chlorine bl ea ch
may be used
C
C
Chlorine bl ea ch
not be used
Tumble dry normal
Dry flat
No Wring
Tumble dry. Med iu m
(max 150℃ )
Tumble dry. Low h ea t
(max 110℃)
Drip dry
Hang to dry
/Line dry
No machine wash
Steam Iron
Line Dry in shade
Do not tumble dry
To avoid fire,electrical shock and other accidents,please remember the following reminding:
- Only the voltage indicated in power label can be used. If you are not clear of the voltage
at home, please contact the local power bureau.
- When you are using the heating function, the maximum current through the washing
machine will reach 10A. Therefore, please make sure the power supply units (current,
voltage and cable) can meet the normal load requirements for the machine.
- Protect the power cord properly. Power cord shall be fixed well so that it will not trip the
people or other t
hings and be damaged. Special attention shall be paid to the socket. It
shall be plugged into the sockets easily and attention shall be paid to the plug location.
- Do not make the wall-mounted socket overloaded or cable extended. Overloading of the
wiring may cause fire or electrical shock. Do not pull out power plug with wet hand.
- To ensure your safety, power plug shall be inserted into an earthed three-pole socket.
Carefully check and ensure that your socket is properly and reliably earthed.
Page 22
User Manual
Attach your receipt
to this page
22
ADDITIONAL INFORMATION FOR STANDARD PERFORMANCE TESTING
(AS/NZS 2040.1:2005+Amdt1-2007+Amdt2-2009)
1. Water connections: Cold & hot water connection
2. Water supply pressure: 320 kPa
3. Warm wash Program: Cotton 60º C Display: 4:36
Cold wash program: Cotton Cold( no temperature
display is cold wash)
4. Detergent type: Drum detergent
5. Detergent quantity: Default
6. Adding detergent:
The detergent is dissolved and added as Paragraph B7.3
of AS/NZS 2040.1
The detergent shall be dissolved in 1 L of water
7. Anti-sudsing agent: Max
8. Test load mass: 6.0kg
9. Water consumption: 61L
10. Test Voltage:220-240V~,50Hz
1. Water connections: Cold & hot water connection
2. Water supply pressure: 320 kPa
3. Warm wash Program: Cotton 60º C Display: 4:41
Cold wash program: Cotton Cold( no temperature
display is cold wash)
4. Detergent type: Drum detergent
5. Detergent quantity: Default
6. Adding detergent:
The detergent is dissolved and added as Paragraph B7.3
of AS/NZS 2040.1
The detergent shall be dissolved in 1 L of water
7. Anti-sudsing agent: Max
8. Test load mass: 7.5kg
9. Water consumption: 77L
10. Test Voltage:220-240V~,50Hz
Page 23
esatto.house
23
Purchase Details
For future reference, please record the following information
which can be found on the rating plate and the date of
purchase which can be found on your sales invoice.
STORE DETAILS
STORE NAME
ADDRESS
TELEPHONE
|
|
PURCHASE DATE
|
PRODUCT DETAILS
The rating plate of your hob is located on the underneath
of the appliance. Therefore please t the duplicate data
plates or label on the outside of the cupboard to sure that
the label can be easily seen during operation.
|
MODEL NO.
SERIAL NO.*
|
|
Page 24
User Manual
Warranty Information
24
WARRANTY TERMS & CONDITIONS
WASHING MACHINES & CLOTHES DRYERS
This document sets out the terms and conditions of the
product warranties for Residentia Group Appliances. It is
an important document. Please keep it with your proof of
purchase documents in a safe place for future reference
should you require service for your Appliance.
1. IN THIS WARRANTY
(a) ‘acceptable quality’ as referred to in clause 10 of this
warranty has the same meaning referred to in the ACL;
(b) ‘ACL’ means Trade Practices Amendment (Australian
Consumer Law) Act (No.2) 2010;
(c) ‘Appliance’ means any Residentia Group product
purchased by you accompanied by this document;
(d) ‘ASR’ means Residentia Group authorised service
representative;
(e) ‘Residentia Group’ means Residentia Group Pty Ltd
of 118 Campbell St, Collingwood VIC, ACN 600 546
656 in respect of Appliances purchased in Australia;
(f ) ‘major failure’ as referred to in clause 10 of this
warranty has the same meaning referred to in the ACL
and includes a situation when an Appliance cannot
be repaired or it is uneconomic for Residentia Group,
at its discretion, to repair an Appliance during the
Warranty Period;
(g) ‘Warranty Period’ means:
(i) where the Appliance is used for personal,
domestic or household use (i.e. normal
single family use) as set out in the instruction
manual, the Appliance is warranted against
manufacturing defects for 24 months, following
the date of original purchase of the Appliance;
(h) ‘you’ means the purchaser of the Appliance not having
purchased the Appliance for re-sale, and ‘your’ has a
corresponding meaning.
2. This warranty only applies to Appliances purchased
and used in Australia and is in addition to (and does
not exclude, restrict, or modify in any way) any
non-excludable statutory warranties in Australia.
3. During the Warranty Period Residentia Group or its
ASR will, at no extra charge if your Appliance is readily
accessible for service, without special equipment and
subject to these terms and conditions, repair or replace
any parts which it considers to be defective. Residentia
Group or its ASR may use remanufactured parts to
repair your Appliance. You agree that any replaced
Appliances or parts become the property of Residentia
Group. This warranty does not apply to light globes,
batteries, lters or similar perishable parts.
4. Parts and Appliances not supplied by Residentia Group
are not covered by this warranty.
Page 25

esatto.house
25
5. You will bear the cost of transportation, travel and
delivery of the Appliance to and from Residentia Group
or its ASR. If you reside outside of the service area,
you will bear the cost of:
(a) travel of an authorised representative;
(b) transportation and delivery of the Appliance to and
from Residentia Group or its ASR, in all instances,
unless the Appliance is transported by Residentia
Group or its ASR, the Appliance is transported at
the owner’s cost and risk while in transit to and from
Residentia Group or its ASR.
6. Proof of purchase is required before you can make
a claim under this warranty.
7. You may not make a claim under this warranty unless
the defect claimed is due to faulty or defective parts
or workmanship. Residentia Group is not liable in the
following situations (which are not exhaustive):
(a) the Appliance is damaged by:
(i) accident
(ii) misuse or abuse, including failure to properly
maintain or service
(iii) normal wear and tear
(iv) power surges, electrical storm damage or
incorrect power supply
(v) incomplete or improper installation
(vi) incorrect, improper or inappropriate operation
(vii) insect or vermin infestation
(viii) failure to comply with any additional instructions
supplied with the Appliance;
(b) the Appliance is modied without authority from
Residentia Group in writing;
(c) the Appliance’s serial number or warranty seal has
been removed or defaced;
(d) the Appliance was serviced or repaired by anyone
other than Residentia Group, an authorised repairer
or ASR.
8. This warranty, the contract to which it relates and the
relationship between you and Residentia Group are
governed by the law applicable where the Appliance
was purchased.
10. For Appliances and services provided by Residentia
Group in Australia, the Appliances come with a
guarantee by Residentia Group that cannot be
excluded under the Australian Consumer Law. You
are entitled to a replacement or refund for a major
failure and for compensation for any other reasonably
foreseeable loss or damage. You are also entitled
to have the Appliance repaired or replaced if the
Appliance fails to be of acceptable quality and the
failure does not amount to a major failure. The benets
to you given by this warranty are in addition to your
other rights and remedies under a law in relation to the
Appliances or services to which the warranty relates.
11. At all times during the Warranty Period, Residentia
Group shall, at its discretion, determine whether repair,
replacement or refund will apply if an Appliance has a
valid warranty claim applicable to it.
12. To enquire about claiming under this warranty, please
follow these steps:
(a) carefully check the operating instructions, user manual
and the terms of this warranty;
(b) have the model and serial number of the Appliance
available;
(c) have the proof of purchase (e.g. an invoice) available;
(d) telephone the numbers shown below.
13. You accept that if you make a warranty claim,
Residentia Group and its ASR may exchange
information in relation to you to enable Residentia
Group to meet its obligations under this warranty.
IMPORTANT
Before calling for service, please ensure that the steps
in point 12 have been followed.
Telephone contacts
→ Service: Please call 1300 11 HELP (4357)
→ Spare Parts: Please call 1300 11 SPARE (7727)
9. To the extent permitted by law, Residentia Group
excludes all warranties and liabilities (other than as
contained in this document) including liability for any
loss or damage whether direct or indirect arising from
your purchase, use or non use of the Appliance.
The Australian Consumer Law requires the
inclusion of the following statement with
this warranty:
Our goods come with guarantees that cannot be excluded under the Australian Consumer Law.
You are entitled to a replacement or refund for a major failure and for compensation for any other
reasonably foreseeable loss or damage. You are also entitled to have the goods repaired or replaced
if the goods fail to be of acceptable quality and the failure does not amount to a major failure.
Page 26

User Manual
This page
is intentionally
left blank
26
Page 27

esatto.house
27
This page
is intentionally
left blank
Page 28
Appliances
Exctly wht
you need
WWW.RESIDENTIA.GROUP
 Loading...