

Page 1

Product:
Model Code/s:
142L White Hybrid
Chest Fridge/Freezer
User Mnul
Exctly wht
you need
ECF142WE
Online:
estto.house
Page 2
2Welcome 02
Residentia Group Pty Ltd
ACN 600 546 656
—
Head Office.
118 Campbell Street
Collingwood, VIC
Australia 3066
—
Postage.
PO Box 341, Mt Eliza
Victoria Australia 3930
—
Support.
1300 11 4357
[email protected]
—
Online.
residentia.group
Congratulations on purchasing your new fridge. The Esatto brand is proudly
distributed within Australia by Residentia Group Pty Ltd.
Please refer to the warranty card at the rear of this manual for information
regarding your product’s parts and labour warranty, or visit us online at
www.residentia.group
At Residentia Group, we are customer obsessed and our Support Team are
there to ensure you get the most out of your appliance. Should you want
to learn more about recommended temperatures, the various features of
your fridge, and importantly taking care of your appliance when cleaning,
our Support Team are here to help. You can use our online Support Centre
at anytime by visiting http://support.residentiagroup.com.au, or you can
contact us via calling us on 1300 11 HELP (4357).
It is important that you read through the following use and care manual
thoroughly to familiarise yourself with the installation and operation
requirements of your appliance to ensure optimum performance.
Again, thank you for choosing an Esatto appliance and we look forward to
being of service to you.
Kind Regards,
The Residentia Team
A RESIDENTIA
GROUP INITIATIVE
Page 3

Contents
2 Welcome
4 Purchase Details
5 General Safety Instructions
8 Product Overview
10 Getting Started
10 Installation
11 Using Your Chest Freezer
13 Tips for Using the Appliance
13 Tips for Energy Saving
14 Maintenance and Cleaning
3www.esatto.house
16 FAQs and Troubleshooting
17 Specications
18 Warranty Returns
Page 4
Purchase Details
For future reference, please record the following information which can be found on
the rating plate and the date of purchase which can be found on your sales invoice.
STORE DETAILS
STORE NAME
ADDRESS
TELEPHONE
PRODUCT DETAILS
MODEL NO.
SERIAL NO.*
|
|
PURCHASE DATE
|
|
|
4
|
Page 5
General Safety Instructions
IMPORTANT SAFETY INSTRUCTIONS
READ CAREFULLY AND KEEP FOR FUTURE REFERENCE
Read this manual thoroughly before rst use, even if you are familiar with this type of product. The safety
precautions enclosed herein reduce the risk of re, electric shock and injury when correctly adhered to.
Make sure you understand all instructions and warnings.
Keep the manual in a safe place for future reference, along with the completed warranty card and purchase
receipt. If you sell or transfer ownership of this product, pass on these instructions to the new owner.
Always follow basic safety precautions and accident prevention measures when using an electrical appliance,
including the following:
IMPORTANT: Pay particular attention to messages that contain the words DANGER, WARNING or
CAUTION. These words are used to alert you to a potential hazard that can seriously injure you and others.
The instructions will tell you how to reduce the chance of injury and let you know what can happen if the
instructions are not followed.
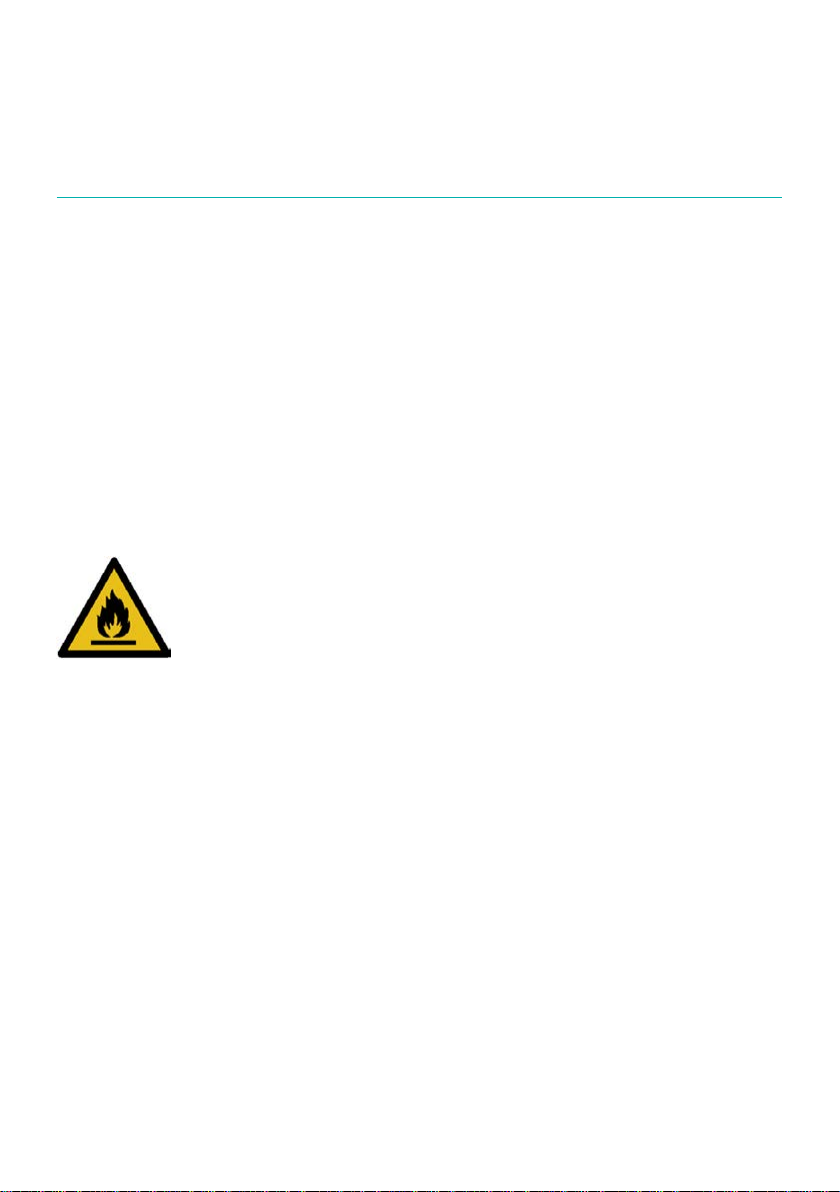
This symbol alerts you to take care as this appliance contains a ammable
refrigerant (isobutane) and insulation blowing gas (cyclopentane). Do not expose
it to high heat, sparks and open ames.
The refrigerant isobutane (R600a) is contained within the refrigerant circuit of
the appliance, a gas with a high level of environmental compatibility, which is
CAUTION
RISK OF FIRE
nevertheless ammable. During transportation and installation of the appliance,
ensure that none of the components of the refrigerant circuit become damaged.
5www.esatto.house
WARNING: Do not damage the refrigerant circuit! Never use an appliance with a damaged refrigerant
circuit! If the refrigerant circuit becomes damaged, avoid proximity to open res and all types of heat and
ignition sources. Thoroughly ventilate the room in which the appliance is located.
DANGER: It is hazardous for anyone other than an authorised service person to service this appliance. In
Queensland, the authorised service person MUST hold a Gas Work Authorisation for hydrocarbon refrigerants
to carry out servicing or repairs which involve the removal of covers.
The room for installing the appliance must be at least 1m³ per 8g of refrigerant. The amount and type of
refrigerant in the appliance can be found in the Technical Specications on page 17 and on the rating plate,
found on the appliance.
Usage Conditions and Restrictions
• Domestic use only: This appliance is intended for indoor household use only. It is not intended for
commercial, industrial or outdoor use. It is not intended for use in a recreational vehicle.
• Purpose: Do not use this appliance for anything other than its intended purpose. Other uses are not
recommended and may cause re, electric shock or personal injury.
• Attachments: The use of attachments is not recommended by the appliance manufacturer and
distributor as they may be hazardous.
• Improper use: Damage due to improper use, or repairs made by unqualied personnel will void
your warranty. We assume no liability for any eventual damages caused by misuse of the product or
noncompliance with these instructions.
Page 6

General Safety Instructions Cont.
• WARNING: Do not use mechanical devices or other means to accelerate the defrosting process, other
than those recommended by the manufacturer.
• Usage restriction: This appliance is not intended for use by persons (including children) with reduced
physical, sensory or mental capabilities, or lack of experience and knowledge, unless they have been given
supervision or instructions concerning use of the appliance by a person responsible for their safety.
• Children: Supervise young children to ensure they do not play with the appliance. Never allow children to
operate, play with or crawl inside the appliance.
• WARNING: Do not use electrical appliances inside the appliance, unless they are of the type
recommended by the manufacturer.
• Explosive or ammable substances: Do not store explosive substances such as aerosol cans with
a ammable propellant in this appliance. Do not store or use petrol or any other ammable vapours and
liquids in the vicinity of this or any other appliance. Do not use such substances for cleaning the appliance.
The fumes can create a re hazard or an explosion.
• Damage: Do not use the appliance if the power cord, plug or the appliance itself is damaged. If the cord
is damaged, contact the after sales support line and have the cord replaced by qualied personnel in order
to avoid a hazard.
• WARNING: Do not damage the refrigerant circuit.
• Do not modify: Do not attempt to alter or modify this appliance in any way.
• Repair: Do not attempt to repair or replace any part of this appliance unless it is specically
recommended in this manual. All other servicing should be referred to a qualied technician. Contact the
after sales support line for advice.
Electrical Safety
• Voltage: Before connecting and turning on the appliance, ensure the electrical voltage and circuit
frequency correspond to that indicated on the appliance rating label.
• Earthing: This appliance should be properly earthed for your safety. The power cord of this appliance is
equipped with a three-prong plug for use in standard wall outlets to minimise the possibility of electrical
shock. Do not modify the cord and/or plug provided with the appliance. Improper use of the earthed plug
can result in the risk of electric shock.
• Connection: This appliance requires a standard 220-240 V AC 50Hz electrical outlet. Do not overload the
electrical circuit.
• Power cord: Do not kink or damage the power cord; do not leave it exposed or dangling. Secure it at the
back of the appliance so no one steps on or places anything on the cord or against it. Keep the cord out of
reach of children. When moving the appliance, make sure not to damage the power cord.
• Auxiliary Items: Do not use an inverter, adaptor or extension cord with this appliance. If the cord is too
short, have a qualied electrician install an outlet near the appliance. Use of an extension cord and an
inverter can negatively affect the performance of the unit.
• Protect from moisture: To protect against the risk of electric shock, do not immerse the unit, cord or
plug in water or spray it with any other liquid. Do not connect or disconnect the electric plug when your
hands are wet. Turn the power switch off before removing the plug from the socket.
• WARNING: Disconnect! To reduce the risk of re, electric shock or personal injury, always unplug the
appliance from the socket when not in use, when moving and before cleaning or servicing. Never unplug
the unit by pulling the power cord. Always grip the plug rmly and pull straight out from the power point.
• Electrical work: Any electrical work required for the installation of this appliance should be carried out by
a qualied electrician.
6
Never use this appliance with a damaged refrigerant circuit! If the coolant circuit becomes damaged,
avoid proximity to open res and all types of heat sources. The room in which the appliance is located should
be ventilated for a few minutes.
Page 7

General Safety Instructions Cont.
Installation
Heavy: This appliance is heavy, take care when moving it. To avoid back or other injury, consider a two
person lift or mechanical aid when installing it. Failure to do so can result in back or other injury.
Damage: When unpacking, check the appliance carefully for damage. If it is damaged, do not install the
appliance. Contact our after sales support centre on 1300 43 57 for advice on examination or return of the
damaged appliance.
Protect from moisture: Install the appliance in an indoor area protected from wind, rain, water spray or
drips.
Protect from heat: Do not install the appliance next to an oven, grill or other source of high heat, or where it
will be exposed to direct sunlight for prolonged periods of time.
WARNING: Ventilation: To ensure proper ventilation, keep any ventilation openings, in the appliance
enclosure or in the built-in structure, clear of obstructions. Ensure adequate air circulation around the
appliance to prevent overheating.
Level: Install the appliance level in order to ensure proper operation.
Cleaning and Maintenance
Disconnect: Unplug the appliance before cleaning or servicing. Failure to do so can result in electric shock,
injury or death. Do not connect or disconnect the plug when your hands are wet.
Flames: Do not let open ames or ignition sources enter the appliance.
Flammable/explosive substances: Never clean this appliance with ammable uids. Do not store or use
volatile, ammable or explosive propellants or liquids in or close to this or any other appliance. The fumes
can create a re hazard or explosion.
Solvents: Do not use solvent based cleaning agents or abrasives on the interior as these may damage or
discolour the surfaces of the appliances.
WARNING! Do not use mechanical devices or other means to accelerate the defrosting process. Never use a
sharp or metal instrument to remove frost or clean the appliance. Use a plastic scraper, if necessary.
Service: Do not attempt to repair, modify or replace any part of the appliance unless specically
recommended in this manual. Refer all other servicing to a qualied technician, or contact the after sales
support line for advice on examination or repair of the appliance.
7www.esatto.house
Responsible disposal
Note: At the end of its working life, do not throw this appliance out with your household rubbish. Electrical
and electronic products contain substances that can have a detrimental effect on the environment and
human health if disposed of inappropriately. Observe any local regulations regarding the disposal of electrical
consumer goods and dispose of it appropriately for recycling and recovery of the refrigerant and blowing
agent. Contact your municipal authorities for advice on recycling facilities in your area.
WARNING! This refrigeration appliance contains ammable refrigerants and insulation blowing gases, which
must be removed before disposal. Contact your municipal authorities for any codes or regulations concerning
the disposal of such materials.
Page 8
Product Overview
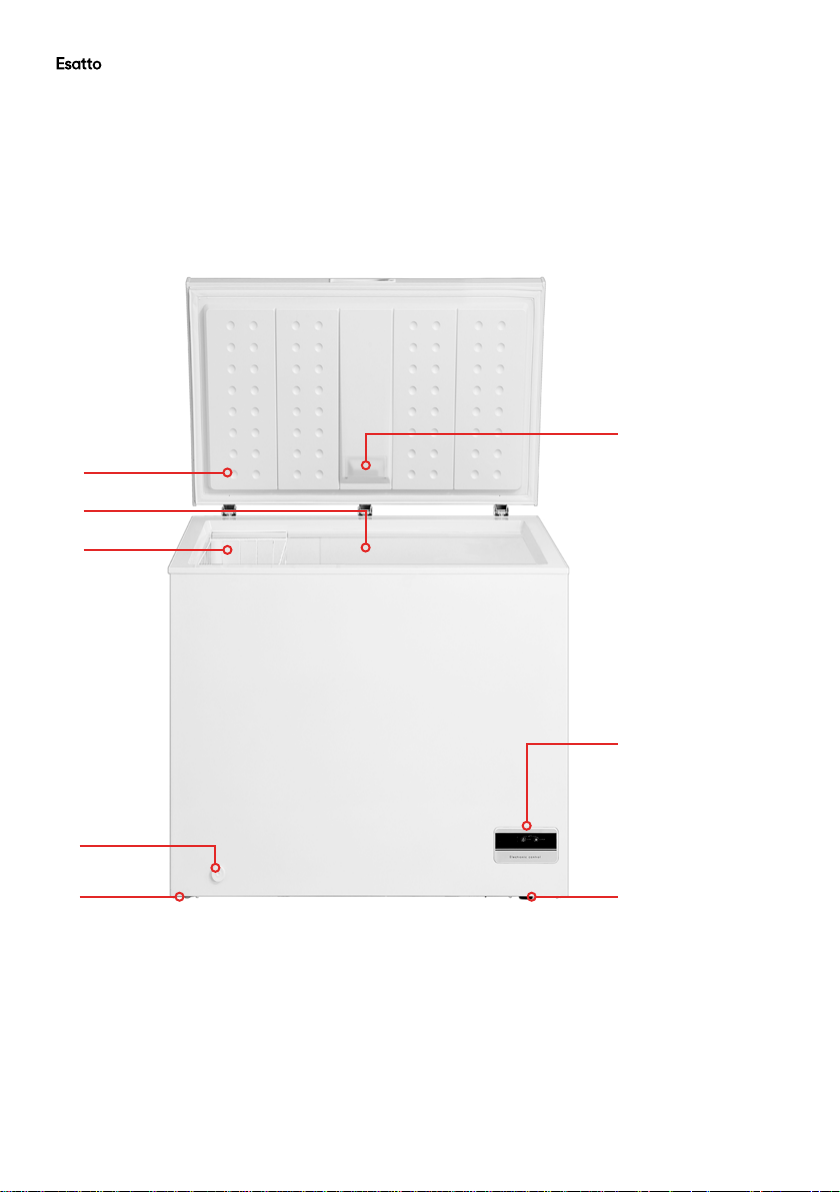
Chest Freezer Layout
1
2
3
8
4
5
7
Key:
1. Counter balanced lid
2. Freezer compartment
3. Wire storage basket (removable)
4. Automatic light
5. Drainage hole
6. LED Display & Controls
7. 2 × Adjustable legs (front + back)
8. 2 × wheels (front + back)
6
8
Not shown but also included:
• 1 × Instruction manual
• 1 × Quick start guide
• 1 × Warranty certicate
Page 9
Product Overview Cont.
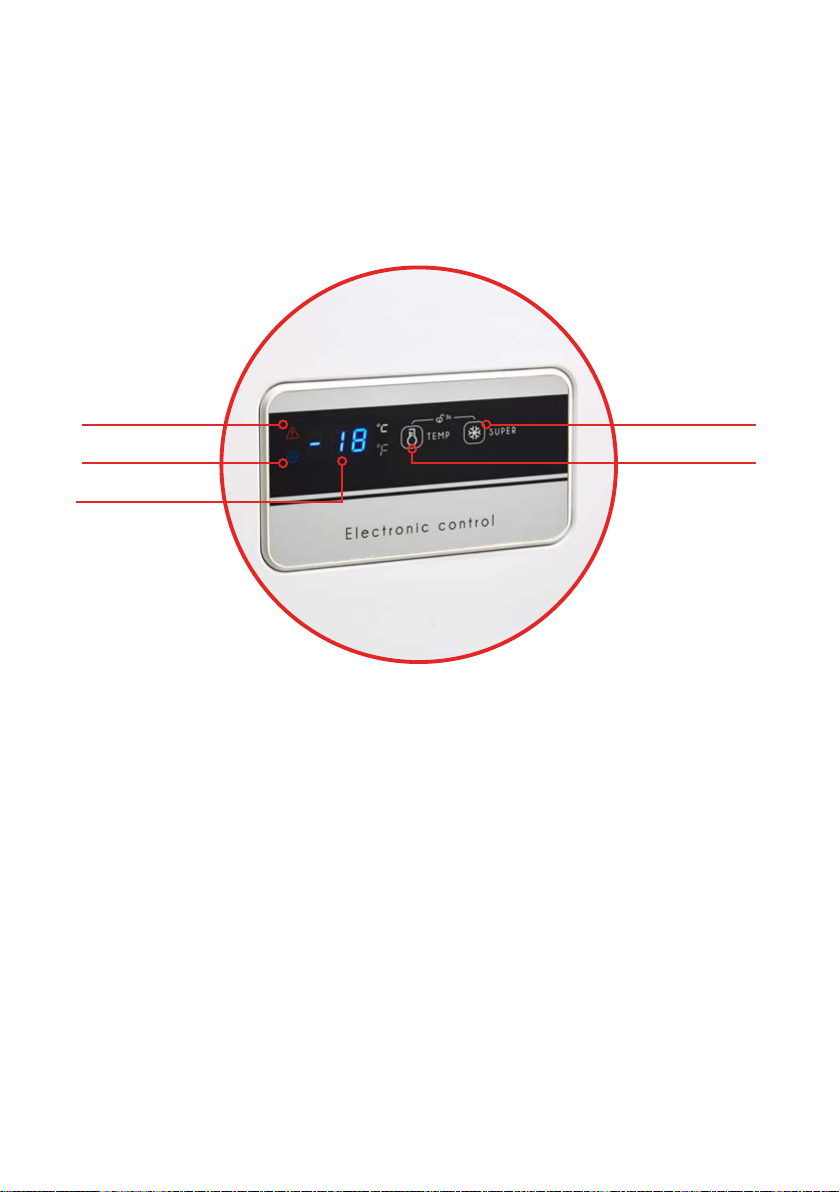
Control Panel Layout
1 4
3
9www.esatto.house
52
Key:
1. Alarm Lamp
This warns you if the temperature is rising and your food may be spoiled.
2. Quick Freeze Lamp
This indicates that the Quick Freeze function has been activated.
3. LED Display
Displays the set temperature inside the freezer.
4. Quick Freeze Button
Press this to activate or deactivate the Quick Freeze Function.
5. Temperature Adjusting Button
Press the button to set the temperature.
For more details on this, see page 11.
Note.
• Temperature Units
Press and hold the Temperature Adjusting button for 3 seconds to
change the temperature display units from Celsius to Fahrenheit
Page 10

10
Getting Started
Unpacking
• Packaging materials: This appliance has been packaged to protect it against transportation damage.
Remove all packaging materials from around and inside the appliance and keep the original packaging
carton and materials in a safe place. It will help prevent any damage if the product needs to be transported
in the future, and you can use it to store the appliance when it is not in use. In the event the carton is to be
disposed of, please recycle all packaging materials where possible.
• Suffocation: Plastic wrapping can be a suffocation hazard for babies and young children, so ensure all
packaging materials are out of their reach and disposed of safely.
• Power cord: Unwind the power cord to its full length and inspect it for damage. Do not use the appliance
if it or its cord have been damaged or are not working properly. In case of damage, contact our after sales
support line for advice on examination, repair or return of the damaged product.
• Read the manual: Read this manual to familiarise yourself with the appliance. Pay particular attention to
the safety instructions on the previous pages.
• Clean: To remove any dust from transit and storage, clean the interior and exterior surfaces of the
appliance with lukewarm water and a soft cloth. Dry thoroughly. Important: do not use harsh or abrasive
detergents or powders as these will damage the nish.
Installation
• Two person installation: Use two or more people to move and install the appliance. Failure to do so can
result in back or other injury.
• Freestanding design: This appliance is designed to be freestanding only, and should not be recessed or
built-in.
• Floor surface: This appliance must be properly positioned on a dry, sturdy, level surface that is strong
enough to support it when it is fully loaded.
• Ambient temperature: The ambient temperatures must correspond to the climate class ( T ) indicated on
the rating plate of the appliance: 16° C – 43° C.
• Clearances: Ensure that air can circulate freely around the back of the cabinet, which is necessary to
cool the compressor and condenser. Allow at least 12cm clear space at the back and 5cm at the sides of
the unit.
• Wall Units Above: Ideally, the appliance should not be positioned below overhanging wall units.
However, if the appliance must be positioned below an overhanging wall unit, make sure to allow sufcient
room so you can comfortably open the lid and access the contents.
Do NOT install/use the appliance in the following locations/situations:
• In moist areas or areas of high humidity.
• In a recreational vehicle, or for use with an inverter.
• In direct sunlight, near heat sources, next to an open ame, cooking or heating appliance, or near any
other source of high heat.
• Direct sunlight may affect the acrylic coating and heat sources may increase the unit’s power
consumption. For best energy efciency install the appliance in the coolest area of the room.
• In an area with extreme cold ambient temperatures.
• In an area with excessive moisture and high humidity. Make sure it is protected from elements such as
wind, rain, water spray or drips.
• In an area where petrol or other explosive and/or ammable liquids or fumes are used or stored. The
fumes can create a re hazard or explosion.
Page 11
Installation Cont.
Electrical connection
• WARNING! It must be possible to disconnect the appliance from the mains power supply; the plug must
therefore be easily accessible after installation.
• Before plugging in your new freezer, let it stand upright for at least 2 hours. This will allow the refrigerant
gases to settle into the compressor and reduce the possibility of a malfunction in the cooling system.
• The appliance must be earthed. The plug of the power supply cord is equipped with a contact for this
purpose. Do not under any circumstances cut or remove the third (earth) prong from the power cord.
If the plug does not t your outlet, consult a licensed electrician for advice to have the outlet changed.
• Plug the unit into a dedicated, properly earthed wall outlet. Ensure that your outlet voltage and circuit
frequency correspond to the voltage stated on the rating label.
• Secure the freezer’s supply cord behind the unit. Do not leave it exposed or dangling to prevent injury and
accidental disconnection from the power supply.
• Adjust the temperature control as described below.
• When rst starting up, and after a period out of use, allow the unit to cool down for at least 2–3 hours
(4 hours if starting up during warm weather in summer) before placing food in the freezer.
Using Your Chest Freezer
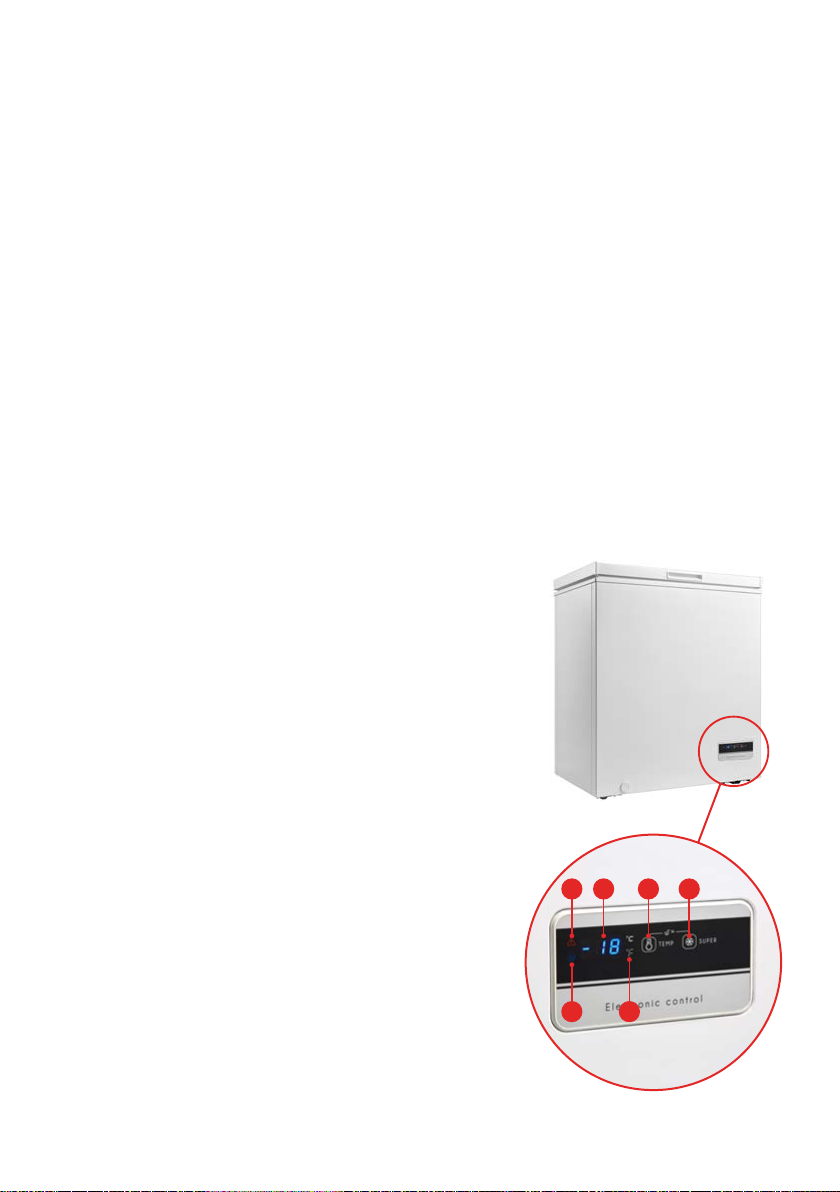
The temperature control is located at the front of the
freezer cabinet, in the bottom right corner (Fig.1).
• Display: When powering on the freezer, the display
window (Fig. 1, B) illuminates fully for 3 seconds
before entering into ‘normal’ display showing the
default temperature: -18º C (0º F). If no error occurs
the display panel shows the set temperature or mode
(if an error has occurred, the code will show in the
display).
11www.esatto.house
• Locking: Press the Temperature Adjustment button
(Fig. 1, C) and the Quick Freeze button (Fig. 1, D) for
3 seconds at the same time. The display will ash for
several seconds and the unit will be locked.
• Unlocking: Press the Temperature Adjustment button
(Fig. 1, C) and the Quick Freeze button (Fig. 1, D) for
3 seconds at the same time. The unit will exit locked
mode, and the temperature can be adjusted.
NOTE: If any functions are attempted while the unit is
locked, the display will ash for 3 seconds, signaling
an invalid operation.
• Swapping between Celsius and Fahrenheit: Press
the Temperature Adjustment button (Fig. 1, C) for 3
seconds and the unit of measurement (Fig. 1, F) will
swap.
A B
E F
C D
Fig. 1
Page 12

Using Your Chest Freezer Cont.
• Swapping the Unit from Freezer to Fridge: While in freezer mode, press the Temperature Adjustment
button (Fig. 1, C) until the display shows -24º C / -11º F. Pressing the Temperature Adjustment button (Fig.
1, C) again will convert the freezer into a fridge and the display will show 1º C / 34º F.
• Swapping the Unit from Fridge to Freezer: While in fridge mode, press the Temperature Adjustment button
(Fig. 1, C) until the display shows 10º C / 50º F. Pressing the Temperature Adjustment button (Fig. 1, C)
again will convert the fridge into a freezer and the display will show -12º C / 10º F.
• Adjusting the Temperature while in Freezer mode: Press the Temperature Adjustment button (Fig. 1, C) to
change the set temperature. For each press of the button, the set temperature will drop by -1º C / º F.
• Adjusting the Temperature while in Fridge mode: Press the Temperature Adjustment button (Fig. 1, C) to
change the set temperature. For each press of the button, the set temperature will go up by 1º C / º F.
NOTE: The unit may not work at the set temperature on particularly hot days, or if the lid is opened too
frequently. To ensure efcient operation, do not open the lid unnecessarily or for prolonged periods of time.
NOTE: When the unit is set to -24º C / -11º F, the compressor will continuously run.
IMPORTANT: Once the unit has started, continuous operation is recommended. Please try and avoid turning
the unit off and on as this may affect the service life.
• Quick Freeze Mode: To enter Quick Freeze Mode press the Quick Freeze button (Fig. 1, D). The Quick
Freeze indicator light will light up (Fig. 1, E). To exit Quick Freeze Mode, press the Quick Freeze button
(Fig. 1, D). The Quick Freeze indicator light will then go out.
NOTE: If running in Quick Freeze Mode for a continuous 24 hours, the unit will automatically exit the mode as
a safeguard.
12
• High Temperature Alarm: The High Temperature indicator light (Fig. 1, A) will illuminate if the unit rises
above a set temperature and your food may be at risk of spoiling. This may be caused by the lid not being
closed properly, by a fault in the unit or a number of other causes. Please contact our after sales support
on 1300 11 43 57 if this is an issue you cannot resolve.
• Power Off Memory: In case of power failure, the previous settings will be memorised until the power
returns.
• Failure Code: When the failure code E2 appears on the display screen it means that the temperature
sensor has failed. Please contact the after sales support on 1300 11 43 57.
Page 13

13www.esatto.house
Tips for Using the Appliance
• Do not store food uncovered in the freezer. Always use good quality, freezer-proof packaging to maintain
food quality. Remove air from packages of solid food and seal bags tightly before freezing.
• Keep portions small to ensure they are frozen (and subsequently defrosted) rapidly.
• Make sure that fresh, unfrozen food packages do not touch food that is already frozen, thus avoiding a
temperature rise in the frozen food.
• When freezing food, do not push food together too much, leave some space for air to circulate around
each item. Do not place packages directly against the back wall.
• When buying frozen food, only buy quantities that you can store straight away; use an insulated container
for your shopping and when you get home, place the food in the freezer immediately.
• When storing pre-packed, commercially frozen food, follow the food manufacturer’s instructions for storing
the food in a home freezer. Do not exceed any storage times listed on the packaging.
• Once you have opened a packet of frozen food, re-wrap it airtight to prevent surface evaporation which
causes drying or freezer burn.
• Do not place carbonated liquids such as bottles of zzy drink in the freezer as the container could explode
under pressure and damage the freezer.
• Do not refreeze food once it has been defrosted.
• Frozen food which has thawed accidentally should either be used immediately or thrown away.
Alternatively, if the food is uncooked and has not been completely defrosted, it may be cooked and then
refrozen.
• CAUTION! Do not remove items from the freezer if your hands are damp or wet as this could cause skin
abrasions.
Tips for Energy Saving
• The appliance should be placed in the coolest area of the room, away from heat producing appliances or
heating ducts. Please avoid placement in direct sunlight.
• Let hot foods cool to room temperature before placing them in the appliance.
• Do not overload the appliance with unfrozen food as this may cause it to freeze slowly and risk food
spoilage.
• Be sure to wrap foods properly and wipe containers dry before placing them in the appliance. This cuts
down on frost building up inside in the unit.
• Please do not wrap items in aluminium foil, wax paper or paper towel. This materials interfere with cold air
circulation, making the appliance less efcient.
• Organise and label food to reduce door openings and extended searches. Remove as many items as
needed at one time, ensuring the unit is opened as few times as possible.
Page 14
Maintenance and Cleaning
Defrosting
The chest freezer requires manual defrost. For efcient operation and minimum energy consumption, defrost
the freezer compartment when the frost on the freezer walls is building up. Do not let frost build up to more
than 3–4mm thickness. For efciency, choose a time when your stock of frozen food is low.
• Unplug the freezer and open the door. Remove the food and storage basket. (Keep any frozen food
temporarily in a fridge or cooler bag to keep defrosting to a minimum.)
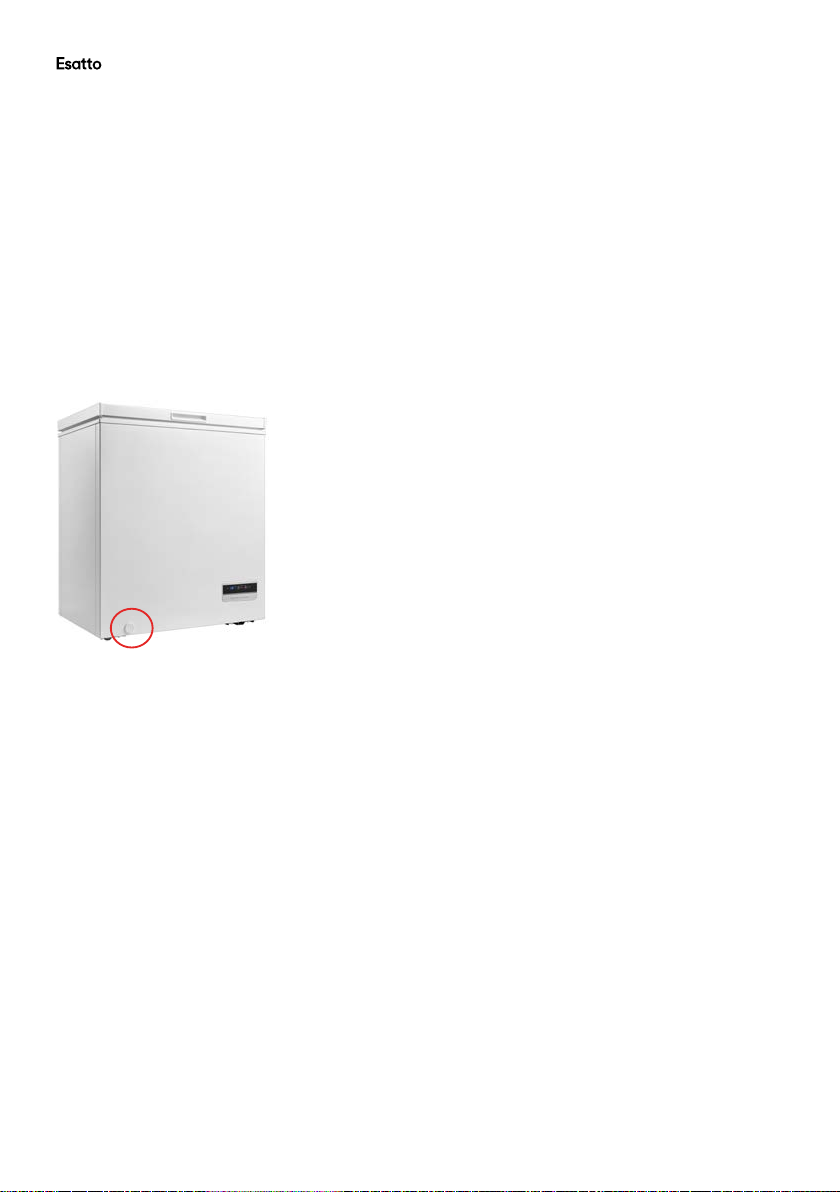
• During defrosting, any ice and frost that has accumulated will melt into the freezer cabinet. To drain the
water, open the drainage hole (Fig. 2). When the ice softens, an ice scraper can be used to help speed up
the process.
14
Fig. 2
Cleaning
WARNING
Before cleaning the appliance, make sure it is switched off and disconnected from the power supply.
Failure to do so can result in electric shock or injury.
• Wash the inside surfaces and the interior accessories with a damp, warm cloth moistened in a water and
baking soda solution. The solution should be about 2 tablespoons of baking soda to 1 litre of water. Rinse
and wipe dry with a soft cloth.
• Clean the outside of the unit with a damp, well wrung out cloth, keeping the area of the controls dry. Keep
the lid gasket (seal) clean.
• Never use boiling water to accelerate defrosting as it may damage the plastic components.
• Regularly check the drain in the freezer for defrost water. If necessary, clean the drain. If the drain is
blocked, water will collect in the base of the appliance.
• After cleaning/defrosting, push the drain plug in and also re-plug the drain plug inside the freezer cabinet.
• After everything is dry, place appliance back into service.
• Allow approximately 1–2 hours for the cabinet to cool down again (depending on the length of time the
freezer was disconnected from the power).
WARNING
Never clean the unit with an abrasive, acid, oil or solvent based cleaning agent. Never use ammable uids or
sprays for cleaning as the fumes from these substances can create a re hazard or Explosion.
Page 15
Maintentance and Cleaning Cont.
Interior light
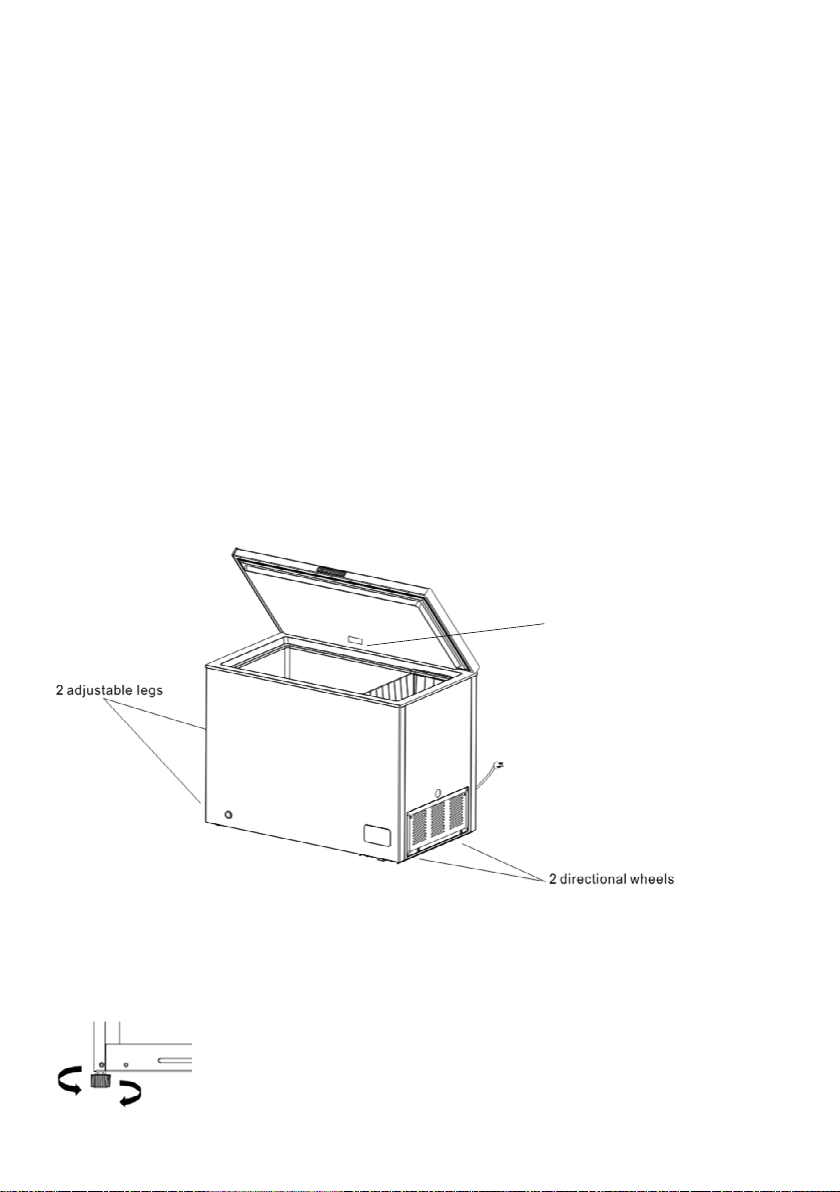
This chest freezer has an interior LED light bulb built into the lid (Fig. 3 ). It alights and extinguishes
automatically when the lid is opened and closed. If the light bulb needs replacing, contact our after sales
support on 1300 11 4357 to book a service call. The light bulb can only be replaced by properly qualied
service personnel.
Service, repair and spare parts
Do not attempt to alter or modify this appliance in any way, or to repair or replace any part unless it is
specically recommended in this manual. All other servicing should be referred to a qualied technician.
Contact our after sales support on 1300 11 43 57 for advice.
Our after sales support centre stocks a selection of spare parts for the Esatto 142L Chest Freezer.
To enquire about purchasing a part, call us on 1300 11 43 57 or email [email protected]
Power Failure
Most power failures are corrected within a few hours and should not affect the temperature of your appliance
if you minimise the number of times the door is opened. If the power is going to be off for a longer period of
time, take proper steps to protect the contents.
Levelling the Unit
The appliance has 2 adjustable legs and 2 directional wheels. (Fig. 3 )
Automatic light
15www.esatto.house
Fig. 3
To adjust the height of the legs:
• Turn the adjustable leg clockwise to raise the chest freezer. (Fig. 4)
• Turn the adjustable leg anti-clockwise to lower the chest freezer. (Fig. 4)
Fig. 4
Page 16
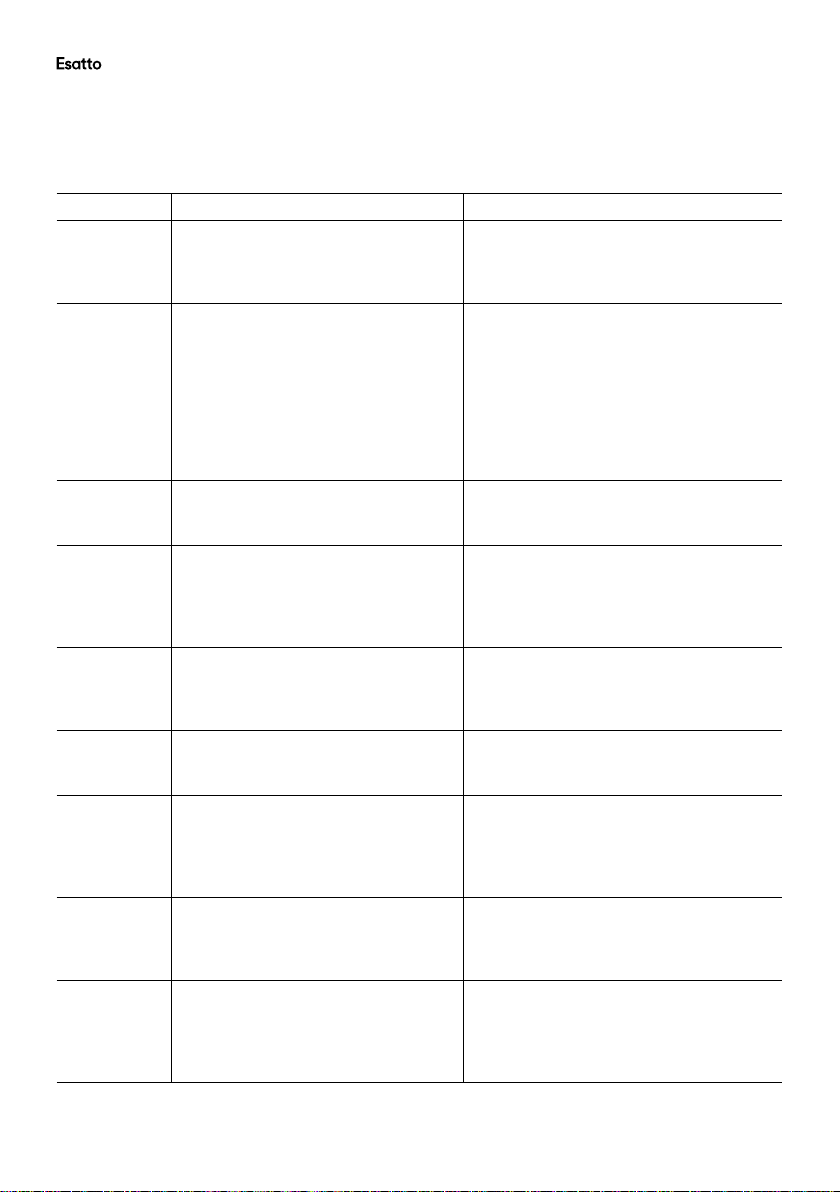
FAQs & Troubleshooting
Problem Possible Cause Possible Solution
The appliance
does not
operate.
The appliance
is not cold
enough.
The appliance
has an odd
odour.
The internal
light does not
illuminate.
The door
will not close
properly.
The door
is difcult
to open.
Moisture forms
on the inside
freezer walls.
Moisture
forms on the
outside of the
appliance.
There are
vibrations.
• The appliance is not plugged in.
• The appliance is turned off.
• The circuit breaker tripped or a
blown fuse.
• Check the temperature control
setting.
• The door is opened too often, or is
kept open for too long; the door is
not closed completely; hot food has
been placed inside.
• The appliance has recently been
disconnected for a period of time.
• Food may not be wrapped properly.
• Food may be rotten.
• The interior may not be clean.
• The appliance is not plugged in.
• The appliance is turned off.
• The circuit breaker tripped or a
blown fuse.
• The light is damaged.
• The appliance is not level.
• The gasket is dirty.
• Food is stacked too high.
• A difference in pressure between the
air inside and outside of the unit.
• Hot and humid weather increases
the internal rate of frost build-up.
• The lid is slightly open.
• The lid is kept open too long, or is
opened too frequently.
• The lid is slightly open, causing cold
air from inside the freezer to meet
warm, moist air from the outside.
• The appliance is not level.
• The floor is uneven or weak.
• The freezer is touching the wall.
• Plug in the appliance.
• Turn on power point.
• Reset circuit breaker/replace fuse.
• Reduce the temperature.
• Do not open door for 2+ hours; Check
that the door is closed properly and for
any obstructions preventing the door
closing properly; Remove hot food and
let it cool rst before replacing it.
• Plug in the appliance.
• Check that the food is wrapped tightly.
• Check for rotten food and remove.
• Clean the interior of the appliance.
• Plug in the appliance.
• Turn on power point.
• Reset circuit breaker/replace fuse.
• Please contact after sales support.
• Level the appliance.
• Clean gasket with warm water and
a soft cloth.
• Re-position food so it does not obstruct.
• This is a normal phenomenon and
cannot be avoided.
• This is normal.
• Close the lid.
• Open the lid less often
• Close the lid or check for obstructions.
• Level the appliance.
• Be sure your floor can adequately
support the freezer.
• Move the appliance away from the wall
and check it is level.
16
Page 17
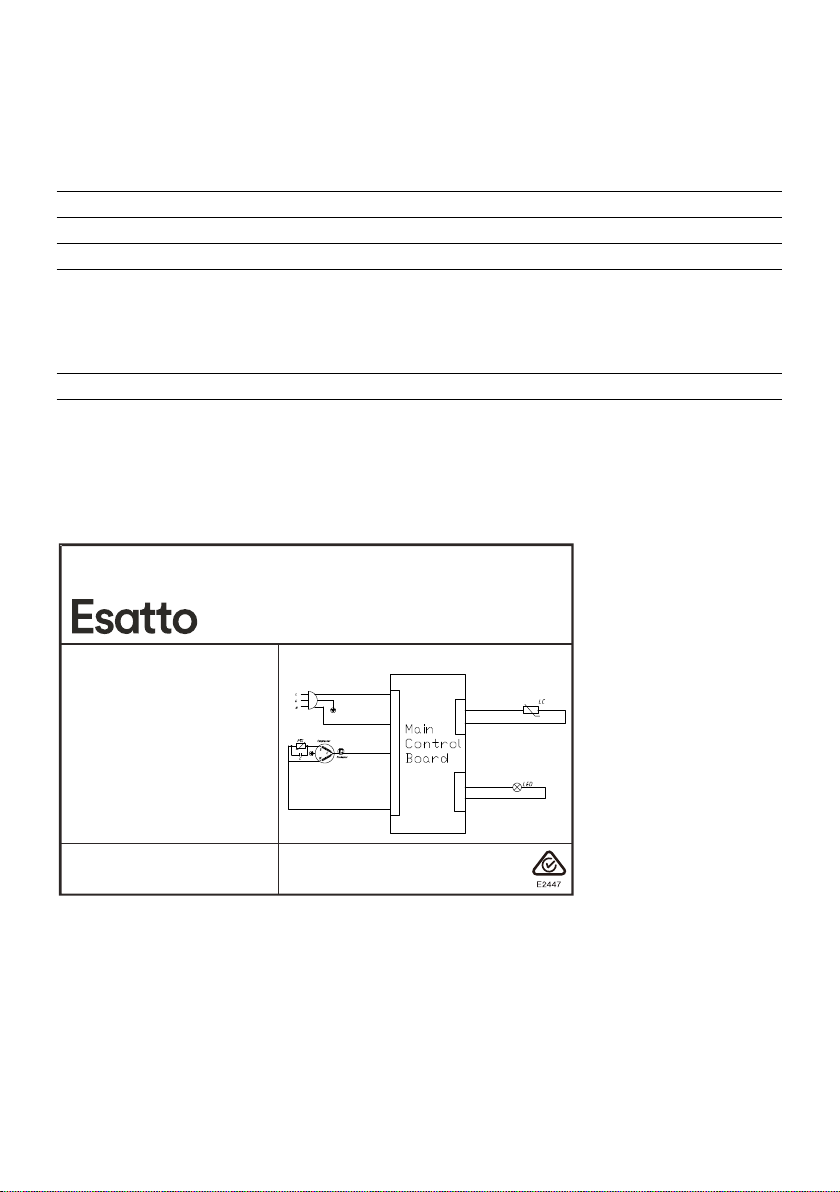
Specications
130mm
Product Dimensions: W: 730mm, D: 523mm, H: 850mm
Weight: 27kg
Gross Capacity: 142L
Other Features: 142 litre gross capacity, Electronic thermostat control (not mechanical),
Fridge/freezer interchangable, High temperature alarm, Quick Freeze function,
Anti-condensation technology, Silent hinge, Removable wire storage basket,
Automatic interior LED lighting, Defrost drain system, Digital temperature control
Energy Rating: 3.5 Stars MEPS
Standards
This product complies with AS/NZS 60335.1 and AS/NZS 60335.2.24 electrical safety, and with
EN 55014-1:2006+A1:2009 A2:2011 for electromagnetic compatibility.
Rating Label
17www.esatto.house
Climate Class T
Pretection Against Electric Shock
Rated Voltage/Frequency 220-240V~/50Hz
Rated Current 0.5A
Foaming Agent Cyclopentane
Total Storage Volume 142L
Refrigerant, Amount
Freezing Capacity
Ⅰ
R600a, 46g
6.5kg/24h
Exactly what you need
www.estto.house
142L White Hybrid
Chest Fridge/Freezer
Electric Diagram
Support: 1300 11 4357
support@residentigroup.com.u
Model:
ECF142WE
Page 18
Warranty Information
18
WARRANTY TERMS & CONDITIONS
REFRIGERATION APPLIANCES
This document sets out the terms and conditions of the
product warranties for Residentia Group Appliances. It is
an important document. Please keep it with your proof of
purchase documents in a safe place for future reference
should you require service for your Appliance.
1. IN THIS WARRANTY
(a) ‘acceptable quality’ as referred to in clause 10 of this
warranty has the same meaning referred to in the ACL;
(b) ‘ACL’ means Trade Practices Amendment (Australian
Consumer Law) Act (No.2) 2010;
(c) ‘Appliance’ means any Residentia Group product
purchased by you accompanied by this document;
(d) ‘ASR’ means Residentia Group authorised service
representative;
(e) ‘Residentia Group’ means Residentia Group Pty Ltd
of 118 Campbell St, Collingwood VIC, ACN 600 546
656 in respect of Appliances purchased in Australia;
(f ) ‘major failure’ as referred to in clause 10 of this
warranty has the same meaning referred to in the ACL
and includes a situation when an Appliance cannot
be repaired or it is uneconomic for Residentia Group,
at its discretion, to repair an Appliance during the
Warranty Period;
(g) ‘Warranty Period’ means:
(i) where the Appliance is used for personal,
(h) ‘you’ means the purchaser of the Appliance not having
2. This warranty only applies to Appliances purchased
3. During the Warranty Period Residentia Group or its
4. Parts and Appliances not supplied by Residentia Group
domestic or household use (i.e. normal
single family use) as set out in the instruction
manual, the Appliance is warranted against
manufacturing defects for 24 months, following
the date of original purchase of the Appliance;
purchased the Appliance for re-sale, and ‘your’ has a
corresponding meaning.
and used in Australia and is in addition to (and does
not exclude, restrict, or modify in any way) any
non-excludable statutory warranties in Australia.
ASR will, at no extra charge if your Appliance is readily
accessible for service, without special equipment and
subject to these terms and conditions, repair or replace
any parts which it considers to be defective. Residentia
Group or its ASR may use remanufactured parts to
repair your Appliance. You agree that any replaced
Appliances or parts become the property of Residentia
Group. This warranty does not apply to light globes,
batteries, lters or similar perishable parts.
are not covered by this warranty.
Page 19

19www.esatto.house
5. You will bear the cost of transportation, travel and
delivery of the Appliance to and from Residentia Group
or its ASR. If you reside outside of the service area,
you will bear the cost of:
(a) travel of an authorised representative;
(b) transportation and delivery of the Appliance to and
from Residentia Group or its ASR, in all instances,
unless the Appliance is transported by Residentia
Group or its ASR, the Appliance is transported at
the owner’s cost and risk while in transit to and from
Residentia Group or its ASR.
6. Proof of purchase is required before you can make
a claim under this warranty.
7. You may not make a claim under this warranty unless
the defect claimed is due to faulty or defective parts
or workmanship. Residentia Group is not liable in the
following situations (which are not exhaustive):
(a) the Appliance is damaged by:
(i) accident
(ii) misuse or abuse, including failure to properly
(iii) normal wear and tear
(iv) power surges, electrical storm damage or
(v) incomplete or improper installation
(vi) incorrect, improper or inappropriate operation
(vii) insect or vermin infestation
(viii) failure to comply with any additional instructions
(b) the Appliance is modied without authority from
(c) the Appliance’s serial number or warranty seal has
(d) the Appliance was serviced or repaired by anyone
8. This warranty, the contract to which it relates and the
9. To the extent permitted by law, Residentia Group
maintain or service
incorrect power supply
supplied with the Appliance;
Residentia Group in writing;
been removed or defaced;
other than Residentia Group, an authorised repairer
or ASR.
relationship between you and Residentia Group are
governed by the law applicable where the Appliance
was purchased.
excludes all warranties and liabilities (other than as
contained in this document) including liability for any
loss or damage whether direct or indirect arising from
your purchase, use or non use of the Appliance.
10. For Appliances and services provided by Residentia
Group in Australia, the Appliances come with a
guarantee by Residentia Group that cannot be
excluded under the Australian Consumer Law. You
are entitled to a replacement or refund for a major
failure and for compensation for any other reasonably
foreseeable loss or damage. You are also entitled
to have the Appliance repaired or replaced if the
Appliance fails to be of acceptable quality and the
failure does not amount to a major failure. The benets
to you given by this warranty are in addition to your
other rights and remedies under a law in relation to the
Appliances or services to which the warranty relates.
11. At all times during the Warranty Period, Residentia
Group shall, at its discretion, determine whether repair,
replacement or refund will apply if an Appliance has a
valid warranty claim applicable to it.
12. To enquire about claiming under this warranty, please
follow these steps:
(a) carefully check the operating instructions, user manual
and the terms of this warranty;
(b) have the model and serial number of the Appliance
available;
(c) have the proof of purchase (e.g. an invoice) available;
(d) telephone the numbers shown below.
13. You accept that if you make a warranty claim,
Residentia Group and its ASR may exchange
information in relation to you to enable Residentia
Group to meet its obligations under this warranty.
IMPORTANT
Before calling for service, please ensure that the steps
in point 12 have been followed.
Telephone contacts
→ Service: Please call 1300 11 HELP (4357)
→ Spare Parts: Please call 1300 11 SPARE (7727)
The Australian Consumer Law requires the
inclusion of the following statement with
this warranty:
Our goods come with guarantees that cannot be excluded under the Australian Consumer Law.
You are entitled to a replacement or refund for a major failure and for compensation for any other
reasonably foreseeable loss or damage. You are also entitled to have the goods repaired or replaced
if the goods fail to be of acceptable quality and the failure does not amount to a major failure.
Page 20
Appliances
20
Exctly wht
you need
A RESIDENTIA
GROUP INITIATIVE
 Loading...