

Page 1

Product:
Model Code/s:
60cm Electric Cooktop
User Manual
ECC604T-C
Exctly wht
you need
Online:
esatto.house
Page 2
User Manual 02
Residentia Group
—
Head Office.
118 Campbell Street
Collingwood, VIC
Australia 3066
—
ACN.
600 546 656
—
Online.
residentia.group
Congratulations on purchasing your new electric cooktop. The Esatto brand is proudly
distributed within Australia by esidentia Group Pty Ltd.
Please refer to the warranty card at the rear of this manual for information regarding
your product’s parts and labour warranty, or visit us online at www.residentia.group
At esidentia Group, we are customer obsessed and our Support Team are there
to ensure you get the most out of your appliance. Should you want to learn more
about recommended cooking temperatures, the various features of your cooktop,
and importantly taking care of your appliance when cleaning, our Support Team
are here to help. You can use our online Support Centre at anytime by visiting
http://support.residentiagroup.com.au, or you can contact us via calling us on
1300 11 HELP (4357).
It is important that you read through the following use and care manual thoroughly to
familiarise yourself with the installation and operation requirements of your appliance
to ensure optimum performance.
Again, thank you for choosing an Esatto appliance and we look forward to being of
service to you.
Kind Regards,
The esidentia Team
Postage.
PO Box 341, Mt Eliza
Victoria Australia 3930
Telephone.
1300 11 4357
Email.
[email protected]
Page 3

esatto.house 03
Contents
02
Welcome
06
Your Esatto
Cooktop
10
Operating your
Cooktop
04
Safety
Instructions
07
Installation
Instructions
17
Cleaning &
Maintenance/
17
Technical
Data
19
Purchase
Details
18
Troubleshooting
20
Warranty
Information
Page 4

Safety Instructions
User Manual 04
This cooktop must only be installed by a suitably
qualified and licenced person and in accordance with
the instructions provided. Incorrect installation may
cause harm to persons, damage property and void
the product’s warranty.
IMPORTANT!
The electricity supply to the cooktop must be cut off before
any adjustments or maintenance work is undertaken.
WARNING
When using this product, basic precautions should always
be taken including the following:
► This cooktop is designed for domestic household use
and for the cooking and frying of domestic foodstuffs.
IMPORTANT!
The adjacent furniture and all materials used in the
installation must be able to withstand a minimum
temperature of 85°C above the ambient temperature
of the room it is located in, whilst in use.
► Certain types of vinyl or laminate kitchen cabinetry
are particularly prone to heat damage or discolouration
at temperatures above the guidelines given.
► Any damage caused by the cooktop being installed in
contravention of this temperature limit, will be the
liability of the owner.
► Your new cooktop is guaranteed against electrical or
mechanical defects, subject to certain exclusions that
are noted in the Warranty Terms and Conditions (at the
rear of this user manual). The foregoing does not affect
your statutory rights.
► The use of this cooktop for any other purpose or in any
other environment, without the express agreement
of Residentia Group, will invalidate any warranty or
liability claim.
► You should not use this appliance to store items on or
as a work surface.
► No modifications to the appliance are permitted by
Residentia Group.
► You should not store or place flammable or highly
flammable liquids/materials on top of or near the
appliance. Items made from aluminium, plastic
or plastic film should also be kept away from the
appliance, as they may fuse to the surface.
► Repairs may only be carried out by authorised service
agents.
► Your Esatto cooktop is not to be used by children or
persons with reduced physical, sensory or mental
capabilities, or lack of experience and knowledge,
unless they have been given supervision or instruction.
► Any film or stickers that are present on the cooktop
when it is delivered should be removed before use.
► Care should be used when utilising the cooktop,
otherwise there is a risk of burns being caused.
► You should not allow the electrical connection cables
to come into contact with the cooktop surface when
it is hot or any hot cookware.
► If fat and oil overheats, then it can ignite extremely
quickly. For this reason, when cooking with fat and
oil the appliance should not be left unattended.
► Make sure that all of the cooking zones are switched
off after use.
► Cleaning of the cooktop should be carried out on a
regular basis, once the cooktop has cooled down.
► Great care should be taken whilst using this appliance
and when following the cleaning procedure.
► You should not use a steam jet or any other high
pressure cleaning equipment to clean the appliance.
Page 5

esatto.house 05
DECLARATION OF CONFORMITY
The manufacturer declares that the cooktop is built using
certified materials and requires the appliance to be installed
in accordance with the standards currently in force. This
appliance must be used by a trained person for domestic
purposes only.
TO AVOID DAMAGING YOUR COOKTOP
► The ceramic glass can be damaged by objects falling
onto it.
► The ceramic glass edge can be damaged by knocks
from cookware.
► Cast iron and cast aluminium cookware with damaged
bases may scratch the ceramic surface if they are
dragged across it.
► Pans should be lifted on and off the cooktop surface
and not dragged.
► Cooking zones should not be switched on without
cookware placed on it. Also the cookware should
not be empty.
UNPACKING
During transportation, protective packaging was used to
protect the appliance against any damage. After unpacking,
please dispose of all elements of packaging in a way that will
not cause damage to the environment. All materials used for
packaging the appliance are environmentally friendly; they
are 100% recyclable and are marked with the appropriate
symbol.
► During unpacking, the packaging materials (polythene
bags, polystyrene pieces, etc.) should be kept out of
reach of children.
DISPOSAL OF THE APPLIANCE
Old appliances should not simply be disposed of with
normal household waste, but should be delivered to a
collection and recycling centre for electric and electronic
equipment. A symbol shown on the product, the instruction
manual or the packaging shows that it is suitable for
recycling.
Materials used inside the appliance are recyclable and
are labelled with information concerning this. By recycling
materials or other parts from used devices you are
making a significant contribution to the protection of
our environment.
Information on appropriate disposal centres for used
devices can be provided by your local authority.
Page 6
PAGE 07
I
NST
L
(mm
U
nder
aren
ot
590
USER MANUAL PAGE 06
YOUR INALTO COOKTOP
User Manual 06
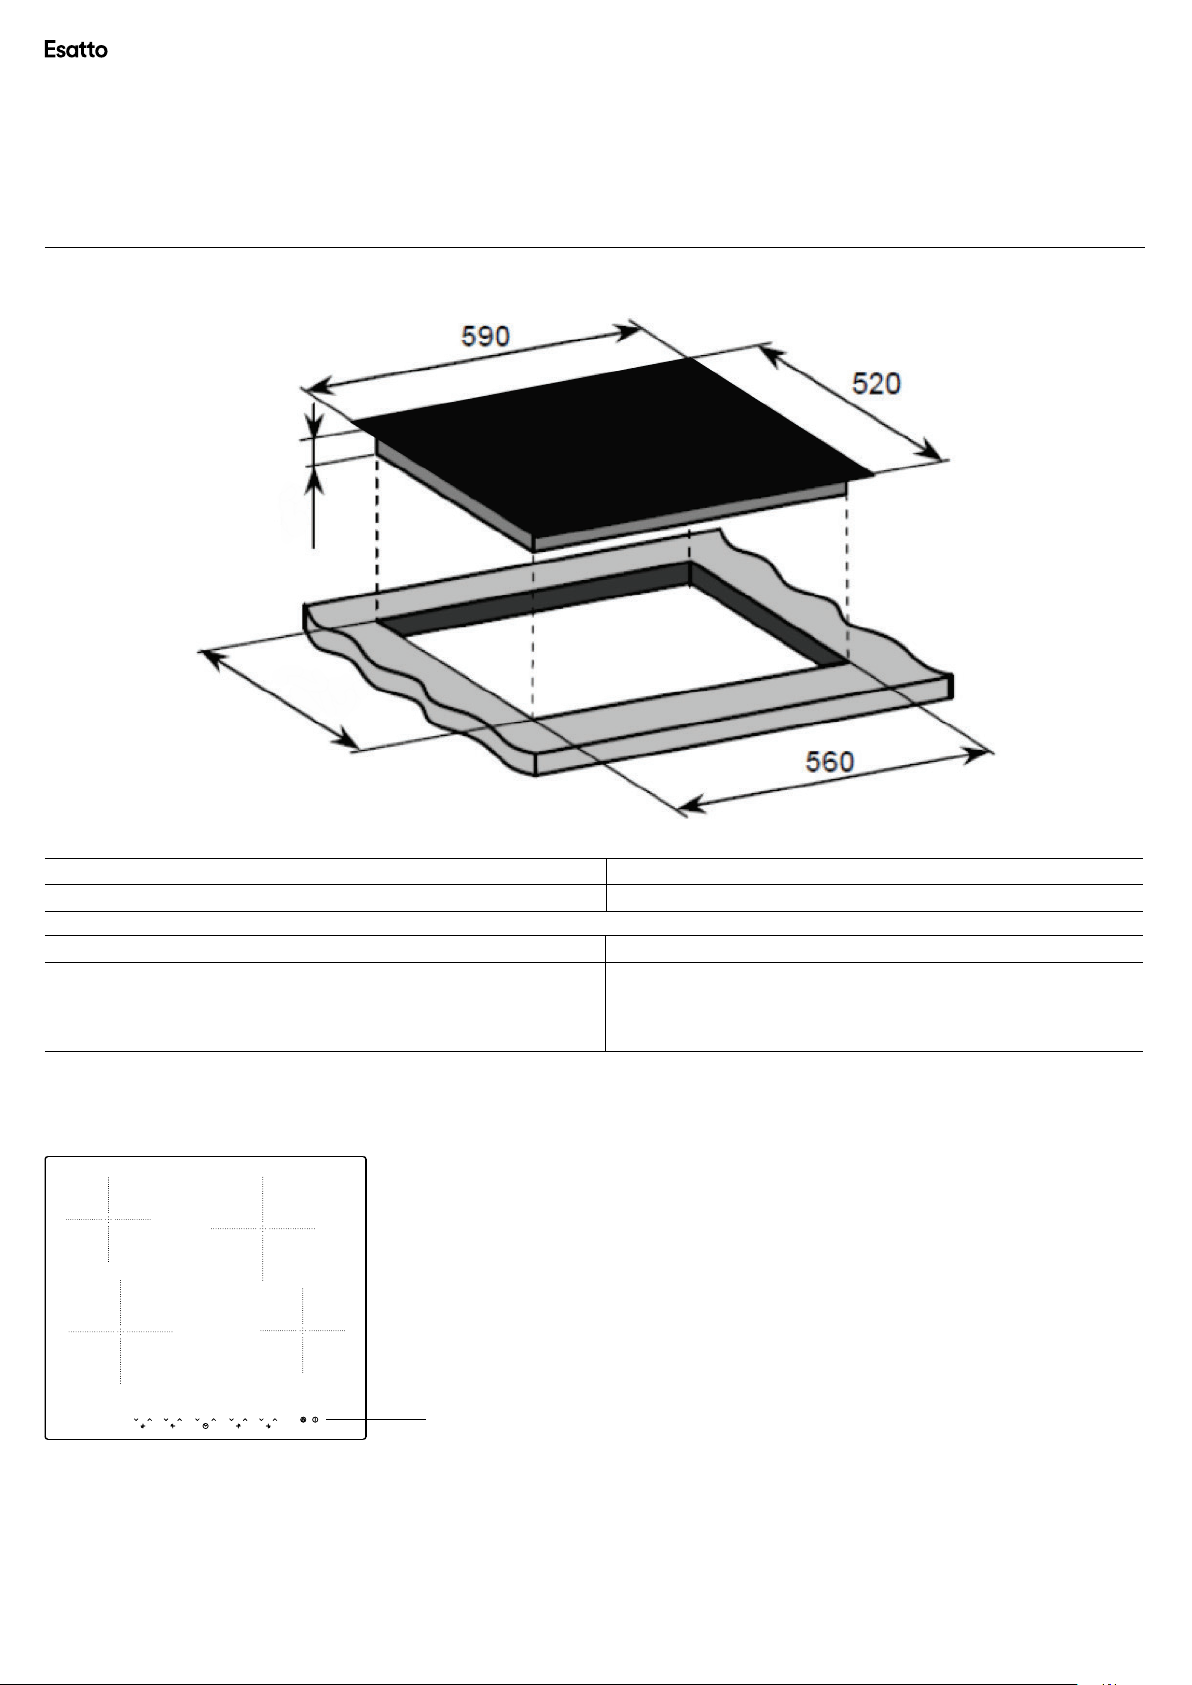
Your Esatto Cooktop
55
490
PRODUCT DIMENSIONS (W×D×H) CUT-OUT DIMENSIONS (W×D)
590mm, 520mm, 55mm 560mm x 490mm
BURNERS OTHER
x 1.80 kW radiant zones (Ø 190mm)
2
2 x 1.20 kW radiant zones (Ø 155mm)
CERAMIC COOKTOP SURFACE LAYOUT
1 2
34
TOUCH CONTROLS
Touch control operation
4 x Individual residual heat indicators
Frameless design
1.20kW zone (Ø
1
1.80kW zone (Ø 190mm)
2
1.20kW zone (Ø 155mm)
3
1.80kW zone (Ø 190mm)
4
155mm)
Page 7
PAGE 07
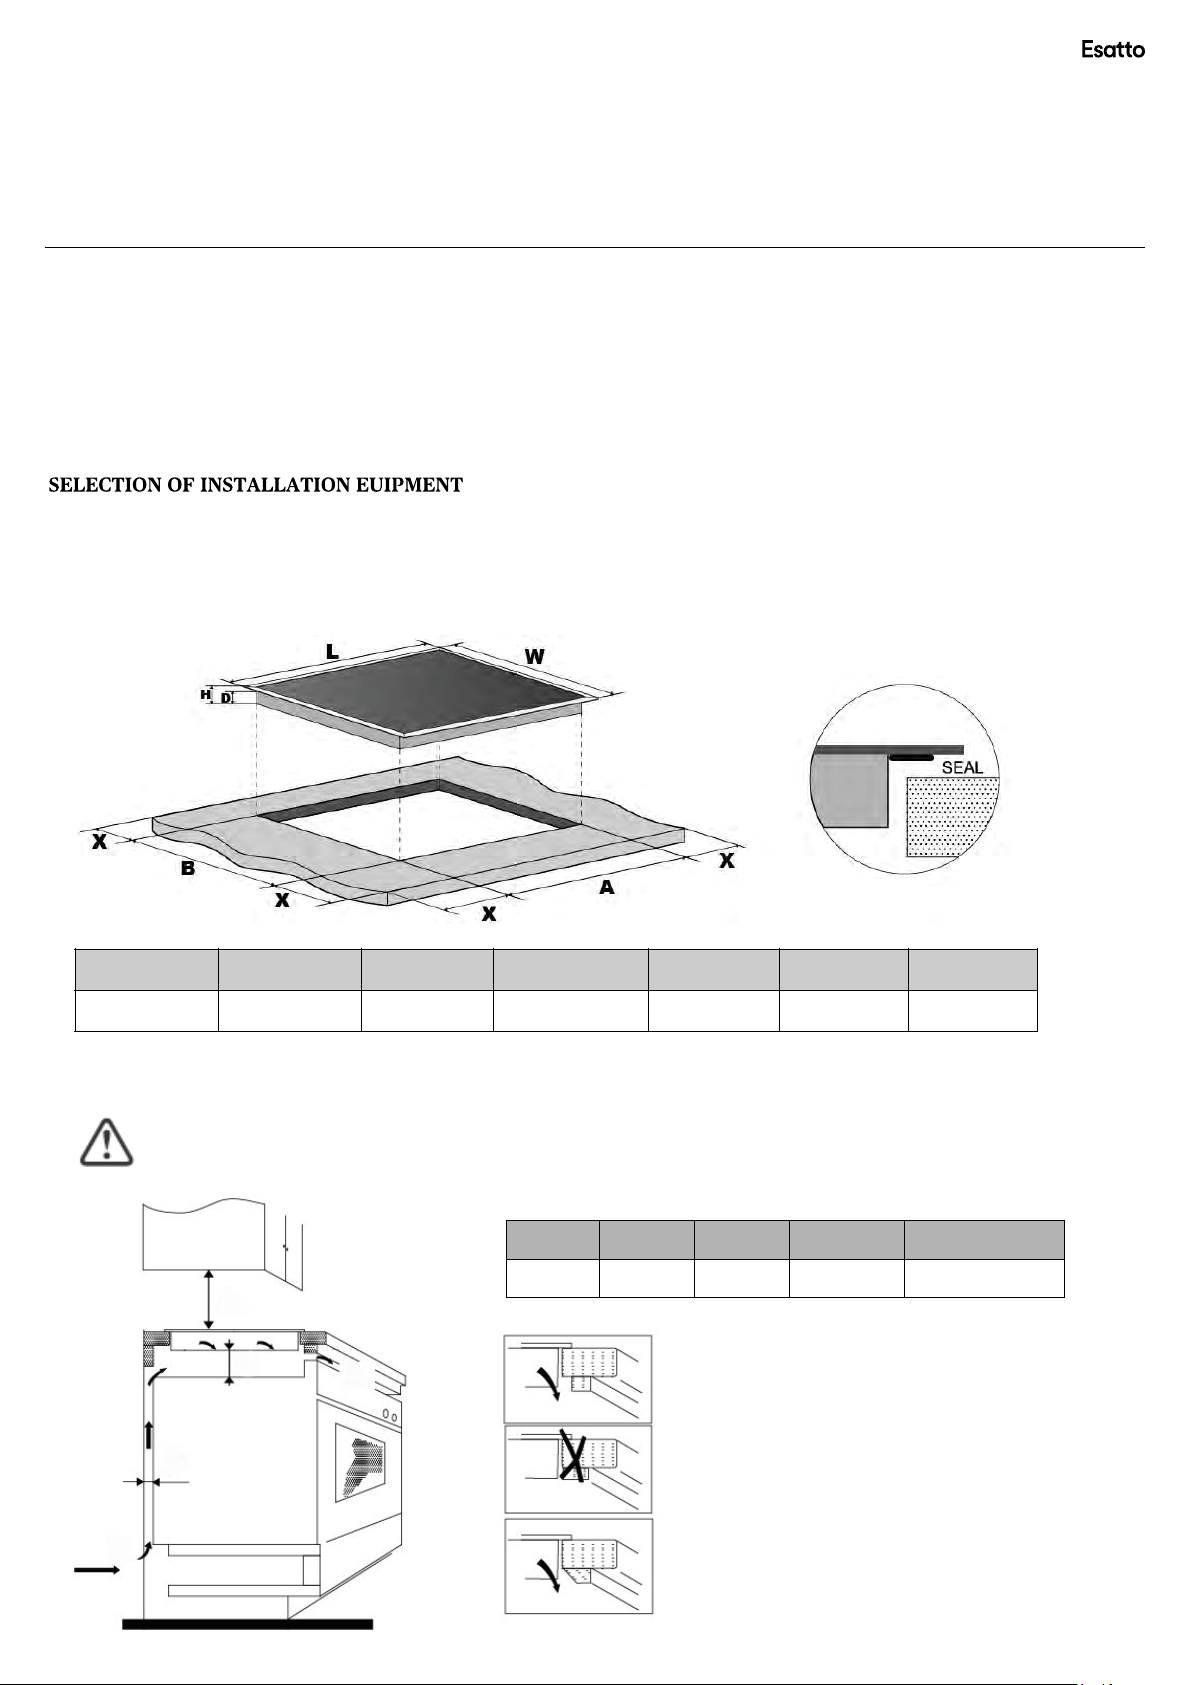
It’s important to carefully read the following installation instructions before beginning the installation of your cooktop.
I
NST
ALLATION INSTRUCTIONS
esatto.house 07
Installation Instructions
IMPORTANT!
AS/NZS 3000 Wiring Rules
► AS/NZS 3000: 2007 Wiring Regulations
► 2010 Electricity Safety Regulations
► The installation instructions within this user manual
Cutoutthew
am
inimumof50mmspaceshallbe
Bes
urethethicknessoftheworksurfaceis
toav
oidlargerdeformationcausedby
The connection of this cooktop must be carried out by a suitably qualified and licensed person, in
accordance with the current version of the following:
orksurfaceaccordingtothesizesshowninthedrawing.
p
reservedaroundthehole.
at l
east30mm.Pleaseselect
theh
eatradiationfromthehotplate.Asshownbelow
Forthep
urposeofinstallationanduse,
h
eat-resistantworksurfacematerial
:
(mm)
L
590
nderanycircumstances,makesuretheceramiccookerhobiswellventilated
U
arenotb
locked.
ote:Thesafetydistancebetweenthehotplateandthecupboardabove
N
otplateshouldbe
theh
(mm)
W
520 55 51 560 490 50 mini
nsuretheceramiccookerhobisin
E
(mm)
H
650mm.
east760mm.
at l
(mm)
D
oodworkstate.Asshownbelow:
g
A1(mm) B1(mm) C1(mm) D1(mm) E1
760
650
50 mini 20 mini Air intake Air exit 5mm
(mm)
A
B
A1
B1
E1
C1
D1
(mm)
andtheairi
(mm)
X
nletandoutlet
Page 8
USER MANUAL PAGE 08
INSTALLATION INSTRUCTIONS
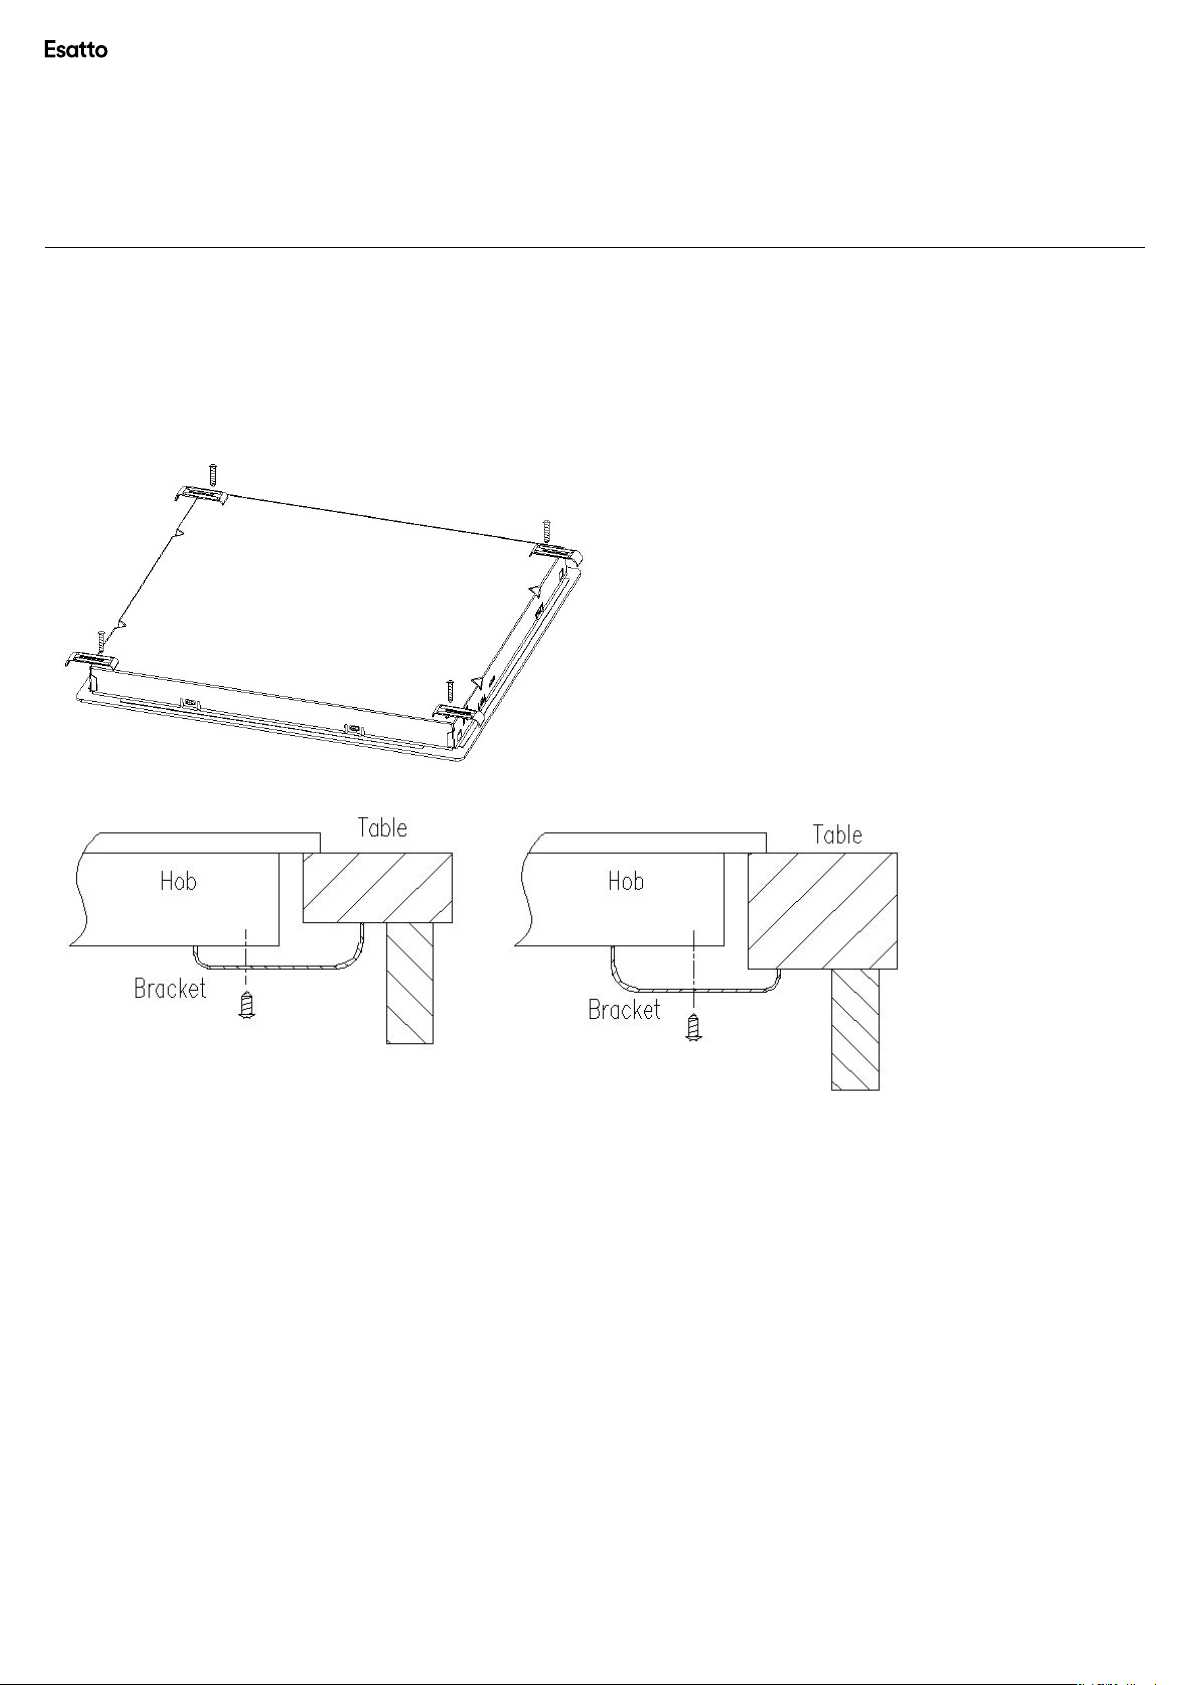
LOCATING THE FI ING BRACKETS
Theu
nitshouldbeplacedon
p
rotrudingfromthehob.
Fixthehobonthew
A
djustthebracketpositiontosuitfordifferentworksurface
x
a s
table,smoothsurface(usethepackaging).Donot
orksurfacebyscrewfourbracketsonthebottomofhob(see
User Manual 08
ap
plyforceontothecontrols
p
icture)afterinstallation.
’s t
hickness.
CAUTIONS!
The ceramic cooker hob must be installed by qualified personnel or technicians.
►
your service.
The ceramic cooker hob shall not be mounted to cooling equipment,
►
The ceramic cooker hob shall be installed such that better heat radiation can be
►
reliability.
The wall and induced heating zone above the work surface shall withstand heat.
►
To avoid any damage, the sandwich layer and adhesive must be resistant to
►
A steam cleaner is not to be used.
►
This ceramic can be connected only to a supply with system impedance no more
►
necessary, please consult your supply authority for
Please never conduct the operation by
yourself.
dishwashers and rotary dryers.
system impedance information.
We have professionals at
ensured to enhance its
heat.
than 0.427 ohm. In case
Page 9

PAGE 09
CONNECTING THE HOB TO THE MAINS POWER SUPPLY
esatto.house 09
The power supply should be connected in compliance with the relevant standard,
►
breaker.
The method of connection is shown below.
or a single-pole
circuit
If the cable is damaged or needs replacing, this should be done by an
►
the proper tools, so as to avoid any accidents.
If the appliance is being connected directly to the mains supply, an omnipolar
►
installed with aminimum gap of3mm between the
be
The installer must ensure that the correct electrical connection has been made
►
contacts.
with safety regulations.
The cable must not be bent or compressed.
►
The cable must be checked regularly and only replaced by a properly qualified
►
This appliance is labeled in compliance with European directive
2002/96/EC for Waste Electrical and Electronic Equipment (WEEE).
By ensuring that this appliance is disposed of correctly, you will help
prevent any possible damage to the environment and to human
health, which might otherwise be caused if it were disposed of in the
wrong way.
The symbol on the product indicates that it may not be treated as
normal household waste. It should be taken to a collection point for
the recycling of electrical and electronic goods.
This appliance requires specialist waste disposal. For further
ISPOSAL: Do not
D
dispose this product
as unsorted municipal
waste. Collection of
such waste separately
for special treatment is
necessary.
information regarding the treatment, recover and recycling of this
product please contact your local council, your household waste
disposal service, or the shop where you purchased it.
For more detailed information about treatment, recovery and
recycling of this product, please contact your local city office, your
household waste disposal service or the shop where you purchased
the product.
after-sales technician using
circuit breaker must
andthat it complies
person.
Page 10

USER MANUAL PAGE 10
OPER
A
TING
Y
OUR
COOKTOP
User Manual 10
Operating Your Cooktop
BEFORE FIRST USE
IMPORTANT! You should clean the ceramic cooktop surface (refer to the “Cleaning and Maintenance” section).
► You should switch on one cooking zone at a time, for 5 minutes at the maximum setting. This will help to eliminate
any new smell that exists and evaporate any humidity that has formed on the heating elements during transit.
► Do not burn off more than one zone at once.
► You must place a saucepan filled half full with cold water on each cooking zone as you burn it off.
TOP VIEW
TOUCH CONTROLS
► All operations are performed by means of the touch controls that can be found on the control panel at the front .
11 112 34
. Power regulating key
1
2. Timer regulating key
3. keylock control
4. ON/OFF control
Page 11

PAGE 1 1
CHOOSING THE RIGHT COOKWARE
OPERATING YOUR COOKTOP
esatto.house 11
Donot use cookware with jagged edges or a curved base.
Make surethat the base ofyour pan is smooth, sits flat against the glass, and is
the cooking zone. Always centre your pan on the cooking zone.
Always lift pans off the ceramic hob – do not slide, or they may scratch the glass.
the same size as
USING THE TOUCH CONTROLS
►
►
►
►
ontrolsrespondtotouch,soyoudon
Thec
Usetheb
Youw
akesurethecontrolsarealwaysclean,dry,andthatthereisnoobject(e.g.
M
loth)coveringthem.Evenathinfilmofwatermaymakethe
ac
allofyourfinger,notitstip.
illhear
eepeachtimeatouchisregistered.
ab
eedtoapplyanypressure.
’t n
ontrolsdifficulttooperate.
c
tensilor
a
u
Page 12

USER MANUAL PAGE 12
User Manual 12
TO START COOKING
Do not use cookware with jagged edges or a curved base.
►
After power on, the buzzer beeps once, all the indicators light up for 1 second
then go out, indicating that the ceramic hob has entered the state of standby
mode.
1. Touch the ON/OFF
control. all the indicators
2. Place a suitable pan on the cooking zone that
Make sure the bottom of the pan and the surface
►
show “-“.
you wish to use.
of the cooking
zone are clean and dry.
3.Select a heat setting by touching the “-“ or “+”
If you don’t choose a heat setting within 1
►
automatically
You will need to start again at
►
You can modify the heat setting at any time
switch off.
step 1.
control.
minute, the Induction hob will
during cooking.
WHEN YOU HAVE FINISHED COOKING
Turn the cooking zone off by scrolling down to“0” or
►
touching “-” and “+”
Make sure the display shows“0”
►
Turn the whole cooktop off by touching the ON/OFF control.
control together.
Page 13

RESIDUAL HEAT INDICATORS
PAGE 13
esatto.house 13
► After a zone is switched off, the corresponding cooking zone will show an “H” in the control panel. This means that
the temperature of the zone still high enough to cause injury.
► The residual heat indicator will go out when the surface has cooled down to a safe temperature.
► The residual heat also can be used as an energy saving function if you want to heat further pans,use the hotplate
that is still hot.
►
When the hob has been operating for some time, there will be some residual
heat. The “H”appears to warn you to keep away from it.
IMPORTANT! The residual heat indicator will disappear if the mains supply to the product is cut.
Warning! It is still possible to burn yourself on a cooktop zone, even when the residual heat indicator has gone
off. Always use caution when using the cooktop.
LOCKING THE CONTROLS
You can lock the controls to prevent unintended use (for example children
►
accidentally turning the
cooking zones on).
►
When the controls arelocked, all the controls except the ON/OFF control are
disabled.
TO LOCK THE CONTROLS
Touch the keylock control. The timer indicator will show“Lo “
TO UNLOCK THE CONTROLS
Make sure the ceramic hob is turned on.
►
Touch and hold the keylock control for a while.
►
You can now start using your ceramic hob.
►
When the hob is in the lock mode, all the controls aredisable except the ON/OFF
you can always turn the ceramic hob off with the ON/OFF control in an emergency,
but you shall unlock the hob first in the next operation
AUTO SHUTDOWN
safety feature of the hob is auto shut down. This occurs whenever you forget to
The default shutdown times are shown in
Power level
Default working timer (hour)
the table below:
1 23456789
8 88444222
,
switch offacooking zone.
Page 14

OPERATING YOUR COOKTOP
USER MANUAL PAGE 14
User Manual 14
USING THE TIMER
You can use the timer in two different ways:
You can use it as a minute minder. In this case, the timer will not turn any
►
cooking zone off when the set time is up.
►
You can set it to turn one or more cooking zones off after the set time is up.
►
You can set the timer up to 99 minutes.
USING THE TIMER AS A MINUTE MINDER
If you are not selecting any cooking zone
Make sure the cooktop is turned on.
►
Note: you can use the minute minder even if you’re not selecting any cooking
zone.
Touch”+” the controls of the timer. The minder
►
indicator will start flashing and “10” will show
in the timer display.
Set the time by touching the “-“ or ”+” control
►
Touch the “-“ or ”+” control of the timer
►
once to decrease or increase by 1 minute.
Touch and hold th“-“ or “+” control of the
►
timer to decrease or increase by 10 minutes.
of the timer.
Touching the “-“ and ”+” together, the timer
►
and the”00” will show in the minute
When the time is set, it will begin to count down
►
The display will show the remaining
will flash for 5 seconds.
display.
time and the timer indicator
Buzzer will bips for 30 seconds and the timer
►
when the setting time
finished.
is cancelled,
immediately.
indicator shows “- - “
Page 15

SETTING THE TIMER TO TURN ONE OR MORE COOKING ZONES OFF
PAGE 15
esatto.house 15
If the timer is set on one zone:
Touch the”-“ or ”+” of the corresponding cooking
►
zone that want to set the timer for.
.
Set the time by touching the “-“ or “+” control of the
►
Touch the “-“ or “+” control of the timer
►
once will decrease or increase by 1 minute.
Touch and hold the ”-“ or “+”control of the timer
►
will decrease or increase by 10 minutes.
Touching the ”-“ and “+” together, the timer is
►
cancelled, and the ”00” will show in the minute
display.
you
timer.
When the time is set, it will begin to count down
►
immediately. The display will show the remaining
time and the timer indicator flash for 5 seconds.
NOTE: The red dot next to power level indicator
will illuminate indicating that zone is selected.
When cooking timer expires, the corresponding
►
cooking zone will be switch off automatically.
Other cooking zone will keep operating if they are turned on previously.
Page 16

USER MANUAL PAGE 16
OPERATING YOUR COOKTOP
User Manual 16
Ifthe timer is set on more zone:than one
When you set the time for several cooking zones simultaneously, decimal dots
►
of the relevant cooking zones are on. The minute display shows the min. timer.
The dot of the corresponding zone flashes.
(set to 15 minutes) (set to 45 minutes)
Once the countdown timer expires, the corresponding zone will switch off.
►
Then it will show the new min. timer and the dot of corresponding zone will
flash.
(set to 30 minutes)
COOKTOP GUIDELINES
► The first few times the cooktop is used, it may give off a burning smell. This smell will disappear completely with
repeated use.
► The cooktop surface is fitted with cooking areas of different diametre and power.
► The positions where the heat will radiate from are clearly marked on the cooktop. The saucepans must be positioned
exactly on these zones for efficient heating to occur. Pans should have the same diametre as the cooking zone that they
are being used on.
► You should not use saucepans with rough bottoms, as this can scratch the ceramic surface.
► Before use, make sure that the bottoms of the saucepans are clean and dry.
► When cold, the bottom of the pans should be slightly concave, as they expand when hot and lie flat on the surface of
the cooktop.
► This will allow the heat to transfer more easily.
► The best thickness for the bottom of the pans is 2–3 mm of enameled steel and 4–6 mm for stainless steel with
sandwich type bottoms.
► If these rules are not followed, then there will be a great loss of heat and energy. Heat not absorbed by the saucepan,
will spread to the cooktop, frame and surrounding cabinets.
► Preferably cover pans with a lid to permit cooking at a lower heat.
► Always cook vegetables and potatoes, etc. in as little water to reduce cooking times.
► Food or liquid that has high sugar content may damage the cooktop if it comes into contact with the ceramic cooktop
surface. Any spillages should be wiped up immediately, however this may not prevent the cooktop surface from
becoming damaged.
Page 17

esatto.house 17
Cleaning & Maintenance
By ensuring proper cleaning and maintenance of your Esatto cooktop,
you can ensure that it will have a long and fault free operation.
WARNING! Do not start cleaning the cooktop until it has completely cooled.
CLEANING YOUR CERAMIC COOKTOP
► Any residues that are left on the cooktop surface from cleaning agents will damage it.
You should remove any residues with warm water mixed with a little washing up liquid.
► Abrasive cleaners or sharp objects will damage the cooktop surface; you should clean
it using warm water mixed with a little washing up liquid.
► Although it is easier to clean some deposits whilst the cooktop surface is still warm, you
should take care not to burn yourself if cleaning the cooktop surface when it is still warm.
After each use:
► Wipe the cooktop over with a damp cloth.
► Dry the cooktop by rubbing the surface with a clean cloth.
Type of deposit Remove immediately? Remove when the cooktop
has cooled down?
Sugar or food/liquid
containing sugar
Tin foil or plastic Yes No Ceramic cooktop scraper
Fat splashes No Yes Ceramic cooktop cleaner
Metallic discolouration No Yes Ceramic cooktop cleaner
Water splashes or water rings No Yes Ceramic cooktop cleaner
USING A SPECIALIST CERAMIC COOKTOP CLEANER
It is possible to purchase a specialist ceramic cooktop cleaner/conditioner.
You should follow the instructions given by the manufacturer of the cleaner
and ensure that it is suitable for use on your appliance.
Yes No Ceramic cooktop scraper
What should I use to
remove the deposit?
Technical Data
ELECTRICAL DETAILS Rated Voltage: 220 - 240 Volts, 50/60 Hz
Supply Connection: 30A (double pole switch fuse outlet with 3mm contact gap)
Max Rated Inputs: 6.0kW
Mains Supply Lead: 5 core x 1.5mm (not supplied)
2
Page 18

User Manual 18
Troubleshooting
Please read the issues below carefully and try all relevant steps.
If none of this helps, please contact us on 1300 11 4357 for further advice
or to schedule a technician to inspect your cooktop.
Tips & Hints
THE COOKING ZONES
ARE NOT FUNCTIONING
Please check...
That your cooktop is plugged in and there is
power to the wall socket.
Hint: Check the mains power or the isolation
switch.
If your cooktop has a Control Lock or Child
Lock function, check that it is switched off.
THE ELEMENTS STAY ON HIGH
Please...
Contact our Support Team on 1300 11 4357 to
arrange for a technician to visit.
THE RESIDUAL HEAT INDICATOR
DOES NOT APPEAR
Please note...
If the cooking zone has only been turned
on for less than 30 seconds, the residual heat
indicator will not appear.
If the cooking zone does appear to be
hotter than 50° C or has been activated for
longer than 30 seconds, and the residual heat
indicator has not come on, please contact our
Support Team on 1300 11 4357 for advice.
THE GLASS IS SCRATCHED
Please note...
Scratches are often caused by using cookware
with rough-edges. Please ensure pots and
pans have smooth bases.
THE COOKTOP IS HUMMING
WHEN A ZONE IS SELECTED
Please note...
This is normal—the sound will disappear
when the zone heats up.
If the humming sound continues once
the zone is fully at heat, please contact our
Support Team on 1300 11 4357 for advice.
THE COOKTOP IS
NOT TURNING OFF
Please...
Ensure the child lock is disabled.
Hint: On some models you may have to touch
the zone control twice to disable.
THE COOKING ZONES HAVE
BECOME DISCOLOURED
Please note...
This maybe caused by burnt on remnants of
food. This will not affect the working of the
appliance however you should make sure that
the cleaning instructions are being followed
regularly.
Please note that if an engineer is asked to attend whilst the product is under warranty and finds that the problem
is not the result of an appliance fault, then you may be liable for the cost of the call out charge.
THE COOKTOP IS DIRTY
AFTER COOKING
Please note...
Once it has cooled down, your cooktop
should be cleaned after every use. Any
residues that are left on the cooktop surface
from cleaning agents will damage it. You
should remove any residues with warm water
mixed with a little washing up liquid.
Hint: For physical deposits on the surface,
a specialist ceramic cooktop cleaner/
conditioner should be purchased. Please
follow the instructions with this product.
THERE IS A METALLIC SHEEN
ON THE GLASS
Please note...
This is often caused by pots with aluminium
or copper bases.
Hint: Specialist ceramic cleaner should
remove the marks. Your cooktop should
be cleaned regularly, as spills that are allowed
to burn into the surface may
react with the ceramic glass and become
much harder to remove.
Page 19

Purchase Details
esatto.house 19
For future reference, please record the following
information which can be found on the rating plate and the
date of purchase which can be found on your sales invoice.
STORE DETAILS
STORE NAME
ADDRESS
TELEPHONE
PRODUCT DETAILS
|
|
PURCHASE DATE
|
The rating plate of your cooktop is located on the
underneath of the appliance. Therefore please fit the
duplicate data plates or label on the outside of the
cupboard to sure that the label can be easily seen
during operation.
|
MODEL NO.
SERIAL NO.*
|
|
* Your serial number can be found on the underside of the cooktop.
Page 20

Warranty Information
User Manual 20
WARRANTY TERMS & CONDITIONS
COOKING APPLIANCES
(BUILT-IN OVENS, COOKTOPS)
This document sets out the terms and conditions of the
product warranties for Residentia Group Appliances. It is
an important document. Please keep it with your proof of
purchase documents in a safe place for future reference
should you require service for your Appliance.
1. IN THIS WARRANTY
(a) ‘acceptable quality’ as referred to in clause 10 of this
warranty has the same meaning referred to in the ACL;
(b) ‘ACL’ means Trade Practices Amendment (Australian
Consumer Law) Act (No.2) 2010;
(c) ‘Appliance’ means any Residentia Group product
purchased by you accompanied by this document;
(d) ‘ASR’ means Residentia Group authorised service
representative;
(e) ‘Residentia Group’ means Residentia Group Pty Ltd
of 118 Campbell St, Collingwood VIC, ACN 600 546
656 in respect of Appliances purchased in Australia;
(f ) ‘major failure’ as referred to in clause 10 of this
warranty has the same meaning referred to in the ACL
and includes a situation when an Appliance cannot
be repaired or it is uneconomic for Residentia Group,
at its discretion, to repair an Appliance during the
Warranty Period;
(g) ‘Warranty Period’ means:
(i) where the Appliance is used for personal,
domestic or household use (i.e. normal
single family use) as set out in the instruction
manual, the Appliance is warranted against
manufacturing defects for 24 months, following
the date of original purchase of the Appliance;
(h) ‘you’ means the purchaser of the Appliance not having
purchased the Appliance for re-sale, and ‘your’ has a
corresponding meaning.
2. This warranty only applies to Appliances purchased
and used in Australia and is in addition to (and does
not exclude, restrict, or modify in any way) any
non-excludable statutory warranties in Australia.
3. During the Warranty Period Residentia Group or its
ASR will, at no extra charge if your Appliance is readily
accessible for service, without special equipment and
subject to these terms and conditions, repair or replace
any parts which it considers to be defective. Residentia
Group or its ASR may use remanufactured parts to
repair your Appliance. You agree that any replaced
Appliances or parts become the property of Residentia
Group. This warranty does not apply to light globes,
batteries, lters or similar perishable parts.
4. Parts and Appliances not supplied by Residentia Group
are not covered by this warranty.
Page 21

esatto.house 21
5. You will bear the cost of transportation, travel and
delivery of the Appliance to and from Residentia Group
or its ASR. If you reside outside of the service area,
you will bear the cost of:
(a) travel of an authorised representative;
(b) transportation and delivery of the Appliance to and
from Residentia Group or its ASR, in all instances,
unless the Appliance is transported by Residentia
Group or its ASR, the Appliance is transported at
the owner’s cost and risk while in transit to and from
Residentia Group or its ASR.
6. Proof of purchase is required before you can make
a claim under this warranty.
7. You may not make a claim under this warranty unless
the defect claimed is due to faulty or defective parts
or workmanship. Residentia Group is not liable in the
following situations (which are not exhaustive):
(a) the Appliance is damaged by:
(i) accident
(ii) misuse or abuse, including failure to properly
maintain or service
(iii) normal wear and tear
(iv) power surges, electrical storm damage or
incorrect power supply
(v) incomplete or improper installation
(vi) incorrect, improper or inappropriate operation
(vii) insect or vermin infestation
(viii) failure to comply with any additional instructions
supplied with the Appliance;
(b) the Appliance is modied without authority from
Residentia Group in writing;
(c) the Appliance’s serial number or warranty seal has
been removed or defaced;
(d) the Appliance was serviced or repaired by anyone
other than Residentia Group, an authorised repairer
or ASR.
8. This warranty, the contract to which it relates and the
relationship between you and Residentia Group are
governed by the law applicable where the Appliance
was purchased.
10. For Appliances and services provided by Residentia
Group in Australia, the Appliances come with a
guarantee by Residentia Group that cannot be
excluded under the Australian Consumer Law. You
are entitled to a replacement or refund for a major
failure and for compensation for any other reasonably
foreseeable loss or damage. You are also entitled
to have the Appliance repaired or replaced if the
Appliance fails to be of acceptable quality and the
failure does not amount to a major failure. The benets
to you given by this warranty are in addition to your
other rights and remedies under a law in relation to the
Appliances or services to which the warranty relates.
11. At all times during the Warranty Period, Residentia
Group shall, at its discretion, determine whether repair,
replacement or refund will apply if an Appliance has a
valid warranty claim applicable to it.
12. To enquire about claiming under this warranty, please
follow these steps:
(a) carefully check the operating instructions, user manual
and the terms of this warranty;
(b) have the model and serial number of the Appliance
available;
(c) have the proof of purchase (e.g. an invoice) available;
(d) telephone the numbers shown below.
13. You accept that if you make a warranty claim,
Residentia Group and its ASR may exchange
information in relation to you to enable Residentia
Group to meet its obligations under this warranty.
IMPORTANT
Before calling for service, please ensure that the steps
in point 12 have been followed.
Telephone contacts
→ Service: Please call 1300 11 HELP (4357)
→ Spare Parts: Please call 1300 11 SPARE (7727)
9. To the extent permitted by law, Residentia Group
excludes all warranties and liabilities (other than as
contained in this document) including liability for any
loss or damage whether direct or indirect arising from
your purchase, use or non use of the Appliance.
The Australian Consumer Law requires the
inclusion of the following statement with
this warranty:
Our goods come with guarantees that cannot be excluded under the Australian Consumer Law.
You are entitled to a replacement or refund for a major failure and for compensation for any other
reasonably foreseeable loss or damage. You are also entitled to have the goods repaired or replaced
if the goods fail to be of acceptable quality and the failure does not amount to a major failure.
Page 22

This page
is intentionally
left blank
User Manual 22
Page 23

This page
is intentionally
left blank
esatto.house 23
Page 24

App liances
Exactly what
you need
W WW.RESIDENTIA.GROUP
 Loading...