

Page 1
INSTRUCTIONS for
F-12-747-F
March, 1995
UEC-8
UNIONMELT® ELECTRONIC
WELDING CONTROL
Part No. 677190
These INSTRUCTIONS are for experienced operators. If you are not fully familiar with the principles of operation and safe
practices for electrical welding equipment, we urge you to read our booklet, "Precautions and Safe Practices for Arc Welding,
Cutting and Gouging", Form 52-529. Do NOT permit untrained persons to install, operate, or maintain this equipment. Do NOT
attempt to install or operate this equipment until you have read and fully understand these instructions. If you do not fully
understand these instructions, contact your supplier for further information. Be sure to read the Safety Precautions on page 2
before installing or operating this equipment.
Before applying electrical power, refer to Section IV for an important checklist on the proper interconnection of the UEC-8 Control.
FEA TURES/BENEFITS
Solid State Control ... To assure economical weld-
ing, precise control of welding conditions and arc stability is maintained with UEC-8 solid state accuracy.
Compact Size ... For easy installation and capability
to fit into simple fixtures, OM-48 carriages, or the most
complex automated production lines.
Low Maintenance ... Two basic solid state plug-in
printed circuit boards simplify troubleshooting and
minimize maintenance time.
Operating Versatility ... The UEC-8 is adapted to a
wide range of Sub Arc operations.
Rugged Construction ... Minimize downtime and
maintenance costs, and provides for worry-free operation.
Variable INCH/STRIKE Wire Feed S peed ... Smooth
starts can be obtained even under the most demanding conditions with the UEC-8's front panel variable
INCH/STRIKE wire feed speed adjustment.
Positive Starts ... Result from the UEC-8 voltage/
current detection circuit. This circuit will only allow
transfers from INCH/STRIKE to Welding Wire Feed
speed after an "ARC" has been established. Most
competitive controls do not offer this feature.
Adjustable Anti-Stick ... This feature allows adjust-
Dimensions and weight of the UEC-8 are as follows:
Height ...................................................... (152 mm) 6-in.
Width ..................................................... (305 mm) 12-in.
Depth ...................................................... (209 mm) 8-1/3
Input requirements: 120 Volt 50/60 Hz. 1 phase power @
5 amps A.C.
ment of the wire retract time to prevent the electrode
from sticking in the puddle after completion of a weld.
OM-48 Compatibility.... The UEC-8 has a plug-in
connection for direct interface with the J Governor/
OM-48 Carriage.
UEC-8 and EH-10 or EH-11 Motor .... With large 2-
in. diameter feed rolls offers the reserve power
needed to assure consistent wire feeding under the
most demanding conditions.
Optional Digital Meters .... Provide excellent means
of observing and controlling welding voltage, wire feed
speed - I.P.M., and amperage.
SPECIFICATIONS
Be sure this information reaches the operator.
You can get extra copies through your supplier.
Page 2
SAFETY PRECAUTIONS
WARNING: These Safety Precautions are for
your protection. They summarize precautionary information from the references listed in
Additional Safety Information section. Before
performing any installation or operating procedures, be
sure to read and follow the safety precautions listed below
as well as all other manuals, material safety data sheets,
labels, etc. Failure to observe Safety Precautions can result
in injury or death.
PROTECT YOURSELF AND OTHERS
Some welding, cutting, and gouging
processes are noisy and require ear
protection. The arc, like the sun, emits
ultraviolet (UV) and other radiation and
can injure skin and eyes. Hot metal can cause burns.
Training in the proper use of the processes and equipment is essential to prevent accidents. Therefore:
1. Always wear safety glasses with side shields in any work
area, even if welding helmets, face shields, and goggles
are also required.
2. Use a face shield fitted with the correct filter and cover
plates to protect your eyes, face, neck, and ears from
sparks and rays of the arc when operating or observing
operations. Warn bystanders not to watch the arc and
not to expose themselves to the rays of the electric-arc
or hot metal.
3. Wear flameproof gauntlet type gloves, heavy long-sleeve
shirt, cuffless trousers, high-topped shoes, and a welding helmet or cap for hair protection, to protect against
arc rays and hot sparks or hot metal. A flameproof apron
may also be desirable as protection against radiated
heat and sparks.
4. Hot sparks or metal can lodge in rolled up sleeves,
trouser cuffs, or pockets. Sleeves and collars should be
kept buttoned, and open pockets eliminated from the
front of clothing
5. Protect other personnel from arc rays and hot sparks
with a suitable non-flammable partition or curtains.
6. Use goggles over safety glasses when chipping slag or
grinding. Chipped slag may be hot and can fly far.
Bystanders should also wear goggles over safety glasses.
FIRES AND EXPLOSIONS -- Heat from
flames and arcs can start fires. Hot slag
or sparks can also cause fires and explosions. Therefore:
1. Remove all combustible materials well away from the
work area or cover the materials with a protective nonflammable covering. Combustible materials include wood,
cloth, sawdust, liquid and gas fuels, solvents, paints and
coatings, paper, etc.
2. Hot sparks or hot metal can fall through cracks or
crevices in floors or wall openings and cause a hidden
smoldering fire or fires on the floor below. Make certain
that such openings are protected from hot sparks and
metal.“
3. Do not weld, cut or perform other hot work until the
workpiece has been completely cleaned so that there
are no substances on the workpiece which might produce flammable or toxic vapors. Do not do hot work on
closed containers. They may explode.
4. Have fire extinguishing equipment handy for instant use,
such as a garden hose, water pail, sand bucket, or
portable fire extinguisher. Be sure you are trained in its
use.
5. Do not use equipment beyond its ratings. For example,
overloaded welding cable can overheat and create a fire
hazard.
6. After completing operations, inspect the work area to
make certain there are no hot sparks or hot metal which
could cause a later fire. Use fire watchers when necessary.
7. For additional information, refer to NFPA Standard 51B,
"Fire Prevention in Use of Cutting and Welding Pro-
--
2
cesses", available from the National Fire Protection Association, Batterymarch Park, Quincy, MA 02269.
ELECTRICAL SHOCK -- Contact with live
electrical parts and ground can cause
severe injury or death. DO NOT use AC
welding current in damp areas, if movement is confined, or if there is danger of
falling.
1. Be sure the power source frame (chassis) is connected
to the ground system of the input power.
2. Connect the workpiece to a good electrical ground.
3. Connect the work cable to the workpiece. A poor or
missing connection can expose you or others to a fatal
shock.
4. Use well-maintained equipment. Replace worn or damaged cables.
5. Keep everything dry, including clothing, work area, cables,
torch/electrode holder, and power source.
6. Make sure that all parts of your body are insulated from
work and from ground.
7. Do not stand directly on metal or the earth while working
in tight quarters or a damp area; stand on dry boards or
an insulating platform and wear rubber-soled shoes.
8. Put on dry, hole-free gloves before turning on the power.
9. Turn off the power before removing your gloves.
10. Refer to ANSI/ASC Standard Z49.1 (listed on next page)
for specific grounding recommendations. Do not mistake
the work lead for a ground cable.
ELECTRIC AND MAGNETIC FIELDS —
May be dangerous. Electric current flowing through any conductor causes localized Electric and Magnetic Fields
(EMF). Welding and cutting current creates EMF around welding cables and
welding machines. Therefore:
1. Welders having pacemakers should consult their physician before welding. EMF may interfere with some pacemakers.
2. Exposure to EMF may have other health effects which are
unknown.
3. Welders should use the following procedures to minimize
exposure to EMF:
A. Route the electrode and work cables together. Secure
them with tape when possible.
B. Never coil the torch or work cable around your body.
C. Do not place your body between the torch and work
cables. Route cables on the same side of your body.
D. Connect the work cable to the workpiece as close as
possible to the area being welded.
E. Keep welding power source and cables as far away
from your body as possible.
11/95
Page 3
FUMES AND GASES -- Fumes and
gases, can cause discomfort or harm,
particularly in confined spaces. Do
not breathe fumes and gases. Shielding gases can cause asphyxiation.
Therefore:
1. Always provide adequate ventilation in the work area by
natural or mechanical means. Do not weld, cut, or gouge
on materials such as galvanized steel, stainless steel,
copper, zinc, lead, beryllium, or cadmium unless positive
mechanical ventilation is provided. Do not breathe fumes
from these materials.
2. Do not operate near degreasing and spraying operations. The heat or arc rays can react with chlorinated
hydrocarbon vapors to form phosgene, a highly toxic
gas, and other irritant gases.
3. If you develop momentary eye, nose, or throat irritation
while operating, this is an indication that ventilation is not
adequate. Stop work and take necessary steps to improve ventilation in the work area. Do not continue to
operate if physical discomfort persists.
4. Refer to ANSI/ASC Standard Z49.1 (see listing below)
for specific ventilation recommendations.
CYLINDER HANDLING -- Cylinders, if
mishandled, can rupture and violently
release gas. Sudden rupture of cylinder, valve, or relief device can injure or
kill. Therefore:
1. Use the proper gas for the process and use the proper
pressure reducing regulator designed to operate from
the compressed gas cylinder. Do not use adaptors.
Maintain hoses and fittings in good condition. Follow
manufacturer's operating instructions for mounting regulator to a compressed gas cylinder.
2. Always secure cylinders in an upright position by chain
or strap to suitable hand trucks, undercarriages, benches,
walls, post, or racks. Never secure cylinders to work
tables or fixtures where they may become part of an
electrical circuit.
3. When not in use, keep cylinder valves closed. Have
valve protection cap in place if regulator is not connected. Secure and move cylinders by using suitable
hand trucks. Avoid rough handling of cylinders.
4. Locate cylinders away from heat, sparks, and flames.
Never strike an arc on a cylinder.
5. For additional information, refer to CGA Standard P-1,
"Precautions for Safe Handling of Compressed Gases in
Cylinders", which is available from Compressed Gas
Association, 1235 Jefferson Davis Highway, Arlington,
VA 22202.
EQUIPMENT MAINTENANCE -- Faulty or improperly maintained equipment can cause
injury or death. Therefore:
perform any electrical work unless you are qualified to
perform such work.
2. Before performing any maintenance work inside a power
source, disconnect the power source from the incoming
electrical power.
3. Maintain cables, grounding wire, connections, power cord,
and power supply in safe working order. Do not operate
any equipment in faulty condition.
4. Do not abuse any equipment or accessories. Keep
equipment away from heat sources such as furnaces, wet
conditions such as water puddles, oil or grease, corrosive
atmospheres and inclement weather.
5. Keep all safety devices and cabinet covers in position and
in good repair.
6. Use equipment only for its intended purpose. Do not
modify it in any manner.
ADDITIONAL SAFETY INFORMATION -- For
more information on safe practices for electric arc welding and cutting equipment, ask
your supplier for a copy of "Precautions and
Safe Practices for Arc Welding, Cutting and
Gouging", Form 52-529.
The following publications, which are available from the
American Welding Society, 550 N.W. LeJuene Road, Miami,
FL 33126, are recommended to you:
1. ANSI/ASC Z49.1 - "Safety in Welding and Cutting"
2. AWS C5.1 - "Recommended Practices for Plasma Arc
Welding"
3. AWS C5.2 - "Recommended Practices for Plasma Arc
Cutting"
4. AWS C5.3 - "Recommended Practices for Air Carbon Arc
Gouging and Cutting"
5. AWS C5.5 - "Recommended Practices for Gas Tungsten
Arc Welding“
6. AWS C5.6 - "Recommended Practices for Gas Metal Arc
Welding"“
7. AWS SP - "Safe Practices" - Reprint, Welding Handbook.
8. ANSI/AWS F4.1, "Recommended Safe Practices for Welding and Cutting of Containers That Have Held Hazardous
Substances."
This symbol appearing throughout this manual
means Attention! Be Alert! Your safety is
involved.
The following definitions apply to DANGER, WARNING,
CAUTION found throughout this manual:
Used to call attention to immediate hazards which, if not avoided, will result in
immediate, serious personal injury or loss
of life.
Used to call attention to potential hazards which could result in personal injury
or loss of life.
1. Always have qualified personnel perform the installation, troubleshooting, and maintenance work. Do not
Used to call attention to hazards which
could result in minor personal injury.
3
Page 4

I. INTRODUCTION
1. The UEC-8 electronic welding control P/N 677190 is
designed for a wide range of Subarc† welding applications, and can be used with either a constant-voltage or a constant-current power supply as follows:
650 cvcc, 60 hz.*....................................P/N36006
653 cvcc, 60 hz.*....................................P/N36234
* If higher welding currents are desired, a kit is avail-
able from ESAB that allows you to parallel two 650
cvcc units to provide up to 1300 amperes output.
† If the UEC-8 is to be used with power sources no
longer manufactured (or recommended), please contact your ESAB Welding Supplier or the Factory and
request a copy of edition F-12-747-"E". The "E" edition contains historical information and requirements
previously provided for low-range Subarc and Mig
welding applications.
The UEC-8 is recommended for use with the following
welding heads: EH-11 (for either constant-voltage or
constant-current operation) or the EH-10 or 10A (for constant-voltage operation only). The control utilizes two
solid-state printed circuit boards (described in Sec. II-C)
to obtain excellent wire feed speed regulation. The control is designed to be used for "Touch Work" (with optional D.C. touch work kit) and "scratch" starts (for AC
or DC). In scratch starting the carriage is moving before
the wire has contacted the work; in touch-work starting,
the wire inches down to the work and the carriage does
not move until the welding arc has been initiated.
II. DESCRIPTION
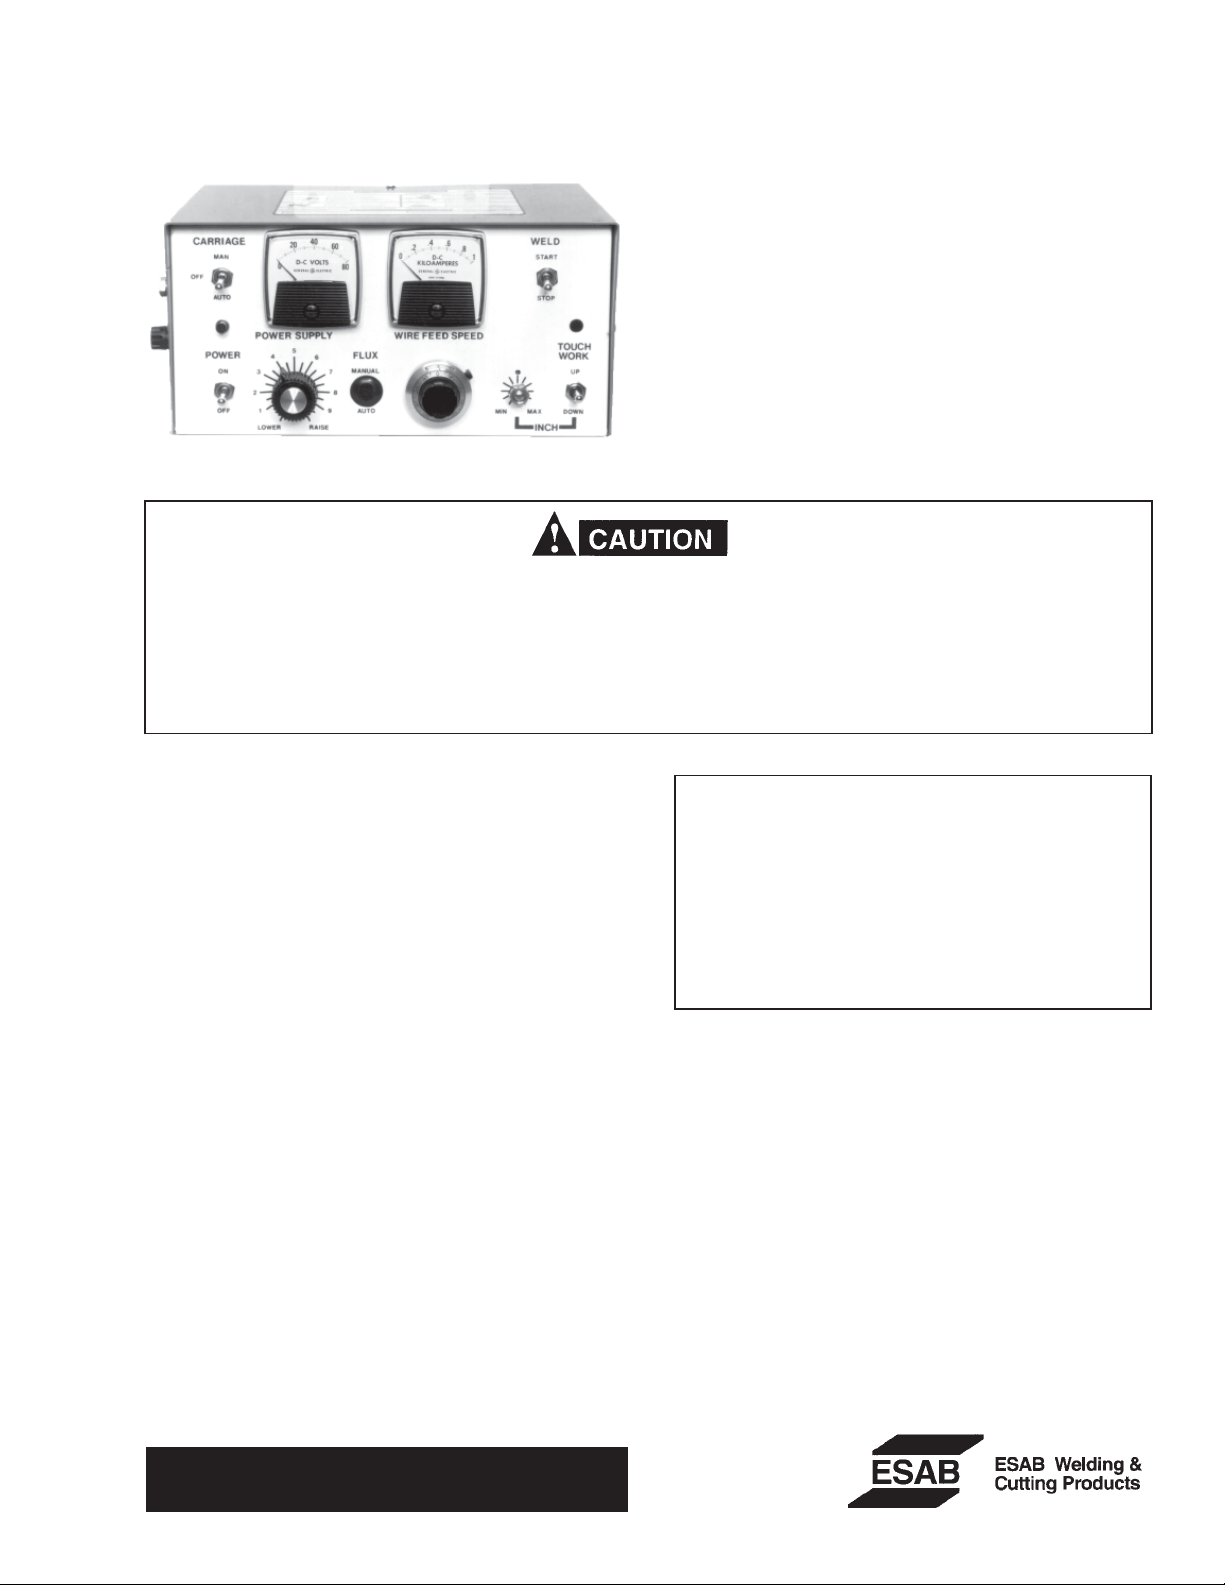
A. FRONT PANEL CONTROLS
1. Main Line Switch -- double pole single throw; breaks
both sides of 120 VAC power to control. Pilot light
built in 5 ampere Slo-Blo fuse in hot side of AC lines.
2. Voltage Control Potentiometer--allows remote ad-
justment of output voltage.
3. Wire Feed Speed Potentiometer -- controls rate of
wire feed speed during welding. This potentiometer
dial contains a 10 turn vernier calibrated from 0 to
100, and a computer which indicates the number of
turns (0 to 9) giving a total of 1000 increment settings
for accurate repeatable wire speed conditions.
4. Inch Speed Potentiometer -- screwdriver adjustment
controls rate of wire feed speed during inching.
5. Inch Up-Down Switch--spring loaded to center off
position - provides signal to allow motor to inch wire
up or down.
6. Carriage Auto-Manual-Off Switch---when a compat-
ible carriage governor is connected to the UEC-8,
allows automatic starting and stopping of carriage in
"Auto" position. In "Manual" position, carriage drive
is energized continuously. In center "Off" position,
there is no carriage operation.
7. Weld Start-Stop Switch--double pole double throw,
no center off position - in. "Start" position is initiates
welding action. In "Stop" position, weld sequence is
terminated.
8. T ouch Work Light -- included in optional Touch Work
Kit-lights when wire touches work prior to arc initiation.
9. Anti-Stick Potentiometer -- located on the left side
panel of the UEC-8. control. The potentiometer controls the length of time the wire is retracted at the end
of the weld cycle, thus allowing the welding wire to
retract a controlled amount. With a clockwise adjustment, the anti-stick time will increase, with a counterclockwise adjustment, the anti- stick time will increase,
with a counter-clock wise adjustment, the anti-stick
time will decrease.
B. INTERNAL CONTROLS
1. Sensitivity Potentiometer (See Figure 3) -- an arc
voltage sensitivity potentiometer is located on the inside back panel of the UEC-8 control. The adjustment of this "pot" controls the amount of arc voltage
signal with respect to motor back e.m.f. (electro-motive force) used; thus controlling motor response to
arc voltage changes.
2. Weld Power Selector Switch (See Figure 5) -- lo-
cated on the Reversible Governor PC Board - allows
the control to be used with either a constant-current
or a constant-potential power supply. Switch must
be placed in the proper position with respect to
the type of power supply selected.
C. PRINTED CIRCUIT BOARDS (See Figures 5 and
6)
1. Logical Board (P/N 675330) -- provides basic se-
quencing of wire feed motor, weld contactor and antistick. A 1/2- amp standard fuse to protect the current
detector circuit is located on the right side of the board.
Also the PC board contains two LED* indicator lights.
These lights help in troubleshooting the unit by indicating the state of the voltage and current detector at
all times.
2. Reversible Governor Board (P/N 675332) -- solid
state motor speed control. Automatic reversing feature for retract starts. During welding, if wire stubs to
the plate or the arc is lost the wire will retract (at inch
speed ) and inch down automatically until the arc is
reestablished. A weld power selector switch (see IIB-2 above) is located on the right side of the PC board.
Also the board contains an LED indicator light to check
proper electrical installation of the wire feed motor.
* Light emitting diode
4
Page 5

III. INSTALLATION
A. EQUIPMENT REQUIRED
1. A 25-ft., 12-conductor cable with 14-pin (@ UEC-8)
extension cables with 19-pin (@ power source)
amphenols at each end to connect the UEC-8 to the
650 cvcc power source, P/N 34135.
D. INST ALLA TION OF METERS
Before performing any installation inside the control, disconnect the electrical power cable at the receptacle (P6) on the control.
Also available are extension cables with 19-pin
amphenols at each as follows:
30-ft., 19-conductor cable ...................... P/N 34378
60-ft., 19-conductor cable ...................... P/N 34377
2. Two-single conductor voltage pickup cables; 6-ft. long,
P/N 996806; or 25-ft. long, P/N 996805.
3. D. C. Analog meters as follows: Voltmeter, 0-80 volts,
P/N 2062416; Ammeter, 0-800 amps, P/N 2062422,
and Trimpot assembly P/N 997507. The trimpot adjusts the ammeter to match the power source ammeter for precise current readings.
4. Flux Manual/Auto Switch Kit, P/N 996369. This
switch can be used to operate an (optional) automatic
flux gate P/N 01E62 (ordered separately).
To install the switch, refer to the schematic and wiring
diagrams in this booklet, and to instructions packed
with the kit.
B. OPTIONAL ACCESSORIES
1. Motor Extension Cable P/N 996808. Provides an extra 25-ft. of cable between the welding head and the
UEC-8.
2. Touch Work Kit, P/N 997868: (Recommended for
sub-arc welding; for use only in D.C. applications.)
The touch work kit senses contact between the welding wire and workpiece, automatically stopping the
wire when contact is established and lighting the touch
work light. For installation, refer to Figs. 7 and 8 and
the instruction literature packed with the kit.
3. Voltage Raise/Lower Switch Kit, P/N 953559: (For use
only with power supplies with motorized control. The
remote voltage control consists of a switch and
silkscreened mounting plate. The switch is installed
in the UEC-8 to control the voltage when the power
supply is not located near the control. For installation, refer to instructions packed with kit.
C. MOUNTING THE CONTROL
Since the operating controls are in the control front panel
the box should be mounted so that the meters and controls are within easy reach and view of the operator. The
control can be mounted on a sidebeam carriage or other
vertical surface by means of the two holes provided on
back of the control.
1. With the UEC-8 cover removed, install the two analog
meters using screws supplied with the meters. (Voltmeter on left, ammeter at right, as viewed from the
front.) Connect meter leads in UEC-8 control as follows:
Ammeter leads: Violet (-) to in-line connector P10
Blue (+) to in-line connector P11
Voltmeter leads: Positive (+) terminal to Yellow lead
from TB1-5, Negative (-) terminal to
Violet lead from TB1-6
Be careful when making the following adjustment
so as not to touch other components. T ouching other
components could result in damage to the unit or
personal injury .
2. The trimpot calibrates the ammeter for applications
where the control is more than 25-ft. from the power
supply. On the rear of the ammeter, mount trimpot
assembly so that the adjusting screw is at the top of
the meter, as you are looking at the chassis. Connect
trimpot leads to terminal points for ammeter as shown
in D-1 above. Under actual welding conditions, remove the UEC-8 cover and adjust the trimpot adjusting screw to bring the control ammeter reading in line
with the power supply ammeter reading.
E. CONNECTIONS FOR SINGLE WIRE OPERATION
Make the required cable connections in accordance with
the interconnection diagram, Fig. 1, and the following:
1. Connect the 14-pin Amphenol of the 12-conductor
cable to the receptacle (P6) on the side of the control. Connect the 19-pin Amphenol to the power supply as shown in Fig. 1.
NOTE: When using DC power and making ammeter
connections from power supply to two leads
of 12-cond. cable connected to control via the
14-pin receptacle, the polarity MUST be proper
or the weld current detector will not operate
and the control will not properly sequence.
2. Connect the motor cable to receptacle (P7) on the side
of the control. See Note 1 on Fig. 1.
3. Connect the plug end of the voltage pick-up cable to
5
Page 6

19-PIN
650 cvcc POWER SOURCE
4/0 CABLES TO WORKPIECE
4/0 CABLE TO NOZZLE BUSBAR
12 COND. CABLE
(OPTONAL EXT. CABLE, see III-A-1
25-FT. 34135
3 COND. CABLE
SUPPLIED WITH WIRE
FEED MOTOR, see
Note 1 or 2.
STRAIN LEFT
UEC-8 CONTROL
DC AMMETER
W/TRMPOT
TB1-8
BLU
P11
BLU
TB1-7
RED
P6
P10
VIO
P7
P8
P9
4 COND. GOV CABLE
2 FT. - 997965
2 - SINGLE COND. CABLES
6-FT. ASSY. - 996806
(also see III-A-2)
TB1-6
VIO
DC VOLTMETER
'J' GOV.
TB1-5
YEL
2 COND. CARRIAGE
CABLE, 10-IN. - 948226
OM-48 CARRIAGE
EH-9 MOTOR
CHART 1
WIRE COLOR PIN
FIELD (-), BLK A
FIELD (+), RED B
ARM (-), GRN C
ARM (+), WHT D
CHART 2
WIRE COLOR PIN
ARM (-), GRN C
ARM (+), WHT D
GND, GRN E
WIRE FEED MOTOR
BUSBAR
4/0 CABLES TO TERMINAL
ON POWER SUPPLY
NOZZLE
See Note 3
4/0 CABLES TO TERMINAL
ON POWER SUPPLY
NOTES
1. If shunt wound motor does NOT have mating plug for UEC-8 motor
receptacle (P7) use connector plug 996513 & cable clamp 525564
and wire per chart-1.
2. If permanent magnet motor does NOT have mating plug for UEC-8
motor receptacle (P7) use above plug and cable clamp and wire per
chart-2.
3. The work voltage pick-up lead must be corrected as shown from the
workpiece. This function is also provided from the power supply thru
P6-1 to TB1-6 in the UEC-8 (via a faston connection). This connection
must be disconnected and taped.
Fig. 1 - Interconnection Diagram
6
Page 7

receptacle (P8) on the side of the control. Connect
the lead tagged No. 1 to busbar and lead No. 2 to the
workpiece or fixture (see Note 3 on Fig. 1).
4. Connect the plug end of the carriage governor cable to
receptacle (P9) on the control.
NOTE: When using "J" Gov. P/N 953534 cable
997965 is required (see Section III-B-5). Insert the lugged end through the strain relief
on the back of the "J" Governor and connect
to TB1 in governor as follows: Red to TB1-8;
White to TB1-9; Black to TB1-10; Green to
ground stud.
F. CONNECTIONS FOR DUAL WIRE OPERATION
1. DC/AC Connection (see Fig. 1). With the numerous
power supplies available for use with the UEC-8, it is
suggested in dual-wire applications that the operator
use a DC unit as the lead power supply source to
provide weld penetration. An AC unit should be used
as the trail power supply to give the weld a cosmetic
finish.
G.IMPORTANT WIRING/OPERATING MODIFICA-
TION USING EH-10A MOTOR
As noted in this booklet, one of the welding heads the
UEC-8 is recommended for use with is the new EH-10A
motor that can accommodate wire speeds from 0-1000
ipm. As a result, the Wire Feed Speed potentiometer
may not have the fine adjustment (or resolution) range
settings that you may prefer, and would normally be afforded the other motors with lower wire speed (ipm)
ranges.
If finer resolution in the "speed" potentiometer is desired,
and you do not plan to operate the control at wire feed
speeds above 500 ipm, you can modify the circuitry to
spread the operating range of this "speed control". To
do this, add a resistor (100K ohm, 1/4 watt) to the Wire
Speed potentiometer as shown in the schematic dia-
gram. Remember, if this modification is made, that
the effective operating range of the potentiometer
will be changed from 0-1000 ipm to 0-500 ipm.
IV. IMPORTANT CHECKLIST
To confirm that the various components (control, head,
carriage, and power supply) have been properly interconnected, it is imperative that the following tests be
performed BEFORE operation starts.
Note: Failure to perform these tests may result in dam-
age to the printed circuit boards in the control.
A. PREP ARA TORY INSTRUCTIONS
Precautionary measures should be taken to provide
maximum protection against electrical shock. Be
sure that all power is off by opening the line (wall)
disconnect switch. To be doubly safe, check your
input leads with a voltmeter to make sure that all
power is OFF.
1. Remove the cover (5 screws) from the UEC-8 Control.
2. Remove the two printed circuit boards (P/N's 677330
& 675332) from inside the UEC-8.
3. The following readings should be taken after all equipment has been installed and interconnected, BEFORE
POWER IS APPLIED to the system, and WITH
PRINTED CIRCUIT BOARDS REMOVED.
B. TEST FOR INPUT POWER CONNECTION
1. Place "MLS" switch in the ON position.
2. Place ohmmeter to the highest resistance scale.
3. Check for continuity between TB1-3 and ground stud;
then check for continuity between TB1-1 and ground
stud. There should be a small deflection when the
meter leads are first connected to these points; then
both readings should be infinity.
C. TEST FOR CONTACTOR, CARRIAGE AND FLUX
GATE CONNECTION
1. Place carriage travel and flux gate switches in the
"OFF" position, ("MLS" switch ON).
2. Place ohmmeter on Rx-1 scale. Check for continuity
between TB1-3 and the center terminal of CTS switch.
Reading should be approx. 1000 ohms (for "J" Gov.).
3. Check for continuity between TB1-3 and the red wire
on WSSS switch. Reading should be approx. 40
ohms. If flux gate is used, check for continuity between TB 1-3 and the center terminal of the Flux
switch. Readings should be approx. 40 ohms.
D. TEST FOR VOLTMETER AND AMMETER CON-
NECTIONS
1. If hookup is made to a DC power supply:
a. Place the positive meter lead on TB1-5 and nega-
tive meter lead on TB1-6. Reading should be
approx. 500 ohms, but this reading will vary con-
7
siderably from power supply to power supply.
Page 8

b. Reverse meter leads and reading should be 50 ohms
or less. To test for ammeter harnessing, place meter
across terminals TB1-7 and TB1-8, reading should
be approx. 1 ohm.
E. TEST FOR MOTOR CONNECTION
1. For permanent-magnet motors such as EH-10, EH11, check for continuity between TB1-13 and TB1-14.
Reading should be approx. 5 ohms.
2. For shunt-wound motors such as EH-2, EH-3, check
for continuity between P7-A and P7-B. Reading
should be approx. 500 ohms.
3. Check for shorts between TB1-13 and ground stud;
check for continuity between P7-B and ground stud.
Both readings should be infinity.
F. RESULTS
If any of the readings do NOT correspond with the readings above, DO NOT APPLY POWER. Instead, check
all connections between components until the problem
is found and corrected.
If all readings correspond with the readings above, place
"MLS" switch in the OFF position and re-install the printed
circuit boards inside the control. UEC-8 is now ready
for operation.
G. LED INDICATOR LIGHTS
There are three LED indicator lights mounted on the PC
boards that will help in setting up the equipment and in
troubleshooting. Two of the lights are located on the
Logic Board (675330) and one on the Reversible Governor Board (675332).
In setting up the equipment, the indicating light (REVLED) on the Reversible Gov. Board (675332) is of main
concern. (Refer to Fig. 5)
1. The control and wire feeder should be set up such
that when the inch switch is depressed in the down
position the motor should be feeding forward. If the
motor feeds in the reverse direction, reverse the yellow and gray armature leads at TB1-13 and TB1-14.
2. To double check motor setup, perform this final test:
Depress inch up switch and see if indicating light on
the Reversible Gov. Board is dimly lit. The unit should
not be operated if the indicating light is not on.
The other two lights are located on the logic board (Fig.
6) and marked C-DET and V-DET. These lights will be
illuminated only when welding currents and welding voltages are detected.
Page 9

V. OPERATION
In each of the starting methods to be considered, it will
be assumed that the unit has been properly installed,
wire placed on reel and fed through sub-arc nozzle, and
checked to insure proper operation and that fuses are
of the proper values. In no case should fuses of larger
capacity be substituted. If sub-arc welding, fill the hopper with welding composition.
The following is a description of the procedures to be
followed in making starts.
IMPORTANT NOTE: When using any of the procedures,
make sure that the Weld Start-Stop
Switch is in the "Stop" position before the Main Line Switch is moved
to "ON" position to energize the
control.
A. SUB-ARC SCRATCH STARTING SEQUENCE
1. Provide flux cover of weld zone.
2. Place Carriage Auto-Manual switch in "Manual", Carriage will move in direction of weld.
3. Place Weld Start-Stop switch in "Start" position.
Welding wire will begin slow inch down through flux
burden; when the wire touches the plate and an arc
is established, wire speed is transferred to the main
control potentiometer and the weld is in progress.
4. Place Carriage Auto-Manual switch in "Auto" position if automatic stoppage of the carriage is required.
5. To stop weld, place Weld Start-Stop switch into the
"Stop" position.
4. Place Weld Start-Stop switch in "Start" position. Power
supply contactor is automatically energized and weld
commences.
5. With start of welding current, carriage starts, and wire
retracts at inch speed creating an arc.
6. After arc is established, the wire is fed in the forward
direction at weld speed required to properly maintain
the selected arc voltage.
7. To end the weld, the Weld Start-Stop switch is placed
in the "Stop" position. Wire feed will cease, and the
contractor and carriage travel will continue for the desired anti-stick time. (To adjust the length of time for
the anti-stick, refer to Section II-A-9).
D. SUB-ARC RETRACT ST ART - C. C. MODE
In this mode the wire is in contact with the workpiece
before the Start key is operational. After the wire is energized, and the current detector detects short circuit
current, the motor will reserve and the wire will retract at
inch speed. As soon as the wire separates from the
workpiece, and arc voltage and current and detected,
the motor will change direction to forward and feed wire
at preset weld speed.
B. POSITIONED STARTING SEQUENCE
(without touch-work kit installed)
1. Wedge a tightly rolled ball of steel wool about 3/8-in.
in diameter between the welding wire and the
workpiece, and cover the weld zone with flux. Place
the Carriage Auto-Manual switch in "Auto" position.
2. Place Weld Start-Stop switch in "Start" position. The
power supply contactor comes in immediately, initiating the welding action and carriage travel.
3. To stop the welding action, place Weld Start-Stop
switch in "Stop" position.
C. TOUCH WORK STARTING SEQUENCE (optional
accessory)
1. Place Carriage Auto-Manual in "Auto" Carriage will
start and stop with welding action.
2. Place Inch Up-Down in "Down" position. Wire will
inch toward work and automatically stop when contact is made, at which time the touch work light will be
energized.
3. Place flux over weld zone, leaving Weld Start-Stop
switch in "Stop" position.
Page 10

VI. TROUBLESHOOTING INFORMATION
If this equipment does not operate properly, stop
work immediately and investigate the cause of the
malfunction. Troubleshooting and maintenance
work must be performed by an experienced person,
and electrical work by a trained electrician. Do not
permit untrained persons to inspect, clean or repair
this equipment. Use only recommended replacement parts.
Precautionary measures should be taken to provide
maximum protection against electrical shock. Be
sure that all power is off by operating the line (wall)
disconnect switch, before attempting any work inside the control.
A. SYMPTOM: F1 fuse blows whenever main line
switch is turned "ON".
1. Check wiring for shorts.
2. If no short, replace governor PC board.
B. SYMPTOM: F1 fuses blows when Inch Switch is
operated.
1. Check for jammed or defective wire feed motor/
drive unit.
2. Replace governor PC board.
F. SYMPTOM: No control over motor speed at wire
feed potentiometer.
1. Check wire speed potentiometer with ohmmeter.
Resistance should range from 0 through 100 K
ohms. Resistance should range from 0 through
100 K ohms. Replace if defective.
2. Replace governor PC board.
3. Replace logic PC board.
G. SYMPTOM: Contactor in power supply does not
energize. Motor operates.
1. Check power supply control cable.
2. Check fuse (power supply).
3. Replace logic PC board.
H. SYMPTOM: Erratic or pulsing wire feed rate.
1. Replace logic PC board.
C. SYMPTOM: Motor inoperative.
1. Check setting of Inch Speed pot.
2. Check main line fuse F1.
3. Check motor plug.
4. Check motor brushes.
5. Replace logic PC board.
6. Replace Governor PC board.
D. SYMPTOM: Wire feed motor operates by inching
but does not operate for welding.
1. Check setting of WFSP.
2. Check touch work indicator light for operation when
wire torches work.
3. Observe that both LED lights on logic PC board
are lit after arc initiating.
4. Replace logic PC board.
E. SYMPTOM: If wire feed motor continues to run
when wire touches plate and work light not on.
1. Check fuse (1/2 amp) located on logic board.
2. Check for fused flux at tip of welding wire.
3. Check power supply ground cable for connection to workpiece.
4. Replace logic PC board.
Page 11

VII. REPLACEMENT P ART DATA
1. All replacement parts are keyed on the illustrations which follow. Order replacement parts by part number and part
name, as shown on illustrations. DO NOT ORDER BY PART NUMBER ONLY.
2. Many of the parts on the illustrations, particularly electronic parts, are 'vendor items.' This means that they are
standard commercial parts made by and purchased from other manufacturers. If you order from these outside
sources, use the manufacturer's part number or designated as shown in the Electrical Parts List.
3. Always state the series or serial number of the machine on which the parts are used. The serial number is stamped
on the unit nameplate.
.
VOLTMETER
(Accy, Refer to Sec. III-A)
CTS, SWITCH 672831
SIDE PANEL - 6787866
(OLD PANEL - 2075186)
CABINET - 30782
POWER PILOT LIGHT 598227
MLS, SWITCH - 97W64
VCP, POTENTIOMETER - 639541
KNOB - 996501
WSP, 10-TURN POTENTIOMETER - 181W85
KNOW - 181W87
* WARNING LABEL - 995204
WARNING
ELECTRICAL SHOCK HAZARD
DO NOT OPERATE WITH COVER REMOVED
NETWORK - 996918
FN, FILTER
RI, RESISTOR
17240005
Fig. 2 - UEC-8 Control, P/N 677190
SENSITIVITY POTENTIOMETER - 92W64
KNOB - 994305
AMMETER/INCHES-PER MINUTE METER
(Accy, Refer to Sec. III-A)
COVER - 677867
(OLD COVER - 2075227)
WSSS, SWITCH 634518
ISP,
POTENTIOMETER 995301
IS, SWITCH 599692
NOTE: Two cap screws 5/16" — 18
X 1/2" lg. (provided in cloth bag) for
attaching control to OM-48 Side
Beam Carriage.
LOGIC BOARD - 675330
INCLUDES:
FUSE - 996523 (1/2 A. STD)
REVERSIBLE GOV.
BOARD - 675332
TB1, TERMINAL BLOCK 635568
TI, CONTROL
TRANSFORMER
995284
* Replace label if it becomes excessively worn or lost.
TOUCH WORK KIT
997868 (OPTIONAL)
INCLUDES:
FUSE - 82W43 (IA. SLO-BLO)
Fig. 3 - UEC-8 Control (Inside View)
Page 12

WARNING LABEL - 995164
WARNING
Disconnect power cord before
performing any maintenance
RECEPTACLE - 6271128
ASP,
POTENTIOMETER
995301
RECEPTACLE - 636694
RECEPTACLE - 996514
Replace label if it becomes
excessively worn or lost. Be
sure to order decal if replacing sheet metal.
REV. LED, See
Sect. IV-G
MOV-2
WELD POWER
SEL. SW.
F-1, FUSE - 97W06
FUSE HOLDER 182W15
RECEPTACLE - 523543
Fig. 4 - UEC-8 Control (Left Side View)
The new Rev. Gov. Bd. P/N 675332 (which replaced
old P/N 997250) is designed for use with permanent
magnet motors only (such as EH-10 or EH-11) and can-
not be used with field-wound motors (such as EH-2 or
EH-5). If your set-up uses a field-wound motor, consult
with the factory.
Fig. 5 - Reversible Governor PC Board, P/N 675332
FUSE 1/2 AMP.
VOLTAGE
DETECTOR
LED
CURRENT
DETECTOR
LED
Fig. 6 - Logic P .C. Board, P/N 9971 15 (Earlier Unit s - obso-
lete)
Logic P.C. Board, P/N 675330 (Later Units - after
March 1984)
Page 13

Fig. 7 - Schematic Diagram, UEC-8 Control
Page 14

Fig. 8 - Wiring Diagram, UEC-8 Control
Page 15

Page 16

ESAB Welding & Cutting Products, Florence, SC Welding Equipment
COMMUNICATION GUIDE - CUSTOMER SERVICES
A. CUSTOMER SERVICE QUESTIONS:
Telephone: (800)362-7080 / Fax: (800) 634-7548 Hours: 8:00 AM to 7:00 PM EST
Order Entry Product Availability Pricing Order Information Returns
B. ENGINEERING SERVICE:
Telephone: (843) 664-4416 / Fax : (800) 446-5693 Hours: 7:30 AM to 5:00 PM EST
Warranty Returns Authorized Repair Stations Welding Equipment Troubleshooting
C. TECHNICAL SERVICE:
Telephone: (800) ESAB-123/ Fax: (843) 664-4452 Hours: 8:00 AM to 5:00 PM EST
Part Numbers Technical Applications Specifications Equipment Recommendations
D. LITERATURE REQUESTS:
Telephone: (843) 664-5562 / Fax: (843) 664-5548 Hours: 7:30 AM to 4:00 PM EST
E. WELDING EQUIPMENT REPAIRS:
Telephone: (843) 664-4487 / Fax: (843) 664-5557 Hours: 7:30 AM to 3:30 PM EST
Repair Estimates Repair Status
F. WELDING EQUIPMENT TRAINING
Telephone: (843)664-4428 / Fax: (843) 679-5864 Hours: 7:30 AM to 4:00 PM EST
Training School Information and Registrations
G. WELDING PROCESS ASSISTANCE:
Telephone: (800) ESAB-123 Hours: 7:30 AM to 4:00 PM EST
H. TECHNICAL ASST. CONSUMABLES:
Telephone : (800) 933-7070 Hours: 7:30 AM to 5:00 PM EST
IF YOU DO NOT KNOW WHOM TO CALL
Telephone: (800) ESAB-123
Fax: (843) 664-4462
Hours: 7:30 AM to 5:00 PM EST
or
visit us on the web at http://www.esabna.com
The ESAB web site offers
Comprehensive Product Information
Material Safety Data Sheets
Warranty Registration
Instruction Literature Download Library
Distributor Locator
Global Company Information
Press Releases
Customer Feedback & Support
F-12-747-F 3/95 1M Printed in U.S.A.
 Loading...