


November, 2002
Installation, Operation and Maintenance Manual for the
PCM-875A Plasmarc Mechanized
Cutting System
F-15-753
Cutting Systems
411 South Ebenezer Road
Florence, South Carolina, U.S.A
.

The equipment described in this manual is
potentially hazardous. Use caution when installing,
operating and maintaining this equipment.
Purchaser is solely responsible for the safe
operation and use of all products purchased,
including compliance with OSHA and other
government standards. ESAB Cutting
Systems has no liability for personal injury or
other damage arising out of the use of any
product manufactured or sold be ESAB. See
standard ESAB terms and conditions of sale
for a specific statement of ESAB’s
responsibilities and limitations on its liabilit y.
ESAB Cutting Systems first priority is total
customer satisfaction. We constantly look for
ways to improve our products, service and
documentation. As a result, we make
enhancements and/or design changes as
required. ESAB makes every possible effort to
ensure our documentation is current. We
cannot guarantee that each piece of
documentation received by our customers
reflects the latest design enhancements.
Therefore, the information contained in this
document is subject to change without notice.
This manual is ESAB Part Number F15753
This manual is for the convenience and use of the
cutting machine purchaser. It is not a contract or
other obligation on the part of ESAB Cutting
Systems.
Printed in U.S.A.
© ESAB Cutting Systems, 2002

PCM-875A System Table of Contents
Section 1 Safety Page 1-(_)
1.1 Introduction ................................................................................................... 1
1.2 Safety Notations And Symbols ....................................................................... 2
1.3 General Safety Information ............................................................................. 3-4
1.4 Installation Precautions................................................................................... 4
1.5 Electrical Grounding ....................................................................................... 5
1.6 Operating A Plasma Cutting Machine ............................................................. 5-8
1.7 Service Precautions........................................................................................ 9-10
1.8 Safety References.......................................................................................... 11-16
1.8.1 National Standards................................................................................. 11
1.8.2 International Standards........................................................................... 12-16
Section 2 Description Page 2-(_)
2.1 General........................................................................................................... 1
2.2 PCM-875A Power Console ............................................................................ 1
2.2.1 Technical Specifications – PCM-875A..................................................... 1
2.2.2 Dimensions and Weight.......................................................................... 2
2.3 Remote Arc Starter (RAS2)............................................................................. 3
2.3.1 Technical Specifications ......................................................................... 3
2.3.2 Dimensions and Weight.......................................................................... 3
2.4 PT-20AMX Torch ........................................................................................... 4
2.4.1 Technical Specifications ......................................................................... 4
2.4.2 Dimensions and Weight.......................................................................... 5
2.4.3 Torch Spare Parts Kit ............................................................................. 6
i

PCM-875A System Table of Contents
Section 3 Installation Page 3-(_)
3.1 General .......................................................................................................... 1
3.2 Installation of power console........................................................................... 1
3.2.1 Requirements ......................................................................................... 1
3.2.2 Location ................................................................................................. 2
3.2.3 Inspection before installation ................................................................... 2
3.2.4 Primary Electrical Input Connections........................................................ 3
3.2.5 Connection of Plasma Console to CNC Interface..................................... 4
3.2.6 Secondary (Output) Connection .............................................................. 5-8
3.3 Connection of Remote Arc Starter (RAS2)....................................................... 9
3.3.1 Mounting ............................................................................................... 9
3.3.2 Connecting Service Lines (Input).............................................................. 10
3.3.3 Setting Spark Gap .................................................................................. 11
3.3.4 RAS2 Output Connections...................................................................... 12
3.3.5 Termination of Torch Shield Braid............................................................ 13-14
3.4 Installing Front-end torch Parts ........................................................................ 15-17
3.5 Interconnecting Diagram................................................................................. 18-19
Section 4 Operation Page 4-(_)
4.1 PCM-875A Console Operation -- General ....................................................... 1
4.2 Console Controls............................................................................................ 2-3
4.3 RAS2 ............................................................................................................. 3
4.4 PT-20AMX Plasma Torch................................................................................ 4
4.5 Cut Quality ..................................................................................................... 5
4.5.1 Introduction ............................................................................................ 5
4.5.2 Cut Angle ............................................................................................... 6
4.5.3 Cut Flatness ........................................................................................... 7
4.5.4 Surface Finish (Roughness) ..................................................................... 8
4.5.5 Dross ..................................................................................................... 9-10
4.5.6 Dimensional Accuracy............................................................................. 10-11
4.6 Process Data................................................................................................... 11-23
ii

PCM-875A System Table of Contents
Section 5 Maintenance Page 5-(_)
5.1 PCM-875A Console ....................................................................................... 1
5.1.1 General.................................................................................................. 1
5.1.2 Inspection and Cleaning ......................................................................... 2-3
5.1.3 Flow Switch 4
5.2 RAS2 (Remote Arc Starter)............................................................................. 5
5.2.1 General.................................................................................................. 5
5.2.2 Spark Gap Procedure............................................................................. 5
5.3 PT-20AMX Plasmarc Torch ............................................................................ 6
5.3.1 General.................................................................................................. 6
5.3.2 Dirt or Contamination ............................................................................. 7
5.3.3 Loose Consumables............................................................................... 7
5.3.4 Damage Caused by Loose Parts or Overheating ..................................... 8
5.3.5 Consumables- Remove and Replace..................................................... 8-10
5.3.6 Measuring Torch Gas Flows ................................................................... 10
5.3.7 Removal and Replacement of the Torch Body......................................... 11
iii

PCM-875A System Table of Contents
Section 6 Troubleshooting Page 6-(_)
6.1 Troubleshooting PCM-875A Plasmarc System ................................................ 1
6.2 Console ......................................................................................................... 2-8
6.2.1 Power Light (PL1) does not come on....................................................... 2
6.2.2 No Air Flow............................................................................................. 2
6.2.3 Power Light is on but nothing happens when signal is given to fire with
no fault light .........................................................................................
6.2.4 Fault light activates when torch fire signal is given.................................... 4-5
6.2.5 Air is on but nothing happens when torch fire signal is given .................... 6
6.2.6 High Frequency and Pilot Arc are on but no main arc transfer.................. 7
6.2.7 Poor Cutting Performance....................................................................... 7
6.2.8 Air does not shut off................................................................................ 7
6.2.9 Main arc difficult to start.......................................................................... 8
6.3 Reference Voltage Checks.............................................................................. 9
6.4 PT-20AMX Torch Troubleshooting10 .............................................................. 10-11
6.4.1 Insufficient Penetration............................................................................ 10
3
6.4.2 Main Arc Extinguishes............................................................................. 10
6.4.3 Dross Formation ..................................................................................... 10
6.4.4 Double Arcing......................................................................................... 11
6.4.5 Uneven Arc............................................................................................. 11
6.4.6 Unstable Cutting Conditions.................................................................... 11
6.4.7 Main Arc Does Not Strike........................................................................ 11
6.4.8 Poor Consumable Life............................................................................. 11
6.5 230V Power Console Electrical Drawings ........................................................ 12-17
6.5.1 Schematic .............................................................................................. 12-13
6.5.2 Wiring Diagrams ..................................................................................... 14-17
6.6 400V Power Console Electrical Drawings ........................................................ 18-23
6.6.1 Schematic .............................................................................................. 18-19
6.6.2 Wiring Diagrams ..................................................................................... 20-23
6.7 Remote Arc Starter Schematic........................................................................ 24
Section 7 Replacement Parts Page 7-(_)
7.1 General .......................................................................................................... 1
7.2 Ordering......................................................................................................... 1
7.3 PCM875A Power Console – 230V .................................................................. 2-9
7.4 PCM-875A Power Console – 400V ................................................................. 10-18
7.5 Remote Arc Starter......................................................................................... 19-21
7.6 PT-20AMX Plasmarc Cutting Torch................................................................. 22-25
Back Manual
Customer/Technical Information
iv
Cover

SECTION 1 PCM-875A Mechanized Plasma Cutting System SAFETY
1.1 Introduction
The process of cutting metals with plasma
equipment provides industry with a valuable and
versatile tool. ESAB cutting machines are
designed to provide both operation safety and
efficiency. However, as with any machine tool,
sensible attention to operating procedures,
precautions, and safe practices is necessary to
achieve a full measure of usefulness. Whether an
individual is involved with operation, servicing, or
as an observer, compliance with established
precautions and safe practices must be
accomplished. Failure to observe certain
precautions could result in serious personnel injury
or severe equipment damage. The following
precautions are general guidelines applicable when
working with cutting machines. More explicit
precautions pertaining to the basic machine and
accessories are found in the instruction literature.
For a wide scope of safety information on the field
of cutting and welding apparatus, obtain and read
the publications listed in the Recommended
References.
1-1
SECTION 1 PCM-875A Mechanized Plasma Cutting System SAFETY
1.2 Safety Notations And Symbols
!
DANGER
!
The following words and symbols are used
throughout this manual. They indicate different
levels of required safety involvement.
ALERT or ATTENTION. Your safety is
involved or potential equipment failure exists.
Used with other symbols and information.
Used to call attention to immediate hazards
which, if not avoided, will result in serious
personal injury o r lo ss o f life.
WARNING
!
CAUTION
!
CAUTION
NOTICE
Used to call attention to potential hazards that
could result in personal injury or loss of life.
Used to call attention to hazards that could
result in minor personal injury or equipment
damage.
Used to call attention to minor hazards to
equipment.
Used to call attention to important
installation, operation or maintenance
information not directly related to safety
hazards.
1-2

SECTION 1 PCM-875A Mechanized Plasma Cutting System SAFETY
1.3 General Safety Information
NOTICE
Some subjects listed are not related specifically to
the type of equipment covered in this manual.
However, the safety principles still apply. They are
offered as a reminder that this equipment or
related apparatus should be operated with
alertness and understanding. Safety of operators,
technicians, maintenance workers and observers
should not be taken for granted.
Machinery may start automatically.
WARNING
!
WARNING
!
Equipment positioning mechanized plasma torch
moves in various directions and speeds.
· Moving machinery can crush.
· Only qualified personnel should operate or
service this power source.
· Keep all personnel, materials, and equipment
not involved in production process clear of
entire system area.
· Fence off entire work cell to prevent personnel
from passing through area or standing in the
working envelope of the equipment.
· Post appropriate WARNING signs at every
work cell entrance.
· Follow lockout procedure before servicing any
equipment.
Failure to follow operating instructions
could result in death or serious injury.
Read and understand this operator’s manual
before using machine.
· Read entire procedure before operating or
performing any system maintenance.
· Special attention must be given to all hazard
warnings that provide essential information
regarding personnel safety and/or possible
equipment damage.
· All safety precautions relevant to electrical
equipment and process operations must be
strictly observed by all having system
responsibility or access.
· Read all safety publications made available by
your company.
1-3

SECTION 1 PCM-875A Mechanized Plasma Cutting System SAFETY
Failure to follow safety warning label
WARNING
!
1.4 Installation Precautions
instructions could result in death or
serious injury.
Read and understand all safety warning labels on
machine.
Refer to operator’s manual for additional safety
information.
WARNING
!
Improperly Installed Equipment Can
Cause Injury Or Death.
Follow these guidelines while installing machine:
· Contact your ESAB representative before
installation. He can suggest certain
precautions regarding piping installation and
machine lifting, etc. to ensure maximum
security.
· Never attempt any machine modifications or
apparatus additions without first consulting a
qualified ESAB representative.
· Observe machine clearance requirements for
proper operation and personnel safety.
· Always have qualified personnel perform
installation, troubleshooting and maintenance
of this equipment.
· Provide a wall mounted disconnect switch with
proper fuse sizes close to the power supply.
1-4

SECTION 1 PCM-875A Mechanized Plasma Cutting System SAFETY
1.5 Electrical Grounding
Electrical grounding is imperative for proper
machine operation and SAFETY. Refer to this
manual’s Installation section for detailed grounding
instructions.
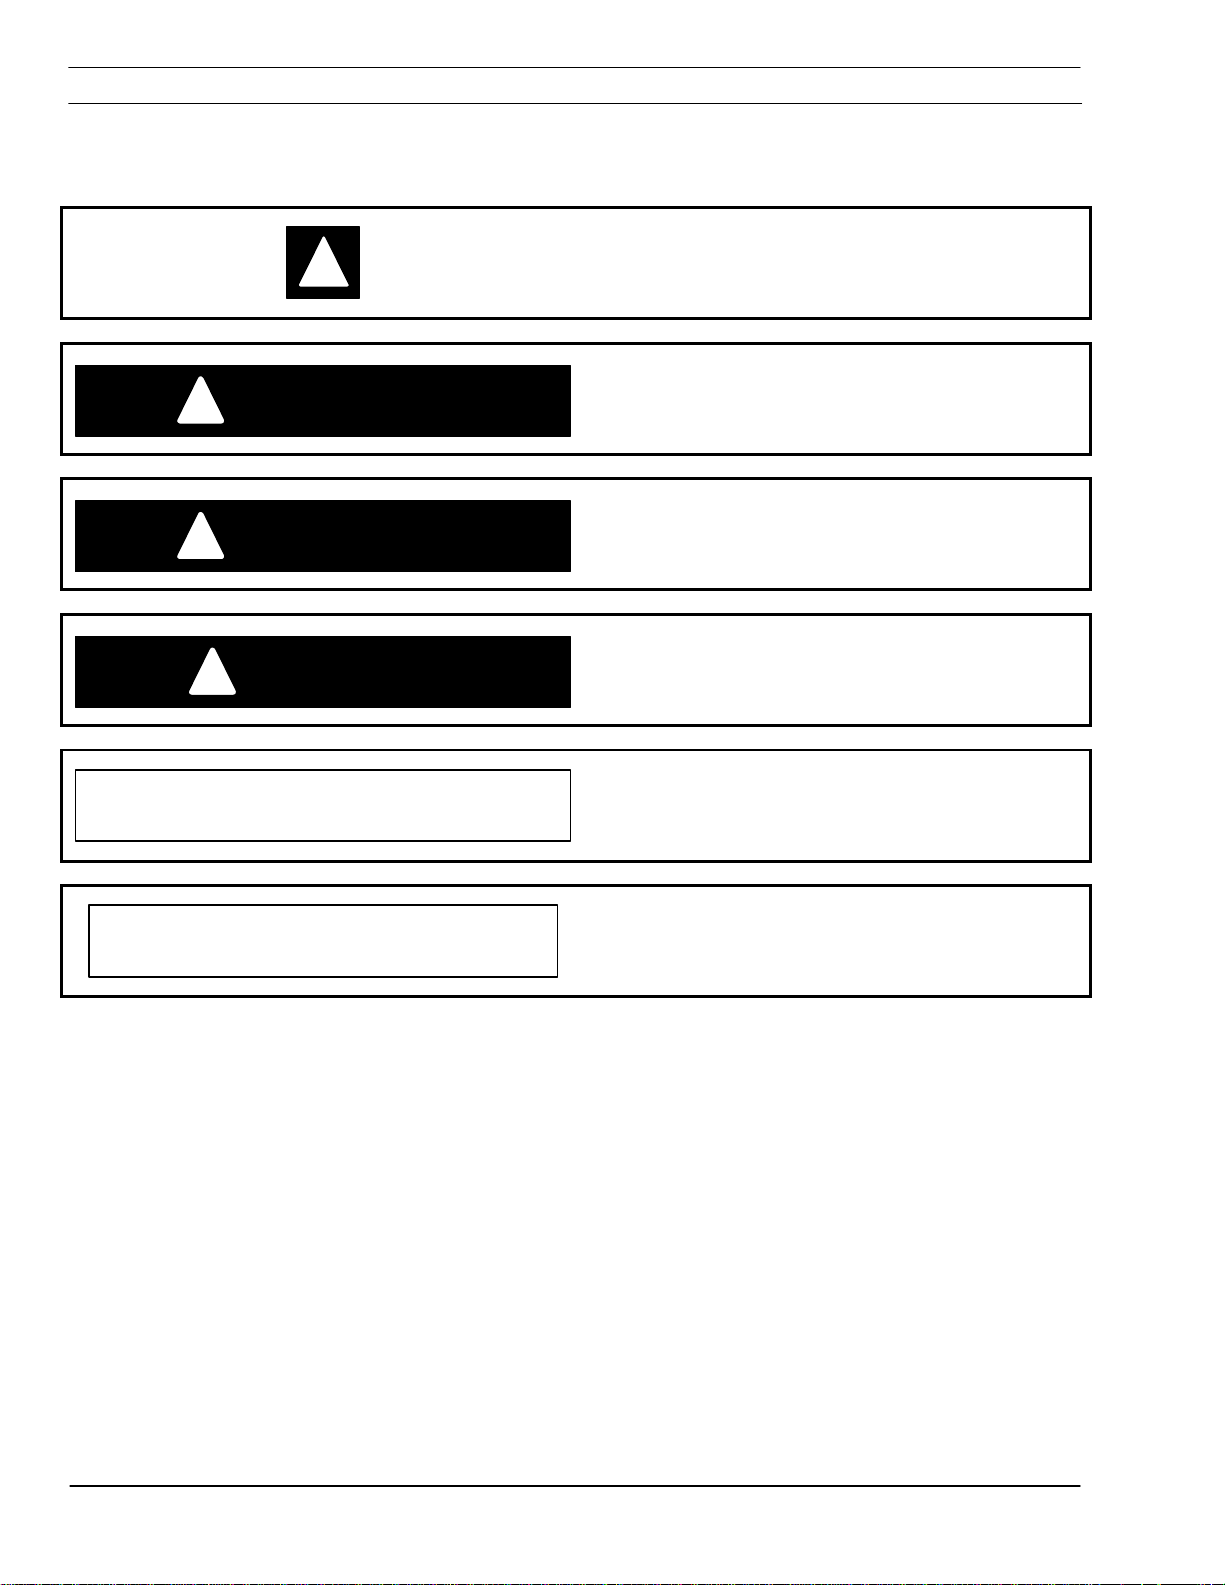
Electric shock hazard.
WARNING
!
1.6 Operating A Plasma Cutting Machine
Improper grounding can cause severe injury or
death.
Machine must be properly grounded before put
into service.
Flying debris and loud noise
WARNING
!
hazards.
· Hot spatter can burn and injure eyes. Wear
goggles to protect eyes from burns and flying
debris generated during operation.
· Chipped slag may be hot and fly far.
Bystanders should also wear goggles and
safety glasses.
· Noise from plasma arc can damage hearing.
Wear correct ear protection when cutting
above water.
Burn hazard.
WARNING
!
Hot metal can burn.
· Do not touch metal plate or parts immediately
after cutting. Allow metal time to cool, or douse
with water.
· Do not touch plasma torch immediately after
cutting. Allow torch time to cool.
1-5
SECTION 1 PCM-875A Mechanized Plasma Cutting System SAFETY
Hazardous voltages. Electric shock
WARNING
!
can kill.
· Do NOT touch plasma torch, cutting table or
cable connections during plasma cutting process.
· Always turn power off to plasma power
supplies before touching or servicing plasma torch.
· Always turn power off to plasma power
supplies before servicing any system component.
· Do not touch live electrical parts.
· Keep all panels and covers in place when
machine is connected to power source.
· Wear insulating gloves, shoes and clothing to
insulate yourself from workpiece and electrical
ground.
· Keep gloves, shoes, clothing, work area, and
equipment dry.
· Replace worn or damaged cables.
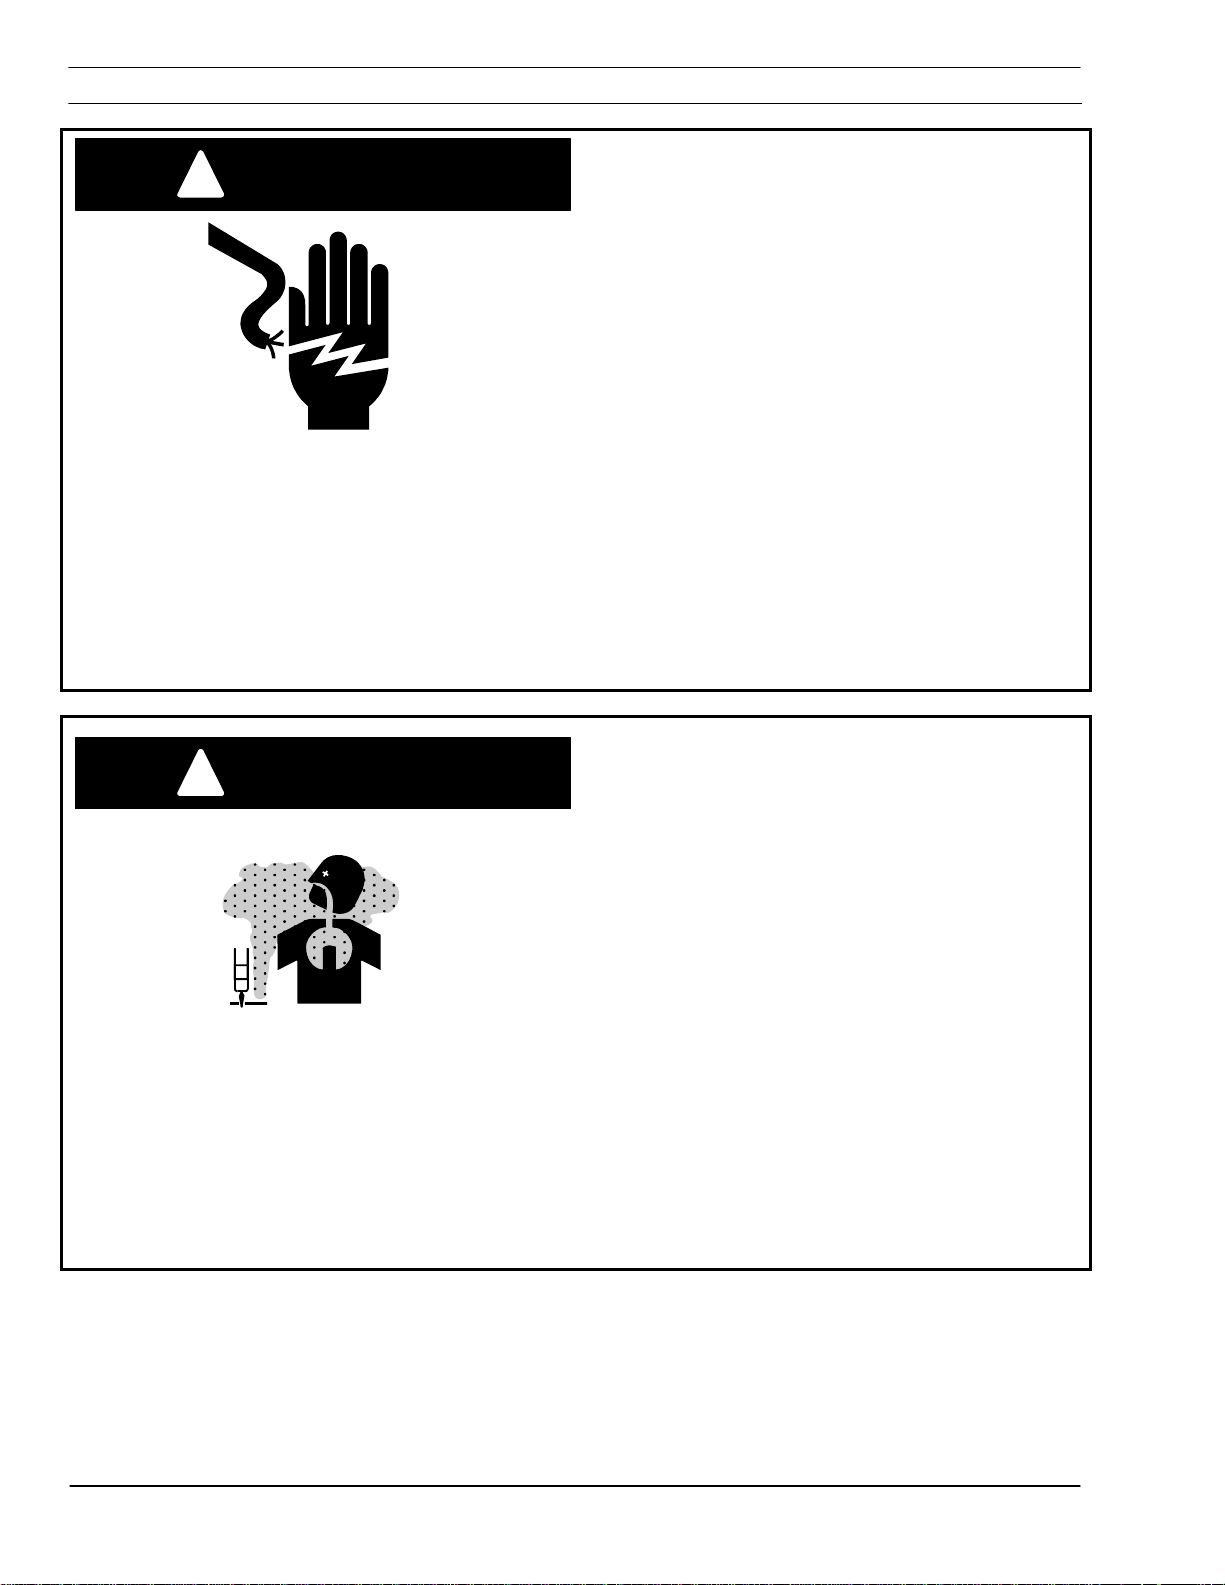
Fume hazard.
WARNING
!
Fumes and gases generated by the plasma cutting
process can be hazardous to your health.
· Do NOT breathe fumes.
· Do not operate plasma torch without fume
removal system operating properly.
· Use additional ventilation to remove fumes if
necessary.
· Use approved respirator if ventilation is not
adequate.
· Provide positive mechanical ventilation when
cutting galvanized steel, stainless steel, copper,
zinc, beryllium, or cadmium. Do not breathe these
fumes.
·
operations. Heat or arc rays can react with
chlorinated hydrocarbon vapors to form phosgene,
a highly toxic gas and other irritant gases.
Do not operate near degreasing and spraying
1-6
SECTION 1 PCM-875A Mechanized Plasma Cutting System SAFETY
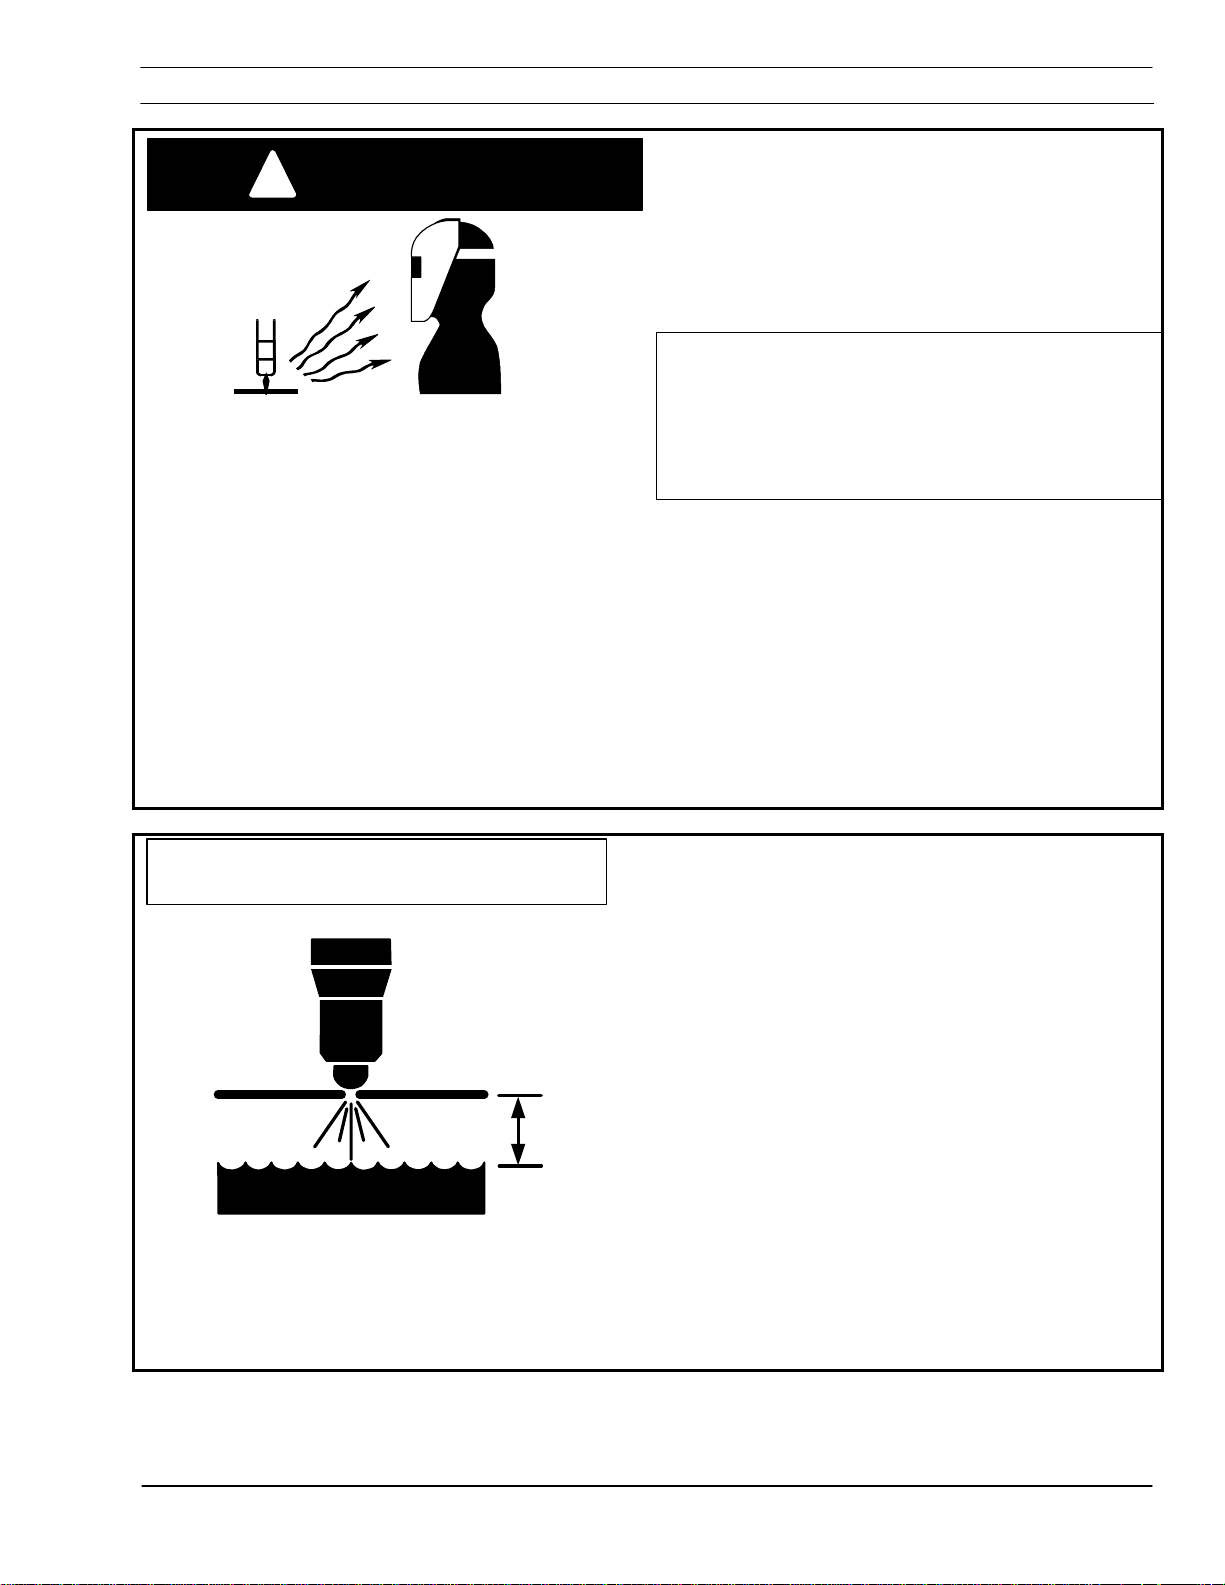
Radiation hazard.
WARNING
!
Arc rays can injure eyes and burn skin.
· Wear correct eye and body protection.
· Wear dark safety glasses or goggles with side
shields. Refer to following chart for recommended
lens shades for plasma cutting:
Arc Current Lens Shade
Up to 100 Amps Shade No. 8
100-200 Amps Shade No. 10
200-400 Amps Shade No. 12
Over 400 Amps Shade No. 14
· Replace glasses/goggles when lenses are
pitted or broken
· Warn others in area not to look directly at the
arc unless wearing appropriate safety glasses.
· Prepare cutting area to reduce reflection and
transmission of ultraviolet light.
§ Use special paint on walls to absorb UV
light.
§ Install protective screens or curtains to
reduce ultraviolet transmission.
CAUTION
Do Not Use this Torch Under Water.
The PT-20AMX is designed to be a dry
cutting process.
Cutting under water may result in:
· reduced consumable life
· degradation of cut quality
· possible damaged torch
Cutting under water may result in poor cutting
performance. Water vapor created when hot material
or sparks contact liquid may cause arcing inside torch.
When cutting on a water table, reduce the water level
to provide maximum clearance between water and
material.
1-7
SECTION 1 PCM-875A Mechanized Plasma Cutting System SAFETY
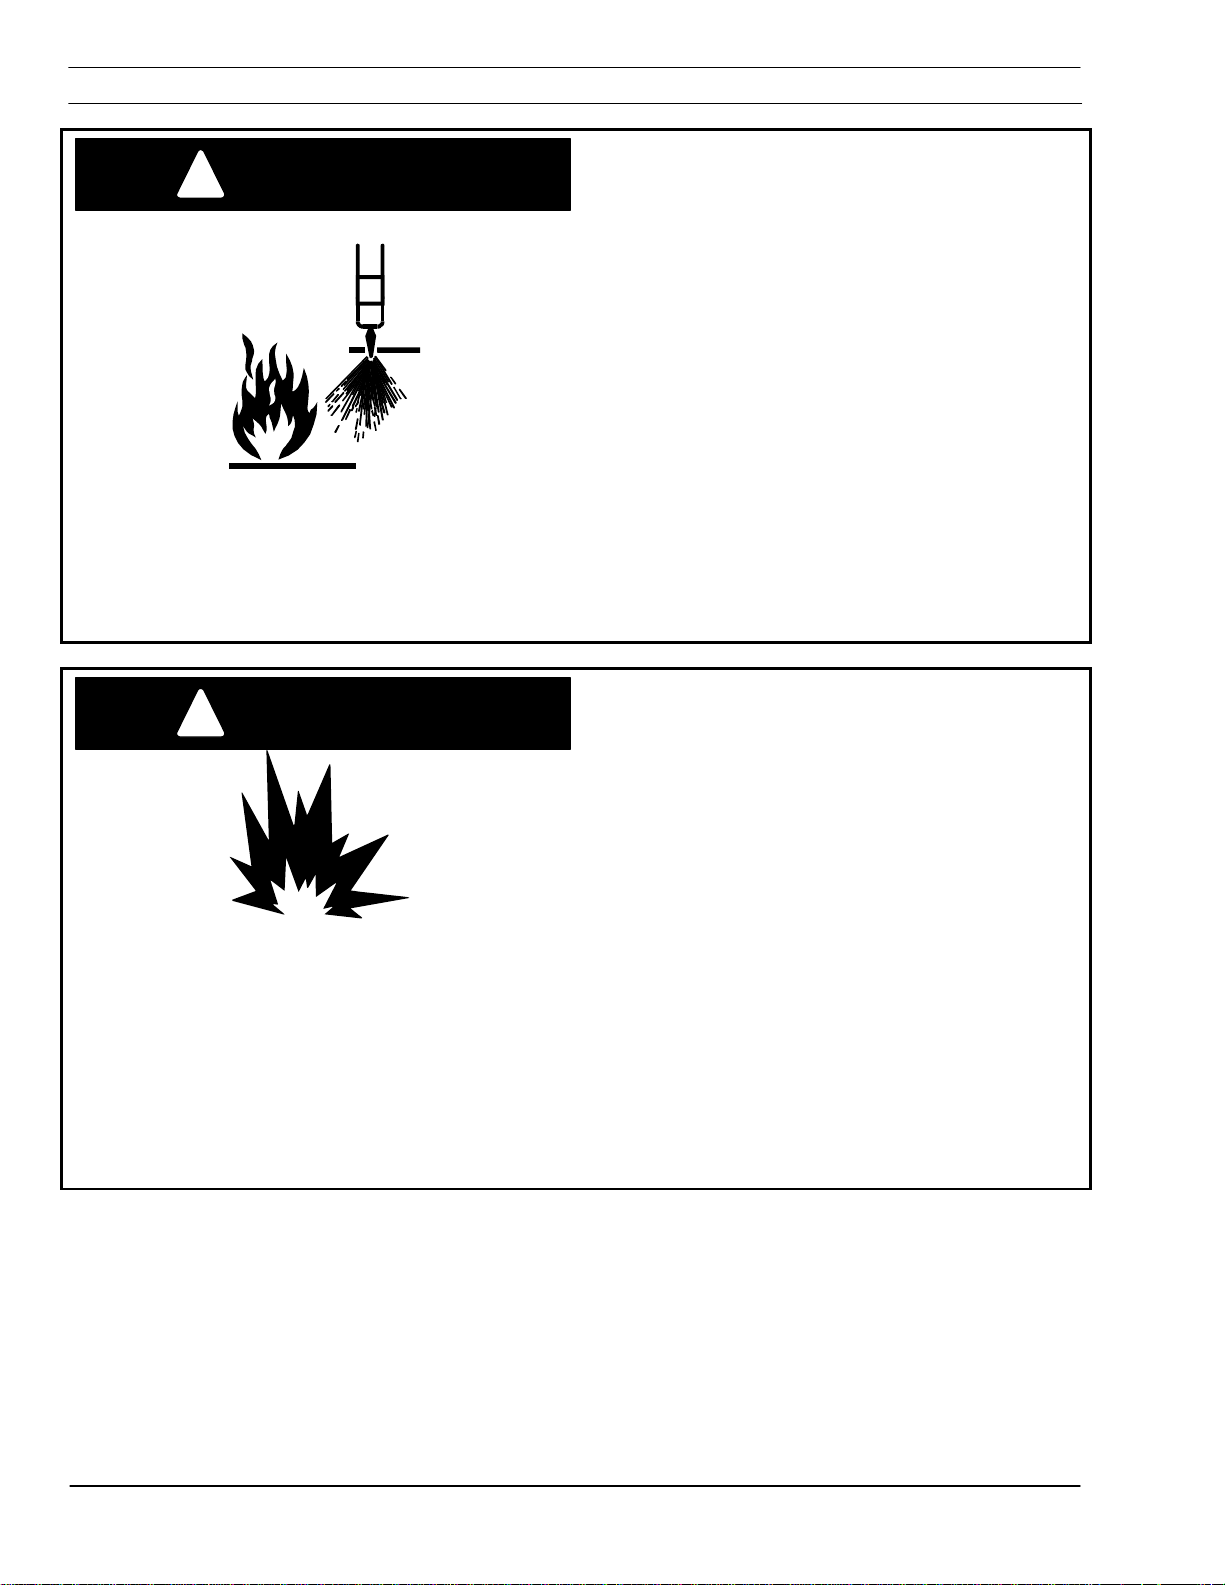
Burn Hazard.
WARNING
!
Heat, spatter, and sparks cause fire and burns.
· Do not cut near combustible material.
· Do not have on your person any combustibles
(e.g. butane lighter).
· Pilot arc can cause burns. Keep torch nozzle
away from yourself and others when activating
plasma process.
· Wear correct eye and body protection.
· Wear gauntlet gloves, safety shoes and hat.
· Wear flame-retardant clothing covering all
exposed areas.
· Wear cuffless trousers to prevent entry of
sparks and slag.
· Have fire extinguishing equipment available for
use.
Explosion hazard.
WARNING
!
· Certain molten aluminum-lithium (Al-Li) alloys
can cause explosions when plasma cut OVER
water.
§ These alloys should only be dry cut on a
dry table.
§ DO NOT dry cut over water.
§ Contact your aluminum supplier for
additional safety information regarding
hazards associated with these alloys
Do not cut in atmospheres containing
·
explosive dust or vapors.
·
Do not carry any combustibles on your person
(e.g. butane lighter)
· Do not cut containers that have held
combustibles.
.
1-8

SECTION 1 PCM-875A Mechanized Plasma Cutting System SAFETY
1.7 Service Precautions
Hazardous voltages. Electric shock
WARNING
!
can kill.
· Do NOT touch plasma torch, cutting table or
cable connections during plasma cutting process.
· Always turn power off to plasma power
supplies before touching or servicing plasma torch.
· Always turn power off to plasma power
supplies before removing covers or panels to
service any system component.
· Do not touch live electrical parts.
· Keep all panels and covers in place when
machine is connected to power source.
· Keep gloves, shoes, clothing, work area, and
equipment dry.
· Inspect power and ground leads cables for
wear or cracking. Replace worn or damaged
cables. Do not use if damaged.
WARNING
!
· Never bypass safety interlocks.
· Follow lock-out procedures.
Hot Torch can cause skin burns.
Allow torch to cool before servicing.
1-9

SECTION 1 PCM-875A Mechanized Plasma Cutting System SAFETY
Danger of Electric Shock.
DANGER
!
CAUTION
CAUTION
!
Torch may be electrically active.
Turn off Plasma Power Console before
servicing torch.
Establish and adhere to preventive maintenance.
A composite program can be established from
recommended schedules.
Avoid leaving test equipment or hand tools on
machine. Severe electrical or mechanical damage
could occur to equipment or machine.
Extreme caution should be used when probing
circuitry with an oscilloscope or voltmeter.
Integrated circuits are susceptible to over voltage
damage. Power off before using test probes to
prevent accidental shorting of components.
All circuit boards securely seated in sockets, all
cables properly connected, all cabinets closed and
locked, all guards and covers replaced before
power is turned on.
1-10

SECTION 1 PCM-875A Mechanized Plasma Cutting System SAFETY
1.8 Safety References -- Regulations, Standards, Guidelines
1.8.1 USA
The following recognized publications on safety in welding and cutting
operations are recommended. These publications have been prepared
to protect persons from injury or illness and to protect property from
damage, which could result from unsafe practices. Although some of
these publications are not related specifically to this type of industrial
cutting apparatus, the principles of safety apply equally.
· “Precautions and Safe Practices in Welding and Cutting with
Oxygen-Fuel Gas Equipment,” Form 2035. ESAB Cutting
Systems.
· “Precautions and Safe Practices for Electric Welding and Cutting,”
Form 52-529. ESAB Cutting Systems.
· “Safety in Welding and Cutting” - ANSI Z 49.1, American Welding
Society, 2501 NW 7th Street, Miami, Florida, 33125.
· “Recommended Safe Practices for Shielded Gases for Welding and
Plasma Arc Cutting” - AWS C5.10-94, American Welding Society.
· “Recommended Practices for Plasma Arc Welding” - AWS C5.1,
American Welding Society.
· “Recommended Practices for Arc Cutting” - AWS C5.2, American
Welding Society.
· “Safe Practices” - AWS SP, American Welding Society.
· “Standard for Fire Protection in Use of Cutting and Welding
Procedures” - NFPA 51B, National Fire Protection Association, 60
Batterymarch Street, Boston, Massachusetts, 02110.
· “Standard for Installation and Operation of Oxygen - Fuel Gas
Systems for Welding and Cutting” - NFPA 51, National Fire
Protection Association.
· “Safety Precautions for Oxygen, Nitrogen, Argon, Helium, Carbon
Dioxide, Hydrogen, and Acetylene,” Form 3499. ESAB Cutting
Systems. Obtainable through your ESAB representative or local
distributor.
· "Design and Installation of Oxygen Piping Systems," Form 5110.
ESAB Cutting Systems.
· “Precautions for Safe Handling of Compressed Gases in
Cylinders”, CGA Standard P-1, Compressed Gas Association.
Literature applicable to safe practices in welding and cutting with
gaseous materials is also available from the Compressed Gas
Association, Inc., 500 Fifth Ave., New York, NY 10036.
1-11

SECTION 1 PCM-875A Mechanized Plasma Cutting System SAFETY
1.8.2 International
Accident Prevention
VBG- Unfallverhütungsvorshriften
General Provisions
VBG 1
Allgemeine Unfallverhütungsvorshriften
Electrical Equipment and operating Equipment
VBG 4
Elektrische Anlagen
Welding, Cutting and related working methods
VBG 15
Schweißen un Schneiden un verwandte Verfahren
Shot Blasting Works
VBG 48
Strahlarbeiten
Gases
VBG 61
Gase
Oxygen
VBG 62
Sauerstoff
Operating liquid jet cutting machines
VBG 87
Arbeiten mit Flüssigkeitsstrahlem
VBG 93
Laser beams, accident prevention and Electrotechnology
Laserstrahlung, Unfallverhütungs-vorschriften für
Feinmechnik und Elektrotechnik
Noise
VBG 121
Lärm
1-12

SECTION 1 PCM-875A Mechanized Plasma Cutting System SAFETY
VDE Regulations
VDE - Vorschriften
VDE 0100
Erection of power installations with normal voltages up to
1000 volts
Bestimmungen für das Errichten von Stakstromanlagen
mit Nennspannungen bis 1000 Volt
Electrical equipment of industrial machines
VDE0113
VDE 0837
VDE 0837-
50
Elektrishe Ausrüstung von Industriemaschinen
Radiation safety of laser products; users guide (DIN EN
60825)
Strahlungssicherheit von Lasereinrichtungen und
Benutzungsrichtlinen (DIN EN 60825)
Specification for laser guards
Anforderung an Lasershcutzwänden
TRAC Technical Rules for Acetylene and Carbide Stores
TRAC- Techische Regein für Azetylenanlagen und Calciumcargidlager
Acetylene lines
TRAC-204
Azetylenleitungen
Acetylene cylinder battery systems
TRAC-206
Azetylenflaschenbatterieanlagen
Safety devices
TRAC-207
Sicherheitseinrichtungen
TRG Technical Rules for Pressure gases
TRG – Technische Regein für Druckgase
TRG 100
TRG 101
TRG 102
TRG 104
General regulations for pressure gases
Allgemeine Bestimmungen für Druckgase
Pressure gases
Druckgase
Technical gas mixtures
Technishe Gasgemische
Pressure gases; alterative use of compressed gas tanks
Druckgase, wahlweise Verwendung von
Druckgasbehältem
1-13

SECTION 1 PCM-875A Mechanized Plasma Cutting System SAFETY
TRGS – Technische Richtlinien für Gefahrstoffe
TRGS-102 Techn. Richtkonzentration (TRK) für gefährliche Stoffe
DIN Standards
DIN-Normen
TRGS-402
TRGS-900 Grenzwerte in der Luft am Arbeitsplatz (Luftgrenzwerte)
TA TA-Luft un TA-Lärm (BLm SchV)
DIN 2310
Part 1
Teil 1
DIN 2310
Part 2
Teil 2
DIN 2310
Part 4
Teil 4
DIN 2310
Part 5
Teil 5
DIN 2310
Part 6
Ermittlung u. Beurteilung der Konzentration gefährlicher
Stoffe in der Luft im Arbeitsbereich
Thermal cutting; terminology and nomenclature
Thermsiches Schneiden, Allgemeine Begriffe und
Bennungen
Thermal cutting; determination of quality of cut faces
Thermsiches Schneiden, Ermittein der Güte von
Schnittflächen
Thermal cutting; arc plasma cutting; process principles,
quality, dimensional tolerances
Thermsiches Schneiden, Plasmaschneiden,
Verfahrensgrundlagen, Güte, Maßtoleranzen
Thermal cutting; laser beam cutting of metallic materials;
process principles
Laserstrahlschneiden von metallischen Werkstoffen,
Verfahrensgrundlagen, Güte, Maßtoleranzen
Thermal cutting; Classification, processes
1-14
Teil 6 Einführung, Verfahren
DIN 4844
Part 1
Teil 1 Sicherheitskennzeichen (Siehe EN 7287)
Safety markings (DIN EN 7287)

SECTION 1 PCM-875A Mechanized Plasma Cutting System SAFETY
DIN EN ISO Harmonized Standards
DIN EN ISO-Harmonisierte Normen
DIN EN
292/1 and 2
DIN EN 559
DIN EN 560
DIN EN 561
DIN EN
626-1
DIN EN
848-1
Safety of machinery
Sicherheit von Maschinen, Geräten und Anlagen
Hoses for welding, cutting and allied processes
Schläuche für Schweißen, Schneiden und verwandte
Verfahren
Hose connections and hose couplings for equipment for
welding, cutting and allied processes
Schlauchanschlüsse und Schlauchverbindungen für
Geräte zum Schweißen, Schneiden und verwandte
Verfahren
Gas welding equipment hose couplings
Gasschweißgeräte, Kupplungen
Safety of machines, reduction of risks to health
Sichereit von Maschinen, Reduzierung des
Gesundheitsrisikos
Single spindle vertical milling machines
Fräsmaschine für einseitige Bearbeitung mit drehendem
Werkzeug
DIN EN
1829
DIN EN
9013
DIN EN
12584
DIN EN
12626
DIN EN
28206
DIN EN
31252
High pressure water jet machines
Hochdruckwasserstrahlschneidmaschine
Thermal cutting, oxygen cutting, process principles,
dimensional tolerances
Thermisches Schneiden, Autogenes Brennschneiden,
Verfahrensgrundlagen, Güte, Maßtoleranzen
Imperfections in oxy/fuel flame cuts, laser beam cuts and
plasma
Unregeimäßigkeiten an Brennschnitten, Laserstrahl- und
Plasmaschnitten
Laser processing machines
Laserbearbeitungsmaschinen
Acceptance testing for oxygen cutting machines
Abnahmeprüfung für Brennschneidmaschinen
Laser Equipment
Lasergeräte
1-15

SECTION 1 PCM-875A Mechanized Plasma Cutting System SAFETY
VDI Guidelines
DIN EN
31553
DIN EN
60204-1
DIN EN
60825
DIN EN 999
VDI 2906
VDI 2084
Laser and laser related equipment
Laser und Laseranlagen
Electrical equipment of machines
Elekrische Ausrüstung von Maschinen
Radiation safety of laser products
Strahlensicherheit von Laseranlagen
Arrangement of protection devices
Anordnung von Schutzeinrichtungen
Quality of cut faces on metallic workpieces; abrasive
water jet cutting and arc plasma cutting
Schnittflächenqualität beim Schneiden von Werkstücken
aus Metall, Abrasiv- Wasserstrahischneiden und
Plasmastrahischneiden
Room air; Technical systems for welding workshops
Raumluft techn. Anlagen für Schweißwerkstätten
1-16

SECTION 2 PCM-875A Mechanized Plasma Cutting System Description
2.1 General
The PCM-875A Mechanized Plasma Cutting
2.2 PCM-875A Power Console
2.2.1 Technical Specifications: PCM-875A
230V 50Hz, 3 Phase
Options
1 phase 3 phase
System is a compact 60 ampere package
consisting of plasma power console, remote arc
starter, and PT-20AMX plasma torch. Simple
bulkhead connections allow easy system assembly.
Connect to input power and a source of clean, dry,
compressed air (5,18 to 5,87 bar) and you can
begin cutting up to 13 mm thick material.
There are 2 power console options available:
230 V 50 Hz, 1 or 3 phase P/N 0558003356
400 V 50 Hz, 3 phase P/N 0558003357
400V 50Hz, 3 phase
P/N 0558003356
P/N 0558003357
60% Duty Cycle 60 A at 120 VDC
Rated Output
100 % Duty Cycle 50 A at 120 VDC
Output Current Range 10 to 60 A/phase
Open Circuit Voltage 275 VDC
Rated Primary Input at 7,2 kW Maximum
Output Power, 60 A at 120 VDC
Power Factor at 60 Amperes Output
55/49 A
(230V, 1
phase)
74% (230 V,
1 phase)
26/24 A per
phase
(230V, 3
phase)
90% (230 V, 3
phase)
13 A/phase
92% (400 V, 3 phase)
Efficiency at 60 Amperes Output 90% typical
Current Capacity 60 A DCSP
Air Requirements 153,4 l/minute at 5,2 bars
Power Cord Length Provided 1,8m 3,1m
2-1

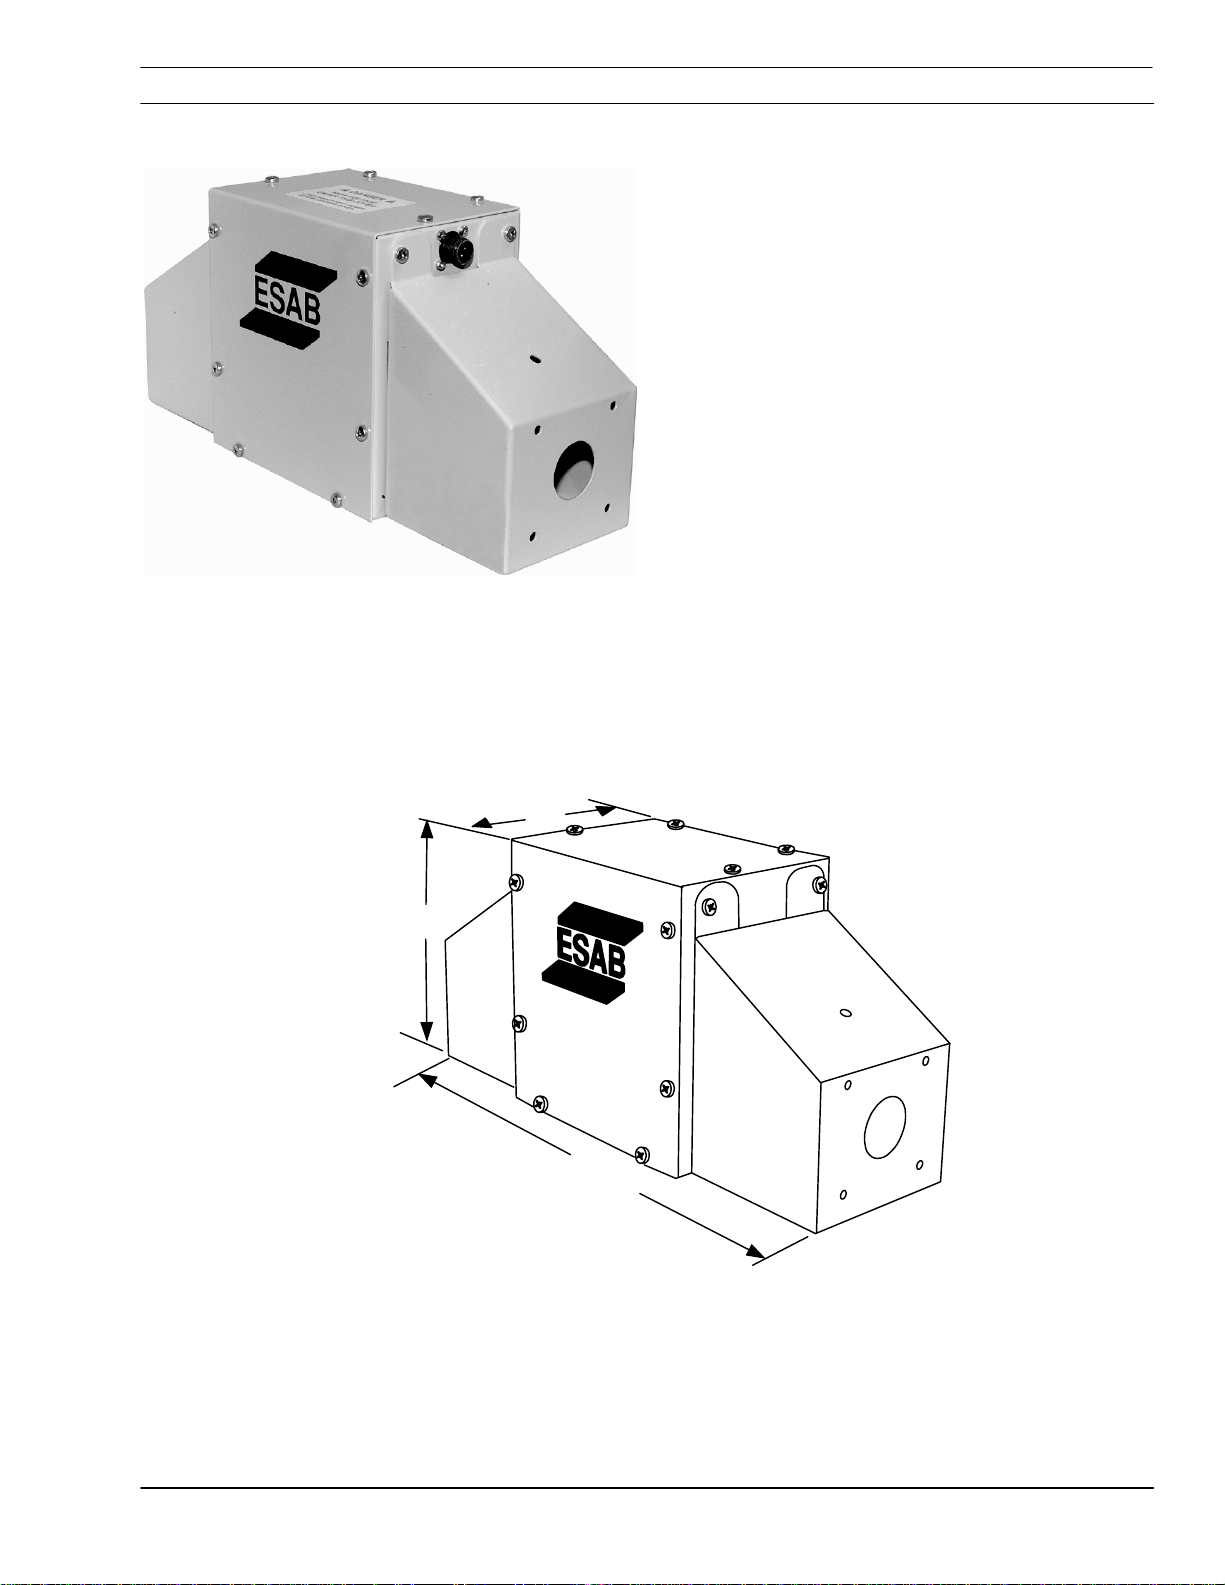
SECTION 2 PCM-875A Mechanized Plasma Cutting System Description
2.2.2 Dimensions and Weight: PCM-875A Power Console
465 mm
Weight = 39,5 kg
516 mm
275 mm
2-2
SECTION 2 PCM-875A Mechanized Plasma Cutting System Description
2.3 Remote Arc Starter (RAS-2)
The remote arc starter (RAS-2) is placed inline
between power console and torch. The RAS is the
source of high frequency energy used to start the
plasma cutting process.
RAS-2 with 15,2 m leads
RAS-2 with 30,4 m leads
Technical Specifications
P/N 0558003601
P/N 0558003602
Input: 110 VAC, 50/60 Hz. Control power provided by
PCM-875A console.
Spark Gap: 1mm
Dimensions and Weight
123,8mm
184,2mm
374mm
Weight = 3,4kg
2-3

SECTION 2 PCM-875A Mechanized Plasma Cutting System Description
2.4 PT-20AMX
The patented PT-20AMX is a 100 amp capacity,
pilot-arc mechanized torch available in 3 different
torch lead length packages.
The torch uses clean, dry air as the cut gas for
cutting carbon steel, aluminum, or stainless steel.
PT-20AMX Torch with 1,2 m lead P/N 0558002632
PT-20AMX Torch with 5,7 m lead P/N 0558002633
PT-20AMX Torch with 7,6 m lead P/N 0558003381
DO NOT use oxygen with this torch!
WARNING
!
2.4.1 Technical Specifications
Type: Air Cooled, single gas at 9,9 kl/hr
A hazardous fire may result.
Rating: 100 Amperes at 100% Duty Cycle
Gas Purity: Air: Needs to be clean, dry and free of all particulate matter.
Nitrogen: 99.995% clean
Gs Type: Air, nitrogen
2-4

SECTION 2 PCM-875A Mechanized Plasma Cutting System Description
2.4.2 Dimensions
34,9 mm
435 mm
2-5

SECTION 2 PCM-875A Mechanized Plasma Cutting System Description
2.4.3 Torch Spare Part Kit
PT-20AMX Torch Spare Parts Kit is available for
maintaining the PT-20AMX torch with minimum
downtime.
P/N 0558002319
Description
Heat Shield (70/100 A)
Cutting Nozzle (50 A)
Cutting Nozzle (70 A)
Electrode 50Hz 0558001617 5
Electrode Insulator 21373 1
Electrode Holder Assembly 21332 1
Baffle Tube 21374 1
Pilot Arc Adaptor 19497 1
O-ring 488157 5
Lubricant (1 oz.) 17672 1
Seat/Baffle Wrench 21375 1
1/16: Hex-Key Wrench 93750006 1
NOTICE
P/Number Quantity
21326 3
21330 5
23129 5
The description of the heat shield (P/N
21326) listed above indicates a range of 70
to 100 amperes. Testing has proven
satisfactory results when used at 60 amps
and lower.
2-6
NOTICE
The 50A cutting nozzle can be used at 50
amperes and lower.
The 70A cutting nozzle can be used at 50
to 70 cutting amperes.

SECTION 3 PCM-875A Mechanized Plasma Cutting System Installation
3.1 General
Proper installation is important for satisfactory and
trouble free operation. Follow these instructions
carefully.
Failure to follow these directions
WARNING
!
carefully may lead to injury or death.
Read this entire manual before
proceeding.
Damage to property or equipment may occur.
3.2 Installation of the PCM-875A Power Console
3.2.1 Equipment Required
A source of clean dry air at 153,4 liters/minute at
5,2 to 5,9 bar. The maximum inlet pressure of the
air filter-regulator is 10,4 bar and should not be
exceeded.
3-1

SECTION 3 PCM-875A Mechanized Plasma Cutting System Installation
3.2.2 Location
Console
Adequate ventilation is necessary to provide proper
cooling of the PCM-875A.
Exposure to dirt, dust and excessive heat should be
minimized.
There should be a minimum of 305 mm clearance
between the power console and any wall or other
obstruction for free air movement.
Restricting airflow into the power console through
CAUTION
the louvers will cause overheating. Do not install
any type of air filtering device on to the power
console cooling air passages. Warranty will be
voided if such a device is used.
3.2.3 Inspection of Power Console Before installation
A. Remove equipment from the shipping
containers.
B. Remove all packing material and inspect for
evidence of concealed damage, which may
not have been initially apparent. Notify the
shipping carrier of any damage at once.
C. Check container for any loose parts prior to
disposing of shipping materials.
D. Check air louvers and all other openings to
ensure that any obstruction is removed.
3-2

SECTION 3 PCM-875A Mechanized Plasma Cutting System Installation
3.2.4 Primary electrical Input Connections
Electric Shock Can Kill!
WARNING
!
CAUTION
!
The PCM-875A Power Console is equipped with a
Ensure all power is off by opening the line
(wall) disconnect switch and power cord is
disconnected before attempting to make any
connections inside the power console.
Ensure that the power source is properly
configured for your input power supply. DO
NOT connect a power console configured for
230V to a 460V input power. Damage to
machine will occur.
3 m 4 conductor power cable for 3- phase
connection. If single-phase 230V is required, tape
back red wire on the input power cable.
A line (wall) disconnect switch with fuses or circuit
breakers should be provided at the main power
panel.
Input Requirements
Volts Phase Amps
230 1 49 16 80
230 3 24 16 50
400 3 13 6 25
Input and
Ground
Conductor
(mm
2
)
Fuse Size
(A)
3-3

SECTION 3 PCM-875A Mechanized Plasma Cutting System Installation
Failure to connect chassis to an
WARNING
!
approved electrical ground may
result in electrical shock, severe
burns or death.
The chassis must be connected to an
approved electrical ground.
The PCM-875A power console is internally wired for
connecting to an external power source.
Console Power Lead
3.2.5 Connection of Plasma Console To CNC Interface
The CNC interface (TB4) is mounted on the
front left corner of the console base.
· Arc On Signal – This signal originates in the
plasma console. It is a normally open contact,
which closes on main arc transfer. Used to
activate machine motion and arc voltage
control.
1234567
Relay
Signal
Arc On
Start
Closing
Signal
Relay
Closing
20:1 (+)
Divider
Voltage
Not Used
· Start Signal – Signal is derived from CNC
machine. It is a normally open contact, which
closes starting the plasma sequence. The
system is off when this contact closure is
removed.
· 20:1 (+) Voltage Divider – The voltage divider
provides a signal ouput, which is proportional to
the cutting voltage. Signal reduction is 20 to 1
and controls whether the torch is raised or
lowered in reference to the work piece. This is
referred to torch to work distance. This
distance is adjustable by varying arc voltage
reference voltage.
· Not Used
3-4

SECTION 3 PCM-875A Mechanized Plasma Cutting System Installation
3.2.6 Secondary (Output) Connections to Power Console
Electric Shock Can Kill!
WARNING
!
Ensure all power is off by opening the line
(wall) disconnect switch and power cord is
disconnected before attempting to make
any connections inside the power console.
Remove outside cover
Insert power cable, pilot arc, and air hose through
power cable bushing.
Power Cable Bushing TB1
3-5

SECTION 3 PCM-875A Mechanized Plasma Cutting System Installation
1
Pilot Arc
2
Cut Gas
3
Arc Current
NOTICE
Bolt pilot arc cable ring connection to the copper
1
terminal.
Connect air hose to air/power connector (left hand
2
threads).
Connect power cable to air/power connector using
3
#10 screw
The console cover does not have to be removed to
make the three connections above. Remove
access panel if replacing cables or checking
connections.
3-6

SECTION 3 PCM-875A Mechanized Plasma Cutting System Installation
115VAC RAS Cable
Insert115VAC Pilot Arc Cable
TB1
Insert 115VAC RAS cable through strain relief
located in the lower right corner of the front panel.
Rout 115VAC RAS cable along inside edge in
notches in insulating material to TB1.
2 conductor
115VAC cable
routed through
notch
3-7

SECTION 3 PCM-875A Mechanized Plasma Cutting System Installation
Remove connection for internal arc start from TB1
TB1
CAUTION
!
Replace cover if next step is not required.
Plug terminal connectors into 2 available lugs on
TB1.
Cable Terminals to TB1 should be
insulated to prevent possible damage due
to internal arcing in the power console.
The above illustration shows the terminals
un-insulated for clarity of wire positions.
3-8

SECTION 3 PCM-875A Mechanized Plasma Cutting System Installation
3.3 Connecting the Remote Arc Starter
3.3.1 Mounting RAS2
Mounting location of RAS unit is restricted by the
length of torch leads, 1,2 m -- 5,4 m or 7,6 m.
228,6mm
203,2mm
12,7mm
13,5mm
82,6mm
8mm
55,9mm
3-9

SECTION 3 PCM-875A Mechanized Plasma Cutting System Installation
3.3.2 Connecting Service Lines to Remote Arc Starter 2
Remove end covers on RAS2 box.
Arc Start
Cable
Pilot Arc
Cable
115 VAC Arc Start Cable
Connector
Pilot Arc Lug
Air Connection
Power Cable Lug
Power
Cable
Air Hose
· Connect arc start cable to RAS2 box.
· Connect pilot arc cable to pilot arc lug using
#10 screw and nut with lock washers.
· Connect power cable to power cable lug using
¼” screw with washers and nut.
· Connect air hose fitting (left hand threads).
Note that this hose has the same fittings on both
ends and orientation does not matter.
3-10

SECTION 3 PCM-875A Mechanized Plasma Cutting System Installation
3.3.3 Setting the Spark Gap in the RAS2
1 mm
Factory set to 1mm.
Adjustment procedure:
1. Loosen screw “a” using a 1/8” (0.125”)
internal hex wrench.
2. Insert 1mm feeler gage between the
tungsten electrodes.
3. Slide electrodes till slight pressure is felt on
the gage.
4. Tighten locking screws on spark gap
assembly.
”a”
3-11

SECTION 3 PCM-875A Mechanized Plasma Cutting System Installation
3.3.4 RAS2 Output Connections to Torch
· Pilot Arc – Connect pilot arc cable in torch
bundle to pilot arc output lug using #10 screw,
lock washers and nut.
· Torch – left hand threads connect the torch
gas (air) and plasma arc current. (Cable inside gas
hose conducts the plasma cutting current)
Torch Lead Pilot Arc
Connector
Torch Lead
Voltage/Gas Hose
3-12

SECTION 3 PCM-875A Mechanized Plasma Cutting System Installation
3.3.5 Terminating Shield Braid at RAS2
1. Insert Braid and hose bundle through RAS
cover hole.
Insert bundle
Flair Braid
2. Flare braid by bending it back at 90 degrees
about 25 mm from the end.
3-13

SECTION 3 PCM-875A Mechanized Plasma Cutting System Installation
3. Insert ground plate over torch leads.
Insert Ground Plate
Fasten Ground Plate
4. Fasten ground plate with 4 screws inserted
from the outside. Trim braid strands if desired.
3-14

SECTION 3 PCM-875A Mechanized Plasma Cutting System Installation
3.4.1 Installing Torch Front End Parts
WARNING
!
Seat
Make sure power switch on console is in
OFF position and primary input power is
de-energized.
1. The seat comes assembled to the front end
of the torch. IF the seat becomes damaged, the
torch body must be replaced. DO NOT attempt
to remove the seat from torch body.
Electrode Holder Assembly
Wrench
21375
Baffle Tube
2. Electrode holder assembly (21332) includes
the baffle tube (21374). If baffle tube becomes
damaged, it can be replaced by un-threading the
damaged tube out of the holder. Use small hex
end of the wrench (21375) in hex broach on the
tube. Tighten tube securely but do not overtighten.
3-15

SECTION 3 PCM-875A Mechanized Plasma Cutting System Installation
3. Install the electrode insulator (21373) onto
electrode holder assembly (21332) and then thread
electrode (21150) onto the electrode holder
assembly. Assemble electrode firmly by hand. Do
not use wrenches or pliers. These three parts
combined are the electrode assembly.
21332
21373
21150
4. Install nozzle onto the electrode assembly by
inserting small shoulder on electrode insulator into
nozzle’s rear opening. Place nozzle and electrode
assembly into the heat shield as shown in page 6.
If front end of the torch is facing down as normal in
a setup, the nozzle and electrode assembly can be
stacked in the heat shield and then assembled to
the torch. Be sure to use proper heat shield and
nozzle combination as noted in page 18.
O-ring (488157)
5. Apply a thin film of lubricant (17672) to O-ring
(488157).
17672
3-16

SECTION 3 PCM-875A Mechanized Plasma Cutting System Installation
6.Tighten heat shield fully to hold the parts in firm
contact with each other and to the torch head.
“Fully” means at least 5mm rotation after electrode
seat contacts electrode holder.
7. After retainer/heat shield is tightened, try to
rotate the nozzle with your finger tips. If it rotates,
the sealing of components is not tight enough and
NOTICE
CAUTION
!
will likely leak gas.
See “Section 6 – Maintenance” for torch
lead installation or replacement.
IMPORTANT: See Maintenance section.
Follow all instructions in the booklet
packed with your unit. DO NOT install or
attempt to operate this torch without
following these instructions.
3-17
SECTION 3 PCM-875A Mechanized Plasma Cutting System Installation
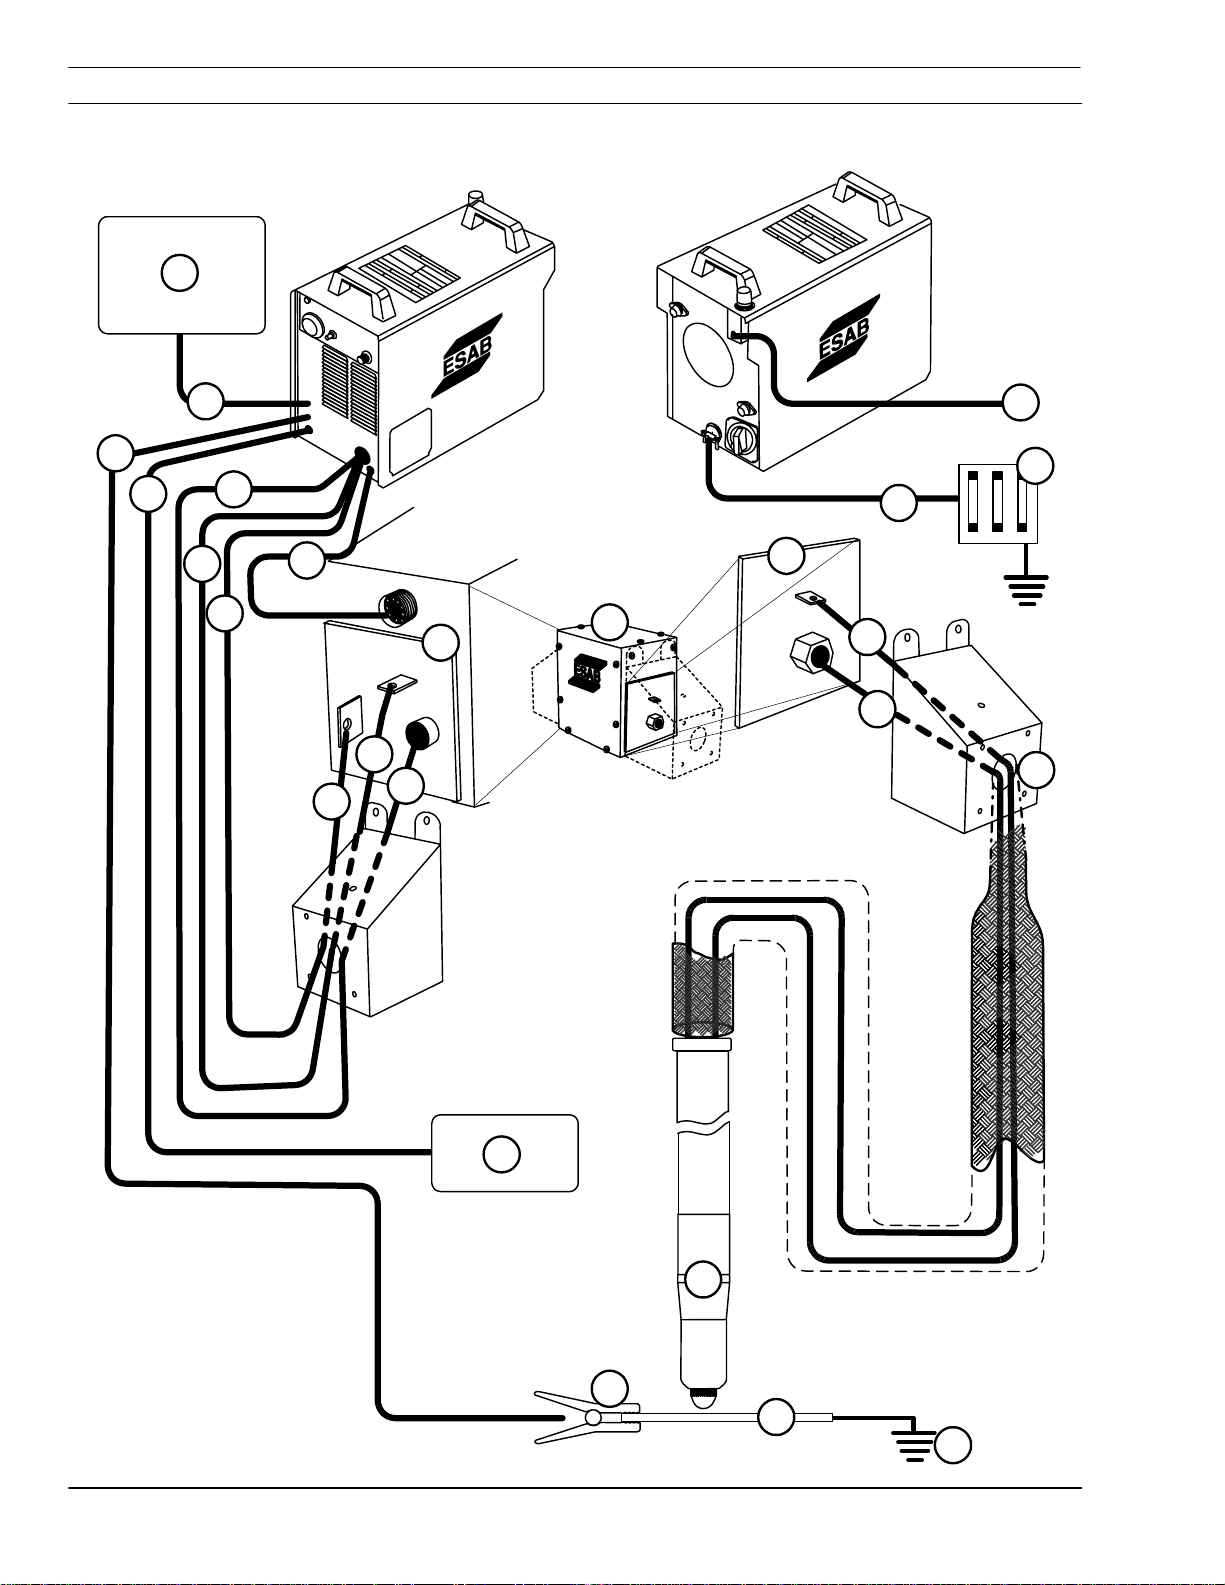
3.5 Interconnecting Diagram
19
20
4
21
5
6
7
8
10
9
6
7
5
11
3
12
13
1
2
14
3-18
22
15
16
17
18

SECTION 3 PCM-875A Mechanized Plasma Cutting System Installation
1 Air Supply
2 Wall Disconnect Switch (Grounded)
3 PCM-875A Power Supply Cable
4 Work Cable (Negative)
5 Pilot Arc Cable
6 Gas Connection
7 Power Supply Cable
8 115 V High Frequency Start Cable
9 RAS Input Bulkhead
10 Remote Arc Starter
11 RAS Output Bulkhead
12 Pilot Arc Cable
13 Power/Gas Hose
14 Torch Lead Bundle Shield Ground
15 PT-20 AMX Plasmarc Torch
16 Work Cable Clamp
17 Work Piece
18 Earth Ground
19 ATAS Start/Stop CSR
20 CSR Cable
21 Height Control Cable (Voltage Divider)
22 Voltage Divider (Height Control)
3-19

SECTION 3 PCM-875A Mechanized Plasma Cutting System Installation
This page intentionally left blank.
3-20

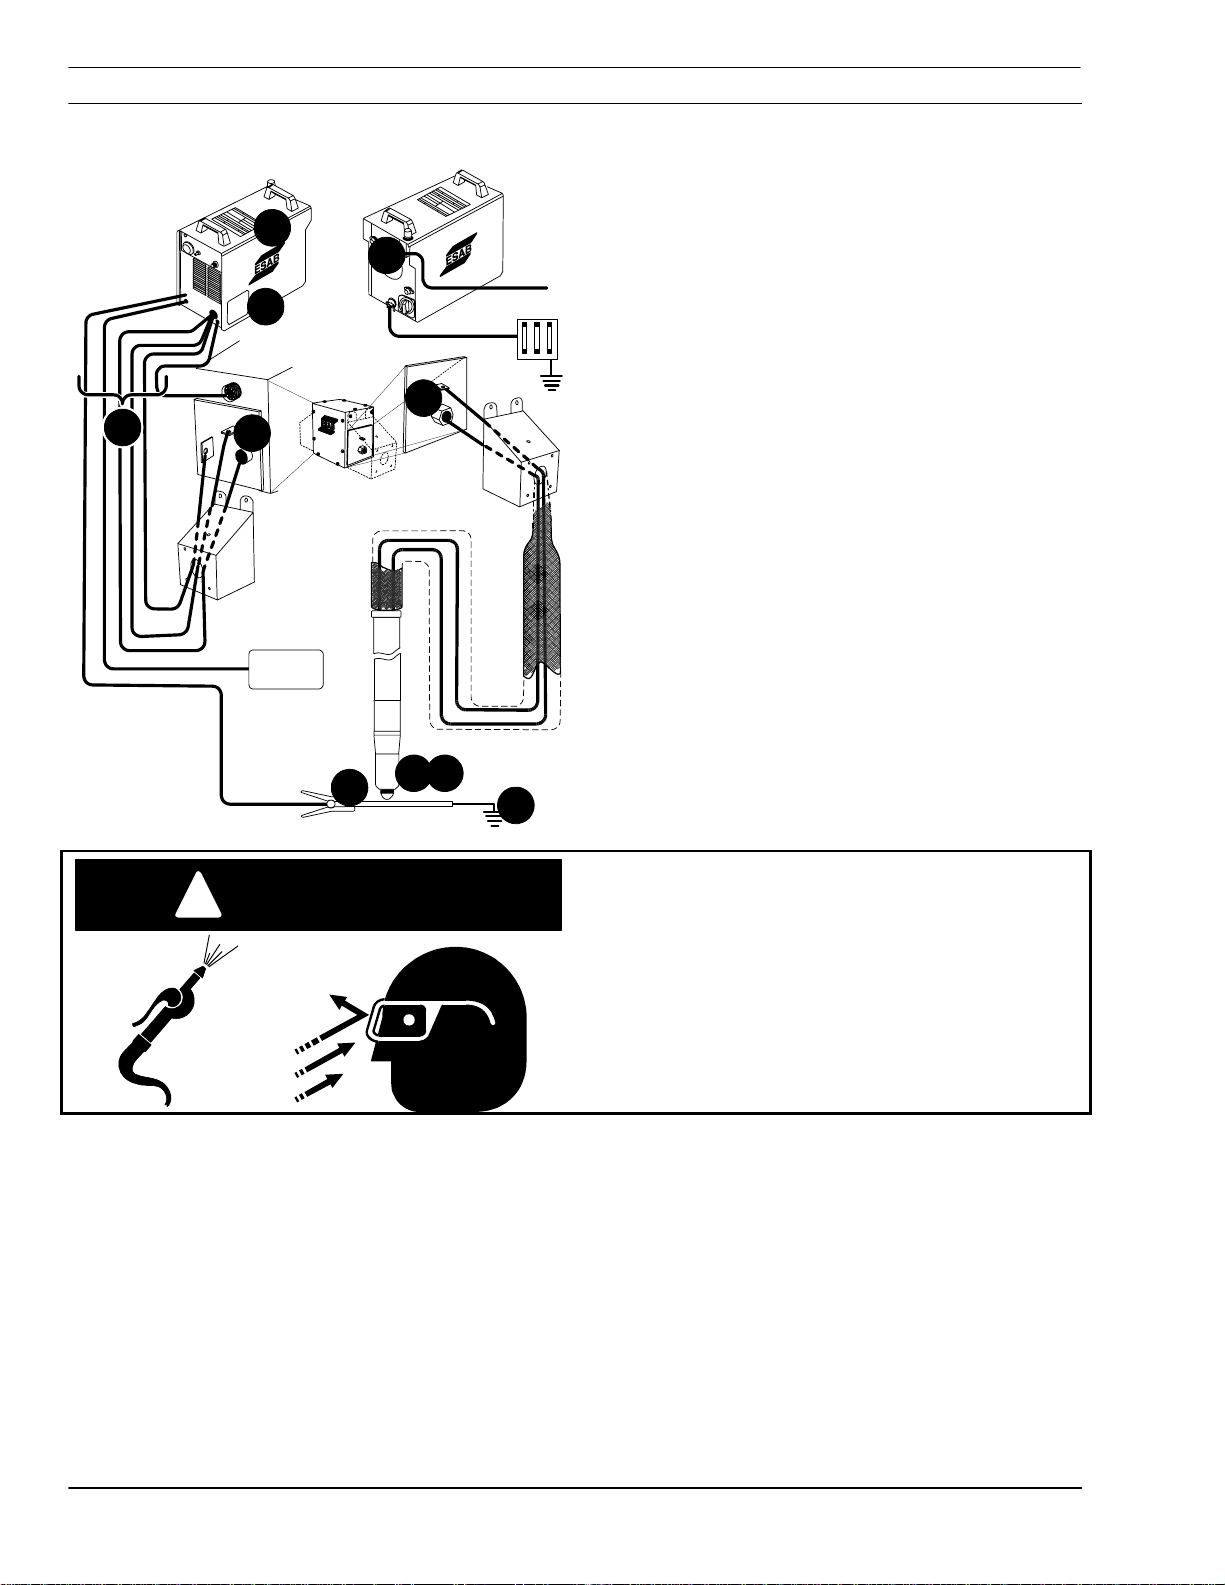
SECTION 4 PCM-875A Mechanized Plasma Cutting System Operation
4.1 PCM-875A Console Operation -- General
Electric Shock Can Kill!
WARNING
!
· Do not operate the console with the
cover removed.
· Do not apply power to the unit while
holding or carrying the console.
· Do not touch the torch while console
power switch is on.
· Plasma Arc Emi t s Haza rdous UV
WARNING
!
and Visible Radiation.
· Damage to skin and eyes is possible.
· Do not ever look directly at a plasma
arc. Blindness could result.
· Wear Safety Approved eye protection.
· Comply to all local and national
regulations for safety equipment.
Noise Levels May Exceed Safe
WARNING
!
Limits.
Sparks and Slag May Be Hazardous.
· Wear Safety Approved Hearing
Protection.
· Wear Safety Approved Eye Protection.
Possible Damage to Console from
CAUTION
Sparks and Slag.
Position PCM-875A at least 3 meters form
the Cutting Area.
4-1

SECTION 4 PCM-875A Mechanized Plasma Cutting System Operation
4.2 PCM-875A Plasma Console Controls
Power Switch -- Rear Panel
· Located on the rear panel.
· On Position – Front panel green pilot light will
glow indication control circuit is energized and
cooling fan will run.
· Off Position – No Power to the control circuit.
Power Switch White Pilot Light
Output Current Control – Front Panel
· Adjustable from 10 to 60 Amperes
Current Output Control
Air Test Switch – Front Panel
· Test Position
Air filter-regulator can be adjusted to
desired pressure 4,6 to 5,3 kgf/cm
to 75 PSI). Allow a few minutes for air to
flow to remove an accumulated
condensation.
2
(65
4-2
Air Test Switch
· Operate Position
Place the toggle switch in this position
for normal operation.

SECTION 4 PCM-875A Mechanized Plasma Cutting System Operation
Fault Light – Operations are stopped.
Will illuminate amber under the following conditions:
· Light mostly ON but will blink off 1/10 of a
second every second. Indicates airflow is low.
· Light is mostly Off but will blink on for 1/10 of
a second every second. Indicates over
temperature and duty cycle has been exceeded.
Allow power console to cool before returning to
operation.
· Light will blink off and on 5 times a second.
Fault Light
NOTICE
4.3 RAS Operation
Indicates the input voltage is outside the plus or
minus 15% range of input rating.
· Light will be on continuously. Indicates input
current has been exceeded. Over Current.
All fault lights will remain on for a
minimum of 10 seconds. If fault is
resolved, all will reset automatically except
for over current. To clear over current,
power must be shut off for 5 seconds and
turned back on.
The RAS is a self-contained unit and requires no
operator intervention to function.
4-3

SECTION 4 PCM-875A Mechanized Plasma Cutting System Operation
4.4 PT-20AMX Plasma Torch.
Electric Shock Can Kill!
WARNING
!
Plasma incorporates high voltages at
dangerous amperage.
Do not touch the;
· Plasma torch
· Torch lead
· RAS
· RAS supply lines
· Console
while power is applied to console.
Electric shock Can Kill!
WARNING
!
Do not service torch or otherwise touch
the plasma torch unless the power source
has been disconnected or turned off.
Hot Torch May Burn Skin.
CAUTION
!
Allow torch to cool before servicing.
4-4

SECTION 4 PCM-875A Mechanized Plasma Cutting System Operation
4.5 Cut Quality
4.5.1 Introduction
NOTICE
Causes affecting cut quality are interdependent.
Changing one variable affects all others. Determining a
solution may be difficult. The following guide offers
possible solutions to undesirable cutting results. To
begin select the most prominent condition:
§ 4.5.2 Cut angle, negative or positive
§ 4.5.3 Cut not flat, rounded or undercut
§ 4.5.4 Surface roughness
§ 4.5.5 Dross
§ 4.5.6 Dimensional Accuracy
§ Process Data
Usually the recommended cutting parameters will give
optimal cut quality. Occasionally conditions may vary
and slight adjustments will be required. If so:
· Make small incremental adjustments when making
corrections.
· Adjust arc voltage in one volt increments, up or
down as required.
Adjust cutting speed 5% or less as required, until
conditions improve.
Before attempting ANY corrections, check cutting
variables with the factory recommended
settings/consumable part numbers listed in Process
Data.
4-5

SECTION 4 PCM-875A Mechanized Plasma Cutting System Operation
4.5.2 Cut Angle
Part
Negative Cut Angle
Top dimension is greater than the bottom.
· Misaligned torch
· Bent or warped material
· Worn or damaged consumables
· Standoff low (arc voltage)
Drop Part
Part
· Cutting speed slow (machine travel rate)
Positive Cut Angle
Top dimension is less than the bottom dimension.
· Misaligned torch
· Bent or warped material
· Worn or damaged consumables
Drop
4-6
Part
· High standoff high (arc voltage)
· Cutting speed fast
· Current high or low. (See process data for
recommended current level for specific nozzles).
· Wrong secondary gas flow.

SECTION 4 PCM-875A Mechanized Plasma Cutting System Operation
4.5.3 Cut Flatness
Top And Bottom Rounded
Condition usually occurs when material is 0.25" thick (6,4mm)
or less.
· High current for given material thickness (See
process data for proper settings).
Drop
Drop
Part
Top Edge Undercut
Standoff low (arc voltage)
Part
4-7

SECTION 4 PCM-875A Mechanized Plasma Cutting System Operation
4.5.4 Surface Finish
Process
Induced
Roughness
Top View
Or Machine
Induced
Roughness
Cut Face
Process Induced Roughness
Cut face is consistently rough and may be confined to
one axis.
· Worn or damaged consumables
Machine Induced Roughness
Can be difficult to distinguish from process induced
roughness and is often confined to one axis.
Roughness is inconsistent.
· Dirty rails, wheels and/or drive rack/pinion. (Refer to
maintenance section in machine owner’s manual).
· Carriage wheel adjustment
4-8

SECTION 4 PCM-875A Mechanized Plasma Cutting System Operation
4.5.5 Dross
Cut Face
Lag Lines
Dross is a by-product of the cutting process. It is the
undesirable material that remains attached to the part.
In most cases, dross can be reduced or eliminated
with proper torch and cutting parameter setup. Refer
to Process Data.
Roll Over
Side View
Cut Face
Lag Lines
High Speed Dross
Material weld or rollover on bottom surface along kerf.
Difficult to remove. May require grinding or chipping.
“S” shaped lag lines.
· Standoff high (arc voltage)
· Cutting speed fast
Side View
Slow Speed Dross
Forms as globules on bottom along kerf. Removes
easily.
Globules
· Cutting speed slow
4-9

SECTION 4 PCM-875A Mechanized Plasma Cutting System Operation
Side View Splatter
Cut Face
Top Dross
Appears as splatter on top of material. Usually
removes easily.
· Cutting speed fast
· Standoff high (arc voltage).
Intermittent Dross
Appears on top or bottom along kerf.
Non-continuous. Can appear as any kind of dross
· Possible worn consumables
Other Factors Affecting Dross:
· Material temperature
· Heavy mill scale or rust
· High carbon alloys
· Gas Purity
4-10

SECTION 4 PCM-875A Mechanized Plasma Cutting System Operation
4.5.6 Dimensional Accuracy
Generally, using the slowest possible speed (within
approved levels) will optimize part accuracy. Most
material thickness overlap for different voltages.
Select consumables to allow a lower arc voltage
and slower cutting speed.
4.6 Process Data
NOTICE
Recommended cutting speed and arc voltage will
give optimal cutting performance.
Small incremental adjustments may be needed due
to material quality, material temperature and specific
alloy. The operator should remember that all
cutting variables are interdependent. Changing one
setting affects all others and cut quality could
deteriorate. Always start at the recommended
settings.
Before attempting ANY corrections, check cutting
variables with the factory recommended settings/
consumable part numbers listed in the process
data.
4-11
SECTION 4 PCM-875A Mechanized Plasma Cutting System Operation
Material:
Mild Steel
PT-20AMX
Plasmarc Torch
Amperes:
Gas:
Lock Ring P/N 57N70
Handle with
Torch Body P/N 21359
40
Air
Sleeve
P/N
05508003419
Electrode
Holder
Assembly
Electrode
Insulator
Electrode
50Hz
Nozzle 50A P/N 21330
Heat Shield –
Blue
P/N 21332
P/N 21373
P/N
0558001617
P/N 21326
4-12
Note: Heat shield rated at 70 to
100A is used for this application

SECTION 4 PCM-875A Mechanized Plasma Cutting System Operation
PT-20AMX
40
Amperes
Process Data
Material Thickness
mm
2,0 3,0
Air Pressure
Bar
5 5
Height Readings
Initial Height
Arc Voltage (Stand-off)
mm
Travel Speed
3,0 3,0
110 110
Mild Steel
mm per minute
Kerf Width
Millimeters
3810 2540
1,1 1,1
4-13

SECTION 4 PCM-875A Mechanized Plasma Cutting System Operation
Material:
Mild Steel
PT-20AMX
Plasmarc Torch
Amperes:
Gas:
Lock Ring P/N 57N70
Handle with
Torch Body P/N 21359
50
Air
Sleeve
P/N
05508003419
Electrode
Holder
Assembly
Electrode
Insulator
Electrode
50Hz
Nozzle 50A P/N 21330
Heat Shield –
Blue
P/N 21332
P/N 21373
P/N
0558001617
P/N 21326
4-14
Note: Heat shield rated at 70 to
100A is used for this application

SECTION 4 PCM-875A Mechanized Plasma Cutting System Operation
PT-20AMX
50
Amperes
Process Data
Material Thickness
mm
5,0 6,0 10,0 13,0
Air Pressure
Bar
6,0 6,0 6,0 6,0
Height Readings
Initial Height
Arc Voltage (Stand-off)
mm
Travel Speed
3,0 5,0 6,0 8,0
110 120 130 150
Mild Steel
mm per minute
Kerf Width
Millimeters
2540 1651 1016 457
1,6 1,9 3,2 4,0
4-15

SECTION 4 PCM-875A Mechanized Plasma Cutting System Operation
Material:
Aluminum
PT-20AMX
Plasmarc Torch
Amperes:
Gas:
Lock Ring P/N 57N70
Handle with
Torch Body P/N 21359
40
Air
Sleeve
P/N
05508003419
Electrode
Holder
Assembly
Electrode
Insulator
Electrode
50Hz
Nozzle 50A P/N 21330
Heat Shield –
Blue
P/N 21332
P/N 21373
P/N
0558001617
P/N 21326
4-16
Note: Heat shield rated at 70 to
100A is used for this application

SECTION 4 PCM-875A Mechanized Plasma Cutting System Operation
PT-20AMX
40
Amperes
Process Data
Material Thickness
mm
2,0 3,0
Air Pressure
Bar
5 5
Height Readings
Initial Height
Arc Voltage (Stand-off)
mm
Travel Speed
3,0 3,0
110 110
Aluminum
mm per minute
Kerf Width
Millimeters
3810 2667
1,57 1,57
4-17

SECTION 4 PCM-875A Mechanized Plasma Cutting System Operation
Material:
Aluminum
PT-20AMX
Plasmarc Torch
Amperes:
Gas:
Lock Ring P/N 57N70
Handle with
Torch Body P/N 21359
50
Air
Sleeve
P/N
05508003419
Electrode
Holder
Assembly
Electrode
Insulator
Electrode
50Hz
Nozzle 50A P/N 21330
Heat Shield –
Blue
P/N 21332
P/N 21373
P/N
0558001617
P/N 21326
4-18
Note: Heat shield rated at 70 to
100A is used for this application

SECTION 4 PCM-875A Mechanized Plasma Cutting System Operation
PT-20AMX
50
Amperes
Process Data
Material Thickness
mm
5,0 6,0 10,0 13,0
Air Pressure
Bar
6,0 6,0 6,0 6,0
Height Readings
Initial Height
Arc Voltage (Stand-off)
mm
Travel Speed
3,0 5,0 6,0 8,0
110 120 130 150
Aluminum
mm per minute
Kerf Width
Millimeters
2286 1905 762 203
Not
Available
3,2 4,7 4,7
4-19

SECTION 4 PCM-875A Mechanized Plasma Cutting System Operation
Material: Stainless Steel
PT-20AMX
Plasmarc Torch
Amperes:
Gas:
Lock Ring P/N 57N70
Handle with
Torch Body P/N 21359
40
Air
Sleeve
P/N
05508003419
Electrode
Holder
Assembly
Electrode
Insulator
Electrode
50Hz
Nozzle 50A P/N 21330
Heat Shield –
Blue
P/N 21332
P/N 21373
P/N
0558001617
P/N 21326
4-20
Note: Heat shield rated at 70 to
100A is used for this application

SECTION 4 PCM-875A Mechanized Plasma Cutting System Operation
PT-20AMX
40
Amperes
Process Data
Material Thickness
mm
2,0 3,0
Air Pressure
Bar
5 5
Height Readings
Initial Height
Arc Voltage (Stand-off)
mm
Travel Speed
3,0 3,0
110 110
Stainless Steel
mm per minute
Kerf Width
Millimeters
3302 1905
Not
Available
1,6
4-21

SECTION 4 PCM-875A Mechanized Plasma Cutting System Operation
Material: Stainless Steel
PT-20AMX
Plasmarc Torch
Amperes:
Gas:
Lock Ring P/N 57N70
Handle with
Torch Body P/N 21359
50
Air
Sleeve
P/N
05508003419
Electrode
Holder
Assembly
Electrode
Insulator
Electrode
50Hz
Nozzle 50A P/N 21330
Heat Shield –
Blue
P/N 21332
P/N 21373
P/N
0558001617
P/N 21326
4-22
Note: Heat shield rated at 70 to
100A is used for this application

SECTION 4 PCM-875A Mechanized Plasma Cutting System Operation
PT-20AMX
50
Amperes
Process Data
Material Thickness
mm
5,0 6,0 10,0 13,0
Air Pressure
Bar
6,0 6,0 6,0 6,0
Height Readings
Initial Height
Arc Voltage (Stand-off)
mm
Travel Speed
3,0 5,0 6,0 8,0
110 120 130 150
Stainless Steel
mm per minute
Kerf Width
Millimeters
1270 762 203 152
Not
available
3,2 4,7 4,7
4-23

SECTION 4 PCM-875A Mechanized Plasma Cutting System Operation
This page intentionally left blank.
4-24

SECTION 5 PCM-875A Plasmarc Cutting System Maintenance
5.1 PCM-875A Console
5.1.1 General
CAUTION
!
CAUTION
!
NOTICE
Stop work immediately if this equipment
does not operate properly. Equipment
damage or personal injury may result.
Do not permit untrained persons to
inspect, clean, or repair this equipment.
Maintenance must be performed by
specially trained personnel.
Use of replacement parts other than ESAB
replacement parts may void warranty.
Electric Shock Can Kill!
WARNING
!
Disconnect wall switch before inspection
and maintenance of the power console.
5-1
SECTION 5 PCM-875A Plasmarc Cutting System Maintenance
5.1.2 Inspection and Cleaning
F
F
F
EE
F
F
Frequent inspection and cleaning of the PCM 875A
system is recommended for safe and proper
operation.
A. Check work cable for secure connection to
workpiece.
B. Check safety earth ground at workpiece and
at power console chassis.
C. Check heat torch heat shield. Replace if
damaged.
D. Check torch electrode and cutting nozzle for
wear at least once per 8 hours operation.
E. Ensure cable and hoses are not damaged
or kinked.
F. Ensure all plugs, fittings and ground
connections are tight.
A
CBD
Wear safety eye protection when
WARNING
!
using compressed air.
Serious eye injury may result.
5-2

SECTION 5 PCM-875A Plasmarc Cutting System Maintenance
Water and oil may accumulate in
CAUTION
compressed air lines. Direct the first air
blast away from equipment to avoid
possible damage.
G. With all input power disconnected, wearing
proper eye and face protection, blow out
the inside of the console using low-pressure
dry compressed air.
H. Periodically drain water from the filter
beneath the air-filter regulator.
5-3

SECTION 5 PCM-875A Plasmarc Cutting System Maintenance
5.1.3 Flow Switch
The Flow Switch (P/N 951202) may need to be
cleaned if excessive contamination is found in the
air supply.
1
Flow Switch Location
1
Solenoid Location
2
Piston Plug
Spring
A
2
View A-A
A
Note: The flow switch can be disassembled and
cleaned without extraction from the power supply.
1) Turn Off power supply
2) Remove piston plug
3) Remove the spring. Use care when handling
spring to prevent distortion.
Piston
5-4
Flow Switch Body
4) Remove the piston.
5) Clean all parts with warm water and a mild
detergent. Allow parts to dry thoroughly before
reassembly.
6) Reassemble switch in reverse order.

SECTION 5 PCM-875A Plasmarc Cutting System Maintenance
5.2. Remote Arc Starter
5.2.1 General
Check input and output bulkhead connections for
5.2.2 Spark Gap
1 mm
tightness.
Factory set to 1mm.
Adjustment procedure:
1. Loosen screw “a” using a 1/8” (0.125”)
internal hex wrench.
2. Insert 1mm feeler gage between the
tungsten electrodes.
3. Slide electrodes till slight pressure is felt on
the gage.
4. Tighten locking screws on spark gap
assembly.
”a”
5-5

SECTION 5 PCM-875A Plasmarc Cutting System Maintenance
5.3 PT-20AMX Plasmarc Torch
WARNING
!
Before any maintenance is attempted on
this torch, make sure the POWER SWITCH
on the console is in the OFF position and
the PRIMARY INPUT POWER is
DE-ENERGIZED.
5.3.1 General
1. Periodically check heat shield, electrode holder
assembly, electrode nozzle seat, and electrode
insulator. Replace if worn or damaged.
2. Apply a thin film of lubricant 17672 (supplied in
spare parts kit) to O-ring. Check O-ring for damage
whenever shield is removed. Replace if necessary.
3. Power and pilot arc cables should be inspected
periodically. If cuts through protective sheath or if
gas leaks are noted, replace damaged component.
5-6

SECTION 5 PCM-875A Plasmarc Cutting System Maintenance
5.3.2 Dirt or Contamination
Dirt or other contamination in the torch and loose
consumable parts can cause premature failure of
the PT-20AM Torch through internal arcing. To
avoid this, users are instructed to do the following:
1. Ensure that clean, dry, or oil-free air is being
used.
2. Avoid excessive use of the silicone o-ring
grease used to lubricate the torch o-ring. A thin
film is sufficient.
3. Wipe the torch body insulator clean with a
cloth before installing each fresh set of
consumables. The ability of the insulator to resist
arc tracking over its surface is reduced when dirt
or other contamination is allowed to collect there.
5.3.3 Loose Consumables
Tests have shown that with proper use of the torch
within rated operating conditions (especially arc
current and gas flow rate), the torch consumable
parts do not become loose if they are firmly
installed in the first place.
1. Tighten heat shield fully at each consumable
change or inspection. “Fully” means at least 5
mm of rotation after electrode seat contacts
electrode holder.
NOTE: trying to rotate the portion of the nozzle
extending outside heat shield can check
consumable tightness.
2. Check consumable tightness at beginning of
each work shift, even if everything was working
normally at the end of the previous shift.
3. Ensure that the torch electrode seat and
electrode holder are clean and free of dust or dirt
Debris may prevent mating surfaces from having
solid contact.
5-7

SECTION 5 PCM-875A Plasmarc Cutting System Maintenance
The torch requires good electrical contact
CAUTION
5.3.4 Damage Caused by Loose Parts and Torch Overheating.
between the electrode seat and electrode
holder. If good contact is not maintained,
then the resulting potential difference
causes internal arcing and possible torch
damage.
Electrode Insulator (21373)
Deformation at this edge indicates
torch overheating. Check gas
pressure, gas flow rate and current
setting. Deformation leads to loose
parts and internal arcing. Do not
operate torch with a deformed
insulator.
5.3.5 Consumables- Remove and Replace
1. Bring torch to a position where it is easily
Arc tracking indicates loose parts. Make sure heat
shield is tightened fully, at least 5mm of rotation
after electrode seat contacts electrode holder.
Check tightness again after a few minutes of use.
Parts damaged by arcing will cause destruction of
torch. Parts damaged by arcing must be replaced.
accessed by machine operator, in its normal
vertical position and at least 6 inches above the
workpiece or the edge of the water table.
Make sure that the power source has been
WARNING
!
turned off and that the power cable has
been unplugged at the wall receptacle
before proceeding.
5-8
2. Unscrew the heat shield and lower it away
from the torch, allowing nozzle and electrode
assembly to remain with shield.

SECTION 5 PCM-875A Plasmarc Cutting System Maintenance
3. Remove the nozzle and electrode assembly
from the shield and inspect for wear. The nozzle
orifice should be round at both the entrance and
the exit. If the nozzle orifice is worn in an oval
shape or shows other signs of damage at either
end, it should be replaced. The inside of the nozzle
may have light gray deposits from the electrode.
These may be removed with steel wool but care
must be taken to remove all traces of the steel
wool afterward.
1,5 mm
If the electrode has a pit that is more than 1.5mm
deep at its center, replace it. Grasp the electrode
holder with the fingers using the two flats and
grasp the electrode between the thumb and finger
of the other hand and twist.
Inspect electrode insulator and electrode holder
assembly for signs of damage such as arc tracking
or cracking and replace them if any are found.
Insure that the baffle tube is securely threaded into
the electrode holder, but do not over tighten. Use
the small hex end of the plastic wrench in the
spare parts kit.
After installing the electrode insulator onto the
electrode holder assembly, install electrode by
reversing the procedure used to remove it. Note
that firm tightening of the electrode by hand is
sufficient. The use of tools such as wrenches or
pliers is not required or recommended.
4. Inspect heat shield for signs of damage or
wear. The gas holes inside shield should not be
blocked by debris, and there should be no signs of
arcing anywhere inside the shield. The outer
insulating jacket of the shield should not be
severely charred or eroded. Replace the heat
shield if any of the above damage is found.
.
5-9

SECTION 5 PCM-875A Plasmarc Cutting System Maintenance
Inspect o-ring of torch
6. Install the nozzle and the electrode assembly
5.3.6 Measuring Torch Gas Flows
5. Inspect the o-ring on the torch. If it shows
signs of wear or damage, replace it. If it is dry,
lubricate it with a thin film of lubricant supplied with
spare parts kit
into heat shield and thread heat shield onto torch.
The shield should be tightened fully to insure good
electrical contact for electrode and nozzle. "Fully"
means at least 3/16 inch of rotation after electrode
seat contacts electrode holder.
Check gas flow if suspected of causing poor
cutting performance. Use Plasma Torch Flow
Measuring Kit. (P/N 19765)The kit includes a hand
held rotameter (flowmeter) that indicates the gas
flow rate exiting the torch. The kit also includes a
set of instructions that should be followed exactly
to insure safe and accurate use of the rotameter.
Total air flow rate in the PT-20AMX should be
325cfh minimum with any nozzle at 75 psi.
Flow Measuring Kit -- P/N 19765
5-10

SECTION 5 PCM-875A Plasmarc Cutting System Maintenance
5.3.7 Removal and Replacement of the Torch Body
Make sure that the power source has been
WARNING
!
turned off and that the power cable has
been unplugged at the wall receptacle
before proceeding.
PT-20AMX Torch
1. Cut and remove the shrink wrap at the back
end of the torch handle. Unscrew the handle from
the torch body and slide it back onto the torch
cable assembly in order to expose the torch
connections.
2. Remove the electrical tape that secures the
short piece of vinyl tubing on the pilot arc cable.
Slide the tubing away from the torch and onto the
pilot arc cable to expose the pilot arc connector.
3. Use the 1/16" Allen Wrench supplied in the
spare parts kit to loosen the pilot arc connector set
screw closest to the torch body, being careful not
to totally remove the screw. Slip the torch’s pilot arc
lead out of the connector.
4. Unscrew the power cable fitting from the
torch’s power lead using a 7/16" open-end wrench
and remove the torch body.
5. Connect the pilot arc cable and the power
cable to the new torch body’s pilot arc lead and
power lead by reversing the steps taken to
disconnect them. Tighten the pilot arc connector
set screw fitting firmly but do not overtighten.
Torque the power fitting to 20 lb. in.
6. Slide the vinyl tubing forward to cover the pilot
arc connector and secure in place with electrical
tape.
7. Slide the handle forward and thread it firmly
onto the torch body.
8. Slide the new piece of shrink tube over the
torch handle and shrink in place over the handle’s
end and the cable sheath.
5-11

SECTION 5 PCM-875A Plasmarc Cutting System Maintenance
This page intentionally left blank
5-12
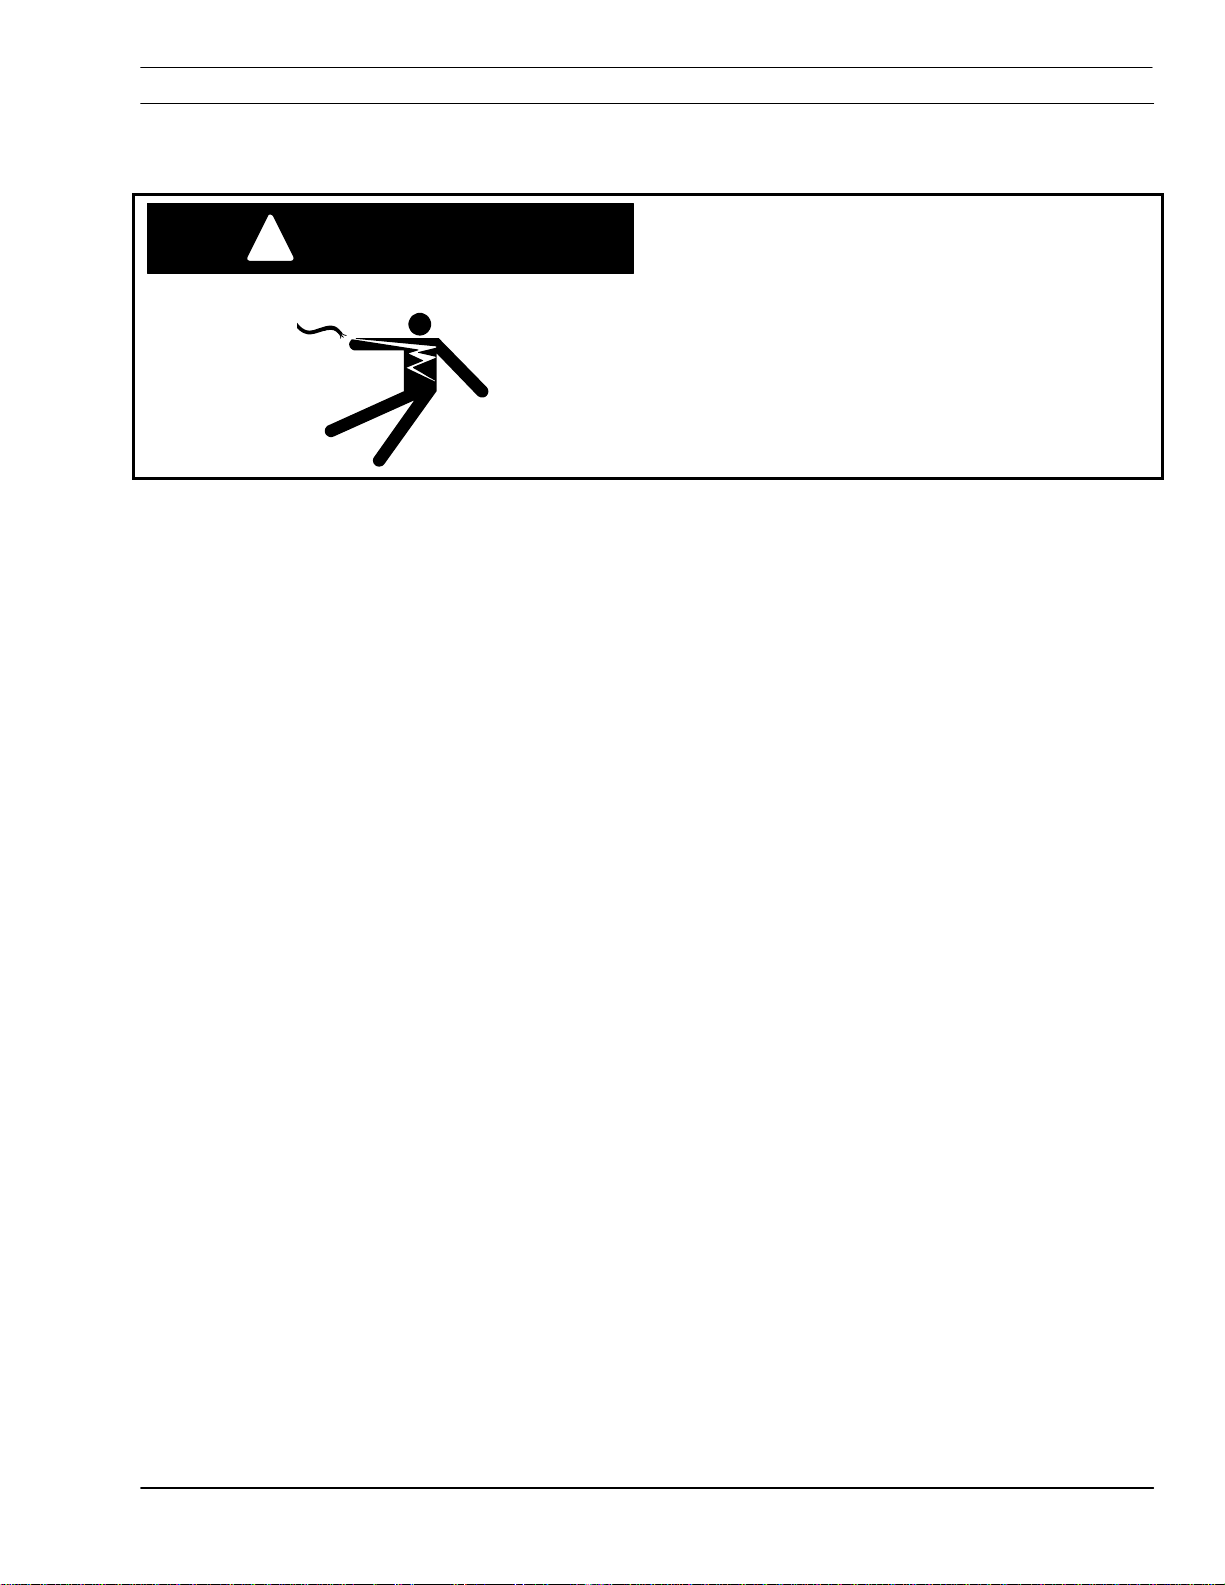
SECTION 6 PCM-875A Plasmarc System Troubleshooting
6.1 Troubleshooting PCM-875A Plasmarc System
Electric Shock Can Kill!
WARNING
!
Ensure that all primary power to the
machine has been externally
disconnected.
Open the line disconnect switch or circuit
breaker before inspection, maintenance or
repair inside power console.
Match the problem with the conditions below.
If problem is not listed,
· shut off input power,
· open unit by removing cover
· Visual inspection of all components and wiring
· Check for loose terminal connections
· Burned wiring or other components
· Bulged or leaking capacitors
· Any other signs of damage or discoloration.
6-1

SECTION 6 PCM-875A Plasmarc System Troubleshooting
6.2 Troubleshooting guide for PCM-875A Plasmarc System
6.2.1 Power Light (PL1) does not come on
6.2.2 No air flow
· Visually inspect the machine for damage.
· Check if the cooling fan is running. If not running,
check the following:
§ Check if machine input power is still connected.
§ Measure input power at the receptacle. If not
present, then check the wall disconnect switch and
it’s fuses.
§ Check fuse (F1). If it is:
§ Check input circuit breaker (CB1).
§ If cooling fan is running, measure voltage
between pins P2-11 and P2-14 of control board
(should be 115VAC). If no voltage, replace
transformer T2.
§ If voltage is present, power light may be burned
out.
The problem is internal if above items are ok. Send unit
to Authorized Repair Station.
· Check air inlet supply. Unit requires 9,2
4,48 bar.
3
m/h at
· Check air hose and connections. Tighten if
leaking.
· Does air flow when “Air Test” switch is in test
position?
§ If not, check torch consumables, replace if
necessary.
If above items are OK, the problem is internal. Return to
authorized repair station for service.
6-2

SECTION 6 PCM-875A Plasmarc System Troubleshooting
6.2.3 The Power light is on, but nothing happens when the torch is signaled to fire.
Fault light does not activate.
NOTE: Unplug high frequency connection before
attempting to work on this problem.
· Check the Pilot Arc fuse (F2) located on the rear
panel. An open fuse will indicate a short in the torch. If
the fuse is all right, then check the following:
§ With the machine power on, depress the torch
switch. On the control board the LED 1 should be
lit as long as the switch is depressed. If not then
check:
§ Turn power off to the machine. Unplug Control
board. Put an ohmmeter across P5-1 and P5-2 to
take resistance reading. Depress torch switch.
Meter should read a short. If not, then one of the
following is not working properly:
§ Torch switch or the leads. Unplug the torch
switch leads at the machine. Put a meter across
the two plug pins. Should read a short when the
torch switch is depressed. If not, then either
broken switch leads or malfunctioning switch.
§ Check T2 transformer secondary voltages at the
plugs P1 and P2. Refer to system schematic.
Replace the transformer if the correct secondary
voltages are not present.
If everything above checks out all right, then the PCB1
Control Board should be replaced.
6-3

SECTION 6 PCM-875A Plasmarc System Troubleshooting
6.2.4 Fault light activates when torch is signaled to fire
The Fault circuit is used to monitor conditions
necessary for the safe operation of the PCM-875. The
fault light will glow amber under the following conditions
and operations will come to a complete stop:
· High/Low line voltage. The Fault Light will rapidly
blink on and off (5 times per second). This indicates
that the input voltage is outside the “+” or “-” 15% safe
operating range rating.
· Flow fault - The fault light will be mostly on but will
blink off for 1/10th of a second every second. This
indicates that the air flow is low.
§ Check the air pressure at the machine regulator.
It should be adjusted to 65 psig. If no air pressure,
check the air at the supply point. Also, check for
any obstructions in the air hose.
§ Air flow may be blocked at the torch tip. Check
the torch consumables. Also check for any
obstructions in the torch leads.
§ NOTE: If above items check OK , the
problem is internal. send unit to an Authorized
Repair Station for repair.
§ Put the ‘Air Check’ switch to On position. Air
should flow through torch. If not, then the
flow switch may be stuck due to oil in the air. Clean
air flow switch per supplier’s instructions or replace
switch. To check if the flow switch is open, put
voltmeter leads between P1-12 and P1-1. It should
read about 12 VDC. When the flow switch closes,
the voltage will drop to zero volts.
§ Air Check switch may also be malfunctioning if
the air is flowing continuously or putting in the
On position does not turn air on.
6-4

SECTION 6 PCM-875A Plasmarc System Troubleshooting
Fault light activates (continued)
· Over Temperature. The fault light will be mostly off
but will blink on for 1/10 of a second, every second.
This generally indicates that the duty cycle has been
exceeded. Allow the power source to cool before
returning to operate.
§ Thermal switch may be open. It will open if the
temperature at the IGBT base reaches 94oC. With
the machine power off, check the continuity
between P1-1 and P1-2 of the control board. If the
switch is OK, then the ohmmeter should read a
direct short. If not then it should read open.
§ If the switch is malfunctioning, replace it. Clean
the surface of the heat sink before installing the
switch.
· Over Current. The fault light will be on continuously.
This indicates that the input current to the main
transformer has exceeded preset limits.
§ To check if the output is shorted, measure the
resistance by putting the ohmmeter leads (make
sure to disconnect HI Frequency leads):”+” of the
meter to Torch “+” output terminal and Work “-”
lead of the meter to the “-” output terminal.
Reading should be about 2 K Ohms. Reverse the
voltmeter leads, the resistance reading should be
less than 1.5 K Ohms.
If the resistance reading is different than above, check
the torch, the output bridge and Filter Board (PCB-5).
6-5

SECTION 6 PCM-875A Plasmarc System Troubleshooting
6.2.5 Air is On but nothing happens when torch is signaled to fire.
· Check pilot arc fuse located on rear panel. If it is
open, nothing will happen when torch switch is
depressed.
· Check torch. Make sure heat shield is very tight.
· Check to assure high frequency is present at torch.
If not, then listen for high frequency at high frequency
generator. It is located on bottom/right side of the unit.
High frequency gap is set to .040". Disconnect HI
FREQUENCY leads. Check for 115 volt supply to high
frequency unit between P2-12 & P2-13 of control
board with torch switch closed.
· With HI FREQUENCY leads disconnected,
measure open circuit voltage. It should be 275 VDC
between “Work” and “Torch” terminals. If it is not
present then any one of the following may not be
working properly:
§ Check the operation of the Thermal Switch. See
D.3.a. above.
§ Check Air Check switch operation. It might be
stuck in On position. Pilot arc will not initiate if this
switch is in the ON position. (safety reasons)
§ Check air flow switch. There may be internal
short. See D.2.c above.
§ Measure voltage across C1 or C2 capacitor. It
should be as follows:
approx. 325 VDC for the 208/230 volt unit.
approx. 280 VDC to 325 VDC for 400 volt unit
If not, one of following could be malfunctioning:
§ Check the capacitors C1 and C2 for any
damage.
§ Check input bridge/SCR Module (IBR) This can
be checked without taking it out of the circuit using
an volt/ohmeter. Replace it if found malfunctioning.
Follow bridge installation instructions.
§ Check Inrush current resistor, R10 and SCR1.
Both are located on the input bridge heat sink.
Replace it if malfunctioning.
§ IGBTs (2 on 230 V, and 1 on the 400 V units) may
be blown. See IGBT installation procedure. Before
replacing IGBTs, make sure to check the zener
diodes and pico fuses on the IGBT driver boards.
6-6

SECTION 6 PCM-875A Plasmarc System Troubleshooting
6.2.6 High Frequency and Pilot Arc are on but Main Arc does not transfer.
6.2.7 Poor Cutting Performance.
· Make sure work clamp is connected to work
material.
· Check the torch. Replace consumables if necessary.
· Make sure the current setting potentiometer is set
above 10 amps. If it is, set below 10 amps, then HI
FREQUENCY will go on and off at 5 sec intervals.
· Check air supply regulator . It should be adjusted to
65-75 psig.
· The air supplied to the torch should be free of oil
and water.
· Make sure the consumables in the torch are
acceptable.
· Check open circuit voltage.
· Check the output. Use a calibrated current probe
capable of measuring 100 amps in the presence of
high frequency.
6.2.8 Air does not shut off.
· Check air test, the gas solenoid valve is energized
when the switch is in the “on” position.
· Does air flow stop when the torch switch is
unplugged? If yes, check and repair the torch. If not,
send unit to an Authorized Repair Station for repair.
· Check voltage to solenoid coil, if present when
torch switch is unplugged, replace PCB1. If voltage is
“0”, replace solenoid valve.
6-7

SECTION 6 PCM-875A Plasmarc System Troubleshooting
6.2.9 Main arc is difficult to start.
· The most common reason is worn or missing
consumables. Check and replace if necessary.
· Input air must be clean and dry.
· Input air pressure must be between 65 - 75 psig.
· Torch connections must be tight.
· Work cable and clamp must be in good condition
and must make a good electrical connection to the
material to be cut.
· If above items check OK , the problem is internal.
Send unit to an Authorized Repair Station for repair.
· Missing or weak pilot arc. Check pilot arc fuse,
open circuit voltage, pilot arc resistors and pilot arc
wiring.
· Inoperative starter board (PCB-5).
· Check Spark gap in RAS unit. 1mm is desired
gap. If gap is to large, spark will be weak or nonexistent.
6-8

SECTION 6 PCM-875A Plasmarc System Troubleshooting
6.3 Reference Voltage Checks
A. Control Board Assembly (PCB1)
LED’s
LED-1 - Torch Switch
LED-2 - High Frequency
LED-3 - Gas Solenoid Valve
Voltage Test Points
Tests are made with power on - no arc.
Disable High Frequency by disconnecting blue wire
with black sleeve
TP-0 - Ground
TP-1 - +15 vdc
TP-2 - +12 vdc
TP-3 - -12 vdc
TP-4 - +5 vdc
TP-9 - IGBT’s driving signal - switching
frequency = 16 KHz
TP-10 - IGBT’s driving signal - switching
frequency = 16 KHz
62 µsec
13 vdc
0
-13 vdc
5 msec
IGBT Gating Signal
For 208/230 VAC input, the IGBT off time is 3msec.
For 400/460/575 VAC input, the IGBT off time is 6msec.
6-9

SECTION 6 PCM-875A Plasmarc System Troubleshooting
6.4 PT-20AMX Torch Troubleshooting
Common Cutting Problems
Listed below are common cutting problems
followed by the probable cause of each. If
problems are determined to be caused by the
PCM-875, refer to the maintenance section of this
manual. If the problem is not corrected after
referring to the maintenance section, contact your
ESAB distributor.
6.4.1 Insufficient Penetration
6.4.2 Main Arc Extinguishes
6.4.3 Dross Formation.
· Current too low.
· Cutting speed too fast.
· Damaged cutting nozzle.
· Improper air pressure.
· Low air flow rate.
· Cutting speed too slow.
· Worn electrode.
(In some materials and thicknesses, it may be
impossible to get dross-free cuts.)
· Current too low.
· Cutting speed too fast or too slow.
· Improper air pressure.
6-10
· Faulty nozzle or electrode.
· Low air flow rate.

SECTION 6 PCM-875A Plasmarc System Troubleshooting
6.4.4 Double Arcing
6.4.5 Uneven Arc.
6.4.6 Unstable Cutting Conditions.
6.4.7 Main Arc Does Not Strike
· .Damaged Nozzle Orifice.
· Low air pressure.
· Damaged cutting nozzle.
· Loose cutting nozzle.
· Heavy spatter accumulation on nozzle.
· Damaged cutting nozzle or worn electrode.
· Incorrect cutting speed.
· Loose cable or hose connections.
· Electrode and/or cutting nozzle in poor
condition.
· Worn electrode.
· Loose connections.
· Worn cable not attached
6.4.8 Poor Consumable Life
· Improper gas pressure.
· Contaminated air supply.
· Low air flow rate
6-11

SECTION 6 PCM-875A Plasmarc System Troubleshooting
6.5 230V Power Console Electrical Drawings
6.5.1 230V Console Schematic Part 1
L1
BLK
LINE
LOAD
T1
A
A
M
R
1
10,50W
O
275V
0
V
3
(+)
2
1
2
3
4
(+)
5
6
7
8
1
9
2
L2
T2
B
B
M
I
B
R
G
R2
1
Q
1
C2E1
Q
2
C2E1
R9
39K,2W
C4
40UF,400VDC
208/230 VAC
50/60 HZ
RED
3 PH CE
N
F
E
C
M
O
V
2
275V
D6
D5
D4
R
R
G1
V
G1
I
F
1
E1
V
P1-4VP1-3
1
L
E
T
M
O
275V
AC3
R
5
2
P1-4VP1-3
E1
3
4
10
R
AC2
C3
C1
C2
V
1
S
P
C
P
C
L3
WHT
S
1
T3
C
C
AC1
D3T
(-)
D2
D1
C
1
9
10K,25W
10K,25W
1UF,600V
1800UF,450VDC
1800UF,450VDC
G2
B
2
P1-1
B
3
P1-1VP1-2
G2
C10
0.022UF,1KV
R7
10 OHM,50 W
V V
P1-2
.22UF,1KV
V
2
1
2
0
H1
TB5-1
1
M
1
T2
F1
3A,600VAC
2 1
X2
2
L
X1
R1
10K,2W
1UF
600V
MAX
2
3
1
T
S
1
2
X3
230V
X2
230V
X1
1
E2
2
C1
3
E2
E2
C1
3
E2
2
1
T
4
(-)
C16
1uf
600V
C15
H1
1
T
2
H2
V
P5-3
V V
V V V
V
V V
TB3
208V
C7 R5
2
1 1
(+)
C5
2
1
X1
20,25W.01UF,1KV
20,25W.01UF,1KV
12V
P2-7
P2-8
P6-13
P6-6
P6-12
P6-5
P1-1
P1-2
V V V V
V V V V V
V
R3
1
P3-2
P3-1
P3-4
P3-5
P4-5
P4-4
P4-1
P4-2
P1-7
P1-8
X2
V
V
P5-4
P1-9
2
3
D1
1
2
X3
18V
1
20,25W
1
20,25W
X4
V
P1-10
R
6
2 21
R4
2 2
X11
1
115V
P2-11
C8
.01UF,1KV
(-)
C6
1
.01UF,1KV
X12
2
V V
P2-14
(CONTROL BOARD)
208V
H2
X5
P1-5
RED
(+)
208V
P
12V
H1
X6
C
B
P6-11
4
2
S
(PCB4)
1
H
230V
TB5-2
230V
V V
P1-6
P6-10
V V
3
1
L
H3
BLK
1
X7
V
P2-1
(-)
X8
24V
R11
8 ,300W
8 ,300W
R12
H2
400V
H4
X10
X9
20V
V
P2-4
V V
P1-3
P1-4
P5-9
V
R16
100K
2W
1
2
3
6-12
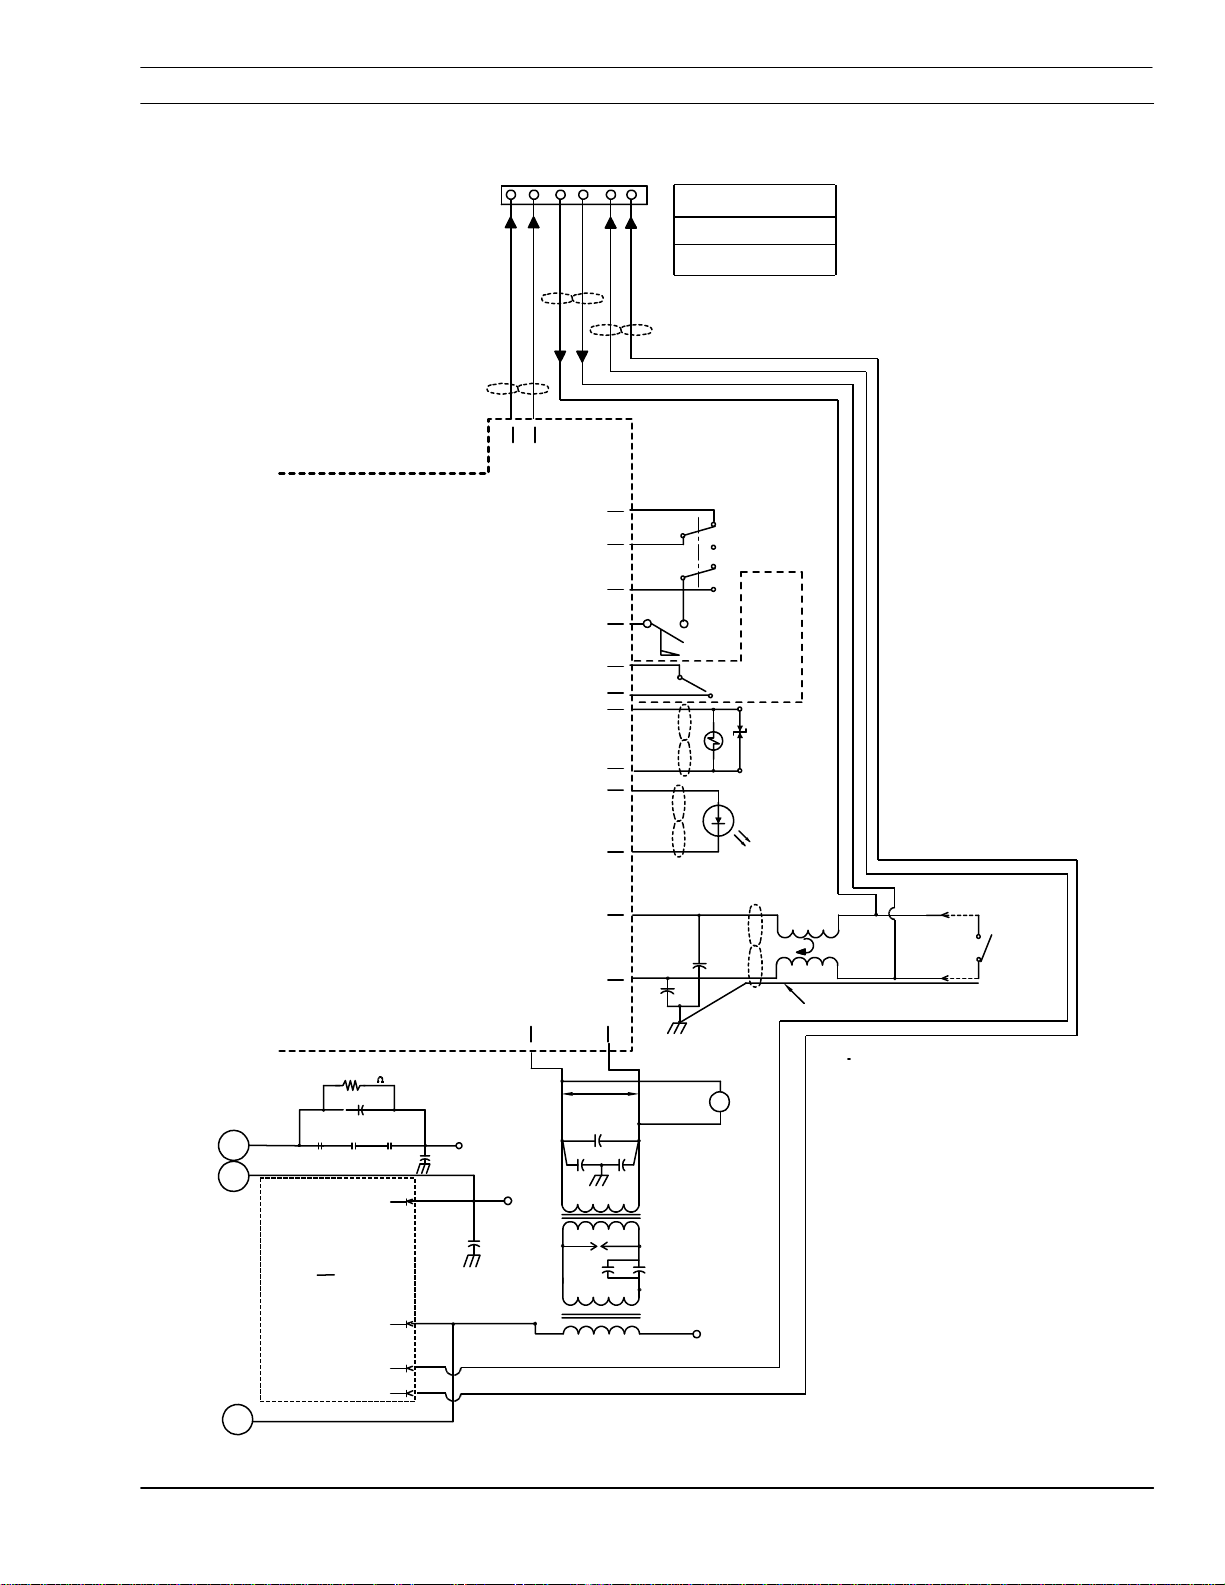
SECTION 6 PCM-875A Plasmarc System Troubleshooting
230V Schematic Part 2
(SEE CHART)
T
B
4
1234
V V
P6-9
P6-7
5 6
(+) (-)
TB4-1
ARC ON
}
SIGNAL TO CNC
TB4-2
TB4-3
START SIGNAL
}
TB4-4
FROM CNC
VOLTAGE DIVIDER
TB4-5
}
SIGNAL TO CNC
TB4-6
P2-3
VV
P2-4
P1-12
1
VV
P1-11
V
P6-1
P6-2
P
C
B
1
(CONTROL BOARD)
330K ,1W
R13
.82UF 630VDC
C21
K1
K1
L2
L3T3
1
2
T2 T1
P.A.
P1-1
P
5
B
C
P1-6
P1-2
P1-3
PILOT
K1
ARC
L1
.022UF, 1KV
C20
GND 3
V
C
V
V
V
R
O
W
K
2
3
0.047uf
660V
G
N
D
5
(+)
(-)
P2-2
P2-3
P5-5
P2-12
VV
115 VAC
.01UF,250 VAC
T
B
1
-
1
G
C
1
1
.01UF
1KV
H1
X1
1
C
2500 PF,15KV
H2
X2
P5-6
P5-1
P5-2
C
N
T
S
1
S
O
L
VVV
V
P
L
2
V
V
V
C
1
8
.022UF
250VAC
P2-13
G
N
9
T
B
D
4
C
1
2
.01UF
1KV
H2
X2
5
2
G
C
3
T
1
T
B
2
H1
X1
3
3
2
5
2
F
S
1
S
3
1
1
2
250VAC
D
2
1
-
2
4
2500 PF,15KV
T
O
R
C
3
1
6
4
2
+
-
C
1
.022UF
A
K
1
B
H
S
2
0558003357
0558003356 &
NOT USED ON CONSOLES
Z
D
1
75mA
60V
L
3
4T
7
SHIELD
1
V
J
1
2
V
TORCH SWITCH
6-13

SECTION 6 PCM-875A Plasmarc System Troubleshooting
6.5.2 230V Power Console Wiring Diagrams Part 1
J1 SHIELD
PCB5 P1-3 VIO
PCB5 P1-2 BLU
J1-2 BLK
J1-1 GRY
*
*
T3-H2 RED
T3-H1 RED
T5-X1 RED
8
1
C
1
C
765
FS
1 2
GND 2
7
SG
P5-1
P5-2
TB2
C
P5
342
1
P6
1
2
C
4
1
3
1
RED
RED
SPLICE
TB4
PCB1 P6-7 YEL
PCB1 P6-9 ORN
PCB1 P1-11 RED
*
T5-X2 RED
(SEE CHART)
S1-T3 BLK
S1-T2 BLK
S1-T1 BLK
S1-5 RED
PCB1
P4
LINE
TB1-2 BLK
TB1-1 BLK
*
SG-1 RED
P3
C
FN1
B
CE MARKED UNITS
ONLY
A
*
*
H2
H1
T5
X1
X2
P1
P2
IBR-T BLK
C
IBR-S BLK
B
LOAD
IBR-R BLK
A
P.A. BUS ORN
BLU
L3
L1 L2
*
SG-2 RED
K1
R13
C21
A
T1 T2
BLU
B
T3
PCB1 P2-13 BLU
R11-2 YEL
6-14
PCB1 P2-12 BLU
YEL PCB1 P2-11
YEL PCB1 P2-14
1
PL1
2
PCB1 P5-5 RED
+
PL2
PCB1 P1-12 BLK
PCB1 P2-4 ORN
0558003357
0558003356 &
NOT USED ON CONSOLES
PCB1 P6-1 BLU
PCB1 P6-6 WHT
-
PCB1 P5-6 BLK
4
1
S3
RED FS-2
56
GRY PCB1 P2-3
2
3
S2
BLU PCB1 P6-2
21
1
2
3
R1
PCB1 P6-12 BRN
PCB1 P6-13 RED

SECTION 6 PCM-875A Plasmarc System Troubleshooting
230V Power Console Wiring Diagrams Part 2
DETAIL "A" (PCB1)
P1
1TS1-1
2TS1-2
34T2-X9
T2-X10
5T2-X5
6 6 6 R1-2 WHTT2-X6 BLU 4 ORNS1-2 BLKPL2-(-)
7T4-1
8T4-2
9T2-X3
10 T2-X4
11 FS-1
12 S1-4
VIO 2
BRN
BRN33
BLU 4
ORN
ORN
WHT
WHT
RED
BLK
1VIO
5
6
7 IBR-G YEL
8 IBR(+) BRN
9
10
11
11
12
12
13
13
14
P2
T2-X7
SOL1-1
SOL1-2
S1-3
T2-X8
T2-X11
PL1-1
TB1-1
K1-A BLU
TB1-2
K1-B
PL1-2
T2-X1214 VIO
WHT
GRY
GRY
ORN
VIO
YEL
BLU
BLU
BLU
YEL
1ORN
J1-1
2
J1-2
T2-X1
3
T2-X2
4
PL2-(+)
5
7
8
9 R16-1 GRY
10
11
12
P5
CLR (TP)
BLK (TP)
YEL
YEL
P6
1S2-1
2S2-2
3
4
5 PCB1 P6-6 WHTRED
PCB1 P6-5 WHT
7
TB4-1
8
8
TB4-29
10 PCB4-3
11 PCB4-4
12 R1-1
13 R1-3
BLU
BLU
YEL
ORN
BLK (TP)
RED (TP)
BRN
RED
GRN
GND1
INPUT POWER CABLE
FN1 LINE A
FN1 LINE B
FN1 LINE C
BLK
BLU
BRN
S1
T1
T2
T3
LINE
1
2
3
BLK
RED T2-H1
BLK M1-2
BLU
BRN
*
BLK TB5-2
*
F1-1
LOAD
*
*
BLK
F1
1
2
IBR (T) BLK
1
M1
2
6-15

SECTION 6 PCM-875A Plasmarc System Troubleshooting
230V Power Console Wiring Diagrams Part 3
TP
TB4-5 BLU
TB4-6 VIO
PCB4-1 RED
PCB5
BLK PCB1 P6-10
P1
345 612
1
6
GND 5
PCB4
(SHUNT)
324
1
RED PCB1 P6-11
+
TB5
T2-H2 BLK
T2-H3 GRY
M1-1 BLK
*
*
*
MOV
MOV
MOV
3
2
1
2
1
F
N
FN1 LOAD B
1
GRY
L
L1-H2 BLK
VIEW E-E
PCB1-P4
WHT
1
TS1
4
3
R7-1 BLU
12 3 54
WHT
RED
RED
134 234
PCB3
C1
C16
E2
C2E1
2
Q2
C10
WHT
T1-H1
PCB4-2 BLU
R3
R4
PCB1- P3
IBR(+) RED
*
L2-X1
C3
IBR
R2R
G
PCB1 P2-8 BRN
+
-
C1(+) RED
L2-X2
R2-2 BLK
YEL
C19
Y
E
L
*
Q1-C2E1 RED
PCB1 P2-7 YEL
O
A
D
A
S
T
F1-2 BLK
FN1 LOAD C
R2-1 RED
+
C1
-
PCB1 P1-2 VIO
PCB1 P1-1 VIO
C4-2 RED
C4-4 BLU
12
R10
ORN
PCB1 P1-7 ORN
1
2
1
WHT
12
PCB2
R7
1
2
T4
R9
C4
RED
ORN PCB1 P1-8ORN
C1
E2
Q1
T1-H2
51423
RED
C15
C2E1
2
*
WORK
R11-1 BLU
D1(+) BLU
PCB5 P1-1 RED
VIEW B-B
R15-2 RED
PCB1 P5-2 BLK(TP)
2
1
PCB1 P5-1 CLR(TP)
*
T1-X3
TB3
P.A. BUS
PCB1 P2-3 GRY
GND 3
K1-L1 ORN
2
1
J1
L3
C20
TB4-4 BLK
CLR
BLK
+
C2
-
R15-1 BLK
*
U
L
B
+
C7
C5
1
1
2
R5
-
1
2
2 1 2
R6
C6
C8
L1-H1 BLK
*
*
T1-X1
1
D1
2
*
3
T1-X2
ZD1
PCB1 P2-2 WHT
U
L
B
SOL1
C23
6-16
LEFT SIDE VIEW
TB4-3 GRY
 Loading...