

ESAB EMP 285ic 1ph, EMP 285ic 3ph Instruction Manual

INSTRUCTION MANUAL
EMP 285ic 1ph & EMP 285ic 3ph
Valid for: serial nos. 745-xxx-xxxx, 747-xxx-xxxx
Rights
reserved
to alter specifications with out
notice.
PART # 0463 618 001 © ESAB AB 2018

(Intentionally Blank)

BE SURE THIS INFORMATION REACHES ALL OPERATORS OF THIS EQUIPMENT. EXTRA
COPIES ARE AVAILABLE THROUGH THE ESAB SUPPLIER OR FROM THE ESAB WEB SITE:
WWW.ESAB.COM.
CAUTION
These INSTRUCTIONS are for experienced operators. If you are not fully familiar with the
principles of operation and safe practices for arc welding and cutting equip
ment, we urge
you to read our booklet, "Precautions and Safe Practices for Arc
Welding, Cutting, and
Gouging," Form 52-529. See:
http://www.esabna.com/eu/literature/precautions%20and%20safe%20practices%20fo
r%20arc%20welding,%20cutting%20and%20gouging.pdf
Do NOT permit untrained persons to install, operate, or maintain this equipment. Do NOT
attempt to install or operate this equipment until you have read and fully understand
these instructions. If you do not fully understand these instructions, contact your supplier
for further information. Be sure to read the Safety Precautions before installing or
operating this equipment.
This equipment will perform in conformity with its proper use when installed, operated,
maintained and repaired in accordance with the instructions provided. This equipment
must be checked periodically. Malfunctioning or poorly maintained equipment should not
be used. Parts that are broken, missing, worn, distorted or contaminated should be
replaced immediately. Should such repair or replacement become necessary, the
manufacturer recommends that a request for service advice be made to the Authorized
Distributor from whom it was purchased. This equipment or any of its parts should not be
altered without the prior written approval of the manufacturer. The user of this
equipment shall have the sole responsibility for any malfunction which results from
improper use, faulty maintenance, damage, improper repair or alteration by anyone
other than the manufacturer or a service facility designated by the manufacturer.

(Intentionally Blank)

SECTION TABLE OF CONTENTS
Paragraph Page
SECTION 1 WELCOME TO ESAB
1.1 HOW TO USE THIS MANUAL ............................................................................... 1-1
1.2 EQUIPMENT IDENTIFICATION ............................................................................. 1-1
1.3
RECEIPT OF EQUIPMENT ..................................................................................... 1-1
1.4 DESCRIPTION ...................................................................................................... 1-1
SECTION 2 SAFETY
2.1 MEANING OF SYMBOLS ...................................................................................... 2-1
2.1.1 SAFETY GUIDANCE AND INFORMATION ........................................................... 2-1
2.1.2 SAFETY PRECAUTIONS ...................................................................................... 2-1
2.1.3 FIRES AND EXPLOSIONS .................................................................................... 2-3
2.1.4 ELECTRICAL SHOCK ........................................................................................... 2-4
2.1.5 ELECTRIC AND MAGNETIC FIELDS ..................................................................... 2-4
2.1.6 FUMES AND GASES .......................................................................................... 2-5
2.1.7 CYLINDER HANDLING ....................................................................................... 2-6
2.1.8 MOVING PARTS ................................................................................................ 2-7
2.1.9 MALFUNCTION ................................................................................................. 2-7
2.1.10 EQUIPMENT MAINTENANCE ............................................................................ 2-7
2.1.11 FALLING EQUIPMENT ....................................................................................... 2-8
2.1.12 ARC RAYS ......................................................................................................... 2-8
2.1.13 NOISE ............................................................................................................... 2-8
2.1.14 USER RESPONSIBILITY....................................................................................... 2-9
SECTION 3 INTRODUCTION
3.1 KEY FEATURES .................................................................................................... 3-1
3.2 EQUIPMENT ........................................................................................................ 3-1
3.2.1 EMP 285ic 1ph ................................................................................................. 3-1
3.2.2 EMP 285ic 3ph: ................................................................................................ 3-2
3.3 OVERHEATING PROTECTION ............................................................................... 3-2
SECTION 4 TECHNICAL SPECIFICATIONS
4.1 EMP 285IC (1PH) SPECIFICATIONS ...................................................................... 4-1
4.2 EMP 285IC (3PH) SPECIFICATIONS ...................................................................... 4-4
SECTION 5 INSTALLATION
5.1 LOCATION ........................................................................................................... 5-1
5.2 HIGH FREQUENCY INTERFERENCE ...................................................................... 5-2

SECTION TABLE OF CONTENTS
Paragraph Page
5.2.1 User’s Responsibility ........................................................................................ 5-3
5.2.2 Assessment of Area .......................................................................................... 5-3
5.3 LIFTING INSTRUCTIONS ...................................................................................... 5-4
5.4 MAIN SUPPLY ..................................................................................................... 5-5
5.5 RECOMMENDED ELECTRICAL-SUPPLY SPECIFICATIONS...................................... 5-6
5.6 SUPPLY FROM POWER GENERATORS ................................................................. 5-7
SECTION 6 OPERATION
6.1 UNIT’S CONNECTIONS AND CONTROLS .............................................................. 6-2
6.2 CONNECTION OF WELDING AND RETURN CABLES .............................................. 6-3
6.2.1 FOR MIG/MMA PROCESS ................................................................................. 6-3
6.2.2 FOR TIG PROCESS ............................................................................................. 6-4
6.3 POLARITY CHANGE ............................................................................................. 6-4
6.4 SHIELDING GAS ................................................................................................... 6-4
6.5 VOLT-AMPERE CURVES ....................................................................................... 6-5
6.5.1 1ph VOLT-AMPERE CURVES.............................................................................. 6-5
6.5.1.1 SMAW (Stick) 120 V, 1ph ............................................................................... 6-5
6.5.1.2 SMAW (Stick) 230 V, 1ph ............................................................................... 6-5
6.5.1.3 GMAW (MIG) 120 V, 1ph ............................................................................... 6-6
6.5.1.4 GMAW (MIG) 230 V, 1ph ............................................................................... 6-6
6.5.1.5 GTAW (TIG) 120 V, 1ph .................................................................................. 6-7
6.5.1.6 GTAW (TIG) 230 V, 1ph .................................................................................. 6-7
6.5.2 3ph VOLT-AMPERE CURVES.............................................................................. 6-8
6.5.2.1 SMAW (Stick) 460 V, 3ph / SMAW (Stick) 575 V, 3ph ..................................... 6-8
6.5.2.2 GMAW (MIG) 460 V, 3ph / GMAW (MIG) 575 V, 3ph ..................................... 6-8
6.5.2.3 GTAW (TIG) 460 V, 3ph / GTAW (TIG) 575 V, 3ph .......................................... 6-9
6.6 DUTY CYCLE ...................................................................................................... 6-10
6.7 REMOVING/INSTALLING BOBBIN ..................................................................... 6-13
6.8 REMOVING/INSTALLING WIRE.......................................................................... 6-15
6.8.1 REMOVING WIRE ........................................................................................... 6-16
6.8.2 INSTALLLING WIRE ......................................................................................... 6-18
6.9 WELDING WITH ALUMINUM WIRE ................................................................... 6-20
6.10 SETTING WIRE-FEED PRESSURE ......................................................................... 6-21
6.11 REMOVING/INSTALLING WIRE-FEED ROLLERS .................................................. 6-23
6.11.1 REMOVING WIRE-FEED ROLLERS .................................................................... 6-24
6.11.2 INSTALLING WIRE-FEED ROLLERS ................................................................... 6-26
6.12 REMOVING/INSTALLING/ADJUSTING WIRE-FEED GUIDES ................................ 6-28
6.12.1 OUTPUT WIRE-GUIDE REMOVAL/INSTALLATION ............................................ 6-32
6.12.2 CENTER WIRE-GUIDE REMOVAL/INSTALLATION ............................................. 6-32

SECTION TABLE OF CONTENTS
Paragraph Page
6.12.3 ADJUSTING WIRE GUIDES ............................................................................... 6-32
SECTION 7 CONTROL PANEL
7.1 HOW TO NAVIGATE ............................................................................................ 7-1
7.2 MAIN MENU ....................................................................................................... 7-1
7.3 SMIG MODE: BASIC ............................................................................................ 7-2
7.4 SMIG MODE: ADVANCED ................................................................................... 7-2
7.5 MANUAL MIG MODE: BASIC............................................................................... 7-3
7.6 MANUAL MIG MODE: ADVANCED ...................................................................... 7-3
7.7 FLUX CORED WIRE MODE: BASIC........................................................................ 7-4
7.8 FLUX CORED WIRE MODE: ADVANCED ............................................................... 7-4
7.9 MMA MODE: BASIC ............................................................................................ 7-5
7.10 MMA MODE: ADVANCED ................................................................................... 7-5
7.11 LIFT-TIG MODE: BASIC ........................................................................................ 7-6
7.12 LIFT-TIG MODE: ADVANCED ............................................................................... 7-6
7.13 SETTINGS ............................................................................................................ 7-7
7.14 USER MANUAL INFORMATION ........................................................................... 7-7
7.15 ICON REFERENCE GUIDE ..................................................................................... 7-8
SECTION 8 MAINTENANCE
8.1 ROUTINE MAINTENANCE .................................................................................... 8-2
8.2 WIRE-FEEDER ASSEMBLY MAINTENANCE .......................................................... 8-2
8.2.1 WIRE-FEEDER ASSEMBLY CLEANING ................................................................. 8-2
8.3 EMP-UNIT POWER-SIDE MAINTENANCE ............................................................ 8-5
8.4 TORCH LINER MAINTENANCE ............................................................................. 8-5
8.4.1 TORCH LINER CLEANING ................................................................................... 8-5
SECTION 9 TROUBLESHOOTING
9.1 PRELIMINARY CHECKS ........................................................................................ 9-1
9.2 USER INTERFACE (UI) SOFTWARE-DISPLAYED ERROR CODES ............................. 9-3
SECTION 10 ORDERING SPARE PARTS
10.1 SPARE PARTS .................................................................................................... 10-1
10.2 WEAR PARTS .................................................................................................... 10-3
10.3 ACCESSORIES .................................................................................................... 10-4
10.4 REPLACEMENTS PARTS ..................................................................................... 10-5

SECTION TABLE OF CONTENTS
Paragraph Page
(Intentionally Blank)

SECTION LIST OF FIGURES
Figure Page
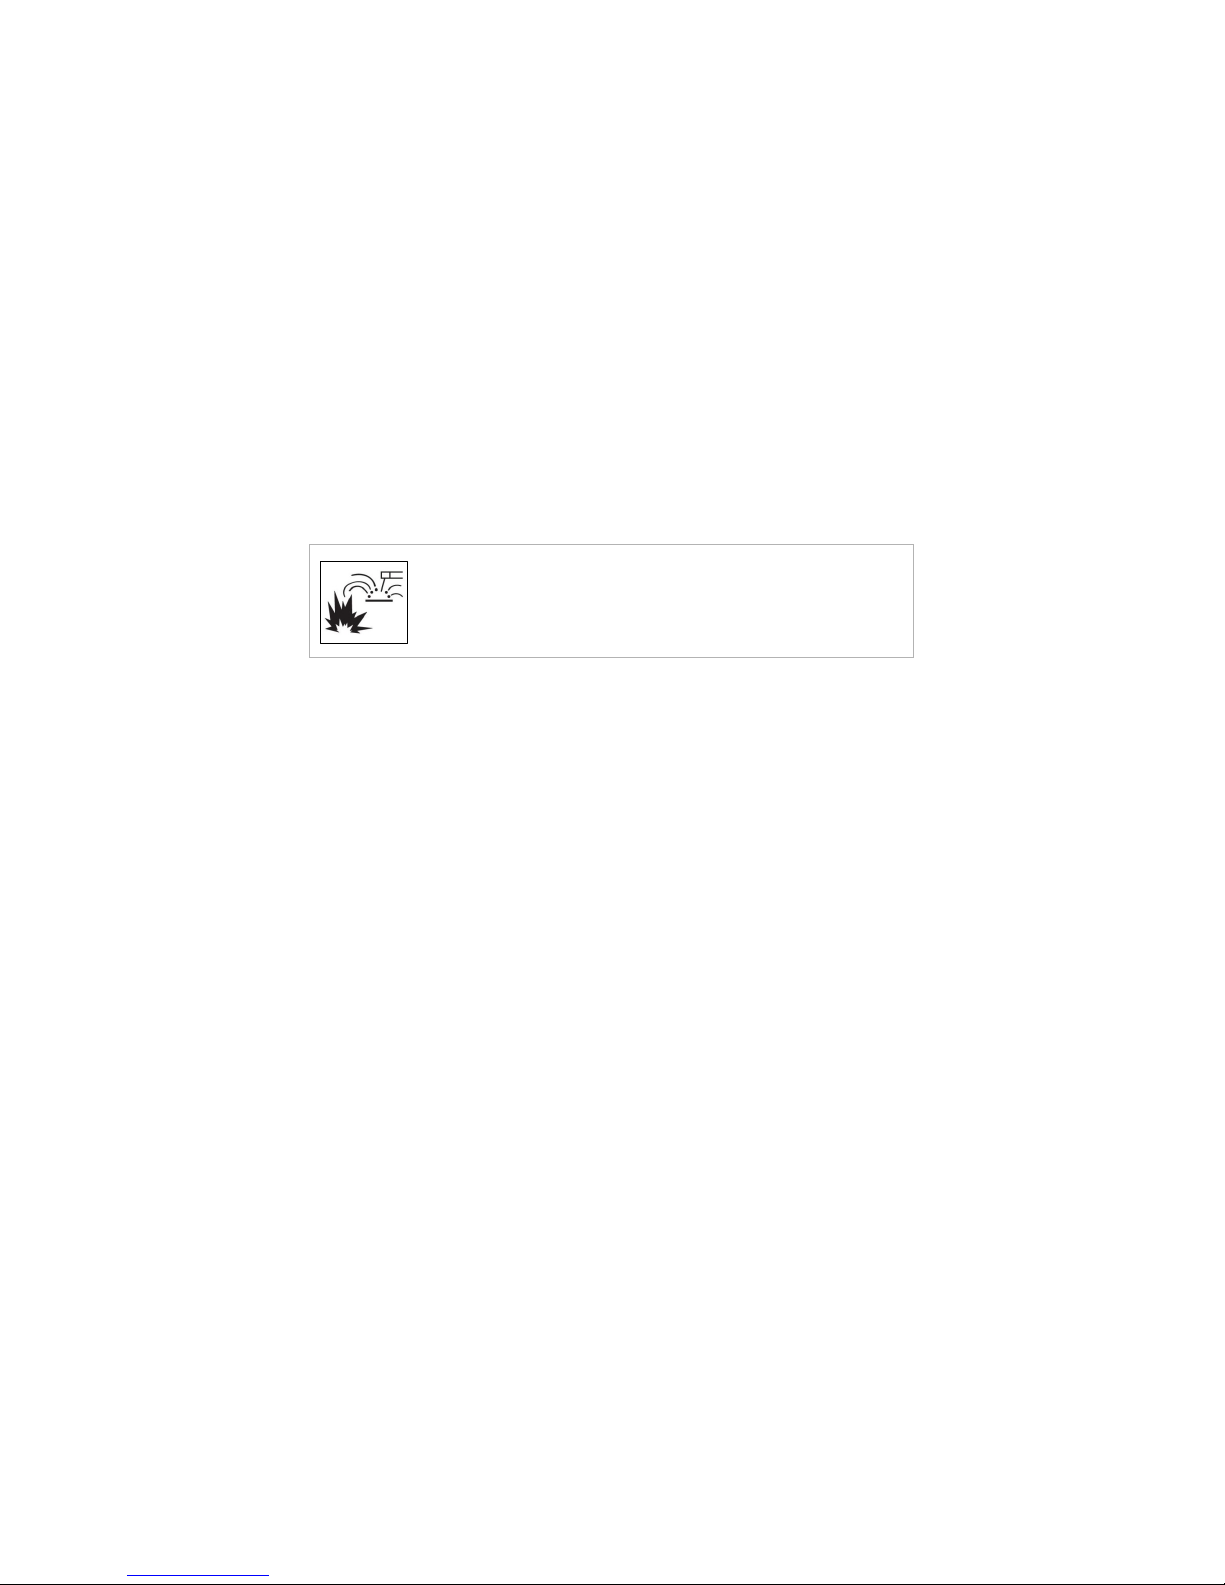
Figure 2-1. Danger and Warning Symbols ............................................................................ 2-1
Figure 5-1. Minimum Safe Clearances ................................................................................. 5-1
Figure 5-2. Lifting Illustrated ............................................................................................... 5-4
Figure 5-3. Sloping Ground .................................................................................................. 5-4
Figure 5-4. Rating plate (1) with supply connection data ..................................................... 5-6
Figure 6-1. Front & Rear Views: Model EMP 285ic............................................................... 6-2
Figure 6-2. Function of User Interface Control Dials ............................................................ 6-3
Figure 6-3. SMAW (Stick) 120 V, 1ph ................................................................................... 6-5
Figure 6-4. SMAW (Stick) 230 V, 1ph ................................................................................... 6-5
Figure 6-5. GMAW (MIG), 120 V, 1 ph ................................................................................. 6-6
Figure 6-6. GMAW (MIG) 230 V, 1ph ................................................................................... 6-6
Figure 6-7. GTAW (TIG) 120 V, 1ph ...................................................................................... 6-7
Figure 6-8. GTAW (TIG) 230 V, 1ph ...................................................................................... 6-7
Figure 6-9. SMAW (Stick) 460 V, 3ph / SMAW (Stick) 575 V, 3ph ......................................... 6-8
Figure 6-10. GMAW (MIG) 460 V, 3ph / GMAW (MIG) 575 V, 3ph ....................................... 6-8
Figure 6-11 GTAW (TIG) 460 V, 3ph / GTAW (TIG) 575 V, 3ph .............................................. 6-9
Figure 6-12. Example of 40 % Duty Cycle ........................................................................... 6-10
Figure 6-13. Example of 50 % Duty Cycle ........................................................................... 6-10
Figure 6-14. Plotting Duty Cycle for 120 V, 1ph AC ............................................................ 6-11
Figure 6-15. Plotting Duty Cycle for 230 V, 1ph AC ............................................................ 6-11
Figure 6-16 Plotting Duty Cycle for 460 V or 575 V, 3ph AC .............................................. 6-12
Figure 6-17 Tightening the Bobbin Locking Nut (A) for 100 mm (4 in.) .............................. 6-13
Figure 6-18. Tightening the Bobbin Locking Nut (A) for 200 mm (8 in.), 300 mm (12 in.) ... 6-14
Figure 6-19. View of Wire-Bobbin-Side .............................................................................. 6-15
Figure 6-20. Wire-Bobbin Side Exposed View .................................................................... 6-16
Figure 6-21. Wire-Feed Mechanism ................................................................................... 6-17
Figure 6-22. Holding Knob for Torch Adapter .................................................................... 6-18
Figure 6-23. Check Feed-Roller for Slip, Indicating no Over-pressure ................................. 6-21
Figure 6-24. Checking for Proper Feed-Roller Pressure ...................................................... 6-22
Figure 6-25. Location of Wire-Feed Rollers and Pressure Rollers ....................................... 6-23
Figure 6-26. Wire-Feed Mechanism ................................................................................... 6-24
Figure 6-27. Drive Gear with Woodruff Key on Motor Shaft .............................................. 6-25

SECTION LIST OF FIGURES
Figure Page
Figure 6-28. Feed Roller Removal and Installation ............................................................. 6-26
Figure 6-29. Wire-Feed Rollers Offered in Multiple Sizes ................................................... 6-27
Figure 6-30. Location of Wire-Guides and Their Set Screws ............................................... 6-29
Figure 6-31. Wire Guides ................................................................................................... 6-30
Figure 6-32. Wire-Feed Mechanism ................................................................................... 6-31
Figure 6-33. Verify Clearance of Both Guide Tubes ............................................................ 6-33
Figure 8-1. Tension Arm & Wire-Feed Cover on Wire-Feed Assembly .................................. 8-3
Figure 10-1. Unit-Pa
Figure 10-2. Wire-Feed Assembly, Wear-Parts .................................................................. 10-3
rt Example.......................................................................................10-2

SECTION LIST OF TABLES
Table Page
Table 4-1. Specifications for EMP 285ic 1ph ........................................................................ 4-1
Table 4-2. Specifications for EMP 285ic 3ph ........................................................................ 4-4
Table 5-1. Recommended Electrical-Supply Specifications: 1 ph, 50/60 Hz .......................... 5-6
Table 5-2. Recommended Electrical-Supply Specifications 3 ph, 50/60 Hz ........................ 5-7
Table 8-1. Maintenance Schedule During Normal Conditions .............................................. 8-2
Table 9-1. Table of Faults .................................................................................................... 9-1
Table 9-2. UI Error Codes..................................................................................................... 9-3
Table 10-1. Unit Part Numbers .......................................................................................... 10-2
Table 10-2. Reference for Figure 10-2 Wire-Feed Assembly, Wear-Parts ........................... 10-3
Table 10-3. Accessories ..................................................................................................... 10-4
Table 10-4. Replacement Part # ........................................................................................ 10-5

(Intentionally Blank)

APPENDIX TABLE OF CONTENTS
Paragraph Page
DIAGRAMS
A.1 FUNCTIONAL BLOCK DIAGRAM 3 PH ................................................................ 10-1
A.2 FUNCTIONAL BLOCK DIAGRAM 1 PH ................................................................ 10-2
Lift-TIG Welding
B.1 2-STROKE AND 4-STROKE WELDING PROCESS ILLUSTRATED .............................. B-1
Roller & Wire-Guide Selection
C.1 ROLLER SELECTION ............................................................................................. C-1
C.2 WIRE-GUIDE SELECTION ..................................................................................... C-1
GLOSSARY

(Intentionally Blank)

SECTION 1 WELCOME TO ESAB
1.1 HOW TO USE THIS MANUAL
To ensure safe operation, read the entire manual, including the section on safety instructions
and warnings.
Throughout this manual, the words WARNING, CAUTION, and NOTE may appear. Pay attention
to the information provided under these headings.
1.2 EQUIPMENT IDENTIFICATION
The unit's identification number (specification or part number), model, and serial number
usually appear on a data tag attached to the rear panel. Equipment which does not have a data
tag such as torch and cable assemblies are identified only by the specification or part number
printed on a loosely attached card or the shipping container. Record these numbers on this
book for future reference.
1.3
RECEIPT OF EQUIPMENT
When you receive the equipment, check it against the invoice to make sure it is complete and
inspect the equipment for possible damage due to shipping. If there is any damage, notify the
carrier immediately to file a claim.
1.4 DESCRIPTION
The ESAB EMP 285ic 1ph (230V or 120V) and the EMP 285ic 3ph (575V or 460V) are 50/60 Hz,
constant current welding machines capable of performing SMAW (STICK), and GTAW (LIFT TIG)
welding processes and constant voltage welding capable of performing GMAW (MIG) welding
processes. The unit is equipped with amperage and voltage meters which display on its User
Interface during welding. A host of other features display to satisfy the broad operating needs
of the user.
The ESAB EMP 285ic provides excellent welding performance across a broad range of
applications when used with the correct welding consumables and procedures. The following
instructions detail how to correctly and safely set up the machine and give guidelines on gaining
the best efficiency and quality from the Power Source. Please read these instructions
thoroughly before using the unit.
Additional copies of this manual may be purchased by contacting ESAB. Include the Owner's
Manual number and equipment identification numbers.
Electronic copies of this manual can also be downloaded at no charge in Acrobat PDF format by
going to the ESAB web site: http://www.esab.com.
1-1

(Intentionally Blank)
1-2

SAFETY
DANGER
will result in immediate, serious personal injury or
WARNING
labels, employer’s safety practices and Safety Data Sheets.
SECTION 2 SAFETY
2.1 MEANING OF SYMBOLS
As used throughout this manual: Means Attention! Be Alert!
Means immediate hazards which, if not avoided,
loss of life.
WARNING
Means potential hazards which could result in
personal injury or loss of life.
CAUTION
Means hazards which could result in minor
personal injury.
Figure 2-1. Danger and Warning Symbols
2.1.1 SAFETY GUIDANCE AND INFORMATION
Before use, read and understand the instruction and follow all
These Safety Precautions are for your protection. They summarize precautionary information
from the references listed in the Additional Safety Information section. Before performing any
installation or operating procedures, be sure to read and follow the safety precautions listed
below as well as all other manuals, material safety data sheets, labels, etc. Failure to observe
the Safety Precautions could result in injury or death.
2.1.2 SAFETY PRECAUTIONS
Users of ESAB equipment have the ultimate responsibility for ensuring that anyone who works
on or near the equipment observes all the relevant safety precautions. Safety precautions must
2-1

SAFETY
meet the requirements that apply to this type of equipment. The following recommendations
should be observed in addition to the standard regulations that apply to the workplace.
All work must be carried out by trained personnel well-acquainted with the operation of the
equipment. INCORRECT OPERATION OF THE EQUIPMENT MAY LEAD TO HAZARDOUS
SITUATIONS WHICH CAN RESULT IN INJURY TO THE OPERATOR AND DAMAGE TO THE
EQUIPMENT.
1. Anyone who uses the equipment must be familiar with:
• its operation
• location of emergency stops
• its function
• relevant safety precautions
• welding and cutting or other applicable operation of the equipment
2. The operator must ensure that:
• no unauthorized person is stationed within the working area of the equipment
when it is started up
• no-one is unprotected when the arc is struck, or work is started with the equipment
3. The workplace must:
• be suitable for the purpose
• be free from drafts
4. Personal safety equipment:
• Always wear recommended personal safety equipment, such as safety glasses,
flame-proof clothing, safety gloves
• Do not wear loose-fitting items, such as scarves, bracelets, rings, etc., which could
become trapped or cause burns
5. General precautions:
• Use side shields in any work area, even if welding helmets, face shields and/or
goggles are also required.
• Use a face shield fitted with the correct filter and cover plates to protect your eyes,
face, neck and ears from sparks and rays of the arc when operating or observing
operations. Warn bystanders not to look at the arc and not to expose themselves to
the rays of the electric-arc or hot metal.
• Wear flameproof gauntlet-type gloves, heavy long-sleeve shirt, cuff-less pants, high-
topped shoes, and a welding helmet or cap for personal protection. A flameproof
apron may also be desirable as additional protection against radiated heat and
sparks.
2-2
• Hot sparks or metal can lodge in rolled up sleeves, trouser cuffs, or pockets. Sleeves
FIRE HAZARD - Sparks (spatter) can cause fire.
and collars should be kept buttoned (closed) and open pockets should be
eliminated from the front of the clothing.
• Protect other personnel from arc rays and hot sparks with a suitable non-flammable
partition or curtains. Post warning signs advising others not to watch the welding
arc or be in direct exposure to the active arc without proper protection.
• Use goggles or face shields over safety glasses when chipping slag or grinding.
Chipped slag may be hot and can fly for long distances. Bystanders should also wear
goggles over safety glasses.
2.1.3 FIRES AND EXPLOSIONS
FIRE HAZARD: Sparks (spatter) can cause fire.
Therefore:
SAFETY
1. Protect yourself and others from flying sparks and hot metal.
2. Remove all combustible materials well away from the work area or cover the
materials with an approved protective non-flammable covering. Combustible
materials include wood, cloth, sawdust, liquid and gas fuels, solvents, paints, and
coating paper, etc.
3. Hot sparks or hot metal can fall through cracks or crevices in floors or wall openings
and cause a hidden smoldering fire or fires on the floor below. Make certain that
such openings are protected from hot sparks and metal.
4. Follow the "hot work" procedures for the location. This can include a fire watch
person who monitors the sparks during the work, the requirement for a formal work
permit and the surveillance of the scene for an extended period of time to ensure no
smoldering fires are developing.
5. Do not weld, cut, or perform other hot work until the work piece has been
completely cleaned so that there are no substances on or in the work piece which
might produce flammable or toxic vapors. Do not perform hot work on closed
containers, they may explode.
6. Have fire extinguishing equipment handy for instant use, such as a garden hose,
water pail, sand bucket, or portable fire extinguisher. Be sure you are trained in its
use.
7. Do not use equipment beyond its ratings. For example, an overloaded welding cable
can overheat and create a fire hazard.
2-3

8. After completing work, inspect the work area to make sure there are no hot sparks
ELECTRIC SHOCK - Can kill
ELECTRIC AND MAGNETIC FIELDS – Can be dangerous
ELECTRIC SHOCK - Can kill
or hot metal that could cause a fire later. Use fire watchers when necessary.
2.1.4 ELECTRICAL SHOCK
Therefore:
1. Be sure the power source frame (chassis) is connected to the earth system of the
input power. All ground points should be verified with periodic testing by an
electrician.
2. Connect the workpiece to a good electrical earth.
3. Connect the work cable to the workpiece. A poor or missing connection can expose
you or others to a fatal shock.
SAFETY
ELECTRIC SHOCK can kill.
4. Use well-maintained equipment. Replace worn or damaged cables.
5. Keep everything dry, including clothing, work area, cables, torch/electrode holder
and power source.
6. Make sure that all parts of your body are insulated from both the work piece and
from the ground.
7. Do not stand directly on metal or the ground while working in tight quarters or a
damp area; stand on an effective insulation layer, such as dry boards, an insulating
platform, and wear rubber-soled shoes.
8. Put on dry, hole-free gloves before turning on the power.
9. Turn off the power, before removing your gloves.
10. Refer to ANSI/ASC Standard Z49.1 for specific grounding recommendations. Do not
mistake the work lead for an earth cable.
2.1.5 ELECTRIC AND MAGNETIC FIELDS
to health.
2-4

Therefore:
FUMES AND GASES - Can be dangerous to health
1. Welders with medical pacemakers fitted should consult their doctor before welding.
2. Exposure to EMF may have other health effects which are unknown.
3. Welders should use the following procedures to minimize exposure to EMF:
SAFETY
EMF may interfere with some pacemakers.
a. Route the electrode and work cables together. Secure them with tape when
possible.
b. Never coil the torch or work cable around your body.
c. Do not place your body between the torch and work cables. Route cables
together on the same side of your body.
d. Connect the work cable to the workpiece as close as possible to the area being
welded.
e. Keep the welding power source and cables as far away from your body as
possible.
2.1.6 FUMES AND GASES
Therefore:
1. Keep your head out of the fumes, smoke, and vapors. Do not breathe the smoke,
fumes, and gases that are generated by welding processes. Always provide
adequate ventilation in the work area by natural or mechanical means.
2. Do not weld, cut or gouge on materials such as galvanized steel, stainless steel,
copper, zinc, lead beryllium or cadmium unless positive mechanical ventilation is
provided. Do not breathe in the fumes from these materials.
3. Orient the ventilation to draw smoke, fumes, and vapors in a direction away from
the welding operator. Position ventilation suction to pull welding fumes and smoke
from the far side of the work area if possible.
4. Provide general ventilation for the surrounding work area if there is a risk of workers
or other persons beyond the immediate work area getting exposed to significant
welding fumes. Monitor the fugitive fumes and smoke for potential collateral
FUMES AND GASES – Can be dangerous to health.
2-5

SAFETY
defects and in some cases cancer (California Health & Safety Code §25249.5 et
EXPLODING CYLINDERS – CAN INJURE, MAME OR KILL.
exposures. Install appropriate ventilation controls or cease surrounding activity if
fumes become an exposure issue outside of the immediate work area
5. Do not operate near degreasing and spraying operations. The heat or arc can react
with chlorinated hydrocarbon vapors or liquids to form phosgene, a highly toxic gas,
and other irritant gases.
6. If you develop momentary eye, nose or throat irritation while operating, this is an
indication that the ventilation is not adequate. Stop work and take the necessary
steps to improve ventilation in the work area. Do not continue to operate if physical
discomfort persists.
7. Respiratory protection is required if worker respiratory exposures to fumes exceed
recommended thresholds. Those thresholds can only be accurately measured
through standardized industrial hygiene sampling protocols. Seek the assistance of
specialists if your work causes respiratory exposures or you have other exposure
concerns.
8. Refer to ANSI/ASC Standard Z49.1 for specific ventilation recommendations.
WARNING
This product when used for welding or cutting, typically produces fumes or gases
which contain chemicals known to the State of California that can cause birth
2.1.7 CYLINDER HANDLING
EXPLODING CYLINDERS – Can injure or kill.
Therefore:
1. Locate cylinders away from heat, sparks and flames.
2. Inspect all connections before use to detect and correct any leaks or system defects.
Use soapy water as a test if you suspect a leak but have difficulty confirming its
location or existence.
3. Never strike an arc on a cylinder. Handle cylinders with care and avoid jolts and
impacts to cylinders; regardless of if they are empty, partial, or full.
4. Secure all cylinders in a way that prevents them from falling and potentially doing
damage to the valve, regulator, or attachments. Typically, this requires the use of a
secure strap or chain at an appropriate height that helps to prevent the cylinder
from falling over.
2-6

5. Use the proper gas for the process and use the proper pressure reducing regulator
MOVING PARTS - Can cause injuries
Faulty or improperly maintained equipment can cause injury or death.
designed to operate from the compressed gas cylinder. Do not use adapters.
Maintain hoses and fittings in good condition. Follow the manufacturer's operating
instructions for mounting a regulator to a compressed gas cylinder.
6. Never secure cylinders to work tables or fixtures where they may become part of an
electrical circuit.
7. When not in use, keep cylinder valves closed. Have valve protection cap in place if
regulator is not connected. Secure and move cylinders by using suitable hand trucks.
2.1.8 MOVING PARTS
Therefore:
SAFETY
MOVING PARTS – Can injure.
1. Keep all doors, panels, guards, and covers closed and securely in place.
2. Have only qualified people remove covers for maintenance and troubleshooting as
necessary
3. Keep hands, hair, loose clothing and tools away from moving parts. Do not use
gloves near moving parts.
4. Reinstall panels or covers and close doors when service is finished and before
starting engine.
2.1.9 MALFUNCTION
• Call for expert assistance in the event of a malfunction.
2.1.10 EQUIPMENT MAINTENANCE
WARNING
Therefore:
1. Always have qualified personnel perform the installation, troubleshooting and
maintenance work. Do not perform any electrical work unless you are qualified for
such work.
2. Before performing any maintenance work inside a power source, disconnect the
power source from the incoming electrical power.
2-7

3. Maintain cables, earthing wire, connections, power cord and power supply in safe
Falling equipment can injure.
Arc Rays can injure eyes and burn skin.
Excessive noise can damage hearing.
working order. Do not operate faulty equipment in a faulty condition.
4. Do not abuse any equipment or accessories. Keep equipment away from heat
sources such as furnaces, wet conditions such as water puddles, oil or grease,
corrosive atmospheres and inclement weather.
5. Keep all safety devices and cabinet covers in position and in good repair.
6. Use equipment only for its intended purpose. Do not modify it in any manner.
2.1.11 FALLING EQUIPMENT
WARNING
Therefore:
1. Use equipment of adequate capacity to life and support unit.
SAFETY
2. Keep cables and cords away from moving vehicles and moving equipment when
working from an aerial location.
2.1.12 ARC RAYS
WARNING
Therefore:
1. Protect your eyes and body. Use the correct welding darkening screen and filter
lens, and wear protective clothing
2. Protect bystanders with suitable screens or curtains
2.1.13 NOISE
WARNING
Therefore:
1. Protect your ears. Use earmuffs or other hearing protection with the appropriate
level of noise reduction/hearing protection.
2-8

SAFETY
ADDITIONAL SAFETY INFORMATION
For more information on safe practices for electric arc welding and cutting
equipment, ask your supplier for a copy of “Precautions and Safe Practices
for Arc Welding, Cutting and Gouging.” Form 52-529.
The following publications are recommended to you:
1. ANSI/ASC Z49.1 - "Safety in Welding and Cutting"
2. AWS C5.5 - "Recommended Practices for Gas Tungsten Arc Welding"
3. AWS C5.6 - "Recommended Practices for Gas Metal Arc Welding"
4. AWS SP - "Safe Practices" - Reprint, Welding Handbook
5. ANSI/AWS F4.1 - "Recommended Safe Practices for Welding and Cutting of Containers
That Have Held Hazardous Substances"
6. OSHA 29 CFR 1910 - "Safety and Health Standards"
7. CSA W117.2 - "Code for Safety in Welding and Cutting"
8. NFPA Standard 51B, “Fire Prevention During Welding, Cutting, and Other Hot Work"
9. CGA Standard P-1, “Precautions for Safe Handling of Compressed Gases in Cylinders”
10. ANSI Z87.1, "Occupational and Educational Personal Eye and Face Protection Devices"
2.1.14 USER RESPONSIBILITY
Users of ESAB equipment have the ultimate responsibility for ensuring that anyone who works
on or near the equipment observes all the relevant safety precautions. Safety precautions must
meet or exceed the standard requirements that apply to this type of equipment.
This equipment will perform as per the information contained herein when installed, operated,
maintained and repaired in accordance with the instructions provided. This equipment must be
checked periodically. Defective equipment (including welding leads) should not be used. Parts
that are broken, missing, plainly worn, distorted or contaminated, should be replaced
immediately. Should such repairs or replacements become necessary, it is recommended that
such repairs be carried out by appropriately qualified persons approved by ESAB. Advice in this
regard can be obtained by contacting an accredited ESAB distributor.
This equipment or any of its parts should not be altered from standard specification without
prior written approval of ESAB. The user of this equipment shall have the sole responsibility for
any malfunction which results from improper use or unauthorized modification from standard
specification, faulty maintenance, damage or improper repair by anyone other than
appropriately qualified persons approved by ESAB.
All work must be carried out by trained personnel well-acquainted with the operation of the
equipment. Incorrect operation of the equipment may lead to hazardous situations, which
could result in injury to the operator and damage to the equipment.
1. ANYONE WHO USES THE EQUIPMENT MUST BE FAMILIAR WITH:
• its operation
2-9

SAFETY
• location of emergency stops and safety features
• its function
• relevant safety precautions
• welding and cutting methods or other applicable operations of the equipment
2. THE OPERATOR MUST ENSURE THAT:
• no unauthorized person is within the working area of the equipment when it is
started up
• no-one is unprotected when the arc is struck, or work is started with the
equipment
3. THE WORKPLACE MUST:
• be suitable for the purpose
• be free from drafts to the extent possible, to maintain effective ventilation and
the control of welding fumes and work byproducts
4. PERSONAL SAFETY EQUIPMENT:
• Always wear recommended personal safety equipment, such as safety glasses,
flame-proof clothing, safety gloves
• Do not wear loose-fitting items, such as scarves, bracelets, rings, etc., which
could become trapped or cause burns
5. GENERAL PRECAUTIONS:
• Make sure the return cable is connected securely
• Work on high voltage equipment may only be carried out by a qualified
electrician
• Appropriate fire extinguishing equipment must be clearly marked and close at
hand
• Lubrication and maintenance must not be carried out on the equipment during
operation
2-10

SAFETY
(Intentionally Blank)
2-11

INTRODUCTION
SECTION 3 INTRODUCTION
The ESAB, EMP product family is a new generation of multi-process (MIG/Stick/TIG) welding
power sources.
All Rebel power sources are designed to match the needs of the user. They are tough, durable,
and portable, providing excellent arc performance across a variety of welding applications.
The EMP features a 4.3 in. (11 cm) color TFT (Thin Film Transistor) user interface (UI) display
which provides quick and easy selection of weld process and parameters, suitable for both
newly trained and intermediate-level users. For more advanced users, any number of functions
could be introduced and customized to give maximum flexibility.
3.1 KEY FEATURES
• Excellent MIG characteristics
• Excellent multi-process, MIG/Stick and Lift/TIG (EMP) welding capabilities
• Automatic recognition of input power with PFC
• Large 4.3 in. (11 cm) high resolution customizable user interface (EMP)
• Rugged case design and internal hardware
• Portable
• High grade cast aluminum wire drive system provides excellent control of drive
roll geometry ensuring smooth, precise wire feeding
• Professional high-grade accessories
3.2 EQUIPMENT
Package consists of the following:
3.2.1 EMP 285ic 1ph
• ESAB EMP 285ic 1ph power source
• Tweco® Spray Master® V250 MIG torch with 15 ft (4.5 m) cable, with 0.032 in,
0.035 in., 0.045 in. (0.8 mm, 0.9 mm, 1.2 mm) contact tips, 5/8” recess nozzle,
• ESAB stick electrode holder, 12 ft (4 m), 300 A
• Ground clamp, 10 ft. (3 m), 300 A
• Victor® Flow Meter with 6 ft (2 m) gas hose
• ESAB OK AristoRod™ premium solid wire 0.035 in. (0.9 mm) 11# spool
• ESAB Atom Arc Acclaim 1/8 in. premium stick electrodes 1# sample pack
• Drive rollers: 0.035 in. (0.9 mm) to 0.045 mm (1.2 mm) V-Groove, 0.045 in. (1.2
mm) to 0.052 mm (1.4 mm) Knurled
• Guide tubes: 0.030 in. (0.8 mm) to 0.062 mm (1.6 mm) Solid Wire
• Thickness gauge tool
3-1

• 4-pin to 8-pin jumper
This unit is equipped with overheating protection for its power supply.
CAUTION!
This unit is equipped with overheating protection for its power supply.
• USB stick including manuals
• Quick Start Guide
• Safety manual
3.2.2 EMP 285ic 3ph:
• ESAB EMP 285ic 3ph power source
• Tweco® Spray Master V350 MIG gun with 15 ft (4.5 m) cable, 0.030 in., 0.035
in., 0.045 in. (0.8 mm, 0.9 mm, 1.2 mm) contact tips and Allen key
• ESAB stick electrode holder, 12 ft (4 m), 300 A
• Ground clamp, 10 ft. (3 m), 300 A
• Victor® Flow Meter with 6 ft (2 m) gas hose
• ESAB OK AristoRod™ premium solid wire 0.035 in. (0.9 mm) 11# spool
INTRODUCTION
• ESAB Atom Arc Acclaim 1/8 in. premium stick electrodes 1# sample pack
• Drive rollers: 0.035 in. (0.9 mm) to 0.045 mm (1.2 mm) V-Groove, 0.045 in. (1.2
mm) to 0.052 mm (1.4 mm) Knurled
• Guide tubes: 0.030 in. (0.8 mm) to 0.062 mm (1.6 mm) Solid Wire
• Thickness gauge tool
• 4-pin to 8-pin jumper
• USB stick including manuals
• Quick Start Guide
• Safety manual
3.3 OVERHEATING PROTECTION
CAUTION!
The welding power source has overheating protection that operates if the internal temperature
becomes too high. When this occurs, the welding current is interrupted, and an overheating
symbol appears on the display. The overheating protection resets automatically when the
temperature has returned to normal working temperature.
3-2

TECHNICAL SPECIFICATIONS
SPECIFICATION
230 V ±10%, 1 ph, 50/60 Hz
120 V ±10%, 1 ph, 50/60 Hz
PRIMARY CURRENT
Imax. GMAW - MIG
43.0 A
Breaker 20 A: 28.6 A
Breaker 15 A: 20.3 A
Imax. GTAW - TIG
33.1 A
Breaker 15 A: 20.8 A
Imax. SMAW - Stick
43.6 A
Breaker 15 A: 20.8 A
Ieff. GMAW - MIG
27.2 A
Breaker 20 A: 18.0 A
Breaker 15 A: 14.6 A
Ieff. GTAW - TIG
18.2 A
Breaker 15 A: 14.7 A
Ieff. SMAW - Stick
27.6 A
Breaker 15 A: 14.7 A
PERMISSIBLE LOAD AT GMAW - MIG
100% duty cycle*
160A (V
out
= 22V)
Breaker 15A: 75A (V
out
=
17.75V)
Breaker 20A: 90A (V
out
=
18.5V)
SECTION 4 TECHNICAL SPECIFICATIONS
This section lists the specifications for the EMP 285ic (1ph and 3ph) models.
TECHNICAL SPECIFICATION PUBLISHED IN THIS MANUAL:
• Due to variations that can occur in manufactured products, claimed performance,
voltages, ratings, all capabilities, measurements, dimensions and weights quoted are
approximate only. Achievable capacities and ratings in use and operation will depend
upon correct installation, use, applications, maintenance and service.
• The Effective Input Current should be used for the determination of cable size &
supply requirements.
• Motor start fuses, or thermal circuit breakers are recommended for this application.
Check local requirements for your situation in this regard.
• Generator Requirements at the Maximum Output Cycle.
• Due to large variations in performance and specifications of different brands and
types of generators, ESAB cannot guarantee full welding output power or duty cycle
on every brand or type of generator. ESAB recommends that when selecting a
generator, that the power source/generator combination be adequately tested to
ensure the combination performs to the user’s expectations without notice.
4.1 EMP 285ic (1ph) SPECIFICATIONS
Table 4-1. Specifications for EMP 285ic 1ph
4-1
 Loading...