

Page 1

A2- A6
Process Controller
PEH
101103105107109111102021110025108024042106023061104022041100020040060001
Bruksanvisning
Brugsanvisning
Bruksanvisning
Käyttöohjeet
Instruction manual
Betriebsanweisung
0443 745 001 000615
Manuel d’instructions
Gebruiksaanwijzing
Instrucciones de uso
Istruzioni per l’uso
Manual de instruções
ПдзгЯет чсЮуещт
Valid for machine no 724 XXX--XXXX
Valid for program version PEH 1.00A, PEH1.1, PEH1.2, PEH2.0
Page 2

SVENSKA 3..............................................
DANSK 22................................................
NORSK 41................................................
SUOMI 60................................................
ENGLISH 79..............................................
DEUTSCH 98.............................................
FRANÇAIS 117.............................................
NEDERLANDS 137.........................................
ESPAÑOL 156..............................................
ITALIANO 176..............................................
PORTUGUÊS 195..........................................
ЕЛЛЗНЙКБ 214.............................................
Rätt till ändring av specifikationer utan avisering förbehålles.
Ret til ændring af specifikationer uden varsel forbeholdes.
Rett til å endre spesifikasjoner uten varsel forbeholdes.
Oikeudet muutoksiin pidätetään.
Rights reserved to alter specifications without notice.
Änderungen vorbehalten.
Sous réserve de modifications sans avis préalable.
Recht op wijzigingen zonder voorafgaande mededeling voorbehouden.
Reservado el derecho de cambiar las especificaciones sin previo aviso.
Ci riserviamo il diritto di variare le specifiche senza preavviso.
Reservamo--nos o direito de alterar as especificações sem aviso prévio.
ДйбфзсеЯфбй фп дйкбЯщмб фспрпрпЯзузт рспдйбгсбцюн ЧщсЯт рспейдпрпЯзуз.
-- 2 --
Page 3

ENGLISH
1 DIRECTIVE 80........................................................
2SAFETY 80...........................................................
3 INTRODUCTION 82...................................................
3.1 General 82..................................................................
3.2 Welding power sources 82.....................................................
3.3 Technical data 82............................................................
4 INSTALLATION 83....................................................
4.1 General 83..................................................................
4.2 Motor connections for the wire feed motor, M1 83.................................
4.3 Motor connections for travel motion (travel motor M2) 83..........................
4.4 Connection of flux or gas valve 84..............................................
4.5 Connection of welding power source 84.........................................
4.6 Connection of the welding head 84.............................................
5 OPERATIONAL DESCRIPTION 85......................................
5.1 General 85..................................................................
5.2 Control panel 85.............................................................
6 MANUAL OPERATION 86..............................................
6.1 Travel and wire feed 86.......................................................
6.2 Controlling valves 86..........................................................
7 MENUS 87...........................................................
7.1 Menu overview 87............................................................
8MAINMENU 88.......................................................
8.1 Entering welding parameters 89................................................
8.2 Adjusting parameter values (during welding) 90..................................
8.3 Choosing a new set of parameters during welding 91..............................
9 WELDING SETUP 92..................................................
9.1 General 92..................................................................
9.2 Available settings 93..........................................................
9.3 Definitions 94................................................................
9.4 Preset indicators 96..........................................................
10 ERROR LIST 97.......................................................
10.1 Error codes 97...............................................................
11 ORDERING SPARE PARTS 97..........................................
DIAGRAM 234............................................................
ACCESSORIES 236.......................................................
SPARE P ARTS LIST 237...................................................
TOCe
-- 7 9 --
Page 4

GB
1 DIRECTIVE
DECLARATION OF CONFORMITY
Esab Welding Equipment AB, 695 81 Laxå, Sweden, gives its unreserved guarantee
that control unit A2--A6 Process Controller from serial number 724 complies with
standard EN 60974--1, in accordance with the requirements of directive (73/23/EEA)
and addendum (93/68/EEA).
-- -- -- -- -- -- -- -- -- -- -- -- -- -- -- -- -- -- -- -- -- -- -- -- -- -- -- -- -- -- -- -- -- -- -- -- -- -- -- -- -- -- -- -- -- -- -- -- -- -- -- -- -- -- -- -- -- -- -- -- -- -- -- --------
Laxå 97--05--30
Paul Karlsson
Managing Director
Esab Welding Equipment AB
695 81 LAXÅ
SWEDEN Tel: + 46 584 81000 Fax: + 46 584 12336
2SAFETY
Users of ESAB welding equipment have the ultimate responsibility for ensuring that anyone who
works on or near the equipment observes all the relevant safety precautions.
Safety precautions must meet the requirements that apply to this type of welding equipment.
The following recommendations should be observed in addition to the standard regulations that apply
to the work place.
All work must be carried out by trained personnel well familiar with the operation of the welding equipment.
Incorrect operation of the equipment may lead to hazardous situations which can result in injury to the
operator and damage to the equipment.
1. Anyone who uses the welding equipment must be familiar with:
S its operation
S location of emergency stops
S its function
S relevant safety precautions
S welding
2. The operator must ensure that:
S no unauthorized person is stationed within the working area of the equipment when it is
started up.
S that no--one is unprotected when the arc is struck
3. The work place must:
S be suitable for the purpose
S be free from draughts
4. Personal safety equipment
S Always wear recommended personal safety equipment, such as safety glasses, flame--proof
clothing, safety gloves.
S Do not wear loose--fitting items, such as scarves, bracelets, rings, etc., which could become
trapped or cause burns.
5. General precautions
S Make sure the return cable is connected securely.
S Work on high voltage equipment shall only be carried out by a qualified electrician.
S Appropriate fire extinquishing equipment must be clearly marked and close at hand.
S Lubrication and maintenance must not be carried out on the equipment during operation.
fgb7safe
-- 8 0 --
Page 5

GB
WARNING
ARC WELDING AND CUTTING CAN BE INJURIOUS TO YOURSELF AND OTHERS. TAKE PRECAUTIONS WHEN WELDING. ASK FOR YOUR EMPLOYER’S SAFETY PRACTICES WHICH SHOULD BE
BASED ON MANUFACTURERS’ HAZARD DATA.
ELECTRIC SHOCK -- Can kill
S Install and earth the welding unit in accordance with applicable standards.
S Do not touch live electrical parts or electrodes with bare skin, wet gloves or wet clothing.
S Insulate yourself from earth and the workpiece.
S Ensure your working stance is safe.
FUMES AND GASES -- Can be dangerous to health
S Keep your head out of the fumes.
S Use ventilation, extraction at the arc, or both, to keep fumes and gases from your breathing zone and
the general area.
ARC RAYS -- Can injure eyes and burn skin.
S Protect your eyes and body. Use the correct welding screen and filter lens and wear protective
clothing.
S Protect bystanders with suitable screens or curtains.
FIRE HAZARD
S Sparks (spatter) can cause fire. Make sure therefore that there are no inflammable materials nearby.
NOISE -- Excessive noise can damage hearing
S Protect your ears. Use ear defenders or other hearing protection.
S Warn bystanders of the risk.
MALFUNCTION -- Call for expert assistance in the event of malfunction.
READ AND UNDERSTAND THE INSTRUCTION MANUAL BEFORE INSTALLING OR OPERATING.
PROTECT YOURSELF AND OTHERS!
WARNING
This product is intended for industrial use. In a domestic environment this
product may cause radio interference. It is the user’s responsibility to take
adequate precautions.
fgb7safe
-- 8 1 --
Page 6

GB
3 INTRODUCTION
3.1 General
ESAB’s A2--A6 Process Controller (PEH) is a control unit which, when combined with
A2--A6 automatic welding equipment can be used for submerged--arc or MIG/MAG
welding.
The process controlle r is designed for use with ESAB’s LAF and TAF welding power
sources. Close integration of the control system with the welding power source
makes it possible to ensure very precise process reliability.
All the controls that are needed to control welding travel and the entire welding
process are situated on the control panel.
Incoming cables from various system components are connected to sockets at the
rear of the process controller or to the circuit board terminals inside the controller.
3.2 Welding power sources
The welding power sources are specially adapted to work with the A2--A6 Process
Controller. T he welding power source and process controller are connected by a twin
wire bus that allows the welding process to be controlled and monitored much more
precisely than previously possible. T he power source settings can be adjusted from
the control panel on the process controller.
ESAB’s earlier generation of welding power sources, such as the LAH, LAE and TAE
can be adapted for use with the new process controller with the aid of a conversion
kit. The new welding power sources are already prepared for straightforward
connection to the A2--A6 Process Controller (PEH). The welding power sources also
supply the correct current to the process controller, thus eliminating the need for any
external power supply.
3.3 Technical data
A2--A6 Process Controller (PEH)
Nominal voltage from power source: 42V AC 50/60 Hz
Nominal load: Max. 900 V A
Motor connections adapted for ESAB’s
A2-- or A6-- motors:
Wire speed regulation: Internal EMK control or with AC tacho,
Welding speed: 0.1--2 m/min (depending on travel unit))
Max. manual travel speed: 2.0 m/min
Filler wire, wire feed speed: 0.3--25 m/min (depending on wire feed unit)
Ambient temperature: Max. 45_ C, Min. --15_ C
Relative humidity: Max. 98 %
Weight: 5.5 kg
Dimensions L x B x H: 355 x 210 x 164 mm
Enclosure class: IP 23
Motor current 5 A continuous, max. 10 A
6 pulses per rev
Enclosure class
The IP code indicates the enclosure class, i. e. the degree of protection against penetration by solid
objects or water. Equipment marked IP 23 is designed for indoor and outdoor use.
fgb7d1ea
-- 8 2 --
Page 7

GB
4 INSTALLATION
4.1 General
The installation shall b e executed by a professional.
4.2 Motor connections for the wire feed motor, M1
A2 motor
S Motor cable, two conductors and screen, connected to connectors K10.1 and
K10.2.
S AC--Tachometer cable (accessory), two conductors and screen, connected to
connectors K10.5 and K10.6.
A6 motor
S Motor cable, four conductors and screen, connected to connectors K10.1 and
K10.2, with the field connections made to K10.3 and K10.4.
S The AC tachometer cable (accessory), is connected to connectors K10.5 and
K10.6.
4.3 Motor connections for travel motion (travel motor M2)
S Motor cable, two conductors with screen, connected to connectors K11.1 and
K11.2.
S The motor field winding is connected to K11.3 and K11.4 (with screen).
S The AC tachometer cable (accessory): two conductors and screen, connected to
K11.5 and K11.6.
Motor connections for the wire feed motor, M1
Motor connections for travel motion (travel motor M2)
fgb7i1ea
-- 8 3 --
Page 8
GB
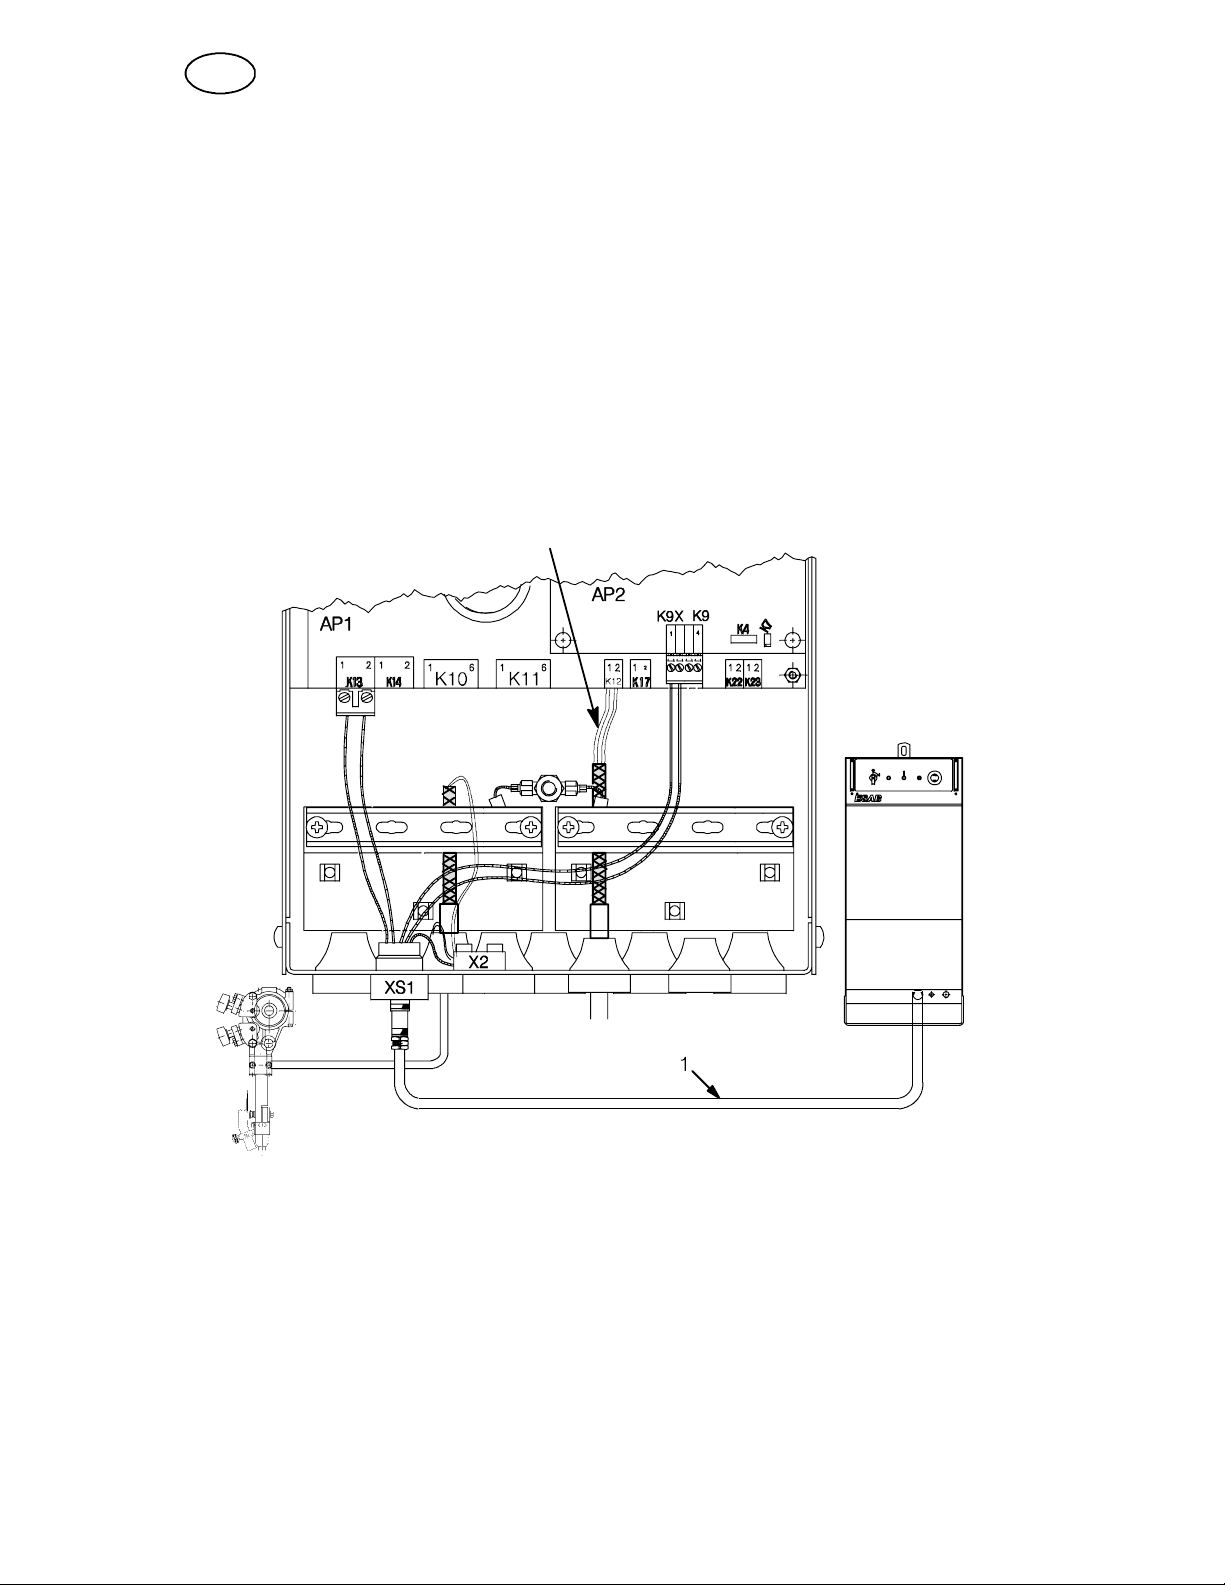
4.4 Connection of flux or gas valve
S Output for connecting a flux or gas valve, 42 V AC max. 0,5 A
2
S Screened 2--wire 2 x 0,75 mm
4.5 Connection of welding power source
S Connect control cable (1) from the welding power source to connector XS1.
4.6 Connection of the welding head
S Arc voltage to terminal X2.1
Connection of flux or gas valve
, connected to K12.1 and K12.2.
Connection of the
welding head
Connection of welding
power source
fgb7i1ea
-- 8 4 --
Page 9

GB
5 OPERATIONAL DESCRIPTION
5.1 General
Switch on welding power source
The process controller can be used in manual or automatic mode.
In manual mode the wire feed speed and travel speed are controlled manually and
you can preset all other essential welding parameters for the current weld.
In automatic mode you can choose a preset group of welding parameters and
fine--tune the actual welding parameters. Other settings made previously in manual
mode cannot be adjusted in automatic mode.
The process controller is ready for manual operation as soon as the mains power is
switched on. When welding begins the controller switches to automatic mode. When
welding stops, or if there is a fault, the controller switches back to manual mode.
5.2 Control panel
1. Emergency stop
2. Retract wire
3. Travel
4. Travel, opposite direction
5. Advance wire
6. Change menu
7. Numerical key, number entry
8. ENTER key, Change row
9. SHIFT key
10. Stop welding.
Return to manual mode
11. Start welding. Switch to automatic mode
12. F a st, wire feed or travel
13. Scroll page (welding setup menu) or close valve (main menu)
The arrowed keys are used during welding to increase or
decrease the current, voltage and speed.
By pressing either
fgb7fb1e
, ,
+
or
-- 8 5 --
+
it is possible to browse.
Page 10

GB
6 MANUAL OPERATION
6.1 Travel and wire feed
Travel and wire feed commands can be given when not welding, as follows:
Switch on welding power source
S The direction of travel is as shown by the square symbol on the power
source.
Normal speed
S The direction of travel is as shown by the triangular symbol on the power
source.
Normal speed
To stop travel described above, press the same key again.
S Retract wire. Normal speed
Wire continues to retract until you release the key.
S Advance wire. Normal speed
Wire continues to advance until you release the key.
S After switching on, you can select maximum speed by pressing the fast key
.
The LED in the key lights up.
S To return to normal speed press the fast key again
To stop immediately, press
Normal speed and max. speed can be adjusted under “PRESET SYSTEM MENU”.
.
.
.
.
.
, or even at max. speed.
6.2 Controlling valves
To operate a valve you must be in the “MAIN MENU”.
S Open the valve for flux or gas by pressing
S Close an open valve by pressing the same key
-- 8 6 --
fgb7o1ea
.
.
Page 11

GB
7 MENUS
7.1 Menu overview
The A2--A6 Process Controller (PEH) software
is divided into several menus. The program
structure is described in the overview below.
MAIN MENU
MAIN MENU
Direction Y
Start Direct
STOP WELDING
WIRE DATA
Regulation CA
PRESET SYSTEM MENU
WELDING SETUP
S SET S Heat input per cm S Welding current
S Wire feed speed S Arc voltage S Travel speed
S Preset indicators
+
WELDING SETUP
S Arc start method S Type of weld finish
S Welding direction S Regulation method
S Wire type S Wire material S Wire size
PRESET SYSTEM MENU / DISPLAY MENU /
ERROR LIST
Menus that are not accessible by the user
fgb7me1e
-- 8 7 --
Page 12

GB
8MAINMENU
In the main menu you choose the welding current, arc voltage and travel speed you
want to use for welding. During welding you can adjust the welding parameters or
choose a complete new set of parameters.
Switch on the power source
.
The main menu will appear as follows:
Example of display if constant current (CA) has been chosen.
A
350
Chosen welding current in amperes.
Example of display if welding with constant wire feed speed (CW) is chosen.
cm/min
110
Indicates chosen wire feed speed.
Example of display during welding at constant wire feed speed (CW).
350 A
Resulting welding current after the
welding start.
For the selection of (CA) or (CW), see the menu WELDING SETUP on page 92.
SET 1 Indicates that parameter set 1 of 10 available has been selected (can be hidden).
30 kJ/cm Indicates the heat input in kJ/cm that will result from the chosen values of welding
current, arc voltage and travel speed (can be hidden).
V
33.0
cm/min
23
Chosen arc voltage in volts.
Chosen travel speed in centimetres per minute.
Indicates the type of start
J Indicates the travel direction
Indicates if the valve output is open or closed.
Example of display in the event of a fault.
Error code appears in bottom left section of display .
Error message is cancelled by pressing
Max. 20 messages saved in chronological order.
S Start welding by pressing . The LED in the key lights up.
S Stop welding by pressing
fgb7hm1e
-- 8 8 --
Page 13

GB
8.1 Entering welding parameters
When the power source is switched on, the main menu appears on the display.
In the “Display menu” you can choose how many sets of parameters you want to
work with. If more than one set of parameters is used then the SET number appears
in the top left corner.
1. Welding current or wire feed speed
2. SET no.
3. Arc voltage
4. Travel speed
If you choose to work with just one set of parameters then start at step 3.
S Press
S Type in the desired SET number and press
S Select the field for welding current or wire feed speed by pressing
S Type in the desired welding current or wire feed speed. Max. 4 numbers, press
.
S Select the field for arc voltage by pressing
S Type in the desired arc voltage, max. 3 numbers, press
S Select the field for travel speed by pressing
S Type in the desired travel speed, max. 3 numbers and press
Now the whole set has been marked and is ready to use. A further 9 additional sets
can be stored. (Total 10 SETs).
+ to mark the “parameter set field “.
.
.
.
.
.
.
fgb7hm1e
-- 8 9 --
Page 14

GB
8.2 Adjusting parameter values (during welding)
Once welding has started the welding parameters can be fine--tuned using the
arrowed numerical keys (over--ride function).
Increase Decrease
Welding current or wire feed speed
Arc voltage
Travel speed
Save the values as follows:
S Stop welding with
S Save the changed values with
.
.
S To revert to the original values, press
+
.
fgb7hm1e
-- 9 0 --
Page 15

GB
8.3 Choosing a new set of parameters during welding
(Only possible when you have chosen to work with several sets of parameters by
programming the “Display” menu)
Immediate selection
Suppose that while welding with parameter set 1 (“SET 1”) you decide to change to
parameter set 6 (“SET 6”) without checking the parameters first.
S Press
The field “SET 1” is marked and parameter set 1 is active
S Press
The field “SET 6” flashes.
S Press
The field “SET 6” is marked and parameter set 6 is active
Check before choosing
Suppose that while welding with parameter set 1 (“SET 1”) you decide to change to
parameter set 6 (“SET 6”) after first checking the parameters.
S Mark the field “SET 1 “ by pressing
S Press .
The field “SET 6” flashes.
S The new parameter set can be checked before being chosen by pressing
+
The complete row displaying the welding parameters flashes and displays the values
for parameter set 6 (“SET 6”), although parameter set 1 (“SET1”) remains in use
during the cur r ent welding cycle.
+
.
.
.
.
+
.
S Press
The field “SET 6” is marked and parameter set 6 is active.
fgb7hm1e
.
-- 9 1 --
Page 16

GB
9 WELDING SETUP
9.1 General
In WELDING SETUP you can choose a variety of settings including start method,
welding direction, wire diameter and similar variables in order to carry out a specific
welding task. These settings cannot be changed during welding.
You can cancel any error message in the main menu by pressing
S Switch from the MAIN MENU to WELDING SETUP by pressing
The display will now show a number of variables in column A (see page 93) and the
relevant options in columns B and C. Other options can be scrolled forward one at a
time. You can change row in column A.
S To change a setting, move from column A to columns B and C by pressing
S Scroll forward to the chosen option by pressing
your own values for rows 3 and 4 (”Number of wires”).
S Return to column A to change row by pressing
S Jump to the next row by pressing .
After the last row you will return to row 1.
S Return to the previous row by pressing
This combination will also take you straight to row 6 from row 1
Explanations of terms:
+
or
+
.
.
.
.
+
or type in
.
When
hold it down while pressing the second key.
fgb7fs1e
is indicated in combination with another key you should press first and
-- 9 2 --
Page 17

GB
9.2 Available settings
A B C
1 Direction
2 Start
3 STOP WELDING
4 WIRE DATA
5 Regulation CA, CW
6 PRESET SYSTEM MENU
Y (TRIANGLE),
J (SQUARE)
Crater fill (ms) 10--3000
Burnback time (ms) 10--3000
Wire type Solid wire, Flux cored, Strip
Wire diameter
if “Solid wire” is chosen
if “Flux cored” is chosen
if “Strip” is chosen
Wire material Fe, Al, SS
Number of wires 1, 2
WELDING SETUP
ScratchDirect
0.8 1.0 1.2 1.6 2.0 2.4 3.0 3.2
4.0 5.0 6.0
0.8 1.0 1.2 1.6 2.0 2.4 3.0 3.2
4.0
30 x 0.5 60 x 0.5 100 x 0.5
Switches to sub--menus in rows 3 and 4:
S Mark menu and press
.
S Return to “WELDING SETUP” by pressing
S Return to “MAIN MENU” by pressing
+
+
.
.
fgb7fs1e
-- 9 3 --
Page 18

GB
9.3 Definitions
1. Direction
Two alternatives can be chosen Y (triangle) and J (square) (these symbols are
repeated on all units)
SY(triangle) indicates travel in one direction.
SJ(square) indicate
2. Start
Two alternatives can be chosen: Direct start or Scratch start.
S
S
3. STOP WELDING
Crater fill and Burnback time canbeset.
Crater fill times between 10 and 3000 ms (0.01 -- 3 sec.) can be selected.
The crater fill function is used to finish the weld without leaving a crater. Crater fill
starts when the welding stop key
fill time. This function is most useful when MIG/MAG welding.
Burnback times between 10 and 3000 ms (0.01 -- 3 sec.) can be selected.
The burnback time starts after the crater fill sequence has ended.
Correct choice of the burnback time prevents:
S the wire sticking to the work piece
S the wire sticking to the nozzle
Direct start means that travel starts when the arc ignites.
Scratch start means that travel starts at the same time as wire feed. Scrape
start is used when welding rusty or dirty material.
is pressed, and continues for the preset crater
fgb7fs1e
-- 9 4 --
Page 19

GB
4. WIRE DATA
type
Wire
The equipment can be preset for the wire you intend to weld with. The control
system must be given information about the wire shape in order to achieve optimum
start/stop characteristics.
S solid wire
S cored wire
S strip
Wire
diameter
The chosen wire diameter has a big effect on the start cycle and crater filling. When
welding with a wire diameter that is not given in the options table, choose the nearest
diameter from the menu.
Note! For certain wire materials a better welding result can be achieved, if a value
deviating from the real wire dimension by 1 step is set (normally 1 step from the real
value).
When metric units are used the following alternatives are available:
S solid wire 0.8 / 1.0 / 1.2 / 1.6 / 2.0 / 2,4 / 3.0 / 3.2 / 4.0 / 5.0 / 6.0 mm
S cored wire 0.8 / 1.0 / 1.2 / 1.6 / 2.0 / 2,4 / 3.0 / 3.2 / 4.0 mm
S strip 30 x 0.5 / 60 x 0.5 / 100 x 0.5 mm
When inch units are used the following alternatives are available
S solid wire 0.030, 0.040, 0.047, 1/16, 5/64, 3/32, 7/64, 1/8, 3/32,
7/64, 1/8, 5/32, 3/16, 1/4
S cored wire 0.030, 0.040, 0.047, 1/16, 5/64, 3/32, 7/64, 1/8, 3/32,
7/64, 1/8, 5/32
S strip 30 x 0,5 / 60 x 0,5 / 100 x 0,5
Wire
composition
When welding with different filler materials the start and stop method is affected by
the choice of materials. It is therefore important that the settings show whether you
are welding with steel--based or aluminium--based filler wires.
S Fe Steel filler wire
S Al Aluminium filler wire
S SS Stainless steel filler wire
Number of
wires
Values between 1 -- 2 can be entered.
For example, if welding with two wires (Twin Arc) enter the value 2.
fgb7fs1e
-- 9 5 --
Page 20

GB
5. Regulation
Two different operating modes can be used for welding, either constant current, CA,
or constant wire feed speed, CW.
S CA, constant current. Normally used for submerged arc welding, which involves
working with large welds, large currents and large weld pools. The wire feed
speed is controlled by the power source to maintain a constant current.
S CW, constant wire feed speed. Normally used for MIG/MAG welding, for small
weld pools, thin sheet metal and thin filler wire. It is easier to achieve a constant
throat thickness when welding with this method. Welding is controlled by
selecting a fixed wire feed speed and the current is adjusted to achieve this
speed. The resulting current is displayed above the selected wire feed speed
(see display shot on page 96).
9.4 Preset indicators
The numbers and symbols on the display show the chosen preset values, see table
below.
Shown in display
MAIN MENU as
Y
J
Shown in plain English
(e.g. 3.0)
WELDING SETUP
options
Start Direct
Scratch
Direction TRIANGLE
SQUARE
Wire diameter:
Solid wire
Flux cored
Strip
OUTPUT
ON/OFF
0.8 1.0 1.2 1.6 2.0 2.5 3.0 3.2 4.0 5.0 6.0
0.8 1.0 1.2 1.6 2.0 2,4 3.0 3.2 4.0
30 x 0.5 60 x 0.5 100 x 0.5
Valve
fgb7fs1e
-- 9 6 --
Page 21

GB
10 ERROR LIST
10.1 Error codes
M1.3 Overheating Stop Wait until temperature has fallen
Wire feed motor (Motor 1)
M1.1 Tacho fault Stop Check wire feed unit / gearbox / tacho
M1.2 Current too high Stop Check wire feed
Travel motor (Motor 2)
M2.1 Tacho fault Stop Check travel motor / gearbox / tacho
M2.2 Current too high Stop Check travel motor / gearbox
Welding power source (T1)
T1.01 Communication error Stop Check cables and connections
T1.51 Incorrect welding voltage Stop Check joint preparation
T1.52 Incorrect current Stop Check joint preparation
T1.53 Unsuccessful start Stop Check stick--out and welding parameters
T1.54 Current limit Stop Welding short--circuited / Cure short--circuit
T1.55 Thermostat / overheating Stop Wait until temperature has fallen
T1.57 Arc extinguished Stop Check wire feed
Inputs / outputs
Display
(Flashing)
(Flashing)
No cooling water
(inlet K22 open) *
No gas flow
(inlet K23 open) *
Stop Check if the water is flowing or if the limit switch
is open.
Stop Check gas pressure
* Inputs are activated by using settings in menu “PRESET SYSTEM MENU”.
11 ORDERING SPARE PARTS
Spare parts are ordered through your nearest ESAB representative, see back cover.
When ordering spare parts, please state machine type and number as well as designation and spare part number as shown in the spare parts list on page 237.
This will simplify dispatch and ensure you get the right part.
fgb7f1ea
-- 9 7 --
Page 22

Schema Skema Skjema Johdotuskaavio Diagram Schaltplan Schéma
Schema Esquema Schema Esquema
Ó÷Þìб уэндеузт УЧЗМБ УХ НДЕУЗУ
dgb7e12a
-- 2 3 4 --
Page 23

dgb7e12a
-- 2 3 5 --
Page 24

Tillbehör Tilbehør Tilbehør Lisävarusteet Accessories Zubehör
Accessoires Accessoires Accesorios Accessori Acessórios Aоеупхбс
БОЕУПХБС
Remote control PHH1, incl. cable (5m)
Ordering no: 0449 040 880
Tillb
-- 2 3 6 --
Page 25

Reservdelsförteckning Reservedelsfortegnelse Reservedelsliste
Varaosaluettelo Spare parts list Ersatzteilliste L iste de pièces détachées
Reserveonderdelenlijst Lista de repuestos Elenco ricambi Lista de peças
sobressalentes РЯнбкбт бнфбллбкфйкюн месюн
РЙнбКБУ бнфблл бкфйкЩн мес Щн
A2- A6 Process Controller (PEH)
Edition 000615
Ordering no. Denomination Notes
0443 741 880 Control box A2--A6 Process Controller (PEH)
Abbreviations used in the spare parts list:
C = Component designation in the circuit diagram
pehspare
-- 2 3 7 --
Page 26

Item
no.
3 1 0443 638 880 Control panel KB1
4 1 0443 740 001 Emergency stop ST1
8 2 0457 278 001 Rail
9 1 0443 748 880 Cable, complete XS1
10 0443 730 880 Circuit board AP1 + AP2
14 1 0443 849 001 Insulation
20 1 0443 726 001 Display DY1
21 0192 526 003 Sealing strip 530 mm
23 10 0192 645 002 Bushing
26 2 0467 911 883 Capacitor Valid from programversion PEH1.2
40 0262 612 714 Cable 330 mm
41 0193 045 001 Connection block 2--pole X2
Ordering no.
Qty
0443 741 880 Control box
Denomination Notes C
s443741r
-- 2 3 8 --
Page 27

Item
no.
2 0456 489 002 Connection terminal 6 poles K10, K11
3 0456 489 001 Connection terminal 2 poles K12, K17, K22, K23
4 0456 489 004 Connection terminal 2 poles K13, K14
5 1 0486 471 880 Flash memory IC15
6 1 0486 473 880 EPROM Capsule IC304
7 0456 489 005 Connection terminal 4 poles K9, K9X
Ordering no.
Qty
0443 730 880 Circuit board AP1 + AP2
Denomination Notes C
s443730r
-- 2 3 9 --
Page 28

ESAB subsidiaries and representative offices
Europe
AUSTRIA
ESAB Ges.m.b.H
Vienna--Liesing
Tel: +43 1 888 25 11
Fax: +43 1 888 25 11 85
BELGIUM
S.A. ESAB N.V.
Brussels
Tel: +32 2 745 11 00
Fax: +32 2 726 80 05
THE CZECH REPUBLIC
ESAB VAMBERK s.r.o.
Prague
Tel: +420 2 819 40 885
Fax: +420 2 819 40 120
DENMARK
Aktieselskabet ESAB
Copenhagen--Valby
Tel:+4536300111
Fax:+4536304003
FINLAND
ESAB Oy
Helsinki
Tel: +358 9 547 761
Fax: +358 9 547 77 71
FRANCE
ESAB France S.A.
Cergy Pontoise
Tel:+33130755500
Fax:+33130755524
GERMANY
ESAB GmbH
Solingen
Tel: +49 212 298 0
Fax: +49 212 298 204
GREAT BRITAIN
ESAB Group (UK) Ltd
Waltham Cross
Tel: +44 1992 76 85 15
Fax: +44 1992 71 58 03
ESAB Automation Ltd
Andover
Tel: +44 1264 33 22 33
Fax: +44 1264 33 20 74
HUNGARY
ESAB Kft
Budapest
Tel:+3612044182
Fax:+3612044186
ITALY
ESAB Saldatura S.p.A.
Mesero (Mi)
Tel:+3902979681
Fax:+390297289181
THE NETHERLANDS
ESAB Nederland B.V.
Utrecht
Tel: +31 30 248 59 22
Fax: +31 30 248 52 60
NORWAY
AS ESAB
Larvik
Tel:+4733121000
Fax:+4733115203
POLAND
ESAB Sp.z.o.o
Warszaw
Tel: +48 22 813 99 63
Fax: +48 22 813 98 81
PORTUGAL
ESAB Lda
Lisbon
Tel: +351 1 837 1527
Fax: +351 1 859 1277
SLOVAKIA
ESAB Slovakia s.r.o.
Bratislava
Tel:+421744882426
Fax:+421744888741
SPAIN
ESAB Ibérica S.A.
Alcobendas (Madrid)
Tel: +34 91 623 11 00
Fax: +34 91 661 51 83
SWEDEN
ESAB Sverige AB
Gothenburg
Tel:+4631509500
Fax:+4631509222
ESAB International AB
Gothenburg
Tel:+4631509000
Fax:+4631509360
SWITZERLAND
ESAB AG
Dietikon
Tel: +41 1 741 25 25
Fax: +41 1 740 30 55
North and South America
ARGENTINA
CONARCO
Buenos Aires
Tel: +54 11 4 753 4039
Fax: +54 11 4 753 6313
BRAZIL
ESAB S.A.
Contagem--MG
Tel: +55 31 333 43 33
Fax: +55 31 361 31 51
CANADA
ESAB Group Canada Inc.
Missisauga, Ontario
Tel: +1 905 670 02 20
Fax: +1 905 670 48 79
MEXICO
ESAB Mexico S.A.
Monterrey
Tel: +52 8 350 5959
Fax: +52 8 350 7554
USA
ESAB Welding & Cutting Products
Florence, SC
Tel: +1 843 669 44 11
Fax: +1 843 664 44 58
Asia/Pacific
AUSTRALIA
ESAB Australia Pty Ltd
Ermington
Tel: +61 2 9647 1232
Fax: +61 2 9748 1685
CHINA
Shanghai ESAB A/P
Shanghai
Tel: +86 21 6539 7124
Fax: +86 21 6543 6622
INDIA
ESAB India Ltd
Calcutta
Tel: +91 33 478 45 17
Fax: +91 33 468 18 80
INDONESIA
P.T. Esabindo Pratama
Jakarta
Tel: +62 21 460 01 88
Fax: +62 21 461 29 29
MALAYSIA
ESAB (Malaysia) Snd Bhd
Selangor
Tel: +60 3 703 36 15
Fax: +60 3 703 35 52
SINGAPORE
ESAB Singapore Pte Ltd
Singapore
Tel: +65 861 43 22
Fax: +65 861 31 95
ESAB Asia/Pacific Pte Ltd
Singapore
Tel: +65 861 74 42
Fax: +65 863 08 39
SOUTH KOREA
ESAB SeAH Corporation
Kyung--Nam
Tel: +82 551 289 81 11
Fax: +82 551 289 88 63
THAILAND
ESAB (Thailand) Ltd
Samutprakarn
Tel: +66 2 393 60 62
Fax: +66 2 748 71 11
UNITED ARAB EMIRATES
ESAB Middle East
Dubai
Tel: +971 4 338 88 29
Fax: +971 4 338 87 29
Representative offices
BULGARIA
ESAB Representative Office
Sofia
Tel/Fax: +359 2 974 42 88
EGYPT
ESAB Egypt
Dokki--Cairo
Tel: +20 2 390 96 69
Fax: +20 2 393 32 13
ROMANIA
ESAB Representative Office
Bucharest
Tel/Fax: +40 1 322 36 74
RUSSIA--CIS
ESAB Representative Office
Moscow
Tel: +7 095 937 98 20
Fax: +7 095 937 95 80
ESAB Representative Office
St Petersburg
Tel: +7 812 325 43 62
Fax: +7 812 325 66 85
Distributors
For addresses and phone
numbers to our distributors in
other countries, please visit our
home page
www.esab.com
ESAB Welding Equipment AB
SE--695 81 LAXÅ
SWEDEN
Phone +46 584 81 000
Fax +46 584 123 08
www.esab.com
001004
 Loading...