

Page 1
LeadCare®II
BLOOD LEAD ANALYZER
Quick Reference Guide
Page 2
Precautions
Precautions
• The LeadCare II Blood Lead Analyzer is a CLIA-waived device. Facilities that
• Any modifications by the laboratory to the test system or the manufacturer’s
• All laboratories eligible for a CLIA Certificate of Waiver must follow the manu-
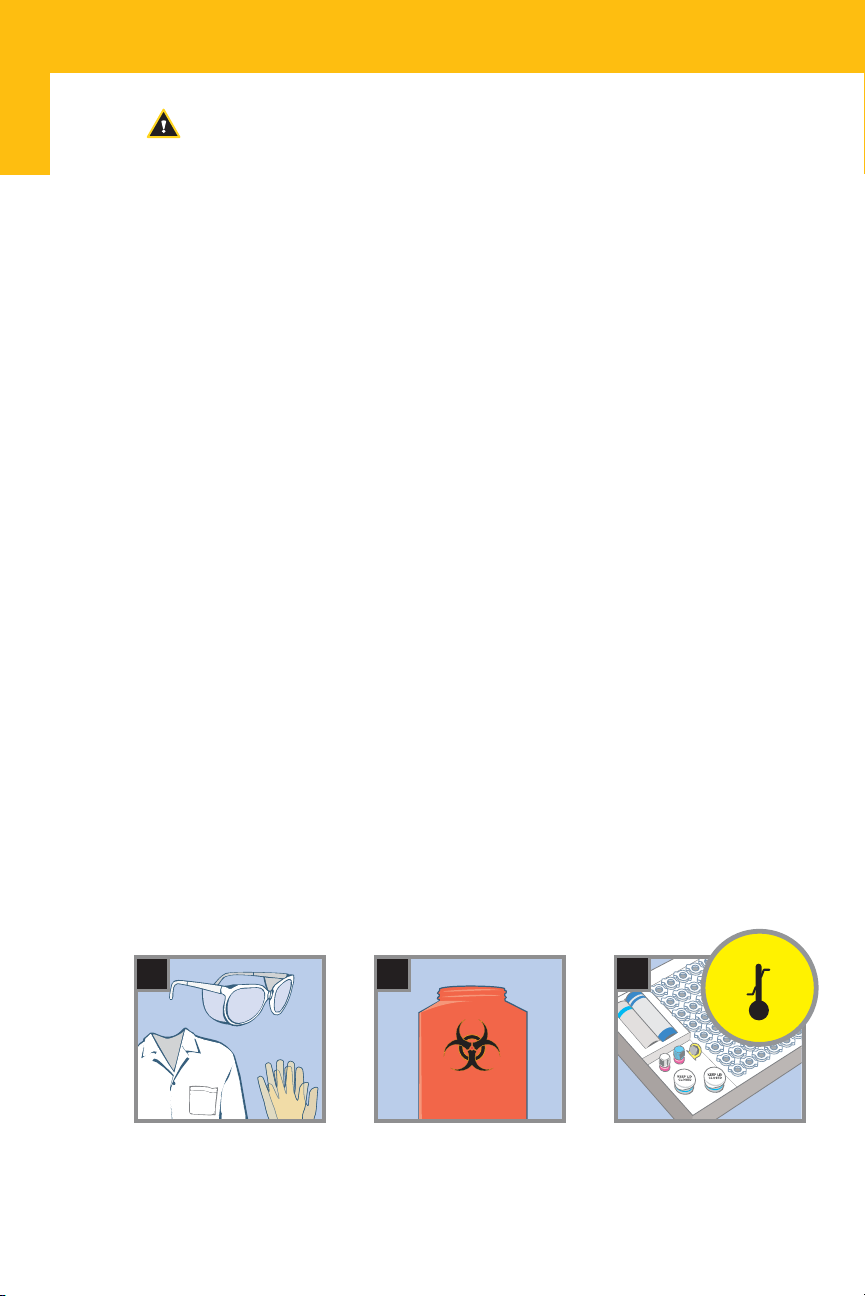
• Observe universal precautions for handling blood samples as defined by the
• The LeadCare treatment reagent contains dilute hydrochloric acid solution.
• Do not mix components from different lots of test kits.
• Test kit components (kit box, sensors, controls, and treatment reagent tubes) are
• Proper sample preparation is essential for accurate results. Take precautions to
• Use only fresh, whole blood. Mix the blood with treatment reagent within
Caution
perform tests with the LeadCare II System must have a CLIA Certificate of Waiver
as issued under the authority of the Public Health Service Act (PHSA) (42 U.S.C.
263(a). In addition to a waiver certificate, laboratories performing this test must
comply with all applicable state and local laws.
instructions will result in the test no longer meeting the requirements of the waived
category.
facturer's instructions as specified in the LeadCare II User's Guide, LeadCare II
Quick Reference Guide and LeadCare II Test Kit package insert.
U.S. Public Health Service, Centers for Disease Control. Refer to the LeadCare II
User's Guide for information about where to find this document.
The reagent is harmful if swallowed. Keep out of reach of children. If swallowed,
consult a physician. If the reagent contacts eyes, flush immediately with water
and consult a physician.
labeled with expiration dates. Using any item with an expired date may produce
inaccurate results. Do not use any component with an expiration date that has
passed. Check the expiration on the kit box as this is the earliest date.
ensure that the sample collection area is not contaminated by environmental
sources of lead. Refer to Collecting and Handling Blood Lead Samples—2004
published by the Department of Health and Human Services, Centers for
Disease Control.
24 hours of collection. Follow sample collection instructions exactly.
Wear protective gloves,
safety glasses and lab
coats.
Dispose of materials
in appropriate biohazard containers.
Allow analyzer, test kit
and samples to reach
room temperature
before testing.
97°F
54°F
Page 3
Required Materials
r
d
dC
Sy
D
LeadCare II
ting System
es
LeadCare II
Blood Lead T
E
NAM
D
PAT I
E
M
NA
NAME
AT ID
P
E
PAT ID
NAM
E
ID
NAM
T
PA
E
NAM
NA
ID
AT
P
E
M
NA
ID
T
PA
ME
NA
AT ID
P
E
NAM
NAME
PAT ID
PA
ME
NA
PAT ID
ME
NA
ID
T
PA
E
NAM
ID
T
PA
E
M
D
NA
T I
PA
E
PAT ID
M
E
ID
NAM
AT
P
NAM
ID
T
E
NAM
PAT
E
M
NA
AT ID
P
E
NAM
T ID
PA
T ID
E
PA
NAME
PAT ID
ID
NAME
AT
P
T ID
ME
PA
NA
E
M
T ID
NA
PA
D
I
NAME
AT
P
PAT ID
NAME
E
M
ID
T
NA
PA
ID
NAME
D
PAT I
NAME
PAT ID
NA
NAME
ID
T
PA
E
M
NA
D
I
T
PA
NAME
PAT ID
NAME
PAT ID
ID
AT
E
P
NAM
E
M
A
N
T ID
PA
E
M
ID
AT
P
E
NAM
PAT
E
M
NA
PAT ID
D
E
PAT I
M
NA
D
NAME
PAT I
NAME
PAT ID
E
PAT ID
NAM
ME
NA
PAT ID
ID
E
M
NA
AT ID
P
ME
NA
PAT ID
ID
T
PA
NAME
E
ID
NAM
T
PA
ID
T
PA
E
M
NA
D
PAT I
Lea
Blood Testing
Z
LY
D ANA
A
E
LeadCare II
OD L
O
BL
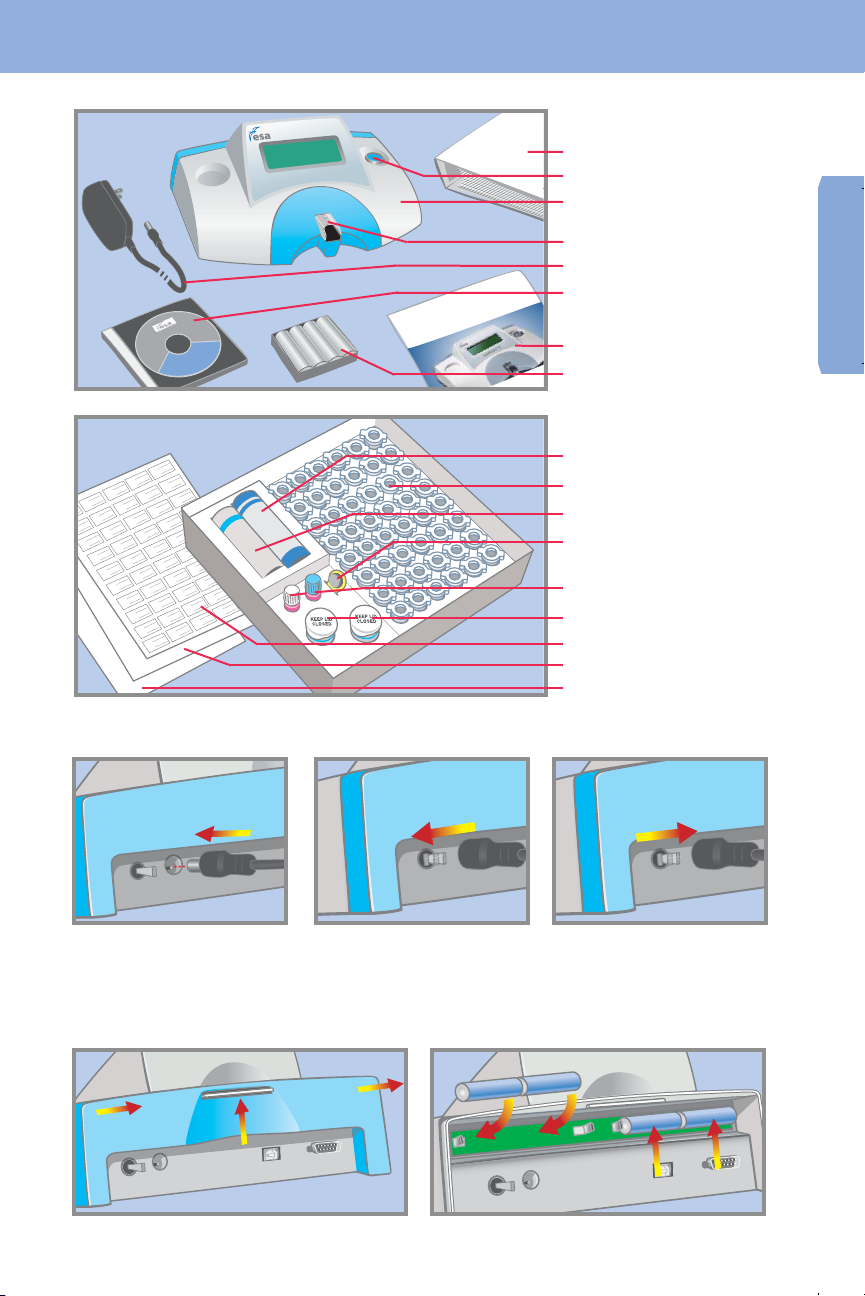
Analyzer Kit Contents
User's guide
Calibration button reader
LeadCare II Blood
Lead Analyzer
Sensor retainer
Materials
Required
AC power cord
R
E
Instructional CD-ROM
Quick reference guide
AA batteries
a
C
ce
Test Kit Contents
Droppers
Treatment reagent tubes
Capillary tubes and plungers
Calibration button
Control solutions
Blood lead sensors
Labels
Package insert
LeadCare II worksheet
Power on the Analyzer
I
POWER
Connect the analyzer to
an outlet using the AC
power cord or install batteries as shown below.
I
POWER
To turn ON the analyzer,
move the switch to the left.
To turn the analyzer OFF,
move the switch to the right.
I
POWER
Battery Installation (Optional)
1
-
2
2
I
POWER
1
I
IOIO
Push white tab up and pull blue cover off.
-
I
Insert batteries as shown and replace cover.
POWER
2
+
+
-
-
+
+
+
+
-
-
+
+
-
-
4
3
IOIOI
Page 4
Analyzer Calibration and Quality Control
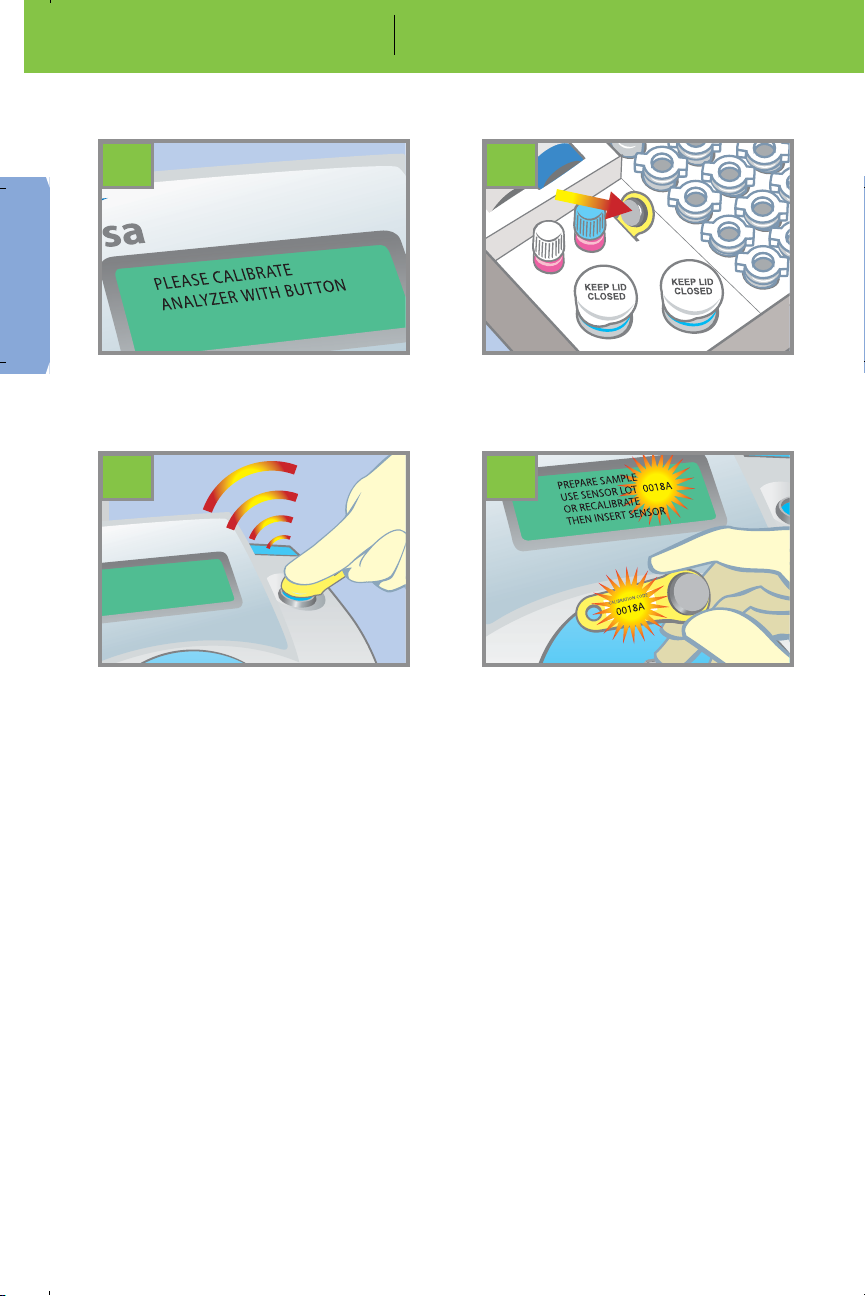
Perform this calibration procedure each time you open a new Test Kit.
1
The first time you turn on the analyzer,
you will see the PLEASE CALIBRATE
message.
3
CALIBRATION
SUCCESSFUL
LeadCare II
Hold the calibration button to the
button reader until you hear a beep.
NOTE: Button must touch both the
center contact and metal side of
button reader.
2
Remove the calibration button from
the Test Kit.
4
LeadCare II
Make sure the number on the button
matches the display.
The analyzer is ready when the
PREPARE SAMPLE message appears.
Quality Control
LeadCare II Blood Lead Controls are intended to monitor the accuracy and
precision of your blood lead testing using the LeadCare II Blood Lead Testing
System.
How Often to Test with Controls
Test two levels of quality control:
• on each new lot of test kits received
• on each new shipment of test kits received
• to test the technique of new users
• if you suspect that the test kit may not have been stored properly
• at any time you think that the system may not be working properly
Results obtained on control samples that are within the expected ranges means
that your LeadCare II System is operating properly. Refer to the LeadCare II
User's Guide for additional important information on quality control.
Page 5
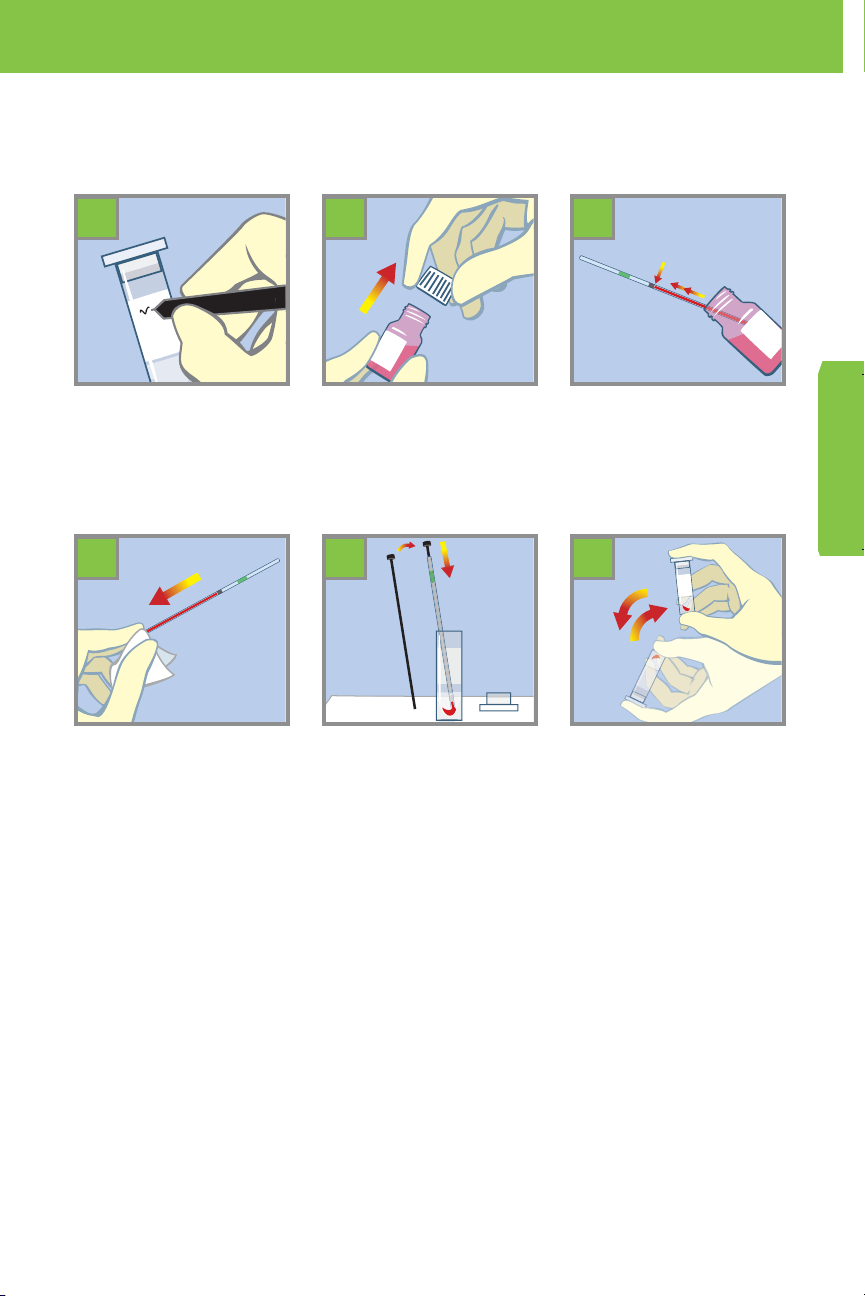
Using the Controls (See Prepare the Sample for Additional Information)
Treat the controls as you would a patient blood sample. Refer to the LeadCare II
User's Guide for detailed instructions on how to perform blood lead testing.
4
Label a fresh treatment
reagent tube “Level 1
Control”.
5 6
After thorough mixing,
remove the cap from the
Level 1 control vial and
place it top down on a
clean laboratory wipe.
7 8 9
Wipe the outside of the
capillary to remove any
excess control.
Inspect the capillary
tube to confirm that it is
properly filled.
Place the capillary tube
into the treatment reagent
tube. Insert a plunger into
the top of the capillary
tube. Dispense the entire
volume of control into the
reagent.
Holding the capillary tube
almost horizontally with the
green band on top, fill the
tube to the 50 µL black line.
Replace the cap on the
control vial.
Replace the tube cap. Invert
the tube 8 to 10 times to mix
the sample completely.
Control material in treatment
reagent tube will appear red.
Quality Control
Calibration &
Analyze the control sample according to the instructions provided in the Analyze the
Sample
section. Repeat this process for the Level 2 control.
Lead Control Test Results: Expected Results
Control target values and acceptable ranges are provided on the control vial label.
The blood lead result you obtain for a control should be within the acceptable range.
If the results are not within the listed range, refer to the Troubleshooting section of the
User's Guide. If, after following the instructions, the controls are still out of range, call
ESA Technical Support at 1-800-275-0102.
CAUTION: Do NOT proceed to patient samples unless both Level 1 and Level 2 control
results are within the acceptable ranges.
Page 6
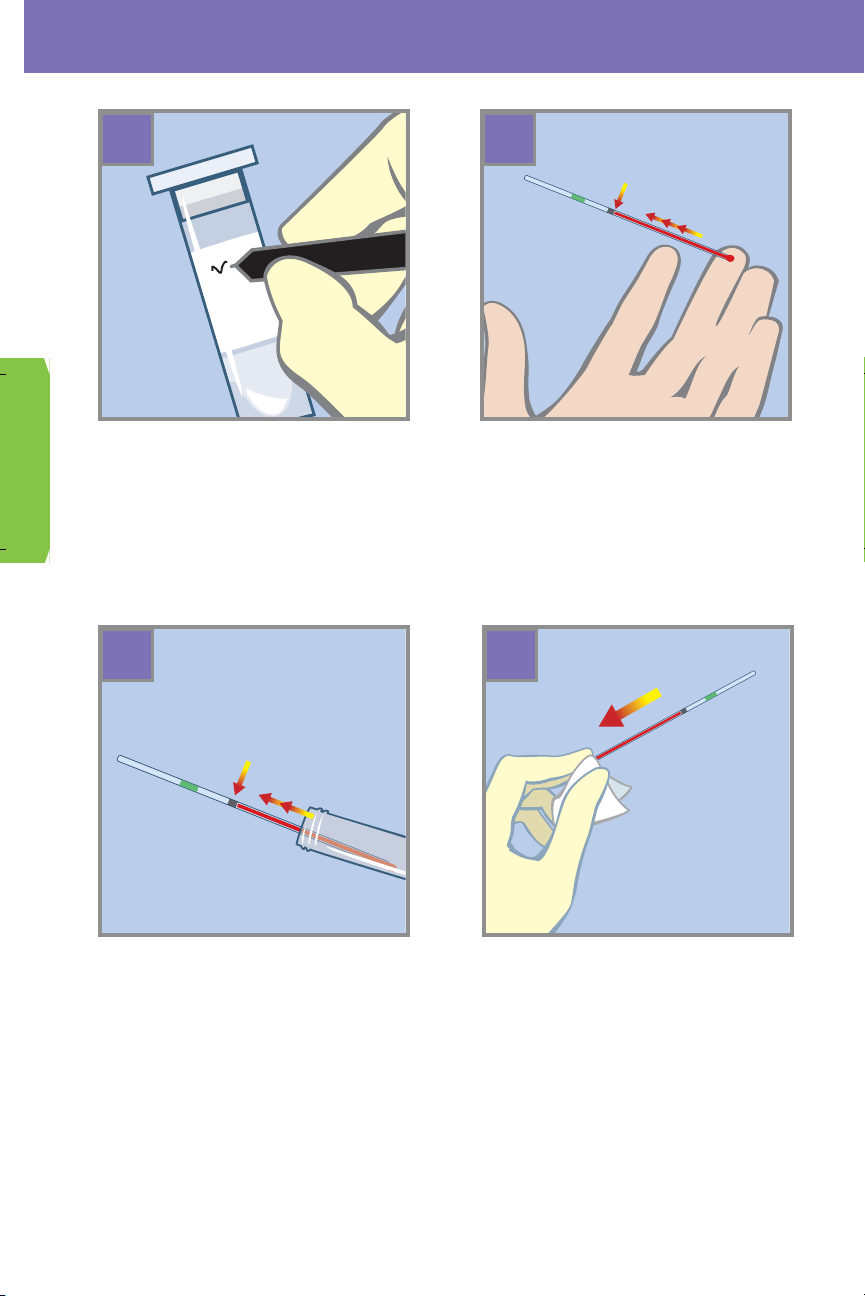
Prepare the Sample
1 2
Label the tube with the patient ID
using the labels provided.
3
OR
If using blood from a tube, make sure
the blood is well mixed by inverting
the tube 8 to 10 times before sampling.
Hold the capillary tube almost
horizontally with the green band on
top, fill the tube to the 50 µL black
line.
Holding the capillary tube almost
horizontally with the green band on
top, fill the capillary to the 50 µL
black line.
Note: The CDC’s Steps for Collecting
Fingerstick Blood Samples for Lead
Testing is provided in Appendix C of
the User’s Guide.
4
Remove excess blood from the outside of the tube with a clean wipe
or gauze.
Use caution not to drain the blood
from the end of the capillary tube.
Page 7
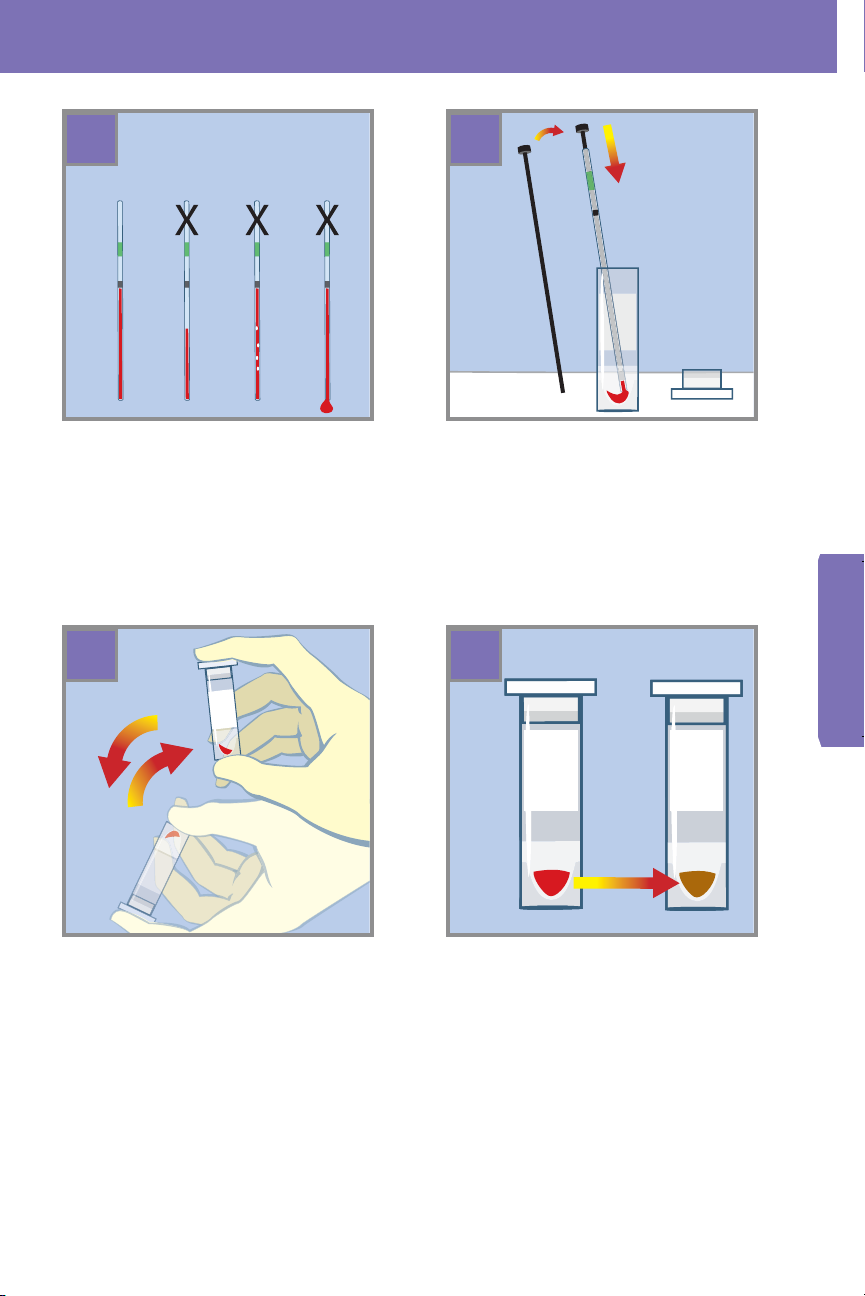
5 6
Correct Underfilled Bubbles Blood
Wrong Air Excess
Wrong Wrong
Inspect the capillary tube for proper
filling. Make sure there are no gaps or
bubbles, or any excess blood on the
outside of the capillary.
7 8
Replace the tube cap. Invert the
tube 8 to 10 times to mix the sample
completely.
Place the capillary tube into the
treatment reagent tube. Insert a
plunger into the top of the capillary
tube. Dispense the entire volume into
the bottom of the tube.
The sample is ready when the mixture turns brown. Samples may be
stored up to one week if refrigerated.
CAUTION: Any visual impairment,
such as color blindness may affect
the operator's ability to detect the
sample color change. Operators with
vision deficiencies should invert the
tube 8 to 10 times to ensure that the
sample is properly mixed.
the Sample
Prepare
Page 8
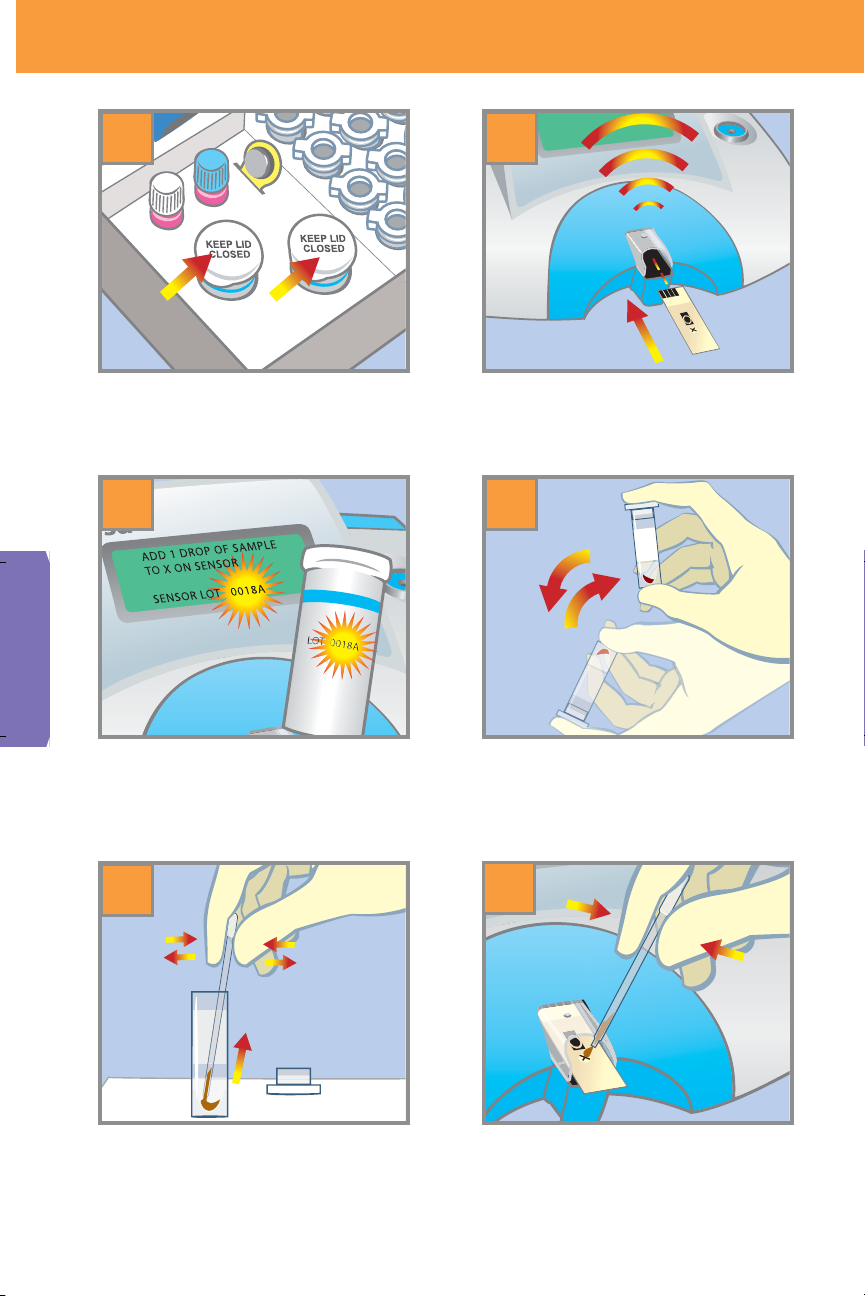
Analyze the Sample
1
Remove a sensor from the sensor
container. Close the container.
3
LeadCare II
2
LeadCare II
Insert the sensor (with black bars
facing up) completely into the
analyzer until you hear a beep.
4
Make sure the sensor lot number
matches the display.
5
Remove the cap from the tube.
Squeeze the walls of the dropper
and insert into the sample. Release
the pressure to draw some sample
into the dropper.
Make sure the sample is thoroughly
mixed. Allow samples that were
stored refrigerated to reach room
temperature before use.
6
dCare II
Touch the dropper tip to the X on
the sensor and squeeze the walls to
dispense the sample.
Page 9
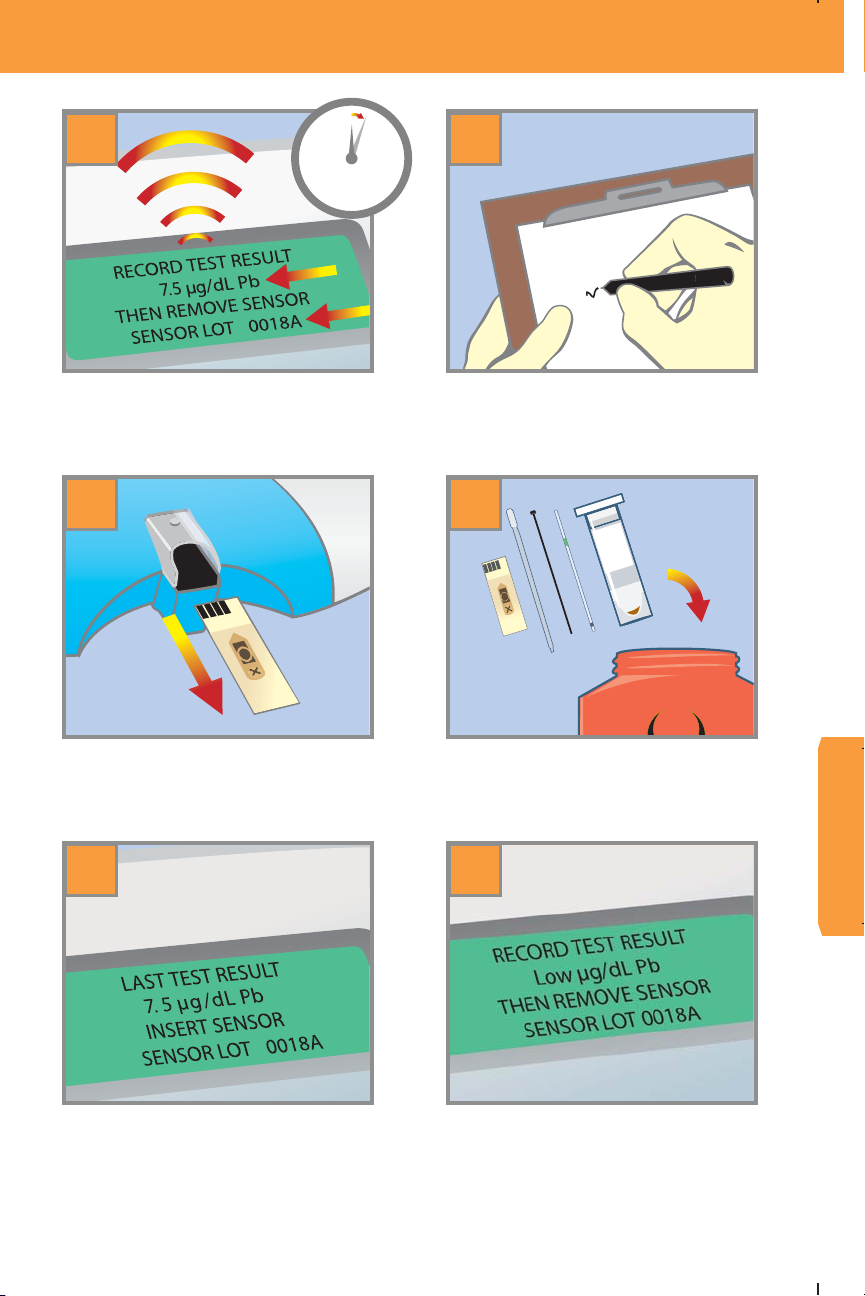
7
8
Wait 3 minutes until the test is done.
The analyzer will beep and display
the lead result in
µg/dL Pb.
Record the test results on the
LeadCare II worksheet provided.
9 10
Remove the used sensor. Discard materials in appropriate
11
containers.
12
the Sample
Analyze
The analyzer is ready for the next
sample.
The analyzer displays “Low” when
it detects a blood lead level below
3.3 ug/dL. “Low” results should be
recorded as “< 3.3
majority of your patient samples
should produce “Low” results.
µg/dL”. The
Page 10

Interpreting Patient Test Results
Interpreting Patient Test Results
The analyzer’s display window shows the blood lead result. The result is in micrograms
(µg) of lead per deciliter (dL) of whole blood. No calculation is needed. Results are
displayed to one decimal place. The reportable range of the test is 3.3 to 65 µg/dL.
“Low” in the display window indicates a blood lead test result less than 3.3 µg/dL.
When this occurs, report the blood lead result as less than (<) 3.3 µg/dL.
“High” in the display windows indicates a blood lead test result greater than
65.0 µg/dL. When this occurs, report the blood lead result as greater than (>) 65 µg/dL.
Blood lead test results should be shared with the patient’s physician for interpretation
and to determine when retesting and follow-up care are necessary.
Blood lead levels less than 10 µg/dL are below the “level of concern”.
Blood lead levels above 10 µg/dL indicate possible lead poisoning, which is a
serious medical condition. Patients with blood lead levels above 10 µg/dL must be
confirmed with a venous sample. The following table shows when to test patients
again if the result is above 10 µg/dL.
Retesting Guidelines
If blood lead result of Perform diagnostic test on
screening test is: venous blood within:
10 – 19 µg/dL 3 months
20 – 44 µg/dL 1 month to 1 week
45 – 59 µg/dL 48 hours
60 – 69 µg/dL 24 hours
Greater than or equal to 70 µg/dL Immediately as an emergency lab test
1
(the higher the result, the more
urgent the need for follow-up testing)
When the LeadCare II display reads “High”, the analyzer has detected a blood lead
level greater than 65 µg/dL. “High” results on LeadCare II should be followed up
immediately as an emergency laboratory test.
Venous confirmation samples can be tested on the LeadCare II System to rule out
contamination in the first sample. However, if the result of the venous sample is also
above 10 µg/dL, ESA recommends that you send the venous sample to a reference
laboratory for confirmation by another method.
NOTE: If you are concerned about the accuracy of results near the 10 µg/dL threshold, ESA recommends that you set the confirmation threshold at 8 µg/dL, and have
venous samples sent out for confirmation by a reference laboratory.
Report all blood lead test results to the appropriate state or federal agency.
Contact your State Childhood Lead Poisoning Prevention Program for the specific
case management guidelines that apply to your patients.
1
CDC (Centers for Disease Control). Screening Young Children for Lead Poisoning: Guidance for State
and Local Public Health Officials. Atlanta: CDC, 1997.
Page 11
Maintenance
Maintaining the Analyzer
• Clean the analyzer with a damp cloth and warm, soapy water. Do not immerse
in water.
• Disinfect with dilute (10%) bleach solution.
• Do not leave any soap film on the analyzer.
• Do not allow liquid of any kind into the sensor connector.
• Do not wash the inside of the calibration button reader.
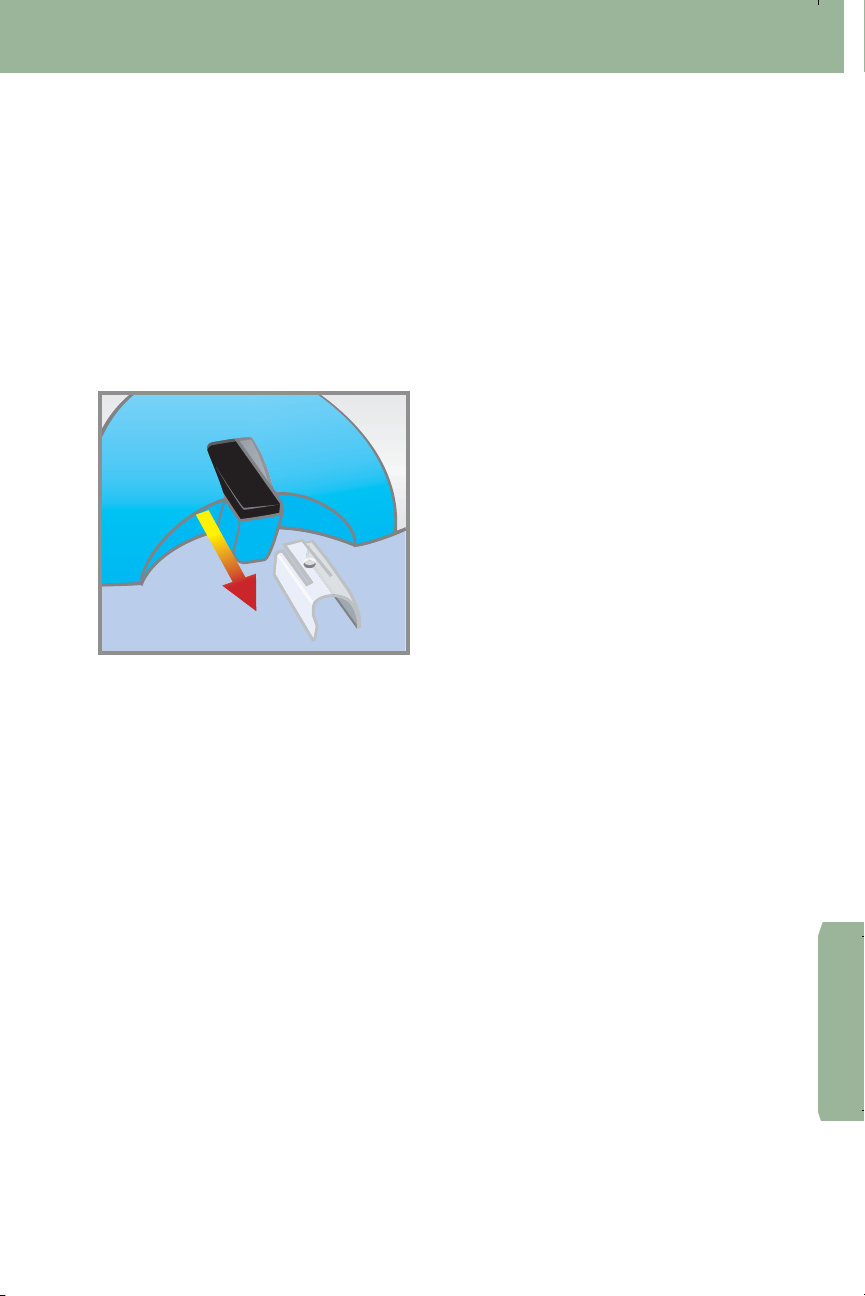
• Remove the sensor retainer to clean. Dry thoroughly before reinstalling.
ESA Biosciences Technical Support Number 1-800-275-0102
Interpreting Results
Maintenance
Page 12

Troubleshooting
STARTUP MESSAGES DEFINITION WHAT TO DO
PLEASE CALIBRATE Analyzer must be calibrated the first Calibrate the analyzer. Refer to the
ANALYZER WITH BUTTON time you use it. calibration instructions in this guide.
TEMP IS TOO HOT The temperature is too hot for testing. Wait until the screen displays
PLEASE WAIT UNTIL the PREPARE SAMPLE message.
ANALYZER IS IN
TEMP RANGE
TEMP IS TOO COLD The temperature is too cold for testing. Wait until the screen displays
PLEASE WAIT UNTIL the PREPARE SAMPLE message.
ANALYZER IS IN
TEMP RANGE
ELECTRONIC The internal quality control check Call ESA Biosciences Technical
QC CHECK FAILED failed. Support at 1-800-275-0102.
CALL TECH SERVICE
ERROR X
PROCESSING MESSAGES DEFINITION WHAT TO DO
WARNING The temperature is changing rapidly. Allow system temperature to stabilize.
TEMP IS UNSTABLE This message flashes for 2 seconds.
TEST MAY FAIL
THIS IS A USED SENSOR The sensor in the analyzer is wet Remove the used sensor or adjust the
PLEASE REMOVE SENSOR or previously used. new sensor until the screen displays
PLEASE REMOVE SENSOR A sensor was left in the analyzer. Remove the sensor.
SENSOR OUT OF VIAL The sensor in the analyzer has been Remove the sensor and insert a new
TOO LONG out of the container too long and sensor.
PLEASE REMOVE SENSOR cannot be used.
TEST FAILED There is not enough sample on the Remove the sensor, discard it and
PLEASE REMOVE SENSOR sensor or the sensor failed. insert a new sensor. When adding the
SENSOR REMOVED TOO SOON The sensor was removed from the Remove the sensor, discard it, insert a
analyzer before the end of the test. new sensor and add another drop of
TEMP IS UNSTABLE The temperature in the room is too Move the analyzer to an area where
RESULT DISCARDED unstable to yield accurate test results. there are fewer temperature changes
PLEASE REMOVE SENSOR (away from sources of cold or heat).
PLEASE RECALIBRATE There was a problem with transferring Repeat the calibration procedure.
the calibration data to the analyzer Refer to the calibration procedure
from the calibration button. in this guide.
SYSTEM FAILURE One of the main system Call ESA Biosciences Technical
CALL TECH SERVICE components failed. Service at 1-800-275-0102.
PLEASE CALIBRATE The analyzer must be calibrated Calibrate the analyzer. Refer to the
ANALYZER WITH BUTTON before you can use it. calibration instructions in this guide.
SENSOR LOT TOO OLD The sensor is from a lot that has Discard the sensor and the expired
PLEASE RECALIBRATE expired. lot. Use a sensor from a new lot and
CHANGE BATTERIES SOON Message flashes before or after a Change the batteries. Use four 1.5 V
test. Voltage is too low for the AA alkaline batteries.
analyzer to run a test.
the PREPARE SAMPLE message.
sample to the sensor, make sure the
sample covers the X area.
sample. Wait 180 seconds (3 minutes)
for the test to finish.
The temperature is stable enough
when the PREPARE SAMPLE message
indicates that the Analyzer is ready.
The PREPARE SAMPLE message indicates that the analyzer is ready to use.
recalibrate the analyzer.
Page 13

Troubleshooting of Inaccurate Results
Scenario 1: Troubleshooting results below the target or expected value
• Make sure the analyzer is calibrated to the sensor lot in use.
• Check the expiration date on the test kit box. Do NOT use a test kit that is beyond the
expiration date. Note: the analyzer will not perform a test when it is calibrated for a
sensor lot that has expired.
• Use only fresh, whole blood from patients. Do NOT use plasma or serum.
• Less than 50 µL in the capillary tube will tend to produce lower blood lead results.
• Make sure that there are no clots or bubbles in the capillary tube.
• Always mix the blood sample with treatment reagent. Results generated with untreated
blood are not accurate.
• Do NOT use clotted blood. If there are clots in the blood, obtain a new sample.
• Operate the analyzer only within the specified humidity range – 12 to 80% relative humidity.
• Make sure that the analyzer, test kit, and sample are all at the same temperature before
testing. Note: The analyzer will not initiate a test if the temperature is changing too rapidly, or if the temperature is outside of the operating range.
• Avoid operating the LeadCare II System in drafts.
• Make sure the blood and treatment reagent is thoroughly mixed before placing onto
the sensor.
• Keep the lid on the sensor container closed to protect unused sensors.
• Do NOT touch the sensor while running a test.
Scenario 2: Troubleshooting results above the target or expected value
• Make sure the analyzer is calibrated to the sensor lot in use.
• Check the expiration date on the test kit box. Do NOT use a test kit that is beyond the
expiration date.
• To avoid contamination, thoroughly clean the sample site prior to puncture. Use clean
gloves during testing and keep your gloved hands clean.
• Make sure you are using lead-free collection devices.
• Do NOT touch the ends of the capillary tubes or the plungers. This could cause
contamination.
• Excess blood on capillary tube. Be sure to wipe excess blood from the tube with a
downward motion. The accuracy of the test depends on filling the capillary tube with
50 µL. Excess blood on the outside of the tube will tend to produce higher blood lead
results.
• Do NOT use clotted blood. If there are clots in the blood, obtain a new sample.
• Do NOT leave the treatment reagent tube uncapped other than to add the blood
sample and remove the blood sample/treatment reagent mixture.
• Make sure to thoroughly mix blood with the treatment reagent. The mixture should turn
brown before you place it on the sensor.
Operate the analyzer only within the specified humidity range – 12 to 80% relative humidity.
•
• Make sure that the analyzer, test kit, and sample are all at the same temperature
before testing.
• Do NOT use a sensor that has been dropped on the floor or exposed to contaminants.
• Do NOT touch the sensor while running a test.
Troubleshooting
If you have any doubt about the accuracy of your results, refer to the Troubleshooting
section of the User's Guide. If, after following the instructions, the problem persists,
call ESA Biosciences Technical Support at 1-800-275-0102.
Page 14
To place an order, call 1-800-959-5095.
Analyzer:
LeadCare®II Analyzer Kit 70-6760
Reagents:
LeadCare®II Test Kit 70-6762
Parts and Accessories:
Label Printer (U.S. only) 70-3447
Printer Labels 70-3443
AA Batteries (4 Pack) 50-0005
Sensor Retainer 70-6543
Quick Reference Guide 70-6552
User’s Guide 70-6551
Instructional CD-ROM 70-6554
AC Power Cord 70-6692
International Power Plug Set 70-6693
ESA Biosciences Technical Support Number 1-800-275-0102
LeadCare II Serial Number: _______________________
ESA Biosciences, Inc.
22 Alpha Road, Chelmsford, MA 01824 USA
(800) 275-0102
www.esainc.com
Copyright© 2005-2007. ESA Biosciences Inc.
Produced under the following U.S. Patent Numbers:
5,368,707; 5,468,366; 5,217,594; 5,873,990
Part Number: 70-6552 Rev C
 Loading...