

Page 1

CPT8200
ADVANCED RACE TIMER
USER GUIDE
V 1.00
Electronic Reading Systems Ltd. Tel: 01234 855300 Fax: 01234 855446 Web: www.ers-online.co.uk
Page 2

CONTENTS
1.0 INTRODUCTION
2.0 CPT8200 RACE TIMER SOFTWARE APPLICATION
2.1 Initializing the Timer
2.2 Using the Timer
2.3 Downloading the Timer
APPENDIX A SYNCHRONISING THE CPT8200 INTERNAL CLOCK
APPENDIX B CHARGING THE BATTERY
APPENDIX C CHANGING THE SPEAKER VOLUME
APPENDIX D TIMER ‘SETTINGS’ MENU
Electronic Reading Systems Ltd. Tel: 01234 855300 Fax: 01234 855446 Web: www.ers-online.co.uk
Page 3
Electronic Reading Systems Ltd. Tel: 01234 855300 Fax: 01234 855446 Web: www.ers-online.co.uk
1.0 INTRODUCTION
The CPT8200 Advanced RaceTimer is a programmable data collection terminal which
has been pre-loaded with the ERS Race timing software application.
This manual describes the operation of the Advanced Race Timer
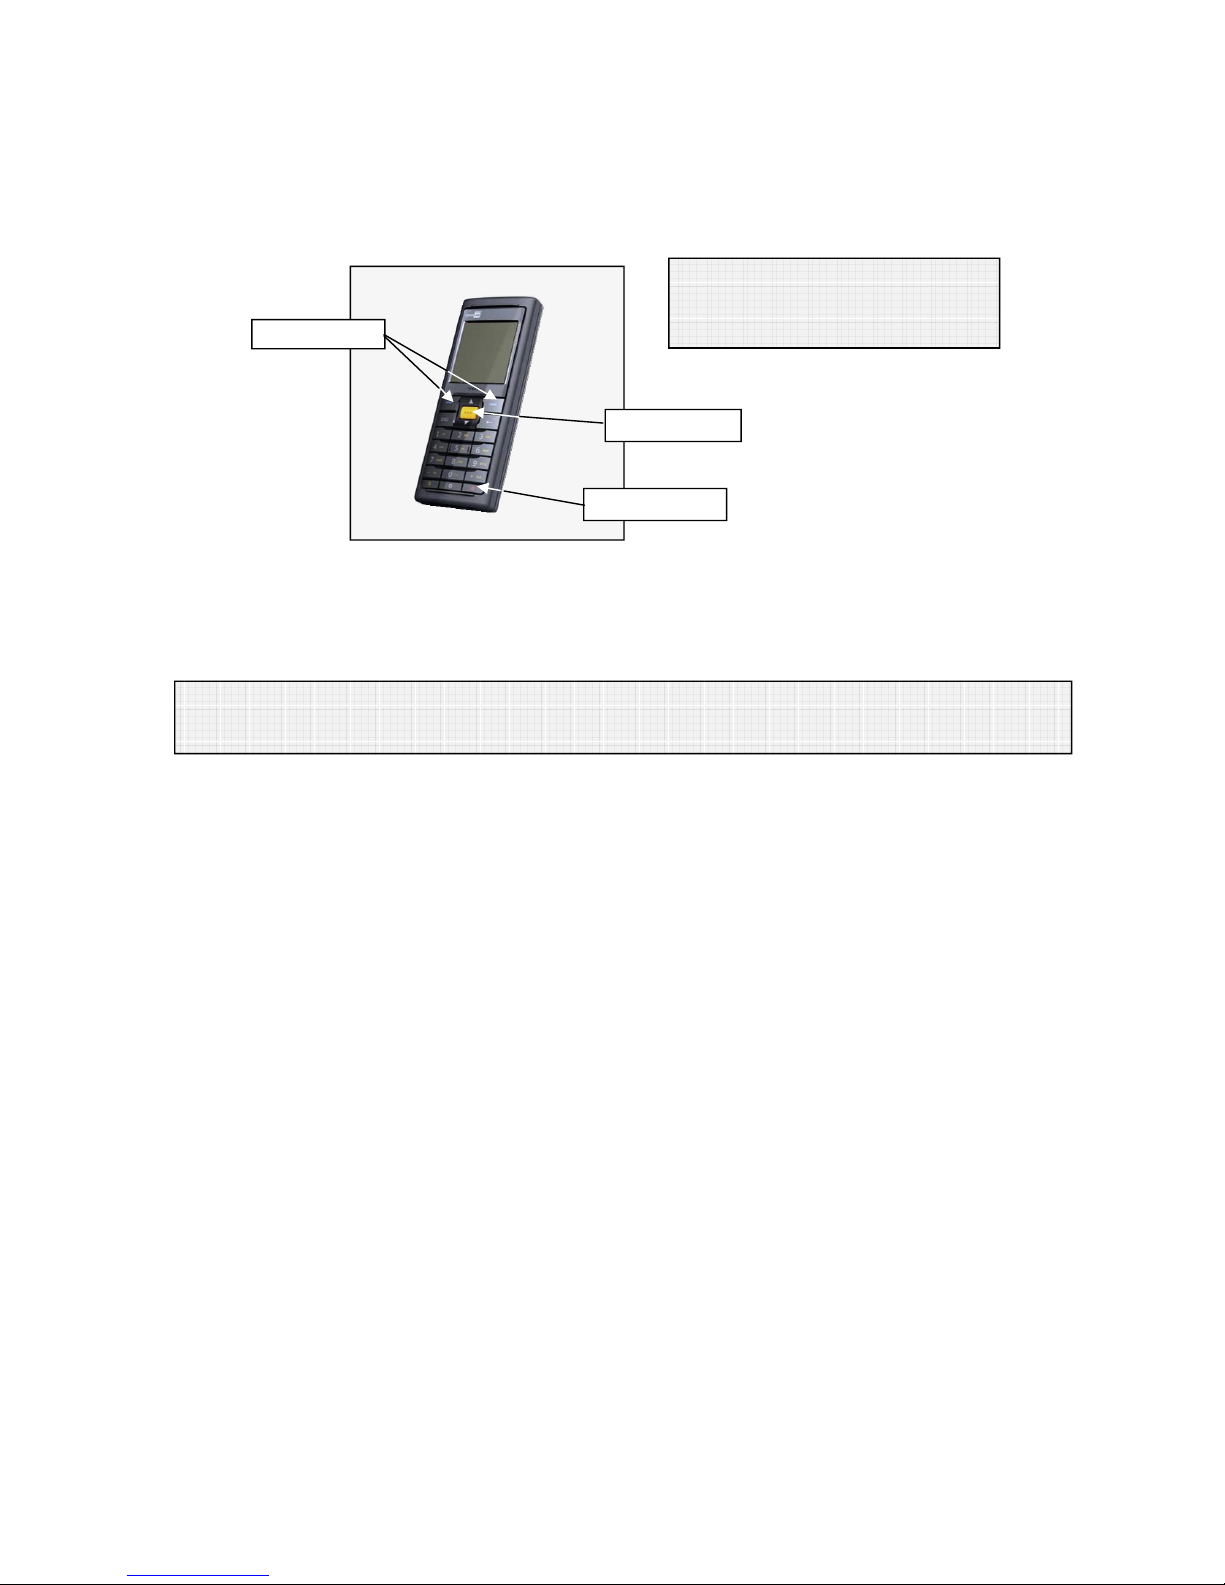
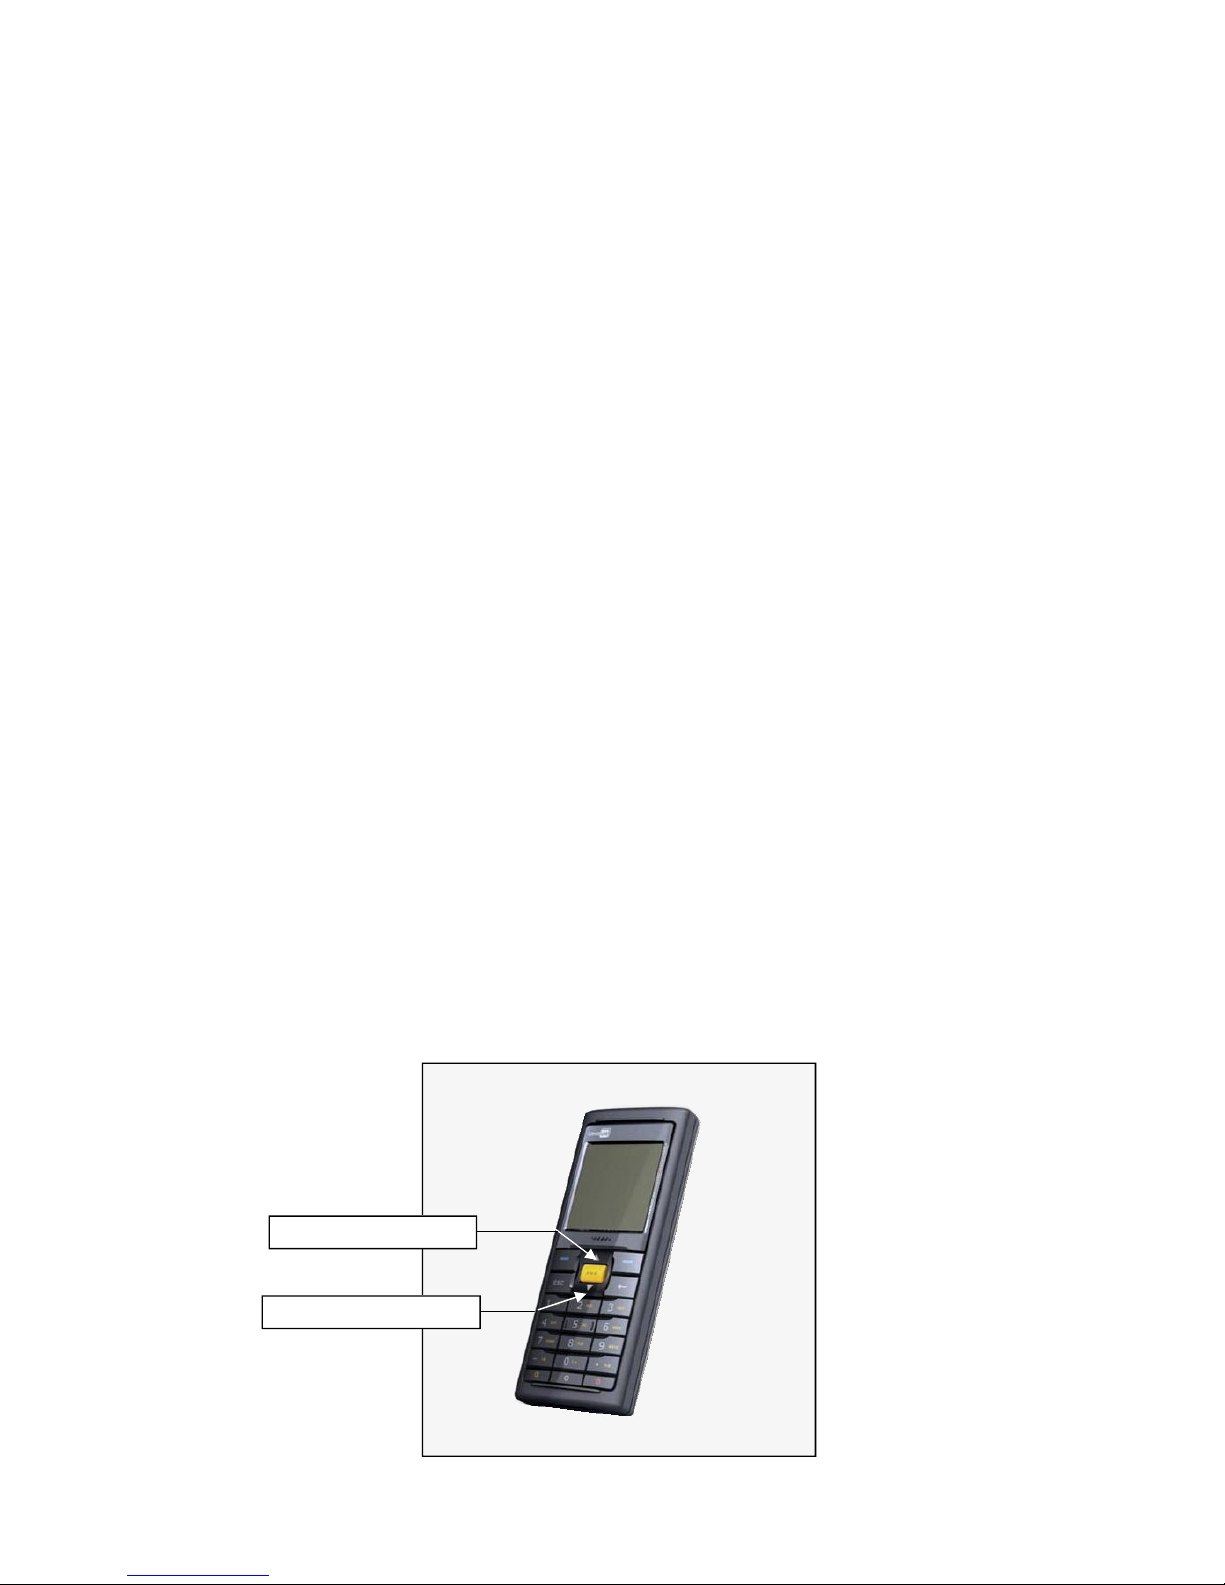
Trigger button
‘ENTER’ Keys
2.0 CPT8200 RACE TIMER SOFTWARE APPLICATION
The Race Timer software for the CPT8200 terminal allows athlete’s times to be logged
using simple button presses as summarised below.
Note: RaceTime supports numerous event types. The operation of the Timer will be the
same for all event types
Power ON/OFF
Note: The sounder volume can be
adjusted from the terminal System
Menu (see Appendix C below)
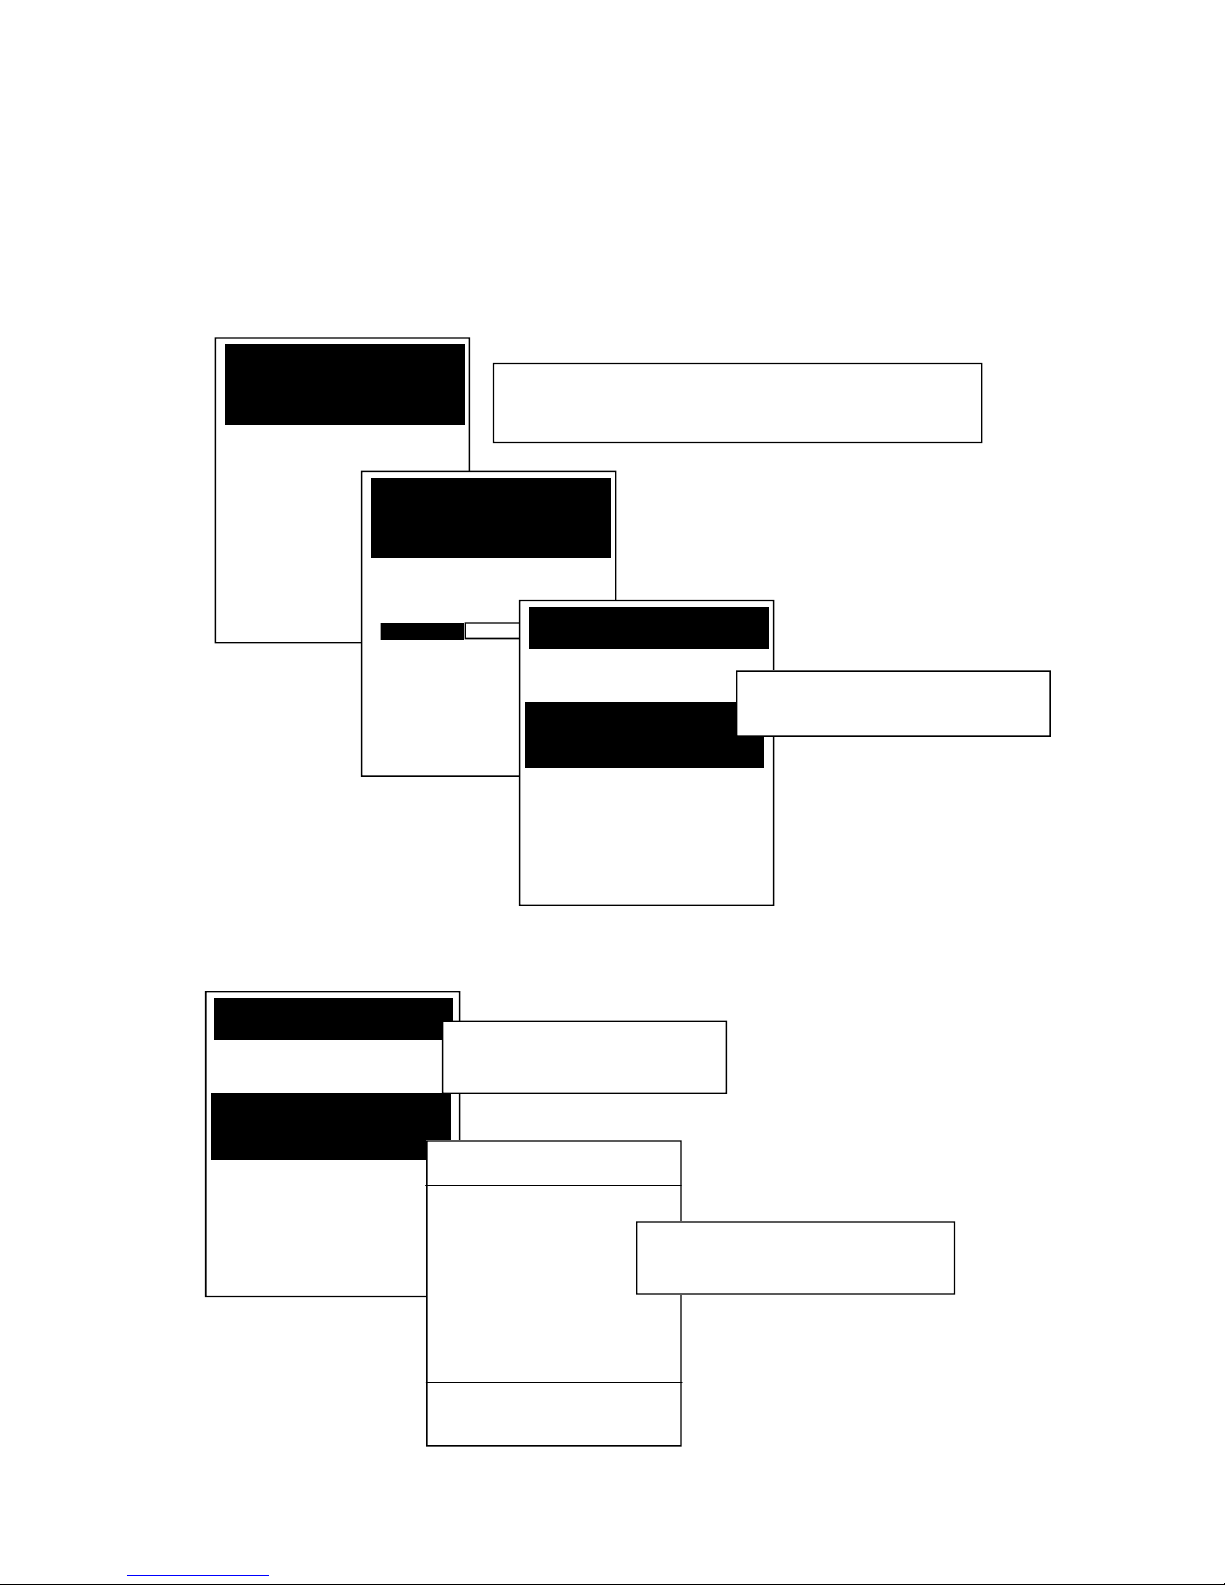
From initial power on the timer will display the Main Menu from which the operator may
select:
1. Main Timer function
2. Send Data function (used when sending the timing data to the RaceTime PC)
3. Initialize function (used to synchronise the timer with the PC real time clock)
4. Settings (Engineering options. Not normally used)
5. About (Displays program version)
2.1 Initializing the Timer
Before each event we recommend initialising all timer and scanner devices and
synchronising to the PC real-time clock.
This ensures the devices are cleared of data and that all clocks are synchronised.
To initialise the CPT8200 timer:
- From the RaceTime software on the PC go to Event >> Initialise Devices to
start the initialization process
- Select menu Option 3 (Initialize) from the Main menu on the Timer and
connect to the RaceTime PC
- On completion of the initialisation press any key on the CPT8200 timer to
return to the Main Menu. The device has been cleared and synchronised to
the PC clock.
Page 4
PRESS AND HOLD
TRIGGER TO ARM FOR
RACE START
WAITING...
ESC - MENU
Electronic Reading Systems Ltd. Tel: 01234 855300 Fax: 01234 855446 Web: www.ers-online.co.uk
2.2 Using the Timer
The operation of the CPT8200 Advanced timer is designed to match with the operation of the
OPN2002 Timer.
Thus the device will be initially ‘armed’ before the event, then used to capture the event start
time and the finish times of the competing athletes. At the end of the event the timer will be disarmed. This operation is summarised below:
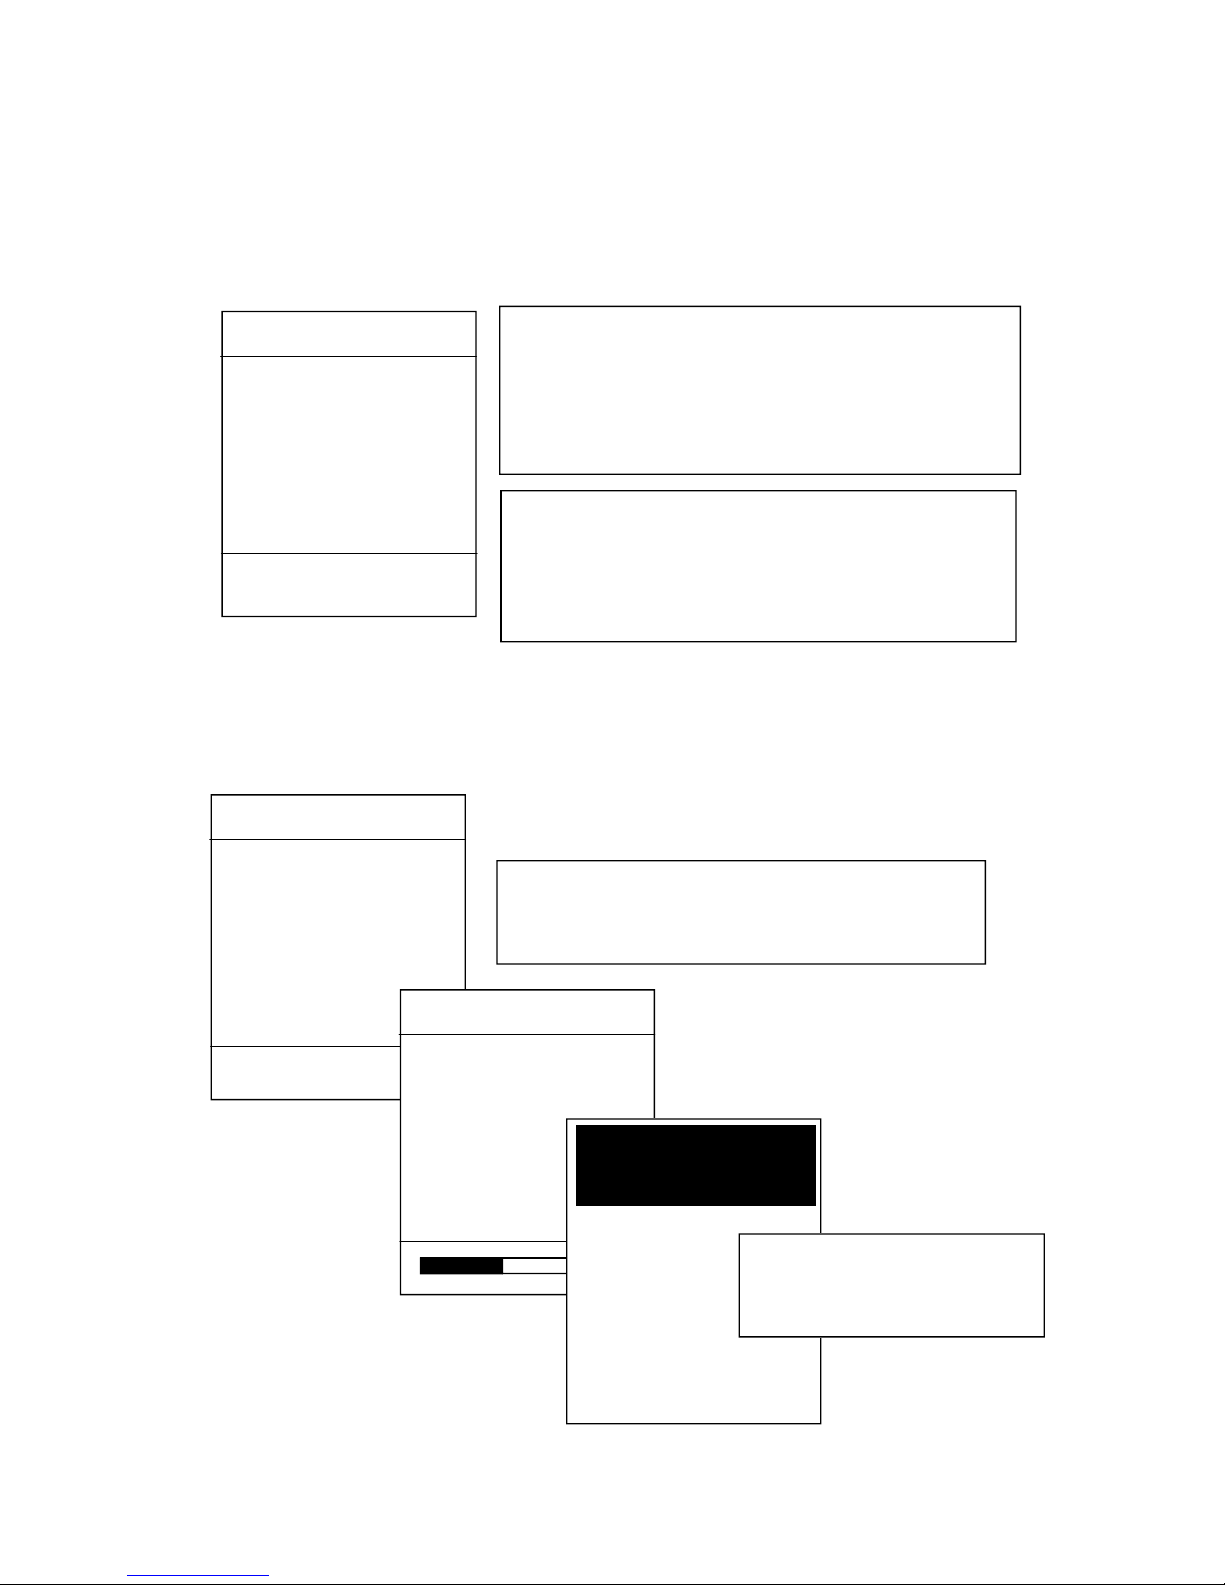
STEP 1 - ARMING THE TIMER
To arm the CPT8200 and set it ready to log times press select Option 1 (Timer) from the main
menu and proceed as follows:
PRESS AND HOLD
TRIGGER TO ARM FOR
RACE START
ARMING...
ESC - MENU
1. Press and hold the trigger button on the Timer for
approx 6 seconds until the progress bar displayed on
screen completes and the device emits a melodic bleep.
ARMED FOR RACE START
ESC - DISARM
PRESS TRIGGER
TO START
2. The timer is Armed and ready to
capture the Race Start time.
STEP 2 - STARTING THE RACE
To capture the race start time press the trigger at the same time as the starter sets off the race.
A record is stored in the CPT8200 timer signifying the race start
ARMED FOR RACE START
ESC - DISARM
PRESS TRIGGER
TO START
1. Press the trigger button to
capture the race start time
HOLD TRIGGER TO STOP
00:00:00
2. The race start time is stored and
the timer ‘stopwatch’ is started
Page 5
Electronic Reading Systems Ltd. Tel: 01234 855300 Fax: 01234 855446 Web: www.ers-online.co.uk
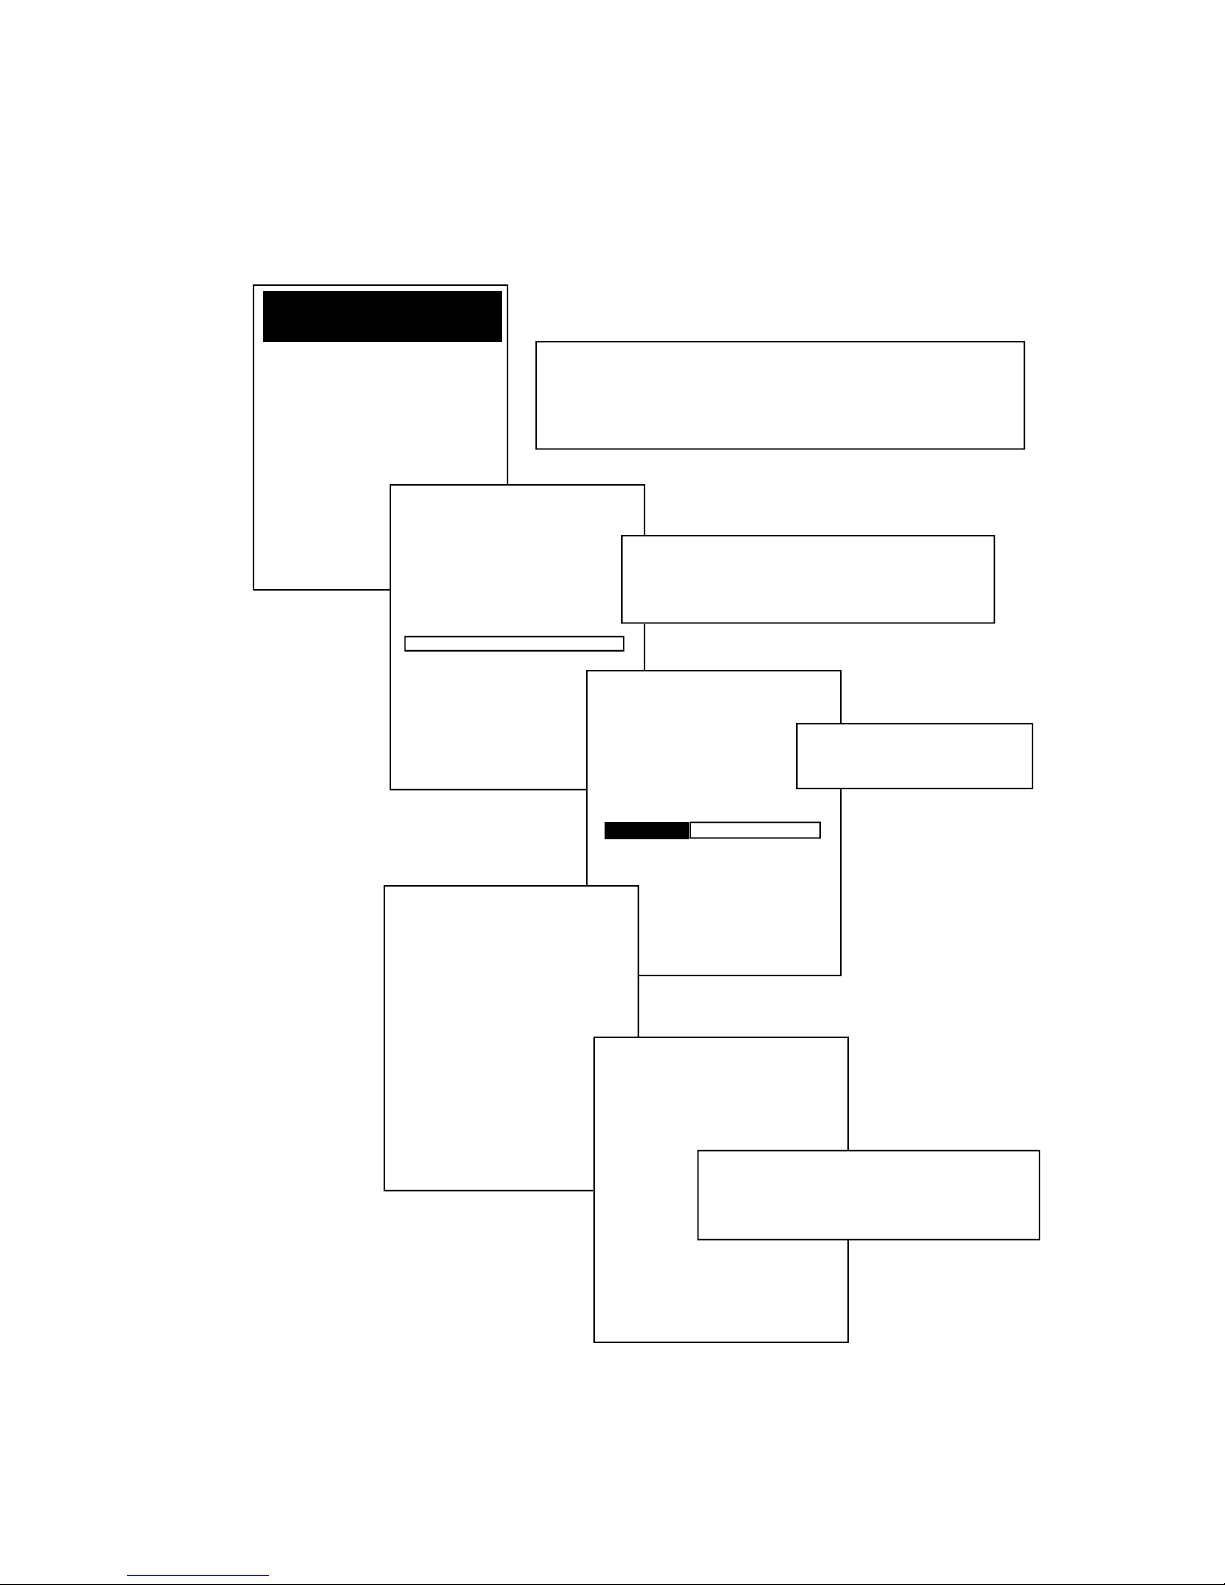
STEP 3 - LOGGING THE ATHLETE FINISH TIMES
To store the position and associated finish time for each athlete press and release the trigger
button once for each runner crossing the finish line. The data collector will beep and store the
position (starting at Position 1) and the associated time.
HOLD TRIGGER TO STOP
00:32:07
1. Press the trigger to record each finishing athlete.
The display shows the finishing position order and time for
the most recent 10 athletes in reverse order (ie: most recent
finishing athlete shown highlighted at the top of the list).
Thus the example shown here indicates that 3 athletes have
so far completed the race.
3 - 00:31:05
2 - 00:29:58
1 - 00:27:00
Note: The finishing position order displayed on the Timer
only relates to the Athlete’s final race position in the case of
a ‘Mass Start’ event.
For Group and Individual start events the Athlete’s final race
position will depend not only on the order in which they
finished, but also the order/time in which they started.
STEP 4 - END THE EVENT/ DISARMING THE TIMER
On completion of the event the Timer will be disarmed as follows:
1. On completion of the race press and hold the trigger
button on the Timer for approx 6 seconds until the progress bar displayed on screen completes and the device
emits a melodic bleep.
HOLD TRIGGER TO
00:52:17
103 - 00:51:45
102 - 00:51:30
101 - 00:51:25
100 - 00:49:08
99 - 00:49:00
98 - 00:48:56
97 - 00:48:55
96 - 00:48:07
95 - 00:47:10
94 - 00:46:32
00:52:17
103 - 00:51:45
102 - 00:51:30
101 - 00:51:25
100 - 00:49:08
99 - 00:49:00
98 - 00:48:56
97 - 00:48:55
96 - 00:48:07
95 - 00:47:10
94 - 00:46:32
PRESS AND HOLD
TRIGGER TO ARM FOR
RACE START
WAITING...
ESC - MENU
2. Device is disarmed and returns
to Step 1 display. Press ESC to
return to Main Menu for downloading of data
Page 6
Electronic Reading Systems Ltd. Tel: 01234 855300 Fax: 01234 855446 Web: www.ers-online.co.uk
2.3 Downloading the Timer
Once all times have been collected the stored data will be downloaded to the RaceTime software as follows:
MAIN MENU
1. TIMER
2. SEND DATA 0103
3. INITIALIZE
4. SETTINGS
5. ABOUT
SEND DATA
TO HOST
WAITING...
ESC - QUIT
SEND DATA
TO HOST
SENDING...
ESC - QUIT
TRANSFER
COMPLETE
PRESS ANY KEY
CLEAR DATA
ARE YOU SURE
ENT - Y ESC - NO
1. Select Menu Option 2 (SEND DATA). The timer will
enter SEND DATA mode.
Connect the Timer to the Race Time PC via the supplied
USB cable.
2. From the RaceTime software click the
Download Timers button from the main
screen to start the download process
3. The Timer downloads
stored timing data
4. After successfully downloading
press ENTER to clear the stored data
from the Timer
Page 7
Electronic Reading Systems Ltd. Tel: 01234 855300 Fax: 01234 855446 Web: www.ers-online.co.uk
APPENDIX A. SYNCHRONISING THE CPT8200 INTERNAL CLOCK
When using RaceTime it is important that all scanner and timer devices are time
synchronised and cleared before starting any new event.
An initialise facility is included in the RaceTime system software. See relevant User
Guide for further details.
To ensure the data collector’s internal clock is synchronised to the correct local time
we recommend synchronising the CPT8200 to the RaceTime software in the
following circumstances:
•
On initial delivery
•
Before every event
•
In the event that the CPT8200 batteries become fully drained
•
After adhoc time changes (eg: BST/ daylight saving time in UK etc)
APPENDIX B. CHARGING THE BATTERY
The CPT8200 batteries will be charged whenever the unit is plugged onto a PC
USB port or connected to the terminal charger.
We recommend fully charging the CPT8200 in the following circumstances:
•
On initial delivery
•
After a period of no use
•
Prior to an event
APPENDIX C. CHANGING THE SPEAKER VOLUME
The speaker volume may be changed from the CPT8200 System menu as follows:
1. Power the terminal off and power on while pressing the 7 and 9 keys. The
terminal should boot into the System Menu.
2. Select Menu Option 2 (Settings)
3. Select Menu Option 7 (Speaker Volume)
4. Now use the 4 way navigation pad around the trigger button to increase/
decrease the volume.
Press to increase volume
Press to decrease volume
Page 8

Electronic Reading Systems Ltd. Tel: 01234 855300 Fax: 01234 855446 Web: www.ers-online.co.uk
APPENDIX D. TIMER ‘SETTINGS’ MENU
Option 4 (SETTINGS) from the Timer Menu provides access to various engineering
functions. The SETTINGS option is not required during normal operation of the
Timer however is summarised here for reference.
To access SETTINGS select Menu Option 4 from the Timer Main Menu and enter
the SETTINGS password (Default password = +ERS++)
The following options are available from SETTINGS:
1. SET TIME/ DATE The Timer clock will normally be synchronised to the
RACETIME PC via the Initialize process (see 2.1 above)
and when downloading RaceTime data, however a
facility to manually update the Timer clock is provided
from SETTINGS
2. CLEAR MEMORY The Timer database will automatically be cleared by the
Initialize process and after successfully downloading
stored RaceTime data. A facility to manually clear the
database is also included under SETTINGS to allow
adhoc clearing of stored data, if required.
3. MEMORY INFO Displays used/ free memory
4. LIST FILES Lists data files currently stored on Timer
5. CHANGE PASS Allows the SETTINGS Password to be changed
6. ABOUT Displays the program version no. for approx 5 seconds
(Note: ABOUT is also available from the timer Main
Menu)
 Loading...