

Page 1

ET312
User Guide
Page 2

2
Use Agreement
Use of the enclosed product(s) indicates full acceptance by the Purchaser
of this Use Agreement. Purchaser acknowledges erotic e-stim has associated risks and
agrees to be bound by all terms and conditions of this Use Agreement.
Limitation of Liability
Purchaser assumes all risk and liability for loss, damage, or injury to Purchaser, others,
and property arising out of the use, misuse, or inability to use ErosTek products (the
“Product”). ErosTek and their related companies, members, agents, employees, afliates,
and consultants (collectively the “Manufacturer”) will in no event be liable to Purchaser, or
any persons or entity claiming through Purchaser, for any direct, indirect, consequential,
incidental, or other damages under any theory of law for any use, misuse, or inability to use
the Product even if the Manufacturer was aware of the possibility of such damages.
Indemnity
Purchaser hereby releases and agrees to indemnify and hold harmless, the Manufacturer
from any and all claims, demands, causes of actions, liabilities, damages, costs, and
expenses, including reasonable attorneys’ fees, arising from the use, misuse, or inability to
use the Product.
Binding Arbitration
Purchaser agrees that any claim or dispute arising out of use, misuse, or inability to use
the Product shall be submitted to an independent and objective aribitrator for binding
arbitration. The Purchaser agrees binding arbitration shall be the sole remedy for any claim
and they expressly waive their right to le a lawsuit in any civil court seeking remedies from
the Manufacturer except to enforce a legally binding arbitration decision.
Non-Acceptance
The Purchaser may return the unused product(s) for a full refund without penalty if they do
no accept this Agreement.
Page 3

3
IMPORTANT SAFETY INFORMATION
Read This Page Before Using
CAUTION
The ET312, like most electrostimulation devices, can cause serious
harm if misused. Always make all connec- tions with the power OFF. Current passed
through the heart, neck or head can be fatal. If you have any doubt about the safe use of
electrostimulation, consult a physician and ErosTek before using.
Use the ET312 at your own risk understanding the ET312 may be harmful if
misused. Given the nature of electrostimulation, ErosTek cannot be liable for any damage
or harm of any kind caused by or related to ErosTek products. Treat the ET312 like a sharp
knife or power tool. It must be used properly or injury may result.
IMPORTANT! E-stim devices are NOT for use by or on anyone with implanted electronic
devices – pacemakers, debrillators, drug pumps, etc. – heart problems, heart disease,
epilepsy, brain disorders, nervous system disorders, a history of strokes or seizures,
serious skin problems or similar medical conditions. Not for use by pregnant women,
women who might be pregnant, or anyone under the age of 18. Current passed through the
heart, neck or head can be fatal. Keep away from children.
The ET312 is intended for use only by healthy, consenting adults familiar
with safe electrostimulation and proper operation of the ET312. If excessive
soreness, skin irritation or other conditions develop, discontinue use. Use care in operating
the device until you’re familiar with it. Sudden stimulation at high levels may cause muscle
injuries, a person to fall, or other harm.
Use the ET312 only with attachments and accessories designed for safe
electrostimulation. Do not attach it to body piercings or similarly small electrodes. Do
not connect the channels together except as shown in section A4 of this Guide. Do not
attempt to open, repair or modify the ET312. Use only the correct AC adapter.
Make sure you connect any external equipment to the proper jacks.
Electro-stimulation uses electrical signals that can damage sensitive audio and computer
equipment. If connections are made to the wrong jacks, the connected equipment may be
damaged. Always make all connections with the power turned off.
Do not use the ET312 in conjunction with “violet wand” type devices. The
extremely high voltages produced by these units can damage the ET -312 and many other
electronic devices.
Page 4

4
1: GETTING STARTED
The ET312 is the most advanced unit of its kind and offers many unique sensations.
Before you go any further, please make sure you have read the Important Safety
Information on page 3 . If you’re new to electrostimulation or just like to keep things
simple, you need only read sections 2 - 4 to get started while sections 5 - 13 offer more
details and let you get the most from your ET312.
The ET312 is like a fully automatic camera which makes things simple by making most of
the adjustments for you. And, like a professional camera, it also offers optional features for
the more experienced user. The Advanced Topics section is for more advanced users.
Regardless of the features used, the ET312 offers superior performance when compared to
any erotic electrostim product.
2: INTRODUCTION TO E-STIM
Erotic electrostimulation (e-stim) is yet another example of how technology is improving
our lives. Partners have discovered it’s the perfect enhancement to spice up their love life.
Individuals nd it takes masturbation to a whole new level with some even experiencing
“hands free” orgasms. Still others use it for erotic BDSM play where it creates high-intensity
sensations without causing the lingering discomfort and possible harm you get with other
techniques.
Electrostimulation, in one form or another, has been around for decades. It’s commonly
used, for example, in physical therapy and pain management by the medical community.
The ET312 produces a similar output to medical TENS (Transcutaneous Electrical Nerve
Stimulation) and EMS (Electro Muscle Stimulation) units.
The ET312 works by using a special waveform made up of high frequency pulses. This
current stimulates the nerves and muscles in unique ways and ows between two pairs of
contacts (often called electrodes) connected to each channel of the ET312.
Some erotic e-stim accessories have a pair of contacts built in. We call these “bipolar”
electrodes and they usually have an attached leadwire that plugs directly into the ET312
or they have two (2) connections points. Other electrodes only have a single connection.
These are called “monopolar” electrodes. These must be used in pairs. The leads supplied
with the ET312 work with many popular erotic accessories and can be adapted to t any
accessory using the appropriate wiring adapter.
Getting Started • Introduction to E-Stim
Page 5

5
3: BASIC OPERATION
Using the ET312 is very simple. Just follow these easy steps:
1 – Connect the supplied AC Adapter to the 12vdc jack when the battery needs charging.
The ET312 may be used while charging.
2 – Make sure the unit is OFF and connect the desired accessories to the output jacks.
Both plugs of each leadwire must be connected to an electrode surface to form a complete
circuit for current to ow. Keep all connections below the waist and follow the directions
supplied with your accessories.
3 – Turn on both Level controls all the way down (to the left).
4 – Press the power switch in to turn ON the power.
5 – Use the white Up/Down keys to select the desired mode (see section 10). The name of
each mode is displayed on the LCD.
6 – Set the Level and MultiAdjust controls to produce the desired stimulation. More
information can be found on pages 6 - 15.
4: SAFETY
Be sure you have read the Important Safety Information printed at the front of
this Guide. Like many things in life, electrostimulation is not without risks. It must
be performed properly and there are certain people who should not use ANY
electrostimulation devices including the ET312 — this includes anyone with a
heart condition.
In general, electrostimulation should only be performed below the waist. It is extremely
important to avoid passing current through the heart, neck, or head areas. You need only
grab a bare metal connector or electrode when the unit is on and wired to at least one
other point on the body. The current will travel from below your waist, through the heart
area and to your hand. Always turn the ET312 OFF when making, changing, or removing
connections.
The ET312 should only be used with accessories and electrodes designed for safe
e-stim. Never make connections to body jewelry or similarly small electrodes. Do not use
electrodes made of toxic metals such as lead solder. If you intend to use the ET312 on
someone else, you should experiment with it on yourself before connecting it to someone
else. Also, avoid splitting a channel to connect more than one person at a time.
Basic Operation • Safety
Page 6
6
5: FEATURES
• Easy to read, lighted liquid crystal display (LCD)
• Eroslink™ computer interface — software sold separately
• Advanced Digital Dynamic Pulse Technology
• Special high frequency output for smoother stimulation
• TriPhase stimulation offers unique sensations
• Full stereo audio processing — works with computer e-stim les
• Included microphone & stereo audio inputs
• Link two units together (four channel stimulation)
• Built in self-test and other safety enhancements
• Symmetrical bipolar output waveforms for balanced (+) and (-) ows.
• Standard 3.5mm output connectors
• Independent and electrically isolated outputs
6: CONNECTIONS
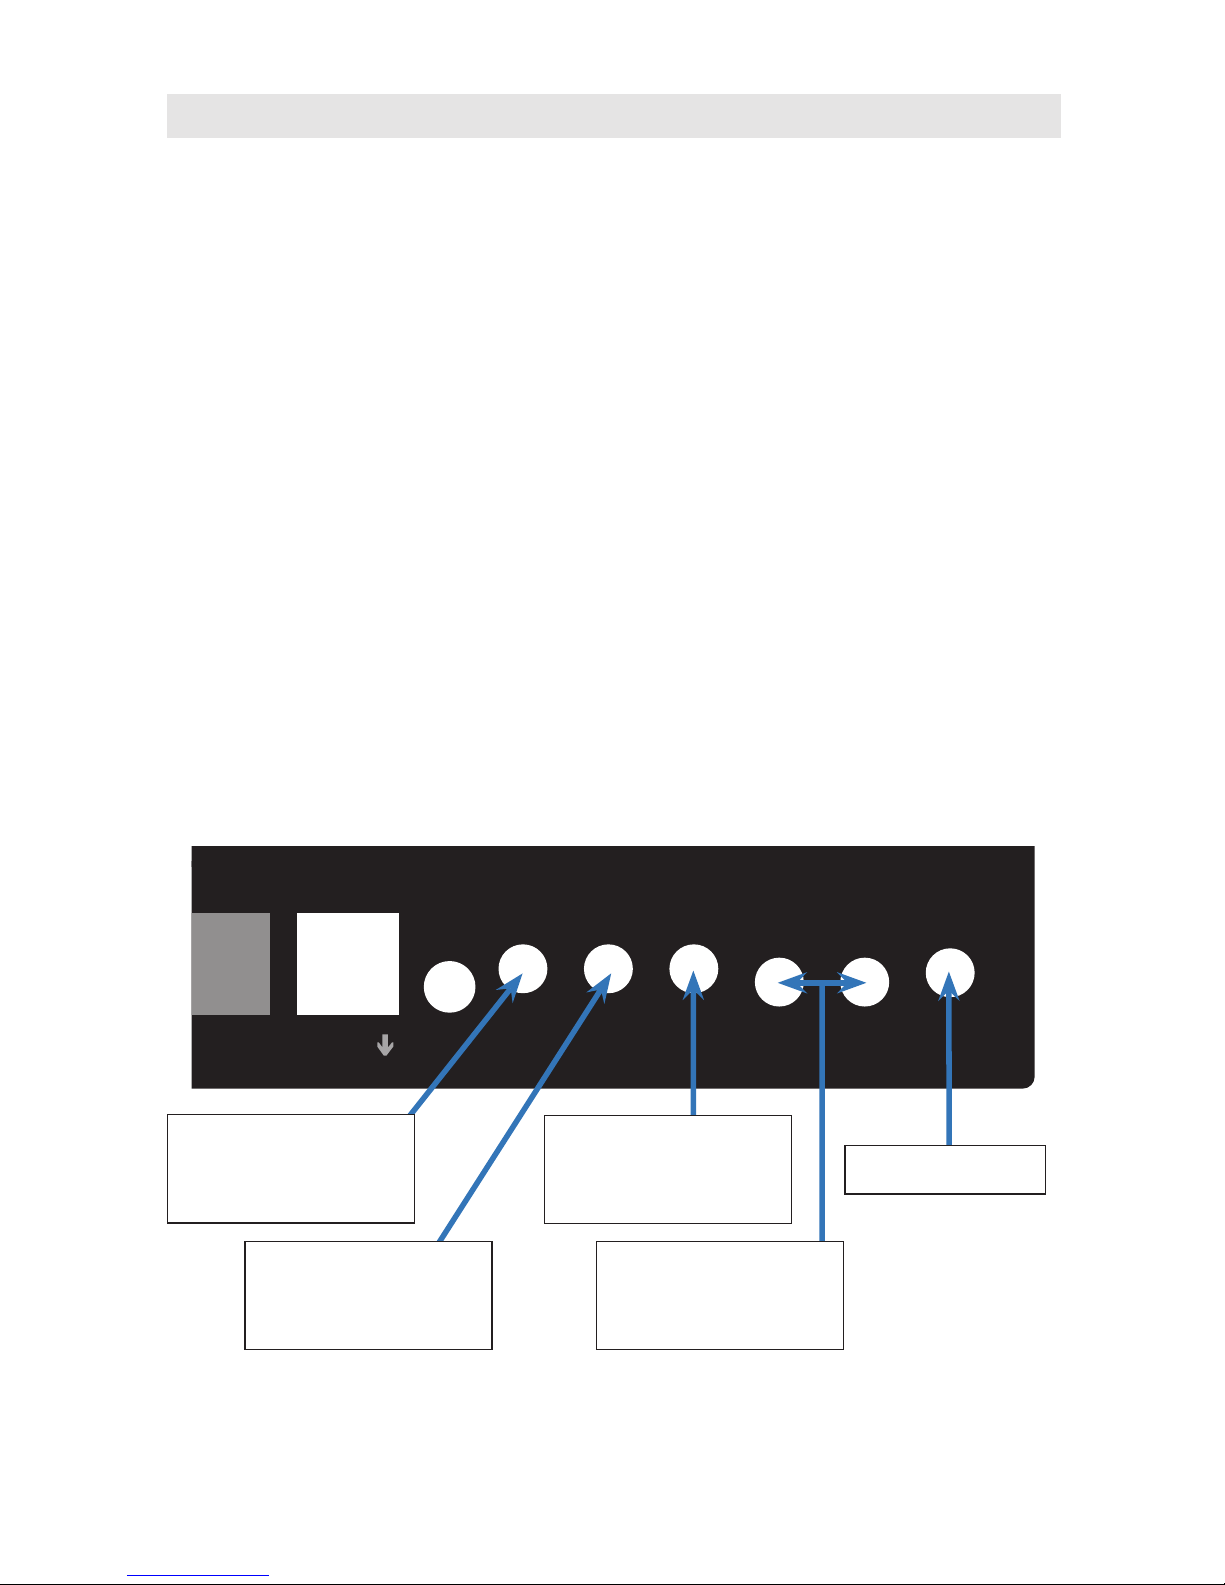
The ET312 has six connection jacks along the lower right side of the front panel as shown
below. Most of the jacks accept the same style plug so it’s important to use care in making
connections.
Features • Connections
DownOK On Link Mic Audio -Out-A B 12vdc
Link
ErosLink Software
or 2nd ET312
Microphone
Connects to mic for
sound-based stim
Audio Jack
Connects to music
player or computer
AC Adapter
Outputs A + B
Connects lead wires
to electrodes
Page 7

7
12 VDC Input - This is where you connect the supplied AC Power Adapter to charge the
battery. Use only the adapter supplied with your unit or one approved by ErosTek. Early
ET312s came with a 12VDC unregulated adapter that had a xed input voltage — 120
VAC in the USA and 240 VAC in EU and other countries — and a variable output voltage
which depended on the load applied. The newest ET312s ship with a worldwide universal
AC adapter that provides a regulated output of 15VDC and comes with different AC plugs
to connect to most power outlets. In either case, an output having a center positive (+)
polarity with 500mA rating is required for connection to the ET312. Connecting a higher
output voltage or one with the wrong polarity will most likely damage the charging circuit
inside the ET312.
Output A & B - The output jacks are labeled “A-Out-B” and each operates independently.
Most erotic accessories will either plug right into these jacks or can be used with the
supplied banana plug cables. If you want to use TENS style pads, or certain other
electrodes, we stock a range of cables, adapters and accessories on our online shop. You
can also purchase 3.5mm (1/8”) 2 conductor (mono) plugs and cables at your ErosTek
dealer or local electronics store. Always make connections with the ET312 turned OFF.
Audio Input - Using the supplied stereo cable, you can connect most any audio device
with a headphone jack to this input. Some common audio sources include portable music
players, smartphones, the sound output from a computer or “sound and light” relaxation
devices. You may want to use a widely-available “Y” cable allowing you to connect both the
ET312 and your headphones to the audio device. Disconnect audio devices when you are
not using them. Audio devices should only be used in the audio modes.
Microphone Input - Connect the supplied microphone to this input for creative audio
stimulation. Other microphones may also be used. See Advanced Topics section A5 for
more information.
Link Connector - This is a proprietary digital interface that serves multiple purposes.
First, it allows the ET312 to be connected to a personal computer running ErosLink™
software (see section A6). The cable and software are available separately. Second, it
allows two ET312 units to be connected together in a master slave conguration. The
slave unit will “mirror” what the master unit is doing providing four channels of stimulation
controlled from one unit. Linking two units requires an inexpensive optional Link Cable
available from our online shop, or you can fabricate your own — see Section A2.
IMPORTANT! — Make certain you never connect an audio device, computer, or
microphone, to the A or B Output jacks! While this will not harm the ET312, it can easily
damage the external equipment. Unfortunately, the erotic e-stim industry standardized
on a common audio connector for their accessories. This makes it easy to plug things
into the wrong jacks and subject external equipment to the e-stim signals. Always make
connections with the power turned OFF.
Connections
Page 8

8
7: ACCESSORIES
You’ll need erotic accessories or electrodes that allow the ET312 to be connected to the
body. A wide variety of erotic electrodes are available and selection is a matter of gender
and personal preference. ErosTek or your dealer can assist you in choosing the best ones
for your interests.
Your ET312 comes with:
• Universal AC adapter with plugs for US/Canada, EU and UK outlets
• (2) Banana Plug Leadwire Cables
• 3.5Mm Stereo Audio Cable
• High-Sensitivity Microphone
8: CONTROLS
The ET312 offers a wide variety of e-stim options yet is very easy to use. There are multiple
e-stim patterns or routines available. These are called “Modes.” You can further tailor each
mode to your tastes.
For normal operation, simply make the desired connections, make sure that output levels
for both channels, A and B, are at their minimum, turn the ET312 ON, choose a mode, and
gradually increase the output level. The MultiAdjust control can be used to easily ne-tune
the sensations.
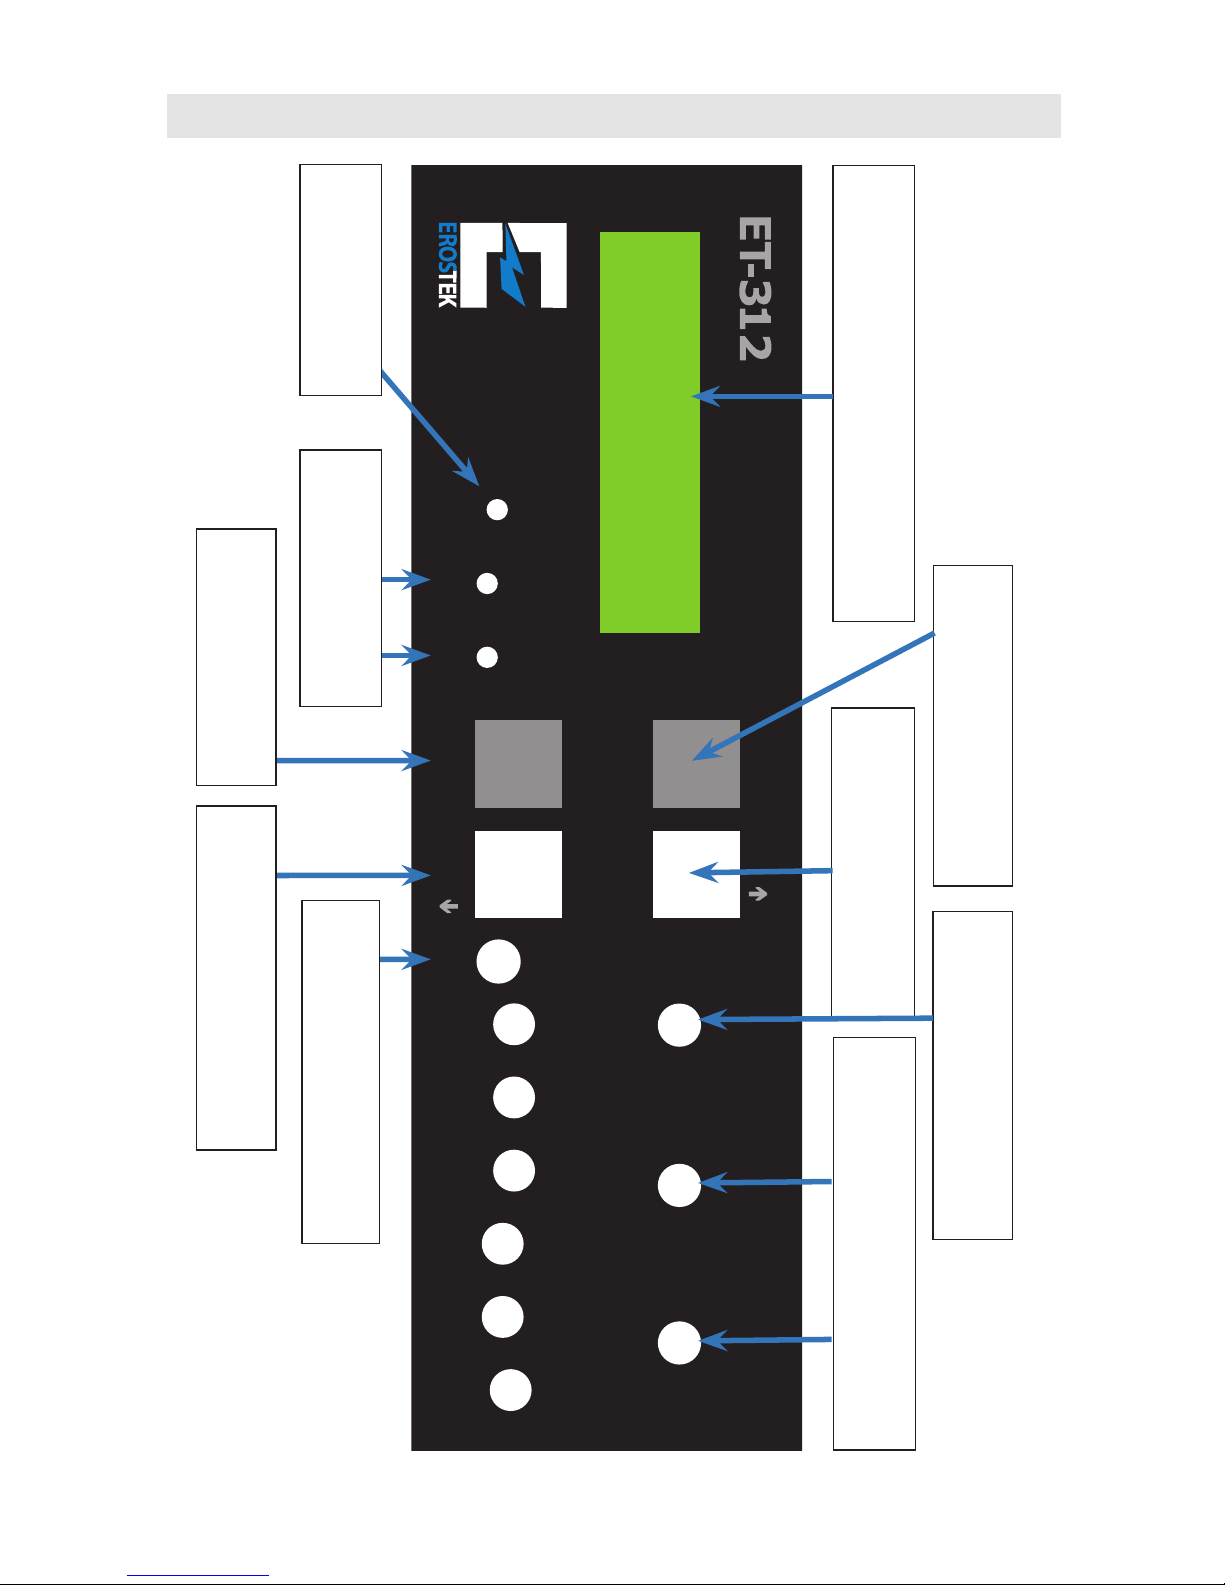
Refer to the Front Panel Diagram on the next page for control locations and descriptions.
Power Switch - The power switch is located just to the left of the connection jacks. Make
your connections and turn the level controls fully down before turning the ET -312 on. Push
the button in to turn the unit on, and push it again to turn it back off. Don’t forget and leave
the ET312B ON without it being powered by its AC adapter. Allowing the battery to go
dead can cause permanent damage and reduce the operating time. Replacement battery
modules are available from ErosTek.
Level A & Level B - These adjust the output intensity for each channel. Fully
counterclockwise (to the left) is all the way down. The intensity level is shown on the LCD
from 00 to 99. It is normal to feel the output sometimes increase in small “steps.” It is also
normal for the displayed level to skip a number with gradual adjustments.
MultiAdjust (MA) - This “smart control“ adjusts the optimum parameters for most
modes. After you’ve selected a mode, and set the Level control(s), use the MA control to
ne tune the output for the desired effect or to provide added variety. In some modes, the
MA control may take a few moments to respond.
Accessories • Controls
Page 9
9
Front Panel Diagram
Menu Up Multi Adjust Level A Level B
DownOK On Link Mic Audio -Out-A B 12vdcLCD Ch A Ch B
A00 B00 Waves
Ramp: 99 =Mode
Lighted LCD
displays current mode and adjustments
Menu Key
optional advanced settings
Up Key
selects next mode or setting
MultiAdjust
adjusts stimulation sensations
Level A and B
adjusts intensity of outputs A and B
Down Key
selects previous mode or setting
OK Key
conrms menu choice
Ch A and B
LED output indicators
LCD
adjusts LCD contrast
On Button
press in to turn unit ON or OFF
Page 10

10
UP - In normal operation, this key advances to the next mode — see Section 10. When
the last mode is reached, the menu “wraps around” back to the rst mode. It is also used to
make adjustments in the Advanced Menus. See Section A2 for more information.
DOWN - This has the opposite effect of the UP key. It selects the previous mode or setting
and also “wraps around” as above. It provides a faster way to access the upper modes.
MENU - This optional key is used to enter and exit the Advanced Menus. This key is not
required for normal automatic operation. See Advanced Topics — Section A2 — for more
information.
OK - This optional key is used to conrm Advanced Menu choices. This key is not
required for normal automatic operation. See Advanced Topics — Section A2 — for more
information.
LED Indicators - A red LED for each channel is located under the LCD display. These
provide an approximate indication of what the output is doing. This is especially useful if
you’re using the ET312 on someone else.
LCD Adjustment - The display does not normally require adjustment. If you’re having
trouble reading the LCD display, see the Troubleshooting section for more information.
9: LCD DISPLAY
The ET312 has a lighted LCD for ease of use. When rst turned ON, it will display a
copyright message and a progressive bar as the various self tests are run. When the tests
are complete, the ET312 displays the result for a few seconds including rmware version:
Eros Tek ET312
SelfTest OK V1.6
Next, the following will be displayed:
Battery: 99%
Press Any Key...
The “99%” is the approximate battery charge level from 0 to 99%. Press any of the white or
gray square keys and the unit will begin normal operation. The following will be displayed:
A00 B00 Waves
Ramp: XX 65=Mode
Controls • Display
Page 11

11
The “Ramp: XX” will display for a few seconds as the output gradually increases to avoid
any sudden surprises if you forgot and started with the level controls turned up.
This soft ramp function automatically happens whenever you select a new mode as some
modes may feel more intense than others. The number “XX” displayed after ramp shows
you the ramp level from 00 to 99%. After the ramp is complete, the ET312 will display
something like this:
A00 B00 Waves
65 Selects Mode
The “A00 B00” represent the setting of the Level controls from 00 to 99%. This allows
precise adjustment of the controls and makes the ET312 easier to use in low-light
conditions. “Waves” indicates the current mode. Pressing the DOWN or UP [65] keys will
change the current mode. This lower line is used to guide the user in operating the ET312.
10: MODES
The ET312 offers 18 factory-loaded modes or “stimulation routines”. They are easily
selected with the UP and DOWN keys and each is displayed on the LCD. Feel free to
experiment as they’re better experienced than described. Until you’re used to what each
one does, you may want to turn down the levels slightly before changing modes.
Waves - This mode constantly adjusts several parameters differently for each channel.
This results in creative interplay between the channels so Waves is best enjoyed with both
channels connected to different areas on the body. MultiAdjust (MA) changes the speed
from very gradual to brisk.
Stroke - This mode provides a unique “push/pull” effect with Channel
A having a deeper or longer stroke. The MA control adjusts the stroke rate. A common hook
up is to connect Channel A “internally” and channel B externally for coordinated “thrusting”
and “stroking.” You may have to use different level settings with Stroke, so use care when
switching between Stroke and other modes.
Climb - This mode increases the frequency in three different “blocks” at different rates.
The MA control adjusts the overall speed.
Combo - This mode combines several effects. The level and frequency subtly change and
the MA control sets the on/off rate or allows continuous stimulation with it all the way up.
Intense - This mode supplies continuous stimulation on Channel A and gated stimulation
on Channel B. The MA control adjusts the pulse frequency over a wide range and changes
the “feel.” Some nd this mode creates “urgency” and possibly even orgasm.
Display • Modes
Page 12

12
Rhythm - This mode toggles the outputs on and off at a rate ranging from slow to very
fast (set by the MA control). At the same time, the output is grouped into “blocks” that get
gradually stronger. Use care with setting the level as this mode slowly grows.
Audio Modes — For all the audio modes, an audio source must be connected to the
Audio input jack, or the supplied microphone should be connected to the Mic jack. When
adjusting the audio modes, rst turn up MA control until the LEDs are ashing fairly brightly
and then turn up the output Level controls. Otherwise you may get an unpleasant surprise
if the audio signal suddenly gets louder. The MA control — or the volume control on your
audio source — should be adjusted so the LEDs icker from dim to bright. If it’s set too
high, the desirable effects are lost. If it’s set too low, the stimulation will be weak.
• Audio 1 - This mode is optimized for use with the Mic input. It picks up sounds from the
microphone and produces synchronized e-stim for both channels. Audio 1 is ideal for
use with Split.
• Audio 2 - This is the stereo version of Audio 1 and works best with the Audio input.
The left and right audio signals are processed independently for Channel A and Channel
B. This mode is ideal for use with a CD player or other stereo music source. Popular,
dance and other music with a dened beat tends to work best Classical or other music
with soft passages may interrupt the stimulation.
• Audio 3 - This mode is like Audio 2 but optimized for use with computer generated
wave les — see Section A5 — but it also provides a unique effect on music and
speech. Adjust MA control carefully for the best effect. Audio 3 is a TriPhase mode and
it’s especially important this mode never be used above the waist.
Split - This mode splits the channels so you can run a different mode on each. From
the factory, Channel A is set to Stroke and Channel B is set to Waves. See Advanced —
Section A2 — for information on how to choose different selections for Split.
Random1 - This mode randomly selects from the rst 6 modes and runs each for a
random length with MA value set to a random value. This provides an extremely wide
variety of stimulation. MA control has no effect.
Random2 - This mixes several random effects and changes them at various intervals. It’s
never the same twice! MA control has no effect.
Toggle - This mode simply alternates a constant output back and forth between the two
channels. MA control adjusts the rate. This produces a similar effect to other e-stim devices
and many TENS units.
Orgasm - This mode starts with a highly erotic synchronized ramp and very slowly builds
in urgency until it reaches a frantic pace and then resets and does it again. MA control
adjusts the pulse frequency.
Modes
Page 13

13
Modes · Tips for Successful E-Stim
Torment - This mode is designed more for BDSM use than pleasure. It delivers brief
random stimulation at random times and varying intensities. MA control adjusts the pulse
frequency. You may want to set the output levels higher than for other modes.
Phase 1 & 2 - These advanced modes use TriPhase stimulation and require a special
electrode conguration. The MA control adjusts the speed of the TriPhase effect. Phase
2 randomizes the effect while each channel varies in intensity for added variety. See
Advanced — Section A4 for more information on TriPhase.
Phase 3 - This is another TriPhase mode as above. It creates three unique currents from
only two channels. See Advanced — Section A4.
User 1 through 6 - These are displayed for custom stimulation routines you can add
using the optional ErosLink software. If you do not have ErosLink software, these modes
will not display. ErosLink is available from ErosTek and most dealers. See Section A5 for
more information.
11: TIPS FOR SUCCESSFUL E-STIM
If you nd yourself turning the Level controls all the way up, see Section
A2 on how to increase the Power Level. Most types of electrodes must be thoroughly
moist to work properly — except for conductive gel adhesive pads. Electrode gel is best but
many report good results using ordinary water based lube with a tiny pinch of baking soda
or contact lens saline solution mixed in. Some conductive rubber accessories may limit the
intensity due to their design and become less conductive with repeated use. Electrodes
made from solid, polished, body-safe metals — namely aluminum and stainless steel —
provide the best conductivity even with repeated use.
Current must always ow between two contacts. Smaller contacts usually feel more intense
compared to larger ones. If the contacts used on a given channel are much different in size,
most of the sensation will usually be concentrated at the smaller contact. Keep in mind that
electrodes used near muscles may cause powerful muscle contractions at higher settings.
Increase levels gradually and use caution if using the ET312 on someone else. Consider
what effects muscle contraction might have. For example, it’s not a good idea to use
electrodes on the legs of a standing person. The stimulation could make them fall.
The body gradually adapts to electrostimulation so either more current is required after
sustained stimulation or the electrodes should be moved to a fresh area. The wider the
variety of stimulation, the slower the body adapts. It’s normal for sustained and/or intense
stimulation to leave the area temporarily numb. Keep this in mind depending on what other
activities you may have planned. When using music for audio based stimulation, it is normal
for quiet passages to produce little or no output—especially with classical music. Music with
a more consistent volume level works best.
Page 14

14
AC / Battery Operation • Caring for your ET312
12: AC / BATTERY OPERATION
The ET312 displays the amount of battery charge remaining when you rst turn it on. The
battery level is only an estimate and will vary with different conditions. With the charge level
above 70%, you can expect at least 4 to 6 hours of battery life remaining. If the battery level
is below 30%, you should charge the battery as soon as possible. The battery is charged
simply by connecting the AC adapter with the ET312 turned OFF. Charging takes 4 to 6
hours but it’s OK to leave the AC adapter connected for extended periods as the charging
automatically shuts off when complete.
Unlike other e-stim products, the ET312 stimulation intensity remains the same whether
connected to the AC adapter or operated on battery power and it does not grow weaker
as the battery discharges. Run time depends on which modes are used and the output
intensity. Higher intensities and frequencies will reduce the run time. If you’re not using a
channel, keep the level for that channel turned down to maximize battery life.
Properly cared for, the battery is rated for 1000+ charge cycles. The SLA battery used in
the ET312 is free from “memory effect” and frequent charging will extend its life. Running
the battery dead or storing the ET312 with a low battery will greatly reduce the battery life.
If the unit is not being used, charge the battery every 6 months.
13: CARING FOR YOUR ET-312
The ET312, like most electronic devices, should be treated with reasonable care. If you
snag one of the leads and drag it off a table onto the oor, it will likely break. Sometimes,
the safest place for it is on the bed or on the oor. It’s also designed to be set up with the
controls and display facing up.
Do not use the ET312 along with or near high-voltage “violet wand” devices. Their extreme
voltages can damage many electronic devices. Never connect the output channels together
except as shown in Section A4 — TriPhase.
Do not use solvents or alcohol to clean the unit. Keep liquids out of it. Don’t use anything
harsh on the front panel or it will scratch.
Don’t leave the ET312 in the sun. If the unit has been exposed to unusually hot or cold
temperatures, let it adjust to room temperature before using it.
Do not attempt to modify or repair the ET312 yourself unless directed by ErosTek. The unit
is requires special care when opening the case and handling certain components. You can
easily damage the ET312 and you will void the warranty by attempting to open it.
If you carry your ET312 onto an airplane, be prepared to explain what it is, or refer to it as
a piece of “audio test equipment”. If you ship it or place it in checked baggage, be sure to
cushion it very well and protect the power switch from being pushed in during shipping.
Page 15

15
Advanced Topics – Introduction and Menus
A1: ADVANCED INTRODUCTION
Consider the ET312 similar to an advanced camera. Most users let their cameras set the
exposure, focus automatically, decide when to use the ash, etc. In a similar way, the
ET312 normally automates several adjustments. Some users, however, may want more
control. This section is intended for advanced users and is optional reading.
A2: MENUS
Main Menu - Pressing the MENU key enters the main menu. The UP and the DOWN
keys now display various menu options and the OK key selects a displayed menu item. To
return to normal operation without making any changes, simply press the MENU key again.
Start Ramp Up? - Pressing OK will immediately reduce the intensity of both channels
and slowly ramp it back up again. The amount of reduction and the ramp time are
adjustable in the Advanced Adjustment Menu. The ramp time can be adjusted from less
than one minute to more than an hour. The ramp level is displayed on the LCD.
To cancel a ramp and return the unit to normal, just change the mode.
The Ramp Up function does not work in the Random1 mode.
This function offers some very interesting options. It can be used to gradually increase
the output over time to adjust for the normal desensitization that occurs during prolonged
e-stim. Used this way, the perceived output level will remain approximately constant.
It can also be used to deliberately increase the intensity over time which some people nd
highly erotic. It can challenge the user to complete the ramp cycle much like a weightlifter
is challenged to complete a certain workout routine. In a BDSM scene, letting the person
connected to the ET312 see the slowly increasing display can be especially arousing.
Set Split Mode? - Pressing OK allows you to select which two modes are used when
Split is selected. So, for example, you might choose Audio 1 for Channel A and Waves for
Channel B or one of 80 other combinations. Simply select the mode for A, press OK, then
select the mode for B and press OK.
Not all modes are available to Split as some require both channels to function correctly and
certain combinations may not work as expected.
Page 16

16
Advanced Topics — A2: Menus
Set As Favorite? - Pressing OK will select the current mode as your favorite mode. This
means next time you turn on your ET-312, it will automatically start in your favorite mode.
The default is Waves.
Set Pwr Level? - Pressing OK brings up the Power Level menu. The ET -312 offers
three ranges of intensity—Low, Normal and High. The unit is set to Normal from the factory.
If you’re using the ET -312 mainly for pleasure, or otherwise want to restrict the maximum
output, the Low range is useful. If you’re using it for very intense BDSM, the High range can
be selected. The new power level will go into effect immediately when OK is pressed.
CAUTION! Turn down the Level controls before changing the Power Level. Use extra care
when using the High setting. If already using High, and you want still more power, increase
the Pulse Width setting — see Section A3.
Link Slave Unit? - Pressing OK will attempt to link a second ET -312 as a “slave” unit.
When linked, the slave unit will mirror the actions of the “master” unit. This provides four
channels of stimulation coordinated by one ET -312. Only the two Level controls are used
on the slave unit to adjust the intensity of the third and fourth channels. The link works in
most but not all modes. If you desire four channels of audio stimulation, use a Y cable or
two microphones to feed the same audio source to both units.
To link two ET -312s, rst turn both units off and connect the Link jacks together using the
optional Eros Tek Link cable. Then, with both on, select the “Link Slave Unit?” option on the
master unit. If the link is established, a “Linked” message is displayed and the master unit
may now be used normally and the slave unit will “mirror” its actions. If it fails, an error is
displayed and you must turn both units off and back on before you can try again.
Save Settings? - Pressing OK saves your choices for the Split mode, Power Level and
the Advanced Menu values in nonvolatile memory. The ET -312 will use these saved values
in the future.
Reset Settings? - Pressing OK will reset the unit back to the factory default settings.
If your ET -312 isn’t working the way it used to, this menu choice will set it back to the
optimum factory settings.
Adjust Advanced? - Pressing OK will bring up another layer of menus. These are for
the very experienced e-stim enthusiast only. If you are not familiar with things like pulse
width, modulation and frequency, we recommend you do not alter these settings.
Page 17

17
Advanced Topics — A3:
A3: ADVANCED ADJUSTMENT MENU
From the main menu, press the DOWN key to reach “Adjust Advanced?”, then press “OK”
to select from the menus below. These menus are intended for the advanced user looking
to further “ne tune” the sensations the ET312 produces. These settings are optimized at
the factory and need not be changed for most users.
Some modes dynamically adjust various parameters. For example, Climb is constantly
changing the frequency. The MultiAdjust control is also often assigned to one or more
parameters for each mode.
For these reasons, only some of the following adjustments will work in any given mode.
These settings are all saved—even after the power is turned off— when the “Save
Settings” function is executed from the main menu. Experiment to feel the effects.
RampLevel Adjust? - This allows you to set the starting level for the Ramp function.
The factory default is 70% and the range is 50% to 100%. Setting it at 50% means the
output intensity will double from the beginning to the end of the ramp. This is more of an increase than many people are comfortable with. Setting it to 100% effectively disables the
Ramp function.
RampTime Adjust? - This allows you to adjust the time between ramp increments.
The factory setting is 20 seconds. The range is 1 to 120 seconds per increment. With the
factory settings, there are 30 steps between 70% and 100%. At 20 seconds per step, that’s
600 seconds total time (10 minutes). If you set RampTime to 120 seconds, it would be
3600 seconds (1 hour). Note: You may not feel the output go up for each 1% increment
depending on the mode and level settings. This is normal.
Depth Adjust? - This adjusts the modulation depth of some of the modes. For example,
on Stroke, it alters the range of the stroking effect. The factory setting is 50 and the range is
10 to 100.
Tempo Adjust? - This adjusts the intensity modulation speed and other rate parameters
of some modes. The factory setting is 10 and the range is 1 to 100.
Freq. Adjust? - This adjusts the frequency of the pulses. Higher settings feel smoother
and have more energy. The default is 150hz.
Effect Adjust? - This adjusts the rate of various frequency effects. The factory setting is
5 and the range is 1 - 100.
Page 18

18
Advanced Topics — A3: and A4: TriPhase
Width Adjust? - This adjusts the pulse width. Pulse width affects the perceived intensity
and “feel” of the stimulation. Wider pulse widths feel more intense and narrow pulse widths
feel softer. The value indicates the width of each half of the bipolar pulse in micro- seconds.
In general, use smaller values for pleasure e-stim and higher values for BDSM e-stim.
See also “Pwr Level” in section A2. The factory setting is 130 and the range is 70 - 250
microseconds.
Note: Altering the factory pulse width will cause some modes (including some in Random1)
to feel dramatically more intense than others. Extra care must then be used when changing
modes.
Pace Adjust? - This adjusts the rate or interval of certain modes.
A4—TRIPHASE STIMULATION
TriPhase is an ErosTek exclusive feature. It creates three stimulation currents using only
two channels. It is especially important the Phase and Audio3 modes never be used above
the waist. While the two channels are normally electrically isolated, TriPhase creates a
common connection between the channels so they are no longer isolated. Audio3 also
supports wave les using phase effects.
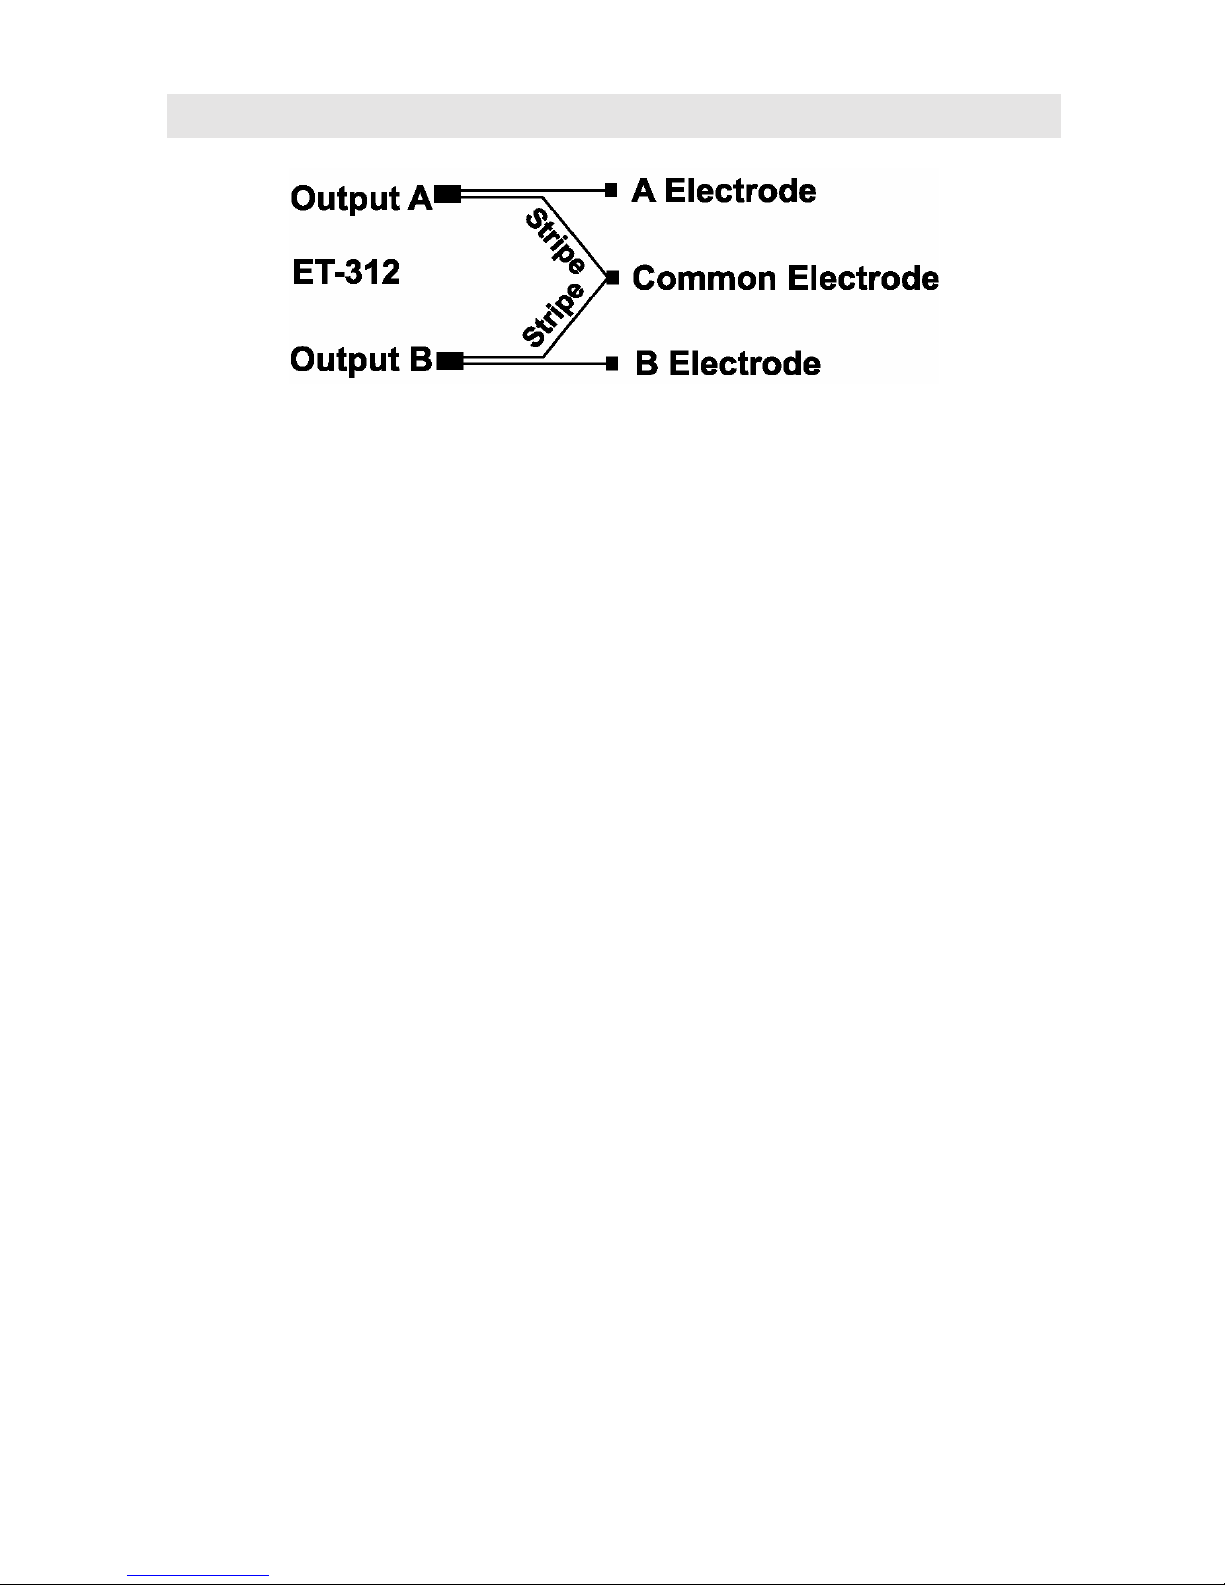
TriPhase can be used two ways. The standard method uses three electrodes with one
common connection between the two channels.
As shown in the diagram on Page 19, the striped wire of each channel is connected
together to form a common connection. Never connect both wires from each channel
together. You can purchase a TriPhase cable directly from ErosTek and most dealers.
Think about the “triangle” of current ow when you place the three electrodes. For a male,
a typical example might be to attach the common electrode at the base of the penis and
testicles. The A electrode would then be used near the end of the penis and the B electrode
on the scrotum or an anal plug. With this conguration, when using the Phase modes, three
currents will ow in the body. The rst ows from A to the Common point. The second ows
from B to the Common point. The third unique (phase) current ows directly from A to B.
Some of the TriPhase effect can also be enjoyed using a more conventional four wire hook
up. To feel the TriPhase current, you need to create overlapping current paths in the body.
So, for example, a male might connect Output A to the head of the penis and one contact
of an anal plug. Output B would connect from the testicles to the other contact of the anal
plug. This will create overlapping current paths around the the genitals and prostate area.
Page 19
19
Advanced Topics — A4: — A5: Adv. Audio
The TriPhase effect will vary dramatically depending on the electrodes, their locations, and
the setting of the Level and MultiAdjust controls. Feel free to experiment—but only below
the waist. You can purchase a TriPhase cable directly from ErosTek and most dealers.
A5: ADVANCED AUDIO / WAVE STIMULATION
Microphone Options - The microphone signal is mixed in with the right channel Audio
input. If a music player and the microphone are both connected, adjusting the volume
on the music player and adjusting the MA control will allow the music stimulation to be
balanced with sounds picked up by the microphone. The ET312 is designed for electret
computer (PC) compatible microphones. A headset style microphone can be interesting for
some applications.
Wave File Processing - Some e -stim enthusiasts have generated computer based
wave les for use with erotic e-stim. These les are available on the Internet and can be
played back using iTunes or other music player software. They can also be encoded as
MP3 les and played back using a computer or a portable music player. Some use these
les to drive an audio amplier and use the output for e-stim. This is not safe for many
reasons!. The ET312 is specially designed to process wave les into a proper TENS-style
e-stim waveform opening up many new creative possibilities. The Audio3 mode should be
used for these les and wave frequencies around 300hz or 600hz will work best. Audio3
preserves phase information and can be used with the TriPhase connections — see
Section A4.
DIY Wired Remote Control - The right channel Audio input (the middle contact on the
3.5mm plug) has response down to DC. This allows an external DC voltage, from 0 to 2
volts, to be used to proportionally control the output of the ET312 in the Audio 1 and Audio
2 modes. The MA control can be used to set the adjustment range. A simple 1.5 volt battery
circuit connected with “+” to the middle ring on the plug and “-” to the base of the plug will
make a remote.
Page 20

20
A6: ErosLink and Troubleshooting
A6: EROSLINK COMPUTER INTERFACE
With the optional ErosLink software and cable, you can add up to six new routines to your
ET312 at one time, share routines with others, and even design your own.
The ErosLink cable can also be used to upgrade the actual internal software that runs the
ET312. Check erostek.com for more information on ErosLink and upgrade options.
TROUBLESHOOTING
Self Test - The ET312 runs a complete check every time you power it on and monitors
various conditions while operating. If any problems are found, the ET312 is designed to
shut off the outputs and either reset itself or display an error message.
Low Battery Message - Normally this means you need to connect the AC adapter and
charge the battery. If you keep getting this message, leave the unit off to charge for awhile.
It can also mean the wrong AC adapter is being used or it’s not connected properly.
LCD Adjustment - The LCD normally does not require any adjustment. If the ET312 is
operated in unusually hot or cold areas, the LCD adjustment can be used to optimize the
contrast. Use a small at blade screwdriver such as those used to repair eye glasses.
Failure Messages - If a failure message is displayed, the error codes below may
indicate the likely problem:
• 04 Link Failure - The slave ET312 did not respond correctly
• 15 User Mode Failure - Invalid data was found in a User mode
• 20 Calibration Error – Allow ET312 to reach room temperature before powering ON.
• 21 Power Failure - The wrong AC adapter may cause this code
If any other code number is displayed, it may indicate an internal problem with your ET312.
If you continue to receive a failure message, note the failure number and contact ErosTek
LEDs Blink On Power Up - This could happen if a software upgrade did not complete
properly or if the MENU and UP keys are held down during power up. Try turning the power
off and back on again. If the LEDs still blink, there is a problem with the internal software
and it needs to be reloaded. See blog.erostek.com for information on installing new
software in your ET312.
Other Problems - If your unit fails to operate properly, hold down the UP and DOWN
keys before turning on the power and keep them held down until the self test completes.
This will reset the unit to the factory settings. Having an audio source connected when
using non-audio modes can cause some unusual variations. Make sure the problem isn’t
caused by the cables or your accessories.
Page 21

21
AC / Battery Operation • ET312 Care
USA Limited Warranty
ErosTek products purchased by customers residing in the USA are warranted
against manufacturing defects for one year from the date of purchase by ErosTek.
This warranty does not cover misuse, abuse, wear and tear, batteries
or products which have been disassembled or tampered with.
There are no express warranties other than those listed here and no warranties
whether express or implied, including, but not limited to, any implied warranties
of merchantability or tness for a particular purpose.
No other warranty of any kind, verbal or written, shall bind ErosTek and their
related companies, members, agents, employees, afliates and consultants
(collectively the “Manufacture”). Further, the Manufacture shall not be liable for
direct, indirect, incidental or consequential damages caused by the use, misuse
or inability to use the product regardless of the legal theory on which the claim is
based. Without limiting the foregoing, Purchaser assumes all risk and liability for
loss, damage or injury to Purchaser, others and property arising out of the use,
misuse or inability to use the product.
Recovery of any kind against the Manufacture shall not exceed the purchase
price of the product. Any claim or dispute arising out of, or related to, use of
ErosTek products shall be submitted to an independent and objective arbitrator
for binding arbitration. Binding arbitration shall be the sole remedy for any
warranty dispute or claim and, by acceptance of the Use Agreement, the
Purchaser expressly waives their right to le a lawsuit in any civil court seeking
remedies from the Manufacture except to enforce a legally binding arbitration
decision.
ErosTek will repair or replace defective products at no charge as stipulated herein
with new or reconditioned parts or products during the warranty period. Contact
ErosTek for more information on obtaining warranty repair service.
A copy of the dated sales receipt is required for warranty repairs.
The customer is responsible for shipping costs and properly packing the unit.
Warranty rights vary from state to state.
This Limited Warranty shall not extend to anyone other than the original
purchaser, is nontransferable and states your exclusive remedy.
Page 22

22
Important!
Customers use the ET312 at their own risk understanding the
ET312 may be harmful if misused.Please understand that, given
the nature of electro-stimulation, ErosTek cannot be liable
for any damage or harm of any kind caused by or related to
ErosTek products. Treat the ET312 like a sharp knife or power
tool. It must be used properly or serious injury may result.
CE Compliance: Connected lead wires must be less than 3 meters (118”) long.
Customer Service
Webstore: http://erostek.com
Blog: http://blog.erostek.com
Email: [email protected]
Phone: +1.888.EROSTEK (in USA)
+1.415.376.6350
© Copyright 2016 ErosTek / ECForbes Inc.
Specications subject to change without notice.
All Rights Reserved.
ET312B V1.7
Page 23

23
Notes:
Page 24

 Loading...