

Page 1
EROAD
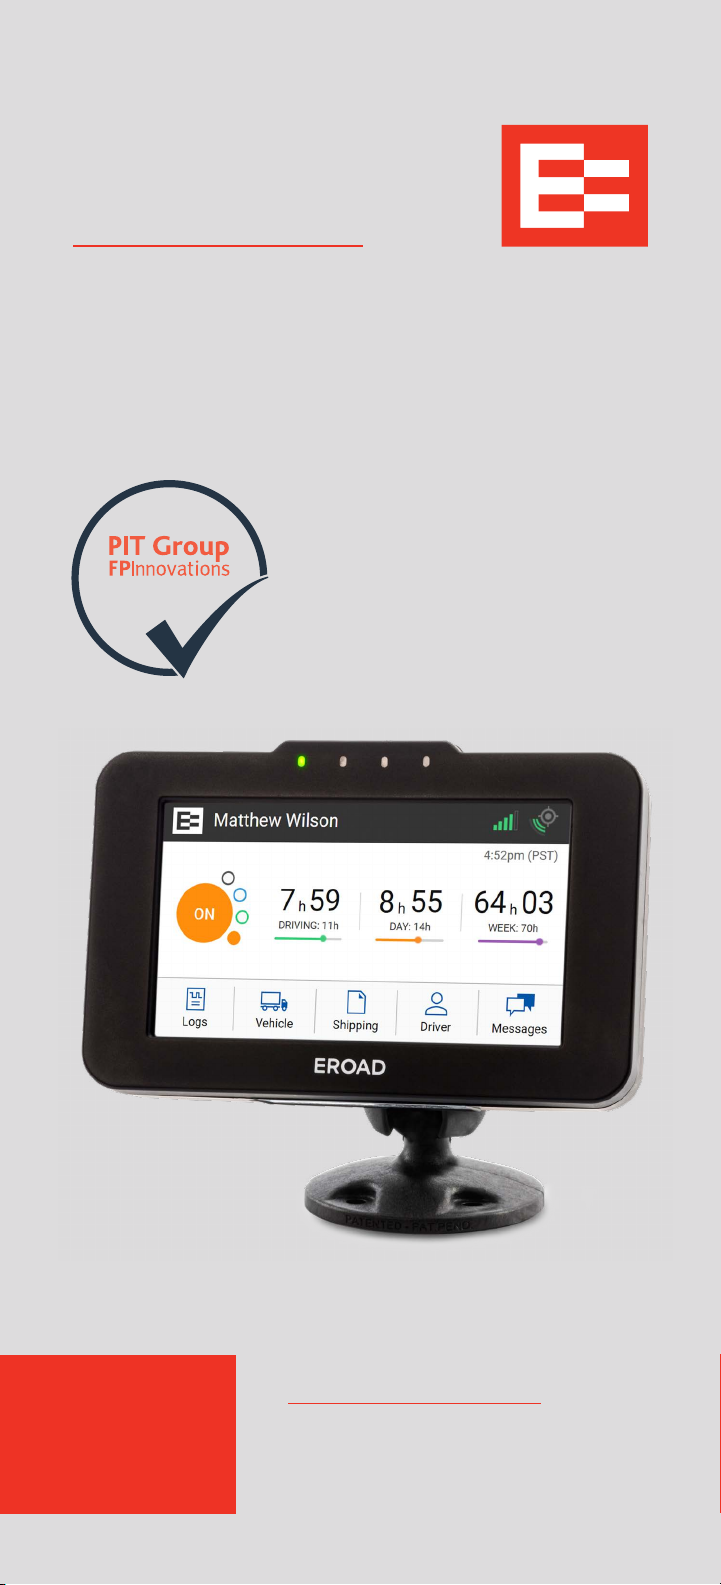
ELD User Manual
VERIFIED
Please keep this
ELD User Manual
in the truck cabEL
Self-certified and registered on FMCSA
https://eld.fmcsa.dot.gov/List
Device Name: EROAD ELD
Model: Ehubo 2
Software Version: v1.33.104 or higher
ELD Identifier: EROAD1
Page 2

LEGAL NOTICE AND DISCLAIMER
The legislation and rules concerning the installation and operation
of GPS driver aids such as the EROAD™ Electronic Logging Device
(ELD) vary between States. You are required to familiarize yourself
with the laws of the jurisdiction(s) in which the vehicle will be operated in prior to installing and using the ELD.
Driving laws place the responsibility on the driver to correctly install
and use GPS driver aids. It is, therefore, the ELD’s owner’s and vehicle driver’s sole responsibility to install and use the ELD in a manner
that complies with the law and will not cause accidents, personal
injury or property damage. The owner of the ELD and vehicle driver
are solely responsible for observing safe driving practices.
EROAD DISCLAIMS ALL LIABILITY FOR ANY USE OF THE ELD IN
A WAY THAT MAY CAUSE ACCIDENTS, DAMAGE OR VIOLATE
THE LAW.
TO THE MAXIMUM EXTENT PERMITTED BY LAW, ALL REPRESENTATIONS AND WARRANTIES (EXCEPT ANY WHICH MAY NOT
LAWFULLY BE EXCLUDED) ARE EXPRESSLY EXCLUDED, INCLUDING WITHOUT PREJUDICE TO THE GENERALITY OF THE FOREGOING, THE IMPLIED WARRANTIES OF MERCHANTABILITY AND
FITNESS FOR A PARTICULAR PURPOSE. THIS LEGAL NOTICE IS
IN ADDITION TO, AND NOT A SUBSTITUTE FOR, THE WARRANTY
DISCLAIMERS AND LIMITATION OF LIABILITY CLAUSE CONTAINED IN EROAD’S STANDARD TERMS.
As EROAD is continuously improving its products, EROAD may
make changes to the ELD at any time which may not be reflected
in this document. Please contact your nearest EROAD oce if you
require any further assistance.
Copyright © 2018 EROAD Inc. All rights reserved. No part of this
User Manual may be reproduced, distributed, or transmitted in any
form or by any means without the express written permission of
EROAD Inc.
EROAD is a trademark of EROAD Inc. All rights reserved.
@2019 EROAD MN000820C
MANUAL,EROAD,EBOX2,ELD DRIVER MANUAL,VER3
Page 3

Content
1 Introduction 1
1.1 Locating the Device Serial Number 2
1.2 PIT Group Verification 2
2 Driving Setup 3
2.1 Logging in to the EROAD ELD 3
2.1.1 Login Name Search 3
2.2 Reviewing the Home Screen 4
2.3 O-Duty Counter 5
2.4 Changing Your Duty Status 6
2.4.1 Duty Status 7
2.4.2 Personal Conveyance Status 7
2.4.3 Yard Moves Status 8
2.5 Using Quick Remarks 9
2.6 Checking Hours of Service 9
2.6.1 Summary 10
2.6.2 Rolling View 10
2.6.3 Rulesets 11
2.6.4 Exemptions 11
2.7 Adding or Dropping Trailers 13
2.7.1 Adding Trailers 13
2.7.2 Dropping Trailers 14
2.8 Entering a Shipping Document 14
2.8.1 Adding a Shipping Document 14
2.8.2 Deleting a Shipping Document 15
2.9 Setting WMT Configuration (Oregon Only) 16
2.10 Entering Fuel Gallons 17
2.11 Vehicle Information 18
3 Everyday Use 19
3.1 Driving Mode 19
3.1.1 Changing Views Between Drivers 19
3.1.2 Exiting Driving Mode 20
3.2 Adding a Co-Driver 21
3.3 Changing Drivers 22
3.4 Changing Vehicles 23
Page 4

3.5 Viewing and Sending Messages 23
3.6 Reviewing Logs 24
3.6.1 Daylight Savings Time 25
3.7 Correcting Logs 25
3.7.1 Adding a Remark 26
3.7.2 Deleting a Record 27
3.7.3 Inserting a Missing Record 28
3.7.4 Editing an Existing Record 30
3.8 Certifying Your Logs 31
3.9 Finishing Your Day / Logging out 32
4 Advanced Log Edits 33
4.1 Reviewing Suggested Corrections 33
4.1.1 Reviewing Suggested Edits at Login 33
4.1.2 Reviewing Suggested Edits from the
Home Page
4.2 Swapping Driving Time 35
4.3 Claiming Unidentified Driving Time 37
4.3.1 Claiming Unidentified Trips at Login 37
4.3.2 Claiming Unidentified Trips in Logs 38
4.4 Emailing Logs to Yourself 39
5 Roadside Inspection 41
5.1 Transferring Your Records 42
5.1.1 Transfer Via Email 43
5.1.2 Transfer Via Web Services 44
5.2 Displaying Your Records 44
5.2.1 Viewing Header Information 45
5.2.2 Viewing Graph Logs 46
5.2.3 Viewing All Events 47
34
5.2.4 Viewing Unidentified Driving Times 48
6 Issues 49
6.1 Managing Malfunctions 49
6.2 Resolving Data Diagnostics 50
7 Appendix 51
7.1 Contacting EROAD 51
7.2 Glossary 51
7.3 Error Messages and Malfunctions 52
Page 5
1 Introduction
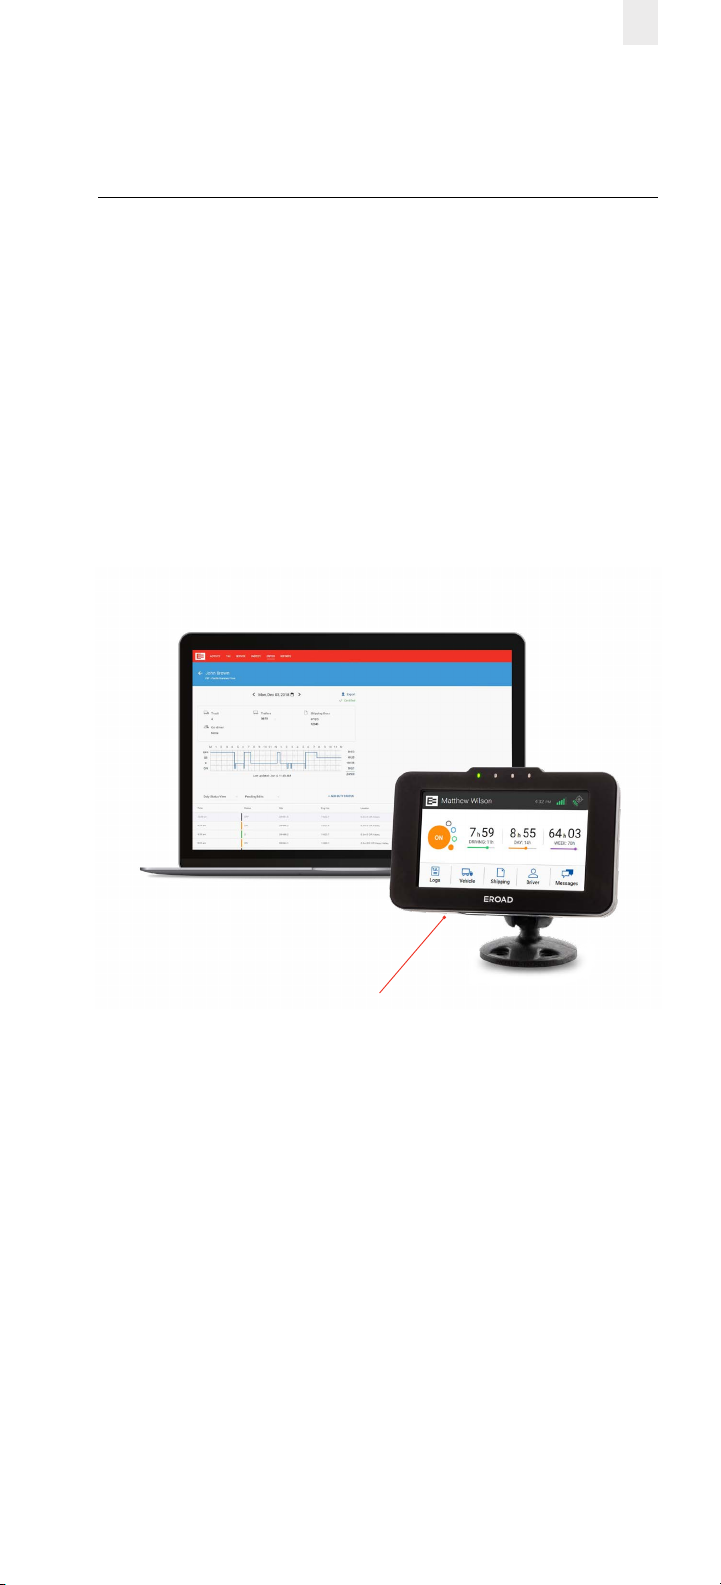
The EROAD™ Electronic Logging Device (ELD) is designed to
make your job easier. This manual might be used by drivers,
mechanics, fleet managers, dispatchers, or anyone accessing
the EROAD ELD.
The EROAD ELD system includes the in-vehicle device and the
Depot application. It gives you control to change duty status
and manage your logs, among other features.
The EROAD ELD is installed in the cab of the truck. It measures
the distance you travel, and captures location [via a global
positional system (GPS)], route, and operational data from
the truck.
1
Serial Number
There are four indicator lights on the front of the in-vehicle
device, which are explained below from left to right:
• Green - Power is ON
• Blue - (not used)
• Yellow - New message is waiting
• Red - Degraded mode, temporary loss of distance
calculation
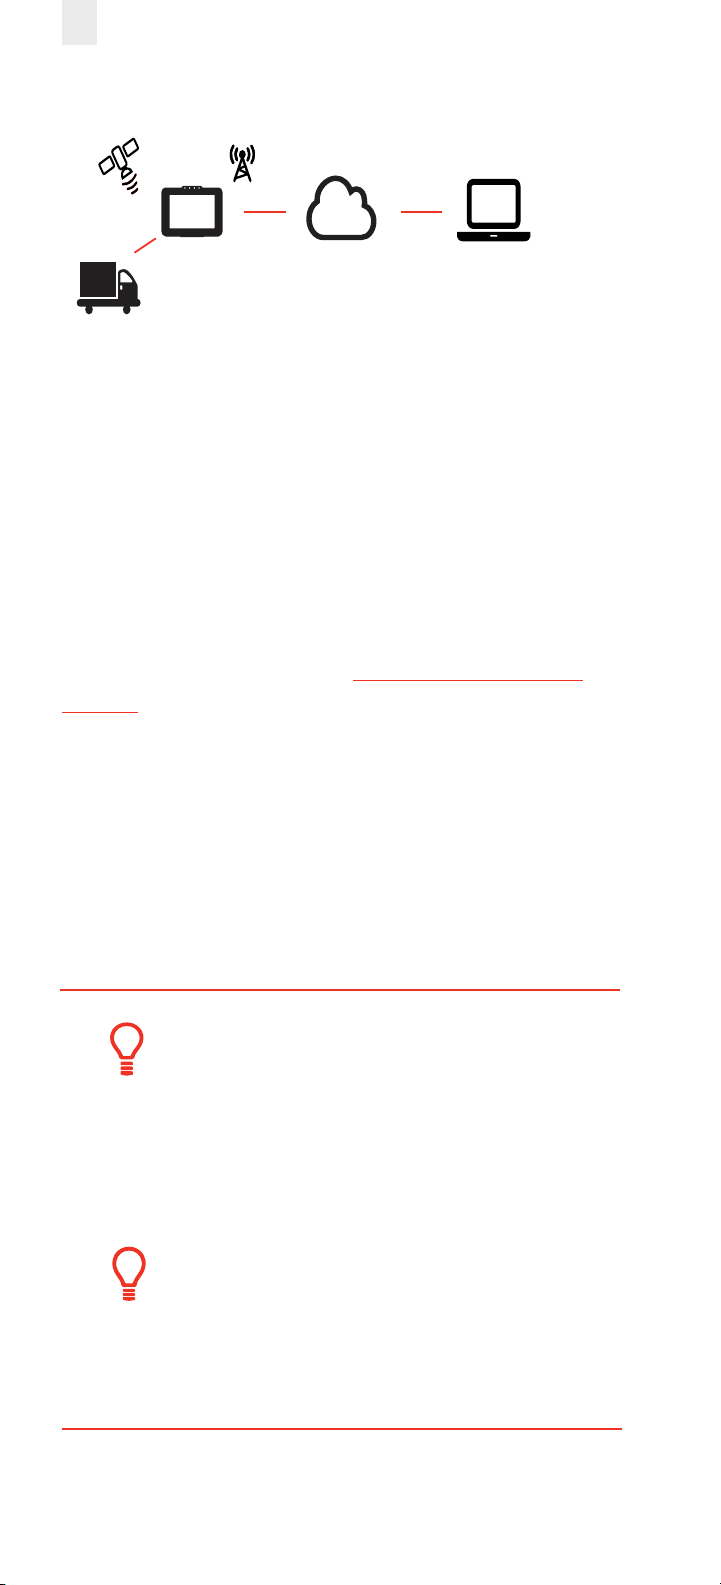
The records are stored via a cellular data network, which
interfaces to EROAD’s Depot application. Users can access
Depot through a Web browser, as shown in the following
illustration.
Page 6
2
GPS Cellular
Engine
ECM Link
EROAD
ELD
Cloud hosted
EROAD Depot
Web browser
1.1 LOCATING THE DEVICE SERIAL NUMBER
The device serial number might be required for setup, technical
support, or for record-keeping purposes. Detach the device
from the mounting arm and turn upside down to view the
serial number on the underside of the front cover plate.
1.2 PIT GROUP VERIFICATION
EROAD self-certified and registered its in-vehicle, tethered ELD
solution with the Federal Motor Carrier Safety Administration
(FMCSA) on their public registry: https://csa.fmcsa.dot.gov/
ELD/List in February 2017.
EROAD also conducted internal testing per the FMCSA’s test
procedures, which confirms that the EROAD ELD meets the
technical specification requirements of 49 CFR Part 395,
Subpart B and Appendix A.
EROAD is the first ELD provider to complete an independent
test and verification of our ELD solution by PIT Group.
Tip:
The first-time appearance of an acronym or
abbreviation is spelled out in this manual; afterward,
it is abbreviated. See section 7.2, Glossary for a
complete list of acronyms and abbreviations used in
this manual.
Tip:
Supervisors should refer to the EROAD Inspect DVIR
manual for instructions on performing pre-trip and
post-trip inspections if these features are included in
your plan.
Page 7
2 Driving Setup
Complete the following setup activities before you begin
to drive.
2.1 LOGGING IN TO THE EROAD ELD
Perform the following tasks to login to the EROAD Electronic
Logging Device (ELD).
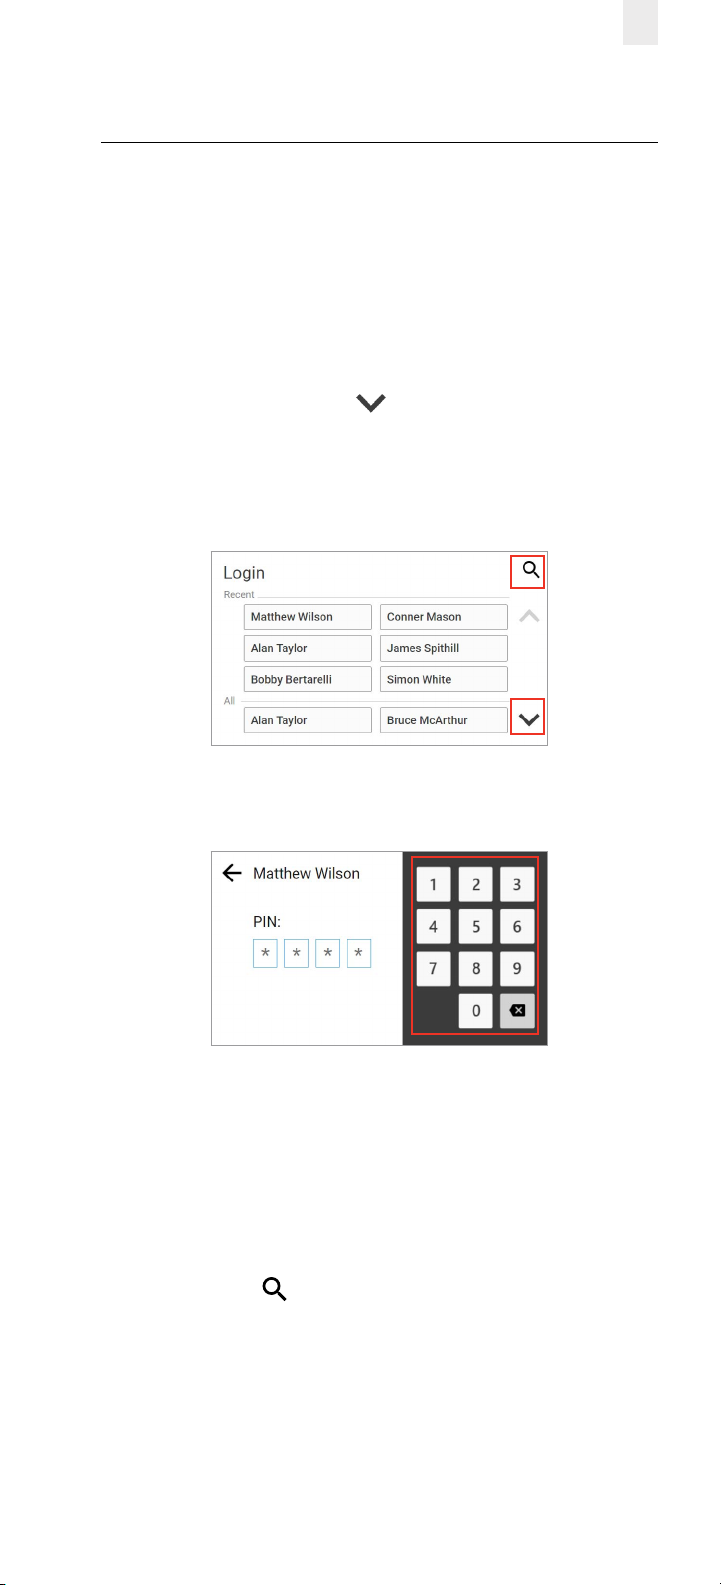
1. Locate and tap your name on the Login screen.
2. (optional) Tap the Down arrow to see more names, if
your name is not on the first screen. This scrolling feature is
not available for organizations with more than 2000 drivers.
Note: See section 2.1.1, Login Name Search to perform a
search, if you cannot locate your name in the list.
3
3. Enter your four-digit personal identification number (PIN)
using the 10-key pad on the right.
Note: The Welcome screen lists your special driving
categories. It might prompt you to review unidentified trips,
accept edits, or certify your logs.
2.1.1 Login Name Search
Perform the following tasks to search for your login name, if it
does not display on the login screen.
1. Tap the Search icon on the Login screen (shown above)
to locate your name quickly, if the driver list is long.
2. Enter your name in the Name field.
Page 8
4
3. Tap the Search button, and then tap on your name
when the list displays.
4. Enter your four-digit personal identification number
(PIN) using the 10-key pad as shown above. Contact your
supervisor or dispatcher if you forgot your PIN or if your
name is not on the list.
Tip:
Driving time is applied to the active driver if the codriver does not login. See section 3.2.
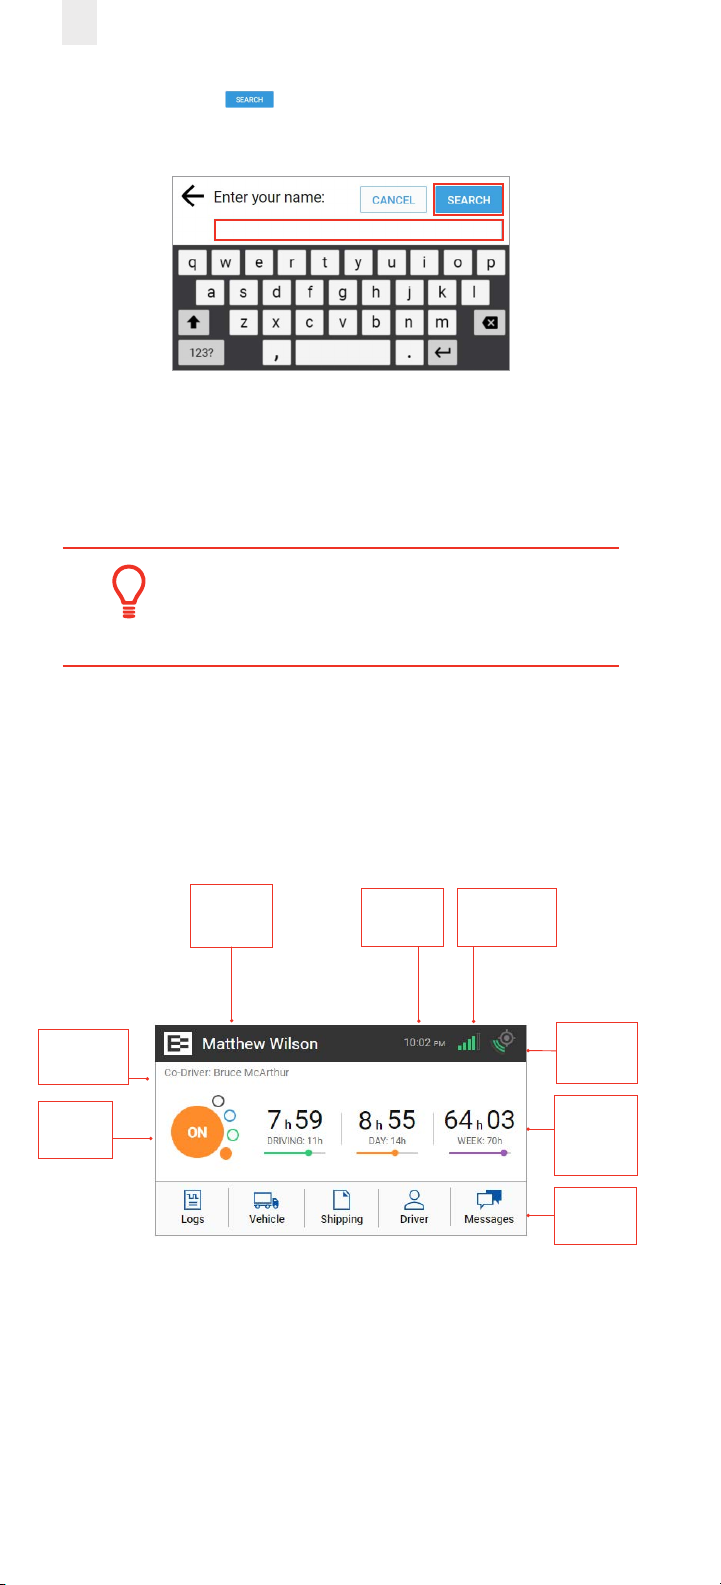
2.2 REVIEWING THE HOME SCREEN
The Home screen is the first screen that appears. The menu
options are represented by the five icons that appear on the
bottom row of the device. The information displayed on the
Home screen is illustrated below.
Co-Driver
Name
Duty
Status
Driver
Name
Current
Time
Cellular
Strength
GPS
Hours of
Service
Counter
Main
Menu
There are additional options available under each menu icon.
The following table outlines additional options to help you
manage your trip. You can tap each icon to access more
options, which are briefly described in the following table.
Page 9
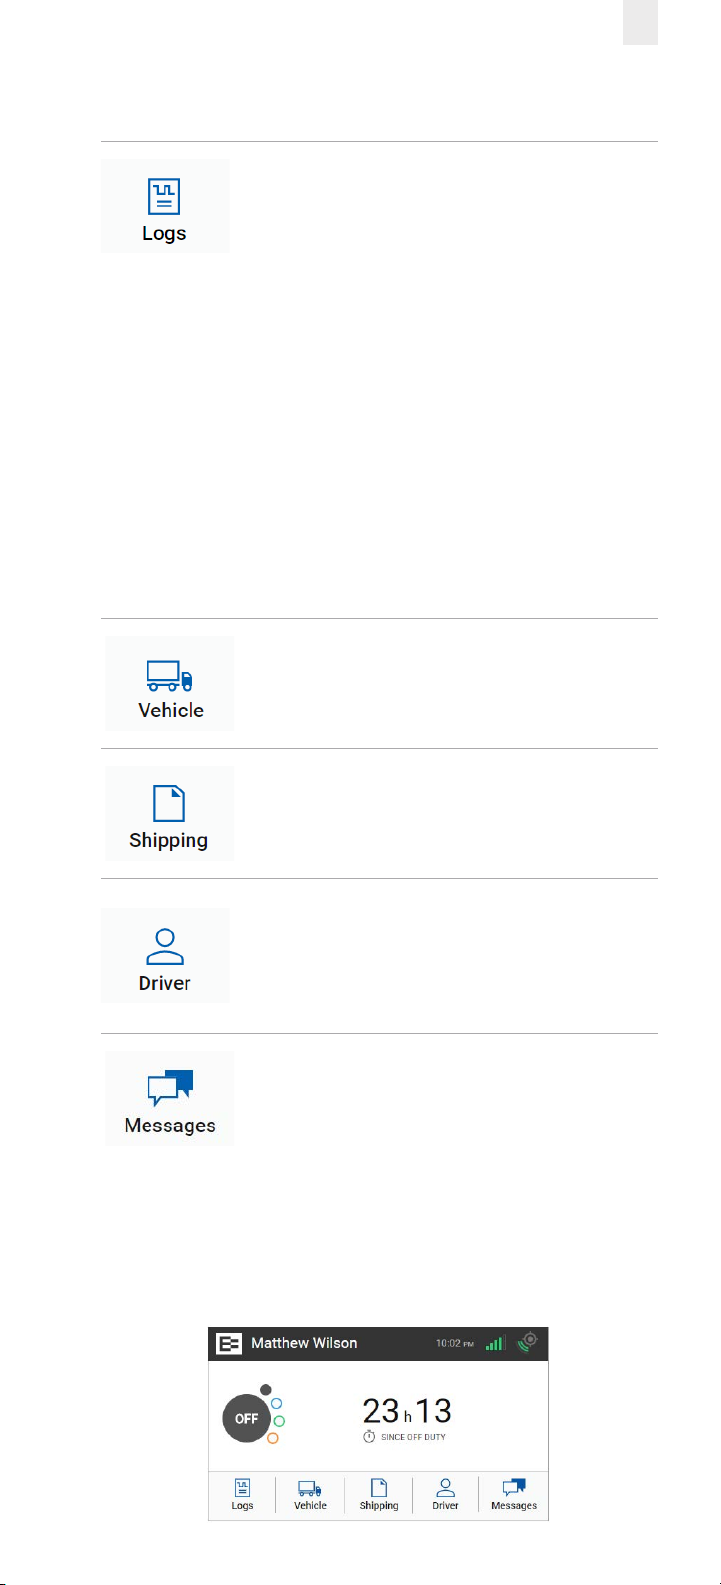
Menu Option Description
Allows you to see a graphical representation
of your duty status for a 24-hour period. You
can cycle through previous days to check log
history. Additional options include:
• View/Edit (section 3.6)
• Hours of Service (HoS) (section 2.6)
• Certify (section 3.8)
• Inspection (display or export log data)
(section 5)
• Pending Edits (section 4.1)
• Unidentified (driver) (section 4.3)
• Issues (section 6)
• Email Logs (section 5.1.1)
• All Events (section 5.2.3)
5
Allows you to enter fuel quantity, connect
or drop trailers, and set the Weight Mile Tax
2.3 OFF-DUTY COUNTER
The o-duty counter shows time spent in O-duty status and
can help in monitoring rest periods. It switches to the O Duty
Since (date) on the Home screen after 99 hours.
(WMT) configuration (Oregon only).
Allows you to add a shipping document
(such as a bill of lading).
Allows you to view the active driver. You can
view the driver’s name, email address and
time zone. The ELD lets you add a co-driver
or logout using this sub menu.
Allows you to scroll through the existing
messages, as well as send a new message.
Page 10
6
2.4 CHANGING YOUR DUTY STATUS
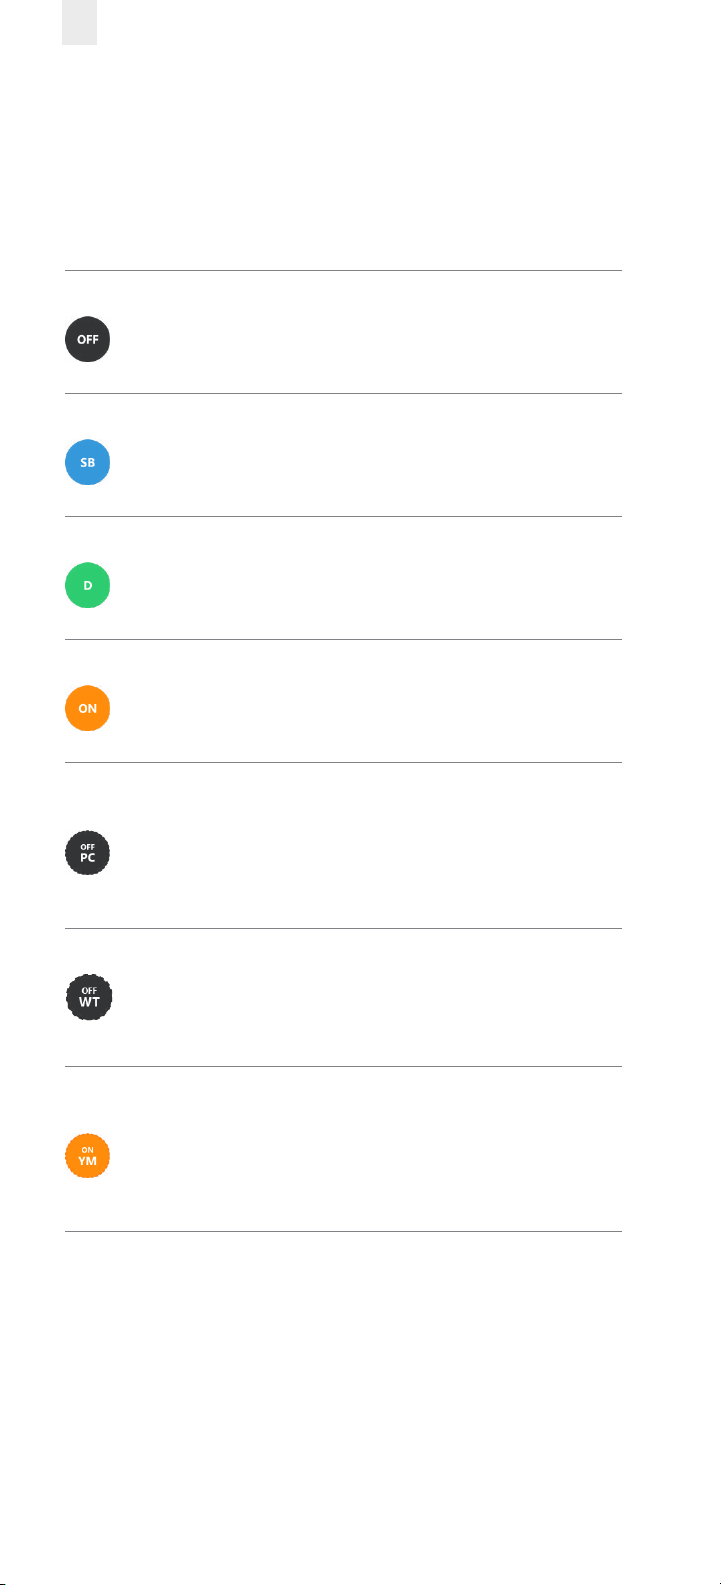
There are four standard duty status options on the EROAD
ELD. Your carrier might allow you to use the optional statuses.
Each status is color-coded.
Duty Status Icon Description
OFF
SB
D
ON
OFF PC
O duty, you are not working.
Sleeper berth; time spent in the berth.
Driving; your status changes to Driving
as soon as the vehicle is in motion (at
5 miles per hour).
On duty, but you are not driving.
O duty/personal conveyance; you
are using the truck for personal
conveyance. This time counts as O
Duty in your hours of service (optional
per your supervisor or dispatcher).
OFF WT
ON YM
O duty/wait time; may be used in
oil field operations (optional per your
supervisor or dispatcher).
On duty/yard move; you are moving
around the yard or o public roads.
Your time counts as On Duty in your
hours of service (optional per your
supervisor or dispatcher).
Page 11
7
2.4.1 Duty Status
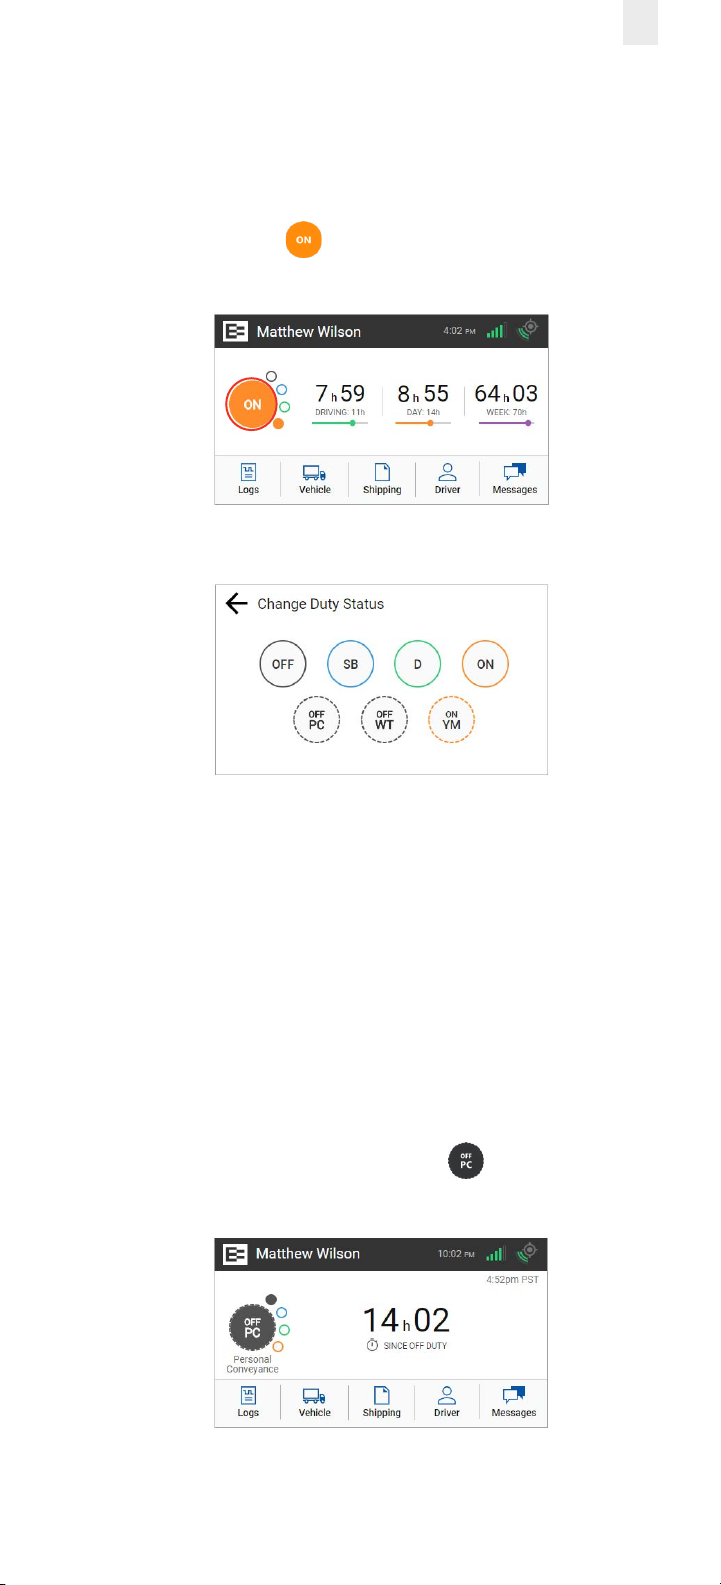
Perform the following steps to change your duty status.
1. Tap the large circle on the left side of the Home screen. Your
duty status is listed in the middle of the circle.
Example: Tap On . The Change Duty Status screen
appears.
2. Tap the duty status that you want. The Home screen
appears with the duty status that you select.
2.4.2 Personal Conveyance Status
This is a special driving category that might be provided by
your supervisor. This duty status counts as O Duty in your
hours of service. You must add a remark in your logs when you
use this duty status.
Note: See section 3.7.1, Adding a Remark to learn more about
adding a remark.
1. Tap the large circle on the left side of the Home screen. The
Change Duty Status screen appears
(as shown in section 2.4.1., Duty Status above).
2. Tap the OFF - Personal Conveyance status. The Home
screen appears with the changed status.
Page 12
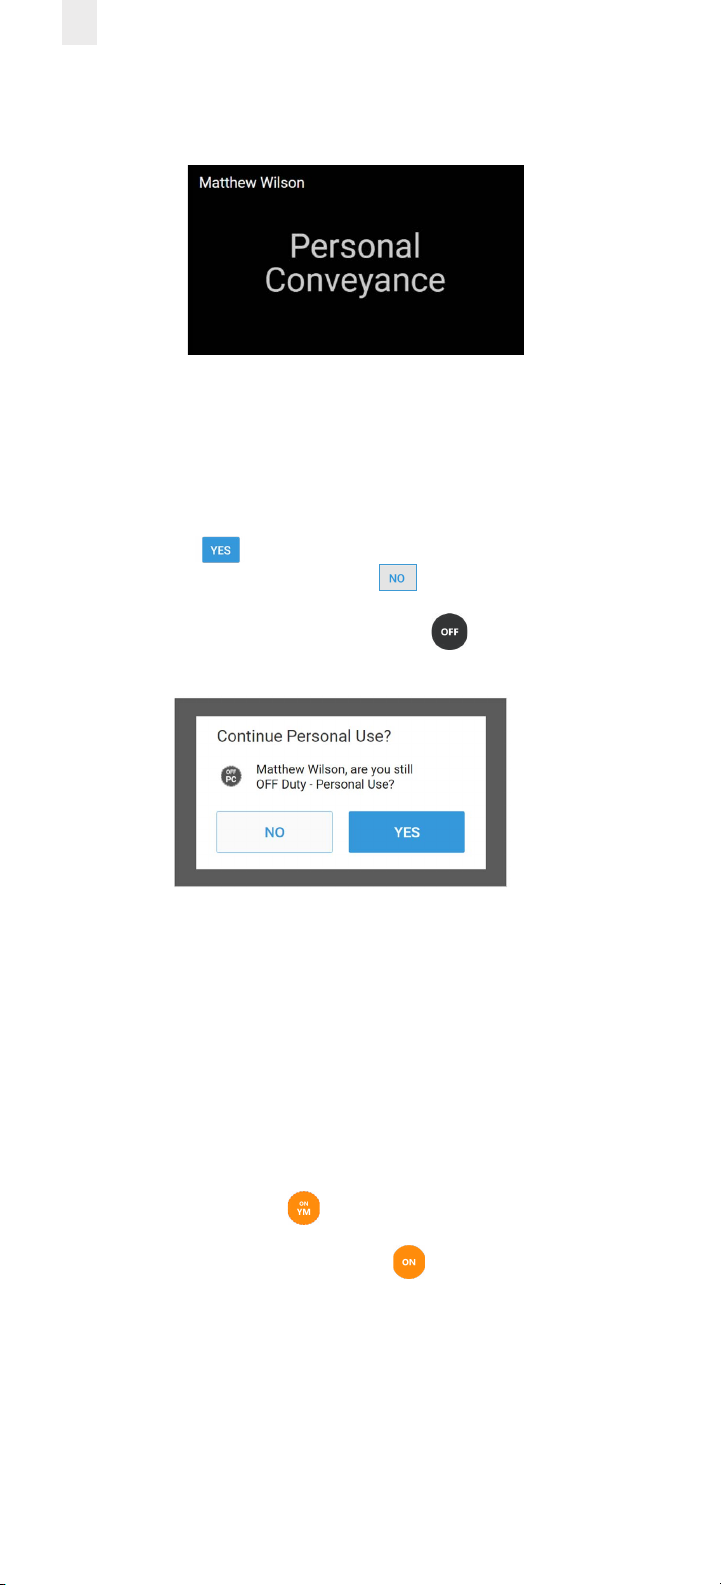
8
The home screen changes to a dark background while you
are driving the vehicle.
The EROAD ELD is designed to prompt the driver about the
O - Personal Conveyance duty status, if the vehicle is shut
o while in this status. The Continue Personal Use screen
displays when the ignition is activated in the vehicle.
3. Tap the Yes button to continue the OFF – Personal
Conveyance status or tap the No button to end this
duty status.
Note: Your duty status changes to OFF duty, if this
prompt is ignored.
2.4.3 Yard Moves Status
This is a special driving category that might be provided by
your carrier for moving material around a yard or via private
driveways. Add a remark in your logs when using this duty
status.
1. Tap the large circle on the left side of the Home screen. The
Change Duty Status screen appears (as shown in section
2.4.1., Duty Status above).
2. Tap the On Yard Move status. The Home screen appears
with the changed status.
Note: Your duty status is set to ON if the engine is
powered o while you are in the On Yard Move duty status.
Page 13
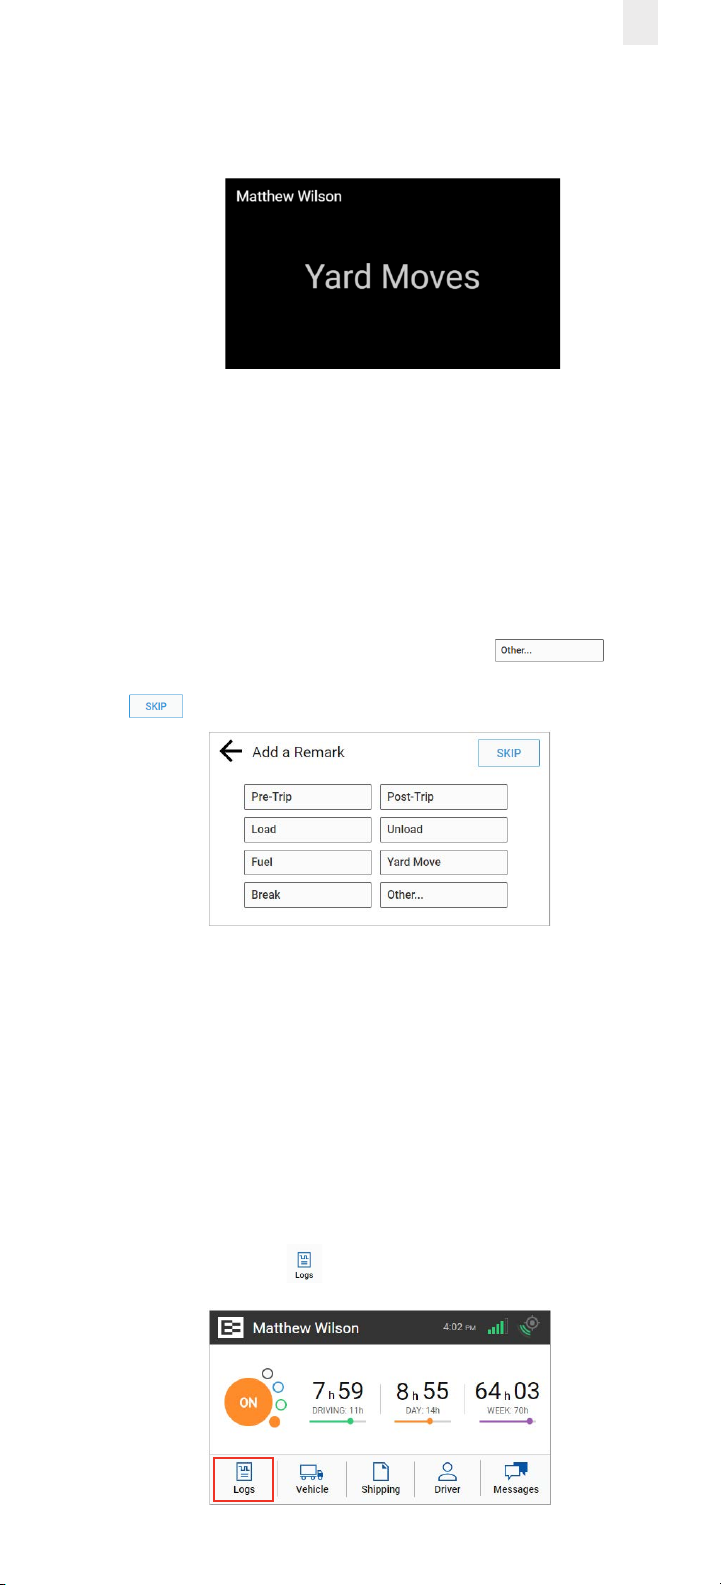
The home screen changes to a dark background when you
are driving the vehicle.
2.5 Using Quick Remarks
Drivers can use the Quick Remarks feature on the EROAD ELD
when logging in and/or when changing duty status. The Quick
Remarks screen automatically appears after you select your
duty status.
Note: Using quick remarks does not change your duty status.
9
1. Tap the applicable quick remark button that applies to the
duty status you selected or tap the Other
button to add a remark not shown in the list. Tap the Skip
button if you prefer not to use the quick remarks .
2.6 CHECKING HOURS OF SERVICE
The EROAD ELD provides an electronic method for tracking
your Hours of Service (HoS) in your eorts to comply with
federal and state driving and duty-hour requirements. It helps
ensure that you are operating safely and eciently.
Users may tap the counters on the home screen to jump to the
HoS screen. The HoS screen provides four views – Summary,
Rolling View, Ruleset, and Exemptions. These views are
described in more detail in the following sections.
1. Tap the Logs icon on the Home screen menu.
Page 14
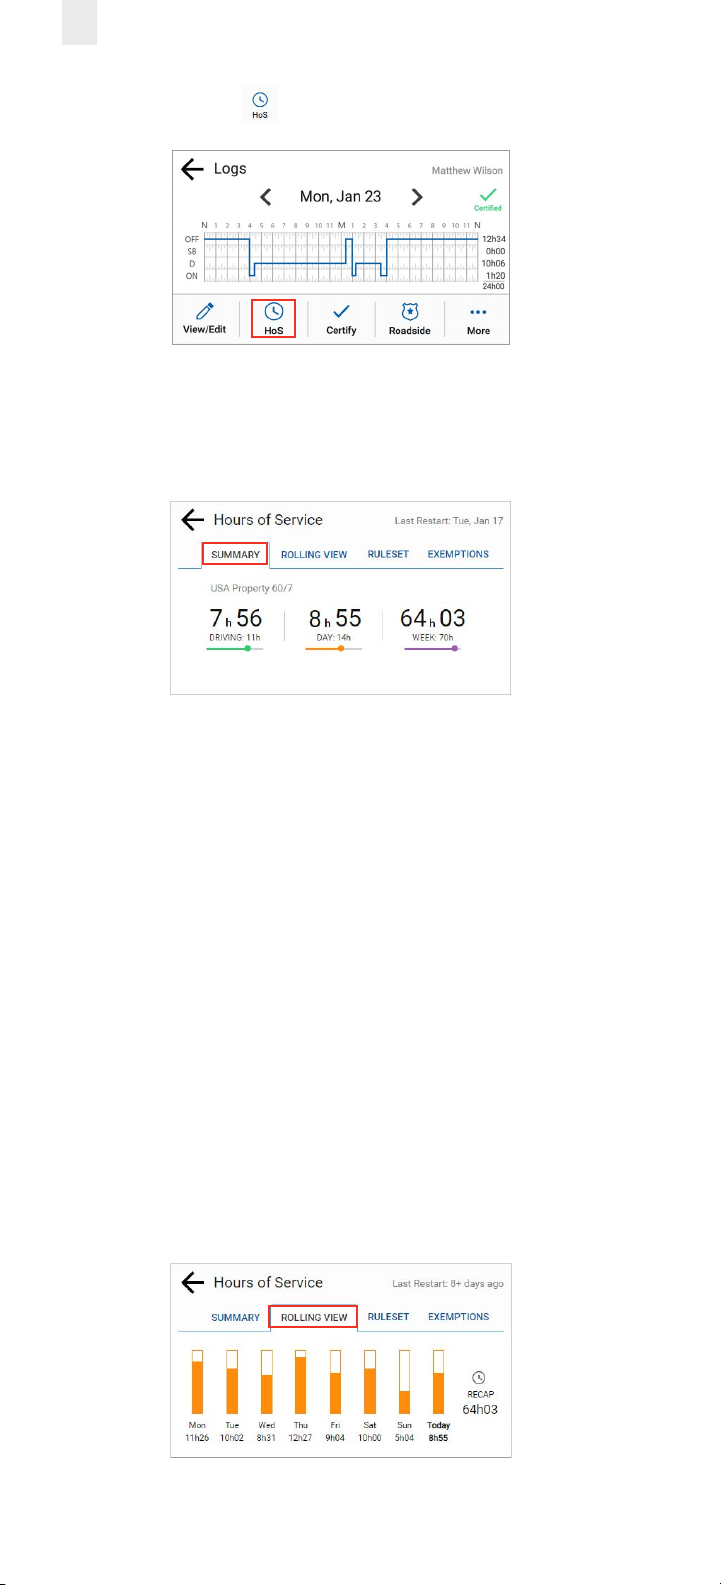
10
2. Tap the HoS icon on the Logs menu.
2.6.1 Summary
This tab section shows your 14-hour driving window, 11-hour
driving limit, and the duty cycle (either 60/7 or 70/8). The
screen displays the remaining time against each of these limits.
• Left counter - Displays the remaining driving hours
available in the total driving limit for the 11-hour rule.
• Center counter - Displays the remaining hours available in
your 14-hour driving window.
• Right counter - Displays the hours remaining in your work
week, based on the 60/70-hour duty limits.
Note: These counters are based on the Property Interstate HOS
rules. The counters shown above may change depending on
any exemptions or exceptions you select.
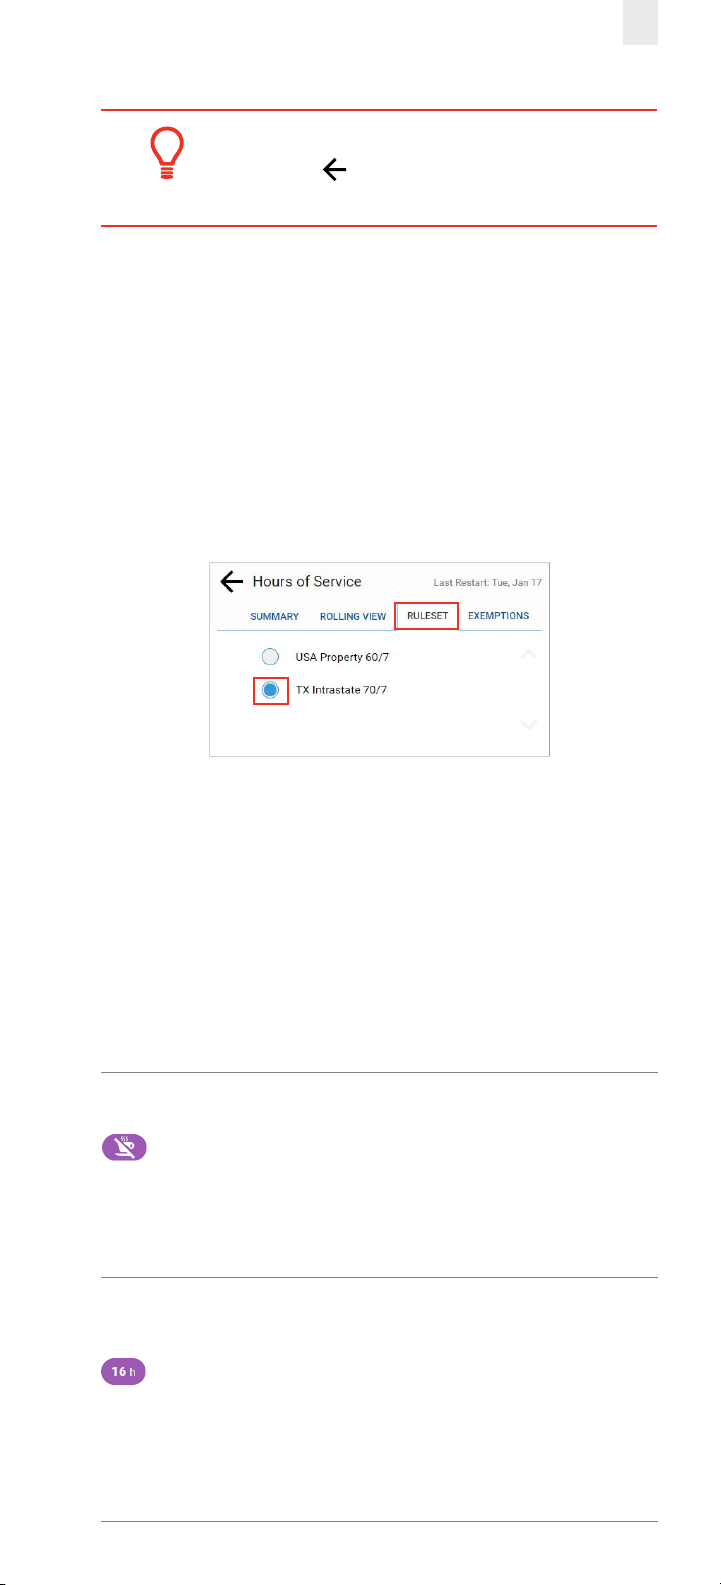
2.6.2 Rolling View
This tab section tracks your eight-day rolling period, lists
remaining hours today, and recaps total hours during the
eight-day rolling period. The bar graph color changes to red if
you exceed your required hours of service.
• Tap the Rolling View tab to view your eight-day rolling
period.
Page 15
11
Tip:
Tap the Back arrow at the top of the screen to
return to the previous screen.
2.6.3 Rulesets
More than one ruleset might be available depending on
your jurisdiction. Example: Drivers operating under the
Texas Intrastate ruleset have the option of selecting this
ruleset on the Hours of Service screen. Note: This option first
must be enabled by your supervisor or dispatcher.
1. Click the Ruleset tab on the Hours of Service screen.
2. Click the applicable ruleset option button. The button
turns blue when a ruleset is enabled.
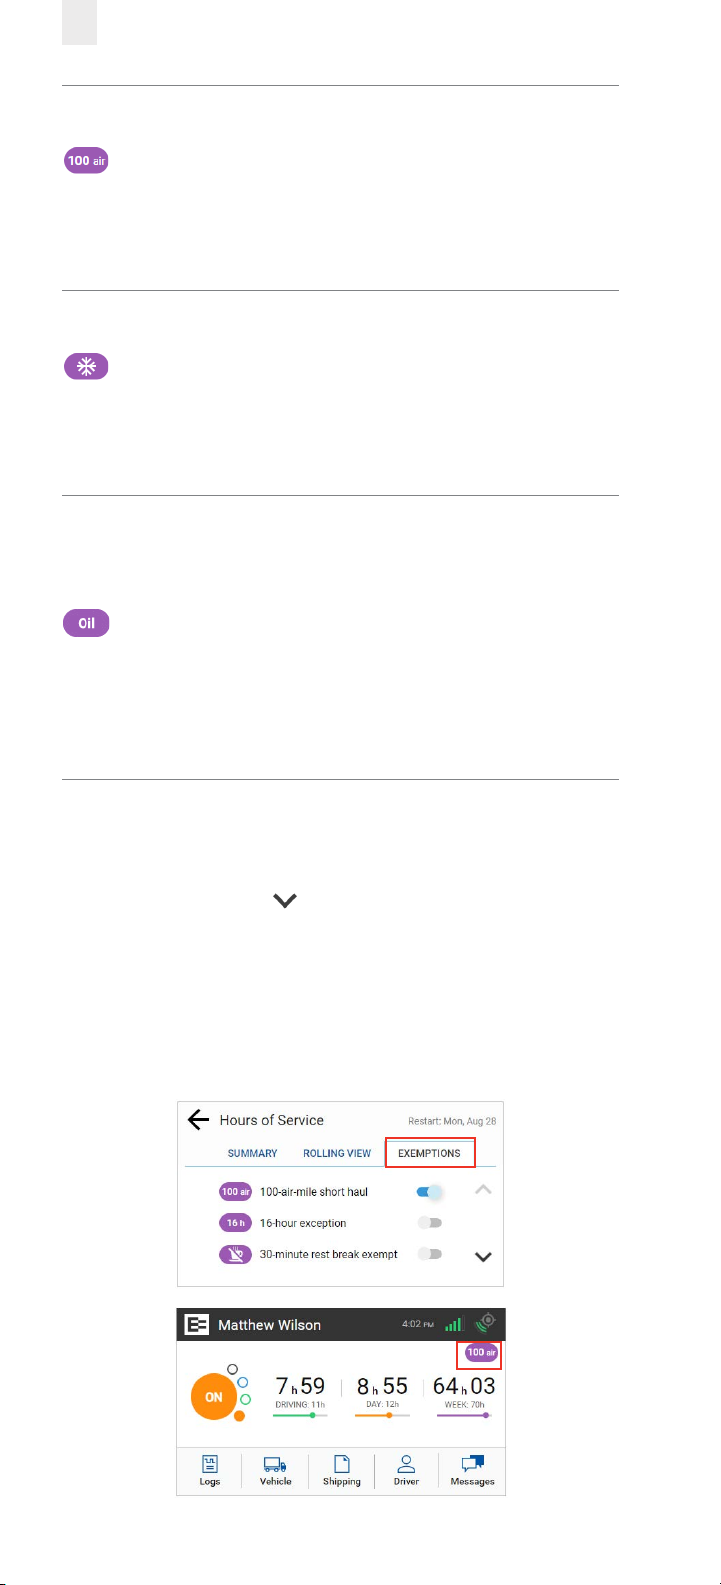
2.6.4 Exemptions
The Exemptions tab includes a list of exemptions or exceptions
that your supervisor has made available for you. These items
must be first enabled by the supervisor or dispatcher in the
Depot application before they are available to drivers on the invehicle device. The list of exemptions may include one or more
of the following items:
Exemption
Description
Type
• Driver is not prompted to take a
30-minute break after eight hours of On-
30-Minute
Rest Break
16-Hour
Short Haul
duty time.
• HOS counters display 11-hr driving limit,
14-hr driving window, and 60/70-hr
(week) limit.
• Applied when the driver operates under
the Interstate or 30-minute rest break
exempt rule sets.
• Extends the 14-hr driving window to
16 hrs.
• Exemption is automatically removed at
the end of the day.
Page 16
12
100 Air-Mile
Short Haul
Adverse
Conditions
Oilfield
• Driver is not prompted to take a
30-minute break after eight hours of Onduty time.
• HOS counters display 11-hr driving limit,
12-hr driving window, and 60/70-hr
(week) limit.
• Applied when a driver operates under
the Interstate rule set and extends the
driving limit by two hours.
• HOS counters display 13-hr driving limit,
14-hr driving window, and 60/70-hr
(week) limit.
• Provides a 24-hr restart instead of a 34hr restart .
• The o-duty wait time (OFF-WT) duty
status (if used under this exemption):
• Extends the 14-hr driving window
period.
• Minimizes the HOS impact on wait
time.
Note: See your supervisor if you have questions about when to
use the exemptions.
1. Tap the Exemptions tab to view the available exemptions.
Note: Tap the Down arrow to see additional exemptions
in the list, if they are enabled by your supervisor.
2. Tap one of the exemptions to enable it. The toggle switch
turns blue when it is enabled and the applicable icon
appears on the Home screen. Note: Tap an enabled (blue)
toggle switch to disable the exemption (shown as gray).
Page 17
2.7 ADDING OR DROPPING TRAILERS
The EROAD ELD lets you easily add or drop trailers. You need
to enter the trailer number in the EROAD ELD each time you
connect a trailer to your vehicle.
2.7.1 Adding Trailers
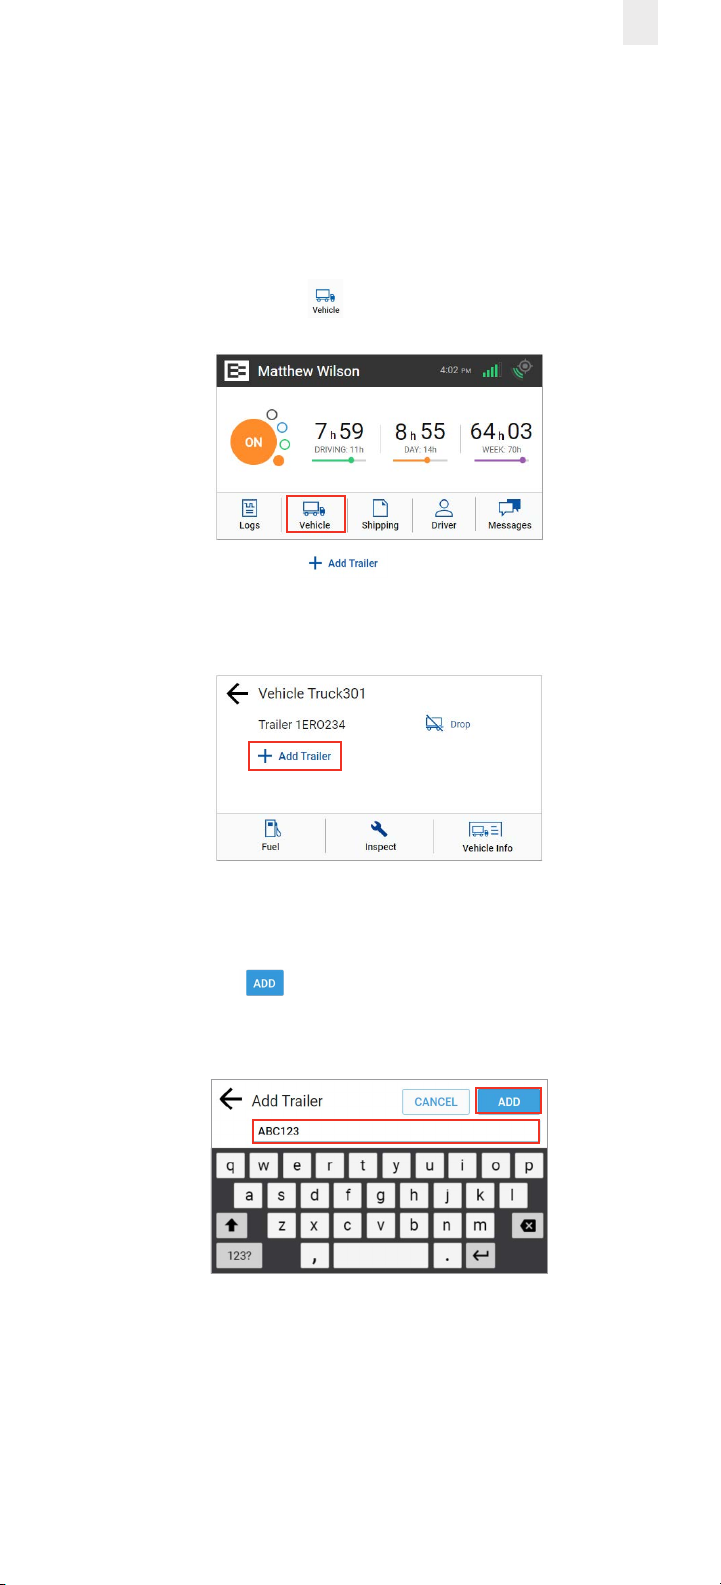
Perform the following steps to add a trailer.
1. Tap the Vehicle icon on the Home menu.
2. Tap the Add Trailer link on the Vehicle screen.
The Trailers screen displays a list of trailers previously
entered.
13
The Connect Trailer screen appears if no trailers are found.
3. Enter the trailer ID in the Add Trailer field.
4. Tap the Add button. The Connected Trailers screen
displays a confirmation message.
Note: You can connect from one up to three trailers.
Page 18
14
2.7.2 Dropping Trailers
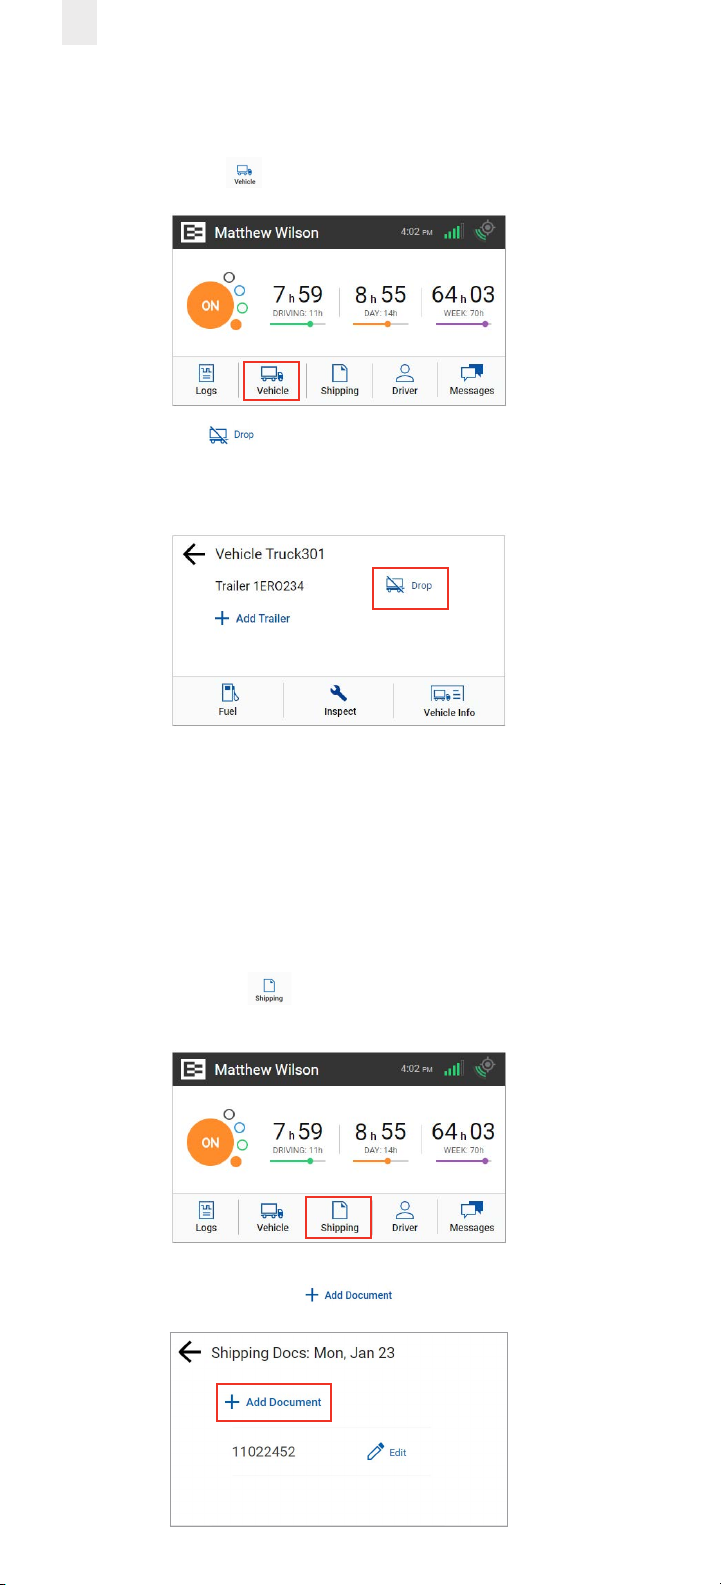
Perform the following steps to drop a trailer.
1. Tap the Vehicle icon on the Home menu.
2. Tap the Drop icon beside the trailer ID that you want
to drop. A confirmation message displays that the trailer
number was removed.
2.8 ENTERING A SHIPPING DOCUMENT
The EROAD ELD allows you to quickly enter a shipping
document (such as a bill of lading). The following sections
describe how to add or delete a shipping document.
2.8.1 Adding a Shipping Document
Perform the following steps to add a shipping document.
1. Tap the Shipping icon on the Home menu. The
Shipping Docs screen appears.
2. Tap the Add Document icon.
Page 19
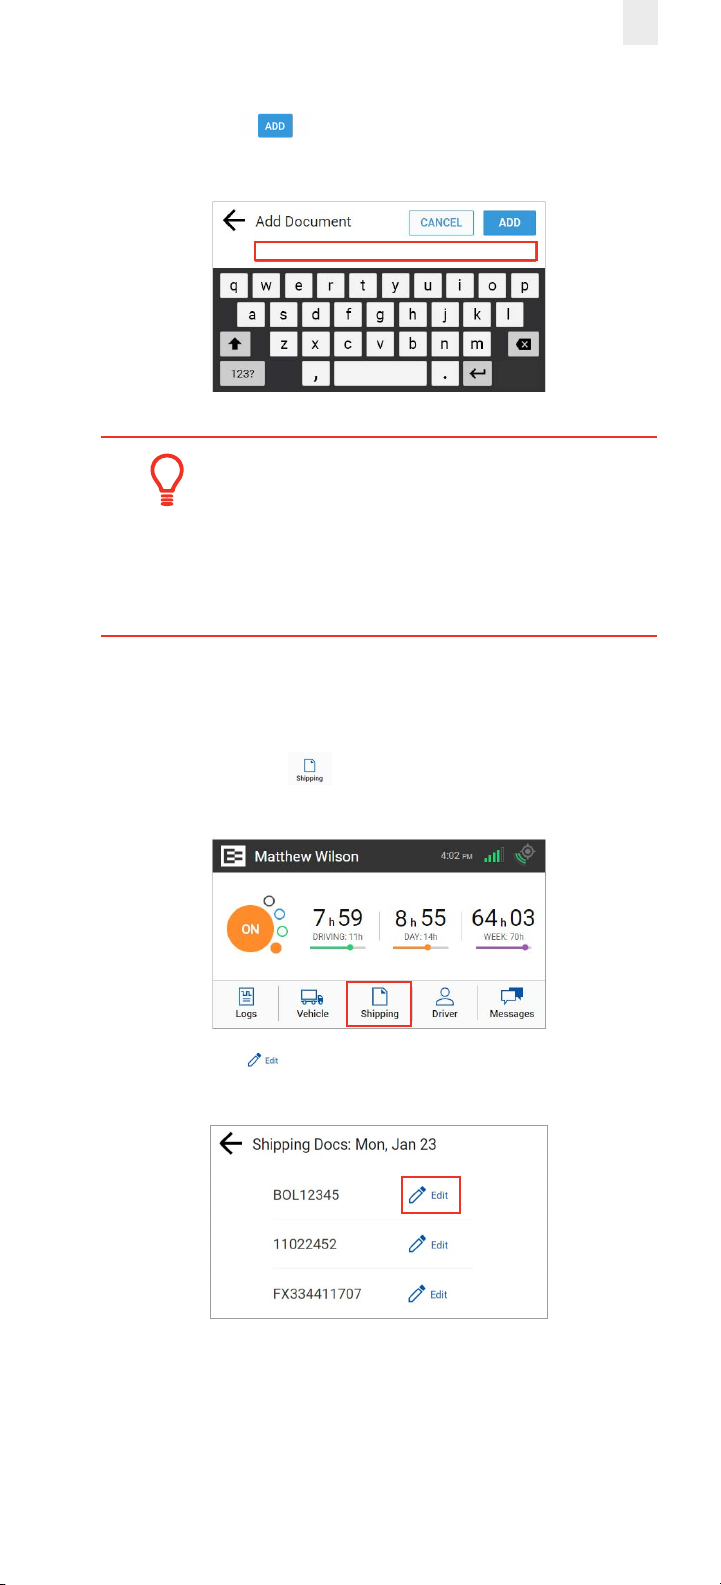
3. Enter the document ID in the Add Document field.
4. Tap the Add button. A confirmation message
appears to confirm the update.
Tip:
Use the Remarks feature if you want to enter a
shipping document on a prior day. You can add a
remark to the first ON duty status to include the
shipping number. See section 3.7.1 for details.
15
2.8.2 Deleting a Shipping Document
Perform the following steps to delete a shipping document.
1. Tap the Shipping icon on the Home menu. The
Shipping Docs screen appears.
2. Tap the Edit icon beside the document number that
you want to delete.
Page 20
16
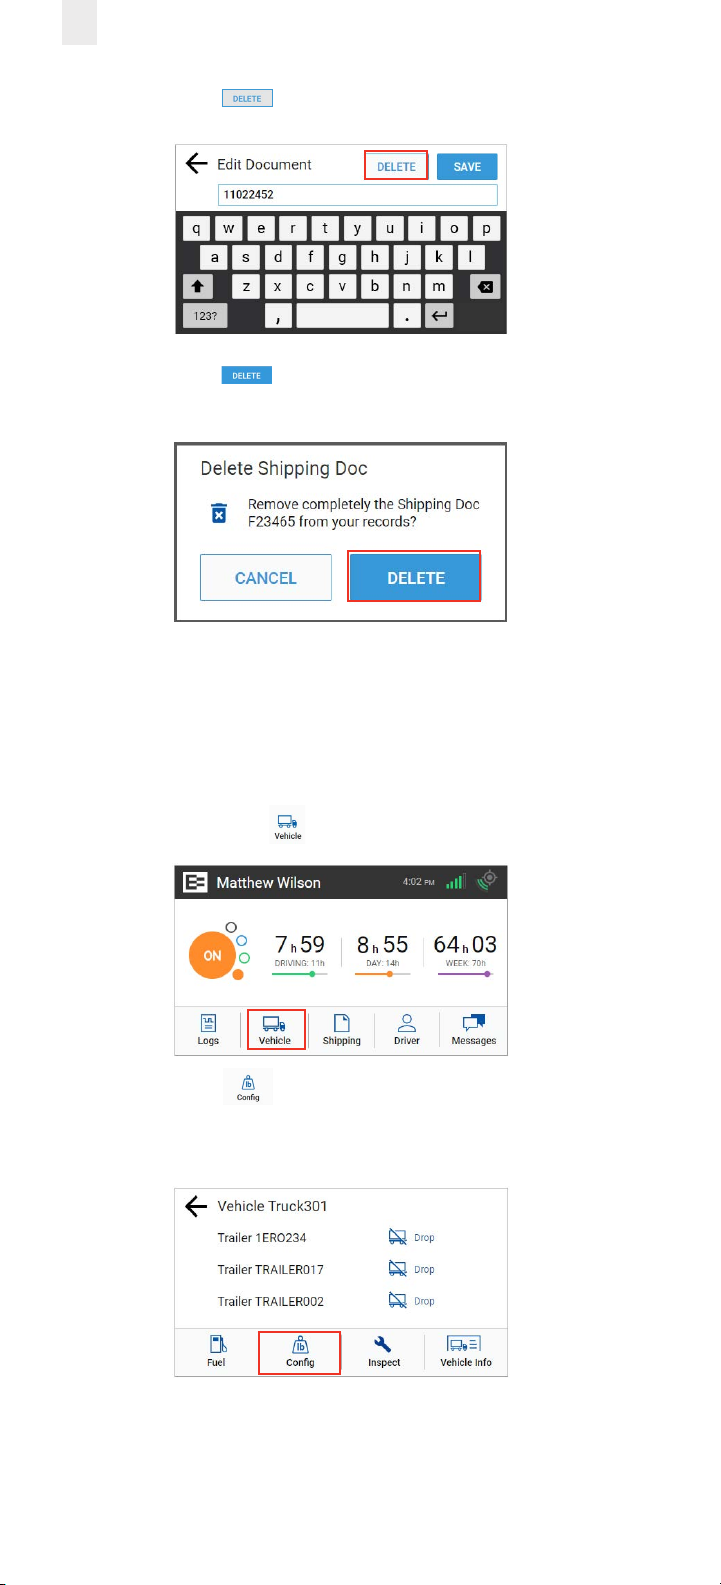
3. Tap the Delete button on the Edit Document screen.
4. Tap the Delete button in the confirmation prompt.
2.9 SETTING WMT CONFIGURATION (OREGON ONLY)
The EROAD ELD lets you easily change your vehicle weight
configuration for use with Weight-Mile Tax (WMT) reporting.
Perform the following steps to set your configuration. This
applies to drivers operating in the State of Oregon.
1. Tap the Vehicle icon on the Home menu.
2. Tap the Config icon on the Vehicle menu. The Config
screen appears and lists various configuration weight or
single-trip permit options.
3. Tap the configuration button that applies to your trip.
Page 21
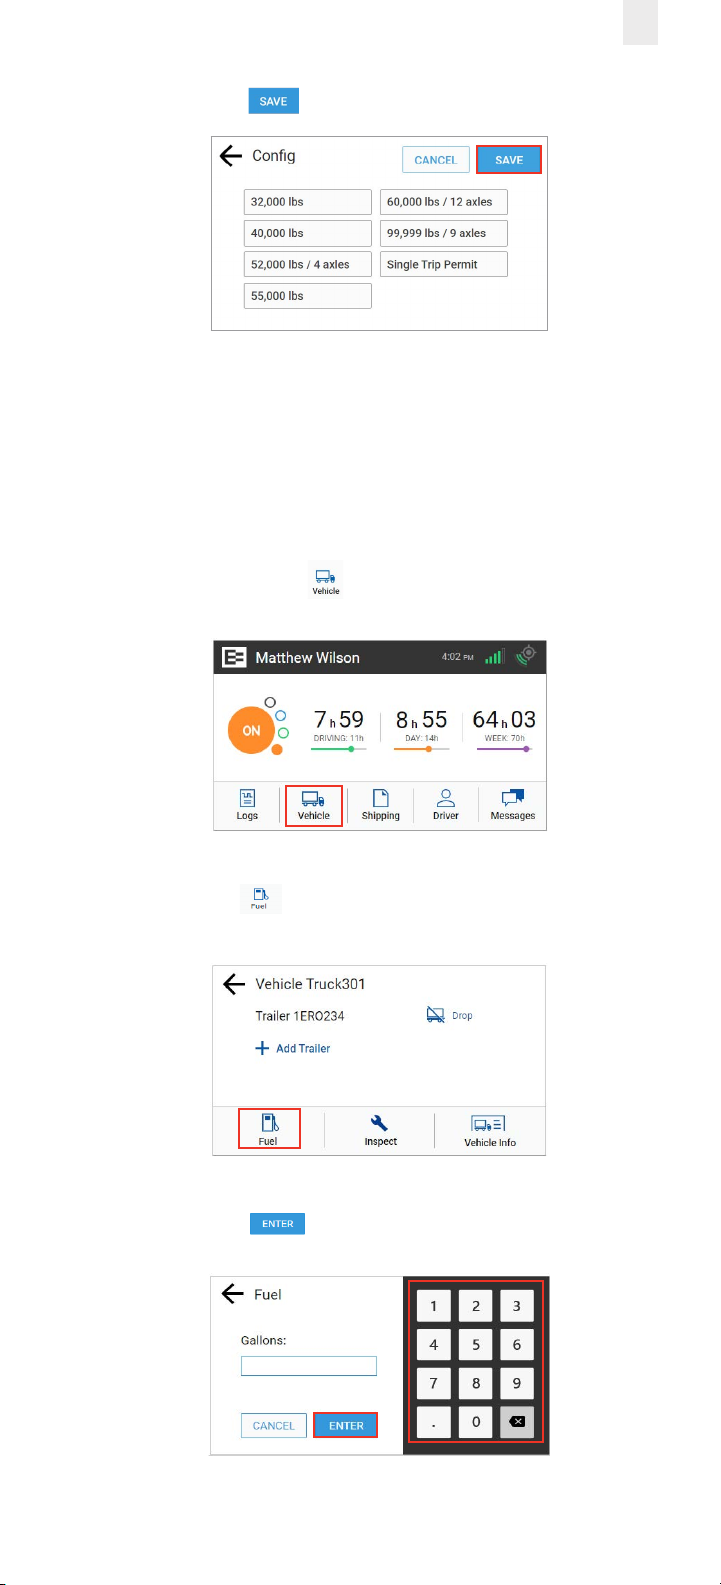
4. Tap the Save button.
Note: The list of available configurations for your vehicle
are options that your motor carrier has registered with the
DOT. Contact your supervisor if you cannot see the right
configuration for your vehicle.
2.10 ENTERING FUEL GALLONS
Perform the following steps to enter fuel gallons.
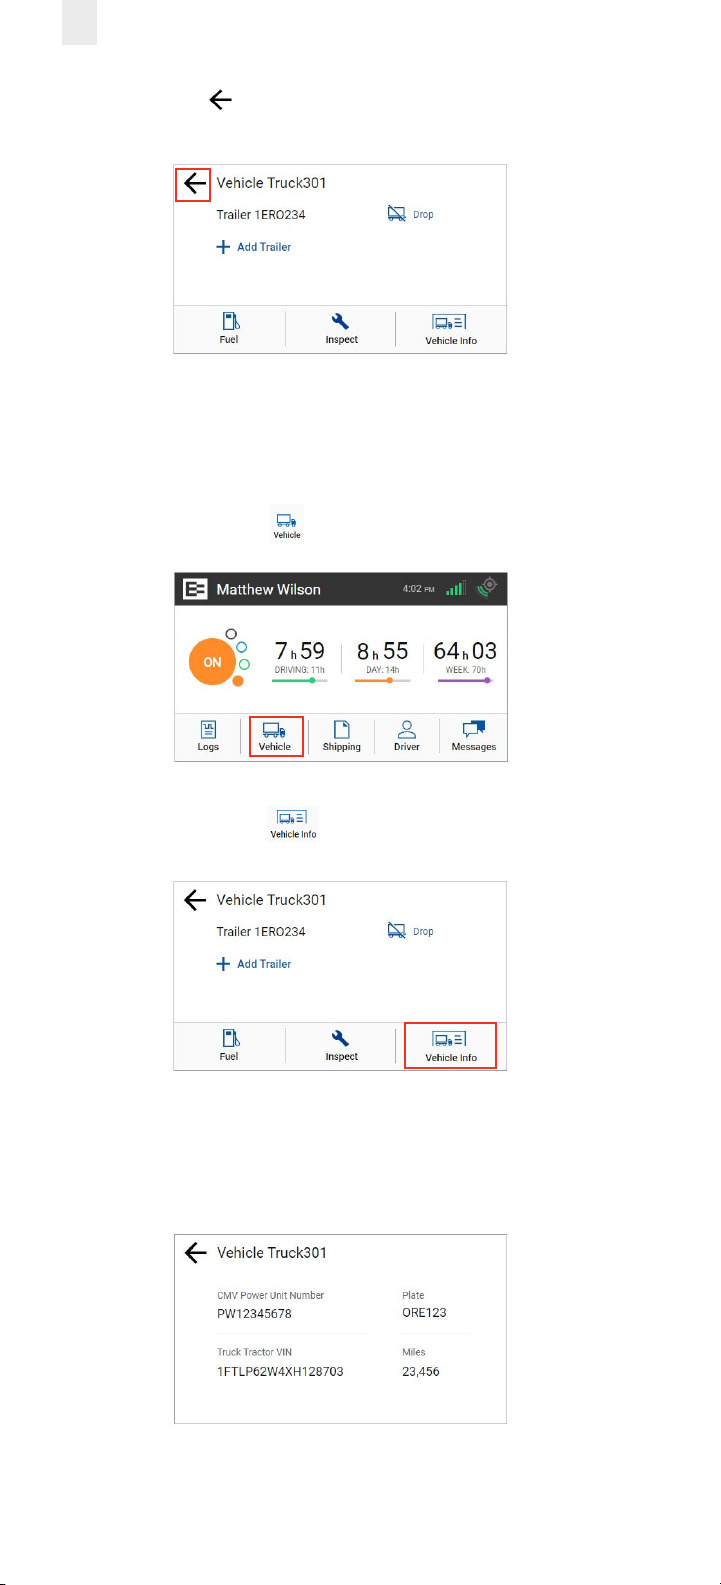
1. Tap the Vehicle icon on the Home menu.
17
2. Tap the Fuel icon on the Vehicle screen.
3. Enter the number of gallons using the key pad.
4. Tap the Enter button.
Page 22
18
5. Tap the Back arrow to return to the Home screen.
2.11 VIEWING VEHICLE INFORMATION
Perform the following steps to view vehicle information.
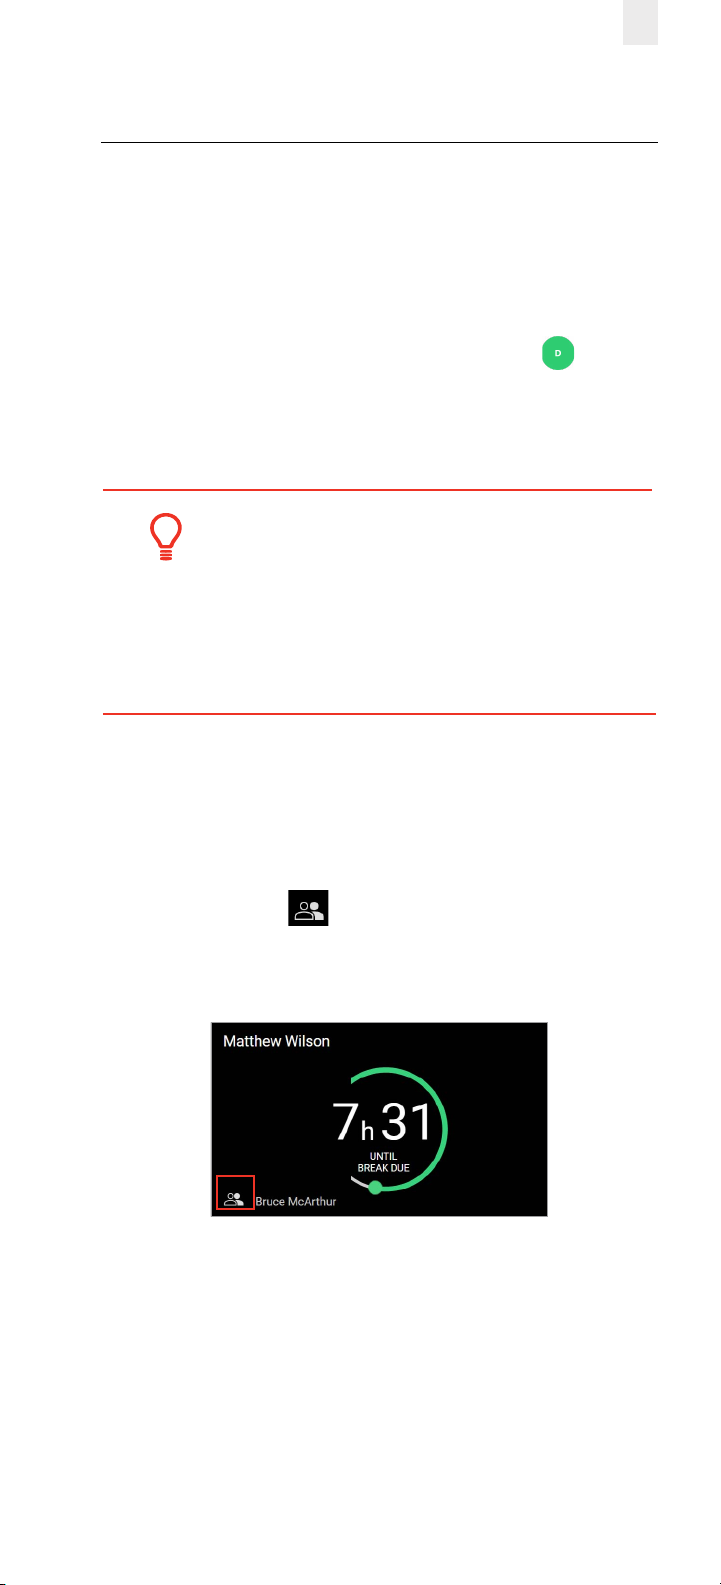
1. Tap the Vehicle icon on the Home menu.
2. Tap the Vehicle Info icon on the Vehicle screen.
3. This screen includes the CMV Power Unit Number, Plate
number, Truck Tractor VIN, and number of miles.
Note: Contact your supervisor if the power unit number, VIN, or
license number does not match your vehicle.
Page 23
19
3 Everyday Use
Certain tasks are performed daily. This chapter describes how
to add a co-driver, change drivers, review and correct logs,
insert missing records, add remarks, delete records, certify your
logs, and log out of the EROAD ELD.
3.1 DRIVING MODE
Your duty status automatically changes to Driving as soon
as your vehicle reaches five miles per hour. The ELD driving
mode only displays a minimal amount of information, for
safety reasons.
Tip:
Safety is essential.
• A driver cannot access any other screen while
driving.
• A co-driver can view logs while the vehicle is in
motion.
3.1.1 Changing Views Between Drivers
A co-driver can review his/her logs while the vehicle is in
motion by changing views between drivers. Perform the
following steps to change views.
1. Tap the Co-Driver icon.
2. Co-Driver: enter your PIN at the prompt. The Home screen
displays, where you can view and certify your logs.
3.1.1.1 Changing Views Alternative Process
Perform the following steps to change views from the Driver
view (default) to the Co-Driver view.
Page 24
20
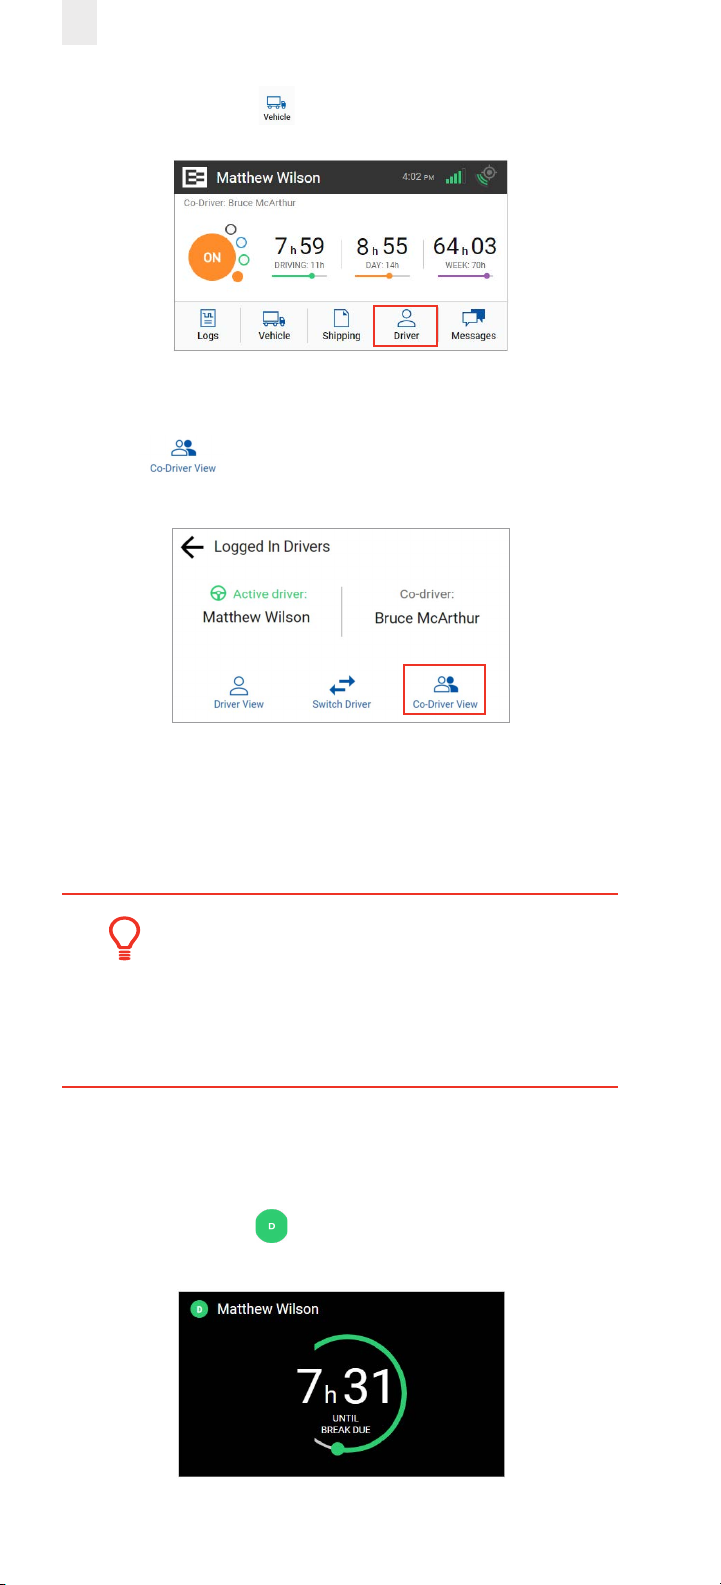
1. Tap the Driver icon on the Home menu.
2. The Logged-in Driver screen appears. Tap the Co-Driver
View icon.
3. Co-driver: Enter your PIN at the prompt. The co-driver’s
driver profile screen displays.
Note: This process can be applied in reverse, if you begin
from the Co-Driver View.
Tip:
• EROAD ELD logs are secure and prevent
unauthorized access to another driver’s logs.
• You must enter your PIN number at the
prompt, if you begin from an opposite view.
3.1.2 Exiting Driving Mode
Perform the following steps to exit driving mode when you
stop driving.
1. Tap on the Driving duty status icon that appears next to
your name when you stop driving.
Page 25
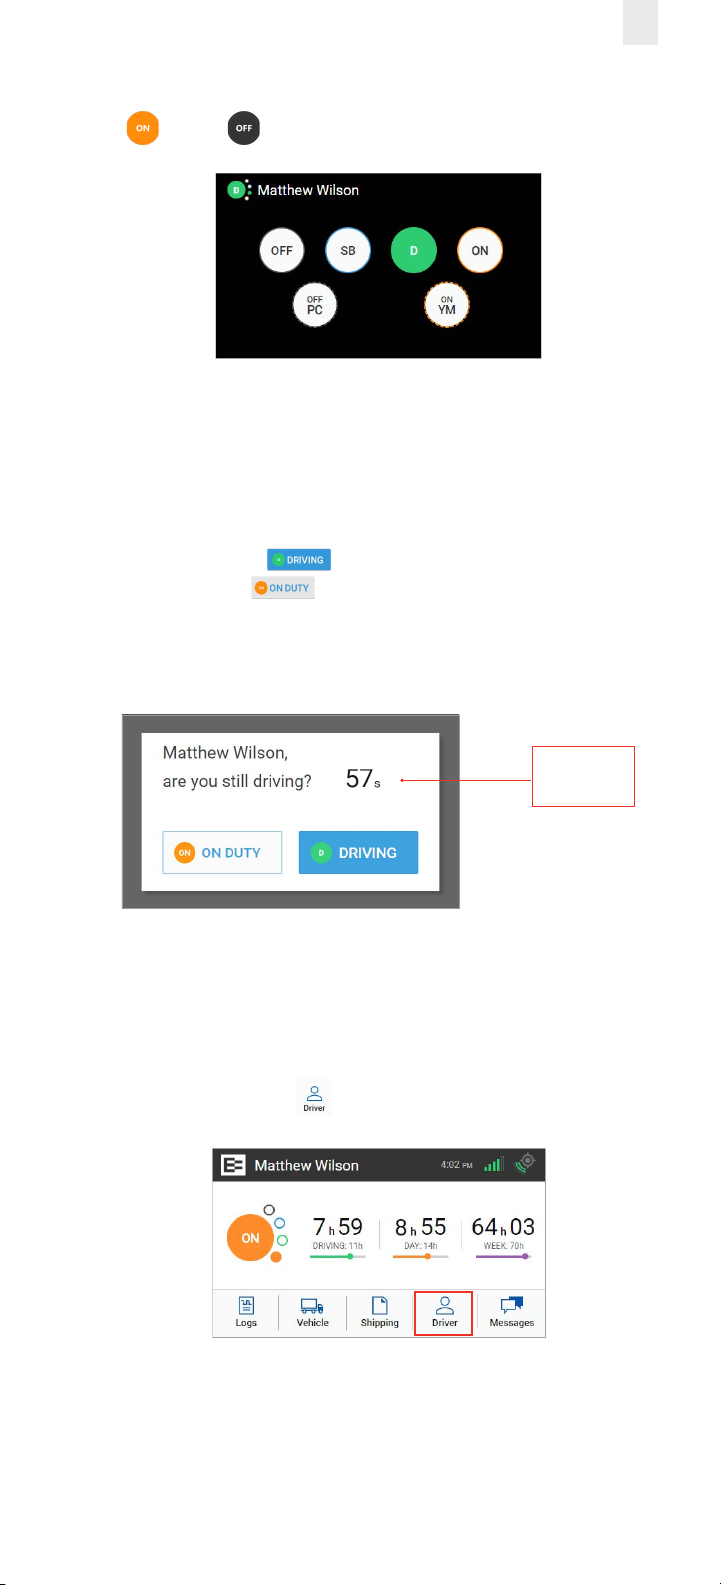
2. Tap the duty status that applies to the change (such as ON
or OFF ). You are returned to the Home screen.
3.1.2.1 Exiting Driving Mode Alternative Process
The screen on the EROAD ELD automatically changes if your
vehicle is stationary for five minutes. You have 60 seconds to
respond to the prompt, otherwise, your status changes to On
Duty, if you ignore the prompt.
• Tap the Driving button if you are still driving or tap
the ON DUTY button if you are not driving.
Note: Use the duty status icon to change your duty status, if
needed. See section 2.4.1, Duty Status for more information.
21
60-Second
Counter
3.2 ADDING A CO-DRIVER
Both the active driver and co-driver must be logged into the
EROAD ELD, when driving with a co-driver. Co-driver login can
be accomplished using the following steps.
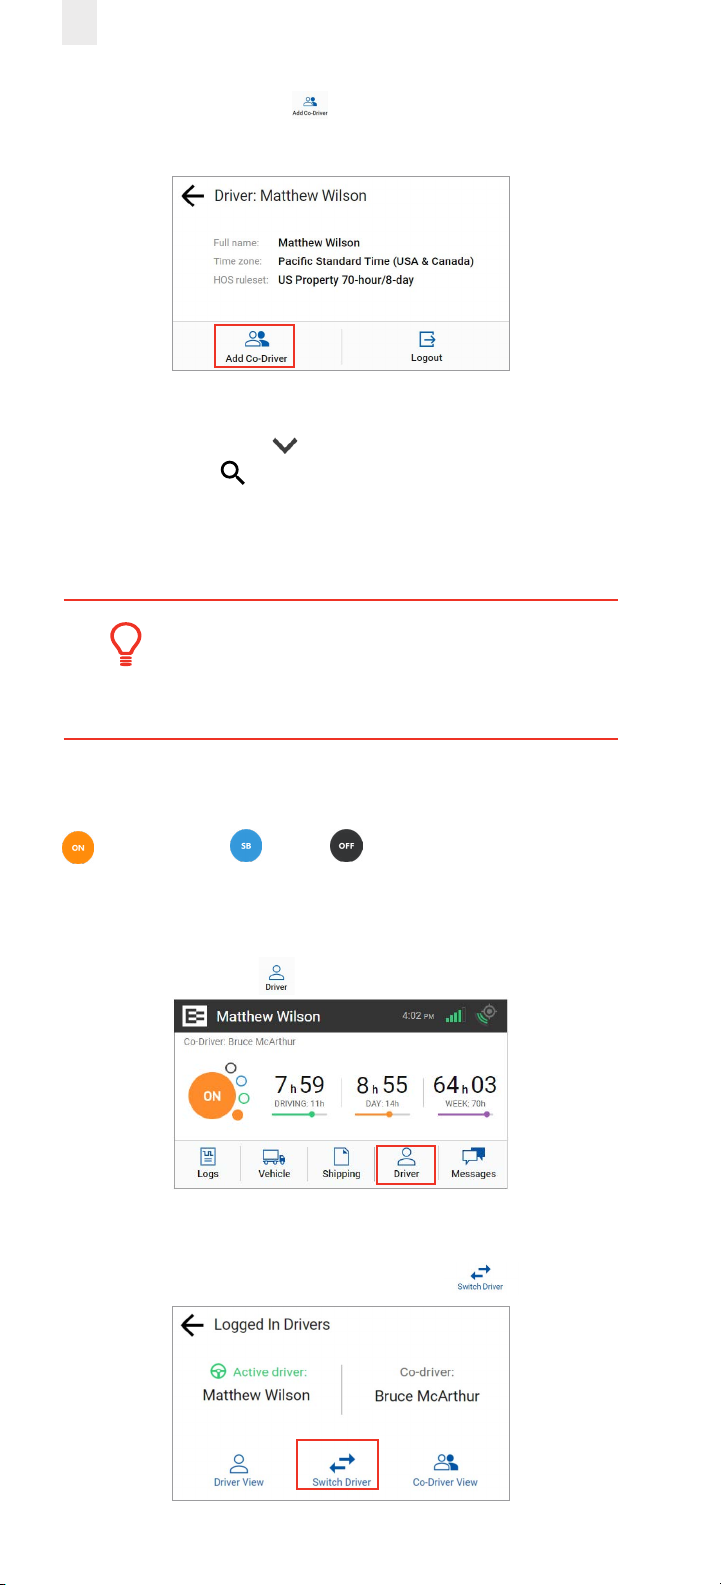
1. Tap the Driver icon on the Home menu.
Page 26
22
2. Tap the Add Co-Driver icon on the Driver menu. The
Co-Driver Login screen appears.
3. Tap the co-driver’s name.
Note: Tap the Down arrow to see the rest of the list or
tap the Search icon to find your name.
4. Co-Driver, enter your four-digit PIN number.
See section 2.1, Logging in to the EROAD ELD for more
information about the login screens.
Tip:
Driving time is applied to the active driver if the
co-driver does not login.
3.3 Changing Drivers
The Active Driver must change his duty status to ON Duty
, Sleeper Berth or OFF before changing drivers
on the EROAD ELD, when a co-driver is present. Perform
the following steps before the vehicle is in motion when you
change drivers.
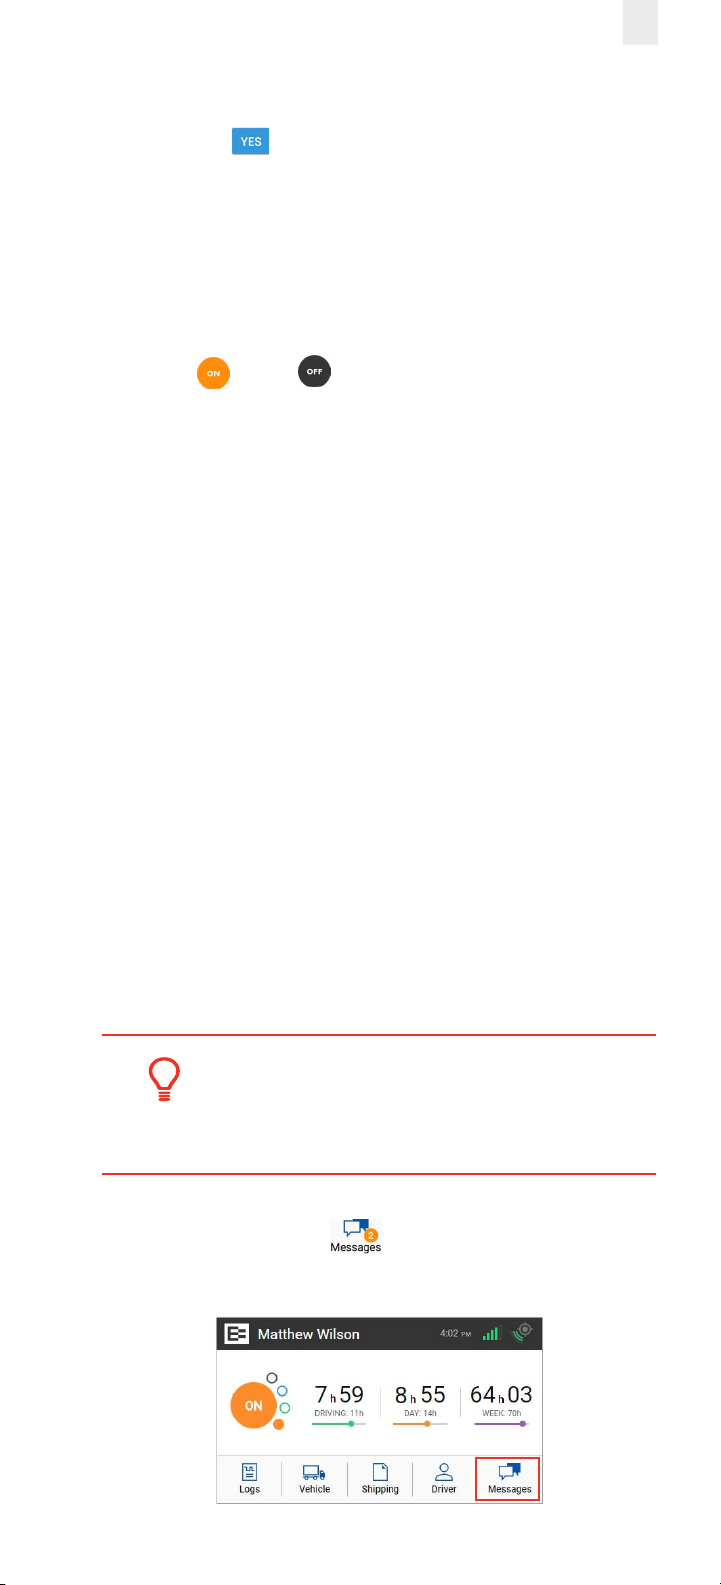
1. Tap the Driver icon on the Home menu.
2. The Logged In Drivers screen displays the Active Driver’s
name on the left side and the Co-Driver’s name on the right
side of the screen. Tap the Switch Driver icon.
Page 27
23
3. Enter the active driver’s PIN.
4. Tap the Yes button. A confirmation message appears.
Note: See section 4.2, Swapping Driving Time if you made a
mistake and recorded driving time for the wrong driver.
3.4 Changing Vehicles
Perform the following steps if you must move from one vehicle
to another vehicle.
1. Tap ON or OFF at the Home screen in the first
vehicle to change your duty status.
See section 2.4.1, Duty Status for more information.
2. Perform the logout procedure in the first vehicle.
See section 3.9, Finishing Your Day / Logging out for
more information.
3. Perform the login procedure on the EROAD ELD in the
second vehicle and set your duty status.
See section 2.1, Logging in to the EROAD ELD and section
2.4.1, Duty Status for more information.
3.5 Viewing and Sending Messages
Dispatchers can send messages to drivers through Depot.
Drivers can view and send messages using the Messages icon
on the Home menu. An orange light illuminates on the ELD
when a message is unread.
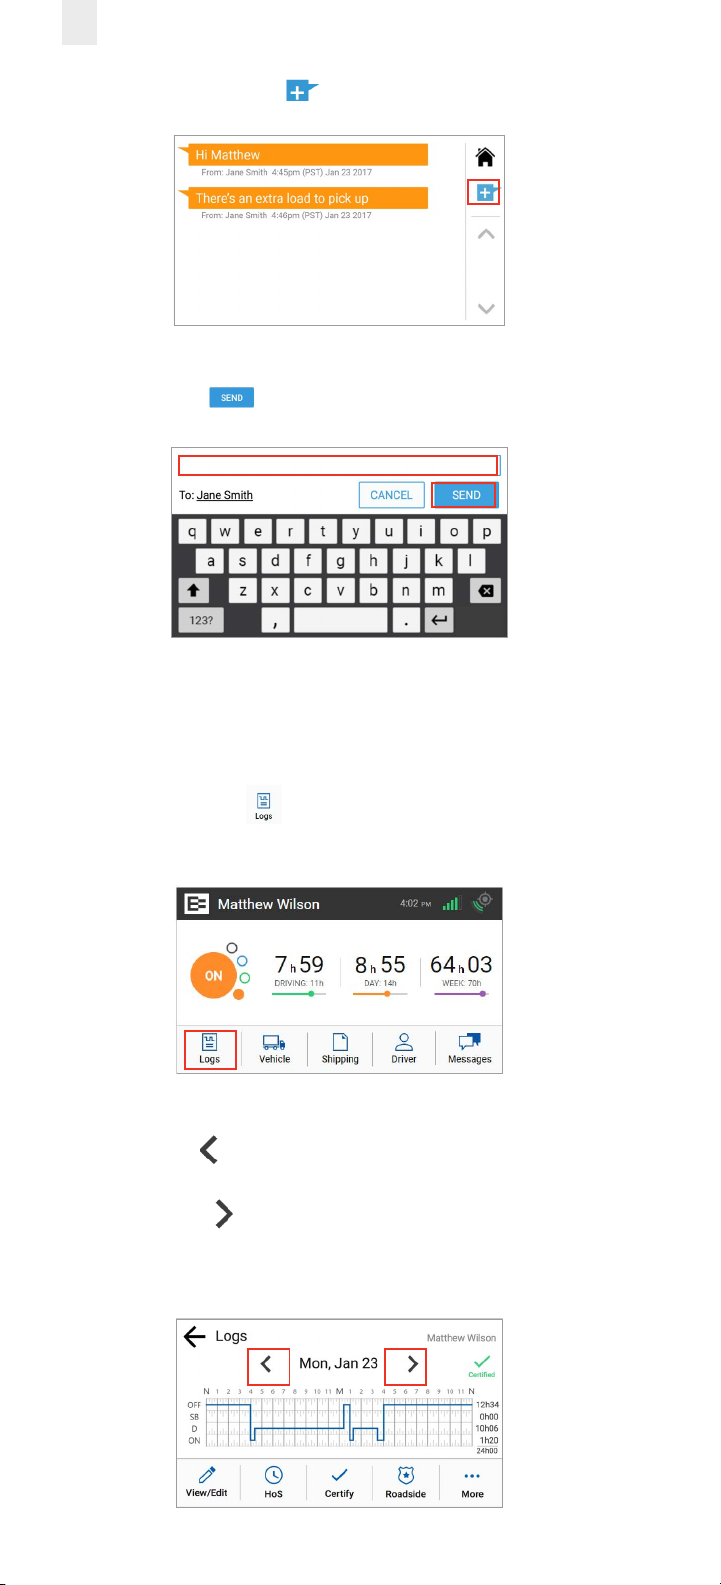
• Unread messages are highlighted in orange.
• Read messages are highlighted in gray.
• Replies are highlighted in blue.
Tip:
The vehicle must be stopped before you reply or
send a message.
Perform the following steps to view and send a message.
1. Tap the Messages icon on the home screen. The alert
on the icon indicates a message is unread.
Page 28
24
2. Tap the New Message button to send a reply.
3. Enter the message in the text field using the key pad.
4. Tap the Send button to send the message.
3.6 REVIEWING LOGS
The EROAD ELD lets you quickly verify that your logs are
accurate and complete. Perform the following steps to review
your logs.
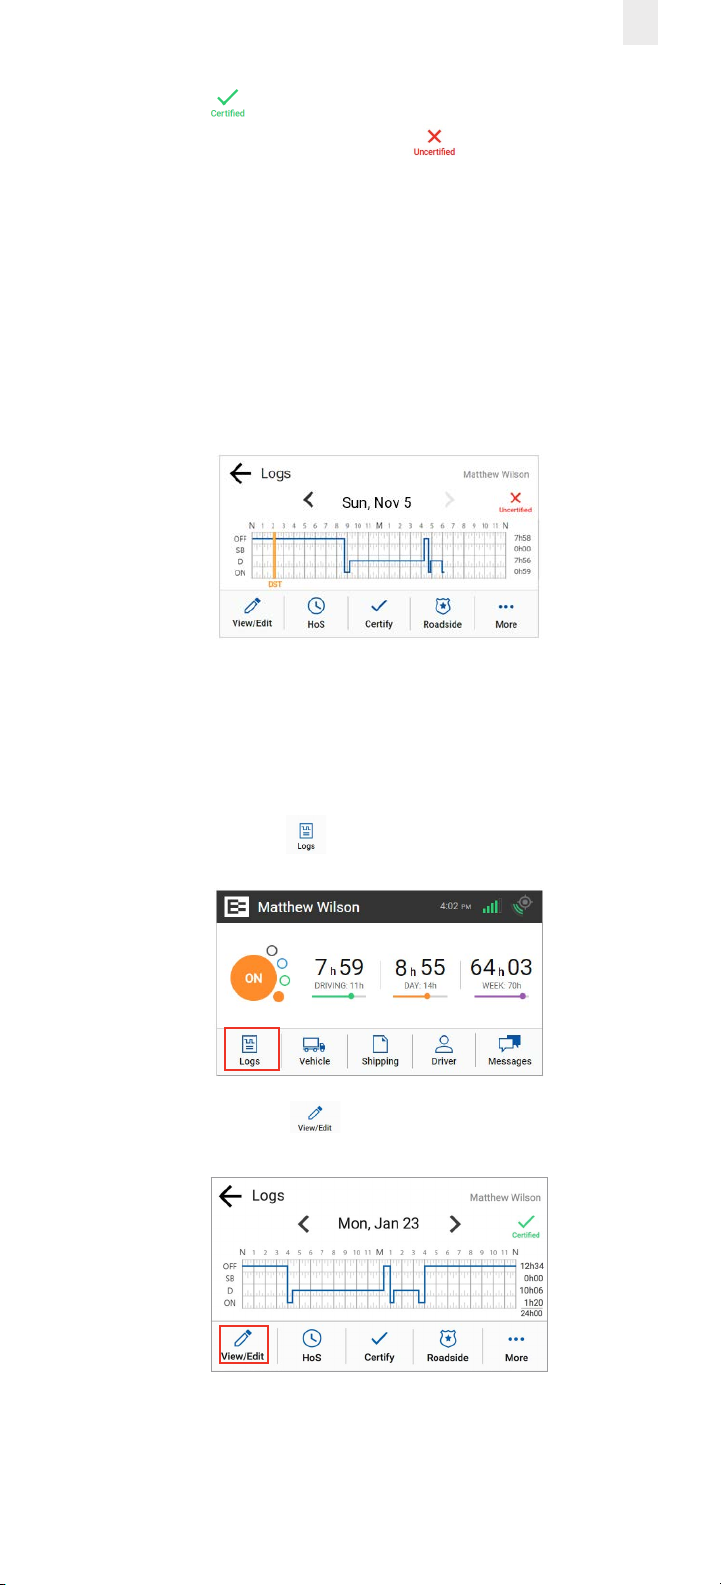
1. Tap the Logs icon on the Home menu. The Logs screen
displays activity for the current day.
2. Tap the Left arrow by the date to view the previous day.
You can view up to seven days of prior activity.
3. Tap the Right arrow by the date to return to the current
date. Your total hours for each duty status are listed on the
right side of the graph.
Page 29
25
A Certified icon displays under your name, if the logs
have been certified. An Uncertified icon appears if you
still need to certify your logs.
Note: See section 3.8, Certifying Your Logs for more
information.
3.6.1 Daylight Savings Time
Daylight savings time is automatically applied to the log graph
as a vertical orange line with an abbreviation of DST. It is also
noted in the events list.
3.7 CORRECTING LOGS
Occasionally, you might have to correct your logs. Perform the
following steps to access a log for correction.
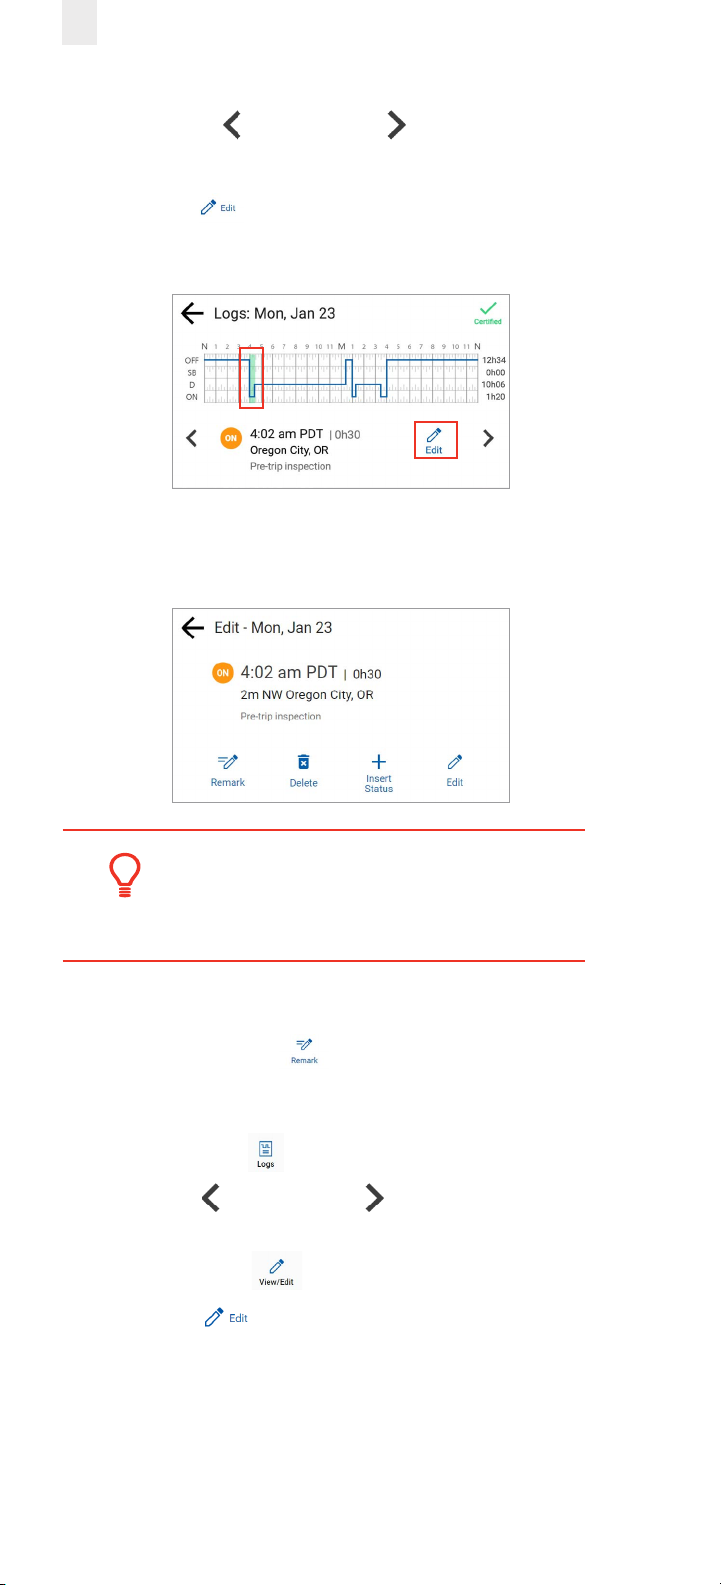
1. Tap the Logs icon on the Home menu.
2. Tap the View/Edit icon on the Logs screen.
Page 30
26
3. Tap the Duty Status on the graph that you want to correct,
or tap the Left arrow or Right arrow below the graph
to locate the duty status that needs correction.
4. Tap the Edit icon on the lower right side of the screen.
The selected log entry for that day appears on screen
highlighted in green.
There are several menu options on the Edit screen that can
be used to modify your logs, which are described in the
following sections.
Tip:
You cannot shorten or edit driving time that was
automatically recorded.
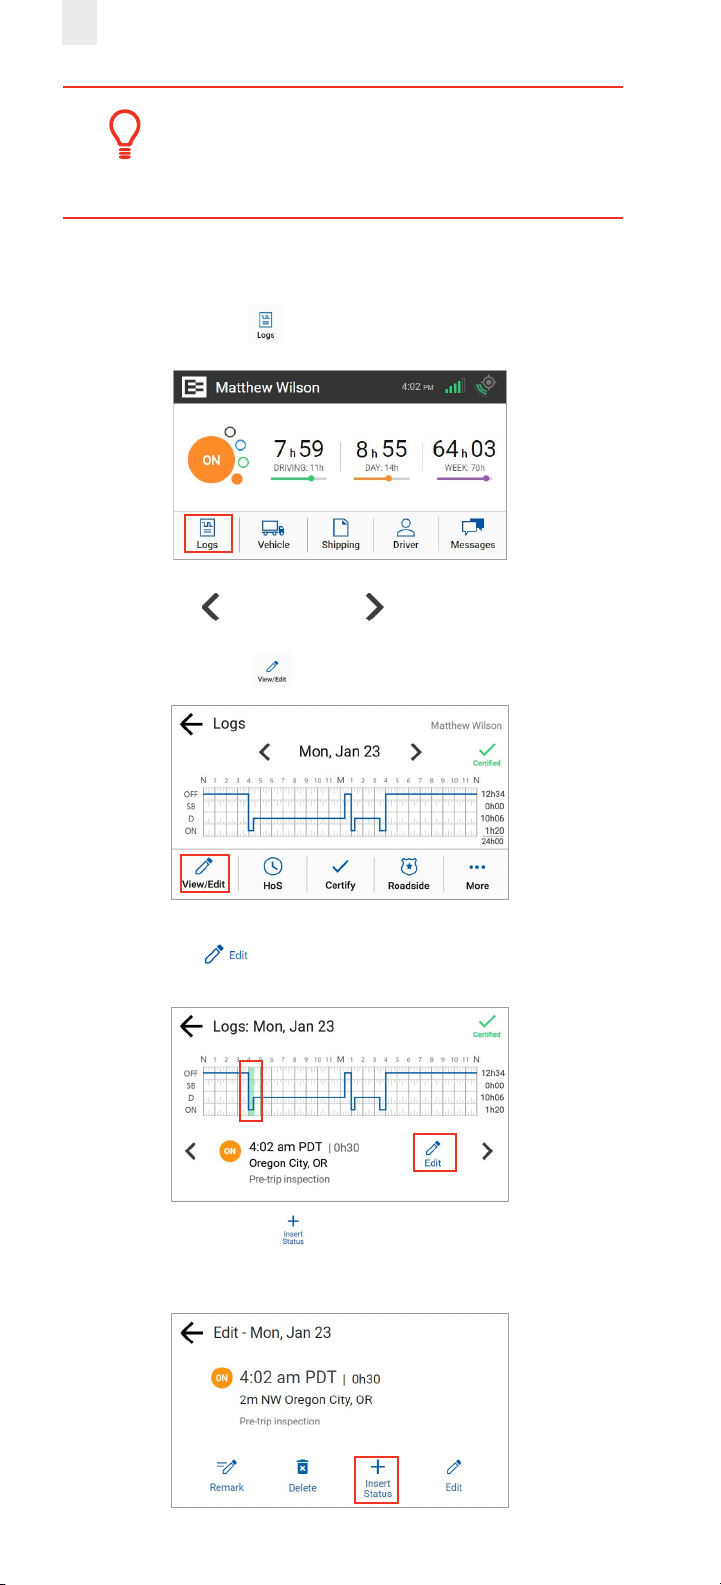
3.7.1 Adding a Remark
You can use the Remark icon to annotate a duty status.
Perform the following steps to add a remark. See section 3.7,
Correcting Logs for illustrations of steps 1 – 4.
1. Tap the Logs icon on the Home screen.
2. Tap the Left arrow or Right arrow until you locate
the point in your logs where you want to annotate a record.
3. Tap the View/Edit icon on the Logs screen.
4. Tap the Edit icon on the View/Edit screen. The Edit
Summary screen appears.
Page 31
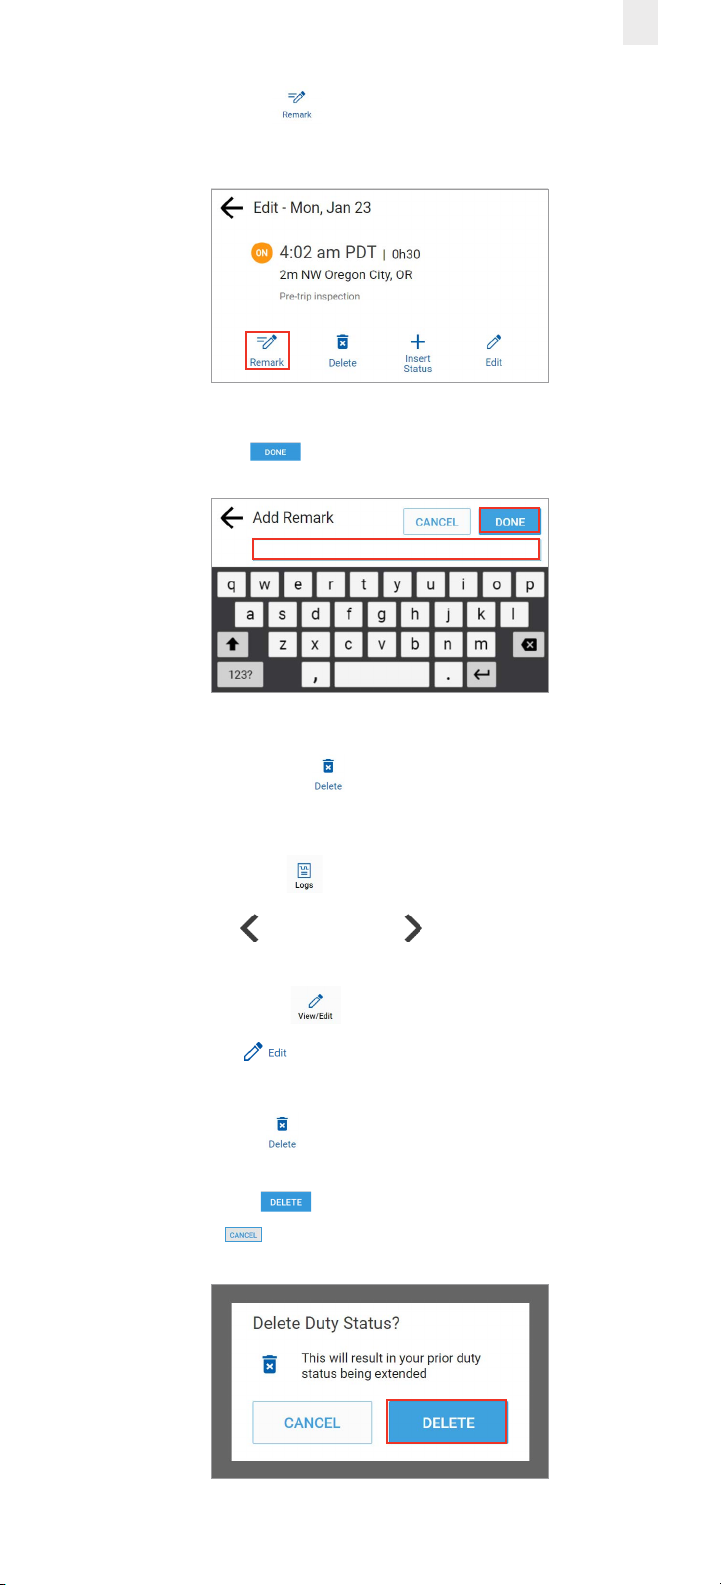
5. Tap the Remark icon. The Add a Remark screen
appears.
6. Enter your comments in the Add Remark field.
7. Tap the Done button.
27
3.7.2 Deleting a Record
You can use the Delete icon to delete a record. Perform
the following steps to delete a record. See section 3.7,
Correcting Logs for illustrations of steps 1 – 4.
1. Tap the Logs icon on the Home screen.
2. Tap the Left arrow or Right arrow until you locate
the point in your logs where you want to delete a record.
3. Tap the View/Edit icon on the Logs screen.
4. Tap the Edit icon on the View/Edit screen. The Edit
Summary screen appears.
5. Tap the Delete icon. The Delete Duty Status prompt
appears.
6. Tap the Delete button to confirm the action or tap
the Cancel button.
Page 32
28
Tip:
You cannot delete driving time that was not
manually entered.
3.7.3 Inserting a Missing Record
Perform the following steps to insert a missing record.
1. Tap the Logs icon on the Home screen.
2. Tap the Left arrow or Right arrow until you locate
the point in your logs where you want to insert a record.
3. Tap the View/Edit icon on the Logs screen.
4. Tap the Edit icon on the View/Edit screen. The Edit
Summary screen appears.
5. Tap the Insert Status icon. The Add Status screen
appears.
Page 33
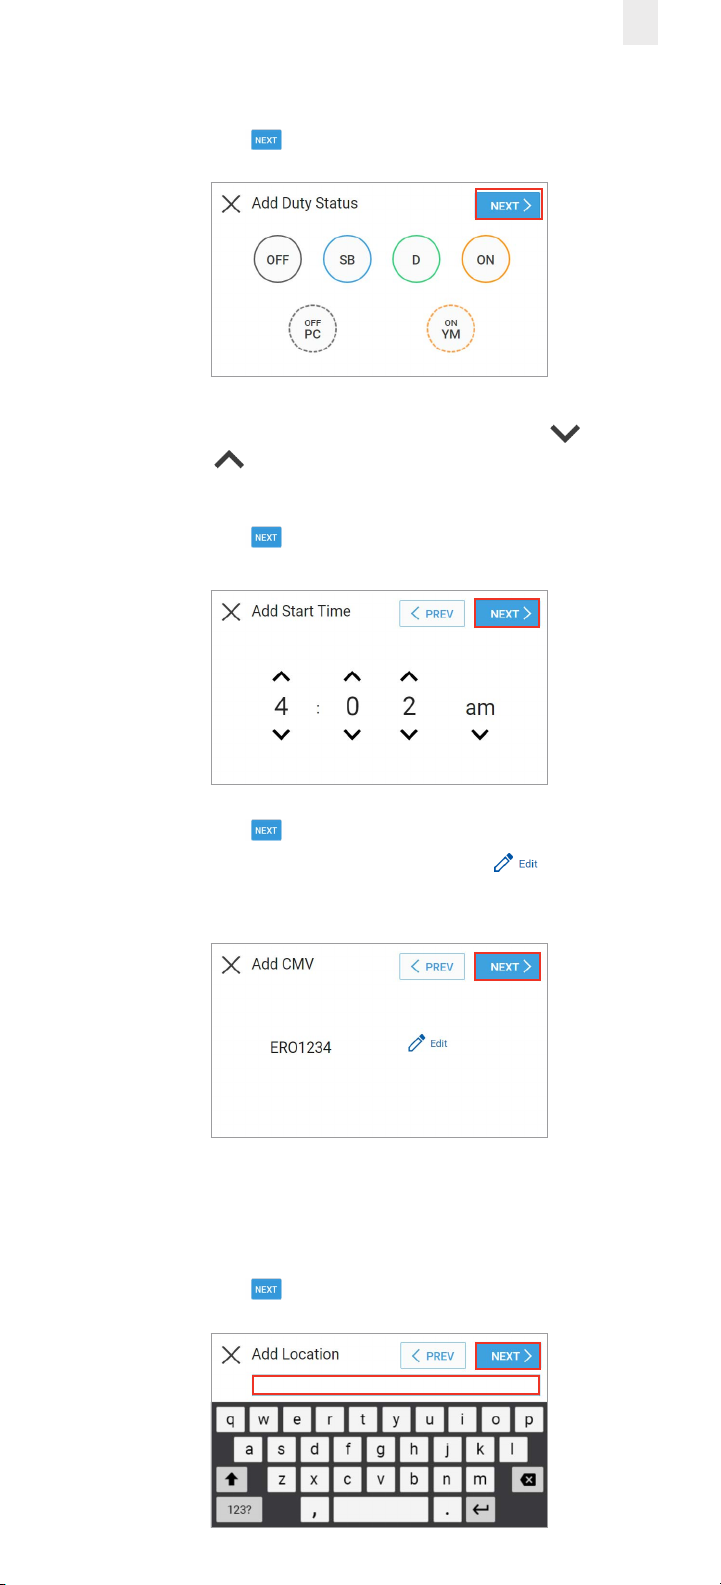
6. Tap the duty status that you want to insert.
7. Tap the Next button.
8. The Add Start Time screen appears. Tap the Up arrow
or Down arrow to set the hour, minute, and AM or PM
setting.
9. Tap the Next button. The Add CMV screen appears.
29
10. Tap the Next button to confirm the CMV.
Note: You have the option to tap the Edit icon if a CMV
change is needed.
11. Enter your location in the Add Location field.
Note: This is pre-populated with the current location, but
might require correction.
12. Tap the Next button. The Add Remark screen appears.
Page 34
30
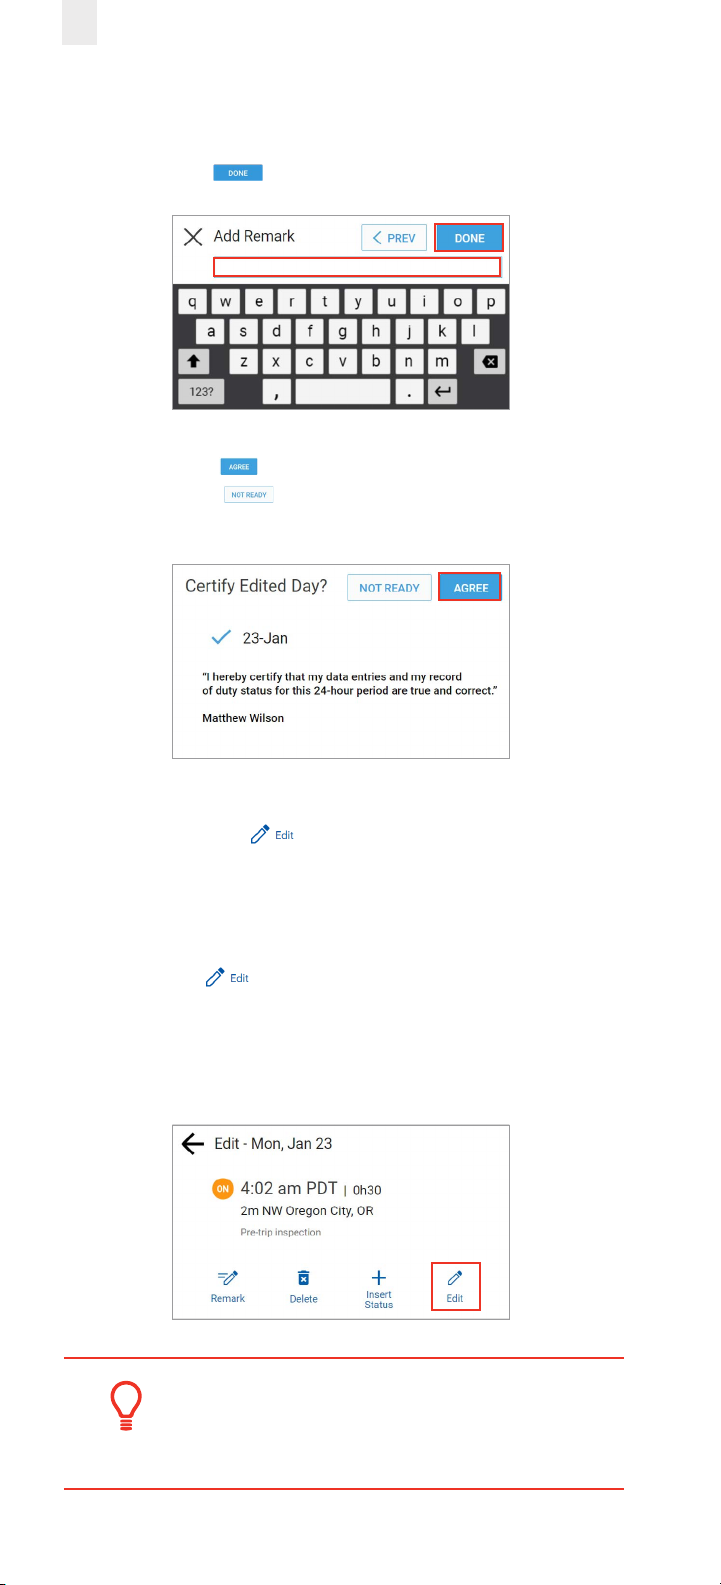
13. Enter your reason for inserting the record in the Add
Remark field.
14. Tap the Done button.
15. Tap the Agree button if you are ready to certify or tap
the Not Ready button. The Logs screen appears with
a confirmation message.
3.7.4 Editing an Existing Record
You can tap the Edit icon to correct an existing record.
Perform the following steps to correct an existing record.
1. Complete the steps described above under section 3.7,
Correcting Logs to open the Edit screen.
2. Tap the Edit icon. The Edit Status screen appears. The
EROAD ELD allows you to proceed through the Edit wizard
to access the following screens: Edit Duty Status, Edit Start
Time, Edit CMV, Edit Location, and Add a Remark, in this
order.
Tip:
You must add a remark when editing your logs
to explain the reason for the edit.
Page 35
31
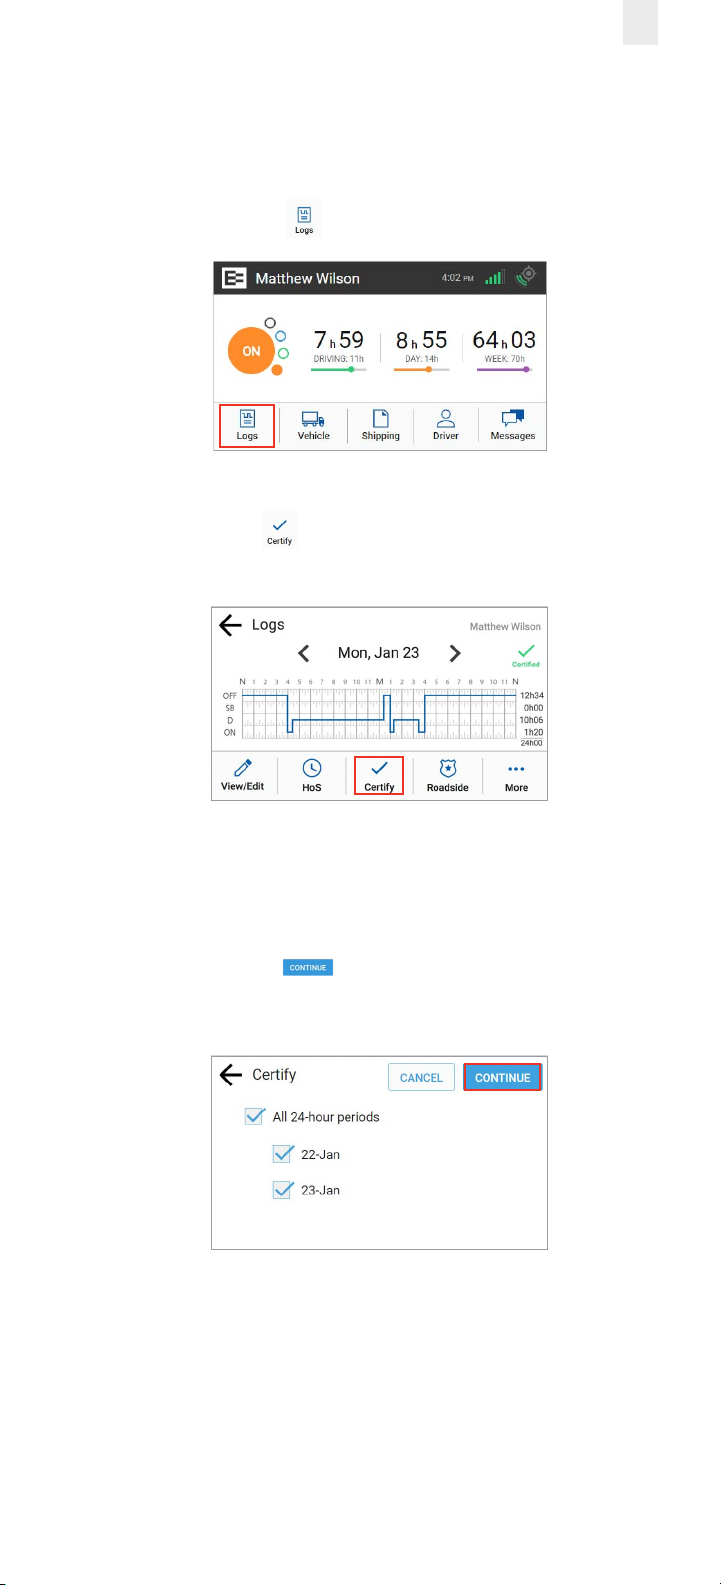
3.8 CERTIFYING YOUR LOGS
It is best to certify your logs at the end of each trip. Perform
the following steps to certify your logs if any previous days are
uncertified.
1. Tap the Logs icon on the Home screen.
2. Tap the Certify icon on the Logs screen. The Certify
screen displays.
(Optional) Tap a check box (date) only on the Certify screen
if you want to disable it because you are not ready to certify
that date.
3. Tap the Continue button. A confirmation message
appears for the selected dates.
Page 36
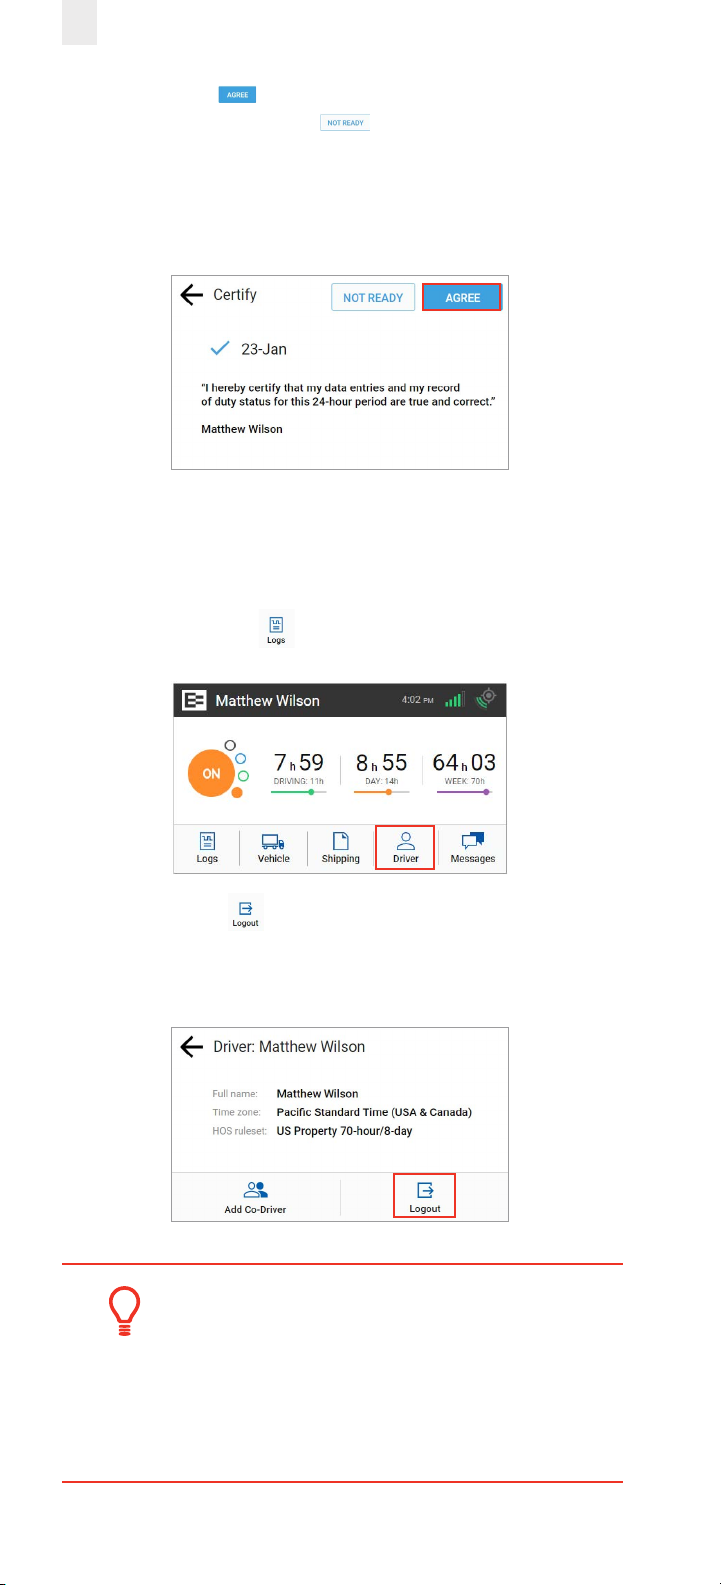
32
4. Tap the Agree button if you are ready to certify those
logs or tap the Not Ready button if you need to edit
something else. Ensure that your log is true and correct
before you certify. A Certification Successful message
appears on screen.
3.9 FINISHING YOUR DAY / LOGGING OUT
You need to log out when you finish your day to prevent
another driver from accessing your logs. Perform the following
steps to logout.
1. Tap the Driver icon on the Home screen.
2. Tap the Logout icon. The EROAD ELD prompts you
to certify your logs if they are uncertified. See section 3.8,
Certifying Your Logs for more information.
Tip:
Be careful if you use a kill switch. Change your
duty status to OFF, then logout before using the
kill switch. Otherwise, you might stay in Driving
status overnight.
Page 37
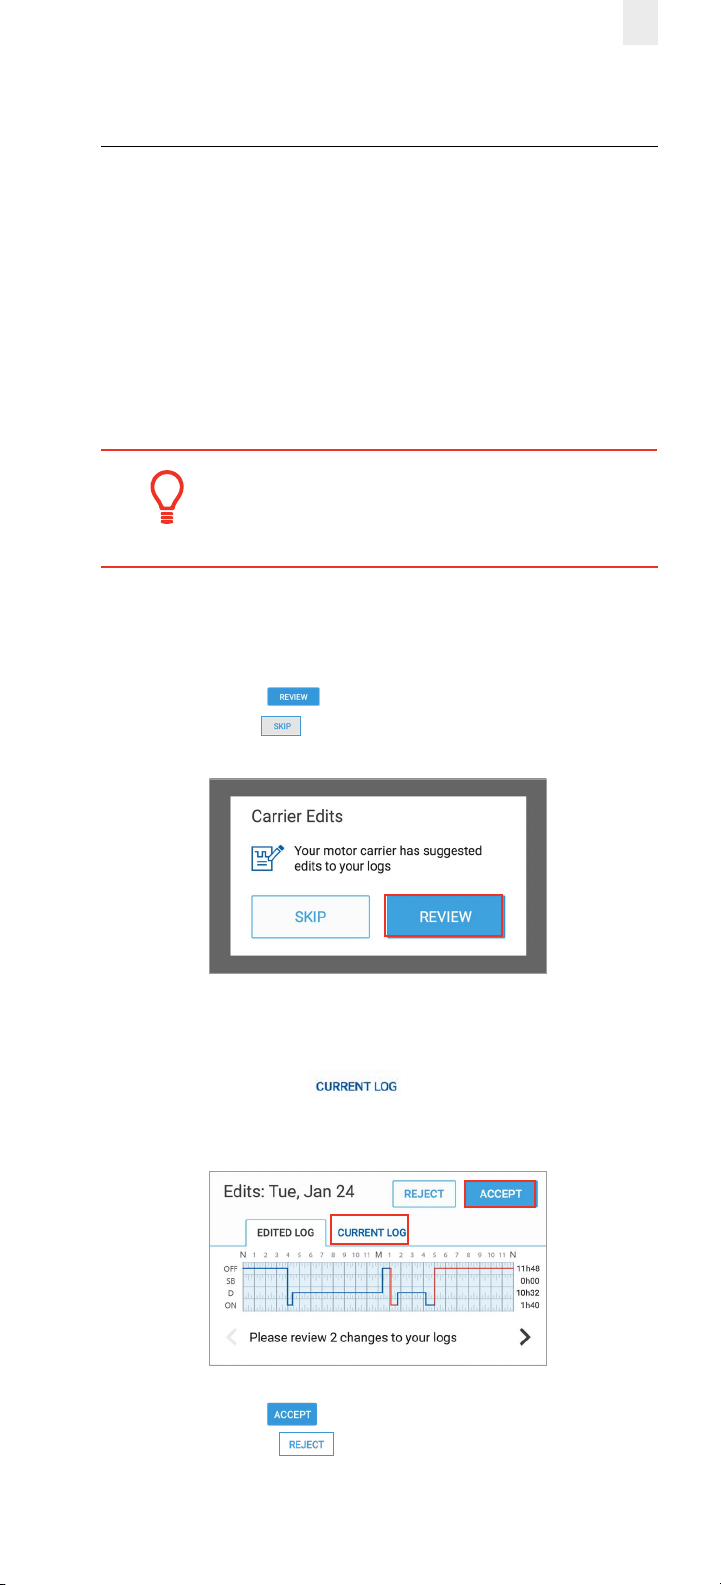
33
4 Advanced Log Edits
This chapter describes how to make corrections that are
suggested by your supervisor, swapping driving time, claiming
unidentified driving time, and exporting your logs.
4.1 REVIEWING SUGGESTED CORRECTIONS
Drivers have two ways to view and make corrections that
are suggested by the supervisor. A prompt appears when
you log into or out of the EROAD ELD or you can review the
suggested changes later through the Logs menu.
Tip:
An orange LED illuminates on the top of the ELD
when a pending edit is ready to review.
4.1.1 Reviewing Suggested Edits at Login and Logout
The Carrier Edits screen might appear at login or logout if the
supervisor has suggested edits to your logs.
1. Tap the Review button to examine the edited record
or tap the Skip button to look at them later.
The Carrier Edits graph screen appears. The edited log is
shown on the graph so you can examine the changes.
2. Tap the Current Log tab to view the previously
certified day.
3. Tap the Accept button if you agree with the change
or tap the Reject button. The Carrier Edits screen
displays a confirmation message when completed. An
accepted change updates your log, and you have to re-
Page 38
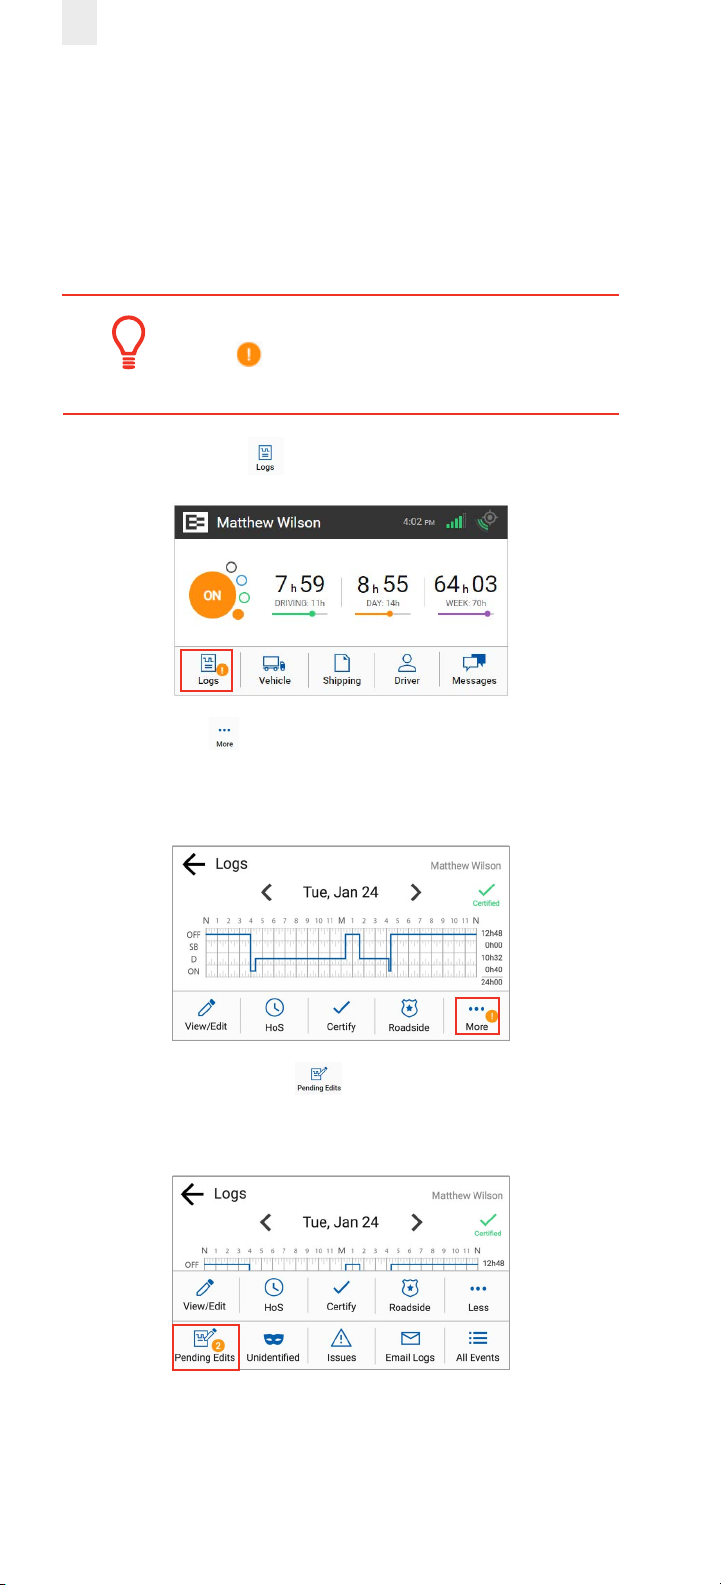
34
certify any aected days. See section 3.8, Certifying Your
Logs for more information.
4.1.2 Reviewing Suggested Edits from the Home Page
Perform the following steps to review supervisor suggestions if
any new edits are made after you logged into the EROAD ELD.
Tip:
An alert appears on the Logs icon on the Home
screen when there are new edits to review.
1. Tap the Logs icon on the Home screen.
2. Tap the More icon on the Logs screen. Notice the alert
icon in the following illustration. The Logs menu expands to
reveal a second row of menu options.
3. Tap the Pending/Edits icon on the Logs screen. The
EROAD ELD contacts Depot to display any pending log
edits.
A summary of the changes for the edited day are shown
under the Edited Tab when there are pending edits to
review. Changes on multiple days are arranged in order
from the least recent to the most recently edited day.
Page 39
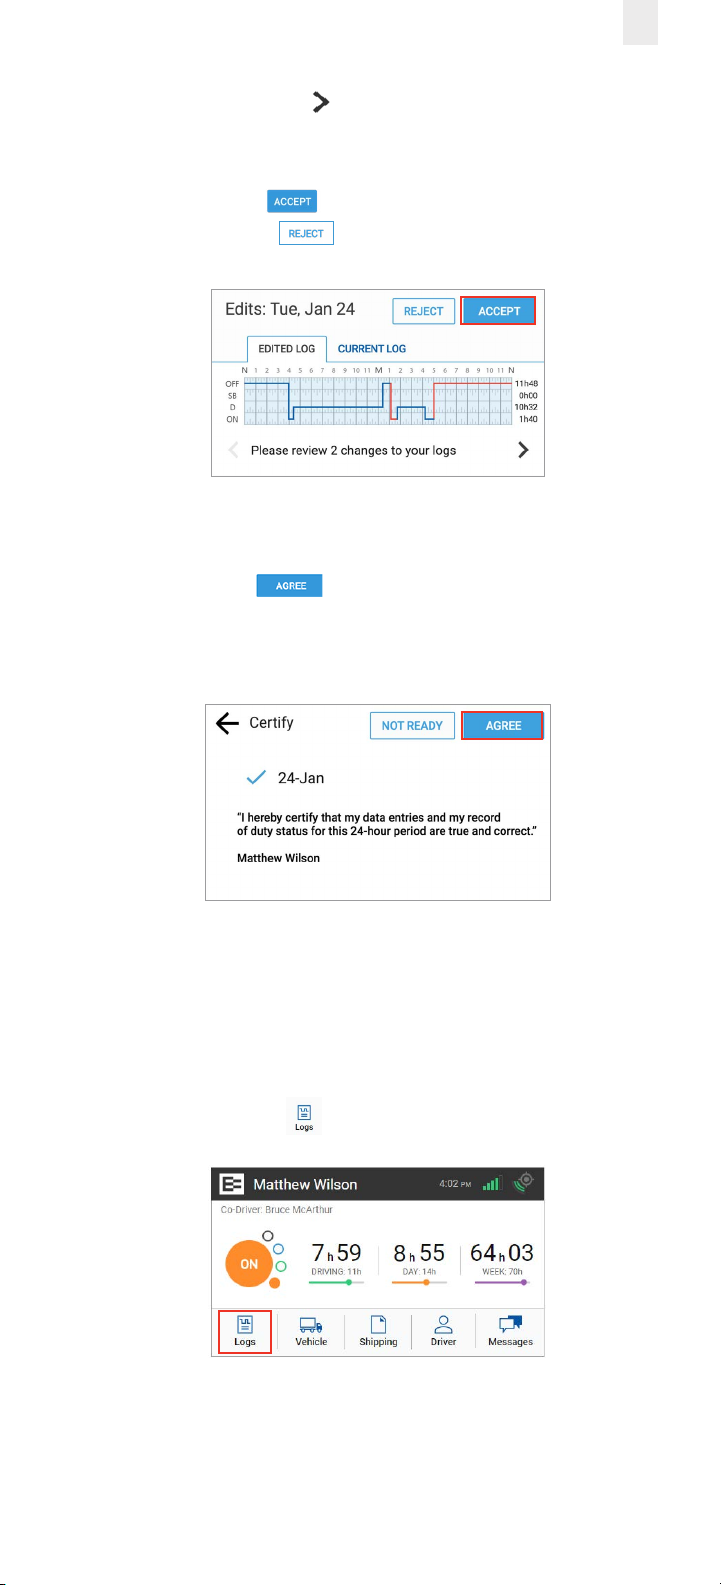
4. Tap the Right Arrow to see additional changes in the
logs.
5. Tap the Accept button if you agree with the change
or tap the Reject button. A confirmation message
appears when completed.
The Certify screen appears, because you must re-certify the
day for the changes that you just accepted.
6. Tap the Agree button to re-certify the day. The
EROAD ELD then synchronizes with Depot. You are
prompted to review the next day, if there are other edited
days.
35
4.2 SWAPPING DRIVING TIME
The driver and co-driver are responsible for setting status
changes. The EROAD ELD lets the co-driver swap driving time
on a portion of the log if the active driver forgot to change
driving status. The co-driver performs the following steps to
swap driving time.
1. Tap the Logs icon on the Home screen.
Page 40
36
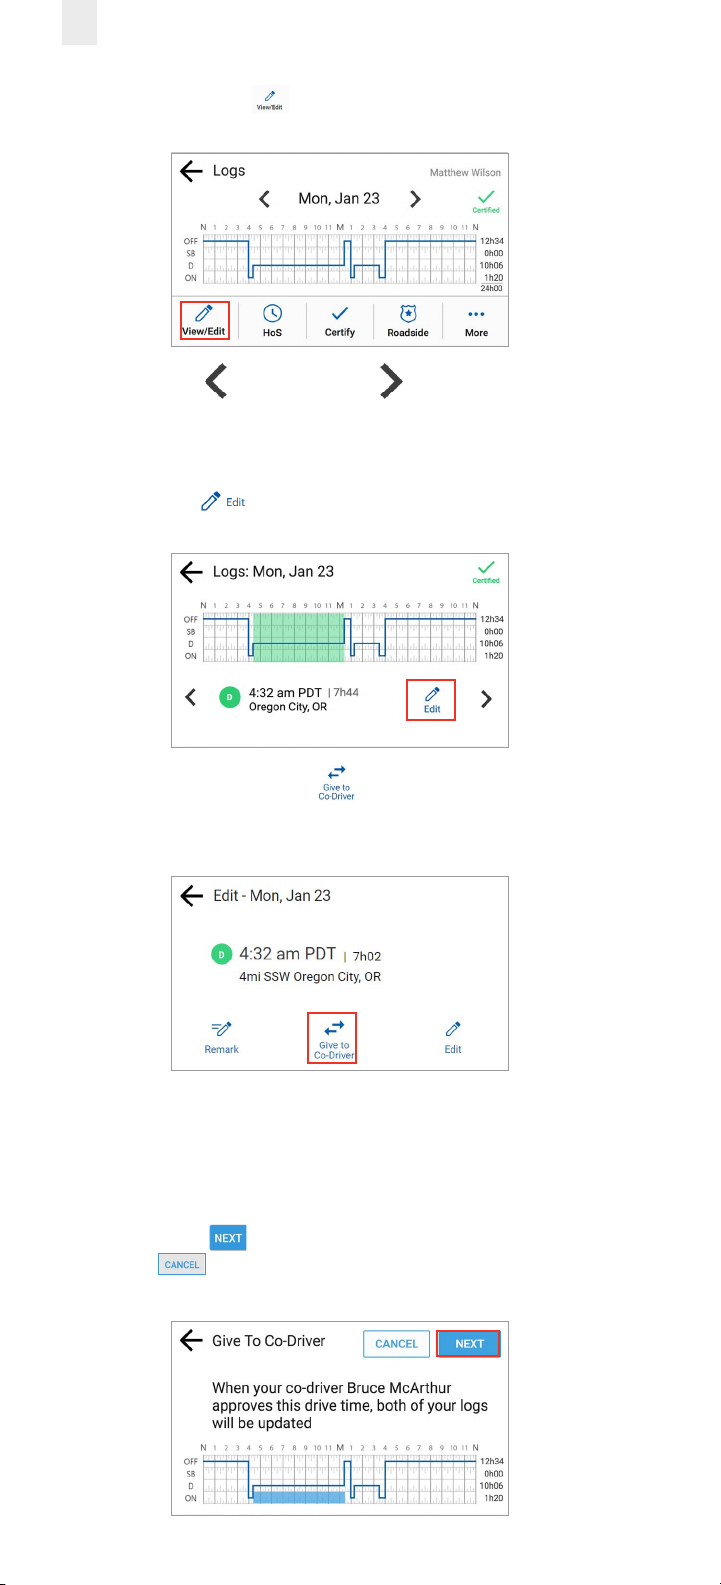
2. Tap the View/Edit icon on the Logs screen.
3. Tap the Left arrow or Right arrow on the bottom
of the screen until you locate the point in your logs where
you want to swap the driving time.
4. Tap the Edit icon. The Edit screen appears.
5. Tap the Give to Co-Driver icon. The Give to Co-Driver
screen appears.
The screen changes to display a graph of the aected area
with the future state highlighted in blue on the graph.
Note: The previous duty status is applied and replaces the
driving time when the co-driver accepts the swap.
6. Tap the Next button to initiate the swap or tap the
Cancel button.
Page 41
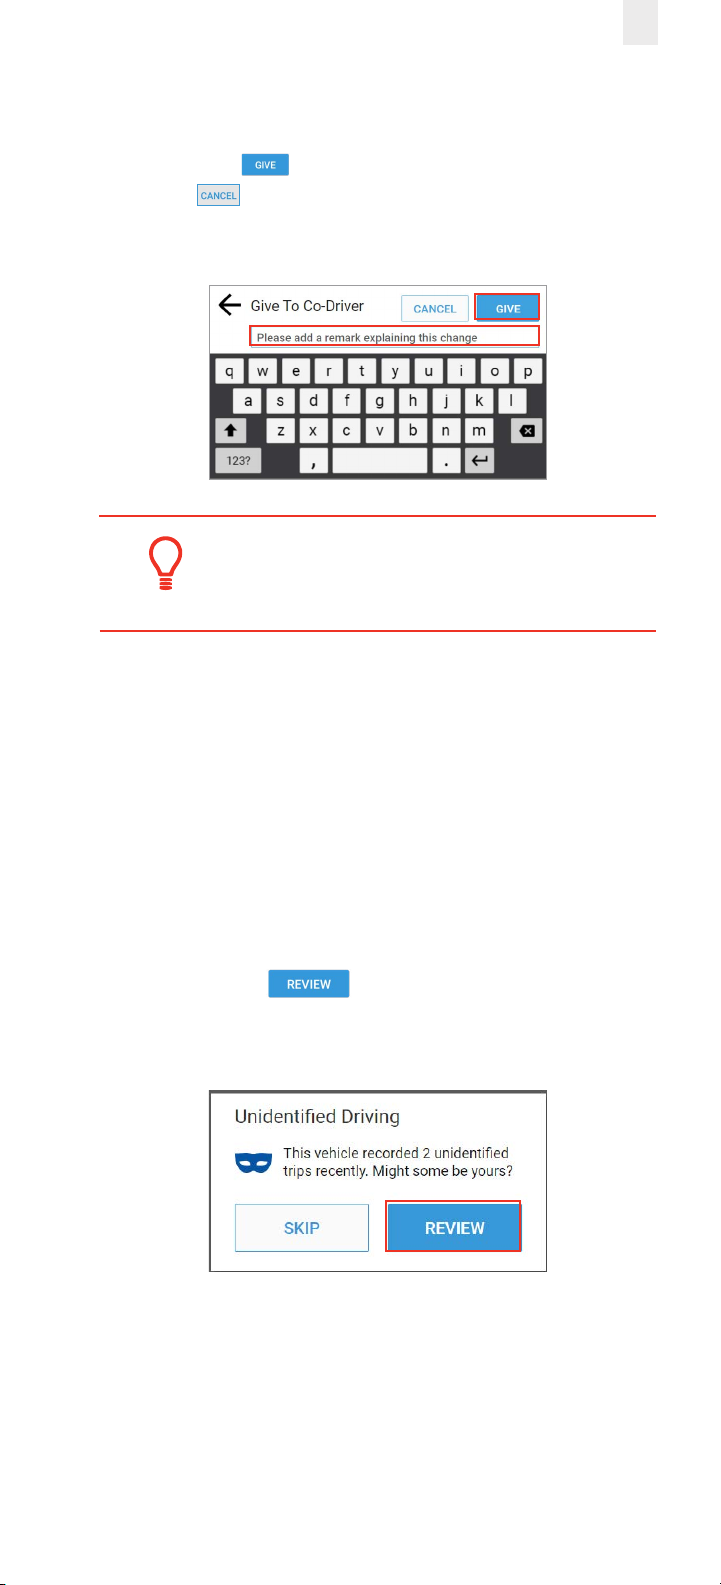
7. Enter a description in the Give to Co-Driver field to explain
the change.
8. Tap the Give button to complete the swap or tap the
Cancel button. The swap is recorded as a pending
request until the co-driver accepts it.
Tip:
A swap becomes eective when the co-driver
accepts the change.
37
4.3 CLAIMING UNIDENTIFIED DRIVING TIME
The EROAD ELD automatically records driving time including
time frames when the driver did not log in. You can claim
unidentified driving time in two dierent ways, which are
described in the following subsections.
4.3.1 Claiming Unidentified Trips at Login
The following prompt appears just after you log in if there are
unidentified trips.
1. Tap the Review button. Then, follow the steps
in section 4.3.2, Claiming Unidentified Trips in Logs Menu,
beginning with step 4.
Page 42
38
4.3.2 Claiming Unidentified Trips in Logs Menu
Perform the following steps to claim unidentified driving time
if you forgot to log in before your trip.
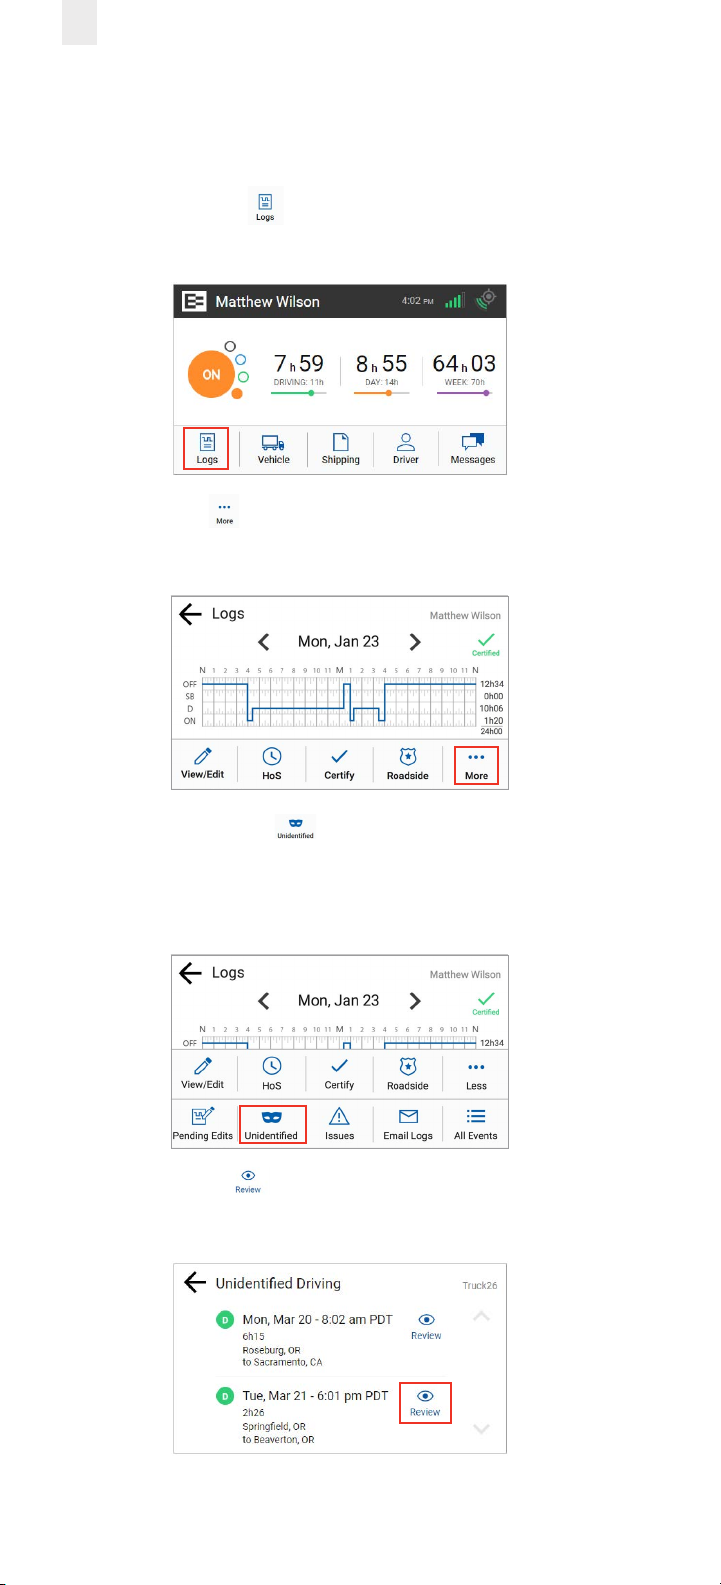
1. Tap the Logs icon on the Home screen. The Logs
screen appears.
2. Tap the More icon on the Logs screen. The Logs menu
expands to reveal a second row of menu options.
3. Tap the Unidentified icon. The Unidentified screen
displays the records that need to be claimed.
Note: An alert icon might appear on the Unidentified icon if
your supervisor assigned an unidentified trip to you.
4. Tap the Review icon to see details about the driving
time. The Claim Driving Time screen appears
Page 43
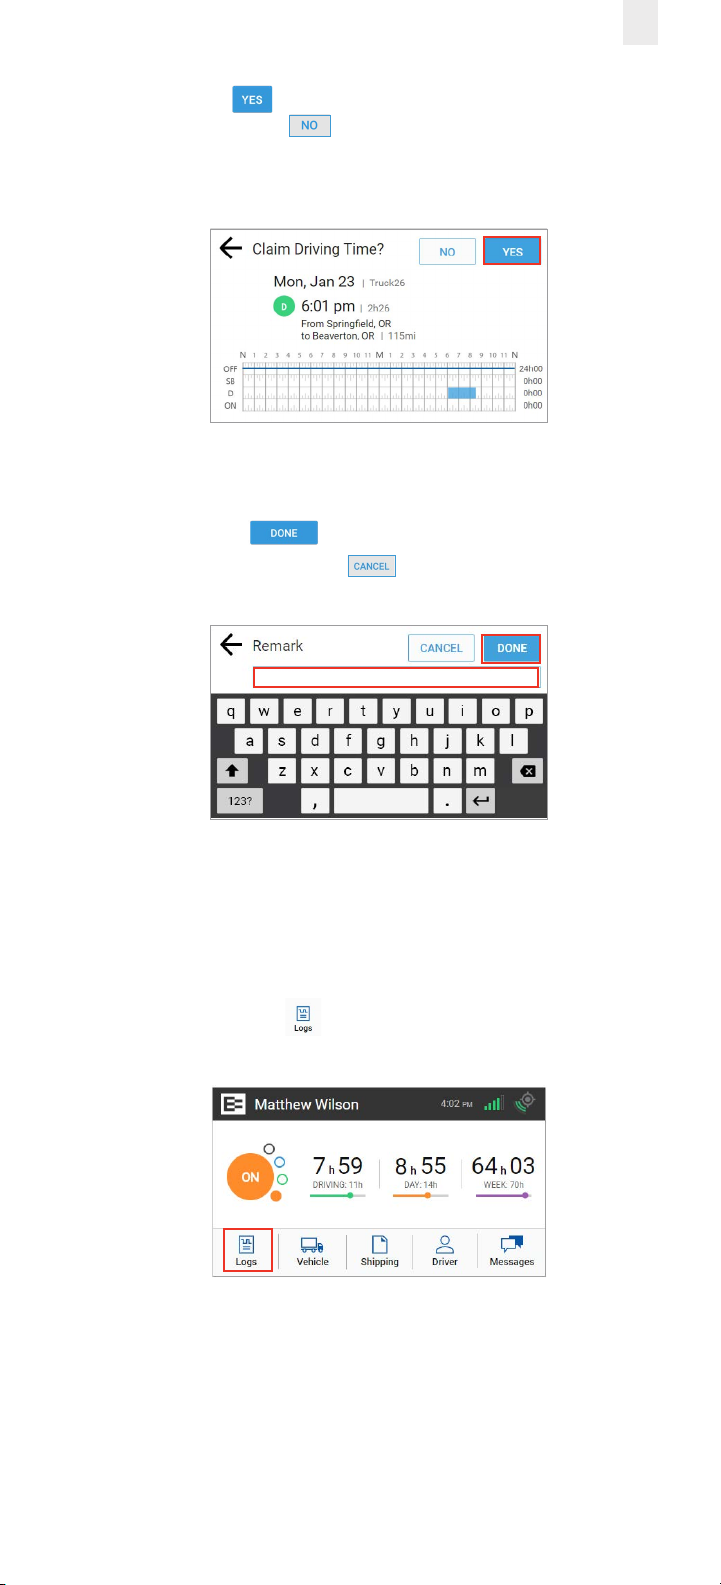
5. Tap the Yes button to claim this driving time for your
logs or tap the No button if this time is not yours. The
Claim Driving Time screen updates the graph (highlighted in
blue) to display how your logs look after you claim this time.
6. Enter a detailed description in the Remarks field to explain
the event.
7. Tap the Done button to enter the remark in your
record or tap the Cancel button. A confirmation
message shows that this time is added to your logs.
39
4.4 EMAILING LOGS TO YOURSELF
It is good practice to keep a back-up copy of your logs.
Perform the following steps to email your logs from the
EROAD ELD to your email address.
1. Tap the Logs icon on the Home screen. The Logs
screen appears.
Page 44
40
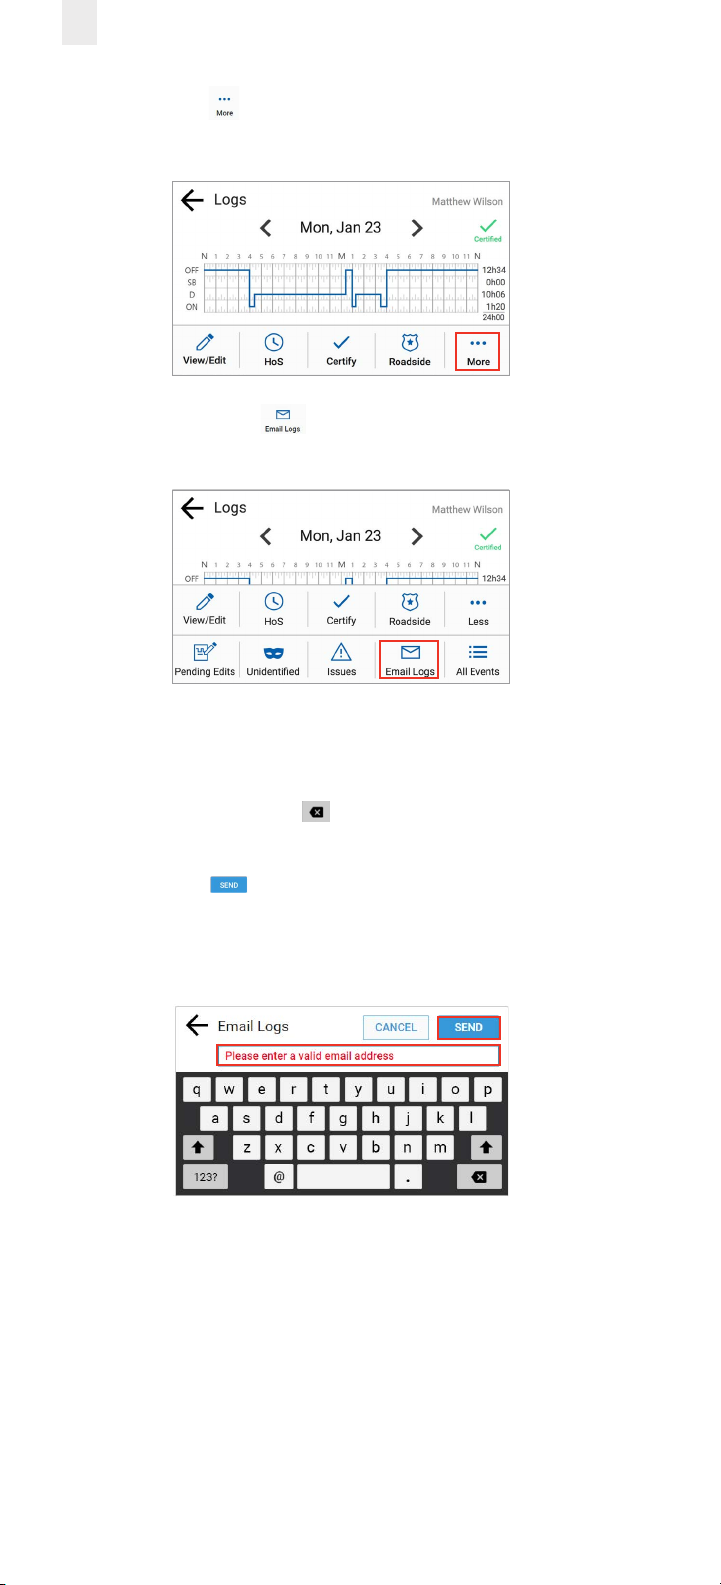
2. Tap the More icon on the Logs screen. The Logs menu
expands to reveal additional menu options.
3. Tap the Email Logs icon. The Email Logs screen
appears.
4. Enter your email address in the Email Logs field.
Note: This field is pre-populated if your supervisor added an
email address to your Driver Profile in Depot. You can press
and hold the Backspace key to erase the entire field if
you want to enter a dierent email address.
5. Tap the Send button to complete this action. A
confirmation message displays the email address where the
logs were sent.
Page 45
41
5 Roadside Inspection
This chapter describes the functions that you perform during a
roadside inspection. Change the EROAD ELD to the Inspection
mode when a roadside inspection occurs. This must be done
before handing the device to the inspector. The inspector
can see only the required information when the device is
in Inspection mode. The EROAD ELD does not allow the
inspector to change your logs. It allows the inspector to either
transfer or display your records.
Note: The inspector might ask you to power o the ignition, but
power is still supplied to the EROAD ELD.
Perform the following steps to open the Roadside menu.
1. Change your duty status to ON duty. See section 2.4,
Changing Your Duty Status for more information, if needed.
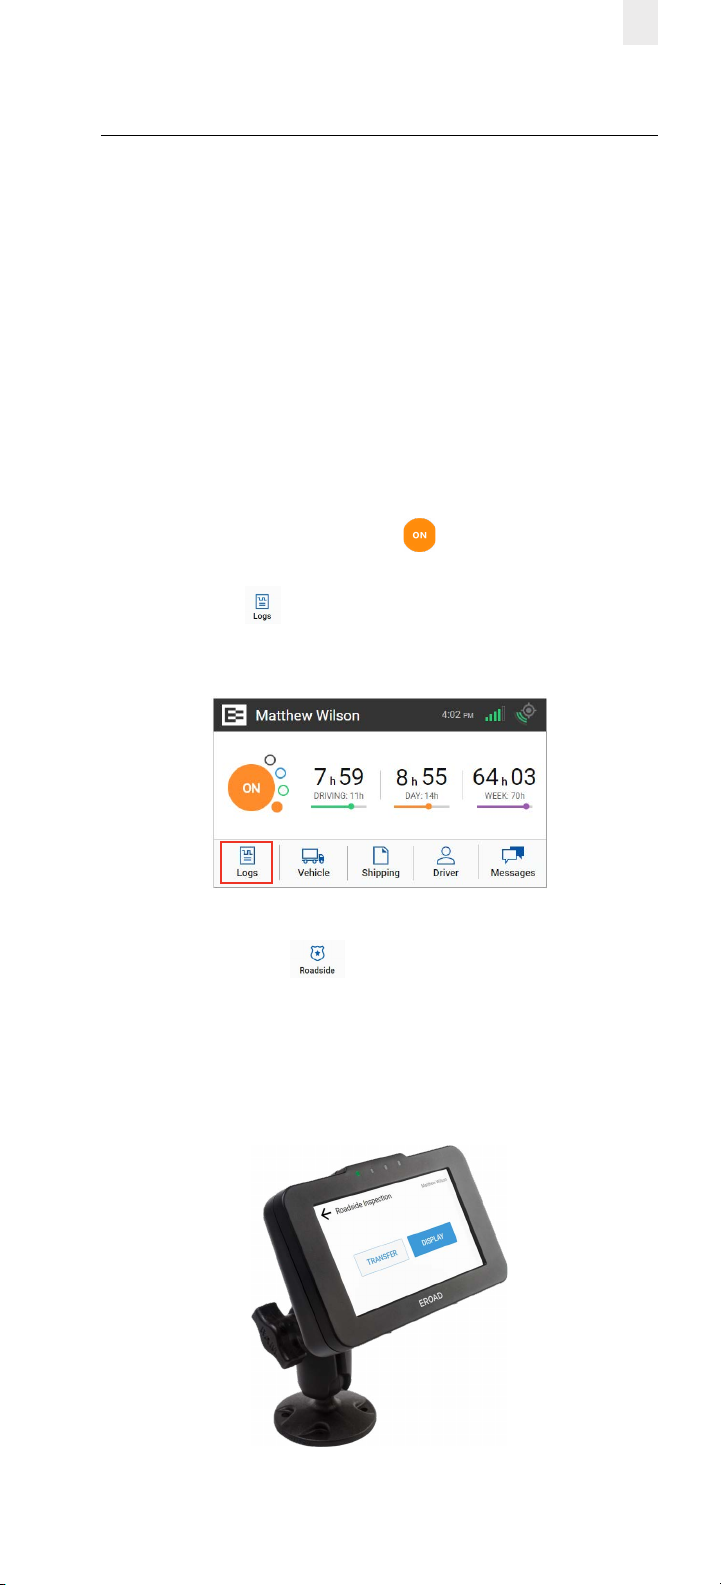
2. Tap the Logs icon on the Home menu. The Logs screen
appears.
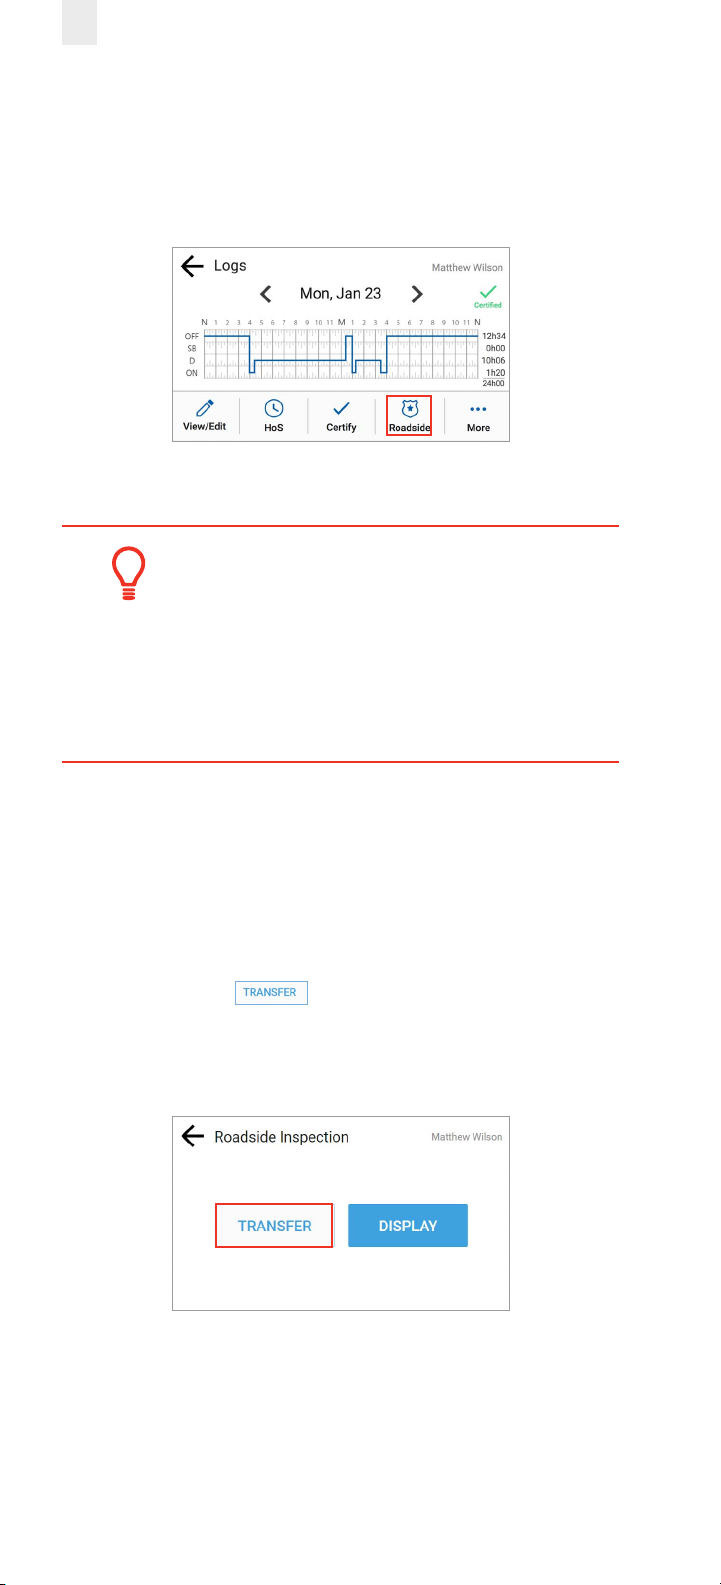
3. Tap the Roadside icon on the Logs menu. The
Roadside Inspection screen appears, as shown in section
5.1, Transferring Your Records.
4. Remove the EROAD ELD by loosening the fastener on the
mounting arm.
Page 46
42
5. Hand the device to the inspector along with the visor cards
and follow instructions. The inspector might request that
you either transfer (export) your records or display the
records. These functions are described in the following
sections.
Tip:
• Your personal privacy is important. You must
enter your PIN to exit the Inspection mode after
the inspection is completed.
• This is a security feature ensuring the safety
ocial cannot access the rest of your data.
5.1 TRANSFERRING YOUR RECORDS
Perform the following steps to transfer logs, if requested.
1. Ensure that you have completed the steps described in
section 5, Roadside Inspection.
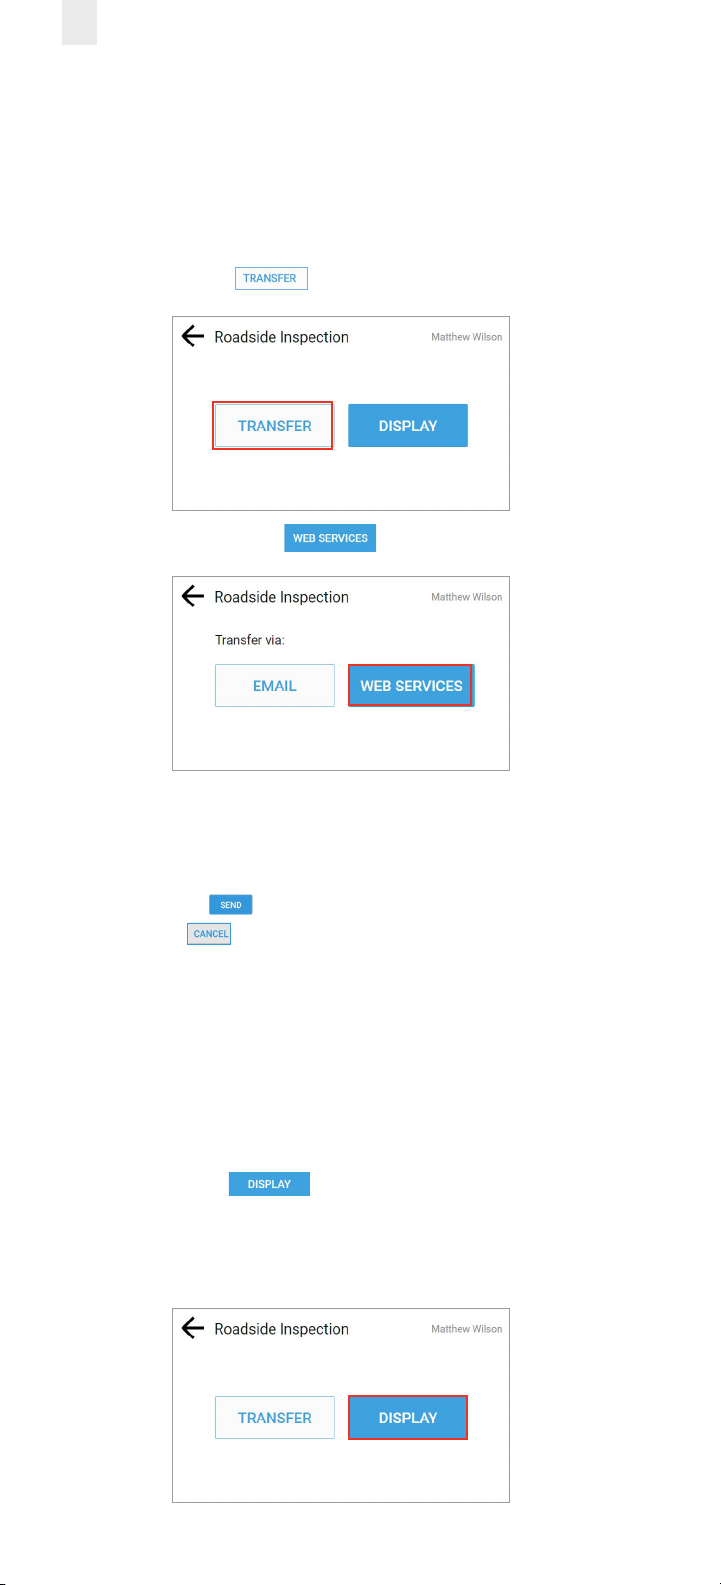
2. Tap the Transfer button on the Roadside Inspection
screen. The Roadside Inspection screen changes to oer
two transfer options: Transfer and Display, which are
described in the following sections.
Page 47
5.1.1 Transfer Via Email
Perform the following steps to transfer records via the email
option.
1. Perform the steps in section 5.1, Transferring your Record
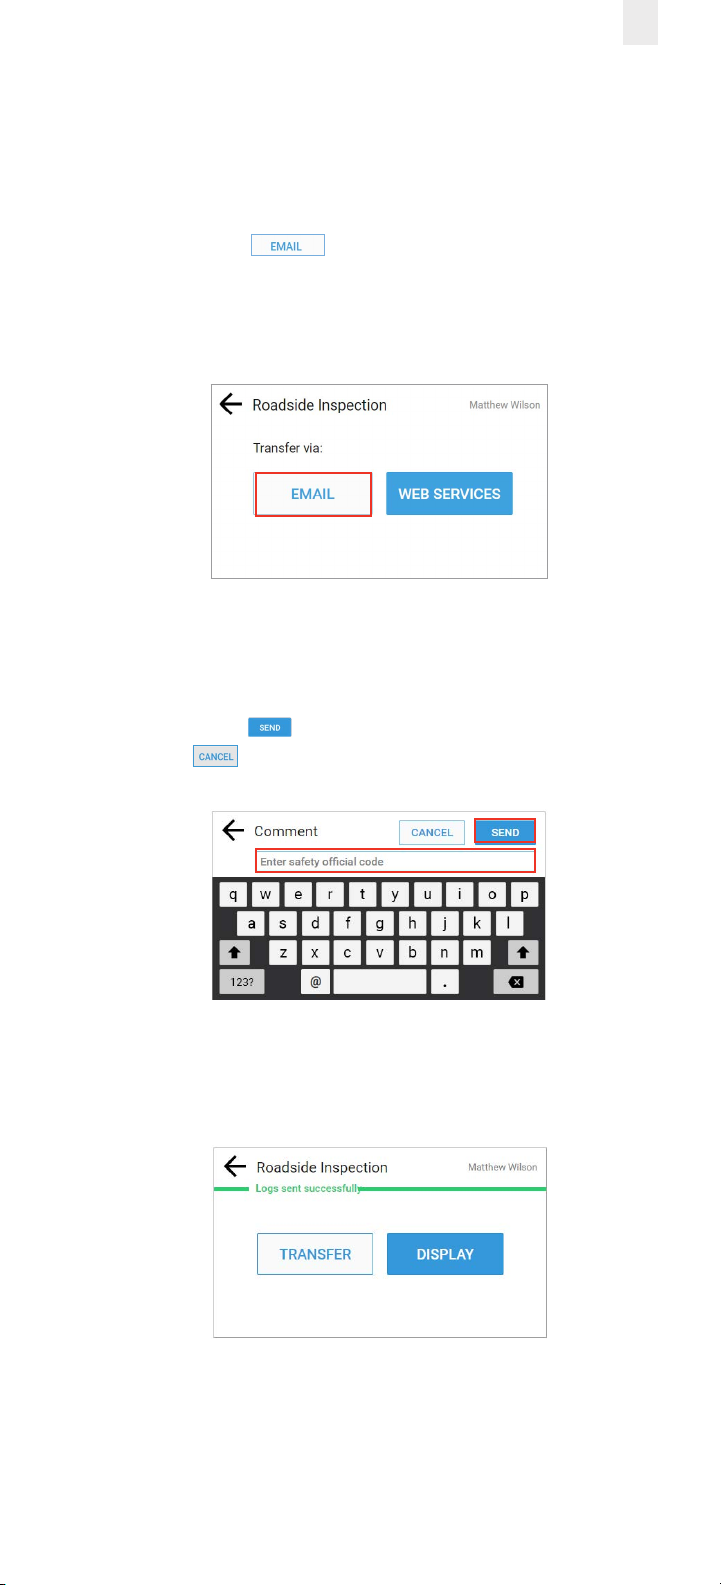
2. Tap the Email button. The Comment screen
appears. The FMCSA destination email address is
preprogrammed in the ELD.
43
3. Enter the safety ocial’s code in the Comment field.
Note: Never enter an email address or the transfer will not
work.
4. Tap the Send button to complete the email or tap the
Cancel button.
A confirmation message appears (shown in green)
indicating the file was transferred successfully.
Page 48
44
5.1.2 Transfer Via Web Services
Perform the following steps to transfer records via Web
Services.
1. Ensure that you have completed the steps described in
section 5, Roadside Inspection.
2. Tap the Transfer button.
3. Tap the Web Services button.
4. Enter the safety ocial’s code in the Comment field.
See section 5.1.1, Transfer Via Email for an illustration of the
Comment field.
5. Tap the Send button to complete the transfer or tap
the Cancel button. A confirmation message appears
indicating the file was transferred successfully.
5.2 DISPLAYING YOUR RECORDS
Perform the following steps to display driver records.
1. Ensure that you have completed the steps described in
section 5, Roadside Inspection.
2. Tap the Display button. The screen changes to
display four tabs of information: Info, Logs, All Events, and
Unidentified. These tabs are described in the following
subsections.
Page 49
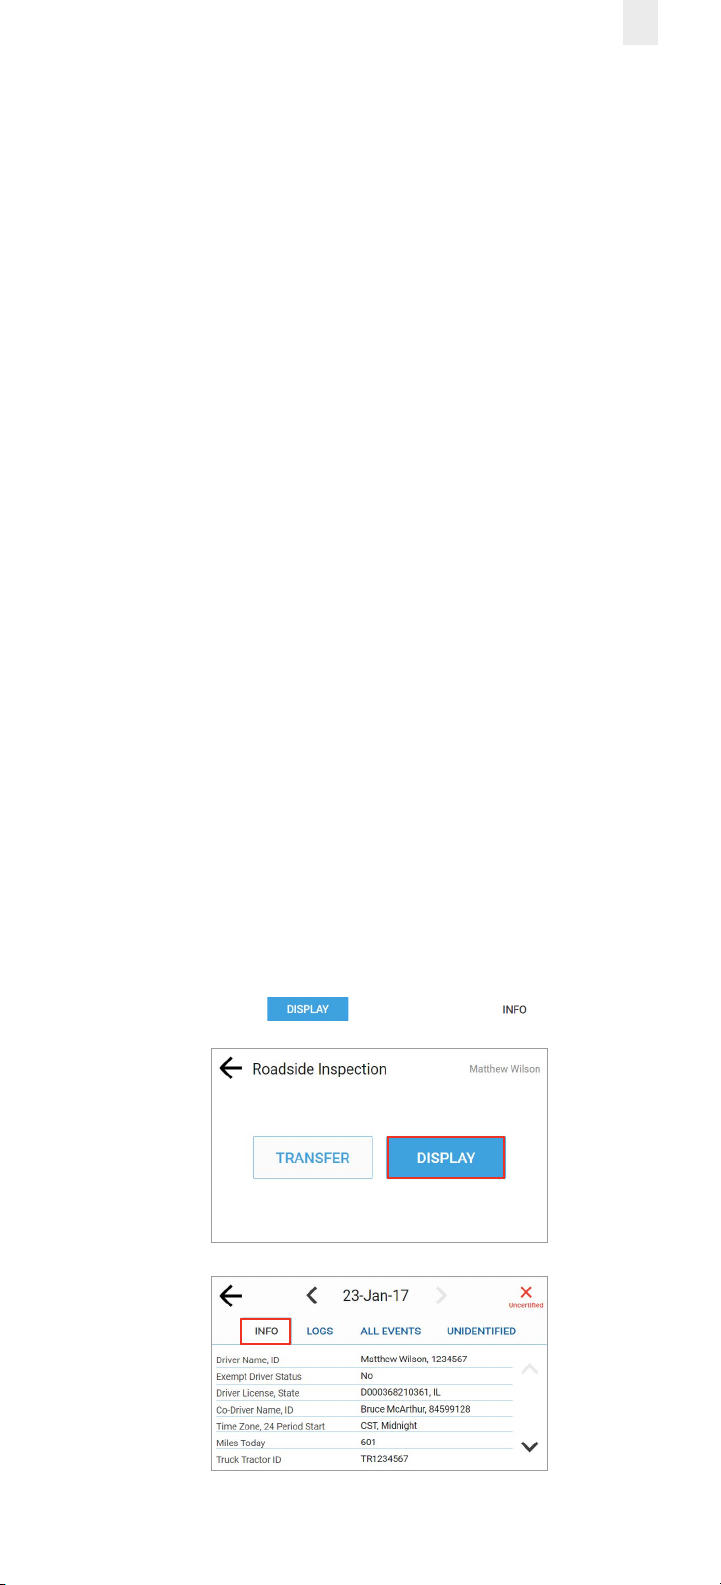
5.2.1 Viewing Header Information
Header information displays a variety of information on
driver status, truck and shipping information, and so on. The
header information demonstrates that your EROAD ELD logs
are compliant with regulations. This information includes the
following criteria:
• Driver Name, ID
• Exempt Driver Status
• Driver License, State
• Co-Driver Name, ID
• Time Zone, 24 (hour) Period Start
• Miles Today
• Truck Tractor ID
• Truck Tractor Vehicle Identification Number (VIN)
• Start – End Odometer
• Start – End Engine Hours
• Trailer ID
• Shipping ID
• Carrier, USDOT Number
• ELD Manufacturer, ID
• Data Diagnostic Indicators
• Unidentified Driver records
• ELD Malfunction Indicators
• Display Date
• Current Location
45
Perform the following steps to view the header information.
1. Ensure that you have completed the steps described in
section 5, Roadside Inspection.
2. Tap the Display button. The Info tab appears.
Page 50
46
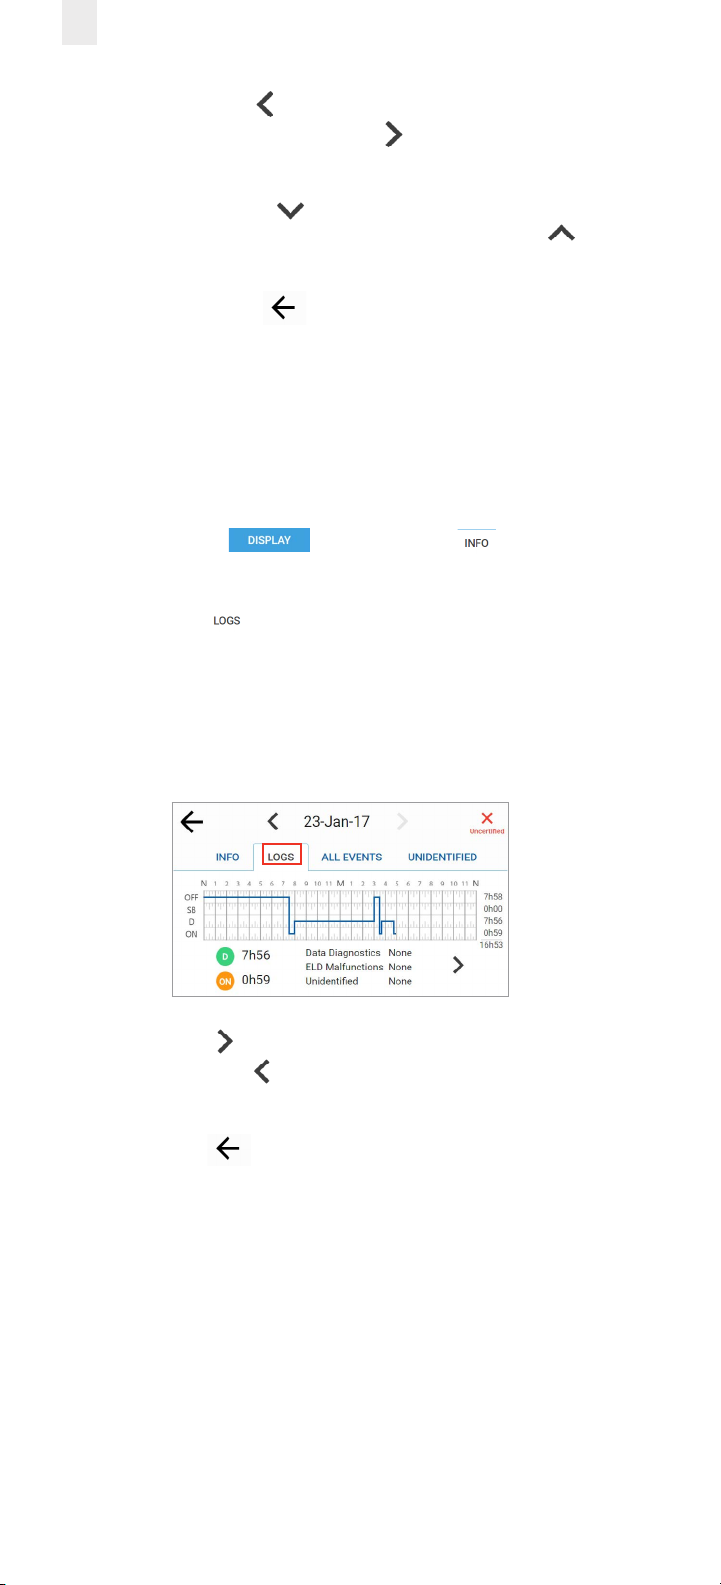
3. Tap the Left arrow icon beside the date to back up to a
prior date or tap the Right arrow icon beside the date to
advance to a current date.
4. Tap the Down arrow icon on the right side of the
screen to see more information or tap the Up arrow
icon to move up to the top of the list.
5. Tap the Back arrow icon to return to the previous
screen.
5.2.2 Viewing Log Graphs
Perform the following steps to view the Log graphs.
1. Ensure that you have completed the steps described in
section 5, Roadside Inspection.
2. Tap the Display button. The Info tab displays
by default.
3. Tap the Logs tab. The log graph illustrates your logs for
the last eight days, listing total hours for each duty status.
It displays hours while driving, on-duty, Data Diagnostics
status, Unidentified hours’ status, and ELD Malfunctions, if
any.
4. Tap the Right arrow to see driver status changes in the
log or tap the Left arrow to return to the first (Logs) tab
screen. The inspector can see details for each duty status.
5. Tap the Back arrow in the upper left corner of the
screen to return to the previous screen.
Page 51
47
Tip:
The inspector can navigate through the logs for the
last eight days by tapping the left or right arrows
next to the date at the top of the screen.
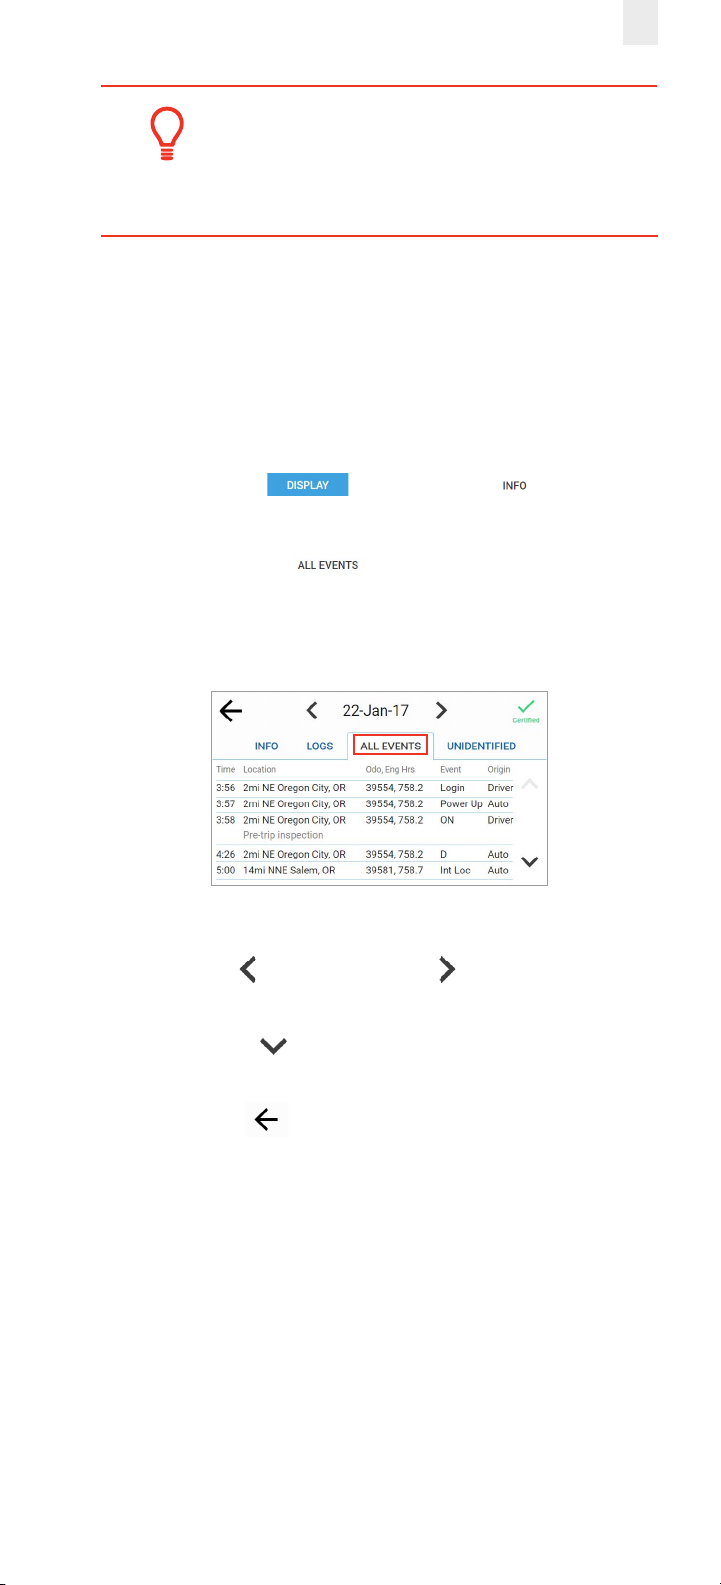
5.2.3 Viewing All Events
The All Events tab displays a list that includes: event time,
location, odometer reading, engine, hours, event type, and
origin. Perform the following steps to view the All Events tab.
1. Ensure that you have completed the steps described in
section 5, Roadside Inspection.
2. Tap the Display button. The Info tab displays
by default.
3. Tap the All Events tab. All the events recorded
by the device are displayed, such as login, change in duty
status, etc. Malfunctions, if any, are displayed under this tab.
4. Tap the Left arrow or the Right arrow to change the
date.
5. Tap the Down arrow to scroll through the events for
the specified date.
6. Tap the Back arrow in the upper left corner of the
screen to return to the previous screen.
Page 52
48
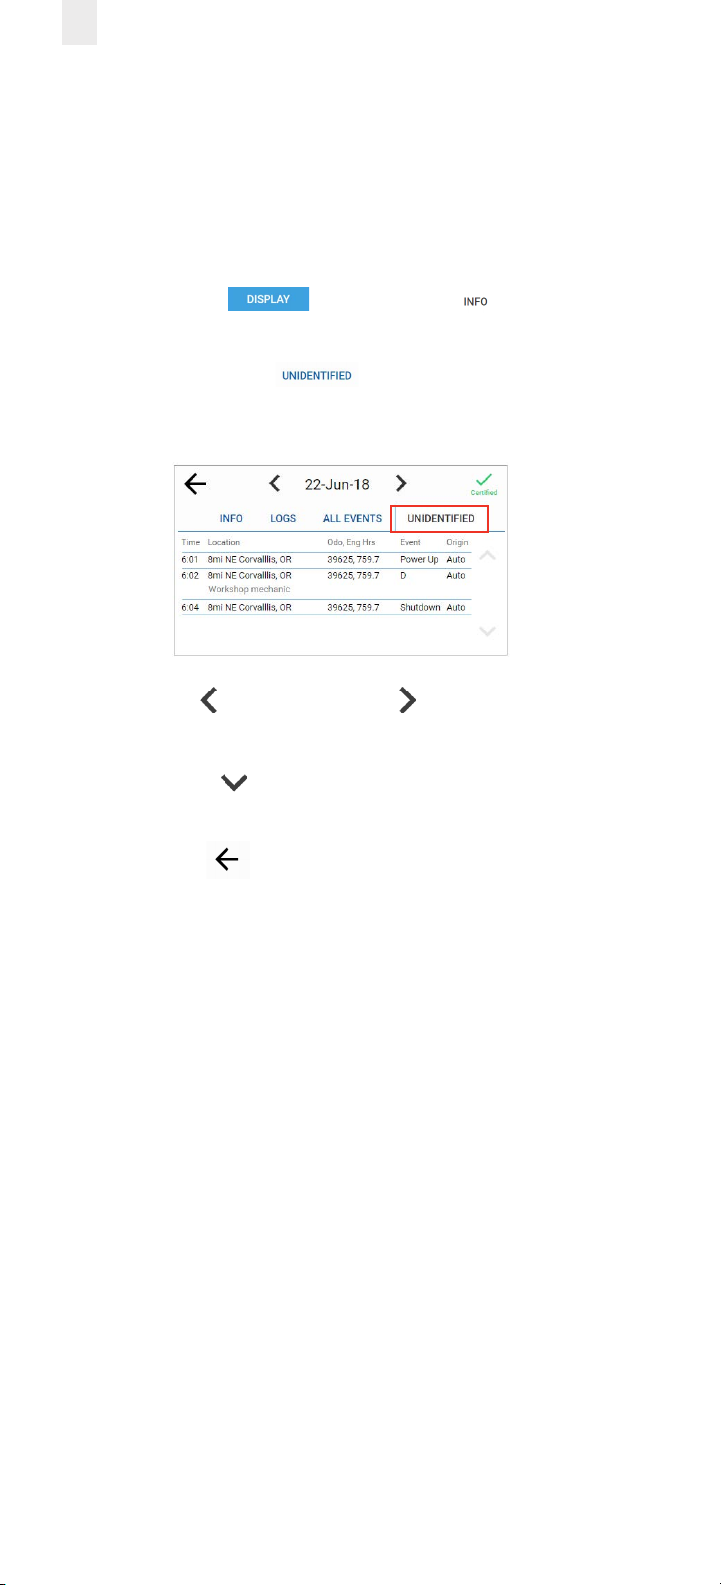
5.2.4 Viewing Unidentified Driving Times
The Unidentified tab displays the times when the vehicle was
driven without the driver logging into the EROAD ELD. Perform
the following steps to view unidentified driving times.
1. Ensure that you have completed the steps described in
section 5, Roadside Inspection.
2. Tap the Display button. The Info tab displays
by default.
3. Tap the Unidentified tab. This tab displays time,
duration, distance, and location for the driving time that is
unidentified.
4. Tap the Left arrow or the Right arrow to change the
date.
5. Tap the Down arrow to scroll through scroll through the
list, if needed.
6. Tap the Back arrow in the upper left corner of the
screen to return to the previous screen.
Page 53
49
6 Issues
The EROAD ELD is fully compliant with the Federal Motor
Carrier Safety Administration (FMCSA) requirements. It
generates data diagnostic events and malfunctions, if there
is missing data or a fault that aects the completeness of the
logs or accuracy of the device.
6.1 MANAGING MALFUNCTIONS
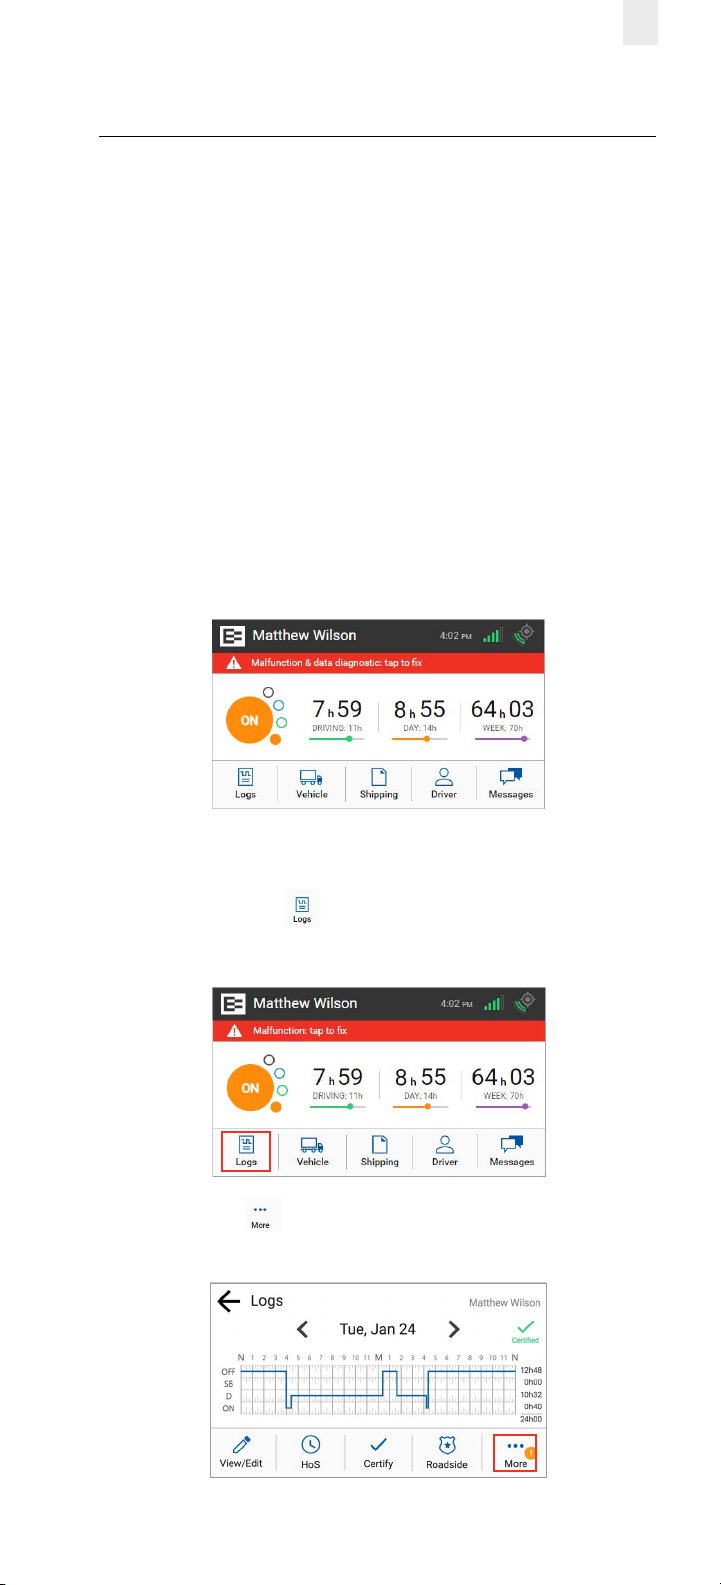
A red banner appears across the Home screen under
the driver’s name if a malfunction occurs, and a red LED
illuminates at the top of the display. You must immediately
view malfunction details and work through the faults using the
malfunctions visor card.
Note: Refer to back side of the EROAD Resolving Data
Diagnostics visor card that describes malfunctions and
recommended actions to remedy specific fault(s).
Perform the following steps to view malfunctions.
1. Tap the Logs icon on the Home screen. The Logs screen
appears.
2. Tap the More icon on the Logs screen. The Logs menu
expands to reveal additional menu.
Page 54
50
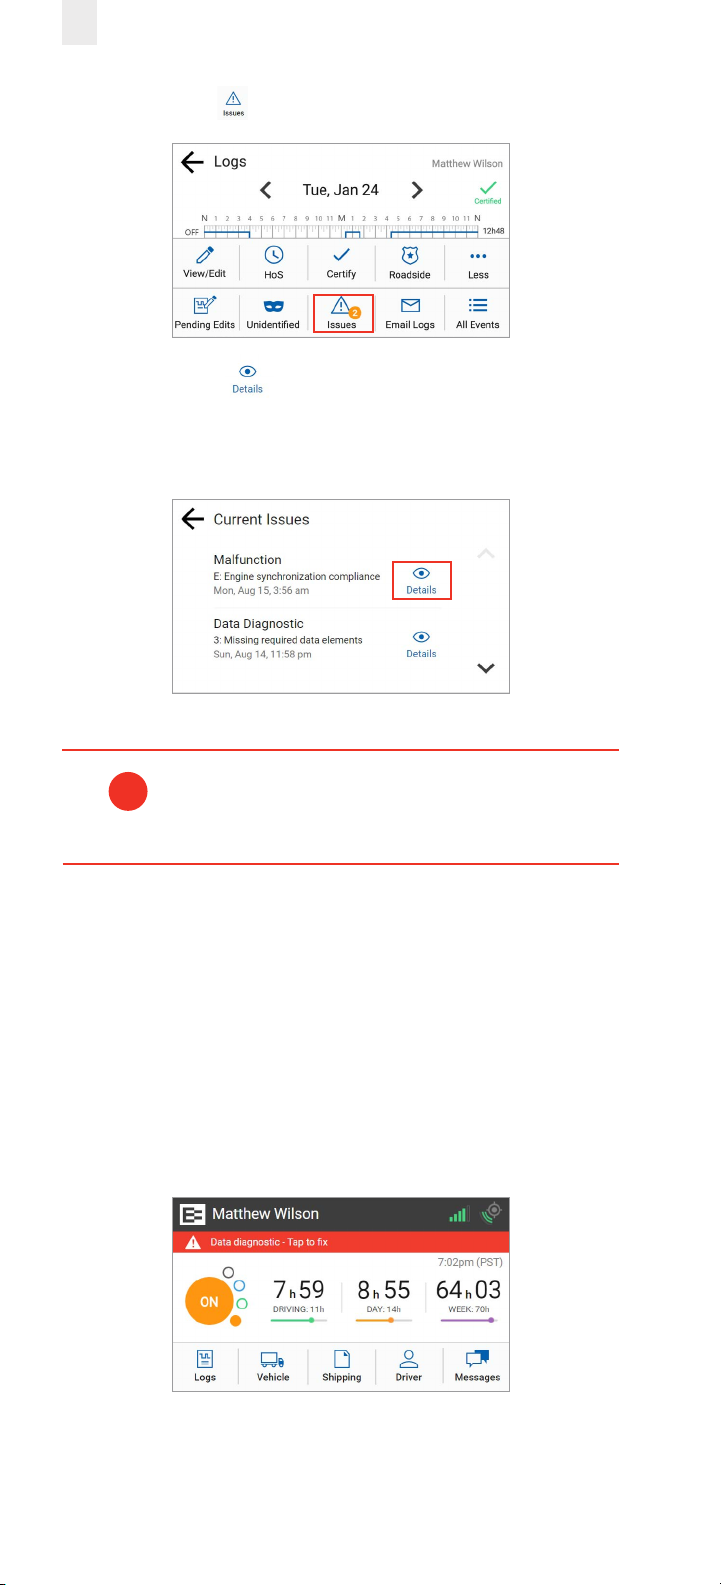
3. Tap the Issues icon. The Current Issues screen appears.
4. Tap the Details button to view more information
about the malfunction.
Note: Tapping the red banner on the Home screen jumps to
the Current Issues screen.
Refer to the malfunction information on the visor
!
card or contact your supervisor if a malfunction is
not resolved.
6.2 RESOLVING DATA DIAGNOSTICS
A red banner appears across the Home screen under the
driver’s name if a data diagnostic issue is present. You must
examine your logs and enter the required information to
resolve the issue.
• Tap the red banner on the Home screen. Follow the steps
described in section 6.1, Managing Malfunctions to view
more information about data diagnostic issues.
Page 55

51
7 Appendix
This appendix contains supplemental information to aid you in
using the EROAD ELD.
7.1 CONTACTING EROAD
Drivers should first contact their supervisor with any questions.
Supervisors may contact their EROAD representative, when
needed.
EROAD, Inc.
7618 SW Mohawk Street
Tualatin, OR 97062
1-855-50-EROAD or 1-503-305-2255
[email protected]
www.eroad.com
7.2 GLOSSARY
The following acronyms and abbreviations are used in
this manual.
Acronym/
Description
Abbreviation
CMV Commercial Motor Vehicle
Config Configuration
D Driving
ELD Electronic Logging Device
FMCSA Federal Motor Carrier Safety Administration
GPS Global Positioning System
HoS Hours of Service
IFTA International Fuel Tax Agreement
Page 56
52
Acronym/
Description
Abbreviation
In-Vehicle
Device
Info Information
Odo Odometer
PC Personal Conveyance
PIN Personal Identification Number
SB Sleeper Berth
EROAD™ Electronic Logging Device system
includes the in-vehicle device and the
EROAD Depot application
USDOT United States Department of Transportation
VIN Vehicle Identification Number
WMT Weight Mile Tax
YM Yard Move
7.3 ERROR MESSAGES AND MALFUNCTIONS
The following list represents typical error messages that might
appear. It is not intended to be all inclusive. Refer to the EROAD
ELD visor cards or contact EROAD for more information.
Message Description or Remedy
Data diagnostic – Tap
to fix
Tap this error message in the red
banner on the in-vehicle device
and follow the instructions. See
section 6.2, Resolving Data
Diagnostics for more information
and refer to the malfunctions
visor card
Page 57

Message Description or Remedy
53
Loss of GPS signal.
This will be resolved
automatically as soon
as there’s a GPS signal.
Missing required data
elements. Please enter
the missing data.
There are no driver
logins available yet,
please contact your
carrier manager and
keep paper logs.
Uncertified icon
appears.
No driver action needed. The
EROAD ELD automatically
searches for a GPS signal.
Tap the Fix button and/or tap
the Edit icon to enter the missing
data elements.
Your login has not been entered
in the EROAD Depot application.
Use your paper logs and contact
your supervisor.
Tap Logs > Certify when you are
ready to certify your logs. See
section 3.8, Certifying Your Logs
for more information.
You cannot shorten
driving time.
Automated driving time using
the Drive, Yard Move, or Personal
Conveyance status codes cannot
be edited.
Page 58

54
With EROAD, you can have the best of all worlds.
EROAD’s user-friendly ELD is built on the same advanced
technology platform as our tax, safety, and fleet
management solutions. That means reliability you can
count on, and a partner you can trust. With EROAD’s
ELD, you get compliance today, and can easily upgrade
to take advantage of electronic IFTA, driver safety, fuel
management and fleet tracking tools.
And with EROAD’s best-in-class customer service,
you always have access to a responsive, friendly and
knowledgeable U.S.-based team as dedicated to your
success as you are.
Page 59

Page 60

56
EROAD.COM
Confidence in every mile.
 Loading...