

Page 1

User’s manual
HD/SD DVB-T DIGITAL TV RECEIVER
Page 2

Page 3

Thank you for choosing our digital tv receiver, you will be able to enjoy high
quality pictures and voice, digital video and audio section in the comfort of your
homes.
Through using the User's manual, you can understand the common operation of
our HD digital tv receiver, by the friendly screen display and friendly menu style,
user-friendly.
All the functions of the HD tv receiver can be accomplished by operating the keys
on remote control, some of the functions also can be done by operating the front
panel buttons.
Please note if download new software may change some of the tv receiver's
original application or functions.
if you find any difficulties when using the HD tv receiver, please view the relevant
part in the user's manual or contact the local digital tv operators.
Preface
Page 4
CONTENTS
4. Accessories Included
-21-
1. Introd uc tion... .. ....... .. ......... .. ....... .. ....... .. ......... .. ....... .. ....... .. ......... .. ....... 1
1.1 Layou t of t he Main Uni t. ....... .. ......... .. ....... .. ....... .. ......... .. ....... .. ......1
1.2 Conne ct ions... .. ....... .. ......... .. ....... .. ....... .. ......... .. ....... .. ....... .. ......... .2
2. Parts me nu i ntroduc ti on..... .. ......... .. ....... .. ....... .. ......... .. ....... .. ....... .. ......... 3
2.1 Remot e co ntrol fun ct ion brief .. ......... .. ....... .. ....... .. ......... .. ....... .. ......3
2.2 Funct io n brief and p or ts introd uc tion..... .. ....... .. ....... .. ......... .. ....... .. .4
2.3 Insta ll ation Gui de ....... .. ......... .. ....... .. ....... .. ......... .. ....... .. ....... .. .......4
2.4 Main Me nu ....... .. ....... .. ......... .. ....... .. ....... .. ......... .. ....... .. ....... .. .......5
2.4.1 Men u- Program .. ....... .. ......... .. ....... .. ....... .. ......... .. ....... .. ..... ... .5
2.4.1.1 P ro gram-Pr og ram Edit. .. ......... .. ....... .. ....... .. ......... .. .....5
2.4.1.2 E PG . ....... .. ....... .. ......... .. ....... .. ....... .. ......... .. ....... .. ......6
2.4.1.3 P ro gram-So rt ....... .. ......... .. ....... .. ....... .. ......... .. ....... .. ...7
2.4.1.4 P ro gram-LC N. ....... .. ......... .. ....... .. ....... .. ......... .. ....... .. .7
2.4.2 Men u- Picture .. ....... .. ......... .. ....... .. ....... .. ......... .. ....... .. ....... .. ..7
2.4.2.1 M en u-Chann el S earch.. .. ......... .. ....... .. ....... .. ......... .. .....7
2.4.2.2 C ha nnel Sear ch -Auto Sea rc h........ .. ....... .. ....... .. ......... .. 8
2.4.2.3 C ha nnel Sear ch -Manual S ea rch...... .. ....... .. ....... .. ......... 8
2.4.2.4 I ns tallati on -Countr y....... .. ......... .. ....... .. ....... .. ......... .. ..8
2.4.3 Men u- Tim e...... .. ......... .. ....... .. ....... .. ......... .. ....... .. ....... .. ........9
2.4.3.1 Ti me-Ti me Offs et ........ .. ....... .. ....... .. ......... .. ....... .. ......9
2.4.3.2 Ti me-Countr y Re gion... .. ....... .. ......... .. ....... .. ....... .. ......9
2.4.3.3 Ti me-Ti me Zone.. .. ....... .. ......... .. ....... .. ....... .. ......... .. ....9
2.4.3.4 S le ep..... .. ....... .. ......... .. ....... .. ....... .. ......... .. ....... .. ....... .9
2.4.4 Men u- Option. .. ....... .. ......... .. ....... .. ....... .. ......... .. ....... .. ....... .. ..9
2.4.4.1 C on figurat io n-Langu ag e........ .. ....... .. ....... .. ......... .. ....10
2.4.5 Men u- System. .. ....... .. ......... .. ....... .. ....... .. ......... .. ....... .. ....... .1 0
2.4.5.1 S ys tem-Par en tal Guida nc e........ .. ....... .. ....... .. ......... .. .10
2.4.5.2 S ys tem-Res to re Factor y De fault.... .. ....... .. ....... .. ........11
2.4.5.3 S ys tem-Inf or mation. .. ......... .. ....... .. ....... .. ......... .. ....... 11
2.4.5.4 S ys tem-Sof tw are Updat e. ......... .. ....... .. ....... .. ......... .. ..12
2.4.5.5 M en u-USB.. .. ....... .. ......... .. ....... .. ....... .. ......... .. ....... .. .12
2.4.6 Men u- Multime di a...... .. ......... .. ....... .. ....... .. ......... .. ....... .. ......1 2
2.4.6.1 M ul timedia .. ....... .. ......... .. ....... .. ....... .. ......... .. ....... .. .12
2.4.6.2 P ho to Config ur e...... .. ......... .. ....... .. ....... .. ......... .. ......1 4
2.4.6.3 M ov ie Config ur e...... .. ......... .. ....... .. ....... .. ......... .. .....15
2.4.6.4 P VR C onfigur e. ....... .. ......... .. ....... .. ....... .. ......... .. ......1 5
2.5 Other m en us..... .. ....... .. ......... .. ....... .. ....... .. ......... .. ....... .. ....... .. ......15
2.5.1 Audi o Languages ......... .. ....... .. ......... .. ....... .. ....... .. ......... .. ....15
2.5.2 EPG N av igation M en u...... .. ......... .. ....... .. ....... .. ......... .. ....... .. 16
2.5.3 Sch ed ule Menu. .. ....... .. ......... .. ....... .. ....... .. ......... .. ....... .. ....... 16
2.5.4 Inf o Me nu..... .. ....... .. ......... .. ....... .. ....... .. ......... .. ....... .. ....... .. 17
2.5.5 Volu me Menu.. .. ......... .. ....... .. ....... .. ......... .. ....... .. ....... .. .......18
2.5.6 Mut e Me nu..... .. ....... .. ......... .. ....... .. ....... .. ......... .. ....... .. ....... .1 8
2.5.7 Fav or ite List Me nu ....... .. ......... .. ....... .. ....... .. ......... .. ....... .. ....19
2.5.8 Time s hifting.. .. ....... .. ....... .. ......... .. ....... .. ....... .. ......... .. ....... .1 9
2.5.9 Pro gr am Record .. ....... .. ......... .. ....... .. ....... .. ......... .. ....... .. ......2 0
3. Fault pr ob lems and so lu tions.. .. ......... .. ....... .. ....... .. ......... .. ....... .. ....... .. ..20
4. Acces so ries Includ ed....... .. ....... .. ......... .. ....... .. ....... .. ......... .. ....... .. ....... .2 1
1
1
1
1
2
1
Page 5
1. Introduction
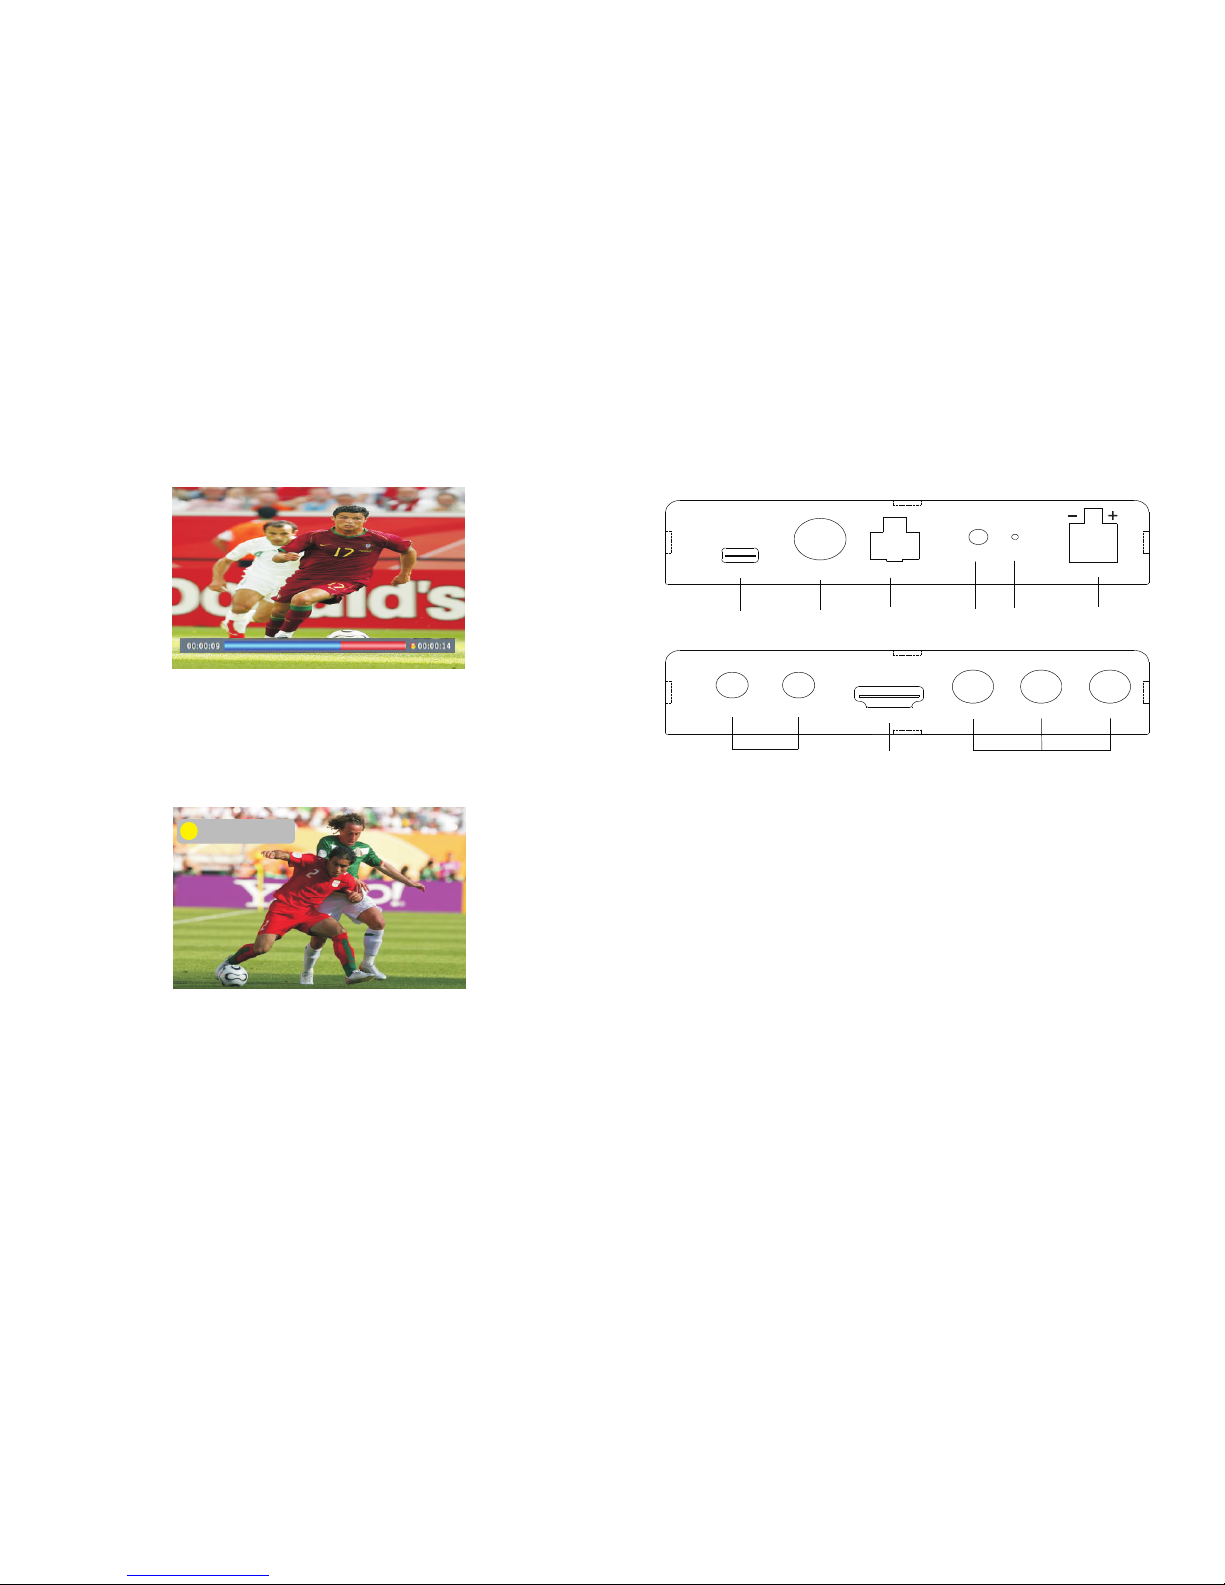
1.1 Layout of the Main Unit
-1-
2. Press『PLAY/PAUSE』again, continue to watch the program from where paused.
Press EXIT to exit the record program, means to exit time shifting function. And
return to current real-time program as below.
2.5.9 Program Record
1. You can record programs when watch tv, press Yellow button pop-up the
recording time setting floating panel, then you can set record time according to the
USB storage device disk space, press ENTER button to start record program you're
watching, and save the video file as below.
From the MENU-USB-Multimedia-PVR, you can find the record program in the
USB device disk, and select to play the record program.
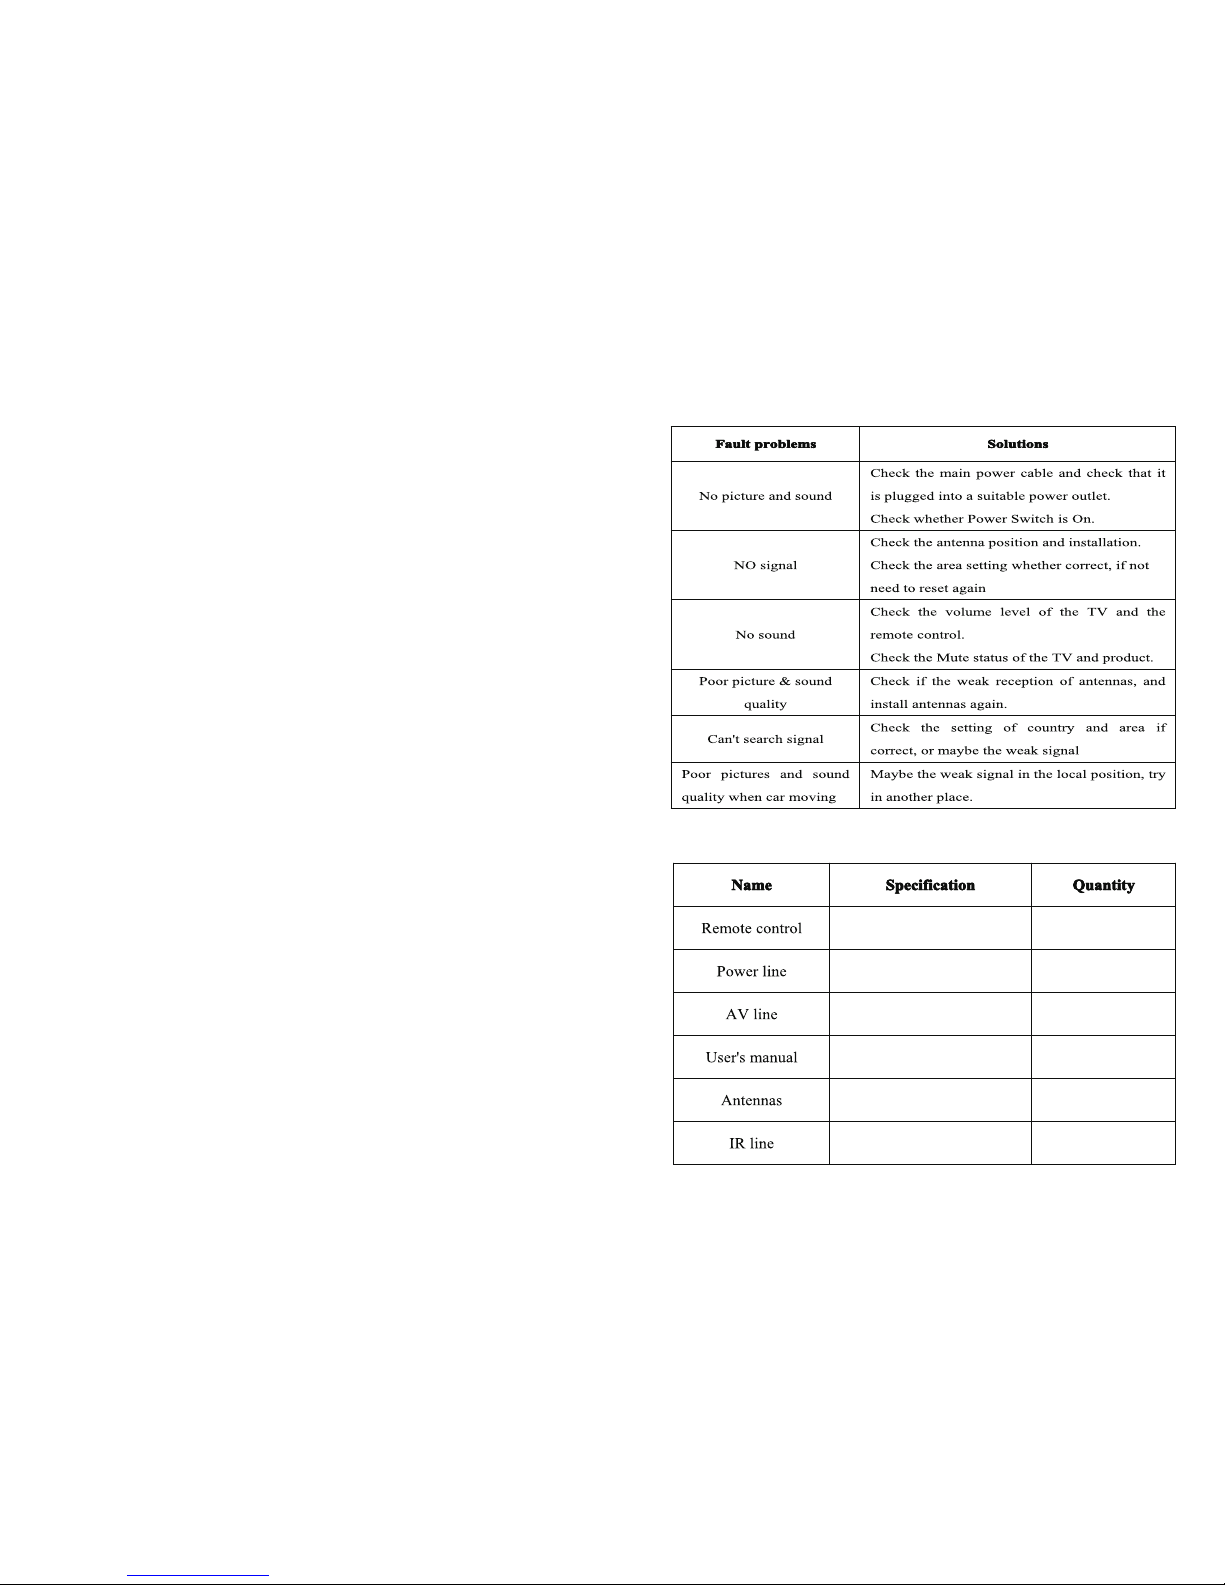
3. Fault problems and solutions
Before contacting your local service, please make sure following instructions. If the
product does not work normally after completing the following fault problems and
solutions, please contact your local product distributor or service center.
-20-
1.Twin An te nna Input (SMA conne ct or )
2. Ext. Remote Sens or
3. AV Outpu t
a) Video Output (Yel low RCA)
b)Left Audio Out pu t (W hi te RCA)
c) Right Audio Out pu t (R ed R CA)
4. Power In pu t DC 12~24 Volts
5. Power LE D
6. Remote Sensor
7. S-AV Port Definitio n
a) One AV Inp ut P or t
b)Two Vid eo Output
8.USB Connector
9.HDMI Out
00:0 0: 07
5
6 42
7
8
9 3
1
P O WE R
L E D
IR
R E M OT E IN
A V I N
U S B
V ID E O
L -O U T
R -O U T
H D MI O U T
A T N INA T N IN
ANT
ANT
S-AV
HDM I
Page 6
-2-
When not Favorite List menu, press FAV button to pop-up this menu, press to
move cursor switch channels.
Press OK to confirm the programme, press EXIT/FAV to exit the menu.
2.5.7 Favorite List Menu
2.5.8 Time shifting
Time shifting means you can stop watching the real-time ongoing program, to
answer calls or make calls, when you finish you can continue to watch from where
you stopped and not miss any wonderful programs.
1. Under full screen ongoing state press『PLAY/PAUSE, the video picture is
paused. If there is external USB device, the tv receiver will start record the
current program automatic as below.
-19-
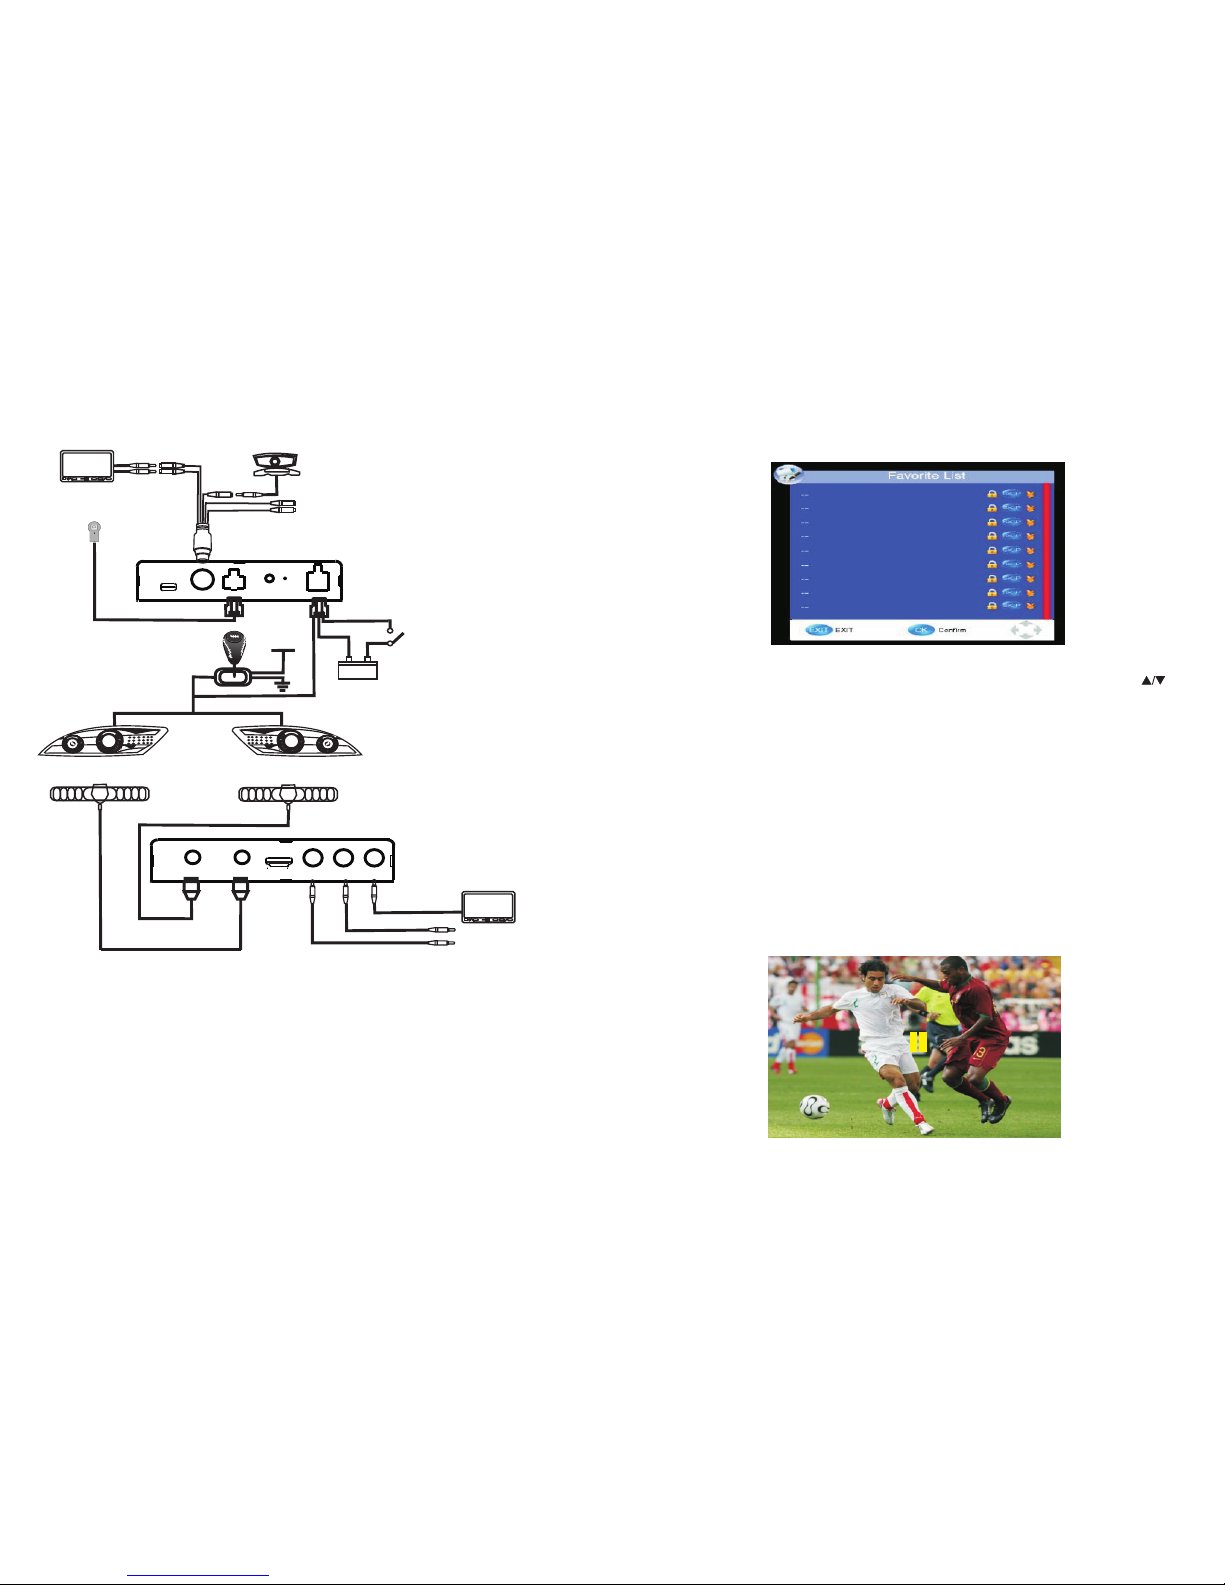
Cautions
1. The re d po we r wire connect to the ACC li ne w hi ch c an control the auto,
don’t c on ne ct to the storage battery d ir ec tl y from the auto, to guard aga in st
long term operati on c an ’t stop. Th e ACC line and the GND line sh ou ld i ns tall
firmly, av oi d so me unnecessary machin e is su es .
2. If the machine don 't u se t he AV input termi na l, p ls c onnect the CAR
BACK yellow line to t he g ro und line, and use the AV input terminal. P ls
connect the CAR BAC K ye ll ow line to the positive pol e of t he v is ual light
after.
3. Th e two antennas shou ld be parallel installation near the car roof, the
input voltage is DC 12 V.
2.5.8 Time s hifti ng
』
1. 2 Connections
ATN
R-OUT
L-OUT
VIDEO
Dis play
power
P+/P-
V+/V-
Menu
rig ht Aud io ou t
lef t Audio o ut
Ant enna
Ant enna
USB
S-AV
REMOTE IN
IR
LED
POWER
Batt ery
Acc+ 12V
CAR BAC K
red
bla ck
yell ow
+
-
rig ht Audio i nput
lef t Aud io inpu t
GND
Dis play
power
P+/P-
V+/V-
Menu
Cam era
Batt ery DC+ 12V
Tele com and o
+
-
R
1
2
3
4
5
6
Car l ighti ng
Car g ear
Vid eo out 2
Vid eo out 3
Vid eo in
Vid eo out 1
HDMI
ATN
Page 7
2. Parts menu introduction
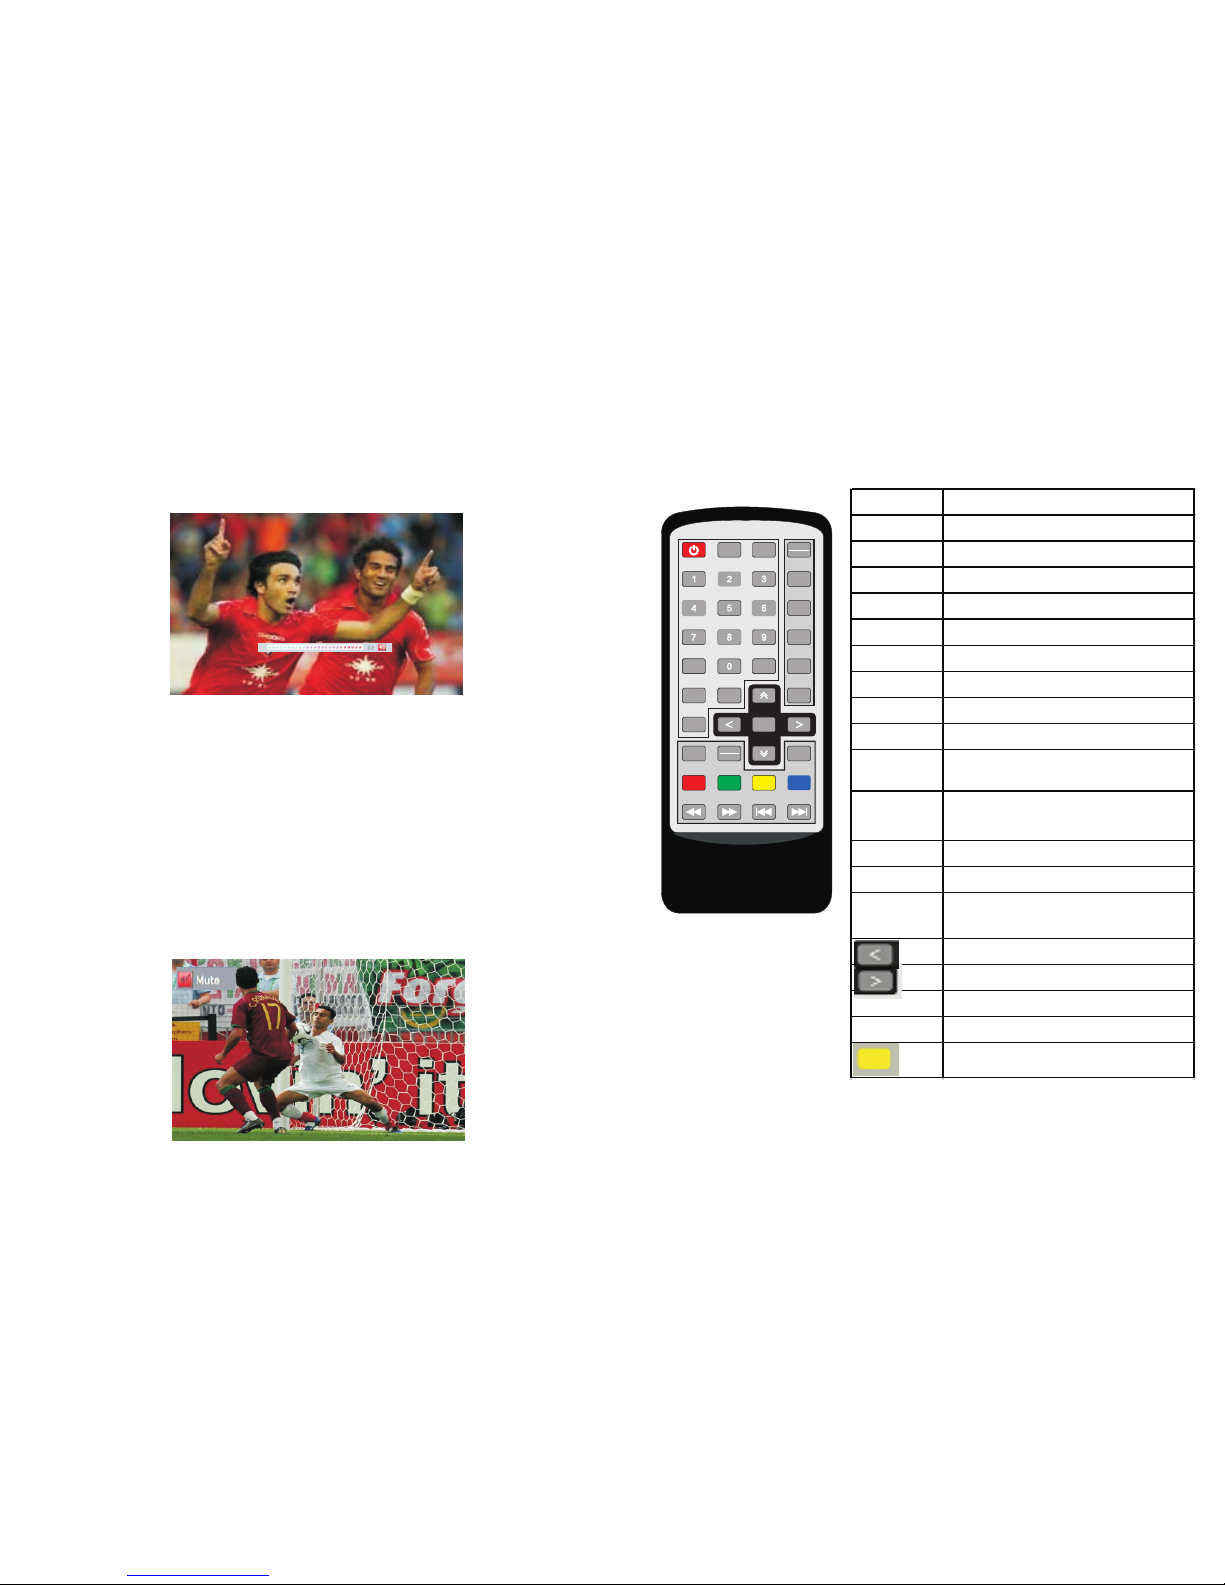
2.1 Remote control function brief
2.5.5 Volume menu
Consist of the progress bar and digital, display at the bottom of the screen, progress
bar show the percentage of current volume, the numbers show the size of the current
volume. The volume adjustment range is 0-32, default 15.
Press VOL+/- to plus/minus volume, and show volume menu. Press MENU button
to close Volume menu, and show main menu.
Press EXIT to close Volume menu.
2.5.6 Mute Menu
When MUTE display at the left bottom screen means current user mute.
Press MUTE button : if current user under not mute, display Mute icon then mute.
If current user under mute, remove user mute, then close mute icon.
Press VOL+/- button : remove user mute, close mute icon, and show Volume menu.
Press Sound button : remove user mute, close mute icon, and show current Sound
Mode.
-18-
-3-
P owe r P ress to tu rn on/ off th e DTV
Mu te Sel ect so und o r remov e so un d
En ter Co nfirm th e select io n
Dis pl ay
Displa ys cur rent c hann el/pr ogram inf orm ation
TV/RA DIO Sw it ch betw een TV an d Rad io mod es
0-9 Inpu t cha nn el n umbe r
SU B Ch an ge th e su btit le lan gua ge
EP G Di sp lay th e E lec tro nic P ro gra m Guid e
AUD IO To ch ang e au dio menu
TTX Dis pl ay teletext feat ur es
FA V
Add or remov e TV cha nn els from one o f
th e fou r fav ori te ch an ne l l is ts
Exi t Me nu exit
VOL +/- Vol ume adj ust and l eft/rig ht in t he menu
Men u D is play t he main Men u
CH +/-
Ch an ge th e ch an ne l o ne by one and
up /do wn in the men u
Men u se lec ti on
Men u se lec ti on
Sear ch S can prog ram
P lay/ Paus e P ress to tu rn on/ off th e Time shi ft
P ress to tu rn on/ off th e record ing
CH+
CH-
MUTE
VOL-
Rem ote Con trol
KR-2 88
SEAR CH
PLAY
PAUSE
FORM AT
VOL+
MENU
ENTE R
CH-
DISP LAY
EPG
AUDI O
TV
RADIO
SUB
TTXEXIT
FAV
CH+
RECA LL
Page 8
The HD tv receiver support H.264, MPEG2, MPEG4 such video decoding.
Support PCM, AAC Level2, AAC Level4 such audio decoding tv receiver.
It is available for European and Australia countries.
Input Port:DTV,USB
Output Port:AV,YPbPr,HDMI,Audio
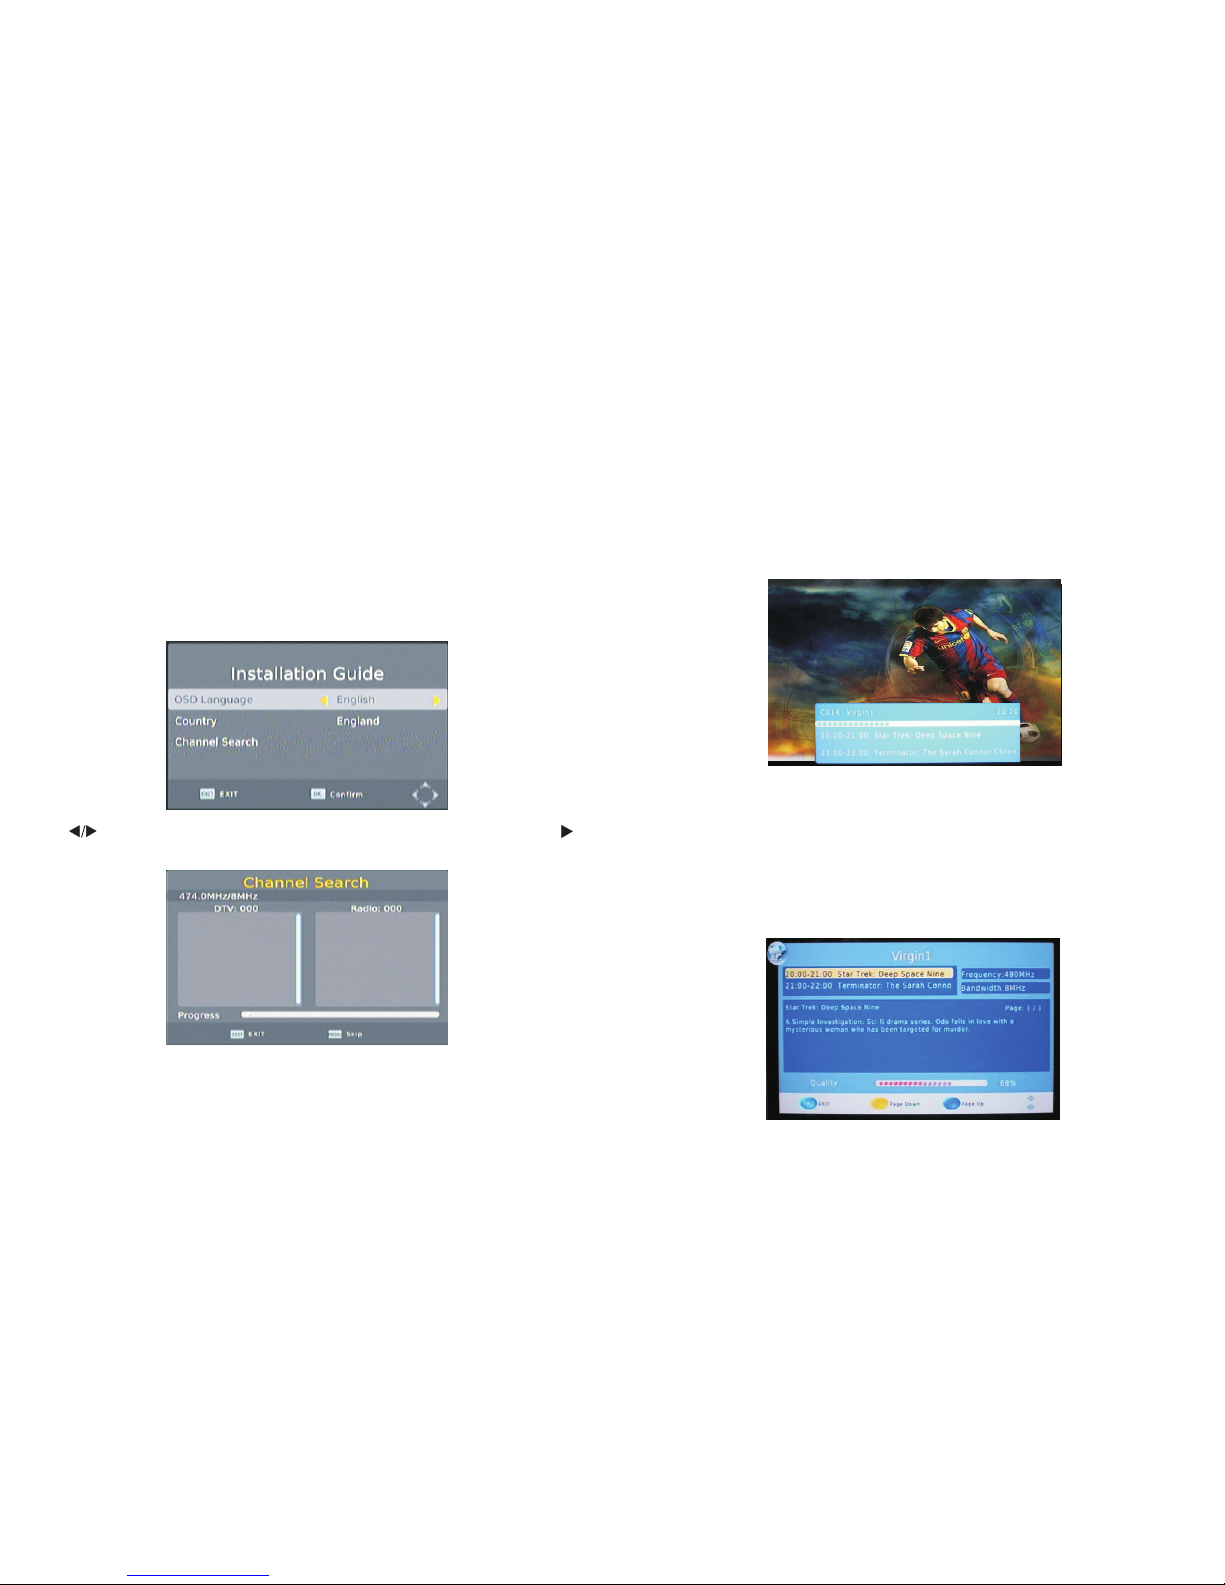
The tv box will show installation guide before search channels, You can select
language and country then enter auto search.
Show as below picture :
Press EXIT stop search, popup whether to stop search tooltip, press OK exit
autosearch function, and save search information then exit search page. Press
MENU to skip the displayed channel search to continue to search for the next
channel status.
Note : Auto search will immediately delete all channel informations.
-4-
2.2 Function brief and ports introduction
2.3 Installation Guide
Press button select language and country, when select channel search, press
button enter auto search.. Show as below picture :
The screen will show broadcast time and programme name of the scheduled
programme.
Press EXIT back to previous menu.
Press OK to confirm whether need to watch the programme scheduled.
2.5.4 Info Menu
When not INFO menu, press INFO button show as above INFO menu, press EXIT
to exit the menu.
When have INFO menu, press INFO button show as below, display channel detail
informations, press EXIT to exit the menu.
-17-
, HDMI, Audio
Page 9
2.5.2 EPG Navigation Menu
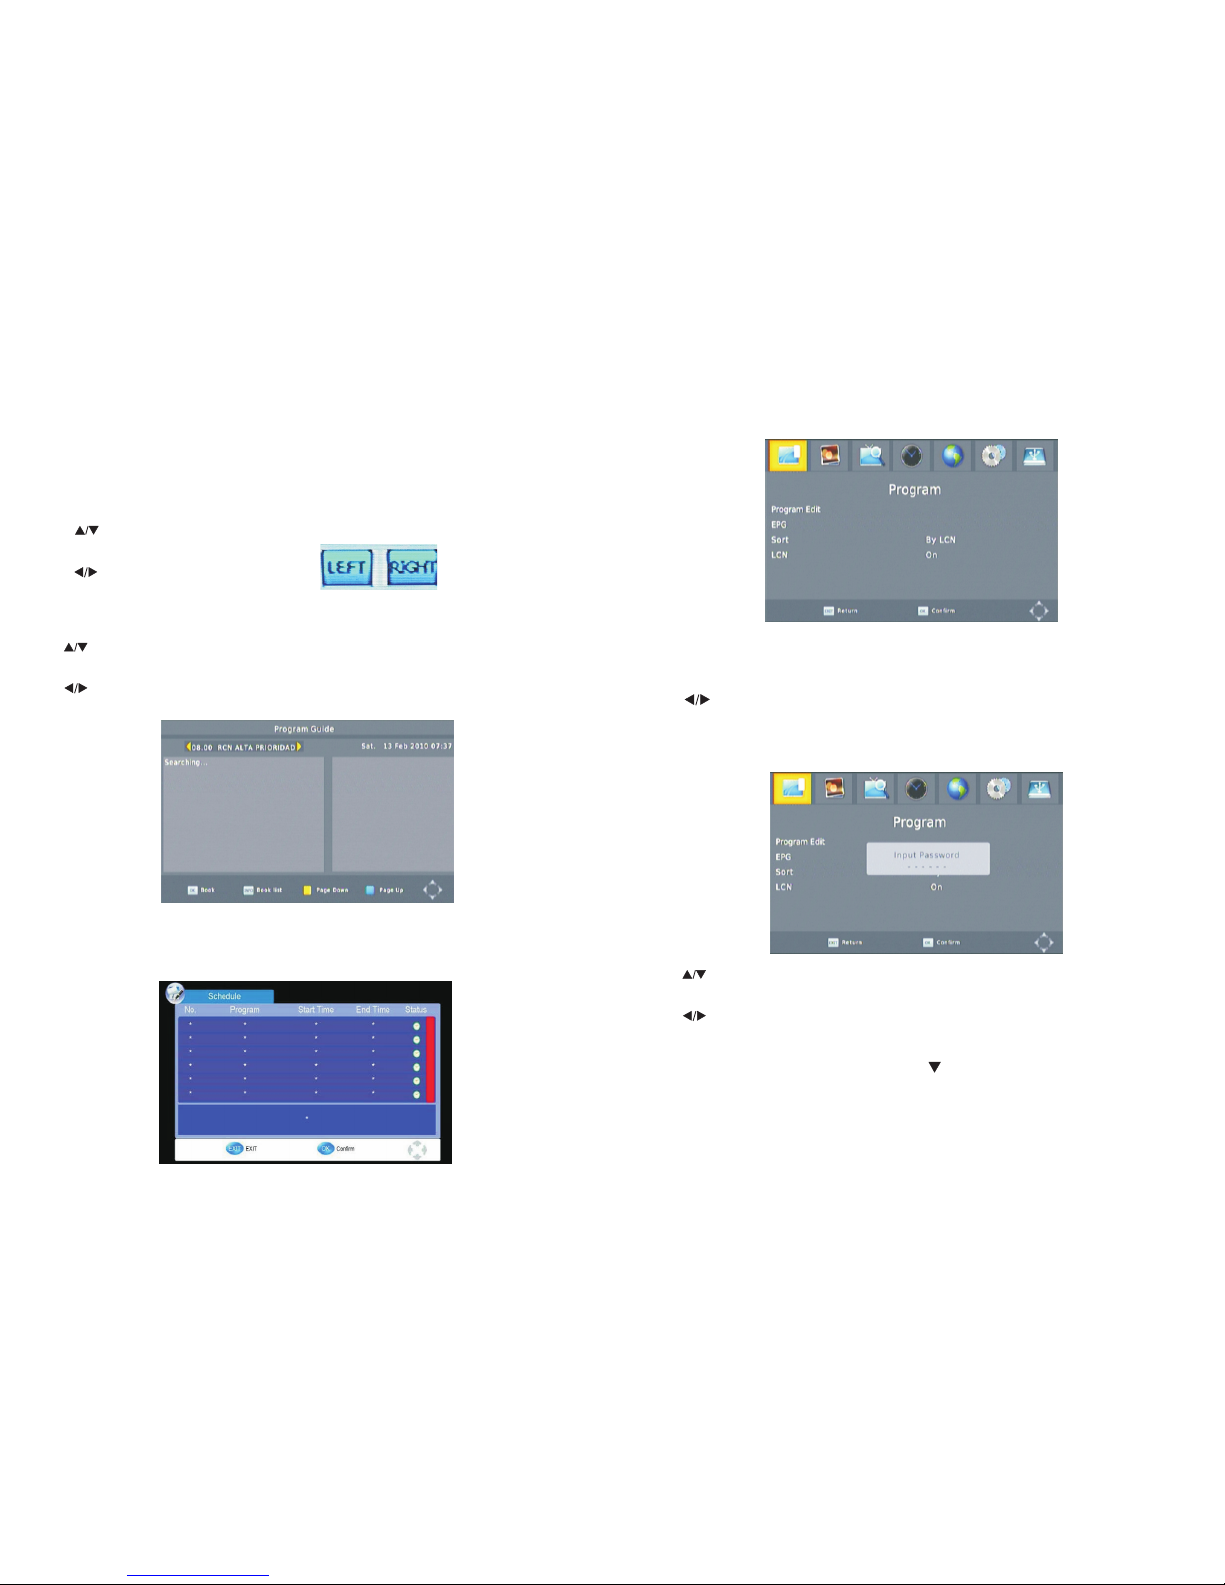
This page show channel information page.
Press to move cursor, switch channel.
Press OK button to select the need to reserve watch programme.
Press to search channel information.
Press Yellow/Blue button to execute programme page up and down function.
Press INFO button, switch to the details information of selected scheduled
programme, screen display Schedule.
2.5.3 Schedule Menu
-16-
Press button to select submenu, then press OK to enter submenu page, press
EXIT to exit submenu back to current page.
Press to move the highlight bar to select debugging project. Press EXIT/MENU
backto main menu.
Press to select focus adjust project.
2.4.1.1 Program - Program Edit
Under the Program Edit option press OK/ enter, firstly prompt customer to
enter a password, defaul setting password : 00000.
If the password is correct, enter the Program Edit menu, if enter wrong
password,it prompt for password error, press EXIT button back to password
error menuprompt.
2.4 Main Menu
Traditional style full screen main menu, and matrix style menu.
Press MENU to open main menu, including : Program、Picture、
Channel Search、Time、Option System、USB six submenu.
2.4.1 Menu–Program
-5-
Audio Languages only show cu rr en t au di o ty pe s in c od e stream.
Press MIS/I/II/NICAM but to n: u nd er D TV, when not Audio Language
menu,show Audio Language Under Audio Language me nu , cl os e Aud io
Language menu.
Press EXIT button: close Audio Language menu.
Press button: Fluctuation op ti on s, s wi tc h au dio to selected language
and audio type
Press button: set sound chan ne l as , c yc le o pt io ns .
Page 10
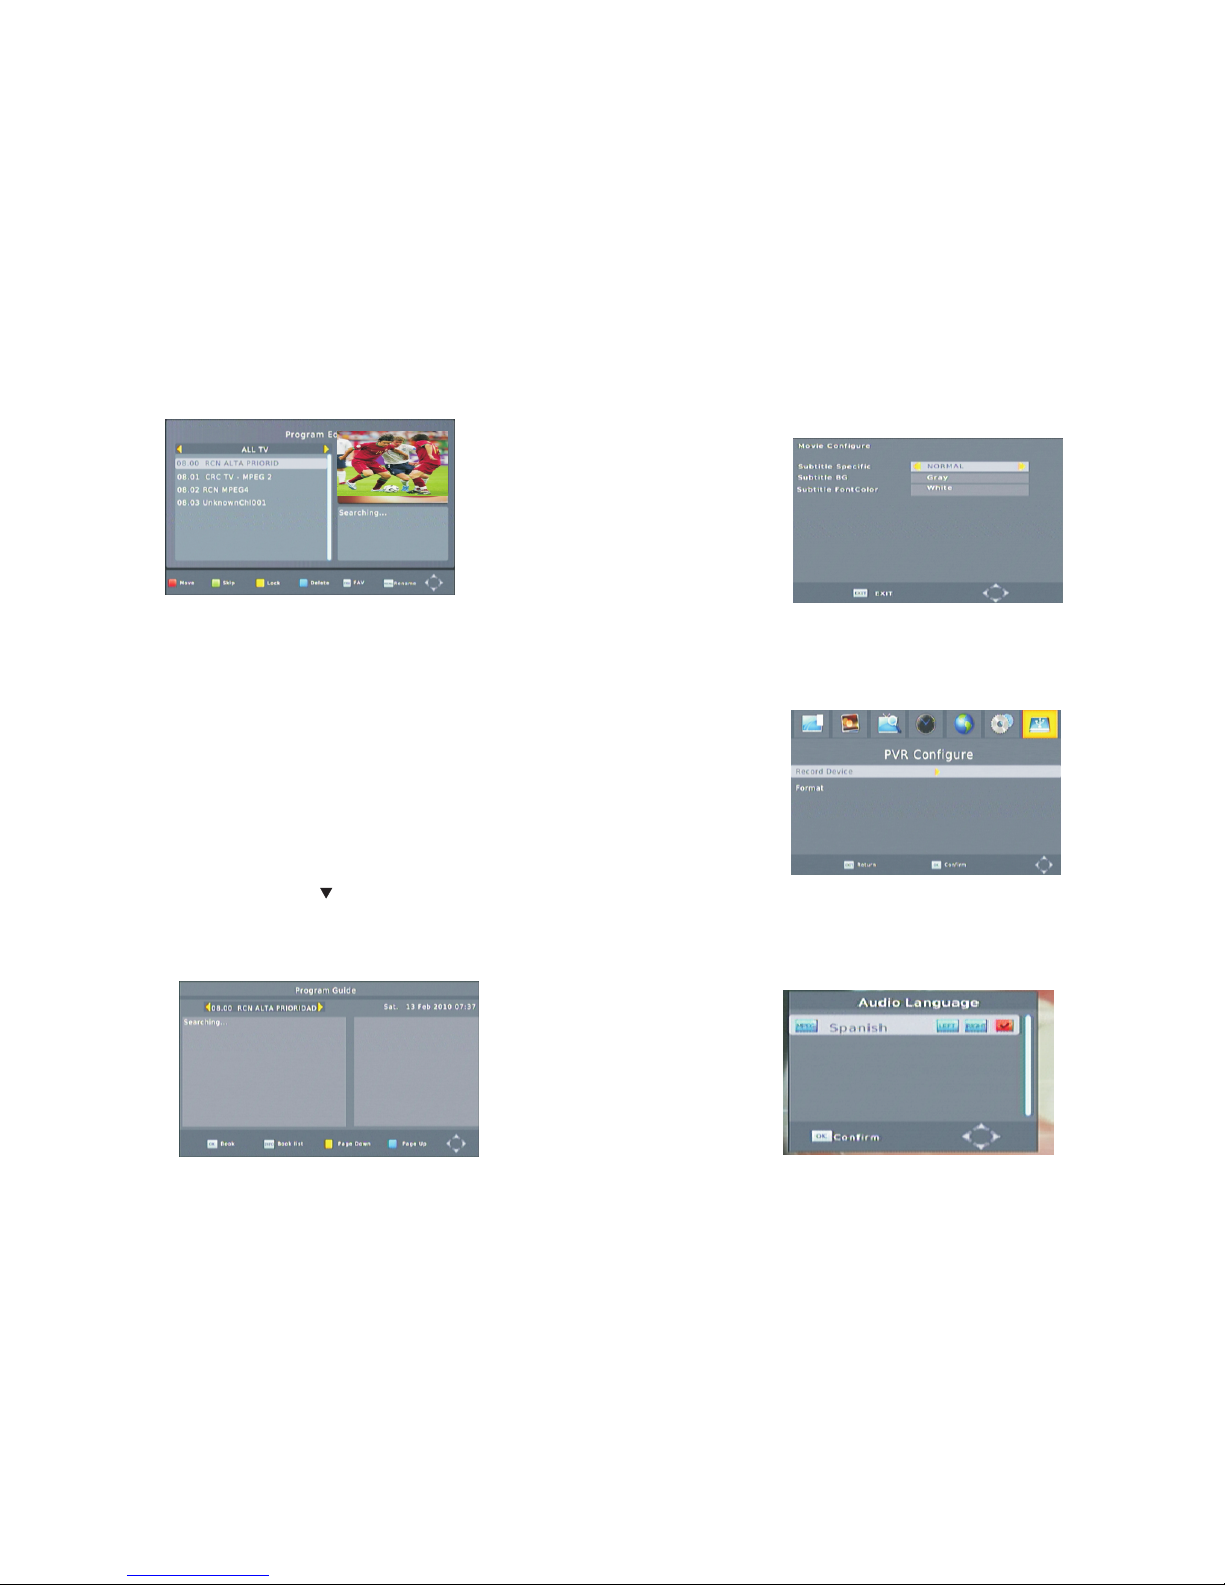
RED button (Move):Press Red button to select the need to move channel, at
customer's satisfy location, press OK, the channel number will move to the
appropriate location.
FAV button (FAV): After press FAV button, the selected channel will add to
FAV List. Press up and down buttons to select multiple channels.
Green button (Skip): After press Green button, the selected channel will skip
during channel switch, can't be selected.
Yellow button (Lock): After press Yellow button, the selected channels will be
locked. When watch need to enter password for viewing.
Blue button (Delete): After press Blue button, popup confirmation for customer
whether delete dialog, press ENTER button will delect the channel.
Exit button:back to Program Edit menu;
Note, if the Program Edit has been modified, press EXIT button back to
Programpage, will popup the save display box, keep save then exit.
2.4.1.2 EPG
Under the Program Edit option press OK/ button, select EPG, to get more
information about the program and program news going to play at current or
future, or press EPG button to entern electronic program guide menu page as
below :
-6-
Subtitle Specific :
Subtitle BG
Subtitle Font color
2.4.6.3 Movie Configure
2.5 O ther menus
2.5.1 Audio Languages
2.4.6.4 PVR C onfigure
Record Device : Checking record device
Format : format of record device
-15-
Page 11
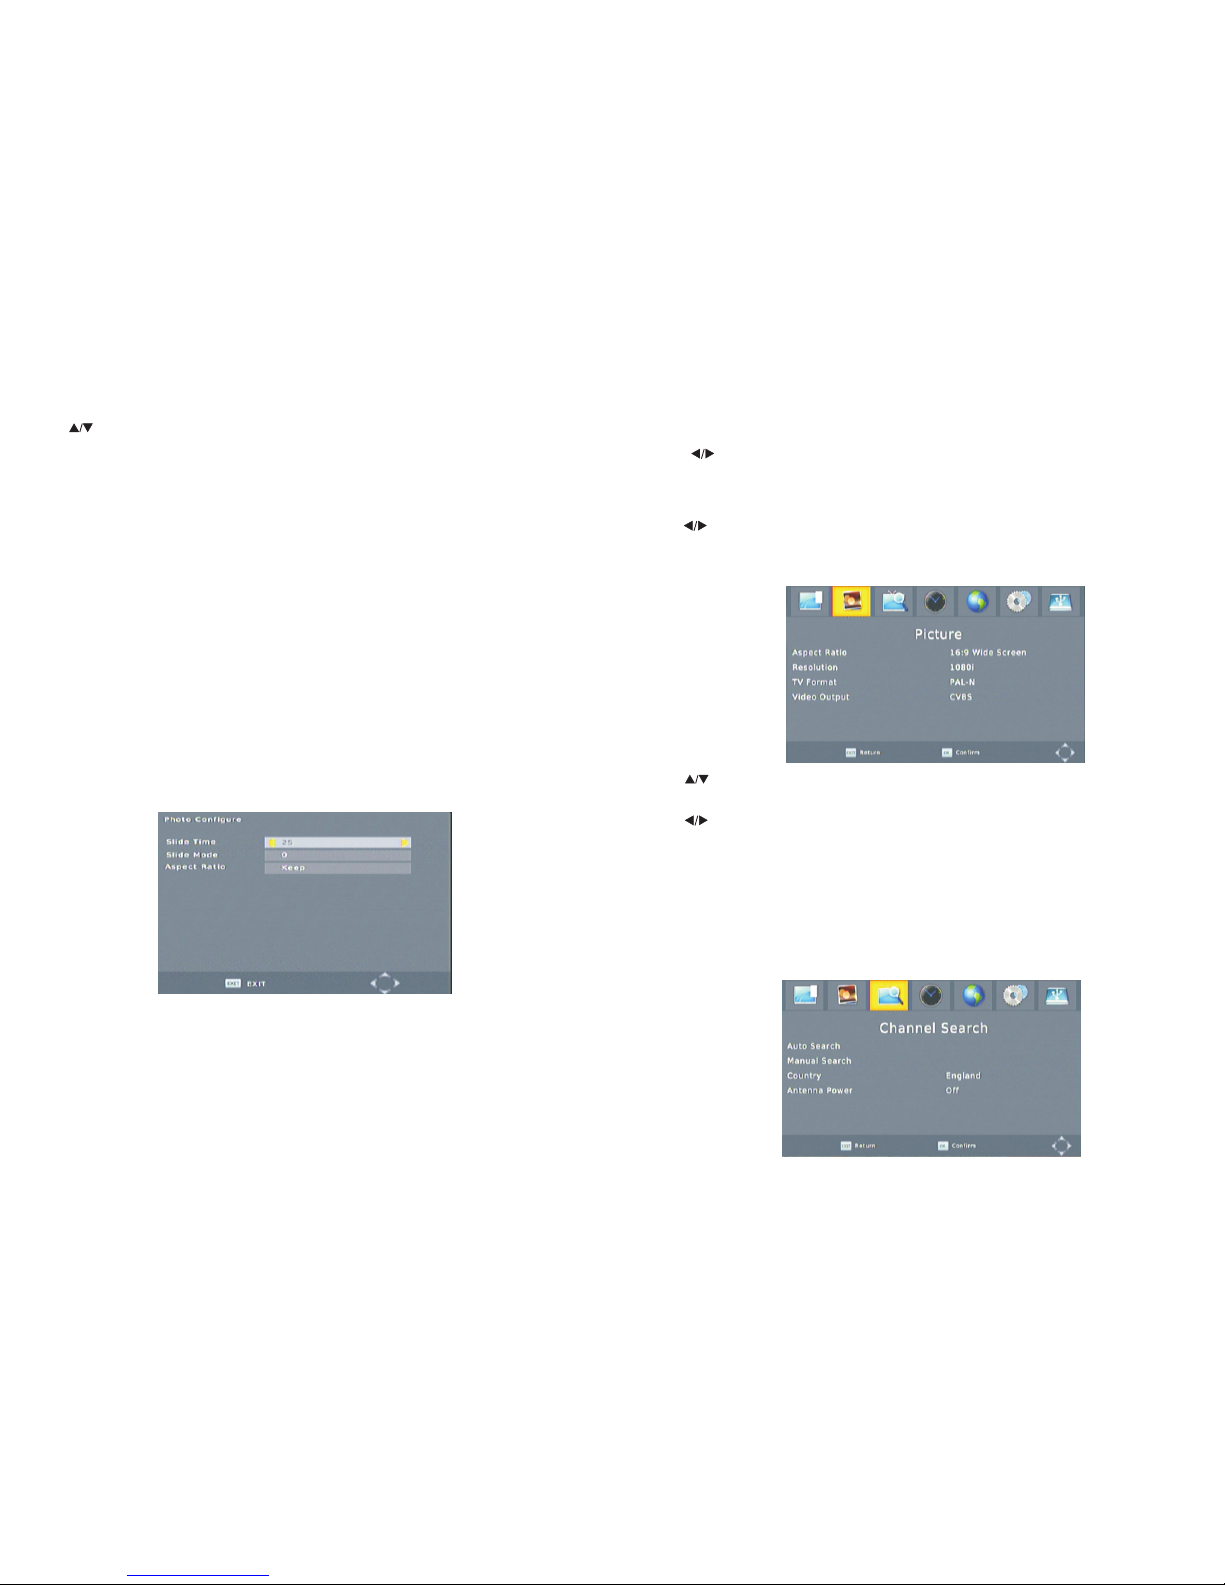
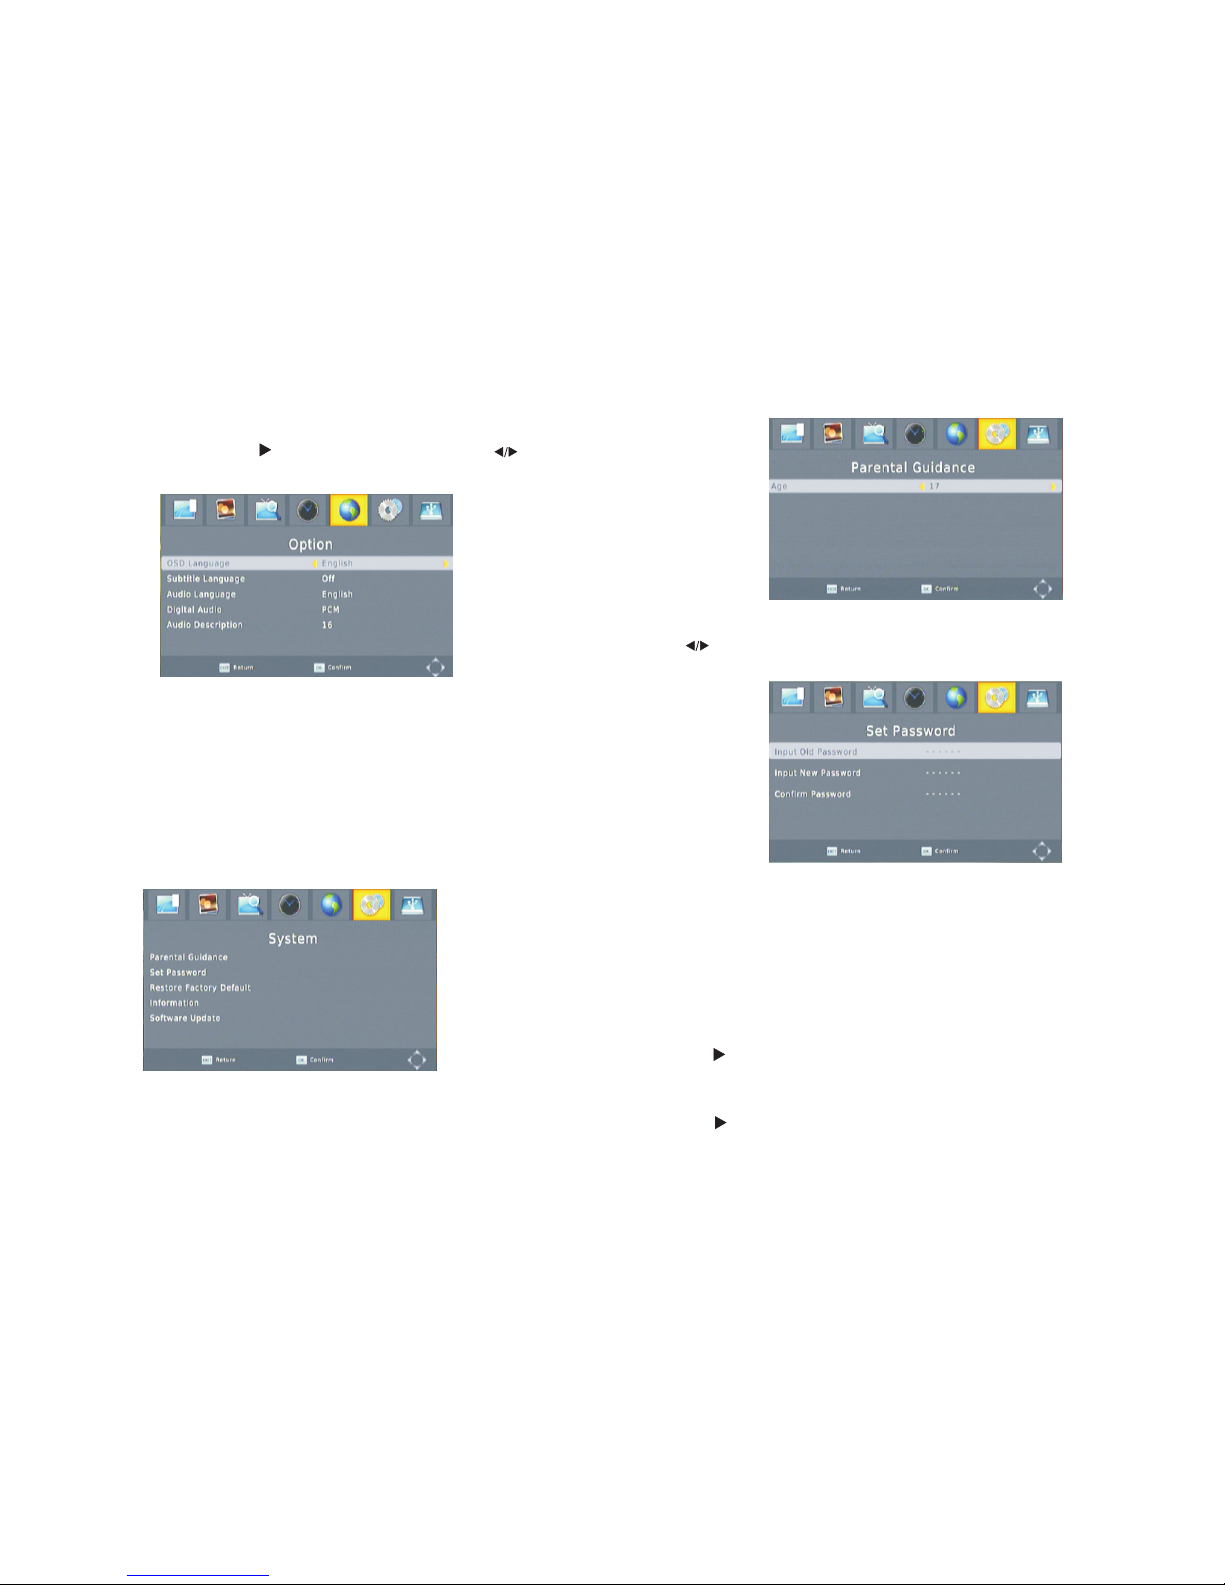
Under Photo Configure option press OK to enter Photo Gonfigure page.
Press to move cursor to select display picture.
The cursor will stay about 2 seconds on the selected file ( in the menu Slide Time
setting to decide the time length ), then enter to scan mode automatic.
Press OK can change to full screen play.
Press RETURN back to previous menu, press PLAY : pictures display from from
top to down.
NOte :
1)Only su pport USB storage device, can't support mobile phone or camera
such multimedia devices. Support removable hard disk, maximum
support 400G. Support NTFS and FAT32 format.
2.4.6.2 Photo Configure
Slide Time Slide time : Play speed and time setting for preview picture
Slide Mode : This function closed.
Aspect Ratio is Images broadcast ratio, Keep for keeping picture Original ratio,
Discard for picture stretching full screen play.
-14-
Pree to select the way of Sort : By LCN; By ONID;By Service name;
By Service ID;default setting By LCN。
Press to move the highlight bar to select debugging project. Press
EXIT/MENU back to main menu.
Press to select focus adjust project.
Aspect Ratio select range :16:9 Wide Screen; Auto; 4:3 Full; 4:3 Pan & scan;
4:3 Letter Box,default 16:9 Wide Screen;
Resolution select range:480P,576P,720P, 1080I;default 1080I;
TV Format select range:NTSC, PAL,default PAL;
Video output select range :CVBS ,RGB
2.4.1.3 Program - Sort
2.4.1.4 Program - LCN
2.4.2 Menu–Picture
2.4.2.1 Menu-Channel Search
Pree to select whether open LCN, default setting ON.
-7-
Note:
Page 12
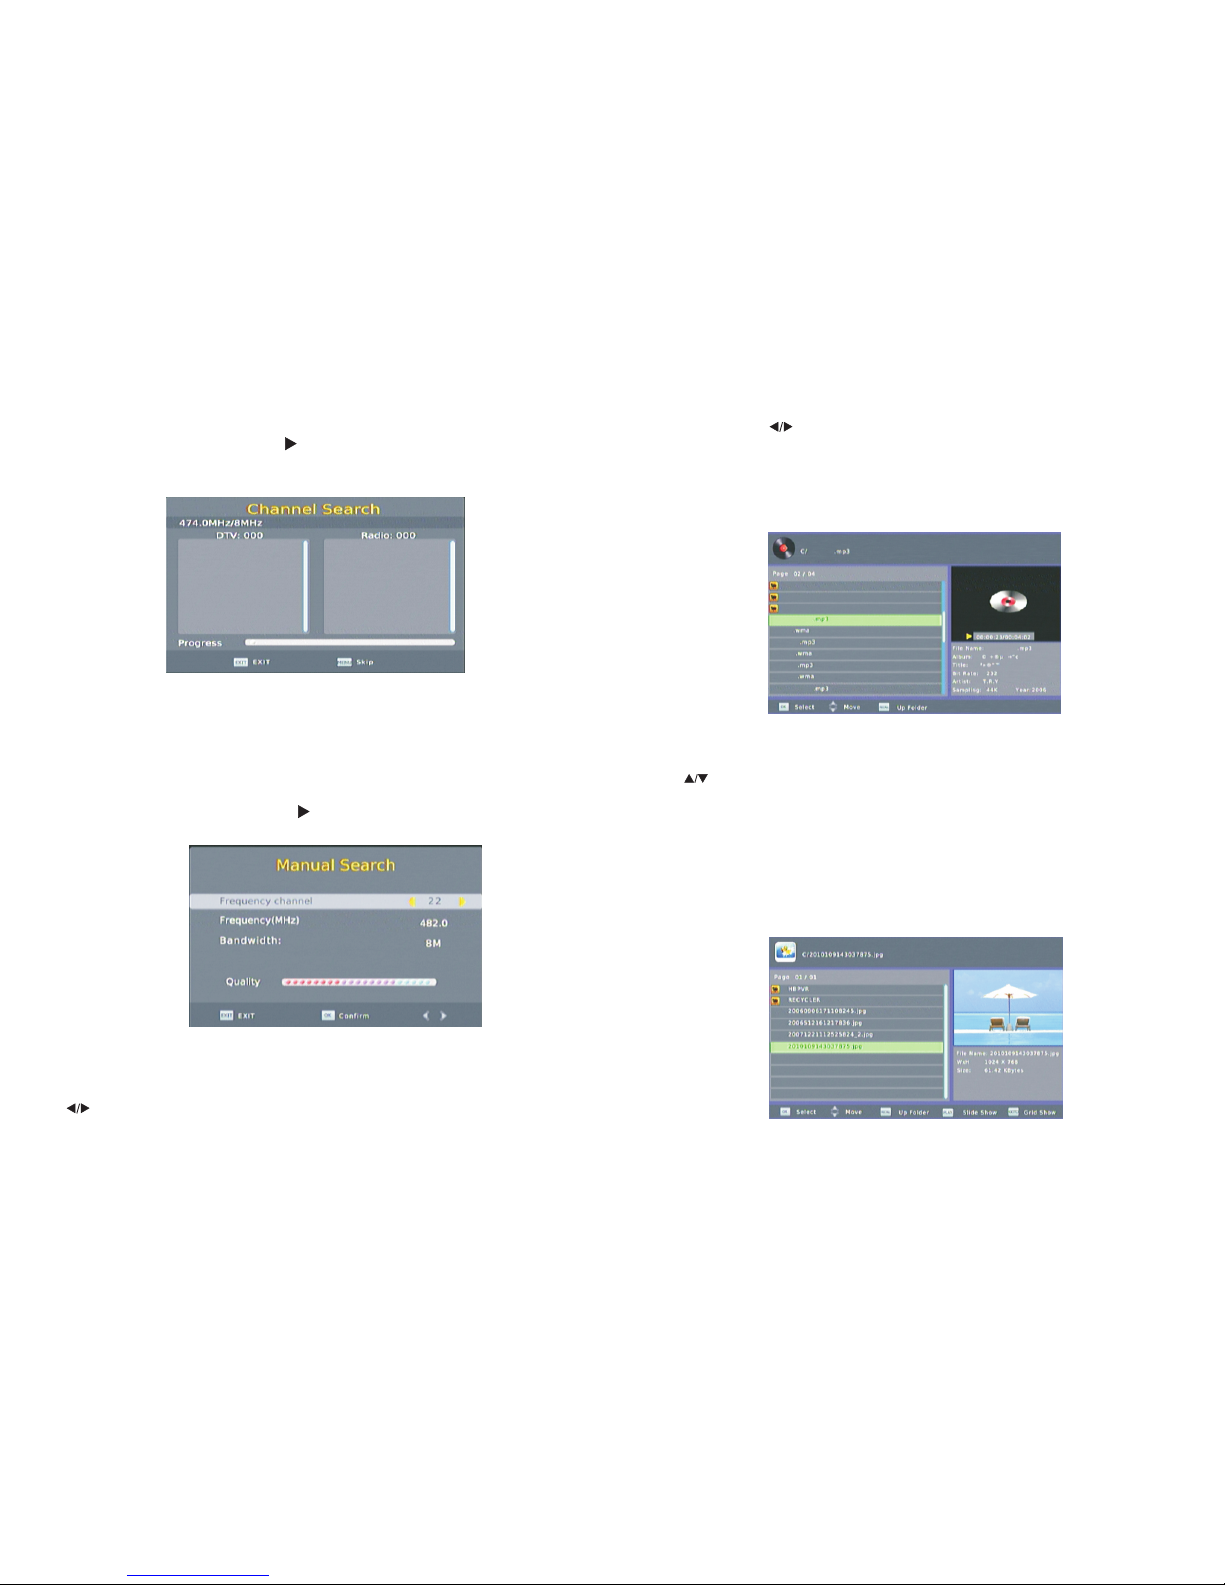
2.4.2.3 Channel Search -Manual Search
2.4.2.4 Installation - Country
Under Auto Search option press OK/ button popup dialog to confirm whether
enter to search, press ENTER button to confirm auto search menu page, the tv
receiver under the processing of searching channels.
Pree EXIT to stop auto search, if the processing of searching didn't finish, will popup
the dialog to confirm whether exit search, after confirmation will exit search.
Press MENU to skip the displayed channel search to continue to search for the next
channel status.
Note : Auto search will immediately delete all channel informations.
Under Manual Search option press OK/ to enter Manual search channel menu,
press EXIT to quit Manual search menu.
The menu show Frequency channel, Frequency, Bandwidth, Quality .
Press OK to entern Channel Search processing.
Press to select country, different country different frequency range and
bandwidth.
Antenna power : open 5V/0V, support one external antenna
2.4.2.2 Ch annel Sear ch -Auto Search
-8-
Enter Media press to move the highlight bar to select Music or Photo, Movie
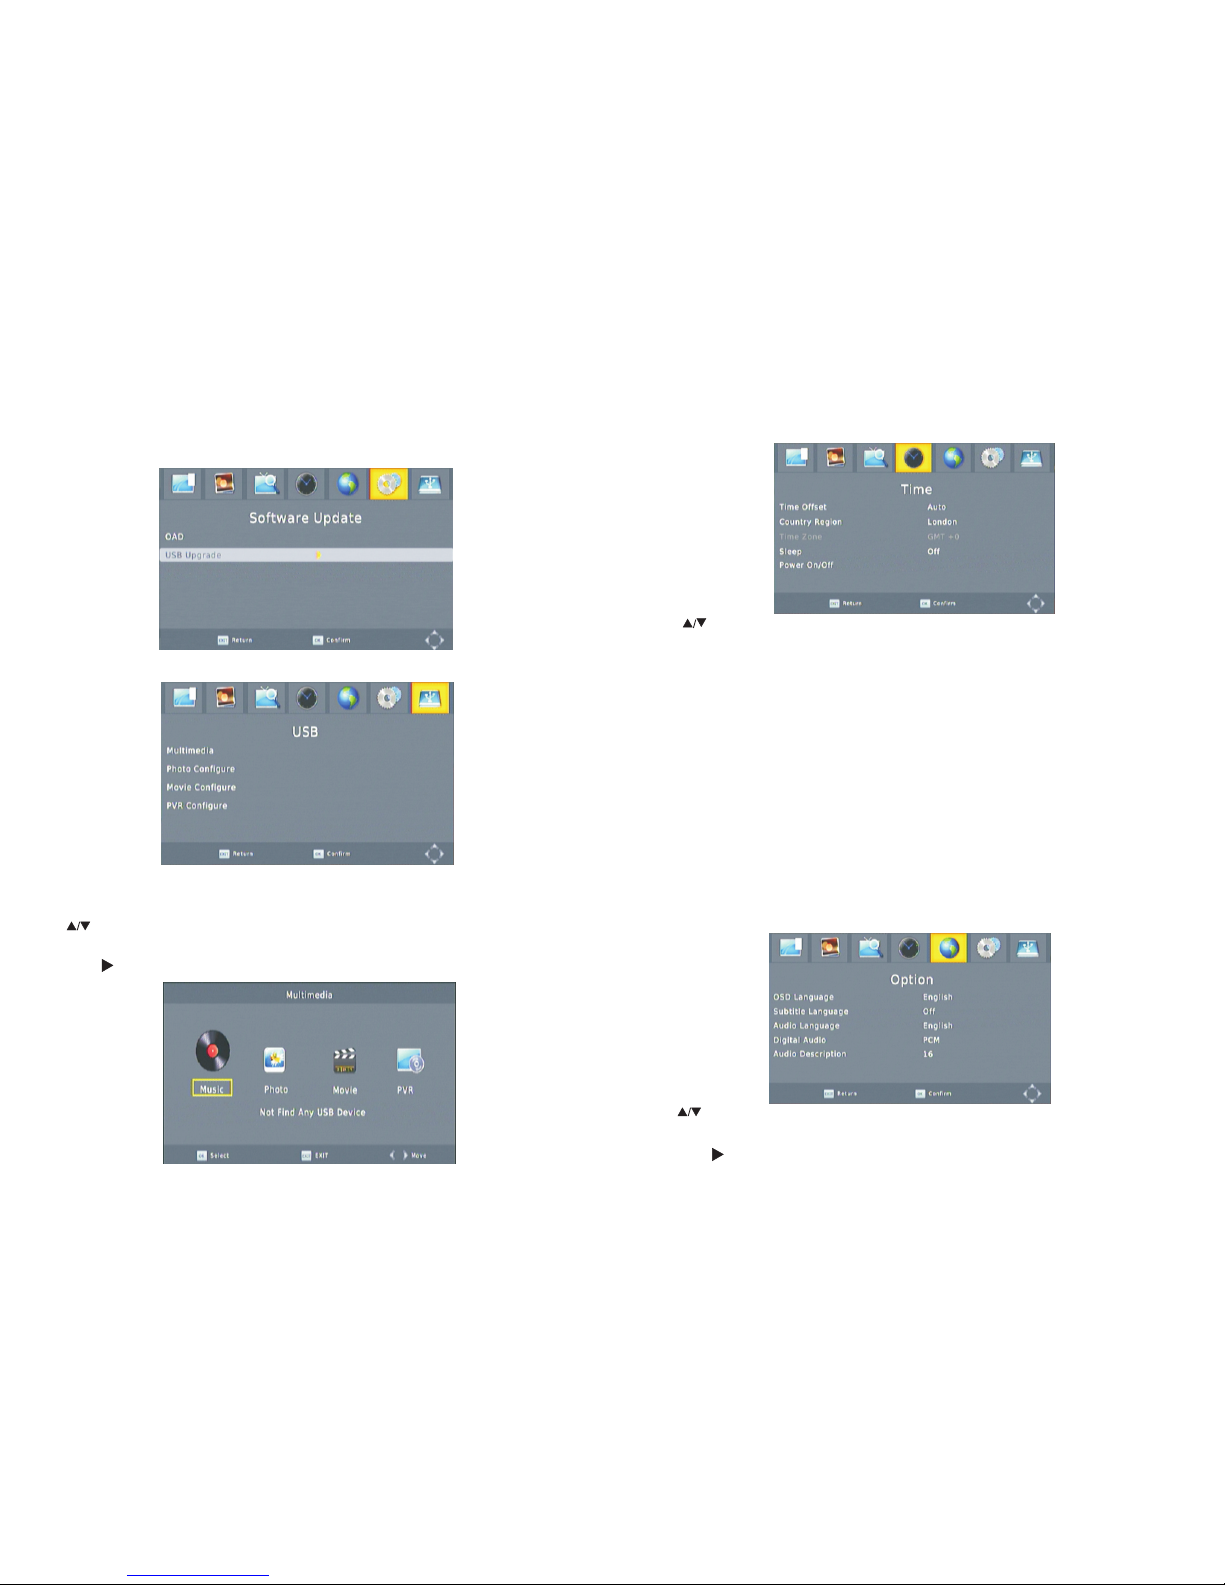
PVR. Press OK to confirm. Press EXIT back to previous page.
Multimedia-Music
Music support play WMA/MP3/AAC format files.
Press to move the cursor select play songs, press OK to enter next menu, press
RETURN back to previous menu.
Press <PLAY/PAUSE>、<PRE>、<NEXT>、<FORWARD>、<BACKWARD>
to play/ Pause, previous song, next song, fast forward, fast backward. Press EXIT to
exit play mode.
Multimedia-Photo support play jpg/bmp/png format files.
-13-
Page 13
Press to move the highlight bar to select debugging project. Press EXIT/MENU
back to main menu.
Press OK/ to enter the option menu page under Configuration menu.
2.4.3 Menu –Time
Press to move the highlight bar to select debugging project. Press EXIT/MENU
back to main menu. The OK button doesn't work in this page.
2.4.3.1 Time - Time Offset
Select range :Auto, Manual,default Auto
2.4.3.2 Time - Country Region
2.4.3.4 Sleep
This function has been closed.
2.4.4 Menu –Option
Different country different selection, default, Paris
2.4.3.3 Time - Time Zone
Select range : GMT-12~GMT+12 , default GMT+1, Select range : GMT12~GMT+12,default GMT+1, When Time offset is Auto, Time Zone option in
gray can't be selected.
-9-
Press to move the highlight bar to select debugging project. Press EXIT/MENU
back to main menu.
Press OK/ to enter the option menu page under the Multimedia menu.
Under Software Update option press OK to enter this page.
2.4.5.4 System - Software Update
2.4.5.5 Menu-USB
2.4.6.1 Multimedia
2.4.6 M enu–Multimed ia
-12-
When Time offs et is Manual, Country Reg io n op tion in gray can't be selec te d.
Page 14
2.4.4.1 Option - Language
Under Language option press OK/ button enter language page, press to
select focus adjust project, press EXIT/MENU back to Configuration menu.
OSD Language range :English,Czech,Danish, French,German,
Italian, Portuguese, Spanish
Subtitle Language : in order to take care of hearing disability, will add special
subtitles when program recording.
Audio Language:Audio language selection type
Digital Audio select range : PCM,RAW,Off,default PCM
Audio Description: this option closed.
2.4.5 Menu –System
2.4.5.1 System -Parental Guidance
Under Parental Guide option press OK to enter, first show 6-digit password input
box, enter correct password, enter to Parental Guide menu page.
-10-
This page is a child lock function, the channel is age limit, can't watch for child.
Press to select age limit range, press OK to confirm setting, press EXIT/MENU
back to previous page.
2.4.5.3 System - Information
Press OK/ show message box : Model, SW Version ( software version ), HW
Version ( type of main engine ).
Input old Password : enter the initial 6-digit password, default password is 000000,
if enter wrong password will pop-up password error massage box, press EXIT to
exit the prompt box.
Input new password : enter new 6-digit password.
Confirm password : enter the password again to confirm new password, if enter
correct again, will pop-up set successfully prompt box, press EXIT to exit prompt
box, password setting successfully.
2.4.5.2 System- Restore Factory Default
Press OK/ then pop-up enter password menu, enter the initial password : 000000,
STB perform reset action, enter engineering default state, restore to default setting.
-11-
 Loading...