

Page 1
USER’S MANUAL
CHORUS20
HYBRID POWER BICYCLE
Page 2

www.EriksonBikes.com
Page 3

TABLE OF CONTENTS
1.IMPORTANT SAFETY INFORMATION
2.GETTING TO KNOW YOUR FOLDING BICYCLE
3.IN THE BOX
4.HOW TO FOLD AND USE
4.1 How to fold
4.2 How to use
5.OPERATION AND ADJUSTMENT
5.1 Introduction to the hybrid-power system
5.2 Battery and charging
5.3 Battery Maintenance
5.4 Cycling computer operations
5.5 Saddle position
5.6 Braking system
5.7 Derailleur
6.USE AND MAINTENANCE
1
2
3
3
3
3
4
4
5
5
7
12
13
14
16
6.1 Intended use
6.2 Before the first ride
6.3 Before each ride
6.4 Regular cleaning
6.5 Regular checks
7.TECHNICAL INFORMATION
16
16
17
18
18
19
Page 4

1. IMPORTANT SAFETY INFORMATION
Do not operate this bicycle without carefully reading the manual and
•
understanding how to operate the bicycle.
Wear your helmet, gloves and other protective gear while riding to
•
protect yourself from injury in case of an accident. We recommend
wearing bright or reflective clothes when riding at night.
Observe traffic rules and regulations when using this bicycle.
•
Passengers should not be carried. When riding in rainy, snowy or
slippery conditions reduce your speed and increase the distance
between yourself and other vehicles.
Your insurance policies may not provide coverage for accidents
•
involving the use of this bicycle, to determine if coverage is provided
you should contact you insurance agent.
Charge the battery in a dry place and ensure there is sufficient
•
ventilation. Neither the battery nor the charger should be covered
during the charging process. Heat can be created during the charging
process and this has to be able to escape, otherwise this could lead to
a danger of overheating or a possible fire hazard. We recommend
charging under supervision or with the user present. Only use an
Erikson specified charger to charge the battery.
If planning to store the battery for a long time without use, make sure
•
to charge it before storing. The battery is best preserved in a cool and
dry environment. It also needs to be charged once a month if it will be
stored for several months.
The bicycle should not be left out in the rain for a long time or
•
submerged; if water enters into the controller and motor wheel, it may
cause short circuit and damage the electrical components.
Keep appropriate air pressure inside the tires, so as to avoid
•
increased friction when riding, as low air pressure may easily wear
tires, deform the rim, reduce range and increase the chance of flats.
When riding at high speed or downhill, use the rear brake to avoid
•
the center of gravity from moving ahead, as using only the front brake
may result in a shift in the center of gravity and may be dangerous.
•
Do not alter any components on the bicycle. Any changes to the
bicycle not approved by Erikson will nullify the warranty on the
manufacturer’s side and may result in damage or injury.
·
the
1
Page 5
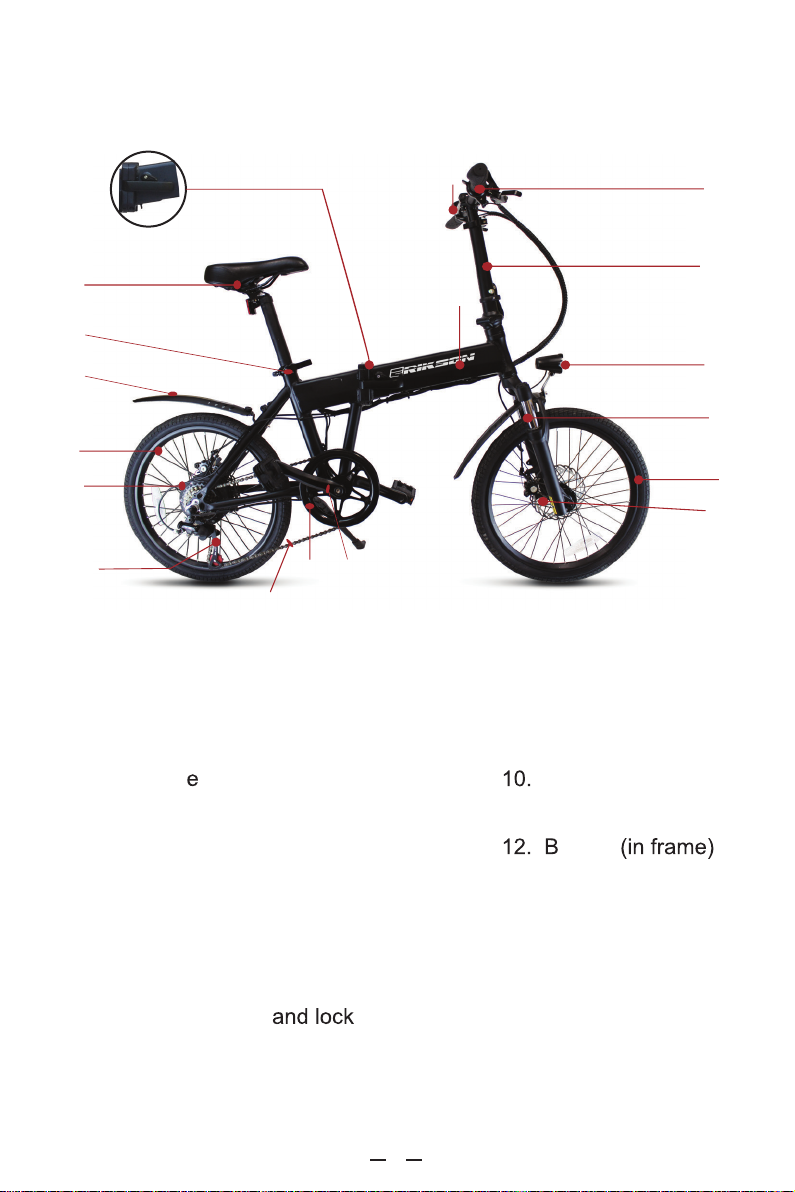
2. GETTING TO KNOW YOUR FOLDING BICYCLE
15
10
11
17
18
8
9
13
14
16
7
1
2
12
3
4
5
6
1. Handl bar
2. Folding stem
3. Headlight
4. Suspension fork
5. Front wheel set
6. Disk brake
7. Cycling computer
8. Folding clamp
9. Seat (saddle)
Mudguard
11. Rear wheel set
attery
13. Cranks
14. Chain ring
15. Seat clamp
16. Chain
17. Motor
18. Derailleur
2
Page 6
3. IN THE CARTON
a) Chrous20 folding e-Bike
b) Charger
c) Reflector
d) This User Manual
1 piece
1 piece
2 pieces
1 piece
4. HOW TO FOLD AND USE
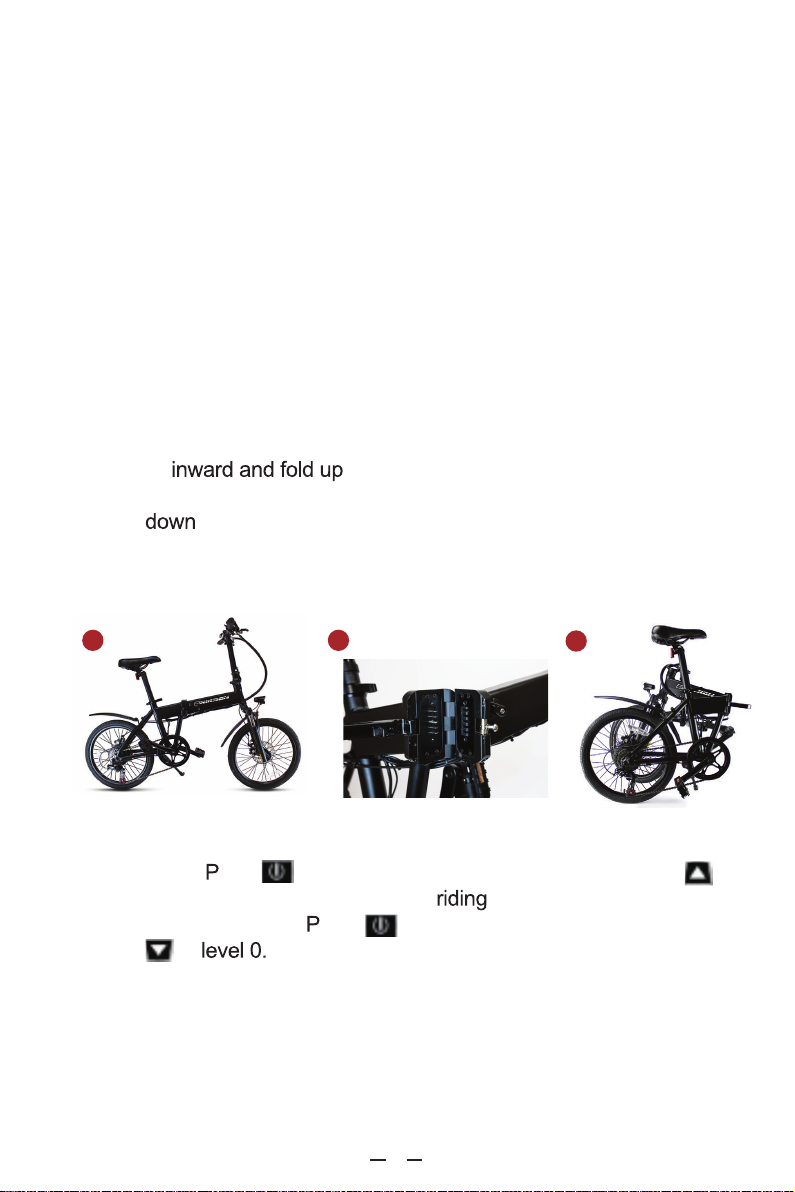
4.1 How to fold
Open the quick-release clamp on the seat post and push the seat
1)
all the way down. Move the pedals to 3/9 o’clock position. Push both
pedals
Unlock and release the handbar stem quick-release clamp and
2)
fold
Unlock and release the folding clamp, fold the-Bike until both wheels
3)
the stem.
are parallel.
1
.
2
2
3
4.2 How to use
PAS mode: ress on cycling computer for 2 seconds, press to
1)
choose power assist level, then start
No-assist mode:
2)
ress on cycling computer for 2 seconds,
.
press to Ride as a regular bike.
3
Page 7
5. OPERATIONS AND ADJUSTMENTS
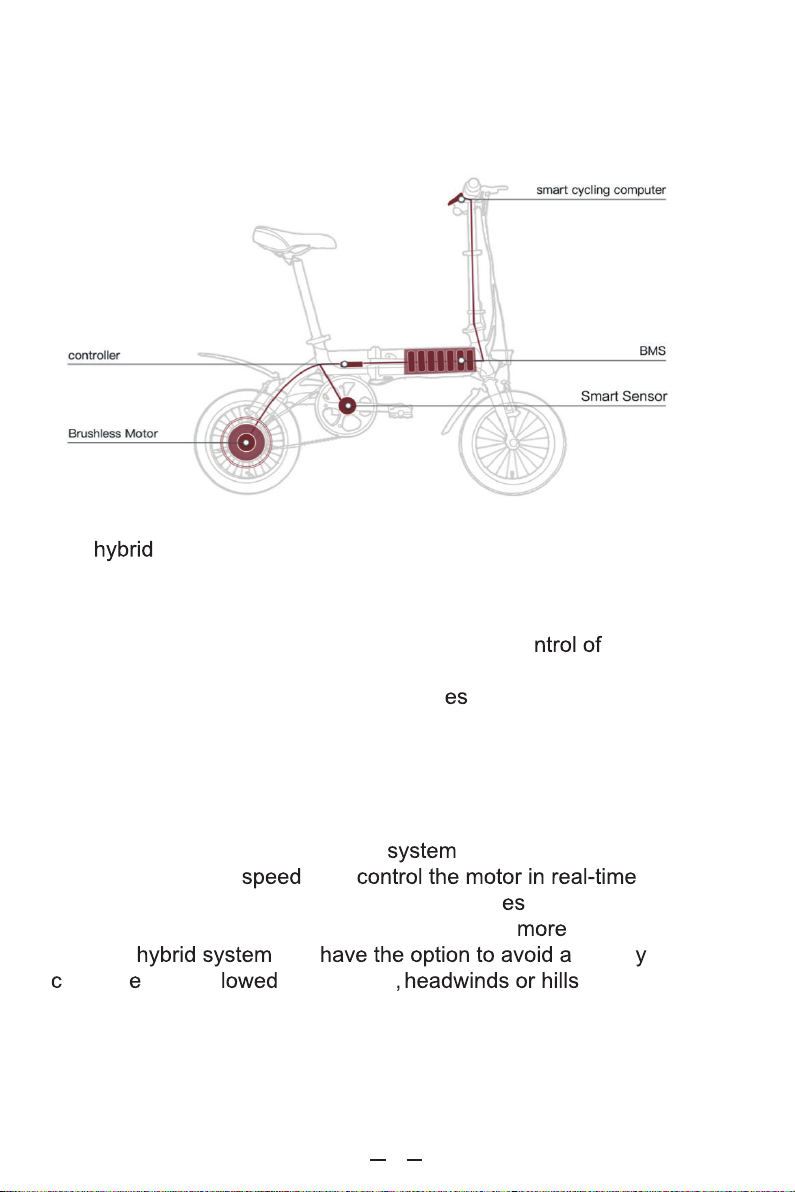
5.1 INTRODUCTION TO THE HYBRID-POWER SYSTEM
The
Smart Sensor – Sensing your pedaling rate and velocity.
•
Smart Controller – Real time calculation and co
•
output.
Battery Management System – Provid
•
system while balancing the power consumption and protecting
the battery cells.
•
BLDC Motor – Provide the power assist.
•
Cycling computer – Control and display terminal.
As soon as you start pedaling, the will sense your cadence
(pedaling rate) and
provide the “just-right” power assist that match your riding
conditions, making your riding much easier and
With the you sweat
ommut , or be s by an injury , and just
enjoy riding.
system consists of the following components:
power
electric power to the
, and to
comfortable.
4
Page 8
5.2 BATTERY AND CHARGING
The battery should be charged before it is used for the first time.
Please only use the charger
by Erikson for charging;
otherwise damage the battery , and may even lead to
fire and other hazard
. Warranty will be voided if a charger other
than the one designated by Erikson is used.
Check carefully whether the rated input voltage of the charger is
1)
consistent with the voltage of the power grid.
Connect first the output plug of the charger with the charging jack
2)
of the battery properly, and then connect the input plug of the
charger to the AC power supply.
Fully charge of an “empty” battery takes 3-4 hours, when the
3)
charge indicator light on the charger turns from red to green, the
battery
After charging, first
4)
charged.
the AC power plug, and then
the the battery.
Safety Concerns:
The battery should be charged in a
1)
away from high temperature, humidity and
environment, staying
he
battery and charger are electronic products, high temperature and
humidity
corrode electronic components, resulting in harmful
gases, and even a possible explosion.
The charg
2)
long. An
excessive charging time will lead to shortened life expectancy of
the battery.
5.3 Battery Maintenance
You can achieve the best possible performance and lifespan of
1)
your battery by charging
on a regular basis and using it within
the recommended temperature range. The battery has almost no
memory effect thanks to the Li-ion technology.
Leaving a battery
2)
to permanent lo
of function. Please recharge an empty battery
for will lead
as soon as . If storing the battery for an extended
period, we recommend to recharge at least up to ¾ (4
least every 30 days to avoid damage to the battery. A dead
battery due to
is not a warranty claim.
5
) at
Page 9
3)
If your bicycle does not move for a 10 minutes period, the BMS
will switch the battery power off. In order to continue riding
with support, switch the
4)
Every battery with Li-ion technology is subject to an
chemical aging process. Provided the b
on again.
has been
properly, capacity 85% after
500 charging cycles.
Please follow municipal regulations as to how to discard the
5)
battery appropriately, so as to avoid environmental pollution.
6)
Recommended temperature ranges:
a) Charging/Discharging:
b) Storage:
0-45℃, 32-113℉
<35℃/95℉
6
Page 10
5.4 CYCLING COMPUTER OPERATIONS
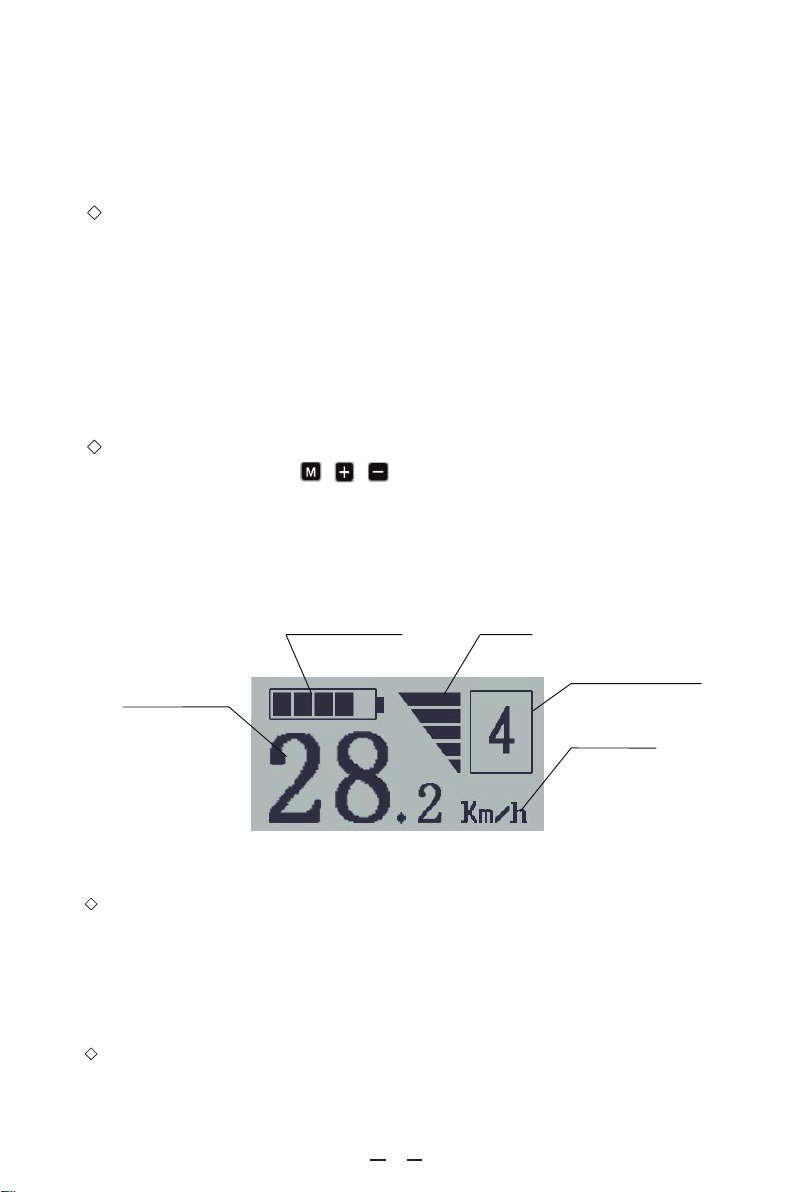
Battery Indicator
Speed Display
Speed Unit
Assistance Level
Power
5.4.1 Function and Display
Function Summary and Button Definition
◆ Function Summary
●Smart Battery indicator
●Assistance-level indication
●Speed indication (incl. current speed, max speed and average speed)
●Power indicator
●Trip time indication
●Trip distance and Total distance
●The push-assistance function
●The Lighting On/Off
●Error Code indication
◆ Button Definition
There are three buttons ( , , ) on the KD58C display that represented by
the following functions respectively: MODE, UP and DOWN.
Function Area Distribution
Monitor Area
General Operation
◆ Switching the eBike On/Off
To switch on the eBike system, hold the MODE button for 2 s.
In the same way to hold the MODE button for 2 s again, the eBike system will turn off.
When switching off the eBike system the leakage current is less than 1 uA.
■When parking eBike for more than 10 minutes, the eBike system switches off
automatically.
Display Interface
◆
After switching on the eBike system, the display shows Current Speed.
When riding to change th
e indicated information, press MODE to show in cycle modes
7
Page 11
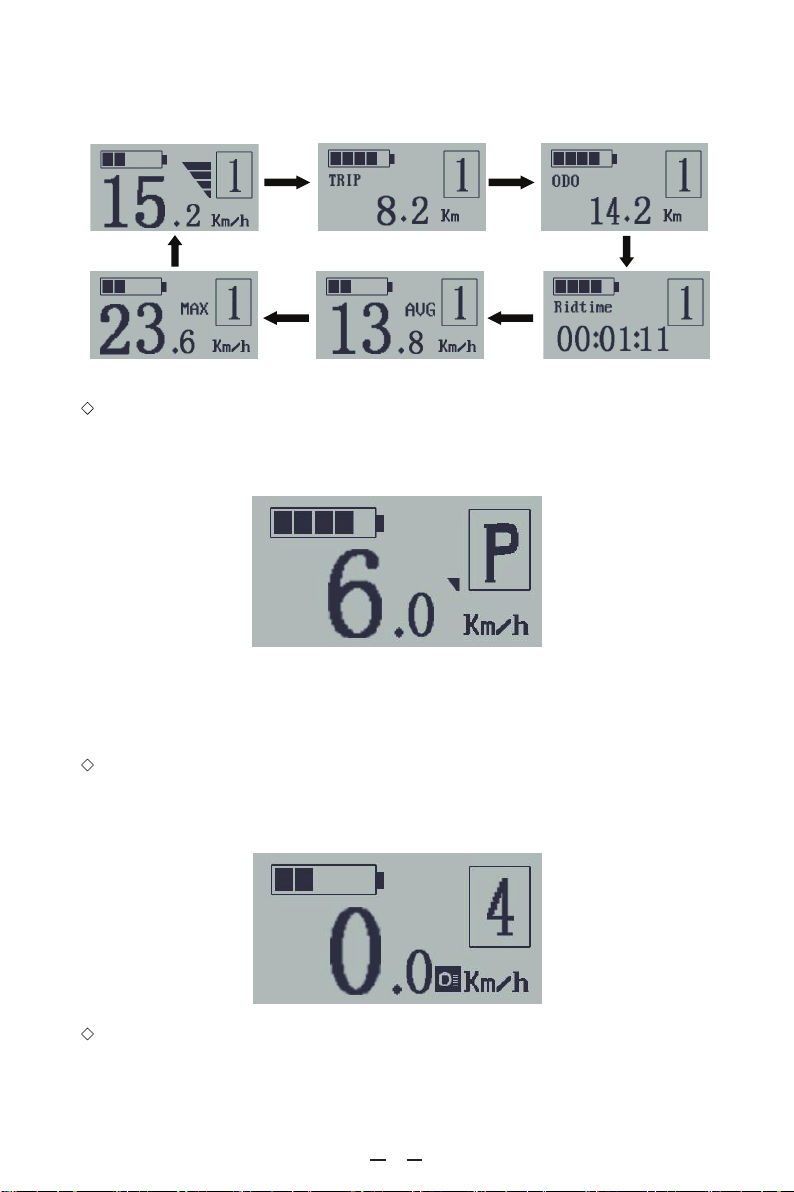
below: Cunning Speed (Km/h) → Trip Distance (Km) →Trip Time (Hour) → Average
Speed (Km/h) → Max Speed (Km/h). Each state will display for 2 seconds and then
automatically returns to the Running Speed interface. When the speed is
0 km/h, Total Distance will be added to the display.
The circulation interface of the condition that the speed is 0 km/h
◆
Switching Push-assistance mode On/Off
To access the push-assistance mode, hold the DOWN button for 2 s, the eBike will
go on at a uniform speed of 6 Km/h, “P” is showed on the screen at the same time. The
push-assistance function switches off as soon as you release the DOWN button.
Push-assistance Mode
■Push-assistance function may only be used when pushing the eBike. There is a risk
injury when the wheels of the eBike are not on the ground using use the
push-assistance function.
Switching the Lighting On/Off
◆
To switch on headlight of the eBike, hold the UP button for 2 s.
In the same way to hold the UP button for 2 s again, the headlight will be switched
off.
Switch On/Off the Lighting
Assistance Level Selection
◆
Assistance levels indicate the output power of the motor. The default value is level
“1”.
The default power ranges from level “0” to level “5”.The output power is zero on
Level “0”. Level “1” is the minimum power. Level “5” is the maximum power.
8
Page 12
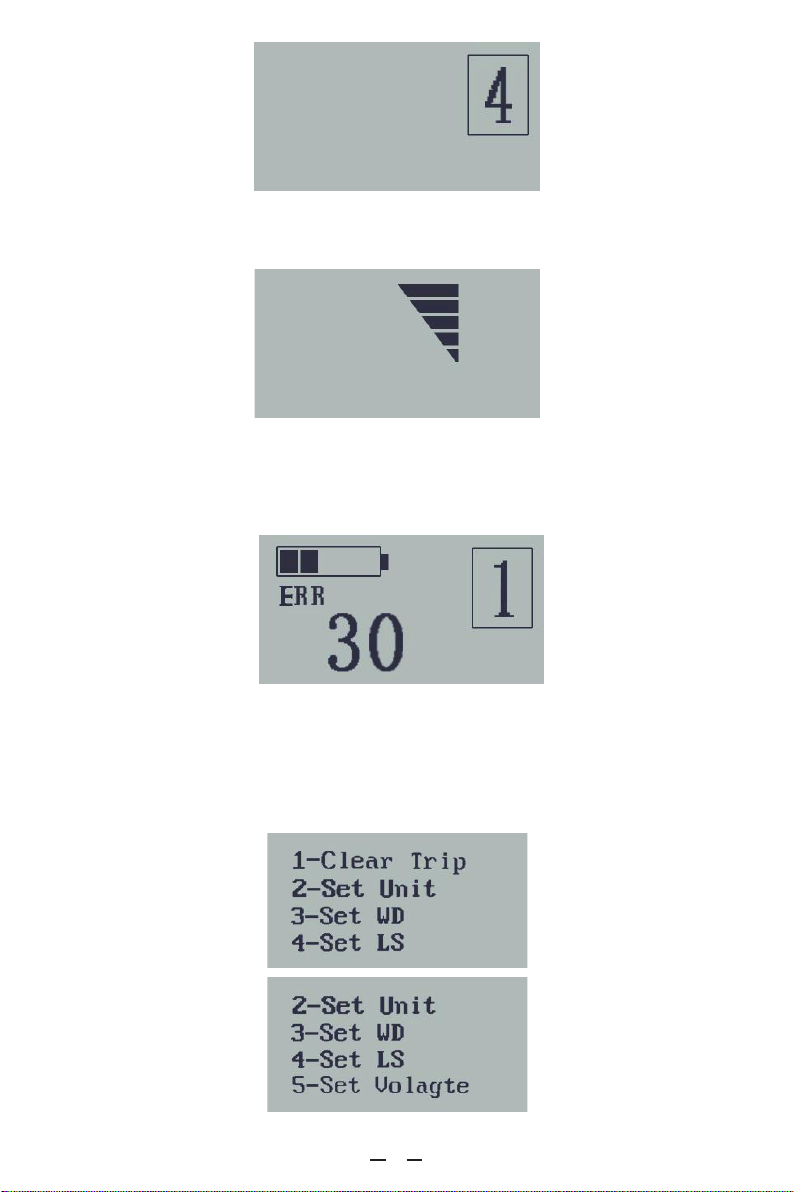
Assistance Level “4”
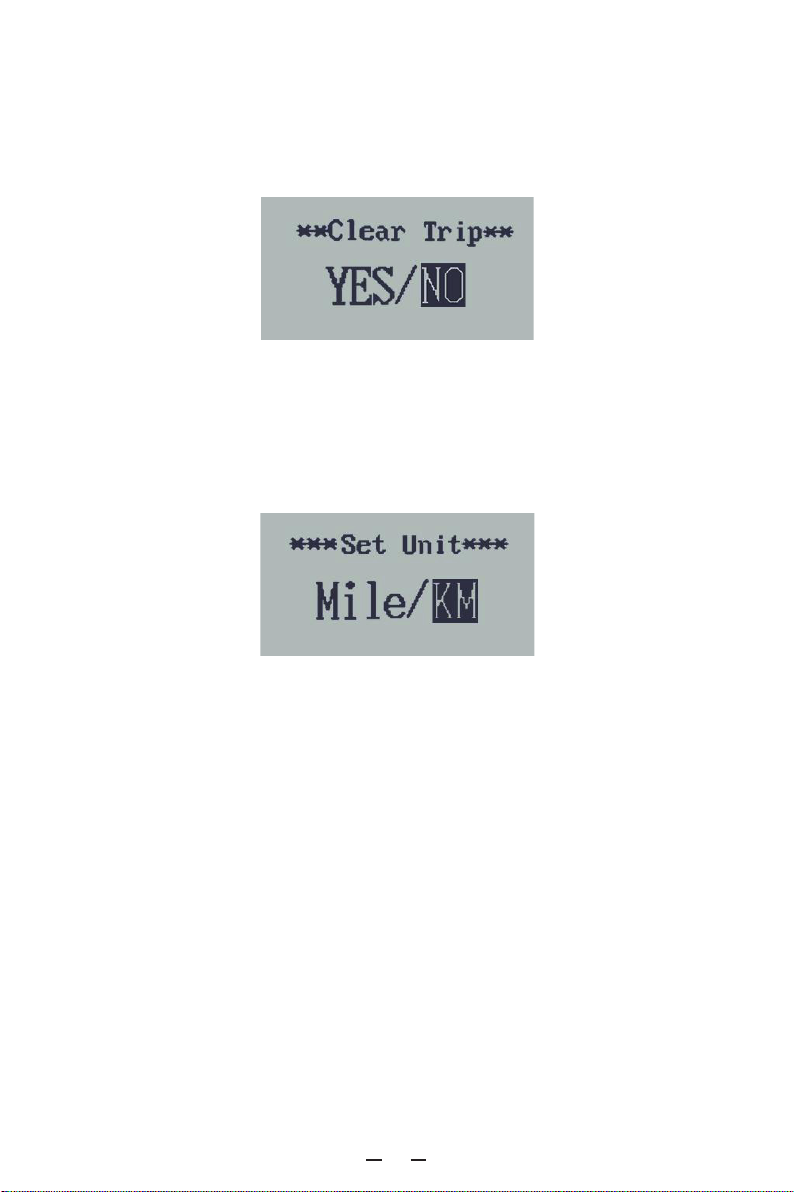
◆ Power Indicator
The out power of the motor can be indicated by the display.
Motor Power Indicator Interface
Error code Indication
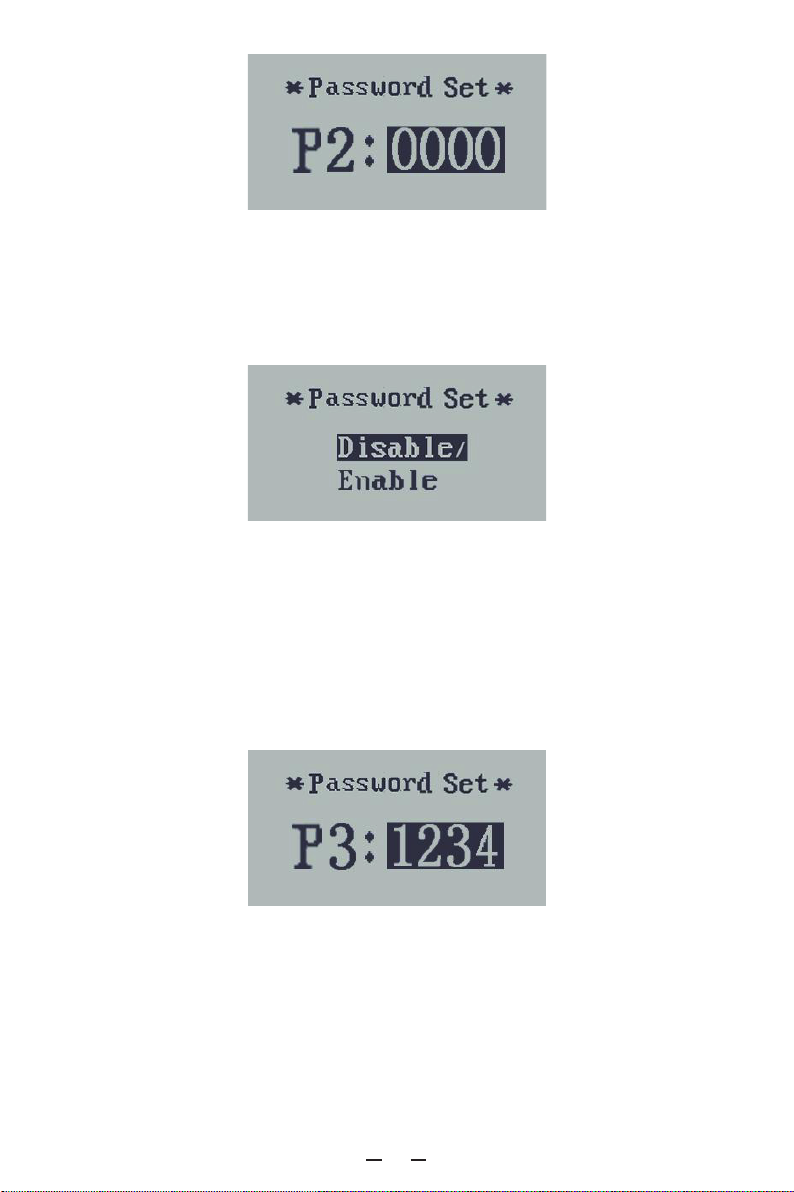
◆
If there are errors about the electronic control system, the error code will appear
automatically. Here is the message of the error code in Attached list 1.
Error Code Indication
■ Please contact a Service Center when an error code appears
.
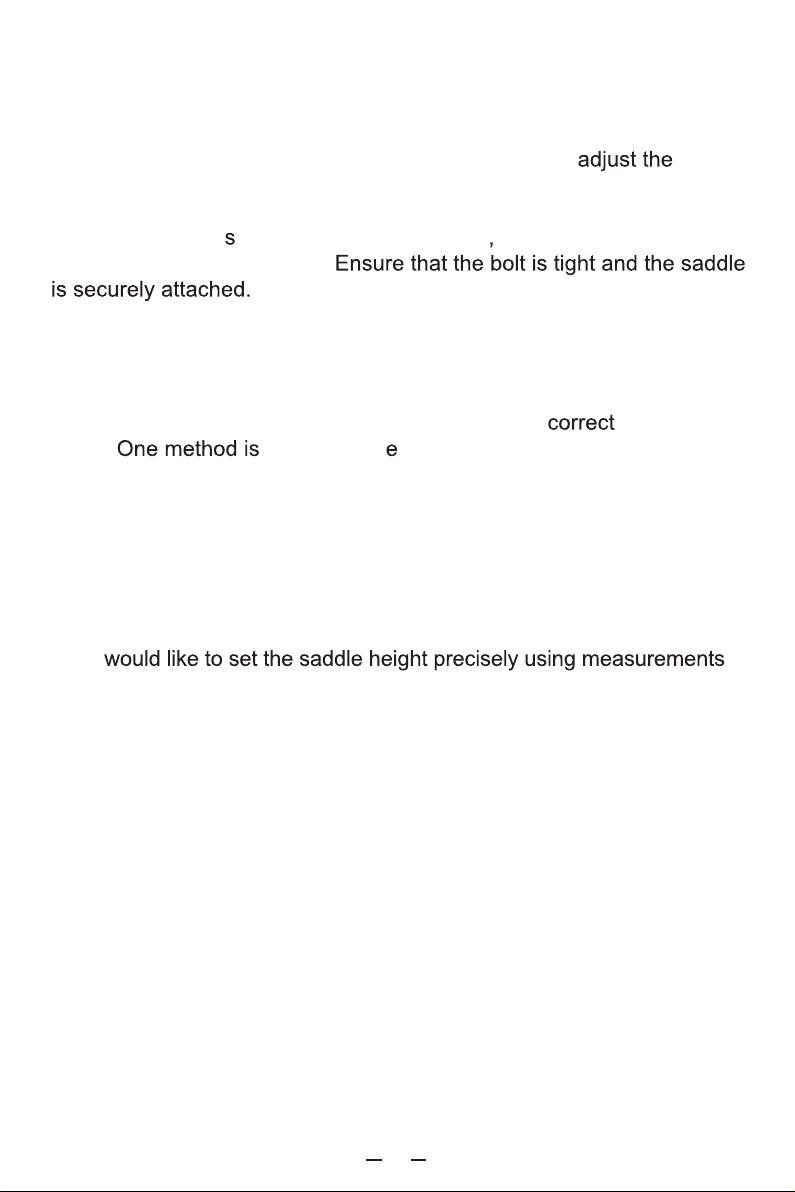
General Settings
After the eBike system is switched on, to access general settings menu, hold both the
UP and DOWN button for 2 s.
Press the Up or DOWN button to select the content, press MODE to confirm the
corresponding settings.
General se le ction settings interface
9
Page 13
◆ Trip Distance Clearance
Clear Trip means single trip distance clearance. Press the UP or DOWN button to
choose YES or NO to clear the trip distance. The default value is NO. If you choose YES
and press the MODE button to
general selection settings interface. Otherwise the display will return to the general
to the
selection settings interface directly.
confirm the option, the display will show OK and return
Trip distance clearance
Unit Mi/KM Conversion
◆
Set Unit represents unit settings.
To convert unit, press UP/DOWN to increase or decrease until the desired setting is
displayed.
To store a changed setting, press the MODE button to access trip distance clearance
settings
and the display will show OK then returns to
The default value is Metric.
general selection settings interface
.
Mile and Kilometer Conversion Settings Interface
Power-on Password Settings
◆
P2:0000 represents power-on password settings. The default value is 1212.
To access the power-on password settings, press UP/DOWN to modify the value
and then press MODE to confirm digit one by one until the correct 4-digit password is
completed, and then press MODE to access power-on password enable settings
interface, otherwise stay on the password input state.
10
Page 14
Power-on Password Entering Interface
Power-on Password Enable/Disable
Press the MODE button to enter power-on password modify interface. Press the UP
or DOWN button to select Disable or Enable and press the MODE button to confirm. The
default value is Enable. If you choose Enable, press the MODE button to enter Power-on
Password Modify interface, otherwise exit the power-on password settings interface.
Power-on Password Disable/Enable
Power-on Password Modify
When the display shows “Password Set, P3”, press the UP or DOWN button to modify
the value and then press the MODE button to confirm digit one by one until the new 4-digit
password is completed.
To store the new power-on password, hold the MODE button for 2 s and then exit
settings.
When switching the eBike system on next time, the display will show P1,0000,
please input the new password to power on.
Power-on
Password Modify
Interface
Interface
◆ Exit settings
In the settings state, press the MODE button to confirm the input. Hold the MODE
button for 2 s to save the settings and then exit the current settings. Hold the DOWN
button for 2 s to cancel the operating but not saving the settings data, and then return to
previous menu.
■If there is not any operations in one minute, display will exit the settings state
automatically.
11
Page 15
5.5 SADDLE POSITION
A properly adjusted saddle can minimize discomfort on the-Bike and
make your pedaling more efficient. Take some time to
saddle position as it will improve your overall riding experience.
Saddles can be adjusted in three ways: saddle height,
forward/backward
position and tilt. To adjust simply loosen the bolt/
clamp, adjust and re-tighten.
5.5.1 Saddle Height
The saddle height controls the leverage for your pedaling. Too low and
it puts stress on your knees, too high and you may rub the saddle
excessively. There are a number of ways to get the
height.
to sit on the -Bike with both feet on the pedals –
saddle
get a friend to help, use a trainer or lean against a wall. Place your
pedals in the 6 o’clock and 12 o’clock position. Your bottom leg should
be fully extended when the heel is placed on the lower pedal. If it’s bent
you need to raise the saddle. If you have to rock your hips to reach or
simply can’t reach, then lower the saddle. You can also tell if the saddle
is too high if you find you are sitting on the narrow front part of the
saddle.
If you
,
use this web-based tool: www.ebicycles.com/bicycle-tools/saddle-height
12
Page 16
Safety Concerns:
The seat post has a MAX marked line (that is, the safety line), this is
the
height that you can raise the saddle.
, the MAX marked line should always below the seat
post clamp. Serious injury
may occur
if the saddle height is raised beyond the MAX line.
5.5.2 Saddle Forward/Backwards Position
The forward/backward position of the saddle will determine
which will also dictate how comfortable and effective you are
on the e-Bike. osition the saddle 2 to 2.5 inches behind the centerline
of the bottom bracket axle or spindle
over the center of the pedal when the crank is in the forward 3 o'clock
position.
5.5.3 Saddle Tilt
The saddle tilt is also important. If the nose is tilted down too much it
will slide you onto the narrower part of the saddle,
putting strain
on your arms and shoulders. If it’s tilted up too much you feel
. The
general rule is to set the saddle parallel to the ground
however
some women prefer a slight down-tilt (particularly if they use saddles
designed for men) and men a slight up tilt, but this should be very
. Whatever position you want to try, test it out for a week or so,
it slightly and try it again until it’s just right.
5.6 Braking System
The braking system is an accessory necessary for each bike and is
a key to riding safety. The braking system includes brake levers,
brake assemblies and brake cables.
Left Brake Lever: Front Brake
Right Brake Lever: Rear Brake
13
Page 17
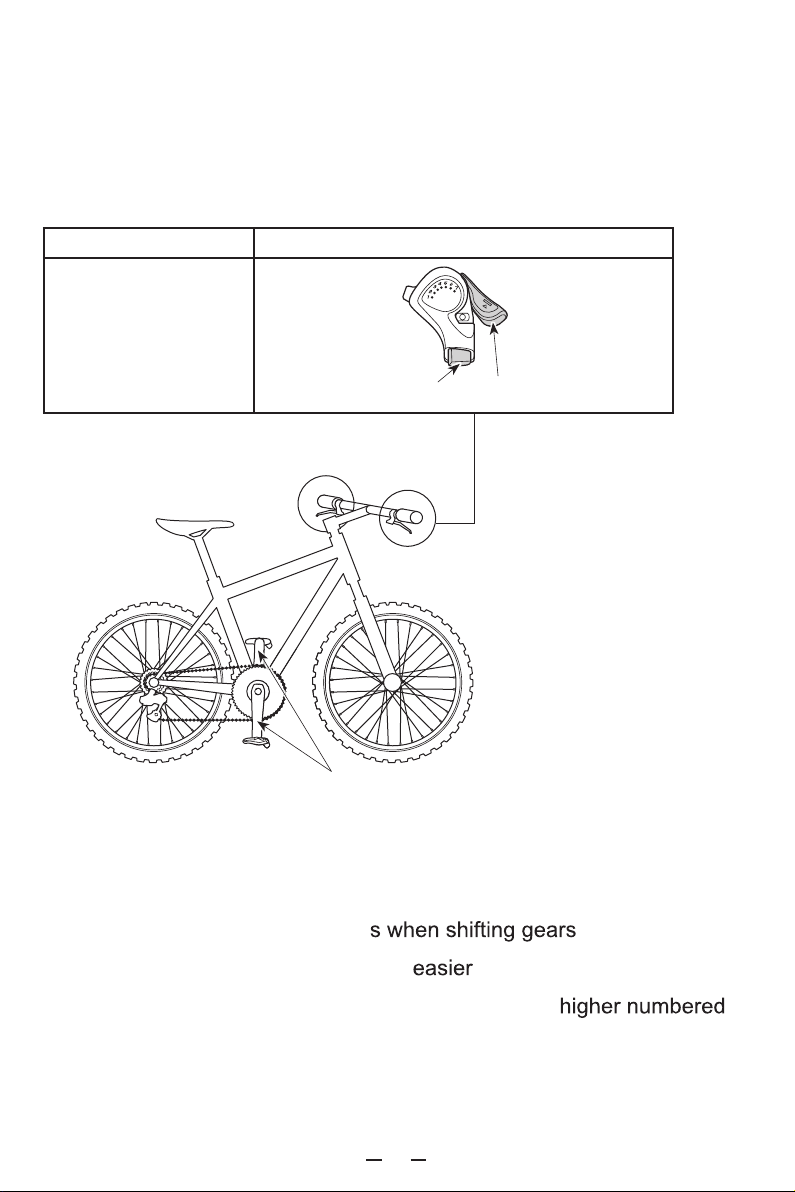
5.7 Derailleur
5.7.1 Name of Parts
Thumb shifter Plus
SL-TX
Rear side
Crank
5.7.2 Gear Shifting Operation
Be sure to keep turning the crank
Button
Lever
.
(A) When you want to make pedaling
Push the lever in the direction of the arrow to shift to
gears.
14
Page 18
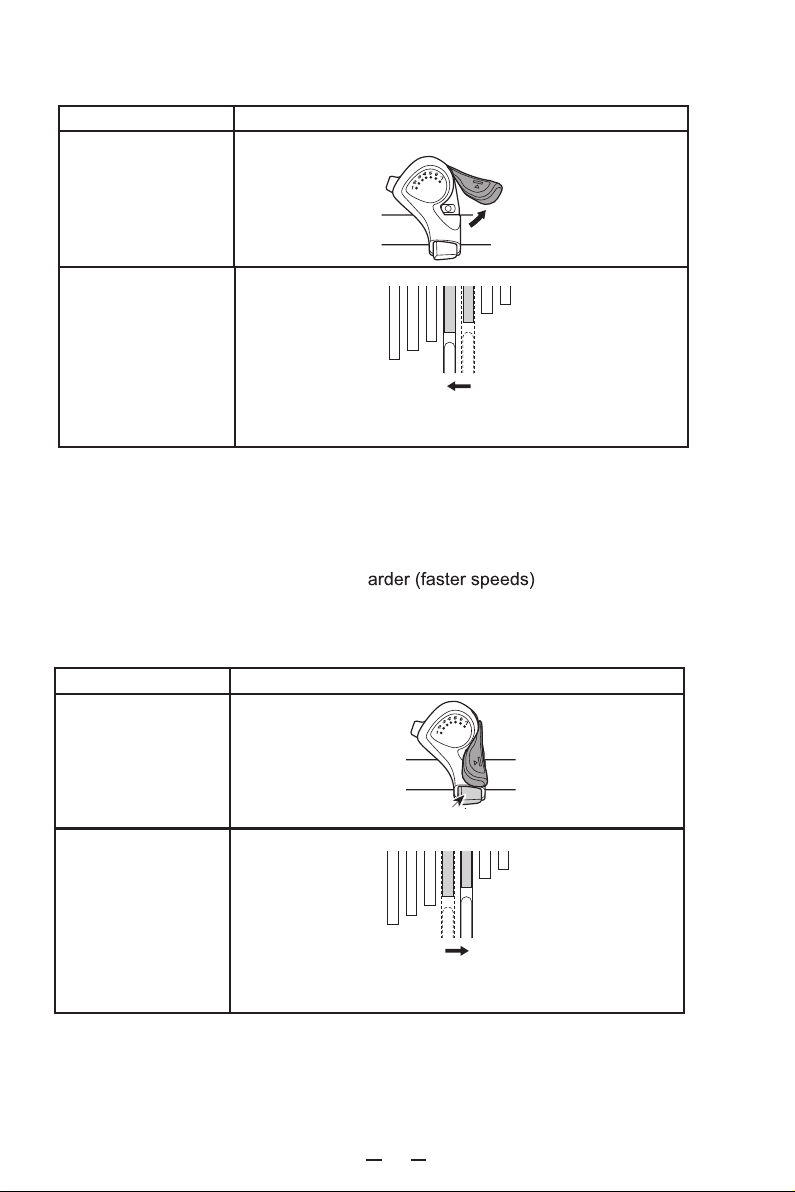
Thumb shifter Plus
Rear side (Right)
SL-TX
(A)
4 3
Chain position
(A)
smaller sprocket
larger sprocket
→
(B) When you want to make pedaling h
Push the button in the direction of the arrow to shift to lower numbered gears.
One press of the button will shift to one higher gear. Multiple presses are
required to shift several gears.
Rear side (Right)
Thumb shifter Plus
SL-TX
Chain position
Button (push)
larger sprocket
15
3 4
(B)
smaller sprocket
→
Page 19

6. USE AND MAINTENANCE
6.1 INTENDED USE
This e-Bike is intended for transporting one person at a time. Fit your
bicycle with suitable equipment if you would like to transport cargo.
Ensure that you do not exceed the maximum permissible load (rider
+ cargo) of 330 lb (150 kg).
The manufacturer and dealer do not assume any liability for activities
above and beyond the intended use. This particularly applies for not
adhering to safety advice and damage resulting from this, for
instance: off-road use, carrying excess weight or making improper
repairs.
The e-Bike is not generally designed to withstand extreme stress,
such as riding down stairs or over jumps.
6.2 BEFORE THE FIRST RIDE
Please fully charge the battery before the first use.
1)
Please ensure that your bicycle is ready for use and is adjusted to
2)
fit your body, including:
Setting the position and fixture of the seat and handlebar
a)
Checking the assembly and adjustment of the brakes
b)
Securing the wheels into the frame and fork
c)
Checking the tire pressure
d)
3)
Ensure that you know which lever operates which brake. Operate
and ride your bicycle in a quiet and safe place.
4)
Ensure that the wheels are securely fastened in the frame and
fork
the are closed and that all important nuts and bolts are
secure.
16
. Check that
Page 20

5)
Push the wheels forward with the brakes pulled. The back brake
should completely prevent the back wheel from moving, while the
front brake should lift the back wheel off the ground with its
braking effect. The bicycle’s steering should not rattle under
braking or exhibit any play.(
6)
The effectiveness of brakes can be different in wet conditions or
).
on slippery surfaces. Please take into account the possibility of
longer braking distances and slippery road surfaces when riding.
7)
Check the air pressure in the tires. Please adhere to the indicated
minimum and maximum pressure. As a general rule of thumb,
e.g. on a ride, you can check the tire pressure as follows: If you
place your thumb on a pumped up tire, you should not be able to
significantly change its shape by applying pressure.
8)
Check the tires and rims. Scan them for any damage, cracks or
deformations, as well as embedded particles, e.g. shards of glass,
sharp stones or nails/screws.
9)
If you should find any cuts, rips or holes in the tires, please refrain
from riding. First have your bicycle checked over by a qualified
bicycle mechanic and ensure appropriate repairs are made.
6.3 BEFORE EACH RIDE
Before each ride, please check that:
The brakes are working safely and are properly secured.
1)
The tires are free of foreign objects and damage, and the wheels
2)
run true.
The tires have sufficient pressure and tread depth.
3)
All bolts and nuts are tight.
4)
All quick releases are correctly closed and tight.
5)
The frame and fork are not damaged.
6)
The handlebar and stem are correctly and securely fastened as
7)
well as set up in the correct position.
The seat post and saddle are secure and in the correct position.
8)
Try turning the seat and tilting it upwards or downwards. It
should be securely attached and should not move.
17
Page 21

6.4 REGULAR CLEANING
Avoid use water spray to clean the e-Bike, as the electrical and
1)
electronic systems may get wet, resulting in malfunction of the
bicycle or personal injury.
Delicately wipe any dirty painted or plastic parts with a soft, damp
2)
cloth and a neutral cleaning solution. Carefully dry the parts with a
soft, dry cloth.
3)
DO NOT grease or use a greasy cloth to wipe down the electrical
connectors, brake pads, wheels, tires or plastic parts.
6.5 REGULAR CHECKS (EVERY 1-2 MONTHS)
Check that the handlebar attachment and seat post are
1)
correctly inserted and tightened.
Check that the wheel hub mounting and quick-release are
2)
correctly tightened.
Check that the wheel rims are not cracked and that no spokes are
3)
loose or broken.
4)Check that the tires have sufficient thread depth and are
not cut or punctured.
Check that the tires are correctly inflated.
5)
Check that the battery is sufficiently charged.
6)
Check that the front and rear brakes operate effectively.
7)
Check that the cables are operate smoothly, and that the brake
8)
pads are in good condition.
Check that frame welds are in good condition and are free from
9)
corrosion or oxidation.
18
Page 22
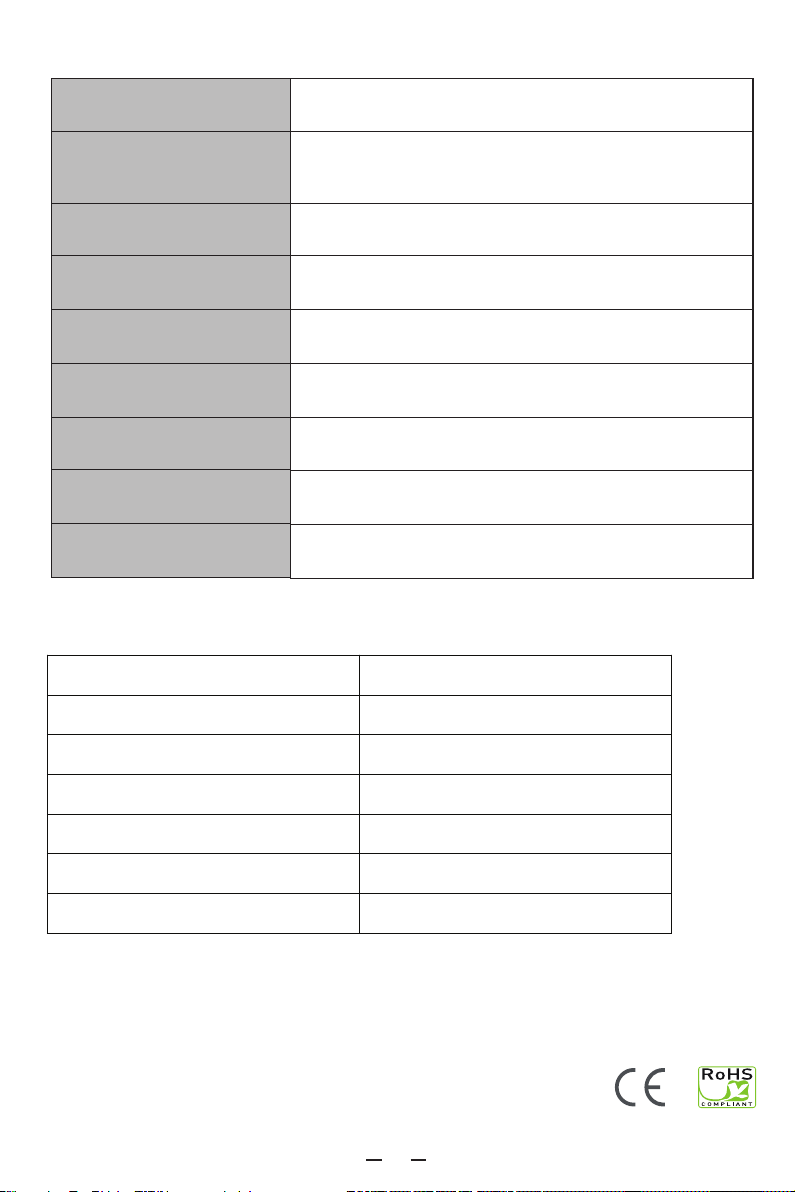
7. TECHNICAL INFORMATION
Error Code
Definition
21
Current Abnormality
22
Throttle Abnormality
23
Motor Abnormality
24
Motor Hall Abnormality
25
Brake Abnormality
30
Communication Abnormality
FRAME Light Weight Aluminum Alloy
SIZE
WEIGHT
MAX LOAD
POWER ASSIST MODE
MOTOR
BATTERY
MAX ASSIST SPEED
BRAKES
Attached list 1: Error code definition
Unfold: 1460 × 560 × 1100 mm
18.5 Kg with battery
330 lb (150 Kg)
5 Level Pedelec
36V 250W DC Brushless Motor
36V 7.8Ah Li-ion Battery. LG or Samsung Cells
32km/h
Mechanical Disc Brakes
19
Page 23

www.EriksonBikes.com
 Loading...