

Page 1

IEEE 802.11n
Wireless PCI Adapter
User’s Manual
March 2008
Page 2

FCC Warning
This equipment has been tested and found to comply with the limits for a Class C digital
device,
pursuant to part 15 of the FCC Rules. These limits are designed to provide reasonable
protection against harmful interference in a residential installation. This equipment generates,
uses, and can radiate radio frequency energy and, if not installed and u sed in a ccordan ce with
the instructions, may cause harmful interference to radio communi cation. Ho we ver, there is no
guarantee that interference will not occur in a particular installation. If this equipment does
cause harmful interference to radio or television recept ion, which can be determined by turning
the equipment off and on, the user is encouraged to try to correct the interference by one or
more of the following measures:
- Reorient or relocate the receiving antenna.
- Increase the separation between the equipment and receiver.
- Connect the equipment into an outlet on a circuit different from that to which
- Consult the dealer or an experienced radio/TV technician for help. the receiver is
connected.
FCC Caution: Any changes or modifications not expressly approved by the party responsible
for compliance could void the user’s authority to operate this equipment.
This device complies with Part 15 of the FCC Rules. Operation is subject to the following two
conditions: (1) This device may not cause harmful interference, and (2) this device must
accept any interference received, including interference that may cause undesired operation.
IMPORTANT NOTE:
FCC Radiation Exposure Statement:
This equipment complies with FCC radiation exposure limits set forth for an uncontrolled
environment. This equipment should be installed and operated with a minimum distance of
about eight inches (20cm) between the radiator and your body.
This transmitter must not be co-located or operated in conjunction with any other antenna or
transmitter.
1
Page 3

Revision History
Revision History
V2.0 Second release
All brand and product names mentioned in this manual are trademarks and/or registered
trademarks of their respective holders.
2
Page 4

Contents
1. Introduction ............................................................................4
1.1 Features.................................................................................................. 4
1.2 LED Indicator......................................................................................... 4
1.3 Package Contents ................................................................................. 5
1.4 Before you start..................................................................................... 5
1.5 Hardware Installation............................................................................ 5
2. Installation Procedure............................................................7
2.1 For Windows XP and 2000.................................................................... 7
2.2 For Vista............................................................................................... 12
3. Wireless Network Configuration Utility..............................17
3.1 For Windows XP & 2000.......................................................................... 17
3.1.1 Start........................................................................................... 23
3.1.2 Profile........................................................................................ 29
3.1.3 Network..................................................................................... 34
3.1.4 Advanced.................................................................................. 35
3.1.5 Statistics................................................................................... 36
3.1.6 WMM ......................................................................................... 37
3.1.7 WPS........................................................................................... 43
3.1.8 About ........................................................................................ 46
3.1.9 Link Status ............................................................................... 47
3.1.10 Enable AP Mode Feature in Windows 2000 OS ................... 48
3.2 For Windows Vista................................................................................... 53
3.2.1 Profile........................................................................................ 53
3.2.2 Link Status ............................................................................... 61
3.2.3 Site Survey............................................................................... 62
3.2.4 Statistics................................................................................... 68
3.2.5 WPS Configuration.................................................................. 69
3.2.6 QoS ........................................................................................... 71
3.2.7 About ........................................................................................ 78
3.2.8 How to Manage Windows Profile ........................................... 79
4. Troubleshooting...................................................................83
3
Page 5

1. Introduction
This is a wireless client device that delivers unrivaled wireless performance for your Desktop
PC. It complies with IEEE 802.11n draft standard and backward compatible with IEEE
802.11b/g. With this adapter, you can easily upgrade your Desktop PC wireless connectivity.
Once the wireless PCI adapter is connected, access the network with high-speed Internet
connection while sharing photos, files, music, video, printers, and storage. Get a better
Internet experience with a fas ter wireless connection so you can enjoy smooth digital phone
calls, gaming, downloading, and video streaming. It also provides peer-to-peer communication
among any compatible wireless users and no Access Point required.
This Wireless PCI Adapter provides maximum transfer rate up to 300Mbps and supports WEP,
WPA, WPA2 and WPS high-level WLAN security features that guarantee the best security for
users.
This product is made in ISO9001 approved factory and complies with FCC part 15 regulations
and CE approval.
1.1 Features
‧ Complies with draft IEEE 802.11n standard
‧ Up to 150Mbps data transfer rates in 802.11n mode
‧ Backward compatible with IEEE 802.11b/g
‧ Legacy and High Throughput Modes
‧ Supports 64/128-bit WEP Data Encryption
‧ Supports WPA, WPA2 (802.11i), WPS, 802.11x advanced security
‧ Supports both Infrastructure and Ad-Hoc Networking Modes
‧ Supports Quality of Service (QoS) - WMM, WMM-PS
‧ Supports Multiple BSSID
‧ Supports Windows 2000/XP/Vista
‧ Simple user setup and diagnostics utilities
‧ 20MHz/40MHz Bandwidth
1.2 LED Indicator
LED Light Status Description
ACT Blinking Data is being transmitted or received.
LINK On
Wireless link is established.
4
Page 6
1.3 Package Contents
‧ One Wireless PCI Adapter
‧ 2 External Antennas (depends on the model)
‧ One CD-ROM (Drivers / Utility, User’s Manual)
If any of the above items is missing, contact your dealer immediately.
1.4 Before you start
You must have the requirements as follow,
‧ A computer with an available PCI slot
‧ At least a 300MHz processor and 32MB memory
‧ Windows 2000/XP/Vista support
‧ A CD-ROM drive
‧ Wireless PCI Adapter properly installed
1.5 Hardware Installation
STEP1: Turn off your computer and remove its cover
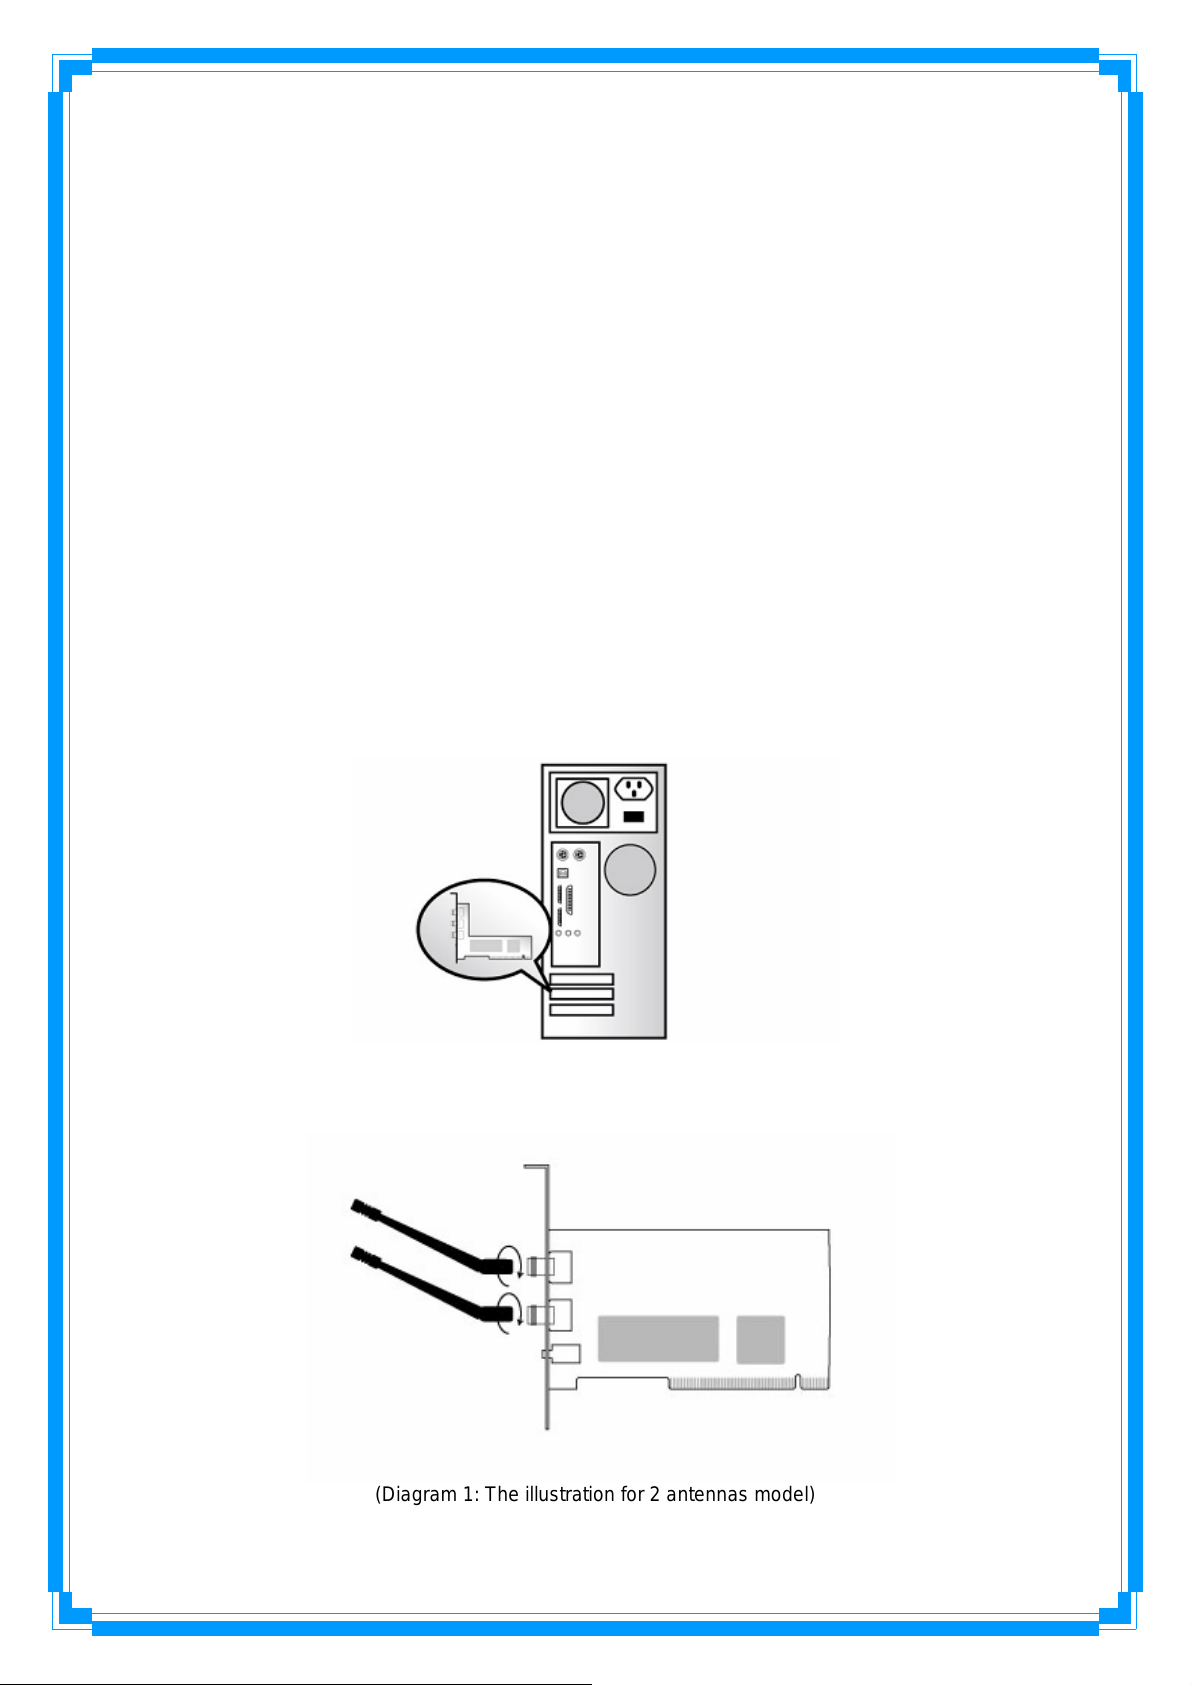
STEP2: Insert the PCI card to an available PCI slot firmly. Please refer to the illustration below:
STEP3: Secure this card to the rear of the computer chassis and put back the cover.
STEP4: Secure the antenna to antenna connector of the card. Please refer to the illustration
below:
(Diagram 1: The illustration for 2 antennas model)
5
Page 7
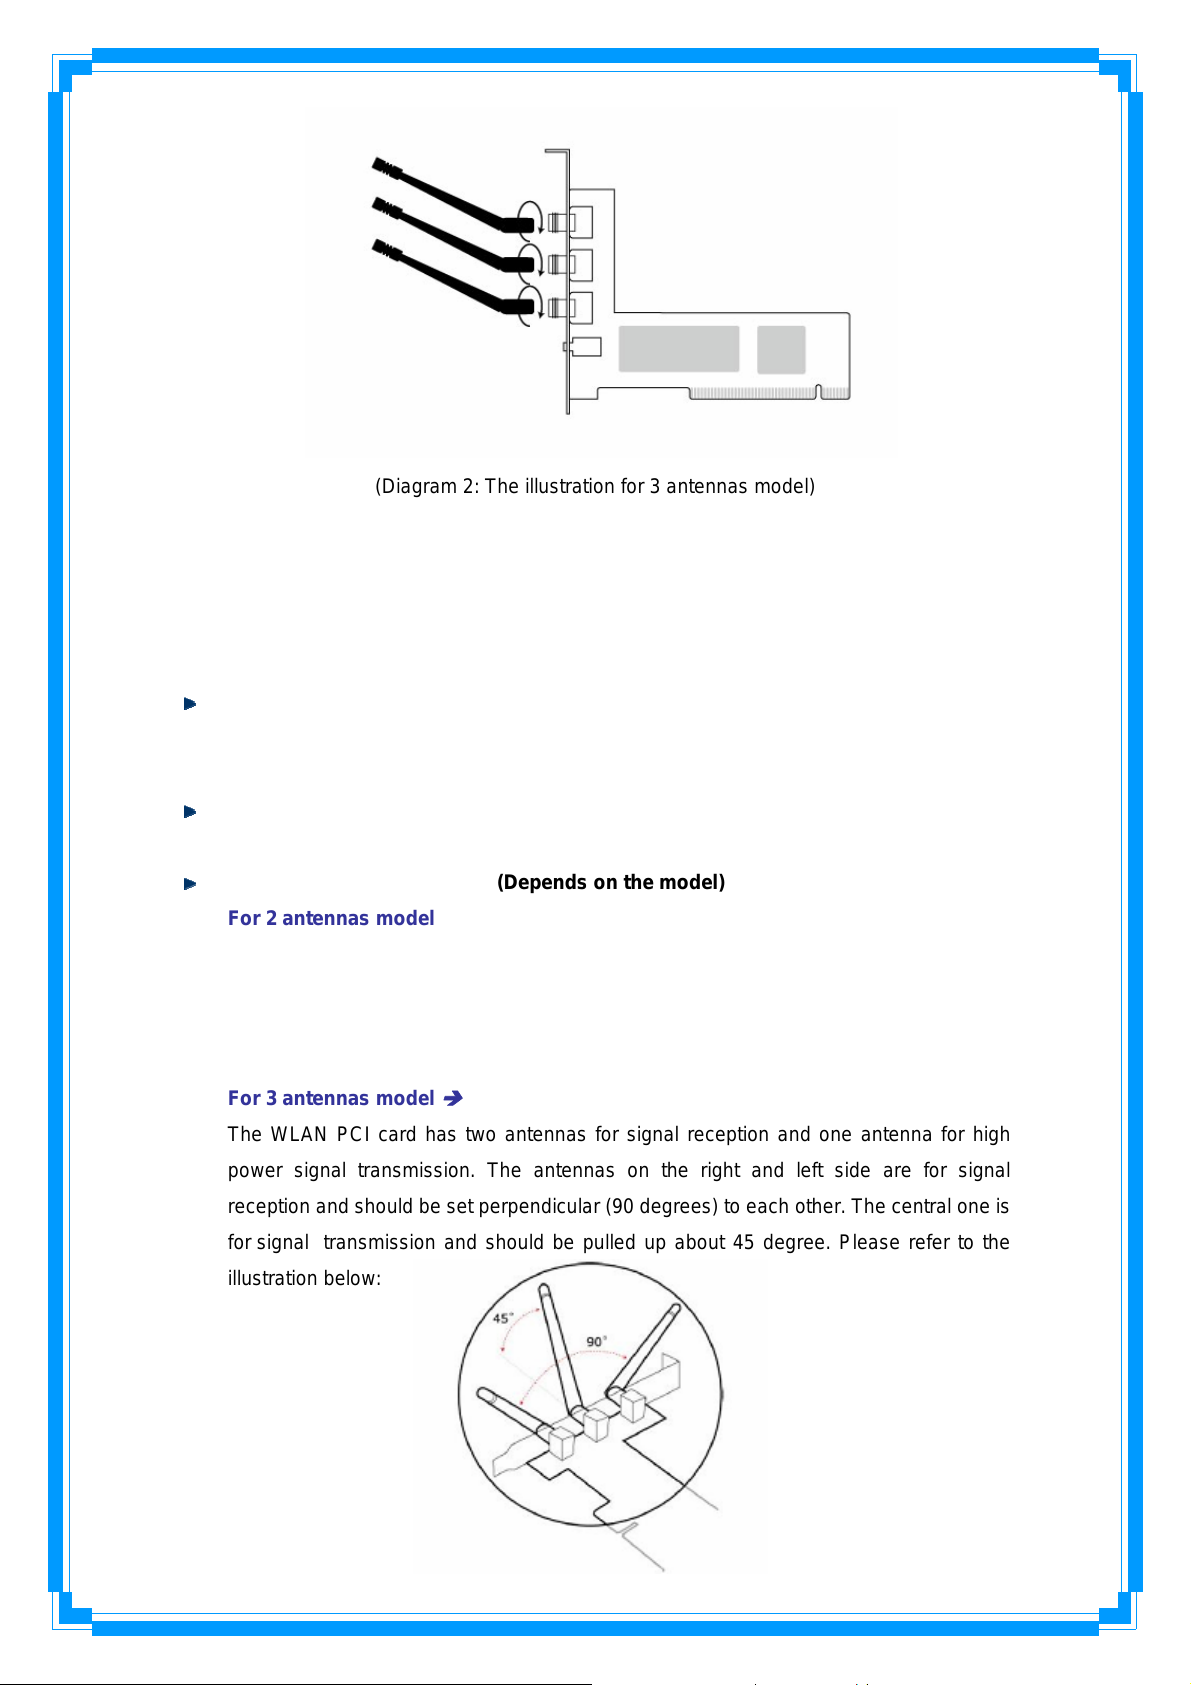
(Diagram 2: The illustration for 3 antennas model)
STEP5: Turn on the computer.
[Guidelines for the Hardware Installation]
Please observe the following guidelines when you are installing the PCI card to the
Desktop PC:
Avoid placing the PC close to obstacles
Obstructions such as concrete and thick walls limit radio signal penetration and reduce
the throughput and the coverage range of the PCI card.
Place the PC as high as possible
The higher the PC is placed, the better the performance.
Adjust the antenna position (Depends on the model)
For 2 antennas model
The WLAN PCI card has one antenna for signal reception and another one antenna for
high power signal transmission. The antenna on the right side is for signal reception and
should be set perpendicular (90 degrees). The left side is for signal transmission and
should be set about 90 degree.
For 3 antennas model
The WLAN PCI card has two antennas for signal reception and one antenna for high
power signal transmission. The antennas on the right and left side are for signal
reception and should be set perpendicular (90 degrees) to each other. The central one is
for signal transmission and should be pulled up about 45 degree. Please refer to the
illustration below:
Î
Î
6
Page 8
2. Installation Procedure
Note: If you have installed the Wireless Adapter driver & utility before, please
uninstall the old version first.
2.1 For Windows XP and 2000
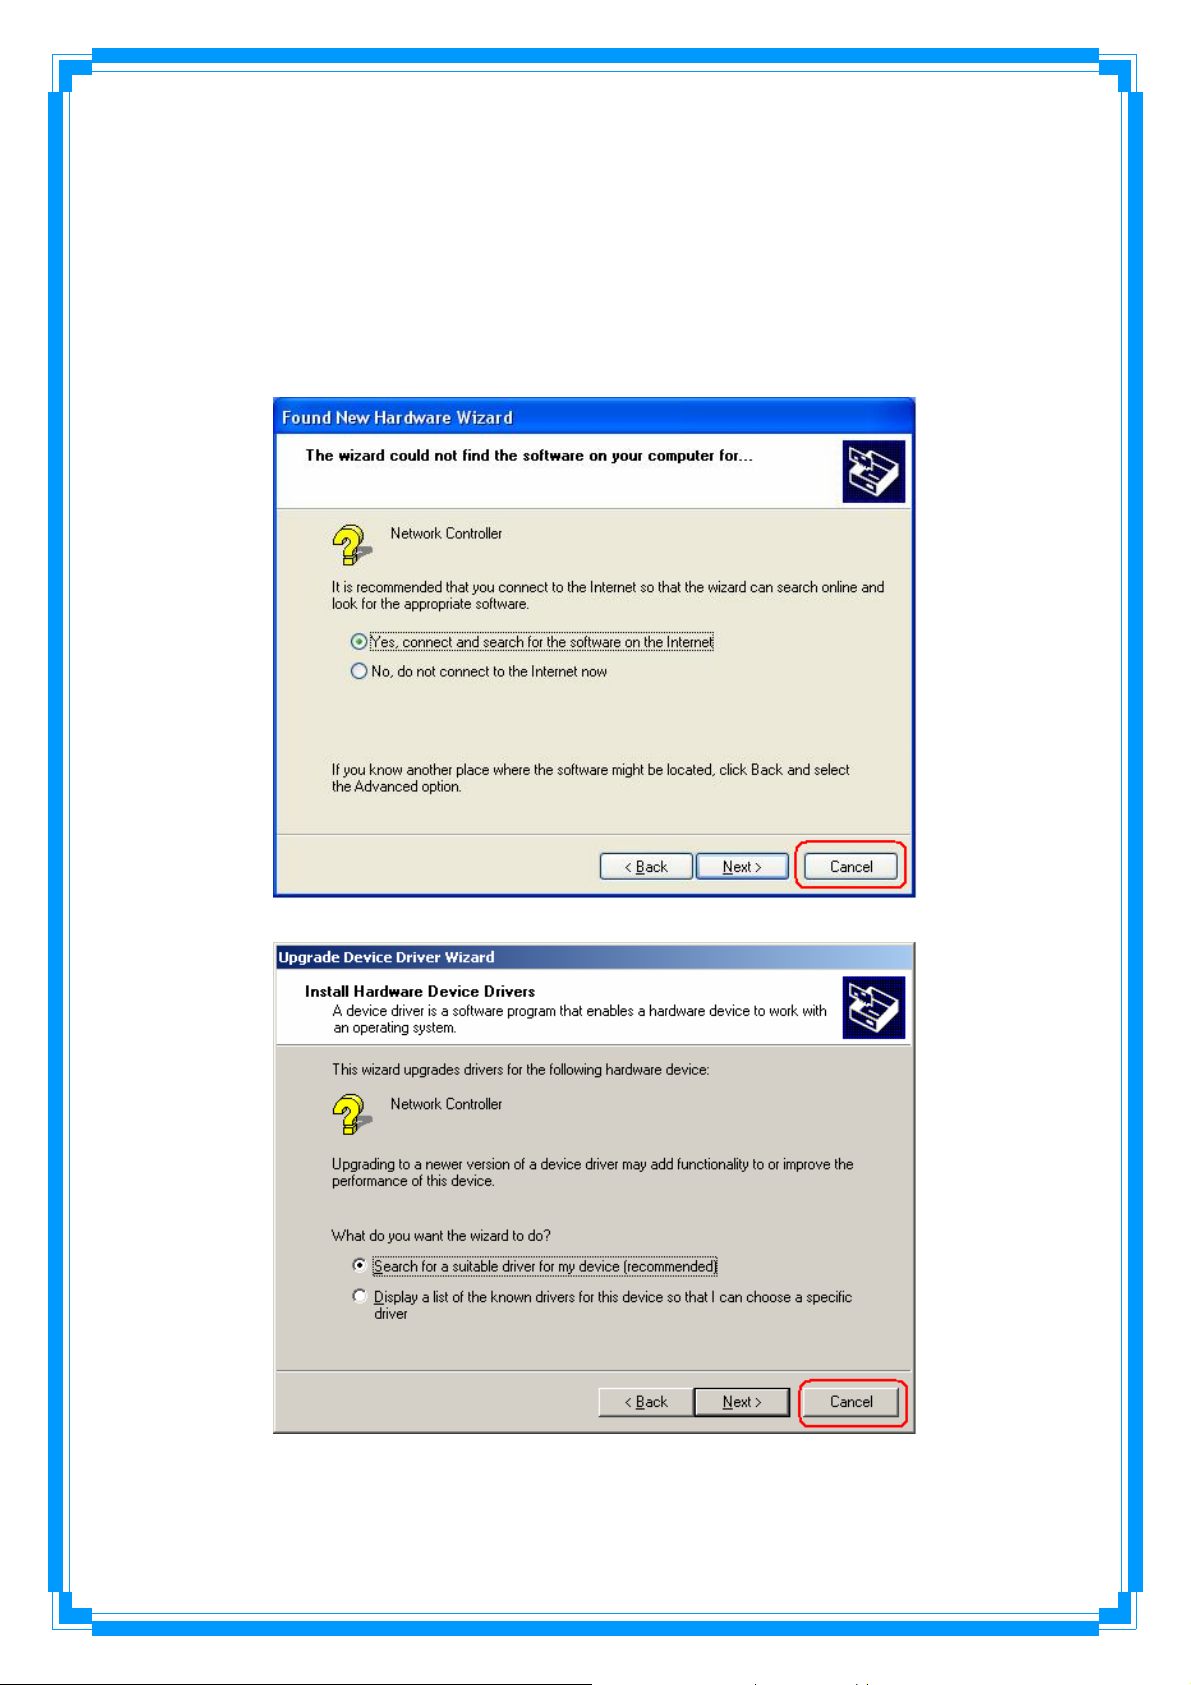
STEP1: Found New Hardware Wizard is displayed after the adapter is installed and the
computer is restarted. Please click Cancel to continue.
(For Windows XP)
(For Windows 2000)
7
Page 9
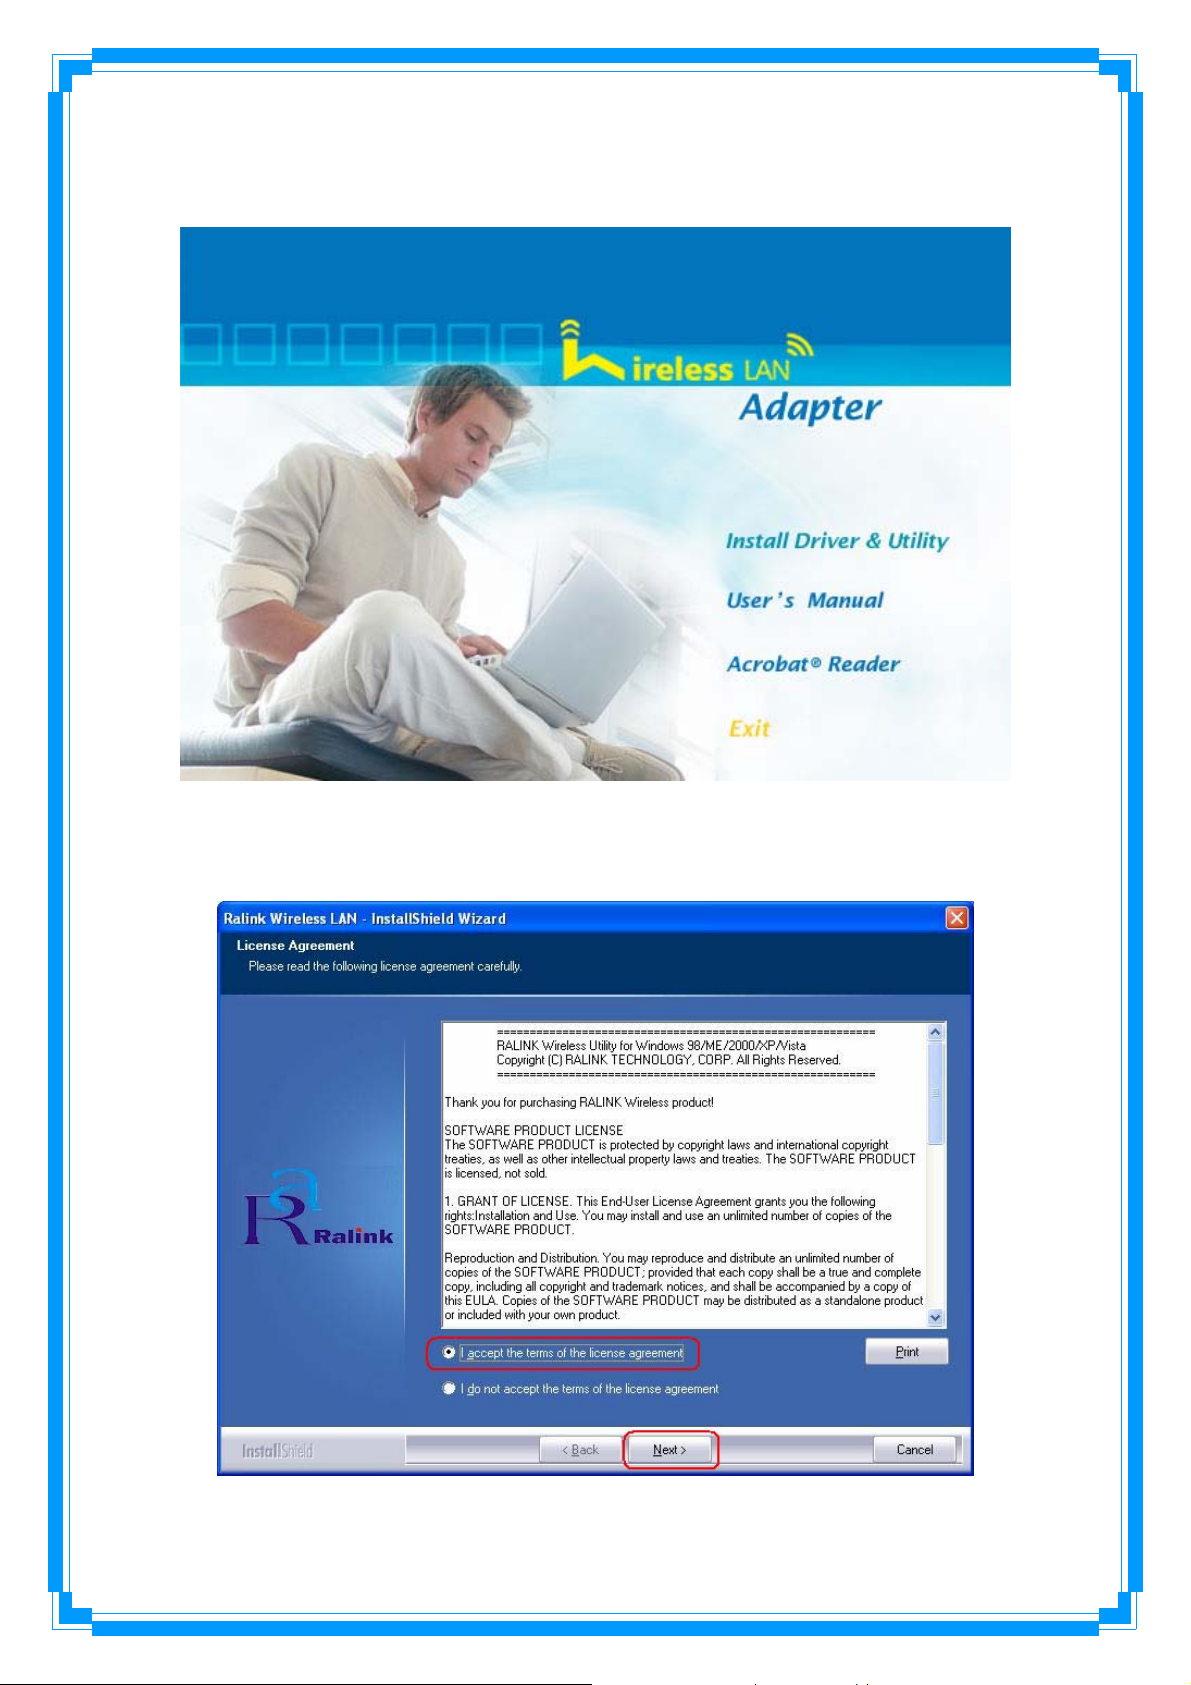
STEP2: Insert Installation CD into CD-ROM drive then windows below will appear. Click
Install Driver & Utility to begin device driver installation.
STEP3: Please read the following license agreement. Use the scroll bar to view the rest of this
agreement. Select I accept the terms of the license agreement and click Next to continue.
8
Page 10
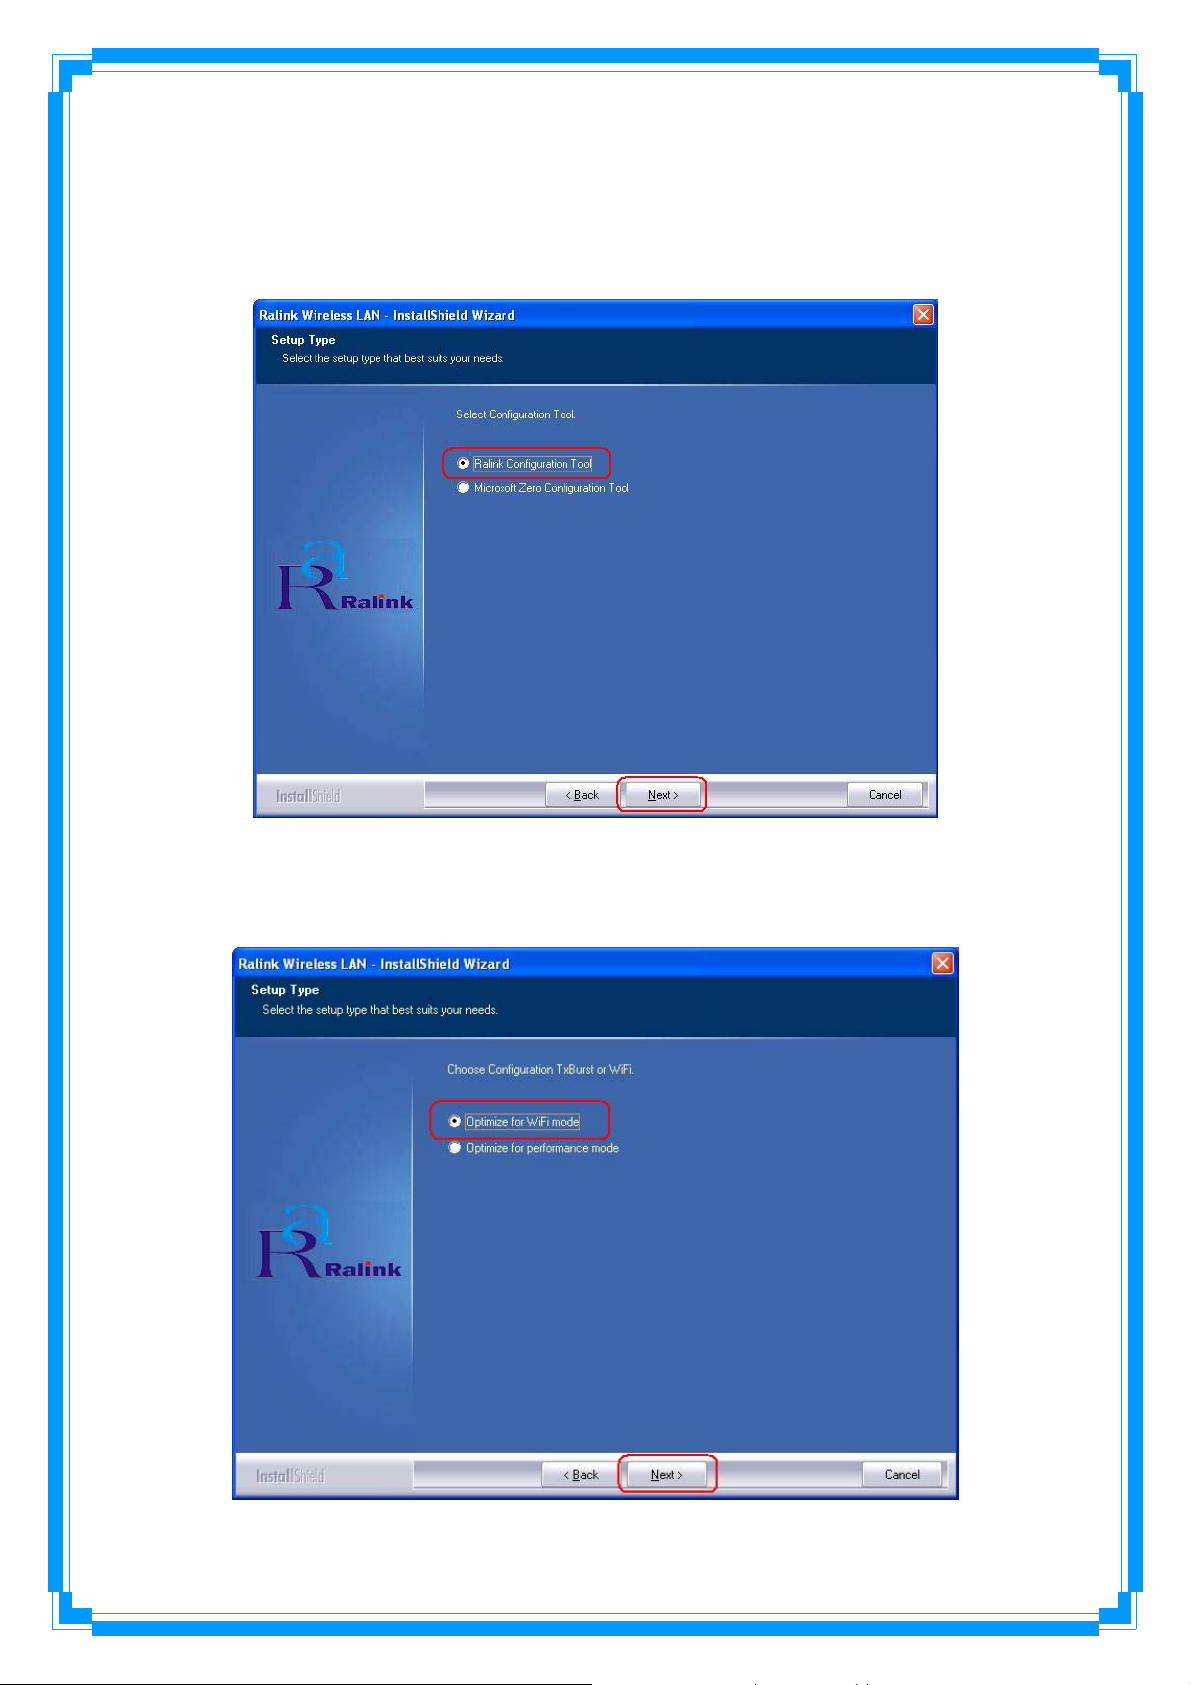
STEP4: In Windows XP, there is a Windows Zero Configuration Tool for you to setup
wireless adapter. You can choose to configure the adapter through the Microsoft Zero
Configuration Tool or the Ralink Configuration Tool. It is recommended to choose the
Ralink Configuration Tool for the adapter. Click Next to continue.
STEP5: If you need the adapter to operate with better performance, please choose Optimize
for performance mode to enable the Tx Burst mode. Or you can choose Optimize for WiFi
mode to run in standard wireless network.
9
Page 11
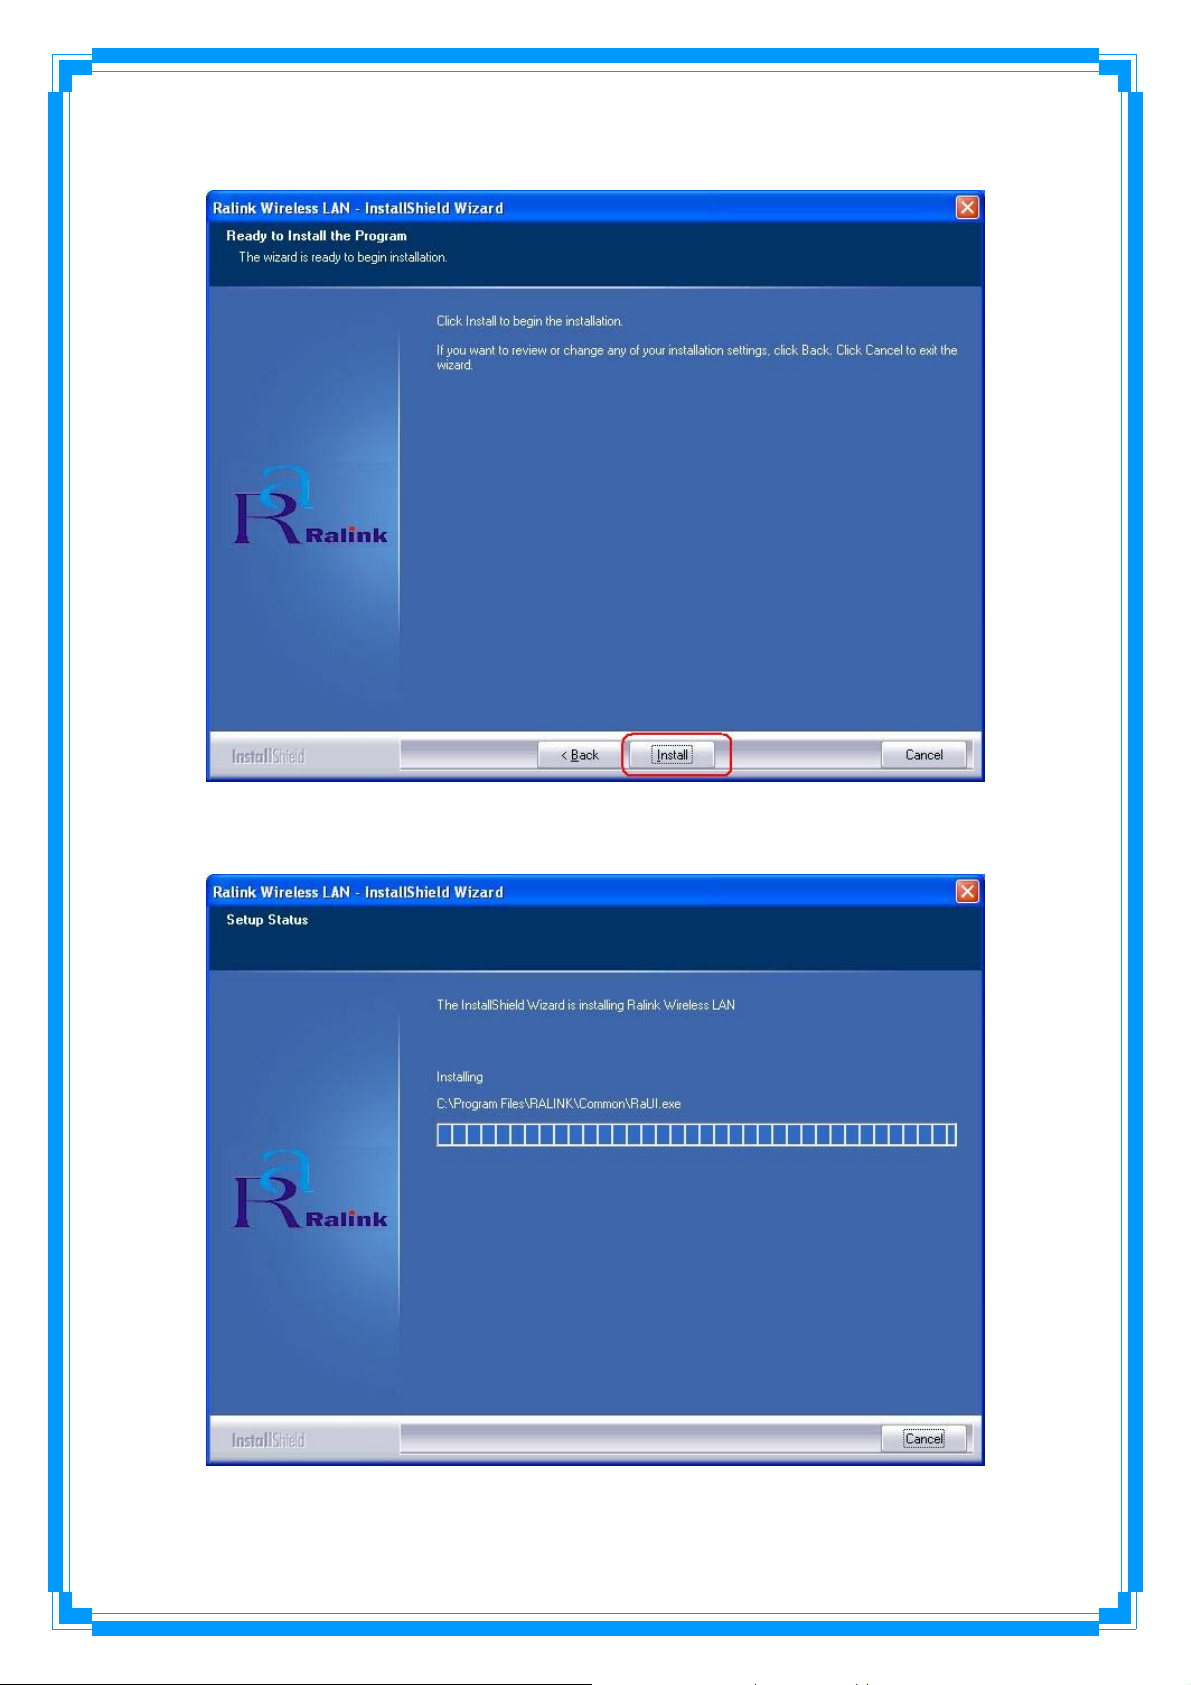
STEP6: Click Install to begin the installation.
STEP7: Please wait for a while during the adapter is configuring your new software
installation.
10
Page 12
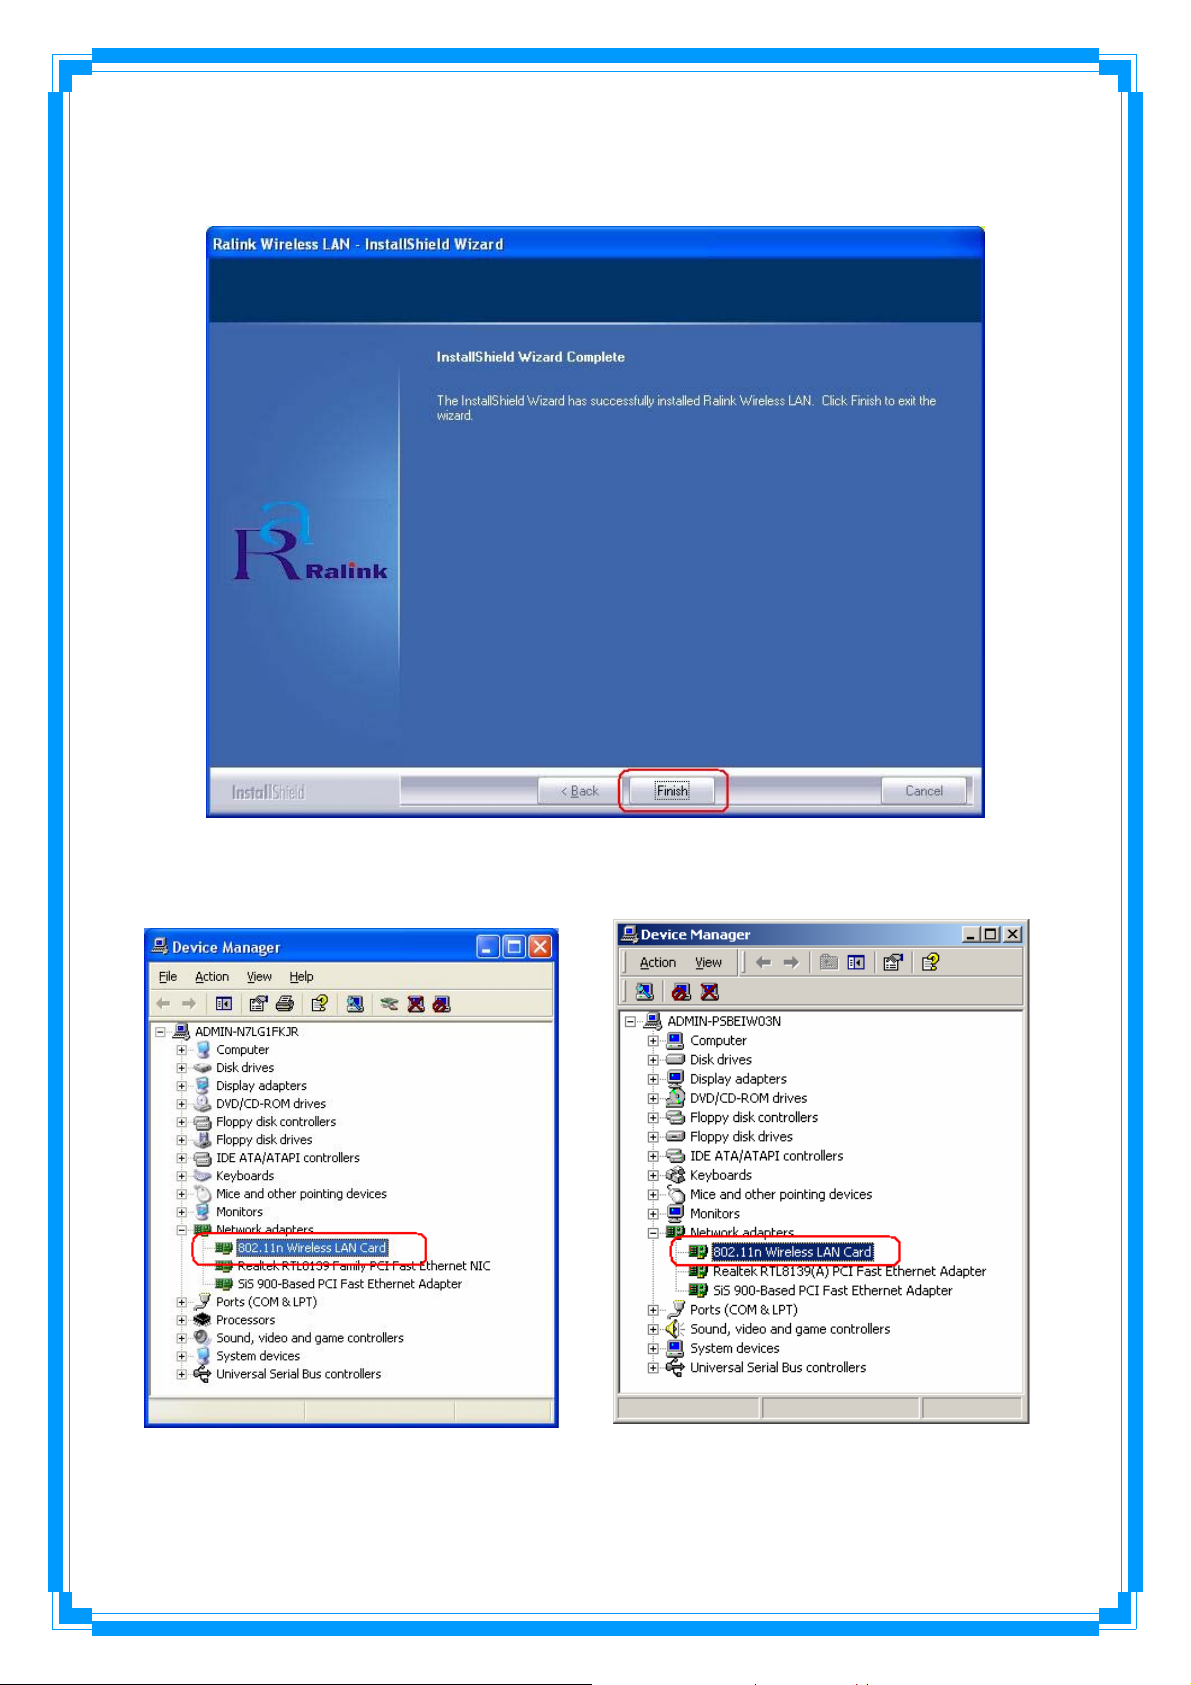
STEP8: After the setup wizard has successfully installed wireless LAN, click Finish to exit the
wizard.
To check if the adapter is properly installed, you can right-click My Computer Æ choose
Properties Æ click Device Manager.
(For Widows XP) (For Widows 2000)
11
Page 13
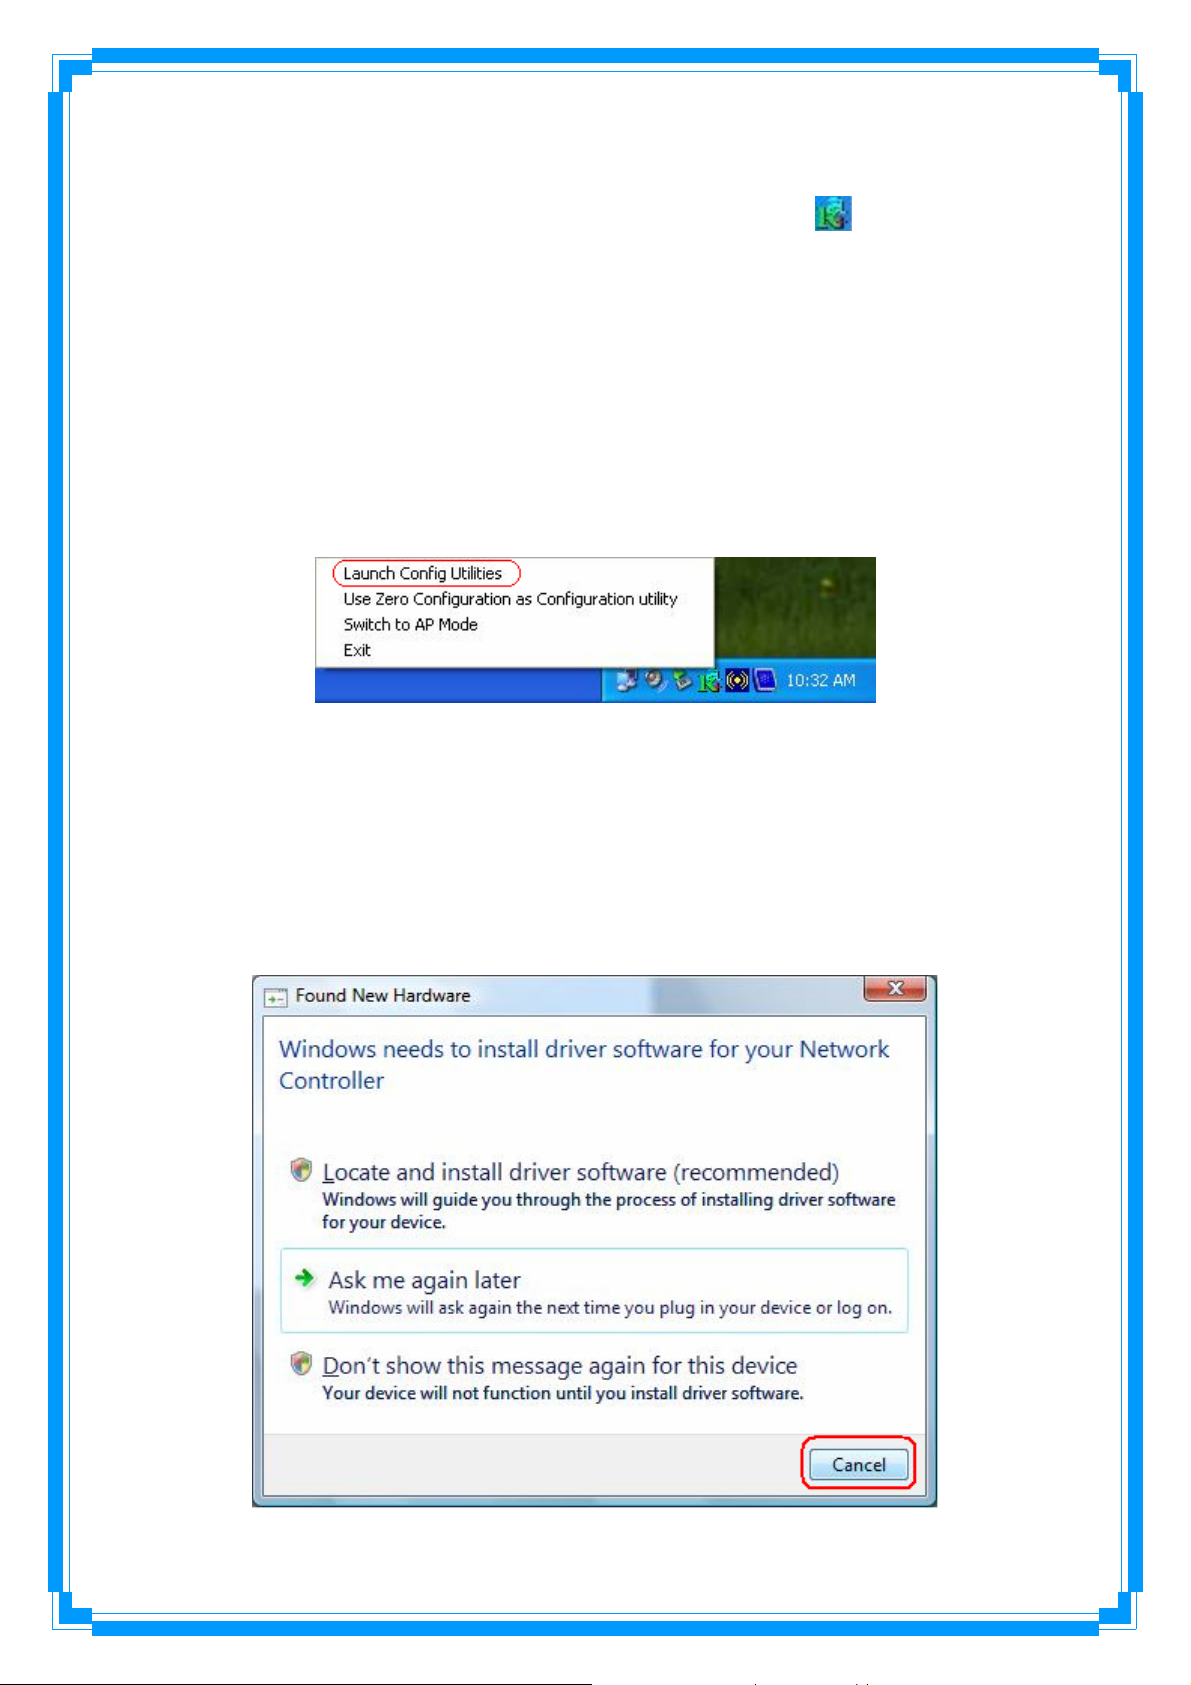
The Configuration Utility appears as an icon on the system tray of Windows while the
adapter is running. You can open the utility by double-click on the icon.
Right-click the icon, there are some items for you to operate the configuration ut ility,
z Launch Config Utilities Æ Select this option to open the Configuration Utility tool.
z Use Zero Configuration as Configuration utilityÆ Select this option to use Windows
XP built-in wireless configuration utility (Windows Zero Configuration) to configure to
card.
z Switch to AP Mode Æ Select this option to change to AP mode.
z Exit Æ Select Exit to close the Configuration Utility tool.
2.2 For Vista
STEP1: Found New Hardware Wizard is displayed after the adapter is installed and the
computer is restarted. Please click Cancel to continue.
12
Page 14
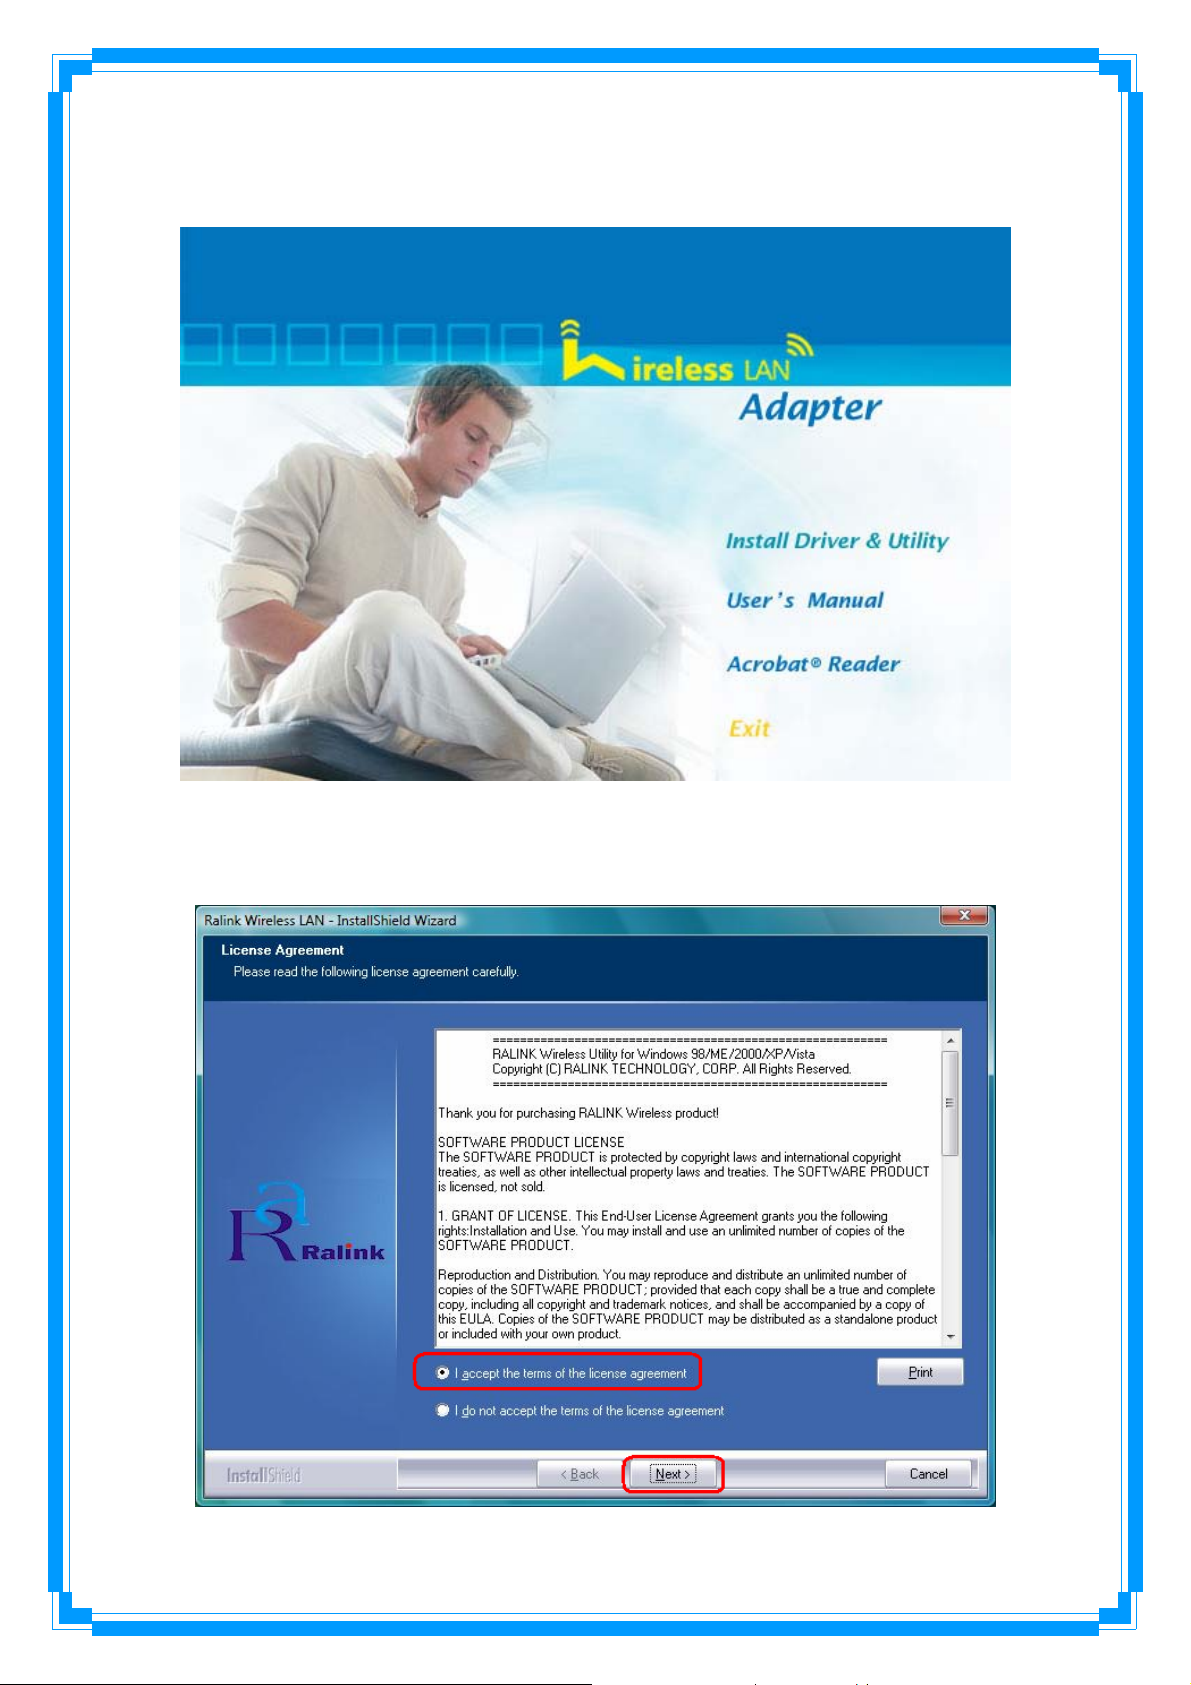
STEP2: Insert Installation CD into CD-ROM drive then windows below will appear. Click
Install Driver & Utility to begin device driver installation.
STEP3: Please read the following license agreement. Use the scroll bar to view the rest of this
agreement. Select I accept the terms of the license agreement and click Next to continue.
13
Page 15
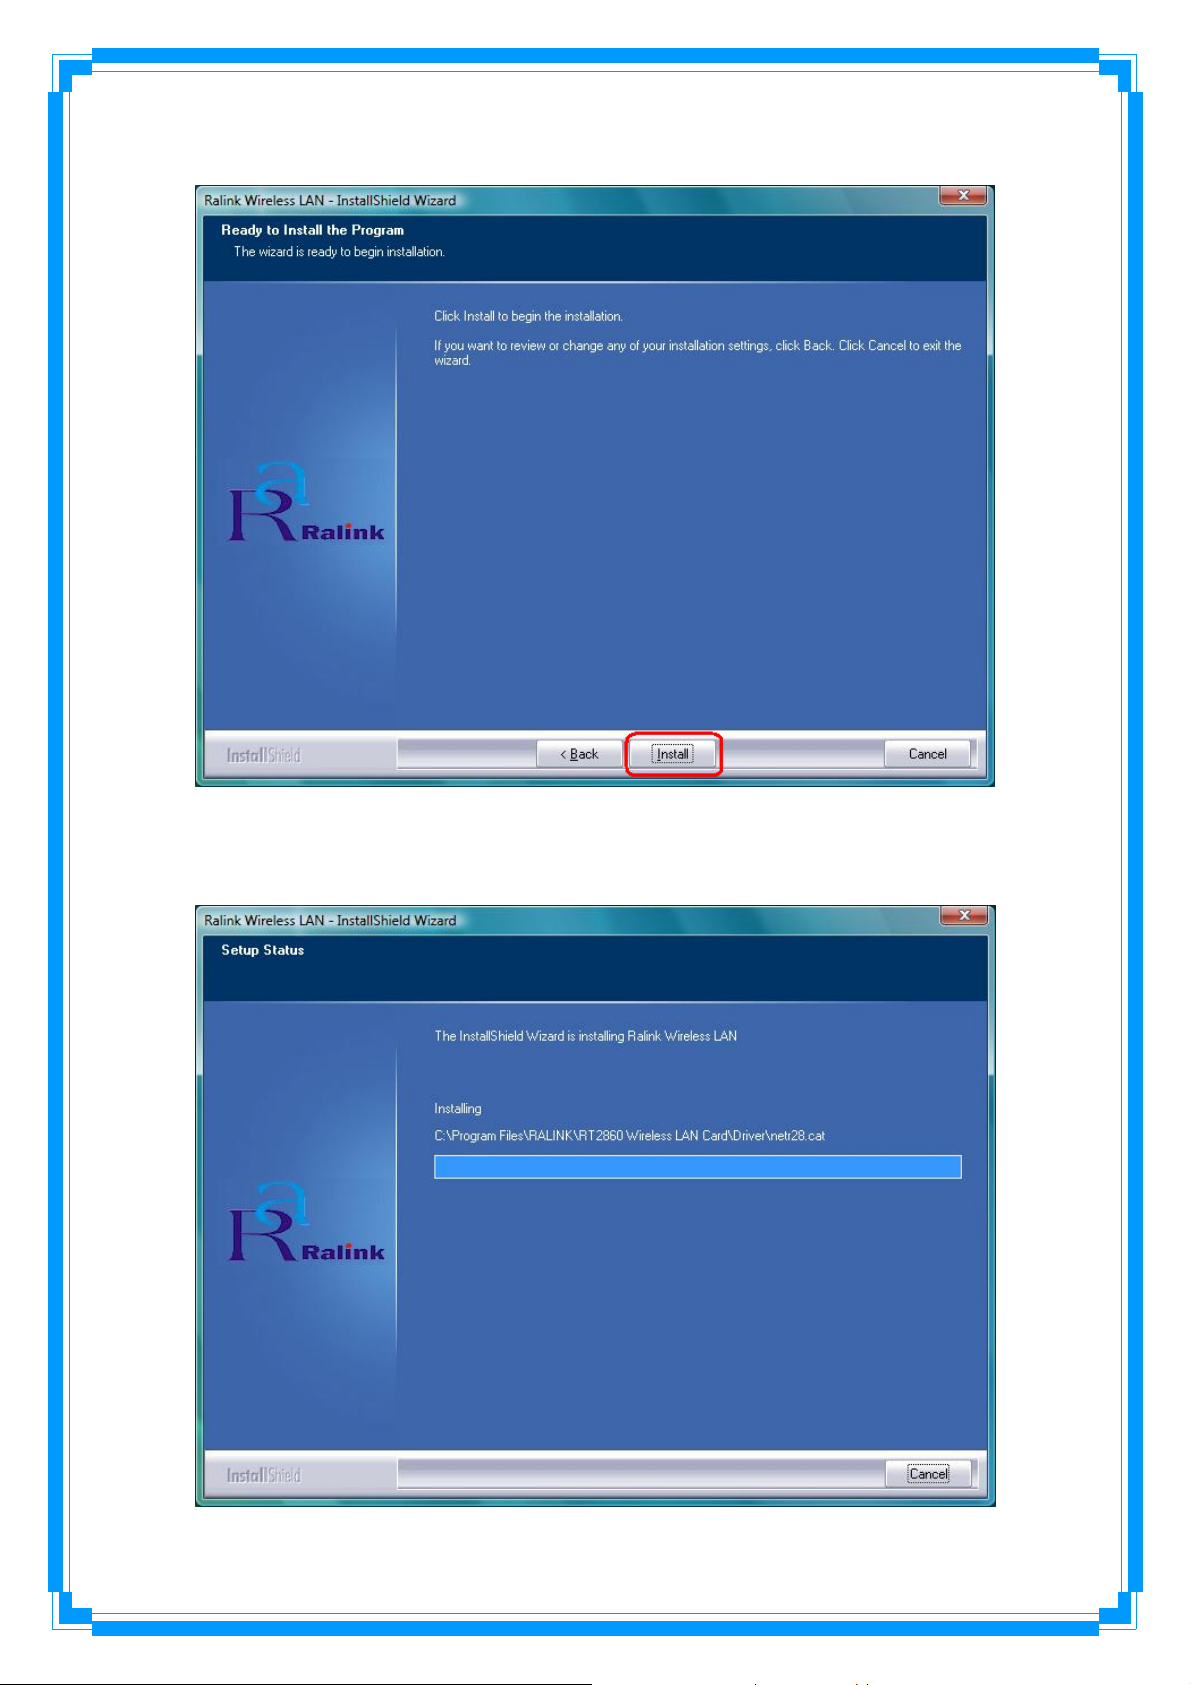
STEP4: Click Install to begin the installation.
STEP5: Please wait for a while during the adapter is configuring your new software
installation.
14
Page 16
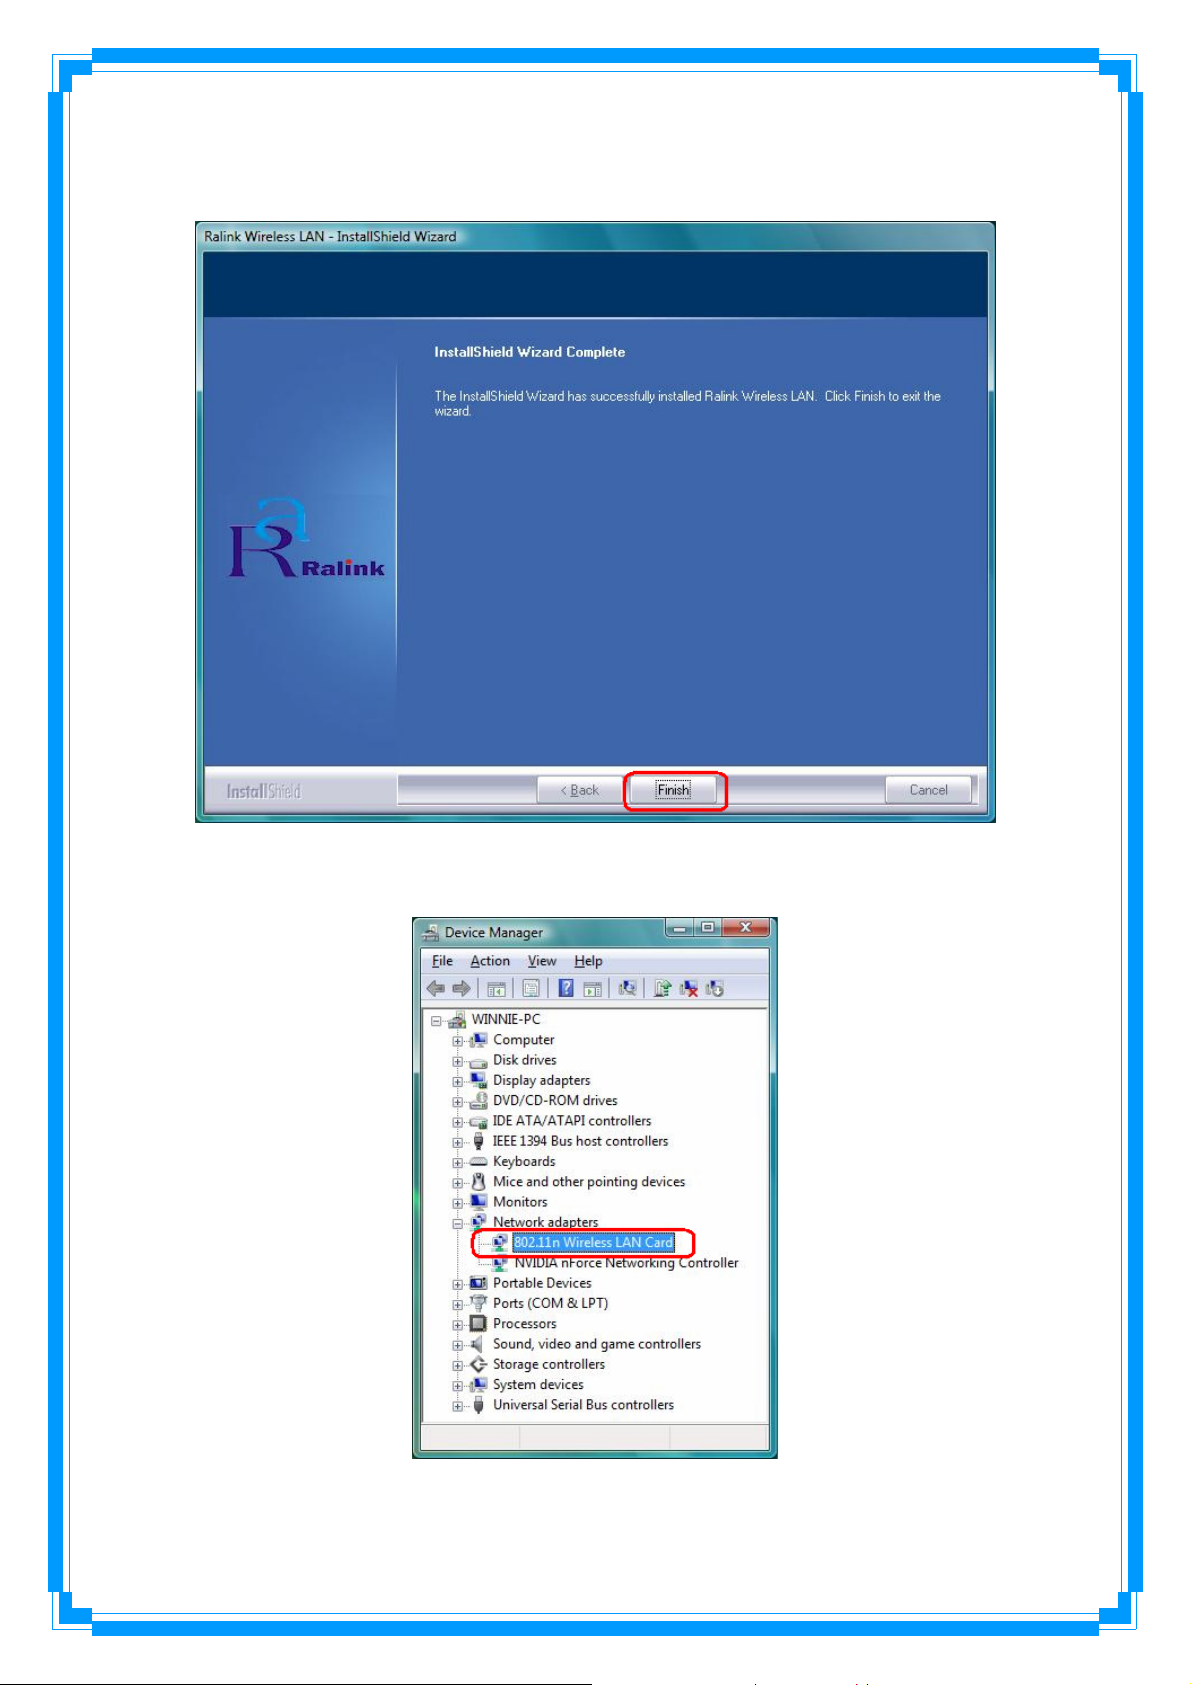
STEP8: After the setup wizard has successfully installed wireless LAN, click Finish to exit the
wizard.
To check if the adapter is properly installed, you can right-click My Computer Æ choose
Properties Æ click Device Manager.
15
Page 17
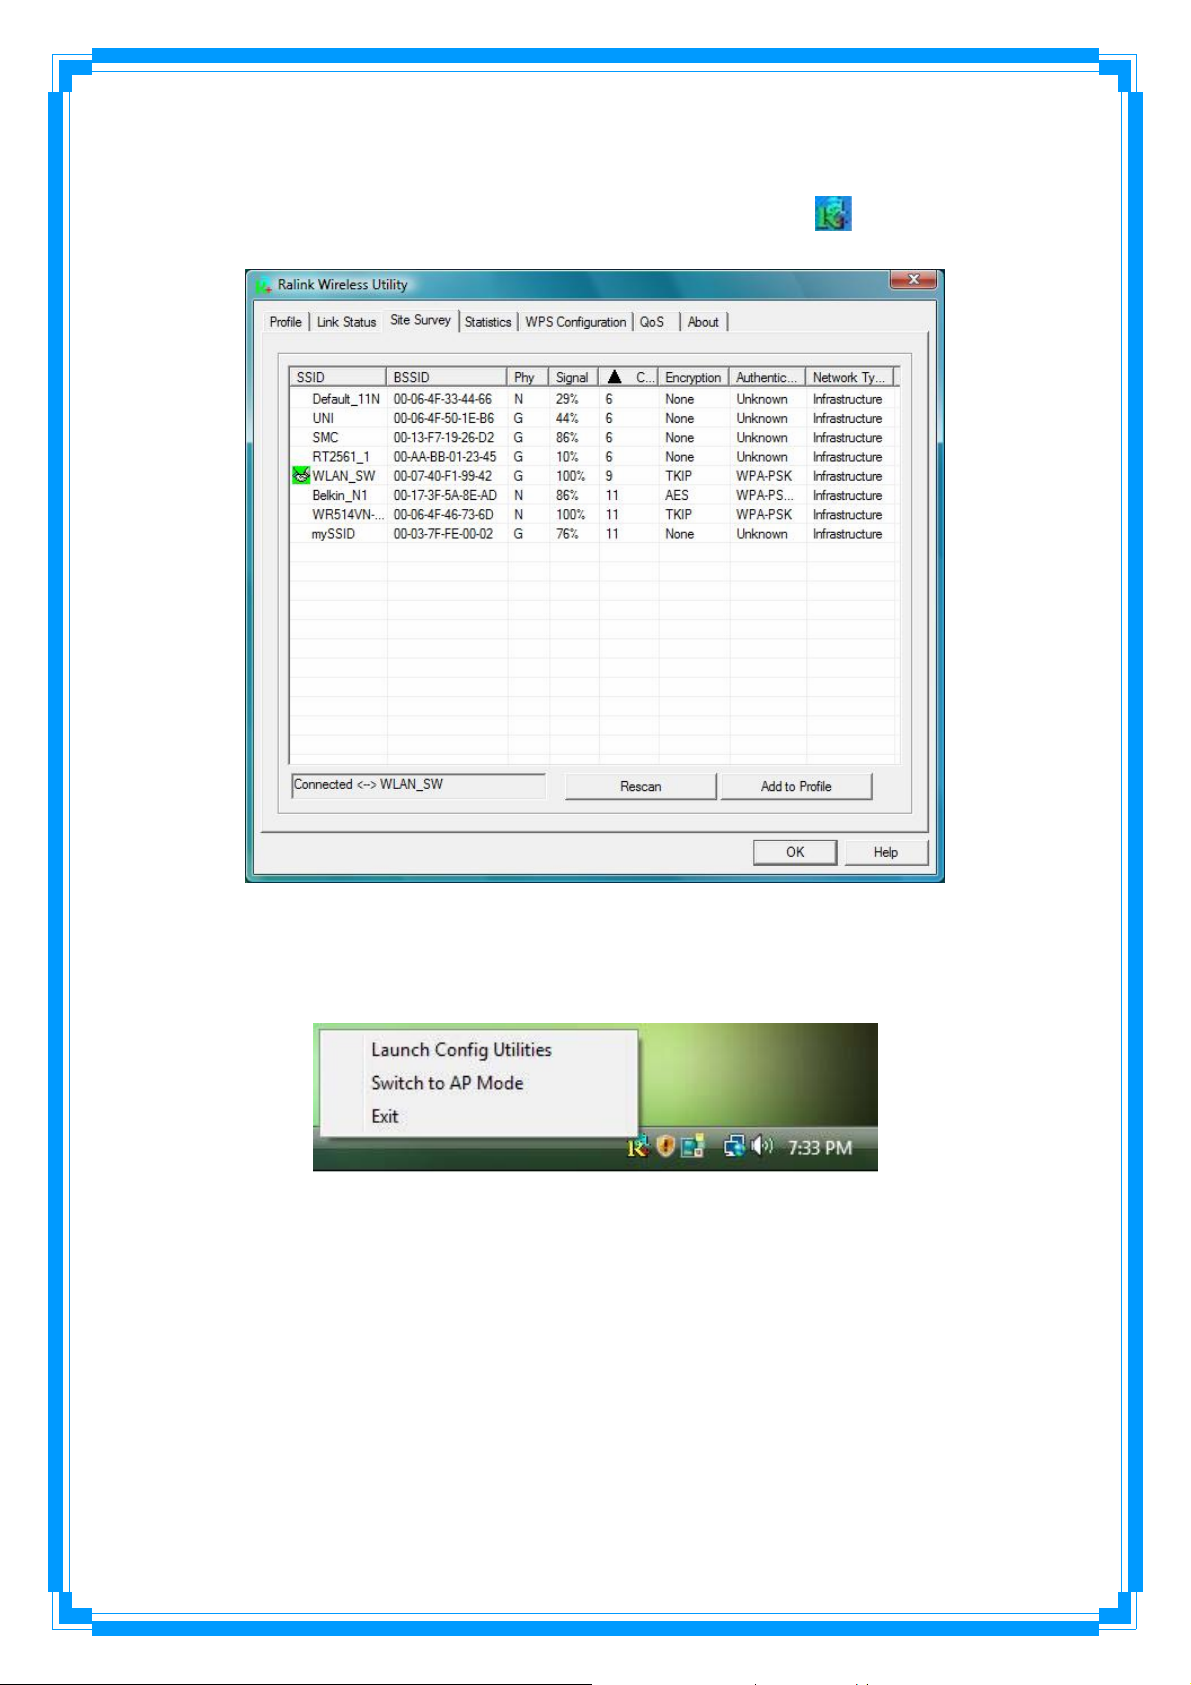
The Configuration Utility appears as an icon on the system tray of Windows while the
adapter is running. You can open the utility by double-click on the icon.
Ralink wireless utility needs to cooperate with Microsoft AutoConfig service in order to
perform scanning and connecting actions, so the AutoConfig service should be enable
beforehand.
Control Menu Î Once Ralink wireless utility is minimized, the user can click the Ralink icon
on the taskbar to bring up the control menu.
z Launch Config Utilities Æ Restore Ralink wireless utility window.
z Switch to AP Mode Æ Select this option to change to AP mode.
z Exit Æ Select Exit to close the Configuration Utility tool.
16
Page 18
3. Wireless Network Configuration Utility
3.1 For Windows XP & 2000
The Configuration Utility is a powerful application that helps you to configure the
Wireless LAN adapter and monitor the link status and statistics during the communication
process.
When the adapter is installed, the configuration utility will be displayed automatically.
This adapter will auto connect to wireless device which has better signal strength and no
wireless security setting.
In Windows XP, it provides wireless configuration utility named “Windows Zero
configuration” which provides basic configuration function for Ralink Wireless NIC, Ralink’s
Utility (RaUI) provides WPA supplicant functionality. To make it easier for user to select the
correct utility, RaUI will let user make the selection when it first runs after windows XP boots.
RaUI can co-exist with WZC (Windows Zero Configuration). When coexisting with
WZC, RaUI only provides monitoring function, such as link status, network status, statistic
counters, advance feature status, WMM status and WPS status. It won’t interfere with WZC’s
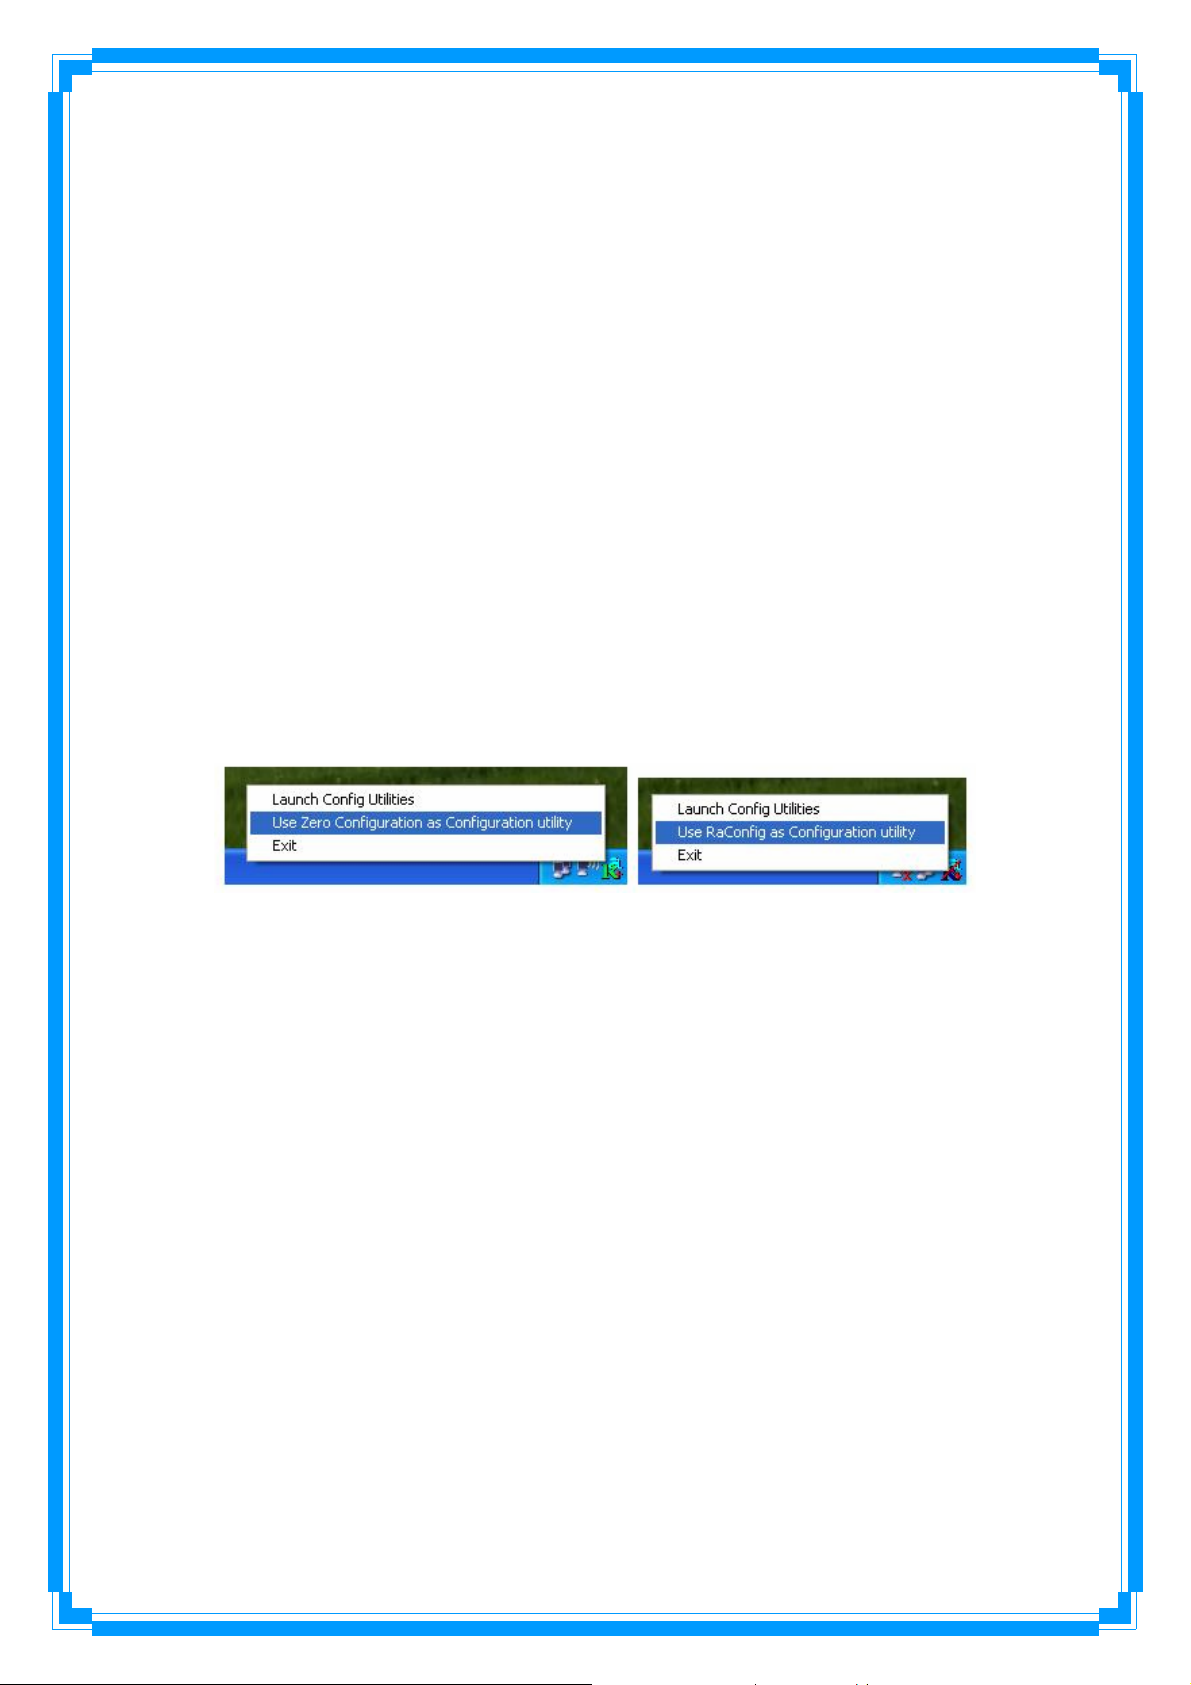
configuration or profile functions. Please see below picture: To select WZC or RaUI
If “Use Zero Configurations as Configuration utility” is selected, please continue on the
section. Below picture shows that the RaUI status when WZC is active as main control utility.
17
Page 19
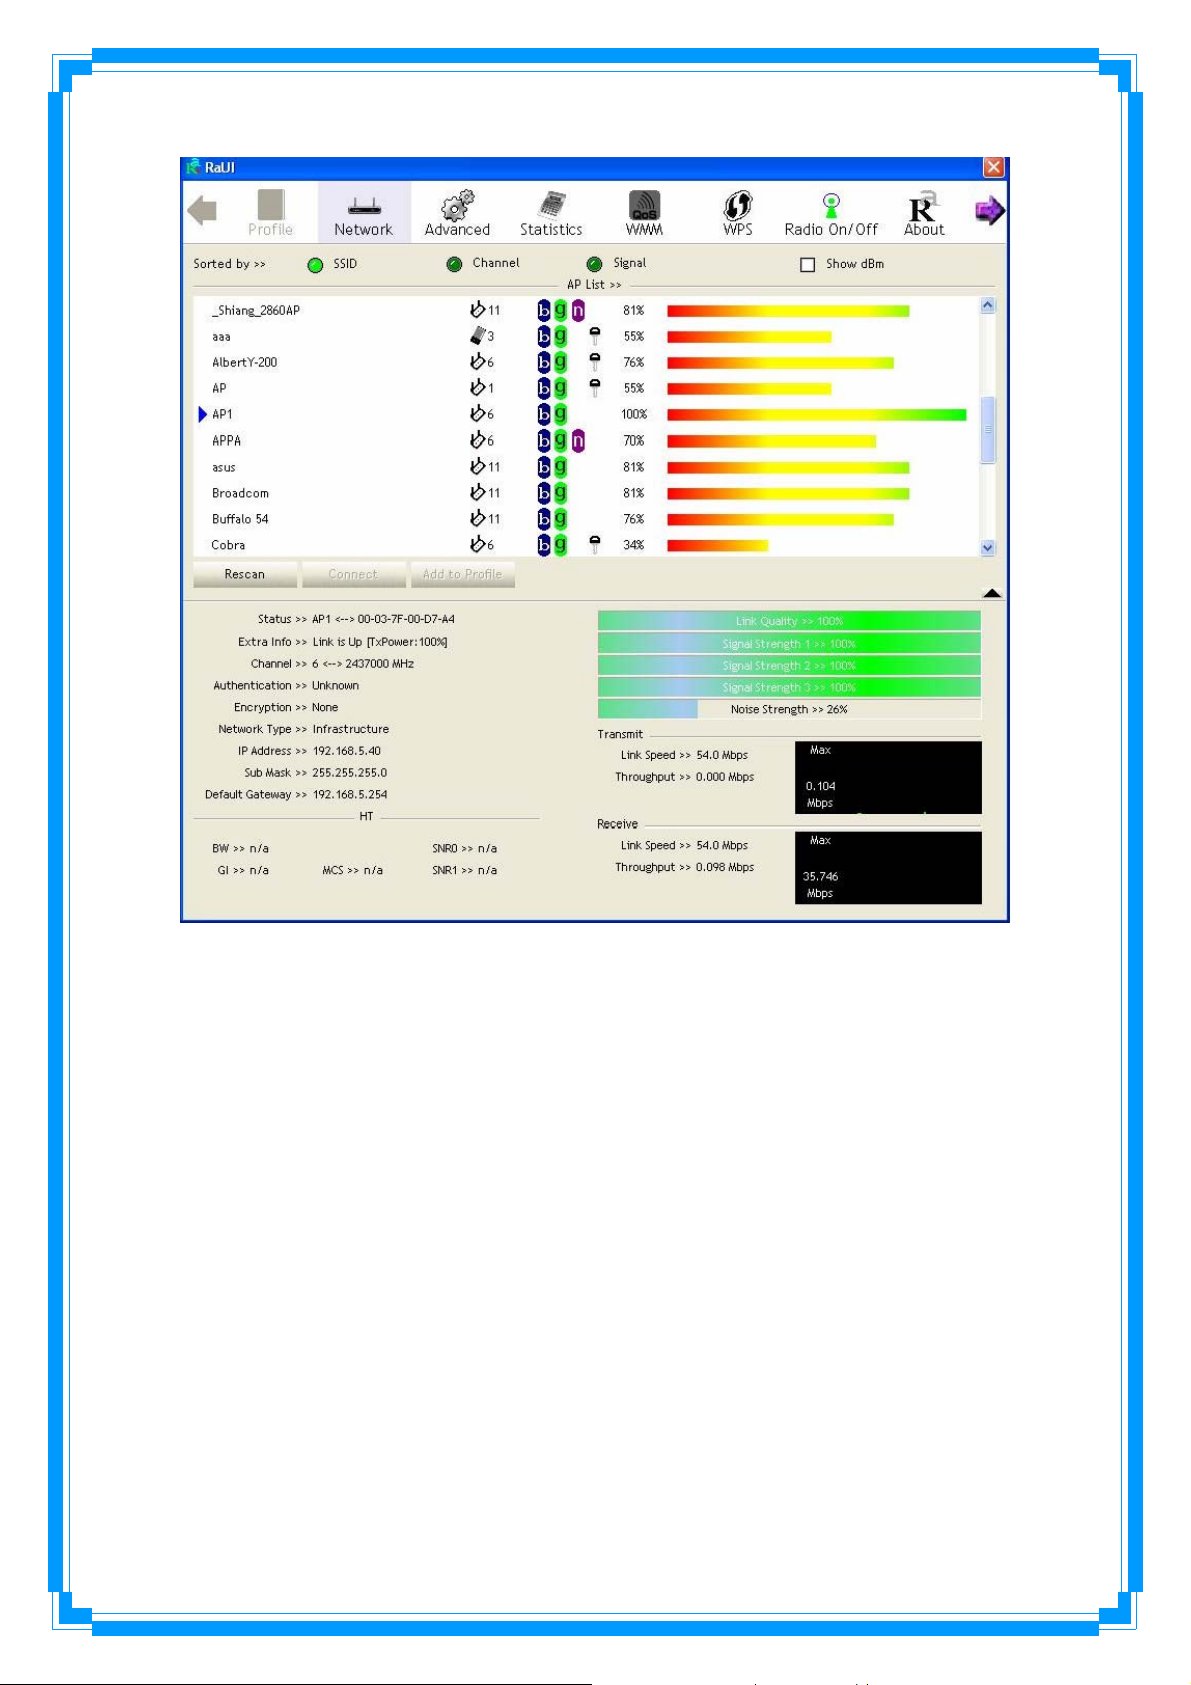
When activating WZC, there are couple different on RaUI status compare to the without
WZC running:
(1) Profile button will be gray, profile function is removed since the NIC is controlled by WZC.
(2) The connect and add profile function will be gray. The reason is same as the first
difference.
18
Page 20
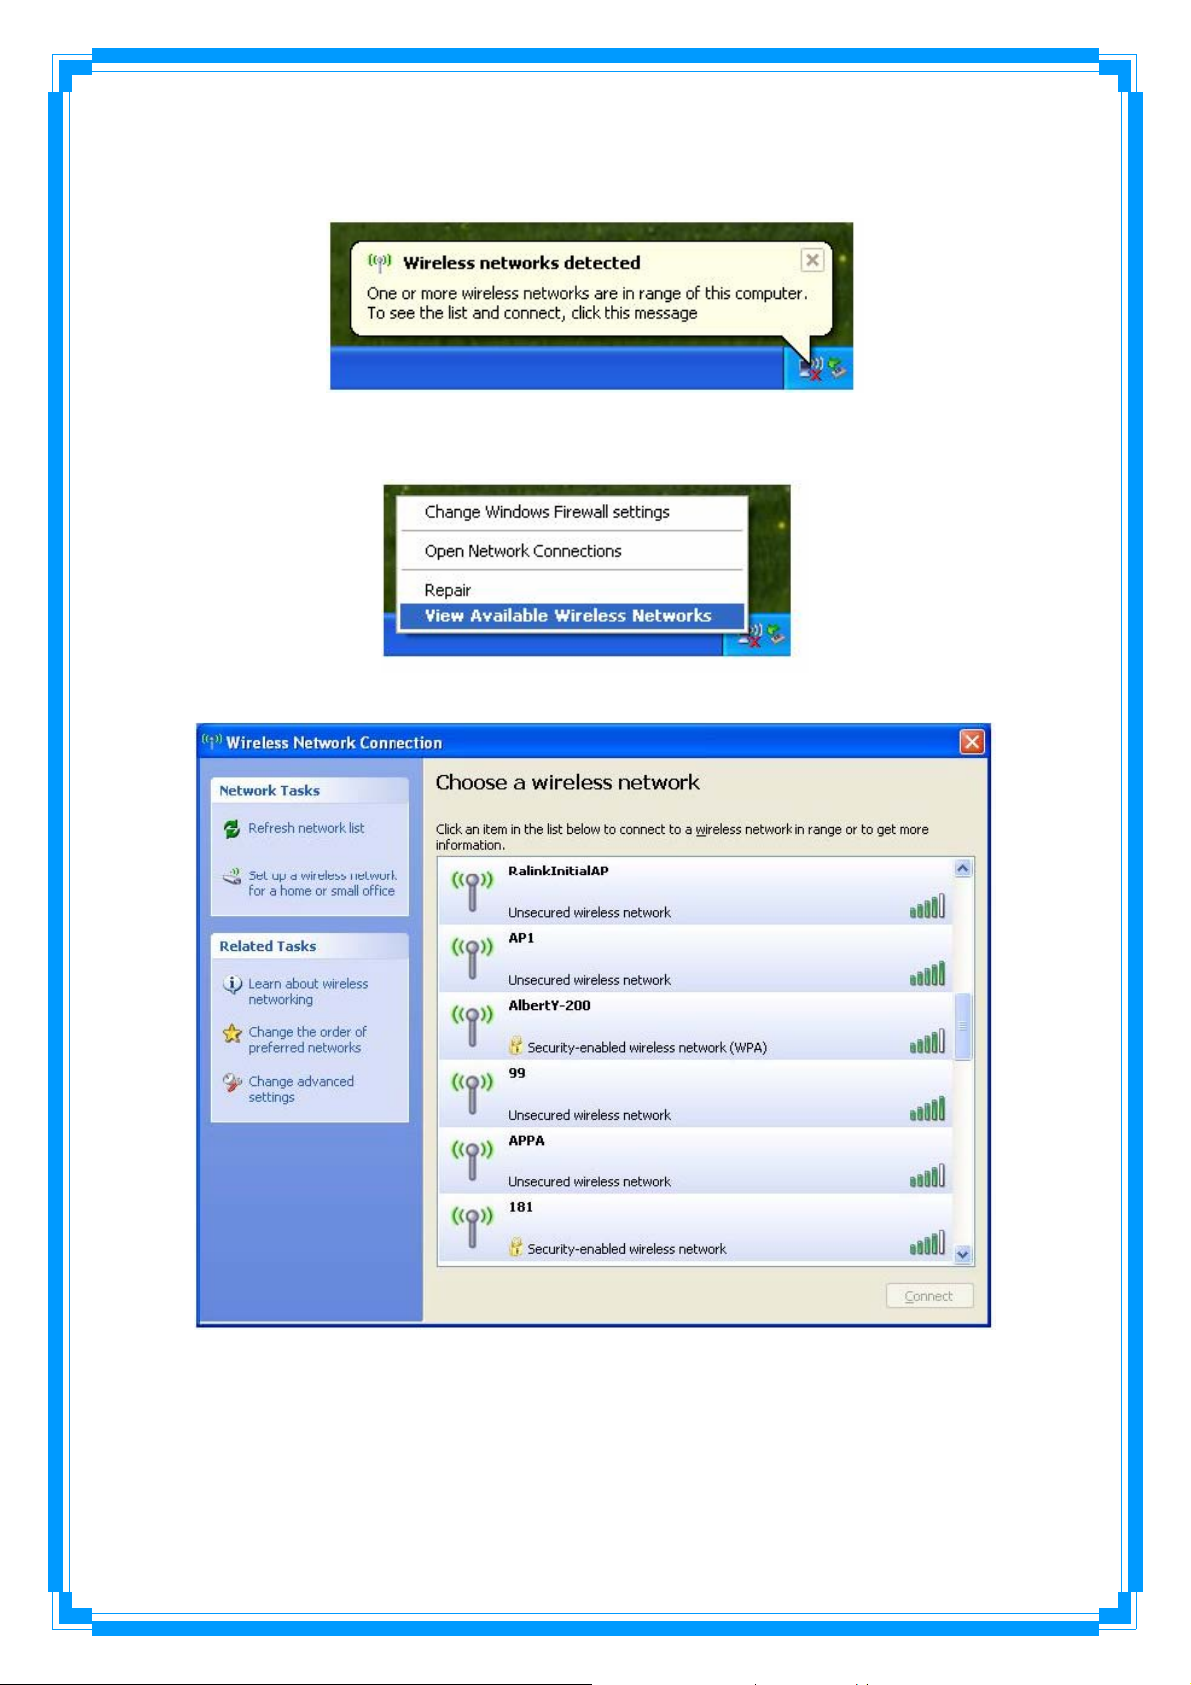
[Use WZC to configure wireless NIC]
STEP1: If connection is lost or not connected, the status prompt as below will pop up.
STEP2: Right-click the network connection icon in the task bar.
STEP3: Select “View Available Wireless Networks” will pop up the dialog shown as below.
19
Page 21
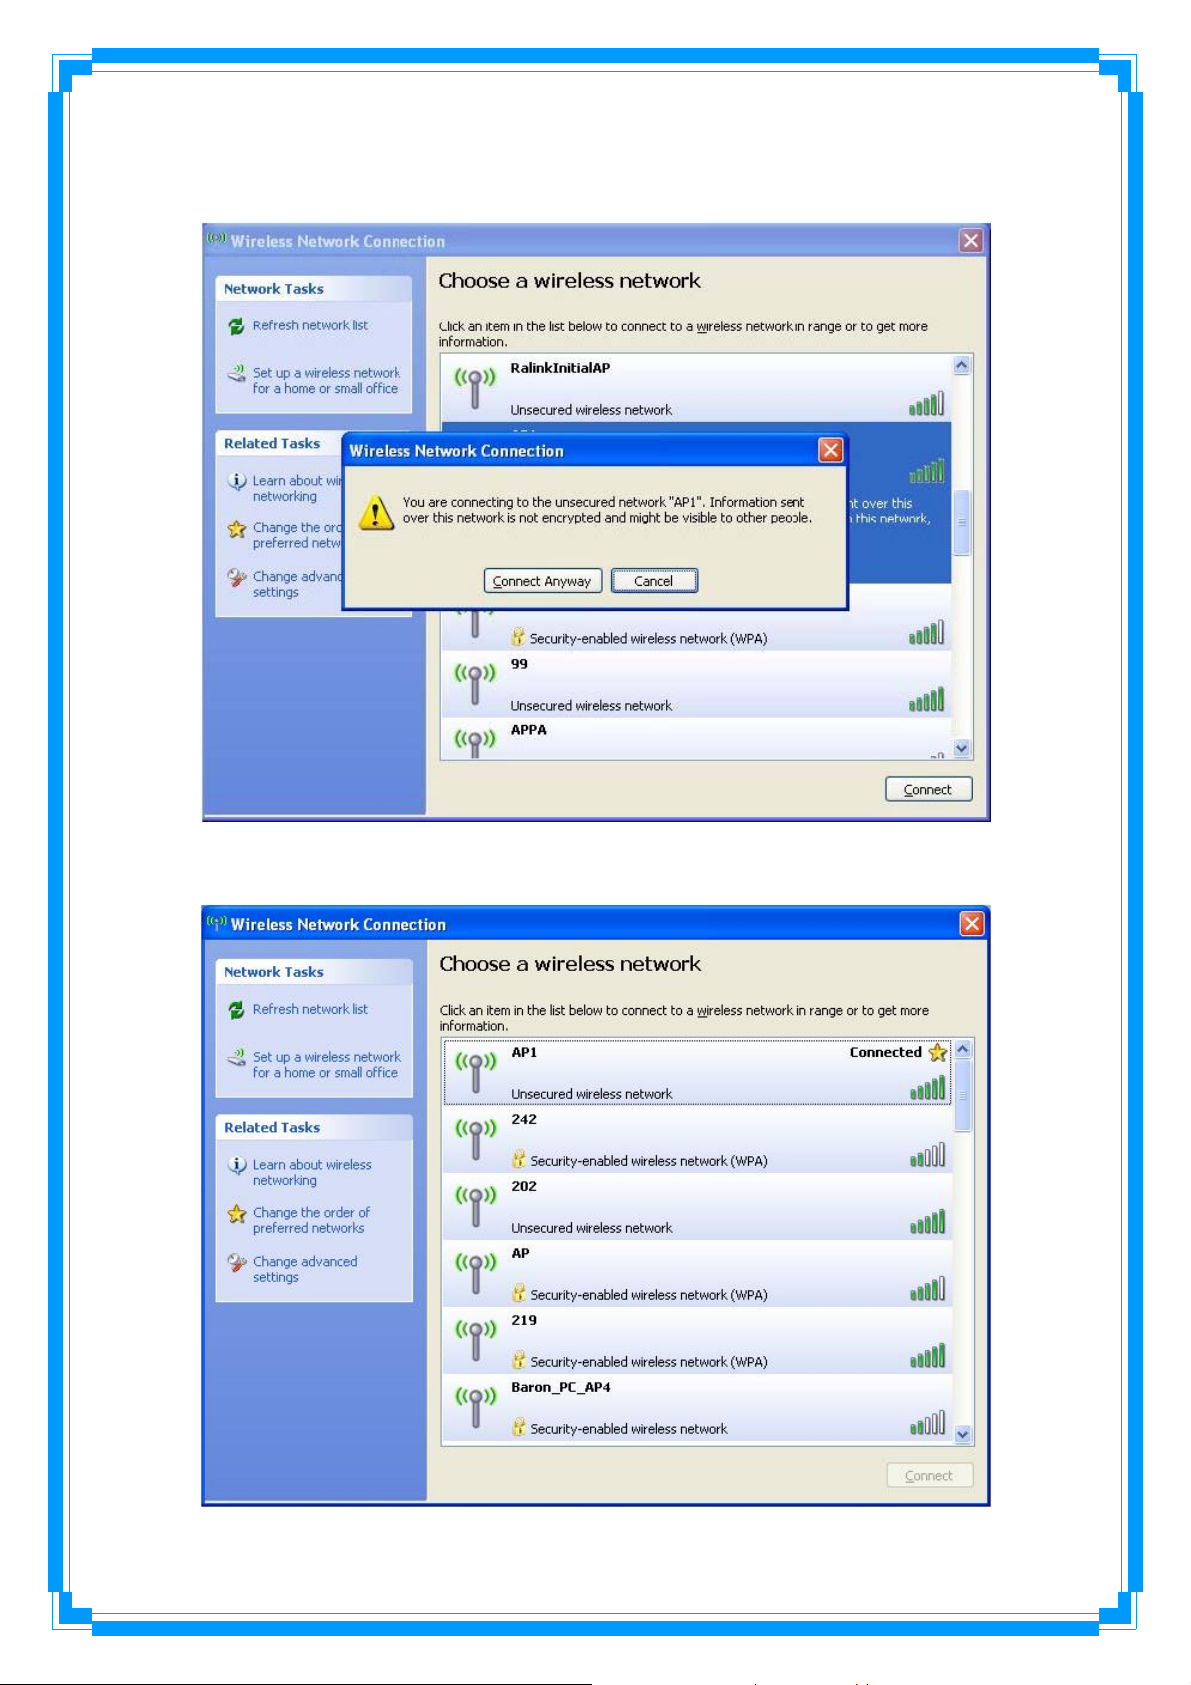
STEP4: Select intended AP and click “Connect” shown as below, then click “Connect
Anyway”.
STEP5: AP1 is successful connected.
20
Page 22
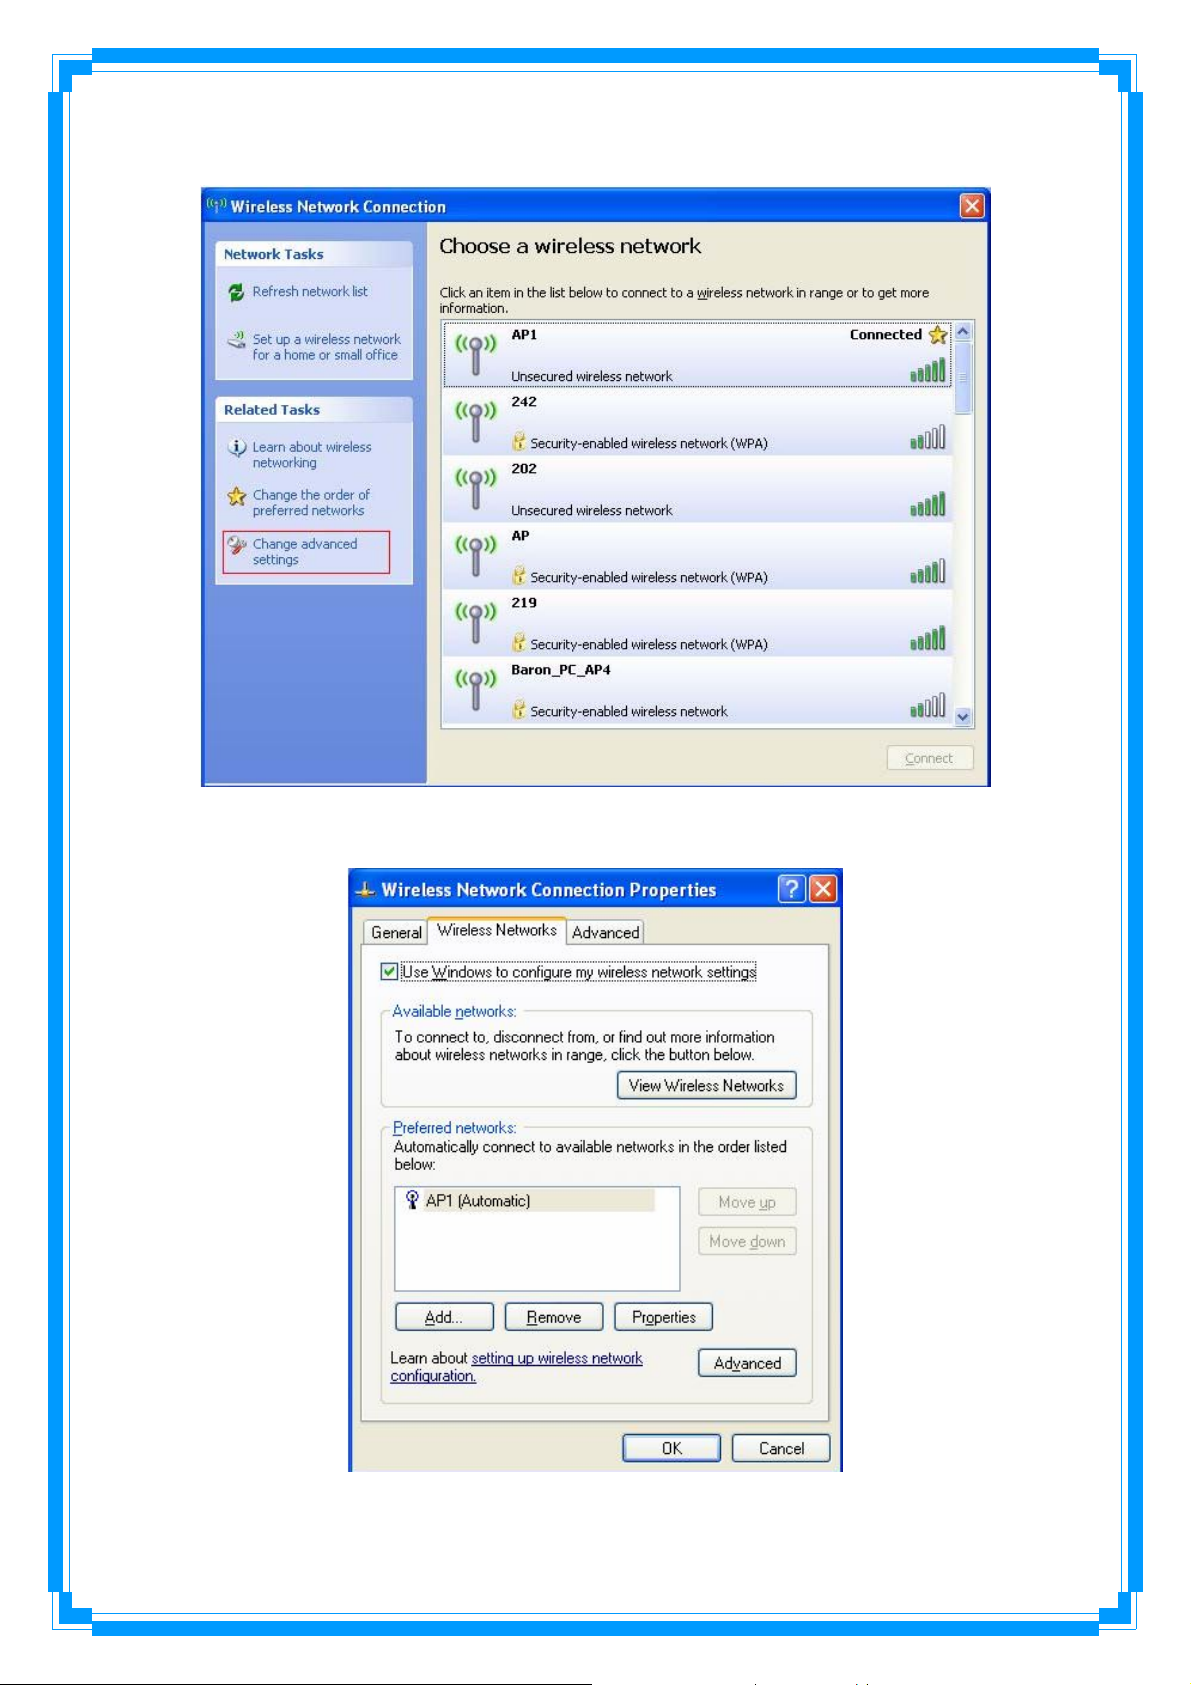
STEP6: If you want to modify information about AP, click “Change advanced settings”
STEP7: Choose “Wireless Networks” tab.
21
 Loading...