

Page 1
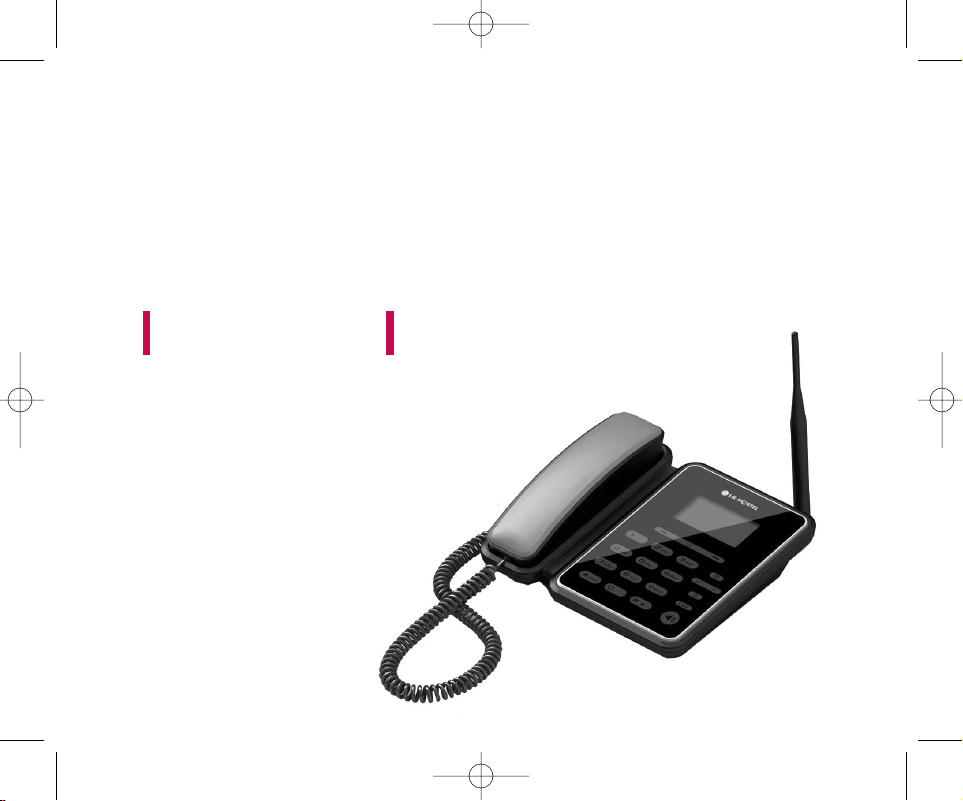
LSP-710 USER GUIDE
Please read this manual carefully before operating your set.
Retain it for future reference.
LSP-710 EN_090416 2009.4.16 2:3 PM 페이지1
Page 2

Congratulations on your subscription to the LSP-710
Fixed Wireless phone. This phone has been designed
to operate on the IS-2000 Air Protocol over the
800MHz band. And the phone has the advanced user
interface similar to mobile phone. It has greatly
enhanced voice clarity and provides various advanced
features.
Key phone features:
ᶀ
Wide view, Graphic, Backlit Display
ᶀ
Polyphonic Ring tones: A choice of 15 melodies
and 5 bell sounds available
ᶀ
Large Phonebook with 500 entries
ᶀ
Speed Dialling for upto 99 numbers
ᶀ
3 Way call conferencing
ᶀ
Enhanced SMS features - Group SMS.
ᶀ
Hands free Speaker Phone
ᶀ
Receiver Off-Hook tone
ᶀ
Adjustable Ringer Volume, Earpiece Volume, Key
Volume, Speaker Volume
ᶀ
A Menu driven interface with prompts for easy
operations
ᶀ
Serial port for Diagnostic.
ᶀ
Organiser: Scheduler, Alarm, Memo, Calculator,
World Clock with DST, Stopwatch
ᶀ
Fast charging battery
ᶀ
Voice Service
Highlights
Highlights
2
LSP-710 EN_090416 2009.4.16 2:3 PM 페이지2
Page 3

1. Important Information 4
1.1 Safety Instruction 4
1.2 Optimal Phone Performance 4
1.3 Care and Service 5
1.4 Safety Information 6
2. Introduction 9
2.1 Front View of the Phone 9
2.2 LCD Display 10
2.3 Installation 11
2.4 Installation Steps 14
3. Basic Operations 15
3.1 Making a Call 15
3.2 Redialing Last Number 15
3.3 3 way call conferencing 15
3.4 Volume Control 16
3.5 Receiving a Call 16
3.6 Lock Mode 16
3.7 Entering and Editing Information 17
4. Menu Tree 19
4.1 Names 23
4.2 Messages 25
4.3 Call History 30
4.4 Sound 32
4.5 Display 35
4.6 Settings 36
4.7 Organiser 42
5. Speaker Phone 45
6. Troubleshooting 46
7. General Information 47
7.1 Main Unit 47
7.2 AC/DC Adapter 47
7.3 Battery 48
CONTENTS
3
CONTENTS
LSP-710 EN_090416 2009.4.16 2:3 PM 페이지3
Page 4

1. Important Information
Important Information
4
1.1 Safety Instruction
WARNING / CAUTION
To reduce the risk of fire or electric shock, do not
expose this phone to rain or moisture. Do not use this
phone in swimming pools or other water bodies.
1.2 Optimal Phone Performance
ᶀ
Do not hold the antenna when operating the
phone, or operate the phone when someone is
within four inches (ten centimeters) of the antenna.
Both cases affect the call quality and may cause the
phone to operate at a higher power level than
required.
ᶀ
For the best call quality, keep the antenna free from
obstructions and position the antenna upright.
ᶀ
Do not use the phone if the antenna is damaged.
Replace the damaged antenna immediately by a
qualified technician. Use only a manufacturerapproved antenna. Non-approved antennas,
modifications or attachments may impair call
quality and damage the phone.
ᶀ
RF energy may affect improperly installed or
inadequately shielded personal medical devices
such as pace-makers or hospital monitors. Consult
the manufacturer of any personal medical devices
to determine whether they are adequately shielded
from external RF energy. Turn your phone OFF in
health care centers if any regulations posted in the
area instruct you to do so. Hospitals or health care
centers may be using equipment that may be
sensitive to external RF energy.
ᶀ
If this phone causes harmful interference to radio
or television reception, which can be determined by
turning the equipment off and on, the user is
encouraged to try to correct the interference by
one or more of the following measures:
- Reorient or relocate the receiving antenna
- Place the radio or television farther away from the
phone.
- Connect the equipment to an outlet on a circuit
different from that to which the phone is
presently connected.
4
LSP-710 EN_090416 2009.4.16 2:3 PM 페이지4
Page 5

- Consult the Authorized LG-Nortel Dealer for
assistance of an experienced radio/TV technician.
ᶀ
Use battery, antenna and AC/DC power adapter
provided by LG-Nortel . Using parts made by any
other manufacturer may invalidate the warranty.
ᶀ
Only authorized personnel should service the
phone and its accessories. Faulty installation or
service can be dangerous and may invalidate the
warranty.
ᶀ
Do not use the phone in any designated “cellular
phone use” area.
ᶀ
Avoid using the phone in high temperature or
humidity.
ᶀ
Avoid spilling any liquid on the phone. If the phone
gets wet, turn the power off immediately. If the
phone doesn’t work, please contact the service
provider immediately.
ᶀ
Avoid shock or impact.
ᶀ
We recommend you to charge the backup battery
before initial use. The backup battery may be
discharged during delivery.
1.3 Care and Service
Before cleaning, always unplug the phone from the
wall outlet and remove the antenna (or disconnect the
antenna cable). Do not use liquid or aerosol cleaners;
use a damp cloth for cleaning.
If the phone doesn’t work, do not attempt to
disassemble it; contact the phone service agent for
assistance.
If any of the following conditions exist, unplug the
phone from the wall plug, remove the battery and call
the qualified engineer.
- The power supply cord is damaged or frayed.
- Liquid has spilled into the phone.
- The phone has been exposed to rain or water.
- The phone has been dropped or damaged.
- The phone does not function normally even after
following the operating instructions.
Important Information
1. Important Information
5
LSP-710 EN_090416 2009.4.16 2:3 PM 페이지5
Page 6
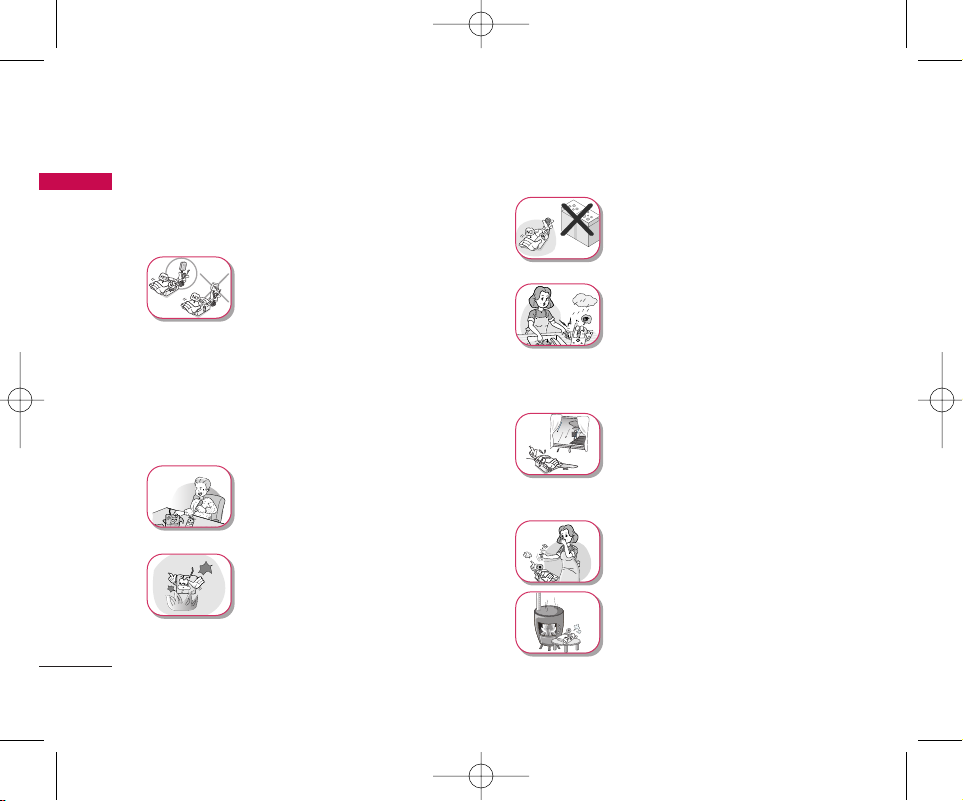
WWAARRNNIINNGG
ᶀ
For safety, use only an adapter
approved by LG-Nortel .
LG-Nortel does not bear
responsibility for any faults that
may arise due to non-conformation
to this guide. Example: LSP-710
(LG-Nortel Power Adapter
Source: DC 5V / 1A)
ᶀ
Do not, in any way, cause a
short-circuit. It may start a fire
or the phone may explode
causing injury.
ᶀ
Do not create a sudden impact
on the battery by throwing it. Do
not dispose off batteries by
putting them in a fire. They may
explode or catch fire due to the
electrolyte within.
1.4 Safety Information
CCAAUUTTIIOONN
ᶀ
Do not use the phone with a car
battery. It may cause electric
shock, fire, breakdown or
transformation.
ᶀ
Avoid using the phone in high
temperature or humidity. Avoid
spilling any liquid on this phone.
If the phone gets wet, Switch off
phone and turn off AC power
supply.
ᶀ
Keep the phone dry.
Submersion, humidity, and
liquids contain minerals that
may corrode internal electronic
circuits.
ᶀ
Do not store or use the phone
in dusty or dirty areas as this
can damage the moving parts.
ᶀ
Do not store the phone in hot
areas. High temperatures can
shorten the life of electronic
devices, damage batteries, and
warp or melt certain plastics.
1. Important Information
Important Information
6
LSP-710 EN_090416 2009.4.16 2:3 PM 페이지6
Page 7
Important Information
7
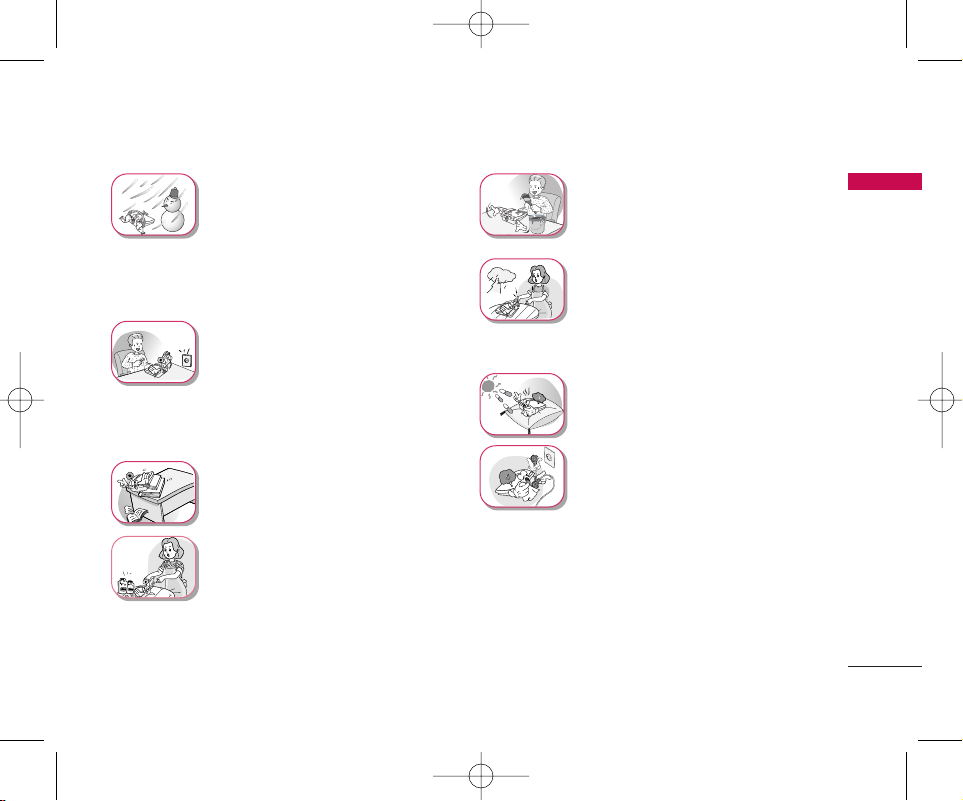
ᶀ
Do not store the phone in cold
areas. When the phone warms
upto its normal operating
temperature, moisture can form
inside the phone, which can
damage the internal electronic
circuit boards.
ᶀ
Do not attempt to open it. Nonexpert handling of the device
could damage it. It may cause
fire, electric shock and
breakdown. Consult your
authorized LG-Nortel dealer for
assistance.
ᶀ
Do not drop, knock or shake the
phone. Rough handling may
break the internal circuit boards.
ᶀ
Do not use harsh chemicals,
cleaning solvents or strong
detergents to clean the phone.
Wipe it with a soft cloth that has
been slightly dampened in a mild
soap and water solution.
ᶀ
Do not paint the phone. Paint
can clog the device’s moving
parts and prevent proper
functioning.
ᶀ
During lightning, do not touch
the power plug or the phone
line. It may result in an electric
shock or death.
ᶀ
Do not install the phone under
direct sunlight or on an uneven
surface.
ᶀ
Before using the plug, check the
available power voltage.
Inaccurate power voltage may
cause fire and damage.
Example: LSP-710 Input
Voltage: 100 ~ 240V.
1. Important Information
LSP-710 EN_090416 2009.4.16 2:3 PM 페이지7
Page 8
Important Information
8
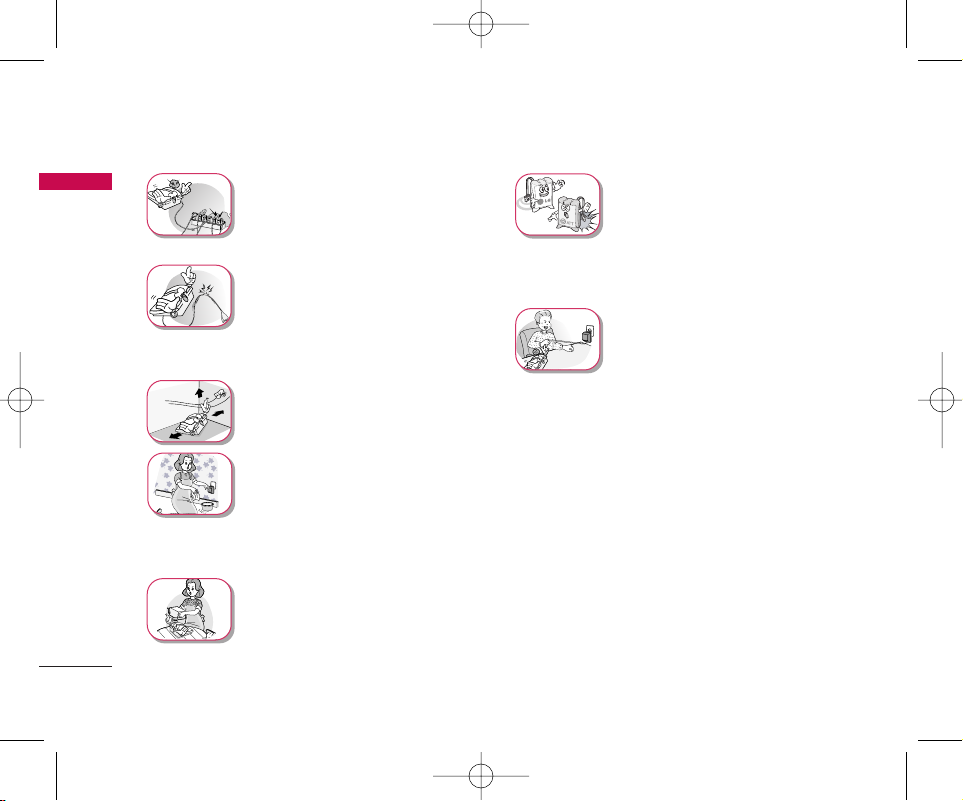
ᶀ
Do not plug many power cords
into one outlet.
It may cause fire or electric
shock.
ᶀ
Do not remodel the power cord
or disassemble it.
If the power cord or plug is
impaired, do not use it.
It may cause fire or electric shock
ᶀ
Do not install the phone in an illventilated place.
It may cause fire or a breakdown.
ᶀ
Do not touch the plug with wet
hands. When disconnecting the
power cord of any accessory,
grasp and pull out the plug itself
and not the cord. It may cause
fire or electric shock.
ᶀ
Do not put heavy objects on the
power cord. Do not bend the
power cord too much. It may
cause fire or electric shock.
ᶀ
Use only an LG-Nortel approved
battery and adapter. If not, it
may cause an explosion or result
in a short-circuit. LG-Nortel
does not bear any responsibility
for the damage.
ᶀ
When you disconnect the power
cord of any accessory, grasp and
pull the plug itself and not the
cord. It may cause the adapter to
breakdown.
1. Important Information
LSP-710 EN_090416 2009.4.16 2:3 PM 페이지8
Page 9
Introduction
2. Introduction
9
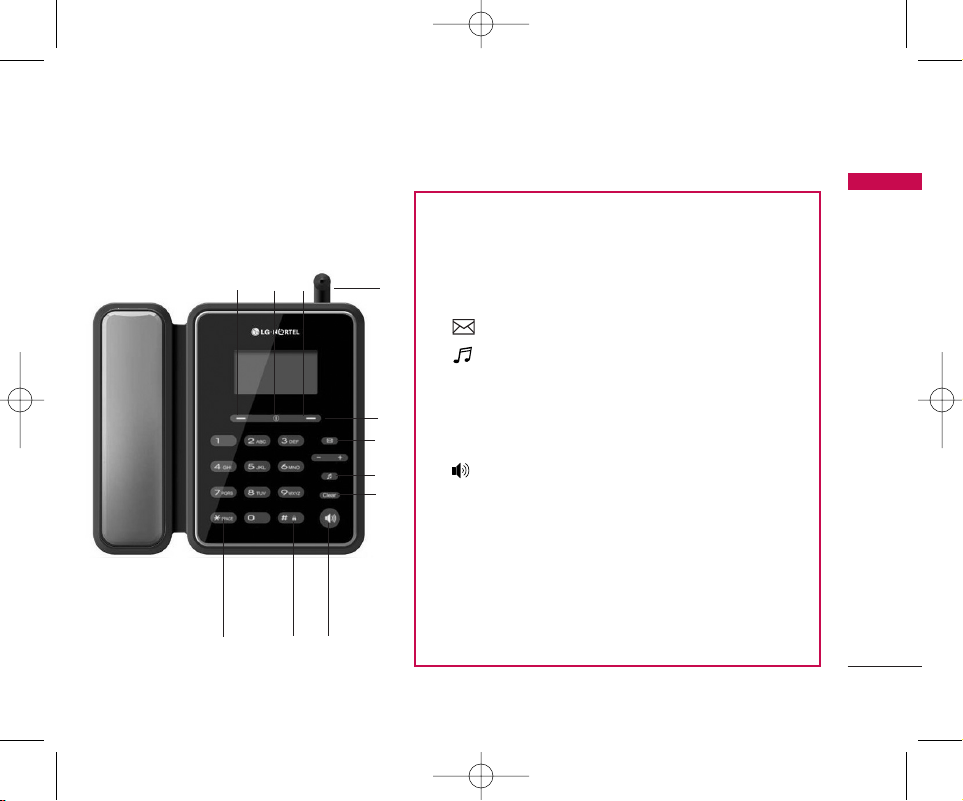
2.1 Front View of the Phone
ῡ
Soft key 1 : Activates Menu state
②
Dial/Flash : Activates Dial or Flash state, make it possible to
redial from call history
③
Soft key 2 : Searches phone number list
④
(
▲
) : Moves to SMS Menu, Moves up in the Menu
⑤
(
▼
) : Selects Melody/Bell setting Menu, Moves down
in the Menu
⑥
END : Deactivates a state - End or Power ON/OFF
⑦
Clear : Deletes the last digit, Moves previous Menu, My Menu
⑧
() : Activates hands free speaker phone function
⑨
‘
*
’ : Input dial ‘*’, Makes a phone switch between the ‘Light
mode’ & the ‘Previous set mode’ after long-press
⑩
‘#’ : Input dial ‘#’, Makes a phone lock after long-press
⑪
MIC
⑫
Attached Antenna
ڹ
ںڻ
ڼ
ڽ
ھ
ڿ
ۀ
ہ
ۂ
ۃ
LSP-710 EN_090416 2009.4.16 2:3 PM 페이지9
Page 10
2. Introduction
Introduction
10
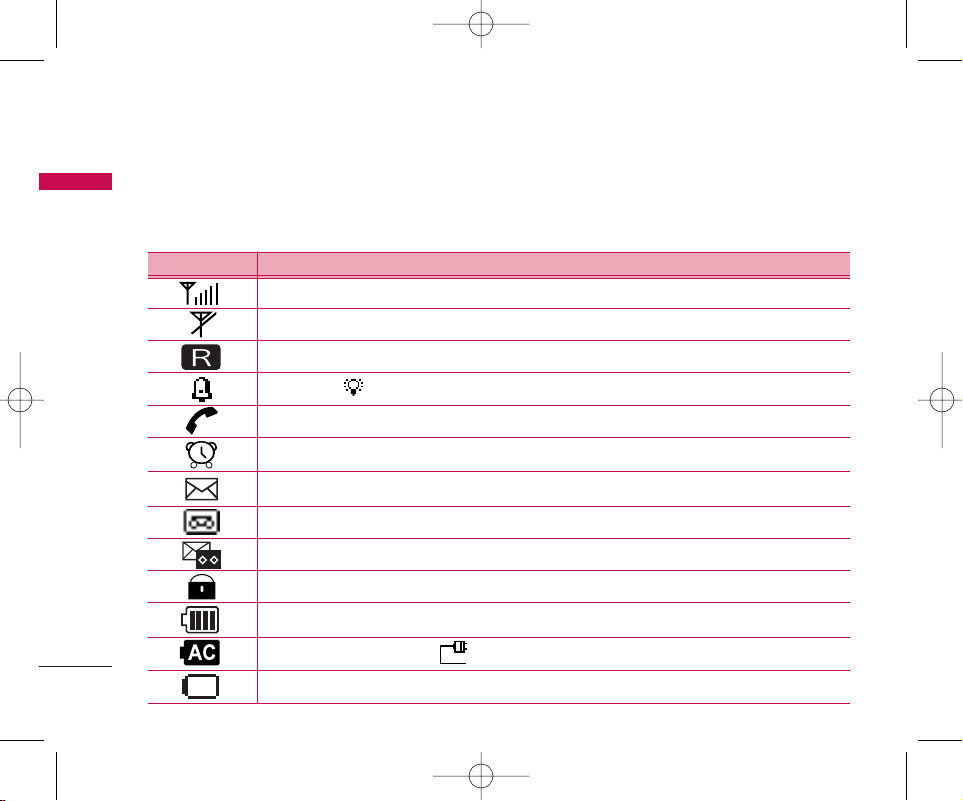
2.2 LCD Display
The LCD shows icons on the top of the LCD screen.
Different indicators appear based on the phone's operating mode.
Lock mode
IIcc oo nn OOppee rraatt ii nn gg CCoo nn ddiittiioonn
RSSI indicator: Indicates the signal strength in the service area.
No service: The phone is not receiving any system signal.
Bell (Light : ).
In use: Displayed when a call is in progress or the phone is in off-hook state
Alarm: Displayed when alarm time is set
Text message: Displayed when a text message is received
Voice message: Displayed when voice message are received
Text and Voice message: Displayed when text and voice messages are received.
Battery charge level: Indicates charged battery level
Charge complete (Others : , Only outlet (No battery) )
No AC power & Battery ON. But in low battery state
Roaming Service
LSP-710 EN_090416 2009.4.16 2:3 PM 페이지10
Page 11

Introduction
2. Introduction
11
2.3 Installation
You should follow each step carefully as shown below in order to guarantee the proper operation of
CDMA Fixed Wireless Phone.
Main Phone
Dipole Antenna
AC/DC Power Adapter User Guide
LSP-710 EN_090416 2009.4.16 2:3 PM 페이지11
Page 12

2. Introduction
Introduction
12
STEP I. Check Components
ᶀ
The following components are supplied for Fixed
Wireless Phone.
1. LSP-710 Main Phone with Handset -1EA-
2. Dipole Antenna -1EA-
3. AC/DC Power Adapter -1EA-
4. User Guide -1EA-
ᶀ
Please make sure that these components are
present before you begin to install the phone. If
any of the components are missing or damaged,
contact your service provider immediately.
STEP II. Place the Terminal
ᶀ
Place the phone on the stable flat surface area
(desk, table, etc.). Serious damage may result if the
phone is dropped. Do not place the phone within
1 meter of heaters or radiators.
This phone is designed for desktop usage. Avoid
the direct exposure to sunlight and dampness.
ᶀ
Read the Safety Information located in the first
part of this document before you place the phone.
STEP III. Connect Components
(Please refer to “Installation Steps” in 2.4)
ᶀ
Connect the antenna to the TNC antenna
connector located at the top of the phone. If you
have placed the phone on a flat surface, position
the antenna upright.
ᶀ
Connect the curl cord of the handset to the RJ-11
port located on the bottom side of the phone.
ᶀ
Connect the AC/DC Adapter cable to the DC input
port located at the top of the phone.
- If it is correct, you will be saw “Under Charge” on
the LCD.
- If it is not correct(Booting fails or you don’t see
“Under Charge” on the LCD), you will have to
reconnect the adapter.
LSP-710 EN_090416 2009.4.16 2:3 PM 페이지12
Page 13
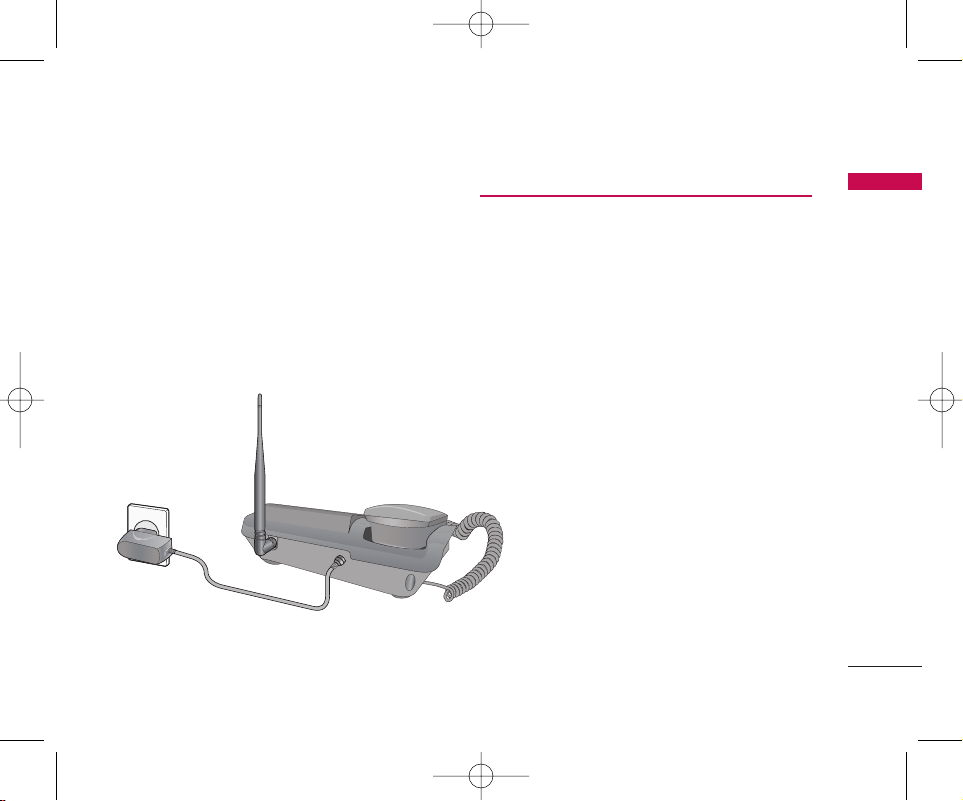
ᶀ
Please observe the following to get better voice
quality.
1. Keep away from electrical appliances such as TV,
computer, radio etc.
2. Keep the phone in a high and central location
without any obstructions.
3. Raise the integral antenna of the phone to get
maximum strength as shown in the figure.
STEP IV. Check the LCD Display
ᶀ
After you follow the installation instruction step I
to step III, please check the LCD for normal
operation.
ᶀ
If you do not see the status of service, please
repeat the 4th instruction of step III.
Then confirm the status of phone to get the proper
signal strength from the service operator system.
Introduction
2. Introduction
13
LSP-710 EN_090416 2009.4.16 2:3 PM 페이지13
Page 14
2. Introduction
Introduction
14
2.4 Installation Steps
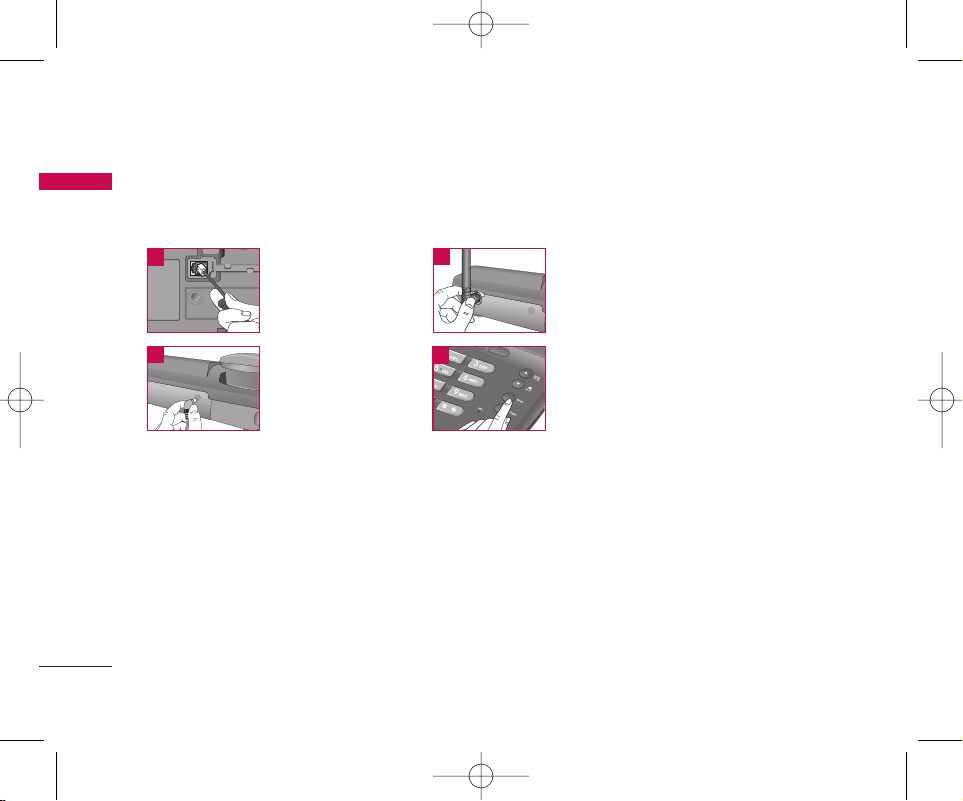
Please follow the procedure below to install the phone properly.
Connect basehandset to the
handset connector.
Connect the antenna to the
TNC connector (Turn right).
Connect the AC
power supply.
1
2
Press END button to
operate initially.
4
3
LSP-710 EN_090416 2009.4.16 2:3 PM 페이지14
Page 15
Basic Operations
3. Basic Operations
15
3.1 Making a Call
You can make a call as follows.
1. Pick up the handset or press button.
2. Listen for dial tone.
3. Enter the phone number with area code if
needed.
4. Wait for the Auto Dial Time-out or Press
button.
5. The call is connected and you may start
conversation.
6. To disconnect the call, replace the handset or
press button.
આ
When the user presses the button
after dialing any desired number, the phone makes
a call immediately.
3.2 Redialing Last Number
You can make a redial to last number, shown in All
Calls.
1. Pick up the handset or press button.
2. Listen for dial tone.
3. Press button.
4. The call is connected and you may start
conversation.
5. To disconnect the call, replace the handset or
press button.
આ
You can also dial any of the last 60
(Dialled+Received+Missed+In Call Memo) numbers
stored in All Calls.
3.3 3 way call conferencing
You can start tripartite conversation.
1. Enter the phone number of the 2nd party phone
while you are in telephonic conversation with 1st
party.
2. Press button.
This service should be provided by your service
provider.
DDii aall//FF ll aasshh
DDii aall//FF ll aasshh
DDii aall//FF ll aasshh
DDii aall//FF ll aasshh
LSP-710 EN_090416 2009.4.16 2:3 PM 페이지15
Page 16
3. Basic Operations
Basic Operations
16
3.4 Volume Control
1. Press button of navigation while in
a call, to adjust Earpiece volume.
3.5 Receiving a Call
When the bell rings or backlight blinks in Light mode,
you can receive a call as follows
1. Pick up the handset or press the button.
2. Start a conversation.
3. To disconnect the call, replace the handset or
press the button.
3.6 Lock Mode
Protects your phone from unauthorized use. Once the
phone is locked, it is in restricted mode, until the lock
code is entered. This will allow you to receive phone
calls and still make only emergency calls. The lock
code/password on your phone is “0000” by default. If
you need to modify the lock code, you may modify it
using the new lock code within the security set Menu.
* Also, you can lock your phone manually and change
your default password as explained [4.6.4 page
no.39]
UUnn ddee rr LLoo cckk MM ooddee
1. Press ‘#’ button for some time.
The phone is now locked.
2. To unlock, press Unlock button(Soft Key 2).
Soft Key 1 Soft Key 2
3. Enter unlock code. (Default “0000”)
●●●●●●
Dial/Flash
●●●●●●
UUpp //DD oowwnn
LSP-710 EN_090416 2009.4.16 2:3 PM 페이지16
Page 17
Basic Operations
3. Basic Operations
17
3.7 Entering and Editing
Information
You can edit the phonebook, Short Messages,
Scheduler and Banner using various text input mode.
Soft key 2 : Press to scroll and select a mode through
menus.
- You can scroll through the modes using Soft key 2 in
the following
- Shift key : Used to change the letter case. In
Abc Mode, it switches 3-types of letter case such as
Abc, ABC, abc.
- . key : In Abc mode, press to insert sentence
mark ( . , - ? ! ‘ @ : 1 )
- SPACE key : Press to complete a word or insert
a space.
- Clear key : Press to delete a single space or
character. Press and hold to delete entire words.
Text Input provides six modes for entering text,
numbers, special characters, and punctuation.
-- AAbbcc MMoo ddee
: Use Abc mode to input text in English.
If you want an instant input of numbers in Abc mode
without converting to 123 mode, press the button
until number is displayed In Abc mode.
-
112233 MMoodd ee
: Type numbers using one keystroke
per number. To change to 123 mode in a text entry
field, press Soft key 2 until 123 mode is displayed.
-- SSyymmbb oollss MMoo ddee
: Insert special characters,
punctuation. You may use any of the special
characters. When the special characters are
displayed, you can select the number corresponding
to the character that you want to input. To search
more symbols, press Soft key 1 or
key button.
-- SSmmiilleeyyss MMoo ddee
: Insert smileys in your text. When
the smileys are displayed, you can select the number
corresponding to the smileys that you want to
input. To search more smileys, press Soft key
1or key button.
-- TTee mm ppllaa ttee ss
: You can use predefined message in
the phone memory immediately. This mode is very
useful for save your time.
UUpp //DD oowwnn
NN eexxtt
UUpp //DD oowwnn
NN eexxtt
IInnpp uu tt MM ooddee
KKee yy FF uu nn ccttiioo nn ss
LSP-710 EN_090416 2009.4.16 2:3 PM 페이지17
Page 18
3. Basic Operations
Basic Operations
18
Initial Cap(Abc)
Only the first letter is capitalized.
Caps Lock(ABC)
All subsequent letters are capitalized.
Lowercase(abc)
All subsequent letters are lowercase.
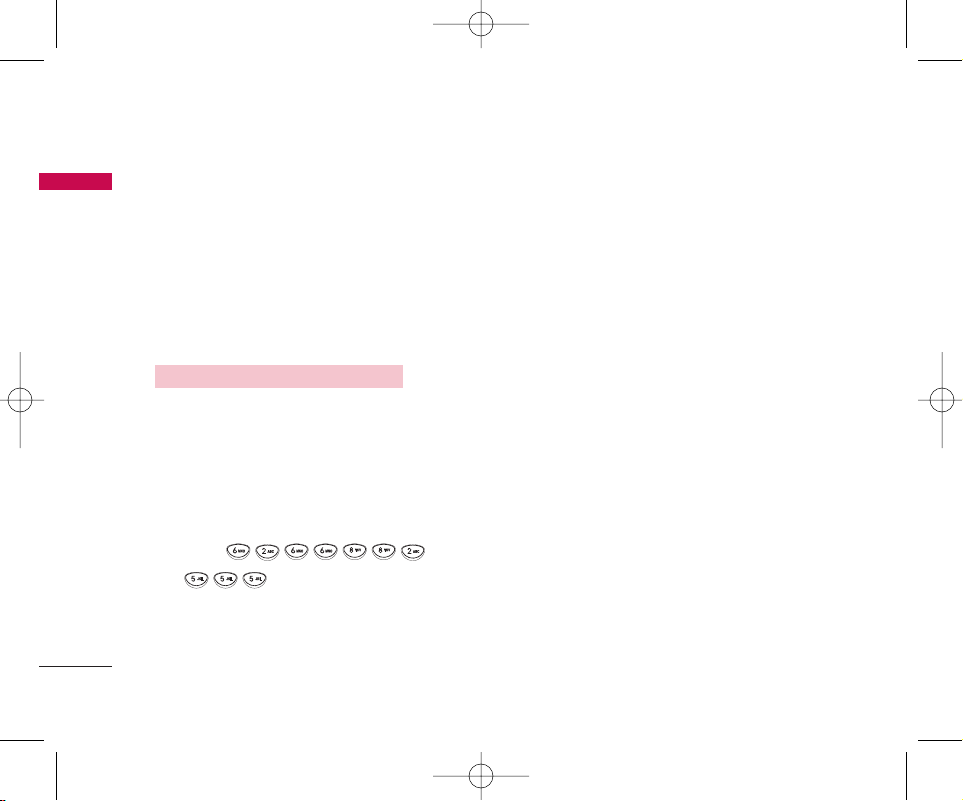
Typing In ABC(Multi-tap) Mode
For example, to type “MANUAL”, follow these steps:
1. Press: Soft key 2 to change letter case Abc
mode.
2. Press: Shift key to change to ABC Caps Lock
mode.
3. Press:
4. Display: MANUAL
EExxaammpplleess UUssiinngg AA BBCC TTeexxtt iinnpp uu tt
LSP-710 EN_090416 2009.4.16 2:3 PM 페이지18
Page 19
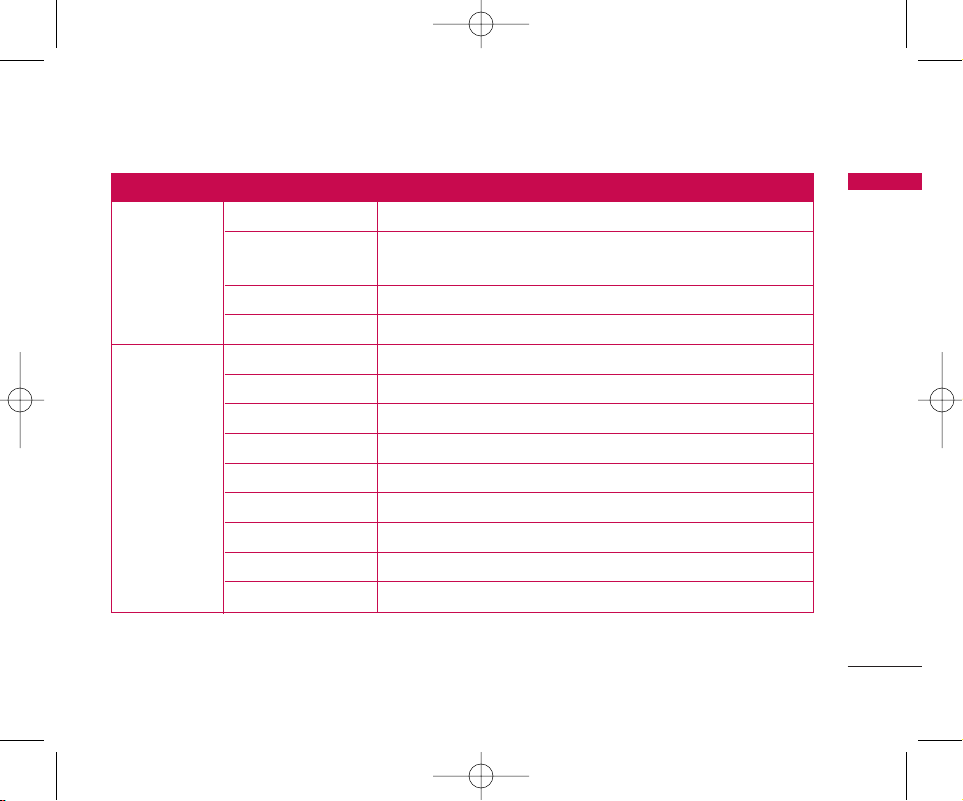
Menu Tree
4. Menu Tree
19
1. Find Name Search / Number Search
2. Add
Name / Mobile / Home / Office / General /
1. Names
E-mail / Memo / Ring
3. Speed Dial Options / Erase
4. Erase All Names Yes / No
1. Write Fra / Abc / 123 / Symbols / Smileys / Templates
2. Inbox View / Erase
3. Outbox View / Erase
4. Voice Mail Erase
2. Messages
5. Broadcast box View / Erase
6. Archive View / Erase
7. Drafts View / Erase
8. Templates View / Add
9. SMS Groups View / Options
Main Menu
Sub-Menu Setting Value
LSP-710 EN_090416 2009.4.16 2:3 PM 페이지19
Page 20
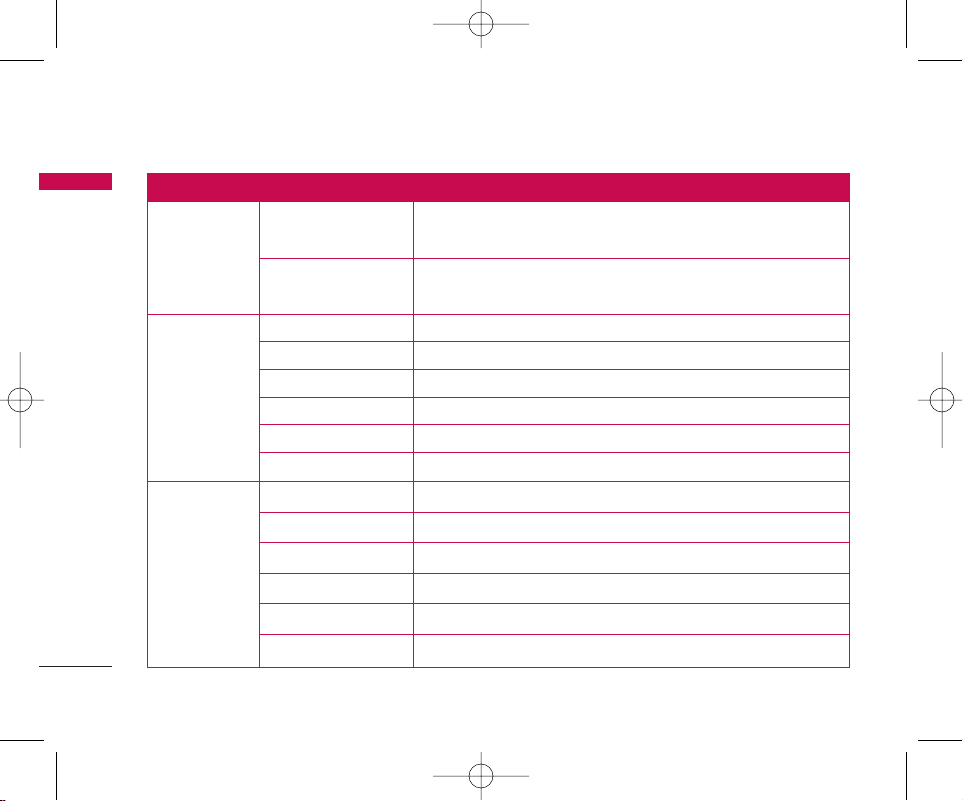
4. Menu Tree
Menu Tree
20
0. Erase Message
Erase Inbox / Erase Outbox / Erase Broadcast box / Erase Archive /
Erase Drafts / Erase All Messages
*. Message Settings
Priority / Delivery Ack / Deferred Delivery / Validity Period /
Save Sent Message / Auto Delete Inbox
1. Missed View / Erase
2. Received View / Erase
3. Call History
3. Dialled
View / Erase
4. In Call Memo View / Erase
5. Call Duration Last Dialled Calls / All Dialled Calls / All Calls / Reset Call Duration
6. Erase History Erase Missed / Erase Received / Erase Dialled
1. Ring Type Ring / One-Beep / Light
4. Sound
2. Ring Tone Bell / Melody
3. Ringer Volume Option setting (Bar 0 ~ Bar 5)
4. Earpiece Volume Option setting (Bar 1 ~ Bar 5)
5. Key Volume Option setting (Bar 0 ~ Bar 5)
6. Speaker Volume Option setting (Bar 1 ~ Bar 5)
Main Menu
Sub-Menu Setting Value
LSP-710 EN_090416 2009.4.16 2:3 PM 페이지20
Page 21
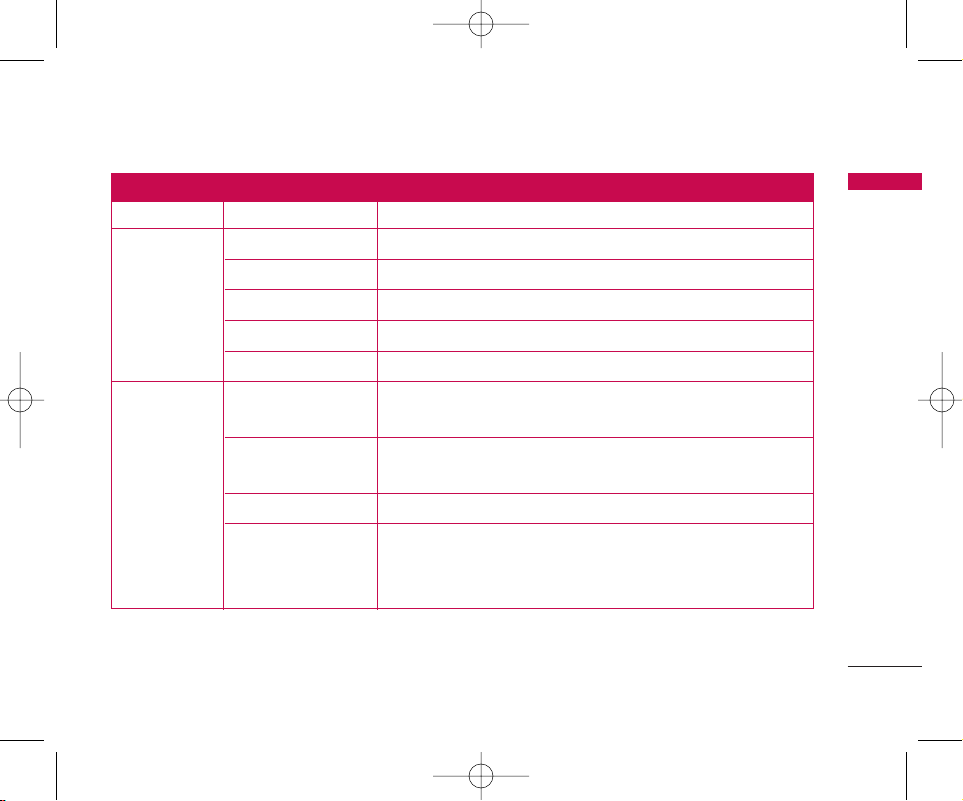
Menu Tree
4. Menu Tree
21
7. Message Alert Alert Type / Alert Tone / Message Reminder
1. Language English/Français
5. Display
2. Wallpaper Idle Screen / Banner
3. Menu Style List / Icon
4. Backlight Off / 10 Secs / 30 Secs / Night Only / Always On
5. Contrast Option setting (Bar 0 ~ Bar 8)
1. Add to My Menu Names / Messages / Call History / Sound / Display/
Settings / Organiser
2. Call
Call Forward / VMS Forward / Voice Mail Access Number / Call Timer /
6. Settings Call Connect Alert / Silent Scratch Pad
3. Phone Auto Dial Time Out / Phone Info
Lock Mode / Emergency Numbers / Change Lock Code /
4. Security Restrict Call / HotLine / Set NAM / Clear Memory & Reset /
Reset Phone
Main Menu
Sub-Menu Setting Value
LSP-710 EN_090416 2009.4.16 2:3 PM 페이지21
Page 22
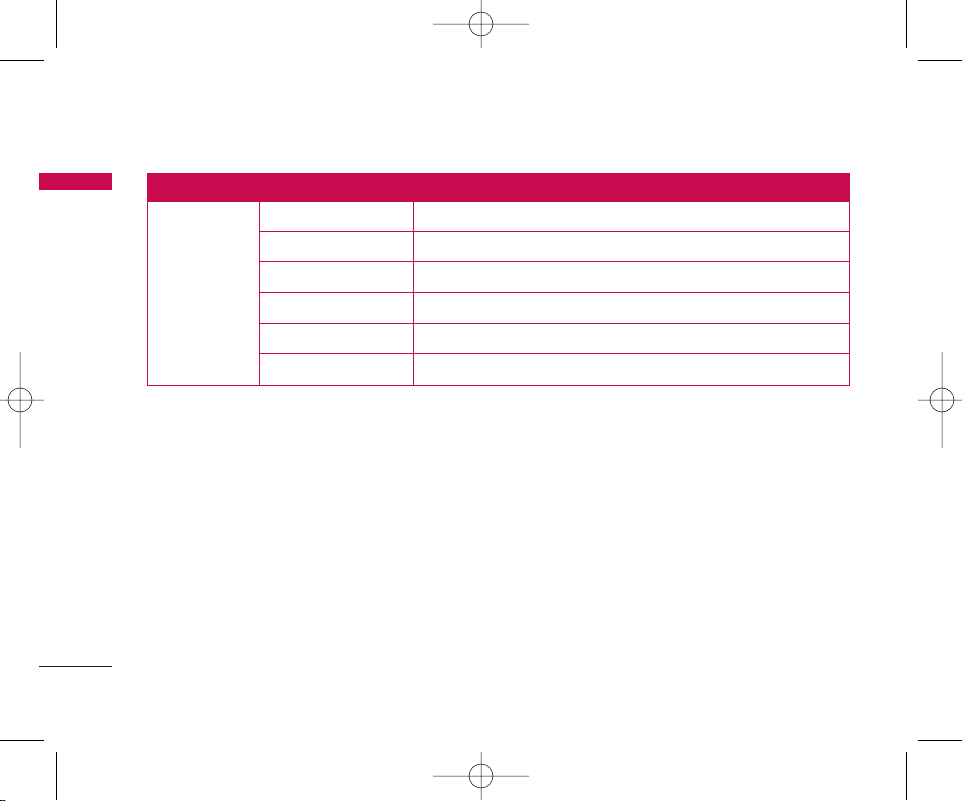
4. Menu Tree
Menu Tree
22
1. Scheduler OK / Add
2. Alarm Options / View
7. Organiser
3. Memo View/ Add
4. Calculator OK / Back
5. World Clock DST / Back
6. Stopwatch Start
Main Menu
Sub-Menu Setting Value
LSP-710 EN_090416 2009.4.16 2:3 PM 페이지22
Page 23
Menu Tree
4. Menu Tree
23
4.1 Names
You may select from four Sub-Menus (Find, Add,
Speed Dial, Erase All Names) for this item. If you press
Soft Key1, Menu is activated.
Soft Key 1 Soft Key 2
To scroll in Menu, press ᵋ, ᵍ,ᵾor ᶀbutton.
To return to the initial screen, press
button and to return to the previous screen, press
button.
*
In this menu, All sorts of the icon have the meaning
as follows:
- Name of person :
- Mobile phone number :
- Home phone number :
- Office phone number :
- General phone number :
- E-mail address :
- Memo:
- Ring:
4.1.1 Find
To find phone numbers you have stored in the Phone
Book.
1. Press Soft key 1 + 11() +
11
() in on-hook state.
2. Select a desired search Menu.
,
: Enter full or starting of
name (Number), select .
3. Select desired item.
4. To make a call, pick up the handset or press
button.
5. To view, press Soft Key 1.
: You can
EE ddiitt
or
EE rr aass ee
.
You can send a message also while number is
highlighted.
OOpptt ii oonnss
OOKK
NN uu mm bbeerr SS ee aarrcchh
NN aammee SSee aarrcchh
FFiinndd
NN aammee ssMMee nnuu
CClleeaa rr
EE NNDD
●●●●●●
Dial/Flash
●●●●●●
LSP-710 EN_090416 2009.4.16 2:3 PM 페이지23
Page 24
4. Menu Tree
Menu Tree
24
4.1.2 Add
You can save upto 500 entries in your LSP-710
phonebook.
You can store multiple contact details under a Name:
Mobile Number, Home Number, Office Number,
General Number, E-mail address of the contact.
You can also add any additional details about the
contact like the Person’s birthday , favorite things etc
in Memo.
Lastly, there is an option to assign a Ring tone to a
Name.
1. Press Soft key 1 + 11()
22
() in on-hook state.
2. Enter the information to select a desired item.
4.1.3 Speed Dial
Speed Dial allows you to make a call faster by just
pressing a corresponding number.
You can save upto 99 entries.
1. Press Soft key 1 + 11() +
33
() ++
11
()
in on-hook state.
2. Find your desired phone number.
3. Select
.
*
You can
RR eepp ll aacc ee oorr EErraa ssee
a stored item.
4.1.4 Erase All Names
You can delete all Entries in your LSP-710 phone
book.
1. Press Soft key 1 + 11() +
44
() in on-hook state.
2. Enter Lock Code. ( Default 0000)
3. Press “Yes” or “No”.
EErraassee AAllll NNaa mmee ss
NN aammee ss
MMee nnuu
OOKK
AA dd ddOOpptt ii oonnssSSppee eedd DDiiaa ll
NN aammee ss
MMee nnuu
AA dd dd
NN aammee ss
MMee nnuu
LSP-710 EN_090416 2009.4.16 2:3 PM 페이지24
Page 25
Menu Tree
4. Menu Tree
25
4.2 Messages
Text messaging, page and voice mailbox become
available as soon as the power is on. You may access
the above type of messages using the Messages
( ) key.
The phone can store upto 50 messages in each Inbox
and Outbox. And the phone can also store upto 50
messages in Archive, 30 messages in Drafts, 30
messages in Templates, 5 SMS Groups with 10
Entries per Group.
If you press Soft Key1, Menu is activated.
Soft Key 1 Soft Key 2
To scroll in Menu, pressᵋ, ᵍ,ᵾor ᶀbutton.
To return to the initial screen, press
button and to return to the previous screen, press
button.
To access messages, Press Soft key 1 +
22
() in on-hook state.
*
In the list of Inbox or Outbox , all sorts of the icon
have the meaning as follows:
- Unread :
- Unread Urgent :
- Read :
- Read Urgent :
- Sent :
- Sent Urgent :
- Unsent :
- Unsent Urgent :
4.2.1 Write
1. Press Soft key 1 + 22() +
11
() in on-hook state.
2. Write message.
Refer to the 3.7 (page 16) Entering and Editing
Information about text input.
3. Select .
OOKK
WWrriittee
MM eess ss aaggee ss
MMee nnuu
MM eess ss aaggee ss
MMee nnuu
CClleeaa rr
EE NNDD
●●●●●●
Dial/Flash
●●●●●●
LSP-710 EN_090416 2009.4.16 2:3 PM 페이지25
Page 26
4. Menu Tree
Menu Tree
26
4. Enter phone number or press .
: can select ,
.
5. Select options as following.
Priority
: Allows you to give priority to Message as
or .
Delivery Ack
: This function allows you to know
whether the Messages have been successfully
transmitted to the recipient. If you want to
activatethis function, set to
or
.
Deferred Delivery
: This function allows you to
reserve when the message is sent.
You may select from seven options( /
/ /
/ /
/ )
Validity Period
: This function allows you to define
the period of the valid message until the message
sending is completed.
You may select from seven options( /
/ / /
/ / )
Save Sent Message:
This function allows you to
choose whether the sent message shall be saved or
not. You may select or
6. Select .
4.2.2 Inbox
Received messages are stored here.
1. Press Soft key 1 + 22() +
22
() in on-hook state.
2. To erase message, select .
3. To view desired message, select .
4. You may select from five options (1.
2. 3. 4.
5. ).
* For example, the meaning of (2/3) in Inbox is that 2
out of 3 messages are unread.
SSaavvee NNuummbbeerr
MMoovvee TToo AArrcchhiivvee
FFoorrwwaarrddRR eepp ll yy
EE rr aass ee
VV ii eeww
EE rr aass ee
IInnbb ooxx
MM eess ss aaggee ssMMee nnuu
SSee nn dd
OOff ffOOnn
22 DDaa yyss11 DDaa yy1122 HH oouurrss
22 HHoo uu rr ss11 HHoo uu rr3300 MMiinnuutteess
DDeeffaauu ll tt
AA fftteerr 22 DDaa yy ssAA fftteerr 11 DDaa yy
AA fftteerr 1122 HH oouurrssAA fftteerr 22 HHoouurrss
AA fftteerr 11 HHoo uu rrAA fftt eerr 3300 MMiinnuuttee ss
IImmmmee ddiiaa ttee
OOff ffOOnn
UUrrggee nn ttNNoorrmmaa ll
SSMMSS GGrroouuppss
FFiinndd
OOpptt ii oonnss
OOpptt ii oonnss
LSP-710 EN_090416 2009.4.16 2:3 PM 페이지26
Page 27
Menu Tree
4. Menu Tree
27
4.2.3 Outbox
All your successfully sent messages are saved here.
1. Press Soft key 1 + 22() +
33
() in on-hook state.
2. To erase message, select .
3. To view desired message, select .
4. You may select from four options (1.
2. 3. 4. ).
4.2.4 Voice Mail
Voice mail notifications indicate the number of new
voice mail messages in your mailbox.
Only the most recent voice mail notification will be
stored in your phone;
previous message will be overwritten.
1. Press Soft key 1 + 22() +
44
() in on-hook state.
2. Pick up the handset or press button to
make a call back your voice mailbox if the number
of the voice mailbox is provided by the telecom
service company’s system.
4.2.5 Broadcast box
Message box for advertisement
1. Press Soft key 1 + 22() +
55
() in on-hook state.
2. To erase all messages, Select .
3. To view desired message, Select .
4. You may select option.
4.2.6 Archive
Archive allows you to store your messages in a
different folder.
1. Press Soft key 1 + 22() +
66
() in on-hook state.
AA rr cchhiivvee
MM eess ss aaggee ss
MMee nnuu
VV ii eeww
EE rr aass ee
BB rr ooaa ddccaa ss tt bbooxx
MM eess ss aaggee ss
MMee nnuu
VV ooiiccee MMaaiill
MM eess ss aaggee ssMMee nnuu
MMoovvee TToo AArrcchhiivvee
FFoorrwwaarrddRReesseenndd
EE rr aass ee
VV ii eeww
EE rr aass ee
OOuutt bbooxx
MM eess ss aaggee ss
MMee nnuu
LSP-710 EN_090416 2009.4.16 2:3 PM 페이지27
Page 28
4. Menu Tree
Menu Tree
28
2. To erase message, select .
3. To view desired message, select .
4. You may select options
(
IInnbb ooxx ::
1. 2. 3.
4.
OOuuttbboo xx::
1. 2.
3. )
4.2.7 Drafts
A Draft is a function enabling you to store messages
to be sent in Future. A total of upto 30 messages may
be saved in Draft. These include failed messages,
incomplete/unsent messages saved by the user and
also messages which automatically get saved when a
user is interrupted by a call while composing a
message.
The most recent data is saved at the top of list.
1. Press Soft key 1 + 22() +
77
() in on-hook state.
2. To erase message, select .
3. To view desired message, select .
4. You may select from two options (1.
2. ).
4.2.8 Templates
There are 10 predefined phrases included in the
Templates.
You may add up 20 templates more. A total of 30
templates may be saved.
1. Press Soft key 1 + 22() +
88
() in on-hook state.
2. If you select the message, View/Add appears on
the screen.
View
: There are two options: Erase and Edit.
Add
: You may add new template Messages to
the Templates list.
4.2.9 SMS Groups
Five SMS Groups are available in your phone. You can
add upto ten members in each group. You can also
TT eemmppllaatteess
MM eess ss aaggee ss
MMee nnuu
SSee nn dd
EE rr aass ee
VV ii eeww
EE rr aass ee
DDrraa ffttss
MM eess ss aaggee ssMMee nnuu
FFoo rr wwaarrddRR eessee nn dd
EE rr aass eeSSaa vv ee NNuummbbee rr
FFoorrwwaarrdd
RR eeppllyy
EE rr aass ee
VV ii eeww
EE rr aass ee
LSP-710 EN_090416 2009.4.16 2:3 PM 페이지28
Page 29
Menu Tree
4. Menu Tree
29
rename the group name.
1. Press Soft key 1 + 22() +
99
() in on-hook state.
2. Select desired group
View :
There are five options (1. Send 2. Send to
all 3. Replace 4. Erase Member 5. Erase Group)
or add new member.
Options
: There are four options (1. Send
2. Rename 3. Erase Group 4. Erase All).
4.2.10 Erase Message
You may erase message with various options from
Inbox, Outbox, Broadcast box, Archive, or Drafts. You
may Erase All Messages by selecting single option All
Messages.
1. Press Soft key 1 + 22() +
00
() in on-hook state.
2. Select desired option to erase.
3. Press button.
4.2.11 Message Settings
PPrriioo rr ii ttyy
1. Press Soft key 1 + 22() +
*
() + 11() in
on-hook state.
2. You may select from two options (1.
2. ).
DD eelliivveerryy AAcckk
1. Press Soft key 1 + 22() +
*
() + 22()
in on- hook state.
2. Select or .
DD eeffee rr rr ee dd DD eelliivveerryy
1. Press Soft key 1 + 22() +
*
() +
33
() in on-hook state.
2. Select one of the following.
DDeeff eerrrreedd DDeelliivveerryy
MM ee ssssaa gg ee SSee ttttiinnggss
MM eess ss aaggee ss
MMee nnuu
OOff ffOOnn
DDeelliivveerryy AAcckk
MM ee ssssaa gg ee SSee ttttiinnggss
MM eess ss aaggee ss
MMee nnuu
UUrrggee nn tt
NN oorrmmaall
PPrriioorriittyyMM ee ssssaa gg ee SSee ttttiinnggss
MM eess ss aaggee ssMMee nn uu
OOKK
EE rr aassee MM ee ssssaaggee
MM eess ss aaggee ss
MMee nnuu
SSMMSS GGrroouuppss
MM eess ss aaggee ssMMee nnuu
LSP-710 EN_090416 2009.4.16 2:3 PM 페이지29
Page 30
4. Menu Tree
Menu Tree
30
1. 2.
3. 4.
5. 6.
7.
VV aalliidd ii ttyy PPee rriioodd
1. Press Soft key 1 + 22() +
*
() +
44
() in on-hook state.
2. Select desired time.
1. 2. 3.
4. 5. 6.
7.
SSaavvee SSee nntt MMeessssaaggee
1. Press Soft key 1 + 22() +
*
() +
55
() in on-hook state.
2. Select or
.
AAuuttoo DDeelleettee IInnbb ooxx
1. Press Soft key 1 + 22() +
*
() +
66
() in on-hook state.
2. Select or .
4.3 Call History
If you press Soft Key1, Menu is activated.
Soft Key 1 Soft Key 2
To scroll in Menu, press ᵋ, ᵍ,ᵾor ᶀbutton.
To return to the initial screen, press
button and to return to the previous screen, press
button.
The phone can store upto 60 Received Call, 60
Dialled Call, 60 Missed Call and 5 In Call Memo in Call
History.
CCllee aarr
EE NNDD
●●●●●●
Dial/Flash
●●●●●●
OOff ffOOnn
AA uuttoo DDeellee ttee IInnbboo xx
MM ee ssssaa gg ee SSee ttttiinnggss
MM eess ss aaggee ss
MMee nnuu
ooffffOO nn
SSaa vv ee SSee nn tt MM eess ss aaggee
MM ee ssssaa gg ee SSee ttttiinnggss
MM eess ss aaggee ss
MMee nnuu
22 DDaa yyss
11 DDaa yy1122 HH oouurrss22 HH oouurrss
11 HHoo uu rr3300 MMiinnuutteess DDeeffaauu ll tt
VV aalliidd ii ttyy PP eerriioodd
MM ee ssssaa gg ee SSee ttttiinnggss
MM eess ss aaggee ss
MMee nnuu
AA fftteerr 22 DDaa yy ss
AA fftteerr 11 DDaa yy AA fftt eerr 1122 HH oouurrss
AA fftteerr 22 HHoouurrss
AA fftteerr 11 HHoo uu rr
AAfftt eerr 3300 MM ii nn uu ttee ss IImmmmeeddiiaattee
LSP-710 EN_090416 2009.4.16 2:3 PM 페이지30
Page 31
Menu Tree
4. Menu Tree
31
*
In the list of All Calls, All sorts of the icon have the
meaning as follows:
- Received :
- Dialled :
- Missed :
- In Call Memo :
- 3 Way Call :
4.3.1 Missed
1. Press Soft key 1 + 33() +
11
() in on-hook state.
2. To erase missed call, select .
3. To view desired item, select .
4. You may select from three options (1.
2. 3. ).
4.3.2 Received
1. Press Soft key 1 + 33() +
22
() in on-hook state.
2. To erase received calls, select .
3. To view desired item, select .
4. You may select from three options (1.
2. 3. ).
4.3.3 Dialled
1. Press Soft key 1 + 33() +
33
() in on-hook state.
2. To erase dialled numbers, select
.
3. To view desired item, select
.
4. You may select from three options (1.
2. 3. ).
SSaa vv ee NNuummbbee rrSS eenndd MM eessssaaggee
EE rr aass ee
VV ii eeww
EE rr aass ee
DDiiaalllleedd
CCaa ll ll HHiisstt oorryy
MMee nnuu
SSaa vv ee NNuummbbee rrSS eenndd MM eessssaaggee
EE rr aass ee
VV ii eeww
EE rr aass ee
RR eecc eeiivveedd
CCaa ll ll HHiisstt oorryyMMee nn uu
SSaa vv ee NNuummbbee rrSS eenndd MM eessssaaggee
EE rr aass ee
VV ii eeww
EE rr aass ee
MM ii ss sseedd
CCaa ll ll HHiisstt oorryy
MMee nnuu
LSP-710 EN_090416 2009.4.16 2:3 PM 페이지31
Page 32
4. Menu Tree
Menu Tree
32
4.3.4 In Call Memo
“In Call Memo” allows you to make quick notes
(numbers only) while call is in progress. While in call,
press Soft key 1(Menu), and then select 2 to type in
‘In Call Memo’.
To retrieve an In Call Memo :
1. Press Soft key 1 + 33() +
44
() in on-hook state.
2. To erase in call memo, select .
3. To view desired item, select .
4. You may select from three options (1.
2. 3. ).
4.3.5 Call Duration
1. Press Soft key 1 +33() +
55
() in on-hook state.
2. You may select from four options
(1. 2.
3. 4. ).
4.3.6 Erase History
You may erase all history from three options (1.
2. 3. )
1. Press Soft key 1 + 33() +
66
() in on-hook state.
2. To select history that you want to erase, press
.
When you press the button, All Calls
are displayed.
4.4 Sound
Sound lets you choose your phone’s sound settings
to your environment.
Sound Menu contains settings for your phone’s Ring
Type, Ring Tone, Ringer Volume, Earpiece Volume,
Key Volume, Speaker Volume, and Message Alert.
DDii aall//FF ll aasshh
OOKK
EErraassee HHiissttoo rr yy
CCaa ll ll HHiisstt oorryy
MMee nnuu
EErraassee DDiiaalllleedd
EErraassee RReecceeiivveeddEErraassee MMiisssseedd
RReesseett CCaallll DDuurraattiioonnAAllll CCaallllss
AAllll DDiiaalllleedd CCaallllssLLaasstt DDiiaalllleedd CCaallllss
CCaa ll ll DDuurraattiioo nn
CCaa ll ll HHiisstt oorryyMM eennuu
SSaa vv ee NNuummbbee rrSS eenndd MM eessssaaggee
EE rr aass ee
VV ii eeww
EE rr aass ee
IInn CCaa ll ll MMee mmoo
CCaa ll ll HHiisstt oorryy
MMee nnuu
LSP-710 EN_090416 2009.4.16 2:3 PM 페이지32
Page 33
Menu Tree
4. Menu Tree
33
If you press Soft Key1, Menu is activated.
Soft Key 1 Soft Key 2
To scroll in Menu, press ᵋ, ᵍ,ᵾor ᶀbutton.
To return to the initial screen, press
button and to return to the previous screen, press
button.
4.4.1 Ring Type
You may select the call alert option.
1. Press Soft key 1 +44() +
11
() in on-hook state.
2. There are three modes (1. 2.
3. ).
4.4.2 Ring Tone
1. Press Soft key 1 + 44() +
22
() in on-hook state.
2. There are two modes (1. 2. ).
You may select one ring sound among the 5 Bells
or 15 Melodies.
4.4.3 Ringer Volume
You may select a volume level of ringer sound among
the 0 ~ 5 steps.
When you select 0 level, ringer sound become mute.
1. Press Soft key 1 +44() +
33
() in on-hook state.
2. Select the desired volume level by using the
navigation key and press .
4.4.4 Earpiece Volume
You may select a volume level of handset earpiece
sound among the 1 ~ 5 steps.
1. Press Soft key 1 + 44() +
44
() in on-hook state.
EEaarrpp ii eeccee VVoo ll uu mm ee
SSoouunn ddMMee nn uu
OOKK
RR ii nn gg eerr VV oolluummee
SSoouunn ddMM eenn uu
MMeellooddyyBBeellll
RR ii nn gg TToo nn ee
SSoouunn dd
MMee nnuu
LLiigghhtt
OOnnee--BBeeeepp
RRiinngg
RR ii nn gg TTyyppee
SSoouunn dd
MMee nnuu
CCllee aarr
EE NNDD
●●●●●●
Dial/Flash
●●●●●●
LSP-710 EN_090416 2009.4.16 2:3 PM 페이지33
Page 34
4. Menu Tree
Menu Tree
34
2. Select the desired volume level by using the
navigation key and press .
4.4.5 Key Volume
You may select a volume level of key tone sound
among the 0 ~ 5 steps.
When you select 0 level, key tone sound become
mute.
1. Press Soft key 1 + 44() +
55
() in on-hook state.
2. Select the desired volume level by using the
navigation key and press .
4.4.6 Speaker Volume
You may select a volume level of speaker phone sound
among the 1 ~ 5 steps.
1. Press Soft key 1 + 44() +
66
() in on-hook state.
2. Select the desired volume level by using the
navigation key and press .
4.4.7 Message Alert
1. Press Soft key 1 + 44() +
77
() in on-hook state.
2. Select desired item (1. 2.
3. )
Alert Type
: 1. 2. 3.
4.
Alert Tone
: 1. 2. 3.
4. 5.
Message Reminder
:1. 2.
3. 4.
EEvvee rr yy 55 MMiinnuutt eessEEvveerryy 22 MM iinnuutt eess
OOnncceeOO ffff
EEffffeecctt
55
EEffffeecctt
44
EEffffeecctt
33
EEffffeecctt
22
EEffffeecctt
11
LLiigg hh tt
OOnnee --BB eeee ppRR ii nn ggOO ffff
MMeessssaaggee RReemmiinnddeerr
AAlleerrtt TToonneeAAlleerrtt TTyyppee
MM ee ssssaa gg ee AAllee rr tt
SSoouunn ddMM eenn uu
OOKK
SSppeeaakk eerr VV oolluummee
SSoouunn dd
MMee nnuu
OOKK
KKee yy VVoolluummee
SSoouunn ddMMee nn uu
OOKK
LSP-710 EN_090416 2009.4.16 2:3 PM 페이지34
Page 35
Menu Tree
4. Menu Tree
35
4.5 Display
You can personalize your phone’s display by selection
of various display settings like Language, Wallpaper,
Menu Style, Backlight and Contrast.
If you press Soft Key1, Menu is activated
Soft Key 1 Soft Key 2
To scroll in Menu, press ᵋ, ᵍ,ᵾor ᶀbutton.
To return to the initial screen, press
button and to return to the previous screen, press
button.
4.5.1 Language
1. Press Soft key
11
+ 55() +
11
( ) in on-hook state.
2. Select between English or Francais and press.
4.5.2 Wallpaper
It allows you to customize the LCD screen display in
the standby mode / idle state.
1. Press Soft key 1 + 55() +
22
() in on-hook state
2. Select11() or 22().
IIdd ll ee SScc rr eeeenn
Allows you to choose among given LCD screen
display option during idle state.
The Idle Screen has 6 options( , ,
, , , ), So you
may choose the one of those screens.
BB aannnnee rr
Enter the string of characters you want to be
displayed.
Banner is presented during idle mode along with
selected wallpaper.
SSeeaaBBeeaacchhCCaassttlleeMMuusshhrroooomm
CClloocckk22CClloocckk11
BB aannnnee rrIIdd ll ee SScc rr eeeenn
WWaallllppaappeerr
DDiiss ppllaa yyMMee nnuu
LLaa nn gg uu aaggee
DDiiss ppllaa yy
MMee nnuu
CCllee aarr
EE NNDD
●●●●●●
Dial/Flash
●●●●●●
LSP-710 EN_090416 2009.4.16 2:3 PM 페이지35
Page 36
4. Menu Tree
Menu Tree
36
In the “clock 2” idle screen option, banner will not
displayed.
4.5.3 Menu Style
Allows you to select the Menu style.
1. Press Soft key 1 +
55
()
+33() in on-hook state
2. Select 11() or 22() and press .
4.5.4 Backlight
Allows you to choose the settings of the LCD and
keypad backlight.
1. Press Soft key 1 +
55
()
+44() in on-hook state.
2. Select among / / /
/
* If you want to turn on the backlights from 6 PM to 6
AM, select Night Only.
4.5.5 Contrast
Allows you to select the contrast setting using the
scale of brightest to darkest.
You may select a contrast level of LCD among the
0 ~8 steps.
1. Press Soft key 1 + 55() +
55
() in on-hook state.
2. Select the desired contrast level by using the
navigation keys and press .
4.6 Settings
If you press Soft Key1, Menu is activated.
Soft Key 1 Soft Key 2
To scroll in Menu, press ᵋ, ᵍ,ᵾor ᶀbutton.
To return to the initial screen, press
button and to return to the previous screen, press
button.
CCllee aarr
EE NNDD
●●●●●●
Dial/Flash
●●●●●●
OOKK
CCoo nn tt rr aasstt
DDiiss ppllaa yy
MMee nnuu
AA ll wwaa yyss OOnnNN ii gg hh tt OOnnllyy
3300 SSee ccss11 00 SS eeccssOO ffff
BB aacckk ll ii gg hh tt
DDiiss ppllaa yy
MMee nnuu
OOKKIIcc oo nnLLii ss tt
MMeennuu SSttyyllee
DDiiss ppllaa yy
MMee nnuu
LSP-710 EN_090416 2009.4.16 2:3 PM 페이지36
Page 37
Menu Tree
4. Menu Tree
37
4.6.1 Add to My Menu
Allows you to: 1) Make you own menu. 2) Access
your favorite menu quickly by customizing My Menu.
By pressing the Clear button in idle condition, user
will go to ‘My Menu’ option and can access or erase.
To add to My Menu
1. Press Soft key 1 + 66() +
11
() in on-hook state.
1) Search desired item in Add to My Menu.
2) Select .
2. To delete My Menu, press button:
1) Search desired item in My Menu.
2) Select using soft key 2.
4.6.2 Call
CCaa ll ll FF oorrwwaa rr dd
“Call Forward” lets you forward all your incoming calls
to another number.
1. Press Soft key 1 + 66() +
22
() + 11() in on-hook
state.
2. Select from / /
/ / .
“Disable All” deactivates all the activated call
forwarding options.
3. Select or and press .
VV MM SS FF oorrwwaa dd
“VMS Forward” lets you forward all your incoming
calls to Voice Mail connection.
1. Press Soft key 1 + 66() +
22
() + 22() in on-hook
state.
2. Select from / /
/ .
3. Select or and press .
OOKK
DDiiss aabb lleeEE nn aabbllee
NNoott RReeaacchhaabblleeNNoo RReeppllyy
WWhheenn BBuussyyIImmmmeeddiiaattee
VVMMSS FFoorrwwaarrddCCaallll
SSee ttttiinnggss
MMee nnuu
OOKK
DDiiss aabb lleeEE nn aabbllee
DDiissaabbllee AAllllNNoott RReeaacchhaabblleeNNoo RReeppllyy
WWhheenn BBuussyyIImmmmeeddiiaattee
CCaa ll ll FF oorrwwaa rr ddCC aa ll ll
SSee ttttiinnggss
MMee nnuu
EE rr aass ee
CCllee aarr
AA dd dd
AA dddd tt oo MM yy MMeennuu
SSee ttttiinnggss
MMee nnuu
LSP-710 EN_090416 2009.4.16 2:3 PM 페이지37
Page 38
4. Menu Tree
Menu Tree
38
*
Contact your service provider for more information
on Call Forward and VMS Forward.
VV ooiicc ee MMaaiill AA cccceessss NNuummbbee rr
When you want to access your Voice mail, you are
required dialing Voice Mail Access Number.
1. Press Soft key 1 + 66() +
22
() + 33()
in on-hook state.
CCaa ll ll TTiimmeerr
While a call is in progress, you can see the elapsed
time of the active call if you set Call Timer to be
Enable.
1. Press Soft key 1 + 66() +
22
() + 44() in on-hook
state.
2. Select or and press .
CCaa ll ll CCoonnnneecctt AAllee rr tt
This function will alert you when the call connection
has been established.
1. Press Soft key 1 + 66() +
22
() + 55() in
on-hook state.
2. Select or and press .
SSiilleenntt SScc rr aattcchh PPaa dd
Silent Scratch Pad (if set on) may stop a receiver
from hearing DTMF key sound of taking notes while
talking over the phone.
1. Press Soft key 1 + 66() +
22
() + 66() in
on-hook state.
2. Select or and press .
4.6.3 Phone
AAuuttoo DDiiaall TT ii mm ee OOuutt
Allows you to place a call automatically after the last
digit of the phone number is dialled.
OOKKOOff ffOO nn
SSiilleenntt SScc rr aattcchh PPaa ddCCaa ll ll
SSee ttttiinnggss
MMee nnuu
OOKKOOff ffOOnn
CCaa ll ll CCoonnnneecctt AAllee rr ttCCaa ll ll
SSee ttttiinnggss
MMee nnuu
OOKKDDiiss aabb lleeEE nn aabb llee
CCaa ll ll TTiimmeerrCCaa llll
SSee ttttiinnggss
MMee nnuu
VVooiiccee MMaaiill AAcccceessss NNuummbbeerr
CCaa ll ll
SSee ttttiinnggssMM ee nnuu
LSP-710 EN_090416 2009.4.16 2:3 PM 페이지38
Page 39
Menu Tree
4. Menu Tree
39
1. Press Soft key 1 + 66() +
33
() + 11() in
on-hook state.
2. Select desired time and press .
You may select one of the seven options ( /
/ / / / /
)
PPhhoo nn ee IInnff oo
Memory Usage
Displays the Phone’s Memory Usage (Names,
Messages, Scheduler, Memo)
1. Press Soft key 1 + 66()
+33()+
22
()
+ 11() in on-hook state.
Version
Displays the Phone Software version, PRL version,
Hardware version.
1. Press Soft key 1 + 66() +
33
() + 22() +
22
() in on-hook state.
4.6.4 Security
1. Press Soft key 1 + 66() +
44
() in on-hook state.
2. Enter Lock Code. (Default “0000”)
LLoocckk MMoo ddee
1. Press Soft key 1 + 66() +
44
() + 11() in on-hook
state.
2. Select desired options and press .
You may select one of lock mode options.( /
/ )
OOff ff ::
means that the phone is never locked (Lock
mode can be used).
When locked, you can receive incoming calls or
LLoocckk NNoowwPPoowweerr OOnn
OOffff
OOKK
LLoocckk MMoo ddeeSSee ccuurriittyy
SSee ttttiinnggssMMee nn uu
SSee ccuurriittyy
SSee ttttiinnggssMMee nn uu
VV eerrssiioonn
PPhhoo nn ee IInnff ooPPhhoonnee
SSee ttttiinnggssMMee nnuu
MM ee mm oorryy UUssaaggee
PPhhoonnee IInnffoo
PPhhoonnee
SSee ttttiinnggss
MMee nnuu
1100 SSeeccss
77 SSeeccss55 SSeeccss44 SSeeccss33 SSeeccss22 SSeeccss
OOffff
OOKK
AA uuttoo DDiiaall TTiimmee OO uu ttPPhhoonnee
SSee ttttiinnggssMM eennuu
LSP-710 EN_090416 2009.4.16 2:3 PM 페이지39
Page 40
4. Menu Tree
Menu Tree
40
make only emergency calls.
PPoowwee rr OO nn ::
means that the phone is always
locked whenever it is turned on although you have
unlocked before.
LLoocc kk NNooww ::
means that the phone is locked
immediately.
(In idle state press “Key #” for a long time, The
phone is locked immediatly.)
NN oo ttee ::
To unlock the phone, press Unlock button
(soft key2)
Enter 4-digit lock code (Default “0000”)
EEmmee rr gg eennccyy NN uu mm bbeerrss
Emergency Number can store upto three Numbers.
1. Press Soft key 1 + 66() +
44
() + 22()
in on-hook state.
2. To edit a number, press .
CChhaa nn gg ee LLoo cckk CCoo ddee
Change Lock Code allows you to enter a new four-
digit lock code.
1. Press Soft key 1 + 66() +
44
() + 33()
in on-hook state.
2. Enter current lock code.
3. Enter new four-digit lock code.
4. For confirmation, it will ask you to enter the new
lock code again.
RR eessttrriicctt CCaallll
You can restrict your outgoing calls including numbers
/ numbers beginning with specified digit in the
Restrict list.
For example: If ‘9’ is stored in the Restrict list, all
number beginning with ‘9’ cannot be called. However
if ‘92’ is stored in Permit List, you can call numbers
beginning with ‘92’ successfully.
1. Press Soft key 1 + 66() +
44
() + 44() in
RReesstt rriicc tt CCaallll
SSee ccuurriittyy
SSee ttttiinnggssMMee nnuu
CChhaa nn gg ee LLoo cckk CCoo ddee
SSee ccuurriittyy
SSee ttttiinnggss
MMee nnuu
EE ddiitt
EEmmee rr gg eennccyy NN uu mm bbeerrssSSee ccuurriittyy
SSee ttttiinnggssMMee nn uu
LSP-710 EN_090416 2009.4.16 2:3 PM 페이지40
Page 41
Menu Tree
4. Menu Tree
41
on-hook state.
2. Select or and press .
3. If is selected,
⍥
Enter the numbers / starting digit of specific
numbers to be restricted in the Restrict list.
⍥
Enter the number / starting digits of the
numbers to be allowed in the Permit list.
4. To add new list, press .
5. To erase (or edit) the existing list, press
+
HHoottLLiinnee
HotLine automatically calls to registered number by
passing setup time in off-hook state.
1. Press Soft key 1 + 66() +
44
() + 55() in on-hook
state.
2. Select or and press .
3. Enable is selected, enter Number and Time.
If you have selected ‘Enable’ and enter the HotLine
Number and Time, HotLine functions as follows:
When you pick up the handset or press button ,
the phone automatically dials the HotLine Number
that you have already saved if any number is not
dialed for duration specified in HotLine Time.
SSee tt NNAAMM
This option is presently not available. Please contact
your service provider for further information. Use
NAM 1 only.
1. Press Soft key 1 + 66() +
44
() + 66() in on-hook
state.
2. Select or and press .
CClleeaarr MMee mm oorryy && RRee ss eett
Erase all data and return to factory setting. Be
cautious since any erased information is not
recoverable.
1. Press Soft key 1 + 66() +
SSee ttttiinnggss
MMee nnuu
OOKK
NN AA MM 22NNAAMM 11
SSee tt NNAAMMSSee ccuurriittyy
SSee ttttiinnggssMMee nn uu
OOKKDDiissaabb ll eeEEnnaabbllee
HHoottLLiinneeSS eecc uu rr ii tt yy
SSee ttttiinnggssMM eennuu
OOpptt ii oonnss
VV ii eeww
AA dd dd
OOnn
OOKKOOff ffOO nn
LSP-710 EN_090416 2009.4.16 2:3 PM 페이지41
Page 42
4. Menu Tree
Menu Tree
42
44
() + 77()
in on-hook state.
2. Enter lock code.
3. To Clear Memory and Erase all data, select
.
RR eessee tt PPhhoonnee
Return to factory setting. But User data is not erased.
1. Press Soft key 1 + 66() +
44
()+
88
() in
on-hook state.
2. Enter lock code.
3. To Reset Phone, select .
4.7 Organiser
If you press Soft Key1, Menu is activated.
Soft Key 1 Soft Key 2
To scroll in Menu, press ᵋ, ᵍ,ᵾor ᶀbutton.
To return to the initial screen, press button.
And to return to the previous screen, press
button.
4.7.1 Scheduler
Scheduler keep your agenda convenient and easy to
access. Simply store your appointment and your
phone would alert you with a reminder of your
appointment.
1. Press Soft key 1 +77()
+11() in on-hook state.
2. Move cursor to desired day
3. Select .
4. If is selected, you can store new
schedules.
5. If is selected,
1) In case of already stored schedule, you may see
stored schedules and select from Options.
OOKK
AA dd dd
AA dd dd
SScchheedduullee rr
OOrrggaanniisseerr
MMee nnuu
CCllee aarr
EE NNDD
●●●●●●
Dial/Flash
●●●●●●
YY ee ss
RR eessee tt PPhhoonneeSSee ccuurriittyy
SSee ttttiinnggssMM eennuu
YY ee ss
CClleeaarr MMee mm oorryy && RRee ss eett
SSee ccuurriittyy
LSP-710 EN_090416 2009.4.16 2:3 PM 페이지42
Page 43
Menu Tree
4. Menu Tree
43
(/ / / /
/ )
2) In the absence of schedule, “There is no data”
message is displayed.
Select from Options: /
4.7.2 Alarm
Allows user to set alarm time.
You can save 3 Alarms and set the alarm for a period
and specified time.
1. Press Soft key 1 + 77()
+ 22() in on-hook state.
In case of already stored alarm, you may see stored alarm
and select from Options. ( / / )
In the absence of alarm, “There is no data” message
is displayed.
2. To enter new alarm,
1) Press .
2) Enter time and date.
3) You can select option from /
/ / ~ /
~
/
~
/
4) Select ring tone and press .
4.7.3 Memo
Memo function allows user to store upto 10 memos.
1. Press Soft key 1 +
77 ((
) +
33
() in on-hook state to add, view or
edit memos.
4.7.4 Calculator
Calculates simple mathematical computations.
1. Press Soft key 1 + 77() +
44
() in on-hook state.
2. Use Navigation Key for the four arithmetical
operations.
llee fftt::
+
rr ii gg hh tt::
-
uupppp eerr::
X
lloowwee rr ::
÷
** ::
.
##::
Clear
CCaa ll ccuu llaatt oorr
OOrrggaanniiss ee rr
MMee nnuu
MM eemmoo
OOrrggaanniiss ee rr
MMee nnuu
OOKK
SSeelleecctt ddaayyssSSuunnSSaatt
SSaattMMoonnFFrriiMMoonnOOnnccee
DDaaiillyyOOffff
AA dd dd
EErraasseeEEddiittAAdddd
AA ll aarrmm
OOrrggaanniiss ee rrMM eennuu
EErraassee PPaasstt DDaayyRRiinngg
EErraassee PPaasstt DDaayy
EErraassee TTooddaayyRRiinnggEErraasseeEEddiittAAdddd
LSP-710 EN_090416 2009.4.16 2:3 PM 페이지43
Page 44
4. Menu Tree
Menu Tree
44
3. Press for computing result of the
calculation.
4.7.5 World Clock
It is useful when you need to make a call to another
country, and you are not sure about the time
difference.
1. Press Soft key 1 + 77() +
55
() in on-hook state.
2. Select the city by pressing navigation button.
4.7.6 Stopwatch
1. Press Soft key 1 + 77() +
66
() in on-hook state.
2. Select .
Lap
: Saves the lap time.
Stop
: Stops the Lap.
View
: Shows saved time (also stop time).
Reset
: Deletes Lap time and returns to initial
screen.
SSttaa rr tt
SSttoo ppwwaa tt cchh
OOrrggaanniiss ee rr
MMee nnuu
WWoorrlldd CClloo cckk
OOrrggaanniiss ee rr
MMee nnuu
OOKK
LSP-710 EN_090416 2009.4.16 2:3 PM 페이지44
Page 45

Speaker Phone
45
This function is a convenient feature, which enables
you to make a call using the Speaker Phone ( )
button in on-hook state.
5. Speaker Phone
LSP-710 EN_090416 2009.4.16 2:3 PM 페이지45
Page 46
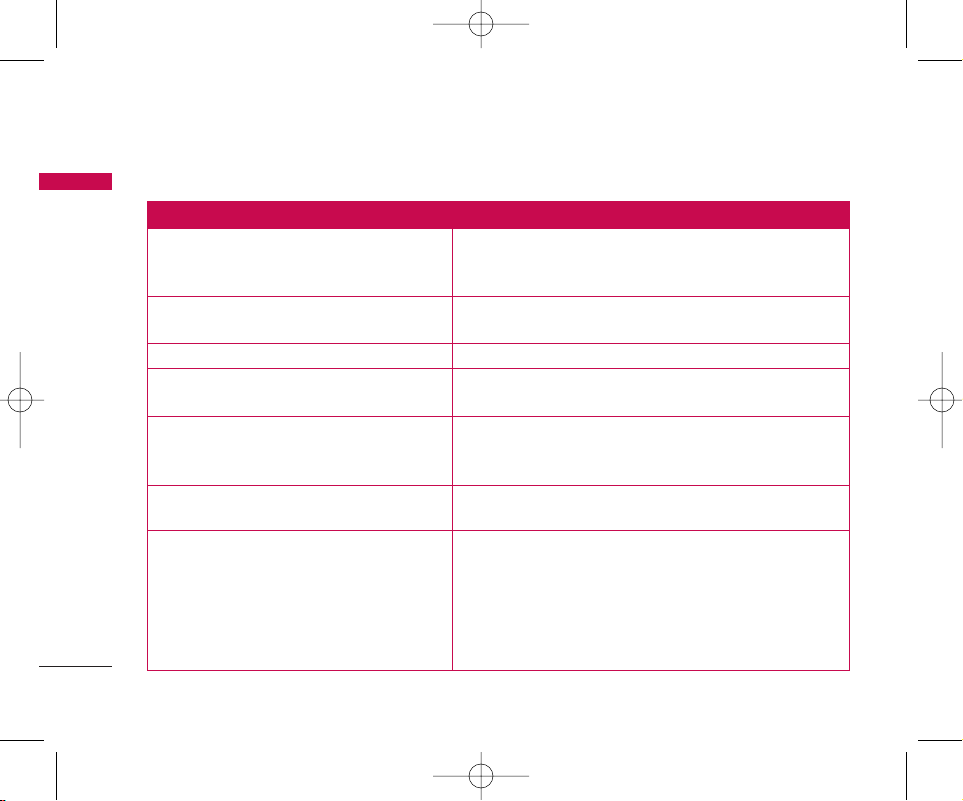
Troubleshooting
46
6. Troubleshooting
Please check the following items before contacting service center.
Item Remedy
Phone doesn’t operate at all.
Because of noise and cross talking,
call status is bad.
When I press button to call, can’t hear the dial tone.
Call cannot be received.
Battery fails to charge.
Bell sound isn’t heard
• The LCD repeats on and off when you plug-in
the adapter while battery switch is off.
• Phone repeats abnormally power-on and
power-off after a few second when you plug-in
the adapter while battery switch is on and
phone is power-off.
• There is no charging display when you plug-in
the adapter while the phone is power on.
• Check that the phone is installed correctly.
• Check that the battery is fully charged.
• Check that the power is on.
Keep away from electrical application such as TV,
computer, radio and so on.
Check that phone cord or power is connected correctly.
Check the current status of Rx call mode settings in data
settings menu. Voice option should be selected.
Check that the authorized adaptor (5V/1A) for LSP-710 is
correctly connected to the DC power connector of the phone
and Battery ON/OFF switchis ON.
If bell sound is low, please adjust the volume level and make
sure that Light Mode is not selected.
Check that the adapter is the approved from LG-Nortel.
Adapter should be 5V(DC), 1A
LSP-710 EN_090416 2009.4.16 2:3 PM 페이지46
Page 47
General Information
47
7. General Information
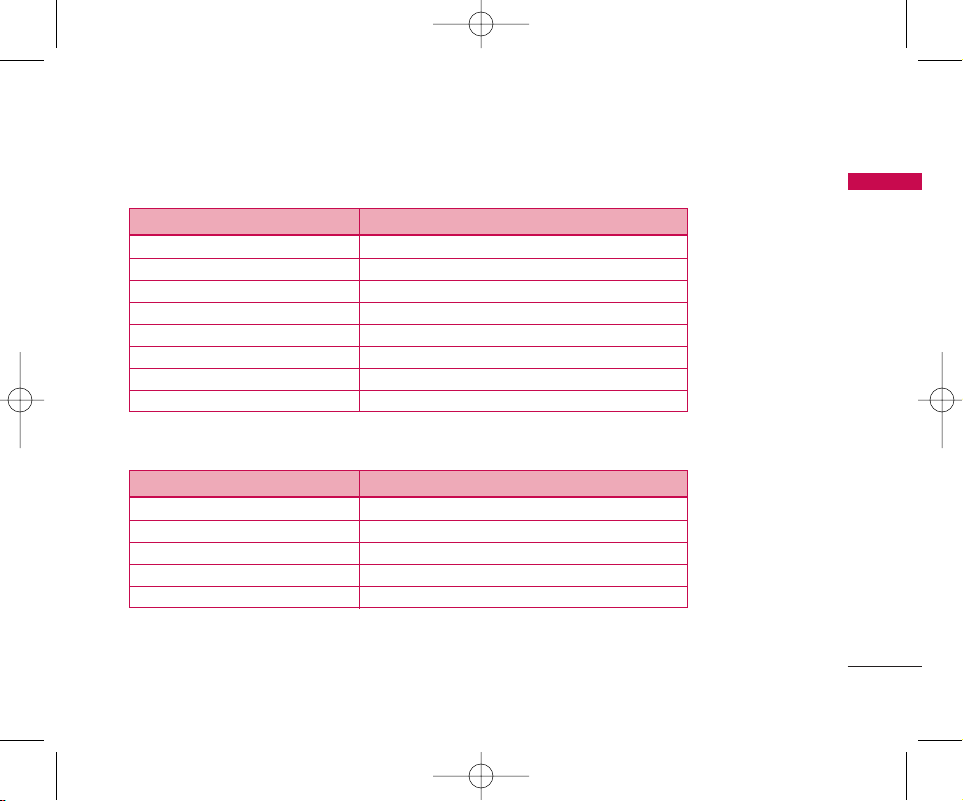
7.1 Main Unit
IItt eemm LLSSPP--771100
Tx Frequency Digital: 824 ~849 MHz
Rx Frequency Digital: 869 ~894 MHz
Channel Bandwidth 1.25 MHz
Tx Power Digital: LOWER: 200mW ~ UPPER:1.0W
Rx Sensitivity -104dBm below (at FER=0.5%)
Size (mm) 191X 156X 75 (L X W X H)
Weight (gms) 652gram
Operating Temperature -10 ~50。C
7.2 AC/DC Adapter
IItt eemm SSMMPPSS TTyyppee DDee ss ccrriippttiioo nn
Rated Input Voltage AC 100 ~240V
Operating Input voltage AC 80 ~300V
Rated Input Frequency 50 / 60Hz
Operating Input Frequency 47 ~63Hz
Rated Output Voltage, Current 5V(DC), 1A
LSP-710 EN_090416 2009.4.16 2:3 PM 페이지47
Page 48
General Information
48
7. General Information
7. 3 B a ttery
IItt eemm DDeess ccrriippttiioo nn
Capacity 3.7V Li-ion / 1400mA
Talk time / Standby time 4 Hours / 120 Hours
Charging time duration 5 Hours (Standby condition)
LSP-710 EN_090416 2009.4.16 2:3 PM 페이지48
Page 49

LG-Nortel CDMA Fixed Wireless Phone LSP-710
49
LG-Nortel CDMA Fixed Wireless Phone LSP-710
Licensed by QUALCOMM Incorporated under one or more of the following Patents:
U.S, Patent No. 4,901,307 U.S, Patent No. 5,056,109 U.S, Patent No. 5,099,204
U.S, Patent No. 5,101,501 U.S, Patent No. 5,103,459 U.S, Patent No. 5,107,225
RReegguu llaa ttoorryy SSttaatteemm ee nntt ss ttoo bb ee iinncclluuddeedd iinn tthhee UUsseerr ss GG uuiiddee ffoorr SSppuuttnniikk
UUSSAA--FF eeddeerraall CCoommmm uunniiccaa tt iioonnss CCoo mmmmiissss iioonn (( FFCCCC))
This device complies with part 15 of the FCC Rules. Operation is subject to the following two conditions: (1) This device
may not cause harmful interference, and (2) this device must accept any interference received, including interference that
may cause undesired operation.
This equipment has been tested and found to comply with the limits for a Class B digital device, pursuant to Part 15 of
FCC Rules. These limits are designed to provide reasonable protection against harmful interference in a residential
installation. This equipment generates, uses, and can radiate radio frequency energy. If not installed and used in
accordance with the instructions, it may cause harmful interference to radio communications. However, there is no
guarantee that interference will not occur in a particular installation.
If this equipment does cause harmful interference to radio or television reception, which can be determined by tuning the
equipment off and on, the user is encouraged to try and correct the interference by one or more of the following
measures:
-Reorient or relocate the receiving antenna
-Increase the distance between the equipment and the receiver.
-Connect the equipment to outlet on a circuit different from that to which the receiver is connected.
-Consult the dealer or an experienced radio/TV technician for help.
Any changes or modifications not expressly approved by the party responsible for compliance could void the user’s
authority to operate the equipment.
CCaa uuttiioonn:: EExxppoossuu rree ttoo RRaaddiioo FFrreeqquuee nn cc yy RRaaddiiaa tt iioonn..
To comply with FCC RF exposure compliance requirements, for mobile configurations, a separation distance of at least
20 cm must be maintained between the antenna of this device and all persons.
This device must not be co-located or operating in conjunction with any other antenna or transmitter.
LSP-710 EN_090416 2009.4.16 2:3 PM 페이지49
Page 50
P/N : MMBB
APR/2009/ISSUE 1.0
PRINTED IN KOREA
LSP-710 EN_090416 2009.4.16 2:3 PM 페이지50
 Loading...