

Page 1
LBI-39007
Mobile Communications
Monogram
Series
DUAL RATE
CHARGER
MHCH3V
Operator's Manual
Page 2

IMPORTANT SAFETY
INSTRUCTIONS
1. SAVE THIS MANUAL - It contains
important safety and operating
instructions for the Dual Rate Charger
MHCH3V (349A9730P25).
2. Before using the battery charger, read all
instructions and cautionary markings on
(1) the battery charger, (2) the battery
and (3) the product using the battery.
3. CAUTION - To reduce the risk of injury,
charge only Ericsson GE battery packs.
Charging any other battery pack or
batteries may cause the battery to burst
and cause personal injury or damage.
4. Do not expose charger to rain or snow.
5. Do not use auxiliary equipment not
recommended or sold by the
manufacturer. To do so may result in a
risk of fire, electrical shock or injury to
persons.
2
Page 3

IMPORTANT SAFETY
INFORMATION (CONT.)
6. To reduce risk of damage to electric plug
and cord, pull by the plug rather than the
cord when disconnecting the charger.
7. Make sure the cord is located so that it
will not be stepped on, tripped over or
otherwise subjected to damage or stress.
8. An extension cord should not be used
unless absolutely necessary. Use of an
improper extension cord could result in a
risk of fire and electric shock. If an
extension cord must be used, make sure:
a. That pins on the plug of the
extension cord are the same
number, size and shape as those on
the charger's plug;
b. That the extension cord is properly
wired and in good condition; and
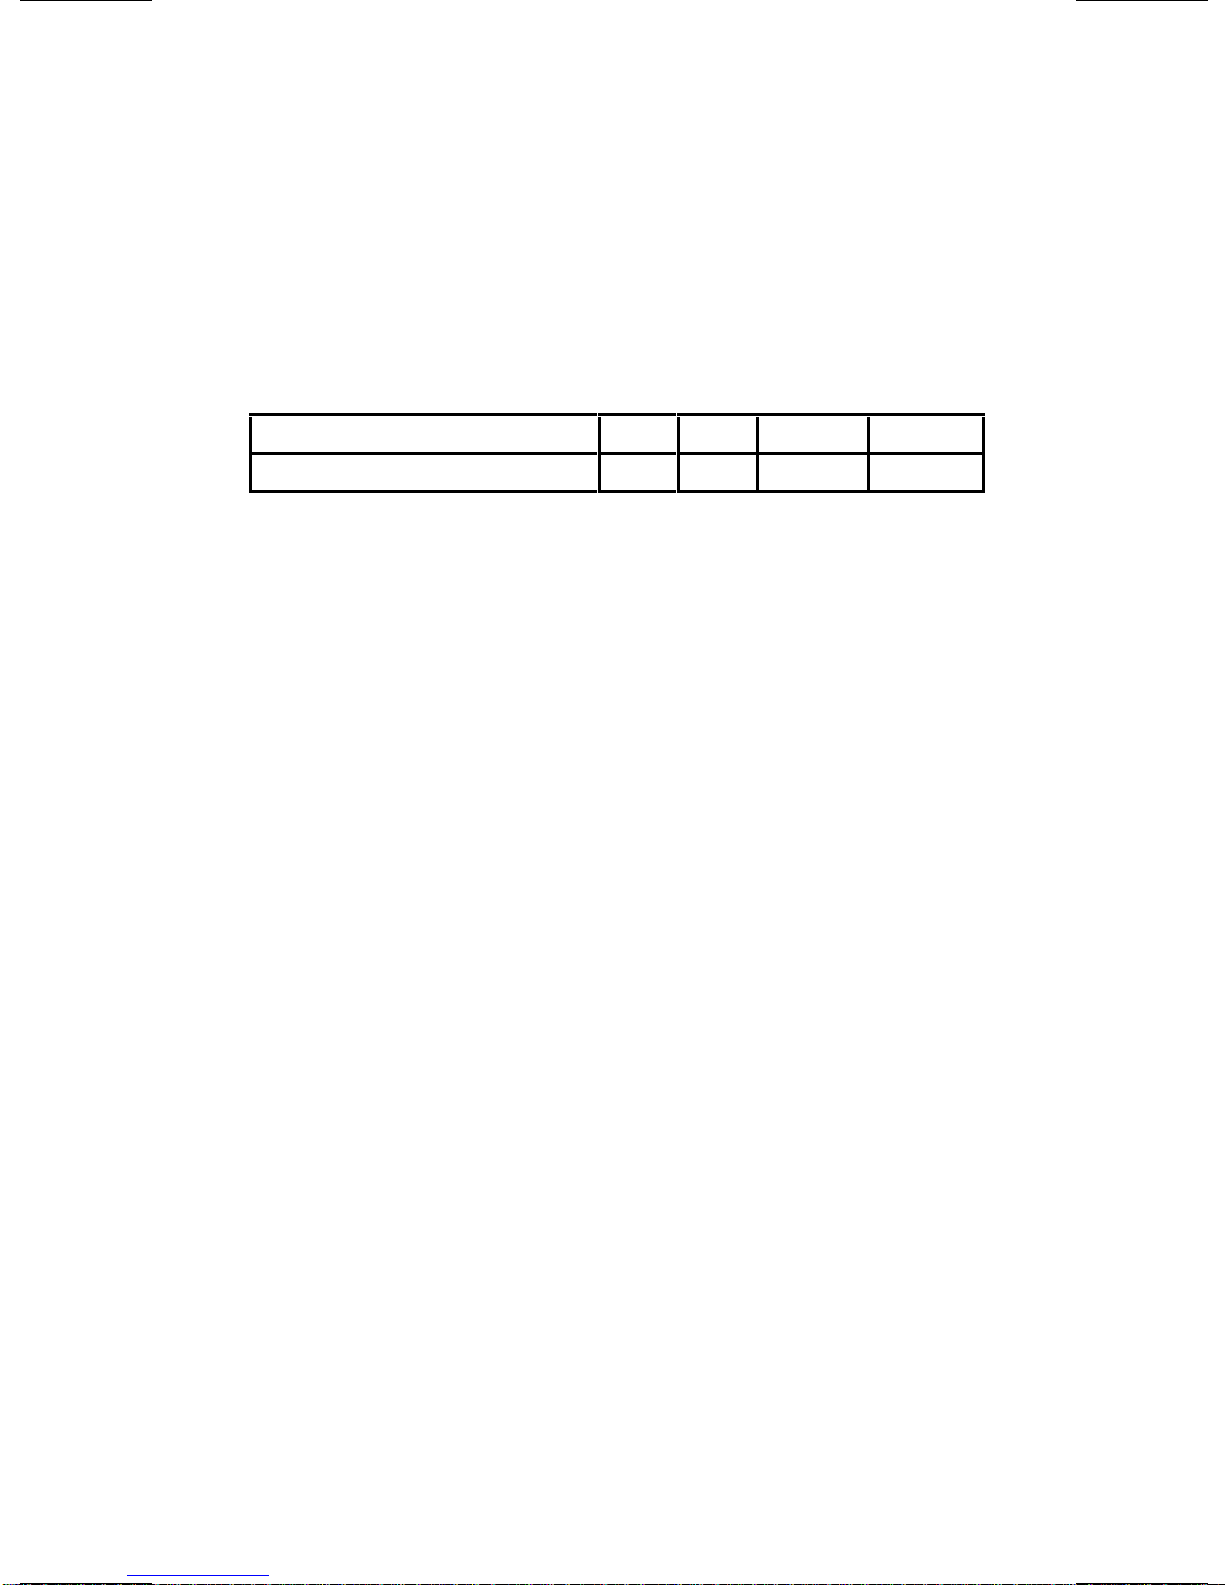
c. That the wire size is large enough
for the AC ampere rating of the
charger as specified in Table 1.
3
Page 4
IMPORTANT SAFETY
150
16
INFORMATION (CONT.)
TABLE 1 - RECOMMENDED MINIMUM SIZE
FOR EXTENSION CORDS FOR BATTERY
CHARGERS
LENGTH OF CORD (FT.) 25 50 100
AWG SIZE OF CORD 18 18 18
9. Do not operate charger with damaged
cord or plug - replace them immediately.
10. Do not operate charger if it has received
a sharp blow, been dropped or otherwise
damaged in any way; return it to a
qualified service shop.
11. Do not disassemble the charger; return it
to a qualified service shop when service
or repair is required. Incorrect reassembly may result in a risk of fire or
electrical shock.
12. To reduce risk of electric shock, unplug the
charger from the outlet before attempting any
maintenance or cleaning.
4
Page 5

IMPORTANT SAFETY
INFORMATION (CONT.)
13. GROUNDING AND AC POWER CORD
CONNECTION - To reduce the risk of
electrical shock, use only a properly
grounded outlet. The charger is equipped
with an electric cord having an equipment-
grounding conductor and a grounding
plug. Be sure that the outlet is properly
installed and grounded in accordance
with all local codes and ordinances.
14. DANGER - Never alter the AC cord or
plug. If it will not fit in the outlet, have a
proper outlet installed by a qualified
electrician. Improper connection can
result in risk of an electric shock.
15. The charger 120 VAC line cord has a
grounding plug that looks like the plug
illustrated in Figure 1. A temporary
adapter, which looks like the adapter
illustrated in sketches B and C, may be
used to connect this plug to a two-pole
receptacle as shown in sketch B if a
properly grounded outlet is not available.
The temporary adapter should be used
only until a properly grounded outlet can
be installed by a qualified electrician.
5
Page 6

IMPORTANT SAFETY
INFORMATION (CONT.)
FIGURE 1 - GROUNDING METHODS
16. DANGER - Before using an adapter as
illustrated, be certain the center screw of
the outlet plate is grounded. The greencolor rigid ear of lug extending from the
adapter must be connected to a properly
grounded outlet--make certain it is
grounded. If necessary, replace the outlet
cover plate screw with a longer screw
that will secure adapter ear or lug to
outlet plate and make ground connection
to grounded outlet.
6
Page 7
IMPORTANT SAFETY
INFORMATION (CONT.)
17. Care should be taken when placing the
charger in service to ensure proper top
and bottom ventilation. A minimum of ¼"
is required between the bottom of the
charger and the surface on which it sits.
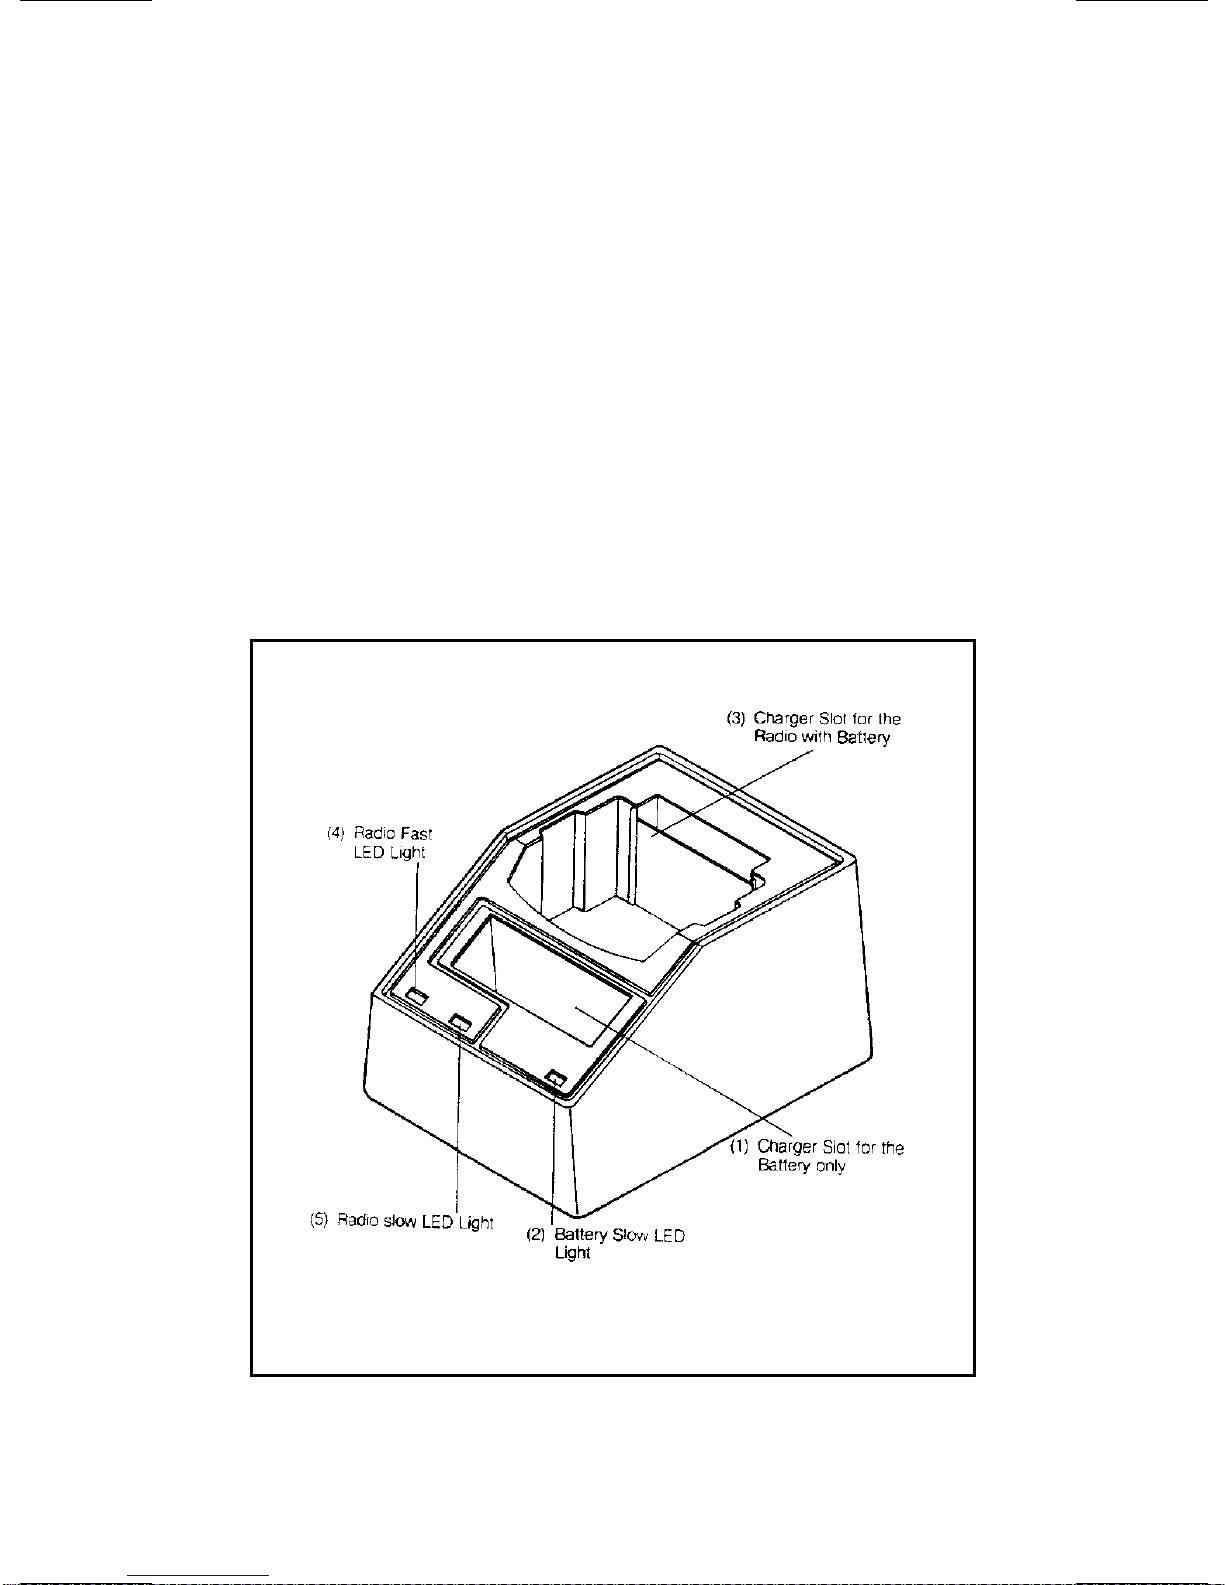
FEATURES
7
Page 8

(1) Battery Charging Slot: This slot is
provided so that a battery may be
charged independently. Dual positive
contacts are wired so that positioning of
the battery is not relevent.
(2) Slow LED Light: will be illuminated as
long as a battery is positioned in the
Battery Charging Slot.
(3) Radio Charging Slot: For insertion of a
Monogram
Series Model MGP 300 low
band radio unit without a carrying case
but with a battery inside.
(4) Fast Radio LED Light: will be
illuminated when a radio with battery is
inserted into the Radio Charging Slot.
Remains "ON" for the initial 3-hour
charging period and extinguishes
automatically at the end of that period.
(5) Slow Radio LED Light: Remains
illuminated for the second 3-hour slow
charging period, extinguishing itself
automatically at the end of six hours. This
LED remains dark; however, the charging
process continues indefinitely at a 10 mA
rate.
8
Page 9

CAUTION
Never insert a radio into the charger without a
battery. The higher voltage of the charger can
damage the circuitry of the radio.
OPERATION
RADIO WITH BATTERY
With a battery inside the radio, insert the radio
into the Radio Charge Slot. The Radio Fast
LED will illuminate and the battery will
commence charging at a rapid rate for
approximately 3 hours. At the end of the 3hour period, the battery will have reached
approximately 85% of full charge and the
charger will automatically switch to the slow
rate. At this point, the Radio Fast LED will go
out and the Radio Slow LED will glow. After a
3-hour period at the slow charge rate, the
charger will automatically switch to a trickle
rate and the Radio Slow LED will go out. The
trickle rate will maintain the battery at full
charge, provided the radio is turned off.
BATTERY ONLY
Insert a 600 mAh battery (MHPA5P) into the
Battery Charge Slot, battery contacts
9
Page 10

downward. Dual positive contacts are provided
so that battery polarity will be correct
regardless of battery orientation.
After approximately 14 hours the battery will
be fully charged. The Battery Slow LED will
remain illuminated as long as the battery
remains in the charger slot. Prolong charging
in this mode will not cause battery damage.
The battery in a radio and a battery in the
Battery Charge Slot can be charged
simultaneously without degradation of charger
performance.
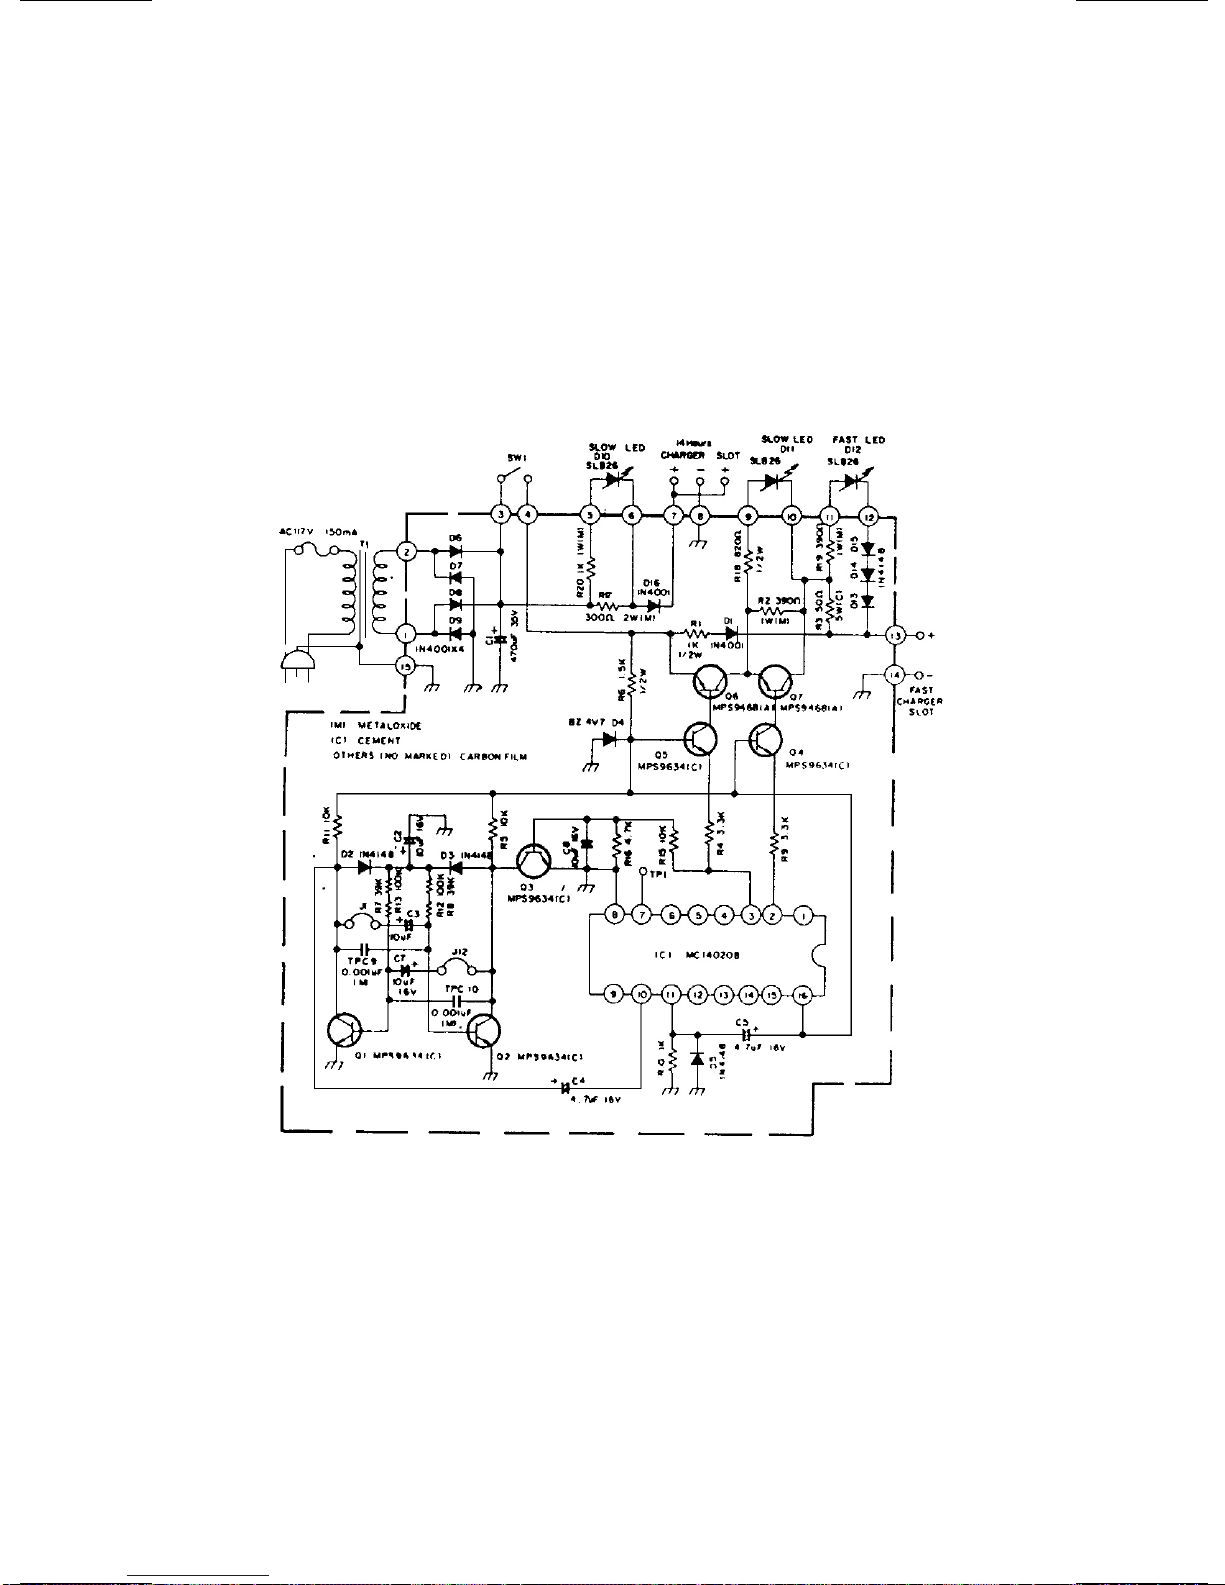
CIRCUIT DIAGRAM
CAUTION
These servicing instructions are for use by
qualified personnel only. To avoid electric
shock, do not perform any servicing other than
that contained in the operating instructions
unless you are qualified to do so. Refer all
servicing to qualified service personnel.
10
Page 11
11
Page 12

Ericsson GE Mobile Communications Inc.
Mountain View Road • Lynchburg, Virginia 24502
Printed in U.S.A.
12
 Loading...