

Page 1
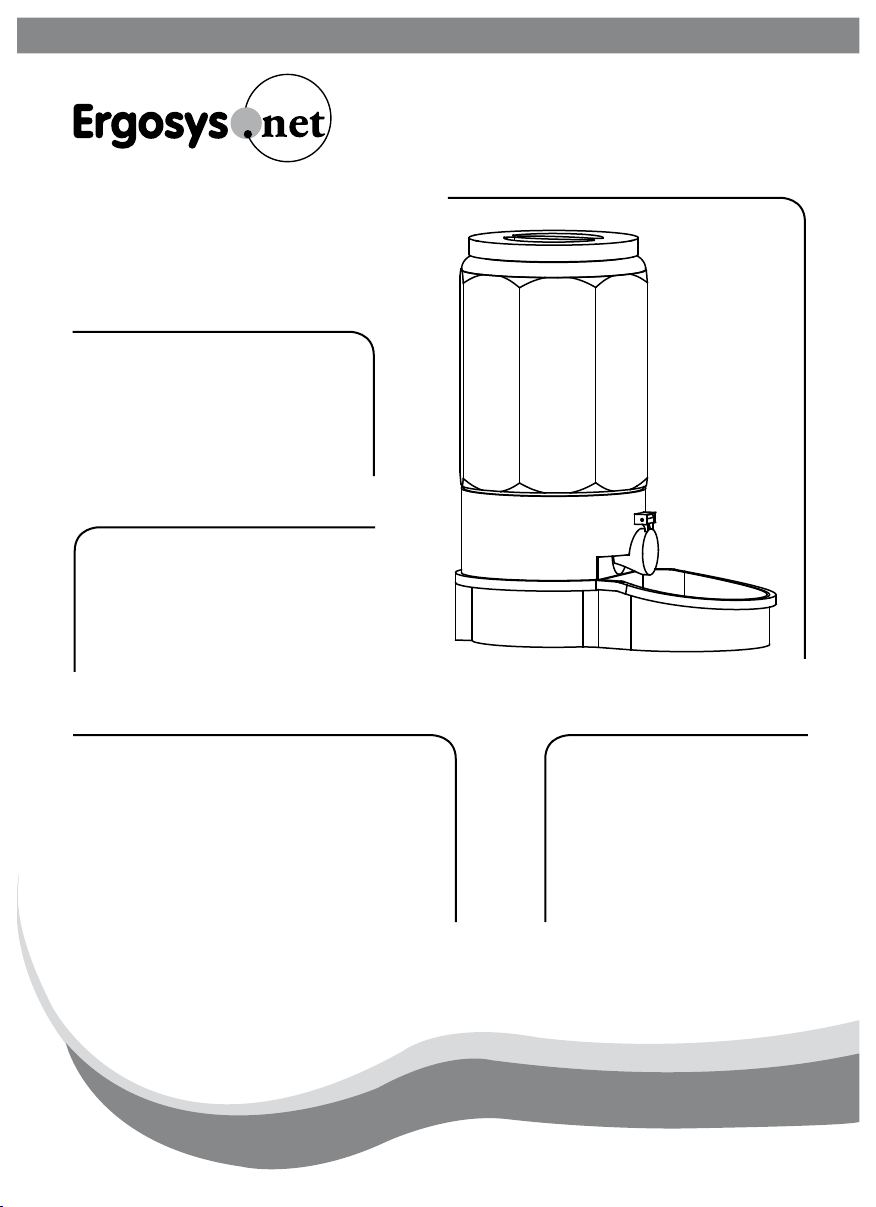
Model and serial number may be found
at the rear of the feeder base.
Please record
both model and serial
number in a safe place for future use
.
Where Purchased : ______________________
Date
Purchased : Month ________________
: Day __________________
: Year __________________
Model No
. : ______________________
Serial
# : ______________________
This
Owner’s Manual contains
in
formation for all models.
Read and keep this manual
for
future r
eference.
This
manual contains important
in
formation on Safety, Assembly,
Operation and Maintenanc
e.
Ergo Systems Inc. Rev# 1.
2
MODEL NO.
2000GS - 083497500017
2000GM - 083497500024
2000GL - 083497500031
Auto Pet Feeder
Owner’s Manual
ergo systems inc.
HOUSEHOLD TYPE
Page 2

Important : This is an owner’s manual for Autopetfeeder.
Please do not discard this.
Congratulations on purchasing the “AUTOPETFEEDER“.
You will now have more time on your hands. Before you
can use this appliance you need to follow some simple
steps to assemble the Autopetfeeder and program the
digital timer.
DO NOT RETURN THE PRODUCT TO
THE STORE
Check all packing for missing parts
prior to discarding the package.
Call 1-888 ERGOSYS (1-888-374-6797)
LIMITED WARRANTY
Please read this warranty carefully. Ergo Systems Inc. will warranty this product to be free from manufacturing
defects, includingworkmanship, when assembled and operated according to operating instructions enclosed
with this product, for a period of ninety (90) days from the date of original purchase. This warranty is nontransferable and applies solely to the original purchaser and does not extend to subsequent owners of this
product. Please register your product at http://www.autopetfeeder.com.
1. Repair/service for a period of ninety (90) days from the date of original purchase at no charge for parts
and labor with proof of purchase.
2. Replacement of defective parts for a period of 12 months from the date of original purchase with proof of
purchase. (Labor not included after Initial ninety (90) days).
3. This warranty does not cover cost incurred in the shipping of the product to and from Ergo Systems
Inc. for service. Shipping to Ergo Systems Inc. must be prepaid and insured by UPS or other parcel
delivery services.
THIS WARRANTY IS VOID IF
1. Damaged due to negligence, abuse, misuse, accident, modication, tampering, alteration, faulty installation
and/or acts of God.
2. Used for commercial applications or rentals.
3. Modied or repaired by anyone other than Ergo Systems Inc.
The extent of Ergo Systems Inc. under this limited warranty is the repair or replacement of the product at the sole
discretion of Ergo Systems Inc, In no event shall Ergo Systems Inc.’s. liability exceed the purchase price paid by the
purchaser. Under no circumstances shall Ergo Systems Inc. be liable for any loss, direct, indirect, incidental, foreseen,
unforeseen, special or consequential damage arising out of or in connection with the use of this product. This
warranty is valid only in the United States of America and Canada.
Before you call us, please have the following
information ready.
1. Details of purchase like Invoice number (found
on the bill or invoice)
2. Name and model number of the product (found
on the manual and on the carton.)
3. Actual problem after following the instructions.
4. List of missing parts.
THE PRODUCT IS:
Reviewing these important safety alert symbols
When you see this Safety Symbol on the following pages, it will alert you to
the possibility of damage to your Pet Feeder, if you do not comply with the
corresponding instructions. The hazard may come from something mechanical
or electrical. Read the instructions carefully.
2
Page 3
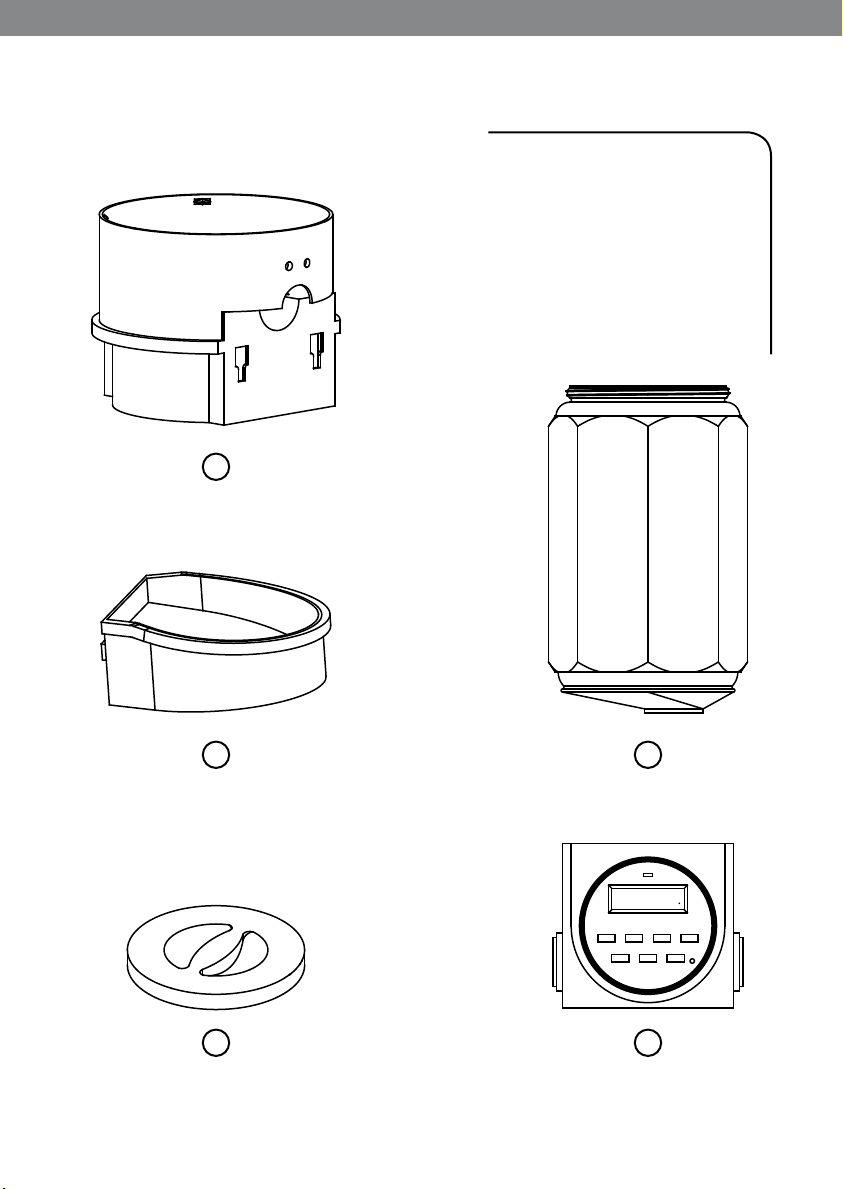
List of parts in the Auto Pet Feeder Box
1
Components
1. Pet Feeder Base
2. Pet Feeder Bowl
3. Food Storage Container
4. Food Storage Container Cover
5. Digital Timer
2
4
3
Mo
PM
30
5:30
AUT O
WEEK HOUR MIN R
CLOCK PROG ON/AUTO/OFF
5
3
Page 4
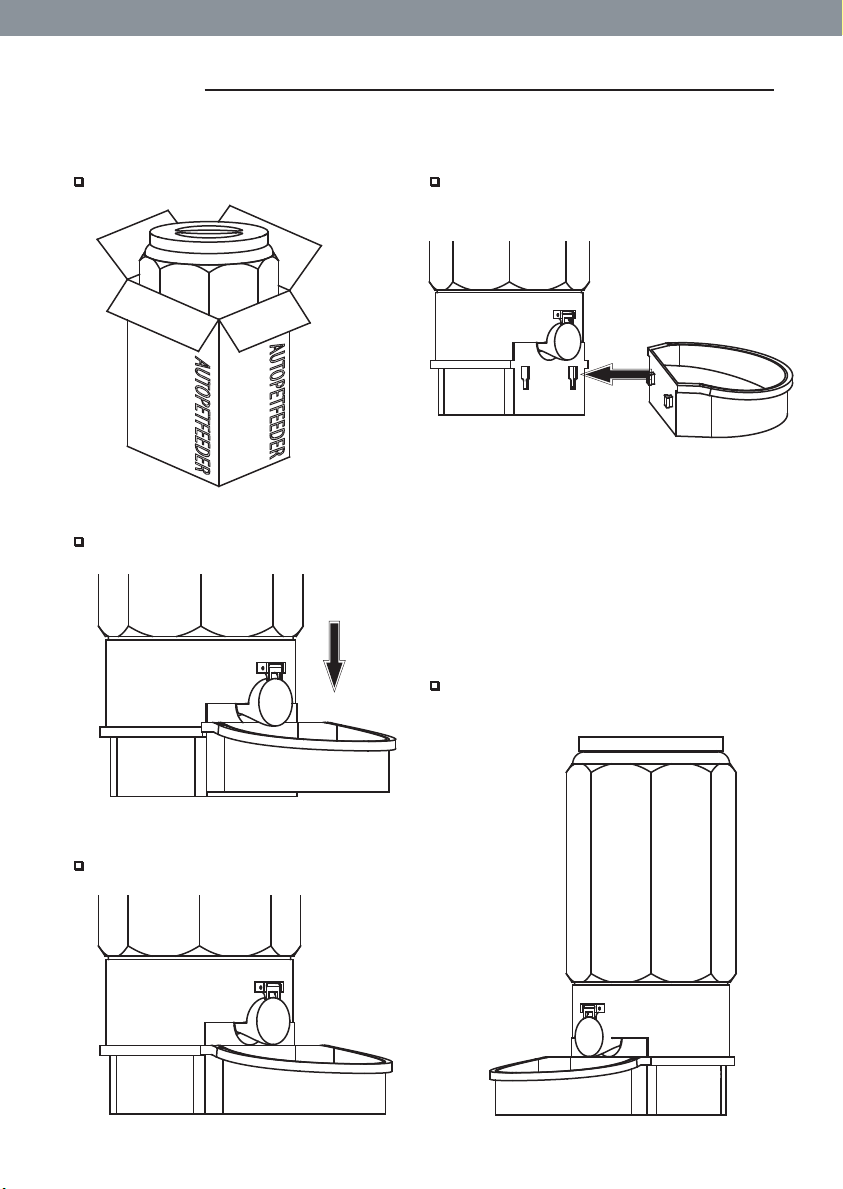
Assembly
1.1
Take out the Autopetfeeder from the box.
AUTOPETFEEDER
1.3
Pull down the Pet Feeder Bowl
Fig 1
AUTOPETFEEDER
1.2
The Bowl is aligned with the T-slots on the
Pet Feeder body.
Fig 2
Pull down the Pet Feeder
Bowl in the T-slot.
1.5
The assembly of Auto Pet Feeder is completed.
Fig 3
1.4
Final position of Pet Feeder Bowl
Fig 4
Fig 5
4
Page 5
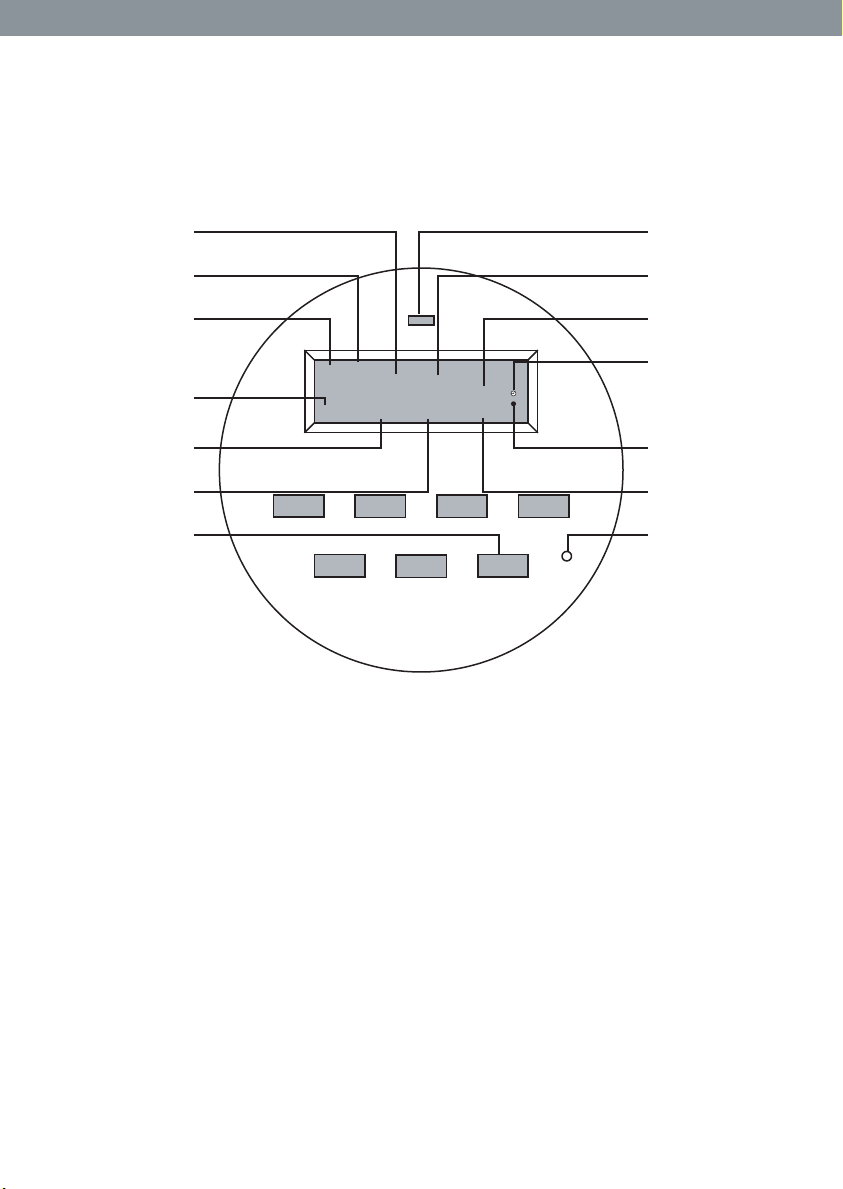
TIMER PROGRAMMING
INDICATES
HOUR
INDICATES
WEEK DAY SETTING
INDICATES
AM OR PM
INDICATES PROGRAM
NUMBER AND “ON” OR
“OFF” MODE
INDICATES PROGRAM
MODE “ON”
INDICATES PROGRAM
MODE “AUTO”
“ON / AUTO / OFF” BUTTON
Mo
TU
AM
PM
12:30
ON
OFF
1
WEEK HOUR MIN R
CLOCK PROG ON/AUTO/OFF
WE TH
AU TO
FR SA S U
30
OF FON
SEC
INDICATOR
INDICATES
MINUTES SETTING
INDICATES
SECONDS SETTING
INDICATES DAY LIGHT
SAVING TIME
INDICATES
STANDARD TIME
INDICATES PROGRAM
MODE “OFF”
MASTER RESET
BUTTON
This is the digital timer unit for the Autopetfeeder. The timer plugs in to the wall socket and has two
outlets,one outlet is labeled as “Power” which is on the left hand side of the timer, directly connects to the
power supply, and the second outlet is labeled as “Timer” which is on the right hand side of the timer
switches the Autopetfeeder ON and OFF based on the timer settings. The indicator will glow when ever
the feeder is ON.
First time use : Connect your digital timer unit into the wall socket. This will charge the internal battery
if you are using the timer for the first time. Reset it by pressing the Master Reset button using a small
pin such as a paperclip. This will reset the timer. All other programming functions can perform without
plugging the timer in to the wall socket.
NOTE :
The timer may have to be charged for 10 minutes prior to use if the timer display is blank. Press
the Master Reset button after 5 minutes while the timer is charging.
5
Page 6
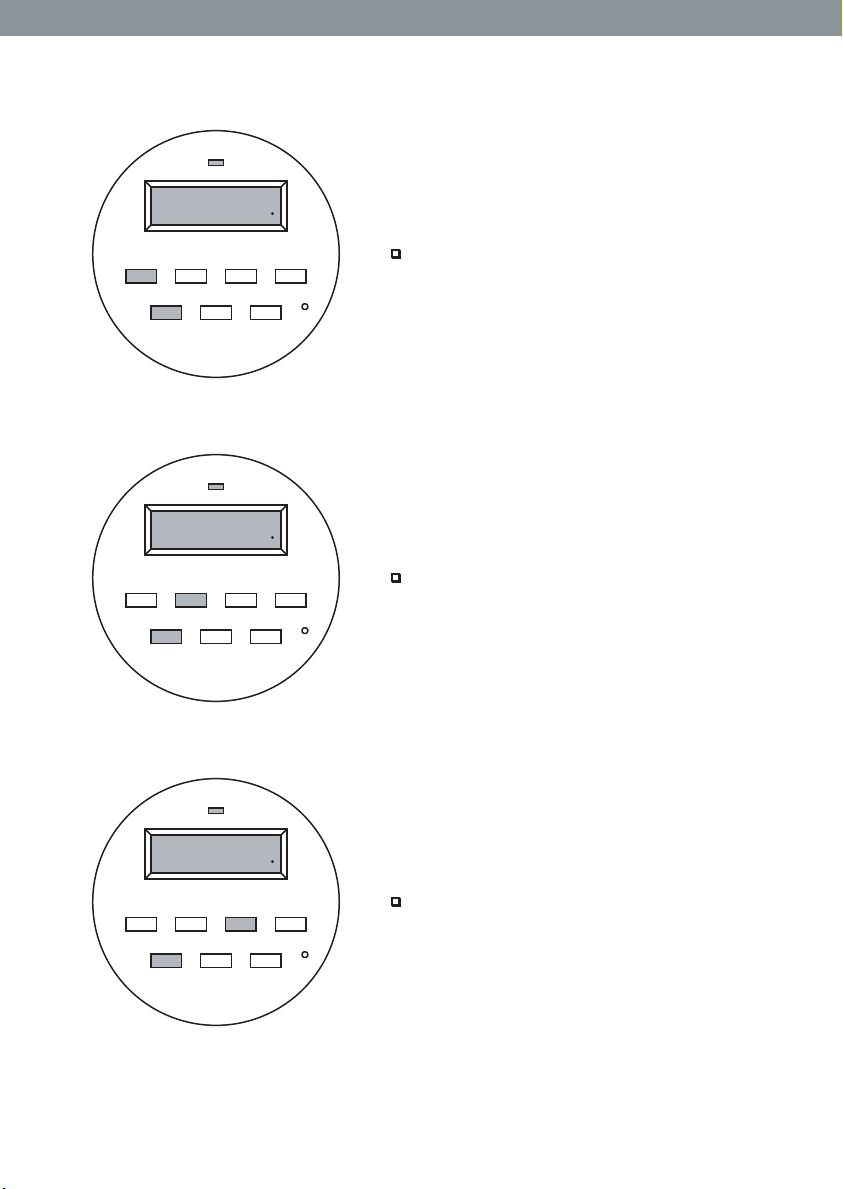
2.1 Setting the Current Time
Mo
AM
WEEK HOUR MIN R
CLOCK PROG ON/AUTO/OFF
Mo
AM
WEEK HOUR MIN R
12:00
AUT O
Fig 1
8:00
AUT O
00
SEC
00
Press and hold the CLOCK button. While holding
the CLOCK button press the WEEK button to set
the day of the week.
Press and hold the CLOCK button. Now press the
HOUR button to set the hour.
CLOCK PROG ON/AUTO/OFF
SEC
Fig 2
Mo
AM
WEEK HOUR MIN R
CLOCK PROG ON/AUTO/OFF
8:05
AUT O
09
SEC
Fig 3
Press and hold the CLOCK button. Press the
MINUTE button to set the minutes.
6
Page 7
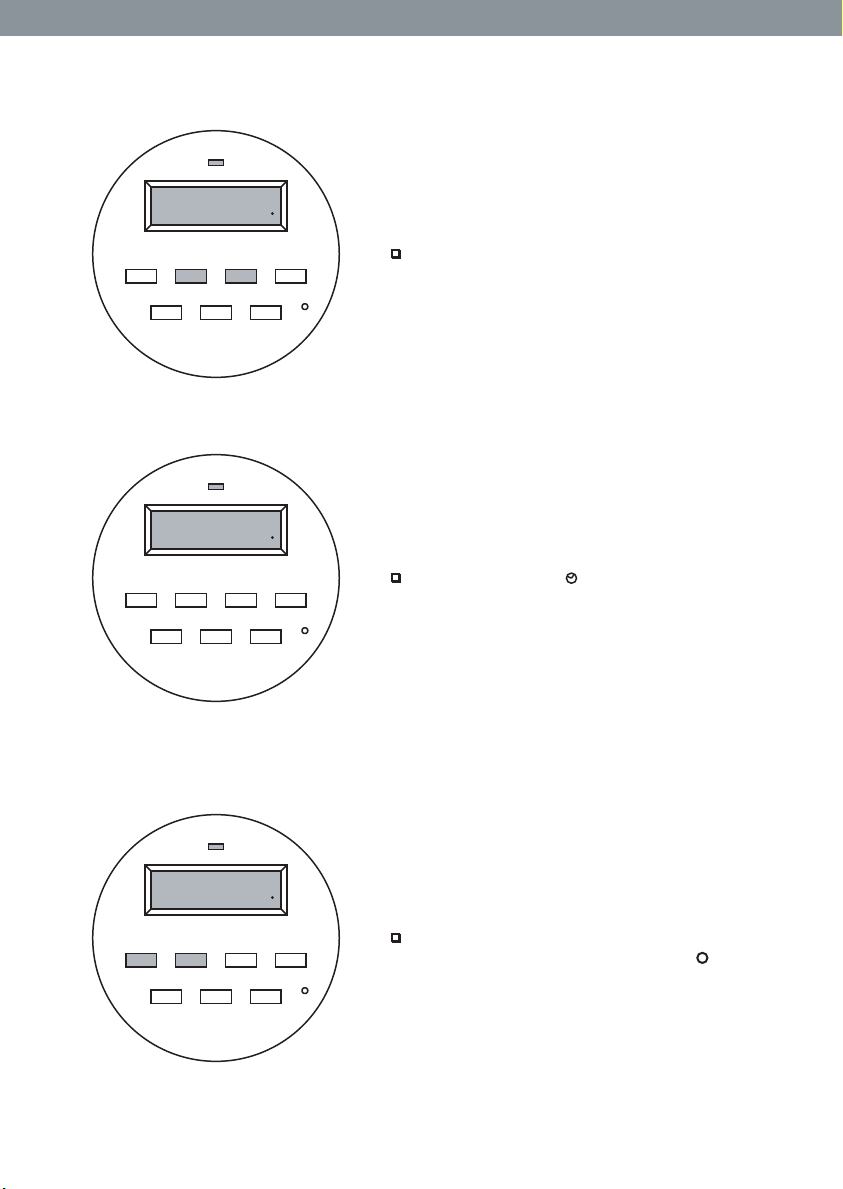
2.2.1 Day Light Saving Time
Mo
AM
WEEK HOUR MIN R
CLOCK PROG ON/AUTO/OFF
Mo
AM
WEEK HOUR MIN R
CLOCK PROG ON/AUTO/OFF
8:30
AUT O
Fig 4
9:30
AUT O
09
SEC
09
SEC
To set day light saving time, press the HOUR and
the MINUTE button simultaneously. This will make
the clock to run an hour ahead.
This introduces a “ ” symbol indicating a small
clock above the black dot on the display. This is
possible only in clock mode. This indicates that the
timer is set in day light saving Mode.
Fig 5
2.2.2 Random Function: DO NOT USE
Mo
AM
WEEK HOUR MIN R
CLOCK PROG ON/AUTO/OFF
8:30
AUT O
09
SEC
By Pressing the WEEK and HOUR at the same time
you will activate the random function. “ ” Symbol
will be visible on the display.
DO NOT USE THIS FUNCTION.
7
Page 8
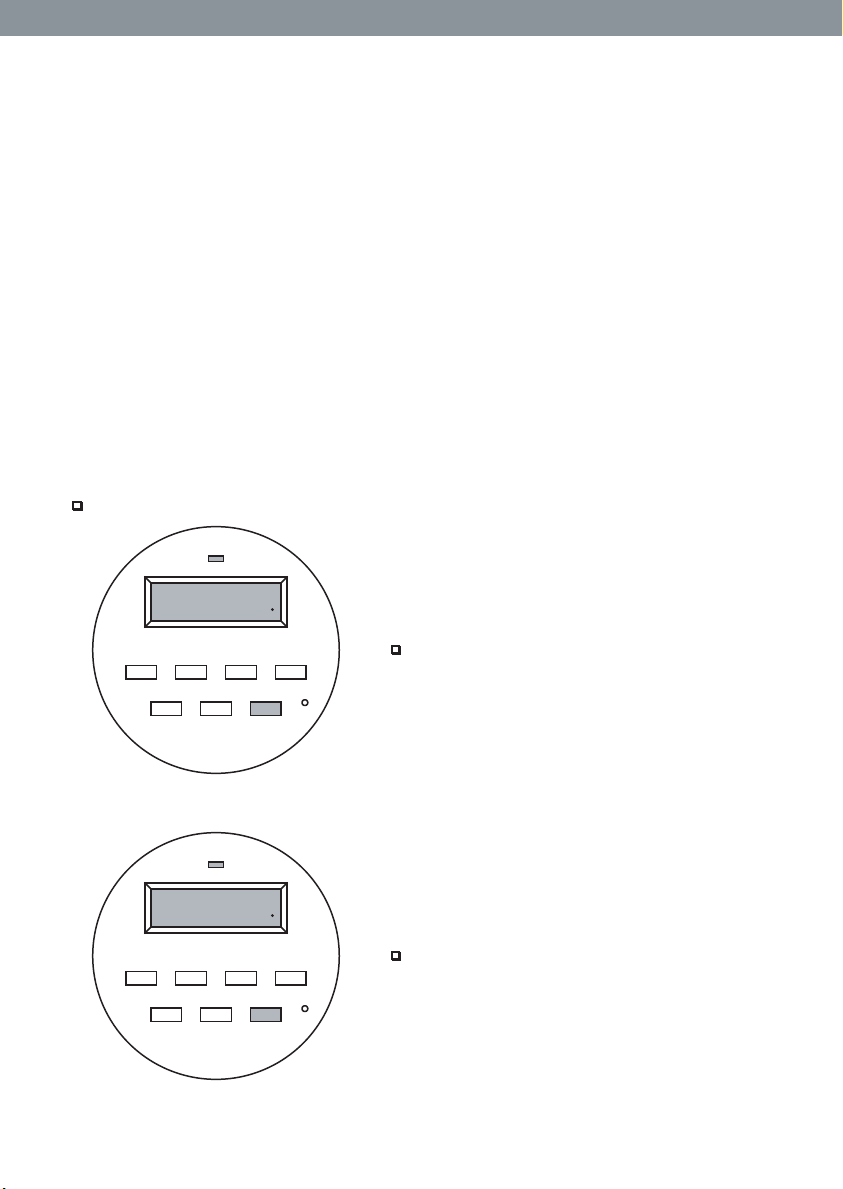
2.3 Understanding the Timer
2.3.1 Number of meal times per day
The Autopetfeeder is capable of feeding your pet 8 times per day. You can set the ON time and the OFF
time for the feeder 8 times per day. This will give you control over the amount of food you feed your pet
and also the time you pet is fed. By pressing PROG button you will enter into programming mode. The
display will now show 1ON . This means program #1 and ON time (time when the feeder turns ON) By
pressing the PROG button again the display will change to 1OFF . This means program #1 and OFF time
(time when the feeder turns OFF) The time between ON and OFF determines the quantity of food fed to
the pet by the Autopetfeeder. By pressing PROG repeatedly we can program up to 8 times i.e. 8ON and 8OFF
2.3.1 Setting ON and OFF Time
The pet feeder is capable of feeding dierent sizes and shapes of pet food. Hence, the quantity of food
dispensed per minute changes. It is advised that you measure the quantity of food that your pets consume
for every schedule by testing the feeder on the ON mode and pre-determining the amount of time
required to feed your pet.
ON/AUTO/OFF Mode
Now let us understand the dierent modes of operation in the timer.
Mo
AM
WEEK HOUR MIN R
CLOCK PROG ON/AUTO/OFF
8:00
00
OFF
Press ON/AUTO/OFF button to toggle between
ON/AUTO/OFF mode. The feeder must always be
in OFF mode prior to setting the auto mode. The
display will show the mode in which the timer is
SEC
set.
Fig 6
Mo
AM
ON
WEEK HOUR MIN R
CLOCK PROG ON/AUTO/OFF
8:00
00
SEC
Fig 7
In ON mode the timer is cuto and the feeder
dispenses food continuously. So if you feel that you
need to feed your pet a little more than the
schedule time just select this mode. This mode is
also used to prell the auger on rst time use and
measure the quantity of food you schedule every
meal time. This is more like a manual feed.
8
Page 9
Mo
AM
WEEK HOUR MIN R
CLOCK PROG ON/AUTO/OFF
8:00
AUT O
00
SEC
Fig 8
Mo
AM
WEEK HOUR MIN R
CLOCK PROG ON/AUTO/OFF
8:00
00
OFF
SEC
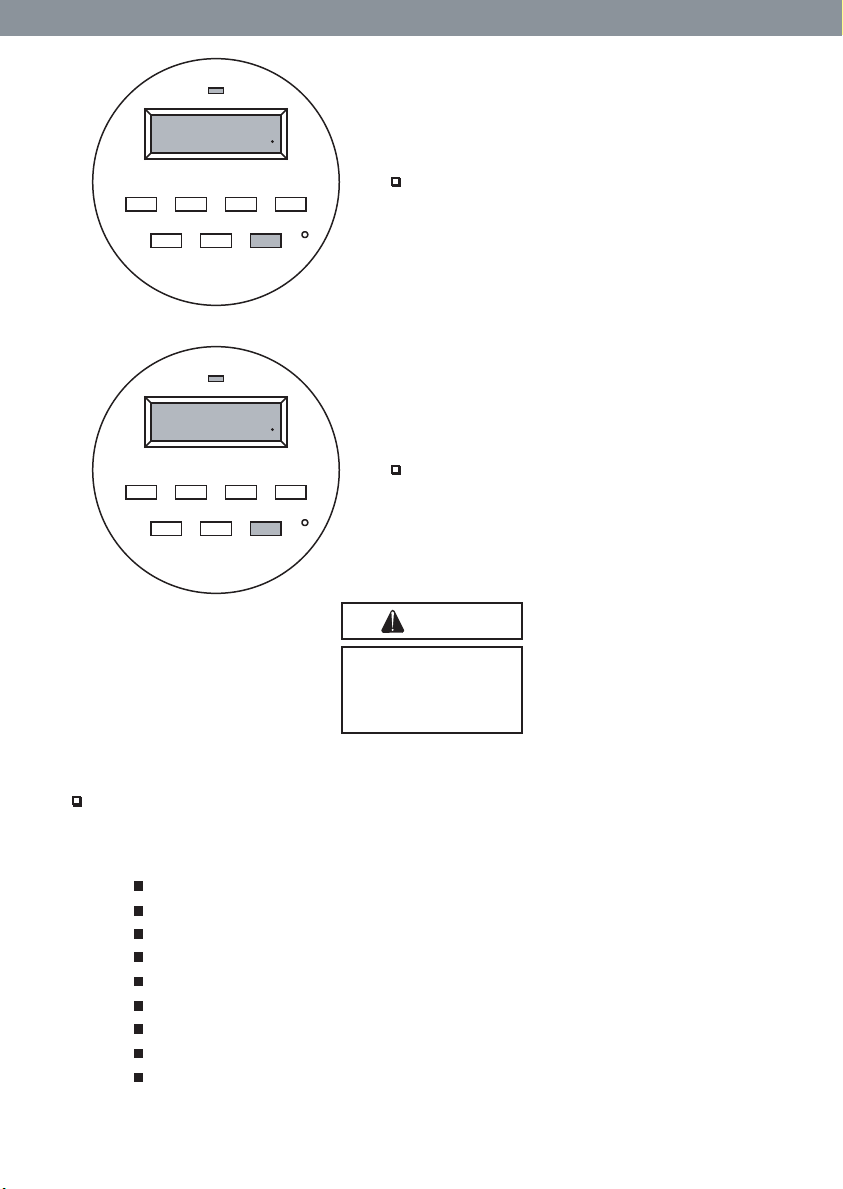
In AUTO mode the feeder works as per the
program schedule. In order for AUTO mode to work
properly you must cycle from OFF mode to AUTO
mode. Do not cycle from ON mode to AUTO mode
as the feeder will feed continuously.
In OFF mode, the feeder does not work. So if you
choose to feed your pet manually use this function
to turn o the feeder.
Fig 9
To put the timer in AUTO mode
always cycle from OFF mode to
AUTO mode. Do not cycle from
ON mode to AUTO mode as the
feeder will feed continuously.
N O T E
2.3.2 Setting days of week to feed your pet
The digital timer has 9 dierent WEEK options in which we can set schedules. Let us now see how to
use these 9 dierent options.
The following 9 options are available:
All Days (Mon, Tue, Wed, Thu, Fri, Sat and Sun)
Each Day (Mon), (Tue), (Wed), (Thu), (Fri), (Sat) and (Sun)
Week Days (Mon, Tue, Wed, Thu and Fri)
Week End (Sat and Sun)
Six Days (Mon, Tue, Wed, Thu, Fri and Sat)
Alternate Days (Mon, Wed and Fri)
Alternate Days (Tue, Thu and Sat)
Three Days (Mon, Tue and Wed)
Three Days (Thu, Fri and Sat)
9
Page 10
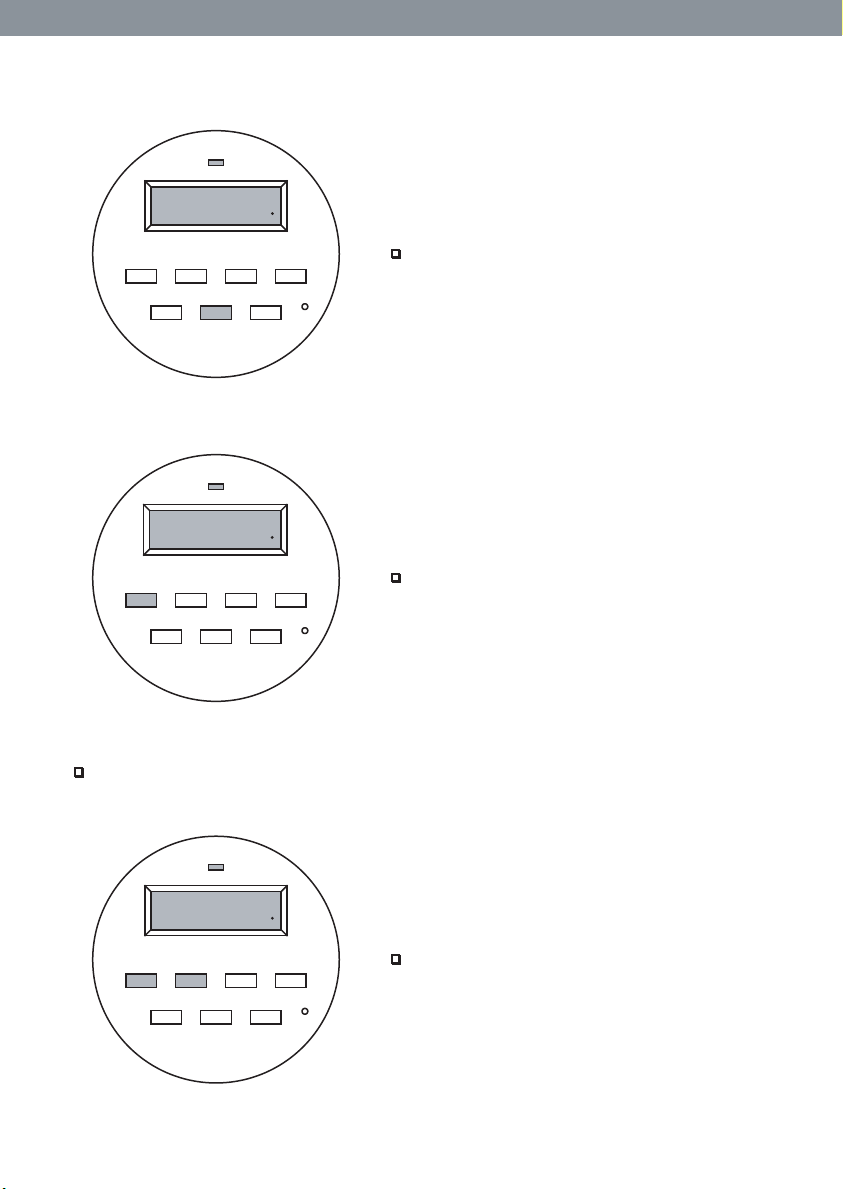
2.2.4 Setting the days of Week
AUT O
--
ON
1
-- --
Press PROG button to enter in to the program
WEEK HOUR MIN R
CLOCK PROG ON/AUTO/OFF
SEC
mode. The display will show 1ON which means that
we are setting the 1st schedule ON time.
Fig 10
Mo
TU WE TH FR SA SU
AM
ON
1
12:00
AUT O
00
Press the WEEK button once and the display will
WEEK HOUR MIN R
CLOCK PROG ON/AUTO/OFF
SEC
show all days option.
Fig 11
This option will set a common schedule for the entire week and this is recommended for all pet
owners unless there are special requirements.
Mo
AM
ON
1
WEEK HOUR MIN R
CLOCK PROG ON/AUTO/OFF
12:00
AUT O
00
SEC
Fig 12
Press WEEK button again and the display will show
the each day option. This is the 2nd option, where
the user can select another schedule that can be
programmed. Toggle through the days of the
WEEK by pressing the week button.
10
Page 11
Mo
TU WE TH FR
AM
ON
1
WEEK HOUR MIN R
12:00
AUT O
00
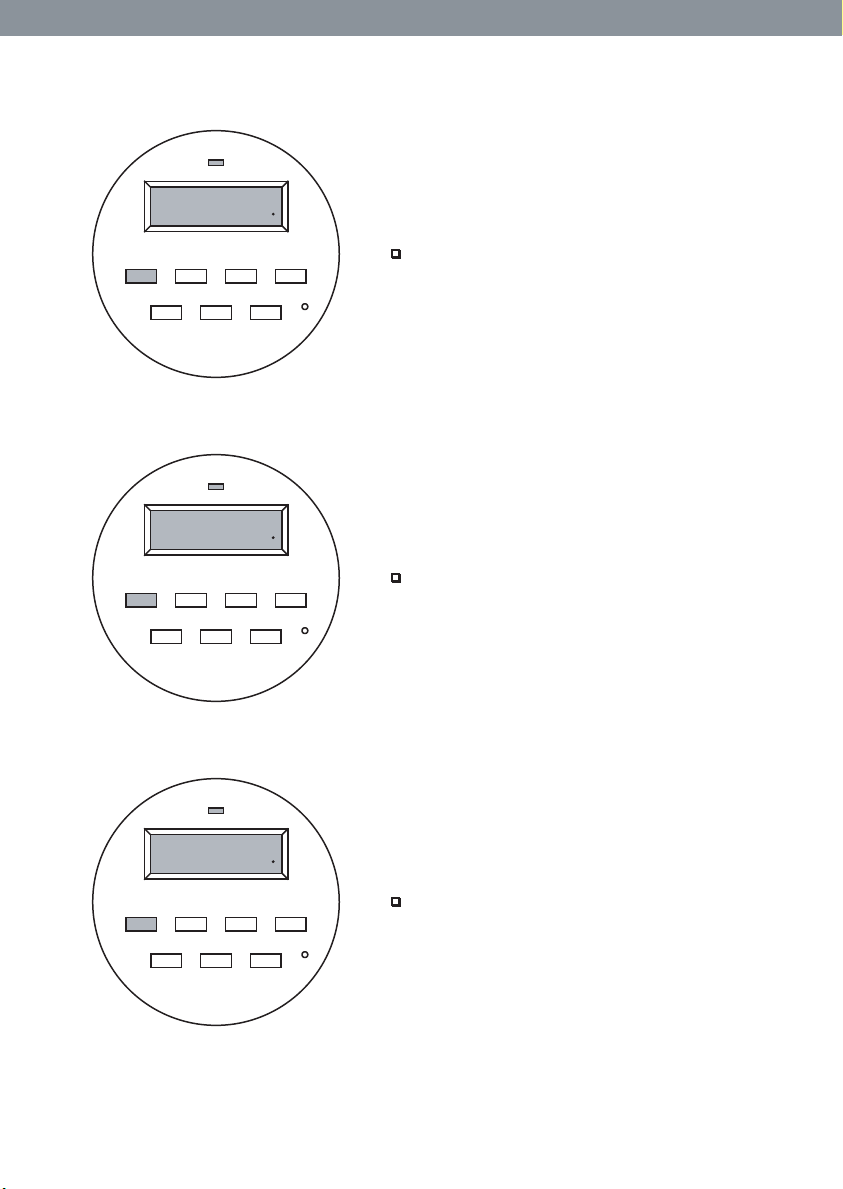
Pressing WEEK button again will give you the week
days option. This display will show Mon-Fri.
CLOCK PROG ON/AUTO/OFF
SEC
Fig 13
12:00
AUT O
SA SU
00
SEC
AM
ON
1
WEEK HOUR MIN R
CLOCK PROG ON/AUTO/OFF
Fig 14
Mo
TU WE TH FR SA
AM
ON
1
WEEK HOUR MIN R
CLOCK PROG ON/AUTO/OFF
12:00
AUT O
00
SEC
A scheduled program in this option will work on
week days. Pressing WEEK button once again will
lead to the weekend option. This display will show
sat & sun. The schedule programmed in this option
will work on weekends.
Press WEEK button to go to the 5th option six days.
You can schedule your feeder for six days from
mon - sat.
Fig 15
11
Page 12
Mo
WE FR
AM
ON
1
WEEK HOUR MIN R
12:00
AUT O
00
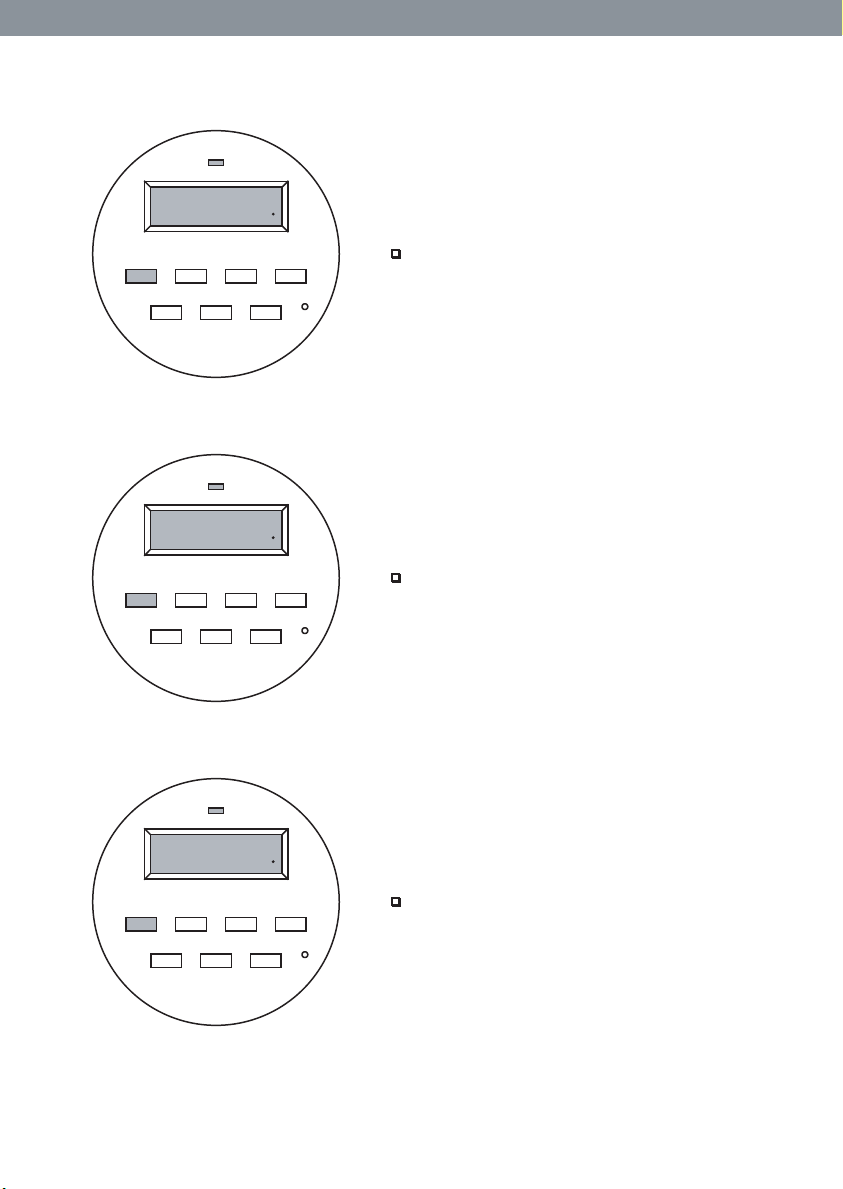
Press WEEK button again for the alternate day
option mon, wed & fri.
CLOCK PROG ON/AUTO/OFF
SEC
Fig 16
TU TH S A
AM
ON
1
WEEK HOUR MIN R
CLOCK PROG ON/AUTO/OFF
12:00
AUT O
00
SEC
Fig 17
Mo
TU WE
AM
ON
1
WEEK HOUR MIN R
CLOCK PROG ON/AUTO/OFF
12:00
AUT O
00
SEC
Press WEEK button once more for the other
alternate option day tue, thu & sat.
Press WEEK button again to go to the three days
option which is to schedule for the rst three days
of the week such as mon, tue & wed.
Fig 18
12
Page 13
TH FR S A
AM
ON
1
WEEK HOUR MIN R
CLOCK PROG ON/AUTO/OFF
12:00
AUT O
00
SEC
Fig 19
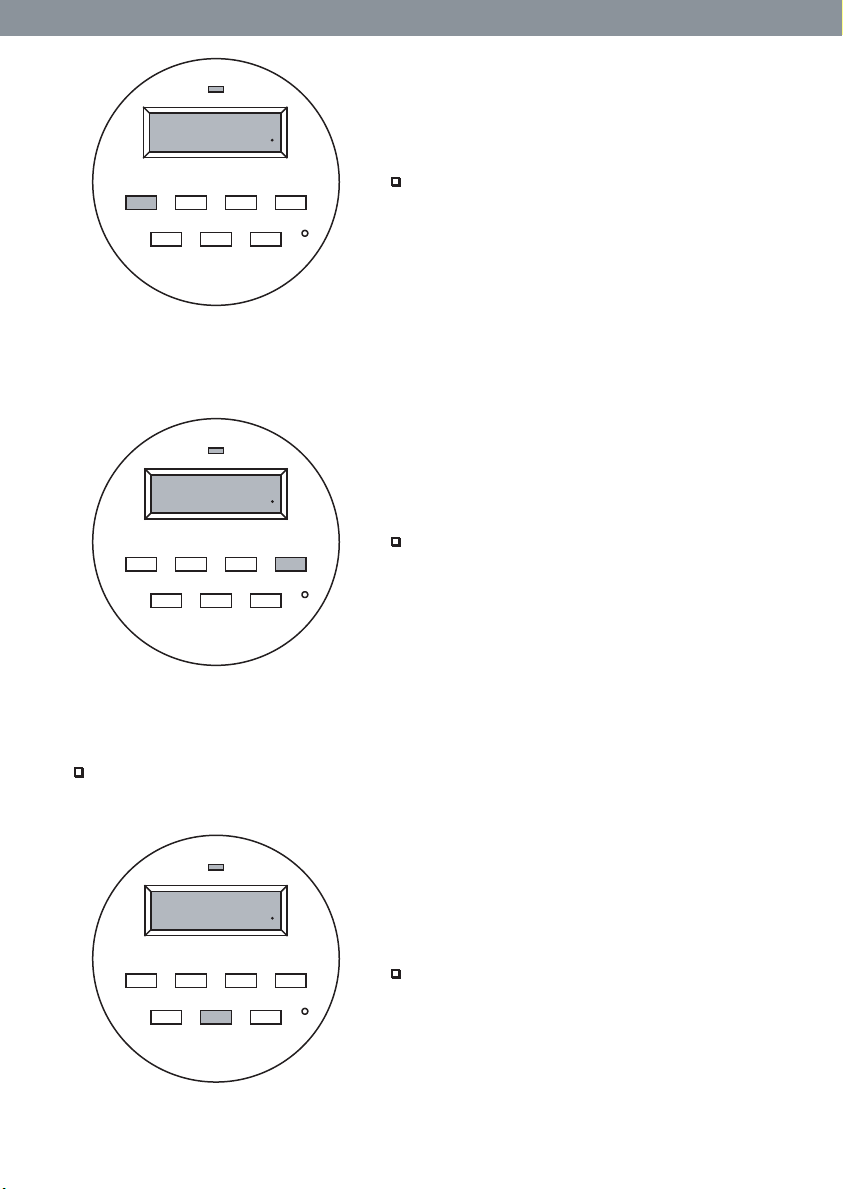
2.4 Erasing all schedules
Press WEEK button again to go to three days option
which is to schedule for next three days of the week
such as thu, fri & sat.
AUT O
--
ON
1
-- --
Press R button to erase all schedules.
WEEK HOUR MIN R
CLOCK PROG ON/AUTO/OFF
SEC
NOTE :
If you don’t press a button while in program mode
you will be taken back to CLOCK mode.
Fig 20
2.5 Timer Programming Examples
Let us set a schedule of ON time for 8 a.m. and OFF time of 8 hours, 1 minute, 30s econds. After 1
minute
AUT O
--
Press PROG button to enter in to program mode.
The display will show 1ON which means that we are
setting the 1st schedule ON time.
SEC
-- --
ON
1
WEEK HOUR MIN R
CLOCK PROG ON/AUTO/OFF
Fig 21
13
Page 14
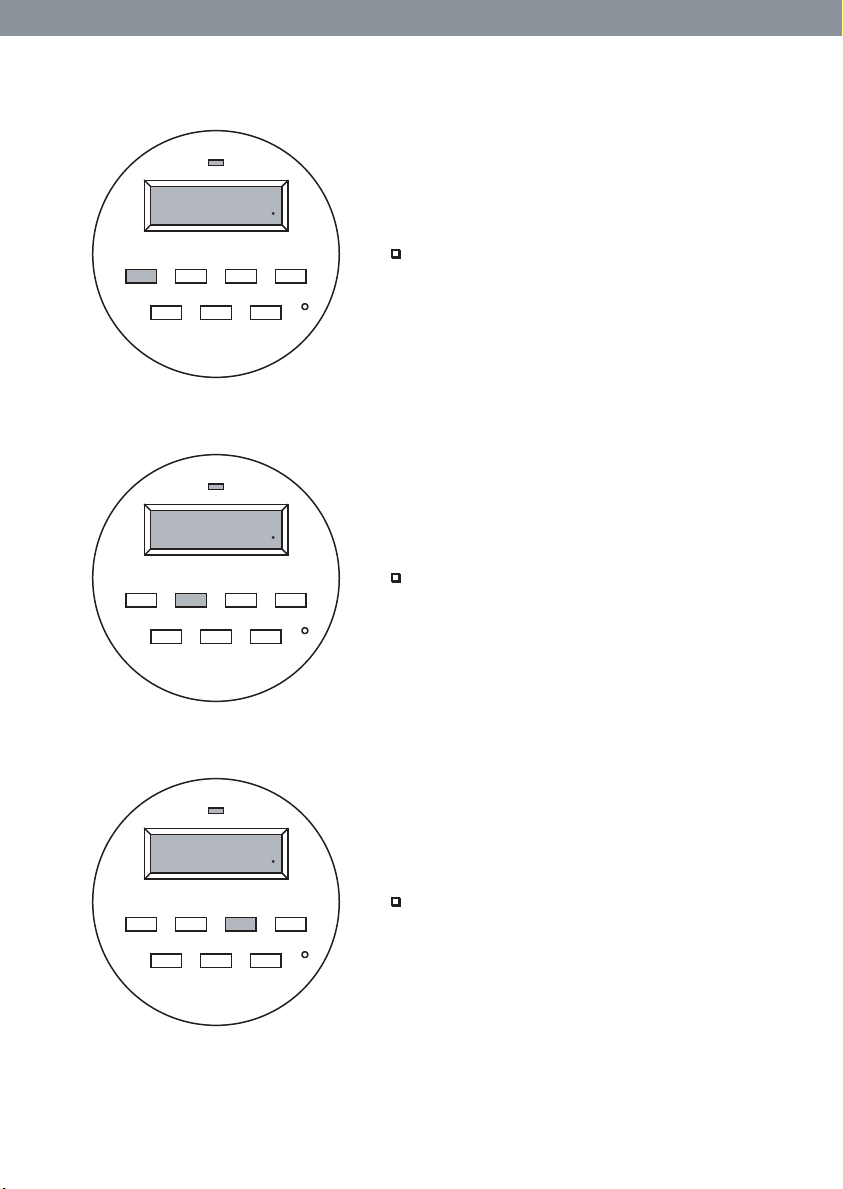
2.5.2
2.5.3
Mo
TU WE TH FR SA
AM
ON
1
WEEK HOUR MIN R
CLOCK PROG ON/AUTO/OFF
12:00
AUT O
00
SEC
Fig 22
Mo
TU WE TH FR SA
AM
ON
1
WEEK HOUR MIN R
8:00
AUT O
00
Press WEEK button once and the display will show
Mon-Sun. This is the recommended program for all
days of week
Press the HOUR button till the display shows 8.
2.5.4
CLOCK PROG ON/AUTO/OFF
SEC
Fig 23
Mo
TU WE TH FR SA
AM
ON
1
WEEK HOUR MIN R
CLOCK PROG ON/AUTO/OFF
8:00
AUT O
00
SEC
Fig 24
Press the minute button till the display shows 00.
14
Page 15
2.5.5
Mo
TU WE TH FR SA SU
PM
ON
1
WEEK HOUR MIN R
8:00
AUT O
00
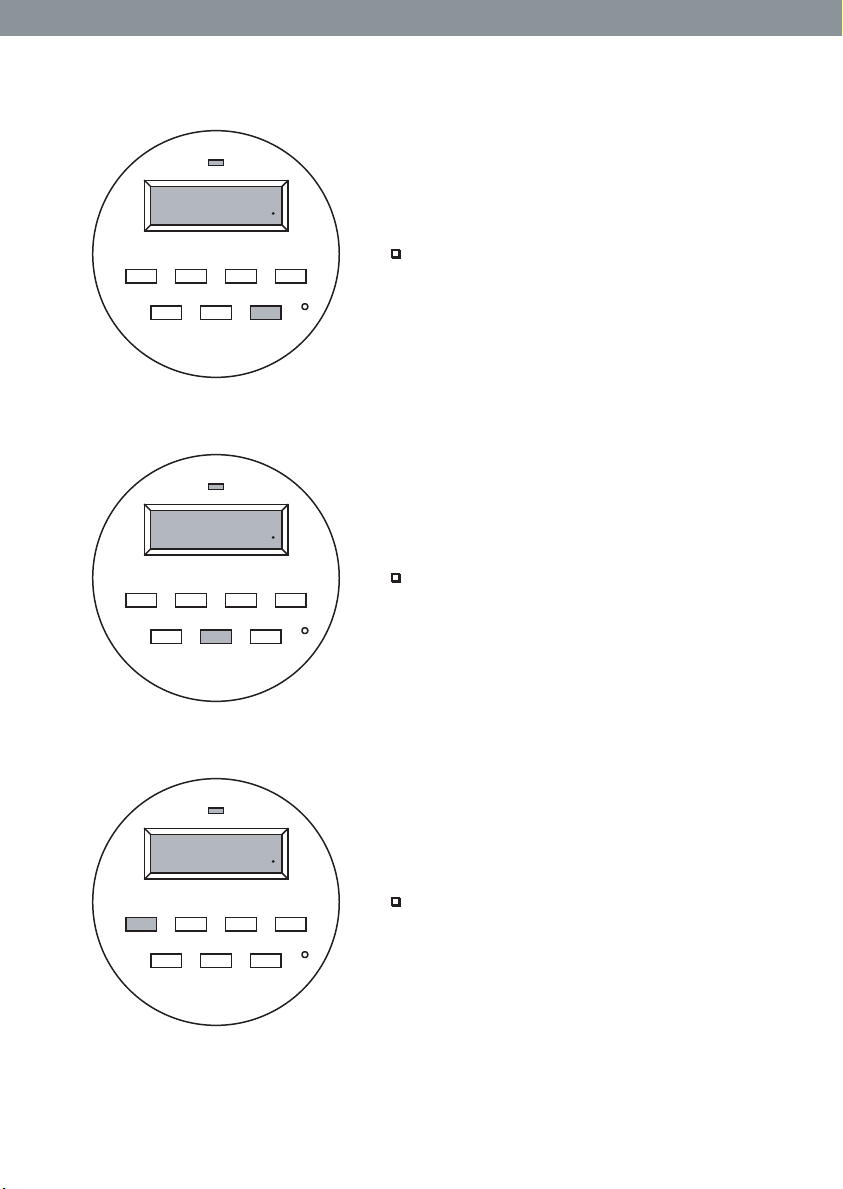
Press the ON/AUTO/OFF button till the display
shows 00 seconds. The ON time is now set to 8 a.m.
2.5.6
2.5.7
CLOCK PROG ON/AUTO/OFF
SEC
Fig 25
1
WEEK HOUR MIN R
AUT O
CLOCK PROG ON/AUTO/OFF
SEC
--
--:--
OFF
Fig 26
Mo
TU WE TH FR SA SU
AM
OFF
1
WEEK HOUR MIN R
CLOCK PROG ON/AUTO/OFF
12:00
AUT O
00
SEC
Press the PROG button again and the display will
show 1OFF which means that we are setting the
rst schedule for the OFF time.
Press the WEEK button once and the display will
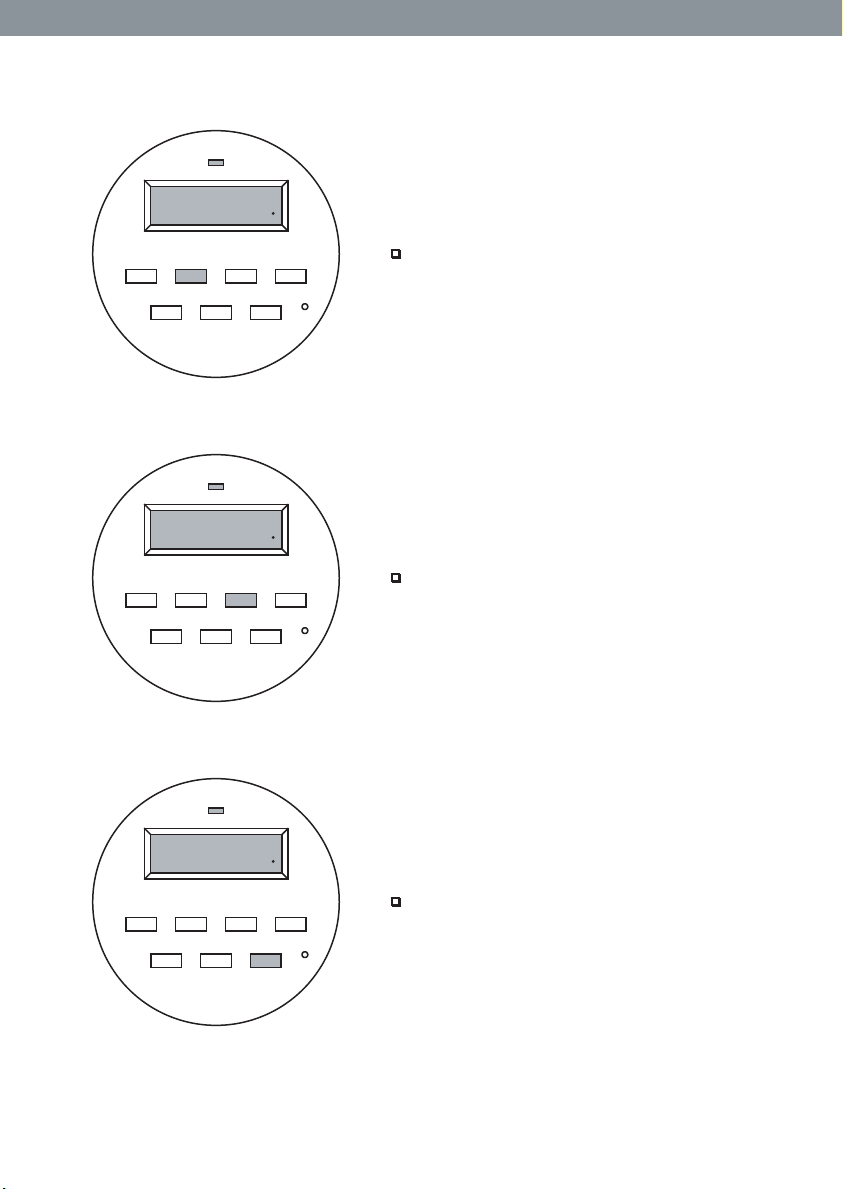
show Mon-Sun. This is the recommended days of
week set in 1ON.
Fig 27
15
Page 16
2.5.8
Mo
TU WE TH FR SA SU
PM
OFF
1
WEEK HOUR MIN R
8:00
AUT O
00
Press the HOUR button till the display shows 8.
2.5.9
2.5.10
CLOCK PROG ON/AUTO/OFF
SEC
Fig 28
Mo
TU WE TH FR SA SU
PM
OFF
1
WEEK HOUR MIN R
CLOCK PROG ON/AUTO/OFF
8:01
AUT O
00
SEC
Fig 29
Mo
TU WE TH FR SA SU
PM
OFF
1
WEEK HOUR MIN R
CLOCK PROG ON/AUTO/OFF
8:01
AUT O
30
SEC
Press the MINUTE button until display in the
MINUTE shows 8.01.
Press the ON/AUTO/OFF button till the display
shows 30 seconds. The OFF time is now set to 8hrs
1 min & 30 sec. The feeder time will be for 1 min
and 30 sec.
Fig 30
16
Page 17
2.5.11
2
ON
--:--
AUT O
--
WEEK HOUR MIN R
2ON which means that we are setting the second
feed.
Press the PROG button again. The display shows
CLOCK PROG ON/AUTO/OFF
SEC
Repeat programming from no. 2.5.2 to 2.5.10 to
complete programming the second feed time.
Fig 31
Similarly we can set 8 schedules for all days of the week by pressing the PROG button to go from
program 1 to program 8.
2.5.12
Mo
TU WE TH FR SA SU
AM
OFF
1
8:01
AUT O
30
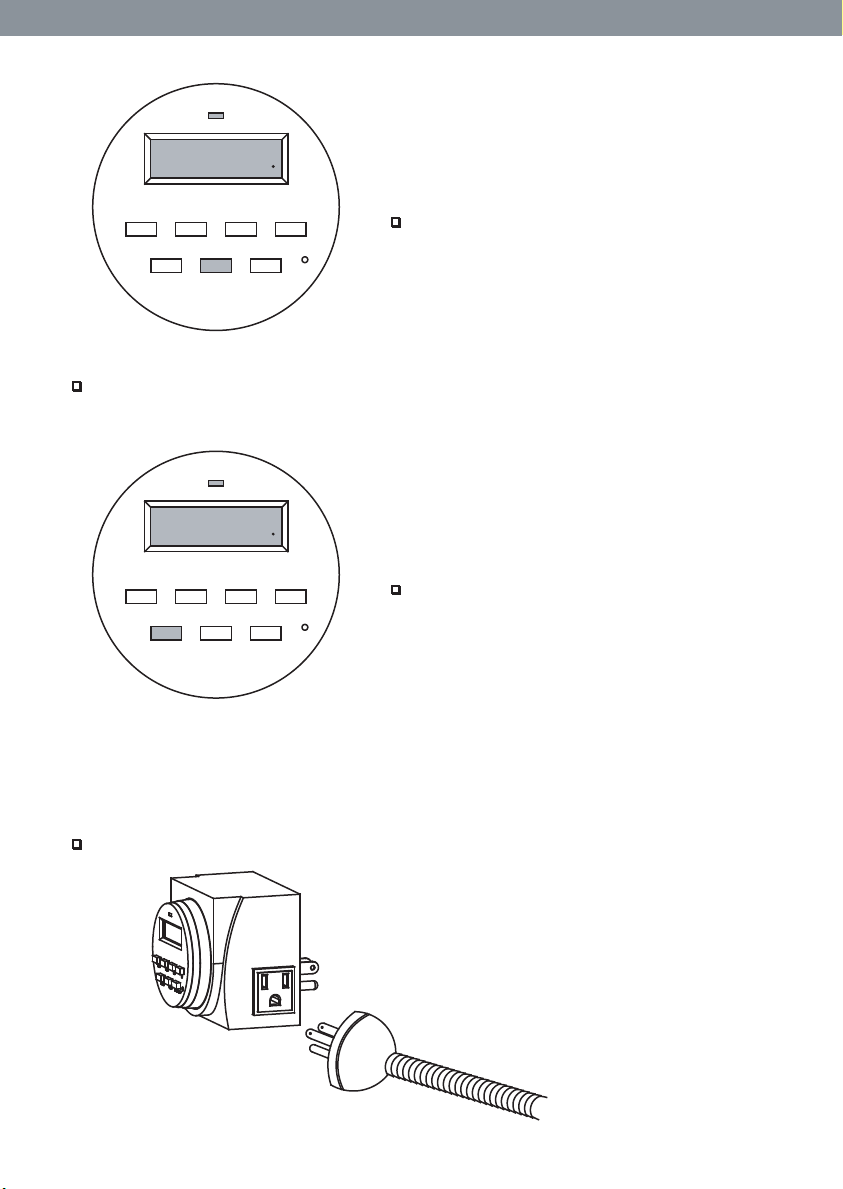
Press the CLOCK button to exit from the PROG
WEEK HOUR MIN R
CLOCK PROG ON/AUTO/OFF
SEC
mode.
Fig 32
2.6 Connecting the feeder into the timer
2.6.1
Connect the cord of the feeder into the timer side of the timer.
17
Page 18
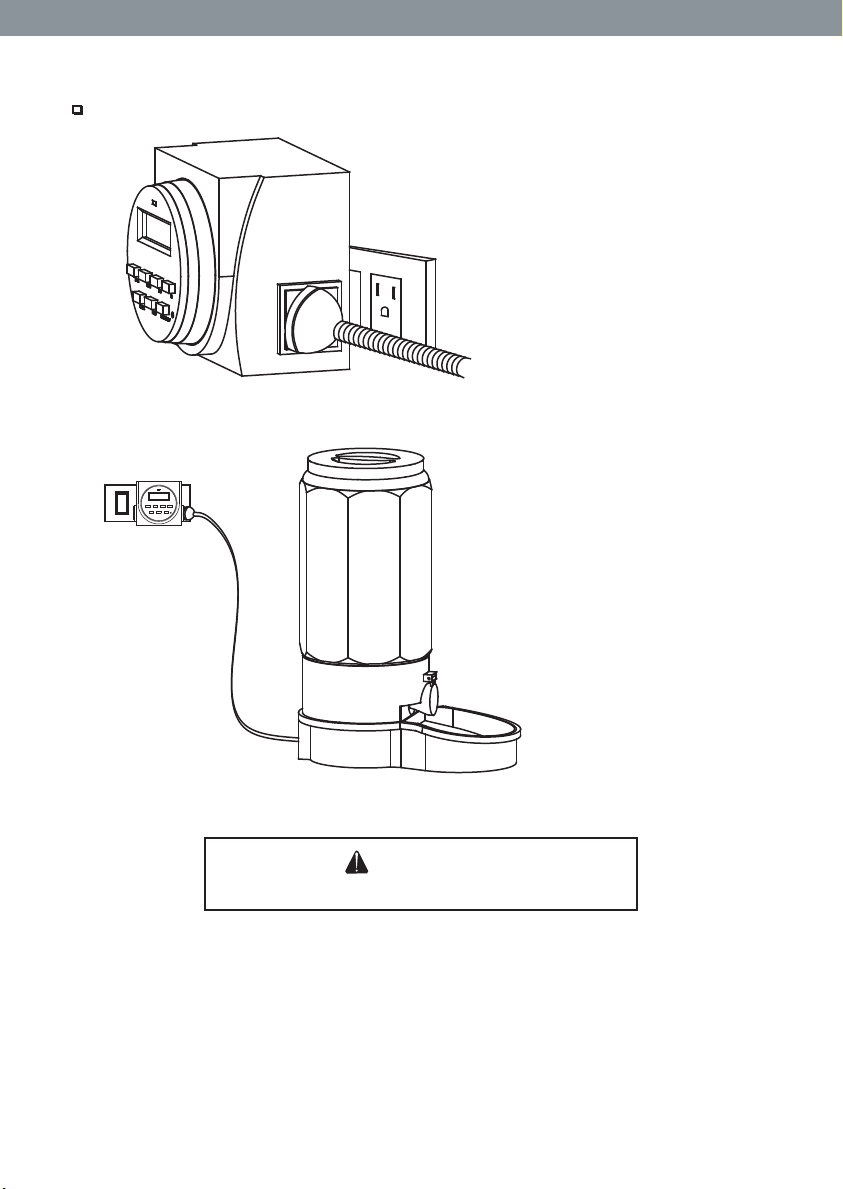
2.6.2
Plug the timer into an 110 VAC wall socket.
NOTE :
Do not plug the cord of the fedder into the power side of the timer.
Now the AUTOPET FEEDER is ready to feed your pet as per your schedule.
CAUTION
GROUNDING INSTRUCTIONS
This product is for use on a normal 110-volt AC circuit. Make sure that the product is connected to an outlet
having the same conguration as the plug. No adapter should be used with the product. This product must
be grounded. If it should malfunction or breakdown, grounding provides a path of least resistance for
electric current to reduce the risk of electric shock. This product is equipped with a cord having an
equipment-grounding conductor and a grounding plug. The plug must be plugged into an appropriate
outlet that is properly installed and grounded in accordance with all local codes and ordinances.
DANGER : Improper connection of the equipment-grounding conductor can result in a risk of electric
shock. Check with qualied electrician or serviceman if you are in doubt as to whether the product is
properly grounded. Do not modify the plug provided with the product - if it will not t the outlet; have a
proper outlet installed by a qualied electrician.
18
Page 19
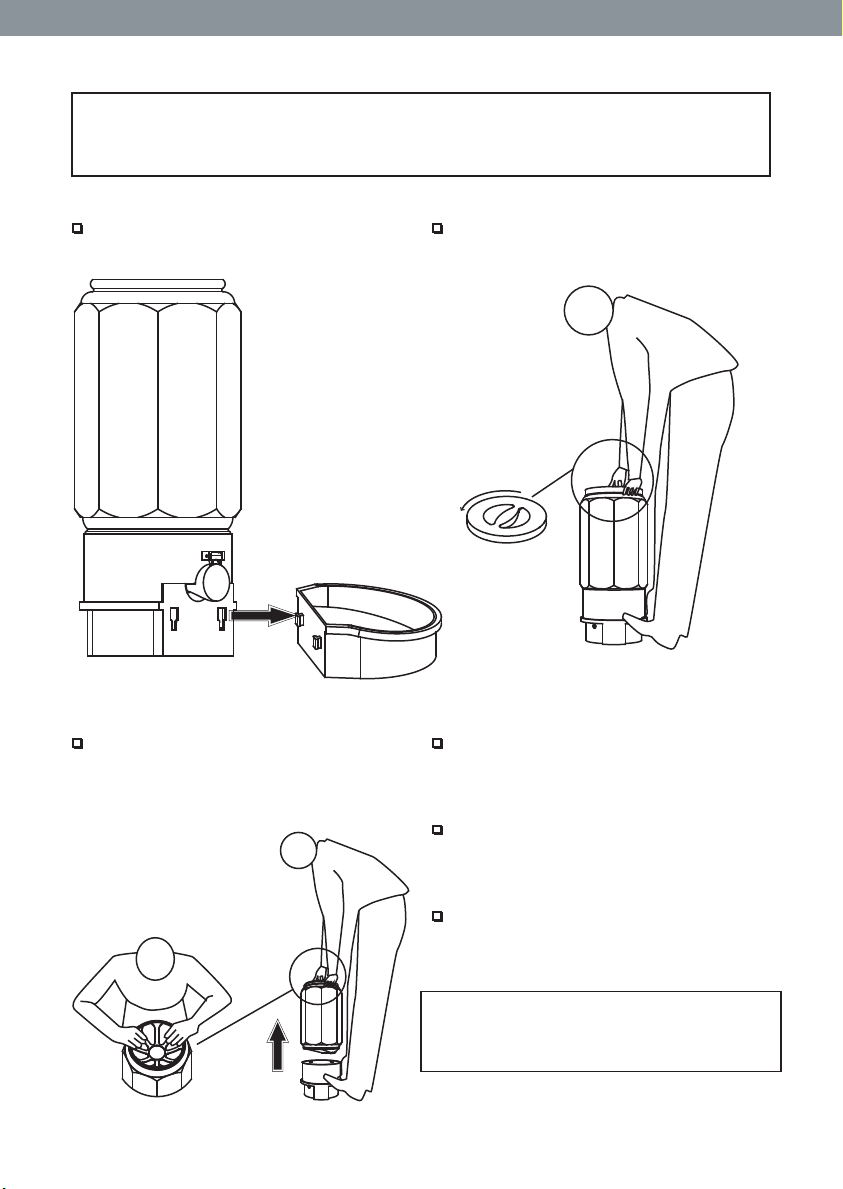
Maintenance
Your Autopetfeeder is easy to dismantle, clean and to assemble. Always disconnect feeder from
110VAC prior to cleaning. Do not under any circumstances wash down this feeder, serious injury
could occur if the applicance is connected to 110 VAC. Below steps will make your cleaning process
easier.
Step 1 Step 2
First disconnect the feeder bowl as shown in
Fig 1.
Unscrew the food container cover as shown
in Fig 2.
ANTI-CLOCKWISE
DIRECTION
Fig 1
Step 3 Step 4
Holding the feeder base tightly between
your feet pull up the food container as
shown in Fig 3.
Clean the inner area of the storage container.
Step 5
Clean the Bowl and Lid.
Step 4
Clean the Base.
Cleaning of Autopetfeeder is completed.
Follow the below steps to reassemble your
PULL UP
Fig 3
19
Fig 2
feeder.
Page 20
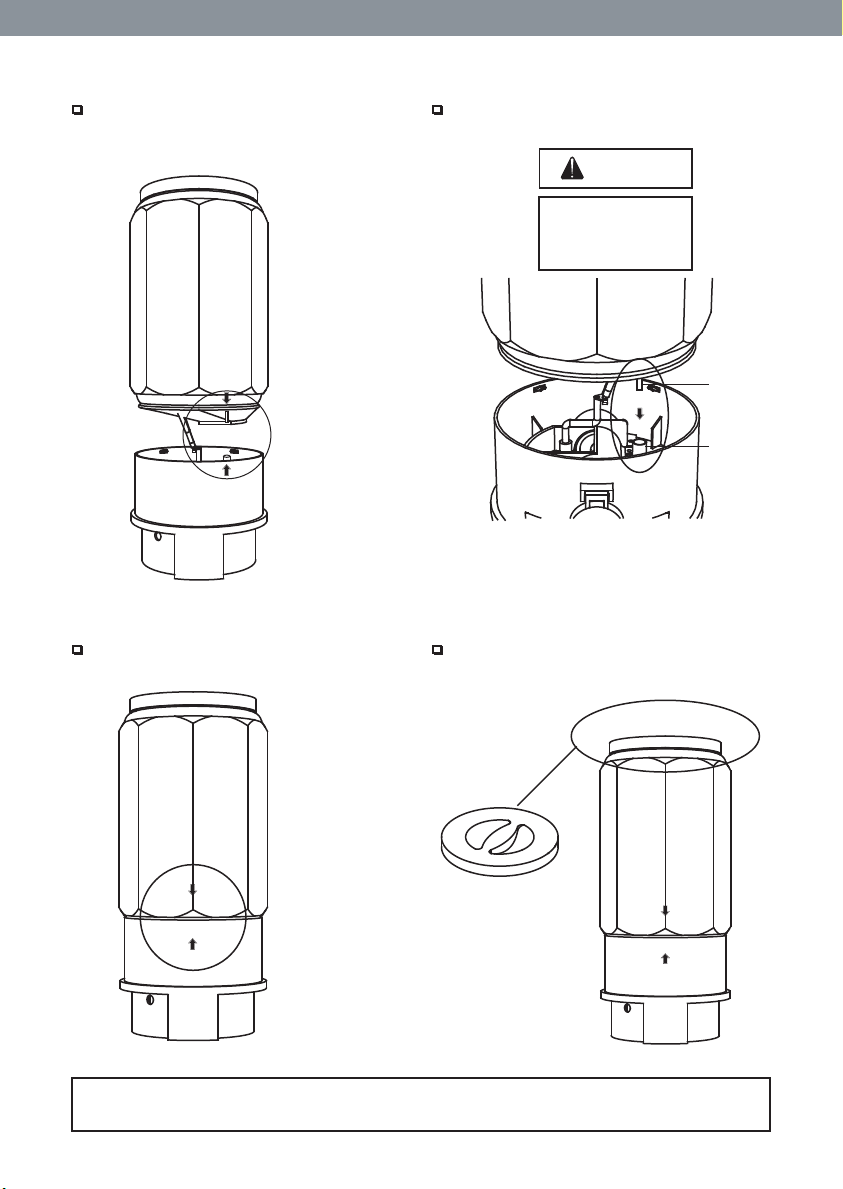
Step 7
Step 8
Check the arrow marks on the Feeder base
and the Feeder container lines up together
as shown in Fig 4.
Fig 4
Step 9
Then the bottle is pressed into the base as
shown.
Make sure that the safety pin aligns with the
safety switch receiver as shown in Fig 5.
CAUTION
Make sure that the safety switch pin at
the bottom of the container interlocks
with the safety switch pin receiver hole
on the base. This safety feature ensures
that the feeder can operate only if the
storage container is installed properly.
Fig 5
Step 10
Replace the food container cover.
Safety Pin
Safety Pin
Receiver
Fig 7
Fig 8
For replacing the bowl refer to Page No.4. (Step 1.2, 1.3 & 1.4)
Connect timer and power outlet and start feeding your loved ones with your clean Feeder.
20
Page 21

Ergo Systems Inc.,
Toll-Free Phone. US only
1-888-ERGOS
YS
(1-888-374-6797)
International Phone
1-630-543-7686
Fax
1-866-899-5389
E-Mail
suppor
Website
http://
www.autopetfeeder.com
Warranty Registration
http://
www.autopetfeeder.com/warranty.asp
 Loading...