


BA3 / BA3 E /
BA3 E Protect
Bedienungsanleitung
User Instructions
Mode d‘emploi
AVERTISSEMENT
Bitte lesen Sie diese Anleitung
sorgfältig durch.
Jegliche Modifikationen dieses
Produkts sind unzulässig und können
unter Umständen Ihre Sicherheit oder
sogar Ihr Leben gefährden.
Bewahren Sie diese Anleitung zum
späteren Nachschlagen an einem
sicheren Ort auf. Sollten Sie dieses
Produkt an eine dritte Person weitergeben, so ist diese Anleitung oder eine
Kopie beizulegen. Bei Verlust kann
die Anleitung unter ergonbike.com
heruntergeladen werden.
Please read this manual
carefully.
This product must not be modified in
any way. Doing so may endanger your
safety or life.
Please keep these instructions in a
safe place to refer to at a later date.
Should you pass the product on to
a third person, please include these
instructions or a copy thereof. Should
you misplace these instructions,
a copy can be downloaded at:
ergonbike.com
Merci de lire attentivement
ces instructions d‘emploi.
Toute modification de ce produit est
interdite et peut le cas échéant mettre
en péril votre sécurité, voire votre vie.
Conservez ce mode d‘emploi en lieu
sûr après le montage afin de pouvoir le
consulter ultérieurement. Si vous devez
transmettre ce produit à une tierce
personne, veuillez y joindre le présent
mode d‘emploi ou une copie. En cas
de perte, le mode d‘emploi peut être
téléchargé sur
ergonbike.com
WARNUNG

3
DE
Protektor BP100*
(optional bei BA3 & BA3 E,
inklusive bei BA3 E Protect)
Trinkblase BH300
(optional)
WARNUNG
* nicht erhältlich in USA / CAN
Trinkblase BH150
(optional)
Sport Camera Chest Mount
(optional)
Es ist wichtig, diese Gebrauchsanleitung gelesen und verstanden zu haben, bevor Sie den BA3 verwenden.
Außerdem sollten Sie sich der mit der Aktivität verbundenen Verletzungs- und Todesrisiken bewusst sein.
Erklärung Zeichen / Symbole in dieser Anleitung:
Schenken Sie den folgenden Symbolen besondere Beachtung.
Warnung: Dieses Symbol verweist auf eine sicherheitsrelevante Information, deren Nichtbefolgen Ihr Leben /
Ihre Gesundheit gefährden kann.
Information: Dieses Symbol kennzeichnet Zusatzinformationen, z.B. über die Handhabung des Produkts.
Die oben geschilderten möglichen Konsequenzen werden in der Anleitung nicht immer wieder geschildert,
wenn diese Symbole auftauchen.
Die Vorteile des Rucksacks BA3
Das Ergon Entwicklungsteam hat nach verschiedenen Ansätzen ein einzigartiges Gurtsystem entwickelt, welches sich automatisch
den anatomischen Gegebenheiten des Trägers anpasst. So richten sich die Schulter gurte sowie der Hüftgurt ohne weitere Einstellungen am natürlichen Winkel der Schultern bzw. der Hüfte aus. Durch eine 4-fache Verstellung der Rückenlänge ergibt sich
ein vollkommen neuer, individueller Tragekomfort.
Eine weitere große Innovation stellt die Last-Kompression über das Tragesystem dar. Die beiden Schultergurte sind entlang der
Unter seite des Rucksacks miteinander verbunden. Dieses intelligente Konzept gewährt stets einen körpernahen Transport des
mitge führten Equipments. Konstruktionsbedingt sitzt der Rucksack deutlich stabiler und näher am Rücken als herkömmliche
Rucksäcke.
Darüber hinaus bieten die Rucksäcke BA3, BA3 E und BA3 E Protect die Möglichkeit zur Aufnahme eines Protektors,
bei optional gleichzeitiger Verwendung einer Trinkblase. Hierzu findet sich eine separate Einstecktasche innerhalb
des Trinkblasenfachs. Außerdem können die Rucksäcke um eine Brustgurt-Halterung für Action Cams erweitert
werden.

4
ERGON BIKE ERGONOMICS
DE
Rückseite
Taschenaufteilung (empf. Einsatzzweck)
Außentaschen
1. Reparatur-Kit, Schlüssel
2. Pumpe
3. Erste-Hilfe
4. Werkzeug, Schlauch
5. Verschiedenes
6. Ersatzteile, Verschiedenes
Seite
Innentaschen
1. Geldbeutel
2. Telefon
3. E-Bike Akku (nur BA3 E / BA3 E Protect)
4. Trinkblase
5. Protektor BP100
6. Schutzbrille
Seite
Front
Front
Verbessertes Rückenklima
Die Rückenpolster sind mit einem speziellen
Abstandsgewirk bezogen. Dadurch wird die
Belüftung des Rückens während der Fahrt
gegenüber herkömmlichen Rucksäcken deutlich
verbessert. Durch die Anordnung ergeben sich
zwischen den Polstern Ventilations kanäle, in
denen der Fahrtwind zusätzlich für einen trockeneren Rücken sorgt.
1
2
3
4
5
6
1
2
3
4
5
6

5
DE
Die Einstellung der Rückenlänge des Rucksacks kann anhand der gemessenen Rückenlänge des Trägers eingestellt werden.
Nehmen Sie hierzu ein Maßband und messen Sie die kürzeste Strecke zwischen der fühlbaren Oberkante des Beckenknochens
und dem gewohnten Auflagepunkt der Gurte auf der Schulter (höchster Schulterpunkt). Suchen Sie den ermittelten Wert in der
Tabelle unten und stellen Sie den Rucksack auf die zugeordnete Rückenlänge ein (s. Seite 6 & 7).
Einstellung der Rückenlänge
Rückenlänge in
cm / inch
Empfohlene Einstellung
49 - 53 cm
19.3’’- 20.9’’
M
53 - 57 cm
20.9’’ - 22.4’’
L
45 - 49 cm
17.7’’- 19.3’’
S
57 - 61 cm
22.4’’ - 24’’
XL
Alle Angaben sind Richtwerte und gelten für durchschnittlich proportionierte Personen. Abweichungen hiervon sind möglich
und können – ebenso wie persönliche Vorlieben beim Tragen des Rucksacks – zu einem anderen Ergebnis führen.
Auflagepunkt
der Schultergurte
Oberkante
des Beckens

6
ERGON BIKE ERGONOMICS
DE
Einstellung der Rückenlänge
1. Klettverbindung lösen. 2. Ziehen Sie die geöffnete Klettlasche aus der Öse
der verstellbaren Rückenplatte.
3. Lösen Sie die Verbindung der Klettflächen, die das Rucksackfach und die verstellbare Rückenplatte verbinden und
halten Sie sie offen.
4. Ziehen Sie die Rückenplatte auf die gewünschte Größe
(S/M/L/XL) und schließen Sie die Klettflächen wieder. Die gewünschte Größe ist dann korrekt eingestellt, wenn eine grüne
Markierung oberhalb der entsprechenden Größenmarkierung
zu sehen ist.
5. Fädeln Sie die Lasche durch die Öse der gewünschten
Größe. Schließen die den Klettverschluss und verstauen Sie
das Ende der Lasche wieder in der Öffnung.
6. Die vorgebogene, horizontale Aluminiumschiene kann bei
Bedarf individuell angepasst werden. Sie verhindert ein „Ausbeulen“ des Rucksacks gegen den Rücken des Trägers.

7
DE
Abb. 1 Abb. 2
Anprobe
Lösen Sie die Schultergurte etwas und setzen Sie den Rucksack auf. Schließen Sie den Hüftgurt. Die optimale Gewichtsverteilung wird erreicht, wenn die Oberkante des Hüftgurtes
entlang der Oberkante des Becken knochens (+/– 3 cm)
verläuft und die Hüfte fest umschließt (nicht den Bauch!)
(Abb.1). Spannen Sie nun die Schultergurte bis diese ohne
großen Druck am Körper anliegen. Setzen Sie sich auf Ihr
Fahrrad oder in ähnlicher Weise auf einen Stuhl in Fahrposition und überprüfen Sie die Position der farbigen Justiermarke
auf den Schultergurten wie folgt: Die Rückenlänge ist richtig,
wenn Ihr Schlüsselbein den Schultergurt im Bereich der
farbigen Justiermarke kreuzt (Abb.2). Wenn dies nicht der
Fall ist, stellen Sie bitte die Rückenlänge neu ein.
Automatische Anpassung an die Schulterneigung
Durch die zwei D-Ringe mit denen die Schultergurte befestigt
sind, passt sich das Tragesystem automatisch an die Schul terform an. Durch Festziehen der Gurte wird diese Position fixiert.

8
ERGON BIKE ERGONOMICS
DE
Trinkblase / Trinkschlauch
Öffnen Sie das Trinkblasenfach und befestigen Sie die
befüllte Trinkblase an der Aufhängevorrichtung (Abb. 1).
Schließen Sie den Reißverschluss soweit, bis der Schlauch
in der dafür vorgesehenen Schlauchdurchführung rechts
eingeklemmt ist. (Abb. 2)
Beachten Sie die Hinweise auf Seite 10 bei der gleichzeitigen Nutzung von Trinkblase und E-Bike Akku.
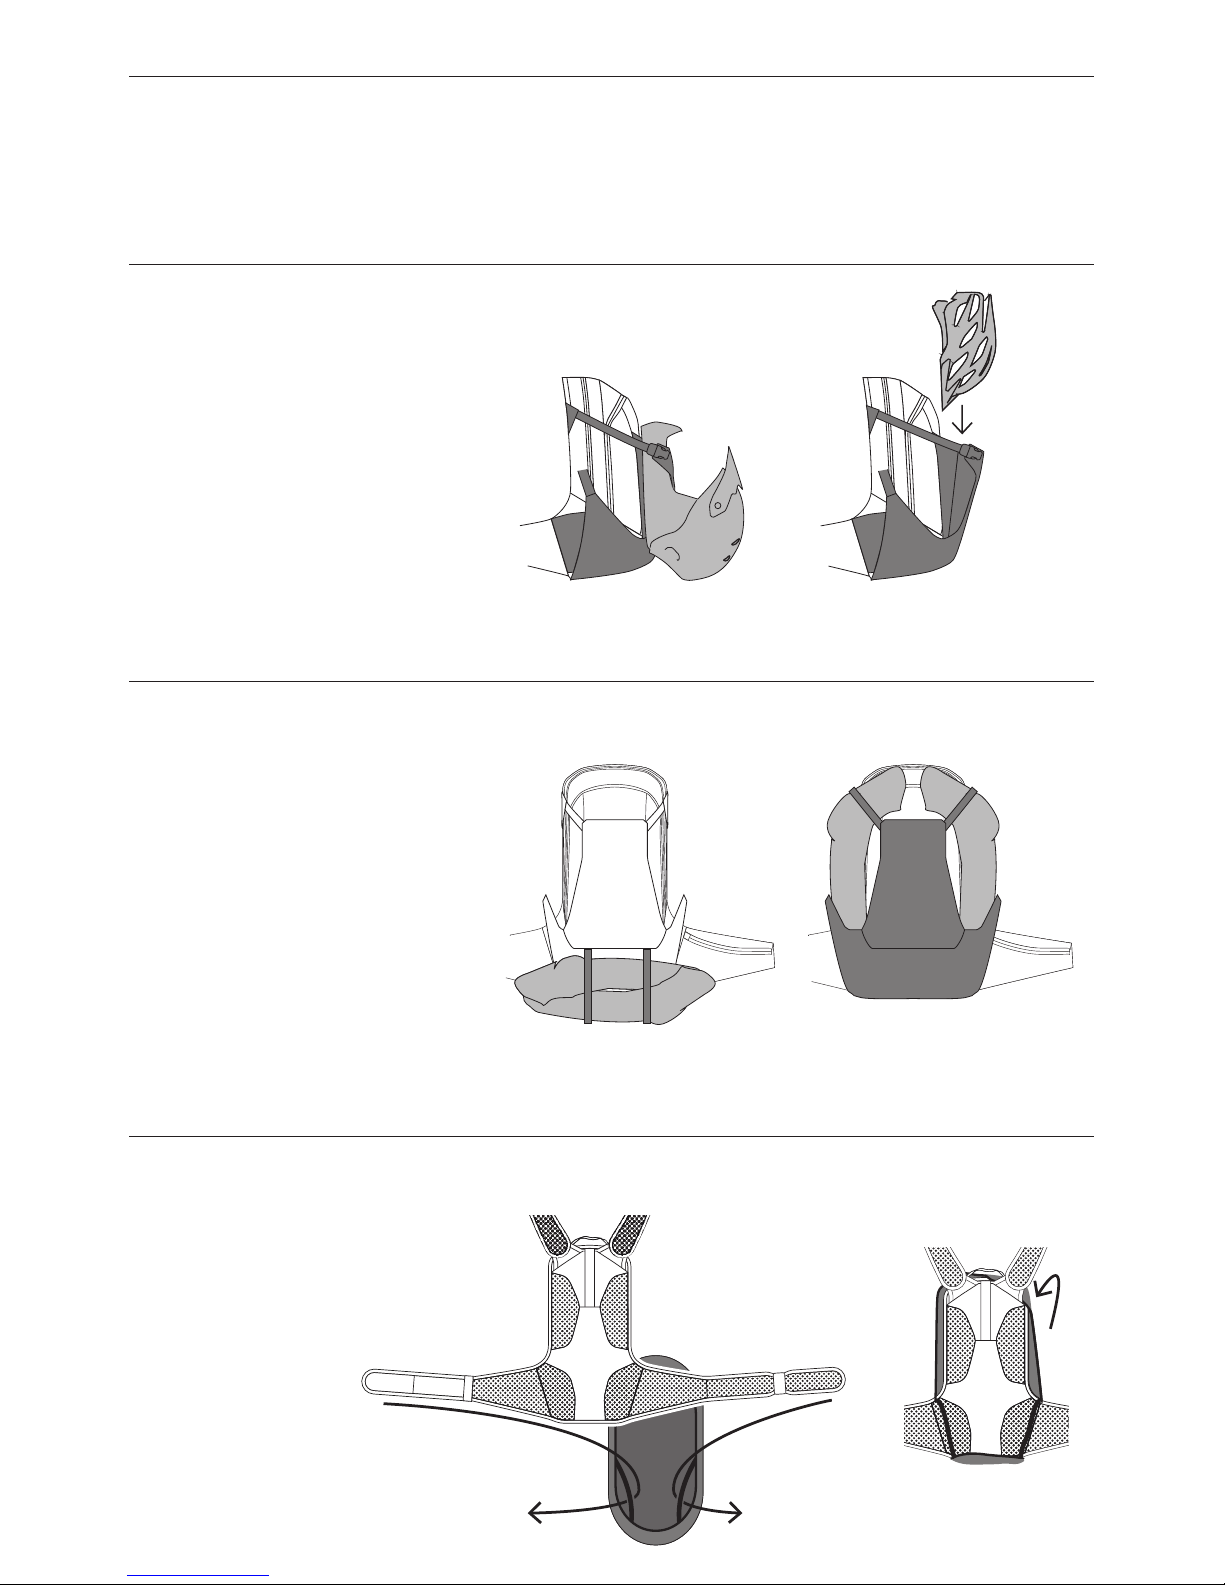
Durch Öffnen des Trinkblasenfachs gelangen Sie zur
Einstecktasche des Protektors. Der Reißverschluss sollte
möglichst geschlossen sein. Achten Sie bei der Benutzung
des Protektors darauf, dass dessen schwarze Seite
immer zum Rücken des Trägers zeigt.
Protektor BP100 (separat erhältlich/nicht in USA/CAN)
Die schwarze Seite des
Protektors zeigt zum
Rücken des Fahrers.
Abb. 1
Abb. 1
Abb. 2
Abb. 2
Abb. 3
Unbedingt die Anleitung des Protektors
BP100 lesen.

9
DE
Abb. 1
Abb. 1
Abb. 2
Abb. 2
Halter für Protektoren
Protektoren lassen sich durch die vertikalen Aufnahmegurte am unteren Bereich des Rucksacks
befestigen (Abb. 1). Mit Hilfe des variablen
Helmhalters können Protektoren auch problemlos seitlich angebracht werden (Abb. 2).
Abb. 1 Abb. 2
Helmhalter
Der variable Helmhalter ermöglicht die Befestigung eines Full-Face-Helms (Abb. 1) sowie
die Aufnahme eines Standard-Helms (Abb. 2).
Außerdem ermöglicht er die rasche Unterbringung zusätzlicher Ausrüstung und Bekleidung
sowie die Fixierung des Inhalts.
Rückseite
Regenhülle
Führen Sie den Hüftgurt durch die Schlaufen der
Regenhülle (Abb. 1). Ziehen Sie die Hülle rundum über den Rand des Rucksacks. (Abb. 2)

10
ERGON BIKE ERGONOMICS
DE
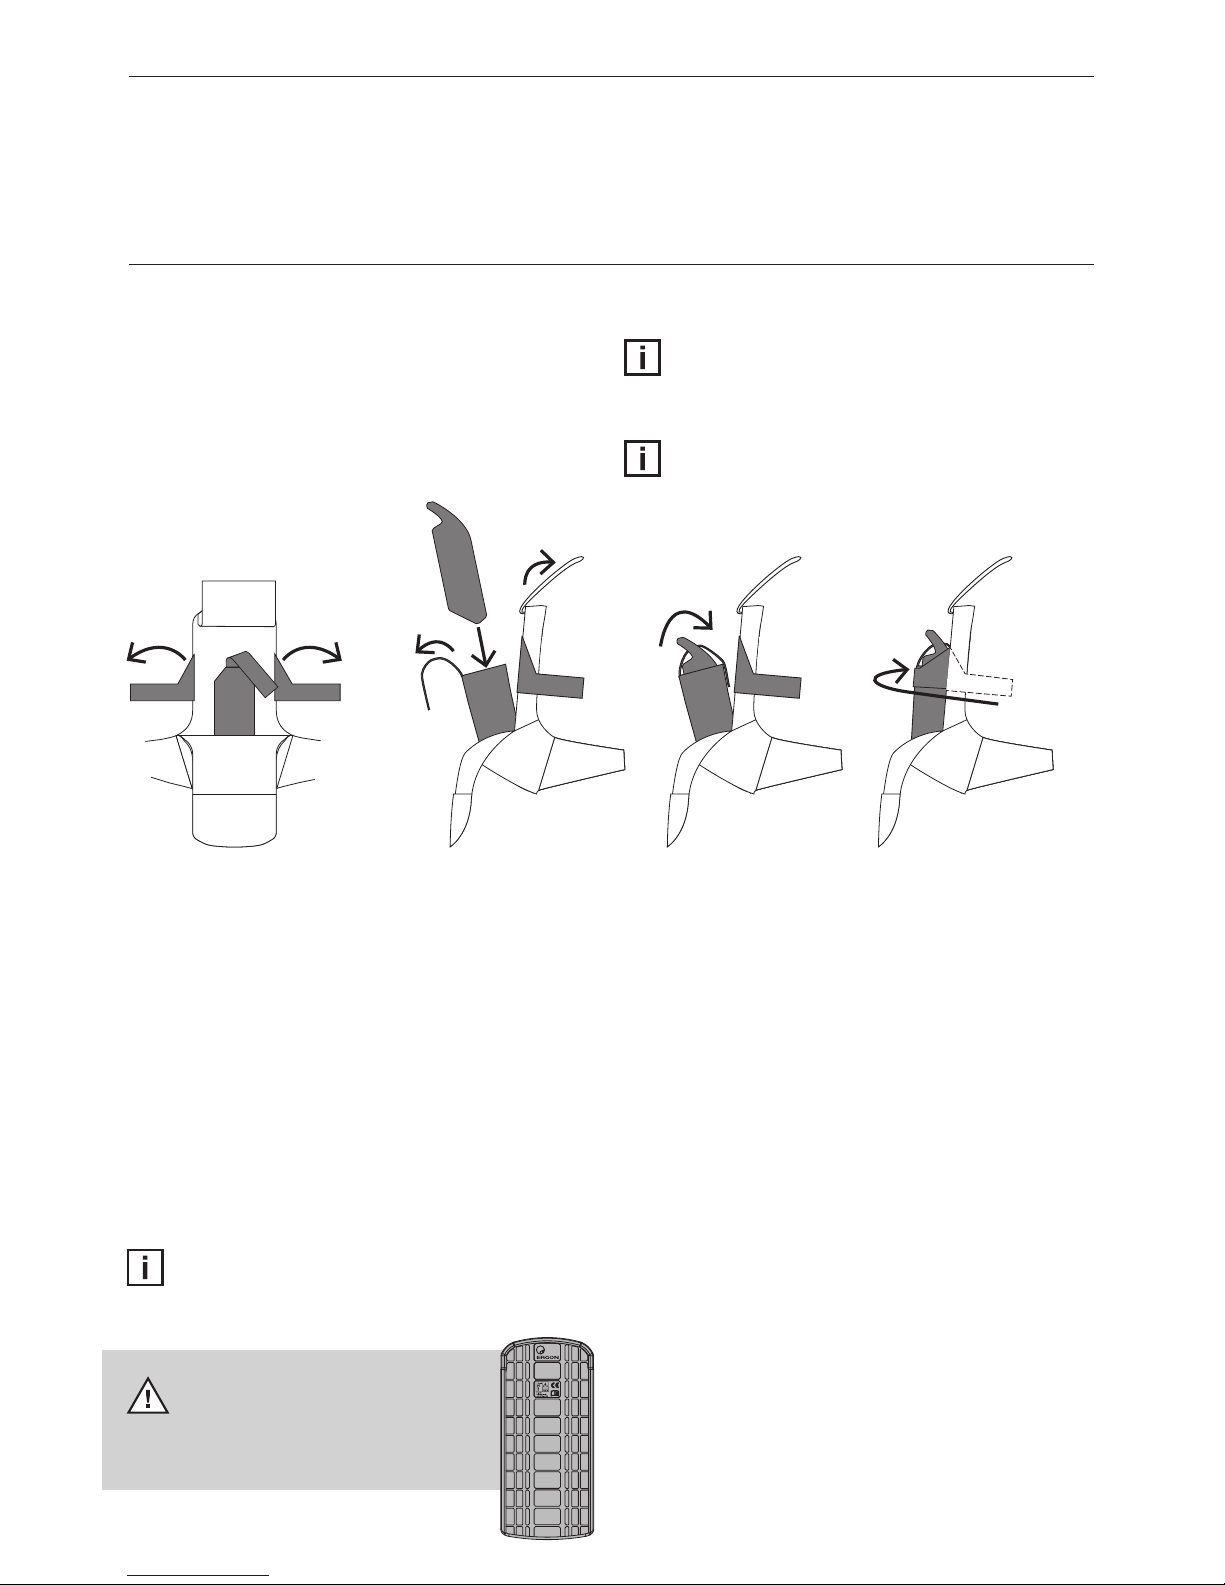
Befestigung des Akkus
Öffnen Sie das Hauptfach komplett und klappen Sie den
Taschenbeutel nach oben. Lösen Sie anschließend alle drei
Klettbänder des Batteriehalters und schwenken Sie diese nach
außen. Klappen Sie den Akkuhalter leicht nach außen und
schieben Sie den Akku hinein (Abb. 1 & Abb. 2). Schlagen Sie
das mittlere Klettband über den Akku (ggf. durch die Grifföffnung) und schließen Sie es auf der Rückseite (Abb. 3).
Klappen Sie den Halter zurück in den Rucksack und schließen
Sie die beiden übrigen Klettbänder über dem Halter (Abb. 4).
Gleichzeitige Nutzung von E-Bike Akku und Trinkblase
Der gleichzeitige Transport eines Akkus und der Trinkblase
BH300 ist nicht möglich. Wir empfehlen stattdessen das kleinere Modell BH150 an der dafür vorgesehenen Aufhängevorrichtung oben im Trinkblasenfach zu befestigen. Die Trinkblase
BH150 nur zu ca. 80% befüllen. Der Akku im Hauptfach sollte
erst nach der Trinkblase eingepackt werden um das Verstauen
zu erleichtern.
Das integrierte Batteriefach ermöglicht den sicheren Transport von abnehmbaren E-Bike Akkus. Drei verstellbare Klettbänder fixieren den Akku in alle Richtungen und erlauben eine
Anpassung an unterschiedliche Formen und Größen.
Batteriefach (nur BA3 E und BA3 E Protect)
Abb. 1 Abb. 2 Abb. 3
Seite
Front
Abb. 4
BATTERY
BAT
TE
RY
BATTERY
CB
Mitführen eines E-Bike Akkus nur
bei gleichzeitiger Nutzung eines
Protektors. Unbedingt den
Hinweisen auf Seite 8 folgen!
Da es eine Vielzahl von E-Bike Akkus auf dem Markt
gibt, kann eine 100%ige Kompatibilität nicht uneingeschränkt für alle Fabrikate gewährleistet werden.
Der Rucksack ist wasserabweisend, jedoch nicht
wasserdicht! Wir empfehlen den E-Bike Akku
separat zu verpacken.
Vergewissern Sie sich vor Antritt der Fahrt, dass der
E-Bike Akku weitgehend wackelfrei arretiert ist und
alle Klettbänder sicher geschlossen sind.

11
DE
Kürzen der Gurte
Die Gurte können bei Bedarf auf die gewünschte Länge gekürzt werden.
Anschließend die Schnittkanten mit einem Streichholz oder Feuerzeug
versengen um ein Ausfransen zu verhindern.
Prüfen Sie VOR dem Kürzen die richtige Grö ßen einstellung
des Rucksacks (s. Seite 5-6) und welche
Gurtlänge Sie tat-
sächlich benötigen! Zu kurz abgeschnittene
Gurte werden
nicht als Reklamationsgrund anerkannt! Nach dem Kürzen
ist das Produkt vom Umtausch ausgeschlossen!
+
Tipps zum Packen und Gewichtsverteilung
Packen Sie die schwersten Ausrüstungsgegenstände möglichst nahe am unteren Rücken entlang – davor die leichteren Sachen.
Außen am Rucksack sollten nur ganz leichte Dinge wie etwa Helm oder Ähnliches verstaut werden.
Hinweis
Der Rucksack ist wasserabweisend, jedoch nicht wasserdicht! Wir empfehlen elektronische Geräte sowie E-Bike Akkus separat
zu ver packen.
Reinigung und Pflege
Reinigen und trocknen Sie Ihren Ergon Rucksack gründlich nach jedem Gebrauch. Nehmen Sie dazu kaltes bis handwarmes
Wasser und einen weichen Schwamm. Wischen Sie die Innenseite des Rucksacks mit einem feuchten Tuch ab, um die Beschichtung zu schonen. Verwenden Sie kein heißes Wasser, Bleiche, Geschirrspülmittel, Einweichlösungen oder Fleckenreiniger. Bei
starker Verschmutzung sind ausschließlich detergentienfreie Seifen zu verwenden. Verwenden Sie auf keinen Fall Lösungsmittel
zur Reinigung Ihres Ergon Rucksacks, da diese die Beschichtung des Gewebes irreparabel beschädigen können. Durch die
Verwendung von Lösungsmitteln erlöschen jegliche Gewährleistungs- und Garantieansprüche. Zum Trocknen hängen Sie den
Rucksack in geöffnetem Zustand an einem luftigen und schattigen Ort auf und lassen ihn vollständig trocknen. Der Rucksack ist
nicht für Waschmaschinen und Trockner geeignet.
Lagerung
Lagern Sie Ihren Ergon Rucksack nie, wenn er feucht oder schmutzig ist, da sich sonst Schimmel auf dem Gewebe bilden kann.
Schäden durch Schimmel führen zu Geruchsbildung und können nicht behoben werden. Bewahren Sie Ihren Rucksack an einem
kühlen, trockenen Ort auf und schützen Sie ihn vor direkter Sonneneinstrahlung.
Sachmängelhaftung
Während der ersten zwei Jahre nach dem Kauf dieses Produkts haben Sie vollen Anspruch auf die gesetzliche Sachmängelhaftung (vormals Gewährleistung). Sollten Mängel auftreten, wenden Sie sich bitte unter Vorlage des Kaufbelegs an Ihren
Ergon-Fachhändler. Ein Gewährleistungsanspruch ist nach einem unsachgemäßen Gebrauch (Modifikation des Produktes,
Nichteinhalten der Warnhinweise dieser Anleitung) nicht gegeben.
Detailliertere Informationen zur Sachmängelhaftung / Reklamation finden Sie online unter
www.ergonbike.com/warranty oder einfach QR-Code scannen.

12
ERGON BIKE ERGONOMICS
DE

13
EN
WARNING
It is important to have read and understood these instructions before using the BA3. You should also be aware of the
risk of injury and death associated with the activity.
Explanation of signs / symbols used in these instructions.
Please pay particular attention to the following symbols when mounting the product.
Warning: Failure to follow the warning notices in these instructions could lead to injury or endanger your life.
Information: This symbol indicates additional information, for example about how to handle the product.
The explanation here serves as a description of the possible consequences of not following the instructions. These consequences
wont always be repeated when the symbols are used.
Advantages of the BA3 Backpack
The Ergon Development Team has designed a unique strap system, based on different approaches, which automatically adapts
to the anatomical features of the wearer. This means the shoulder straps as well as the hip strap align to the natural angle of the
shoulders or the hips without further adjustments. Thanks to 4-way back length adjustment, a completely new, individual level of
wearing comfort is created.
The load compression via the harness is another huge innovation. Both shoulder straps are connected along the underneath of
the backpack. This intelligent concept ensures that the equipment inside the backpack is always close to the body. Based on its
design, the backpack is much more stable and closer to the back than conventional backpacks.
Furthermore, the BA3 and BA3 E backpacks have the option of adding a protector, whilst also using a reservoir at
the same time, if desired. For this, there is a separate pocket within the hydration compartment. Additionally, a chest
strap mount for action cams can be added to the backpack.
Reservoir BH300
(optional)
Protector BP100*
(BA3 & BA3 E: optional,
BA3 E Protect: inclusive)
* not available in USA/ CAN
Reservoir BH150
(optional)
Sport Camera Chest Mount
(optional)

14
ERGON BIKE ERGONOMICS
EN
Back
Pack Layout (recommended use)
External Layout
1. Puncture Repair Kit, Keys
2. Pump
3. First Aid
4. Tools, Tube
5. Miscellaneous
6. Spare parts
Side
Internal Layout
1. Wallet / Purse
2. Cell Phone
3. Battery (only BA3 E / BA3 E Protect)
4. Hydration
5. Protector
6. Goggles
Side
Front
Front
Improved Ventilation
The backpack using contact padding which
is specially designed with ventilation in mind
– a large open weave allows air to flow freely.
This improves air flow when riding – especially
compared to traditional designs. These pads are
laid out to create air channels – perfect for drying
any moisture which may exist.
1
2
3
4
5
6
1
2
3
4
5
6

15
EN
The backpack back length can be adjusted based on the measured back length of the wearer.
To do this, using a measuring tape, measure the shortest distance between the noticeable top of the pelvic bone and the usual
support point of the straps on the shoulders (highest shoulder point). Find your measurement in the table and adjust the backpack
to the corresponding back length (see pages 16 & 17).
Adjusting The Back Length
Back Length in
cm / inch
Recommended Setting
49 - 53 cm
19.3’’- 20.9’’
M
53 - 57 cm
20.9’’ - 22.4’’
L
45 - 49 cm
17.7’’- 19.3’’
S
57 - 61 cm
22.4’’ - 24’’
XL
All details are guidelines only and apply to people with average proportions. Variations are possible and can lead to a
different result - as can personal preferences when wearing a backpack.
Support point
of the shoulder
straps
Top of
the pelvis

16
ERGON BIKE ERGONOMICS
EN
Adjusting the Back Length
1. Loosen the Velcro. 2. Pull the opened Velcro strap from the eye
of the adjustable back plate.
3. Loosen the connection of the Velcro surfaces that connect
the backpack compartment and the adjustable back plate
and hold it open.
4. Pull the back plate to the required size (S/M/L/XL), and
close the Velcro again. The required size is correctly set when
a green marker can be seen above the relevant size marking.
5. Thread the strap through the eye of the required size.
Close the Velcro and stow the end of the strap in the
opening.
6. The contoured, horizontal aluminium bar can be individually
adjusted, if required. It prevents the backpack from bulging
against the wearer’s back.

17
EN
Adjustment
Loosen the shoulder straps and put the pack on. Fasten the
hip belt. The hip belt is correctly positioned when the top of
the hip belt follows the line of the pelvis (+/- 3cm) and relatively
tight. It should not be positioned across the stomach (Fig. 1).
Tighten the shoulder straps until there is little or no
slack in the
system. They should not press into your shoulders.
Sit on a
bicycle, or on a stool and mimic the position on a
bicycle. The coloured adjustment marks allow the user to
check that the back length is correctly adjusted. This is the
case when the coloured adjustment marks cross the
collarbones (Fig. 2). If this is not the case, please re-adjust the
pack.
Fig. 1 Fig. 2
Automatic Adjustment of the Shoulder Strap Angles
Thanks to the two D-rings at the top of the shoulder straps, the
carrying system has a certain amount of automatic adjustment.

18
ERGON BIKE ERGONOMICS
EN
Hydration / Drinking Tube
Open the Hydration compartment and fix the filled reservoir
on the mount (Fig. 1). Close the zip until the tube is clamped in the tube feed-through provided on the right (Fig. 2).
Note the information on page 22 when using the
hydration reservoir and e-bike battery at the same time.
Using the opening for the hydration reservoir compartment, a
back protector can be inserted. Please ensure that the black
side of the back protector faces the back of the user. The
zipper should then be closed as much as possible at each
side.
Warning: The black side of the impact protector always
faces the wearer‘s back (Fig. 1).
Fig. 1
Fig. 1
Fig. 2
Fig. 2
Fig. 3
Please ensure that the
black side of the impact
protector faces the back
of the user.
Always read the instructions for the BP100
impact protector.
Impact Protector BP100 (available separately)
19
EN
Back
Helmet Carrying
The adjustable helmet holder allows a full-face
helmet to be carried (Fig. 1), or a standard
bicycle helmet (Fig. 2). In addition it can be used
to carry other items such as clothing. It also
allows the pack’s contents to be secured.
Carrying Arm / Leg Protectors
Arm / Leg protectors can be carried using the
vertical straps on the underside of the backpack
(Fig. 1). Protectors can also be carried using the
adjustable helmet flap (Fig. 2).
Rain Cover
Guide the hip strap through the rain cover loops
(Fig. 1). Pull the cover all around the edge of the
backpack (Fig. 2).
Fig. 1
Fig. 2
Fig. 1 Fig. 2
Fig. 1
Fig. 2
20
ERGON BIKE ERGONOMICS
EN
Mounting the Battery
Completely open the main compartment and fold the pocket
pouch upwards. Then loosen all three battery mount Velcro
straps and move them outwards. Slightly turn the battery
mount outwards and insert the battery (Fig. 1 and 2). Put the
middle Velcro strap across the battery (if necessary, through
the handle opening) and close it on the back (Fig. 3).
Fold the mount back into the backpack and close the other
two Velcro straps across the mount (Fig. 4).
Using the E-bike Battery and the Reservoir at the
same Time
Transporting a battery and the BH300 reservoir at the same
time is not possible. Instead, we recommend fixing the smaller
BH150 model to the mount provided at the top of the hydration
reservoir compartment. Only fill up the BH150 reservoir to 80%.
Pack the battery in the main compartment after the reservoir to
make stowage easier.
The integrated battery compartment enables the safe transport
of removable e-bike batteries. Three adjustable Velcro straps
fix the battery in all directions and enable adjustment to
different shapes and sizes.
Battery Compartment (only BA3 E and BA3 E Protect)
Fig. 1 Fig. 2 Fig. 3
Side
Front
Fig. 4
BATTERY
BAT
TE
RY
BATTERY
CB
Transport an e-bike battery only
when using a protector at the
same time. Make sure you follow
the notices on page 18!
Since there are numerous e-bike batteries in the market,
100% compatibility cannot be guaranteed for all makes.
The backpack is water-repellent but not waterproof!
We recommend packing the e-bike battery separately.
Before setting off, ensure the e-bike battery has been
fixed so that shaking is prevented as much as
possible, and that all Velcro straps are closed.

21
EN
Shortening the Belts
The belts can be shortened to the desired length if necessary. Afterwards,
use a match or a lighter to melt the edges of the cut to prevent fraying.
BEFORE shortening the belts, be sure the backpack size is
correctly adjusted (see page 15 & 16) and that you know the
belt length you actually need! Belts that have been
overshortened cannot be considered a reason for return of
the product! After shortening, the product cannot be
replaced!
+
Tips for Packing the Bag and Weight Distribution
Pack heavy articles first (so they are at the bottom of the pack). Only pack lightweight items (such as a helmet or rain jacket) using
the helmet holder.
Cleaning and Maintenance
Clean and dry your pack after each use to keep it in top condition. Use only luke warm water and a soft sponge. Wipe the pack
internally with a damp cloth – this protects the coating on the fabric. Do not use hot water, bleach, washing up liquid, solvents,
paint or stain removers. For stubborn stains use a detergent free soap. Use of solvents on your backpack will damage the water
resistant coating irreparably. Failure to follow these instructions will result in an invalidated warranty. To dry, hang the open pack in
a cool, dry, well ventilated place out of direct sunlight. The backpack may not be machine washed or dried.
Note
The backpack is water-repellent but not waterproof! We recommend packing electronic devices as well as
e-bike batteries separately .
Storage
Never put an Ergon backpack away wet or dirty. This could lead to mould which can damage the fabrics and cause unpleasant
smells. Store the pack in a cool, dry place out of direct sunlight.
Warranty
Ergon warrants to the original retail purchaser that this product is free from defects in material and workmanship for (2) two years
from the date of original retail purchase. If you have any cause to return the product please take it to a specialist bicycle retailer
together with proof of purchase. The product warranty does not cover modified products, or products used in a way not intended
or set out in this document. Failure to follow all instructions will invalidate the warranty.
Please see the current full warranty policy at www.ergonbike.com/warranty
or scan QR-code for details.

22
ERGON BIKE ERGONOMICS
EN

23
F
Il est primordial d‘avoir lu et compris ces instructions d‘emploi avant d‘utiliser le BA3. En outre, vous devriez avoir
conscience des risques de blessures et de mort liés à votre activité.
Explication des caractères / symboles dans le présent mode d‘emploi:
lors du montage, accordez une attention particulière aux symboles suivants.
Avertissement: Le non-respect des avertissements présents dans ce mode d’emploi peut entraîner des blessures graves
ou mortelles.
Information : ce symbole fait référence aux informations supplémentaires, p. ex. sur la manipulation du produit.
Les conséquences éventuelles qui sont décrites ci-dessus ne sont pas toujours expliquées dans le mode d‘emploi quand ces
symboles apparaissent.
Les avantages du sac à dos BA3
Par différentes méthodes, l’équipe de développement Ergon a créé un système de sangles unique qui s’adapte automatiquement
à l’anatomie du porteur. Ainsi, les sangles des épaules et des hanches s’adaptent naturellement à la courbure des épaules ou
des hanches sans réglage nécessaire. Par ailleurs, avec ses 4 longueurs réglables, le sac à dos offre un confort personnalisé
totalement nouveau.
Autre grande innovation : la compression de charge du système de transport. Les deux sangles des épaules sont reliées entre la
partie basse du sac à dos. Ce concept intelligent permet de maintenir le sac le long du corps. Grâce à sa structure, ce sac à dos
est beaucoup plus stable et proche du dos qu’un sac à dos classique.
En outre, les sac à dos BA3 et BA3 E offrent la possibilité d’ajouter un protecteur si vous utilisez également une
poche à eau en option. Un compartiment a été spécialement prévu à cet effet dans le compartiment de la poche à
eau. De plus, les sac à dos peuvent être équipés d’une fixation au niveau de la sangle de poitrine pour attacher une
Action Cam.
Sac à eau BH300
(optionel)
Sport Camera Chest Mount
(optionel)
Protecteur BP100*
(BA3 & BA3 E: optionel,
BA3 E Protect: inclus)
AVERTISSEMENT
Sac à eau BH150
(optionel)

24
ERGON BIKE ERGONOMICS
F
Arrière
Présentation du sac à dos (usage recommandé)
Disposition extérieure
1. Outils, clés
2. Pompe
3. Trousse de premiers soins
4. Trousse de réparation pour chambre à air,
pièces de rechange diverses
5. Divers
6. Autres / pièces de rechange
Côté
Disposition intérieure
1. Portefeuille / sac à main
2. Portable
3. Batterie de vélo électrique.
(uniquement BA3 E / BA3 E Protect)
4. Sac à eau
5. Protecteur BP100
6. Lunettes de protection
Côté
Avant
Avant
Ventilation améliorée
Les coussinets dorsaux rembourrés sont
composés d‘un épais tissu à mailles de
ventilation. Pendant le trajet, celui-ci assure
une aération du dos nettement supérieure à
celle d‘un sac à dos ordinaire. Cette confection
permet la création de canaux de ventilation entre
les coussinets, dans lesquels le vent s‘introduit
pour maintenir le dos au sec.
1
2
3
4
5
6
1
2
3
4
5
6

25
F
La longueur du sac à dos peut être réglée en fonction de la taille du dos du porteur.
Pour ce faire, utilisez un mètre et mesurez la plus petite longueur entre l’arête supérieure sensible du bassin et l’endroit où la
sangle est habituellement posée sur l’épaule (sommet de l’épaule). Recherchez la valeur mesurée dans le tableau et réglez le sac
sur la longueur indiquée (v. p. 26 et 27).
Réglage de la longueur
Longueur en
cm / inch
Réglage recommandé
49 - 53 cm
19.3’’- 20.9’’
M
53 - 57 cm
20.9’’ - 22.4’’
L
45 - 49 cm
17.7’’- 19.3’’
S
57 - 61 cm
22.4’’ - 24’’
XL
Toutes les informations sont données à titre indicatif pour une personne aux proportions moyennes. Des écarts sont possible
et peuvent entraîner un résultat différent, tout comme les préférences personnelles quant au port du sac.
Point où la sangle
d’épaule est posée
Arête supérieure
du bassin

26
ERGON BIKE ERGONOMICS
F
Réglage de la longueur
1. Détachez la bande Velcro. 2. Retirez la bande Velcro ouverte de l’œillet
du dossier réglable.
3. Retirez les sangles des bandes Velcro qui relient le
compartiment du sac à dos au dossier réglable et maintene
les ouvertes.
4. Réglez le dossier à la taille souhaitée (S/M/L/XL) et refermez
les bandes Velcro. La taille est correctement réglée si vous
voyez un marquage vert au-dessus de l’indication de la taille
correspondante.
5. Glissez les sangles dans les œillets de la taille souhaitée.
Fermez les bandes Velcro et placez le bout de la sangle dans
l’ouverture.
6. En cas de besoin, la bande d’aluminium horizontale
précambrée peut être adaptée à chaque porteur. Elle évite que
le sac à dos ne crée une bosse contre le dos du porteur.

27
F
Adjustment
Desserrez les bretelles et enfilez le sac à dos. Attachez
maintenant la ceinture. Cette dernière devrait être assez serrée
et déposée le long de la région pelvienne, pas au niveau du
ventre (Fig. 1). Réglez les bretelles jusqu’à ce que tout le
système soit bien ajusté (elles ne devraient pas presser les
épaules). Asseyez-vous ensuite sur un vélo ou placez-vous
sur un tabouret et inclinez-vous vers l’avant
(comme sur un vélo). Les marques d’ajustement coloré
permettent de déterminer si la ceinture est assez serrée et si
la longueur du dos est correctement réglée. Si les marques
d’ajustement coloré se croisent, l’ajustement est parfait.
(Fig. 2). Sinon, il faut recommencer le réglage.
Fig. 1 Fig. 2
Ajustement automatique de l’angle des bretelles
Le sac à dos BA3 d’Ergon comporte un système d’ajustement
automatique: les anneaux en forme de D situés au-dessus de
chacune des bretelles règle l’angle de ces dernières.

28
ERGON BIKE ERGONOMICS
F
Poche / Tube à eau
Ouvrez le compartiment de la poche à eau et attachez
la poche remplie à l’aide des fixations (Fig. 1). Fermez la
fermeture éclair jusqu’à ce que le tube soit bloqué dans le
passage de flexible prévu à cet effet à droite (Fig. 2).
Suivez les instructions de la page 30 en cas d’utilisation
simultanée d’une poche à eau et d’une batterie de vélo
électrique.
Ouvrez le compartiment pour sac à eau pour accéder à
la poche du protecteur. Lors de l‘utilisation du protecteur,
assurez-vous que sa face noire est toujours orientée vers
le dos du porteur.
La fermeture éclair doit si possible est fermée aux deux
extrémités. Attention: La face noire de la protection doit
toujours être orientée vers le dos du porteur (Fig. 1).
Fig. 1
Fig. 1
Fig. 2
Fig. 2
Fig. 3
La face noire du
protecteur est
orientée vers le
dos du cycliste.
Il est impératif de lire le mode d‘emploi de la
protection dorsale BP100.
Protection dorsale BP100 (vendue séparément)

29
F
Arrière
Compartiment à casque
Le compartiment à casque ajustable vous permet
de transporter un casque intégral (Fig. 1) ou
conventionnel (Fig. 2). Vous pouvez également y
insérer d‘autres items tels que des vêtements. Il
protège enfin le contenu du sac à dos.
Housse de pluie
Faites glisser la sangle de hanche dans les
boucles de la housse de pluie (Fig. 1). Placez la
housse le long des bords du sac à dos. (Fig. 2)
Fig. 1
Fig. 2
Fig. 1 Fig. 2
Fig. 1
Fig. 2
Système de transport pour protège-bras/
jambes
Transportez vos protège-bras/jambes grâce aux
courroies verticales situées en dessous du sac à
dos (Fig. 1). Servez-vous du rabat ajustable de
casque pour transporter votre équipement de
protection (Fig. 2).

30
ERGON BIKE ERGONOMICS
F
Fixation de la batterie
Ouvrez entièrement le compartiment principal et relevez la
doublure. Ensuite, ouvrez les trois bandes Velcro du portebatterie et maintenez-les ouvertes. Relevez le porte-batterie
et glissez la batterie à l’intérieur (Fig. 1 et 2). Rabattez la
bande Velcro du milieu sur la batterie (le cas échéant à travers
l’ouverture de poignée) et fermez-la à l’arrière (Fig. 3).
Replacez le porte-batterie dans le sac à dos et fermez les deux
bandes Velcro restantes sur le porte-batterie (Fig. 4).
Utilisation simultanée d’une batterie de vélo électrique et
d’une poche à eau
Il n’est pas possible de transporter simultanément une batterie
et une poche à eau BH300. Nous conseillons plutôt d’attacher
le petit modèle BH150 au dispositif de fixation prévu à cet effet
en haut du compartiment de poche à eau. La poche à eau
BH150 ne doit être remplie qu’à 80 %. La batterie ne doit être
insérée dans le compartiment principal qu‘une fois la poche à
eau installée pour faciliter le stockage.
Le compartiment de batterie intégré permet de
transporter les batteries de vélos électriques amovibles en
toute sécurité. Trois bandes Velcro réglables fixent la
batterie dans tous les sens et s’adaptent aux différentes
formes et tailles de batteries.
Compartiment de batterie
(uniquement pour BA3 E et BA3 E Protect)
Fig. 1 Fig. 2 Fig. 3
Côté
Avant
Fig. 4
BATTERY
BAT
TE
RY
CB
Utilisez toujours un protecteur
lorsque vous emmenez une
batterie de vélo électrique. Suivez
obligatoirement les instructions de
la page 28 !
Dans la mesure où de nombreuses batteries de vélos
électriques existent sur le marché, une compatibilité
totale, illimitée, avec toutes les marques, ne peut pas être
garantie.
Le sac à dos est déperlant mais n’est pas étanche à
100 % ! Nous conseillons d’emballer séparément
la batterie de vélo électrique.
Avant de démarrer votre déplacement, assurez-vous
que la batterie de vélo électrique soit bien stable et
que toutes les bandes Velcro soient bien fermées.
BATTERY

31
F
Raccourcir les courroies
Si nécessaire, vous pouvez raccourcir les courroies à la longueur qui
vous convient. Ensuite, faites chauffer les nouvelles extrémités à l‘aide
d‘une allumette ou d‘un briquet, afin d‘éviter que les courroies ne
s‘effilochent.
AVANT de raccourcir les courroies, veuillez vous assurer
d‘avoir correctement ajusté la taille du sac à dos (voir
page 25 & 26) et vérifiez de quelle taille de courroie vous
avez vraiment besoin ! Des courroies coupées trop court
ne représentent pas un motif de réclamation valide. Une
fois les courroies raccourcies, le produit ne peut plus être
échangé.
+
Conseils de chargement et de répartition de poids
Mettre les articles les plus lourds en premier (pour qu’ils soient au bas du sac à dos). Les articles plus légers tels qu’un casque ou
un imperméable seront empaquetés dans le compartiment à casque.
Nettoyage et entretien
Pour le maintenir en bon état, nettoyez votre sac à dos après chaque sortie avec une éponge douce et de l’eau tiède, puis
faites-les sécher. Protégez le revêtement du tissu à l’intérieur du sac en l’essuyant avec un chiffon humide. N’utilisez pas d’eau
chaude, d’eau de Javel, de détergents, de solvants, de peinture ni de détachants. Pour les taches tenaces, choisissez un savon
sans détergent. Les solvants endommagent le revêtement résistant à l’eau. Le non-respect de ces instructions risque d’invalider
la garantie. Pour le sécher, ouvrez votre sac à dos et accrochez-le dans un endroit frais, sec, bien ventilé et à l’abri du soleil. Il ne
doit pas être lavé ni séché à la machine.
Remarque
le sac à dos est déperlant mais n’est pas étanche à 100 % ! Nous conseillons d’emballer séparément les appareils électroniques
et les batteries de vélos électriques.
Entreposage
Ne rangez jamais un sac à dos Ergon lorsqu’il est sale ou mouillé, car il risque de moisir. Cette moisissure peut endommager le
tissu, en plus de causer des odeurs désagréables. Accrochez-le dans un endroit frais, sec, bien ventilé et à l’abri du soleil.
Garantie
Pendant les deux premières années suivant l‘achat de ce produit, vous bénéfi ciez d‘une garantie totale sur les vices cachés
légaux (anciennement appelée „garantie“). N‘oubliez toutefois pas que le sac à dos subissent une usure naturelle. En cas de
manquements, adressez-vous à votre revendeur Ergon en vous munissant de la preuve d‘achat. Un emploi non conforme
(modifi cation du produit, nonrespect des avertissements présents dans le présent mode d‘emploi) supprime tout droit à la
garantie.
Veuillez consulter la politique de garantie complète en vigueur sur
www.ergonbike.com/warranty ou scanner votre code QR pour de plus amples informations.

32
ERGON BIKE ERGONOMICS
F

Ergon® is a worldwide trademark. Ergon reserves the right to change any products
without prior notice. Druckfehler, Irrtümer und Änderungen vorbehalten.
ERG_MAN_BA3_OCT_2017
Ergon Bike Ergonomics
RTI Sports GmbH
Universitaetsstr. 2, 56070 Koblenz / Germany
T +49 (0) 261 899998-28, F +49 (0) 261 899998-19
info@ergonbike.com, ergonbike.com
ERGONBIKE.COM
 Loading...