

Page 1
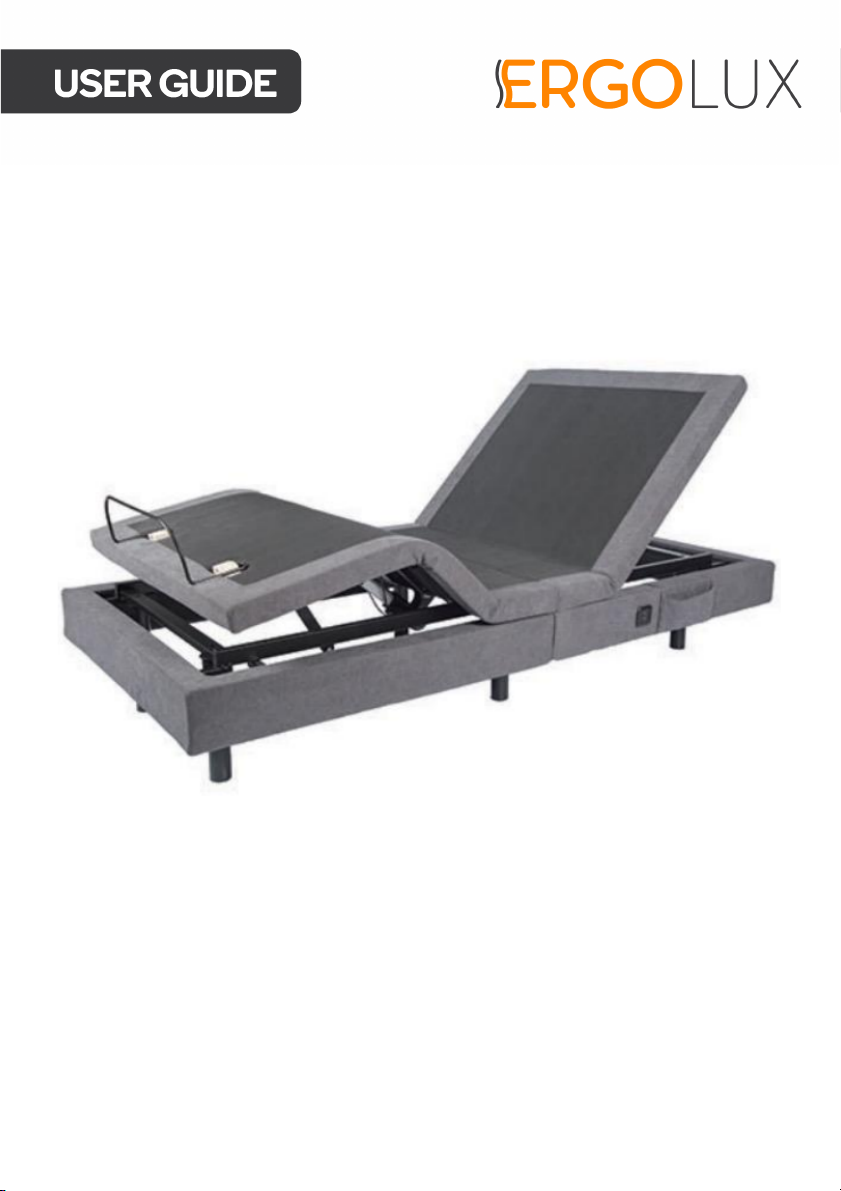
EVA MASSAGE BED FRAME
ELEVAMSBKSA
Page 2

Page 3

SAFETY & WARNINGS
Please read these safety instructions thoroughly before using this product. Retain this guide
for future reference.
When using electrical furnishings, basic precautions should always be followed, including
the following:
To r e d u c e t h e r i s k o f b u r n s , f i r e , e l e c t r i c s h o c k o r i n j u r y t o p e r s o n s :
• Unplug from the power outlet before installing or removing any parts.
• Always unplug this product from the power outlet before cleaning or performing
any maintenance.
• Close supervision is necessary when this product is used by or near children,
invalids or disabled persons.
• Keep children away from under the head and foot of the base when moving.
• Use this furnishing only for its intended use as described in these instructions. Do
not use attachments not recommended by the manufacturer.
• If this product or its power cord and plug show any sign of damage or is dropped in
water, cease use immediately and contact Kogan.com for support.
• Keep the power cord away from open flames and other sources of heat.
• Do not drop or insert any objects into any openings on this product.
• This product is not suitable for outdoor use.
• Do not operate where aerosol (spray) products are being used or where oxygen is
being administered.
• To d i s c o n n e c t , t u r n a l l c o n t r o l s t o t h e o f f p o s i t i o n , t h e n disconnect the power cord
from the outlet.
• Do not reach under the base during operation.
• Do not use near people using or wearing medical devices.
• This product is only suitable for household/residential use only.
War nin g: Risk of electric shock:
• This product must only be connected to a properly grounded power outlet.
• This product must be grounded. If it should malfunction or breakdown, grounding
provides a path of least resistance for electric current to reduce the risk of electric
shock.
• This product is equipped with a cord having an equipment-grounding conductor
and a grounding plug. The plug must be plugged into an appropriate outlet that is
properly installed and grounded in accordance with all local codes and ordinances.
Page 4

Danger:
• Improper connection of the equipment grounding conductor can result in a risk of
electric shock. Check with a qualified electrician or serviceman if you are in doubt
as to whether the product is properly grounded.
• Do not modify the plug provided with the product. If it will not fit the outlet, have a
proper outlet installed by a qualified electrician.
• For be st re sult s, yo ur powe r b ase shoul d be p lugge d int o a s urge pro tec tor (no t
included).
• This product is for use on a circuit having a standard rating of 120 volts and is
factory equipped with a specific electric cord and plug to permit connection to a
proper electric circuit. Make sure that the product is connected to an outlet having
the same configuration as the plug.
• An adapter should not be used with this product. If the product must be
reconnected for use on a different type of electric circuit, the reconnection should
be made by qualified service personnel.
Important safety features:
• Use this furnishing only for its intended use as described in these instructions.
• Do not use with any attachments that are not supplied with this product.
• If there is an overload weight condition on the head or foot mechanism, the control
unit will automatically stop all functions. Once the excess weight is removed the
control unit will automatically allow all functions to resume operation after 30
seconds.
• As with any product that produces a vibrating motion, it is possible that some
pacemakers may interpret this motion as a false sense of movement and or
exercise. This may or may not affect your pacemaker. If you have any concerns,
please consult your physician before use.
• This product has designed with no user serviceable parts. Do not repair or modify
this product in any way.
• To a v o i d d a m a g e t o t h e bed frames, always open the carton while it is laying flat
on the floor.
• Lifting of the adjustable bed frame must be performed by two (2) people;
In-home use and hospital disclaimer:
• This product is designed for in-home use only. It is not designed for hospital use and
is not designed to meet hospital standards.
• Do not use this bed with tent type oxygen therapy equipment or near explosive
gases.
Page 5

Small children and pets warning:
• After unboxing this product, immediately dispose of all packaging.
• To a v o i d i n j u r y , c h i l d r e n a n d p e t s s h o u l d n o t b e a l l o w e d t o p l a y o n o r u n d e r t h is
product.
• This product is not intended for use by persons (including children) with reduced
physical, sensory or mental capabilities or lack of experience and knowledge,
unless they have been given supervision or instruction concerning use of the
product in a safe way by the person responsible for their safety, and understand
the hazards involved.
• For be st per form ance, you shou ld ent er and exit the bed while it is in the flat or fully
lowered position.
• Do not sit on the head or foot sections while in the raised position.
Intended usage
This product should be installed with the headboard brackets and/or the head of the frame
positioned close to a wall.
Page 6
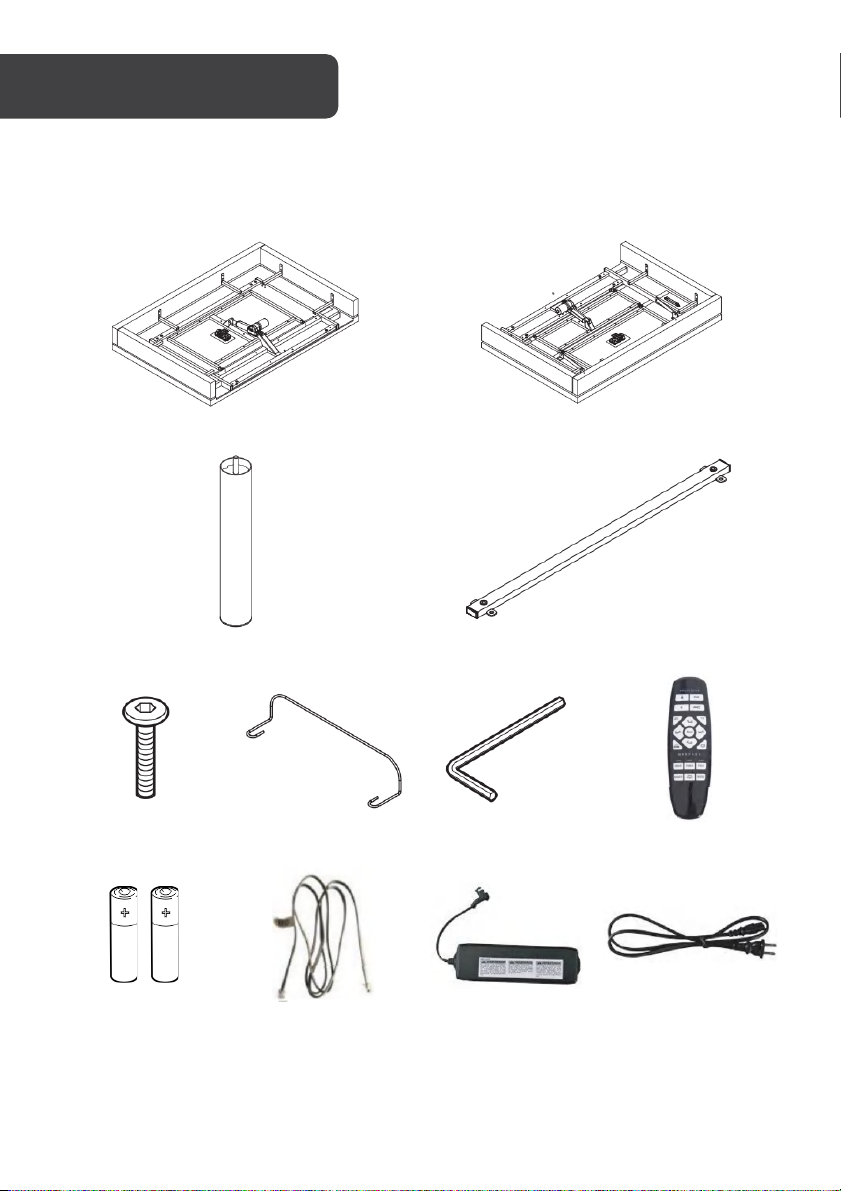
Bed Frame A
Bed Frame B
Legs (x6)
Frame Bracket
Screws (x4)
Retainer Bar
Allen Key
Remote
AAA Batteries (x2)
Sync Cable
Power Supply
Power Cord
Lay all components out on a clean floor and ensure all parts are included. If any pieces are
missing, check all packaging thoroughly, then contact help.Kogan.com for assistance.
Page 7
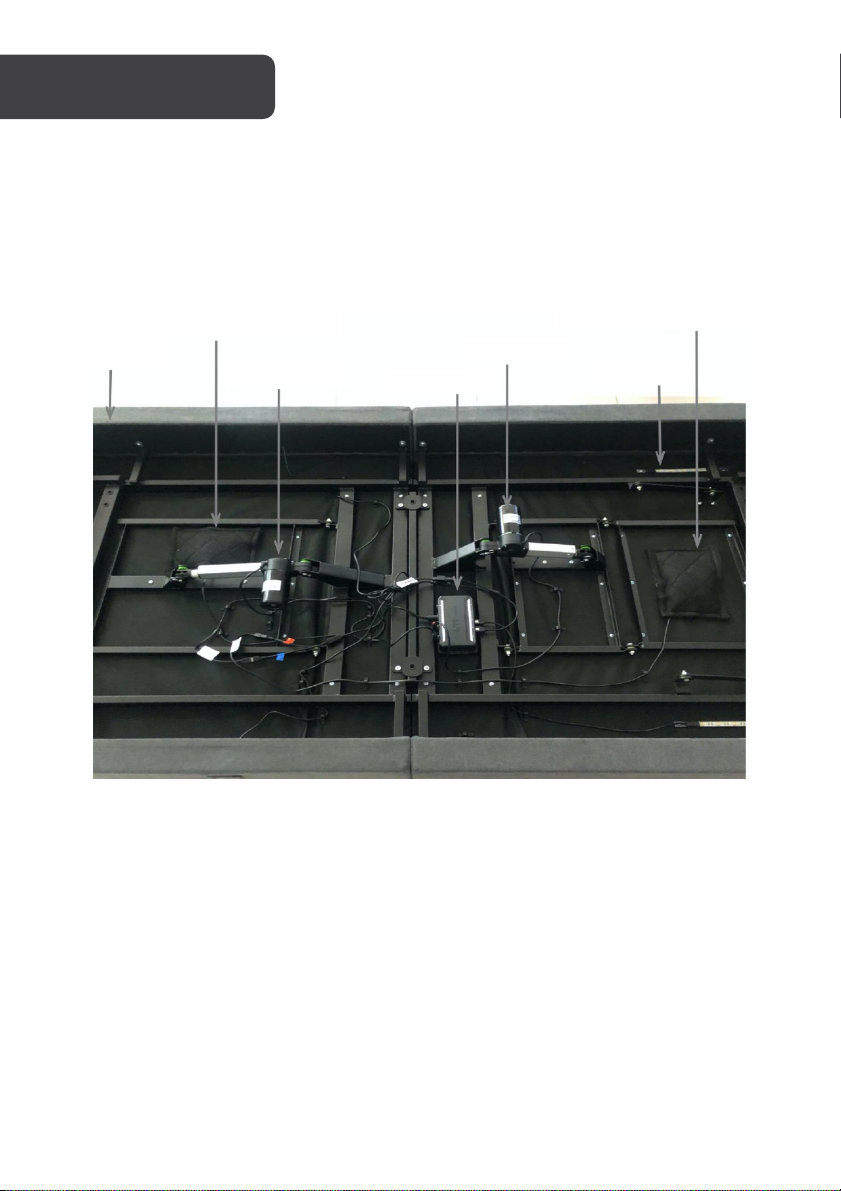
Head massage
motor
Foo t mo tor
LED light
Foo t massage
motor
Head motor
USB port
Control box
Page 8
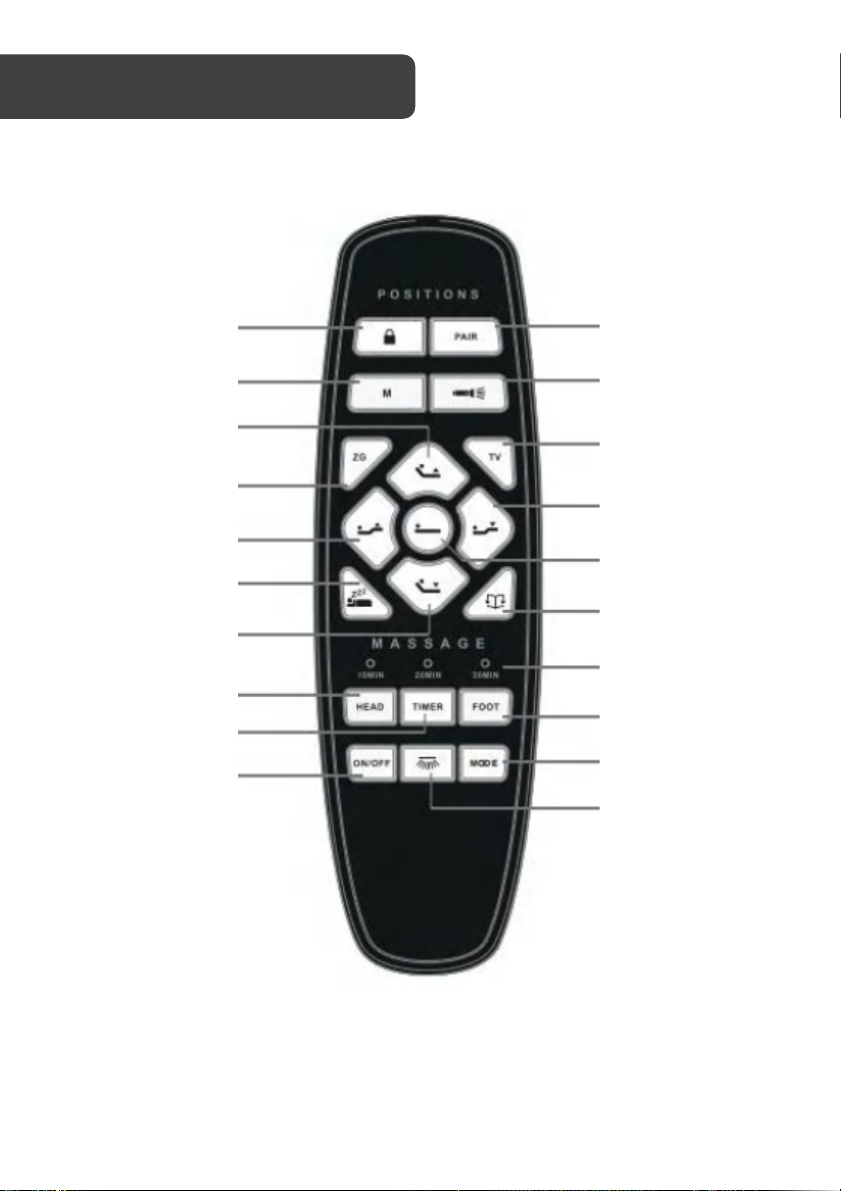
Child lock
Memory
Head up
Head down
Head massage
on (3 intensities)
Foo t up
Timer
Massage ON/OFF
Pair with control box
Anti-snore
Zero-G
Light
Lounge
Massage time indicators
(10, 20, 30 Min)
Foo t ma ssage
(3 intensities)
Massage modes
(3 modes)
Under bed LED
TV
Foo t do wn
Flat button
Page 9
ASSEMBLY
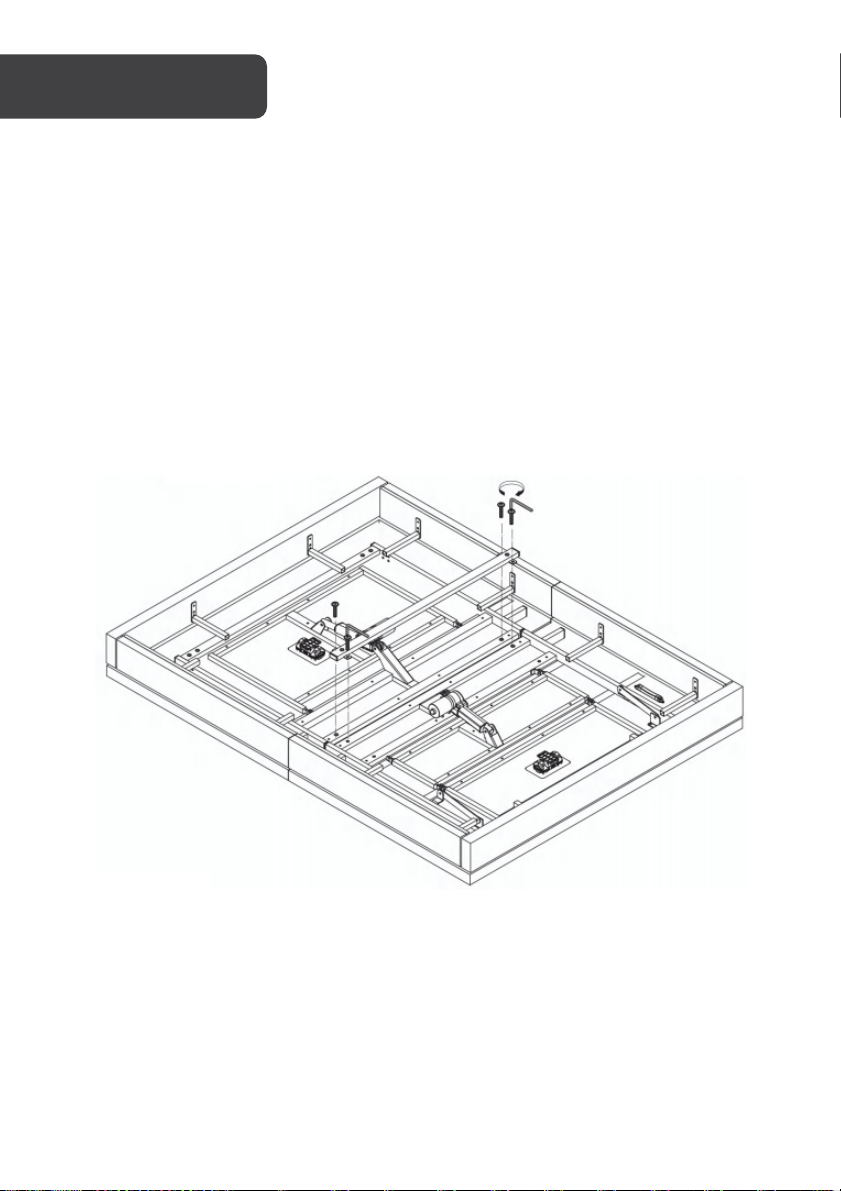
Caution: For saf ety rea sons, l ift ing of th e bed frame must be performed by two (2) people.
Bed Frame Assembly
Step 1:
• Carefully remove the 2 bed frames from the shipping cartons. Remove and discard
the plastic packaging.
• Place the 2 bed frames facing downwards.
• Attach the 2 bed frames together using the frame bracket and the 4 screws.
Tighten the screws using the Allen Key.
Page 10
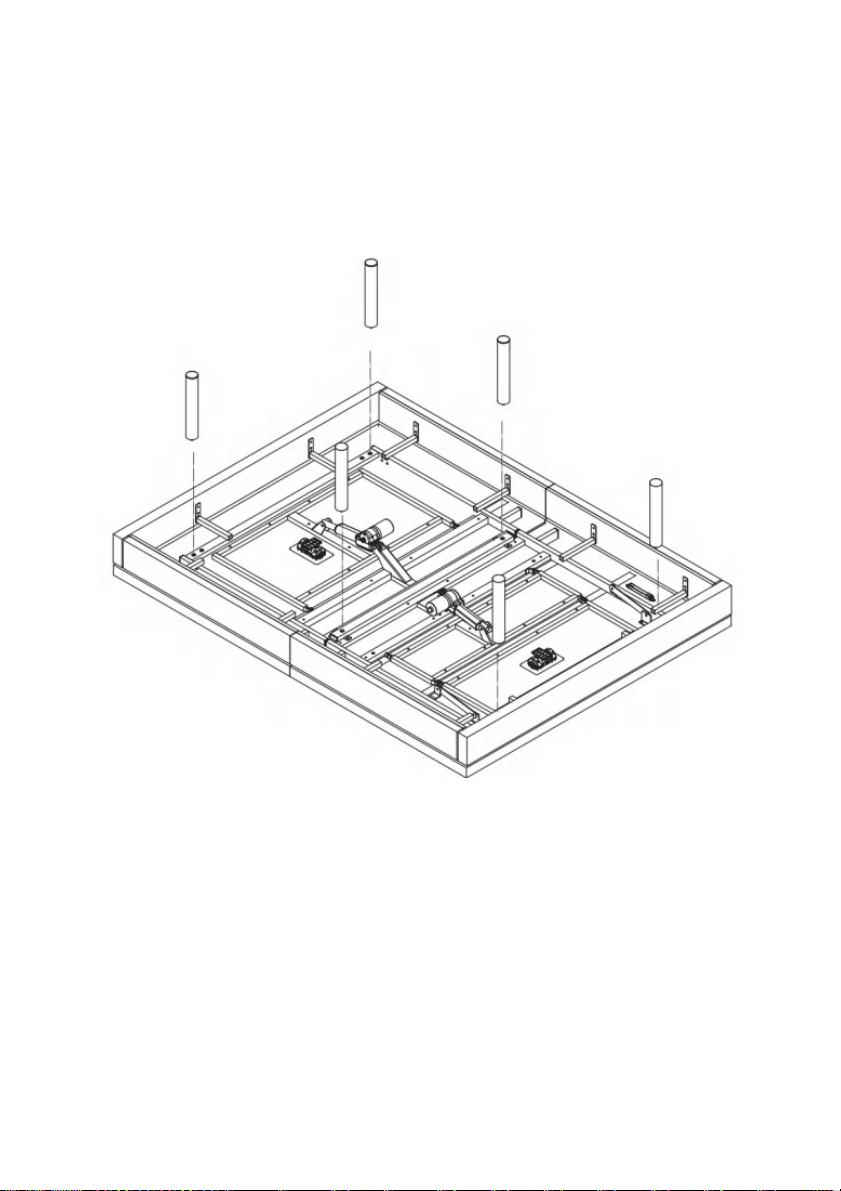
Step 2:
Attach the 6 legs to the treaded holes in the bed frame by screwing them in a clockwise
direction.
Note: Ensure the corner legs are inserted into the outer most holes.
Page 11
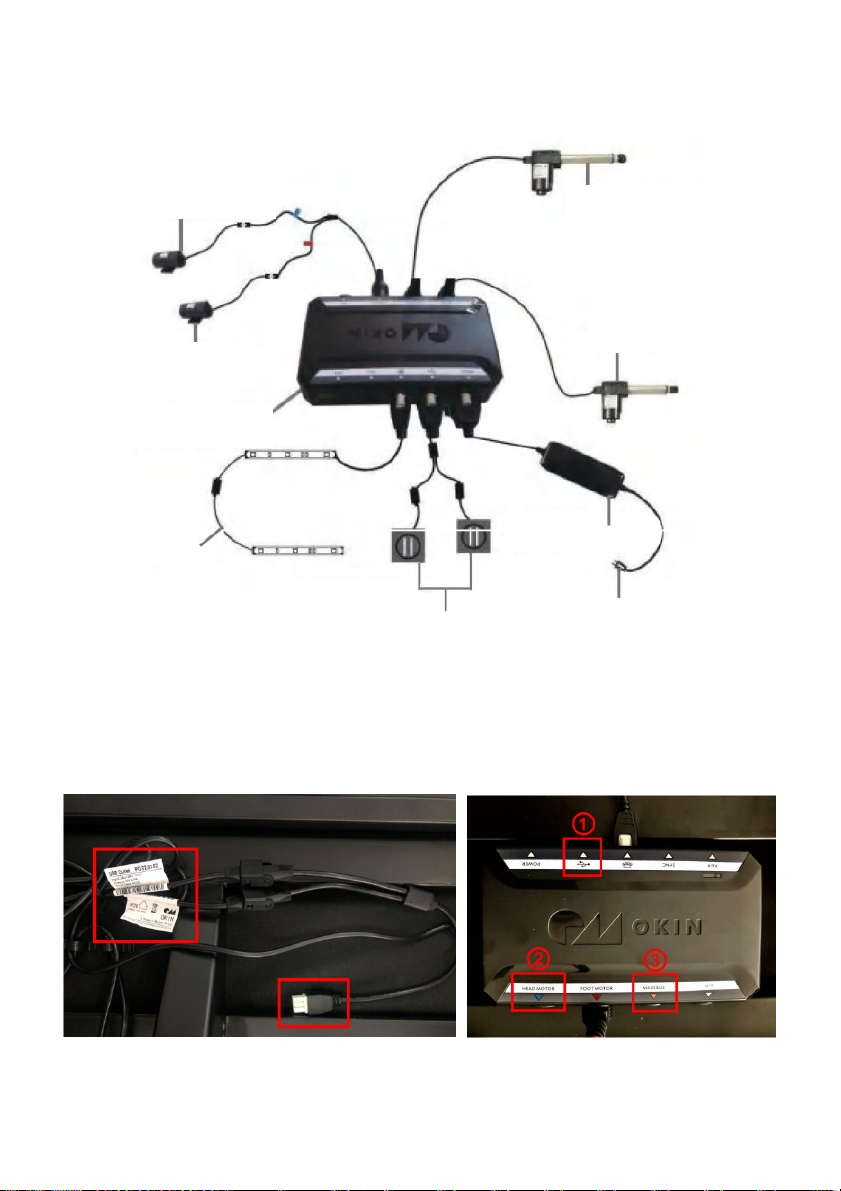
Figure 1
LED lights
USB ports
Power supply
Power cord
Head massage
motor
Head motor
Foo t mo tor
Control box
Foo t massage
motor
Control Box Connections
Step 1: Connect the USB cable (Figure 1).
Locate the cable labelled “USB Outlet” and connect it to USB input on the control box in
the position
(1)
shown below.
Page 12
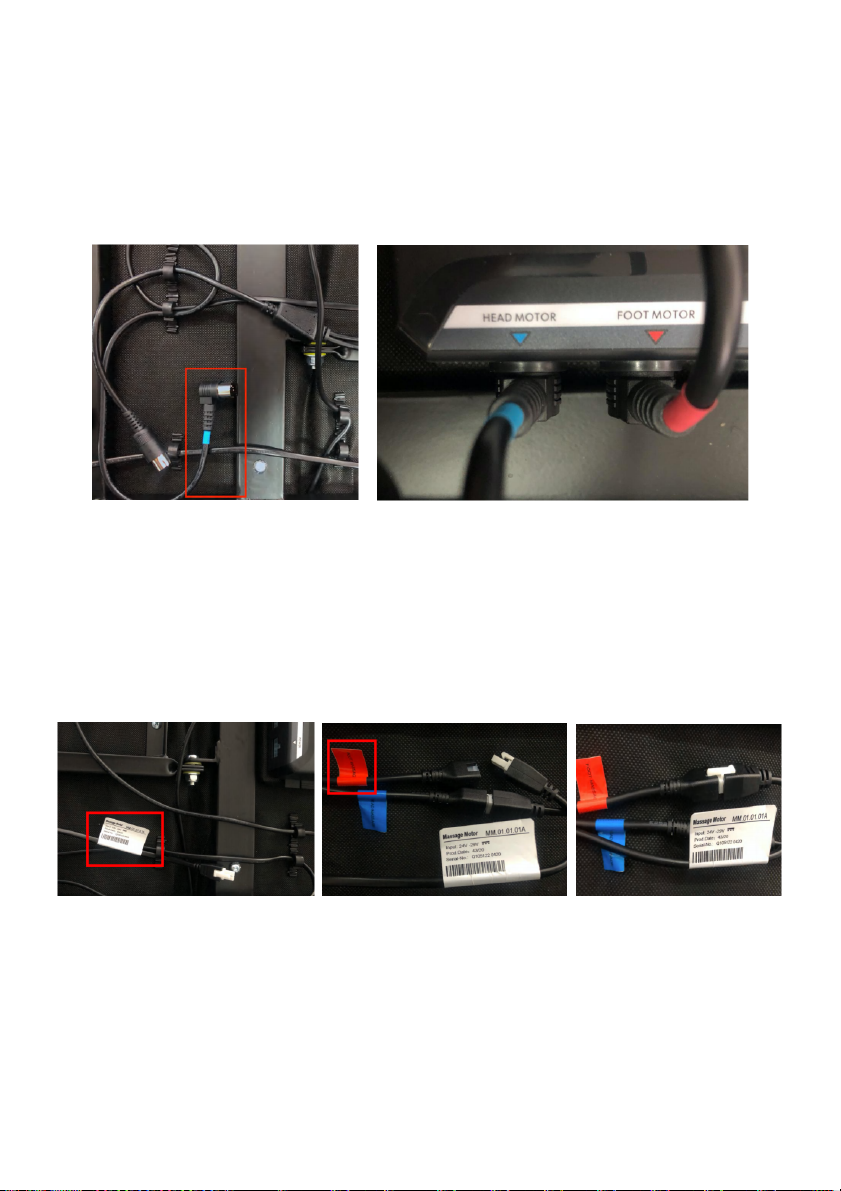
Figure 2
Figure 3
Step 2: Connect Motor cables (Figure 2).
• Locate the cable with the BLUE tape and connect it to the “Head Motor” input on
the control box.
• Locate the cable with the RED tape and connect it to the “Foo t Motor” input on
the control box.
Step 3: Connect the Massage cable.
Locate the cable labelled “Massage Motor” and connect it to the cable labelled “Fo ot
Massage” (Figure 3).
Page 13
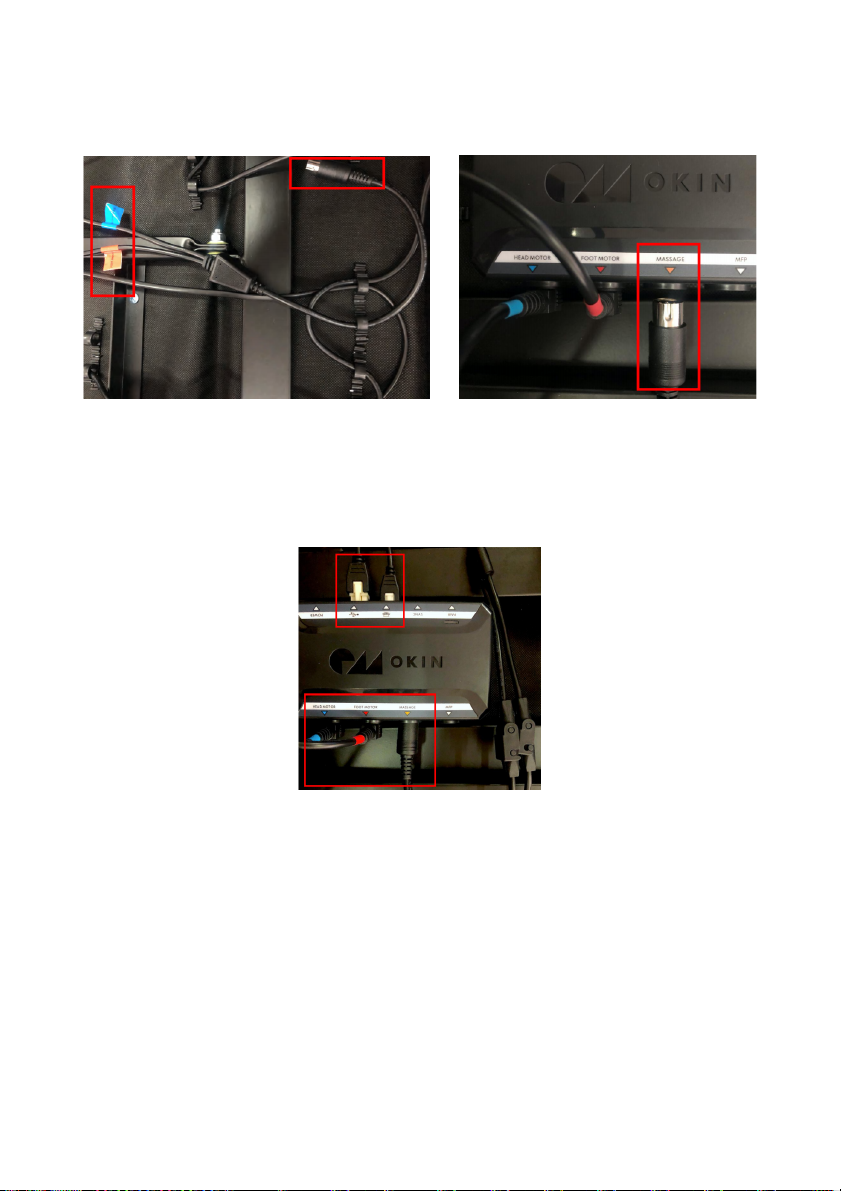
Figure 4
Figure 5
Locate the Y-shaped cable with RED and BLUE labels and connect it to the “Massage”
input on the control box (Figure 4).
Ensure the 5 cables shown below (Figure 5) are all properly connected to the control box.
Page 14
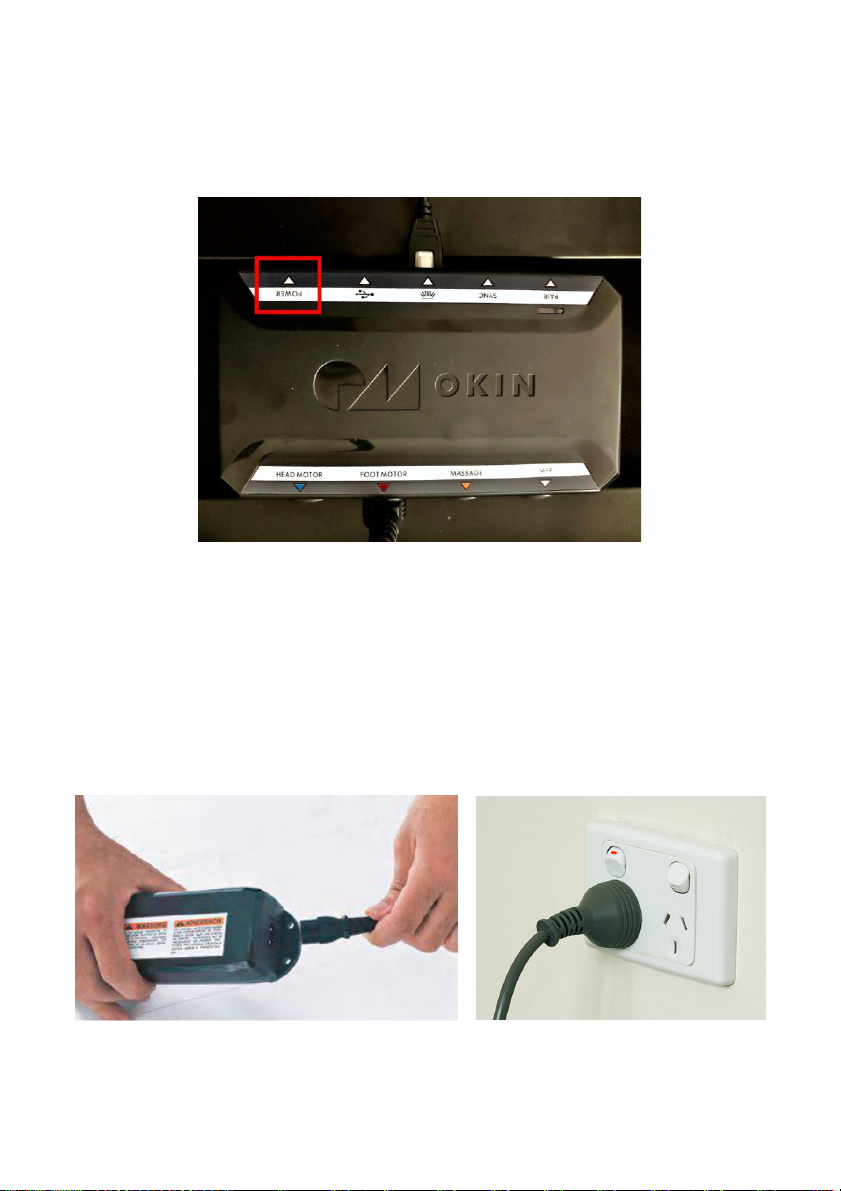
Figure 6
Figure 7
Connecting to Power
Step 1: Connect to control box (Figure 6).
Connect the power supply to the “Power” input on the control box.
Step 2: Connect to power outlet (Figure 7).
• Connect the power cord to the power supply.
• Plug the power cord into a power outlet.
• The underbed LEDs will flash for 10 seconds.
Page 15
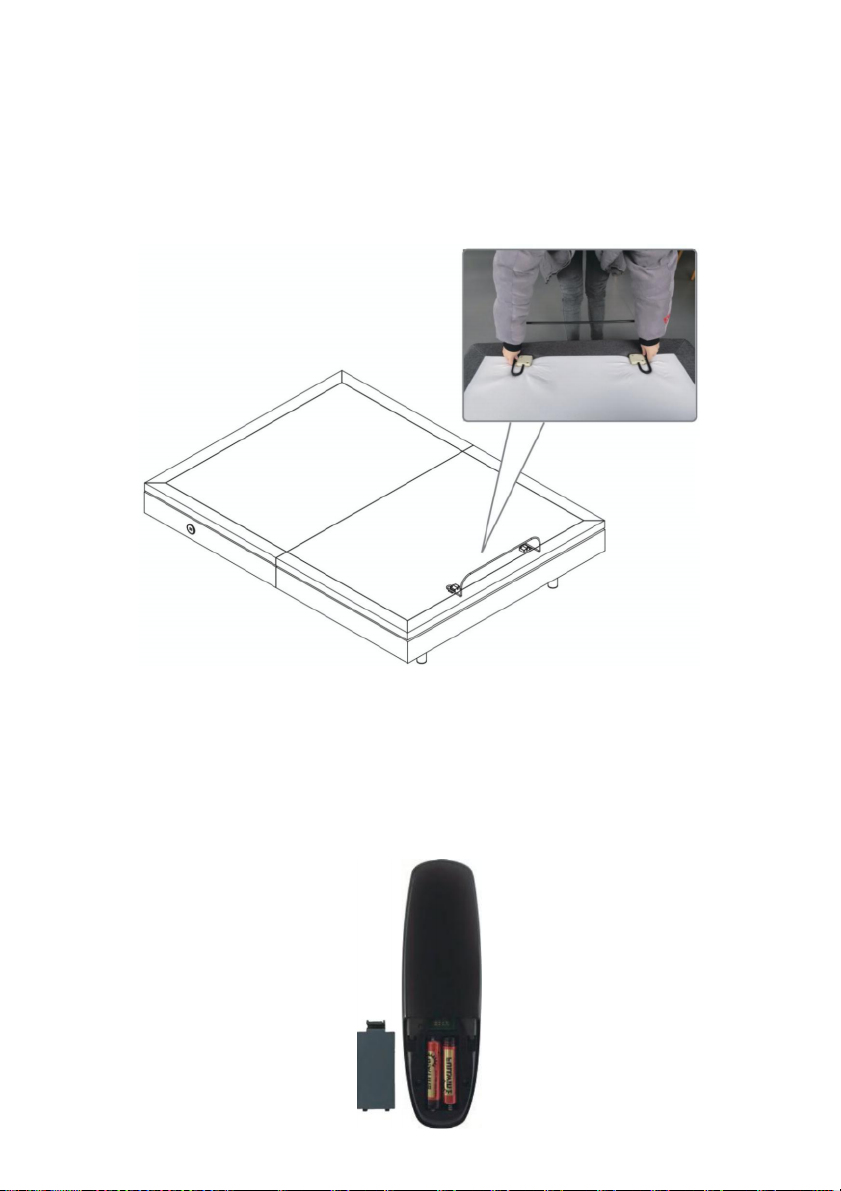
Figure 8
Installing the Retainer Bar
• With the assistance of another person, carefully flip over the bed frame onto its
feet.
• Insert the mattress retainer bar into the 2 mount holes located at the foot end of
the power base (Figure 8).
Remote Control
• Install the 2 AAA batteries into the remote control.
• Confirm the remote control works by pressing the lift buttons.
Page 16
Remote
Bed 1
Bed 2
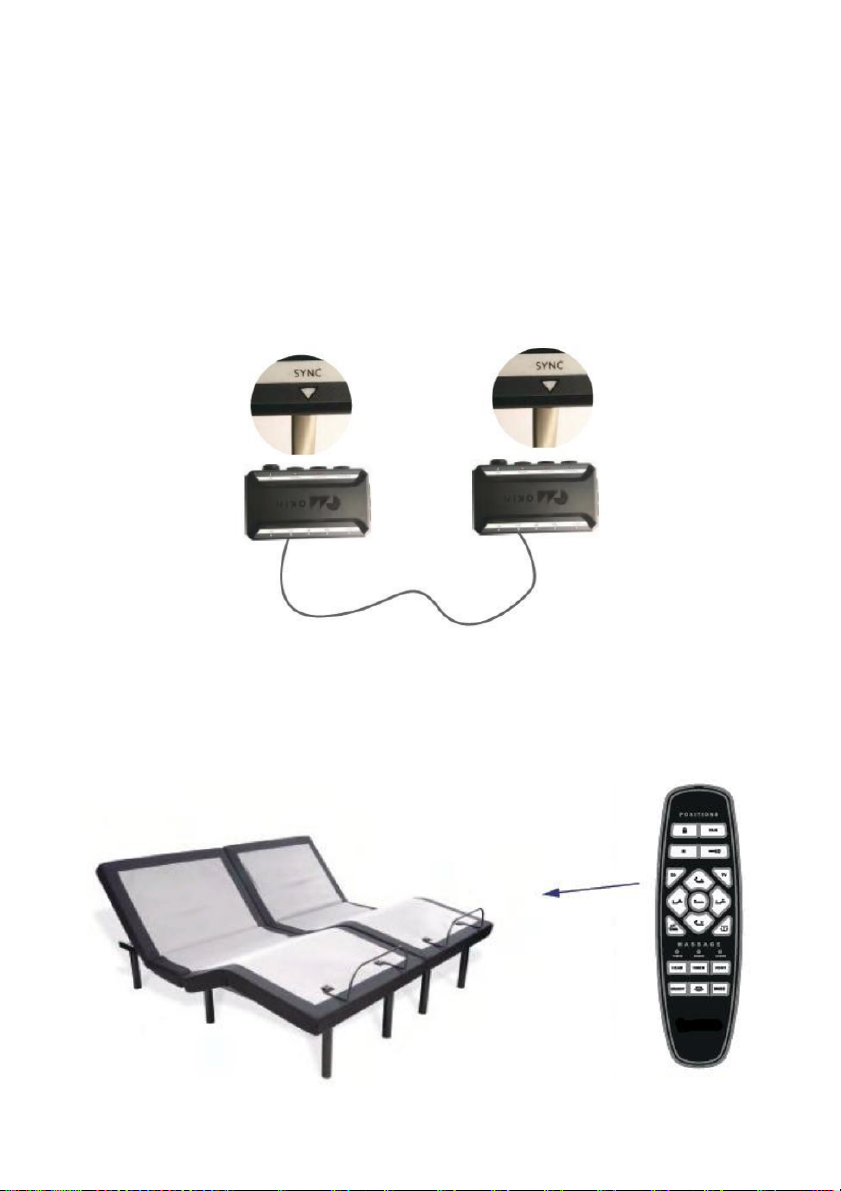
Synchronising Two Beds
If you wish to synchronise the functions of a second bed frame (sold separately), the two bed
frames can be connected using the included sync cable.
Step 1:
• Ensure both bed frames are plugged into the power outlets.
• Connect the sync cable to the “Sync” input on both control boxes on the bed
frames.
Step 2:
The two bed frames can now be controlled simultaneously using a single remote control.
Page 17
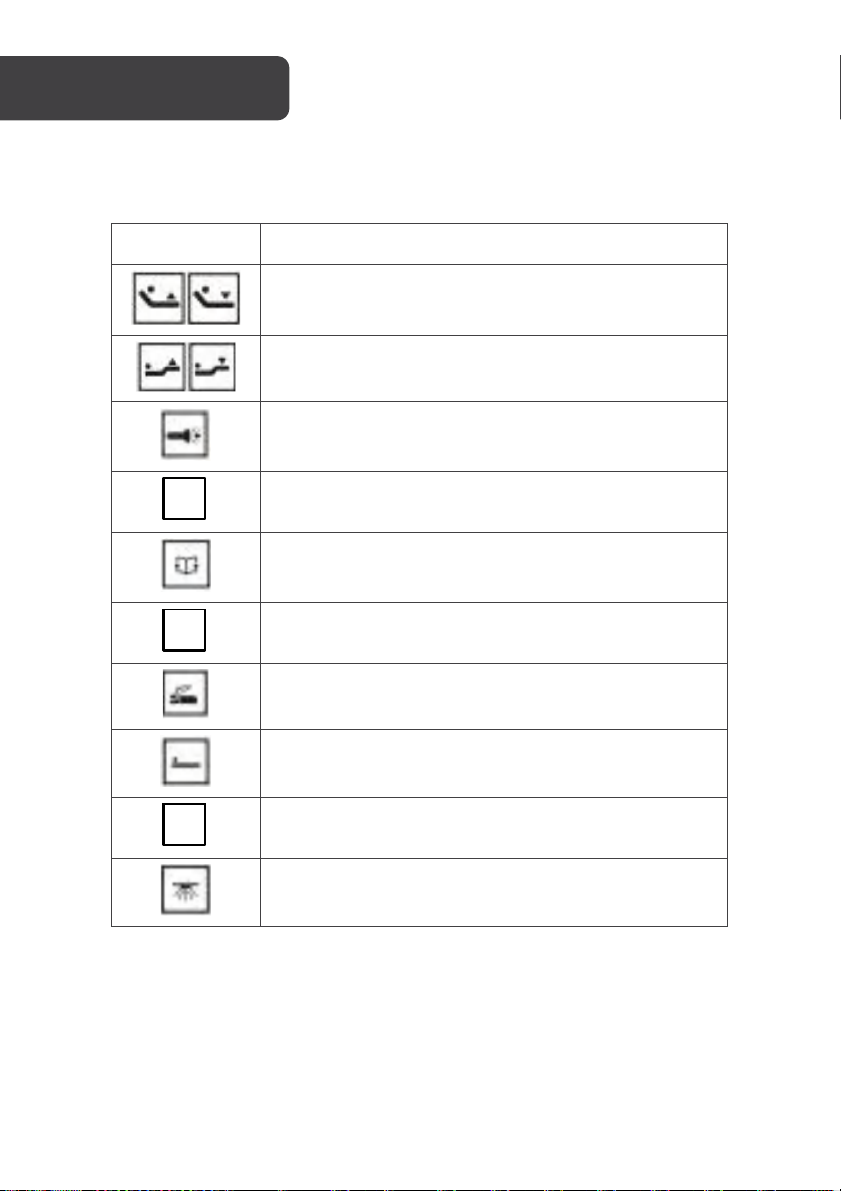
Button
Fun ct ion
Adjusts the head position up and down.
Adjusts the foot position up and down.
Press and hold the button to turn the flashlight on.
Adjusts the bed to the “TV” preset position.
Adjusts the bed to the “Lounge” preset position.
Adjusts the bed to the “Zero-G” preset position.
Adjusts the bed to the “Anti-snore” preset position.
Adjusts the bed to a flat position.
Press this button to save the current position of bed to
one of the 4 preset buttons.
Tu r n s underbed LEDs On/Off.
M
ZG
TV
Remote Control
Page 18
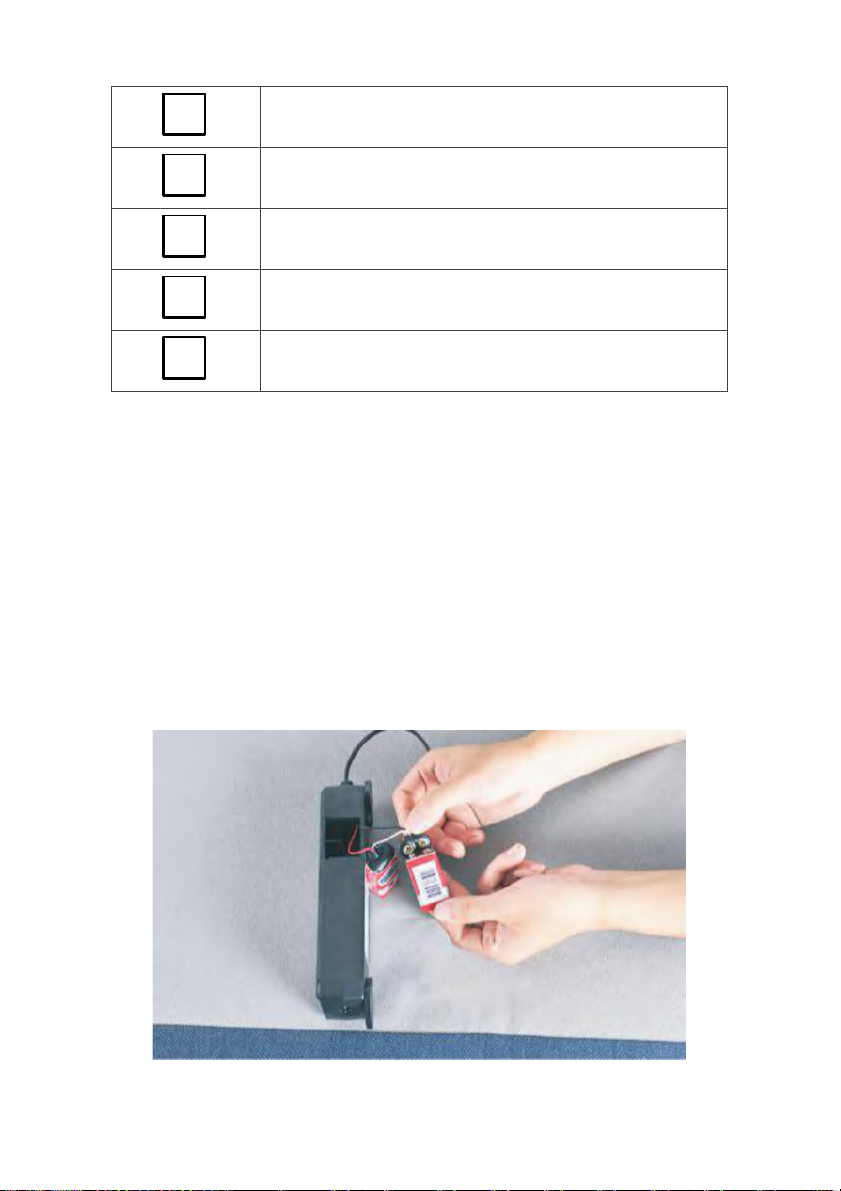
Turns head massage On/Off.
Turns foot massage On/Off.
Cycles between the 3 massage settings.
Turns massage function On/Off.
Cycles between the 3 massage preset times. (10, 20 or
30 minutes).
HEAD
FOOT
MODE
ON/OFF
TIMER
Emergency Power Down Feature
In the event of a power failure, if the head and/or foot sections are raised, you can enable the
emergency power down feature to return the bed to the flat position.
• Install 2 new 9V batteries (not included) into the battery compartment of the power
supply.
• Press the flat position on the remote. The bed will lower the head and foot sections
until they are back in the flat position.
• Replace the 9V batteries after this procedure.
Note: The 9V batteries are for single use only.
Page 19
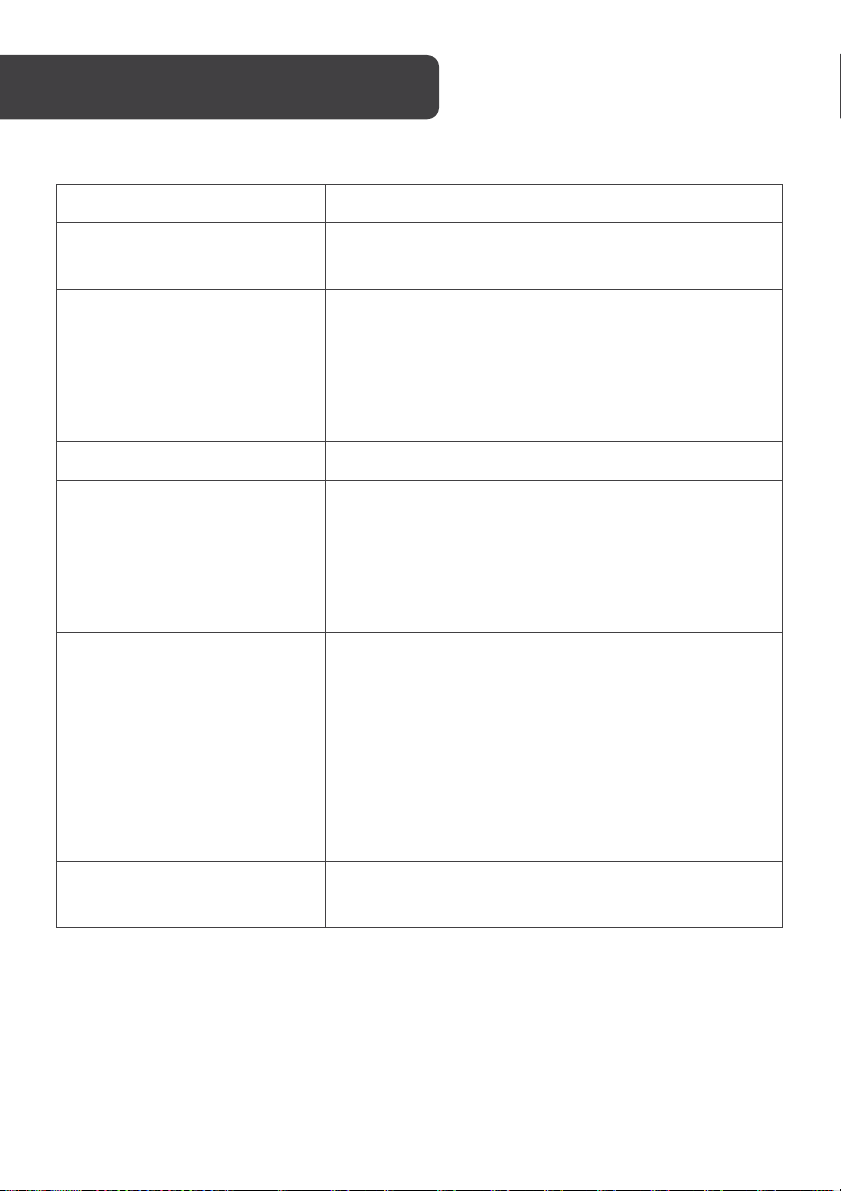
Problem
Solutions
Remote control illuminates but
bed is unresponsive.
Confirm that the power cord is plugged into a power
outlet. Test the outlet by plugging in another working
appliance.
None of features of the massage
bed will turn on.
• Unplug the power cord, wait 30 seconds and plug
back to reset the electronic components.
• The surge protection device or the electrical outlet
may be defective. Test the outlet by plugging in
another working appliance.
• Ver ify that the connec tor on the wired remote
control is securely attached to the control box.
Remote control is unresponsive.
Replace the batteries in the remote control.
Head or foot section will raise
but will not return to the flat
position.
• Bed mechanism may be obstructed. Elevate bed
and check for obstruction. Remove obstruction.
• Head section may be too close to the wall.
• Headboard may be too close to the edge of the
mattress. Verify that there is enough distance
between the headboard brackets and mattress.
Adjust if required.
Head & Foot lift function has
minor interference during
operation.
• Check batteries in the remote control, replace with
2 new AAA batteries if necessary.
• Duty cycle of the motors has been exceeded. Do
not operate more than two minutes continuously
over an 18-minute period.
• Ensure you are pressing the lift buttons squarely
and accurately.
• Remote control may be experiencing Radio
Frequ ency Inte rferenc e from other radi o
transmitting devices. Wait several seconds and
then try pressing appropriate button again.
A clicking noise is heard under
the bed when raising or
lowering.
This is normal. The lift motor relays “click” when they are
engaged. No action is required.
Page 20

Page 21

Need more information?
We hope that this user guide has given you
the assistance needed for a simple set-up.
For th e mo st up -to-date guide for your product,
as well as any additional assistance you may require,
head online to help.kogan.com
 Loading...