

Page 1
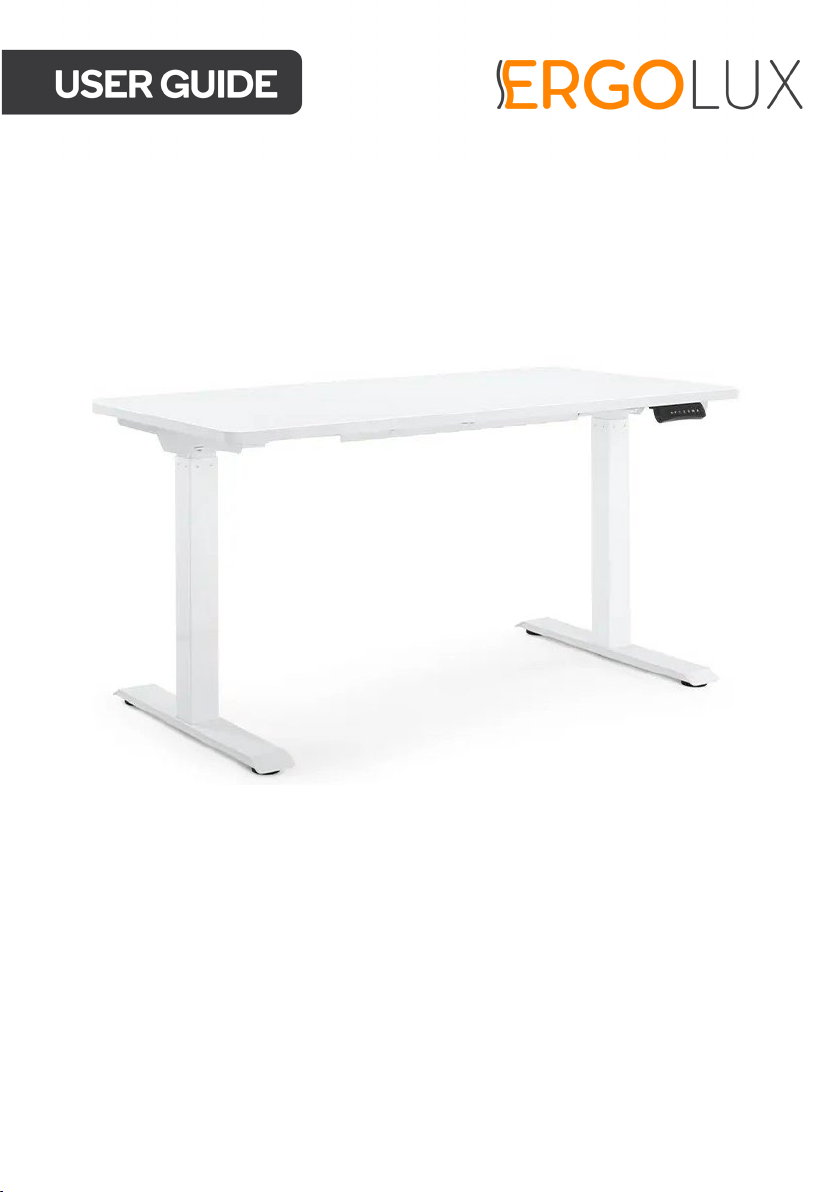
DUAL MOTOR STANDING DESK
WHITE
ELDUALMTWHA
Page 2

Safety & Warnings 3
Components 4
Overview 5
Assembly 7
Operation 14
Cleaning & Care 16
Troubleshooting 16
Specifications 18
Frame Dimensions 18
Notes 19
2
Page 3

Ensure to read all instructions and warnings in this user guide prior to assembly. Retain this
user guide for future reference.
• This desk can be used by children aged from 8 years and above and persons with
reduced physical, sensory, or mental capabilities or lack of experience and knowledge
if they have been given supervision or instruction concerning use of the desk in a safe
way and understand the hazards involved.
• Do not allow children to play with the desk.
• This desk supports voltages between 100–240V and frequencies of 50Hz and 60Hz.
Ensure the socket matches this.
• The operating temperature of this desk is 0–40°C.
• The maximum load capacity of this desk is 100kg. Do not exceed this.
• Ensure the power cord is unplugged when not in use.
• Take care with the packaging to avoid potential hazards for children (for example,
plastic bags, small components).
• Ensure there are no hazards or obstacles in the operating environment.
• Do not to allow water or any other liquids to enter the internal parts or connections.
• The control box contains electronic components, metals, plastics, and wires. If
disposed, ensure it is done in an environmentally responsible manner in accordance
with local regulations.
• Be familiar with all functions and program settings of the desk before first use.
• It is normal for slight noise to be caused by the belt or brake system. This does not
affect the desk’s performance.
• Cleaning and user maintenance should not be performed by children without adult
supervision.
• If the power cord is damaged, stop use immediately and contact help.Kogan.com for
assistance.
• Keep the original packaging of the equipment if necessary in the case of future
transportation of the desk.
3
Page 4
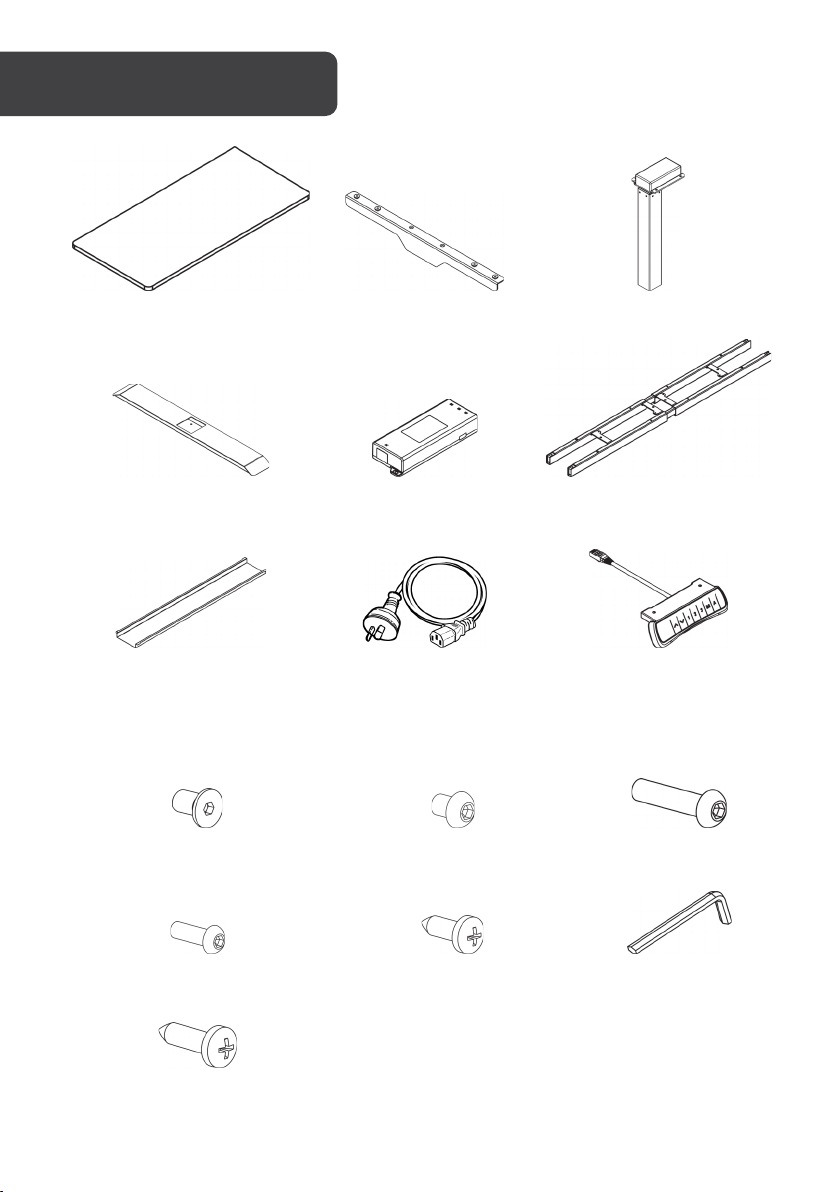
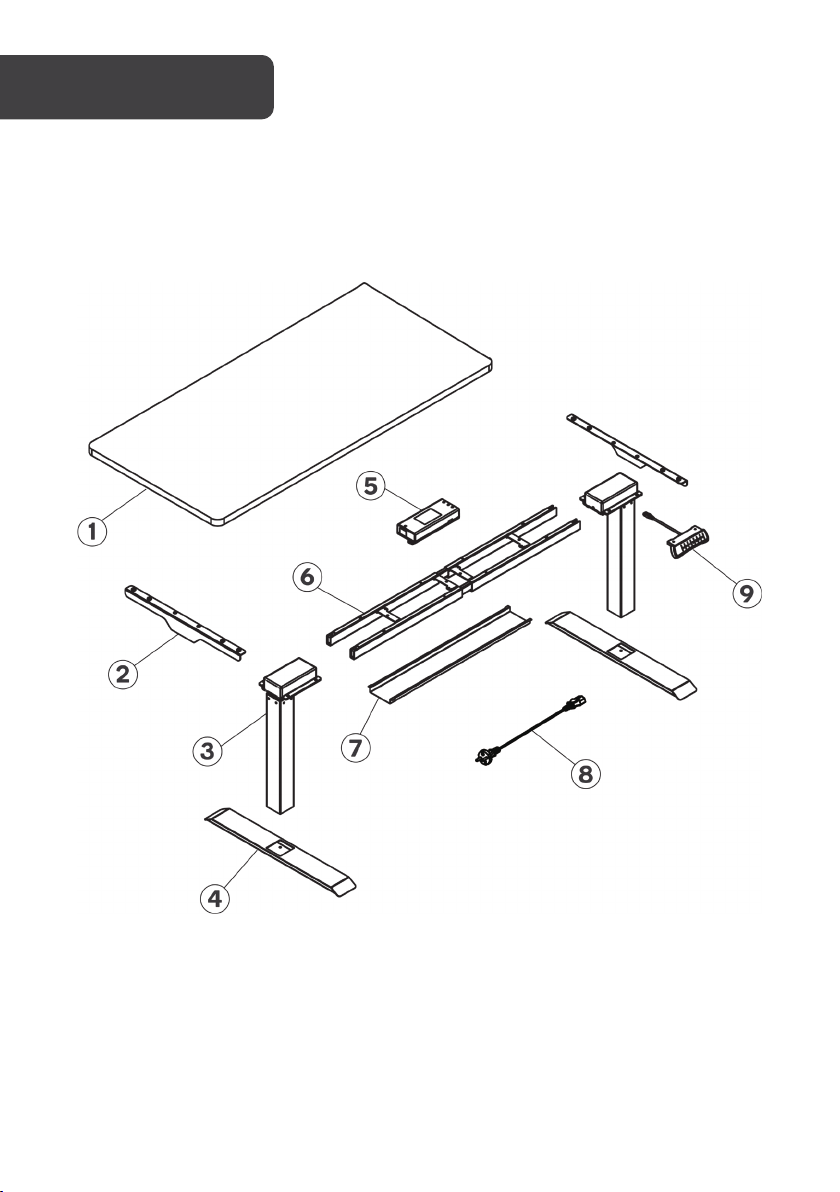
1 Tabletop (x1)
2 Side bracket (x2)
3 Leg (x2)
4 Foot (x2)
5 Control box (x1)
6 Supporting beam (x1)
7 Cable management tray (x1)
8 Power cord (x1)
9 Control panel (x1)
A 12mm flat M6 screw (x4)
B 10mm M6 screw (x4)
C 16mm M6 screw (x8)
D 12mm rounded M6 screw (x12)
E 19mm ST4.2 screw (x16)
F Allen key (x1)
G 25mm ST4.2 screw (x2)
COMPONENTS
Hardware
4
Page 5
5
Page 6
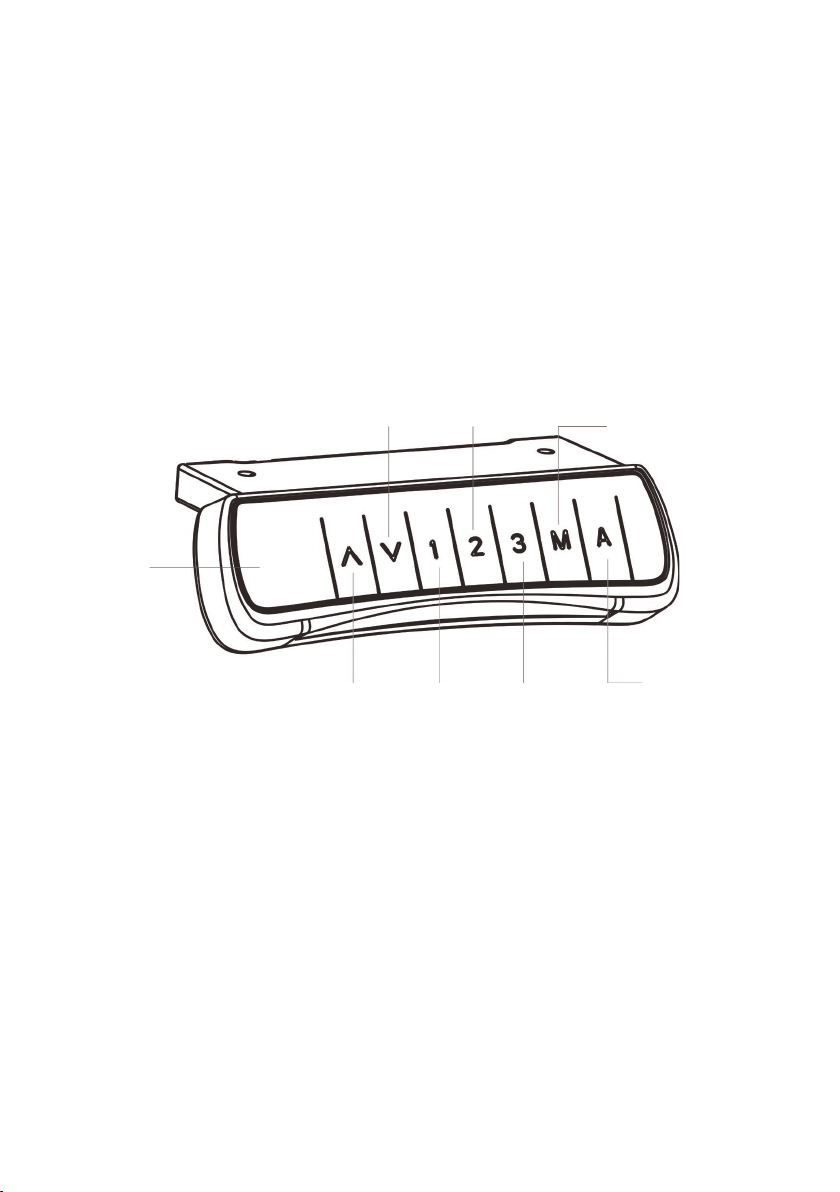
Control panel
Up button
Position 1
Position 3
Down button
Position 2
Height memory
LED display
Posture timer
button
button
6
button
button
button
Page 7
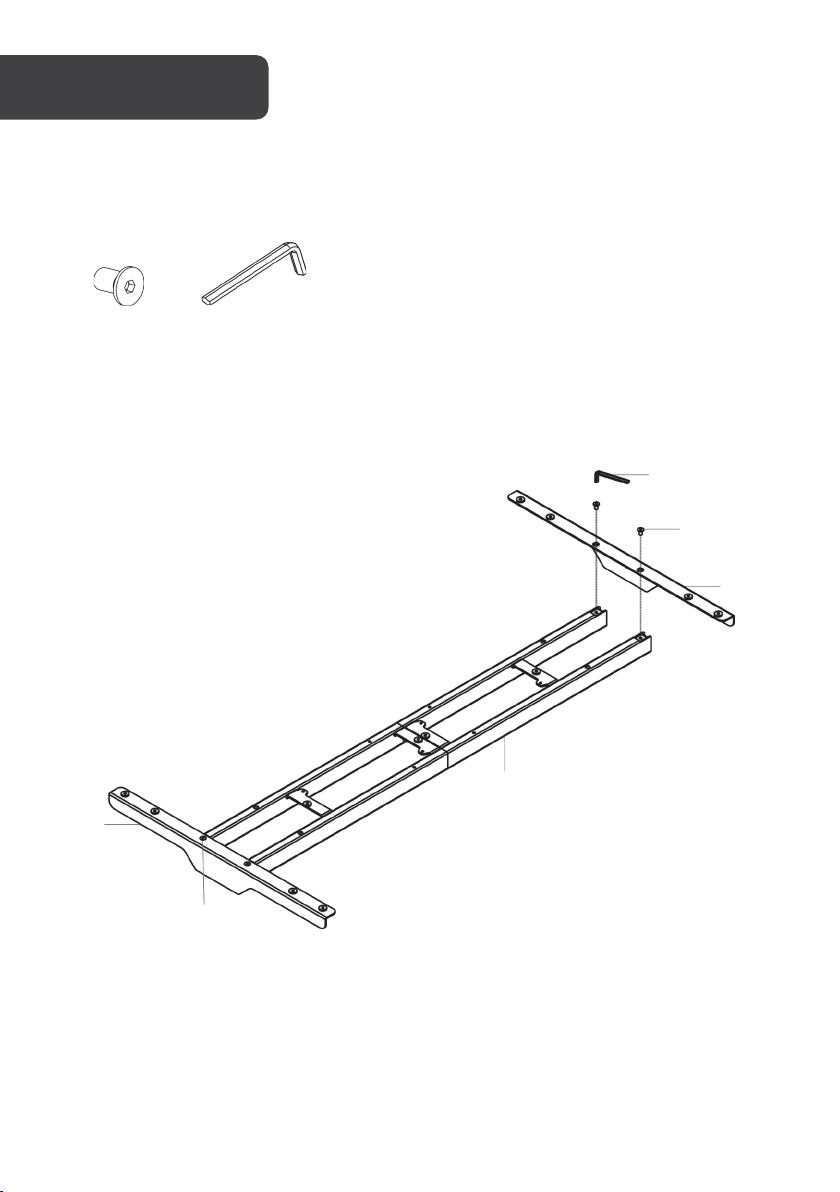
A (x4)
F (x1)
2
A F A 2 6
Step 1: Installing the side brackets
Using the Allen key (F), attach the side brackets (2) to the ends of the supporting beam (6)
with four 12mm flat M6 screws (A).
7
Page 8
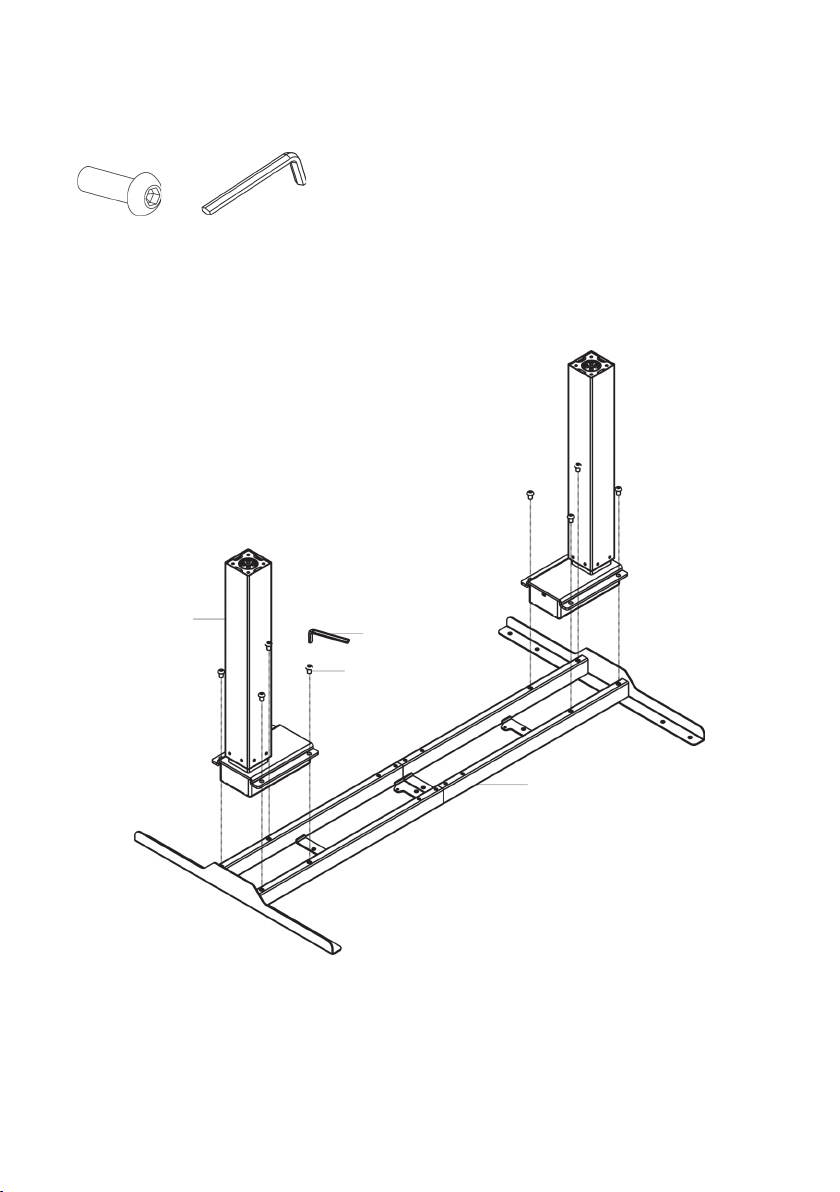
Step 2: Installing the legs
D (x8)
F (x1)
3 F D
6
Insert the legs (3) into the ends of the supporting beam (6). Using the Allen key (F), secure
the legs (3) with eight 12mm rounded M6 screws (D).
8
Page 9
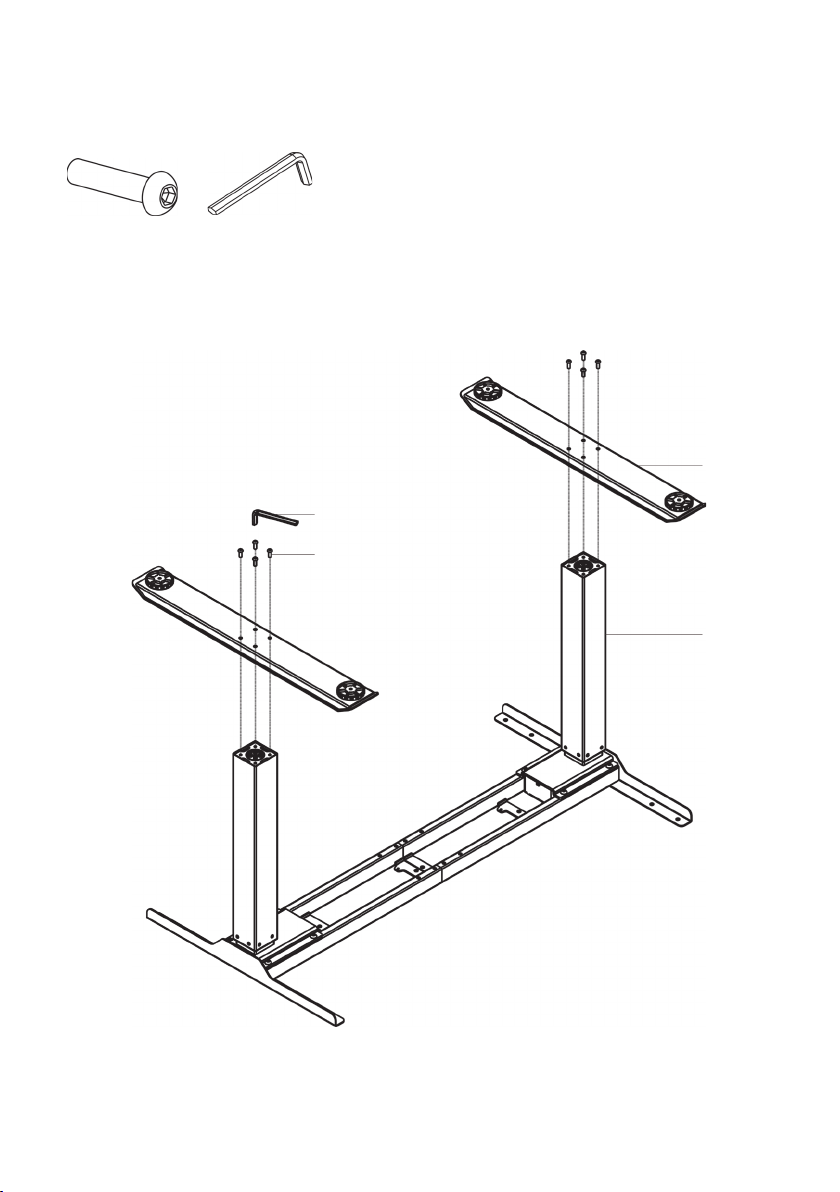
Step 3: Installing the feet
C (x8)
F (x1)
F C 4
3
Place the feet (4) on the bottom of the legs (3). Using the Allen key (F), secure the feet (4)
with eight 16mm M6 screws (C).
9
Page 10
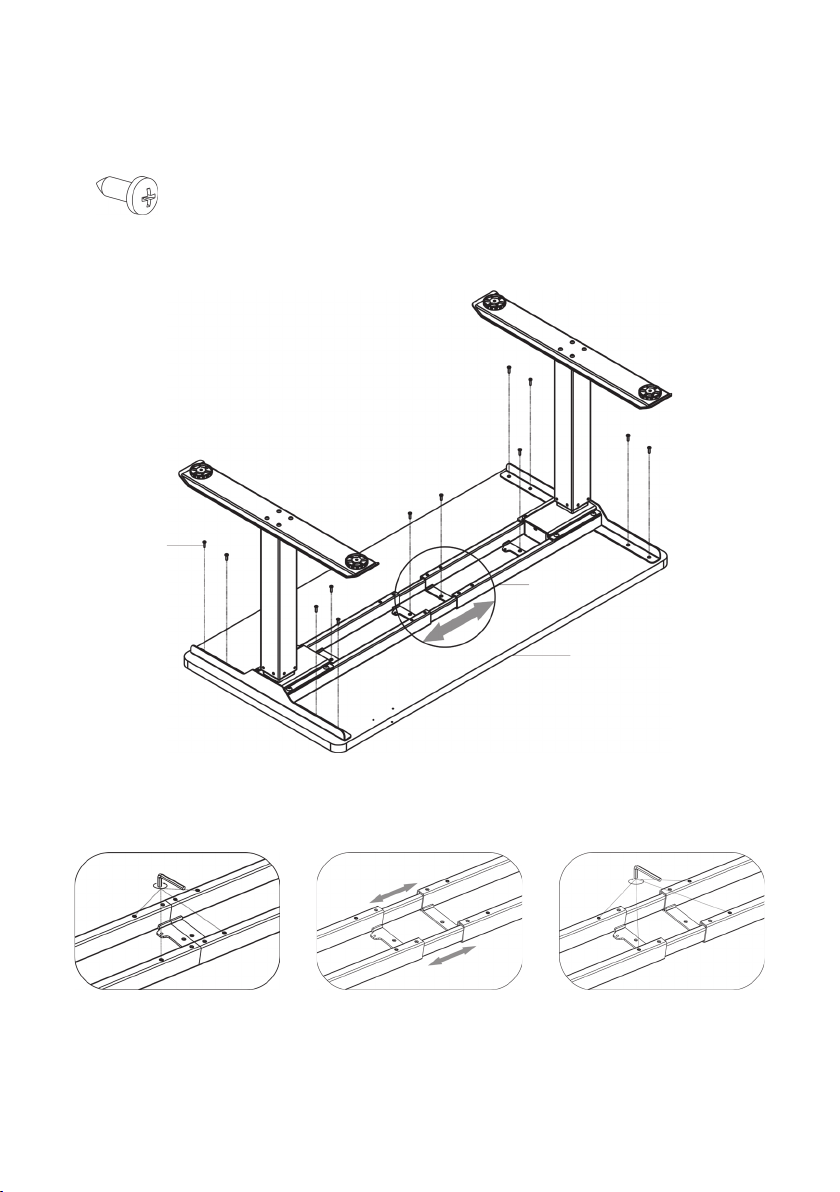
Step 4: Installing the tabletop
E (x12)
Loosen
Adjust
Tighten
E 6 1
Pull the supporting beam (6) to the desired length. Using a Phillips head drill (not supplied),
secure the tabletop (1) with twelve ST4.2 screws (E).
To make further adjustments, use the Allen key (F) to loosen the screws. Adjust the length
of the supporting beam (6) then retighten the screws.
10
Page 11
Step 5: Installing the control panel
G (x2)
Power port
Ports for the
Port for control panel
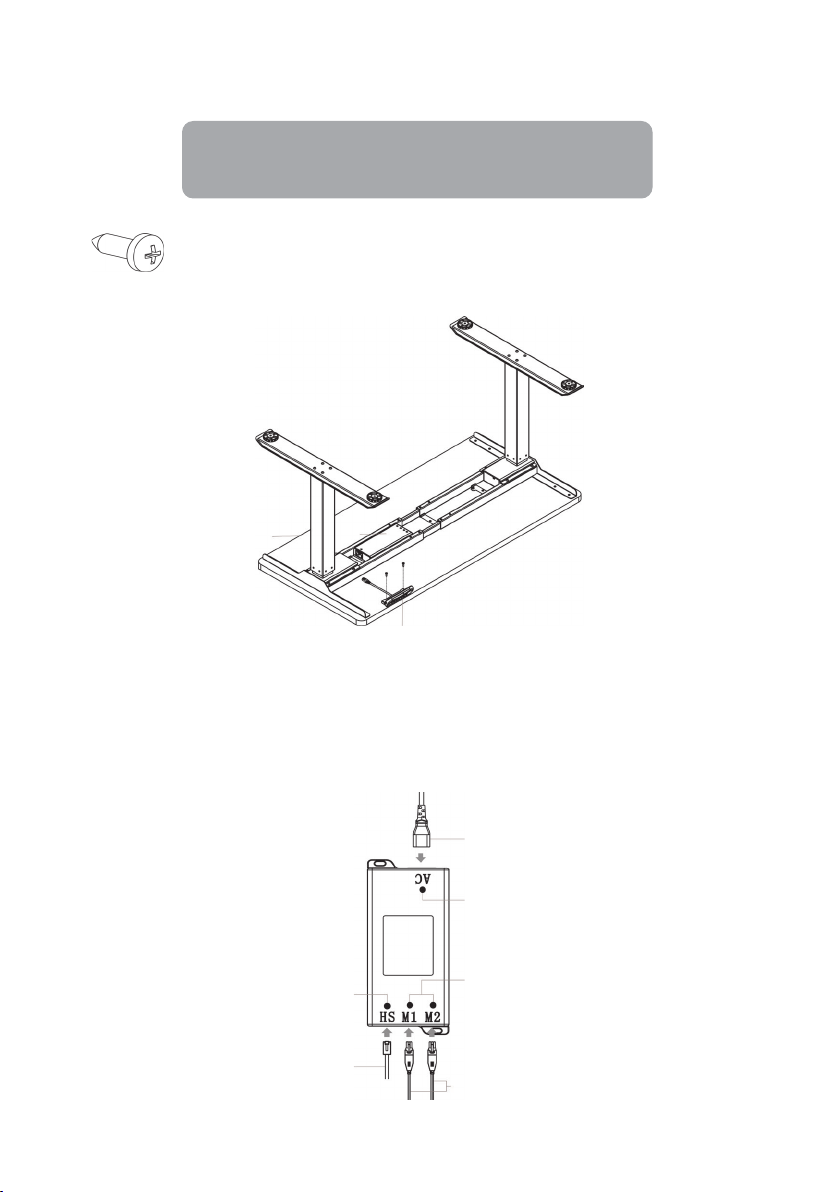
9 5 8
Note:
1 9 3
Using a Phillips head drill, secure the control panel (9) with two 25mm ST4.2 screws (G).
The control box (5) comes attached to the tabletop (1).
Step 6: Connecting the cables
Connect the end of the power cord (8), cables on the control panel (9), and legs (3) into the
control box as shown.
legs
11
Page 12
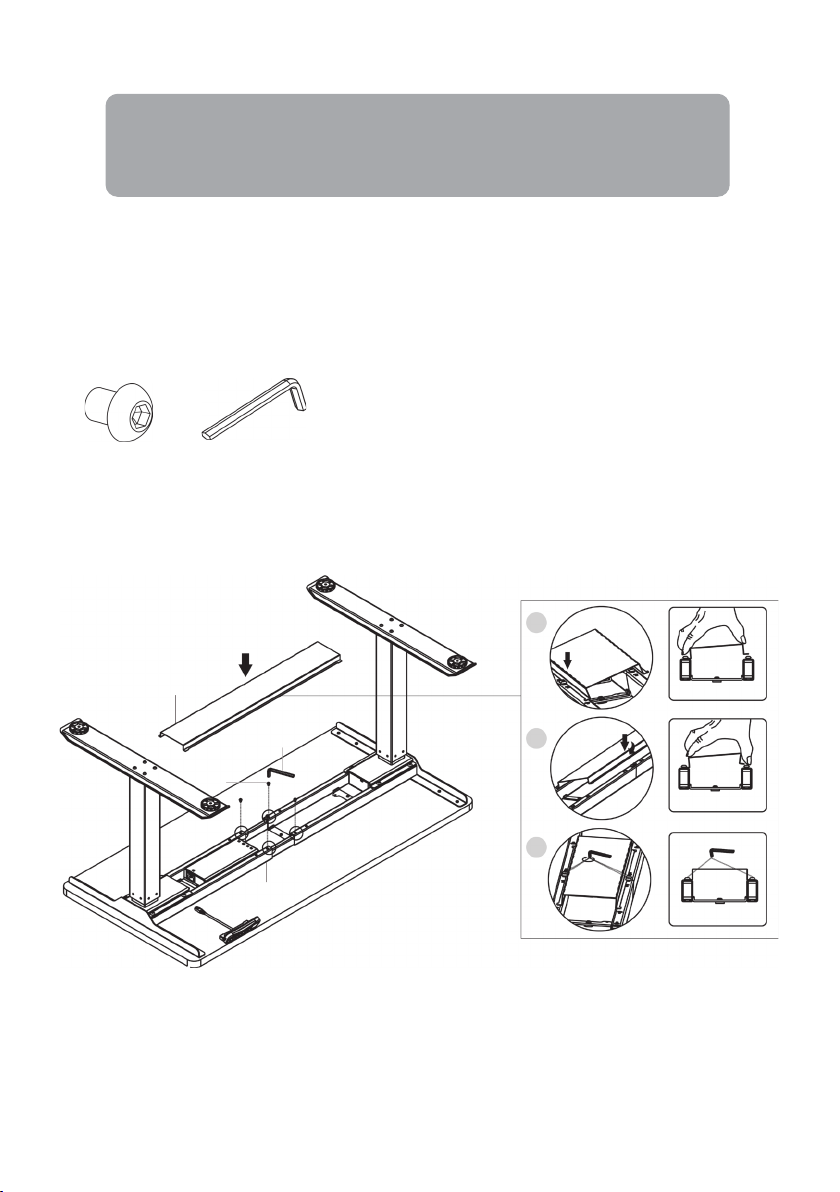
Step 7: Securing the cable management tray
B (x4)
F (x1)
Notes:
7 6 F
B
1 2 3
Clip one
Clip other
Tighten
• If the supporting beam is shorter than 1720mm, follow method one.
• If the supporting beam is longer than 1720mm, follow method two.
Method one
Using the Allen key (F), rotate four 10mm M6 screws (B) loosely into the supporting beam (6).
Do not fully tighten.
Clip one side of the cable management tray (7) into the 10mm M6 screws, then repeat on
the other side. Using the Allen key (F), tighten the 10mm M6 screws.
12
side
side
Page 13
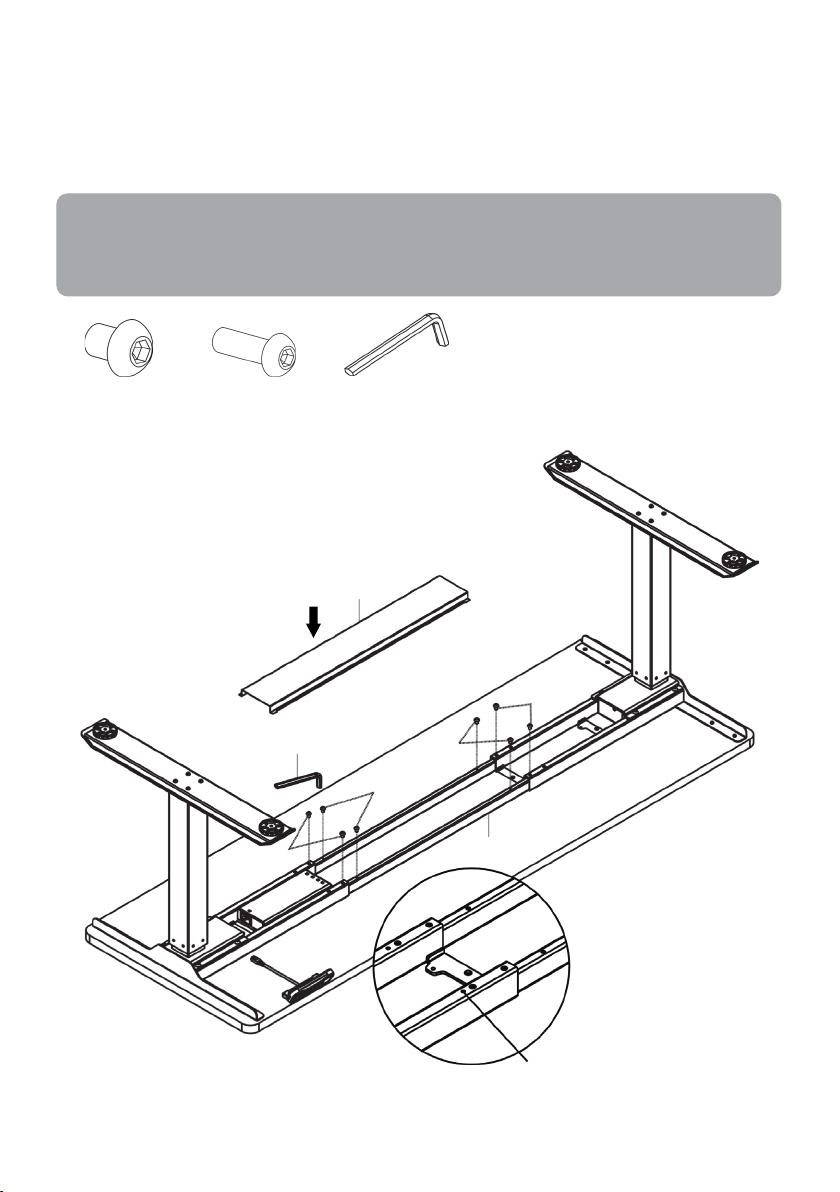
Method two
B (x4)
D (x4)
F (x1)
7
D F D B B
6
Note:
Using the Allen key (F), rotate the 10mm M6 screws (B) and 12mm M6 screws (D) loosely into
the supporting beam (6). Do not fully tighten.
Clip one side of the cable management tray (7) into the screws (B, D), then repeat on the
other side. Using the Allen key (F), tighten the screws (B, D).
When the supporting beam is longer than 1720mm, ensure the cable management tray
(7) is mounted in the middle of the supporting beam (6).
Do not stretch the support beam
beyond this hole.
13
Page 14

Note:
OPERATION
Powering on/off
Plug the power cord into a socket and turn the socket on.
To turn off, switch off the socket and unplug the power cord.
Height adjustment
Press the up or down button to adjust to the desired height of the desk. The LED display will
show the current height.
Height memory button
This desk allows users to save up to three height levels, making it easier to adjust the desk
to commonly used heights.
Posture timer button
Sitting at a desk for continuous periods may lead to slouched posture. This desk features an
alarm that can be set to ring after a specified period to remind users to correct their posture.
To set the timer:
Check carefully to ensure correct and complete assembly before using.
1. Press the up or down button to adjust to the desired height of the desk. Press the
height memory button and the LED display will show ‘5-’.
2. Press the position 1, 2, or 3 button to save the current height to the corresponding
button. This will be reflected on the LED display as ‘5-1’, ‘5-2’, or ‘5-3’ respectively.
3. Press the position 1, 2 or 3 button to automatically adjust the desk to the saved height
mapped to the button.
1. Press the posture timer button and the LED display will show ‘On’.
2. After two seconds, the LED display will start flashing. Press the up and down buttons
to adjust the time interval for the alarm to ring (default is 45 minutes). This will be
reflected on the LED display.
3. After adjusting, either press any button on the control panel, or wait for five seconds
to save.
14
Page 15

4. When the timer has elapsed, the alarm will sound for ten seconds and the LED
Note:
display will show ‘000’. Press any button on the control panel within these ten
seconds to reset the timer.
Alternatively, press and hold the posture timer button for three seconds to manually
turn off the timer. The LED display will show ‘Off’.
• If no buttons are pressed within the ten seconds, the alarm will ring again in another
five minutes.
• If no buttons are pressed when the alarm rings again, the timer will turn off.
Anti-collision function
This function allows the desk to rebound during height adjustment if it makes contact with
any surface, avoiding damage. There are four settings with this function as listed below.
To adjust the sensitivity of this function:
1. Press and hold the up and down buttons for five seconds. The LED display will show
‘A-3’.
2. Press the up and down buttons to adjust to the desired sensitivity level. This will be
reflected on the LED display.
If any buttons are pressed after the timer is set, the timer will reset.
LED display shows Description
A-0 Function disabled
A-1 Low sensitivity
A-2 Medium sensitivity
A-3 High sensitivity, default setting
15
Page 16
Note:
Ensure the desk is turned off and the power cord is unplugged before cleaning.
Wipe any dust on the surface with slightly damp cloth.
TROUBLESHOOTING
Do not use corrosive or abrasive detergents to clean this desk.
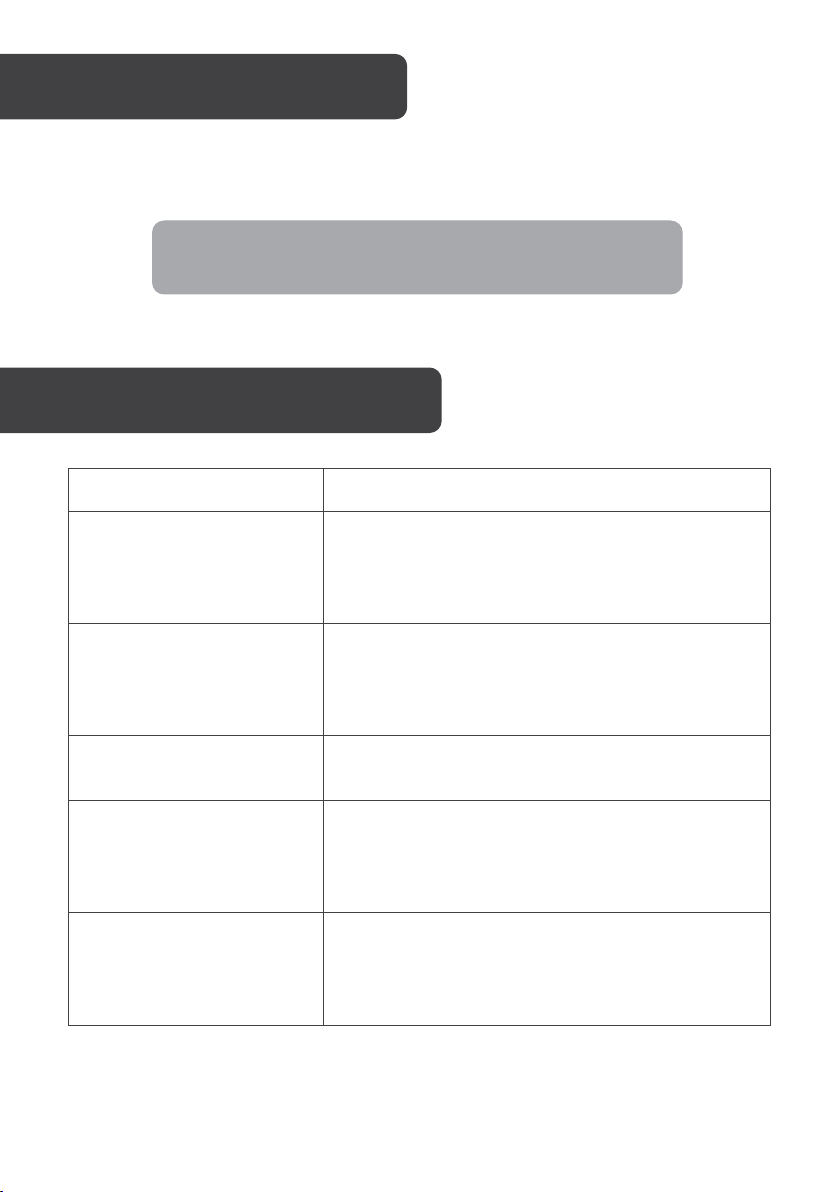
Problem Solution
There is no response when the
holding down the up or down
buttons.
When adjusting, the desk is
rising at a slow speed.
The motor is not moving as
instructed.
The desk height can be
adjusted downwards but not
upwards.
The desk is slanted.
16
1. Ensure all cables are properly connected and the
socket is turned on.
2. If the problem persists, contact help.Kogan.com for
assistance.
1. Ensure the desk is not overloaded. The maximum
load is 100kg.
2. If the problem persists, contact help.Kogan.com for
assistance.
Stop use immediately and contact help.Kogan.com for
assistance.
1. Reposition the desk to ensure there are no
obstructions.
2. If the problem persists, contact help.Kogan.com for
assistance.
1. Ensure the desk is not overloaded. The maximum
load is 100kg.
2. If the problem persists, contact help.Kogan.com for
assistance.
Page 17
The desk needs to be
repositioned frequently.
1. Ensure the desk is not overloaded. The maximum load is
100kg.
2. If the problem persists, contact help.Kogan.com for
assistance.
The desk has been
overworked and stopped
working.
The desk is insufficiently
raising or lowering.
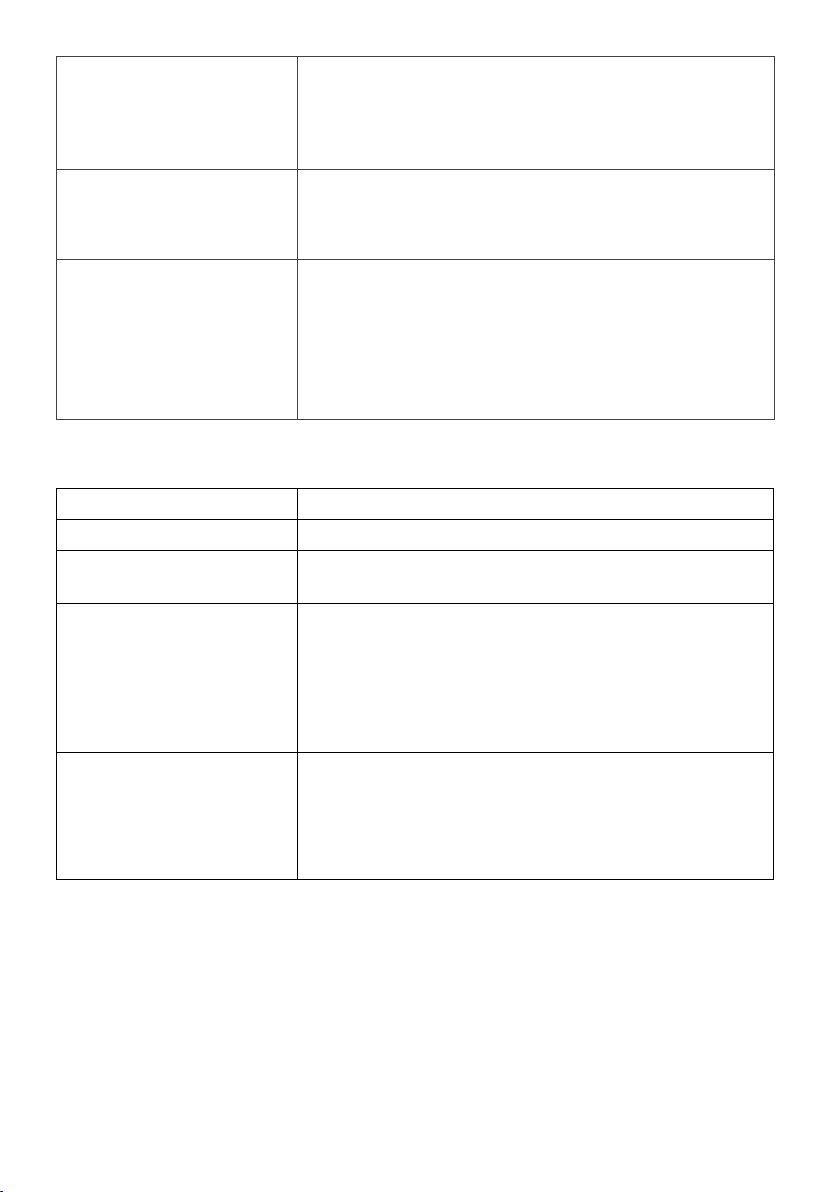
Error codes
LED display shows Solution
E01 Turn off the desk and reuse after 13 minutes.
E02
E03, E04, or E09
E07, E08, E20, E21, E22, or
E23
1. Turn off and restart the desk after 18 minutes.
2. If the problem persists, stop use immediately and
contact help.Kogan.com for assistance.
1. Press and hold the height memory and position 3
buttons together for at least three seconds.
2. The desk will beep twice. After beeping, turn off and
restart the desk.
If the problem persists, contact help.Kogan.com for
assistance.
The desk has overheated. Turn off the desk and reuse
after 25 minutes.
Ensure the desk is not loading more than 100kg. If so,
reduce the loading weight.
1. Press and hold the down button to enter the ‘Asr’/’rSt’
mode.
2. Hold the down button until the desk hits a stop, then
release the button to reset.
Ensure all cables are properly connected.
1. Press and hold the down button to enter the ‘Asr’/’rSt’
mode.
2. Hold the down button until the desk hits a stop, then
release the button to reset.
If the fault encountered is not listed or rectified in the list below, contact help.Kogan.com for
assistance.
17
Page 18
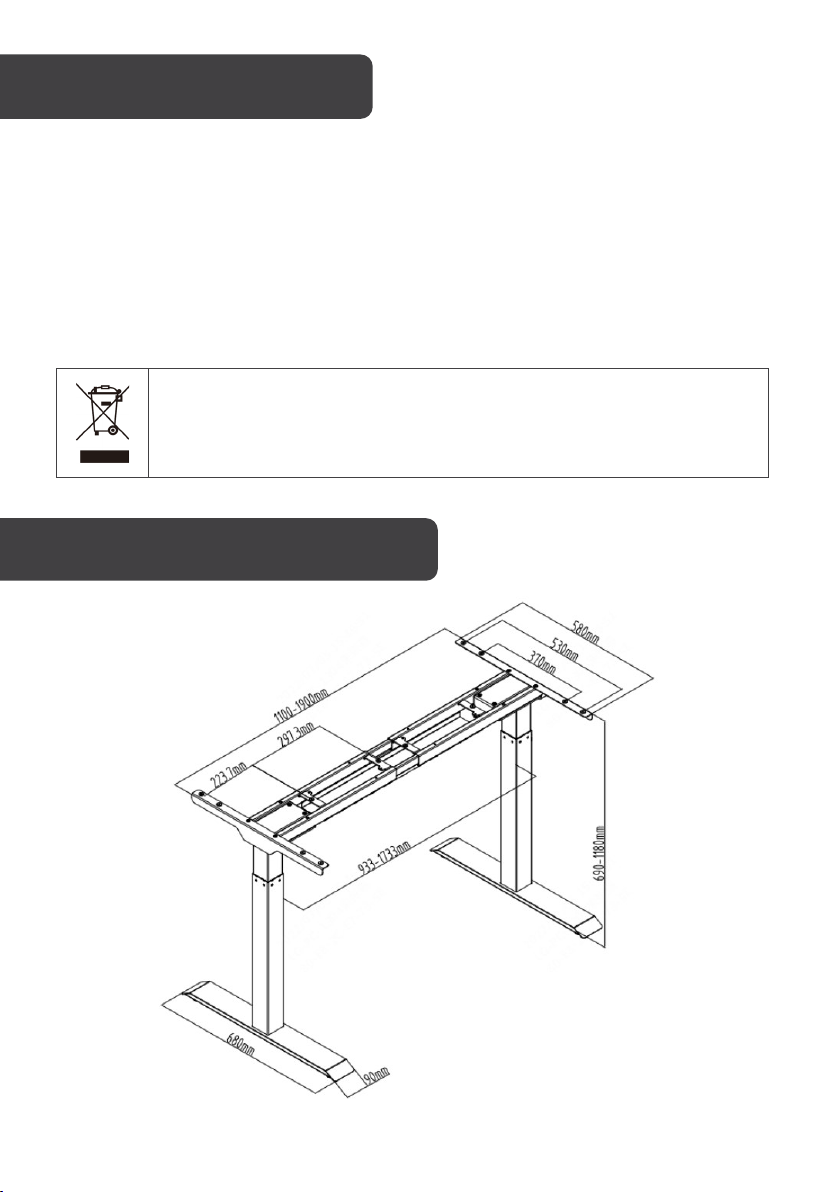
Column stages 2
Maximum weight capacity 100kg
Dimensions 140 x 70 x (69–118cm)
Disposal
This marking indicates that this appliance should not be disposed with other
household wastes. To prevent possible harm to the environment or human
health from uncontrolled waste disposal, recycle it responsibly to promote
the sustainable reuse of material resources.
18
Page 19

NOTES
19
Page 20

Need more information?
We hope that this user guide has given you
the assistance needed for a simple set-up.
For the most up-to-date guide for your product,
as well as any additional assistance you may require,
head online to help.kogan.com
20
 Loading...