


Ergoline Vertical
User Manual

Ergoline Vertical
User manual
Seite 2 von 29
INDEX
1. INTRODUCTION .................................................................................................................. 3
IMPORTANT................................................................................................................................. 3
WARRANTY.................................................................................................................................. 3
2. EQUIPMENT DATA.............................................................................................................. 4
STANDARDS................................................................................................................................ 6
3. COMPULSORY PRECAUTIONS............................................................................................ 7
SAFETY RULES............................................................................................................................ 8
MANUFACTURER’S RESPONSIBILITY........................................................................................ 8
4. INSTALLATION....................................................................................................................9
PACKAGING................................................................................................................................. 9
CABIN ........................................................................................................................................ 10
ELECTRICAL CONNECTION...................................................................................................... 10
HOW TO INSTALL THE UNIT ..................................................................................................... 10
5. FUNCTIONING MODE ....................................................................................................... 19
PROGRAMMING......................................................................................................................... 19
REMOTE CONTROL CONNECTION ........................................................................................... 23
ROUTINE AND EXTRAORDINARY MAINTENANCE ................................................................... 23
MAINTENANCE REGISTER........................................................................................................ 24
6. NOTES............................................................................................................................... 28
TANNING ADVICE CARD ........................................................................................................... 28
EXPOSURE TIMES CARD........................................................................................................... 29

Ergoline Vertical
User manual
Seite 3 von 29
INTRODUCTION
In thanking and congratulating on your choice, with this manual we are illustrating in the simplest
possible way the general instructions for use and maintenance of the vertical solarium 48-180 high
performance.
IMPORTANT
IMPORTANT: Before installing the equipment, carefully read the present manual and scrupulously
follow the technical operating instructions and advice contained in it.
The material contained in the present document is given exclusively for informative purposes and is
subject to modification without notice. Despite the maximum attention paid in preparing the
document, Quadra Medical srl is not responsible for any damage deriving from errors or omissions or
from the use of information contained in it.
Carefully keep this manual and all the attached documentation in an accessible place known to all the
operators.
WARRANTY
The warranty is limited to the repair or replacement of the faulty part and is not valid for malfunctions
due to incorrect use and/or tampering and repairs carried out by unauthorized persons.
The warranty does not cover elements due to consumption like starters and lamps.
The warranty does not cover costs of labour and possible shipment costs.
The warranty is cancelled if the instructions contained in the present manual are not followed.
The warranty becomes effective from the date given in the delivery document.

Ergoline Vertical
User manual
Seite 4 von 29
EQUIPMENT DATA
Model
Ergoline Vertical
Voltage supply
400 V ac
Phase
3 + N + PE
Frequency
50 Hz
Amperage
20 A
lamps
48x 180W 2mt
Unit dimensions
(door closed)
Length x width x height
(1200 x 1000 x 2350) mm
Unit dimensions
(door opened)
Length x width x height
(1290 x 1265 x 2350) mm
H = 2360mm
H1 = 2660mm
H2 = 2330mm
H3 = 65mm
H9 = 3000mm
D = 500mm
B3 = 525mm
TK = 2380mm
BK = 1630mm
TK = 2600mm

Ergoline Vertical
User manual
Seite 5 von 29
B = 930mm
B1 = 1270mm
B4 = 440mm
B6 = 600mm
B8 = 1600mm
T = 1230mm
T1 = 1380mm
T2 = 920mm
Installation site
In dry rooms with sufficient air supply (more than 2000 m3/h)
Relative air humidity
≤70 %
Ambient temperature
≤30°C (86 °F)
Exhaust air hose gauge
500mm
Distance between top and
ceiling
300mm
ATTENTION!
The unit must not be operated in case of faulty of control panel or
some broken parts
Electrical connection

Ergoline Vertical
User manual
Seite 6 von 29
Mains voltage
400 V / 3+N+PE / 50 Hz
Cable cross section
5 x 4mmq
Here is a copy of the label on the unit:
Model:
Ergoline Vertical
Serial number:
******
UV type:
* *
Power supply:
400V 3+N+PE 50 Hz 10kW
Year:
* * * *
Lamps:
180W 2mt
Rated current:
3x 20A
Exercise temperature:
30°C max
Service:
4 to 15 minutes
STANDARDS
The equipment is built in compliance with current standards.
Reference standards:
CEI EN 55014-1 Electromagnetic compatibility – Provision for electrical household appliances, electric
tools and the like. Part 1: Emission.
CEI EN 55014-2 Electromagnetic compatibility – Requisites for electrical household appliances,
electric tools and the like. Part 2: Immunity.
CEI EN 60335-1 General part, safety standards for electrical appliances for domestic and similar use.
CEI EN 60335-2-27 Part II, particular standard for the safety of appliances for skin treatment with
ultraviolet and infrared rays for household and similar use.
CEI EN 50106 Particular standards for routine tests on electrical appliances coming within the
application field of EN 60335-1.

Ergoline Vertical
User manual
Seite 7 von 29
COMPULSORY PRECAUTIONS
Appliances that emit UVA and UVB rays can cause damage to the skin and eyes, due to the quantity
and quality of the radiation and depending on individual sensitivity.
Frequent exposure, in excessive doses and/or with poor or no protection, to the sun and a tanning
lamp causes early ageing of the skin, and could result in sunburn and increase the risk of skin
neoplasia.
If the eyes are inadequately protected they can develop superficial inflammation (reddening), after
excessive exposure, and in certain cases there could be damage to the retina; repeated exposure
could cause cataracts.
Persons who get sunburnt easily, who suffer from erythema solare, or who have suffered from skin
neoplasia should avoid exposure.
Special attention must be paid in cases of marked individual sensitivity to ultraviolet radiation and if
medicines or cosmetics are used; in this case it is advisable to previously see a doctor.
Always use the special protection glasses.
Carefully remove make-up and perfumes before exposure.
Use specific tanning products, suitable for the skin type and degree of tanning.
Respect intervals of at least 48 hours between two successive exposures and avoid exposure to the
sun on the same day.
In the event of skin reddening and/or rashes following tanning treatments or exposure to the sun,
avoid exposure and if the condition persists, see a doctor.
Respect the recommended exposure times and the equal distance between the body surface and the
radiant surface
The following picture shows the correct position of the body inside the cabin:
YES NO

Ergoline Vertical
User manual
Seite 8 von 29
SAFETY RULES
The owner or the employer must instruct the operational personnel on the accident risks, the devices
arranged for the safety of the operator and the user (client), the risks of UV ray emissions and on the
general accident prevention regulations provided for by international directives and by the law in the
country where the appliance is used.
The behaviour of operative personnel must in any case scrupulously comply with the accidentprevention regulations in the country where the appliance is used.
Before turning the appliance on, the operator must perfectly know the position and function of all the
controls and the characteristics of the equipment. Moreover, the operator must have carefully and
fully read the present manual.
It is absolutely prohibited to obstruct the aeration ducts of the equipment.
Routine and extraordinary maintenance must be carried out with the power to the appliance turned
off.
Any tampering or unauthorized replacement of one or more parts or units of the equipment, the use of
accessories or consumable materials other than the originals or in any case not recommended by the
manufacturer, can represent an accident risk and relieves the manufacturer of any civil and penal
responsibility.
In case of doubt as to the functioning of the timer, do not use the machine.
The UV emitters must only be replaced with identical emitters and by qualified
technical; personnel.
MANUFACTURER’S RESPONSIBILITY.
The manufacturer is relieved of any responsibility in the following cases:
• Lack of scheduled maintenance.
• Unauthorized modifications and/or interventions.
• Use of non-original replacement parts.
• Complete or partial non-compliance with the instructions.

Ergoline Vertical
User manual
Seite 9 von 29
INSTALLATION
PACKAGING
The paking for the stand up unit is so composed:
1 pallette 2200 x 1100 x 930(high) mm
1 pallette 1200 x 1000 x 360(high) mm
The external boxes are in Vulcan cardboard, this means a high robustness and a high resistance to
hits.
The parts inside are placed on special polyester seats, that allow to insert in one box 6 panels with
tubes without risk of damaging: The polyester seats make the panels separated one to each other and
make that the weight of the upper panels do not impact on the panels below but on the seats.

Ergoline Vertical
User manual
Seite 10 von 29
CABIN
The aeration of the room (room/cubicle) must be adequate. The room will have a possible duct for the
suction and extraction of the hot air produced by the tanning equipment. In any case, see the
maximum working temperatures given on the dataplate of the appliance.
For optimum functioning of the appliance it is advisable to comply with the measurements (distances)
given below:
ELECTRICAL CONNECTION
The electrical system of the room must comply with current regulations (CEI 64-8/7;V2).
The equipment will be delivered with a power supply cable (4 mt) without plug.
It is the buyer’s responsibility to arrange the power outlet complete with plug.
The grid connection device must have a contact opening of at least 3 mm.
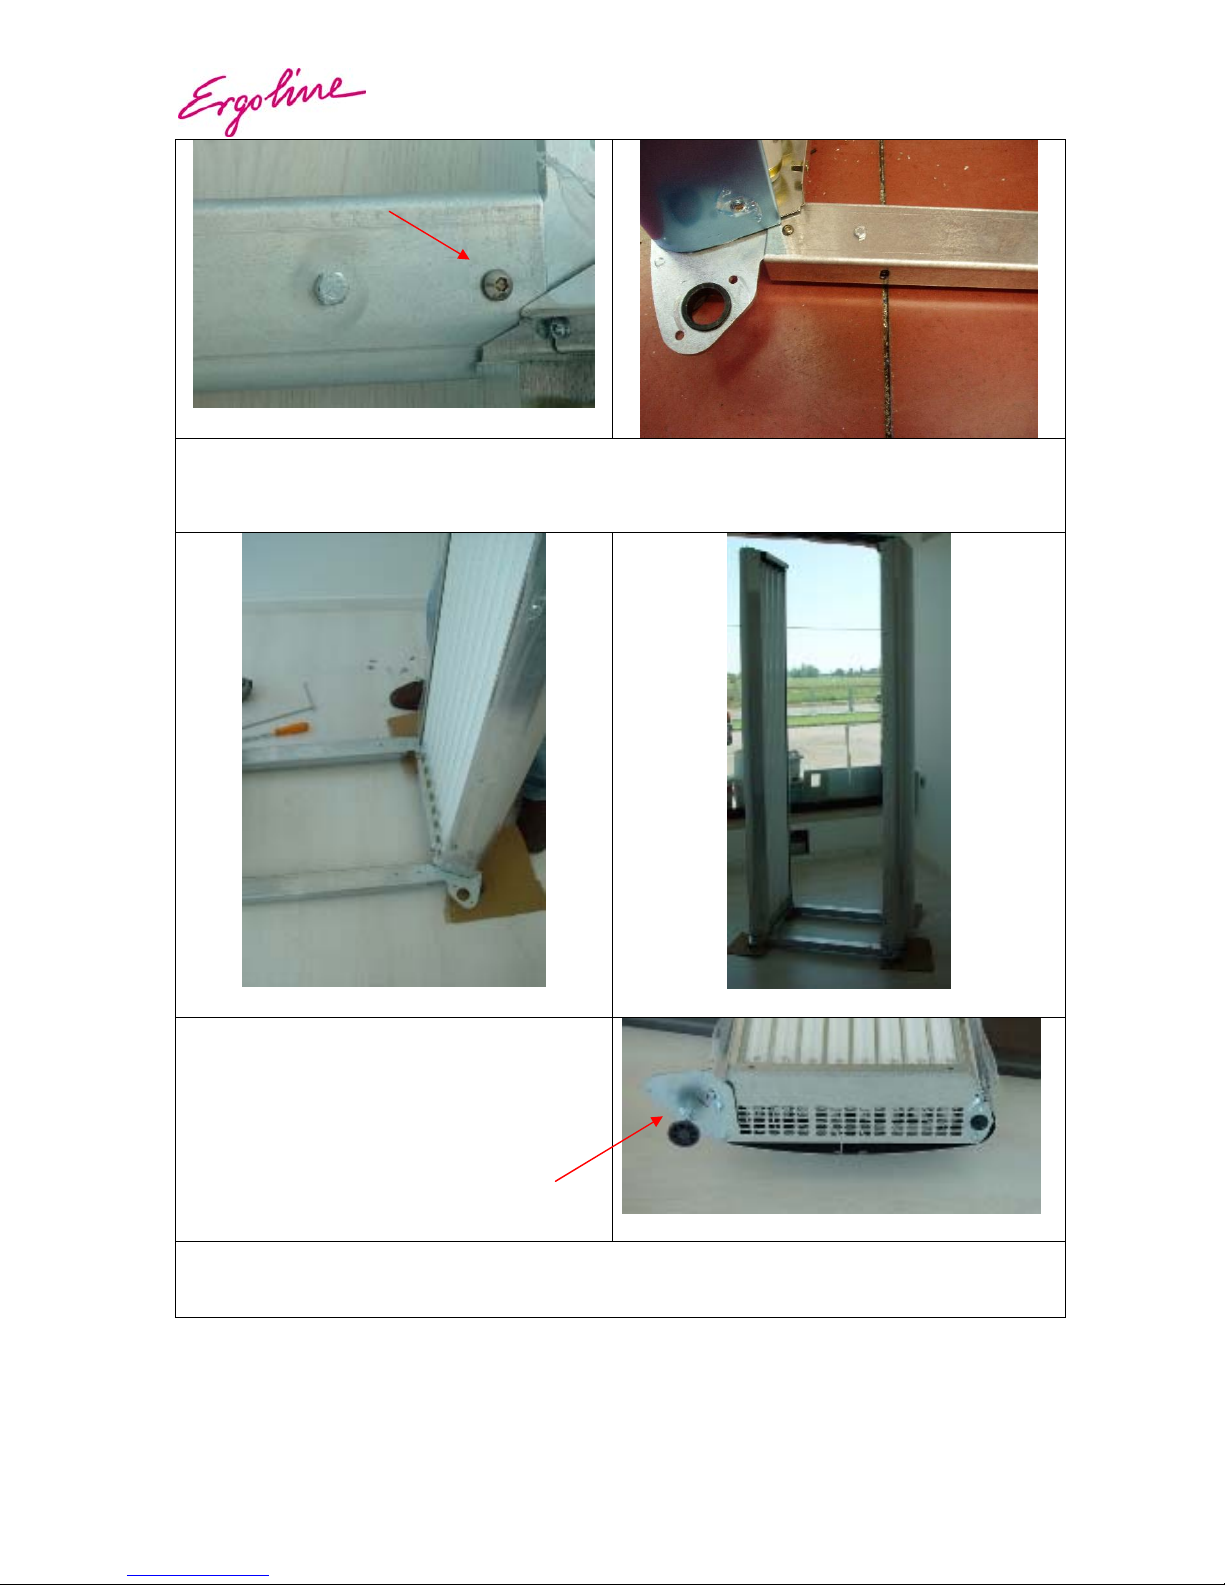
HOW TO INSTALL THE UNIT
Take out from the package the metal brackets.
The brackets are numbered too as shown on the
right.
C
D
E
A
B

Ergoline Vertical
User manual
Seite 11 von 29
Each panel of the unit is signed with a number
from 1 to 6 (see on the right), so you can see
which is the right position of the panel.
Fix the brackets on the bottom side of panel 2 (brackets number 1 and 2) and panel 5 (brackets number
4 and 5), and insert the feet. For fixing brackets use nuts into bag 1B.
Insert the 2 long metal brackets on panel 2, then
fix them with screws in bag 1A (see below);
Do not fix at all for the moment.
Panel 2
Panel 5
1B
1A
3
4
5
1
2
6
Ergoline Vertical
User manual
Seite 12 von 29
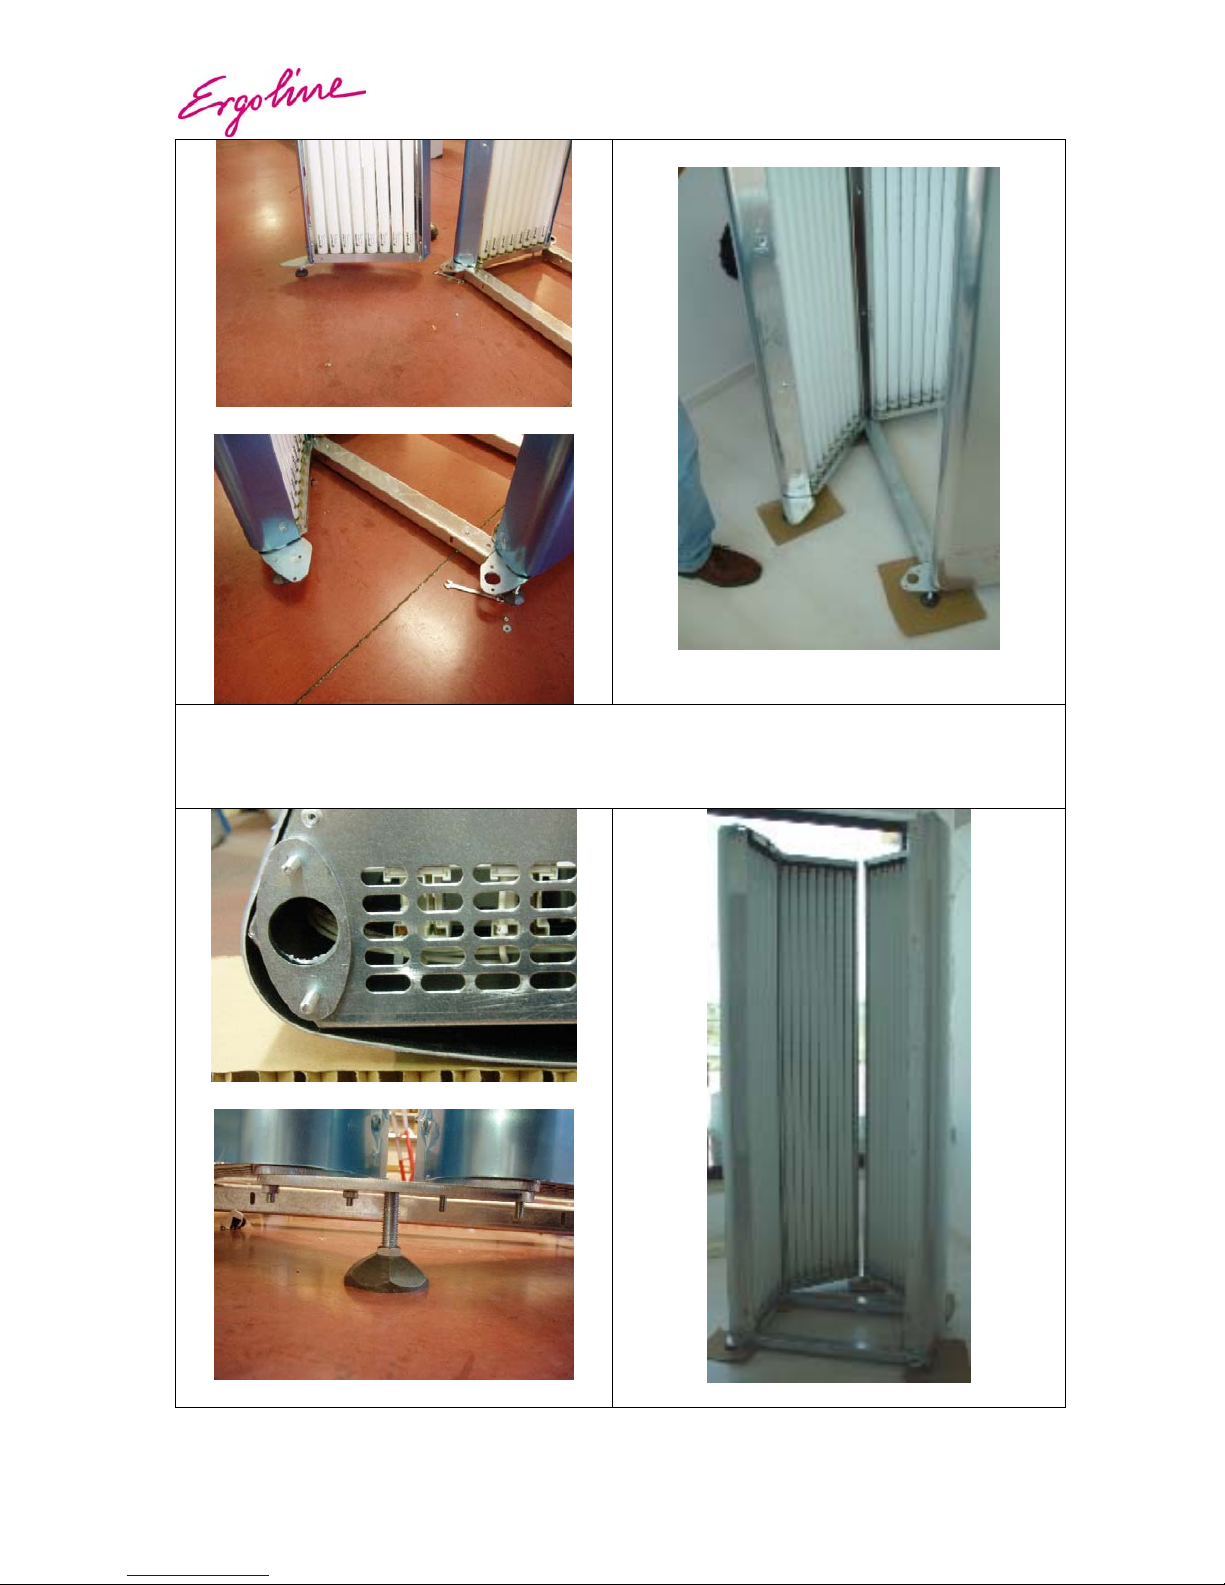
Fix together panel 5 with panel 2 inserting panel 5 into long brackets as shown below, without fixing
completely the screws.
At the end of this operation the 2 panels can stand up by themselves.
Fix on the bottom side of panel 4 the bracket
numer 3 with the foot, as shown on the right.
Fix panel 4 near panel 5, taking care to insert the 2 screws on the bottom of the panel inside the right
holes; then insert on these screws the M6 nuts fixing them a little bit.
Ergoline Vertical
User manual
Seite 13 von 29
Panel 3 has no brackets on the bottom, this has to be inserted between panel 2 and 4, taking care to
insert screws into holes. Then fix the nuts on the bottom.

Ergoline Vertical
User manual
Seite 14 von 29
Put the roof on the 4 panels; take care about cables that have to pass through the right holes of the roof.
Insert M6 nuts on rear side without fixing them at
all.
Insert plastic cylinders on the top side of panel 1 and 6 (doors);

Ergoline Vertical
User manual
Seite 15 von 29
Insert the door: First insert the bottom side (see
picture on the right).
Then lift up a little the front side of the roof and
insert the top of the door (remember the cable
trough the hole, see picture below).
Repeat the same operation with the second door.
Now you can fix strongly the nuts on the roof.
Insert cables from the panel through the roof.

Ergoline Vertical
User manual
Seite 16 von 29
Connect white plastic connectors with the same
number.
Connect the power supply cable to the main filter,
then push the cable through the channel on panel
4 as shown in following pictures;
the cable comes out from the bottom side.
Repeat the same operation with the 6-pole cable for connecting to external timer if needed;

Ergoline Vertical
User manual
Seite 17 von 29
Take the external handle and fix it on the left door
using screws on bag 4 and aluminium cylinders
on bag 5; take care on fixing step by step one all
screw, otherwise you can damage the handle.
Fix the 2 internal handles with screws on bag 6 to the doors;
Fix the 2 internal support handles with screws on bag 7 to the internal side of the roof;
Remove plastic covers from internal side of
panels (acrylics and metal covers).

Ergoline Vertical
User manual
Seite 18 von 29
Put the metal cover on the top.
Connect the main cable to the power supply and switch on the unit, check that all lamps, fans and the
main ventilator are on.

Ergoline Vertical
User manual
Seite 19 von 29
FUNCTIONING MODE
PROGRAMMING
The purpose of this chapter is to describe how the system works, giving a detailed description of
several pages on the display and of several steps during a treatment; it’s also possible to setup some
features of the unit.
The electronic control device mainly carries out the function of a timer: it enables a tanning treatment
of programmed duration to be carried, automatically providing for the switching on and off of the
lamps and the cooling fans of the cabin and the tanning system.
Implemented in the electronic device are also meters in which the equipment activity times are
memorized and that can be used for controlling takings.
The first page you can see shows as the following:
1 E R G O L I N E
S T A R T
This page will come back automatically if you do not press any button for 3 minutes (of course not
during the treatment!); pressing one of the 4 buttons you can enter in the following page:
2
T R E A T D U R 1 0 : 0 0
S T A R T E S C
Press ESC for going back to page 1
The treatment duration shown on the display is the last one you have entered in the service menu;
Pressing START button the page below will be shown, and you can listen the following vocal message:
“
Welcome, we hope you enjoy your pleasant moment of relaxation while you tan. Please make sure
you removed all make up, and contact lenses and you’re wearing protective goggles. To control the
ventilation, use the dial on the lower right of the panel
”.
2a L E F T T I M E 1 0 : 0 0
Vocal message running
S T O P
Then the treatment begins and the following page appears:
2b L E F T T I M E 0 9 : 4 8
Decreasing time is shown
S T O P
At half time of the session you’ll listen the following vocal message:
“
You’re now halfway through your sunbed session
”.
When 10 seconds to the end are missing, you can hear the following vocal message:
“
Your session is now ending. Thank you and goodbye
”.

Ergoline Vertical
User manual
Seite 20 von 29
Pressing STOP button the session terminates, and if there’s a cooling time set up the following page
will be shown:
2c C O O L I N G
S Y S T E M
At the end the program will come back to page 1.
All operations shown before can be executed without any access key.
Service-Mode
Using the access key you can enter inside the service menu: insert the key and press any button, the
following page will be displayed:
3 S E R V I C E M E N U
E N T
Removing the access key, from any page you’ll come back to page 1;
Pressing ENT next page appears:
4 T R E A T D U R : 1 0 : 0 0
< > E N T E S C
Press ESC for going back to page 1
Here it is possible to adjust the default tanning time. (1-30 minutes)
Selecting buttons < or > you can shift to several functions of the menu, and after the last page you’ll
find the first one again:
5 M
I N U T E S : 0 0 2 3 1
< > R E S E S C
Press ESC for going back to page 1
Indication of the total unit operating minutes. Keeping pressed RES button for at least 3 seconds
minutes value will be reset to 00000.
6 L A M P H O U R S 0 0 0 0 3
< > R E S E S C
Press ESC for going back to page 1
Indication of the remaining operating hours of the low pressure lamps. Keeping pressed RES button
for at least 3 seconds minutes value will be reset to 00000.
7 U N I T H O U R S 0 0 0 0 3
< > E S C
Press ESC for going back to page 1
Indication of the total unit operating hours. Keeping pressed RES button for at least 3 seconds
minutes value will be reset to 00000.

Ergoline Vertical
User manual
Seite 21 von 29
8 C O O L I N G
< > E N T E S C
Press ESC for going back to page 1
Adjustment of the run-on time. The fan run on time can be adjusted between 30 seconds and 5
minutes by the european version and between 3 minutes and 5 minutes by the US-Version.
The factory setting is 3 minutes.
Press ENTER for the next page:
8a C O O L I N G : 0 3 0
Value 30 is blinking
< > M E M O E S C
Press ESC for going back to page 8
Pressing < or > buttons you can modify the cooling value with steps of 30 seconds.
9 R E M O T E C O N T R O L
< > E N T E S C
Press ESC for going back to page 1
Adjustment of using a coin box or a studio control system.
Pressing ENT button the following page will appear:
9a R E M O T E : E N A B
ENAB is blinking
< > M E M O E S C
Press ESC for going back to page 9
Selecting < or > you can choose between ENAB and DISAB, that means the unit is controlled
by an external timer (remote control enabled) or by the internal one (disable):
9b R E M O T E : D I S A B
DISAB is blinking
< > M E M O E S C
Press ESC for going back to page 9
Pressing MEMO button the chosen option is saved.
If the remote control function is enabled, the display will appear as the following page:
9c E R G O L I N E
S T A R T
This page will come back after 3 minutes without pressing any button; pressing one of the 4
buttons the following page will appear:
9d L E F T T I M E 0 0 : 0 0
S T A R T E S C
Press ESC for going back to page 1
Pressing START button a free potential switch will be closed (start command), and this switch
will remain closed for 5 seconds and then will open again;
Ergoline Vertical
User manual
Seite 22 von 29
If a start arrives from the external connector, the session begins:
9e L E F T T I M E 0 0 : 1 3
Increasing time is displayed
S T O P
10 V E R S I O N : E N G 0 4
< > E S C
Press ESC for going back to page 1
Indication of the main software version.
11 S Y S T E M
A U D I O
< > E N T E S C
Press ESC for going back to page 1
Turn on/off the voice guide function.
Pressing ENT button the following page will appear:
11a A U D I O : E N A B
ENAB is blinking
< > M E M O E S C
Press ESC for going back to page 12
Selecting < or > you can choose between ENAB and DISAB, that means that vocal messages
are active or not:
11b A U D I O : D I S A B
DISAB is blinking
< > M E M O E S C
Press ESC for going back to page 12
Pressing MEMO button the chosen option is saved.
Pressing MEMO button you can see for some seconds the following page:
P A R A M E T E R
P R O G R A M M E D
If the sentence PARAMETER NOT PROGRAMMED appears, please repeat the operation;

Ergoline Vertical
User manual
Seite 23 von 29
REMOTE CONTROL CONNECTION
On the external side you have a 6-wire cable, that’s outcoming from the back bottom of the unit, to
allow the interfacing to the external control.
In the drawing below you can see how to connect the unit to a generic external control.
Qmed 48-180
ROUTINE AND EXTRAORDINARY MAINTENANCE
To keep the solarium efficient, carry out the following simple operations:
Clean the lamps with a mixture of water and alcohol (50%+50%) or with specific products for cleaning
glass surfaces.
Clean the acrylic without using detergent products based on alcohol (the surface could become dull
and therefore stop a part of the UV).
Various suitable products are readily available on the market for this purpose.
Clean the equipment (especially the parts in contact) with non-aggressive disinfectant products.
Various suitable products are readily available on the market for this purpose.
Periodically make sure that the air intakes are not blocked with dust or other materials (tissues, etc.).
Periodically replace the lamps and the starters (normally between 400 and 600 hours of work).
Brown
White
Pink
Gray
Yellow
Green
230V ac L
N
Input 230Vac L1
For start from N1
external control
Internal start
(Start button)
External start

Ergoline Vertical
User manual
Seite 24 von 29
MAINTENANCE REGISTER
Model of equipment:
Serial No.:
Intervention No:
Date of intervention:
Total hours of operation:
Type of intervention: Lamp replacement Starter replacement
Other______________________________________________________________________________
Next intervention in________________ hours
Notes ____________________________________________
____________________________________________
____________________________________________
Stamp and signature of authorized
technician
Model of equipment:
Serial No.:
Intervention No.:
Date of intervention:
Total hours of operation:
Type of intervention: Lamp replacement Starter replacement
Altro______________________________________________________________________________
Next intervention in________________ hours
Notes ____________________________________________
____________________________________________
____________________________________________
Stamp and signature of authorized
technician
Model of equipment:
Serial No.:
Intervention No.:
Date of intervention:
Total hours of operation:
Type of intervention: Lamp replacement Starter replacement
Other______________________________________________________________________________
Next intervention in________________ hours
Notes ____________________________________________
____________________________________________
____________________________________________
Stamp and signature of authorized
technician

Ergoline Vertical
User manual
Seite 25 von 29
Model of equipment:
Serial No.:
Intervention No:
Date of intervention:
Total hours of operation:
Type of intervention: Lamp replacement Starter replacement
Other______________________________________________________________________________
Next intervention in________________ hours
Notes ____________________________________________
____________________________________________
____________________________________________
Stamp and signature of authorized
technician
Model of equipment:
Serial No.:
Intervention No.:
Date of intervention:
Total hours of operation:
Type of intervention: Lamp replacement Starter replacement
Altro______________________________________________________________________________
Next intervention in________________ hours
Notes ____________________________________________
____________________________________________
____________________________________________
Stamp and signature of authorized
technician
Model of equipment:
Serial No.:
Intervention No.:
Date of intervention:
Total hours of operation:
Type of intervention: Lamp replacement Starter replacement
Other______________________________________________________________________________
Next intervention in________________ hours
Notes ____________________________________________
____________________________________________
____________________________________________
Stamp and signature of authorized
technician
Ergoline Vertical
User manual
Seite 26 von 29
Model of equipment:
Serial No.:
Intervention No:
Date of intervention:
Total hours of operation:
Type of intervention: Lamp replacement Starter replacement
Other______________________________________________________________________________
Next intervention in________________ hours
Notes ____________________________________________
____________________________________________
____________________________________________
Stamp and signature of authorized
technician
Model of equipment:
Serial No.:
Intervention No.:
Date of intervention:
Total hours of operation:
Type of intervention: Lamp replacement Starter replacement
Altro______________________________________________________________________________
Next intervention in________________ hours
Notes ____________________________________________
____________________________________________
____________________________________________
Stamp and signature of authorized
technician
Model of equipment:
Serial No.:
Intervention No.:
Date of intervention:
Total hours of operation:
Type of intervention: Lamp replacement Starter replacement
Other______________________________________________________________________________
Next intervention in________________ hours
Notes ____________________________________________
____________________________________________
____________________________________________
Stamp and signature of authorized
technician

Ergoline Vertical
User manual
Seite 27 von 29
Model of equipment:
Serial No.:
Intervention No:
Date of intervention:
Total hours of operation:
Type of intervention: Lamp replacement Starter replacement
Other______________________________________________________________________________
Next intervention in________________ hours
Notes ____________________________________________
____________________________________________
____________________________________________
Stamp and signature of authorized
technician
Model of equipment:
Serial No.:
Intervention No.:
Date of intervention:
Total hours of operation:
Type of intervention: Lamp replacement Starter replacement
Altro______________________________________________________________________________
Next intervention in________________ hours
Notes ____________________________________________
____________________________________________
____________________________________________
Stamp and signature of authorized
technician
Model of equipment:
Serial No.:
Intervention No.:
Date of intervention:
Total hours of operation:
Type of intervention: Lamp replacement Starter replacement
Other______________________________________________________________________________
Next intervention in________________ hours
Notes ____________________________________________
____________________________________________
____________________________________________
Stamp and signature of authorized
technician

Ergoline Vertical
User manual
Seite 28 von 29
NOTES
TANNING ADVICE CARD
CAUTION
INTENSE LIGHT: DO NOT STARE AT THE EMITTER
Ultraviolet radiation or UV appliances can damage the skin and eyes. These biological effects not only
depend on the quantity and quality of the radiation but also on the individual sensitivity of the skin and
eyes.
ADVICE FOR CORRECTLY GET A TAN WITH UV EQUIPMENT
• Getting a tan without exaggerating: this is the main rule. In other words: not more than one
exposure per day. As a general rule a maximum of ten initial exposures spread over a period
of 3 – 4 weeks is appropriate. Subsequently, from 1 to 2 sessions a week will be sufficient to
maintain the degree of tan achieved. Also. make sure to comply with the following advice.
• Respect the exposure times recommended for the different types of skin (skin types).
• In case of doubt we recommend contacting the personnel of the beauty centre who will
provide the relative details and appropriate information.
• Respect the minimum interval of 48 hours between one exposure and another.
• Before carrying out the tanning treatment remove any cosmetic products and make up (do not
use alcoholic products), do not spray perfumes and deodorants.
• Remove any jewellery and contact lenses.
• Only use cosmetic products specifically designed for exposure to the sun and/or with tanning
equipment.
• Before beginning the cycle of tanning treatments consult a doctor who must give his
favourable opinion and, whenever requested, issue the necessary certification.
• In the event you are taking medicines or if you are pregnant, make sure to tell the doctor
during the visit.
• During exposure, keep the eyes closed and always wear protective glasses.
• Exposure to UV rays is inadvisable after hair-removal or particular treatments.
• Do not expose yourself to the sun on the same day on which a tanning appliance has been
used.
For further information in this respect, it is advisable to directly contact your beauty centre.
Take care of the skin before and after the session, in order to guarantee a more lasting tan.
For this purpose, protective cosmetics and after-sun products are particularly recommended,
as they are specially designed for the particular needs of the skin which is exposed to the rays.

R&D Department – Quadra Medical srl pag. 1 di 2
Rapporto di prova misure radiometriche su apparecchiatura
abbronzante
Misurazione eseguita con modalità di prova come indicato nella normativa
EN60335-2-27
Modello: Ergoline Vertical
Costruttore: Quadra Medical srl
Tipo lampada: Lighttech Engineering Sample 180R Longlife No5/226, c252
Tipo alimentatore: ERC HID/90 180W 1,5A 230V 50Hz , cod. MPEE001019
Numero lampade: 48
Data: 26-11-2005
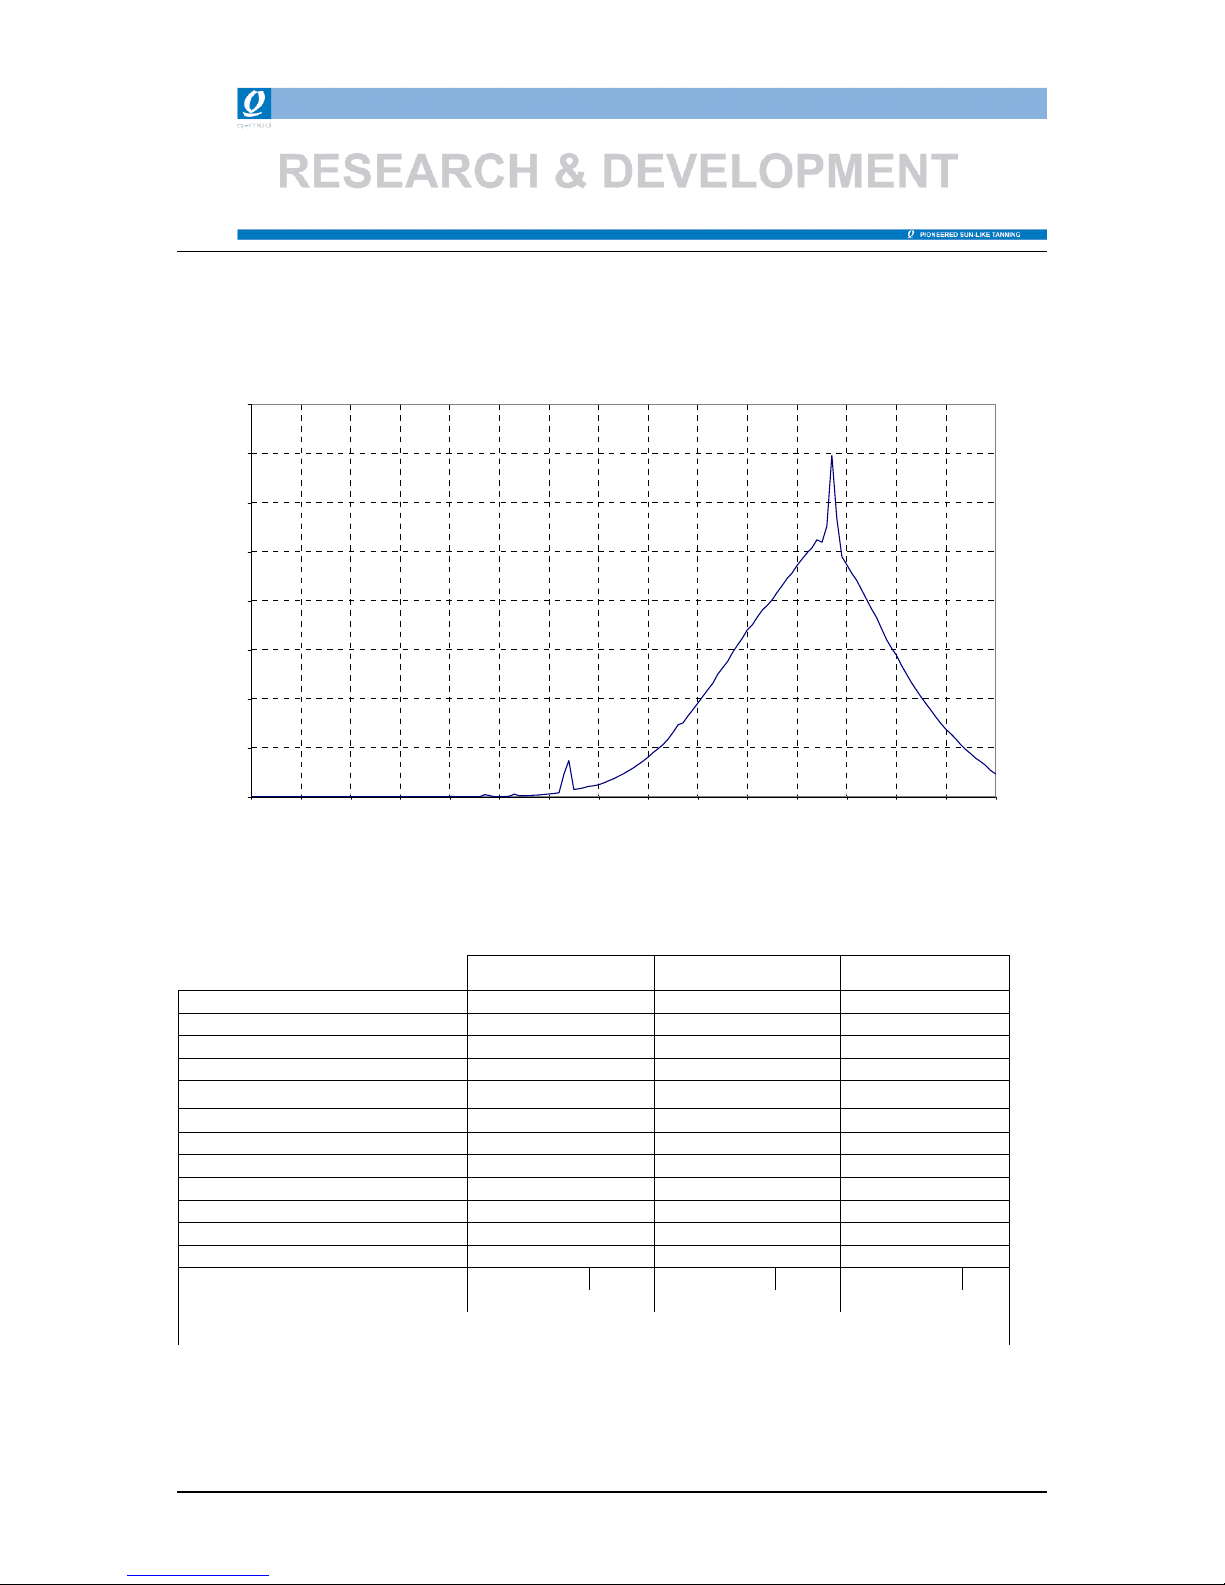
1. Calcolo irradianza reale e irradianza efficace:
Irradianza
E
UVC250-280
= 0,00 W/m²
E
UVB280-320
= 5,30 W/m² E
er
= 417,5968 W/m²
E
UVA320-400
= 412,29 W/m²
Irradianza Efficace
E
er<=320
= 0,38 W/m²
E
er>320
= 0,23 W/m² E
er
= 0,6179 W/m²
R&D Department – Quadra Medical srl pag. 2 di 2
2. Grafico:
Curva irradianza spettrale
0,00
2,00
4,00
6,00
8,00
10,00
12,00
14,00
16,00
250 270 290 310 330 350 370 390
Lunghezza d'onda [nm]
Irradianza [W/m²/nm]
3. Tabella tempi di esposizione:
Fototipo II Fototipo III Fototipo IV
1. Sessione 3 min 3 min 3 min
2. Sessione 3 min 3 min 4 min
3. Sessione 3 min 4 min 4 min
4. Sessione 4 min 5 min 5 min
5. Sessione 4 min 5 min 6 min
6. Sessione 4 min 6 min 7 min
7. Sessione 5 min 6 min 8 min
8. Sessione 5 min 7 min 9 min
9. Sessione 6 min 8 min 9 min
10. Sessione 6 min 8 min 10 min
11. Sessione 6 min 9 min 11 min
12. Sessione 7 min 9 min 12 min
Numero massimo 60 43 33
di sessioni all’anno (=15kJ/m²) (=15kJ/m²) (=15kJ/m²)
L'intervallo minimo tra due sessioni deve essere almeno di 48 ore.
note: I risultati della prova si riferiscono esclusivamente alle condizioni specificate a pagina 1. Il
rapporto di prova non può essere riprodotto anche parzialmente senza consenso scritto da parte
del laboratorio.
 Loading...