

ERGO-FIT Power Line 4000 MED, SHOULDER ABDUCTION 4000, Power Line 4000 S MED, BUTTERFLY 4000, SHOULDER PRESS 4000 Owner's Manual
...
E
POWER LIN
Owner‘s manual
POWER LINE 4000
POWER LINE 4000
OW
POWER LINE 4000
Please read this manual carefully before use and keep it in a safe place for future reference


Further information on ERGO-FIT-products available at:
ERGO-FIT GmbH & Co. KG
Blocksbergstraße 165
66955 Pirmasens
Phone: 06331/2461-0
Fax.: 06331/2461-55
Email: info@ergo-fit.de
http: www.ergo-fit.de
Development and production of all devices of the MED series according to the
European Medical Device Directive 93/42/EWG. They thus show the CE marking and
the number of the notified body.
© 2013 by ERGO-FIT GmbH & Co. KG.All rights reseved.
This owner's manual has been created with great care. Please inform us of any detail that does not correspond to your
training tool to allow for the quickest possible remedy of any possible discrepancy.
This document is protected by copyright. All rights originating from this, particularly the right of copying, duplication,
distribution as well as translation and reprint, even copies in extract, are reserved. No part of this manual may be
reproduced, manifold or distributed for any kind of purposes or in any kind of form, by any means, (print, photocopy,
microfilm, or any other information-saving mechanisms) without prior written permission given by the company ERGOFIT GmbH & Co. KG.
Trademark:
ERGO-FIT and the ERGO-FIT Logo are registered trademarks of ERGO-FIT GmbH & Co. KG. All other trademarks
mentioned or shown in the following text are trademarks of the respective owners and are recognised as protected.
Technical and optical modifications as well as misprints reserved.
Version: POWER LINE 4000-20131101-en
Printed in Germany

Dear customer,
We are glad that you have decided to purchase an ERGO-FIT training tool. You are
now the owner of a sophisticated and exclusive training system that combines highest
technical standards with practice oriented ease of use.
This owner’s manual contains information on multiple gym machines. For this reason,
you will find explanations that do not apply to your training machine.
You will find important information on the operation and use of your training machine
in this owner’s manual. We recommend that you read this owner’s manual carefully
before training in order to become familiar with your training device quickly and to
understand its correct and safe use.
Should you have any questions that are not answered in this manual, please contact
us. The ERGO-FIT team is always there for you!
POWER LINE 4000
Table of contents
1 General information ................................................................................... 1
2 Safety information ..................................................................................... 5
3 Short manual ............................................................................................. 11
4 Destination of the product ......................................................................... 13
5 Transport and setup .................................................................................. 21
6 Start up ...................................................................................................... 41
7 Training ..................................................................................................... 45
8 Maintenance .............................................................................................. 73
A Appendix ................................................................................................... 77
Please note:
This owner’s manual contains information on multiple gym machines.
There may be variations in detail according to the type of machine!
Technical and optical modifications as well as misprints reserved - © 2013 by ERGO-FIT GmbH & Co. KG


POWER LINE 4000
Chapter 1: General information
1.1 ERGO-FIT strength equipment at a glance .......................................... 2
1.2 General information on this manual ..................................................... 2
1.3 Scope of delivery .................................................................................. 3
1.4 Service ................................................................................................ 3
Please note:
This owner’s manual contains information on multiple gym machines.
There may be variations in detail according to the type of machine!
Technical and optical modifications as well as misprints reserved - © 2013 by ERGO-FIT GmbH & Co. KG
1

General information
1 General information
1.1 ERGO-FIT strength equipment at a glance
ERGO-FIT’s POWER LINE 4000 range consists of strength training machines
designed for building up all relevant muscle groups. ERGO-FIT strength training
machines offer you the best training options, regardless of your age, gender, or fitness
level.
Among others, the eccentric technique, integrated beverage holders, and the
concentration on functional aspects are highlights of the whole product line. In addition,
it is the ease of use and the customisation that demonstrate ERGO-FIT’s focus: A high
technical standard, optimal training possibilities and precise training control, combined
with customer-friendly ease of use.
However, technology alone is not all that is required to develop outstanding training
machines. They also need to meet biomechanical and sports medical requirements.
Priority is given to the human being. Thus, a sophisticated training and testing system
can only be developed by combining technical electronic expertise with the latest
advances in sports medicine and coaching science. ERGO-FIT clearly met this
target.
Our POWER LINE 4000/4000 S is especially designed for fitness purposes, whereas
POWER LINE 4000 MED/4000 S MED is designed to meet medical targets.
The lifetime of the equipment is 6 years.
EN 957-2: 7.2 b) Please note that the exercise machine may only be used in areas
where access and supervision are controlled by the owner. The extent of this
supervision depends on the users, i.e. degree of reliability, age, experience etc.
Advantages and benefits
Regular training on these machines prevents malpositions from day-to-day life,
associated arthrosis of the spinal column as well as muscle tension, and will increase
personal performance even at an advanced age. Your workout machine represents an
indispensable tool in injury prevention and rehabilitation. You will feel fit, more powerful,
more attractive, and more balanced.
2
Technical and optical modifications as well as misprints reserved - © 2013 by ERGO-FIT GmbH & Co. KG

POWER LINE 4000
1.2 General information on this manual
This manual provides you with helpful information, regardless of if you are already
familiar or have no experience with ERGO-FIT training machines.
It is structured in a way that you can find the desired information in the table of contents
easily and thematically. In addition, a short manual has been produced.
However, if you belong to this user group and wish to read the short manual only, you
should review the safety information first.
This manual will give you many hints and tips, which will familiarise you with your
workout machine’s features and allow you to become an experienced user very
quickly.
You should always keep this manual easily accessible. This saves you from
unnecessary and time-consuming queries and enables you to rapidly fix any possible
error.
1.3 Scope of delivery
Please check if the delivery is complete and inform our sales department immediately
of any missing parts (phone: 06331/2461-25).
Please ensure that the following parts are included in your delivery:
1. The correct model (series) of training machine
2. Hard copy of the manual or digital version on CD ROM
3. Handle and weights not included
1.4 Service
Our service comprises problem analysis, technical support, spare parts service and
information services.
In case of technical questions and service orders, please call us at:
Head office: Phone: (+49) 06331/2461-0
Fax: (+49) 06331/2461-55
Service and spare parts: Phone: (+49) 06331/2461-20, -22, -23, -27, -29 or -45
Technical and optical modifications as well as misprints reserved - © 2013 by ERGO-FIT GmbH & Co. KG
3

General information
4
Technical and optical modifications as well as misprints reserved - © 2013 by ERGO-FIT GmbH & Co. KG

POWER LINE 4000
Chapter 2: Safety information
2.1 What you need to know when using your training machine ................. 6
2.2 Operational safety – what needs to be done ........................................ 8
2.3 Choosing the right place of installation ................................................. 8
2.4 What needs to be considered in case of repair .................................... 8
2.5 What should be avoided ....................................................................... 9
Please note:
This owner’s manual contains information on multiple gym machines.
There may be variations in detail according to the type of machine!
Technical and optical modifications as well as misprints reserved - © 2013 by ERGO-FIT GmbH & Co. KG
5
Safety information
2 Safety information
Before starting to use your new ERGO-FIT equipment, please read the following
chapter carefully and observe all safety regulations.
Please keep this manual in a safe place in order to provide it to future owners if you
sell your training machine.
For evidence of ownership, please fill in the following data:
Model/product line __________________________________
Serial number __________________________________
Date of purchase __________________________________
You will also need these data in case of guarantee claims.
The following symbols designate important information:
Caution
Danger!
Hint!
It is absolutely necessary to observe this warning in order to
avert any danger to your life or health..
It is absolutely necessary to observe this warning in order to
avoid any material damage.
Important information and hints are displayed here to improve
operations.
2.1 What you need to know when using your training
machine
⊗ Please read the owner’s manual carefully before using your new ERGO-FIT
exercise machine.
⊗ Familiarise yourself with the machine before you start it.
⊗ Only use the machine after a proper function test (see chapter 6.3 for more
information). For your own safety and before every use, please check the
machine for damage (loose screws, worn parts, cords etc). If the machine is
damaged, do not use it before it is repaired.
⊗ In order to reduce any risk during training, please put on sportswear and the
appropriate footwear.
6
Technical and optical modifications as well as misprints reserved - © 2013 by ERGO-FIT GmbH & Co. KG
POWER LINE 4000
⊗ In case of nausea, dizziness, pain in the chest, limbs, joints or muscles, you
should stop the training immediately and see a doctor.
⊗ In case you have a cardiac pace maker or are affected, suffer from joint or
spinal column arthrosis or orthopaedic injuries, or if you have a health condition,
please consult your doctor before using the training machine. If this is the case,
you should discuss the training program with him.
⊗ Do not hold your breath during training, as this causes a reduced blood flow to
and from the brain and an increase in blood pressure. When muscle training, it
is important to breathe out during strain (i.e. the phase when the weight is lifted)
ant to breathe in during relaxation (i.e. when the weight is lowered).
⊗ Your training machine is not a toy! Never leave children unattended with the
machine. Children cannot always assess possible danger. Parents or other
supervisors should always be aware of their responsibility because children’s
natural play instinct and eagerness to experiment may produce situations and
behaviour the training machine is not designed for.
⊗ The machine may be used after instruction of a supervisor only. The machine
must not be used without the presence of a supervisor.
⊗ Make sure that persons who stand close to the machine are not hit by moving
parts.
EN 957-2: 7.2 c) If the exercise machine is featured as described in 5.4.1.3.2 (snapon
weights without cover), the user should always be able to see the machine during
workout. The user always needs to see the snap-on weights to avoid any danger to
others.
⊗ If you are lying or sitting on a towel, please make sure that it does not come in
contact with spinning or running parts of the machines.
⊗ When adjusting the height of the seat, backrest or footrest, please make sure to
retighten the fasteners after individual adjustment of the optimal position.
Otherwise, there is a risk of injury.
⊗ Do not put your hands between the snap-on weights. Otherwise, there is a risk
of injury.
⊗ Only use the included dowel pins for adjusting the weights. Make sure to insert
the dowel pins completely into the borings of the snap-on weights.
⊗ Warm up thoroughly before training. Start the training slowly and gradually
increase the intensity until you reach the desired strain degree within your range
of control.
⊗ Never start power training with the maximum strain. Increase its intensity slowly
with light weights to get used to the right motion sequence and familiarise your
body to the unaccustomed strain. If you set the strain too high in the beginning,
you might injure or damage your musculoskeletal system.
⊗ Note that physical fatigue reduces coordination and increases the risk of
Technical and optical modifications as well as misprints reserved - © 2013 by ERGO-FIT GmbH & Co. KG
7
Safety information
injury.
⊗ Please pay attention to the correct use of the triceps rope. Always clasp the rope
with both hands. Never hold and tear at only one end of the rope due to risk of
injury.
⊗ Carefully lower the weights during the workout. They must not be thrown since
any impact may damage the weights.
⊗ During the training do not touch the USB port, the RS232 port or the audio
port.
⊗ Please review the additional safety and operational notices in this manual.
All safety instructions in this manual are based on many years of experience and
selfconception.
2.2 Operational safety – what needs to be done
⊗ After delivery, make sure that the machine has not been damaged during
transport. In case of doubt, do not start the machine and contact the customer
service.
⊗ Regularly check the cable, wires, steel cable and cable clamp for damage.
⊗ Do not place beverages on your training machine. Instead, use the bottle holder
which is specially designed for beverages.
⊗ Set up the training machine so that there is sufficient open space around it. This
reduces risks to the trainee as well as other people around.
2.3 Choosing the right place of installation
⊗ The machine can be set up on any level and stable floor. Make sure that it
stands firmly on the floor.
⊗ Never put wood, cardboard or similar materials underneath the machine to
compensate surface unevennesses. This increases the risk of an accident.
2.4 What needs to be considered in case of repair
⊗ Electric parts must be replaced with original equipment only.
⊗ Repairs must be carried out by a qualified technician only. If you do not have the
necessary qualifications, ask the ERGO-FIT Service Center
8
Technical and optical modifications as well as misprints reserved - © 2013 by ERGO-FIT GmbH & Co. KG

POWER LINE 4000
2.5 What should be avoided
⊗ Only use the machine for the purposes it is designed for. If you use the ERGOFIT
machine improperly, you will be charged for all damages resulting from this. Any
guarantee claim will be excluded!
⊗ Never use the machine in any other way than for those purposes described in
this manual. Improper use can damage the machine and be hazardous to your
health.
⊗ Caution! There is a risk of injury if moving parts are used improperly.
⊗ You should never exercise on a damaged machine.
⊗ When exercising, you should never try to exceed your current performance
level. This can seriously damage your health.
⊗ Always connect the machine to the power supply before using it.
⊗ You should never prop up your body on the machine and make improper
movements.
A summary of the most important safety information can be found in Appendix A of this
manual. You should remove this summary and display it near the machine where it is
clearly visible. All users of the machine must be informed of the dangers and safety
regulations. The manufacturer will not be liable for personal injury or material
damage.
Technical and optical modifications as well as misprints reserved - © 2013 by ERGO-FIT GmbH & Co. KG
9

Safety information
10
Technical and optical modifications as well as misprints reserved - © 2013 by ERGO-FIT GmbH & Co. KG
POWER LINE 4000
Chapter 3: Short manual
Please note:
This owner’s manual contains information on multiple gym machines.
There may be variations in detail according to the type of machine
Technical and optical modifications as well as misprints reserved - © 2013 by ERGO-FIT GmbH & Co. KG
11

Short manual
3 Short manual
After delivery of your power machine, please check first if the serial number (see type
label) is identical with the one indicated on the delivery note and if all components
listed in chapter 1.3 (“Scope of delivery”) are included in the delivery.
Only start your workout after performing a proper function test (see Chapter 6.5 for
more information). Sit on the machine after this test and set your individual training
weight. Seat areas (seat pads etc.) or restraints (foot roller etc.) may be adjusted
easily with the pneumatic spring or snap-in mechanism.
⊗ Pneumatic spring mechanism: Lift the adjustment lever. The integrated
pneumatic spring will automatically lift the seat area or restraint. To lower the
seat or the restraint, loosen the adjustment lever and push the seat downwards
into the desired position with the help of your body weight. To lock the seat or
restraint at the desired height, bring the adjustment lever back to its initial
position.
Depending on the user weight the pneumatic spring will go down up to 120mm. This
might affect the position number reading. After you have set the pad or the stabilizer
as described above, rise from the machine so your body weight does not impact the
pad or stabilizer. Now you can read the position number.
⊗ Snap-in mechanism: Pull the dowel pin out of the punched matrix. Pull the seat
area or restraint up or down. To lock the seat area or restraint at the desired
height, let the dowel pin snap-in again.
Note that the seat is a standard seat. This means that every adjustable seat has the
same snap-in positions. On some exercise machines, not all snap-in positions may be
usable.
Exercise machines with eccentric technique (e.g. LEG EXTENSION 4000) are
equipped with adjustable strain levers. Pull out the dowel pin and adjust the strain as
desired.
During training make sure to use the following exercise technique: Breathe out during
the strain sequence and breathe in during the relaxing sequence. The motions should
be carried out slowly. Avoid jerky movements. If you want to stop the workout, control
the downward motion of the weights. The exercise is finished only when the training
weight is resting.
12
Technical and optical modifications as well as misprints reserved - © 2013 by ERGO-FIT GmbH & Co. KG

POWER LINE 4000
Chapter 4: Destination of the product
4.1 Back muscles ....................................................................................... 14
4.1.1 BACK EXTENSION 4000 ................................................................................ 14
4.1.2 BACK PULL 4000 ............................................................................................ 14
4.1.3 BUTTERFLY REVERSE 4000 ......................................................................... 14
4.1.4 LAT PULL 4000 ............................................................................................... 15
4.2 Shoulder muscles ................................................................................. 15
4.2.1 SHOULDER ABDUCTION 4000 .......................................................................15
4.2.2 SHOULDER PRESS 4000 .............................................................................. 15
4.3 Chest muscles ...................................................................................... 15
4.3.1 BUTTERFLY 4000 ........................................................................................... 15
4.3.2 CHEST PRESS 4000 ...................................................................................... 15
4.4 Upper arm muscles .............................................................................. 16
4.4.1 BICEPS FLEXION 4000 .................................................................................. 16
4.4.2 TRICEPS EXTENSION 4000 .......................................................................... 16
4.5 Abdominal muscles .............................................................................. 16
4.5.1 ABDOMINAL FLEXION 4000 .......................................................................... 16
4.5.2 ABDOMINAL TORSION 4000 ......................................................................... 16
4.6 Pelvic muscles ...................................................................................... 16
4.6.1 ABDUCTOR 4000 ........................................................................................... 16
4.6.2 ADDUCTOR 4000 ........................................................................................... 17
4.6.3 HIP EXTENSION 4000 .................................................................................... 17
4.7 Thigh muscles ...................................................................................... 17
4.7.1 LEG EXTENSION 4000 ................................................................................... 17
4.7.2 LEG FLEXION 4000 ........................................................................................ 17
4.7.3 LEG PRESS 4000 ........................................................................................... 17
4.8 Multifunctional ...................................................................................... 17
4.8.1 CABLE 4000 .................................................................................................... 17
4.8.2 CABLE CROSSOVER 4000 ............................................................................ 18
4.8.3 CABLE TOWER 4000 ...................................................................................... 18
4.8.4 MULTI PRESS 4000 ........................................................................................ 18
4.8.5 PULL UP/DIP 4000 .......................................................................................... 18
4.8.6 SEATED DIP 4000 .......................................................................................... 18
4.9 Benches ............................................................................................... 18
4.9.1 ABDOMINAL BENCH 4000 ............................................................................. 18
4.9.2 BACK BENCH 4000 ........................................................................................ 19
4.9.3 FLAT BENCH 4000 .......................................................................................... 19
4.9.4 MULTI BENCH 4000 ....................................................................................... 19
4.9.5 OLYMPIC FLAT BENCH 4000 ......................................................................... 19
4.9.6 OLYMPIC INCLINE BENCH 4000 ................................................................... 19
4.9.7 SCOTT BENCH 4000 ...................................................................................... 19
4.9.8 SQUAT RACK 4000 ......................................................................................... 19
Technical and optical modifications as well as misprints reserved - © 2013 by ERGO-FIT GmbH & Co. KG
13

Destination of the product
4 Destination of the product
Please note:
This owner’s manual contains information on multiple gym machines.
There may be variations in detail according to the type of machine!
The machines of this series are stationary exercise machines primarily designed to
improve strength abilities in terms of muscle building or strength endurance. They are
specially designed for fitness purposes. The mechanical layout allows for low-impact
training as the motion direction is set, withdrawal movements are reduced and muscles
are targetted. The machines meet almost all strain demands as each of the weight
plates can be snapped in individually. Different models, whose intended purpose is
described in the following section, have been designed to tailor training to individual
needs
.
4.1 Back muscles
4.1.1 BACK EXTENSION 4000
BACK EXTENSION 4000 is a strength training machine that is designed for
strengthening the back muscles by erecting the upper body. The training strain is
controlled using plug-in weights. Regular workouts on this machine prevent postural
deformity and spinal column arthrosis.
4.1.2 BACK PULL 4000
BACK PULL 4000 is a strength training machine that is designed for strengthening the
muscles between the shoulder blades through a rowing motion. The training strain is
controlled using plug-in weights. The seat height adjustment allows users to set an
optimal training position.
4.1.3 BUTTERFLY REVERSE 4000
BUTTERFLY REVERSE 4000 is a strength training machine that is designed for
strengthening the muscles which stabilise the neck and the thoracic column by opening
the arms acromially. The training strain is controlled using plug-in weights. The seat
height adjustment allows users to set an optimal training position. Regular workouts
on this machine prevent postural deformity and back pain caused by improper
stress.
14
Technical and optical modifications as well as misprints reserved - © 2013 by ERGO-FIT GmbH & Co. KG

POWER LINE 4000
4.1.4 LAT PULL 4000
LAT PULL 4000 is a strength training machine that is designed for strengthening the
back muscles by a pull-down motion of the arms. The training strain is controlled using
plug-in weights. The restraint of the thighs makes the workout more effective. The
seat height adjustment allows users to set an optimal training position.
4.2 Shoulder muscles
4.2.1 SHOULDER ABDUCTION 4000
SHOULDER ABDUCTION 4000 is a strength training machine that is designed for
strengthening the shoulder muscles by abducting the arms. The training strain is
controlled using plug-in weights. The seat height adjustment allows users to set an
optimal training position.
4.2.2 SHOULDER PRESS 4000
SHOULDER PRESS 4000 is a strength training machine that is designed for
strengthening the muscles which stabilise the neck and the thoracic column by
stretching the arms upwards. The training strain is controlled using plug-in weights.
The seat height adjustment allows users to set an optimal training position.
4.3 Chest muscles
4.3.1 BUTTERFLY 4000
BUTTERFLY 4000 is a strength training machine that is designed for strengthening
the abdominal muscles by pulling the arms together in front of the body. The training
strain is controlled using plug-in weights. The seat height adjustment allows users to
train the three different types of chest muscles individually.
4.3.2 CHEST PRESS 4000
CHEST PRESS 4000 is a strength training machine that is designed for strengthening
the chest and arm extensor muscles by bench pressing in a sitting position. The
training strain is controlled using plug-in weights. The seat height adjustment as well
as the different handle variations allow for multiple training.
Technical and optical modifications as well as misprints reserved - © 2013 by ERGO-FIT GmbH & Co. KG
15

Destination of the product
4.4 Upper arm muscles
4.4.1 BICEPS FLEXION 4000
BICEPS FLEXION 4000 is a strength training machine that is designed for strengthening
the arm flexion muscles by angling the arms while in a sitting position. The training
strain is controlled using plug-in weights. The seat height adjustment allows users to
set an optimal training position.
4.4.2 TRICEPS EXTENSION 4000
TRICEPS EXTENSION 4000 is a strength training machine that is designed for
strengthening the arm extension muscles by stretching the arms while in a sitting
position. The training strain is controlled using plug-in weights. The seat height
adjustment allows users to set an optimal training position.
4.5 Abdominal muscles
4.5.1 ABDOMINAL FLEXION 4000
ABDOMINAL FLEXION 4000 is a strength training machine that is designed for
strengthening the abdominal muscles by bending the upper body while in a sitting
position. The training strain is controlled using plug-in weights. Regular workouts on
this machine prevent postural deficiencies and spinal column arthrosis.
4.5.2 ABDOMINAL TORSION 4000
ABDOMINAL TORSION 4000 is a strength training machine that is designed for
strengthening the lateral abdominal muscles by a rotation of the upper body while
restraining the lower body. The training strain is controlled using plug-in weights.
4.6 Pelvic muscles
16
4.6.2 ABDUCTOR 4000
ABDUCTOR 4000 is a strength training machine that is designed for strengthening
the outer thigh muscles by spreading the legs. The training strain is controlled using
plugin weights.
Technical and optical modifications as well as misprints reserved - © 2013 by ERGO-FIT GmbH & Co. KG
POWER LINE 4000
4.6.2 ADDUCTOR 4000
ADDUCTOR 4000 is a strength training machine that is designed for strengthening
the inner thigh muscles by closing the legs. The training strain is controlled using plugin weights.
4.6.1 HIP EXTENSION 4000
HIP EXTENSION 4000 is a strength training machine that is designed for strengthening
the gluteal muscles by stretching the leg while the knee is bent. The training strain is
controlled using plug-in weights. Regular workouts on this machine prevent an
unstable hip joint.
4.7 Thigh muscles
4.7.1 LEG EXTENSION 4000
LEG EXTENSION 4000 is a strength training machine that is designed for strengthening
the front thigh muscles by stretching the legs. The training strain is controlled using
plug-in weights. Regular workouts on this machine prevent an unstable knee joint.
4.7.2 LEG FLEXION 4000
LEG FLEXION 4000 is a strength training machine that is designed for strengthening
the back thigh muscles by bending the legs. The training strain is controlled using
plug-in weights. Regular workouts on this machine prevent an unstable knee joint.
4.7.3 LEG PRESS 4000
LEG PRESS 4000 is a strength training machine that is designed for strengthening
thigh and gluteal muscles by performing leg presses while in a sitting position. The
training strain is controlled using plug-in weights. Regular workouts on this machine
prevent an unstable knee joint.
4.8 Multifunctional
4.8.1 CABLE 4000/CABLE 4000 FREE
CABLE 4000 is an explosion cable tower offering a facet of exercises for the upper
and lower body. The athlete can pull in different directions. It can be mounted on the
wall or placed on the floor. The training strain is controlled using plug-in weights
Technical and optical modifications as well as misprints reserved - © 2013 by ERGO-FIT GmbH & Co. KG
17

Destination of the product
4.8.2 CABLE CROSSOVER 4000
CABLE CROSSOVER 4000 is a strength training machine that offers multiple
exercises for the upper and lower body by lat pulling combined with different exercises.
The workout may be carried out unilaterally or bilaterally and the pulling direction is
variable. The training strain is controlled using plug-in weights.
4.8.3 CABLE TOWER 4000
CABLE TOWER 4000 is a strength training machine consisting of various exercise
stations which allow several people to train simultaneously. Users can perform lat
pulling, lat pulldown, rowing, bicep and tricep exercises. This allows you to train the
majority of your upper and lower body muscles with just one exercise machine. The
training strain is controlled using plug-in weights.
4.8.4 MULTI PRESS 4000
MULTI PRESS 4000 is a strength training machine that offers multiple exercises for
the torso, arms and legs. Training position and strain are variable. The machine is
equipped with safety supports and weight rests.
4.8.5 PULL UP/DIP 4000
PULL UP/DIP 4000 is a strength training machine consisting of a chin-up and a dip
machine. It assists the trainee during the respective exercises and strengthens the
back, chest and arm muscles.
4.8.6 SEATED DIP 4000
With the SEATED DIP 4000 strength training machine the exerciser performs dips in
seated position. The machine supports the exerciser and targets triceps as well as
shoulder and chest muscles.
4.9 Benches
18
4.9.1 ABDOMINAL BENCH 4000
ABDOMINAL BENCH 4000 is an exercise bench which creates all conditions for
sustainable training of the abdominal muscles. It facilitates a more stable training
posture. The variable back pad and the adjustable leg pad ensure an optimal training
position.
Technical and optical modifications as well as misprints reserved - © 2013 by ERGO-FIT GmbH & Co. KG
POWER LINE 4000
4.9.2 BACK BENCH 4000
BACK BENCH 4000 is a special back exercise bench that trains and strengthens both
the back and the gluteal muscles in a position of 45°. The adjustable leg pad allows
the user to adapt the machine to any body height. A second pad allows the user to
restrain his legs, which ensures a stable training position.
4.9.3 FLAT BENCH 4000
FLAT BENCH 4000 supports a great number of exercises for the upper and lower
body muscles as well as free barbells training. It supports a better training position.
4.9.4 MULTI BENCH 4000
MULTI BENCH 4000 is a training bench that supports a great number of exercises for
the upper and lower body muscles as well as free weight training. It supports a better
training position. The back pad adjustment allows the user to set an optimal training
position
4.9.5 OLYMPIC FLAT BENCH 4000
OLYMPIC FLAT BENCH 4000 trains arm and chest muscles and is equipped with a
stable pad and a safety support for weights.
4.9.6 OLYMPIC INCLINE BENCH 4000
OLYMPIC INCLINE BENCH 4000 efficiently strengthens arm and chest muscles.
Back rest and variable seat height support and optimal training position. The bench is
also equipped with a safety support for weights.
4.9.7 SCOTT BENCH 4000
SCOTT BENCH 4000 trains the arm muscles in a seated position while the upper
body is fixed. It is equipped with a vertically adjustable seat and a safety support for
weights.
4.9.8 SQUAT RACK 4000
SQUAT RACK 4000 is a knee bend rack to train different muscle groups. Training
position as well as training load are variable. In addition, the SQUAT RACK offers
safety supports as well as racks for weights.
Technical and optical modifications as well as misprints reserved - © 2013 by ERGO-FIT GmbH & Co. KG
19

Destination of the product
20
Technical and optical modifications as well as misprints reserved - © 2013 by ERGO-FIT GmbH & Co. KG

POWER LINE 4000
Chapter 5: Transport and Setup
5.1 Transport .............................................................................................. 22
5.2 Setup and the right place for setup ...................................................... 22
5.3 Ambient temperature ............................................................................ 22
5.4 Components ......................................................................................... 23
5.4.1. Back muscles ....................................................................................... 23
5.4.1.1 BACK EXTENSION 4000 ................................................................................ 23
5.4.1.2 BACK PULL 4000 ............................................................................................ 24
5.4.1.3 BUTTERFLY REVERSE 4000 ......................................................................... 24
5.4.1.4 LAT PULL 4000 ............................................................................................... 25
5.4.2 Shoulder muscles ................................................................................. 25
5.4.2.1 SHOULDER ABDUCTION 4000 ...................................................................... 25
5.4.2.2 SHOULDER PRESS 4000 .............................................................................. 26
5.4.3 Chest muscles ...................................................................................... 26
5.4.3.1 BUTTERFLY 4000 ........................................................................................... 26
5.4.3.2 CHEST PRESS 4000 ...................................................................................... 27
5.4.4 Upper arm muscles ............................................................................. 27
5.4.4.1 BICEPS FLEXION 4000 .................................................................................. 27
5.4.4.2 TRICEPS EXTENSION 4000 .......................................................................... 28
5.4.5 Abdominal muscles .............................................................................. 28
5.4.5.1 ABDOMINAL FLEXION 4000 .......................................................................... 28
5.4.5.2 ABDOMINAL TORSION 4000 ......................................................................... 29
5.4.6 Pelvic muscles ...................................................................................... 29
5.4.6.1 ABDUCTOR 4000 ........................................................................................... 29
5.4.6.2 ADDUCTOR 4000 ........................................................................................... 30
5.4.6.3 HIP EXTENSION 4000 .................................................................................... 30
5.4.7 Thigh muscles ...................................................................................... 31
5.4.7.1 LEG EXTENSION 4000 ................................................................................... 31
5.4.7.2 LEG FLEXION 4000 ........................................................................................ 31
5.4.7.3 LEG PRESS 4000 ........................................................................................... 32
5.4.8 Multifunctional ...................................................................................... 32
5.4.8.1 CABLE 4000 .................................................................................................... 32
5.4.8.2 CABLE CROSSOVER 4000 ............................................................................ 33
5.4.8.3 CABLE TOWER 4000 ...................................................................................... 33
5.4.8.4 MULTI PRESS 4000 ........................................................................................ 34
5.4.8.5 PULL UP/DIP 4000 .......................................................................................... 34
5.4.8.6 SEATED DIP 4000 ......................................................................:.................... 35
5.4.9 Benches ............................................................................................... 35
5.4.9.1 ABDOMINAL BENCH 4000 ............................................................................. 35
5.4.9.2 BACK BENCH 4000 ........................................................................................ 36
5.4.9.3 FLAT BENCH 4000 .......................................................................................... 36
5.4.9.4 MULTI BENCH 4000 ....................................................................................... 37
5.4.9.5 OLYMPIC FLAT BENCH 4000 ......................................................................... 37
5.4.9.6 OLYMPIC INCLINE BENCH 4000 ................................................................... 38
5.4.9.7 SCOTT BENCH 4000 ...................................................................................... 38
5.4.9.8 SQUAT RACK 4000 ......................................................................................... 39
Technical and optical modifications as well as misprints reserved - © 2013 by ERGO-FIT GmbH & Co. KG
21
Transport and Setup
5 Transport and Setup
5.1 Transport
In order to avoid damage, ERGO-FIT machines are transported by ERGO-FIT GmbH
& Co. KG directly or by an authorised freight forwarding company. After delivery,
packaging will be collected and disposed of professionally. If ERGO-FIT machines are
delivered by a freight forwarder, the customer needs to dispose of the packaging
himself or can send it back to ERGO-FIT GmbH & Co. KG (the customer is responsible
for the transportation costs).
The machines do not have any shipping locks!
5.2 Setup and the right place for setup
1. Make sure that the surface underneath the machine is flat and level.
2. The machines are mounted and set up directly by the manufacturer or an
authorised service technician. Only this way can a safe and proper function of
the machine be guaranteed.
Any guarantee claim will be excluded if the machine is assembled or disassembled by
the purchaser or another non-authorised person.
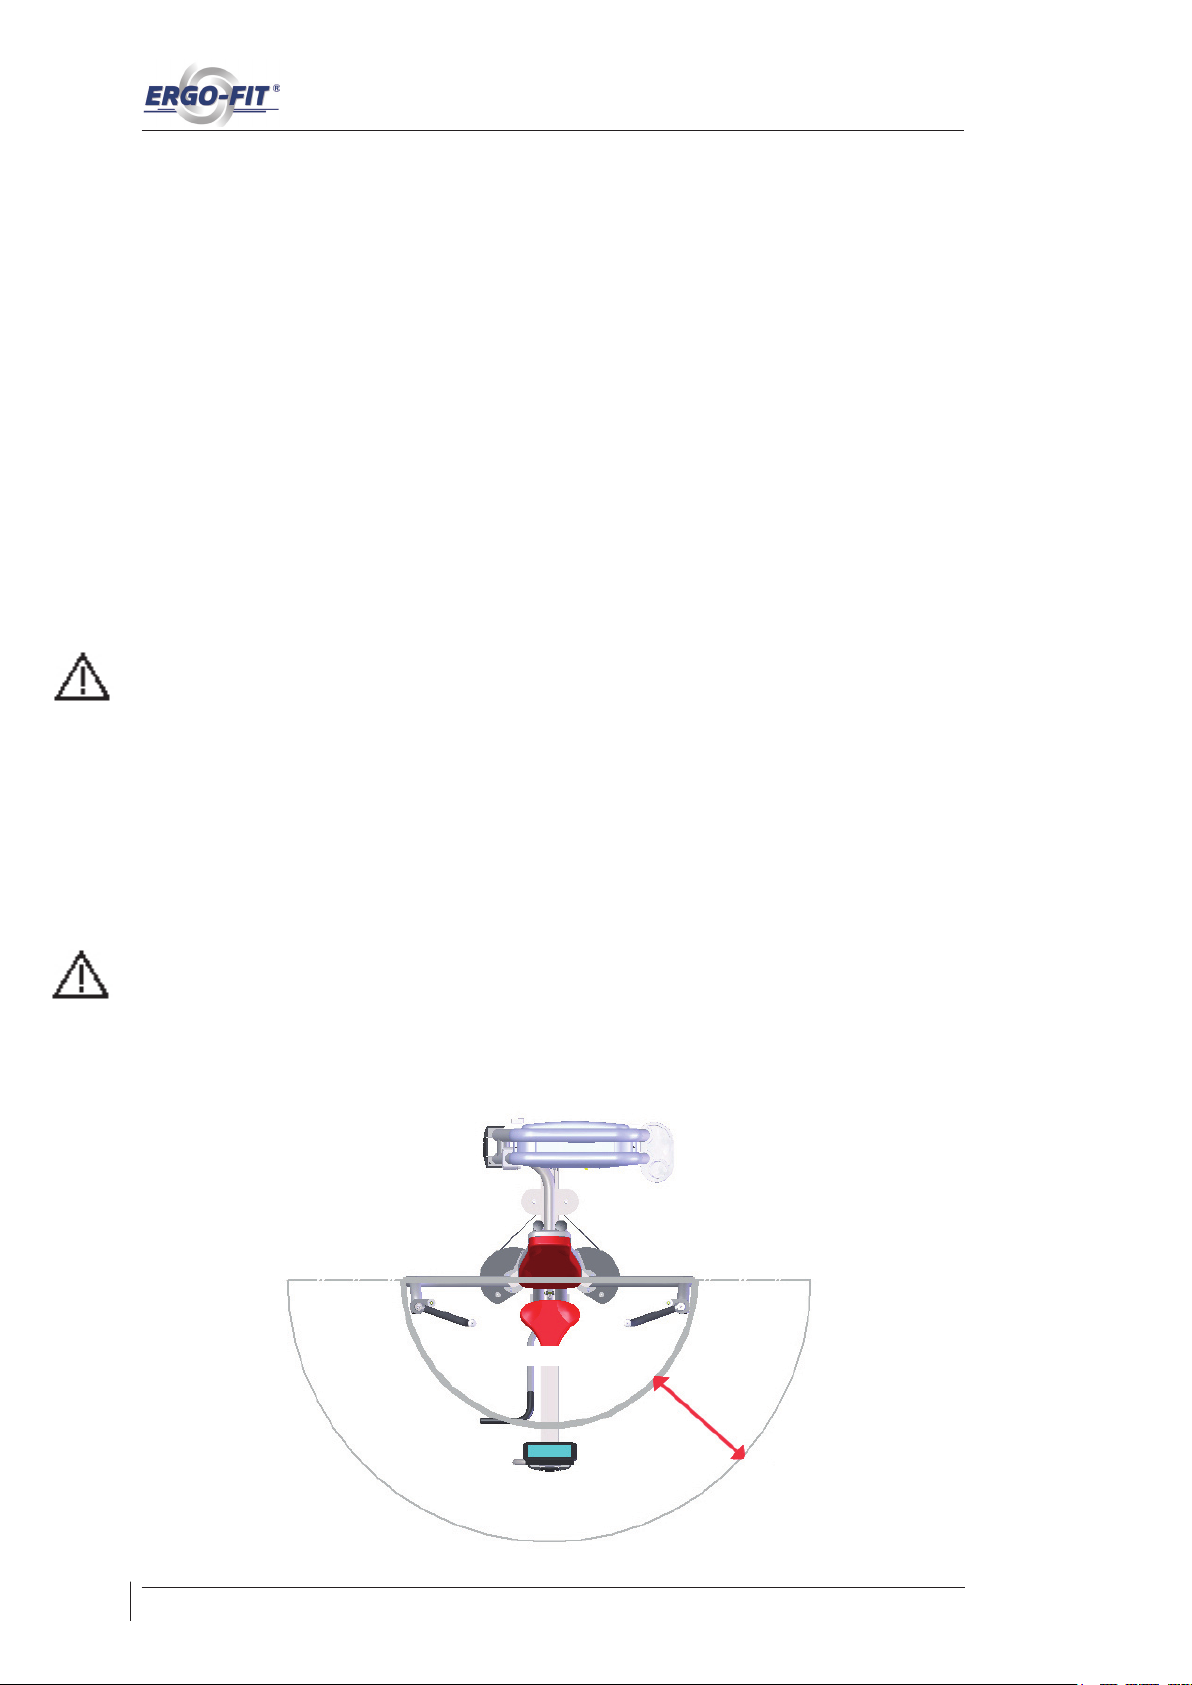
3. For safety reasons make sure to provide enough free space around the machine
so the exerciser can move freely and bystanders are not injured by moving
parts: Depending on the mounting direction of the machine the free area must
exceed the exercise area by 0.6m. This area is also needed for emergency
disassembly. Adjacent machines can use the same free area.
22
Übungsbereich
Freibereich
Technical and optical modifications as well as misprints reserved - © 2013 by ERGO-FIT GmbH & Co. KG
POWER LINE 4000
4. Bitte beachten Sie: Die Wandmontage des CABLE 4000 muss fachgerecht ausgeführt werden. Die Firma ERGO-FIT GmbH & Co. KG übernimmt für die
Wandmontage keine Haftung. Der CABLE 4000 muss an den 4
Befestigungspunkten befestigt werden, die Haltekraft pro Schraube/Dübel sollte
mindestens 200 N betragen.
5. Perform a function test after setup or relocation.
5.3 Ambient temperature
⊗ Your ERGO-FIT exercise machine may be used at an ambient temperature of
+10°C to +40°C, a relative humidity of 30 to 75% (non condensing) and an
atmospheric pressure of 700 hPa to 1060 hPa without a problem.
⊗ The machine may be stored at a temperature between -30°C and +50°C.
5.4 Components
5.4.1 Back muscles
5.4.1.1 BACK EXTENSION 4000
7
6
1
2
3
4
1 Steel cable
(weight transmission)
5
2 Eccentric
3 Dowel pin (locked)
4 Snap-on weights (5kg each)
5 Handhold
6 Seat pad
7 Back support
Technical and optical modifications as well as misprints reserved - © 2013 by ERGO-FIT GmbH & Co. KG
23
5.4.1.2 BACK PULL 4000
Transport and Setup
1
6
5.4.1.3 BUTTERFLY REVERSE 4000
2
3
4
5
1 Chest pad
2 Steel cable
(weight transmission)
3 Dowel pin (locked) +
Snap-on weights (5kg each)
4 Seat pad
5 Seat height adjustment
6 Handhold
5
6
1
4
2
1 Steel cable
(weight transmission)
2 Dowel pin (locked) +
Snap-on weights (5kg each)
3 Footrest
4 Seat pad
3
5 Chest pad
6 Handhold
24
Technical and optical modifications as well as misprints reserved - © 2013 by ERGO-FIT GmbH & Co. KG

POWER LINE 4000
5.4.1.4 LAT PULL 4000
4
1 Steel cable
(weight transmission)
2 Dowel pin (locked) +
Snap-on weights
(5kg each)
3 Seat height adjustment +
5
Seat pad
4 Leg pads
5 Handhold
1
2
3
5.4.2 Shoulder muscles
5.4.2.1 SHOULDER ABDUCTION 4000
6
5
1
2
3
4
1 Steel cable
(weight transmission)
2 Dowel pin (locked) +
Snap-on weights (5kg each)
3 Seat pad
4 Seat height adjustment
5 Handhold
6 Arm pad
Technical and optical modifications as well as misprints reserved - © 2013 by ERGO-FIT GmbH & Co. KG
25

5.4.2.2 SHOULDER PRESS 4000
6
5
Transport and Setup
1
2
3
4
1 Handhold
2 Steel cable
(weight transmission)
3 Dowel pin (locked) +
Snap-on weights (5kg each)
4 Seat pad
5 Seat height adjustment
6 Back pad
5.4.3 Chest muscles
5.4.3.1 BUTTERFLY 4000
4
3
1
2
1 Handhold
2 Steel cable
(weight transmission)
3 Seat pad
4 Back pad
26
Technical and optical modifications as well as misprints reserved - © 2013 by ERGO-FIT GmbH & Co. KG

POWER LINE 4000
5.4.3.2 CHEST PRESS 4000
6
1
2
3
4
1 Steel cable
(weight transmission)
2 Handhold
3 Seat pad
4 Seat height adjustment
5
5 Easy entry feature
6 Back pad
5.4.4 Upper arm muscles
5.4.4.1 BICEPS FLEXION 4000
8
6 7
5
4
3
1
2
1 Steel cable
(weight transmission)
2 Dowel pin (locked)
Snap-on weights (5kg each)
3 Seat height adjustment
4 Seat pad
5 Handhold
6 Upper arm pad
7 Chest pad
8 Eccentric
Technical and optical modifications as well as misprints reserved - © 2013 by ERGO-FIT GmbH & Co. KG
27

5.4.4.2 TRICEPS EXTENSION 4000
Transport and Setup
7
6
5
1
2
3
1 Back pad
4
2 Steel cable
(weight transmission)
3 Dowel pin (locked)
Snap-on weights (5kg each)
4 Seat pad
5 Upper arm pad
6 Handhold
7 Eccentric
5.4.5 Abdominal muscles
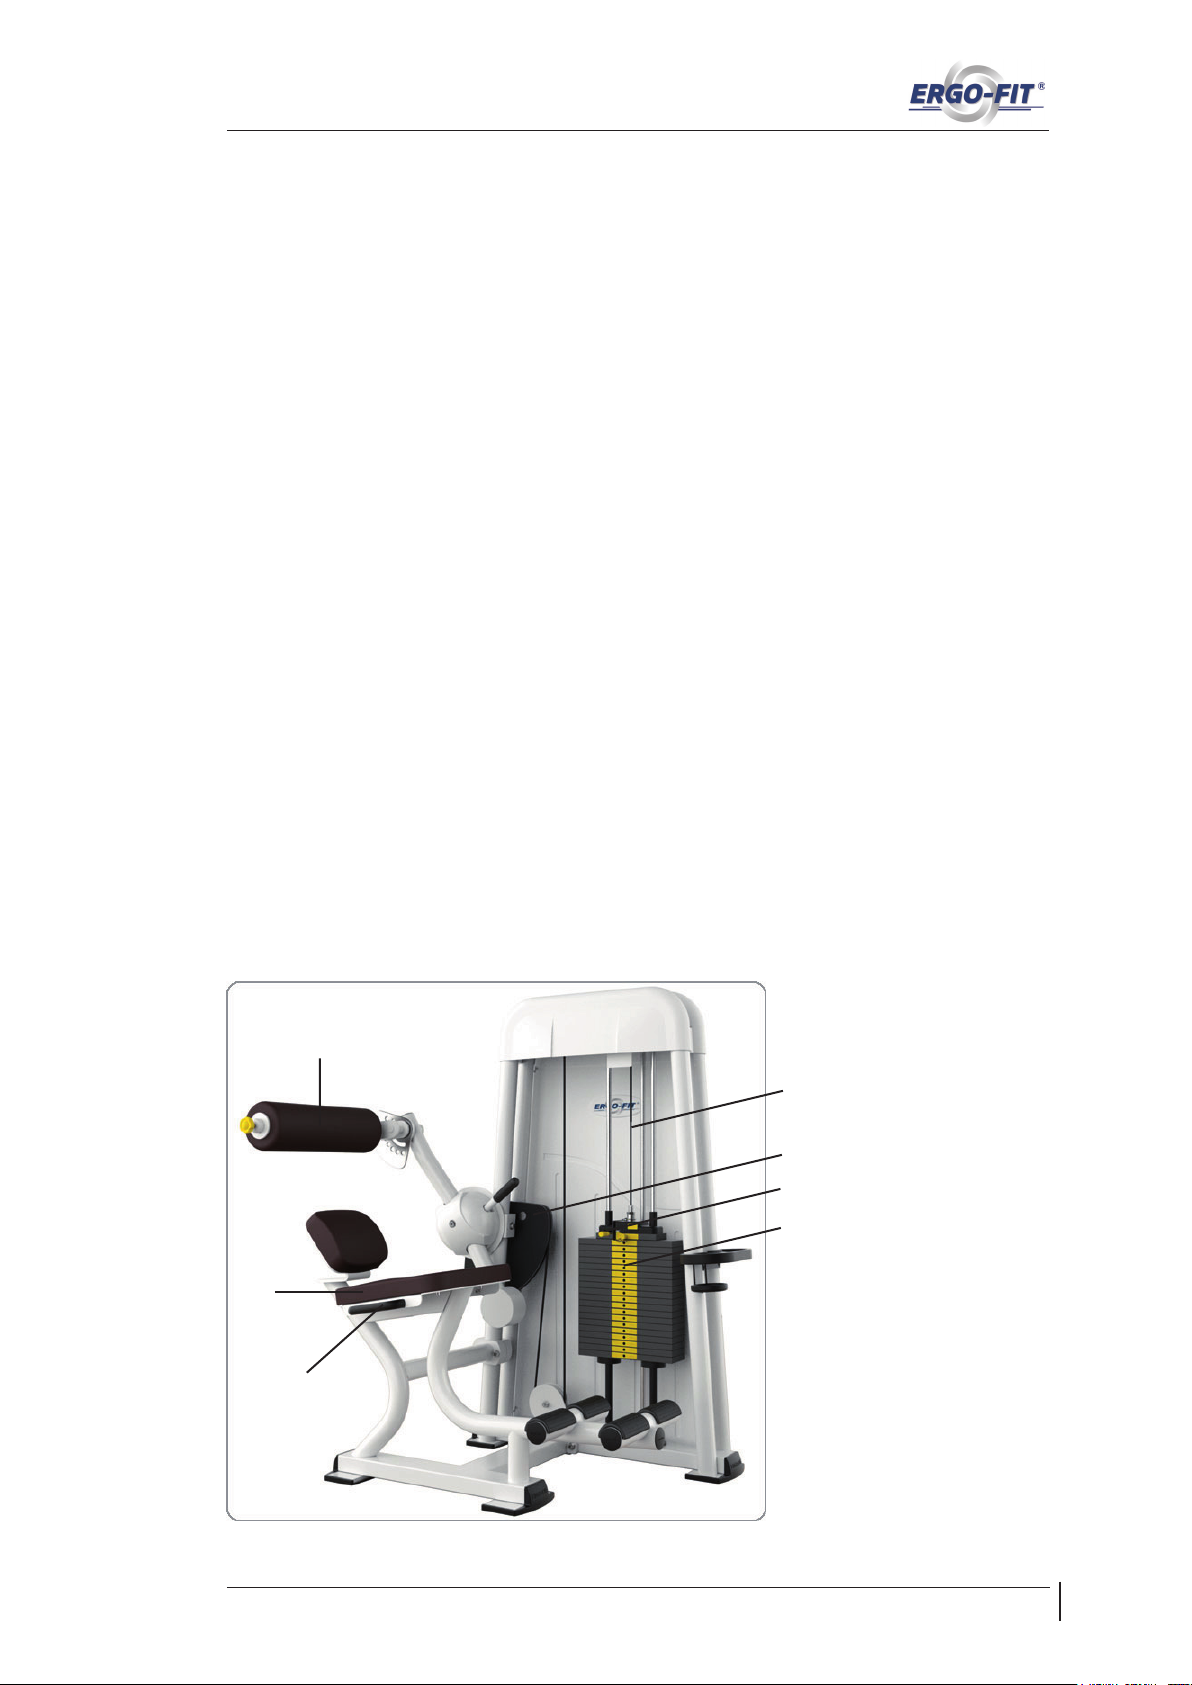
5.4.5.1 ABDOMINAL FLEXION 4000
6
5
4
7
3
1
2
1 Steel cable
(weight transmission)
2 Dowel pin (locked)
Snap-on weights (5kg each)
3 Footrest
4 Handhold
5 Seat pad
6 Eccentric
7 Chest pad
28
Technical and optical modifications as well as misprints reserved - © 2013 by ERGO-FIT GmbH & Co. KG

POWER LINE 4000
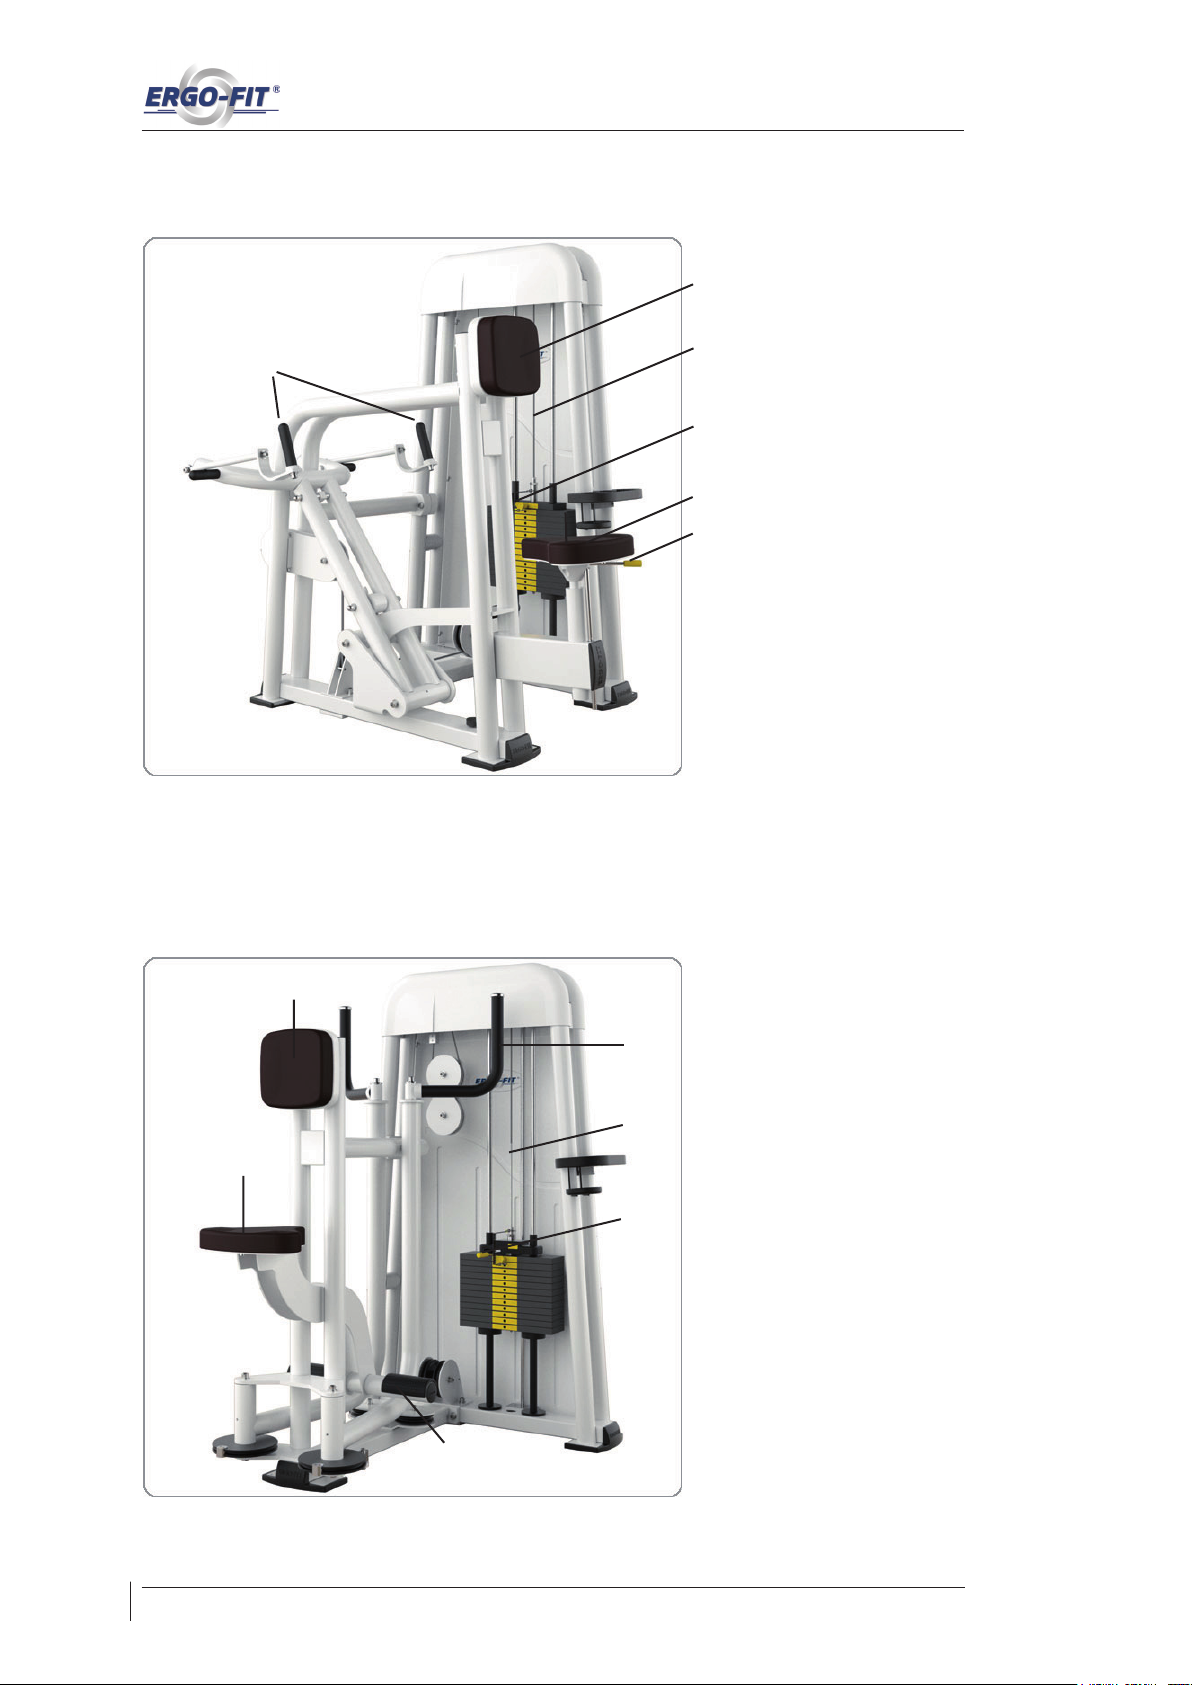
5.4.5.2 ABDOMINAL TORSION 4000
7
6
5
4
5.4.6 Pelvic muscles
1
2
1 Steel cable
(weight transmission)
2 Dowel pin (locked) +
Snap-on weights (5kg each)
3 Thigh restraint
4 Seat pad
5 Back pad
3
6 Upper arm restraint
7 Handhold
5.4.6.1 ABDUCTOR 4000
5
6
4
1
2
1 Steel cable
(weight transmission)
2 Dowel pin (locked) +
Snap-on weights (5kg each)
3 Foot rest
4 Seat pad
3
5 Back pad
6 Knee pad
Technical and optical modifications as well as misprints reserved - © 2013 by ERGO-FIT GmbH & Co. KG
29

5.4.6.2 ADDUCTOR 4000
5
6
4
3
Transport and Setup
1
2
1 Steel cable
(weight transmission)
2 Dowel pin (locked) +
Snap-on weights (5kg each)
3 Foot rest
4 Knee pad
5 Back pad
6 Seat pad
5.4.6.3 HIP EXTENSION 4000
6
5
4
1
2
1 Steel cable
(weight transmission)
2 Handhold
3 Dowel pin (locked) +
Snap-on weights (5kg each)
4 Footrest
3
5 Upper body restraint
6 Eccentric
30
Technical and optical modifications as well as misprints reserved - © 2013 by ERGO-FIT GmbH & Co. KG

POWER LINE 4000
5.4.7 Thigh muscles
5.4.7.1 LEG EXTENSION 4000
7
6
5
4
5.4.7.2 LEG FLEXION 4000
1
2
3
1 Back pad
2 Steel cable
(weight transmission)
3 Dowel pin (locked) +
Snap-on weights (5kg each)
4 Foot pad
5 Handhold
6 Seat pad
7 Eccentric
7
6
1
2
3
1 Back pad
4
5
2 Steel cable
(weight transmission)
3 Dowel pin (locked) +
Snap-on weights (5kg each)
4 Handhold
5 Foot pad
6 Seat pad
7 Thigh restraint
Technical and optical modifications as well as misprints reserved - © 2013 by ERGO-FIT GmbH & Co. KG
31

5.4.7.3 LEG PRESS 4000
Transport and Setup
4
6
5
3
5.4.8 Multifunctional
1
2
1 Neck pad
2 Back pad
3 Guide rail
4 Foot support
5 Seat pad
6 Steel cable
(weight transmission) +
Dowel pin (locked) +
Snap-on weights (7,5kg each)
5.4.8.1 CABLE 4000
Please note: Wall mounting of the CABLE 4000 must be performed by a skilled technician. ERGO-FIT GmbH & Co. KG
will not be liable for wall mounting. CABLE 4000 must be attached to 4 xing points, the bolt retention force must be 200N.
1
2
1 Steel cable
(weight transmission)
2 Dowel pin (locked) +
Snap-on weights (5kg each)
32
Technical and optical modifications as well as misprints reserved - © 2013 by ERGO-FIT GmbH & Co. KG

POWER LINE 4000
5.4.8.2 CABLE CROSSOVER 4000
3
1
2
1 Steel cable
(weight transmission)
2 Dowel pin (locked)
Snap-on weights (5kg each)
3 Handlebars
5.4.8.3 CABLE TOWER 4000
Bring the machine to the desired place and adjust the same. Then attach the rubber pads to the base plates (5) and
fix the seat and the seat bench by the clamp collar on the frame. Turn the feet down until the machine has a stable
position on the floor. Then tighten the clamp collars at the seat and the seat bench. Finally, test again the feet for a
stable position and readjust the same if necessary.
8
1
7
2
3
6
5
4
1 Steel cable + Flat belt
(weight transmission)
2 Dowel pin (locked)
Snap-on weights (5kg each)
3 Rowingstation
4 Seat pad
5 Base plates
6 Seat pad
7 Thigh restraint
8 Lat pulldown
Technical and optical modifications as well as misprints reserved - © 2013 by ERGO-FIT GmbH & Co. KG
33

5.4.8.3 MULTI PRESS 4000
4
1
3
Transport and Setup
2
1 Dumbell bar
2 Seat/lying pad
3 Weight storage bar
4 Guide rail
(with safety holder)
5.4.8.4 PULL UP/DIP 4000
5
4
3
1
2
1 Pull up handhold
2 Steel cable
(weight transmission) +
Dowel pin (locked) +
Snap-on weights (7,5kg each)
3 Foot rest
4 Dip handhold
5 Knee pad
34
Technical and optical modifications as well as misprints reserved - © 2013 by ERGO-FIT GmbH & Co. KG

POWER LINE 4000
5.4.8.5 SEATED DIP 4000
1
5
5.4.9 Benches
2
3
4
1 Back pad
2 Steel cable
(weight transmission) +
Dowel pin (locked) +
Snap-on weights (7,5kg each)
3 Handhold
4 Seat pad
5 Back pad adjustment
5.4.9.1 ABDOMINAL BENCH 4000
1
3
2
1 Back pad
2 Back pad adjustment
3 Foot support
Technical and optical modifications as well as misprints reserved - © 2013 by ERGO-FIT GmbH & Co. KG
35

5.4.9.2 BACK BENCH 4000
1
3
Transport and Setup
2
5.4.9.3 FLAT BENCH 4000
1
1 Leg pad
2 Leg restraint
3 Leg pad adjustment
36
1 Seat/lying pad
Technical and optical modifications as well as misprints reserved - © 2013 by ERGO-FIT GmbH & Co. KG

POWER LINE 4000
5.4.9.4 MULTI BENCH 4000
3
1
2
5.4.9.5 OLYMPIC FLAT BENCH 4000
2
1 Back pad
2 Seat pad
3 Seat pad adjustment
1
1 Seat pad
2 Leg pad
Technical and optical modifications as well as misprints reserved - © 2013 by ERGO-FIT GmbH & Co. KG
37

5.4.9.6 OLYMPIC INCLINE BENCH 4000
2
1
Transport and Setup
5.4.9.7 SCOTT BENCH 4000
1
3
1 Seat/lying pad
2 Safety support for weights
2
38
1 Upper arm pad
2 Safety support for weights
3 Seat pad +
Seat pad adjustment
Technical and optical modifications as well as misprints reserved - © 2013 by ERGO-FIT GmbH & Co. KG

POWER LINE 4000
POWER LINE 4000
5.4.9.8 SQUAT RACK 4000
1
2
2
1 Safety support for weights
2 Weight storage bar
Technical and optical modifications as well as misprints reserved - © 2013 by ERGO-FIT GmbH & Co. KG
39

Transport and Setup
40
Technical and optical modifications as well as misprints reserved - © 2013 by ERGO-FIT GmbH & Co. KG

POWER LINE 4000
Chapter 6: Start up
6.1 Calibrating the weight plates ................................................................ 42
6.1 Resistance adjustment ......................................................................... 42
6.2 Eccentric function ................................................................................. 42
6.3 Function test ........................................................................................ 43
Please note:
This owner’s manual contains information on multiple gym machines.
There may be variations in detail according to the type of machine!
Technical and optical modifications as well as misprints reserved - © 2013 by ERGO-FIT GmbH & Co. KG
41

Start up
6 Start up
Connect the machine to a dedicated power supply (110...220VAC) and avoid using an
extension cord or a multi-outlet power strip. If necessary, please EN 60601-1 extension
cords or power strips. After switching on the machine have to wait 35 minutes before
you can use the machine. During this warm-up period you can adjust the weight
plates. After the warm-up period the weight plates should be correctly displayed in the
Cockpit. You can now start your workout. We recommend DC-isolated cables for the
connection of external equipment to a POWER LINE 4000 MED machine
6.1 Calibrating the Weight Plates
Before any new calibration/re-calibration of the weight plates you have to consider a
warm-up period of 35 minutes. The warm-up period starts as soon as you switch on
the machine. Re-calibration is only possible after the warm-up period has finished.
Otherwise the weight plates may be displayed incorrectly in the Cockpit or may adjust
automatically.
Note: The workout machine with laser sensor is a precision measuring instrument. But
even here you have to consider measuring tolerances due to environmental factors
(temperature changes, operation time etc.). Therefore, we recommend to check the
functionality of the machine regularly. In case of a the weight plate difference you have
to perform a re-calibration.
6.2 Resistance adjustment
On all machines of the POWER LINE4000 series the resistance can be adjusted by
adding or reducing the number of snap-on weights. Dowel pins are used to adjust the
weight by inserting them into the borings in the snap-on weights. The weights may be
chosen directly from the machine.
When adjusting, consider the following aspects:
⊗ You can only adjust the weights when the weight bundle is not under tensile
stress and the snap-on weights are resting firmly. Accordingly, you should avoid
modifying the training weight during a motion sequence.
⊗ Make sure to insert the dowel pins completely. If this is not the case, the pins
might loosen during motion. The snap-on weights can fall on the weight bundle
and this might damage the weights or injure the trainee because of jerky removal
of the load.
42
⊗ To secure the weights, insert the dowel pins straight into the borings. Otherwise,
the dowel pins might tilt during motion.
⊗ Do not put your hands between the snap-on weights. Otherwise, there is a risk
Technical and optical modifications as well as misprints reserved - © 2013 by ERGO-FIT GmbH & Co. KG

POWER LINE 4000
of injury.
⊗ Do not let the weights impact on the weight bundle during and after exercise.
Always make sure that the weights fall smoothly on the bundle.
6.3 Eccentric function
When designing strength training machines, strength curves are often made use of.
The aim of considering strength curves is to ensure the correct and targetted
adjustment of the resistance for the respective abilities of the muscle to be trained.
This means concretely that training stimuli can be used optimally by almost all parts
of a muscle.
The technological aid for this purpose is the eccentric technique. The eccentric is
connected with the rotation axis of the exercise machine via which the load of the
training weight is transferred to the lever arm (moment arm) that is moved by the
trainee. The set weight is transferred to the outer border of the eccentric disc via a flat
belt.
The edge of the eccentric does not form a concentric
radius (constant distance between outer edge and
rotation axis) around the rotation point of the disc but
an eccentric radius (variable distance between outer
edge and rotation axis). The distance between the
respective surface location of the weight plate (load)
and the rotation point determines the length of the
lever arm with which the weight pulls the plate. This
distance is called the load arm. In contrast, the length
of the lever arm (against which the trainee works)
determines the so-called moment arm. According to
Eccentric (example:
LEG EXTENSION 4000)
transferred via a long load arm to the rotation axis and vice versa (i.e. via a point of
the disc with a longer distance to the rotation point). Thus, the maximum strain on the
muscles may be realised by a high torque already at the beginning of the motion and
will be maintained almost until the final position is reached.
the lever principle (Load x load arm = moment x
moment arm), an eccentric transfers a high torque
(more load) on the rotation axis if the weight is
To meet individual needs, the moment arm may be adjusted in relation to the eccentric
to allow for strain adjustment by modifying the link positions.
Some machines of the POWER LINE 4000 are not equipped with an eccentric. This
is due to the vertical (LAT PULL 4000, SHOULDER ABDUCTION 4000, SHOULDER
Technical and optical modifications as well as misprints reserved - © 2013 by ERGO-FIT GmbH & Co. KG
43

Start up
PRESS 4000) or horizontal (CHEST PRESS 4000, LEG PRESS 4000) exercise
motion.
6.4 Function test
Function test: How to proceed:
⊗ Check if all handling parts are locked properly before training. Make sure there
are no loose or badly mounted handling parts.
⊗ Check the cable and wires for damage.
⊗ Check moving parts (steel cables, rollers) for proper function.
⊗ Check the rests and paddings for damage.
⊗ Check if all adjustable parts function properly.
44
Technical and optical modifications as well as misprints reserved - © 2013 by ERGO-FIT GmbH & Co. KG

POWER LINE 4000
Kapitel 7: Training
7.1 The effect of training ............................................................................. 46
7.2 Strain parameters ................................................................................. 46
7.3 Training routine – aspects to be considered ......................................... 47
7.4 Training tips .......................................................................................... 48
7.5 Proper training technique ..................................................................... 49
7.5.1. Back muscles ....................................................................................... 49
7.5.1.1 BACK EXTENSION 4000 ..................................................................... 49
7.5.1.2 BACK PULL 4000 ................................................................................. 50
7.5.1.3 BUTTERFLY REVERSE 4000 .............................................................. 51
7.5.1.4 LAT PULL 4000 ..................................................................................... 52
7.5.2 Shoulder muscles ................................................................................. 53
7.5.2.1 SHOULDER ABDUCTION 4000 .......................................................... 53
7.5.2.2 SHOULDER PRESS 4000 ................................................................... 54
7.5.3 Chest muscles ...................................................................................... 55
7.5.3.1 BUTTERFLY 4000 ................................................................................ 55
7.5.3.2 CHEST PRESS 4000 ........................................................................... 56
7.5.4 Upper arm muscles .............................................................................. 57
7.5.4.1 BICEPS FLEXION 4000 ....................................................................... 57
7.5.4.2 TRICEPS EXTENSION 4000 ............................................................... 59
7.5.5 Abdominal muscles .............................................................................. 60
7.5.5.1 ABDOMINAL FLEXION 4000 ............................................................... 60
7.5.5.2 ABDOMINAL TORSION 4000 .............................................................. 61
7.5.6 Pelvic muscles ...................................................................................... 62
7.5.6.1 ABDUCTOR 4000 ................................................................................. 62
7.5.6.2 ADDUCTOR 4000 ................................................................................ 63
7.5.6.3 HIP EXTENSION 4000 ......................................................................... 64
7.5.7 Thigh muscles ...................................................................................... 65
7.5.7.1 LEG EXTENSION 4000 ....................................................................... 65
7.5.7.2 LEG FLEXION 4000 ............................................................................. 66
7.5.7.3 LEG PRESS 4000 ................................................................................ 67
7.5.8 Multifunctional ....................................................................................... 68
7.5.8.1 PULL UP/DIP 4000 ............................................................................... 68
7.5.8.1.1 PULL UP 4000 ...................................................................................... 68
7.5.8.1.2 DIP 4000 ............................................................................................... 70
7.5.8.2 SEATEDD DIP 4000 ............................................................................. 71
Please note:
This owner’s manual contains information on multiple gym machines.
There may be variations in detail according to the type of machine!
Technical and optical modifications as well as misprints reserved - © 2013 by ERGO-FIT GmbH & Co. KG
45

Training
7 Training
7.1 The effect of training
The demands of today’s lifestyle in modern societies are not enough to remain in good
physical condition. Increasing automation and mechanisation involve an increasing
number of activities limited to fine motor skills. This development includes everyday
life. Physical inactivity inevitably leads to physical deterioration.
Muscle power allows the human being to stand up against gravity and to carry out
movements. However, general prejudices against strength training have suppressed
the importance of its promotion and preservation so far. Recent studies show that
physical inactivity leads to postural deficiencies, muscle weakness and osteoporosis.
A lack of muscle power activities is the cause of this. This leads to malpositions, and
these lead to overstraining of the muscles, ligaments and the skeletal system.
Irreparable damage to the muscular-skeletal system is the long-term consequence.
Strength training has the potential to counteract this physical deterioration. The effect
of strength training is – depending on the target and the fitness - a general increase
in power in individual muscles, muscle groups or the entire skeletal muscles with and
without muscle growth (muscular hypertrophy). Furthermore, it creates a physical
base for the exertion of sports or physical activities, counteracts physical inactivity and
related effects, and allows for a faster recovery of working abilities after injuries. In
addition, it has a positive indirect effect on the psyche and the appearance. You will
feel fit, more agile, and more attractive.
Muscle activity releases energy. This energy is converted into warmth. The body gets
warmer. To avoid overheating, the body counteracts this mechanism through
perspiration. However, loss of liquid reduces physical capabilities. Sports physicians
recommend a regular fluid intake during training to counteract this effect.
7.2 Strain parameters
The following aspects are relevant for general fitness purposes: muscle building
training (growth of muscle diametre, increase in maximum strength, firming body
tissue) and maintenance of strength performance (strength endurance training:
increasing fatigue resistance during stress, firming body tissue).
46
The general strain levels are:
Technical and optical modifications as well as misprints reserved - © 2013 by ERGO-FIT GmbH & Co. KG

POWER LINE 4000
Muscle building training
Beginner Advanced
Intensity
(% of maximum strenght)
Repetitions 8-15 8-15
Break duration (minutes) 1-2 2-4
Sequences 2-3 3-5
Exercise units per week 1-3 3-5
Training mode slowly, guided slowly, guided
Number of exercises 5-10 7-15
Strength endurance training
Intensity
(% of maximum strenght)
Repetitions 8-15 8-15
Break duration (minutes) 1-2 2-4
Sequences 2-3 3-5
Exercise units per week 1-3 3-5
Training mode slowly, guided slowly, guided
Number of exercises 5-10 7-15
40-60 60-80
Beginner Advanced
40-60 60-80
7.3 Training routine – aspects to be considered
If you exercise for the first time or restart training after a longer break, your training
routine should include the following stages (example):
1. Warmup: Carry out a general cardio vascular training (e.g. walking, running,
cycling) for 10-15 minutes to prepare your body for the upcoming strain.
2. Stretching: Then stretch those muscle groups you are going to strain during
workout.
3. Main routine: Now start your actual strength training and try to complete your
training target. Carry out a warmup on the exercise machine before each
exercise sequence to specifically prepare the muscles for the upcoming strain
(low intensity, high number of repetitions).
Technical and optical modifications as well as misprints reserved - © 2013 by ERGO-FIT GmbH & Co. KG
47

Training
7.4 Training tips
General
⊗ If you perform an exercise for the first time, work with little or no weight to
familiarise yourself with the motion sequence. Only increase the intensity when
you have perfect control over the respective exercise.
⊗ Exercise systematically. Make up a training schedule or have somebody else do
it for you.
⊗ Have someone correct your training every now and then to counteract habitual
mistakes.
⊗ Choose strains that correspond to your current performance status. Avoid setting
strains too high. This might lead to an overstrain or injuries to your musculoskeletal
system.
⊗ Modify the training routine regularly (at an interval of approx. 6 to 8 weeks). To
do so, you can change parameters such as the intensity, number of repetitions,
duration of the breaks, training method or the choice of exercise. Lasting training
effects will only be achieved by modifying the training routine.
⊗ Exercise regularly. However, allow sufficiently long recreational periods. Only
regular exercise combined with recovery phases leads to the desired effect.
Training mode
⊗ Do not hold your breath during training. Breathe out during the strain sequence
and breathe in during the relaxing sequence.
⊗ Exercise in an upright position. Avoid over-arching (hyperlordosis) your back.
⊗ Always keep your head in line with your spinal column.
⊗ Stabilise your hand joints (do not kink your wrists!).
⊗ Avoid jerky movements as this might lead to overstrain or injuries.
⊗ Stop the workout immediately if you feel a pain during exercise.
⊗ 4 Carefully lower the weights during the workout.
⊗ Maintain the training position described here for your entire workout.
7.5 Proper training technique
48
You should always take into account biomechanical considerations when you exercise.
This is why we have listed aspects concerning this matter for each of the strength
exercise machines in this chapter.
Technical and optical modifications as well as misprints reserved - © 2013 by ERGO-FIT GmbH & Co. KG

POWER LINE 4000
7.5.1 Back muscles
7.5.1.1 BACK EXTENSION 4000
Principal muscles worked:
Mm. erector spinae
Start position End position
1. Adopt the right exercise position. Sit on the seat. Your upper body (back straight)
leans on the chest padding. Place your feet on the footrests (feet about shoulder
width apart) and grasp the lateral handlebars with your hands (see also Chapter
5.4).
2. Now contract the torso muscles and press your straight upper body backwards
against the backpad until you are sitting upright. Make sure not to hyperextend
your upper body and to keep your pelvis in a stable position. Breathe out when
you exert strain against the resistance. Maintain this position momentarily.
3. Now lower your upper body forwards again, making sure to maintain control.
Stop the return motion in time so that your torso does not sag downwards.
Breathe in during the return sequence
Technical and optical modifications as well as misprints reserved - © 2013 by ERGO-FIT GmbH & Co. KG
49

7.5.1.2 BACK PULL 4000
Principal muscles worked:
M. latissimus dorsi
Start position End position
Training
50
1. Adopt the right exercise position. Sit on the seat. Your upper body (back straight)
leans on the chest padding. Place your feet on the footrests (feet about shoulder
width apart) and grasp the lateral handlebars with your hands (see also Chapter
5.4).
2. Now contract the torso muscles and press your straight upper body backwards
against the backpad until you are sitting upright. Make sure not to hyperextend
your upper body and to keep your pelvis in a stable position. Breathe out when
you exert strain against the resistance. Maintain this position momentarily.
3. Now lower your upper body forwards again, making sure to maintain control.
Stop the return motion in time so that your torso does not sag downwards.
Breathe in during the return sequence.
Technical and optical modifications as well as misprints reserved - © 2013 by ERGO-FIT GmbH & Co. KG

POWER LINE 4000
7.5.1.3 BUTTERFLY REVERSE 4000
Principal muscles worked:
M. trapecius
M. rhomboideus
M. deltoideus
Start position
1. Adopt the right exercise position. Sit on the seat. Your upper body (back straight)
leans on the chest padding. Place the balls of your feet on the footrests (feet
about shoulder width apart). Extend your arms at shoulder height and grasp the
lateral handlebars. The elbows are slightly bent (see also Chapter 5.4).
End position
2. Now contract the torso muscles and pull your arms backwards while maintaining
a straight back until your upper arms reach the height of your shoulders. During
this movement, pull your shoulder blades together. Make sure not to hyperextend
your arms! Breathe out when you exert strain against the resistance. Maintain
this position momentarily.
3. Now return the handlebars, making sure to maintain control and stop the return
motion when your upper arms are extended in front of you at shoulder width.
Breathe in during the return sequence.
Exercise variations:
⊗ Vary the angle between your arm and torso (adjust the height of the handlebars)
to work different areas of the back muscles individually.
Technical and optical modifications as well as misprints reserved - © 2013 by ERGO-FIT GmbH & Co. KG
51

7.5.1.4 LAT PULL 4000
Principal muscles worked:
M. latissimus dorsi
Training
Start position
1. Adopt the right exercise position: Sit on the seat with your upper body upright.
Secure your pelvis with the leg pads. Place your feet about shoulder width apart.
Grasp the handlebars with your extended arms. The elbows are slightly bent
and your palms are facing forwards (see also Chapter 5.4).
End position
52
2. Now contract your torso muscles and pull your arms downwards against the
resistance of the machine until the handles reach the height of your neck. Keep
your elbows opened to the sides and pull your shoulder blades together in the
final phase. Breathe out when you exert strain against the resistance. Maintain
this position momentarily.
3. Now return the handlebars, making sure to maintain control. Stop the return
motion in time before the arms are completely extended to avoid increased
stress on the elbows. Breathe in during the return sequence.
Technical and optical modifications as well as misprints reserved - © 2013 by ERGO-FIT GmbH & Co. KG

POWER LINE 4000
7.5.2 Shoulder muscles
7.5.2.1 SHOULDER ABDUCTION 4000
Principal muscles worked:
M. deltoideus
Start position
1. Adopt the right exercise position: Sit on the seat with your upper body upright.
The shoulder joint should be at the same height as the rotation axis of the
exercise machine. Place your feet about shoulder width apart. Grasp the
handlebars with your hands. Your palms are facing each other. Bend your
elbows at a right angle. Your forearms touch the inside of the arm pads (also
see Chapter 5.4).
End position
2. Now contract your torso muscles, extend your arms sideways and upwards
against the resistance of the machine until your arms reach the height of your
shoulders. The motion originates from the shoulder joint only. Breathe out when
you exert strain against the resistance. Maintain this position momentarily.
3. Now return your arms, making sure to maintain control. Stop the return motion
shortly before reaching the torso. Breathe in during the return sequence.
Technical and optical modifications as well as misprints reserved - © 2013 by ERGO-FIT GmbH & Co. KG
53

7.5.2.2 SHOULDER PRESS 4000
Principal muscles worked:
M. deltoideus
M. trapecius
Training
Start position
1. Adopt the right exercise position: Sit on the seat so that your upper body touches
the backrest completely. Place your feet about shoulder width apart. Grasp the
handlebars with your hands. Your palms show forwards. Bend your elbows at a
right angle. Your forearms touch the inside of the arm pads (also see Chapter
5.4).
End position
54
2. Now contract your torso muscles, extend your arms upwards against the
resistance of the machine until your elbow joints are almost completely straight.
Make sure not to hyperextend your elbow joints. This may lead to injuries and
joint arthrosis in the long term. Breathe out when you exert strain against the
resistance. Maintain this position momentarily
3. Now bend your elbows and return the handles, making sure to maintain control.
Stop the return motion when the upper arms are in line with the axis of your
shoulders. Breathe in during the return sequence.
Technical and optical modifications as well as misprints reserved - © 2013 by ERGO-FIT GmbH & Co. KG

POWER LINE 4000
Exercise variations:
⊗ Choose a different handlebar position so that your palms are facing each other.
Continue the exercise exactly as described above. With this variation, you can
increase the effect on the triceps brachii
7.5.3 Chest muscles
7.5.3.1 BUTTERFLY 4000
Principal muscles worked:
M. pectoralis major
M. pectoralis minor
Start position
1. Adopt the right exercise position: Sit on the seat so that your upper body touches
the backrest completely. Place your feet about shoulder width apart. Grasp the
handlebars with your hands at shoulder height. Your palms are facing forwards.
Your arms should be almost completely extended (also see Chapter 5.4).
End position
2. Now contract your torso muscles, and push your arms together in front of your
upper body against the resistance of the machine. Breathe out when you exert
strain against the resistance.
3. Now return the handholds to the start position, making sure to maintain control.
Technical and optical modifications as well as misprints reserved - © 2013 by ERGO-FIT GmbH & Co. KG
55

Training
Stop the return motion when the upper arms are in line with the axis of your
shoulders. Breathe in during the return sequence.
Exercise variations:
⊗ Vary the angle between your arm and torso (adjust the height of the handlebars)
to work different areas of the chest muscles individually. When choosing an
angle of 90°, the middle part of the chest muscles will be targeted with increased
intensity, while an angle exceeding 90° (arm extended diagonal and upwards)
focuses on the upper muscle area. An angle of less than 90° (arm extended
downwards) increases the stress on the lower part.
7.5.3.2 CHEST PRESS 4000
Principal muscles worked:
M. pectoralis major
M. pectoralis minor
M. triceps brachii
Start position
1. Adopt the right exercise position: Sit on the seat so that your upper body touches
the backrest completely. Place your feet about shoulder width apart. Kick down
the easy entry feature to move the handles forwards. Grasp the handlebars with
your hands. Your palms are facing downwards. Bend your elbows at a right
angle. Your arms are at shoulder height (also see Chapter 5.4).
End position
56
Technical and optical modifications as well as misprints reserved - © 2013 by ERGO-FIT GmbH & Co. KG

POWER LINE 4000
2. Now contract your torso muscles, extend your arms forwards against the
resistance of the machine until your elbows are almost completely extended.
Make sure not to hyperextend your elbows. This may lead to injuries and
arthrosis in the long term. Breathe out when you exert strain against the
resistance. Maintain this position momentarily.
3. Now bend your elbows and return the handles, making sure to maintain control.
Stop the return motion when the upper arms are in line with the axis of your
shoulders. Breathe in during the return sequence. When you have finished the
training sequence, kick the easy entry feature again with your foot. Now release
the handles and return them to the start position.
Exercise variations:
⊗ Choose a different handlebar position so that your palms are facing each other.
Continue the exercise exactly as described above. With this variation, you can
increase the effect on the triceps brachii.
⊗ Vary the angle between your arm and torso (modify the height of the seat) to
work different areas of the chest muscles individually. When choosing an angle
of 90°, the middle part of the chest muscles will be targeted with increased
intensity, while an angle exceeding 90° (arm extended diagonally and upwards)
focuses on the upper muscle area. An angle of less than 90° (arm extended
downwards) increases the stress on the lower part.
Technical and optical modifications as well as misprints reserved - © 2013 by ERGO-FIT GmbH & Co. KG
57

7.5.4 Upper arm muscles
7.5.4.1 BICEPS FLEXION 4000
Principal muscles worked:
M. biceps brachii
Training
Start position
1. Adopt the right exercise position: Sit on the seat so that your upper body touches
the chest pad. Place your feet about shoulder width apart. Rest your hands on
the arm pads and grasp the handlebars with your hands. Your palms are facing
upwards. Your elbows should be at the height of the machine’s rotation axis and
almost completely extended (also see Chapter 5.4).
End position
58
2. Now contract your torso muscles, and bend your arms against the resistance of
the machine. Lift your forearms upwards in a semicircular curve. The motion
originates from the elbows only and should stop when your forearms reach the
vertical line. Breathe out when you exert strain against the resistance. Maintain
this position momentarily
3. Now straighten your arms and return the handles, making sure to maintain
control. Stop the return motion when your arms are almost completely extended.
Make sure not to hyperextend your elbow joints as this increases the stress on
your elbows. Breathe in during the return sequence.
Technical and optical modifications as well as misprints reserved - © 2013 by ERGO-FIT GmbH & Co. KG

POWER LINE 4000
7.5.4.2 TRICEPS EXTENSION
Principal muscles worked:
M. triceps brachii
Start position
1. Adopt the right exercise position: Sit on the seat so that your upper body touches
the back pad. Place your feet about shoulder width apart. Rest your upper arms
on the arm pads. Grasp the handlebars with your hands. Your palms are facing
each other. Your elbows should be at the height of the machine’s rotation axis
and your forearms should be vertical (also see Chapter 5.4).
End position
2. Now contract your torso muscles, and stretch your arms against the resistance
of the machine. Move your forearms downwards in a semicircular curve. The
motion originates from the elbow joints only and should stop when your forearms
are extended. Make sure not to hyperextend your elbow joints as this increases
the stress on your elbows. Breathe out when you exert strain against the
resistance. Maintain this position momentarily.
3. Now bend your elbows and return the handles, making sure to maintain control.
Stop the return motion once your forearms are vertical. Breathe in during the
return sequence.
Technical and optical modifications as well as misprints reserved - © 2013 by ERGO-FIT GmbH & Co. KG
59

7.5.5 Abdominal muscles
7.5.5.1 ABDOMINAL FLEXION 4000
Principal muscles worked:
M. rectus abdominis
M. obliquus internus abdominis
M. obliquus externus abdominis
Training
Start position
1. Adopt the right exercise position: Sit on the seat so that the upper part of your
chest touches the chest pad. Place the balls of your feet on the footrests (feet
about shoulder width apart). Hug the chest pad with your arms (also see Chapter
5.4).
End position
60
2. Lower your upper body against the resistance of the pad until it reaches an
angle of approx. 45°. Breathe out when you exert strain against the resistance.
Maintain this position momentarily.
3. Now lift your upper body back up, making sure to maintain control. Stop the
return motion once you are sitting upright. Make sure not to hyperextend your
upper body. Breathe in during the return sequence.
Technical and optical modifications as well as misprints reserved - © 2013 by ERGO-FIT GmbH & Co. KG

POWER LINE 4000
7.5.5.2 ABDOMINAL TORSION 4000
Principal muscles worked:
M. obliquus internus abdominis
M. obliquus externus abdominis
Start position
1. Adopt the right exercise position: Sit on the seat and set the training direction by
pulling the adjustment lever close to the right handle. Turn your upper body to
the right. Position your legs to the right and left of the leg pads and place your
feet about shoulder width apart. Wrap your arms around the handles. Place
your forearms on the forearm restraints (also see Chapter 5.4).
End position
2. Contract your lateral abdominal muscles and turn your upper body to the left
against the resistance of the pad. Breathe out when you exert strain against the
resistance. Maintain this position momentarily.
3. Return your upper body to the start position. Breathe in during the return
sequence.
Exercise variations:
⊗ Move the adjustment lever while you are sitting and turn your upper body to the
left. Continue the exercise as described above but turn your upper body to the
right.
Technical and optical modifications as well as misprints reserved - © 2013 by ERGO-FIT GmbH & Co. KG
61

7.5.6 Pelvic muscles
7.5.6.1 ABDUCTOR 4000
Principal muscles worked:
Mm. abductores
Training
Start position
1. Adopt the right exercise position: Sit on the seat so that your upper body touches
the backrest completely. Place the balls of your feet on the footrests and rest
your knees against the knee pads. Hold the lateral handlebars with your hands
(also see Chapter 5.4).
End position
62
2. Open your legs against the resistance of the machine as far as you can. Breathe
out when you exert strain against the resistance. Maintain this position
momentarily.
3. Return to the start position by closing your legs. Stop the return motion before
your knees touch. Breathe in during the return sequence.
Technical and optical modifications as well as misprints reserved - © 2013 by ERGO-FIT GmbH & Co. KG

POWER LINE 4000
7.5.6.2 ADDUCTOR 4000
Principal muscles worked:
Mm. adductores
Start position
1. Adopt the right exercise position: Sit on the seat so that your upper body touches
the backrest completely. Place the balls of your feet on the footrests and rest
your knees against the kneepads. Hold the lateral handlebars with your hands
(also see Chapter 5.4).
End position
2. Close your legs against the resistance of the machine until the pads almost
touch each other. Breathe out when you exert strain against the resistance.
Maintain this position momentarily.
3. Return to the start position by closing your legs. Stop the return motion when
your legs are opened as wide as possible. Breathe in during the return
sequence.
Technical and optical modifications as well as misprints reserved - © 2013 by ERGO-FIT GmbH & Co. KG
63

7.5.6.3 HIP EXTENSION 4000
Principal muscles worked:
M. glutaeus maximus
M. glutaeus medius
M. glutaeus minimus
Training
Start position
1. Adopt the right exercise position: Stand next to the machine and rest your upper
body against the upper body restraint. Hold the handlebars with both hands.
Place your left foot firmly on the ground and the ball of your right foot on the
footrest (also see Chapter 5.4).
End position
64
2. Extend your right leg back and upwards against the resistance of the machine
until your hip is extended. Breathe out when you exert strain against the
resistance. Maintain this position momentarily.
3. Return your leg to the start position. Stop the return motion when your thigh is
vertical. Breathe in during the return sequence.
Exercise variations:
⊗ Place your right foot on the ground and your left foot on the footrest. Continue
the exercise as described above with the other leg.
Technical and optical modifications as well as misprints reserved - © 2013 by ERGO-FIT GmbH & Co. KG

POWER LINE 4000
7.5.7 Thigh muscles
7.5.7.1 LEG EXTENSION 4000
Principal muscles worked:
M. quadriceps femoris
Start position
1. Adopt the right exercise position: Sit on the seat so that your upper body touches
the backrest completely. The axis of your knee joint should be at the same
height as the rotation axis of the machine. Position your feet behind the foot
padding so that the pad is in the same height as your ankle joint. Hold the
handlebars with both hands (also see Chapter 5.4).
End position
2. Extend your legs upwards in front of you until your knees are almost completely
straight. Make sure that the motion originates in the knee joint only and that your
knees are not hyperextended. Breathe out when you exert strain against the
resistance. Maintain this position momentarily.
3. Now return your legs to the start position. Stop the return motion once your knee
joints reach an angle of approx. 90°. Breathe in during the return sequence.
Technical and optical modifications as well as misprints reserved - © 2013 by ERGO-FIT GmbH & Co. KG
65

Training
Exercise variations:
⊗ You can also perform this exercise with only one leg. This prevents the stronger
leg from performing more of the work.
7.5.7.2 LEG FLEXION 4000
Principal muscles worked:
M. biceps femoris
M. semitendinosus
M. semimembranosus
Start position
1. Adopt the right exercise position: Sit on the seat so that your upper body touches
the backrest completely. The axis of your knee joint should be at the same
height as the rotation axis of the machine. Place your feet in front of the foot
padding so that the pad is at the same height as your ankle joint. Secure your
legs with the thigh restraint and hold the handlebars with both hands (also see
Chapter 5.4).
End position
66
2. Bend your legs back and upwards until your knees reach an angle of approx.
90°. Breathe out when you exert strain against the resistance. Maintain this
position momentarily
3. Now extend your legs to the start position. Stop the return motion when your
knees are almost completely straight. Make sure that the motion originates from
the knee joint only and that your knees are not hyperextended. Breathe in during
Technical and optical modifications as well as misprints reserved - © 2013 by ERGO-FIT GmbH & Co. KG

POWER LINE 4000
the return sequence.
Exercise variations:
⊗ You can also perform this exercise with only one leg. This prevents the stronger
leg from performing more of the work.
7.5.7.2 LEG PRESS 4000
Principal muscles worked:
M. quadriceps femoris
M. glutaeus maximus
Start position
1. Adopt the right exercise position: Sit on the seat so that your upper body touches
the backrest completely. Make sure to adjust the backrest’s slope ergonomically
to counteract existing back pain. Place your feet on the footrests about shoulder
width apart. The height of your feet on the footrest is determined by your legs,
which should be bent at an angle of approx. 90°. If you have knee problems, this
angle should not be less than 90°. Hold the handlebars with your hands (also
see Chapter 5.4).
End position
2: Extend your legs against the resistance of the machine until your knees are
almost completely straight. Make sure not to hyperextend your knees! Breathe
out when you exert strain against the resistance. Mantain this position
Technical and optical modifications as well as misprints reserved - © 2013 by ERGO-FIT GmbH & Co. KG
67

Training
2. momentarily.
3. Bend your legs to return to the start position. Stop the return motion once the
legs reach an angle of approx. 90°. Breathe in during the return sequence.
Exercise variations:
⊗ You can also perform this exercise with only one leg. This prevents the stronger
leg from performing more of the work.
⊗ Vary the position of your feet to target different muscle groups individually:
a) Feet at the upper edge of the footrest (optimal positioning of the feet in case
of knee problems): The muscle work is mainly taken over by the gluteal muscles
(M. glutaeus maximus) as well as the muscles on the rear of the thighs M.
biceps femoris, M. semitendinosus, M. semimembranosus)
b) Feet on the lower edge of the footrest: The muscle work is mainly taken over
by the front muscles on the thighs (M. quadriceps femoris).
c) Feet largely apart: The muscle work is mainly taken over by the lateral inside
muscles of the thighs (Mm. adductores).
d) Feet closely together: The muscle work is mainly taken over by the lateral
front muscles of the thighs (M. quadriceps femoris)
68
Technical and optical modifications as well as misprints reserved - © 2013 by ERGO-FIT GmbH & Co. KG

POWER LINE 4000
7.5.8 Multifunctional
7.5.8.1 PULL UP DIP 4000
7.5.8.1.1 PULL UP 4000
Principal muscles worked:
M. latissimus dorsi
Start position
1. Adopt the right exercise position: Kneel on the pad while facing the machine.
Your legs should be about shoulder width apart and parallel to each other. Grasp
the upper outer handlebars with your hands. Your palms are facing forwards
and your arms are almost fully extended (also see Chapter 5.4).
End position
2. Lift yourself up slowly. Avoid any rotation of your elbow joints. Breathe out when
you exert strain against the resistance. Maintain this position momentarily.
3. Let yourself sink until your arms are almost completely straight. Make sure not
to hyperextend your elbow joints. Breathe in during the return sequence.
Technical and optical modifications as well as misprints reserved - © 2013 by ERGO-FIT GmbH & Co. KG
69

7.5.8.1.2 DIP 4000
Training
Principal muscles worked:
M. triceps brachii
M. pectoralis major
Start position
1. Adopt the right exercise position: Kneel on the pad while facing the machine.
Your legs should be about shoulder width apart and parallel to each other. Grasp
the outer handlebars with your hands. Your palms are facing your body and your
arms are almost completely extended (also see Chapter 5.4).
End position
70
2. Let yourself sink until the handlebars are almost at the height of your chest and
your upper arms in a horizontal position. Breathe in during this motion. Maintain
this position momentarily.
3. Now contract your arm and chest muscles, and slowly lift yourself upwards until
your arms are almost completely straight. Make sure not to hyperextend your
elbow joints. Breathe out when you exert strain against the resistance.
Technical and optical modifications as well as misprints reserved - © 2013 by ERGO-FIT GmbH & Co. KG

Power Line Fitness
Technische und optische Änderungen sowie Druckfehler vorbehalten - © 2002 by ERGO-FIT GmbH & Co. KG
POWER LINE 4000
7.5.8.2 SEATED DIP 4000
Principal muscles worked:
M. triceps brachii
M. pectoralis major
M. pectoralis minor
M. deltoideus
Start position
End position
1. Adopt the right exercise position: Sit on the seat so that your upper body touches
the backrest completely. Your legs should be about shoulder width apart and
parallel to each other. Grasp the outer handlebars with your hands. Your palms
are facing your body. Bend your elbows at a right angle. Your arms are at
shoulder height (also see Chapter 5.4).
2. Now contract your torso muscles, extend your arms downward against the
resistance of the machine until your elbows are almost completely extended.
Make sure not to hyperextend your elbows. This may lead to injuries and
arthrosis in the long term. Breathe out when you exert strain against the
resistance. Maintain this position momentarily.
3. Now bend your elbows and return the handles, making sure to maintain control.
Stop the return motion when the upper arms are in line with the axis of your
shoulders. Breathe in during the return sequence.
Technical and optical modifications as well as misprints reserved - © 2013 by ERGO-FIT GmbH & Co. KG
71

Training
72
Technical and optical modifications as well as misprints reserved - © 2013 by ERGO-FIT GmbH & Co. KG

POWER LINE 4000
Chapter 8: Maintenance
8.1 Care and maintenance ......................................................................... 74
8.2 Cleaning ............................................................................................... 75
Please note:
This owner’s manual contains information on multiple gym machines.
There may be variations in detail according to the type of machine!
Technical and optical modifications as well as misprints reserved - © 2012 by ERGO-FIT GmbH & Co. KG
73

Maintenance
8 Maintenance
Regular, thorough care and appropriate maintenance in particular help preserve the
value and extend the lifetime of your exercise machine. For this reason, we recommend
regular preventive maintenance! Always switch off the machine for maintenance and
cleaning!
These regular inspections are essential for compliance in case of guarantee claims.
In case of a malfunction, ERGO-FIT’s technicians and engineers are pleased to assist
you.
Immediate maintenance is to be carried out if:
⊗ the machine has undergone extreme mechanical stress
⊗ steel cables, rollers, handles, levers or snap-on weights are damaged
Maintenance of the machine may be carried out by ERGO-FIT’s customer service
department. A maintenance contract may also be implemented.
8.1 Care and maintenance
During manufacturing of its training machines, ERGO-FIT makes every effort to reduce
future maintenance.
In the following chapters, some of the maintenance and inspection tasks are described.
You should carry out these tasks regularly.
During maintenance, consider the following:
⊗ This machine requires very little maintenance.
⊗ Moving parts need no further oiling or greasing.
⊗ The chrome bars need to be cleaned with a dry cloth and sprayed with teflon
spray.
⊗ Before every use, check paddings, frame, flat belt, snap-on weights, handles
and levers for cracks or breaks.
74
⊗ Before every use, check if all fastenings are firmly tightened.
⊗ 1 Regularly check the correct position of the sensor connectors on 4000 S
machines.
⊗ Please lubricate the ropes monthly or as required. We recommend "Spray AT44
Allround Spray mit Teflon".
Technical and optical modifications as well as misprints reserved - © 2012 by ERGO-FIT GmbH & Co. KG

POWER LINE 4000
8.2 Cleaning
Sweat, dust particles and dirt will damage your exercise machine. This can be observed
after only a few weeks. Metal and aluminium parts of your machine may alter its surfaces
in combination with sweat. For this reason, you should clean your machine every day.
We recommend “Ecolab P3-steril” or “Scarabig” for cleaning. You can obtain these
detergents at the following suppliers:
Ecolab Deutschland GmbH
Reisholzer Werftstraße 38-42
Postfach 13 04 06
40554 Düsseldorf
www.ecolab.com
SCARAPHARM chem.-pharm. Produkte GmbH
Wachmannstraße 86
28209 Bremen
www.scarapharm.de
During cleaning, consider the following aspects:
⊗ Clean your machine with a damp cloth, mild cleaning agent or soap suds only
and dry it with a soft cloth.
⊗ Regularly clean the lens and the display of the 4000 S sensor.
Technical and optical modifications as well as misprints reserved - © 2012 by ERGO-FIT GmbH & Co. KG
75

Maintenance
76
Technical and optical modifications as well as misprints reserved - © 2012 by ERGO-FIT GmbH & Co. KG

POWER LINE 4000
Chapter A: Appendix
A.1 Customer service ................................................................................. 78
A.2 Ordering information ............................................................................. 78
A.3 Technical specifications ........................................................................ 78
A.3.1 Back muscles ....................................................................................... 79
A.3.2 Shoulder muscles ................................................................................. 80
A.3.3 Chest muscles ...................................................................................... 80
A.3.4 Upper arm muscles .............................................................................. 81
A.3.5 Abdominal muscles .............................................................................. 81
A.3.6 Pelvic muscles ...................................................................................... 82
A.3.7 Thigh muscles ..................................................................................... 83
A.3.8 Multifunctional ...................................................................................... 84
A.3.9 Benches ............................................................................................... 85
A.4 Warranty clauses .................................................................................. 89
A.5 Declaration of conformity ...................................................................... 91
Safety Information ................................................................................ 96
Please note:
This owner’s manual contains information on multiple gym machines.
There may be variations in detail according to the type of machine!
Technical and optical modifications as well as misprints reserved - © 2013 by ERGO-FIT GmbH & Co. KG
77

Appendix
A Appendix
A.1 Customer service
If you cannot correct a malfunction yourself, please get in touch with our customer
service.
Service: Phone: (+49) 6331/2461-22
(+49) 6331/2461-23
(+49) 6331/2461-27
(+49) 6331/2461-29
Fax: (+49) 6331/2461-55
Email: service@ergo-fit.de
Repairs of ERGO-FIT machines are carried out by highly qualified and competent
service technicians. Only original spare parts are used for repairs.
A.2 Spare parts
Spare parts and current exploded drawings are available from ERGO-FIT’s service
department:
Service: Phone: (+49) 6331/2461-22
(+49) 6331/2461-23
(+49) 6331/2461-27
(+49) 6331/2461-29
Fax: (+49) 6331/2461-55
Email: service@ergo-fit.de
When ordering, please provide the following information:
⊗ model
⊗ serial number
A.3 Technical specifications
This chapter provides the technical specifications of your strength exercise machine.
The specifications are listed in separate charts for each model of the POWER LINE
4000 series and sorted by muscle groups.
78
Technical and optical modifications as well as misprints reserved - © 2013 by ERGO-FIT GmbH & Co. KG

POWER LINE 4000
A.3.1 Back muscles
BACK EXTENSION
4000
Area of application Fitness / medical Fitness / medical
Dimensions (L/W/H) in cm 100 x 120 x 155 120 x 145 x 155
Max. weight strain /
Weight plate increment
Total weight /machine approx. 235 kg approx. 205 kg
Max. user weight 200 kg 200 kg
Adjustments possible Lever arm Seat height
Adjustment by pneumatic spring - Seat height adjustment
Eccentric yes no
Locked dowel pins yes yes
Easy entry feature no yes
Weight transmission Steel cable Steel cable
Ambient temperature: Operation
Ambient temperature: Storage
Relative humidity
100 kg / 5 kg 75 kg / 5 kg
+10°C to +40°C
-30°C to +50°C
30% - 75%
non condensing
BACK PULL
4000
+10°C to +40°C
-30°C to +50°C
30% - 75%
non condensing
Area of application
Dimensions (L/W/H) in cm
Max. weight strain /
Weight plate increment
Total weight /machine
Max. user weight
Adjustments possible
Adjustment by pneumatic spring
Eccentric
Locked dowel pins
Easy entry feature
Weight transmission
Ambient temperature: Operation
Ambient temperature: Storage
Relative humidity
BUTTERFLY REVERSE
4000
Fitness / medical Fitness / medical
135 x 155 x 155 130 x 170 x 240
60 kg / 5 kg 75 kg / 5 kg
approx. 190 kg approx. 220 kg
200 kg 200 kg
- Seat height
- Seat height adjustment
yes no
yes yes
no no
Steel cable Steel cable
+10°C to +40°C
-30°C to +50°C
30% - 75%
non condensing
LAT PULL
4000
+10°C to +40°C
-30°C to +50°C
30% - 75%
non condensing
Technical and optical modifications as well as misprints reserved - © 2013 by ERGO-FIT GmbH & Co. KG
79

A.3.2 Shoulder muscles
Appendix
SHOULDER
ABDUCTION 4000
Area of application Fitness / medical Fitness / medical
Dimensions (L/W/H) in cm 120 x 115 x 155 135 x 135 x 180
Max. weight strain /
Weight plate increment
Total weight /machine approx. 200 kg approx. 210 kg
Max. user weight
Adjustments possible Seat height Seat height
Adjustment by pneumatic spring Seat height adjustment Seat height adjustment
Eccentric no no
Locked dowel pins yes yes
Easy entry feature no no
Weight transmission Steel cable Steel cable
Ambient temperature: Operation
Ambient temperature: Storage
Relative humidity 30% - 75%
75 kg / 5 kg 75 kg / 5 kg
200 kg 200 kg
+10°C to +40°C
-30°C to +50°C
non condensing
SHOULDER PRESS
4000
+10°C to +40°C
-30°C to +50°C
30% - 75%
non condensing
A.3.3 Chest muscles
Area of application
Dimensions (L/W/H) in cm
Max. weight strain /
Weight plate increment
Total weight /machine
Max. user weight
Adjustments possible
Adjustment by pneumatic spring
Eccentric
Locked dowel pins
Easy entry feature
Weight transmission
Ambient temperature: Operation
Ambient temperature: Storage
Relative humidity
BUTTERFLY
4000
Fitness / medical Fitness / medical
120 x 155 x 155 145 x 155 x 155
75 kg / 5 kg 75 kg / 5 kg
approx. 200 kg approx. 230 kg
200 kg 200 kg
lever arm Seat height
- Seat height adjustment
yes no
yes yes
no yes
Steel cable Steel cable
+10°C to +40°C
-30°C to +50°C
30% - 75%
non condensing
CHEST PRESS 4000
+10°C to +40°C
-30°C to +50°C
30% - 75%
non condensing
80
Technical and optical modifications as well as misprints reserved - © 2013 by ERGO-FIT GmbH & Co. KG

POWER LINE 4000
A.3.4 Upper arm muscles
BICEPS FLEXION
4000
Area of application Fitness / medical Fitness / medical
Dimensions (L/W/H) in cm 95 x 130 x 155 135 x 110 x 180
Max. weight strain /
Weight plate increment
Total weight /machine approx. 170 kg approx. 185 kg
Max. user weight
Adjustments possible Seat height; lever arm Seat height, lever arm,
Adjustment by pneumatic spring Seat height adjustment Seat height adjustment
Eccentric yes yes
Locked dowel pins yes yes
Easy entry feature no no
Weight transmission Steel cable Steel cable
Ambient temperature: Operation
Ambient temperature: Storage
Relative humidity 30% - 75%
60 kg / 5 kg 60 kg / 5 kg
200 kg 200 kg
+10°C to +40°C
-30°C to +50°C
non condensing
TRICEPS EXTENSION
4000
Back padding
+10°C to +40°C
-30°C to +50°C
30% - 75%
non condensing
A.3.5 Abdominal muscles
ABDOMINAL FLEXION
4000
Area of application
Dimensions (L/W/H) in cm
Max. weight strain /
Weight plate increment
Total weight /machine
Max. user weight
Adjustments possible
Adjustment by pneumatic spring
Eccentric
Locked dowel pins
Easy entry feature
Weight transmission
Ambient temperature: Operation
Ambient temperature: Storage
Relative humidity 30% - 75%
Fitness / medical Fitness / medical
105 x 130 x 155 135 x 100 x 155
75 kg / 5 kg 60 kg / 5 kg
approx. 220 kg approx. 170 kg
200 kg 200 kg
lever arm -
- -
yes no
yes yes
no no
Steel cable Steel cable
+10°C to +40°C
-30°C to +50°C
non condensing
ABDOMINAL TORSION
4000
+10°C to +40°C
-30°C to +50°C
30% - 75%
non condensing
A.3.6 Pelvic muscles
Technical and optical modifications as well as misprints reserved - © 2013 by ERGO-FIT GmbH & Co. KG
81

Appendix
ABDUCTOR
4000
Area of application Fitness/medical Fitness/medical
Dimensions (L/W/H) in cm 140 x 130 x 155 175 x 125 x 155
Max. weight strain /
Weight plate increment
Total weight /machine approx. 215 kg approx. 215 kg
Max. user weight
Adjustments possible Twist angle Twist angle
Adjustment by pneumatic spring - -
Eccentric yes yes
Locked dowel pins yes yes
Easy entry feature no no
Weight transmission Steel cable Steel cable
Ambient temperature: Operation
Ambient temperature: Storage
Relative humidity
75 kg / 5 kg 75 kg / 5 kg
200 kg 200 kg
+10°C to +40°C
-30°C to +50°C
30% - 75%
non condensing
ADDUCTOR
4000
+10°C to +40°C
-30°C to +50°C
30% - 75%
non condensing
Area of application
Dimensions (L/W/H) in cm
Max. weight strain /
Weight plate increment
Total weight /machine
Max. user weight
Adjustments possible
Adjustment by pneumatic spring
Eccentric
Locked dowel pins
Easy entry feature
Weight transmission
Ambient temperature: Operation
Ambient temperature: Storage
Relative humidity
HIP EXTENSION
4000
Fitness/medical
100 x 125 x 155
60 kg / 5 kg
approx. 170 kg
200 kg
-
-
yes
yes
no
Steel cable
+10°C to +40°C
-30°C to +50°C
30% - 75%
non condensing
82
Technical and optical modifications as well as misprints reserved - © 2013 by ERGO-FIT GmbH & Co. KG

POWER LINE 4000
A.3.7 Oberschenkelmuskulatur
LEG EXTENSION
4000
Area of application Fitness / medical Fitness / medical
Dimensions (L/W/H) in cm 105 x 140 x 155 105 x 145 x 155
Max. weight strain /
Weight plate increment
Total weight /machine approx. 265 kg approx. 255 kg
Max. user weight
Adjustments possible Back rest, leg length,
Adjustment by pneumatic spring - -
Eccentric yes yes
Locked dowel pins yes yes
Easy entry feature no no
Weight transmission Steel cable Steel cable
Ambient temperature: Operation
Ambient temperature: Storage
Relative humidity 30% - 75%
100 kg / 5 kg 75 kg / 5 kg
200 kg 200 kg
lever arm
+10°C to +40°C
-30°C to +50°C
non condensing
LEG FLEXION
4000
Back rest, thigh restraint,
lever arm, foot pad
+10°C to +40°C
-30°C to +50°C
30% - 75%
non condensing
LEG PRESS
4000
Area of application
Dimensions (L/W/H) in cm
Max. weight strain /
Weight plate increment
Total weight /machine
Max. user weight
Adjustments possible
Adjustment by pneumatic spring
Eccentric
Locked dowel pins
Easy entry feature
Weight transmission
Ambient temperature: Operation
Ambient temperature: Storage
Relative humidity 30% - 75%
Fitness / medical
100 x 225 x 155
172,5 kg / 7,5 kg
approx. 375 kg
200 kg
Back rest, leg length,
footrest
-
yes
yes
no
Steel cable
+10°C to +40°C
-30°C to +50°C
non condensing
Technical and optical modifications as well as misprints reserved - © 2013 by ERGO-FIT GmbH & Co. KG
83

A.3.8 Multifunktional
Appendix
CABLE 4000
(placed on the oor)
Area of application Fitness/medical Fitness/medical
Dimensions (L/W/H) in cm 120 x 160 x 225 86 x 41 x 225
Max. weight strain /
Weight plate increment
Total weight /machine approx. 156 kg approx. 123 kg
Max. user weight
Adjustments possible - -
Adjustment by pneumatic spring - -
Eccentric no no
Locked dowel pins yes yes
Easy entry feature no no
Weight transmission Steel cable Steel cable
Ambient temperature: Operation
Ambient temperature: Storage
Relative humidity
75 kg / 5 kg 75 kg / 5 kg
- -
+10°C to +40°C
-30°C to +50°C
30% - 75%
non condensing
CABLE 4000
(mounted on the wall)
+10°C to +40°C
-30°C to +50°C
30% - 75%
non condensing
CABLE CROSSOVER
4000
Area of application Fitness
Dimensions (L/W/H) in cm 91 x 338 x 218
Max. weight strain /
Weight plate increment
Total weight /machine approx. 250 kg
Max. user weight
Adjustments possible -
Adjustment by pneumatic spring -
Eccentric no
Locked dowel pins yes
Easy entry feature no
Weight transmission Steel cable
Ambient temperature: Operation
Ambient temperature: Storage
Relative humidity
2x 75 kg / 5 kg
- 200 kg
+10°C to +40°C
-30°C to +50°C
30% - 75%
non condensing
CABLE TOWER
4000
Fitness
120 x 290 x 220
2 X 100 kg, 2 x 75 kg /
5kg
approx. 530 kg
-
-
no
yes
no
Steel cable
+10°C to +40°C
-30°C to +50°C
30% - 75%
non condensing
84
Technical and optical modifications as well as misprints reserved - © 2013 by ERGO-FIT GmbH & Co. KG

POWER LINE 4000
Area of application
Dimensions (L/W/H) in cm
Max. weight strain /
Weight plate increment
Total weight /machine
Max. user weight
Adjustments possible
Adjustment by pneumatic spring
Eccentric
Locked dowel pins
Easy entry feature
Weight transmission
Ambient temperature: Operation
Ambient temperature: Storage
Relative humidity
Plate hole diameter
MULTI PRESS
4000
Fitness Fitness / medical
170 x 210 x 220 81 x 120 x 215
- 90 kg / 7,5 kg
approx. 150 kg approx. 210 kg
- 200 kg
- -
- -
no
no
no
Steel cable Steel cable
+10°C to +40°C
-30°C to +50°C
30% - 75%
non condensing
50/51mm
PULL UP/DIP
4000
no
yes
no
+10°C to +40°C
-30°C to +50°C
30% - 75%
non condensing
-
SEATED DIP
4000
Area of application
Dimensions (L/W/H) in cm
Max. weight strain /
Weight plate increment
Total weight /machine
Max. user weight
Adjustments possible
Adjustment by pneumatic spring
Eccentric no
Locked dowel pins yes
Easy entry feature no
Weight transmission
Ambient temperature: Operation
Ambient temperature: Storage
Relative humidity 30% - 75%
Fitness / medical
162 x 117 x 155
100 kg / 5 kg
approx. 210 kg
200 kg
Seat height, Back pad
Seat height adjustment
Steel cable
+10°C to +40°C
-30°C to +50°C
non condensing
Technical and optical modifications as well as misprints reserved - © 2013 by ERGO-FIT GmbH & Co. KG
85

A.3.9 Benches
Appendix
ABDOMINAL BENCH
4000
Area of application Fitness Fitness
Dimensions (L/W/H) in cm 145 x 60 x 75 135 x 80 x 75
Total weight /machine approx. 60 kg approx. 50 kg
Max. weight strain 250 kg 250 kg
Adjustments possible Back pad Leg pad
Adjustment by pneumatic spring - -
Ambient temperature: Operation
Ambient temperature: Storage
Relative humidity 30% - 75%
Area of application Fitness Fitness
Dimensions (L/W/H) in cm 105 x 60 x 40 135 x 60 x 100
Total weight /machine approx. 25 kg approx. 35 kg
Max. weight strain 250 kg 250 kg
+10°C to +40°C
-30°C to +50°C
non condensing
FLAT BENCH
4000
BACK BENCH
4000
+10°C to +40°C
-30°C to +50°C
30% - 75%
non condensing
MULTI BENCH
4000
Adjustments possible - Backrest
Adjustment by pneumatic spring - -
Ambient temperature: Operation
Ambient temperature: Storage
Relative humidity
Area of application Fitness Fitness
Dimensions (L/W/H) in cm 160 x 125 x 125 160 x 125 x 135
Total weight /machine approx. 50 kg approx. 45 kg
Max. weight strain 400 kg 350 kg
Adjustments possible Seat height Seat height
Adjustment by pneumatic spring - -
Ambient temperature: Operation
Ambient temperature: Storage
Relative humidity 30% - 75%
+10°C to +40°C
-30°C to +50°C
30% - 75%
non condensing
OLYMPIC FLAT
BENCH 4000
+10°C to +40°C
-30°C to +50°C
non condensing
+10°C to +40°C
-30°C to +50°C
30% - 75%
non condensing
OLYMPIC INCLINE
BENCH 4000
+10°C to +40°C
-30°C to +50°C
30% - 75%
non condensing
86
Technical and optical modifications as well as misprints reserved - © 2013 by ERGO-FIT GmbH & Co. KG

POWER LINE 4000
SCOTT BENCH
4000
Area of application Fitness Fitness
Dimensions (L/W/H) in cm 160 x 125 x 125 175 x 120 x 175
Total weight /machine approx. 50 kg approx. 65 kg
Max. weight strain 250 kg -
Adjustments possible - -
Adjustment by pneumatic spring - -
Ambient temperature: Operation
Ambient temperature: Storage
Relative humidity 30% - 75%
+10°C to +40°C
-30°C to +50°C
non condensing
SQUAT RACK
4000
+10°C to +40°C
-30°C to +50°C
30% - 75%
non condensing
Technical and optical modifications as well as misprints reserved - © 2013 by ERGO-FIT GmbH & Co. KG
87

SQUAT RACK
4000
Area of application Fitness
Dimensions (L/W/H) in cm 175 x 120 x 175
Max. weight mounting -
Weight plate increment -
Total weight /machine approx. 65 kg
Max. weight strain 150 kg
Adjustments possible -
Adjustment by pneumatic spring -
Eccentric no
Locked dowel pins no
Easy entry feature no
Weight transmission -
Appendix
Ambient temperature: Operation
Ambient temperature: Storage
Relative humidity 30% - 75%
+10°C to +40°C
-30°C to +50°C
non condensing
88
Technical and optical modifications as well as misprints reserved - © 2013 by ERGO-FIT GmbH & Co. KG

POWER LINE 4000
A.4 Warranty clauses
2 years warranty, full warranty of 4 years on request*
The seller shall be liable, to the exclusion of other liability, for deficiencies of the
delivery, of which the absence of expressly affirmed properties is part, as follows:
1. All parts that are found to be unusable or restricted in use in consequence of a
circumstance dated before the transfer of risk – notably because of faulty design,
bad manufacturing material or faulty workmanship - shall be repaired or replaced
during a period of 24 months after delivery. The decision if the fault will be
repaired or should be replaced will be at the seller’s discretion. The supplier
shall only be liable for deficiencies of drawings and materials delivered or chosen
by the seller if he would have been able to recognise the deficiency when
applying professional accuracy unless the seller notified the purchaser of the
recognised deficiency immediately.
2. The purchaser’s right to claim ends in all cases after 24 months after transfer of
the object.
3. No guarantee shall be assumed for damage as a result of inappropriate or
improper use, faulty assembly or faulty startup carried out by the purchaser or a
third party, natural wear, faulty or careless handling, inappropriate equipment or
exchange work material, faulty construction works, chemical, electrochemical or
electric influences, except in the event that they can be traced to the fault of the
seller. The purchaser will assume all risks in connection with the delivery, even
in case of free freight ex-factory.
4. Initially, the seller has the right to two rectifications or replacements. Should
these fail, the purchaser has the right of abatement or rescission within the
scope of valid legislation. The seller will have a period of six weeks as from
communicating the notice of defect for rectification.
5. Improper modifications or repairs carried out on behalf of the purchaser or a
third party without prior permission of the seller will abrogate warranty claims.
6. If goods are exported, warranty will be restricted to the availability of loose spare
parts ex-factory within the warranty period. Packing costs, freight charge and
labour will be at the expense of the purchaser. In case the purchaser demands
site repair by a technician of the factory or another service address, the purchaser
Technical and optical modifications as well as misprints reserved - © 2013 by ERGO-FIT GmbH & Co. KG
89

Appendix
will assume the costs of travelling expenses and labour.
7. All merchandise that has not been produced by the seller is subject to legal
provisions.
Wear parts are excluded from warranty specifications, e.g.:
⊗ Flat belt, steel cable, pull ropes
⊗ Snap-on weights
⊗ Dowel pins
⊗ Adjusting Lever
⊗ Paddings
⊗ cable-winch sensor
⊗ Seat, tread, handholds
The warranty is voided if maintenance instructions are not observed!
_________________
*see General Terms and Conditions
90
Technical and optical modifications as well as misprints reserved - © 2013 by ERGO-FIT GmbH & Co. KG

POWER LINE 4000
A.5 Declaration of conformity
EG Declaration of conformity
This is to certify that the products:
ABDUCTOR 4000 S ABDOMINAL FLEXION 4000 S
ABDOMINAL TORSION 4000 S ADDUCTOR 4000 S
BACK EXTENSION 4000 S BACK PULL 4000 S
BICEPS FLEXION 4000 S BUTTERFLY 4000 S
BUTTERFLY REVERSE 4000 S CABLE 4000 S
CABLE FREE 4000 S CHEST PRESS 4000 S
HIP EXTENSION 4000 S LAT PULL 4000 S
LEG EXTENSION 4000 S LEG FLEXION 4000 S
LEG PRESS 4000 S PULL UP/DIP 4000 S
SEATED DIP 4000 S SHOULDER ABDUCTION 4000 S
SHOULDER PRESS 4000 S TRICEPS EXTENSION 4000 S
fulfil the requirements laid down in the following guidelines and standards
• 2006/95/EC
Low voltage directive
• 2004/108/EC
EMC (electromagnetic compatibility) Directive
• EN 957 SA
Stationary training equipment
• DIN EN 60335-1, class of protection I, IP21
Household and similar electrical appliances - Safety – Part 1: General
requirements
This declaration is valid for all products delivered from 01.01.2013 until
31.12.2013 and has been issued with full responsibility to the producer
ERGO-FIT GmbH & Co.KG
Blocksbergstraße 165
D-66955 Pirmasens
Name of the CE document commissioner: Alexander Harrer
Address of the CE document commissioner: see manufacturer's address
by:
Michael Resch
(Managing director)
Pirmasens, 20.06.2013
Technical and optical modifications as well as misprints reserved - © 2013 by ERGO-FIT GmbH & Co. KG
91

Appendix
EG Declaration of conformity
This is to certify that the products:
ABDUCTOR 4000 MED ABDOMINAL FLEXION 4000 MED
ABDOMINAL TORSION 4000 MED ADDUCTOR 4000 MED
BACK EXTENSION 4000 MED BACK PULL 4000 MED
BICEPS FLEXION 4000 MED BUTTERFLY 4000 MED
BUTTERFLY REVERSE 4000 MED CABLE 4000 MED
CABLE FREE 4000 MED CHEST PRESS 4000 MED
HIP EXTENSION 4000 MED LAT PULL 4000 MED
LEG EXTENSION 4000 MED LEG FLEXION 4000 MED
LEG PRESS 4000 MED PULL UP/DIP 4000 MED
SEATED DIP 4000 MED SHOULDER ABDUCTION 4000 MED
SHOULDER PRESS 4000 MED TRICEPS EXTENSION 4000 med
fulfil the requirements laid down in the following standards and guidelines
• MPG, MDD 93/42/EEC, class of models I,
Medical Device Directive
• EN 957 SA
Stationary training equipment
• DIN EN 62366
Medical devices - Application of usability engineering to medical devices
This declaration is valid for all products delivered from 01.01.2013 until
31.12.2013 and has been issued with full responsibility to the producer
ERGO-FIT GmbH & Co.KG
Blocksbergstraße 165
D-66955 Pirmasens
Name of the CE document commissioner: Alexander Harrer
Address of the CE document commissioner: see manufacturer's address
by:
Michael Resch
(Managing director)
92
Pirmasens, 20.06.2013
Technical and optical modifications as well as misprints reserved - © 2013 by ERGO-FIT GmbH & Co. KG

POWER LINE 4000
EG Declaration of conformity
ABDUCTOR 4000 S MED ABDOMINAL FLEXION 4000 S MED
ABDOMINAL TORSION 4000 S MED ADDUCTOR 4000 S MED
BACK EXTENSION 4000 S MED BACK PULL 4000 S MED
BICEPS FLEXION 4000 S MED BUTTERFLY 4000 S MED
BUTTERFLY REVERSE 4000 S MED CABLE 4000 S MED
CABLE FREE 4000 S MED CHEST PRESS 4000 S MED
HIP EXTENSION 4000 S MED LAT PULL 4000 S MED
LEG EXTENSION 4000 S MED LEG FLEXION 4000 S MED
LEG PRESS 4000 S MED PULL UP/DIP 4000 S MED
SEATED DIP 4000 MED SHOULDER ABDUCTION 4000 S MED
SHOULDER PRESS 4000 S MED TRICEPS EXTENSION 4000 S MED
fulfil the requirements laid down in the following standards and guidelines
• MPG, MDD 93/42/EEC, class of models I, Appendix II
Medical Device Directive
• EN 957 SA
Stationary training equipment
• DIN EN 60601-1, class of protection I, degree of protection type B, IP21
Medical electrical equipment – Part 1: General requirements for safety and
essential performance
• DIN EN 60601-1-2
Medical electrical equipment – Part 1: General requirements for safety and
essential performance – Collateral standard 2: Electromagnetic compatibility Requirements and tests
• DIN EN 60601-1-6
Medical electrical equipment – Part 1: General requirements for safety and
essential performance – Collateral standard 6: Usability
• DIN EN 62304
Medical device software - Software life-cycle processes
This declaration is valid for all products delivered from 01.01.2013 until
31.12.2013 and has been issued with full responsibility to the producer
ERGO-FIT GmbH & Co.KG
Blocksbergstraße 165
D-66955 Pirmasens
Name of the CE document commissioner: Alexander Harrer
Address of the CE document commissioner: see manufacturer's address
by:
Michael Resch
(Managing director)
Pirmasens, 20.06.2013
Technical and optical modifications as well as misprints reserved - © 2013 by ERGO-FIT GmbH & Co. KG
93

Appendix
94
Technical and optical modifications as well as misprints reserved - © 2013 by ERGO-FIT GmbH & Co. KG
 Loading...