

Page 1
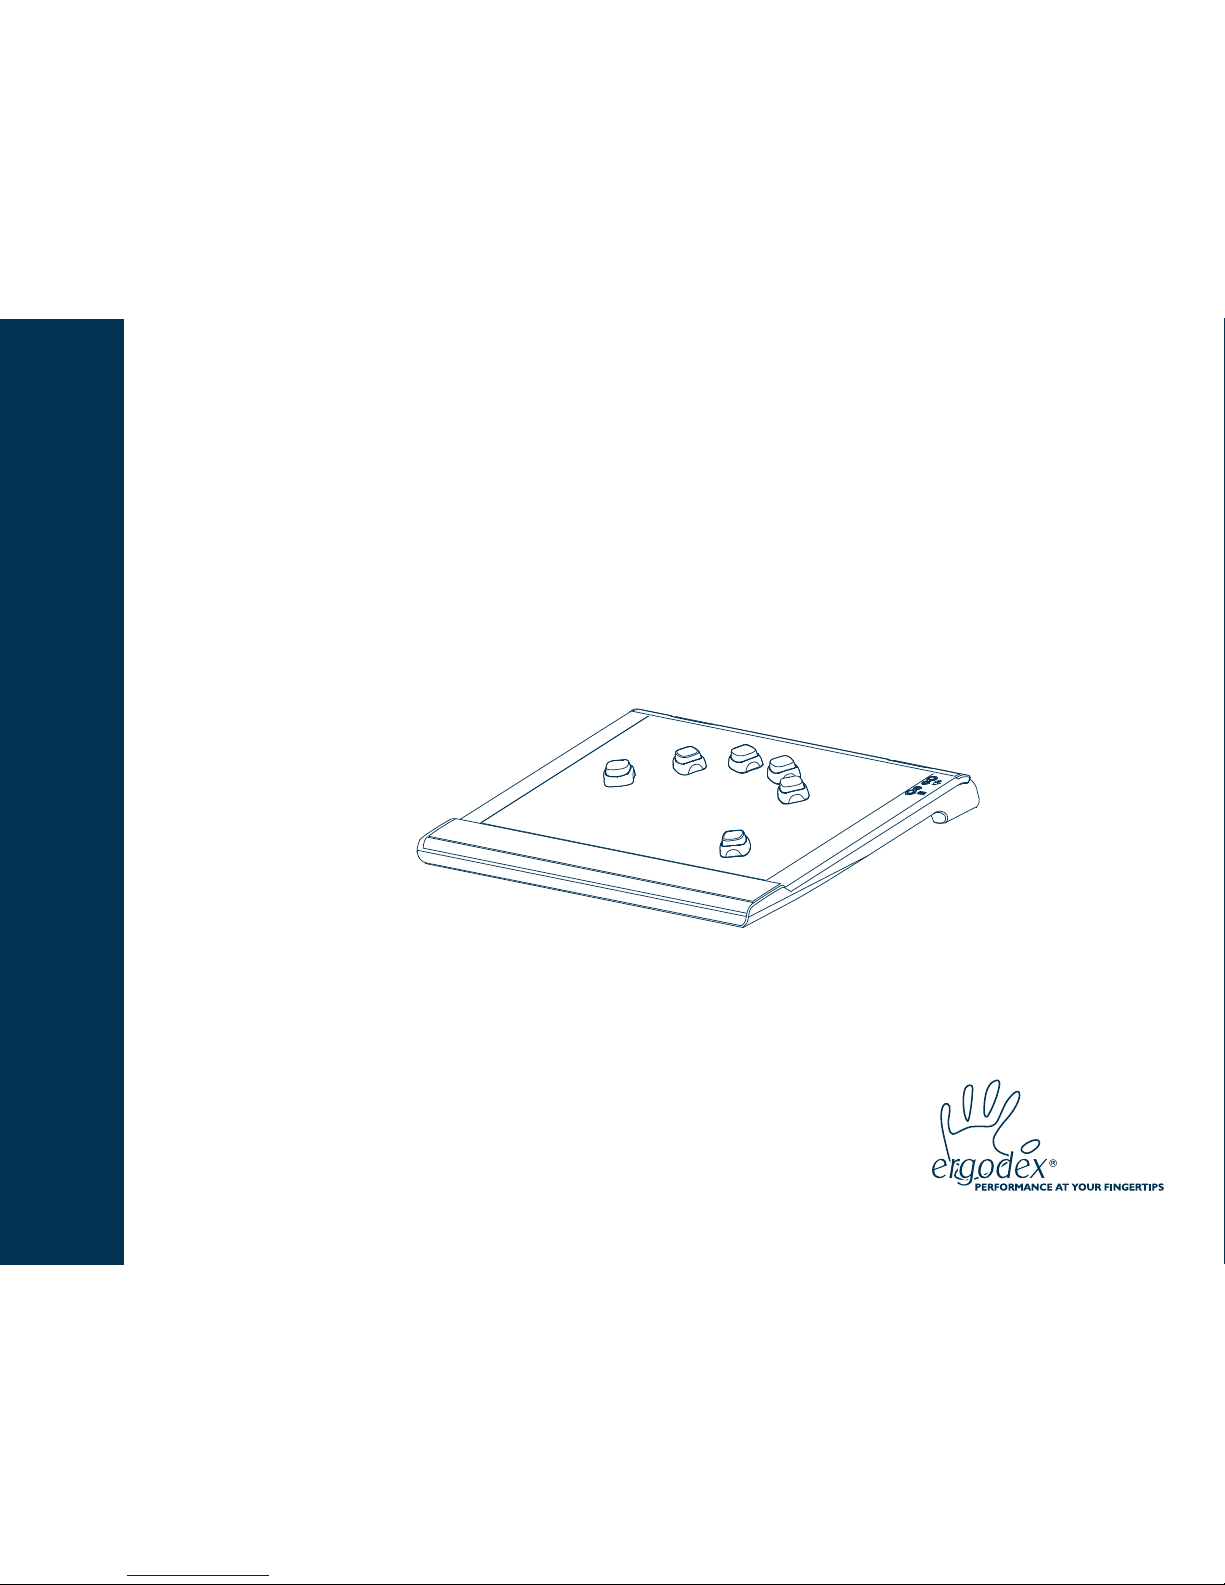
User Guide
Ergodex
®
DX1
TM
Input System
Page 2

2
© 2005 Ergodex Corporation. All Rights reserved.
Ergodex® DX1™ Input System User Guide
Reproduction, adaptation, or translation without prior written permission is prohibited, except as allowed under copyright laws.
Warranty
The information contained in this document is subject to change without notice. Ergodex Corporation makes no warranty of any kind with regard
to this material, including, but not limited to, the implied warranties of merchantability and fitness for a particular purpose. Ergodex shall not be
liable for errors contained herein or for incidental or consequential damage in connection with the furnishing, performance, or use of this material.
Trademark Credits
Ergodex, the Ergodex Logo, DX1, and Performance at Your Fingertips are trademarks of Ergodex Corporation and may be registered.
Microsoft, Windows, Windows 2000, Windows XP, and WordPad are either registered trademarks or trademarks of Microsoft Corporation in the
United States and/or other countries.
Pentium is either a registered trademark or trademark of Intel Corporation in the United States and other countries.
All other trademarks are property of their respective owners.
Ergodex Corporation,
1060 La Avenida
Mountain View, CA 94043
USA
www.ergodex.com
Notices
Page 3
3
It is important to read and understand fully the following
Health and Safety Warnings before using your DX1 Input
System.
Use of any computer input device, including the DX1Input System,
may be linked to serious injuries or disorders.
When using the DX1 Input System, as with many other activities, you
may experience occasional pain or discomfort in your fingers, hands,
arms, shoulders, neck, or other parts of your body. However, if you
experience symptoms such as persistent or recurring discomfort,
pain, throbbing, aching, tingling, numbness, burning sensation, or
stiffness, DO NOT IGNORE THESE WARNING SIGNS. STOP USE
IMMEDIATELY AND SEE A QUALIFIED HEALTH PROFESSIONAL,
even if symptoms occur while you are not working with the DX1 Input
System. Symptoms like these can be associated with painful and
sometimes permanently disabling injuries or disorders of the nerves,
muscles, tendons, or other parts of the body. These musculoskeletal
disorders (MSDs) include carpal tunnel syndrome, tendonitis,
tenosynovitas, and other conditions.
CHOKING HAZARD. Because they are small, the keys included
with the DX1 Input System present a choking hazard. The keys
should always be kept out of the reach of children.
ELECTRICAL MEDICAL IMPLANTS. The Radio Frequency (RF)
technology used in the DX1 Input System may pose health risks for
people with electrical medical implants, such as PACEMAKERS,
HEARING AIDS, AND OTHER MEDICAL DEVICES. Immediately
unplug the DX1 Input System if you have reason to suspect that
interference is taking place. Consult a physician or the manufacturer
of the medical device to determine if it is adequately shielded from
external RF energy, or if you have any questions.
SWITCH OFF IN HOSPITALS. Follow all regulations and rules.
Switch the DX1 Input System off near medical equipment.
SWITCH OFF IN AIRCRAFT. The DX1 Input System may cause
interference in aircraft and may be dangerous to the operation of the
aircraft. It may not be legal to use the DX1 Input System during
flight.
ELECTRONIC DEVICES. Most modern electronic equipment is
shielded from Radio Frequency (RF) signals. However, certain
electronic equipment may not be shielded against RF signals
emanating from your DX1 Input System.
CONNECTING TO OTHER DEVICES. When connecting to another
device, read its user guide for detailed safety instructions. Do not
connect incompatible products.
BACKUP COPIES. Remember to make backup copies of all
important data on your computer.
WATER-RESISTANCE. Your DX1 Input System is not waterresistant. Keep it dry.
QUALIFIED SERVICE. Only qualified personnel may repair the DX1
Input System. There are no user serviceable parts in the DX1 Input
System. Do not attempt to open. Non-expert handling may cause
damage, will void all product warranties, and will likely cause your
DX1 Input System to fail. Tampering with or removing the label on
the back of the DX1 Pad will void all product warranties and will likely
cause your DX1 Input System to malfunction.
Warning: CHOKING HAZARD - Small Parts
This product is not a toy and should be kept away from
children.
Health and Safety
Page 4
4
Regulatory Notices
This information applies to the Ergodex model DX1.
FCC Information to the User
This device complies with Part 15 of the FCC Rules. Operation is subject to the following two conditions:
• This device may not cause harmful interference
• This device must accept any interference received, including interference that may cause undesired operation
NOTE: This equipment has been tested and found to comply with the limits for a Class B digital device, pursuant to Part 15 of the FCC Rules.
These limits are designed to provide reasonable protection against harmful interference in a residential installation. This equipment generates,
uses and can radiate radio frequency energy and, if not installed and used in accordance with the instructions, may cause harmful interference to
radio communications. However, there is no guarantee that interference will not occur in a particular installation.
If this equipment does cause harmful interference to radio or television reception, which can be determined by turning the equipment off and on,
the user is encouraged to try to correct the interference by one or more of the following measures:
-- Reorient or relocate the receiving antenna.
-- Increase the separation between the equipment and receiver.
-- Connect the equipment into an outlet on a circuit different from that to which the receiver is connected.
-- Consult the dealer or an experienced radio/TV technician for help.
You may find the FCC Interference Handbook, 1986, to be helpful. It is available for purchase from the U. S. government Printing Office,
Washington, DC 20402, Stock No. 004-0000-00450-7 or at http://www.fcc.gov/Bureaus/Compliance/WWW/tvibook.html.
Industry Canada Notice (Canada only) Complies IC Class B ICES-3.
This Class B digital apparatus meets the requirements of the Canadian Interference-Causing Equipment regulations.
Cet appereil numérique de la classe B respect toutes les exigences du Reglement sur le Material Brouiller du Canada.
Regulatory Notices
Page 5
5
CE Notice (European Union)
Marking of this product with the CE marking symbol indicates compliance of this product to the EMC Directive and the Low Voltage Directive of the
European Union. This marking indicates compliance with the following technical standards:
• EN 55022 - “Limits and methods of Measurement of Radio Interference Characteristics of Information Technology Equipment.”
• EN 55082-1 – “Electromagnetic compatibility-Generic immunity standard Part 1: Residential, commercial and light industry.”
• EN 60950 – “Safety of Information Technology Equipment.”
VCCI Notice (Japan)
The Voluntary Control Council for Interference classifies this product as Class B. This product meets VCCI requirements and is registered with
VCCI.
Regulatory Notices
Page 6

6
NOM Information (Mexico)
The following information is provided on the device described in this document in compliance with the requirements of the official Mexican
standards (NOM):
Exporter: Ergodex, Inc.
1060 La Avenida
Mountain View, CA 94043
Importer:
Ship to:
Supply Voltage: 5 VDC
Frequency: 0 Hz
Input current rating: 0.5 A
Regulatory Notices
Page 7
7
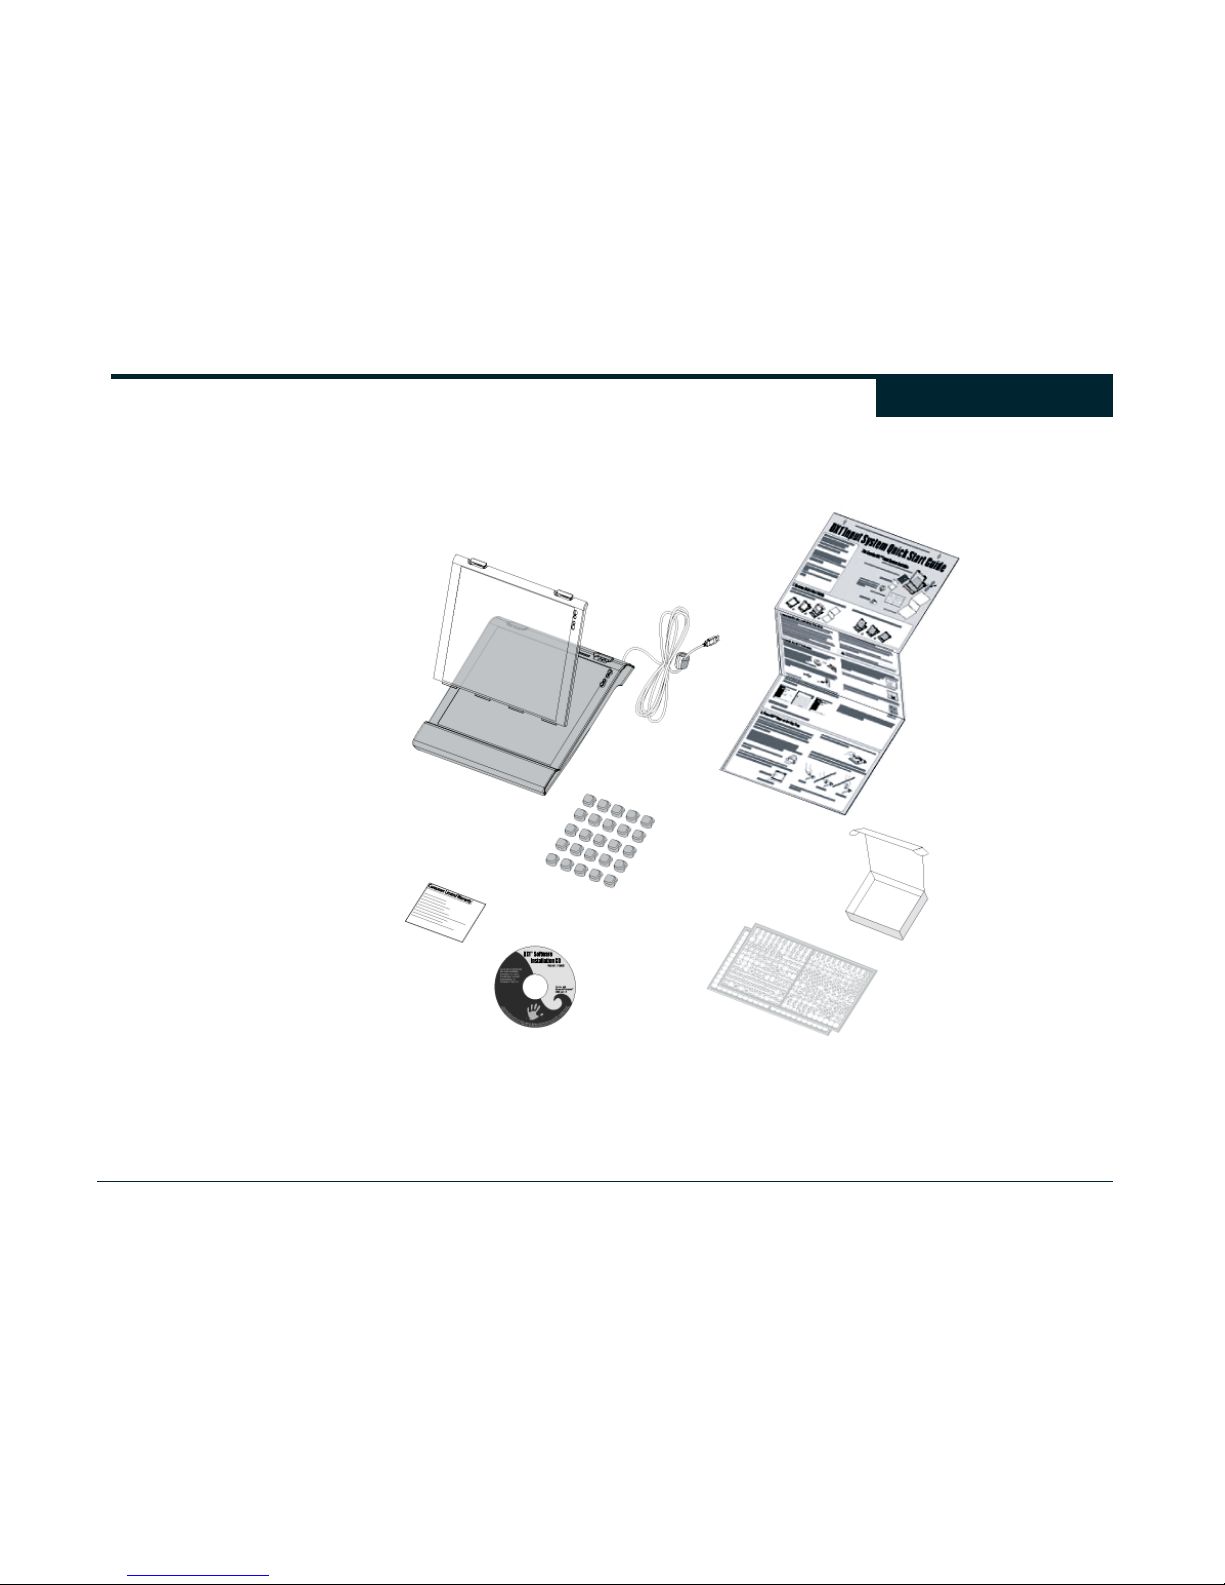
A
DX1 Pad with USB Cable
A
Removable Key Tra
y
25 positionable DX1 Keys
(numbered 1 through 25)
A Warranty Card
An Installation CD containing:
• Ergodex Manager Software
• Windows® 2000/XP Drivers
• User Guide
Key Labels
A Key Storage Box
A Quick Start Guide
Box Contents
Page 8

8
Notices 2
Health and Safety 3
Regulatory Notices 4
Box Contents 7
Table of Contents 8
Introduction 10
What is it? 10
DX1 Input System Features 10
Overview of the DX1 Input System 11
Installation CD 11
DX1 Keys 11
DX1 Key Tray 11
DX1 Pad 11
Key Storage Box 12
Preprinted Labels 12
Getting Started 13
Minimum System Requirements 13
Removing the Quick Start Guide 13
Installing Ergodex Manager 13
For Window® XP 14
For Windows® 2000 15
Verify Install 15
Placing DX1 Keys on the Key Tray 15
Concepts & Definitions 17
DX1 - Performance at Your Fingertips™ 17
Macros 17
Single Key Macros 17
Multi Key Macros 17
Text Block Macros 18
Program/File/URL Launch Macros 18
Categories 18
Program Profiles 19
Active and Inactive Profiles 19
Automatic Program Profile Creation 19
Pre-created Program Profiles 19
The Global Profile 20
Users 20
Hierarchy Summary 20
Keeping Track of Everything 21
Ergodex Manager Overview 22
Ergodex Manager Main Screen 22
Ergodex Manager 23
Users 26
Creating New Users 26
Switching the Active User 26
Changing the Default User 26
Deleting Users 26
Profiles 27
Program Profiles 27
The Global Profile 27
Creating Program Profiles 28
Automatically Creating a Profile 28
Manually Creating a Profile 28
View and Edit Profile Properties 30
Exporting Program Profiles 30
Importing Program Profiles 30
Deleting Program Profiles 30
Categories 31
Creating New Categories 31
Macros 32
Creating Macros 32
Recording Macros 32
Composing Macros with Ergodex Manager 34
Edit Macro Dialog Box 35
Edit Macro Dialog Box – Single Key Macro 35
Edit Macro Dialog Box – Multi Key Macro 36
Edit Macro Dialog Box – Text Block Macro 38
Edit Macro Dialog Box – Progr/File/URL Macro 38
Assigning Macros 38
Unassigning Macros 39
Playing Macros 39
Stopping Macros 40
Importing Macros 41
Finding Macros 41
Deleting Macros 42
Mouse Clicks 42
Table of Contents
Page 9

9
Wizard 43
Ergodex Manager Wizard 43
Skins 44
Creating Skins 44
Skin Backgrounds 45
Background Grid 46
Importing Skin Backgrounds 46
Exporting Skin Backgrounds 46
Copying Skin to Clipboard 46
Deleting Skin Backgrounds 46
Printing Skins 46
Returning to Main Screen 46
Ergodex Manager Preferences 47
Macro Preferences 47
Macro Recording Timeouts 47
Macro Recording 47
Macro Playback 48
Profiles Preferences 48
Global Profiles 48
Program Profiles 49
User Settings 49
Menu Commands 50
Main Screen Menu Commands 50
File Menu 50
Edit Menu 51
View Menu 51
Help Menu 51
Skin View Menu Commands 52
File Menu 52
Edit Menu 52
View Menu 52
Help Menu 53
Care & Maintenance 54
Care of the DX1 Input System 54
Maintenance of the DX1 Input System 54
Cleaning the Pad 54
Clean the Pad with a damp cloth. 54
Cleaning the Key Tray 54
Cleaning the Keys 54
Troubleshooting 55
Troubleshooting 55
Interference 55
Table of Contents
Table of Contents
Page 10

10
Thank you for purchasing the DX1 Input System from Ergodex. The
DX1 is a powerful tool that lets you build a completely personalized
computer interface. This User Guide describes the features and
operation of your DX1.
Before continuing, we would like to acknowledge upfront that most
people detest reading User Guides. It is usually much more fun to
discover how a new product works by trial and error, after maybe a
brief glance at the Quick Start Guide. However, it is important that
you read and understand fully the Health and Safety Warnings
at the beginning of this User Guide before using the DX1 Input
System.
We have tried to provide a balance between ease of use and
maximum flexibility with the DX1. The intuitive interface and “in
program” recording capability allow you to begin using the DX1 right
away. However, the DX1 also provides many advanced features
that may not be immediately obvious. As you experiment with the
DX1, you may want to read the rest of this User Guide to discover all
the powerful features that are offered.
What is it?
So, what exactly is the DX1 Input System? Well, if you are reading
this guide, you probably have some idea about what it can do.
Essentially, the DX1 is a computer peripheral that allows you to
create your own custom computer interface. DX1 Keys may be
arranged (and rearranged) anywhere on the surface of the DX1 Pad.
You assign these Keys powerful Macro functions to control programs
on your computer. The DX1 is compatible with most programs
including: Games, Graphics Packages, Audio/Video Editing
Software, CAD/Engineering Packages, Word Processors, Web
Browsers, Email Programs, and Office Applications. Essentially,
your DX1 Pad can be used with any program that uses a regular
keyboard for input.
You can arrange the DX1 Keys to suit your particular preferences or
work style. You no longer have to tolerate awkward layouts or
complex key combinations to control your programs. You might
arrange the DX1 Keys to fit the geometry of your particular hand.
Alternately, you might group Keys with similar functions into “logical
neighborhoods.” The locations and functions of DX1 Keys are
whatever you decide they should be.
DX1 Input System Features
Your DX1 Input System provides many features, including:
• A DX1 Pad that connects to your computer with USB 1.1 or 2.0.
• Positionable DX1 Keys that communicate wirelessly with the
DX1 Pad and may be assigned powerful Macro functions.
• A clear removable Key Tray that attaches to the surface of the
DX1 Pad and holds the DX1 Keys. Arrange Keys on the Key
Tray to create your own custom layout.
• Ergodex Manager software to create, assign, edit, and store your
Macros.
• “In program” keystroke recording feature. Create and assign
Macros directly within programs using your regular keyboard.
Ergodex Manager automatically organizes and stores the
Macros you record for future viewing and editing.
• Macro timing options that provide complete control over the
speed at which your Macros play with millisecond precision.
• Four different Macro types supported:
- Single Key Macros – replicate any key on your regular
keyboard.
- Multi Key Macros – replace a complex sequence of
keystrokes with the press of a single DX1 Key.
- Text Block Macros – store text of virtually any length to be
inserted directly into your documents.
- Program/File/URL Launch Macros – open your favorite
software program, file, or web site by pressing a DX1 Key.
• Individual DX1 Keys can be assigned a different Macro for each
program you use or a single Global Macro that works
everywhere.
• Program Profiles allow you to organize your Macros for each
program you use with the DX1. Ergodex Manager automatically
switches to the correct Program Profile based on the currently
active program.
• Key Labels and custom Skins allow you to personalize the look
of your Pad and see the function of your Dx1 Keys at a glance.
Introduction
Page 11
11
Overview of the DX1 Input System
Please take a minute to review the following items that constitute
your DX1 Input System.
Installation CD
The installation CD contains Ergodex® Manager, the software
program that allows your DX1 Input System to work with your
computer.
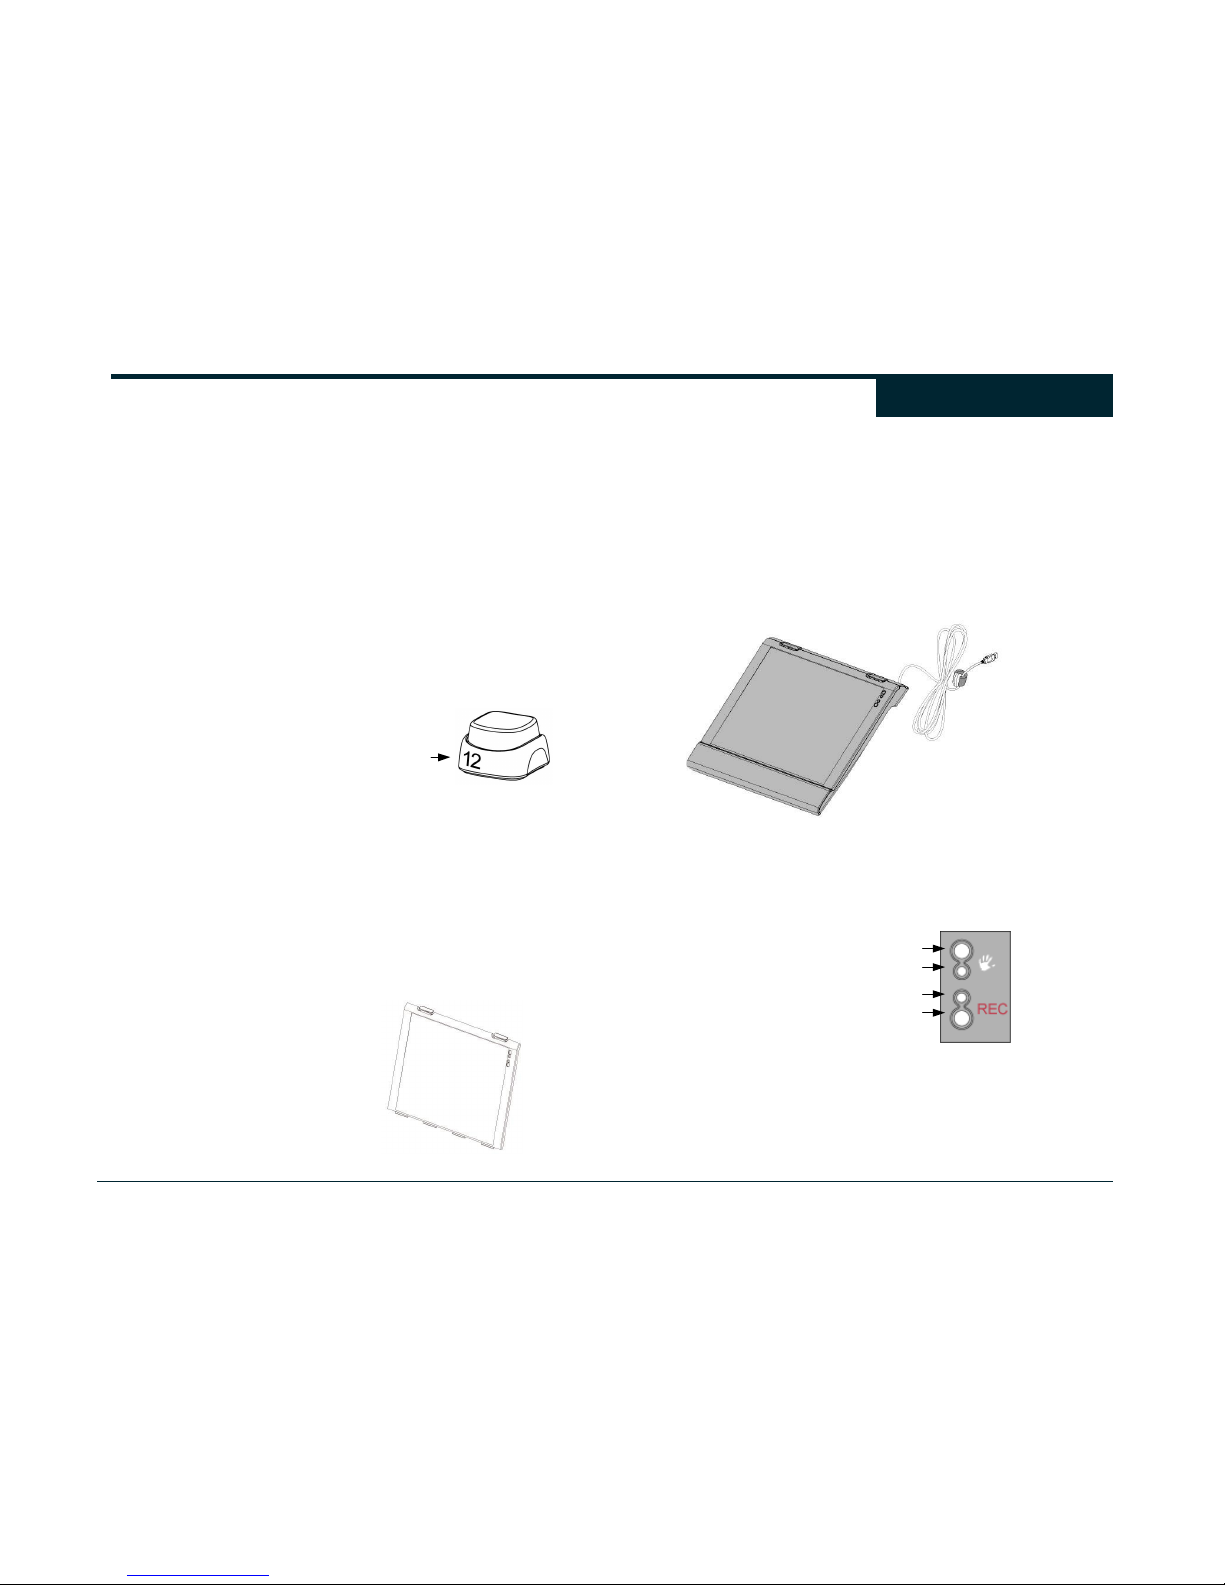
DX1 Keys
Your DX1 Input System comes with twenty-five numbered DX1 Keys.
Each Key has a number on its base that identifies the Key. The
Keys that come with your Pad are numbered 1 through 25.
The Key number identifies the individual DX1 Key and any of its
assigned Macros. If you move a DX1 Key to another location on the
Key Tray, the Macro assignment remains with the Key and continues
to work.
DX1 Key Tray
The removable DX1 Key Tray provides a surface upon which you
arrange your DX1 Keys. The transparent Key Tray snaps onto the
DX1 Pad and allows you to print and place custom graphics (or
Skins) underneath your Key layouts.
DX1 Pad
The DX1 Pad connects to your computer via a USB cable. The Pad
communicates wirelessly with the DX1 Keys that are placed above
its surface on the Key Tray. (You should wait until you have installed
Ergodex Manager before plugging the DX1 Pad into your computer.
See the next section Getting Started for installation instructions.)
There are two buttons and two indicator lights located in the upper
right hand corner of the DX1 Pad, with the functions shown below.
Introduction
USB
Cable
Press to Display Ergodex Manage
r
Green Light (shows Pad status)
Red Light (shows Record status)
Press to enter/exit Record Mode
Key number
DX1 Pad
Ke
y
Tray
Page 12
12
Key Storage Box
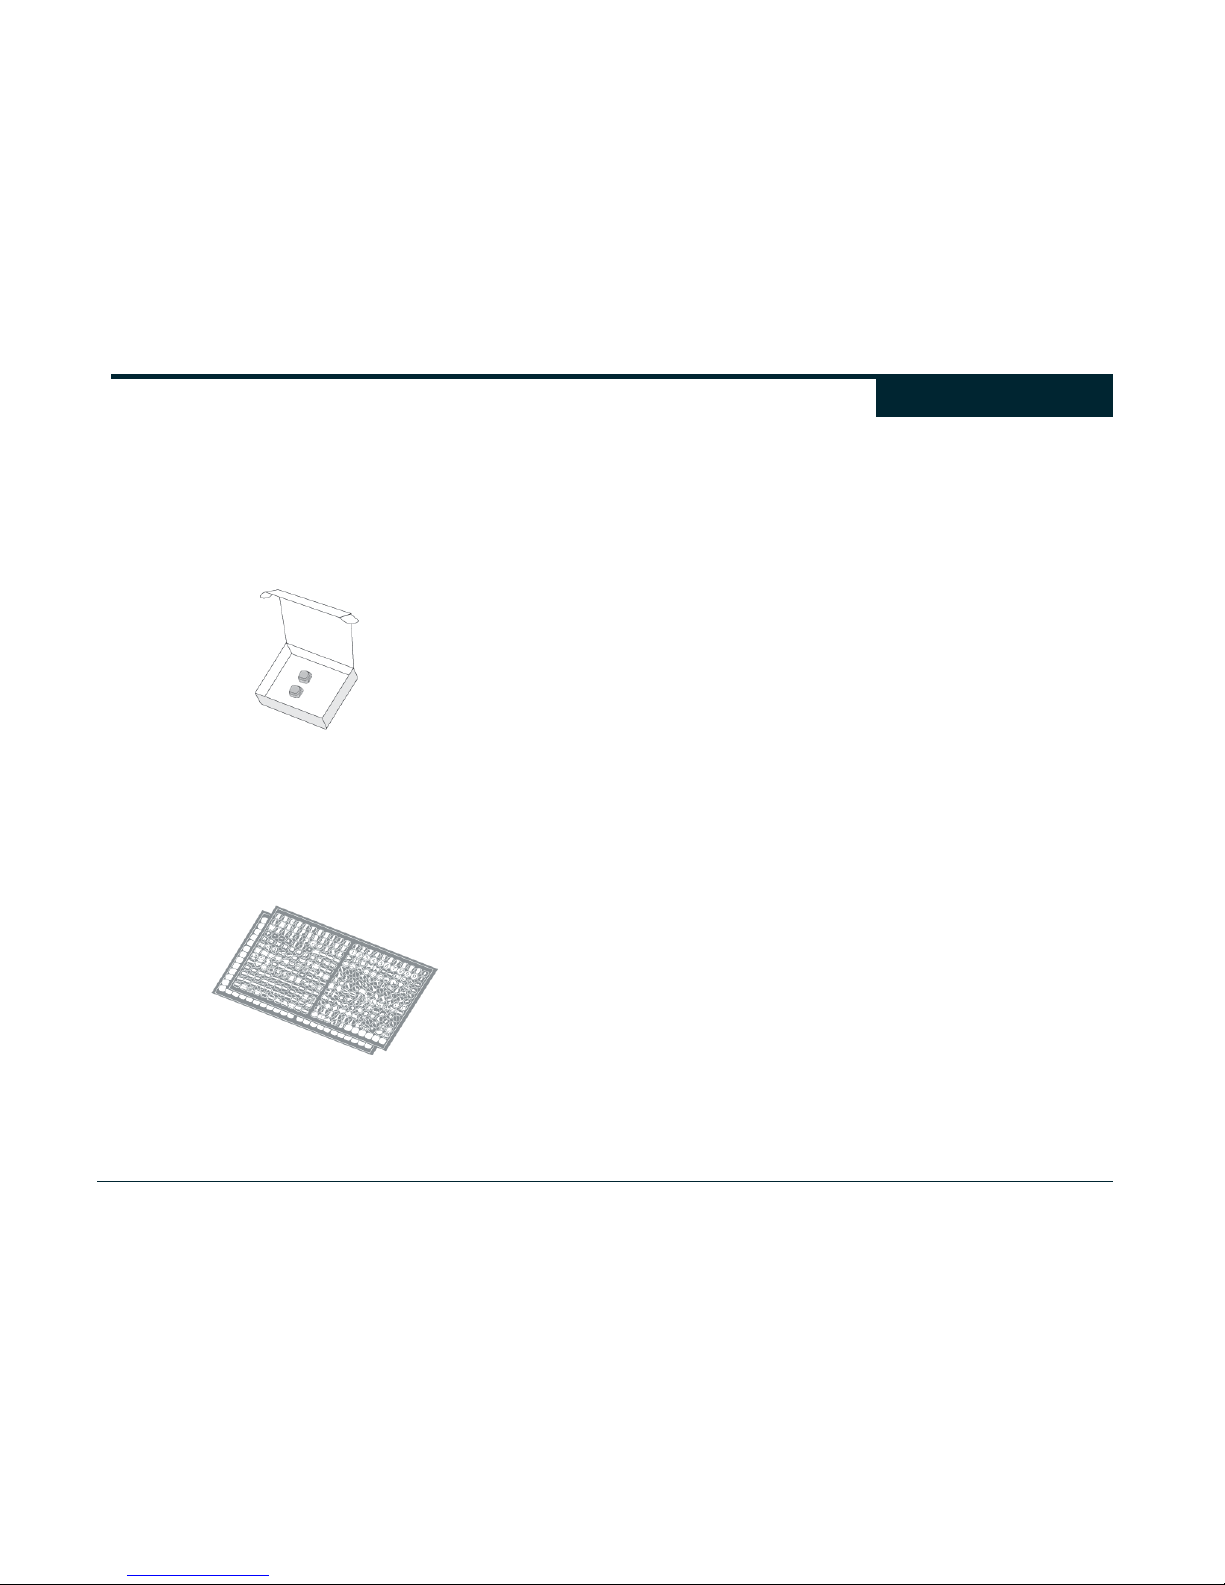
Your DX1 Keys are delivered in a Key storage box that holds 25
Keys. The box has a plastic base that allows you to park your DX1
Keys when they are not in use on the Pad.
Preprinted Labels
A set of preprinted Key labels comes with every DX1 Input System.
The labels provide a wide range of icons that you can use to identify
the functions of your individual DX1 Keys. Blank labels allow you to
create your own Key labels. The blank labels can be marked with a
ballpoint pen.
Introduction
Page 13
13
Minimum System Requirements
Computer:
350 MHz Pentium® III PC (or equivalent)
128 MB RAM
50 MB of free hard drive space
Powered USB Port (1.1 or 2.0)*
U.S. English Keyboard
Mouse
Operating System:
Windows® XP -orWindows® 2000 (with Service Pack 3 or later)
*The DX1 Input System requires the use of a powered USB Port,
such as the USB Ports integrated into your computer or provided by
Self-powered Hubs. The DX1 will not work with Bus-powered Hubs,
which do not have their own power supply. Windows® will
automatically notify you if you attempt to use the DX1 with a Buspowered Hub.
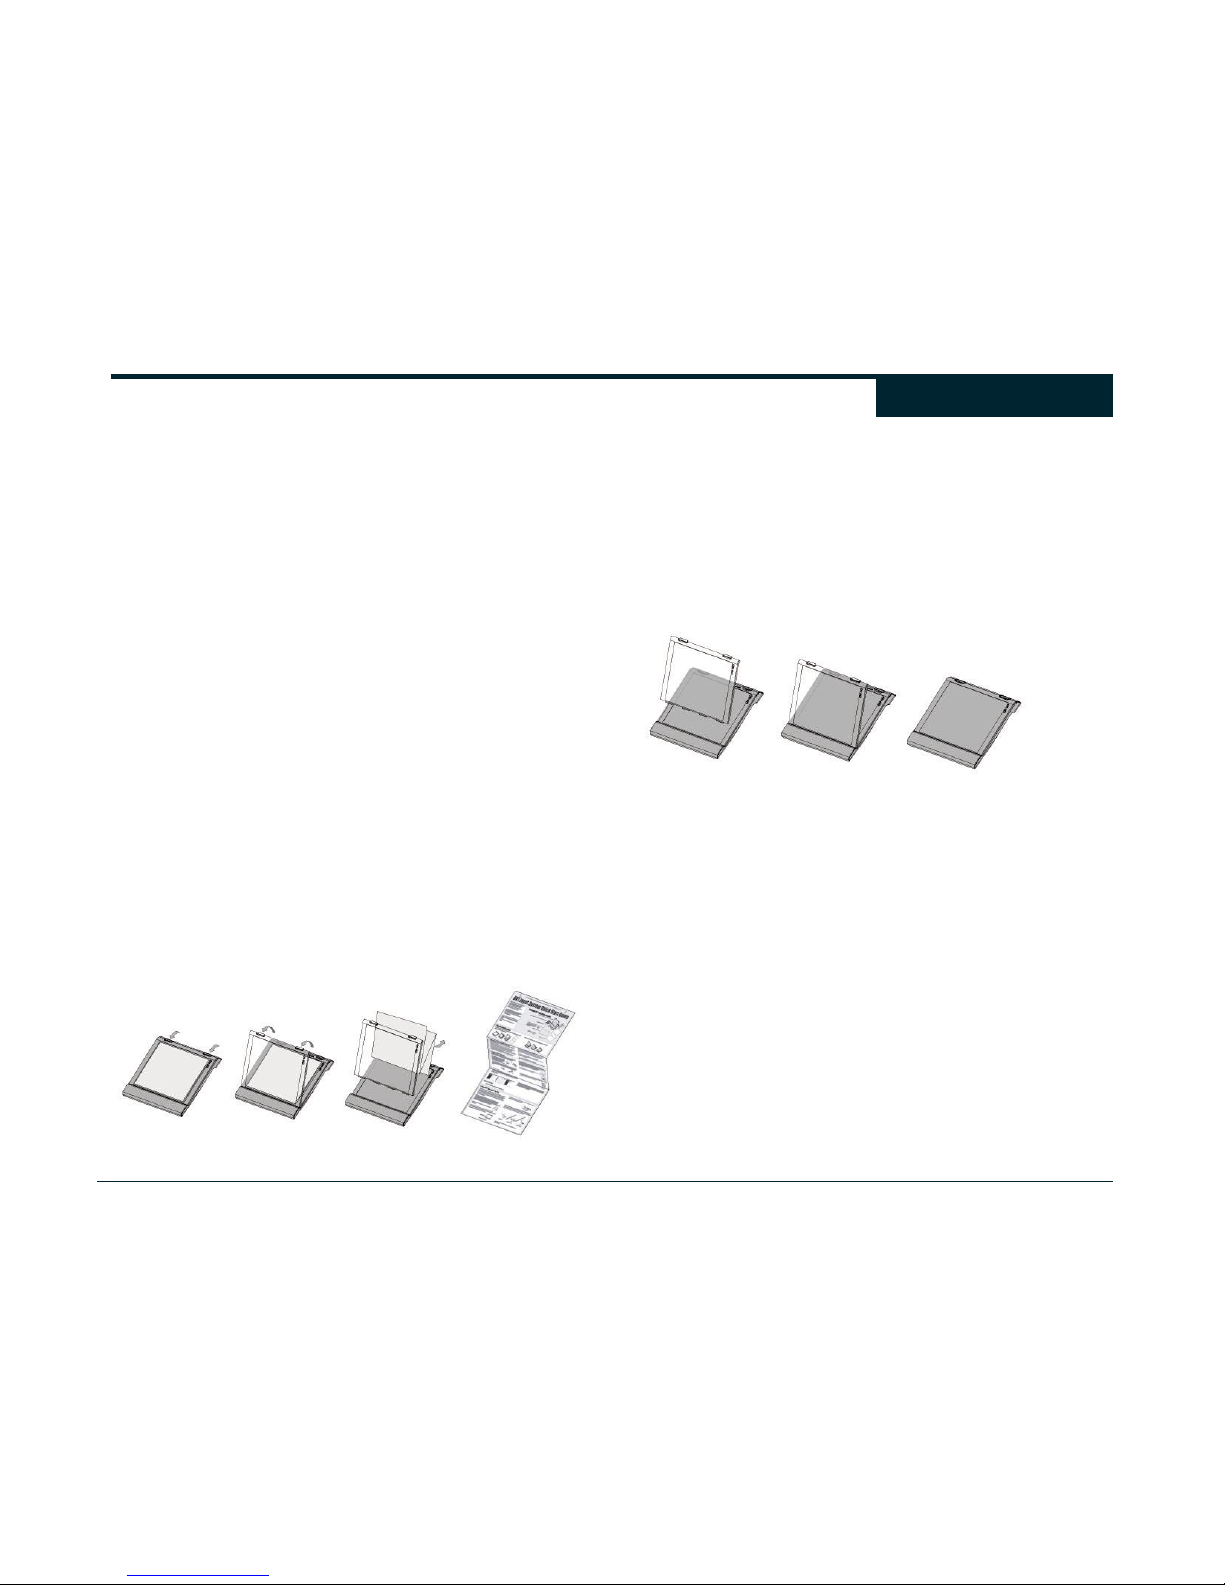
Removing the Quick Start Guide
If you have not already done so, you should remove and read the
Quick Start Guide that is delivered under the removable Key Tray on
your DX1 Pad. To remove the Quick Start Guide, gently PULL and
LIFT on the two tabs located on the top edge of the Key Tray, as
shown below. The Key Tray will rotate forward and you will be able
to lift it away from the Pad.
The Quick Start Guide provides an overview of the DX1 Input
System and some of its basic features. The placement of the Quick
Start Guide under the Key Tray also reveals a useful feature of the
DX1. In later sections you will see how to create and print your own
paper inserts, or Skins, that you can place underneath the Key Tray.
Using Skins allows you to label the functions of your DX1 Keys and
provide a custom look for your Pad. Ergodex Manager provides a
utility that lets you import graphics and organize a Key layout for your
Skins.
For now, you should put the Key Tray back onto the Pad without a
Skin. To replace the Key Tray, reverse the steps for removing it.
Insert the bottom edge of the Key Tray into the slots on the Pad, as
shown. Rotate the Key Tray down until it snaps back into place on
the Pad.
Installing Ergodex Manager
Ergodex Manager is the program that allows the DX1 Input System
to work with your computer. It is responsible for storing all of your
Macros and Key assignments for each program that you use with the
DX1. It also monitors the currently active program you are using and
switches to your assigned Macros for that program automatically.
Ergodex Manager includes an intuitive graphical interface to manage
all of your Macros.
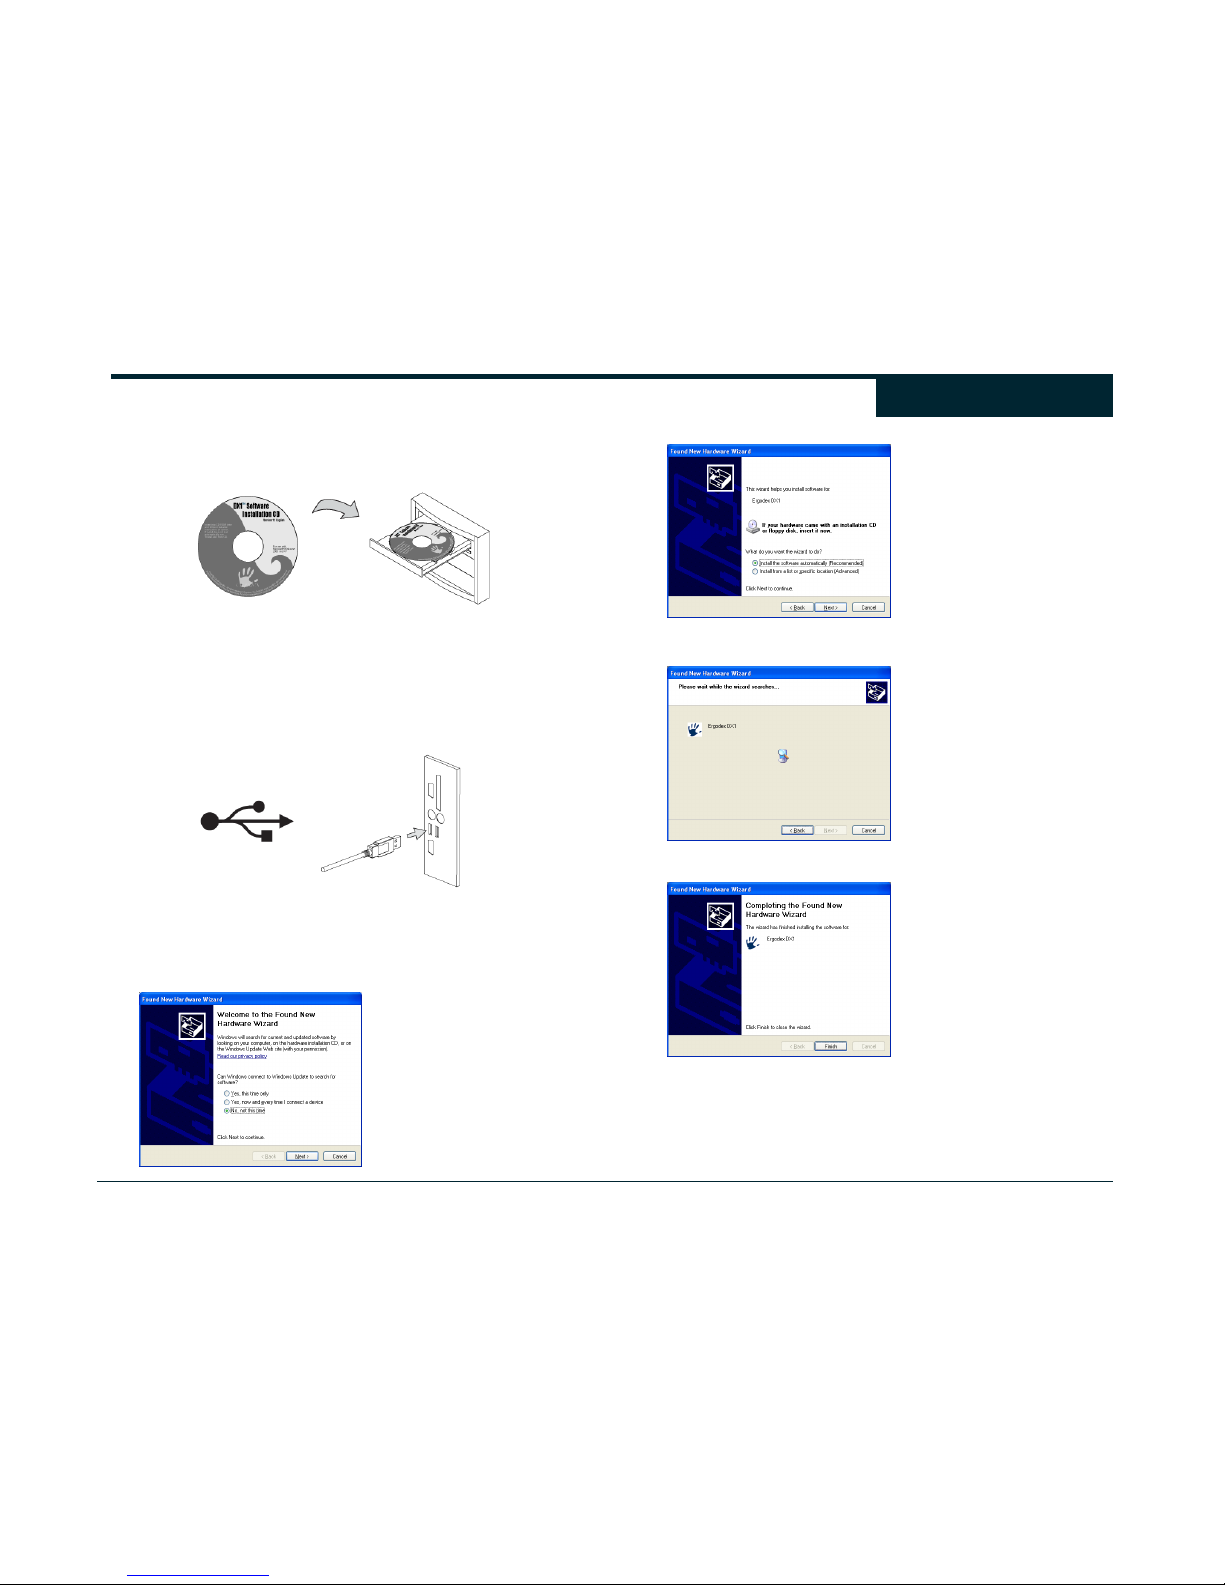
To install Ergodex Manager, close all open programs and place the
Installation CD into your CD-ROM drive. If you have auto-run
enabled on your computer, the installer program should load after a
Getting StartedGetting Started
Page 14
14
few moments. If the installer program does not load automatically,
run "Install.exe" from the Installation CD.
When the installer program loads, click on "Install Software" and
follow the on-screen instructions to install Ergodex Manager.
During the installation, you will be prompted to plug in your DX1 Pad.
When asked, plug the USB cable into one of your computer’s
powered USB ports. The port should be marked with the USB
symbol shown below.
For Window® XP
After plugging in the Pad, the Windows® "Found New Hardware
Wizard" will open. (If Windows® Update is enabled, you will start at
Screen 1, otherwise you will start at Screen 2.)
Note: Windows® XP manages each USB port separately. Windows®
XP will require that you go through this installation process each time
you plug the DX1 Pad into a new USB port on your computer.
Getting Started
Screen 1
Screen 2
Screen 3
Screen 4
Select “No, not this time”
and click “Next”
Select “Install the software
automatically” and click “Next”
Wait for installer to complete
Click “Finish” to close the
wizard.
Page 15
15
For Windows® 2000
Windows® 2000 will load the DX1 Pad automatically after you install
Ergodex Manager and plug in the USB cable.
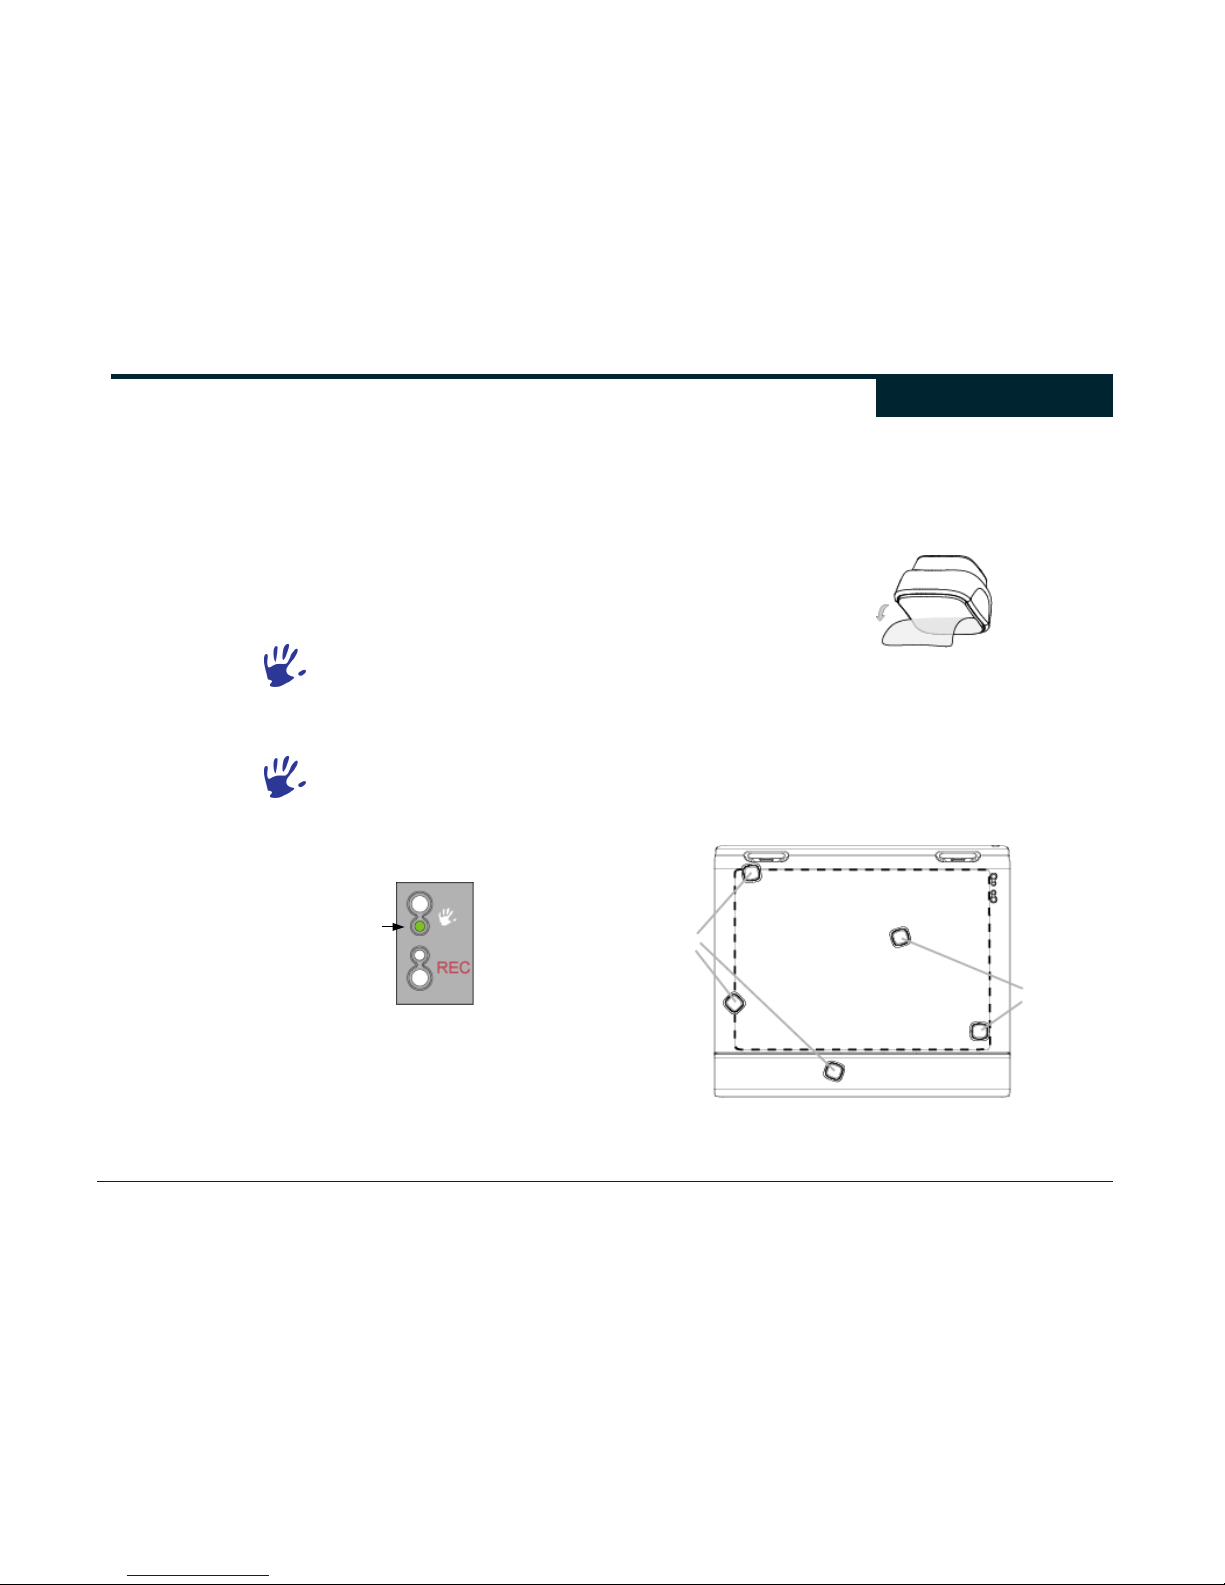
Verify Install
Once the installation is complete, an Ergodex hand icon will appear
in the Windows® System Tray (usually in the lower right-hand corner
of your Windows® Desktop). This icon shows the connection status
of the Pad. A blue hand icon indicates the Pad is properly plugged
into your computer.
A blue hand icon with a red "X" through it indicates the Pad is not
plugged in to your computer.
Additionally, when Ergodex Manager is running, and the Pad is
plugged in and operating properly, the Green Light in the upper right
hand corner of the Pad will be illuminated.
Ergodex Manager will start automatically when you turn on your
computer. If there is no Ergodex hand icon in your Windows®
System Tray, Ergodex Manager is not running. You will need to
launch Ergodex Manager before using your DX1 Input System.
(Click on Start > Programs Ergodex > Ergodex Manager)
If the Pad is plugged into your computer and the Green Light is on,
you are ready to use your DX1 Input System.
Placing DX1 Keys on the Key Tray
To use the DX1 Keys, you must first place them on your Pad. Each
DX1 Key has an adhesive base that allows it to “stick” to the Key
Tray. The adhesive base has a clear protective film cover that
should be removed before using the DX1 Key. Gently peel and
remove the cover as shown.
Once removed, this protective film cover may be discarded.
DX1 Keys will only work over the Active Surface of the Pad. When
the Key Tray is attached to the Pad, the Active Surface is indicated
by the clear rectangular area (shown with dashed lines below). To
function properly, the Key Tray should be attached to the Pad and
the DX1 Keys must be positioned entirely within the Active Surface,
as shown.
Green Light indicates Pad is
working properly.
Active Surface
NO
OK
Getting Started
Page 16
16
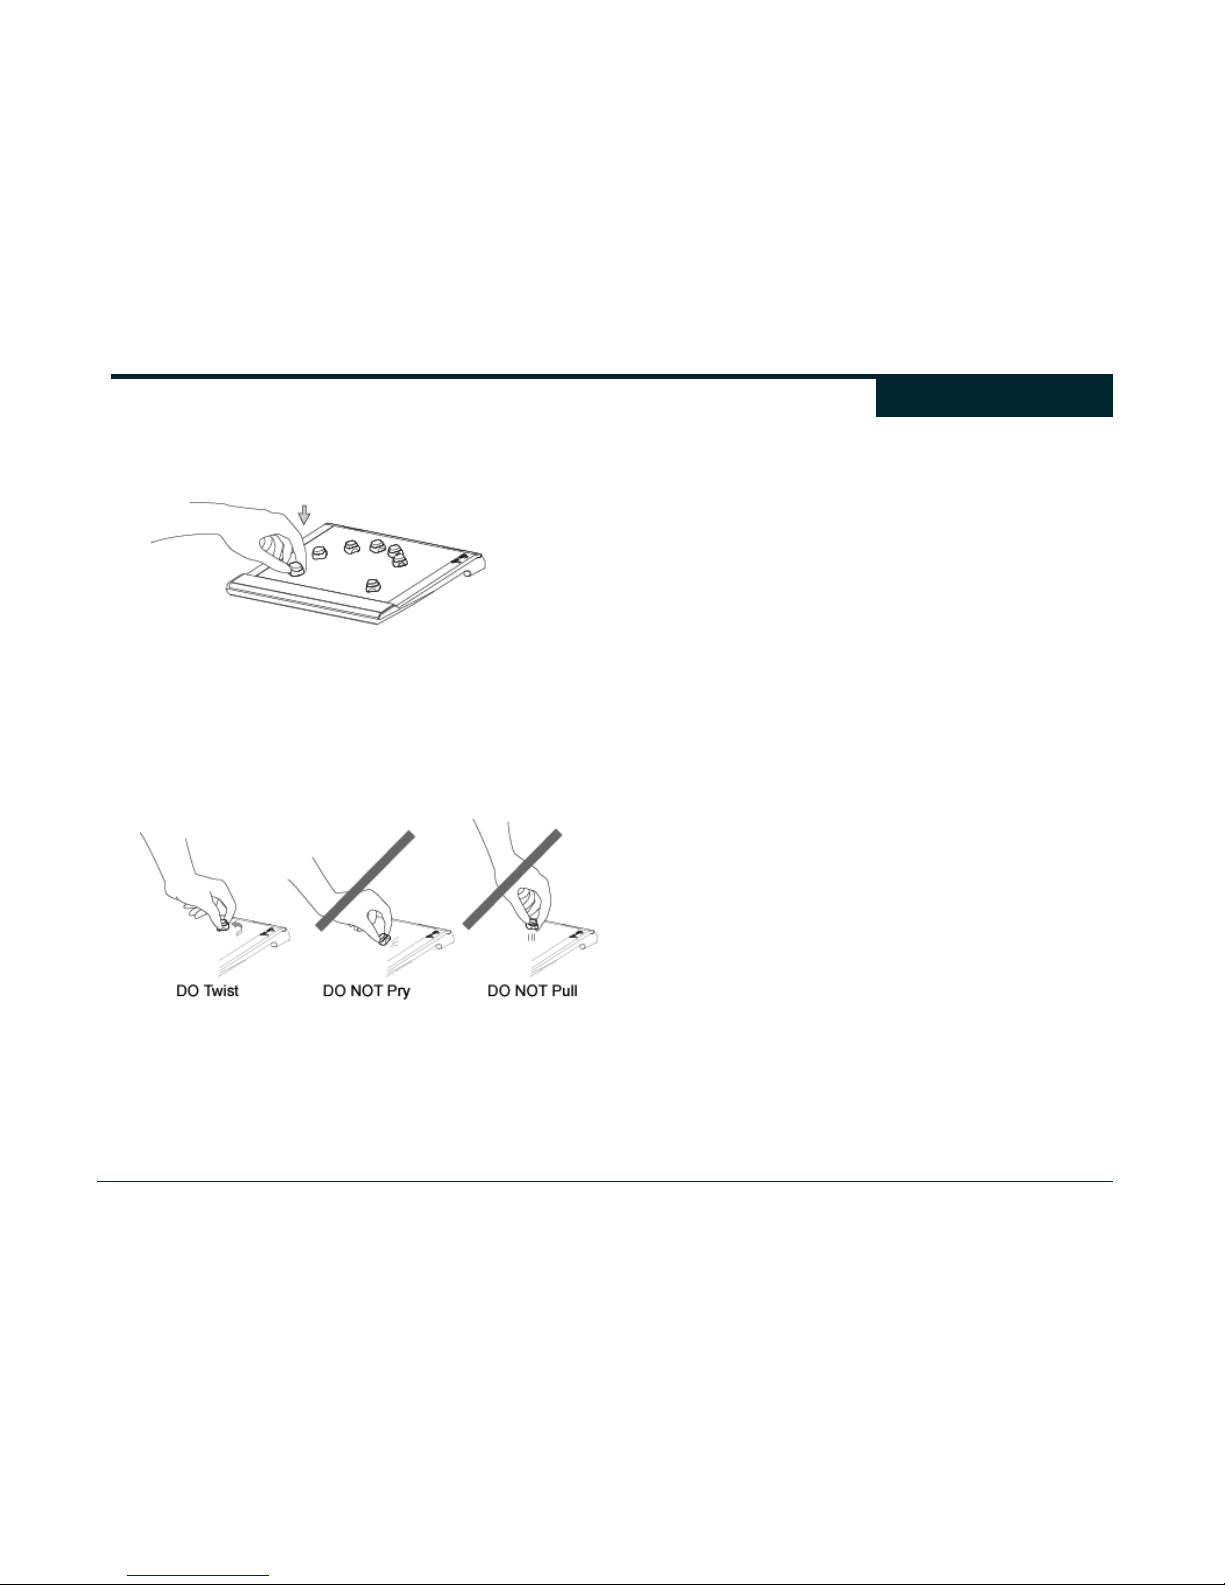
To position a DX1 Key, place it on the Key Tray and press down
firmly to attach the adhesive.
The reusable adhesive is designed to hold the DX1 Key securely
under normal use while allowing the Key to be easily repositioned at
any time.
To remove or reposition a DX1 Key, gently TWIST and lift the Key off
the Key Tray. The twisting motion will free the DX1 Key. To prevent
damage to the adhesive base, NEVER PULL or PRY a DX1 Key
from the Key Tray.
Care should be taken to keep the adhesive base free from
contaminants (dust, dirt, finger oils, etc.). Unused DX1 Keys may be
kept on the plastic tray in the Key Storage Box. If a DX1 Key loses
its "stickiness," cleaning it with a damp cotton swab or cloth will
restore the adhesive. See Care & Maintenance of Your DX1 Input
System for more information.
Getting Started
Page 17

17
DX1 - Performance at Your Fingertips™
Computers continue to be too hard to use. Many programs have
grown so complex and loaded with features and functionality that
standard input devices are insufficient and represent a bottleneck to
user performance. Your regular keyboard and mouse do not provide
the freedom to best use and interact with your computer. Your DX1
Input System will help you break through this artificial bottleneck.
This section introduces to you basic concepts and terminology of the
DX1 Input System and Ergodex Manager. As you read on, we hope
you will see that the DX1 Input System opens up a whole new
opportunity for improved performance controlling your computer.
Macros
DX1 Macros are the fundamental concept around which the rest of
the DX1 Input System is built. A Macro is a collection of keystrokes
or functions that are executed with a single press of a DX1 Key. By
combining several keystrokes into one action, the DX1 can
significantly improve your performance and productivity. Thus,
Macros are actions that can be assigned to DX1 Keys.
DX1 Macros can be one of four different Macro Types:
• Single Key Macros replicate any key on your regular keyboard.
• Multi Key Macros replace a complex sequence of keystrokes
with the press of a single DX1 Key.
• Text Block Macros store text of virtually any length to be inserted
directly into your documents.
• Program/File/URL Launch Macros open your favorite software,
file, or website by pushing a DX1 Key.
The Macro Type is defined when the Macro is first created.
Every Macro also has a Macro Name that is defined during creation.
The Macro Name is a short label that allows you to identify the
Macro by its function. For example, if you make a Multi Key Macro
to copy text (Ctrl + C), you might give it the Macro Name “Copy text.”
You can name your Macros any way that makes sense to you.
Ergodex Manager allows you to edit or change the Type and Name
of a Macro at any time.
Single Key Macros
The most basic Macro Type is the Single Key Macro. Single Key
Macros duplicate the behavior of any key on your regular keyboard.
For example, if you assign a DX1 Key with a Single Key Macro of the
“Q “ key, it functions just like the “Q” key on your regular keyboard.
Single Key Macros, like all DX1 Macros, do not interfere with the
operation of your regular keyboard. You can think of a DX1 Key with
a Single Key Macro as a cloned keyboard key that can be moved.
Single Key Macros are particularly useful for programs that use
single keyboard keys for input commands, including graphic editing
programs and games.
Multi Key Macros
Multi Key Macros combine a sequence of keystrokes into a single
logical group. Multi Key Macros can range from short simple key
combinations to long complex key sequences. For example, you
might use Multi Key Macros to simplify keyboard shortcuts for a word
processor or create a precisely timed script for a game. Multi Key
Macros offer nearly unlimited flexibility for controlling your programs.
Multi Key Macros also allow you to have precise control over the
playback rate, or Timing, of the keystroke sequence. When you
create a Multi Key Macro from your keyboard, there naturally is a
time delay between each key that you press. When you record a
Multi Key Macro with your regular keyboard, Ergodex Manager
automatically captures the exact rate at which you type each key.
The information includes the specific time each key is pressed Down
and when it comes back Up. The intervals between key presses in a
Multi Key Macro can be a short as a few milliseconds, or as long as
five minutes.
Ergodex Manager provides the option of playing a Multi Key Macro
with or without its associated timing. When a Multi Key Macro is
specified to Use Timing, the keystrokes are played back with the
exact time delays recorded. If you deselect the Use Timing option of
a Multi Key Macro, the key sequence is played back in a single rapid
burst.
Concepts & Definitions
Page 18

18
Each Multi Key Macro stores its own timing settings; you may use
both timed and untimed Multi Key Macros in the same program.
Ergodex Manager allows you to edit the precise timing
characteristics of every Multi Key Macro. A graphical interface allows
you to edit the timing between every key press event in your Macro.
The timing option you use with your Multi Key Macros depends on
your particular application. For simple key commands in applications
that do not place large demands on your computer, it is usually best
to use untimed Macros. For example, if you wanted to create a
simple Cut (Ctrl + X) or Paste (Ctrl +V) Macro to use in a word
processor, it is usually acceptable to turn the timing option off to get
the fastest response. However, if you wanted to create a complex
sequence of key commands that required opening multiple option
windows in the same word processor, it might be necessary to create
a Macro with the timing option enabled. Often there is a small delay
between when a program receives a command and when it is able to
respond. If you chain a bunch of commands together you might
overrun the ability of your program to keep up. In these cases, you
may find that adding a small time delay (30 to 100 ms) between key
events allows the program you are using to process the Macro while
still keeping the overall playback time reasonably short. You might
need to experiment with the exact timing that works on your
particular computer/program combination.
We have found that most modern computer games require that you
use at least a small time delay (~30 ms) between key events in your
Macros. This is due to the way that games process key information
under Windows®. If you attempt to play an untimed Multi Key Macro
in a game, Ergodex Manager plays the sequence so quickly that the
game might miss some of the keystroke events, causing unexpected
behavior. The easiest way to create fast executing Macros for
games is to record them with timing, then edit the Macro to reduce
(but not eliminate) the time between key presses. See the section
on editing Macros for more information.
Multi Key Macros offer an advanced feature that lets you play one
key sequence when your press a DX1 Key and a second key
sequence when you release the same DX1 Key. This Press/Release
option allows you to fine tune the playback of your Multi Key Macro.
The option is particularly useful in games. For example, you might
create a Macro that switches to binoculars and zooms in when you
press a DX1 Key, and then zooms out and switches back to a
weapon when you release the Key.
Text Block Macros
Text Block Macros allow you to insert text information into a
document with a single DX1 Key press. For example, you could use
a Text Block Macro to insert your name and address into a word
processing document, an email program, or a web page. The
assigned text can be as short as a single word or many pages long.
There is no timing associated with the playback of text block Macros;
the text is inserted almost instantly at the current text cursor location.
Program/File/URL Launch Macros
Program/File/URL Launch Macros allow you to open or launch your
favorite programs, files or web site by pressing a DX1 Key. You can
direct the Macro to open any specific file or program on your
computer, or a website that you want to visit. If you provide an
Internet address (the URL), Ergodex Manager will automatically
open your default web browser and navigate to the specified web
site.
Categories
You will most likely create many different Macros for each of the
programs you use often. Categories allow you to organize your
Macros for a particular program within Ergodex Manager. You can
use Categories to group similar Macros together. You can think of a
Category as a folder to hold similar Macros. Example Categories
might include: File, Tools, Weapons, Functions, Play, Actions, and
Recorded Macros. You may create or remove a Category in
Ergodex Manager at any time, and Categories can be empty.
If you record Macros from within your programs, Ergodex Manager
will automatically add the Macro to either a Recorded Single Keys or
Recorded Macros Category. You may move a recorded Macro to a
different Category at any time.
Concepts & Definitions
Page 19

19
Program Profiles
Most of the programs you use are probably quite different from each
other in terms of the commands and functions that they offer. As a
result, the set of Macros that you use for each program is likely to be
different. When you switch from one program to another, typically
you will want a different set of Macros. Ergodex Manager keeps track
of Macros for each program with Program Profiles.
A Program Profile or a Profile is a collection of Macros that works
with one particular program, such as a word processing program or a
game. For each program you use, the DX1 Input System looks for a
Profile specifically associated with that program. The Profile contains
the Macros and Key assignments to be used with your DX1 Keys.
Thus, each program on your computer may have its own Profile or
set of unique Macros associated with it. When you create a Program
Profile, it is tied to a particular “.exe” file on your computer (including
the path and file name). Once you create a Program Profile, you
cannot change the “.exe” file that it is associated with. If you need a
Profile to work with a new program “.exe”, you must first create
another Profile for the new program and then copy your Macros over.
Ergodex Manager provides an easy mechanism to move Macros
among Profiles.
Usually, you will have several Macros within a Profile. Each Macro
within a Profile will have a Macro Name to identify it. To avoid
confusion, each Macro within a Profile must have a unique name.
For example, you could not have two different Macros named “Copy”
within the same Profile. However, you could use something like
“Copy” and “Copy2” for your Macro Names. You may use the same
Macro Name for Macros in separate Program Profiles.
Active and Inactive Profiles
Typically, you will have a single Program Profile for each program
you use with the DX1 Input system. Sometimes, you might want to
have two or more Program Profiles associated with the same
program. You may add additional Profiles for a program at any time.
However, only one Program Profile may be Active for a given
program; the other Profiles are Inactive. Ergodex Manager will only
use the Active Profile for a particular program. You can use Ergodex
Manager to select which Profile is Active for your program.
Automatic Program Profile Creation
Whenever you record a new Macro, Ergodex Manager will
automatically add it to the correct Program Profile. If a Program
Profile does not exist for the program you are using, Ergodex
Manager will automatically create a new Profile for you. This is a
very handy feature for creating Profiles for your programs.
Pre-created Program Profiles
In addition to automatically creating Profiles with the record feature,
there are several ways to obtain pre-built Profiles and Macros. The
DX1 installation CD has Program Profile Templates for many popular
programs and games. These Profile Templates contain some basic
Macros for their respective programs. A typical gaming Profile
Template contains the most frequently used default Single Key
Macros specified in the game’s user manual. You can choose to use
one or more of these Templates as the starting point for your own
Profile. Once a Profile based upon one of these pre-packaged
Templates has been imported, you can add to, delete, or modify the
Macros within it.
You can also import, export, and exchange your Profiles
electronically with your friends. If you have created a particularly
useful Profile for a program you use, you may share it with others.
Ergodex will continue to add Program Profiles to our web site
(www.ergodex.com) for download.
Please remember that imported Macros have the potential to
cause damage to your computer system. A Macro can do
anything to your computer that you can do, including changing
data and deleting or installing programs. To prevent harmful or
malicious Macros from running on your machine, you should
only use Profiles and Macros from sources that you trust. Make
sure you examine and understand any Macros that you import
before using them.
Concepts & Definitions
Page 20

20
After using the DX1 for a while, you will have several Profiles on your
computer, each with its own set of Macros, and each corresponding
to a particular program. Ergodex Manager is “program aware,” it
knows which program you are using, and will automatically load the
Profile for the active program. Whenever you switch to a different
program (for example, by clicking on the task bar or using “Alt-Tab”),
Ergodex Manager automatically switches Profiles (if any).
The Global Profile
What happens if you have a Macro that you want to use in several
programs? For example, it might be useful to have a Text Block
Macro that inserts your Name and Address whenever you press a
DX1 Key. Instead of trying to copy this Macro into every one of your
Program Profiles, you could use the Global Profile. The Global
Profile is a unique Profile provided within Ergodex Manager. Unlike
other Program Profiles that only work with a single program, Macros
assigned under the Global Profile work in every program on your
computer. The Global Profile comes with some system related
Macros, such as Browser, Email, and Volume commands. Although
these pre-packaged Macros are read-only and may not be deleted,
you can add your own Macros to the Global Profile. Any Macros you
add to the Global Profile can be edited or removed at any time.
Global Profiles serve two special purposes. First, Global Profiles can
be used as defaults for programs that do not have their own Profiles.
For example, if you do not want to create a separate Profile for your
word processing program, the DX1 Keys will use the Macros you
have assigned in the Global Profile.
Second, Global Profiles can be used as default settings in other
Program Profiles. For example, assume you have DX1 Key 15
assigned as VolumeMute in the Global Profile. You also have a
Profile for Wordpad®, where various DX1 Keys are assigned
Macros. If you do not have a Macro assigned to DX1 Key 15 in your
Wordpad® Profile, the Key will take its Macro setting from your
Global Profile configuration and contain the VolumeMute Macro.
You can always override the Macro assignments made under the
Global Profile within any Program Profile. Overriding a Global Macro
assignment will only affect the Key assignment in the particular
Profile. The local override will not affect other Profiles.
Users
What happens if more than one person uses your computer? How do
you keep each person’s Program Profiles separate? Ergodex
Manager provides a way to manage separate Users on the same
computer.
When you install Ergodex Manager, it creates the first User with the
name you provide. You may add additional Users in Ergodex
Manager at any time. Each User in Ergodex Manager can have a
completely different set of Program Profiles and Macros. There is
only active User at a time; you activate Users from within Ergodex
Manager. The name of the currently active User is always displayed
in the middle of the title bar of Ergodex Manager. Ergodex Manager
uses the Profiles and Macros from the active User. Each User has
its own Global Profile.
Note: There is no relationship between DX1 Users and “users” of
your operating system, such as administrator, guest, root or other
system defined users.
Hierarchy Summary
The above elements constitute the important elements in DX1 Input
System hierarchy:
Ergodex Manager contains one or more Users.
Users contain one or more Program Profiles.
Program Profiles contain one or more Categories.
Categories contain individual Macros.
Macros are assigned to individual DX1 Keys.
DX1 Keys are placed on the DX1 Pad to control
your programs.
Concepts & Definitions
Page 21
21
Keeping Track of Everything
After designing your perfect Key layout and assigning all your
powerful Macros, how do you keep track of your creation? Well,
many people stop there, happy to have an interface exactly the way
they like it. However, the DX1 Input System offers more features to
customize the display of your Key layout.
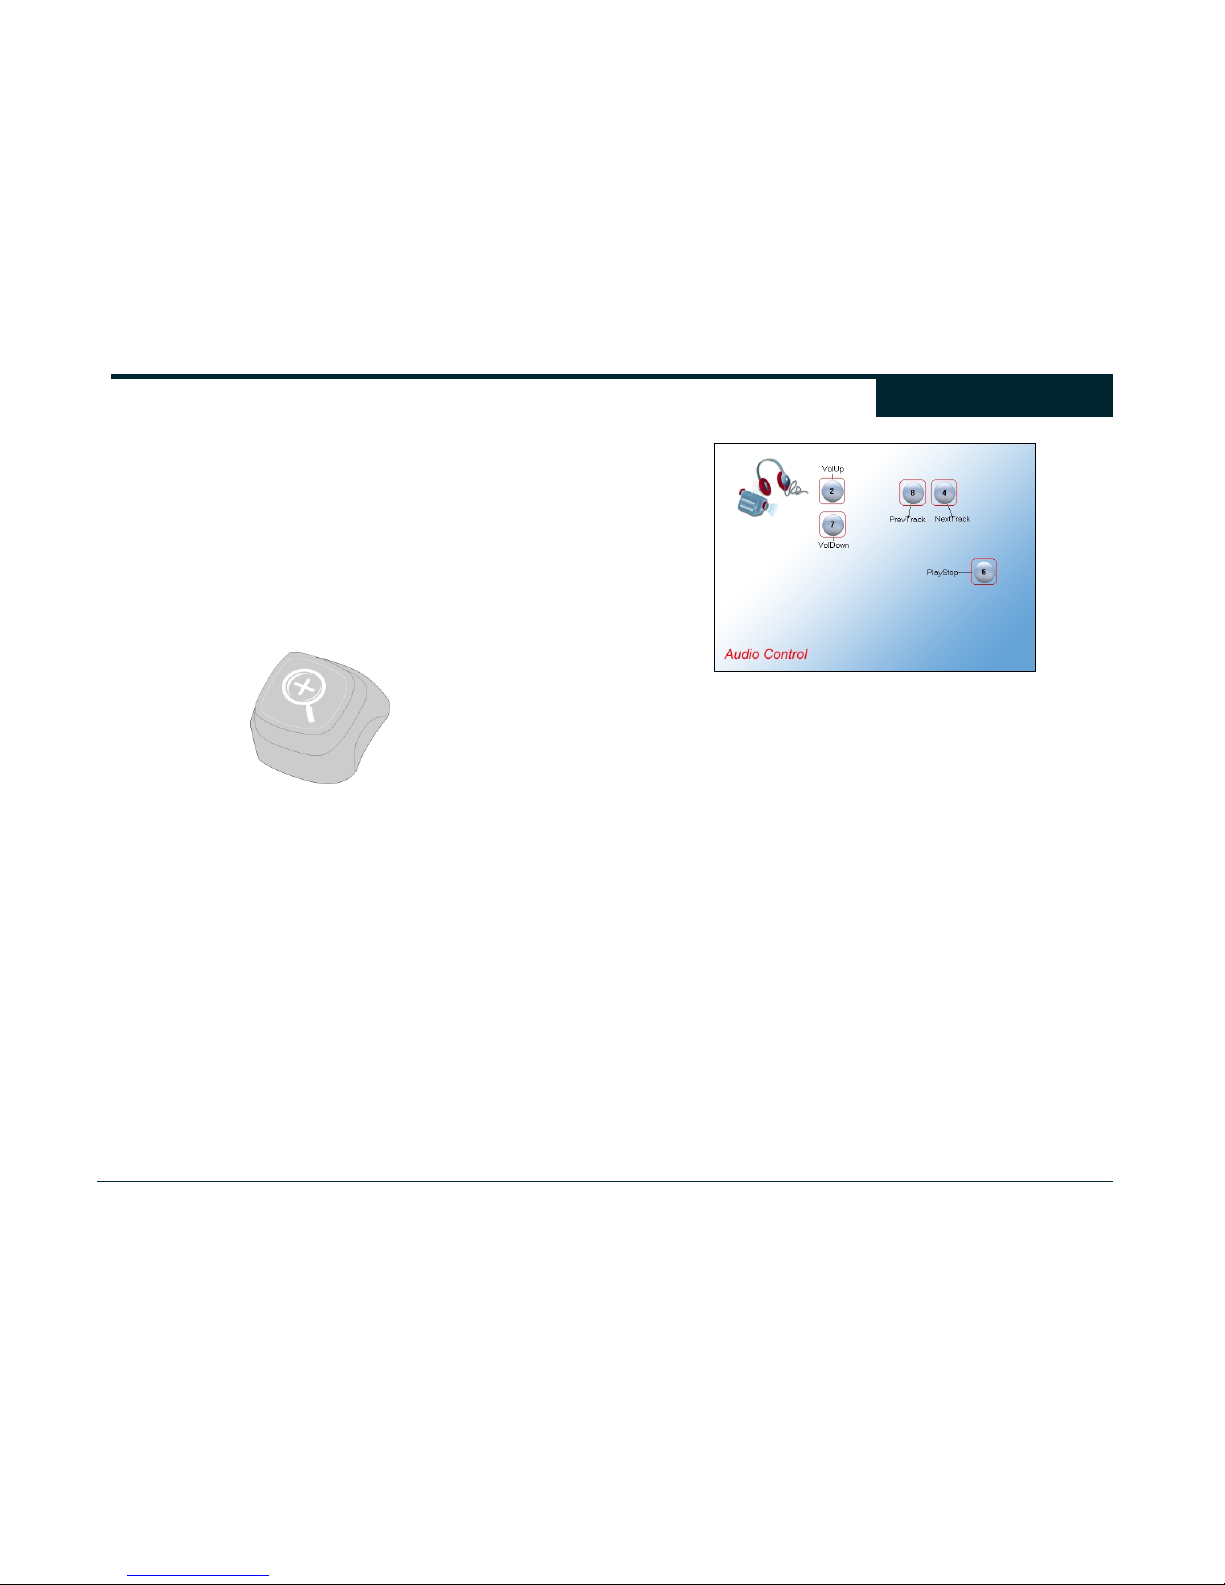
Included with your DX1 Input system are two sheets of adhesive Key
Labels. The Key Labels contain many icons that you can use to
indicate the function of your DX1 Keys. There also are blank labels
that you can write on with a ballpoint pen to make your own labels.
Apply Key Labels to identify your DX1 Keys
To further customize you DX1 Pad, Ergodex Manager provides a
utility to design and print Skins that you can place underneath your
Key Tray to label your DX1 Keys and display your own graphics.
You can create plain Skins that simply call out the function of each of
your Keys or you can import graphics (“.bmp”, “.jpg”, and “.gif”
images) to completely customize the background of your Key layout.
In the Skin creation utility, Ergodex Manager displays a virtual DX1
Pad on your screen. You can drag icons representing your DX1
Keys onto the virtual Pad and arrange them as they are on your
actual Pad.
Each Skin you create is associated with one of your Profiles; you can
create a different Skin for each program you use. Skin information is
saved with your Profile, and can be edited and exported to share
with your friends.
Create and print paper Skins for your Profiles.
Concepts & Definitions
Page 22
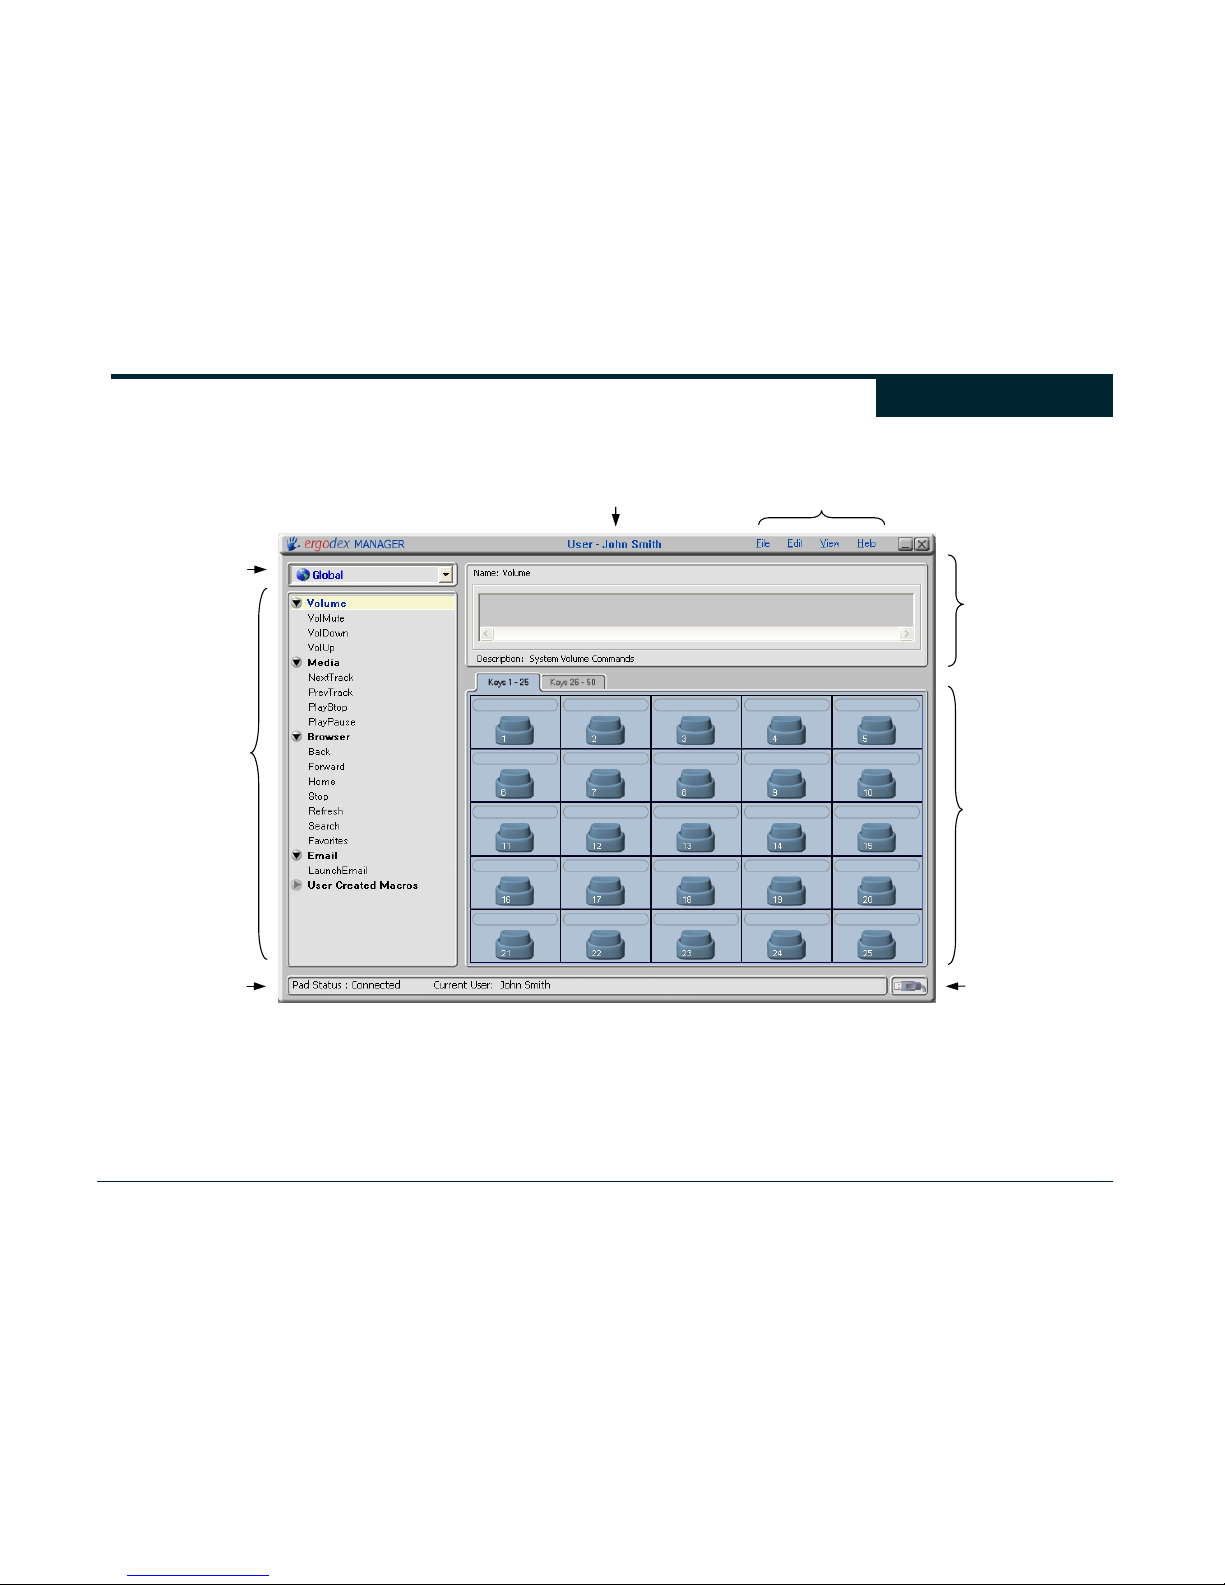
22
Ergodex Manager Main Screen
Menu
A
ctive User
Connection
Status
Help Ba
r
Program Profile
Selection Box
Macro Lis
t
Key
Assignment
Table
Category/Macro
View
Ergodex Manager
Overview
Page 23
23
Ergodex Manager
Ergodex Manager is the core of the DX1 Input System. This
software package has many functions, including: communicating with
the DX1 pad; tracking the currently active program; creating and
managing Users, Profiles, Categories, and Macros; assigning
Macros to DX1 Keys; importing and exporting Profiles; and editing
custom Skins. Ergodex Manager must be running whenever you
want to use the DX1 Input System with your computer. Ergodex
Manager will load automatically each time you start your computer.
There are two parts to Ergodex Manager, the graphical interface and
the runtime component.
The graphical interface lets you configure your DX1 Pad, manages
and displays your Profiles and Categories, provides Macro editing
and management, and lets you assign Macros to DX1 Keys. You can
launch the Ergodex Manager graphical interface in any of the
following four ways:
• Pressing the button next to the hand icon on the DX1 Pad
Note: This will only work if you are already running Ergodex
Manager and your Pad is plugged in. Some programs, including
many games, do not release control of the Windows ® Desktop;
you will need to exit these programs before you can open the
Ergodex Manager graphical interface.
• Double-clicking on the Ergodex Manager icon on your desktop
• Right clicking on the Ergodex hand icon in the system tray and
selecting “Open Ergodex Manager”
• From the Start menu, select “Programs > Ergodex > Ergodex
Manager”
Whenever you open the Ergodex Manager graphical interface, the
runtime program (if not already running) is also launched
automatically. The runtime program operates in the background and
communicates with the Pad and DX1 Keys according to your
Profiles. The runtime program keeps the hand icon visible in the
Windows® System Tray when it is running. If the blue hand icon is
visible in the System Tray, the Pad is functioning normally. If there is
a red “X” across the hand icon, the Pad is either disconnected or not
functioning properly. When you close the Ergodex Manager
graphical interface, the runtime program continues to operate,
allowing you to use the DX1 Pad without keeping the interface open
on your desktop. If you need to close Ergodex Manager completely,
right click on the hand in the System Tray and select “Exit-Shutdown
Pad.” This will close both components of Ergodex Manager. You
will need to restart Ergodex Manager before using your Pad.
The figure on the previous page shows the main section of Ergodex
Manager. The currently Active User is shown in the center of the
window title bar. The currently displayed Program Profile is
displayed in the Program Profile Selection Box.
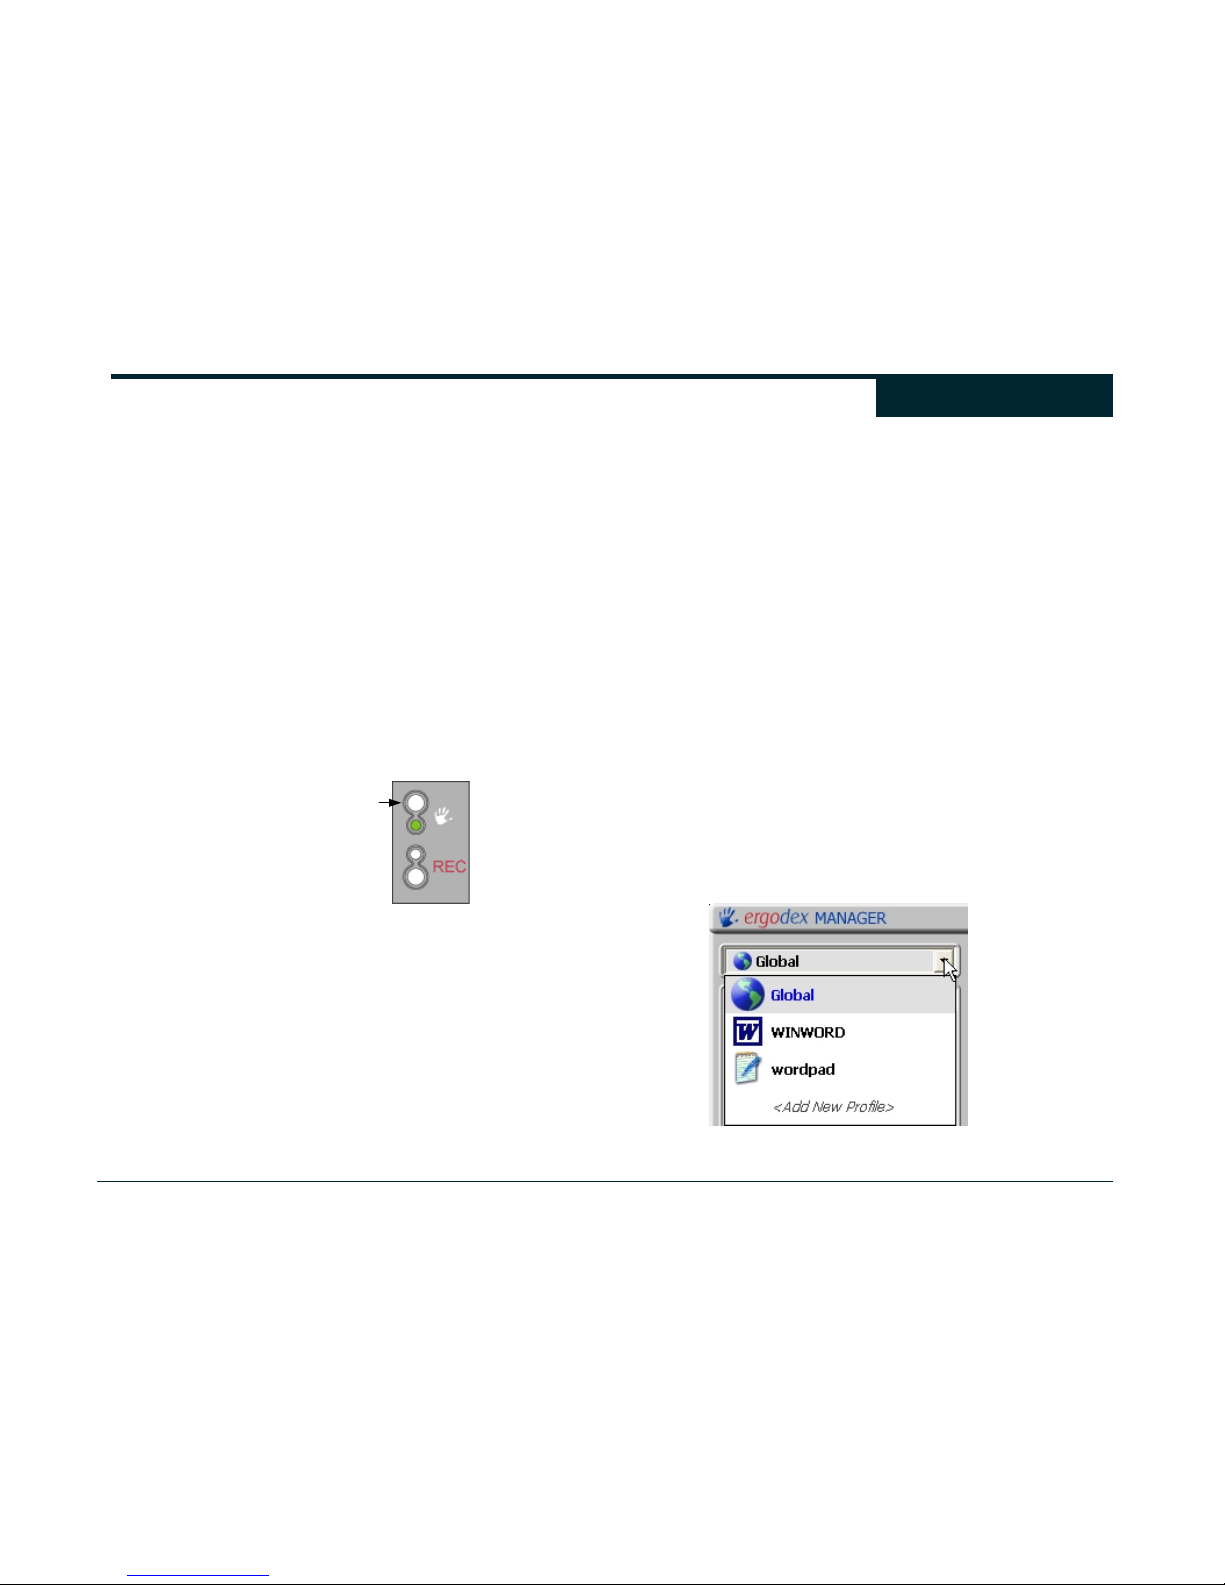
You can change the currently displayed Program Profile by clicking
on the down arrow and selecting from the list.
Press to launch the Ergodex
Manger graphical interface
Ergodex Manager
Overview
Page 24
24
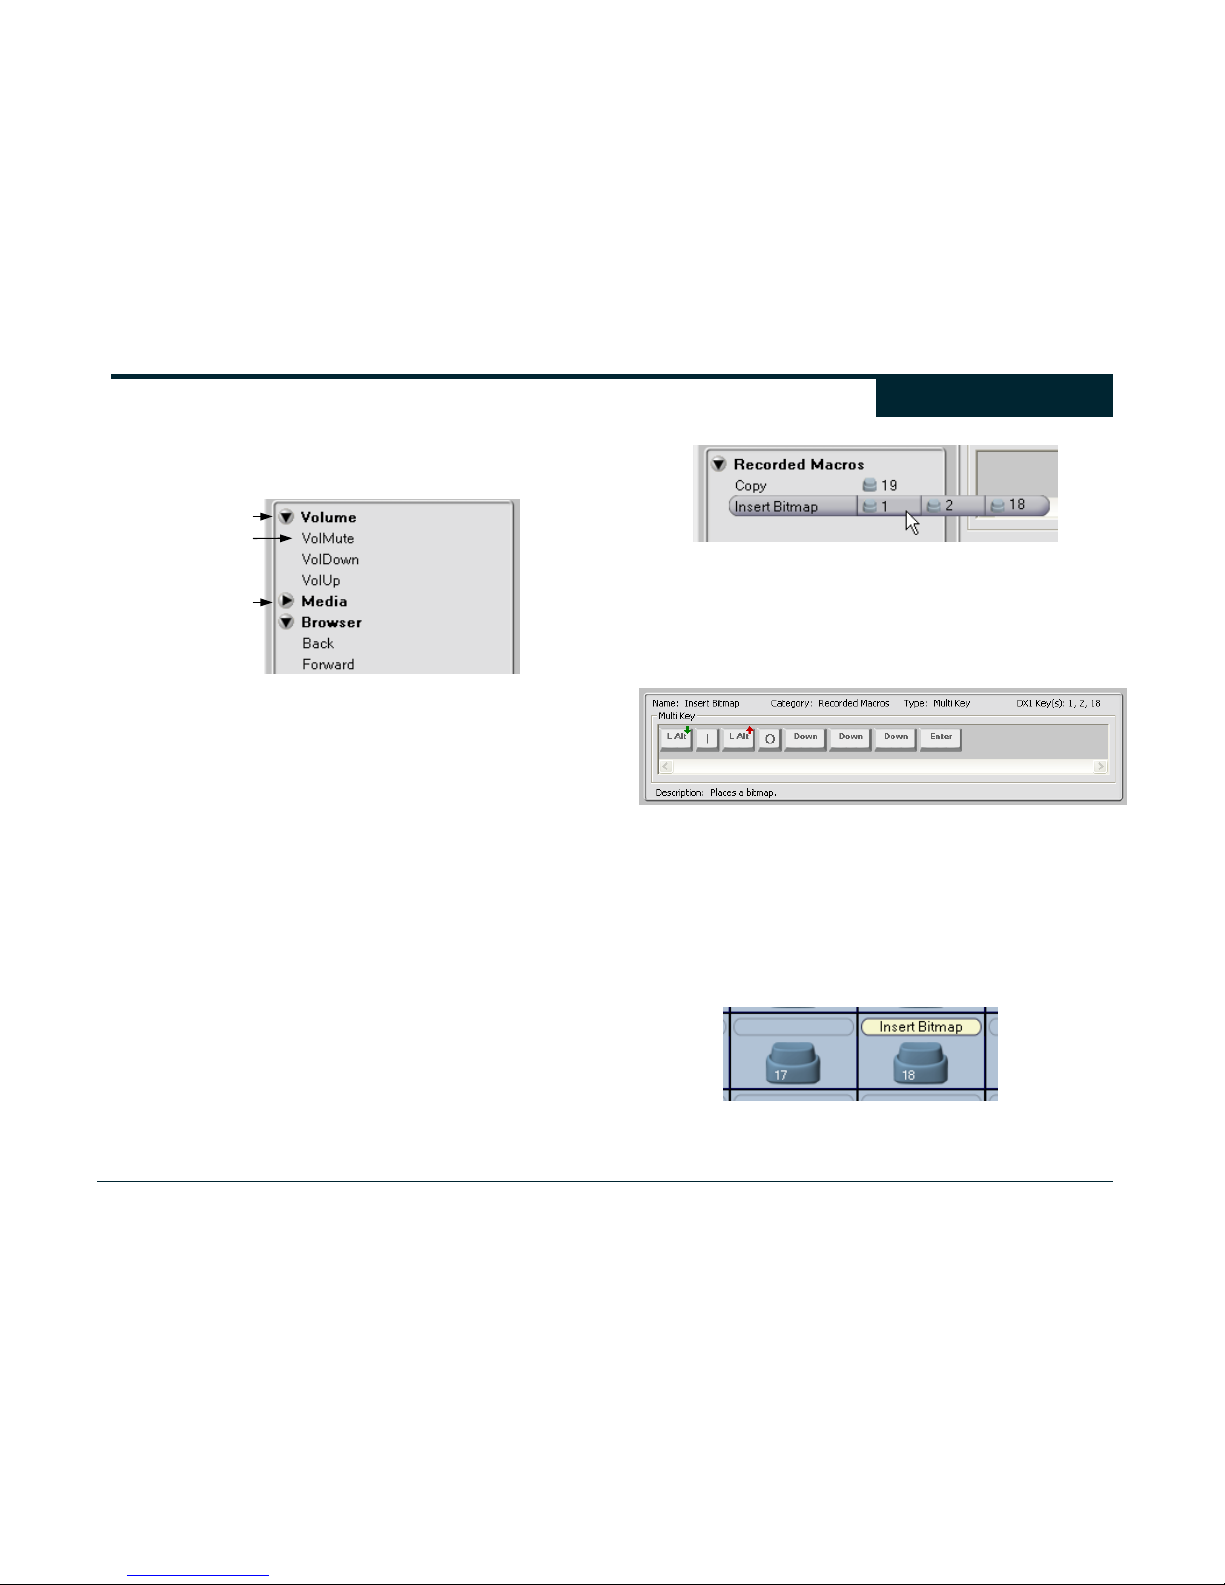
Below the Program Profile Selection Box is the Macro List. All the
Macros for the displayed Program Profile are shown in the Macro
List, grouped into Categories.
The Categories are displayed in bold and have small triangular
buttons to their left that can be clicked to expand or contract their
contents. Expanding a Category reveals all the Macros within that
Category. Contracting a Category will hide its associated Macros in
the Macro List. You can also double-click a Category Name to
expand or contract a Category. Empty Categories are grayed out
and will not expand.
Macros appear in the Macro List as entries underneath Categories.
As you drag your mouse over the Macro List, the Macros beneath
your mouse cursor will change into 3D-style buttons. Single clicking
on a Macro Name in the Macro List will select the Macro. Doubleclicking on a Macro Name will open the Macro Edit W indow for the
Macro.
The Macro List also displays any DX1 Keys that have been assigned
with a Macro. Each Macro may be assigned to up to three separate
DX1 Keys. If a Macro is assigned to more than one DX1 Key,
moving the cursor over the right side of a Macro in the Macro List
reveals all of its Key assignments.
Moving the cursor over the “Insert Bitmap” Macro here reveals that
the Macro is assigned to DX1 Keys 1, 2, and 18.
The Category/Macro View region displays summary details of the
currently selected Macro or Category. Single-clicking any Macro in
the Macro List will select the Macro and display its information in the
Category/Macro View.
The Category/Macro View displays the Macro Name, Category,
Macro Type, Any Assigned DX1 Keys, and a Description of the
Macro.
Underneath the Category/Macro View is the Key Assignment Table.
This Table contains a grid of 25 Keys representing the actual DX1
Keys. Each Key image includes the Key number and its associated
Macro, if any. The two tabs at the top of the Key Table let you switch
the view between DX1 Keys 1 to 25 and DX1 Keys 26 to 50
(available as an add on package).
This close up shows that Key 17 is not assigned a Macro, and Key
18 is assigned the “Insert Bitmap” Macro.
Expanded Category
Contracted Category
Macro
Ergodex Manager
Overview
Page 25
25
You can select a DX1 Key by clicking on its image in the Key
Assignment Table. You can also select a DX1 Key by pressing the
corresponding Key on your Pad. Selecting a Key will automatically
select and show any associated Macro in the Category/Macro View
region. This feature is useful if you want to quickly check the
function of one of your DX1 Keys. You can open Ergodex Manager
and press the DX1 Key in question on your Pad to see its Macro
assignments in the current Profile.
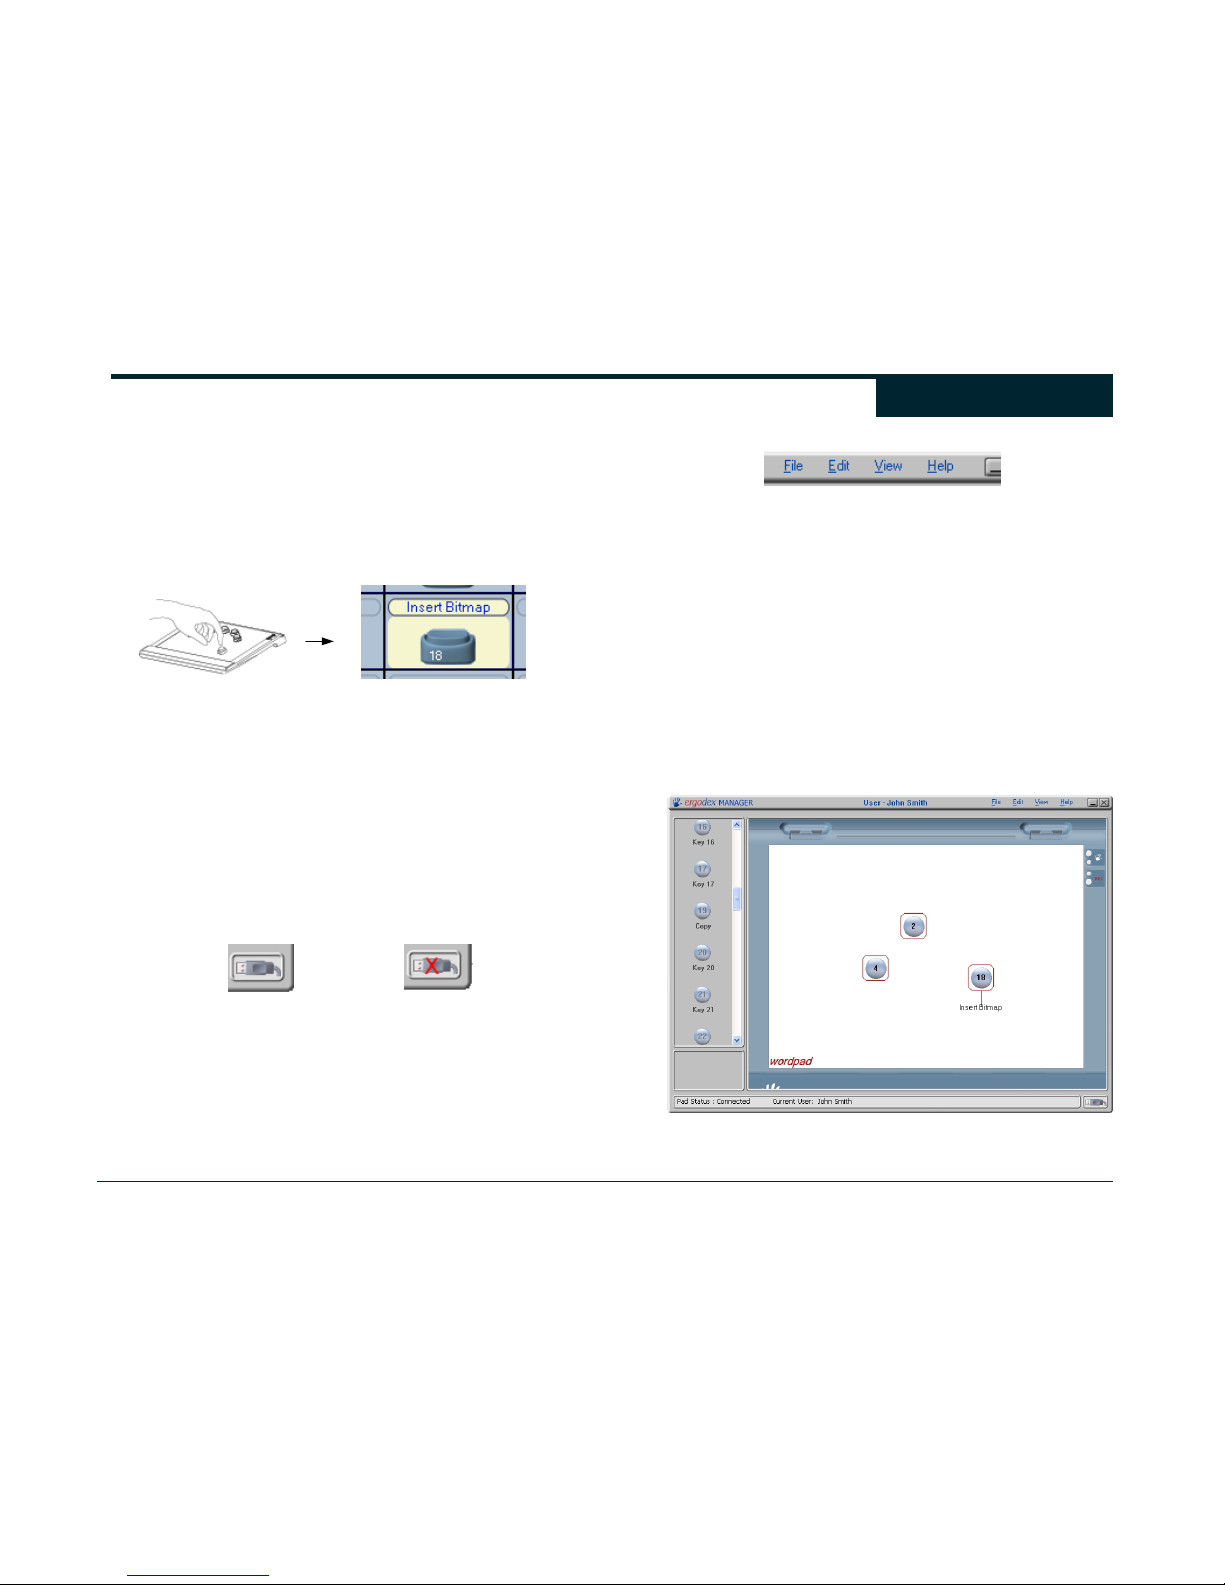
Here, pressing Key 18 on the Pad selects the corresponding Key in
the Key Assignment Table, and selects the assigned Macro “Insert
Bitmap”. The Key images in the Table will animate as you press the
Keys on the Pad.
At the bottom of the Ergodex Manager Main Screen is a Help Bar.
The Help Bar provides useful information related to your current
actions in Ergodex Manager.
To the right of the Help Bar is the Connection Status icon. When
your DX1 Pad is connected and working properly, a picture of a USB
plug will be displayed. If your Pad is disconnected, a red “x” will
appear over the USB plug.
Pad Connected Pad Disconnected
At the top right corner of the Ergodex Manager Main Screen is the
Menu. The Menu is used to control the setting and functions of
Ergodex Manager.
Ergodex Manager Menu
Along with the Main Screen view, Ergodex Manager provides a Skin
view that allows you to create, edit, and print Skins for your Program
Profiles. To make a Skin, first select the Profile (in the Program
Profile Selection Box) for which you would like to use. Next, select
“View > Skin View” from the Menu.
The Skin view is organized differently from the Main view. The list to
the left of the Skin view represents the DX1 Keys and shows their
currently assigned Macros, if any. The right side of the window
represents a virtual DX1 Pad. You can drag the DX1 Key images
onto this area, creating Footprints of the Keys. You can also select
an image or picture as a background for this template. To navigate
back to the Main Screen view, select “View > Main View.”
Ergodex Manager Skin View
Ergodex Manager
Overview
Page 26
26
Ergodex Manager provides a way to manage multiple Users on the
same computer. Each User can have unique Profiles, Categories,
and Macros for the DX1 Input System. Only one User is active at a
time; Ergodex Manager will use the Program Profiles and Macro
assignments from the active User.
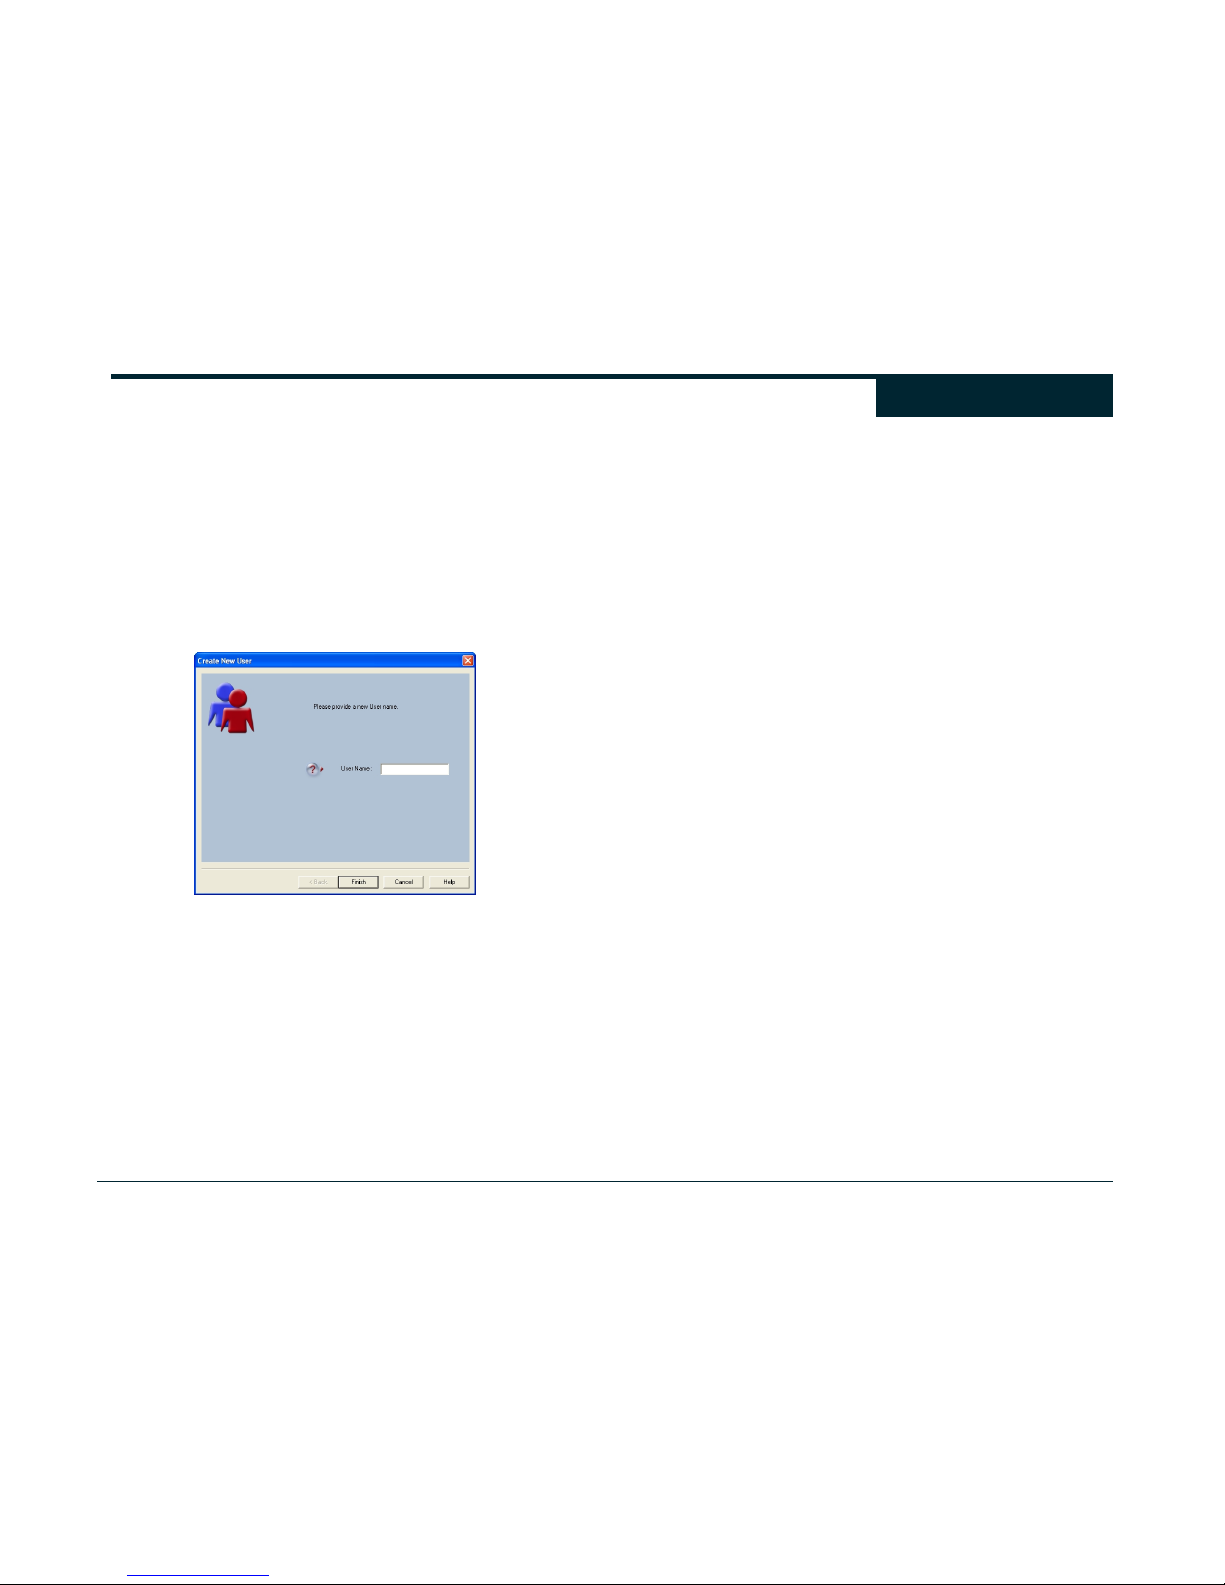
Creating New Users
When you install Ergodex Manger, a single User is created. You can
add additional Users by selecting “File > New > Users” from the
Ergodex Manager Menu. A unique User Name is required for each
User on your computer.
Switching the Active User
The currently active User Name is always displayed in the center of
the Ergodex Manger title bar. You can change the active User by
selecting “File > Change User” from the Ergodex Menu. Select from
the list of available Users and click “Select”. Ergodex Manager will
now use the Program Profiles and Macro Assignments from the User
you activate.
Changing the Default User
If you have more than one User in Ergodex Manager, one of the
Users will be set as the Default User. On startup (such as when you
start your computer) Ergodex Manager will activate the Default User.
You may set the currently active User to the Default User by
selecting “Actions > Users > Mark as Default” from the Ergodex
Manger Menu.
Note: There is an option available under “File > Preferences >
Profiles” that will allow Ergodex Manager to use the last active User
instead of the Default User on startup.
Deleting Users
You can remove a User from Ergodex Manager by selecting “Edit >
Actions > Users > Delete User” from the Ergodex Manager Menu.
When a User is deleted, all Profiles, Categories, and Macros for that
User are removed from your computer. There must always be at
least one active User in Ergodex Manager, and you cannot delete a
currently active User. If you want to delete the currently active User,
you must first activate another User.
Users
Page 27
27
Program Profiles
Each User in Ergodex Manger will have one or more Program
Profiles. Each Profile stores Macros that work with a specific
program on your computer. The Profile also stores the DX1 Key
assignments for its Macros. You will typically have one Program
Profile for each program that you use with the DX1 Input System.
Whenever you use a program, Ergodex Manager will load the Macro
Assignments from the corresponding Program Profile (if any).
Profiles for the active User are listed in the Program Profile Selection
Box on the Ergodex Manager Main Screen. To avoid confusion,
every Program Profile (under a particular User) must have a unique
Profile Name.
Each Program Profile is associated with only one program on
your computer. A program (a game, word processor, web browser,
etc.) is identified by both its path and filename. The path is the
directory location where the program resides on your computer (e.g.
“C:\Program Files\WordProcessor\”). The filename is the “.exe” file
for your program (e.g. “WordProcessor.exe”). Ergodex Manager
uses the path and the filename of your program to determine which
Program Profile to use. Fortunately, Ergodex Manager provides
some helpful tools to associate Profiles with the programs on your
computer.
Once you create a Program Profile and associate it with a specific
program, you cannot change this link. However, if you need to use
Macros from an existing Profile with a new program, you can easily
create a new Program Profile and import the Macros you want.
A Profile can only be made for programs that have a stable “.exe”
file on your computer. If you need to use the DX1 Input System with
“temporary” programs (like some Flash games), you will probably
need to use the Global Profile discussed below.
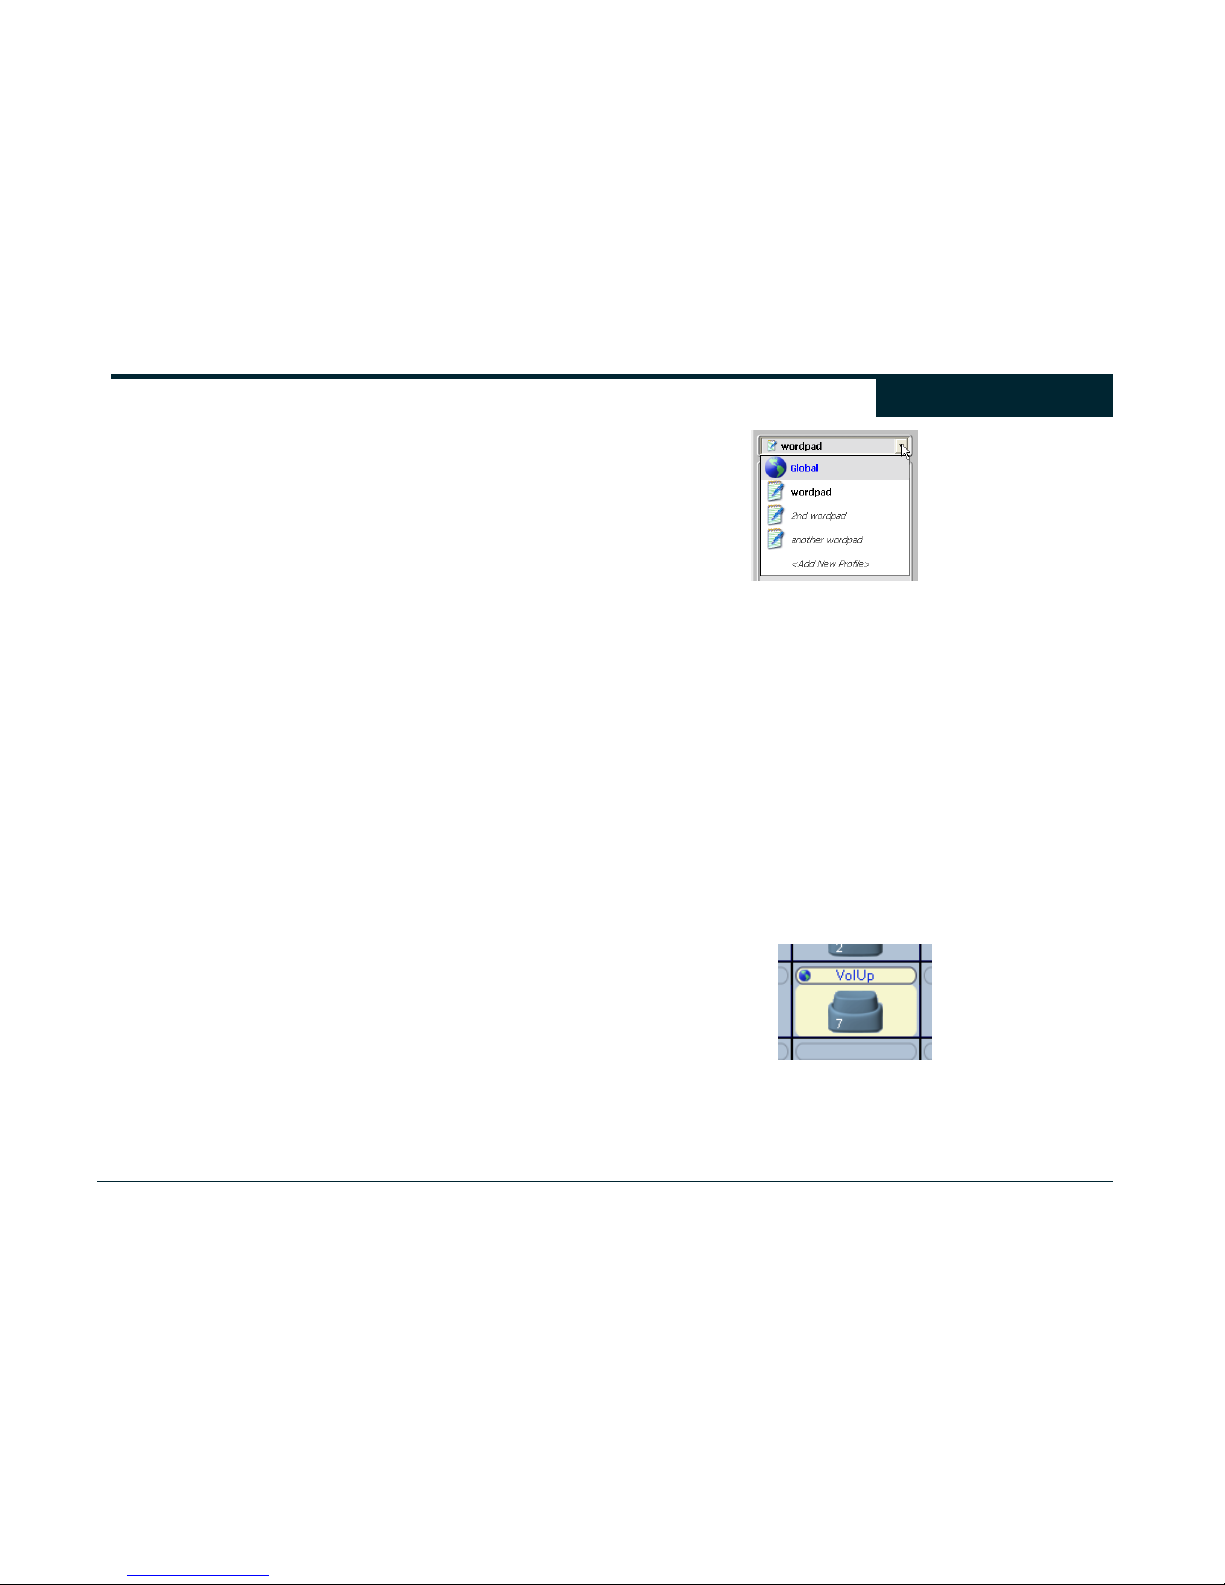
You can have more than one Profile for a program, but only one may
be active. Inactive Program Profiles are displayed in italics in the
Program Profile Selection Box. To activate a Profile, first select the
Profile in the Selection Box then select “Edit > Actions > Profiles >
Set Active” from the Ergodex Manager Menu.
Only one Profile may be active for a particular program. Inactive
Program Profiles appear in italics in the Program Profile Selection
Box.
The Global Profile
In addition to any Program Profiles, each User in Ergodex Manager
has one Global Profile. The Global Profile allows you to assign
Macros that will play in any program. Unlike Program Profiles, the
Global Profile is not associated with a particular “.exe” file.
If the program you are using does not have an associated Profile,
Ergodex Manager will use the Macro assignments (if any) from the
Global Profile. If the program you are using does have an associated
Profile, Ergodex Manager will use the Global Profile Macros for any
DX1 Keys without assignments in the Profile. Basically, Macro
Assignments made in the Global Profile will work unless they are
“overridden” in a Program Profile. Macros that are assigned to DX1
Keys in the Global Profile appear with a small globe icon to the left of
the Macro Name in the Key Assignment Table.
Using the Global Profile is optional. If you do not assign any Macros
under the Global Profile, Ergodex Manager will not use it.
Profiles
Page 28
28
Creating Program Profiles
Program Profiles contain Macros and DX1 Key Assignments for a
particular program. Usually, you create a Program Profile for each
program you want to use with the DX1 Input System.
Automatically Creating a Profile
Whenever you record a Macro in a program that is not already
associated with a Program Profile, Ergodex Manager creates a new
Profile for you. Your recorded Macro (and the DX1 Key to which it is
assigned) is automatically added to the new Profile. Automatically
creating Profiles is a useful way to work with the DX1 Input System.
You do not need to manage any of the details. The Macro record
and assign will work whenever the program is active. The “Macros”
section of this User Guide describes how to record Macros directly
from within a program.
Manually Creating a Profile
You can manually create a new Program Profile from within Ergodex
Manager. Selecting “File > New > Program Profile” from the
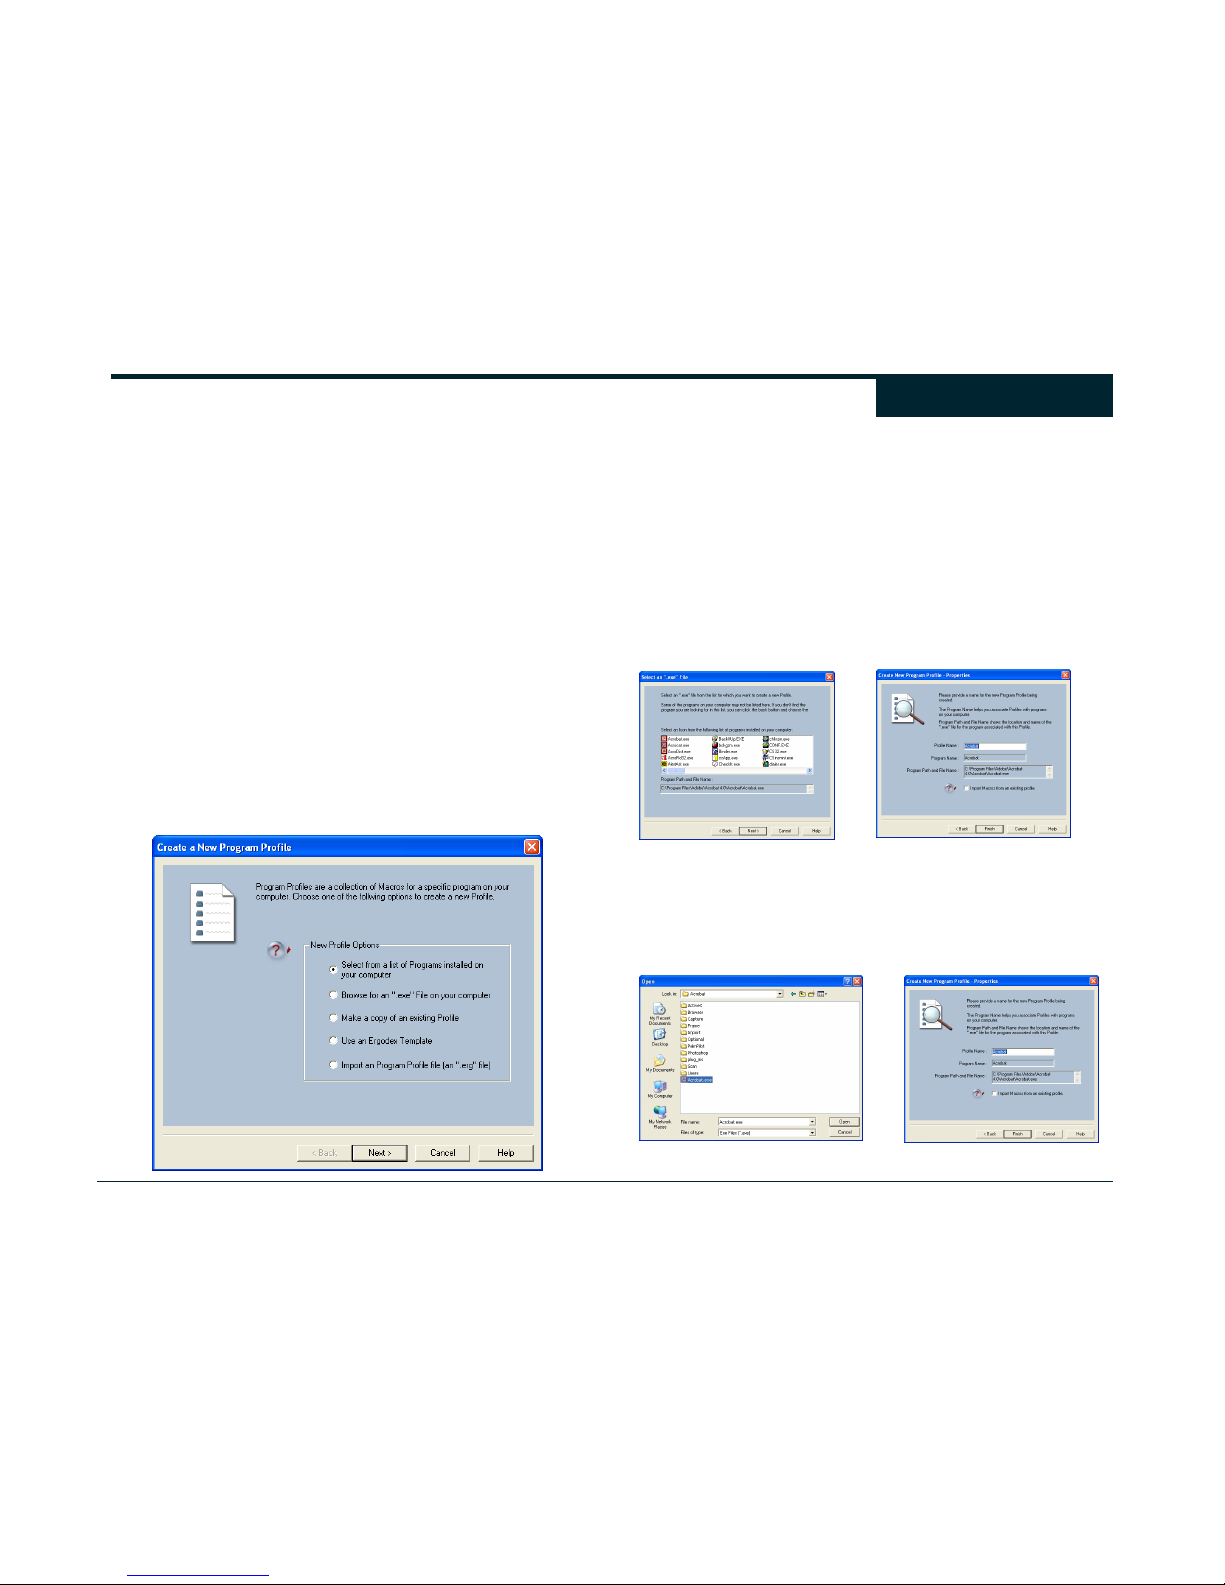
Ergodex Manager Menu displays the “Create a New Program
Profile” dialog box. There are several ways to create a Profile.
Select from a list of programs installed on your computer - You
can create a new Profile by selecting from a list of installed programs
on your computer. Ergodex Manager shows a list of many (not
necessarily all) of the available programs. Select your program from
this list (if it is available) and click “Next.” Ergodex Manager will
automatically find the path and filename of the program for you.
When prompted enter a Profile Name and click Finish to create the
new Profile.
Using this option frees you from the hassle of searching for the exact
location of a particular program file. If the program you are looking
for is not in this list, you will need to specify its location using the
“Browse for an “.exe” option.
Browse for an “.exe” - You can browse through your hard disk files
and select the program “.exe” file for which a Profile is desired.
Once you have selected an “.exe” file, enter a Profile Name and click
Finish to create the new Profile.
Profiles
Page 29
29
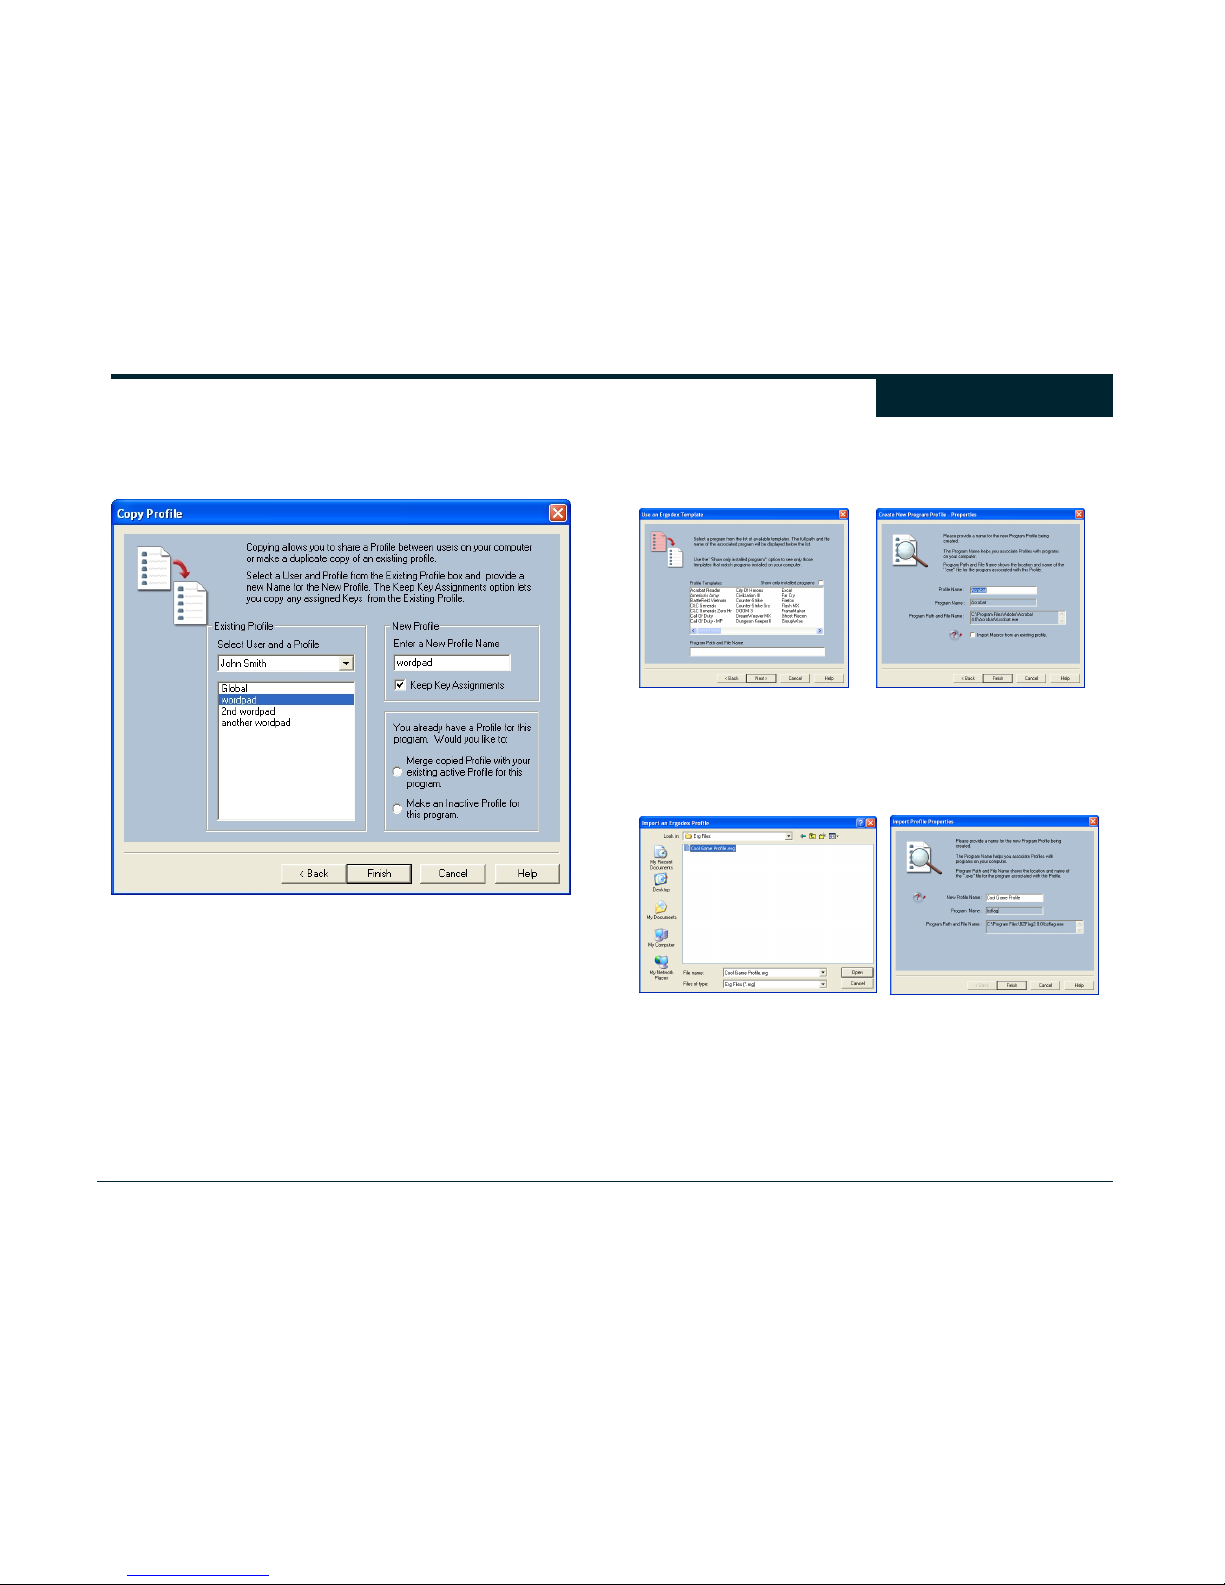
Make a copy of an existing Profile – This option lets you create a
new Program Profile by copying an existing Profile. You can select a
Profile from any User, including the currently active User.
The “Existing Profile” area allows you to select the Profile you want
to copy. Select the User that contains the Profile, and then the Profile
itself. Next, in the “New Profile” area provide a unique Profile Name
for the new Program Profile. The “Keep Key Assignments” option
allows you to retain the DX1 Key assignments of the copied Profile.
If you try to copy a Profile to a User that already has an existing
Profile for the same program, two more options will be available.
You may either merge the copied and existing Profiles together, or
you may create an inactive Program Profile. Click “Finish” to create
the new Profile.
Use an Ergodex Template – An easy way to create a new Profile is
to start with a Template. Ergodex provides Templates for many
common programs. Templates contain pre-created Macros that you
can assign to your DX1 Key.
Select the Template you would like to use and click “Next”
Import a Program Profile file (an “.erg” file) – You can create a
new Profile by importing a Program Profile file. These files are
labeled with an “.erg” extension. Importing and exporting “.erg” files
lets you share your Profiles with other people using the DX1 System.
Please remember that imported Macros have the potential to
cause damage to your computer system. A Macro can do
anything to your computer that you can do, including changing
data and deleting or installing programs. To prevent harmful or
malicious Macros from running on your machine, you should
only use Profiles and Macros from sources that you trust. Make
sure you examine and understand any Macros that you import
before using them.
Profiles
Page 30
30
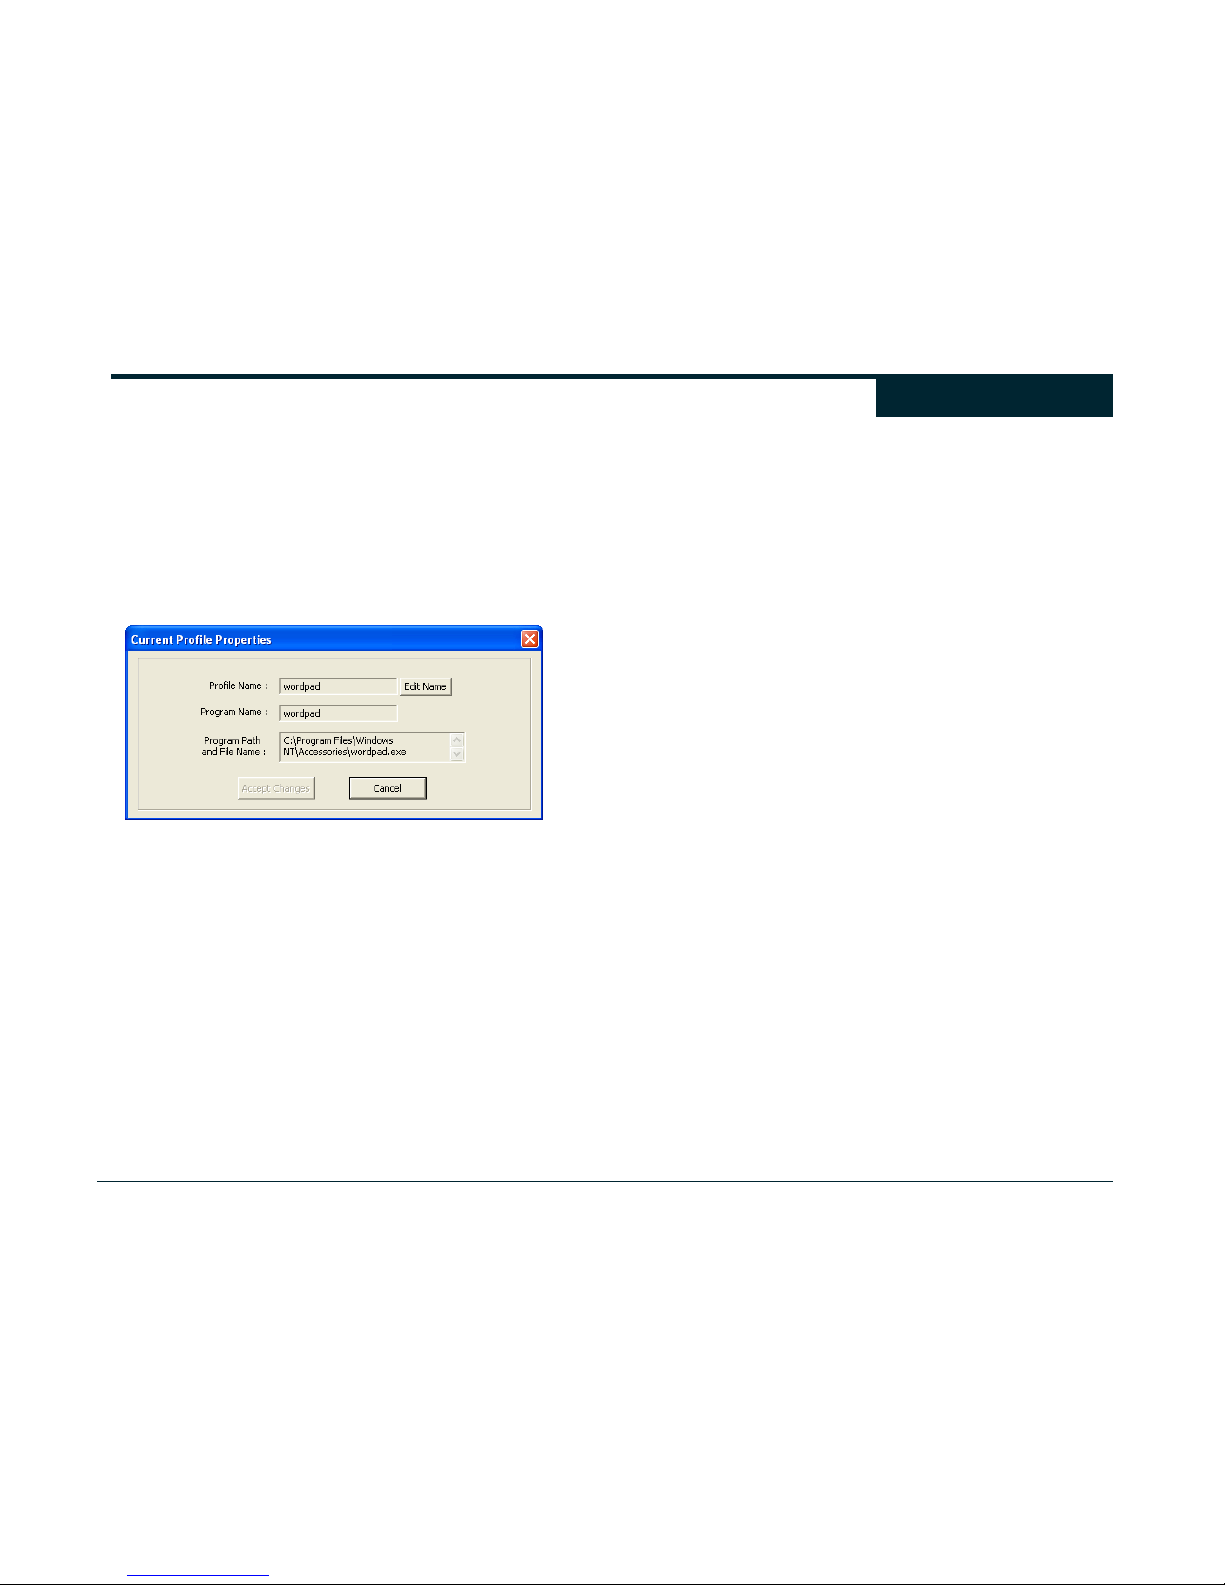
View and Edit Profile Properties
Ergodex Manager allows you to view the properties of any Program
Profile. First select the Profile from the Program Profile Selection
Box. Next select “View > Profile Properties” from the Ergodex
Manager Menu. A dialog box will display the Profile Name, the
associated program name, and the program path and filename. You
can only edit the Profile name. Once a Profile has been created, you
cannot change the program with which it is associated. If you need a
Profile for a different program, you can create a new Profile and
Import the Macros from the existing Profile.
If you uninstall and reinstall a program that has an associated
Program Profile, an “Update Path” button will become available.
Clicking “Update Path” will allow you to redirect the Program Profile
to the new program location.
Exporting Program Profiles
You can export your Profiles to share with other Users of the DX1
Input System. Program Profile files are saved with an “.erg”
extension. These “.erg” files can then be used by you or others as a
basis for new Profiles.
To Export a Profile, first select the Profile in the Program Profile
Selection Box. Next select “File > Export Profile” from the Menu.
You will be prompted to provide the name and location for the
exported file. When you click “Save,” the Profile will be exported to
the disk. If you have a Skin associated with the Profile, you will be
asked if you want to include the Skin with the exported Profile.
To ensure they continue to work as designed, exported Profiles
remain associated the original program “.exe” name. When you
import an “.erg” file to a different computer, you may be prompted to
identify the location of the “.exe” file if Ergodex Manager cannot
locate it.
Global Profiles cannot be exported or imported.
Importing Program Profiles
Selecting “File > Import Profile” from the Menu lets you browse your
computer for “.erg” files. Importing and Exporting Profiles allows you
to share your Macros with other DX1 Input System Users. See
“Import a Program Profile” file under the “Create a Profile” section.
Please remember that imported Macros have the potential to
cause damage to your computer system. A Macro can do
anything to your computer that you can do, including changing
data and deleting or installing programs. To prevent harmful or
malicious Macros from running on your machine, you should
only use Profiles and Macros from sources that you trust. Make
sure you examine and understand any Macros that you import
before using them.
Deleting Program Profiles
To delete a Program Profile, select “Edit > Actions > Profiles >
Delete Profile(s)” from the Menu. You can specify the Profile that
you want to delete for any User. You can select more than one
Profile by holding down the CTRL key while clicking on the Profiles
to delete. Deleted Profiles are permanently removed from Ergodex
Manager.
You can also delete the current Profile by right clicking the Profile
Name in Program Profile Selection Box and selecting “Delete
Profile.”
The Global Profile cannot be deleted from any User.
Profiles
Page 31
31
Categories allow you to group similar Macros together within a
Profile.
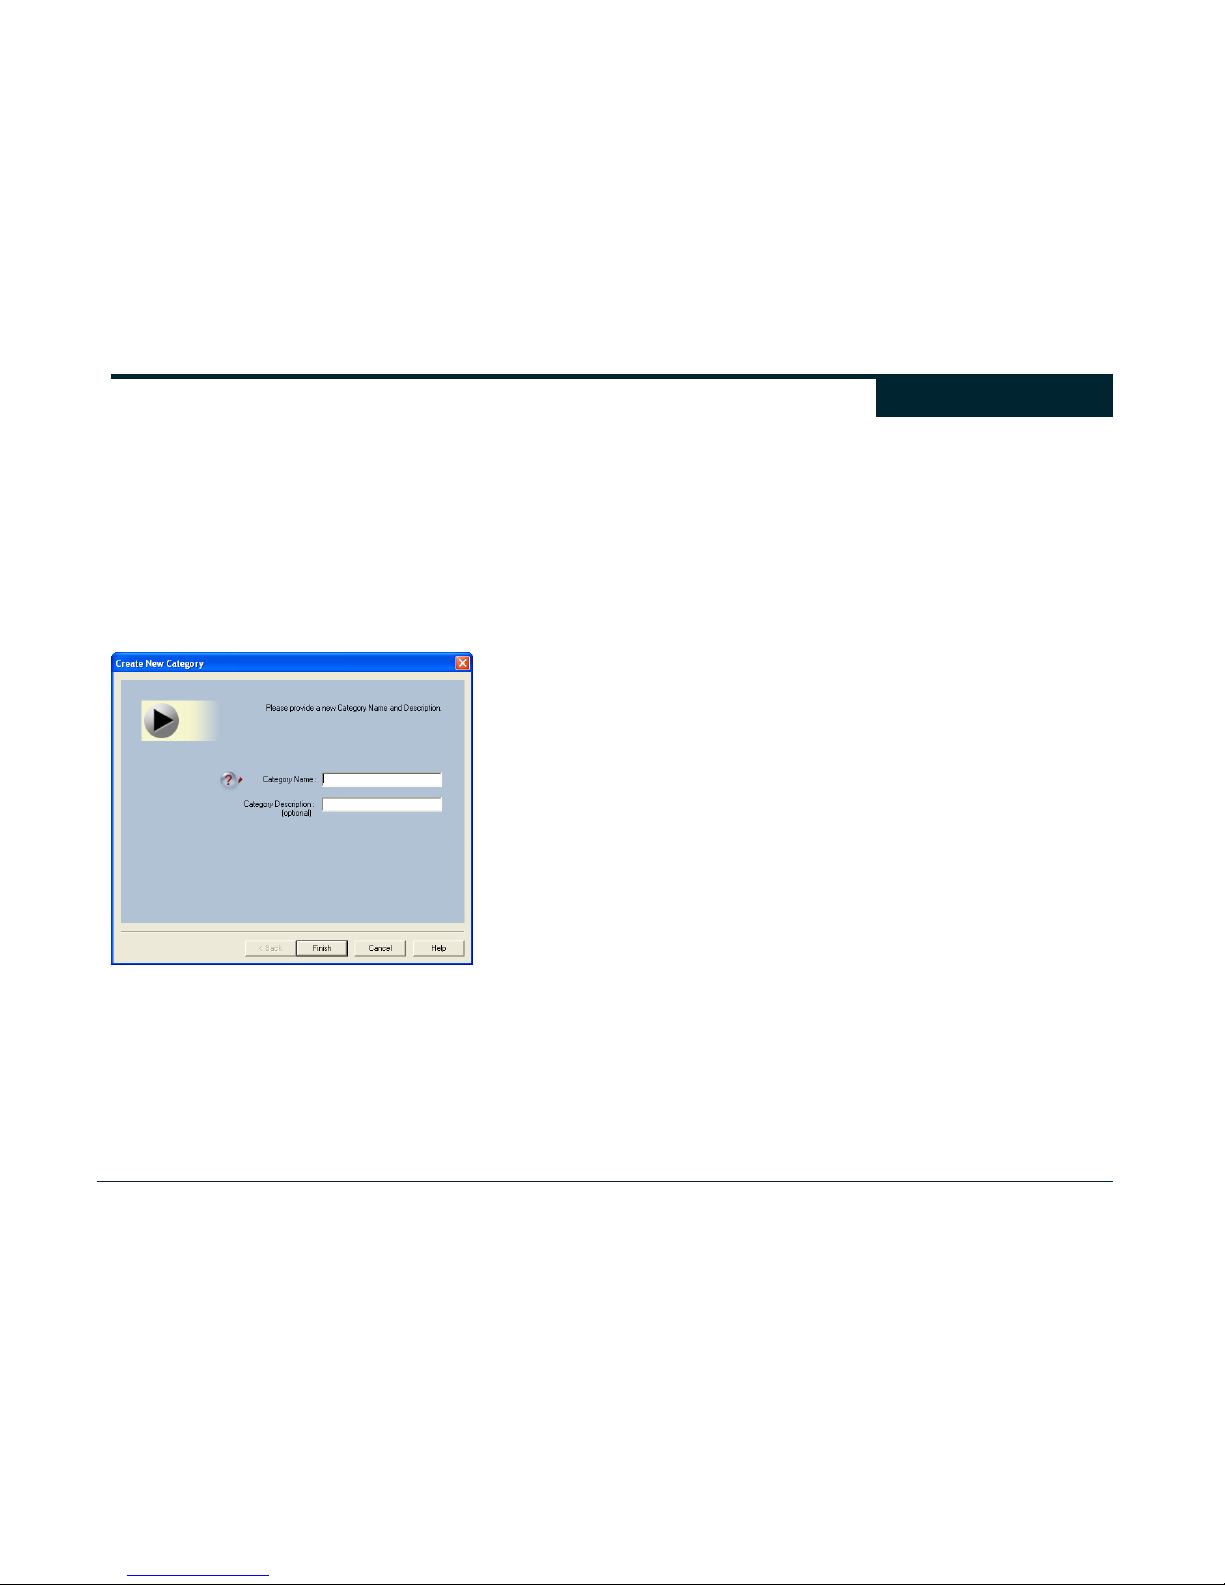
Creating New Categories
You can create a new Category in the Macro List by selecting “File >
New > Category” from the Menu. You can also create a new
Category by right clicking on an existing category (or by right clicking
on the empty space at the bottom of the Macro List) and choosing
“Create New Category.” Each Category within a Profile must have a
unique name.
Categories
Page 32
32
Creating Macros
You can create new Macros in two ways:
• Record a Macro directly from within a program.
• Compose a Macro using the Edit Macro Screen in Ergodex
Manager.
Each of these methods has advantages. Recording a Macro from
within a program allows you to see the effects of your Macro
immediately in the environment it will be used. If you make a
mistake in your recording, you can “record over” the flawed Macro
assignment with a corrected version. Recording a Macro is simple; it
does not require you to interact with editing screens. Ergodex
Manager will automatically organize and store your recorded Macro
in the background.
Composing Macros in Ergodex Manager offers much more flexibility
and some advanced options not available when Recording Macros.
If you choose to compose your Macros, the exact sequence and
timing of each key event is under your precise control. However,
when composing Macros it is often necessary to switch back and
forth between Ergodex Manager and your program to see the exact
results of your edits.
Of course, it is also possible to use a combination of both methods to
create your Macros. For example, it is sometimes useful to record a
Macro from within your program, and then open Ergodex Manager to
“fine tune” the Macro timing.
Recording Macros
To record a Macro using the DX1 Input System, you must have the
Pad plugged in and operational (as described in previous sections).
During Macro recording, you type keys on your regular keyboard
while using a program (such as a word processor or game).
Ergodex Manager automatically captures your key presses in the
background and stores the recorded Macro in a Program Profile for
the program you are using.
To record a Macro, you must have at least one DX1 Key placed on
your Pad. Switch to the program for which you would like to create a
Macro.
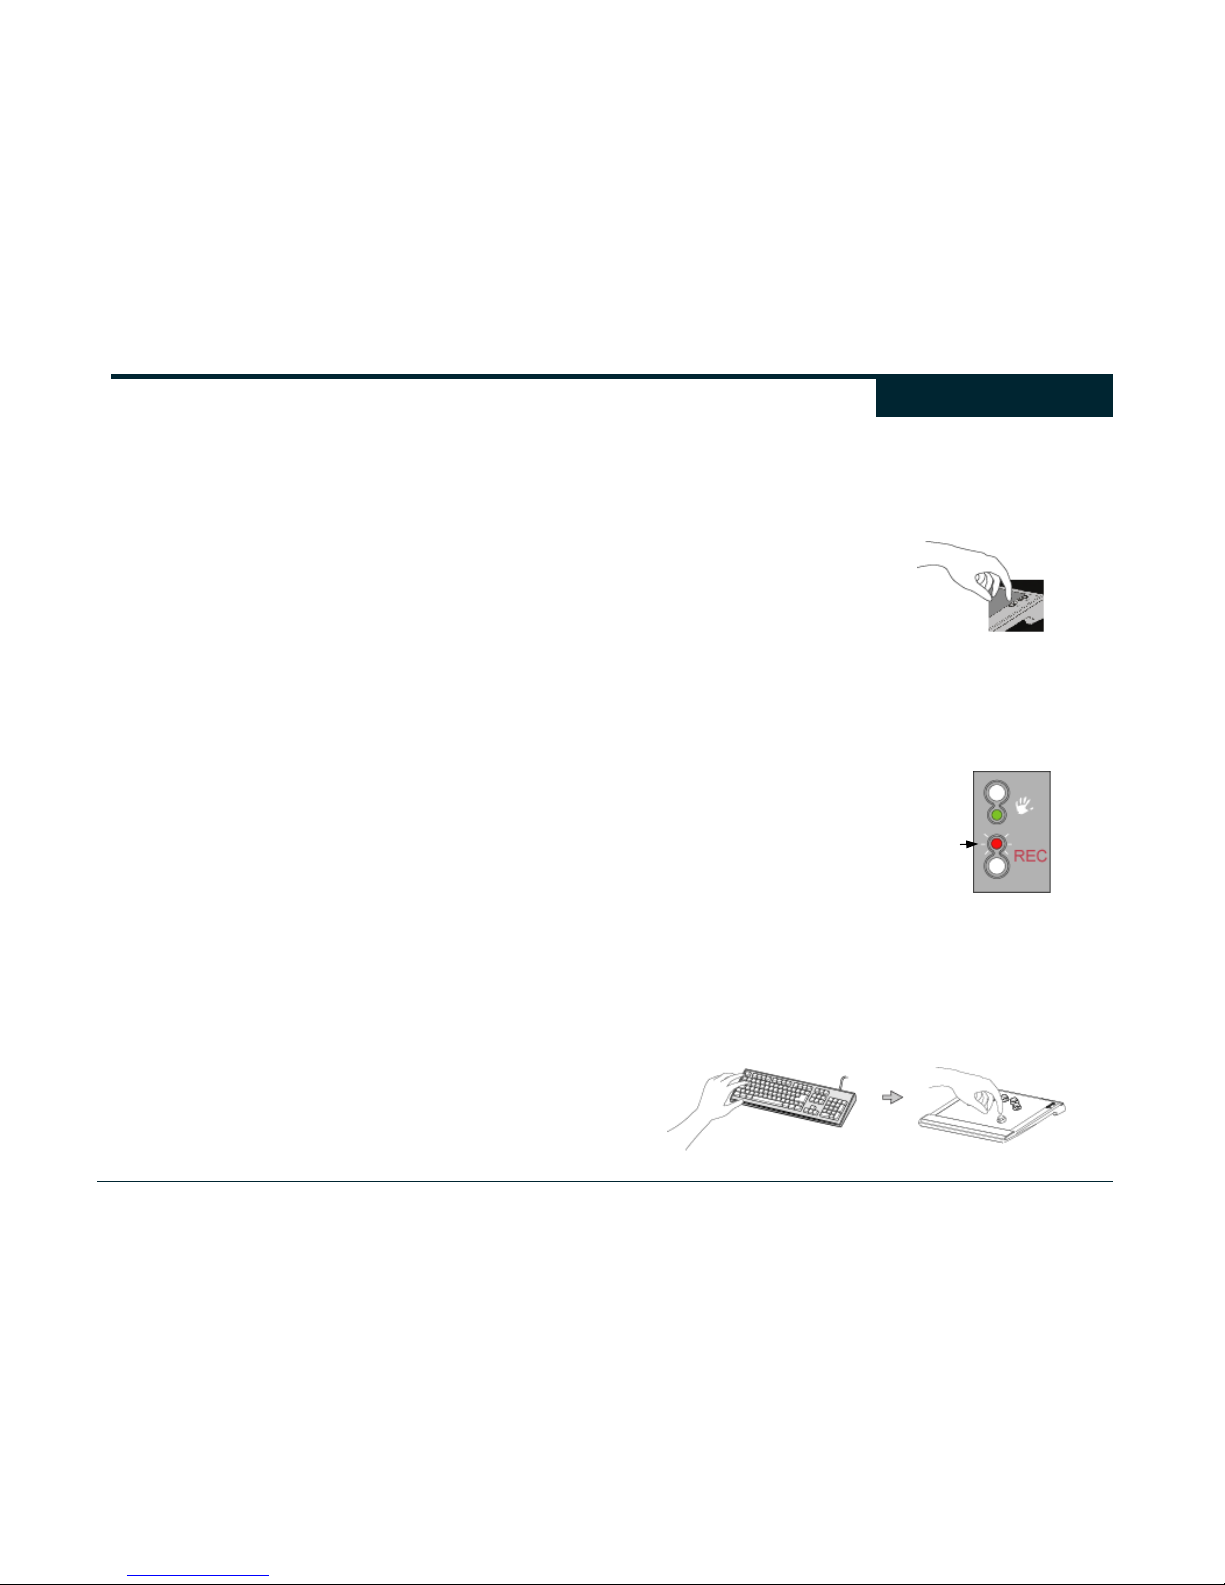
Make sure the program is the active window. Next, place the DX1
Pad into RECORD mode by pressing the REC button.
After you press the REC button, the Red Light on the DX1 Pad will
begin blinking, and a metronome sound will play (if you have sound
enabled on your computer). This blinking Red Light and the “tic - tic
- tic” sound notify you that Ergodex Manager is now recording
whatever you type on your regular keyboard.
Once the Pad is in RECORD mode, you create Macros by typing one
or more keys on your regular keyboard, followed by pressing a DX1
Key on your Pad. A brief “plunk” sound will indicate that you have
assigned the Macro to your DX1 Key. Whatever sequence you type
on your keyboard is recorded as a new Macro in a Program Profile,
and this Macro is assigned to the DX1 Key that you pressed.
Blinking Red Light
Macros
Page 33
33
By default, the Pad stays in RECORD mode after you have recorded
a Macro. This feature allows you to continue to create and assign
Macros to your DX1 Keys. To create each Macro, first type on your
regular keyboard then press a DX1 Key to which you want to assign
the Macro.
When you have finished recording Macros, you can exit RECORD
mode by pressing the REC button on your Pad (the Red Light will
turn off and the metronome sound will stop). After exiting RECORD
mode, your Macros are ready to use. Pressing the DX1 Key will play
back the Macro that you recorded in your program.
Record a Single Key Macro
To record a Single Key Macro, first make sure you are in RECORD
mode. Press the key you want to “clone” on your regular keyboard,
and then press a DX1 Key on your Pad. A Single Key Macro will be
created and assigned to that DX1 Key. Whenever you type only one
key in a record sequence, Ergodex Manager automatically creates a
Single Key Macro. No timing information is recorded for Single Key
Macros; you control the timing directly by pressing and releasing the
DX1 Key (just like a key on your regular keyboard).
Record a Multi Key Macro
To record a Multi Key Macro, first make sure you are in RECORD
mode. Type a sequence of two or more keys on your regular
keyboard, and then press a DX1 Key on your Pad. A Multi Key
Macro will automatically be created and assigned to that DX1 Key.
By default, Ergodex Manager records Multi Key Macros with timing;
the Macro you record will play keystrokes back at the same rate that
you originally typed them.
The Macro timing is often necessary for slow or complex programs,
where the computer needs time to process one command before
receiving the next command. It is also useful for many games,
where the time delay between key presses is important. You may
easily adjust or remove this timing from your recorded Macros using
Ergodex Manager.
Advanced Recording
If you would like to record your Multi Key Macros without timing, the
DX1 Input System offers some advanced features. First, you may
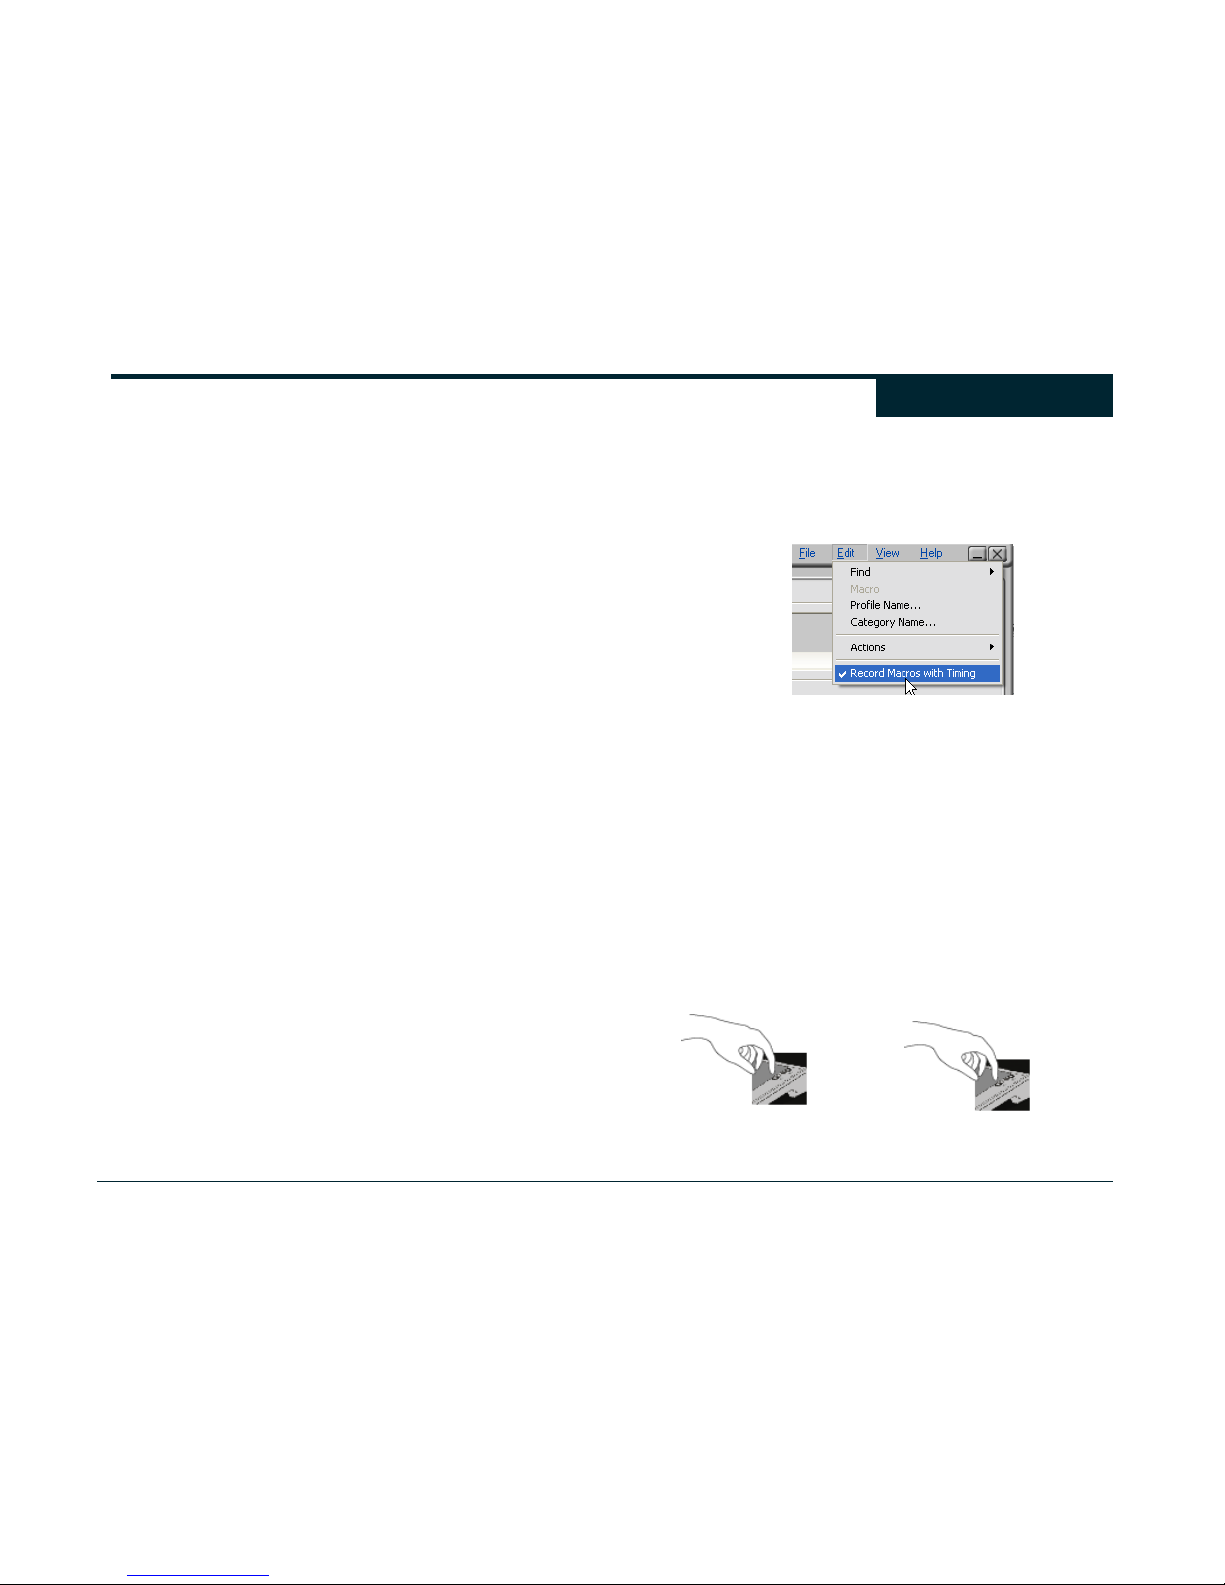
change the default record timing mode from the Menu in Ergodex
Manager. Click on “Edit > Record Macros with Timing” to toggle the
record timing mode.
If “Record Macros with Timing” is checked, Multi Key Macros will be
recorded with timing enabled. If it is unchecked Multi Key Macros
will be recorded without timing.
You can tell which RECORD mode you are using based on the
metronome “tic” sounds. Recording with timing has a slower “tic”
rate (once per second) while recording without timing has a faster
“tic” rate (twice per second).
Additionally, the DX1 Pad offers the ability to select which RECORD
mode (with or without timing) is used based on how you press the
record button. If you press the record button on your Pad normally,
Ergodex Manager will enter the RECORD mode that you have
specified with the ”Edit > Record Macros with Timing” option. If you
press and hold the record button for 3 seconds, the other record
mode will be used. Pressing the record button again while in either
RECORD mode will exit the RECORD mode.
Press and hold 3 seconds to
enter alternate RECORD mode
Press and release to enter
default RECORD mode.
Macros
Page 34
34
When you record a Macro from within a new program, Ergodex
Manager will automatically create a Program Profile for that program
(if one is not already available). Ergodex Manager will then insert
the Macro you recorded into the Macro List for that Profile.
Recorded Macros are added to either “Recorded Macros” or
“Recorded Single Keys” Categories. Ergodex Manager will
automatically name your Macros (e.g. “1
st
MACRO”, “Z Key”). After
recording your Macro, you can use Ergodex Manager to change the
Macro Name to something more meaningful or move the Macro into
another Category.
Composing Macros with Ergodex Manager
You may compose and edit Macros from within Ergodex Manager.
To compose a Macro, make sure Ergodex Manager is open and is
the active window on your desktop.
Before you compose a new Macro, you should first make sure that
you have selected the correct Program Profile for the Macro. Display
the correct Profile by selecting it from the Program Profile Selection
Box. (See the section on Creating New Profiles for more information
on adding new Profiles with Ergodex Manager.)
Once you have the correct Profile displayed in Ergodex Manager,
you may use one of the following methods to create a new Macro:
• In the Menu, select “File > New > Macro”
• In the Menu, select “File > Wizard” and then select the “Create a
New Macro” option
• Type the keyboard shortcut “Ctrl+M”
• Right click on a Category in the Macro List and select “Add New
Macro”
• Double click on an unassigned Key Image in the Key
Assignment Table. (This method has the advantage of both
creating a Macro and assigning it to a DX1 Key at the same
time.)
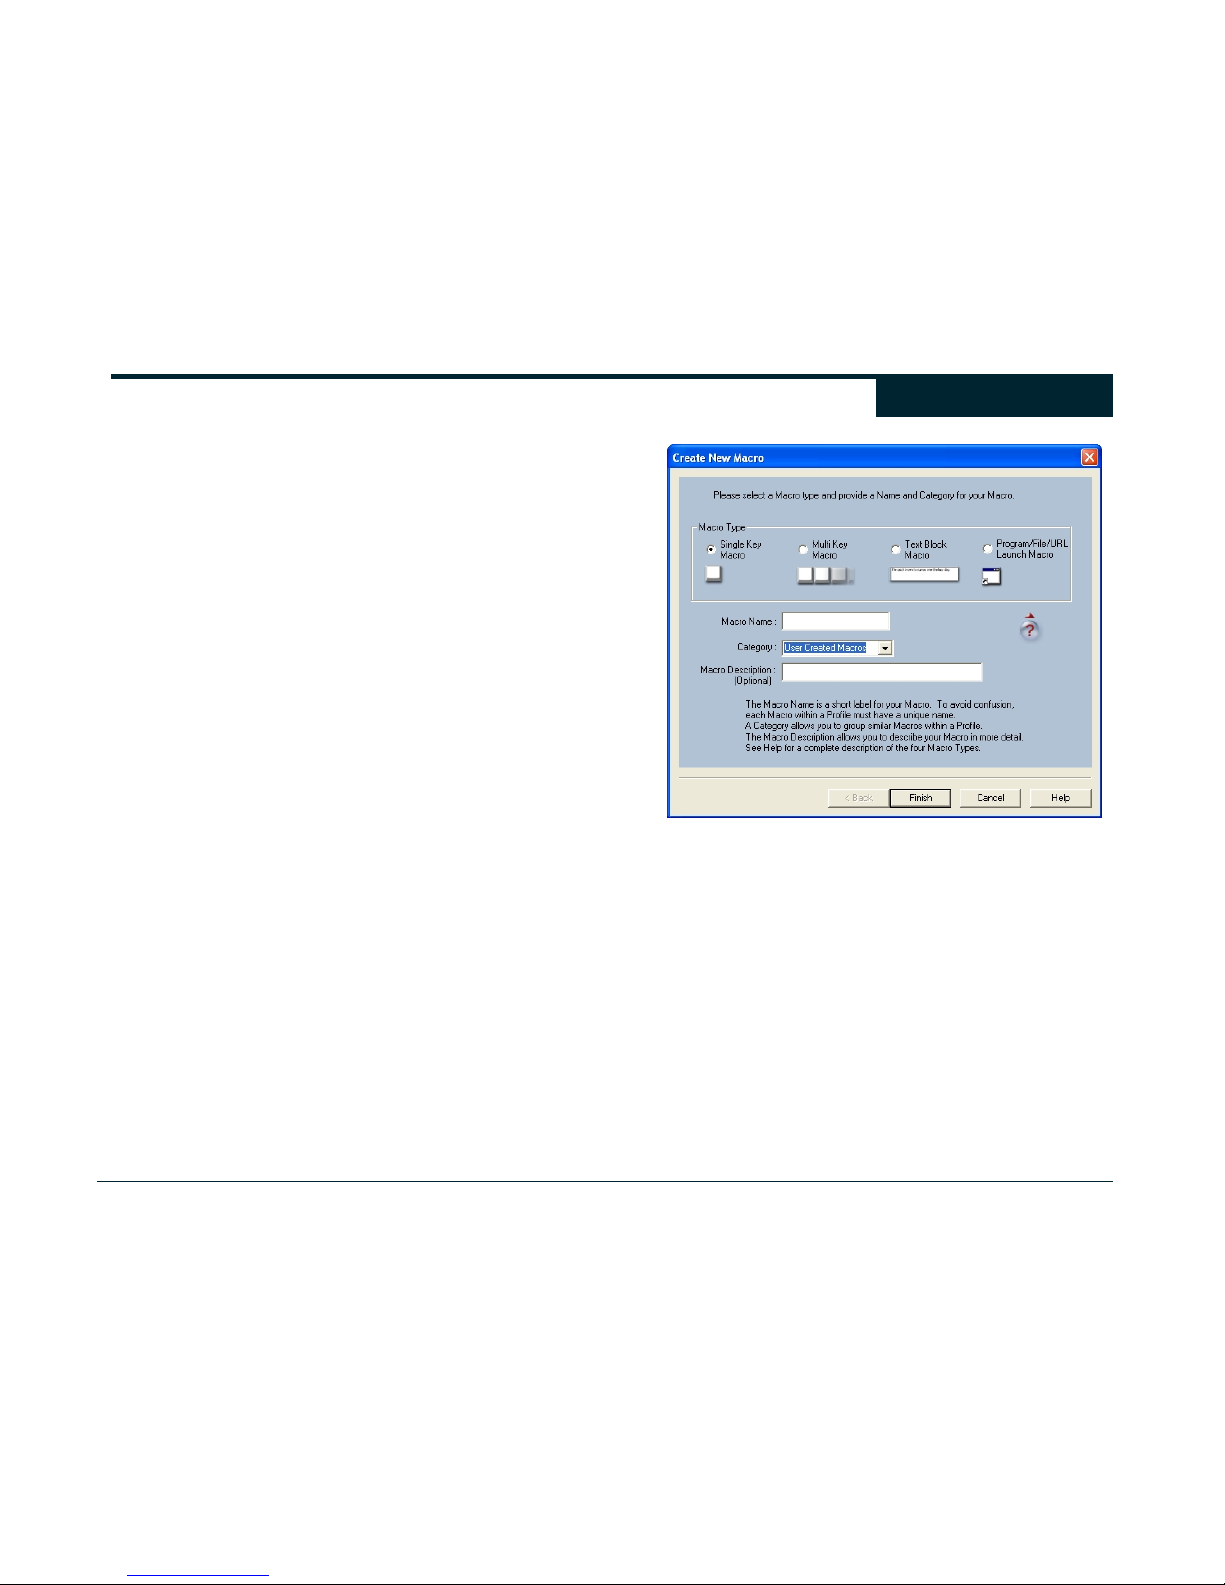
Each of these methods will open a dialog box that will require you to
provide a Macro Type, a Macro Name, and a Category for the
Macro.
You must provide the Macro Type, Macro Name, and the Category
to create the Macro. A Macro Description is optional; it allows you to
enter a brief description of the Macro function.
The Category list box will display the currently active Category with a
drop down arrow for changing to another category (if any). You can
also create a new Category by typing in the name of a Category that
does not already exist.
When you click “Finish,” an empty Macro with the Name and Type
you specified will appear in the Macro List. The Edit Macro dialog
box will open to allow you to specify the new Macro function.
Macros
Page 35
35
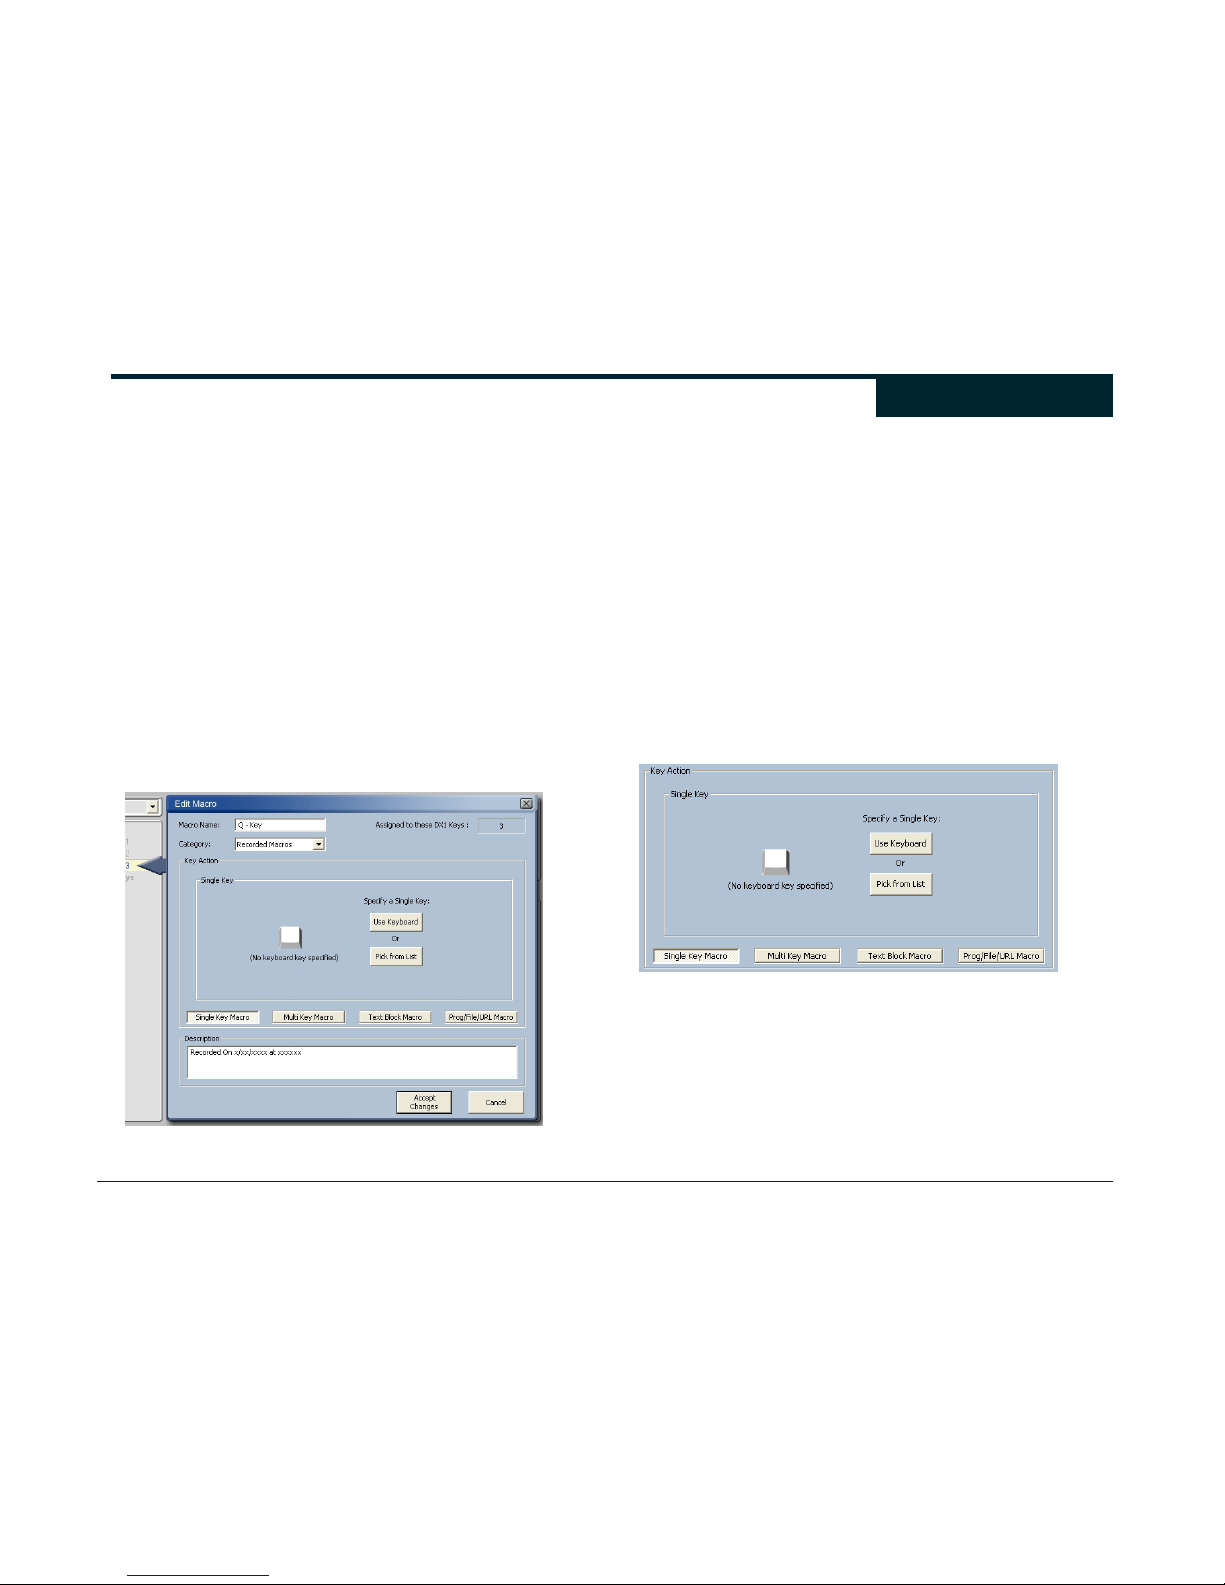
Edit Macro Dialog Box
You can use the Edit Macro Dialog Box to provide the information for
a new Macro, or to edit the function of an existing Macro.
The Edit Macro dialog box allows you to specify all the
characteristics of a Macro, including the Type, Name, Category,
Macro Sequence, Description, playback timing, and Press/Release
properties. Also, this dialog box can be used to view additional
information about the Macro. You can see DX1 Key assignments (if
any), as well as Macro data and timing information from several
views. Each Macro Type has a unique set of Macro data.
You can open the Edit Macro dialog box by double-clicking an
existing Macro, through the “Edit > Macro” command, or by using
one of the “Create New Macro” options. The Edit Macro dialog box
lets you provide data for a new Macro, edit an existing Macro or view
a Macro’s properties. The dialog box appears over the Key
Assignment Table in the Main Screen. The Edit Macro dialog box
always points to the Macro that is currently being created or edited.
The dialog box has many components, and you can edit Macro
information in several different ways.
The top left corner of the dialog box shows the Macro Name and
Category. To the right of the Macro Name is a box that shows the
current DX1 Keys that are assigned with this Macro. At the bottom of
the dialog box is the Macro description.
The area in the middle of the dialog box labeled “Key Action”
represents the Macro’s data and defines its behavior. The
information shown here depends upon the current Macro Type. The
four buttons at the bottom of this area allow you to change the
current Macro to another Macro Type.
Edit Macro Dialog Box – Single Key Macro
A Single Key Macro needs to know which key from the regular
keyboard it is expected to reproduce.
For a Single Key Macro, a Key Image appears in the middle of the
dialog box and represents the keyboard key that is currently
assigned to this Macro. The buttons to the right allow you to assign a
keyboard key using your keyboard or by picking from a list of
“special” keys. “Special” keys include keys that are usually used for
window navigation or may be difficult to insert from your regular
keyboard. For example, the “Enter” key is included under “special”
keys, because pressing the Enter will normally dismiss a dialog box
window.
Macros
Page 36
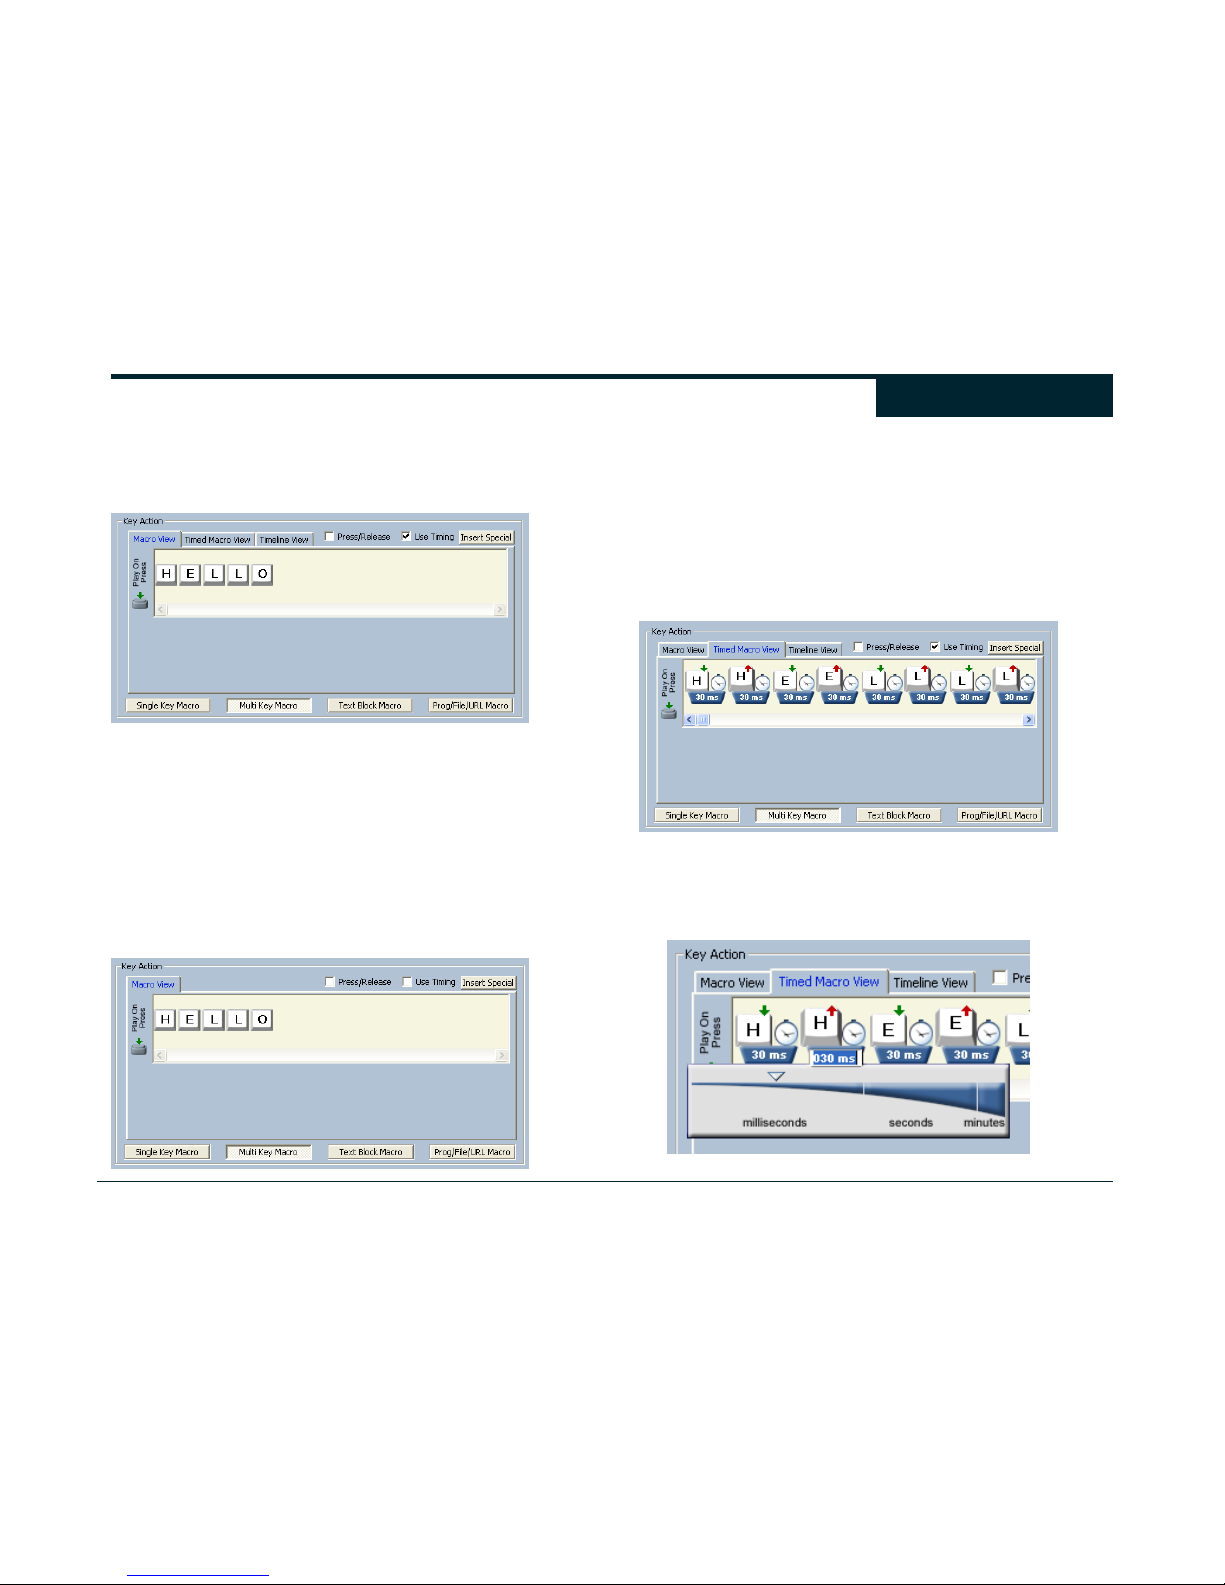
36
Edit Macro Dialog Box – Multi Key Macro
For a Multiple Key Macro, you can insert the Macro sequence in the
yellow “Play on Press” edit box. For the example here, the keys “H”
“E” “L” “L” and “O” were entered from a regular keyboard.
The “Play on Press” edit box displays the keystroke sequence that
will play when you play this Macro. Click “Insert Special” to insert
navigational keys from your keyboard. For example, the left/right
arrow keys on your keyboard will move the edit cursor left and right
in the “Play on Press” edit box. If you wanted to insert a left or right
arrow key into your Macro sequence, you need to select it from the
“Insert Special" list.
The Key Action provides three potential views of your Macro. If the
Macro does not use timing (the “Use Timing” option in the Key Action
window is unchecked) only the standard “Macro View” will be
available.
If the Macro is specified to use timing (the “Use Timing” option in the
Key Action window is checked), the Key Action area will display two
additional view options for your Macro, “Timed Macro View” and
“Timeline View.” You can switch between the three views by clicking
the corresponding tabs in the Key Action area.
The Timed Macro View shows the precise sequence of keystrokes
(both down and up) that constitute the Macro. Keystroke presses
are shown with green down arrows; keystroke releases are shown
with red up arrows.
Following each keystroke event, there is a clock icon that displays
the precise time delay before the next keystroke event in your Macro.
Clicking on the time delay will open an edit window that lets you
specify a time delay between 1 millisecond and 5 minutes.
Macros
Page 37
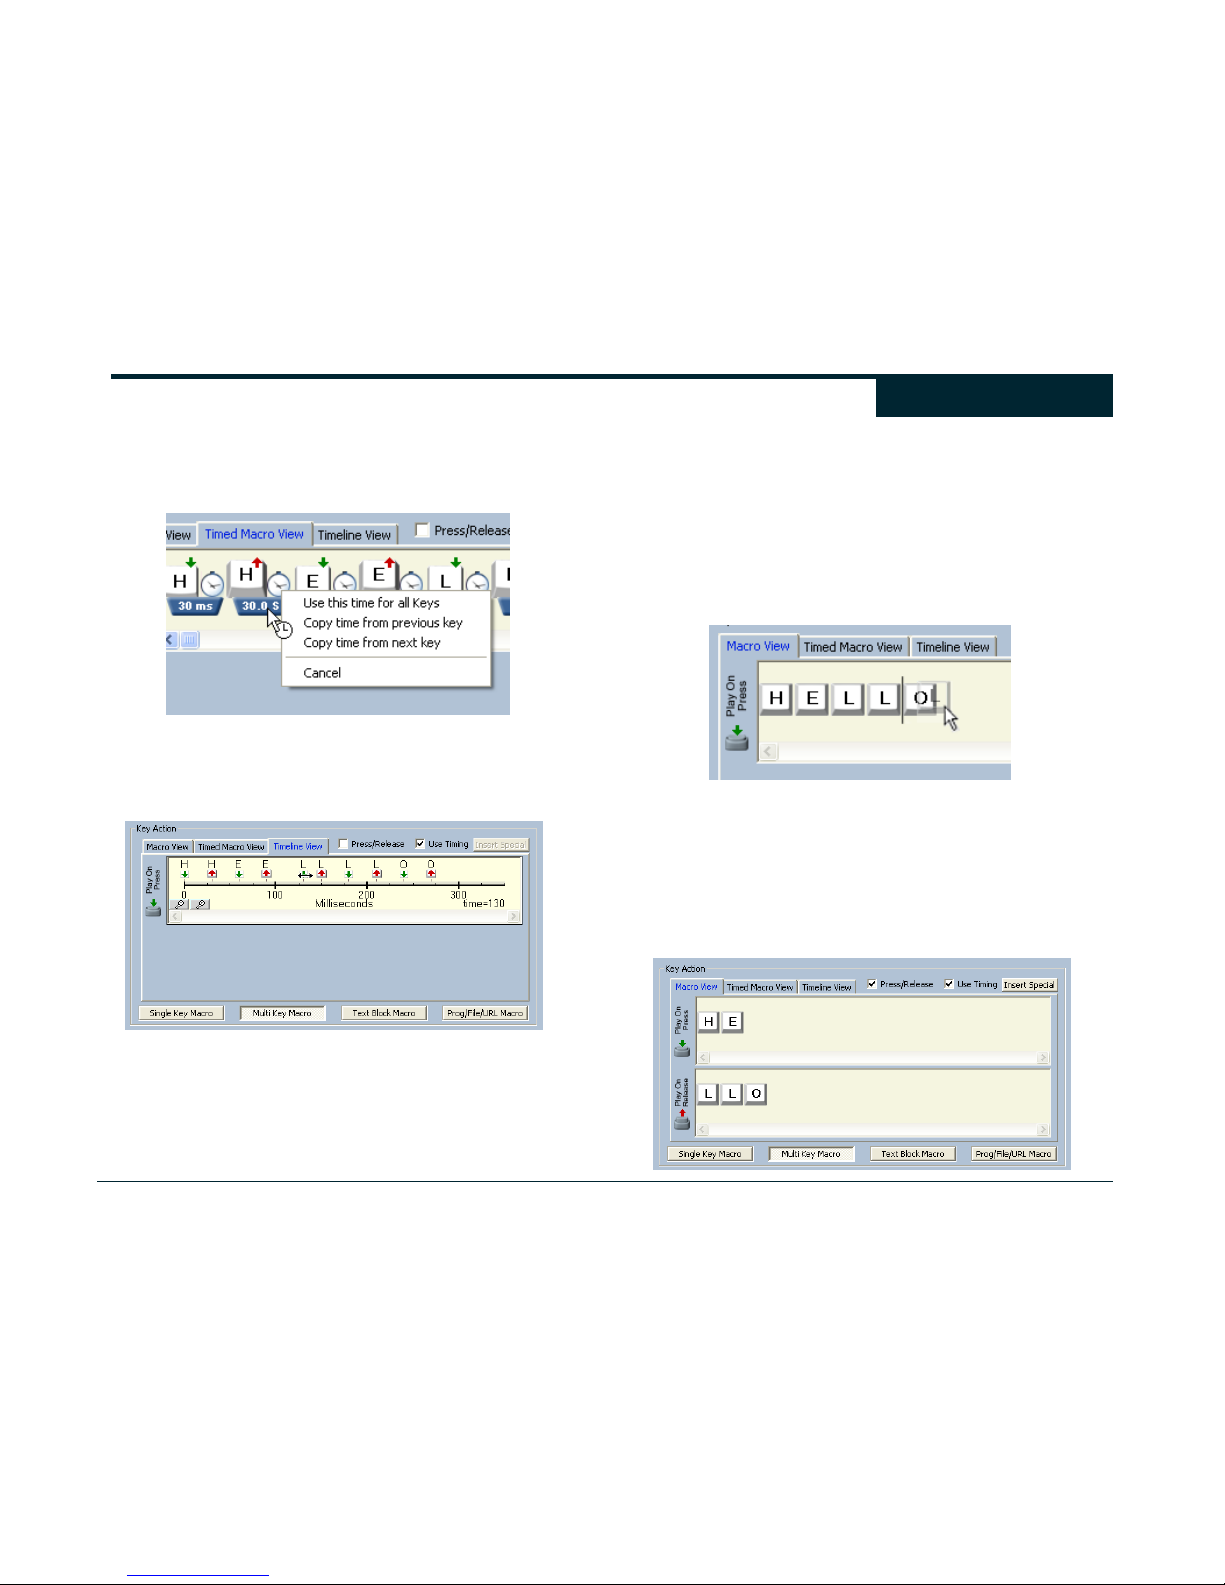
37
Right clicking a clock icon will display a useful list of time editing
shortcuts that allow you copy, paste and set the timing for the Entire
Macro.
The Timeline View graphically displays the time of each keystroke
event. Using the Timeline View, you can see the relative timing
between each of the keystroke events.
You can drag keystroke events along the timeline to adjust the
Macro timing. Click on the “plus” and “minus” magnifying glass icons
with the to adjust the zoom level of the timeline.
It is important to note that each of the timed Macro views (Macro
View, Timed Macro View, and Timeline View) all represent the same
Macro. You may edit the Macro in any of these three views.
In all three Multi Key Macro views you may edit the order of the
keystroke events by dragging a key image to another position. Of
course, in the Timed Macro View, Ergodex Manager will prevent you
from making impossible Macros combinations (e.g., A keystroke
must have a “down event” before it can have an “up event.”)
Press/Release Macros
Press/Release Macros allow you to play one sequence of keystrokes
when you press a DX1 Key, and a second sequence of keystrokes
when you release the DX1 Key. Checking the “Use Press/Release”
Macro option in the Key Action displays a “Play on Release” edit box.
This sequence will play when you release the DX1 Key assigned
with this Macro. The “Play on Release” edit box works the same as
the “Play on Press” edit box discussed in this section.
Macros
Page 38
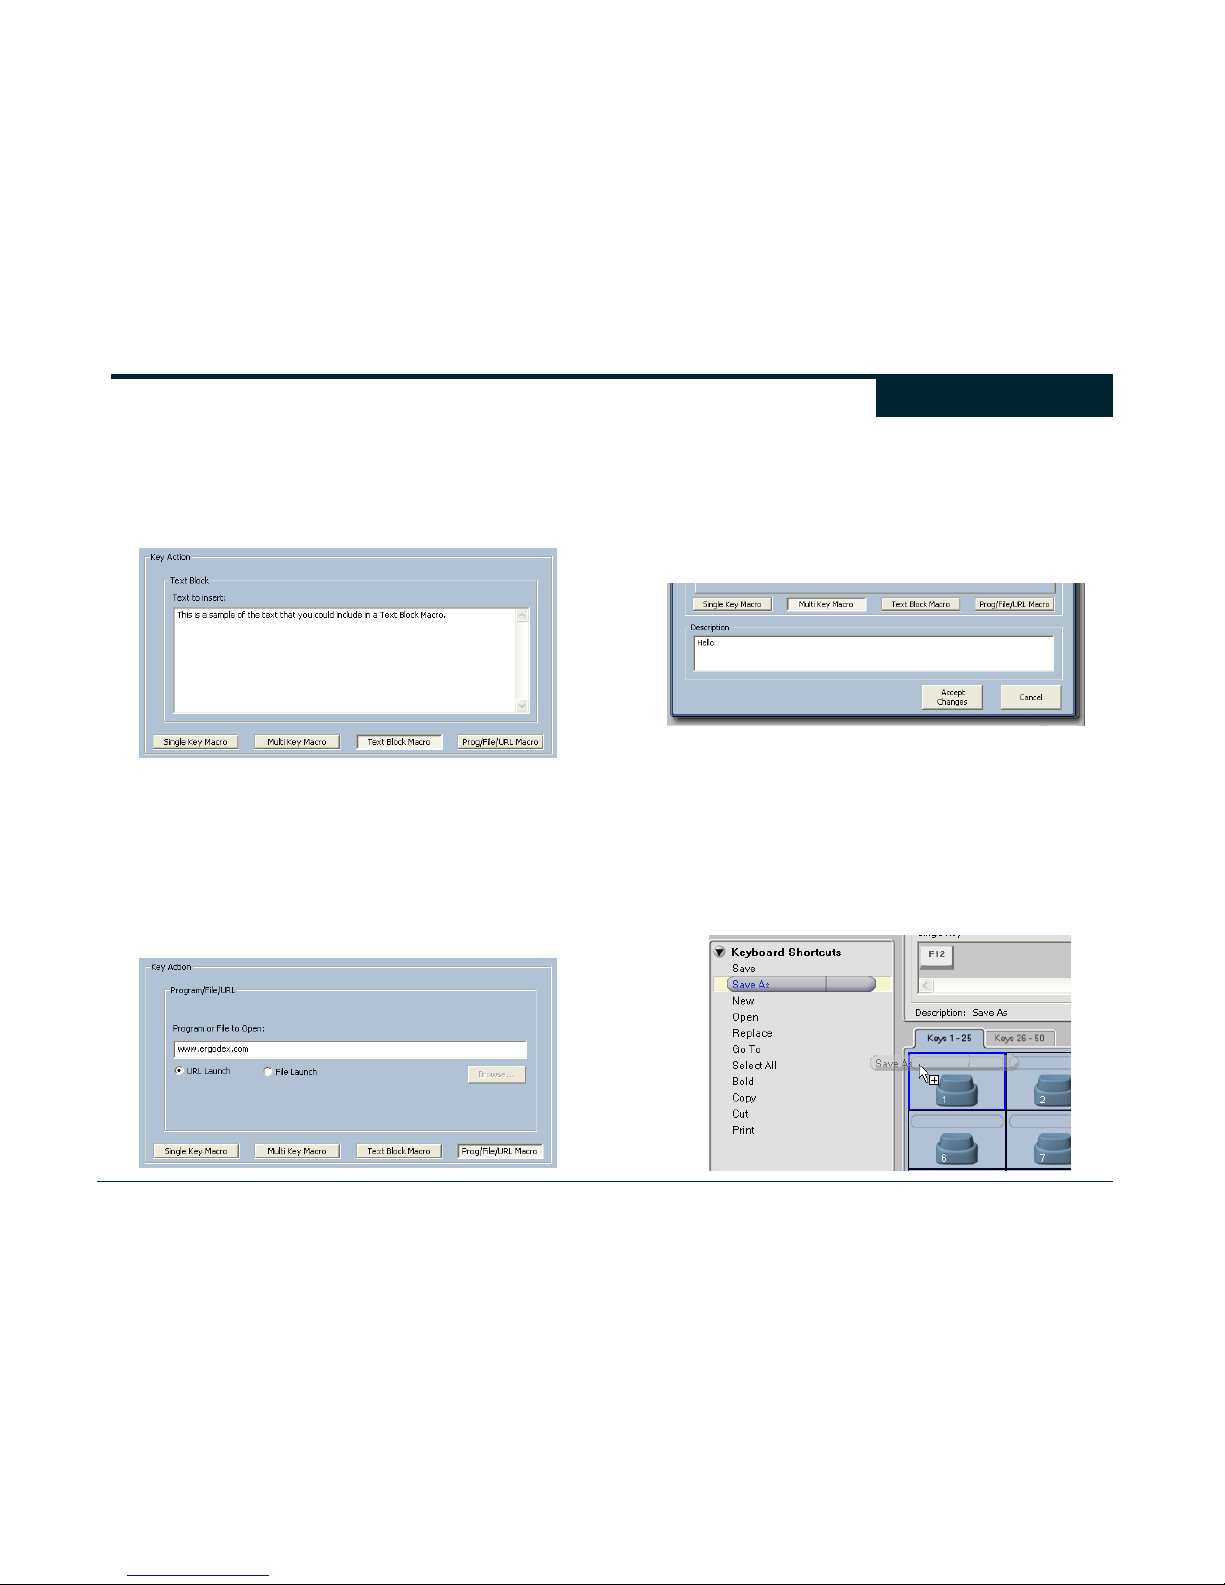
38
Edit Macro Dialog Box – Text Block Macro
The Text Block Macro lets you provide the text that is inserted into a
form or document when the Macro is played. You can type in the
space provided, or copy and paste a block of text from another
document. Text Block Macros do not contain timing; text is inserted
instantly.
Edit Macro Dialog Box – Program/File/URL Launch Macro
The Program/File/URL Launch Macro (or Launch Macro) allows you
to specify a program, a file, or a web site to open whenever the
Macro is played. To open a file or program, you provide the full path
and filename to the file. To launch a web site, you provide the web
site address (called the URL) that you wish to launch. The Macro
area provides a box to type in the required information. You can also
use the browse button to find a program or file on the disk.
You can edit the properties of a Macro at any time, including the
Macro Type. Whenever you make a change to a Macro in the Macro
Edit dialog box, the “Accept Changes” in the lower right hand corner
of the dialog box will become available. Your edits will only take
effect after you click “Accept Changes.” If you do not want to keep
the changes you made to your Macro, hit “Cancel” to close the
Macro Edit dialog box.
Assigning Macros
Assigning a Macro associates the Macro with a specific DX1 Key (for
a given Program Profile). When you press the DX1 Key in the
program for which you have a Profile, the corresponding Macro will
play. When you first install the DX1 Input System, there are no
Macros assigned to any of your DX1 Keys. Macros can be assigned
to DX1 Keys in several ways. Within Ergodex Manager, you can drag
a Macro and drop it onto a Key image in the Key Assignment table.
Alternately, you can drag a Key image from the table and drop it onto
a Macro in the Macro list.
Macros
Page 39
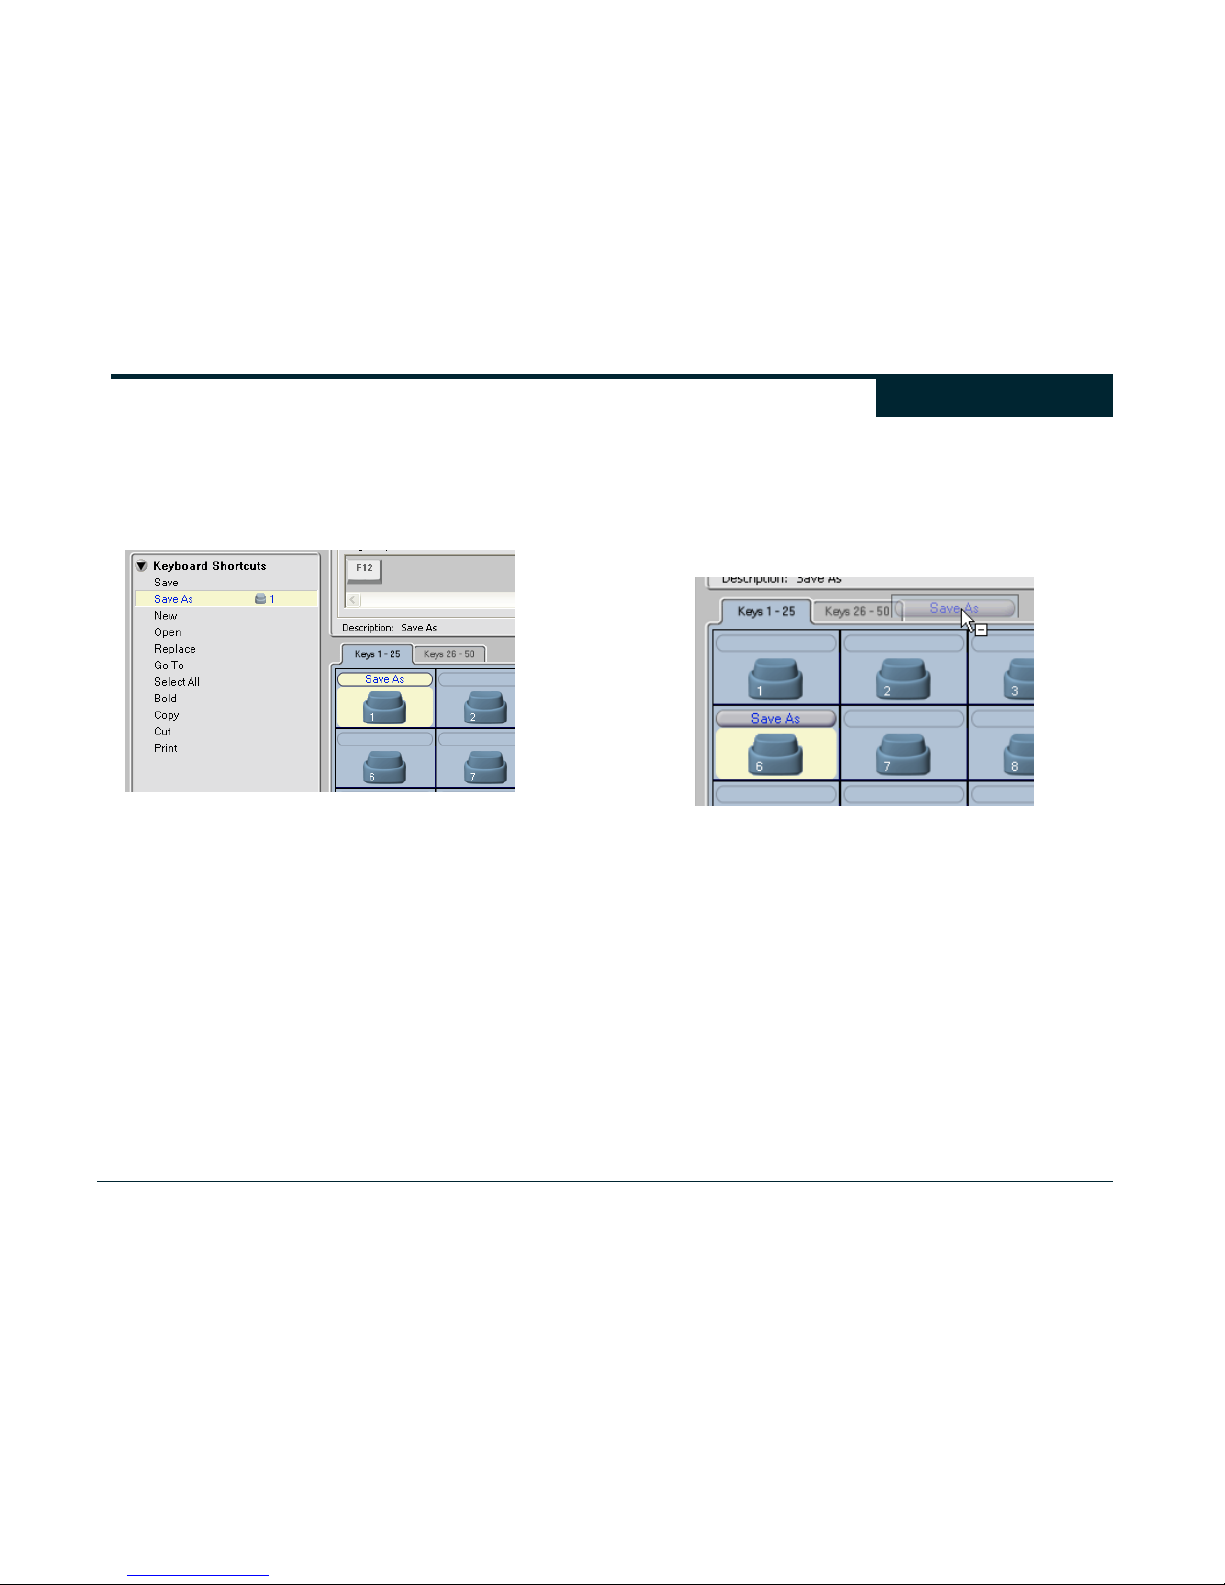
39
Whenever a Macro is assigned to a DX1 Key, the Key number will
appear to the right of the Macro in the Macro List. Likewise, the
Macro name will appear over the assigned DX1 Key. In the example
shown below, the Macro “Save As” has been assigned to DX1 Key
number 1.
If a DX1 Key already has a Macro assigned to it, and you drag and
drop another Macro onto it, the new Macro replaces the old one. The
Key image will have a new caption representing the new Macro
name. The same Macro can be assigned to up to three DX1 Keys.
Macros can also be assigned to Keys by several other methods. You
can right click on a Macro Name in the Macro List and choose
“Assign Macro” to select from a list of DX1 Keys. Alternately, you
can right click on a DX1 Key in the Key Assignment Table to select
from a list of available Macros. As was shown in the Recording
Macros section, DX1 Keys are automatically assigned when you
record Macros directly from within a program.
Unassigning Macros
Unassigning a Macro removes the link between the Macro and a
DX1 Key within a Profile. When you unassign a Macro, the Macro
remains in the Macro List of the Profile, but it will no longer play
when you press the Key. Macros assigned to DX1 Keys can be
unassigned by dragging the Macro away from the Key Image in the
Key Assignment Table.
Drag the Macro Name off the Key Image to unassign a Macro
You can also unassign a Macro by selecting it and choosing “Actions
> Keys > Unassign” from the Menu. Alternately, can also right click
on a Macro in the Key Assignment Table and choose “Unassign.”
The shortcut for unassigning a selected Macro is “Ctrl + U”
DX1 Keys are automatically reassigned when you record a new
Macro over them. The Macro that you replace will remain available
in the Macro List, but the newly recorded Macro will be assigned to
the DX1 Key.
Playing Macros
Once you have created and assigned your Macro to a DX1 Key, you
can play the Macro by pressing the DX1 Key when running the
program you have specified. Ergodex Manager keeps track of all
your Macro assignments, and will play the assigned Macro based
upon the currently active program on your computer. For example,
Macros
Page 40
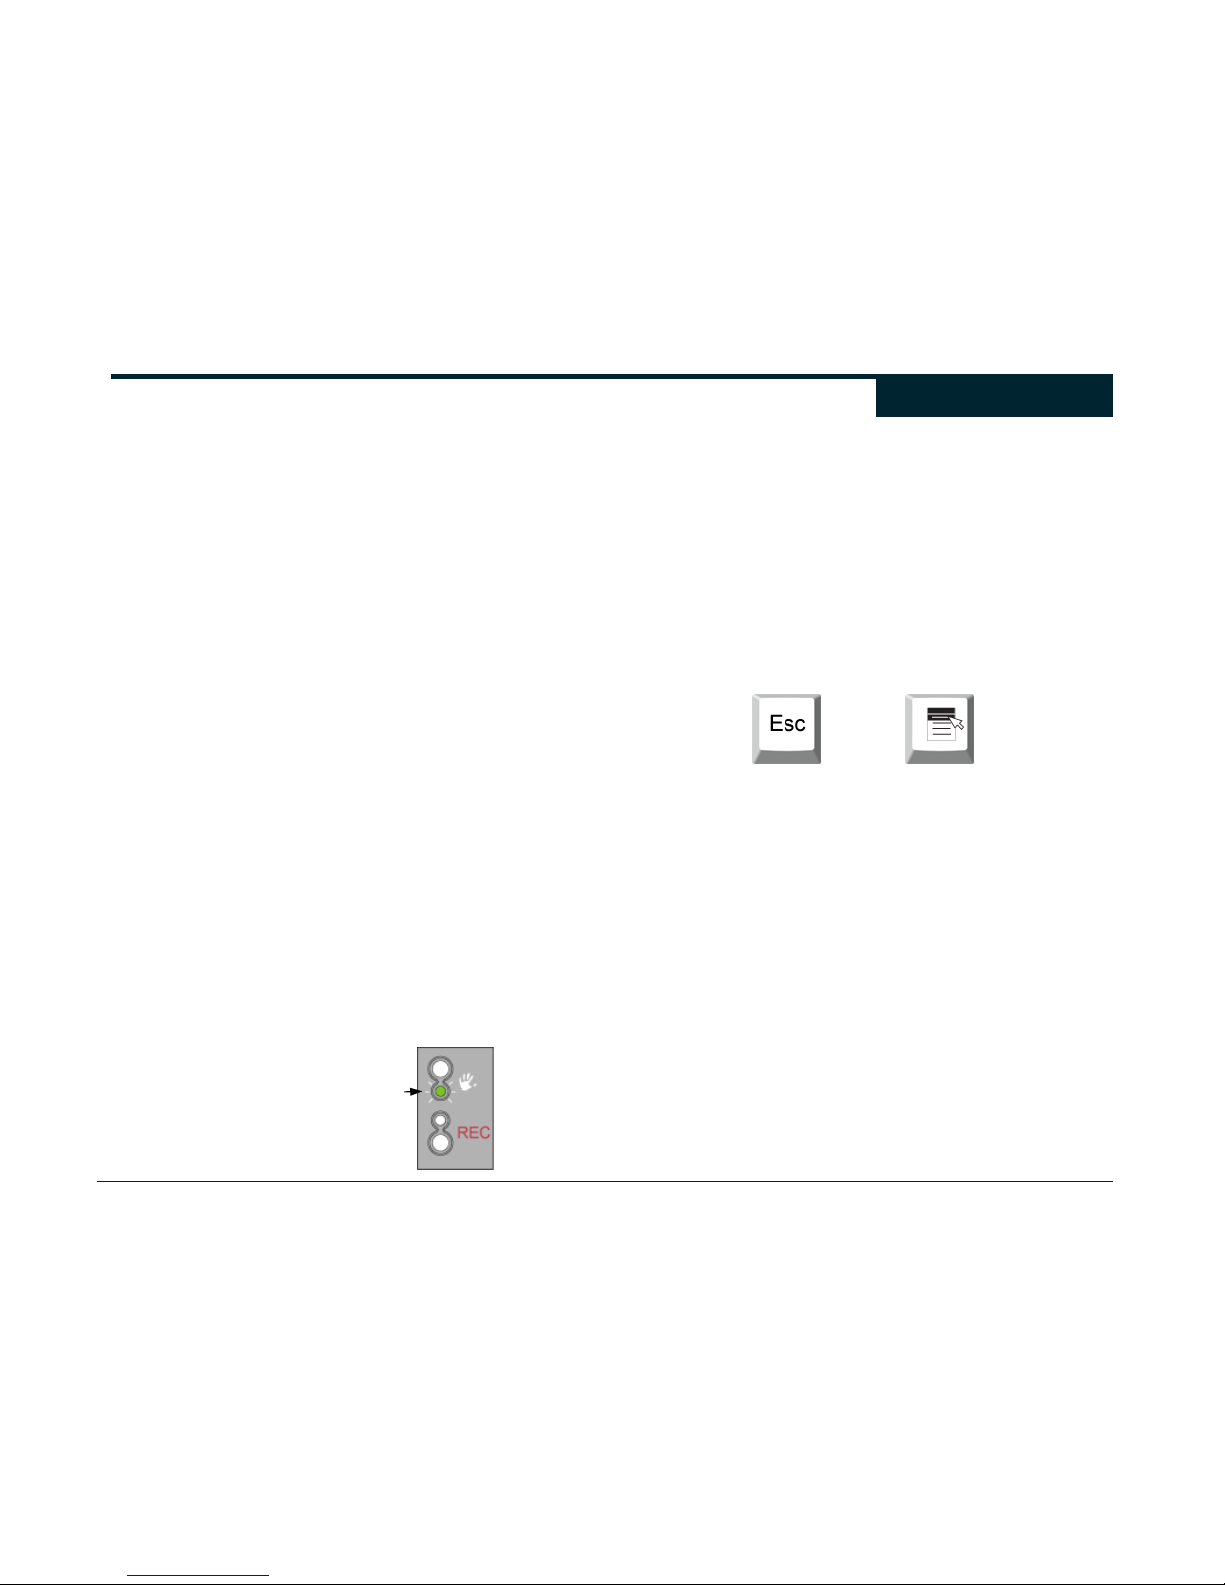
40
you might assign a DX1 Key with a “Copy” Macro in a Profile for a
word processing program. You might assign a “Jump” Macro to the
same DX1 Key in a Profile for a game. When you are using the word
processor and you press the DX1 Key, the “Copy” Macro will play.
Likewise, whenever you are running the game program, pressing the
DX1 Key will play the “Jump” Macro. Ergodex Manager
automatically switches the Program Profile and the associated
Macros depending on the program that is active on your computer.
You may press multiple DX1 Keys if they are assigned Single Key
Macros. In fact, the DX1 Input System will register up to six
simultaneous DX1 Key presses. (Most regular keyboards only
support three or four simultaneous key presses, which can be a
problem in some games.)
Although you may use up to six simultaneous Single Key Macros,
you may only play one Multi Key Macro at a time. This feature
prevents your Multi Key Macros from “colliding” and causing
unintended results. For example, if you played two Multi Key Macros
simultaneously, and one of them included a “Control” or “Shift”
keystroke, the other Macro function could change dramatically.
Ergodex Manager avoids this problem by blocking a second Multi
Key Macro when another Multi Key Macro is already playing. Once
the first Macro is finished, you can play the second Macro.
Note that playing a Multi Key Macros does not interfere with playing
Single Key Macros at the same time. If you are playing a game, you
can continue to use any Single Key Macros (to move or jump, for
example) while a Multi Key Macro is also playing.
Whenever a timed Multi Key Macro is playing, the Green Light on
your DX1 Pad will pulse. This pulsing is a signal that the Multi Key
Macro is still playing. When the Green Light stops pulsing, the Multi
Key Macro has finished playing.
Stopping Macros
Ergodex Manager allows you to create very long and complex Multi
Key Macros with precise control over the playback timing. However,
what happens if you want to stop your Multi Key Macro early?
Ergodex Manager provides a number of ways to stop a Multi Key
Macro.
One way to stop a Multi Key Macro is to press either the “Escape”
key or the “Apps” key on your regular keyboard. (The “Apps” key is
usually in the lower right hand corner of your regular keyboard, next
to the Right “Ctrl” key. It usually has a menu select icon of some
kind on it.)
Pressing either the “Esc” or “Apps” keys on your regular keyboard
will halt a Multi Key Macro.
Another way to stop a Macro early is to press a DX1 Key assigned
either “Esc” or “Apps” with a Single Key Macro. Since Single Key
Macros perform identically to regular keyboard keys, pressing a DX1
Key assigned with “Esc” or “Apps” would stop the Multi Key Macro in
the same way.
Finally, if pressing either the “Esc” or the “Apps” key might interfere
with your program, you can assign a “Break Macro” to one of your
DX1 Keys. The “Break Macro” is a special Single Key Macro that will
stop a Multi Key Macro. You will find “Break Macro” in the “Insert
From List” feature in the Edit Macro dialog box.
Note: Although the “Break Macro” feature is useful when pressing
either the “Esc” or “Apps” key would interfere with the program you
are using, there is a slight time delay between playing the “Break
Macro” and stopping the Multi Key Macro. We have found that for
game programs in particular, assigning the “Apps” key to a DX1 Key
on your Pad is the best way to stop a Multi Key Macro.
Pulsing Green Light indicates a
timed Multi Key Macro is playing
Macros
Page 41
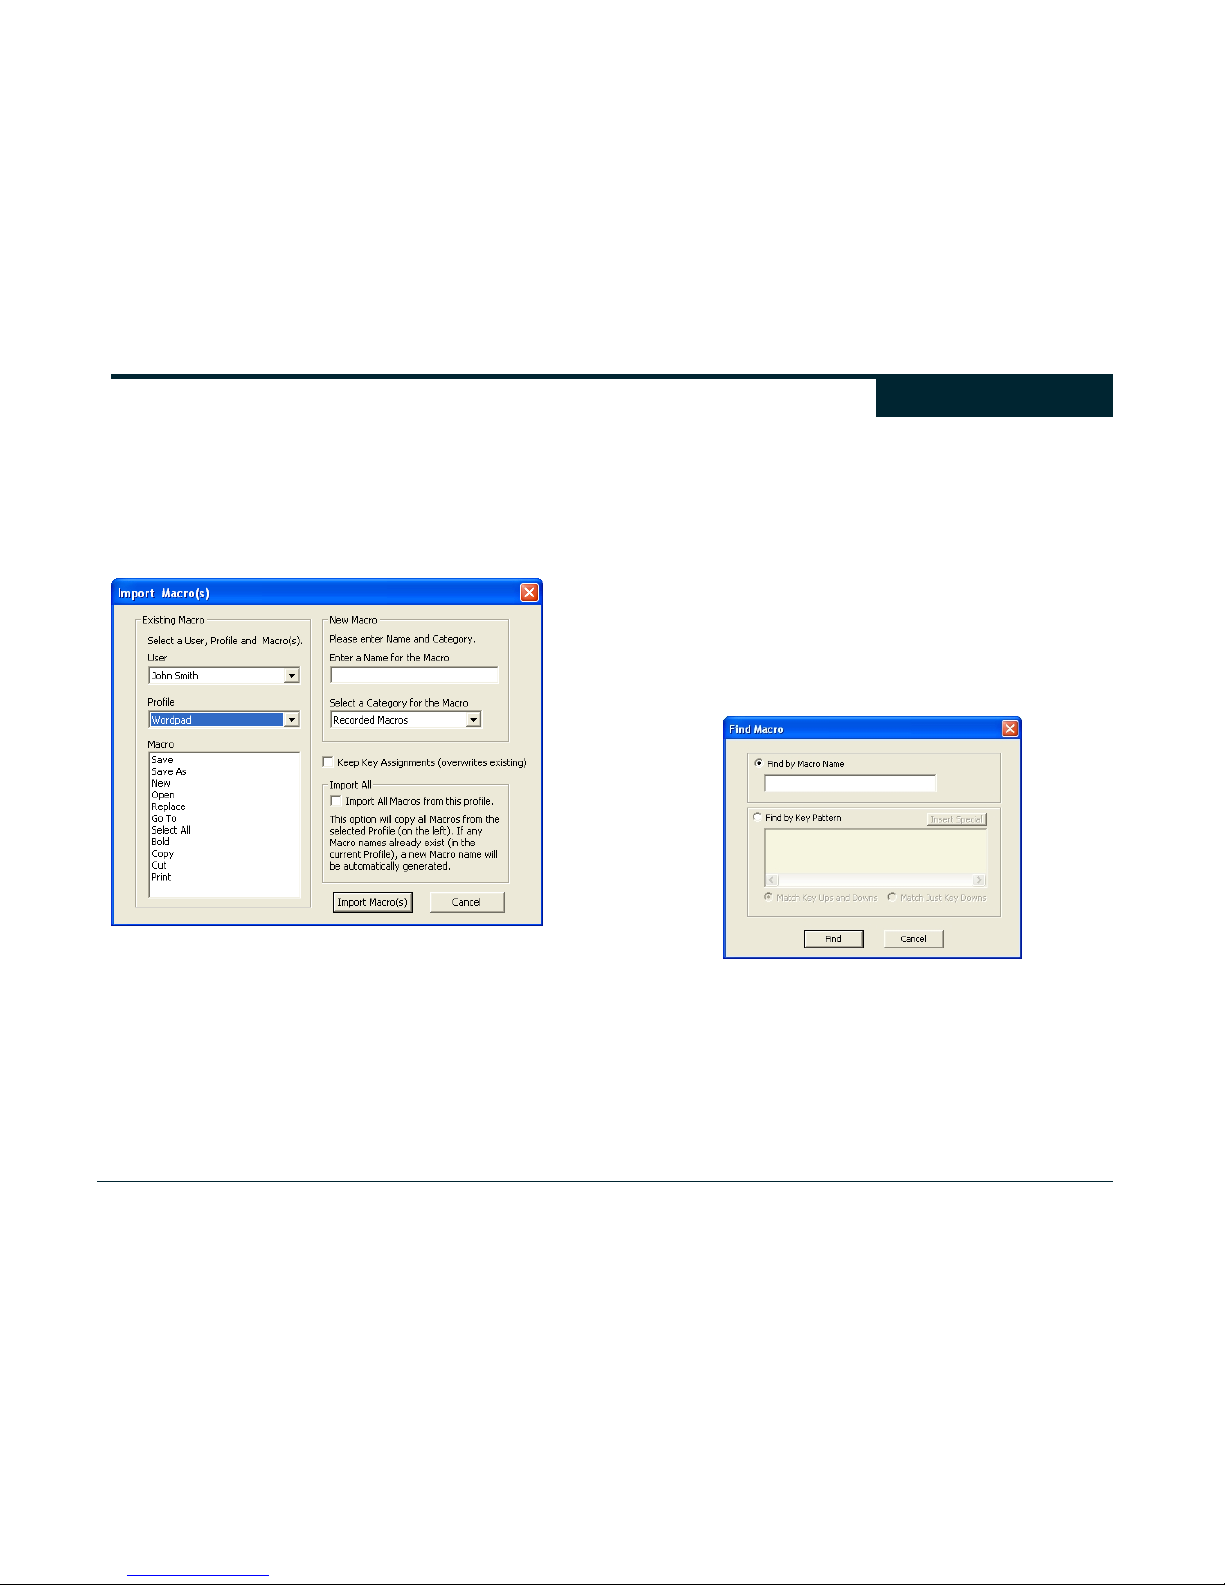
41
Importing Macros
Ergodex Manager lets you import Macros from the existing Profiles
of any User on your computer. You can use the import Macro
feature to copy Macros between Profiles. To import one or more
Macros select “File > Import Macro(s)” from the Menu. A dialog box
will let you choose the User and Profile for the Macros you would like
to copy. A list box will display all the available Macros in that Profile.
You can now choose one or more Macros to import. If you select a
single Macro, you can provide a new name for the imported Macro.
If you select more than one Macro (using CTRL + click) to import,
Ergodex Manager will automatically create the Macro names.
Ergodex Manager uses a special merge technique to create the new
Macros. If the names of any imported Macros match those already in
your Profile, Ergodex Manager compares the contents of both
Macros. Identical Macros are automatically removed from your
Profile. If the imported Macro has a duplicate Macro Name but a
different Macro keystroke sequence, Ergodex Manager will mark the
imported Macro by appending an “*” to the end of the Macro Name.
Selecting the “Keep Key Assignments” option will import the DX1
Key assignments for any imported Macros. Ergodex Manager will
overwrite the existing assignments (if any) on affected Keys. If this
option is not selected, Ergodex Manager will only import the Macros,
not the DX1 Key assignments.
You can import all of the Macros from a Profile by selecting the
“Import All” option.
Finding Macros
Using the DX1 Input System can quickly produce a large number of
Macros. Ergodex Manager provides a very powerful way of
searching for a Macro within a Program Profile. Select “Edit > Find
Macro” from the Menu to open a Macro search dialog box.
You can search for a Macro by Name or by the contents of the
Macro keystroke sequence. If you choose to enter a Key pattern,
Ergodex Manager will identify any Macros in the current Profile that
contain that pattern.
Macros
Page 42
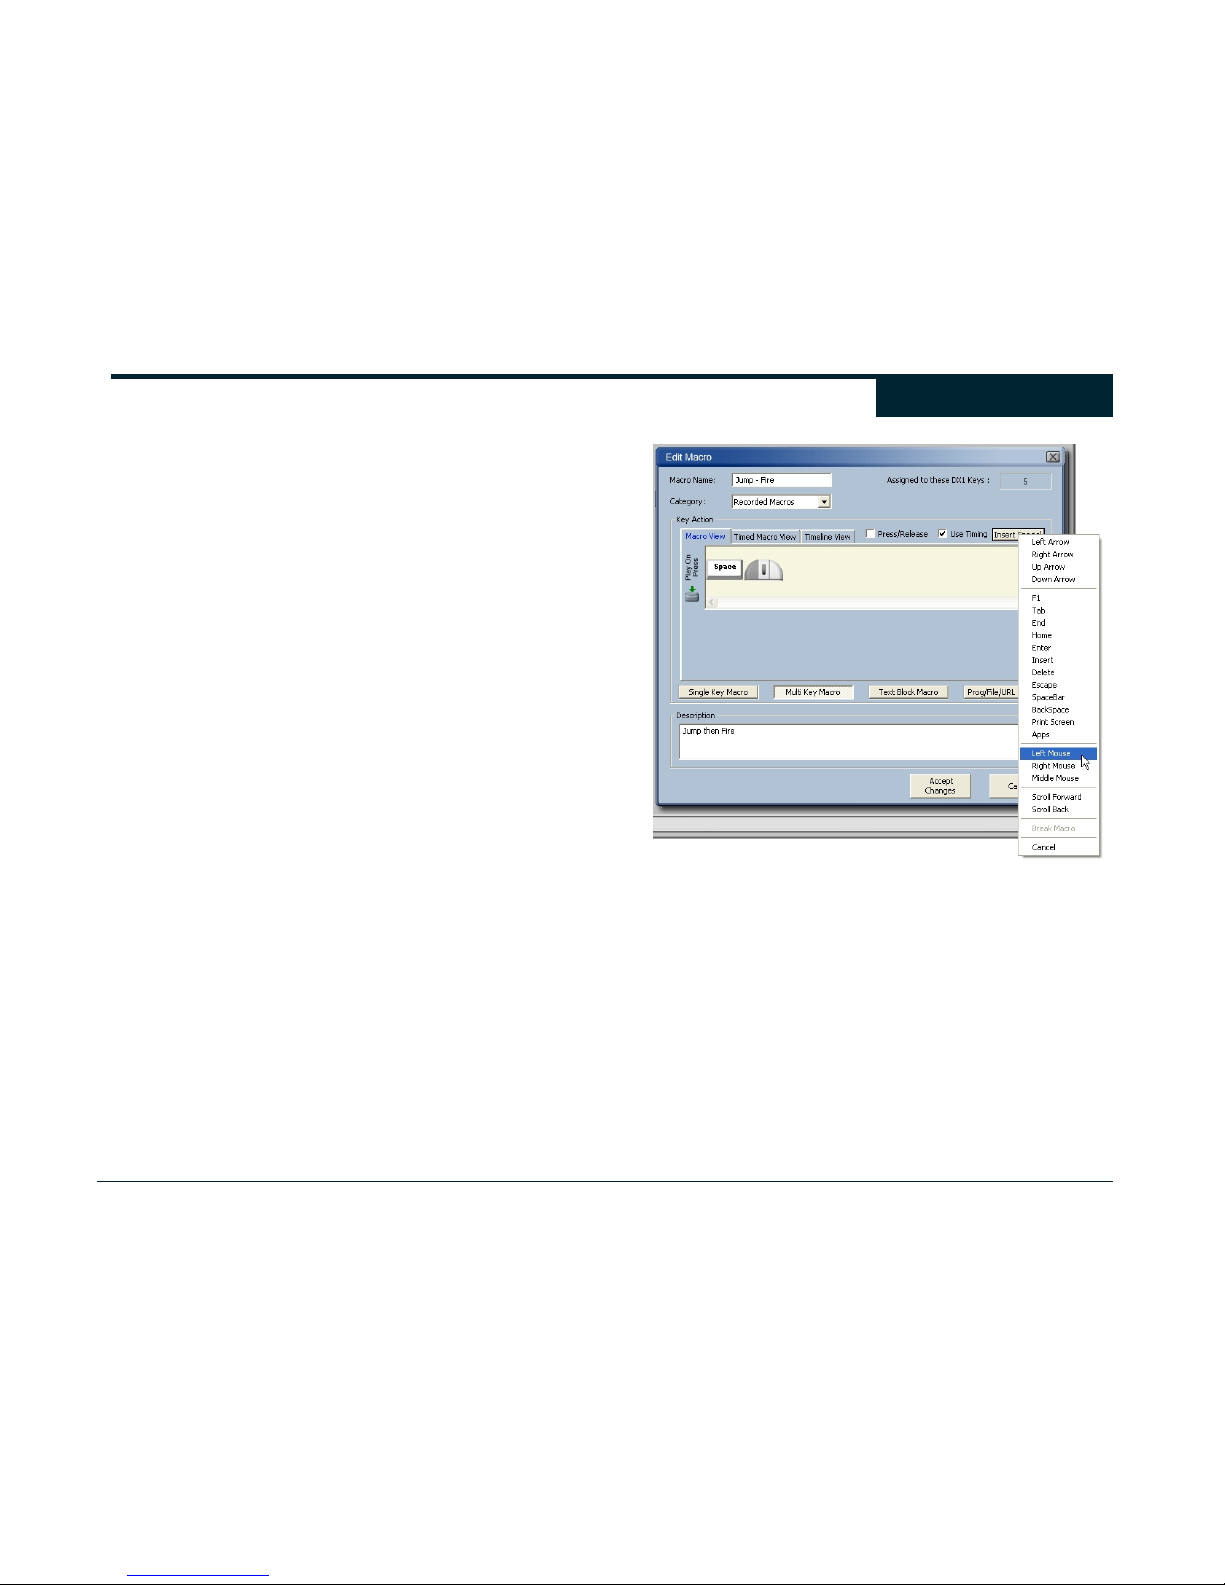
42
Deleting Macros
You can delete Macros by first selecting a Macro. Next select
“Actions > Macro > Delete” from the Menu. You may also delete a
Macro by right clicking on the Macro Name in the Macro List and
selecting “Delete Macro.”
Deleting a Macro permanently removes the Macro from Ergodex
Manager. Deleting a Macro also removes its assignments to any
DX1 Keys.
Mouse Clicks
Sometimes, when you are creating a Multi Key Macro sequence, you
would like to include one or more Mouse Clicks. This is often helpful
in games where mouse button clicks trigger actions that you want to
include in your Macro. W hen recording a Multi Key Macro, Ergodex
Manager treats the buttons and scroll wheel of your mouse just like
the keys on your regular keyboard. If you click a mouse button
during your recording, the action will be added to the Macro
sequence. You can also add mouse click events to Macros from the
Edit Macro dialog box by clicking “Insert Special.”
Important Note: When you add a mouse click to a Multi Key Macro,
Ergodex Manager inserts the click into the Macro Sequence.
However, no information about the mouse cursor location is
recorded. If you play a Macro that contains a mouse click, Ergodex
Manager will simply insert the click during playback. The effect of
this mouse click may depend upon where your mouse cursor is on
the desktop when the click occurs. You should not, for example, try
to record a Macro by clicking on menu items in a program. This is
because Ergodex Manager only records the actual clicks, not
the location or action of the mouse clicks. If you want to record a
Macro to select menu items in a program, you should use keyboard
navigation not the mouse cursor. Mouse click recording is primarily
included for game compatibility.
Mouse clicks are treated like other key press events. You can record
them directly or use “Insert Special” to include them in your Macros.
Macros
Page 43
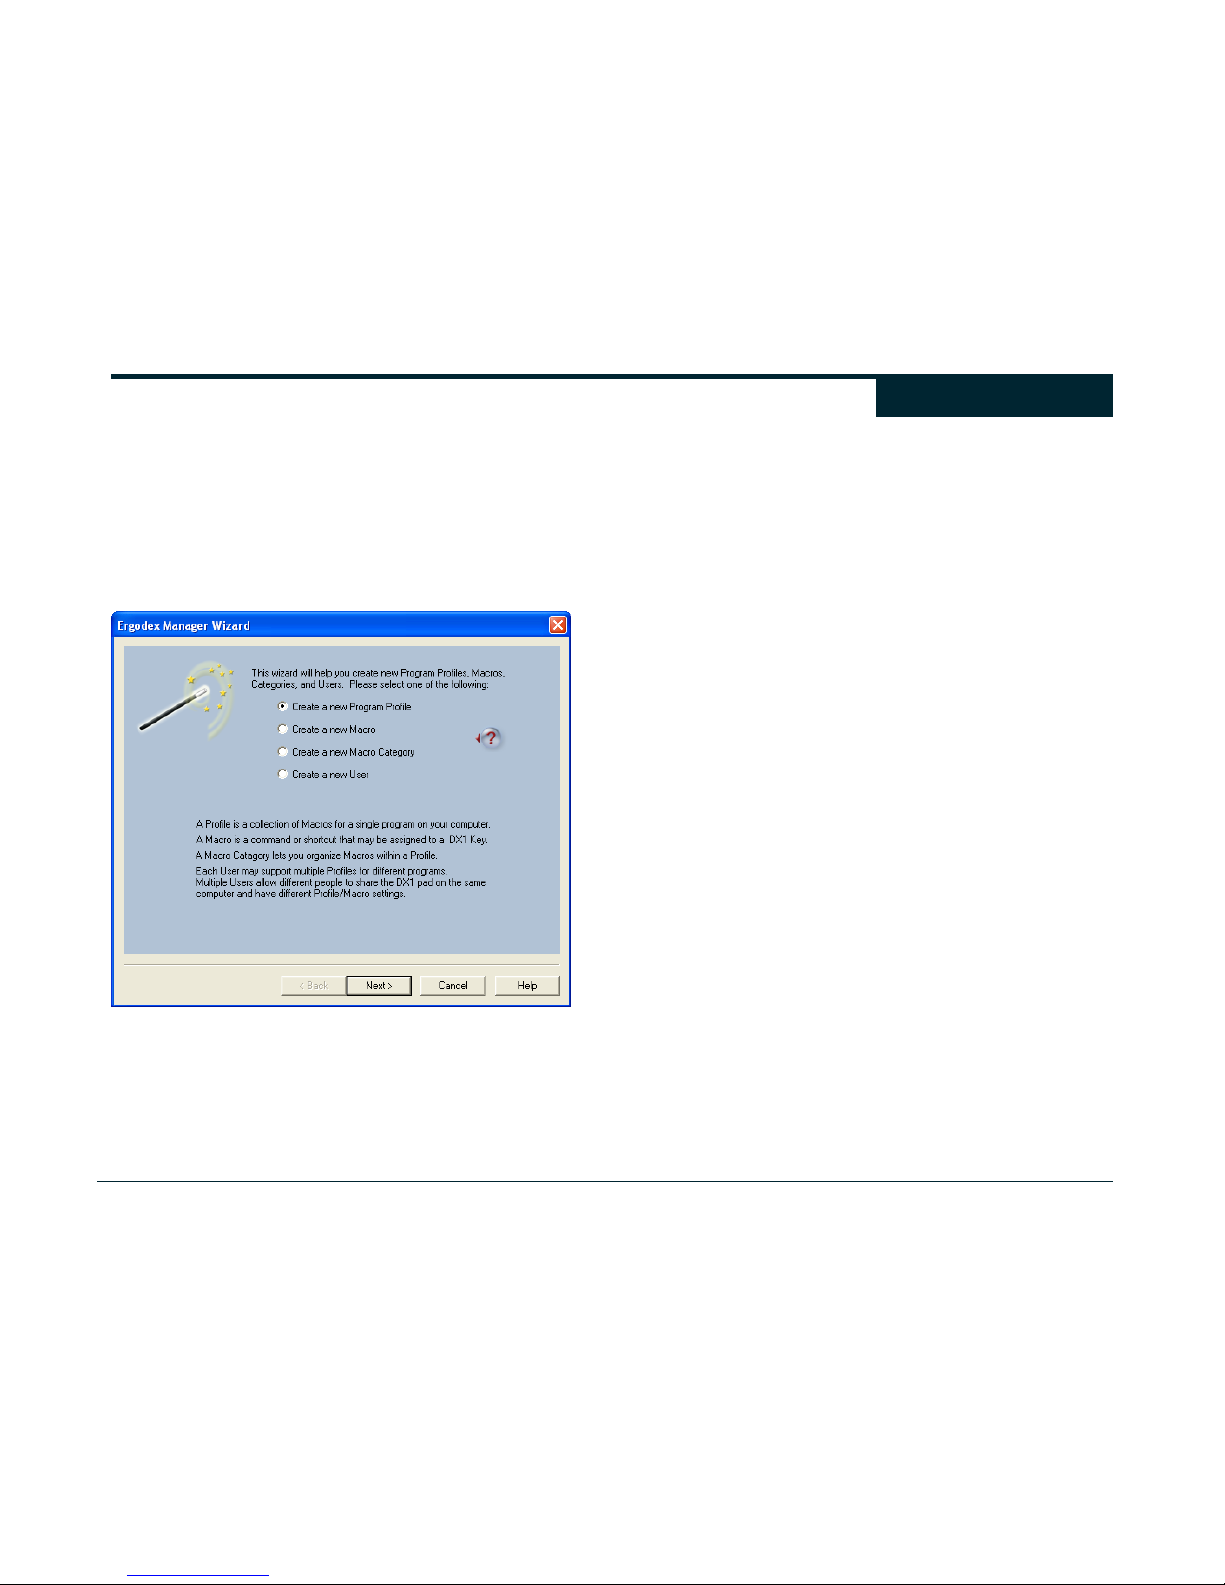
43
Ergodex Manager Wizard
Ergodex Manager has a built in Wizard that helps you configure the
DX1 Input System. The Wizard will help you create a new Program
Profile, Macro, Category, or User.
To use the Wizard, select “File > Wizard” from the Ergodex Manager
Menu. The Wizard will let you choose what you want to do, and then
guide you through the appropriate steps.
Please see the Users, Profiles, Categories, or Macros section of this
User Guide for more information on each of these options.
Wizard
Page 44
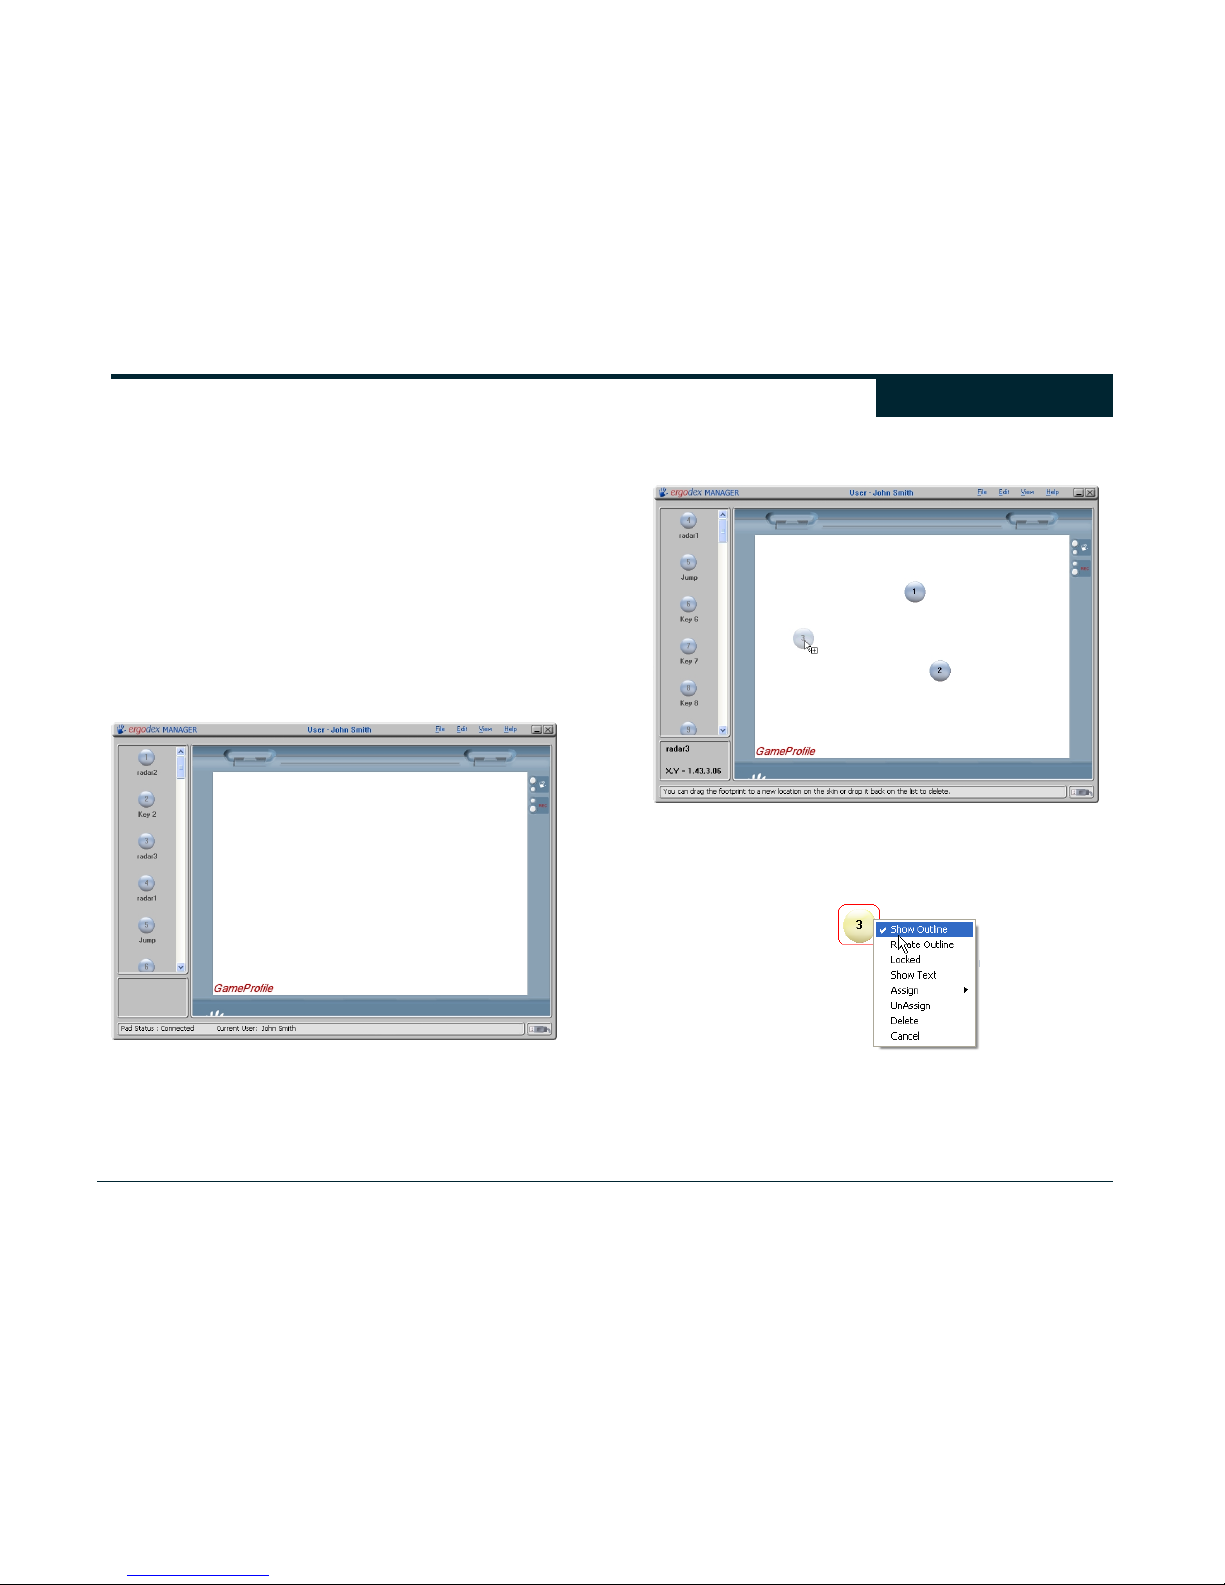
44
A Skin is a picture that you can design and print to complement your
Key Layout. A Skin is placed between the DX1 Pad and the Key
Tray. You can use Skins to display the functions of your DX1 Keys
or to customize the look of your Pad. Skins can include the positions
of your DX1 Keys in a Key Layout and/or a graphical background.
Creating Skins
Each Skin that you create is attached to a specific Program Profile.
This link allows Skins to display and use the correct DX1 Key
assignment information from the corresponding Profile. You can
create a separate Skin for each of your Program Profiles. To create
a Skin, first display the Program Profile you want to use by selecting
it from the Program Profile Selection Box. Next, select “View > Skin
View” from the Ergodex Manager Menu. This will switch the Main
Screen to display the Skin View utility.
Each “blue orb” in the list on the left side of the screen represents the
Footprint of a DX1 Key. You can drag a Key Footprint onto the
virtual Pad located in the middle of the screen. Footprints placed on
the Skin are the same size (when printed) as the DX1 Keys. The
Key Footprints are circles to allow you to place your DX1 Keys in any
rotation, and still cover the entire Footprint image on the Skin.
If you would like to specify the location and rotation angle of a DX1
Key, you can right click on a Footprint on the Skin and select “Show
Outline”
Outlines around a Footprint allow you show the exact desired
location of a DX1 Key. You can show or hide all Outlines by right
clicking on the Skin and selecting “Show/Hide Outline for all
Footprints”
Skins
Page 45
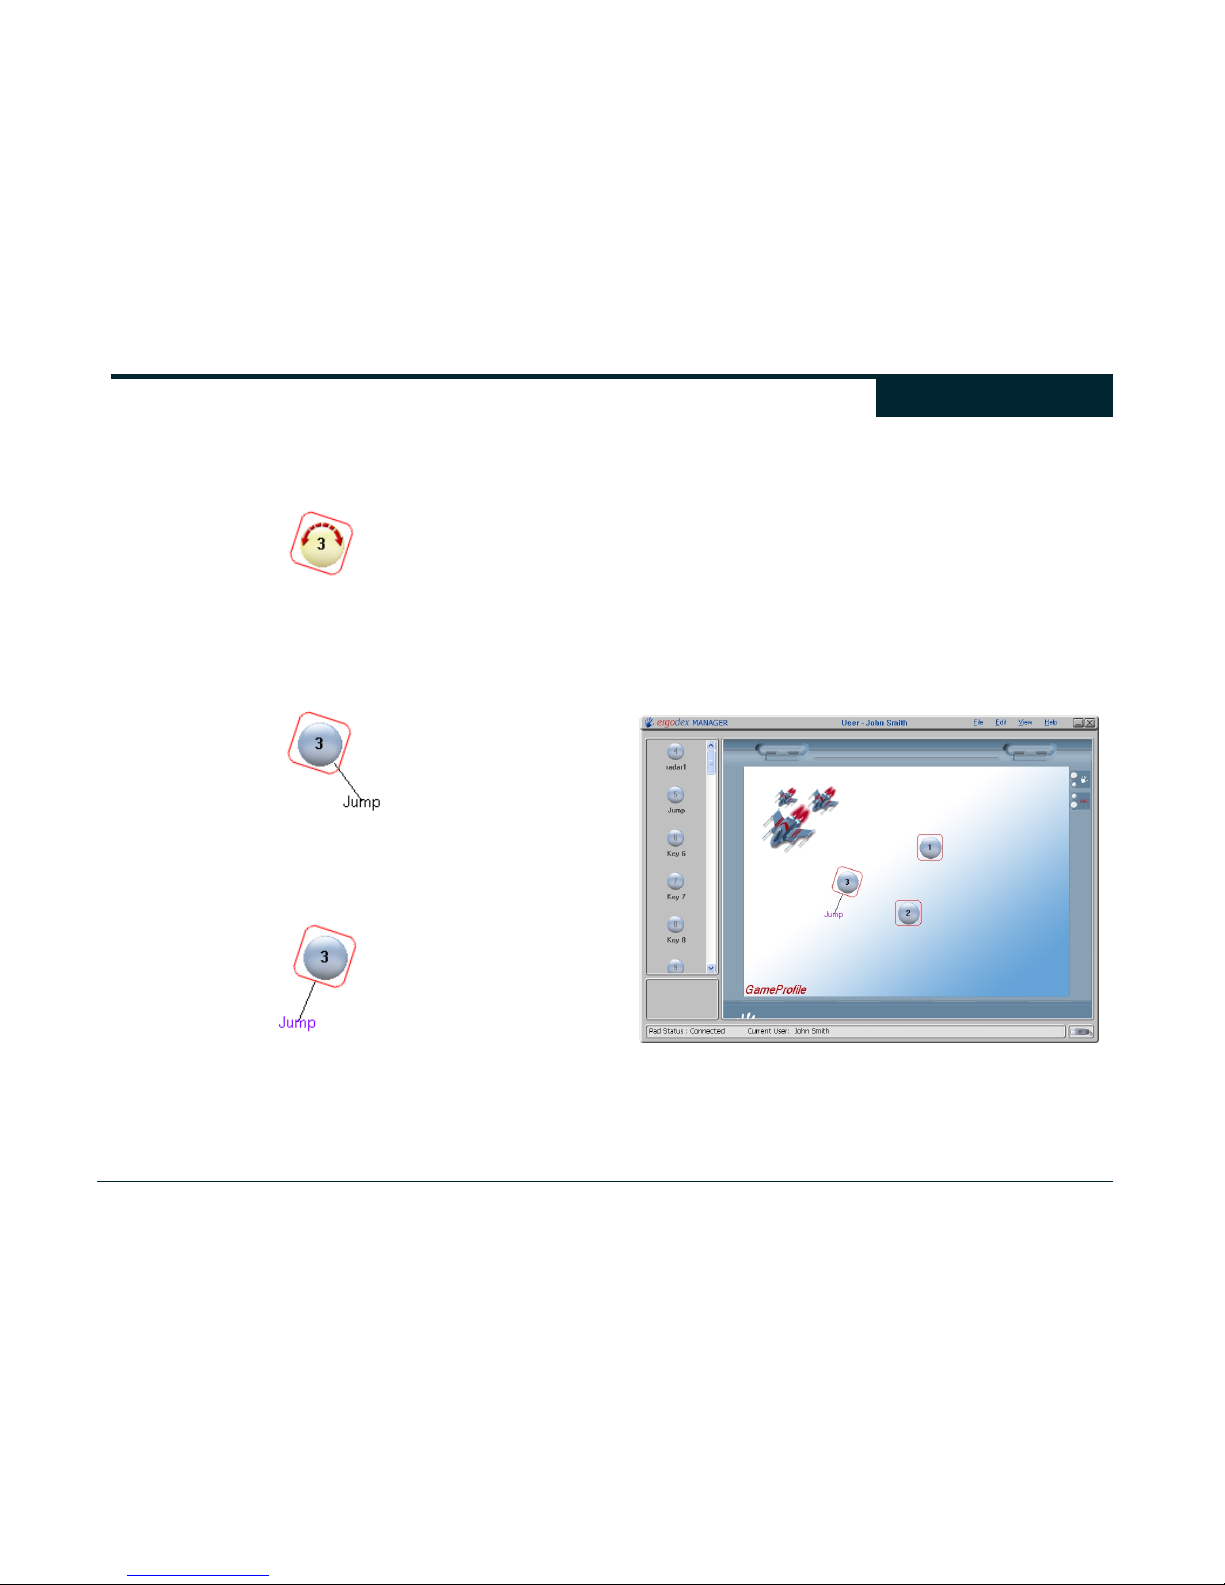
45
Once the Outline of a Footprint is visible, you can right click on it and
select “Rotate Outline” to specify the rotation angle of the Outline.
You can use the left/right arrow keys to adjust the rotation. Clicking
the Footprint will exit the rotation edit mode.
You can also display the Name of the assigned Macro next to the
Key Footprint. Ergodex Manager automatically supplies the Macro
Name for the Key from the current Profile. To view the Macro Name,
right click on a Footprint and select “Show Text.” The Macro Name
will display with a connector line to the corresponding Footprint.
You can drag the Macro name to a different location. You can also
edit the text color of the Macro Name by right clicking on the text and
selecting “Text Color”.
You can show or hide all the Macro Names by right clicking on the
Skin and selecting “Show/Hide text for all Footprints”
Ergodex Manager allows you to assign Macros to DX1 Keys from
within the Skin View utility. To change the Macro assignments, right
click on the Footprint and select “Assign” or “Unassign.” Changes
made to Macro assignments in the Skin View utility will automatically
update the Profile.
Footprints can also be locked at their locations by using the right
click menu. Locking a Footprint prevents you from accidentally
moving it while editing your Skin.
Skin Backgrounds
Backgrounds let you personalize your Skin by selecting an
underlying image. The Ergodex Manager software contains a few
basic background images to get you started. To add a background
image, select “Edit > Change Skin Background” from the Menu.
The image you select will become the background for the skin. Note
that every Skin you create can have a different background image.
Selecting an image for one Skin will not affect any other Skin
background.
Skins
Page 46
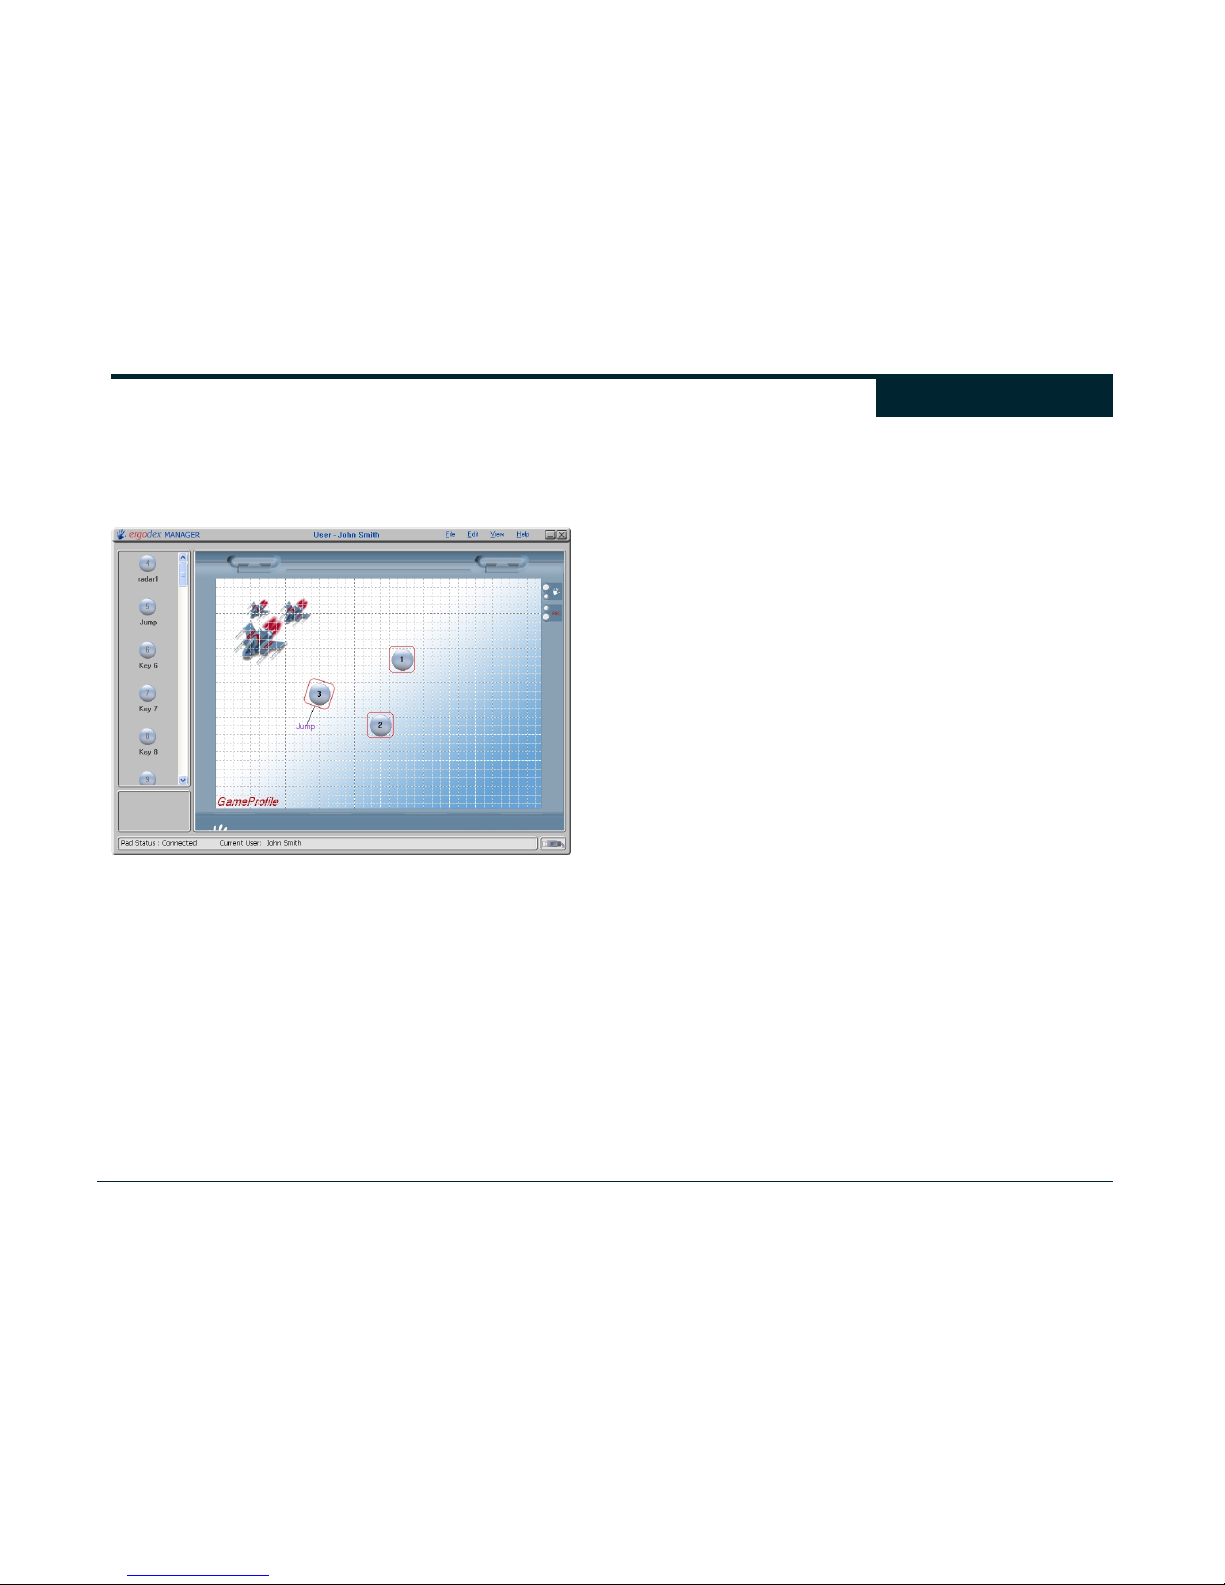
46
Background Grid
To help you align and position the Footprints, you can display a
reference grid on the Skin background. To toggle the gridlines on or
off, select “View > Gridlines” from the Menu.
Importing Skin Backgrounds
You can add your own images for Skin backgrounds. To import a
background image, select “File > Import Skin Background” from the
Menu. You can use “.bmp”, “.jpg”, or “.gif” type image files. Once
imported, these images are available for use with any of the Skins
you have created.
Note: When printed, a Skin is 240 mm wide by 170 mm high.
(9.4” wide by 6.7” high)
Exporting Skin Backgrounds
Skin background images can be exported as image files from the
Ergodex Manager software. To export a skin as an image file, select
“File >Export Skin Background” from the Menu.
Copying Skin to Clipboard
If you would like to capture the current Skin image (both the
background and the Footprints), you can copy the current Skin to the
Windows® Clipboard. Select “Edit > Copy Skin to Clipboard” from
the Menu. Once you have copied the Skin to the clipboard, you can
paste and edit the image in other graphics programs.
Deleting Skin Backgrounds
Skin background images can be deleted by selecting “Edit > Delete
Skin Background” from the Menu. You can only delete the currently
selected Skin background. Once you delete a Skin background, it will
no longer be available for use in any other Skin.
Printing Skins
Once you have created your Skin, you can print it by selecting “File >
Print” from the Menu. After you have printed your Skin, you can cut
or fold the paper around the Skin border, and place it between the
Key Tray and the Pad.
Returning to Main Screen
To exit the Skin View utility and return to the Ergodex Manager Main
Screen, select “View > Main Screen” from the Menu.
Skins
Page 47
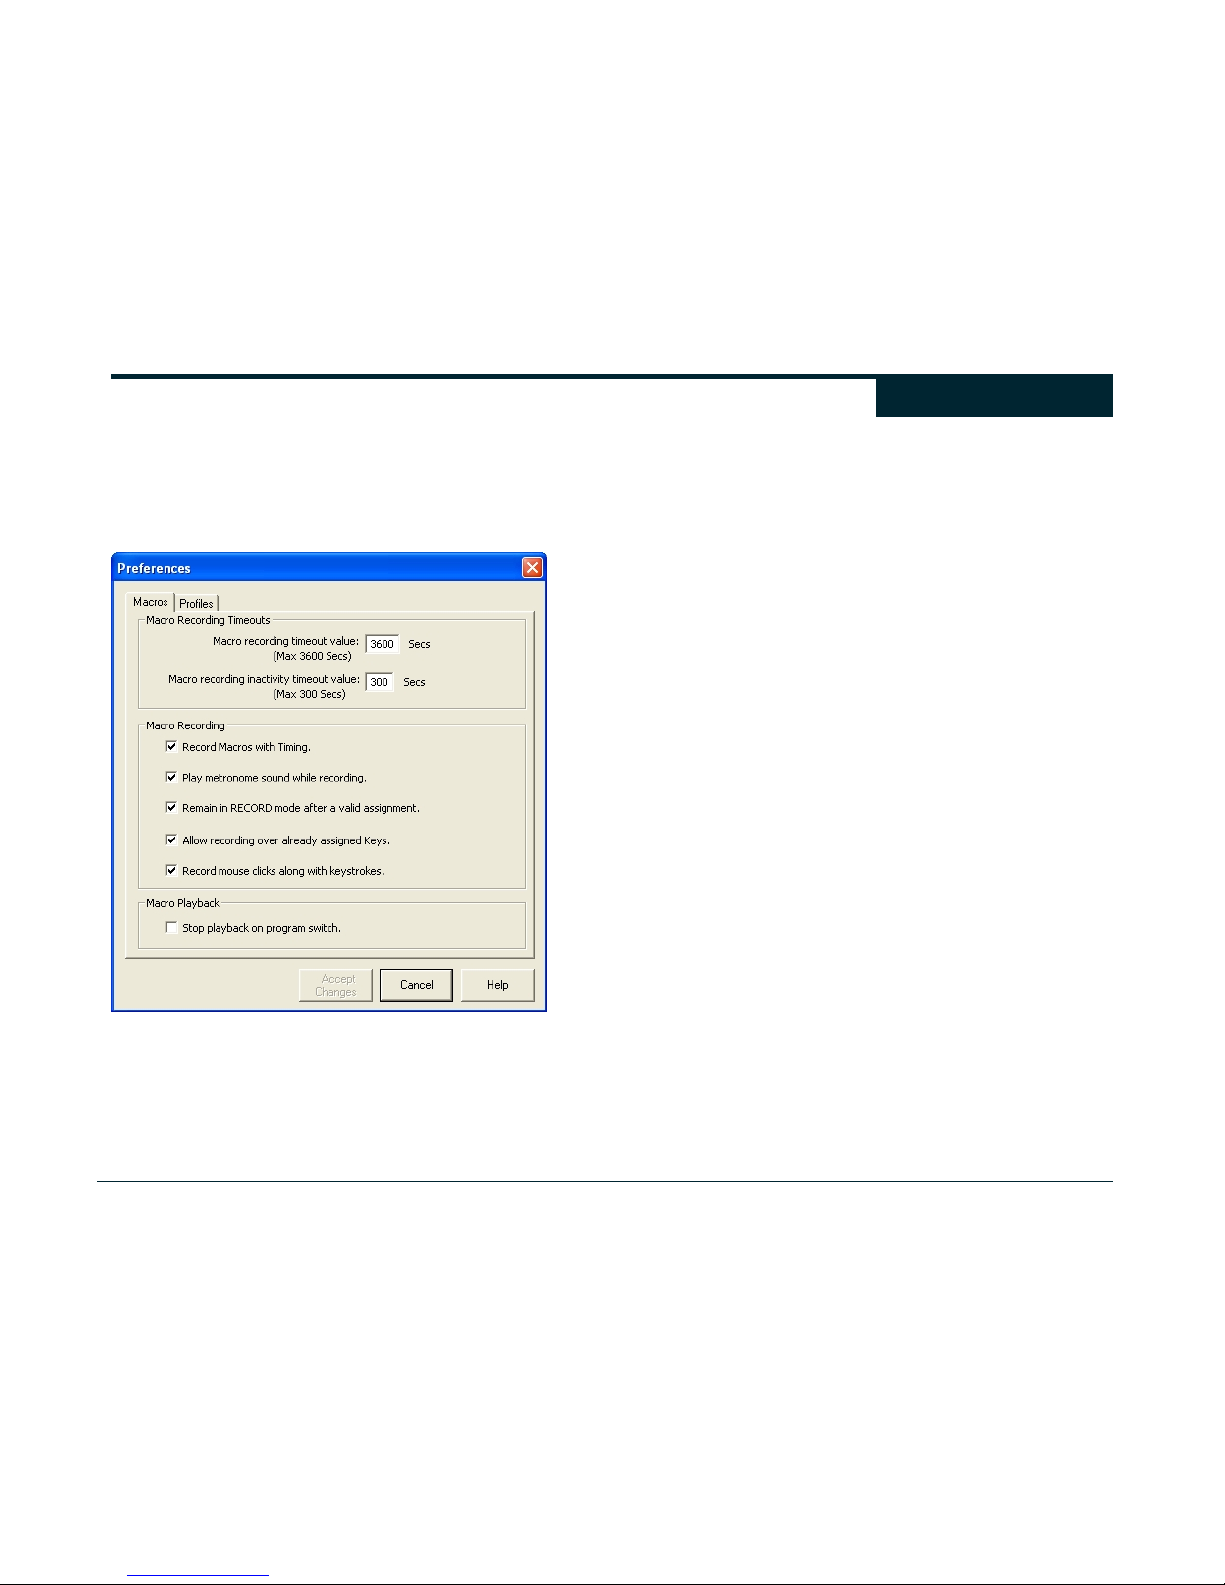
47
The Preferences dialog box allows you to control the behavior and
settings of Ergodex Manger. To open Preferences, select “File >
Preferences” from the Menu. The Preferences box displays settings
for both “Macros” and “Profiles.”
Macro Preferences
The Preferences provided under ”Macros” allow you to control how
Ergodex Manager manages Macros.
Macro Recording Timeouts
Macro recording timeout value.
Specify the maximum duration, in seconds, of a recorded Multi Key
Macro. The default duration is 3600 seconds (1 hour).
Macro recording inactivity timeout value.
Specify the maximum amount of time, in seconds, that is allowed
between any two keystroke events in a Multi Key Macro. The default
duration is 300 seconds (5 minutes).
Macro Recording
Record Macros with Timing.
Toggle the default RECORD mode for Ergodex Manager. If
checked, recorded Macros will be created with the time delay
between keystrokes that you enter. If unchecked, Macros will not
include the time delay between keystrokes. Changing this setting
does not change the playback timing for Macros that already exist.
This option is also displayed in the Menu under “Edit > Record
Macros with Timing.”
Play metronome sound while recording.
If checked, Ergodex Manager will play the “tic” sound when the Pad
is in RECORD mode.
If unchecked, Ergodex Manger will not play the “tic” sound when the
Pad is in RECORD mode.
Remain in RECORD mode after a valid assignment.
If checked, the Pad will stay in RECORD mode after recording a
Macro. This allows you to continue recording and assigning Macros
without interruption. To exit RECORD mode, press the REC button.
If unchecked, the Pad will exit RECORD mode automatically after
you record a Macro.
Ergodex Manager
Preferences
Page 48
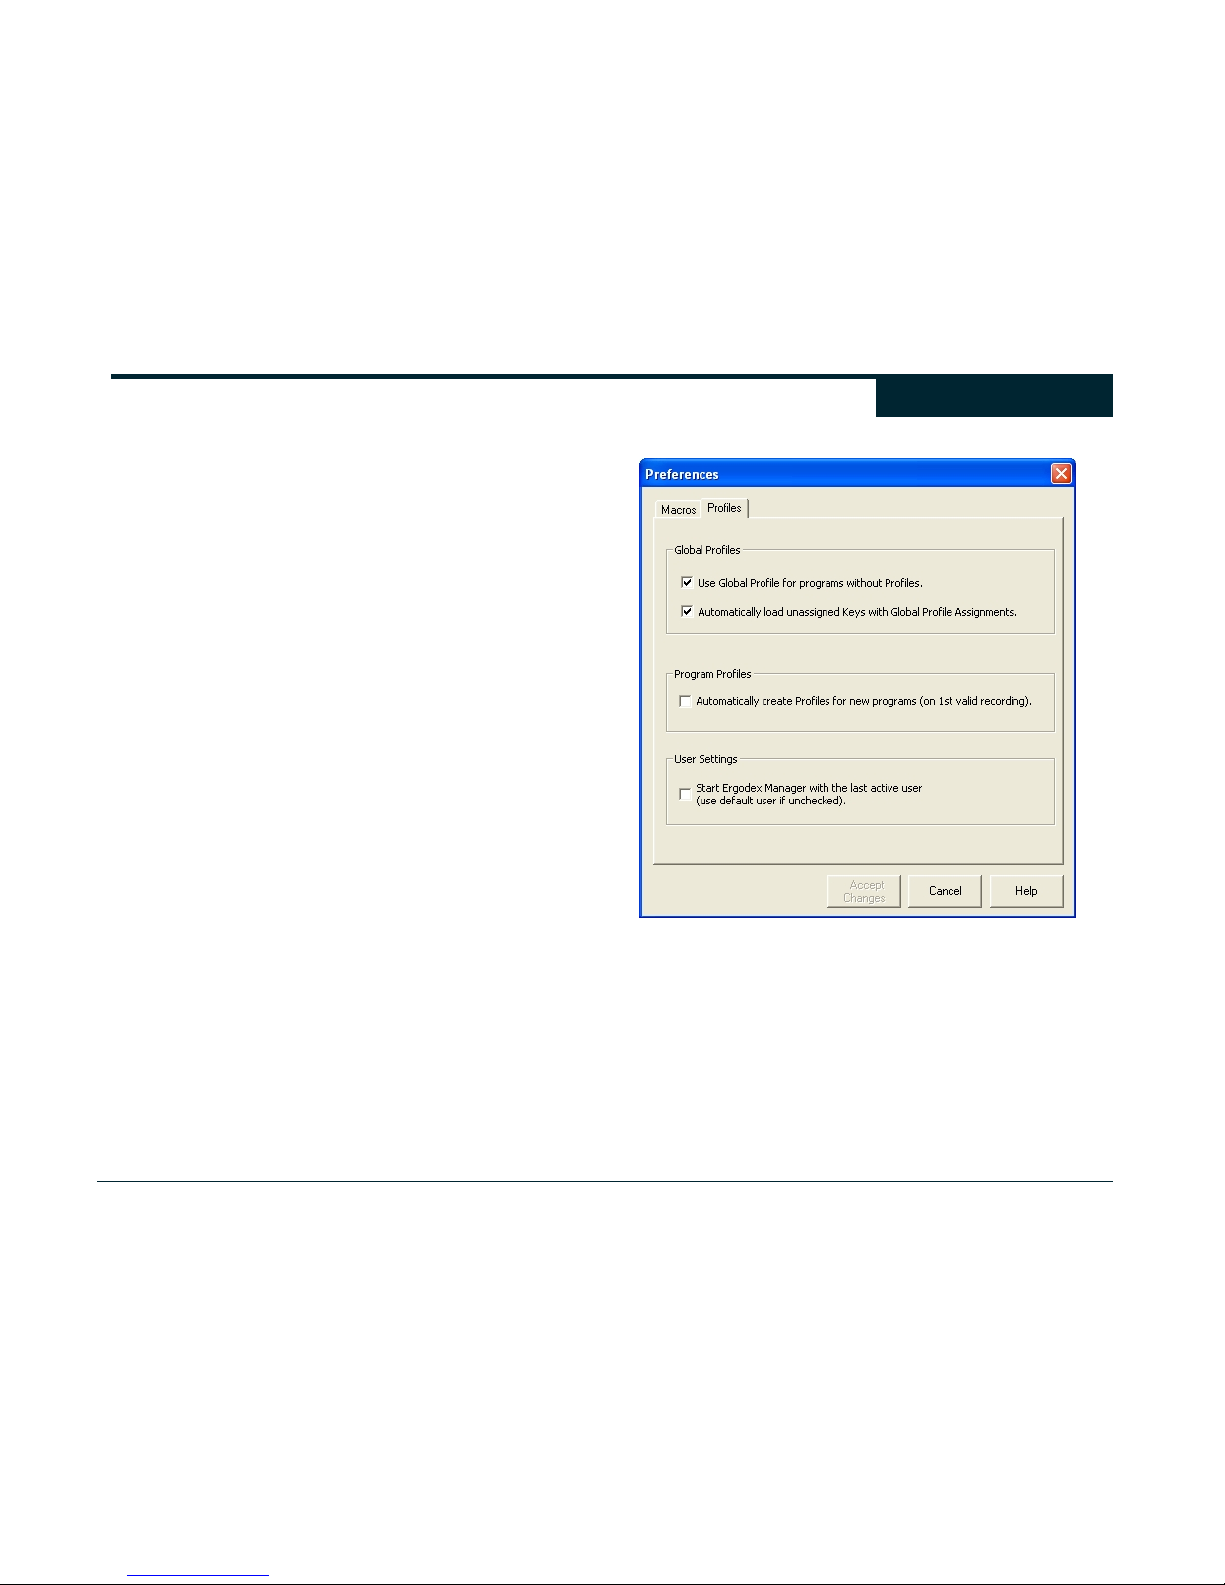
48
Allow recording over already assigned Keys.
If checked, Ergodex Manger allows you to replace Macros assigned
to DX1 Keys while in RECORD mode. The replaced Macro will
remain in the current Profile, but will no longer be assigned to the
DX1 Key.
If unchecked you cannot assign a Macro while in RECORD mode to
a DX1 Key that already has an assigned Macro.
Record mouse clicks along with keystrokes.
If checked, Ergodex Manger records Mouse button clicks in Macro
sequences. Note: The position of the cursor, or the result of the
mouse button click is not recorded. Only the mouse button state is
recorded and played back in the Macro. See “Mouse Clicks” in the
“Macros” section of this User Guide for more information.
If unchecked, Ergodex Manager does not record mouse button clicks
in Macro sequences.
Macro Playback
Stop playback on program switch.
If checked, Ergodex Manager will stop any currently playing Macros
if you switch away from the program that you are using.
If unchecked, Ergodex Manager will allow a Macro to finish playing
even if you switch away from the program in which the Macro was
started.
Profiles Preferences
The Preferences provided under ”Profiles” allow you to control how
Ergodex Manager manages Profiles and Users.
Global Profiles
Use Global Profile for programs without Profiles.
If checked, Ergodex Manager will use the Global Profile Macro
assignments for any program that does not have an associated
Program Profile.
Ergodex Manager
Preferences
Page 49

49
If unchecked, Ergodex Manager will not use the Global Profile Macro
assignments for programs without an associated Program Profile.
The DX1 Keys will be unassigned while using the program.
Automatically load unassigned Keys with Global Profile
Assignments.
If checked, Ergodex Manager will use the Global Profile Macro
assignments for any unassigned DX1 Keys in a Program Profile.
If unchecked, Ergodex Manager will not use the Global Profile Macro
assignments for any unassigned DX1 Keys in a Program Profile.
Only DX1 Keys assigned in the Program Profile will have Macro
assignments.
Program Profiles
Automatically create Profiles for new programs (on 1
st
valid
recording).
If checked, Ergodex Manager will automatically create a new
Program Profile if the program you are using does not already have
one. The new Profile will be created only if you record a new Macro
while using the program.
If unchecked, Ergodex Manager will not create a new Program
Profile for programs that do not have one. If you record a Macro in a
program without a Profile, the Macro and DX1 Key assignment will
be stored in the Global Profile.
User Settings
Start Ergodex Manager with the last active User.
If checked, on startup Ergodex Manager will remember and activate
the last User to be set as active in Ergodex Manager.
If unchecked, on startup Ergodex Manager will always activate the
default User.
Ergodex Manager
Preferences
Page 50

50
The Ergodex Manager Menu provides a series of commands to
configure and control your DX1 Input System. The following is a
brief description of the commands found in the Menu.
Main Screen Menu Commands
File Menu
File > New >Macro
(Hot Key - Ctrl + M)
Create a new Macro in the current Profile.
File > New >Category
(Hot Key - Ctrl + G)
Create a new Category for Macros in the current Profile.
File > New > Program Profile
(Hot Key - Ctrl + L)
Create a new Program Profile for the current User.
File > New > User
(Hot Key - Ctrl + N)
Create a New User in Ergodex Manager.
File > Change User
(Hot Key - Ctrl + O)
Switch the currently active User in Ergodex Manager.
File > Save
(Hot Key - Ctrl + S)
Ergodex Manager automatically saves any updates or changes you
make to Users, Profiles, Categories, Macros, and Skins.
Accumulated changes are normally written to your hard drive when
you close the Ergodex Manager graphical interface. This command
forces Ergodex Manager to write changes before you close the
interface.
File > Import Profile
(Hot Key - Ctrl + I)
Import a Program Profile “.erg” file to the current User.
Please remember that imported Macros have the potential to cause
damage to your computer system. A Macro can do anything to your
computer that you can do, including changing data and deleting or
installing programs. To prevent harmful or malicious Macros from
running on your machine, you should only use Profiles and Macros
from sources that you trust. Make sure you examine and understand
any Macros that you import before using them.
File > Import Macro(s)
(Hot Key - Ctrl + T)
Import one or more existing Macros to the current Program Profile.
File > Export Profile
(Hot Key - Ctrl + E)
Export the current Program Profile as an “.erg” file.
File > Wizard
(Hot Key - Ctrl + W)
Launch the Ergodex Wizard to perform common tasks.
File > Preferences
(Hot Key - Ctrl + R)
Open the Ergodex Manager Preferences screen which allows you to
control the behavior of Ergodex Manager.
File > Close – Keep Pad Running
Close the Ergodex Manager graphical interface. This is the normal
method of closing the Main Screen. Ergodex Manager will continue
to run in the background and allow you to use the DX1 Input System
with programs on your computer. This command is identical to
clicking the close button in the upper left hand corner of the Ergodex
Manager Main Screen (the “x” button).
File > Exit – Shutdown Pad
Exit Ergodex Manager. Closes both the graphical interface and
runtime component of Ergodex Manager. You will need to restart
Ergodex Manager before using your DX1 Input System.
Menu Commands
Page 51

51
Edit Menu
Edit > Find > Macro
(Hot Key - Ctrl + F)
Search for a Macro in the current Profile by Name or keystroke
sequence.
Edit > Macro
Edit the currently selected Macro in the Edit Macro dialog box.
Edit > Profile Name
Edit the current Program Profile Name.
Edit > Category Name
Edit the name of the currently selected Category.
Edit > Actions > Profiles > Add Profile
(Hot Key - Ctrl + L)
Add a new Program Profile to the currently active User.
Edit > Actions > Profiles > Delete Profile(s)
Delete one or more Program Profiles.
Edit > Actions > Profiles > Set Active
Activate the currently displayed Program Profile. Used if you have
more than one Program Profile associated with the same program on
your computer. Only one Program Profile can be active for a given
program.
Edit > Actions > Users > Add New User
(Hot Key - Ctrl + N)
Create a New User in Ergodex Manager.
Edit > Actions > Users > Delete a User
Delete a User from Ergodex Manager. Ergodex Manager must
contain at least one User.
Edit > Actions > Users > Set Current User as Default
Set the current User as the default User. Ergodex Manager
activates the Default User at startup.
Edit > Actions > Macros > Add New
(Hot Key - Ctrl + M)
Create a new Macro in the current Profile.
Edit > Actions > Macros > Delete
(Hot Key - Ctrl + D)
Delete the currently selected Macro.
Edit > Actions > Macros > Import (copy)
(Hot Key - Ctrl + T)
Import a Macro from an existing Program Profile.
Edit > Actions > Keys > Unassign
(Hot Key - Ctrl + U)
Unassign the Macro from the currently selected DX1 Key.
Edit > Record Macros with Timing
Toggle the default RECORD mode for Ergodex Manager. If
checked, recorded Macros will be created with the time delay
between keystrokes that you enter. If unchecked, Macros will not
include the time delay between keystrokes. Changing this setting
does not change the playback timing for Macros that already exist.
View Menu
View > Skin View
(Hot Key - Ctrl + 2)
Switch to the Skin View utility. “Ctrl + 1” switches back to the Main
Screen.
View > Properties
Show the current Program Profile properties.
Help Menu
Help > Help
(Hot Key – F1)
Open the Ergodex Manager Help.
Help > About Ergodex Manager
Show the About screen. Includes copyright notice, Ergodex
Manager version and DX1 Pad Firmware version.
Menu Commands
Page 52

52
Skin View Menu Commands
File Menu
File > Change Profile
(Hot Key - Ctrl + O)
Change the currently displayed Profile.
File > Import Skin Background
Import a “.bmp”, “.gif”, or “.jpg” image file to use as the background
for a Skin.
File > Export Skin Background
Export a background image file to disk. The exported image file
does not contain the Key Footprints. To capture the background
image with the Key Footprints, select “Edit > Copy Skin to Clipboard”
from the Menu.
File > Save
(Hot Key - Ctrl + S)
Ergodex Manager automatically saves any updates or changes you
make to Users, Profiles, Categories, Macros, and Skins.
Accumulated changes are normally written to your hard drive when
you close the Ergodex Manager graphical interface. This command
forces Ergodex Manager to write changes before you close the
interface.
File > Print
(Hot Key - Ctrl + S)
Print the currently displayed Skin.
Edit Menu
Edit > Change Skin Background
Select a new background image for the current Skin from the
available Skin backgrounds. To use your own image, you must first
import it as a Skin background using “File > Import Skin Background”
Edit > Delete Skin Background
Delete the current Skin background and remove it from the list of
available backgrounds.
Edit > Copy Skin to Clipboard
Copy the current Footprint layout and background image to the
Windows® Clipboard. You can paste the image from the Clipboard
to edit it in another graphics program.
Edit > Clear All Footprints
Remove all Key Footprints from the Skin and place them back in the
Footprint list.
Edit > Clear Unassigned Footprints
Remove Key Footprints from the Skin for any DX1 Keys that are not
assigned with a Macro. The Footprints are placed back in the
Footprint list.
Edit > Footprint > Show Outline
Show the outline for the currently selected Key Footprint.
Edit > Footprint > Rotate
Rotate the Outline of the currently selected Key Footprint.
Edit > Footprint > Locked
Lock/Unlock the currently selected Key Footprint. A locked Footprint
cannot be moved.
Edit > Footprint > Unassign
Remove the Macro assignment from the DX1 Key of the currently
selected Key Footprint.
Edit > Footprint > Clear
Remove the currently selected Key Footprint from the Skin and place
it back in the Footprint list.
View Menu
View > Main Screen
(Hot Key - Ctrl + 1)
Switch to the Ergodex Manager Main Screen. “Ctrl + 2” switches
back to the Skin View utility.
View > Gridlines
Toggle the display of gridlines on the background image of the Skin.
Menu Commands
Page 53

53
View > Footprint > Show Outline
Show/Hide the Outline of the currently selected Key Footprint.
View > Footprint > Show Text
Show/Hide the Macro Name associated with the DX1 Key of the
currently selected Key Footprint.
Help Menu
Help > Help
(Hot Key – F1)
Open Ergodex Manager Help.
Help > About Ergodex Manager
Show the About screen. Includes copyright notice, Ergodex
Manager version and DX1 Pad Firmware version.
Menu Commands
Page 54
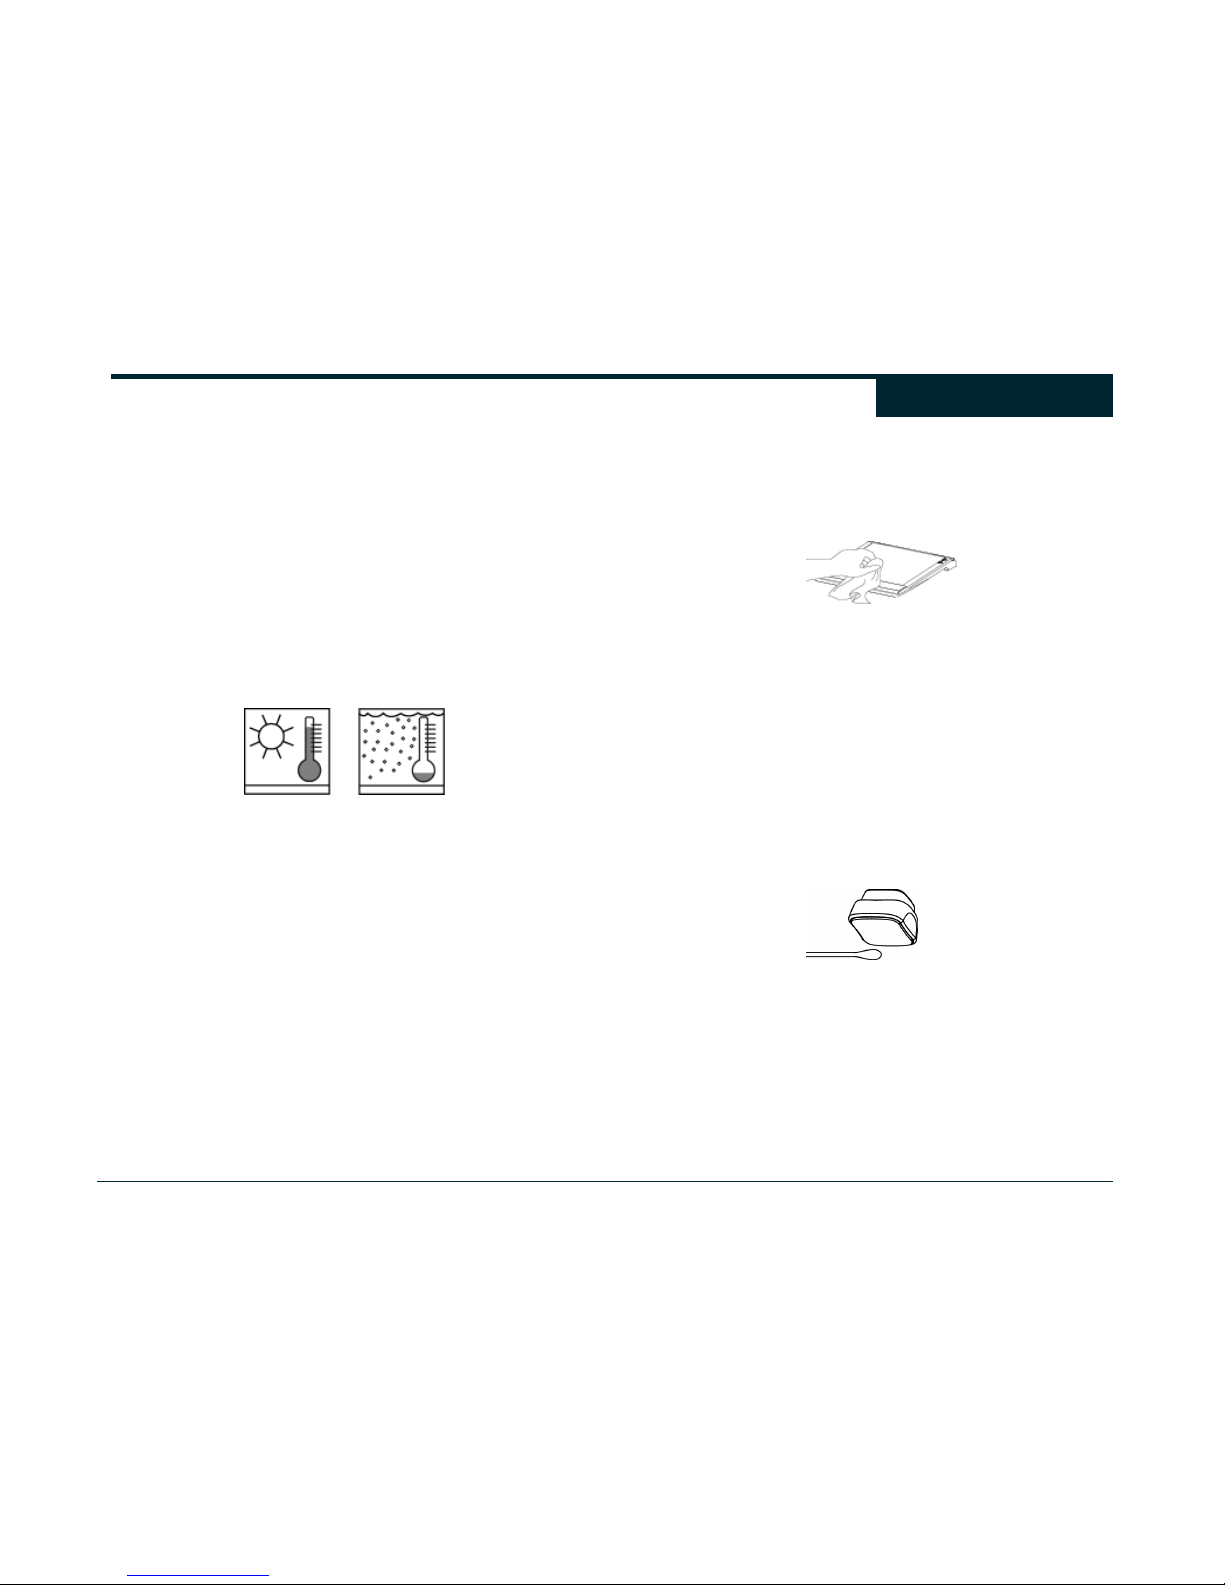
54
Care of the DX1 Input System
Like any electronic device, the Ergodex DX1 Input System should be
handled with care. Please observed the following guidelines:
Protect the DX1 from extremes in temperature. Don’t leave your
system in a car where it could be subjected to very high or low
temperatures. High temperatures can shorten the life of electronic
devices. Do not store parts or accessories in hot areas.
When electronic equipment, such as the DX1 Input System, has
been stored in a colder area and moved to a relatively warmer area,
moisture can form inside the equipment. As electronic equipment
warms up to its normal operating temperature, this moisture may
damage electronic circuit boards. Do not store parts or accessories
in cold areas.
Protect the DX1 Input System from temperature extremes.
Precipitation, humidity, and liquids contain minerals that will corrode
electronic circuits. Keep all parts and accessories dry.
Allowing dust or dirt to get into moving parts can cause damage. Do
not use or store parts or accessories in dusty, dirty areas.
Only qualified personnel may repair the DX1 Input System. There
are no user serviceable parts in the DX1 Input System. Do not
attempt to open. Non-expert handling may cause damage, will void
all product warranties, and will likely cause your DX1 Input System to
fail. Tampering with or removing the label on the back of the DX1
Pad will void all product warranties and will likely cause your DX1
Input System to malfunction.
Maintenance of the DX1 Input System
Cleaning the Pad
You may clean your Pad with a damp cloth, but NEVER submerge it
in water or allow liquids to spill on it. Do not use harsh chemicals,
cleaning solvents, or strong detergents to clean parts or accessories.
Clean the Pad with a damp cloth.
Cleaning the Key Tray
Always remove the Key Tray from the Pad for cleaning. The Key
Tray may be cleaned with warm soapy water. Always remove any
attached Keys before cleaning the Key Tray.
Cleaning the Keys
The Keys, like the Pad, should be protected from temperature
extremes. The Keys should NEVER be submerged in liquid. The
adhesive surfaces of the Key bottoms may pick up dirt with repeated
use and become less sticky. To restore the Key adhesive, wipe with
a damp cotton swab or paper towel and let dry.
Restore Key adhesive by wiping with water and allowing to dry.
Care & Maintenance
Page 55
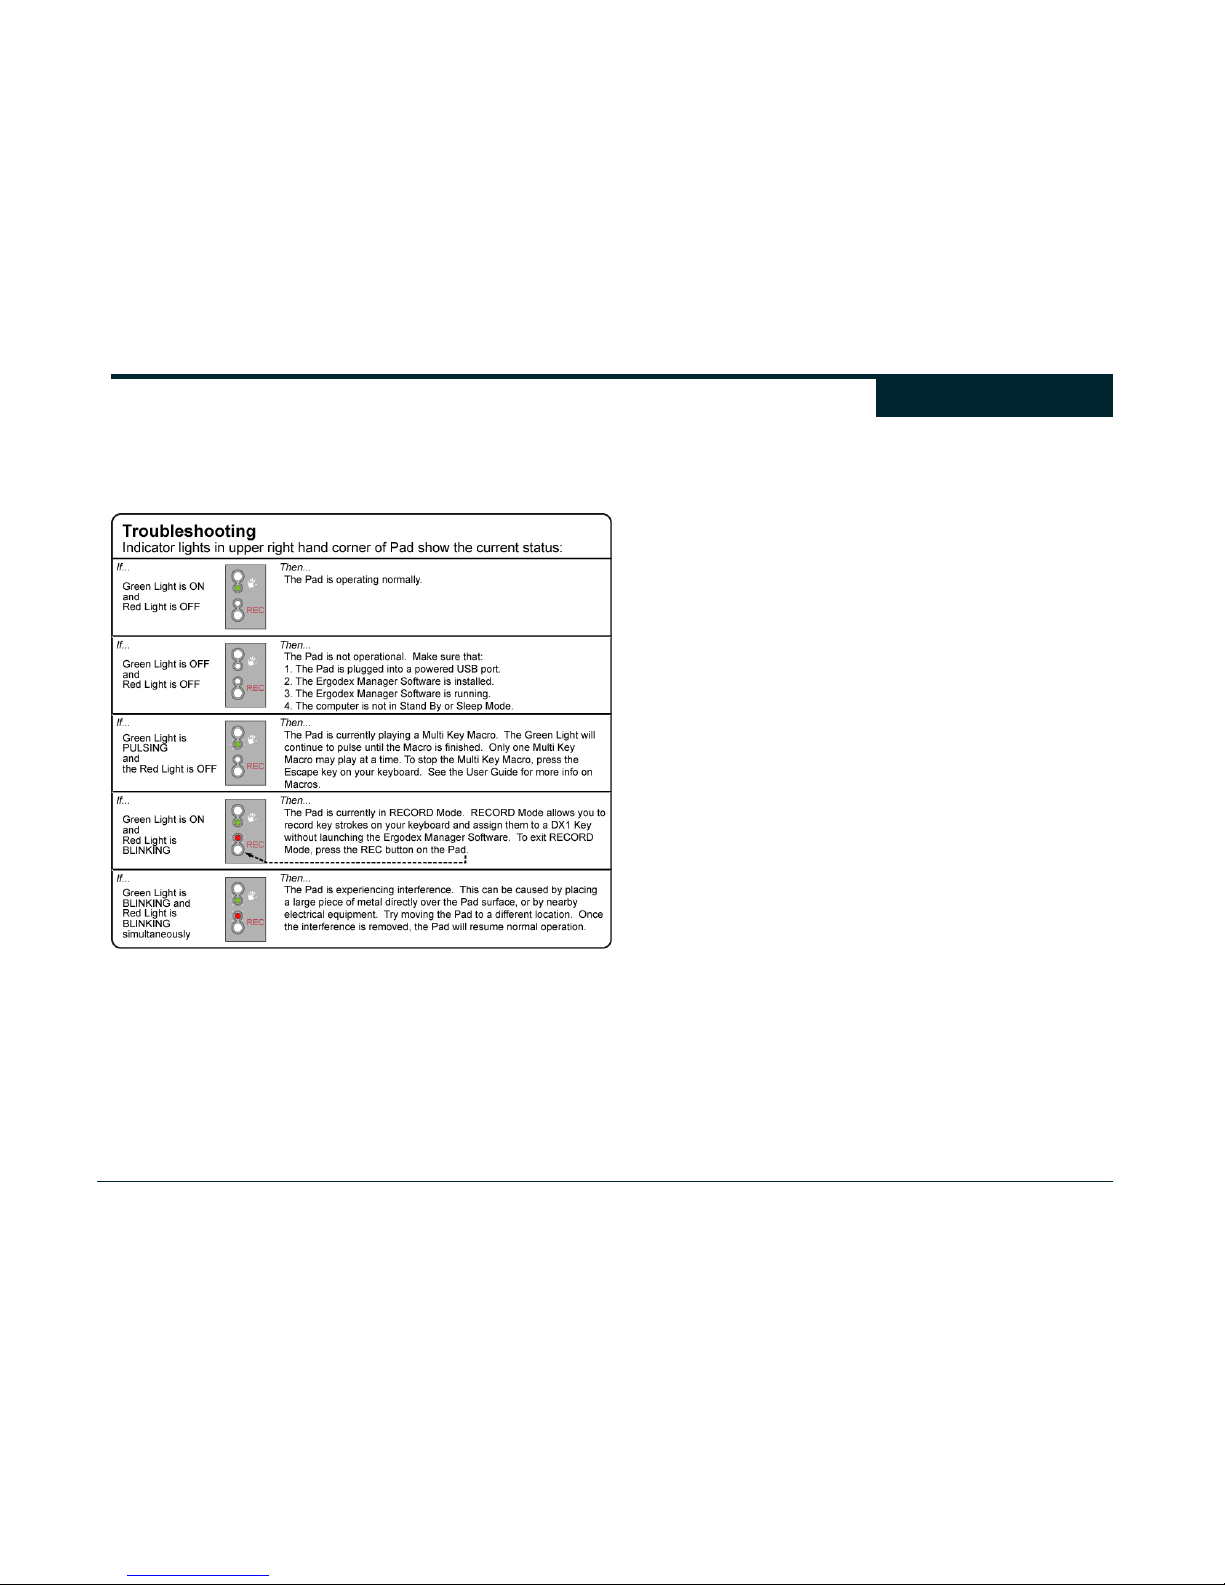
55
Troubleshooting
If your DX1 System is not working properly, you can refer to the
status lights on the DX1 Pad to help you diagnose the problem.
Interference
Your DX1 Input System is designed to work in any standard home or
office environment under normal use. However, some conditions
may cause your DX1 Pad to experience interference. If the DX1 Pad
detects a condition that causes interference with its normal
operation, both the Red and Green lights on the Pad will blink
simultaneously (every two seconds, both lights will blink on briefly).
Conditions that may cause your DX1 Pad to report interference
include:
• Placing large metal objects over the Active Surface of the pad.
• Locating the Pad close to electrical equipment or machinery.
• Pressing and holding more than 10 to 15 DX1 Keys on your Pad
simultaneously. (The Pad will recognize up to six simultaneous
DX1 Key presses.)
If your DX1 Pad encounters interference, try to identify and remove
the source or move the Pad to a different location. Once the
interference is removed, the Pad will resume normal operation.
Troubleshooting
 Loading...