

E RAE Electronics Industry Co EPT 4210 User Manual

Sample Test product
42˝ PDP TV User's Guide
Please observe all safety precautions
when using this product.
Please read this manual carefully before
using this product.
Supports HDCP

CONTENTS
l Quick and Easy Installation
l Versatility and Expendability
l That doesn’t make you feel fatigue on your Eyes.
l Flat-Panel Digital Display easy on the Eyes.
Important Safety Instructions
Important safeguards for you and your new product
Note to Cable/TV Installer
Warning
Regulatory Information
Considerations For Usage
⋯⋯⋯⋯⋯⋯⋯⋯⋯⋯⋯⋯⋯⋯⋯⋯⋯⋯⋯⋯⋯⋯⋯⋯⋯⋯⋯⋯⋯⋯⋯⋯⋯⋯⋯⋯⋯⋯⋯⋯⋯⋯⋯⋯⋯⋯
⋯⋯⋯⋯⋯⋯⋯⋯⋯⋯⋯⋯⋯⋯⋯⋯⋯⋯⋯⋯⋯⋯⋯⋯⋯⋯⋯⋯⋯⋯⋯⋯⋯⋯⋯⋯⋯
⋯⋯⋯⋯⋯⋯⋯⋯⋯⋯⋯⋯⋯⋯⋯⋯⋯⋯⋯⋯⋯⋯⋯⋯⋯⋯⋯⋯⋯⋯⋯⋯⋯⋯⋯⋯⋯⋯⋯
⋯
⋯⋯⋯⋯⋯⋯⋯⋯⋯⋯⋯⋯⋯⋯⋯⋯⋯⋯⋯⋯⋯⋯⋯⋯⋯⋯⋯⋯⋯⋯⋯⋯⋯⋯⋯⋯
User Guidance Information
Name of each part
Controls and Functions
Mounting on a Desktop
Installation Precautions
Installing an Antenna
Remote controller
Precautions
⋯⋯⋯⋯⋯⋯⋯⋯⋯⋯⋯⋯⋯⋯⋯⋯⋯⋯⋯⋯⋯⋯⋯⋯⋯⋯⋯⋯⋯⋯⋯⋯⋯⋯⋯⋯⋯⋯⋯⋯⋯
⋯⋯⋯⋯⋯⋯⋯⋯⋯⋯⋯⋯⋯⋯⋯⋯⋯⋯⋯⋯⋯⋯⋯⋯⋯⋯⋯⋯⋯⋯⋯⋯⋯⋯⋯⋯⋯⋯
⋯⋯⋯⋯⋯⋯⋯⋯⋯⋯⋯⋯⋯⋯⋯⋯⋯⋯⋯⋯⋯⋯⋯⋯⋯⋯⋯⋯⋯⋯⋯⋯⋯⋯⋯⋯⋯⋯
⋯⋯⋯⋯⋯⋯⋯⋯⋯⋯⋯⋯⋯⋯⋯⋯⋯⋯⋯⋯⋯⋯⋯⋯⋯⋯⋯⋯⋯⋯⋯⋯⋯⋯⋯⋯⋯⋯
⋯⋯⋯⋯⋯⋯⋯⋯⋯⋯⋯⋯⋯⋯⋯⋯⋯⋯⋯⋯⋯⋯⋯⋯⋯⋯⋯⋯⋯⋯⋯⋯⋯⋯⋯⋯⋯⋯
⋯⋯⋯⋯⋯⋯⋯⋯⋯⋯⋯⋯⋯⋯⋯⋯⋯⋯⋯⋯⋯⋯⋯⋯⋯⋯⋯⋯⋯⋯⋯⋯⋯⋯⋯⋯⋯⋯⋯⋯⋯
⋯⋯⋯⋯⋯⋯⋯⋯⋯⋯⋯⋯⋯⋯⋯⋯⋯⋯⋯⋯⋯⋯⋯⋯⋯⋯⋯⋯⋯⋯⋯⋯⋯⋯⋯⋯⋯⋯⋯⋯⋯⋯⋯
Connection
VCR Connections
Cable TV Connections
Camcorder/ Game Console Connections
DVD Connections
DTV Connections
PC Connections
⋯⋯⋯⋯⋯⋯⋯⋯⋯⋯⋯⋯⋯⋯⋯⋯⋯⋯⋯⋯⋯⋯⋯⋯⋯⋯⋯⋯⋯⋯⋯⋯⋯⋯⋯⋯⋯⋯⋯⋯⋯
⋯⋯⋯⋯⋯⋯⋯⋯⋯⋯⋯⋯⋯⋯⋯⋯⋯⋯⋯⋯⋯⋯⋯⋯⋯⋯⋯⋯⋯⋯⋯⋯⋯⋯⋯⋯⋯⋯
⋯⋯⋯⋯⋯⋯⋯⋯⋯⋯⋯⋯⋯⋯⋯⋯⋯⋯⋯⋯⋯⋯⋯⋯⋯⋯⋯⋯⋯
⋯
⋯⋯⋯⋯⋯⋯⋯⋯⋯⋯⋯⋯⋯⋯⋯⋯⋯⋯⋯⋯⋯⋯⋯⋯⋯⋯⋯⋯⋯⋯⋯⋯⋯⋯⋯⋯⋯⋯⋯⋯
⋯⋯⋯⋯⋯⋯⋯⋯⋯⋯⋯⋯⋯⋯⋯⋯⋯⋯⋯⋯⋯⋯⋯⋯⋯⋯⋯⋯⋯⋯⋯⋯⋯⋯⋯⋯⋯⋯⋯⋯⋯
⋯⋯⋯⋯⋯⋯⋯⋯⋯⋯⋯⋯⋯⋯⋯⋯⋯⋯⋯⋯⋯⋯⋯⋯⋯⋯⋯⋯⋯⋯⋯⋯⋯⋯⋯⋯⋯⋯⋯⋯⋯
⋯⋯⋯⋯⋯⋯⋯⋯⋯⋯⋯⋯⋯⋯⋯⋯⋯⋯⋯⋯⋯⋯⋯⋯⋯
⋯
⋯
4
6
6
6
7
8
9
1 0
1 0
1 1
1 2
1 3
1 4
1 5
1 6
1 7
1 8
1 9
Basic Use
Powering the PDP TV
Initial Settings
Watching TV
Memorizing the channels
Selecting input source
Changing Picture Settings
Changing Sound Settings
Selecting the Menu Language
Setting OSD Tone Menu Background
Setting Blue Background
2
⋯⋯⋯⋯⋯⋯⋯⋯⋯⋯⋯⋯⋯⋯⋯⋯⋯⋯⋯⋯⋯⋯⋯⋯⋯⋯⋯⋯⋯⋯⋯⋯⋯⋯⋯⋯⋯⋯⋯⋯⋯⋯⋯
⋯⋯⋯⋯⋯⋯⋯⋯⋯⋯⋯⋯⋯⋯⋯⋯⋯⋯⋯⋯⋯⋯⋯⋯⋯⋯⋯⋯⋯⋯⋯⋯⋯⋯⋯⋯⋯⋯⋯⋯⋯⋯⋯
⋯
⋯⋯⋯⋯⋯⋯⋯⋯⋯⋯⋯⋯⋯⋯⋯⋯⋯⋯⋯⋯⋯⋯⋯⋯⋯⋯⋯⋯⋯⋯⋯⋯⋯⋯⋯⋯⋯⋯
⋯
⋯⋯⋯⋯⋯⋯⋯⋯⋯⋯⋯⋯⋯⋯⋯⋯⋯⋯⋯⋯⋯⋯⋯⋯⋯⋯⋯⋯⋯⋯⋯⋯⋯⋯⋯
⋯⋯⋯⋯⋯⋯⋯⋯⋯⋯⋯⋯⋯⋯⋯⋯⋯⋯⋯⋯⋯⋯⋯⋯⋯⋯⋯⋯⋯⋯⋯⋯⋯⋯⋯⋯⋯
⋯⋯⋯⋯⋯⋯⋯⋯⋯⋯⋯⋯⋯⋯⋯⋯⋯⋯⋯⋯⋯⋯⋯⋯⋯⋯⋯⋯⋯⋯⋯⋯⋯⋯⋯⋯⋯
⋯⋯⋯⋯⋯⋯⋯⋯⋯⋯⋯⋯⋯⋯⋯⋯⋯⋯⋯⋯⋯⋯⋯⋯⋯⋯⋯⋯⋯⋯⋯⋯⋯⋯⋯⋯⋯
⋯⋯⋯⋯⋯⋯⋯⋯⋯⋯⋯⋯⋯⋯⋯⋯⋯⋯⋯⋯⋯⋯⋯⋯⋯⋯⋯⋯⋯⋯⋯⋯⋯⋯⋯
⋯⋯⋯⋯⋯⋯⋯⋯⋯⋯⋯⋯⋯⋯⋯⋯⋯⋯⋯⋯⋯⋯⋯⋯⋯⋯⋯⋯⋯⋯
⋯⋯⋯⋯⋯⋯⋯⋯⋯⋯⋯⋯⋯⋯⋯⋯⋯⋯⋯⋯⋯⋯⋯⋯⋯⋯⋯⋯⋯⋯⋯⋯⋯⋯⋯⋯⋯
2 2 ~ 2 3
⋯
2 0
2 0
2 1
2 3
2 4
2 5
2 6
2 6
2 7

CONTENTS
Application
Changing Screen Size
Adjusting Unclear Screen
LNA (Low Noise Amplifier)
Using the V-Chip
Viewing the Closed Captions
Viewing Picture in Picture
Auto Volume Level
Listening to Stereo Sound / MTS(Multi Television Sound)
Resetting PDP TV Settings / Panel Protection
Setting Time
Automatic Power On/ Off
Using TV as a Monitor
Adjusting PC Screen
Adjusting Color Tone
⋯⋯⋯⋯⋯⋯⋯⋯⋯⋯⋯⋯⋯⋯⋯⋯⋯⋯⋯⋯⋯⋯⋯⋯⋯⋯⋯⋯⋯⋯⋯⋯⋯⋯⋯⋯⋯⋯⋯⋯⋯⋯⋯⋯
⋯⋯⋯⋯⋯⋯⋯⋯⋯⋯⋯⋯⋯⋯⋯⋯⋯⋯⋯⋯⋯⋯⋯⋯⋯⋯⋯⋯⋯⋯⋯⋯⋯⋯⋯⋯⋯⋯⋯
⋯⋯⋯⋯⋯⋯⋯⋯⋯⋯⋯⋯⋯⋯⋯⋯⋯⋯⋯⋯⋯⋯⋯⋯⋯⋯⋯⋯⋯⋯⋯⋯⋯⋯⋯⋯⋯⋯
⋯⋯⋯⋯⋯⋯⋯⋯⋯⋯⋯⋯⋯⋯⋯⋯⋯⋯⋯⋯⋯⋯⋯⋯⋯⋯⋯⋯⋯⋯⋯⋯⋯⋯⋯⋯⋯
⋯⋯⋯⋯⋯⋯⋯⋯⋯⋯⋯⋯⋯⋯⋯⋯⋯⋯⋯⋯⋯⋯⋯⋯⋯⋯⋯⋯⋯⋯⋯⋯⋯⋯⋯⋯⋯⋯⋯⋯
⋯⋯⋯⋯⋯⋯⋯⋯⋯⋯⋯⋯⋯⋯⋯⋯⋯⋯⋯⋯⋯⋯⋯⋯⋯⋯⋯⋯⋯⋯⋯⋯⋯⋯⋯⋯
⋯⋯⋯⋯⋯⋯⋯⋯⋯⋯⋯⋯⋯⋯⋯⋯⋯⋯⋯⋯⋯⋯⋯⋯⋯⋯⋯⋯⋯⋯⋯⋯⋯⋯⋯⋯
⋯⋯⋯⋯⋯⋯⋯⋯⋯⋯⋯⋯⋯⋯⋯⋯⋯⋯⋯⋯⋯⋯⋯⋯⋯⋯⋯⋯⋯⋯⋯⋯⋯⋯⋯⋯⋯⋯⋯⋯⋯
⋯⋯⋯⋯⋯⋯⋯⋯⋯⋯⋯⋯⋯⋯⋯⋯⋯⋯⋯⋯⋯⋯⋯⋯⋯⋯⋯⋯
⋯⋯⋯⋯⋯⋯⋯⋯⋯⋯⋯⋯⋯⋯⋯⋯⋯⋯⋯⋯⋯⋯⋯⋯⋯⋯⋯⋯⋯⋯⋯⋯⋯⋯⋯⋯⋯⋯
⋯⋯⋯⋯⋯⋯⋯⋯⋯⋯⋯⋯⋯⋯⋯⋯⋯⋯⋯⋯⋯⋯⋯⋯⋯⋯⋯⋯⋯⋯⋯⋯⋯⋯⋯⋯⋯⋯⋯
⋯⋯⋯⋯⋯⋯⋯⋯⋯⋯⋯⋯⋯⋯⋯⋯⋯⋯⋯⋯⋯⋯⋯⋯⋯⋯⋯⋯⋯⋯⋯⋯⋯⋯⋯⋯⋯⋯⋯⋯
⋯⋯⋯⋯⋯⋯⋯⋯⋯⋯⋯⋯⋯⋯⋯⋯⋯⋯⋯⋯⋯⋯⋯⋯⋯⋯⋯⋯⋯⋯⋯⋯⋯⋯⋯⋯⋯⋯⋯⋯
3 0 ~ 3 2
3 4 ~ 3 5
⋯⋯⋯⋯⋯⋯⋯⋯⋯⋯⋯⋯⋯⋯⋯⋯⋯⋯⋯⋯⋯⋯
Monitor
External adjustment
2 8
2 9
2 9
3 3
3 6
3 6
3 7
3 8
3 9
4 0
4 0
4 1
External adjustment
Set ID
Special features
RS232C Communication Protocol
Trouble shooting
Trouble shooting Tip
Supported Display Modes
⋯⋯⋯⋯⋯⋯⋯⋯⋯⋯⋯⋯⋯⋯⋯⋯⋯⋯⋯⋯⋯⋯⋯⋯⋯⋯⋯⋯⋯⋯⋯⋯⋯⋯⋯⋯⋯⋯⋯⋯⋯⋯⋯⋯⋯⋯⋯
⋯⋯⋯⋯⋯⋯⋯⋯⋯⋯⋯⋯⋯⋯⋯⋯⋯⋯⋯⋯⋯⋯⋯⋯⋯⋯⋯⋯⋯⋯⋯⋯⋯⋯⋯⋯⋯⋯⋯⋯
⋯⋯⋯⋯⋯⋯⋯⋯⋯⋯⋯⋯⋯⋯⋯⋯⋯⋯⋯⋯⋯⋯⋯⋯⋯⋯⋯⋯⋯⋯⋯⋯⋯⋯⋯⋯⋯⋯⋯⋯⋯⋯
⋯⋯⋯⋯⋯⋯⋯⋯⋯⋯⋯⋯⋯⋯⋯⋯⋯⋯⋯⋯⋯⋯⋯⋯⋯⋯⋯⋯⋯⋯⋯⋯⋯⋯⋯⋯⋯⋯⋯⋯⋯⋯
⋯⋯⋯⋯⋯⋯⋯⋯⋯⋯⋯⋯⋯⋯⋯⋯⋯⋯⋯⋯⋯⋯⋯⋯⋯⋯⋯⋯⋯⋯⋯⋯⋯⋯⋯⋯⋯⋯⋯
⋯
⋯⋯⋯⋯⋯⋯⋯⋯⋯⋯⋯⋯⋯⋯⋯⋯⋯⋯⋯⋯⋯⋯⋯⋯⋯⋯⋯⋯⋯⋯⋯⋯⋯⋯⋯⋯⋯
⋯⋯⋯⋯⋯⋯⋯⋯⋯⋯⋯⋯⋯⋯⋯⋯⋯⋯⋯⋯⋯⋯⋯⋯⋯⋯⋯⋯⋯⋯⋯⋯
Maintenance and Service
4 2
4 3
4 4
4 5 ~ 4 9
5 0
⋯
5 1
5 2
3

Important Safety Instructions
Important Safety Instructions
● Important safeguards for you and your new product
Always be careful when using your LCD TV. To reduce the risk of fire, electrical shock, and
other injuries, keep these safety precautions in mind when installing, using, and maintaining
your machine.
1) Read these instructions.
2) Keep these instructions.
3) Heed all warnings.
4) Follow all instructions.
5) Do not use this apparatus near water.
6) Clean only with a dry cloth.
7) Do not block any of the ventilation openings. Install in accordance with the manufacturer's
instructions.
8) Do not install near any heat sources such as radiators, heat registers, stoves, or other
apparatus (including amplifiers) that produce heat.
9) Do not defeat the safety purpose of the polarized or grounding type plug. A polarized plug
has two blades with one wider than the other. A grounding type plug has two blades and a
third grounding prong. The wide blade or the third prong is provided for your safety. When
the provided plug does not fit into your outlet, consult an electrician for replacement of the
obsolete outlet.
10) Protect the power cord from being walked on or pinched particularly at plugs, convenience
receptacles, and the point where they exit from the apparatus.
11) Only use the attachments/accessories specified by the manufacturer.
12) Use only with a cart, stand, tripod, bracket, or table specified by the manufacturer, or sold
with the apparatus. When a cart is used, use caution when moving the cart/apparatus
combination to avoid injury from tip-over.
13) Unplug this apparatus during lightning storms or when unused for long periods of time.
4
Important Safety Instructions
Important Safety Instructions
14) Refer all servicing to qualified service personnel. Servicing is required when the apparatus
has been damaged in any way, such as power supply cord or plug is damaged, liquid has
been spilled or objects have fallen into the apparatus, the apparatus has been exposed to
rain or moisture, does not operate normally, or has been dropped.
• Apparatus sha ll not be exposed to dripping or splashing and no objects filled with
liquids, such as vases, shall be placed on the apparatus
CAUTION
RISK OF ELECTRIC SHOCK DO NOT OPEN
CAUTION :
CTRIC SHOCK, DO NOT REMOVE COVER
(OR BACK). NO USER SERVICEABLE PARTS
INSIDE. REFER SERVICING TO QUALIFIED
SERVICE PERSONNEL.
TO REDUCE THE RISK OF ELE-
This symbol indicates high voltage
is present inside. It is dangerous
to make any kind of contact with
any inside part of this product.
This symbol alerts you that
important literature conceming
operation and maintenance has
been included with this product.
NOTE TO CABLE/TV INSTALLER :
This reminder is provided to call the CATV system installer’s attention to Article 820-40 of the
National Electric Code (U.S.A.). The code provides guidelines for proper grounding and, in
particular, specifies that the cable ground shall be connected to the grounding system of the
building, as close to the point of the cable entry as practical.
WARNING
TO PREVENT DAMAGE WHICH MAY RESULT IN FIRE OR ELECTRIC SHOCK HAZARD,
DO NOT EXPOSE THIS APPLIANCE TO RAIN OR MOISTURE.
5

Important Safety Instructions
Important Safety Instructions
Caution :
- These servicing instructions are for use by qualified service personnel only.
To reduce the risk of electric shock, do not perform any servicing other than that contained in
the operating instructions unless you are qualified to do so.
- Any changes or modifications not expressly approved by the party responsible for compliance
could void the user’s authority to operate the equipment.
Important :
One Federal Court has held that unauthorized recording of copyrighted TV programs is an
infringement of U.S. copyright laws.
Certain Canadian programs may also be copyrighted and any unauthorized recording in whole or
in part may be in violation of these rights.
REGULATORY INFORMATION :
This equipment has been tested and found to comply with the limits for a Class B digital device,
pursuant to Part 15 of the FCC Rules. These limits are designed to provide reasonable protection
against harmful interference when the equipment is operated in a residential installation. This
equipment generates, uses and can radiate radio frequency energy and, if not installed and used in
accordance with the instruction manual, may cause harmful interference to radio communications.
However, there is no guarantee that interference will not occur in a particular installation. If this
equipment does cause harmful interference to radio or television reception, which can be
determined by turning the equipment off and on, the user is encouraged to try to correct the
interference by one or more of the following measures:
• Reorient or relocate the receiving antenna.
• Increase the separation between the equipment and receiver.
• Connect the equipment into an outlet on a circuit different from that to which the receiver is connected.
• Consult the dealer or an experienced radio/TV technician for help.
6

Safety Precautions
Considerations For Usage
Still image (immovable) screen may cause permanent damage to
PDP TV.
1. Lengthy display of still images from video games, banners, graphics and others may fatally damage
the screen.
2. When using Picture-In-Picture, permanent damage may occur if the sub-image screen stays on the
corner of screen for a long time.
3. When using the PDP TV in 4 : 3 formats with sidebars for a long period of time, it may cause
damage to the plasma panel. It is recommended that you use Wide(16:9) or Panorama format.
(Image burn-in can be avoided by using "Panel Protection" function or a screen-saver. However,
once image burn-in occurs, it may not disappear completely. An image will be dimmed as the image
is displayed long time or repeatedly.)
※ Any damage to the PDP TV caused by improper usage (such as image burn-in) shall not be covered
by the warranty.
Defective pixels that can be seen on PDP TV screen.
(illuminated spots, bright spots, scotoma , blind spot, blinking)
Generally, PDP TV consists of about 1.22 million pixels and having defective pixels is possible. A PDP
TV with a number of defective pixels below a certain number is not considered defective. The limited
number of defective pixels does not affect the performance or reliability of the PDP TV. The standard of
inspection regarding defective pixels is the same or better as the competitor's offering on similar PDP
TV. It is not subject to replacement or a refund. We will do our best to minimize the defective pixel as
best as we can.
7
User Guidance Information
Names of each part
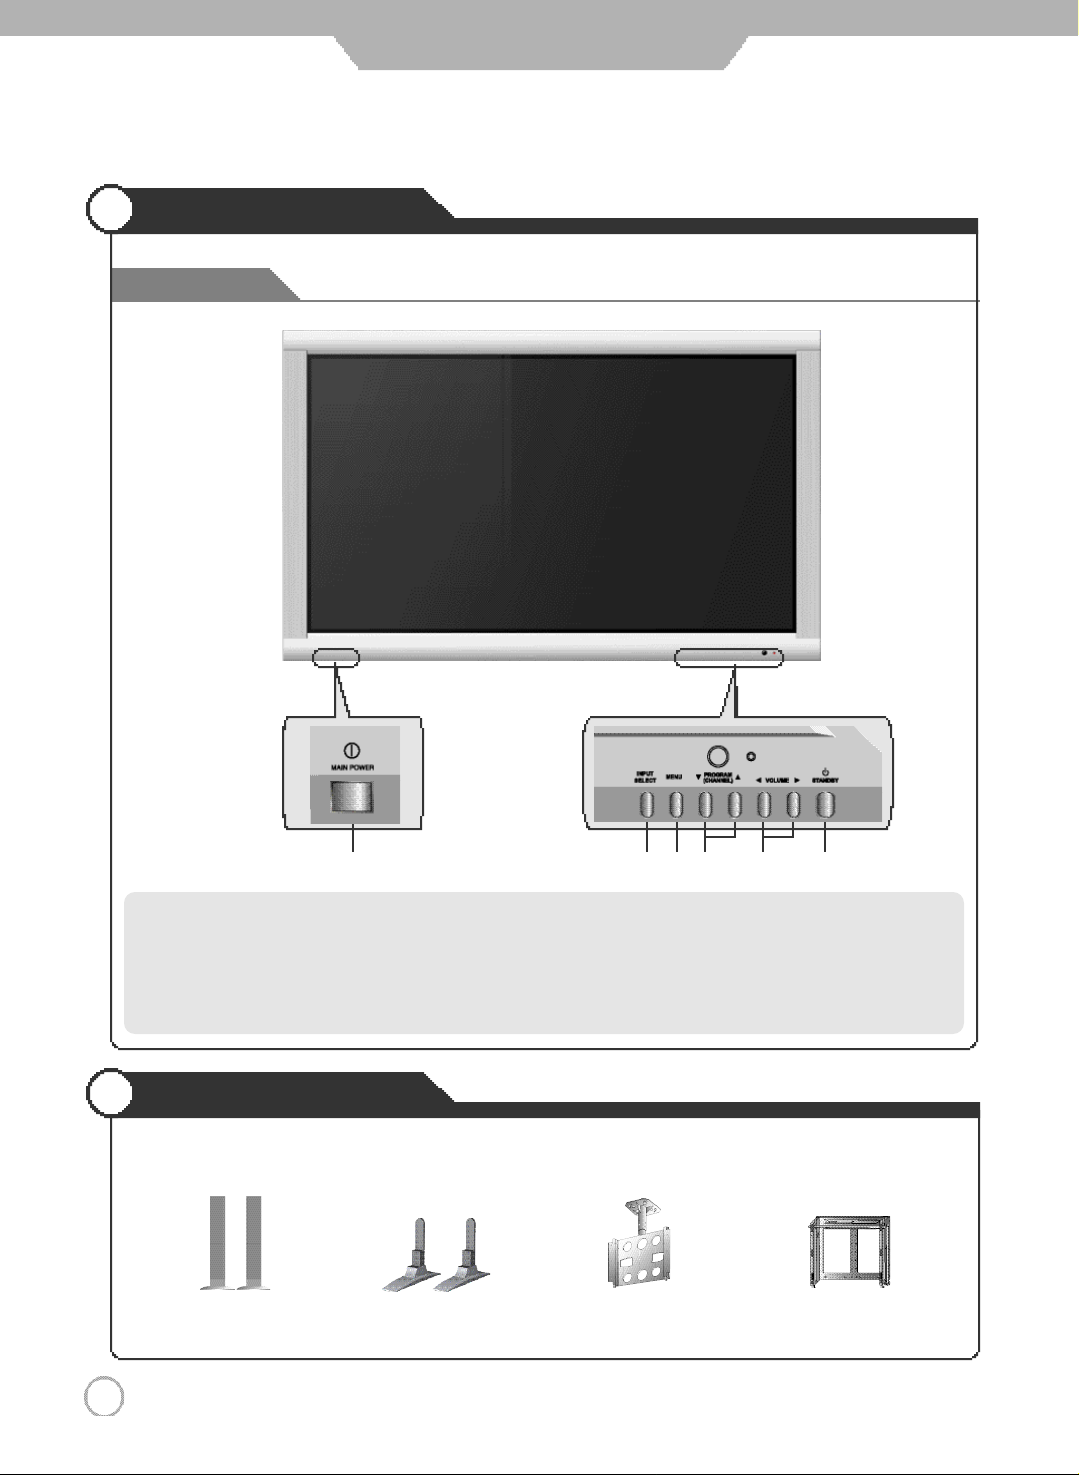
Front View
8
Main Power Button
- Please turn off the main power switch, if the PDP TV will not be
used for a long period of time.
Input Selection Button
Menu Button
Program(CHANNEL) ▼,▲ Button
Volume ◀,▶ Button
Standby Button
Options
●
To improve the quality of the PDP TV, specification is subject to change without notice. Please contact your dealer for
current options available.
S p e a k e r
Stand
Ceiling - Mount Bracket Adjustable - Angle
Wall mount
User Guidance Information
Controls and Functions
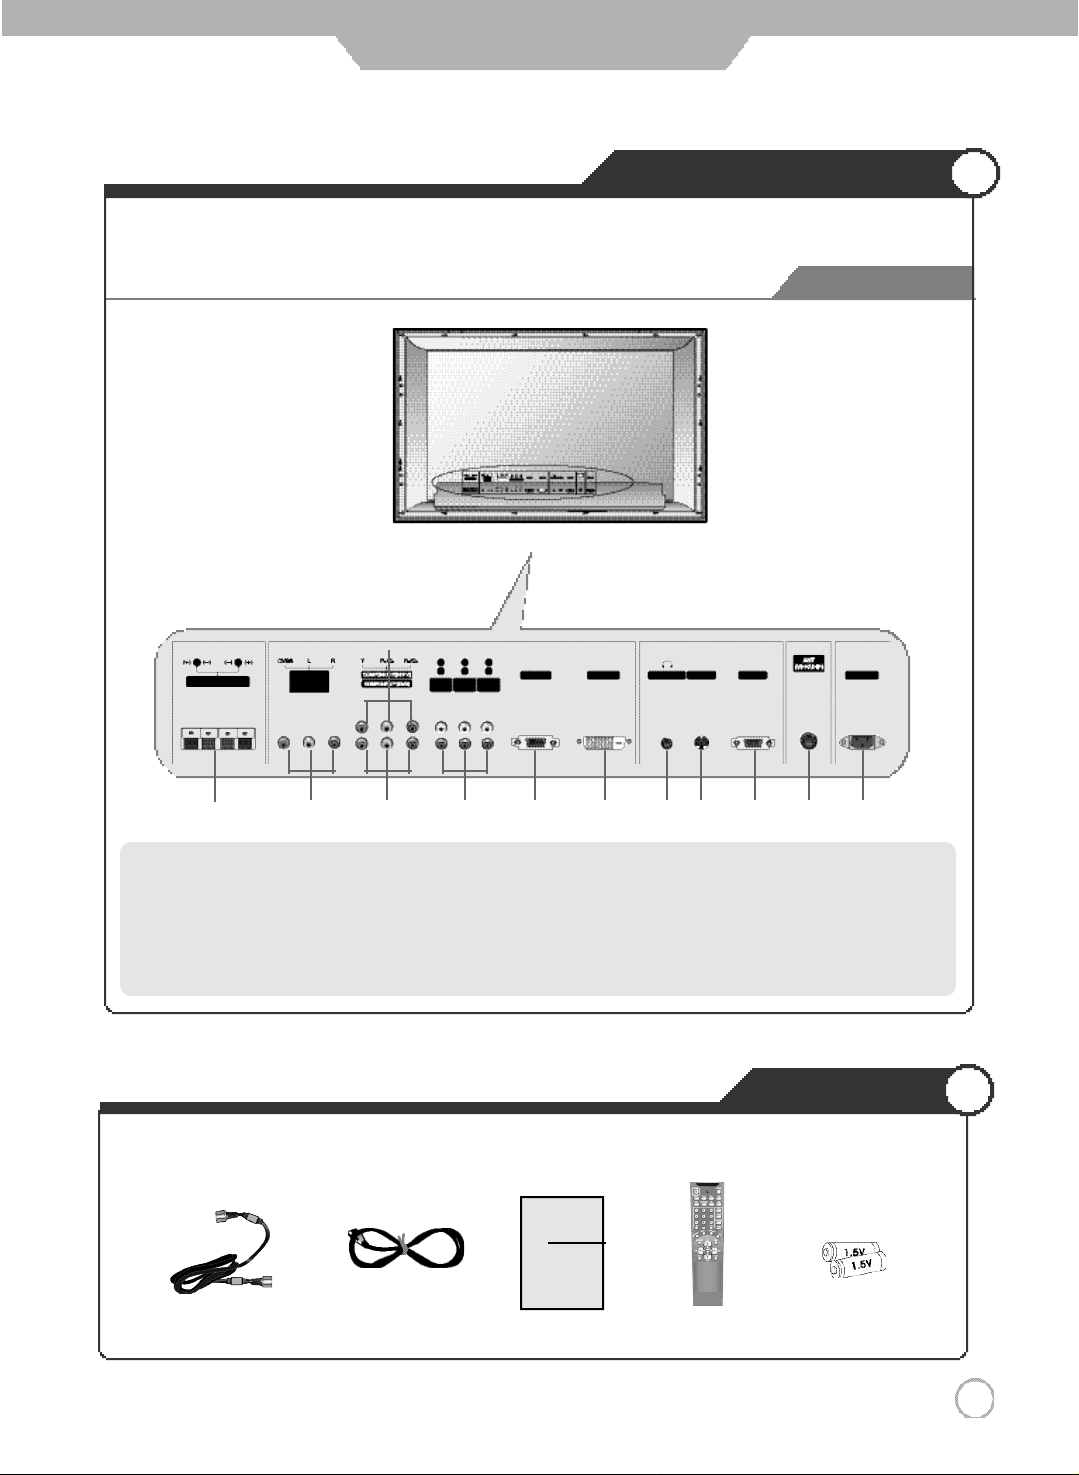
Back View
External Speaker Connection Terminal (8Ω)
AV (Video/Audio) Input
Component 1 (DVD) Input Terminal (480i~1080i)
Component 2 (DTV) Input Terminal (480i~1080i)
Audio Input Terminal (DVD, DTV, PC)
RGB PC Input Terminal (VGA~XGA)
DVI-D Input Terminal
EAR PHONE Input Terminal
S-Video Input Terminal
RS-232C Terminal
Antenna (RF) Input Terminal
AC Input Terminal
● The configuration of the components may look different from the following illustration.
Accessories
User's Guide
Power CordAntenna Cable Remote
User's Guide Battery1.5V (AAA×2)
Control
9
User Guidance Information
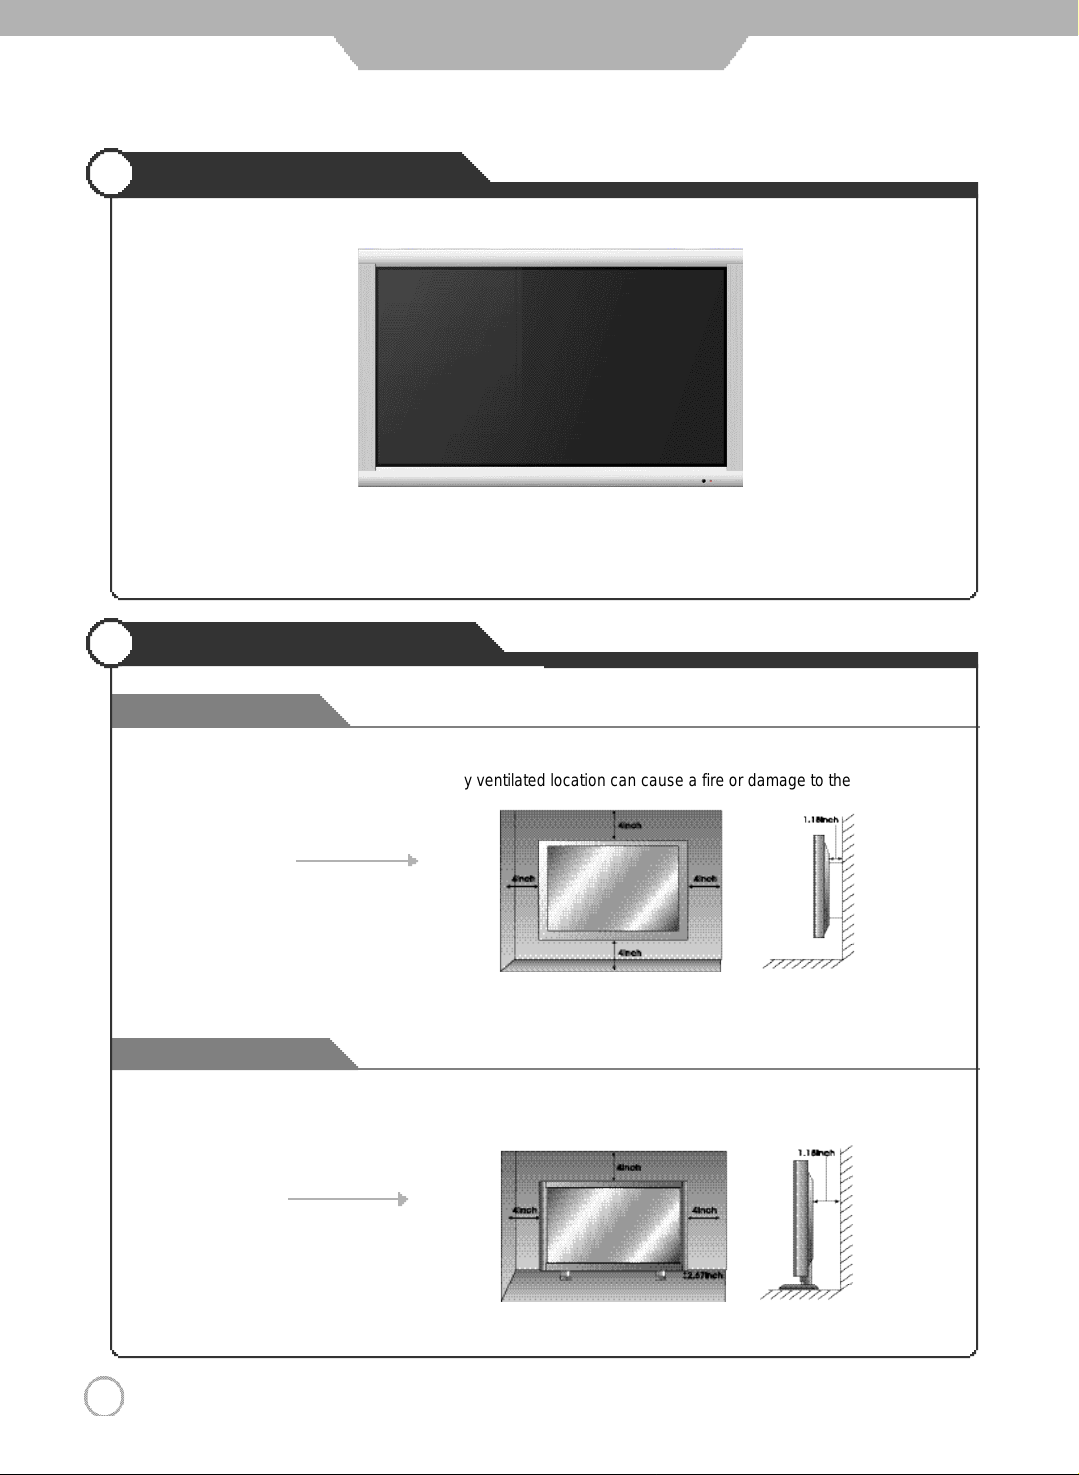
Mounting on a Desktop
● Your PDP TV can be mounted on a Desktop as shown in the figure above.
● This is not floor-standing unit.
Installation Precautions
Wall Mounting
●
Please secure enough space for safe use. (Please refer to A and B.)
●
Installation of the PDP TV in an improperly ventilated location can cause a fire or damage to the PDP TV
due to increased temperature
A
(Mounting on a wall)
※
Contact your dealer to purchase the "Adjustable-angle wall mount" required for wall-mounted installation.
Using the Stand
●
Do not install on an unstable location with support area smaller than the PDP TV.
●
Please refer to the desktop stand user's manual for details of installation.
B
(Using the Stand)
.
1 0
※
Please contact your dealer to purchase the "speakers".
User Guidance Information
Wall Jack with
F-Connector
Connecting an Outdoor Antenna
Coaxial (Round) Antenna Cable
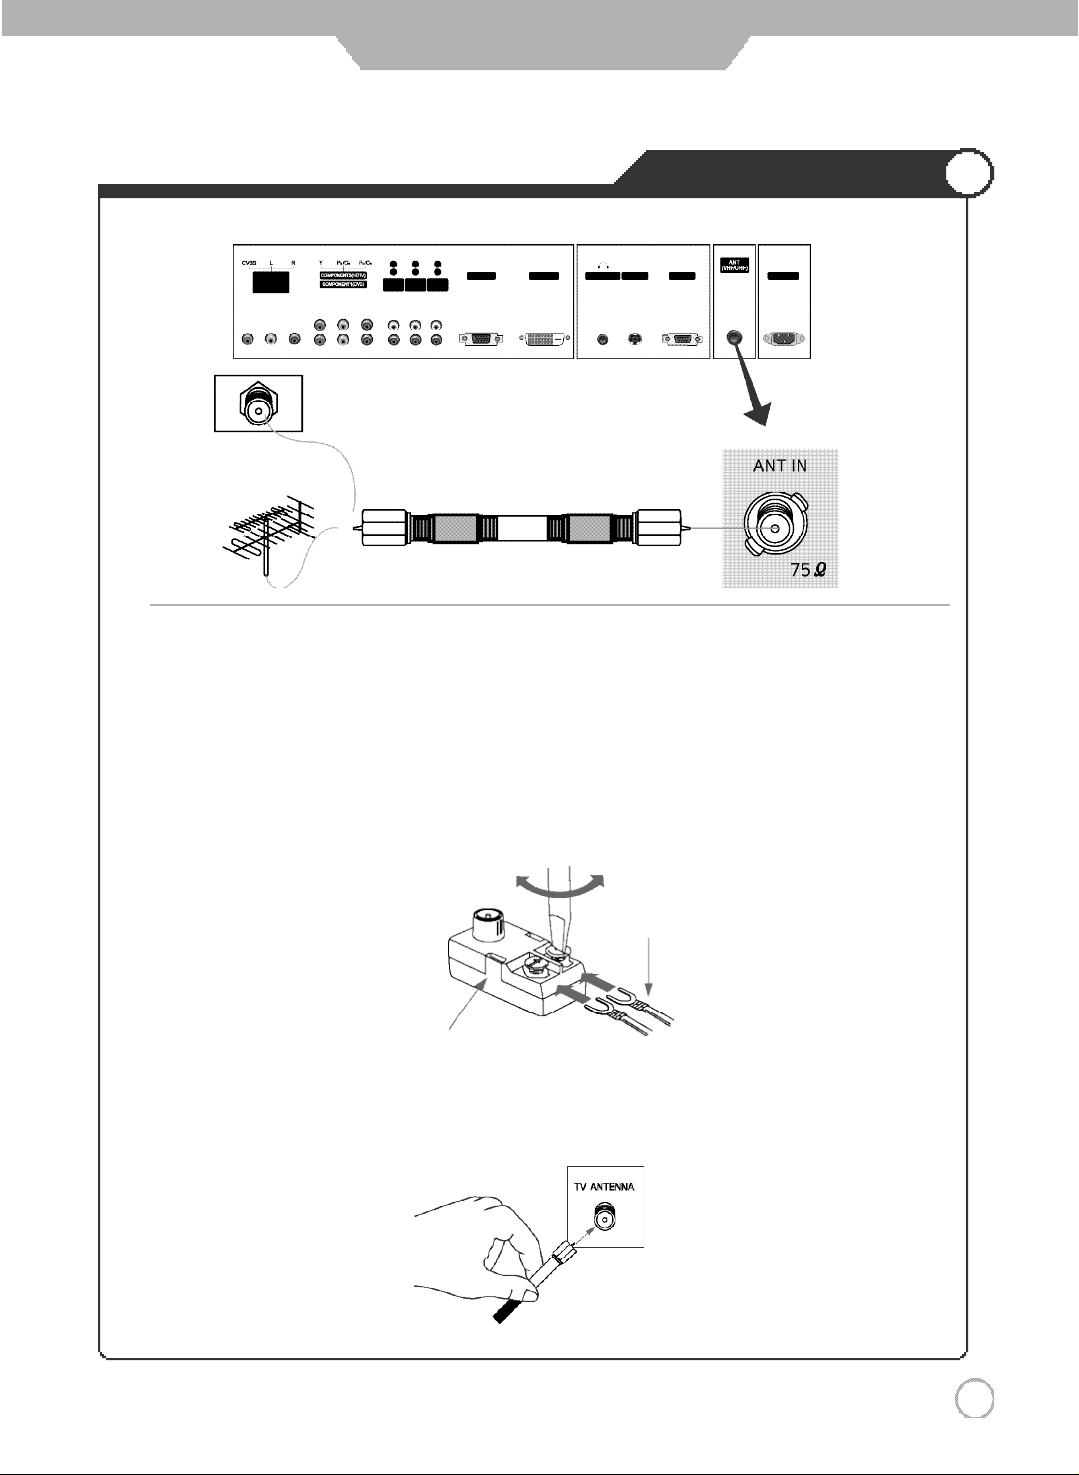
Installing an Antenna
For the best reception, we recommend you use an outdoor antenna.
Severely weathered antennas and antenna cables can reduce the signal quality.
Before making any connections, inspect all antenna hardware. Any service center can explain the various
outdoor antennas available to you.
●
300 Ohm Flat Wire
Connect the 300 ohm flat wire to the screws on the 300 ohm to 75 ohm adapter. Push the end of 300 ohm to 75 ohm
adapter onto the 75 ohm antenna jack.
300 ohm Flat Wire
300 to 75
ohm Adapter
●
75 Ohm Coaxial Cable
Connect the 75 ohm coaxial cable directly to the 75 ohm antenna jack.
1 1
User Guidance Information
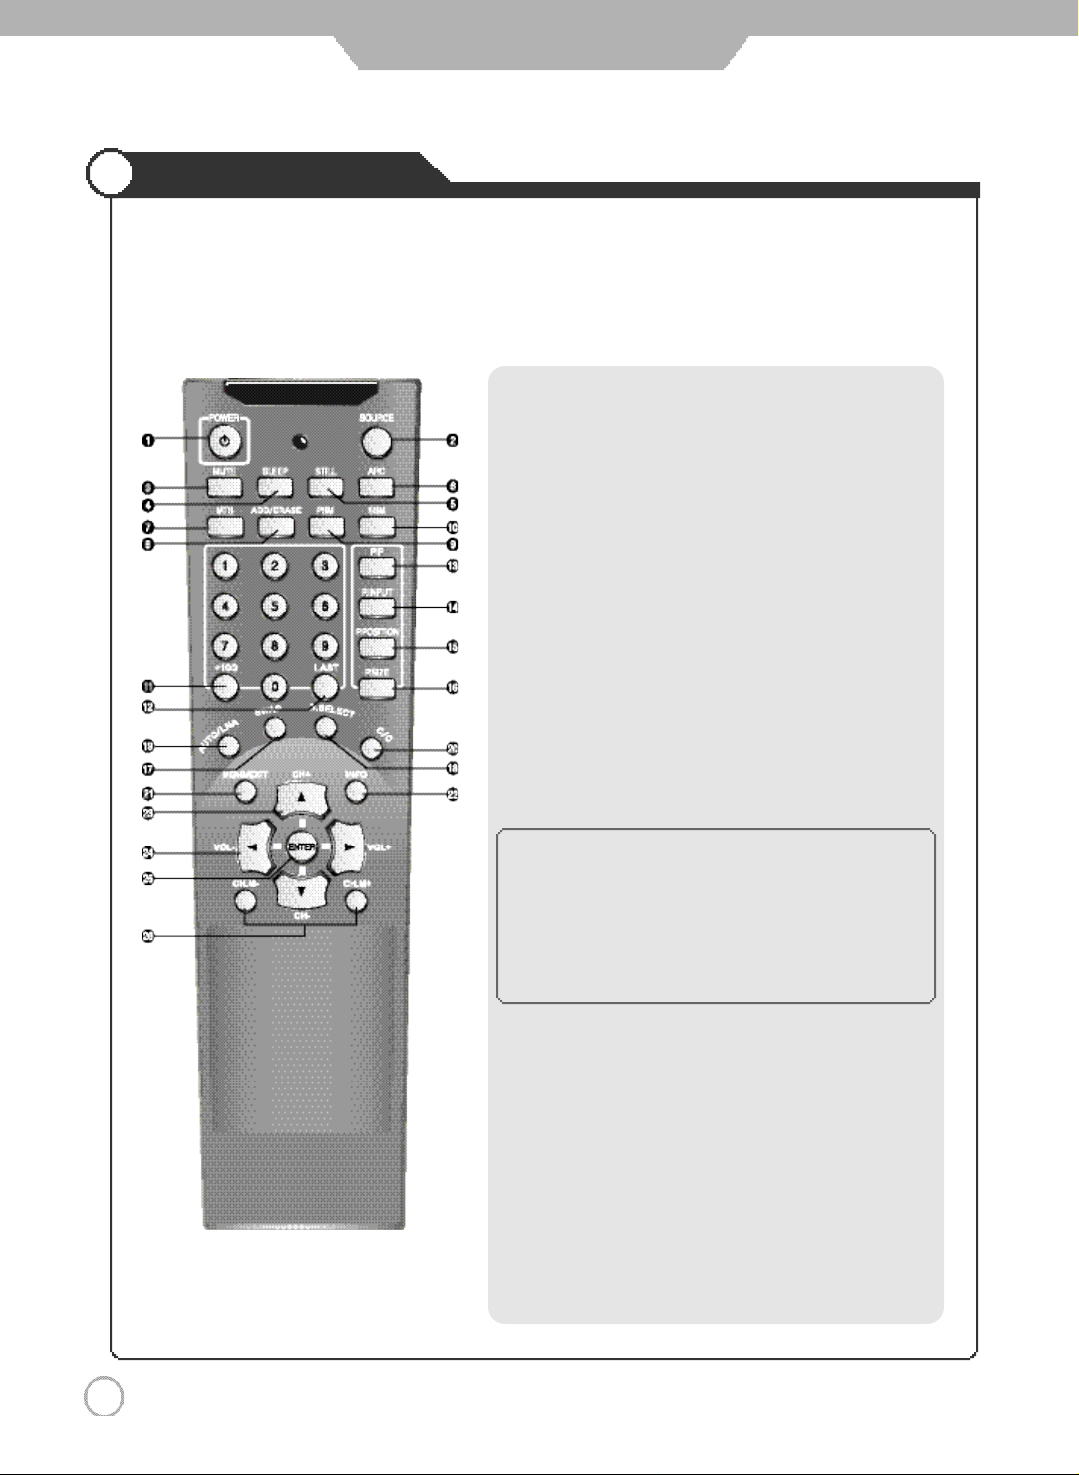
Remote Controller
●Functions of remote control buttons
The remote control is using Infra-Red (IR). Point it towards the front of the PDP TV. The remote control may not
work correctly if it is operated out of range or out of angle.
1. POWER : TURNS THE TV ON AND OFF(page.20)
2. SOURCE : USE TO SELECT AN INPUT SOURCE (page.23)
3. MUTE : PRESS TO TEMPORARILY TURN OFF THE SOUND (page.21)
4. SLEEP : PRESS TO SELECT A TIME FOR THE TV TO TURN OFF
AUTOMATICALLY (page.39)
5. STILL : PRESS TO STOP THE ACTION DURING A PARTICULAR
SCENE (page.21)
6. ARC (Aspect Ratio Control) : PRESS TO CHANGE THE
SCREEN SIZE (page.28)
7. MTS (Multi-Television Sound) : PRESS TO SELECT MONO
OR STEREO MODE (page.36)
8. ADD/ ERASE : PRESS TO ADD OR ERASE CHANNELS
IN THE TV'S MEMORY (page.23)
9. PSM : PICTURE STATUS MEMORY KEY (page.24)
(CUSTOM, DYNAMIC, STANDARD, MOVIE, MILD)
10. SSM : SOUND STATUS MEMORY KEY (page.25)
(CUSTOM, STANDARD, MUSIC, MOVIE, SPEECH)
11. +100 : PRESS TO SELECT CHANNELS OVER 100.
12. LAST :
◈
PIP CONTROL KEY
13. PIP : PIP ON/OFF
14. P.INPUT : PIP INPUT SELECT KEY
15. P.POSITION :PIP POSITION CONTROL KEY
16. P.SIZE : PIP AND PBP MODE CHANGE
17. SWAP : PIP SOURCE SWAP
18. S.SELECT : MAIN OR SUB SOUND SELECT KEY
19. AUTO/ LNA : PC MODE : AUTO IN PROGRESS KEY (Press to
20. C/C : CLOSED CAPTION (page.33)
21. MENU/EXIT :
22. INFO : PRESS TO DISPLAY THE CURRENT CHANNEL
23. ▲,▼ (CH+, CH-) : PRESS TO CHANGE THE MEMORIZED
24. ◀,▶ (VOL+, VOL-) : PRESS TO INCREASE OR DECREASE
25. ENTER : SAVE THE VALUE
26. CH.M-, CH.M+ : PRESS TO CHANGE THE ONE BY ONE
FOR EXAMPLE, TO SELECT CHANNEL 107,
PRESS"+100" THEN PRESS "0" AND "7"
TUNES TO THE PREVIOUS CHANNEL (page.21)
(page.34~35)
Control the Monitor screen automatically)
TV MODE : LNA KEY(Low Noise Amplifier) (page.29)
ON-SCREEN MENU ON/OFF KEY
AND AUDIO/ VIDEO SETTINGS (page.21)
CHANNELS OR MENU CONTROL KEY
THE VOLUME OR MENU CONTROL KEY
CHANNEL
1 2
User Guidance Information
Precautions
Avoiding Remote Control Problems
1. Check the polarity (+,-) of the batteries in the remote controller.
2. Check that the batteries have power.
3. Check that the PDP TV is powered and that it is properly plugged in.
4. Check if any three-wavelength lamp, special fluorescent or neon sign is turned on near the PDP TV.
Inserting Batteries in the Remote Controller
1. Open the cover out Completely.
2. Insert the two supplied batteries (AAA, 1.5V). Ensure
that the polarities (+and -) of the batteries are aligned
correctly.
3. Replace the cover.
CAUTION : Risk of explosion if battery is replaced by an incorrect type.
Dispose of used batteries according to the national code (Recycling program).
How to use remote controller
·
The remote control should be operated within 30 feet
on the front of the PDP TV.
(7m) and 3
0˚to the left and the right of the IR receiver
·
Used batteries should be disposed properly.
1 3
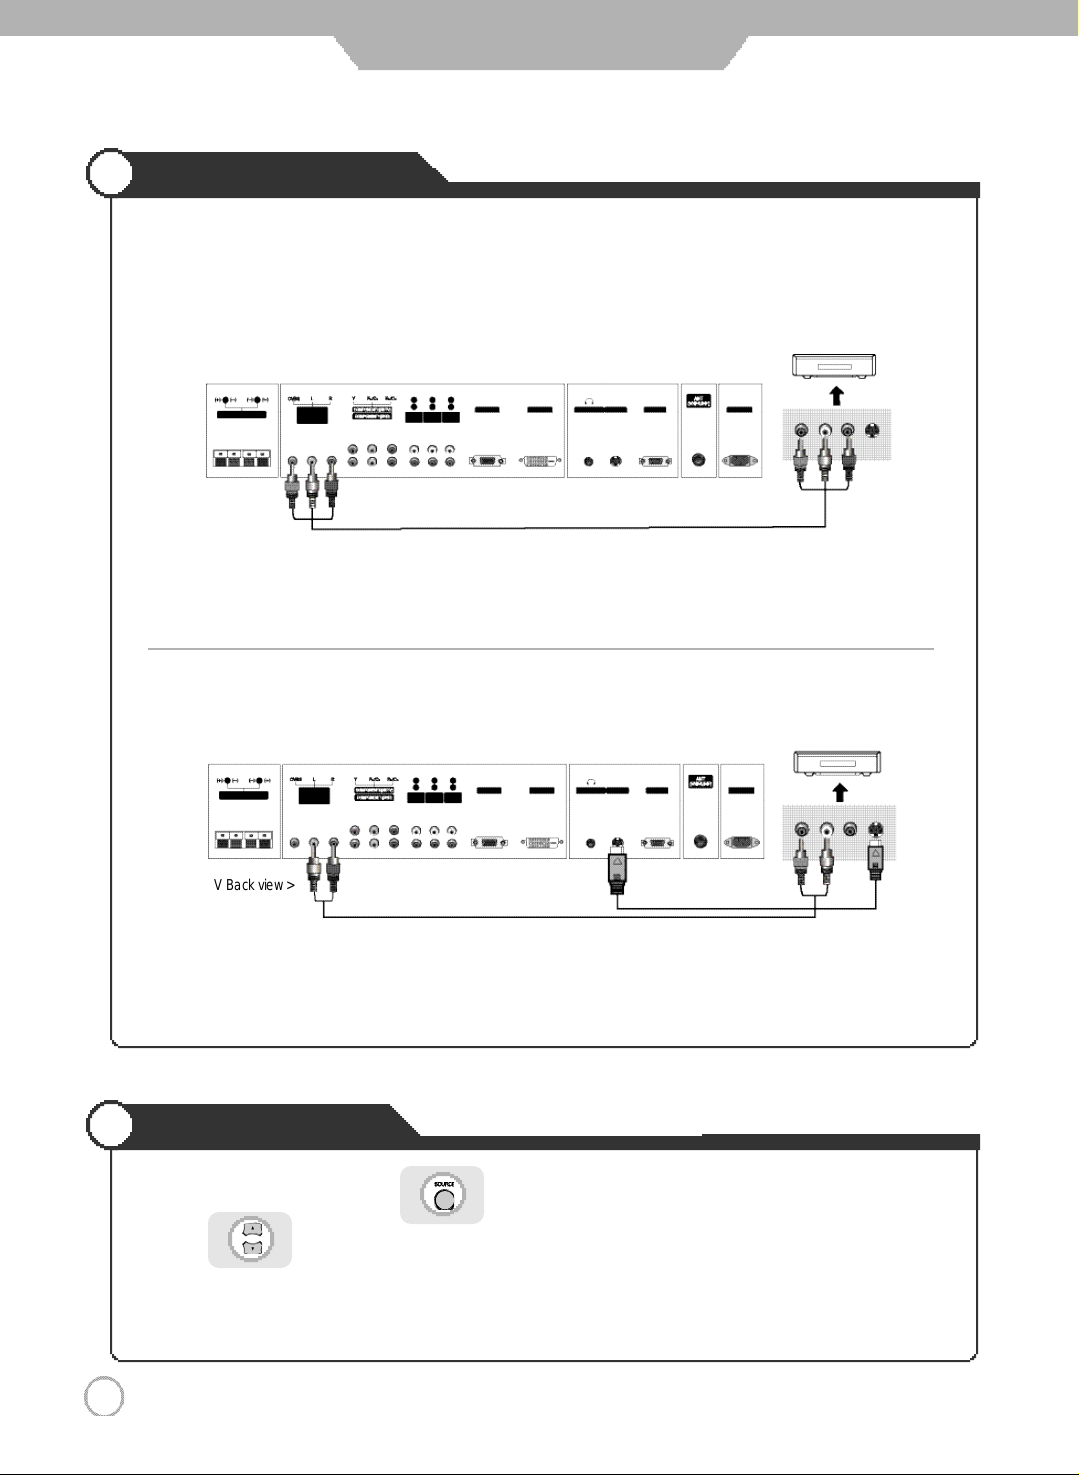
Connection
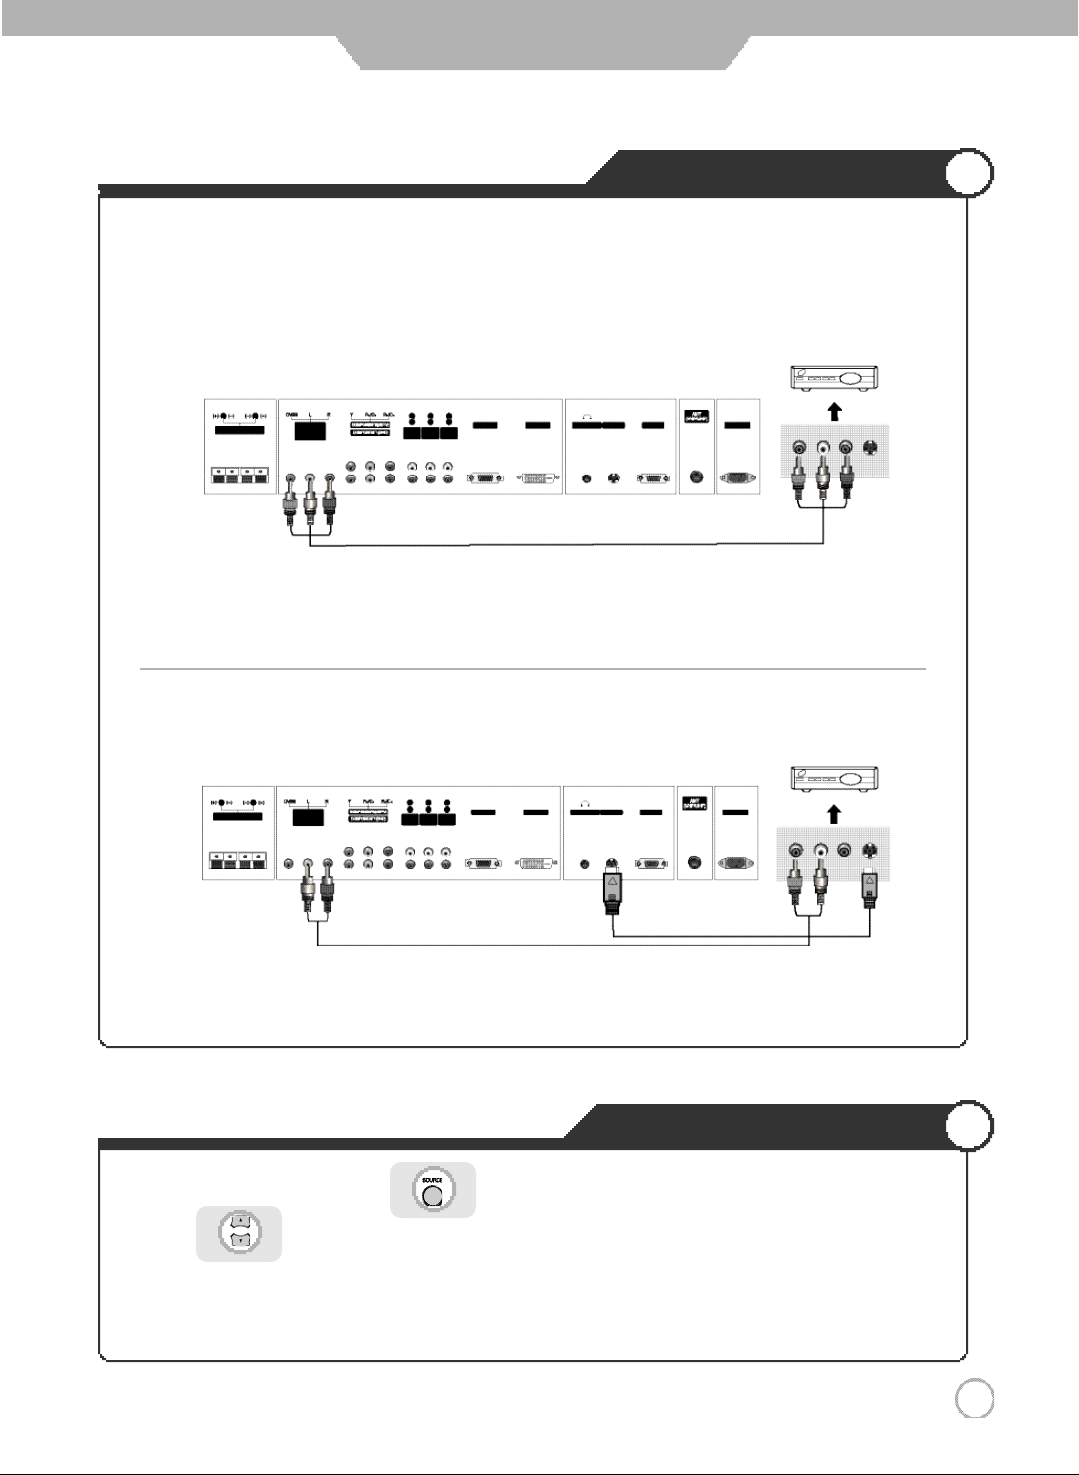
VCR Connections
● Connecting to the AV terminal
※
Connection terminals of other appliances differ by manufacturer and model.
< VIDEO >
( R ) ( L )
< PDP TV Back view >
·Connect the PDP TV's AV In terminal to the VCR's AV Out terminal using the AV cable.
(Make sure the color of the terminals and the color of the cable are the same)
AV Cable
● Connecting to the S-Video terminal
< PDP TV Back view >
※ Use the S-Video cable for higher picture quality.
S-Video Cable
< VIDEO >
( R ) ( L )
Playing the VCR
1. Turn on the PDP TV and press on the remote controller.
2. Use to move to "AV".
·If S-Video has been connected, select S-Video.
3. Turn on the VCR, insert the tape and press play button.
1 4
Connection
Cable TV Connections
● Connecting to the AV terminal
※ In order to watch Cable TV, Subscribe to your local Cable TV company and install a separate converter(Set-Top-Box)
※ Connection terminals of other appliances differ by manufacturer and model.
< Cable broadcasting receiver >
( R ) ( L )
< PDP TV Back view >
AV Cable
·Connect the PDP TV's AV In terminal to the cable broadcasting receiver AV Out terminal using the AV cable. (Make
sure the color of the terminals and the color of cable are the same)
● Connecting to S-Video terminal
< PDP TV Back view >
※ Use the S-Video cable for higher picture quality.
1. Turn on the PDP TV and press on the remote controller.
2. Use to move to "AV".
< Cable broadcasting receiver >
( R ) ( L )
S-Video Cable
Viewing Cable TV
·If S-Video has been connected, select S-Video.
3. Turn on the cable broadcasting receiver and select the channel you wish to view.
1 5
Connection
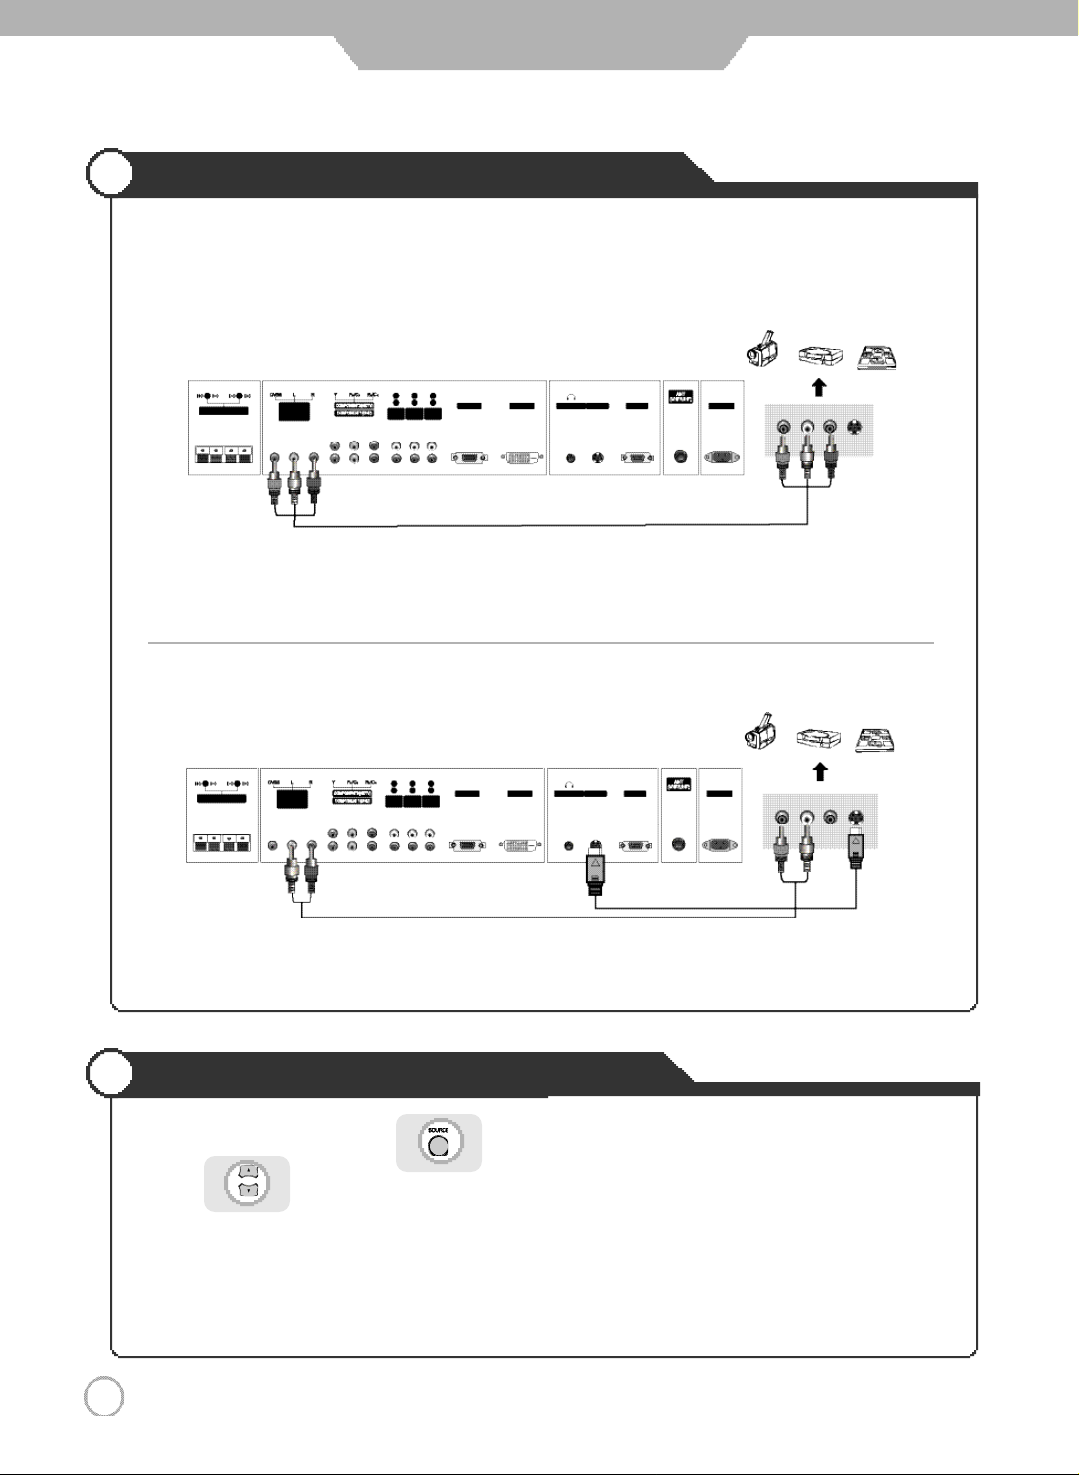
Camcorder/Game Console Connections
● Connecting to the AV terminal
※ Connection terminals of other appliances differ by manufacturer and model.
< Camcorder/ Game machine >
( R ) ( L )
< PDP TV Back view >
AV Cable
·Connect the PDP TV's AV In terminal to the camcorder/game console's AV Out terminal with the AV cable. (Make
sure the color of the terminals and the color of cable are the same)
● Connecting to S-Video terminal
< Camcorder/ Game machine >
< PDP TV Back view >
S-Video Cable
※ S-Video cable can be used if there is an S-Video terminal.
Using Camcorder/Game Console
1. Turn on the PDP TV and press on the remote controller.
2. Use to move to "AV".
· If S-Video has been connected, select S-Video.
3. Turn on the Camcorder or video game and set to Video mode.
(Please refer to the User's manual of Camcorder/ Video game for more information)
4. Insert tape into Camcorder and press play button or insert disc into the Video game console.
( R ) ( L )
1 6
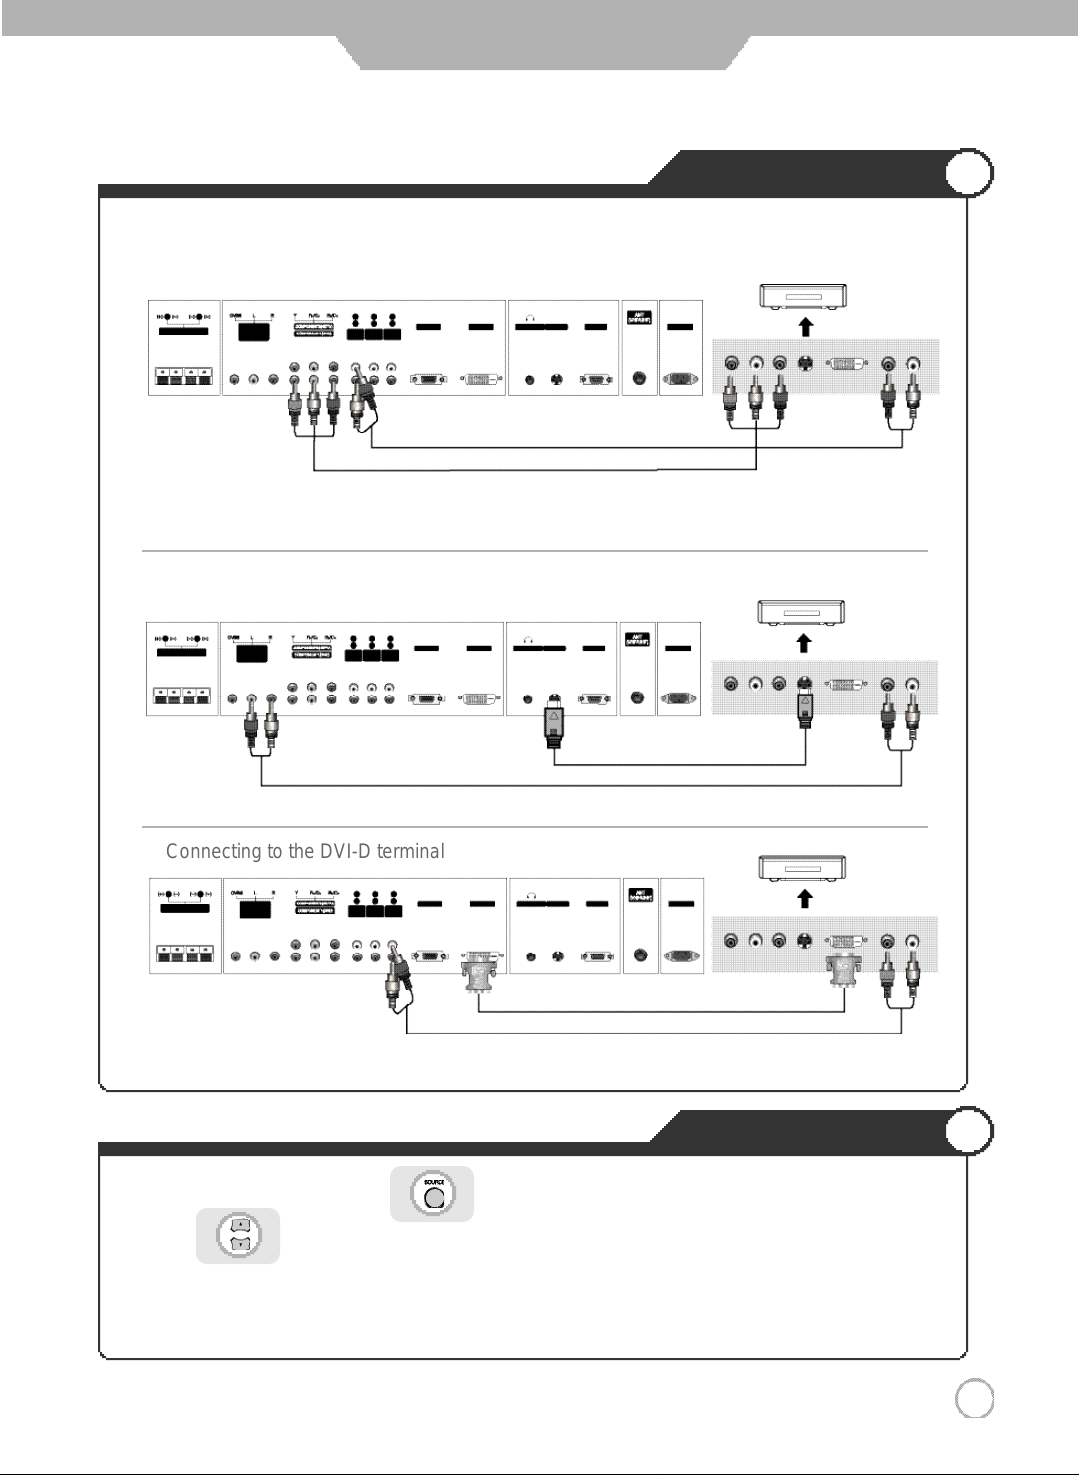
Connection
● Connecting to the component terminal
※ Connection terminals of other appliances differ by manufacturer and model.
DVD Connections
< DVD >
PRPBY
< PDP TV Back view >
Component Audio cable
Component connection cable
1. Connect PDP TV's Y, PB, PR terminal in Component 1 to DVD's Video Out terminal using the external cable.
2. Connect PDP TV's Audio terminals (left & right) in Component 1 to DVD's Audio Out terminal using the Audio cable.
● Connecting to the S-Video terminal
< PDP TV Back view >
S-Video Cable
※ S-Video cable can be used if there is an S-Video terminal.
● Connecting to the DVI-D terminal
< DVD >
PRPBY
< DVD >
PRPBY
( R ) ( L )
( R ) ( L )
( R ) ( L )
< PDP TV Back view >
※ Use the DVI-D with HDCP connection if there is a DVI-D terminal in your DVD.
DVI-D Cable
1. Turn on the PDP TV and press on the remote controller.
2. Use to move to "Component1".
·If S-Video has been connected, select S-Video.
·If DVI-D has been connected, select “DVI”
3. Turn on the DVD, insert the DVD and press Play button.
Playing the DVD
1 7
 Loading...