

Page 1
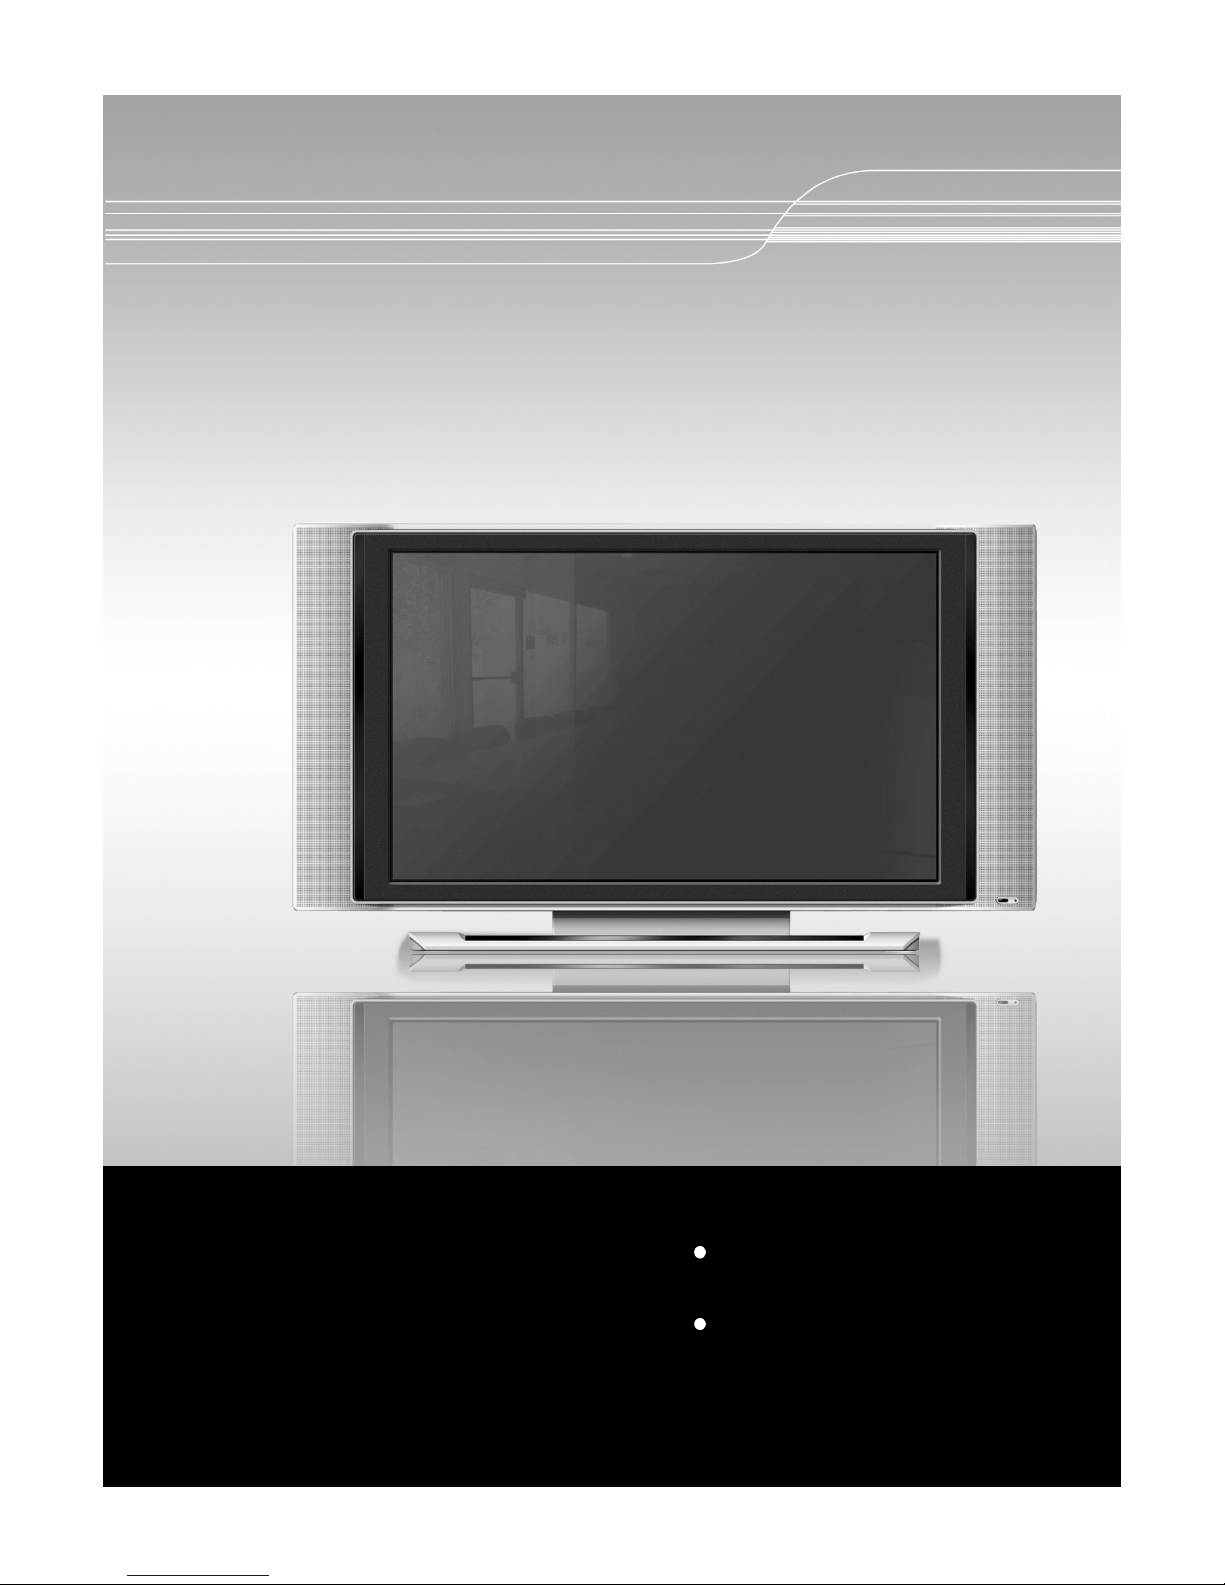
Please observe all safety precautions
when using this product.
Please read this manual carefully
before using this product.
32 LCD TV User’s Guide
Page 2
2
CONTENTS
Quick and Easy Installation
Versatility and Expandability
That doesnt make you feel fatigue on your Eyes.
Flat-Panel Digital Display easy on the Eyes.
Safety Precautions
Power Supply 4
Installation 5
Use and Maintenance 5~6
Important Safety Instructions 7~8
User Guidance Information
What is the LCD TV? 9
Name of each part 10
Controls and Functions 11
Accessories 11
Mounting on a wall 12
Installation Precautions 12
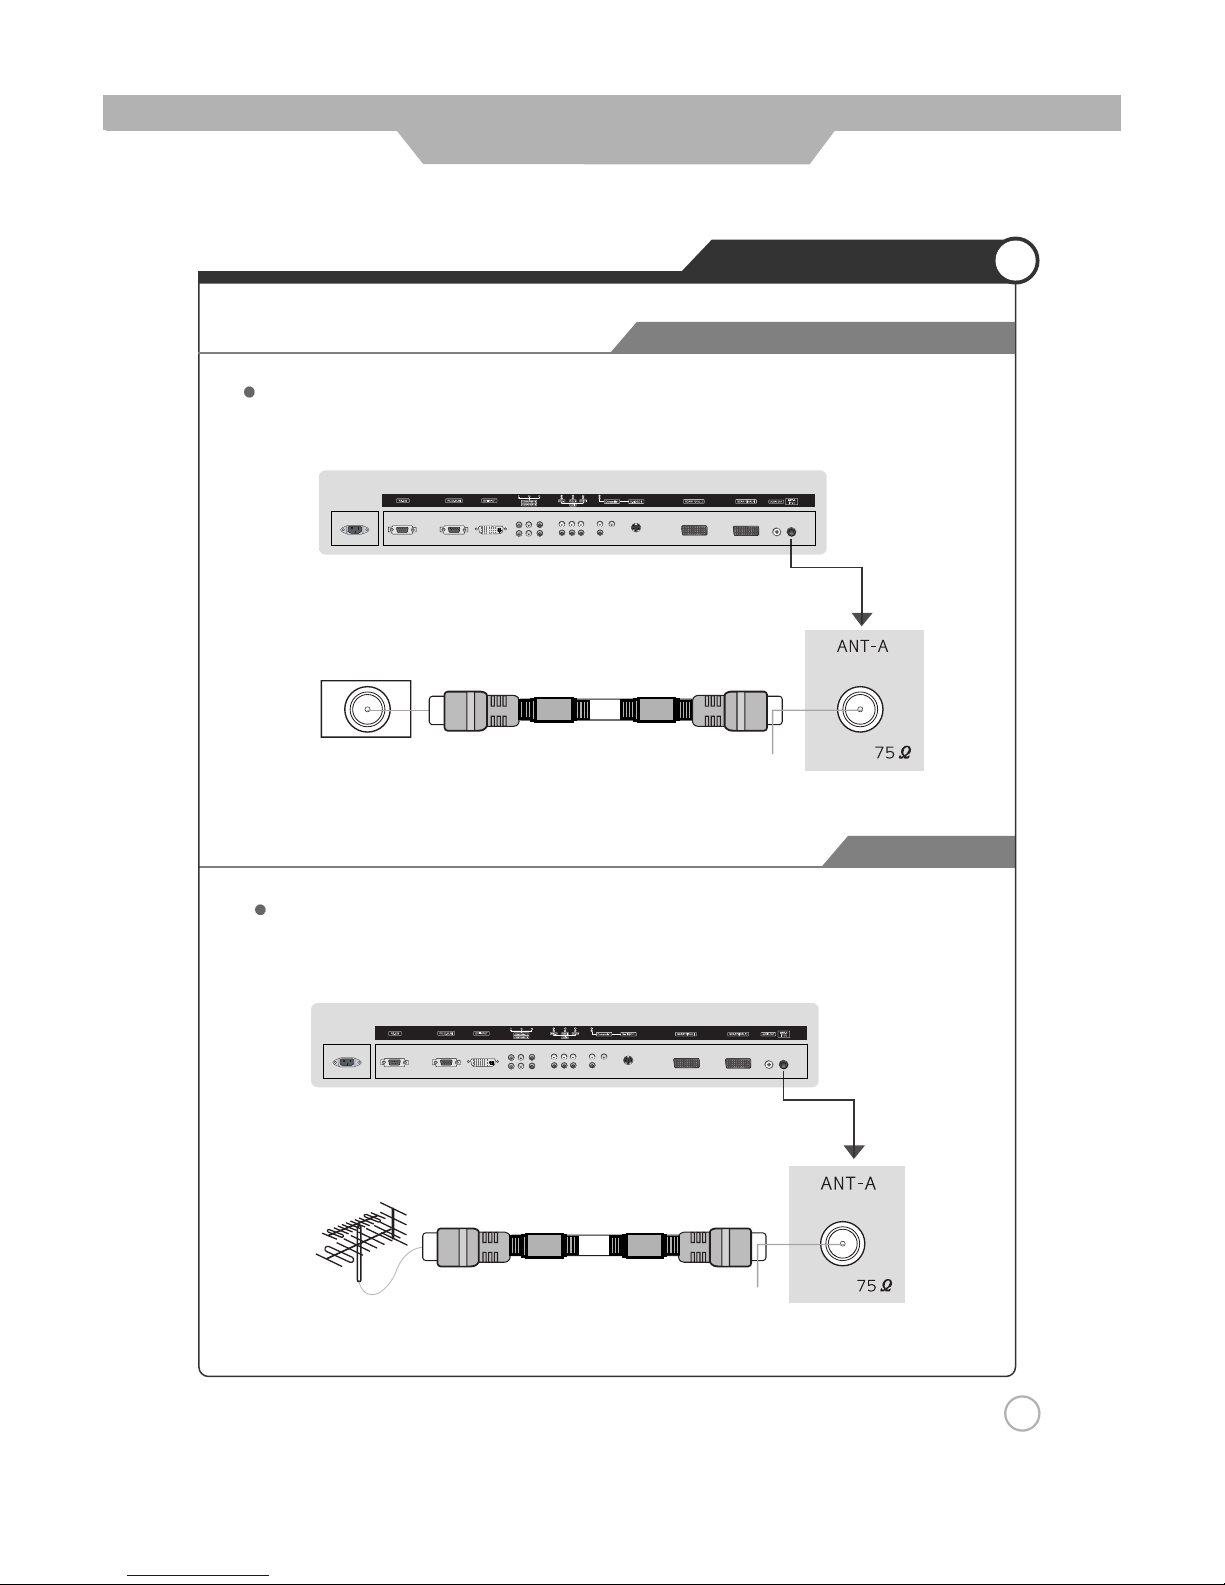
Installing an Antenna 13
Remote controller 14
Precautions 15
Connections
VCR Connections 16
Cable TV Connections 17
Camcorder/ Game Console Connections 18
DVD Connections 19
DTV Connections 20
PC Connections 21
Audio Out Connections 22
Headphone Connections 22
External Adjustment 23
Basic Use
Powering the LCD TV 24
Initial Settings 24
Watching TV 25
Selecting TV/ External Input 26
Using the Menu 26
Page 3
3
CONTENTS
Basic Use
To Set Location 27
Setting Channels 28
To set or erase a channel 28
Changing Picture Settings 29
Changing Sound Settings 30
Custom Sound Adjustment 31
Sound Output 31
Selecting the Menu Language 32
Setting OSD Tone Menu Background 32
Setting Blue Background 33
Setting Digital Noise Reduction 33
Application
Changing Screen Size 34
Changing the Screen Size for WSS Signal Input 35
Manual Store 35
Sorting Program 36
Editing Program Name 37
Adjusting Unclear Screen 38
To view the still picture 38
Viewing Picture in Picture 39~40
Auto Volume Level 41
Stereo Setting 41
Resetting LCD TV Setting 42
Setting Time 43
Automatic Power On/ Off 44
Teletext 45
Maintenance and Service
Trouble shooting 46
Trouble shooting Tip 47
Supported Display Modes 47~48
Page 4
4
Safety Precautions
Cautions
Warnings
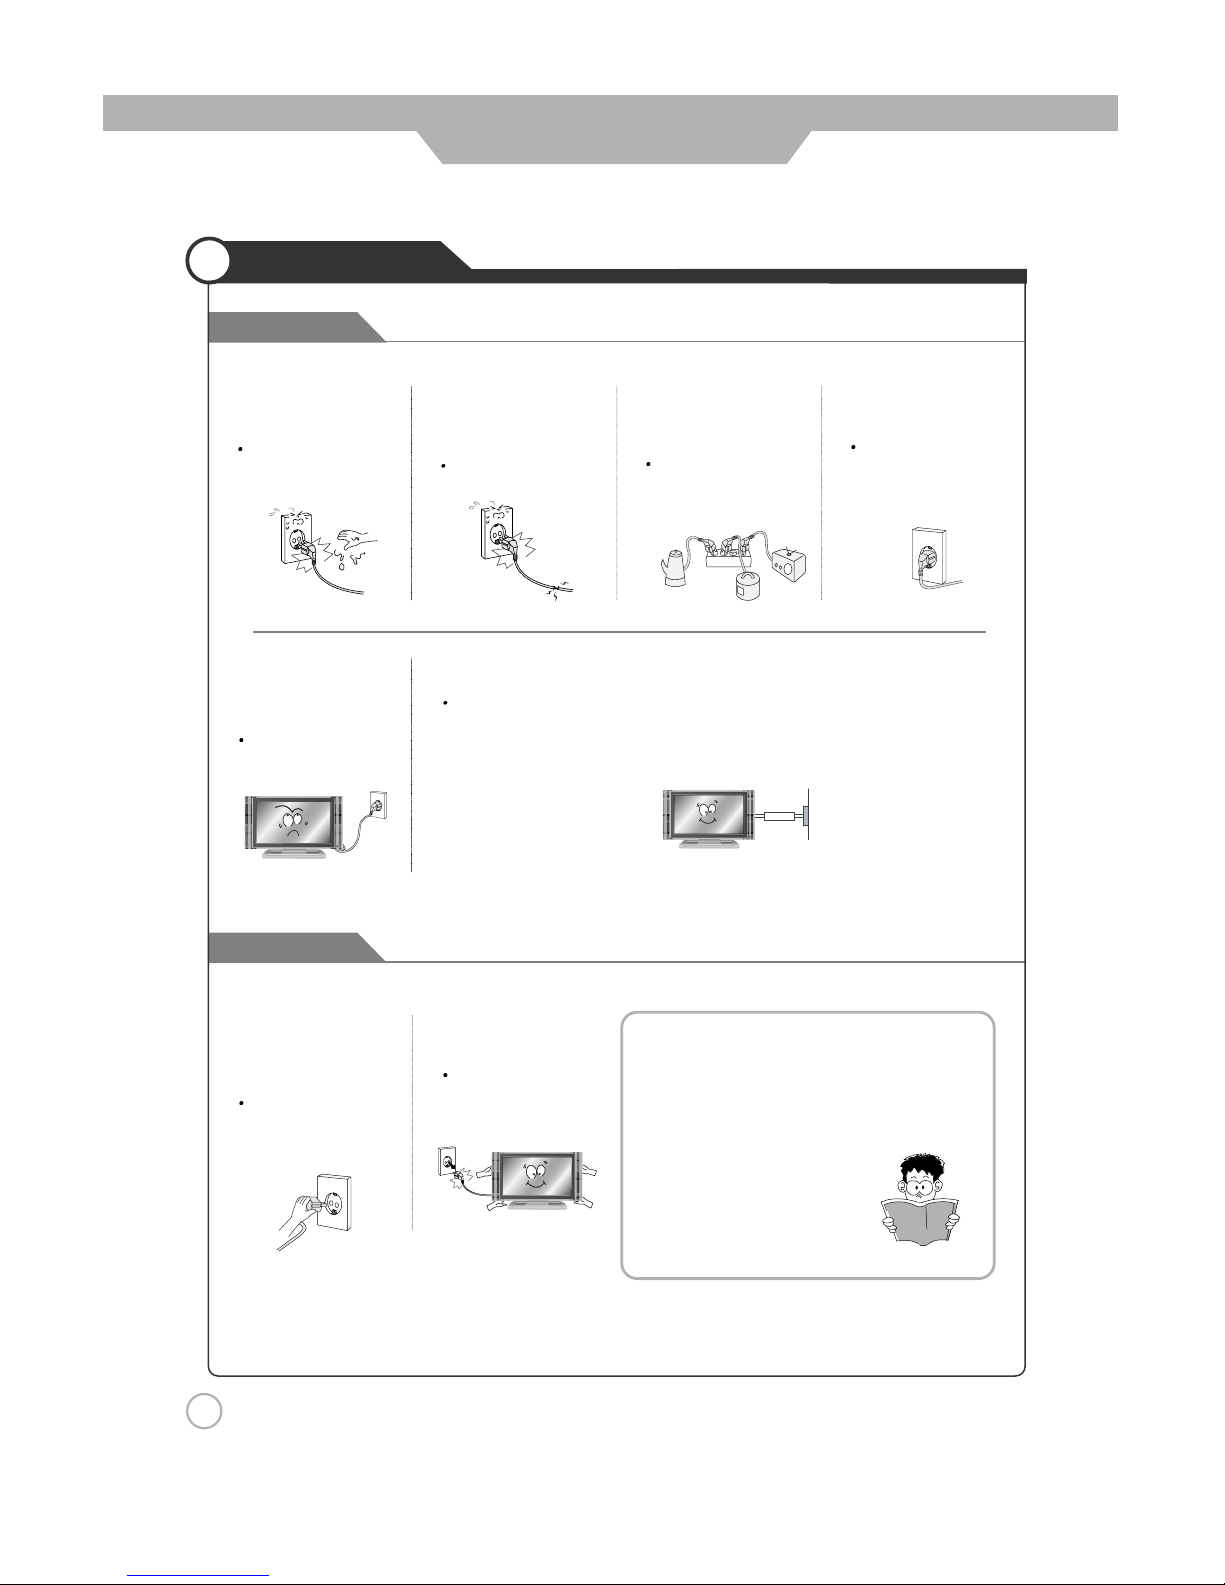
Power Supply
Do not use a damaged
power cord or plug or a
loose outlet.
Doing so may result in
fire or electric shock.
Do not plug several
devices into the same
outlet.
Doing so may cause
the outlet to overheat
and start a fire.
Insert the power plug
fully into the outlet.
A loose or improperly
inserted power plug
may result in fire.
Do not touch the power
plug with wet hands.
Doing so may result in
electric shock.
Be sure to ground the unit.
Failing to do so may lead to electric shock when a short circuit or overload occurs.
If necessary, install a ground fault circuit breaker. Never ground to a telephone line,
lightning rod, or metal gas pipe. (Doing so may result in fire, electric shock, or other
hazards.)
Do not bend the power
cord excessively or place
heavy objects on it.
Doing so may result in
fire or electric shock.
Always unplug the unit
before cleaning.
Not doing so may
result in fire or electric
shock.
When disconnecting the
power cord from an AC
outlet, always grasp it by
the plug.
Pulling on the cord
can damage the
internal wire and may
result in fire.
The purpose of these precautions is to
ensure user safety and prevent property
damage.
Be sure to read and observe all safety
precautions.
Page 5
5
Safety Precautions
Cautions
Warnings
Installation
Warnings
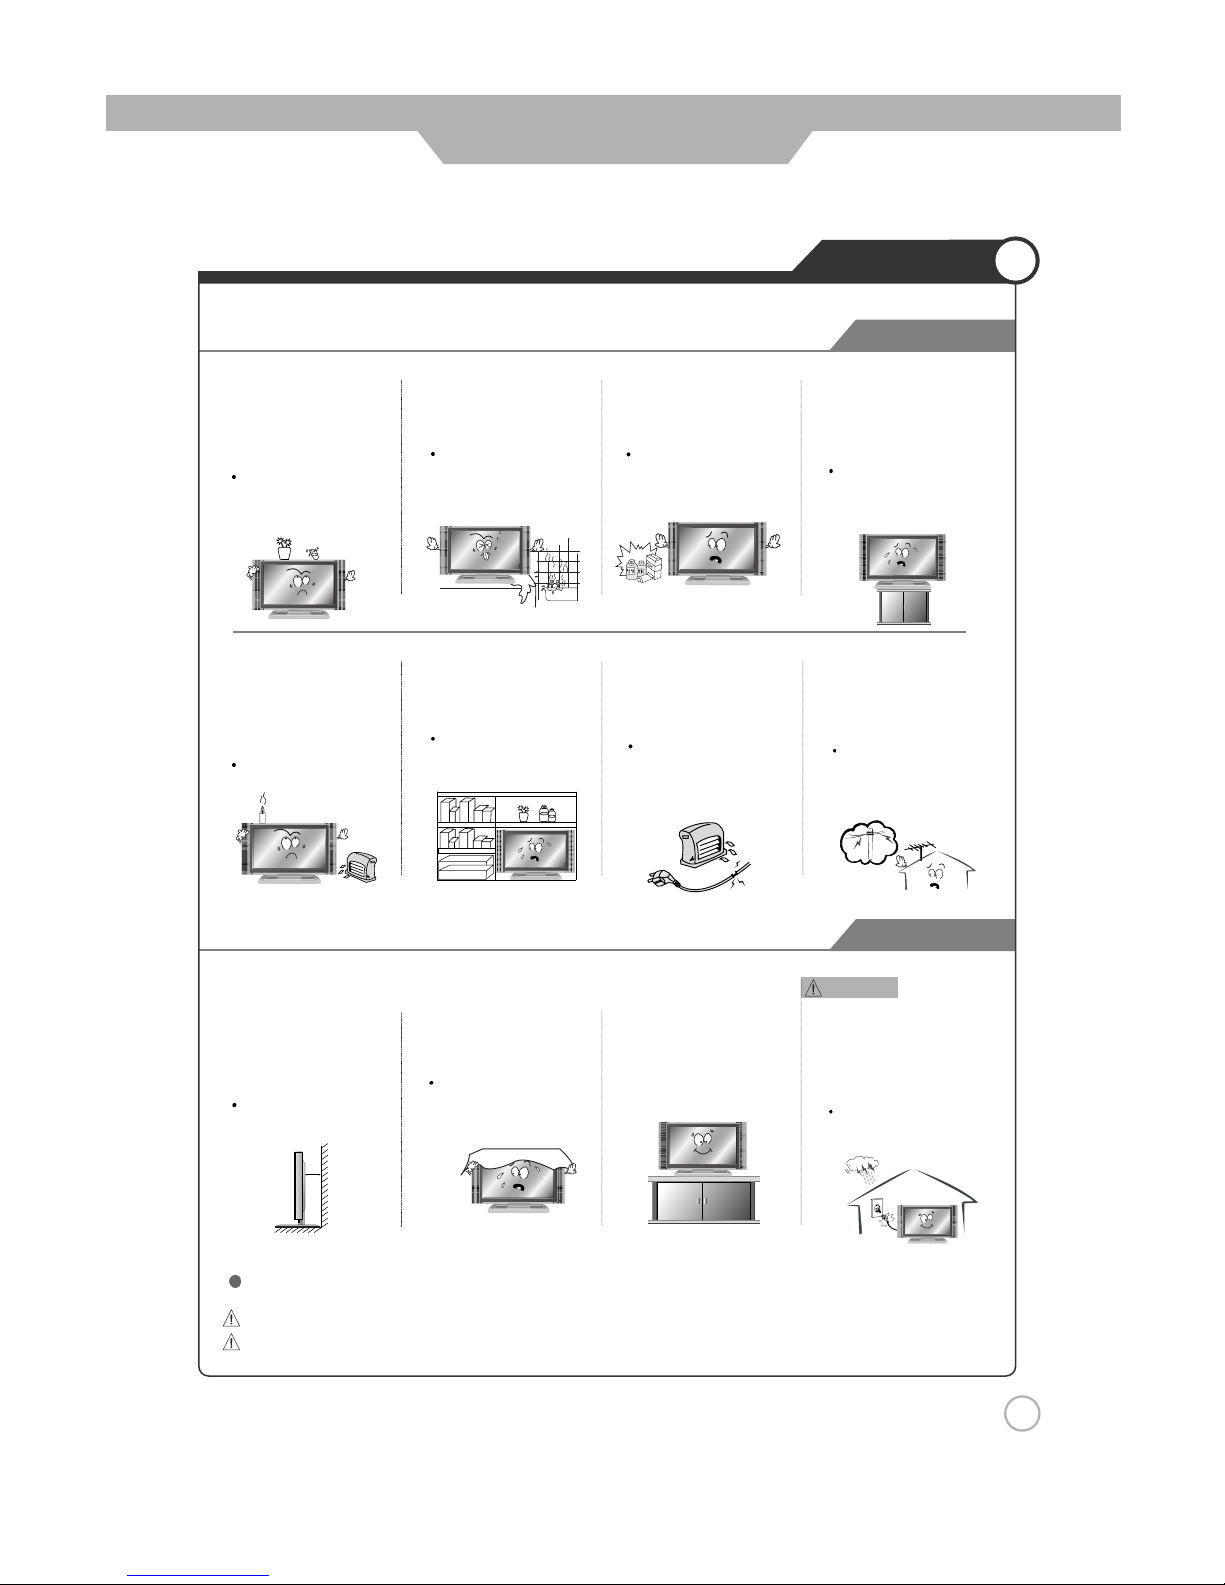
Do not place the unit where it
is exposed to rain, excessive
moisture or grease.
Doing so may result in fire,
electric shock, malfunction,
or deformation.
Do not use or store flamm
able or combustible materials
near the unit.
Doing so may result in fire
or explosion.
Do not place the unit on an
unstable surface, such as a
wobbly stand or sloped table, or
on any surface whose area is
smaller than the bottom area of
the unit.
If a child climbs on the unit, it could
topple and fall onto the child,
resulting in serious injury to the
child or damage to the unit. Place
the unit on a flat stable surface
.
Do not place containers with
liquids such as flower vases,
soft drink cans, or medicine
bottles or small metallic objects
on top of the unit.
If liquid enters the unit or any
metal object falls into the unit,
it may result in short-circuit,
fire, or electric shock.
Do not place the unit in a
poorly ventilated enclosure,
such as a cabinet.
Doing so poses a serious
risk of fire.
Do not run power cords near
heat-producing appliances
such as radiators, stoves, or
irons.
The excessive heat could
melt the insulation and
expose live wires, resulting
in fire or electric shock.
Install the antenna away from
high-voltage power lines and
communication cables and
make sure it is installed
securely.
If the antenna touches a power
line, contact with the antenna
could result in fire, electric
shock, serious injury, or death.
Do not place a burning candle,
burning anti-mosquito incense,
or lighted cigarette on top of the
unit. Do not place the unit near
any heat source such as a
fireplace or space heater.
Doing so poses a serious
risk of fire.
Install the unit at an adequate distance from the
wall to ensure sufficient
ventilation.
If the temperature inside
the unit rises, it may resultin fire.
Do not cover the unit with
a tablecloth, curtain, or
other material.
If the temperature inside
the unit rises, it may result
in fire.
Be sure to place the unit
on a level surface.
Form a drip loop where the
coaxial antenna cable enters
your building to prevent rainwater
from traveling along the cable
and coming in contact with the
antenna input terminal.
If rainwater finds its way inside
the unit, it may result in fire or
electric shock.
The following precautions are divided into "Warnings" and "Cautions".
Warning : Ignoring this precaution may result in death or serious injury.
Caution : Ignoring this precaution may result in injury or property damage.
Page 6
6
Safety Precautions
Warnings
Cautions
Use and Maintenance
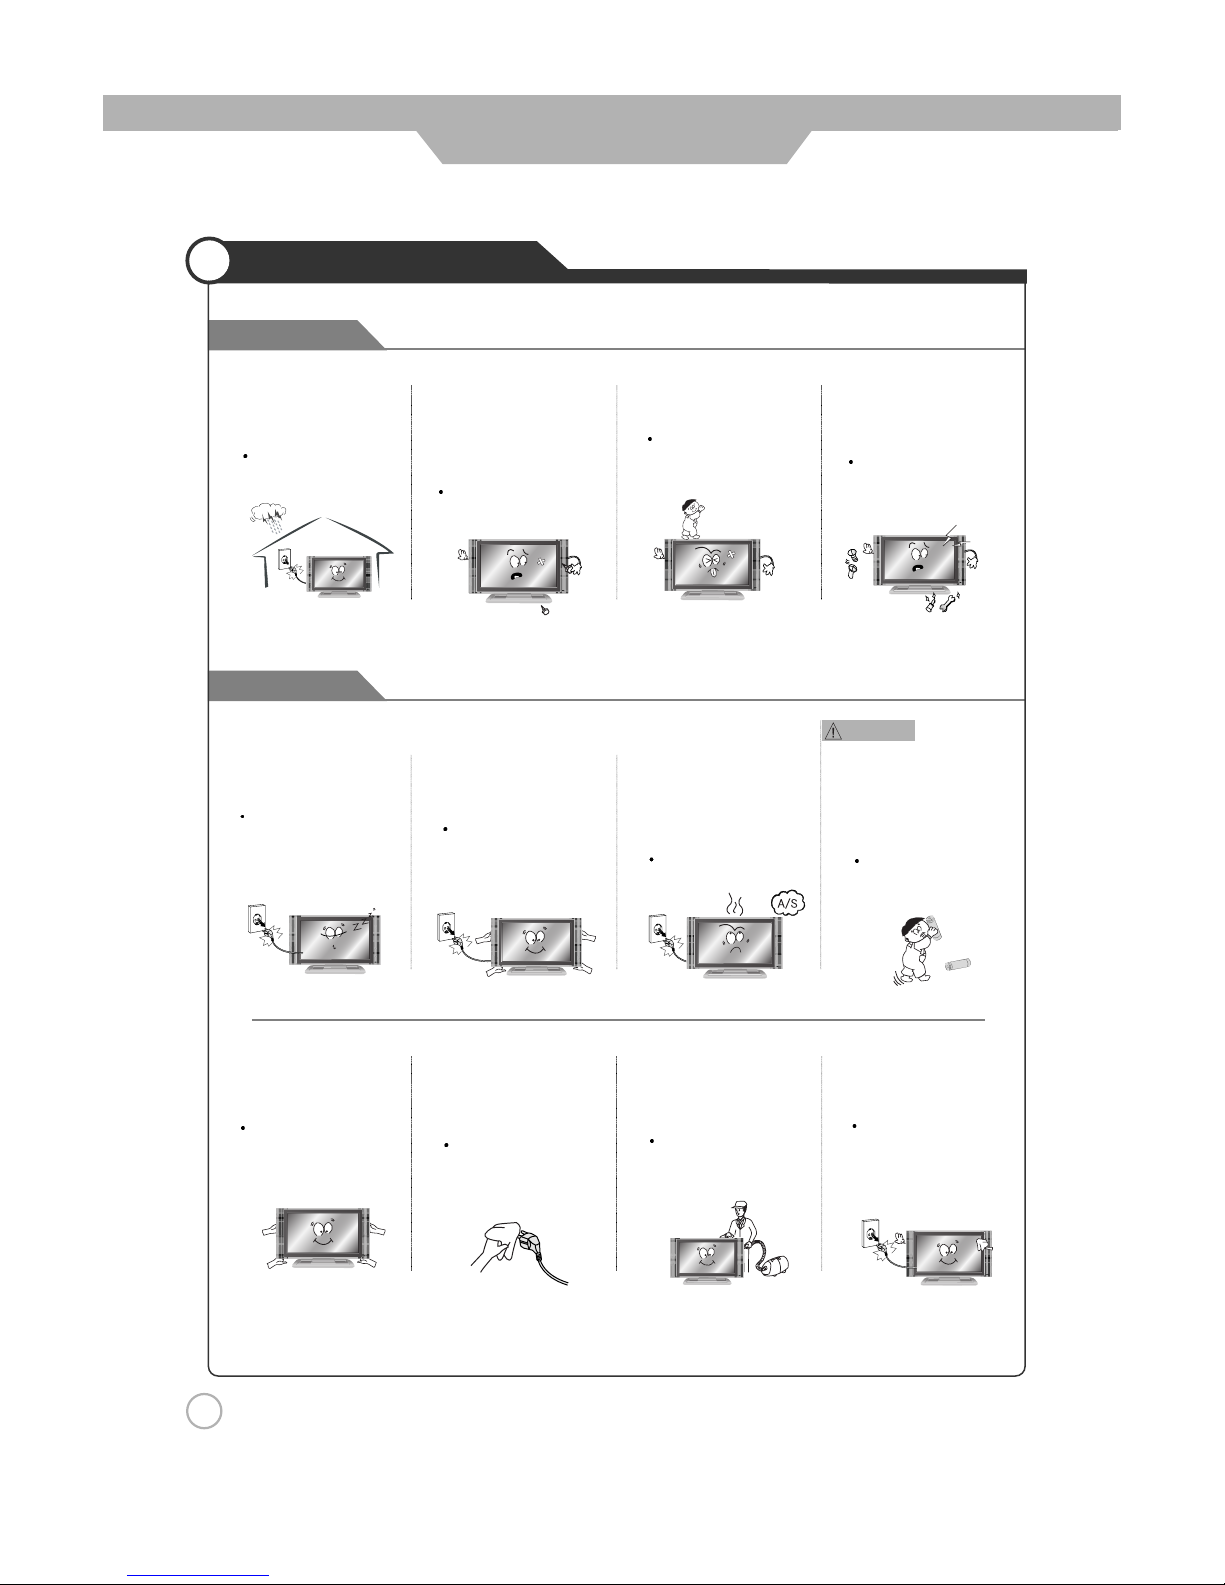
Do not insert any metal
objects, such as a screwdriver,
paper clip, or bent wire into
the ventilation openings or
A/V terminals.
Doing so poses a serious
risk of fire or electric shock.
Do not allow children to
climb or hang on the unit.
The unit could topple
over onto a child and
result in serious injury.
Never disassemble or modify
the unit in any way. Do not
attempt to service the unit
yourself.
Doing so may result in fire
or electric shock. If the unit
requires repair, contact the
service center.
Disconnect the power
cord from the wall outlet
during an electrical storm.
Not doing so may result
in fire or electric shock.
When not using the unit for
long periods of time, disconnect the power cord from
the wall outlet.
Dust could accumulate over time
on the unit and cause it to
generate heat and ignite, or
deteriorate insulation, which in
turn may result in an electrical fire.
When removing the batteries
from the remote control, make
sure children do not swallow
them. Keep the batteries out
of the reach of infants and
children.
If a child has swallowed a
battery, seek medical atten-
tion immediately.
If you notice any unusual
odors or smoke around the
unit, immediately disconnect
the unit from the outlet and
contact the service center.
Failure to do so may result
in fire or electric shock.
When moving the unit, be
sure to turn off the unit and
unplug the power cord from
the wall outlet.
Moving the unit with the
power cord connected to the
outlet may cause damage to
the cord, resulting in fire or
electric shock.
Wipe off any moisture,
dirt, or dust on the power
plug pins with a clean dry
cloth.
Failure to do so may
result in fire or electric
shock.
Always use two or more
people to lift or move the
unit.
If the unit is dropped, it
could be damaged or
otherwise cause injury.
Always turn off the unit and
unplug the power cord when
cleaning the unit. Use a soft dry
cloth to clean the unit.
Never clean with industrial
strength polish, wax, benzene,
paint thinner, air freshener,
lubricant, detergent, or other
such chemicals. Also, do not
clean with a damp cloth.
It is advisable to clean the
interior of the unit at least once
a year. Contact the store of
purchase or service center for
information.
Continuing to use the unit
without cleaning off the dust
build-up inside it may result
in fire or electric shock.
Warnings
Page 7
7
Safety Precautions
Important Safety Instructions
Important safeguards for you and your new product
1) Read these instructions.
2) Keep these instructions.
3) Heed all warnings.
4) Follow all instructions.
5) Do not use this apparatus near water.
6) Clean only with a dry cloth.
7) Do not block any of the ventilation openings. Install in accordance with the manufacturer’s
instructions.
8) Do not install near any heat sources such as radiators, heat registers, stoves, or other
apparatus (including amplifiers) that produce heat.
9) Do not defeat the safety purpose of the polarized or grounding type plug. A polarized plug
has two blades with one wider than the other. A grounding type plug has two blades and a
third grounding prong. The wide blade or the third prong is provided for your safety. When
the provided plug does not fit into your outlet, consult an electrician for replacement of the
obsolete outlet.
10) Protect the power cord from being walked on or pinched particularly at plugs, convenience
receptacles, and the point where they exit from the apparatus.
11) Only use the attachments/accessories specified by the manufacturer.
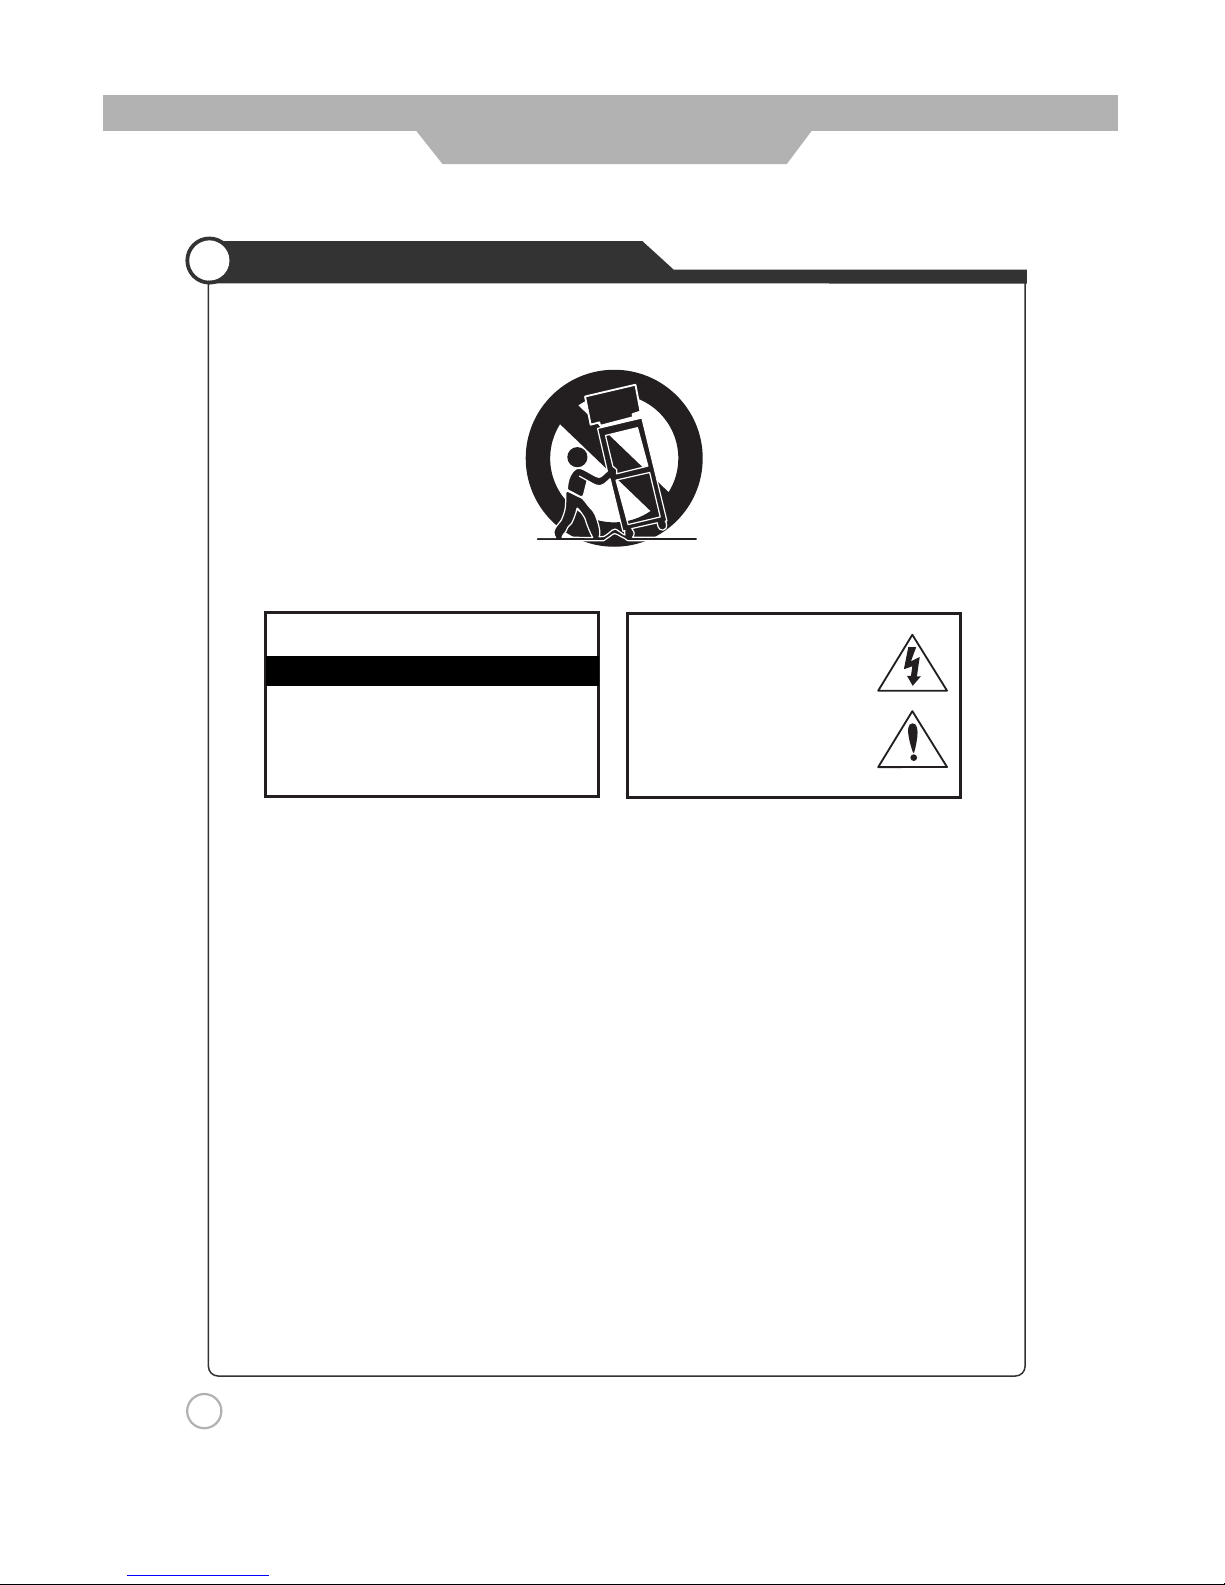
12) Use only with a cart, stand, tripod, bracket, or table specified by the manufacturer, or sold
with the apparatus. When a cart is used, use caution when moving the cart/apparatus
combination to avoid injury from tip-over.
13) Unplug this apparatus during lightning storms or when unused for long periods of time.
14) Refer all servicing to qualified service personnel. Servicing is required when the apparatus
has been damaged in any way, such as power supply cord or plug is damaged, liquid has
been spilled or objects have fallen into the apparatus, the apparatus has been exposed to
rain or moisture, does not operate normally, or has been dropped.
¥ Apparatus shall not be exposed to dripping or splashing and no objects filled with
liquids, such as vases, shall be placed on the apparatus
Always be careful when using your LCD TV. To reduce the risk of fire, electrical shock, and
other injuries, keep these safety precautions in mind when installing, using, and maintaining
your machine.
Page 8
Safety Precautions
8
Important Safety Instructions
- These servicing instructions are for use by qualified service personnel only.
To reduce the risk of electric shock, do not perform any servicing other than that contained in
the operating instructions unless you are qualified to do so.
- Any changes or modifications not expressly approved by the party responsible for compliance
could void the users authority to operate the equipment.
Caution :
TO PREVENT DAMAGE WHICH MAY RESULT IN FIRE OR ELECTRIC SHOCK HAZARD,
DO NOT EXPOSE THIS APPLIANCE TO RAIN OR MOISTURE.
WARNING
CAUTION
RISK OF ELECTRIC SHOCK DO NOT OPEN
CAUTION : TO REDUCE THE RISK OF ELE-
CTRIC SHOCK, DO NOT REMOVE COVER
(OR BACK). NO USER SERVICEABLE PARTS
INSIDE. REFER SERVICING TO QUALIFIED
SERVICE PERSONNEL.
This symbol indicates high voltage
is present inside. It is dangerous
to make any kind of contact with
any inside part of this product.
This symbol alerts you that
important literature conceming
operation and maintenance has
been included with this product.
This reminder is provided to call the CATV system installers attention to Article 820-40 of the
National Electric Code (U.S.A.). The code provides guidelines for proper grounding and, in
particular, specifies that the cable ground shall be connected to the grounding system of the
building, as close to the point of the cable entry as practical.
NOTE TO CABLE/TV INSTALLER :
Page 9
Safety Precautions
9
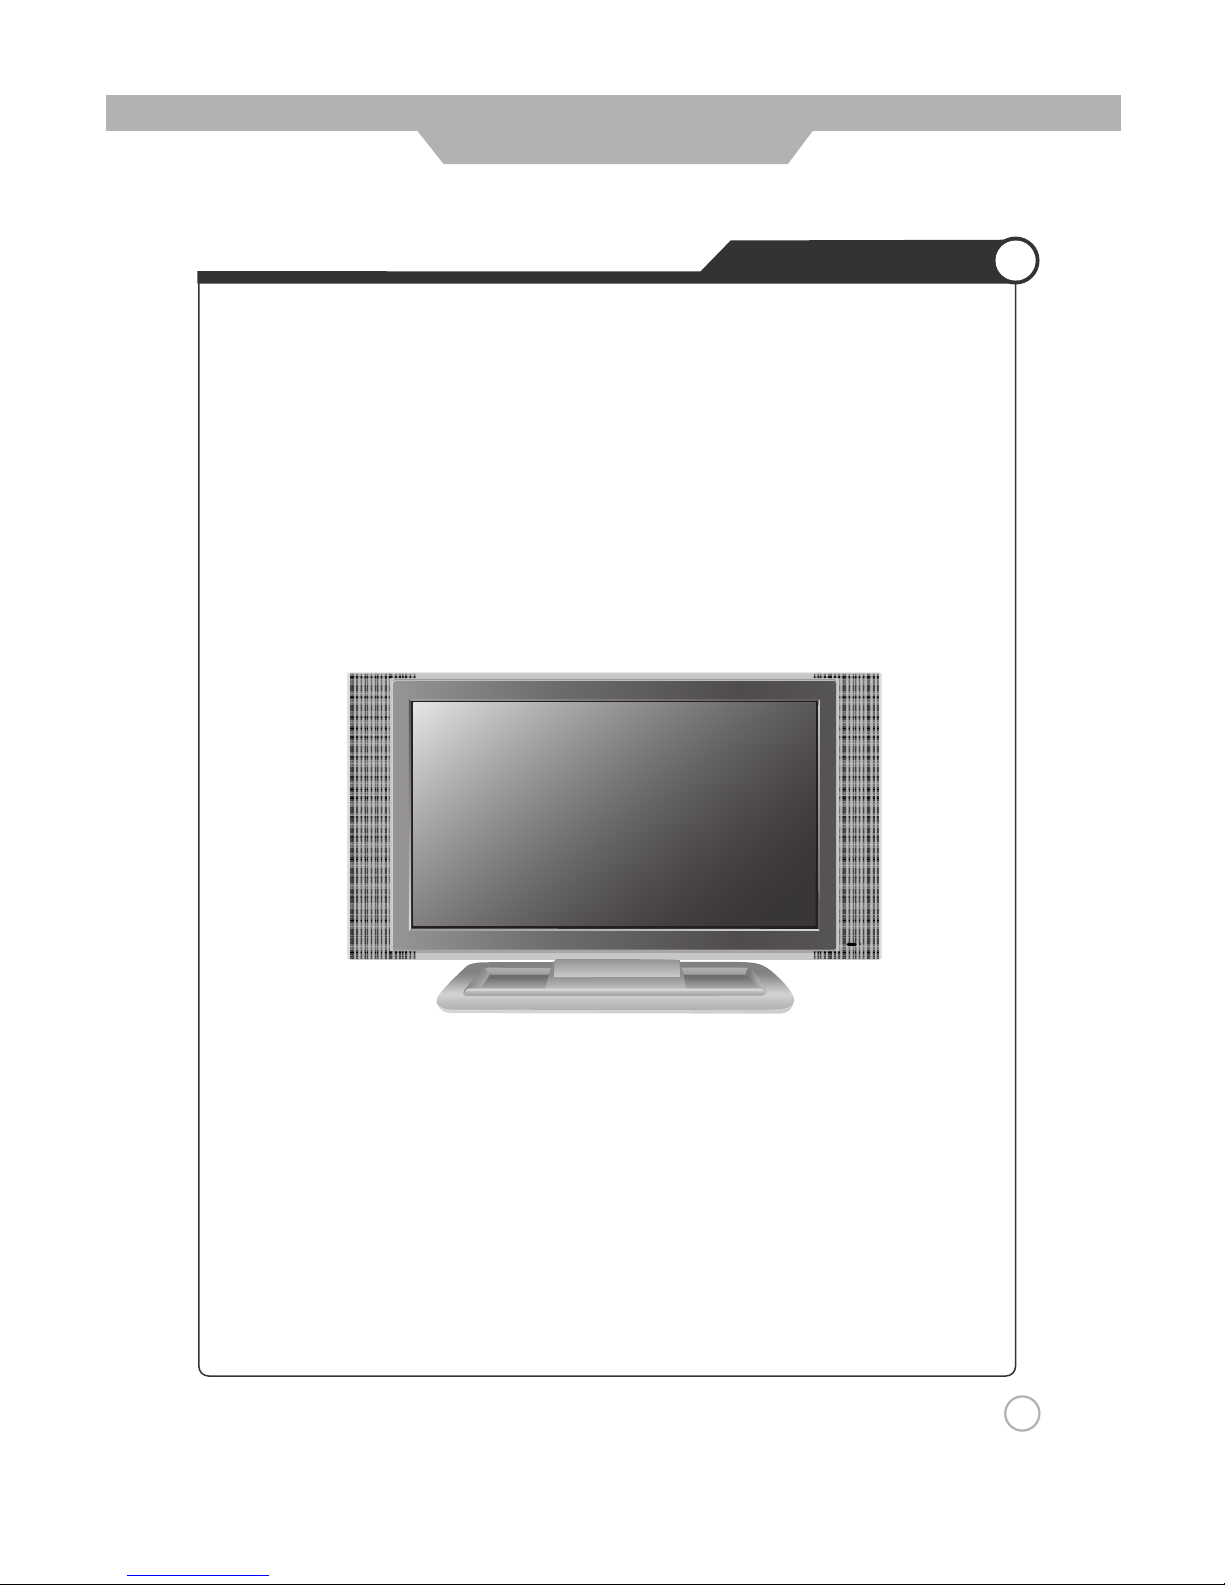
What is LCD TV?
What is LCD TV?
LCD (Liquid Crystal Display) is a next generation flat-panel display module. Liquid crystal material is
contained between sheets of glass and electricity causes the liquid crystal material to reflect or block
the light emitted from a light source inside the display chassis.
By incorporating this LCD display module, LCD TVs enable you to enjoy outstanding picture quality
without the worries of space limitation and harmful radiation you may have experienced with
conventional CRT TVs.
Features
- Picture-in-Picture : Enables you to simultaneously display two different image sources.
- PC Compatible Monitor : Enables you to connect PC (D-Sub) input for displaying high-resolution SXGA (1280x1024, 60Hz)
PC images.
- HDTV-Ready Display : Enables you to view high-definition digital pictures using a DVD player or HDTV set-top receiver.
- Various Picture/Sound Controls : Enables you to set the picture and sound settings for a number of different types of
programs and viewing and listening conditions.
- Auto Power On/Off Timer : Enables you to set the TV to automatically turn ON or OFF at a preset time.
- ATM : Enables you to set the TV to search for all available standard broadcast and cable TV channels and store them
automatically.
Page 10
10
User Guidance Information
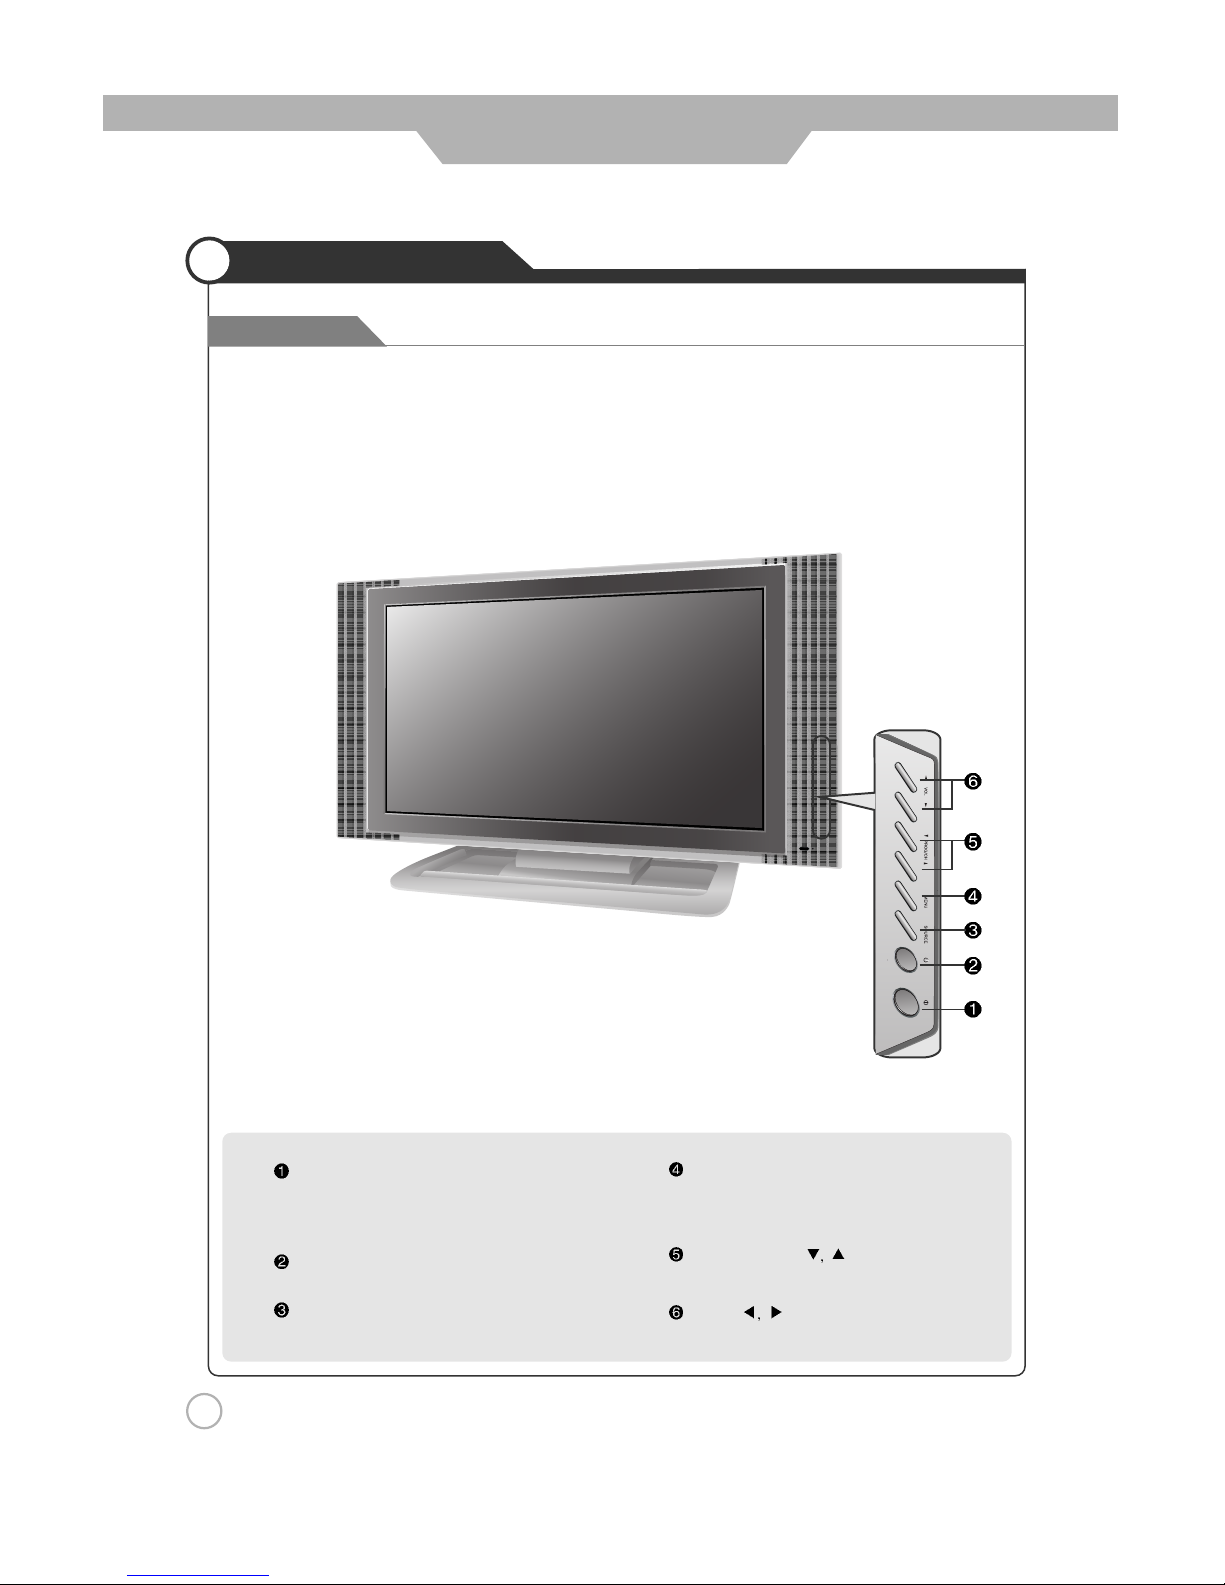
Front View
Names of each part
Main Power Button
- Please turn off the main power switch, if the LCD TV will
not be used for a long period of time.
Stand by Button
Source Button
- Input Source Select Button
Menu Button
- OSD Menu Display Button
Program/Channel Button
Volume Button
Page 11
11
User Guidance Information
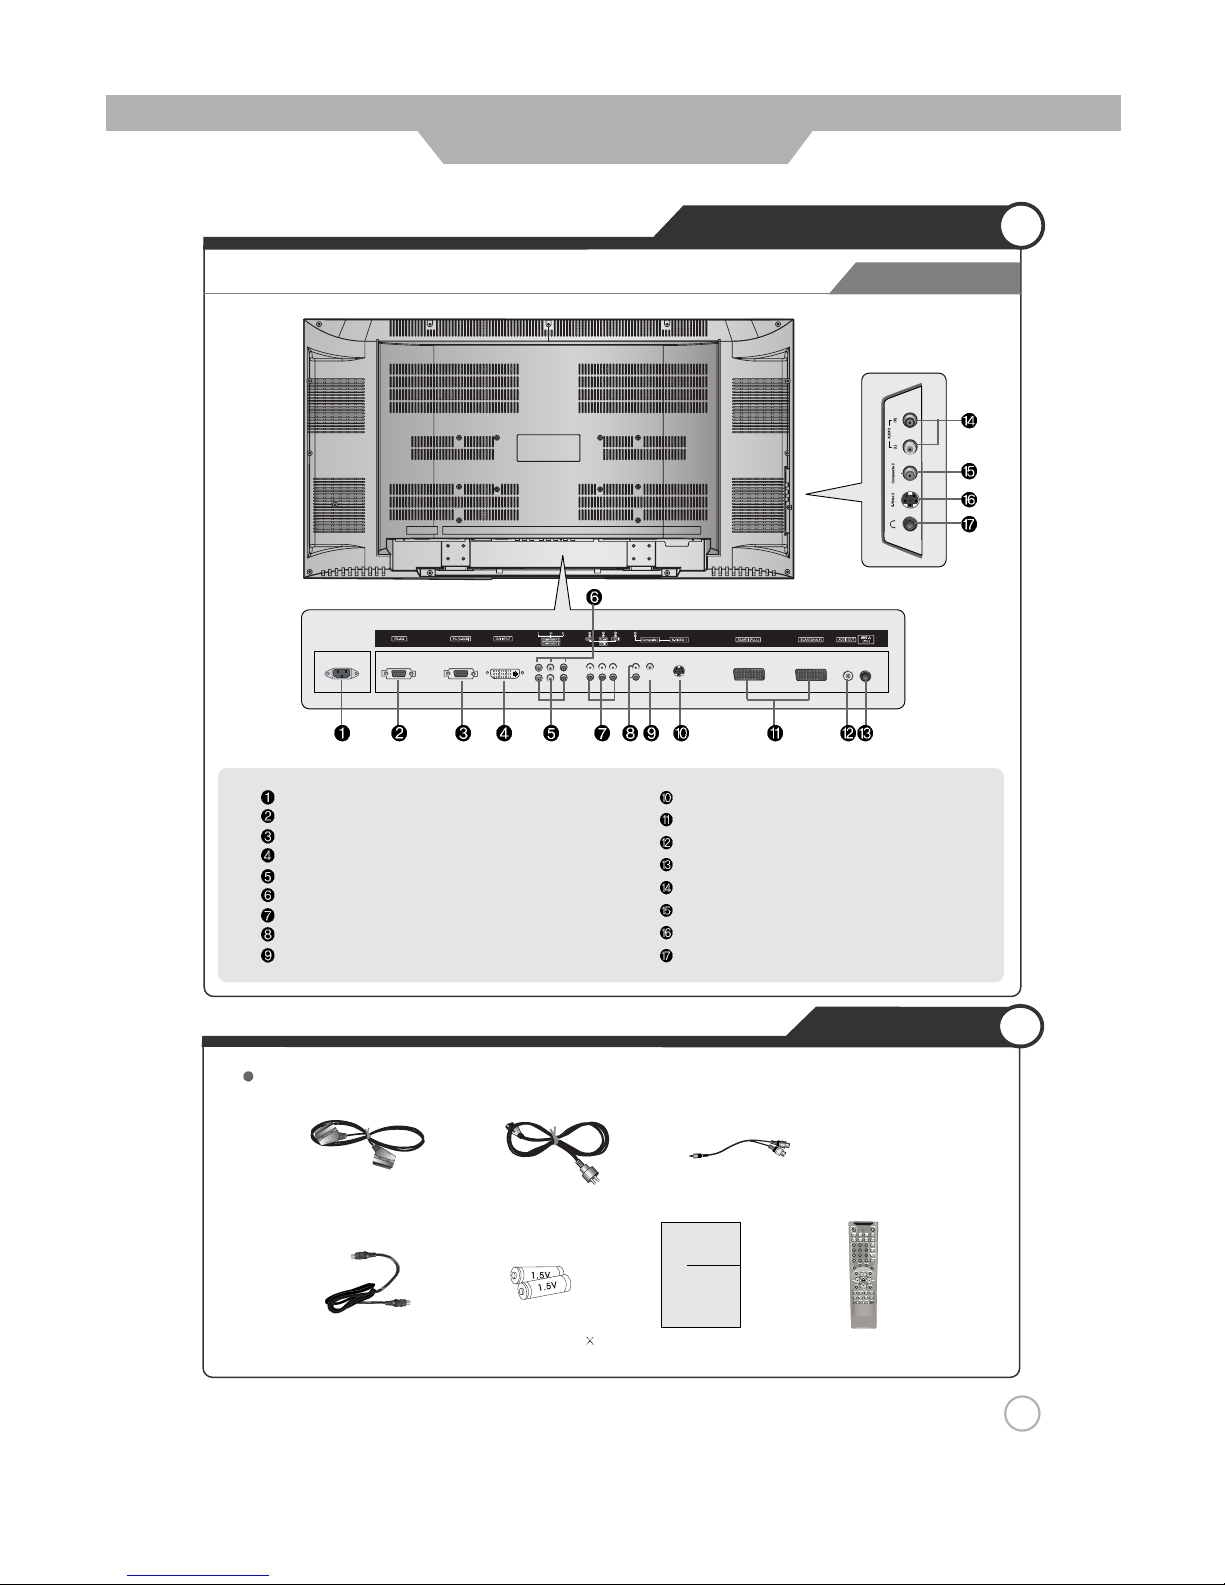
Back View
Controls and Functions
S-Video 1
SCART (Full SCART, Half SCART)
Audio out
ANT A-Terrestrial
Audio Input (Composite 2/S-Video 2)
Composite 2
S-Video 2
Headphone
AC Input
RS-232C Terminal
Analog RGB (D-SUB)
Digital RGB (DVI-D)
Component 1
Component 2
Audio Input (Component 1, 2, PC/DVI)
Audio Input (Composite 1/S-Video 1)
Composite 1
Audio out Cable
Accessories
The configuration of the components may look different from the following illustration.
Power Cord
Antenna Cable
User’s Guide
Battery 1.5V( AAA
2)
User’s Guide
SCART Cable
(Europe+Middle East only)
Remote Control
Page 12
Wall Mounting
Using the Stand
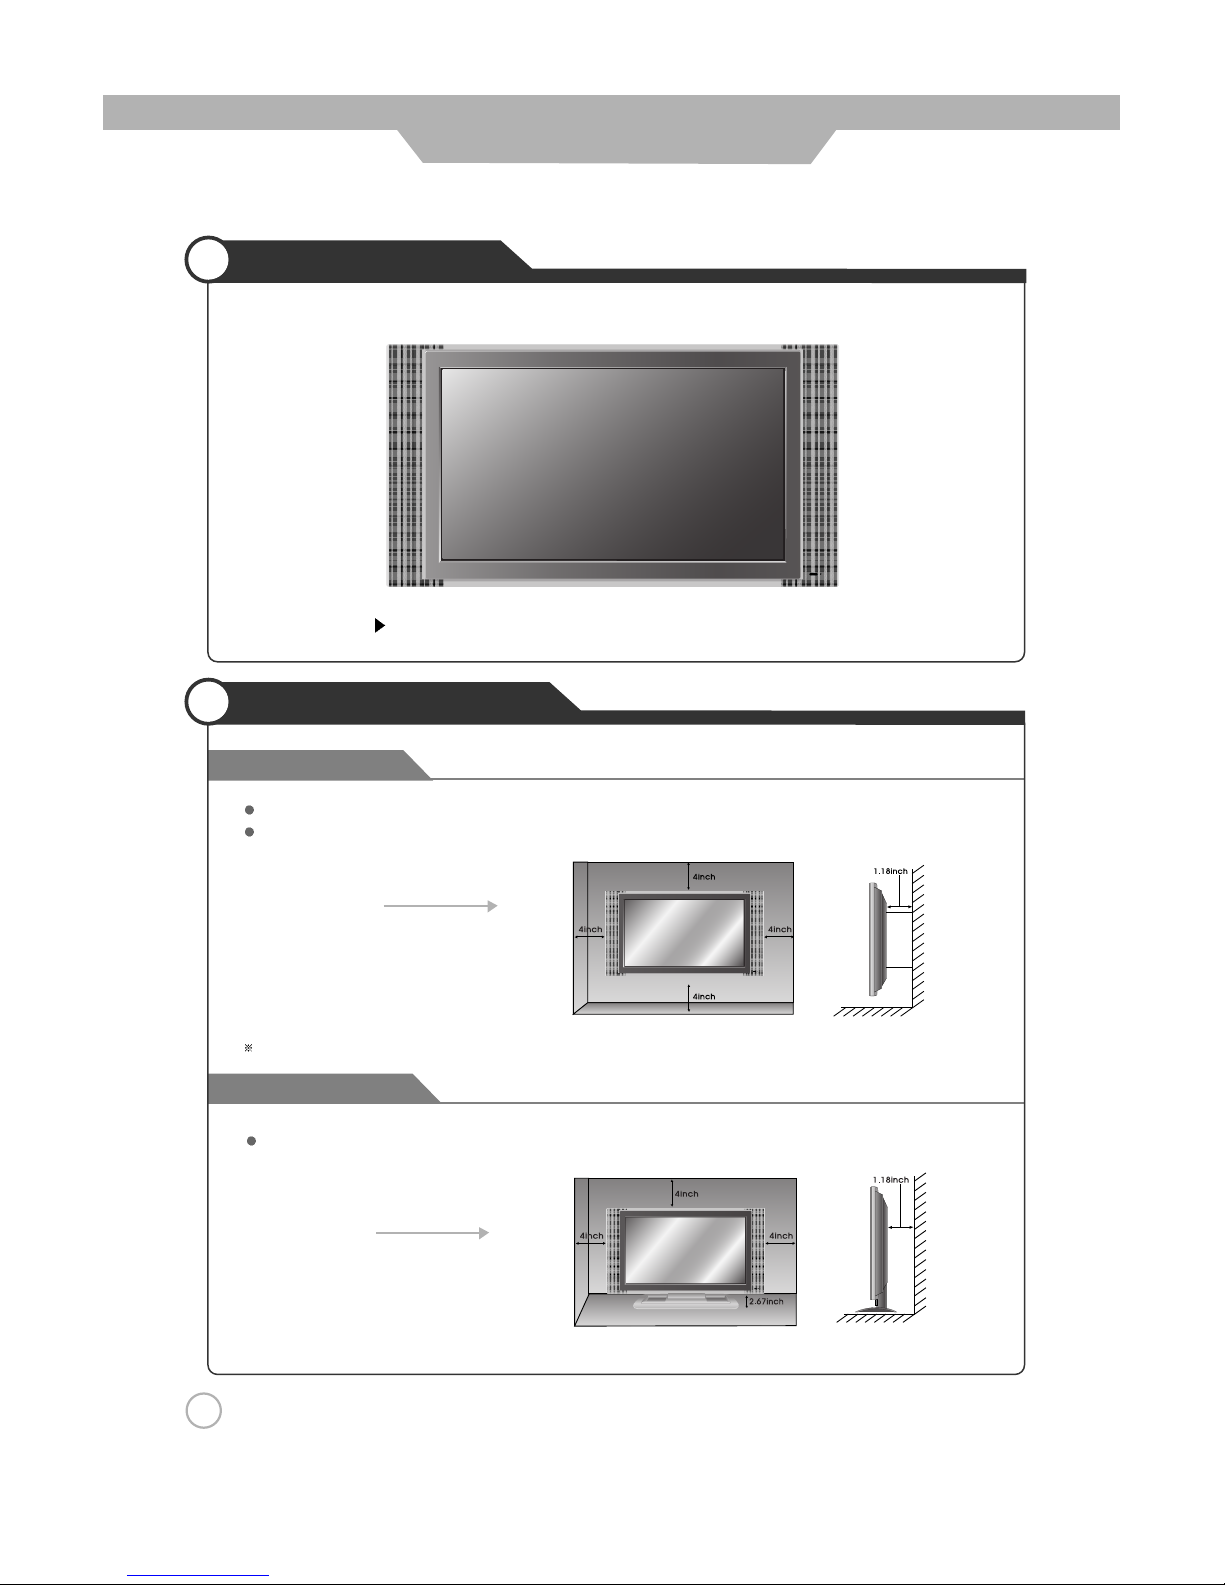
Mounting on a Wall
Installation Precautions
12
User Guidance Information
Your LCD TV can be mounted on a wall as shown in the figure above.
Please secure enough space for safe use. (Please refer to A and B.)
Installation of the LCD TV in an improperly ventilated location can cause a fire or damage to the LCD TV
due to increased temperature
.
(Using the Stand)
B
(Mounting on a wall)
A
Do not install on an unstable location with support area smaller than the LCD TV.
Contact your dealer to purchase the "Adjustable-angle wall mount" required for wall-mounted installation.
Page 13
13
User Guidance Information
For a House
Installing an Antenna
Using an Outdoor Antenna
To install or use an outdoor antenna, if possible, consult a qualified technician for help.
Using an Indoor Antenna
Locate a wall jack with an F-connector, and then connect the coaxial antenna cable to the wall jack.
For an Apartment or Condo Complex
Wall Jack with
F-Connector
Coaxial (Round) Antenna Cable
Copper
Wire
Copper
Wire
Coaxial (Round) Antenna Cable
Page 14
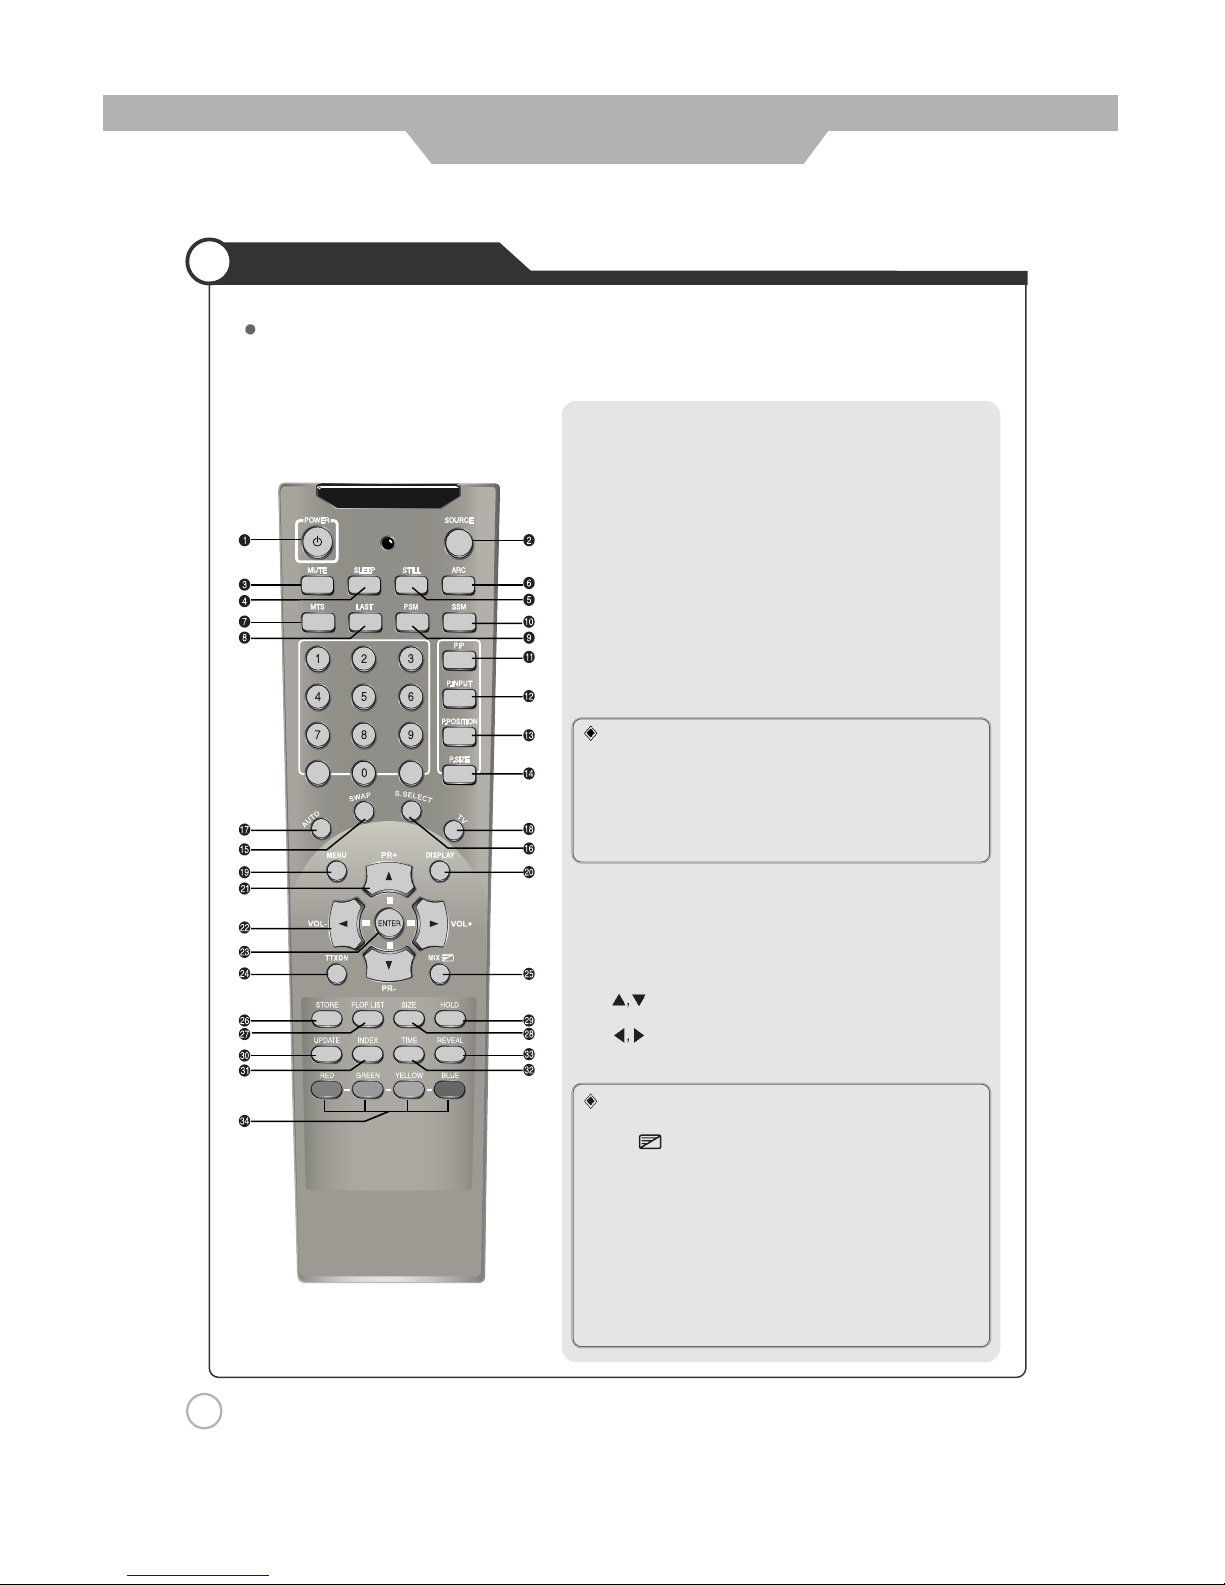
Remote Controller
1. POWER : TURNS THE TV ON AND OFF(page.24)
2. SOURCE : USE TO SELECT AN INPUT SOURCE (page.26)
3. MUTE : PRESS TO TEMPORARILY CUT OFF THE SOUND (page.25)
4. SLEEP : PRESS TO SELECT A TIME FOR THE TV TO TURN OFF
AUTOMATICALLY (page.44)
5. STILL : PRESS TO STOP THE ACTION DURING A PARTICULAR
SCENE (page.38)
6. ARC (Aspect Ratio Control) : PRESS TO CHANGE THE
SCREEN SIZE (page.34)
7. MTS (Multi-Television Sound) : PRESS TO SELECT MONO
OR STEREO MODE (page.41)
8. LAST : TUNES TO THE PREVIOUS PROGRAM (page.25)
9. PSM : PICTURE STATUS MEMORY KEY (page.29)
(CUSTOM, DYNAMIC, STANDARD, MOVIE, MILD)
10. SSM : SOUND STATUS MEMORY KEY (page.30)
(CUSTOM, STANDARD, MUSIC, MOVIE, SPEECH)
PIP CONTROL KEY (page 39, 40)
11. PIP : PIP ON/OFF
12.
P.INPUT : PIP INPUT SELECT KEY
13.
P.POSITION : PIP POSITION CONTROL KEY
14.
P.SIZE : PIP AND PBP MODE CHANGE
15.
SWAP : PIP SOURCE SWAP
16.
S.SELECT : SOUND SWAP KEY
17. AUTO (
AUTO IN PROGRESS) : PRESS TO CONTROL THE
MONITOR SCREEN AUTOMATICALLY
18. TV : TV INPUT SOURCE SELECT KEY
19. MENU : DISPLAYS THE MAIN ON-SCREEN MENU
20. DISPLAY : PRESS TO DISPLAY THE CURRENT PROGRAM
AND AUDIO/ VIDEO SETTINGS (page.25)
21. (PR+, PR-) : PROGRAM, MENU CONTROL OR PAGE UP
AND DOWN KEY, STAND BY ON
22. (VOL-, VOL+) : PRESS TO INCREASE OR DECREASE
THE VOLUME OR MENU CONTROL KEY
23. ENTER : SAVE THE VALUE
TELETEXT CONTROL KEY (page 45)
24. TTXON : TEXT ON KEY
25. MIX : MIX WITH TV SCREEN
26. STORE : STORE THE USER DEFINED FAVORITE PAGE
27. FLOF LIST : EXCHANGE FLOF/LIST MODE
28. SIZE : TELE TEXT SCREEN SIZE KEY
29. HOLD : HOLD FUNCTION DURING TELETEXT DISPLAY
30. UPDATE : DISPLAY CANCEL OR TEXT UPDATE KEY
31. INDEX : TEXT INDEX KEY
32. TIME: TIME DISPLAY
33. REVEAL :
SELECT HIDDEN CONTENT DURING TELETEXT DISPLAY
34. RED, GREEN, YELLOW, BLUE : DIRECT ACCESS TELETEXT
LINKED PAGE KEY
Functions of remote control buttons
The remote control is using Infra-Red (IR). Point it towards the front of the LCD TV. The remote control may not
work correctly if it is operated out of range or out of angle.
14
User Guidance Information
Page 15
Avoiding Remote Control Problems
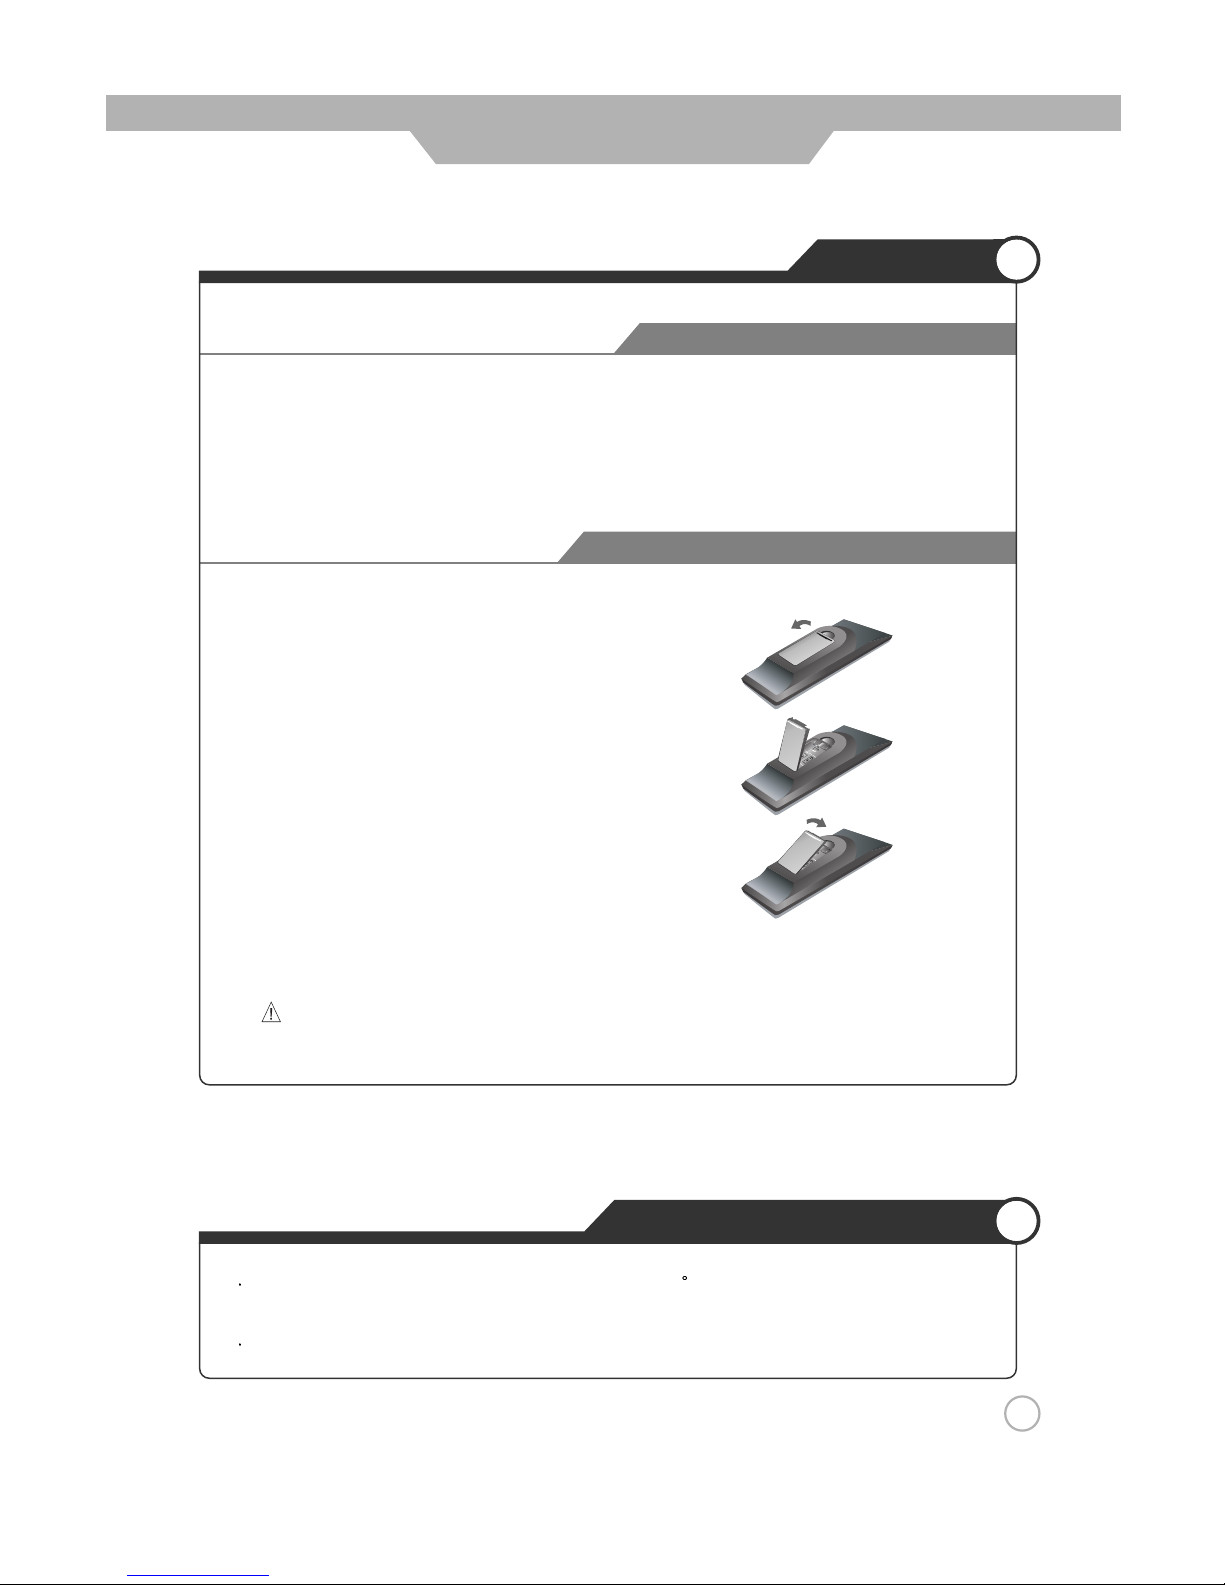
Instering Batteries in the Remote Controller
Precautions
How to use remote controller
2. Insert the two supplied batteries (AAA, 1.5V). Ensure
that the polarities (
+
and -) of the batteries are aligned
correctly.
1. Open the cover out completely.
3. Replay the cover.
1. Check the polarity (
+
,-) of the batteries in the remote controller.
2. Check that the batteries have power.
3. Check that the LCD TV is powered and that it is properly plugged in.
4. Check if any three-wavelength lamp, special fluorescent or neon sign is turned on near the LCD TV.
CAUTION : Risk of explosion if battery is replaced by an incorrect type.
Dispose of used batteries according to the national code (Recycling program).
The remote control should be operated within 23feet(7m) and 30 to the left and the right of the IR receiver
on the front of the LCD TV.
Used batteries should be disposed properly.
15
User Guidance Information
Page 16
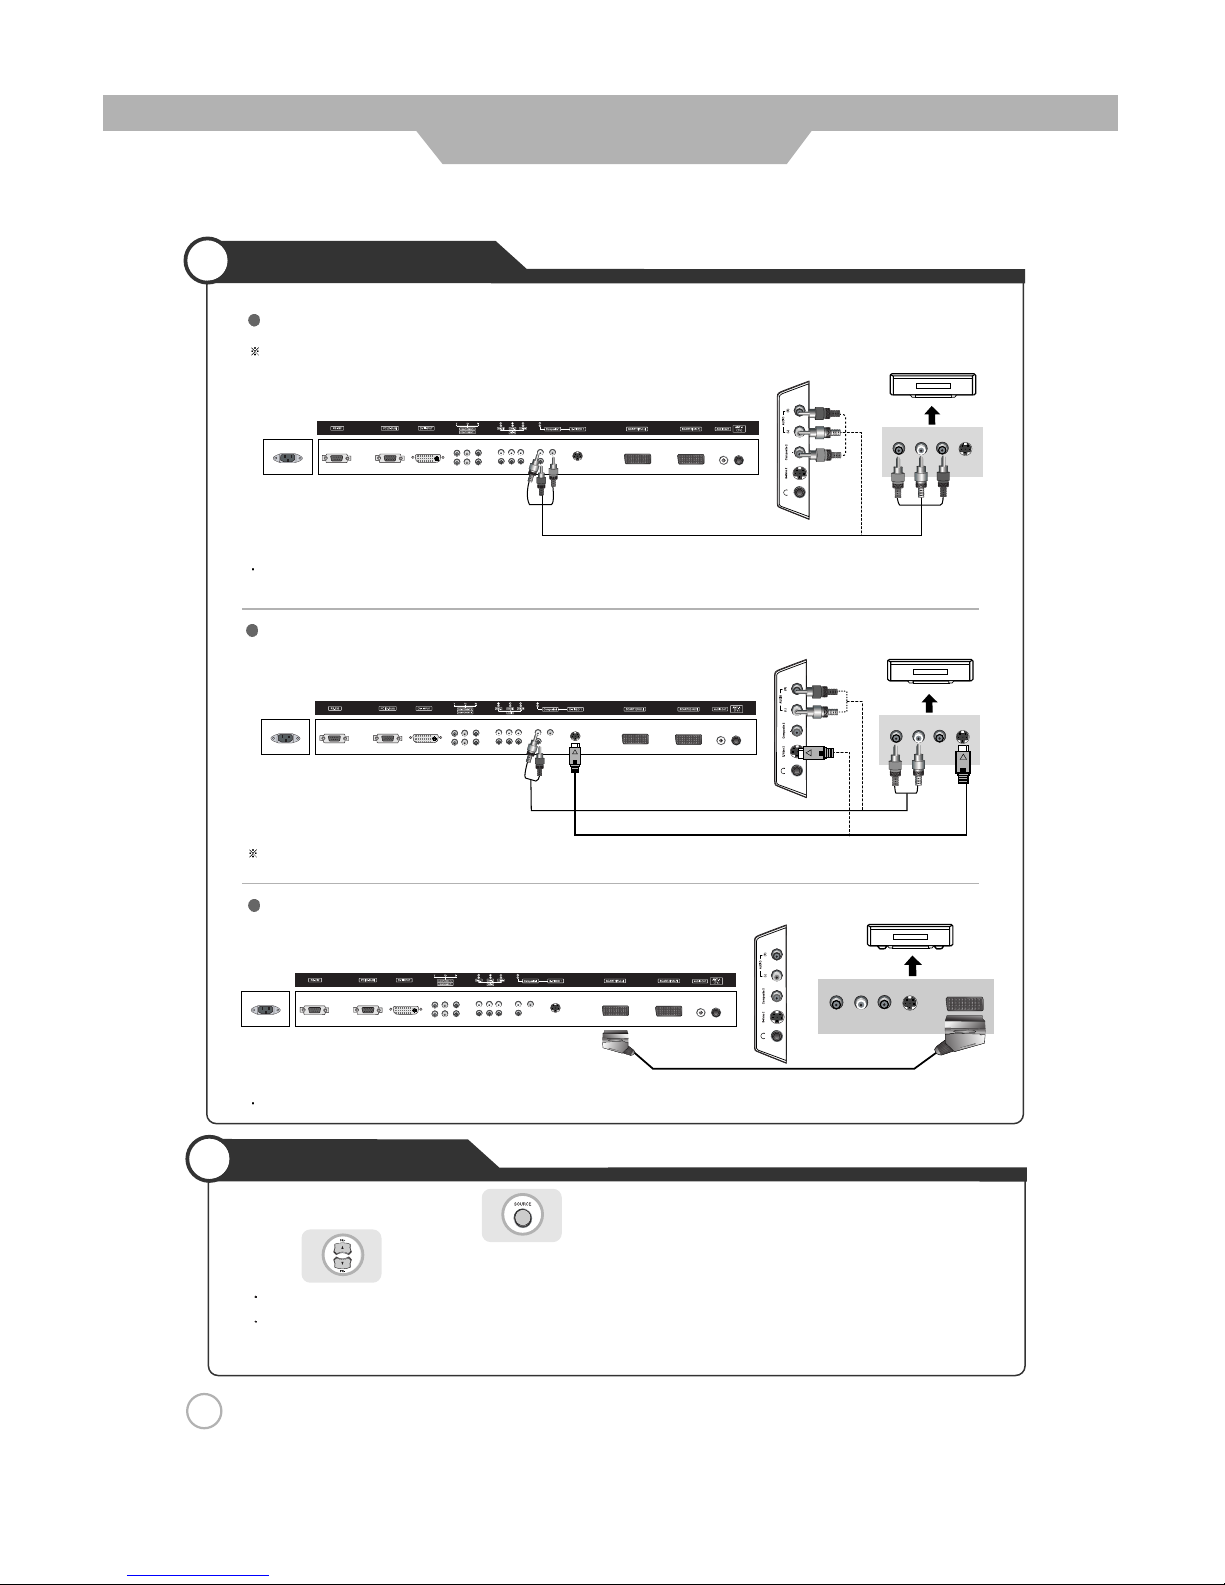
1. Turn on the LCD TV and press on the remote controller.
2. Use to move to "Composite 1/2".
If S-Video has been connected, select "S-Video 1/2".
If SCART terminal has been connected, select SCART1 or SCART2.
3. Turn on the VCR, insert the tape and press play button.
VCR Connections
Connect the LCD TV’s Composite In terminal to the VCR’s Composite Out terminal using the Composite cable.
(Make sure the colour of the terminals and the colour of the cable are the same)
Use the S-Video cable for higher picture quality.
Connection terminals of other appliances differ by manufacture and model.
< LCD TV Back view >
< LCD TV Back view >
Composite Cable
S-Video Cable
SCART Cable
Auto Cable
Connect the SCART terminal of the LCD TV and the VCR with the SCART cable.
< VIDEO >
(R) (L)
< VIDEO >
(R) (L)
< VIDEO >
(R) (L)
Connecting to the composite terminal
Connecting to the S-Video terminal
Connecting to the SCART terminal
< LCD TV Back view >
Playing the VCR
16
Connection
Page 17
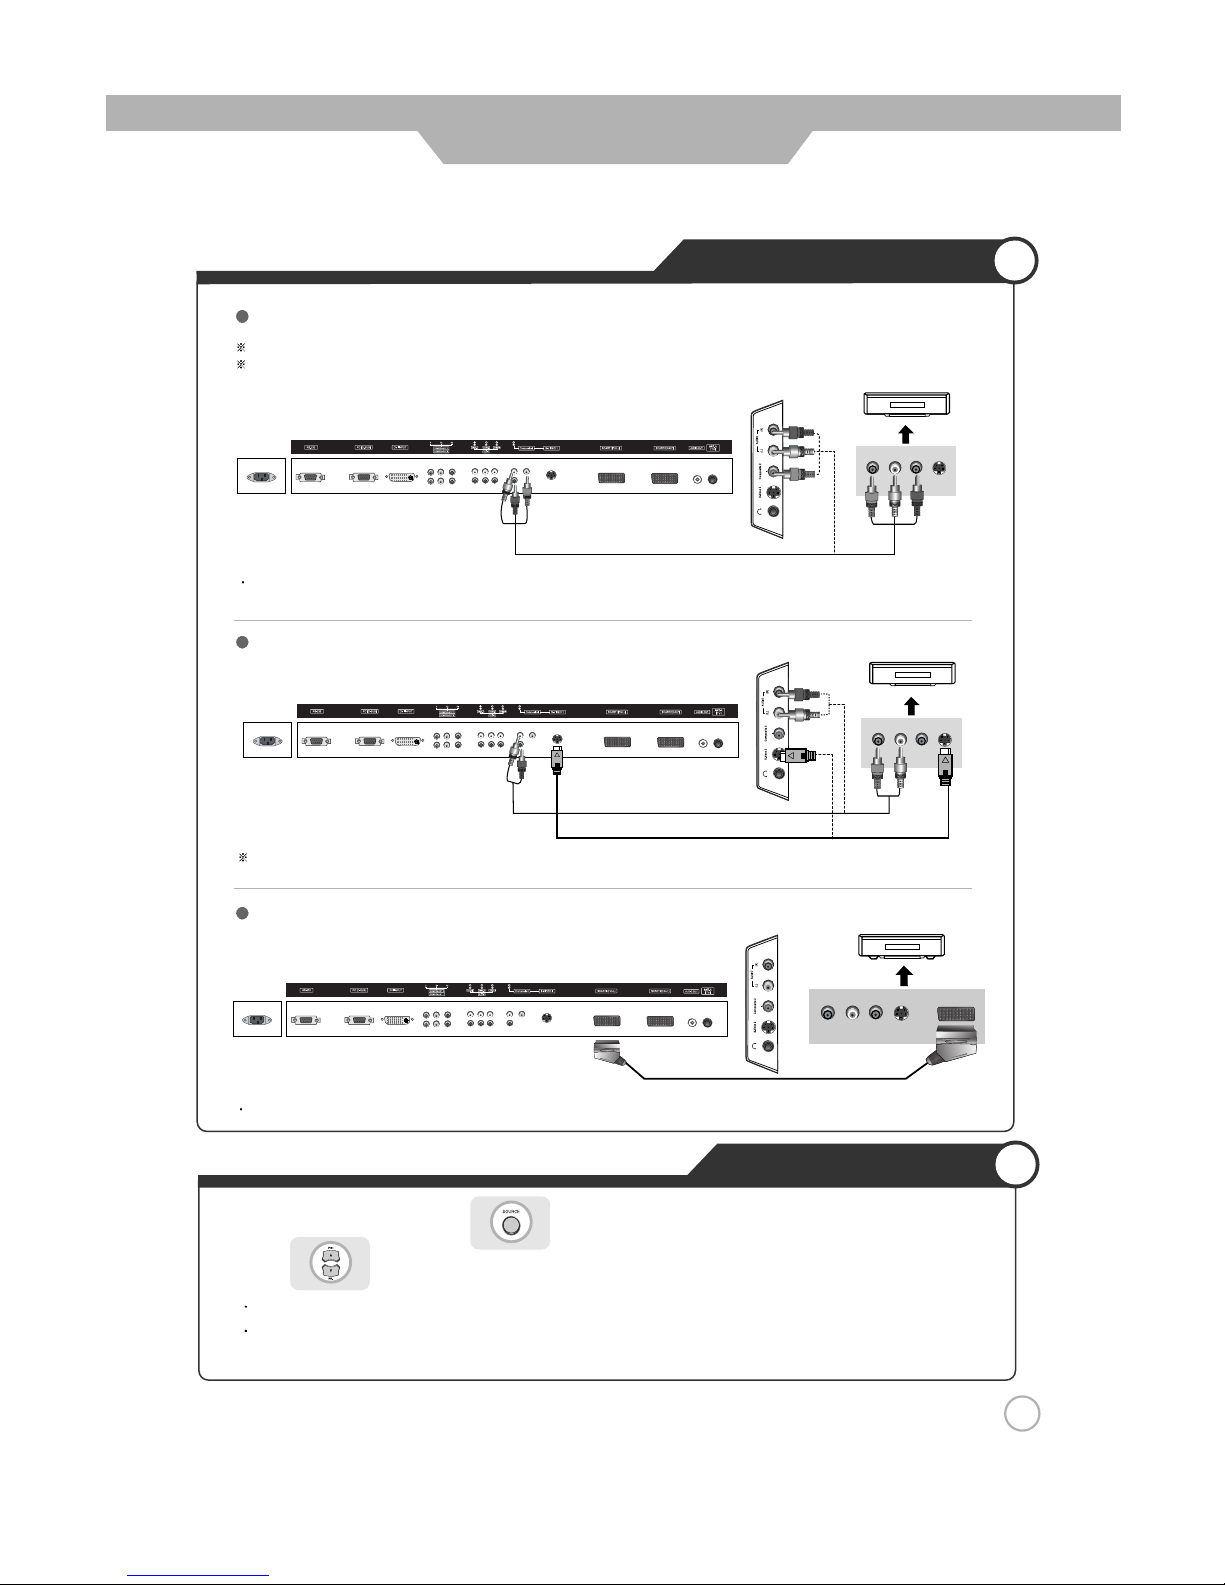
Viewing Cable TV
1. Turn on the LCD TV and press on the remote controller.
2. Use to move to "Composite 1/2".
If S-Video has been connected, select "S-Video 1/2".
If SCART terminal has been connected, select SCART1 or SCART2.
3. Turn on the cable broadcasting receive and select the channel you wish to view.
Cable TV Connections
Connect the LCD TV’s Composite in terminal to the cable broadcasting receivers composite Out terminal using the
Composite cable. (Make sure the colour of the terminals and the colour of cable are the same)
Connect the SCART terminal of the LCD TV and the cable broadcasting receiver with the SCART cable
In order to watch Cable TV, Subscribe to your local Cable TV company and install a separate converter(Set-Top-Box)
Connection terminals of other appliances differ by manufacture and model.
Use the S-Video cable for higher picture quality.
Composite Cable
S-Video Cable
SCART Cable
Audio Cable
< LCD TV Back view >
< LCD TV Back view >
< LCD TV Back view >
(R) (L)
< Cable broadcasting receiver >
< Cable broadcasting receiver >
< Cable broadcasting receiver >
(R) (L)
(R) (L)
Connecting to the composite terminal
Connecting to S-Video terminal
Connecting to the SCART terminal
17
Connection
Page 18
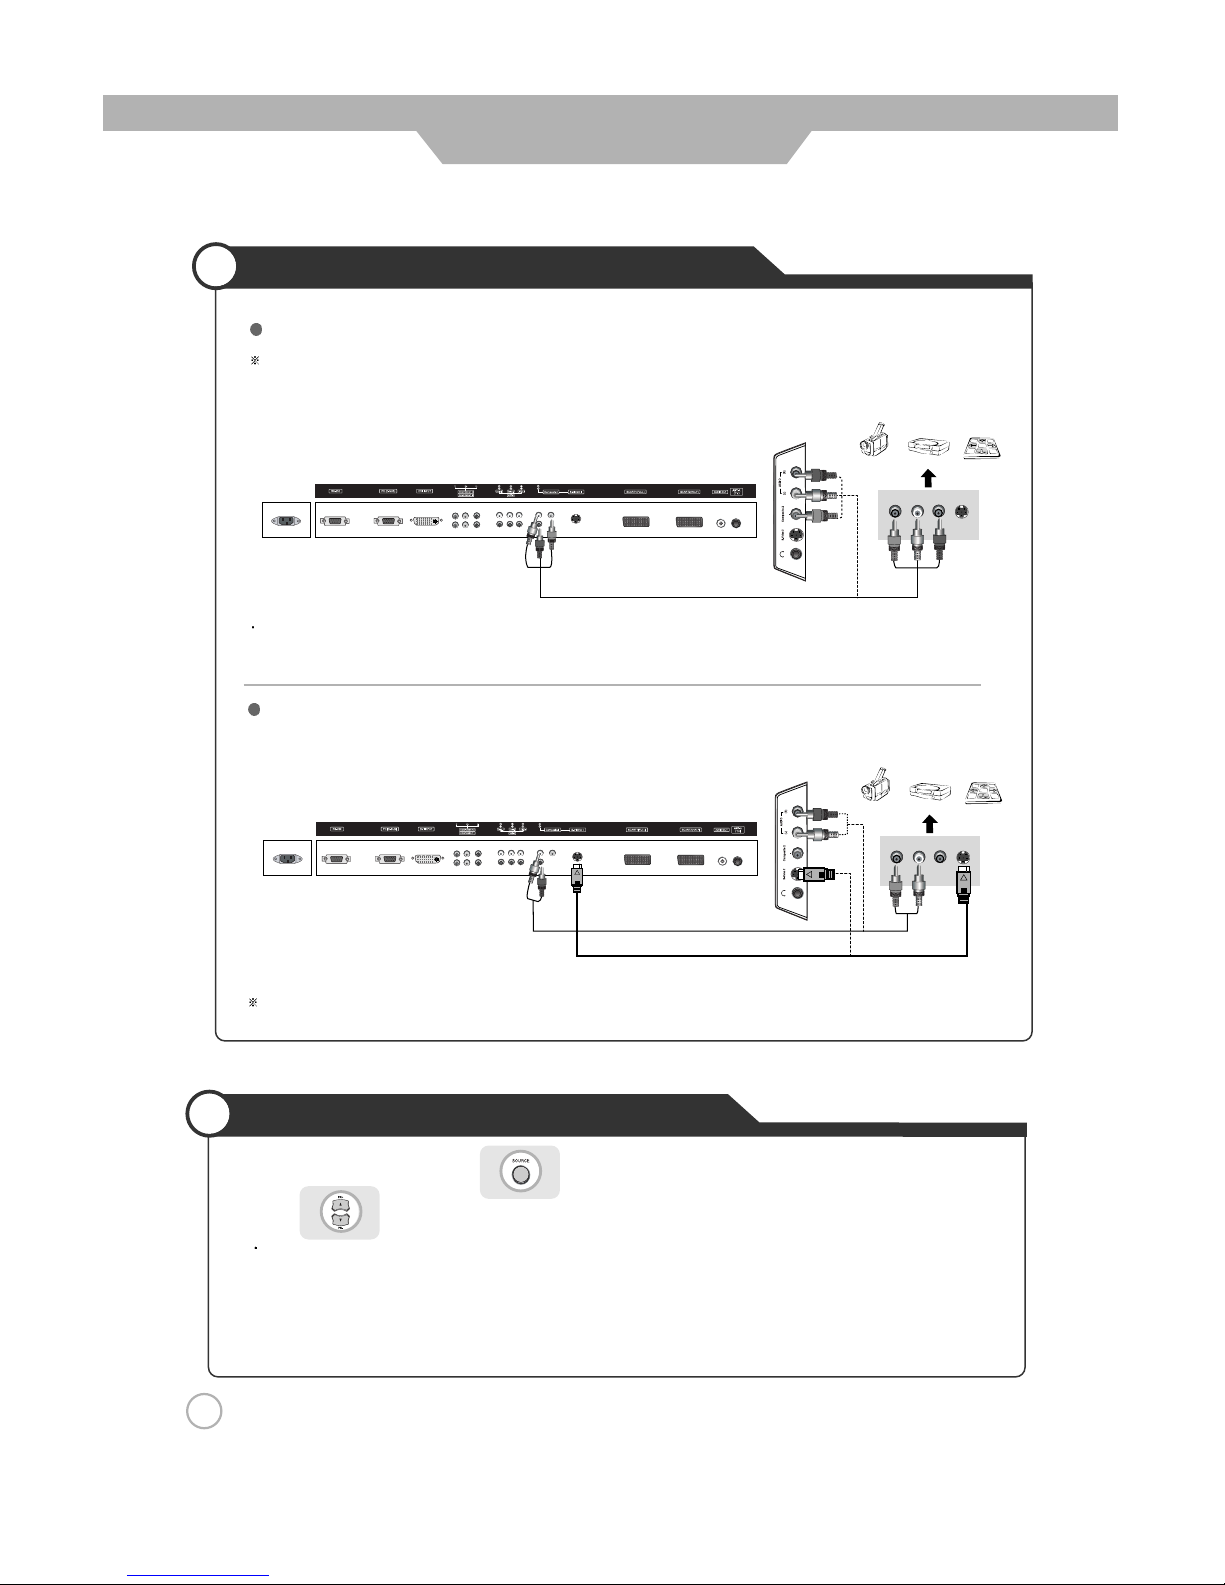
Using Camcorder/Game Console
1. Turn on the LCD TV and press on the remote controller.
2. Use to move to "Composite 1/2".
If S-Video has been connected, select "S-Video 1/2".
3. Turn on the Camcorder or video game and Set to Video mode.
(Please refer to the User’s manual of Camcorder/ Video game for more information)
4. Insert tape into Camcorder and press play button or insert disc into the Video game console.
Camcorder/Game Console Connections
18
Connection
Connection terminals of other appliances differ by manufacture and model.
< LCD TV Back view >
< LCD TV Back view >
Composite Cable
Connect the LCD TV’s Composite In terminal to the camcorder/game console’s Composite Out terminal with the
Composite cable. (Make sure the colour of the terminals and the colour of cable are the same)
S-Video cable can be used if there is an S-Video terminal.
Connecting to the composite terminal
Connecting to S-Video terminal
(R)
(L)
(R)
(L)
< Camcorder/ Game machine >
< Camcorder/ Game machine >
S-Video Cable
Audio Cable
Page 19
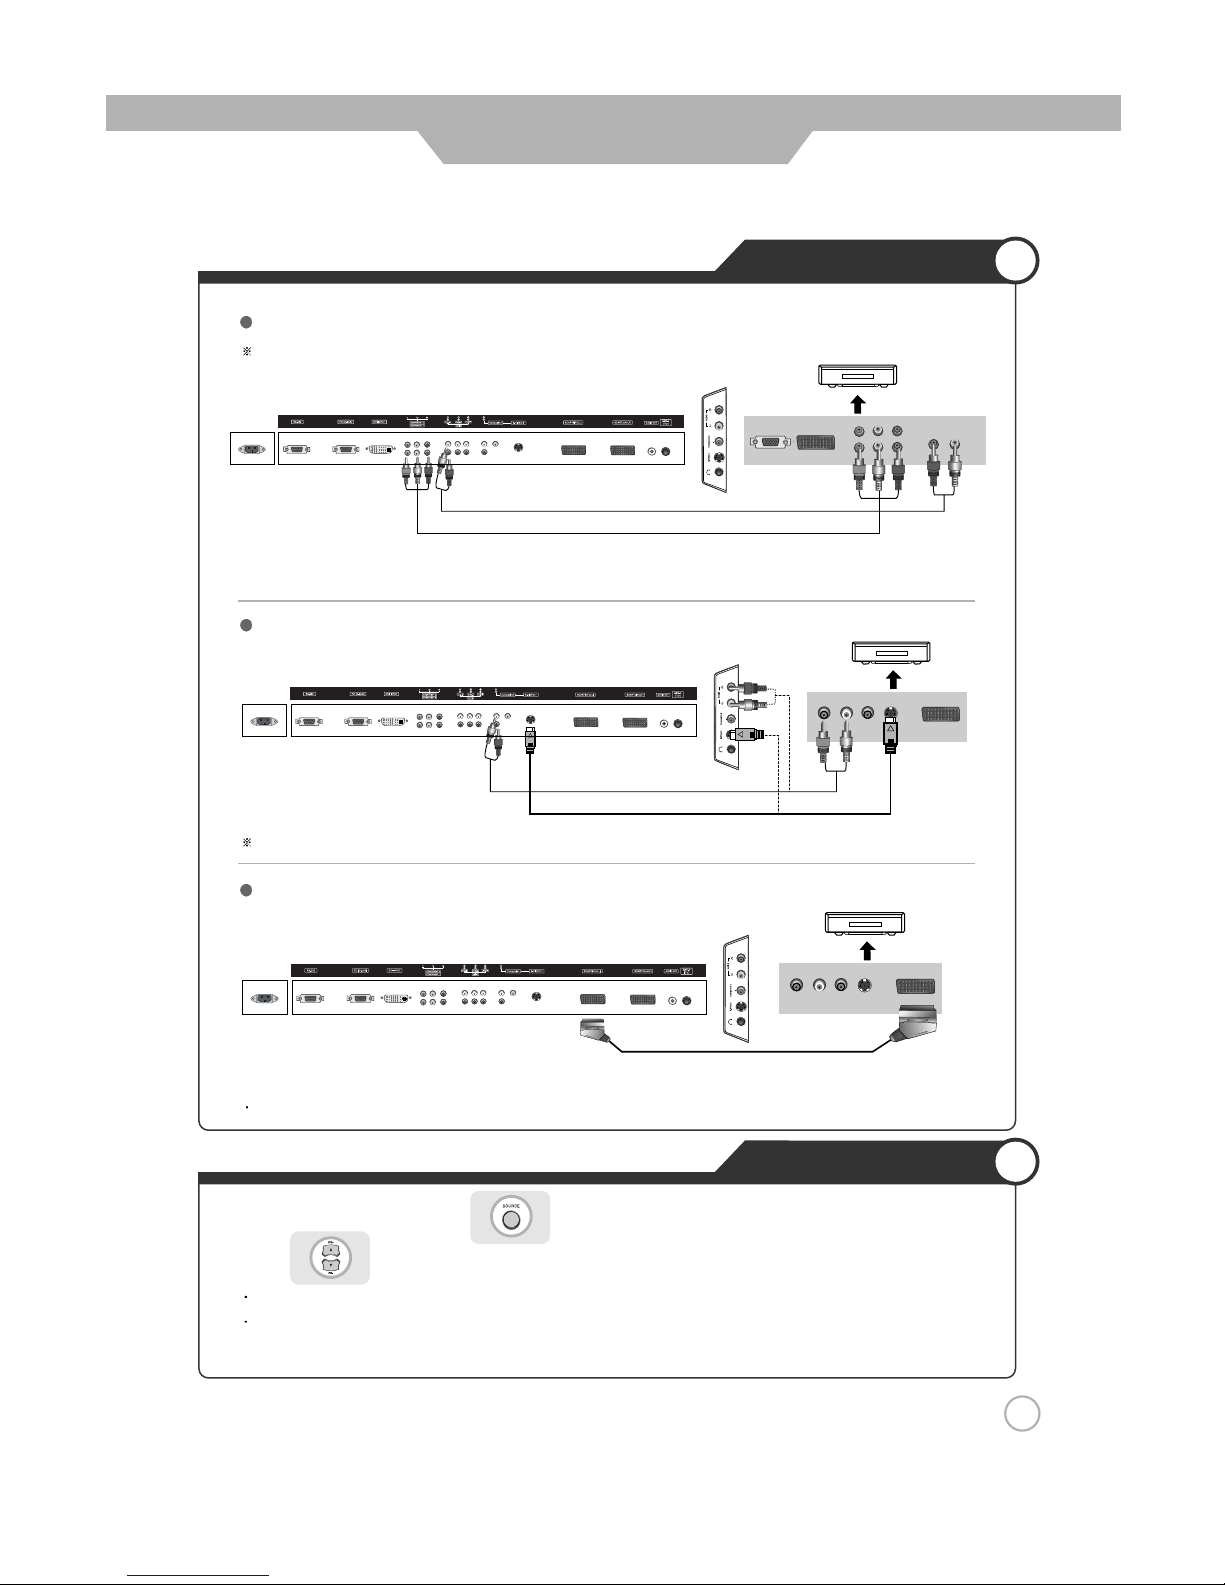
DVD Connections
Playing the DVD
19
Connection
1. Turn on the LCD TV and press on the remote controller.
2. Use to move to "Component 1/2".
If S-Video has been connected, select "S-Video 1/2".
If SCART terminal has been connected, select SCART1 or SCART2.
3. Turn on the DVD, insert the DVD and press Play button.
Connection terminals of other appliances differ by manufacture and model.
< LCD TV Back view >
< LCD TV Back view >
< LCD TV Back view >
Component cable
Audio cable
(R)
(L)
1. Connect LCD TV’s Y, Pb,Pr terminal in component 1/2 to DVD’s Video Out terminal using the external cable.
2. Connect LCD TV’s Audio terminals (left & right) in component 1/2 to DVD’s Audio Out terminal using the Audio cable.
S-Video cable can be used if there is an S-Video terminal.
Connect the SCART terminal of the LCD TV to the DVD with the SCART cable.
Connecting to the component terminal
Connecting to the S-Video terminal
Connecting to the SCART terminal
PrPbY
S-Video Cable
SCART Cable
Audio Cable
< DVD >
< DVD >
< DVD >
(R) (L)
(R) (L)
Page 20
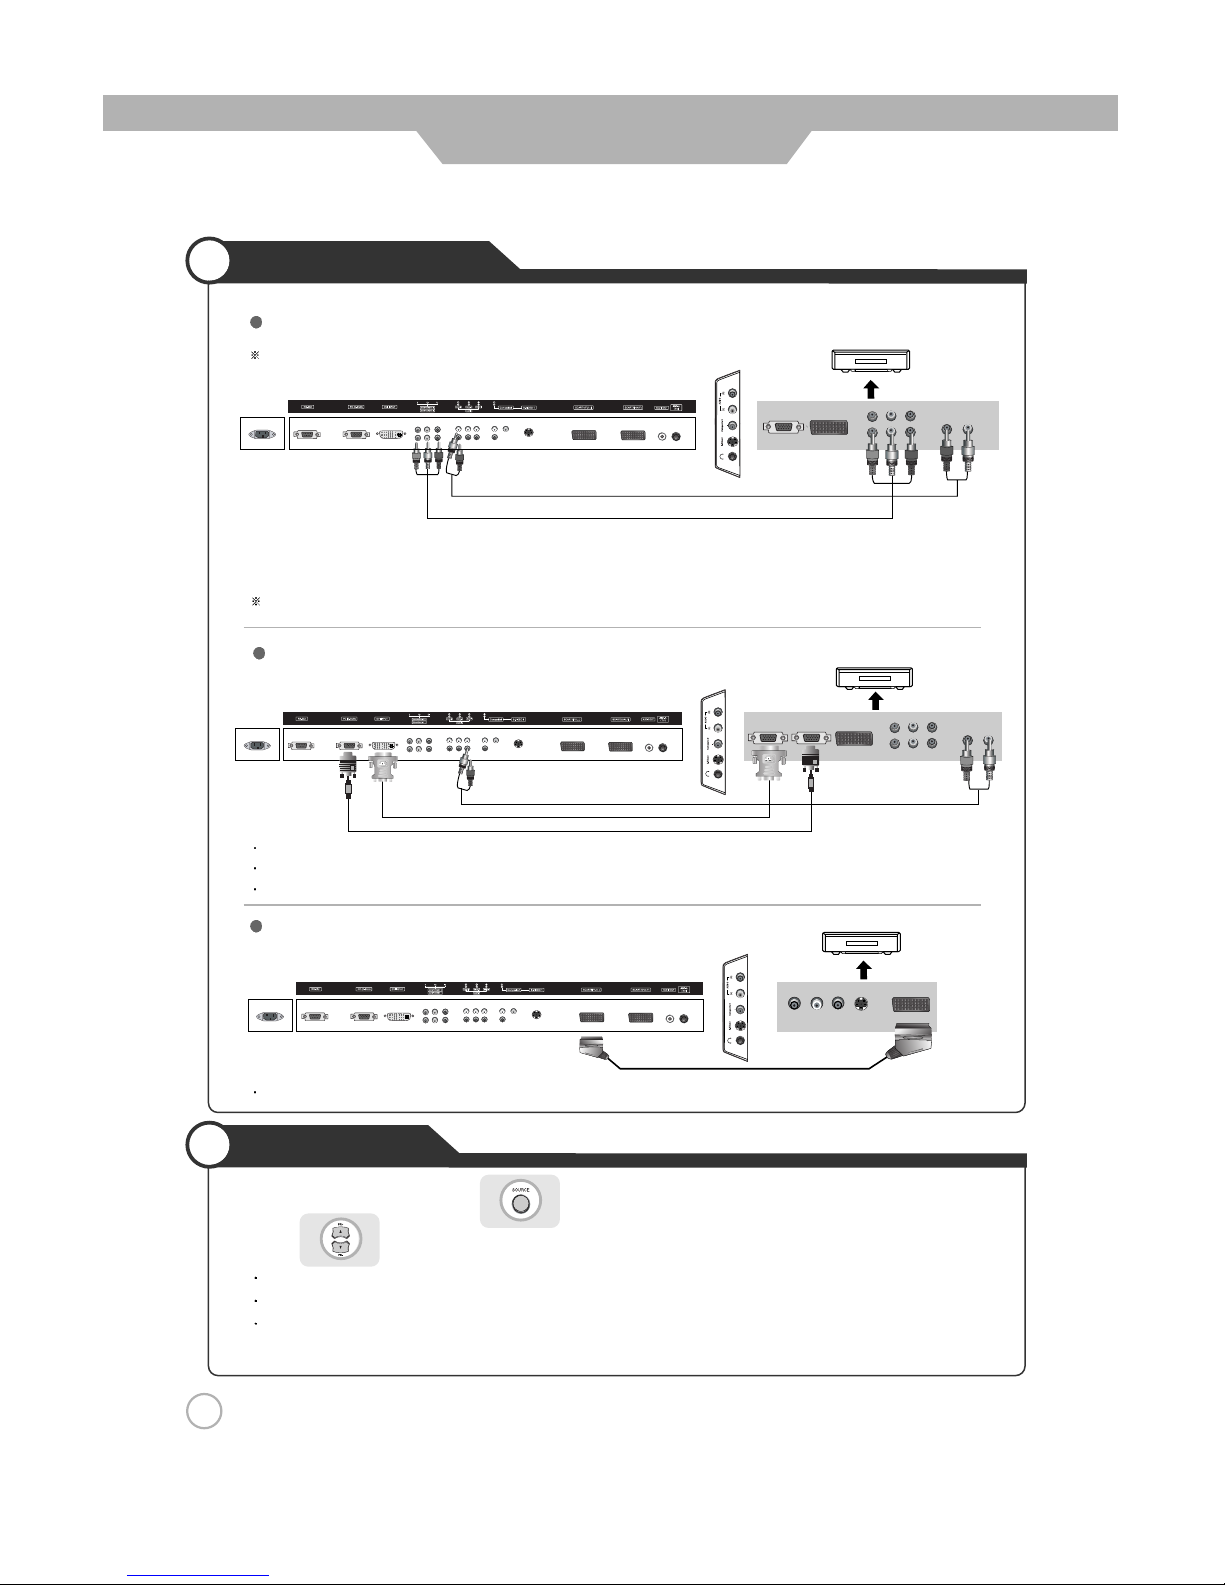
Viewing DTV
1. Turn on the LCD TV and press on the remote controller.
2. Use to move to "Component 1/2".
If D-Sub 15 Pin terminal has been connected, select PC.
If DVI terminal has been connected, select "DVI".
If SCART terminal has been connected, select SCART1 or SCART2 .
3. Turn on the DTV receiver and select the channel that you want.
DTV Connections
20
Connection
< LCD TV Back view >
< LCD TV Back view >
1. Connect LCD TV’s Y, Pb,Pr terminal in component 1/2 to Video receiver’s Video Out terminal using the external cable.
2. Connect LCD TV’s Audio terminals (left & right) in component
1/2 to DTV receiver’s Audio Out terminal using
the Audio cable.
DTV receiver’s output terminal can be marked Y, Pb,Pr or Y, Cb, Cr according to products.
Some of DTV receiver(Set-Top-Box) have an PC Connector (D-Sub 15pin) instead of Component output .
Some of DTV receiver(Set-Top-Box) have an DVI Connector instead of Component output .
Connect Audio Cable from the Audio output terminal of receiver to the PC Audio input terminal of the LCD TV.
Connect the SCART terminal of the LCD TV to the DTV receiver with the SCART cable.
Connecting to the component terminal
Connecting to the D-SUB or DVI terminal
Connecting to the SCART terminal
Connection terminals of other appliances differ by manufacture and model.
(R)
(L)
< DTV receiver>
(R)
(L)
P
rPbY
< DTV receiver>
< DTV receiver>
Audio Cable
Audio Cable
Component Cable
D-SUB Cable
DVI-D Cable
Audio Cable
SCART Cable
< LCD TV Back view >
Page 21
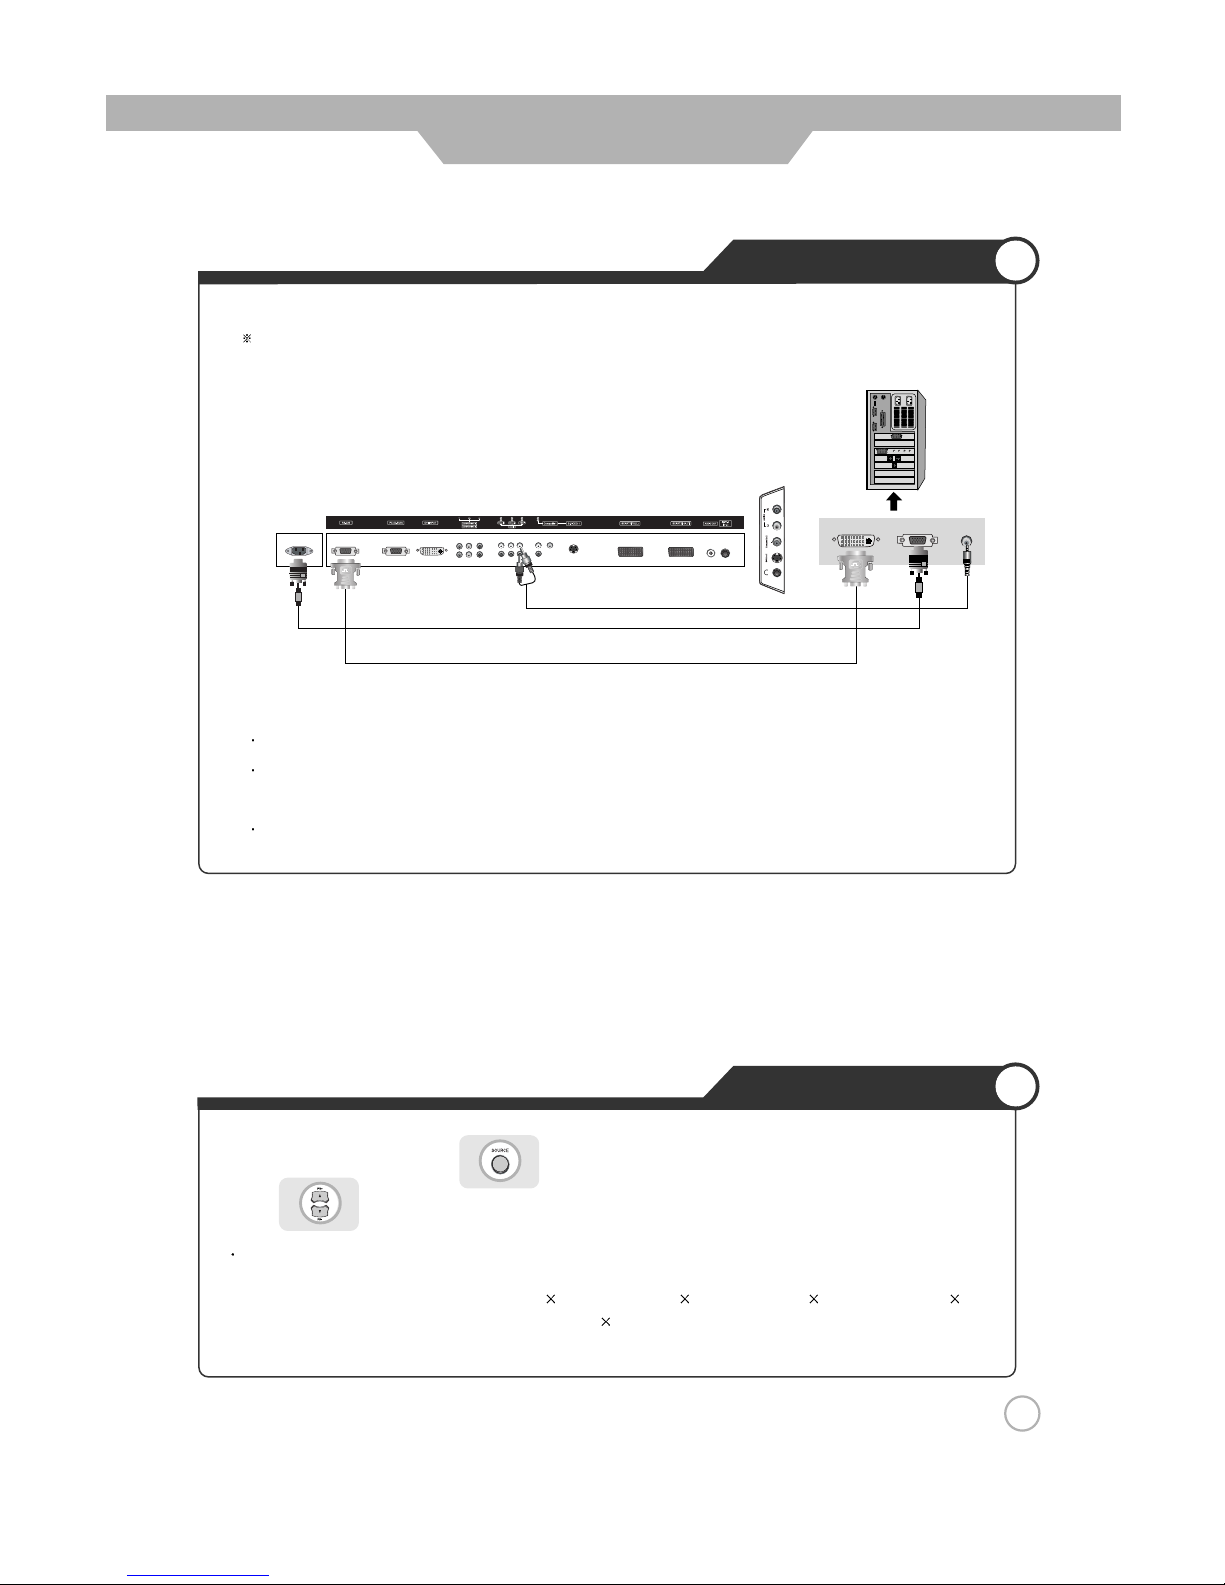
PC Connections
How to Use as PC
PC Connections
21
Connection
Connect LCD TV’s RGB terminal to PC’s RGB terminal using the D-Sub cable.
Connect LCD TV’s PC Audio terminal to PC’s Audio terminal using the Audio cable.
(Only possible for PC’s with Audio terminal)
If there is a DVI- D terminal in your PC, use the DVI- D cable connection.
1. Turn on the LCD TV and press on the remote controller.
2. Use to move to "PC".
If DVI has been connected, select "DVI".
3. Set the PC video output mode to VGA (640
480)/ SVGA (800 600)/ XGA (1024 768), SXGA (1280
1024, 60Hz). In the mode higher than SXGA (1280 1024, 60Hz) "Out of Range" message appears. Be
sure to change your PC video format to less than SXGA mode.
< LCD TV Back view >
< PC >
Connection terminals of other appliances differ by manufacture and model.
D-SUB Cable
Audio Cable
DVI-D Cable
Page 22
Connection
22
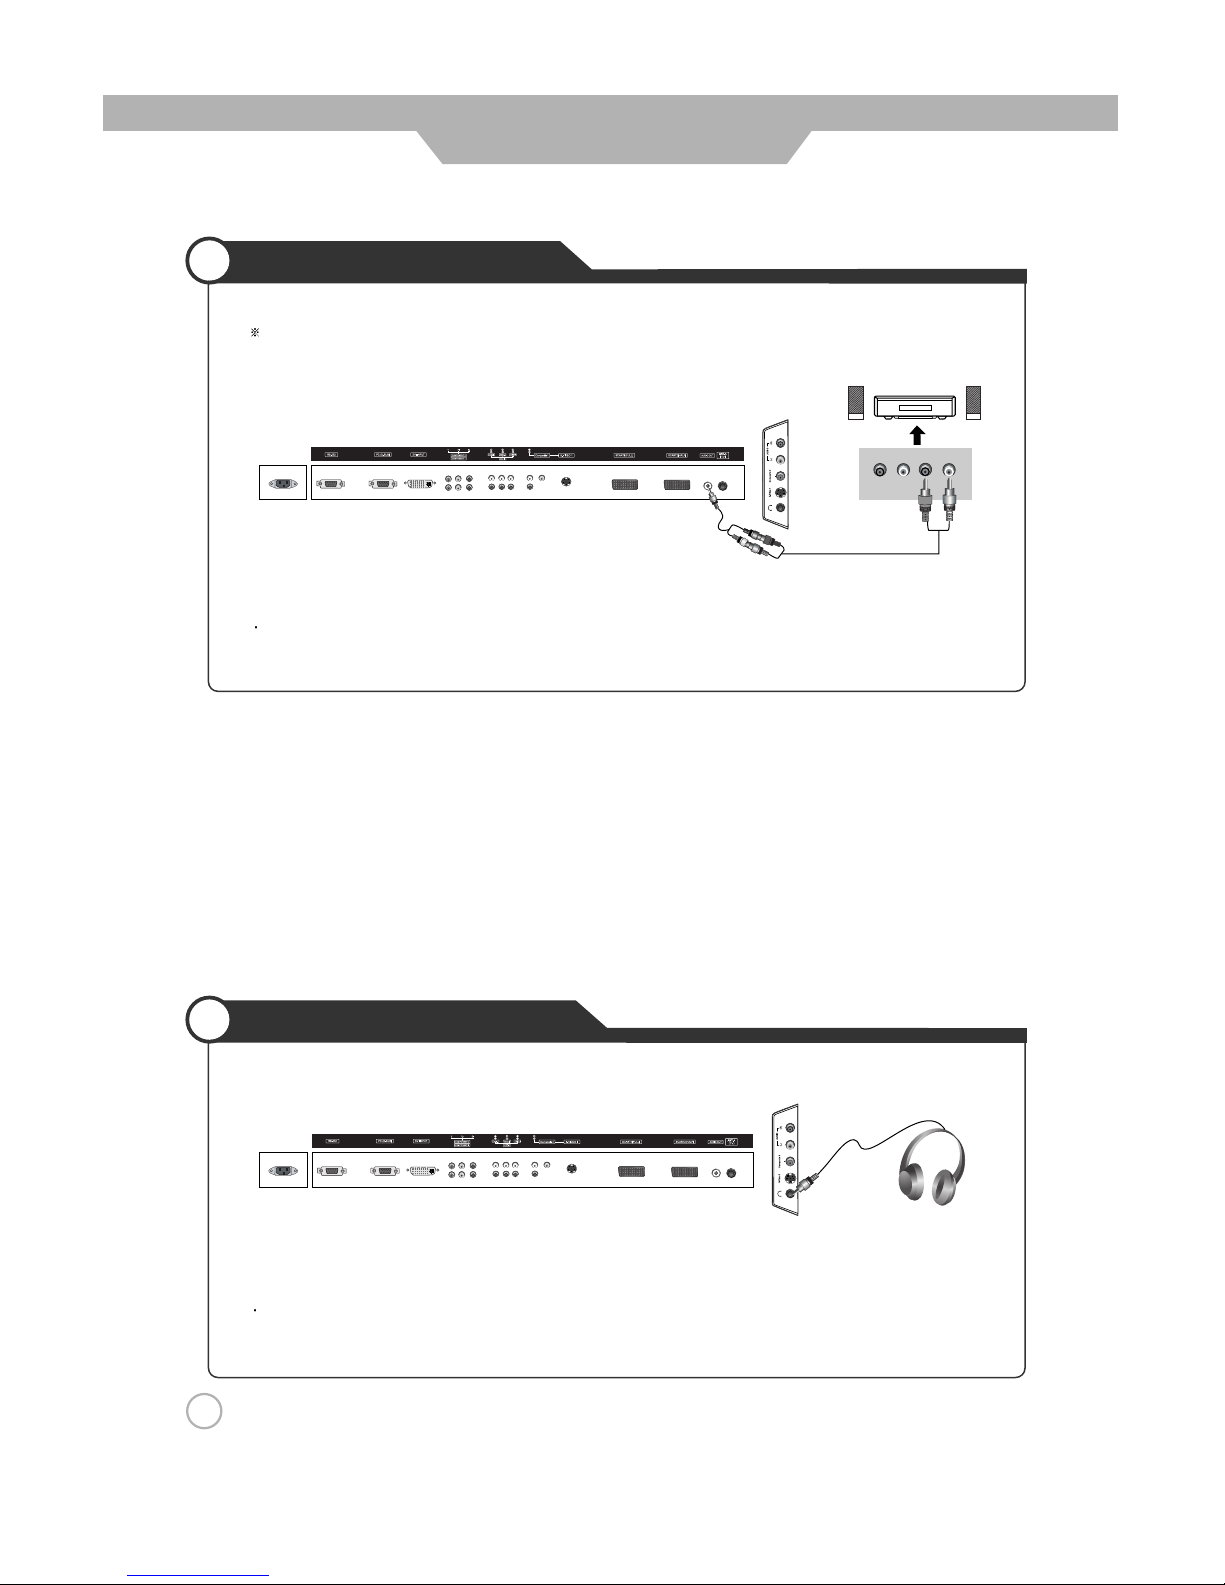
Audio Out Connections
Headphone Connections
< LCD TV Back view >
Connect LCD TV’s Audio Out terminal to AUDIO’s Audio Out terminal using the Audio Out Cable.
Connect the Headphone to the LCD TV’s headphone terminal.
Connection terminals of other appliances differ by manufacture and model.
(R)
VIDEO
(L)
< AUDIO>
< Speaker> < Speaker>
< LCD TV Back view >
Audio Cable
Audio Out Cable
Headphone
Page 23
Connection
23
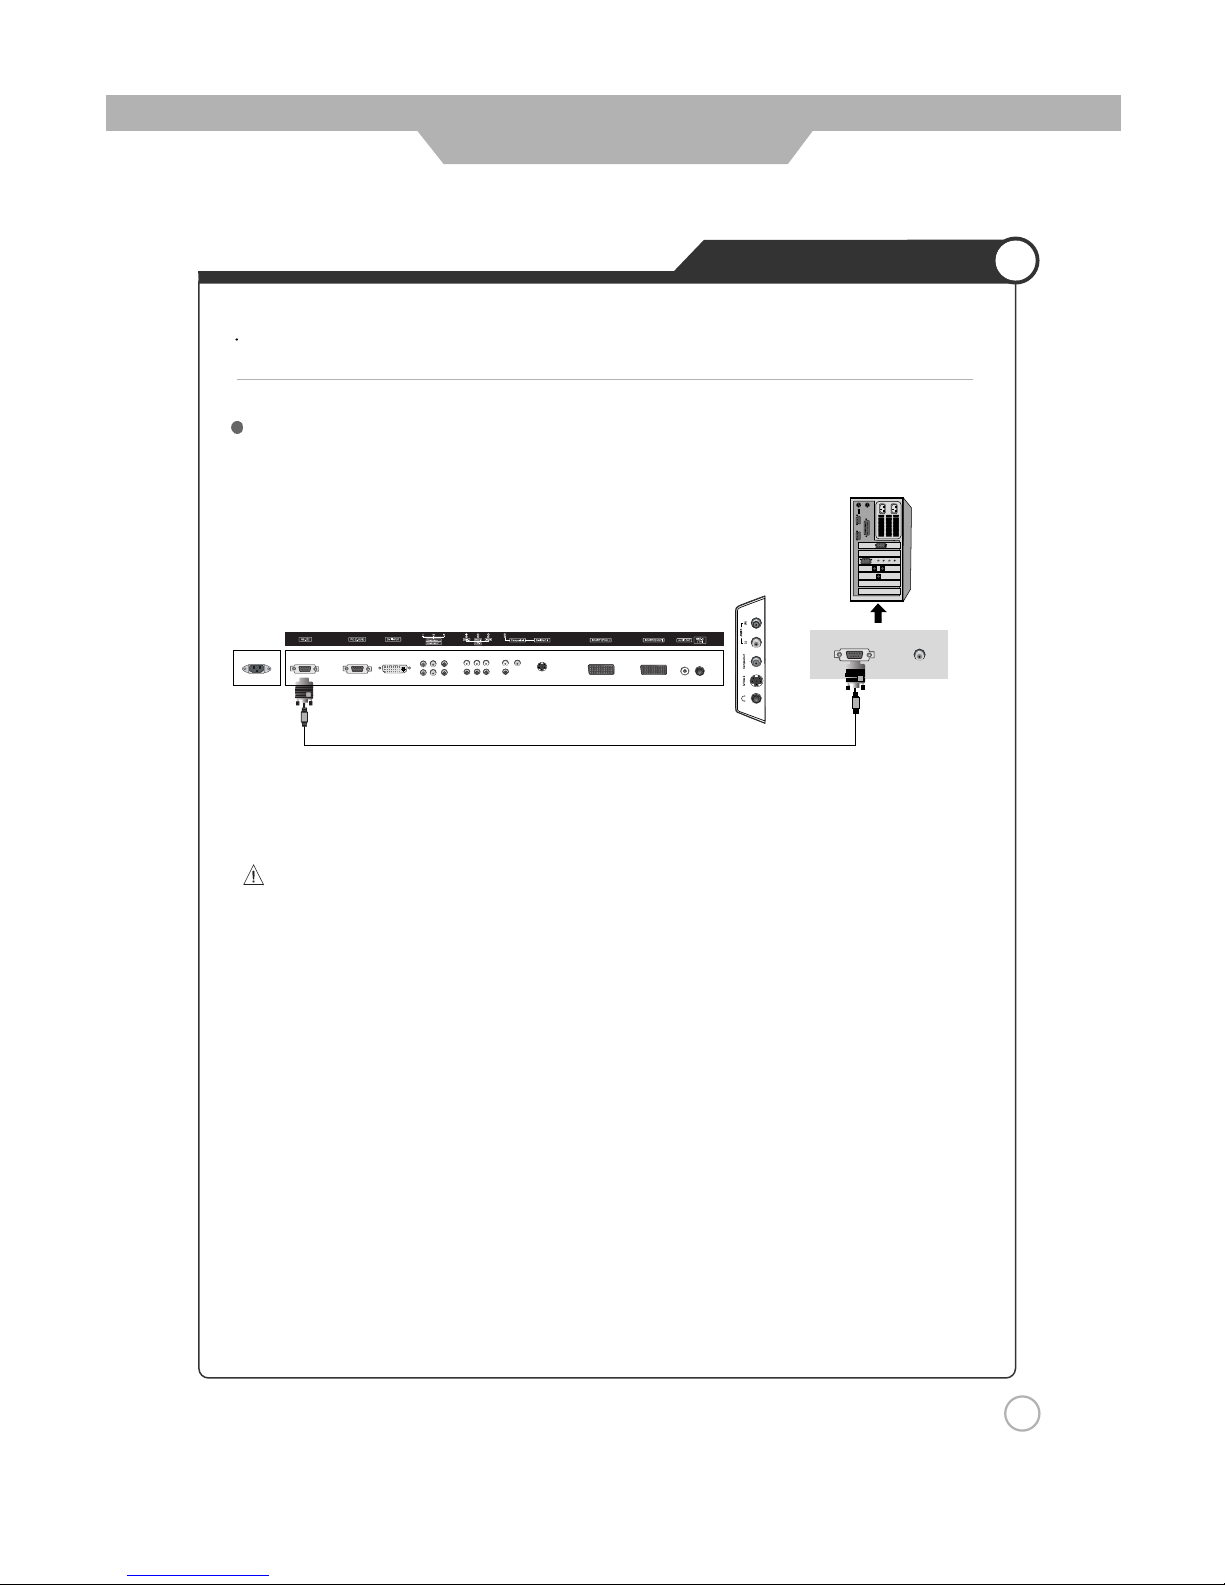
External Adjustment
<Back view of the LCD TV>
Use the RS-232C jack to control monitor’s functions externally by external equipment.
How connect a external equipment
Caution : Regular customer does not allow using the external adjustment that is used for service
purpose only.
RS232C Cable
Page 24
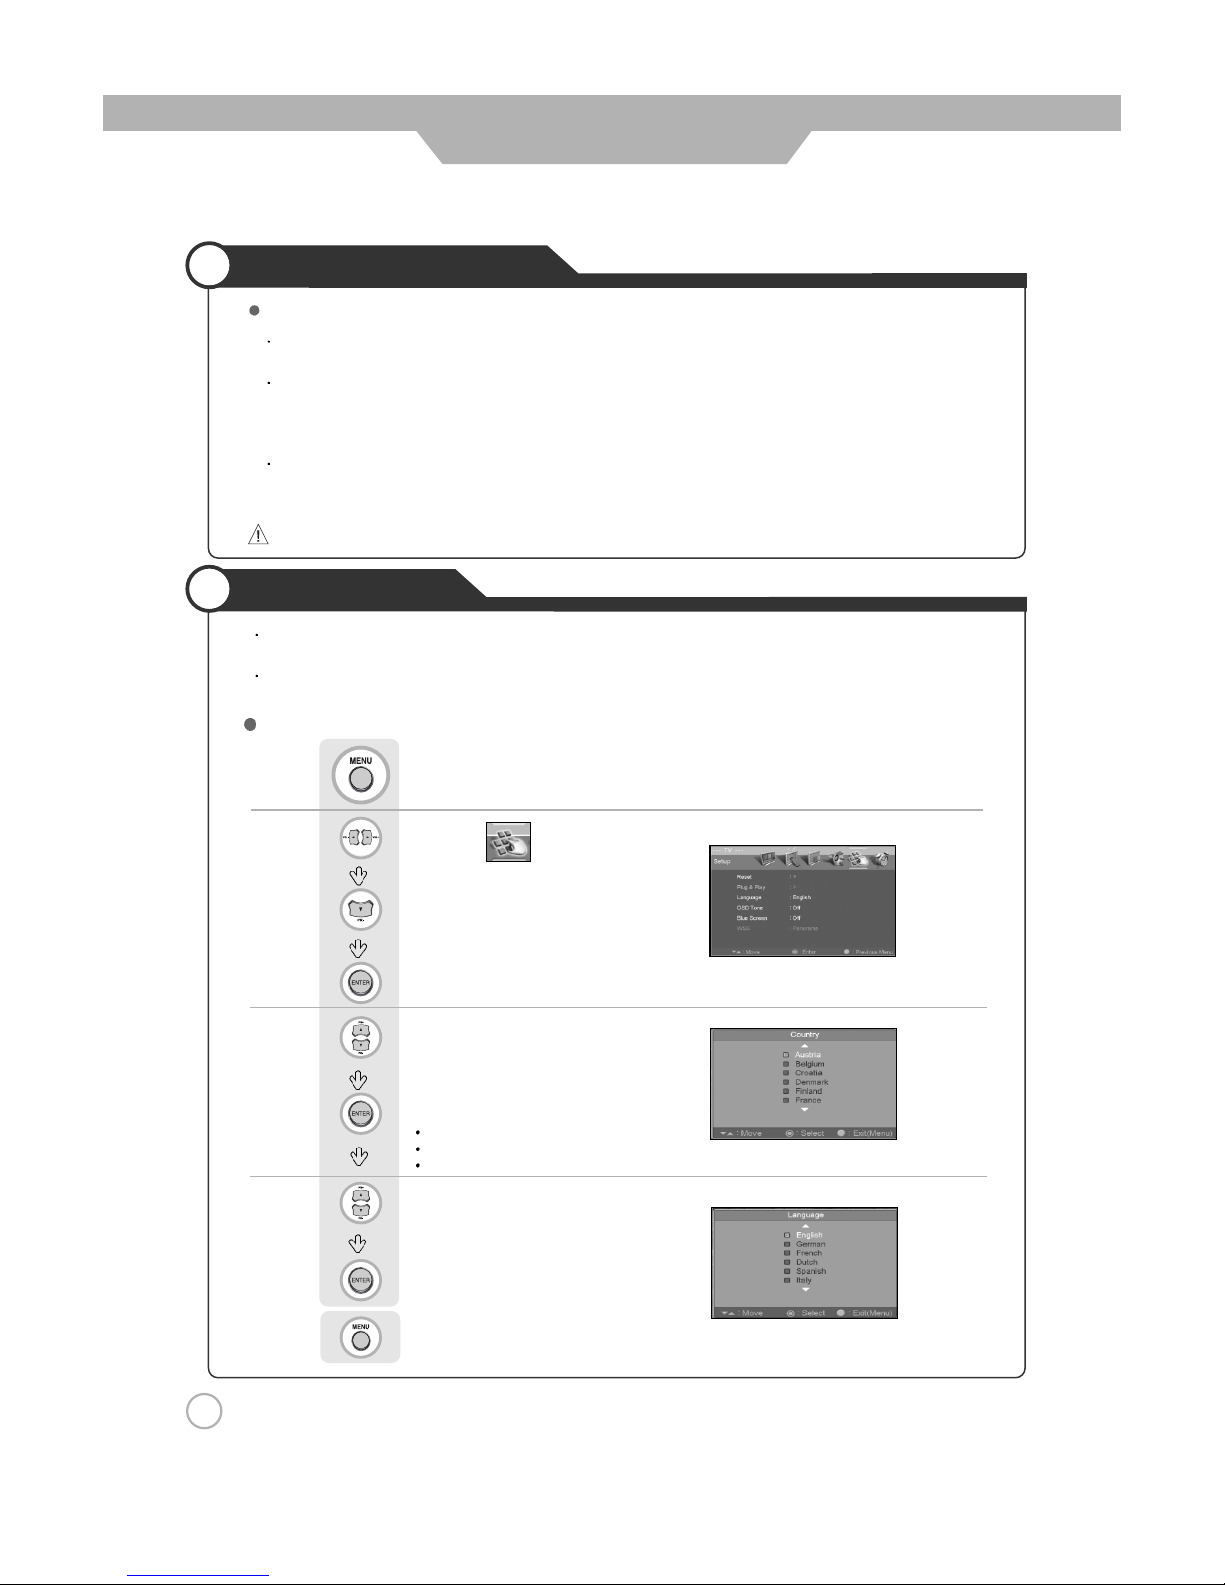
Use to move to .
Press to move to "Plug & Play".
Press to select.
Use to move to the desired "Language".
Press to select.
Press to go back to the previous menu.
Use to move to the desired "country".
Press to select.
24
Using the menu
When the brand new television set it turned on for the first time, following settings can be set using the plug
and play function of the TV.
Press the "Main power" button of LCD TV and then press the "Stand by" button. You will see the country mode
selection menu.
Press .
Basic Use
Automatically "ATM" beginning.
After "ATM" ends, select the desired Language.
Select other of none expressed country.
Initial Settings
Powering the LCD TV
Power on/ off
To turn the LCD TV on :
Press the "Main Power" button of LCD TV and then press the "Standby" button.
To turn the LCD TV off :
Press "Standby" button on the LCD TV and then press the "Main Power" button.
Turning the main power switch off will save energy. It is the same as unplugging the power cord.
If ON Time setting is set, the main power should be ON.
To turn on/off by remote controller :
Press the Power button of remote controller (If the LCD TV is not turned on, check that the "Main Power"
button on the LCD TV main body is turned on. The main power indicator will light up red if turned on).
CAUTION -
After turning off the main Power, please wait at least more than 3 seconds to turn the main power back on.
Page 25
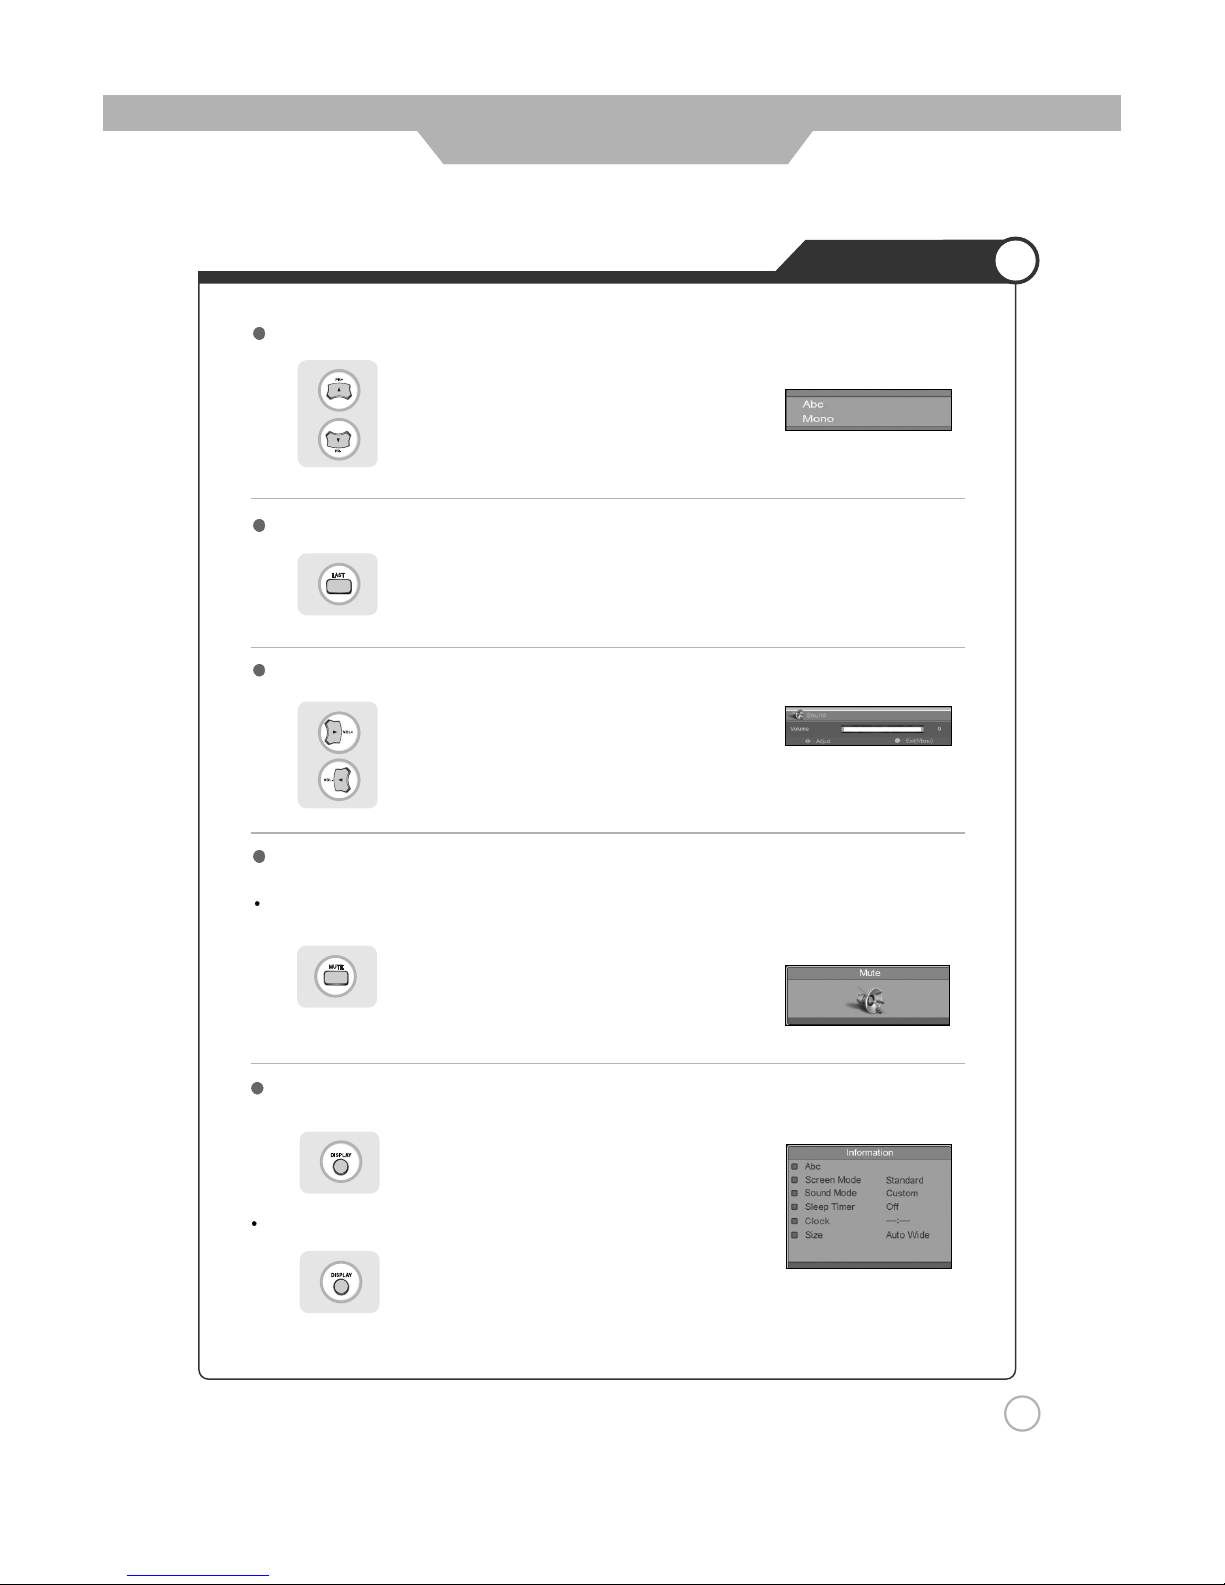
Press button on the remote control.
Press button or wait 10 seconds for the display to disappear.
25
Watching TV
Basic Use
INFO - To check the current state
To turn off only sound
Volume Control
Channel Selection
Use the mute function to turn off the LCD TV sound for a while, when a phone or a bell rings.
Press to go back to the channel previously viewed.
increases the channel.
decreases the channel.
Press button again to hear the sound again.
Display shows user’s setting and selections.
To go back to the previous channel
increases the volume.
decreases the volume.
Page 26
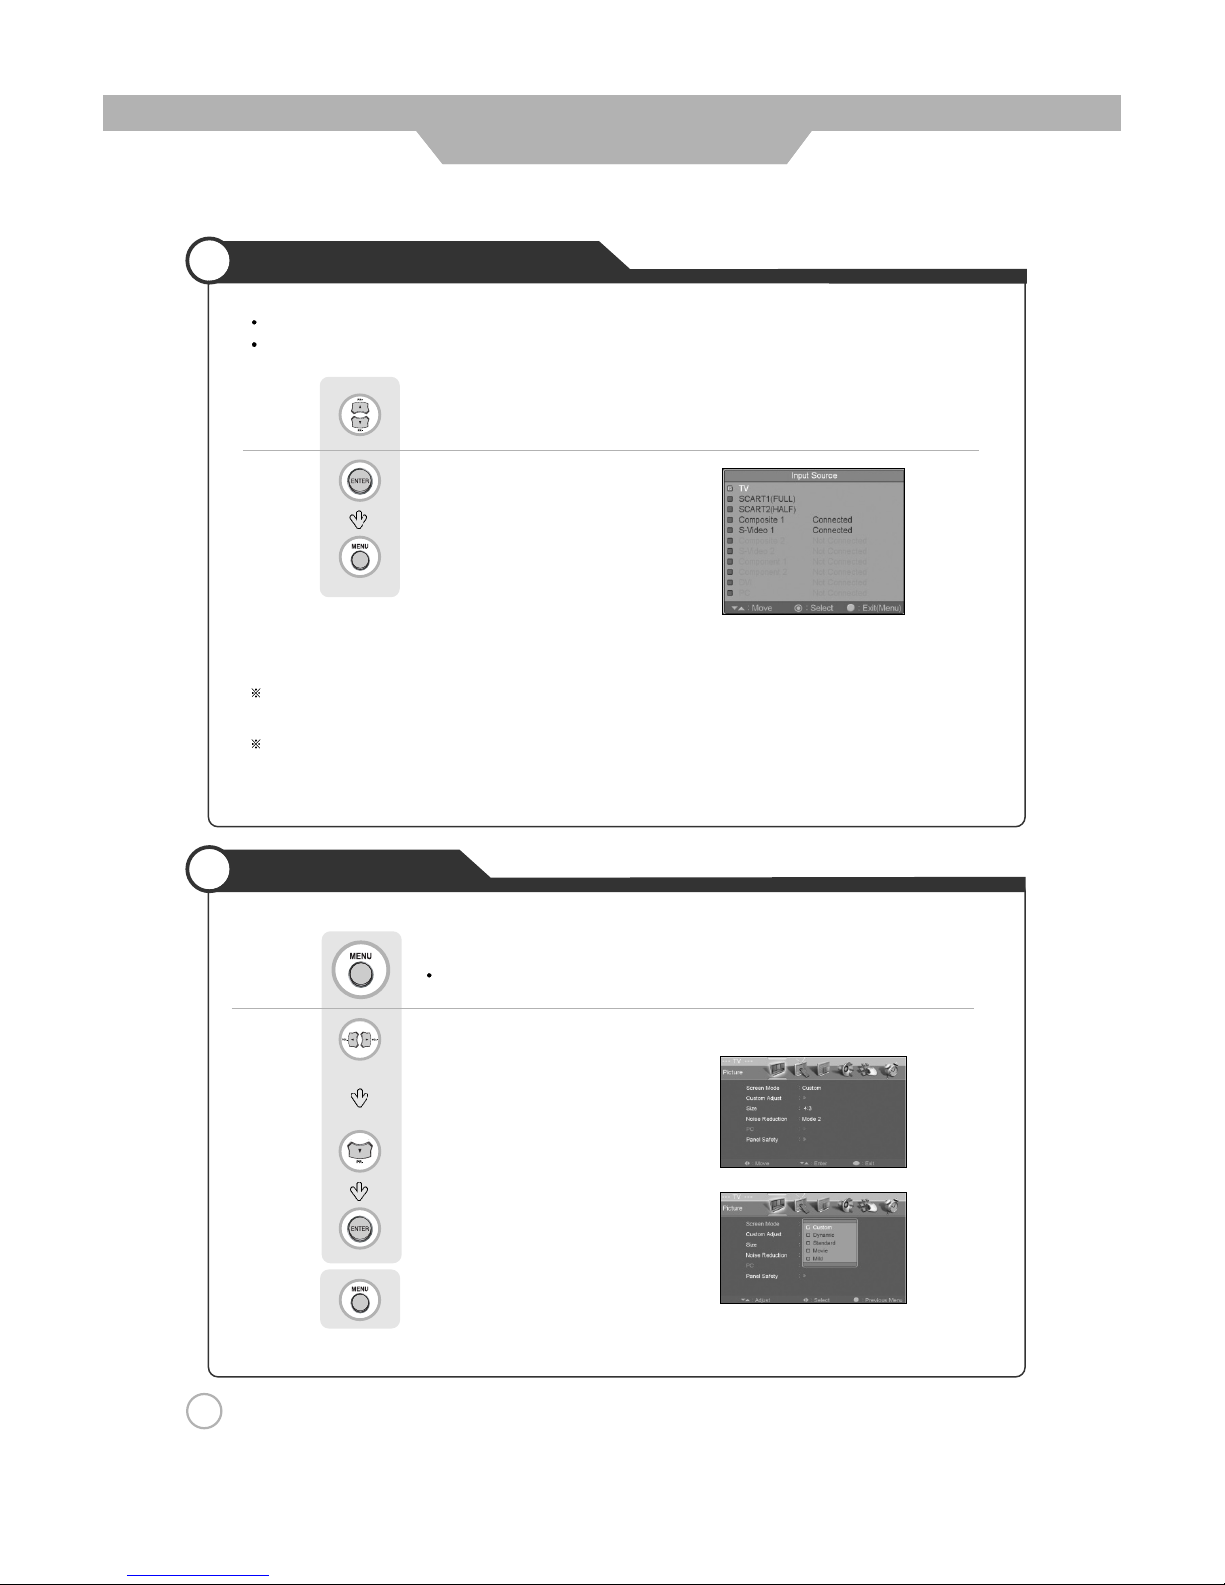
Use to move to the desired item.
Press to select.
Use (left, right arrows) to move the cursor
to the desired function.
Press to get into the sub menu.
Press to select.
Using the Menu
Selecting TV/External Input
26
Basic Use
Aside from the watching TV, you can connect SCART 1/2, Composite 1/2 , S-Video 1/2, Component
PC and DVI to the TV set and enjoy these functions.
All input sources will be automatically detected and displayed on screen, but you may select an
activated source when the input cable is connected only.
PressPress
You can between the TV signal and the input signal of other appliances connected to the TV.
Use this function to switch to the input source you wish to view.
Press . The menu screen will appear.
Press to go back to the previous menu.
Page 27
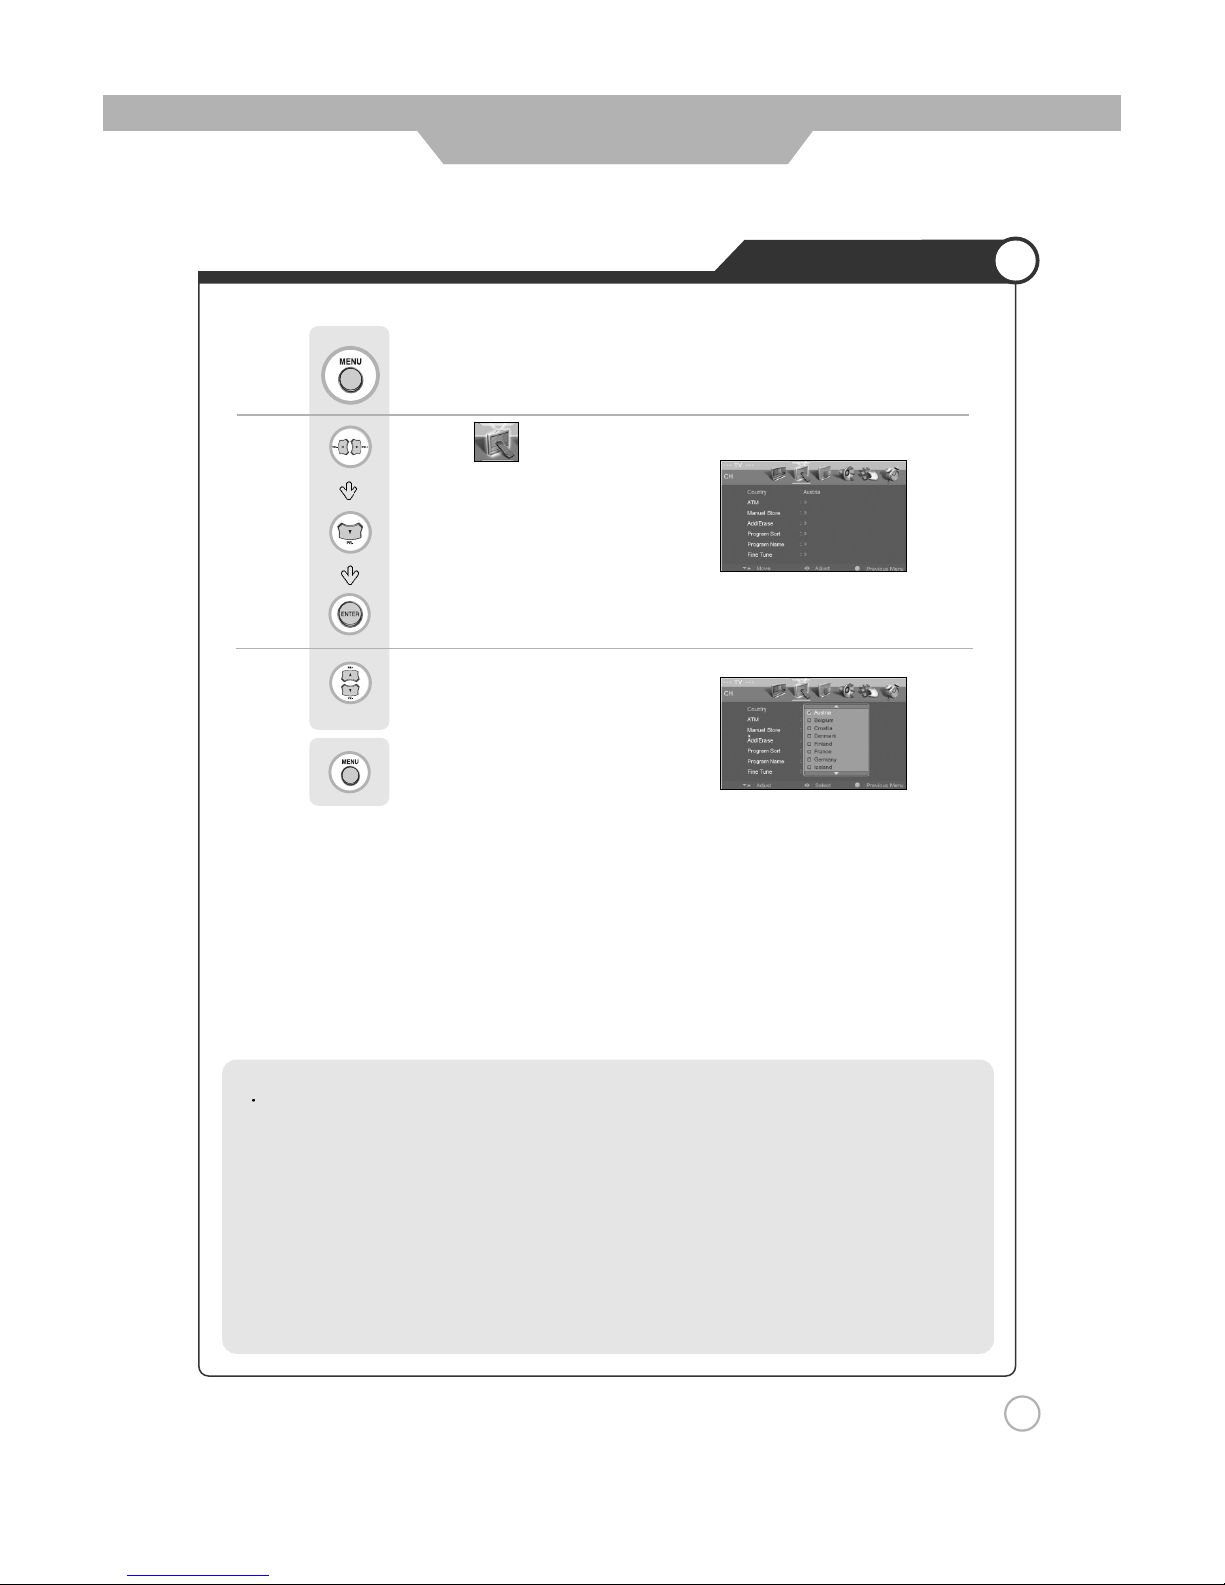
Use to select the desired country.
Press to go back to the previous menu.
Use to move to .
Press to move to "Country".
Press to select.
To Set Location
27
Basic Use
TV System Standard
I/PAL : United Kingdom, Hongkong
B.G/PAL : Germany ,Netherland, Switzerland, Italy, Austria, Yugoslavia
B/PAL : Australia, New Zealand, Singapore, Norway, India, Thailand, Indonesia, Malaysia
D/PAL : China, North Korea
B.H/PAL : Belgium
L/SECAM : France
D.K/SECAM : Russia, Poland, Czechoslovakia, Hungary
B/SECAM : Egypt, Iran, Iraq
To Set Location
Press .
Page 28
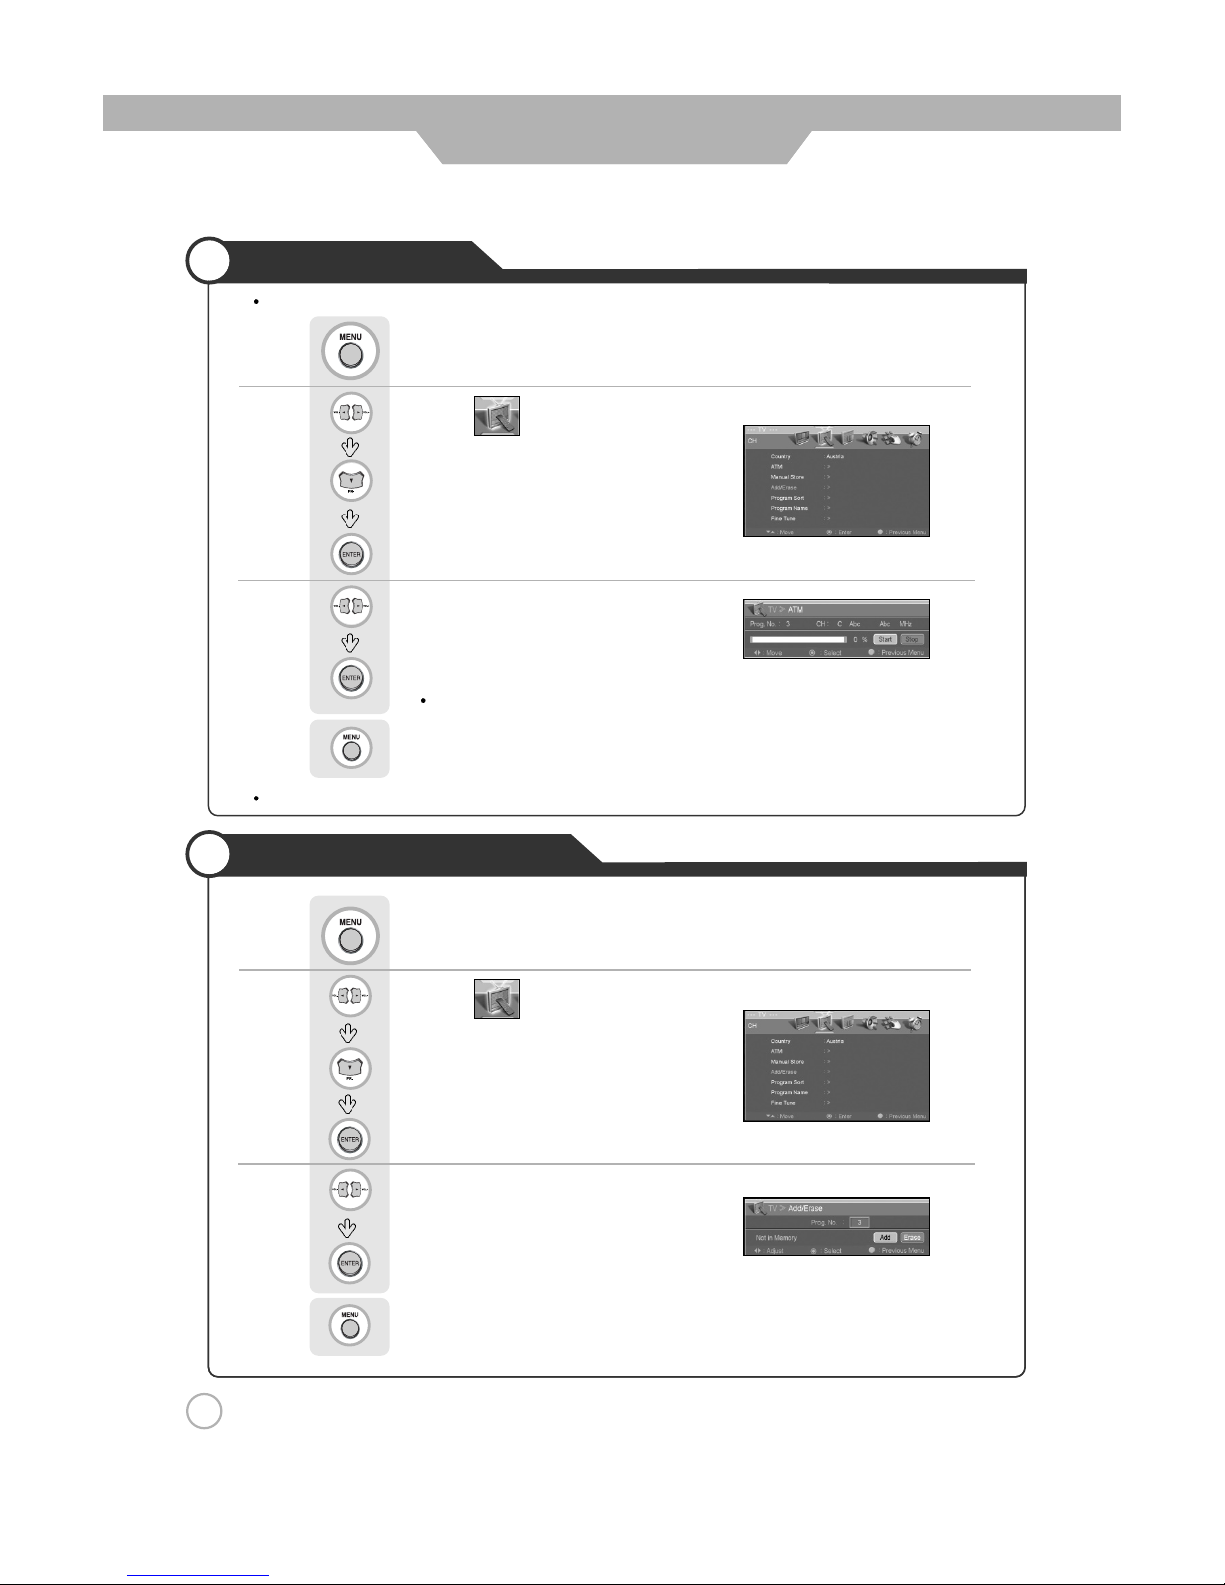
To set or erase a channel
Use to move to "Add" or "Erase".
Press to select.
Press to go back to the previous menu.
Use to move to .
Press to move to "Add/ Erase"
Press to select.
Use to move to "Start".
Press to select.
Press "Start" to start the automatic channel search/set function.
All broadcasting channels will be set.
Press to go back to the previous menu.
Use to move to .
Press to move to "ATM".
Press to select.
Setting Channels
Press .
28
Basic Use
Use the Auto Search function to preset all channels that are being broadcast
Press .
ATM : Auto tuning management.
Page 29
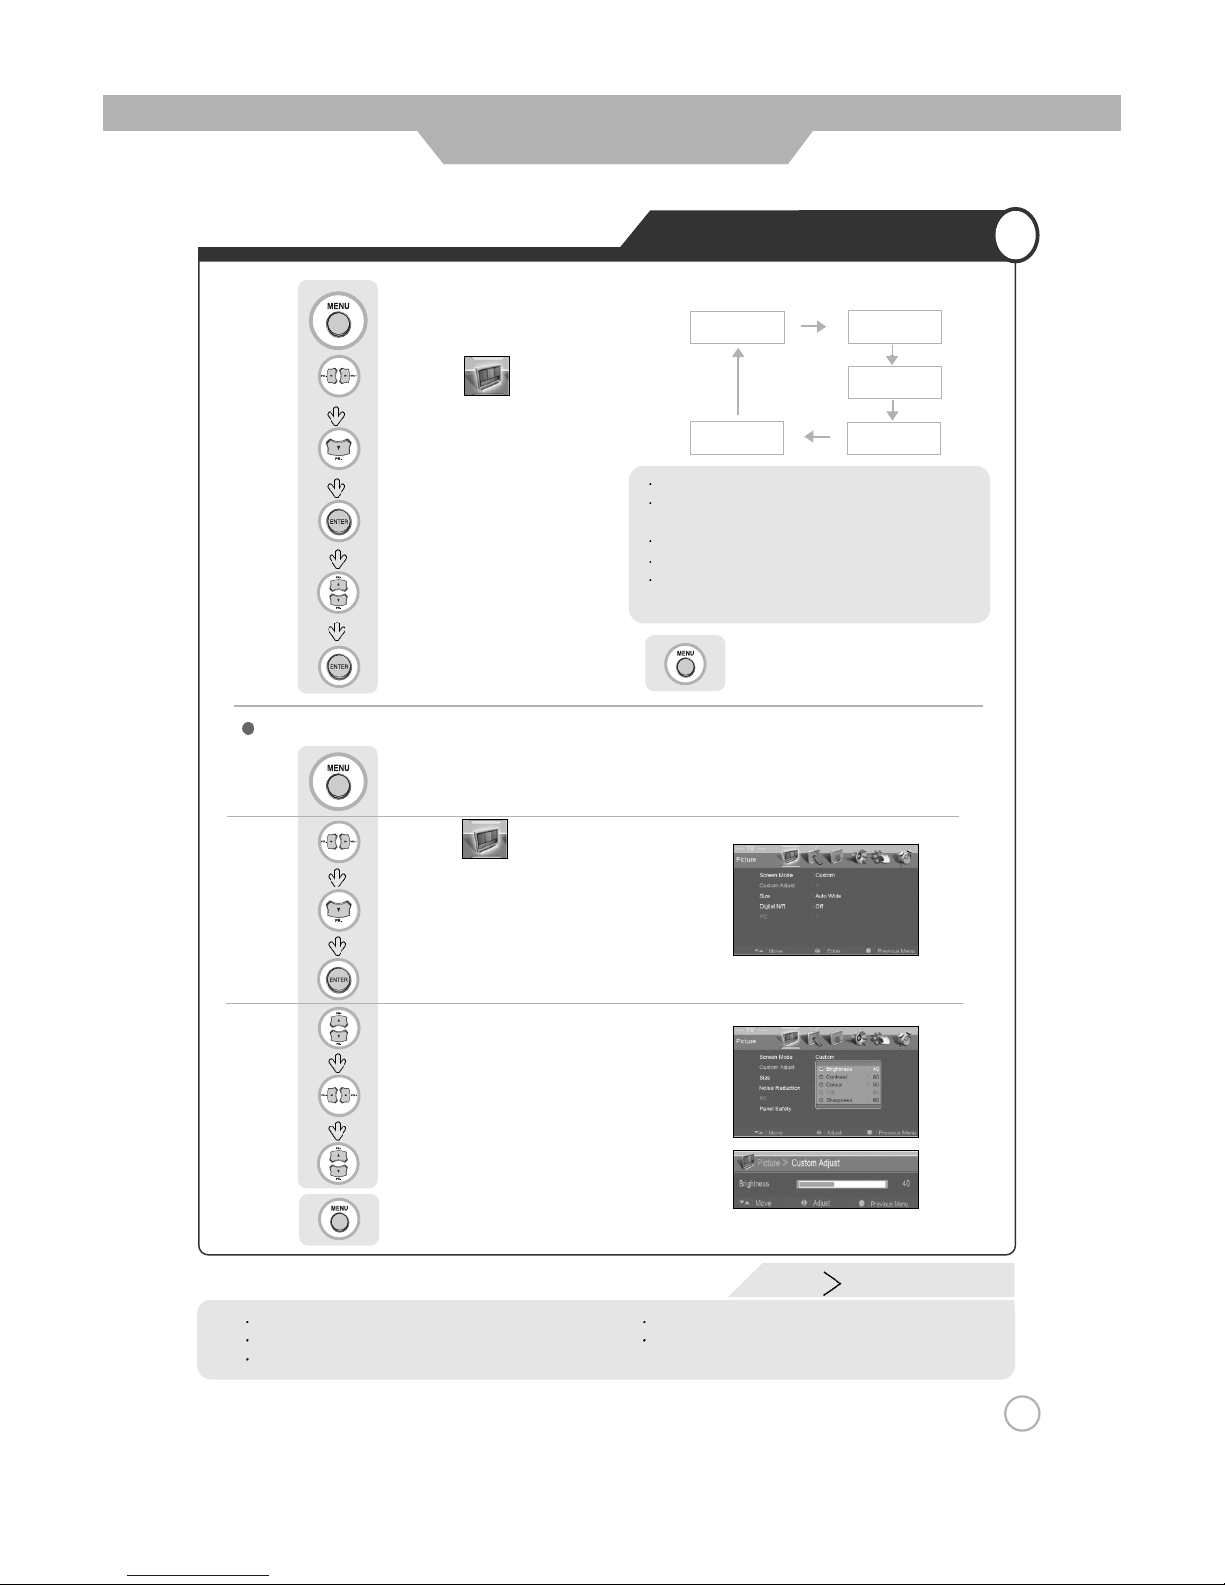
Use select between Custom/ Dynamic/
Standard/ Move/ Mild.
Press to select.
Use to move to .
Press to move to "Screen Mode".
Press to select.
Use to move to .
Press to move to "Custom Adjust".
Press to select.
Use to move to the desired category.
Use to adjust the setting.
Use select between Brightness/ Contrast/
Colour/ Sharpness
Press to go back to the previous menu.
Changing Picture Settings
Press to go back to the previous menu.
Custom Mode
29
Basic Use
Press .
Custom Picture Adjustment
Brightness : It adjusts the brightness of the image.
Contrast : It adjusts the contrast of image.
Tint : It adjust the natural tint of the image.
Colour : It adjusts the intensity of the colour.
Sharpness : It adjusts the clarity of the image.
Custom : Select to set user’s preferences.
Dynamic : Select when using the LCD TV in a
brightly lit environment.
Standard : It is the best screen setting.
Movie : Select when watching a movie.
Mild : Select when using the LCD TV in a dimly lit
environment.
Custom
Dynamic
Standard
Movie
Mild
Press .
Page 30
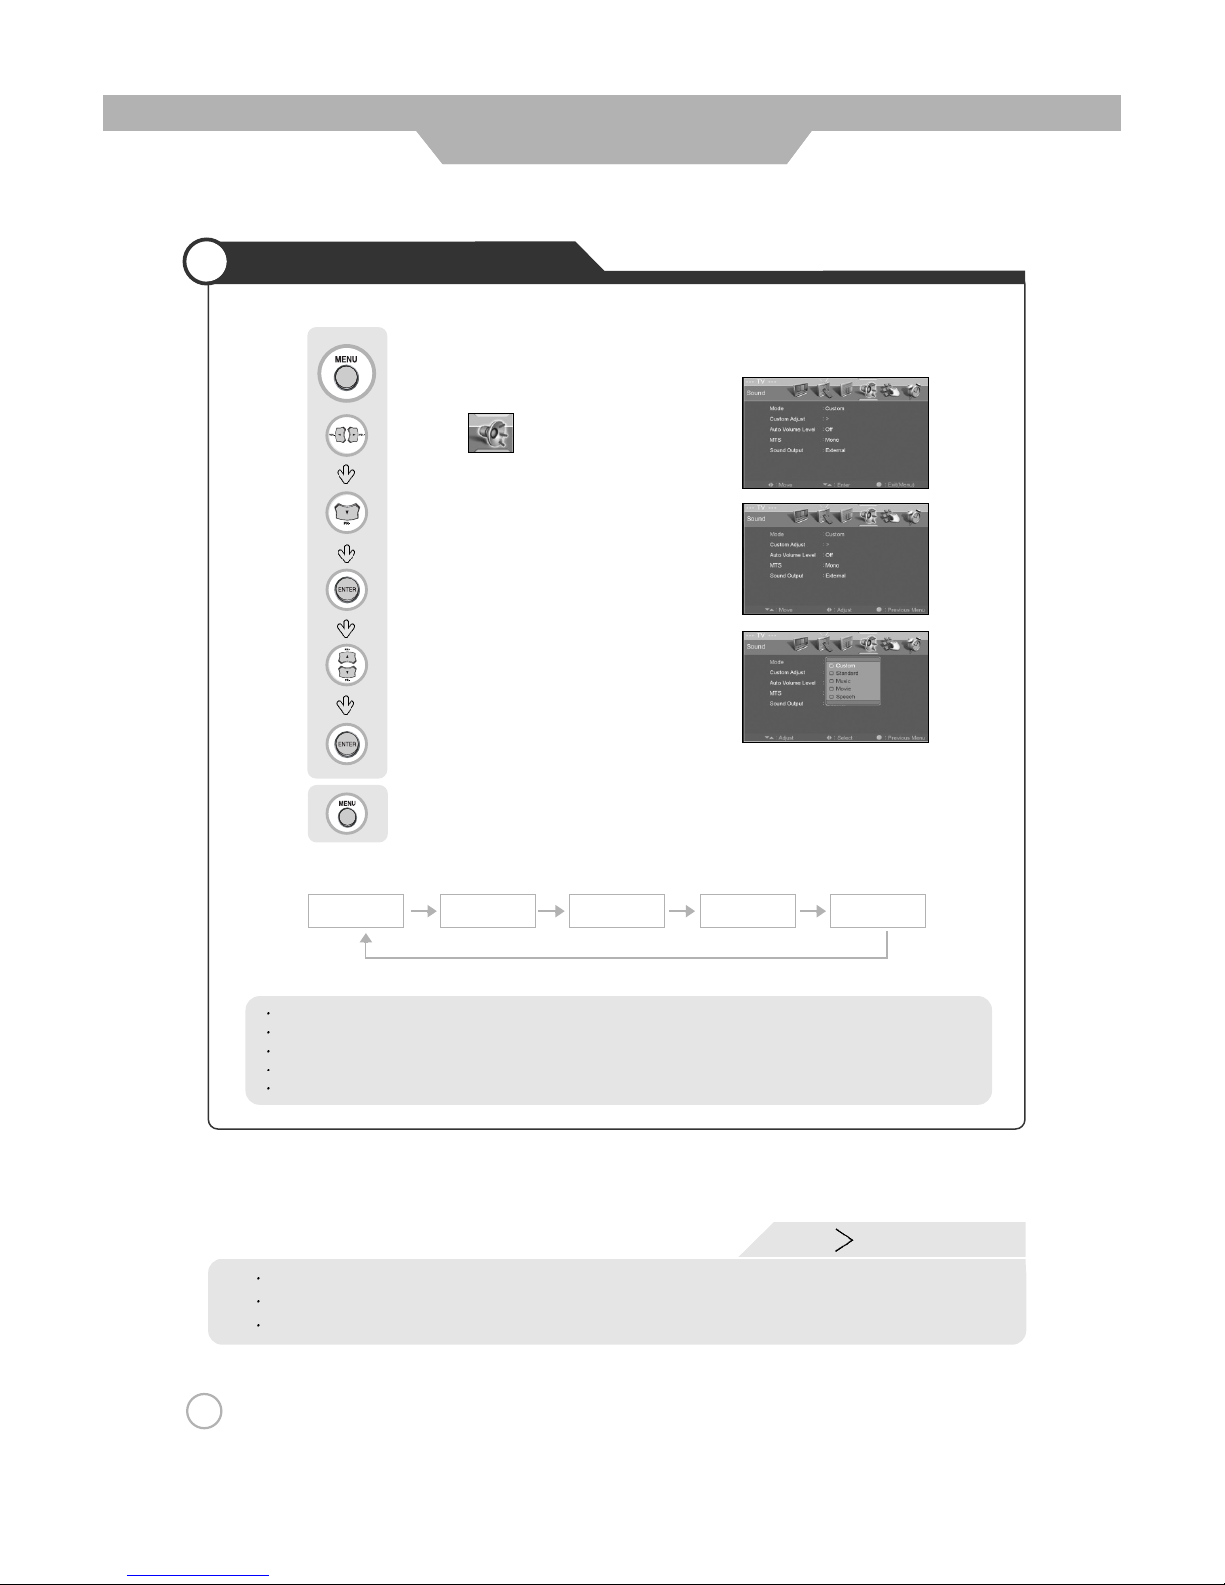
Use select between Custom,
Standard
,
Music, Movie, Speech.
Press to select.
Use to move to .
Press to move to " Mode".
Press to select.
30
Basic Use
Changing Sound Settings
Press to go back to the previous menu.
Custom Mode
Volume : It adjusts the sound volume.
Balance : It adjusts the volume of speakers on the left and the right.
Equalizer : It adjusts the volume by frequency bands and the user can select the desired sound quality.
Press .
Custom
Standard
Music
Movie Speech
Standard : It is the flat sound setting with no equalizer effect at all.
Music : It is preset for music listening.
Movie : It is preset sound for watching a movie.
Speech : It is preset for hearing vocal audio clearly.
Custom : Select when listening to the sound to user’s preference.
Page 31
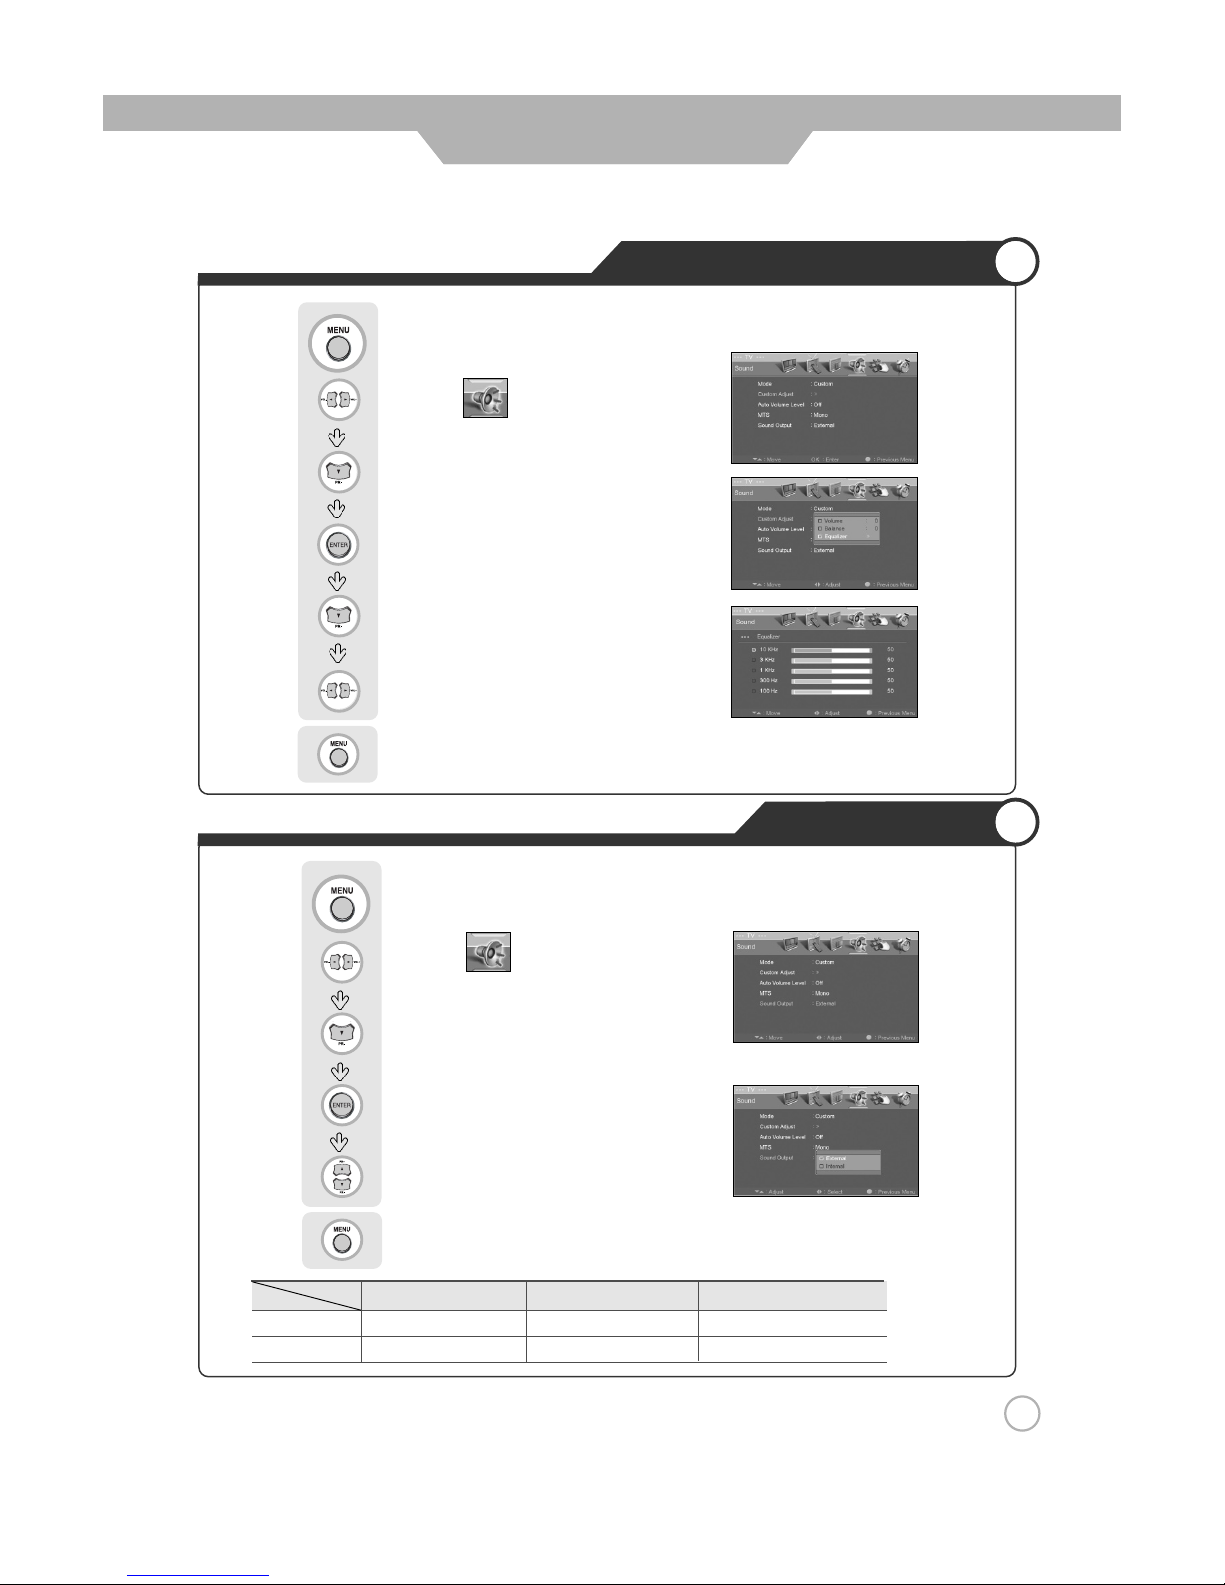
Use to select the "External" or "Internal".
Use to move to .
Press to move to " Sound Output".
Press to select.
Use to move to the desired category.
Use to adjust the setting.
Press to go back to the previous menu.
Use to move to .
Press to move to " Custom Adjust".
Press to select.
Built-in Speaker External Speaker Note
External X O 500mVrms
Internal O X Adjusts the Sound Volume
Sound Output
Custom Sound Adjustment
31
Basic Use
Press .
Press to go back to the previous menu.
Press .
Page 32
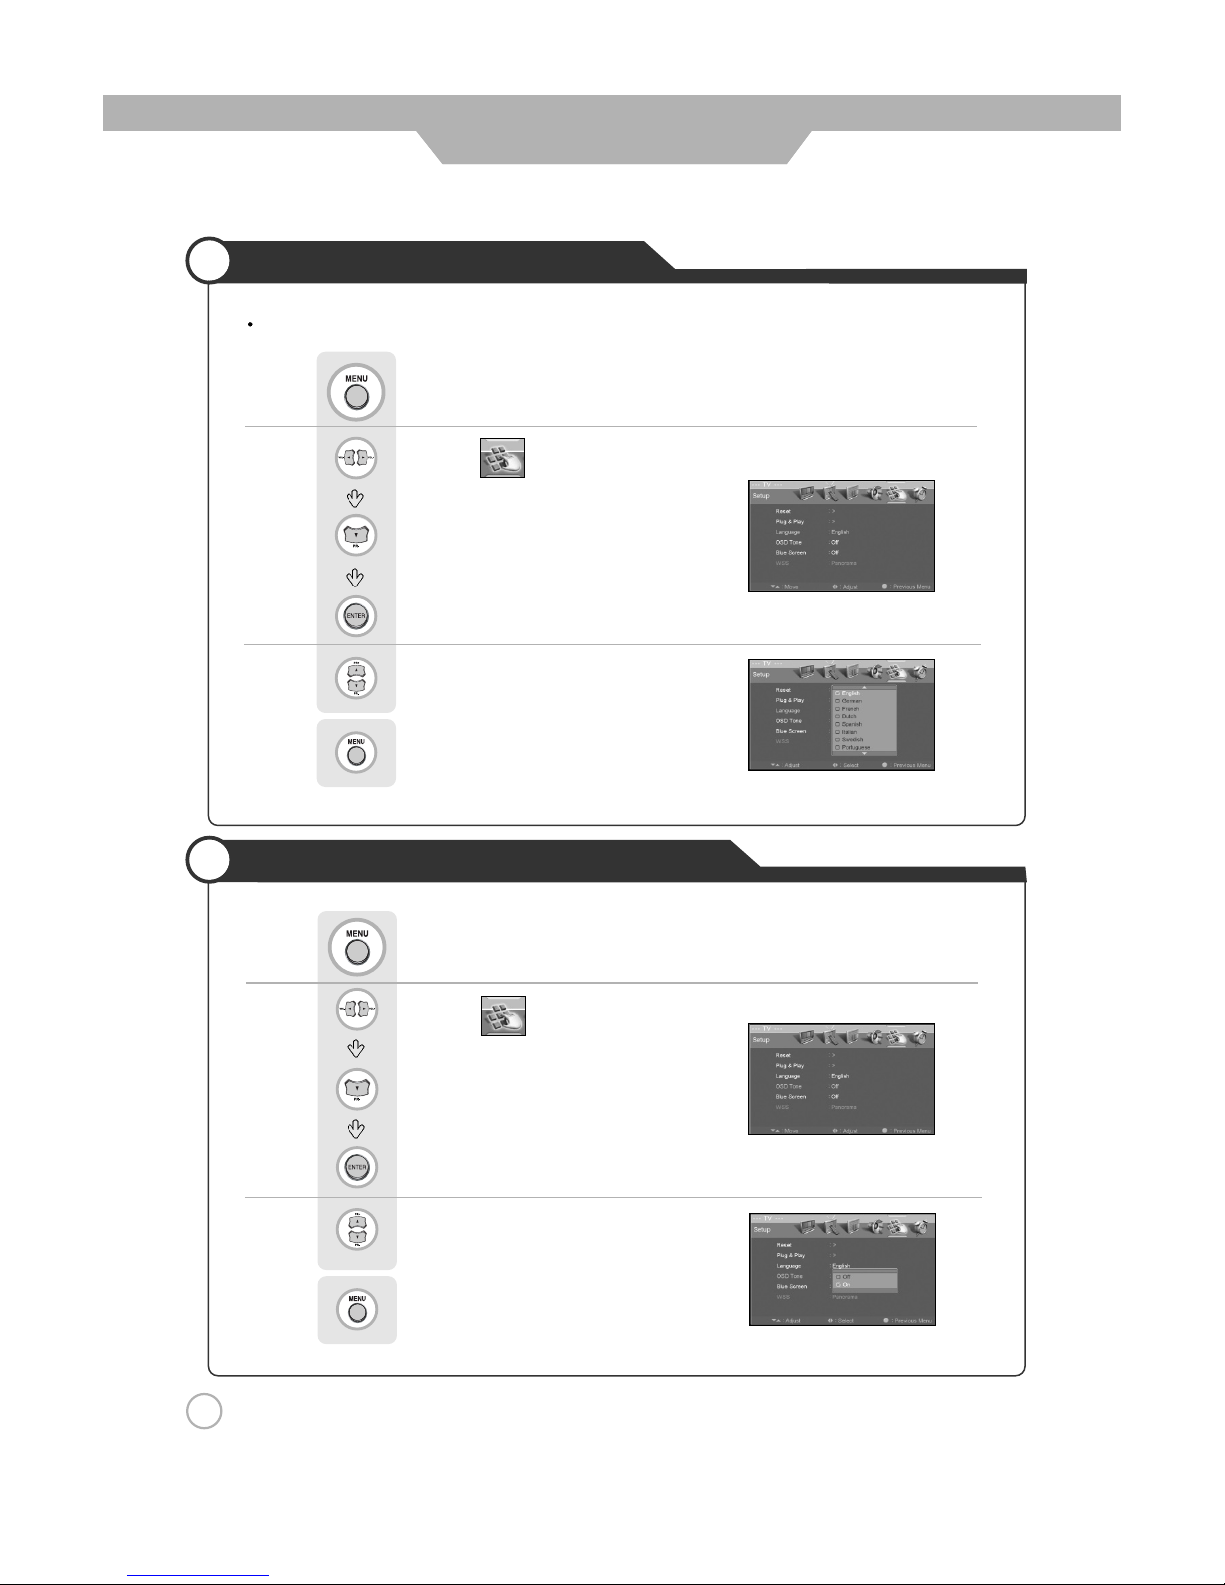
Use to select the "On" or "Off".
Press to go back to the previous menu.
Setting OSD Tone Menu Background
Use to move to .
Press to move to "OSD Tone".
Press to select.
Use to select the desired language.
Press to go back to the previous menu.
Use to move to .
Press to move to "Language".
Press to select.
Selecting the Menu Language
32
Basic Use
Menu screen can be viewed in the language preferred by the user.
Press .
Press .
Page 33
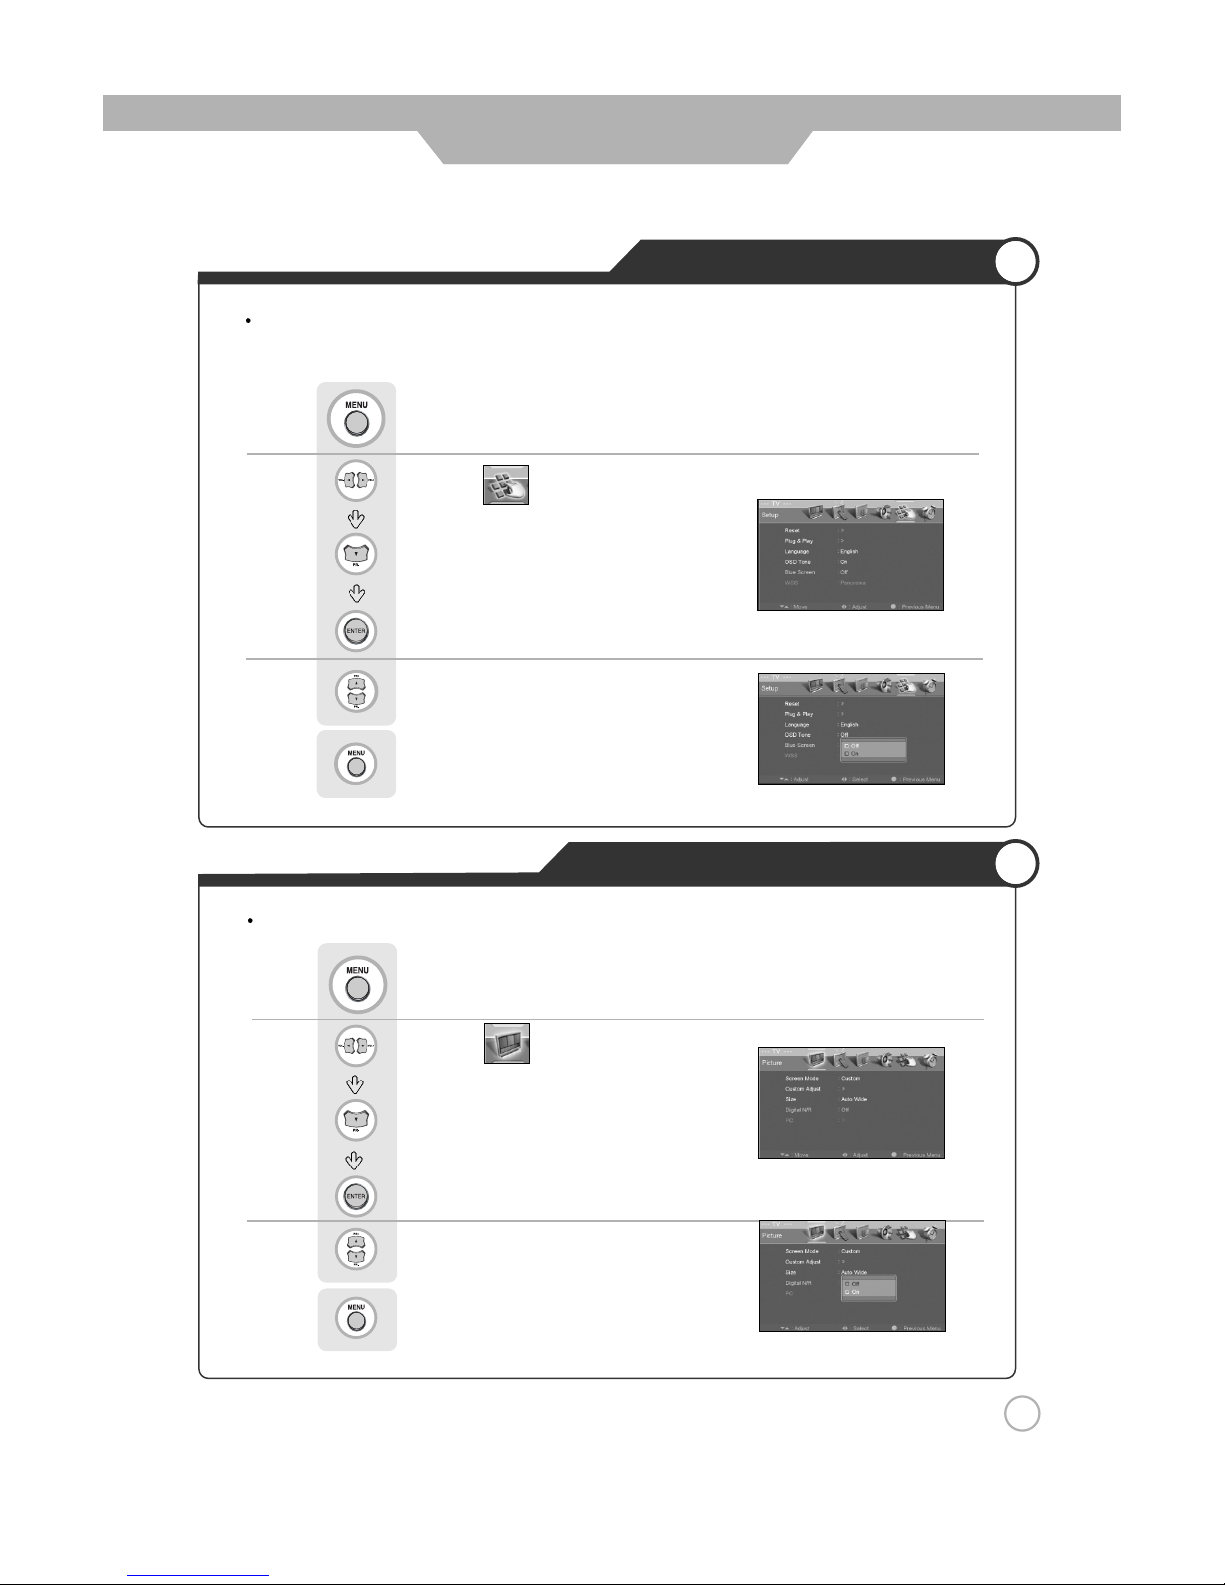
Use to select the "On" or "Off".
Press to go back to the previous menu.
Use to move to .
Press to move to "Digital N/R".
Press to select.
Setting Digital Noise Reduction
Use to move to .
Press to move to "Blue Screen".
Press to select.
Setting Blue Background
Use to select the "On" or "Off".
Press to go back to the previous menu.
33
Basic Use
The LCD TV can be set to display blue screen when no TV signal or signal from other connected
appliances are being received. If there is an incoming signal, the blue screen will be replaced by the
normal picture screen.
Press .
Use when screen is noise or lines appear.
Press .
Page 34
34
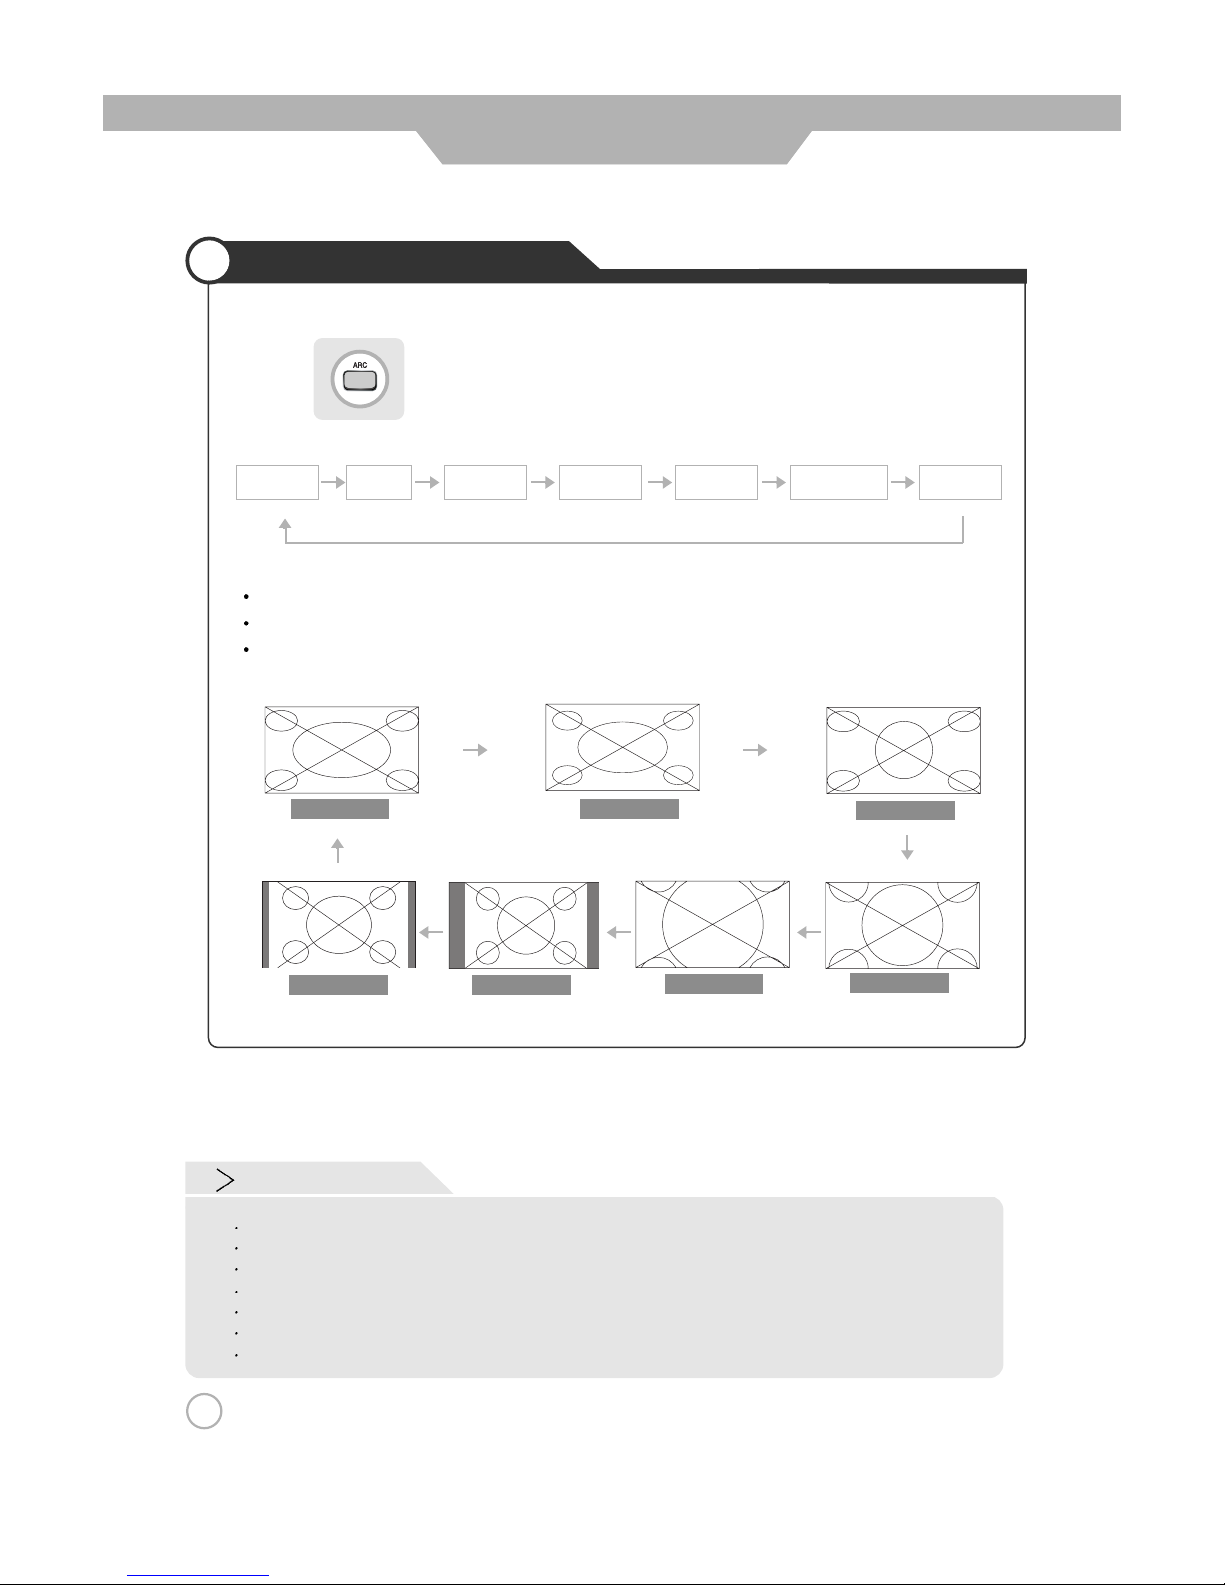
Changing Screen Size
Application
Press .
Auto wide wide
4 : 3
Zoom 1
Zoom 2
Panorama
14 : 9
Auto wide
wide
Panorama
Zoom1 Zoom2
4 : 3 (normal)
14 : 9
In PC input mode, you can only select either the wide or the normal (4 : 3) mode.
In Component 1/2 input mode, you can’t Select Auto Wide.
In Component 1/2 input mode (1080i), you can’t Select Zoom2.
Screen Size
Auto wide - It automatically displays for the screen format of input signal.
wide - It makes 16 : 9 format for input signal.
Panorama - It makes 4 : 3 format fit into 16 : 9 format with minimal loss in content.
Zoom 1 - It enlarges the natural screen factor by approx. 5 %
Zoom 2 - It enlarges the natural screen factor by approx. 10 %
4 : 3 - It is the standard format of broadcasting.
14 : 9 - It makes 14 : 9 format for input signal.
Page 35
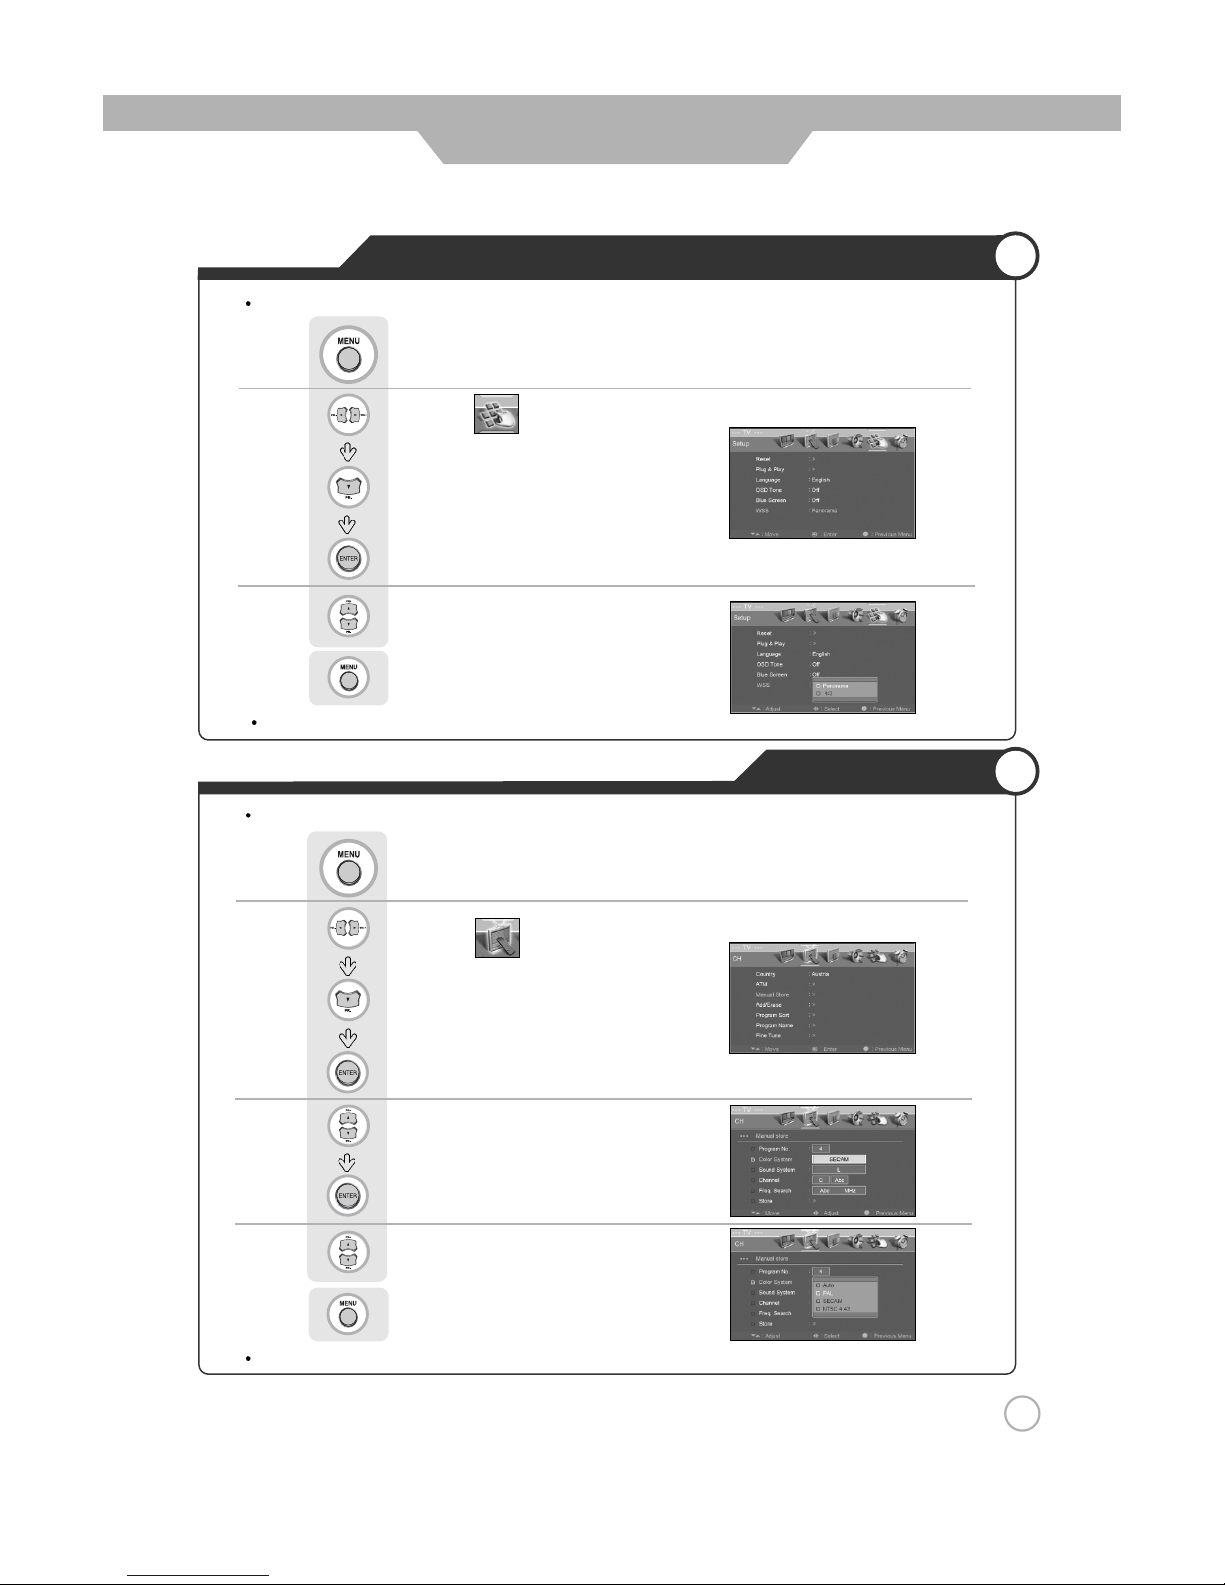
Use to move to the desired category.
Press to select.
Use to adjust the setting.
Press to go back to the previous menu.
Use to move to .
Press to move to "Manual Store".
Press to select.
Manual Store
Use to select the Panorama or 4 : 3.
Press to go back to the previous menu.
Changing the Screen Size for WSS Signal Input
Use to move to .
Press to move to "WSS ".
Press to select.
Press .
35
Application
When WSS signal is incoming from a connected external appliance, screen size can be changed to panorama or 4 : 3.
Colour system and sound system can be setup for each channel.
Select "Yes" in Manual Store to save the Program settings.
Press .
WSS : Wide Screen Size.
Page 36
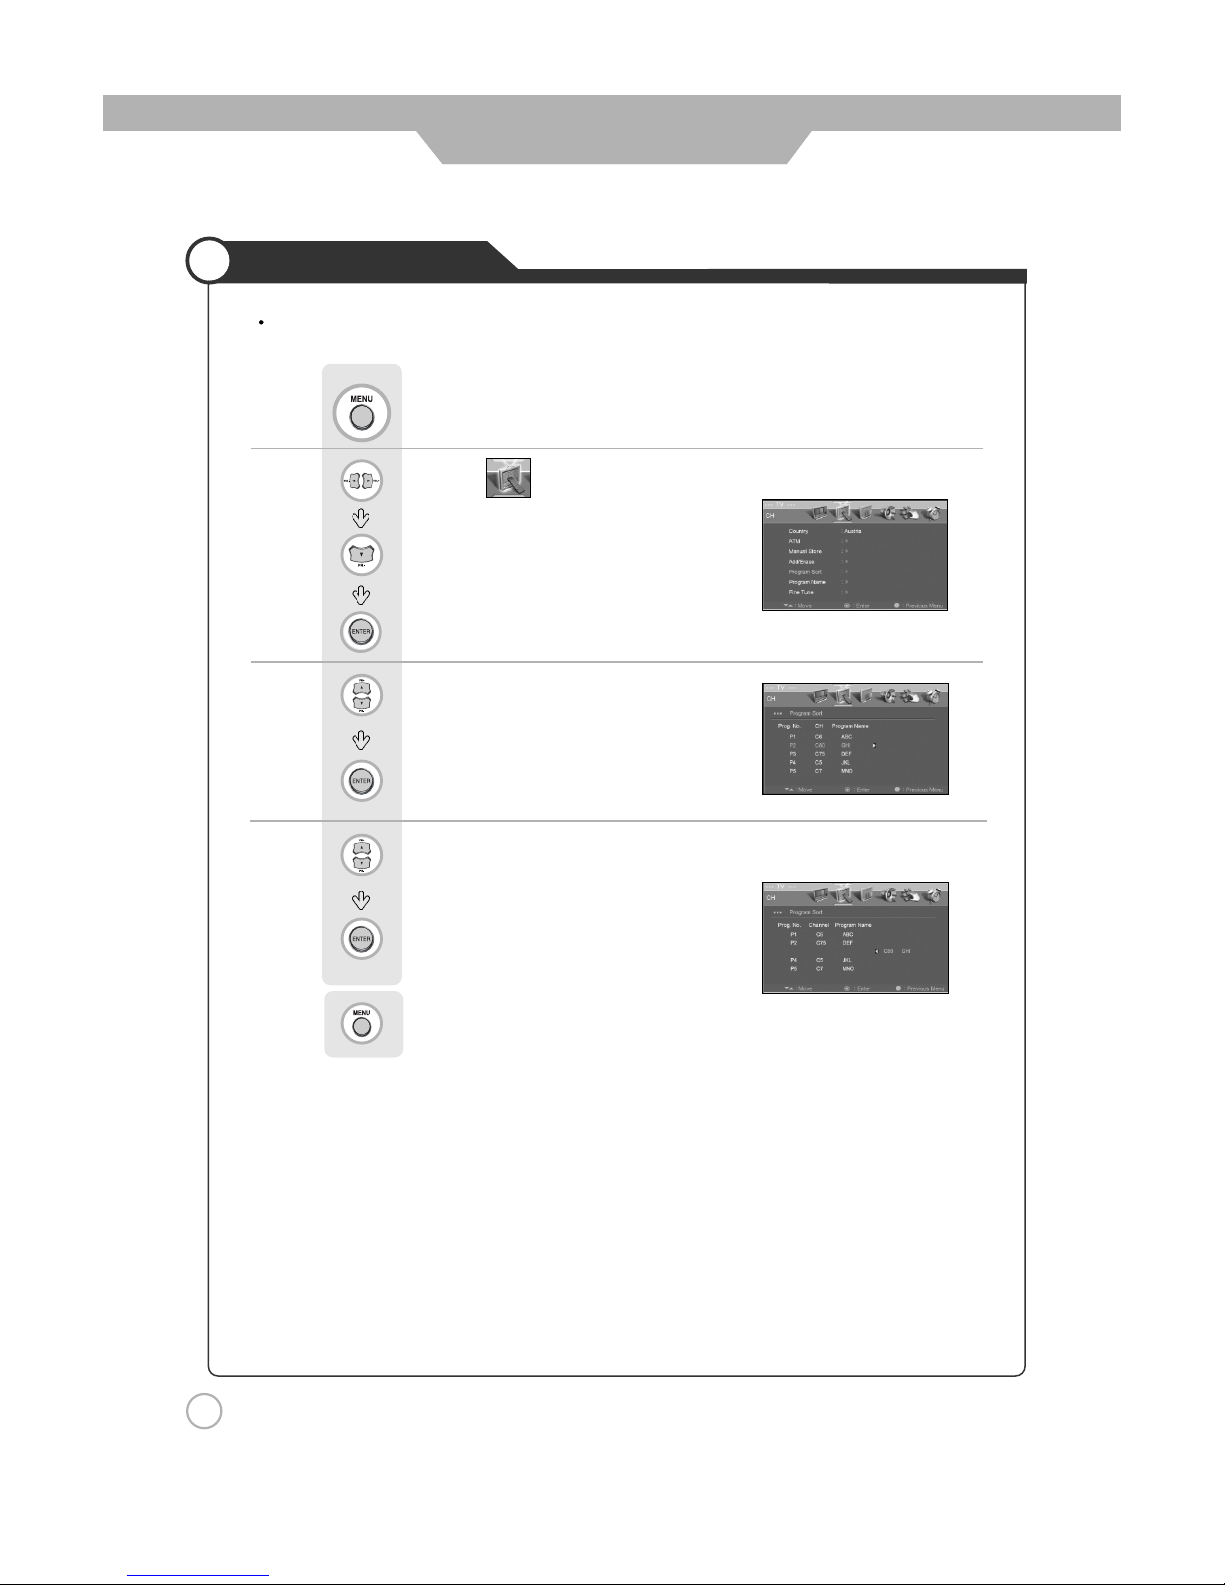
Use to move to the desired Program Number.
Press to move to the next category.
Use to move to the Preferred Program Number.
Press to sort.
Press to go back to the previous menu.
Use to move to .
Press to move to "Program Sort".
Press to select.
Sorting Program
36
Application
Press .
In this mode, you can arrange programs in numerical order.
Page 37
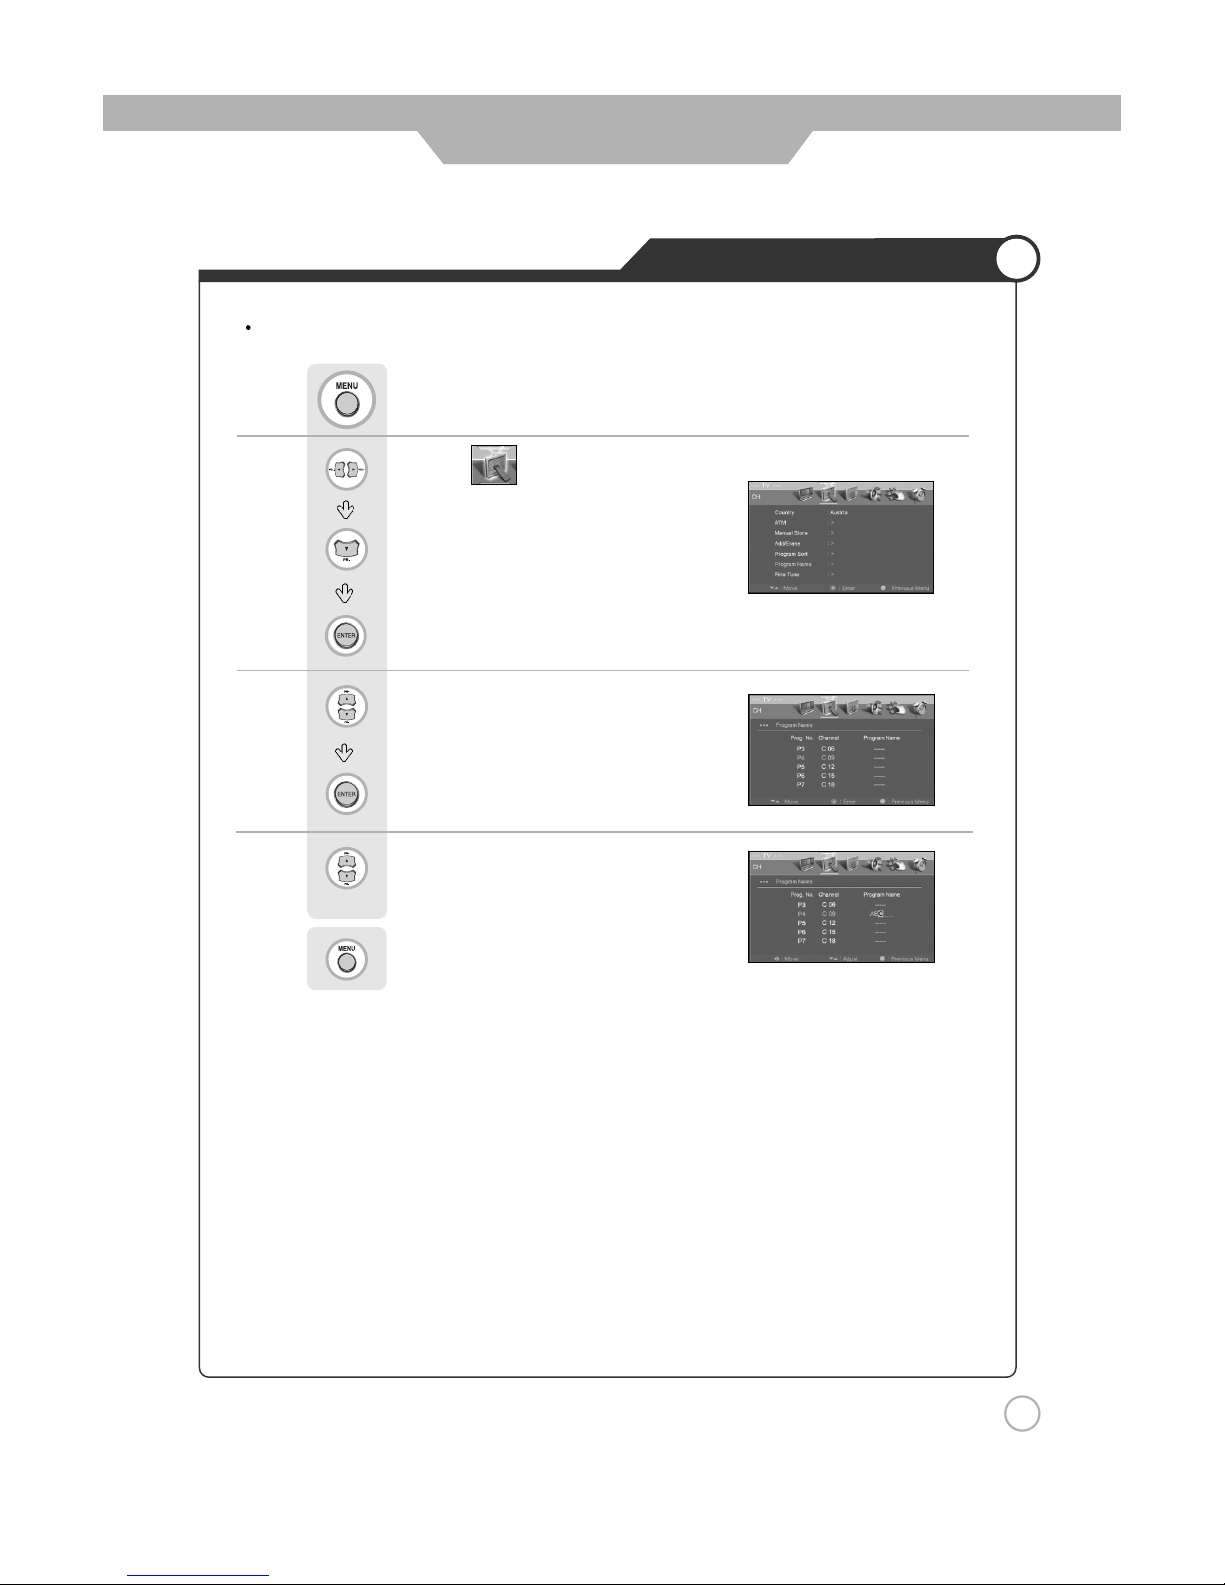
Editing Program Name
Use to move to the desired Program Number.
Press to move to program name.
Use to register program name.
Press to go back to the previous menu.
Use to move to .
Press to move to "Program Name".
Press to select.
Press .
37
Application
Favorite programs can be stored to make it easier to find.
Page 38
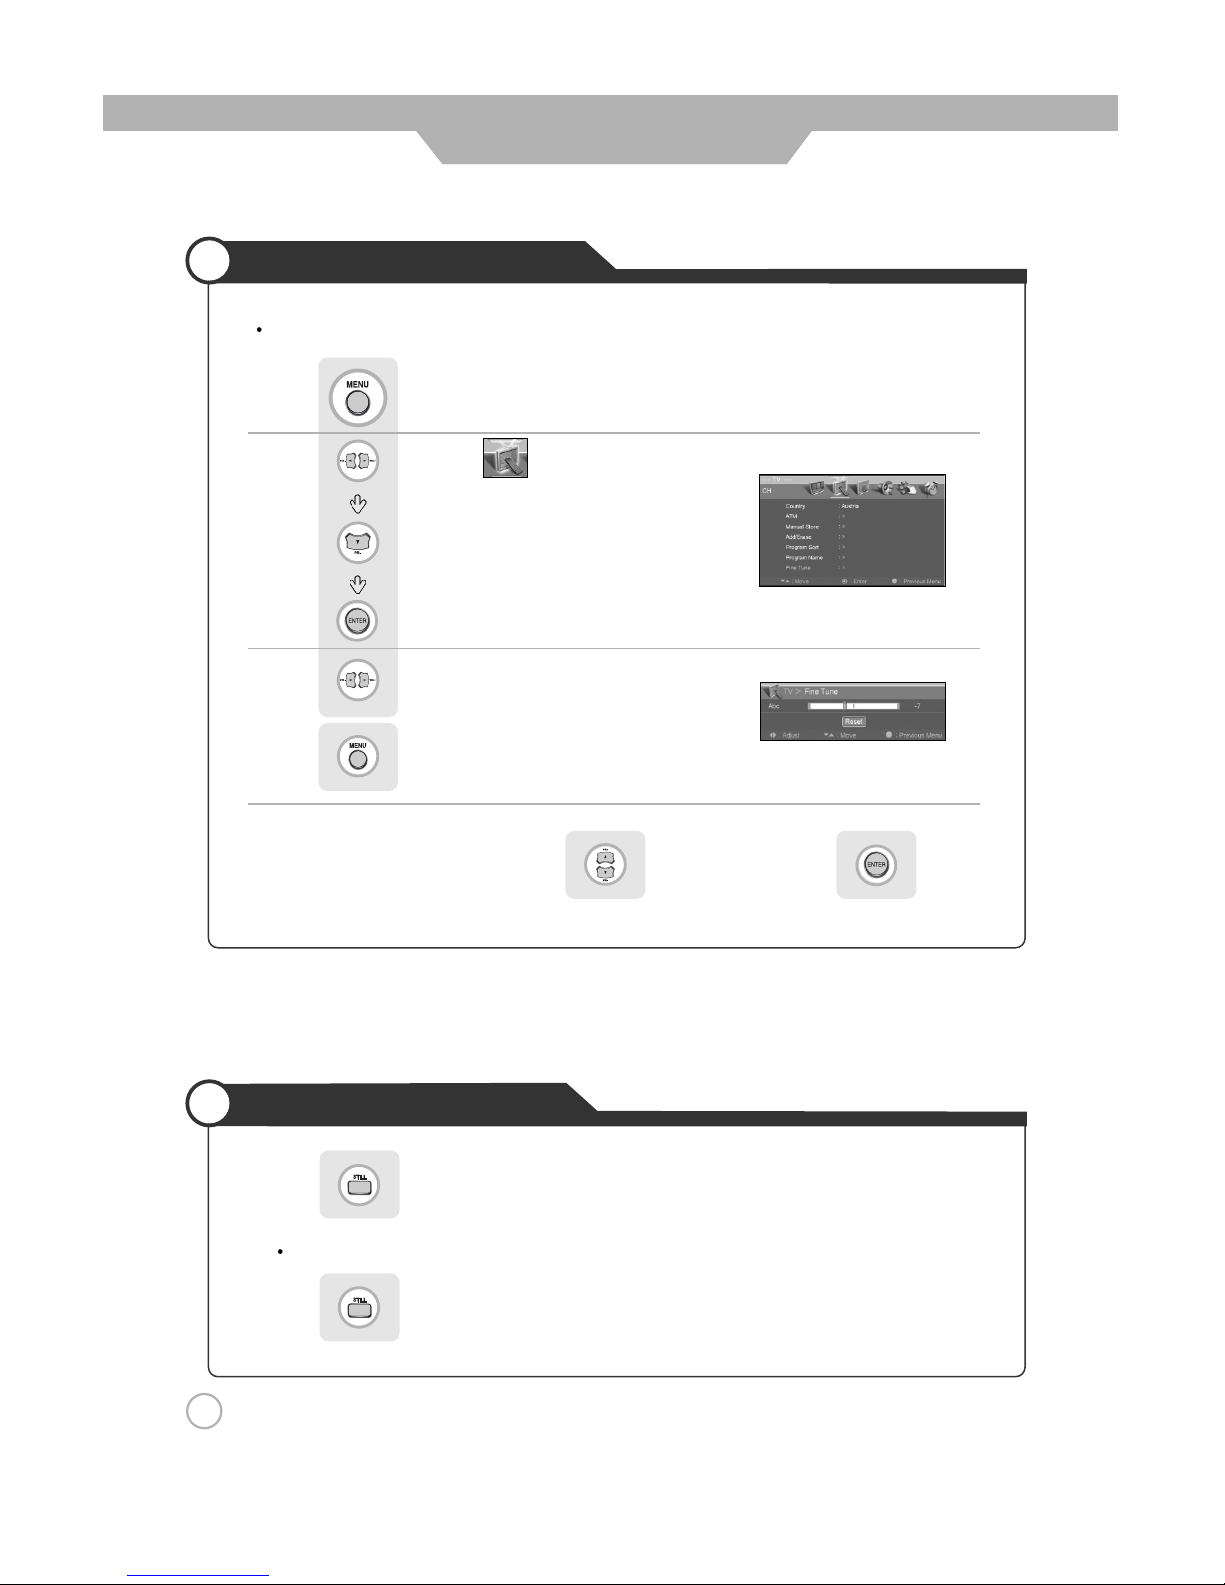
Adjusting Unclear Screen
Use to move to .
Press to move to "Fine Tune".
Press to select.
Press .
Use to tune.
Press to go back to the previous menu.
To return to initial setting or Auto Setting, use to select "Reset" and press .
To view the still picture
38
Application
Use screen fine-tune controls to adjust the screen when picture quality is unclear or lines appear.
Press .
Picture will freeze, but sound will continue to be heard.
Press again to cancel.
Page 39
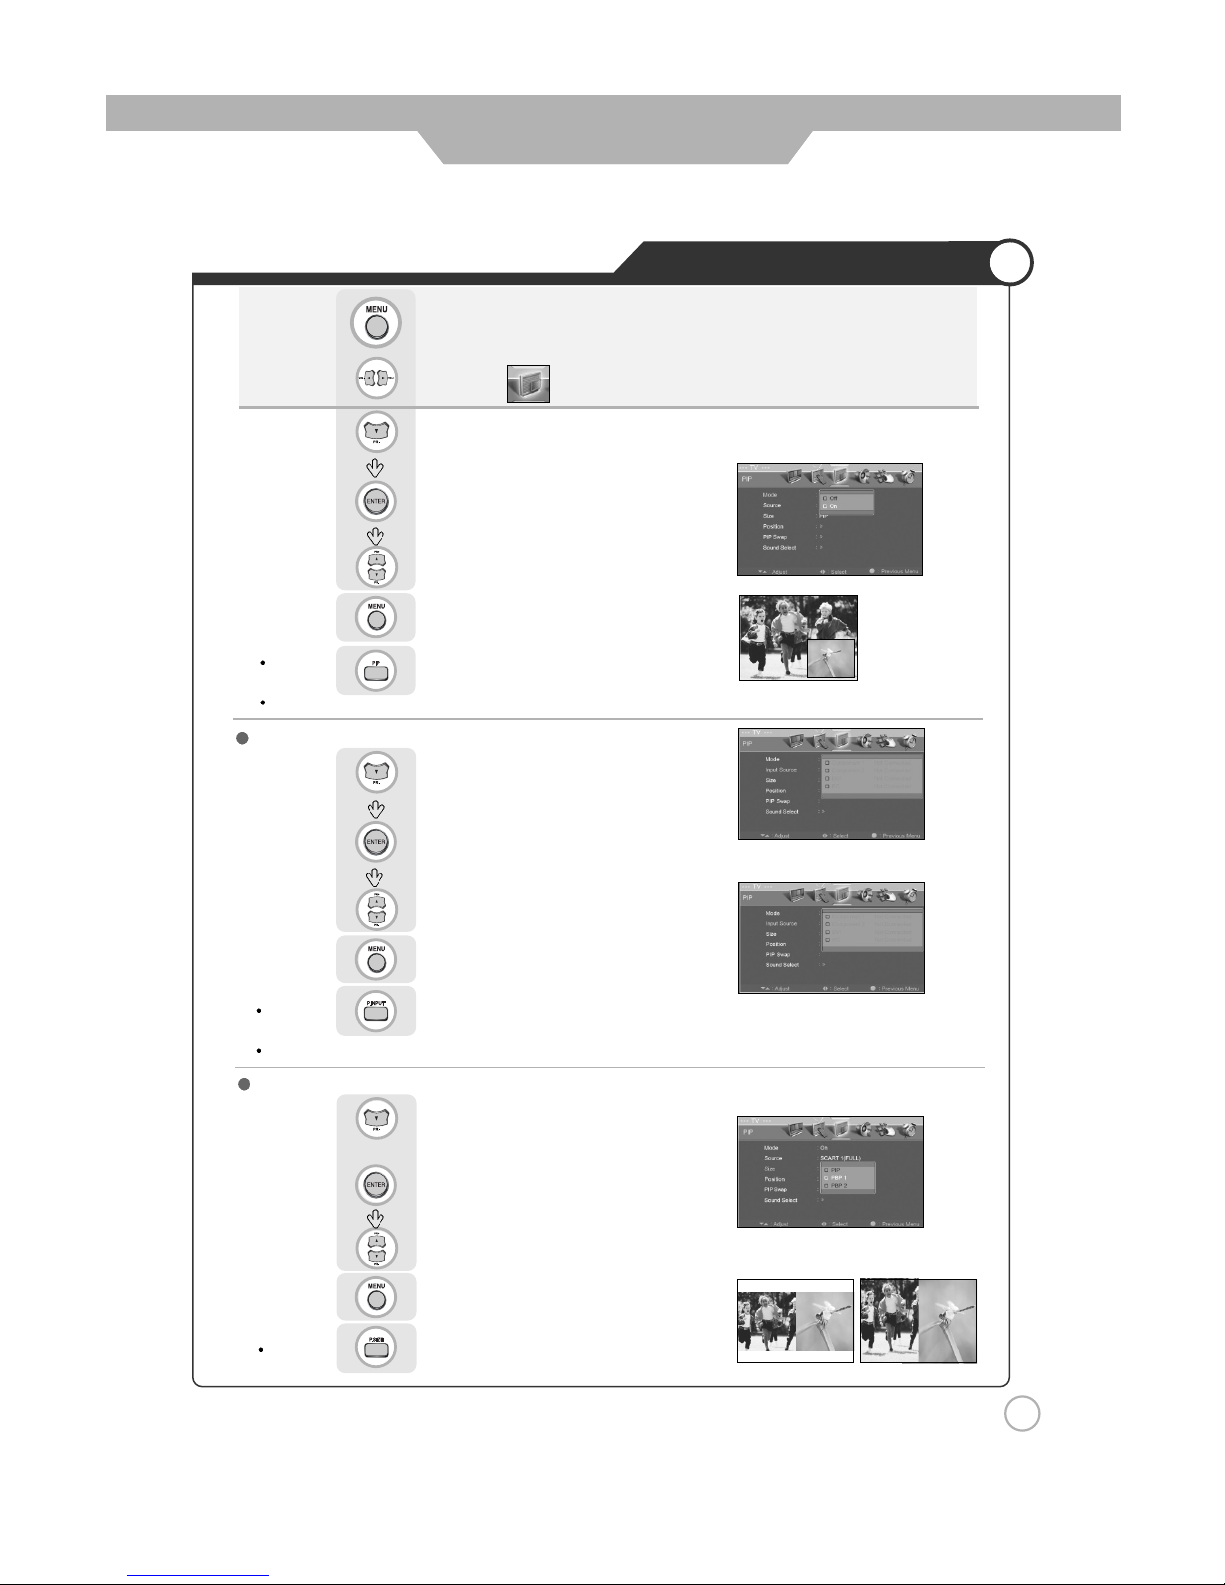
Use to select the desired input source.
Press to go back to the previous menu.
Press to move to "Size".
Press to select.
Use to select the desired size.
Press to go back to the previous menu.
Viewing Picture in Picture
Press to move to "Input Source"
Press to select.
Use to select the "On" or "Off".
Press to go back to the previous menu.
Use to move to .
Press to move to "Mode".
Press to select.
Press .
Or press .
The sub-screen can be changed to display picture from the desired input source
.
<In case, main source is Component 1/2, DVI, PC>
<In case, main source isTV, SCART 1/2,
Composite 1/2, S-Video 1/2>
39
Application
Or press .
Sound from only one of the screens may be heard.
Or press .
TV/External Input
Changing the Screen Size
Page 40
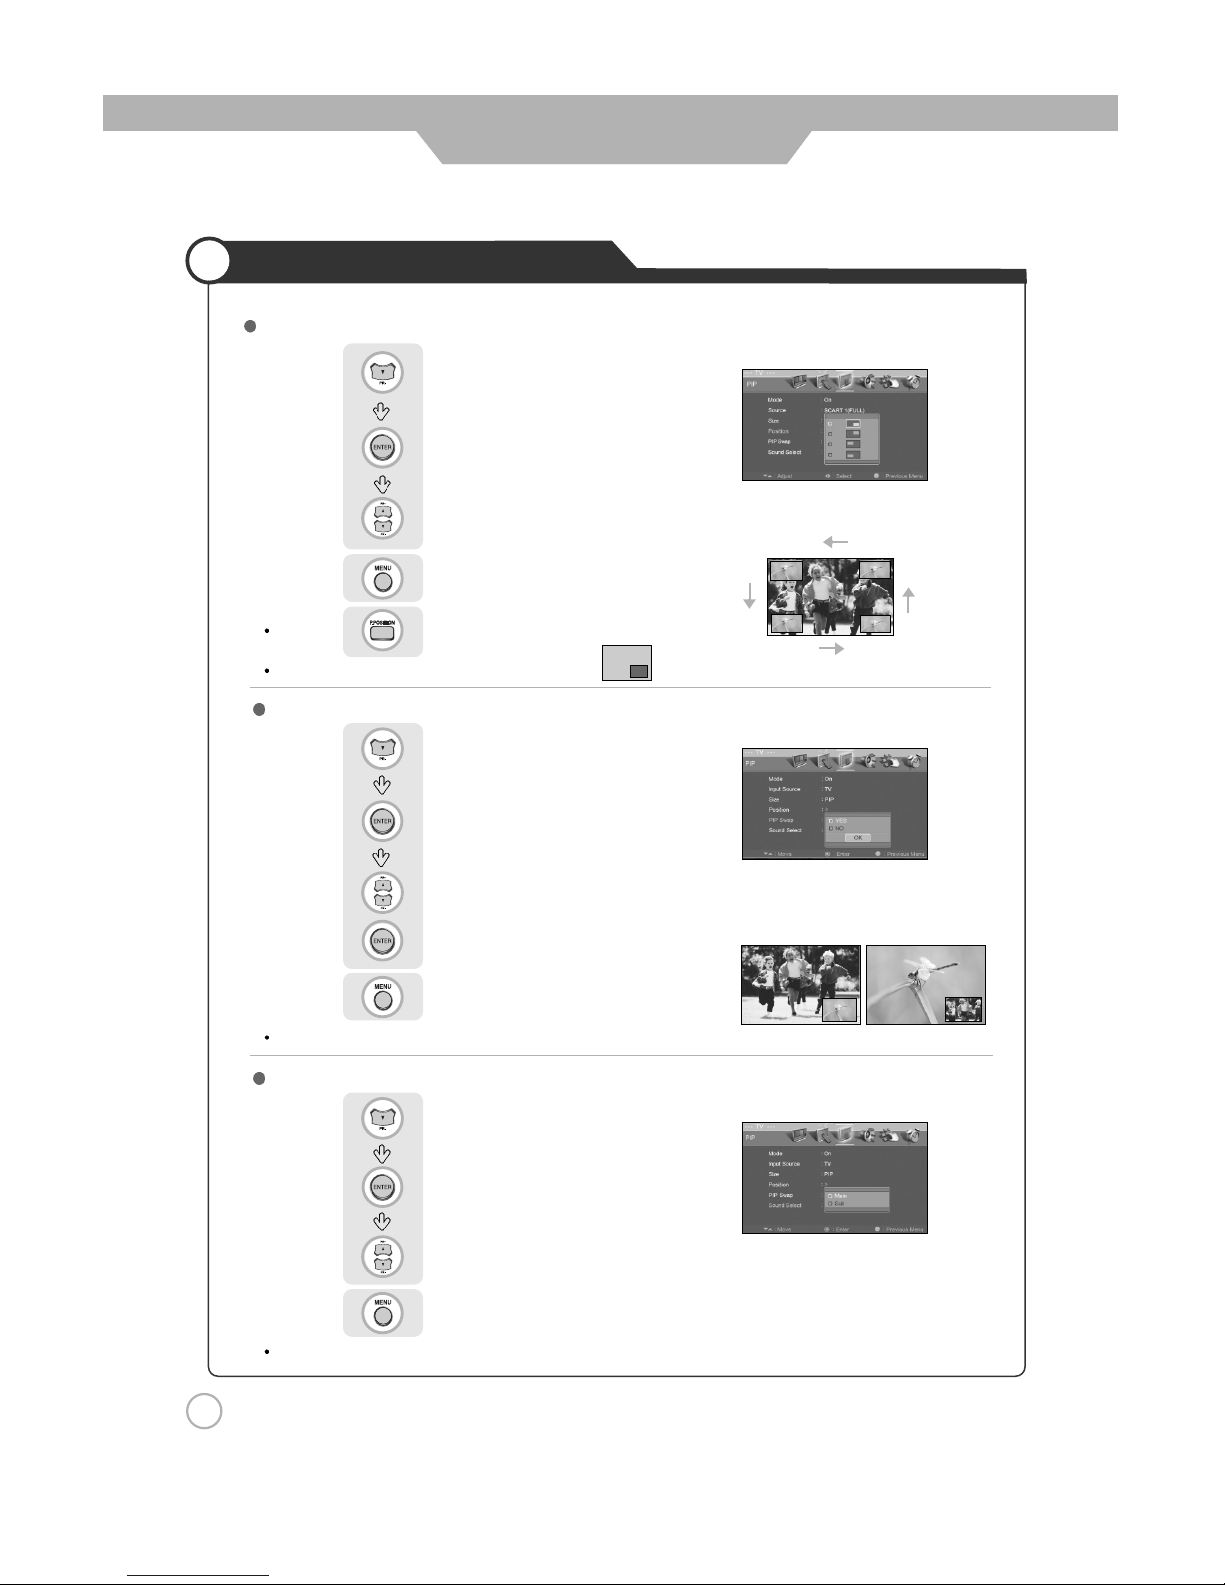
Use to select the "Main" or "Sub".
Press to go back to the previous menu.
Press to move to "Sound Select".
Press to select.
Press to move to "PIP Swap".
Press to select.
Viewing Picture in Picture
Use to select the "Yes".
Press to select "OK".
Press to go back to the previous menu.
Use to select the desired position.
Press to go back to the previous menu.
Press to move to "Position".
Press to select.
4040
Application
Selecting Sub Screen Sound
Selecting Position
Or press .
Sub-screen position can be selected only from the .
The main screen and the sub screen will swap.
The sound of the sub screen can be selected when PIP is being displayed.
Main Screen/Sub Screen Swap
Page 41
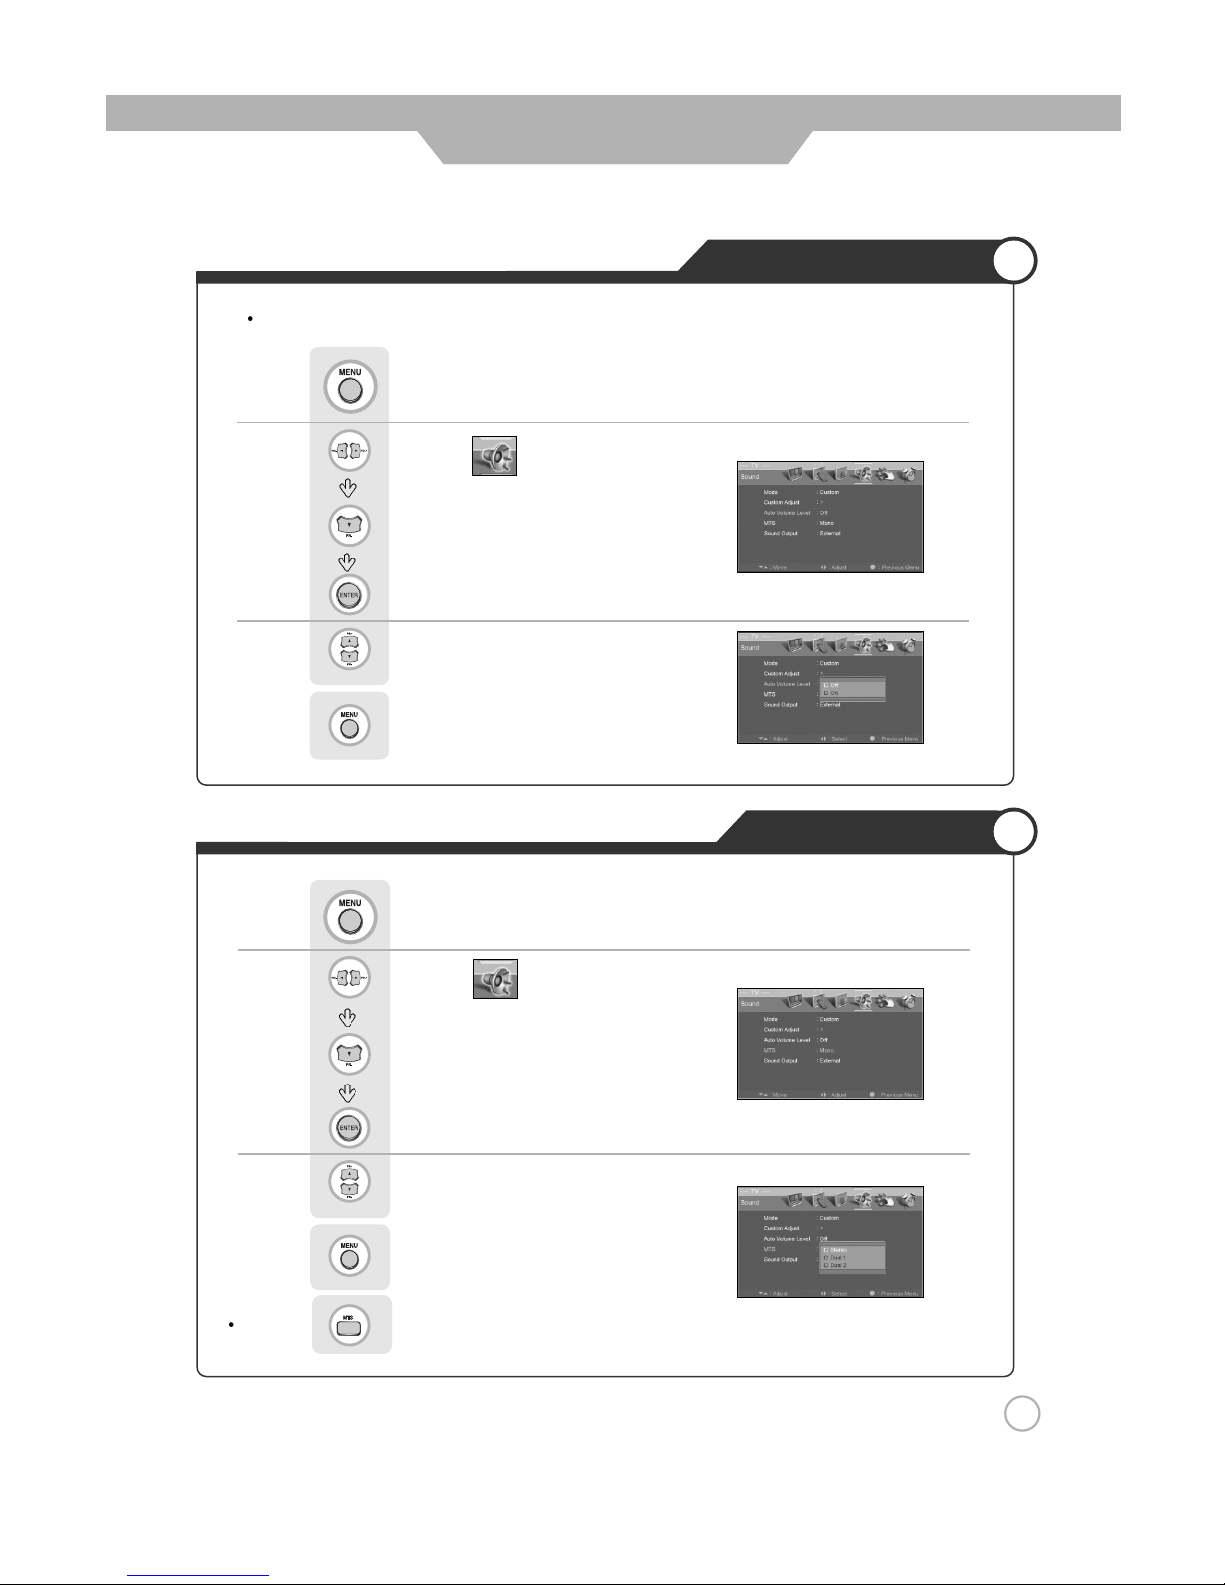
Use to select the desired category.
Press to go back to the previous menu.
Stereo Settings
Use to move to .
Press to move to "MTS".
Press to select.
Use to select the "On" or "Off".
Press to go back to the previous menu.
Use to move to .
Press to move to "Auto Volume Level".
Press to select.
Auto Volume Level
4141
Application
This feature maintains an equal Volume level ; even if you change channels.
Or press . (Multi Television Sound)
Press .
Press .
Page 42
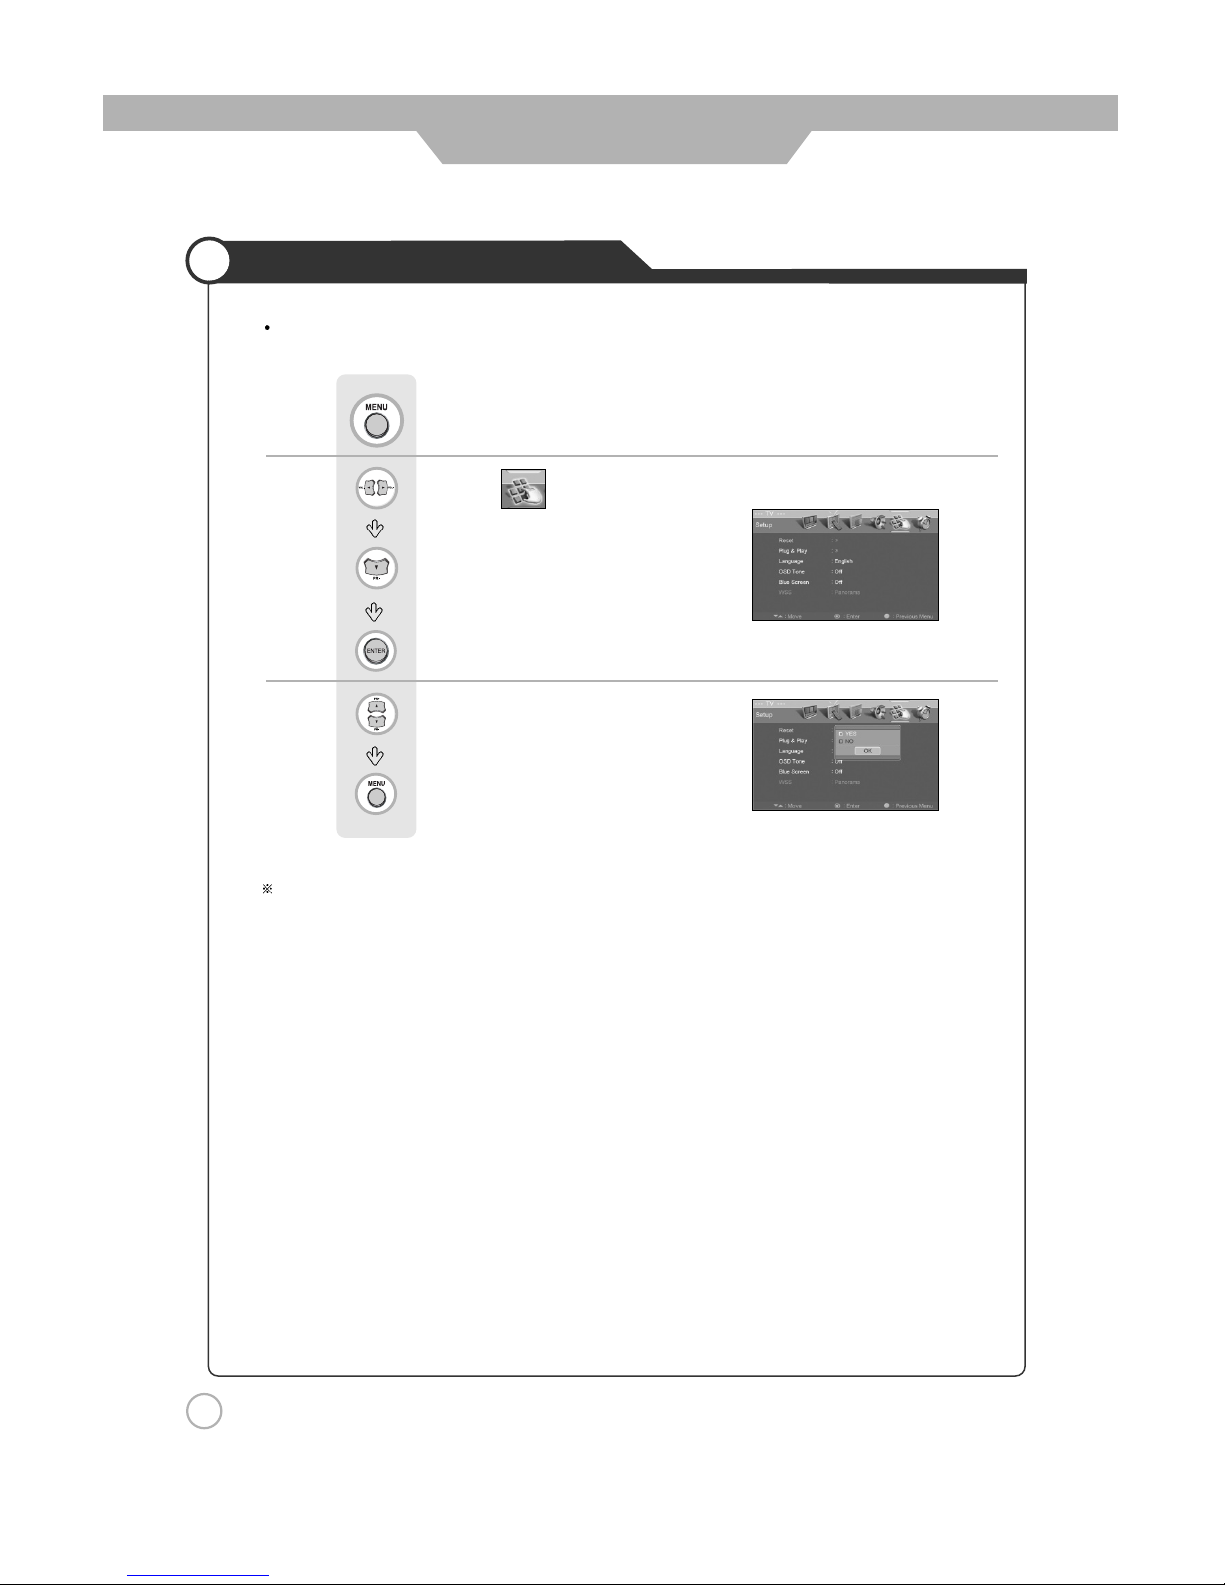
Use to select the "Yes".
Press to select
Use to move to .
Press to move to "Reset".
Press to select.
Resetting LCD TV Settings
Application
42
It resets all of the parameters to the factory default.
The LCD TV will turn off. The parameters will be set to factory default.
Press .
Page 43
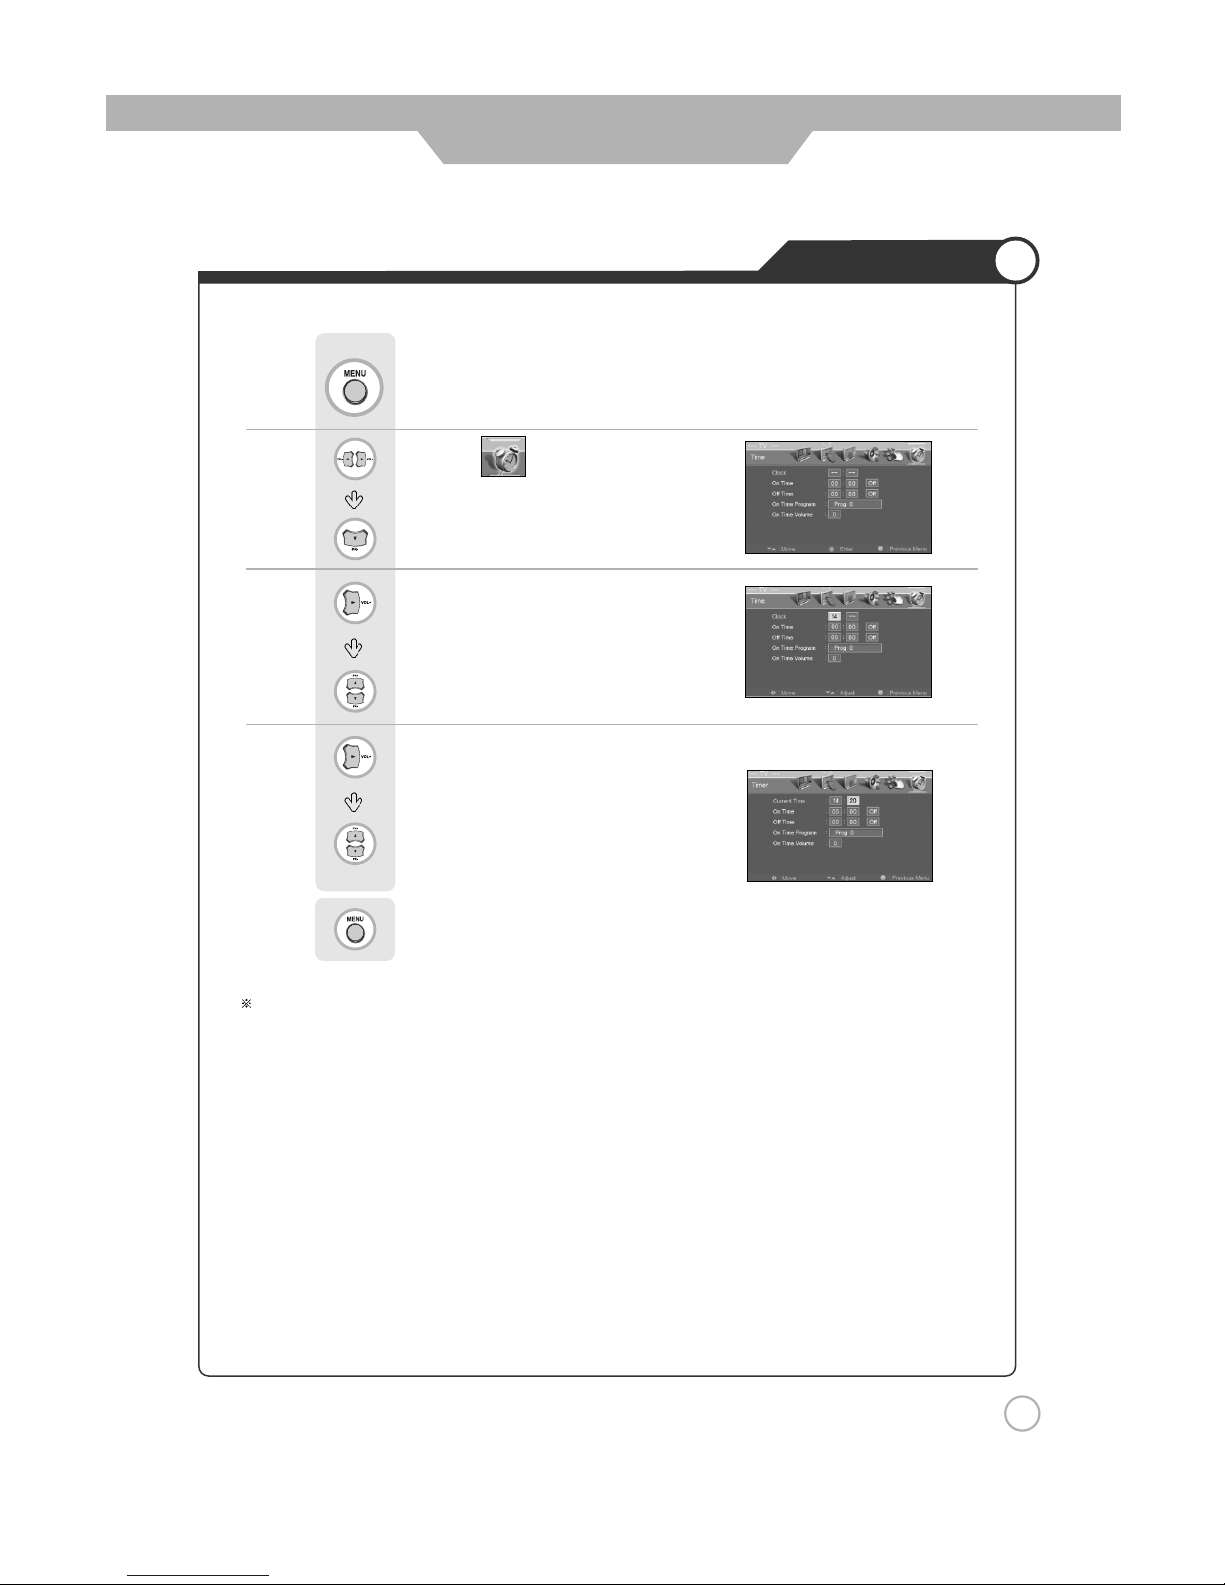
Use to move to .
Press to move to "Clock".
Press to move one step.
Use to adjust the desired hour.
Press to move one step.
Use to adjust the desired minute.
Press to go back to the previous menu.
Setting Time
43
Application
Press .
You can set your local time by adjusting the differences from GMT, according to your location.
Page 44
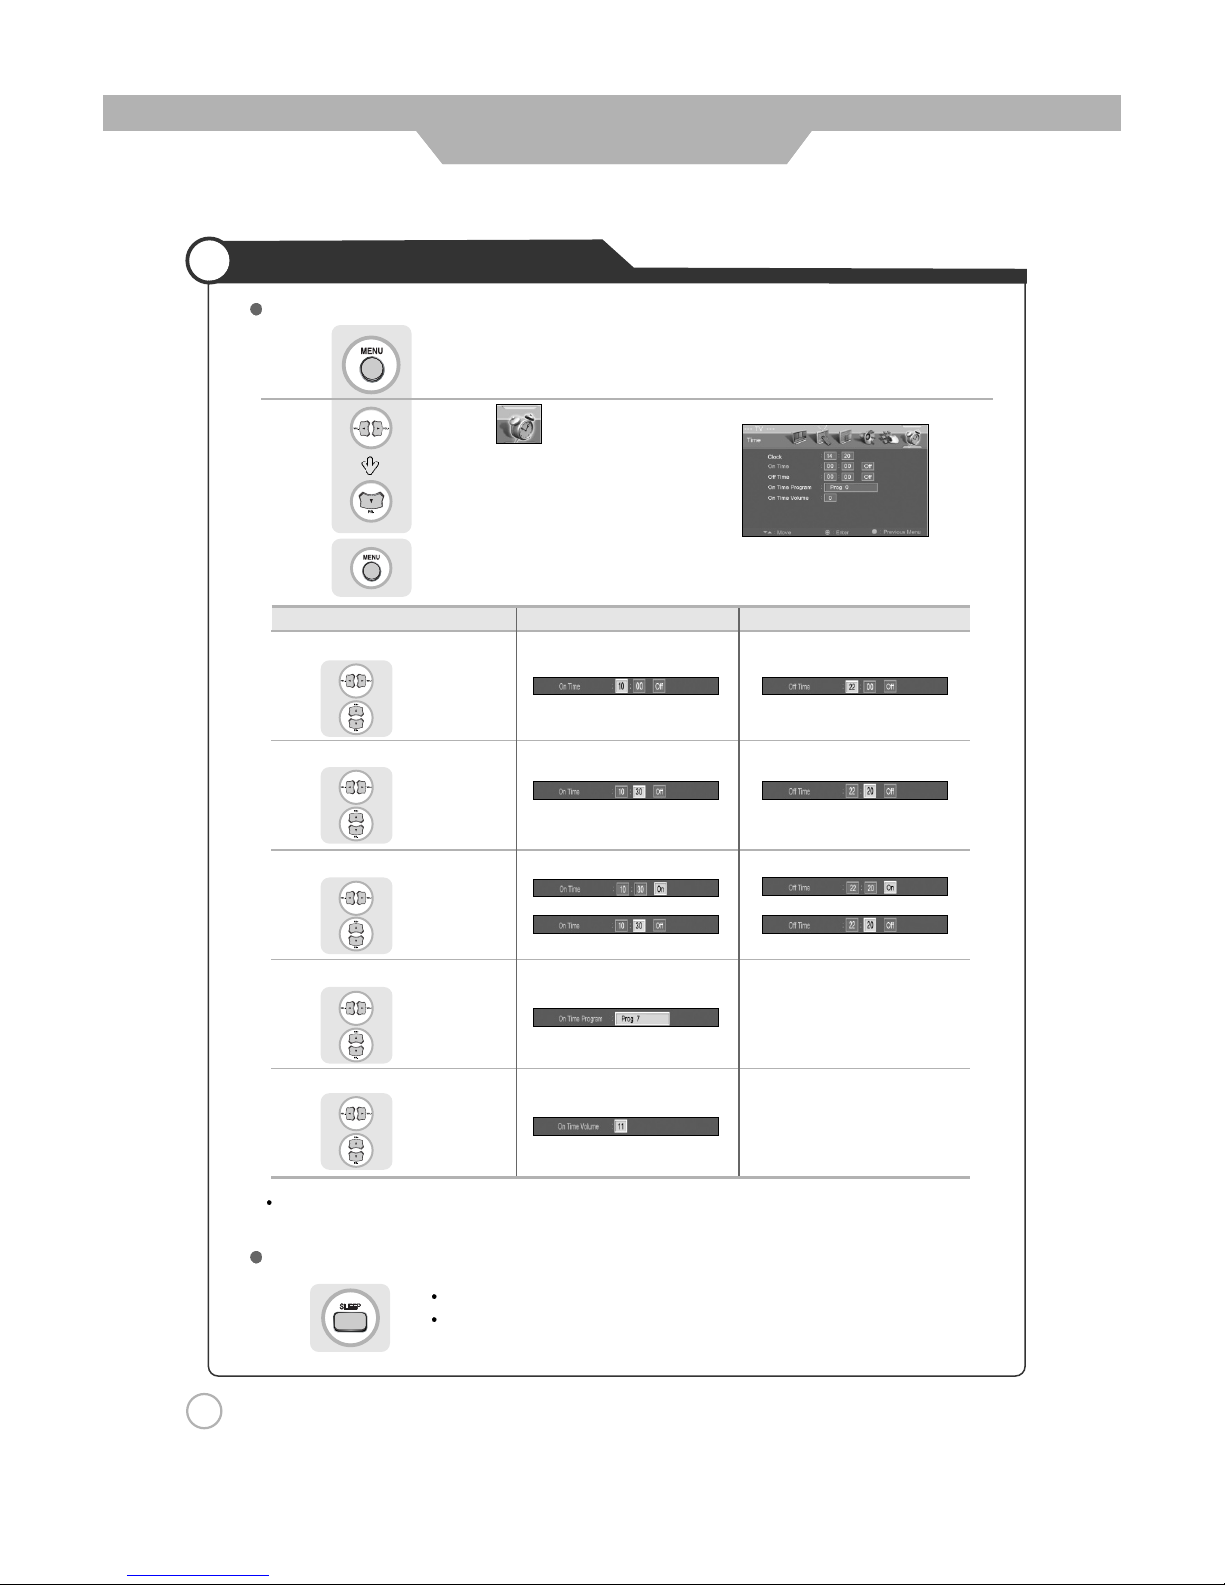
Use to move to .
Press to move to desired category.
Press to go back to the previous menu.
Automatic Power On/Off
44
Application
Setting Time for Power On Setting Time for Power Off
Setting Hour
Use to select,
to set
Setting Minute
Use to select,
to set
Set/Cancel
Use to select,
to select the
"On" or "Off"
or or
Channel Select
Use to select,
to set program
Volume Control
Use to select,
to set volume
It automatically turns off the TV after a designated period of time
Depending on the number of times the "Sleep" button is pressed, the TV will be
turned off after 30, 60, 90, 120, 150 or 180 minutes.
It sets the current time and then the automatic turn on/off can be set. The time settings are retained only
if the main power is off, the time is reset. To retain the time setting, do not turn the main power switch off.
To have the TV turn off after you fall a sleep
Clock time must be set
Press .
Press .
Page 45
45
Teletext
Basic Function
TEXT On/Off
1. Press "ON" once , then displays the Teletext pages.
2. If you press "ON" once more, Text mode is off.
TOP TEXT
The user guide displays four fields-red, green, yellow and blue at the bottom of the screen. The yellow field
denotes the next group and the blue field indicates the next block.
- Group/Block/Page selection
1. WIth the blue button you can progress block to block.
2. Use the Yellow button to proceed to the next group with automatic overflow to the next block.
3. With the Green button you can proceed to the next existing page with automatic overflow to the next group.
4. The RED button permits to return to previous selection.
FLOF TEXT
The teletext pages are colour coded along the bottom of the screen and are selected by pressing the
corresponding coloured button.
- Page selection
1. Press the Index button to select the index page.
2. You can select the pages, which are colour coded along the bottom line with the same coloured buttons.
Special Teletext Function key
MIX : In the mix mode display, the underlying video and the teletext page display are both simultaneously
visible on the screen. This command turns the display to mix mode and is enabled only in the text
mode.
STORE : This command stores the user defined favorite pages. This command is enabled only if the list
mode is active.
LIST : This command toggles between list mode and current. Text mode(FLOF, TOP or normal)
SIZE : Toggle the display page size between double-size top, double-size bottom and normal.
HOLD : The update of the current display page is halted so that the content will not be changed.
CANCEL : Press this button to view the updated teletext page or display cancel.
INDEX : Return to the index page.
TIME : When watching a TV program, press this button to display the time at the top right hand corner of the
screen.
Press this button again to remove the display.
REVEAL : Press this button to display the concealed information. Such as solutions of riddles or puzzles.
RED, GREEN, YELLOW, BLUE-In the TOP/FLOF automatic navigation mode, these keys select and display
the linked page.
Application
Page 46
46
Maintenance and Service
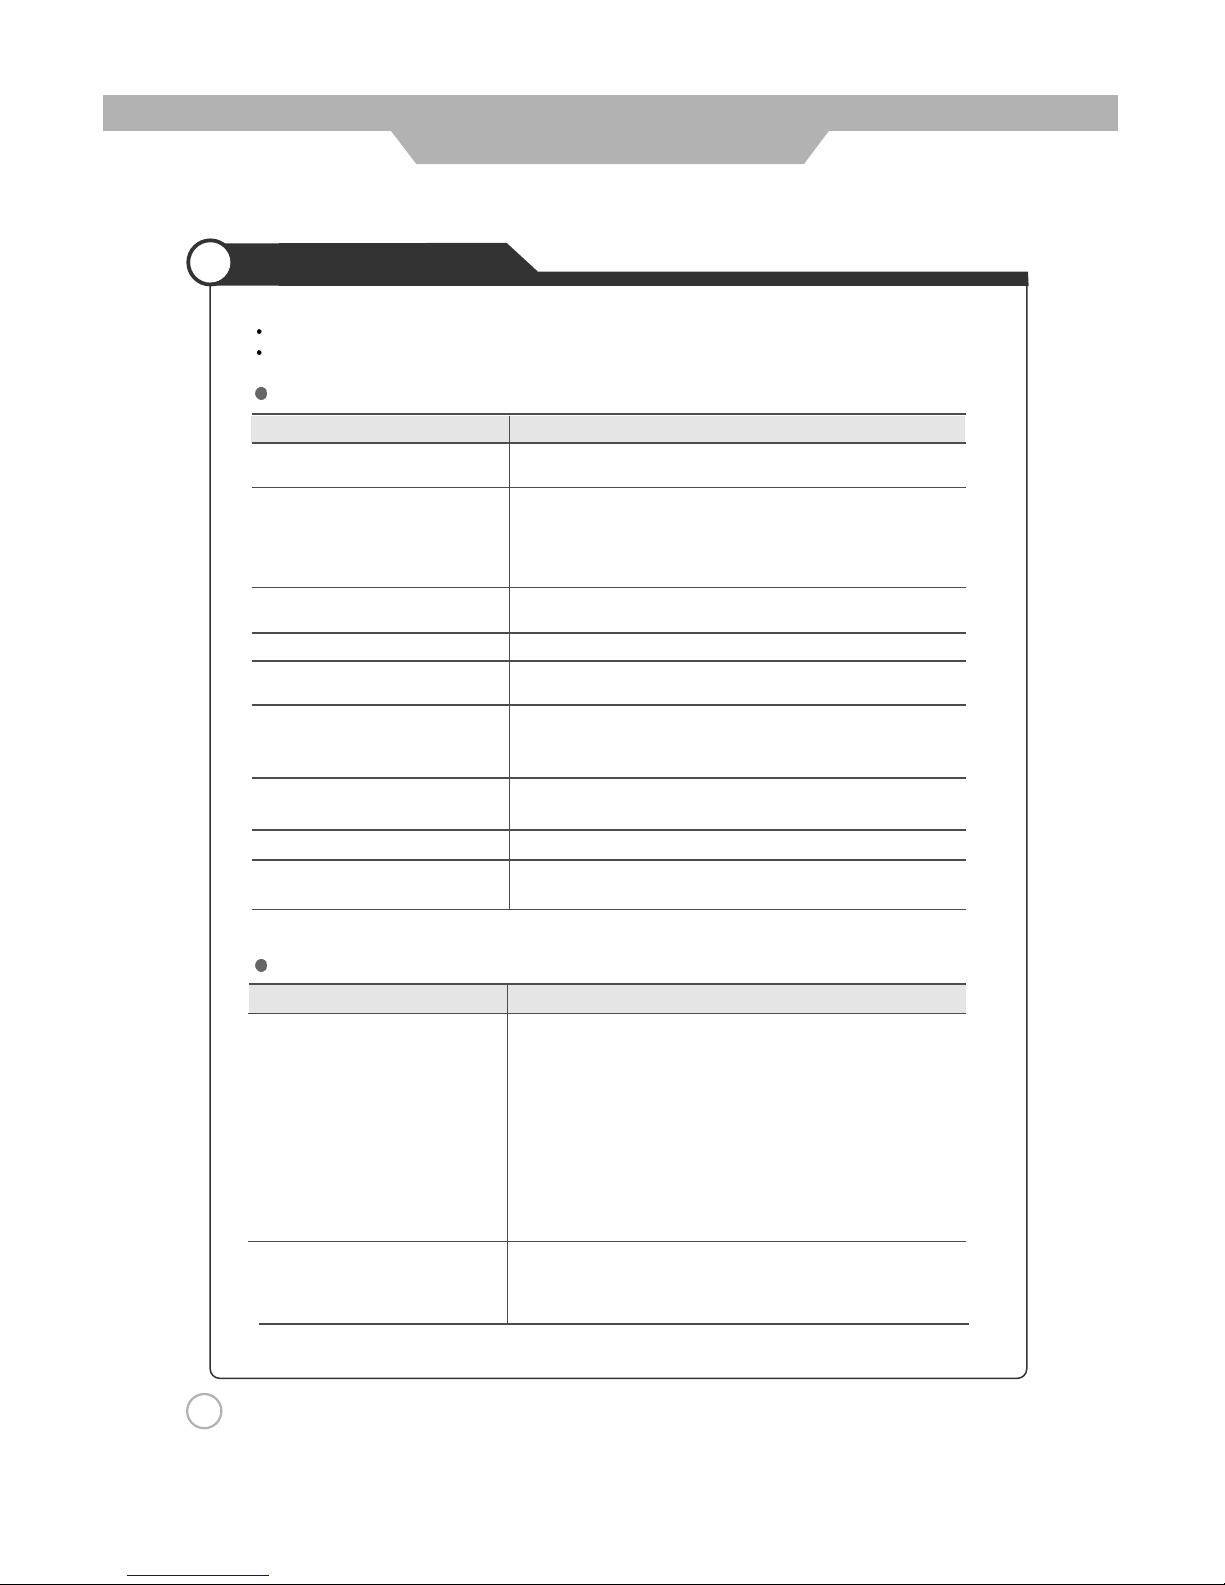
Trouble shooting
Problem Action
Screen appears, Voice is not heard 1. Press the "Mute"button. (page 25)
2. Increase the sound by pressing volume adjustment button.
3. Check if voice terminal of external input is connected properly.
4. Check if speaker cables are connected properly.
5. If it is on PIP mode, convert audio of main screen and sub screen by
pressing S.SELECT.
6. Select and check the other input.
If the sound still does not work and the other channels are the same after
you have done as the above, contact your dealer or an authorized
service center.
7. Check if the headphone jack gets pluged in.
8. Check if the speaker on/off selection at "On" in sound mode.
Lots of noise (static) occurs. When connecting a Set-Top-Box, check that it is on stereo broadcasting. If it
is, the TV program may not be available or the reception may be bad.
Check the audio source with another player. If that source is good, contact
your dealer or an Authorized service center.
Sound related Matters
In case a problem occurs with your LCD TV, please take the following steps first.
If you still have the problem, turn the power off and contact your dealer or an authorized service center.
Screen related Matters
Problem Action
The screen does not appear.
Is the power plug pulled out? Insert the power plug. Turn the main
power button on and press the power button of the remote controller.
The screen appears too
This problem occurs for a brief time in the process of
slowly after the power is turned on.
image elimination processing in order to hide temporary screen noise
that occurs when the power is turned on. But if the screen does not
come after 1 minute has passed, contact your dealer or an
authorized service center.
Screen is too bright or too dark. Perform brightness adjustment or Contrast adjustment. (Please refer
to page 29)
Screen is too large or too small. Adjust the screen size. (Please refer to page 34)
Stripes appear on the screen
Stop using wireless telephones, hair driers and electric drills.
and it shakes.
Simultaneous Screen
Check that LCD TV and external equipment are connected.
does not appear.
Check the inputs of simultaneous screen by pressing sub-screen
selection.
The screen does not move. Press the STILL button. (Please refer to page 38) Check if the Pause
button is pressed on external equipment.
Computer Input Screen is abnormal. Perform manual fine adjustment (Please refer to page 21).
Automatic Turn On does not work.
Automatic Turn On function works only when turning the LCD TV off
with the remote controller or Standby button.
Page 47
Trouble shooting Tips
Supported Display Modes
Maintenance and Service
47
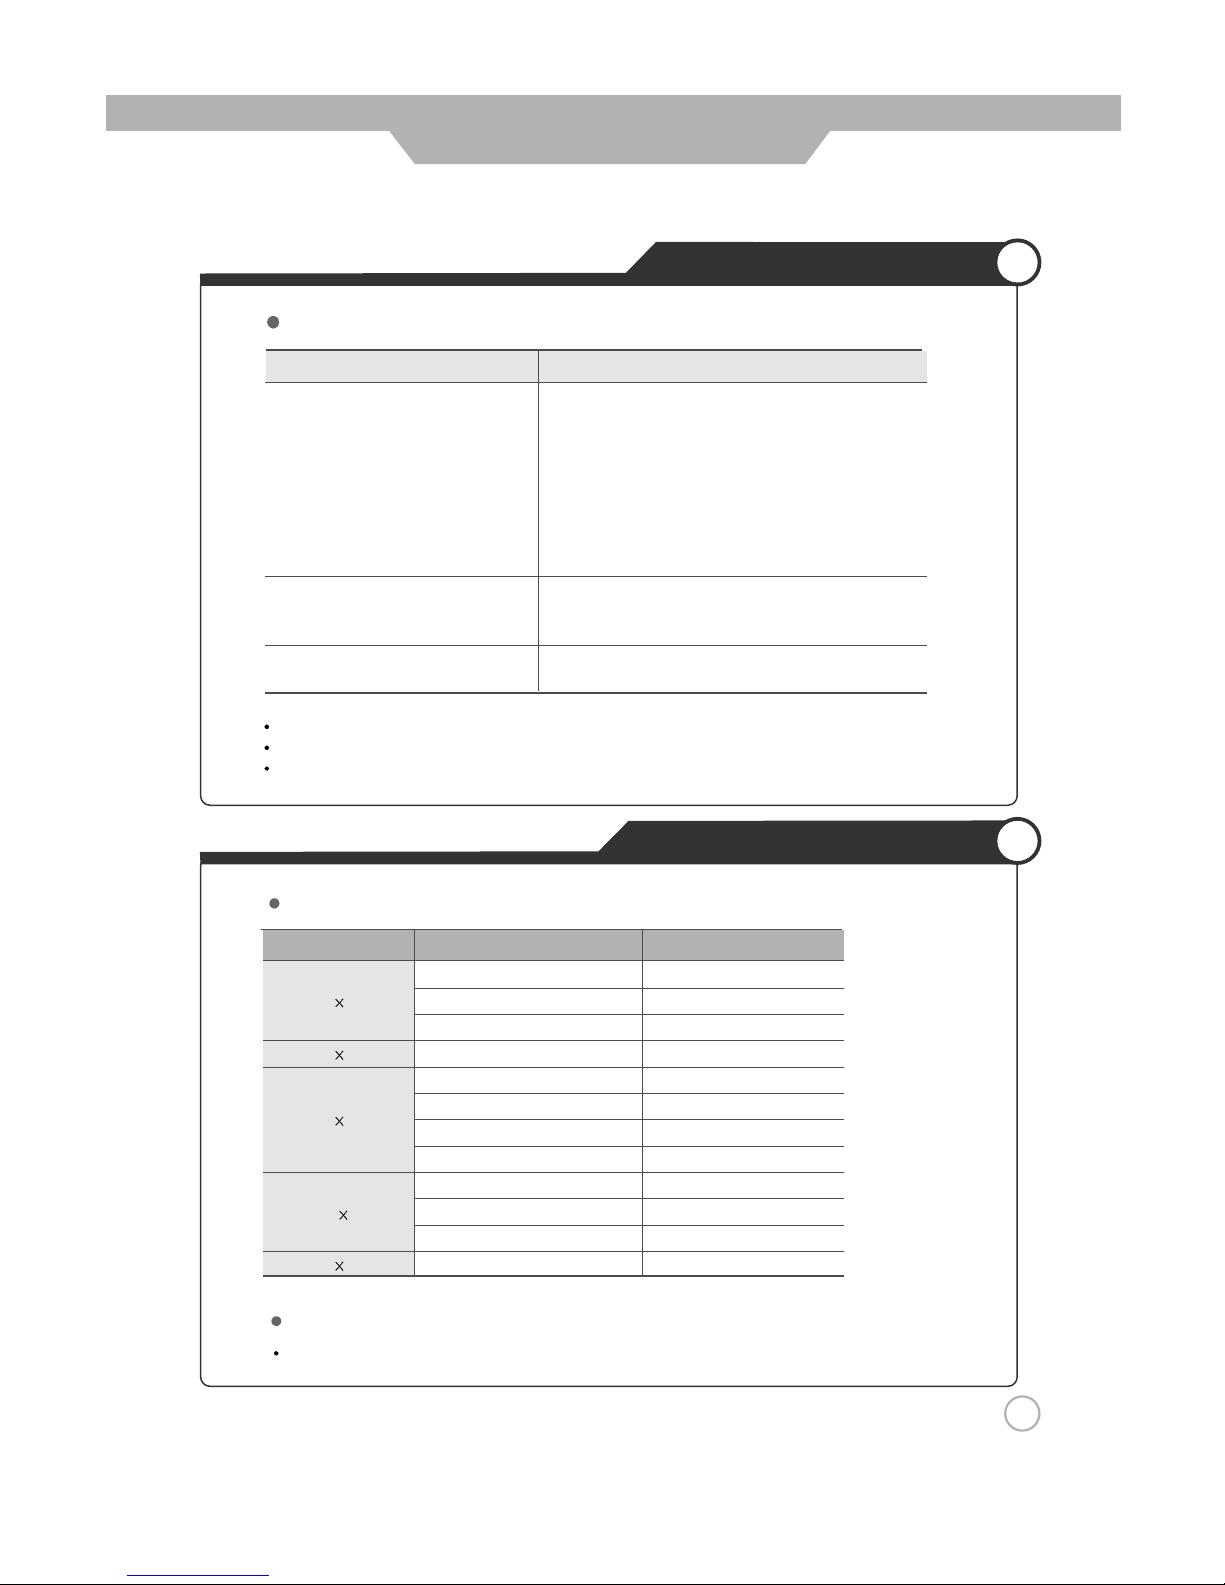
Problem Action
Remote controller does not work. 1. Check if main power is On.
2. Check that the batteries of the remote controller were
loaded properly.
3. Check to see if any obstacle exists between the LCD
TV and the remote controller and remove it, if any.
4. If the batteries have no power, replace them with two
new batteries.
5.Please check out current mode of fnuction key.
LCD TV makes strange noise. It is the noise when the mechanism expands or contracts
from to changes to the environment due to factors such
as humidity, temperature, etc. It is not a failure.
LCD TV indication lamp is On. The red means the Stand-by power is ON. It will take a
few seconds to turn off as the main power is off.
This LCD TV is for household use and registered as suitable on electromagnetic waves.
Therefore, you can use it in every location as well as residential areas.
For improvement of product’s quality, program can be upgrade without costomer’s agreemant.
Others
If any signal of unsupported resolution is input, the "Out of Range" message appears.
Considerations in Installation
PC mode
Resolution Horizontal Frequency (KHz) Vertical Frequency (Hz)
31.47 60
37.86 72
37.50 75
31.47 70
35.15 56
37.88 60
48.88 72
46.88 75
48.36 60
56.48 70
60.02 75
64.0 60
640 480
720
400
800 600
1024
768
1280 1024
Page 48
Supported Display Modes
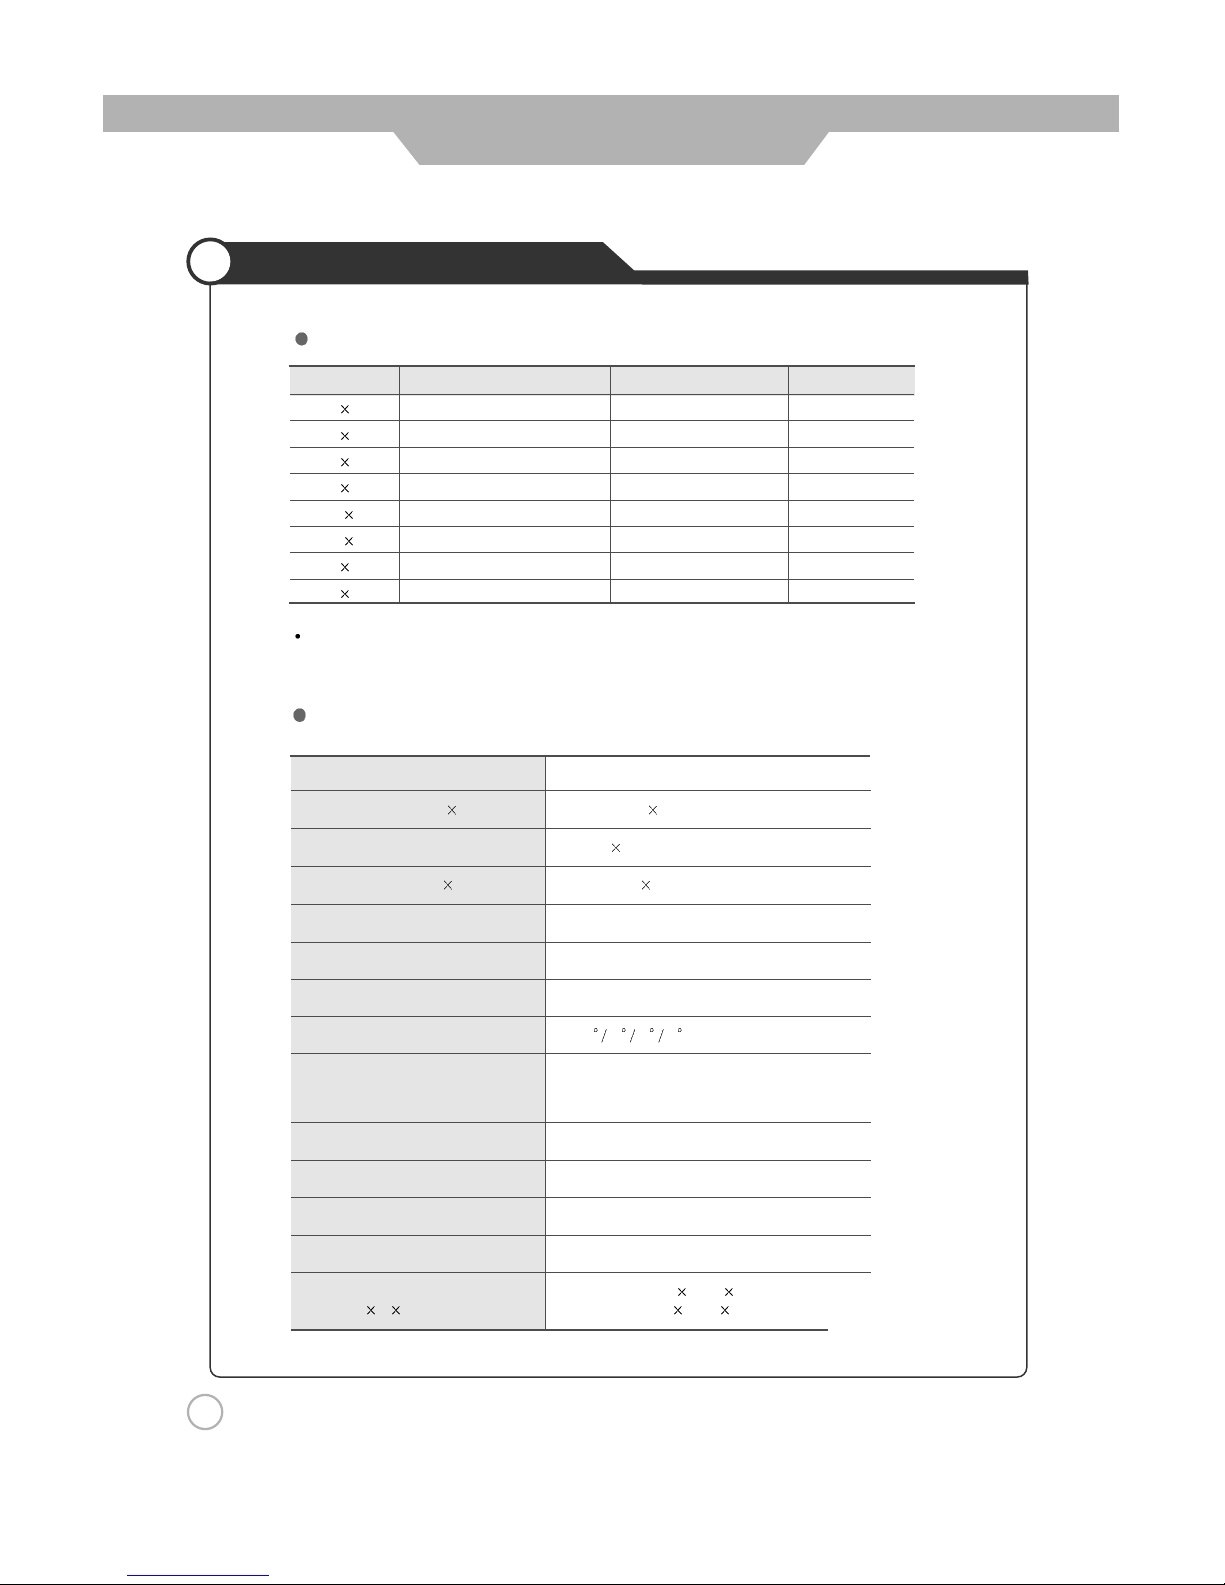
Specifications
Aspect Ratio 16 : 9
Screen Size (H V) 708.954(H) 398.592(V)mm
Resolution 1366 768
Pixel pitch (H V) 0.1730(H) 0.5190(V)mm (RGB Vertical Script)
Displayable Colors 16.7M
Brightness 550cd/m2 (Center Luminance of White)
Contrast 1000:1
Viewing Angle 88 88 88 88
Input signal
PAL, SECAM,
SD, HD, VGA~SXGA
Tuner PAL, SECAM
PC Input Analog RGB, DVI-D
AC Input AC100-240V~, 50/60Hz, 3.5A (MAX)
Power Consumption 125W (Typical)
Dimensions/ Weight TV Only - 946.6
559.6 106/ 16.4Kg
(W H D) (Kg) with stand - 949.6 559.6 270/ 21Kg
If any signal of unsupported resolution is input, the "Out of Range" message appears.
Component Mode
[
Y, Cb(
Pb), Cr(Pr)
]
Resolution Horizontal Frequency (KHz) Vertical Frequency (Hz)
720 480 15.73 60.00 SDTV, DVD 480i
720 576 15.63 50.00 SDTV, DVD 576i
720 480 31.47 59.94 SDTV, 480p
720 576 31.25 50.00 HDTV, 576p
1280 720 37.50 50.00 HDTV, 720p
1280 720 45.00 60.00 HDTV, 720p
1920 1080 28.12 50.00 HDTV, 1080i
1920 1080 33.75 60.00 HDTV, 1080i
Maintenance and Service
48
Page 49
Memo
Maintenance and Service
Page 50
Maintenance and Service
Memo
Page 51
Maintenance and Service
Memo
Page 52

DIGITAL ART
90-X-3220P-L01-EXP-00
 Loading...