

ERA P700 Installation Manual

INSTALLATION
MANUAL
Ceiling Mounted PIR Motion Detector
1. INTRODUCTION
The Sensor works by detecting the human body’s infrared
spectrum. When human movement takes place within the scope,
the detector receives the signal and inputs it into the
microprocessor after magnification. Microprocessor continues to
sample infrared signal and sends wireless signal to the control
panel after calculating. The products can be applied in banks,
warehouses and homes etc.
2. GET TO KNOW
4. PCB LAYOUT
Infrared Sensor Zone Setting
AA LR6 1.5V
AA LR6 1.5V
Infrared Sensor: Detecting Human Body’s infrared spectrum.
DO NOT touch the surface by hand and keep it clean.
YOUR PRODUCT
1. Test Button
2. Detection Lens
3. LED Indicator
4. Mounting Plate
5. LED
INDICATION
The LED indicator can be turned on or off by setting jumpers.
See ‘PCB Layout’ above.
Flash Continuously: Under self-testing state
Flash Once: Intruder is detected
Flash Twice: Testing mode is finished, enters power-saving
Flash Once Every 3 Seconds: Low battery indication,
please change batteries.
Model: P700
LED ON/OFF
3. FEATURES
Accurate Detection
360 detection, no dead angle. Automatic temperature
compensation and anti-air turbulance technology
False Alarm Prevention
Digital dual core fuzzy logic infrared control processing technology.
Effectively identify interferance signals from body movement
signals through intelligent analysis.
Space-saving
Ceiling mounted, not much space occupation.
Integrated to home decoration, suitable for most premises.
Energy-saving
Featured energy-saving mode enables 1 year standby.
ERA Home Security Ltd
Valiant Way, Wolverhampton,
West Midlands, WV9 5GB.
Email: support@erahomesecurity.com
6. DETECTION
RANGE
3.6m
6m
Side View
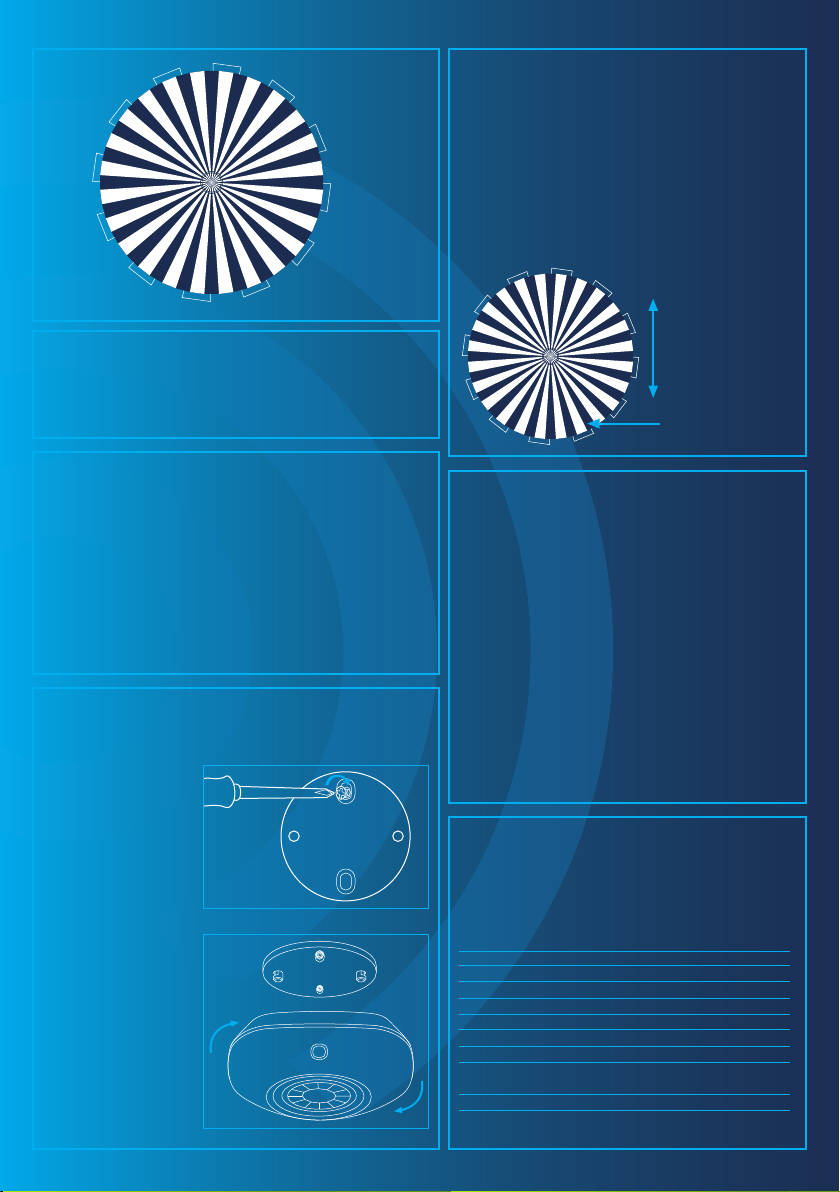
Top View
360°
8. USAGE
Remove the battery activation strip to activate batteries. It will
enter working state after one-minute’s self testing.
11. TESTING
After installation, power on the detector. After
self-testing for 1 minute, press the test button,
walk in the scope by crossing the infrared
spectrum (see diagram below) and watch the
LED indicator to make sure it is working. The
LED indicator will flash once when body
movement is detected.
High detection
sensitivity
Low detection
sensitivity
9. MODE SETTING
Testing mode: Press the test button, the sensor enters testing
mode and detects once every 10 seconds. After 3 minutes, the LED
flashes twice, the sensor enters the power saving mode.
Power-Saving Mode: In working state, if the sensor is triggered
twice within 3 minutes, it will enter sleeping mode to save power.
After no movement within the following 3 minutes, the sensor goes
back to working state.
10. INSTALLATION
Choose a suitable position
and fix the mounting plate
on the ceiling with screws.
Fasten the detector on the
mounting plate in a
clockwise direction. It is
suggested to mount it at
the height of 2.5-6 metres
from the ground.
Keep the detector away
from the air conditioner,
electronic fan,
refridgerator, over, heater
or any other objects which
will cause a fast change in
temperature.
Avoid mounting it in direct
sunlight or any objects
blocking the lens, so the
detection is not affected.
12. CONNECT
WITH CONTROL
PANEL
When the control panel is in a connecting state, press the
test button twice to send wireless signal. One beep is heard
after the panel receives signal, meaning a successful
connection.
Arm the system and trigger the detector again. This panel
will alarm immediately, indicating a successful connection
to the panel.
13.
SPECIFICATION
Power Supply
Static Current
Alarm Current
Installation Height
Detection Scope
Transmitting Distance
Radio Frequency
Housing Material
Operation Condition
Sensor Dimensions
Mounting Plate Dimensions
DC 3V (AA LR6 1.5V Battery x 2 Pcs)
Dia. 6m (when installation height is 3.6m)
Relative Humidity: <80% (non-condensing)
< 80m (in open area)
433.92MHz (±75KHz)
Temperature: 0°C ~ +55°C
90 x 90 x 36.8mm (L x W x H)
56 x 56 x 8mm (L x W x H)
< 13uA
< 15mA
2.5-6m
ABS Plastic
 Loading...