

ERA ERA-DOORCAM-W, ERA-DOORCAM-B Installation & Operating Manual

THE SMART WAY TO ANSWER YOUR DOOR
INSTALLATION
& OPERATING
MANUAL

Standards: EN 300 328 V2.1.1.1 (2016-11); EN 301 489-1 V2 1.1 (2017-02)
EN 301 489-17 V3.1.1 (2017-02); EN 55032:2012/AC:2013 (Class B)
EN 55024:2010+A1:2015; IEC 60950-1:2005 (2nd Edition)+Am 2:2013
EN 60950-1:2006 (2nd Edition)+A11:2009+A1:2010+A12:2011+A2:2013
EC DECLARATION
OF CONFORMITY
ERA Home Security Ltd
Valiant Way
Wolverhampton
WV9 5GB
United Kingdom
Tel: +44(0) 1922 490 000
Fax: +44(0) 1922 494 420
ERA-DOORCAM-B
ERA-DOORCAM-W
DoorCam WiFi Video Doorbell
The products described above are in conformity with the Radio Equipment
Directive 2014/53/EU.
Applicable Products:
DoP N°: EM0038
Signed for and on behalf of ERA Home Security Ltd:
Ben Penson:
Technical & Quality Director
02/02/2018
Page 1

Page 2
All devices, with the exception of the External Siren are suitable for mounting
in dry interior locations only.
Any repairs must be carried out by an Authorised Repair Centre. Misuse
or attempted repairs to a component part of the product will invalidate the
warranty. The photocopying, copying, reproduction, translation to any language,
modification, storage in a retrieval system or retransmission, in whole or in part,
in any form or by any means, electronic, mechanical or otherwise of this manual,
is strictly prohibited without the prior written permission of ERA Home Security.
Disposal and Recycling
Disposal of this product is covered by the Waste Electrical or
Electronic Equipment (WEEE) Directive. It should not be
disposed of with other household or commercial waste.
At the end of the product's useful life, the packaging and
product should be disposed of via a suitable recycling centre.
Please contact your local authority or the retailer from where
the product was purchased for information on available facilities.
Declaration of Performance
This equipment complies with the essential requirements of the Radio
and Telecommunications Terminal Equipment Directive, 1999/5/EC.
Additional Accessories
This system can easily be extended at any time with the range of ERA
Wireless Alarm Accessories, for details visit www.eraeverywhere.com or
call our Customer Support team on 0345 257 2500 (local call rate).
IMPORTANT
PLEASE READ THIS MANUAL CAREFULLY BEFORE OPERATING
THE SYSTEM AND RETAIN FOR FUTURE REFERENCE.

Page 3
Power Supply Requirement2.2.
Fitting DoorCam to Wall Mount Plate5.2.
Wiring DoorCam5.1.
Bypassing your Existing DoorChime3.2.
Wiring DoorCam without Chime Box3.1.
WiFi Signal Check2.1.
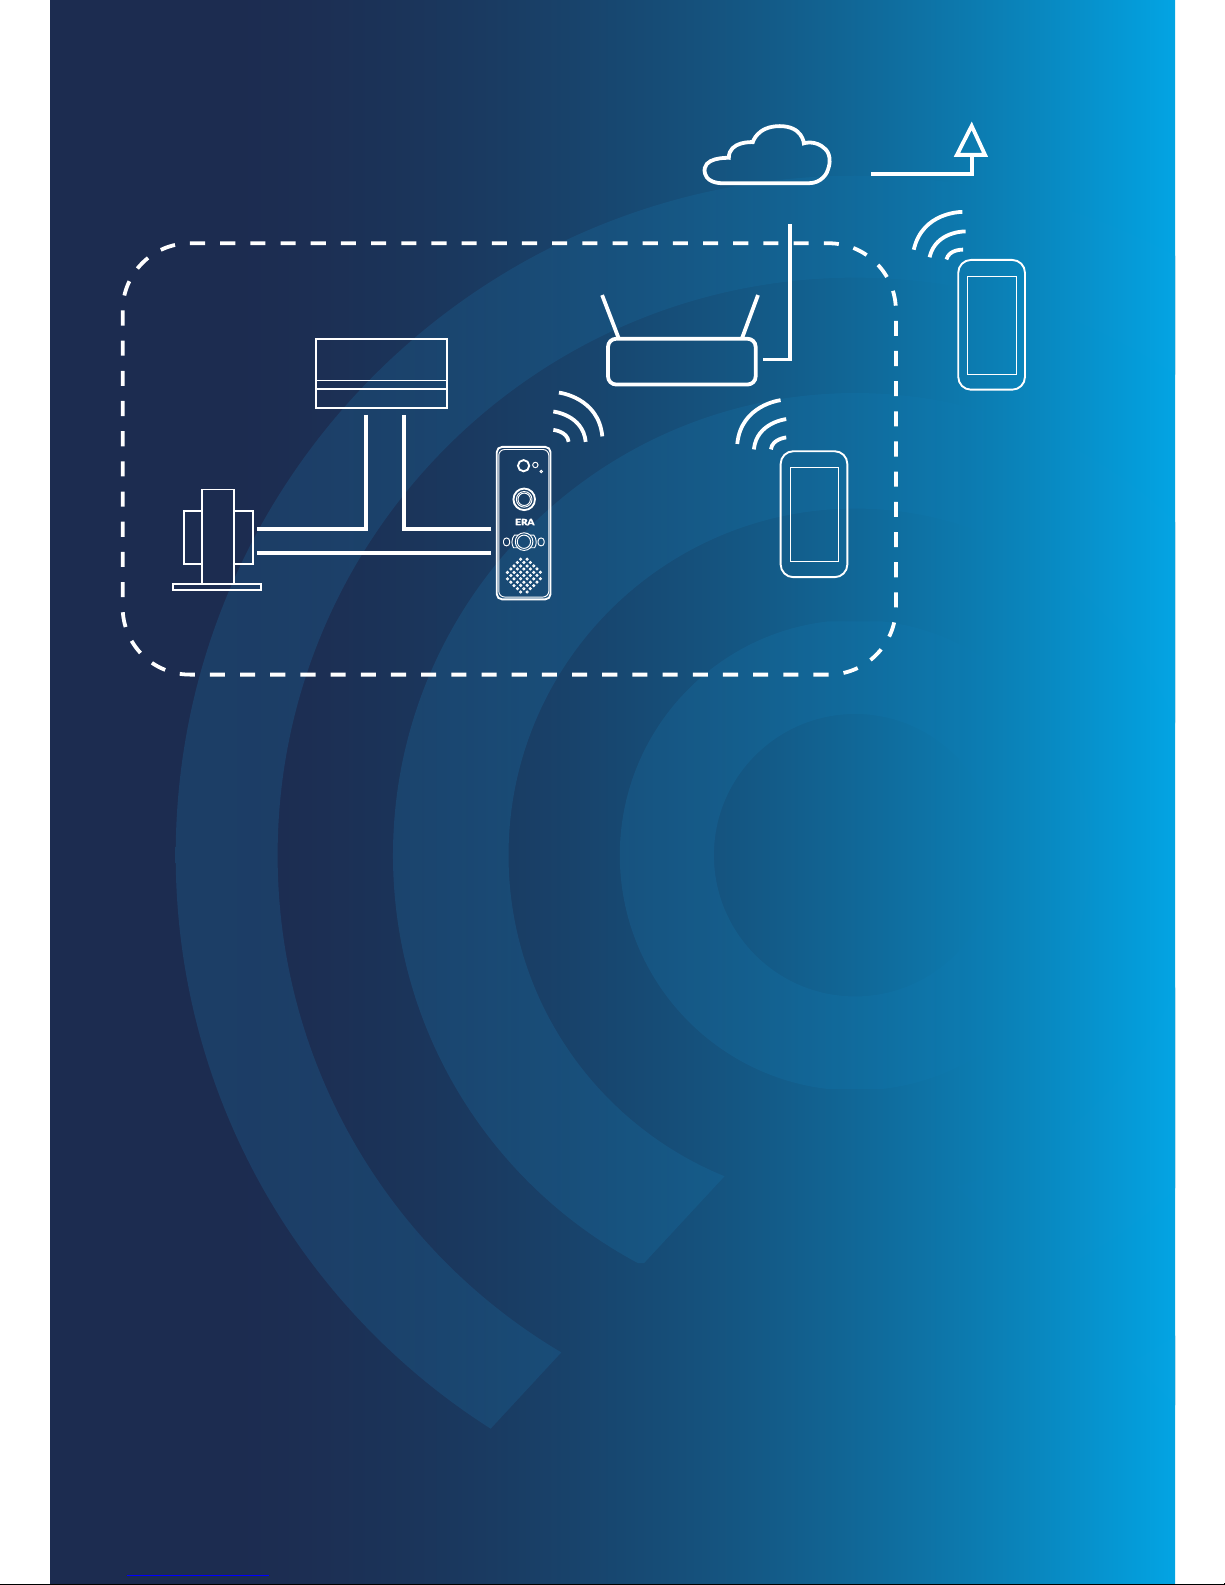
System Architecture1.2.
WiFi Video Doorbell1.1.
Get to Know Your Doorbell
Prepare for installation
Installing the Diode in Chime box
Removing the existing Doorbell Pushbutton
Mounting Wall Mount Plate
Check the Result
Setup Operation
LED Indicator Status
WiFi Chime Quick Installation Guide
Troubleshooting 22
15
14
13
12
11
10
9
8
6
6
6
5
5
5
5
4
4
4
TABLE OF
CONTENT
What’s inside the box
1.
2.
3.
4.
5.
6.
7.
8.
9.
10.

Page 4
1. GET TO KNOW
YOUR DOORBELL
1.1. WiFi Video Doorbell
Fixing Kit
WiFi Door Chime
Wall Mount Plate
WiFi Video Doorbell
WHAT’S INSIDE THE
BOX
Speaker
LED
Indicator
Camera
Microphone
Light
Sensor
IR LED
Button
Page 5
Go to the location of the existing doorbell button.
Connect your Smartphone to the WiFi router to confirm that you have a strong
WiFi signal. If the WiFi signal is too weak or out of range, you will need to install
a WiFi repeater.
PLEASE NOTE: DOORBELL ONLY SUPPORTS 2.4Ghz WiFi NETWORK.
2.2. Power Supply Requirement
The doorbell works best with a 15 to 20VAC, 10 to 30VA supply (Transformer)
The doorbell also works with 12V DC up to 500mA (Max)
2.1. WiFi Signal Check
2. PREPARE FOR
INSTALLATION
1.2. System Architecture
3G/ 4G Network
Cloud Server
Smartphone
Smartphone
WiFi Router
Cloud Video
Doorbell
Chime Box
Home
16VAC
Transformer
3.1. Wiring to Include Existing DoorChime
Page 6
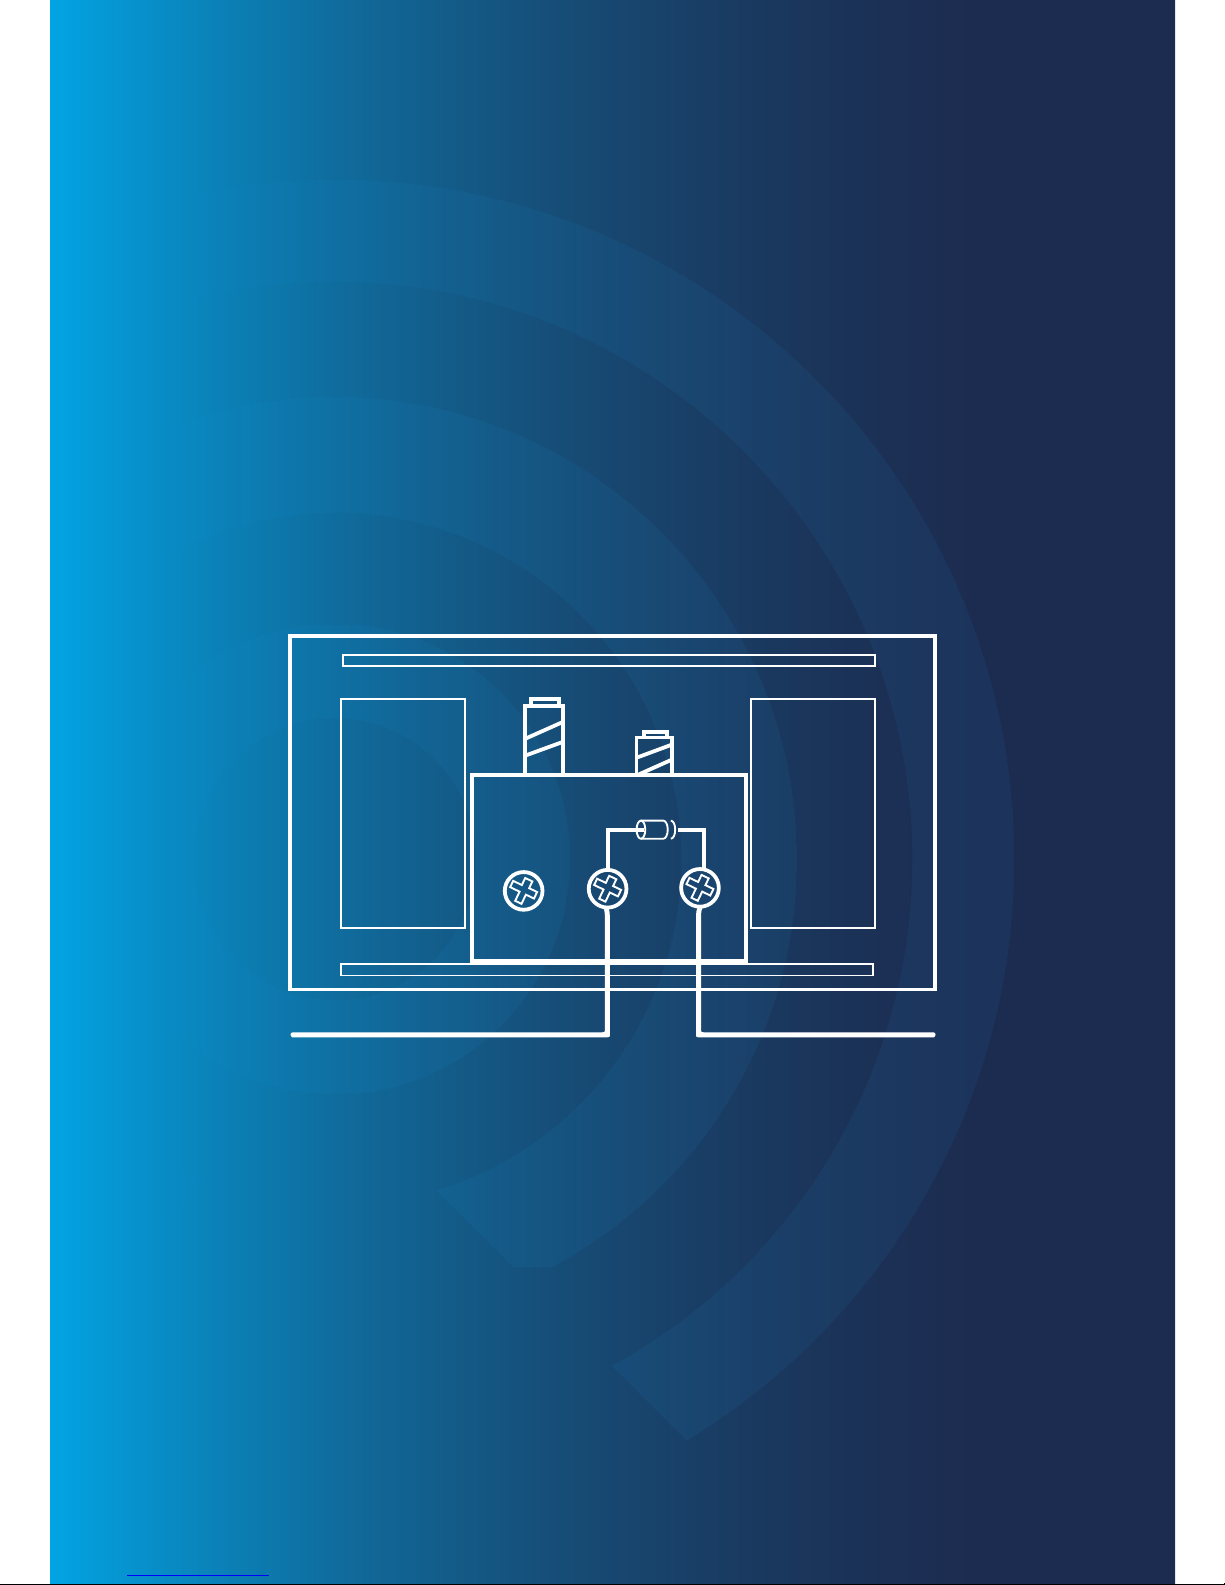
3.2. Bypassing Your Existing DoorChime
Step 1: Turn off the power
Step 2: Open the Chime Box
Step 3: Connect the two wires
on the Transformer terminal
PLEASE NOTE: DOORCAM DOES NOT SUPPORT ELECTRONIC CHIMES
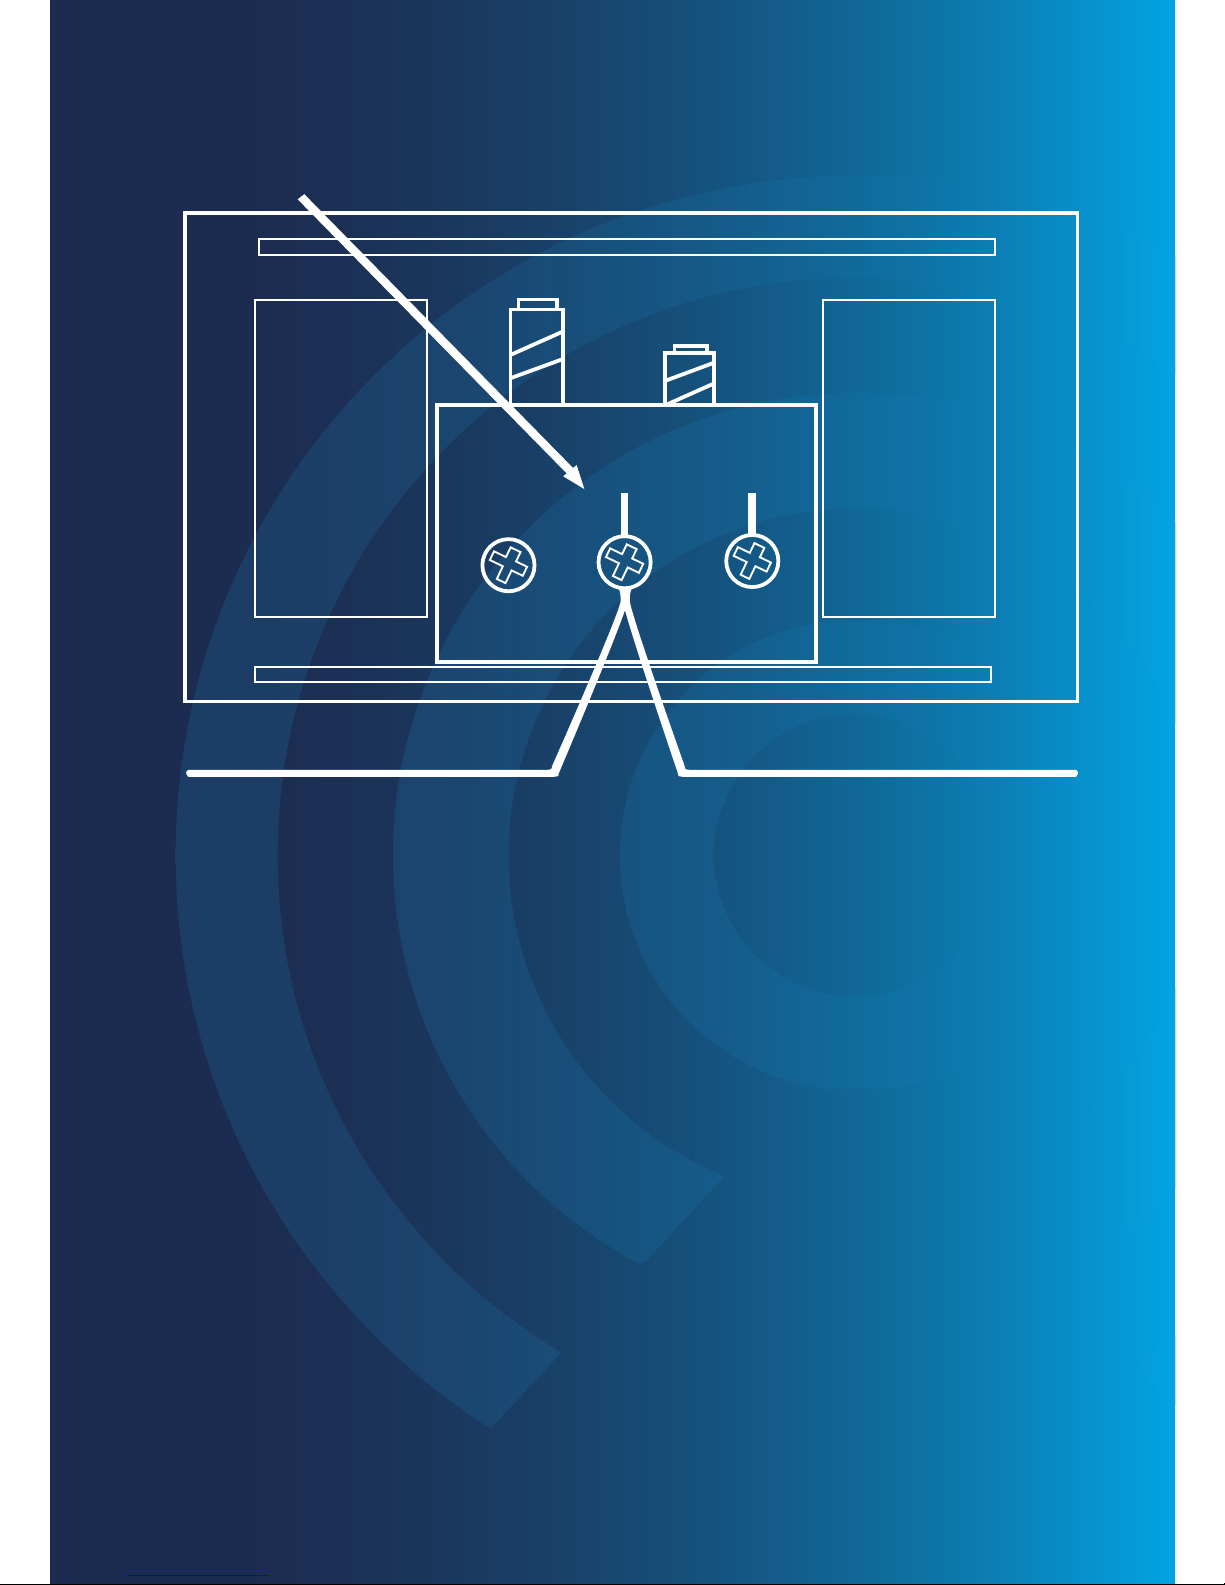
Step 1: Turn off the mains power supply which will be located at your
electrical fuse board usually marked up as 'Doorbell'.
Step 2: Open Chime box
Step 3: Install Diode between the Front and TRANS terminals.
(The direction of diode does not matter)
3. WIRING IN THE
DOORCAM
DoorCam
Transformer
Step 4: Turn on the power
Step 5: Blue LED flashes once
Step 6: Check the result
Page 7
DoorCamTransformer
Connect the two wires
on the Transformer
terminal.
The blue LED flashes for 5 seconds (twice per second) and then the
red LED is solid ON for around 30 seconds. The voltage is still not
strong enough, therefore the voltage of transformer is too low, or
the length of wire is too long. Please replace the transformer with
a 16VAC 30VA.
Result 2:
Blue LED is ON for 5 seconds, and then red LED is ON for around 30
seconds. Finally the red and green LED will flash. This means the
doorbell is working correctly. You can go to ‘SETUP OPERATION’.
Result 1:
 Loading...