

Page 1

www.eraeverywhere.com
ERA Home Security
Straight Road, Short Heath, Willenhall, West Midlands, WV12 5RA
email: alarms @ eraeverywhere.com
Customer Helpline: 0345 257 2500
Garrison V1.0_3616
Page 2

IMPORTANT
PLEASE READ THIS MANUAL CAREFULLY BEFORE OPERATING THE SYSTEM AND
RETAIN FOR FUTURE REFERENCE.
All devices, with the exception of the External Siren are suitable for mounting in dry
interior locations only.
Any repairs must be carried out by an ERA Authorised Repair Centre. Misuse or
attempted repairs to a component part of the product will invalidate the warranty.
The photocopying, copying, reproduction, translation to any language, modication,
storage in a retrieval system or retransmission, in whole or in part, in any form or by any
means, electronic, mechanical or otherwise of this manual, is strictly prohibited without
the prior written permission of ERA Home Security.
Disposal and Recycling
Disposal of this product is covered by the Waste Electrical or Electronic Equipment (WEEE)
Directive. It should not be disposed of with other household or commercial waste.
At the end of the product's useful life, the packaging and product should be disposed
of via a suitable recycling centre. Please contact your local authority or the retailer from
where the product was purchased for information on available facilities.
Declaration of Conformity
This equipment complies with the essential requirements of the Radio and
Telecommunications Terminal Equipment Directive, 1999/5/EC.
Additional Accessories:
This system can easily be extended at any time with the range of ERA Wireless Alarm
Accessories, for details visit www.eraeverywhere.com or call our Customer Support team
on 0345 257 2500 (local call rate).
Contents
Kit Contents ..................................................................................................................................... 1~2
Control Panel .....................................................................................................................................1
Accessories.........................................................................................................................................2
Introduction ...........................................................................................................................................3
Accessories ...................................................................................................................................... 4~9
Remote Control ................................................................................................................................4
Door/Window Sensor .....................................................................................................................5
Pet Friendly PIR Motion Sensor.....................................................................................................6
Sensor Zone Modes ........................................................................................................................8
Getting Started ............................................................................................................................. 9~12
Step 1. Insert SIM Card ...................................................................................................................9
Step 2. Download the App ............................................................................................................9
Step 3. Add an Account .............................................................................................................. 10
Step 4. System Familiarisation .................................................................................................... 10
Step 5. System Settings..........................................................................................................11-13
Setting through SMS .................................................................................................................14~15
Other SMS Notications ............................................................................................................... 15
Installation .....................................................................................................................................16~19
Sensor Placement .......................................................................................................................... 16
Test Mode ........................................................................................................................................ 17
Positioning the Control Panel ..................................................................................................... 17
Fitting a Door/Window Sensor ................................................................................................... 18
Fitting a Pet Friendly PIR Motion Detector .............................................................................. 19
Pairing/Deleting Accessories ....................................................................................................20~21
Pairing a New Remote Control or Sensor ................................................................................20
Pairing a Wireless Solar Siren ...................................................................................................... 21
Deleting Sensor(s) .......................................................................................................................... 21
Deleting a Wireless Solar Siren ................................................................................................... 21
Battery Replacement ........................................................................................................................ 22
Arm & Disarm by Free Phone Call ................................................................................................ 23
Restore to Factory Settings ............................................................................................................. 23
Specications ...............................................................................................................................24~25
Control Panel .................................................................................................................................. 24
Remote Control .............................................................................................................................. 24
Door/Window Sensor ................................................................................................................... 25
Pet Friendly PIR Motion Sensor .................................................................................................. 25
Product Guarantee ........................................................................................................................... 26
Page 3
1 2
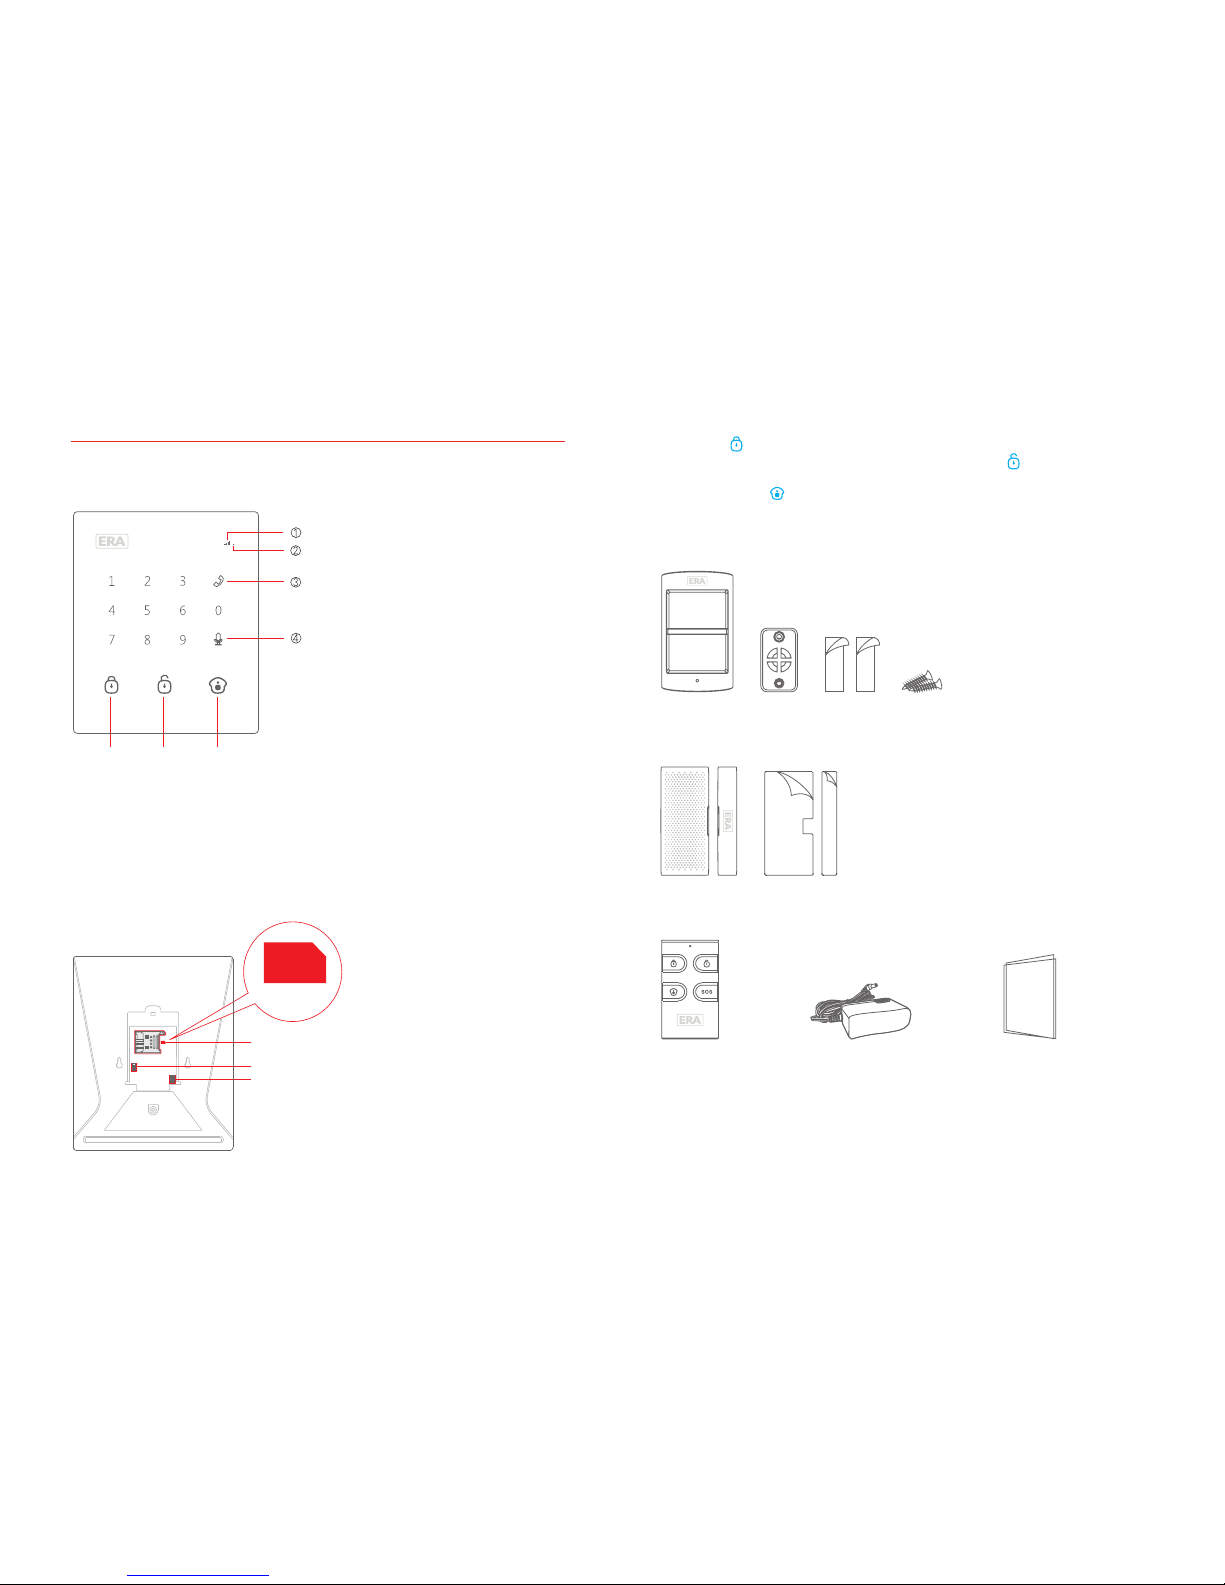
Kit Contents
Control Panel
Panel Front
GSM Signal Indicator
Voice Memo Indicator
Call
Record Voice Memo
Home ArmDisarmArm
1.
Blinks once per second: Searching for a network.
Blinks once per 3 seconds: Connected to the network.
2.
Blinking: There is a new voice memo.
3.
Enter a phone number and press to make a call.
4.
Press and hold for 3 seconds to leave a 10-second voice memo.
Press once to listen to a new voice memo or replay.
Panel Back
SIM
SIM Card Slot
Power On/Off
Adapter Jack
SIM
Key Operation
Arm: Press [ ] to arm your system. All Sensors are now armed.
Disarm: Enter the password (default setting: 1234) and press [ ]. All Sensors except
those set to a 24-H zone are now inactive.
Home Arm: Press [ ] to part arm your system. All Sensors will be active except those
set to home mode allowing freedom of movement in the selected areas.
Accessories
PIR Motion Sensor x 1
Door/Window Sensor x 1
Remote Control x 2 AC Adapter x 1 User Manual x 1
Page 4

3 4
INTRODUCTION
When triggered by the activation of a Sensor, Detector, Remote Control or Personal Alert
Button the Control Panel sounds the internal siren and sends SMS texts to all stored
telephone numbers. When texting is nished the Control Panel will call out to the stored
numbers and play the pre-recorded alarm message. If an optional external Siren is
installed the Control Panel will also send a trigger signal to the Siren and the Siren will
sound and ash.
SOS
When you receive a phone call from the Control Panel you will hear your pre-recorded
alarm voice message. Once the message has been played you can remotely control the
system with your smartphone by pressing the operational numbers as shown below.
Operation Function
0 Disarm
1 Arm
6 Turn off siren
9 Turn on siren
*
Two-way talk
# Hang up
To record/store an alarm voice message of up to 10 seconds duration, enter the disarm password
(default setting: 1234), then press [
] and [ ] .
Note: Alarm Voice Message: This is the message played when you pick up an emergency call.
Voice Memo This feature is for recording/playing back personal messages
Accessories
Remote Control
SOS
Arm
Disarm
Status Indicator
Part Arm
(Home Arm)
Button System Status
Press once to arm. The Control Panel siren beeps once to conrm the system is
armed.
Press once to disarm. The Control Panel siren beeps twice to conrm the system
is disarmed.
Press once to Part Arm (Home Arm). After 3 seconds, the siren beeps once to
conrm the system is in Home Mode.
Note: Sensors set to Part Arm will not be active when the system is triggered.
The Control Panel will sound on-site and the idicator will ash. System users will
receive SMS text and telephone calls.
Press the [ ] button. After the indicator on the Remote Control blinks once,
press [ ] button within 3 seconds to silently arm the system.
Press the [ ] button. After the indicator on the Remote Control blinks once,
press [ ] button within 3 seconds to silently disarm the system.
Page 5
5 6
Door/Window Sensor
The Door/Window Sensor comprises of a transmitter and a magnet. The Sensor can be
mounted on doors, windows and any other objects that can be opened or closed. When
the transmitter and magnet are separated by more than 2 cm, the Sensor will send a
signal to the Control Panel to trigger an alarm.
Overview
Status Indicator
Transmitter
Zone Setting
Battery
Tamper Switch
Magnet
Status Indicator
Blinks once: Door/window is opened.
Blinks once per 3 seconds: Low battery - battery replacement required.
Note: When tamper switch is pressed, the system will alarm immediately.
Pet Friendly PIR Motion Sensor
The Sensor features pet immunity for animals up to 25kgs.
Overview
5
1. Detection Lens
2. Status Indicator
3. Test Button
4. Fixing Bracket Slot
5. Self-adhesive Double-sided
Tape
Status Indicator
Blinks continuously: Sensor performs a self-test.
Blinks once: Motion is detected.
Blinks twice: Sensor has exited test mode, and entered into power saving mode.
Blinks once per 3 seconds: Low battery - battery replacement required
PCB Layout
Infrared Sensors
Infrared Sensors Zone Setting
Tamper Switch
2
1
LED ON/OFF
Tamper Switch: When the tamper switch is pressed the system will alarm immediately.
Infrared Sensors: The Infrared Sensors detect movement. Ensure the Sensors are kept
clean and dust free.
Page 6

7 8
Test Mode
After self-testing the Sensor automatically enters into Test Mode for 3 minutes and will
detect movement every 10 seconds.
Note: To activate test mode at any time press the Test Button.
Power Saving Mode
Sleep after detecting human movement twice.
3 minutes later
No human movement within 3 minutes
Switch from sleep to arm.
Example 2:
Press the test button and then arm.
When the Sensor detects motion 2 times in 3 minutes it will automatically enter into
power saving mode. When no movement is detected in the next 3 minutes the Sensor
will re-set to working mode. During the 3 minute power saving the Sensor will not be
active and will not send a signal to the Control Panel.
Detection Range
Top view
Side view
2.2m
Pet-Immune Function
The Sensor is designed to improve detection accuracy. Pets less than 25kgs will not
trigger the alarm.
2-2.2m
1m
8m
2-2.2m
Sensor Zone Modes
Sensors can be assigned to different zones for different requirements, there are four
different zone types:
Normal Zone: In Arm or Home Arm Mode, the Sensors set to normal zone work
normally. Once intrusion is detected, the Sensors will trigger an alarm.
Home Zone: When the system is in Home Arm (Part Arm) state the Sensors set to
Home Zone are disarmed. The Sensors set to other zones are armed. This is known as,
Part Arm.
Single Delay Zone: Sensors set to this zone will alarm at the specied time (which can
be set in the Entry Delay setting) after being triggered.
24-H Zone: Sensors set to 24-H Zone trigger an alarm immediately when intrusion is
detected both when the system is armed or disarmed.
Sensors Zone Mode (Default Settin
g)
Door/Window Sensor Normal Zone
PIR Motion Sensor Home Zone
You can set the zone assigned to the Sensor by changing the array of the jumpers inside
the Sensor. After changing the zone setting the Sensor must be re-paired to the Control
Panel.
Note: any movement within the 3 minutes will extend power saving mode by another 3 minutes
Example 1:
Initial start and then arm
Page 7

9 10
How to set:
Open the rear cover of the Sensor and change the array of the jumpers to correspond
to the Zone required (Note the direction of D0-D3):
Home Mode Zone Normal Zone Signal Delay Zone 24-H Zone
Getting Started
Step 1. Inserting a SIM Card
Before inserting a SIM card, perform the following steps:
1. Make sure the alarm system is powered off.
2. IMPORTANT: Remove the (default) code permanently from the SIM card.
3. Turn off the voicemail function if it is enabled.
4. Insert the SIM card into the SIM card slot; wait until the GSM indicator starts blinking
once every 3 seconds indicating that the network is connected.
SIM card requirement: 2G GSM SIM card with calling, SMS and caller display functions.
Step 2. Download the App
Download the App by searching keywords “ERA Garrison Alarm” in the App Store or
Google Play, and then create your own account.
ERA Garrison Alarm
Step 3. Add an Account
Step 4. System Familiarisation
Tap [ ], [ ], [ ] to arm/disarm/home arm your system remotely.
Tap [ ] and the app will skip to the messages interface automatically. After sending
the SMS text, you will receive a phone call from the Control Panel, you can then leave a
voice memo of up to 10 seconds duration.
Tap [ ] and the app will skip to the messages interface automatically. After sending
the SMS text, you will receive a phone call from the Control Panel to start a two-way
conversation.
Page 8

11 12
Step 5. System Settings
Store Emergency Numbers & SMS Numbers
Emergency numbers are the telephone numbers that will be called when the alarm
is activated. SMS numbers are the telephone numbers that will receive SMS text
notications when the alarm is activated.
It is recommended that you enter your country area code when storing emergency
numbers (e.g. 0044 for the UK), as this will allow you to operate the alarm system from
abroad.
IMPORTANT:
After telephone numbers are stored, only those numbers can modify the system settings.
Commands from unauthorised phone numbers will be rejected.
Once an alarm is triggered, the Control Panel will call the emergency numbers up to a maximum
of 3 rounds. If the call is answered the system will stop dialing out.
Store Speed Dial Number
After the telephone number is stored, you can dial this number immediately by pressing
the [ ] button once on the Control Panel.
Change Zone Names
The system can easily be extended to include up to 10 Remote Controls and 50 Wireless
Sensors. Each sensor can each be assigned a zone name for ease of identication in the
event of alarm activation.
The naming sequence follows the order of pairing. For example, the rst paired Sensor is
by default set to Zone 1; the second paired Sensor is by default assigned to Zone 2, etc.
You can change the Sensor ’s Zone name for ease of recognition in the event of alarm
activation, for example you can change the default notication ‘Zone 1 name: Zone 1
alarm’ to read: ‘Zone 1 name: Entrance Door Sensor’. If you do not change a Sensor’s
Zone name, the Control Panel will send an SMS text with the automatically generated
zone name as to the sequence of pairing (e.g. Zone 1 Alarm).
Page 9

13 14
Exit & Entry Delay
When the system is armed with Exit/Entry Delay enabled, Sensors on an active zone
will not trigger an alarm status until after the Exit/Entry Delay time set has expired. This
enables the system to be armed from within the property (at the Control Panel) giving
time for the user to exit the property without triggering an alarm.
Exit Delay Time
If the Exit Delay is set to 30 seconds for example, the system would allow you 30
seconds to leave the area before the system is armed. The ‘beep’ is sounded once ever y
second to remind you to leave. The pace of the reminder sound will speed up in last 15
seconds. Exit Delay applies to all Sensors in any mode.
Entry Delay Time
If the Entry Delay is set to 15 seconds for example, the system would allow you 15
seconds to disarm the system before it enters into alarm status. Entry delay applies only
to Single Zone Delay Sensors.
If a Sensor is set to Normal or Home Mode zone, the alarm will sound instantly.
If a Sensor is set to Single Zone Delay, the alarm will sound as per the Entry Delay set.
To apply this function set the zone mode of the Sensor to single zone delay. For details
refer to ‘Zone Mode of Sensor’ as shown on page 9. This setting activates an Entry
Delay Setting.
Sensor Exit Delay (if 30s) Entry Delay (if 15s)
Normal and home mode zone 30s
Does not apply - Alarms
immediately
Single delay zone 30s 15s
24-H zone Always armed Alarms immediately
Disarm Code
The default disarm code is 1234. It is suggested that the system administrator changes
the passcode at the time of system set-up.
Duress Code
The default duress code is 1111. The Alarm will disarm as usual but the Control Panel will
also silently send an SMS text: “Duress code alarm” and then call the pre-programmed
telephone number allowing the user to listen-in to the property.
Setting through SMS
Non-smartphone App users can set-up their system by sending the related SMS text
command codes to the SIM card in the Control Panel.
Item SMS Command Code
SMS menu ?, ??, ???
System setting enquiry 00
Disarm 0
Arm 1
Home Mode (Part Arm) 2
Two-way talk 3
Call back to leave a 10-second voice memo 4
Store emergency telephone numbers 5
Store emergency SMS numbers 6
Store speed dial numbers 8
Change zone name 901~950
Set exit delay time 11
Set alarm volume and ringing time 12
Change disarm passcode 13
Set entry delay time 14
Change duress code 15
Page 10

15 16
Example:
1. Send “5” to the SIM card number of the Control Panel.
5
2. You will receive a menu SMS from the Control Panel.
TEL:
1.
2.
3.
4.
5.
3. Copy and edit the menu message, and then send it back.
Send
SendSend
Text MessageText Message
Paste
Copy More...
5 5
Paste
4. You will receive an SMS text conrmation from the Control Panel.
Other SMS Notications
You will receive SMS text reminders when:
1. The Control Panel and Sensor batteries are low - the rst stored telephone number
will receive an SMS text
2. The AC power of Control Panel fails or restores - the rst stored telephone number
will receive an SMS text.
3. The Sensor tamper switch triggers an alarm - all stored phone numbers will receive
an SMS text
Installation
Sensor Placement
The alarm system is most effective with well-placed Sensors. Determine the areas you
want to secure and the appropriate Sensor type for the selected areas. The following
diagram is for illustration purposes only.
A. Alarm Control Panel B. Remote Control C. Wireless Solar Siren
Magnetic Door/Window Sensor
PIR Motion Sensor
Magnetic Door/Window Sensor
Magnetic Door/Window Sensor
Magnetic Door/Window Sensor
Magnetic Door/Window Sensor
Pet Friendly PIR Motion Sensor
Water Detector
1. Front door
2. Living area
3. Window: living area
4. Window: living area
5. Terrace door
6. Window
7. Bedroom
8. Kitchen
Page 11

17 18
Test Mode
The system can be put into Test Mode for installation & testing purposes.
To enter Test Mode press the [ ] button on the Control Panel three times. The Control
Panel will enter into a 10 minute Test Mode. During Test Mode the Control Panel will
beep 3 times whenever a sensor is triggered. After 10 minutes Test Mode will end
automatically. It is also possible to exit Test Mode by pressing the [ ] button.
Positioning the Control Panel
The Control Panel can either be mounted to a suitable wall using the xing kit supplied,
or for portability can be tted with the free-standing bracket.
②
①
Fitting a Door/Window Sensor
Test the Sensor prior to installation to ensure that it is in working order.
Step 1: Choose a suitable installation location. A Sensor can be tted to a door, window
or any other object that opens/closes. If tted to a metal door, place a spacer (not
supplied) under the Transmitter and the Magnet.
Step 2: Secure the Sensor parts in place with the self-adhesive pads supplied. The
distance between the transmitter and magnet must not exceed 1cm when in the closed
position.
The Magnet can be positioned either side of the Sensor.
When the transmitter and magnet are separated by more than 2cm the LED indicator
on the transmitter will blink once indicating that the Sensor has been activated.
Note: Avoid placing ther door/window Sensor in an area where a lot of metal is
present as this may affect performance. Always check that the LED indicator blinks
when opening the door or window.
Page 12

19 20
Fitting a Pet Friendly PIR Motion Sensor
lmportant: Avoid installing Sensors facing windows or near to heat sources, such as;
extraction units, air-conditioning, a microwave oven, refrigerator, etc. Avoid placing two
Motion Sensors opposite to each other and within each others detection range.
O
N
Step 1: The ideal mounting height is between 2 and 2.2 metres of ground level.
O
N
2-2.2m
Ground
Step 2: Press the test button twice and walk from left to right in the room. The status
indicator will blink once when motion is detected.
O
N
2-2.2m
Ground
Note: This PIR motion Sensor can be mounted using the bracket and xing kit or with the self-
adhesive pads supplied.
Pairing/Deleting Accessories
The included accessories have been paired with the Control Panel by default. To pair
new accessories, follow the instructions below:
Pairing a New Remote Control or Sensor
Enter the disarm password (default: 1234), press the [ ] button on the Control Panel,
the Sensor will trigger once.
When a beep is heard from the Control Panel, the Sensor is paired successfully. If two
beeps are heard, the Sensor was already paired.
Note: To pair additional Sensor types please refer to the related user manual.
Press any button on
the remote control
Press the test button
more than twice
Separate the
transmitter and the
magnet by over 2cm
Page 13

21 22
Pairing a Wireless Solar Siren
Solar Siren sold separately.
1. Enter the Siren into pairing mode (refer to the relevant user manual).
2. Press [ ] or [ ] on the Control Panel to send out a pairing signal to the Siren.
When a beep is heard from the Siren it is successfully paired. If two beeps are heard,
the Siren has previously been paired.
The Siren’s arm/disarm tone can be turned on or off by sending “63701” or “63700” to the
Control Panel.
Deleting Sensor(s)
Send an SMS text with content “21” to the Control Panel, you will then receive an SMS
text conrmation of the successful deletion of the Sensor(s).
Send an SMS text with content “22” to the Control Panel, then you will receive an SMS
text to conrm the successful deletion of RFID Tag(s). RFID Tags can also be deleted via
the app.
Send an SMS text with content “23” to the Control Panel, then you will receive an SMS
text to conrm the successful deletion of Remote Control(s).
Deleting a Wireless Solar Siren
Press and hold the Siren’s pair button, the deletion is successfull when two beeps are
heard from the Siren.
Battery Replacement
Remote Control
Remove the battery compartment
retaining screw.
Remove the cover and replace the battery.
Re-t the retaining screw.
Door/Windor Sensor
Use a at-headed screwdriver to prize open the battery compartment cover. Fit a new
battery and click the cover back in place.
PIR Sensor
Remove the battery compartment
retaining screw.
Pull the PIR Lens section away from the
backplate and replace the battery. Re-t the
retaining screw.
Page 14

23 24
Specications
Control Panel
Power Supply
Battery
GSM Frequency
Standby Current
Alarm Current
Internal Siren
Expandable Accessories
Radio Frequency
Housing Material
Operating Condition
Control Panel Dimensions
Bracket Dimensions
DC12V 500 mA
3.7V 600 mAh Li-ion Battery
850/900/1800/1900 MHz
<56 mA
<270 mA
90 dB
10 Remote Controls, 50 Sensors
433 MHz
ABS Plastic
Temperature -10°C~+55°C
Relative Humidity <80% (non-condensing)
125 x 150 x 30 mm (L x W x H)
87.5 x 81.5 x 12 mm (L x W x H)
Remote Control
Power Supply
Transmit Current
Transmitting Distance
Radio Frequency
Housing Material
Operating Condition
Dimensions
DC 3V (CR2025 lithium battery x 1pc)
<7 mA
<80 m (open area/no interference)
433 MHz
ABS Plastic
Temperature -10°C~+55°C
Relative Humidity <80% (non-condensing)
53 x 31 x 11 mm (L x W x H)
Arm & Disarm by Free Phone Call
To arm the alarm system by free phone call, call the SIM card telephone number in the
Control Panel. When you hear the dial tone hang up. The Control Panel will be armed
and will call you back - do not answer the call, it will stop automatically.
To disarm the alarm system by free phone call, call the SIM card telephone number. After
6 rings the system will terminate the call (the Control Panel will not answer the call). The
alarm system will not call you back this time and will be disarmed.
IMPORTANT: To arm or disarm the alarm system make sure that voicemail is disabled
on the alarm system SIM card.
Restore to Factory Settings
Send SMS “0000” to the Control Panel; the system will be restored to factory settings,
but the paired sensors remain working.
Page 15

Door/Window Sensor
Power Supply DC 6V (CR2032 lithium battery x 2pcs)
Static Current <35 uA
Alarm Current <40 mA
Transmitting Distance <80 m (open area/no interference)
Radio Frequency 433 MHz
Housing Material ABS Plastic
Operating Condition Temperature -10°C~+55°C
Relative Humidity <80% (non-condensing)
Transmitter Dimensions 71 x 31.5 x 15 mm (L x W x H)
Magnet Dimensions 71 x 12.5 x 15 mm (L x W x H)
Pet Friendly PIR Motion Sensor
Power Supply DC 3V (AA 1.5V LR6 battery x 2 pcs)
Static Current <50 uA
Alarm Current <9.5 mA
Detection Scope 8m/110°
Transmitting Distance <80 m (open area/no interference)
Radio Frequency 433 MHz
Housing Material ABS Plastic
Operating Condition Temperature -10°C~+55°C
Relative Humidity <80% (non-condensing)
Detector Dimensions 100 x 59 x 43 mm (L x W x H)
Bracket Dimensions 52 x 30 x 26.5 mm (L x W x H)
PRODUCT GUARANTEE *
We at ERA rmly believe in the quality of our goods. Our technology achieves outstanding
performance and durability and we can therefore offer, in addition to your statutor y rights, an
additional limited guarantee. In the event of any material defects in any product manufactured by
us due to faulty design, materials and/or workmanship, and which arise following correct installation
and during normal use in accordance with our instructions, as included in the product packaging,
within the period of two years from the date of purchase, we will either repair, provide a replacement,
substitute with an equivalent product free of charge from our then current range or refund in full the
amount paid for the product at point of purchase.
Conditions
In order to take advantage of our guarantee, you must comply with the following conditions:-
1. This limited guarantee is not transferable and is extended only to, and is solely for the benet of, the original
purchaser of the product. Please retain your dated sales invoice as proof of purchase and for ward this to us if you
wish to make a claim under this guarantee.
2. Products must be installed, used and maintained in accordance with our instructions otherwise the guarantee will
be invalidated.
3. The product must not be damaged or modied in any way nor must it have been subjected to any unauthorised
repairs.
Exclusions
This guarantee does not cover:-
1. Periodic maintenance, repair and replacement of parts due to fair wear and tear.
2. Abuse or misuse, including but not solely limited to the failure to use this product for its normal purposes or in
accordance with ERA’s instructions on usage and maintenance.
3. Failure of the product arising from incorrect installation or use not consistent with the instructions supplied and the
cost of any removal or installation of products.
4. Accidents, Acts of God, lightning, water, re, public disturbances, improper ventilation, voltage uctuations or any
cause beyond the control of ERA (Force Majeure).
5. Unauthorised modications carried out to the product.
6. Damage caused by incorrect/improper use of supplied batteries.
7. Alteration to, deletion, removal or illegibility of the Serial Number as shown on the Product Label.
8. Consumables: any damages so caused by the use of batteries not supplied by ERA.
9. Repair or attempted repairing by bodies who are not ERA authorised repairers.
10. Neglect.
11. The loss of any stored data on your product.
This guarantee is in addition to your contractual and statutory rights and does not affect your statutory rights
To make a claim
Please contact Customer Support either by telephone on 0345 257 2500 or email alarms@eraeverywhere.com, with
full details of your claim. If your claim satises our Conditions and is not subject to any of our Exclusions, we will agree
with you the repair, replacement, substitution or refund of payment of goods. For product returns you will be issued
with a Return Authorisation Number (RAN). Please note: Returns will not be accepted unless accompanied by a RAN.
*Terms and conditions apply.
Page 16

SOS
Smartphone not included
Suggested installation layout
 Loading...